OPERAT IONS | 11740 Jollyville Road, Suite 100A
Austin, Texas 78759
ADMI N I STR AT I ON | P.O. Box 201417, Austin, Texas 78720
Phone 512.835.2273 | Fax 512.834.3654
www.efueling.com P a g e | 1
FUELSOFT User Manual

www.efueling.com P a g e | 2
TABLE OF CONTENTS
1. INTRODUCTION .............................................................................................................................. 5
i. System Requirements.................................................................................................................................... 5
ii. Installation .................................................................................................................................................... 7
iii. FuelSoft Updates Install............................................................................................................................... 13
2. CREATING YOUR FIRST DATABASE ....................................................................................... 15
i. Remote Installations ................................................................................................................................... 15
ii. Local Installations ........................................................................................................................................ 16
3. LOGGING INTO FUELSOFT ........................................................................................................ 20
4. FUELSOFT VIEWS ......................................................................................................................... 22
i. The Ribbon .................................................................................................................................................. 22
ii. Quick Access Toolbar ................................................................................................................................... 23
iii. Viewing Short Cut Keys ................................................................................................................................ 26
iv. Appearance ................................................................................................................................................. 26
v. Table Navigation Bar ................................................................................................................................... 27
vi. Table Views ................................................................................................................................................ 28
vii. Card View ................................................................................................................................................ 34
viii. Tab Options ............................................................................................................................................. 35
ix. Record Associations .................................................................................................................................... 35
x. Record Selection .......................................................................................................................................... 36
a) Quick Search ................................................................................................................................................... 36
b) Filter Editor ..................................................................................................................................................... 37
5. PROGRAMMING ............................................................................................................................ 39
a) Users ............................................................................................................................................................... 39
b) Mail Setup....................................................................................................................................................... 40
c) Company Information .................................................................................................................................... 41

www.efueling.com P a g e | 3
d) ............................................................................................................................................................................. 41
i. Database Menu ........................................................................................................................................... 41
a) Accounts ......................................................................................................................................................... 41
b) Vehicles........................................................................................................................................................... 43
c) Employees ...................................................................................................................................................... 44
d) Classes ............................................................................................................................................................ 44
e) Sites ................................................................................................................................................................ 45
f) Products .......................................................................................................................................................... 48
g) Tanks ............................................................................................................................................................... 48
h) Hoses .............................................................................................................................................................. 49
i) Prompts .......................................................................................................................................................... 52
j) Networks ........................................................................................................................................................ 53
k) Headers........................................................................................................................................................... 54
l) Deliveries ........................................................................................................................................................ 56
m) ICU Events .................................................................................................................................................. 56
n) Transactions ................................................................................................................................................... 57
o) Transaction Analyzer ...................................................................................................................................... 58
p) Transactions manual entry ............................................................................................................................. 59
ii. Pricing ......................................................................................................................................................... 60
a) Retail Pricing ................................................................................................................................................... 60
b) Price Groups ................................................................................................................................................... 61
iii. Communication ........................................................................................................................................... 63
a) Polling Schedules ............................................................................................................................................ 63
iv. Site Communication .................................................................................................................................... 66
a) Connection ..................................................................................................................................................... 66
b) Send ................................................................................................................................................................ 67
c) Retrieve .......................................................................................................................................................... 68
d) Reset ............................................................................................................................................................... 69
e) Diagnostics...................................................................................................................................................... 69
6. REPORTS......................................................................................................................................... 70
7. DATA EXCHANGE ......................................................................................................................... 77
8. DATABASE MAINTENANCE / UTILITIES .............................................................................. 79
9. APPENDIX A – TECH TIPS .......................................................................................................... 85
i. Frequently Asked Questions ........................................................................................................................ 85
ii. Troubleshooting .......................................................................................................................................... 85

www.efueling.com P a g e | 4
iii. Support Contact Information ....................................................................................................................... 86
10. DOCUMENT VERSION CONTROL ......................................................................................... 87

www.efueling.com P a g e | 5
1. INTRODUCTION
Welcome to FuelSoft. FuelSoft is eFueling‟s latest in fuel management control
software. Within this document you will find installation help, setup instructions and
details about FuelSoft features.
i. SYSTEM REQUIREMENTS
Your system must meet following system requirements.
Process type Process speed Memory (Ram)
Pentium IV –
compatible processor
or higher
Minimum: 1 MHz
Recommended: 2 GHz or
higher
Minimum: 1 GB
Recommended: 2 GB or
more
Supported Operating
Systems
Windows XP SP3
Windows Server 2003
Windows Vista
Windows 7
Windows 2008
The following are the required software prerequisites required in order to install
FuelSoft. You can install most of these items by performing a Microsoft Windows
update first.

www.efueling.com P a g e | 6
Required software prerequisites
.Net Framework 2.0, & SP1, & SP2
.Net Framework 3.0, & SP1, & SP2
.Net Framework 3.5, & SP1
.Net Framework 4.0
MDAC 2.8 Refresh SP1
XML Parser 6.0
Internet Explorer 6.0 SP1
Windows Installer 3.0, + 3.1, + 4.5
Microsoft Report Viewer 2010 Redistributable
Optional software
Crystal Reports 2008 SP3 +
Windows PowerShell 1.0 / Windows Management Framework Core package
SQL Server 2005 +
Your display monitor should support a minimum resolution of 1024 x 768 or higher.

www.efueling.com P a g e | 7
ii. INSTALLATION
Most of the required items for FuelSoft can actually be installed by using Microsoft
Updates. It is highly recommended that you perform all the required Microsoft
Windows Updates to your workstation prior to installing FuelSoft.
Insert the FuelSoft CD or download the installer media from our webserver.
http://www.efueling.biz/efueling/bits/fuelsoft/fuelsoftinstaller.exe
Press “Next” and follow the instruction on your screen. The installer will take you
through the installation process.
Read the license agreement and if you accept the terms check the box and press Next
to continue.

www.efueling.com P a g e | 8
This screen is for your information. The installer is letting you know what is about to
be installed. Press “Next” to continue.
Enter your registration information and press “Next” to continue.
www.efueling.com P a g e | 9
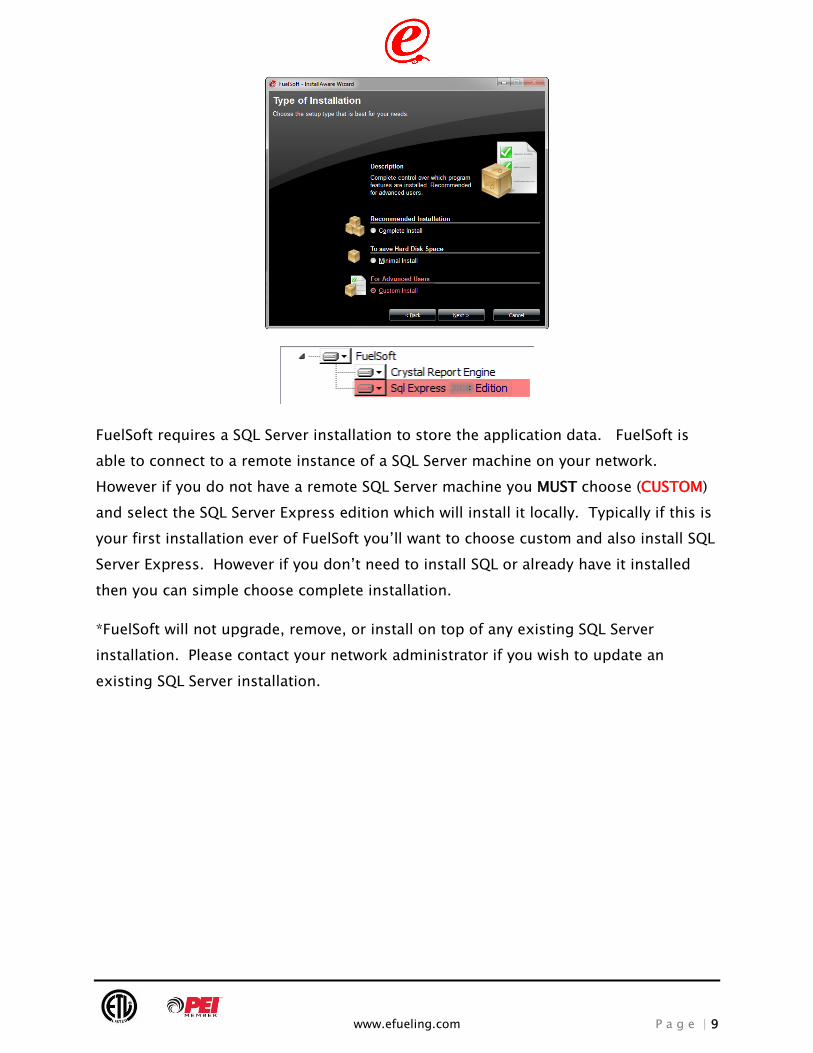
FuelSoft requires a SQL Server installation to store the application data. FuelSoft is
able to connect to a remote instance of a SQL Server machine on your network.
However if you do not have a remote SQL Server machine you MUST choose (CUSTOM)
and select the SQL Server Express edition which will install it locally. Typically if this is
your first installation ever of FuelSoft you‟ll want to choose custom and also install SQL
Server Express. However if you don‟t need to install SQL or already have it installed
then you can simple choose complete installation.
*FuelSoft will not upgrade, remove, or install on top of any existing SQL Server
installation. Please contact your network administrator if you wish to update an
existing SQL Server installation.

www.efueling.com P a g e | 10
Set the destination folder or just press “Next” to use the default folder (recommended).
Change the programming group and set the “Create Shortcuts for” option. It is
recommended to use the default values for “Program Group” and choose “All Users” for
the shortcuts option. Press Next to continue.

www.efueling.com P a g e | 11
Click Install to start the installation.
FuelSoft will attempt to install the required application file during installation.
However it may be necessary to connect to the internet and download additional
required files. If you need to manually copy the required files they can be downloaded
from here.
http://www.efueling.biz/efueling/bits/filebags/

www.efueling.com P a g e | 12
Congratulation! You have successfully completed the install.
This screen gives you the option of running FuelSoft now (recommended). If you are
ready to run FuelSoft, check the option and press “Finish”. This will start the
installation process for FuelSoft Updates.

www.efueling.com P a g e | 13
iii. FUELSOFT UPDATES INSTALL
FuelSoft update is a program that will automatically check for and install FuelSoft
updates.
After installing FuelSoft you will see this install wizard for the updater.
Press Next to continue.

www.efueling.com P a g e | 14
Select the day and time that suits you best and set how you would like to handle the
updates. Press Next to continue.
Enter your Windows username and password and press Next to continue. This
information is used in the event you are “logged off” from your workstation.
All done, press Finish to close the wizard.
When an update to FuelSoft is found you will need to download and install the new
updated. You may be prompted to uninstall your “old” copy of FuelSoft prior to
installing the new version. This behavior is by design and you can safely uninstall the
“old” copy without affecting any of your application data. Then you will install the new
copy after that. I should reiterate the fact that uninstalling and reinstalling FuelSoft
doesn‟t delete any of your existing data.

www.efueling.com P a g e | 15
2. CREATING YOUR FIRST DATABASE
Now that you have completed the install you need to create a database.
FuelSoft comes with a database utility program called DB Util that will create the local
installation of the database.
i. REMOTE INSTALLATIONS
If you are going to use FuelSoft on a remote installation of SQL Server instead of using
SQL Server express on the local machine you will need to get your SQL Server
administrator (DBA) to assist you with the creation of the database. However if you
have installed SQL Server express on your local workstation you can skip this section
“remote installation instructions” and proceed to “Local Installation”.
The DBA will need to perform the following actions:
Create a new catalog called eFueling.
Run the first script file “10212009 0 FuelSoft.sql” located here (C:\Program
Files\eFueling Technologies\FuelSoft\Scripts\Schema\10212009 0 FuelSoft.sql).
This will script the initial design of the database.
Then the DBA can perform one of these steps below to update the database.
Either run FuelSoft which will also apply all required updated scripts automatically.
*Preferred
--OR--
Run the DB Util application and choose “Update database” option to run the scripts.
--OR--
Run the additional scripts IN ORDER (“01052010 1 FuelSoft.sql”, “02052010 2
FuelSoft.sql”, “02182010 3 FuelSoft.sql”, etc…)

www.efueling.com P a g e | 16
ii. LOCAL INSTALLATIONS
Go to your FuelSoft installation folder. Find a file named “FuelSoft DBUtilities”.
Run FuelSoft DBUtilities.
Press the SQL Login botton.

www.efueling.com P a g e | 17
The first step is to connect to your database server. Press the Connect button.
You will see this window if you have successfully connected to SQL Server. Press OK to
continue.
Next, press the Create Database button.
Click on the 3 dots highlighted above.

www.efueling.com P a g e | 18
Give your database a name. Remember the name, you will use it to log into FuelSoft
for the first time.
The recommended database name is “efueling”. Press the “Save” button to continue.
Press Create database (highlighted above) and wait for the following window.

www.efueling.com P a g e | 19
You may need to use this Username and Password to log into FuelSoft for the first time
if you are using SQL Server authentication with a remote SQL Server machine.

www.efueling.com P a g e | 20
3. LOGGING INTO FUELSOFT
Double click on the FuelSoft icon. You will find it on your desktop.
First thing you need to do is login. You‟ll want to choose „Use Windows
Authentication‟ which will use your windows or domain credentials to log into the
database.
FuelSoft will display this screen next.

www.efueling.com P a g e | 21
Now you‟re ready to jump into programming your sites.
www.efueling.com P a g e | 22
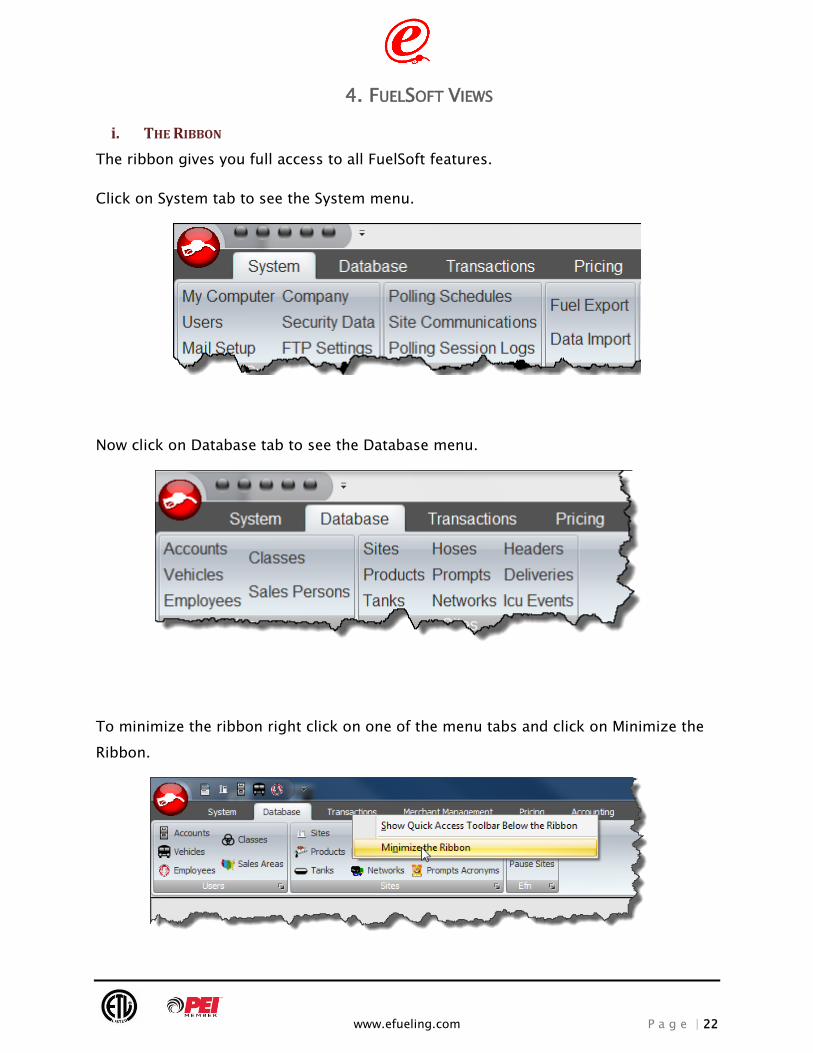
4. FUELSOFT VIEWS
i. THE RIBBON
The ribbon gives you full access to all FuelSoft features.
Click on System tab to see the System menu.
Now click on Database tab to see the Database menu.
To minimize the ribbon right click on one of the menu tabs and click on Minimize the
Ribbon.

www.efueling.com P a g e | 23
Now the Ribbon will only show up when you click on one of the menu tabs.
If you have a small display you can increase your screens work area by minimizing the
ribbon.
You can use the main ribbon menu to close the FuelSoft application.
ii. QUICK ACCESS TOOLBAR
You may have noticed the icons located at the top of the screen. This is the Quick
Access Toolbar.
Let‟s click on the first icon and open the Transactions table view.

www.efueling.com P a g e | 24
Let the mouse pointer hover over an icon to see what it is.
Right click on an icon.

www.efueling.com P a g e | 25
Click on Remove from Quick Access Toolbar to remove the icon.
I removed the Site icon from my toolbar.
To add an icon open the Ribbon menu and right click on the one you want to add.

www.efueling.com P a g e | 26
I added the Sites icon to my toolbar.
iii. VIEWING SHORT CUT KEYS
Sometimes it‟s quicker to use the keyboard. Press the Alt key to see the short cut
keys associated with the toodbar and menus.
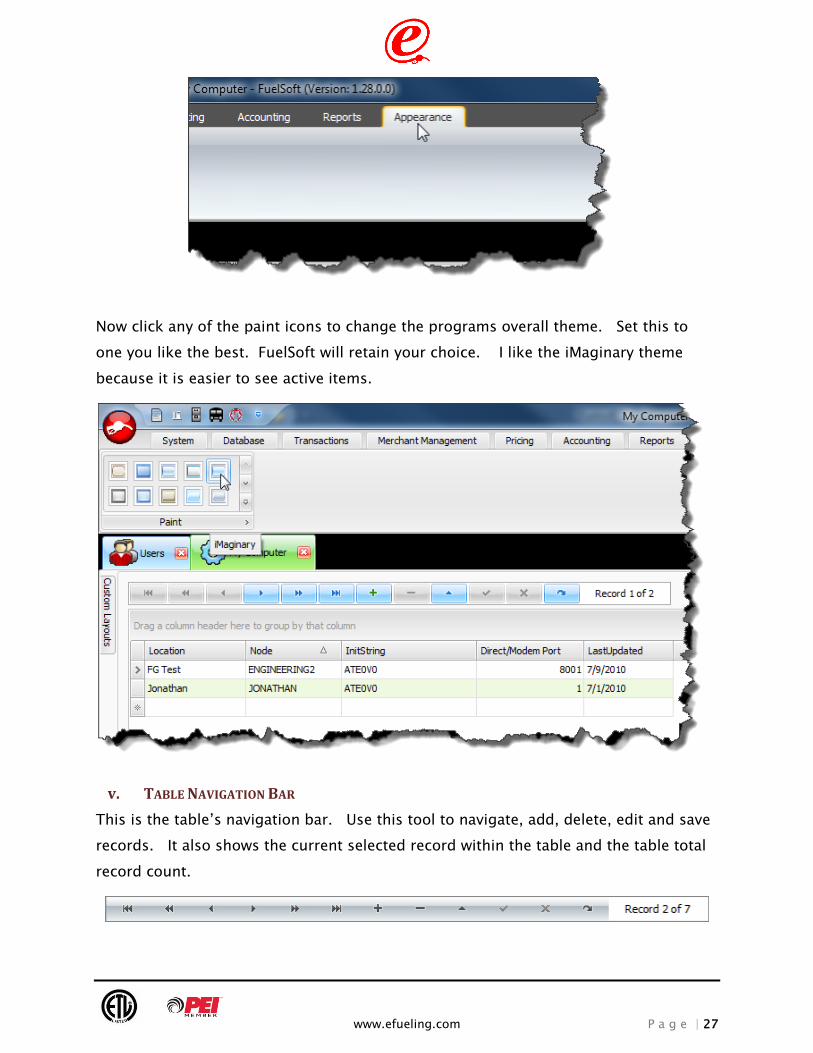
iv. APPEARANCE
You can change the FuelSoft appearance to your liking.
Click on the Appearance tab to see available appearance themes.
www.efueling.com P a g e | 27
Now click any of the paint icons to change the programs overall theme. Set this to
one you like the best. FuelSoft will retain your choice. I like the iMaginary theme
because it is easier to see active items.
v. TABLE NAVIGATION BAR
This is the table‟s navigation bar. Use this tool to navigate, add, delete, edit and save
records. It also shows the current selected record within the table and the table total
record count.

www.efueling.com P a g e | 28
Using a different theme makes the button states more obvious.
If you are using the card view screens for data entry it is necessary to choose
“Add” to add a new record to the system.
If you are an administrator and using the grid view you can select multiple records by
holding down either CTRL or SHIFT and then mass delete by choosing the “Delete”
option.
Choosing the “Refresh” option will refresh the data retrieving the latest data from the
database. This is extremely useful if you are working in a multiuser environment.
vi. TABLE VIEWS
FuelSoft will display database table information in table and form layout views. Let‟s
look at the table layout view first. You are able to toggle between the grid and the
card views by hitting the (CTRL + Q).
Select the Database tab and click on Show Vehicles as shown here.

www.efueling.com P a g e | 29
FuelSoft displays information in rows and columns or a table view. Each row
represents a Vehicle record in the Vehicles table and the columns are fields.

www.efueling.com P a g e | 30
Right click on a column header to discover column header features.
Let the mouse pointer hover over a column to see the full column name.
Drag the border of a column to increase or decrease the width as shown here or right
click on the column header and select “Best Fit”. Use “Best Fit (all columns)” to
automatically adjust columns.
Drag and drop to rearrange the columns.

www.efueling.com P a g e | 31
Click on a column header to sort it ascending or descending. Right click on column
header and press “Clear Sorting” to clear the sort. These icons indicate descending
or ascending order.
You can drag and drop a column header to the group box to create a group.
Now the table view is grouped by Account. Click on to see the records under each
group.

www.efueling.com P a g e | 32
Drag and drop Account back to the table view to ungroup the table view.
To hide the Group by box right click on the column and select “Hide Group By Box”.
To remove a column drag the column header down until you see an X as shown here or
right click on the column header and choose “Remove this Column”.

www.efueling.com P a g e | 33
To add the column back right click on a column header and select “Column Chooser”.
This Customization box will appear in the low right hand corner. Drag and drop
items to and from the box to customize table view.
Double click Account to restore the Account field the table view.

www.efueling.com P a g e | 34
vii. CARD VIEW
In the card view mode you are able to focus on a single record at a time. You are able
to toggle between the grid and the card views by hitting the (CTRL + Q).
You will notice the card view design allows for easy entry/update of an individual
record.
You can change the presentation view of the cards by choosing one of the following
options (one card, one row, one column, multiple rows, multiple columns, and
carousel).
You can customize the layout of the card entry by choosing “Customization”. This will
allow you to redesign the layout of the screen creating a more personalized view.

www.efueling.com P a g e | 35
viii. TAB OPTIONS
FuelSoft allows you to open multiple screens at a time in tabs along the top. You can
easily switch between tabs to change the page that you are viewing.
This shows the various tabs that are currently open.
If you right click a tab you can choose either “close” which will close this tab or “close
all but this” which will close all the other tabs.
If you have various open tabs that is larger than your tab viewing area you will notice
the option to navigate the hidden tabs using this button.
ix. RECORD ASSOCIATIONS
In various screens you are able to activate a context based menu bar that will allow you
to “jump” to the associated record. For example if you are in the accounts screen
viewing an account record you can right click the card header and choose vehicles.
This will then open the vehicles screen with a filter based on the previously selected
account.
Right click the card header to activate associated menus.
Right click the left hand area of the grid to activate associated menus.

www.efueling.com P a g e | 36
This is an example of the context based menu that may appear.
x. RECORD SELECTION
FuelSoft uses a complete query based record filter selection engine. This allows you to
reduce network load and often gives you a more precise set of data based on your
preselected queries. When FuelSoft opens a table it performs a quick scan to count
how many records are available within this table. If the table exceeds the total allowed
record count (usually 5,000) then you must perform a query to ask FuelSoft to return
specific results to you instead of the entire table. You will notice this behavior on
some of the larger data tables such as transactions.
a) Quick Search
You can hit (CTRL + S) in various screens to active the instant search. If for example
you on the accounts screen and hit (CTRL + S) you will be prompted to key in the
account number you wish to search on. Depending on the screen being searched the
primary search field will differ.

www.efueling.com P a g e | 37
b) Filter Editor
You can hit (CTRL + F) in various screens to active the filter editor. This will allow you
to design complex filter based queries. You will then use a combination of field
names, operands, and values to create your query.
You will also notice at the bottom of the grid/card view that you can active the filter by
also pressing the “Edit Filter” button. You can also activate your most recent queries

www.efueling.com P a g e | 38
by hitting the down arrow on the bottom left hand side as well to jump to your
previous filters.
www.efueling.com P a g e | 39
5. PROGRAMMING
System Menu >> My Computer:
This is used to define your workstation serial port settings.
Location: An internal name such as (Bob‟s PC)
Node: This will automatically complete your computer‟s workstation name
Direct/Modem Port: This will be the serial port that you use for communicating with
the ICU hardware (such as „1‟ or „3‟).
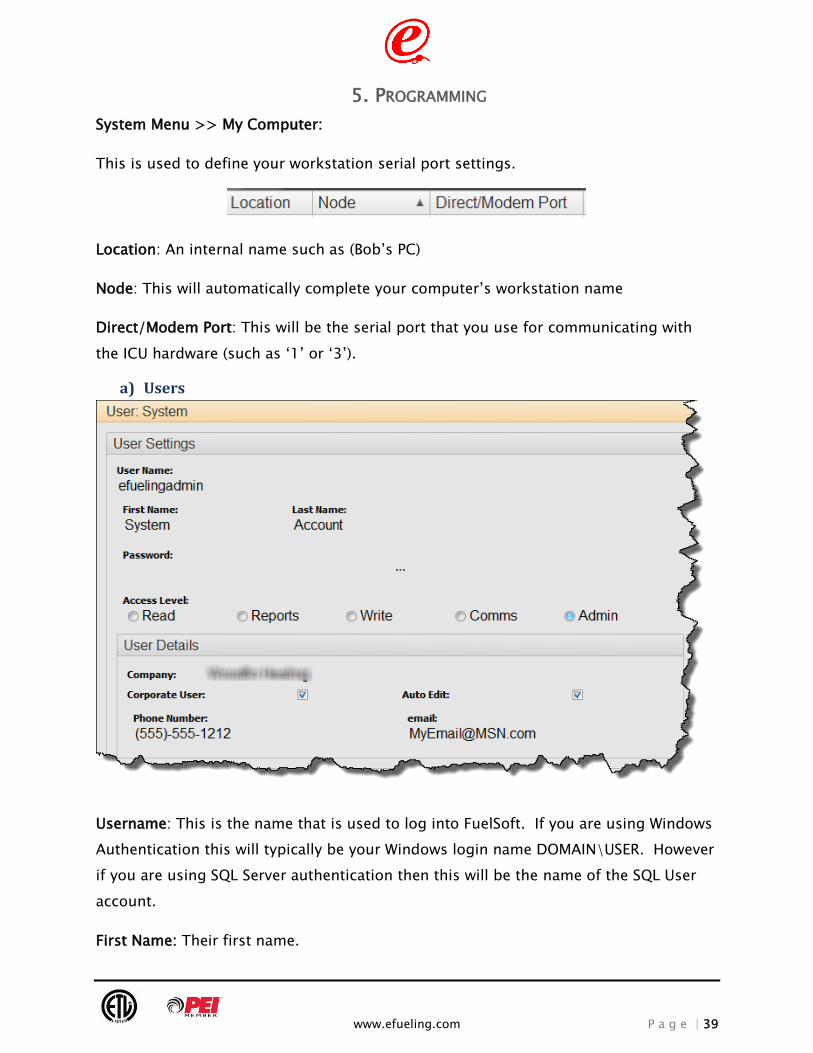
a) Users
Username: This is the name that is used to log into FuelSoft. If you are using Windows
Authentication this will typically be your Windows login name DOMAIN\USER. However
if you are using SQL Server authentication then this will be the name of the SQL User
account.
First Name: Their first name.

www.efueling.com P a g e | 40
Last Name: Their last name.
Password: Passwords are not required for Windows authentication mode. However if
you are using SQL Server authentication you can change the password by either using
FS, SQL Server Management Studio, or by contacting your SQL Server administrator
(DBA). You may also be required to contact your SQL Server administrator (DBA) to
perform this task as this may be restricted command.
Access Level: This is used to set the application level security within FuelSoft.
Company: This should be the company that this user belongs to.
Corporate User: This will indicate if this user has access to manage data in other
companies. This should typically be checked as true by default.
Auto Edit: This option will enable/disable the editing of records in the grid view
without having to hit the „Enable Edit‟ option within the screens. This option is useful
to prevent users from accidentally editing data within the grid. This should typically be
checked as true by default and then set to false depending on user behavior.
Phone: This is the primary phone number to reach the FuelSoft user.
Email: This is the primary email address to contact the FuelSoft user.
b) Mail Setup
This is used to define your companies email / POP settings for sending outbound
email. Please contact your email administrator for details on obtaining an outbound
company email account.

www.efueling.com P a g e | 41
Server: The address of your email server.
Port: The port in which to send the mail.
Username: The username for the mail account.
Password: The password for the email account. You will leave this field blank if the
email account doesn‟t require a password.
SSL: This indicates if the mail server requires SSL.
User Friendly: This is used as the „friendly‟ name on the „from‟ address. An example
would be if the email address is [email protected] you might want to
choose “FuelReports” as your friendly name.
c) Company Information
d)
This is used to define your company details which typically will be just one company
entry. However please contact eFueling to discuss the option of supporting a multiple
company configuration within FuelSoft.
i. DATABASE MENU
a) Accounts

www.efueling.com P a g e | 42
Account: The account number for the account.
Account Alpha: (Required: No) A field that could be used to for miscellaneous purposes
(such as cross referencing to another back end AR account).
Account Inactive: Used to indicate if the account has been closed/terminated.
Account Name: The customer‟s account name
Contact: The primary contact on the account
Price Group: (Required: No) Used to indicate what pricing scheme to apply to this
account.
Memo: A field used to record optional comments on the account.
Street 1, Street2, City, State, Zip code, Email, Phone, Fax are optional fields used to
identify the account holder.
www.efueling.com P a g e | 43
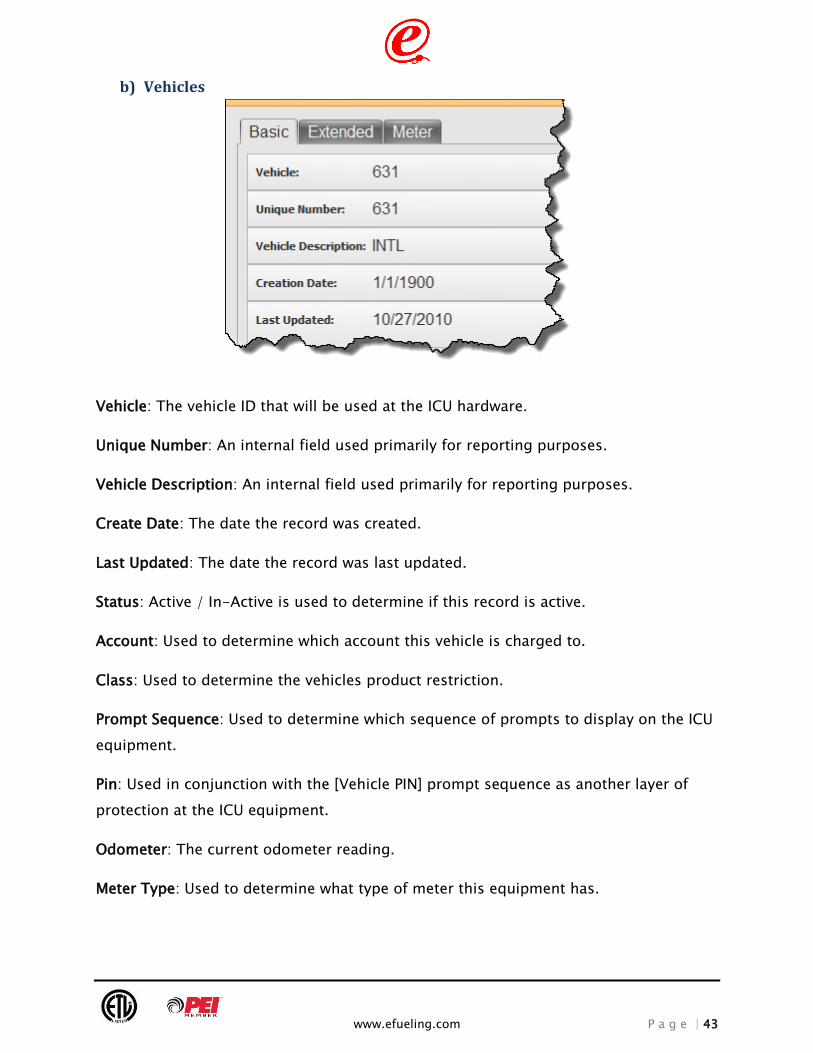
b) Vehicles
Vehicle: The vehicle ID that will be used at the ICU hardware.
Unique Number: An internal field used primarily for reporting purposes.
Vehicle Description: An internal field used primarily for reporting purposes.
Create Date: The date the record was created.
Last Updated: The date the record was last updated.
Status: Active / In-Active is used to determine if this record is active.
Account: Used to determine which account this vehicle is charged to.
Class: Used to determine the vehicles product restriction.
Prompt Sequence: Used to determine which sequence of prompts to display on the ICU
equipment.
Pin: Used in conjunction with the [Vehicle PIN] prompt sequence as another layer of
protection at the ICU equipment.
Odometer: The current odometer reading.
Meter Type: Used to determine what type of meter this equipment has.

www.efueling.com P a g e | 44
c) Employees
Employee: The employee ID that is to be used with the ICU equipment.
Employee Name: The name of the employee
Status: The status of the record
Last Updated: The date the record was last updated.
Last Fuel: The date the record was last fueled.
Account: Used to determine which account this vehicle is charged to.
Class: Used to determine the vehicles product restriction.
Prompt Sequence: Used to determine which sequence of prompts to display on the ICU
equipment.
d) Classes
When you setup the class record you will want to click on the products allowed cell and
choose which products are authorized to be used with this call.

www.efueling.com P a g e | 45
When navigating through the class records you can easily at a glance determine which
products are allowed within the class by viewing the products allowed list at the
bottom of the screen. However this is a read only view if you wish to change the
record you must click in the products allowed field for that particular record.
Class: The class # for the record
Class Name: The name of the class
Max Fuel: The maximum amount of fuel the user can receive in a single transaction.
Minimum Range: the minimum range the user must travel before they can fuel again.
Maximum Range: The maximum range the user can travel without being locked out.
e) Sites
The basic tab will allow you to setup the basic site information. The site name must be
unique for each site added.

www.efueling.com P a g e | 46
The ICU tab is used to configure ICU specific data.
ICU Init: The initialization string that the ICU equipment will use to initialize the on-site
modem (if applicable).
Unit Type: This is used to determine what type of ICU equipment you are using such as
(Orion, Rev9, C6Rev6, Rev10, Gemini). Please contact eFueling technologies if you are
unsure of which option to choose. This will typically be Rev9 for most customers
unless your equipment is an Orion.
The communication tab is used to define the communication parameters that is used
with the ICU equipment.

www.efueling.com P a g e | 47
COS: This is the code operated switch value that is used when the ICU installation uses
a code operated switch equipment.
Baud Rate: The serial baud rate in which the ICU equipment communicates.
Parity: The parity setting in which the ICU equipment communicates.
DataBits: The data bits in which the ICU equipment communicates.
StopBits: The stop bits in which the ICU equipment communicates.
Modem Number: The ICU equipment modem number. This is the number that FuelSoft
will dial to create a connection to the ICU equipment.
IP Address: The remote IP address to the ICU equipment if the ICU equipment is
currently connected to the network.
TCP/IP Port: The port in which to connect to the ICU equipment such as (8001, 6968)
Init String: The initialization string that is used to initialize your local workstation
modem for establishing a connection to the modem. This field is required for
customers use a dial-up connection to the ICU equipment.
Receipt Line 1,2,3,4 is used for printing custom message on the receipt footer.
Receipt lines 1 & 2 have a 17 character limit. Receipt lines 3 & 4 have a 35 character
limit.

www.efueling.com P a g e | 48
f) Products
Product Number: This is the product ID for the product. This must be a number from
1-16.
Product Name: The name of the product.
Units: The unit type for the product.
Fuel: This box is to be checked if this is a fuel product otherwise you will uncheck it for
non-fuel products such as (oil, antifreeze).
g) Tanks

www.efueling.com P a g e | 49
Site: The site that this tank is physically located at.
Tank: The number of the tank.
Tank Size: the size of the tank.
Tank Balance: The current balance of the tank
Reorder Level: The suggested reorder level for ordering fuel. The tank graphic will
turn red when the tank indicates a reorder condition.
**The tank balance is mathematically computed based on hand entered deliveries and
collected transactions. If you require an automated system tied in with your on-site
tank monitor equipment please contact our sales team to inquire about our Fluid
Management module.
h) Hoses

www.efueling.com P a g e | 50
Site Name: Pick the that this hose is connected to (Site ID & Island should
autocomplete).
Last Updated: The last time the record was modified.
Turn On Timer: This is how long from the time the ICU equipment authorizes a hose
until they pick up the handle before we terminate the sale. The recommended value
for this is 60 seconds
Inactivity Timer: This is how long from the time the customer stops product flow until
we terminate the sale. The recommended value for this is 60 seconds.
Channel: This is used to indicate which relay positions on the ICU hardware will be
authorized with this hose.
PPU: This is the pulses per unit „pulse ratio‟ that is used on the hose. They typical
values are 10/100/1000 but it depends on your dispensers equipment.
Max Pulser Failure: This is a safety feature which will lock out the hose if there are
excessive authorizations with no product being detected as being dispensed. The
recommend value for this is 5.
Handle Type: This is dependent on how the dispenser is wired in the equipment. The
typically value is “open” but it will vary by dispenser manufacture.

www.efueling.com P a g e | 51
Hose: This is the hose # for the hoses.
Tank: This is the tank for which the hose pulls the product from.
Product Name: This should autocomplete when you select the tank.
RF Scanner: This is used for mapping the RF position of the ground loop antenna based
on the RF Mux board location.
Max Quantity: The maximum quantity that can be dispensed in a single transaction.
Pulser Volume: This defines what type of pulser is installed on your dispenser
(volume/dollar).
Hose State: This sets the hose position hose state. You can set this value to disabled if
you wish to lock out a hose.

www.efueling.com P a g e | 52
The Orion prices tab is used to set the price levels 2-7 for merchant based pricing.
This only applies to the Orion equipment. Please contact eFueling for additional
information in regards to the usage of the Orion Pricing features.
i) Prompts
You will need to create a system/default prompts group if it doesn‟t already have one.
Most customers will typically only have one master prompts group such as (system or
default).
Then you can expand the “+” plus sign to add the prompt records to the parent
prompt group.
You will then define the ICU prompts that you wish to have displayed on the ICU
equipment.
Prompt Sequence: The sequence number for the prompt.
Prompt Order: the order in which to display the prompts within the sequence.
Database Field Name: The field definition for the prompt such as “Employee/Vehicle”.
Prompt Text: The custom prompt text you wish to display on the reader for this
prompt.
Max Keys: The number of allowed keyboard digits allowed to be entered by the user.
You may set this to zero to disable the keypad.
Echo Keystrokes: This is used for determining if the ICU equipment will “echo” the
characters back to customer or if it will instead display masked digits ******.
Enable Reader: This is used when you wish to activate the card swipe hardware for this
particular prompt.

www.efueling.com P a g e | 53
Retries: This determines how many times the user can retry failed entries.
j) Networks
This is used to define which cards the ICU equipment will accept. The exact network
configuration will differ based on what ICU equipment you have installed and which 3rd
party processing centers you are using.
Please contact eFueling if you require assistance in setting up your network entries.
You will need to create a system/default network group if it doesn‟t already have one.
Most customers will typically only have one master network group such as (system or
default).
Then you can expand the “+” plus sign to add the network records to the parent
network group.
Priority: The priority of the network
Service: The type of service being used (C6, PTECH, CFN, COMDATA, etc…).
Card Scan: This determines if the network supports the new card scan features.
Price Level: Indicates which price level to apply to this network
Minimum Amount: This is used to determine what are the number of allowed
downtime sales that can be stored when using the EFN service.

www.efueling.com P a g e | 54
Maximum Amount: this is used to determine the maximum quantity that can be
dispensed in any single transaction.
Phone Number: This is the phone number to the remote 3rd party processing center.
Login Name: This is the login details for the 3rd party processing center.
Password: This is the password details for the 3rd part processing center. This field is
also used to define the prompt sequences on the EFN server.
Terminal ID: This is your unique customer id that is issued to you by your 3rd party
processing center.
Download Time: This is used to determine the sanity check for the maximum quantity
a sale can be stored and forwarded to the processing center.
Hold Time: This is how long the ICU equipment will hold onto a transaction before
sending it to the 3rd party processing center.
k) Headers
The headers screen allows you to customize the header configuration of your ICU
equipment. The ICU equipment may also have different memory limits depending on
the installed hardware. Therefore you are able to create site specific headers within
FuelSoft.
You will want to configure your site specific header records by choosing the specific
site in the site dropdown list.

www.efueling.com P a g e | 55
File Name: This shows you the specific header type you are going to modify. This field
cannot be changed.
Database File: This shows you the specific database file you are going to modify. This
field cannot be changed.
Max Records: The maximum number of records the file type can support.
Number of records: The current number of records in the ICU equipment. This field is
read only and cannot be changed. The data is updated anytime you read headers from
the ICU equipment.
Head: The head pointer value in the ICU equipment. This field is read only and cannot
be changed. The data is updated anytime you read headers from the ICU equipment.
Tail: The tail pointer value in the ICU equipment. This field is read only and cannot be
changed. The data is updated anytime you read headers from the ICU equipment.
Offset: The offset memory value in the ICU equipment. This field is read only and
cannot be changed. The data is updated anytime you read headers from the ICU
equipment.
Record Length: The length of the record in the ICU equipment. This field is read only
and cannot be changed. The data is updated anytime you read headers from the ICU
equipment.

www.efueling.com P a g e | 56
l) Deliveries
You will insert your fuel deliveries into the deliveries screen. This will record the
deliveries and also increase your tank balance in the tanks screen.
Delivery Date: The date of the delivery.
Vendor: The vendor that supplies you with the fuel.
Site ID: The Site of the delivery.
Tank: The tank the delivery was delivered to.
Beginning balance: The tank balance prior to the delivery.
Ending balance: The ending tank balance after the delivery.
Net Delivery: the net delivery of the drop.
Cost: The cost per gallon of the fuel.
User Name: The person who inserted the delivery.
Product: The product being delivered.
Ticket: This is an option field used for tracking your delivery invoice.
Balance: The ending balance of the tank after the delivery of the product.
m) ICU Events
This screen records specific ICU events that have occurred on your ICU equipment (if
applicable).

www.efueling.com P a g e | 57
Date: The date and time of the event.
Site: The site the event occurred at.
Island: The island the event occurred at.
Event ID: the event ID that indicates which event occurred.
Description: A brief description of the event details.
n) Transactions
Date: The date and time of the transaction.
Account: The account the transaction is billed to.
Site: The site the transactions was performed at.
Island: The island the transaction was performed at.
Sequence: The sequence number of the transaction.
Account Name: The account name of the transaction.
Vehicle: The vehicle id of the transaction.
Unique Number: The vehicle unique number of the vehicle that fueled.
Vehicle Description: The vehicle description of the vehicle that fueled.
Employee: The employee that fueled the vehicle.
Employee Name: The employee name that fueled the vehicle.

www.efueling.com P a g e | 58
Product: The product number that was fueled.
Product Name: The name of the product that was fueled.
Odometer / Hourmeter: The odometer / hourmeter entry captured.
Shutdown Reason: The termination code for why the sale was ended.
Price: The price per gallon of the sale.
Quantity: The quantity of the sale.
Amount: The amount of the sale.
Card Data: The masked card information (if applicable)
Captured: A flag used to indicate if the transaction has been exported to a 3rd party
system using the data export module.
Session ID: A unique identifier that is recorded during each communication session
which collected the transaction.
o) Transaction Analyzer
This utility will help search your transactions and identify any missing transactions.
Pick the starting and ending date range to analyze a range of transaction. This should
typically be either a daily/weekly value. Then pick the sites that you wish to analyze
www.efueling.com P a g e | 59
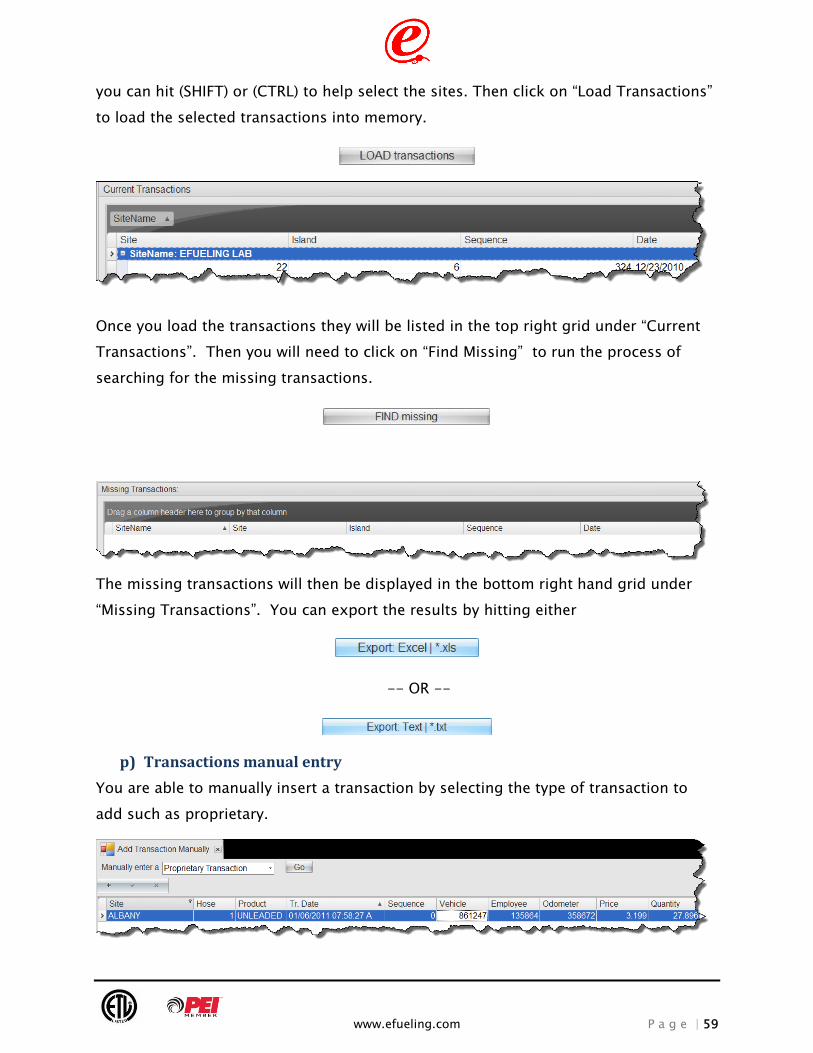
you can hit (SHIFT) or (CTRL) to help select the sites. Then click on “Load Transactions”
to load the selected transactions into memory.
Once you load the transactions they will be listed in the top right grid under “Current
Transactions”. Then you will need to click on “Find Missing” to run the process of
searching for the missing transactions.
The missing transactions will then be displayed in the bottom right hand grid under
“Missing Transactions”. You can export the results by hitting either
-- OR --
p) Transactions manual entry
You are able to manually insert a transaction by selecting the type of transaction to
add such as proprietary.

www.efueling.com P a g e | 60
Site: Choose the site in which the sale occurred.
Hose: Enter the hose in which the sale occurred.
Product: Choose the product in which the sale occurred.
Tr. Date: Choose the date and time of the transaction.
Sequence: Enter a sequence number for the sale.
Vehicle: Enter a vehicle id for the sale.
Employee: Enter an employee id for the sale.
Odometer: Enter an odometer reading for the sale.
Price: Enter the price of the sale.
Quantity: Enter the quantity of the sale.
ii. PRICING
a) Retail Pricing
The pricing in FuelSoft has been updated to support a grouping concept for the ICU
prices. This will allow you to assign one or more sites to a particular group and then
control all the ICU‟s price in this group at once. The pricing is also set by product
instead of per hose so when you change the product price you will change all the
prices for that product.
First you will need to create/setup some pricing groups in FuelSoft. You‟ll want to
click “add new group” and enter the name of the group. It may be helpful to use a
group name that defines a region such as the county or region name that the sites
belong to. Typically ICU‟s that are in close proximity may be able to share the same
price points and therefore the grouping principal will be very beneficial. You‟ll want to
add a new group for each unique “group” of ICU pricing you will to apply.

www.efueling.com P a g e | 61
Once you have setup your groups you‟ll then want to go to the “sites” tab and choose
which sites belong to each selected retail price group that you have defined. This is
how you will associate the sites to the group for pricing.
After you have set the sites then you‟ll want to switch back over to “current pricing”
and set the current retail / pump price for each product. You‟ll notice that at the top
you can choose the starting date and time which is going to be the effective starting
date for the posted entries. When transactions are collected we use the retail prices
starting date and the transaction date to determine what price should be applied to the
transaction.
You are able to review and update your existing posted prices by using the price
history tab. First start by selecting the starting date and time. Then select the ending
date and time. After that you‟ll hit the “retrieve history” button to load you historical
data.
Once the data is loaded in the grid are able to make changes in the grid. When a
change is made the change is automatically saved as you make the change.
b) Price Groups
Price groups are an easy option for adjusting the price point for an account. You can
create various price groups to offer cents on/off or absolute pricing.

www.efueling.com P a g e | 62
First you will need to create/setup some pricing groups in FuelSoft. You‟ll want to
click “add new group” and enter the name of the group.
You must set the starting date value that you wish the price adjustments to take
effect.
Then you‟ll set the adjusted rate for each product. You‟ll select the method type for
the group by selecting Cent off/on or absolute. After that you‟ll then type in the value
such as (0.005).
Once you have set all the new adjusted rates you must hit “post” to save your changes.
You are able to review and update your existing posted price adjustments by using the
price history tab. First start by selecting the starting date and time. Then select the
ending date and time. After that you‟ll hit the “retrieve history” button to load you
historical data.

www.efueling.com P a g e | 63
Once the data is loaded in the grid are able to make changes in the grid. When a
change is made the change is automatically saved as you make the change.
iii. COMMUNICATION
a) Polling Schedules
Schedule Name: The name of the schedule. This must be one word such as (daily).
Schedule Definition: A detailed comment on the purpose of the schedule.
Retrieve Transactions: This will collect the transactions from the ICU hardware.
Retrieve Events: This will collect the ICU events (if applicable)
Send Updates: This will send the database changes such as (vehicles, hose price,
employees) to the ICU hardware.
Send Hose Data: This will send the hose price to the ICU hardware.
Send Odometers: This will redistribute the vehicle‟s odometer readings to your ICU‟s (if
applicable). This feature is very similar to the same functionality as Send Updates.
You will then need to select the sites tab and choose the desired schedule.
After that you will then choose which sites to connect to for this schedule. You must
choose “Save Scheduled Sites” for this to take effect.
Once you have defined your schedule names and activities you must then set up your
MS Windows to run the task at the desired time.
Open the task scheduler for Windows.

www.efueling.com P a g e | 64
Then choose new/create task.
Define the name of the task, and which Windows account to run schedule under.
Then choose “NEW” action.

www.efueling.com P a g e | 65
Then choose run a program and browse for your FuelSoft.exe application file located in
(C:\Program Files\eFueling Technologies\FuelSoft).
You must supply the arguments to the application. The “\p” indicates that you want
FuelSoft to use the polling module. The “MySchedule” is the name of the schedule that
you want the polling module to run.
Arguments: \p MySchedule
Start In: (C:\Program Files\eFueling Technologies\)
Please contact your network administrator / eFueling Technologies if you require
assistance on how to setup a scheduled task to run an application with command line
parameters.
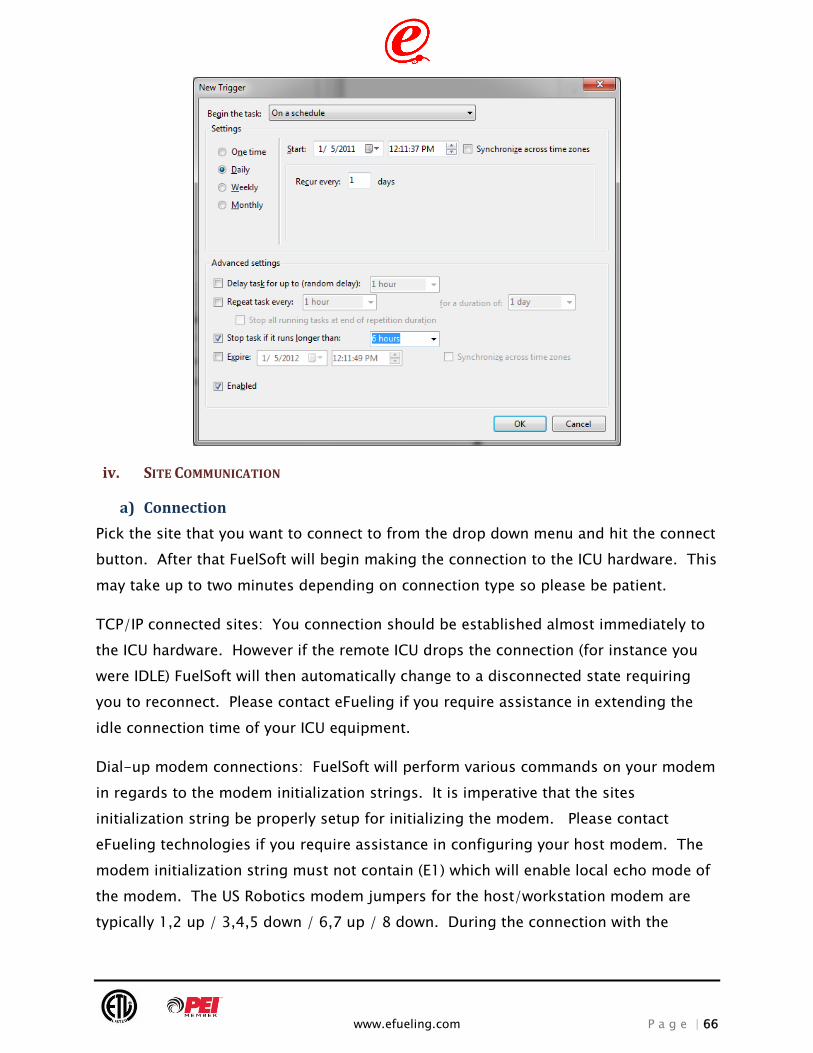
You will then need to create a new trigger that will define how often to run the
schedule.
www.efueling.com P a g e | 66
iv. SITE COMMUNICATION
a) Connection
Pick the site that you want to connect to from the drop down menu and hit the connect
button. After that FuelSoft will begin making the connection to the ICU hardware. This
may take up to two minutes depending on connection type so please be patient.
TCP/IP connected sites: You connection should be established almost immediately to
the ICU hardware. However if the remote ICU drops the connection (for instance you
were IDLE) FuelSoft will then automatically change to a disconnected state requiring
you to reconnect. Please contact eFueling if you require assistance in extending the
idle connection time of your ICU equipment.
Dial-up modem connections: FuelSoft will perform various commands on your modem
in regards to the modem initialization strings. It is imperative that the sites
initialization string be properly setup for initializing the modem. Please contact
eFueling technologies if you require assistance in configuring your host modem. The
modem initialization string must not contain (E1) which will enable local echo mode of
the modem. The US Robotics modem jumpers for the host/workstation modem are
typically 1,2 up / 3,4,5 down / 6,7 up / 8 down. During the connection with the

www.efueling.com P a g e | 67
remote terminal if the connection is lost FuelSoft will automatically change to a
disconnected state.
Direct RS232 serial connection: This will allow FuelSoft to connect to your ICU
hardware using a direct serial cable physically connecting your workstation and the ICU
equipment.
b) Send
Accounts: This will send the account records to the ICU hardware.
Classes: This will send the class records to the ICU hardware.
Clock Time: This will send the clock information to the ICU hardware.
Employees: This will send the employee records to the ICU hardware.
Hoses: This will send the hose records to the ICU hardware.
Networks: This will send the network records to the ICU hardware.
Prompts: This will send the prompt records to the ICU hardware.
Vehicles: This will send the vehicle records to the ICU hardware.
Everything: This will send the following items (accounts, classes, clock time,
employees, hoses, networks, prompts, vehicles) to the ICU hardware.

www.efueling.com P a g e | 68
Updates: This will scan for changes to the database such as (vehicles, hose prices,
employees) and only download the new changes since the last time updates where
performed.
Wake Up: This will force the ICU hardware to become responsive to the host commands
in the event the ICU hardware went into sleep mode.
Vehicle Odometers: This will send the vehicle odometers to the ICU hardware (if
applicable)
Restrictive Send: This allows the user to selectively send certain data to the ICU
hardware using query expressions.
c) Retrieve
Site Status: This is used to retrieve status from the ICU hardware such as (site number,
site name, clock information).
Retrieve Headers: This is used to retrieve header information from the ICU hardware.
Transaction: This is used to collect your transactions from the ICU hardware. This is a
process that should typically be done on a daily basis.
Events: This is used to collect your events from the ICU hardware (if applicable). This is
a process that should typically be done on a daily basis.
Read: This allows you to read back records from the ICU hardware based on the
records pointer locations. This typically is only used for diagnostics or advanced data
recovery.

www.efueling.com P a g e | 69
d) Reset
Accounts: This is used to reset the accounts data in the ICU hardware.
Classes: This is used to reset the class data in the ICU hardware.
Employees: This is used to reset the employee data in the ICU hardware.
Hoses: This is used to reset the hose data in the ICU hardware.
Networks: This is used to reset the network data in the ICU hardware.
Prompts: This is used to reset the prompt data in the ICU hardware.
Vehicles: This is used to reset the vehicle data in the ICU hardware.
Headers: This is used to reset the ICU headers which will permanently erase all the ICU
data including fuel transactions. Then the memory is pre-allocated into blocks for
storage of the ICU data. Please contact eFueling if you need assistance on the proper
usage of this command. This command may cause permanent loss of data and should
be used with caution.
e) Diagnostics
Remote Authorization: This will allow you to remotely authorize a transaction at the
ICU hardware (if applicable).

www.efueling.com P a g e | 70
6. REPORTS
FuelSoft uses Crystal Reports for report generation. You are able to define various
report parameters for generating your report.
First you‟ll click add new report on the navigation bar. Then you will need to fill in the
new report template.
Report Name: This is the name of the report such as (Transaction Report).

www.efueling.com P a g e | 71
Report Filename: This is where you will browse and select the crystal report file (*.rpt).
This file defines the layout of the report so it is important to pick a report that will
meet your needs. You will need to browse to your reports folder typically located in
this directory (C:\Program Files\eFueling Technologies\FuelSoft\Reports\Crystal
Reports\*.rpt).
Report Title: This is the title of the report that will be printed on the actual report in
the title section. This can be the same name as the report name or a different title if
you desire.
Description: This is an internal description field used for providing a generic
description about the report.

www.efueling.com P a g e | 72
Crystal Parameters: Some Crystal Reports documents may contain embedded
parameters within the report. This allows you to prefill the parameters prior to
running the report. However you are able skip this section and leave this blank and
the report will then prompt you to complete the parameters during report generation.
In some cases the report parameter may be a required item as determined by the
specific report and in other cases it may be an optional prompt.

www.efueling.com P a g e | 73

www.efueling.com P a g e | 74
Selection Formula: This allows you to set a record selection formula in the report prior
to running the report. You could for example choose (site = 1) or (account = 2300) or
(vehicle = 542378) as record selection formulas. This will allow you to filter the report
contents based on certain expressions to offer a more customized report. You can
choose from various fields and operands to build complex filter expressions.
Output Format: You‟ll choose either printer or display. If you choose display you can
still print and export the report after it appears on the screen.
Once you are ready to generate the report you will need to hit the “RUN” button on the
form.

www.efueling.com P a g e | 75
Since the report that I generated was a transaction report it does contain some
embedded Crystal Report parameters that are required to be completed. Since I did
not set the values for the parameters prior to running the report Crystal Reports will
prompt be to enter them when the report is generated. This report has two embedded
parameters which are used for date selections. You can either fill in the starting and
ending date in the top section or complete the „quick‟ pick such as “yesterday” in the
bottom section. These values will then be passed on to the report to filter the report
based on your desired dates.
Once you have generated your report you can print and export your report by using
the respective buttons.

www.efueling.com P a g e | 76
If you have defined the mail setup section of FuelSoft then you will be able to send the
report as a PDF copy by using the send via email option.
You will then define the recipient ([email protected]) and the message details such
as subject line. After that hit “Send Mail” and the sending process will start in 5
minutes. You must keep FuelSoft open for at least another 5 minutes as the email
“outbox” sends mail on 5 minute intervals. However if you close FuelSoft the mail will
then be sent the next time you login to FuelSoft.

www.efueling.com P a g e | 77
7. DATA EXCHANGE
eFueling has worked with various 3rd party accounting and fleet software packages in
order to exchange data between those systems. Please contact our sales team to
inquire about obtaining a data exchange module. We can also design a custom
interface to meet your specific needs as well.
On the main export / import page you will select which module you wish to run.
* The company, product and brand names mentioned herein are trademarks, registered trademarks and/or
service marks of their respective owners.
Then you will click the (…) on the right hand side to open the file dialog box windows
for saving the file to a specific location.

www.efueling.com P a g e | 78
In this example I am saving the file as follows (C:\My Exported File.txt). The append
data to existing file is used to determine if you wish to overwrite the file or add to it.
The update transaction captured flag is used to indicate if you would like the
application to mark the transaction as exported so it wouldn‟t be exported again
(default value is checked).

www.efueling.com P a g e | 79
8. DATABASE MAINTENANCE / UTILITIES
The application is used to perform various database related tasks on the application
database.
First you‟ll want to click on SQL Login:

www.efueling.com P a g e | 80
Then you will fill out your login details in order to login to the database for
maintenance.
Create Database:
The create database is usually a onetime process and instructions on how to use this
feature are at the beginning of the manual.
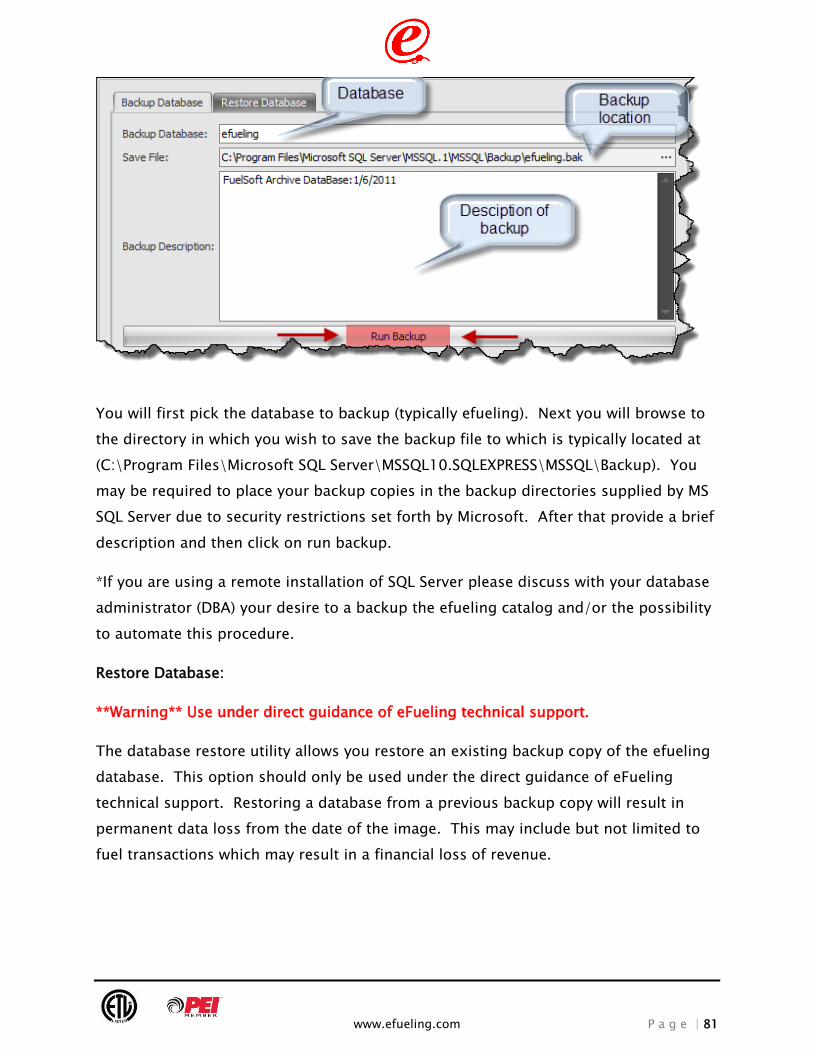
Backup Database:
The database backup utility allows you to create periodic manual backups of the
eFueling database.
www.efueling.com P a g e | 81
You will first pick the database to backup (typically efueling). Next you will browse to
the directory in which you wish to save the backup file to which is typically located at
(C:\Program Files\Microsoft SQL Server\MSSQL10.SQLEXPRESS\MSSQL\Backup). You
may be required to place your backup copies in the backup directories supplied by MS
SQL Server due to security restrictions set forth by Microsoft. After that provide a brief
description and then click on run backup.
*If you are using a remote installation of SQL Server please discuss with your database
administrator (DBA) your desire to a backup the efueling catalog and/or the possibility
to automate this procedure.
Restore Database:
**Warning** Use under direct guidance of eFueling technical support.
The database restore utility allows you restore an existing backup copy of the efueling
database. This option should only be used under the direct guidance of eFueling
technical support. Restoring a database from a previous backup copy will result in
permanent data loss from the date of the image. This may include but not limited to
fuel transactions which may result in a financial loss of revenue.

www.efueling.com P a g e | 82
*If you are using a remote installation of SQL Server please discuss with your database
administrator (DBA) your desire to restore a backup image.
Update Database:
Typically when a new version of FuelSoft is released it requires a change to the
database design. These changes may include (new tables, columns, indexes,
relationships, triggers, constraints, etc...). These changes scripts typically span
thousands of lines of scripting code. Therefore FuelSoft has implemented an easy to
use scripting engine that can automatically apply changes using some of the following
methods.
1) If you log into FuelSoft as a “privileged” account (such as windows
authentication) in which FuelSoft is capable of automatically applying all
required change scripts with little interaction from the user. (PREFERRED
OPTION)
2) You can launch the update database option and apply the scripts one at a time
until all the scripts have been applied.

www.efueling.com P a g e | 83
3) Your DBA can manually apply the change scripts IN ORDER located in here
(C:\Program Files\eFueling Technologies\FuelSoft\Scripts\Schema\*.sql). You
can reference the “SqlDbaseVersion” table to determine the current database
version which is also shown when you log into FuelSoft.
** eFueling recommends always performing a database backup prior to any FuelSoft
software upgrade or database updates/modifications.
Import WinC6 Database
FuelSoft has the ability to import your existing data from WinC6 into FuelSoft. Please
ask our sales team about the WinC6 Import utility.
**The upgrade process will make certain modifications to your existing WinC6
database. Therefore eFueling recommends making a backup copy of your WinC6
database prior to using the WinC6 upgrade tables.

www.efueling.com P a g e | 84
Choose “Yes” for Orion or “No” for Fuel Guard/Manager.
Then pick your WinC6 database from the file dialog usually located here (c:\Program
Files\NBCS\WinC640\WinC6.mdb).
After that choose all tables EXCEPT “Active & Preauths”. Then hit “RUN” at the bottom
to import those selected tables. Once you have successfully imported the selected
tables you‟ll then want to run the import one more time. Now select the “Active &
Preauths” table and hit “RUN”. This process may take some time to complete
depending on the number of records to import.
Should you have any issues with the upgrade process or would like assistance with
using the WinC6 import module please contact our support staff.

www.efueling.com P a g e | 85
9. APPENDIX A – TECH TIPS
i. FREQUENTLY ASKED QUESTIONS
1) How do I get the latest version of FuelSoft?
a. You can tell FuelSoft to check for updates in your “Start Menu” under
“eFueling Technologies, FuelSoft, Tools, Check for updates.
b. You can manually download and install the latest version which is always
published at this address.
http://www.efueling.biz/efueling/bits/fuelsoft/fuelsoftinstaller.exe
i. You may need to uninstall the old version first which does not
affect your customer data.
2) How do I manage my database version?
a. FuelSoft can automatically detect database changes and apply the scripts.
3) Do I have to use a local installation of SQL Server?
a. No you may also use a remote SQL Server machine to host your data.
However this may require assistance from your database administrators
(DBA) since there are special requirements in regards to security
procedures.
4) What type of authentication is offered in FuelSoft?
a. FuelSoft offers both Windows and SQL Authentication.
5) What is minimum version of SQL Server required to run FuelSoft
a. You must have SQL Server 2005+
b. SQL Server 2000 is not supported
6) What are the different versions of FuelSoft?
a. FuelSoft Standard, Enterprise, Premier
b. FuelSoft Accounting module
c. FuelSoft Fluid Management module
d. FuelSoft EFN module
ii. TROUBLESHOOTING
1) What can I do if I can‟t log into FuelSoft
a. Check the (server name, username, password, catalog) and ensure that
those fields are correct.
b. There is no „secret/back door‟ access to FuelSoft as the application uses
the SQL Server security engine for accessing your data.
www.efueling.com P a g e | 86
c. You can try to use a different user account.
d. You can try using the eFuelingAdmin account which is installed during
installation. Although it is also possible that this account was removed
from your network administrator.
e. You can use SQL Server Management Studio (SSMS) to manage your user
credentials assuming you have the proper permission.
f. Contact your network administrator and/or eFueling for assistance.
2) What if I receive an application exception
a. Please check to ensure that you have the latest version of FuelSoft.
eFueling publishes various updates to the product which address most
concerns.
b. Please take a screen shot and/or copy the exception message and send
that to [email protected] .
c. There are various application logs that are recorded to help manage
errors. C:\Users\”your user account”\AppData\Roaming\FuelSoft.exe
3) The screen size doesn‟t look correct and/or you can‟t see the entire window.
a. You must run FuelSoft on a screen resolution of 1024X768 or higher.
b. The application dynamics adjusts size depending on your screen
resolution and monitor.
iii. SUPPORT CONTACT INFORMATION
(512) 835-2273
(800) 835-2106
www.efueling.com

www.efueling.com P a g e | 87
10. DOCUMENT VERSION CONTROL
Status Version Date Comment
Draft 0.0.1 06/16/2010 Document creation.
Draft 0.0.2 01/06/2011 Added FuelSoft core items
Release 1.0.0 1/07/2011 Manual Release
Recommended