6/14/2012
1
MIGRATING STORAGE:
FROM PTOV AND VTOV
FORSYTHE TALKS
Andrew Goade
agoade@forsythe com
This document and the material contained herein is confidential and proprietary and intended solely for the use and information of the client or customer to whom it is addressed. It should not be copied, disseminated, or used in any other manner without the prior written consent of Forsythe
AGENDA
Overview of Disk Connection Technologies
Overview of Disk Migration Options
NPIV Requirements
O i f T ti E i t Overview of Testing Environment
Steps to Migrate from PtoV
datavg
rootvg
Steps to Migrate from VtoV
Wrap-up/Questions
6/14/2012
2
OVERVIEW OF DISK CONNECTION TECHNOLOGIES
Overview of Disk Connection Technologies – Physical/Direct Attach
Physical/Direct Attach LPAR is given access to disk directly without the use of virtualization
technology
Example #1: LPAR owns SAS Adapter that connects to EXP24 disk Example #1: LPAR owns SAS Adapter that connects to EXP24 disk enclosure
Example #2: LPAR owns Fiber Adapter that connects to SAN. Disk is provisioned directly to LPAR.
6/14/2012
3
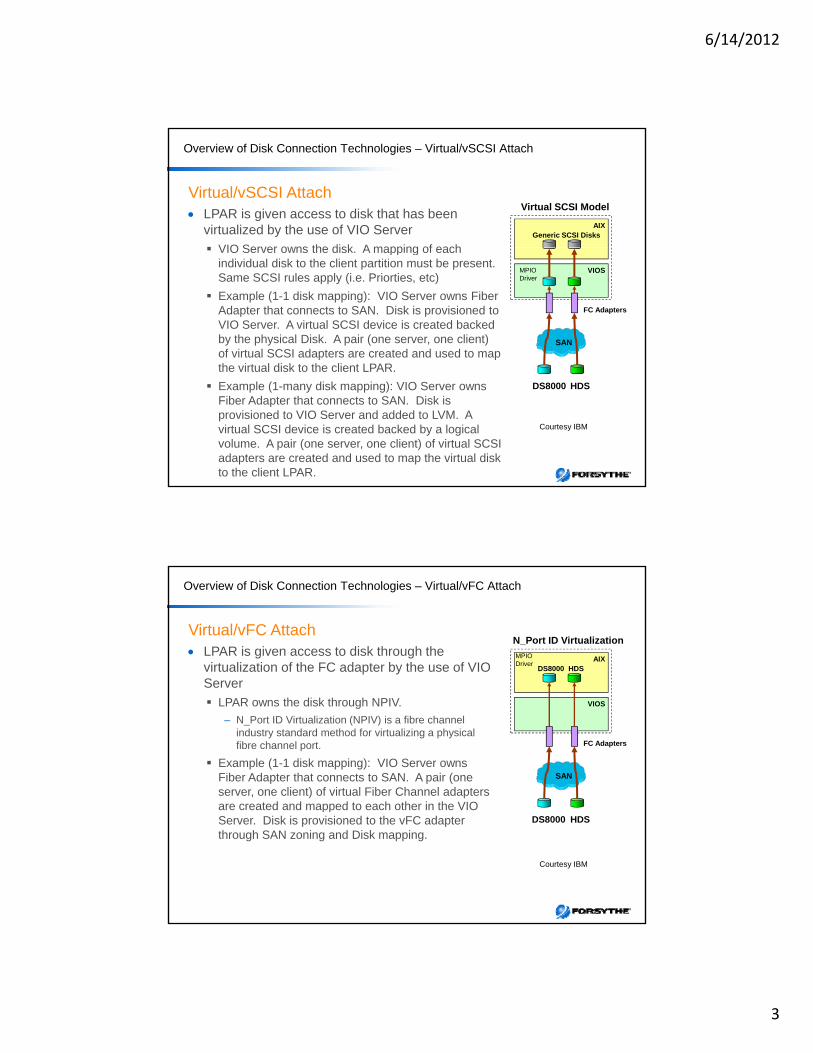
Overview of Disk Connection Technologies – Virtual/vSCSI Attach
Virtual/vSCSI Attach LPAR is given access to disk that has been
virtualized by the use of VIO Server
VIO Server owns the disk A mapping of each
AIXGeneric SCSI Disks
Virtual SCSI Model
VIO Server owns the disk. A mapping of each individual disk to the client partition must be present. Same SCSI rules apply (i.e. Priorties, etc)
Example (1-1 disk mapping): VIO Server owns Fiber Adapter that connects to SAN. Disk is provisioned to VIO Server. A virtual SCSI device is created backed by the physical Disk. A pair (one server, one client) of virtual SCSI adapters are created and used to map the virtual disk to the client LPAR
VIOS
SAN
FC Adapters
MPIODriver
the virtual disk to the client LPAR.
Example (1-many disk mapping): VIO Server owns Fiber Adapter that connects to SAN. Disk is provisioned to VIO Server and added to LVM. A virtual SCSI device is created backed by a logical volume. A pair (one server, one client) of virtual SCSI adapters are created and used to map the virtual disk to the client LPAR.
DS8000 HDS
Courtesy IBM
Overview of Disk Connection Technologies – Virtual/vFC Attach
Virtual/vFC Attach LPAR is given access to disk through the
virtualization of the FC adapter by the use of VIO Server
AIX
N_Port ID Virtualization
DS8000 HDS
MPIODriver
Server
LPAR owns the disk through NPIV.
– N_Port ID Virtualization (NPIV) is a fibre channel industry standard method for virtualizing a physical fibre channel port.
Example (1-1 disk mapping): VIO Server owns Fiber Adapter that connects to SAN. A pair (one server, one client) of virtual Fiber Channel adapters are created and mapped to each other in the VIO
VIOS
SAN
FC Adapters
are created and mapped to each other in the VIO Server. Disk is provisioned to the vFC adapter through SAN zoning and Disk mapping.
DS8000 HDS
Courtesy IBM
6/14/2012
4
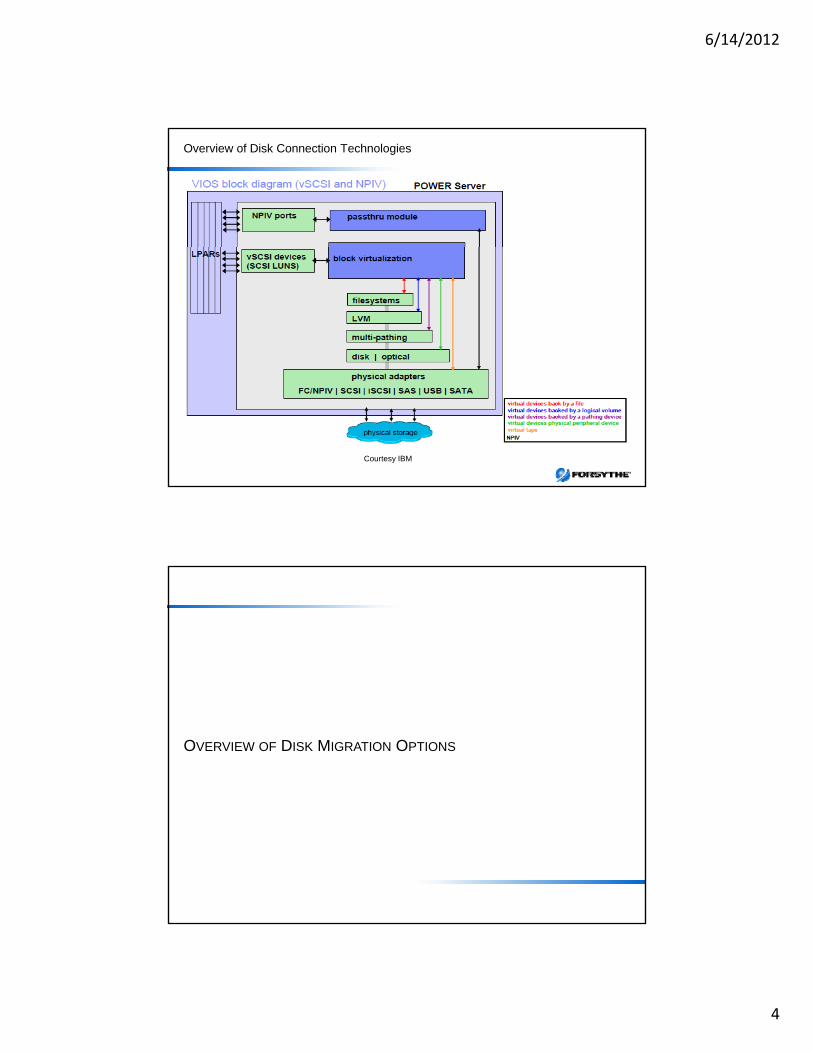
Overview of Disk Connection Technologies
Courtesy IBM
OVERVIEW OF DISK MIGRATION OPTIONS
6/14/2012
5
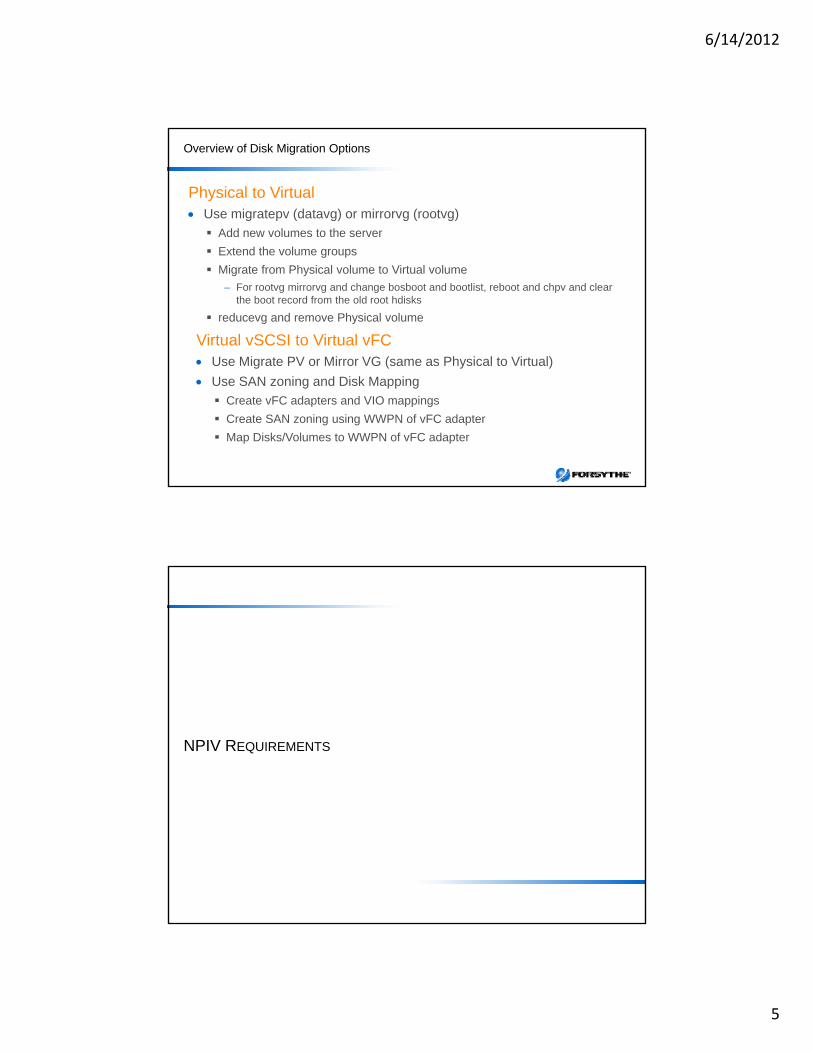
Overview of Disk Migration Options
Physical to Virtual Use migratepv (datavg) or mirrorvg (rootvg)
Add new volumes to the server
E t d th l Extend the volume groups
Migrate from Physical volume to Virtual volume
– For rootvg mirrorvg and change bosboot and bootlist, reboot and chpv and clear the boot record from the old root hdisks
reducevg and remove Physical volume
Virtual vSCSI to Virtual vFC Use Migrate PV or Mirror VG (same as Physical to Virtual)g ( y )
Use SAN zoning and Disk Mapping
Create vFC adapters and VIO mappings
Create SAN zoning using WWPN of vFC adapter
Map Disks/Volumes to WWPN of vFC adapter
NPIV REQUIREMENTS
6/14/2012
6
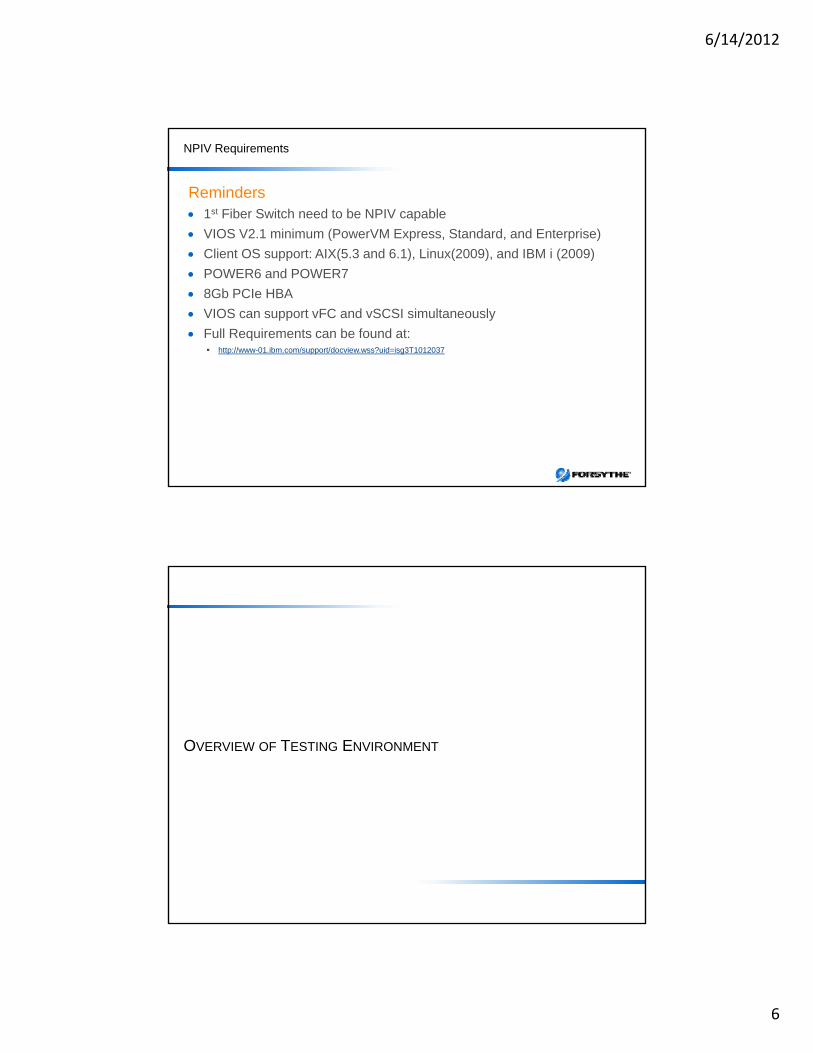
NPIV Requirements
Reminders 1st Fiber Switch need to be NPIV capable
VIOS V2.1 minimum (PowerVM Express, Standard, and Enterprise)
Client OS support: AIX(5.3 and 6.1), Linux(2009), and IBM i (2009)
POWER6 and POWER7
8Gb PCIe HBA
VIOS can support vFC and vSCSI simultaneously
Full Requirements can be found at: http://www-01.ibm.com/support/docview.wss?uid=isg3T1012037
OVERVIEW OF TESTING ENVIRONMENT
6/14/2012
7
OVERVIEW OF TESTING ENVIRONMENT
Example Environment IBM Power 740
Dual VIO server
C tl tili i SCSI d FC– Currently utilizing vSCSI and vFC
AIX 6.1 LPAR
V7000 Disk subsystem
Brocade SAN switches
STEPS TO MIGRATE FROM PTOV: MIGRATING FROM PHYSICAL TO VSCSI
6/14/2012
8
MIGRATING DATAVG
Physical to vSCSI Migration – Notes/Assumptions
Partition is already up and running with Physical disks
It is known how to do vSCSI mappings
Hosts have already been setup in the storage subsystem

6/14/2012
9
Physical to vSCSI Migration – datavg Step #1
On the HMC identify the partition you are working on
Take note of the ID as this will be the identification method used in the VIO server
LPAR ID 9LPAR ID 9
Physical to vSCSI Migration – datavg Step #2
Provision the disk to the host defined in your storage subsystem
6/14/2012
10
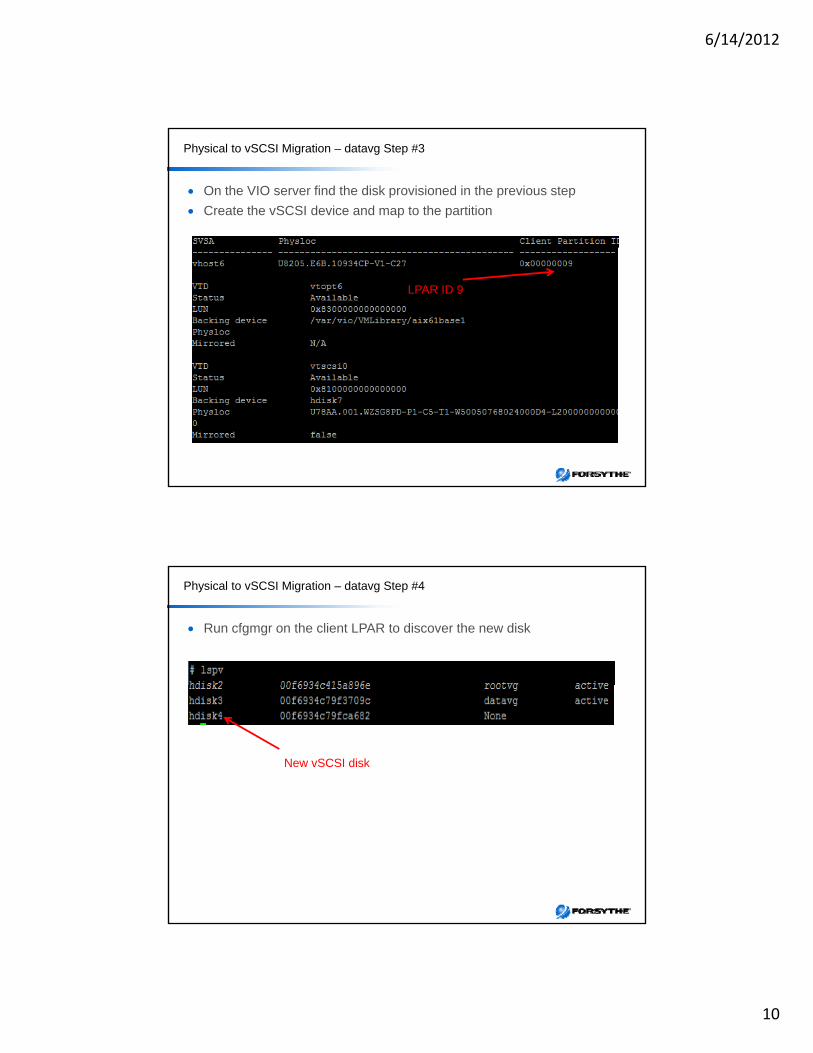
Physical to vSCSI Migration – datavg Step #3
On the VIO server find the disk provisioned in the previous step
Create the vSCSI device and map to the partition
LPAR ID 9
Physical to vSCSI Migration – datavg Step #4
Run cfgmgr on the client LPAR to discover the new disk
New vSCSI disk
6/14/2012
11
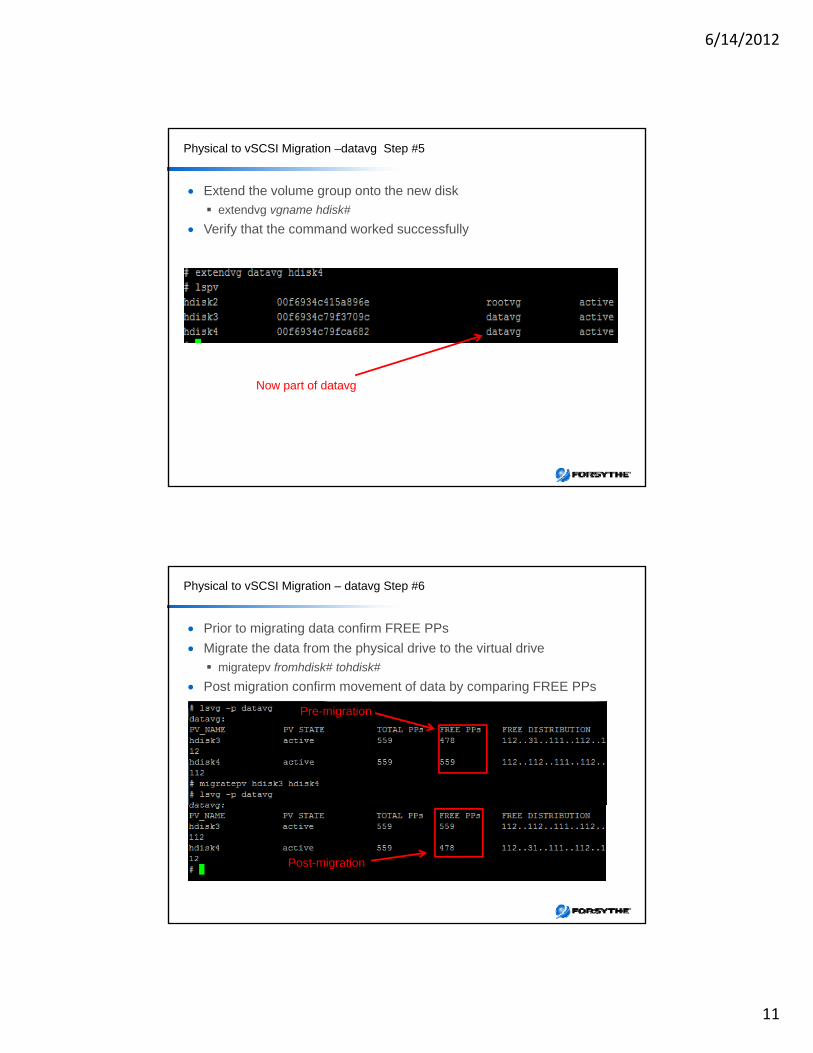
Physical to vSCSI Migration –datavg Step #5
Extend the volume group onto the new disk
extendvg vgname hdisk#
Verify that the command worked successfully
Now part of datavg
Physical to vSCSI Migration – datavg Step #6
Prior to migrating data confirm FREE PPs
Migrate the data from the physical drive to the virtual drive
migratepv fromhdisk# tohdisk#
Post migration confirm movement of data by comparing FREE PPs Post migration confirm movement of data by comparing FREE PPs
Pre-migration
Post-migration
6/14/2012
12
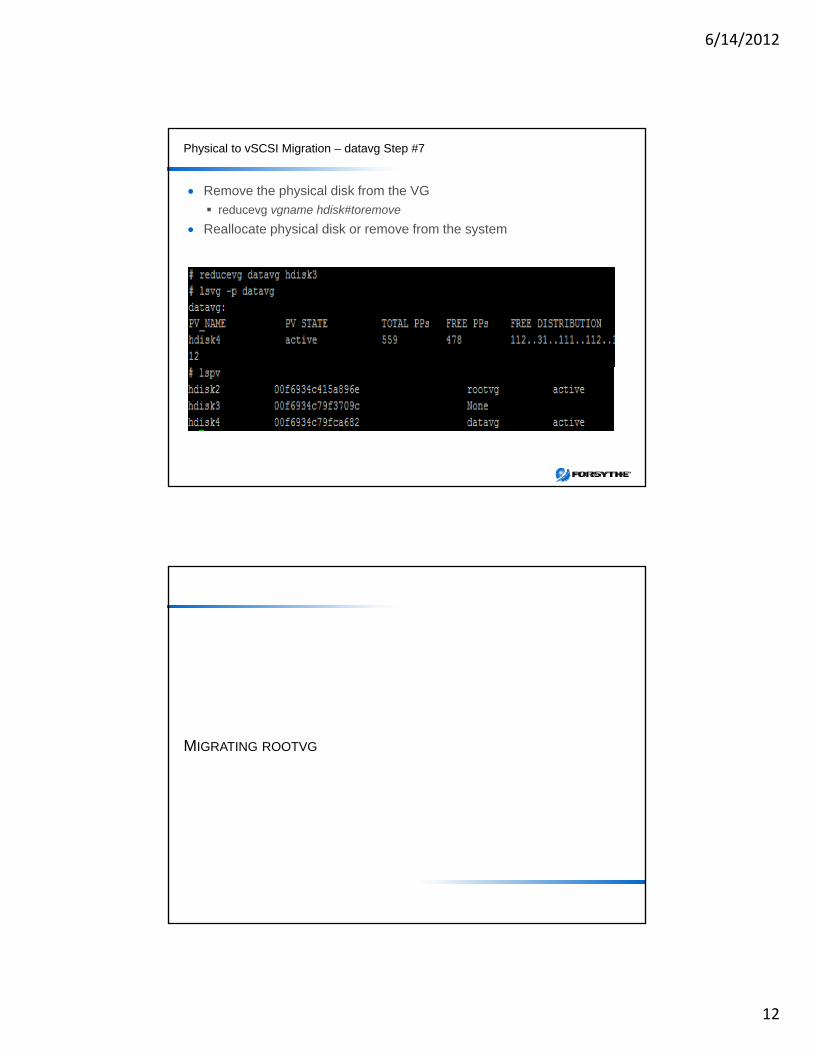
Physical to vSCSI Migration – datavg Step #7
Remove the physical disk from the VG
reducevg vgname hdisk#toremove
Reallocate physical disk or remove from the system
MIGRATING ROOTVG
6/14/2012
13
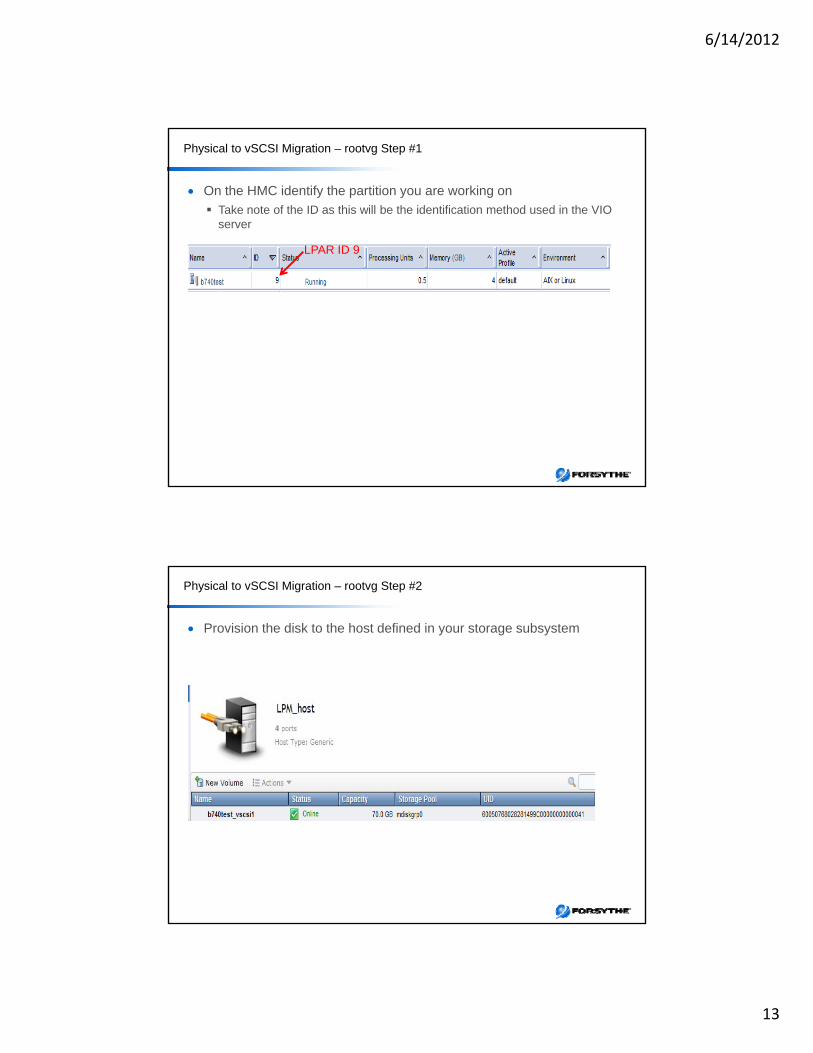
Physical to vSCSI Migration – rootvg Step #1
On the HMC identify the partition you are working on
Take note of the ID as this will be the identification method used in the VIO server
LPAR ID 9LPAR ID 9
Physical to vSCSI Migration – rootvg Step #2
Provision the disk to the host defined in your storage subsystem
6/14/2012
14
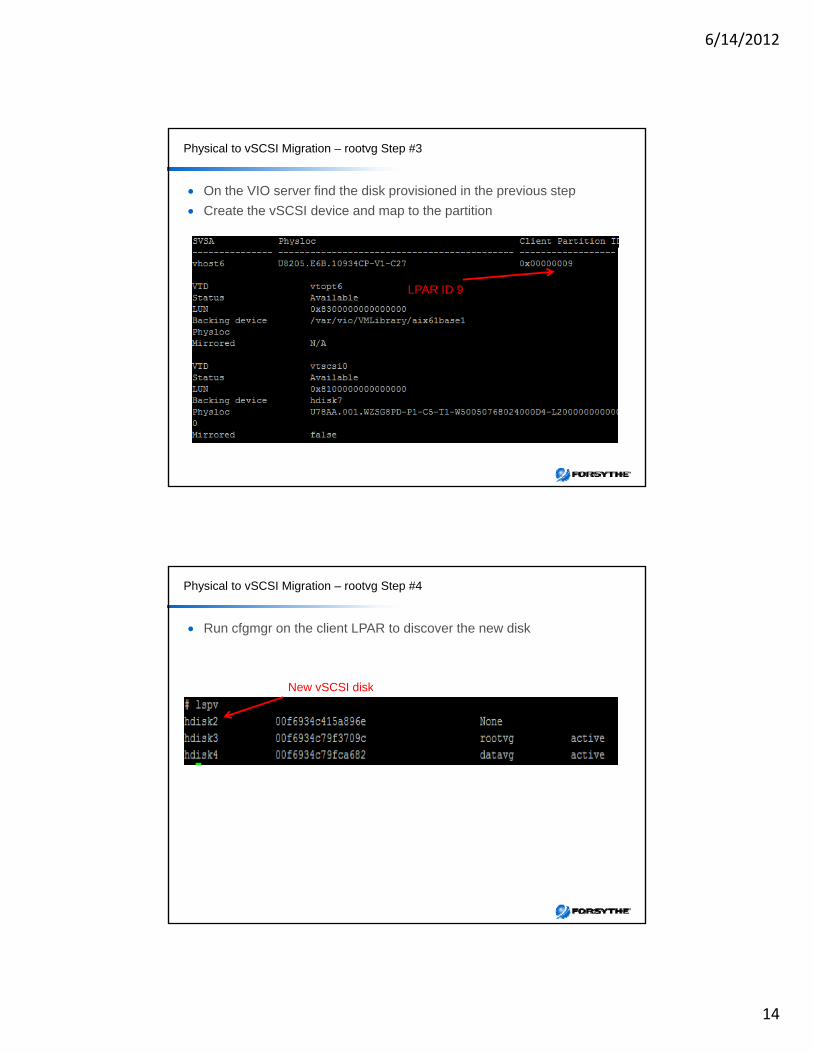
Physical to vSCSI Migration – rootvg Step #3
On the VIO server find the disk provisioned in the previous step
Create the vSCSI device and map to the partition
LPAR ID 9
Physical to vSCSI Migration – rootvg Step #4
Run cfgmgr on the client LPAR to discover the new disk
New vSCSI diskNew vSCSI disk
6/14/2012
15
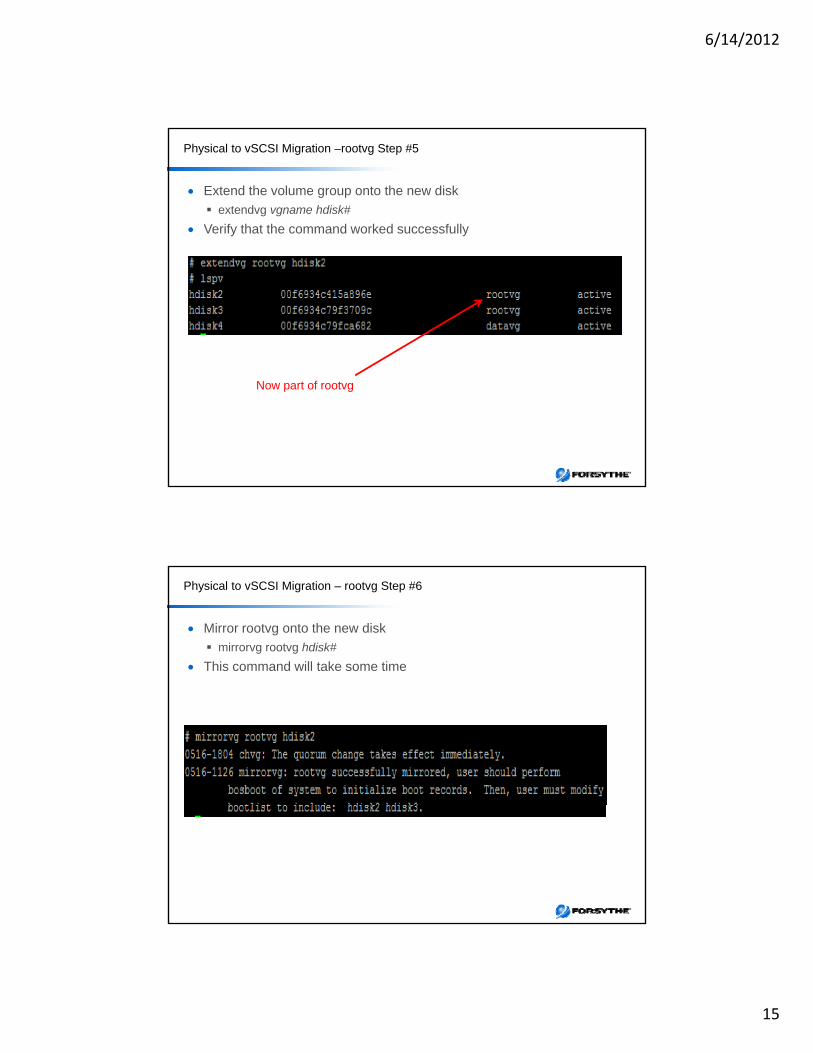
Physical to vSCSI Migration –rootvg Step #5
Extend the volume group onto the new disk
extendvg vgname hdisk#
Verify that the command worked successfully
Now part of rootvg
Physical to vSCSI Migration – rootvg Step #6
Mirror rootvg onto the new disk
mirrorvg rootvg hdisk#
This command will take some time
6/14/2012
16
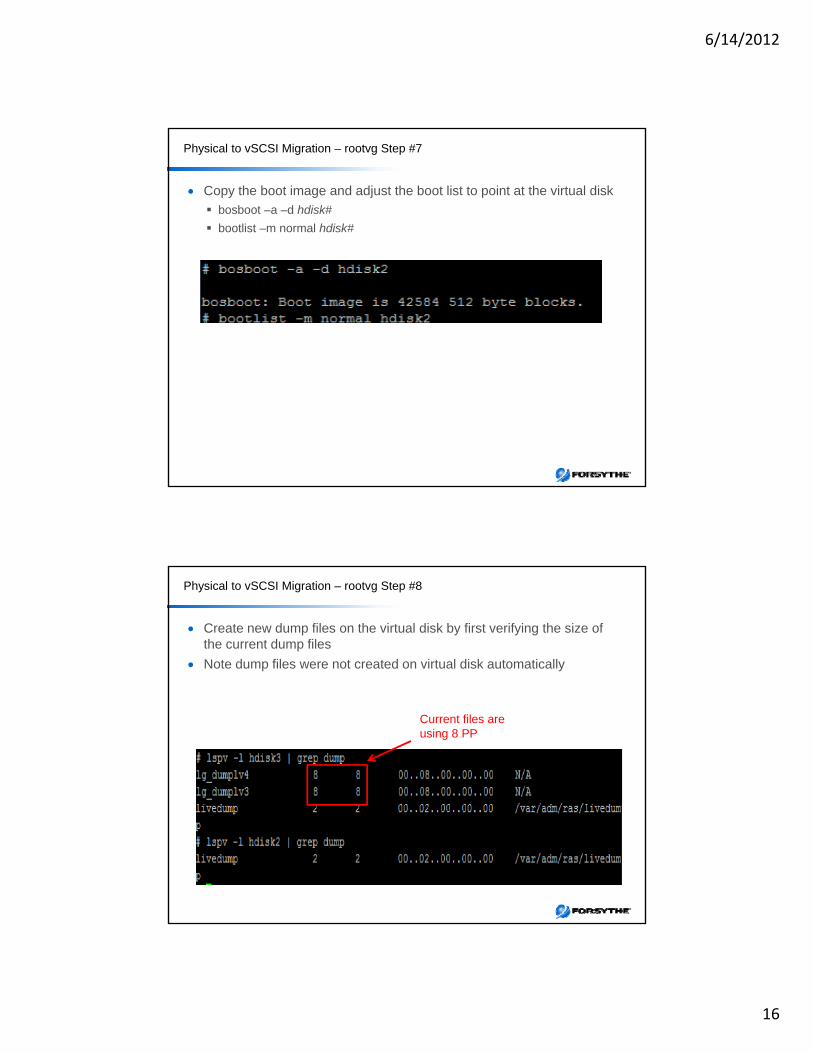
Physical to vSCSI Migration – rootvg Step #7
Copy the boot image and adjust the boot list to point at the virtual disk
bosboot –a –d hdisk#
bootlist –m normal hdisk#
Physical to vSCSI Migration – rootvg Step #8
Create new dump files on the virtual disk by first verifying the size of the current dump files
Note dump files were not created on virtual disk automatically
Current files are using 8 PP
6/14/2012
17
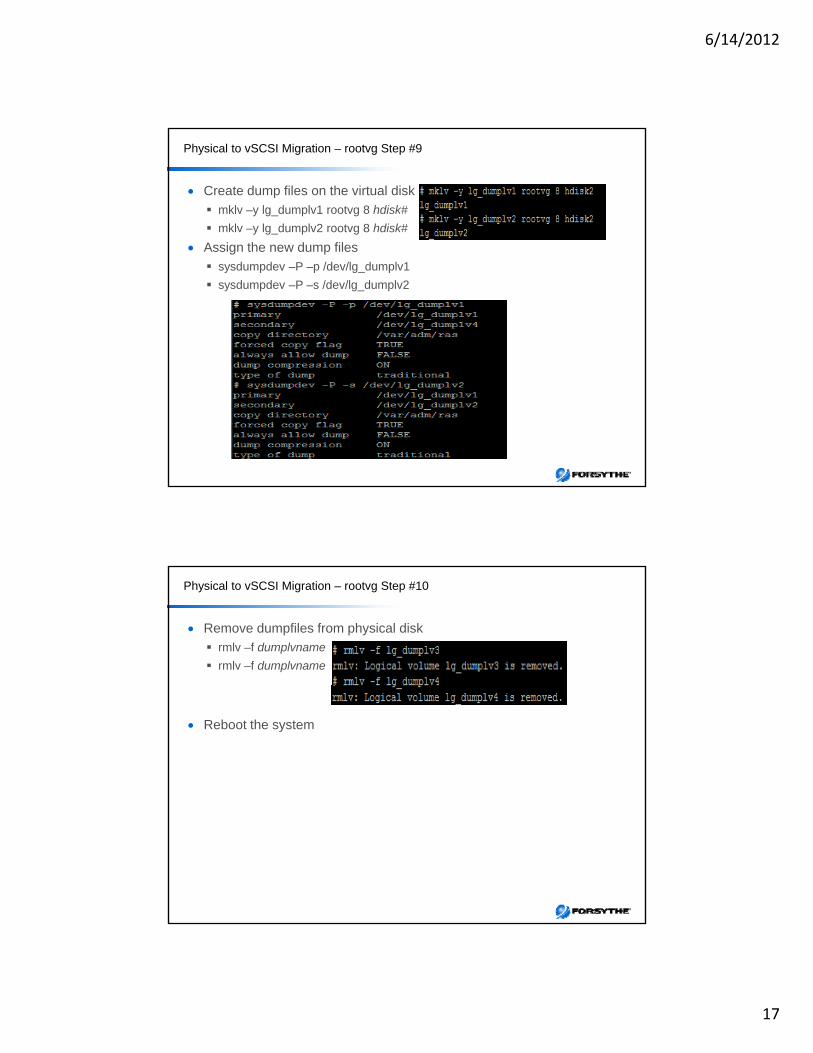
Physical to vSCSI Migration – rootvg Step #9
Create dump files on the virtual disk
mklv –y lg_dumplv1 rootvg 8 hdisk#
mklv –y lg_dumplv2 rootvg 8 hdisk#
Assign the new dump files Assign the new dump files
sysdumpdev –P –p /dev/lg_dumplv1
sysdumpdev –P –s /dev/lg_dumplv2
Physical to vSCSI Migration – rootvg Step #10
Remove dumpfiles from physical disk
rmlv –f dumplvname
rmlv –f dumplvname
Reboot the system
6/14/2012
18
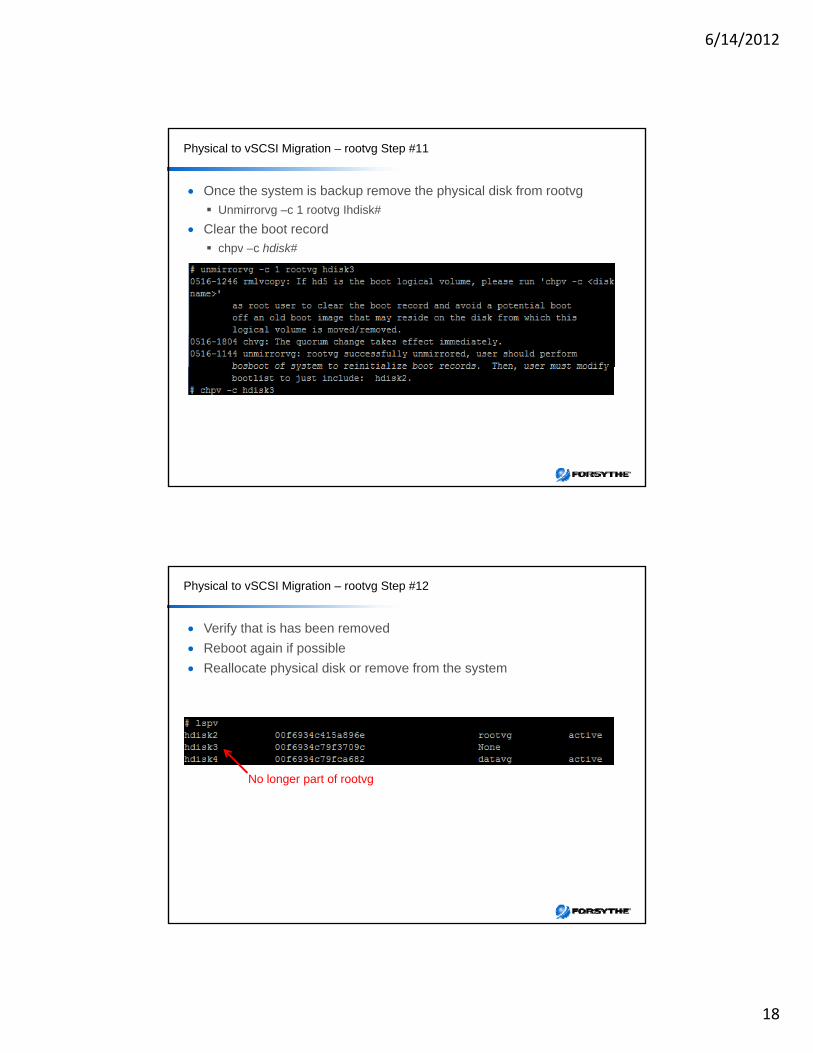
Physical to vSCSI Migration – rootvg Step #11
Once the system is backup remove the physical disk from rootvg
Unmirrorvg –c 1 rootvg Ihdisk#
Clear the boot record
chpv c hdisk# chpv –c hdisk#
Physical to vSCSI Migration – rootvg Step #12
Verify that is has been removed
Reboot again if possible
Reallocate physical disk or remove from the system
No longer part of rootvg
6/14/2012
19
STEPS TO MIGRATE FROM VTOV: MIGRATING FROM VSCSI TO VFC
NPIV Requirements
Reminders 1st Fiber Switch need to be NPIV capable
VIOS V2.1 minimum (PowerVM Express, Standard, and Enterprise)
Client OS support: AIX(5.3 and 6.1), Linux(2009), and IBM i (2009)
POWER6 and POWER7
8Gb PCIe HBA
VIOS can support vFC and vSCSI simultaneously
Full Requirements can be found at: http://www-01.ibm.com/support/docview.wss?uid=isg3T1012037
6/14/2012
20
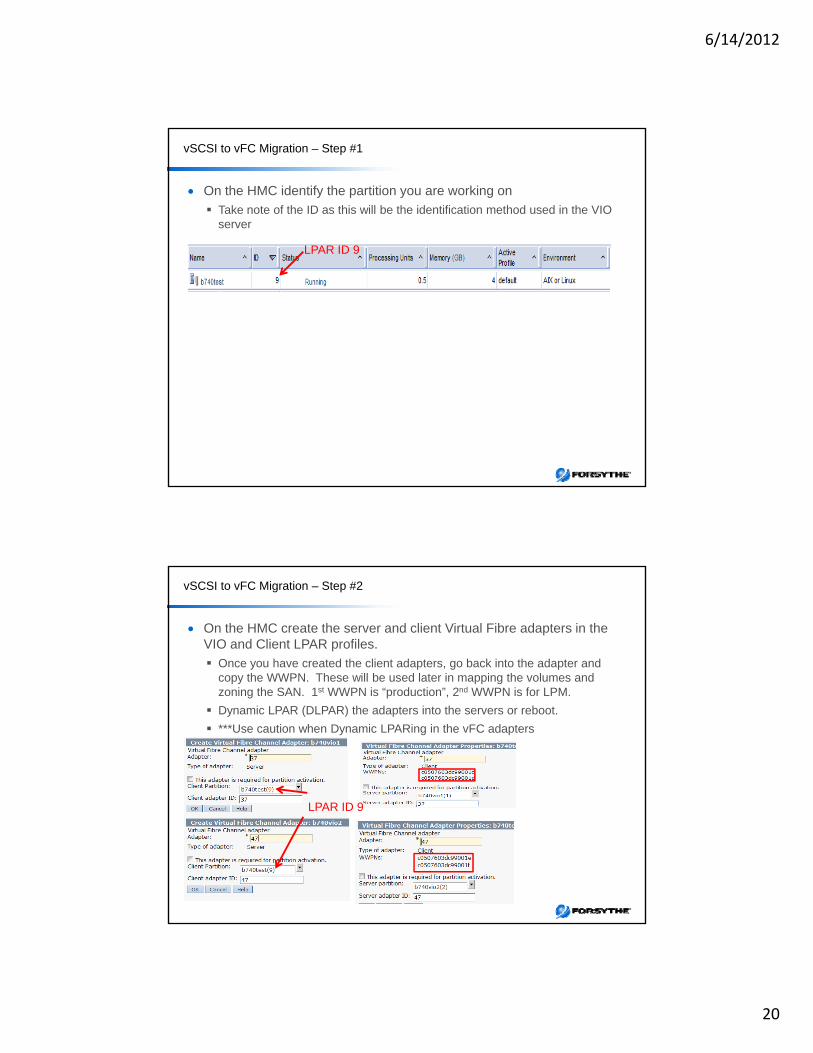
vSCSI to vFC Migration – Step #1
On the HMC identify the partition you are working on
Take note of the ID as this will be the identification method used in the VIO server
LPAR ID 9LPAR ID 9
vSCSI to vFC Migration – Step #2
On the HMC create the server and client Virtual Fibre adapters in the VIO and Client LPAR profiles.
Once you have created the client adapters, go back into the adapter and copy the WWPN. These will be used later in mapping the volumes and zoning the SAN. 1st WWPN is “production”, 2nd WWPN is for LPM.
Dynamic LPAR (DLPAR) the adapters into the servers or reboot.
***Use caution when Dynamic LPARing in the vFC adapters
LPAR ID 9LPAR ID 9
6/14/2012
21
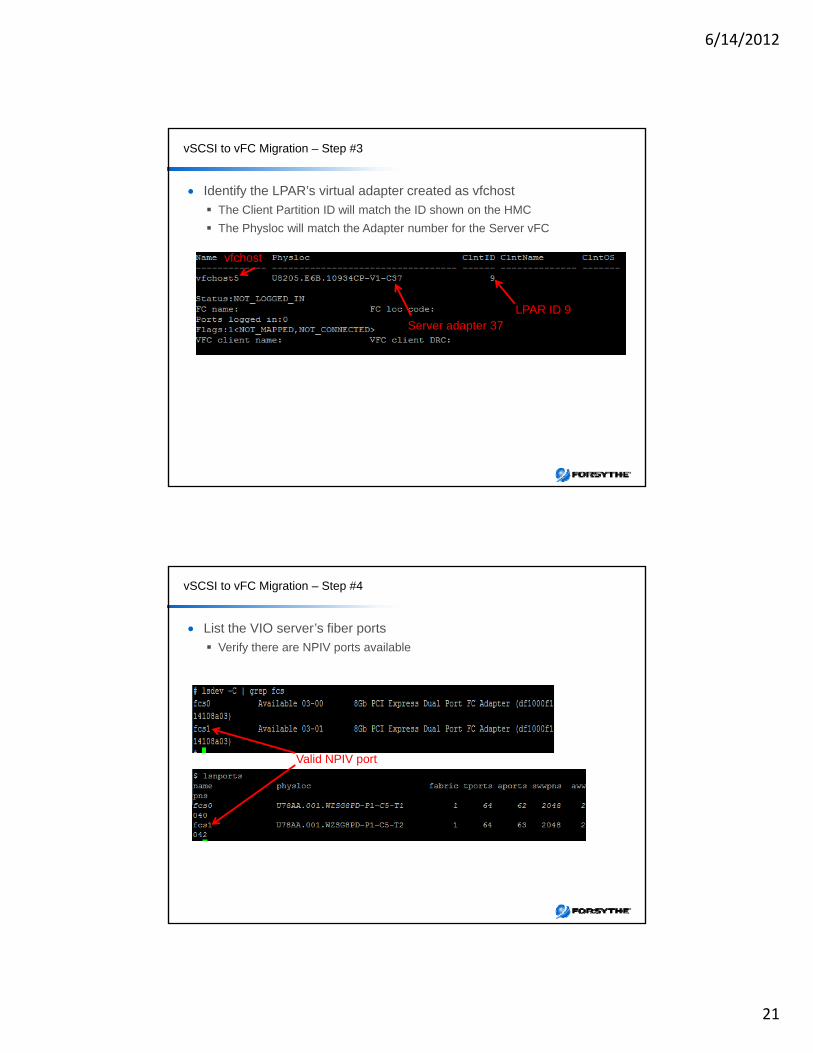
vSCSI to vFC Migration – Step #3
Identify the LPAR’s virtual adapter created as vfchost
The Client Partition ID will match the ID shown on the HMC
The Physloc will match the Adapter number for the Server vFC
LPAR ID 9Server adapter 37
vfchost
vSCSI to vFC Migration – Step #4
List the VIO server’s fiber ports
Verify there are NPIV ports available
vfchost
Valid NPIV port
6/14/2012
22
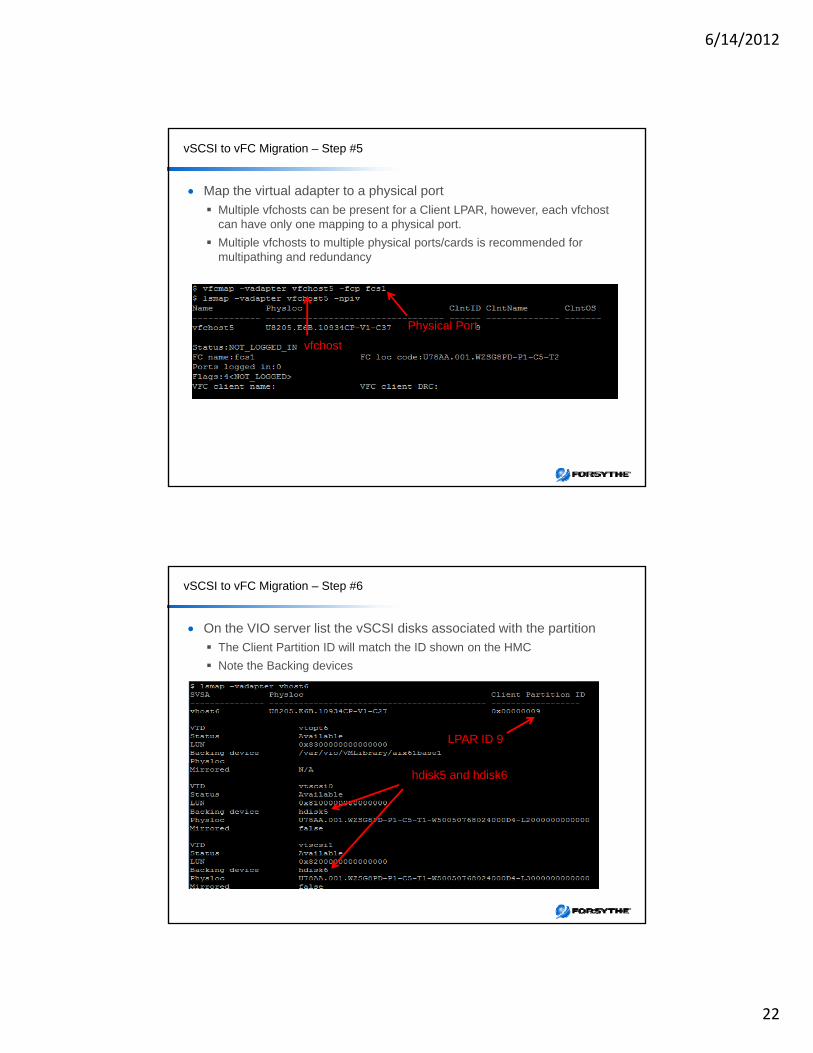
vSCSI to vFC Migration – Step #5
Map the virtual adapter to a physical port
Multiple vfchosts can be present for a Client LPAR, however, each vfchostcan have only one mapping to a physical port.
Multiple vfchosts to multiple physical ports/cards is recommended for p p p y pmultipathing and redundancy
vfchost
Physical Port
vSCSI to vFC Migration – Step #6
On the VIO server list the vSCSI disks associated with the partition
The Client Partition ID will match the ID shown on the HMC
Note the Backing devices
hdisk5 and hdisk6
LPAR ID 9
6/14/2012
23
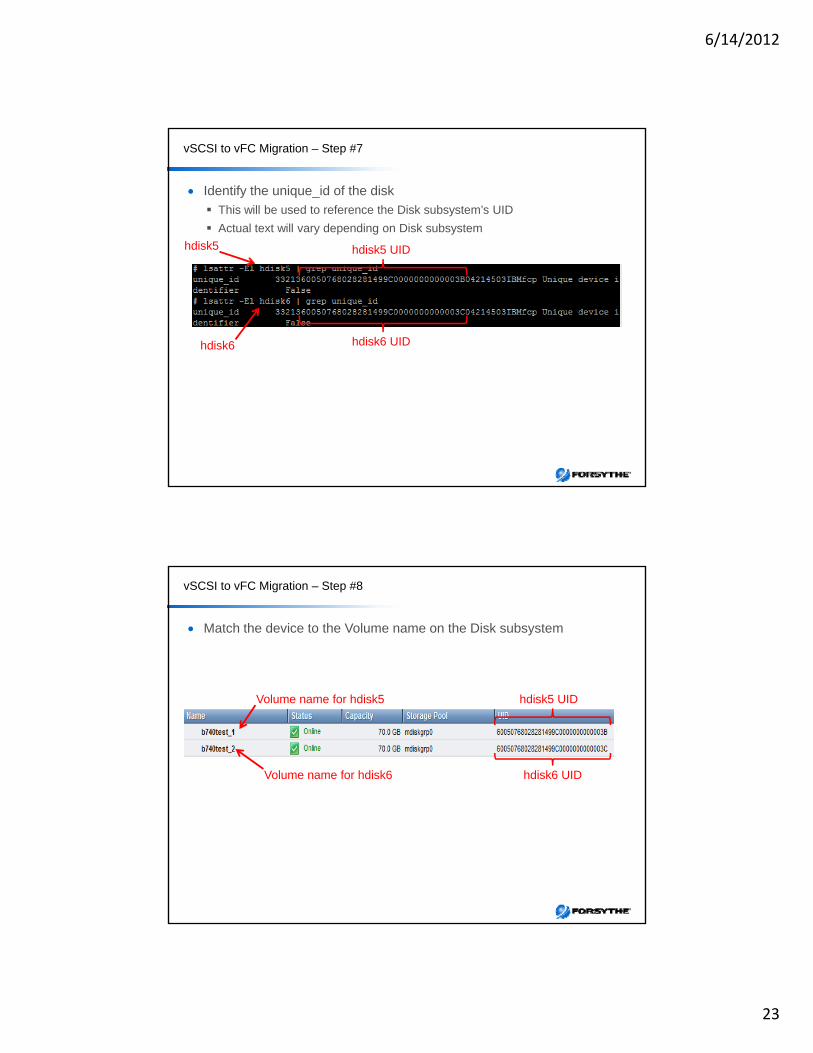
vSCSI to vFC Migration – Step #7
Identify the unique_id of the disk
This will be used to reference the Disk subsystem’s UID
Actual text will vary depending on Disk subsystem
hdisk5 hdisk5 UID
hdisk6
LPAR ID 9
hdisk5 hdisk5 UID
hdisk6 UID
vSCSI to vFC Migration – Step #8
Match the device to the Volume name on the Disk subsystem
LPAR ID 9
hdisk5 UID
hdisk6 UID
Volume name for hdisk5
Volume name for hdisk6
6/14/2012
24
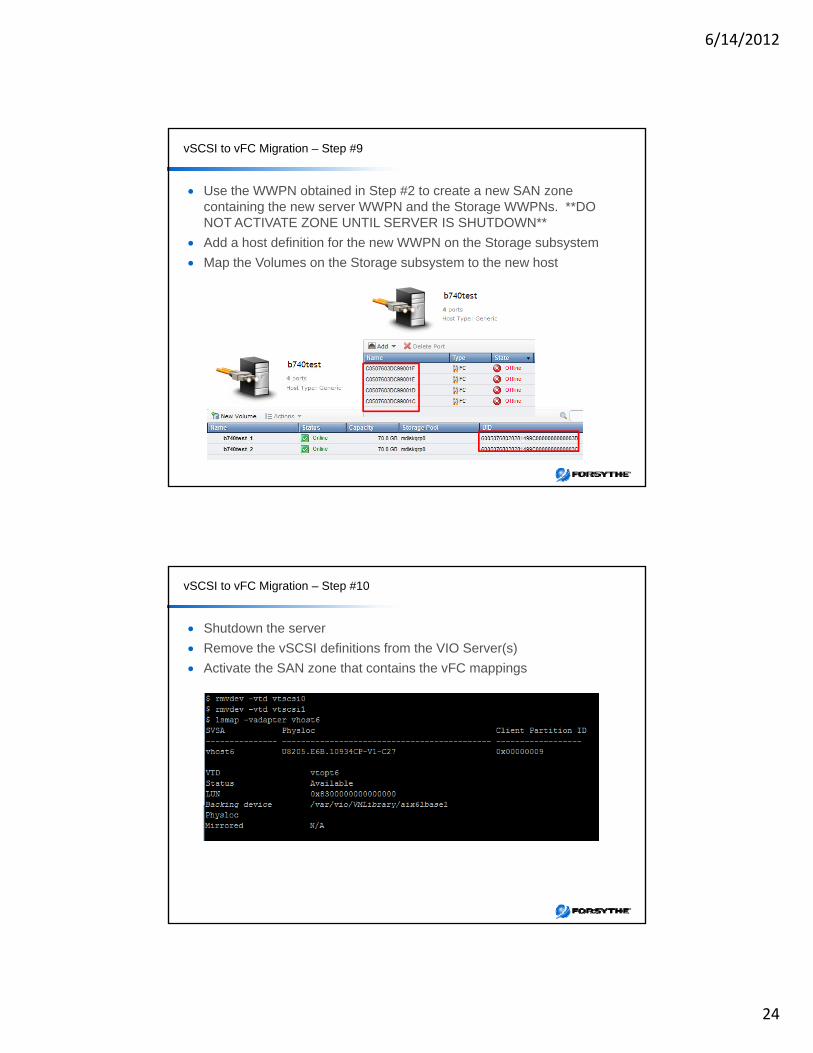
vSCSI to vFC Migration – Step #9
Use the WWPN obtained in Step #2 to create a new SAN zone containing the new server WWPN and the Storage WWPNs. **DO NOT ACTIVATE ZONE UNTIL SERVER IS SHUTDOWN**
Add a host definition for the new WWPN on the Storage subsystemg y
Map the Volumes on the Storage subsystem to the new host
vSCSI to vFC Migration – Step #10
Shutdown the server
Remove the vSCSI definitions from the VIO Server(s)
Activate the SAN zone that contains the vFC mappings

6/14/2012
25
vSCSI to vFC Migration – Step #11
Activate the server in SMS mode
List the boot devices and choose the boot device
Multiple devices show up because of multiple paths
Matches vfchostPhysloc
vSCSI to vFC Migration – Step #12
Once the server boots
Verify drives
Reset boot list
Install appropriate disk management SW (i e SDDPCM Powerpath etc ) Install appropriate disk management SW (i.e. SDDPCM, Powerpath, etc.)
CLEAN UP!!
Remove volume mappings in Storage Host mappings
Remove SAN zone (if all Volumes have been migrated)
Remove hdisks from VIO Server(s)
6/14/2012
26
THANK YOU & QUESTIONS
Recommended