EJBCA with GemSAFE Toolbox Part1 Workstation Logon
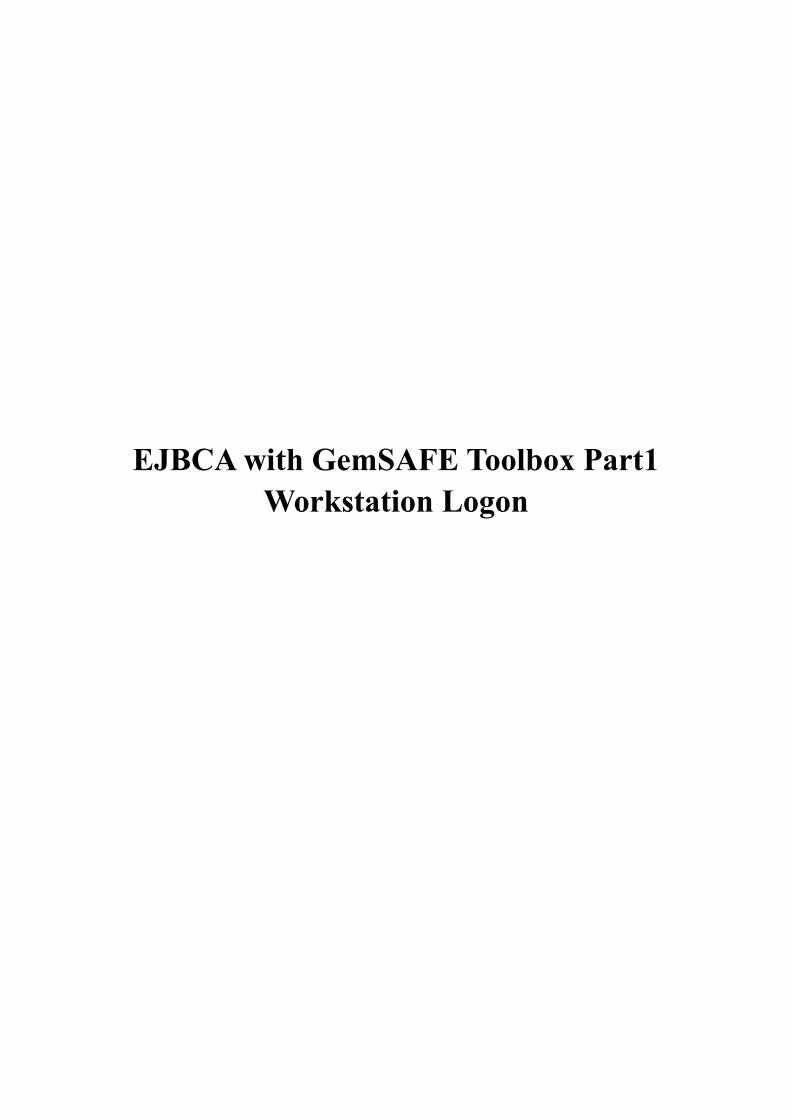
Introduction
This document describes installation of EJBCA3.6.0, starting from a
clean Windows Server 2003 and a clean Window XP Professional.
In this document, EJBCA 3.6.0 is used together with:
1. GemSAFE toolbox
2. GemSAFE PCSC token
3. ApacheAnt1.7.0
4. Jboss4.2.2
5. JDK 6 Update 6
6. JCE6
for workstation smart card logon.
The procedures to use EJBCA for email signing, email encryption and
SSL service will be described in another document in series
2
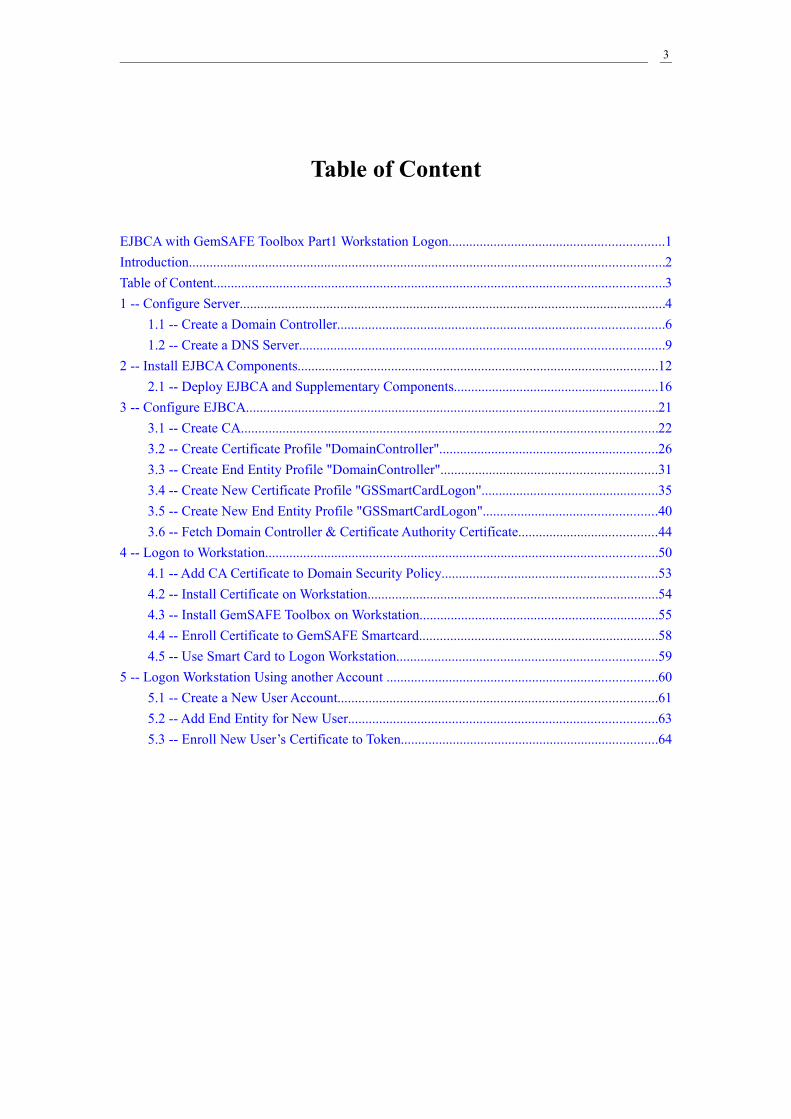
Table of Content
EJBCA with GemSAFE Toolbox Part1 Workstation Logon..............................................................1Introduction.........................................................................................................................................2Table of Content..................................................................................................................................31 -- Configure Server...........................................................................................................................4
1.1 -- Create a Domain Controller..............................................................................................61.2 -- Create a DNS Server.........................................................................................................9
2 -- Install EJBCA Components........................................................................................................122.1 -- Deploy EJBCA and Supplementary Components...........................................................16
3 -- Configure EJBCA.......................................................................................................................213.1 -- Create CA........................................................................................................................223.2 -- Create Certificate Profile "DomainController"...............................................................263.3 -- Create End Entity Profile "DomainController"..............................................................313.4 -- Create New Certificate Profile "GSSmartCardLogon"...................................................353.5 -- Create New End Entity Profile "GSSmartCardLogon"..................................................403.6 -- Fetch Domain Controller & Certificate Authority Certificate........................................44
4 -- Logon to Workstation.................................................................................................................504.1 -- Add CA Certificate to Domain Security Policy..............................................................534.2 -- Install Certificate on Workstation....................................................................................544.3 -- Install GemSAFE Toolbox on Workstation.....................................................................554.4 -- Enroll Certificate to GemSAFE Smartcard.....................................................................584.5 -- Use Smart Card to Logon Workstation...........................................................................59
5 -- Logon Workstation Using another Account ..............................................................................605.1 -- Create a New User Account............................................................................................615.2 -- Add End Entity for New User.........................................................................................635.3 -- Enroll New User’s Certificate to Token..........................................................................64
3
1 -- Configure Server
4
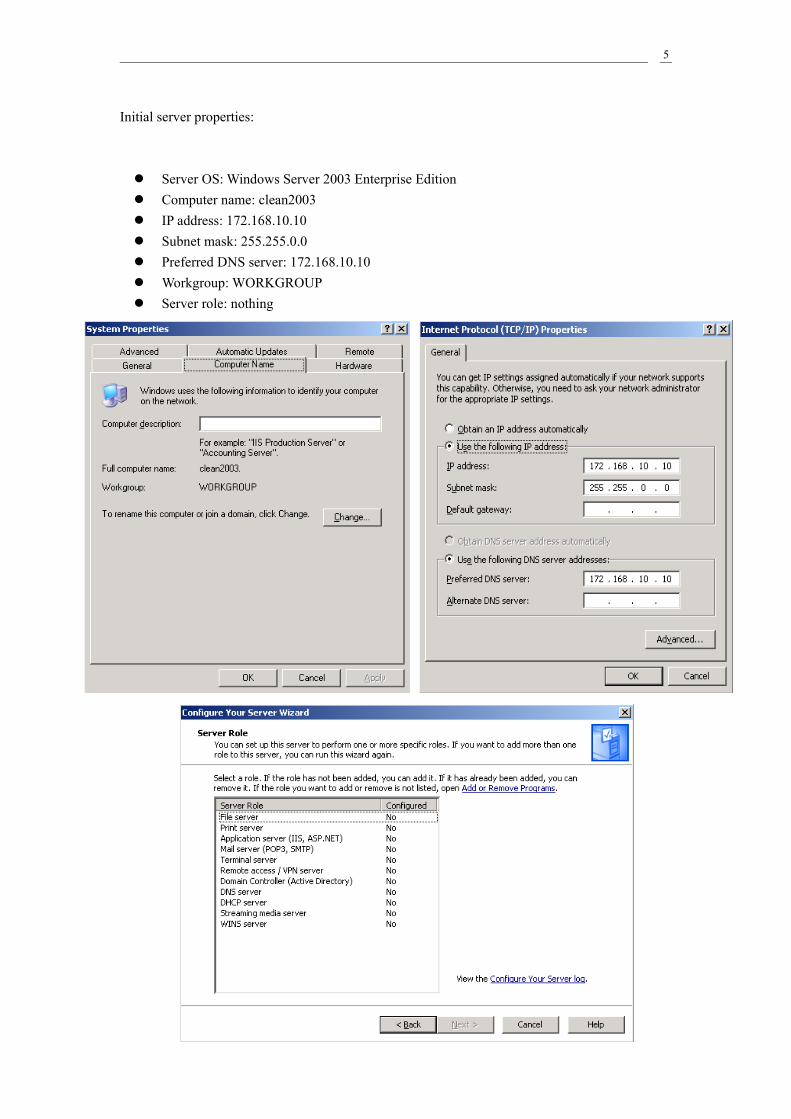
Initial server properties:
Server OS: Windows Server 2003 Enterprise Edition Computer name: clean2003 IP address: 172.168.10.10 Subnet mask: 255.255.0.0 Preferred DNS server: 172.168.10.10 Workgroup: WORKGROUP Server role: nothing
5

1.1 -- Create a Domain Controller
1. Start\Manage Your Server\Add or remove a role\click “Next”
2. Choose “Domain Controller (Active Directory)”
6
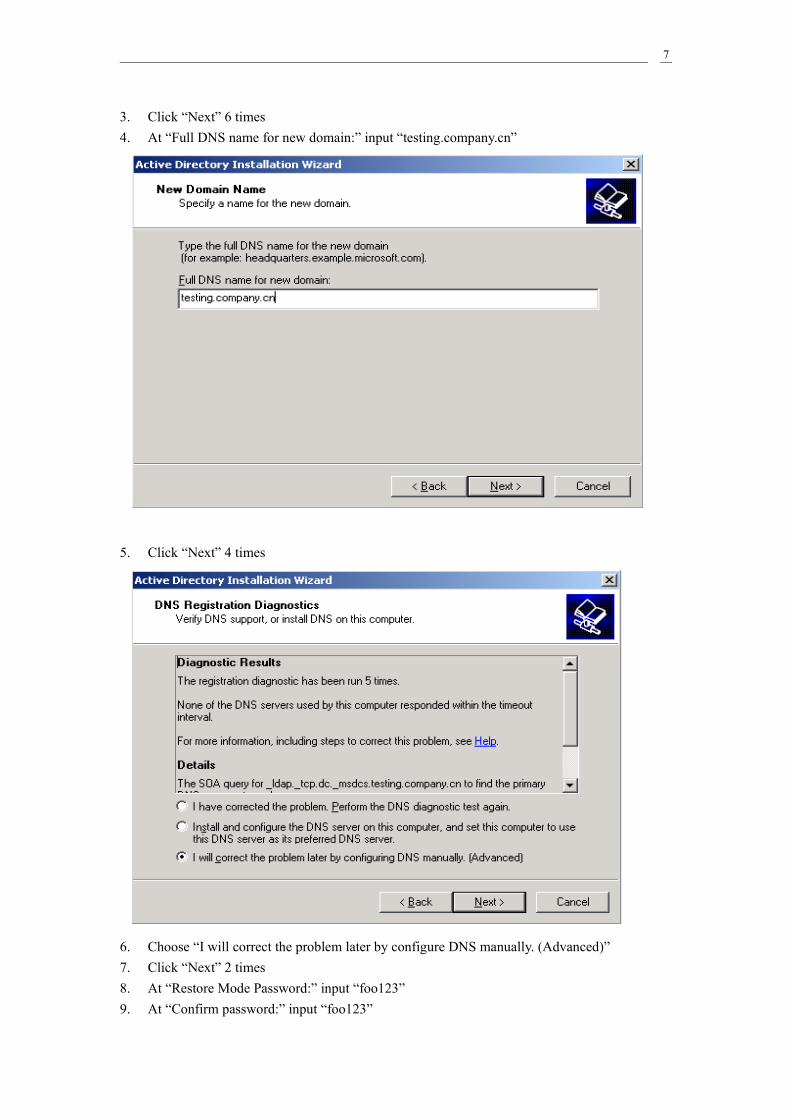
3. Click “Next” 6 times4. At “Full DNS name for new domain:” input “testing.company.cn”
5. Click “Next” 4 times
6. Choose “I will correct the problem later by configure DNS manually. (Advanced)”7. Click “Next” 2 times8. At “Restore Mode Password:” input “foo123”9. At “Confirm password:” input “foo123”
7
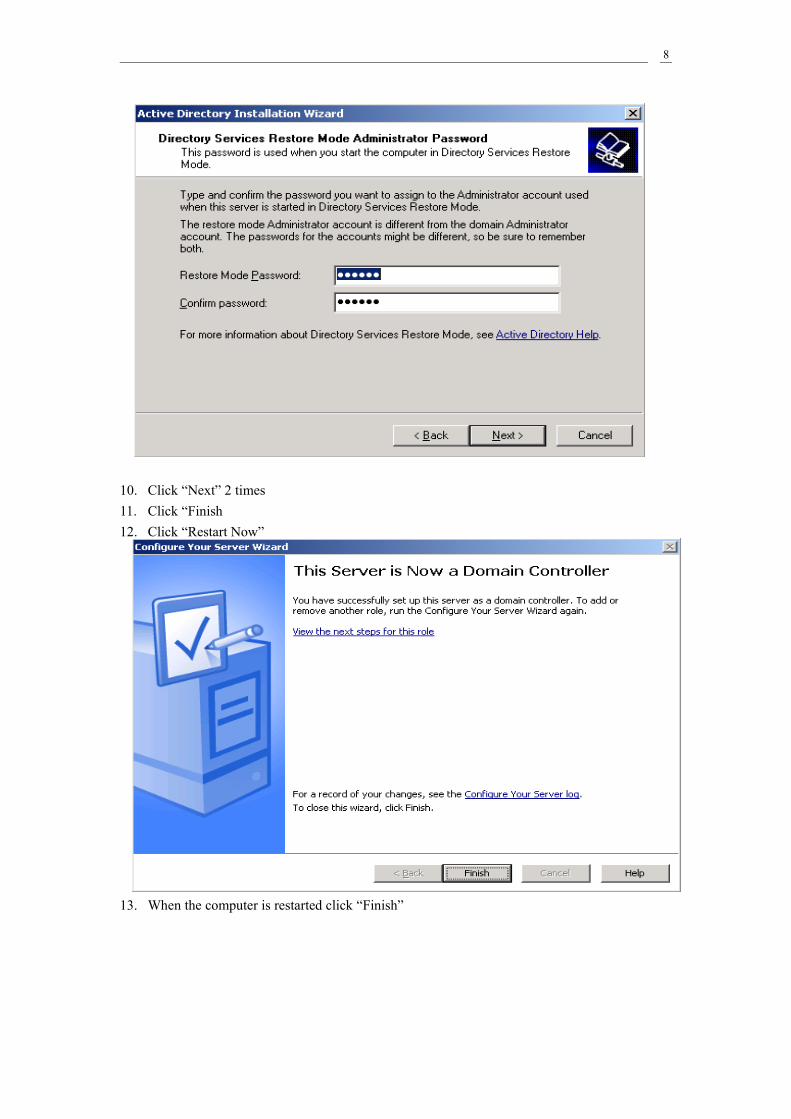
10. Click “Next” 2 times11. Click “Finish12. Click “Restart Now”
13. When the computer is restarted click “Finish”
8
1.2 -- Create a DNS Server
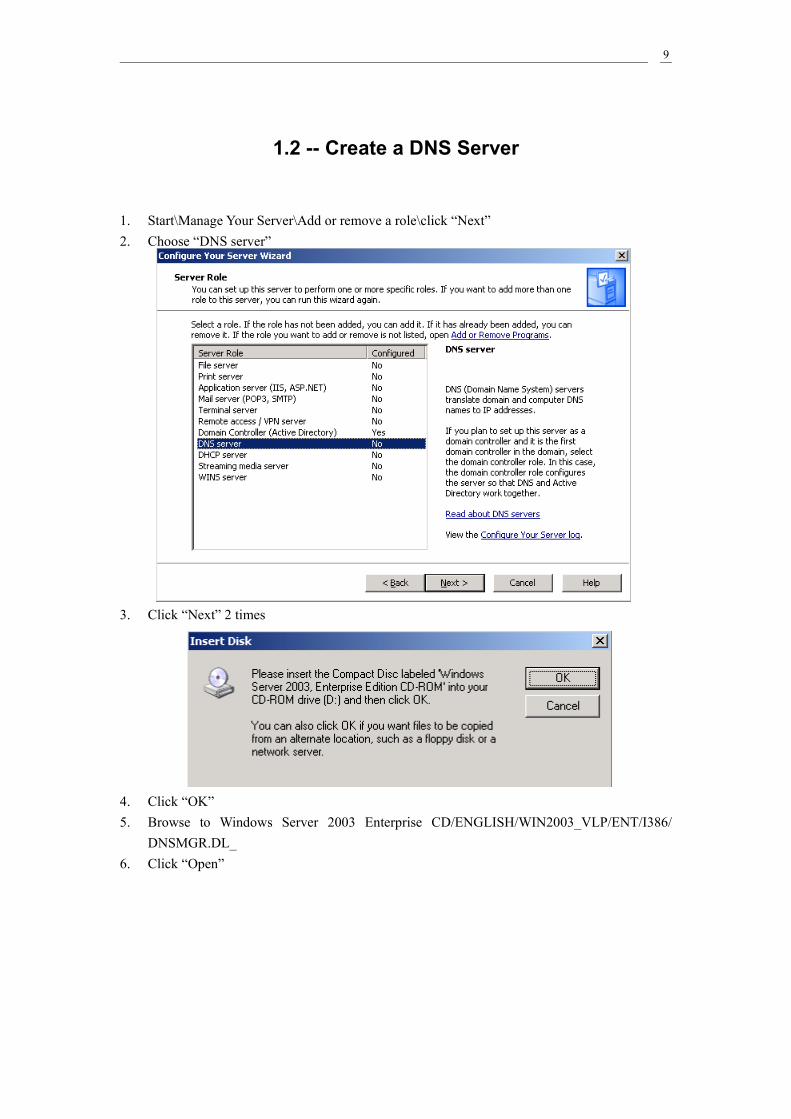
1. Start\Manage Your Server\Add or remove a role\click “Next”2. Choose “DNS server”
3. Click “Next” 2 times
4. Click “OK”5. Browse to Windows Server 2003 Enterprise CD/ENGLISH/WIN2003_VLP/ENT/I386/
DNSMGR.DL_6. Click “Open”
9
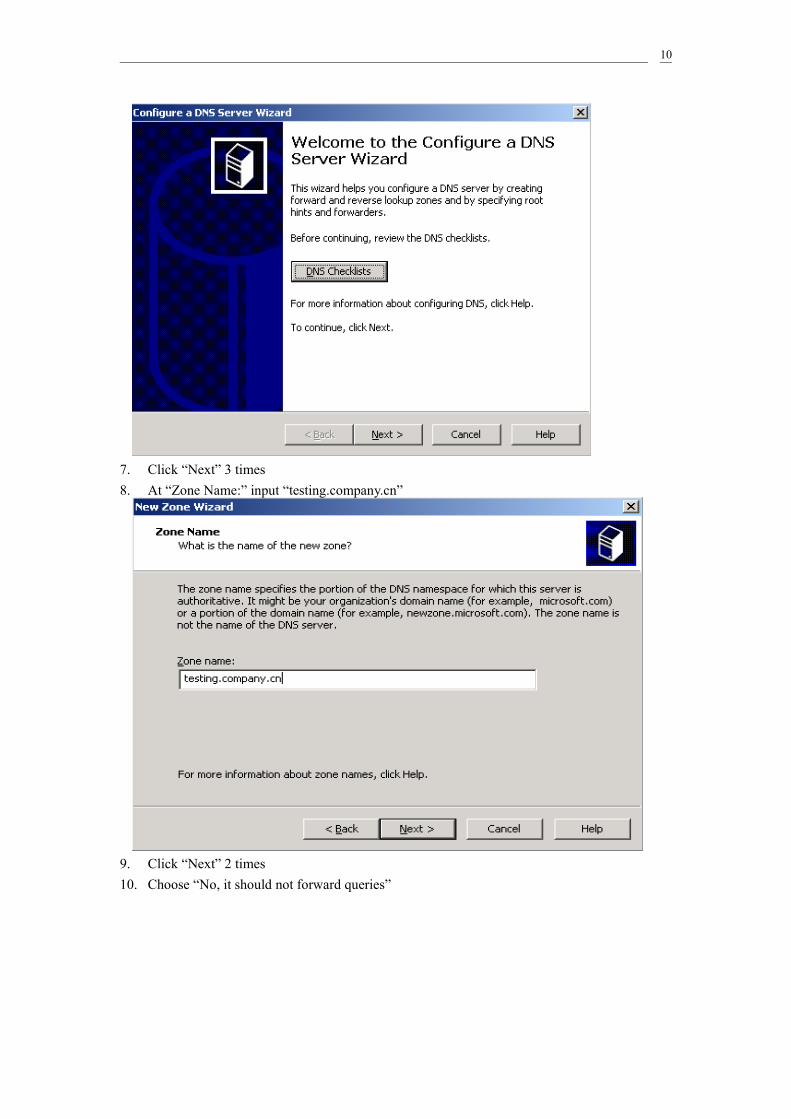
7. Click “Next” 3 times8. At “Zone Name:” input “testing.company.cn”
9. Click “Next” 2 times10. Choose “No, it should not forward queries”
10

11. Click “Next”12. Click “Finish”13. Ignore the error message
14. Click “Finish”
11

2 -- Install EJBCA Components
12
1. Download various installation files
Apache ant 1.7.0 http://apache.mirror.phpchina.com/ant/binaries/apache-ant-1.7.0-bin.zipJBoss 4.2.2 http://downloads.sourceforge.net/jboss/jboss-4.2.2.GA.zip?
modtime=1193094131&big_mirror=1
EJBCA 3.6.0 http://downloads.sourceforge.net/ejbca/ejbca_3_6_0.zip?modtime=1207510966&big_mirror=0
JDK 6 Update 6 http://java.sun.com/javase/downloads/index.jspJava Cryptography Extension (JCE) Unlimited Strength Jurisdiction Policy Files 6
http://java.sun.com/javase/downloads/index.jsp
1. GenerateDCCertRequest.vbs http://download.primekey.se/ejbca/smartcardlogon/ReleasePackage/Scripts/1.%20GenerateDCCertRequest.vbs
2. InstallDomainControllerCert.vbs http://download.primekey.se/ejbca/smartcardlogon/ReleasePackage/Scripts/2.%20InstallDomainControllerCert.vbs
3. ImportCACertToNTAuthStore.vbs http://download.primekey.se/ejbca/smartcardlogon/ReleasePackage/Scripts/3.%20ImportCACertToNTAuthStore.vbs
ReqDCCert.vbs http://download.primekey.se/ejbca/smartcardlogon/ReleasePackage/Scripts/ReqDCCert.vbs
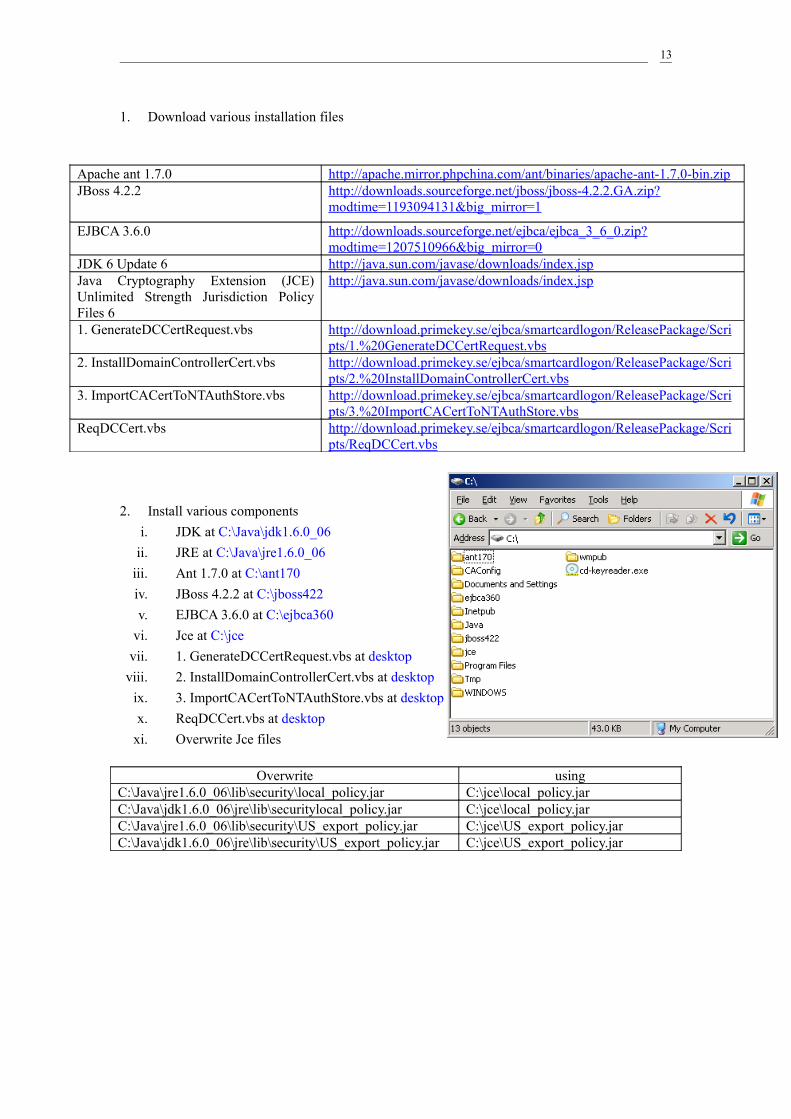
2. Install various componentsi. JDK at C:\Java\jdk1.6.0_06
ii. JRE at C:\Java\jre1.6.0_06iii. Ant 1.7.0 at C:\ant170iv. JBoss 4.2.2 at C:\jboss422v. EJBCA 3.6.0 at C:\ejbca360
vi. Jce at C:\jcevii. 1. GenerateDCCertRequest.vbs at desktop
viii. 2. InstallDomainControllerCert.vbs at desktopix. 3. ImportCACertToNTAuthStore.vbs at desktopx. ReqDCCert.vbs at desktop
xi. Overwrite Jce files
Overwrite usingC:\Java\jre1.6.0_06\lib\security\local_policy.jar C:\jce\local_policy.jarC:\Java\jdk1.6.0_06\jre\lib\securitylocal_policy.jar C:\jce\local_policy.jarC:\Java\jre1.6.0_06\lib\security\US_export_policy.jar C:\jce\US_export_policy.jarC:\Java\jdk1.6.0_06\jre\lib\security\US_export_policy.jar C:\jce\US_export_policy.jar
13
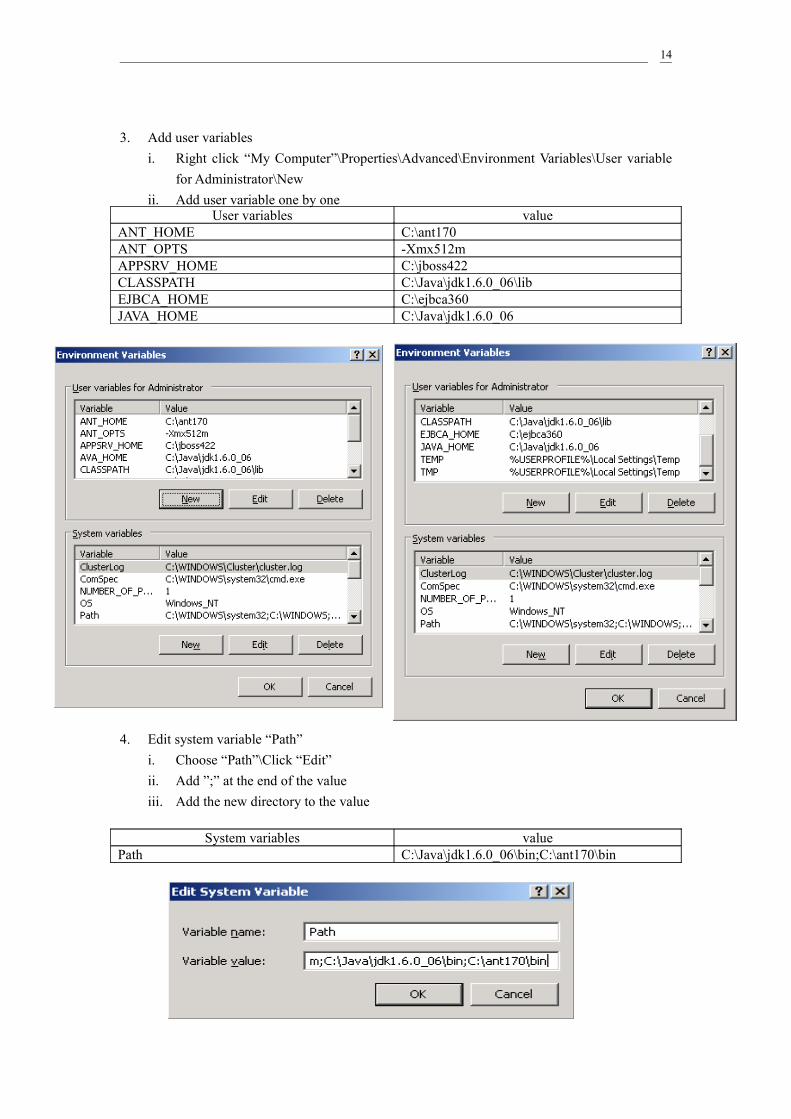
3. Add user variablesi. Right click “My Computer”\Properties\Advanced\Environment Variables\User variable
for Administrator\Newii. Add user variable one by one
User variables valueANT_HOME C:\ant170ANT_OPTS -Xmx512mAPPSRV_HOME C:\jboss422CLASSPATH C:\Java\jdk1.6.0_06\libEJBCA_HOME C:\ejbca360JAVA_HOME C:\Java\jdk1.6.0_06
4. Edit system variable “Path”i. Choose “Path”\Click “Edit”ii. Add ”;” at the end of the valueiii. Add the new directory to the value
System variables valuePath C:\Java\jdk1.6.0_06\bin;C:\ant170\bin
14
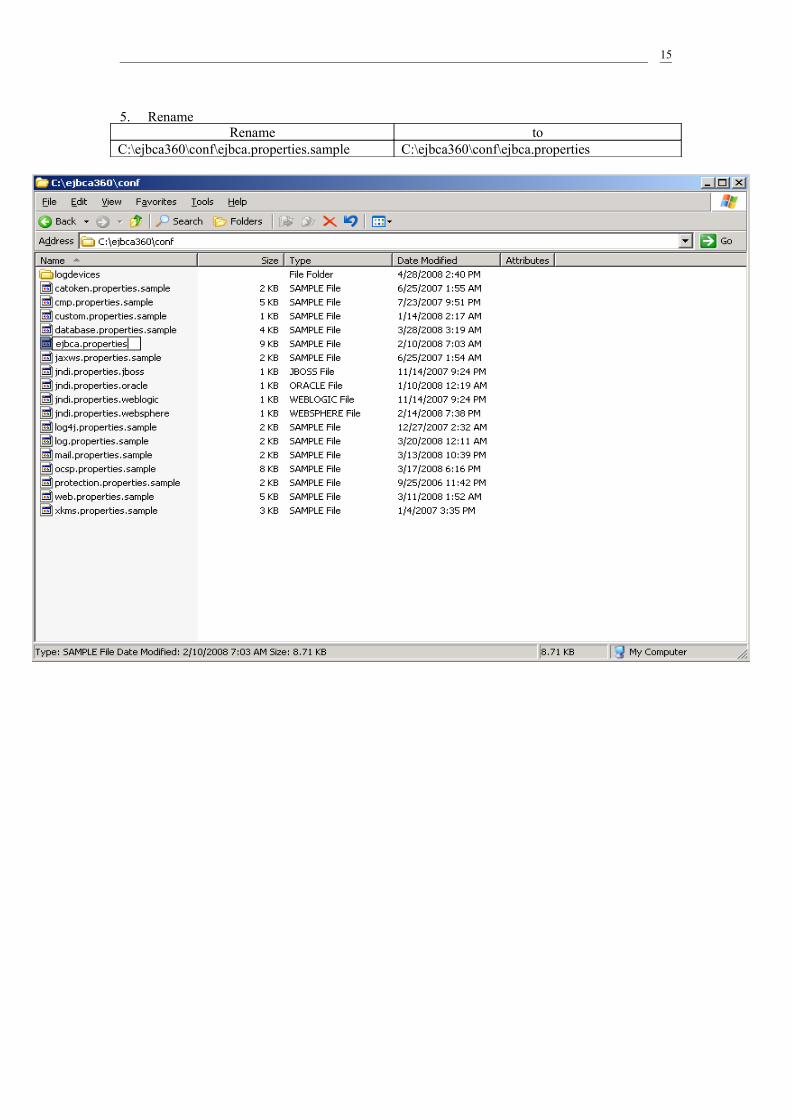
5. RenameRename to
C:\ejbca360\conf\ejbca.properties.sample C:\ejbca360\conf\ejbca.properties
15
2.1 -- Deploy EJBCA and Supplementary Components
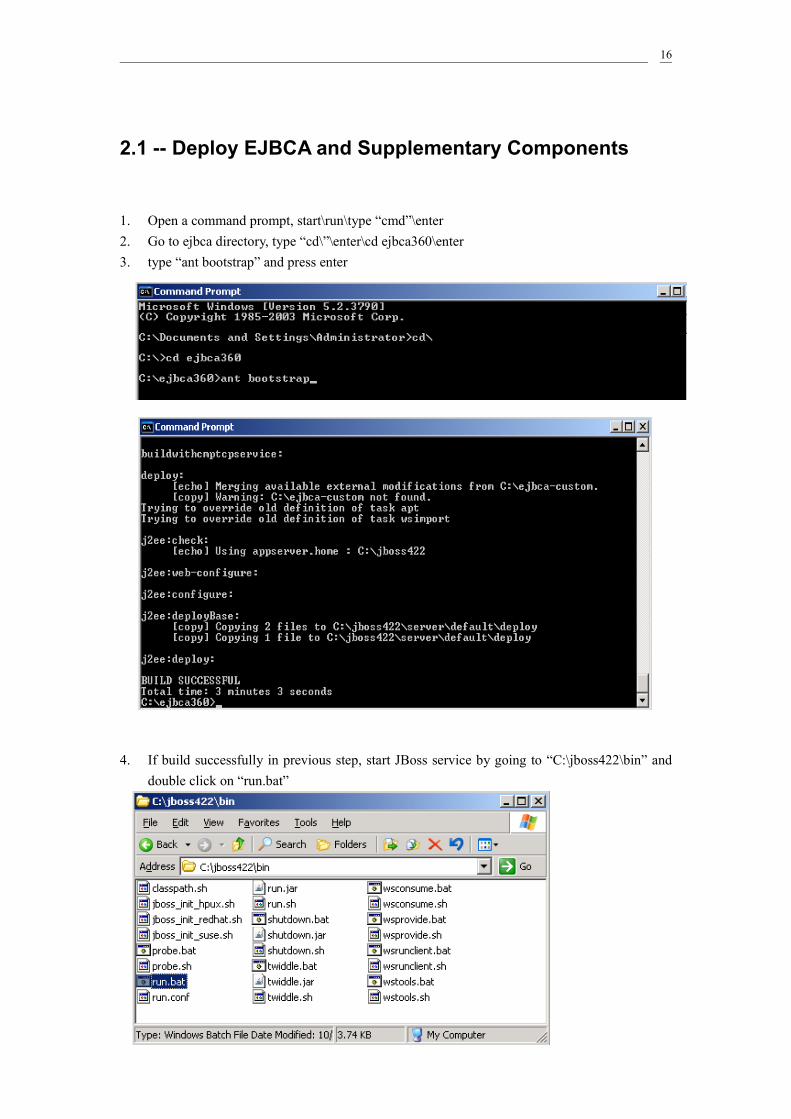
1. Open a command prompt, start\run\type “cmd”\enter2. Go to ejbca directory, type “cd\”\enter\cd ejbca360\enter3. type “ant bootstrap” and press enter
4. If build successfully in previous step, start JBoss service by going to “C:\jboss422\bin” and double click on “run.bat”
16
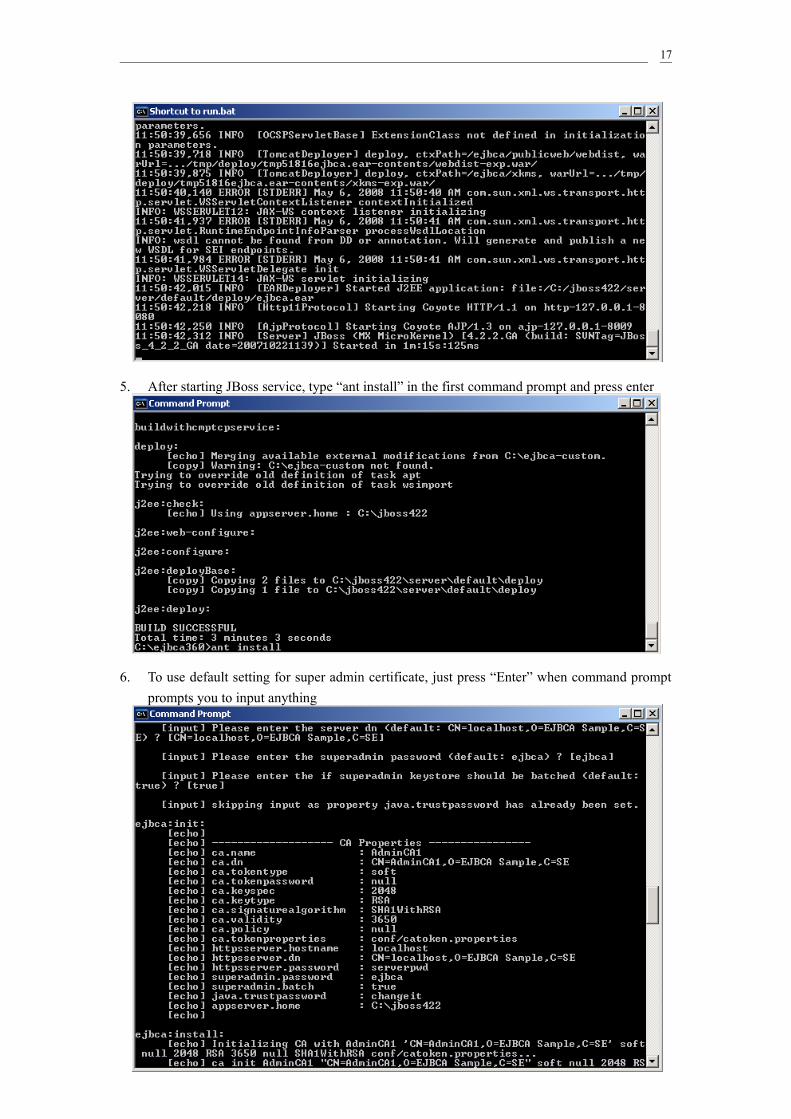
5. After starting JBoss service, type “ant install” in the first command prompt and press enter
6. To use default setting for super admin certificate, just press “Enter” when command prompt prompts you to input anything
17
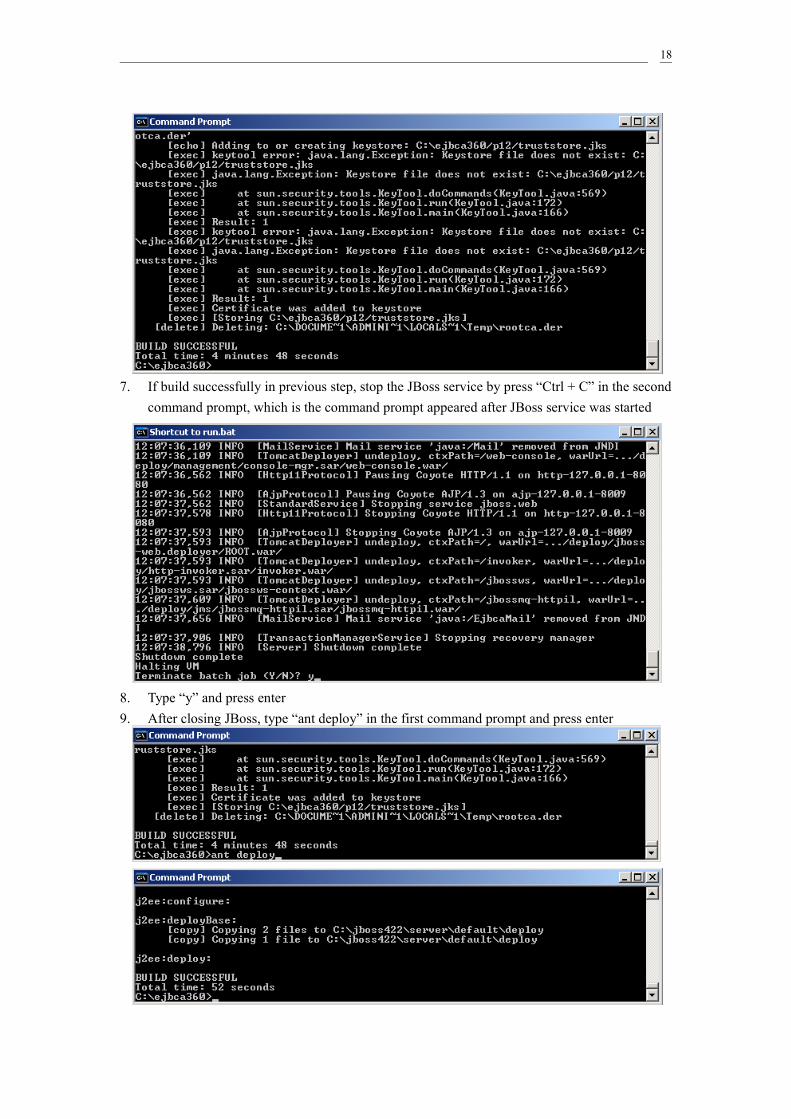
7. If build successfully in previous step, stop the JBoss service by press “Ctrl + C” in the second command prompt, which is the command prompt appeared after JBoss service was started
8. Type “y” and press enter 9. After closing JBoss, type “ant deploy” in the first command prompt and press enter
18
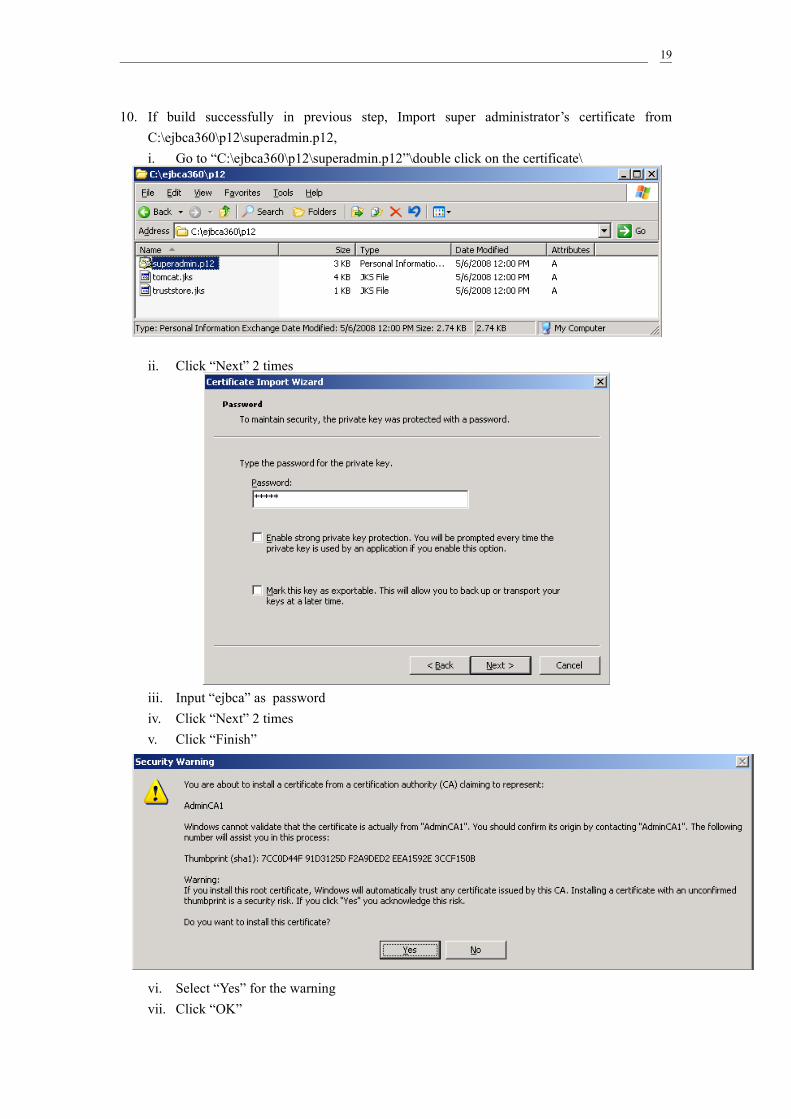
10. If build successfully in previous step, Import super administrator’s certificate from C:\ejbca360\p12\superadmin.p12, i. Go to “C:\ejbca360\p12\superadmin.p12”\double click on the certificate\
ii. Click “Next” 2 times
iii. Input “ejbca” as password iv. Click “Next” 2 timesv. Click “Finish”
vi. Select “Yes” for the warningvii. Click “OK”
19
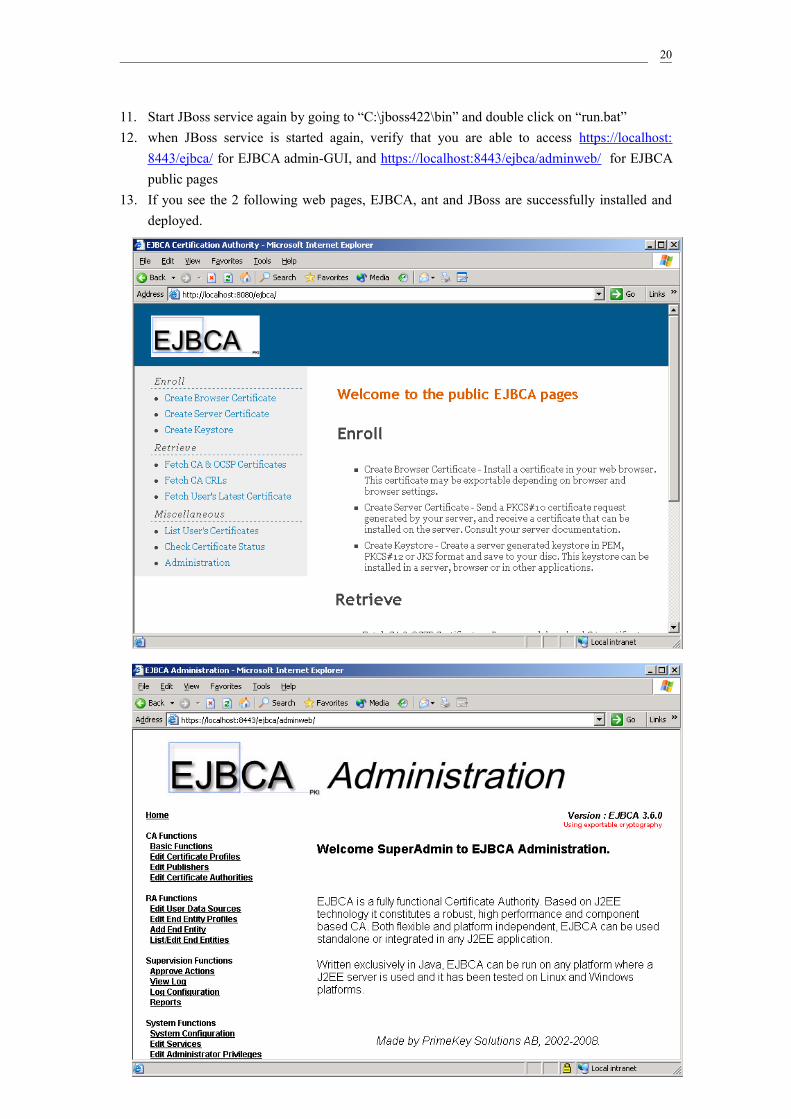
11. Start JBoss service again by going to “C:\jboss422\bin” and double click on “run.bat”12. when JBoss service is started again, verify that you are able to access https://localhost:
8443/ejbca/ for EJBCA admin-GUI, and https://localhost:8443/ejbca/adminweb/ for EJBCA public pages
13. If you see the 2 following web pages, EJBCA, ant and JBoss are successfully installed and deployed.
20
3 -- Configure EJBCA
21
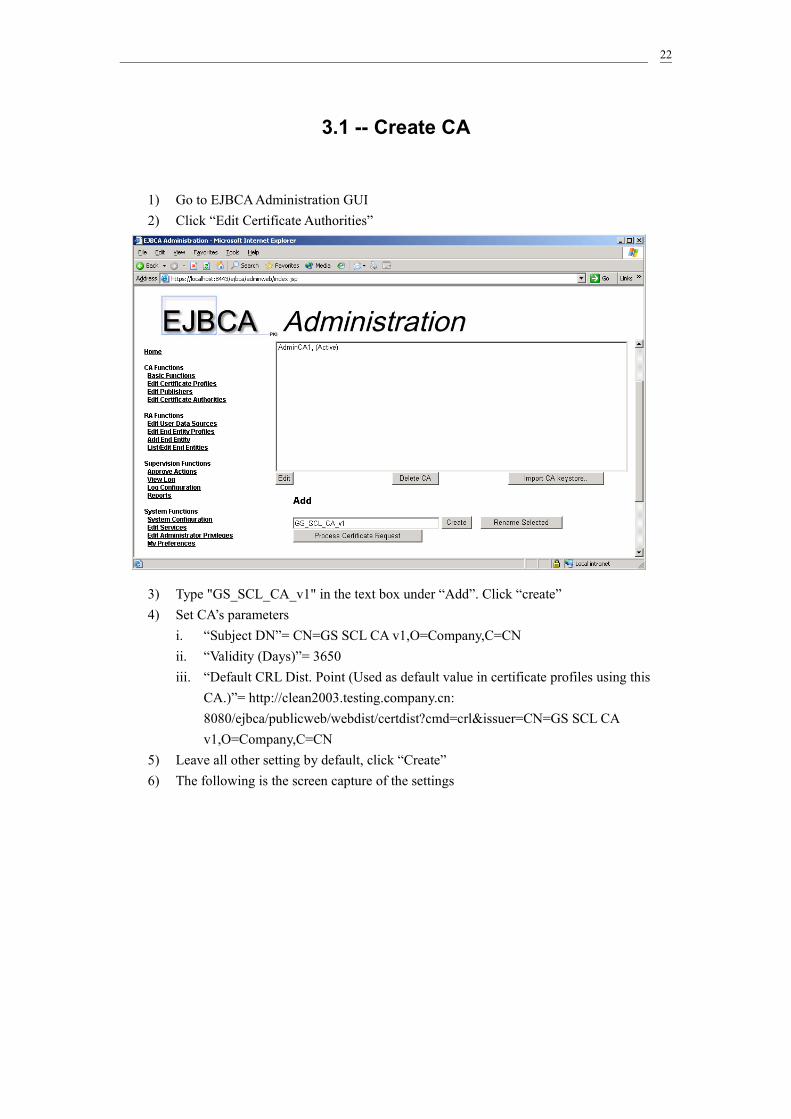
3.1 -- Create CA
1) Go to EJBCA Administration GUI2) Click “Edit Certificate Authorities”
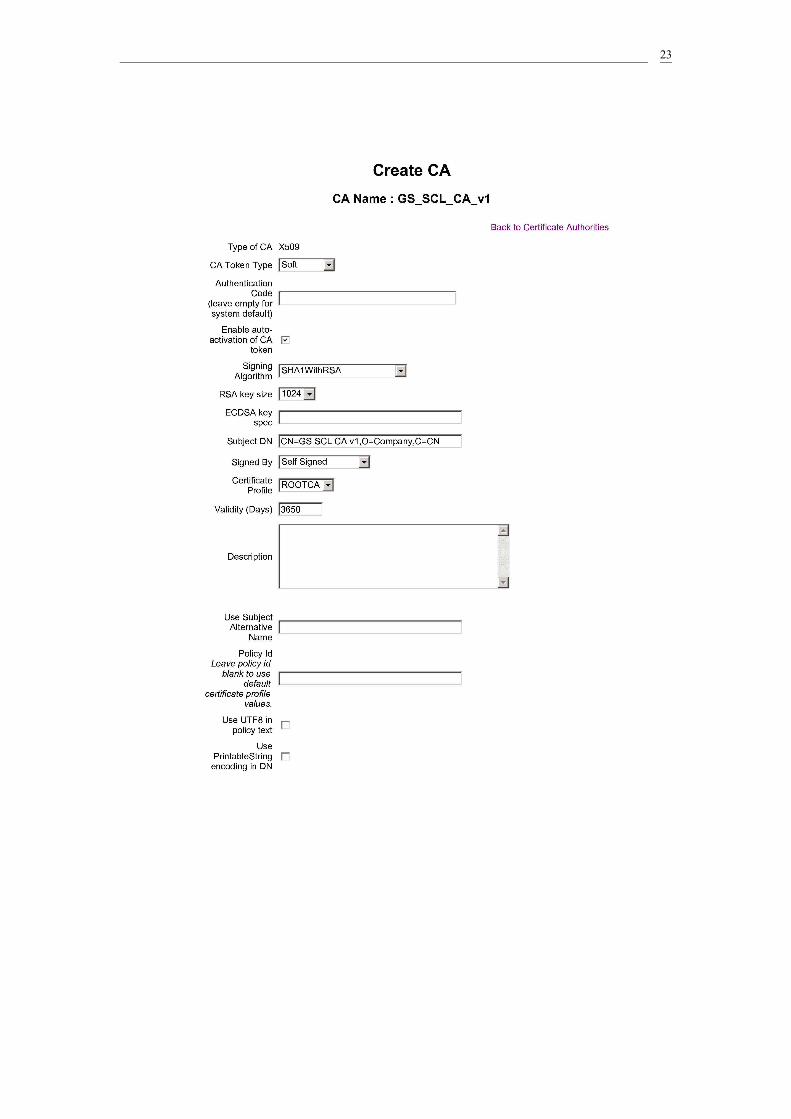
3) Type "GS_SCL_CA_v1" in the text box under “Add”. Click “create”4) Set CA’s parameters
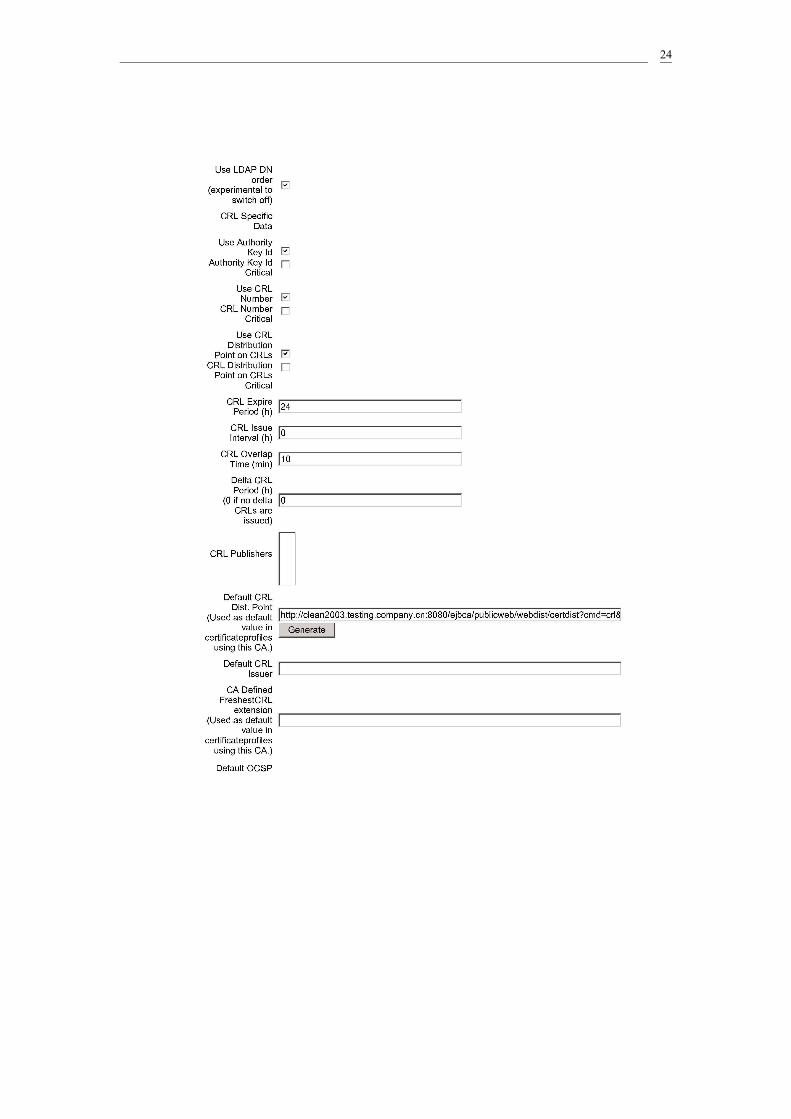
i. “Subject DN”= CN=GS SCL CA v1,O=Company,C=CNii. “Validity (Days)”= 3650iii. “Default CRL Dist. Point (Used as default value in certificate profiles using this
CA.)”= http://clean2003.testing.company.cn:8080/ejbca/publicweb/webdist/certdist?cmd=crl&issuer=CN=GS SCL CA v1,O=Company,C=CN
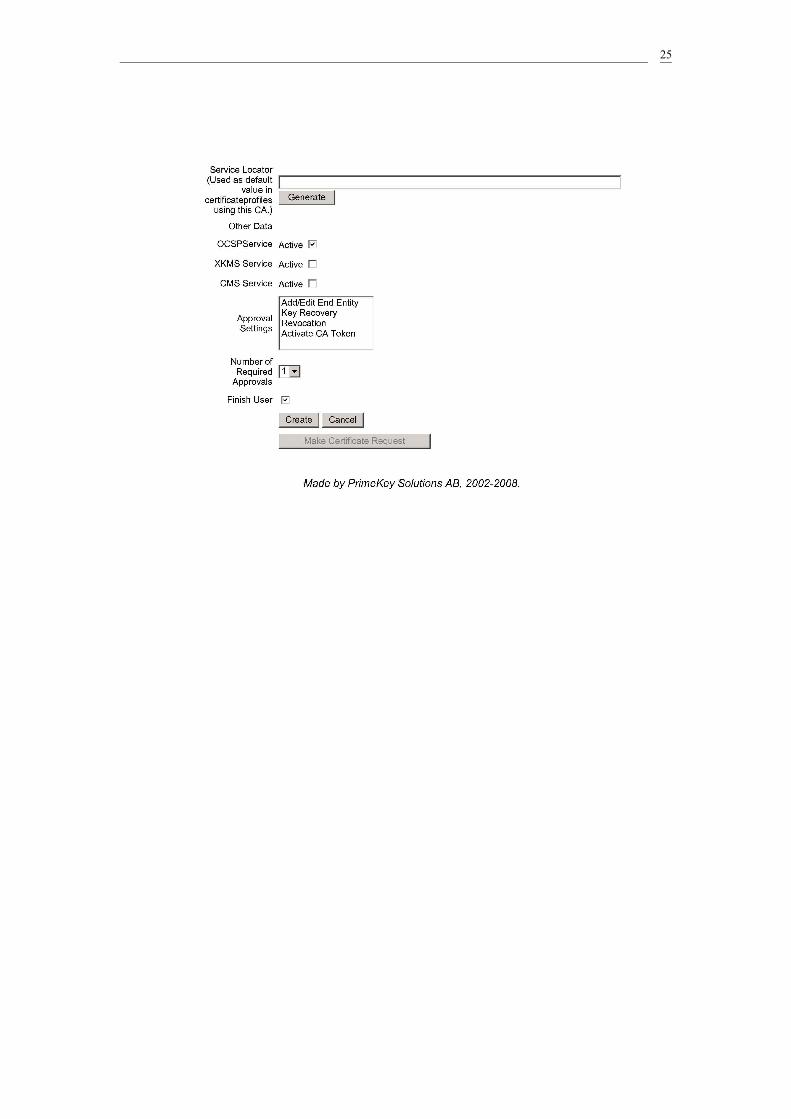
5) Leave all other setting by default, click “Create”6) The following is the screen capture of the settings
22
23
24
25
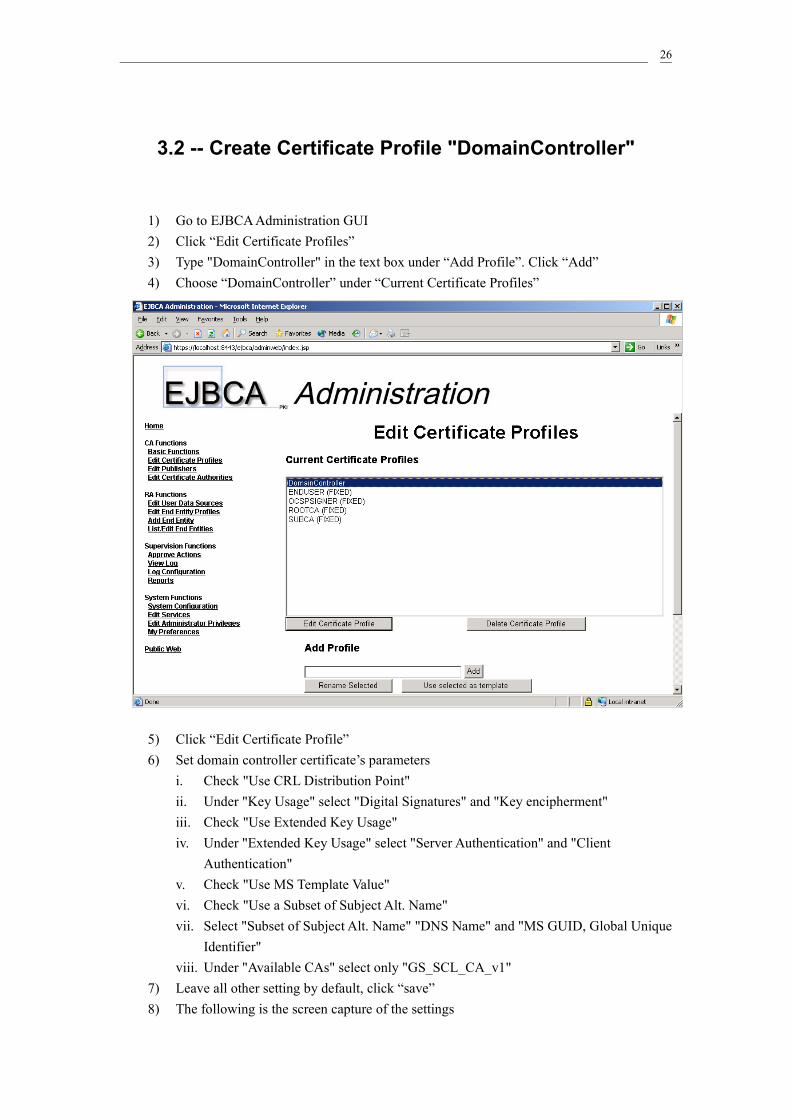
3.2 -- Create Certificate Profile "DomainController"
1) Go to EJBCA Administration GUI2) Click “Edit Certificate Profiles”3) Type "DomainController" in the text box under “Add Profile”. Click “Add”4) Choose “DomainController” under “Current Certificate Profiles”
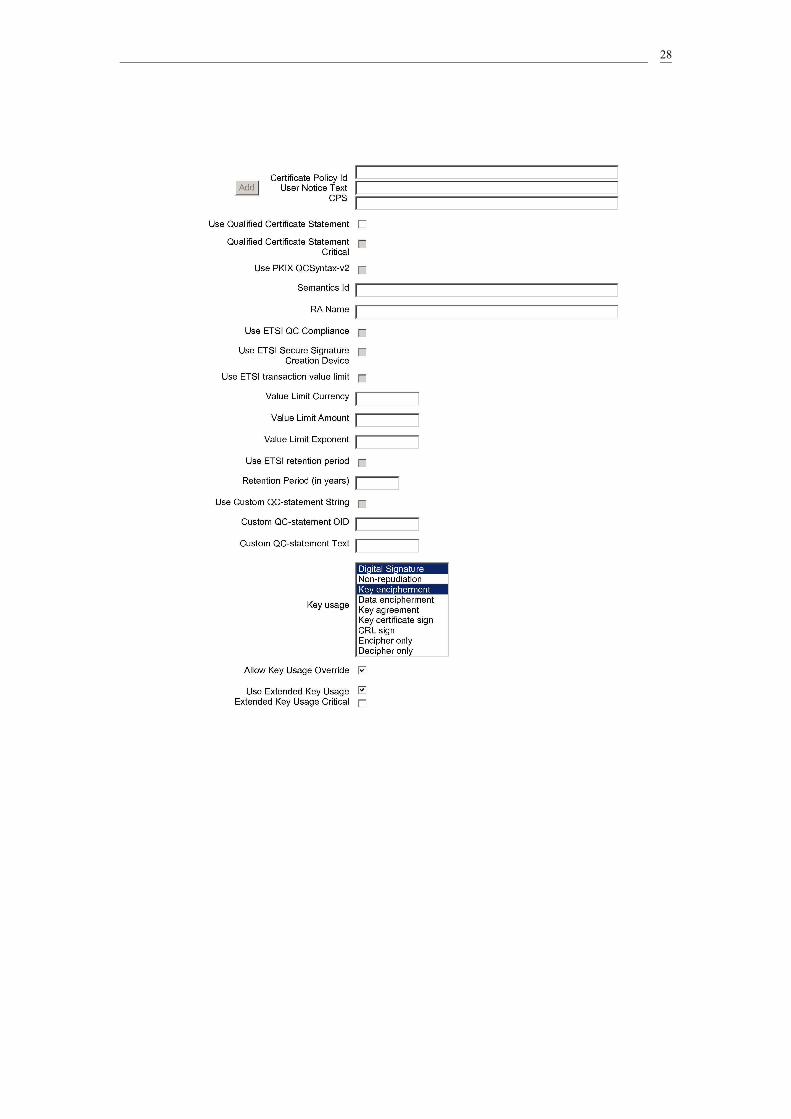
5) Click “Edit Certificate Profile”6) Set domain controller certificate’s parameters
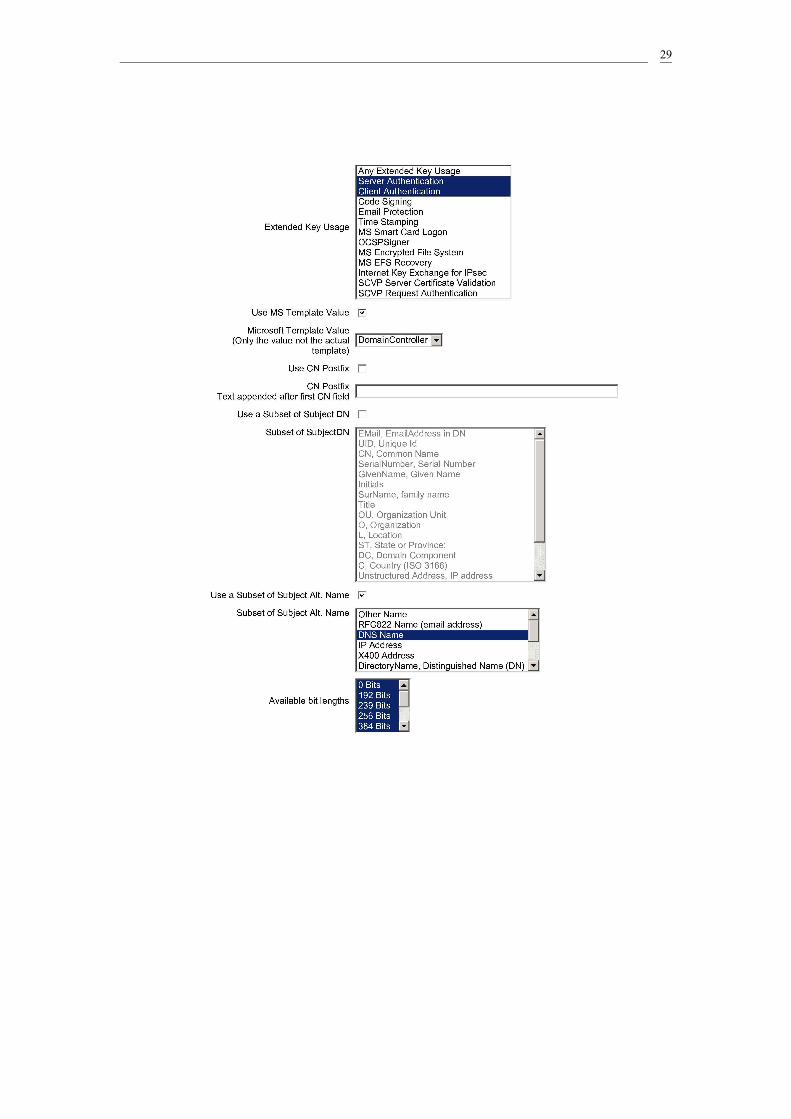
i. Check "Use CRL Distribution Point"ii. Under "Key Usage" select "Digital Signatures" and "Key encipherment"iii. Check "Use Extended Key Usage"iv. Under "Extended Key Usage" select "Server Authentication" and "Client
Authentication"v. Check "Use MS Template Value"vi. Check "Use a Subset of Subject Alt. Name"vii. Select "Subset of Subject Alt. Name" "DNS Name" and "MS GUID, Global Unique
Identifier" viii. Under "Available CAs" select only "GS_SCL_CA_v1"
7) Leave all other setting by default, click “save”8) The following is the screen capture of the settings
26

27
28
29

30
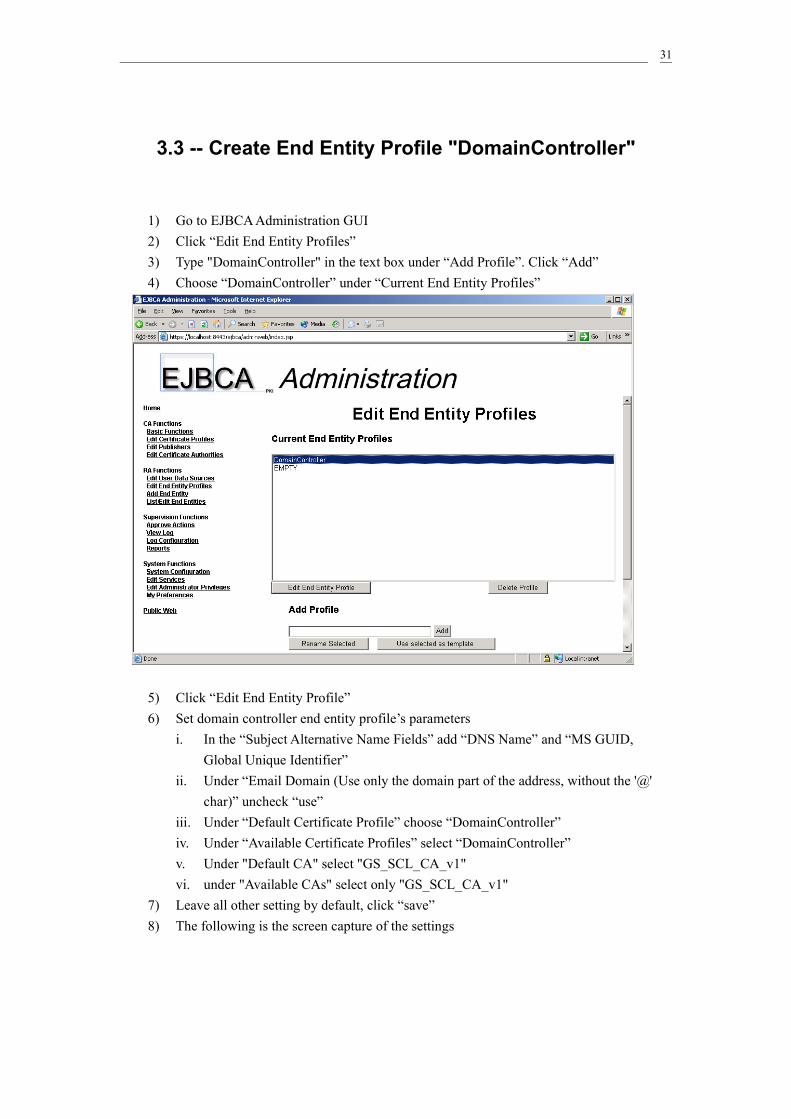
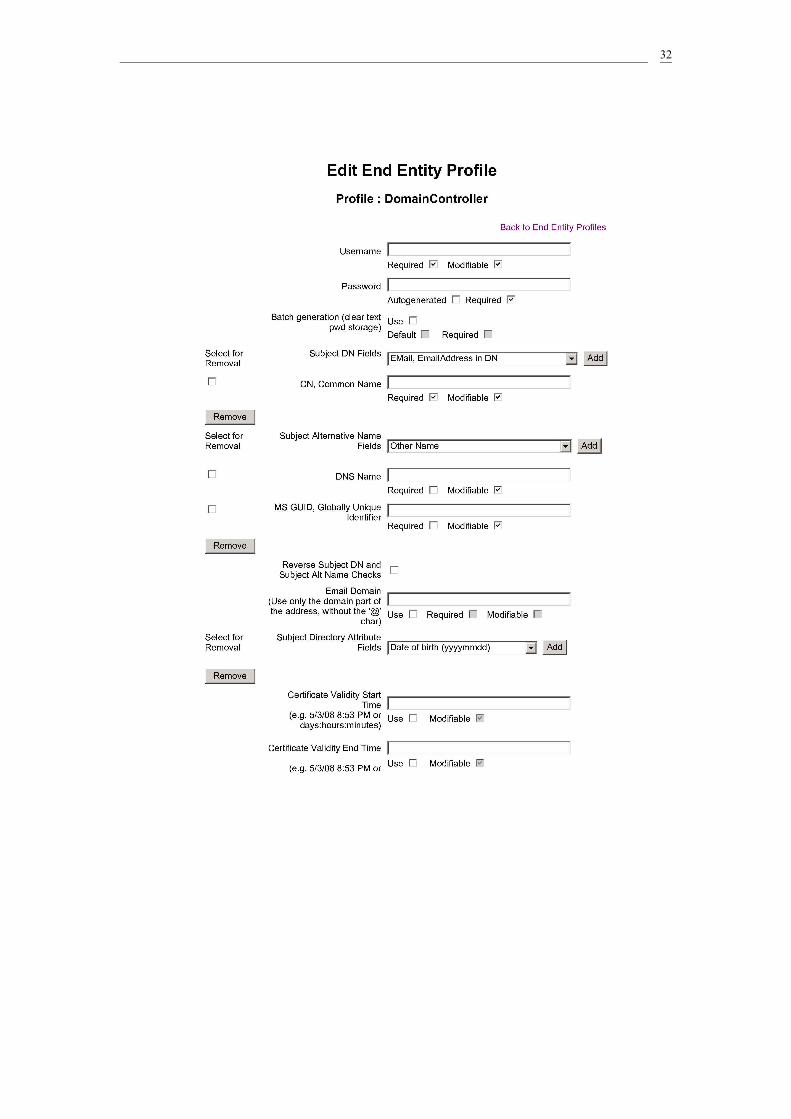
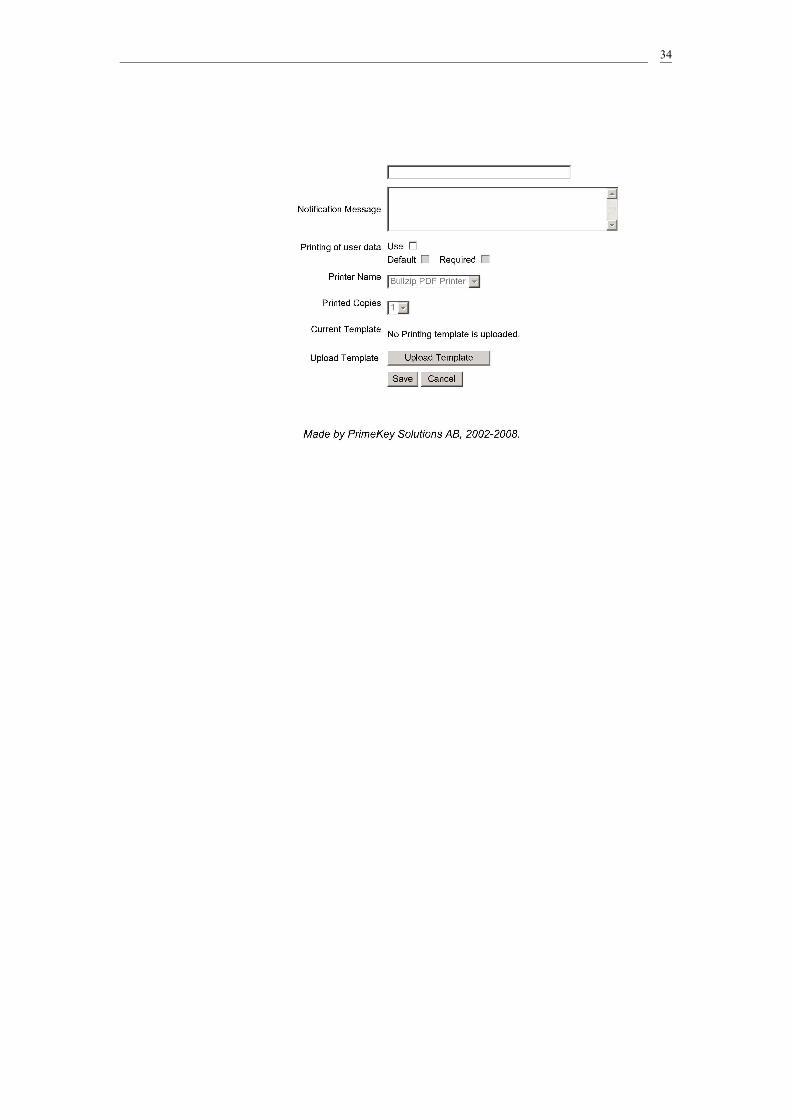
3.3 -- Create End Entity Profile "DomainController"
1) Go to EJBCA Administration GUI2) Click “Edit End Entity Profiles”3) Type "DomainController" in the text box under “Add Profile”. Click “Add”4) Choose “DomainController” under “Current End Entity Profiles”
5) Click “Edit End Entity Profile”6) Set domain controller end entity profile’s parameters
i. In the “Subject Alternative Name Fields” add “DNS Name” and “MS GUID, Global Unique Identifier”
ii. Under “Email Domain (Use only the domain part of the address, without the '@' char)” uncheck “use”
iii. Under “Default Certificate Profile” choose “DomainController”iv. Under “Available Certificate Profiles” select “DomainController”v. Under "Default CA" select "GS_SCL_CA_v1"vi. under "Available CAs" select only "GS_SCL_CA_v1"
7) Leave all other setting by default, click “save”8) The following is the screen capture of the settings
31
32

33
34
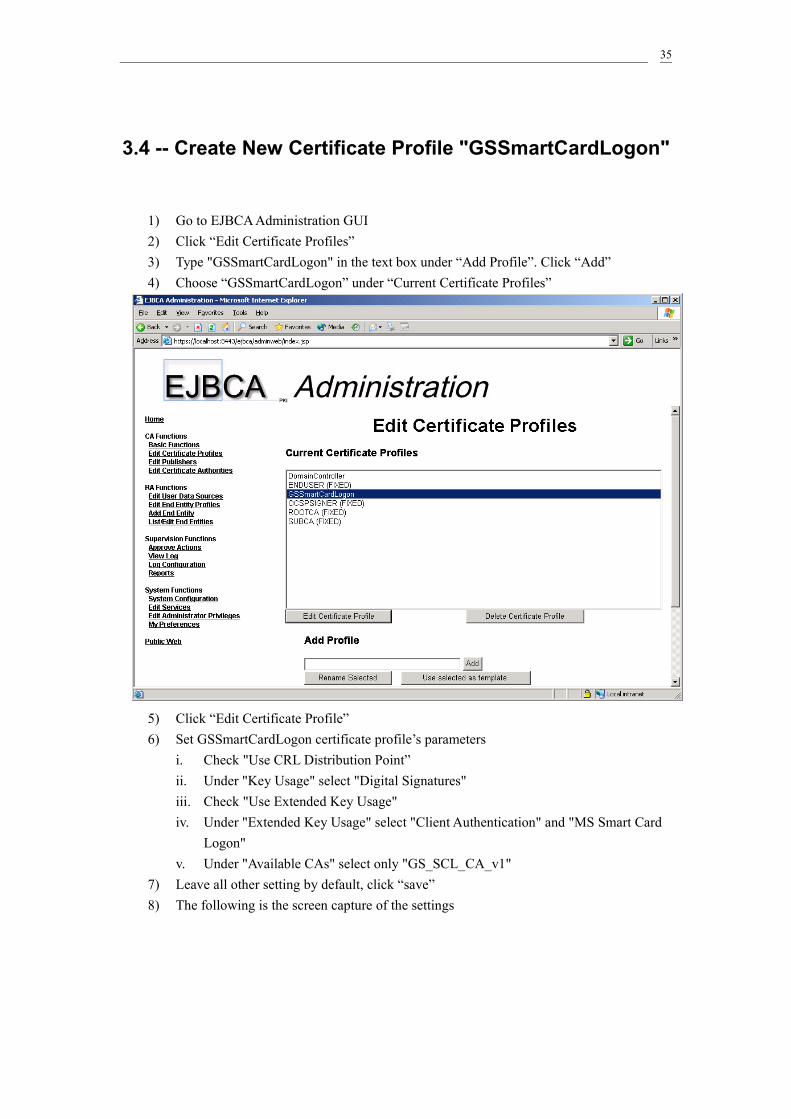
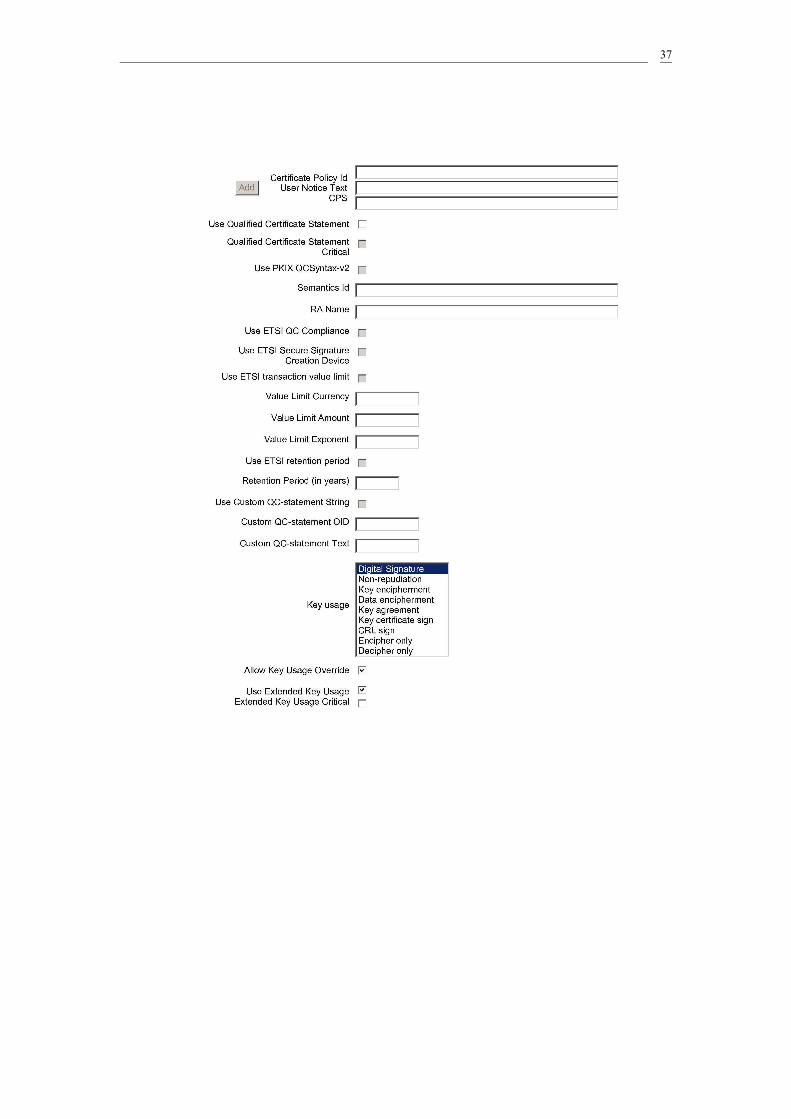
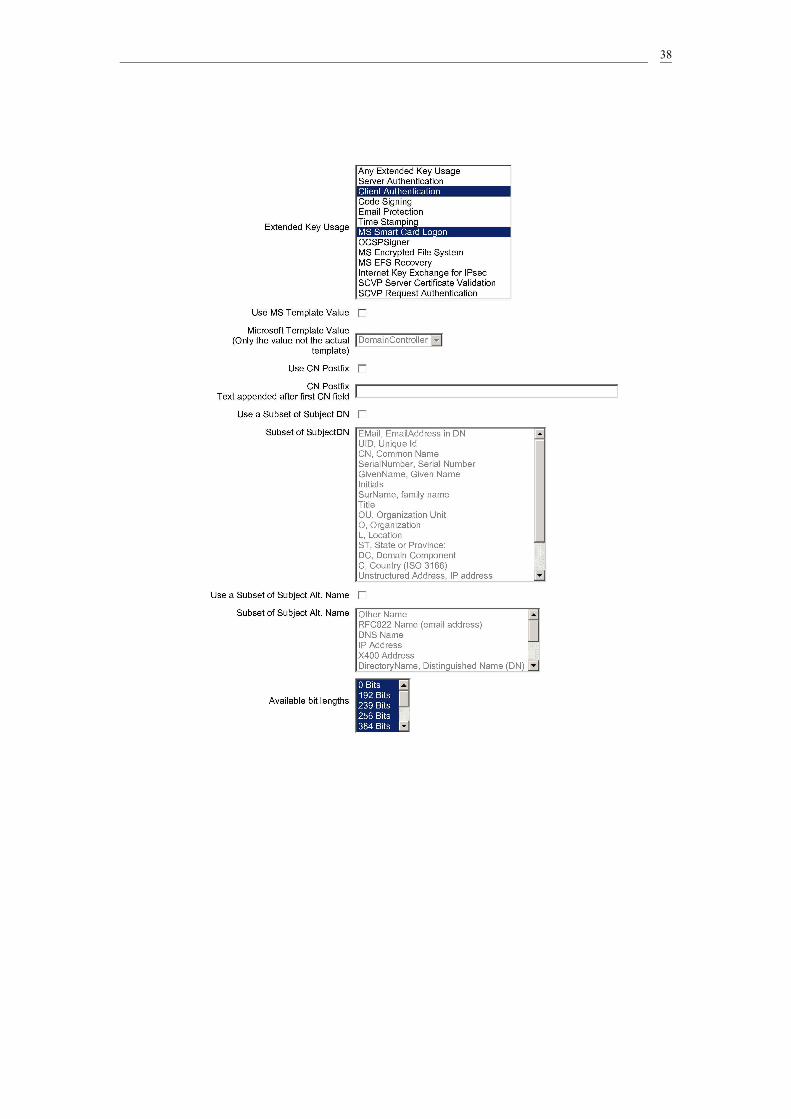
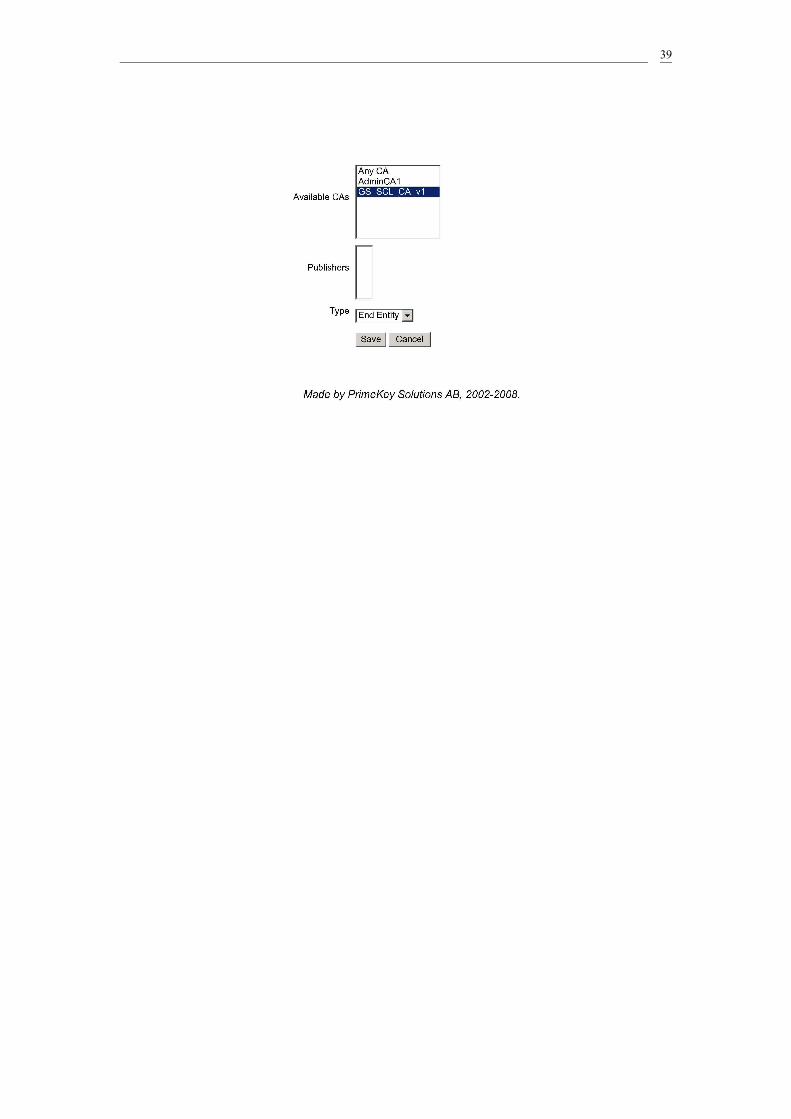
3.4 -- Create New Certificate Profile "GSSmartCardLogon"
1) Go to EJBCA Administration GUI2) Click “Edit Certificate Profiles”3) Type "GSSmartCardLogon" in the text box under “Add Profile”. Click “Add”4) Choose “GSSmartCardLogon” under “Current Certificate Profiles”
5) Click “Edit Certificate Profile”6) Set GSSmartCardLogon certificate profile’s parameters
i. Check "Use CRL Distribution Point”ii. Under "Key Usage" select "Digital Signatures"iii. Check "Use Extended Key Usage"iv. Under "Extended Key Usage" select "Client Authentication" and "MS Smart Card
Logon"v. Under "Available CAs" select only "GS_SCL_CA_v1"
7) Leave all other setting by default, click “save”8) The following is the screen capture of the settings
35

36
37
38
39
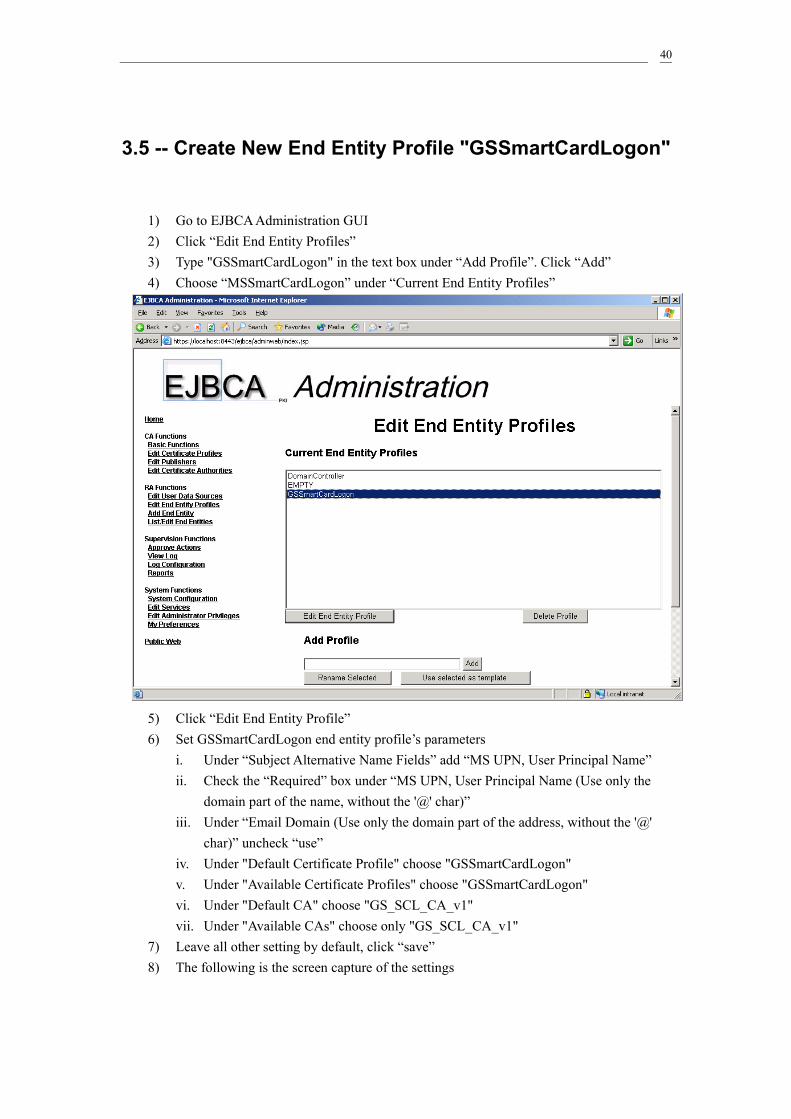
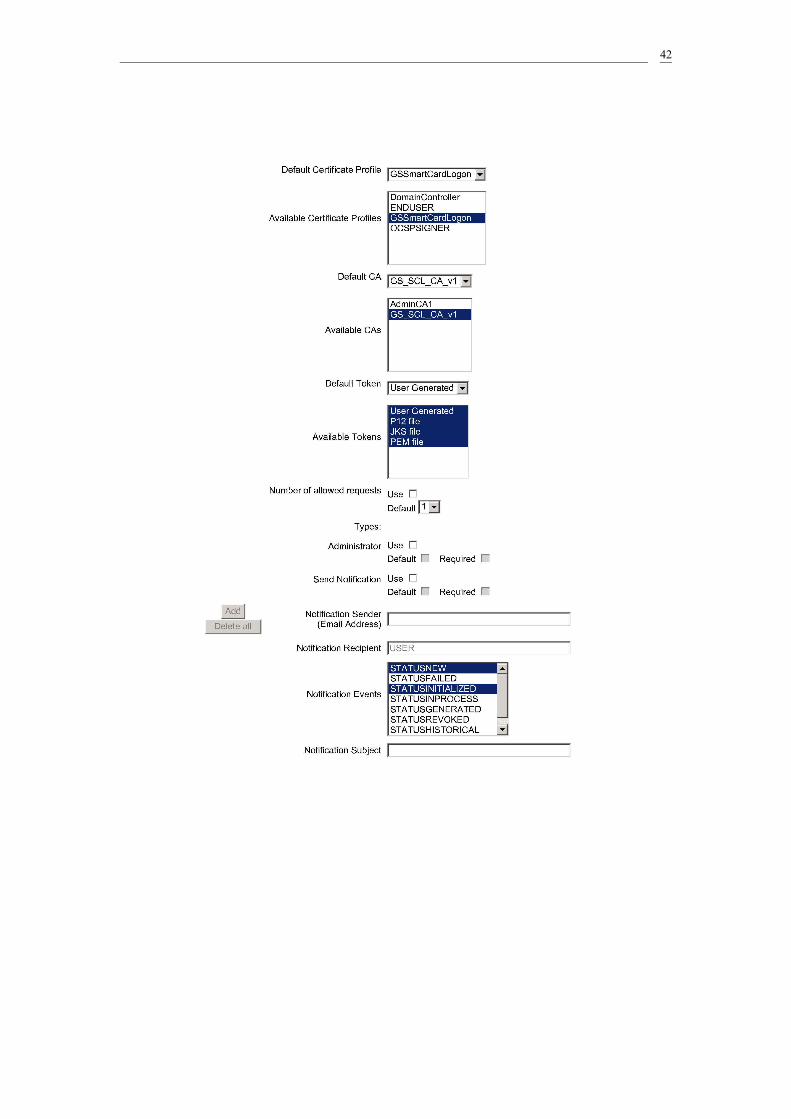
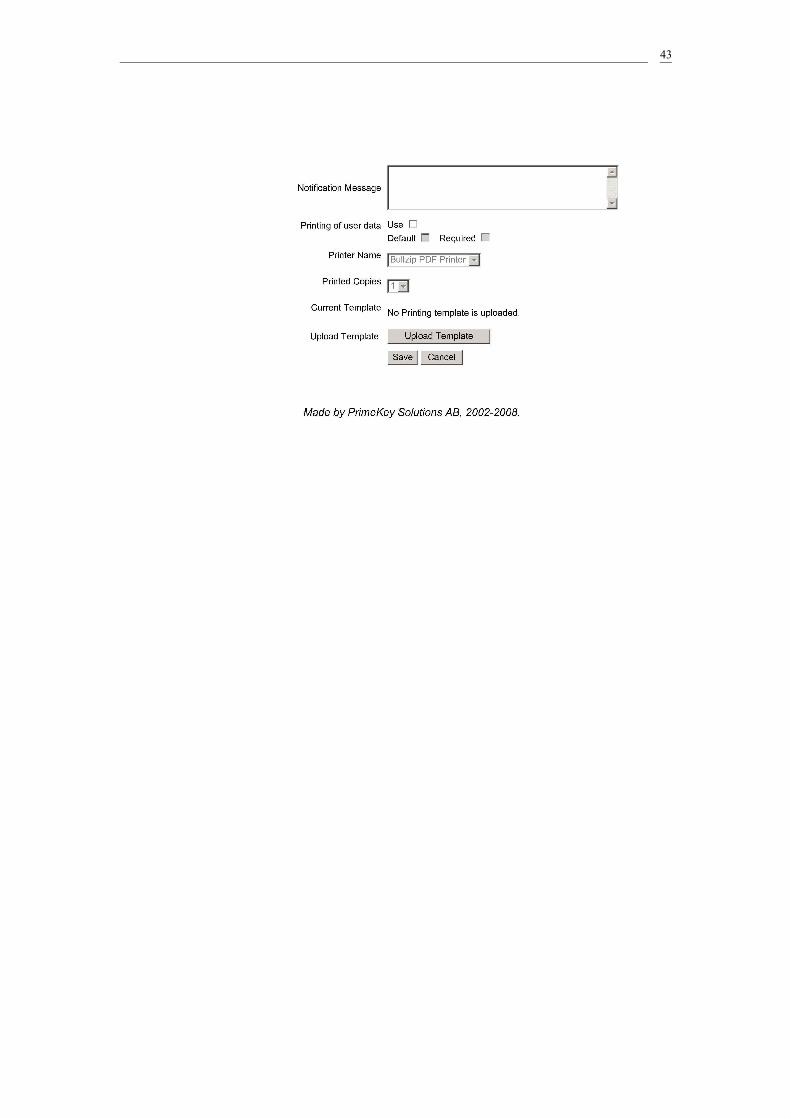
3.5 -- Create New End Entity Profile "GSSmartCardLogon"
1) Go to EJBCA Administration GUI2) Click “Edit End Entity Profiles”3) Type "GSSmartCardLogon" in the text box under “Add Profile”. Click “Add”4) Choose “MSSmartCardLogon” under “Current End Entity Profiles”
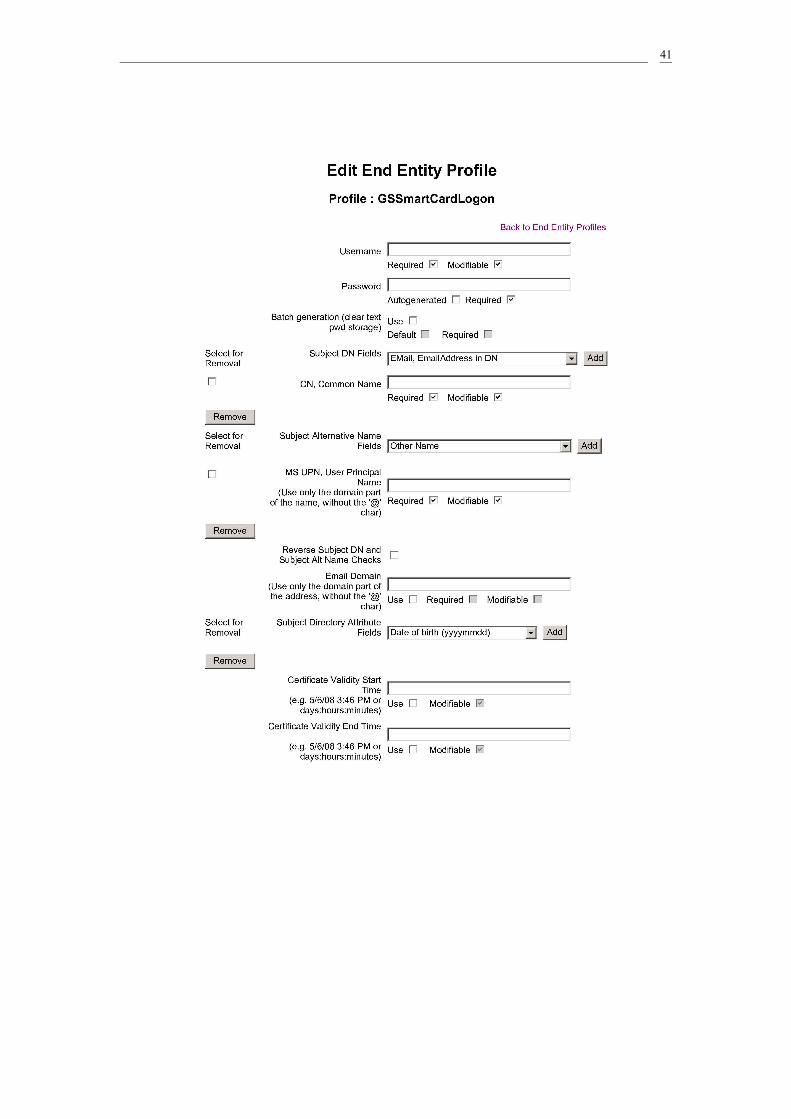
5) Click “Edit End Entity Profile”6) Set GSSmartCardLogon end entity profile’s parameters
i. Under “Subject Alternative Name Fields” add “MS UPN, User Principal Name”ii. Check the “Required” box under “MS UPN, User Principal Name (Use only the
domain part of the name, without the '@' char)”iii. Under “Email Domain (Use only the domain part of the address, without the '@'
char)” uncheck “use”iv. Under "Default Certificate Profile" choose "GSSmartCardLogon"v. Under "Available Certificate Profiles" choose "GSSmartCardLogon"vi. Under "Default CA" choose "GS_SCL_CA_v1"vii. Under "Available CAs" choose only "GS_SCL_CA_v1"
7) Leave all other setting by default, click “save”8) The following is the screen capture of the settings
40
41
42
43
3.6 -- Fetch Domain Controller & Certificate Authority
Certificate
1. Go to domain controller\desktop\double click on “1. GenerateDCCertRequest.vbs”2. A visual confirmation--“Done!” will be shown3. Click “OK”4. This script produces the following files on desktop
DomainControllerCertRequest-CLEAN2003.reqDomainControllerInfo-CLEAN2003.txt
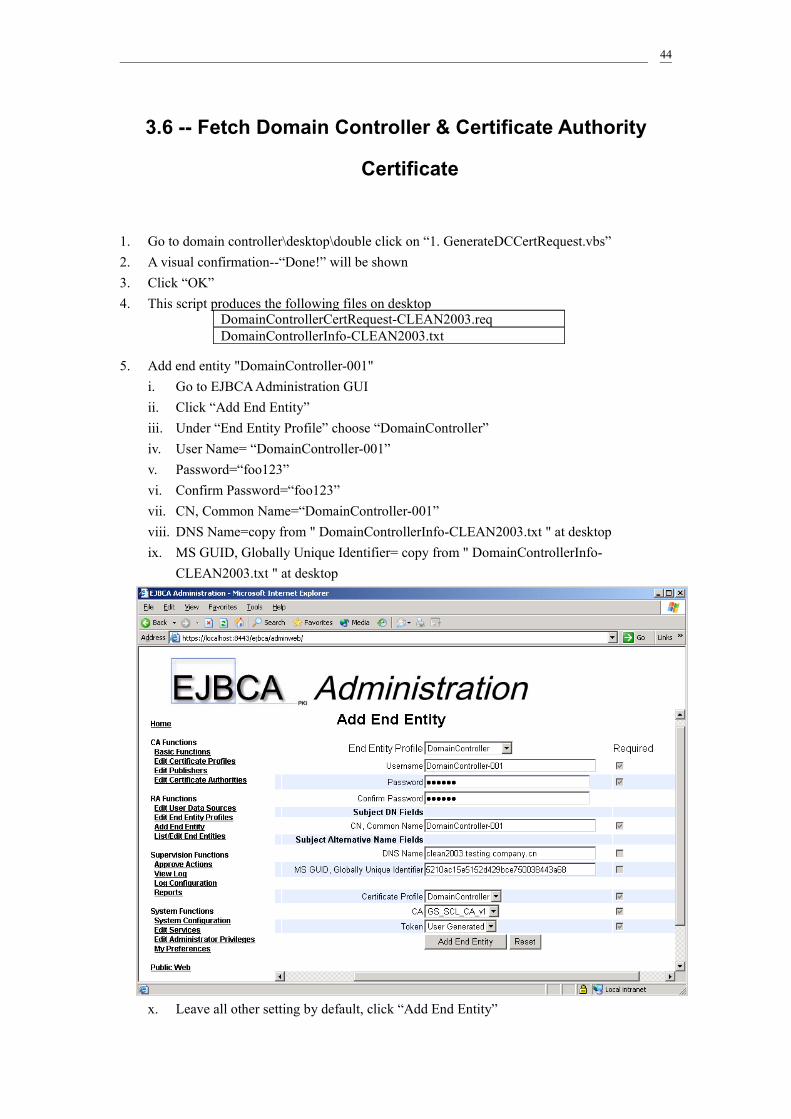
5. Add end entity "DomainController-001"i. Go to EJBCA Administration GUIii. Click “Add End Entity”iii. Under “End Entity Profile” choose “DomainController”iv. User Name= “DomainController-001”v. Password=“foo123”vi. Confirm Password=“foo123”vii. CN, Common Name=“DomainController-001”viii. DNS Name=copy from " DomainControllerInfo-CLEAN2003.txt " at desktopix. MS GUID, Globally Unique Identifier= copy from " DomainControllerInfo-
CLEAN2003.txt " at desktop
x. Leave all other setting by default, click “Add End Entity”
44
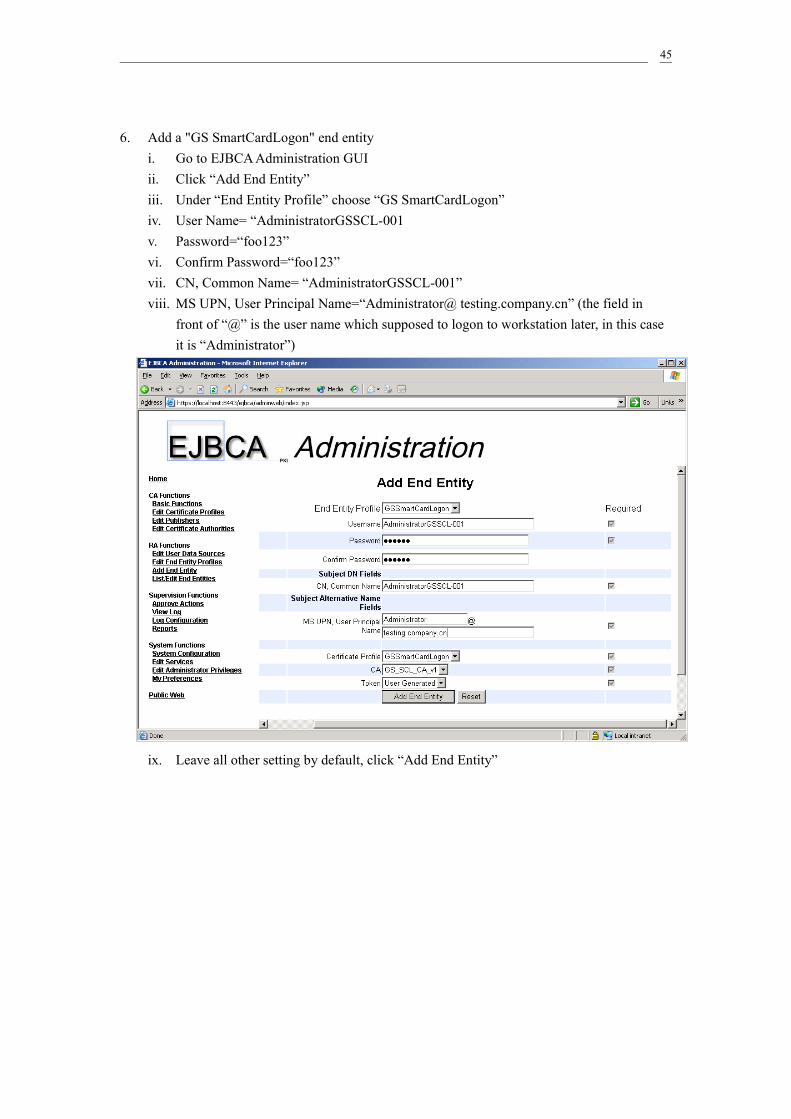
6. Add a "GS SmartCardLogon" end entityi. Go to EJBCA Administration GUIii. Click “Add End Entity”iii. Under “End Entity Profile” choose “GS SmartCardLogon”iv. User Name= “AdministratorGSSCL-001v. Password=“foo123”vi. Confirm Password=“foo123”vii. CN, Common Name= “AdministratorGSSCL-001”viii. MS UPN, User Principal Name=“Administrator@ testing.company.cn” (the field in
front of “@” is the user name which supposed to logon to workstation later, in this case it is “Administrator”)
ix. Leave all other setting by default, click “Add End Entity”
45
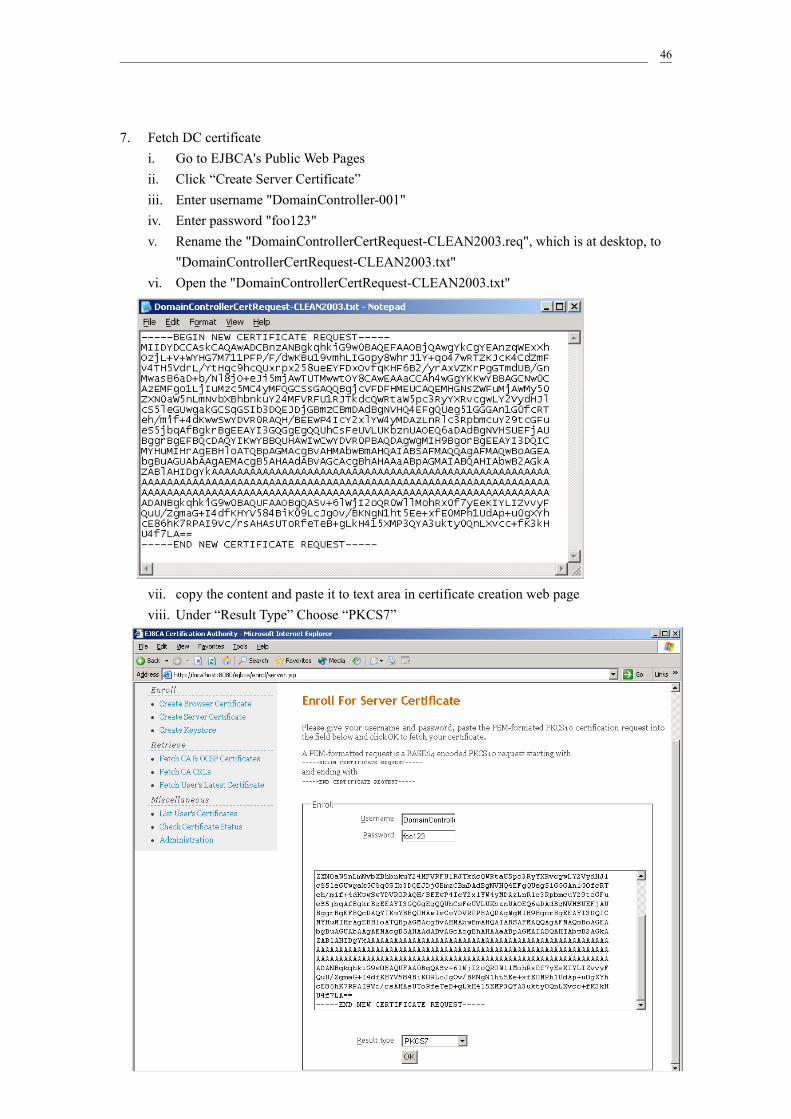
7. Fetch DC certificatei. Go to EJBCA's Public Web Pagesii. Click “Create Server Certificate”iii. Enter username "DomainController-001"iv. Enter password "foo123"v. Rename the "DomainControllerCertRequest-CLEAN2003.req", which is at desktop, to
"DomainControllerCertRequest-CLEAN2003.txt"vi. Open the "DomainControllerCertRequest-CLEAN2003.txt"
vii. copy the content and paste it to text area in certificate creation web pageviii. Under “Result Type” Choose “PKCS7”
46

ix. Click “OK”x. A page of code will be generated, starting by “-----BEGIN PKCS7-----“ and ending by
“-----END PKCS7-----”
xi. Copy it to a blank text file, save it, then rename the text file to “DomainControllerCert-CLEAN2003.p7b
xii. Ignore the warning message
xiii. Click “Yes”
47
Become =>
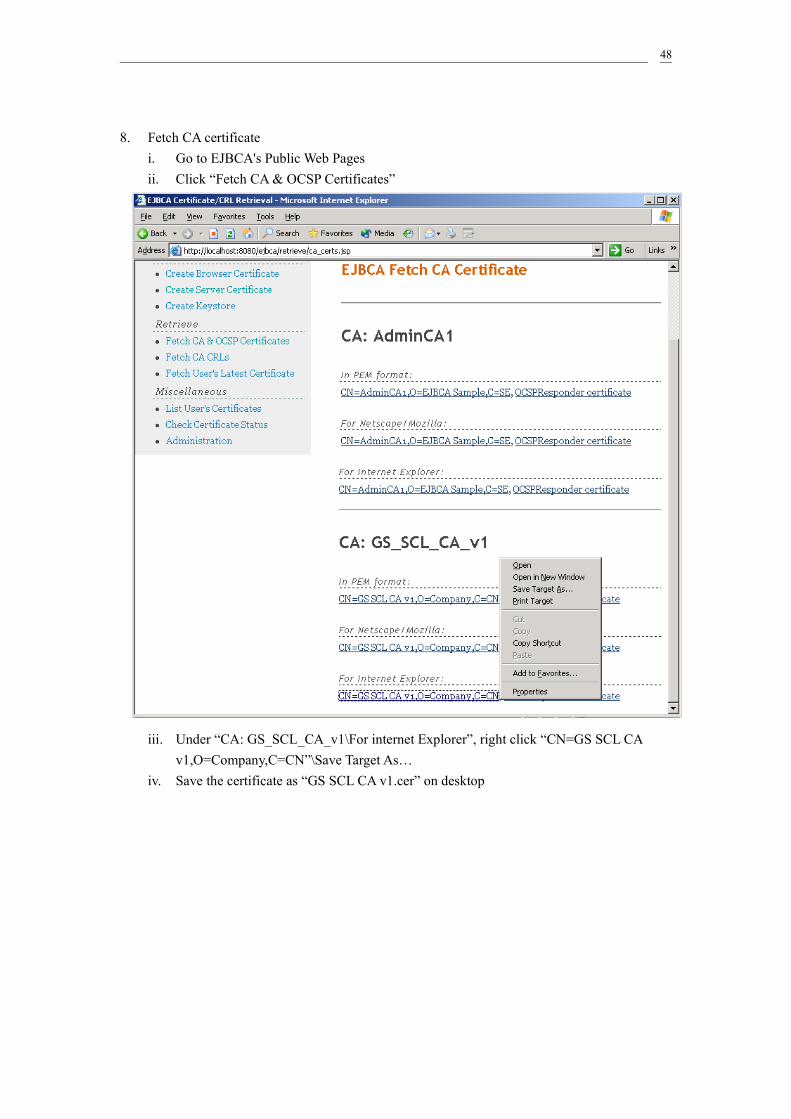
8. Fetch CA certificatei. Go to EJBCA's Public Web Pagesii. Click “Fetch CA & OCSP Certificates”
iii. Under “CA: GS_SCL_CA_v1\For internet Explorer”, right click “CN=GS SCL CA v1,O=Company,C=CN”\Save Target As…
iv. Save the certificate as “GS SCL CA v1.cer” on desktop
48
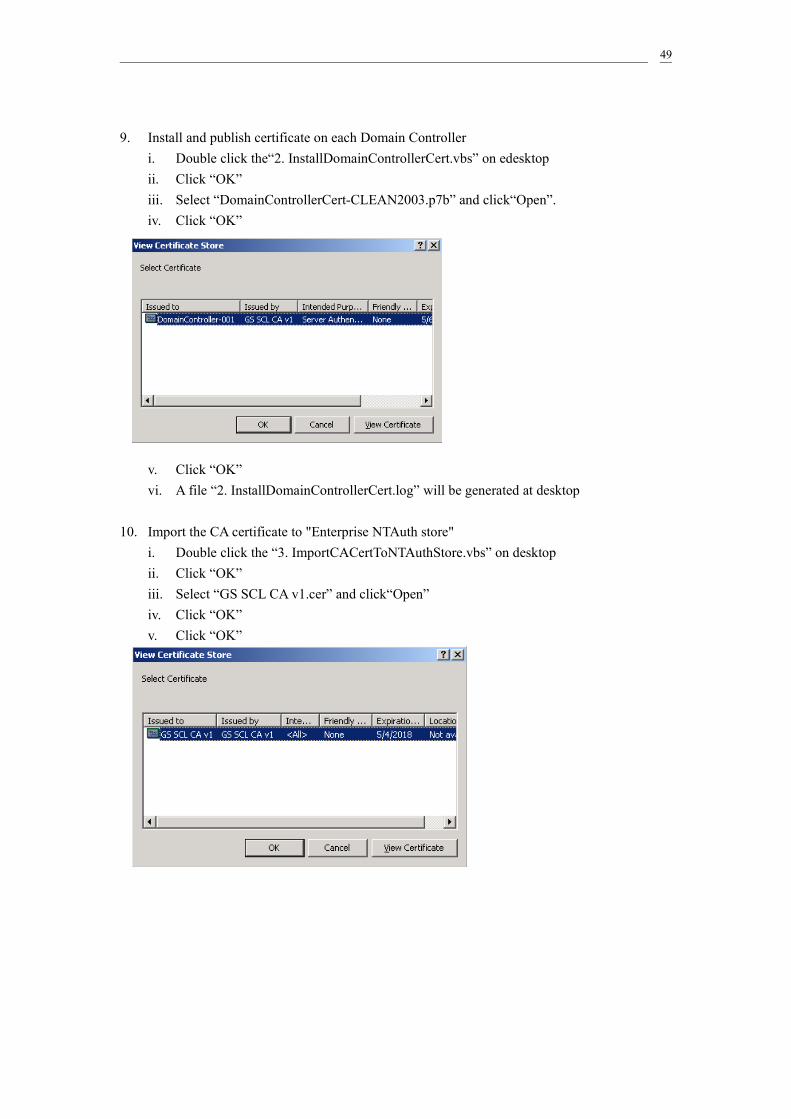
9. Install and publish certificate on each Domain Controlleri. Double click the“2. InstallDomainControllerCert.vbs” on edesktopii. Click “OK”iii. Select “DomainControllerCert-CLEAN2003.p7b” and click“Open”.iv. Click “OK”
v. Click “OK”vi. A file “2. InstallDomainControllerCert.log” will be generated at desktop
10. Import the CA certificate to "Enterprise NTAuth store"i. Double click the “3. ImportCACertToNTAuthStore.vbs” on desktopii. Click “OK”iii. Select “GS SCL CA v1.cer” and click“Open”iv. Click “OK”v. Click “OK”
49
4 -- Logon to Workstation
50
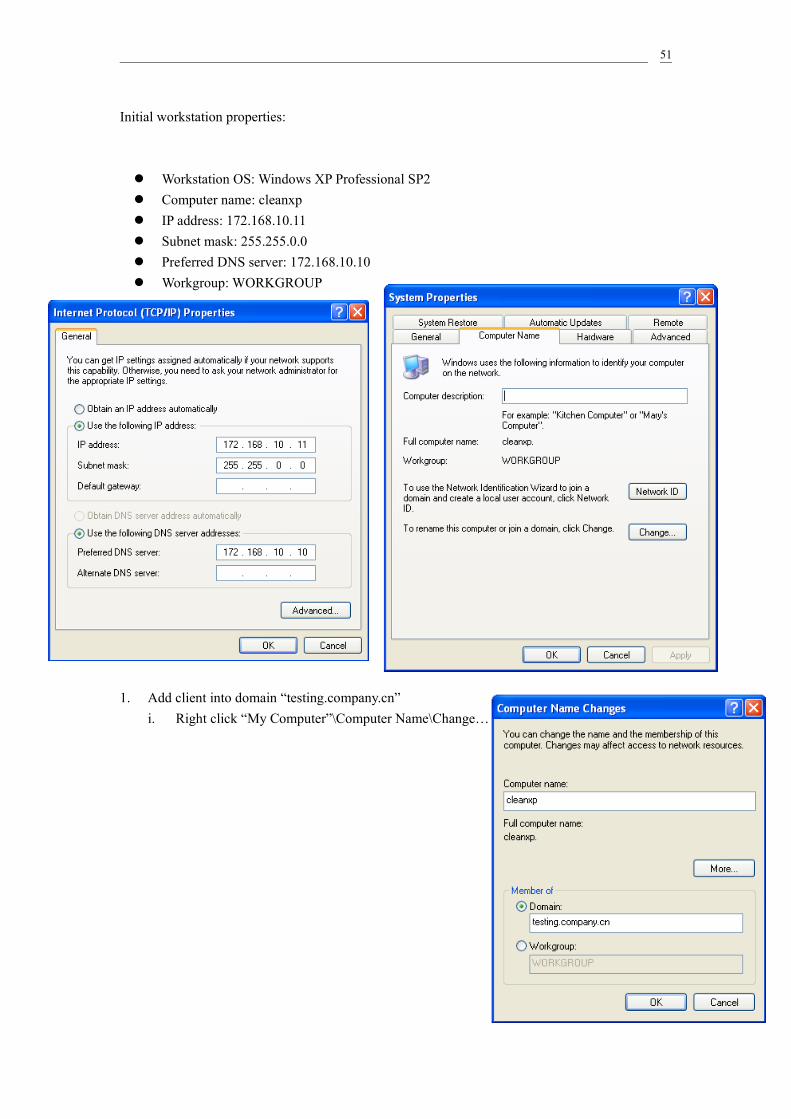
Initial workstation properties:
Workstation OS: Windows XP Professional SP2 Computer name: cleanxp IP address: 172.168.10.11 Subnet mask: 255.255.0.0 Preferred DNS server: 172.168.10.10 Workgroup: WORKGROUP
1. Add client into domain “testing.company.cn”i. Right click “My Computer”\Computer Name\Change…
51
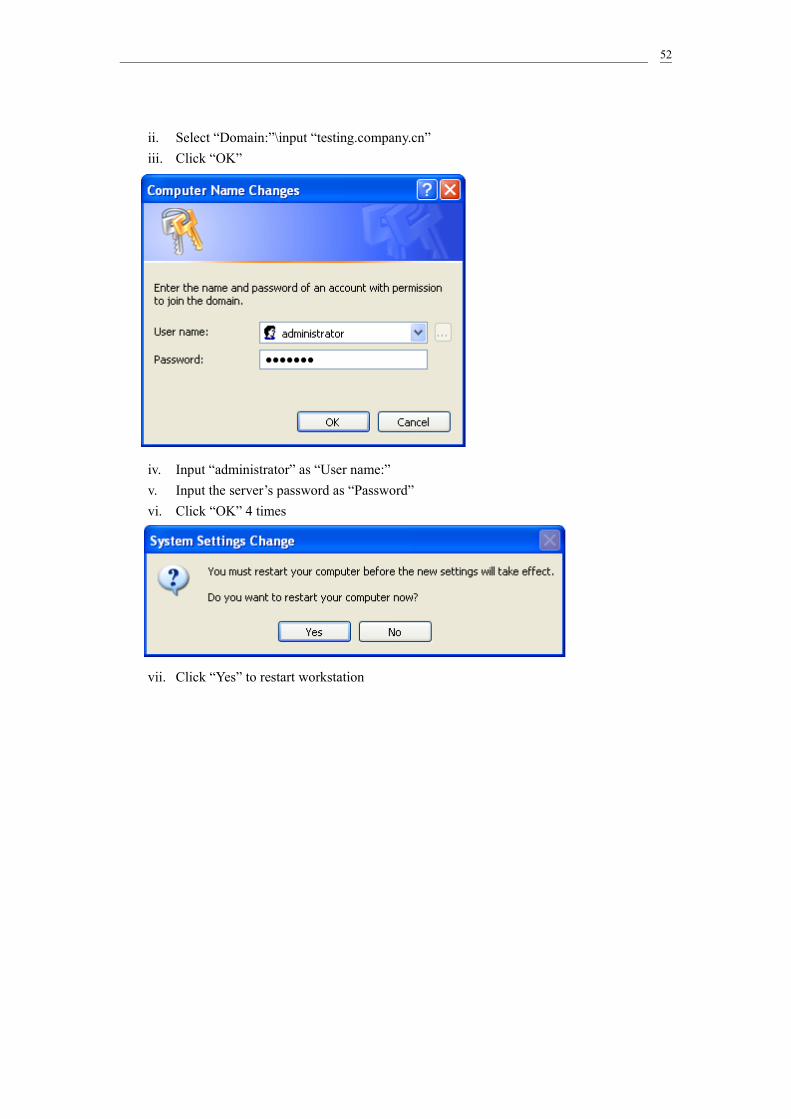
ii. Select “Domain:”\input “testing.company.cn”iii. Click “OK”
iv. Input “administrator” as “User name:” v. Input the server’s password as “Password”vi. Click “OK” 4 times
vii. Click “Yes” to restart workstation
52
4.1 -- Add CA Certificate to Domain Security Policy
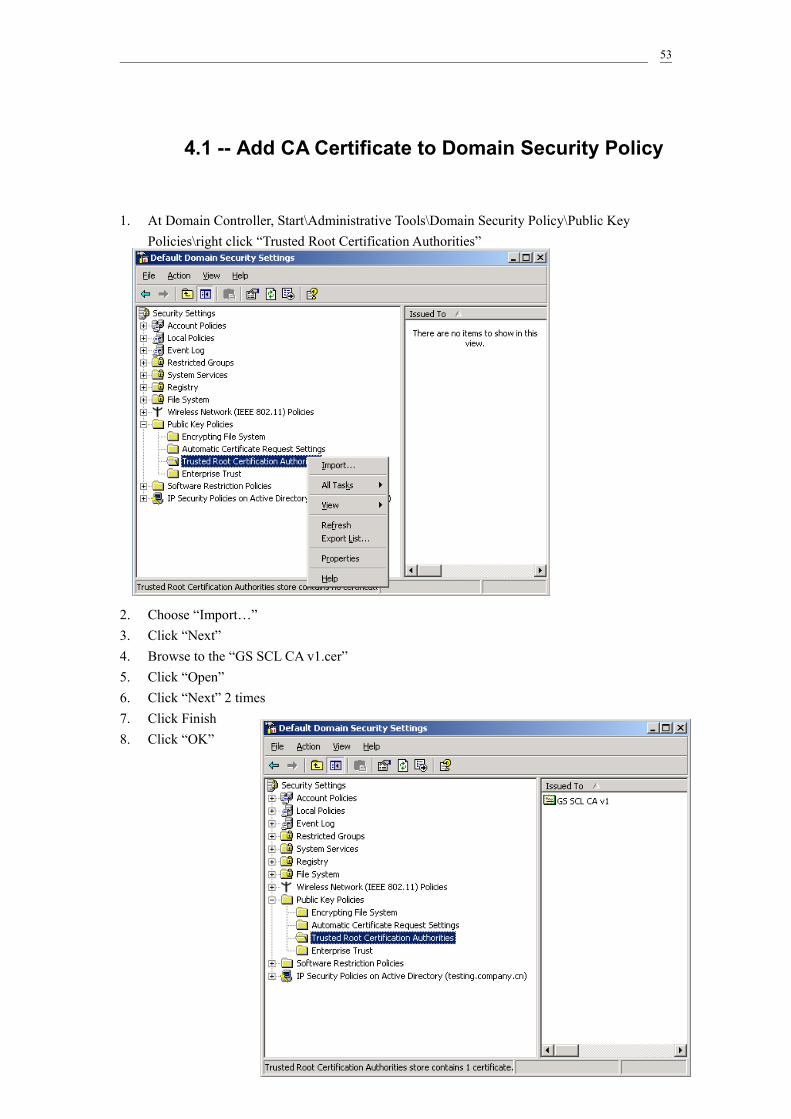
1. At Domain Controller, Start\Administrative Tools\Domain Security Policy\Public Key Policies\right click “Trusted Root Certification Authorities”
2. Choose “Import…”3. Click “Next”4. Browse to the “GS SCL CA v1.cer”5. Click “Open”6. Click “Next” 2 times7. Click Finish8. Click “OK”
53
4.2 -- Install Certificate on Workstation
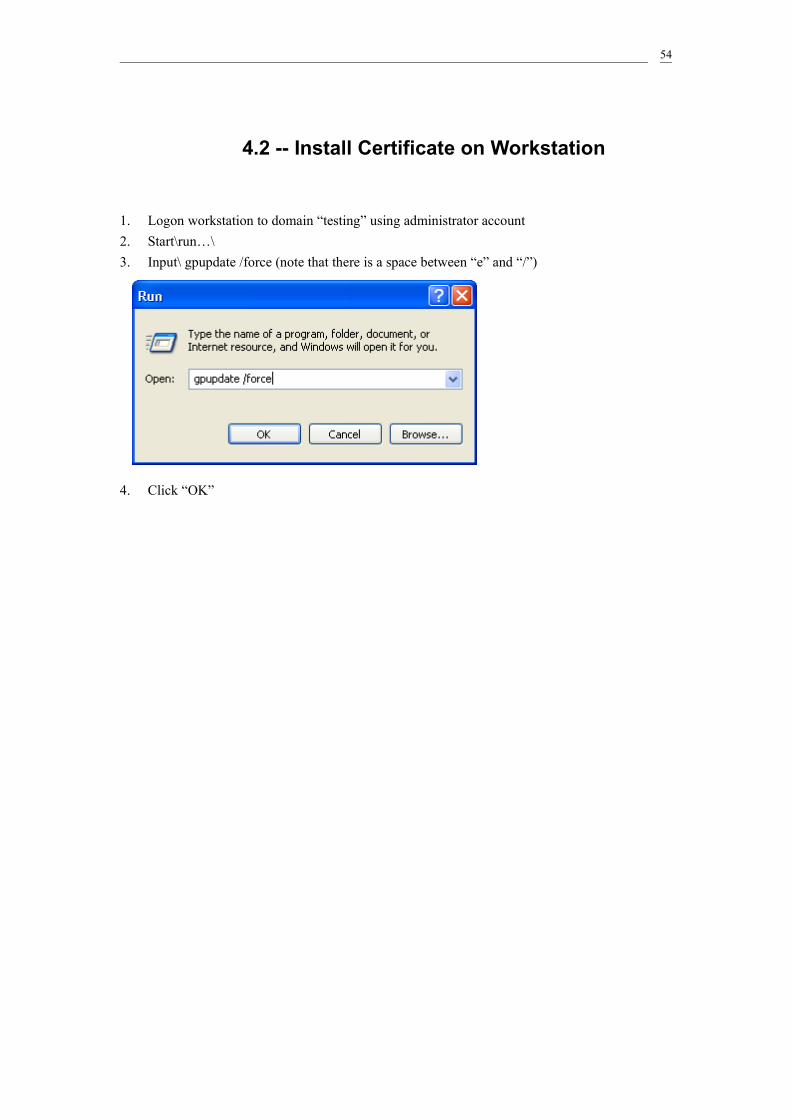
1. Logon workstation to domain “testing” using administrator account2. Start\run…\3. Input\ gpupdate /force (note that there is a space between “e” and “/”)
4. Click “OK”
54
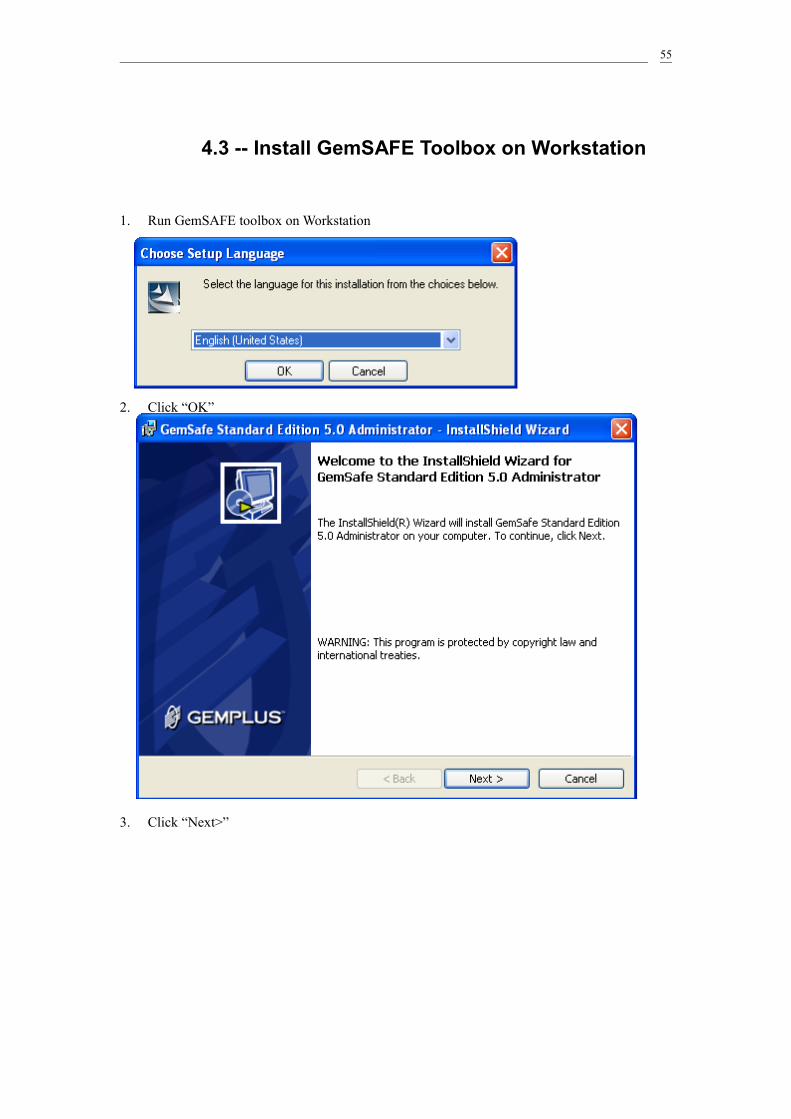
4.3 -- Install GemSAFE Toolbox on Workstation
1. Run GemSAFE toolbox on Workstation
2. Click “OK”
3. Click “Next>”
55
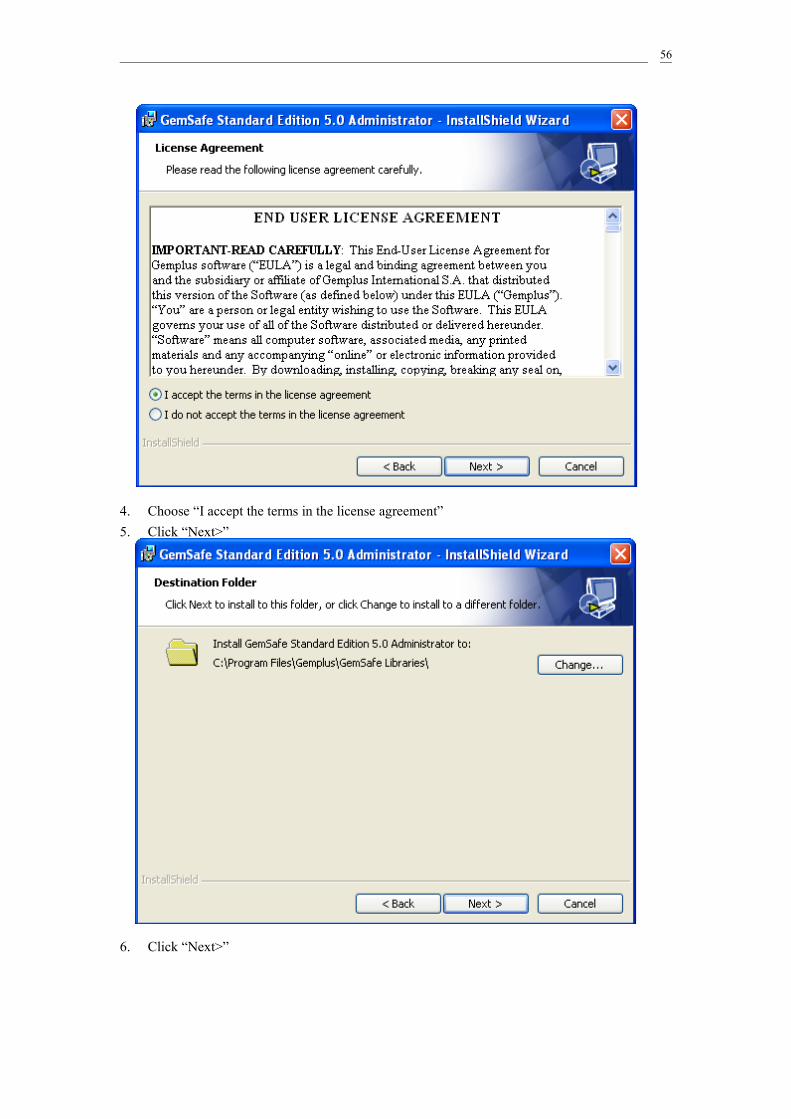
4. Choose “I accept the terms in the license agreement”5. Click “Next>”
6. Click “Next>”
56
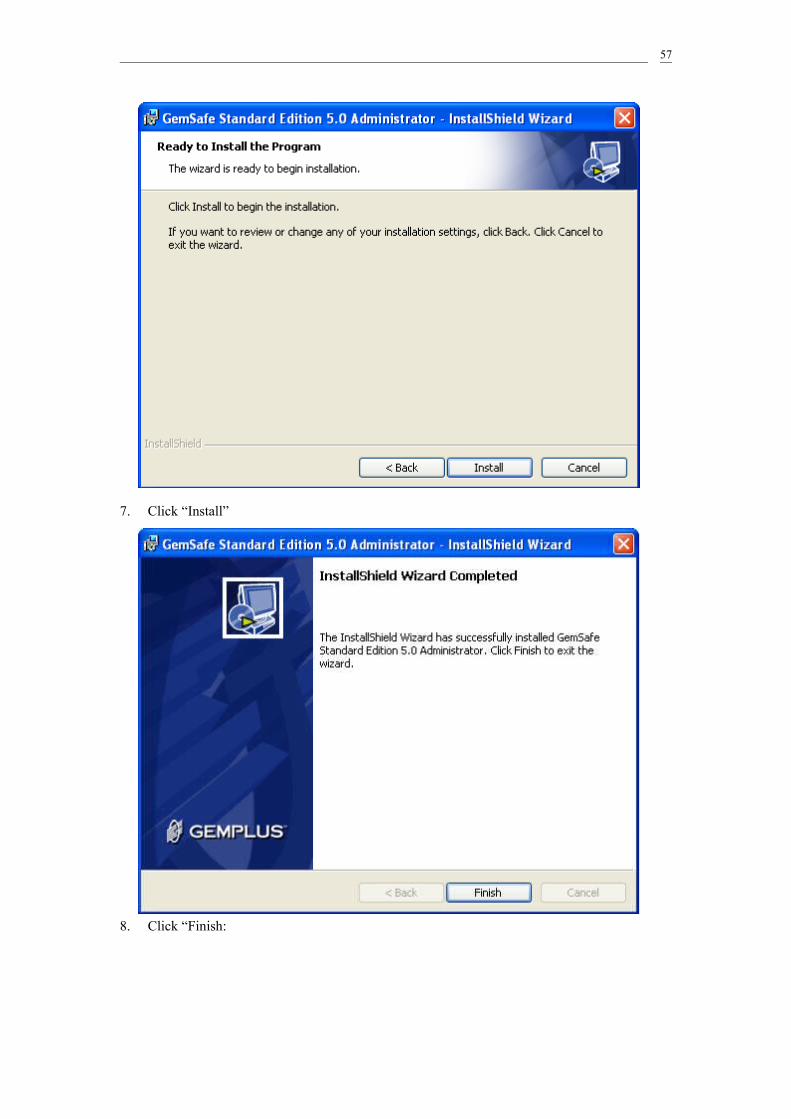
7. Click “Install”
8. Click “Finish:
57
4.4 -- Enroll Certificate to GemSAFE Smartcard
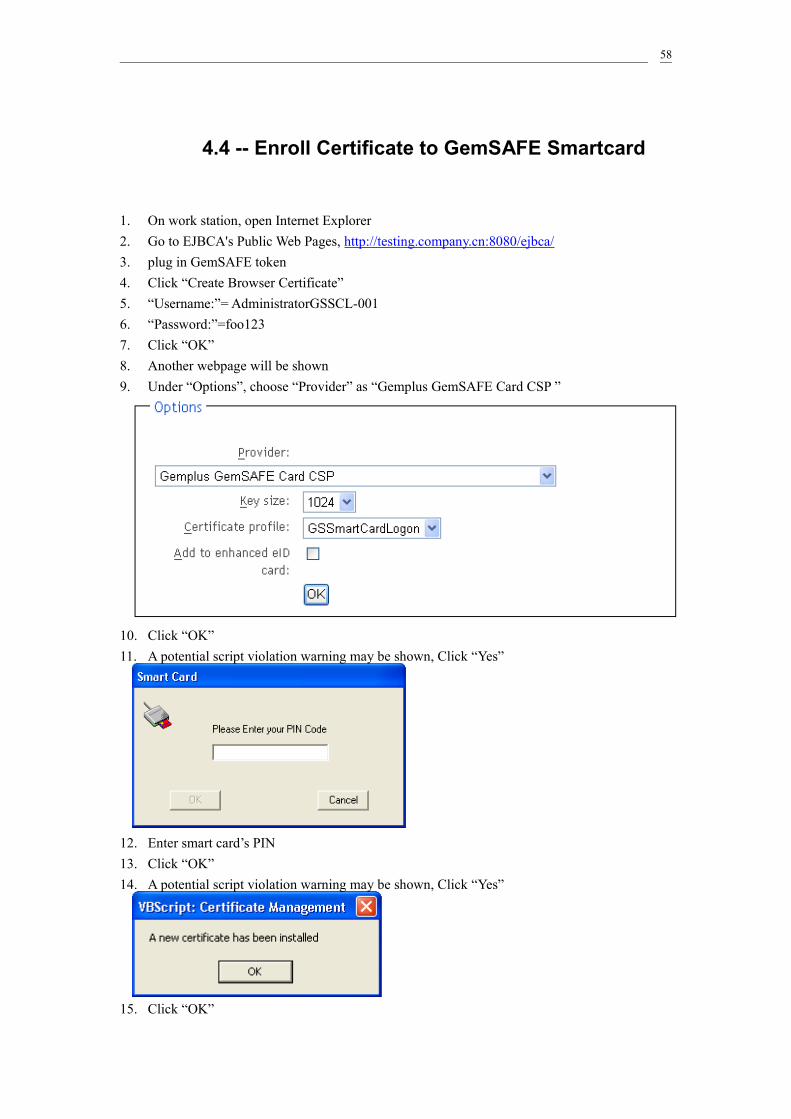
1. On work station, open Internet Explorer2. Go to EJBCA's Public Web Pages, http://testing.company.cn:8080/ejbca/ 3. plug in GemSAFE token4. Click “Create Browser Certificate”5. “Username:”= AdministratorGSSCL-0016. “Password:”=foo1237. Click “OK”8. Another webpage will be shown9. Under “Options”, choose “Provider” as “Gemplus GemSAFE Card CSP ”
10. Click “OK”11. A potential script violation warning may be shown, Click “Yes”
12. Enter smart card’s PIN13. Click “OK”14. A potential script violation warning may be shown, Click “Yes”
15. Click “OK”
58
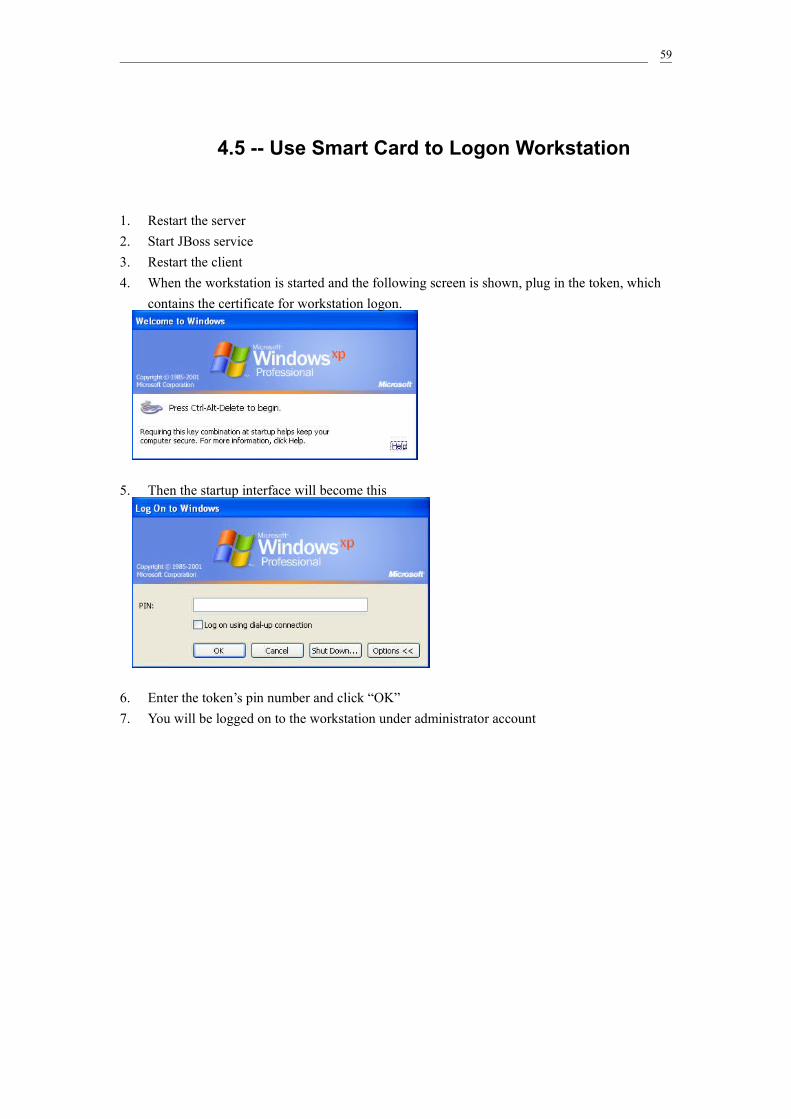
4.5 -- Use Smart Card to Logon Workstation
1. Restart the server2. Start JBoss service3. Restart the client4. When the workstation is started and the following screen is shown, plug in the token, which
contains the certificate for workstation logon.
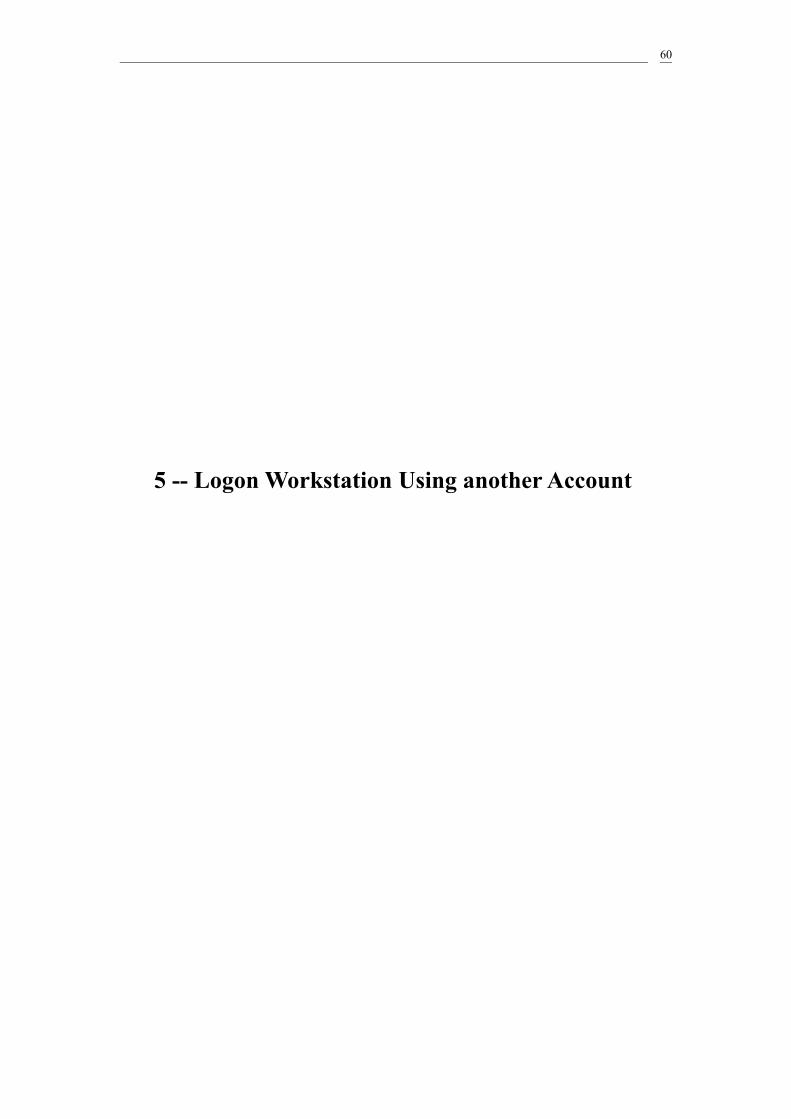
5. Then the startup interface will become this
6. Enter the token’s pin number and click “OK”7. You will be logged on to the workstation under administrator account
59
5 -- Logon Workstation Using another Account
60
If you want to logon to other user account, you must know your account username, which is stored under domain controller’s database
5.1 -- Create a New User Account
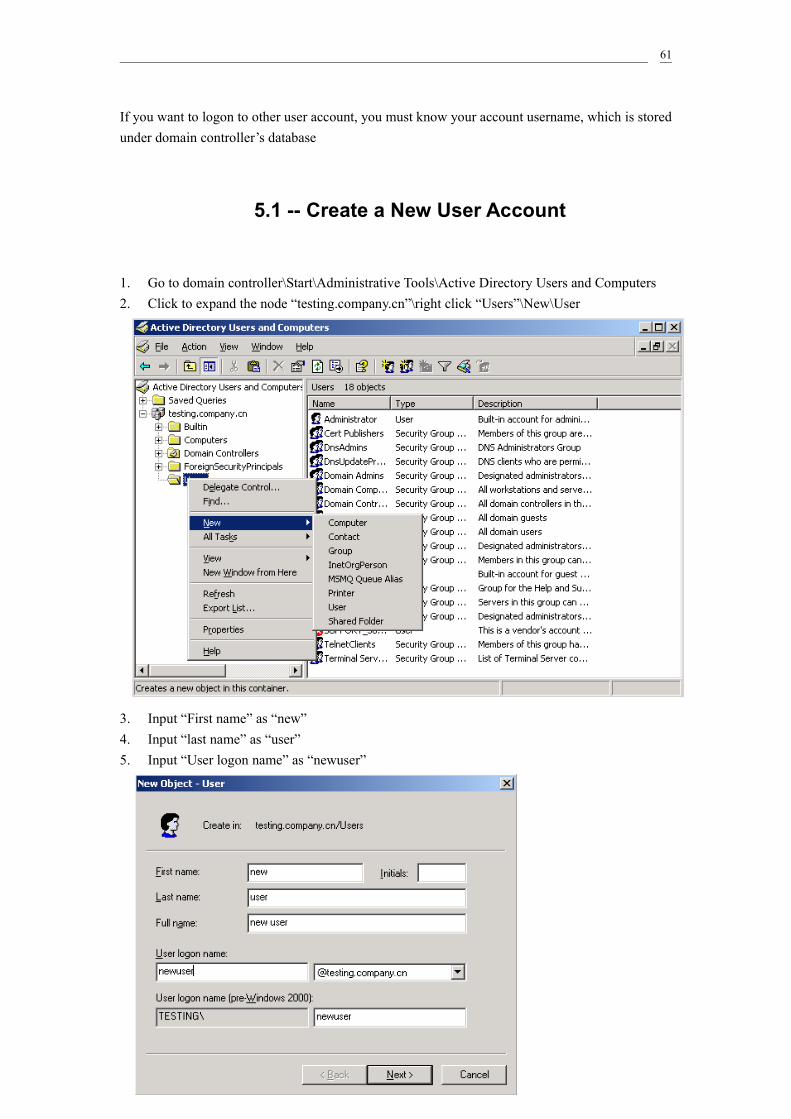
1. Go to domain controller\Start\Administrative Tools\Active Directory Users and Computers2. Click to expand the node “testing.company.cn”\right click “Users”\New\User
3. Input “First name” as “new”4. Input “last name” as “user”5. Input “User logon name” as “newuser”
61
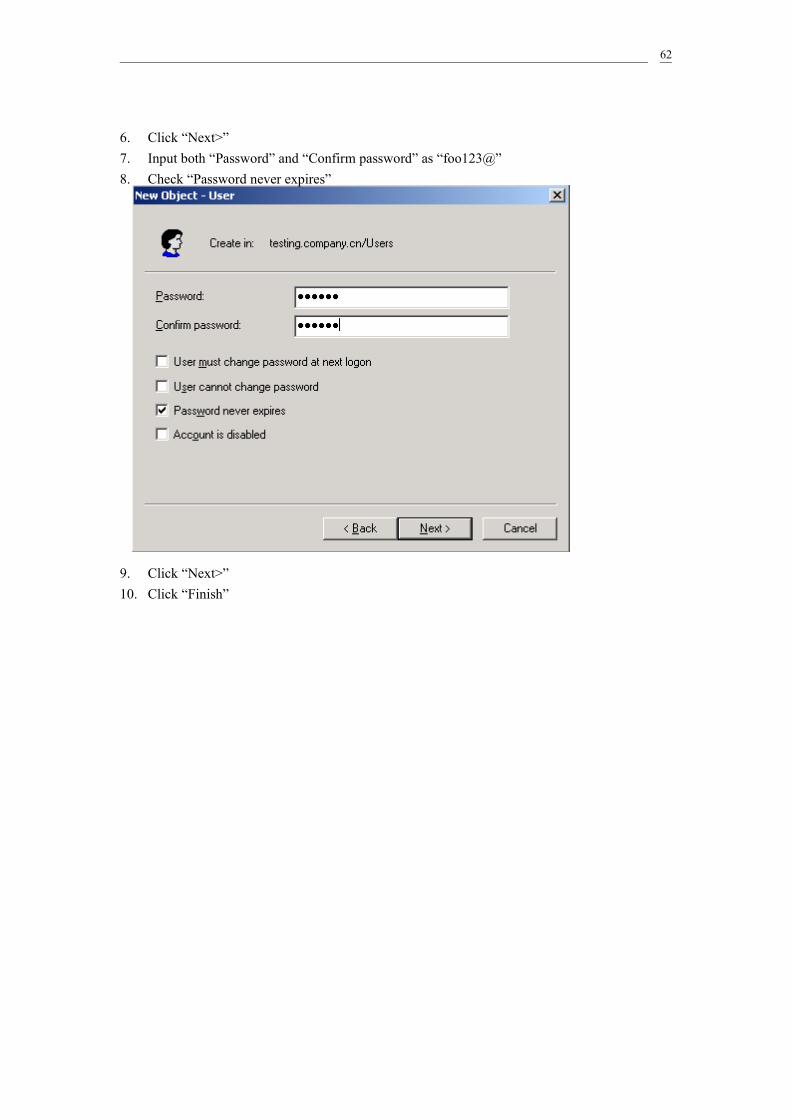
6. Click “Next>”7. Input both “Password” and “Confirm password” as “foo123@”8. Check “Password never expires”
9. Click “Next>”10. Click “Finish”
62
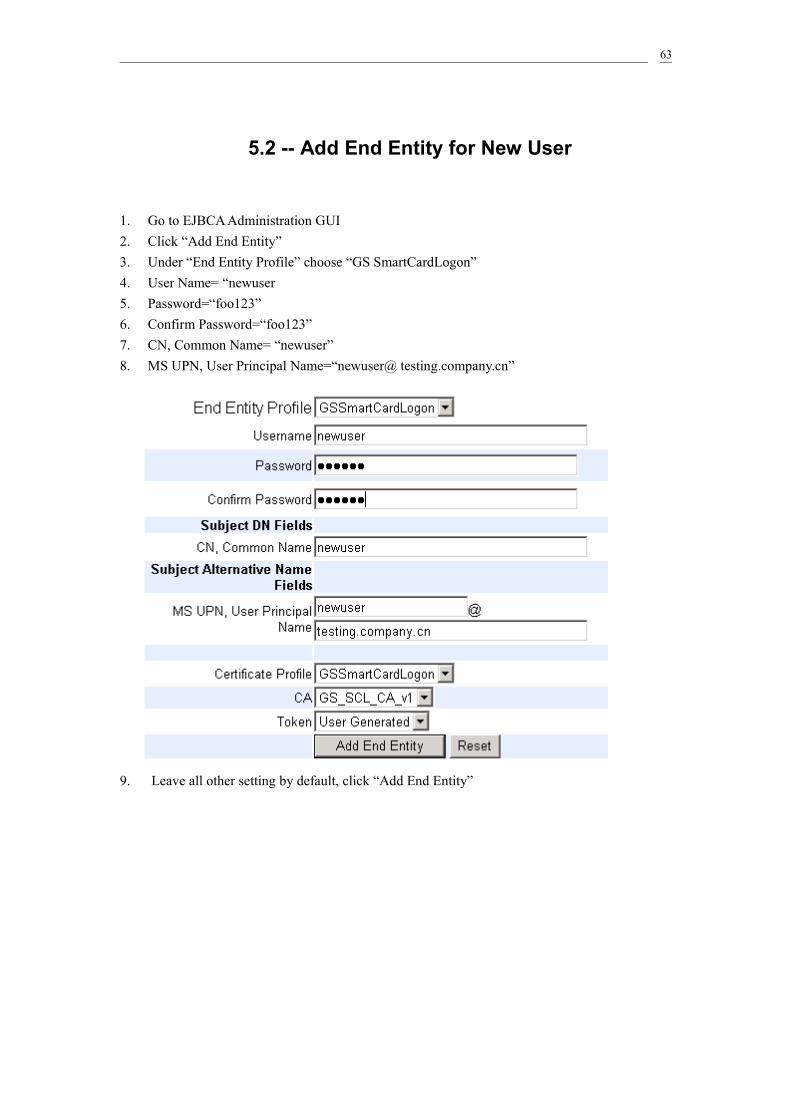
5.2 -- Add End Entity for New User
1. Go to EJBCA Administration GUI2. Click “Add End Entity”3. Under “End Entity Profile” choose “GS SmartCardLogon”4. User Name= “newuser5. Password=“foo123”6. Confirm Password=“foo123”7. CN, Common Name= “newuser”8. MS UPN, User Principal Name=“newuser@ testing.company.cn”
9. Leave all other setting by default, click “Add End Entity”
63
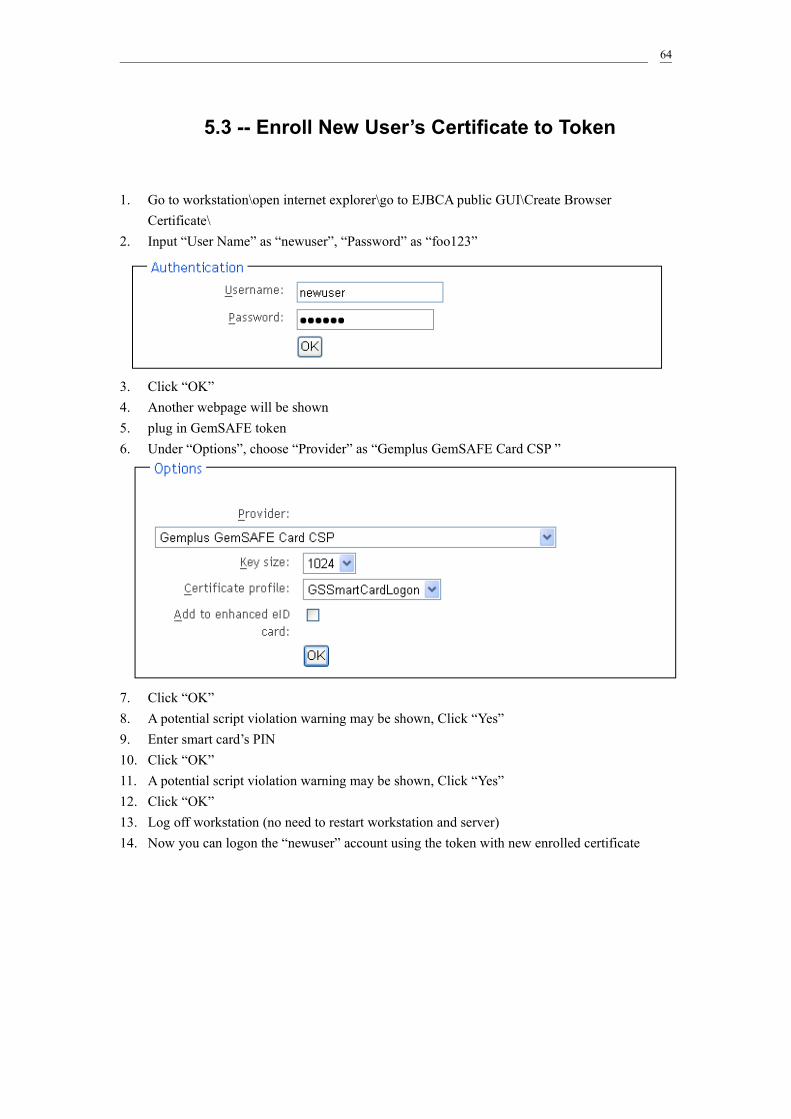
5.3 -- Enroll New User’s Certificate to Token
1. Go to workstation\open internet explorer\go to EJBCA public GUI\Create Browser Certificate\
2. Input “User Name” as “newuser”, “Password” as “foo123”
3. Click “OK”4. Another webpage will be shown5. plug in GemSAFE token6. Under “Options”, choose “Provider” as “Gemplus GemSAFE Card CSP ”
7. Click “OK”8. A potential script violation warning may be shown, Click “Yes”9. Enter smart card’s PIN10. Click “OK”11. A potential script violation warning may be shown, Click “Yes”12. Click “OK”13. Log off workstation (no need to restart workstation and server)14. Now you can logon the “newuser” account using the token with new enrolled certificate
64
Recommended