e - Book A Manual on Orchid Education
ICAR-National Research Centre for Orchids
Pakyong-737106, East Sikkim, India
Website-https://nrcorchids.nic.in
Conceptualized and developed by
Siddhartha Sankar Biswas, D R Singh
1
ISO 9001-2008
ICAR-National Research Centre for Orchids Pakyong-737106, East Sikkim, Sikkim, India
Tele No: +3592-267031, 267032, 267033
Telefax: +3592-267032
Email: [email protected]
Website: www.nrcorchids.nic.in
e-Book- A manual on orchid education
Conceptualized and developed by
Siddhartha Sankar Biswas and D R Singh
Produced by
D R Singh, Director
ICAR-National Research Centre for Orchids
Pakyong-737106, East Sikkim, Sikkim, India
Copyright@2019 ICAR-National Research Centre for Orchids

2
PREFACE
Orchid is a unique cop to grow artificially. Domesticating this crop requires controlled
conditions; potting these plants also requires unique potting materials, as the root of this crop
requires high aeration and optimum moisture for proper growth. Potting method of these
plants also vary from orchid to orchid. Seed germination of orchids are very rare in nature,
thus it requires unique practices to propagate. Also it requires expert management of light,
temperature, humidity, nutrients throughout its life cycle. The management of above
mentioned factors even varies from season to season. In spite of above mentioned difficulties;
orchid account a large share of global trade, estimated around 10% of international fresh and
cut flower trade, because, global demand for these flowers are very high for its beauty, utility,
colour, texture, fragrance, long vase life etc.
Cultivating orchid requires high expertise, understanding and unique procedures of managing
different factors. In this e-book we are providing basic information regarding success full
growing of orchids. The e-book covers botanical description, cultivation procedures, post-
harvest management, value addition and marketing. It also includes management of light,
temperature, humidity, water, nutrient, insect, pest, diseases for orchids. It also provides
information about orchid specific cultivation practices, their management and marketing.
Thus, this e-book provides an education from propagating orchids to successful growing of it,
their post-harvest management and marketing.
I hope this e-book will be a valuable and handy source of manual for amateur and
professional orchid growers, orchid farmers, orchid entrepreneurs, business men, students and
exporters.
Authors
3
Contents
1. Introduction 1
2. How to distinguish orchids from other plants 1
3. Growth habits of orchids 5
4. Natural habitats of orchids 6
5. Propagation procedures 7
6. Potting of orchids 11
7. Light requirement for growing orchids 15
8. Temperature for growing orchids 16
9. Humidity for growing orchids 18
10. Common method of fertilizing orchids 19
11. Method of watering your orchids 20
12. Pests of orchids 22
13. Diseases of orchids 25
14. Cultural problems which are common to most of the orchids 26
15. Orchid specific cultivation practice 28
15.1. Cymbidium 28
15.2. Dendrobium 30
15.3. Phalaenopsis 32
15.4. Paphiopedilum 34
15.5. Cattleya 36
15.6. Oncidium 38
15.7. Vanda 40
16. Organic cultivation of orchids 42
17. Orchid based farming system a technological option to double farm income 49
18. Vertical Farming of Orchids: 51
19. Post-harvest technologies of orchids 52
20. Unique use of single orchid flowers 57
21. Orchids preparations 59
22. Protection measures 67
4
1. Introduction
The Orchidaceae are one of the largest families in the plant kingdom, consisting of about
28,000 currently accepted species, some 800 subspecies distributed in about 763 genera. At
recent count around 110000 registered hybrids of orchids are there. Most species occur in the
subtropical and tropical regions of Asia, South and Central America, but this diverse and
adaptable family of flowering plants is found all around the globe except for the Polar
Regions and extreme arid deserts. Along with the Asteraceae, they are one of the two largest
families of flowering plants, they are a diverse and widespread family of flowering plants,
often colourful and fragrant and, the family encompasses about 6–11% of all seed plants. The
largest genera are Bulbophyllum (2,000 species), Epidendrum (1,500 species), Dendrobium
(1,400 species) and Pleurothallis (1,000 species). It also includes Vanilla–the genus of the
vanilla plant, the type genus Orchis, and many commonly cultivated plants such as
Phalaenopsis and Cattleya. In addition to their geographical and taxonomic diversity, orchids
are also widely used and traded for a variety of reasons, both legally and illegally, sustainably
and unsustainably. One of the best-known plant groups in the global horticultural and cut
flower trades (De, 2015; FloraHolland, 2015), orchids are also harvested, grown and traded
for a variety of purposes, including as ornamental plants, medicinal products and food.
2. How to distinguish orchids from other plants
2.1.You need to distinguish your orchids from other flowering plants when you want to
grow it personally. Three elements are there that can distinguish orchids from other
flowering plants-
Pollen: Pollens are formed into masses (generally two masses), called “pollinarium”, plural
“pollina”
Column: In case of flowers other than orchids stamens and pistils are present in the flower
separately but for orchids Stamens and pistils are joined together in a structure called the
column.
Seeds and capsule: Orchid seeds are very small present in a very large quantity in a single
capsule (may be up to 3 million in a capsule), Seeds are having no endosperms also do not
contain any organized embryo.
5
Beside this orchid leaves are generally thick and leathery and orchid root is generally thicker
than those of a normal conventional plant and may even appear as individual strands having a
thick spongy outer layer or grey, white protective tissue (velamen).
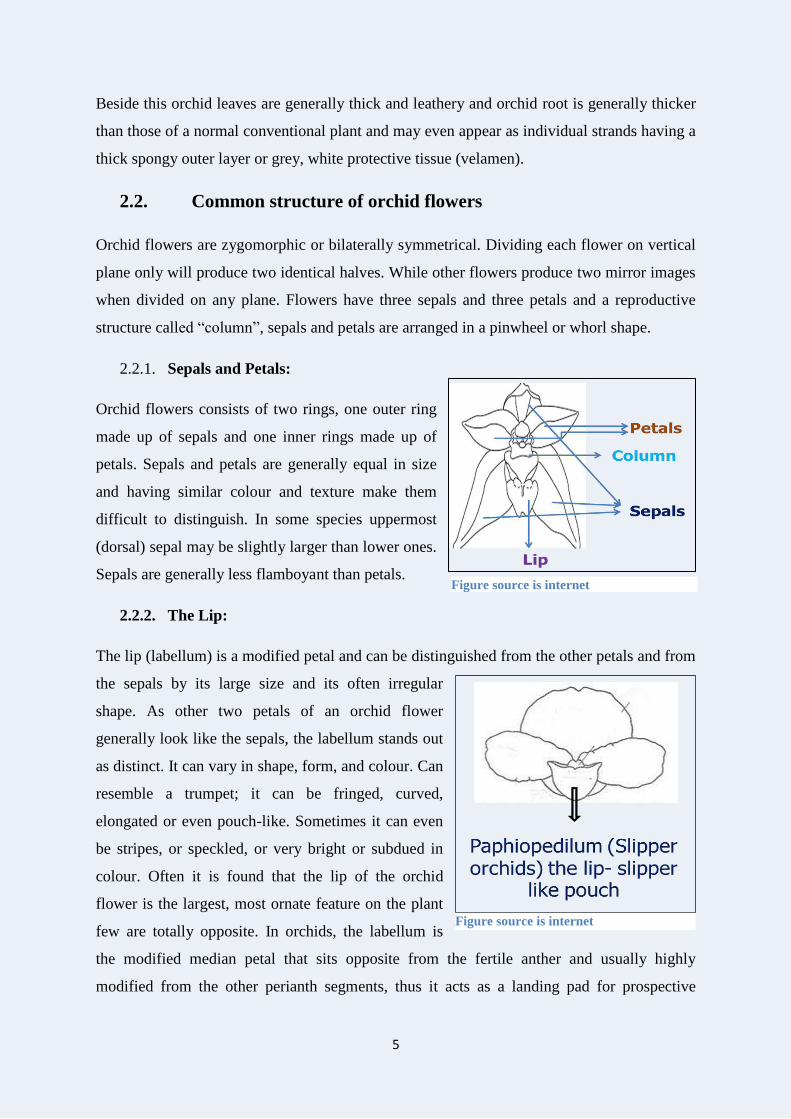
2.2. Common structure of orchid flowers
Orchid flowers are zygomorphic or bilaterally symmetrical. Dividing each flower on vertical
plane only will produce two identical halves. While other flowers produce two mirror images
when divided on any plane. Flowers have three sepals and three petals and a reproductive
structure called “column”, sepals and petals are arranged in a pinwheel or whorl shape.
2.2.1. Sepals and Petals:
Orchid flowers consists of two rings, one outer ring
made up of sepals and one inner rings made up of
petals. Sepals and petals are generally equal in size
and having similar colour and texture make them
difficult to distinguish. In some species uppermost
(dorsal) sepal may be slightly larger than lower ones.
Sepals are generally less flamboyant than petals.
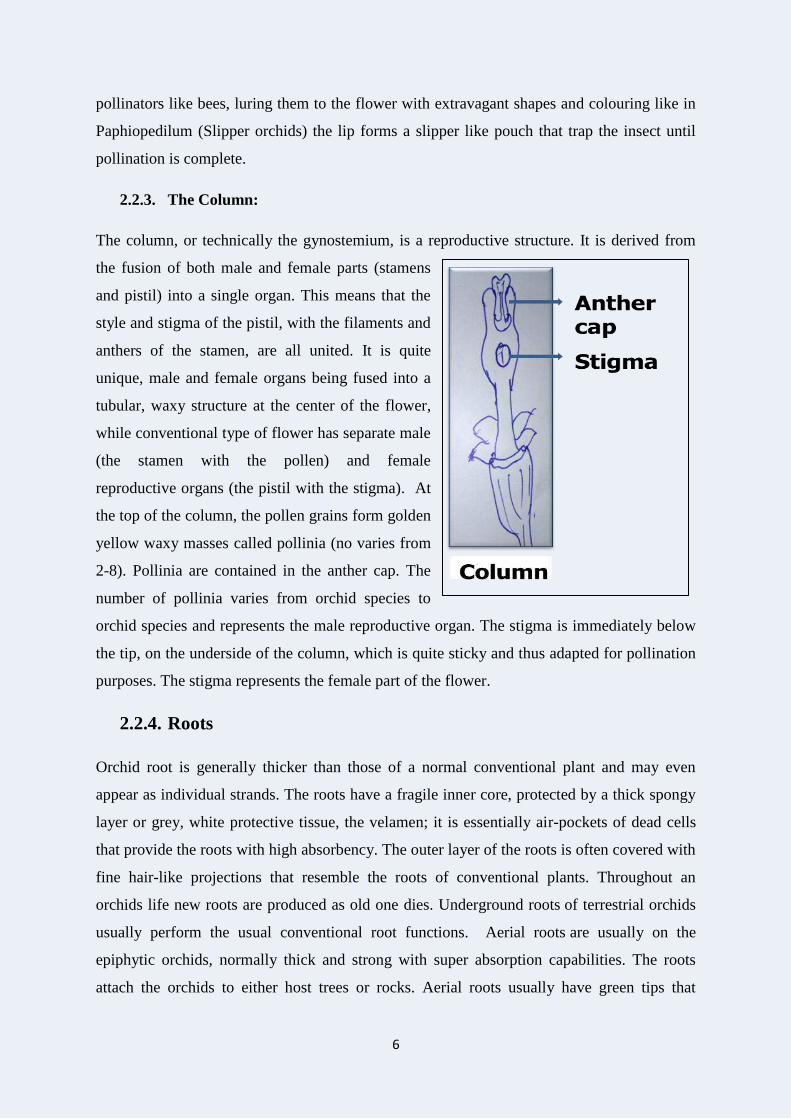
2.2.2. The Lip:
The lip (labellum) is a modified petal and can be distinguished from the other petals and from
the sepals by its large size and its often irregular
shape. As other two petals of an orchid flower
generally look like the sepals, the labellum stands out
as distinct. It can vary in shape, form, and colour. Can
resemble a trumpet; it can be fringed, curved,
elongated or even pouch-like. Sometimes it can even
be stripes, or speckled, or very bright or subdued in
colour. Often it is found that the lip of the orchid
flower is the largest, most ornate feature on the plant
few are totally opposite. In orchids, the labellum is
the modified median petal that sits opposite from the fertile anther and usually highly
modified from the other perianth segments, thus it acts as a landing pad for prospective
Figure source is internet
Figure source is internet
6
pollinators like bees, luring them to the flower with extravagant shapes and colouring like in
Paphiopedilum (Slipper orchids) the lip forms a slipper like pouch that trap the insect until
pollination is complete.
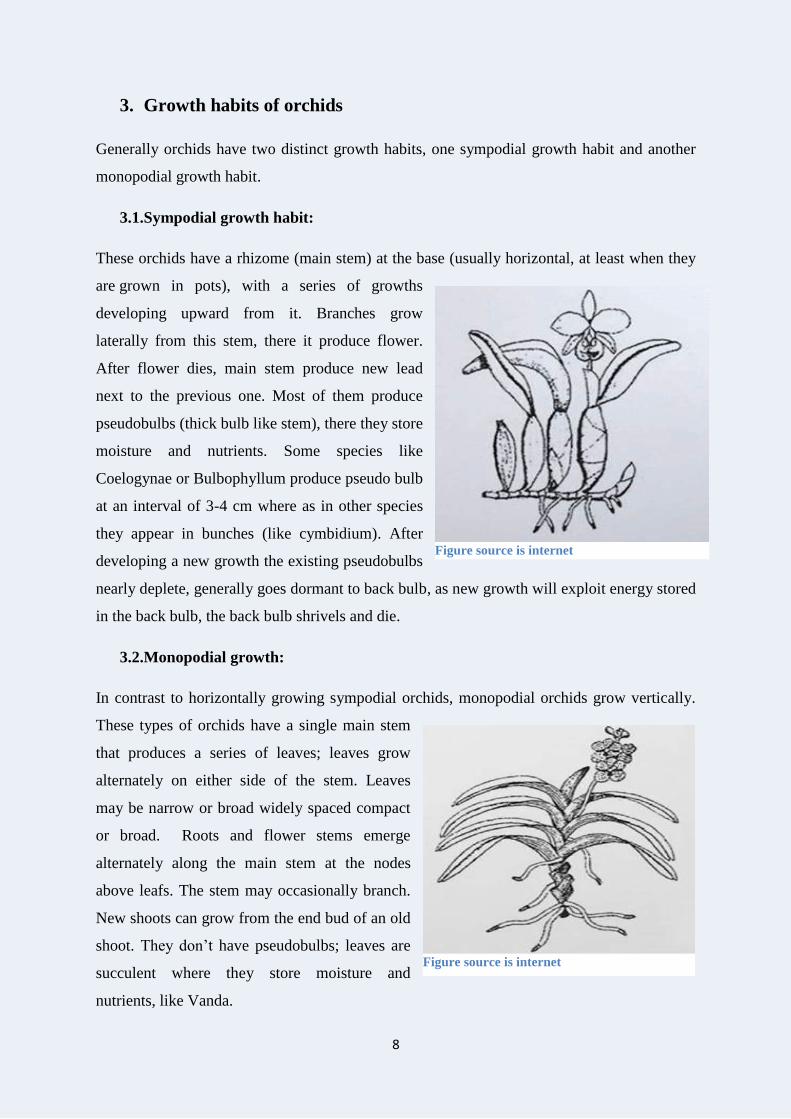
2.2.3. The Column:
The column, or technically the gynostemium, is a reproductive structure. It is derived from
the fusion of both male and female parts (stamens
and pistil) into a single organ. This means that the
style and stigma of the pistil, with the filaments and
anthers of the stamen, are all united. It is quite
unique, male and female organs being fused into a
tubular, waxy structure at the center of the flower,
while conventional type of flower has separate male
(the stamen with the pollen) and female
reproductive organs (the pistil with the stigma). At
the top of the column, the pollen grains form golden
yellow waxy masses called pollinia (no varies from
2-8). Pollinia are contained in the anther cap. The
number of pollinia varies from orchid species to
orchid species and represents the male reproductive organ. The stigma is immediately below
the tip, on the underside of the column, which is quite sticky and thus adapted for pollination
purposes. The stigma represents the female part of the flower.
2.2.4. Roots
Orchid root is generally thicker than those of a normal conventional plant and may even
appear as individual strands. The roots have a fragile inner core, protected by a thick spongy
layer or grey, white protective tissue, the velamen; it is essentially air-pockets of dead cells
that provide the roots with high absorbency. The outer layer of the roots is often covered with
fine hair-like projections that resemble the roots of conventional plants. Throughout an
orchids life new roots are produced as old one dies. Underground roots of terrestrial orchids
usually perform the usual conventional root functions. Aerial roots are usually on the
epiphytic orchids, normally thick and strong with super absorption capabilities. The roots
attach the orchids to either host trees or rocks. Aerial roots usually have green tips that

7
contain chlorophyll (especially the leafless orchid species such as the Chilochistra parishii)
that is required to absorb energy from the sun.
2.2.5. Leaves
Orchid leaves are generally thick and leathery. They are just as varied as the flowers. It can
be broad, thin, succulent, cylindrical, tiny and even as huge as more than a meter. Most of the
orchid leaves occur in shades of green, blue and grey. There is however, a group of orchids
that have leaves that are shades of grey, green, red, brown, silver, bronze and even in copper
tones – the so-called jewel orchids. Orchid leaves can grow in various ways: fan shape, at
intervals ranging from a few to several centimetres in between. Whichever way it grows, it
reflects the adaptations of the orchid to its environmental conditions, for example some
Vanda orchid species grow in shaded areas and thus their leaves are broad, flat or pinnate for
maximum exposure to sunlight. The other example is the Brassavola species which grow
naturally in tropical regions in harsh sunlight. Their leaves are fleshy and pencil shaped to as
to expose the minimal surface area of the plant and retain moisture.
8
3. Growth habits of orchids
Generally orchids have two distinct growth habits, one sympodial growth habit and another
monopodial growth habit.
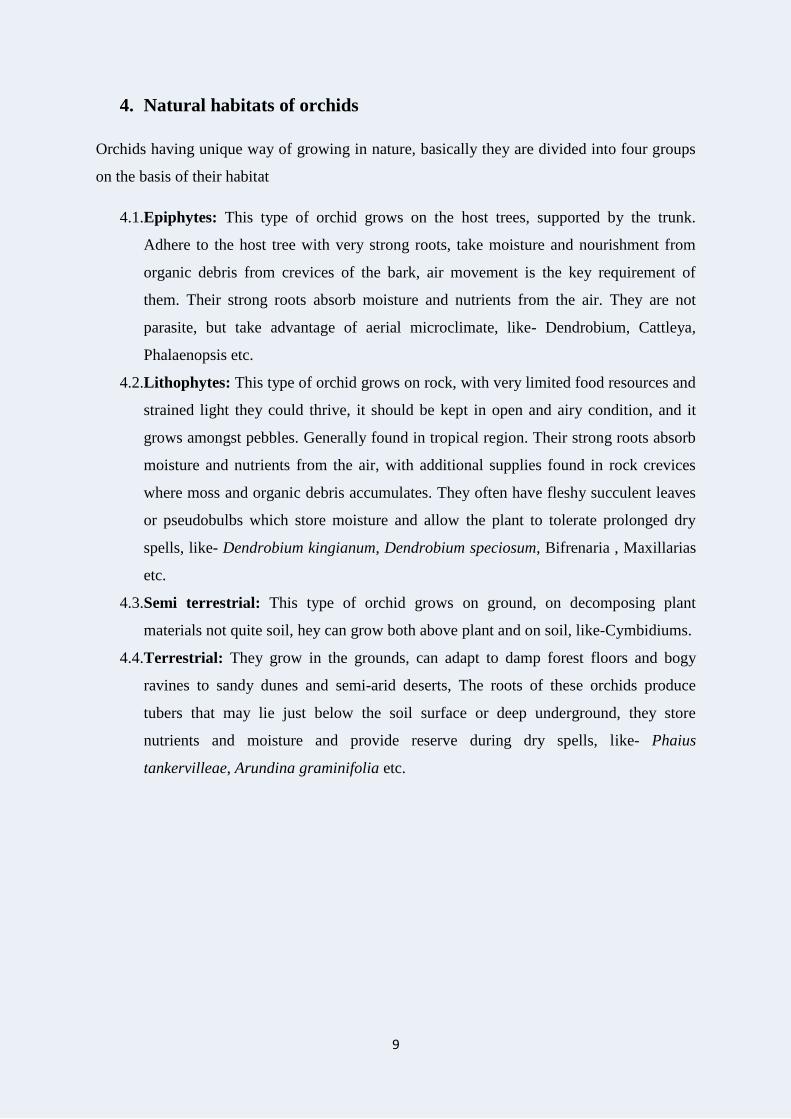
3.1.Sympodial growth habit:
These orchids have a rhizome (main stem) at the base (usually horizontal, at least when they
are grown in pots), with a series of growths
developing upward from it. Branches grow
laterally from this stem, there it produce flower.
After flower dies, main stem produce new lead
next to the previous one. Most of them produce
pseudobulbs (thick bulb like stem), there they store
moisture and nutrients. Some species like
Coelogynae or Bulbophyllum produce pseudo bulb
at an interval of 3-4 cm where as in other species
they appear in bunches (like cymbidium). After
developing a new growth the existing pseudobulbs
nearly deplete, generally goes dormant to back bulb, as new growth will exploit energy stored
in the back bulb, the back bulb shrivels and die.
3.2.Monopodial growth:
In contrast to horizontally growing sympodial orchids, monopodial orchids grow vertically.
These types of orchids have a single main stem
that produces a series of leaves; leaves grow
alternately on either side of the stem. Leaves
may be narrow or broad widely spaced compact
or broad. Roots and flower stems emerge
alternately along the main stem at the nodes
above leafs. The stem may occasionally branch.
New shoots can grow from the end bud of an old
shoot. They don’t have pseudobulbs; leaves are
succulent where they store moisture and
nutrients, like Vanda.
Figure source is internet
Figure source is internet
9
4. Natural habitats of orchids
Orchids having unique way of growing in nature, basically they are divided into four groups
on the basis of their habitat
4.1.Epiphytes: This type of orchid grows on the host trees, supported by the trunk.
Adhere to the host tree with very strong roots, take moisture and nourishment from
organic debris from crevices of the bark, air movement is the key requirement of
them. Their strong roots absorb moisture and nutrients from the air. They are not
parasite, but take advantage of aerial microclimate, like- Dendrobium, Cattleya,
Phalaenopsis etc.
4.2.Lithophytes: This type of orchid grows on rock, with very limited food resources and
strained light they could thrive, it should be kept in open and airy condition, and it
grows amongst pebbles. Generally found in tropical region. Their strong roots absorb
moisture and nutrients from the air, with additional supplies found in rock crevices
where moss and organic debris accumulates. They often have fleshy succulent leaves
or pseudobulbs which store moisture and allow the plant to tolerate prolonged dry
spells, like- Dendrobium kingianum, Dendrobium speciosum, Bifrenaria , Maxillarias
etc.
4.3.Semi terrestrial: This type of orchid grows on ground, on decomposing plant
materials not quite soil, hey can grow both above plant and on soil, like-Cymbidiums.
4.4.Terrestrial: They grow in the grounds, can adapt to damp forest floors and bogy
ravines to sandy dunes and semi-arid deserts, The roots of these orchids produce
tubers that may lie just below the soil surface or deep underground, they store
nutrients and moisture and provide reserve during dry spells, like- Phaius
tankervilleae, Arundina graminifolia etc.
10
5. Propagation procedures
Orchid seeds lack of endosperm, which provide energy for seed germination in natural
condition. Orchid seeds need fungal association to germinate in natural condition. Initially the
fungus will invade the seed as a parasite in search of food source. But before it become
destructive, the embryo inhibits the activity of the potentially destructive invader, the fungus
provide the embryo with the nutrients for germination. Thus a symbiotic relation establish
between orchid and mycorrhizae that continues for the life of the plant. Thus for the
production of orchid seedlings you can’t do seed sowing directly. You have to follow specific
mechanised methods. Or the seedlings will be produced from different plant parts.
5.1. Sexual propagation (Propagation from seed):
All the operations for this method must be conducted in a sterile environment (in laminar
flow hood)
1. The encapsulated seeds are in a sterile environment as long as the seed pod is closed.
It will eventually crack open at a certain time, in which case the tiny seeds will have
to be decontaminated before sowing them. So collect the mature seed pod before it
starts to open so that seeds need not to decontaminate.
2. Externally disinfect them using HgCl2 solution followed by washing in distilled water,
then cut open with a disinfected tool (scalpel).
3. Sow the seed masses into a flask which contains a nutrient solution (the flask and its
contents should be previously sterilized in an autoclave).
4. The nutrients solutions contain minerals, sugars, sometimes banana extracts or
coconut milk, Agar (a substance like gelatin for solidification of the media)
5. Seal and label the flask and place it in a growth chamber / room where light is
relatively limited and temperatures are relatively constant. After several weeks to
several months the tiny seeds will germinate. Then they will be transferred to the pots.
5.2. Tissue culture
All the operations for this method must be conducted in a sterile environment (in laminar
flow hood)

11
1. Plant tissue from a new growth is used in this method. Excise (cut) the tissue,
removed its outer layers till the active center of developing cells (the meristem); is
reached
2. Then cut this tiny mass of cells (less than 1 mm in diameter) into 20 or so parts
3. Immerse them into a flask with growing liquid solution without agar,. This media for
this solution is usually called “multiplication” formula.
4. Place the flasks or tubes on an agitator (an apparatus than either slowly rotates or tilts
to left and right. The constant movement of the agitator allows the lumps of cells to
develop and increase in mass but prevents them from forming roots or leaves.
5. Then the developed lumps are replated into flasks as is done for germinated seeds.
From there on the process is the same as for seeds as stated above.
5.3. Stem propagation
All the operations for this method must be conducted in a sterile environment
1. In this method flower stem is used for propagation, take a flower stem with just the
first flower open or with up to half the flowers open, flower buds nearer the base of
the flower stem open first, below them there will be a number of undeveloped buds,
refer to as “nodes”.
2. Remove the flower stem from the plant and externally decontaminate it. Cut the stem
at about 1 inch above and below the node, then deep it in decontamination solution for
15 to 20 minutes
3. Remove the protective sheath over the nodes, and remove about 1/8 of an inch further
from both ends of the stem
4. Insert it in the sterilized media solution in a tube or jar or flask.
5. After successful operation we may get up to 4 plantlets per node, conduct all these
operations in a sterile environment.
5.4. Internode propagation:
This technique is similar to the stem propagation but instead of using a flower stem as the
start-up point we use a growth. It is often used with Dendrobiums.
1. Remove a growth from the plant and cut it in between nodes.
2. Dip the edges in a fungicide (RIDOX, PHENTOM, COMPASS, etc.) and then either
insert or lay on sphagnum moss, water it at a regular interval to keep it moist.
12
After successful operation we may get one plantlet per node. The technique does not require
any sophisticated equipment, is inexpensive and can be done practically by anyone. These
plants are entitled to be recognized by the same variety name as the original plant from which
the growth was removed.
5.5. Divisions & back bulbs:
Some orchids grow by developing new growth from the base of the plants, like-Cymbidium
After several years they may have 5, 6, 10 or more growths. By subdividing such plants we
can get two or three plants out of the original one. If we remove the older growth or old
pseudobulbs of these plants and sow them separately they will generate new growths. P.lants
resulting from divisions and backbulbs are also entitled to be recognized by the same variety
name as the original.The resulting plants will be identical to the plant we divided or from
which we removed the pseudobulb(s).
1. Remove fully mature but no shrivelled back bulb (provided that sufficient no of bulbs
should be there with the original plant for nourishing the plant with moisture and
nutrients)
2. Plant the removed back bulb in sand/or coco peat.
3. Water it at a regular interval to keep it moist.
4. After two months or more new growths will come out of it.
5.6. Use of keikis:
Some orchids, mostly Dendrobiums, are famous for producing keikis. Keikis is the
Hawaiian word for “babies”. Occasionally Phalaenopsis will also produce keikis. Some
species do it because it is programmed into their genes, others do it when they are
exposed to high temperatures while they are developing a flower stem. Keikis will
develop leaves first, and then roots. When roots are about an inch in length we can
remove the keikis from the mother plant and plant it in its own container. Keikis will be
identical to the plant they were removed from and are also entitled to be recognized by
the same variety name, if any, as the plant from which they originated.
5.7. Top cuts:
Some plants, mostly vandaceous orchids, tend to grow very tall. Heights of 4, 5 or 6 feet
or more, make them difficult to handle. These also tend to develop new roots along their
stem, in between leaves. These can be divided by cutting off the top portion of the plant,

13
this top portion should have at least 2 pairs of roots attached to it. The remaining (bottom)
part of the plant will often respond to this attack by sending out new shoots from its base.
Top cuts are the same as the plant they were removed from and are also entitled to be
recognized by the same variety name, if any, as the plant from which they originated.
14
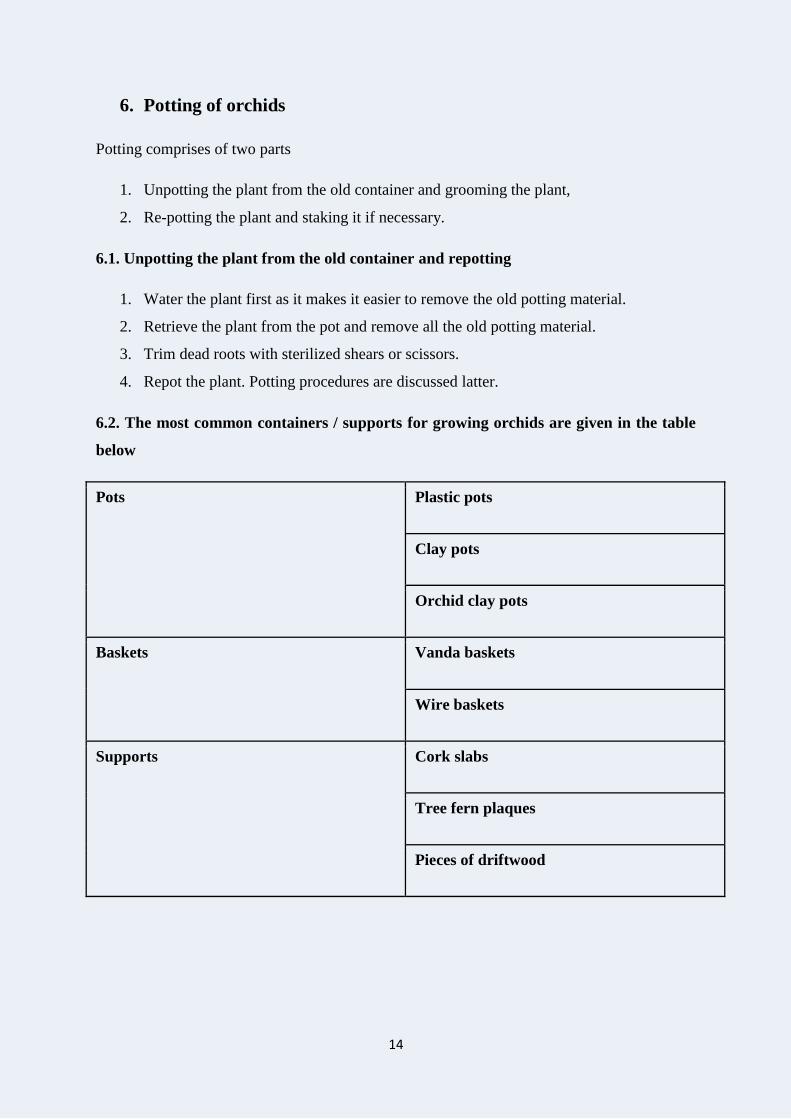
6. Potting of orchids
Potting comprises of two parts
1. Unpotting the plant from the old container and grooming the plant,
2. Re-potting the plant and staking it if necessary.
6.1. Unpotting the plant from the old container and repotting
1. Water the plant first as it makes it easier to remove the old potting material.
2. Retrieve the plant from the pot and remove all the old potting material.
3. Trim dead roots with sterilized shears or scissors.
4. Repot the plant. Potting procedures are discussed latter.
6.2. The most common containers / supports for growing orchids are given in the table
below
Pots Plastic pots
Clay pots
Orchid clay pots
Baskets Vanda baskets
Wire baskets
Supports Cork slabs
Tree fern plaques
Pieces of driftwood

15
6.2.1. Plastic pots
There are several benefits of using plastic pots. They are less expensive, lighter weight, easier
to store. They hold water for a longer period than other pots, mineral salts (from water and
fertilizer) will not adhere to them, and roots don’t get attached to them. Clear plastic pots
enable roots to photosynthesize. Only drawback, of plastic pot is that some plants (like
Dendrobiums) might get top heavy in them. Plastic pots should have a fair number of
drainage holes (4 to 8 holes on 3” to 4” pots, 8 to 12 holes on 5” to 6” pots).
6.2.2. Clay pots
The advantage of using clay pots is the stability, light weight and their porosity which allows
good aeration to the orchid roots. A possible disadvantage is that orchid roots tend to attach
themselves to the pot.
6.2.3. Clay orchid pots
They are like clay pots but have holes or slits on their sides, allow more air circulation than
regular clay pots.
6.2.4. Vanda baskets
Mostly used for Vanda and vandaceous orchids, most Vanda baskets are made of cedar or
teak wood. Plastic Vanda baskets are available. 4” and 8” size are made of sturdy plastic that
should last long.
6.2.5. Cork slabs
They are used for mounting orchids. Pieces of cork range can be as small as 2” by 3” or as
large as 12” by 24”. It gives a much more natural and interesting look.
6.2.6. Tree fern plaques
They are flat, and come in different sizes (4” by 4”, 4” by 6”, 8” by 8” etc.), like cork, they
are also used to mount orchids. They are easier to cut than cork slabs. They should not be too
dense to adsorb water.
6.2.7. Driftwood
An alternative for cork, can make some very intriguing and interesting “compositions”.

16
6.3. List of potting material for orchids
6.3.1. Before knowing the potting materials you need to know the works performed by the
potting materials.
a. It holds the plant in place
b. Holds enough moisture for a particular orchid
c. Provide favourable environment for better roots growth (aeration), most potting
materials for orchids do not provide any nutrients, nutrients added in the water in the
form of fertilizers are main source of mineral nutrition for the plant.
6.3.2. Several things could be used for potting orchids. Some of their names are given
below-
1. Tree bark,
2. Sphagnum moss,
3. Tree fern,
4. Coconut chunks,
5. Coconut fibre,
6. Lava rock,
7. Charcoal,
8. Pieces of cork,
9. Peat moss,
10. Rock wool,
11. Brick pieces
12. Leaf mould etc.
ICAR-NRCO recommend brick piece/Stone, Leaf mould, Coconut husk and semi rotten logs
in the ratio of 1:1:1:1 for proper aeration, moisture retention and root proliferation and
support to the plant as a general recommendation, repotting will be done on every two years.
6.4. Potting monopodial orchids
1. Place the roots in the pot. The plastic pot size should be just large enough to
accommodate the roots. To use a clay pot, use a one size larger pot than the plastic
pot, a little more to use clay orchid pot.
2. Center the plant and hold it so that the junction of roots and lower leaves flush on the
top of the plastic pot.
17
3. For best results potting media will be well moist (but not dripping wet)
4. When done the base of the plant should be just a little higher so that leaves do not
touch the potting media and the top of the roots are just a little bit exposed.
5. Trim yellow, shrivelled leaves and parts of leaves with spots.
6. If necessary stake the plants so that it does not wobble.
7. After two or three months just pull out the stakes without disturbing the plant.
6.5. Potting sympodial orchids
On some sympodial orchids such as Cymbidiums, Jumeleas, Paphiopedilum, Phragmipedium
etc. the new growths will be very close to the base of the old growth(s), forming sort of a
circle around the older growths. The potting procedure for these type of young plants is
similar to monopodial orchids, but for many sympodial orchids, such as Cattleyas,
Dendrobiums, Oncidiums, etc. the new growths develop along a rhizome and usually tend to
grow in the opposite direction of the old growths. The procedure for potting these is the same
as for monopodial orchids except that instead of centring the plant places it close to one edge
of the pot, leaving room on the opposite side of the pot for the new growths.
6.6. Care after repotting of orchids
Repotting is similarly shocking to plants as major surgery is to humans. So for a few weeks
after repotting a plant it is required to nurture it a bit.
1. Spray (mist) their leaves lightly twice a day for two weeks for healthy plants, up to
four weeks for weak and ailing plants. Spray early in the day and again not later than
mid-day. Do not water after 12 noon in the winter.
2. Addition of 2 or 3 drops of superthrive and 2 or 3 drops of a rooting solution to
misting water will be very beneficial. If you do not have rooting solution add a pinch
of phosphorus reach fertilizer to the misting water.
3. Place the newly repotted plants at less light than what they usually get for 3-4 weeks.
The lower light levels will reduce the stress caused by the repotting shock and will
help the plants recover better and faster.
4. Water lightly (just enough to get the potting material moist, for one week), don’t add
enough water to run through the drainage holes, After one week water thoroughly
once a week, Use the rooting solution instead of fertilizer for the first 3 or 4 watering
after repotting.
5. Don’t fertilize the plant just after repotting.

18
7. Light requirement for growing orchids
7.1. Watch the foliage of your plants, they will provide you the information regarding light,
whether the available light is sufficient for the pant or not or if it is too high?
1. If the leaves of your orchids stay green, crisp and firm, then the light is probably right.
2. If the foliage is dark green, then the light is too low
3. If the foliage shows purplish coloration, then the light is probably too high.
Sometimes if the light is too high the leaves tips will dry up.
Most orchids will not tolerate direct sunlight, except maybe for an hour or two after sunrise
and an hour or two before sunset. You have to provide some shade, at least for the brightest
part of the day. Surrounding trees or tall buildings may provide enough shade. You should
remember, there is a substantial reduction in the light from summer to winter. Provide more
light and less shade at winter (from mid of October to mid of February) to compensate for
this natural reduction of light. Although the plants will adapt to changing environments, they
will adapt better, with less stress if you gradually ease into the new conditions (such as
summering them in bright outdoors light). Your orchids will adapt to the environment, to
some degree. Orchids will tolerate higher levels of light of their range provided the plant
receives more water (more frequent watering), more fertilizer and, if possible, better air
movement to keep their leaves a little cooler. More frequent watering mean maybe you will
water your orchid on every five days or so instead of every seven days. This does not mean
you should subject your plants to excessive light. If your orchids get too much light but not
enough water and fertilizer, they will be stressed. Stressed plants have less defences against
pests and diseases, they will be easily attacked by the insects and pests.
7.2. Signs of stress
Plants will show several symptoms when they are stressed, like-Shrivelling pseudobulbs and /
or leaves, drying buds, prematurely wilting flowers. Note that this kind of stress can also
result from improper potting, decaying potting material and insufficient watering.
19
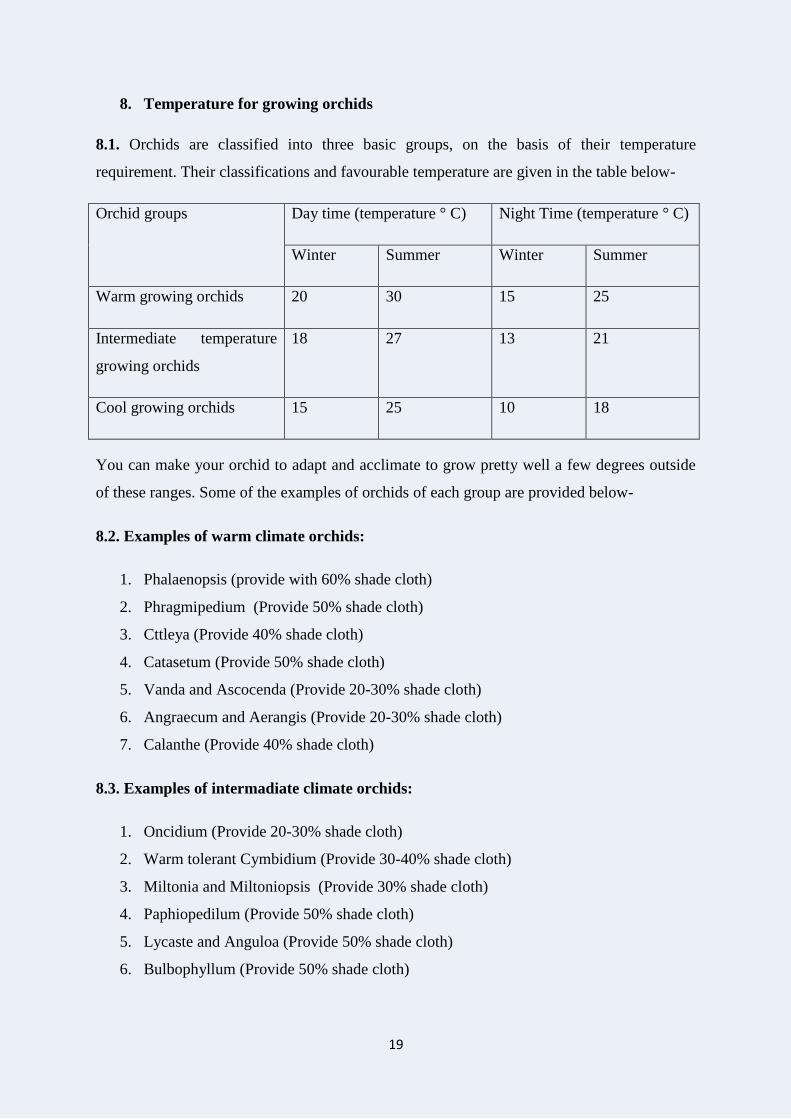
8. Temperature for growing orchids
8.1. Orchids are classified into three basic groups, on the basis of their temperature
requirement. Their classifications and favourable temperature are given in the table below-
Orchid groups Day time (temperature ° C) Night Time (temperature ° C)
Winter Summer Winter Summer
Warm growing orchids 20 30 15 25
Intermediate temperature
growing orchids
18 27 13 21
Cool growing orchids 15 25 10 18
You can make your orchid to adapt and acclimate to grow pretty well a few degrees outside
of these ranges. Some of the examples of orchids of each group are provided below-
8.2. Examples of warm climate orchids:
1. Phalaenopsis (provide with 60% shade cloth)
2. Phragmipedium (Provide 50% shade cloth)
3. Cttleya (Provide 40% shade cloth)
4. Catasetum (Provide 50% shade cloth)
5. Vanda and Ascocenda (Provide 20-30% shade cloth)
6. Angraecum and Aerangis (Provide 20-30% shade cloth)
7. Calanthe (Provide 40% shade cloth)
8.3. Examples of intermadiate climate orchids:
1. Oncidium (Provide 20-30% shade cloth)
2. Warm tolerant Cymbidium (Provide 30-40% shade cloth)
3. Miltonia and Miltoniopsis (Provide 30% shade cloth)
4. Paphiopedilum (Provide 50% shade cloth)
5. Lycaste and Anguloa (Provide 50% shade cloth)
6. Bulbophyllum (Provide 50% shade cloth)

20
8.4. Examples of Cool climate orchids:
1. Cymbidium (Provide 30-40% shading)
2. Odontoglossum alliance (Provide 60-70% shade cloth)
3. Disa uniflora (Provide 50-70% shade cloth)
4. Pelione (Provide 50-60% shade cloth)
5. Zygopatalum (Provide 40% shade cloth)
6. Dendrobium (30% shading)
7. Masdevallia (provide 70% shading)
8. Coelogyne (provide 50% shading)
Shed cloths of green colour are generally preferred.

21
9. Humidity for growing orchids
Most of the orchids require 60 % to 80 % humidity. These humidity levels are necessary for
the plants to perform at their best, flowering and longevity of the flowers. Although these
levels may appear high, they are in fact well within the comfort zone for people which are 40
% to 70 % of relative humidity. In the summer time the natural humidity is usually sufficient
to meet the needs of your plants, except on bright, sunny, dry days. Air conditioning in the
summer and artificial heat in the winter, especially from forced air heating and electrical
baseboard heating, will dry the air well below the need of your orchids. Plants placed in the
path of air conditioning or in the path of forced air heating or next to a radiator or next to a
heat source such as a refrigerator can get quickly desiccated, loose their buds and even their
leaves in just a few days. Consider investing few rupees in a hygrometer to help you evaluate
humidity of the air of your poly house.
9.1. Procedures to increase humidity around your orchids
If the humidity levels are consistently too low, consider buying a humidifier to increase the
humidity level. Another way of increasing humidity is by setting your plants on trays filled
with pebbles or gravel and with water, but plants should not be in contact with the water. The
trays must be wide enough so that the leaves of your plants are over the tray (from where the
humidity will raise). A tray for a single plant will not be of much help as the little humidity
rising from it will disperse very fast. You should have a dozen or more plants grouped
together, they will create a micro climate with higher levels of humidity. The humidifier is
the better solution. But mist should not blow directly on your plants as this will eventually
wet them and promote bacteria and fungus growth that may kill your plants.
22
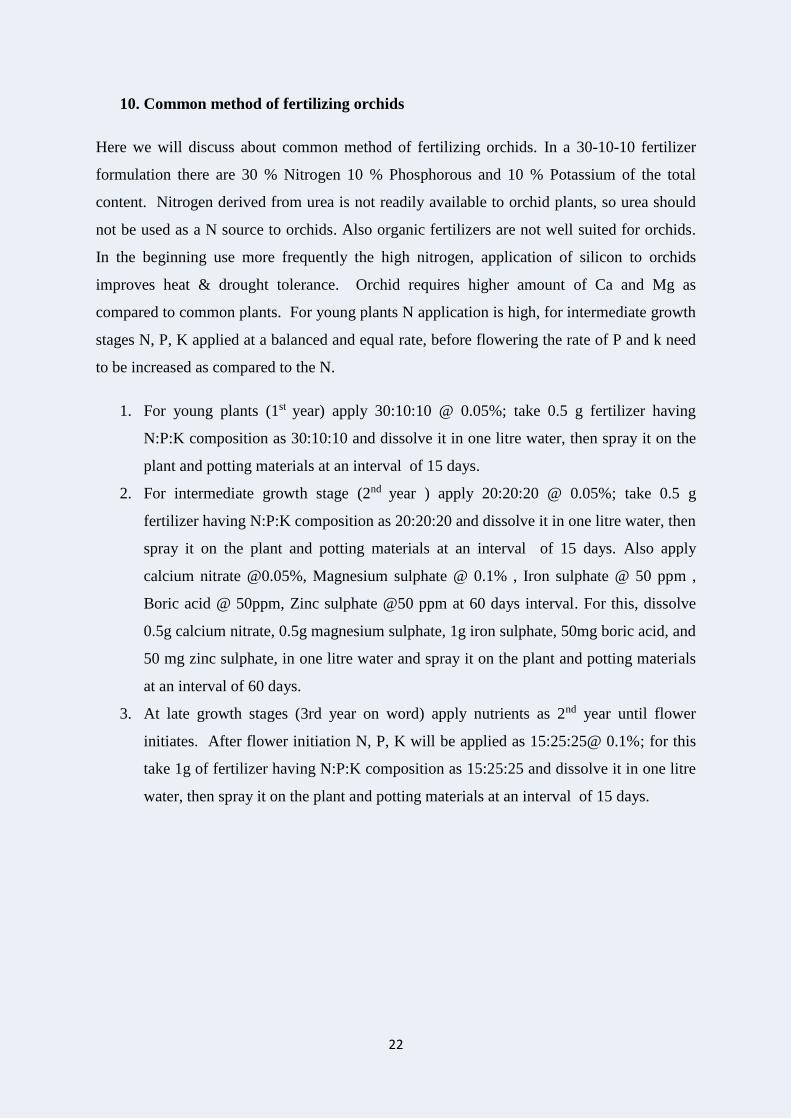
10. Common method of fertilizing orchids
Here we will discuss about common method of fertilizing orchids. In a 30-10-10 fertilizer
formulation there are 30 % Nitrogen 10 % Phosphorous and 10 % Potassium of the total
content. Nitrogen derived from urea is not readily available to orchid plants, so urea should
not be used as a N source to orchids. Also organic fertilizers are not well suited for orchids.
In the beginning use more frequently the high nitrogen, application of silicon to orchids
improves heat & drought tolerance. Orchid requires higher amount of Ca and Mg as
compared to common plants. For young plants N application is high, for intermediate growth
stages N, P, K applied at a balanced and equal rate, before flowering the rate of P and k need
to be increased as compared to the N.
1. For young plants (1st year) apply 30:10:10 @ 0.05%; take 0.5 g fertilizer having
N:P:K composition as 30:10:10 and dissolve it in one litre water, then spray it on the
plant and potting materials at an interval of 15 days.
2. For intermediate growth stage (2nd year ) apply 20:20:20 @ 0.05%; take 0.5 g
fertilizer having N:P:K composition as 20:20:20 and dissolve it in one litre water, then
spray it on the plant and potting materials at an interval of 15 days. Also apply
calcium nitrate @0.05%, Magnesium sulphate @ 0.1% , Iron sulphate @ 50 ppm ,
Boric acid @ 50ppm, Zinc sulphate @50 ppm at 60 days interval. For this, dissolve
0.5g calcium nitrate, 0.5g magnesium sulphate, 1g iron sulphate, 50mg boric acid, and
50 mg zinc sulphate, in one litre water and spray it on the plant and potting materials
at an interval of 60 days.
3. At late growth stages (3rd year on word) apply nutrients as 2nd year until flower
initiates. After flower initiation N, P, K will be applied as 15:25:25@ 0.1%; for this
take 1g of fertilizer having N:P:K composition as 15:25:25 and dissolve it in one litre
water, then spray it on the plant and potting materials at an interval of 15 days.
23
11. Method of watering your orchids
The quality of your water is extremely important for good culture; rain water is acceptable for
watering orchids. Well water or underground water is acceptable if its content of total
dissolved Solids (TDS) is below 120 ppm. Hard water (water with mineral contents TDS
above 120 PPM) will create hard deposits on the leaves of plants. This may clog the pores on
the leaves of plants. If your water is hard it may be beneficial to periodically (once to twice a
year) clean the leaves with distilled water. The best water is water processed through a
reverse osmosis system which will remove most of the minerals from the water.
11.1. Some general rules for watering potted orchids
1. While watering you should be careful, you should look after the matter that, the
potting material should never be soggy. Water potted plants sufficiently to prevent
them from becoming bone dry.
2. In general water once a week, but be aware that small pots (5” or less) need more
frequent watering than large pots (6” or more).
3. Different potting materials and different size potting materials will dry at different
rates. Clay pots will evaporate more water than plastic pots when other factors are
equal, Clay pots will dry faster than plastic pots. Clay orchid pots, because of their
openings, will dry out faster than regular clay pots.
4. Finally temperatures, light air conditioning and heating will affect how fast the
potting material dries out. Be ready to adjust your watering habits as the season
changes.
5. By a thumb rule method you can adjust the time of watering. By inserting your finger
an inch or two in the potting media you can feel the moisture condition of it, it should
be moist not soggy, if not moist water it to moisten it, and if it is soggy; let it dry.
6. During watering, some water may get in between leaves or new growth. If this water
stays there overnight, it may promote the growth of bacteria and fungi that may harm
or kill your orchids or the new growth. To reduce this risks you should adopt sound
watering practices, like-
Water only on sunny days. If the weather is cool, cloudy or rainy, wait for a day or
two before watering.

24
Water early in the day. This will allow any water that got in between leaves or new
growth to evaporate before nightfall. Stop watering at 2 PM in the summer, at 12
noon in the winter and at 1 PM in the spring
Water your plants with room temperature or lukewarm water as a difference of 10
degrees or more between the temperature of the water and the room temperature may
cause injuries to the plants
7. Water from the top till the water runs freely through the drainage holes. or immerse
the plant in water up to 1/2” or so below the rim and let it absorb water for 10 minutes
or so.
8. Wipe out any water that splashed on the leaves or in between the leaves. Using a
straw is a convenient way of focusing the flow of air to blow out water from in
between leaves.
25
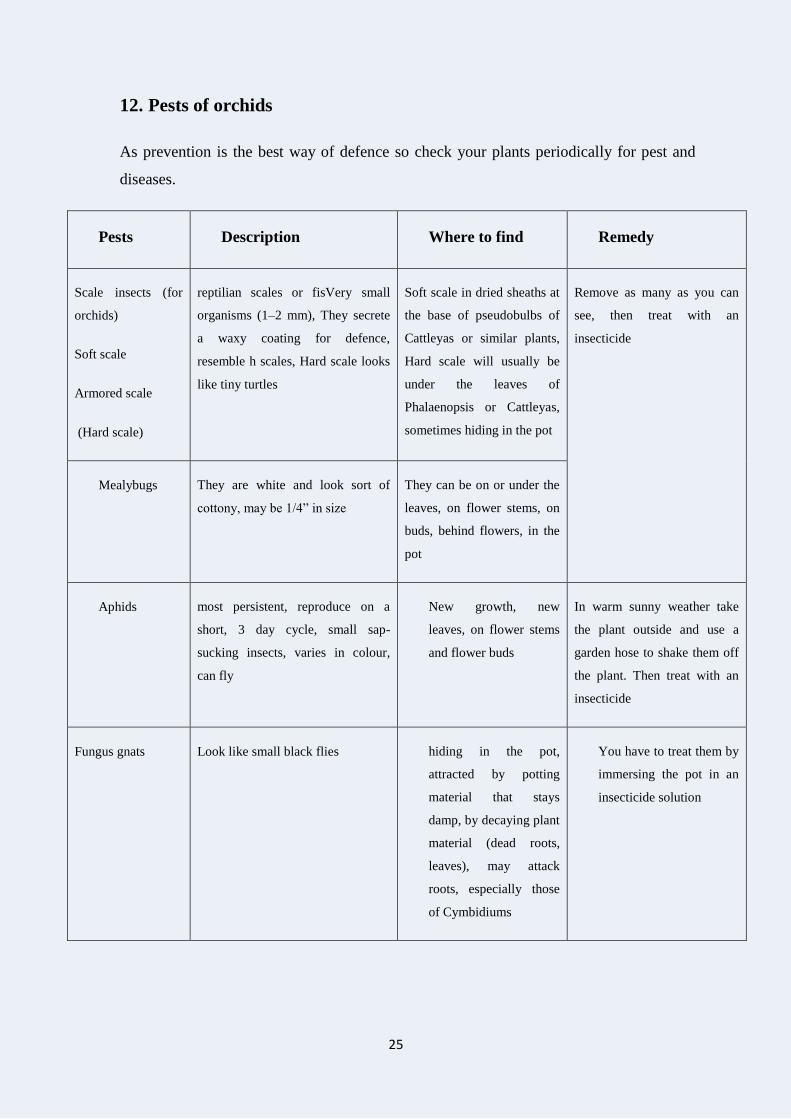
12. Pests of orchids
As prevention is the best way of defence so check your plants periodically for pest and
diseases.
Pests Description Where to find Remedy
Scale insects (for
orchids)
Soft scale
Armored scale
(Hard scale)
reptilian scales or fisVery small
organisms (1–2 mm), They secrete
a waxy coating for defence,
resemble h scales, Hard scale looks
like tiny turtles
Soft scale in dried sheaths at
the base of pseudobulbs of
Cattleyas or similar plants,
Hard scale will usually be
under the leaves of
Phalaenopsis or Cattleyas,
sometimes hiding in the pot
Remove as many as you can
see, then treat with an
insecticide
Mealybugs They are white and look sort of
cottony, may be 1/4” in size
They can be on or under the
leaves, on flower stems, on
buds, behind flowers, in the
pot
Aphids most persistent, reproduce on a
short, 3 day cycle, small sap-
sucking insects, varies in colour,
can fly
New growth, new
leaves, on flower stems
and flower buds
In warm sunny weather take
the plant outside and use a
garden hose to shake them off
the plant. Then treat with an
insecticide
Fungus gnats Look like small black flies hiding in the pot,
attracted by potting
material that stays
damp, by decaying plant
material (dead roots,
leaves), may attack
roots, especially those
of Cymbidiums
You have to treat them by
immersing the pot in an
insecticide solution
26
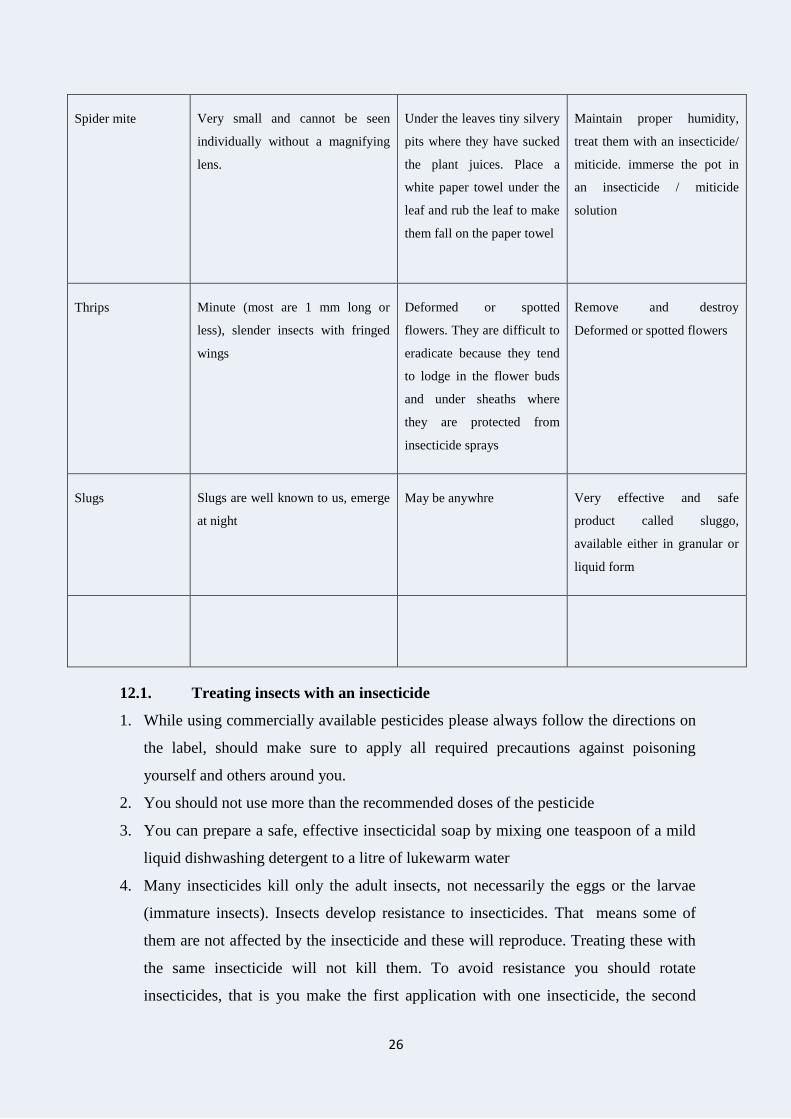
Spider mite Very small and cannot be seen
individually without a magnifying
lens.
Under the leaves tiny silvery
pits where they have sucked
the plant juices. Place a
white paper towel under the
leaf and rub the leaf to make
them fall on the paper towel
Maintain proper humidity,
treat them with an insecticide/
miticide. immerse the pot in
an insecticide / miticide
solution
Thrips Minute (most are 1 mm long or
less), slender insects with fringed
wings
Deformed or spotted
flowers. They are difficult to
eradicate because they tend
to lodge in the flower buds
and under sheaths where
they are protected from
insecticide sprays
Remove and destroy
Deformed or spotted flowers
Slugs Slugs are well known to us, emerge
at night
May be anywhre Very effective and safe
product called sluggo,
available either in granular or
liquid form
12.1. Treating insects with an insecticide
1. While using commercially available pesticides please always follow the directions on
the label, should make sure to apply all required precautions against poisoning
yourself and others around you.
2. You should not use more than the recommended doses of the pesticide
3. You can prepare a safe, effective insecticidal soap by mixing one teaspoon of a mild
liquid dishwashing detergent to a litre of lukewarm water
4. Many insecticides kill only the adult insects, not necessarily the eggs or the larvae
(immature insects). Insects develop resistance to insecticides. That means some of
them are not affected by the insecticide and these will reproduce. Treating these with
the same insecticide will not kill them. To avoid resistance you should rotate
insecticides, that is you make the first application with one insecticide, the second
27
application with another and the third one either with the first insecticide or with a
third one.
5. Rotating is not necessary with the insecticidal soap you prepare, because this
insecticidal soap works by suffocating the insects. You need to apply it frequently so
that insects coming out of eggs are also controlled.
6. If the infestation is not excessive, spray thoroughly on the new growths, leaves (both
sides), flower stem, back of buds and flowers with the insecticidal solution. If the
infestation is widespread dip the hole plant for 15 minutes or so in the insecticide
solution
7. For the treatment to be effective you have to treat the plants (spraying or immersing)
at least three times, at an intervals of one week (at an intervals of 3 - 4 days for
aphids), make more than one application because the insecticide will kill the adults
and a few days later the eggs will hatch and the cycle will restart, unless you treat
again to kill them too.
There are lots of insecticides available on market here I am providing common name of
some of them, like- Chlorpyrifos-methyl, Imidacloprid, Acetamiprid, Dinotefuran,
Thiamethoxam, Malathion, Pirimicarb, Carbosulfan, Lambda-cyhalothrin, Es-fenvalerate,
Pymetrozine and Diafenthiuron.
12.2. Cautions
1. Immerse plants in a solution only on sunny days; if the weather is cool, cloudy or
rainy, you’ll be much better off waiting a day or two before treating your plant(s).
2. Do it early in the day. , this will allow any water that got in between leaves or new
growth to evaporate before nightfall.
3. Prepare the solution with room temperature or lukewarm water.
28
13. Diseases of orchids
13.1. Viruses
1. Occasionally you may come across a plant that has a virus. This may manifest itself
by concentric or elongated black or brown or discoloured circles on the leaves or
black streaks on flowers and leaves
2. These will be repeated on all leaves / flowers. New leaves / flowers will appear free of
it at first, but as they age the virus will manifest itself.
3. Unfortunately there is nothing you can do but discard the plant. Remove the plant or
infected plant part and burn it or destroy it.
13.2. Bacterial and fungal diseases
1. These will appear if water stays in between leaves or if the potting material stays
soggy, especially when the night temperatures are cooler (winter, spring).
2. You can treat these with fungicides (RIDOX, PHENTOM, COMPASS, etc.), but the
best way is to avoid these problems by practicing proper cultural practices.
29
14. Cultural problems which are common to most of the orchids
14.1. Leaves
1. Leaves are dark green, look very healthy, but plant does not bloom: Probably due to
insufficient light, decrease shade and increase the light level.
2. Leaves are not as lustrous, eventually they shrivel: Plant is not absorbing enough
water: Check the root system. If roots are abundant, healthy, firm and white, then the
plant is being under watered. If the root system is not healthy repot the plant as soon
as possible.
3. Yellowing of leaves (chlorosis): May be due to excessive light and/or deficiency of
nitrogen and /or sulphur, provide shade, apply nutrient.
4. Clear or watery spots on leaves: usually result from fungal/bacterial infection. Repot
the plant, treat the plant with a fungicide (RIDOX, PHENTOM, COMPASS, etc.),
keep it relatively dry for a few weeks.
5. Discoloured area on top of curled leaves on leaf area exposed to light: most probably
due to sunburn or excessive light for this type of orchid. Provide with sufficient shade.
14.2. Leaves or new growth
1. Soft, rapid growth: may be due to excessive nitrogen, adjust and reduce the
application rate of N.
2. New growths are smaller, not as plump than previous ones, are stunted, do not grow
upright: the plant is under stress, either because of weakened root system or
insufficient light or too extreme temperatures, deficiency in nitrogen, or a
combination of these. Check light, temperature levels & fertilizer dosage. Repot if
needed. Provide with sufficient shade and increase humidity of the house.
3. No or limited new growth: may result from nitrogen and/or phosphorous deficiency,
or damage / rotting of growth or setback if the plant was divided and left with only
one growth. Apply N and P fertilizer.
14.3. Buds, flowers & flower spikes
1. Buds yellow and drop: Reasons may be extreme temperatures, extreme or insufficient
light, too dry air, inadequate watering, micronutrients deficiency or weak root system.
Adjust temperature and light at optimum level, and follow proper fertilizer
management practice as specified earlier. If root system got too weak due to decaying
potting materials then repot the plant as soon as possible.

30
2. Flowers do not open up fully: may be due to genetics, or by too low temperatures, or
may be due to too low humidity or thrip damage. Adjust the humidity and
temperature. If it is thrip damage, treat the plant with an insecticide.
14.4. Buds, flowers & flower spikes
1. Flowers are too small, colours are not as strong as before: most probably due to
insufficient light, and or too extreme temperatures. Adjust the light and temperature.
2. Flowers fade too fast: may be caused by too high or too low temperatures, exposure to
direct sunlight, too low humidity, micronutrients deficiency, inadequate watering or
poor condition of the root system. Adjust temperature and light at optimum level, and
follow proper fertilizer management practice as specified earlier. If root system got
too weak due to decaying potting materials then repot the plant as soon as possible.
3. Too few flowers: May be due to weak plant, too low light, phosphorous deficiency.
Adjust the light and follow proper fertilizer application procedure.
4. Brown streaks or mosaic patterns on flowers: may be due to a virus
5. Poor display of flowers: When buds start to form on the flower spikes, be careful not
to change the orientation of the flower spike so as to get the best possible display of
flowers.
14.5. Roots
1. Roots are black or brown: may be damaged or have rotted (root rot fungus). Cut
damaged & rotten roots. If rotted, treat with a fungicide, repot the plant, keep a little
drier
2. Chewed or missing tips: chewed by pests (millipedes, sowbugs, snails or slugs), use
an insectiside .
3. Dead tips: may be caused by salt built-up due to too hard water or excess fertilizer or
not leaching medium regularly. Leach the medium, use good quality water, maintain
proper fertilizer dose.
4. Deformed: may be due to chlorine deficiency.
5. Stunted roots: probably because of micronutrients deficiency.

31
15. Orchid specific cultivation practice
15.1. Cymbidium
Cymbidium flowers are long lasting, at least 6 weeks when cut and up to ten weeks on the
plant. It flowers at late summer to spring.
15.1.1. Temperature: Cymbidiums are cool grower; most favourable temperature for it is
10-30°C (50-85°F). It can adapt a few degrees out of this range. When
temperature is higher, it got stressed, and flower will not last less long as
compared to cool climate condition.
15.1.2. Light: It should be provided with good light, but direct sunlight should be
avoided. A shade net of 30-40% should be provided to the house.
15.1.3. Water and Humidity: During flowering the plants must be watered regularly to
the point of being damp. They should not be saturated and also there should not be
any standing water. During active growth stage humidity requirement is 70-80%
whereas during winter it is 40-50%.
15.1.4. Fertilization:
1. For young plants (1st year) apply 30:10:10 @ 0.05%; take 0.5 g fertilizer having
N:P:K composition as 30:10:10 and dissolve it in one litre water, then spray it on the
plant and potting materials at an interval of 15 days.
2. For intermediate growth stage (2nd year ) apply 20:20:20 @ 0.05%; take 0.5 g
fertilizer having N:P:K composition as 20:20:20 and dissolve it in one litre water, then
spray it on the plant and potting materials at an interval of 15 days. Also apply
calcium nitrate @0.05%, Magnesium sulphate @ 0.1% , Iron sulphate @ 50 ppm ,
Boric acid @ 50ppm, Zinc sulphate @50 ppm at 60 days interval. For this, dissolve
0.5g calcium nitrate, 1g magnesium sulphate, 0.25g iron sulphate, 0.28g boric acid,
and 0.22g zinc sulphate, in one litre water and spray it on the plant and potting
materials at an interval of 60 days.
3. At late growth stages (3rd year on word) apply nutrients as 2nd year until flower
initiates. The difference is that at 3rd year from February to May 30:10:10 NPK will
be applied at a rate of 1g litre-1 at an interval of 15 days., and from June to August
20:20:20 NPK will be applied @ 1g litre-1 at an interval of 15 days., After flower
initiation (August to January) N, P, K will be applied as 15:25:25@ 0.1%; for this
32
take 1g of fertilizer having N:P:K composition as 15:25:25 and dissolve it in one litre
water, then spray it on the plant and potting materials at an interval of 15 days.
15.1.5. Pest and disease:
Cymbidiums are mostly attacked by red spider mite and scale insects. Also
cymbidium mosaic virus attacks them. Proper cultural practices should be
followed to avoid and prevent the virus attack; if it is attacked already the plant
and plant part must be destroyed to avoid the spread of the viruses to the other
plants. Scale insects should be removed using a soft brush, insecticidal soap and
water without damaging the leaf. You can also use 50:50 solution of water:
denatured alcohol. Take cotton swab, deep it in water alcohol solution and clean
the leaves, for very severe infestation required to apply a systemic insecticide
(acephate, imidacloprid, dinotefuran etc.) several times. Red spider mite can be
prevented by regular misting on the top and underside of the leaf. Clean the leaves
with insecticidal soap and water to kill the adult mites. Repeat the cleaning
procedure thrice at 10 days interval to control any egg hatched new mite. Also
miticide (Permethrin, dicofol etc.) could be used. While using commercial
chemical insecticide strictly follow the instruction given on the container
regarding precaution and dose of application. For diseases and their control see at
the table given at section 16.
15.1.6. Potting and repotting:
Potting procedures and materials could be used for potting are discussed earlier. Do repotting
at spring time, after flowering at an interval of two years are recommended.
33
15.2. Dendrobium
15.2.1. Temperature: Various species of dendrobium falls in all the three temperature
classes of orchid cultivation; examples of cool growing Dendrobiums are
Dendrobium wattii, Dendrobium wangliangii, Dendrobium vonroemeri,
Dendrobium vexillarius, Dendrobium vannouhuysii, Dendrobium sutepense,
Dendrobium sulphureum, Dendrobium subclausum, Dendrobium stellar,
Dendrobium sinominutiflorum, Dendrobium sculptum, Dendrobium rupestre,
Dendrobium putnamii, Dendrobium piranha, Dendrobium otaguroanum,
Dendrobium cuthbertsonii, optimum temperature for them is 10-24°C. They can
tolerate as low as 8°C temperature. Medium temperature growing Dendrobium is
Dendrobium kingianum, Dendrobium nobile, Dendrobium crassifolium,
Dendrobium crassicaule, Dendrobium amethystoglossum, Dendrobium gnomus,
Dendrobium harveyanum, Dendrobium loddigesii, Dendrobium longicornu etc.
optimum temperature for them is 14-26°C.warmer growing species of
Dendrobium are Dendrobium phalaenopsis, Dendrobium speciosum, Dendrobium
spectabile, Dendrobium tangerinum, Dendrobium taurinum, Dendrobium
transparens, Dendrobium truncatum, Dendrobium unicum etc. and optimum
temperature for them is 16-30°C.
15.2.2. Light: It should be provided with bright light, but direct sunlight should be
avoided. A shade net of 30% should be provided to the house.
15.2.3. Water and Humidity: Humidity requirement of the crop is very high, optimum
range of humidity is 60-80%, It can be watered once in a week, although it varies
from season to season and climatic conditions.
15.2.4. Fertilization:
1. For young plants (1st year) apply 20:10:10 @ 0.1%; take 1 g fertilizer having N:P:K
composition as 20:10:10 and dissolve it in one litre water, then spray it on the plant
and potting materials at an interval of 15 days. Also apply calcium nitrate @0.05%,
Magnesium sulphate @ 0.1% , Iron sulphate @ 50 ppm , Boric acid @ 50ppm, Zinc
sulphate @50 ppm at 60 days interval. For this, dissolve 0.5g calcium nitrate, 1g
magnesium sulphate, 0.25g iron sulphate, 0.28g boric acid, and 0.22g zinc sulphate, in
one litre water and spray it on the plant and potting materials at an interval of 60 days.
2. For intermediate growth stage (2nd year on word at the month of February to May)
apply 10:20:20 @ 0.2%; take 2g fertilizer having N:P:K composition as 10:20:20 and
dissolve it in one litre water, then spray it on the plant and potting materials at an

34
interval of 15 days. Also apply calcium nitrate @0.05%, Magnesium sulphate @
0.1% , Iron sulphate @ 50 ppm , Boric acid @ 50ppm, Zinc sulphate @50 ppm at 60
days interval. For this, dissolve 0.5g calcium nitrate, 1g magnesium sulphate, 0.25g
iron sulphate, 0.28g boric acid, and 0.22g zinc sulphate, in one litre water and spray it
on the plant and potting materials at an interval of 30 days.
3. At late growth stages (2nd year on word at the month of June to September) 20:10:10
NPK will be applied at a rate of 1g litre-1 at an interval of 15 days. Also apply calcium
nitrate @0.05%, Magnesium sulphate @ 0.1% , Iron sulphate @ 50 ppm , Boric acid
@ 50ppm, Zinc sulphate @50 ppm at 60 days interval. For this, dissolve 0.5g calcium
nitrate, 1g magnesium sulphate, 0.25g iron sulphate, 0.28g boric acid, and 0.22g zinc
sulphate, in one litre water and spray it on the plant and potting materials at an
interval of 30 days.
4. At late growth stages (2nd year on word at the month of October to January) 20:20:20
NPK will be applied @ 2g litre-1 at an interval of 30 days.
15.2.5. Pest and disease: Shoot borer and aphid generally attack dendrobiums. If shoot
borer attacks cut and remove the plant parts and destroy the insect. For diseases
and their control see at the table given at section 16.
15.2.6. Potting and repotting:
Potting procedures and materials could be used for potting are discussed earlier. Generally
repotting will be done immediately after flowering is over at an interval of two years.

35
15.3. Phalaenopsis
15.3.1. Temperature: It is a worm growing orchid (Tropical). Optimum temperature
range for this orchid ranges from 15-30°C.
15.3.2. Light: It should be provided with bright light, but direct sunlight should be
avoided. A shade net of 60% should be provided to the house.
15.3.3. Water and Humidity: The plants must be watered regularly to the point of being
damp. Allow the potting media almost dry before watering. Humidity requirement
is very high. If the humidity is high the plant can survive even without watering.
15.3.4. Fertilization:
1. For young plants (1st year) apply 30:10:10 @ 0.05%; take 0.5 g fertilizer having
N:P:K composition as 30:10:10 and dissolve it in one litre water, then spray it on the
plant and potting materials at an interval of 15 days. Also apply calcium nitrate
@0.05%, Magnesium sulphate @ 0.1% , Iron sulphate @ 50 ppm , Boric acid @
50ppm, Zinc sulphate @50 ppm at 60 days interval. For this, dissolve 0.5g calcium
nitrate, 1g magnesium sulphate, 0.25g iron sulphate, 0.28g boric acid, and 0.22g zinc
sulphate, in one litre water and spray it on the plant and potting materials at an
interval of 60 days.
2. For intermediate growth stage (2nd year on word at the month of February to May)
apply 10:20:20 @ 0.1% + calcium nitrate @0.05% + Magnesium sulphate @ 0.1%;
take 1g fertilizer having N:P:K composition as 10:20:20, 0.5 g calcium nitrate and 1
g Magnesium sulphate in one litre water, then spray it on the plant and potting
materials at an interval of 30 days. Also apply Iron sulphate @ 50 ppm, Boric acid @
50ppm, Zinc sulphate @ 50 ppm at 60 days interval. For this, dissolve 0.25g iron
sulphate, 0.28g boric acid, and 0.22g zinc sulphate, in one litre water and spray it on
the plant and potting materials at an interval of 30 days.
3. At late growth stages (2nd year on word at the month of June to September) apply
30:10:10 NPK will be applied at a rate of 1g litre-1 at an interval of 15 days. Also
apply calcium nitrate @0.05%, Magnesium sulphate @ 0.1% , Iron sulphate @ 50
ppm , Boric acid @ 50ppm, Zinc sulphate @50 ppm at 60 days interval. For this,
dissolve 0.5g calcium nitrate, 1g magnesium sulphate, 0.25g iron sulphate, 0.28g
boric acid, and 0.22g zinc sulphate, in one litre water and spray it on the plant and
potting materials at an interval of 30 days.
4. At late growth stages (2nd year on word at the month of October to January) 20:20:20
NPK will be applied @ 1g litre-1 at an interval of 30 days.

36
15.3.5. Pest and disease: Phalaenopsis mainly infested by mealy bug and scale insects.
These insects should be removed using a soft brush, insecticidal soap and water
without damaging the leaf. You can also use 50:50 solution of water: denatured
alcohol. Take cotton swab, deep it in water alcohol solution and clean the leaves,
for very severe infestation required to apply a systemic insecticide (acephate,
imidacloprid, dinotefuran etc.) several times. For diseases and their control see at
the table given at section 16.
15.3.6. Potting and repotting:
Potting procedures and materials could be used for potting are discussed earlier. Generally
repotting will be done immediately after flowering is over at an interval of two years.
37
15.4. Paphiopedilum (slipper orchid)
15.4.1. Temperature: It is an intermediate climate orchid (Tropical). Optimum
temperature range for this orchid ranges from 14-28°C, can grow in subtropical as
well as tropical regions.
15.4.2. Light: It should be provided with dappled light, but direct sunlight should be
avoided. A shade net of 50% should be provided to the house.
15.4.3. Water and Humidity: The plants must be watered regularly. There should not be
any standing water in the pot. Humidity requirement is very high.
15.4.4. Fertilization:
1. For young plants (1st year) apply 20:10:10 @ 0.05%; take 0.5 g fertilizer having
N:P:K composition as 30:10:10 and dissolve it in one litre water, then spray it on the
plant and potting materials at an interval of 30 days. Also apply calcium nitrate
@0.05%, Magnesium sulphate @ 0.1% , Iron sulphate @ 50 ppm , Boric acid @
50ppm, Zinc sulphate @50 ppm at 60 days interval. For this, dissolve 0.5g calcium
nitrate, 1g magnesium sulphate, 0.25g iron sulphate, 0.28g boric acid, and 0.22g zinc
sulphate, in one litre water and spray it on the plant and potting materials at an
interval of 60 days.
2. For intermediate growth stage (2nd year on word at the month of May to October)
apply 20:10:10 @ 0.1% + calcium nitrate @0.05% + Magnesium sulphate @ 0.1% +
Iron sulphate @ 50 ppm + Boric acid @ 50ppm + Zinc sulphate @ 50 ppm. For this,
dissolve 1 g fertilizer having N:P:K composition as 20:10:10, 0.5g calcium nitrate,
0.5g Magnesium sulphate, 0.25g iron sulphate, 0.28g boric acid, and 0.22g zinc
sulphate, in one litre water and spray it on the plant and potting materials at an
interval of 30 days.
3. At late growth stages (2nd year on word at the month of November to April) 10:20:20
NPK will be applied @ 1g litre-1 at an interval of 30 days.
15.4.5. Pest and disease: There many pests that attack the orchid, mainly infested by
mealy bug and woolly aphid. These insects should be removed using a soft brush,
insecticidal soap and water without damaging the leaf. Diazinon can be used for
mealy bug and acephate (Orthene) can be used to control woolly aphids. Neem oil
can also be used for them @5 ml liter-1. For diseases and their control see at the
table given at section 16.
15.4.6. Potting and repotting: Potting procedures and materials could be used for
potting are discussed earlier. It is vital to use a potting mixture that will not hold

38
too much moisture. Generally repotting will be done immediately after flowering
is over at an interval of two years.
39
15.5. Cattleya:
15.5.1. Temperature: It is a warm climate orchid (Tropical). Optimum temperature
range for this orchid ranges from 14-28°C, can grow in subtropical as well as
tropical regions.
15.5.2. Light: It should be provided with shaded light, no direct sunlight should be given.
A shade net of 40% should be provided to the house.
15.5.3. Water and Humidity: Water only if substrate/potting media is dry. It can be done
once a week, but it all depends on the environmental conditions and the season.
Humidity must be between 40-70% with good ventilation; however plants must not
be exposed to air currents.
15.5.4. Fertilization:
1. For young plants (1st and 2nd year) apply 30:10:10 @ 0.05%; take 0.5 g fertilizer
having N:P:K composition as 30:10:10 and dissolve it in one litre water, then spray it
on the plant and potting materials at an interval of 15 days. Also apply calcium
nitrate @0.05%, Magnesium sulphate @ 0.1% , Iron sulphate @ 50 ppm , Boric acid
@ 50ppm, Zinc sulphate @50 ppm. For this, dissolve 0.5g calcium nitrate, 1g
magnesium sulphate, 0.25g iron sulphate, 0.28g boric acid, and 0.22g zinc sulphate, in
one litre water and spray it on the plant and potting materials at an interval of 30 days.
2. For intermediate growth stage (3rd year on word at the month of February to May)
apply 10:20:20 @ 0.1% + calcium nitrate @0.05% + Magnesium sulphate @ 0.1% +
Iron sulphate @ 50 ppm + Boric acid @ 50ppm + Zinc sulphate @ 50 ppm. For this,
dissolve 1 g fertilizer having N:P:K composition as 20:10:10, 0.5g calcium nitrate,
0.5g Magnesium sulphate, 0.25g iron sulphate, 0.28g boric acid, and 0.22g zinc
sulphate, in one litre water and spray it on the plant and potting materials at an
interval of 30 days.
3. At late growth stages (3nd year on word at the month of June to September) apply
30:10:10 @ 0.05%; take 0.5 g fertilizer having N:P:K composition as 30:10:10 and
dissolve it in one litre water, then spray it on the plant and potting materials at an
interval of 15 days. Also apply calcium nitrate @0.05%, Magnesium sulphate @
0.1% , Iron sulphate @ 50 ppm , Boric acid @ 50ppm, Zinc sulphate @50 ppm. For
this, dissolve 0.5g calcium nitrate, 1g magnesium sulphate, 0.25g iron sulphate, 0.28g
boric acid, and 0.22g zinc sulphate, in one litre water and spray it on the plant and
potting materials at an interval of 30 days.

40
4. At late growth stages (3nd year on word at the month of October to January) 20:20:20
NPK will be applied @ 1g litre-1 at an interval of 30 days.
15.5.5. Pest and disease: Ants love the sugary substances produced by newly emerging
flowers, ants are also the carrier of scale insects. Regularly remove old bracts and
sheaths and groom. These insects should be removed using a soft brush,
insecticidal soap and water without damaging the leaf. You can also use 50:50
solution of water: denatured alcohol. Take cotton swab, deep it in water alcohol
solution and clean the leaves, for very severe infestation by scale insects required
to apply a systemic insecticide (acephate, imidacloprid, dinotefuran etc.) several
times. For diseases and their control see at the table given at section 16.
15.5.6. Potting and repotting:
Potting procedures and materials could be used for potting are discussed earlier. It is vital to
use a potting mixture that will not hold too much moisture. Young plant requires repotting
annually. After flowering starts generally repotting will be done immediately after flowering
is over at an interval of two years.

41
15.6. Oncidium:
15.6.1. Temperature: It is an intermediate climate orchid . Optimum temperature range
for this orchid ranges from 14-28°C.
15.6.2. Light: It should be provided with bright light, but direct sunlight should be
avoided. A shade net of 30-50% should be provided to the house.
15.6.3. Water and Humidity: Water only if substrate/potting media is dry. It can be done
once a week, but it all depends on the environmental conditions and the season.
Humidity must be between 60-80% with good ventilation; however plants must not
be exposed to air currents.
15.6.4. Fertilization:
1. For young plants (1st year) apply 20:10:10 @ 0.05%; take 0.5 g fertilizer having
N:P:K composition as 20:10:10 and dissolve it in one litre water, then spray it on the
plant and potting materials at an interval of 30 days. Also apply calcium nitrate
@0.05%, Magnesium sulphate @ 0.1% , Iron sulphate @ 50 ppm , Boric acid @
50ppm, Zinc sulphate @50 ppm. For this, dissolve 0.5g calcium nitrate, 1g
magnesium sulphate, 0.25g iron sulphate, 0.28g boric acid, and 0.22g zinc sulphate, in
one litre water and spray it on the plant and potting materials at an interval of 60 days.
2. For intermediate growth stage (2nd year on word at the month of February to May)
apply 10:20:20 @ 0.1%; take 1g fertilizer having N:P:K composition as 10:20:20 and
dissolve it in one litre water, then spray it on the plant and potting materials at an
interval of 30 days. Also apply calcium nitrate @0.05%, Magnesium sulphate @
0.1% , Iron sulphate @ 50 ppm , Boric acid @ 50ppm, Zinc sulphate @50 ppm at 60
days interval. For this, dissolve 0.5g calcium nitrate, 1g magnesium sulphate, 0.25g
iron sulphate, 0.28g boric acid, and 0.22g zinc sulphate, in one litre water and spray it
on the plant and potting materials at an interval of 30 days.
3. At late growth stages (2nd year on word at the month of June to September) 20:10:10
NPK will be applied at a rate of 1g litre-1 at an interval of 15 days. Also apply calcium
nitrate @0.05%, Magnesium sulphate @ 0.1% , Iron sulphate @ 50 ppm , Boric acid
@ 50ppm, Zinc sulphate @50 ppm at 60 days interval. For this, dissolve 0.5g calcium
nitrate, 1g magnesium sulphate, 0.25g iron sulphate, 0.28g boric acid, and 0.22g zinc
sulphate, in one litre water and spray it on the plant and potting materials at an
interval of 30 days.
4. At late growth stages (2nd year on word at the month of October to January) 20:20:20
NPK will be applied @ 2g litre-1 at an interval of 30 days.

42
15.6.5. Pest and disease: Not many pests attack it, but during flowering at flower stem
aphids attack. If you have a large aphid invasion, dust plants with flour. It
constipates the pests. Neem oil, insecticidal soaps, and horticultural oils are
effective against aphids. You can often get rid of aphids by wiping or spraying the
leaves of the plant with a mild solution of water and a few drops of dish soap. For
diseases and their control see at the table given at section 16.
15.6.6. Potting and repotting:
Potting procedures and materials could be used for potting are discussed earlier. Potting
media that holds moisture rather than water is beneficial for this orchid, so add some compost
in the potting media mixture. Generally repotting will be done immediately after flowering is
over at an interval of two years.
43
15.7. Vanda
15.7.1. Temperature:
It is a warm climate orchid (Tropical). Optimum temperature range for this orchid ranges
from 15-32°C, can grow in subtropical as well as tropical regions. It can tolerate as low as
10°C.
15.7.2. Light: It should be provided with very bright light, no direct sunlight should be
given. A shade net of 20-30% should be provided to the house.
15.7.3. Water and Humidity: This orchid must have high humidity and warmth. It must
be supplied with frequent watering. When winter temperature drops they will
perish if they are exposed to frost and cold for long periods.
15.7.4. Fertilization:
1. For young plants (1st and 2nd year) apply 30:10:10 @ 0.2%; take 2 g fertilizer having
N:P:K composition as 30:10:10 and dissolve it in one litre water, then spray it on the
plant and potting materials at an interval of 15 days. Also apply calcium nitrate
@0.05%, Magnesium sulphate @ 0.1% , Iron sulphate @ 50 ppm , Boric acid @
50ppm, Zinc sulphate @50 ppm. For this, dissolve 0.5g calcium nitrate, 1g
magnesium sulphate, 0.25g iron sulphate, 0.28g boric acid, and 0.22g zinc sulphate, in
one litre water and spray it on the plant and potting materials at an interval of 30 days.
2. For intermediate growth stage (3rd year on word at the month of February to May)
apply 10:20:20 @ 0.2% + calcium nitrate @0.05% + Magnesium sulphate @ 0.1% +
Iron sulphate @ 50 ppm + Boric acid @ 50ppm + Zinc sulphate @ 50 ppm. For this,
dissolve 2 g fertilizer having N:P:K composition as 20:10:10, 0.5g calcium nitrate,
0.5g Magnesium sulphate, 0.25g iron sulphate, 0.28g boric acid, and 0.22g zinc
sulphate, in one litre water and spray it on the plant and potting materials at an
interval of 30 days.
3. At late growth stages (3nd year on word at the month of June to September) apply
30:10:10 @ 0.2%; take 2 g fertilizer having N:P:K composition as 30:10:10 and
dissolve it in one litre water, then spray it on the plant and potting materials at an
interval of 15 days. Also apply calcium nitrate @0.05%, Magnesium sulphate @
0.1% , Iron sulphate @ 50 ppm , Boric acid @ 50ppm, Zinc sulphate @50 ppm. For
this, dissolve 0.5g calcium nitrate, 1g magnesium sulphate, 0.25g iron sulphate, 0.28g

44
boric acid, and 0.22g zinc sulphate, in one litre water and spray it on the plant and
potting materials at an interval of 30 days.
4. At late growth stages (3nd year on word at the month of October to January) 20:20:20
NPK will be applied @ 2g litre-1 at an interval of 30 days.
15.7.5. Pest and disease: Vanda mainly infested by scale insects. These insects should be
removed using a soft brush, insecticidal soap and water without damaging the leaf.
You can also use 50:50 solution of water: denatured alcohol. Take cotton swab,
deep it in water alcohol solution and clean the leaves, for very severe infestation
required to apply a systemic insecticide (acephate, imidacloprid, dinotefuran etc.)
several times. Chemicals are least recommended for this orchid. For diseases and
their control see at the table given at section 16.
15.7.6. Potting and repotting:
Potting procedures and materials could be used for potting are discussed earlier. Generally
repotting will be done immediately after flowering is over, at an interval of two years.
45
16. Organic cultivation of orchids
Temperature, light, shading, humidity, pots, propagation methods will be similar with general
common methods orchid cultivation as discussed earlier in this book. The differences will be
there in nutrient management, water, and weed and pest management. We will discuss it here.
16.1. Growing media:
Growing media should be prepared from leaf mould, coconut husk, and semi rotten logs and
bricks bits taking it at a ratio of 1:1:1:1. The pH of the media should be slightly acidic,
ranging from 5.5 to 6.5 and electrical conductivity (EC) of the media will be below 1.05 dS
m-1. Most of the diseases come from the potting media only, so it is a god practice to sterilize
the media before its use as a potting media. For organic cultivation mainly heating treatment
is used, different potting media heated at different temperature. Bricks and stone piece can be
heated up to 100-105°C but organic matters used for potting like leaf mould, logs etc. they
will be heated at a temperature below 65°C. Few potting materials such as coconut husk
require overnight soaking so that undesirable chemicals could be leached out. In case of
chemical treatments, potting materials will be cut into small pieces and mixed thoroughly,
and then soak it by spraying a solution containing formaldehyde 20 ml litre-1. Keep the
formaldehyde solution soaked materials covered under polythene sheet in bright sunshine for
72 hours. After opening dry it for few hours in to evaporate obnoxious gasses. This chemical
treatment is not given to the media required for organically growing orchids. For them only
heat treatment and leaching treatment is applicable. Potting and repotting will be same as
discussed earlier.
16.2. Organic nutrient management:
Application of nutrients to the plants through supplying it from organic sources is continuing
science time immemorial. As it buffers media pH and temperature. Provide favourable
moisture retention and good air circulation, improves biological activity provide dissolve
organic carbon, macro and micro nutrients slowly, thus it can help for healthy growing of the
plants. Some organic nutrient sources such as mustard cake, neem cake can act against
disease and pest resistant.
Poultry manure generally has N, P and K content 2-4.5%, 4.5-6% and 1.2-4% respectively,
also contains almost all the micronutrients. Add this poultry manure @ 10 g pot-1 in a10-12
46
cm pot during potting of orchids. Drench the potting media with vermiwash weekly. Add 50
ml of vermiwash in one litre of water and use to drench your orchid weakly.
You can prepare organic manure by mixing 8kg mustard oil cake and 0.5 kg dried fish along
with 4 kg bone meal, then decomposing or composting it for 21 days. It will contain nearly
3.5% N, 2.1% P, 2.7% K, 4.5% Ca and 1.6% Mg. Apply 5 g of this manure at an interval of 6
months. Drench the potting media with vermiwash weekly. Add 50 ml of vermiwash in one
litre of water and use to drench your orchid weakly.
16.3. Weed management:
Weed competes with the orchids for moisture nutrient and free space. So removal of weeds is
necessary. You should not apply any chemical to eradicate weeds in the organic method of
orchid cultivation. Weeds in the orchid pots can be easily managed manually by picking
through hand and single tooth fork.
16.4. Organic management of orchid’s insect pest and diseases:
Sl. No. Name Symptoms Management
Disease
1. Black rot
Name of
causal
organism
and
susceptible
orchids are
given at
section 22.
Water soaked lesions on the
aerial part of the plant,
subsequently it become
black. The necrotic lesions
develop on pseudobulbs and
roots which latter spread
upward, cause complete
defoliation of the plant
Immediate removal of the disease plant
from the house and manually cutting of the
infected leaf portion with sterilized scissors.
Repotting of the plant. Proper moisture
aeration and plant spacing should be
maintained, contaminated pot and potting
media should not be used. Infected plant
should be removed from rest of the
population and will be treated with
biological agents alike Bacillus subtilis or
Trichoderma viride/harzianum or
Burkholderia cepacia @ 2g pot-1at monthly
interval.
2. Anthracnose
of Orchid
Name of
Initially small, oblong to
circular, oval, sunken and
reddish brown to dark brown
and grey coloured spots
Immediate removal of the disease plant
from the house and manually cutting of the
infected leaf portion with sterilized scissors.
Repotting of the plant. Sterilize potting
47
causal
organism
and
susceptible
orchids are
given at
section 22.
appear at the tip or middle of
the leaf lamina which
gradually enlarges and covers
large area of the leaf surface
mixture. Don’t over exposure your orchids
to direct sunlight. Maintenance of adequate
growing condition and proper nutrition
should be done. Infected plant should be
removed from rest of the population and
will be treated with biological agents alike
Trichoderma viride/harzianum @ 2g pot-1at
monthly interval.
3. Blossom,
petal or leaf
blight
Name of
causal
organism
and
susceptible
orchids are
given at
section 22.
Water soaked lesions and
dense grey mold growing on
infected tissues. First appear
as numerous small dark spots
on petals, especially on older
flowers. Sometimes shot hole
effect is found in infected
flower petals.
Avoid deposition and condensation of water
on orchid. Wide plant spacing to ensure
ventilation. Immediate removal and
destruction of the disease plant part and
flower. Infected plant should be removed
from rest of the population and will be
treated with biological agents alike Candida
oliophila I-182 or Trichoderma harzianum
or Steptomyces griseoviridis @ 2g pot-1at
monthly interval.
4. Orchid wilt
Name of
causal
organism
and
susceptible
orchids are
given at
section 22.
Rotting of roots and
stems/pseudobulbs, the
effected plants turn yellow
and rot and eventually
become brown and dry. Leaf
base turns yellow and
defoliate. Presence of
mycelial webs with fan
shaped growth on the
infected surface is the sign of
disease.
Immediate removal of the disease plant
from the house. Repotting of the plant with
sterilize potting mixture. Apply of
Coniothyrium minitans or Trichoderma
harzianum @ 2g pot-1at monthly interval.
Organic Bordex mixture @ 2g pot-1 can also
be applied to control this disease during
rainy season.
5. Pseudo
bulb rot or
root rot
Pseudobulbs and bulbs
become dark brown to
black in colour and rot also
Ensure proper aeration, moisture, air
circulation and provide sufficient
sunlight, avoid excess watering and
48
Generally
observed
in
cymbidium
caused by
Pythium
and
Fusarium
spread to leaves, entire
Pseudobulb tissue got
rotten in severe case,
chlorosis on leaf bases and
root rot also observed
ensure proper drainage. Use sterilize
potting mixture for potting. Apply
biological agents alike Bacillus subtilis MB
1600 or Trichoderma viride/harzianum or
Burkholderia cepacia @ 2g pot-1at monthly
interval.
6. Bacterial
soft rot of
cymbidium
caused by
Erwinia
carotovora
Deep greyish green lesions
on leaves, cause leaf spot,
leaf soft rot and finally
stem rot with foul fishy
smell, progressive rot of
pseudobulbs and bulbs
leads to soft, shrivelled
and burnt like appearance
to them.
Use disease free planning materials,
destroy diseased plants and maintain
proper sanitation, use sterilised potting
mixture, spray Pseudomonas
fluorescence @ 0.5 ml litre-1.
Insects
7. Red spider
mite
Feed on under surface of
the leaves, yellowing of
leaves, silvery marks on
both the surface of the
leaves which turn to
brown or black latter, in
case of severe infestation
plants get covered with
webbing, stunting,
defoliation of the plant,
under developed bud and
abortion of flowers are
observed.
Proper sanitation and cultural practices,
removal of infected plant part, insects
can be removed using a soft brush,
insecticidal soap and water without
damaging the leaf, In case of severe
infestation immediately spray the plant
with plain water; twice a day. Spray
Artemisia or tobacco leaves extract
(1:10 extract: water) reduce the
population. Spray neem oil 0.03 EC
(Azadirachtin) 5ml litre-1or Verticillium
lecanii @ 0.5 ml litre-1 or Paecilomyces
fumososeus @ 0.5 ml litre-1 at weekly
interval, will reduce the mite
population.
49
8. Scale
insects
Loss of vigour and
deformation of infested
plants. Yellow leaves, leaf
drop and stunted new
growth, sticky honey dew
secretion observed.
Cleanliness and regular care is
necessary, Prompt pruning and burning
of infested plant part will reduce further
spread. Isolate the infested plant. Scale
insects should be removed using a soft
brush, insecticidal soap and water
without damaging the leaf. You can also
use 70% Isopropyl alcohol or sprit.
Take cotton swab, deep it in alcohol and
clean the leaves. If root is infested with
scale insects repot the plant with
sterilized potting media, spray neem oil
0.03EC (Azadieachtin) @5ml litre-1 to
roots, or drench roots with
Metarrhizium anisopliae @ 0.5 ml litre-
1 at 15 days interval.
9. Black
Aphid
Mainly attack flowers,
small irregular shaped
spots appear on the petals
and sepals, affected plants
become retarded, aphids
also excrete honeydew on
which sooty mould
develop.
Spray Artemisia or Tobacco or Datura
leaves extract (1:10 extract: water). You
can also spray the plants with tobacco
leaf extract @ 10 ml litre-1, or neem oil
0.03 EC @ 5 ml litre-1or Servo
Agrospray @ 6 ml litre-1 of water.
Application of Bauveria bassiana @ 0.5
ml litre-1 at weekly interval effectively
controls aphids.
10. Thrips Suck sap from the tender
portion of the plants.
Leaves become curled,
wrinkled and discoloured,
malformation of leaves,
buds and flowers. Plants
become stunted, finally it
may dry up also.
Remove infected plant part or plant and
destroy them. Spray Artemisia or
Tobacco or Datura leaves extract (1:10
extract: water). Application of neem oil
0.03 EC @ 5 ml litre-1 or Bauveria
bassiana @ 0.5 ml litre-1 at weekly
interval effectively controls the pest.
50
11. Mealy bug Suck cell sap from leaf and
petioles, plants become
weakened, also excrete
honeydew that attracts
ants, in case of severe
infestation sooty mould
develop.
Remove infected plant part or plant and
destroy them. Maintain proper spacing.
12. Black
weevil
Newly born larva feed on
young leaves, exudates
come out from the
puncture on which
Fusarium fungus develop.
Larva enters into the
shoots then feed on
pseudobulbs results in
rotting of pseudobulbs.
Arrest further growth of
the plant.
Collection and destruction of adult
weevil and infected plant pat is a
common cultural practice to control it.
Spraying of neem oil 0.03 EC @ 5 ml
litre-1 or Pongamia oil @1.5 ml litre-1
effectively controls further spread of
weevil.
13. Grass
hopper
Mostly cause damage
during rainy season. Feed
on young leaves, unopened
flower buds and flowers
by cutting them in
irregular sheps.
Remove weeds from surrounding areas.
Manually collect nymphs and adults by
hand or insect collecting nets and kill
them by putting in Kerosene .
14. Nematode Necrosis and swelling on
roots, root system become
fluffy, leaves show
bending, twisting and
unusual enlargement.
Use nematode free planting materials,
application of Verticillium lecanii @ 0.5
ml litre-1 can control nematode. Use
tissue cultured propagated materials
followed by planting in sterilised
potting media. Treat the propagating
material with hot water. Incorporate
mustard oil cake and neem oil cake in
the potting media.

51
Above mentioned practices for organic cultivation of orchids are most suitable for growing
cymbidium, but they could be used for cultivation of other orchids also.
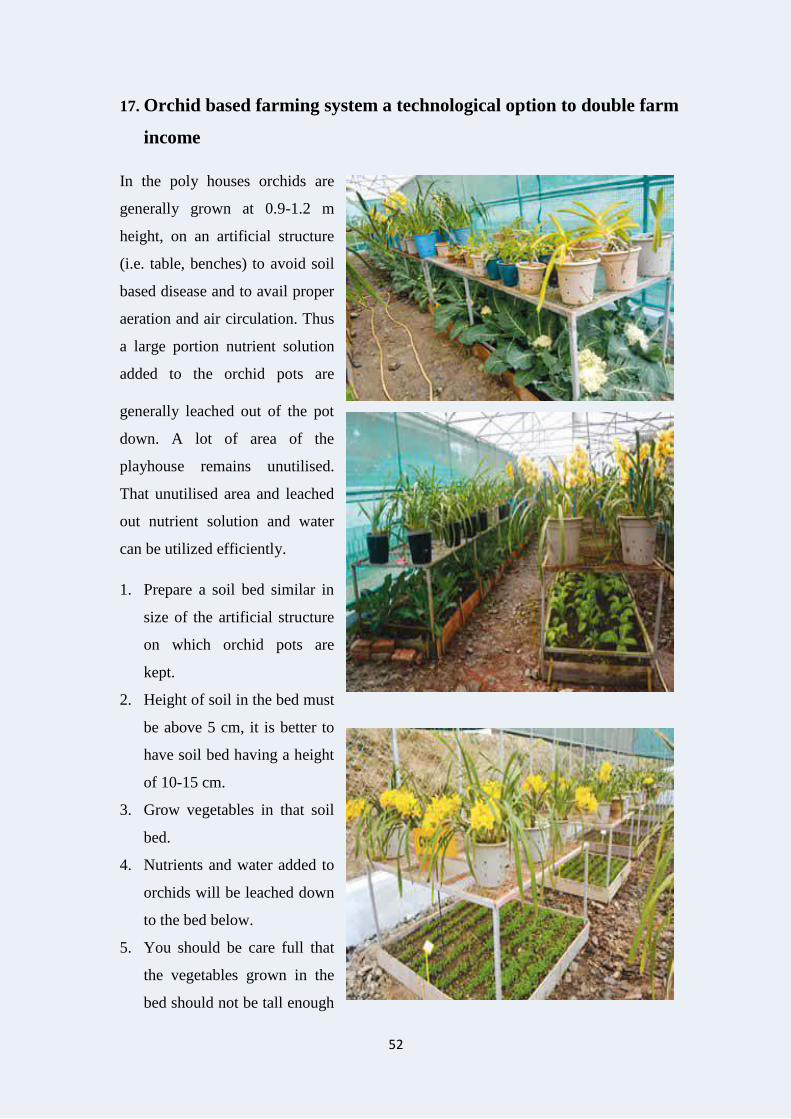
52
17. Orchid based farming system a technological option to double farm
income
In the poly houses orchids are
generally grown at 0.9-1.2 m
height, on an artificial structure
(i.e. table, benches) to avoid soil
based disease and to avail proper
aeration and air circulation. Thus
a large portion nutrient solution
added to the orchid pots are
generally leached out of the pot
down. A lot of area of the
playhouse remains unutilised.
That unutilised area and leached
out nutrient solution and water
can be utilized efficiently.
1. Prepare a soil bed similar in
size of the artificial structure
on which orchid pots are
kept.
2. Height of soil in the bed must
be above 5 cm, it is better to
have soil bed having a height
of 10-15 cm.
3. Grow vegetables in that soil
bed.
4. Nutrients and water added to
orchids will be leached down
to the bed below.
5. You should be care full that
the vegetables grown in the
bed should not be tall enough
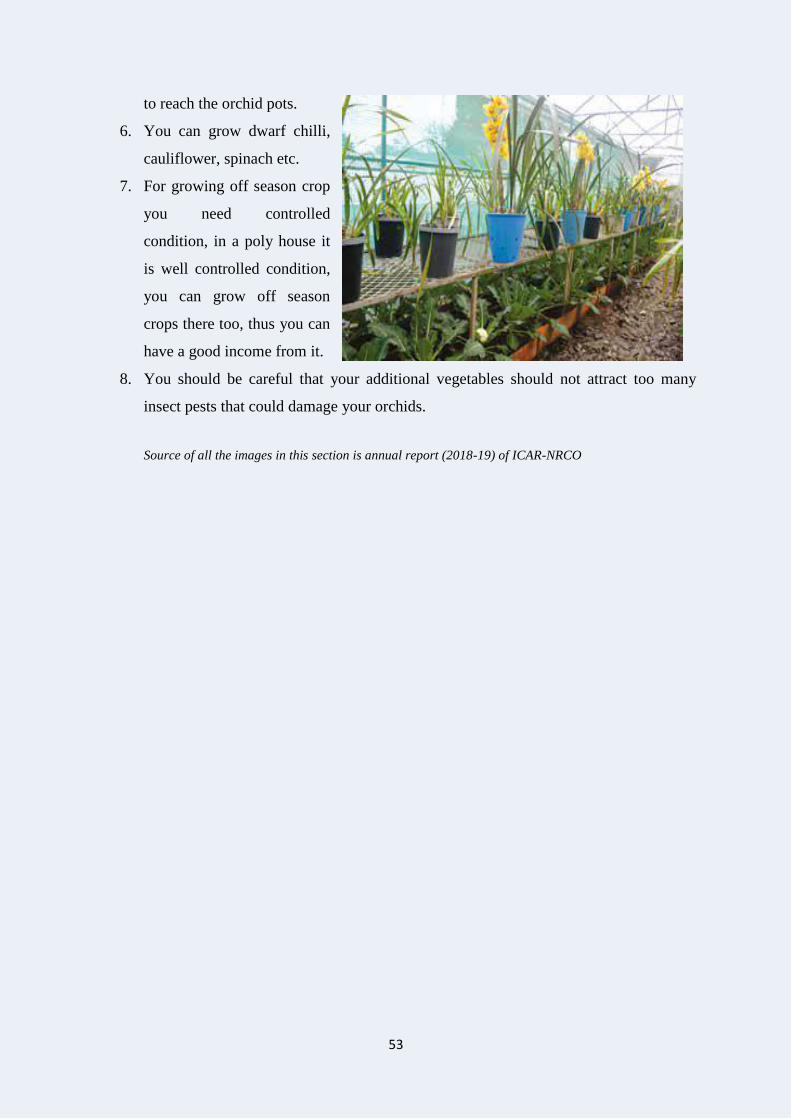
53
to reach the orchid pots.
6. You can grow dwarf chilli,
cauliflower, spinach etc.
7. For growing off season crop
you need controlled
condition, in a poly house it
is well controlled condition,
you can grow off season
crops there too, thus you can
have a good income from it.
8. You should be careful that your additional vegetables should not attract too many
insect pests that could damage your orchids.
Source of all the images in this section is annual report (2018-19) of ICAR-NRCO
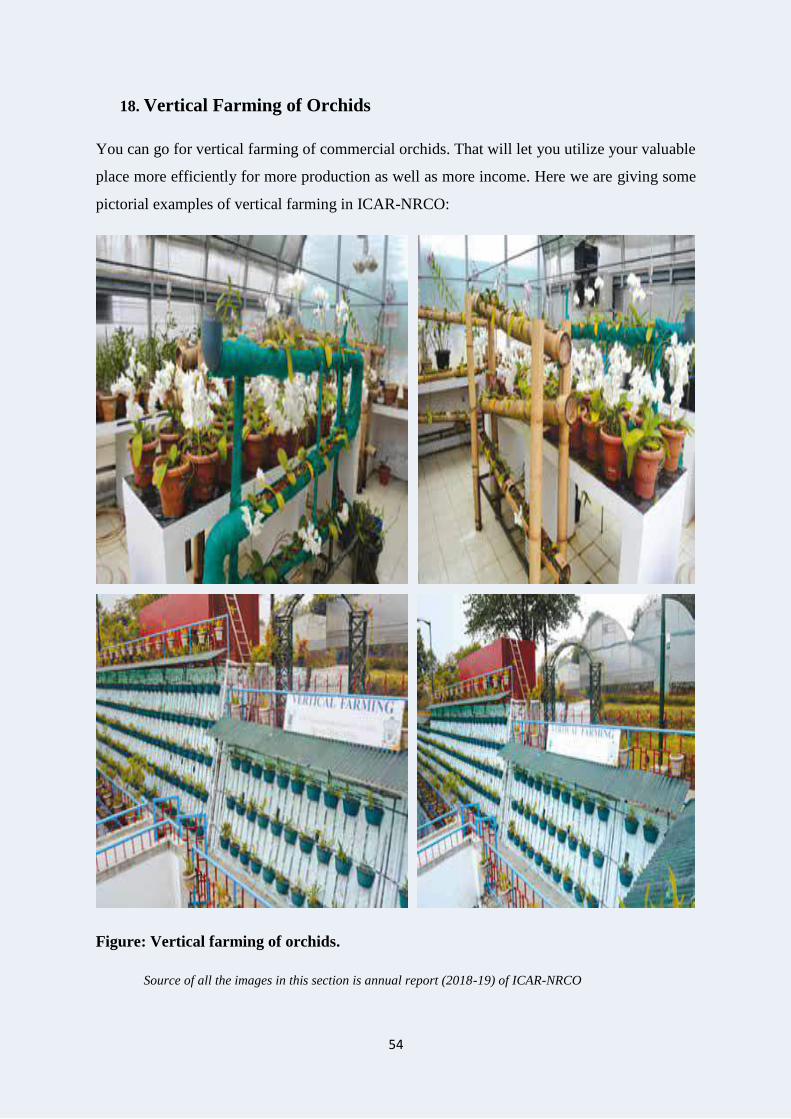
54
18. Vertical Farming of Orchids
You can go for vertical farming of commercial orchids. That will let you utilize your valuable
place more efficiently for more production as well as more income. Here we are giving some
pictorial examples of vertical farming in ICAR-NRCO:
Figure: Vertical farming of orchids.
Source of all the images in this section is annual report (2018-19) of ICAR-NRCO
55
19. Post-harvest technologies of orchids
19.1. Grading and packaging of Cymbidium orchids:
19.1.1. Grading: The parameters taken into account for grading cymbidium orchids are
as follows
i. Stage of maturity
ii. Appearance
iii. Colour and size of the bud
iv. Blemishes or injuries due to disease
v. Infestations caused by insect and pests
vi. Strength
vii. Straightness and
viii. Length of the flower stem
Cymbidium cut flowers divided into two types i) Cymbidium Standard and ii) Cymbidium
miniature, Cymbidium Standard are graded into two grades, like- AAA and AA. AAA grade
cymbidium standard will have strong straight stem of 1.25 m length along with 12-15 flowers
on it and AA grade cymbidium standard will have flower stems of uniform length of 90 cm
length along with 8 flowers on it, there will be no marks on the flowers. Cymbidium
miniature has four grades, they are XL, L, M and S, and they will have perfect flowers but
bent crooked spikes. XL grade cymbidium miniature flower stem will be of 65+ cm length
along with 15 flowers. L grade cymbidium miniature flower stem will be of 55-64 cm length
along with 12-14 flowers. M grade cymbidium miniature flower stem will be of 40-54 cm
length along with 8-11 flowers, and S grade cymbidium miniature flower stem will be of 30-
39 cm length along with at least 5 flowers.
19.1.2. Packaging:
1. Basal end of cymbidium cut flower can be inserted in a tube containing water or water
with preservatives or can be wrapped with wet cotton swab, then they could covered
with plastic and tied with rubber band to keep it in place. You can use 2% sucrose or
2% sucrose+100 ppm Al2(SO4)3 or 2% sucrose+100 ppm Ca(NO3), or 2%
sucrose+200 ppm 8-HQS or 2% sucrose+100 ppm salicylic acid as preservatives.
2. You can group 5-20 flower stems together, and tie them loosely with a rubber band.
3. Wrap individual flower bunches with suitable packing materials like cellophane
paper, Kraft paper, newspaper, tissue paper, or corrugated card board sheet.
56
4. After wrapping place them in the package.
5. For local market you can held the bunches in a bucket containing preservative
solution or water
6. For long distance transport and storage you should pack the flower bunches in dry
card board box. The box should be large enough to comfortably fit the flower
bunches. The length of the box will be about twice of the width and the width will be
about twice of the height. The ideal boxes are telescope style boxes made of CFB.
7. Place the bunches or individual spikes in the box inside the packaging box in alternate
fashion.
8. Keep ethylene scrubber with KMnO4 or purafil in the boxes to increase the keeping
quality of the flowers.
9. Cymbidium single flowers can be packed and made attractive for sell. Single flower
backed with fern leaves or any other attractive leaves and base wrapped with wet
cotton swab preservative solution can be packed in three sided box with a display
window.
19.2. Grading and packaging of Dendrobium orchids:
19.2.1. Grading: Export quality orchids are graded to maintain the quality. They are
graded on the basis of length, colour, flower size, number of flowers on the spike,
arrangement of the flowers etc. Dendrobiums are graded in four standard grades,
like- XL, L, M and S. XL graded dendrobium spikes will be of at least 50 cm
length along with >10 flowers per spike. L graded dendrobium spikes will be of
45-50 cm length along with 8-10 flowers per spike. M graded dendrobium spikes
will be of 40-45 cm length along with 6-8 flowers per spike and S graded
dendrobium spikes will be of 30-40 cm length along with 4-5 flowers per spike.
19.2.2. Packaging:
1. Put base of each spike in a tube containing water or preservative solution or wrap the
base with wet cotton swab. To use cotton swab, dip the cotton swab in water or
preservative solution and wrap it at the base of the flower spike then cover it with a
polythene sheet tied by a rubber band.
2. Put flower spikes of Dendrobium along with preservatives in polythene sleeves of
standard thickness.
3. You should keep a bunch of around five spikes of same grade and variety in a box.
4. Provide a cushioning material in the back side of the sleeve to avoid damage during
transportation.
57
5. Tie the base of the spike with the base of the cartoon with an adhesive tape to prevent
the movement of the flower spikes inside the box during transportation.
6. Size of the cartoon varies according to the size of the spike; the cartoon used for
packaging will be large enough to comfortably place the flower spike in it. The
cartoon should be provided with sufficient no of holes or vent for proper aeration.
19.3. Cut flower Storage
Orchid cut flowers can be stored in cold storage. Reduced temperature reduces the metabolic
activity of flower tissues, also decreases respiration, transpiration and ethylene action and
retards fungal and bacterial activities. In genera tropical orchids are stored at 7-10°C and
temperate orchids are stored at 5°C. To prevent moisture loos and wilting of the cut flower
90-95% relative humidity should be maintained in the store. Two types of cold and storages
are there, they are wet storage and dry storage. In case of wet storage flowers are kept in the
storage with their base dipped in water or preservative solution for a short time, whereas dry
storage method is used for long term. In dry storage method after harvesting the fresh flowers
in the morning they are graded and sealed in plastic bags or boxes so that loss of moisture can
be prevented. Oncidium, Phalaenopsis, Odontoglossum, Cattleya can be stored for two weeks
by following wet method of storage at 7-10°C temperature. Dendrobium can be stored for 10-
14 days by following wet method of storage at 5-7°C temperature and Cymbidium can be
stored for two weeks by following dry method of storage at 1-4°C temperature.
19.4. Orchids flower drying:
Orchid flowers can be dried for their long term preservation, after drying they remain still
attractive.
1. Dendrobium moschatum, Vanda teres,
Arundina graminifolia, Den. ‘Madam Pink’,
Den. ‘Abraham’, Den. ‘Lervia’, Phal.
‘Detroit’, Phal. ‘Casa Blanca’ and Oncidium
‘Sweet Sugar’ can be dried at 50°C by
embedding in borax in a hot air oven.
Figure: Dendrobium williamsonii (dried)

58
2. Epidendrum spp., Cattleya bowringiana and
Cattleya hybrids, Phal. ‘Ox Plum Rose x
Black Jack’ and Den. ‘Big White’, Vanda
coerulea can be dried at 60°C by embedding
in borax in a hot air oven.
3. Coelogyne flaccida, Coelogyne cristata,
Dendrobium nobile, Dendrobium
williamsonii, Dendrobium aphyllum, Den,
‘Erika’, Den. ‘Big White 4N’, Den.
‘Bangkok Blue’, Phal.’Nagasaki’ and Cym.
‘Sungold’ can be dried at 55°C by
embedding in borax in a hot air oven.
4. Dendrobium, Phalaenopsis, Cattleya,
Cymbidium, Aranda, Mokara hybrids can be
dried by embedding them in perlite, Perlite +
borax and Perlite + Silica gel under room
condition (24-25oC).
5. Cattleya ‘Guanmian City’, Dendrobium
‘Lervia, Phalanopsis ‘Vienna ‘, Vanda
tessellata, Oncidium ‘Taka Yellow’,
Phalanopsis ‘Taida S.Red’ can be dried at
50°C by embedding in sand in a hot air oven.
6. After drying they can be packed in packed in
three sided box with a display window and
used for decorating purpose.
Source of all the images in the section (18.4) is annual report (2018-19) of ICAR-NRCO
Figure: Vanda coerulea (dried)
Figure: Coelogyne flaccida (dried)
Figure: Dendrobium nobile (dried)
Figure: Den. Madam Pink (dried)
Figure: Oncidium Taka Yellow (dried)
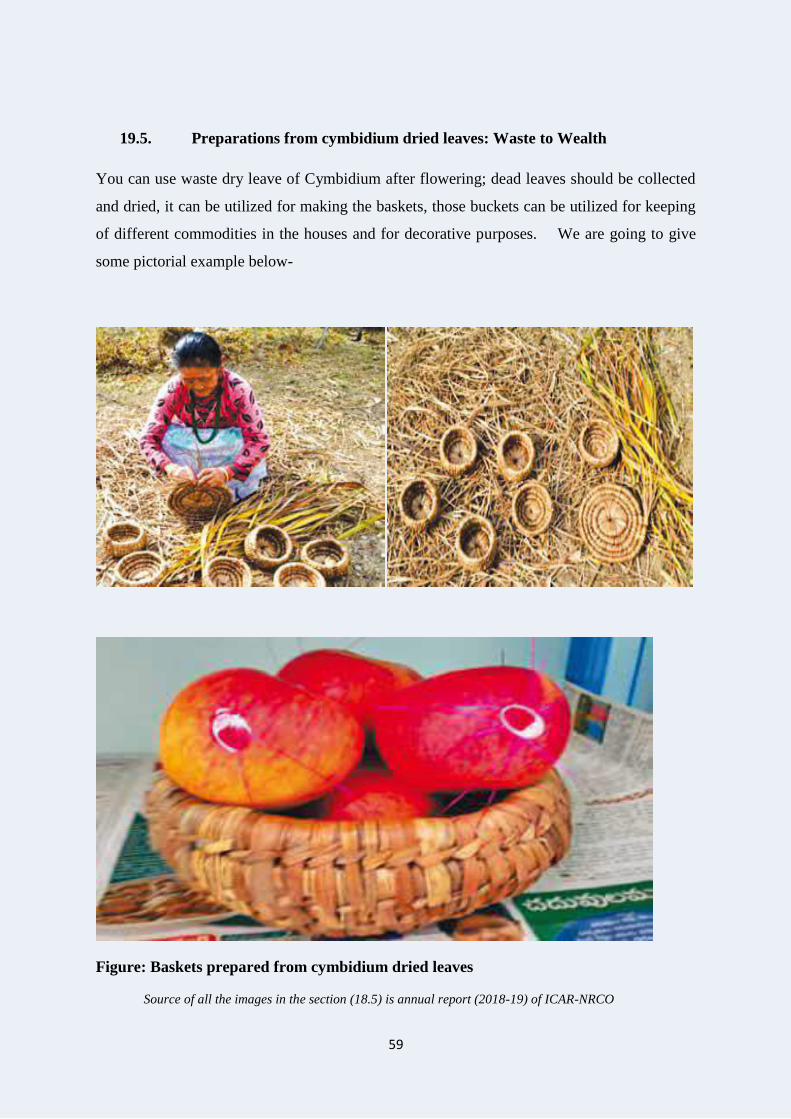
59
19.5. Preparations from cymbidium dried leaves: Waste to Wealth
You can use waste dry leave of Cymbidium after flowering; dead leaves should be collected
and dried, it can be utilized for making the baskets, those buckets can be utilized for keeping
of different commodities in the houses and for decorative purposes. We are going to give
some pictorial example below-
Figure: Baskets prepared from cymbidium dried leaves
Source of all the images in the section (18.5) is annual report (2018-19) of ICAR-NRCO
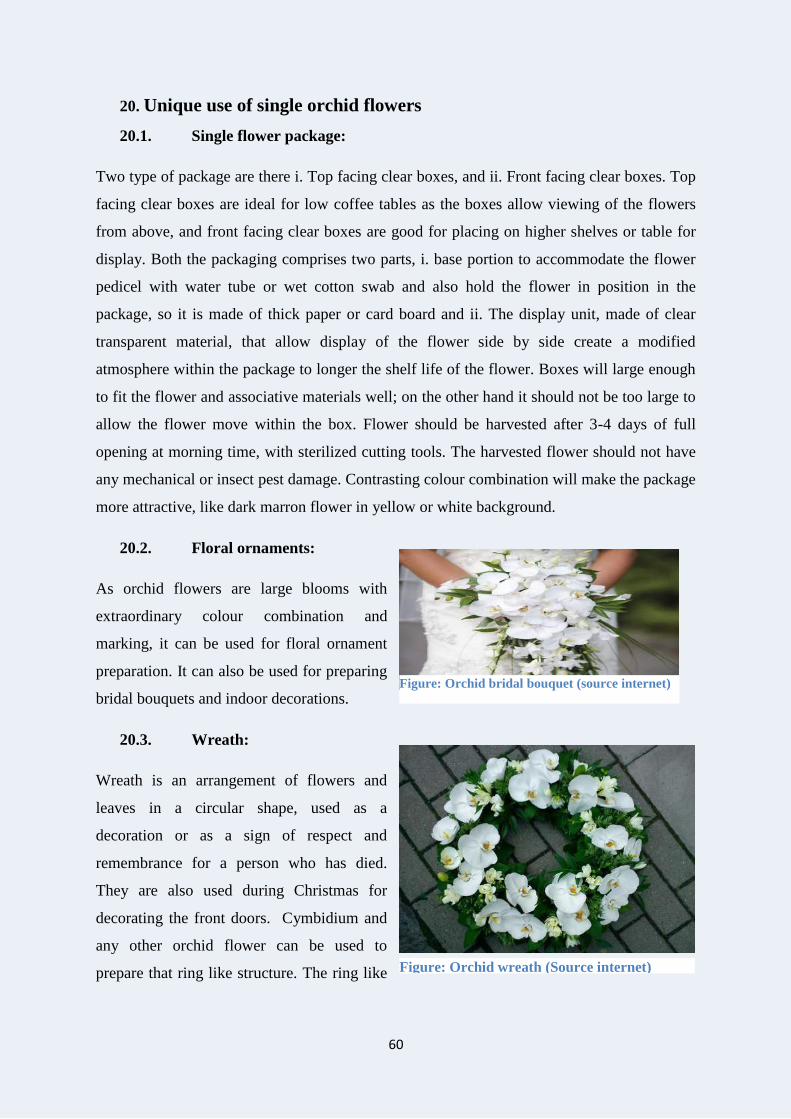
60
20. Unique use of single orchid flowers
20.1. Single flower package:
Two type of package are there i. Top facing clear boxes, and ii. Front facing clear boxes. Top
facing clear boxes are ideal for low coffee tables as the boxes allow viewing of the flowers
from above, and front facing clear boxes are good for placing on higher shelves or table for
display. Both the packaging comprises two parts, i. base portion to accommodate the flower
pedicel with water tube or wet cotton swab and also hold the flower in position in the
package, so it is made of thick paper or card board and ii. The display unit, made of clear
transparent material, that allow display of the flower side by side create a modified
atmosphere within the package to longer the shelf life of the flower. Boxes will large enough
to fit the flower and associative materials well; on the other hand it should not be too large to
allow the flower move within the box. Flower should be harvested after 3-4 days of full
opening at morning time, with sterilized cutting tools. The harvested flower should not have
any mechanical or insect pest damage. Contrasting colour combination will make the package
more attractive, like dark marron flower in yellow or white background.
20.2. Floral ornaments:
As orchid flowers are large blooms with
extraordinary colour combination and
marking, it can be used for floral ornament
preparation. It can also be used for preparing
bridal bouquets and indoor decorations.
20.3. Wreath:
Wreath is an arrangement of flowers and
leaves in a circular shape, used as a
decoration or as a sign of respect and
remembrance for a person who has died.
They are also used during Christmas for
decorating the front doors. Cymbidium and
any other orchid flower can be used to
prepare that ring like structure. The ring like Figure: Orchid wreath (Source internet)
Figure: Orchid bridal bouquet (source internet)
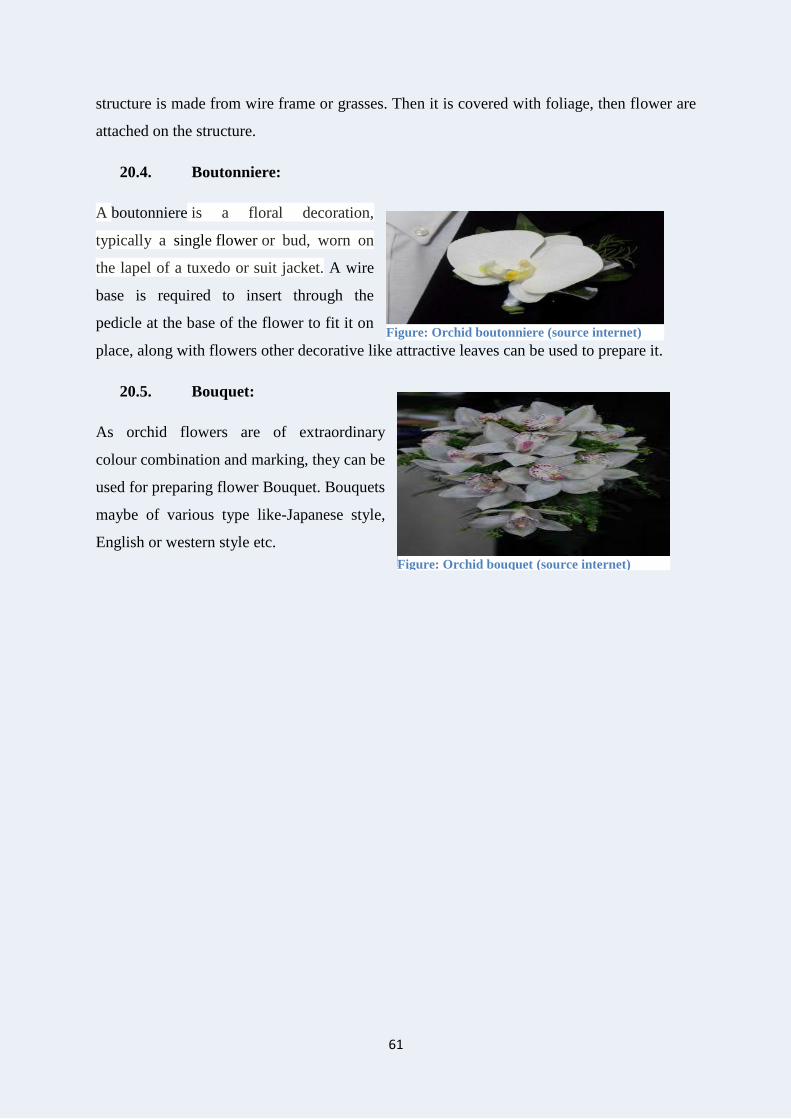
61
structure is made from wire frame or grasses. Then it is covered with foliage, then flower are
attached on the structure.
20.4. Boutonniere:
A boutonniere is a floral decoration,
typically a single flower or bud, worn on
the lapel of a tuxedo or suit jacket. A wire
base is required to insert through the
pedicle at the base of the flower to fit it on
place, along with flowers other decorative like attractive leaves can be used to prepare it.
20.5. Bouquet:
As orchid flowers are of extraordinary
colour combination and marking, they can be
used for preparing flower Bouquet. Bouquets
maybe of various type like-Japanese style,
English or western style etc.
Figure: Orchid boutonniere (source internet)
Figure: Orchid bouquet (source internet)
62
21. Orchids preparations
Orchid is one of the main ingredients for various products like-
A. Edible products:
i. Spice e.g. Vanillin
ii. Herbal tea
iii. Vegetable
iv. Pickles
v. Ice cream
B. Ornamental products
i. Orchidscaping
ii. Cut flowers
iii. Dried flower craft
C. Medicinal products
i. Skin care products
ii. Hair cosmetics
iii. Nutraceuticals
iv. Herbal drugs
D. Fragrant products
i. Perfumery
ii. Essential oils
E. Other uses
i. Floral ornaments
ii. Religious uses
iii. Potpourri
iv. Designer candles
21.1. Orchid ice cream:
This is made with salep, mastic, milk and sugar and thein rubbed either by mixer or hand. It
is chewy and resistant to melting.
21.2. Salep:
Salep is a Turkish word refers to the tubers of terrestrial orchids. It is flour, made from
grinding dried tubers of Orchis mascula, Orchis militaris and related species of orchids.

63
1. Tubers are collected at close of the summer when the seed vessels are fully formed.
Because at this time tubers are full and fleshy also contain largest amount of starchy
matters.
2. After collecting tubers they are immersed in boiling milk or water. This process
destroys their vitality and removes the bitterness of their fresh state.
3. The outer skins are then rubbed off and tubers are dried by exposing it in the sun or
drying it in oven with a bread making temperature for near about 10 minutes. After
removing from the oven the will be changed to transparent from milky but the bulk
will not be reduced.
4. They are then dried and hardened in fresh air for few days, after hardening they
become ready for use or store for as long as time required.
5. Then the dried salep is generally ground to powder before use. Powders are yellowish
in colour. These powders are used to produce beverages, desserts. Salep of Indian
market known as Salib misri, derived from certain species of Eulophia, Orchis and
Satyrium.
1:10 salep: water homogeneous mixture could be used for treatment to irritation in
gastrointestinal track. It is also used for infants suffering from diarrhoea and bilious
fever.
21.3. Vanilla:
The pods of the climbing orchid Vanilla planifolia is used for the commercial production of
the vanilla flavour, it is prepared by curing process. Vanilla is used in ice-creams, dairy
products, biscuits, cakes, beverages, perfumery and cosmetics as flavouring agent. Vanilla
capsules improves food intake, reduces nausea and menstrual discharge.
21.4. Chikanda:
Tubers of orchid genera Disa, Habenaria and Satyrium are the main ingredients of chikanda,
a popular sausage, a brown jelly. Orchid tubers are pounded to remove skins, after that dried
and grinded to produce flour, that is yellowish in colour. To enhance the test the flour is
mixed with water, soda and salt, and peanut flour is also added to adjust the thickness.
21.5. Chinaka:
It is delicious along with medicinal values, also act as source of energy. Orchid species used
to produce it is Satyrium cursonii, Disa englerian, Disa robusta, Disa zombica, Habenaria
64
clavate, Satyrium ambylosaccos etc. The tubers are pounded I importer and used for cooking
along with locally produced baking powder called “Chidulo”, In case of non-availability of
chidulo sodium bicarbonate can also be used. In a few minutes a cake mixture is produced,
that is put in a container and cooled for solidification. Finally the cake is cut into small pieces
and cooked with ground nut or tomato sauces.
21.6. Olatshe:
It is a part of the local diet of Bhutan people. Orchid species preferred for this dish is
Cymbidium hookerianum. Flowers (open or not) are removed from the flower stack and
washed and boiled in water until flowers become soft. Flowers make it bitter, additional
spices are added to remove the bitterness. Then the water is removed and mixture of spices
and melted cheese and salt are added and cocked for five minutes. The dish becomes ready.
Olatshe can be served with rice, noodle etc.
21.7. Olachoto:
Cymbidium flower is used to prepare this Bhutan delicacy. Flowers are cut into pieces and
boiled and cooked along with meat, chilli, cheese or it can also be stir-fried.
21.8. Dendrobium as an edible orchid:
Dendrobium flowers are dipped in butter and deep fried and to be used as food. Dendrobium
flowers are also used in desserts and cakes. Dendrobium chrysotoxum flowers and
Dendrobium cathenatum cane are dried and consumed as tea. Dendrobium longicornu
flowers are used for pickled preparation.
21.9. Phytochemicals from orchids
Flavonoid derived from Anoectochilus roxburghii, bibenzyle derivatives from Dendrobium
amoneum, Ephemeranthone and Erianthridin derived from Ephemerantha lonchophylla
having antioxidant activity. Flavonoid and Lusianthrin derived from Cypripedium
macranthos have anti-fungal activities. Flavonoid derived from Spiranthes australis and
Plicatol B derived from Bulbophyllum kwangtungense have anti tumor activity. Like these
there are many beneficial phytochemicals those could be derived from orchids. Detailed
discussion about them is out of the scope of this book.
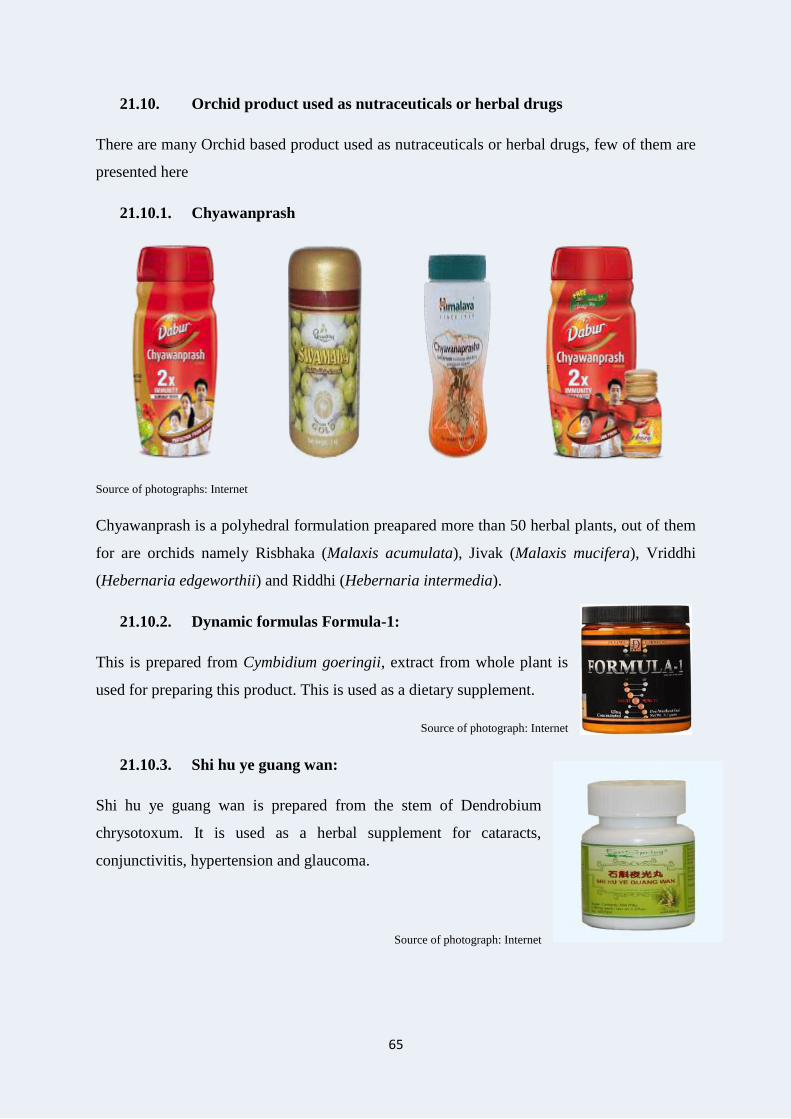
65
21.10. Orchid product used as nutraceuticals or herbal drugs
There are many Orchid based product used as nutraceuticals or herbal drugs, few of them are
presented here
21.10.1. Chyawanprash
Source of photographs: Internet
Chyawanprash is a polyhedral formulation preapared more than 50 herbal plants, out of them
for are orchids namely Risbhaka (Malaxis acumulata), Jivak (Malaxis mucifera), Vriddhi
(Hebernaria edgeworthii) and Riddhi (Hebernaria intermedia).
21.10.2. Dynamic formulas Formula-1:
This is prepared from Cymbidium goeringii, extract from whole plant is
used for preparing this product. This is used as a dietary supplement.
Source of photograph: Internet
21.10.3. Shi hu ye guang wan:
Shi hu ye guang wan is prepared from the stem of Dendrobium
chrysotoxum. It is used as a herbal supplement for cataracts,
conjunctivitis, hypertension and glaucoma.
Source of photograph: Internet

66
21.10.4. Kunbao wan:
Kunbao wan is prepared from Dendrobium nobile orchid.
For this purpose whole plant extract is used. It is used for
Menopausal syndrome, nourishing liver and kidney function,
calm and soothe the nerves, insomnia and joint pain
treatment.
Source of photograph: Internet
21.10.5. Tian Ma Shou Wu Pian:
Tian Ma Shou Wu Pian is prepared from Gastrodia
elata orchid. Rhizom tuber of this orchid is used for
this prepartion. It is used as a herbal suplement
capsule.
Source of photograph: Internet
21.10.6. Valiya Narayana thaliam:
Valiya Narayana thaliam is prepared from Malaxis
acuminata orchid. Pseudobulbs and roots of this orchid
are used for this preparation. It is used for rheumetoid
arthritis, body pain, inflammatons etc treatment.
Source of photograph: Internet
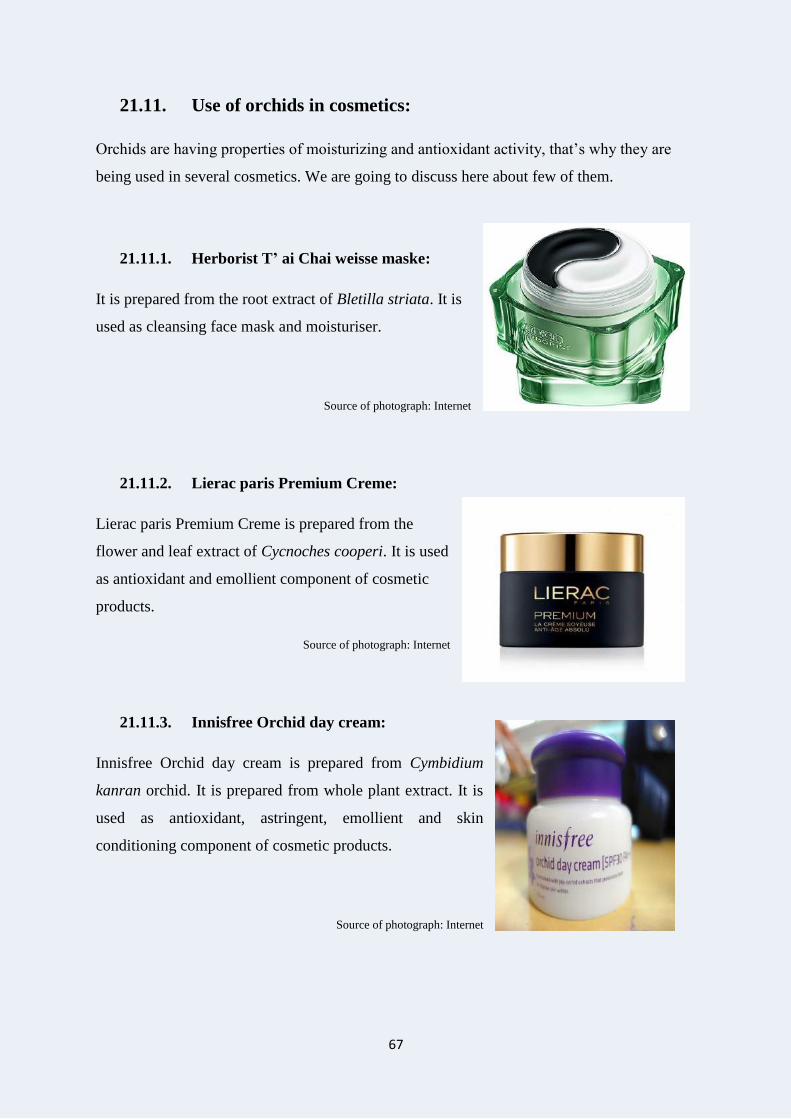
67
21.11. Use of orchids in cosmetics:
Orchids are having properties of moisturizing and antioxidant activity, that’s why they are
being used in several cosmetics. We are going to discuss here about few of them.
21.11.1. Herborist T’ ai Chai weisse maske:
It is prepared from the root extract of Bletilla striata. It is
used as cleansing face mask and moisturiser.
Source of photograph: Internet
21.11.2. Lierac paris Premium Creme:
Lierac paris Premium Creme is prepared from the
flower and leaf extract of Cycnoches cooperi. It is used
as antioxidant and emollient component of cosmetic
products.
Source of photograph: Internet
21.11.3. Innisfree Orchid day cream:
Innisfree Orchid day cream is prepared from Cymbidium
kanran orchid. It is prepared from whole plant extract. It is
used as antioxidant, astringent, emollient and skin
conditioning component of cosmetic products.
Source of photograph: Internet
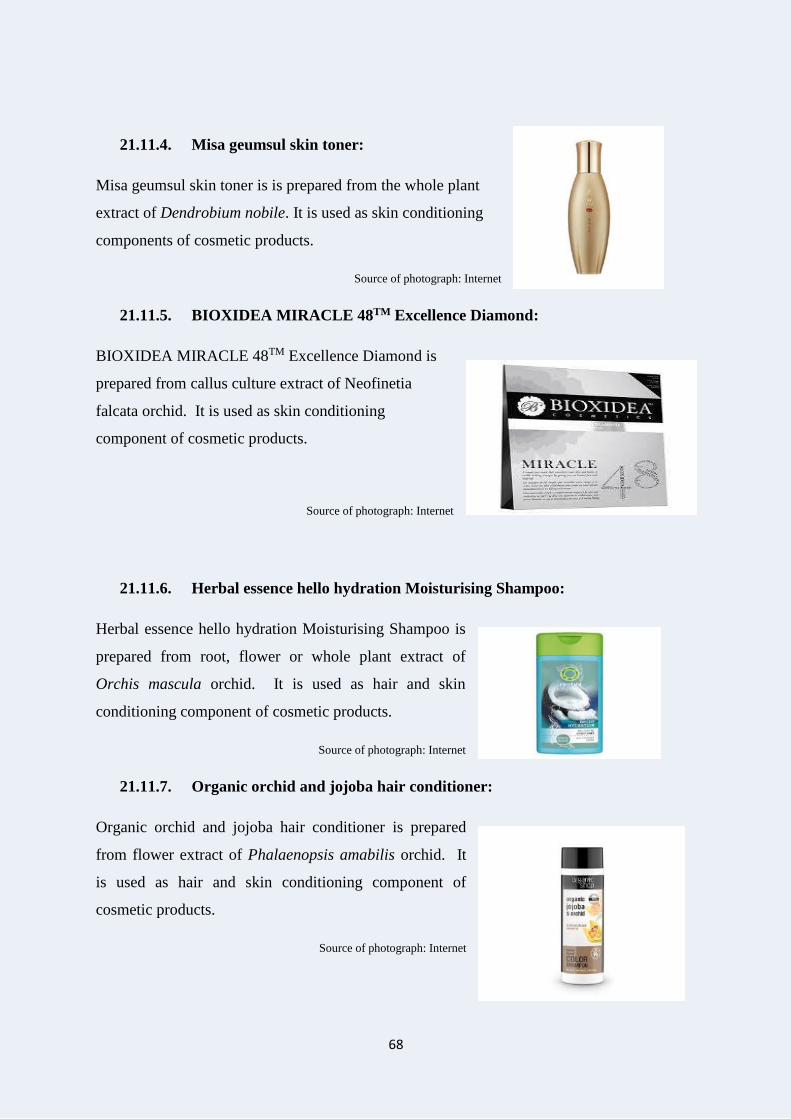
68
21.11.4. Misa geumsul skin toner:
Misa geumsul skin toner is is prepared from the whole plant
extract of Dendrobium nobile. It is used as skin conditioning
components of cosmetic products.
Source of photograph: Internet
21.11.5. BIOXIDEA MIRACLE 48TM Excellence Diamond:
BIOXIDEA MIRACLE 48TM Excellence Diamond is
prepared from callus culture extract of Neofinetia
falcata orchid. It is used as skin conditioning
component of cosmetic products.
Source of photograph: Internet
21.11.6. Herbal essence hello hydration Moisturising Shampoo:
Herbal essence hello hydration Moisturising Shampoo is
prepared from root, flower or whole plant extract of
Orchis mascula orchid. It is used as hair and skin
conditioning component of cosmetic products.
Source of photograph: Internet
21.11.7. Organic orchid and jojoba hair conditioner:
Organic orchid and jojoba hair conditioner is prepared
from flower extract of Phalaenopsis amabilis orchid. It
is used as hair and skin conditioning component of
cosmetic products.
Source of photograph: Internet
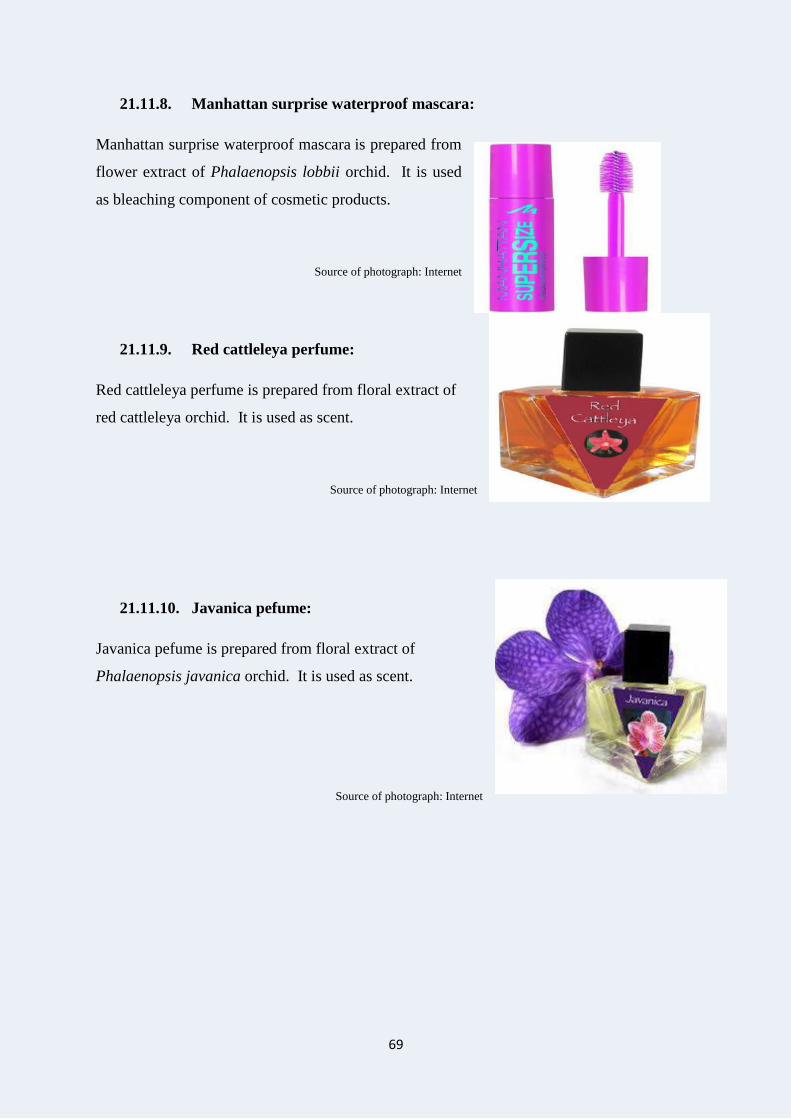
69
21.11.8. Manhattan surprise waterproof mascara:
Manhattan surprise waterproof mascara is prepared from
flower extract of Phalaenopsis lobbii orchid. It is used
as bleaching component of cosmetic products.
Source of photograph: Internet
21.11.9. Red cattleleya perfume:
Red cattleleya perfume is prepared from floral extract of
red cattleleya orchid. It is used as scent.
Source of photograph: Internet
21.11.10. Javanica pefume:
Javanica pefume is prepared from floral extract of
Phalaenopsis javanica orchid. It is used as scent.
Source of photograph: Internet
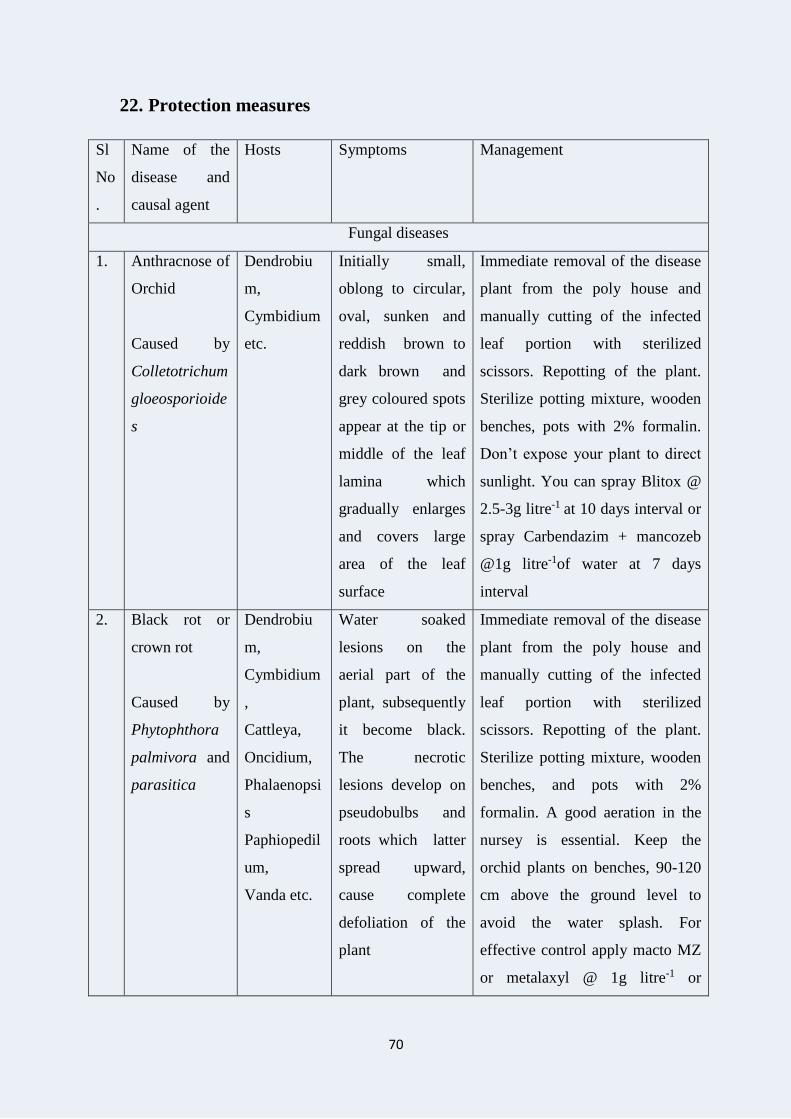
70
22. Protection measures
Sl
No
.
Name of the
disease and
causal agent
Hosts Symptoms Management
Fungal diseases
1. Anthracnose of
Orchid
Caused by
Colletotrichum
gloeosporioide
s
Dendrobiu
m,
Cymbidium
etc.
Initially small,
oblong to circular,
oval, sunken and
reddish brown to
dark brown and
grey coloured spots
appear at the tip or
middle of the leaf
lamina which
gradually enlarges
and covers large
area of the leaf
surface
Immediate removal of the disease
plant from the poly house and
manually cutting of the infected
leaf portion with sterilized
scissors. Repotting of the plant.
Sterilize potting mixture, wooden
benches, pots with 2% formalin.
Don’t expose your plant to direct
sunlight. You can spray Blitox @
2.5-3g litre-1 at 10 days interval or
spray Carbendazim + mancozeb
@1g litre-1of water at 7 days
interval
2. Black rot or
crown rot
Caused by
Phytophthora
palmivora and
parasitica
Dendrobiu
m,
Cymbidium
,
Cattleya,
Oncidium,
Phalaenopsi
s
Paphiopedil
um,
Vanda etc.
Water soaked
lesions on the
aerial part of the
plant, subsequently
it become black.
The necrotic
lesions develop on
pseudobulbs and
roots which latter
spread upward,
cause complete
defoliation of the
plant
Immediate removal of the disease
plant from the poly house and
manually cutting of the infected
leaf portion with sterilized
scissors. Repotting of the plant.
Sterilize potting mixture, wooden
benches, and pots with 2%
formalin. A good aeration in the
nursey is essential. Keep the
orchid plants on benches, 90-120
cm above the ground level to
avoid the water splash. For
effective control apply macto MZ
or metalaxyl @ 1g litre-1 or
71
mancozeb @ 2g litre-1, captan,
thiram could also be applied
3. Blossom, petal
or leaf blight
Caused by
Botrytis
cinerea
Cymbidium
,
Cattleya,
Phalaenopsi
s
Phaius etc.
Water soaked
lesions and dense
grey mold growing
on infected tissues.
First appear as
numerous small
dark spots on
petals, especially
on older flowers.
Sometimes shot
hole effect is found
in infected flower
petals.
Avoid deposition and
condensation of water on orchid.
Wide plant spacing to ensure
ventilation. Many chemicals are
effective like-spray Bavastin @1
g litre-1 or indofil M 45@ 2 g litre-
1 or topson M @ 2 g litre-1 or
benalte @ 1 g litre-1 at 7-10 days
interval
4. Orchid wilt
Caused by
Sclerotium
rolfsii
Dendrobiu
m,
Cymbidium
,
Paphiopedil
um,
Vanda etc.
Rotting of roots
and
stems/pseudobulbs,
the effected plants
turn yellow and rot
and eventually
become brown and
dry. Leaf base turns
yellow and
defoliate. Presence
of mycelial webs
with fan shaped
growth on the
infected surface is
the sign of disease.
Immediate removal of the disease
plant from the poly house and
repotting of the plant. Sterilize
potting mixture, wooden benches,
and pots with 2% formalin.
5. Rust
Uredo sp.
Phaius,
Calanthe
etc.
Yellow flecks
usually on the
lower surface of
Immediate removal of the disease
plant or plant part from the poly
house, spraying with Zineb @ 2g
72
leaves and later on
upper leaf surface.
The older spots
became dark with
large target board
effect of numerous
ruptured small
pustules.
litre-1.
Bacterial diseases of orchids
6. Bacterial
brown rot
Caused by
Pseudomonas
cattleya
Dendrobiu
m,
Cymbidium
,
Cattleya,
Phalaenopsi
s
Paphiopedil
um
Small, soft, water
soaked sunken
spots are found on
leaves, that become
black and brown
latter. The disease
advance rapidly
and results
immediate death of
plant.
Reduce prolonged wetness and
increase air circulation. Separate
the infected plants from others to
prevent the spreading of the
disease. Overhead irrigation
should be avoided, cut of the
infected leaves. Copper based
fungicides like Blitox @ 2g litre-1
can be used. Infected plants
should be drenched or sprayed
with 8-hydroxyquinoline at a
dilution of 1:2000 in water.
Nematode disease of orchids
7. Root necrosis
of Cymbidium
Caused by
Helicotylenchu
s
microcephalus
Cymbidium Develop severe
necrosis swelling
and fluffy root
system. The leaves
of effected plants
also exhibit typical
bending twisting
and abnormal
growth.
You should have nematode free
planting materials, tissue cultured
plants are the best options. Follow
proper cultural practices. Hot
water treatment o the propagative
materials. Incorporate mustard oil
cake, neem oil cake in the
planting media. For heavy
infestation use Carbofuran 3G
Viral disease of orchid
8. Cymbidium Cymbidium Symptoms like Separate the plant or plant part
73
mosaic virus
(CymMV)
Can also
infect any
other
orchids
mosaic, necrosis,
chlorotic flecks,
water soaked
lesions and flower
necrosis on
different orchid
hosts.
and destroy it.
Author’s acknowledgement
We would like to thanks and acknowledge all the scientists and technical of ICAR-NRC for
Orchids for providing information through their publications to develop this e-book entitled
“e-Book-A manual on orchid education”
Sources of information:
1. Annual reports of ICAR-NRC for Orchids
2. Technical bulletins of ICAR- NRC for Orchids
3. A practical guide to care and cultivation of orchids, a book written by Michael Tibbs
4. Internet
5. Available published papers on orchid cultivation.

74
Recommended


![CaseReport Habit Breaking Appliance for Multiple Corrections · Habit Breaking Appliance for Multiple Corrections ... removable habit breaking appliances [15, 16]. Hence, habit breaking](https://img.pdfslide.us/doc/110x75/5f15893424a8522d646af1b7/casereport-habit-breaking-appliance-for-multiple-corrections-habit-breaking-appliance.jpg)


![Predictability and Habit Persistencefabcol.free.fr/pdf/predictability.pdfPredictability and Habit Persistence 6 son [2005], real dividend growth is much more volatile than consumption](https://img.pdfslide.us/doc/110x75/5ed3f9a98d46b66d226332ce/predictability-and-habit-predictability-and-habit-persistence-6-son-2005-real.jpg)