Dolby Surround Tools
Version 7.3
™
Copyright
© 2007 Digidesign, a division of Avid Technology, Inc. All rights reserved. This guide may not be duplicated in whole or in part without the express written consent of Digidesign.
Avid, Digidesign, Pro Tools, and Pro Tools HD are either trademarks or registered trademarks of Avid Technology, Inc. in the US and other countries. All other trademarks contained herein are the property of their respective owners.
Product features, specifications, system requirements, and availability are subject to change without notice.
PN 9329-55975-00 REV A 01/07
contents
Chapter 1. Introduction . . . . . . . . . . . . . . . . . . . . . . . . . . . . . . . . . . . . . . . . . . . . . . . . . . . . . . 1
Welcome to Dolby Surround Tools . . . . . . . . . . . . . . . . . . . . . . . . . . . . . . . . . . . . . . . . . . . . 1
Contents of the Boxed Version of Your Plug-in . . . . . . . . . . . . . . . . . . . . . . . . . . . . . . . . . . . . 2
System Requirements . . . . . . . . . . . . . . . . . . . . . . . . . . . . . . . . . . . . . . . . . . . . . . . . . . . . . 2
Playback System Requirements . . . . . . . . . . . . . . . . . . . . . . . . . . . . . . . . . . . . . . . . . . . . . . 3
Register Your Plug-ins . . . . . . . . . . . . . . . . . . . . . . . . . . . . . . . . . . . . . . . . . . . . . . . . . . . . . 4
Working with Plug-ins . . . . . . . . . . . . . . . . . . . . . . . . . . . . . . . . . . . . . . . . . . . . . . . . . . . . . 5
Using This Guide . . . . . . . . . . . . . . . . . . . . . . . . . . . . . . . . . . . . . . . . . . . . . . . . . . . . . . . . . 5
Conventions Used in This Guide . . . . . . . . . . . . . . . . . . . . . . . . . . . . . . . . . . . . . . . . . . . . . . 5
About www.digidesign.com . . . . . . . . . . . . . . . . . . . . . . . . . . . . . . . . . . . . . . . . . . . . . . . . . 6
Chapter 2. Installation and Setup . . . . . . . . . . . . . . . . . . . . . . . . . . . . . . . . . . . . . . . . . . . . . 7
Installing Dolby Surround Tools. . . . . . . . . . . . . . . . . . . . . . . . . . . . . . . . . . . . . . . . . . . . . . . 7
Authorizing Dolby Surround Tools . . . . . . . . . . . . . . . . . . . . . . . . . . . . . . . . . . . . . . . . . . . . . 7
Removing Plug-ins. . . . . . . . . . . . . . . . . . . . . . . . . . . . . . . . . . . . . . . . . . . . . . . . . . . . . . . 10
Traditional Analog Configuration . . . . . . . . . . . . . . . . . . . . . . . . . . . . . . . . . . . . . . . . . . . . . 10
Configuring Pro Tools for Dolby Surround Mixing . . . . . . . . . . . . . . . . . . . . . . . . . . . . . . . . . 11
Inserting Dolby Surround Tools Plug-ins . . . . . . . . . . . . . . . . . . . . . . . . . . . . . . . . . . . . . . . . 17
5.1 and LCRS . . . . . . . . . . . . . . . . . . . . . . . . . . . . . . . . . . . . . . . . . . . . . . . . . . . . . . . . . . 18
Opening Older Dolby Surround Sessions . . . . . . . . . . . . . . . . . . . . . . . . . . . . . . . . . . . . . . . 21
Chapter 3. Overview of Dolby Surround . . . . . . . . . . . . . . . . . . . . . . . . . . . . . . . . . . . . . . . 23
Dolby Surround: Striving for Better Sound . . . . . . . . . . . . . . . . . . . . . . . . . . . . . . . . . . . . . . 23
Matrix Encoding . . . . . . . . . . . . . . . . . . . . . . . . . . . . . . . . . . . . . . . . . . . . . . . . . . . . . . . . 26
Matrix Decoding . . . . . . . . . . . . . . . . . . . . . . . . . . . . . . . . . . . . . . . . . . . . . . . . . . . . . . . . 27
Dolby Surround: Enhanced Matrix Processing. . . . . . . . . . . . . . . . . . . . . . . . . . . . . . . . . . . . 28
The Dolby Surround Adaptive Matrix . . . . . . . . . . . . . . . . . . . . . . . . . . . . . . . . . . . . . . . . . . 30
Mixing for Dolby Surround . . . . . . . . . . . . . . . . . . . . . . . . . . . . . . . . . . . . . . . . . . . . . . . . . 30
Contents iii
iv
Chapter 4. Dolby Surround Encoder and Decoder Plug-ins . . . . . . . . . . . . . . . . . . . . . . 31
The Dolby Surround Encoder Plug-in . . . . . . . . . . . . . . . . . . . . . . . . . . . . . . . . . . . . . . . . . . 31
The Dolby Surround Decoder Plug-in. . . . . . . . . . . . . . . . . . . . . . . . . . . . . . . . . . . . . . . . . . 33
Chapter 5. Dolby Surround Panner Plug-in . . . . . . . . . . . . . . . . . . . . . . . . . . . . . . . . . . . . 43
Appendix A. DSP Requirements. . . . . . . . . . . . . . . . . . . . . . . . . . . . . . . . . . . . . . . . . . . . . . 49
Dolby Surround Tools DSP Requirements . . . . . . . . . . . . . . . . . . . . . . . . . . . . . . . . . . . . . . 50
Appendix B. DSP Delays Incurred by TDM Plug-ins . . . . . . . . . . . . . . . . . . . . . . . . . . . . 51
Dolby Surround Tools DSP Delay . . . . . . . . . . . . . . . . . . . . . . . . . . . . . . . . . . . . . . . . . . . . 52
Appendix C. Dolby Surround Monitoring Systems . . . . . . . . . . . . . . . . . . . . . . . . . . . . . . 53
System Information . . . . . . . . . . . . . . . . . . . . . . . . . . . . . . . . . . . . . . . . . . . . . . . . . . . . . 53
Additional Equipment Required . . . . . . . . . . . . . . . . . . . . . . . . . . . . . . . . . . . . . . . . . . . . . 56
Speaker Sound Pressure Level. . . . . . . . . . . . . . . . . . . . . . . . . . . . . . . . . . . . . . . . . . . . . . 68
Appendix D. Calibrating Your Playback System . . . . . . . . . . . . . . . . . . . . . . . . . . . . . . . 69
Why Dolby Surround Calibration is Essential . . . . . . . . . . . . . . . . . . . . . . . . . . . . . . . . . . . . 69
Preparing to Calibrate. . . . . . . . . . . . . . . . . . . . . . . . . . . . . . . . . . . . . . . . . . . . . . . . . . . . 72
Setting the Playback Levels. . . . . . . . . . . . . . . . . . . . . . . . . . . . . . . . . . . . . . . . . . . . . . . . 73
Setting the Surround Delay . . . . . . . . . . . . . . . . . . . . . . . . . . . . . . . . . . . . . . . . . . . . . . . . 78
Saving Calibration Settings . . . . . . . . . . . . . . . . . . . . . . . . . . . . . . . . . . . . . . . . . . . . . . . . 79
Dolby Surround Tools Plug-ins Guide
Appendix E. Mixing for Dolby Surround. . . . . . . . . . . . . . . . . . . . . . . . . . . . . . . . . . . . . . . . 81
Announcers and Dialogue . . . . . . . . . . . . . . . . . . . . . . . . . . . . . . . . . . . . . . . . . . . . . . . . . 81
Interior Effects . . . . . . . . . . . . . . . . . . . . . . . . . . . . . . . . . . . . . . . . . . . . . . . . . . . . . . . . . 81
Positioning of the Stereo Image . . . . . . . . . . . . . . . . . . . . . . . . . . . . . . . . . . . . . . . . . . . . . 81
Panning Sounds . . . . . . . . . . . . . . . . . . . . . . . . . . . . . . . . . . . . . . . . . . . . . . . . . . . . . . . . 82
Stacking Encoded Tracks . . . . . . . . . . . . . . . . . . . . . . . . . . . . . . . . . . . . . . . . . . . . . . . . . . 82
Magic Surround. . . . . . . . . . . . . . . . . . . . . . . . . . . . . . . . . . . . . . . . . . . . . . . . . . . . . . . . . 83
Decoder Mistracking and Steering Artifacts . . . . . . . . . . . . . . . . . . . . . . . . . . . . . . . . . . . . . 83
Surround Channel Pumping . . . . . . . . . . . . . . . . . . . . . . . . . . . . . . . . . . . . . . . . . . . . . . . . 84
Proper Surround Level and Content. . . . . . . . . . . . . . . . . . . . . . . . . . . . . . . . . . . . . . . . . . . 84
Limiters, Delays, Reverb Units, Other Effects Processors . . . . . . . . . . . . . . . . . . . . . . . . . . . . 84
Stereo Synthesizers . . . . . . . . . . . . . . . . . . . . . . . . . . . . . . . . . . . . . . . . . . . . . . . . . . . . . . 85
Mono, Stereo, and Dolby Surround Compatibility . . . . . . . . . . . . . . . . . . . . . . . . . . . . . . . . . 85
4-2-4 Monitoring . . . . . . . . . . . . . . . . . . . . . . . . . . . . . . . . . . . . . . . . . . . . . . . . . . . . . . . . 86
Common Pitfalls . . . . . . . . . . . . . . . . . . . . . . . . . . . . . . . . . . . . . . . . . . . . . . . . . . . . . . . . 86
Appendix F. The Dolby Surround Templates . . . . . . . . . . . . . . . . . . . . . . . . . . . . . . . . . . . 87
Surround Encoding Template . . . . . . . . . . . . . . . . . . . . . . . . . . . . . . . . . . . . . . . . . . . . . . . 88
4-2-4 Monitoring Template . . . . . . . . . . . . . . . . . . . . . . . . . . . . . . . . . . . . . . . . . . . . . . . . . 89
Surround Encoding to Disk Template. . . . . . . . . . . . . . . . . . . . . . . . . . . . . . . . . . . . . . . . . . 90
Surround Encoding to DAT Template . . . . . . . . . . . . . . . . . . . . . . . . . . . . . . . . . . . . . . . . . . 91
I/O Setup for the Dolby Surround Templates . . . . . . . . . . . . . . . . . . . . . . . . . . . . . . . . . . . . 92
5.1 to LCRS Downmixing Template . . . . . . . . . . . . . . . . . . . . . . . . . . . . . . . . . . . . . . . . . . . 94
I/O Setup for the Downmixing from 5.1 to LCRS . . . . . . . . . . . . . . . . . . . . . . . . . . . . . . . . . 95
Appendix G. Use of Dolby Trademarks . . . . . . . . . . . . . . . . . . . . . . . . . . . . . . . . . . . . . . . . 97
Introduction . . . . . . . . . . . . . . . . . . . . . . . . . . . . . . . . . . . . . . . . . . . . . . . . . . . . . . . . . . . 97
Trademark and Standardization Agreements . . . . . . . . . . . . . . . . . . . . . . . . . . . . . . . . . . . . 97
Who Should Sign the Trademark and Standardization Agreement . . . . . . . . . . . . . . . . . . . . . 98
Licensing Procedure . . . . . . . . . . . . . . . . . . . . . . . . . . . . . . . . . . . . . . . . . . . . . . . . . . . . . 98
A Note to Replicators and Studios. . . . . . . . . . . . . . . . . . . . . . . . . . . . . . . . . . . . . . . . . . . . 99
Contacting Dolby Laboratories . . . . . . . . . . . . . . . . . . . . . . . . . . . . . . . . . . . . . . . . . . . . . . 99
Index . . . . . . . . . . . . . . . . . . . . . . . . . . . . . . . . . . . . . . . . . . . . . . . . . . . . . . . . . . . . . . . . . . . . 101
Contents v

vi
Dolby Surround Tools Plug-ins Guide
chapter 1
Introduction
Welcome to Dolby Surround ToolsDolby Surround Tools are TDM plug-ins for Pro Tools|HD systems. With Dolby Surround Tools, you will be able to produce authentic Dolby Surround mixes for television produc-tions, videos, DVDs, multimedia CD-ROMs, ad-vertising spots, interactive games, music CDs, and more.
On Pro Tools|HD systems, Dolby Surround Tools support sample rates up to 96 kHz.
The Dolby Surround Encoder and Dolby Sur-round Decoder plug-ins deliver the same ac-claimed Dolby Surround quality and perfor-mance as Dolby’s Model SEU4 and SDU4 analog, and DP563 and DP564 digital rack-mount hardware processors. Since Dolby Sur-round Tools work within the Pro Tools environ-ment, you’ll enjoy benefits and features (such as integrated automation and advanced routing options) that go well beyond stand-alone pro-cessors.
Dolby Surround Tools features:
• Digital implementation of the Dolby Sur-round Encoder and Pro Logic Decoder pro-cesses
• Creates Dolby Surround matrix-encoded two-channel audio, which allows playback through a consumer surround system or any ordinary stereo system, and also allows multi-channel Dolby Surround information to be distributed with only two channels
• Performs “4-2-4” monitoring, giving you a preview of the matrix-encoded process on dis-crete four-channel audio material
• Four-way automatable surround panner
• Comprehensive metering of four-channel and matrix-encoded stereo audio
• Adjustable surround delay and band-limited pink noise generator, to calibrate your studio’s monitoring system
Chapter 1: Introduction 1
2
Applications of Dolby Surround Tools
Designed for mixing in four-channel Dolby Sur-round, Dolby Surround Tools are the ideal solu-tion to mixing for television, video, multimedia, interactive games, and other consumer-distrib-uted formats.
Dolby Surround Tools can also play an impor-tant role in the audio post-production process for feature films and other theatrical picture re-leases. Using Dolby Surround Tools’ “4-2-4” monitoring capability, it’s possible to monitor a four-channel mix through the Surround En-coder and Decoder, without actually creating a two-channel Dolby Surround-encoded mix. This way, audio editors, mixers, and sound de-signers can preview how the mix will sound once it’s finally encoded on the film mixing stage.
Dolby Surround Tools must not be used for mas-tering matrix-encoded material for theatrical films. For this application, Dolby Laboratories offers specialized film sound Encoder and De-coder systems, and also has available profes-sional Dolby Sound Consultants who can assist you during production and post-production.
Dolby Surround Tools does not perform Dolby Digital (AC-3) encoding. Consequently, it does not support the Dolby Digital 5.1 multichannel format (which delivers the rear surround speak-ers with discrete left and right channels, and also includes a discrete subwoofer channel).
If you have any questions regarding Dolby Sur-round Tools applications, or Dolby’s film sound Encoder/Decoder products, please contact Dolby Laboratories (see “Contacting Dolby Lab-oratories” on page 99).
Dolby Surround Tools Plug-ins Guide
Contents of the Boxed Version of Your Plug-inYour Dolby Surround Tools plug-in package contains the following components:
• Installation disc
• Digidesign Registration Information Card
• One of the following authorization cards for authorizing plug-ins with an iLok USB Smart Key (not supplied):
• Activation Card with an Activation Code
– or –
• License Card
System Requirements
To use the Dolby Surround Tools plug-ins you need the following:
• An iLok USB Smart Key
• An iLok.com account for managing iLok li-censes
◆ One of the following:
• A Digidesign-qualified Pro Tools|HD sys-tem or Pro Tools|HD Accel system
– or –
• A Digidesign-qualified VENUE system
For complete system requirements, visit the Digidesign website (www.digidesign.com).
Compatibility Information
Digidesign can only assure compatibility and provide support for hardware and software it has tested and approved.

For a list of Digidesign-qualified computers, op-erating systems, hard drives, and third-party de-vices, refer to the Digidesign website (www.digidesign.com).
Playback System Requirements
To monitor your mixes in Dolby Surround, you will need:
■ A Dolby Surround-compatible playback sys-tem: a five-speaker monitor system, consisting of three “front” speakers (left-channel, center-channel, and right-channel), plus two “rear” surround speakers (rear-left and rear-right, fed monaurally by the single surround channel)
■ At least four channels of power amplification, matched to the demands of your speakers (this could be two separate stereo power amps or a specialized multi-channel power amp)
■ ProControl or Control|24 (optional)
■ A 4-bus (or greater) mixing console (optional)
Dolby Surround-Compatible Playback Systems
It is strongly recommend that your three front speakers be “matched” (all identical), and that they offer relatively accurate, full-range perfor-mance. Professional studio monitor speakers are usually a much better choice than ordinary home hi-fi speakers, since they tend to be more accurate. For the rear surround speakers, be-cause the surround channel has limited fre-quency response, it is possible to use lesser-qual-ity speakers—even inexpensive hi-fi speakers—and they needn’t be matched to the front speak-
ers. However, surround speakers with relatively wide high-frequency dispersion (unlike the nar-row dispersion pattern of certain professional monitor speakers) are recommended.
If it’s not possible to have three matched front speakers, you can use a smaller center speaker of similar sonic character. You can also use a three-channel, four-speaker playback system—with-out a center-channel speaker (the Dolby Sur-round Decoder plug-in offers several center speaker settings, including None). Without a center speaker, it is vital to sit in the “sweet spot” between the front left and right speakers—and even so, you may encounter mixing prob-lems. A complete four-channel, five-speaker Dolby Surround playback system is the best way to ensure that your mix is what the audience will hear.
While the Dolby Surround Decoder does not produce an LFE channel, you may still want to use a subwoofer with a bass management system.
Chapter 1: Introduction 3
4
For more information about selecting an appro-priate Dolby Surround playback system, see Appendix C, “Dolby Surround Monitoring Sys-tems.”
Setting Up and Positioning Your Playback System
If your studio is already configured for Dolby Surround mixing, you may already have a five-speaker, four-channel playback system installed. However, if you’re new to mixing Dolby Sur-round, this would be a good time to set up and position your playback system.
For detailed instructions on setting up your stu-dio for Dolby Surround mixing, see Appendix C, “Dolby Surround Monitoring Systems.”
Calibrating Your Playback System
Before you start mixing in Dolby Surround, you will need to calibrate your Dolby Surround play-back system. The calibration procedure ensures consistent monitoring levels from each speaker.
It is recommend that you do not use a Dolby Surround Pro Logic amplifier or receiver to decode a Dolby Surround matrix-encoded signal to drive your five monitoring speak-ers. The reason is that Pro Logic consumer products are not built to the same profes-sional specifications as the Model SDU4 Decoder, Model DP564 Decoder, and Sur-round Decoder plug-in. Furthermore, Pro Logic-equipped consumer products have auto-balancing features which, if used in a mix monitoring situation, may contribute to inappropriate mixing decisions. Only by using one of Dolby’s professional decoder products can you be assured of professional results.
Dolby Surround Tools Plug-ins Guide
The Dolby Surround Decoder plug-in includes everything you need to perform a professional-quality calibration. For detailed information on calibrating your Dolby Surround playback sys-tem, see Appendix D, “Calibrating Your Play-back System.”
Using an External Decoder with the Dolby Surround Encoder Plug-in
You can use a stand-alone Dolby Surround hard-ware decoder (such as the Model SDU4 or Model DP564 decoder) instead of the Surround De-coder plug-in. In this situation, you’ll mix within Pro Tools using the Dolby Surround En-coder plug-ins, and you’ll use the hardware de-coder for monitoring your encoded Dolby Sur-round mix.
Register Your Plug-insIf you purchase a plug-in online from the Digi-Store (www.digidesign.com) using Internet Acti-vation, you are automatically registered.
If you purchase a plug-in boxed version, check the included Digidesign Registration Informa-tion Card for information about how to register online.
Registered users receive periodic software up-date and upgrade notices.
Please refer to the Digidesign website (www.digidesign.com) or the Digidesign Regis-tration Information Card for information on technical support.
For more information on Dolby Surround hardware decoders, visit Dolby’s website (www.dolby.com).
Working with Plug-insBesides the information provided in this guide, refer to the DigiRack Plug-ins Guide for general information on working with plug-ins, includ-ing:
• Inserting Plug-ins on Tracks
• Clip Indicators
• The Plug-in Window
• Adjusting Parameters
• Automating Plug-ins
• Using the Librarian
Using This GuideDolby Surround Tools are designed to be easy to understand and use, even if you’ve never mixed in Dolby Surround. To get the most out of all that Dolby Surround Tools have to offer, please read the complete guide, and allow yourself some “practice time” before you launch into a project.
This guide assumes that you’re familiar with Pro Tools, and that you have a good under-standing of your Digidesign-qualified computer and its operating system. If you’re unfamiliar with any terms or techniques that are specific to Pro Tools or your computer, refer to the appro-priate documentation.
Experienced Users
If you are familiar with mixing in Dolby Sur-round and have used stand-alone Dolby Sur-round Encoder and Decoder products, you may already understand many of the concepts, terms, and techniques described in this guide. Functionally, using Pro Tools with the Dolby Surround Tools plug-ins is similar to the tradi-tional approach of using a professional mixing
console with Dolby Surround hardware encod-ers and decoders (such as the Dolby Surround SEU4 or DP563 encoder and the SDU4 or DP564 decoder).
Conventions Used in This GuideAll Digidesign guides use the following conven-tions to indicate menu choices and key com-mands::
The following symbols are used to highlight im-portant information:
Convention Action
File > Save Choose Save from the File menu
Control+N Hold down the Control key and press the N key
Control-click Hold down the Control key and click the mouse button
Right-click Click with the right mouse button
User Tips are helpful hints for getting the most from your Pro Tools system.
Important Notices include information that could affect your Pro Tools session data or the performance of your Pro Tools system.
Shortcuts show you useful keyboard or mouse shortcuts.
Cross References point to related sections in the Pro Tools Guides.
Chapter 1: Introduction 5
6
About www.digidesign.comThe Digidesign website (www.digidesign.com) is your best source for information to help you get the most out of your Pro Tools system. The following are just a few of the services and fea-tures available.
Registration Register your purchase online. See the enclosed registration form for details.
Support Contact Digidesign Technical Support or Customer Service; download software up-dates and the latest online manuals; browse the Compatibility documents for system require-ments; search the online Answerbase; join the worldwide Pro Tools community on the Digide-sign User Conference.
Training and Education Become a certified Pro Tools Operator or Expert; study on your own using courses available online, or find out how you can learn in a classroom setting at a certified Pro Tools Training Center.
Products and Developers Learn about Digidesign products; download demo software; learn about our Development Partners and their plug-ins, applications, and hardware.
News and Events Get the latest news from Digidesign; sign up for a Pro Tools demo.
To learn more about these and other resources available from Digidesign, visit the Digidesign website (www.digidesign.com).
Dolby Surround Tools Plug-ins Guide
chapter 2
Installation and Setup
Installing Dolby Surround ToolsInstallers for your plug-ins can be downloaded from the DigiStore (www.digidesign.com) or can be found on the plug-in installer disc (included with boxed versions of plug-ins). Additionally, an installer may also be available on a Pro Tools software bundle installer disc.
Installation steps are essentially the same, re-gardless of the bundle, package, or system you purchase.
Installation
To install the Dolby Surround Tools plug-ins:
1 Do one of the following:
• Download the appropriate plug-in installer for your computer platform from the Digidesign website (www.digidesign.com). After downloading, make sure the installer is uncompressed (.ZIP on Windows or .SIT on Mac).
– or –
• Insert the Installer disc into your computer.
2 Double-click the plug-in installer application.
3 Follow the on-screen instructions to complete the installation.
4 When installation is complete, click Finish (Windows) or Quit (Mac).
When you open Pro Tools, you are prompted to authorize your new plug-in.
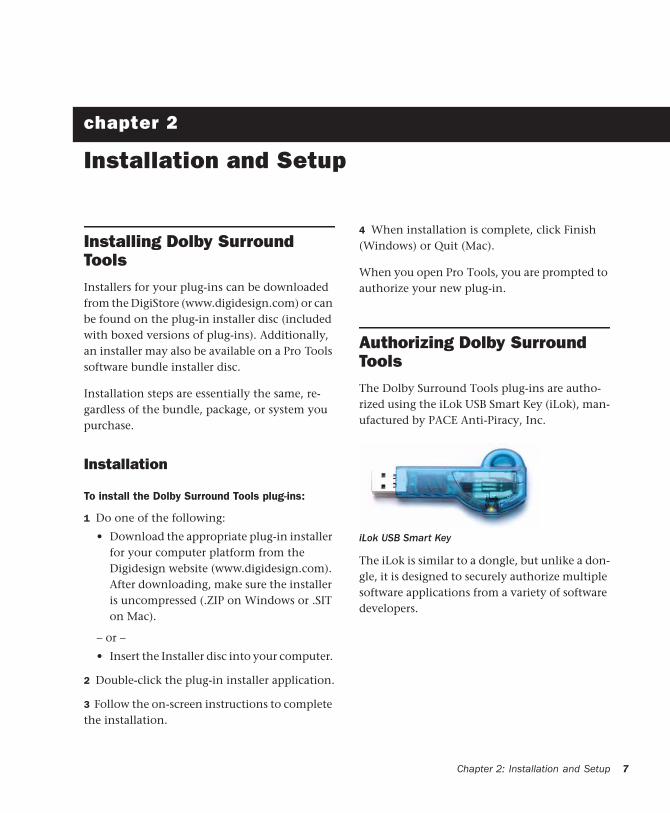
Authorizing Dolby Surround ToolsThe Dolby Surround Tools plug-ins are autho-rized using the iLok USB Smart Key (iLok), man-ufactured by PACE Anti-Piracy, Inc.
The iLok is similar to a dongle, but unlike a don-gle, it is designed to securely authorize multiple software applications from a variety of software developers.
iLok USB Smart Key
Chapter 2: Installation and Setup 7
8
This key can hold over 100 licenses for all of your iLok-enabled software. Once an iLok is au-thorized for a given piece of software, you can use the iLok to authorize that software on any computer.
If you purchased a plug-in online at the DigiStore (www.digidesign.com), authorize the plug-in by downloading licenses from iLok.com to an iLok.
If you purchased a boxed version of a plug-in, it comes with either an Activation Code (on the included Activation Card) or an iLok License card:
• To authorize plug-ins using an Activation Code, see “Authorizing Plug-ins Using an Ac-tivation Code” on page 8.
• To authorize plug-ins using an iLok License Card, see “Authorizing Plug-ins Using a Li-cense Card” on page 9
The iLok USB Smart Key is not supplied with your plug-in or software option. You can use the one included with certain Pro Tools systems (such as Pro Tools|HD-series systems), or purchase one separately.
See the iLok Usage Guide for details, or visit the iLok website (www.iLok.com).
Dolby Surround Tools Plug-ins Guide
Authorizing Plug-ins Using an Activation Code
To authorize a plug-in using an Activation Code:
1 If you do not have an existing iLok.com ac-count, visit www.iLok.com and sign up for an iLok.com account.
2 Transfer the license for your plug-in to your iLok.com account by doing the following:
• Visit http://secure.digidesign.com/activation.
• Input your Activation Code (listed on your Activation Card) and your iLok.com User ID. Your iLok.com User ID is the name you create for your iLok.com account.
3 Transfer the licenses from your iLok.com ac-count to your iLok USB Smart Key by doing the following:
• Insert the iLok into an available USB port on your computer.
• Go to www.iLok.com and log in.
• Follow the on-screen instructions for trans-ferring your licences to your iLok.
4 Launch Pro Tools.
5 If you have any installed unauthorized plug-ins or software options, you are prompted to au-thorize them. Follow the on-screen instructions to complete the authorization process.
For information about iLok technology and licenses, see the electronic PDF of the iLok Usage Guide.
Authorizing Plug-ins Using a License Card
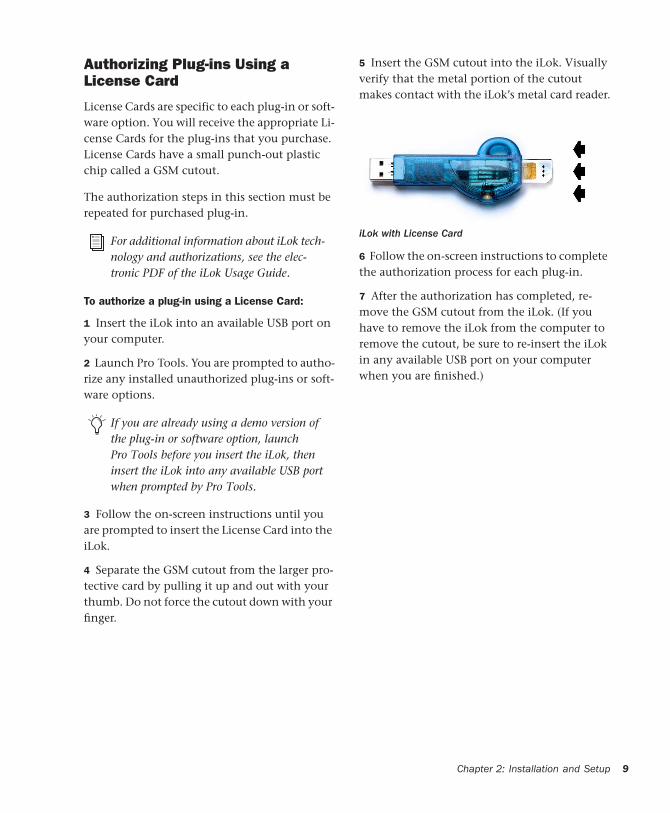
License Cards are specific to each plug-in or soft-ware option. You will receive the appropriate Li-cense Cards for the plug-ins that you purchase. License Cards have a small punch-out plastic chip called a GSM cutout.
The authorization steps in this section must be repeated for purchased plug-in.
To authorize a plug-in using a License Card:
1 Insert the iLok into an available USB port on your computer.
2 Launch Pro Tools. You are prompted to autho-rize any installed unauthorized plug-ins or soft-ware options.
3 Follow the on-screen instructions until you are prompted to insert the License Card into the iLok.
4 Separate the GSM cutout from the larger pro-tective card by pulling it up and out with your thumb. Do not force the cutout down with your finger.
For additional information about iLok tech-nology and authorizations, see the elec-tronic PDF of the iLok Usage Guide.
If you are already using a demo version of the plug-in or software option, launch Pro Tools before you insert the iLok, then insert the iLok into any available USB port when prompted by Pro Tools.
5 Insert the GSM cutout into the iLok. Visually verify that the metal portion of the cutout makes contact with the iLok’s metal card reader.
6 Follow the on-screen instructions to complete the authorization process for each plug-in.
7 After the authorization has completed, re-move the GSM cutout from the iLok. (If you have to remove the iLok from the computer to remove the cutout, be sure to re-insert the iLok in any available USB port on your computer when you are finished.)
iLok with License Card
Chapter 2: Installation and Setup 9
10
Removing Plug-insIf you need to remove a plug-in from your sys-tem, follow the instructions below for your computer platform.
Windows
To remove a plug-in:
1 Click Start.
2 Click Control Panel.
3 Double-click Add or Remove Programs.
4 Select the plug-in from the list of installed ap-plications.
5 Click the Change/Remove button.
6 Click OK to remove the plug-in.
7 When removal is complete, close the Add or Remove Programs window.
Mac OS X
To remove a plug-in:
1 Locate and open the Plug-ins folder on your Startup drive (Library/Application Support/Digidesign/Plug-ins).
2 Do one of the following:
• Drag the plug-in to the Trash and empty the Trash.
– or –
• Drag the plug-in to the Plug-ins (Unused) folder.
Dolby Surround Tools Plug-ins Guide
Traditional Analog ConfigurationTraditionally, Dolby Surround encoding is done using a mixing console and a stand-alone Dolby Surround encoder (such as the SEU4).
During the mixing session, multiple source tracks—from multitrack tape recorders, film sound “mag” players, or even Pro Tools—feed the mixing console’s input channels. Each input channel is then routed, using pan controls and bus-assign switches, to one or more of the con-sole’s bus outputs: bus 1 is typically “Left”; bus 2 is “Right”; bus 3 is “Center”; and bus 4 is “Sur-round.” (Specialized film mixing consoles have dedicated LCRS busses, as well as Left-Right pan and Center-Surround pan controls, or joystick panners.)
The console’s four output busses are then patched to the Encoder’s four inputs. In turn, the Encoder’s two outputs are routed to the Lt and Rt inputs of a stand-alone Dolby SDU4 De-coder, or may be routed to a recording device, such as a DAT recorder. Finally, the decoder’s four LCRS outputs are then routed to four chan-nels of amplification and a five-speaker play-back system. (Remember, the Surround channel is mono, even though it feeds two or more rear speakers.)
Using this common setup, you can create a two-channel Dolby Surround master, while simulta-neously monitoring the mix in four-channel Dolby Surround. This can also be accomplished within Pro Tools using Dolby Surround Tools.
Configuring Pro Tools for Dolby Surround MixingUsing the multichannel mixer in Pro Tools, you can encode your mix for Dolby Surround; and decode it to monitor your mix as it might be heard through different consumer Dolby Sur-round playback systems.
Figure 1. A “traditional” Dolby Surround mixing arrangement, showing the Dolby SEU4 Surround Encoder and Dolby SDU4 Surround Decoder, as well as five monitor speakers.
For an overview of Dolby Surround, see Chapter 3, “Overview of Dolby Surround.”
For information on mixing surround in Pro Tools, see the Pro Tools Reference Guide.
Encoding
During Dolby Surround encoding, four chan-nels of audio—Left, Center, Right, and Surround (LCRS)—get “matrixed” together into just two channels of Dolby Surround audio, called Left Total (Lt) and Right Total (Rt) (see “Matrix En-coding” on page 26).
To encode Dolby Surround in Pro Tools and create a Dolby Surround Master recording:
1 Route audio tracks to a multichannel (LCRS) Auxiliary Input track for Dolby Surround encod-ing.
2 Route the output of the Lt/Rt-encoded signal to physical analog or digital outputs on your Digidesign audio interface (for example, to record to VHS or DAT).
– or –
Bounce or record the output of the Lt/Rt-en-coded signal to disk.
Decoding
During Dolby Surround decoding, the LCRS channels are extracted from the encoded Lt and Rt channels (see “Matrix Decoding” on page 27).
To monitor Dolby Surround while mixing in Pro Tools:
1 Bus the Dolby Surround encoded two-channel signal to a stereo Auxiliary Input track for Dolby Surround decoding.
2 Route the output of the Dolby Surround de-coded signals to physical outputs on your Digidesign audio interface for LCRS monitoring.
Chapter 2: Installation and Setup 11
12
Configuring the I/O Setup in Pro Tools
In preparation for mixing in Dolby Surround with Pro Tools, you will need to create LCRS and stereo output and bus paths in the I/O Setup.
Since each Pro Tools system can have a different numbers and types of audio interfaces, the I/O Setup configuration may be different from the following configuration.
To configure the I/O Setup for Dolby Surround:
1 Make sure your audio interfaces are enabled and configured properly in the Hardware Setup.
2 Choose Setup > I/O.
3 Click the Output tab.
4 Create an LCRS path on channels 1–4 and name it (such as “LCRS Mon”).
When you install Dolby Surround Tools, I/O Settings files for Dolby Surround are in-stalled in /Digidesign/Dolby Surround Tools/Surround Templates/Surround IO Set-tings.
Dolby Surround Tools Plug-ins Guide
5 Create stereo paths on channels 5–6 and 7–8 and name them. If you want to record your Dolby Surround encoded mix to DAT, enable Digital (AES/EBU or S/PDIF) on one of the stereo channels.
6 Click the Bus tab.
7 Create an LCRS path on busses 1–4 and name it (such as “LCRS bus”).
8 Create a stereo path on busses 5–6 and name it (such as “Lt/Rt bus”).
I/O Setup dialog, Output tab (96 I/O shown)
I/O Setup dialog, Bus tab
9 When you are finished configuring the I/O Setup, click OK.
Routing for Dolby Surround
You will use LCRS and stereo outputs and busses configured in the I/O setup to:
• Route audio tracks to the Dolby Surround En-coder.
• Route the Dolby Surround Lt/Rt-encoded sig-nal to physical outputs on your audio inter-face or to audio tracks for recording the Dolby Surround-encoded master.
• Route the Dolby Surround Lt/Rt-encoded sig-nal to the Dolby Surround Decoder.
• Route the Dolby Surround decoded signal to physical outputs on your Digidesign audio in-terface for LCRS monitoring.
Routing for Dolby Surround Encoding
To route audio for Dolby Surround encoding:
1 Configure your I/O setup as described in “Configuring the I/O Setup in Pro Tools” on page 12.
2 Create one or more new audio tracks. These will be your source audio tracks.
For detailed information on the I/O Setup, see the Pro Tools Reference Guide.
For Pro Tools sessions that are pre-config-ured for mixing in Dolby Surround, see Appendix F, “The Dolby Surround Tem-plates.”
3 Select an LCRS bus for the output of all audio tracks you want to mix to the Dolby encoder. An LCRS Panner will appear on each LCRS bussed track (for stereo tracks, there will be two LCRS Panners—one for each channel).
4 Create an LCRS Auxiliary Input track.
Selecting an LCRS bus output for an audio track
For detailed information on Pro Tools sur-round panning, see the Pro Tools Reference Guide.
For compatibility with older surround ses-sions you can use the Dolby Surround Pan-ner plug-in. See Chapter 5, “Dolby Sur-round Panner Plug-in.”
Chapter 2: Installation and Setup 13
14
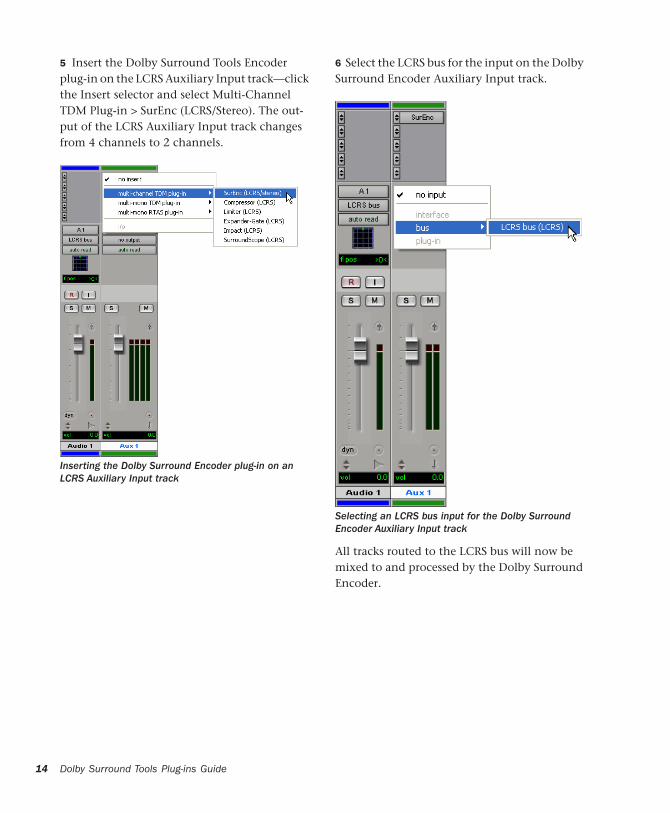
5 Insert the Dolby Surround Tools Encoder plug-in on the LCRS Auxiliary Input track—click the Insert selector and select Multi-Channel TDM Plug-in > SurEnc (LCRS/Stereo). The out-put of the LCRS Auxiliary Input track changes from 4 channels to 2 channels.
Inserting the Dolby Surround Encoder plug-in on an LCRS Auxiliary Input track
Dolby Surround Tools Plug-ins Guide
6 Select the LCRS bus for the input on the Dolby Surround Encoder Auxiliary Input track.
All tracks routed to the LCRS bus will now be mixed to and processed by the Dolby Surround Encoder.
Selecting an LCRS bus input for the Dolby Surround Encoder Auxiliary Input track
Outputs from the Dolby Surround Encoder
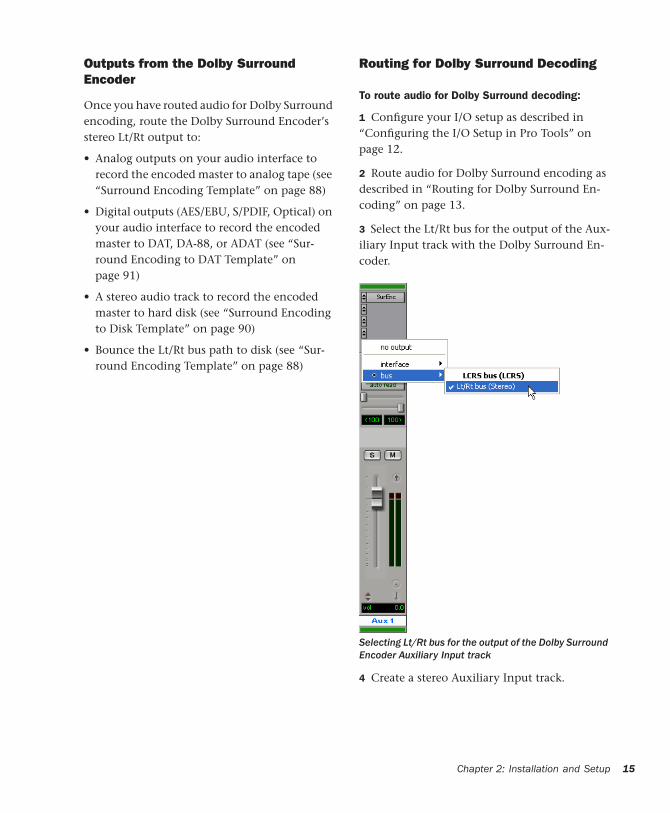
Once you have routed audio for Dolby Surround encoding, route the Dolby Surround Encoder’s stereo Lt/Rt output to:
• Analog outputs on your audio interface to record the encoded master to analog tape (see “Surround Encoding Template” on page 88)
• Digital outputs (AES/EBU, S/PDIF, Optical) on your audio interface to record the encoded master to DAT, DA-88, or ADAT (see “Sur-round Encoding to DAT Template” on page 91)
• A stereo audio track to record the encoded master to hard disk (see “Surround Encoding to Disk Template” on page 90)
• Bounce the Lt/Rt bus path to disk (see “Sur-round Encoding Template” on page 88)
Routing for Dolby Surround Decoding
To route audio for Dolby Surround decoding:
1 Configure your I/O setup as described in “Configuring the I/O Setup in Pro Tools” on page 12.
2 Route audio for Dolby Surround encoding as described in “Routing for Dolby Surround En-coding” on page 13.
3 Select the Lt/Rt bus for the output of the Aux-iliary Input track with the Dolby Surround En-coder.
4 Create a stereo Auxiliary Input track.
Selecting Lt/Rt bus for the output of the Dolby Surround Encoder Auxiliary Input track
Chapter 2: Installation and Setup 15
16
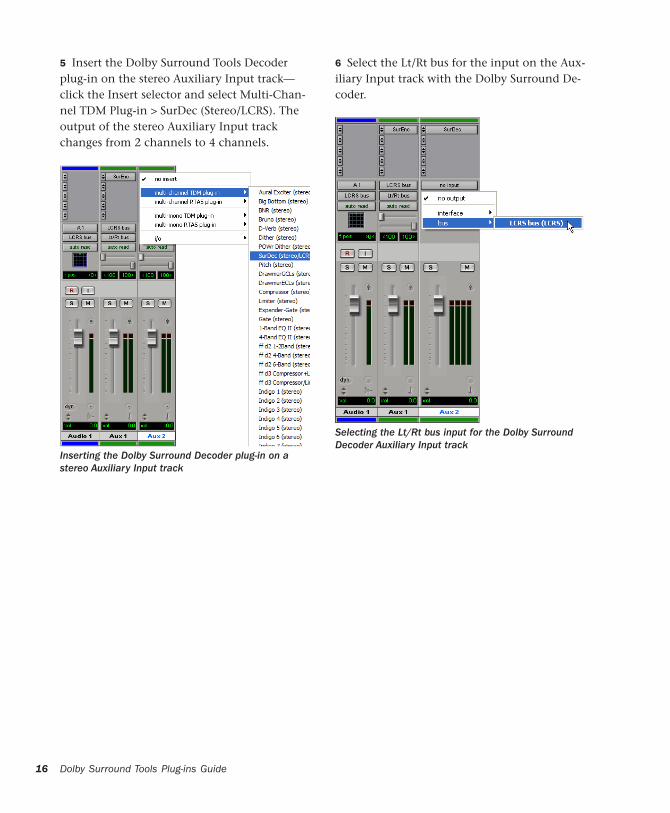
5 Insert the Dolby Surround Tools Decoder plug-in on the stereo Auxiliary Input track—click the Insert selector and select Multi-Chan-nel TDM Plug-in > SurDec (Stereo/LCRS). The output of the stereo Auxiliary Input track changes from 2 channels to 4 channels.
Inserting the Dolby Surround Decoder plug-in on a stereo Auxiliary Input track
Dolby Surround Tools Plug-ins Guide
6 Select the Lt/Rt bus for the input on the Aux-iliary Input track with the Dolby Surround De-coder.
Selecting the Lt/Rt bus input for the Dolby Surround Decoder Auxiliary Input track
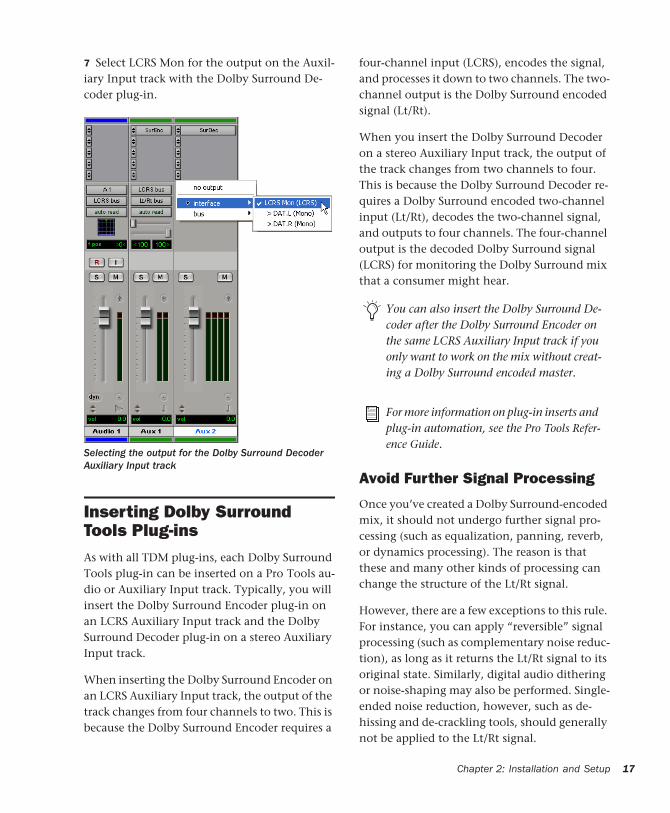
7 Select LCRS Mon for the output on the Auxil-iary Input track with the Dolby Surround De-coder plug-in.
Inserting Dolby Surround Tools Plug-insAs with all TDM plug-ins, each Dolby Surround Tools plug-in can be inserted on a Pro Tools au-dio or Auxiliary Input track. Typically, you will insert the Dolby Surround Encoder plug-in on an LCRS Auxiliary Input track and the Dolby Surround Decoder plug-in on a stereo Auxiliary Input track.
When inserting the Dolby Surround Encoder on an LCRS Auxiliary Input track, the output of the track changes from four channels to two. This is because the Dolby Surround Encoder requires a
Selecting the output for the Dolby Surround Decoder Auxiliary Input track
four-channel input (LCRS), encodes the signal, and processes it down to two channels. The two-channel output is the Dolby Surround encoded signal (Lt/Rt).
When you insert the Dolby Surround Decoder on a stereo Auxiliary Input track, the output of the track changes from two channels to four. This is because the Dolby Surround Decoder re-quires a Dolby Surround encoded two-channel input (Lt/Rt), decodes the two-channel signal, and outputs to four channels. The four-channel output is the decoded Dolby Surround signal (LCRS) for monitoring the Dolby Surround mix that a consumer might hear.
Avoid Further Signal Processing
Once you’ve created a Dolby Surround-encoded mix, it should not undergo further signal pro-cessing (such as equalization, panning, reverb, or dynamics processing). The reason is that these and many other kinds of processing can change the structure of the Lt/Rt signal.
However, there are a few exceptions to this rule. For instance, you can apply “reversible” signal processing (such as complementary noise reduc-tion), as long as it returns the Lt/Rt signal to its original state. Similarly, digital audio dithering or noise-shaping may also be performed. Single-ended noise reduction, however, such as de-hissing and de-crackling tools, should generally not be applied to the Lt/Rt signal.
You can also insert the Dolby Surround De-coder after the Dolby Surround Encoder on the same LCRS Auxiliary Input track if you only want to work on the mix without creat-ing a Dolby Surround encoded master.
For more information on plug-in inserts and plug-in automation, see the Pro Tools Refer-ence Guide.
Chapter 2: Installation and Setup 17
18
It is also possible to take two or more Dolby Sur-round-encoded Lt/Rt pairs and mix them to-gether at equal levels to create a master Lt/Rt sig-nal. Check the overall effect by decoding the master signal, since interaction between the two Lt/Rt pairs may prevent the decoder steering logic from reproducing the soundfield as you had intended.
Finally, it is not recommended that you change the gain of the encoded Lt/Rt signal. Doing so may cause clipping in the Dolby Surround De-coder, or may cause the Dolby B-type noise re-duction in the Surround channel path to mis-track. Instead, to create fades, for instance, change the level going into the Dolby Surround Encoder; to adjust the monitoring level, change the level coming out of the Dolby Surround De-coder.
If you need to apply sample rate conversion to Dolby Surround-encoded audio, be sure to normalize the output to –0.1 dB first to avoid clipping.
Use the Surround Scope plug-in before the Dolby Surround Encoder and after the Dolby Surround Decoder for a visual refer-ence to compare the unencoded mix to the decoded mix.
Dolby Surround Tools Plug-ins Guide
5.1 and LCRSIf your studio is configured for mixing and mon-itoring in 5.1, Pro Tools can be configured to downmix from 5.1 to LCRS for Dolby Surround encoding. Pro Tools can also be configured to monitor an LCRS mix on a 5.0 playback system.
When downmixing from 5.1 to LCRS, the 5.1 Ls and Rs channels will be summed to the single surround channel (S). Because you will be sum-ming the 5.1 Ls and Rs channels, you will need to attenuate the gain by –3 dB to compensate.
There is a risk of phase cancellation when sum-ming 5.1 Ls and Rs channels to the single LCRS surround channel. Also, be aware that the Dolby Surround channel (S) is band-limited to 7 kHz.
The 5.1 LFE channel can be mixed to the Left and Right LCRS channels.
When monitoring an LCRS mix on your 5.1 playback system, there will be no LFE channel generated, so you will actually be monitoring in 5.0. A bass management system is recommend for handling low frequency material. Because you will be splitting the LCRS surround channel to the 5.0 Ls and Rs channels, you will need to boost the gain when monitoring by +2.5 dB to compensate for the panner.
For a Pro Tools session that is pre-config-ured for downmixing from 5.1 to LCRS, see “5.1 to LCRS Downmixing Template” on page 94.
Configuring the I/O Setup for 5.1 and LCRS
When configured for mixing from 5.1 to LCRS for Dolby Surround, the Pro Tools I/O Setup will include 5.1, LCRS, LCR, stereo, and mono out-put and bus paths.
To monitor your LCRS Dolby Surround mix in a 5.1 session, you will need to configure the out-puts in your I/O Setup using a 5.1 path with an LCR sub-path and a stereo surround (Rs and Ls) sub-path.
Also, in addition to the LCRS and stereo paths for the Dolby Surround Encoder and Decoder, you will need to create a 5.1 bus path and two LCRS bus paths, each with LCR, stereo, and mono sub-paths for routing the 5.1 mix to the encoder and for monitoring the decoded signal.
The following example shows a 96 I/O. How-ever, since each Pro Tools system can have a dif-ferent numbers and types of audio interfaces, the I/O Setup configuration may be different from the following configuration.
To configure the I/O Setup for Dolby Surround in a 5.1 session:
1 Make sure your audio interfaces are enabled and configured properly in the Hardware Setup.
2 Choose Setup > I/O.
3 Click the Output tab.
4 Create an 5.1 path on channels 1–6.
5 Create an LCR sub-path for the 5.1 path on channels 1–3.
6 Create a stereo sub-path for the 5.1 path on channels 4–5.
7 Create a stereo path on channels 7–8. If you want to record your Dolby Surround encoded mix to DAT, enable Digital (AES/EBU, S/PDIF) on the corresponding stereo channels of your audio interface.
8 Click the Bus tab.
9 Create a 5.1 path with LCR, L/R, C, Ls/Rs, and LFE sub-paths.
10 Create an LCRS path and name it (such as “LCRS Encode”).
11 Create LCR, L/R (stereo), and S (mono) sub-paths for the LCRS encoding path.
12 Create a stereo path and name it (such as “Lt/Rt”).
13 Create an additional LCRS path for routing the decoded Dolby Surround signal for monitor-ing.
I/O Setup dialog, Output tab (96 I/O shown)
Chapter 2: Installation and Setup 19
20
14 Create LCR, L/R (stereo), and S (mono) sub-paths for the LCRS monitoring path.
15 When you are finished configuring the I/O Setup, click OK.
Routing 5.1 to LCRS for Dolby Surround Encoding
After you have configured the I/O Setup (see “Configuring the I/O Setup for 5.1 and LCRS” on page 19), you can downmix your 5.1 session to LCRS for Dolby Surround encoding.
To route audio for Dolby Surround Encoding in a 5.1 session:
1 Create a 5.1 Auxiliary Input track (or use the one that already exists for the 5.1 mix).
2 Buss your 5.1 mix to the new (or existing) 5.1 Auxiliary Input track. Use this track to monitor your 5.1 mix. Mute it when you don’t want to hear it.
3 Create an LCR Auxiliary Input track.
I/O Setup dialog, Bus tab
For detailed information on the I/O Setup, see the Pro Tools Reference Guide.
Dolby Surround Tools Plug-ins Guide
4 Select the LCR sub-path of the 5.1 bus path for the input on the LCR Auxiliary Input track.
5 Select the LCR sub-path of the LCRS encode bus path for the output on the LCR Auxiliary In-put track.
6 Create a stereo Auxiliary Input track.
7 Select the stereo (Ls/Rs) sub-path of the 5.1 bus path for the input on this track.
8 Select the S sub-path of the LCRS to Encoder bus path for the output on this track.
9 Set this track’s volume fader to –6 dB to com-pensate for the summing of channels.
10 Create a mono Auxiliary Input track.
11 Select the mono (LFE) sub-path of the 5.1 bus path for the input on this track.
12 Select the mono center (C) sub-path of the LCRS to Encoder bus path for the output on this track.
13 Create an LCRS Auxiliary Input track.
14 Insert the Dolby Surround Tools Encoder plug-in on this track—click the Insert selector and select Multi-Channel TDM Plug-in > SurEnc (LCRS/Stereo). The output of this track changes from 4 channels to 2 channels.
15 Select the LCRS encode bus for the input on this track.
Because of phase cancellation, any out-of-phase content in the original, 5.1 Ls and Rs channels will not be audible when summed to the mono S channel of the LCRS path.
Because low frequency content, especially material with sharp attacks, can cause the entire mix to shift to the center channel, be careful when mixing the LFE channel to the LCRS path for Dolby Surround encoding.
Routing to Monitor LCRS on 5.0
To route audio for Dolby Surround Encoding, Decoding, and monitoring on a 5.0 playback system:
1 Configure your I/O setup as described in “Configuring the I/O Setup for 5.1 and LCRS” on page 19.
2 Route audio for downmixing from 5.1 to LCRS for Dolby Surround encoding as described in “Routing 5.1 to LCRS for Dolby Surround En-coding” on page 20.
3 Create a stereo track, insert the Dolby Sur-round Decoder, and route audio for Dolby Sur-round decoding as described in “Routing for Dolby Surround Decoding” on page 15.
4 Select the LCRS monitoring bus path for the output on this track.
5 Create an LCR Auxiliary Input track.
6 Select the LCR sub-path of the LCRS monitor-ing bus path for the input on this track.
7 Select the LCR sub-path of the 5.1 output path for the output on this track.
8 Create an mono Auxiliary Input track.
9 Select the S (mono) sub-path of the LCRS monitoring bus for the input on this track.
10 Select the stereo Surround (L/R) sub-path of the 5.1 output path for the output on this track and be sure to keep the pan center.
11 Set this track’s volume fader to +2.5 dB to compensate for the panner.
Opening Older Dolby Surround SessionsIf you have a session created using an earlier ver-sion of Dolby Surround Tools, you can open it and continue working using Dolby Surround Tools version 7.0 and higher. However, because of support for multichannel tracks and surround mixing in Pro Tools 5.1 or higher, the Mas-ter/Slave paradigm used for linking the Dolby Surround Encoder and Decoder plug-ins in ear-lier versions of Dolby Surround Tools no longer applies. You will need to reconfigure the ses-sion, adding bussing, Auxiliary Input tracks, and the Dolby Surround Encoder and Decoder plug-ins as described in “Configuring Pro Tools for Dolby Surround Mixing” on page 11.
Any tracks using the Dolby Surround Panner will retain their automation playlists. You can continue to use the Dolby Surround Panner, or use the Pro Tools Surround (LCRS) Panner. If you want to use existing panning automation, copy and special paste the automation playlists from the Dolby Surround Panner (front/back and left/right) to the Pro Tools panner’s auto-mation playlists (front/rear and front position).
For more information on using the Special Paste function for automation data, see the Pro Tools Reference Guide.
Chapter 2: Installation and Setup 21

22
Dolby Surround Tools Plug-ins Guide
chapter 3
Overview of Dolby Surround
Dolby Surround: Striving for Better SoundThis chapter covers the theory behind Dolby Surround. If you are new to Dolby Surround, this chapter will give you the foundation you’ll need to understand how Dolby Surround Tools work. If you are experienced with Dolby Sur-round, this chapter will be a good review.
Limitations of Stereo Playback
We have been listening to recorded sound for about a century now; for most of that time, we’ve listened monaurally, through a single loudspeaker. (To this day, many of us continue to listen in mono, such as with an inexpensive television or radio, or even a built-in computer speaker.)
Stereo sound became commercially available in the 1950s, adding a level of realism to audio playback. By recording sound with two (or more) microphones onto two channels, which in turn play through two speakers, stereo audio delivers a panoramic soundfield (or sound-stage). In terms of life-like playback, stereo is a significant improvement over mono.
For all of the benefits of stereo, it has some sig-nificant limitations—especially with sound-for-picture. First of all, in order to hear a proper soundfield, you need to sit as close as possible to
the “sweet spot” between the left and right speakers. If you sit too far to the left or the right, sounds can seem “unbalanced,” and you may hear almost nothing from the other speaker. This problem is particularly apparent in large rooms. If, for instance, you were to sit in an aisle seat of a movie theatre equipped with just a two-speaker stereo playback system, you’d see actors’ dialogue coming from the center of the screen, but you’d hear it from the nearest side of the screen.
Multichannel Playback
To help overcome the limitations of stereo play-back, the first step is to add a third, center chan-nel to the traditional stereo arrangement, with a dedicated center-channel speaker. Using this three-speaker approach, center-channel signals can be firmly “localized” to the center of the ac-tion. This means an audience member could sit anywhere in a movie theatre, see an actor talk-ing in middle of the screen, and hear the sound come from the middle of the screen. At the same time, the left and right stereo speakers can de-liver a wide soundfield for music, sound effects, and off-screen dialogue, with many creative possibilities.
Chapter 3: Overview of Dolby Surround 23
24
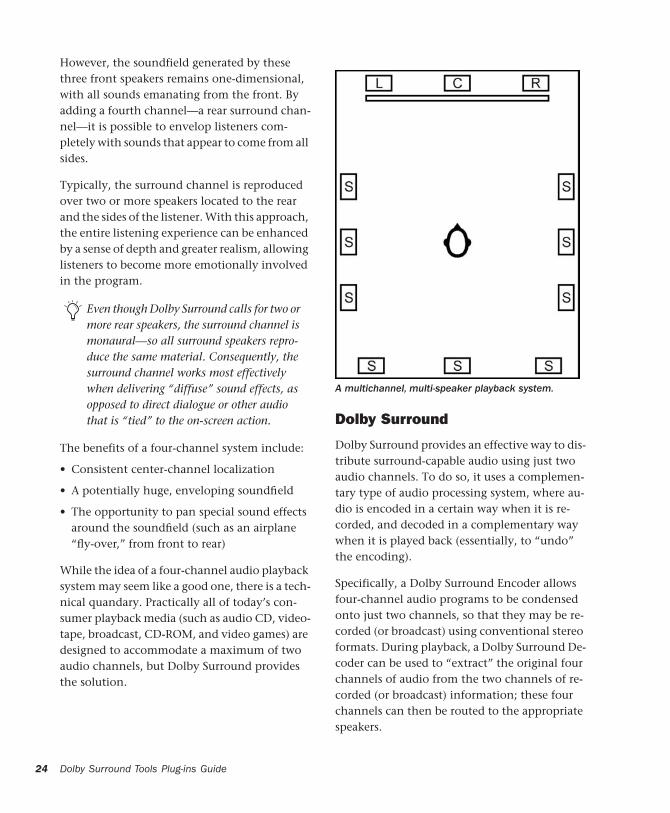
However, the soundfield generated by these three front speakers remains one-dimensional, with all sounds emanating from the front. By adding a fourth channel—a rear surround chan-nel—it is possible to envelop listeners com-pletely with sounds that appear to come from all sides.
Typically, the surround channel is reproduced over two or more speakers located to the rear and the sides of the listener. With this approach, the entire listening experience can be enhanced by a sense of depth and greater realism, allowing listeners to become more emotionally involved in the program.
The benefits of a four-channel system include:
• Consistent center-channel localization
• A potentially huge, enveloping soundfield
• The opportunity to pan special sound effects around the soundfield (such as an airplane “fly-over,” from front to rear)
While the idea of a four-channel audio playback system may seem like a good one, there is a tech-nical quandary. Practically all of today’s con-sumer playback media (such as audio CD, video-tape, broadcast, CD-ROM, and video games) are designed to accommodate a maximum of two audio channels, but Dolby Surround provides the solution.
Even though Dolby Surround calls for two or more rear speakers, the surround channel is monaural—so all surround speakers repro-duce the same material. Consequently, the surround channel works most effectively when delivering “diffuse” sound effects, as opposed to direct dialogue or other audio that is “tied” to the on-screen action.
Dolby Surround Tools Plug-ins Guide
Dolby Surround
Dolby Surround provides an effective way to dis-tribute surround-capable audio using just two audio channels. To do so, it uses a complemen-tary type of audio processing system, where au-dio is encoded in a certain way when it is re-corded, and decoded in a complementary way when it is played back (essentially, to “undo” the encoding).
Specifically, a Dolby Surround Encoder allows four-channel audio programs to be condensed onto just two channels, so that they may be re-corded (or broadcast) using conventional stereo formats. During playback, a Dolby Surround De-coder can be used to “extract” the original four channels of audio from the two channels of re-corded (or broadcast) information; these four channels can then be routed to the appropriate speakers.
A multichannel, multi-speaker playback system.
Dolby Surround-encoded programs are mono- and stereo-compatible, as well as Dolby Sur-round-compatible. Two-channel Dolby Sur-round-encoded audio can be summed to a single channel, for monaural playback. Unlike Dolby Digital, you can listen to Dolby Surround with-out a decoder—anyone with an ordinary stereo or mono playback system (such as a home ste-reo, car radio, television, portable cassette player, or multimedia speaker system) can listen to Dolby Surround-encoded audio, as if it were ordinary stereo or mono audio. Anyone with a Dolby Surround-capable playback system can enjoy the same audio in full, four-channel Dolby Surround. In this way, Dolby Surround audio is truly “consumer compatible.”
Dolby Surround encoding takes place during production. Audio professionals are the ones who encode videotapes, CDs, and other releases with Dolby Surround audio. Decoding, on the other hand, typically takes place at the con-sumer’s end, with the help of a Dolby Surround-equipped home theatre or multimedia playback system.
For example, Ms. Allen can listen, through her mono TV, to the same videotape that Mr. Smith listens to through his stereo TV, which can be the same videotape that envelopes Ms. Jones in four-channel Dolby Surround on her home the-atre system.
Chapter 3: Overview of Dolby Surround 25
26
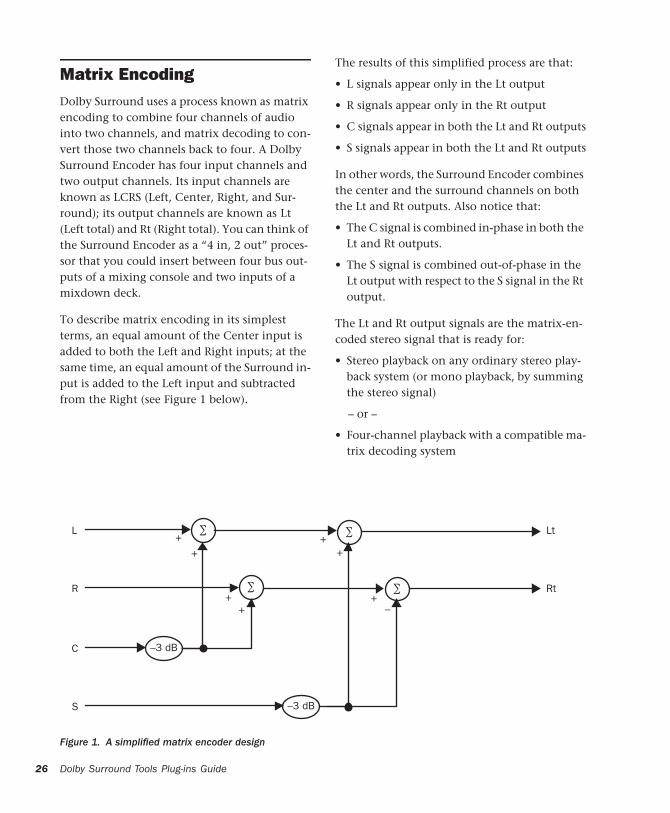
Matrix EncodingDolby Surround uses a process known as matrix encoding to combine four channels of audio into two channels, and matrix decoding to con-vert those two channels back to four. A Dolby Surround Encoder has four input channels and two output channels. Its input channels are known as LCRS (Left, Center, Right, and Sur-round); its output channels are known as Lt (Left total) and Rt (Right total). You can think of the Surround Encoder as a “4 in, 2 out” proces-sor that you could insert between four bus out-puts of a mixing console and two inputs of a mixdown deck.
To describe matrix encoding in its simplest terms, an equal amount of the Center input is added to both the Left and Right inputs; at the same time, an equal amount of the Surround in-put is added to the Left input and subtracted from the Right (see Figure 1 below).
Dolby Surround Tools Plug-ins Guide
The results of this simplified process are that:
• L signals appear only in the Lt output
• R signals appear only in the Rt output
• C signals appear in both the Lt and Rt outputs
• S signals appear in both the Lt and Rt outputs
In other words, the Surround Encoder combines the center and the surround channels on both the Lt and Rt outputs. Also notice that:
• The C signal is combined in-phase in both the Lt and Rt outputs.
• The S signal is combined out-of-phase in the Lt output with respect to the S signal in the Rt output.
The Lt and Rt output signals are the matrix-en-coded stereo signal that is ready for:
• Stereo playback on any ordinary stereo play-back system (or mono playback, by summing the stereo signal)
– or –
• Four-channel playback with a compatible ma-trix decoding system
Figure 1. A simplified matrix encoder design
∑L
R
–3 dBC
–3 dBS
Lt
Rt
∑
∑
∑
+
+
+
+
++
+
–
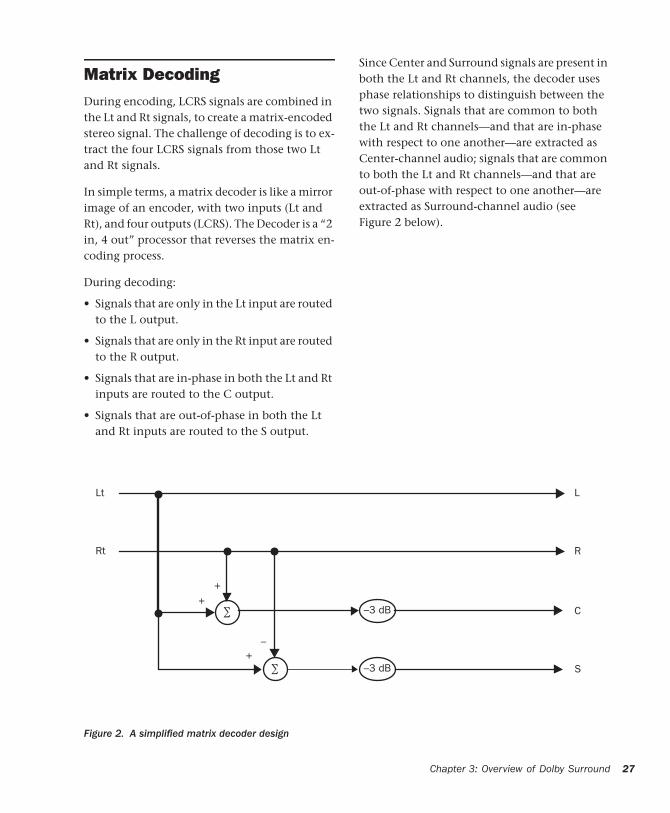
Matrix DecodingDuring encoding, LCRS signals are combined in the Lt and Rt signals, to create a matrix-encoded stereo signal. The challenge of decoding is to ex-tract the four LCRS signals from those two Lt and Rt signals.
In simple terms, a matrix decoder is like a mirror image of an encoder, with two inputs (Lt and Rt), and four outputs (LCRS). The Decoder is a “2 in, 4 out” processor that reverses the matrix en-coding process.
During decoding:
• Signals that are only in the Lt input are routed to the L output.
• Signals that are only in the Rt input are routed to the R output.
• Signals that are in-phase in both the Lt and Rt inputs are routed to the C output.
• Signals that are out-of-phase in both the Lt and Rt inputs are routed to the S output.
Since Center and Surround signals are present in both the Lt and Rt channels, the decoder uses phase relationships to distinguish between the two signals. Signals that are common to both the Lt and Rt channels—and that are in-phase with respect to one another—are extracted as Center-channel audio; signals that are common to both the Lt and Rt channels—and that are out-of-phase with respect to one another—are extracted as Surround-channel audio (see Figure 2 below).
Figure 2. A simplified matrix decoder design
∑
L
R
–3 dB C
–3 dB S
Lt
Rt
∑
++
+–
Chapter 3: Overview of Dolby Surround 27
28
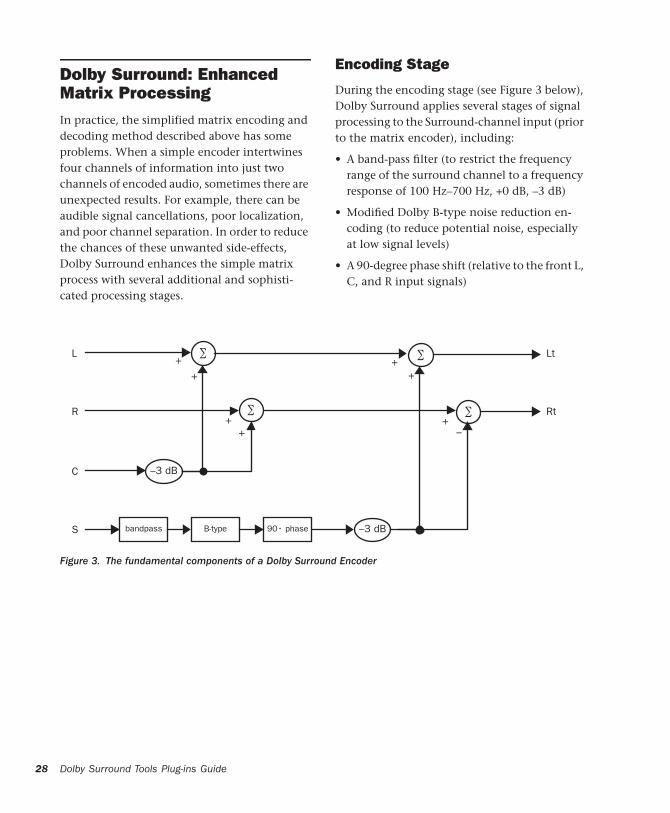
Dolby Surround: Enhanced Matrix ProcessingIn practice, the simplified matrix encoding and decoding method described above has some problems. When a simple encoder intertwines four channels of information into just two channels of encoded audio, sometimes there are unexpected results. For example, there can be audible signal cancellations, poor localization, and poor channel separation. In order to reduce the chances of these unwanted side-effects, Dolby Surround enhances the simple matrix process with several additional and sophisti-cated processing stages.
Dolby Surround Tools Plug-ins Guide
Encoding Stage
During the encoding stage (see Figure 3 below), Dolby Surround applies several stages of signal processing to the Surround-channel input (prior to the matrix encoder), including:
• A band-pass filter (to restrict the frequency range of the surround channel to a frequency response of 100 Hz–700 Hz, +0 dB, –3 dB)
• Modified Dolby B-type noise reduction en-coding (to reduce potential noise, especially at low signal levels)
• A 90-degree phase shift (relative to the front L, C, and R input signals)
Figure 3. The fundamental components of a Dolby Surround Encoder
∑L
R
–3 dBC
–3 dBS
Lt
Rt
∑
∑
∑
+
+
+
+
++
+
–
bandpass B-type 90• phase
Decoding Stage
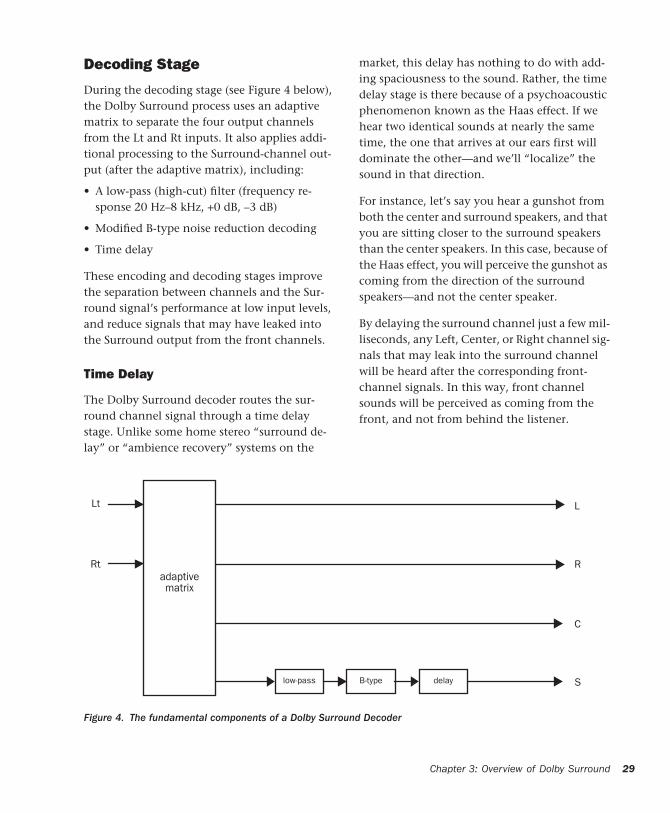
During the decoding stage (see Figure 4 below), the Dolby Surround process uses an adaptive matrix to separate the four output channels from the Lt and Rt inputs. It also applies addi-tional processing to the Surround-channel out-put (after the adaptive matrix), including:
• A low-pass (high-cut) filter (frequency re-sponse 20 Hz–8 kHz, +0 dB, –3 dB)
• Modified B-type noise reduction decoding
• Time delay
These encoding and decoding stages improve the separation between channels and the Sur-round signal’s performance at low input levels, and reduce signals that may have leaked into the Surround output from the front channels.
Time Delay
The Dolby Surround decoder routes the sur-round channel signal through a time delay stage. Unlike some home stereo “surround de-lay” or “ambience recovery” systems on the
market, this delay has nothing to do with add-ing spaciousness to the sound. Rather, the time delay stage is there because of a psychoacoustic phenomenon known as the Haas effect. If we hear two identical sounds at nearly the same time, the one that arrives at our ears first will dominate the other—and we’ll “localize” the sound in that direction.
For instance, let’s say you hear a gunshot from both the center and surround speakers, and that you are sitting closer to the surround speakers than the center speakers. In this case, because of the Haas effect, you will perceive the gunshot as coming from the direction of the surround speakers—and not the center speaker.
By delaying the surround channel just a few mil-liseconds, any Left, Center, or Right channel sig-nals that may leak into the surround channel will be heard after the corresponding front-channel signals. In this way, front channel sounds will be perceived as coming from the front, and not from behind the listener.
Figure 4. The fundamental components of a Dolby Surround Decoder
L
R
C
S
Lt
Rt
low-pass B-type delay
adaptivematrix
Chapter 3: Overview of Dolby Surround 29
30
The Dolby Surround Adaptive MatrixEvery Dolby professional and consumer Pro Logic Decoder has built-in adaptive matrix cir-cuitry. A proprietary technology of Dolby Labo-ratories, the adaptive matrix helps overcome the problem of isolating the “dominant channel.”
A successful surround system needs to be able to determine, at any given moment, which chan-nel is carrying the bulk of the energy (such as the center channel when dialogue is dominant in the mix). Without this ability, a simple ma-trix encoder/decoder system suffers from poor localization and channel separation, where, for instance, Center-channel dialogue winds up “leaking” into other channels.
The Dolby Surround adaptive matrix (a collec-tion of many sophisticated signal processing stages) helps identify the dominant channel—or the steering direction of the mix. The matrix is considered “adaptive” because it adjusts “on-the-fly” to the changing nature of a complex Dolby Surround-encoded mix. As the steering direction of the mix shifts—from moment to moment—the adaptive matrix tracks the changes and makes the appropriate decoding adjustments. The result is playback that is as faithful as possible, using a matrix process, to the mixing engineer’s intent.
Dolby Surround Tools Plug-ins Guide
Mixing for Dolby Surround
Dolby Surround’s ability to restore a multichan-nel soundfield from only two encoded channels is impressive. However, because of the nature of the matrixing process, the decoded soundfield will not always match the original discrete sig-nals. Consequently, whenever you mix in Dolby Surround, you must monitor the encoded audio using a professional Dolby Surround decoder (such as the Dolby Surround Decoder plug-in, or a Dolby Surround hardware decoder) and a Dolby Surround-compatible speaker system. This is the only way you can be sure that what you are mixing is what the consumer will hear from their home Dolby Surround decoder.
For tips on how to mix effectively for Dolby Surround, and how to compensate for the potential pitfalls of the matrix encoding process, see Appendix E, “Mixing for Dolby Surround.”
chapter 4
Dolby Surround Encoder and Decoder Plug-ins
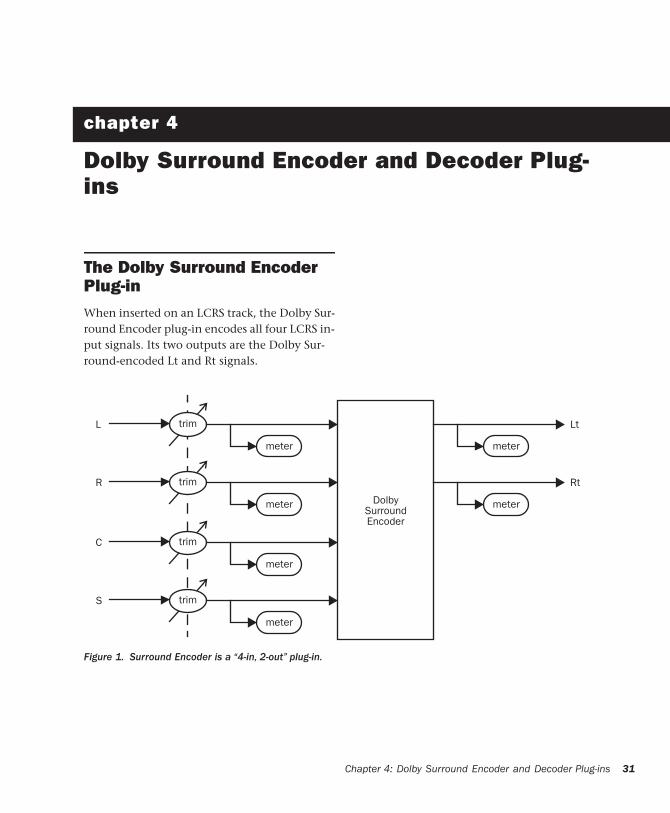
The Dolby Surround Encoder Plug-inWhen inserted on an LCRS track, the Dolby Sur-round Encoder plug-in encodes all four LCRS in-put signals. Its two outputs are the Dolby Sur-round-encoded Lt and Rt signals.
C
Figure 1. Surround Encoder is a “4-in, 2-out” plug-in.
DolbySurroundEncoder
trim
meter
L
trim
meter
R
trim
meter
C
trim
meter
S
meter
meter
Lt
Rt
hapter 4: Dolby Surround Encoder and Decoder Plug-ins 31
32
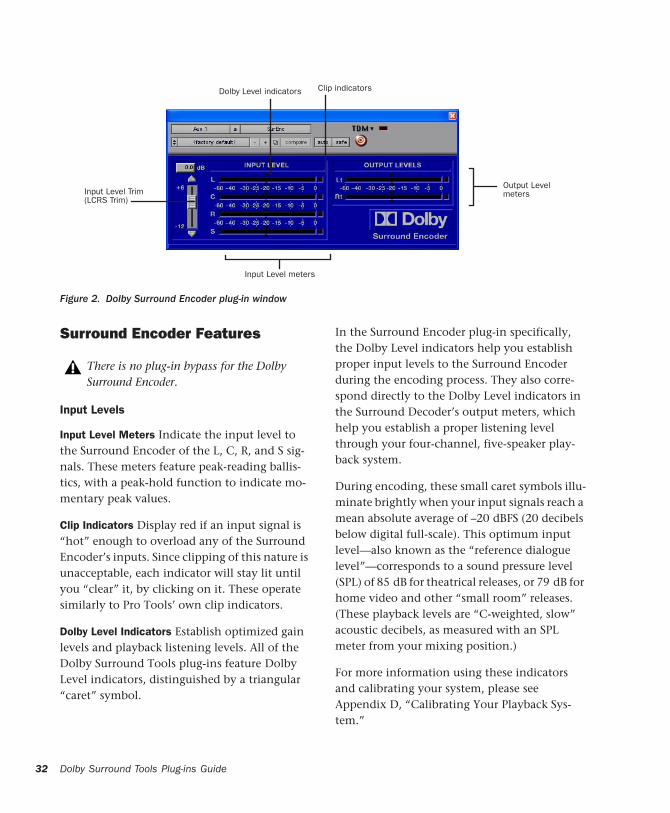
Dolby Surround Tools Plug-ins GuideFigure 2. Dolby Surround Encoder plug-in window
Input Level meters
Clip indicatorsDolby Level indicators
Input Level Trim Output Level
(LCRS Trim)meters
Surround Encoder Features
Input Levels
Input Level Meters Indicate the input level to the Surround Encoder of the L, C, R, and S sig-nals. These meters feature peak-reading ballis-tics, with a peak-hold function to indicate mo-mentary peak values.
Clip Indicators Display red if an input signal is “hot” enough to overload any of the Surround Encoder’s inputs. Since clipping of this nature is unacceptable, each indicator will stay lit until you “clear” it, by clicking on it. These operate similarly to Pro Tools’ own clip indicators.
Dolby Level Indicators Establish optimized gain levels and playback listening levels. All of the Dolby Surround Tools plug-ins feature Dolby Level indicators, distinguished by a triangular “caret” symbol.
There is no plug-in bypass for the Dolby Surround Encoder.
In the Surround Encoder plug-in specifically, the Dolby Level indicators help you establish proper input levels to the Surround Encoder during the encoding process. They also corre-spond directly to the Dolby Level indicators in the Surround Decoder’s output meters, which help you establish a proper listening level through your four-channel, five-speaker play-back system.
During encoding, these small caret symbols illu-minate brightly when your input signals reach a mean absolute average of –20 dBFS (20 decibels below digital full-scale). This optimum input level—also known as the “reference dialogue level”—corresponds to a sound pressure level (SPL) of 85 dB for theatrical releases, or 79 dB for home video and other “small room” releases. (These playback levels are “C-weighted, slow” acoustic decibels, as measured with an SPL meter from your mixing position.)
For more information using these indicators and calibrating your system, please see Appendix D, “Calibrating Your Playback Sys-tem.”
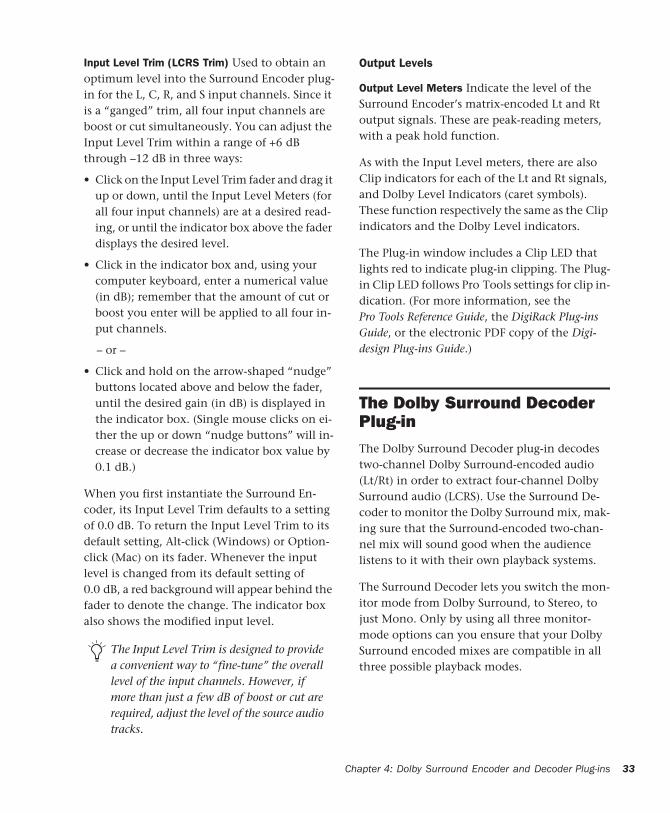
Input Level Trim (LCRS Trim) Used to obtain an optimum level into the Surround Encoder plug-in for the L, C, R, and S input channels. Since it is a “ganged” trim, all four input channels are boost or cut simultaneously. You can adjust the Input Level Trim within a range of +6 dB through –12 dB in three ways:
• Click on the Input Level Trim fader and drag it up or down, until the Input Level Meters (for all four input channels) are at a desired read-ing, or until the indicator box above the fader displays the desired level.
• Click in the indicator box and, using your computer keyboard, enter a numerical value (in dB); remember that the amount of cut or boost you enter will be applied to all four in-put channels.
– or –
• Click and hold on the arrow-shaped “nudge” buttons located above and below the fader, until the desired gain (in dB) is displayed in the indicator box. (Single mouse clicks on ei-ther the up or down “nudge buttons” will in-crease or decrease the indicator box value by 0.1 dB.)
When you first instantiate the Surround En-coder, its Input Level Trim defaults to a setting of 0.0 dB. To return the Input Level Trim to its default setting, Alt-click (Windows) or Option-click (Mac) on its fader. Whenever the input level is changed from its default setting of 0.0 dB, a red background will appear behind the fader to denote the change. The indicator box also shows the modified input level.
The Input Level Trim is designed to provide a convenient way to “fine-tune” the overall level of the input channels. However, if more than just a few dB of boost or cut are required, adjust the level of the source audio tracks.
C
Output Levels
Output Level Meters
Indicate the level of the Surround Encoder’s matrix-encoded Lt and Rt output signals. These are peak-reading meters, with a peak hold function.
As with the Input Level meters, there are also Clip indicators for each of the Lt and Rt signals, and Dolby Level Indicators (caret symbols). These function respectively the same as the Clip indicators and the Dolby Level indicators.
The Plug-in window includes a Clip LED that lights red to indicate plug-in clipping. The Plug-in Clip LED follows Pro Tools settings for clip in-dication. (For more information, see the
Pro Tools Reference Guide
, the
DigiRack Plug-ins Guide
, or the electronic PDF copy of the
Digi-design Plug-ins Guide
.)
The Dolby Surround Decoder Plug-in
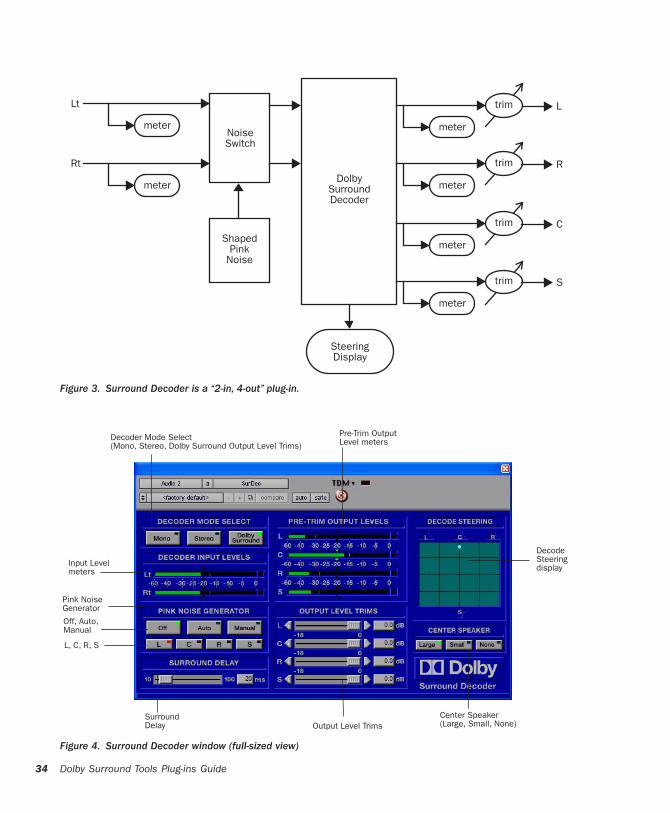
The Dolby Surround Decoder plug-in decodes two-channel Dolby Surround-encoded audio (Lt/Rt) in order to extract four-channel Dolby Surround audio (LCRS). Use the Surround De-coder to monitor the Dolby Surround mix, mak-ing sure that the Surround-encoded two-chan-nel mix will sound good when the audience listens to it with their own playback systems.
The Surround Decoder lets you switch the mon-itor mode from Dolby Surround, to Stereo, to just Mono. Only by using all three monitor-mode options can you ensure that your Dolby Surround encoded mixes are compatible in all three possible playback modes.
hapter 4: Dolby Surround Encoder and Decoder Plug-ins 33
34
Dolby Surround Tools Plug-ins GuideFigure 3. Surround Decoder is a “2-in, 4-out” plug-in.
DolbySurroundDecoder
trim
meter
L
trim
meter
R
trim
meter
C
trim
meter
S
meter
meter
Lt
Rt
NoiseSwitch
ShapedPink
Noise
SteeringDisplay
Figure 4. Surround Decoder window (full-sized view)
Input Level
Pink Noise
L, C, R, S
Surround
Pre-Trim Output
Output Level Trims
Decode
Center Speaker
Off, Auto,
meters
Level meters
Manual
Generator
Delay (Large, Small, None)
Steering display
Decoder Mode Select(Mono, Stereo, Dolby Surround Output Level Trims)
Surround Decoder Features(Full-Sized Window)
Decoder Mode Select
The Decoder Mode Select section lets you select the playback monitor mode: four-channel Dolby Surround, conventional two-channel Ste-reo, or single-channel Mono. Switching moni-tor modes takes the Surround Decoder’s input signals—Lt and Rt—and routes them to either one, two, or four playback channels. By switch-ing monitor modes frequently, you can ensure that your Dolby Surround mixes will maintain compatibility with the most common types of playback systems.
Mono Mono monitor mode combines the Lt and Rt input signals and routes them to your Center speaker (when it is available and selected; see “Center Speaker” on page 38); all other playback channels are muted. However, if you’re moni-toring without a Center speaker, the mono sum of the Lt and Rt signals is sent equally to the Left and Right speakers at a reduced level, thereby creating a correct “phantom center” image. The LED indicator illuminates when you select Mono.
Stereo Stereo monitor mode delivers conven-tional stereo reproduction of the Lt and Rt input signals, using only your Left and Right playback speakers. The other playback channels are al-ways muted. The LED indicator illuminates when you select Stereo.
Dolby Surround Dolby Surround monitor mode provides full four-channel (LCRS) decoding of the two-channel (Lt/Rt) input material. All available playback channels are active. (For
There is no plug-in bypass for the Dolby Surround Decoder.
C
more information on monitoring without a cen-ter speaker, see “Center Speaker” on page 38.) The LED indicator illuminates when you select Dolby Surround.
In practice, Dolby Surround mode is most com-monly used, since it replicates what someone with a Dolby Surround-capable playback system will hear. However, by frequently switching to Stereo and Mono monitor modes, you can audi-tion what listeners with ordinary stereo or mono playback systems will hear. This “confi-dence check” ensures that your Surround mix is also stereo and mono compatible.
For example, due to the nature of the matrix-en-coding process, the rear Surround channel sig-nals are inaudible during mono playback (be-cause in the Lt/Rt mix, the S channel information in the Rt output is out-of-phase with respect to the S channel information in the Lt output; consequently, they cancel each other out when the Lt and Rt signals are summed to-gether for mono playback). Therefore if you pan sound effects or other information exclusively to the rear Surround channel, listeners with mono-only playback systems won’t hear those sounds—and for non-essential sounds, that might be fine. However, you will want to ensure that nothing too important is lost during mono playback. If you select Mono monitor mode, and an important sound cannot be heard, you should add some of that effect to at least one of the front channels (L, C, or R).
If you are panning a mono or stereo source to LCRS using the Pro Tools surround pan-ner, you can ensure that it is never panned exclusively to the Surround channel by set-ting the panner’s Front/Rear Divergence control to less than 100%. For more infor-mation, see the Pro Tools Reference Guide.
hapter 4: Dolby Surround Encoder and Decoder Plug-ins 35
36
Decoder Input Levels
Input Level Meters Indicate the input level of Dolby Surround encoded (Lt and Rt) signals. These are peak-reading meters, with a peak hold function. There are also Clip indicators for each of the Lt and Rt signals, and Dolby Level indica-tors (caret symbols); these function the same as on the Dolby Surround Encoder (see “Clip Indi-cators” on page 32 and “Dolby Level Indicators” on page 32).
Pink Noise Generator
Use the Pink Noise Generator to generate and send band-limited pink noise to the Surround Decoder’s LCRS output channels. This is useful for setting up and calibrating your playback sys-tem. The Surround Decoder’s Output Level Trims should be adjusted so the pink noise sig-nal produces a sound pressure level of 85 dB for theatrical releases, or 79 dB for home video and other “small room” releases. (These playback levels are “C-weighted, slow” acoustic decibels, as measured with an SPL meter from your mix-ing position.) For more information about using these indicators and calibrating your system, please see Appendix D, “Calibrating Your Play-back System.”
Off When this button is selected, its LED indica-tor illuminates and the Surround Decoder func-tions normally (that is, there’s no pink noise output, and the plug-in is not in calibration mode).
Auto Turns on the Pink Noise Generator, and cy-cles pink noise automatically between the Left, Center, Right, and Surround output channels. Only one output channel at a time is fed pink noise, and channels are switched every three seconds. When you select Auto, its LED indica-tor illuminates, as does the corresponding
Dolby Surround Tools Plug-ins Guide
Channel selector (L, C, R, or S) that’s currently active in the cycle. The Surround Decoder win-dow must be open and visible when in Auto mode.
Manual Turns on the Pink Noise Generator, and lets you step manually between each output channel, by selecting the desired Channel selec-tor (L, C, R or S; see Channel Selectors below). The LED indicator illuminates, as does the indi-cator for whichever Channel selector you’ve chosen.
Channel Selectors If you’ve selected Auto, an LED indicator will show which one of the four output channels is active in the cycle. If you’ve selected Manual, clicking on any one of the Channel selectors will send pink noise to that output channel, and its LED indicator will illu-minate.
If you select Stereo monitor mode, pink noise cycles between just the Left and Right out-put channels. If you select Mono monitor mode, pink noise is sent only to the Center output channel. However, if you’re operat-ing in Mono mode without a Center speaker, and None is selected for the Center Speaker, pink noise will be heard from the Left and Right speakers.
In Stereo monitor mode, only the L or R Channel selectors can be selected (C and S are unavailable). In Mono monitor mode, only the C Channel selector can be selected (L, R, and S are unavailable). However, if you’re operating in Mono mode without a Center speaker, and None is selected for the Center Speaker, pink noise will be heard from the Left and Right speakers.
Surround Delay
The Surround Decoder has a Surround Delay control, which delays the rear Surround channel in 10 millisecond increments, from 10 ms to 100 ms. This ensures that any front-channel (L, C, or R) information that has “leaked” into the S channel is heard from the front speakers first. The default setting is 20 ms, and there is no by-pass control for the delay. Please keep in mind that the Surround Delay control is not intended to add an enhanced ambience or other sound ef-fect to your playback.
This control is used to ensure that any front-channel information that may have leaked into the rear Surround channel is heard first from the front channels (L, C, or R), and then from the rear. By delaying the Surround channel just a fraction of a second, any common “crosstalk” information will arrive at the listener after the main front signal. As a result, the information will be perceived to have emanated from the front. For more information, see “Time Delay” on page 29.
The amount of Surround Delay is set in one of two ways:
■ Click on the horizontal slider and drag it left or right until the adjacent indicator box displays the desired value.
– or –
■ Click in the indicator box and, using your computer keyboard, enter the value of the delay time desired directly (in 10 ms steps).
To return to the default setting (20 ms), Alt-click (Windows) or Option-click (Mac) on the slider. For more information about using the Surround Delay, and how to calculate the correct delay time, see Appendix D, “Calibrating Your Play-back System.”
C
Pre-Trim Output Levels
Pre-Trim Output Level Meters Indicate the out-put levels from the Surround Decoder for each of the LCRS channels. These meters are pre-trim, which means that adjusting the Output Level Trims (see Output Level Trims, below) does not affect the meter readings.
These are peak-reading meters, with a peak hold function. There are also Clip Indicators for each of the LCRS signals, and Dolby Level Indicators (caret symbols); these function the same as in the Dolby Surround Encoder plug-in (see “Clip Indicators” on page 32 and “Dolby Level Indica-tors” on page 32).
Output Level Trims
Output Level Trims Used to adjust the output level of the Surround Decoder to each of the LCRS output channels. This is done as part of the setup and calibration procedure, while the Pink Noise Generator is active, in order to adjust the relative playback level balance between any of the speakers. There are three ways to adjust the output levels:
• Click on a desired Output Level Trim fader and drag left or right, until the indicator box next to the fader displays the desired output gain (or your sound pressure level meter regis-ters the desired listening level, as described in Appendix D, “Calibrating Your Playback Sys-tem”).
• Click in the indicator box located next to the fader and, using your computer keyboard, en-ter the numerical value (in dB) of the desired output gain.
hapter 4: Dolby Surround Encoder and Decoder Plug-ins 37
38
• Click and hold on the arrow-shaped “nudge” buttons to the left or right of the faders until the desired output is displayed in the indica-tor box next to the fader in dB. (Single mouse clicks on either the right or left nudge buttons will increase or decrease the indicator box value by 0.1 dB.)
The Output Level Trims default to a setting of 0.0 dB. To return any fader to its default setting, Alt-click on it (Windows) or Option-click on it (Mac).
For more about these and other calibration is-sues, see Appendix D, “Calibrating Your Play-back System.”
Decode Steering
Decode Steering Display Shows the current di-rection that the Pro Logic decoder output is be-ing “steered” by the mix. This perspective shows the position of the dominant channel, relative to your front-wall (L, C, and R) and rear-wall (S) speakers.
The Decode Steering display has no user con-trols: It is only a positional meter that shows the mix’s steering direction. The steering direction of the mix is another way to describe whichever single output channel is dominant at any given time. The Surround Decoder’s adaptive matrix tracks the changes and makes the appropriate decoding adjustments as the steering direction of the mix shifts (from moment to moment).
The Output Levels Trims should be ad-justed only as part of your setup and cali-bration procedure. They are not to be used to compensate for an overly “hot” or unbal-anced mix. Using the Output Level Trims improperly may affect your monitor sys-tem’s accuracy for Dolby Surround mixing, and may lead to poor mixing decisions.
Dolby Surround Tools Plug-ins Guide
The Decode Steering display uses a brightly lit “dot” to give you a dynamic picture of which di-rection your mix is being steered, based upon how the mix is being decoded.
Remember, although at first it may seem counter-intuitive to think of your mix as having only one dominant direction at any given time, you’ll find that in practice, this is how Dolby Surround works. For more on this topic, see Appendix E, “Mixing for Dolby Surround.”
Center Speaker
The Surround Decoder includes selectors for dif-ferent center speaker configurations: Large, Small, and None. During the setup and calibra-tion procedures, it’s necessary to select what type of Center-channel speaker (if any) you have in your monitoring system.
Large Choose this selection if your Center speaker is matched or closely matched—in terms of low-end frequency response—with your Left and Right speakers. When you select Large, its associated LED indicator illuminates, and the Center-channel output signal is sent en-tirely to the center speaker.
Small Choose this selection if your Center speaker has somewhat or significantly less low-end frequency response than your Left and Right speakers (a characteristic typical of rela-tively small Center speakers). When you select Small, its associated LED indicator illuminates, and the Center-channel output signal is fed to a crossover within the Surround Decoder’s DSP structure. There, signal content above 100 Hz is sent to the Center output channel; signal con-tent below 100 Hz is attenuated by 4.5 dB and
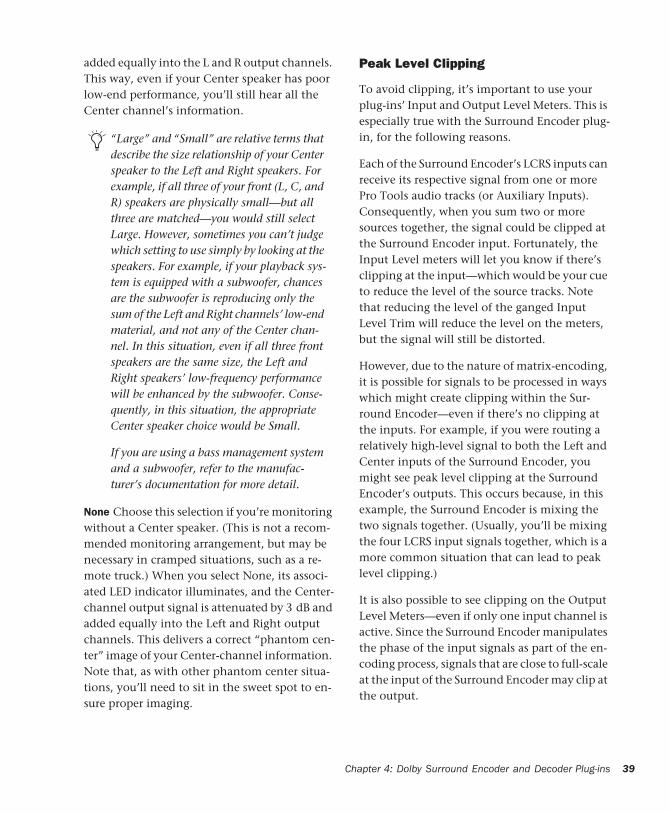
added equally into the L and R output channels. This way, even if your Center speaker has poor low-end performance, you’ll still hear all the Center channel’s information.
None Choose this selection if you’re monitoring without a Center speaker. (This is not a recom-mended monitoring arrangement, but may be necessary in cramped situations, such as a re-mote truck.) When you select None, its associ-ated LED indicator illuminates, and the Center-channel output signal is attenuated by 3 dB and added equally into the Left and Right output channels. This delivers a correct “phantom cen-ter” image of your Center-channel information. Note that, as with other phantom center situa-tions, you’ll need to sit in the sweet spot to en-sure proper imaging.
“Large” and “Small” are relative terms that describe the size relationship of your Center speaker to the Left and Right speakers. For example, if all three of your front (L, C, and R) speakers are physically small—but all three are matched—you would still select Large. However, sometimes you can’t judge which setting to use simply by looking at the speakers. For example, if your playback sys-tem is equipped with a subwoofer, chances are the subwoofer is reproducing only the sum of the Left and Right channels’ low-end material, and not any of the Center chan-nel. In this situation, even if all three front speakers are the same size, the Left and Right speakers’ low-frequency performance will be enhanced by the subwoofer. Conse-quently, in this situation, the appropriate Center speaker choice would be Small.
If you are using a bass management system and a subwoofer, refer to the manufac-turer’s documentation for more detail.
C
Peak Level Clipping
To avoid clipping, it’s important to use your plug-ins’ Input and Output Level Meters. This is especially true with the Surround Encoder plug-in, for the following reasons.
Each of the Surround Encoder’s LCRS inputs can receive its respective signal from one or more Pro Tools audio tracks (or Auxiliary Inputs). Consequently, when you sum two or more sources together, the signal could be clipped at the Surround Encoder input. Fortunately, the Input Level meters will let you know if there’s clipping at the input—which would be your cue to reduce the level of the source tracks. Note that reducing the level of the ganged Input Level Trim will reduce the level on the meters, but the signal will still be distorted.
However, due to the nature of matrix-encoding, it is possible for signals to be processed in ways which might create clipping within the Sur-round Encoder—even if there’s no clipping at the inputs. For example, if you were routing a relatively high-level signal to both the Left and Center inputs of the Surround Encoder, you might see peak level clipping at the Surround Encoder’s outputs. This occurs because, in this example, the Surround Encoder is mixing the two signals together. (Usually, you’ll be mixing the four LCRS input signals together, which is a more common situation that can lead to peak level clipping.)
It is also possible to see clipping on the Output Level Meters—even if only one input channel is active. Since the Surround Encoder manipulates the phase of the input signals as part of the en-coding process, signals that are close to full-scale at the input of the Surround Encoder may clip at the output.
hapter 4: Dolby Surround Encoder and Decoder Plug-ins 39
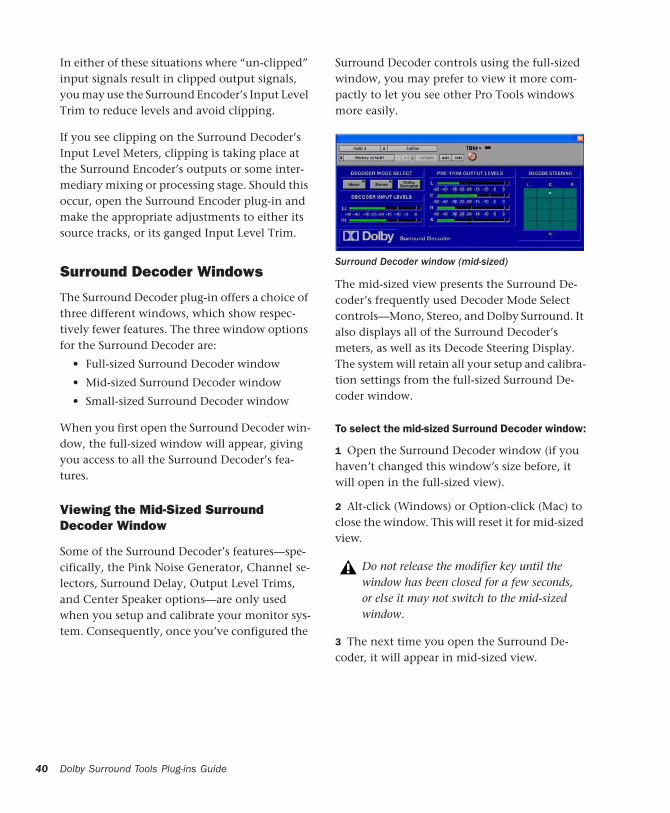
40
In either of these situations where “un-clipped” input signals result in clipped output signals, you may use the Surround Encoder’s Input Level Trim to reduce levels and avoid clipping.
If you see clipping on the Surround Decoder’s Input Level Meters, clipping is taking place at the Surround Encoder’s outputs or some inter-mediary mixing or processing stage. Should this occur, open the Surround Encoder plug-in and make the appropriate adjustments to either its source tracks, or its ganged Input Level Trim.
Surround Decoder Windows
The Surround Decoder plug-in offers a choice of three different windows, which show respec-tively fewer features. The three window options for the Surround Decoder are:
• Full-sized Surround Decoder window
• Mid-sized Surround Decoder window
• Small-sized Surround Decoder window
When you first open the Surround Decoder win-dow, the full-sized window will appear, giving you access to all the Surround Decoder’s fea-tures.
Viewing the Mid-Sized Surround Decoder Window
Some of the Surround Decoder’s features—spe-cifically, the Pink Noise Generator, Channel se-lectors, Surround Delay, Output Level Trims, and Center Speaker options—are only used when you setup and calibrate your monitor sys-tem. Consequently, once you’ve configured the
Dolby Surround Tools Plug-ins Guide
Surround Decoder controls using the full-sized window, you may prefer to view it more com-pactly to let you see other Pro Tools windows more easily.
The mid-sized view presents the Surround De-coder’s frequently used Decoder Mode Select controls—Mono, Stereo, and Dolby Surround. It also displays all of the Surround Decoder’s meters, as well as its Decode Steering Display. The system will retain all your setup and calibra-tion settings from the full-sized Surround De-coder window.
To select the mid-sized Surround Decoder window:
1 Open the Surround Decoder window (if you haven’t changed this window’s size before, it will open in the full-sized view).
2 Alt-click (Windows) or Option-click (Mac) to close the window. This will reset it for mid-sized view.
3 The next time you open the Surround De-coder, it will appear in mid-sized view.
Surround Decoder window (mid-sized)
Do not release the modifier key until the window has been closed for a few seconds, or else it may not switch to the mid-sized window.
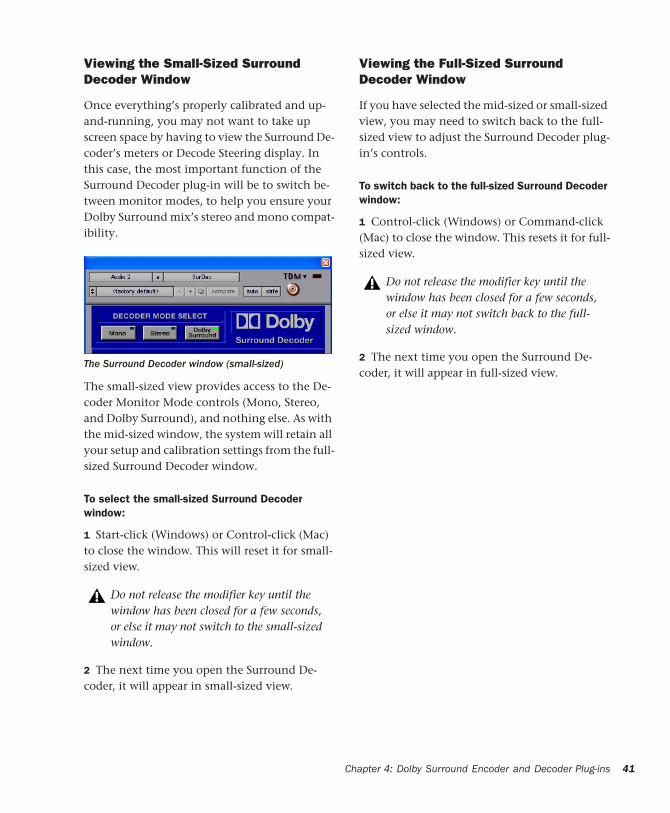
Viewing the Small-Sized Surround Decoder Window
Once everything’s properly calibrated and up-and-running, you may not want to take up screen space by having to view the Surround De-coder’s meters or Decode Steering display. In this case, the most important function of the Surround Decoder plug-in will be to switch be-tween monitor modes, to help you ensure your Dolby Surround mix’s stereo and mono compat-ibility.
The small-sized view provides access to the De-coder Monitor Mode controls (Mono, Stereo, and Dolby Surround), and nothing else. As with the mid-sized window, the system will retain all your setup and calibration settings from the full-sized Surround Decoder window.
To select the small-sized Surround Decoder window:
1 Start-click (Windows) or Control-click (Mac) to close the window. This will reset it for small-sized view.
2 The next time you open the Surround De-coder, it will appear in small-sized view.
The Surround Decoder window (small-sized)
Do not release the modifier key until the window has been closed for a few seconds, or else it may not switch to the small-sized window.
C
Viewing the Full-Sized Surround Decoder Window
If you have selected the mid-sized or small-sized view, you may need to switch back to the full-sized view to adjust the Surround Decoder plug-in’s controls.
To switch back to the full-sized Surround Decoder window:
1 Control-click (Windows) or Command-click (Mac) to close the window. This resets it for full-sized view.
2 The next time you open the Surround De-coder, it will appear in full-sized view.
Do not release the modifier key until the window has been closed for a few seconds, or else it may not switch back to the full-sized window.
hapter 4: Dolby Surround Encoder and Decoder Plug-ins 41

42
Dolby Surround Tools Plug-ins Guide
chapter 5
Dolby Surround Panner Plug-in
The Dolby Surround Panner is redundant to the more flexible surround panning available in Pro Tools 5.1 or later. It is included for back-wards compatibility with Pro Tools sessions cre-ated with older versions Dolby Surround Tools.
If you are creating a new session, you should use the surround panning available in Pro Tools. Do not use the Dolby Surround Panner.
The Dolby Surround Tools Surround Panner plug-in does not support the Axis Panner controller.
For detailed information on surround pan-ning in Pro Tools, see the Pro Tools Refer-ence Guide.
The Dolby Surround Panner is useful for posi-tioning an individual track within the LCRS soundfield. It offers an interactive display that functions like a “virtual joystick”—allowing you to position the track quickly and intuitively, us-ing your mouse.
The Dolby Surround Panner can only be instan-tiated on a mono Audio or Auxiliary Input track. When a Surround Panner plug-in is inserted on an audio track, the track’s outputs and metering will change to an four-channel LCRS configura-tion (mono to LCRS). Also, the track’s own pan-ning controls will not be available.
Chapter 5: Dolby Surround Panner Plug-in 43
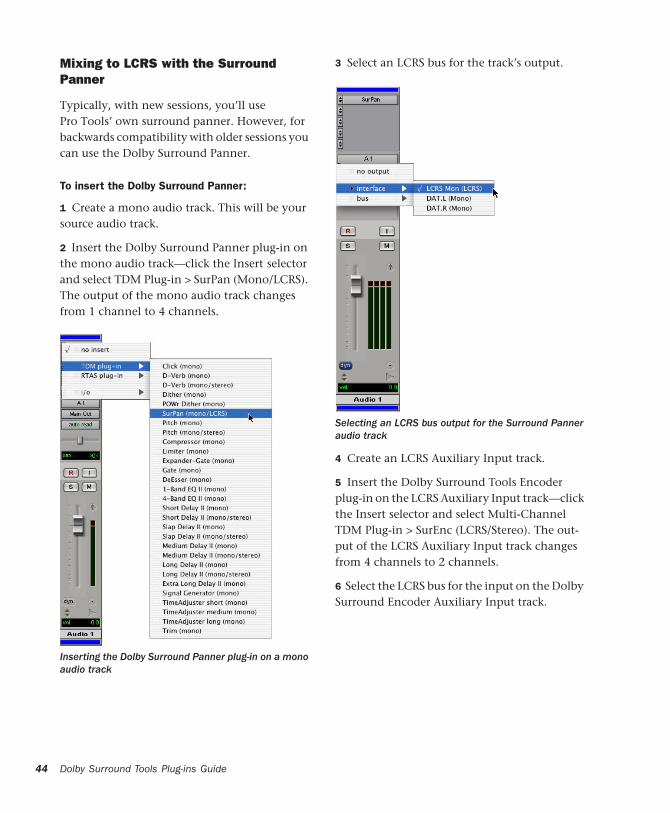
44
Mixing to LCRS with the Surround Panner
Typically, with new sessions, you’ll use Pro Tools’ own surround panner. However, for backwards compatibility with older sessions you can use the Dolby Surround Panner.
To insert the Dolby Surround Panner:
1 Create a mono audio track. This will be your source audio track.
2 Insert the Dolby Surround Panner plug-in on the mono audio track—click the Insert selector and select TDM Plug-in > SurPan (Mono/LCRS). The output of the mono audio track changes from 1 channel to 4 channels.
Inserting the Dolby Surround Panner plug-in on a mono audio track
Dolby Surround Tools Plug-ins Guide
3 Select an LCRS bus for the track’s output.
4 Create an LCRS Auxiliary Input track.
5 Insert the Dolby Surround Tools Encoder plug-in on the LCRS Auxiliary Input track—click the Insert selector and select Multi-Channel TDM Plug-in > SurEnc (LCRS/Stereo). The out-put of the LCRS Auxiliary Input track changes from 4 channels to 2 channels.
6 Select the LCRS bus for the input on the Dolby Surround Encoder Auxiliary Input track.
Selecting an LCRS bus output for the Surround Panner audio track
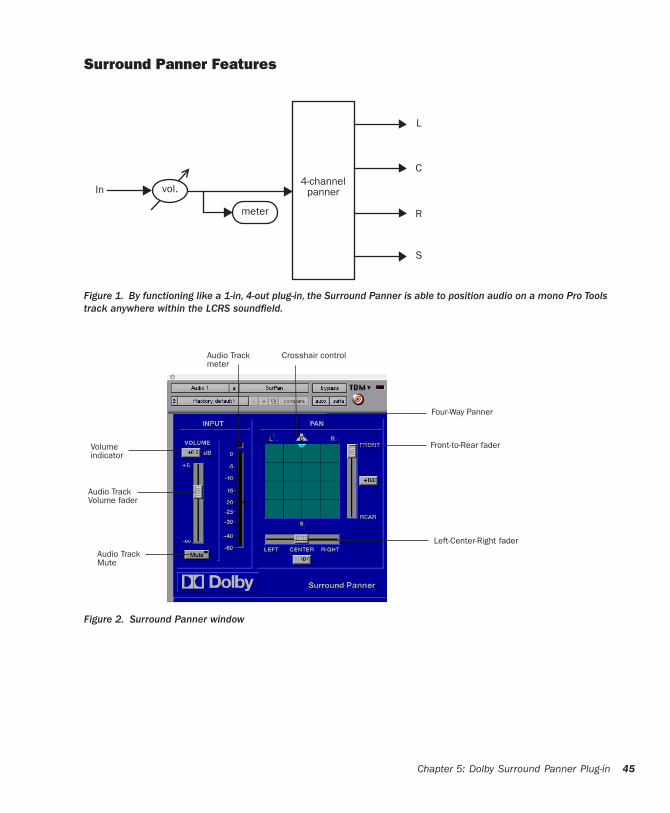
Surround Panner Features
Figure 1. By functioning like a 1-in, 4-out plug-in, the Surround Panner is able to position audio on a mono Pro Tools track anywhere within the LCRS soundfield.
4-channelpanner
meter
In
L
R
C
S
vol.
Figure 2. Surround Panner window
Audio Track
Volume
Audio Track
Audio Track
Four-Way Panner
Front-to-Rear fader
Crosshair control
Left-Center-Right fader
Volume fader
indicator
Mute
meter
Chapter 5: Dolby Surround Panner Plug-in 45
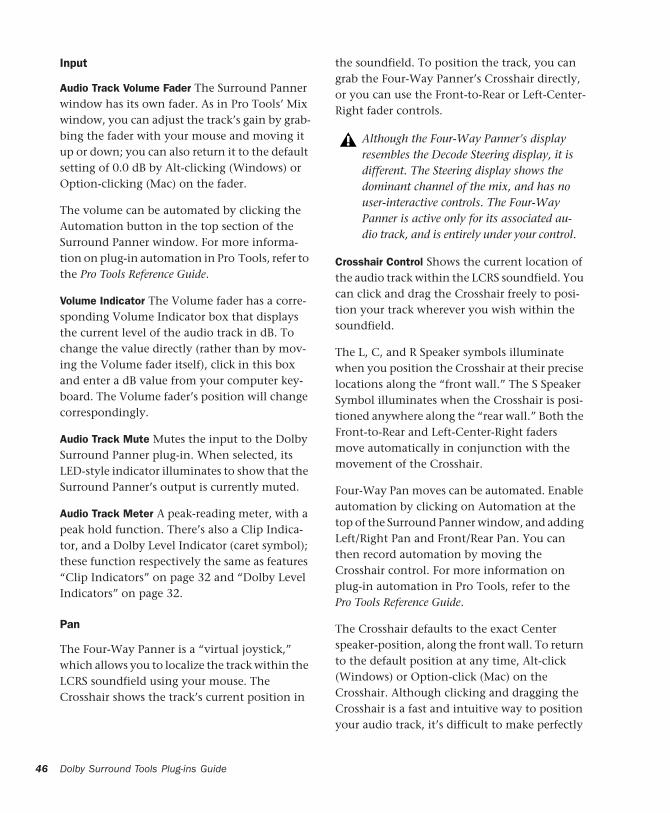
46
Input
Audio Track Volume Fader The Surround Panner window has its own fader. As in Pro Tools’ Mix window, you can adjust the track’s gain by grab-bing the fader with your mouse and moving it up or down; you can also return it to the default setting of 0.0 dB by Alt-clicking (Windows) or Option-clicking (Mac) on the fader.
The volume can be automated by clicking the Automation button in the top section of the Surround Panner window. For more informa-tion on plug-in automation in Pro Tools, refer to the Pro Tools Reference Guide.
Volume Indicator The Volume fader has a corre-sponding Volume Indicator box that displays the current level of the audio track in dB. To change the value directly (rather than by mov-ing the Volume fader itself), click in this box and enter a dB value from your computer key-board. The Volume fader’s position will change correspondingly.
Audio Track Mute Mutes the input to the Dolby Surround Panner plug-in. When selected, its LED-style indicator illuminates to show that the Surround Panner’s output is currently muted.
Audio Track Meter A peak-reading meter, with a peak hold function. There’s also a Clip Indica-tor, and a Dolby Level Indicator (caret symbol); these function respectively the same as features “Clip Indicators” on page 32 and “Dolby Level Indicators” on page 32.
Pan
The Four-Way Panner is a “virtual joystick,” which allows you to localize the track within the LCRS soundfield using your mouse. The Crosshair shows the track’s current position in
Dolby Surround Tools Plug-ins Guide
the soundfield. To position the track, you can grab the Four-Way Panner’s Crosshair directly, or you can use the Front-to-Rear or Left-Center-Right fader controls.
Crosshair Control Shows the current location of the audio track within the LCRS soundfield. You can click and drag the Crosshair freely to posi-tion your track wherever you wish within the soundfield.
The L, C, and R Speaker symbols illuminate when you position the Crosshair at their precise locations along the “front wall.” The S Speaker Symbol illuminates when the Crosshair is posi-tioned anywhere along the “rear wall.” Both the Front-to-Rear and Left-Center-Right faders move automatically in conjunction with the movement of the Crosshair.
Four-Way Pan moves can be automated. Enable automation by clicking on Automation at the top of the Surround Panner window, and adding Left/Right Pan and Front/Rear Pan. You can then record automation by moving the Crosshair control. For more information on plug-in automation in Pro Tools, refer to the Pro Tools Reference Guide.
The Crosshair defaults to the exact Center speaker-position, along the front wall. To return to the default position at any time, Alt-click (Windows) or Option-click (Mac) on the Crosshair. Although clicking and dragging the Crosshair is a fast and intuitive way to position your audio track, it’s difficult to make perfectly
Although the Four-Way Panner’s display resembles the Decode Steering display, it is different. The Steering display shows the dominant channel of the mix, and has no user-interactive controls. The Four-Way Panner is active only for its associated au-dio track, and is entirely under your control.
straight moves with a mouse. When you do not want any unintended movement, the Front-to-Rear and Left-Center-Right faders may be better tools.
Front-to-Rear Fader When used in conjunction with the Left-Center-Right fader, this fader of-fers an alternative to clicking and dragging the Crosshair, for positioning the audio track within the soundfield. This fader’s primary advantage over grabbing the Crosshair is that moving it will not cause any unintended left-to-right movement. For instance, if the audio track is po-sitioned anywhere along the front wall, and you want the track to move directly to the rear wall—without shifting left or right during the move—simply click and hold this fader with your mouse, and then pull it down toward the S Speaker Symbol. This is also the control to use for any front-to-rear or rear-to-front “fly-over” moves; for example, an airplane passing over-head. The indicator box on the right of the fader displays relative values from +100 at the front wall to –100 at the rear wall. A value of 0 indi-cates the audio track is positioned equally be-tween the front and rear walls. When the fader is along the front wall and positioned precisely beneath one of the Speaker Symbols (L, C, or R), the appropriate Speaker Symbol will illuminate. When the fader is anywhere along the rear wall, the S Speaker Symbol will illuminate.
Keep in mind that the Surround Channel is mono (even though it may be feeding two or more surround speakers); Dolby Surround’s four-channel design does not let you posi-tion sounds in just the “left” or “right” rear Surround speakers. Consequently, as long as the Crosshair is positioned anywhere along the Four-Way Panner’s rear wall (the “S” plane), the same signal will be sent to the Surround channel—regardless of whether the Crosshair is in the left, center, or right of the rear wall.
The Front-to-Rear fader can be automated. En-able automation by clicking on Automation at the top of the Surround Panner window, and adding Front/Rear Pan. For more information on plug-in automation in Pro Tools, refer to the Pro Tools Reference Guide.
Left-Center-Right Fader Used as an alternative to clicking on and moving the Crosshair, to posi-tion the audio track within the soundfield with-out introducing any accidental front-to-rear movement.
To move the audio track along the front wall from Left to Center to Right, simply click, hold, and move this fader with your mouse. To return this fader to an exact-Center position—without changing its front-to-rear position—Alt-click (Windows) or Option-click (Mac) on the fader.
The indicator box below the fader displays val-ues from –100 in the far-Left position, through >0< at exact Center, to +100 in the far-Right po-sition. The L, C, and R Speaker Symbols illumi-nate when the fader is located exactly at their lo-cations (assuming the Front-to-Rear fader is positioned at the front wall).
The Left-Center-Right fader can be automated. Enable automation by clicking on Automation at the top of the Surround Panner window, and adding Front/Rear Pan. For more information on plug-in automation in Pro Tools, refer to the Pro Tools Reference Guide.
Chapter 5: Dolby Surround Panner Plug-in 47

48
Dolby Surround Tools Plug-ins Guide
appendix a
DSP Requirements
The number of TDM plug-ins you can use at one time depends on how much DSP power is avail-able in your system. Since the TDM hardware on Pro Tools cards provide dedicated DSP for plug-ins, plug-in performance isn’t limited by CPU processing power.
The DSP tables in this appendix show the theo-retical number of instances of each plug-in that can be powered by a single DSP chip on Pro Tools|HD cards. DSP usage differs according to card type.
There are a total of nine DSP chips on a Pro Tools|HD card (HD Core, HD Process, and HD Accel). HD Core and HD Process cards pro-vide identical chip sets. HD Accel cards provide newer, more powerful DSP chips (making the HD Accel card ideal for DSP-intensive plug-ins, and for high sample rate sessions).
DSP tables show the theoretical maximum performance when no other plug-ins or sys-tem tasks (such as I/O) are sharing avail-able DSP resources. You will typically use more than one type of plug-in simulta-neously. The data in these tables are pro-vided as guidelines to help you gauge the relative efficiency of different plug-ins on your system. They are not guaranteed per-formance counts that you should expect to see in typical real-world sessions and usage.
Not all plug-ins are supported on all types of chips. The following tables indicate the number of compatible chips per card.
DSP Sharing Between TDM Plug-ins
Dolby Surround Tools plug-ins are MultiShell TDM plug-ins. Digidesign’s MultiShell II tech-nology allows different types of MultiShell TDM plug-ins to share the same DSP chip at the same time. This allows you to simultaneously use a greater variety of plug-ins by efficiently manag-ing the DSP available on each chip in your sys-tem.
Monitoring DSP Usage
The System Usage window (Window > System Usage) shows how much DSP is available in your system and how it is being used in the current Pro Tools session.
For more information about DSP usage and allocation, see the Pro Tools Reference Guide.
DSP Requirements 49
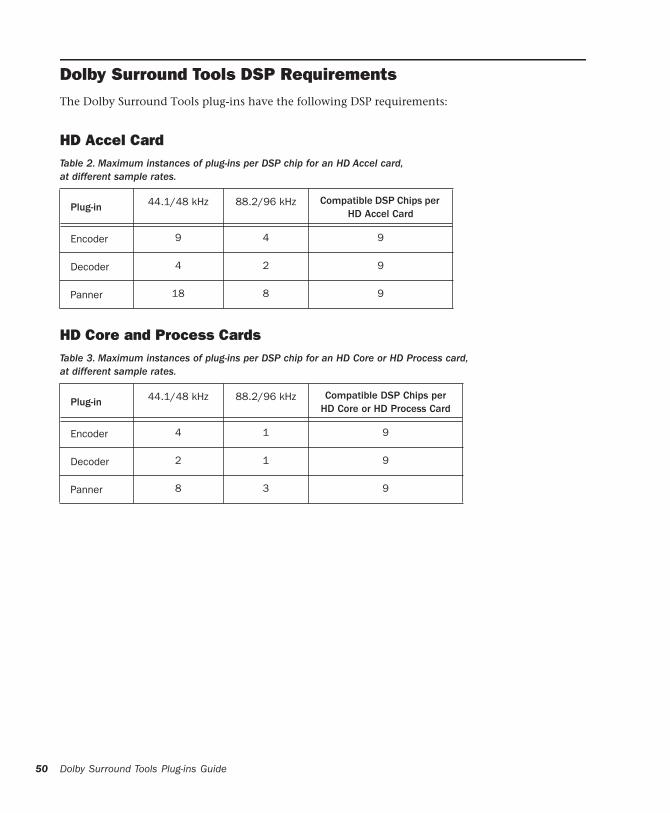
50
Dolby Surround Tools DSP RequirementsThe Dolby Surround Tools plug-ins have the following DSP requirements:
HD Accel Card
Table 2. Maximum instances of plug-ins per DSP chip for aDolby Surround Tools Plug-ins Guide
n HD Accel card,
HD Core and Process Cards
at different sample rates.
Plug-in 44.1/48 kHz 88.2/96 kHz Compatible DSP Chips per HD Accel Card
Encoder 9 4 9
Decoder 4 2 9
Panner 18 8 9
Table 3. Maximum instances of plug-ins per DSP chip for a
n HD Core or HD Process card, at different sample rates.Plug-in 44.1/48 kHz 88.2/96 kHz Compatible DSP Chips per HD Core or HD Process Card
Encoder 4 1 9
Decoder 2 1 9
Panner 8 3 9
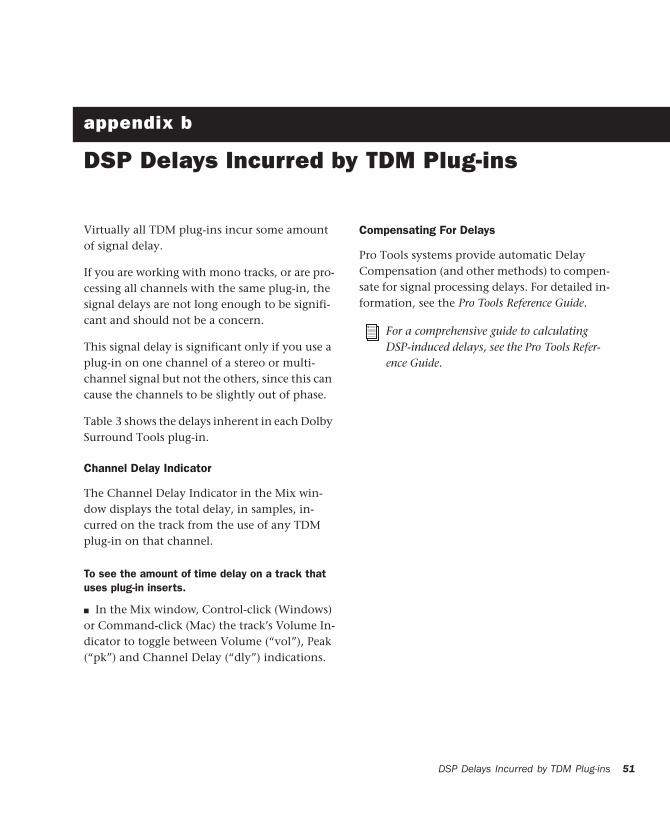
appendix b
DSP Delays Incurred by TDM Plug-ins
Virtually all TDM plug-ins incur some amount of signal delay.
If you are working with mono tracks, or are pro-cessing all channels with the same plug-in, the signal delays are not long enough to be signifi-cant and should not be a concern.
This signal delay is significant only if you use a plug-in on one channel of a stereo or multi-channel signal but not the others, since this can cause the channels to be slightly out of phase.
Table 3 shows the delays inherent in each Dolby Surround Tools plug-in.
Channel Delay Indicator
The Channel Delay Indicator in the Mix win-dow displays the total delay, in samples, in-curred on the track from the use of any TDM plug-in on that channel.
To see the amount of time delay on a track that uses plug-in inserts.
■ In the Mix window, Control-click (Windows) or Command-click (Mac) the track’s Volume In-dicator to toggle between Volume (“vol”), Peak (“pk”) and Channel Delay (“dly”) indications.
Compensating For Delays
Pro Tools systems provide automatic Delay Compensation (and other methods) to compen-sate for signal processing delays. For detailed in-formation, see the Pro Tools Reference Guide.
For a comprehensive guide to calculating DSP-induced delays, see the Pro Tools Refer-ence Guide.
DSP Delays Incurred by TDM Plug-ins 51
52
Dolby Surround Tools DSP Delay≈
Table 3. Samples of delay incurred by each TDM plug-in on Pro Tools|HD systems
Plug-inSamples of Delay on Pro Tools|HD Cards
Encoder 14
Decoder 3
Panner 3
Dolby Surround Tools Plug-ins Guide
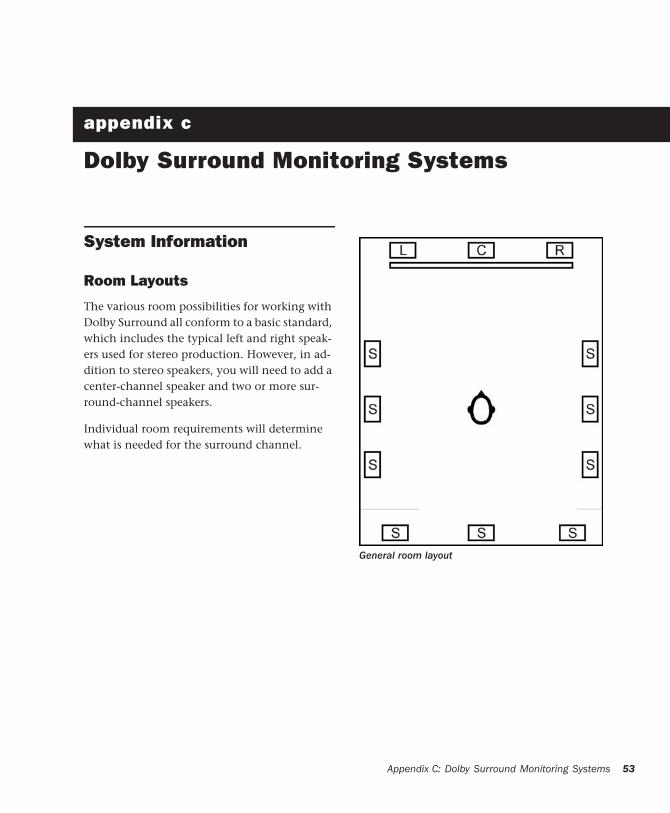
appendix c
Dolby Surround Monitoring Systems
System Information
Room Layouts
The various room possibilities for working with Dolby Surround all conform to a basic standard, which includes the typical left and right speak-ers used for stereo production. However, in ad-dition to stereo speakers, you will need to add a center-channel speaker and two or more sur-round-channel speakers.
Individual room requirements will determine what is needed for the surround channel.
General room layout
Appendix C: Dolby Surround Monitoring Systems 53
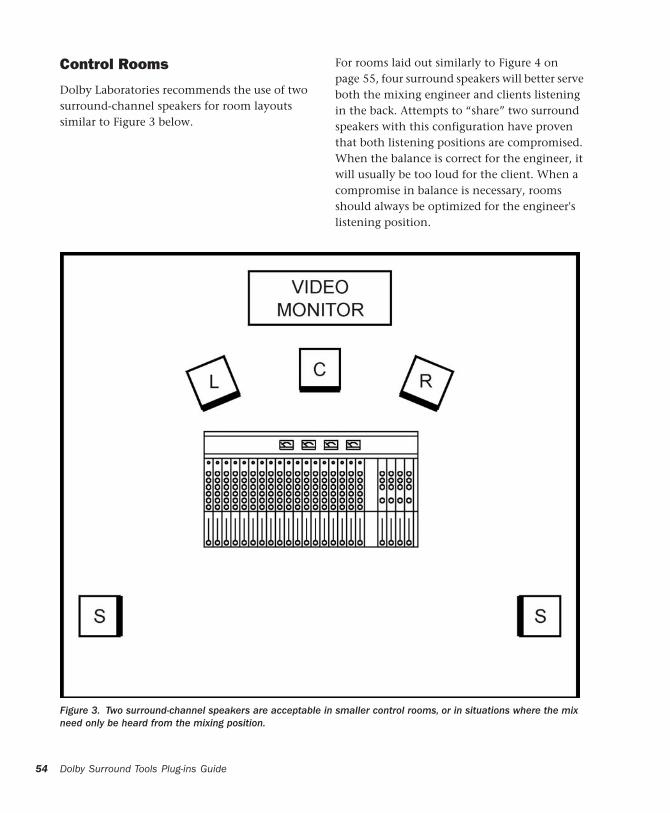
54
Control Rooms
Dolby Laboratories recommends the use of two surround-channel speakers for room layouts similar to Figure 3 below.
Dolby Surround Tools Plug-ins Guide
For rooms laid out similarly to Figure 4 on page 55, four surround speakers will better serve both the mixing engineer and clients listening in the back. Attempts to “share” two surround speakers with this configuration have proven that both listening positions are compromised. When the balance is correct for the engineer, it will usually be too loud for the client. When a compromise in balance is necessary, rooms should always be optimized for the engineer's listening position.
Figure 3. Two surround-channel speakers are acceptable in smaller control rooms, or in situations where the mix need only be heard from the mixing position.
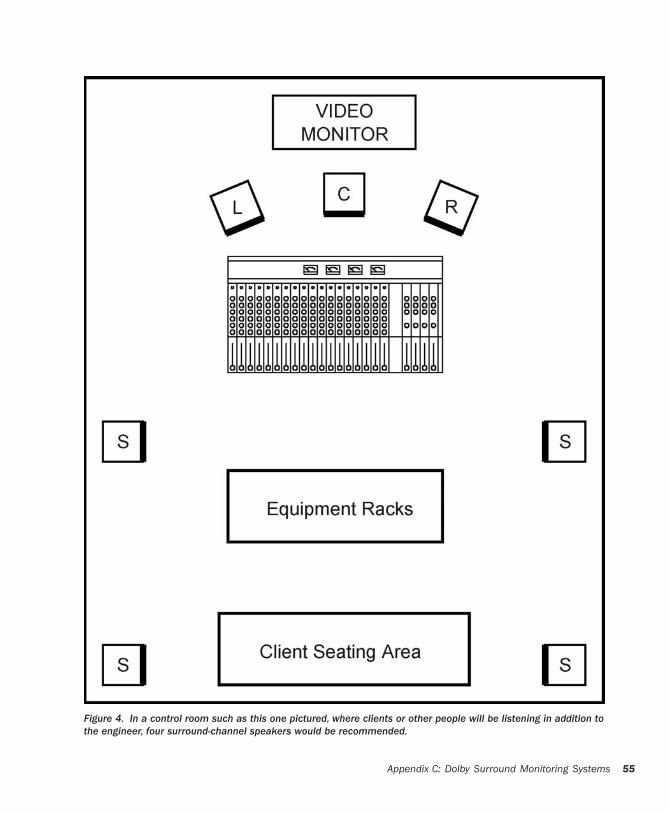
Figure 4. In a control room such as this one pictured, where clients or other people will be listening in addition to the engineer, four surround-channel speakers would be recommended.
Appendix C: Dolby Surround Monitoring Systems 55
56
Consumer Decoders
Consumer decoders operate in an identical fash-ion to the Dolby Model SDU4 professional de-coder and Dolby Surround Decoder plug-in, but they typically include special “auto balance” cir-cuitry. While such features are useful at the con-sumer level to correct for transmission or tape duplication imbalances between channels, they are undesirable when mixing or checking for quality. In addition, consumer units do not nor-mally have enough time delay for studios, or a simple way to compare mono, stereo, and Dolby Surround compatibility. While they are fine for small listening rooms, they should never be used in control rooms as part of the mixing pro-cess.
Dolby Surround Tools Plug-ins Guide
Additional Equipment Required
Speakers and Amplifiers
The front speaker setup may be accomplished in one of two ways. Either add a center-channel speaker that matches the acoustic design charac-teristics of the existing soffit-mounted left and right speakers, or install three identical near-field monitors. In either case, it is important that the designs of all three front speakers be identical, or else panning from one type of speaker to the other will result in significant dif-ferences in the sound. This does not mean, how-ever, that all of the speakers have to be the same size. It is quite acceptable to use large left and right speakers in combination with a smaller center speaker from the same product line.
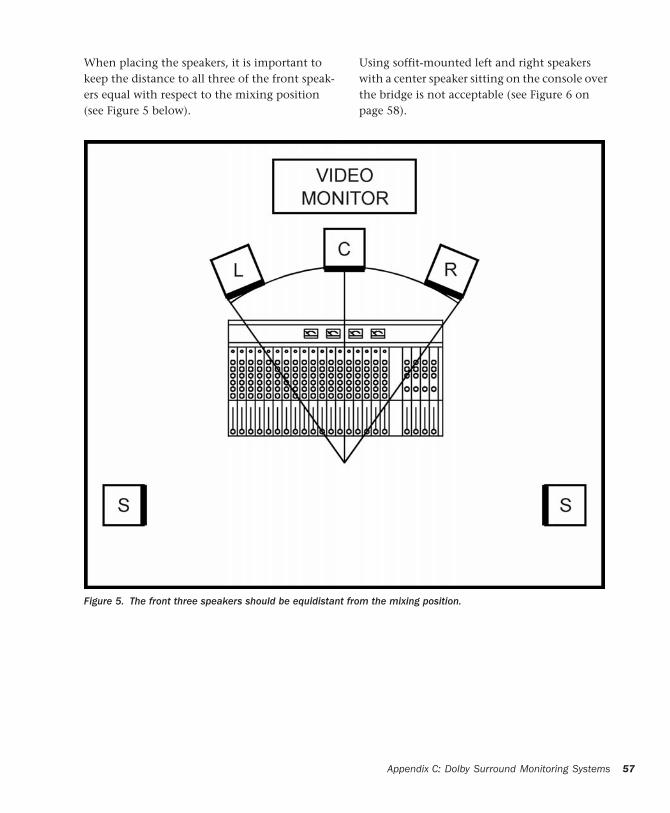
When placing the speakers, it is important to keep the distance to all three of the front speak-ers equal with respect to the mixing position (see Figure 5 below).
Using soffit-mounted left and right speakers with a center speaker sitting on the console over the bridge is not acceptable (see Figure 6 on page 58).
Figure 5. The front three speakers should be equidistant from the mixing position.
Appendix C: Dolby Surround Monitoring Systems 57

58
Dolby Surround Tools Plug-ins GuideFigure 6. This type of arrangement—with soffit-mounted main speakers and the center speaker sitting on the console—is not acceptable.
The surround speakers can be smaller bookshelf-type speakers. Since the actual frequency re-sponse of the surround channel is 100 Hz to 7 kHz, large speakers for bass reproduction and extended range tweeters for ultra-high frequen-cies aren't necessary.
If all three front speakers are identical, they should be driven by power amplifiers of equal rating. If the center speaker is smaller, the power rating of the center amplifier should be at least 75% that of the left and right amplifiers. If sep-
arate amplifiers are used for each surround speaker (the preferred method), each should be rated at least 50% of the left and right amplifi-ers. If a single amplifier is used for the surround channel (acceptable, but not as desirable), it should be rated the same as the left and right amplifiers. For example, a typical arrangement might consist of three identical front speakers each powered by a 100 watt amplifier, and two surround speakers powered by individual 50 watt amplifiers.
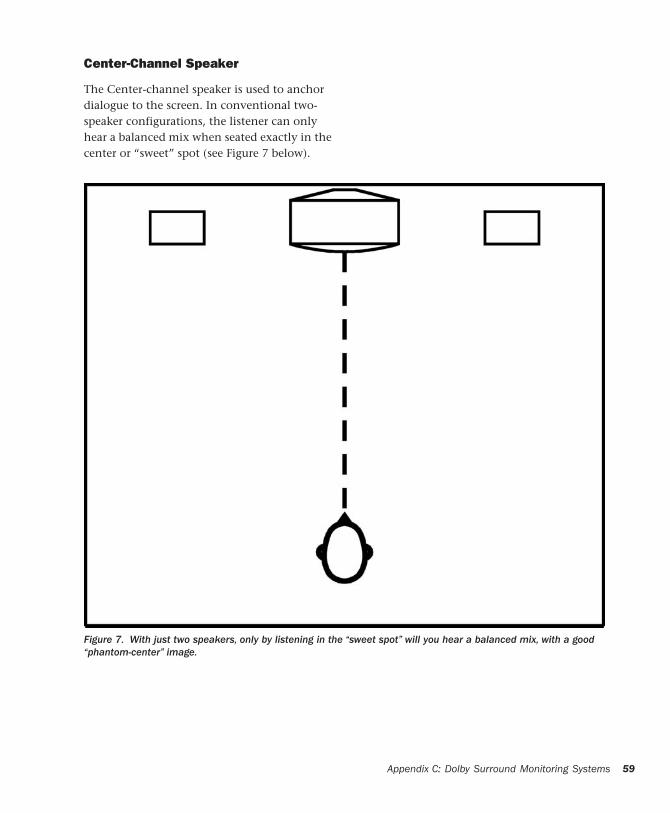
Center-Channel Speaker
The Center-channel speaker is used to anchor dialogue to the screen. In conventional two-speaker configurations, the listener can only hear a balanced mix when seated exactly in the center or “sweet” spot (see Figure 7 below).
Figure 7. With just two speakers, only by listening in the “sweet spot” will you hear a balanced mix, with a good “phantom-center” image.
Appendix C: Dolby Surround Monitoring Systems 59
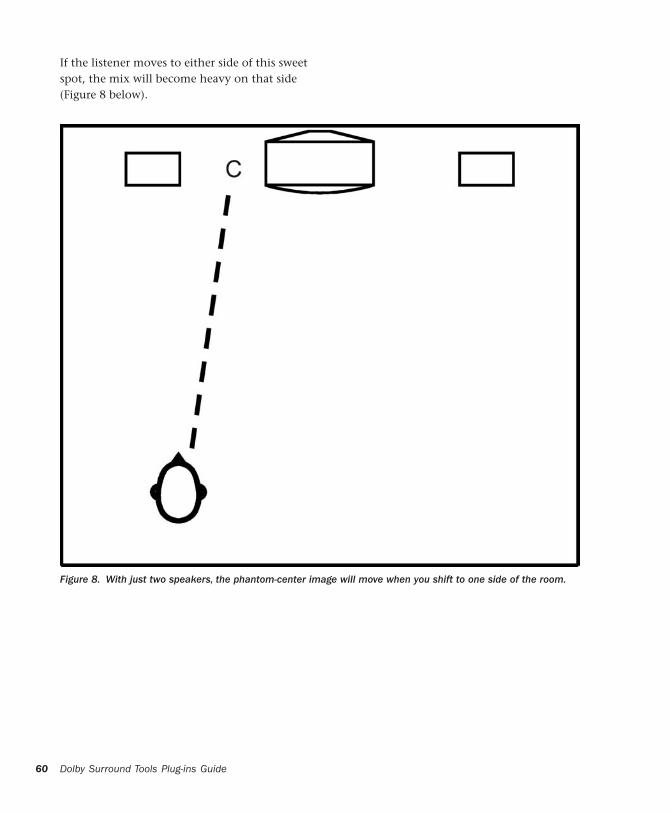
60
If the listener moves to either side of this sweet spot, the mix will become heavy on that side (Figure 8 below).
Dolby Surround Tools Plug-ins Guide
Figure 8. With just two speakers, the phantom-center image will move when you shift to one side of the room.
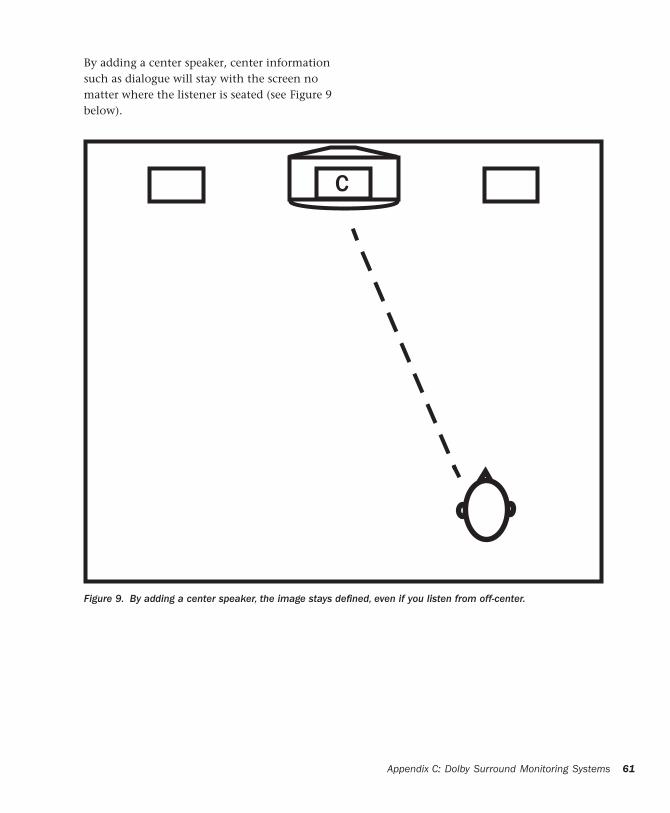
By adding a center speaker, center information such as dialogue will stay with the screen no matter where the listener is seated (see Figure 9 below).
Figure 9. By adding a center speaker, the image stays defined, even if you listen from off-center.
C
Appendix C: Dolby Surround Monitoring Systems 61
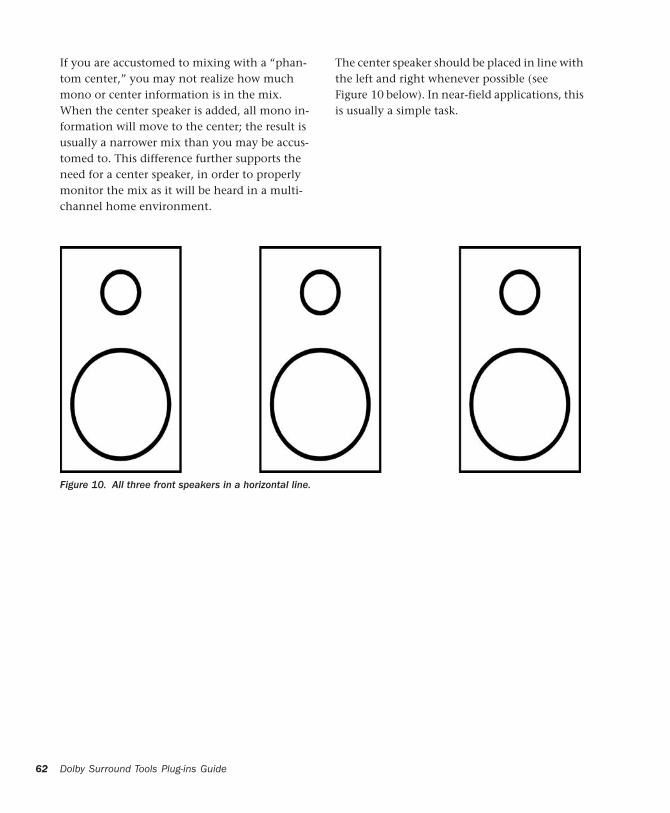
62
If you are accustomed to mixing with a “phan-tom center,” you may not realize how much mono or center information is in the mix. When the center speaker is added, all mono in-formation will move to the center; the result is usually a narrower mix than you may be accus-tomed to. This difference further supports the need for a center speaker, in order to properly monitor the mix as it will be heard in a multi-channel home environment.
Dolby Surround Tools Plug-ins Guide
The center speaker should be placed in line with the left and right whenever possible (see Figure 10 below). In near-field applications, this is usually a simple task.
Figure 10. All three front speakers in a horizontal line.
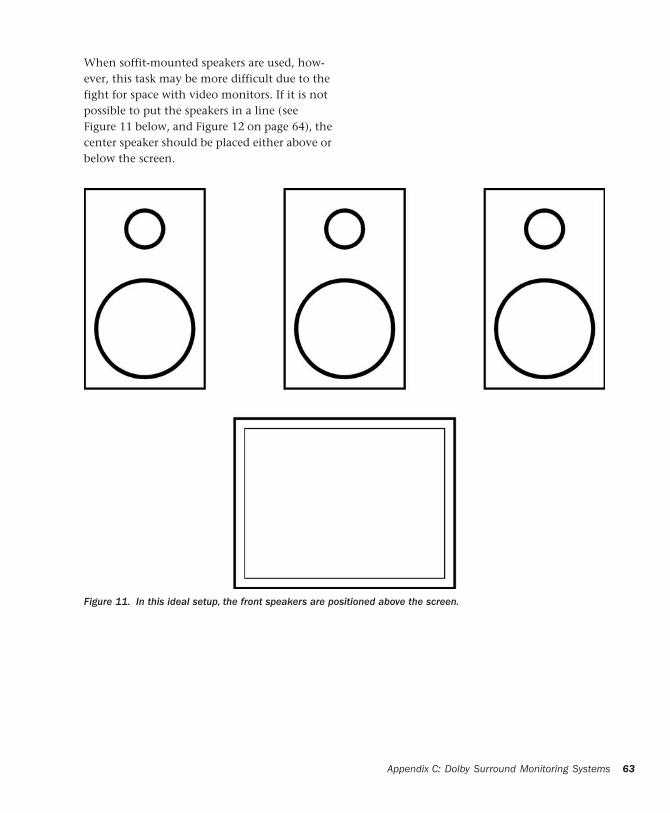
When soffit-mounted speakers are used, how-ever, this task may be more difficult due to the fight for space with video monitors. If it is not possible to put the speakers in a line (see Figure 11 below, and Figure 12 on page 64), the center speaker should be placed either above or below the screen.
Figure 11. In this ideal setup, the front speakers are positioned above the screen.
Appendix C: Dolby Surround Monitoring Systems 63
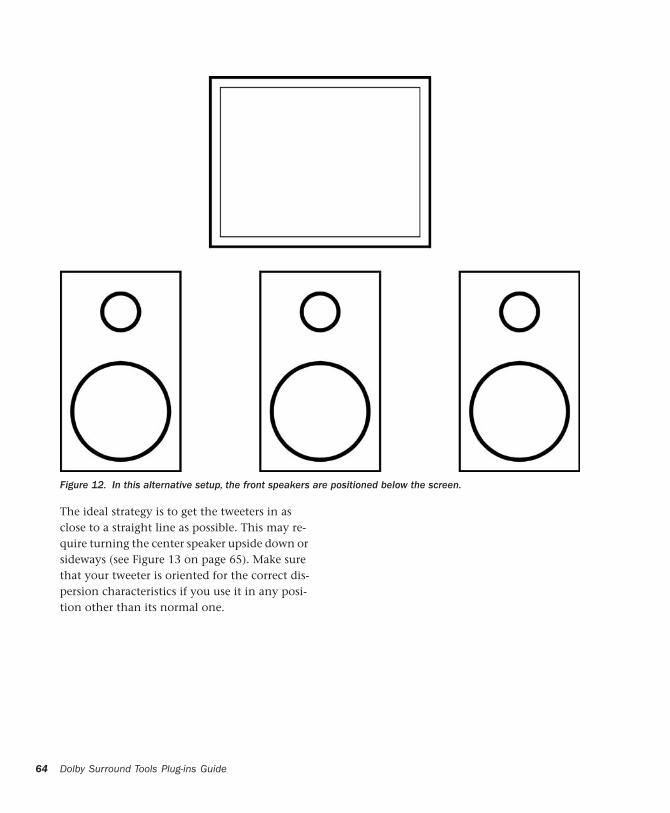
64
Dolby Surround Tools Plug-ins GuideFigure 12. In this alternative setup, the front speakers are positioned below the screen.
The ideal strategy is to get the tweeters in as close to a straight line as possible. This may re-quire turning the center speaker upside down or sideways (see Figure 13 on page 65). Make sure that your tweeter is oriented for the correct dis-persion characteristics if you use it in any posi-tion other than its normal one.
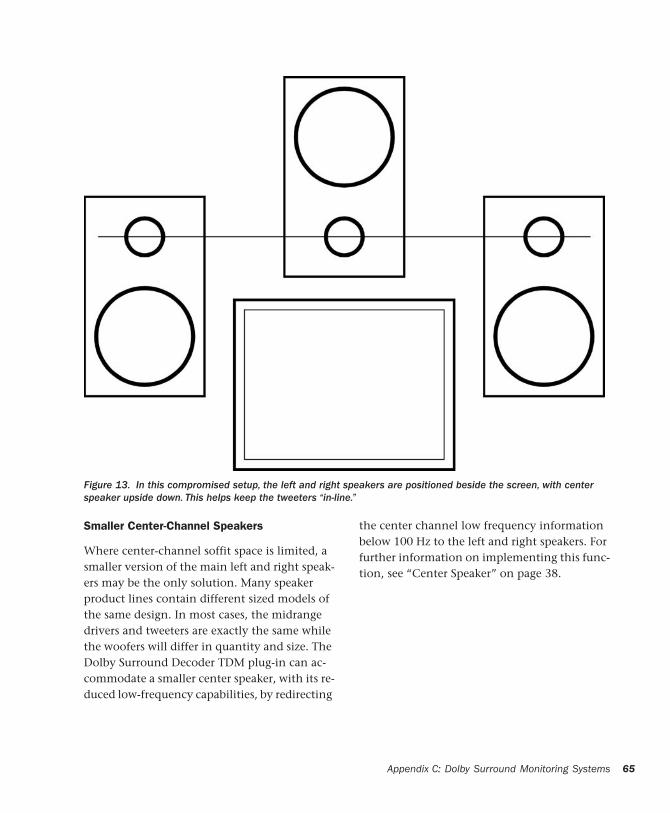
Figure 13. In this compromised setup, the left and right speakers are positioned beside the screen, with center speaker upside down. This helps keep the tweeters “in-line.”
Smaller Center-Channel Speakers
Where center-channel soffit space is limited, a smaller version of the main left and right speak-ers may be the only solution. Many speaker product lines contain different sized models of the same design. In most cases, the midrange drivers and tweeters are exactly the same while the woofers will differ in quantity and size. The Dolby Surround Decoder TDM plug-in can ac-commodate a smaller center speaker, with its re-duced low-frequency capabilities, by redirecting
the center channel low frequency information below 100 Hz to the left and right speakers. For further information on implementing this func-tion, see “Center Speaker” on page 38.
Appendix C: Dolby Surround Monitoring Systems 65

66
Surround-Channel Speakers
For normal Dolby Surround installations, small bookshelf speakers will suffice. However, you may wish to consider planning for the future. The 5.1-channel mixing format is currently the format of choice for mixing motion pictures (see Figure 14 below).
Dolby Surround Tools Plug-ins Guide
Figure 14. A control room layout, showing a 5.1-channel playback system installed.
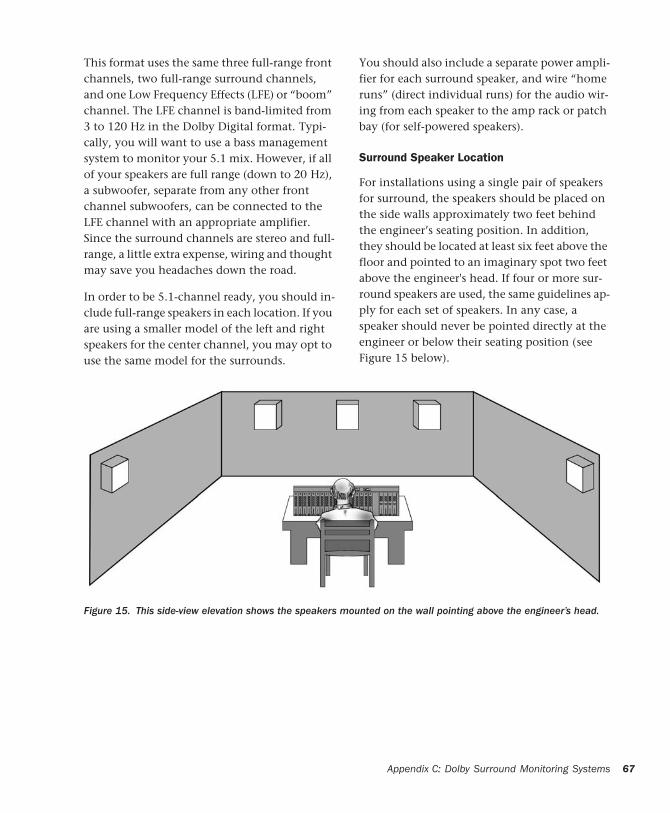
This format uses the same three full-range front channels, two full-range surround channels, and one Low Frequency Effects (LFE) or “boom” channel. The LFE channel is band-limited from 3 to 120 Hz in the Dolby Digital format. Typi-cally, you will want to use a bass management system to monitor your 5.1 mix. However, if all of your speakers are full range (down to 20 Hz), a subwoofer, separate from any other front channel subwoofers, can be connected to the LFE channel with an appropriate amplifier. Since the surround channels are stereo and full-range, a little extra expense, wiring and thought may save you headaches down the road.
In order to be 5.1-channel ready, you should in-clude full-range speakers in each location. If you are using a smaller model of the left and right speakers for the center channel, you may opt to use the same model for the surrounds.
You should also include a separate power ampli-fier for each surround speaker, and wire “home runs” (direct individual runs) for the audio wir-ing from each speaker to the amp rack or patch bay (for self-powered speakers).
Surround Speaker Location
For installations using a single pair of speakers for surround, the speakers should be placed on the side walls approximately two feet behind the engineer’s seating position. In addition, they should be located at least six feet above the floor and pointed to an imaginary spot two feet above the engineer's head. If four or more sur-round speakers are used, the same guidelines ap-ply for each set of speakers. In any case, a speaker should never be pointed directly at the engineer or below their seating position (see Figure 15 below).
Figure 15. This side-view elevation shows the speakers mounted on the wall pointing above the engineer’s head.
Appendix C: Dolby Surround Monitoring Systems 67
68
Speaker Sound Pressure LevelSpeaker levels are adjusted using the Dolby Sur-round Decoder's internal Pink Noise Generator. For film work, the industry standard is that pink noise at the 0 dB reference level (–20 dB from digital full scale) should produce a sound pres-sure level (SPL) of 85 dB (C-weighted, slow). If you are working on projects for theatrical re-lease, the level should be set and left there. For music mixing, speaker levels should be set for the same SPL in each channel. (Some engineers prefer to mix louder than others, but if the levels between channels are correct, the overall level isn’t as important.)
For very small mixing rooms, the surround channel is generally set 2 dB lower than the front channels (for example, 85 dB in front and 83 dB in back). This takes into account the closeness to the surround speakers and has proven to make the sound in the home environ-ment very close to what was heard by the mixer. For home video releases the overall level is usu-ally set to 79 dB. The lower level is used to en-sure that dialogue will not be lost in a typical (somewhat noisy) home environment.
For detailed information on calibrating you Dolby Surround monitoring system, see Appendix D, “Calibrating Your Playback System.”
Dolby Surround Tools Plug-ins Guide
appendix d
Calibrating Your Playback System
Why Dolby Surround Calibration is EssentialThis appendix reviews the necessary steps for calibrating your playback system for use with Dolby Surround Tools plug-ins. By following these steps as carefully as possible, you will help to ensure that your Dolby Surround-encoded mixes conform to professional standards.
Calibration is not optional; it is imperative. It is the only way to establish a proper balance be-tween channels, as well as proper dialogue lev-els. Without calibration, upon playback your mixes may sound imbalanced, and Center-channel dialogue may be unintelligible. Fortu-nately, once you’ve initially calibrated your sys-tem, you’ll find that future calibrations go very quickly.
Furthermore, all the tools you need to perform this calibration procedure are included in the Dolby Surround Decoder plug-in, with the ex-ception of one: a Sound Pressure Level (SPL) meter. There are a wide range of devices avail-able—for example, Radio Shack (Tandy Elec-tronics outside of North America) offers reliable and inexpensive hand-held SPL meters for less than $50 (£30). The two important settings to look for are “C weighting” and “slow response.”
A Unique Calibration Procedure
Calibrating your playback system for Dolby Sur-round requires that you to adjust your Dolby Surround Tools plug-ins for the proper gain lev-els and listening levels. If you’ve ever calibrated a stand-alone (“hardware”) Dolby Surround en-coder or decoder, then you’ll find that the pro-cess is very similar.
If, however, you’ve calibrated the input/output levels of your Pro Tools audio interface—or if you’ve ever calibrated an analog tape recorder—you’ll find that calibrating your playback system for Dolby Surround is rather different.
The biggest difference is that ordinary types of calibration aim to adjust internal and external gain levels, as measured, typically, in voltage or electronic dB (such as dBm or dBV). With these devices, your actual listening level is usually ir-relevant.
When it comes to calibrating your playback sys-tem for Dolby Surround mixing, listening level is extremely important. Consequently, to per-form the calibration properly, you’ll be setting your system to play back at a specific “reference” level, as measured with your SPL meter.
Appendix D: Calibrating Your Playback System 69
70
Why Calibrate to Particular Listening Levels?
The most important reason to calibrate your playback system is to establish a balance be-tween all four channels, so that all the speakers playback at the same level. When you have five speakers, it can be difficult to judge if all the speakers are the same level.
The second most important reason is to ensure that all four channels play back at a particular listening level, as measured in decibels using an SPL meter. This is done because Dolby Surround is frequently used for broadcast production. By calibrating your mixing and playback monitor system so that Dolby Surround processing takes place at “universally” referenced listening lev-els, you can ensure that when played back, your mix will be at roughly the same volume level as other productions.
For example, proper calibration is one reason why you can switch television stations between two different Dolby Surround-encoded shows, and the dialogue from each show will be at roughly the same perceived volume.
When to Calibrate?
Calibrating is relatively simple, and it’s some-thing you need to do only occasionally. The first of these occasions is after you’ve purchased Dolby Surround Tools—and before you begin mixing in Dolby Surround.
Calibration is done using the Dolby Surround Decoder plug-in; when you’re done, you can ex-port its settings and save them to disk, just like any other plug-in’s settings. Then, each time you start a brand-new session, you simply im-port the settings back into the Surround De-coder, and begin work. (Previously saved ses-sions will open again with the calibration
Dolby Surround Tools Plug-ins Guide
settings already in place, so this applies only to previously un-saved sessions, including new ses-sions you might create based upon the Surround Templates.)
For the most part, once you calibrate your play-back system and Dolby Surround Tools, you can set it and forget it—as long as you remember to import (and check) the calibration settings whenever you begin work on a brand-new ses-sion. However, because proper calibration is so important, you may wish to do as many profes-sionals do, which is to recalibrate before every important mixing session.
In addition, there are some other—though less frequent—circumstances under which you’ll need to recalibrate your system:
• If you reinstall your Dolby Surround Tools plug-ins, or if your system preferences files are trashed or corrupted
• If you reset (accidentally or intentionally) the input or output level trims for any of your Dolby Surround Tools plug-ins
• If you recalibrate the input or output levels of your Pro Tools audio interface
• If you change any of the settings or compo-nents for your playback system (such as speakers, amplifiers, mixers, and level-match-ing devices)
• If you reposition your mixing console, speak-ers, or listening position, or if you move your system into a new room
• If you modify the acoustical character of your room in any significant way
• If you change the type of release format (the-atrical or small-room, as detailed below)
Using Dolby Surround Tools with an External Dolby Decoder or Encoder
Dolby SDU4 or DP564 Decoder
If you’re using the Dolby Surround Encoder plug-in with an external Dolby SDU4 or DP564 Decoder, you will need to ensure that the plug-in’s output level is aligned to the decoder’s nominal input level. To accomplish this, you may need to record a 1 kHz sine wave into a Pro Tools session, and then play it back at a –20 dB level—so that the Surround Encoder plug-in’s “Dolby Level” carets illuminate—and route it to the input of the SDU4.
Dolby SEU4 or DP563 Encoder
If you’re using the Dolby Surround Decoder plug-in with an external Dolby SEU4 or DP563 Encoder, you will need to ensure proper En-coder/Decoder level-matching. To accomplish this, confirm that the levels into the Encoder are set properly, using its Input Trim control. You may also need to adjust the Encoder’s Output Trims, or your mixer’s gain, to ensure that the Surround Decoder plug-in receives the correct input level (–20 dB, with the “Dolby Level” car-ets just illuminating).
For specific procedures for playback calibra-tion and Encoder/Decoder level-matching, refer to Dolby’s documentation.
For specific procedures for playback calibra-tion and Encoder/Decoder level-matching, refer to Dolby’s documentation.
Built-In Pink Noise Generator
One of the calibration tools you’ll use is the Sur-round Decoder plug-in’s built-in Pink Noise Generator. If you’re familiar with full-band-width pink noise, you may notice that the Sur-round Decoder’s built-in generator sounds dif-ferent from typical pink noise. This is because it uses a band-limited type of pink noise, with minimal low- or high-frequency content. This type of shaped pink noise is ideal for playback systems where speakers may not be the same size: by concentrating on mid-range frequencies (which virtually any speaker can reproduce), calibration is more consistent with a wider vari-ety of playback systems. Since this type of band-limited pink noise sounds very similar coming from almost any kind of speaker, it can be par-ticularly helpful when you check your settings by ear.
Appendix D: Calibrating Your Playback System 71
72
Preparing to CalibrateCalibrating your playback system for Dolby Sur-round is a straightforward process. Even if you’ve never previously calibrated electronic equipment, just follow these steps for a well-tuned system. First, prepare Dolby Surround Tools, Pro Tools, and your playback system for calibration.
To prepare to calibrate:
1 If necessary, calibrate your Pro Tools audio in-terface. For information on calibrating your Pro Tools audio interface, refer to your Pro Tools I/O guide.
2 Make sure your Dolby Surround-compatible playback system is completely connected, and the Dolby Surround Tools plug-ins are correctly installed. (For information about suitable play-back systems, please see “Playback System Re-quirements” on page 3 and Appendix C, “Dolby Surround Monitoring Systems.”)
3 In the Surround Templates folder (which you should have copied from your Dolby Surround Tools folder onto one of your Pro Tools hard disks), locate the 4-2-4 Monitor Template. Dou-ble-click on it to launch it and Pro Tools.
4 Do one of the following:
• On Windows, as Pro Tools launches and the session opens. Choose File > Save Copy In, name the session CALIBRATION SETUP, and save it to your Pro Tools hard drive.
– or –
• On Mac, as Pro Tools launches, it will ad-vise you that you have opened a Mac Sta-tionary-format file, and will ask you if you want to edit the file, or create a new ses-sion. Choose New, name the session CALI-BRATION SETUP, and save it to your Pro Tools hard drive.
Dolby Surround Tools Plug-ins Guide
5 Next, turn on your mixing console (if you’re using one to monitor Pro Tools), and also turn on your playback system’s power amplifiers. If your power amps have gain controls, ensure they’re at moderate listening-level settings—and if you have identical amps, make sure that all the gain controls are set to the exact same po-sition. If you’re using a mixer, set its Pro Tools input faders to their nominal positions, and set your monitor playback level (control room level) to a moderate listening-level position. If you’re using your mixer’s group or direct out-puts to run Pro Tools into the amplifier chan-nels, make sure they’re all set to the same moderate level.
6 Return to Pro Tools and, within the Mix win-dow, locate the fader labeled MON LCRS. This controls the monitor output levels for the Left, Right, Center, and Surround channels. Alt-click (Windows) or Option-click (Mac) the fader to set it to the default volume setting (“0 dB”).
7 Click once on the plug-in button labeled SurDec. This will open the Dolby Surround De-coder plug-in window. The Dolby Surround De-coder should open in its full-sized window. If not, hold down the Control key (Windows) or Command key (Mac) and close the window; when you reopen it, the window will be full-sized.
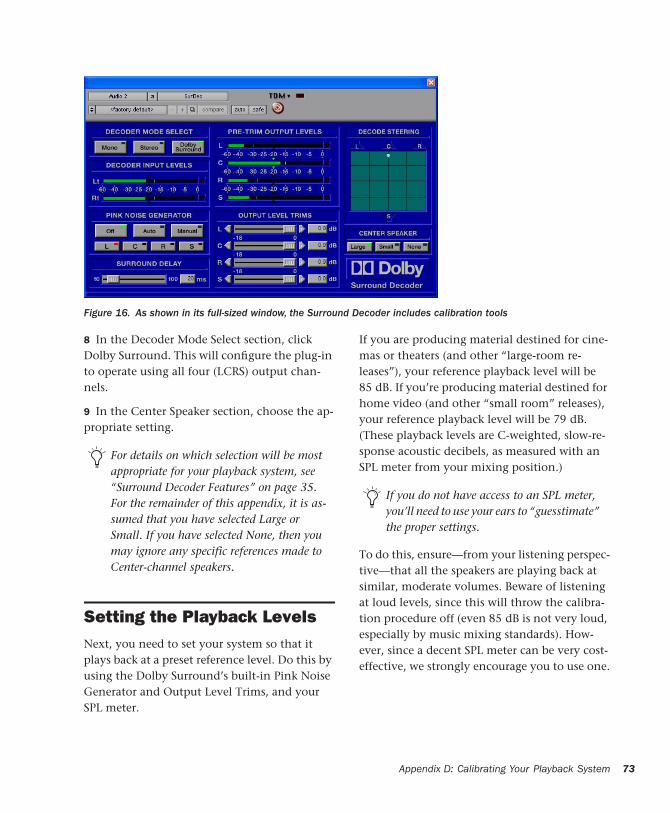
Figure 16. As shown in its full-sized window, the Surround Decoder includes calibration tools
8 In the Decoder Mode Select section, click Dolby Surround. This will configure the plug-in to operate using all four (LCRS) output chan-nels.
9 In the Center Speaker section, choose the ap-propriate setting.
Setting the Playback LevelsNext, you need to set your system so that it plays back at a preset reference level. Do this by using the Dolby Surround’s built-in Pink Noise Generator and Output Level Trims, and your SPL meter.
For details on which selection will be most appropriate for your playback system, see “Surround Decoder Features” on page 35. For the remainder of this appendix, it is as-sumed that you have selected Large or Small. If you have selected None, then you may ignore any specific references made to Center-channel speakers.
If you are producing material destined for cine-mas or theaters (and other “large-room re-leases”), your reference playback level will be 85 dB. If you’re producing material destined for home video (and other “small room” releases), your reference playback level will be 79 dB. (These playback levels are C-weighted, slow-re-sponse acoustic decibels, as measured with an SPL meter from your mixing position.)
To do this, ensure—from your listening perspec-tive—that all the speakers are playing back at similar, moderate volumes. Beware of listening at loud levels, since this will throw the calibra-tion procedure off (even 85 dB is not very loud, especially by music mixing standards). How-ever, since a decent SPL meter can be very cost-effective, we strongly encourage you to use one.
If you do not have access to an SPL meter, you’ll need to use your ears to “guesstimate” the proper settings.
Appendix D: Calibrating Your Playback System 73
74
Calibration Overview
Your main goals will be:
1 To adjust your monitor system so that all four channels play back through their respective speakers at the same level.
2 To set your monitor system’s overall playback level so that dialogue and other prominent ma-terial will be heard at the appropriate reference level. (The reference level will be either 85 dB or 79 dB, as described above.)
Once you have achieved these goals, you’ll be able to mix your Dolby Surround sessions accu-rately, and at the same listening levels other en-gineers use worldwide. And the results of this will be greater playback level consistency for your finished work.
For adjusting monitor system playback levels, most users have three options from which to choose—and some options are better than oth-ers. They are, in order of preference:
1 Your amplifier gain trim controls (or your speaker gain trim controls, if you’re using self-powered speakers).
2 Your mixer’s group outputs (one for each of the L, C, R, and S channels).
Dolby Surround Tools Plug-ins Guide
3 Your Dolby Surround Decoder’s Output Level Trim controls.
Adjusting the Output Level Trim controls is the least preferable option—as a matter of sonic quality. If you use the Output Level Trims to re-duce the output of the Surround Decoder signif-icantly, you also reduce its effective signal-to-noise ratio; that is, the difference between the audio signal and the noise floor is reduced, ef-fectively raising the relative level of the noise.
The issue is similar when you adjust your mixer’s group outputs: too little gain, and you sacrifice signal-to-noise; too much, and you may overload the amplifier’s inputs. Another problem with adjusting your mixer is that it’s somewhat easy for physical faders to be acciden-tally moved, which would require a re-calibra-tion.
Therefore, sonically and practically speaking, the best option is to use your amplifier gain con-trols (or self-powered speaker gain controls) to set the proper playback levels. This way, you’ll be able to maintain optimum signal-to-noise performance from both Pro Tools and your mixer. (Also, in most studios, it’s less likely that the amp gain controls will be accidentally moved.)
You will most likely either be using a pair of pro-fessional stereo amplifiers to deliver four chan-nels of power to your speakers, or you’ll be using self-powered speakers. Ideally, you’ll have inde-pendent gain controls for each channel or speaker.
If you do not have such individual channel gain controls, you’ll need to use the next-best op-tion—your mixer’s group outputs—to adjust the LCRS playback levels. If you aren’t able to adjust these levels at your mixer, then your Dolby Sur-round Decoder’s Output Level Trim controls may be your only option.
If you are using a console designed for Dolby Surround mixing, you may also have a four-channel monitor playback (“control room”) level control, which adjusts the overall lis-tening level of the LCRS channels. (Don’t confuse this with the much more common stereo monitor playback level control, which adjusts the listening level of only the left and right channels.)
If you do have a four-channel monitor play-back control, keep in mind that you’ll need to set it in one position, and leave it there throughout the calibration process. Ideally, it should be set to a level that delivers some-thing close to your reference level (85 or 79 dB) when you take an SPL reading of the first speaker—or of the “quietest” speaker, if you have a speaker that is considerably qui-eter than the others. (The goal here is to set the overall four-channel gain level such that all channels, even the quietest, is able to “drive” your amplifiers or speakers with enough gain to deliver the desired reference playback level.)
Finally, when the calibration process is fin-ished, you’ll need to take note of the con-trol’s position (a small piece of tape can do the trick). Then, whenever you mix in Dolby Surround, you can ensure that your monitor playback control is returned to its marked “calibration” level before you begin a ses-sion.
Taking Your First Measurement
To take your first measurement:
1 Before you turn on the Pink Noise Generator, be sure that your playback system has been set to a moderate listening level. Adjust your ampli-fiers, self-powered speakers, or mixer only—don’t adjust Pro Tools’ faders since you already set them for nominal playback levels when you prepared Pro Tools for calibration (see “Prepar-ing to Calibrate” on page 72). Beware that if the playback level is very high, you may run the risk of damaging your speakers or possibly your hearing.
2 Click Auto once. This will cycle pink noise au-tomatically between the Left, Center, Right, and Surround channels, remaining three seconds at each output before moving onto the next. The Surround Decoder Plug-in window must be open and visible to use Auto mode. If you don’t hear any pink noise, check all your system’s con-nections and settings.
3 Ensure that you are sitting in your normal, proper reference listening position, as detailed in Appendix C, “Dolby Surround Monitoring Systems.” Pick up your SPL meter, turn it on, and set it for “C weighting” and “slow re-sponse.”
Appendix D: Calibrating Your Playback System 75

76
4 As you face forward toward your front speak-ers, hold the SPL meter at approximately chest level (at the level of your head when seated for monitoring the mix) and away from your body, with its microphone facing roughly toward the center speaker. You should be able to take SPL readings, in decibels, as you look down at the meter.
Do not change your listening position as the pink noise cycles between the speakers. You should not turn to face the currently active speaker, nor should you turn the SPL meter. At all times that you are reading levels dur-ing the calibration procedure, keep sitting forward, with the SPL meter at chest level, and with its microphone facing forward, roughly toward the center speaker. Only in this way can you ensure proper readings. Also, please note that when you measure the SPL from the Surround channel, you’ll actually be measuring the summed output of both Surround-channel speakers. Just think of them as one; that is, when the out-put of both Surround speakers reaches a 79 or 85 dB reading on your SPL meter, the Surround channel will be calibrated to the proper reference level.
Dolby Surround Tools Plug-ins Guide
Adjusting Playback Levels
Using Amplifier or Speaker Gain Controls, or Adjustable Mixer Group Outputs
Adjust playback levels according to this section only if you have individual channel amplifier gain controls, self-powered speaker gain con-trols, or less preferably, adjustable mixer group outputs. If you have none of these, please skip to “Using the Dolby Surround Decoder Output Level Trims” on page 77.
To Adjust the Playback Levels:
1 Set the playback level of the Left channel. While sitting in your reference listening posi-tion, select Manual to turn on the Pink Noise Generator, and choose the channel selector L. You should hear pink noise coming from the Left (front) speaker only.
2 Take note of the level on the SPL meter. If it reads the desired level, skip to the next step. If not, adjust that channel’s amplifier gain control (or self-powered speaker gain control, or the channel’s associated mixer group output) up or down as necessary. Unless you have an assistant, you may need to leave your sitting position to do this; if you do, be sure to return to the same position, with the SPL meter in the same posi-tion.
3 Once the channel is set to the desired refer-ence level (85 dB or 79 dB), turn the Pink Noise Generator off (click Off). You have now properly set the level for one of your four playback chan-nels. Repeat the same procedure for the remain-ing C, R, and S channels.
4 When you’ve set the last channel, put the Pink Noise Generator back into Auto mode, so that it cycles pink noise between all the speak-ers. Using your SPL meter—and your ears—con-firm that each speaker sounds equally loud from your reference sitting position, and that each speaker is playing back at the exact reference level. If there are any discrepancies, you may need to repeat portions of these steps until ev-erything is properly adjusted.
When you are finished skip to “Once the Play-back Levels are Set” on page 78.
Using the Dolby Surround Decoder Output Level Trims
If you do not have individual channel amplifier gain controls, self-powered speaker gain con-trols, or adjustable mixer group outputs, adjust your playback levels according to the following steps. Otherwise, adjust your playback levels ac-cording to the steps in “Using Amplifier or Speaker Gain Controls, or Adjustable Mixer Group Outputs” on page 76.
To Adjust the Playback Levels:
1 Set the playback level of your Left channel. While sitting in your reference listening posi-tion, select Manual to turn on the Pink Noise Generator, and choose the channel selector L. You should hear pink noise coming from your Left (front) speaker.
2 Take note of the level on the SPL meter. If it reads the desired level, skip to the next step. If not, adjust the channel’s playback level using the Surround Decoder’s respective Output Level Trim control, until your SPL meter indicates the desired reference level of 85 or 79 dB.
3 Once the channel is set to the desired refer-ence level (85 or 79 dB), turn the Pink Noise Generator off (click Off). You have now properly set the level for one of your four playback chan-nels. Repeat the same procedure for the remain-ing C, R, and S channels.
It is possible that the range of your Output Level Trim controls may not give you enough gain to reach the desired reference level, especially if your amplifier/speaker combination is particularly inefficient. If you find this is the case, please double-check your amplifiers for any “hidden” trim controls, such as back-panel controls or screw-pot trims. Failing this option—since you have neither amplifier nor self-powered speaker gain controls, nor mixer group out-put controls—you can adjust the overall monitor playback levels by adjusting the fader level of the Mon LCRS Aux Input channel in Pro Tools; or, insert a multi-mono Trim plug-in after the decoder, unlink its controls, and adjust each of the channel gains independently. However, since this can cause overloading of signals within Pro Tools, it should be done only as a last resort! A much preferable alternative, would be to use different amplifiers or speakers—with gain controls—or to add a mixer with group outputs.
Appendix D: Calibrating Your Playback System 77
78
4 When you’ve set the last channel, put the Pink Noise Generator back into Auto mode, so that it cycles pink noise between all the speak-ers. Using your SPL meter—and your ears—con-firm that each speaker sounds equally loud from your reference sitting position, and that each speaker is playing back at the exact reference level. If there are any discrepancies, you may need to repeat portions of these steps until ev-erything is properly adjusted.
5 Also, look at your Output Level Trims. Ideally, one or more of them will be at 0 dB, or at least very close to 0. This indicates a decent signal-to-noise ratio out of the Dolby Surround Decoder. However, if you notice that all four of the Out-put Level Trims are set at low levels, you may be sacrificing signal-to-noise. If this is the case, you may want to consider adding a mixer between your Pro Tools audio interface and your amplifi-ers, or to get amplifiers with individual channel gain controls. Either of these approaches will mean that you can reduce the gain at the mixer or the amplifiers. You can then raise the gain of the Output Level Trims, restoring the lost signal-to-noise performance, and adjust your playback levels according to the steps in “Using Amplifier or Speaker Gain Controls, or Adjustable Mixer Group Outputs” on page 76.
Once the Playback Levels are Set
Now that your monitor system’s playback levels have been properly calibrated for Dolby Sur-round mixing, all of your speakers should be balanced (each one reproducing the same level from your mixing position). Furthermore, prop-erly encoded dialogue should now play back at levels that closely correspond to your desired reference playback level of 85 or 79 dB.
Dolby Surround Tools Plug-ins Guide
You will notice that during mixing sessions, the caret-style Dolby Indicators will flicker when di-alogue plays back. With practice, you’ll grow ac-customed to the reference sound pressure level of dialogue. This will help you make better-sounding mixes, since you’ll learn to detect any level anomalies that may affect decoding perfor-mance or playback level.
If you have adjusted any of your amplifier’s or mixing console’s controls, be sure to take careful note of their settings. If you’re using a mixing console designed for Dolby Surround mixing, this also applies to its four-channel monitor playback (“control room”) level control. It is vi-tal that you use the same settings whenever you are performing a final surround-encoded mix!
Before you close the session or quit Pro Tools, you’ll also want to save your Dolby Surround Decoder’s settings, but not until after you set the Surround Delay.
Setting the Surround DelayThe Surround Delay control is used to ensure that any front-channel information that may have leaked into the rear Surround channel is heard first from the front channels (L, C, or R), and then from the rear (see “Time Delay” on page 29). By delaying the Surround channel just a fraction of a second, any common “crosstalk” information will arrive at the listener after the main front signal. As a result, the information will be perceived to have emanated from the front.
The Surround Delay control delays the output to the Surround channel in 10 millisecond incre-ments, from 10 to 100 ms. The Surround Delay’s default setting is 20 ms. There is no overall by-pass control for the delay.
To calculate how much Surround Delay you need:
1 Estimate the distance from your primary lis-tening position to the Center speaker.
2 Subtract from this value the distance from your primary listening location to the nearest Surround speaker.
3 Calculate this value in feet, if you haven’t done so already (1 meter is approximately 3.25 feet). To this value, add “10” and round up (in 10 ms steps).
4 The result is the correct delay setting, in mil-liseconds.
For example, if the distance from your listening position to the Center speaker is 5 feet, and the distance from your listening position to the nearest Surround speaker is 3 feet, subtract 3 from 5 and add 10. In this example, therefore, the correct Surround Delay setting is 20 ms (rounded-up from 12 to 20).
Saving Calibration SettingsOnce you have completed calibrating your play-back system for Dolby Surround mixing, you need to save the settings. You can then recall your settings whenever you start a new session.
To save your calibration settings to a disk file:
1 With the Surround Decoder window open, and with all the calibrated settings still active, select Save Settings As from the Settings menu.
2 Save the calibration settings to a disk file. To remember the file name and creation date, name it something like “DolbyCalibra-tion<Date>.” It is also recommend you save the file inside the Dolby Surround Tools folder, or within a new folder, which you might want to name Dolby Calibrations.
Later, when it’s time to create a new session, you’ll be able to import these same plug-in set-tings before you begin any mixing.
To import your calibration settings into a new session:
1 Launch the appropriate Surround Template and save it as a new session, with whatever name you wish.
2 Before you do any other work, click once on the plug-in button labeled SurDec. This will open the Dolby Surround Decoder plug-in win-dow.
3 Select Import Settings from the Settings menu.
4 Locate, select, and open the appropriate cali-bration settings file.
5 Your calibration settings will be loaded into the Dolby Surround Decoder plug-in.
6 Finally—before you begin work on your new session—you should once again save the Pro Tools session. This will store the calibration settings as part of the session, and you can open this session later without having to load the cal-ibration settings again.
Congratulations! You’ve now completed all the necessary steps for calibrating your playback system for Dolby Surround. For a variety of im-portant Dolby Surround concepts and tips—to help you get the most out of your mixes—be sure to read Appendix E, “Mixing for Dolby Sur-round.”
Appendix D: Calibrating Your Playback System 79

80
Dolby Surround Tools Plug-ins Guide
appendix e
Mixing for Dolby Surround
Announcers and DialogueTraditionally, dialogue is mixed only to the cen-ter speaker to keep the on-screen sounds tied to the picture.
When a center speaker is used, all dialogue will appear to come from the screen regardless of where the listener is seated. If dialogue were to come from the left or right speakers, the stereo image would differ depending on the listener's location, which would be highly undesirable. This does not mean that voices should be ex-cluded from the other channels, but any such placement should be strictly limited to “effects” voices.
Interior EffectsEffects and ambient sounds will normally be mixed between left, right, and surround. Com-mon practice is to use a stereo ambiance that is panned left and surround for the left channel of the source, and panned right and surround for the right channel of the source. The result is a sound that surrounds you, yet still has a front stereo image. The amount of surround added will determine how far back you are in relation to the front sounds; more surround corresponds to placement further back in the soundfield.
Sometimes a mono element is all that is avail-able, yet a surround effect is desired. In this case, you can put the signal in both the center and surround channels. By applying it equally to both center and surround, the sound will appear to come from all four channels. This technique is commonly used with ambient elements for television and film mixes. You can also use a lit-tle stereo reverb with the same mono signal, and apply the reverb effect to the left and right chan-nels while the original signal is applied to center and surround—this will give a slightly wider im-age.
Another stereo imaging trick is to take the mono signal and assign it to the left channel while adding a roughly eight millisecond delay of the same signal to the right channel. The effective-ness of this technique will depend on the nature of the program material.
Positioning of the Stereo ImageBecause of the center speaker, stereo imaging differs slightly from conventional (two speaker) stereo. The most noticeable difference is that the perceived stereo image will tend to be narrower. This is due to the fact that most music mixes contain considerable amounts of center channel information that you are accustomed to hearing as a phantom image from the left and right
Appendix E: Mixing for Dolby Surround 81
82
speakers. With a center speaker, all of this infor-mation is directed to a single point source, cre-ating the impression that it all originates from the center. Although engineers who do motion picture work are accustomed to this, most music engineers find it a little distracting at first (un-less they have their own home theater systems). The solution is to mix for a wider image than you are normally used to.
A common mistake in this situation is to elimi-nate the center speaker in the control room and use “phantom” center monitoring. While this may give you a better feeling about your mix in the control room, it does not address the listen-ers at home who have a complete home theatre system. Although the mix sounds different with a center speaker, it is the preferred listening method.
Panning SoundsThere are different ways to pan sounds around in a mix. The best way is to use “film style” pan-ners, such as in Pro Tools, that pan from left to center to right, and from front to back. This type of panning system will allow you to position a sound anywhere in the soundfield with little ef-fort.
If you are mixing from a console and film style panners are not available, panning from left to right on one stereo bus, and from center to sur-round on a second stereo bus, can also be an ef-fective way to place sounds, although not as easy to use (especially for moving effects).
On small, function-limited consoles, front pan-ning can be accomplished by the stereo bus, and the surround channel can be fed by an auxiliary bus. This is extremely limiting in use, but will work if necessary.
Dolby Surround Tools Plug-ins Guide
For complicated moves, assigning the signal to multiple faders while feeding each fader to a dif-ferent output will allow you to use the faders as panners. For example, assigning one fader to the left to right pan (with the pan pot set to left cen-ter) and a second fader to the surround bus will allow you to pan from left center to surround by bringing up the second fader as the first one is brought down. If the console is automated, these moves can be perfected one at a time and then repeated by the automation system. In a similar manner, a circle pan can be created by assigning the signal to four faders and routing each fader to a different input of the encoder.
Stacking Encoded TracksA common practice in the film industry is to premix elements to reduce the complexity of the final mix. For example, four-track LCRS pre-mixes are made of the dialogue, music or effects components of the mix. These individual pre-mixed elements may, in some cases, be stored as Dolby Surround encoded 2-channel elements (Lt/Rt) to then be combined in the final mix. Each pre-encoded element should be assigned directly to the left and right inputs of the final mix encoder. This technique should, however, be avoided when mixing material that may also be used to generate a discrete mix master for for-mats such as Dolby Digital on laser disc, DVD or DTV.
Magic SurroundIn certain cases, stereo microphone techniques and stereo electronic instruments will cause a phenomenon known as “magic surround.” This effect can occur when part of the signal is placed in the surround channel by the decoder, and is caused by out of phase information in the stereo pair. X-Y microphone techniques will almost al-ways produce magic surround. While the effect may sound pleasing by itself and you may feel that no encoding is necessary, it is unpredict-able, subject to constantly changing phase in-formation and cannot be relied upon. A simple addition of another element in the mix (such as a voice over) could easily change the phase char-acteristics of the mix, and the decoder would no longer decode the original element the same way. The best thing to do in this situation is to add a small amount of the original element to the surround input of the encoder. This will in-sure that the decoder will find the real surround signals and not some random phase informa-tion.
In some cases, too much surround information may be present. This is especially true with elec-tronic keyboards that use various types of elec-tronic processing to produce a “stereo” signal from a mono source. If you have too much in-formation in the surround channel with your fa-vorite sound, simply pan the left a little towards center and the right an equal amount towards center. This will cancel out some of the out of phase information and make the decoder work normally again. The amount of panning re-quired will vary with the sound, but it usually does not take much to clean it up.
Decoder Mistracking and Steering ArtifactsWhen mixing, you will quickly realize that the decoder can only steer in one direction at a time. This requires careful planning of the sound field.
Troubles can occur when one tries to send two very different and unrelated sounds to two dif-ferent channels at once, such as crickets in the surround and chickens in the front. The result is that the sounds bleed into the other channels while appearing to shift in the sound field. This is very distracting and undesirable.
Another problem can occur when a music track contains a lead instrument prominent in the left- or right-channel mix, while an announcer comes and goes from the center channel. In this case, the instrument will appear to move from its intended speaker towards the center and then return to the correct speaker when the an-nouncer stops talking. The solution here is to ei-ther pan the music element towards center (for example, by using the Pro Tools surround pan-ner’s Center Percentage control) or reduce its level until the problem goes away.
Often, when making sound effects for motion pictures, the sound effects designer will delete all ambient sounds briefly to allow another sound to be more prominently heard. For exam-ple, there may be nighttime sounds and traffic in the background. The next big sound might be a door slam. While the door slams, the traffic and night sounds will either be very low-level or will disappear entirely. When the door slam sound is gone, the other sounds are already back in the mix. They were never missed, since the sound of the door would have covered them anyway.
Appendix E: Mixing for Dolby Surround 83
84
Surround Channel PumpingPumping of the surround channel is frequently caused by bad transmission paths and is rarely heard during the mix.
The problem is commonly caused by a limiter that is active in one channel but not the other, or a stereo limiter that is not set up the same for both channels. The solution is to either remove the limiters or set them up identically.
This problem can also be heard during the mix if a stereo limiter is being used excessively or if part of the element is limited, but not all of it. It is impossible to cover every possibility here, but look for inconsistencies between the two stereo channels as the likely cause of the problem.
Proper Surround Level and ContentThe appropriate amount of surround content is usually left up to the taste of the producer and engineer mixing the project. As a guideline, the image should direct attention to the front of the soundfield, and the listener should notice some-thing missing when the surround channel is re-moved from the mix. Conversely, attention should not be drawn directly to the surround channel when it is returned to the mix. Within reason, there’s no right or wrong mix.
Dolby Surround Tools Plug-ins Guide
Limiters, Delays, Reverb Units, Other Effects ProcessorsAs with any mixing situation, signal processing devices are commonly used in Dolby Surround mixes. Limiters and compressors present few problems, as long as they are used before the en-coder. Digital delays and soundfield generators (such as reverbs) may also be used, although the methods you use to generate soundfields from these effects may not work as expected when Dolby Surround decoding is used.
Since you will be monitoring through a decoder, you can instantly hear what the soundfield will actually sound like. If you find that your favorite room reverb setting has an excessive surround content when nothing has in fact been mixed to the surround channel, try panning the stereo output of the effect in towards the center in-stead of hard left and right. Experiment to get the exact sound you desire. Excessive surround content is usually caused by competition be-tween phase shifting in the effect and the phase encoding found in Dolby Surround.
Stereo SynthesizersMono to stereo synthesizers (spatializers) can create all sorts of problems for mixing in Dolby Surround. To begin with, the Dolby Surround program is a stereo signal so there is no need for a stereo synthesizer in the recording path. Addi-tionally, if you have ever listened to a mono broadcast run through an aggressively adjusted stereo synthesizer followed by a surround de-coder, you have probably experienced dialogue coming from all the speakers all the time. All lo-calization of the voices to the screen is lost.
For this reason, with complete mixes, a stereo synthesizer is not a desired tool in the recording path. This is not to say, however, that stereo synthesizers can’t be used to advantage for indi-vidual mono sources within a Dolby Surround mix during production and before encoding. When used properly, they can be effective on certain elements. However, they should be used only sparingly when dialogue or vocals are part of the mono element.
Mono, Stereo, and Dolby Surround CompatibilityMixing techniques used in Dolby Surround pro-ductions are similar to those used in normal ste-reo productions. Just as you should check the mono compatibility of a stereo mix, you should check both mono and stereo compatibility of a Dolby Surround mix.
In most cases, stereo compatibility is not an is-sue. The surround element of the mix will ap-pear to be outside of the speakers, just as an out of phase signal would. However, you should still have a hard center image.
Mono compatibility is a little trickier. Anything that is in the surround channel input of the en-coder will disappear in mono. This can be con-sidered an asset in some cases and a detriment in others.
With live sporting events, for example, the lack of some crowd noise in the mono mix will help home listeners with small mono speakers to hear the announcers more clearly. In other ap-plications, however, the mix may contain criti-cal elements that are predominantly located in the surround channel. For compatibility rea-sons, those elements should also be mixed to a front channel (interior panned) so that they can be heard in mono (a common practice in the film industry).
Appendix E: Mixing for Dolby Surround 85
86
4-2-4 MonitoringAs well as mixing Dolby Surround soundtracks for consumer media, it is also possible to pre-view the results of the Dolby Surround process (“4-2-4” monitoring) on discrete four-channel audio tracks (L, C, R, and S), that will subse-quently be combined with other elements dur-ing the final mixing of film soundtracks. This 4-2-4 monitoring through the Dolby Surround en-coder and decoder is vital to any facility that regularly supplies four-channel sound effects or music recordings for theatrical film produc-tions.
Tracks for film applications are seldom Dolby Surround matrix encoded before delivery to the film mixing stage, but are commonly sent as dis-crete elements on separate tracks (LCRS). It is important, however, to know how these ele-ments will be affected when processed by the Dolby Surround encoding system during the fi-nal mix, or undesirable results may occur. Prob-lems most commonly result from soundtracks having a large mono component, or containing phase information that makes them too sur-round heavy.
Dolby Surround Tools Plug-ins Guide
Common PitfallsAlthough you may like an effect that spins your head around, and it may be just what your pro-duction needs, repeating that effect dozens of times will usually be tiring to the listener. The key to creating good surround mixes is subtlety. Don’t draw attention to the techniques you are using. The listener should never have to stop paying attention to what is happening up front while trying to figure out what they just heard from the back. Loud, obnoxious, or out of place effects are distractions, not additions. Be taste-ful.
Another pitfall is placing too much information in the surround channel. In general, it is better to be more sparing with surround information. Mixes that are surround heavy will distract the viewer from the on-screen action. If you find yourself thinking about what you have just heard in the surround channel, instead of pay-ing attention to the action on the screen, there is too much surround information.
appendix f
The Dolby Surround Templates
Dolby Surround Tools include several Surround Templates, which are Pro Tools sessions pre-configured for a variety of Dolby Surround mix-ing and monitoring situations. The Templates include:
• Surround Encoding
• 4-2-4 Monitoring
• Surround Encoding to Disk
• Surround Encoding to DAT
• 5.1 to LCRS Downmixing
When you install Dolby Surround Tools, all of the Surround Templates are installed automati-cally in /Digidesign/Dolby Surround Tools/Sur-round Templates/. To use the Surround Tem-plates, copy the Surround Templates folder to one of your Pro Tools audio drives.
The Surround Templates provide the basic track and bussing configurations required for Dolby Surround mixing and monitoring: each tem-plate includes four empty audio tracks, plus one or two Auxiliary Input tracks with the Dolby Surround Tools plug-ins.
To use the Surround Templates:
1 Launch the Surround Template that most closely matches your needs.
2 Choose File > Save As to save it as a new ses-sion to a Pro Tools audio drive.
3 Name and save the new session.
4 Begin working on your session.
Each Template has four audio tracks, each hard-panned to one of the four LCRS channels. This setup is designed as only a starting point. The Surround Encoding Templates can be reconfig-ured to include any number of audio, Auxiliary Inputs, and Master Fader tracks with panning and automation.
On Mac, Surround Templates are in Mac Stationary format. When opening a Sur-round Template in Pro Tools, a warning di-alog will appear and prompt you to create a new session or edit stationary. Select New Session, then name the new session and save it to a Pro Tools hard drive. Do not se-lect Edit Stationary, or you will overwrite the original Template when you save the session.
Appendix F: The Dolby Surround Templates 87
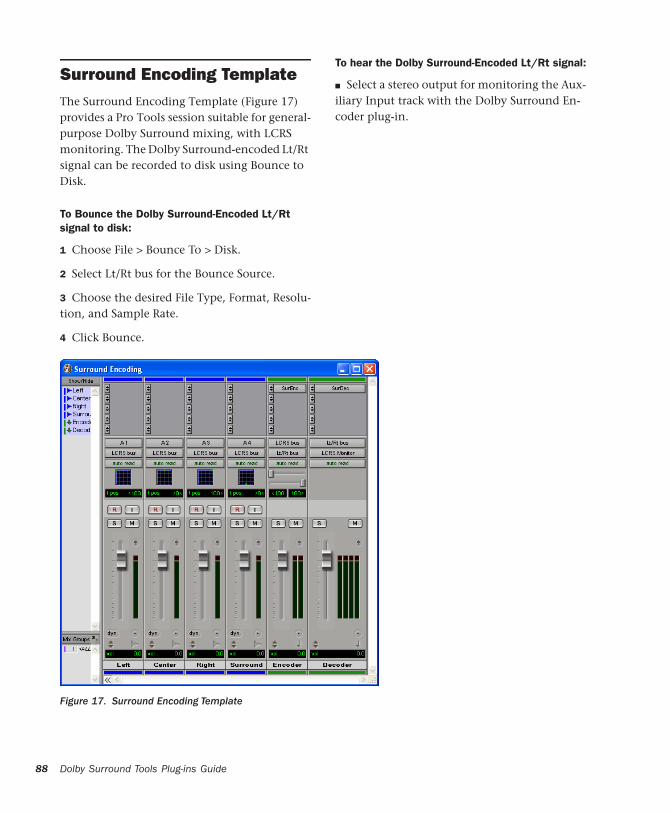
88
Surround Encoding TemplateThe Surround Encoding Template (Figure 17) provides a Pro Tools session suitable for general-purpose Dolby Surround mixing, with LCRS monitoring. The Dolby Surround-encoded Lt/Rt signal can be recorded to disk using Bounce to Disk.
To Bounce the Dolby Surround-Encoded Lt/Rt signal to disk:
1 Choose File > Bounce To > Disk.
2 Select Lt/Rt bus for the Bounce Source.
3 Choose the desired File Type, Format, Resolu-tion, and Sample Rate.
4 Click Bounce.
Dolby Surround Tools Plug-ins Guide
To hear the Dolby Surround-Encoded Lt/Rt signal:
■ Select a stereo output for monitoring the Aux-iliary Input track with the Dolby Surround En-coder plug-in.
Figure 17. Surround Encoding Template
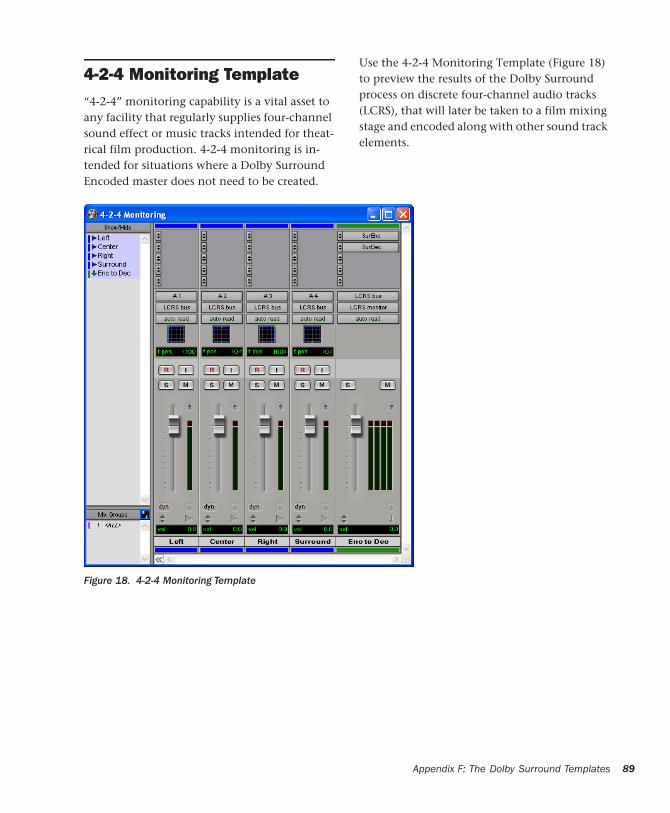
4-2-4 Monitoring Template“4-2-4” monitoring capability is a vital asset to any facility that regularly supplies four-channel sound effect or music tracks intended for theat-rical film production. 4-2-4 monitoring is in-tended for situations where a Dolby Surround Encoded master does not need to be created.
Use the 4-2-4 Monitoring Template (Figure 18) to preview the results of the Dolby Surround process on discrete four-channel audio tracks (LCRS), that will later be taken to a film mixing stage and encoded along with other sound track elements.
Figure 18. 4-2-4 Monitoring Template
Appendix F: The Dolby Surround Templates 89
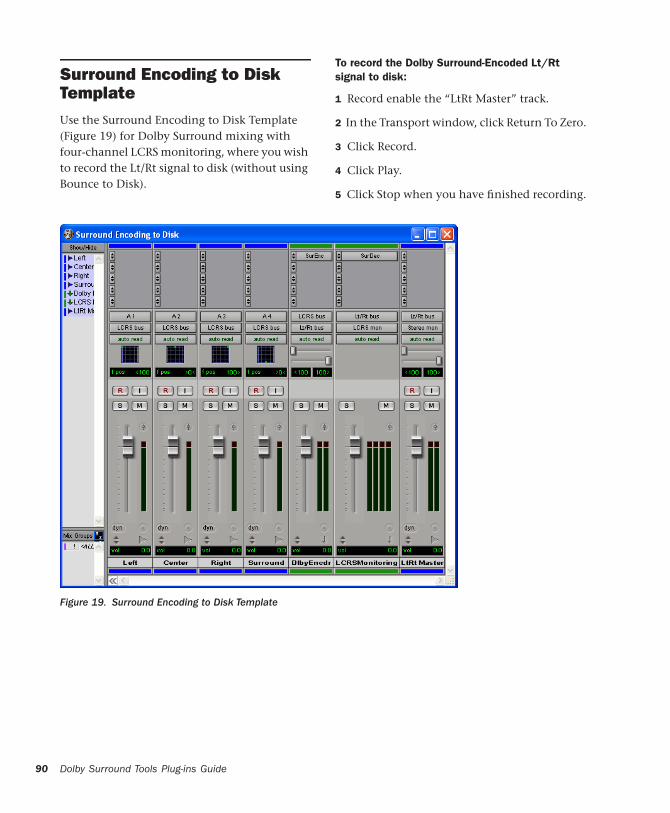
90
Surround Encoding to Disk TemplateUse the Surround Encoding to Disk Template (Figure 19) for Dolby Surround mixing with four-channel LCRS monitoring, where you wish to record the Lt/Rt signal to disk (without using Bounce to Disk).
Dolby Surround Tools Plug-ins Guide
To record the Dolby Surround-Encoded Lt/Rt signal to disk:
1 Record enable the “LtRt Master” track.
2 In the Transport window, click Return To Zero.
3 Click Record.
4 Click Play.
5 Click Stop when you have finished recording.
Figure 19. Surround Encoding to Disk Template
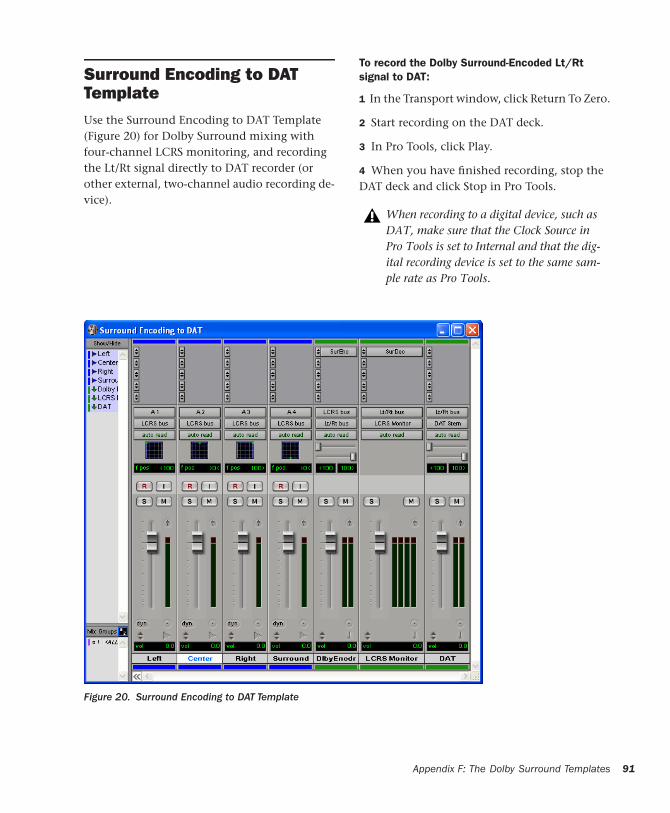
Surround Encoding to DAT TemplateUse the Surround Encoding to DAT Template (Figure 20) for Dolby Surround mixing with four-channel LCRS monitoring, and recording the Lt/Rt signal directly to DAT recorder (or other external, two-channel audio recording de-vice).
To record the Dolby Surround-Encoded Lt/Rt signal to DAT:
1 In the Transport window, click Return To Zero.
2 Start recording on the DAT deck.
3 In Pro Tools, click Play.
4 When you have finished recording, stop the DAT deck and click Stop in Pro Tools.
When recording to a digital device, such as DAT, make sure that the Clock Source in Pro Tools is set to Internal and that the dig-ital recording device is set to the same sam-ple rate as Pro Tools.
Figure 20. Surround Encoding to DAT Template
Appendix F: The Dolby Surround Templates 91
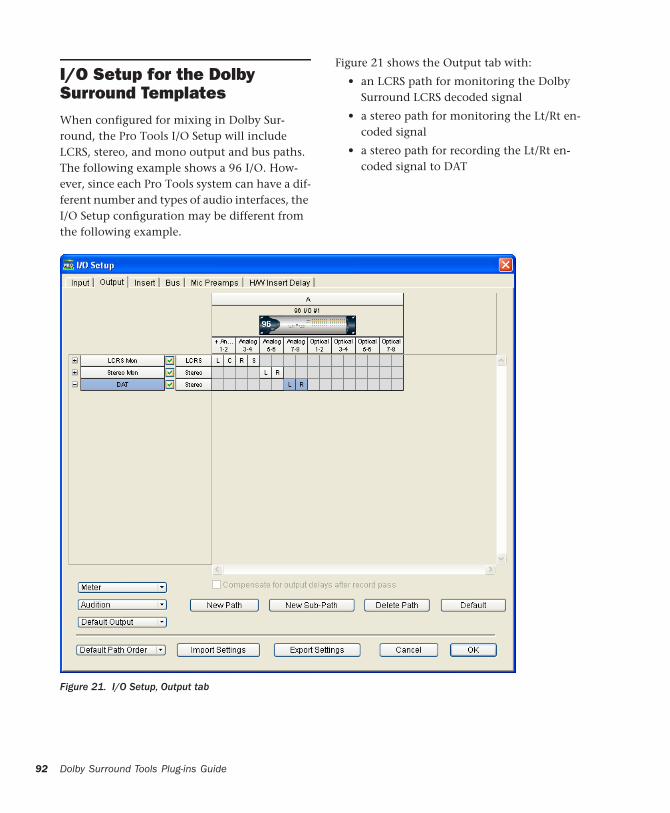
92
I/O Setup for the Dolby Surround TemplatesWhen configured for mixing in Dolby Sur-round, the Pro Tools I/O Setup will include LCRS, stereo, and mono output and bus paths. The following example shows a 96 I/O. How-ever, since each Pro Tools system can have a dif-ferent number and types of audio interfaces, the I/O Setup configuration may be different from the following example.
Dolby Surround Tools Plug-ins Guide
Figure 21 shows the Output tab with:
• an LCRS path for monitoring the Dolby Surround LCRS decoded signal
• a stereo path for monitoring the Lt/Rt en-coded signal
• a stereo path for recording the Lt/Rt en-coded signal to DAT
Figure 21. I/O Setup, Output tab
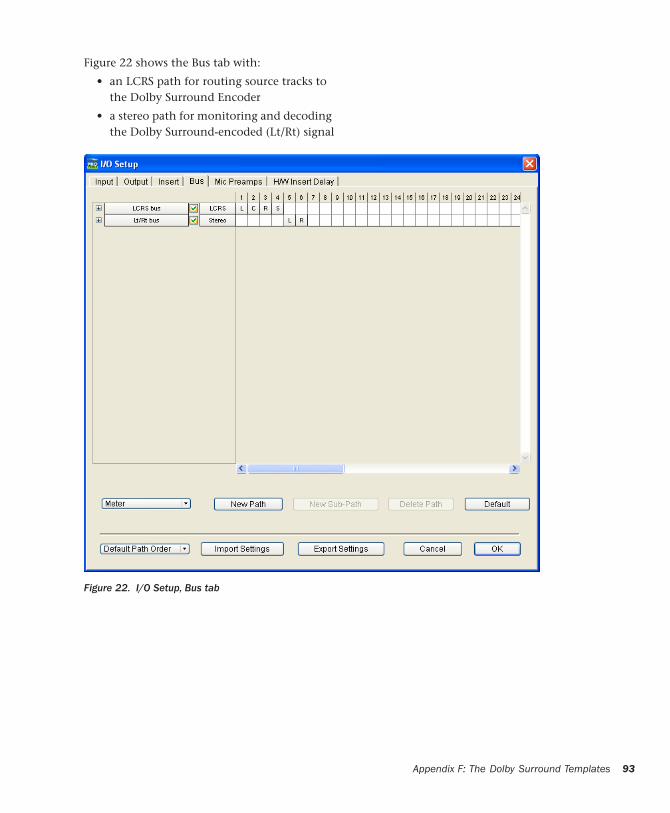
Figure 22 shows the Bus tab with:
• an LCRS path for routing source tracks to the Dolby Surround Encoder
• a stereo path for monitoring and decoding the Dolby Surround-encoded (Lt/Rt) signal
Figure 22. I/O Setup, Bus tab
Appendix F: The Dolby Surround Templates 93
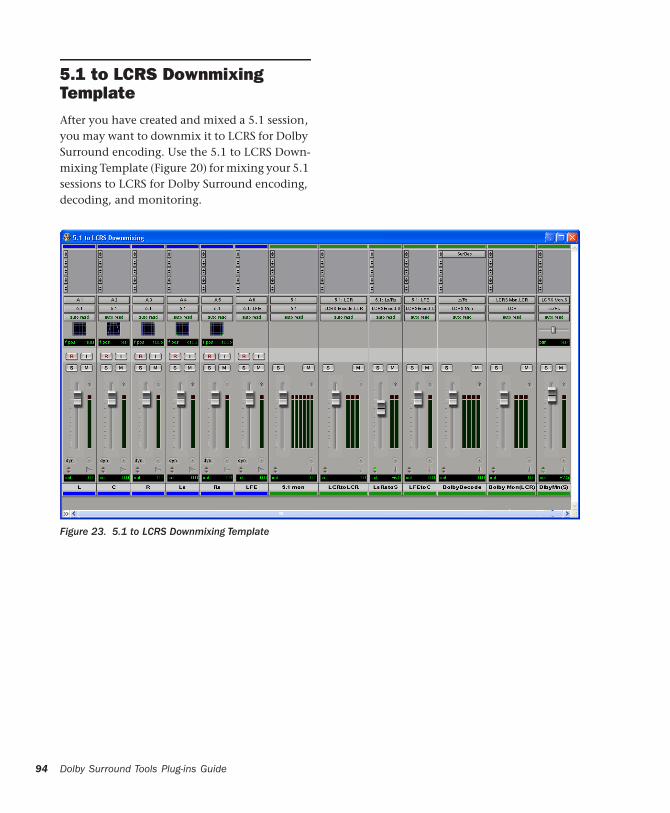
94
5.1 to LCRS Downmixing TemplateAfter you have created and mixed a 5.1 session, you may want to downmix it to LCRS for Dolby Surround encoding. Use the 5.1 to LCRS Down-mixing Template (Figure 20) for mixing your 5.1 sessions to LCRS for Dolby Surround encoding, decoding, and monitoring.
Dolby Surround Tools Plug-ins Guide
Figure 23. 5.1 to LCRS Downmixing Template
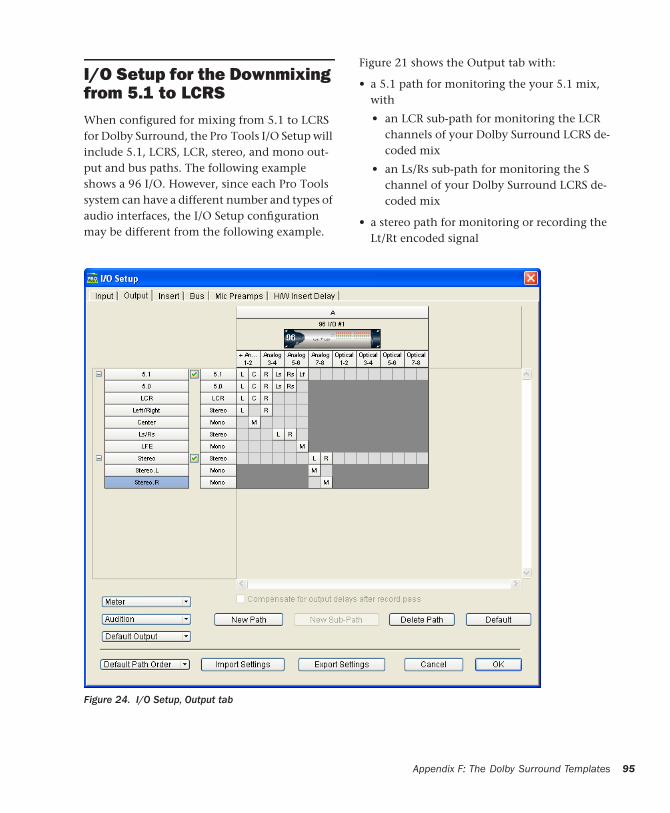
I/O Setup for the Downmixing from 5.1 to LCRSWhen configured for mixing from 5.1 to LCRS for Dolby Surround, the Pro Tools I/O Setup will include 5.1, LCRS, LCR, stereo, and mono out-put and bus paths. The following example shows a 96 I/O. However, since each Pro Tools system can have a different number and types of audio interfaces, the I/O Setup configuration may be different from the following example.
Figure 21 shows the Output tab with:
• a 5.1 path for monitoring the your 5.1 mix, with
• an LCR sub-path for monitoring the LCR channels of your Dolby Surround LCRS de-coded mix
• an Ls/Rs sub-path for monitoring the S channel of your Dolby Surround LCRS de-coded mix
• a stereo path for monitoring or recording the Lt/Rt encoded signal
Figure 24. I/O Setup, Output tab
Appendix F: The Dolby Surround Templates 95
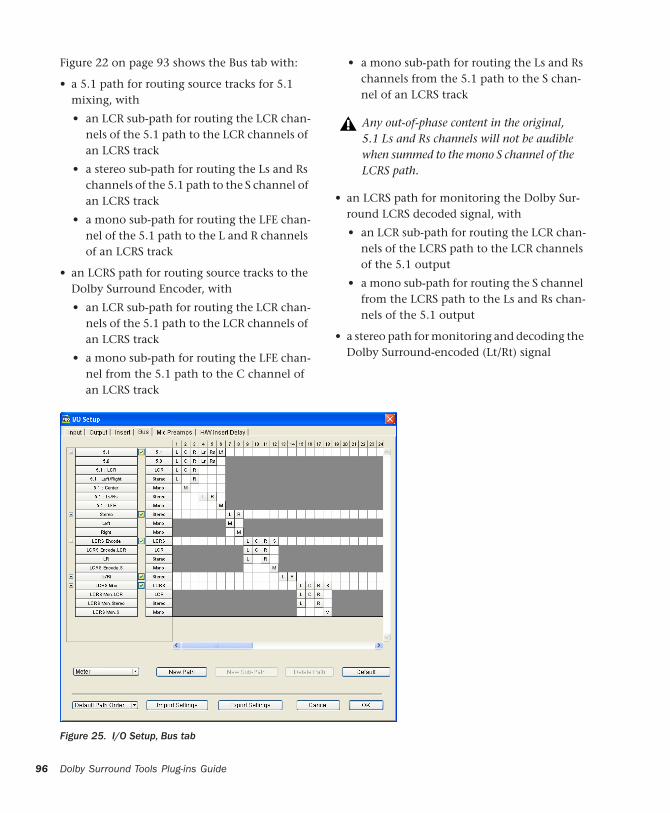
96
Figure 22 on page 93 shows the Bus tab with:
• a 5.1 path for routing source tracks for 5.1 mixing, with
• an LCR sub-path for routing the LCR chan-nels of the 5.1 path to the LCR channels of an LCRS track
• a stereo sub-path for routing the Ls and Rs channels of the 5.1 path to the S channel of an LCRS track
• a mono sub-path for routing the LFE chan-nel of the 5.1 path to the L and R channels of an LCRS track
• an LCRS path for routing source tracks to the Dolby Surround Encoder, with
• an LCR sub-path for routing the LCR chan-nels of the 5.1 path to the LCR channels of an LCRS track
• a mono sub-path for routing the LFE chan-nel from the 5.1 path to the C channel of an LCRS track
Dolby Surround Tools Plug-ins Guide
• a mono sub-path for routing the Ls and Rs channels from the 5.1 path to the S chan-nel of an LCRS track
• an LCRS path for monitoring the Dolby Sur-round LCRS decoded signal, with
• an LCR sub-path for routing the LCR chan-nels of the LCRS path to the LCR channels of the 5.1 output
• a mono sub-path for routing the S channel from the LCRS path to the Ls and Rs chan-nels of the 5.1 output
• a stereo path for monitoring and decoding the Dolby Surround-encoded (Lt/Rt) signal
Any out-of-phase content in the original, 5.1 Ls and Rs channels will not be audible when summed to the mono S channel of the LCRS path.
Figure 25. I/O Setup, Bus tab

appendix g
Use of Dolby Trademarks
IntroductionDolby Laboratories Licensing Corporation (DLLC) owns the trademarks “Dolby” and the double-D symbol:
These are registered in over 90 countries in the world. The marks are used on a variety of profes-sional noise reduction products, cinema equip-ment, and signal processors manufactured and sold by Dolby Laboratories, Inc.
Use of the Dolby Trademarks is licensed to man-ufacturers of consumer audio and video equip-ment. The appearance of one or more of the trademarks on a consumer product indicates that the product contains technology developed by Dolby Laboratories and that it meets perfor-mance standards set by DLLC.
Use of the Dolby Trademarks is also licensed to prerecorded audio and video producers whose products are made using technology developed by Dolby Laboratories. The appearance of any of the Dolby Trademarks on prerecorded media in-dicates that it was produced using one or more Dolby technologies and that it meets perfor-
mance standards set by DLLC. Soundtracks pro-duced using Dolby Surround encoding are iden-tified by the use of the Dolby Surround Trademark.
Trademark and Standardization AgreementsLike any material property, the Dolby Surround Trademark may not be used without the permis-sion of Dolby Laboratories. Also, if a trademark is licensed to others, the trademark owner must set quality standards and see that they are ad-hered to so that the use of the trademarks by others does not undermine the good reputation of the marks. In addition to these rather straightforward requirements, trademark law also demands that trademarks be used in some-what restricted ways.
So that it and its licensees can comply with the requirements of trademark licensing law, DLLC provides Trademark and Standardization Agree-ments for companies who wish to use the Dolby Trademarks on their audio and video media.
Appendix G: Use of Dolby Trademarks 97
98
These agreements are royalty-free, and as a spe-cial incentive to promote the use of the Dolby Surround Trademark, may be obtained free of charge.
The Trademark and Standardization Agreement must be executed prior to use of the Dolby Sur-round Trademark logo. The main points of the Agreements are as follows:
1 An authorization for the licensee to use the Dolby Surround Trademark on prerecorded me-dia produced with Dolby Surround;
2 Specifications for the correct use of the Dolby Surround Trademark and for acknowledging the ownership of the mark;
3 Specifications of the quality control arrange-ments, which involve the licensee providing oc-casional samples for quality appraisal.
Who Should Sign the Trademark and Standardization AgreementA company that owns the rights to a piece of music or other recording, and is involved in the preparation, production and sale of prerecorded media incorporating Dolby technology must sign an Agreement if it wishes to use the Dolby Trademarks on the media released under the company's own labels, whether or not it manu-factures its own products or prepares its own art-work.
A company which, under contract, simply man-ufactures prerecorded media for one or more customers (Dolby licensees), and/or is only in-volved in the preparation of artwork (labels, boxes, jackets, insert cards) need not sign an Agreement.
Dolby Surround Tools Plug-ins Guide
Responsibility for the quality of recordings and proper trademark usage rests with the licensee.
Licensing ProcedureA company interested in using Dolby Trade-marks on its prerecorded video or audio media should contact DLLC for licensing information and to request a license.
DLLC sends a questionnaire and the appropriate Agreements to licensee for review and comple-tion.
Licensee returns the completed questionnaire and signed Agreements to DLLC. In the case of tape-based formats such as audio and video cas-sette, a sample recording must also be submitted for quality evaluation. Test samples are accept-able, but only if they are manufactured using the same processes and equipment as the prod-uct which will eventually be distributed to the public. Samples of non-tape formats may be sent later, once the final product has been com-pleted.
DLLC countersigns and returns one copy of each Agreement along with the appropriate trademark artwork.
Subsequent to signing an Agreement, Dolby re-quires licensees to provide sample copies of ma-terials which incorporate the Dolby Trademarks, such as discs, cassettes, insert cards, catalogs, and advertisements to Dolby so that Dolby can verify that Dolby trademarks are being used cor-rectly. If licensees have any doubts about correct trademark usage, they should contact Dolby. Dolby will check drafts of material to be printed or used in advertising and promotion, and to give advice on the correct use of Dolby trade-
marks. Dolby may also require the licensee to periodically submit product samples so that soundtrack quality and proper trademark use can be verified.
A Note to Replicators and StudiosYour clients may not be aware of the fact that a license Agreement with DLLC is required before Dolby Trademarks may be used on their prod-ucts. Strictly speaking, it is Dolby’s responsibil-ity to provide information to new customers, but Dolby needs to know who those customers are. Accordingly, if your clients wish to use Dolby Trademarks, Dolby must rely on your co-operation to refer them so that licensing formal-ities can be completed.
Contacting Dolby LaboratoriesTo obtain a Dolby Surround Trademark license, please contact the nearest Dolby office.
Dolby Offices
San Francisco, U.S.A. Ph: 415-558-0200 Fax: 415-863-1373
Wootton Bassett (UK), Europe Ph: 44-0793-842100 Fax: 44-0793-842101
Los Angeles, U.S.A. Ph: 213-845-1880 Fax: 213-845-1890
New York, U.S.A. Ph: 212-767-1700 Fax: 212-767-1705
Tokyo, Japan Ph: 81-03-3584-0039 Fax: 81-03-3588-0930
Appendix G: Use of Dolby Trademarks 99

100
Dolby Surround Tools Plug-ins Guide
Symbols“4-2-4” monitoring 86“4-2-4” Monitoring Template 89
Numerics5.0 playback system 185.1 185.1 to LCRS
downmixing 18template 95
85 dB (C-weighted, slow) 68
AActivation Code 8authorizing plug-ins 8, 9
Bboxed version 2
Ccalibrating your playback system 69calibration 69calibration settings
importing 79saving 79
Clip indicatorsencoder input 32
clipping 39configuring I/O Setup for Dolby Surround 12configuring I/O Setup for Dolby Surround (LCRS)
and 5.1 19
DDecode Steering Display 38Decoder Mode Select 35Decoder plug-in 33delay
DSP-induced delays 51Dolby DP563 Surround Encoder 71Dolby DP564 Surround Decoder 71Dolby Laboratories Licensing Corporation (DLLC)
97Dolby Level indicators 32Dolby SDU4 Surround Decoder 11, 71Dolby SEU4 Surround Encoder 11, 71Dolby Surround 24
adaptive matrix decoding 29enhanced matrix encoding 28mixing for 81overview 23playback system requirements 3
Dolby Surround adaptive matrix 30Dolby Surround Decoder
Center Speaker selector 38Decode Steering Display 38Decoder Mode Select 35Dolby Surround mode 35full-sized view 41Input Level Meters 36mid-sized view 40Mono mode 35Output Level Trims 37Pink Noise Generator 36plug-in insert 17Pre-Trim Output Level Meters 37small-sized view 41Stereo mode 35Surround Delay 37
Dolby Surround Decoder Model DP564 4Dolby Surround Decoder Model SDU4 4
index
Index 101
102
Dolby Surround Decoder plug-in 33Dolby Surround Encoder
Clip indicators 32Dolby Level indicators 32Input Level Meters 32Input Level Trim (LCRS Trim) 33Output Level Meters 33plug-in insert 17
Dolby Surround Encoder plug-in 31Dolby Surround hardware decoder
using with Dolby Surround Tools 4Dolby Surround Panner 43
Audio Track Meter 46Audio Track Mute 46Audio Track Volume Fader 46Crosshair control 46Four-Way Panner 46Front-to-Rear Fader 47Left-Center-Right Fader 47plug-in insert 44Volume indicator 46
Dolby Surround Toolsapplications of 2Decoder plug-in 33Encoder plug-in 31features 1inserting plug-ins 17
Dolby Surround Trademark licenseobtaining 99
Dolby Surround-encoded signal (Lt/Rt)additional signal processing 18outputs 15
downmixing 5.1 to LCRS 18downmixing from 5.1 to LCRS 95DP564 4, 71DSP delays inherent in plug-ins 51DSP requirements 49DSP-induced delays 51
EEncoder plug-in 31
FFour-Way Panner 46
Gguide conventions 5
Dolby Surround Tools Plug-ins Guide
HHaas effect 29help 6
II/O Setup 12, 19
configuring for Dolby Surround 12configuring for Dolby Surround (LCRS) and 5.1
19importing calibration settings 79Input Level Meters 32Input Level Trim (LCRS Trim) 33inserting plug-ins on a track 49
LLCRS (Left, Center, Right, and Surround) 26License Card 9Lt (Left total) 26
Mmatrix decoding 27matrix encoding 26mixing
additional signal processing 84ambient sounds 81decoder mistracking and steering artifacts 83dialogue 81panning sounds 82stereo image 81surround channel pumping 84
mixing for Dolby Surround 81monitoring Dolby Surround
Center-channel speaker 59speaker setup 56Surround-channel speakers 66
monitoring LCRS on 5.0 playback system 18MultiShell II compatible plug-ins 49
Oopening older Dolby Surround sessions 21Output Level Meters 33
Ppackage contents 2panning sounds 82peak level clipping 39Pink Noise Generator 36playback system 3
calibration 69plug-ins
authorizing 8registration 4
Pro Logic Decoder 30Pro Tools
configuring for Dolby Surround 11Pro Tools
routing for Dolby Surround (LCRS) monitoring on a 5.0 playback system 21
routing for Dolby Surround decoding 15routing for Dolby Surround encoding 13routing for Dolby Surround Encoding in a 5.1
session 20
Rregistration 4removing plug-ins
Windows 10requirements
playback system 3Rt (Right total) 26
Ssaving calibration settings 79SDU4 4, 11, 71Setups menu
I/O Setup 12, 19SEU4 11, 71sound pressure level (SPL) 68stereo synthesizers (spatializers) 85Surround Delay 37Surround Delay control
setting 78Surround Encoding Template 88Surround Encoding to DAT Template 91Surround Encoding to Disk Template 90Surround Templates 87Surround Trademark 97Surround-channel speakers 66System Usage window 49
TTDM plug-ins
DSP requirements 49technical support 6Templates 87
“4-2-4” monitoring Template 89Surround Encoding Template 88Surround Encoding to DAT Template 91Surround Encoding to Disk Template 90
Wwww.digidesign.com 6
Index 103

DIGIDESIGN2001 Junipero Serra Boulevard
Daly City, CA 94014-3886 USA
Tel: 650.731.6300
Fax: 650.731.6399
TECHNICAL SUPPORT (USA)Tel: 650.731.6100
Fax: 650.731.6384
PRODUCT INFORMATION (USA)Tel: 800.333.2137
INTERNATIONAL OFFICESVisit the Digidesign websitefor contact information
www.digidesign.com
Recommended