Securing a desktop virtualization environment with NetScaler Gateway
Self-paced exercise guide
Table of ContentsTable of Contents............................................................................................2
Overview.........................................................................................................3
How to log into the lab environment..............................................................4
Exercise 1: XenDesktop and starting NS VPX................................................5
Exercise 2: Load Balancing...........................................................................17
Exercise 3: Access Gateway..........................................................................29
Exercise 4: Web Interface on NetScaler – Time Permitting.........................51
Optional Advanced Scenario Exercises 1......................................................56
Optional Advanced Scenario Exercises 2......................................................58
Appendix A – Keyboard Layouts....................................................................59
Page 2

OverviewHands-on Training ModuleThis training module has the following details:
Objective Provide hands on experience with common tasks in integrating Access Gateway Enterprise with XenDesktop and XenApp
Audience Primary: Citrix Partners and Citrix Administrators
Lab Environment DetailsThis section is used to describe the lab environment and the virtual machines that are used.
Machine Name
Hostname Details IP Address
AD AD.training.lab AD / DNS /DHCP 192.168.10.11
NSVPX1 NS Access Gateway Enterprise
192.168.10.20
NSVPX2 NS High Availability peer 192.168.10.21
SQLServer SQLServer SQL and license server 192.168.10.12
Win7Client Win7Client Win7 workspace DHCPWin7Master Win7Master Win7 Golden for XD DHCPXenApp1 XenApp1 XenApp 6.5 192.168.10.8
0XenApp2 XenApp2 XenApp 6.5 192.168.10.8
5XenDesktop1 XenDesktop1 XenDesktop 5.6 DDC / WI 192.168.10.6
5XenDesktop2 XenDesktop2 XenDesktop 5.6 DDC / WI
HA192.168.10.70
Optional Servers for Advanced Scenarios ONLY - (Shutdown XenApp2 and XenDesktop2)WebRed WebRed HTTP and MySQL Web
Server192.168.10.215
WebBlue WebBlue HTTP and MySQL Web Server
192.168.10.205
WebGreen WebGreen HTTP and MySQL Web Server
192.168.10.210
Required Lab CredentialsPage 3
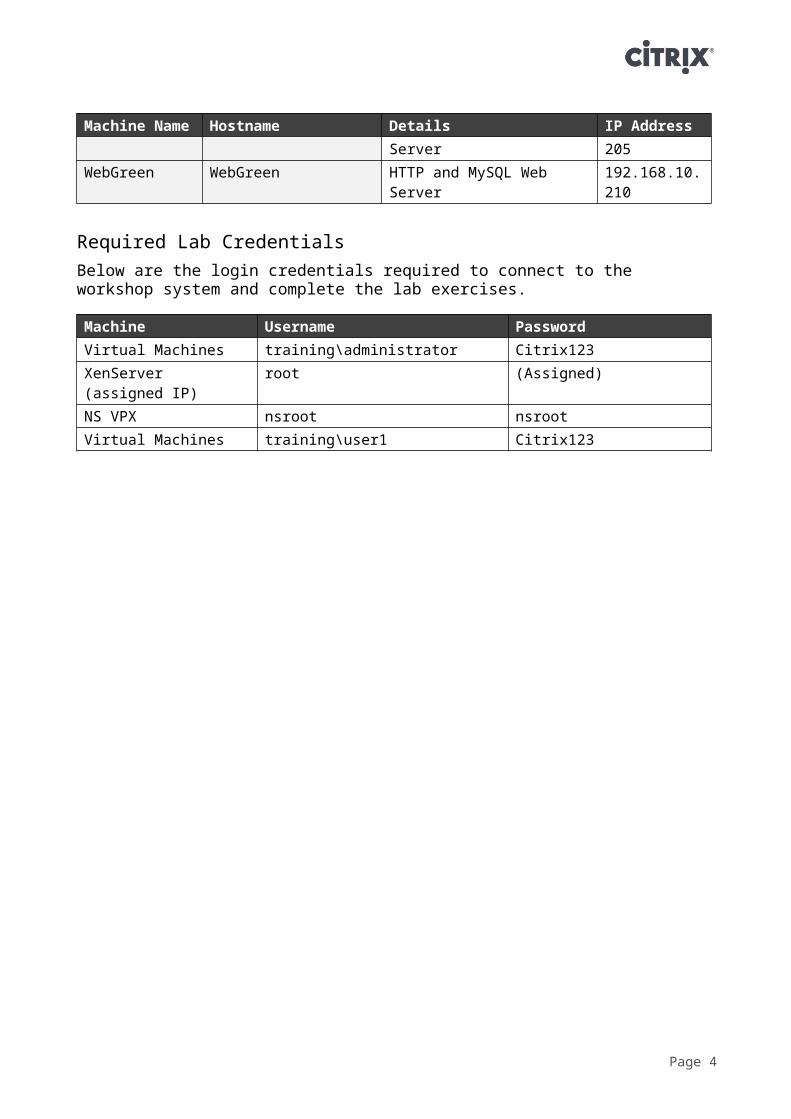
Below are the login credentials required to connect to the workshop system and complete the lab exercises.
Machine Username PasswordVirtual Machines training\administrator Citrix123XenServer (assigned IP)
root (Assigned)
NS VPX nsroot nsrootVirtual Machines training\user1 Citrix123
Page 4
Exercise 1: XenDesktop and starting NS VPXOverviewThis lab will start by configuring XenDesktop and create a desktop for the later labs. Additionally we will begin the NetScaler configuration. If a specific setting is not mentioned then we will use the defaults.
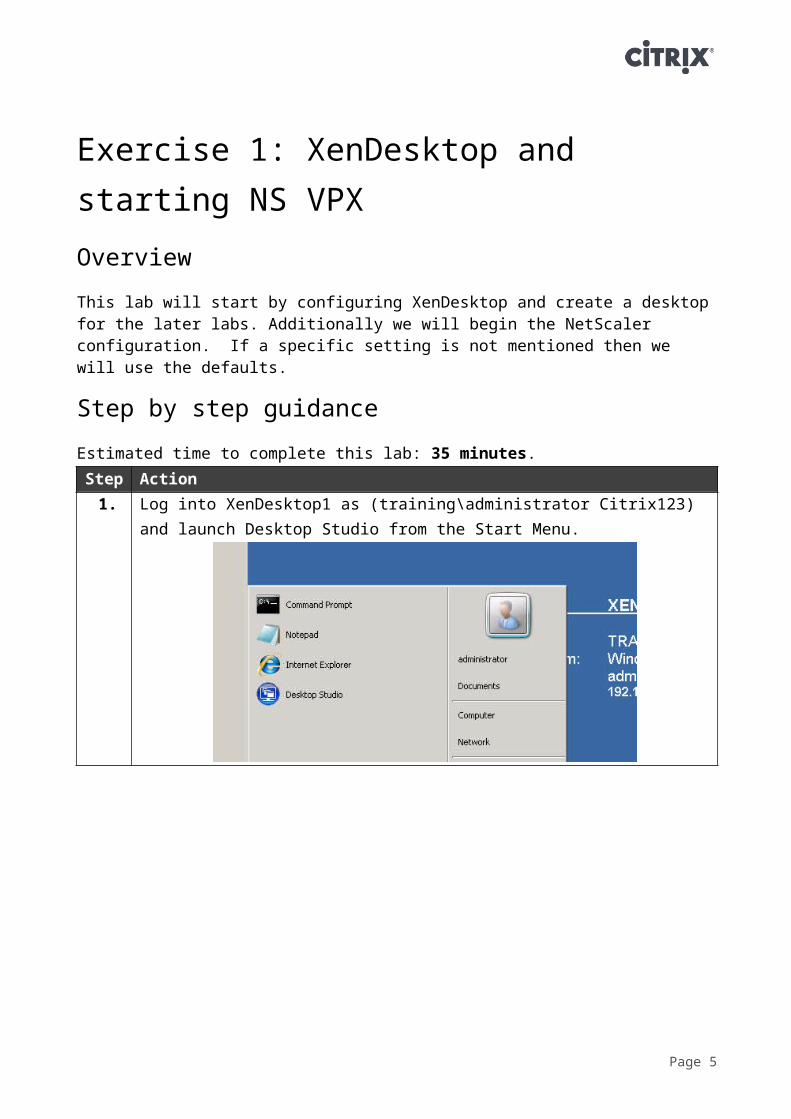
Step by step guidanceEstimated time to complete this lab: 35 minutes.Step Action
1. Log into XenDesktop1 as (training\administrator Citrix123) and launch Desktop Studio from the Start Menu.
Page 5
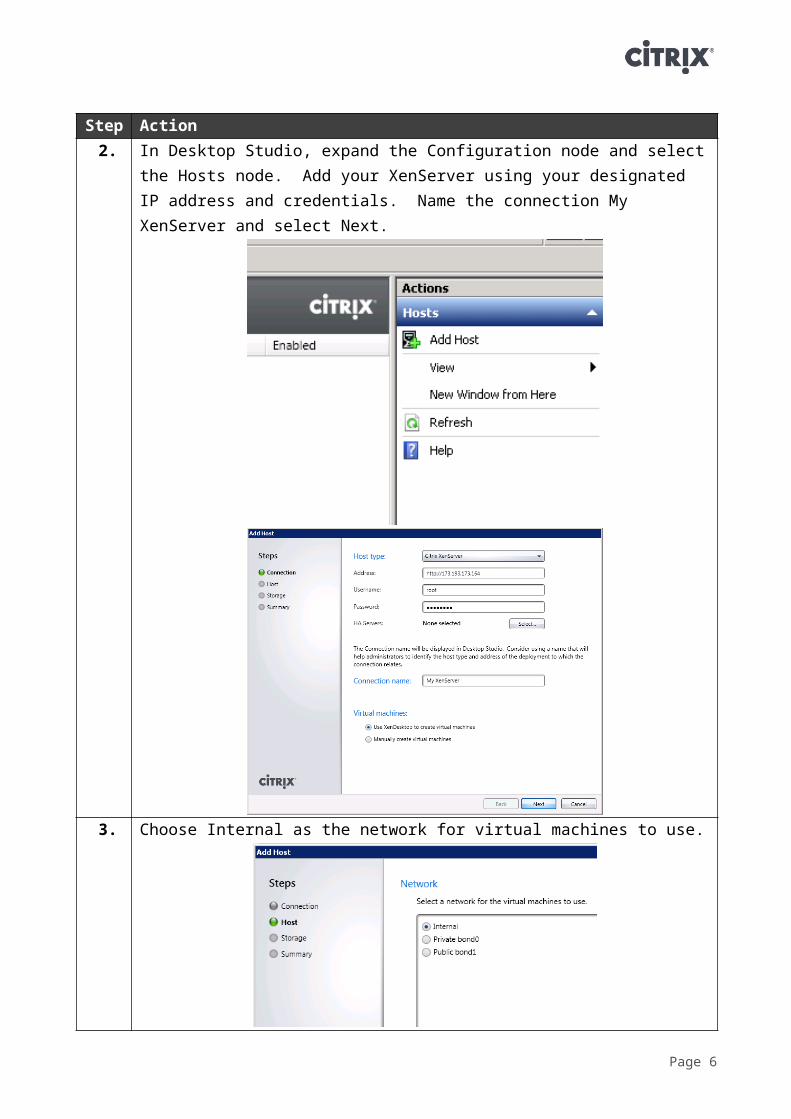
Step Action2. In Desktop Studio, expand the Configuration node and select the
Hosts node. Add your XenServer using your designated IP address and credentials. Name the connection My XenServer and select Next.
3. Choose Internal as the network for virtual machines to use.
Page 6
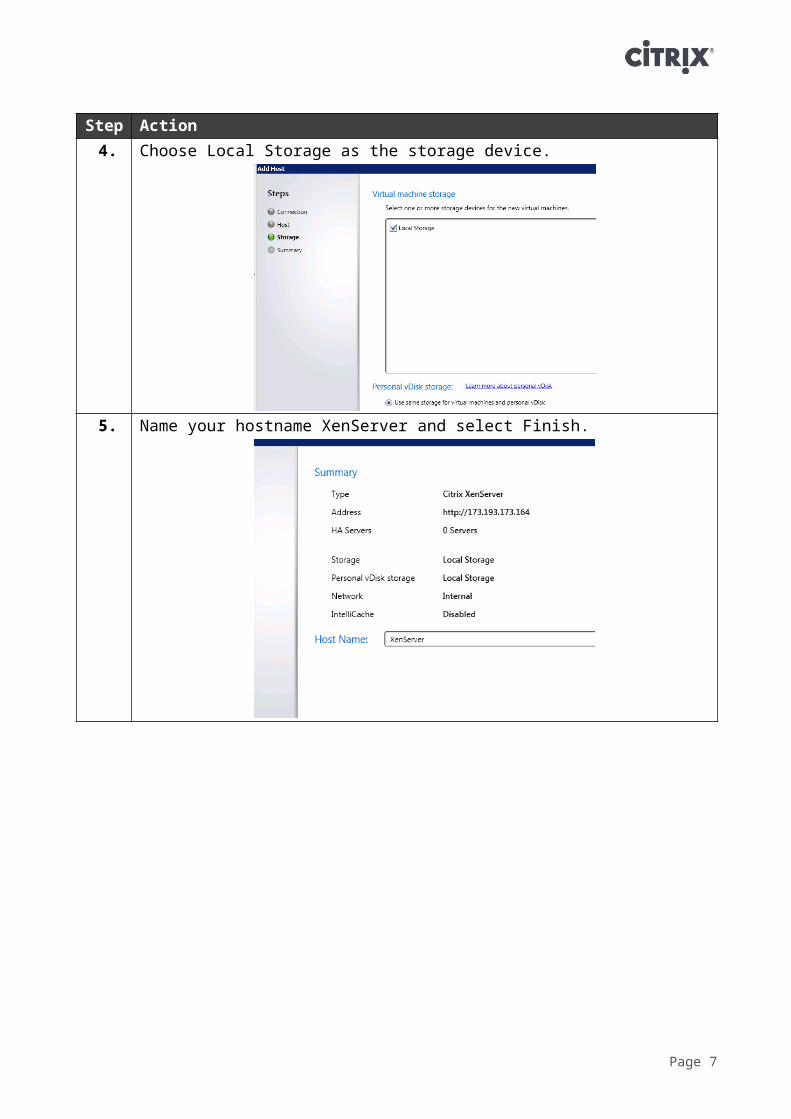
Step Action4. Choose Local Storage as the storage device.
5. Name your hostname XenServer and select Finish.
Page 7
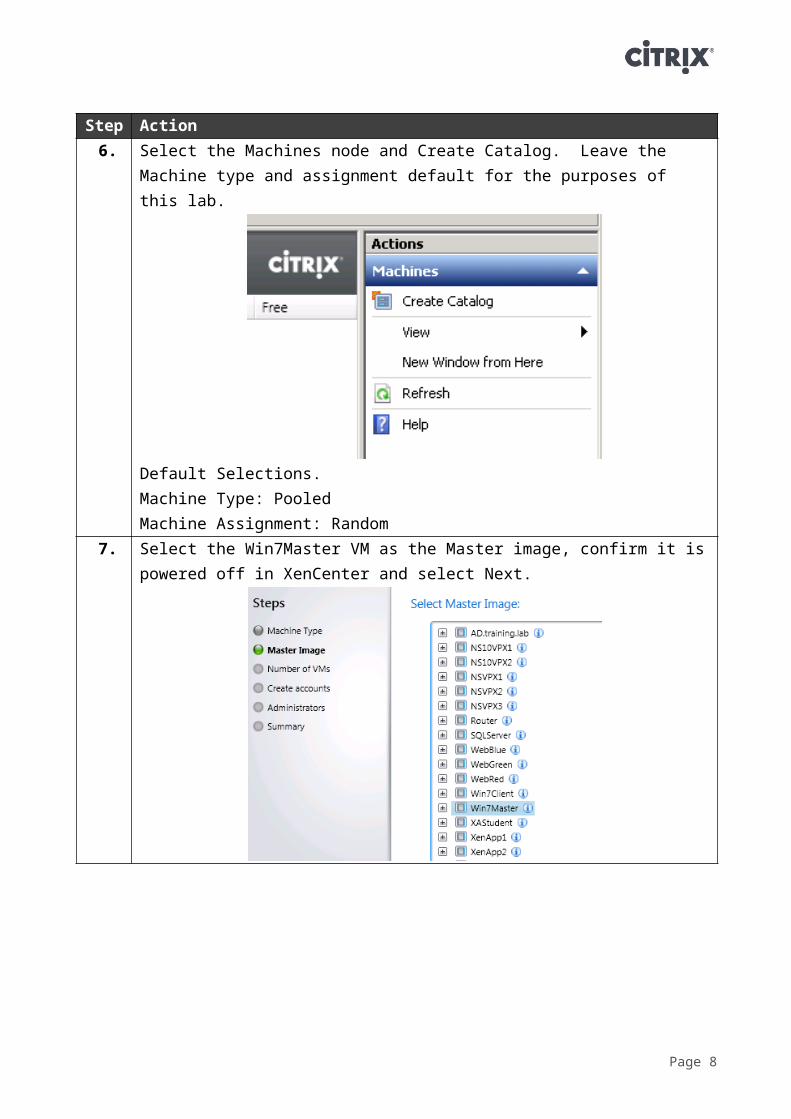
Step Action6. Select the Machines node and Create Catalog. Leave the Machine
type and assignment default for the purposes of this lab.
Default Selections.Machine Type: PooledMachine Assignment: Random
7. Select the Win7Master VM as the Master image, confirm it is powered off in XenCenter and select Next.
Page 8
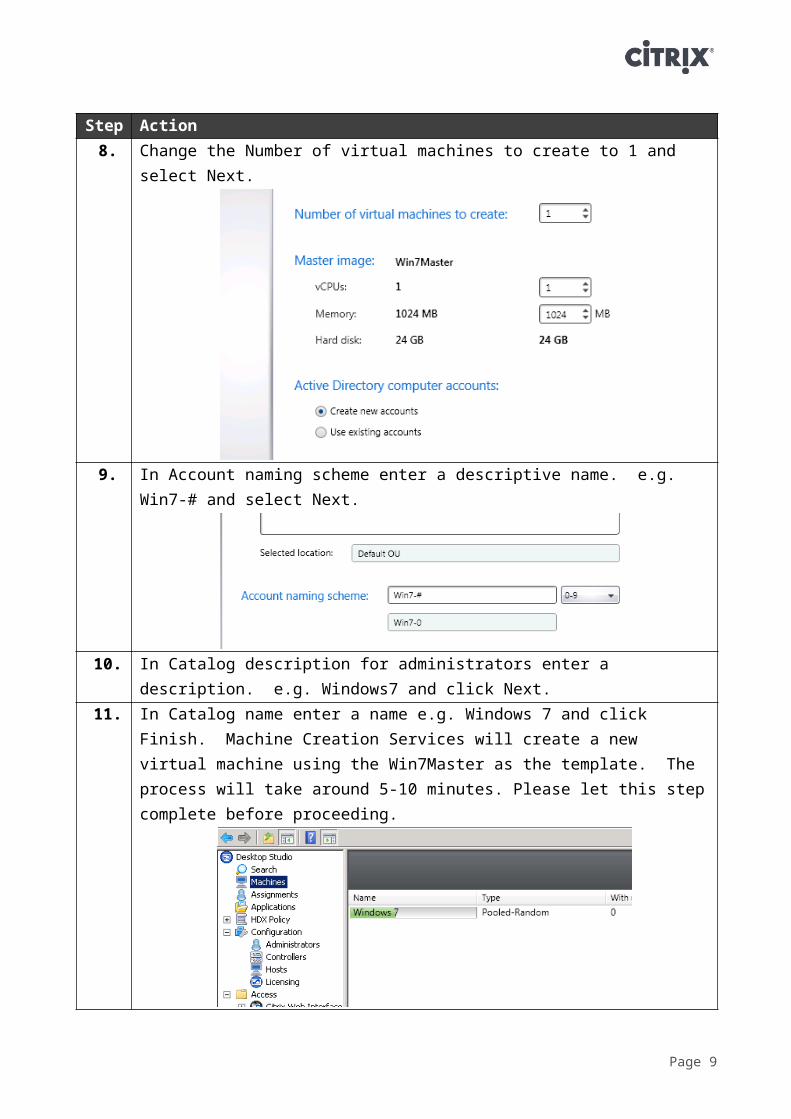
Step Action8. Change the Number of virtual machines to create to 1 and select
Next.
9. In Account naming scheme enter a descriptive name. e.g. Win7-# and select Next.
10. In Catalog description for administrators enter a description. e.g. Windows7 and click Next.
11. In Catalog name enter a name e.g. Windows 7 and click Finish. Machine Creation Services will create a new virtual machine using the Win7Master as the template. The process will take around 5-10 minutes. Please let this step complete before proceeding.
Page 9

Step Action12. Select the Assignments node and Create Desktop Group. Select the
Windows7 catalog, add 1 machine and select Next.
13. Add Domain Users to the user list and select Next.
Select Next on the Delegate to screen.14. Add a display name and Desktop Group name, e.g. Windows 7 and
Sales then select Finish. The Win7-1 VM should boot up within a couple of minutes.
Page 10
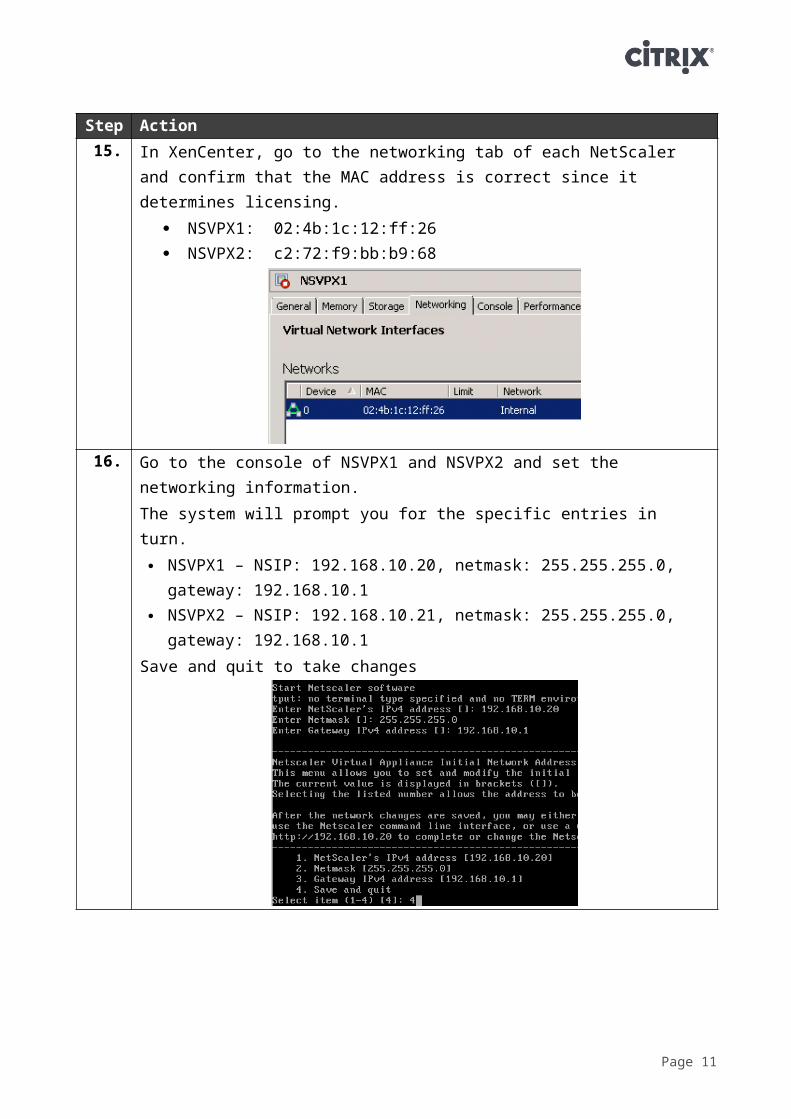
Step Action15. In XenCenter, go to the networking tab of each NetScaler and
confirm that the MAC address is correct since it determines licensing. NSVPX1: 02:4b:1c:12:ff:26 NSVPX2: c2:72:f9:bb:b9:68
16. Go to the console of NSVPX1 and NSVPX2 and set the networking information.The system will prompt you for the specific entries in turn. NSVPX1 – NSIP: 192.168.10.20, netmask: 255.255.255.0,
gateway: 192.168.10.1 NSVPX2 – NSIP: 192.168.10.21, netmask: 255.255.255.0,
gateway: 192.168.10.1Save and quit to take changes
Page 11
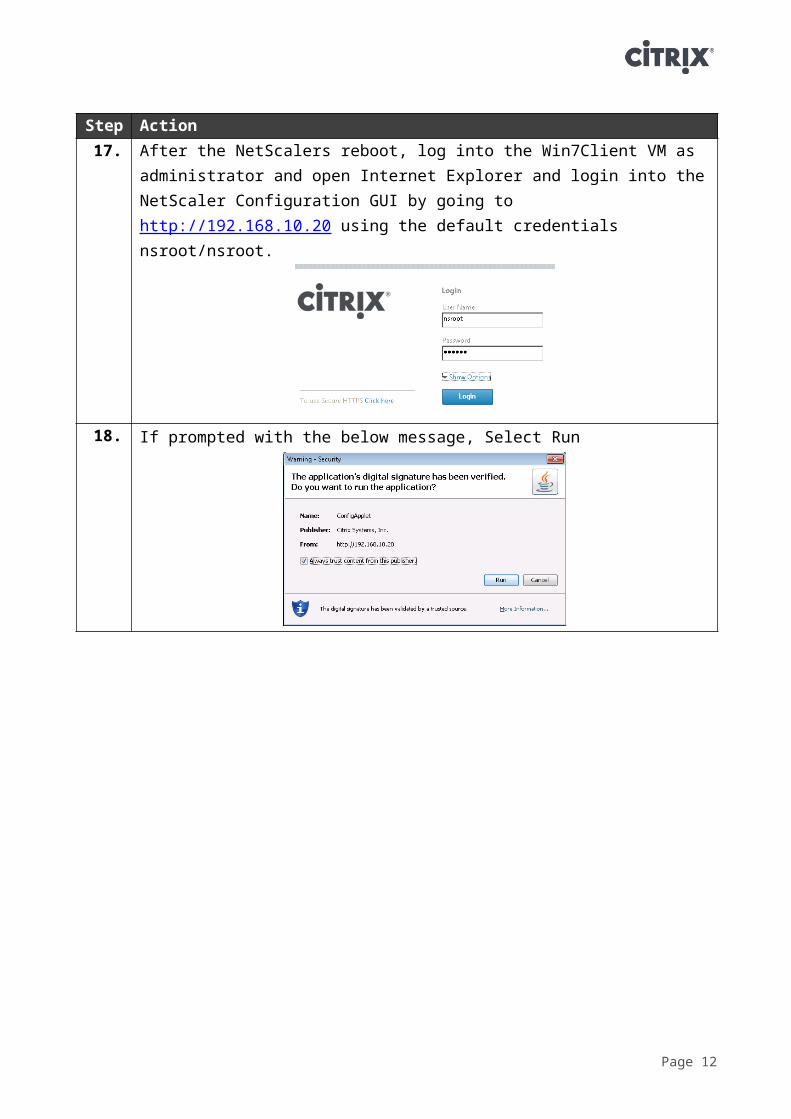
Step Action17. After the NetScalers reboot, log into the Win7Client VM as
administrator and open Internet Explorer and login into the NetScaler Configuration GUI by going to http://192.168.10.20 using the default credentials nsroot/nsroot.
18. If prompted with the below message, Select Run
19. Run through Setup Wizard (lower ribbon of the central window) and enter the following:
Change Host Name: ns1 Subnet IP (SNIP): 192.168.10.22 Netmask: 255.255.255.0
Page 12
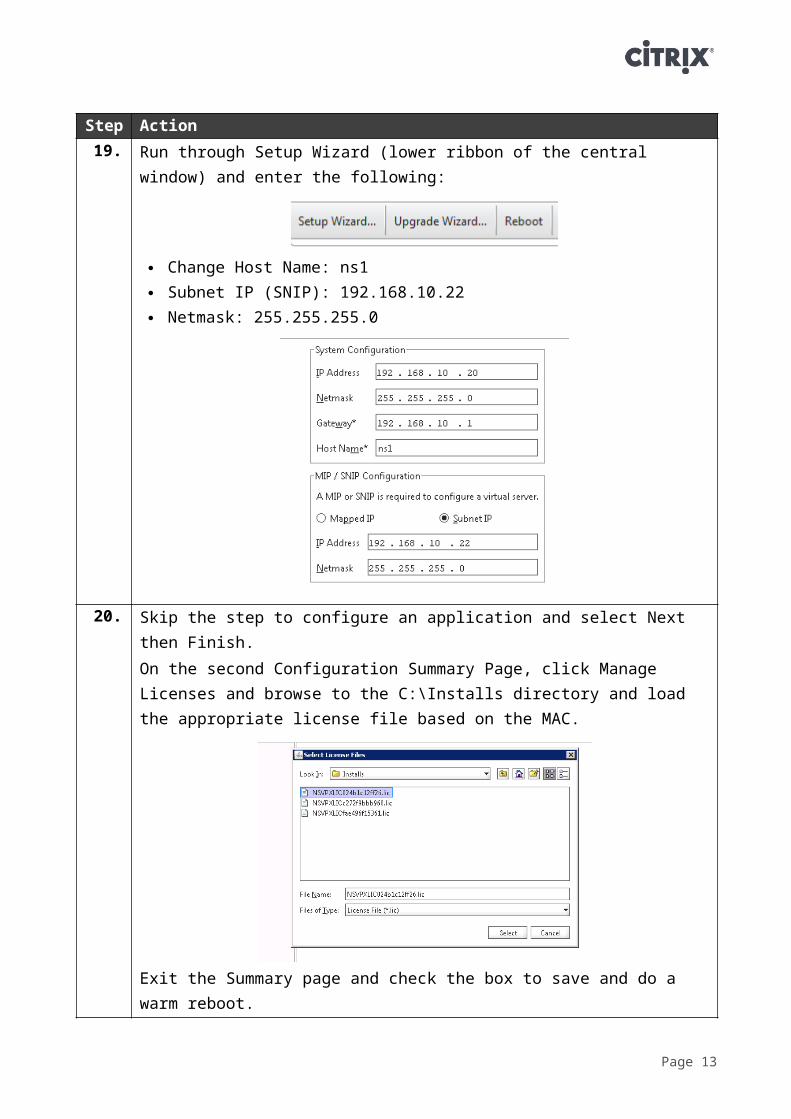
Step Action20. Skip the step to configure an application and select Next then Finish.
On the second Configuration Summary Page, click Manage Licenses and browse to the C:\Installs directory and load the appropriate license file based on the MAC.
Exit the Summary page and check the box to save and do a warm reboot.
21. Repeat the previous steps for NSVPX2 (192.168.10.21). Be sure to run the browser addon when connecting to NS2. Change Host Name: ns2 Subnet IP (SNIP): 192.168.10.22 Netmask: 255.255.255.0
22. Close out your browser and log in to NSVPX1 again and go to System > Licenses page and note all the potential featuresNote the Maximum Access Gateway Users Allowed.
Page 13
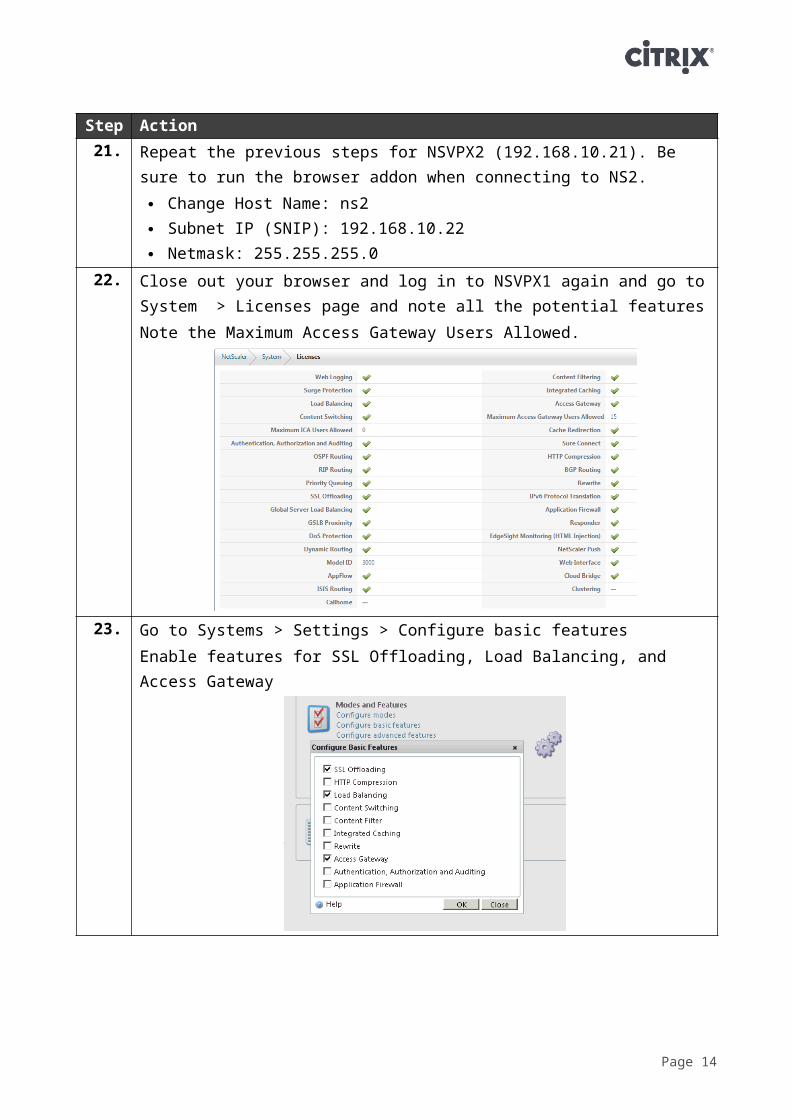
Step Action23. Go to Systems > Settings > Configure basic features
Enable features for SSL Offloading, Load Balancing, and Access Gateway
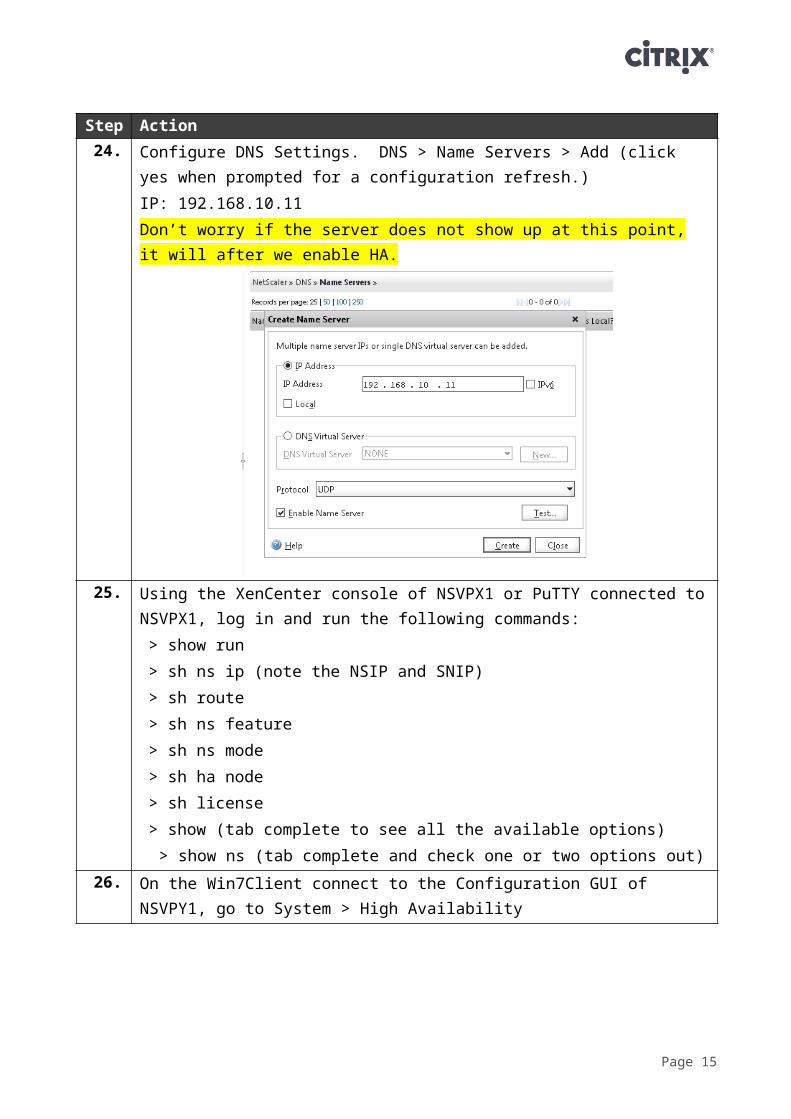
24. Configure DNS Settings. DNS > Name Servers > Add (click yes when prompted for a configuration refresh.)IP: 192.168.10.11Don’t worry if the server does not show up at this point, it will after we enable HA.
Page 14
Step Action25. Using the XenCenter console of NSVPX1 or PuTTY connected to
NSVPX1, log in and run the following commands:> show run> sh ns ip (note the NSIP and SNIP)> sh route> sh ns feature> sh ns mode> sh ha node> sh license> show (tab complete to see all the available options)
> show ns (tab complete and check one or two options out)26. On the Win7Client connect to the Configuration GUI of NSVPY1, go to
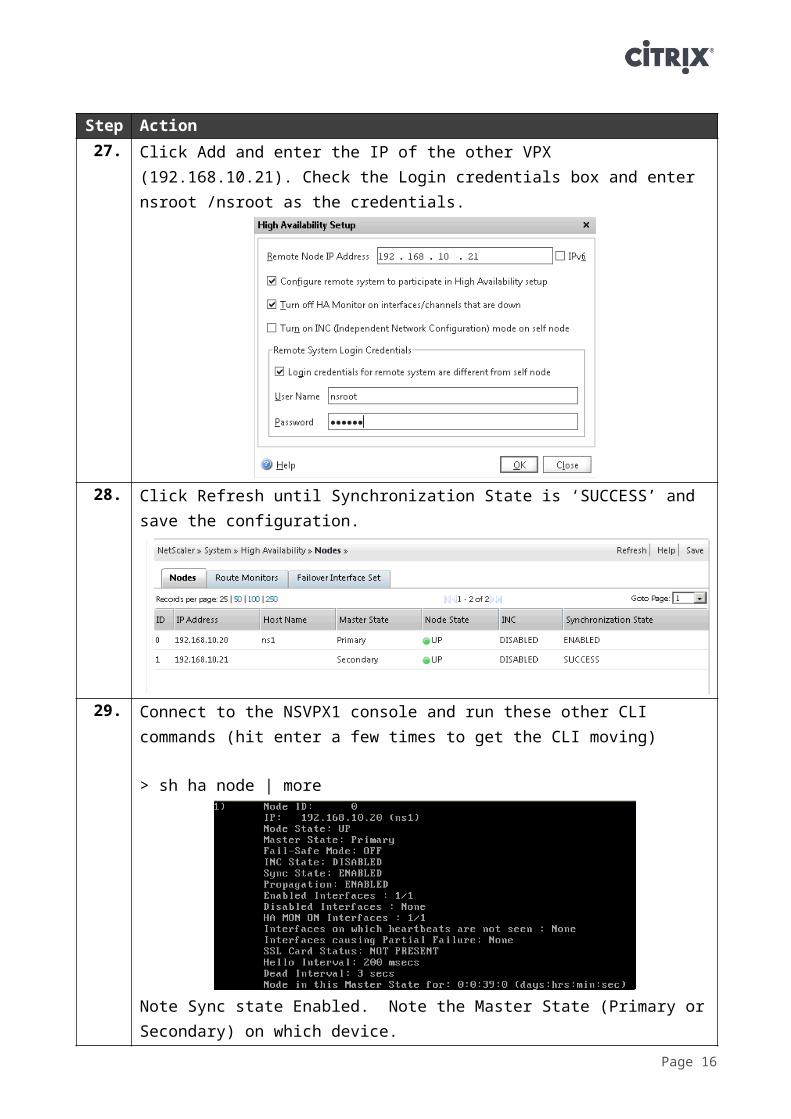
System > High Availability27. Click Add and enter the IP of the other VPX (192.168.10.21). Check
the Login credentials box and enter nsroot /nsroot as the credentials.
28. Click Refresh until Synchronization State is ‘SUCCESS’ and save the configuration.
Page 15
Step Action29. Connect to the NSVPX1 console and run these other CLI commands
(hit enter a few times to get the CLI moving)
> sh ha node | more
Note Sync state Enabled. Note the Master State (Primary or Secondary) on which device.
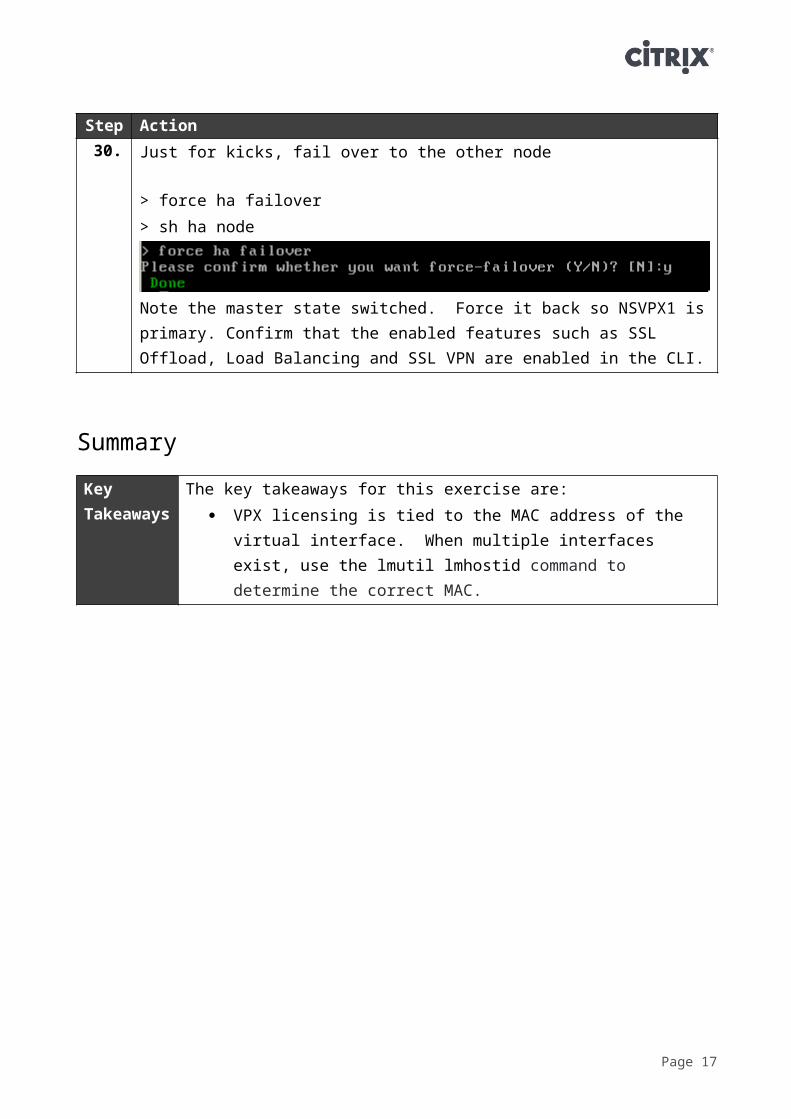
30. Just for kicks, fail over to the other node
> force ha failover> sh ha node
Note the master state switched. Force it back so NSVPX1 is primary. Confirm that the enabled features such as SSL Offload, Load Balancing and SSL VPN are enabled in the CLI.
Summary
Key Takeaways
The key takeaways for this exercise are: VPX licensing is tied to the MAC address of the virtual
interface. When multiple interfaces exist, use the lmutil lmhostid command to determine the correct MAC.
Page 16
Exercise 2: Load BalancingOverviewThis lab will go through two ways of configuring load balancing from the GUI—using the wizard (OPTIONAL) and manually. Web Interface is installed and configured on both XenDesktop1 and XenDesktop2.
Step by step guidanceEstimated time to complete this lab: 30 minutes.Step Action
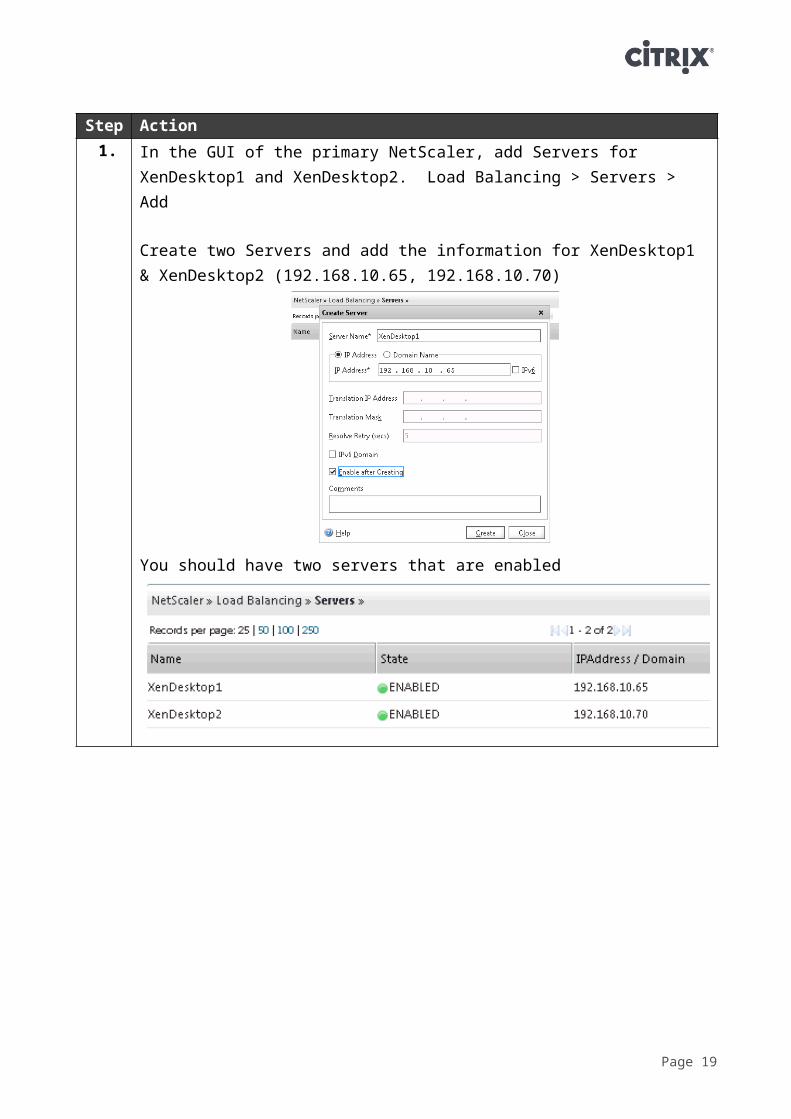
1. In the GUI of the primary NetScaler, add Servers for XenDesktop1 and XenDesktop2. Load Balancing > Servers > Add
Create two Servers and add the information for XenDesktop1 & XenDesktop2 (192.168.10.65, 192.168.10.70)
You should have two servers that are enabled
Page 17
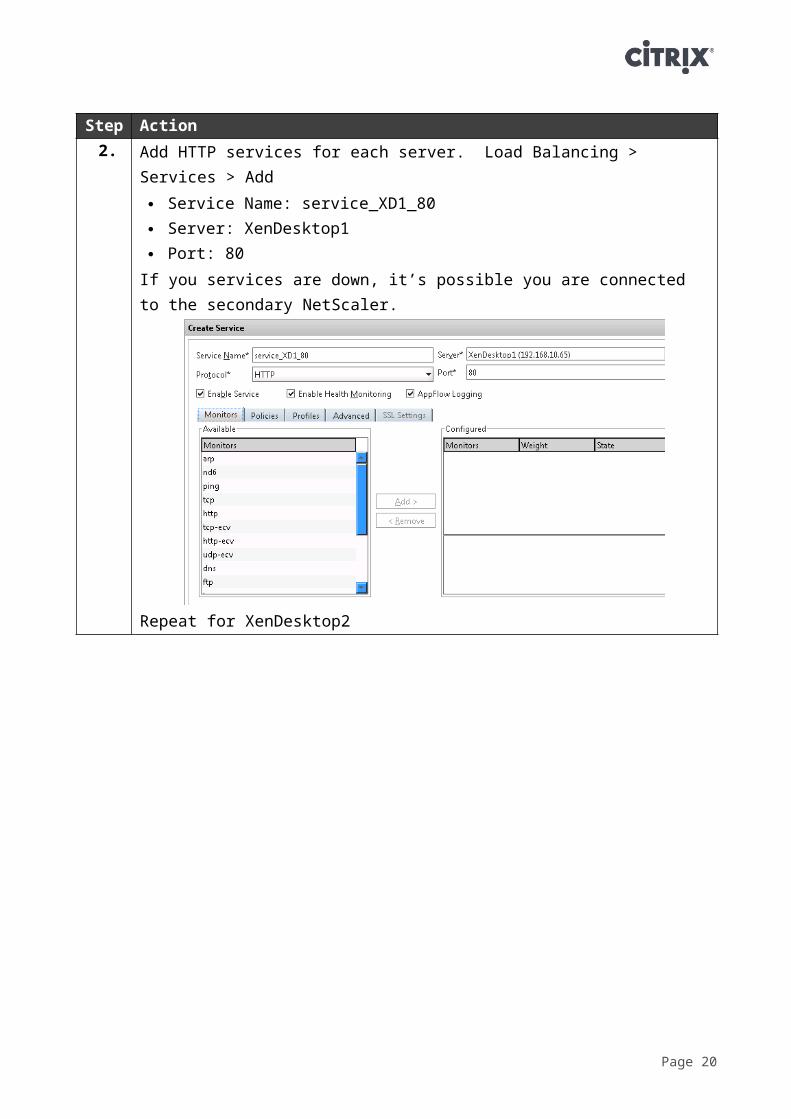
Step Action2. Add HTTP services for each server. Load Balancing > Services > Add
Service Name: service_XD1_80 Server: XenDesktop1 Port: 80
If you services are down, it’s possible you are connected to the secondary NetScaler.
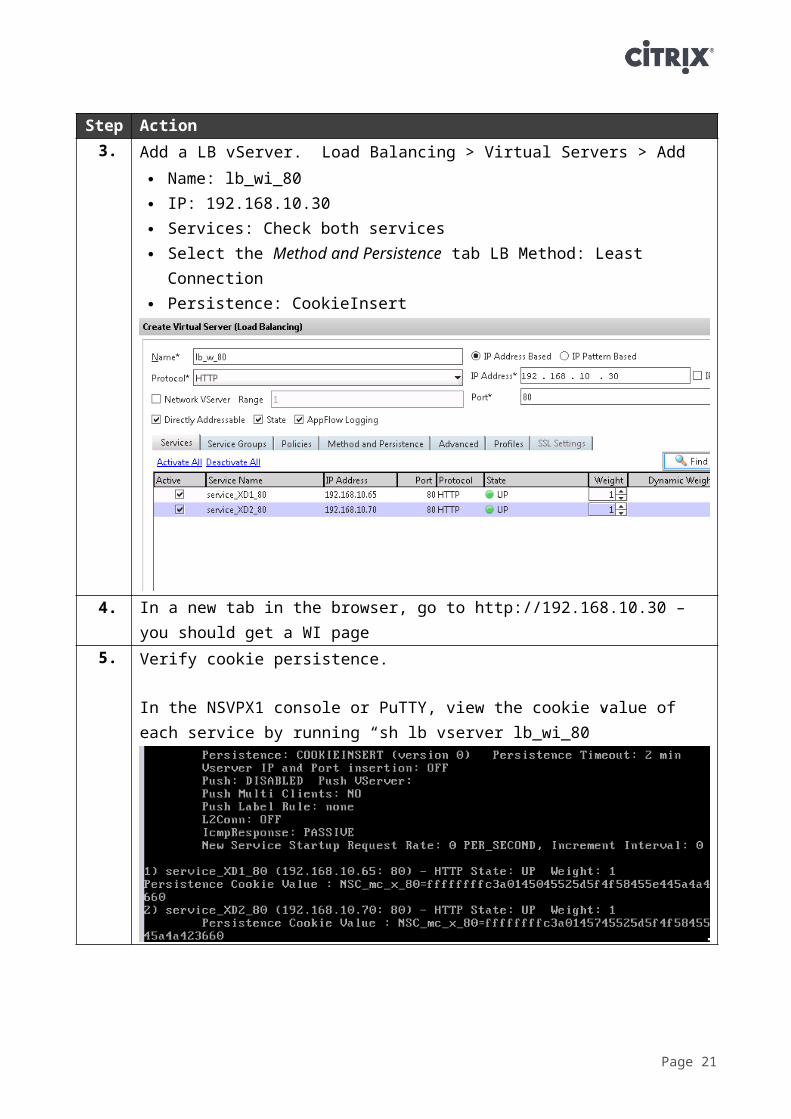
Repeat for XenDesktop23. Add a LB vServer. Load Balancing > Virtual Servers > Add
Name: lb_wi_80 IP: 192.168.10.30 Services: Check both services Select the Method and Persistence tab LB Method: Least
Connection Persistence: CookieInsert
Page 18
Step Action4. In a new tab in the browser, go to http://192.168.10.30 – you should
get a WI page5. Verify cookie persistence.
In the NSVPX1 console or PuTTY, view the cookie value of each service by running “sh lb vserver lb_wi_80”
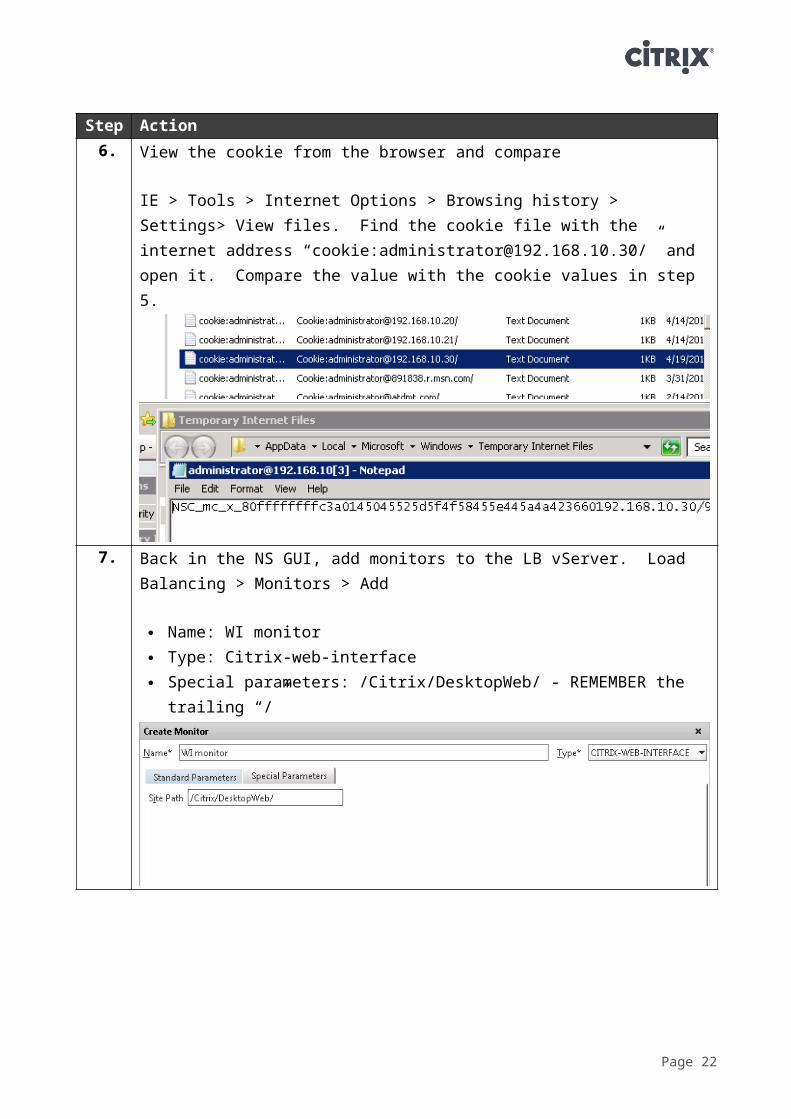
6. View the cookie from the browser and compare
IE > Tools > Internet Options > Browsing history > Settings> View files. Find the cookie file with the internet address “cookie:[email protected]/” and open it. Compare the value with the cookie values in step 5.
Page 19
Step Action7. Back in the NS GUI, add monitors to the LB vServer. Load Balancing
> Monitors > Add
Name: WI monitor Type: Citrix-web-interface Special parameters: /Citrix/DesktopWeb/ - REMEMBER the
trailing “/”
Page 20
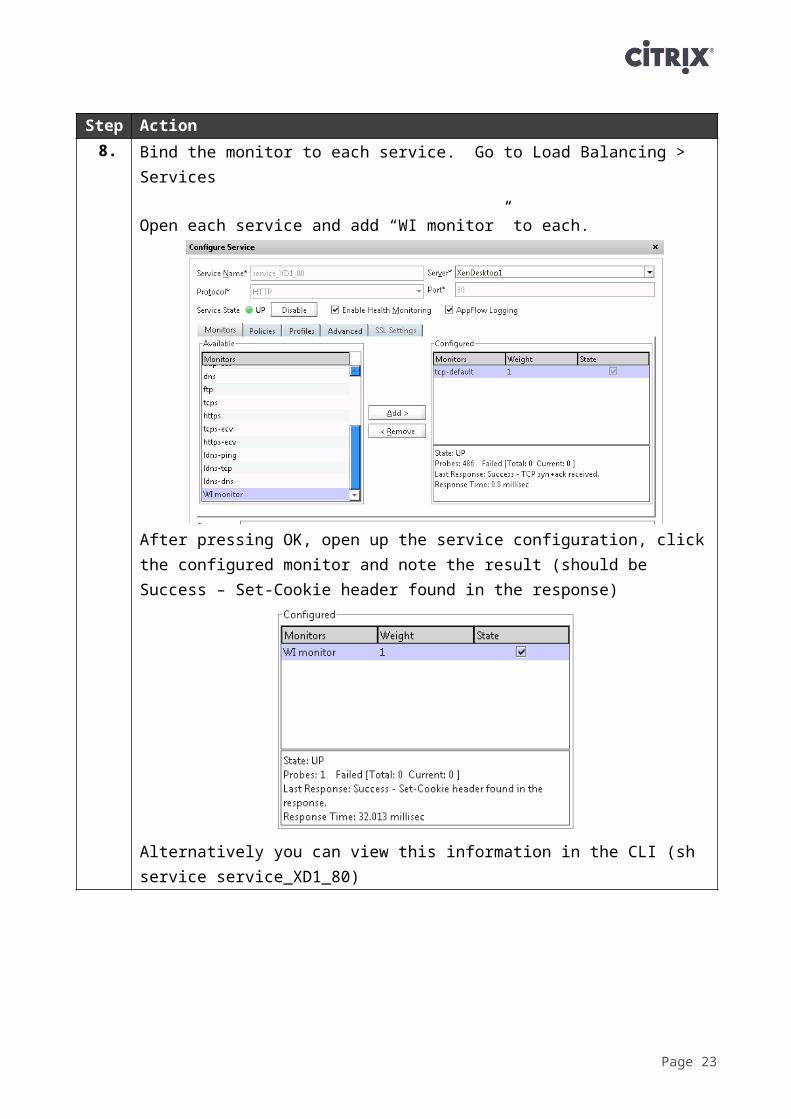
Step Action8. Bind the monitor to each service. Go to Load Balancing > Services
Open each service and add “WI monitor” to each.
After pressing OK, open up the service configuration, click the configured monitor and note the result (should be Success – Set-Cookie header found in the response)
Alternatively you can view this information in the CLI (sh service service_XD1_80)
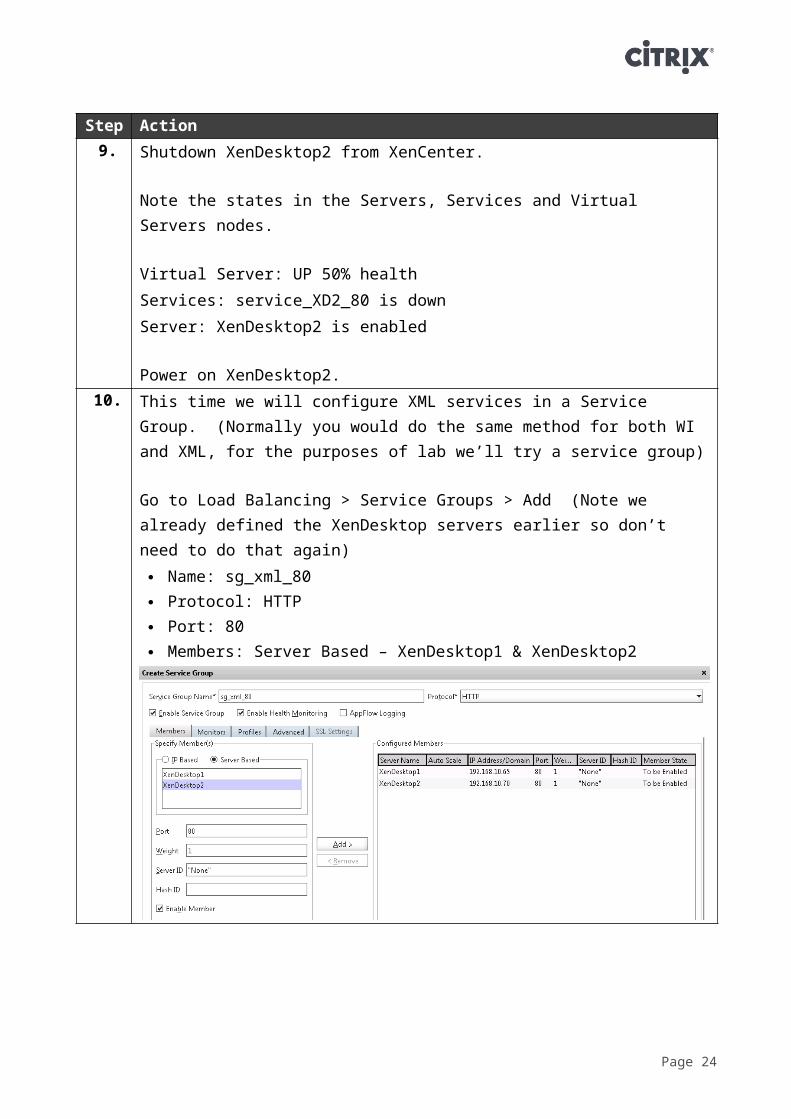
9. Shutdown XenDesktop2 from XenCenter.
Note the states in the Servers, Services and Virtual Servers nodes.
Virtual Server: UP 50% healthServices: service_XD2_80 is downServer: XenDesktop2 is enabled
Power on XenDesktop2.
Page 21
Step Action10. This time we will configure XML services in a Service Group.
(Normally you would do the same method for both WI and XML, for the purposes of lab we’ll try a service group)
Go to Load Balancing > Service Groups > Add (Note we already defined the XenDesktop servers earlier so don’t need to do that again) Name: sg_xml_80 Protocol: HTTP Port: 80 Members: Server Based – XenDesktop1 & XenDesktop2
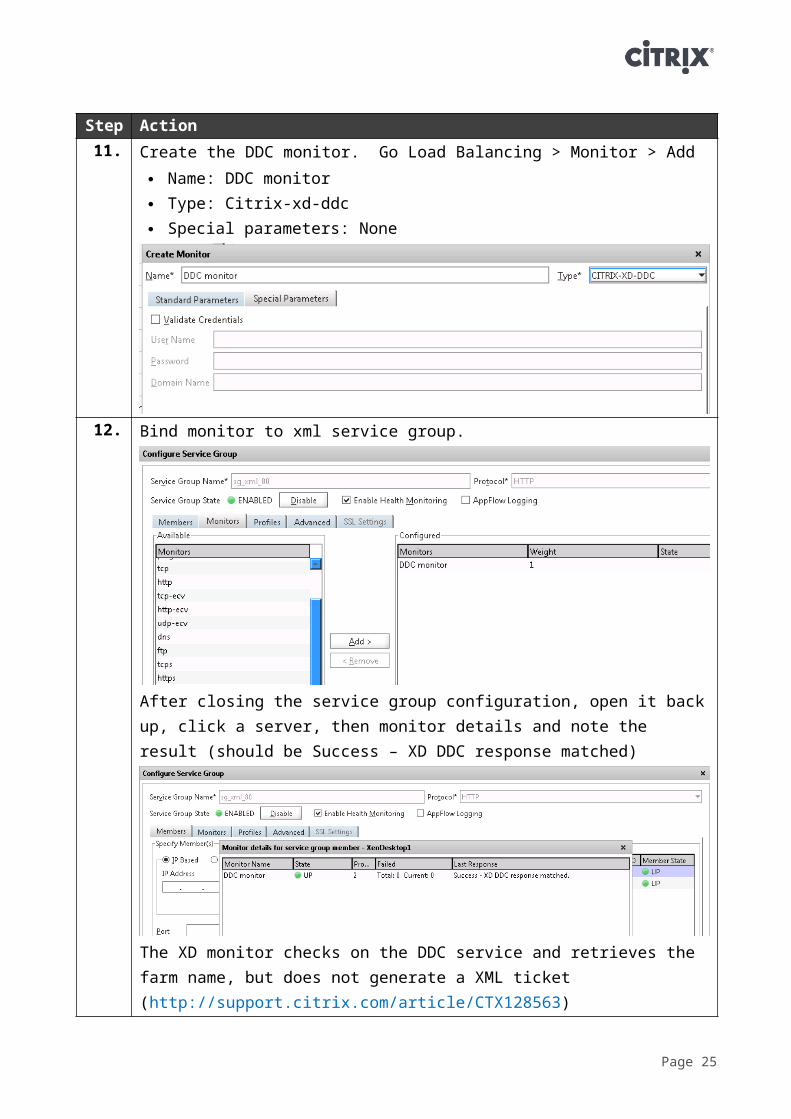
11. Create the DDC monitor. Go Load Balancing > Monitor > Add Name: DDC monitor Type: Citrix-xd-ddc Special parameters: None
Page 22
Step Action12. Bind monitor to xml service group.
After closing the service group configuration, open it back up, click a server, then monitor details and note the result (should be Success – XD DDC response matched)
The XD monitor checks on the DDC service and retrieves the farm name, but does not generate a XML ticket (http://support.citrix.com/article/CTX128563)
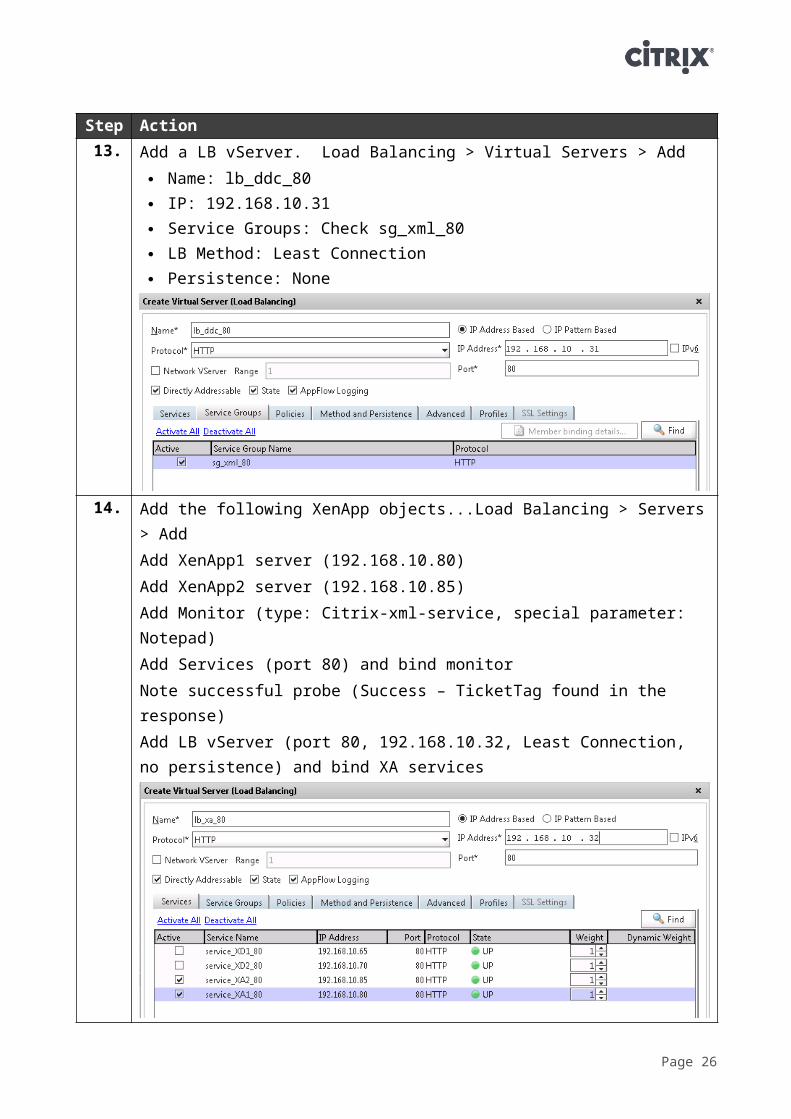
13. Add a LB vServer. Load Balancing > Virtual Servers > Add Name: lb_ddc_80 IP: 192.168.10.31 Service Groups: Check sg_xml_80 LB Method: Least Connection Persistence: None
Page 23
Step Action14. Add the following XenApp objects...Load Balancing > Servers > Add
Add XenApp1 server (192.168.10.80)Add XenApp2 server (192.168.10.85)Add Monitor (type: Citrix-xml-service, special parameter: Notepad)Add Services (port 80) and bind monitorNote successful probe (Success – TicketTag found in the response)Add LB vServer (port 80, 192.168.10.32, Least Connection, no persistence) and bind XA services
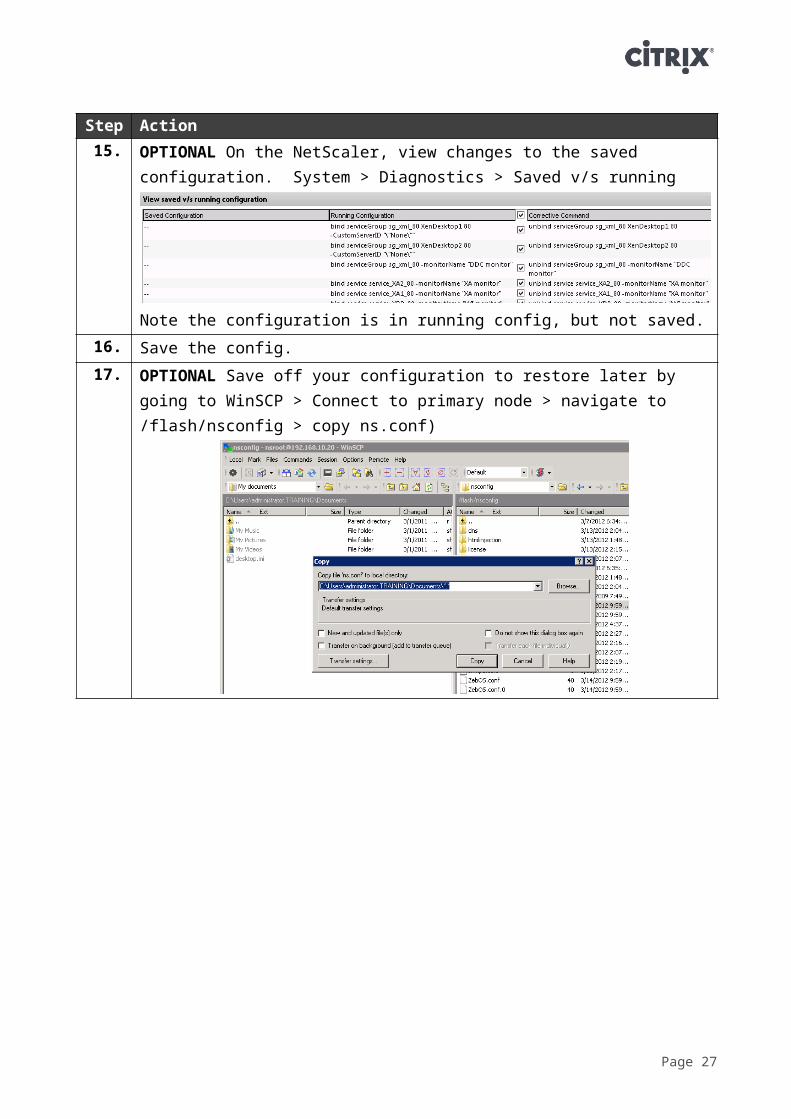
15. OPTIONAL On the NetScaler, view changes to the saved configuration. System > Diagnostics > Saved v/s running
Note the configuration is in running config, but not saved.16. Save the config.
Page 24
Step Action17. OPTIONAL Save off your configuration to restore later by going to
WinSCP > Connect to primary node > navigate to /flash/nsconfig > copy ns.conf)
Page 25
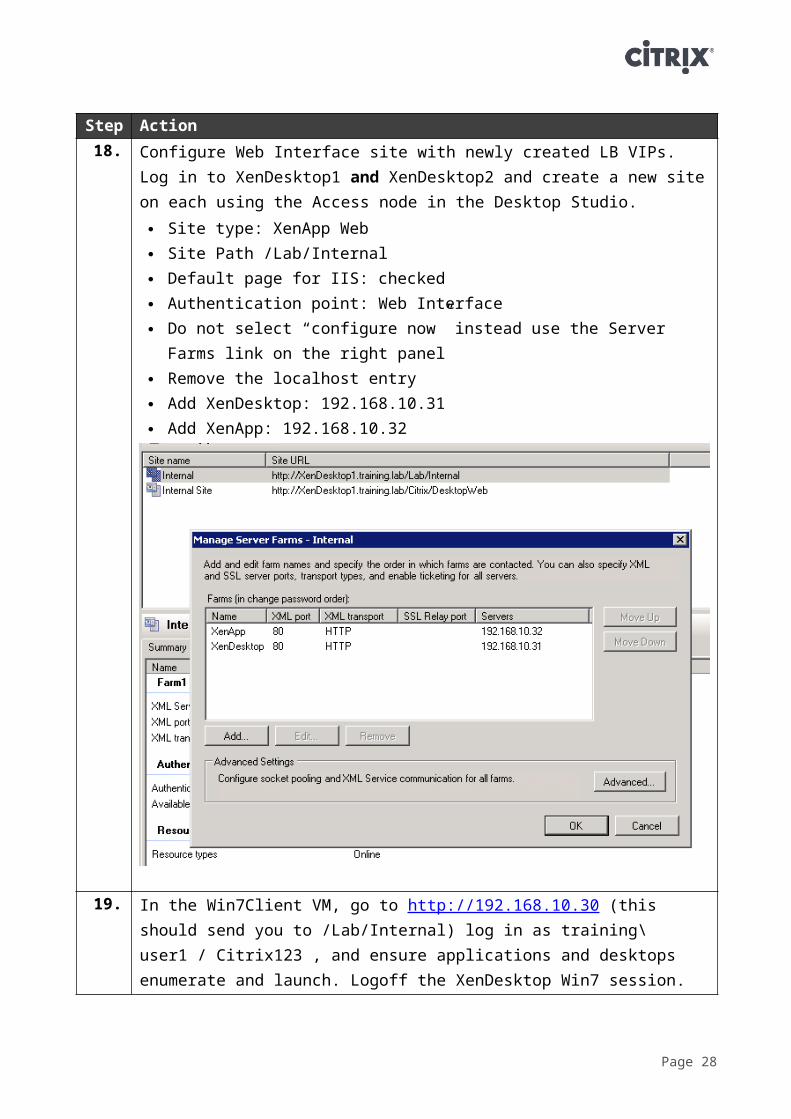
Step Action18. Configure Web Interface site with newly created LB VIPs. Log in to
XenDesktop1 and XenDesktop2 and create a new site on each using the Access node in the Desktop Studio. Site type: XenApp Web Site Path /Lab/Internal Default page for IIS: checked Authentication point: Web Interface Do not select “configure now” instead use the Server Farms link
on the right panel Remove the localhost entry Add XenDesktop: 192.168.10.31 Add XenApp: 192.168.10.32
19. In the Win7Client VM, go to http://192.168.10.30 (this should send you to /Lab/Internal) log in as training\user1 / Citrix123 , and ensure applications and desktops enumerate and launch. Logoff the XenDesktop Win7 session.The following steps in this exercise are OPTIONAL, time permitting. They illustrate how the configuration steps above are performed with the Wizards.
Page 26
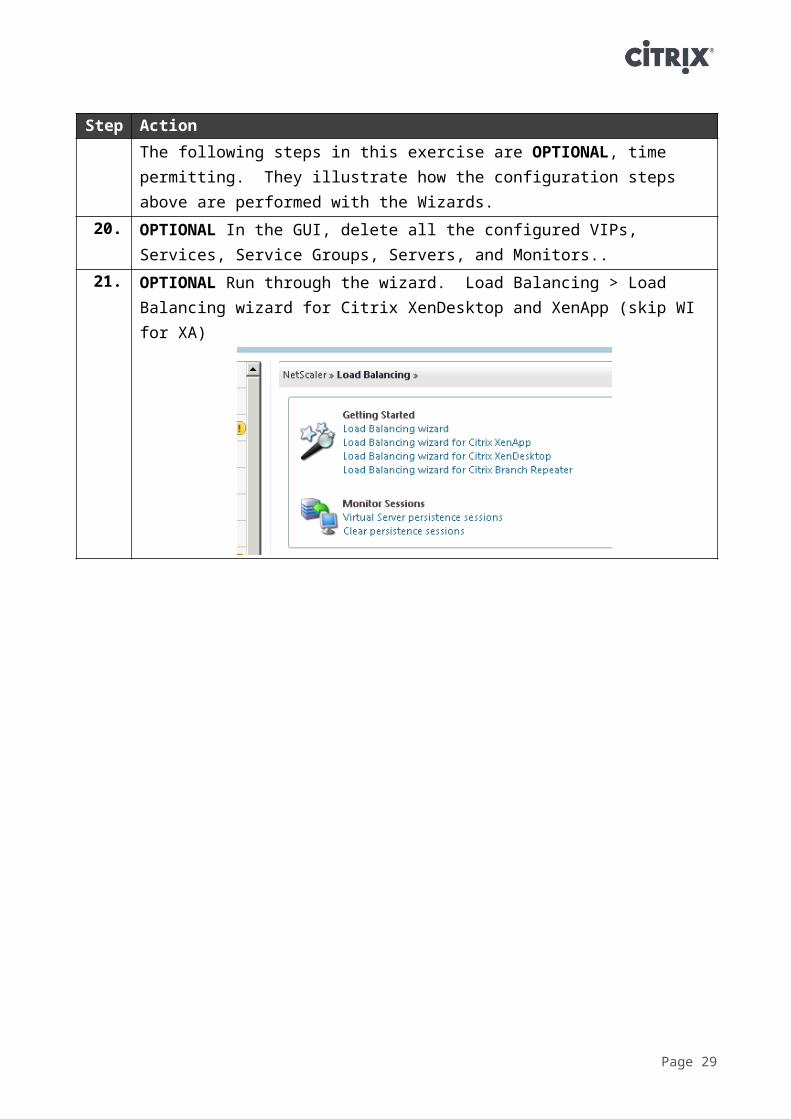
Step Action20. OPTIONAL In the GUI, delete all the configured VIPs, Services,
Service Groups, Servers, and Monitors..21. OPTIONAL Run through the wizard. Load Balancing > Load
Balancing wizard for Citrix XenDesktop and XenApp (skip WI for XA)
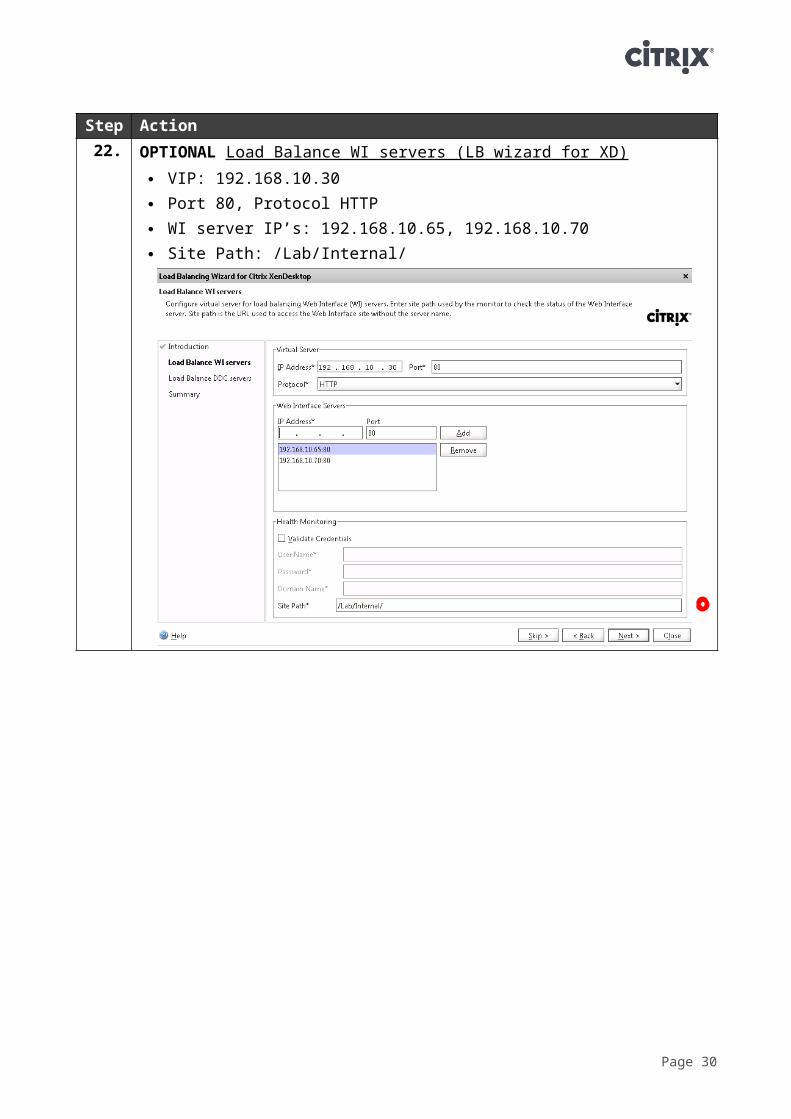
22. OPTIONAL Load Balance WI servers (LB wizard for XD) VIP: 192.168.10.30 Port 80, Protocol HTTP WI server IP’s: 192.168.10.65, 192.168.10.70 Site Path: /Lab/Internal/
Page 27
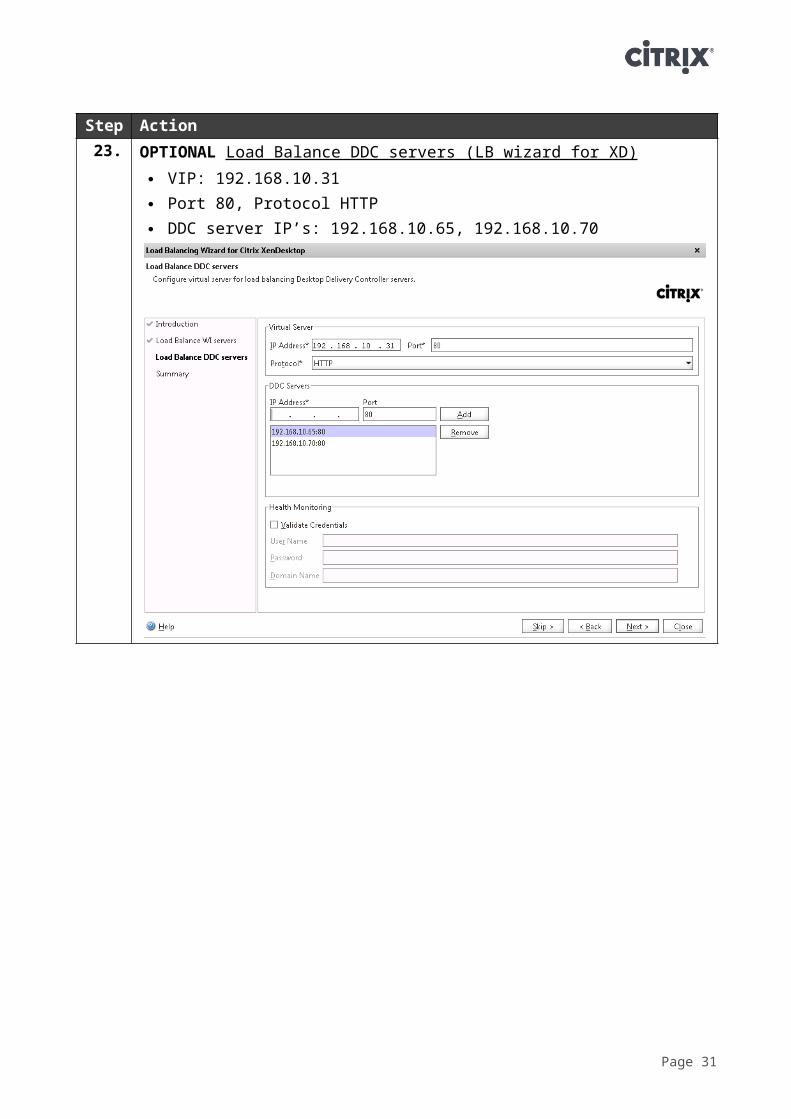
Step Action23. OPTIONAL Load Balance DDC servers (LB wizard for XD)
VIP: 192.168.10.31 Port 80, Protocol HTTP DDC server IP’s: 192.168.10.65, 192.168.10.70
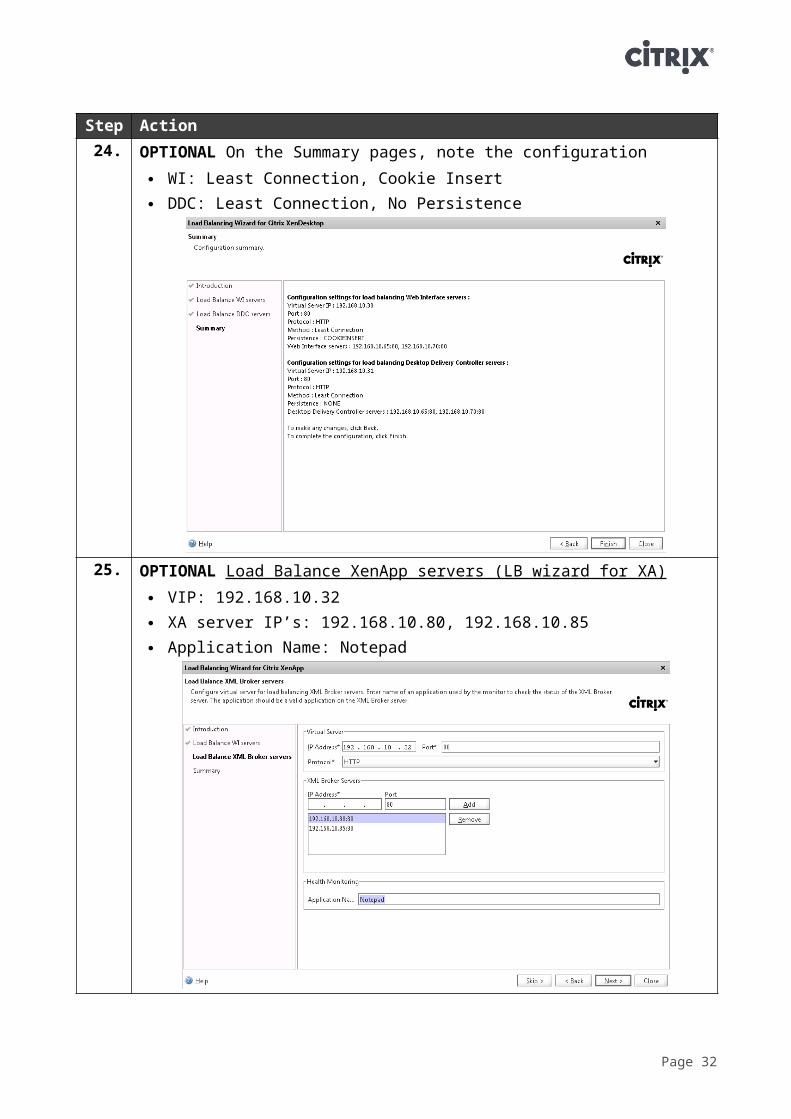
24. OPTIONAL On the Summary pages, note the configuration WI: Least Connection, Cookie Insert DDC: Least Connection, No Persistence
Page 28
Step Action25. OPTIONAL Load Balance XenApp servers (LB wizard for XA)
VIP: 192.168.10.32 XA server IP’s: 192.168.10.80, 192.168.10.85 Application Name: Notepad
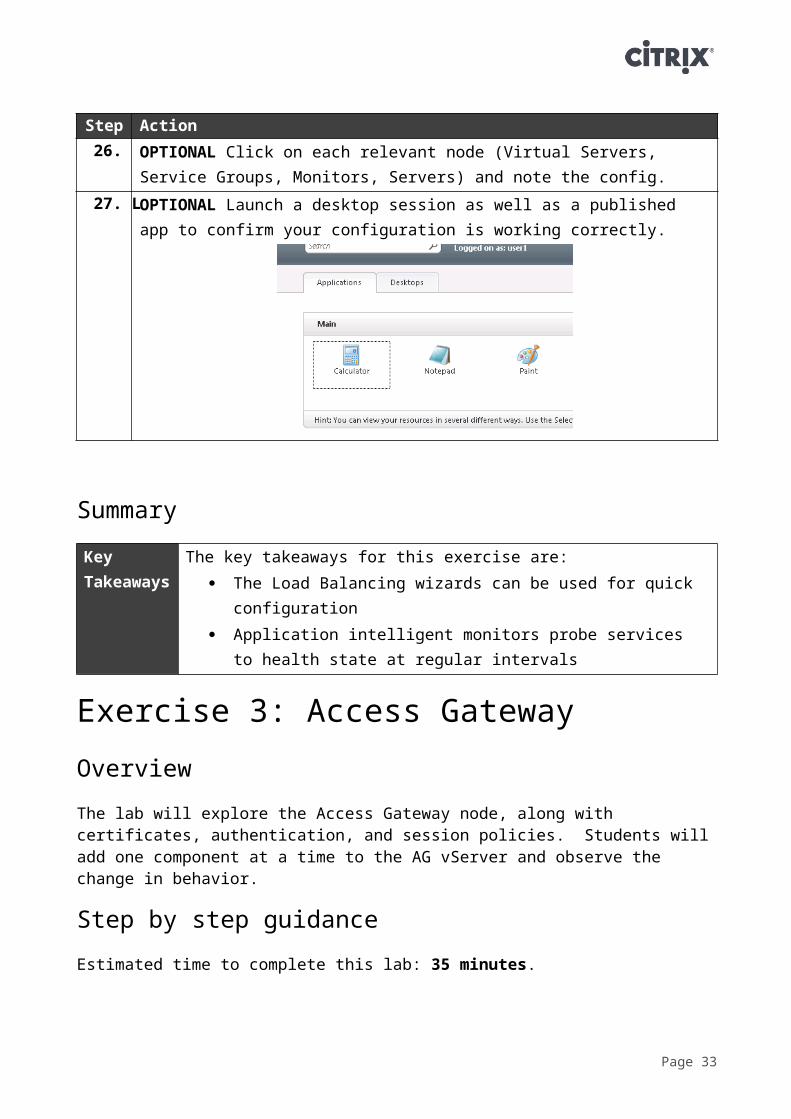
26. OPTIONAL Click on each relevant node (Virtual Servers, Service Groups, Monitors, Servers) and note the config.
27. LOPTIONAL Launch a desktop session as well as a published app to confirm your configuration is working correctly.
Summary
Page 29
Key Takeaways
The key takeaways for this exercise are: The Load Balancing wizards can be used for quick
configuration Application intelligent monitors probe services to health
state at regular intervals
Exercise 3: Access GatewayOverviewThe lab will explore the Access Gateway node, along with certificates, authentication, and session policies. Students will add one component at a time to the AG vServer and observe the change in behavior.
Step by step guidanceEstimated time to complete this lab: 35 minutes.
Page 30
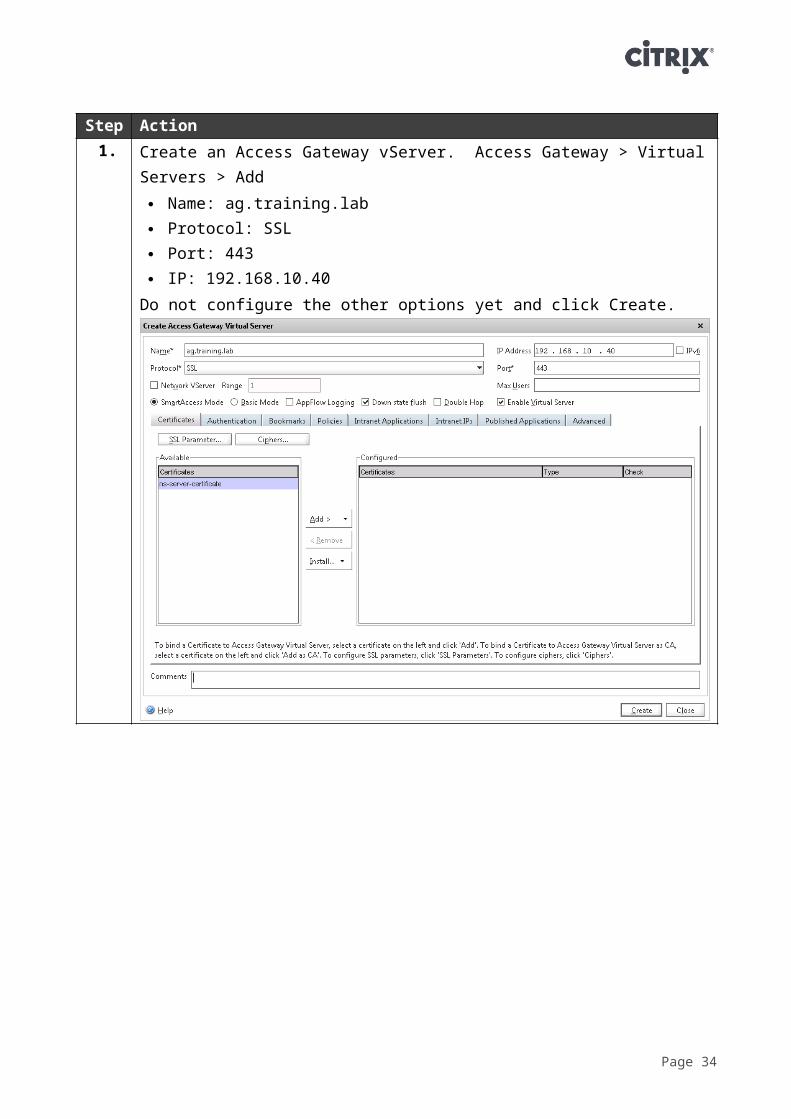
Step Action1. Create an Access Gateway vServer. Access Gateway > Virtual
Servers > Add Name: ag.training.lab Protocol: SSL Port: 443 IP: 192.168.10.40
Do not configure the other options yet and click Create.
Page 31
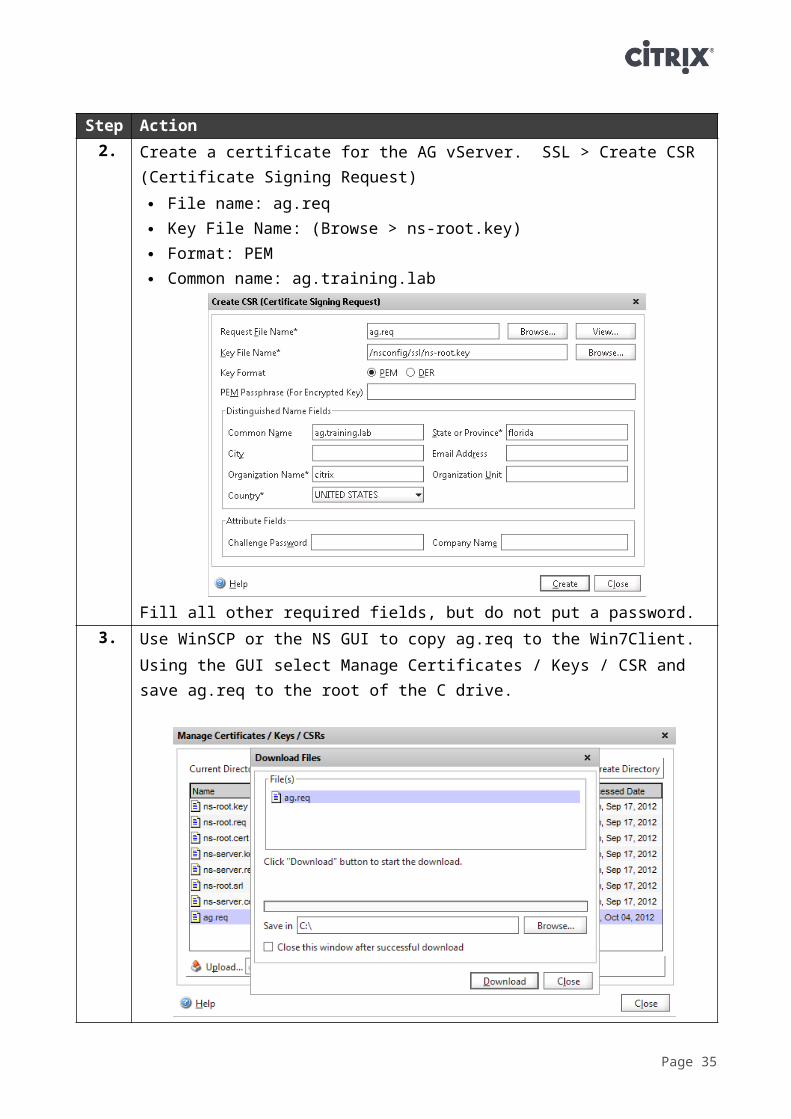
Step Action2. Create a certificate for the AG vServer. SSL > Create CSR
(Certificate Signing Request) File name: ag.req Key File Name: (Browse > ns-root.key) Format: PEM Common name: ag.training.lab
Fill all other required fields, but do not put a password.3. Use WinSCP or the NS GUI to copy ag.req to the Win7Client.
Using the GUI select Manage Certificates / Keys / CSR and save ag.req to the root of the C drive.
Page 32
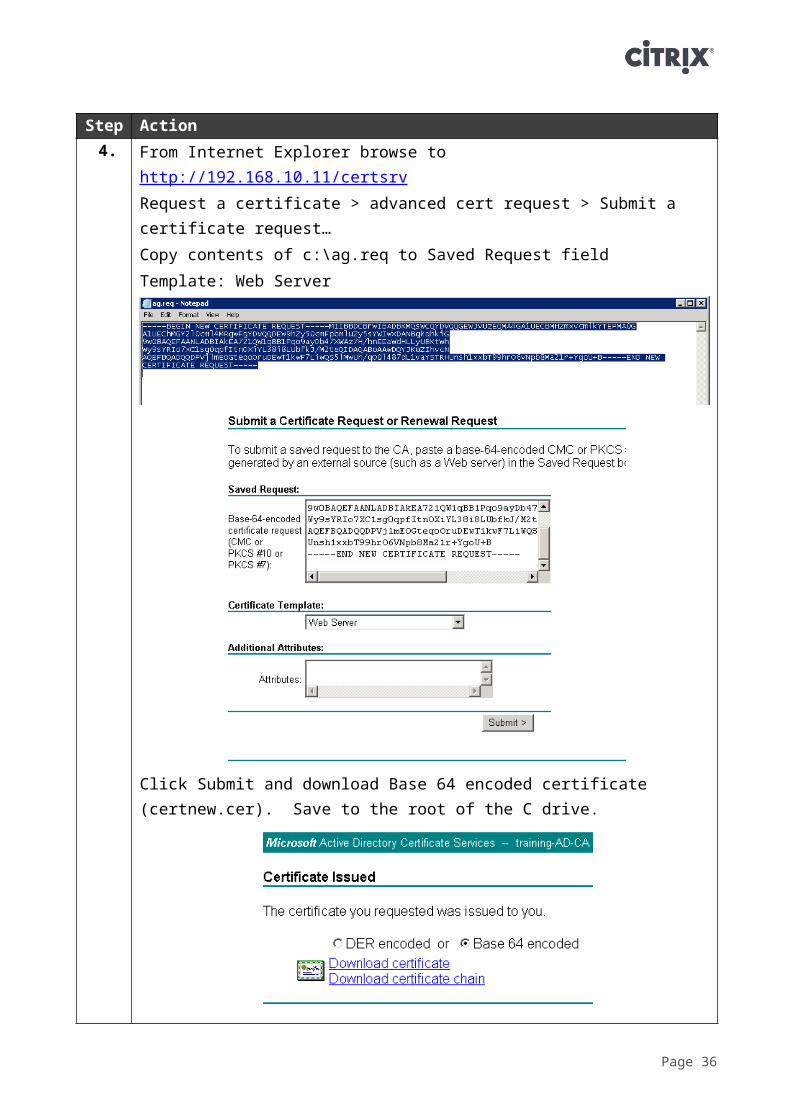
Step Action4. From Internet Explorer browse to http://192.168.10.11/certsrv
Request a certificate > advanced cert request > Submit a certificate request…Copy contents of c:\ag.req to Saved Request fieldTemplate: Web Server
Click Submit and download Base 64 encoded certificate (certnew.cer). Save to the root of the C drive.
Page 33
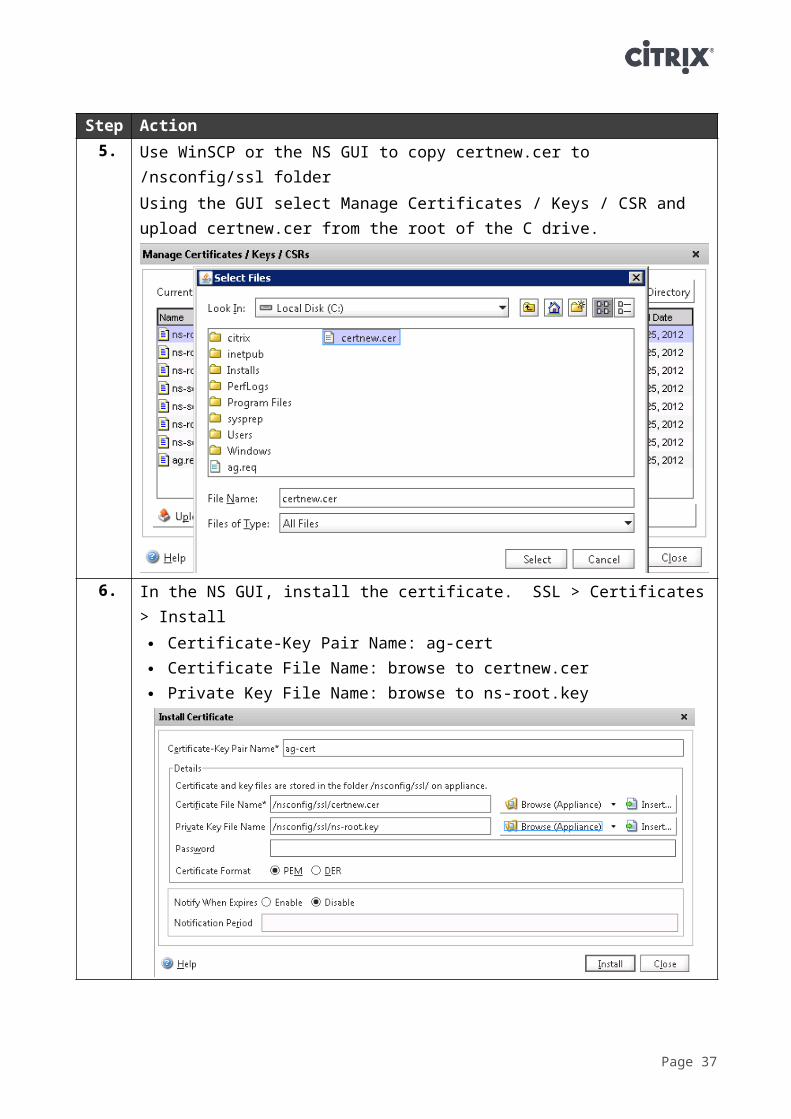
Step Action5. Use WinSCP or the NS GUI to copy certnew.cer to /nsconfig/ssl folder
Using the GUI select Manage Certificates / Keys / CSR and upload certnew.cer from the root of the C drive.
6. In the NS GUI, install the certificate. SSL > Certificates > Install Certificate-Key Pair Name: ag-cert Certificate File Name: browse to certnew.cer Private Key File Name: browse to ns-root.key
Page 34
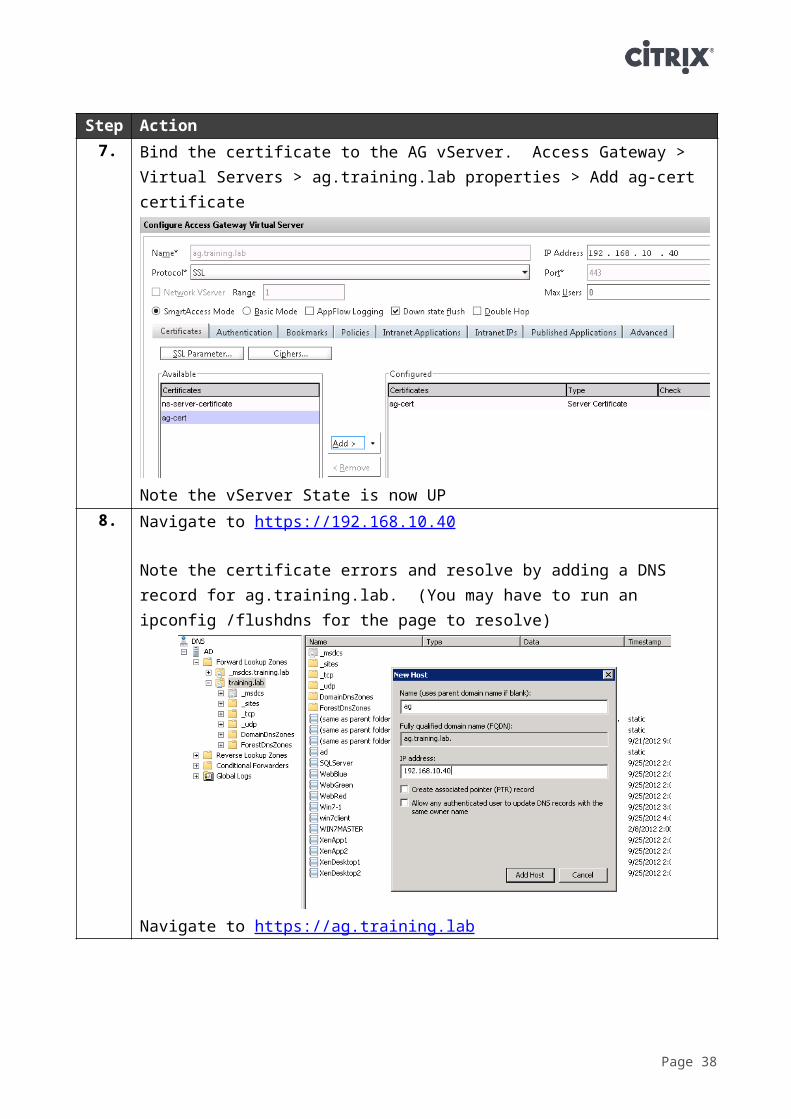
Step Action7. Bind the certificate to the AG vServer. Access Gateway > Virtual
Servers > ag.training.lab properties > Add ag-cert certificate
Note the vServer State is now UP8. Navigate to https://192.168.10.40
Note the certificate errors and resolve by adding a DNS record for ag.training.lab. (You may have to run an ipconfig /flushdns for the page to resolve)
Navigate to https://ag.training.lab
Page 35
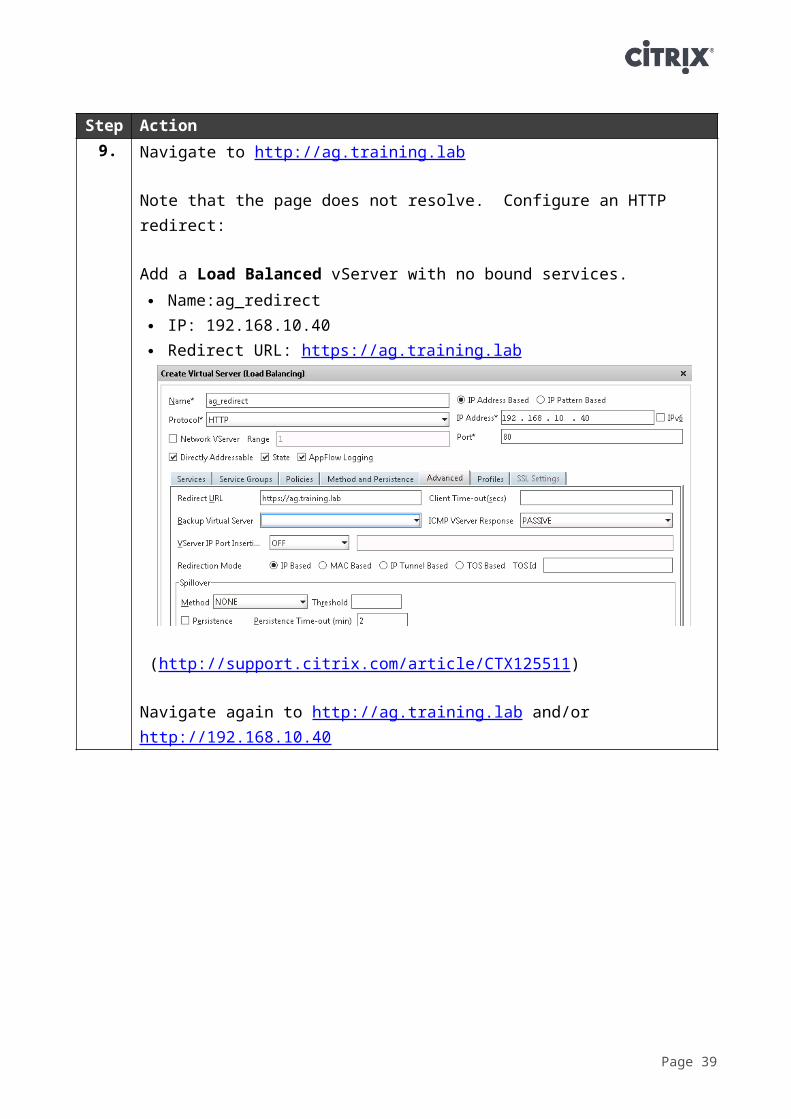
Step Action9. Navigate to http://ag.training.lab
Note that the page does not resolve. Configure an HTTP redirect:
Add a Load Balanced vServer with no bound services. Name:ag_redirect IP: 192.168.10.40 Redirect URL: https://ag.training.lab
(http://support.citrix.com/article/CTX125511)
Navigate again to http://ag.training.lab and/or http://192.168.10.40
Page 36
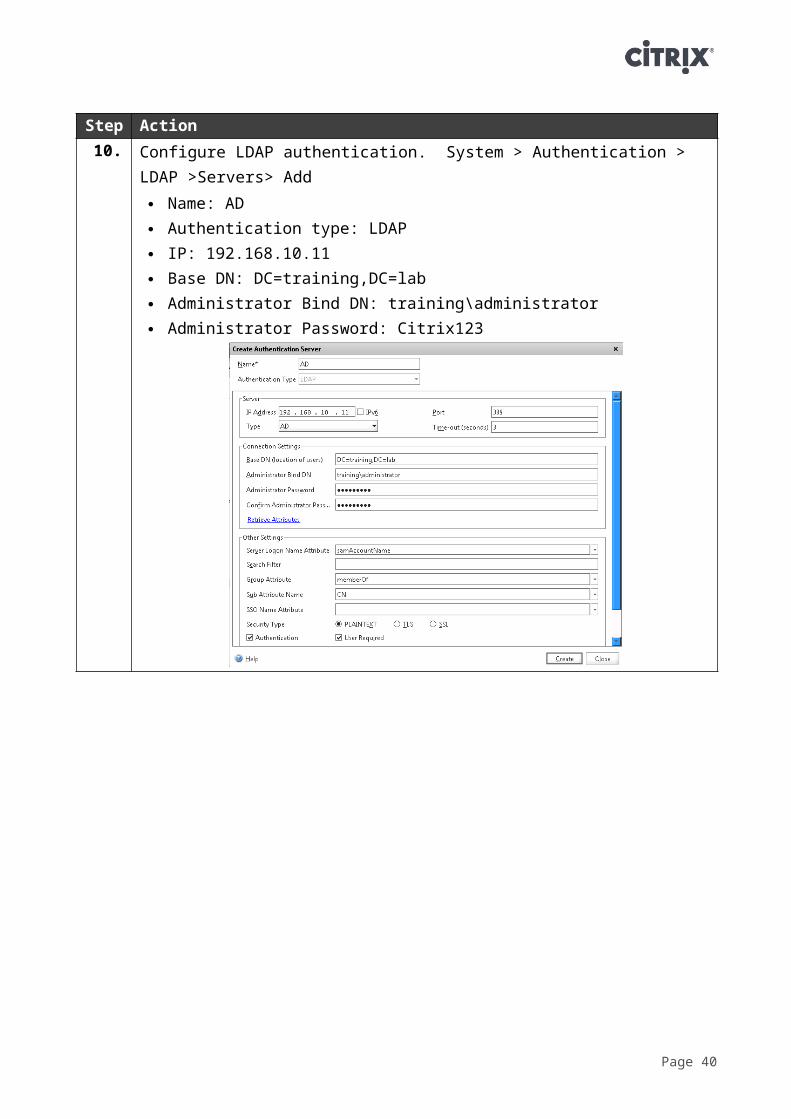
Step Action10. Configure LDAP authentication. System > Authentication > LDAP
>Servers> Add Name: AD Authentication type: LDAP IP: 192.168.10.11 Base DN: DC=training,DC=lab Administrator Bind DN: training\administrator Administrator Password: Citrix123
Page 37
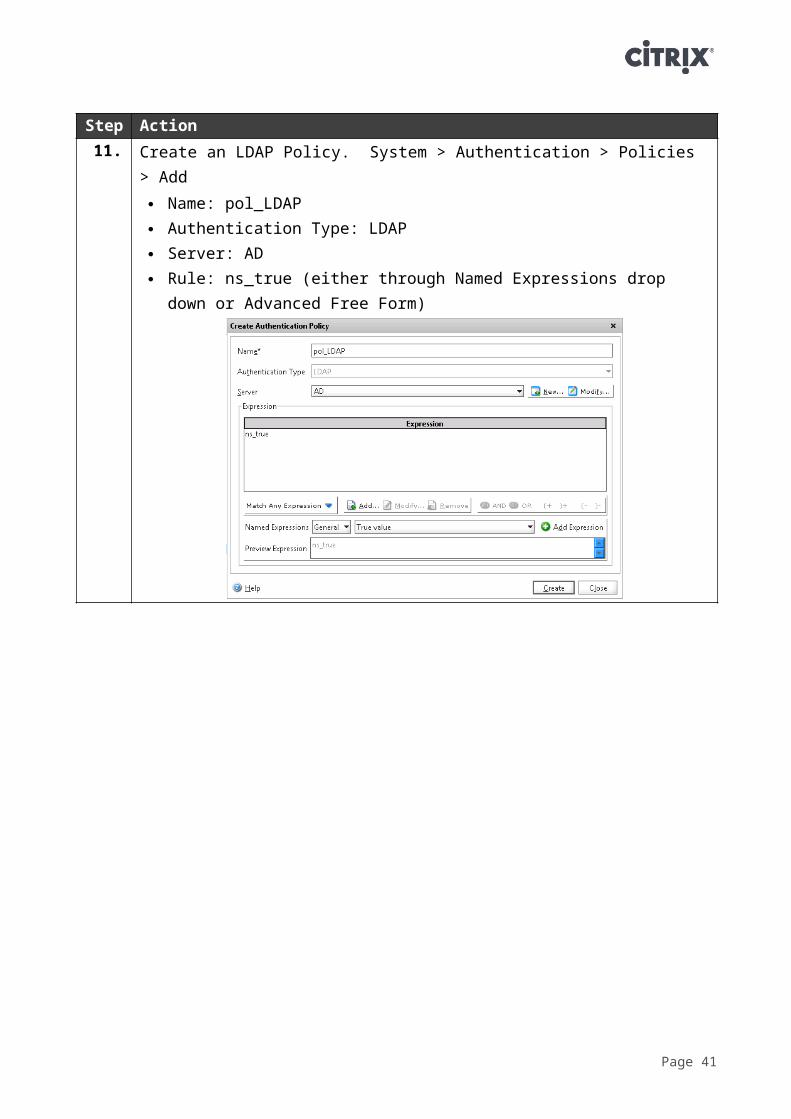
Step Action11. Create an LDAP Policy. System > Authentication > Policies > Add
Name: pol_LDAP Authentication Type: LDAP Server: AD Rule: ns_true (either through Named Expressions drop down or
Advanced Free Form)
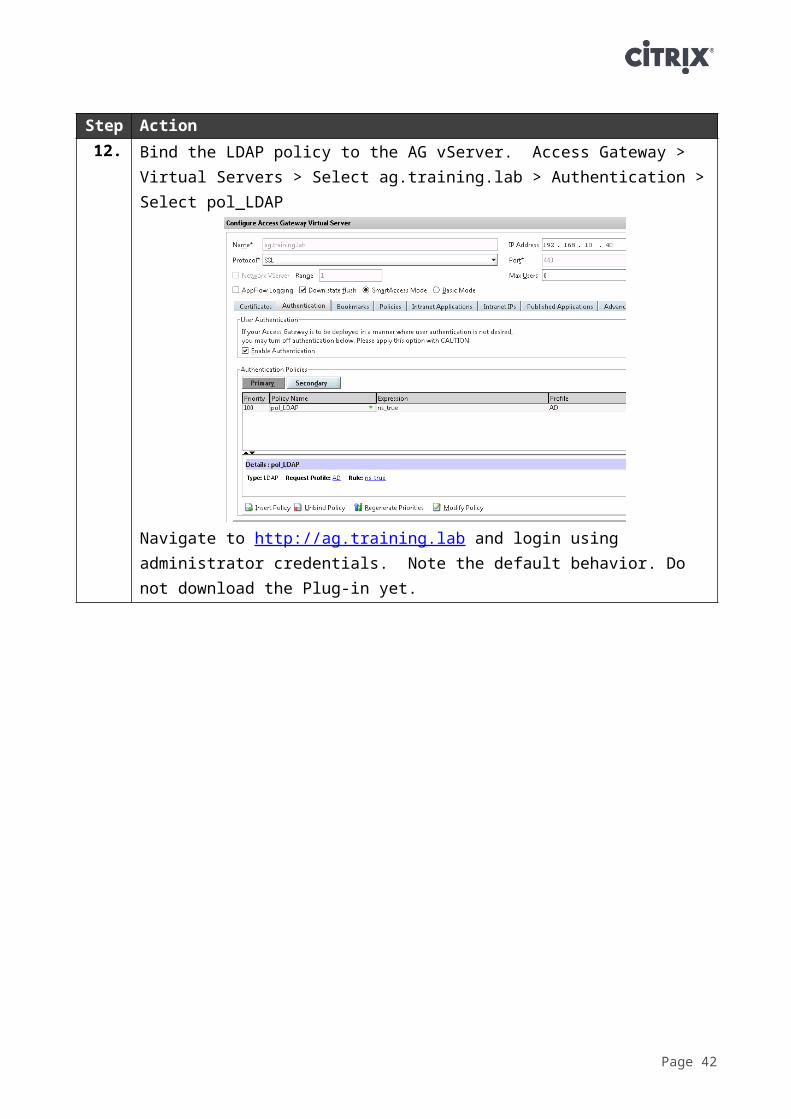
12. Bind the LDAP policy to the AG vServer. Access Gateway > Virtual Servers > Select ag.training.lab > Authentication > Select pol_LDAP
Navigate to http://ag.training.lab and login using administrator credentials. Note the default behavior. Do not download the Plug-in yet.
Page 38
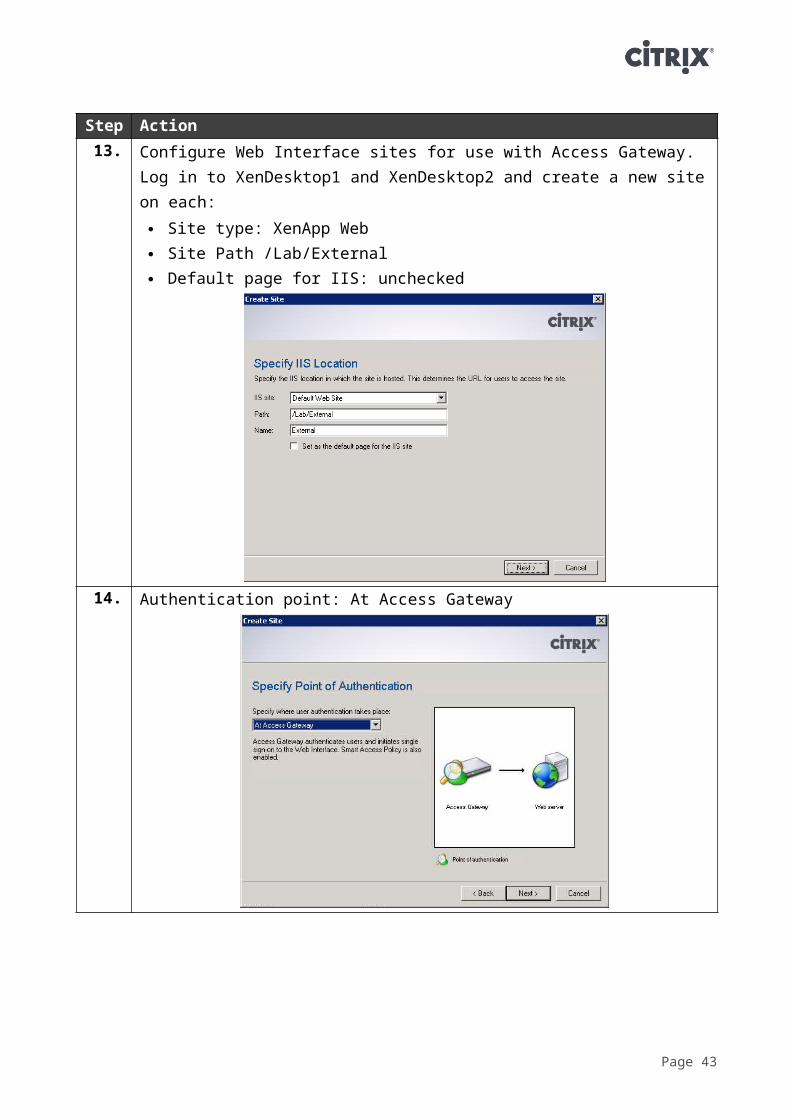
Step Action13. Configure Web Interface sites for use with Access Gateway. Log in to
XenDesktop1 and XenDesktop2 and create a new site on each: Site type: XenApp Web Site Path /Lab/External Default page for IIS: unchecked
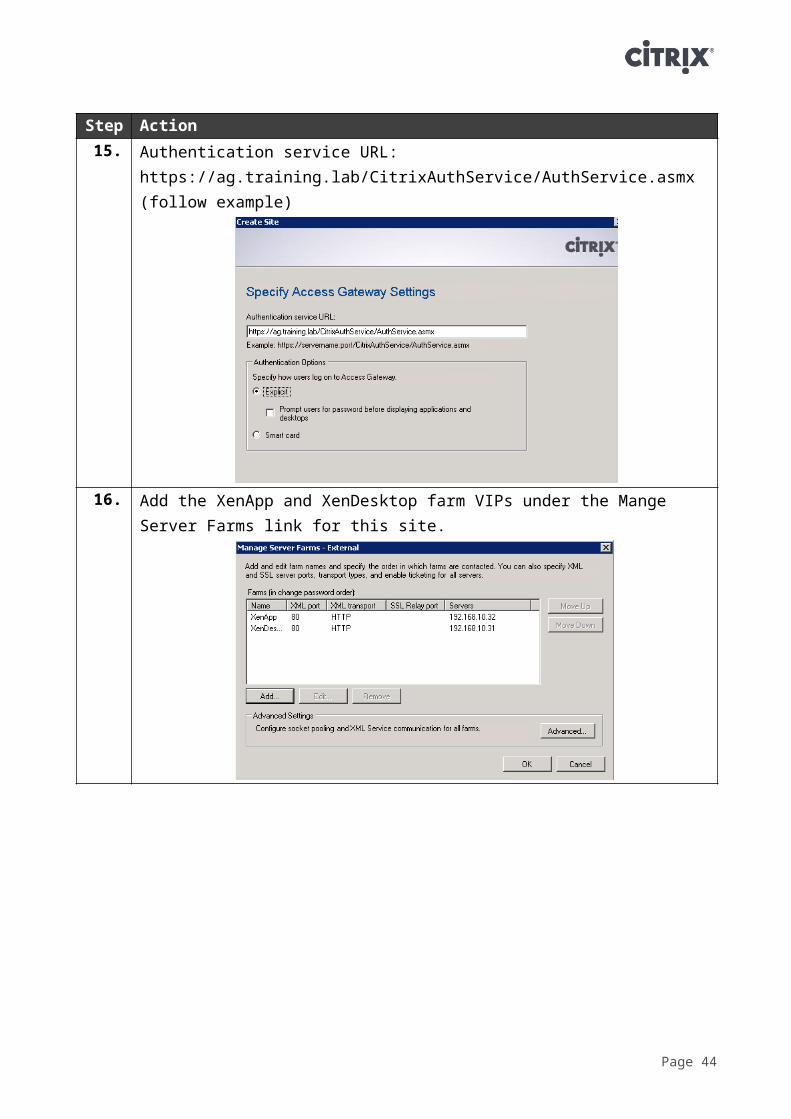
14. Authentication point: At Access Gateway
Page 39
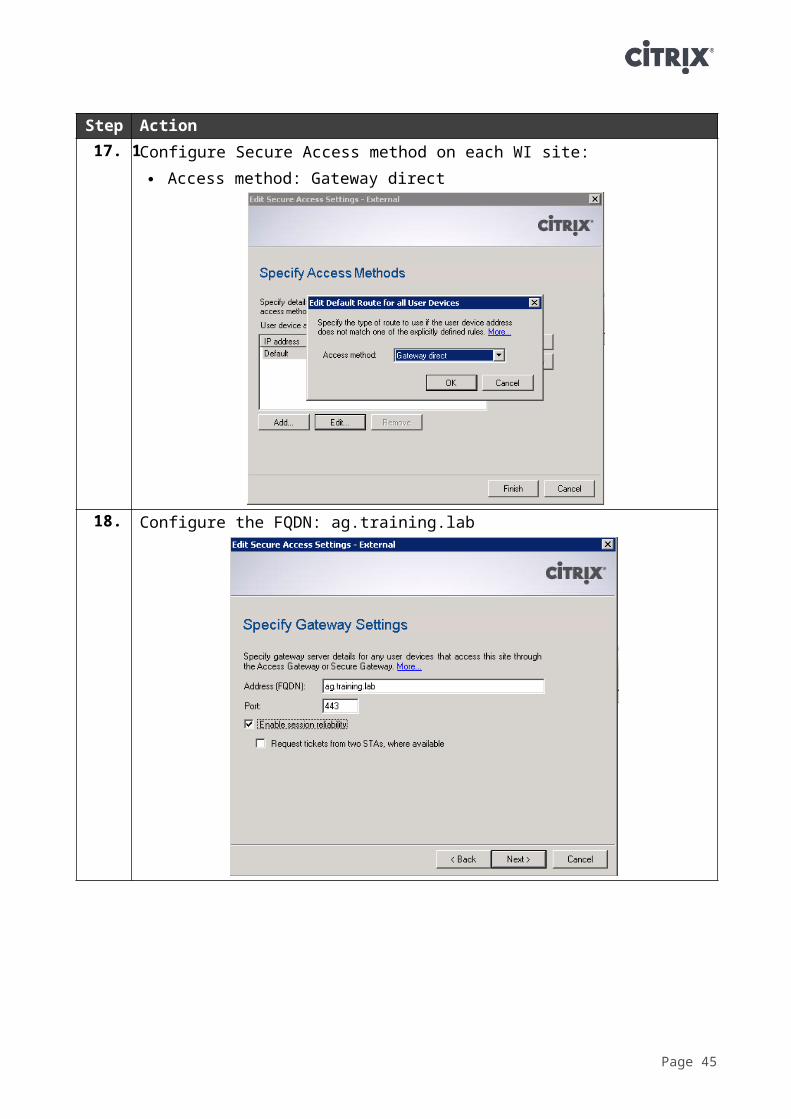
Step Action15. Authentication service URL:
https://ag.training.lab/CitrixAuthService/AuthService.asmx (follow example)
16. Add the XenApp and XenDesktop farm VIPs under the Mange Server Farms link for this site.
Page 40
Step Action17. 1Configure Secure Access method on each WI site:
Access method: Gateway direct
18. Configure the FQDN: ag.training.lab
Page 41
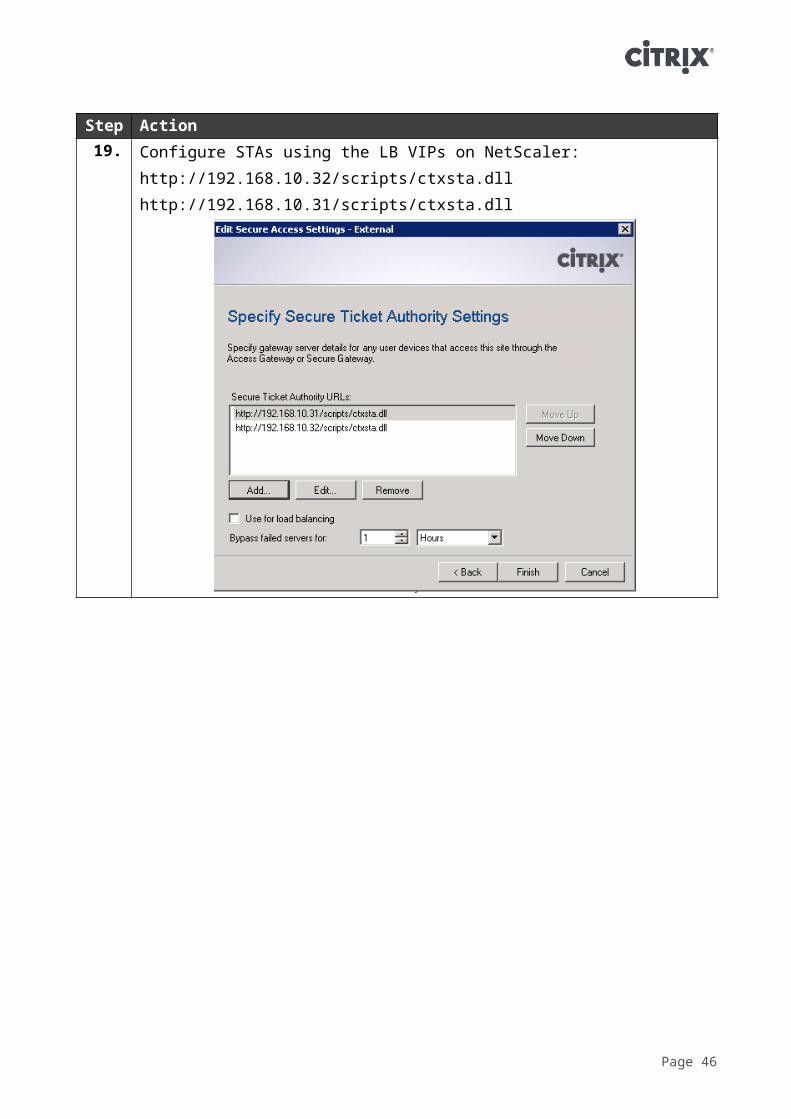
Step Action19. Configure STAs using the LB VIPs on NetScaler:
http://192.168.10.32/scripts/ctxsta.dllhttp://192.168.10.31/scripts/ctxsta.dll
Page 42
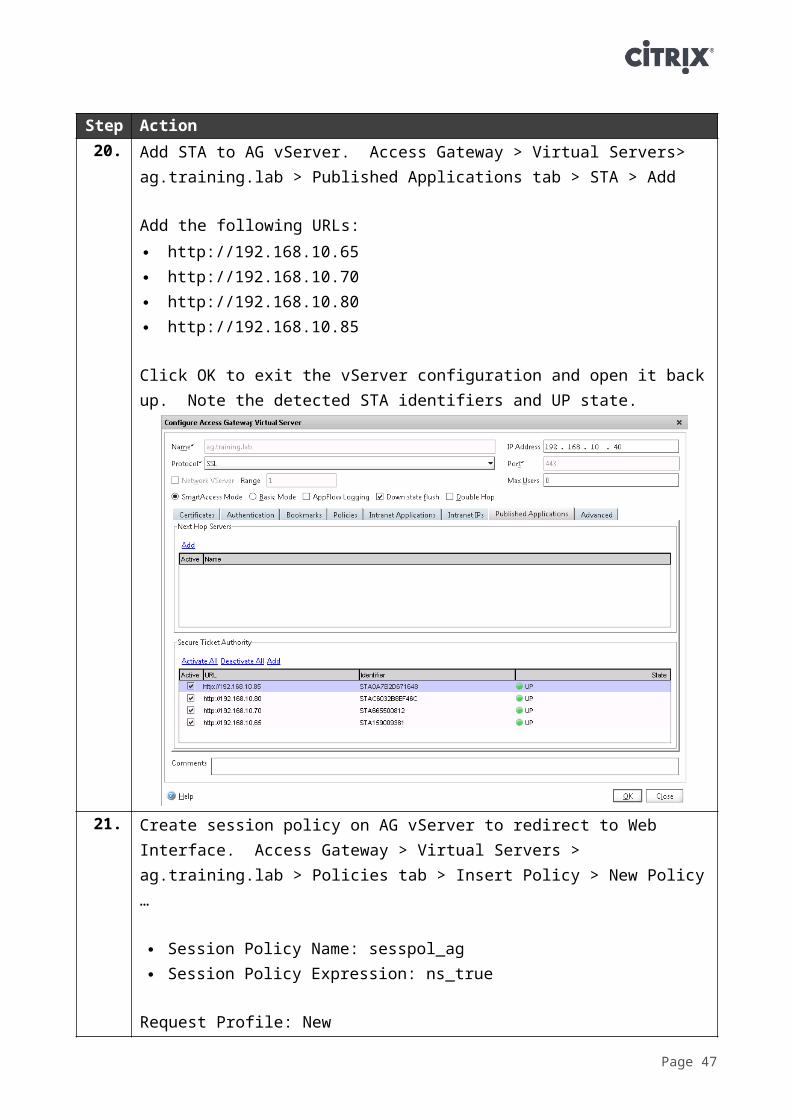
Step Action20. Add STA to AG vServer. Access Gateway > Virtual Servers>
ag.training.lab > Published Applications tab > STA > Add
Add the following URLs: http://192.168.10.65 http://192.168.10.70 http://192.168.10.80 http://192.168.10.85
Click OK to exit the vServer configuration and open it back up. Note the detected STA identifiers and UP state.
21. Create session policy on AG vServer to redirect to Web Interface. Access Gateway > Virtual Servers > ag.training.lab > Policies tab > Insert Policy > New Policy …
Session Policy Name: sesspol_ag Session Policy Expression: ns_true
Request Profile: New
Page 43
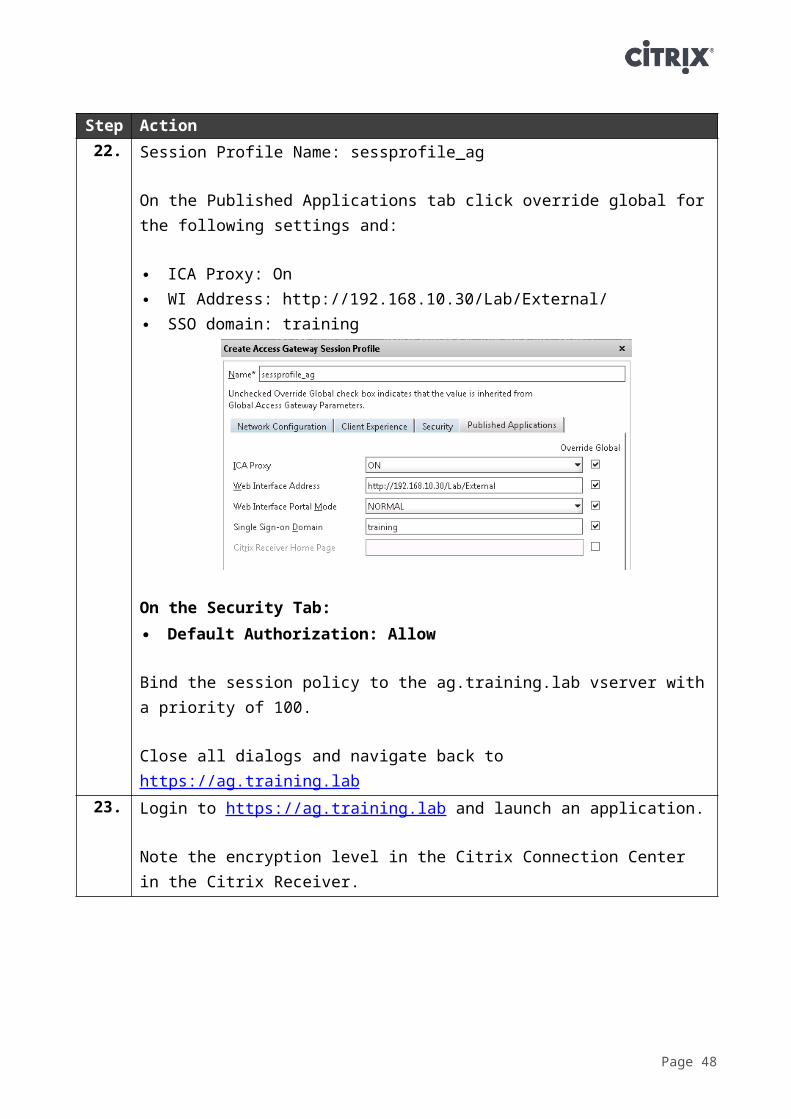
Step Action22. Session Profile Name: sessprofile_ag
On the Published Applications tab click override global for the following settings and:
ICA Proxy: On WI Address: http://192.168.10.30/Lab/External/ SSO domain: training
On the Security Tab: Default Authorization: Allow
Bind the session policy to the ag.training.lab vserver with a priority of 100.
Close all dialogs and navigate back to https://ag.training.lab23. Login to https://ag.training.lab and launch an application.
Note the encryption level in the Citrix Connection Center in the Citrix Receiver.
Page 44
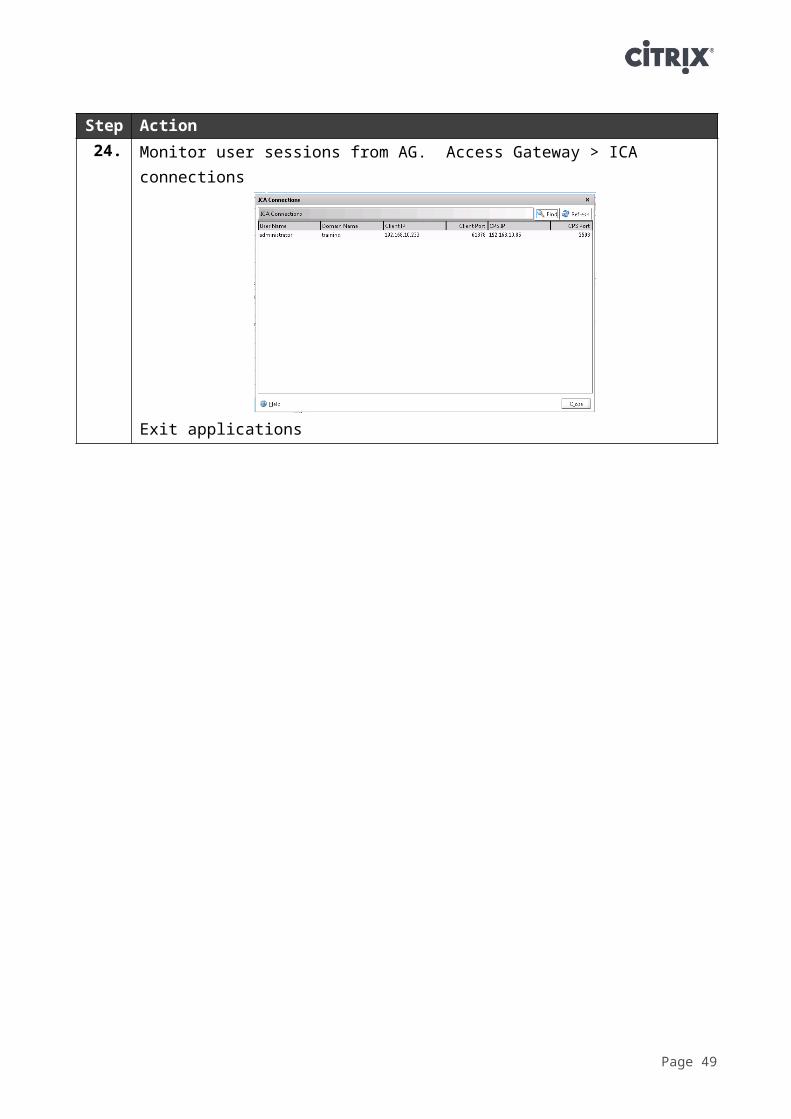
Step Action24. Monitor user sessions from AG. Access Gateway > ICA connections
Exit applications
Page 45
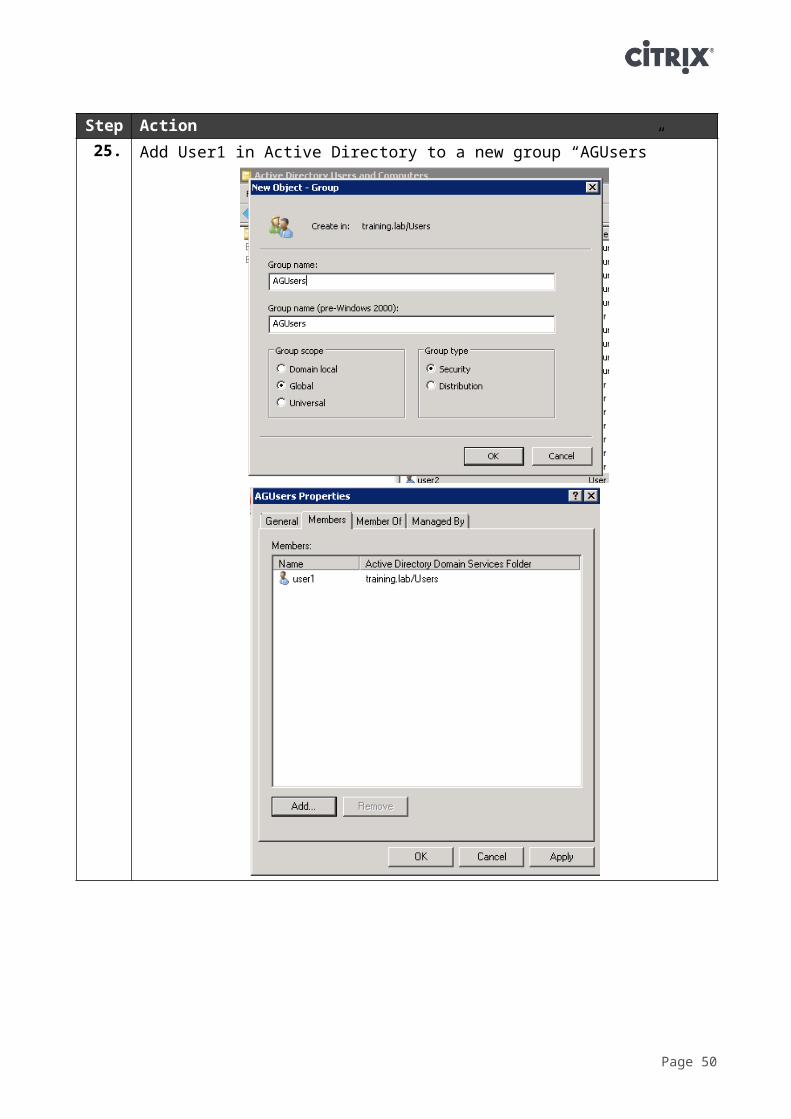
Step Action25. Add User1 in Active Directory to a new group “AGUsers”
Page 46
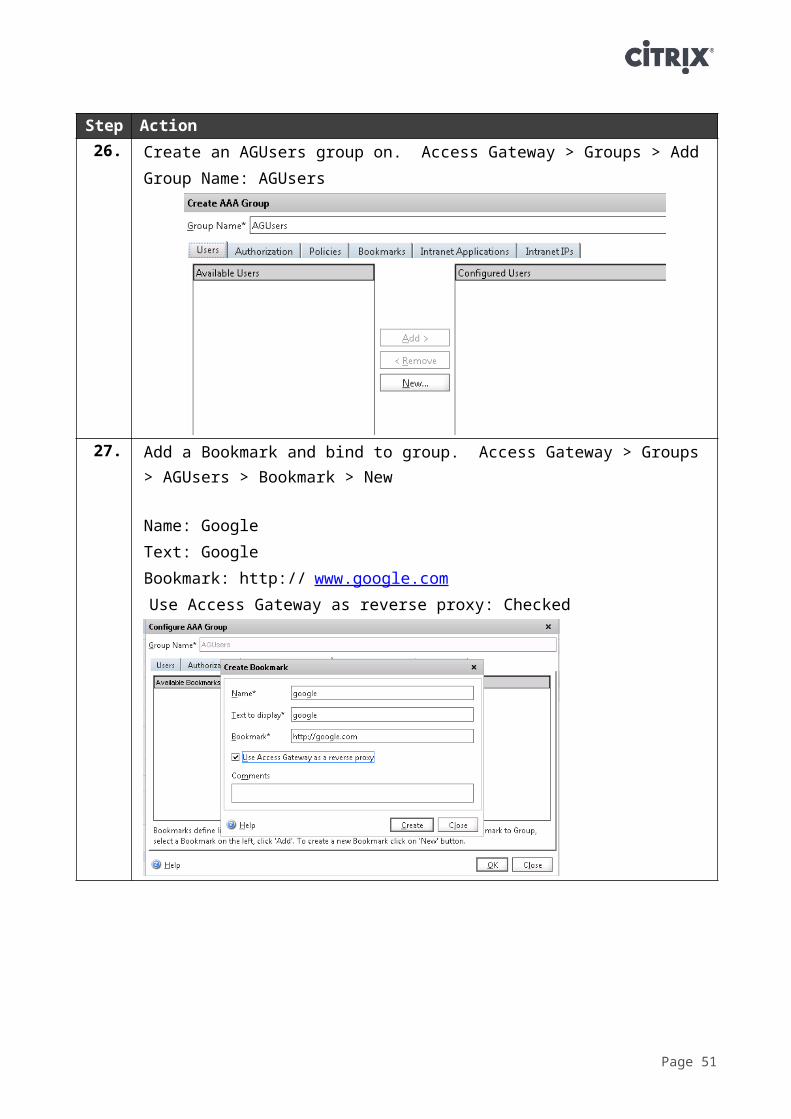
Step Action26. Create an AGUsers group on. Access Gateway > Groups > Add
Group Name: AGUsers
27. Add a Bookmark and bind to group. Access Gateway > Groups > AGUsers > Bookmark > New
Name: GoogleText: GoogleBookmark: http:// www.google.com Use Access Gateway as reverse proxy: Checked
Page 47
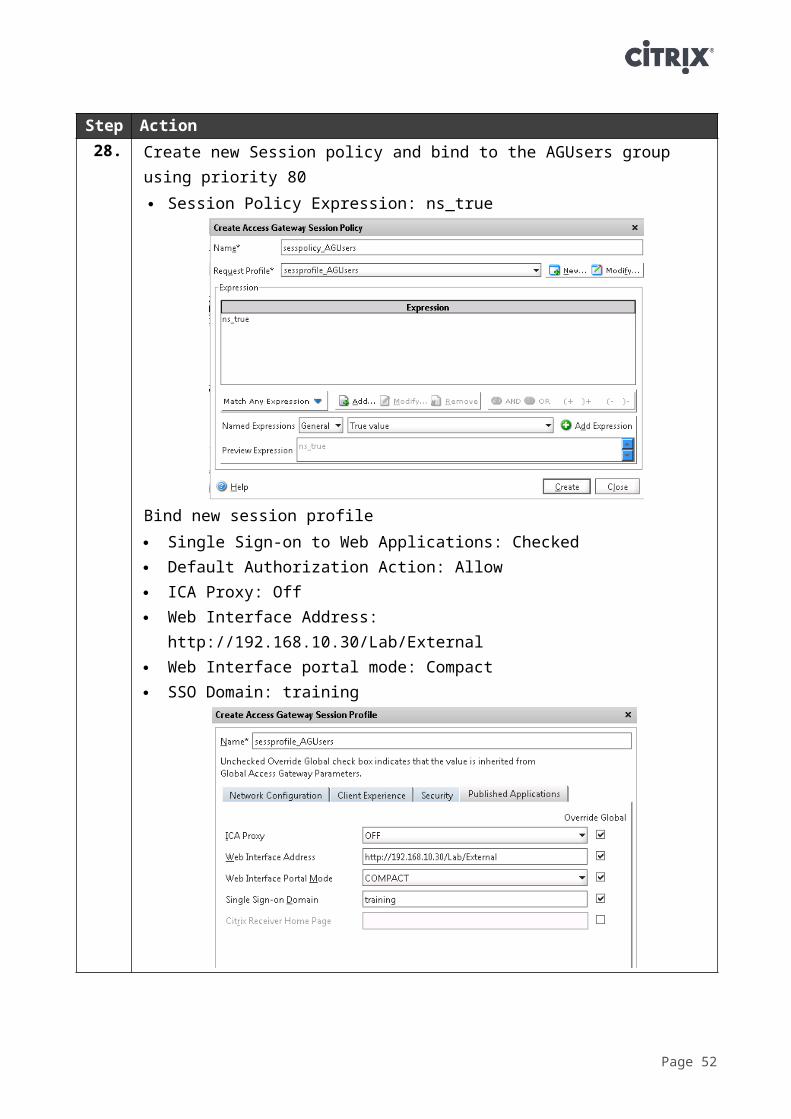
Step Action28. Create new Session policy and bind to the AGUsers group using
priority 80 Session Policy Expression: ns_true
Bind new session profile Single Sign-on to Web Applications: Checked Default Authorization Action: Allow ICA Proxy: Off Web Interface Address: http://192.168.10.30/Lab/External Web Interface portal mode: Compact SSO Domain: training
Page 48
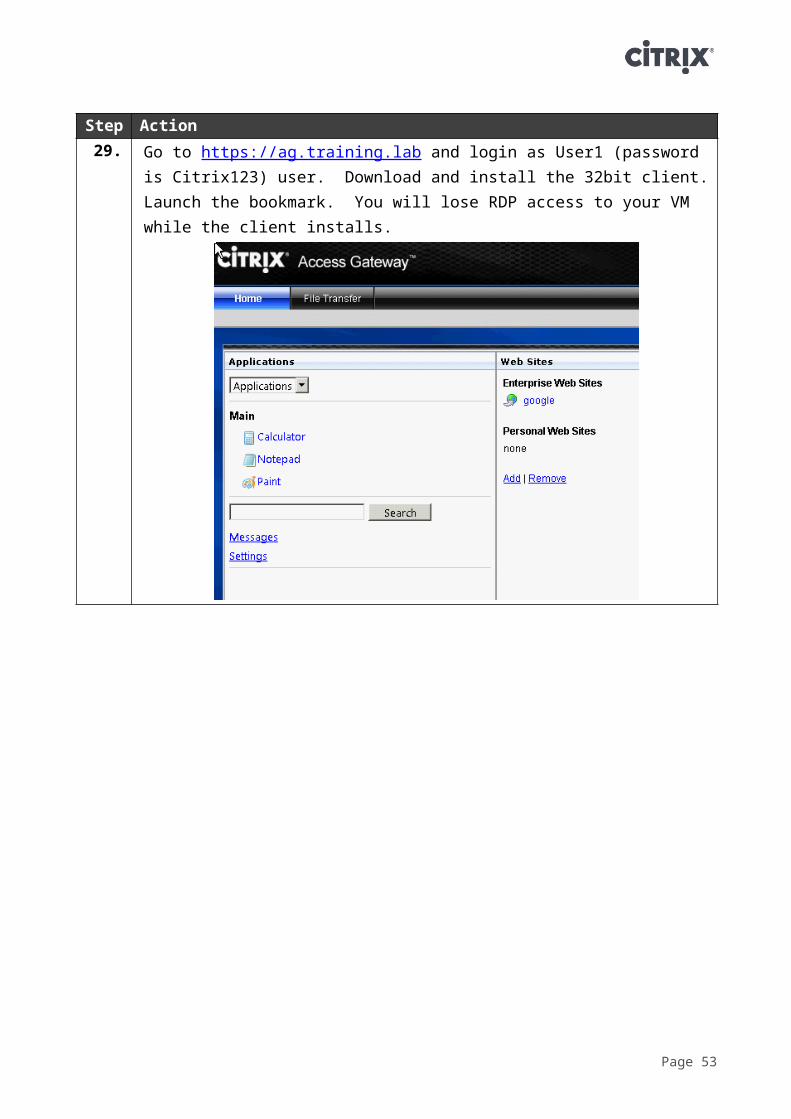
Step Action29. Go to https://ag.training.lab and login as User1 (password is
Citrix123) user. Download and install the 32bit client. Launch the bookmark. You will lose RDP access to your VM while the client installs.
Page 49
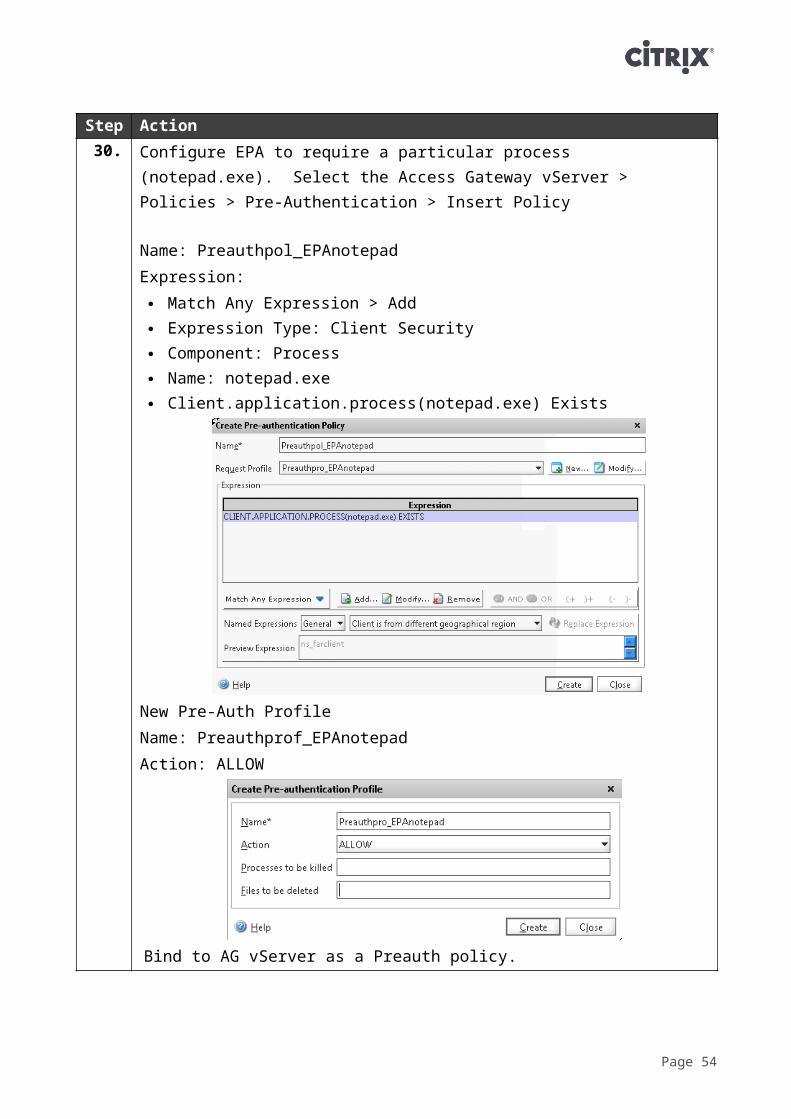
Step Action30. Configure EPA to require a particular process (notepad.exe). Select
the Access Gateway vServer > Policies > Pre-Authentication > Insert Policy
Name: Preauthpol_EPAnotepadExpression: Match Any Expression > Add Expression Type: Client Security Component: Process Name: notepad.exe Client.application.process(notepad.exe) Exists
New Pre-Auth ProfileName: Preauthprof_EPAnotepadAction: ALLOW
Bind to AG vServer as a Preauth policy.31. Navigate to the AG page, install EPA plug-in, and try logging with a
local notepad opened and not opened. Unbind the pre-authentication policy.To launch the LOCAL notepad Select the Star Menu > All Programs > Accessories > Notepad
Page 50
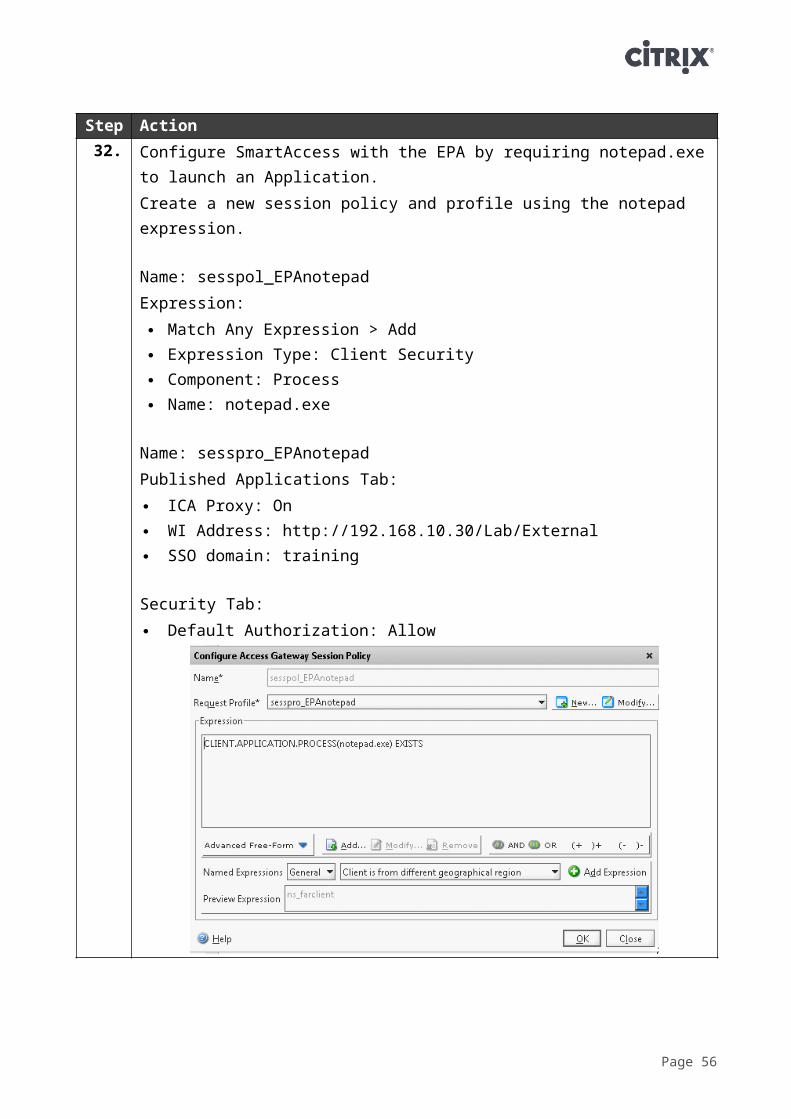
Step Action32. Configure SmartAccess with the EPA by requiring notepad.exe to
launch an Application.Create a new session policy and profile using the notepad expression.
Name: sesspol_EPAnotepadExpression: Match Any Expression > Add Expression Type: Client Security Component: Process Name: notepad.exe
Name: sesspro_EPAnotepadPublished Applications Tab: ICA Proxy: On WI Address: http://192.168.10.30/Lab/External SSO domain: training
Security Tab: Default Authorization: Allow
Page 51
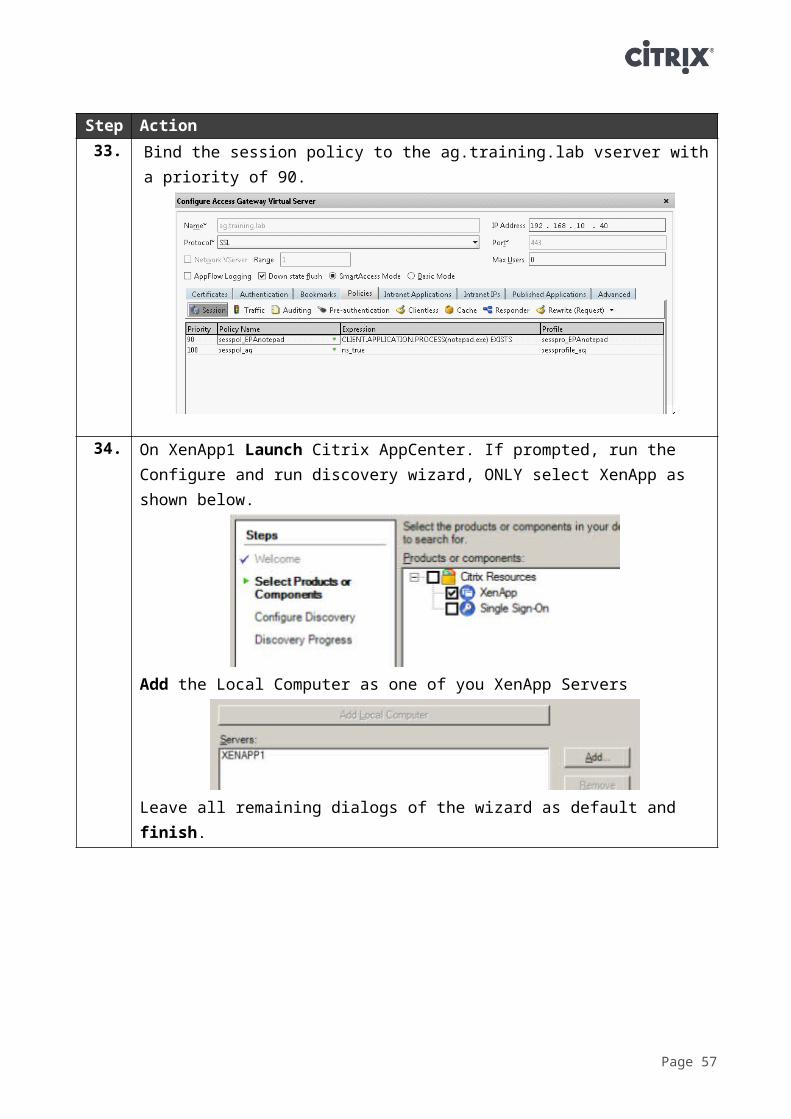
Step Action33. Bind the session policy to the ag.training.lab vserver with a priority
of 90.
34. On XenApp1 Launch Citrix AppCenter. If prompted, run the Configure and run discovery wizard, ONLY select XenApp as shown below.
Add the Local Computer as one of you XenApp Servers
Leave all remaining dialogs of the wizard as default and finish.
Page 52
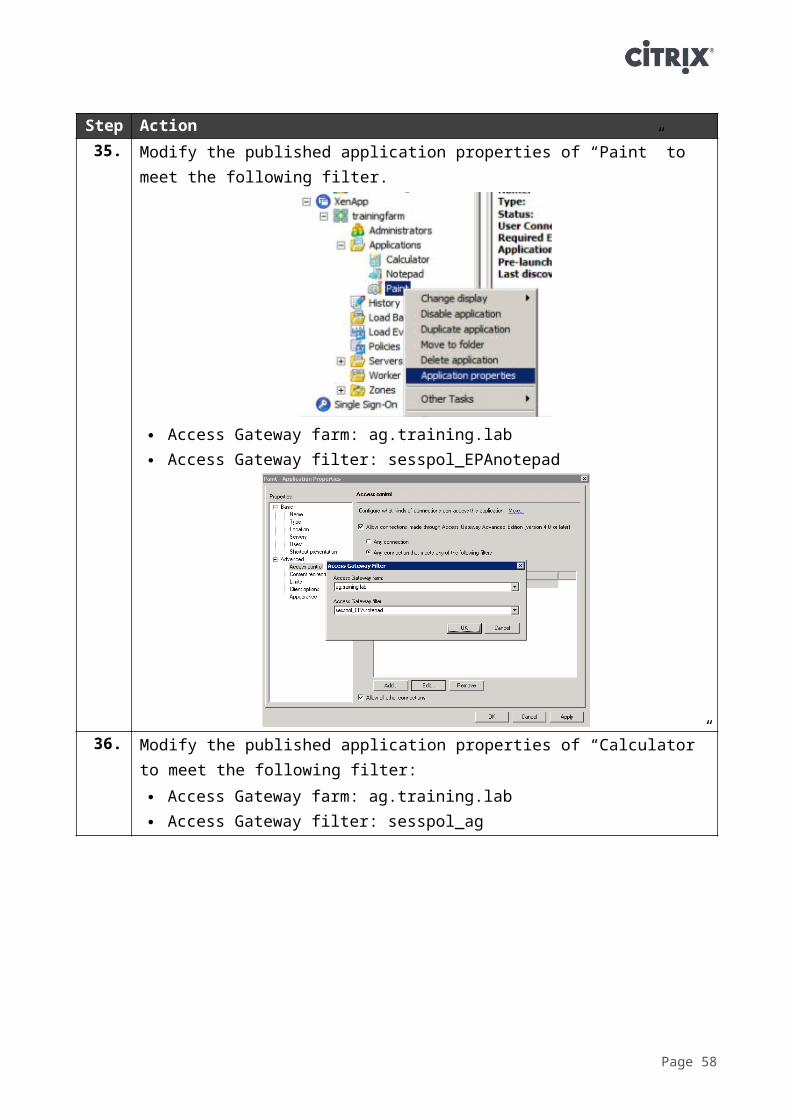
Step Action35. Modify the published application properties of “Paint” to meet the
following filter.
Access Gateway farm: ag.training.lab Access Gateway filter: sesspol_EPAnotepad
36. Modify the published application properties of “Calculator” to meet the following filter: Access Gateway farm: ag.training.lab Access Gateway filter: sesspol_ag
Page 53
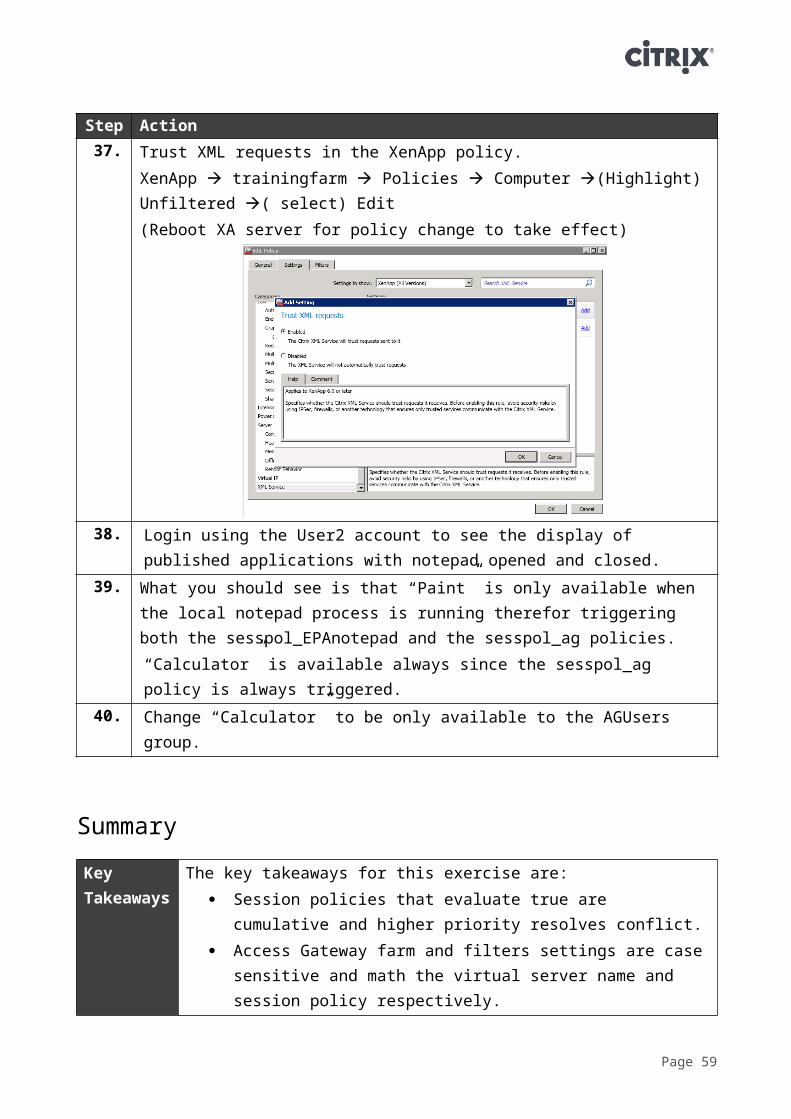
Step Action37. Trust XML requests in the XenApp policy.
XenApp trainingfarm Policies Computer (Highlight) Unfiltered ( select) Edit(Reboot XA server for policy change to take effect)
38. Login using the User2 account to see the display of published applications with notepad opened and closed.
39. What you should see is that “Paint” is only available when the local notepad process is running therefor triggering both the sesspol_EPAnotepad and the sesspol_ag policies.“Calculator” is available always since the sesspol_ag policy is always triggered.
40. Change “Calculator” to be only available to the AGUsers group.
Summary
Key Takeaways
The key takeaways for this exercise are: Session policies that evaluate true are cumulative and
higher priority resolves conflict. Access Gateway farm and filters settings are case
sensitive and math the virtual server name and session policy respectively.
Page 54
Page 55
Exercise 4: Web Interface on NetScaler – Time PermittingOverviewThe lab will explore the Web Interface on NetScaler in both direct and gateway direct modes.
Step by step guidanceEstimated time to complete this lab: 20 minutes.Step Action
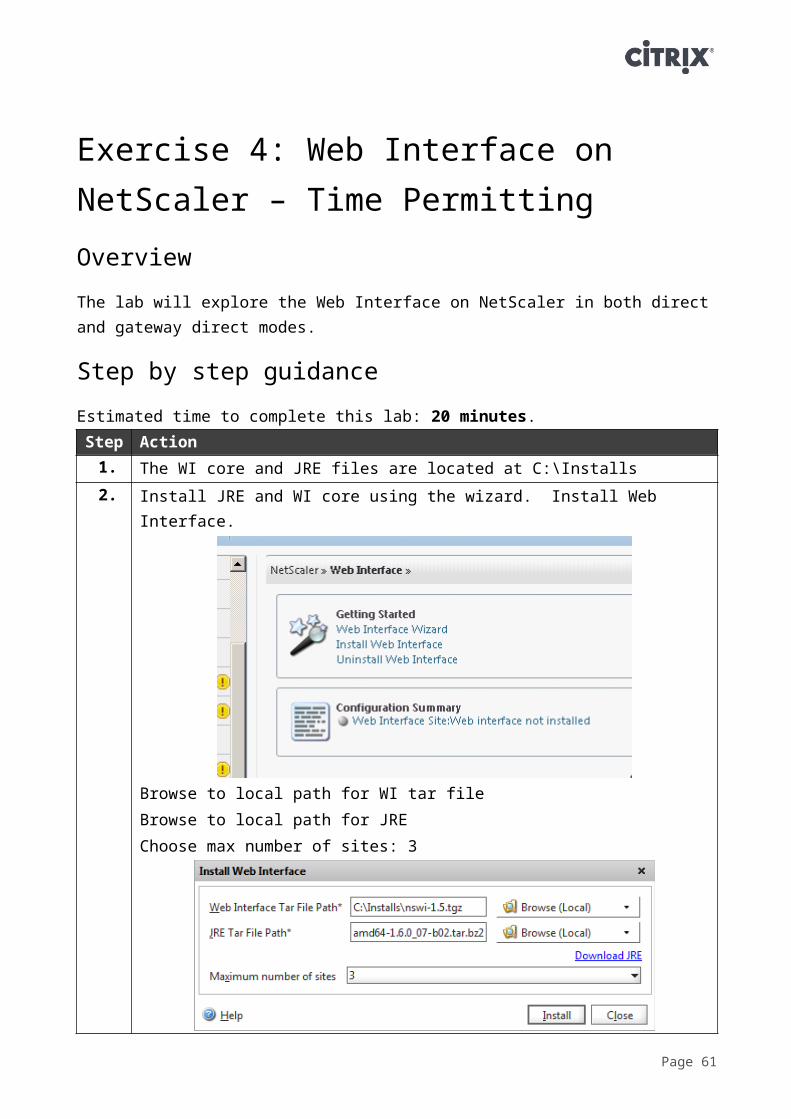
1. The WI core and JRE files are located at C:\Installs2. Install JRE and WI core using the wizard. Install Web Interface.
Browse to local path for WI tar fileBrowse to local path for JREChoose max number of sites: 3
Page 56
Step Action3. Configure Web Interface site using the Wizard. Web Interface > Web
Interface Wizard Site Type XenApp Web Site Site Path /Citrix/XenApp/ Enable access on through mobile receiver: checked Access Method: Direct Mode IP: 192.168.10.52
4. Configure XenDesktop and XenApp farm. Uncheck Load Balance. XD – 192.168.10.31 XA – 192.168.10.32
Page 57
Step Action5. Finish the wizard
Investigate the Load Balancing and Web Interface nodes.Investigate the WebInterface.conf (note no XML servers)Browse to http://192.168.10.52Browse to http://192.168.10.52/citrix/xenappBrowse to http://192.168.10.52/Citrix/XenApp
6. Configure WI to pre-populate the domain name (via WebInterface.conf DomainSelection=training
Page 58
Step Action7. Configure another Web Interface site. This site will be used with
Access Gateway. Site Type XenApp Web Site Site Path /Citrix/External/ Access Method: Gateway Direct Mode Authentication Point: Access Gateway Access Gateway Vserver: ag.training.lab Session Reliability: checked Enable access on through mobile receiver: checked
Access Gateway Vserver settings: Name: AG SSO domain: training SSO to Web: checked
Page 59

Step Action8. Configure XenDesktop and XenApp farm. Uncheck Load Balance.
XD – 192.168.10.31 XA – 192.168.10.32
9. Modify the ag.training.lab virtual server and move the new AG_WIpol policy to a higher priority (85) and log in as User2.
Summary
Key Takeaways
The key takeaways for this exercise are: Web Interface on NetScaler simplifies AGEE deployments
and reduces configuration errors with the Single Sign on Web Interface on NetScaler uses JSP code instead of ASP.
Please complete the survey
We value your feedback! Please take a moment to let us know about your self-paced lab experience by completing a brief survey on the web portal before you logout.
Page 60
Revision History
Revision
Change Description Updated By Date
1.0 Original Version WW Readiness June 2013
About Citrix
Citrix Systems, Inc. designs, develops and markets technology solutions that enable information technology (IT) services. The Enterprise division and the Online Services division constitute its two segments. Its revenues are derived from sales of Enterprise division products, which include its Desktop Solutions, Datacenter and Cloud Solutions, Cloud-based Data Solutions and related technical services and from its Online Services division's Web collaboration, remote access and support services. It markets and licenses its products directly to enterprise customers, over the Web, and through systems integrators (Sis) in addition to indirectly through value-added resellers (VARs), value-added distributors (VADs) and original equipment manufacturers (OEMs). In July 2012, the Company acquired Bytemobile, provider of data and video optimization solutions for mobile network operators.
http://www.citrix.com
© 2013 Citrix Systems, Inc. All rights reserved.
Page 61
Recommended