DIY Custom American Girl Doll ProstheticsCreated by Ruiz Brothers
Last updated on 2017-11-15 08:53:16 PM UTC
2344
555577
9999
10101112131414151516
Guide Contents
Guide ContentsOverview
PartsTools and Supplies
3D Printing3D Printed PartsSlicer SettingsCustomize The DesignFilament MaterialsLeft and Right limbs
AssembleBefore DisassemblyRemoving the headUntying arm cordsPrepping for leg removalStuffingUntie leg cordsSocket partsInsert inner socketAlign socketThread stringAttach legTie stringRe stuffing
© Adafruit Industries https://learn.adafruit.com/diy-custom-american-girl-doll-prosthetics Page 2 of 17

Overview
Bring joy to a child's heart by customizing thier doll to look just like them.
For this project, we wanted to avoid cutting any actual limbs and instead, completely replace them with entirely 3Dprinted ones. We 3D modeled the limbs inside of Autodesk Fusion 360, so it’s easy to modify the design based on thetype of amputee. We then 3D printed the design on our desktop 3D printers, but these could easily be sent to a 3dprinting service.
The tolerances for the sockets closely match the original limbs to the can hold poses to allow the doll to stand up orhold accessories.
Allowing a child to model and design their own doll can also help them realizing they can shape their own future.
© Adafruit Industries https://learn.adafruit.com/diy-custom-american-girl-doll-prosthetics Page 3 of 17

Parts
You can send the files to a 3D Printing service, but owning a 3D printer will make this project much more easier.
3D Printing FilamentElastic String or a piece of NinjaFlex
Tools and Supplies
3D PrinterFlat PliersTweezers
© Adafruit Industries https://learn.adafruit.com/diy-custom-american-girl-doll-prosthetics Page 4 of 17

3D Printing
3D Printed Parts
The limb sockets are held in place using a 17.5cm (7in.) piece of NinjaFlex, but you could also use elastic string.
Download STLs
https://adafru.it/oLB
Slicer Settings
To slice the strip part, we used Simplify3D. We recommend using the settings below or use them as reference. We 3Dprinted the part on a Ultimaker 2+ with a 6.mm nozzle. If you have Simplify3D, you can download our profiles below.
Printer Profiles
https://adafru.it/oHD
Customize The Design
It's easy to modify design based on the type of amputee.
The parts where modeled in Autodesk Fusion 360. The design is public and available to download in different formats.If you'd like to use a different CAD software package, you are free to import the files and remix them.
Edit Leg Design
https://adafru.it/oLf
Edit Arm Design
© Adafruit Industries https://learn.adafruit.com/diy-custom-american-girl-doll-prosthetics Page 5 of 17

https://adafru.it/oLA
Doll-Arm.stl
Doll-Leg.stl
Doll-Disc.stl
245c extruder
50mm/s print speed
120mm/s travel speed
0.6mm Nozzle
.72mm Extrusion width
Arm Brim + supports
Skirt Offset from part:
0mm
Skirt Outlines: 6
Skirt Layers: 1
Support Pillar Resolution: 8mm
To speed up printing we used a .6mm nozzle.
The arm requires custom supports added to the
bottom of the arm's stocket.
Follow the picture below for reference.
The leg doesn't need any supports
© Adafruit Industries https://learn.adafruit.com/diy-custom-american-girl-doll-prosthetics Page 6 of 17

Filament Materials
We recommend using PLA material to reduce wrapping while 3D printing. The parts can be printed in different types offilament, such as ABS, PET or Nylon.
Left and Right limbs
You can easily adjust the arms and legs for left or right by mirroring the mesh on the X axis.
© Adafruit Industries https://learn.adafruit.com/diy-custom-american-girl-doll-prosthetics Page 7 of 17

© Adafruit Industries https://learn.adafruit.com/diy-custom-american-girl-doll-prosthetics Page 8 of 17

Assemble
Before Disassembly
If you are working with a brand new doll, make sure not to remove the hair net that it comes with. This will make working with the head alot easier. The hair can easily get caught on the cloths velcro strips, so becareful not to get it tangled.
Removing the head
The head is held in place by a piece of string tied around the neck. You can loosen the string by wedging a tweezerbetween the knot and carfully pushing the tweezer through until the knot becomes loose.
Untying arm cords
You can skip this step if only need to modify the legs.
© Adafruit Industries https://learn.adafruit.com/diy-custom-american-girl-doll-prosthetics Page 9 of 17

The arms are held in place by a knot on an elastic cord. Use a pair of flat pliers to grip and pull the string until you cansee the knot. Use the same technique with the tweezers and wedge them between the knot until you canunfasten the cord.
Prepping for leg removal
Modifying the legs requires making room in the body
cavity so we can get to the legs elastic cords.
Stuffing
We recommend using a bag to store the stuffing while
working as it will puff up quite a bit once you remove it
from the doll. Remove a enough stuffing until you can
easily reach the legs elastic cord.
© Adafruit Industries https://learn.adafruit.com/diy-custom-american-girl-doll-prosthetics Page 10 of 17
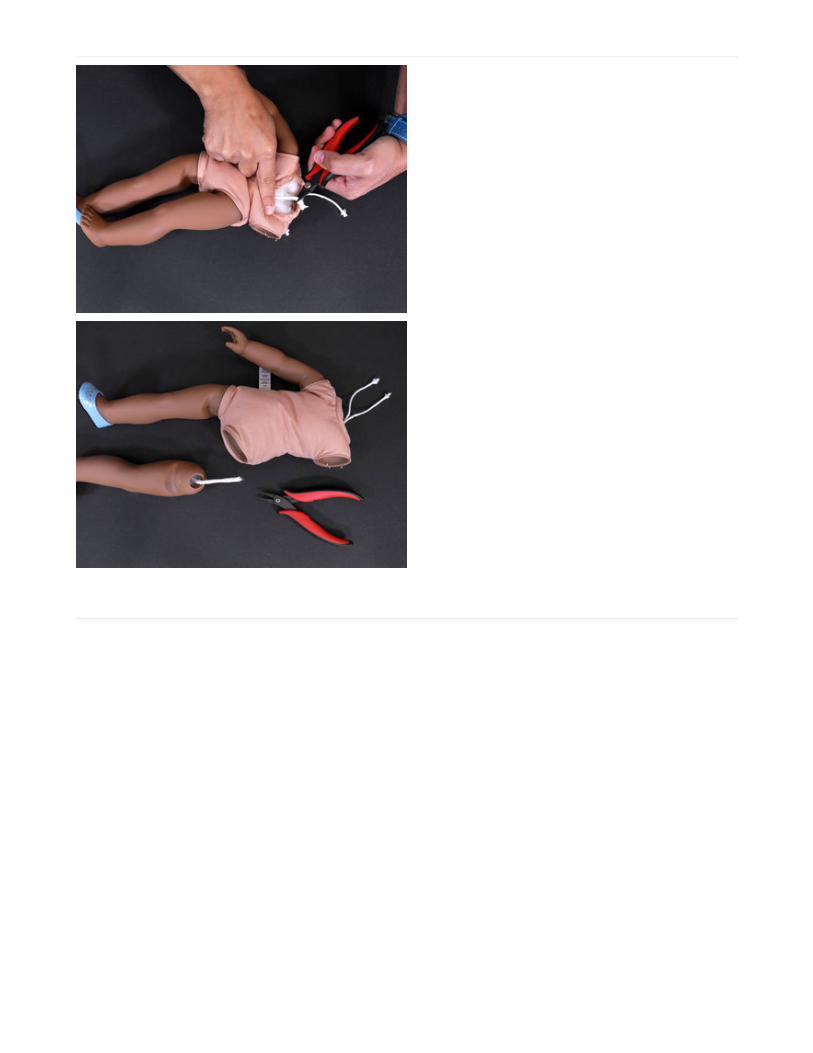
Untie leg cords
Use the flat pliers to grip the elastic cord and tweezers
to unwedge the knot.
© Adafruit Industries https://learn.adafruit.com/diy-custom-american-girl-doll-prosthetics Page 11 of 17

Socket partsWe'll need longer elastic cords to hold the
printed prosthetics to the body. You can cut a new
piece of cord or you can use a piece of NinjaFlex.
The new cord length needs to be at least 17.5cm long.
The inner sockets that hold the limbs together can't be
removed from the original arms and legs.
Use NinjaFlex or any TPU material to print the socket.stl
part. Assemble the cord and inner socket part as shown.
You can actually use brass ferrules to secure the elastic
string in place. A number of collectors swear by that,
and it's what AG used prior to just knotting them as a
cost-cutting measure.
Make sure the knot on the new cord is as close to the end as it can be.
Thread the cord through the inner socket.
If the hole on the socket is tight, use flat pliers to poke through one end of the socket hole, grab the cord from the other side and pull the cord through the hole.
© Adafruit Industries https://learn.adafruit.com/diy-custom-american-girl-doll-prosthetics Page 12 of 17

Insert inner socket
Bend the assembled socket and insert it into the limb as shown.
© Adafruit Industries https://learn.adafruit.com/diy-custom-american-girl-doll-prosthetics Page 13 of 17

Align socket
The inner socket inside the body needs to be aligned so
the cord can thread through the two holes.
Thread string Push the cord through the socket and inner socket.
© Adafruit Industries https://learn.adafruit.com/diy-custom-american-girl-doll-prosthetics Page 14 of 17

Attach leg
Make a loose knot so it can be pushed down towards
the inner socket.
Tie string
Push the knot toward the inner socket and move the
limb around until the knot is taut enough to allow the
limb's position to stay in place.
If you leave the knots loose the doll won't be able to
keep a pose.
Don't re stuff the doll until the knots can completely hold the limbs in a pose. Limbs should be able to hold a posewithout flopping over.
© Adafruit Industries https://learn.adafruit.com/diy-custom-american-girl-doll-prosthetics Page 15 of 17

Re stuffing
Once the limbs can hold a pose without flopping over, your ready to add the suffing back. Make sure to evenly add the stuffing by packing it all around the body.
And that's it! You are ready to repackage and gift a uniquine, one of a kind doll!
© Adafruit Industries https://learn.adafruit.com/diy-custom-american-girl-doll-prosthetics Page 16 of 17
Recommended