Cross-Network Cold Chain Guidelines
ColdChainGuidelines_v1.0_2018-04-26 Page 1 of 16
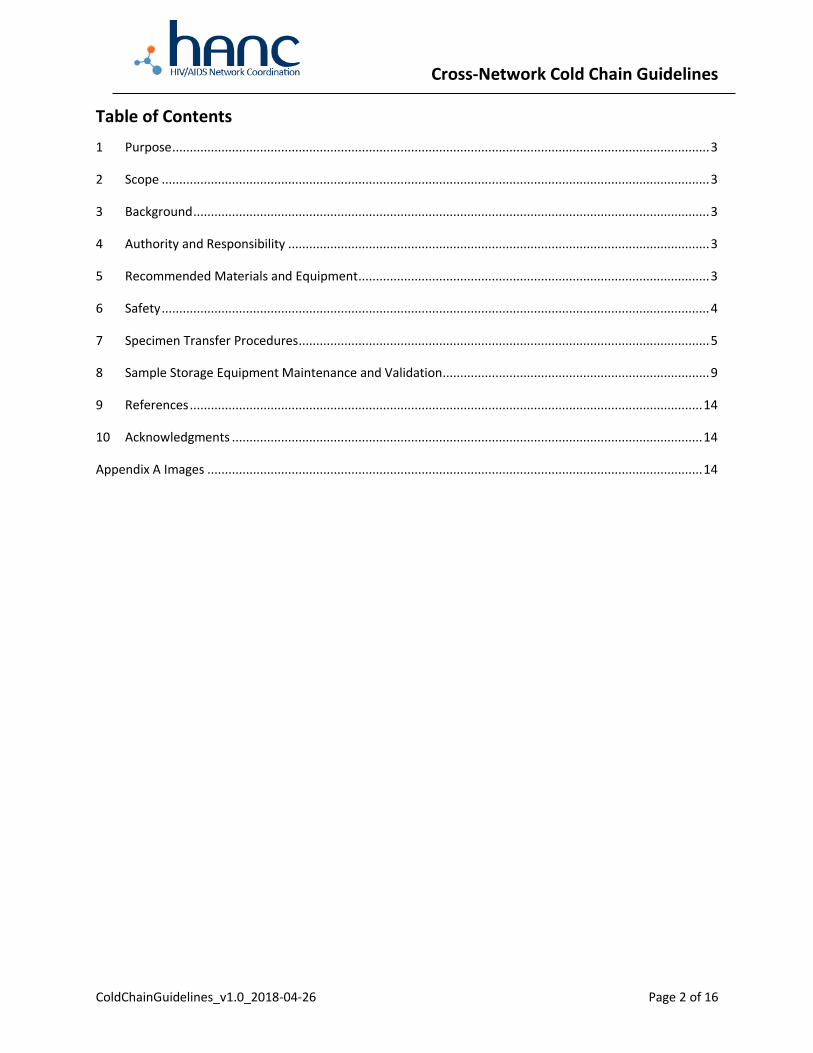
Title: Cross-Network Cold Chain Guidelines
Origination Date: 16 March 2018 Total Pages: 16
Effective Date: 26 April 2018 Version #: 1.0
Written By: Cross Network Cold Chain Guidelines
Working Group
Supersedes
Guidelines Dated: n/a
Approved By
(Network):
Network Name, Title Signature Date
ACTG /
IMPAACT
Grace Aldrovandi, MD
ACTG / IMPAACT Network
Laboratory Principal Investigator
Apr 2,
2018
HPTN
Estelle Piwowar-Manning,
MT(ASCP)SI
HPTN Network Laboratory
Deputy Director
Mar 27,
2018
HVTN
John Hural, PhD
HVTN Associate Director for
Laboratory Operations
Apr 23,
2018
MTN
Edward Livant
MTN Network Laboratory
Research Manager
Mar 26,
2018
Reviewed By
(Laboratory):
Name, Title Signature Date
Cross-Network Cold Chain Guidelines
ColdChainGuidelines_v1.0_2018-04-26 Page 2 of 16
Table of Contents
1 Purpose ......................................................................................................................................................... 3
2 Scope ............................................................................................................................................................ 3
3 Background ................................................................................................................................................... 3
4 Authority and Responsibility ........................................................................................................................ 3
5 Recommended Materials and Equipment .................................................................................................... 3
6 Safety ............................................................................................................................................................ 4
7 Specimen Transfer Procedures ..................................................................................................................... 5
8 Sample Storage Equipment Maintenance and Validation ............................................................................ 9
9 References .................................................................................................................................................. 14
10 Acknowledgments ...................................................................................................................................... 14
Appendix A Images ............................................................................................................................................. 14

Cross-Network Cold Chain Guidelines
ColdChainGuidelines_v1.0_2018-04-26 Page 3 of 16
1 Purpose
This document describes guidelines for utilizing and maintaining optimal cold chain temperature of
specimens during the retrieval process within the laboratory or upon shipment to an external
laboratory/repository. These guidelines are meant to supplement the Cross-Network Peripheral Blood
Mononuclear Cell (PBMC) Processing Standard Operating Procedure (SOP).
2 Scope
This document is intended to be used by all HIV/AIDS clinical trials networks of the National Institute of
Allergy and Infectious Diseases (NIAID). Network protocol-specific instructions supersede those
present in this guidelines document.
3 Background
The integrity of specimens before, during, and after transit plays a pivotal role in ensuring the validity
of results obtained in network studies. Deviations from specified temperature ranges and conditions
during storage and transportation of specimens leads to reduced clinical benefits. To sustain the
integrity and long-term viability of network specimens, the required cold chain temperature must be
maintained at all times.
4 Authority and Responsibility
4.1 The Network Laboratory Center Directors (or his/her designee), in conjunction with the
Network Transformative Science Groups, have the authority to establish, review and update
these guidelines.
4.2 The Cross-Network Laboratory Focus Group (LFG) is responsible for the maintenance and
control of these guidelines.
4.3 The site-affiliated Laboratory Director is responsible for the implementation of these
guidelines or a laboratory-specific SOP, and for ensuring that all appropriate personnel are
trained. A laboratory SOP must:
4.3.1 Include, without procedural modification, portions of the current version of the
LFG guidelines that are used within the network site-affiliated laboratory.
4.3.2 Reference the current version of the Cross-Network Cold Chain Guidelines.
4.4 All laboratory technicians are responsible for reading this document prior to performing
the specimen processing procedures described herein.
4.5 The site Principal Investigator (PI) (or his/her designee) is ultimately responsible for reading
and ensuring adherence to the participant preparation and specimen collection components
described herein.
5 Recommended Materials and Equipment
5.1 Thermometer
5.2 Shipper Boxes
5.3 Dry Ice–see picture in Appendix A
5.4 Liquid nitrogen (LN2)
Cross-Network Cold Chain Guidelines
ColdChainGuidelines_v1.0_2018-04-26 Page 4 of 16
5.5 Absorbent Lining Material
5.6 Rectangular insulated lab pans (-196 to 93oC)
5.6.1 4L (13x10x5.1 in) Bel Art Cat # M188484101 Fischer Scientific 11-676-38A
5.6.2 9L (16x13x5.1) Bel Art Cat # M188489101 Fischer Scientific 11-675-
123
5.7 Data Logger- ElPro Cat # LIBERO Te1-PY
5.8 Dewar with Cork Cover – Manufacturer: MVE
5.9 Stainless Steel Canister with pressure relief valve- Manufacturer: MVE
5.10 Plastic Shipping container (mushroom)- Manufacturer: MVE
5.11 Thermocouple
5.12 Industrial Scale
5.13 LN2 Manifold dispersion system- Manufacturer: MVE
5.14 Cryo-Cart or other approved basin for decanting the charged dewars- - Manufacturer: MVE
6 Safety
6.1 Personal Protective Equipment (PPE)
Recommended Vendor/ Manufacturer
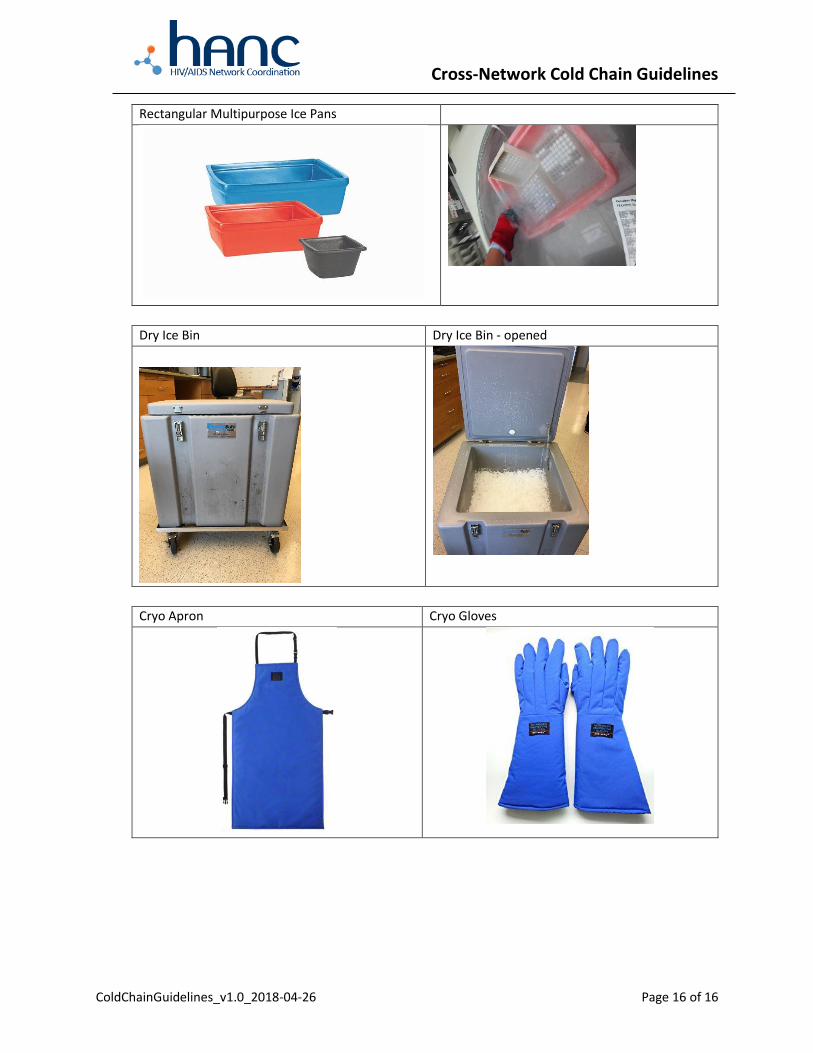
Cryo Apron Cole Parmer Cat # UX-09113-36 See photo in Appendix A
Cryo Gloves Cole Parmer Cat # UX-09113-04 See photo in Appendix A
Face Shield
O2 Sensors/
Monitors
Cross-Network Cold Chain Guidelines
ColdChainGuidelines_v1.0_2018-04-26 Page 5 of 16
6.2 LN2 Handling
6.2.1 Avoid LN2 build up. Anywhere LN2 is used must be well ventilated since nitrogen gas
can deplete oxygen in a poorly ventilated room and lead to asphyxiation (small
volumes of LN2 convert to large volumes of nitrogen gas).
6.2.2 When dispensing, or potentially being exposed to LN2, protect face with a shield and
wear cryo-gloves (designed for working in ultra-cold temperatures), and a protective
apron (gown) in addition to standard personal protective equipment. Prevent spillage
into shoes and unprotected parts of the body. Cuffed pants are not permitted when
working with LN2 since the cuffs can collect LN2.
6.2.3 Handle vessels containing LN2 carefully; it can cause severe frostbite.
6.2.4 In case of LN2 exposure, seek medical attention.
6.2.5 While working with LN2, work in teams of two when possible.
6.2.6 Shippers must be certified for IATA shipper training.
6.2.7 After removing canister from the cryogenic vessel, always release pressure inside
container by lifting up the handle of relief valve.
6.2.8 Be sure to seal the lid of the canister using the provided screws, before shipping.
6.2.9 Remove the canister when filling the dewar with LN2.
6.2.10 Do not place dry ice or liquid nitrogen into the canister or dewar.
6.3 Biohazardous Materials
6.3.1 Treat all human-derived specimens as infectious, using standard/universal
precautions.
7 Specimen Transfer Procedures
Maintaining Proper Temperature during the transfer and manipulation of samples is imperative for
specimen integrity. The following procedures are simple effective methods for avoiding specimen
exposure to temperatures above the recommended storage conditions. This may be employed when
transferring into or from a new or partially filled freezer box or controlled-rate freezing device. The
specimen types for which these transfer procedures apply may include, but is not limited to, PBMC,
serum, plasma, urine or sputum samples.
Note: Every effort should be made to protect the specimen from exposure to temperature variation for
even a short period of time.
7.1 Transfer of ambient / room temperature specimens to refrigerated shippers or containers
(Refer to network-specific instructions or protocols).
7.2 Dry Ice transfer from Controlled Rate Freezer to Freezer Box (-20oC or -80oC)
7.2.1 Prepare Transfer pan and Tall-Sided Cooler.
Select containers appropriate for dry ice transfer. Tall-sided cooler should have a
minimum depth of 8” and have a tightly closing lid.
7.2.2 Add dry Ice to your transfer pan and tall- sided cooler to a minimum depth of 1.5”
such that it covers the bottom and sides of the transfer pan.
Cross-Network Cold Chain Guidelines
ColdChainGuidelines_v1.0_2018-04-26 Page 6 of 16
Insert Inverted Lid to Freezer box and add more dry ice.
Place the upside-down lid of a sample freezer box on the dry ice bed in the
cooler and add more dry ice to pile around the sides of the lid.
Keep the freezer box receiving the transferred specimens in the freezer.
Close the cooler lid, making sure it fits well, for a minimum of 15 minutes.
7.2.3 Position this next to the cooler which will receive the transferred specimens.
Nestle the Stratacooler®, Cool Cell or Mr. Frosty in the transfer pan, adding
more dry ice around the sides.
Position this next to the cooler which will receive the transferred
specimens.
With minimal disturbance to the vapor layer, open the cooler and insert
the specimen freezer box.
7.2.4 Quickly transfer specimens using forceps.
Check the storage box report lifting a specimen out of the controlled rate
freezer box such as Stratacooler®.
Hold specimen with forceps on the dry ice (not in the air) while checking
the label.
Place quickly into position in the specimen freezer box.
When transfer is complete, use the cooler to transport the freezer box
back to the freezer.
Place the box into the freezer and replace the box lid.
Note: All effort should be made to protect specimen vials from exposure to
even brief temperature variations.
7.3 Specimen Transfer from Freezer (-20oC or -80oC TO Dry Ice Shipper)
7.3.1 Have available a dry ice container/bin filled with sufficient dry ice.
Note: if shipping PBMCs, pre-chill the shipping box by adding dry ice for at least 30
minutes prior to adding the freezer box of PBMC aliquots.
Remove the freezer box from the -20oC or -80oC freezer and bury in the
dry ice.
If you are using a barcode scanner, place it on the barcode scanner rack
on top of the dry ice (in vapor phase).
7.3.2 With the barcode scanner, QC the aliquots by scanning each aliquot into the QC
module of the LDMS shipping module. Otherwise, use a manual entry system to
record each aliquot into the QC module.
7.3.3 In the vapor phase, place two rubber bands around each freezer box to hold the
absorbent material in place (STP 150).
7.3.4 Place freezer box into the plastic biohazard bag (STP 710) then into the Tyvek bag
(STP 711).
7.3.5 If shipping in an STP 320, place the freezer box into the brown inner cardboard
box. A maximum of three freezer boxes can go in an STP 320.
Cross-Network Cold Chain Guidelines
ColdChainGuidelines_v1.0_2018-04-26 Page 7 of 16
Fold the flaps of the brown inner cardboard box.
Fill the shipping box with dry ice.
Put the Styrofoam lid on the shipping box.
Place the paperwork into a plastic Ziploc bag and place on top of the
Styrofoam lid.
Close and tape the outer flaps of the shipping box
7.4 Specimen Transfer from Freezer (-20oC or -80oC) to Liquid Nitrogen Dewar
7.4.1 Prepare Transfer pan
Select containers appropriate for liquid nitrogen transfer pan. Use an
insulated ice pan such as the BioCision™ Rectangular Multipurpose Ice
Pans that can withstand liquid nitrogen temperatures of -196oC.
Place a 2 inch (5cm) layer of absorbent material in the bottom of the
pan. Soak the absorbent material with liquid nitrogen and allow the
liquid nitrogen to absorb into the pad. Repeat until there is a 5 inch
(2.5cm) layer of liquid nitrogen in the pan above the absorbent pad. Add
dry ice to your transfer pan and tall- sided cooler to a minimum depth of
1.5”.
Place the upside-down lid of a sample freezer box on the liquid nitrogen
absorbent soaked bed in the pan next to the liquid nitrogen freezer box
receiving the samples.
Keep the freezer box receiving the transferred specimens in the pan with
the liquid nitrogen soaked pan. If possible, place the pan with the both
boxes in the liquid nitrogen absorbent pan in the vapor phase of the
liquid nitrogen freezer.
7.4.2 Quickly transfer specimens using forceps
Hold specimen with forceps on the dry ice (not in the air) while
checking the label.
Place quickly into position in the specimen freezer box.
When transfer is complete, use the liquid nitrogen absorbent soaked pan
to transport the freezer box back to the freezer.
Place the box into the freezer and replace the box lid.
7.5 Specimen Transfer from Liquid Nitrogen Storage to LN2 Shipper
7.5.1 Insulated LN2 Cryogenic Transfer Pan
Cut the absorbent material into pieces that fit the transfer pan.
Roll the pieces from either width wise or length wise into tight bundles.
Hold each bundle together using a rubber band at each end of the
bundle.
Place the bundle in the insulated pan (either length wise or width wise
depending on how it was rolled).
Repeat this process until the bottom of the pan is completely dined with
Cross-Network Cold Chain Guidelines
ColdChainGuidelines_v1.0_2018-04-26 Page 8 of 16
rolls of absorbent material. Create more bundles to line the inside walls
of the pans.
Cut a sheet from the absorbent roll to use as a cover for the insulated
lined pan.
The pan is now ready to be filled with LN2.
Attach the hose/phase separator to the LN2 tank and fill the pan to the
top of the rolls lining the bottom of the pan and use the single sheet to
cover the pan. The pan can now be used to transfer specimens without
causing thawing of the cryovials.
Depending on the length of transfer, the temperature of the interior of
the pan should be taken every minute to ensure adequate freezing
range.
Visually: if frost begins to form on the surface of the rolls, the pan is
becoming too warm and more nitrogen should be added.
7.5.2 Specimen transfer using CryoCart
To begin preparation for cryo vial transfer from the LN2 freezer to the
CryoCart, the cart should be filled to a minimum of two inches with
liquid nitrogen prior to use. This procedure is done beforehand to allow
the temperature within the cart to stabilize. It is recommended that the
CryoCart be filled at least 15 minutes prior to use.
Always wear proper cryo attire, cryo gloves, eye protection/face shield,
and cryo apron.
Attach one end of the steel transfer hose to a filled LN2 tank liquid valve.
Connect the steel transfer hose to the LN2 fill connection port on the
MVE CryoCart. Make sure that the fill valve handle is in the horizontal
(off) position before opening the LN2 tank valve.
Connect the steel transfer hose to the LN2 fill connection port on the
MVE CryoCart. Make sure that the fill valve handle is in the horizontal
(off) position before opening the LN2 tank valve.
Before filling or refilling the MVE CryoCart at room temperature, make
sure that at least one of the 2 lids has been removed.
To begin filling the cart, first open the LN2 tank valve.
Next turn the fill valves handle 90 degrees down to the vertical (on)
position.
Allow the CryoCart to fill with LN2 to approximately 1.0 to 2.0 inches.
Use the rubber meter stick to check the LN2 level, if needed.
To get a temperature reading, use the CryoCart attached digital
thermocouple.
Once the desired LN2 and temperature levels have been met, turn the
fill valve handle on the CryoCart back to the horizontal OFF position.
Turn the LN2 tank valve to the OFF position.
Cross-Network Cold Chain Guidelines
ColdChainGuidelines_v1.0_2018-04-26 Page 9 of 16
Replace the lid on the CryoCart. It is best to leave the cover lid on when
not in use to maintain temperature and also when unit is in storage.
Never move the CryoCart around without the lids. This is to avoid LN2
splashes.
Before using CryoCart, assure that it is at the desired temperature, for
example at -90°C or less.
If temperature is not meet, follow refer to section 6.0 to refill LN2 level.
Before using CryoCart, record temperature read out on CryoCart
Temperature chart .
At the end of using the CryoCart, indicate temperature on CryoCart
Temperature chart.
Record any corrective action located behind the temperature log.
7.6 Refer to Network Specific procedures for shipping and storage conditions.
8 Sample Storage Equipment Maintenance and Validation
Refer to manufacturers’ manual or guidelines for equipment setup, operation, maintenance schedules
and troubleshooting information. Refer to LDMS guidelines (https://www.ldms.org/) for mapping
freezer inventory in the LDMS.
8.1 Refrigerators and Freezer (Refer to DAIDS GCLP Guidelines):
8.1.1 Establish a written policy on how temperatures are monitored, including times
during absence of staff (e.g. nights and weekends), acceptable temperature
ranges, and instructions for what to do in the event of failure.
Establish tolerance limits (e.g. 5°C±3°C, -20°C±5°C, -70°C±10°C).
Maintain daily (minimum) temperatures and/or liquid nitrogen levels as
appropriate.
Maintain appropriate documentation of corrective action for equipment
failure and for out-of-range temperatures.
8.1.2 Adhere to daily, weekly and/or monthly maintenance schedules
Keep the equipment clean and void dust, dirt and ice buildup which can
affect functionality.
Monitor door seals and lid seals for breaks and cracks which can affect
functionality.
8.1.3 Store equipment in a well ventilated facility that has back-up power and
controlled room temperature (whenever possible).
Liquid nitrogen can displace oxygen and oxygen content should be
monitored if the facility is not well ventilated.
Maintain records to verify that back-up generators are in place,
operational and properly maintained.
8.2 LN2 Shippers-Validation
Cross-Network Cold Chain Guidelines
ColdChainGuidelines_v1.0_2018-04-26 Page 10 of 16
8.2.1 3 Day QC Procedure and Charging of LN2 Shipper for Domestic Shipments
DAY 1
Remove the dewar from mushroom-shaped shipping container.
Remove the cork/cover and enclosed steel canister/secondary container from the dewar.
Weigh the empty dewar [Wempty] and record the weight on the IVQAC LN2 Dry shipper Domestic QC Form (Attachment #1). Be sure to replace the cork/cover while weighing the unit.
Fill the unit with LN2 to its maximum capacity (to the bottom of the neck). Do this using the IVQAC LN2 system:
Place the dewar in the LN2 overflow tray.
Place the LN2 hose inside the dewar.
Turn the wall mounted valve counter-clockwise to allow the flow LN2 into the dewar.
Do not overfill the dewar as this will cause a vacuum failure.
If the IVQAC LN2 system is down, use a LN2 tank to charge the dewar:
9.2.1.4.5.1 Place the dewar in the LN2 overflow tray.
9.2.1.4.5.2 Place the LN2 hose inside the dewar and confirm the hose is connected to the liquid LN2 input on the LN2 tank.
8.2.1.4.1.3 Turn the LN2 valve knob counter-clockwise to allow the flow LN2 into the dewar.
8.2.1.4.1.4 Do not overfill the dewar as this will cause a vacuum failure.
Replace the cork cover and let the dewar stand for approximately 2 hours. After approximately 2 hours, refill the dewar as outlined in section 10.5.1.4.
Replace the cork/cover and allow the dewar to stand overnight. This is a cool down period allowing the unit to charge and the LN2 to reach a constant boil-off. Be sure to move the dewar away from any intake vents.
DAY 2
Weigh the unit, keeping the cork/cover in place. Do not remove the cork/cover. Record the weight on the (W1) Attachment #1.
Allow the dewar to stand for 24 hours.
DAY 3
Weigh the unit a second time (W2), keeping the cork/cover in place, 24 hours after the first weight (W1). Record this weight on the Attachment #1.
Take note of excess LN2 boil off especially after W2. LN2 should settle (cease boiling).
Cross-Network Cold Chain Guidelines
ColdChainGuidelines_v1.0_2018-04-26 Page 11 of 16
Take note of uncommon occurrences such as excess frosting or condensation along the outside of the dewar in the comments section on Attachment #1.
If the shipment is ready to send, pour off excess LN2 into the cryo cart. Record the final weight (Wsat) of the unit on Attachment #1.
A shipment delay from the time of QC completion is permissible as long as the dewar is fully charged and filled with LN2. LN2 should only be poured out on the day of shipment. Note any additional days on the QC form.
QC Evaluation
Note 1: If the QC criteria is passed, the cryo-shipper is fully charged and ready to be shipped.
Calculate the LN2 evaporation rate (lbs/day) and record on Attachment #1.
LN2 evaporation rate (lbs/day) = [W1– W2].
Note 2: This is not a pass/fail criteria therefore there is not acceptance criteria.
Calculate the LN2 evaporation rate in liters per day (L/day) and record on Attachment #1.
Note 3: This is a pass/fail criteria.
This figure roughly signifies the NER (normal evaporation rate).
NER (L/day) = (W1 – W2) * 0.5606
The NER should be <0.92 for a unit passing the QC evaluation.
LN2 absorption will be calculated manually and recorded on Attachment #1.
LN2 absorption = Wsat - Wempty
Note 4: This is not a pass/fail criteria therefore there is not acceptance criteria.
Using a thermocouple, measure the temperature of the unit. Record the temperature on Attachment #1.
Note 5: This is a pass/fail criteria.
Temperature should be below -150°C.
The cryo shipper must be fully charged prior to shipping and must be shipped within a week of passing QC.
For local campus deliveries, a unit that has passed the QC procedure.
8.2.2 QC Check and Charging Procedure for LN2 shipper for International Shipments - 11 Day Procedure
DAY 1 through DAY 3
Follow the QC procedure outlined in Section 8.1 recording all weights and temperatures on the IVQAC LN2 Dry Shipper International QC form (Attachment #2).
Complete the QC evaluation following the procedure outlined in Section 8.1.4, except for the temperature before loading.
Cross-Network Cold Chain Guidelines
ColdChainGuidelines_v1.0_2018-04-26 Page 12 of 16
Temperature before loading to be complete on shipment day.
On day 3 the temperature is taken using a thermocouple after the LN2 has been decanted. This reading is recorded on Attachment #2, Day 3, step “e”.
DAY 4 through DAY 9
Using a thermocouple, monitor the temperature over the next 6 days (once every 24 hours). Record the temperature on Attachment #2.
Note any days the temperature is not taken.
Weekends and Holidays are acceptable and do not require a deviation.
DAY 10
Record the temperature on the Attachment #2.
Calculate the average temperature (Day 4 – Day 10) and record it on the International QC form (Attachment #3).
The cryo shipper should then be refilled following the procedure outlined in section 8.1.1.
DAY 11
Dump the LN2 and record the temperature before loading.
Complete the remaining QC criteria on Attachment #2 outlined in section 8.1.4 (i.e. temperature before loading).
8.2.3 QC Check and Charging Procedure for Qwik LN2 shipper for Domestic and Local Campus Deliveries – 2 Hour Charge
Remove the dewar from the mushroom-shaped shipping container.
Remove the cork/cover and enclosed steel canister/secondary container from the dewar.
Weight the empty dewar (Wempty) and record the weight on the IVQAC QWIK LN2 Dry Shipper QC Form (Attachment #3). Be sure to replace the cork/cover before weighing the unit.
Fill the unit to its maximum capacity (to the bottom of the neck). To do this, place the LN2 hose inside the dewar. Turn the knob on the valve counter-clockwise to allow the flow of LN2 into the dewar. Do not overfill the dewar as this will cause a vacuum failure.
Replace the cork/cover and allow the unit to stand for 2 hours.
After 2 hours, pour out the excess LN2 into the cryo cart. Record the final weight (Wsat) of the unit on the Attachment #3. SOP for LN2 Cryo-Shippers
Using a thermocouple, measure the temperature of the unit. Record the temperature on the Attachment #3. The temperature should be below -150°C.
8.2.4 Maintenance- refer to manufacturer’s manual or guidelines.
Cross-Network Cold Chain Guidelines
ColdChainGuidelines_v1.0_2018-04-26 Page 13 of 16
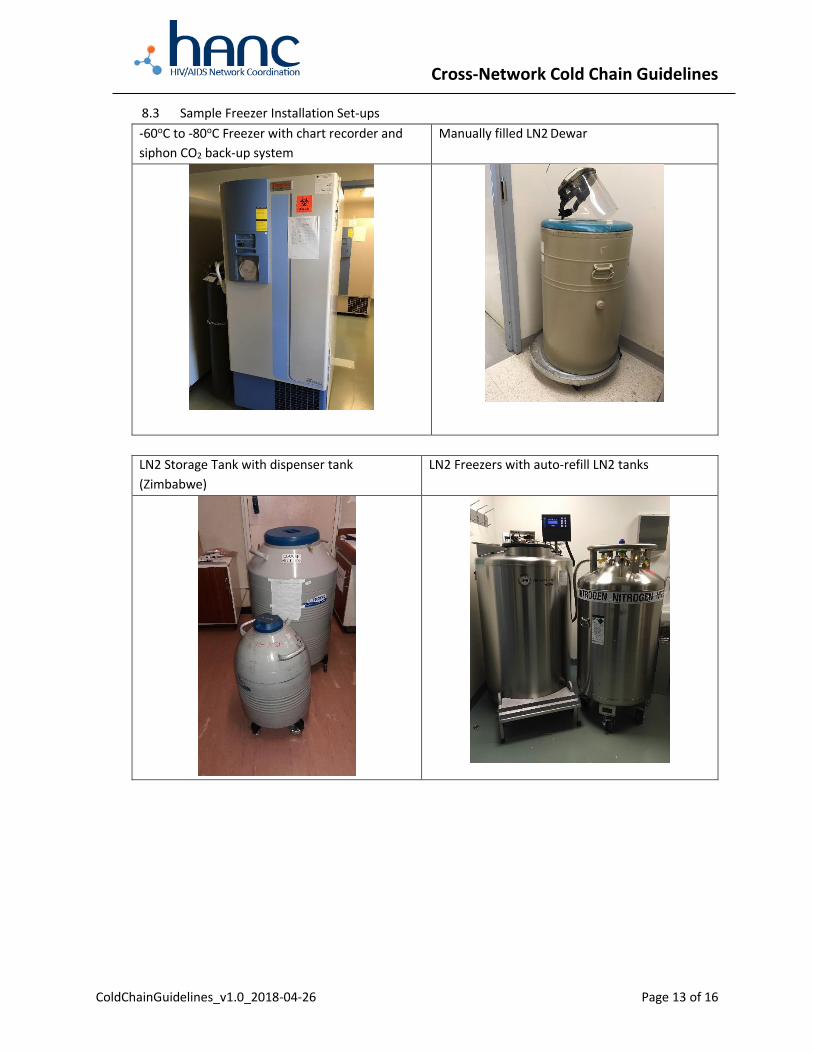
8.3 Sample Freezer Installation Set-ups
-60oC to -80oC Freezer with chart recorder and
siphon CO2 back-up system
Manually filled LN2 Dewar
LN2 Storage Tank with dispenser tank
(Zimbabwe)
LN2 Freezers with auto-refill LN2 tanks
Cross-Network Cold Chain Guidelines
ColdChainGuidelines_v1.0_2018-04-26 Page 14 of 16
9 References
9.1 Cross-Network PBMC Processing SOP
9.2 ACTG/IMPAACT Cat. B Shipping SOP
9.3 ACTG/IMPAACT Cat. B Checklist
9.4 DAIDS Guidelines for GCLP Standards
9.5 IQA SOP Cryo #055 Liquid nitrogen 9LN2 Cryo-Shippers
9.6 IATA
9.7 Network Protocols
10 Acknowledgments
We would like to acknowledge members of the Cold Chain Guidelines Working Group who helped to draft
this document.
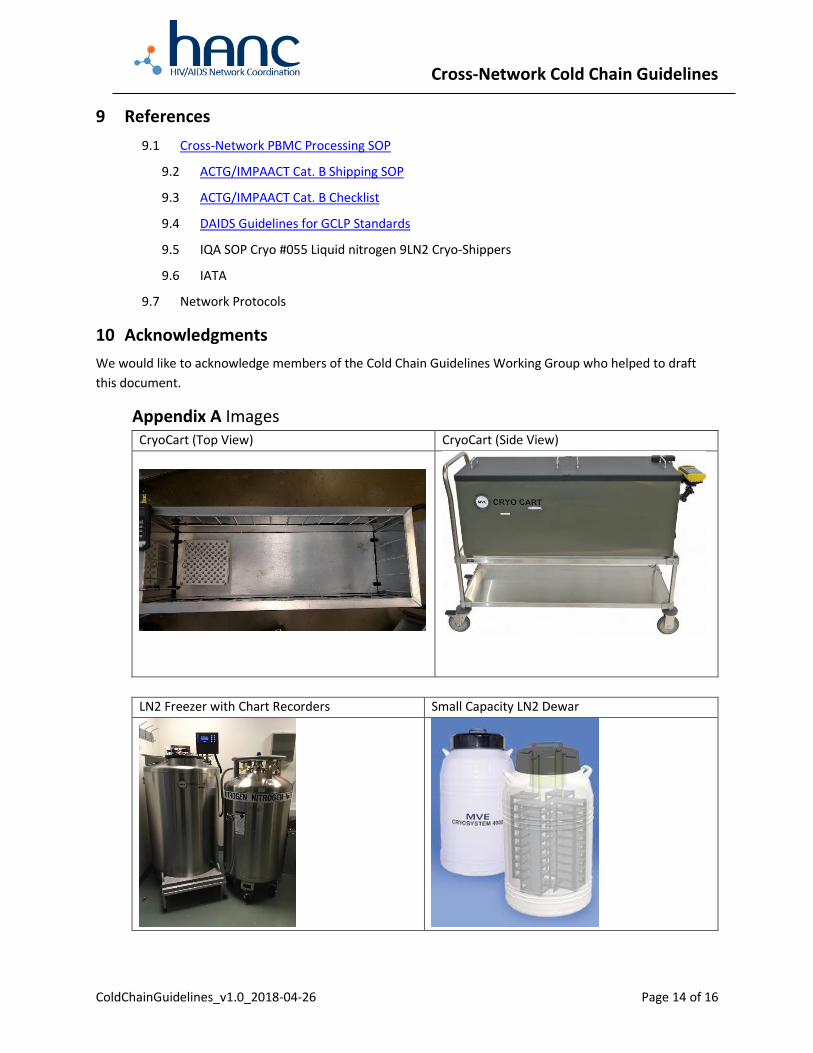
Appendix A Images CryoCart (Top View) CryoCart (Side View)
LN2 Freezer with Chart Recorders Small Capacity LN2 Dewar
Cross-Network Cold Chain Guidelines
ColdChainGuidelines_v1.0_2018-04-26 Page 15 of 16
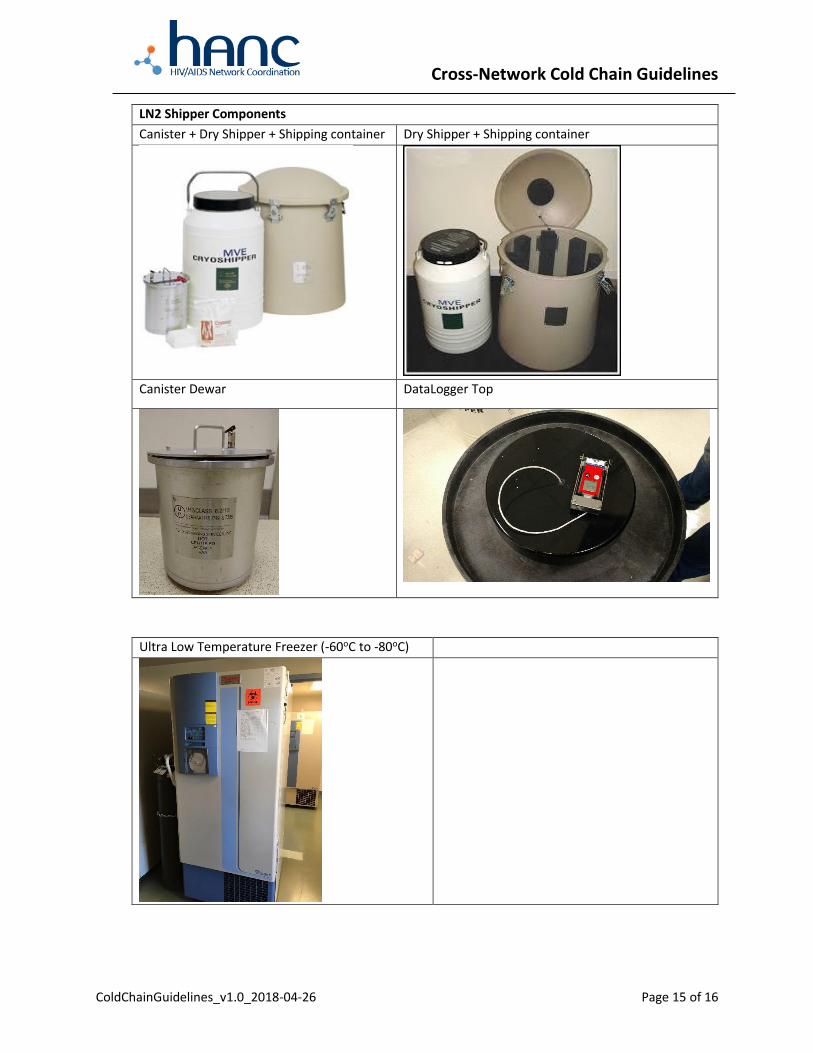
LN2 Shipper Components
Canister + Dry Shipper + Shipping container Dry Shipper + Shipping container
Canister Dewar DataLogger Top
Ultra Low Temperature Freezer (-60oC to -80oC)
Cross-Network Cold Chain Guidelines
ColdChainGuidelines_v1.0_2018-04-26 Page 16 of 16
Rectangular Multipurpose Ice Pans
Dry Ice Bin Dry Ice Bin - opened
Cryo Apron Cryo Gloves
Recommended