1 Updated June 2021
Credential Engine Competency Editor Instructions Credential Engine Competency Editor Instructions ..................................................................................... 1
Entering New Competency Frameworks ..................................................................................................... 1
Entering a Competency Framework via Copy/Paste Import ....................................................................... 5
Connecting Competency Frameworks to an Assessment, Learning Opportunity, or Credential .............. 7
Connecting Competency Frameworks to an Assessment or Learning Opportunity .............................. 7
Connecting Competency Frameworks to a Credential ........................................................................... 9
The below instructions are for the entry of competency frameworks to publish to the
Credential Registry. We encourage users to add any relevant information to their competency
frameworks. For further instructions or questions, please contact Scarlett Jeckel
Entering New Competency Frameworks 1. Once your organization has been approved to begin publishing, you will access the
Credential Engine Publisher here: https://credentialengine.org/publisher. You will log in
using the same login credentials you created in the Accounts System.
2. Select the ‘Add New’ dropdown menu at the top of the page, and then select ‘Manage
Competencies’
3. You will be directed to the Competency Framework search and editor. First, you choose
your organization from the Organization pop up.

2 Updated June 2021
4. After selecting your Organization from the drop-down, the competency search will
display. To begin entering a competency framework manually, select the ‘create new’
button located on the top right-hand side of the screen.
5. Once you are directed to the Competency Framework Editor, you will enter the name
and description of your framework under the ‘General’ pop up. After entering your
name and description, select the ‘done’ button located at the bottom of the pop up.
6. After saving the name of your framework, you will begin building your competency
framework. To begin the framework, select ‘add competency’ button located under the

3 Updated June 2021
name of your framework.
a. After selecting ‘add competency’ you have the option to ‘create new’ or ‘search
competencies’.
i. Create New – will prompt a new competency pop up to enter in the
competency text. After entering your competency text, select the ‘done’
button located at the bottom of the pop up.
ii. Search Competencies – this function allows you to search for
competencies that have already been created and published to the
registry. Use keywords to search for competencies that are applicable for
your framework. Once you have found applicable competencies, select
the + symbol next to the competency. Once selected, you can choose to

4 Updated June 2021
‘copy competency’ or ‘link competency’ to add it to your framework.
7. Follow this same process of entering new competencies and/or searching for
competencies to build your competency framework. While building your framework,
you will see the framework being built as a bulleted list on your editor screen.
8. When your framework is complete, you will approve the framework to be published. To
approve your framework, select the ‘Approve Selected Framework’ button located at
the bottom of the screen.
9. Approving your framework will notify the Credential Engine team of the approval and
will publish the framework.

5 Updated June 2021
Entering a Competency Framework via Copy/Paste Import The competency editor now supports the function of copying competencies from a list in a
word documents, PDF, or webpage and pasting them into the editor to build a framework.
1. Select the ‘import framework’ button located at the top right-hand side of the screen.
2. This will re-direct you to the import framework options. To use the copy/paste function
select the ‘Paste Text’ option.
a. Additional instructions on how to use this function will pop up on the right side
of the page. These instructions can be minimized at any time and to re-open
select the ‘info’ button located at the top right-hand side of the screen.
3. To begin entering your framework, first enter your competency ‘Framework Name.’
Following entering your framework name, begin pasting your competency text into the
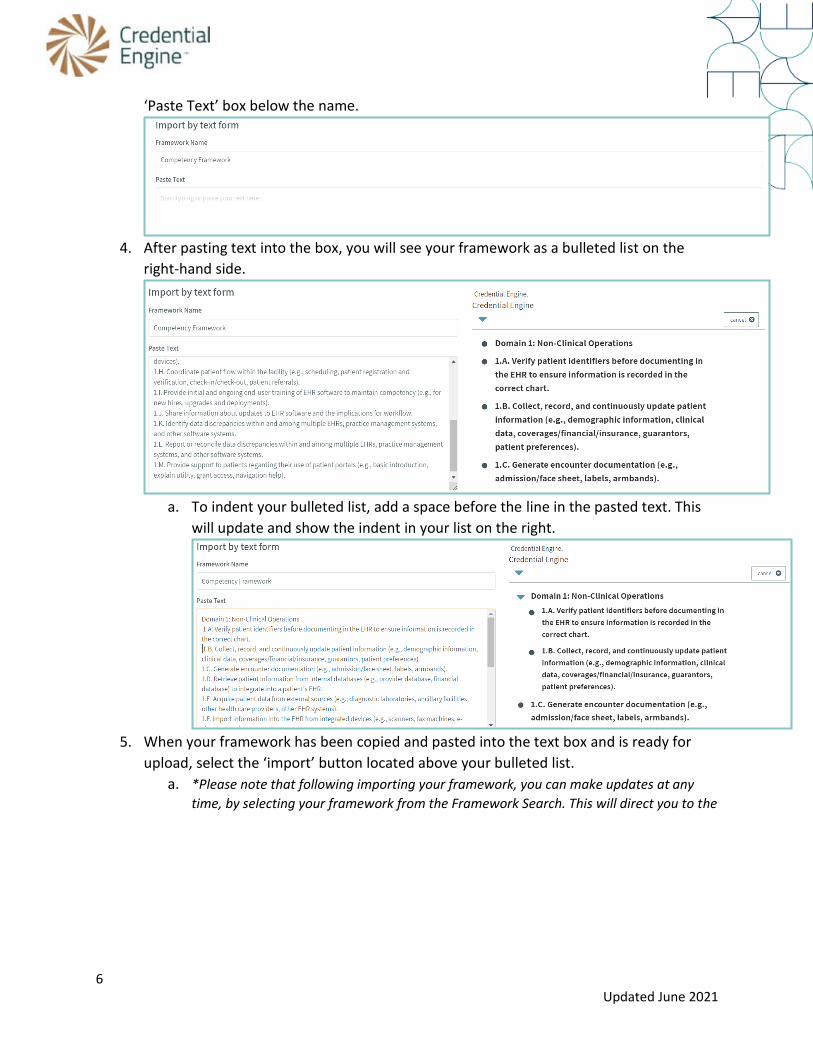
6 Updated June 2021
‘Paste Text’ box below the name.
4. After pasting text into the box, you will see your framework as a bulleted list on the
right-hand side.
a. To indent your bulleted list, add a space before the line in the pasted text. This
will update and show the indent in your list on the right.
5. When your framework has been copied and pasted into the text box and is ready for
upload, select the ‘import’ button located above your bulleted list.
a. *Please note that following importing your framework, you can make updates at any
time, by selecting your framework from the Framework Search. This will direct you to the

7 Updated June 2021
manual editor to make your applicable changes.
6. When your framework is complete, you will approve the framework to be published. To
approve your framework, select the ‘Approve Selected Framework’ button located at
the bottom of the screen.
7. Approving your framework will notify the Credential Engine team of the approval and
will publish the framework.
Connecting Competency Frameworks to an Assessment, Learning
Opportunity, or Credential
Connecting Competency Frameworks to an Assessment or Learning Opportunity
1. To connect your new competency framework to the appropriate credential, you will add
the framework to a Learning Opportunity or Assessment.
2. Select the appropriate Learning Opportunity or Assessment and choose to edit the
profile. From the editor, open the ‘Competencies’ tab. You will see the Competency
search and can search for your framework.
8 Updated June 2021
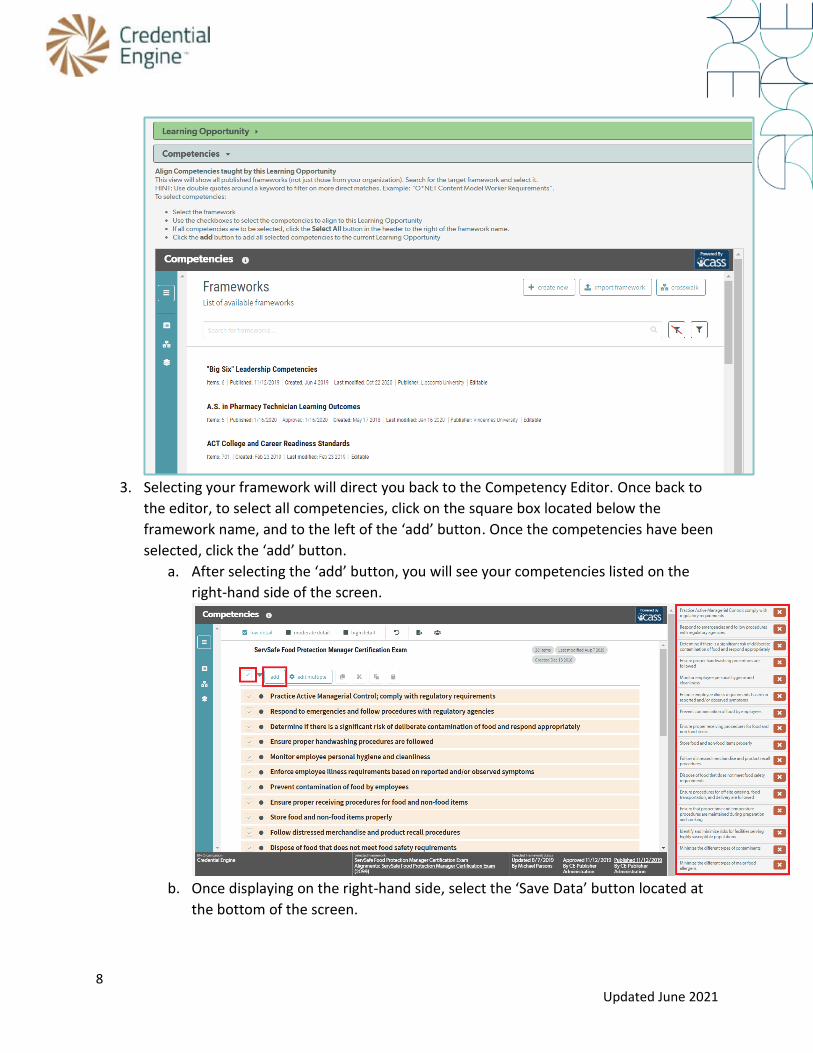
3. Selecting your framework will direct you back to the Competency Editor. Once back to
the editor, to select all competencies, click on the square box located below the
framework name, and to the left of the ‘add’ button. Once the competencies have been
selected, click the ‘add’ button.
a. After selecting the ‘add’ button, you will see your competencies listed on the
right-hand side of the screen.
b. Once displaying on the right-hand side, select the ‘Save Data’ button located at
the bottom of the screen.
9 Updated June 2021
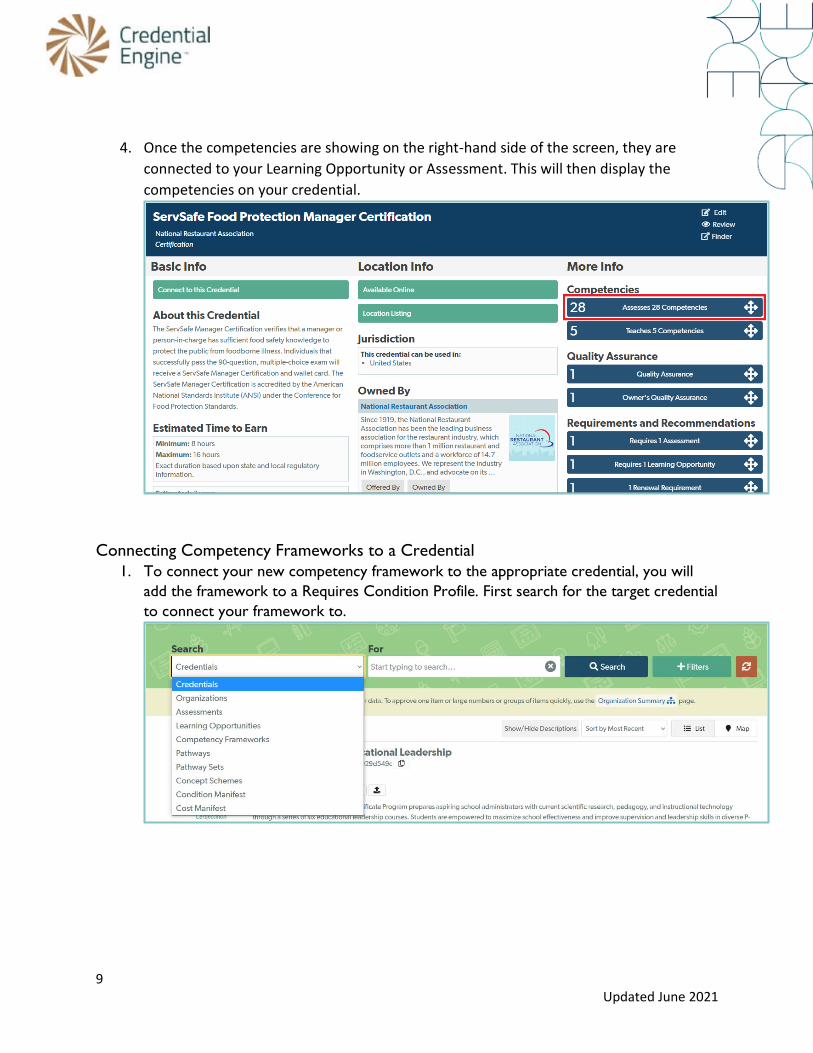
4. Once the competencies are showing on the right-hand side of the screen, they are
connected to your Learning Opportunity or Assessment. This will then display the
competencies on your credential.
Connecting Competency Frameworks to a Credential
1. To connect your new competency framework to the appropriate credential, you will
add the framework to a Requires Condition Profile. First search for the target credential
to connect your framework to.
10 Updated June 2021
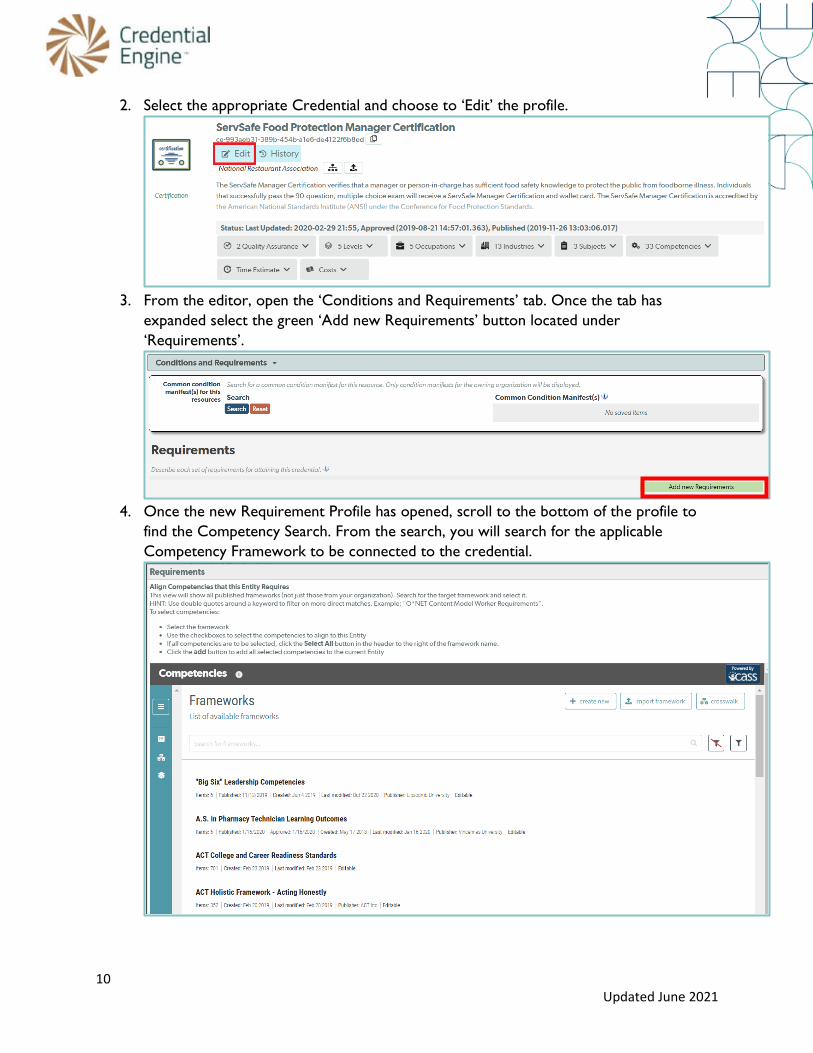
2. Select the appropriate Credential and choose to ‘Edit’ the profile.
3. From the editor, open the ‘Conditions and Requirements’ tab. Once the tab has
expanded select the green ‘Add new Requirements’ button located under
‘Requirements’.
4. Once the new Requirement Profile has opened, scroll to the bottom of the profile to
find the Competency Search. From the search, you will search for the applicable
Competency Framework to be connected to the credential.
11 Updated June 2021
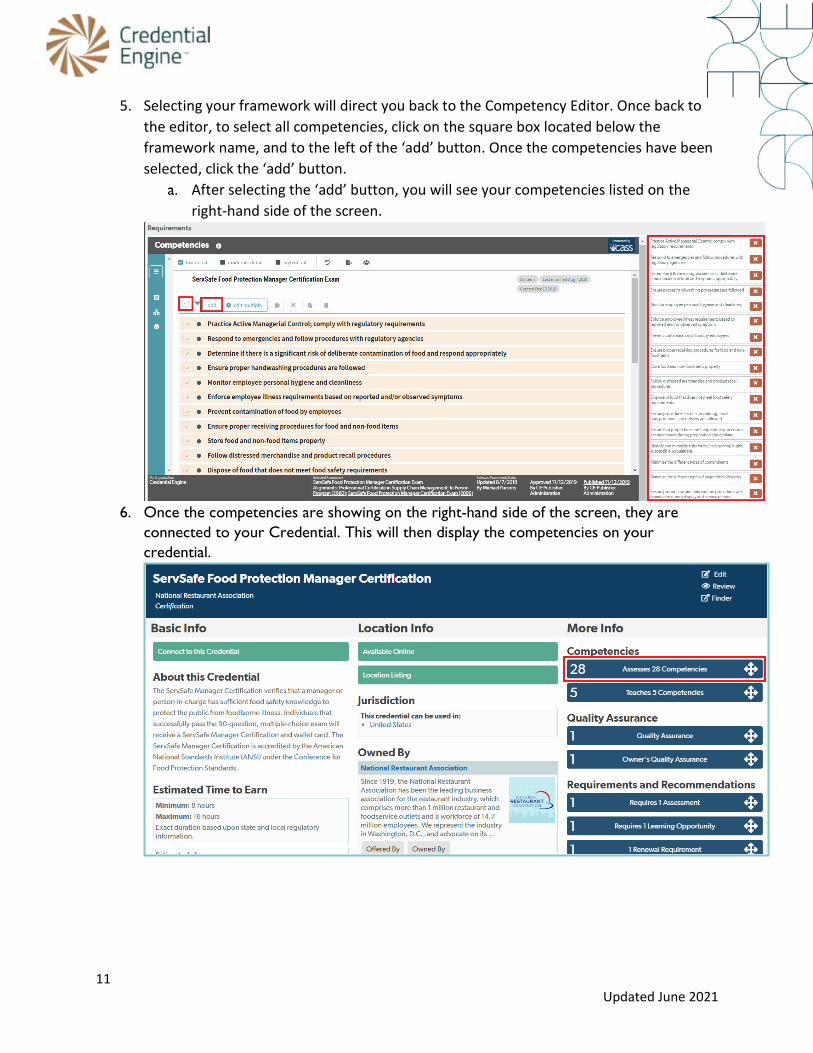
5. Selecting your framework will direct you back to the Competency Editor. Once back to
the editor, to select all competencies, click on the square box located below the
framework name, and to the left of the ‘add’ button. Once the competencies have been
selected, click the ‘add’ button.
a. After selecting the ‘add’ button, you will see your competencies listed on the
right-hand side of the screen.
6. Once the competencies are showing on the right-hand side of the screen, they are
connected to your Credential. This will then display the competencies on your
credential.
Recommended