COOL
How to use Google docs
for business and
education
Presented by Stephanie Walmsley
Softpro Ltd | www.softpro.co.nz 1
I T ’ S G O O D T O S H A R E
This book is a FREE document from www.softpro.co.nz
Please feel free to share and distribute this book. You can print it and share it with others in
your office, you can email it, post it on your website, tweet about it, link to it from Facebook
and share it with whoever you think would be interested.
The document must be unaltered and complete along with our names, copyright
notice and link: www.softpro.co.nz
©2011 Softpro Limited All rights reserved.
DISCLAIMER AND/OR LEGAL NOTICES:
The authors of this book have attempted to make the information in this book as accurate as
possible. However, the information in this book is for personal educational use only and is
provided in good faith without any express or implied warranty. Where the authors have
provided hypertext links to other web sites, this is done as a service to users of this book.
This service does not mean that the authors endorse those sites or material on them in any
way.
Softpro Ltd | www.softpro.co.nz 2
This book is presented by Softpro Ltd.
Softpro has been providing IT support and management
services to small businesses in New Zealand since 1999
IT Management and Support Services:
You can choose from casual IT help to proactive, on-going monitoring, management,
support and planning of your IT systems, the choice is yours, as well as support for those
using the systems.
Backup Services:
It’s not a matter of if you will need a good backup service; it’s a matter of when. All
organisations need good backup. This service is suitable for any company at all, with up to
thirty users. It is a completely automated, totally reliable, economical and practical backup
service. Find out more here: http://www.cloudbackup.co.nz/ .
Technical Training Materials:
We want to help you make best use of technology and keep up to date on what is available
for you. Learn how to use technology wisely and appropriately to improve your business
efficiency. www.Softpro.co.nz
Contact Softpro:
Email: [email protected]
Tel: 09 950 3675
Mobile: 021 763 741
Softpro Ltd | www.softpro.co.nz 3
COOL Google
How to use Google docs for business and
education
Presented by Stephanie Walmsley
Contents
Introduction ........................................................................................................................... 4
1. Create a New Google Document ....................................................................................... 4
2. Share and Grant Access to Google Documents ................................................................ 8
3. Create a New Google Drawing ........................................................................................ 13
4. Create a New Google Form ............................................................................................ 18
5. Create a New Google Presentation ................................................................................. 23
6. Create a New Google Spread Sheet ............................................................................... 29

Softpro Ltd | www.softpro.co.nz 4
Introduction Google docs is a free service offered by Google which allows you to create, edit and store
documents, spread sheets, presentations and drawings from anywhere in the world using
your computer or your smart phone. You can also allow others to see and use the
documents from anywhere in the world.
It’s a useful tool if you want to co-edit a document with someone in another room, whether it
is next door to you, across the Tasman or across on the other side of the planet. It’s a great
way to make up a survey or give a presentation.
Learn how to use Google docs and work more efficiently, today.
1. Create a New Google Document
In this tutorial, we will show you how to create a new Google document.
You will need:
A Google Account
Step 1: Log into Account
Log into your Google account or create one if you don’t currently have an account.
Softpro Ltd | www.softpro.co.nz 5
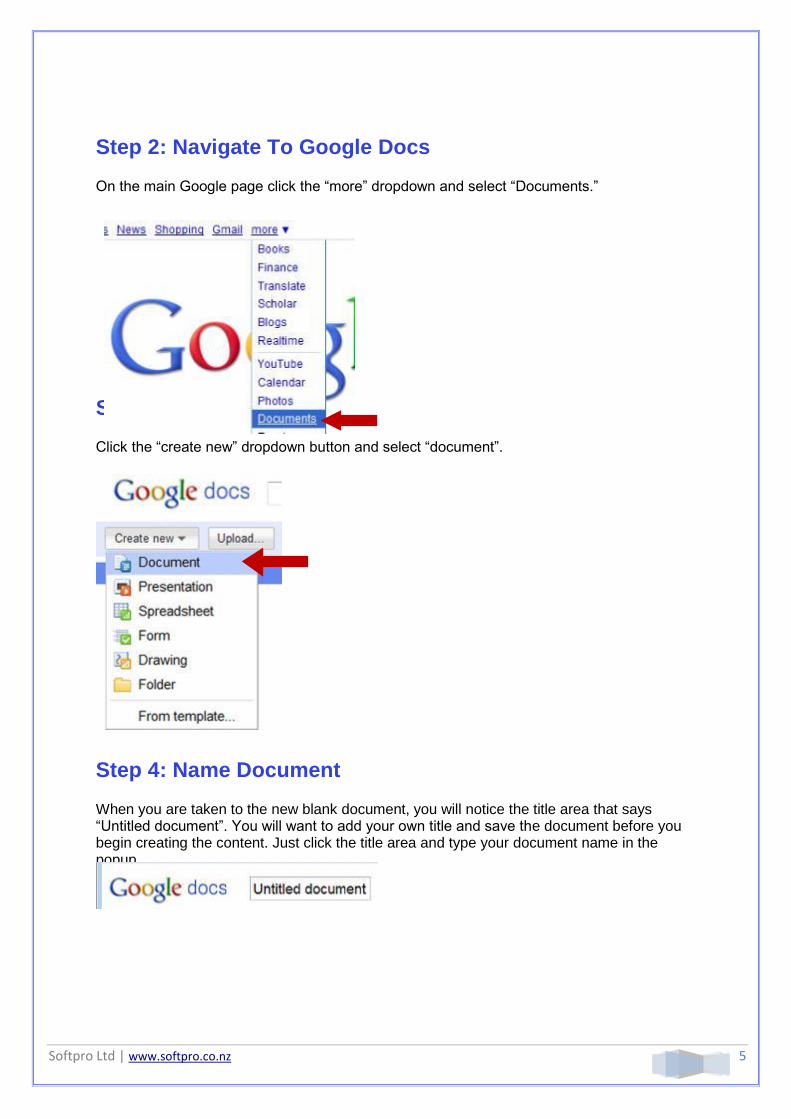
Step 2: Navigate To Google Docs
On the main Google page click the “more” dropdown and select “Documents.”
Ste 3: Select Doc Type
Click the “create new” dropdown button and select “document”.
Step 4: Name Document
When you are taken to the new blank document, you will notice the title area that says “Untitled document”. You will want to add your own title and save the document before you begin creating the content. Just click the title area and type your document name in the popup.
Softpro Ltd | www.softpro.co.nz 6
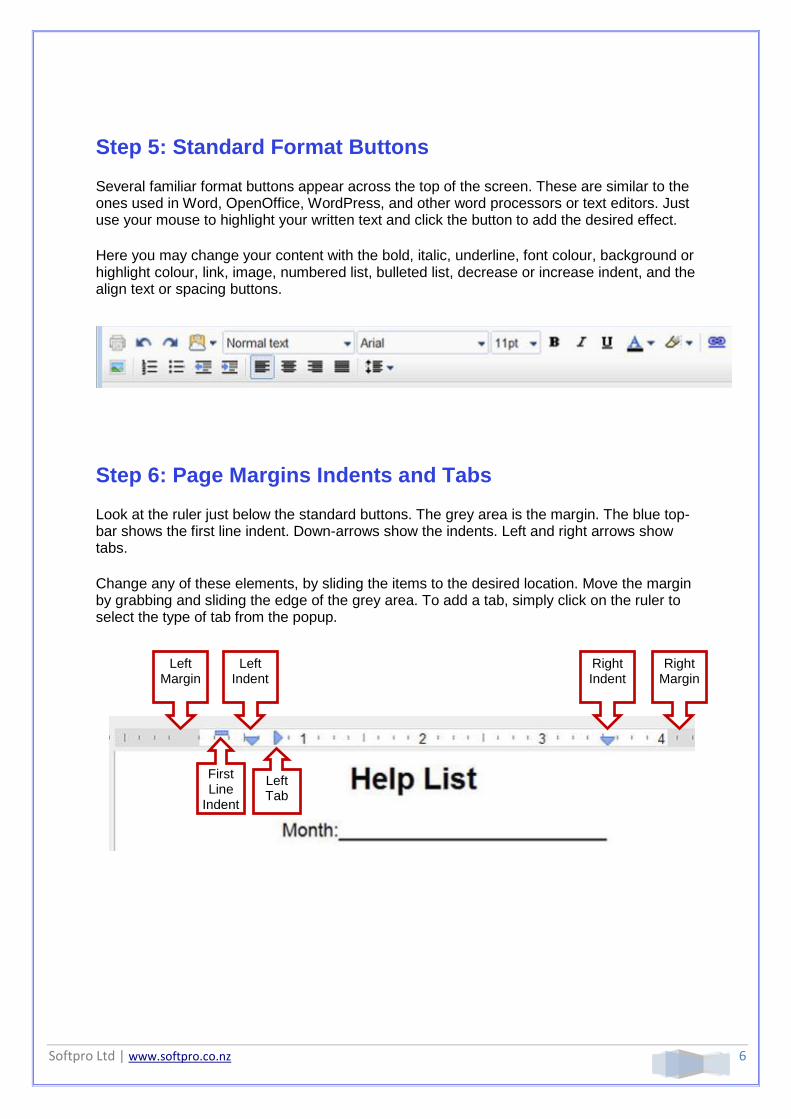
Step 5: Standard Format Buttons
Several familiar format buttons appear across the top of the screen. These are similar to the ones used in Word, OpenOffice, WordPress, and other word processors or text editors. Just use your mouse to highlight your written text and click the button to add the desired effect.
Here you may change your content with the bold, italic, underline, font colour, background or highlight colour, link, image, numbered list, bulleted list, decrease or increase indent, and the align text or spacing buttons.
Step 6: Page Margins Indents and Tabs
Look at the ruler just below the standard buttons. The grey area is the margin. The blue top-bar shows the first line indent. Down-arrows show the indents. Left and right arrows show tabs.
Change any of these elements, by sliding the items to the desired location. Move the margin by grabbing and sliding the edge of the grey area. To add a tab, simply click on the ruler to select the type of tab from the popup.
Left Margin
Left Indent
First Line
Indent
Left Tab
Right Indent
Right Margin
Softpro Ltd | www.softpro.co.nz 7
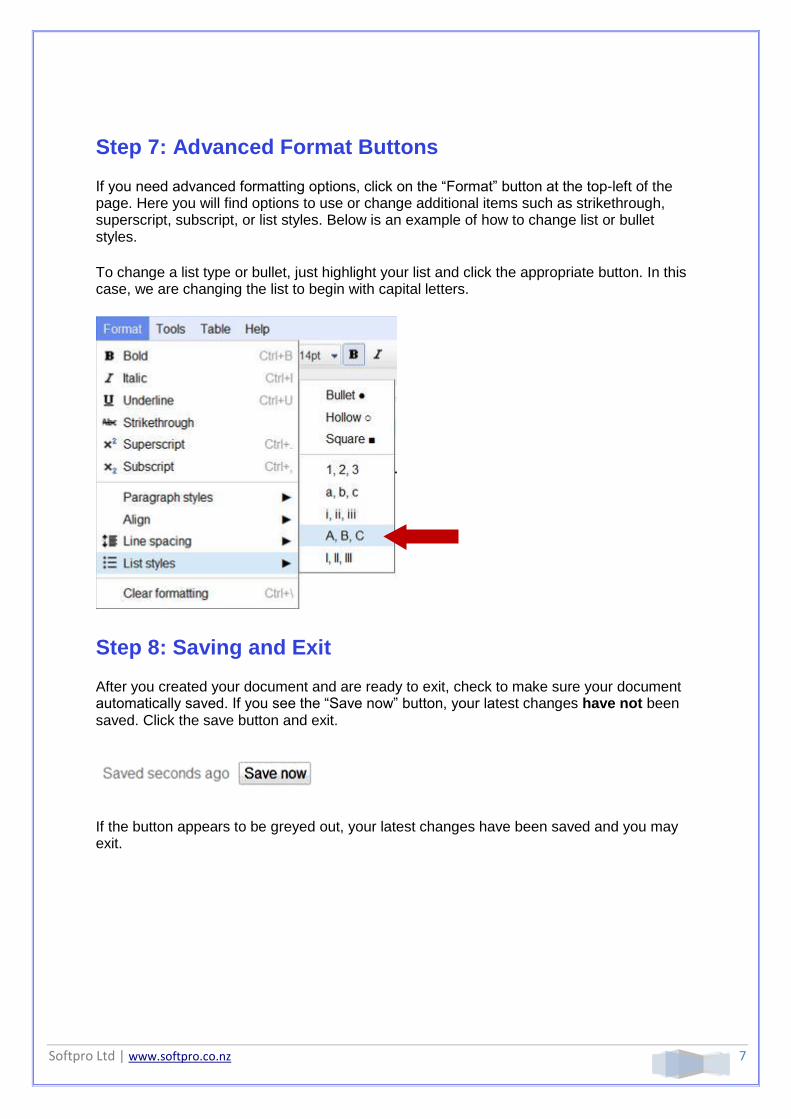
Step 7: Advanced Format Buttons
If you need advanced formatting options, click on the “Format” button at the top-left of the page. Here you will find options to use or change additional items such as strikethrough, superscript, subscript, or list styles. Below is an example of how to change list or bullet styles.
To change a list type or bullet, just highlight your list and click the appropriate button. In this case, we are changing the list to begin with capital letters.
Step 8: Saving and Exit
After you created your document and are ready to exit, check to make sure your document automatically saved. If you see the “Save now” button, your latest changes have not been saved. Click the save button and exit.
If the button appears to be greyed out, your latest changes have been saved and you may exit.
Softpro Ltd | www.softpro.co.nz 8
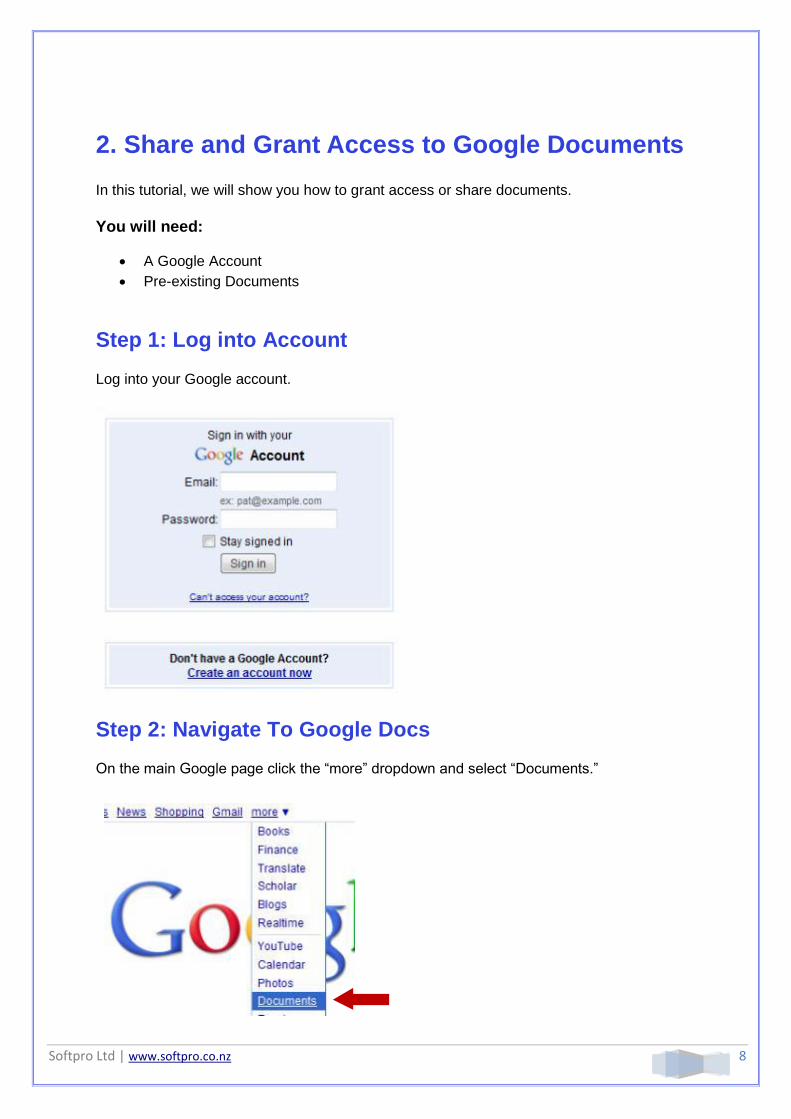
2. Share and Grant Access to Google Documents
In this tutorial, we will show you how to grant access or share documents.
You will need:
A Google Account
Pre-existing Documents
Step 1: Log into Account
Log into your Google account.
Step 2: Navigate To Google Docs
On the main Google page click the “more” dropdown and select “Documents.”
Softpro Ltd | www.softpro.co.nz 9
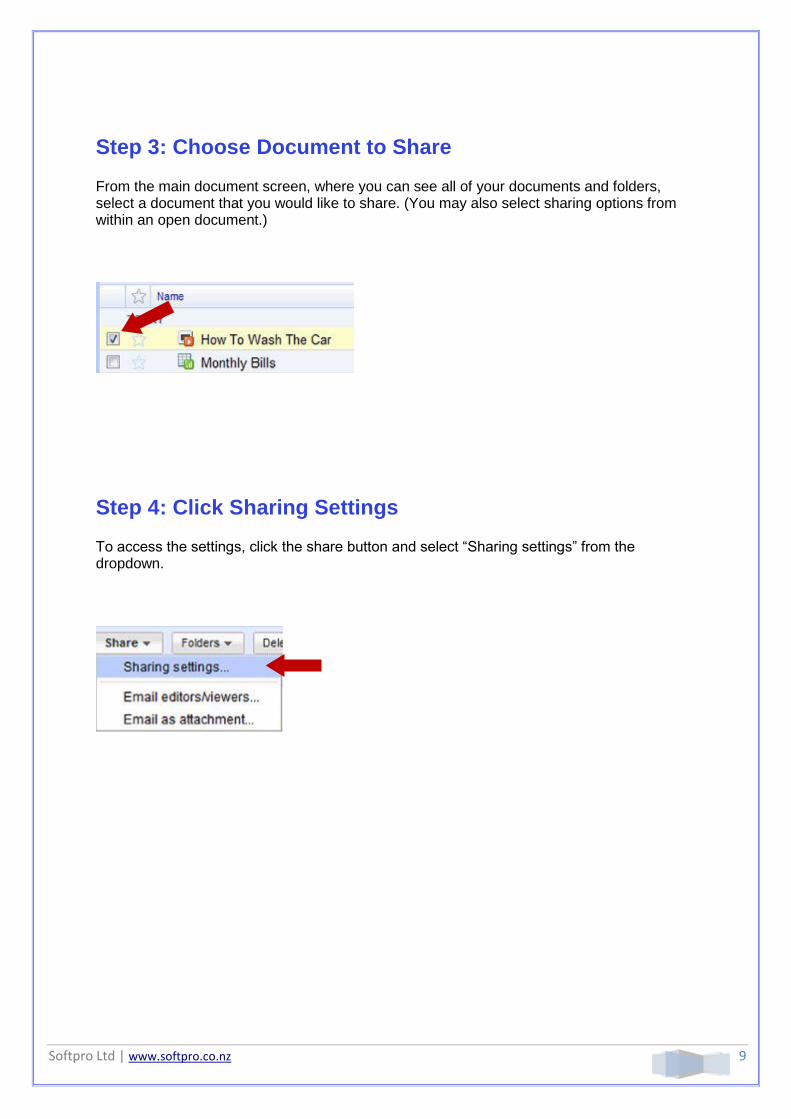
Step 3: Choose Document to Share
From the main document screen, where you can see all of your documents and folders, select a document that you would like to share. (You may also select sharing options from within an open document.)
Step 4: Click Sharing Settings
To access the settings, click the share button and select “Sharing settings” from the dropdown.
Softpro Ltd | www.softpro.co.nz 10
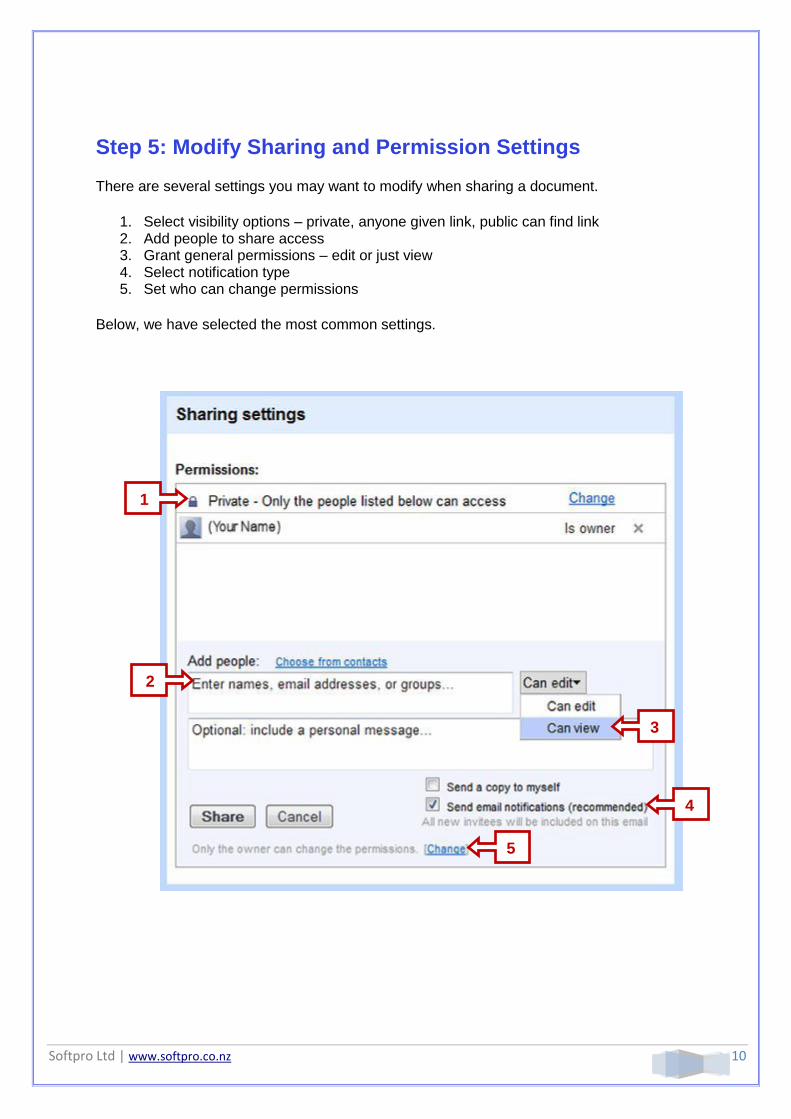
Step 5: Modify Sharing and Permission Settings
There are several settings you may want to modify when sharing a document.
1. Select visibility options – private, anyone given link, public can find link 2. Add people to share access 3. Grant general permissions – edit or just view 4. Select notification type 5. Set who can change permissions
Below, we have selected the most common settings.
1
2
3
4
5
Softpro Ltd | www.softpro.co.nz 11
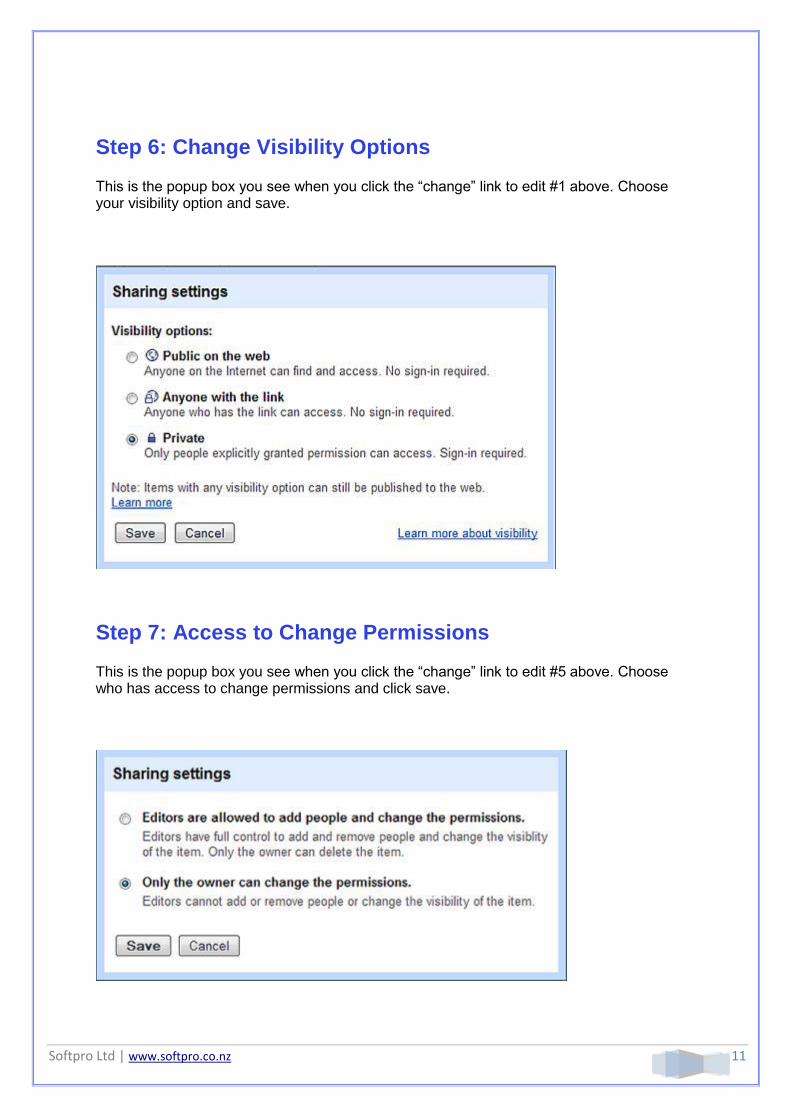
Step 6: Change Visibility Options
This is the popup box you see when you click the “change” link to edit #1 above. Choose your visibility option and save.
Step 7: Access to Change Permissions
This is the popup box you see when you click the “change” link to edit #5 above. Choose who has access to change permissions and click save.
Softpro Ltd | www.softpro.co.nz 12
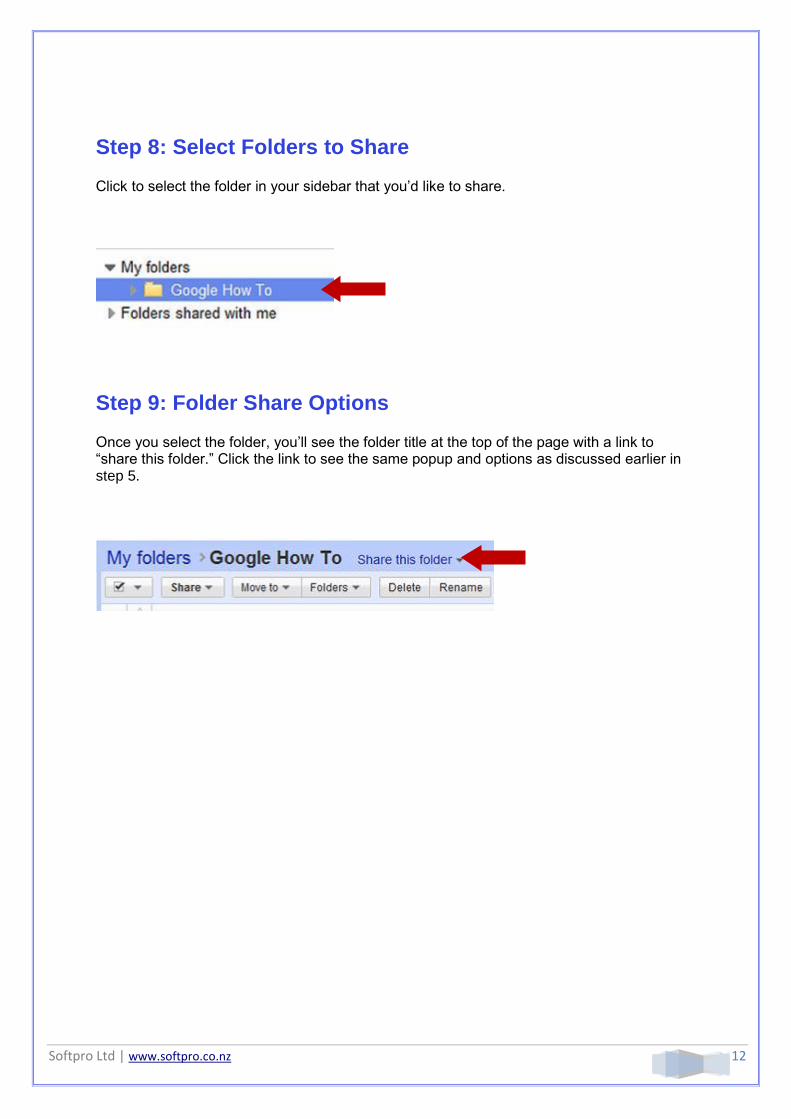
Step 8: Select Folders to Share
Click to select the folder in your sidebar that you’d like to share.
Step 9: Folder Share Options
Once you select the folder, you’ll see the folder title at the top of the page with a link to “share this folder.” Click the link to see the same popup and options as discussed earlier in step 5.
Softpro Ltd | www.softpro.co.nz 13
3. Create a New Google Drawing
In this tutorial, we will show you how to create a new Google drawing.
You will need:
A Google Account
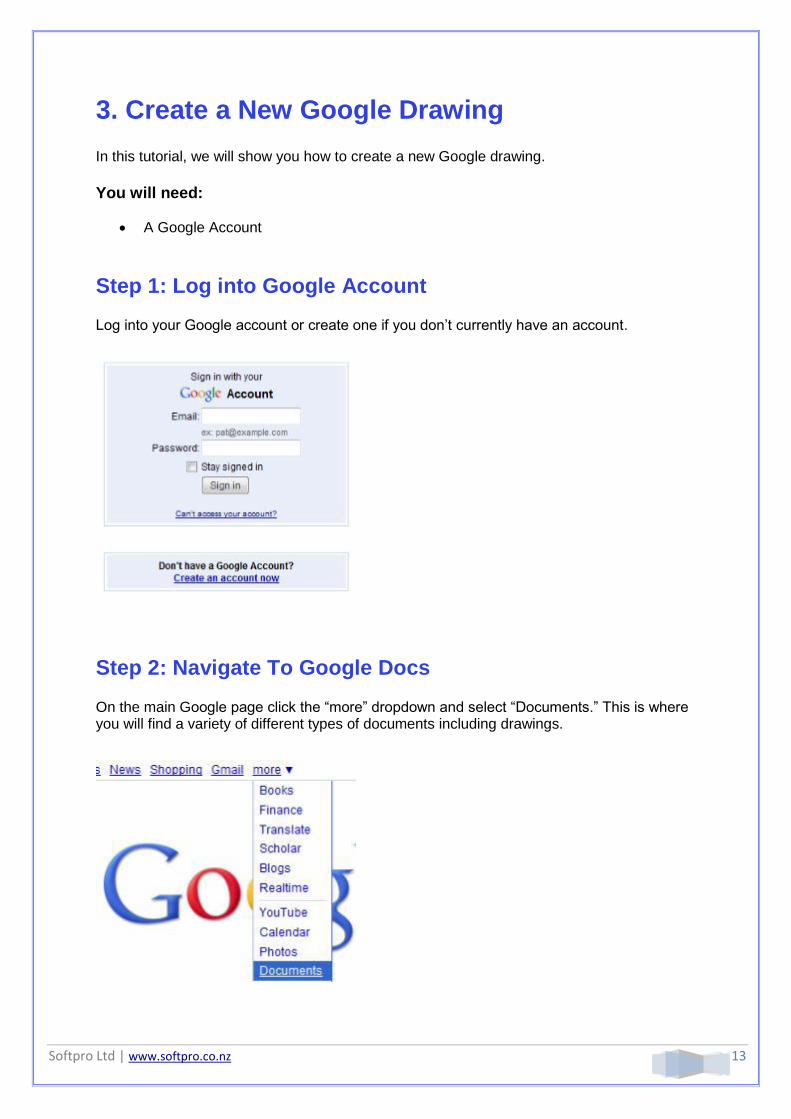
Step 1: Log into Google Account
Log into your Google account or create one if you don’t currently have an account.
Step 2: Navigate To Google Docs
On the main Google page click the “more” dropdown and select “Documents.” This is where you will find a variety of different types of documents including drawings.

Softpro Ltd | www.softpro.co.nz 14
Step 3: Select New Drawing
Click the “create new” dropdown button and select “drawing”.
Step 4: Name Drawing
When the new drawing appears, click in the “Untitled drawing” area to name your drawing.
Step 5: Navigate Tool bar
In the tool bar of the drawing app, the buttons allow you to add pre-set shapes, draw lines, arrows, curved lines, multi-sided shapes, text boxes, and images to your canvas.
To help you become familiar with the buttons, let’s create a pea pod.
Softpro Ltd | www.softpro.co.nz 15
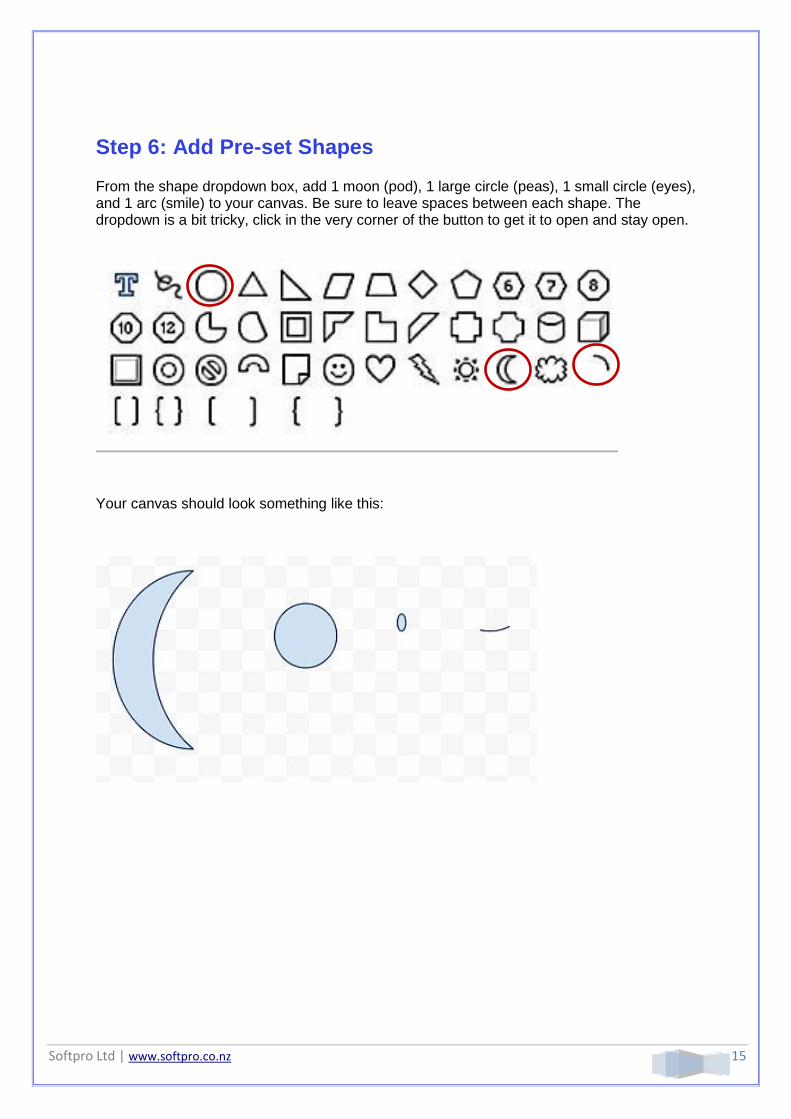
Step 6: Add Pre-set Shapes
From the shape dropdown box, add 1 moon (pod), 1 large circle (peas), 1 small circle (eyes), and 1 arc (smile) to your canvas. Be sure to leave spaces between each shape. The dropdown is a bit tricky, click in the very corner of the button to get it to open and stay open.
Your canvas should look something like this:
Softpro Ltd | www.softpro.co.nz 16
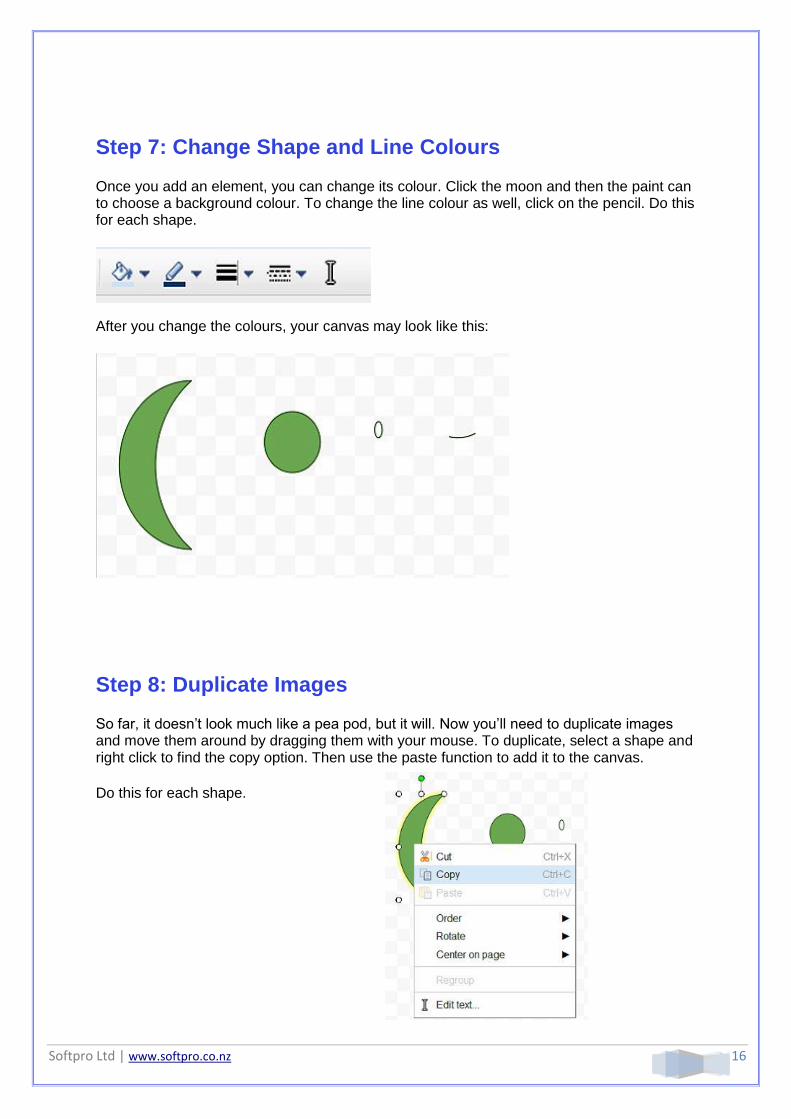
Step 7: Change Shape and Line Colours
Once you add an element, you can change its colour. Click the moon and then the paint can to choose a background colour. To change the line colour as well, click on the pencil. Do this for each shape.
After you change the colours, your canvas may look like this:
Step 8: Duplicate Images
So far, it doesn’t look much like a pea pod, but it will. Now you’ll need to duplicate images and move them around by dragging them with your mouse. To duplicate, select a shape and right click to find the copy option. Then use the paste function to add it to the canvas.
Do this for each shape.
Softpro Ltd | www.softpro.co.nz 17
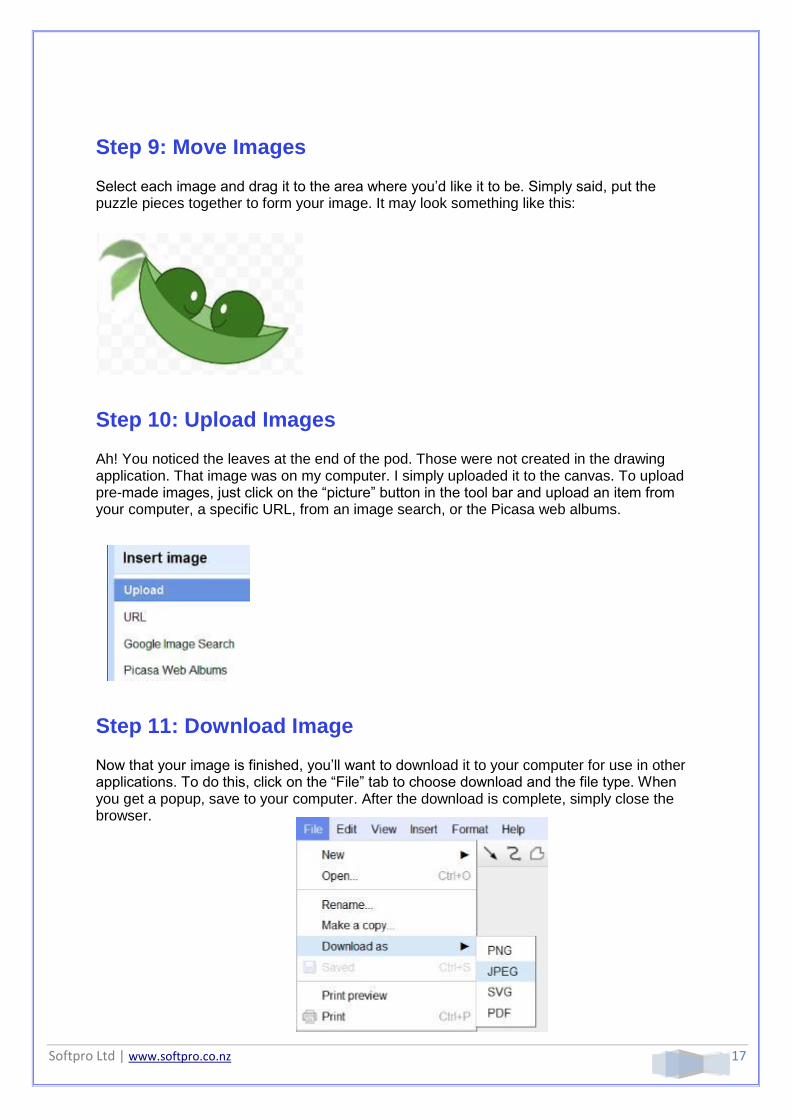
Step 9: Move Images
Select each image and drag it to the area where you’d like it to be. Simply said, put the puzzle pieces together to form your image. It may look something like this:
Step 10: Upload Images
Ah! You noticed the leaves at the end of the pod. Those were not created in the drawing application. That image was on my computer. I simply uploaded it to the canvas. To upload pre-made images, just click on the “picture” button in the tool bar and upload an item from your computer, a specific URL, from an image search, or the Picasa web albums.
Step 11: Download Image
Now that your image is finished, you’ll want to download it to your computer for use in other applications. To do this, click on the “File” tab to choose download and the file type. When you get a popup, save to your computer. After the download is complete, simply close the browser.
Softpro Ltd | www.softpro.co.nz 18
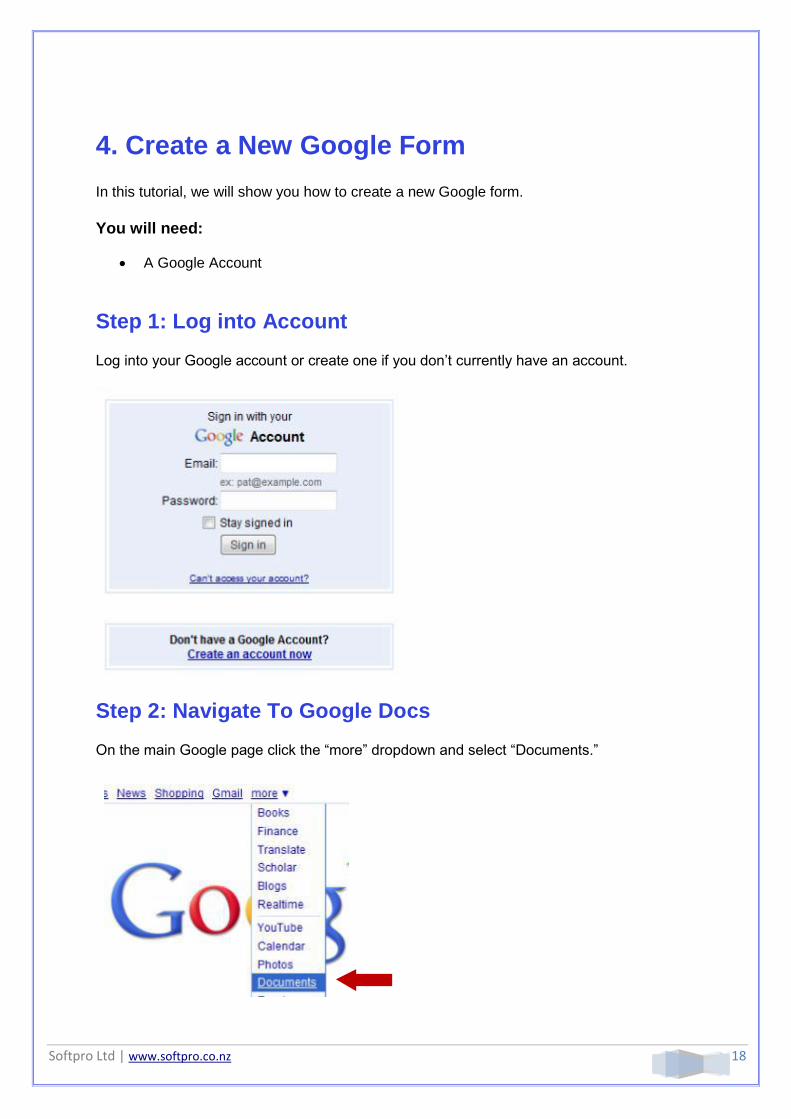
4. Create a New Google Form
In this tutorial, we will show you how to create a new Google form.
You will need:
A Google Account
Step 1: Log into Account
Log into your Google account or create one if you don’t currently have an account.
Step 2: Navigate To Google Docs
On the main Google page click the “more” dropdown and select “Documents.”

Softpro Ltd | www.softpro.co.nz 19
Step 3: Select Doc Type
Click the “create new” dropdown button and select “form”.
Step 4: Name Form and Add Instructions
Click on the included filler text to change the title and the instructions.
Step 5: Add Questions
Add your questions in the text area beside “Question Title” by clicking in that area. Once you click in the box, “Sample Question” disappears. You must type a question for the sample text to disappear permanently.
Softpro Ltd | www.softpro.co.nz 20
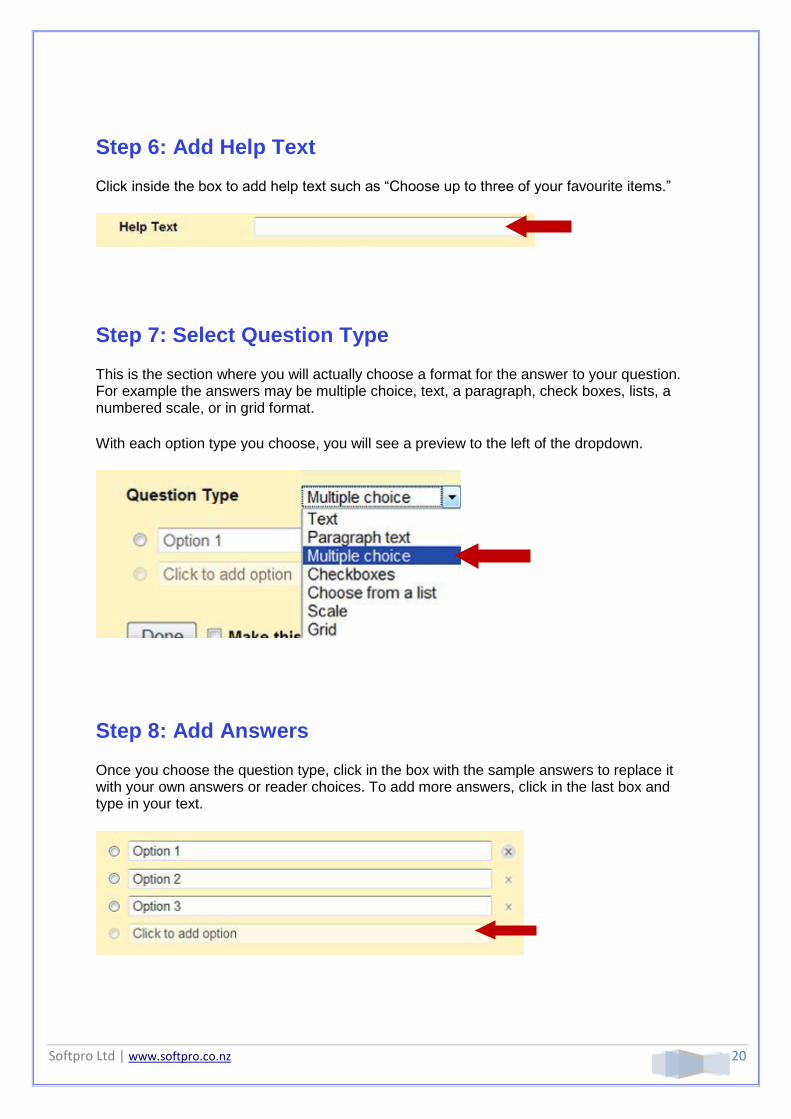
Step 6: Add Help Text
Click inside the box to add help text such as “Choose up to three of your favourite items.”
Step 7: Select Question Type
This is the section where you will actually choose a format for the answer to your question. For example the answers may be multiple choice, text, a paragraph, check boxes, lists, a numbered scale, or in grid format.
With each option type you choose, you will see a preview to the left of the dropdown.
Step 8: Add Answers
Once you choose the question type, click in the box with the sample answers to replace it with your own answers or reader choices. To add more answers, click in the last box and type in your text.
Softpro Ltd | www.softpro.co.nz 21
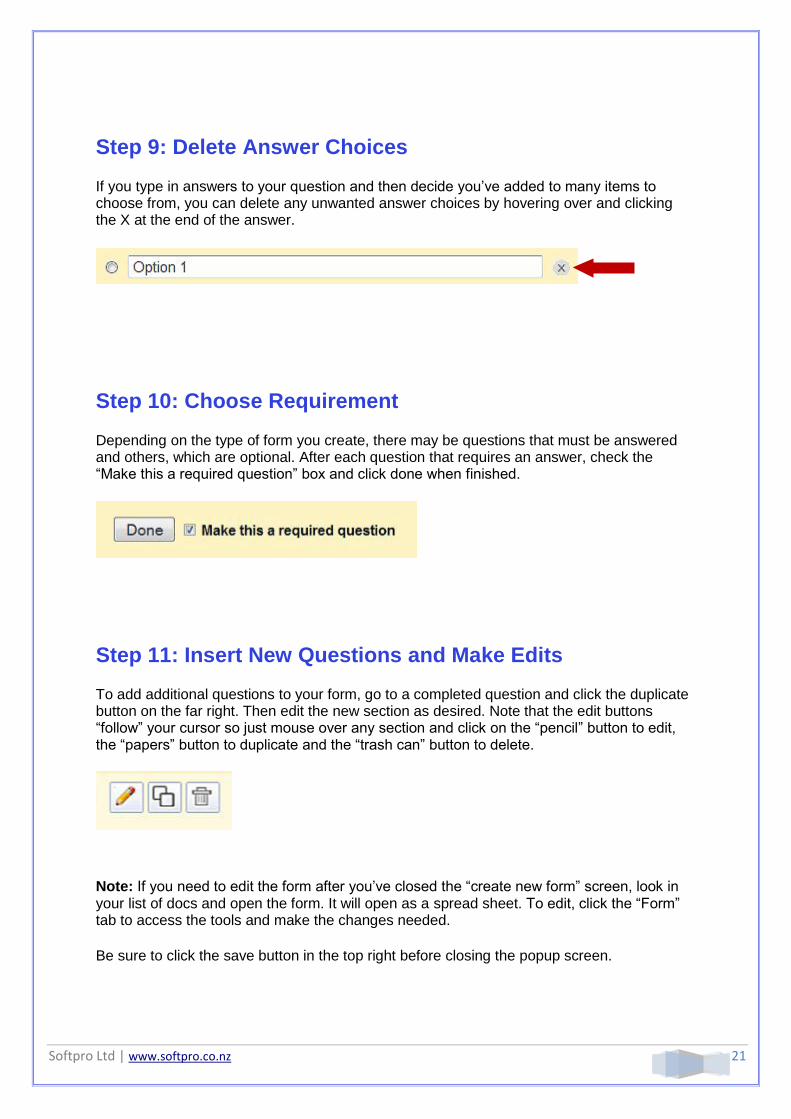
Step 9: Delete Answer Choices
If you type in answers to your question and then decide you’ve added to many items to choose from, you can delete any unwanted answer choices by hovering over and clicking the X at the end of the answer.
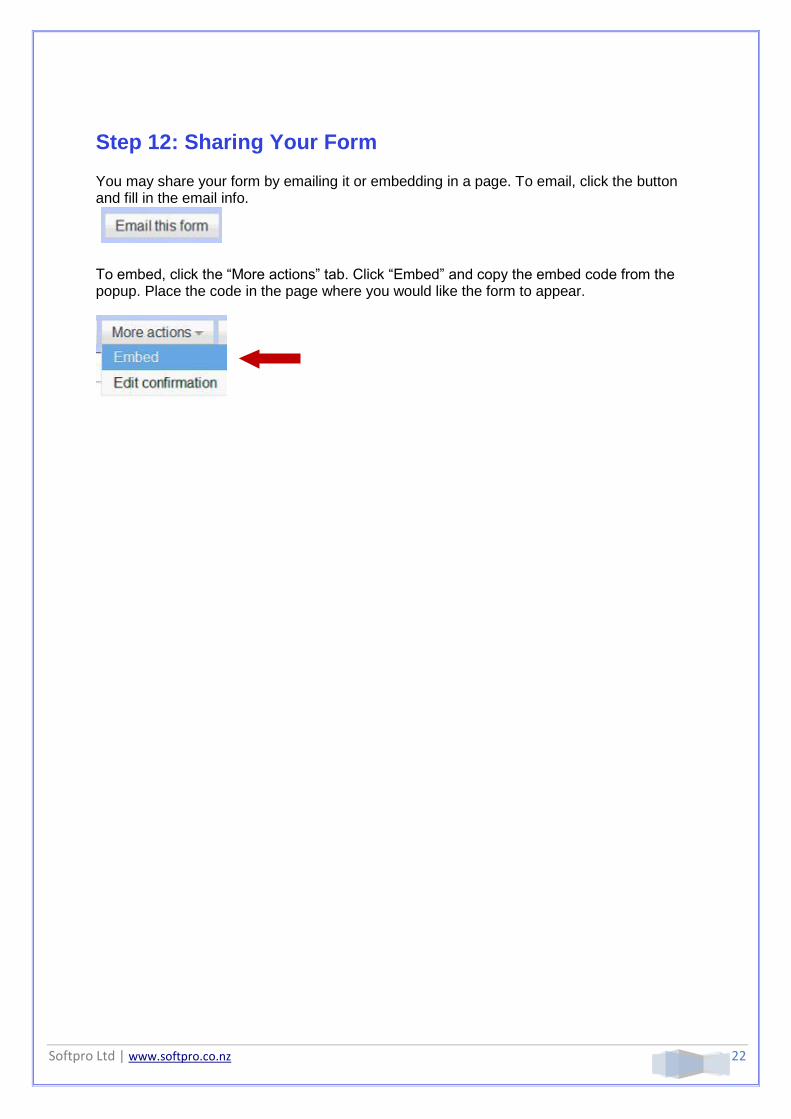
Step 10: Choose Requirement
Depending on the type of form you create, there may be questions that must be answered and others, which are optional. After each question that requires an answer, check the “Make this a required question” box and click done when finished.
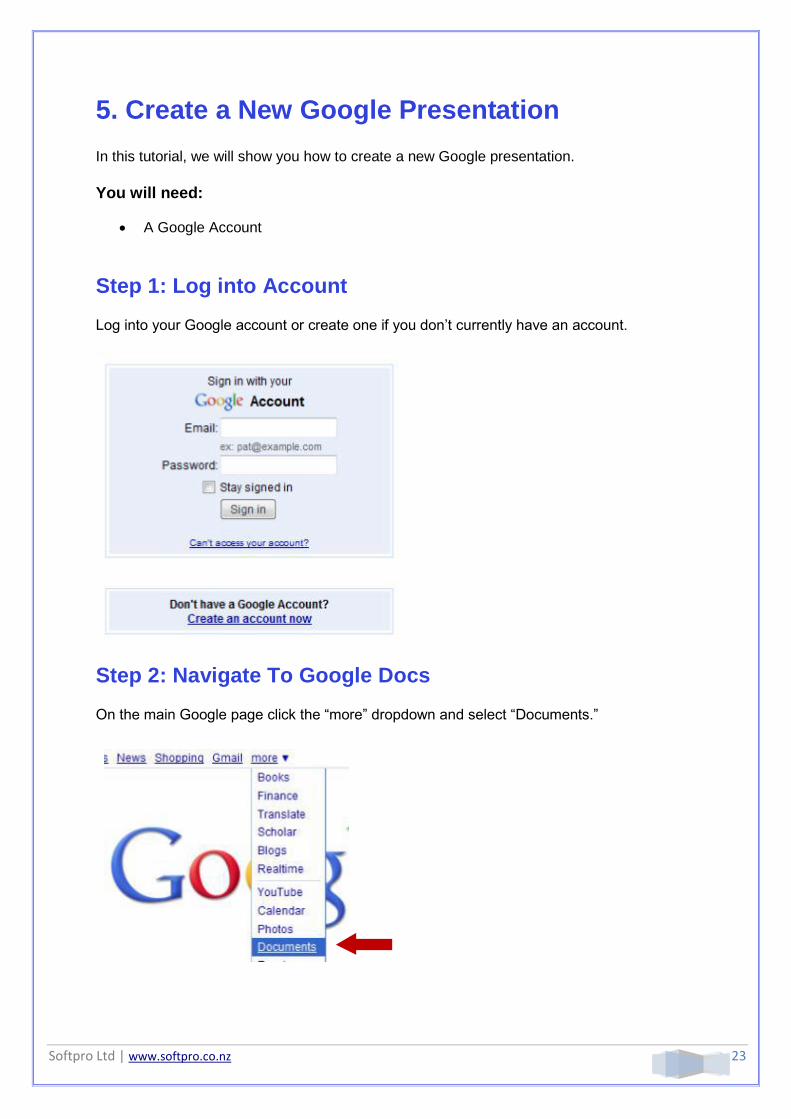
Step 11: Insert New Questions and Make Edits
To add additional questions to your form, go to a completed question and click the duplicate button on the far right. Then edit the new section as desired. Note that the edit buttons “follow” your cursor so just mouse over any section and click on the “pencil” button to edit, the “papers” button to duplicate and the “trash can” button to delete.
Note: If you need to edit the form after you’ve closed the “create new form” screen, look in your list of docs and open the form. It will open as a spread sheet. To edit, click the “Form” tab to access the tools and make the changes needed.
Be sure to click the save button in the top right before closing the popup screen.
Softpro Ltd | www.softpro.co.nz 22
Step 12: Sharing Your Form
You may share your form by emailing it or embedding in a page. To email, click the button and fill in the email info.
To embed, click the “More actions” tab. Click “Embed” and copy the embed code from the popup. Place the code in the page where you would like the form to appear.
Softpro Ltd | www.softpro.co.nz 23
5. Create a New Google Presentation
In this tutorial, we will show you how to create a new Google presentation.
You will need:
A Google Account
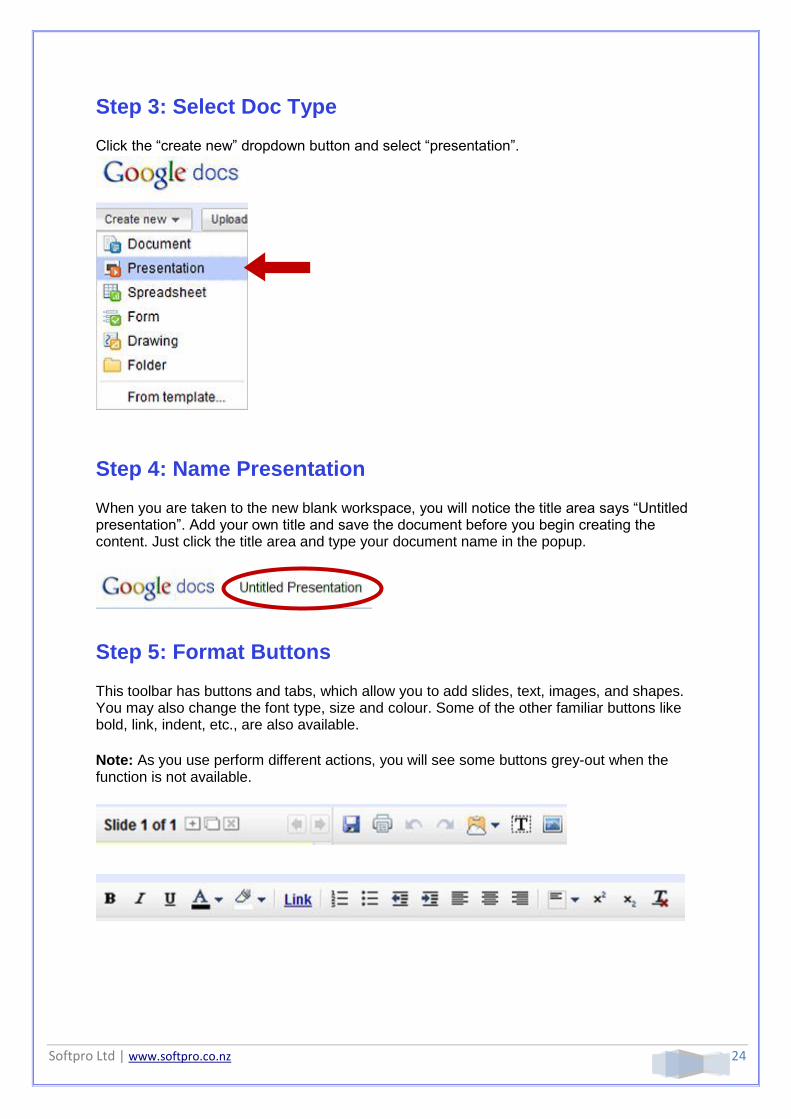
Step 1: Log into Account
Log into your Google account or create one if you don’t currently have an account.
Step 2: Navigate To Google Docs
On the main Google page click the “more” dropdown and select “Documents.”
Softpro Ltd | www.softpro.co.nz 24
Step 3: Select Doc Type
Click the “create new” dropdown button and select “presentation”.
Step 4: Name Presentation
When you are taken to the new blank workspace, you will notice the title area says “Untitled presentation”. Add your own title and save the document before you begin creating the content. Just click the title area and type your document name in the popup.
Step 5: Format Buttons
This toolbar has buttons and tabs, which allow you to add slides, text, images, and shapes. You may also change the font type, size and colour. Some of the other familiar buttons like bold, link, indent, etc., are also available.
Note: As you use perform different actions, you will see some buttons grey-out when the function is not available.
Softpro Ltd | www.softpro.co.nz 25
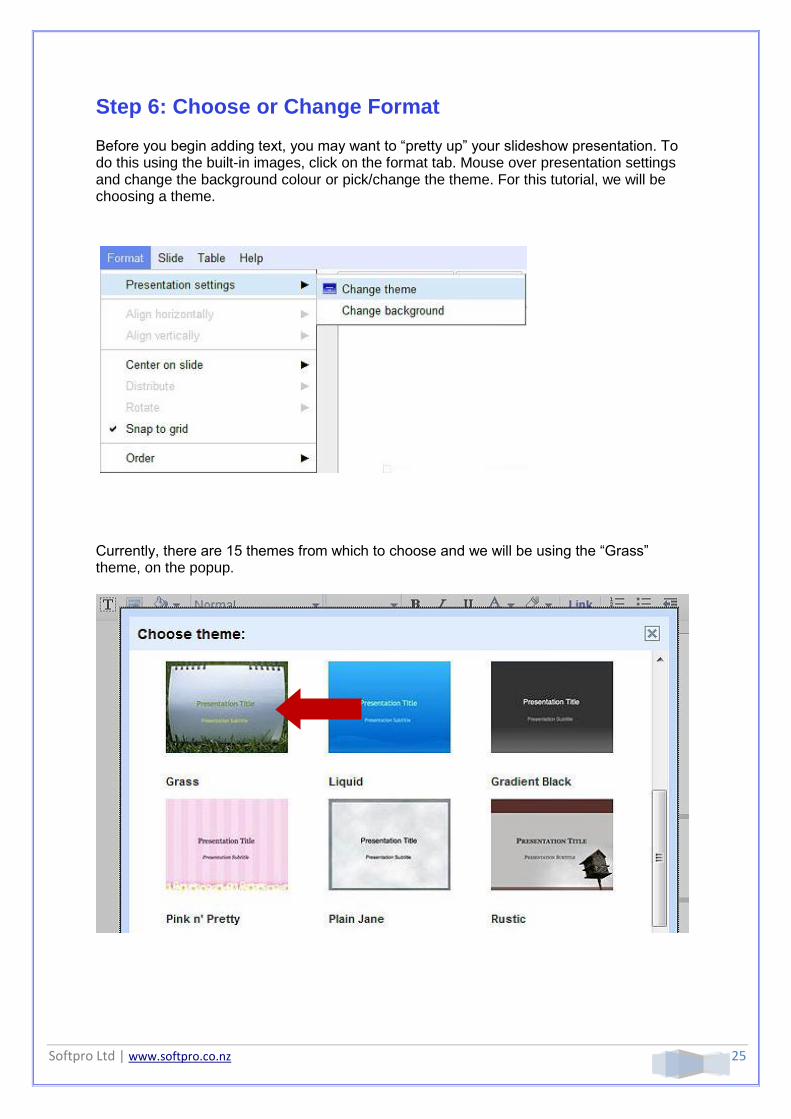
Step 6: Choose or Change Format
Before you begin adding text, you may want to “pretty up” your slideshow presentation. To do this using the built-in images, click on the format tab. Mouse over presentation settings and change the background colour or pick/change the theme. For this tutorial, we will be choosing a theme.
Currently, there are 15 themes from which to choose and we will be using the “Grass” theme, on the popup.

Softpro Ltd | www.softpro.co.nz 26
Step 7: Add Title and Subtitle
On the first slide, add your title and subtitle. Here we added the title in large green text. Below it, we added a phrase in a different colour for the subtitle. To change the font type, size or colour, highlight the text and select the appropriate buttons from the toolbar. Notices when you click in the title area, the new toolbar options are now seen in colour.
Step 8: Add a New Slide
You can add a slide in 2 ways. Click the “ + ” above the slide views on the left or click the slide tab and “New slide” in the dropdown. Both methods will bring up a popup box where you can choose the type of slide you’d like to add.
From the slide tab, you may also choose to duplicate or delete a slide you have already added. We prefer the tab method but you may find the other method is easier for you.
Softpro Ltd | www.softpro.co.nz 27
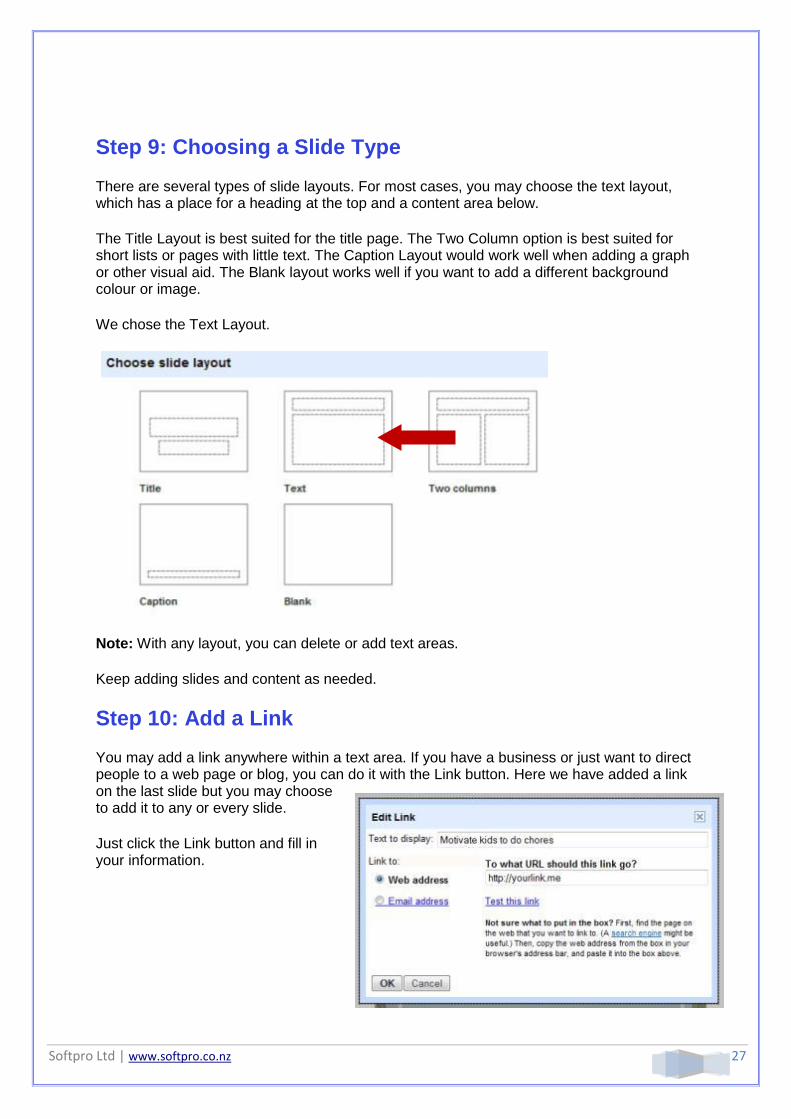
Step 9: Choosing a Slide Type
There are several types of slide layouts. For most cases, you may choose the text layout, which has a place for a heading at the top and a content area below.
The Title Layout is best suited for the title page. The Two Column option is best suited for short lists or pages with little text. The Caption Layout would work well when adding a graph or other visual aid. The Blank layout works well if you want to add a different background colour or image.
We chose the Text Layout.
Note: With any layout, you can delete or add text areas.
Keep adding slides and content as needed.
Step 10: Add a Link
You may add a link anywhere within a text area. If you have a business or just want to direct people to a web page or blog, you can do it with the Link button. Here we have added a link on the last slide but you may choose to add it to any or every slide.
Just click the Link button and fill in your information.
Softpro Ltd | www.softpro.co.nz 28
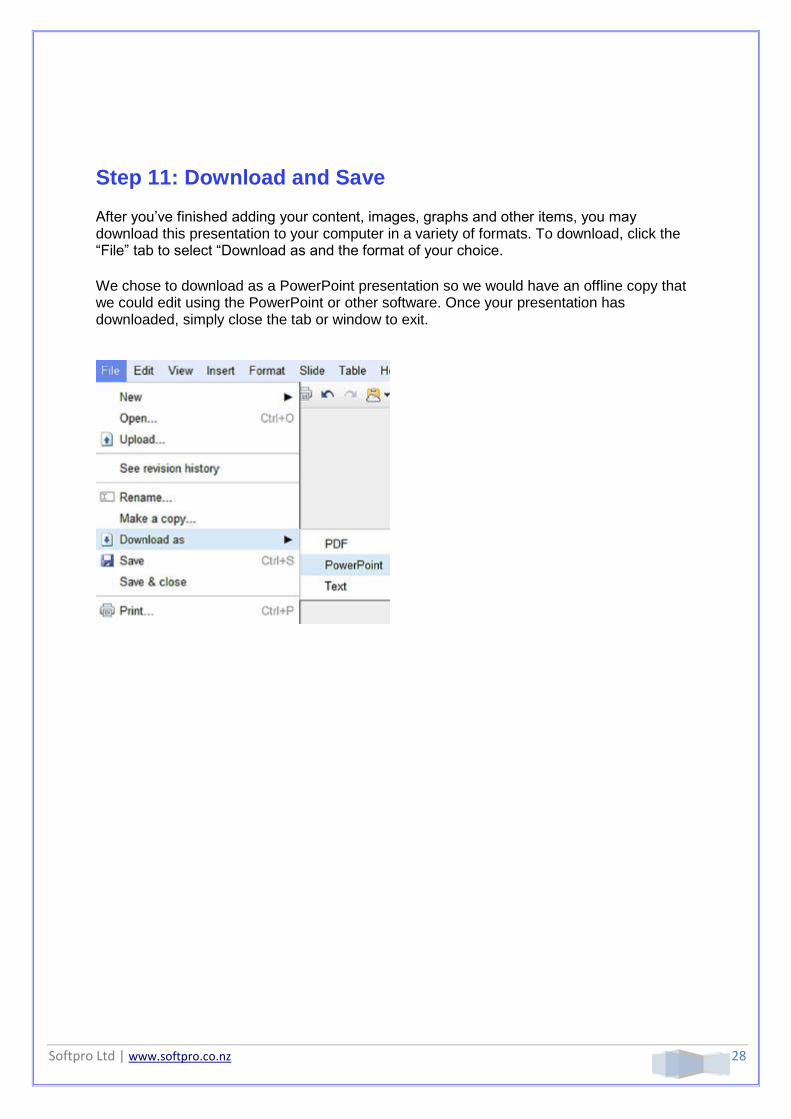
Step 11: Download and Save
After you’ve finished adding your content, images, graphs and other items, you may download this presentation to your computer in a variety of formats. To download, click the “File” tab to select “Download as and the format of your choice.
We chose to download as a PowerPoint presentation so we would have an offline copy that we could edit using the PowerPoint or other software. Once your presentation has downloaded, simply close the tab or window to exit.
Softpro Ltd | www.softpro.co.nz 29
6. Create a New Google Spread Sheet
In this tutorial, we will show you how to create a new Google spread sheet.
You will need:
A Google Account
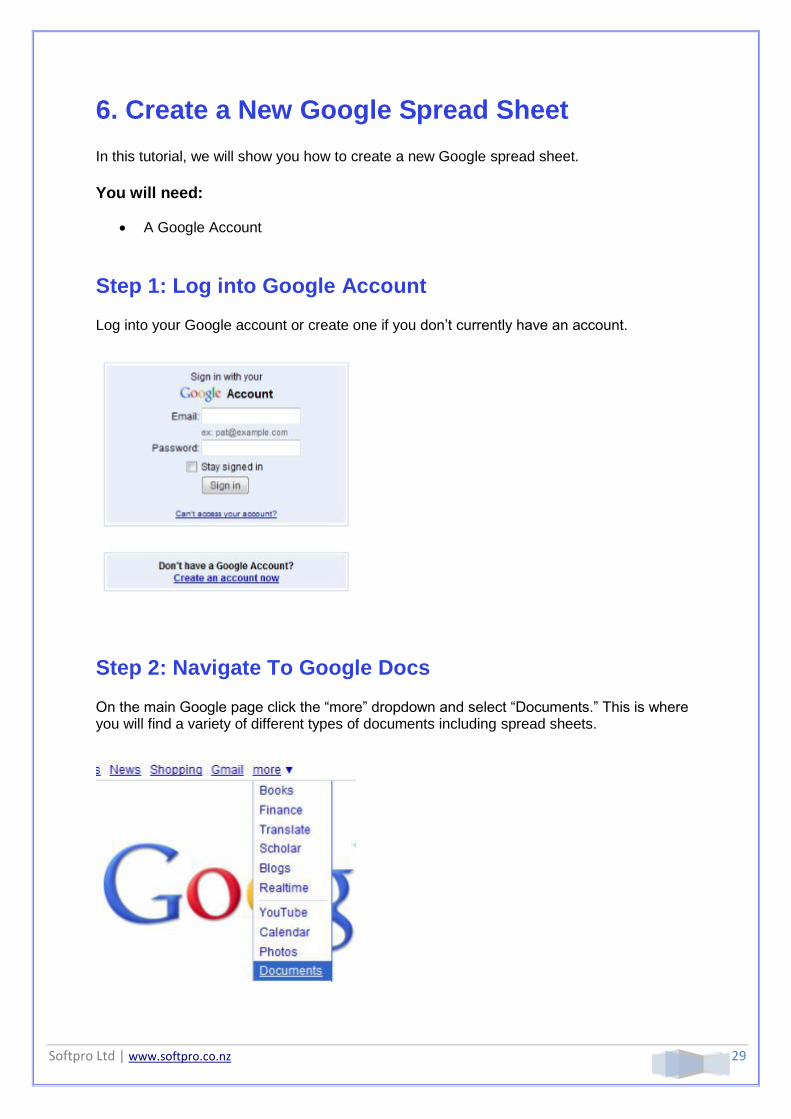
Step 1: Log into Google Account
Log into your Google account or create one if you don’t currently have an account.
Step 2: Navigate To Google Docs
On the main Google page click the “more” dropdown and select “Documents.” This is where you will find a variety of different types of documents including spread sheets.
Softpro Ltd | www.softpro.co.nz 30
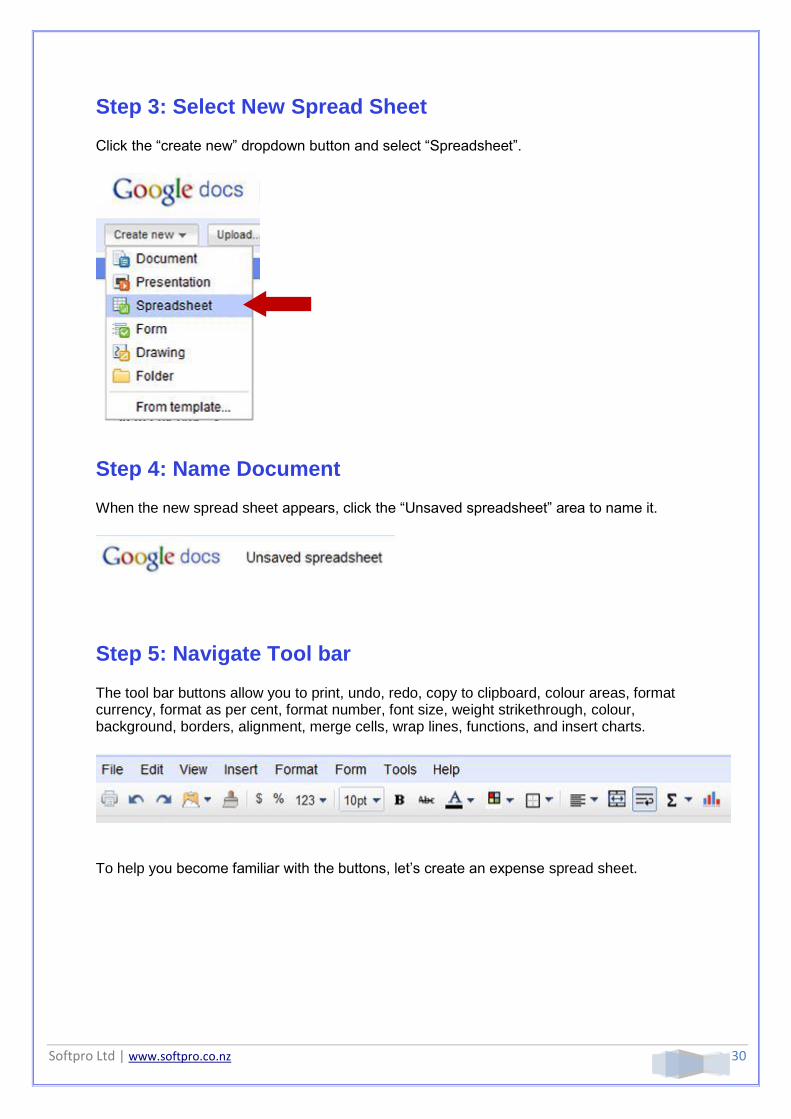
Step 3: Select New Spread Sheet
Click the “create new” dropdown button and select “Spreadsheet”.
Step 4: Name Document
When the new spread sheet appears, click the “Unsaved spreadsheet” area to name it.
Step 5: Navigate Tool bar
The tool bar buttons allow you to print, undo, redo, copy to clipboard, colour areas, format currency, format as per cent, format number, font size, weight strikethrough, colour, background, borders, alignment, merge cells, wrap lines, functions, and insert charts.
To help you become familiar with the buttons, let’s create an expense spread sheet.
Softpro Ltd | www.softpro.co.nz 31
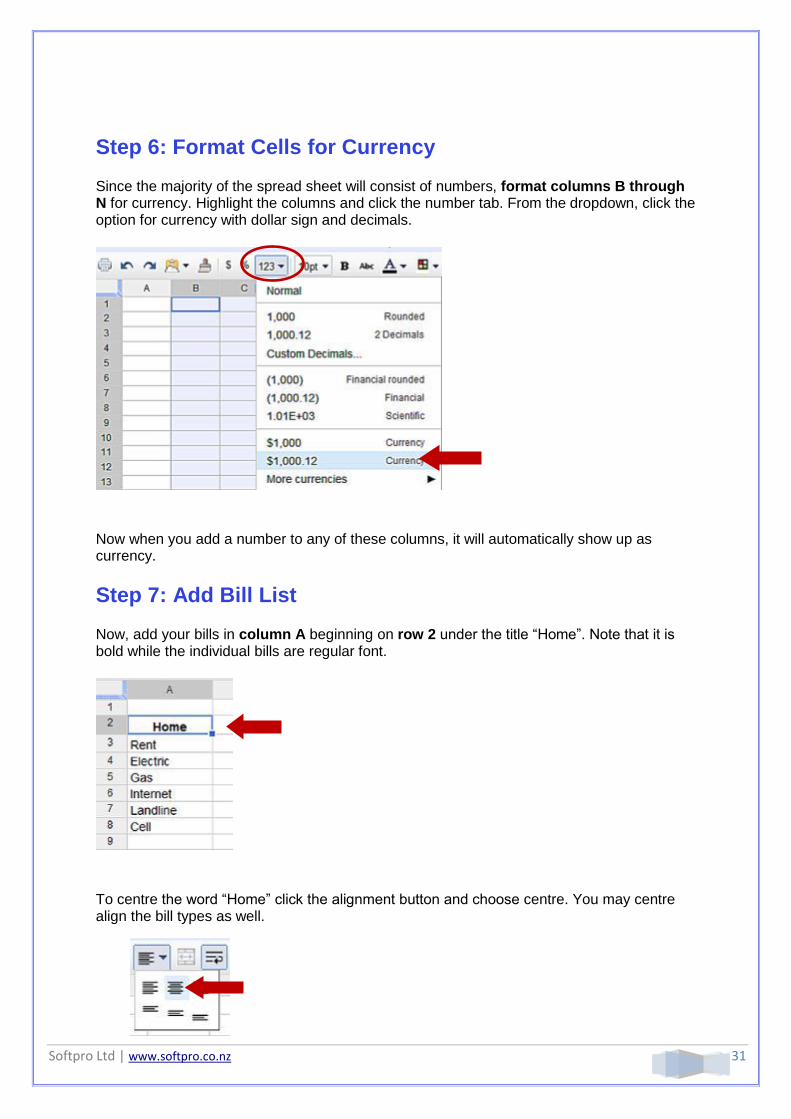
Step 6: Format Cells for Currency
Since the majority of the spread sheet will consist of numbers, format columns B through N for currency. Highlight the columns and click the number tab. From the dropdown, click the option for currency with dollar sign and decimals.
Now when you add a number to any of these columns, it will automatically show up as currency.
Step 7: Add Bill List
Now, add your bills in column A beginning on row 2 under the title “Home”. Note that it is bold while the individual bills are regular font.
To centre the word “Home” click the alignment button and choose centre. You may centre align the bill types as well.
Softpro Ltd | www.softpro.co.nz 32
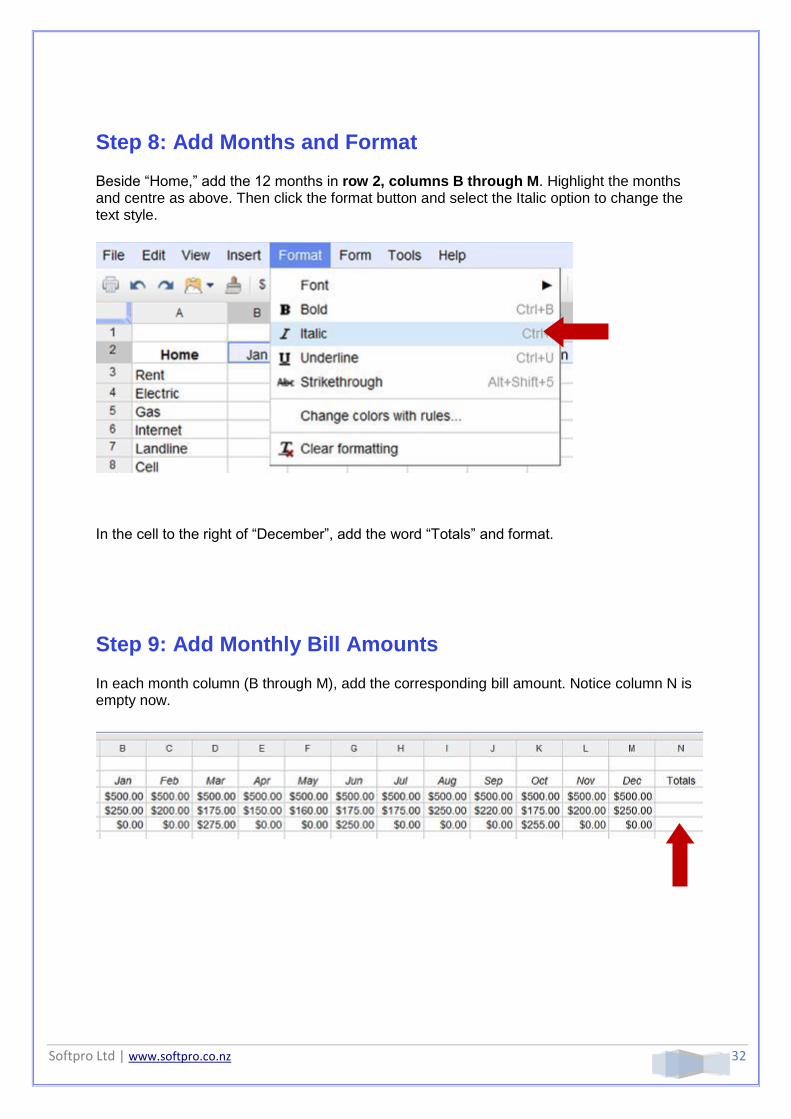
Step 8: Add Months and Format
Beside “Home,” add the 12 months in row 2, columns B through M. Highlight the months and centre as above. Then click the format button and select the Italic option to change the text style.
In the cell to the right of “December”, add the word “Totals” and format.
Step 9: Add Monthly Bill Amounts
In each month column (B through M), add the corresponding bill amount. Notice column N is empty now.
Softpro Ltd | www.softpro.co.nz 33
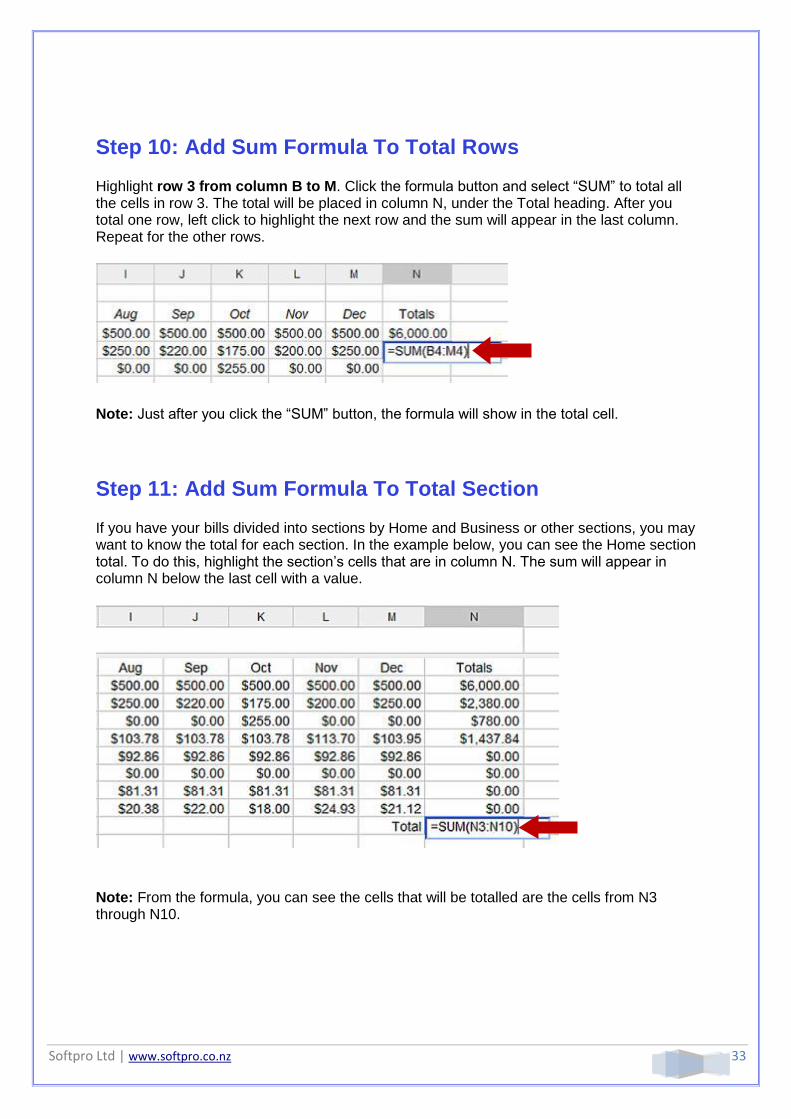
Step 10: Add Sum Formula To Total Rows
Highlight row 3 from column B to M. Click the formula button and select “SUM” to total all the cells in row 3. The total will be placed in column N, under the Total heading. After you total one row, left click to highlight the next row and the sum will appear in the last column. Repeat for the other rows.
Note: Just after you click the “SUM” button, the formula will show in the total cell.
Step 11: Add Sum Formula To Total Section
If you have your bills divided into sections by Home and Business or other sections, you may want to know the total for each section. In the example below, you can see the Home section total. To do this, highlight the section’s cells that are in column N. The sum will appear in column N below the last cell with a value.
Note: From the formula, you can see the cells that will be totalled are the cells from N3 through N10.
Softpro Ltd | www.softpro.co.nz 34
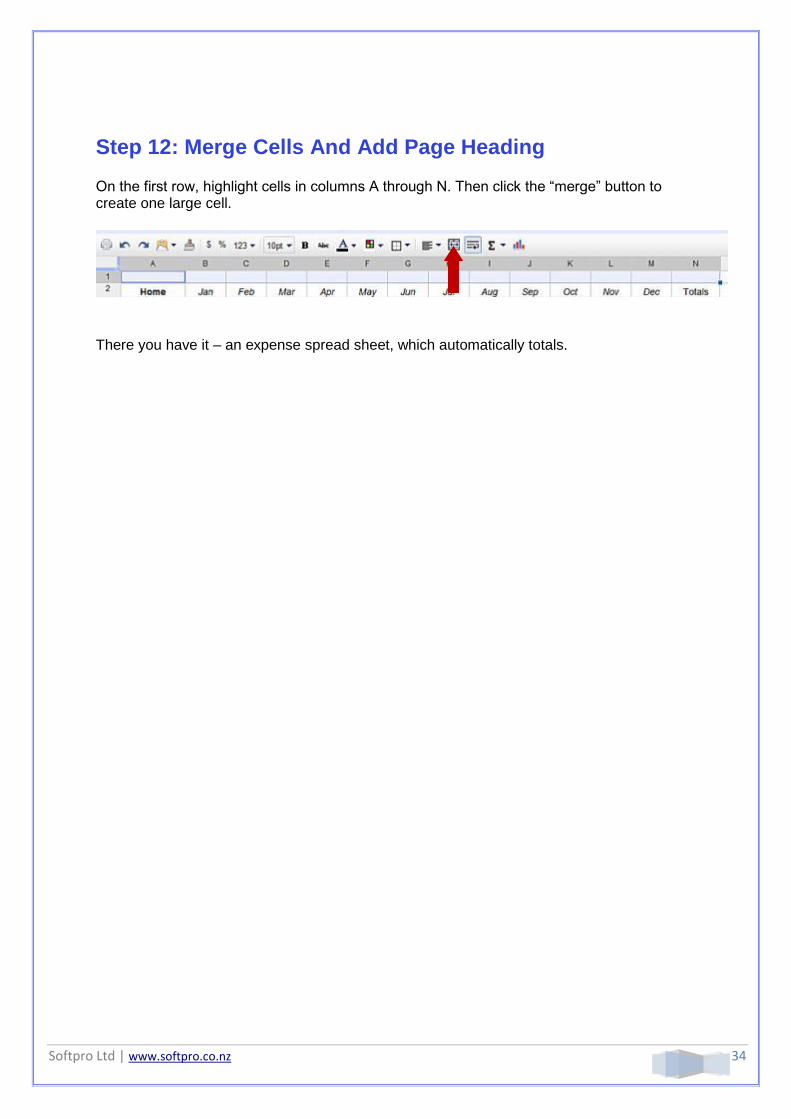
Step 12: Merge Cells And Add Page Heading
On the first row, highlight cells in columns A through N. Then click the “merge” button to create one large cell.
There you have it – an expense spread sheet, which automatically totals.
Recommended