Oracle® Enterprise ManagerCommand Line Interface
10g Release 5 (10.2.0.5)
B40004-09
June 2011

Oracle Enterprise Manager Command Line Interface, 10g Release 5 (10.2.0.5)
B40004-09
Copyright © 2004, 2011, Oracle and/or its affiliates. All rights reserved.
Primary Author: Michael Zampiceni
This software and related documentation are provided under a license agreement containing restrictions on use and disclosure and are protected by intellectual property laws. Except as expressly permitted in your license agreement or allowed by law, you may not use, copy, reproduce, translate, broadcast, modify, license, transmit, distribute, exhibit, perform, publish, or display any part, in any form, or by any means. Reverse engineering, disassembly, or decompilation of this software, unless required by law for interoperability, is prohibited.
The information contained herein is subject to change without notice and is not warranted to be error-free. If you find any errors, please report them to us in writing.
If this is software or related documentation that is delivered to the U.S. Government or anyone licensing it on behalf of the U.S. Government, the following notice is applicable:
U.S. GOVERNMENT RIGHTS Programs, software, databases, and related documentation and technical data delivered to U.S. Government customers are "commercial computer software" or "commercial technical data" pursuant to the applicable Federal Acquisition Regulation and agency-specific supplemental regulations. As such, the use, duplication, disclosure, modification, and adaptation shall be subject to the restrictions and license terms set forth in the applicable Government contract, and, to the extent applicable by the terms of the Government contract, the additional rights set forth in FAR 52.227-19, Commercial Computer Software License (December 2007). Oracle USA, Inc., 500 Oracle Parkway, Redwood City, CA 94065.
This software is developed for general use in a variety of information management applications. It is not developed or intended for use in any inherently dangerous applications, including applications which may create a risk of personal injury. If you use this software in dangerous applications, then you shall be responsible to take all appropriate fail-safe, backup, redundancy, and other measures to ensure the safe use of this software. Oracle Corporation and its affiliates disclaim any liability for any damages caused by use of this software in dangerous applications.
Oracle is a registered trademark of Oracle Corporation and/or its affiliates. Other names may be trademarks of their respective owners.
This software and documentation may provide access to or information on content, products, and services from third parties. Oracle Corporation and its affiliates are not responsible for and expressly disclaim all warranties of any kind with respect to third-party content, products, and services. Oracle Corporation and its affiliates will not be responsible for any loss, costs, or damages incurred due to your access to or use of third-party content, products, or services.
iii
Contents
Preface ................................................................................................................................................................. ix
Audience....................................................................................................................................................... ixDocumentation Accessibility ..................................................................................................................... ixRelated Documents ..................................................................................................................................... xConventions ................................................................................................................................................. x
1 Command Line Interface Concepts and Installation
Overview .................................................................................................................................................... 1-1How the EM CLI Works ......................................................................................................................... 1-2Preliminary Advisory Information ....................................................................................................... 1-3EM CLI Quick Start.................................................................................................................................. 1-3
Requirements ...................................................................................................................................... 1-4Installation and Setup........................................................................................................................ 1-4
Installing the EM CLI Client...................................................................................................... 1-4Setting Up the EM CLI Client ................................................................................................... 1-5Running Setup............................................................................................................................. 1-5Using EM CLI Log Files ............................................................................................................. 1-6Configuring an HTTP Proxy Environment............................................................................. 1-6
EM CLI Command-line Help ........................................................................................................... 1-7Security and Authentication .................................................................................................................. 1-7
HTTPS Trusted Certificate Management ...................................................................................... 1-8Secure Clients...................................................................................................................................... 1-8Secure Mode for the EM CLI Setup ................................................................................................. 1-8
Script Availability for Output Data Verbs........................................................................................... 1-9
2 Verb Reference
Verb Categories ......................................................................................................................................... 2-12.2 Alphabetized Verb List ..................................................................................................................... 2-6
add_beacon ...................................................................................................................................... 2-11add_group_to_mpa......................................................................................................................... 2-12add_mp_to_mpa ............................................................................................................................. 2-13add_target ........................................................................................................................................ 2-15add_target_property....................................................................................................................... 2-18apply_privilege_delegation_setting ............................................................................................. 2-19apply_template ................................................................................................................................ 2-21
iv
apply_template_tests ...................................................................................................................... 2-24argfile ................................................................................................................................................ 2-26assign_test_to_target....................................................................................................................... 2-27change_service_system_assoc ....................................................................................................... 2-28clear_credential................................................................................................................................ 2-29clear_stateless_alerts ....................................................................................................................... 2-30clone_as_home................................................................................................................................. 2-31clone_crs_home ............................................................................................................................... 2-34collect_metric ................................................................................................................................... 2-37clone_database_home..................................................................................................................... 2-38confirm_instance ............................................................................................................................. 2-41create_aggregate_service ............................................................................................................... 2-42create_blackout................................................................................................................................ 2-43create_group .................................................................................................................................... 2-48create_privilege_delegation_setting............................................................................................. 2-49create_red_group ............................................................................................................................ 2-51create_redundancy_group............................................................................................................. 2-52create_role ........................................................................................................................................ 2-54create_service................................................................................................................................... 2-56create_system................................................................................................................................... 2-58create_user........................................................................................................................................ 2-60delete_blackout................................................................................................................................ 2-62delete_guest_vm.............................................................................................................................. 2-63delete_group .................................................................................................................................... 2-64delete_instance................................................................................................................................. 2-65delete_job.......................................................................................................................................... 2-66delete_metric_promotion............................................................................................................... 2-67delete_privilege_delegation_settings ........................................................................................... 2-68delete_role ........................................................................................................................................ 2-69delete_system................................................................................................................................... 2-70delete_target..................................................................................................................................... 2-71delete_test......................................................................................................................................... 2-72delete_test_threshold...................................................................................................................... 2-73delete_user ....................................................................................................................................... 2-74disable_audit.................................................................................................................................... 2-75disable_test ....................................................................................................................................... 2-76enable_audit..................................................................................................................................... 2-77enable_test ........................................................................................................................................ 2-78execute_hostcmd ............................................................................................................................. 2-79execute_sql ....................................................................................................................................... 2-81export_report ................................................................................................................................... 2-83export_template............................................................................................................................... 2-84extend_as_home .............................................................................................................................. 2-85extend_crs_home............................................................................................................................. 2-88extend_rac_home ............................................................................................................................ 2-91extract_template_tests .................................................................................................................... 2-94get_agent_properties ...................................................................................................................... 2-95
v
get_agent_property......................................................................................................................... 2-96get_aggregate_service_info............................................................................................................ 2-97get_aggregate_service_members .................................................................................................. 2-98get_blackout_details ....................................................................................................................... 2-99get_blackout_reasons.................................................................................................................... 2-101get_blackout_targets ..................................................................................................................... 2-102get_blackouts ................................................................................................................................. 2-104get_ca_info ..................................................................................................................................... 2-106get_guest_vm_status .................................................................................................................... 2-108get_group_members ..................................................................................................................... 2-109get_groups...................................................................................................................................... 2-111get_instance_data_xml ................................................................................................................. 2-112get_instance_status ....................................................................................................................... 2-113get_instances .................................................................................................................................. 2-114get_job_execution_detail.............................................................................................................. 2-115get_jobs ........................................................................................................................................... 2-116get_metrics_for_stateless_alerts.................................................................................................. 2-118get_on _demand_metrics ............................................................................................................. 2-119get_procedure_types .................................................................................................................... 2-120get_procedure_xml ....................................................................................................................... 2-121get_procedures .............................................................................................................................. 2-122get_reports...................................................................................................................................... 2-123get_retry_arguments..................................................................................................................... 2-124get_system_members ................................................................................................................... 2-125get_target_properties.................................................................................................................... 2-127get_targets ...................................................................................................................................... 2-128get_test_thresholds ....................................................................................................................... 2-130get_unsync_alerts.......................................................................................................................... 2-132get_virtual_server_status ............................................................................................................. 2-133grant_license_no_validation........................................................................................................ 2-134grant_license_with_validation .................................................................................................... 2-137grant_privs ..................................................................................................................................... 2-140grant_roles...................................................................................................................................... 2-142help.................................................................................................................................................. 2-143ignore_instance.............................................................................................................................. 2-144import_report................................................................................................................................. 2-145import_template ............................................................................................................................ 2-146list_guest_vm ................................................................................................................................. 2-147list_privilege_delegation_settings .............................................................................................. 2-148list_target_privilege_delegation_settings .................................................................................. 2-149list_virtual_server.......................................................................................................................... 2-151list_virtual_server_pool................................................................................................................ 2-152loader_perf ..................................................................................................................................... 2-153login................................................................................................................................................. 2-154logout .............................................................................................................................................. 2-156modify_aggregate_service ........................................................................................................... 2-157modify_collection_schedule ........................................................................................................ 2-158
vi
modify_group ................................................................................................................................ 2-161modify_red_group ........................................................................................................................ 2-162modify_redundancy_group......................................................................................................... 2-163modify_role .................................................................................................................................... 2-165modify_system .............................................................................................................................. 2-167modify_target ................................................................................................................................ 2-169modify_user ................................................................................................................................... 2-172pause_guest_vm............................................................................................................................ 2-174provision......................................................................................................................................... 2-175reboot_guest_vm........................................................................................................................... 2-177reboot_virtual_server ................................................................................................................... 2-178relocate_targets.............................................................................................................................. 2-179remove_beacon.............................................................................................................................. 2-182remove_service_system_assoc .................................................................................................... 2-183remove_target_property .............................................................................................................. 2-184reschedule_instance ...................................................................................................................... 2-185resume_guest_vm ......................................................................................................................... 2-186resume_instance ............................................................................................................................ 2-187resync_agent .................................................................................................................................. 2-188retry_instance................................................................................................................................. 2-189retry_job.......................................................................................................................................... 2-190revoke_license_no_validation ..................................................................................................... 2-191revoke_license_with_validation ................................................................................................. 2-194revoke_privs .................................................................................................................................. 2-197revoke_roles ................................................................................................................................... 2-198run_avail_diag............................................................................................................................... 2-199run_promoted_metric_diag......................................................................................................... 2-200secure_agents ................................................................................................................................. 2-201set_agent_property ....................................................................................................................... 2-204set_availability ............................................................................................................................... 2-205set_credential ................................................................................................................................. 2-206set_instance_jobgrants.................................................................................................................. 2-208set_key_beacons_tests .................................................................................................................. 2-209set_metric_promotion................................................................................................................... 2-210set_properties................................................................................................................................. 2-213set_target_property_value ........................................................................................................... 2-214set_test_threshold.......................................................................................................................... 2-216setup................................................................................................................................................ 2-217show_audit_settings ..................................................................................................................... 2-220show_credential_set_info............................................................................................................. 2-221show_credential_type_info.......................................................................................................... 2-222show_operations_list .................................................................................................................... 2-223start_guest_vm .............................................................................................................................. 2-224start_paf_daemon.......................................................................................................................... 2-225start_vt_daemon............................................................................................................................ 2-226status_paf_daemon ....................................................................................................................... 2-227status_vt_daemon ......................................................................................................................... 2-228
vii
stop_blackout................................................................................................................................. 2-229stop_guest_vm............................................................................................................................... 2-230stop_instance.................................................................................................................................. 2-231stop_job........................................................................................................................................... 2-232stop_paf_daemon.......................................................................................................................... 2-233stop_virtual_server ....................................................................................................................... 2-234stop_vt_daemon ............................................................................................................................ 2-235submit_job ...................................................................................................................................... 2-236submit_agent_patch...................................................................................................................... 2-241submit_procedure ......................................................................................................................... 2-242subscribeto_rule ............................................................................................................................ 2-243suspend_guest_vm ....................................................................................................................... 2-245suspend_instance .......................................................................................................................... 2-246sync.................................................................................................................................................. 2-247sync_beacon ................................................................................................................................... 2-248unpause_guest_vm ....................................................................................................................... 2-249update_audit_settings .................................................................................................................. 2-250update_and_retry_step ................................................................................................................ 2-252update_db_password ................................................................................................................... 2-253update_host_password ................................................................................................................ 2-255update_password.......................................................................................................................... 2-257update_target_password.............................................................................................................. 2-259view_redundancy_group............................................................................................................. 2-261
3 Error Code Reference
EM CLI Infrastructure Errors ................................................................................................................. 3-1OMS Connection Errors .......................................................................................................................... 3-1File-fed Option Errors ............................................................................................................................. 3-2Built-in Verb Errors .................................................................................................................................. 3-2
Index

viii
ix
Preface
This manual covers installation and error codes for the Enterprise Manager Command Line Interface (EM CLI). A complete verb reference, which duplicates the command line help, is also included.
Note that more recent versions of this and other Enterprise Manager books are available on the Oracle Technology Network:
http://www.oracle.com/technology/documentation/oem.html
AudienceThis guide is written for administrators who want to access Enterprise Manager console functions directly from scripts or interactively from an OS shell. You should already be familiar with Enterprise Manager administrative tasks you want to perform.
You should also be familiar with the operation of your specific UNIX or Windows system. Refer to your platform-specific documentation if necessary.
Documentation AccessibilityFor information about Oracle's commitment to accessibility, visit the Oracle Accessibility Program website at
http://www.oracle.com/accessibility/
Accessibility of Code Examples in DocumentationScreen readers may not always correctly read the code examples in this document. The conventions for writing code require that closing braces should appear on an otherwise empty line; however, some screen readers may not always read a line of text that consists solely of a bracket or brace.
Accessibility of Links to External Web Sites in DocumentationThis documentation may contain links to Web sites of other companies or organizations that Oracle does not own or control. Oracle neither evaluates nor makes any representations regarding the accessibility of these Web sites.
TTY Access to Oracle Support ServicesTo reach Oracle Support Services, use a telecommunications relay service (TRS) to call Oracle Support at 1.800.223.1711.
x
Related DocumentsFor more information, see the following manuals in the Oracle Enterprise Manager 10g Release 2 documentation set:
■ Oracle Enterprise Manager Administrator's Guide
■ Oracle Enterprise Manager Concepts
■ Oracle Enterprise Manager Grid Control Quick Installation Guide
■ Oracle Enterprise Manager Grid Control Installation and Basic Configuration
■ Oracle Enterprise Manager Configuration for Oracle Collaboration Suite
■ Oracle Enterprise Manager Policy Reference Manual
■ Oracle Enterprise Manager Metric Reference Manual
■ Oracle Enterprise Manager Extensibility
ConventionsThe following text conventions are used in this document:
Convention Meaning
boldface Boldface type indicates graphical user interface elements associated with an action, or terms defined in text or the glossary.
italic Italic type indicates book titles, emphasis, or placeholder variables for which you supply particular values.
monospace Monospace type indicates commands within a paragraph, URLs, code in examples, text that appears on the screen, or text that you enter.
Command Line Interface Concepts and Installation 1-1
1Command Line Interface Concepts and
Installation
This chapter discusses the following Enterprise Manager Command Line Interface (EM CLI) topics:
■ Overview
■ How the EM CLI Works
■ Preliminary Advisory Information
■ EM CLI Quick Start
■ Security and Authentication
■ Script Availability for Output Data Verbs
1.1 OverviewThe Enterprise Manager Command Line Interface (EM CLI) enables you to access Enterprise Manager Grid Control functionality from text-based consoles (shells and command windows) for a variety of operating systems. You can call Enterprise Manager functionality using custom scripts, such as SQL*Plus, OS shell, Perl, or Tcl, thus easily integrating Enterprise Manager functionality with a company’s business process.
Using EM CLI, you can perform Enterprise Manager Grid Control console-based operations, such as monitoring and managing targets, jobs, groups, blackouts, notifications, and alerts. EM CLI is intended for use by enterprise or system administrators writing scripts, such as shell/batch files, Perl, Tcl, or PHP, that provide workflow in the customer's business process. You can also use EM CLI commands interactively from an operating system console.
EM CLI is fully integrated with Enterprise Manager’s security and user administration functions, enabling you to carry out operations using EM CLI with the same security and confidentiality as the Enterprise Manager Grid Control console. For example, you can only see and operate on targets for which you are authorized.
Examples of EM CLI usage are as follows:
■ Enterprise Manager Integration with third-party or custom software through scripting. Actions (such as adding/deleting targets, submitting/deleting jobs, creating/deleting users) that are part of a customer's business model can be performed through scripting.
■ Every day, send an e-mail list of backup jobs that were still running after 6 a.m.
How the EM CLI Works
1-2 Command Line Interface
■ Every week, write pertinent information about failed Enterprise Manager jobs to a file and then purge the Enterprise Manager job history.
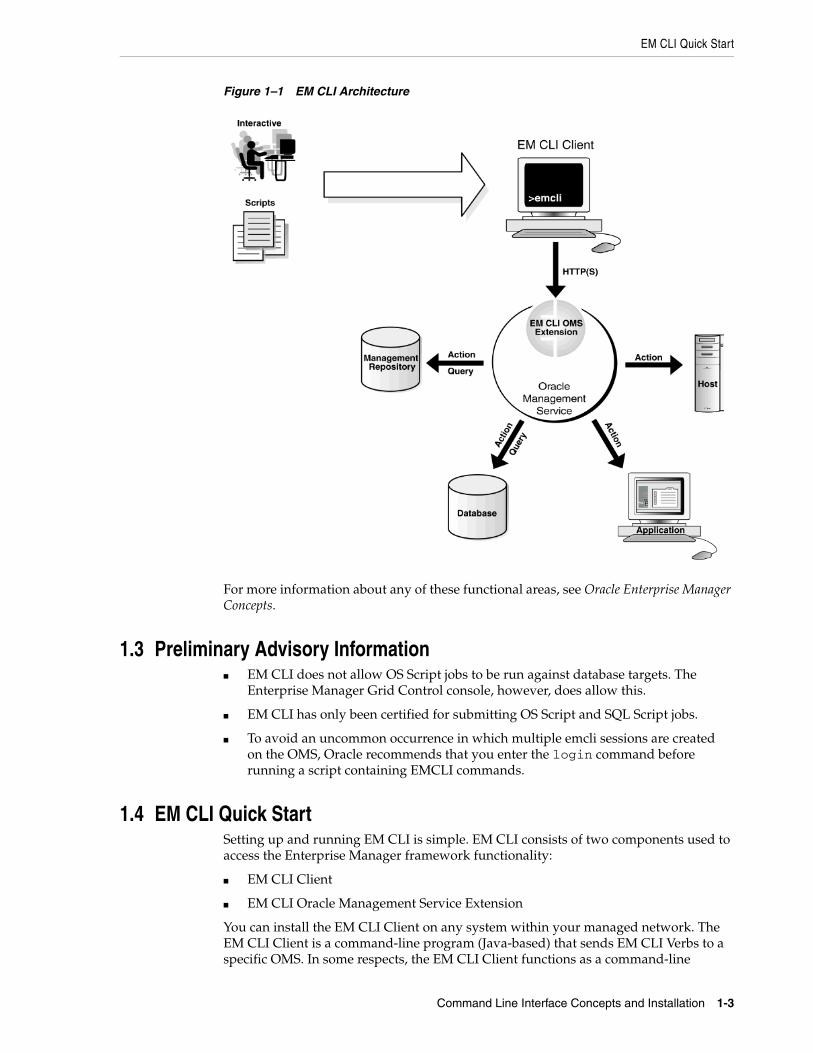
1.2 How the EM CLI Works The EM CLI Client is a Java application that accepts a command as input. The EM CLI Client uses the input command to identify a Verb to execute the command. A Verb is a Java plug-in extension to the EM CLI Client. A Verb services the command with its specific options and posts the results to the standard output stream. Any errors are posted to the error output stream. The Verb also returns an integer exit value that the EM CLI Client sets as the exit value of the command in the Client’s calling environment (the operating system console).
A Verb can perform its operations locally, but most of the verbs included with the EM CLI are covered by the remote Verb in the EM CLI Client. The remote Verb contacts the EM CLI OMS Extension in the Enterprise Manager Oracle Management Services (OMS) Console via HTTP/HTTPS and sends the command line through HTTP to the OMS for processing. The EM CLI OMS Extension is essentially a standard Enterprise Manager console page, and is installed in the OMS just as any other standard console page. As with the EMCLI Client, the EM CLI OMS Extension uses the input command to identify a Verb to execute the command. The Verb can access the Management Repository or Management Agents via OMS services as necessary in processing the command.
The remote Verb logs on to the OMS and establishes a session automatically, as necessary, to access the OMS-Side Controller. The remote Verb impersonates the Enterprise Manager user that invoked the command from the Client. The Enterprise Manager user credentials are established locally to the EM CLI Client during a one-time, interactive exchange when the Enterprise Manager administrator uses the EM CLI setup Verb. Figure 1–1 shows the high-level architecture of EM CLI.
EM CLI Quick Start
Command Line Interface Concepts and Installation 1-3
Figure 1–1 EM CLI Architecture
For more information about any of these functional areas, see Oracle Enterprise Manager Concepts.
1.3 Preliminary Advisory Information■ EM CLI does not allow OS Script jobs to be run against database targets. The
Enterprise Manager Grid Control console, however, does allow this.
■ EM CLI has only been certified for submitting OS Script and SQL Script jobs.
■ To avoid an uncommon occurrence in which multiple emcli sessions are created on the OMS, Oracle recommends that you enter the login command before running a script containing EMCLI commands.
1.4 EM CLI Quick StartSetting up and running EM CLI is simple. EM CLI consists of two components used to access the Enterprise Manager framework functionality:
■ EM CLI Client
■ EM CLI Oracle Management Service Extension
You can install the EM CLI Client on any system within your managed network. The EM CLI Client is a command-line program (Java-based) that sends EM CLI Verbs to a specific OMS. In some respects, the EM CLI Client functions as a command-line

EM CLI Quick Start
1-4 Command Line Interface
equivalent of an Enterprise Manager Grid Control console. The EM CLI OMS Extension is automatically installed with the OMS and serves as the communication conduit between the EM CLI Client and the OMS.
1.4.1 RequirementsBefore installing EM CLI, you will need the following items:
■ Enterprise Manager 10g 10.2.0.5 Grid Control framework
■ Java version 1.4.1 or greater
■ Workstation running Solaris, Linux, HPUX, Tru64, AIX, or Windows with NTFS (client installation)
1.4.2 Installation and SetupAs mentioned above, the EM CLI OMS Extension is automatically installed with the OMS. You must install and set up the client portion. The following instructions cover installation and setup procedures for the EM CLI Client.
1.4.2.1 Installing the EM CLI Client1. Obtain the EM CLI Client kit (emclikit.jar).
You can download the EM CLI client kit from any 10.2 Grid Control installation at the following location:
HTTP(S)://host:port/em/console/emcli/download
The emclikit.jar file is physically located in the $ORACLE_HOME/sysman/jlib directory of the 10.2.0.5 Grid Control OMS home.
2. Set your JAVA_HOME environment variable and ensure that it is part of your PATH. Make sure that this variable is set to the home of a JDK 1.4.1 or greater. For example:
setenv JAVA_HOME /usr/local/packages/j2sdk1.4.1_02
setenv PATH $JAVA_HOME/bin:$PATH
3. Enter the following command to ensure that you have the correct Java in your PATH:
which java
This should show the Java in $JAVA_HOME/bin.
1. Install the EM CLI Client. You can install the client portion of EM CLI in any directory either on the same system as the OMS or on any system in your network (download the emclikit.jar file to that system).
Go to the directory where you have installed emclikit.jar:
cd $HOME/<your emcli installation directory>
2. Enter the following command:
java -jar emclikit.jar client -install_dir=<emcli client dir>
After you have installed the EM CLI Client, you are ready to begin setting up the client.
EM CLI Quick Start
Command Line Interface Concepts and Installation 1-5
1.4.2.2 Setting Up the EM CLI ClientAfter the EM CLI Client is installed, you are ready to begin using EM CLI. At this point, you can run the EM CLI Client out of the installation directory location, or alternatively, you can add it to your PATH.
Immediately after installation, only basic operational Verbs are installed:
■ argfile — Execute an EM CLI Verb where the Verb and any arguments are contained in a file.
■ help — Access command-line help for EM CLI Verbs.
■ login — Log in and establish a session with the OMS.
■ logout — Log out of EM CLI client from Enterprise Manager.
■ setup — Configure EM CLI to function with a specific OMS.
■ sync — Synchronize the EM CLI Client with an OMS.
■ add_mp_to_mpa — Create (or add to) the Management Plug-in Archive. The Management Plug-in Archive is available for adding new target types to Enterprise Manager.
■ add_group_to_mpa — Add a Management Plug-in group to a Management Plug-in Archive.
1.4.2.3 Running SetupYou must run setup to connect the EM CLI Client to the OMS running the EM CLI Management Services. Running the setup Verb installs all available Verb-associated command-line help from the EM CLI Management Service. You must run setup each time you want to connect to a different OMS.
1. Understand the syntax of the setup Verb and its options by entering the following command or referring to the setup Verb in the verb reference chapter of this guide:
./emcli help setup
2. Enter the setup Verb with at least the minimum required parameters as shown in the following example:
./emcli setup -url=http://myworkstation.us.oracle.com:em_port/em -username=em_user
As you observed from step 1, the setup Verb has several options, including the following important options:
■ ssousername and ssopassword
■ noautologin
■ custom_attrib_file
3. Enter your user password when prompted after the EM CLI client connects with the EM CLI Management Services.
After running the setup Verb, the message "Emcli Setup Successful" appears, and you are ready to begin using EM CLI.
EM CLI Quick Start
1-6 Command Line Interface
1.4.2.4 Using EM CLI Log FilesEM CLI creates log files to record informational and error messages generated during operation. Not all of the logs in the following examples are necessarily present. Logs are created as needed and are append-based — they are preserved between invocations of EM CLI. You can safely delete log files any time without affecting EM CLI operation. The logs contain stack traces, which may not be useful for the casual user, but may benefit you with a high level of system knowledge.
The following examples show possible log file locations:
CONFIG_DIR/.emcli.logCONFIG_DIR/.emcli.log.1
CONFIG_DIR refers to the directory specified by the -dir option in the latest running of the setup Verb (with an appended .emcli subdirectory). The current CONFIG_DIR directory can be identified by executing the setup Verb with no options to display the setup summary.
Log files are limited to a maximum of 0.5 MB. EM CLI alternates between the two log files — as each file reaches the 0.5 MB limit, EM CLI begins writing to the other file, overwriting the oldest log file after emcli.log.1 has been filled for the first time.
The following examples show possible log file locations:
Example 1–1 No configuration directory is specified with the setup Verb (Default location)
user.home/.emcli/.emcli.loguser.home/.emcli/.emcli.log.1
If you do not specify a configuration directory when you run the setup Verb (-dir option is omitted), EM CLI assumes the .emcli configuration directory is located within the your local home directory. The log files are placed at the root level of the .emcli directory. The .emcli directory must be local (not mounted remotely).
Example 1–2 Local configuration directory is specified with the setup Verb (-dir=<local directory>
local.dir/.emcli/.emcli.loglocal.dir/.emcli/.emcli.log.1
In this example, the configuration directory is specified using the -dir option when the setup Verb is run. This allows you to specify a local configuration directory if the user home directory is mounted remotely (through NFS, for example).
1.4.2.5 Configuring an HTTP Proxy EnvironmentIf you are planning to use EM CLI through an HTTP proxy server, you need to set an additional environment variable (EMCLI_OPTS) that supplies EM CLI with the requisite proxy host and port information. The following examples illustrate setting
Tip: For complete information on the Setup verb and its options, including ssousername, ssopassword, noautologin, and custom_attrib_file referenced in step 2, see the setup Verb on page 2-217.
To configure the EM CLI Client to function with multiple OMSes by implementing multiple setups, see the Examples section for the Setup verb.
Security and Authentication
Command Line Interface Concepts and Installation 1-7
the EMCLI_OPTS environment variable for both Windows and UNIX operating systems.
Example 1–3 Setting EMCLI_OPTS in a Microsoft Windows Environment
>set EMCLI_OPTS=-Dhttp.proxyHost=<proxy host> -Dhttp.proxyPort=<proxy port>
Example 1–4 Setting EMCLI_OPTS in a UNIX Environment (TCSH)
>setenv EMCLI_OPTS "-Dhttp.proxyHost=<proxy host> -Dhttp.proxyPort=<proxy port>"
1.4.3 EM CLI Command-line HelpEM CLI incorporates a comprehensive command-line help system that provides various levels of assistance. Available from any EM CLI Client installation, the help system provides a listing of all available verbs, descriptive overviews for each verb, syntax, as well as usage examples. The command-line help is the definitive EM CLI information source.
To access command-line help, enter the following command for an overview of all available verbs ...
./emcli help
... or enter the following command for a detailed Verb description, Verb arguments and options, and usage examples.
./emcli help <verb>
1.5 Security and AuthenticationEach operating system user must execute a one-time EM CLI initialization that locally defines the location of the Oracle Management Services and the Enterprise Manager credentials to be used whenever this user invokes EM CLI.
Example 1–5 CLI-Enterprise Manager Authentication
>emcli setup –url="http[s]://host:port/em/" –username="<username>" [-trustall] [-novalidate]
>please enter password:
Note: You can find out the OMS connection information from any EM CLI Client by issuing the setup Verb without any options. For example:
>emcli setup
Oracle Enterprise Manager 10g Release 10.2.0.5
Copyright (c) 1996, 2007 Oracle Corporation. All rights reserved.
CONFIG DIRECTORY: /home/emcli_install_dir/.emcli
OMS : http://my_system.my_co.com:port/em/
EM USER : username
TRUST ALL : false
Security and Authentication
1-8 Command Line Interface
1.5.1 HTTPS Trusted Certificate Management For authenticating an OMS during the SSL server authentication phase of an HTTPS connection handshake, EM CLI searches for trusted certificates in the following key stores:
CONFIG_DIR/.emcli/.localkeystoreuser.home/.emcli/.keystoreJRE_HOME/lib/security/cacerts
CONFIG_DIR is the directory specified by the -dir option in the latest running of the setup Verb (with an appended .emcli subdirectory). See "Using EM CLI Log Files" on page 1-6 for more information about the CONFIG_DIR parameter.
JRE_HOME in a JDK installation is typically JAVA_HOME/jre.
The JDK keytool command can manage the key stores. For more information about this tool, see the security documentation for your Java VM installation, or at the time of this writing:
http://java.sun.com/j2se/1.5.0/docs/tooldocs/solaris/keytool.html
Not all of the key stores in the list above will necessarily be present.
1.5.2 Secure ClientsYou can provide credentials to EM CLI in one of two ways:
■ Provide credentials at the time of use. See the login and logout verbs for information on credentials.
■ Make credentials persistent on the host system where the EM CLI client is running, as might be the case when executing EM CLI verbs from a shell script.
1.5.3 Secure Mode for the EM CLI SetupThe EM CLI client installs certain configuration files and a client-side implementation of verbs on the client system. The EM CLI client configuration files contain information such as OMS URL, Enterprise Manager user name, Enterprise Manager password, and SSO user name and password (if EM is SSO-enabled). The default mode stores these credentials, which is inherently insecure because of backward compatibility reasons.
To eliminate this security risk, a secure mode EM CLI setup does not store any EM or SSO passwords on the client disk. For a secure setup, you need to specify the noautologin option for the Setup verb. You provide the credentials once during setup, after which a session is established between the client and OMS. All subsequent verbs use this session. Inactivity or an explicit logout (using the Logout verb) terminates this session, and a re-setup or an explicit login (using the Login verb) is required before invoking any new verb.
Caution: You should only make credentials persistent on hosts when the host is a secure client, since the only protection available for credentials is the file-system security of the OS.
Oracle also recommends not using persistent credentials if the EM CLI user’s home directory is mounted over NFS or any other insecure file system.
Script Availability for Output Data Verbs
Command Line Interface Concepts and Installation 1-9
■ For information on the noautologin option, see the setup verb on page 2-217.
■ For information on logging in, see the login verb on page 2-154.
■ For information on logging out, see the logout verb on page 2-156.
1.6 Script Availability for Output Data VerbsFor easy parsing of Verb output by scripts, a –script argument is available for all verbs that generate output data. If the -script argument is used, all output columns become tab-separated (with non-null values), and all rows become newline-separated. You can override the default column and row separators by using the -format argument in place of -script.
[-script|-format="name:<format type>;column_separator:<separator_text>;row_separator:<separator_text>"]
Supported -format arguments are shown in Table 1–1.
■ -script is equivalent to –format="name:script;column_separator:\u0009;row_separator:\u000A"
■ The values for column and row separator are given as one or more character strings. Any of the characters can be represented by the unicode sequence \uXXXX (where X is a hex value).
NOTE: The ASCII character set is represented by \u00XX, where XX can range from 00 to 7F. For example, the tab character is represented by \u0009 and the newline character is represented by \u000A.
■ The pretty format type has no attributes.
Table 1–1 Supported "-format" Arguments
Argument Explanation
-format="name:pretty" Pretty-print the output. This is the default when both -script and -format are not specified.
-format="name:script" Identical to just specifying –script. Columns are tab-separated, and rows are newline- separated.
-format="name:script;column_separator:<column_sep_string>"
Causes the Verb output to be column-separated by <column_sep_string>. Rows are separated by the newline character.
-format="name:script;row_separator:<row_sep_string>"
Causes the Verb output to be row-separated by <row_sep_string>. Columns are separated by the tab character.
-format="name:script;column_separator:<column_sep_string>;row_separator:<row_sep_string>"
Causes the Verb output to be column-separated by <column_sep_string> and row- separated by <row_sep_string>.
-format="name:csv" Produces a table with the columns separated by commas and the rows by newlines.
Script Availability for Output Data Verbs
1-10 Command Line Interface
■ In script mode, any Verb output cells that contain the separator strings are substituted with the unicode values for these strings so that the output does not break any scripts required to parse the output.
■ script is the only format type for which separators can be specified.
■ Separators need not be single characters, and can be specified using both regular characters interspersed with unicode sequences as shown in the following example:
Example 1–6 Complex Separator
Separator Specification: xxx\u0009xxx\u0009
This separator appears as xxx followed by a tab, followed by xxx followed by another tab.
Verb Reference 2-1
2Verb Reference
This chapter provides a complete listing of all EM CLI verbs in categorical as well as alphabetical order. Complete syntax and usage information is also available for each verb through EM CLI’s command line help system.
2.1 Verb CategoriesFor your convenience, this section provides another method other than alphabetization for finding verbs. All of the verbs for this release are listed in their respective categories.
Agent Administration Verbsget_agent_propertiesget_agent_propertyset_agent_property
Agent Patch Verbssubmit_agent_patch
Agent Recovery VerbsresyncAgent
Audit Settings Verbsdisable_auditenable_auditshow_audit_settingsshow_operations_listupdate_audit_settings
Blackout Verbscreate_blackoutdelete_blackoutget_blackout_detailsget_blackout_reasonsget_blackout_targetsget_blackoutsstop_blackout
Verb Categories
2-2 Command Line Interface
Cloning Verbsclone_as_homeclone_crs_homeclone_database_homeextend_as_homeextend_crs_homeextend_rac_home
Credential Verbsclear_credentialset_credentialshow_credential_set_infoshow_credential_type_infoupdate_host_passwordupdate_passwordupdate_target_password
Credential Verbs - Oracle Databaseupdate_db_password
Deployment Procedure Verbsconfirm_instancedelete_instanceget_instance_data_xmlget_instance_statusget_instancesget_procedure_typesget_procedure_xmlget_proceduresget_retry_argumentsignore_instancereschedule_instanceresume_instanceretry_instanceset_instance_jobgrantsstart_paf_daemonstatus_paf_daemonstop_instancestop_paf_daemonsubmit_proceduresuspend_instanceupdate_and_retry_step
Execute Command Verbsexecute_hostcmdexecute_sql
Group Verbscreate_groupdelete_groupget_group_membersget_groupsmodify_group
Verb Categories
Verb Reference 2-3
Job Verbsdelete_jobget_job_execution_detailget_jobsretry_jobstop_jobsubmit_job
Licensing Verbsgrant_license_no_validationgrant_license_with_validationrevoke_license_no_validationrevoke_license_with_validation
Management Plug-in Verbsclear_stateless_alertscollect_metricget_metrics_for_stateless_alertsget_on_demand_metricsget_unsync_alerts
Management Services and Repository Verbsloader_perf
Metric Collection and Alerts Verbsadd_group_to_mpaadd_mp_to_mpa
Notification Verbssubscribeto_rule
Monitoring Templates Verbsapply_templateexport_templateimport_templatemodify_collection_schedulesubscribeto_ruleupdate_event_rule
Privilege Delegation Settings Verbsapply_privilege_delegation_settingcreate_privilege_delegation_settingdelete_privilege_delegation_settingslist_privilege_delegation_settingslist_target_privilege_delegation_settings
Provisioning Verbsprovision
Redundancy Group Verbscreate_red_groupcreate_redundancy_group
Verb Categories
2-4 Command Line Interface
modify_red_groupmodify_redundancy_groupview_redundancy_group
Report Import/Export Verbsexport_reportget_reportsimport_report
SecureComm Verbsget_ca_infosecure_agents
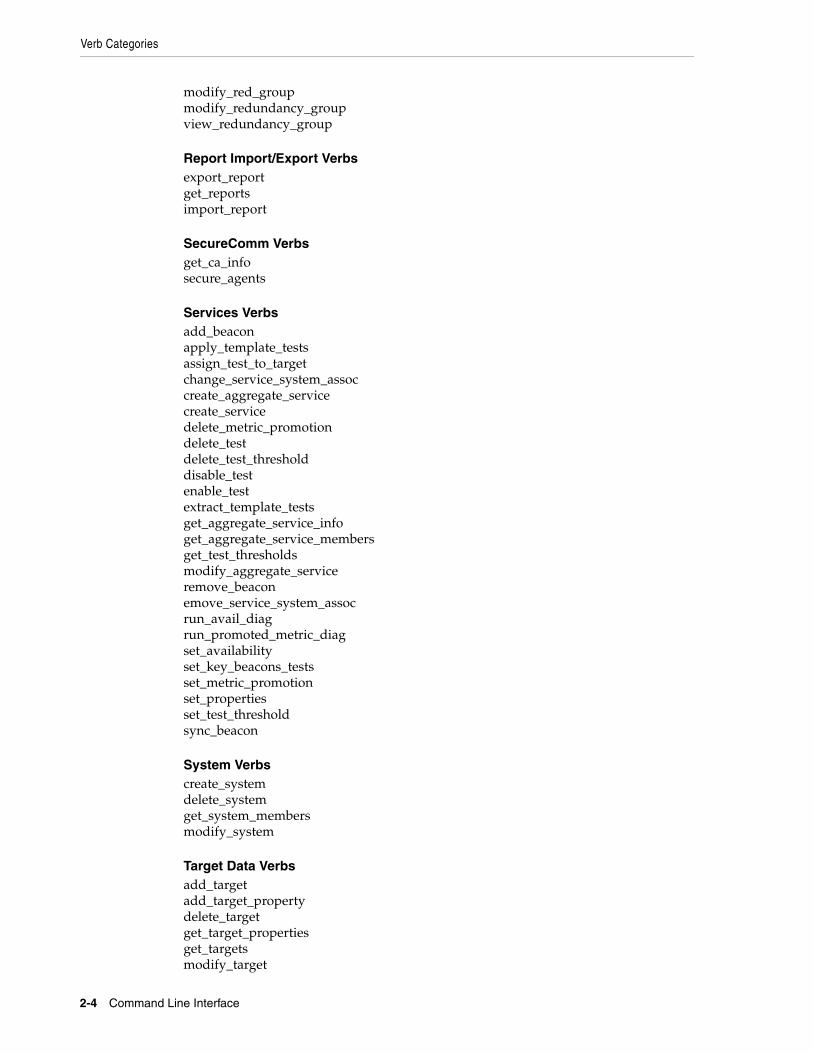
Services Verbsadd_beaconapply_template_testsassign_test_to_targetchange_service_system_assoccreate_aggregate_servicecreate_servicedelete_metric_promotiondelete_testdelete_test_thresholddisable_testenable_testextract_template_testsget_aggregate_service_infoget_aggregate_service_membersget_test_thresholdsmodify_aggregate_serviceremove_beaconemove_service_system_assocrun_avail_diagrun_promoted_metric_diagset_availabilityset_key_beacons_testsset_metric_promotionset_propertiesset_test_thresholdsync_beacon
System Verbscreate_systemdelete_systemget_system_membersmodify_system
Target Data Verbsadd_targetadd_target_propertydelete_targetget_target_propertiesget_targetsmodify_target
Verb Categories
Verb Reference 2-5
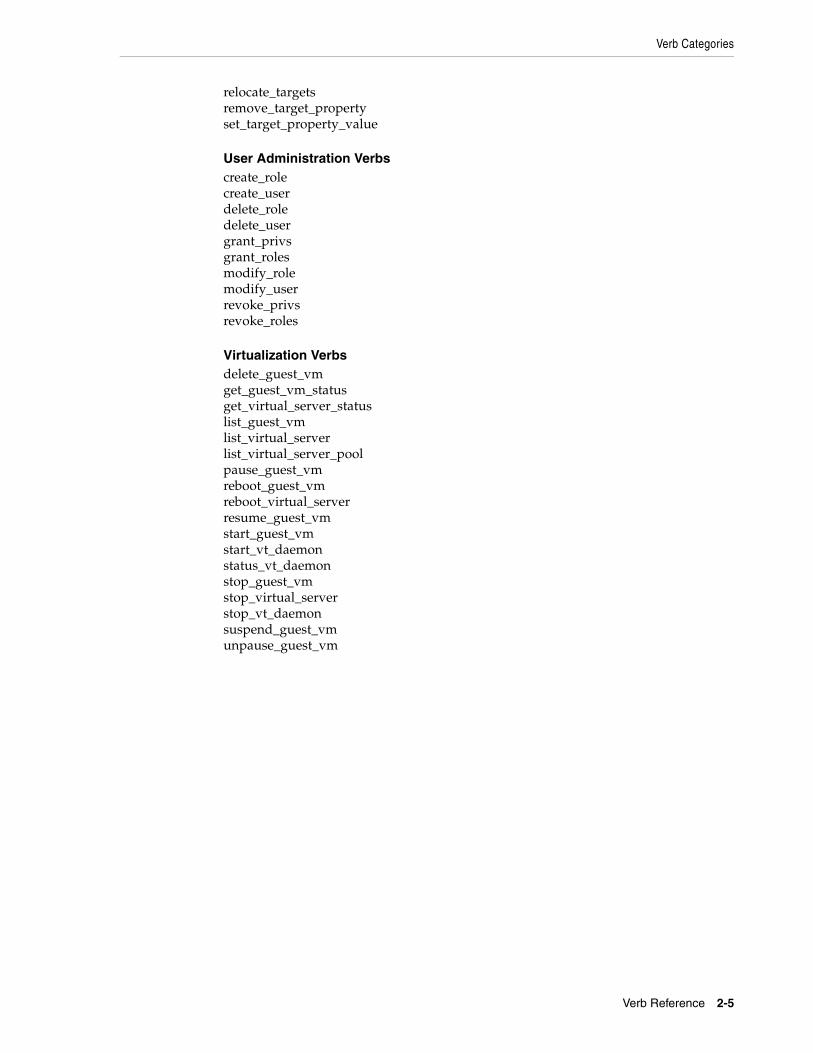
relocate_targetsremove_target_propertyset_target_property_value
User Administration Verbscreate_rolecreate_userdelete_roledelete_usergrant_privsgrant_rolesmodify_rolemodify_userrevoke_privsrevoke_roles
Virtualization Verbsdelete_guest_vmget_guest_vm_statusget_virtual_server_statuslist_guest_vmlist_virtual_serverlist_virtual_server_poolpause_guest_vmreboot_guest_vmreboot_virtual_serverresume_guest_vmstart_guest_vmstart_vt_daemonstatus_vt_daemonstop_guest_vmstop_virtual_serverstop_vt_daemonsuspend_guest_vmunpause_guest_vm
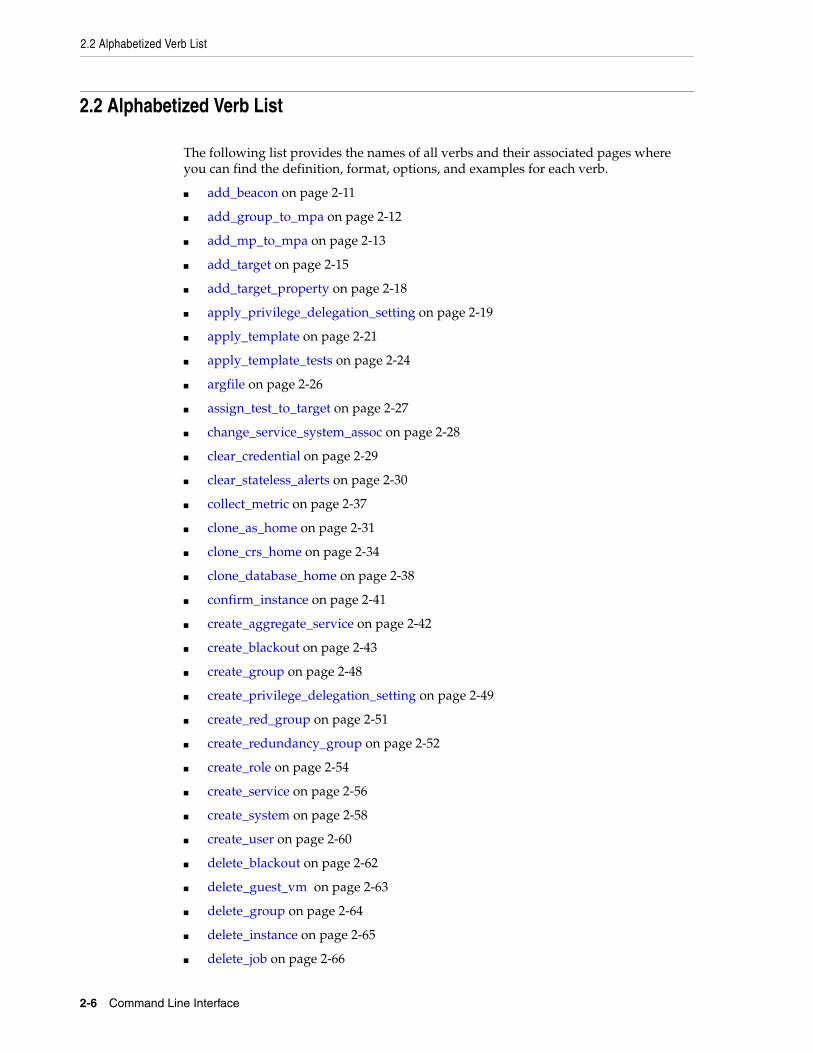
2.2 Alphabetized Verb List
2-6 Command Line Interface
2.2 Alphabetized Verb List
The following list provides the names of all verbs and their associated pages where you can find the definition, format, options, and examples for each verb.
■ add_beacon on page 2-11
■ add_group_to_mpa on page 2-12
■ add_mp_to_mpa on page 2-13
■ add_target on page 2-15
■ add_target_property on page 2-18
■ apply_privilege_delegation_setting on page 2-19
■ apply_template on page 2-21
■ apply_template_tests on page 2-24
■ argfile on page 2-26
■ assign_test_to_target on page 2-27
■ change_service_system_assoc on page 2-28
■ clear_credential on page 2-29
■ clear_stateless_alerts on page 2-30
■ collect_metric on page 2-37
■ clone_as_home on page 2-31
■ clone_crs_home on page 2-34
■ clone_database_home on page 2-38
■ confirm_instance on page 2-41
■ create_aggregate_service on page 2-42
■ create_blackout on page 2-43
■ create_group on page 2-48
■ create_privilege_delegation_setting on page 2-49
■ create_red_group on page 2-51
■ create_redundancy_group on page 2-52
■ create_role on page 2-54
■ create_service on page 2-56
■ create_system on page 2-58
■ create_user on page 2-60
■ delete_blackout on page 2-62
■ delete_guest_vm on page 2-63
■ delete_group on page 2-64
■ delete_instance on page 2-65
■ delete_job on page 2-66
2.2 Alphabetized Verb List
Verb Reference 2-7
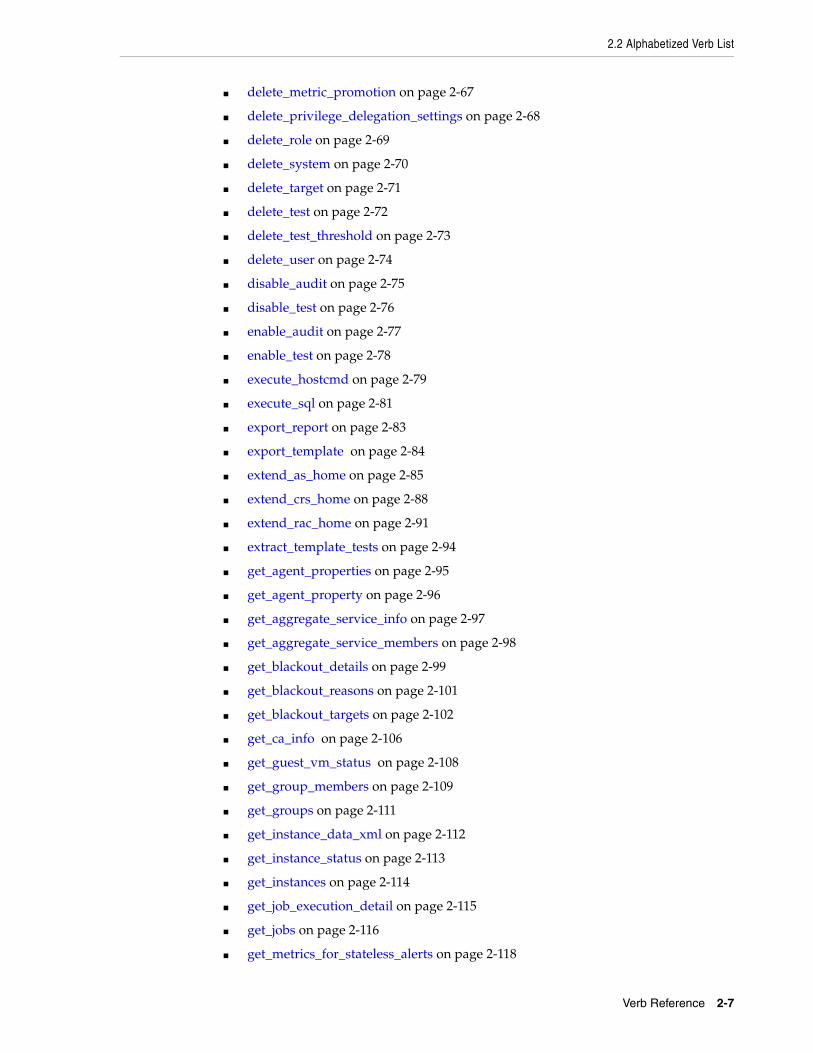
■ delete_metric_promotion on page 2-67
■ delete_privilege_delegation_settings on page 2-68
■ delete_role on page 2-69
■ delete_system on page 2-70
■ delete_target on page 2-71
■ delete_test on page 2-72
■ delete_test_threshold on page 2-73
■ delete_user on page 2-74
■ disable_audit on page 2-75
■ disable_test on page 2-76
■ enable_audit on page 2-77
■ enable_test on page 2-78
■ execute_hostcmd on page 2-79
■ execute_sql on page 2-81
■ export_report on page 2-83
■ export_template on page 2-84
■ extend_as_home on page 2-85
■ extend_crs_home on page 2-88
■ extend_rac_home on page 2-91
■ extract_template_tests on page 2-94
■ get_agent_properties on page 2-95
■ get_agent_property on page 2-96
■ get_aggregate_service_info on page 2-97
■ get_aggregate_service_members on page 2-98
■ get_blackout_details on page 2-99
■ get_blackout_reasons on page 2-101
■ get_blackout_targets on page 2-102
■ get_ca_info on page 2-106
■ get_guest_vm_status on page 2-108
■ get_group_members on page 2-109
■ get_groups on page 2-111
■ get_instance_data_xml on page 2-112
■ get_instance_status on page 2-113
■ get_instances on page 2-114
■ get_job_execution_detail on page 2-115
■ get_jobs on page 2-116
■ get_metrics_for_stateless_alerts on page 2-118
2.2 Alphabetized Verb List
2-8 Command Line Interface
■ get_on _demand_metrics on page 2-119
■ get_procedure_types on page 2-120
■ get_procedure_xml on page 2-121
■ get_procedures on page 2-122
■ get_reports on page 2-123
■ get_retry_arguments on page 2-124
■ get_system_members on page 2-125
■ get_target_properties on page 2-127
■ get_targets on page 2-128
■ get_test_thresholds on page 2-130
■ get_unsync_alerts on page 2-132
■ get_virtual_server_status on page 2-128
■ grant_license_no_validation on page 2-134
■ grant_license_with_validation on page 2-137
■ grant_privs on page 2-140
■ grant_roles on page 2-142
■ help on page 2-143
■ ignore_instance on page 2-144
■ import_report on page 2-145
■ import_template on page 2-146
■ list_guest_vm on page 2-147
■ list_privilege_delegation_settings on page 2-148
■ list_target_privilege_delegation_settings on page 2-149
■ list_virtual_server on page 2-151
■ list_virtual_server_pool on page 2-152
■ loader_perf on page 2-153
■ login on page 2-154
■ logout on page 2-156
■ modify_aggregate_service on page 2-157
■ modify_collection_schedule on page 2-158
■ modify_group on page 2-161
■ modify_red_group on page 2-162
■ modify_redundancy_group on page 2-163
■ modify_role on page 2-165
■ modify_system on page 2-167
■ modify_target on page 2-169
■ modify_user on page 2-172
2.2 Alphabetized Verb List
Verb Reference 2-9
■ pause_guest_vm on page 2-174
■ provision on page 2-175
■ reboot_guest_vm on page 2-177
■ reboot_virtual_server on page 2-178
■ relocate_targets on page 2-179
■ remove_beacon on page 2-182
■ remove_service_system_assoc on page 2-183
■ remove_target_property on page 2-184
■ reschedule_instance on page 2-185
■ resume_guest_vm on page 2-186
■ resume_instance on page 2-187
■ resync_agent on page 2-188
■ retry_instance on page 2-189
■ retry_job on page 2-190
■ revoke_license_no_validation on page 2-191
■ revoke_license_with_validation on page 2-194
■ revoke_privs on page 2-197
■ revoke_roles on page 2-198
■ run_avail_diag on page 2-199
■ run_promoted_metric_diag on page 2-200
■ secure_agents on page 2-201
■ set_agent_property on page 2-204
■ set_availability on page 2-205
■ set_credential on page 2-206
■ set_instance_jobgrants on page 2-208
■ set_instance_jobgrants on page 2-208
■ set_metric_promotion on page 2-210
■ set_properties on page 2-213
■ set_target_property_value on page 2-214
■ set_test_threshold on page 2-216
■ setup on page 2-217
■ show_audit_settings on page 2-220
■ show_credential_set_info on page 2-221
■ show_credential_type_info on page 2-222
■ show_operations_list on page 2-223
■ start_guest_vm on page 2-224
■ start_paf_daemon on page 2-225
2.2 Alphabetized Verb List
2-10 Command Line Interface
■ start_vt_daemon on page 2-226
■ status_paf_daemon on page 227
■ status_vt_daemon on page 2-228
■ stop_blackout on page 2-229
■ stop_guest_vm on page 2-230
■ stop_instance on page 2-231
■ stop_job on page 2-232
■ stop_paf_daemon on page 2-233
■ stop_virtual_server on page 2-234
■ stop_vt_daemon on page 2-235
■ submit_agent_patch on page 2-241
■ submit_job on page 2-236
■ submit_procedure on page 2-242
■ subscribeto_rule on page 2-243
■ suspend_guest_vm on page 2-245
■ suspend_instance on page 2-246
■ sync on page 2-247
■ sync_beacon on page 2-248
■ unpause_guest_vm on page 2-249
■ update_db_password on page 2-253
■ update_host_password on page 2-255
■ update_password on page 2-257
■ update_target_password on page 2-259
■ view_redundancy_group on page 2-261
2.2 Alphabetized Verb List
Verb Reference 2-11
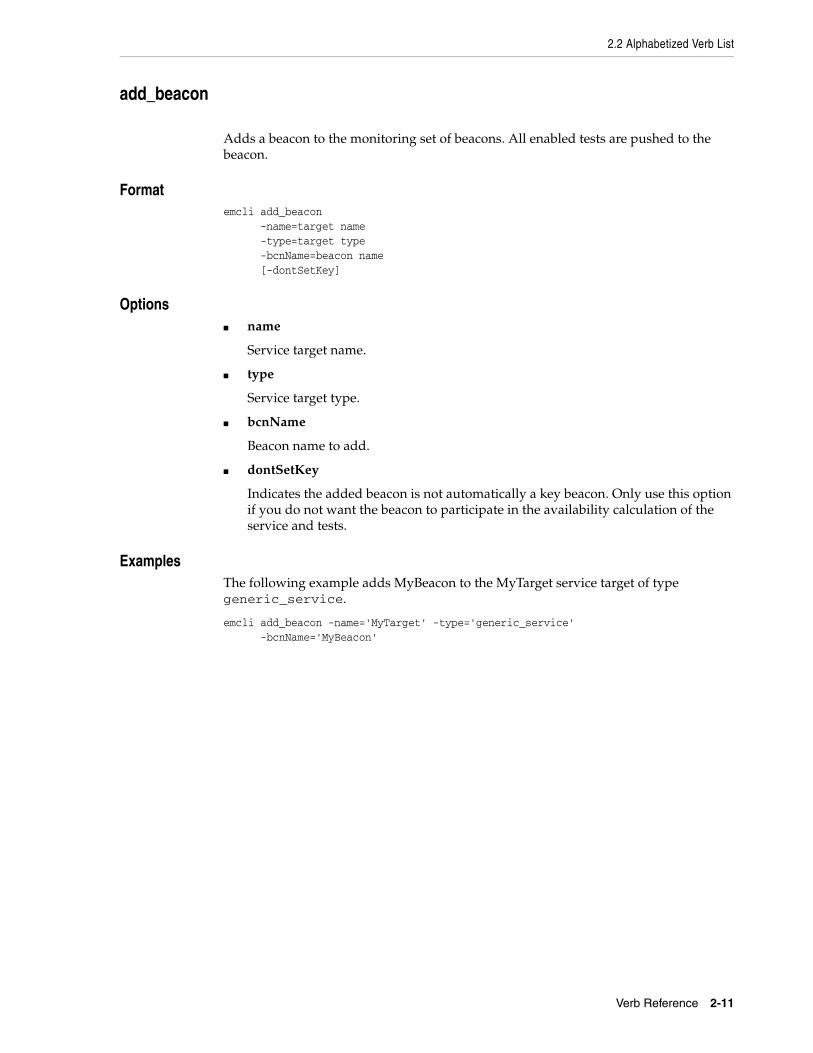
add_beacon
Adds a beacon to the monitoring set of beacons. All enabled tests are pushed to the beacon.
Formatemcli add_beacon -name=target name -type=target type -bcnName=beacon name [-dontSetKey]
Options■ name
Service target name.
■ type
Service target type.
■ bcnName
Beacon name to add.
■ dontSetKey
Indicates the added beacon is not automatically a key beacon. Only use this option if you do not want the beacon to participate in the availability calculation of the service and tests.
ExamplesThe following example adds MyBeacon to the MyTarget service target of type generic_service.
emcli add_beacon -name='MyTarget' -type='generic_service' -bcnName='MyBeacon'
add_group_to_mpa
2-12 Command Line Interface
add_group_to_mpa
Adds a Management Plug-in (MP) group to a Management Plug-in Archive (MPA). If the MPA file does not exist, it is created.
Formatemcli add_group_to_mpa -mpa="mpa" -name="group name" -member="mpname:mpversion"... [-desc="description"]
[ ] denotes that the parameter is optional
Options■ mpa
Name of the MPA where the resulting MP is placed. The MPA file name could be an existing MPA file or a new file. You can only use this option once in the command.
■ name
Name of the group.
■ member
An MP to be added to the group. The MP is specified by its target type as found in the target type definition file and version. Using "newest" as the version specifies no version for this group member MP. When operating on the group, the newest version of the MP available is used. The order of MPs define the order these MPs become deployed when the stack is deployed. The reverse order is used for undeployment.
■ desc
Description of the group.
ExamplesThe following example adds a group that contains a single Management Plug-in.
emcli add_group_to_mpa -mpa="MyMPA.jar" -name="MyGroup" -desc="MyGroup is described by this text." -member="an_mp:1.1"
The following example adds a group that contains multiple Management Plug-ins. On deployment, an_mp is deployed before another_mp. The newest imported version of another_mp is used.
emcli add_group_to_mpa -mpa="MyMPA.jar" -name="AnotherGroup" -desc="AnotherGroup is described by this text." -member="an_mp:1.1" -member="another_mp:newest"
2.2 Alphabetized Verb List
Verb Reference 2-13
add_mp_to_mpa
Adds a Management Plug-in (MP) to a Management Plug-in Archive (MPA). If the MPA file does not exist, it is created.
Formatemcli add_mp_to_mpa -mpa="mpa" -mp_version="mp_version" -ttd="target_type_definition" -dc="default_collection" [-oms_version="oms_version"] [-agent_version="agent_version"] [-file="file_type":"file_path"]... [-func_desc="functional_desc"] [-req_desc="requirements_desc"]
[ ] denotes that the parameter is optional
Options■ mpa
Name of the MPA where the resulting MP is placed. The MPA file name can be an existing MPA file or a new file. You can only use this option once in the command.
■ mp_version
Version of the MP being added to the MPA. This version indicates the version of the files that comprise the MP, and is independent of the metadata version in the target type definition file. This version, along with the MP name (the target type as parsed from the target type definition file), indicates a unique MP.
■ ttd
Path of the target-type definition file. This file specifies the metadata definition of the target type and the metrics for this target type. You can only use this option once in the command.
■ dc
Path of the default collection file. This file specifies the scheduled collection of metrics for targets with this target type. You can only use this option once in the command.
■ oms_version
Minimum OMS version compatible with this MP. You can only use this option once in the command.
■ agent_version
Minimum Enterprise Manager Agent version compatible with this MP. You can only use this option once in the command.
■ file
Type and path of other files to be included in the MP. You can specify this option more than once. The supported types are:
– MONITORING_BINARY — Monitoring binary or executable the target-type definition uses to collect data.
add_mp_to_mpa
2-14 Command Line Interface
– MONITORING_SCRIPT — Monitoring script the target-type definition uses to collect data.
– REPORT_DEFINITION — PL/SQL calls into the reporting framework to define reports for this version of the MP.
– JOB_SCRIPT — Script on the Agent executed by a job type.
– JOB_DEFINITION — XML file that defines a job type.
– HOMEPAGE_DEFINITION — XML file that defines charts to show on the home page.
You must specify JOB_SCRIPT and JOB_DEFINITION together.
■ func_desc
Describes the purpose of the MP and any other general information about the MP. You can only use this option once in the command.
■ req_desc
Describes any conditions that may exist for this MP to be successfully deployed and used. Since this description is optional, you can ignore it, but this is not recommended. You can only use this option once in the command.
ExampleThe following example adds Management Plug-in files to a Management Plug-in Archive called my_new_type.jar.
emcli add_mp_to_mpa -mpa="/my_dir/my_new_type.jar" -mp_version="2.0" -ttd="/my_dir/ttd/new_type.xml" -dc="/my_dir/dc/new_type.xml" -file="MONITORING_SCRIPT:/my_dir/script1.pl" -file="MONITORING_SCRIPT:/my_dir/script2.pl" -file="MONITORING_BINARY:/my_dir/bin1" -func_desc="Management Plug-in to define target type new_type"
2.2 Alphabetized Verb List
Verb Reference 2-15
add_target
Adds a target to be monitored by Enterprise Manager. The target type specified is checked on the Management Agent for existence and for required properties, such as user name and password for host target types, or log-in credentials for database target types. You must specify any required properties of a target type when adding a new target of this type.
For oracle_database target types, you must specify Role with the monitoring credentials. If the Role is Normal, the UserName must be dbsnmp. Otherwise, the Role must be SYSDBA, and UserName can be any user with SYSDBA privileges.
Formatemcli add_target -name="name" -type="type" -host="hostname" [-properties="pname1:pval1;pname2:pval2;..."] [-separator=properties="sep_string"] [-subseparator=properties="subsep_string"] [-credentials="userpropname:username;pwdpropname:password;..."] [-input_file="parameter_tag:file_path"] [-display_name="display name"] [-groups="groupname1:grouptype1;groupname2:grouptype2;..."] [-timezone_region="gmt offset"] [-monitor_mode="monitor mode"] [-instances="rac database instance target name1:target type1;..."]
[ ] denotes that the parameter is optional
Options■ name
Target name. Names cannot contain colons ( : ), semi-colons ( ; ), or any leading or trailing blanks.
■ type
Target type. Standard target types include: host, oracle_database, oracle_apache, oracle_listener, and oracle_emd. To see all available target types available for your environment, check the $AGENT_HOME/sysman/admin/metadata directory. A metadata file (XML) exists for each target type.
■ host
Network name of the system running the Management Agent that is collecting data for this target instance.
■ properties
Name-value pair (that is, prop_name:prop_value) list of properties for the target instance. The "name"(s) are identified in the target-type metadata definition.
Note: You cannot use this verb for composite targets. The verb does not support adding an association between a parent target such as IAS and a child target such as OC4J.
add_target
2-16 Command Line Interface
They must appear exactly as they are defined in this file. Metadata files are located in $AGENT_HOME/sysman/admin/metadata.
■ separator=properties
Specify a string delimiter to use between name-value pairs for the value of the -properties option. The default separator delimiter is ";".
■ subseparator=properties
Specifies a string delimiter to use between the name and value in each name-value pair for the value of the -properties option. The default subseparator delimiter is ":".
■ credentials
Monitoring credentials (name-value pairs) for the target instance. The "name"(s) are identified in the target-type metadata definition as credential properties. The credentials must be specified exactly as they are defined in the target's metadata file. Metadata files are located in $AGENT_HOME/sysman/admin/metadata.
■ input_file
Used in conjunction with the -credentials option, this option enables you to store specific target monitoring credential values, such as passwords, in a separate file. The -input_file option specifies a mapping between a tag and a local file path. The tag is specified in lieu of specific monitoring credentials of the -credentials option. The tag must not contain colons ( : ) or semi-colons ( ; ).
■ display_name
Target name displayed in the Enterprise Manager Grid Control console.
■ groups
Name-value pair list of the groups to which this target instance belongs. Follows the format of groupname:grouptype;groupname2:grouptype2.
■ timezone_region
GMT offset for this target instance. (-7 or -04:00 are acceptable formats.)
■ monitor_mode
Either 0, 1, or 2 (default is 0). 1 indicates OMS-mediated monitoring, and 2 indicates Agent-mediated monitoring.
■ instances
Name-value pair list of RAC database instances that the RAC database target has.
ExamplesThe following example adds an oracle_database target with the name "database." Note how the credentials are specified. The "name"(s) in the name-value pairs come from the oracle_database metadata file. They must appear exactly as they are named in that file. This also applies for the property "name"(s). This example uses the base minimum of required credentials and properties for the database target.
emcli add_target -name="database" -type="oracle_database" -host="myhost.us.oracle.com" -credentials="UserName:dbsnmp;password:dbsnmp;Role:Normal" -properties="SID:semcli;Port:15091;OracleHome:/oracle; MachineName:smpamp-sun1.us.oracle.com"
2.2 Alphabetized Verb List
Verb Reference 2-17
-groups="Group1:database_group;Group2:group"
The following example adds an oracle_database target with the name "database." This example illustrates the use of the input_file to camouflage the credentials. The password is actually in a file named at_pwd_file. The input_file argument is used to replace PWD_FILE with the contents of the at_pwd_file in the credentials argument.
emcli add_target -name="database" -type="oracle_database" -host="myhost.us.oracle.com" -credentials="UserName:dbsnmp;password:PWD_FILE;Role:Normal" -properties="SID:semcli;Port:15091;OracleHome:/oracle; MachineName:smpamp-sun1.us.oracle.com" -input_file="PWD_FILE:/emcli_dir/pwdfiles/at_pwd_file"
The following example illustrates how to add a RAC database with given installed RAC database instances and clusterware. The example adds a rac_database target with the name cluster_database and the cluster name newdb_cluster. A RAC instance is picked up among instances on the given host. This verb should be called after database instances and clusterwares have been installed.
emcli add_target -name="cluster_database" -type="rac_database" -host="myhost.us.oracle.com" -monitor_mode="1" -properties="ServiceName:service.us.oracle.com;ClusterName: newdb_cluster" -instances="database_inst1:oracle_database;database_inst2: oracle_database"
The following example adds an oracle_listener target with the name mylist. The LsnrName is the name of the listener as configured in the listener.ora file, and ListenerOraDir is the directory containing the listener.ora file.
emcli add_target -name="mylist" -type="oracle_listener" -host="myhost.us.oracle.com" -properties="LsnrName:LISTENER;ListenerOraDir:/oracle/lsnr; Port:15091;OracleHome:/oracle;Machine:smpamp-sun1.us
add_target_property
2-18 Command Line Interface
add_target_property
Adds a new target property for a given target type. All targets of this target type will have this new target property.
Formatemcli add_target_property -target_type="target_type" -property="prop_name"
Options■ target_type
Target type for which this property needs to be added. To add this property to all existing target types, you can specify a "*" wildcard character.
■ property
Name of the property to be created for this target type. Property names are case-sensitive. The property name cannot be the same as the following Oracle-provided target property names (in English):
Comment, Deployment Type, Line of Business, Location, Contact
ExamplesThe following example adds the owner name property for all targets of type oracle_database.
emcli add_target_property -target_type="oracle_database" -property="Owner Name"
The following example adds the Owner property for all target types.
emcli add_target_property -target_type="*" -property="Owner"
2.2 Alphabetized Verb List
Verb Reference 2-19
apply_privilege_delegation_setting
Activates Sudo or PowerBroker settings for specified targets.
Formatemcli apply_privilege_delegation_setting -setting_name="setting" -target_type="host/composite" [-target_names="name1;name2;..."] [-input_file="FILE:file_path"] [-force="yes/no"]
[ ] denotes that the parameter is optional
Options■ setting_name
Name of the setting you want to apply.
■ target_names
List of target names. The newly submitted setting applies to this list of EM targets.
– All targets must be of the same type.
– The target list must not contain more than one element if the element’s target type is "group."
– The group referenced above should have at least one host target.
■ target_type
Type of targets to which the setting is applied. Valid target types are "host" or "composite" (group).
■ input_file
Path of the file that has target names. This option enables you to pass targets in a separate file. The file cannot contain any colons ( : ) or semi-colons ( ; ).
■ force
If yes, the operation continues and ignores any invalid targets. The default is no.
ExamplesThe following example applies a privilege setting named sudo_setting. This setting applies to targets of type host, and it is being applied to host1, host2, and so forth.
emcli apply_privilege_delegation_setting -setting_name=sudo_setting -target_type=host -target_names="host1;host2;....."
The following example applies a privilege setting named sudo_setting. This setting applies to targets of type host, and it is being applied to host1, host2, and so forth. The force flag indicates that the setting is applied to all valid targets, and invalid targets are ignored.
emcli apply_privilege_delegation_setting -setting_name=sudo_setting -target_type=host
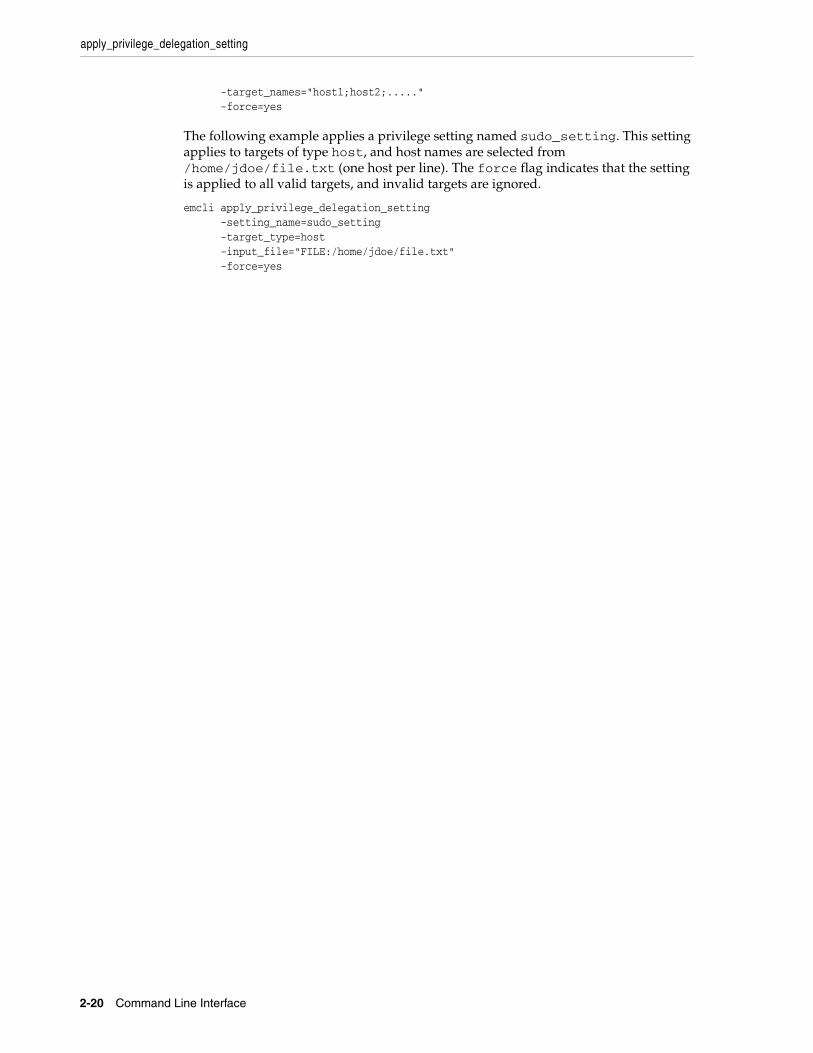
apply_privilege_delegation_setting
2-20 Command Line Interface
-target_names="host1;host2;....." -force=yes
The following example applies a privilege setting named sudo_setting. This setting applies to targets of type host, and host names are selected from /home/jdoe/file.txt (one host per line). The force flag indicates that the setting is applied to all valid targets, and invalid targets are ignored.
emcli apply_privilege_delegation_setting -setting_name=sudo_setting -target_type=host -input_file="FILE:/home/jdoe/file.txt" -force=yes
2.2 Alphabetized Verb List
Verb Reference 2-21
apply_template
Applies a template to a list of specified targets. The parameters to the verb can be supplied in any order.
Formatemcli apply_template -name="template_name" -targets="tname1: ttype1;tname2: ttype2;..." [-copy_flags="0" or "1" or "2"] [-replace_metrics="0" or "1"] [-input_file="FILE1:file_name"]
[ ] denotes that the parameter is optional
Options■ name
Template name as it exists in the database. Names cannot contain colons ( : ), semi-colons ( ; ), or any leading or trailing blanks.
■ targets
The targets should be specified in the following sequence:
TargetName1:TargetType1;TargetName2:TargetType2
For example:
db1:oracle_database;my db group:composite
A semi-colon is the target separator. Ideally, non-composite targets should be of the target type applicable to the template. If not, the template is not applied to the said target. For composite targets, the template is applied only to the member targets that belong to the target type for which the template is applicable.
■ copy_flags
This applies only for metrics with multiple thresholds.
'0' indicates: Apply threshold settings for key values common to the template and target.
'1' indicates: Remove key value threshold settings in the target and replace them with key value threshold settings from the template.
'2' indicates: Apply threshold settings for all key values defined in the template. The default is option '0'.
■ replace_metrics
0 indicates that the thresholds of the metrics not included in the template but available in the target will not be changed. This is the default option. 1 indicates that the thresholds of the metrics present in the target, but not in the template, will be set to NULL. That is, such metrics in the target will not be monitored and therefore, no alert will be raised for them.
■ input_file
The file should contain the credentials according to the following cases:
One:
apply_template
2-22 Command Line Interface
If User-Defined Metric (UDM) credentials take the value "All User-Defined Metrics use the same credentials," you need to provide these credentials in the following format:
Sample input file:
credListType:all;usr_name:joe1;passwrd:pass1;
Two:
If UDM Credentials take the value "Each User-Defined Metric uses its own credentials,"you need to provide these credentials in the following format:
Sample input file:
credListType:perUDM;udm_name:UDM1;usr_name:joe1;passwrd:pass1;udm_name:UDM2;usr_name:joe2;passwrd:pass2;
Three:
If UDM Credentials take the value "Each User-Defined Metric uses different credentials for different targets," you need to provide these credentials in the following format:
Sample input file:
credListType:perTargetperUDM;udm_name:UDM1;tgt_name:TNAME1;usr_name:joe1;passwrd:pass1;udm_name:UDM1;tgt_name:TNAME2;usr_name:joe2;passwrd:pass2;udm_name:UDM2;tgt_name:TNAME1;usr_name:joe3;passwrd:pass3;udm_name:UDM2;tgt_name:TNAME2;usr_name:joe4;passwrd:pass4;
It is important to specify the "credListType" in every input text file that you specify.
ExamplesThe following example applies a monitoring template named my_db_template. This template applies to targets of type oracle_database, and it is being applied to db1 , which is of type oracle_database, and my_db_group, which is of type composite. For composite targets, the template is only applied to member targets that belong to the target type for which the template is applicable. Since the copy_flags option is not specified, the default option ("Apply threshold settings for monitored objects common to both template and target") is meant.
emcli apply_template -name="my_db_template" -targets="db1:oracle_database;my_db_group:composite"
The following example applies a monitoring template named my_db_template. This template applies to targets of type oracle_database and it is being applied to db1, which is of type oracle_database and my_db_group, which is of type composite. In case of composite targets, the template is applied only to member targets that belong to the target type for which the template is applicable. In this case, since the copy_flags option is specified as 1, the threshold settings on the target will be duplicated.
emcli apply_template -name="my_db_template" -targets="db1:oracle_database;my_db_group:composite" -copy_flags="1"
2.2 Alphabetized Verb List
Verb Reference 2-23
The following example applies a monitoring template named my_db_template. This template applies to targets of type oracle_database and it is being applied to db1, which is of type oracle_database and my_db_group, which is of type composite. For composite targets, the template is applied only to member targets that belong to the target type for which the template is applicable. In this case, since the copy_flags option is specified as "1", the threshold settings on the target will be duplicated. Furthermore, the credentials needed for the UDMs are present in the file "/usr/vmotamar/db_credentials.txt".
emcli apply_template -name="my_db_template" -targets="db1:oracle_database;my_db_group:composite" -copy_flags="1" -input_file= "FILE1:/usr/vmotamar/db_credentials.txt"
For more examples, see the online help.
apply_template_tests
2-24 Command Line Interface
apply_template_tests
Applies the variables and test definitions from the file(s) into a repository target.
Formatemcli apply_template_tests -targetName=<target name> -targetType=<target type> -input_file=template:<template filename> [-input_file=variables:<variable filename>] [-overwriteExisting=<all | none | <test1>:<type1>;<test2>:<type2>;...>] [-encryption_key=<key>]
[ ] denotes that the parameter is optional
Options■ targetName
Target name.
■ targetType
Target type.
■ input_file=template
Name of the input file containing the test definitions.
■ input_file=variables
Name of the input file containing the variable definitions. If this attribute is not specified, the variables are extracted from the same file containing the test definitions.
The variables file format is as follows:
<variables xmlns="template"><variable name="<name1>" value="<value1>"/><variable name="<name2>" value="<value2>"/>...</variables>
■ overwriteExisting
Specifies which tests should be overwritten in case they already exist on the target. The possible values are:
1. 'none' (default): None of the existing tests on the target will be overwritten.
2. 'all': If a test with the same name exists on the target, it will be overwritten with the test definition specified in the template file.
3. <test1>:<type1>;<test2>:<type2>;...: If any of tests with names <test1>, <test2>, and so forth exist on the target, they are overwritten with the definition in the template file.
■ encryption_key
Optional key to decrypt the file contents. This key should be the same as the one used to encrypt the file.

2.2 Alphabetized Verb List
Verb Reference 2-25
ExamplesThe following example applies the test definitions contained in the file my_template.xml into the Generic Service target my_target, using the key my_password to decrypt the file contents. If tests with names my_website or my_script exist on the target, they are overwritten by the test definitions in the file.
emcli apply_template_tests -targetName='my_target' -targetType='generic_service' -input_file=template:'my_template.xml' -encryption_key='my_password' -overwriteExisting='my_website:HTTP;my_script:OS'
argfile
2-26 Command Line Interface
argfile
Executes one or more EM CLI verbs, where both verbs and the associated arguments are contained in an ASCII file. argfile enables you to use verbs with greater flexibility. For example, when specifying a large list of targets to be blacked out (create_blackout verb), you can use the argfile verb to input the target list from a file.
Multiple emcli verb invocations are permitted in this file. You should separate each verb invocation with a new line.
Formatemcli argfile /path/to/<input_file_name>
OptionsNone.
Examplesemcli argfile my_verb_arguments
2.2 Alphabetized Verb List
Verb Reference 2-27
assign_test_to_target
Assigns a test-type to a target-type. If a test-type t is assigned to target-type T, all targets of type T can be queried with tests of type t.
Formatemcli assign_test_to_target -testtype=test-type to be assigned -type=target type [-tgtVersion]=version of target type
[ ] denotes that the parameter is optional
Options■ testtype
Test-type to be assigned. Should be the internal name; that is, 'HTTP' instead of 'Web Transaction'.
■ type
Service target type.
■ tgtVersion
Version of the target type. If not specified, the latest version is used.
ExamplesThe following example assigns test type HTTP to targets of type generic service v2.
emcli assign_test_to_target -testtype='HTTP' -type='generic_service' -tgtVersion='2.0'
change_service_system_assoc
2-28 Command Line Interface
change_service_system_assoc
Changes the system that hosts a given service.
Formatemcli change_service_system_assoc -name='name' -type='type' -systemname='system name' -systemtype='system type' -keycomponents='keycomp1name:keycomp1type[;keycomp2name:keycomp2type;...]'
[ ] denotes that the parameter is optional
Options■ name
Service name.
■ type
Service type.
■ systemname
System on which the service resides.
■ systemtype
System type.
■ keycomponents
Name-type pair (such as keycomp_name:keycomp_type) list of key components in the system used for the service.
ExampleThe following example changes the system for a generic service named my service to a generic system named my system with specified key components.
emcli change_service_system_assoc -name='my service' -type='generic_service' -systemname='my system' -systemtype='generic_system' -keycomponents='database:oracle_database; mytestbeacon:oracle_beacon'
2.2 Alphabetized Verb List
Verb Reference 2-29
clear_credential
Clears preferred or monitoring credentials for given users.
Formatemcli clear_credential -target_type="<ttype>" [-target_name="<tname>"] -credential_set="<cred_set>" [-user="<user>"] [-oracle_homes="<home1;home2"]
[ ] denotes that the parameter is optional
Options■ target_type
Type of target, which must be "host" if you specify the oracle_homes parameter.
■ target_name
Name of the target. Omit this option to clear enterprise-preferred credentials. The target name must be the host name if you specify the oracle_homes parameter.
■ credential_set
Credential set affected.
■ user
Enterprise Manager user whose credentials are affected. If omitted, the current user's credentials are affected. This value is ignored for monitoring credentials.
■ oracle_homes
Name of Oracle homes on the target host. Credentials are cleared for all specified homes.
Optionsemcli clear_credential -target_type=oracle_database -target_name=myDB -credential_set=DBCredsNormal -user=admin1
emcli clear_credential -target_type=oracle_database -credential_set=DBCredsNormal -user=admin1
clear_stateless_alerts
2-30 Command Line Interface
clear_stateless_alerts
Clears the stateless alerts associated with the specified target. Only the user can clear these stateless alerts; the Enterprise Manager Agent does not automatically clear these alerts. To find the metric internal name associated with a stateless alert, use the get_metrics_for_stateless_alerts verb.
Formatemcli clear_stateless_alerts -older_than=number_in_days -target_type=target_type -target_name=target_name [-include_members] [-metric_internal_name=target_type_metric:metric_name:metric_column] [-unacknowledged_only] [-ignore_notifications] [-preview]
[ ] denotes that the parameter is optional
Options■ older_than
Specify the age of the alert in days. (Specify 0 for currently open stateless alerts.)
■ target_type
Internal target type identifier, such as host, oracle_database, and emrep.
■ target_name
Name of the target.
■ include_members
Applicable for composite targets to examine alerts belonging to members as well.
■ metric_internal_name
Metric to be cleaned up. Use the get_metrics_for_stateless_alerts verb to see a complete list of supported metrics for a given target type.
■ unacknowledged_only
Only clear alerts if they are not acknowledged.
■ ignore_notifications
Use this option if you do not want to send notifications for the cleared alerts. This may reduce the notification sub-system load.
■ preview
Shows the number of alerts to be cleared on the target(s).
OptionsThe following example clears alerts generated from the database alert log over a week old. In this example, no notifications are sent when the alerts are cleared.
emcli clear_stateless_alerts -older_than=7 -target_type=oracle_database -tar get_name=database -metric_internal_name=oracle_database:alertLog:genericErrStack -ignore_notifications
2.2 Alphabetized Verb List
Verb Reference 2-31
clone_as_home
Clones the specified Application Server Oracle Home or S/W Library component from the target host to specified destinations. For a Portal and Wireless installation, the OID user and password are also needed. For a J2EE instance connected to only a DB-based repository, a DCM Schema password is needed.
Passing Variables Through EMCLIWhen working with variables such as %perlbin% or %oracle_home%, EM CLI passes variable values from the current local environment instead of the variables themselves. To pass variables through an EM CLI command, as might be the case when using the -prescripts or -postscripts options, you can place the EM CLI command in a batch file and replace all occurrences of % with %%.
Formatemcli clone_as_home -input_file="dest_properties:file_path" -list_exclude_files="list of files to exclude" -isSwLib="true/false" -tryftp_copy="true/false" -jobname="name of cloning job" -iasInstance=instance -isIas1013="true/false" [-oldIASAdminPassword=oldpass] [-newIASAdminPassword=newpass] [-oldoc4jpassword=oldpass] [-oc4jpassword=newpass] [-oiduser=oid admin user] [-oidpassword=oid admin password] [-dcmpassword=dcm schema password] [-prescripts="script name to execute"] [-run_prescripts_as_root="true/false"] [-postscripts="script to execute"] [-run_postscripts_as_root="true/false"] [-rootscripts="script name to execute"] [-swlib_component ="path:path to component;version:rev"] [-source_params="TargetName:name;HomeLoc:loc;HomeName:name; ScratchLoc:Scratch dir Location" [-jobdesc="description"]
[ ] denotes that the parameter is optional
Options■ dest_properties
File containing information regarding the targets.
Each line in the file corresponds to information regarding one destination.
Format:
Destination Host Name1;Destination Home Loc; Home Name; Scratch Location;
■ list_exclude_files
Comma-separated list of files to exclude. Not required if the source is software lib. "*" can be used as a wild card.
clone_as_home
2-32 Command Line Interface
■ isSwLib
Specifies whether it is an Oracle Home database or Software Library.
■ ryftp_copy
Try FTP to copy or not. You should set the FTP copy option to false when using EM CLI from the command line.
■ jobname
Name of the cloning job.
■ iasInstance
Name of instance.
■ isIas1013
Specifies whether this is a 10.2.3 Ias home.
■ oldoc4jpassword
Old OC4j password. (Required for 10.1.3 Ias homes.)
■ oc4jpassword
New OC4J password. (Required for 10.1.3Ias homes.)
■ oldIASAdminPassword
Old Application Server administrator password. (Not required for 10.1.3 Ias homes.)
■ newIASAdminPassword
New Application Server administrator password. (Not required for 10.1.3 Ias homes.)
■ oiduser
OID admin user.
■ oidpassword
OID admin password.
■ dcmpassword
DCM schema password.
■ prescripts
Path of script to execute.
■ run_prescripts_as_root
Run prescripts as "root". By default, the option is set to false.
■ postscripts
Path of script to execute.
■ run_postscripts_as_root
Note: Double-quoted parameters can be passed using an escape (\) sequence. For example:
prescripts=" <some value here>=\"some value here\" "
2.2 Alphabetized Verb List
Verb Reference 2-33
Run postscripts as "root". By default, the option is set to false.
■ rootscripts
Path of the script to execute. The job system environment variables (%oracle_home%, %perl_bin%) can be used for specifying script locations.
■ swlib_component
Path to the Software Library to be cloned. "isSwLib" must be true in this case.
■ source_params
Source Oracle home information. "isSwLib" must be false in this case.
■ jobdesc
Description of the job. If not specified, a default description is generated automatically.
clone_crs_home
2-34 Command Line Interface
clone_crs_home
Creates an Oracle Clusterware cluster given a source Clusterware home location or a Clusterware S/W Library component for specified destination nodes.
Formatemcli clone_crs_home -input_file="dest_properties:file_path" -list_exclude_files="list of files to exclude" -isSwLib="true/false" -tryftp_copy="true/false" -jobname="name of cloning job" -home_name="name of home to use when creating Oracle Clusterware cluster" -home_location="location of home when creating Oracle Clusterware cluster" -clustername=name of cluster to create [-isWindows="false/true"] [-ocrLoc=ocr location] [-vdiskLoc=voting disk location] [-prescripts="script name to execute"] [-run_prescripts_as_root="true/false"] [-postscripts="script to execute"] [-run_postscripts_as_root="true/false"] [-rootscripts="script name to execute"] [-swlib_component ="path:path to component;version:rev"] [-source_params="TargetName:name;HomeLoc:loc;HomeName:name; ScratchLoc:Scratch dir Location"] [-jobdesc="description"]
[ ] denotes that the parameter is optional
Options■ dest_properties
File containing information regarding the targets.
Each line in the file corresponds to information regarding one destination.
Format:
Destination Host Name;Destination Node Name;Scratch Location;PVTIC;VirtualIP;
■ list_exclude_files
Comma-separated list of files to exclude. Not required if the source is software lib. An asterisk "*" can be used as a wildcard.
■ isSwLib
Specifies whether it is an Oracle Home database or Software Library.
■ tryftp_copy
Try FTP to copy or not. You should set the FTP copy option to false when using emcli from the command line.
■ jobname
Name of the cloning job.
2.2 Alphabetized Verb List
Verb Reference 2-35
■ home_name
Name of the home to use for all homes in the Oracle Clusterware cluster.
■ home_location
Location of the home to use for all homes in the Oracle Clusterware cluster.
■ clustername
Name of the cluster to create.
■ isWindows
Specify whether the cloning source is on a Windows Platform. This option only applies for creating CRS cloning from a Gold Image source. The default value is false.
■ ocrLoc
Oracle Cluster Registry Loaction.
■ vdiskLoc
Voting disk location.
■ prescripts
Path of the script to execute.
■ run_prescripts_as_root
Run prescripts as "root". By default, this option is set to false.
■ postscripts
Path of the script to execute.
■ run_postscripts_as_root
Run postscripts as "root". By default, it is false.
■ rootscripts
Path of the script to execute.
■ swlib_component
Path to the Software Library to be cloned. "isSwLib" must be true in this case.
■ source_params
Source Oracle home info. "isSwLib" must be false in this case.
■ jobdesc
Description of the job. If not specified, a default description is generated automatically.
Examplesemcli clone_crs_home -input_file="dest_properties:crs.prop" -isSwLib="true" -tryftp_copy="true" -jobname="crs cloning job2" -home_name="cloneCRS1"
Note: Double-quoted parameters can be passed using an escape (\) sequence. For example:
prescripts=" <some value here>=\"some value here\" "

clone_crs_home
2-36 Command Line Interface
-home_location="/scratch/scott/cloneCRS1 " -clustername="crscluster" -ocrLoc="/scratch/shared/ocr" -vdiskLoc="/scratch/shared/vdisk" -postscripts="%perlbin%/perl%emd_root%/admin/scripts/cloning/samples/post_crs_ create.pl ORACLE_HOME=%oracle_home%" -run_postscripts_as_root="true" -rootscripts="%oracle_home%/root.sh" -swlib_component="path:Components/crscomp;version:.1"
Passing Variables Through EMCLIWhen working with variables such as %perlbin% or %oracle_home%, EM CLI passes variable values from the current local environment instead of the variables themselves. To pass variables through an EM CLI command, as might be the case when using the -prescripts or -postscripts options, you can place the EM CLI command in a batch file and replace all occurrences of % with %%.
2.2 Alphabetized Verb List
Verb Reference 2-37
collect_metric
Performs an immediate collection and threshold evaluation of a set of metrics associated with the specified internal metric name. You typically use this command when you believe you have resolved an open metric alert or error and would like to clear the event by immediately collecting and reevaluating the metric. This command applies to most metrics except server-generated database metrics.
Use the get_on_demand_metrics verb to see a complete list of supported metrics for a given target.
Format emcli collect_metric -target_name=name -target_type=type -metric_name=metric_name | -collection_name=user_defined_metric_name
[ ] denotes that the parameter is optional
Options■ target_name
Internal target type identifier, such as host, oracle_database, and emrep.
■ target_type
Name of the target.
■ metric_name
Internal name that represents a set of metrics that are collected together. Use the get_on_demand_metrics verb to see the supported list of metrics for a given target.
■ collection_name
Name of the user-defined metric or SQL user-defined metric. This option only applies to user-defined metrics and SQL user-defined metrics.
ExamplesIf you want to collect the "CPU Utilization (%)" metric, look for the appropriate metric internal name (which is Load) using the get_on_demand_metrics command, then run the command as follows:
emcli collect_metric -target_type=host -target_name=hostname.oracle.com -metric_name=Load
The following example immediately collects and evaluates thresholds for the user-defined metric called MyUDM:
emcli collect_metric -target_type=host -target_name=hostname.oracle.com -collection=MyUDM
The following example immediately collects and evaluates thresholds for the SQL user-defined metric called MySQLUDM:
emcli collect_metric -target_type=oracle_database -target_name=database -collection=MySQLUDM
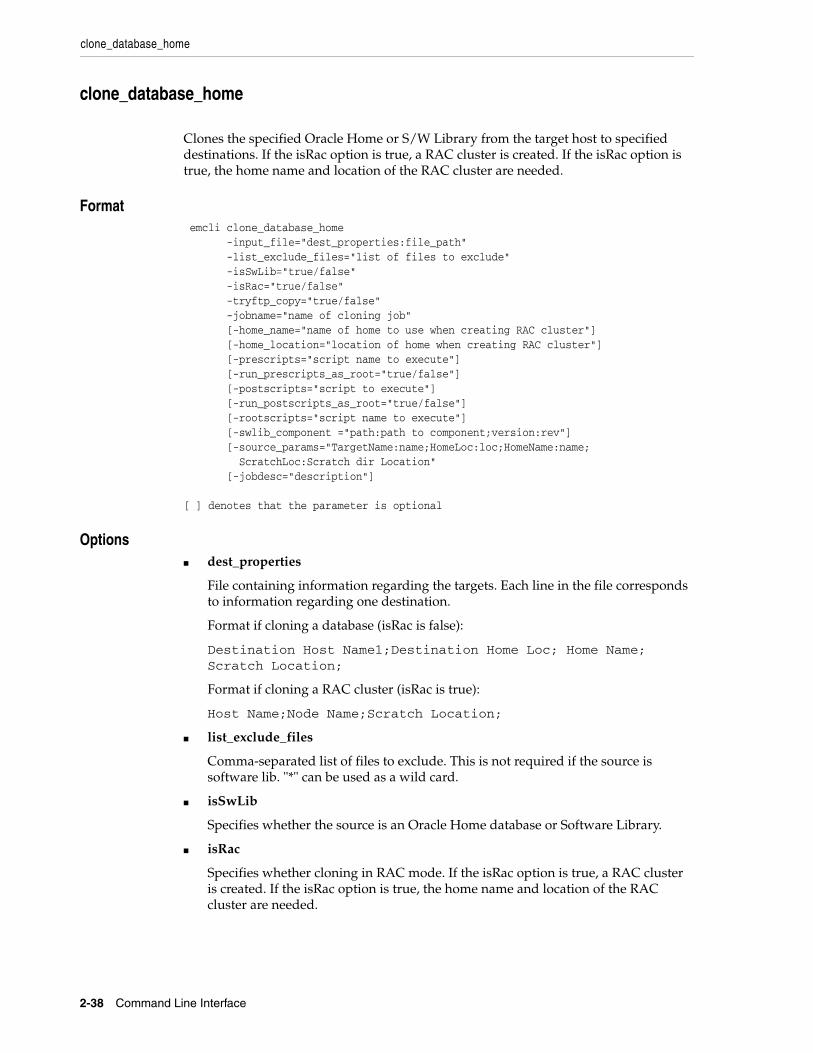
clone_database_home
2-38 Command Line Interface
clone_database_home
Clones the specified Oracle Home or S/W Library from the target host to specified destinations. If the isRac option is true, a RAC cluster is created. If the isRac option is true, the home name and location of the RAC cluster are needed.
Format emcli clone_database_home -input_file="dest_properties:file_path" -list_exclude_files="list of files to exclude" -isSwLib="true/false" -isRac="true/false" -tryftp_copy="true/false" -jobname="name of cloning job" [-home_name="name of home to use when creating RAC cluster"] [-home_location="location of home when creating RAC cluster"] [-prescripts="script name to execute"] [-run_prescripts_as_root="true/false"] [-postscripts="script to execute"] [-run_postscripts_as_root="true/false"] [-rootscripts="script name to execute"] [-swlib_component ="path:path to component;version:rev"] [-source_params="TargetName:name;HomeLoc:loc;HomeName:name; ScratchLoc:Scratch dir Location" [-jobdesc="description"]
[ ] denotes that the parameter is optional
Options■ dest_properties
File containing information regarding the targets. Each line in the file corresponds to information regarding one destination.
Format if cloning a database (isRac is false):
Destination Host Name1;Destination Home Loc; Home Name; Scratch Location;
Format if cloning a RAC cluster (isRac is true):
Host Name;Node Name;Scratch Location;
■ list_exclude_files
Comma-separated list of files to exclude. This is not required if the source is software lib. "*" can be used as a wild card.
■ isSwLib
Specifies whether the source is an Oracle Home database or Software Library.
■ isRac
Specifies whether cloning in RAC mode. If the isRac option is true, a RAC cluster is created. If the isRac option is true, the home name and location of the RAC cluster are needed.
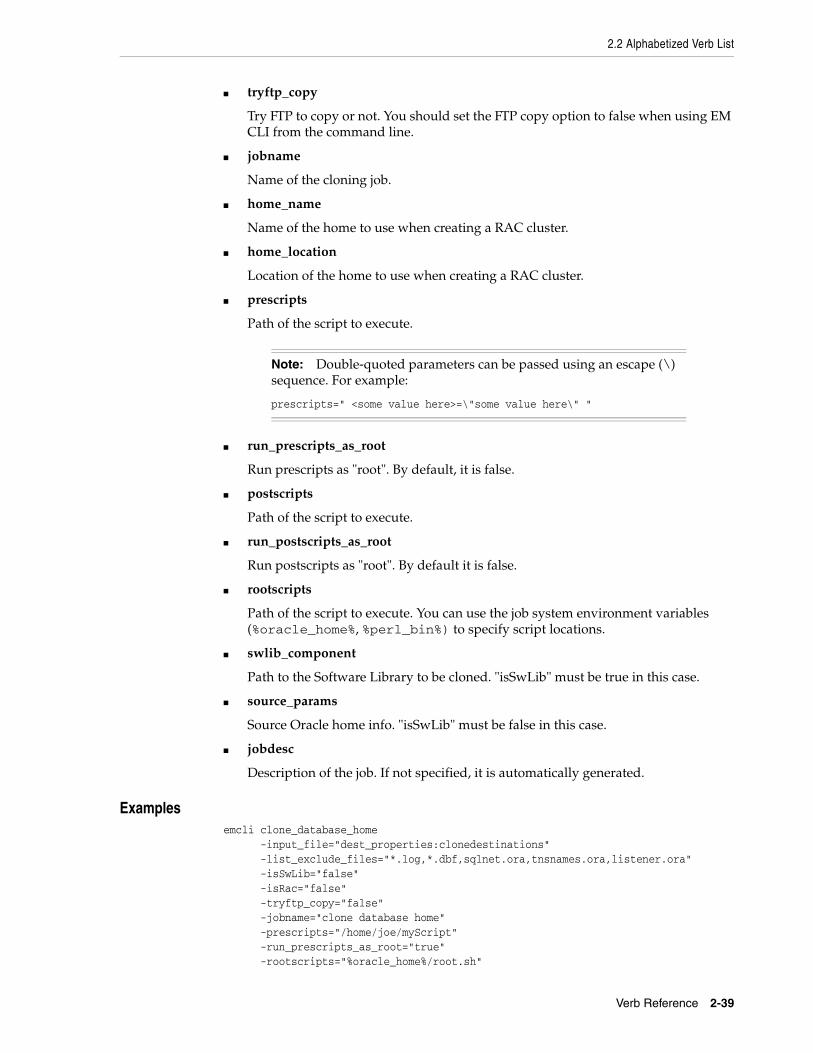
2.2 Alphabetized Verb List
Verb Reference 2-39
■ tryftp_copy
Try FTP to copy or not. You should set the FTP copy option to false when using EM CLI from the command line.
■ jobname
Name of the cloning job.
■ home_name
Name of the home to use when creating a RAC cluster.
■ home_location
Location of the home to use when creating a RAC cluster.
■ prescripts
Path of the script to execute.
■ run_prescripts_as_root
Run prescripts as "root". By default, it is false.
■ postscripts
Path of the script to execute.
■ run_postscripts_as_root
Run postscripts as "root". By default it is false.
■ rootscripts
Path of the script to execute. You can use the job system environment variables (%oracle_home%, %perl_bin%) to specify script locations.
■ swlib_component
Path to the Software Library to be cloned. "isSwLib" must be true in this case.
■ source_params
Source Oracle home info. "isSwLib" must be false in this case.
■ jobdesc
Description of the job. If not specified, it is automatically generated.
Examplesemcli clone_database_home -input_file="dest_properties:clonedestinations" -list_exclude_files="*.log,*.dbf,sqlnet.ora,tnsnames.ora,listener.ora" -isSwLib="false" -isRac="false" -tryftp_copy="false" -jobname="clone database home" -prescripts="/home/joe/myScript" -run_prescripts_as_root="true" -rootscripts="%oracle_home%/root.sh"
Note: Double-quoted parameters can be passed using an escape (\) sequence. For example:
prescripts=" <some value here>=\"some value here\" "
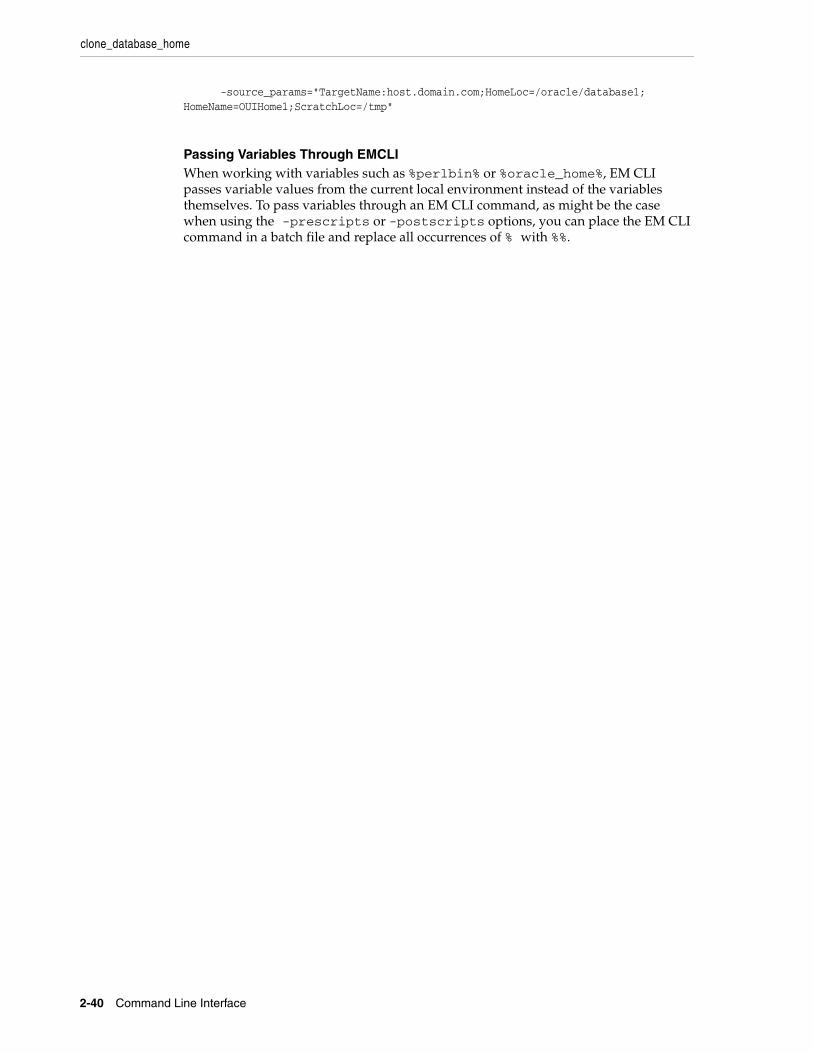
clone_database_home
2-40 Command Line Interface
-source_params="TargetName:host.domain.com;HomeLoc=/oracle/database1; HomeName=OUIHome1;ScratchLoc=/tmp"
Passing Variables Through EMCLIWhen working with variables such as %perlbin% or %oracle_home%, EM CLI passes variable values from the current local environment instead of the variables themselves. To pass variables through an EM CLI command, as might be the case when using the -prescripts or -postscripts options, you can place the EM CLI command in a batch file and replace all occurrences of % with %%.
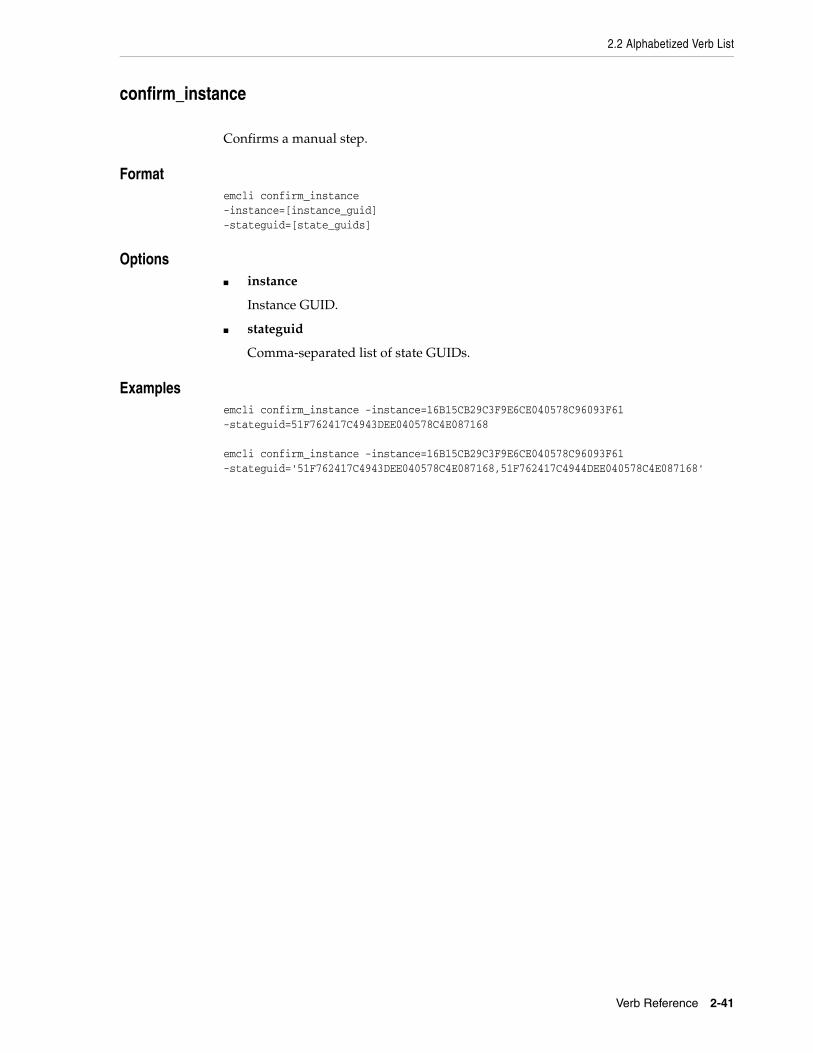
2.2 Alphabetized Verb List
Verb Reference 2-41
confirm_instance
Confirms a manual step.
Formatemcli confirm_instance-instance=[instance_guid]-stateguid=[state_guids]
Options■ instance
Instance GUID.
■ stateguid
Comma-separated list of state GUIDs.
Examplesemcli confirm_instance -instance=16B15CB29C3F9E6CE040578C96093F61 -stateguid=51F762417C4943DEE040578C4E087168
emcli confirm_instance -instance=16B15CB29C3F9E6CE040578C96093F61 -stateguid='51F762417C4943DEE040578C4E087168,51F762417C4944DEE040578C4E087168'
create_aggregate_service
2-42 Command Line Interface
create_aggregate_service
Defines an aggregate service: name and its sub-services. After the aggregate service is created, you can edit it from the Enterprise Manager Grid Control console to configure performance and usage metrics to be collected and displayed.
Formatemcli create_aggregate_service -name="name" -type="type" -add_sub_services="name1:type1;name2:type2;..." -avail_eval_func="function to evaluate availability" [-timezone_region="timezone region"]
[ ] denotes that the parameter is optional
Options■ name
Aggregate service name.
■ type
Aggregate service type.
■ add_sub_services
Sub-services list.
■ avail_eval_func
PL/SQL function to evaluate the availability of the aggregate service. Use [or|and] for a predefined evaluate helper function.
■ timezone_region
Time aone region of the service.
Examplesemcli create_aggregate_service -name="My_Name" -type="aggregate_service" -add_sub_services="sub1:type1;sub2:type2" -avail_eval_func="my_pkg.my_eval_func" -timezone_region="PST"
2.2 Alphabetized Verb List
Verb Reference 2-43
create_blackout
Creates a scheduled blackout to suspend any data collection activity on one or more monitored targets.
Formatemcli create_blackout -name="name" add_targets="name1:type1;name2:type2;..."... reason="reason" [-description="description"] [-jobs_allowed] [-propagate_targets] schedule= frequency:<once|interval|weekly|monthly|yearly>]; duration:[HH...][:mm...]; [start_time:<yy-MM-dd HH:mm>]; [end_time:<yy-MM-dd HH:mm>]; [repeat:<#m|#h|#d|#w>]; [months:<#,#,...>]; [days:<#,#,...>]; [tzinfo:<specified|target|repository>] [tzoffset:#|[-][HH][:mm]] [tzregion:<...>]
[ ] denotes that the parameter is optional
Constraints on schedule arguments:
frequency:once requires => duration or end_time optional => start_time, tzinfo, tzoffsetfrequency:interval requires => duration, repeat optional => start_time, end_time, tzinfo, tzoffsetfrequency:weekly requires => duration, days optional => start_time, end_time, tzinfo, tzoffsetfrequency:monthly requires => duration, days optional => start_time, end_time, tzinfo, tzoffsetfrequency:yearly requires => duration, days, months optional => start_time, end_time, tzinfo, tzoffset
Options■ name
Name of the blackout to create.
■ add_targets
Targets to add to the blackout, each specified as target_name:target_type. You can specify this option more than once.
■ reason
Reason for the blackout. If you have SUPER_USER privileges (you are an Enterprise Manager Super Administrator), any text string can be used for the
create_blackout
2-44 Command Line Interface
reason. The reason is added to the list of allowable blackout reasons if it is not already in the list. If you do not have SUPER_USER privileges, you must specify one of the text strings returned by the get_blackout_reasons verb.
■ description
Description or comments pertaining to the blackout. The description, limited to 2000 characters, can be any text string.
■ jobs_allowed
When this option is specified, jobs are allowed to run against blacked-out targets during the blackout period. When this option is not specified, jobs scheduled to be run against these targets are not allowed to run during the blackout period. After a blackout has been created, you cannot change the "allowed jobs" option from either EM CLI or the Enterprise Manager Grid Control console.
■ propagate_targets
When this option is specified, a blackout for a target of type "host" applies the blackout to all non-Agent targets on the host. Regardless of whether this option is specified, a blackout for a target that is a composite or a group applies the blackout to all members of the composite or group.
■ schedule
Blackout schedule. Note that the "frequency" argument determines which other arguments are required or optional.
■ schedule=frequency
Type of blackout schedule (default is "once").
■ schedule=duration
Duration in hours and minutes of the blackout (-1 means indefinite). Hours and minutes each can be up to 6 digits long.
■ schedule=start_time
Start date/time of the blackout. The default value is the current date/time. The format of the value is "yy-MM-dd HH:mm", for example: "2003-09-25 18:34"
■ schedule=end_time
Last date/time of the blackout. When "frequency" is weekly, monthly, or yearly, only the date portion is used. When "frequency" is interval or once, the date and time are taken into account. The format of the value is "yy-MM-dd HH:mm"; for example: "2003-09-25 18:34"
■ schedule=repeat
Time between successive start times of the blackout. The letter following the number value represents the time units: "m" is minutes, "h" is hours, "d" is days, and "w" is weeks.
■ schedule=months
List of integer month values in the range 1-12. Each value must have a corresponding "day" value to fully specify (month, day) pairs that indicate the blackout starting days of the year.
■ schedule=days
When "frequency" is weekly, this is a list of integer day-of-week values in the range 1-7 (1 is Sunday). When "frequency" is monthly, this is a list of integer
2.2 Alphabetized Verb List
Verb Reference 2-45
day-of-month values in the range 1-31 or -1 (last day of the month). When "frequency" is yearly, this is a list of integer day-of-month values in the range 1-31 or -1 (last day of the month); in this case, the month is taken as the corresponding "month" value for each (month, day) pair.
■ schedule=tzinfo
Type of timezone. The tzinfo argument is used in conjunction with tzoffset. Available timezone types are: "specified" (offset between GMT and the target timezone), "target" (timezone of the specified target), and "repository" (repository timezone -- default setting when tzinfo is not specified). See -schedule=tzoffset for more information.
■ schedule=tzoffset
Value of the timezone. When the tzinfo argument is not specified or is "repository", the timezone value is the repository timezone. In this case, the tzoffset argument must not be specified. Otherwise, the tzoffset argument is required. When tzinfo is set to "specified", the tzoffset argument specifies the offset in hours and minutes between GMT and the timezone. When tzinfo is set to "target", the tzoffset argument specifies an integer index (the first is 1) into the list of targets passed as arguments. For example, for a tzoffset setting of 1, the timezone of the first target specified in the -add_targets option is used.
Note that the timezone is applied to the start time and the end time of the blackout periods. The timezones associated with each target are not taken into account when scheduling the blackout periods (except that when tzinfo is set to "target", the specified target's timezone is used for the blackout times).
■ schedule=[tzregion:<...>]
Time zone region to use. When you "specify" the tzinfo parameter, this parameter determines which timezone to use for the blackout schedule. Otherwise, it is ignored. It defaults to "GMT".
ExamplesThe following example creates blackout b1 for the specified target (database2) to start immediately and last for 30 minutes.
emcli create_blackout -name=b1 -add_targets=database2:oracle_database -schedule="duration::30" -reason="good reason1"
The following example creates blackout b1 for all targets on myhost to start immediately and last until 2007-04-26 05:00 (in the timezone America/New_York).
emcli create_blackout -name=b1 -add_targets=myhost:host -propagate_targets -jobs_allowed -schedule="end_time:2007-04-26 05:00;tzinfo:specified; tzregion:America/New_York" -reason="good reason2"
The following example creates blackout b1 for all targets in group mygroup to start immediately and last until 2007-04-26 05:00 (in the timezone America/New_York). No jobs are allowed to run during the blackout.
emcli create_blackout -name=b1 -add_targets=mygroup:group -schedule="end_time:2007-04-26 05:00;tzinfo:specified; tzregion:America/New_York" -reason="good reason3"
create_blackout
2-46 Command Line Interface
The following example creates blackout b1 for the specified targets (database2 and database3) to start at 2007-08-24 22:30 and last for 30 minutes. The timezone is the timezone for the database2 target.
emcli create_blackout -name=b1 -add_targets="database2:oracle_database;database3:oracle_database -schedule="frequency:once;start_time:07-08-24 22:30;duration::30;tzinfo:target:tzoffset:1" -reason="good reason4"
The following example creates blackout b1 for the specified targets (database2 and database3) to start at 2007-08-24 22:30 and last for 30 minutes. The timezone is the timezone for the database3 target.
emcli create_blackout -name=b1 -add_targets=database2:oracle_database -add_targets=database3:oracle_database -schedule="frequency:once;start_time:07-08-24 22:30;duration::30;tzinfo:target;tzoffset:2" -reason="good reason5"
The following example creates blackout b2 for the specified target (database2) to start at 2007-08-25 03:00 and every day thereafter, and to last 2 hours each time. The timezone is the repository timezone.
emcli create_blackout -name=b2 -add_targets=database2:oracle_database -schedule="frequency:interval;start_time:2007-08-25 03:00;duration:2;repeat=1d" -reason="good reason"
The following example creates blackout b2 for the specified target (database2) to start immediately and every 2 days thereafter (until 06-12-31 23:59), and to last 2 hours 5 minutes each time. The timezone is the repository timezone.
emcli create_blackout -name=b2 -add_targets=database2:oracle_database -schedule="frequency:interval;duration:2:5;end_time:06-12-31 23:59;repeat=2d;tzinfo:repository" -reason="another good reason"
The following example creates blackout b4 for all targets on myhost and otherhost to start every Sunday through Thursday at the current time. The blackout will last 1 hour each time.
emcli create_blackout -name=b4 -add_targets="myhost:host;otherhost:host" -propagate_targets -schedule="frequency:weekly;duration:1:;days:1,2,3,4,5" -reason="very good reason"
The following example creates blackout b5 for all targets within group mygroup to start on the 15th and last day of each month at time 22:30 and last until 2006-12-24 (2006-12-15 will be the actual last blackout date). The blackout will last 1 hour 10 minutes each time. Jobs are allowed to run during the blackouts.
emcli create_blackout -name=b5 -add_targets=mygroup:group -propagate_targets -jobs_allowed -schedule="frequency:monthly;duration:1:10;start_time:06-10-24 22:30; end_ time:06-12-24 23:59:days:15,-1" -reason="pretty good reason"
The following example creates blackout b6 for the specified target (database2) to start at 13:30 on the following dates of each year: 03-02, 04-22, 09-23. The blackout will last 2 hours each time. Jobs are not allowed to run during the blackouts.

2.2 Alphabetized Verb List
Verb Reference 2-47
emcli create_blackout -name=b6 -add_targets=database2:oracle_database -propagate_targets -schedule="frequency:yearly;duration:2;start_time:07-08-24 13:30:months=3,4,9;days:2,22,23" -reason="most excellent reason"
create_group
2-48 Command Line Interface
create_group
Defines a group name and its members. After you create the group, you can edit it from the Enterprise Manager Grid Control console to configure Summary Metrics to be displayed for group members.
Formatemcli create_group -name="name" [-type=<group>] [-add_targets="name1:type1;name2:type2;..."]... [-is_propagating="true/false"]
[ ] denotes that the parameter is optional
Options■ name
Name of the group.
■ type
Group type: group. Defaults to "group".
■ add_targets
Add existing targets to the group. Each target is specified as a name-value pair target_name:target_type. You can specify this option more than once.
■ is_propagating
Flag that indicates whether or not privilege on the group will be propagated to member targets. The default is false.
ExamplesThe following example creates a database-only group named db_group. This group consists of two Oracle databases: emp_rec and payroll.
emcli create_group -name=db_group -add_targets="emp_rec:oracle_database" -add_targets="payroll:oracle_database"
The following example creates a mixed member-type group named my_group that consists of an Oracle database (database2), listener (dblistener), and host (mymachine.myco.com).
emcli create_group -name=my_group -add_targets="database2:oracle_database;dblistener:oracle_listener -add_targets="mymachine.myco.com:host"
The following example creates a host-only group named my_hosts that consists of three systems within the oracle.com domain: smpsun, dlsun, and supersun.
emcli create_group -name=my_hosts -add_targets="smpsun.oracle.com:host" -add_targets="dlsun.oracle.com:host;supersun.oracle.com:host"
2.2 Alphabetized Verb List
Verb Reference 2-49
create_privilege_delegation_setting
Creates Sudo or PowerBroker settings to apply later. You must create at least one setting to use the apply_privilege_delegation_setting verb.
Format emcli create_privilege_delegation_setting -setting_name="setting_name" -setting_type="ttype" [-settings="setting"] [-separator=settings=";"] [-subseparator=settings=","]
[ ] denotes that the parameter is optional
Options■ setting_name
Name of the setting.
■ setting_type
Type of setting you want to create.
■ settings
Parameter value. Choose one of the following parameters:
%USERNAME% — Name of the user running the command.%RUNAS% — Run the command as this user.%COMMAND% — Sudo command.
■ separator
Delimiter inserted between name-value pairs for the given option name. The default value is a semi-colon ( ; ).
■ subseparator
Separator inserted between the name and value in each name-value pair for the given option name. The default value is a semi-colon ( ; ).
ExamplesThe following example creates a setting named sudo_setting. The setting is of type SUDO, and the Sudo path used is /usr/local/bin/sudo. Sudo arguments are:
-S-u%RUNAS%%COMMAND%
emcli create_privilege_delegation_setting -setting_name=sudo_setting -setting_type=SUDO -settings="SETTINGS:/usr/local/bin/sudo -S -u %RUNAS% %COMMAND%"
The following example creates a setting named pb_setting. The setting is of type POWERBROKER, and the PowerBroker path used is /etc/pbrun. Arguments are:
create_privilege_delegation_setting
2-50 Command Line Interface
%RUNAS%%PROFILE%%COMMAND%;PASSWORD_PROMPT_STRINGPassword:
emcli create_privilege_delegation_setting -setting_name=pb_setting -setting_type=POWERBROKER -settings="SETTINGS,/etc/pbrun %RUNAS% %PROFILE% %COMMAND% ;PASSWORD_PROMPT_STRING,Password:" -separator=settings=";" -subseparator=settings=","
For more examples, see the online help.
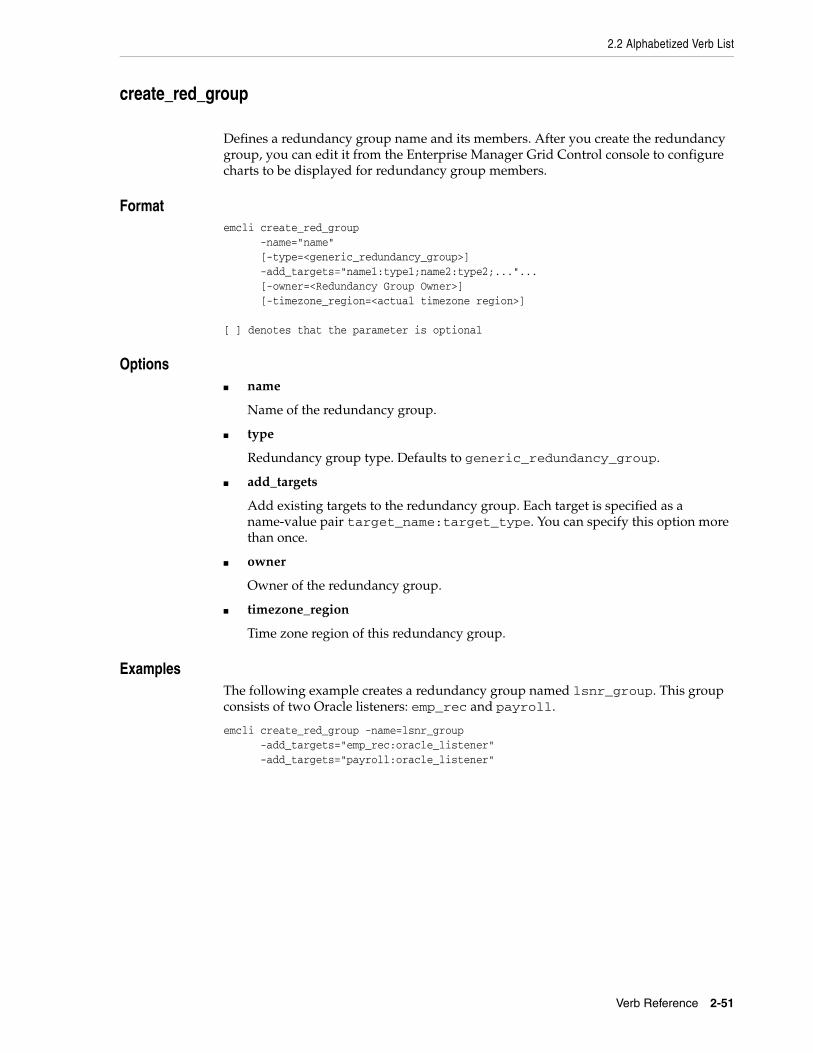
2.2 Alphabetized Verb List
Verb Reference 2-51
create_red_group
Defines a redundancy group name and its members. After you create the redundancy group, you can edit it from the Enterprise Manager Grid Control console to configure charts to be displayed for redundancy group members.
Formatemcli create_red_group -name="name" [-type=<generic_redundancy_group>] -add_targets="name1:type1;name2:type2;..."... [-owner=<Redundancy Group Owner>] [-timezone_region=<actual timezone region>]
[ ] denotes that the parameter is optional
Options■ name
Name of the redundancy group.
■ type
Redundancy group type. Defaults to generic_redundancy_group.
■ add_targets
Add existing targets to the redundancy group. Each target is specified as a name-value pair target_name:target_type. You can specify this option more than once.
■ owner
Owner of the redundancy group.
■ timezone_region
Time zone region of this redundancy group.
ExamplesThe following example creates a redundancy group named lsnr_group. This group consists of two Oracle listeners: emp_rec and payroll.
emcli create_red_group -name=lsnr_group -add_targets="emp_rec:oracle_listener" -add_targets="payroll:oracle_listener"
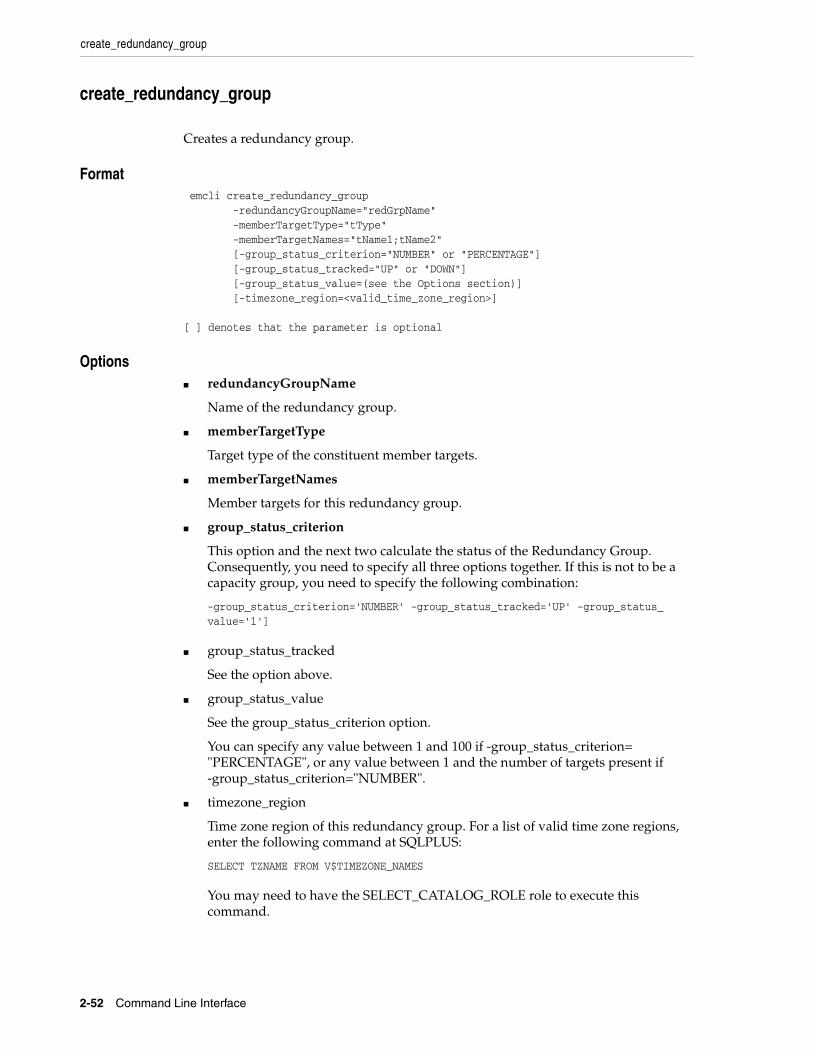
create_redundancy_group
2-52 Command Line Interface
create_redundancy_group
Creates a redundancy group.
Format emcli create_redundancy_group -redundancyGroupName="redGrpName" -memberTargetType="tType" -memberTargetNames="tName1;tName2" [-group_status_criterion="NUMBER" or "PERCENTAGE"] [-group_status_tracked="UP" or "DOWN"] [-group_status_value=(see the Options section)] [-timezone_region=<valid_time_zone_region>]
[ ] denotes that the parameter is optional
Options■ redundancyGroupName
Name of the redundancy group.
■ memberTargetType
Target type of the constituent member targets.
■ memberTargetNames
Member targets for this redundancy group.
■ group_status_criterion
This option and the next two calculate the status of the Redundancy Group. Consequently, you need to specify all three options together. If this is not to be a capacity group, you need to specify the following combination:
-group_status_criterion='NUMBER' -group_status_tracked='UP' -group_status_value='1']
■ group_status_tracked
See the option above.
■ group_status_value
See the group_status_criterion option.
You can specify any value between 1 and 100 if -group_status_criterion= "PERCENTAGE", or any value between 1 and the number of targets present if -group_status_criterion="NUMBER".
■ timezone_region
Time zone region of this redundancy group. For a list of valid time zone regions, enter the following command at SQLPLUS:
SELECT TZNAME FROM V$TIMEZONE_NAMES
You may need to have the SELECT_CATALOG_ROLE role to execute this command.
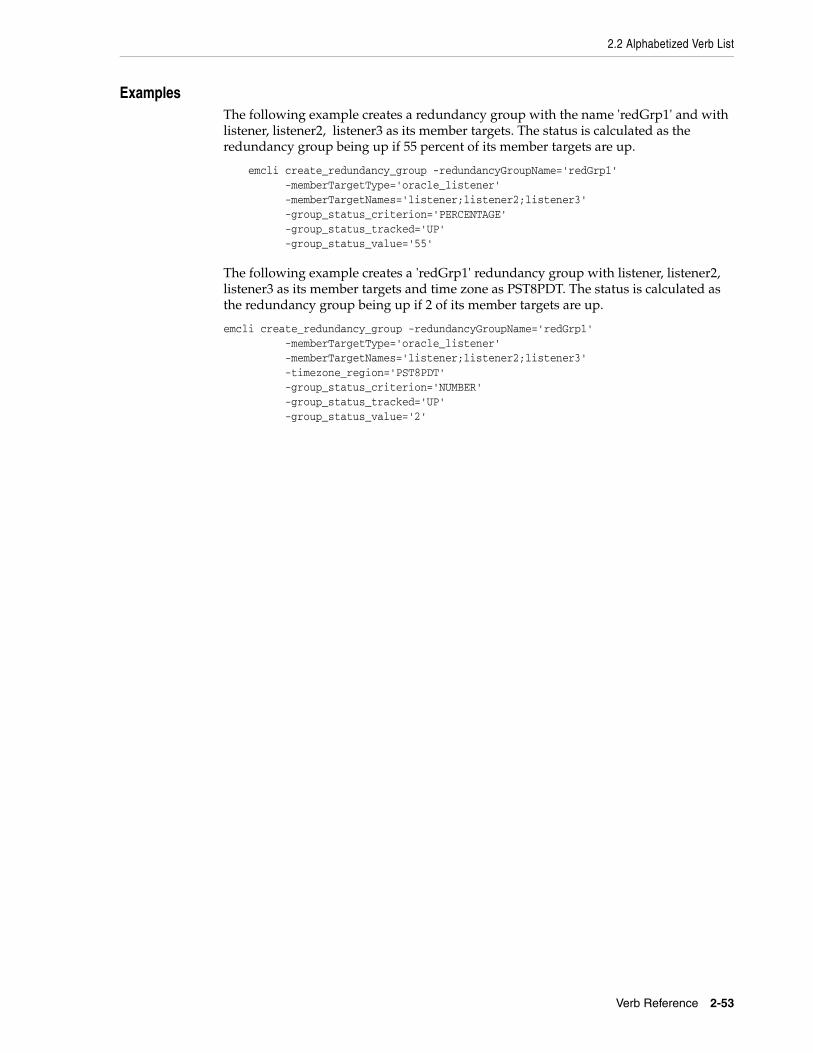
2.2 Alphabetized Verb List
Verb Reference 2-53
ExamplesThe following example creates a redundancy group with the name 'redGrp1' and with listener, listener2, listener3 as its member targets. The status is calculated as the redundancy group being up if 55 percent of its member targets are up.
emcli create_redundancy_group -redundancyGroupName='redGrp1' -memberTargetType='oracle_listener' -memberTargetNames='listener;listener2;listener3' -group_status_criterion='PERCENTAGE' -group_status_tracked='UP' -group_status_value='55'
The following example creates a 'redGrp1' redundancy group with listener, listener2, listener3 as its member targets and time zone as PST8PDT. The status is calculated as the redundancy group being up if 2 of its member targets are up.
emcli create_redundancy_group -redundancyGroupName='redGrp1' -memberTargetType='oracle_listener' -memberTargetNames='listener;listener2;listener3' -timezone_region='PST8PDT' -group_status_criterion='NUMBER' -group_status_tracked='UP' -group_status_value='2'
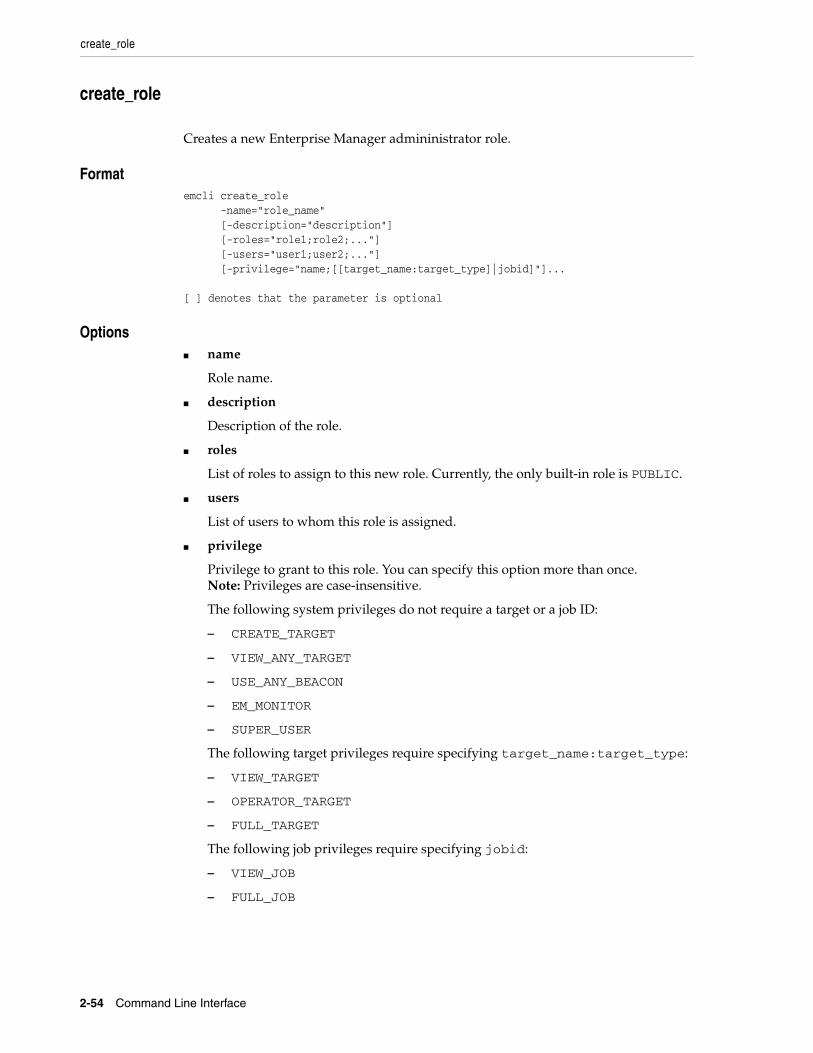
create_role
2-54 Command Line Interface
create_role
Creates a new Enterprise Manager admininistrator role.
Formatemcli create_role -name="role_name" [-description="description"] [-roles="role1;role2;..."] [-users="user1;user2;..."] [-privilege="name;[[target_name:target_type]|jobid]"]...
[ ] denotes that the parameter is optional
Options■ name
Role name.
■ description
Description of the role.
■ roles
List of roles to assign to this new role. Currently, the only built-in role is PUBLIC.
■ users
List of users to whom this role is assigned.
■ privilege
Privilege to grant to this role. You can specify this option more than once. Note: Privileges are case-insensitive.
The following system privileges do not require a target or a job ID:
– CREATE_TARGET
– VIEW_ANY_TARGET
– USE_ANY_BEACON
– EM_MONITOR
– SUPER_USER
The following target privileges require specifying target_name:target_type:
– VIEW_TARGET
– OPERATOR_TARGET
– FULL_TARGET
The following job privileges require specifying jobid:
– VIEW_JOB
– FULL_JOB
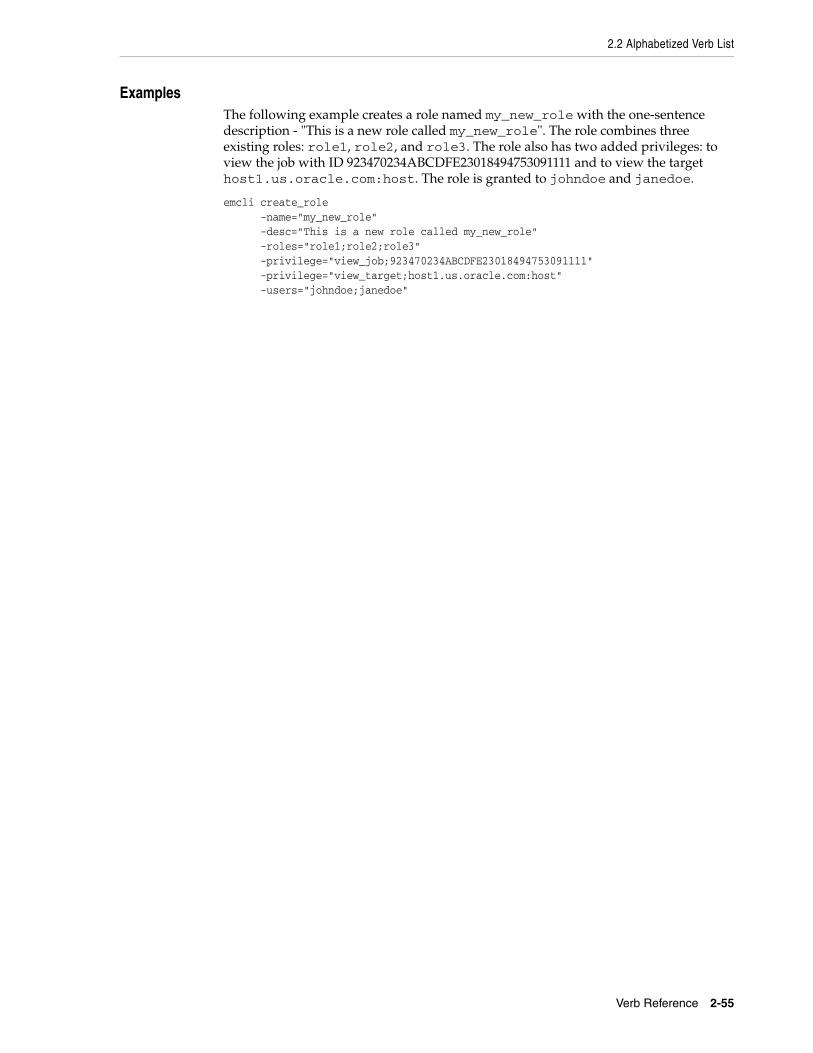
2.2 Alphabetized Verb List
Verb Reference 2-55
ExamplesThe following example creates a role named my_new_role with the one-sentence description - "This is a new role called my_new_role". The role combines three existing roles: role1, role2, and role3. The role also has two added privileges: to view the job with ID 923470234ABCDFE23018494753091111 and to view the target host1.us.oracle.com:host. The role is granted to johndoe and janedoe.
emcli create_role -name="my_new_role" -desc="This is a new role called my_new_role" -roles="role1;role2;role3" -privilege="view_job;923470234ABCDFE23018494753091111" -privilege="view_target;host1.us.oracle.com:host" -users="johndoe;janedoe"
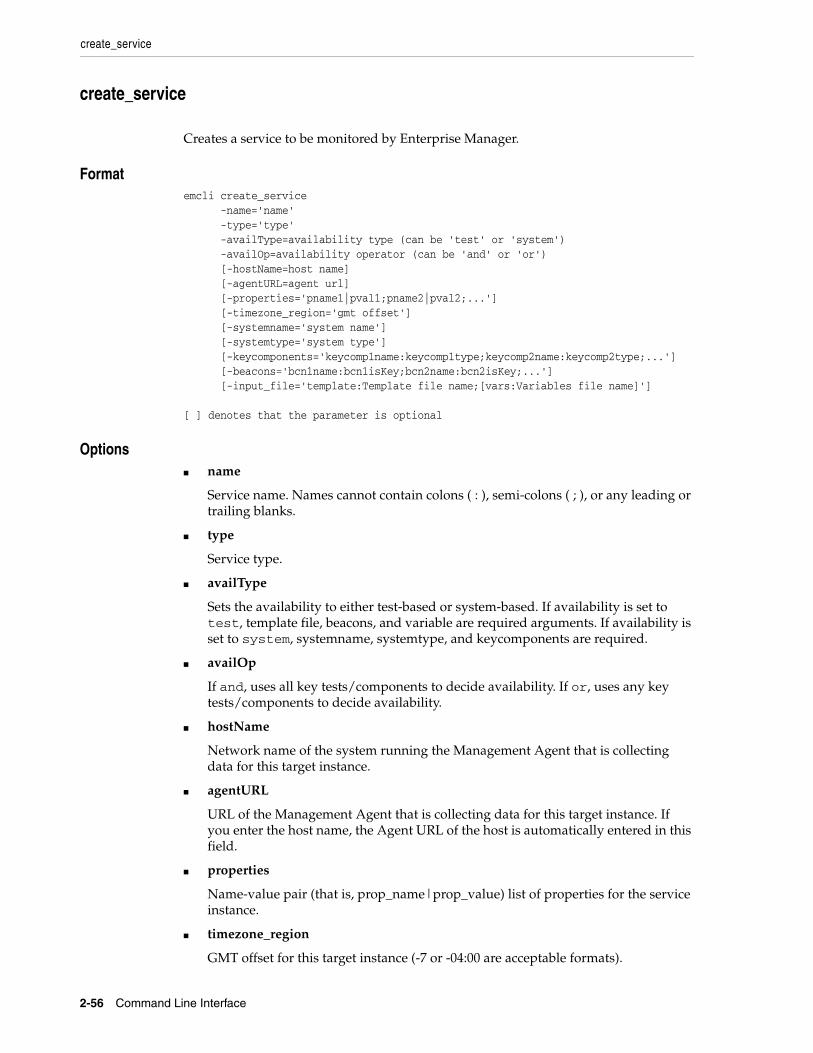
create_service
2-56 Command Line Interface
create_service
Creates a service to be monitored by Enterprise Manager.
Formatemcli create_service -name='name' -type='type' -availType=availability type (can be 'test' or 'system') -availOp=availability operator (can be 'and' or 'or') [-hostName=host name] [-agentURL=agent url] [-properties='pname1|pval1;pname2|pval2;...'] [-timezone_region='gmt offset'] [-systemname='system name'] [-systemtype='system type'] [-keycomponents='keycomp1name:keycomp1type;keycomp2name:keycomp2type;...'] [-beacons='bcn1name:bcn1isKey;bcn2name:bcn2isKey;...'] [-input_file='template:Template file name;[vars:Variables file name]']
[ ] denotes that the parameter is optional
Options■ name
Service name. Names cannot contain colons ( : ), semi-colons ( ; ), or any leading or trailing blanks.
■ type
Service type.
■ availType
Sets the availability to either test-based or system-based. If availability is set to test, template file, beacons, and variable are required arguments. If availability is set to system, systemname, systemtype, and keycomponents are required.
■ availOp
If and, uses all key tests/components to decide availability. If or, uses any key tests/components to decide availability.
■ hostName
Network name of the system running the Management Agent that is collecting data for this target instance.
■ agentURL
URL of the Management Agent that is collecting data for this target instance. If you enter the host name, the Agent URL of the host is automatically entered in this field.
■ properties
Name-value pair (that is, prop_name|prop_value) list of properties for the service instance.
■ timezone_region
GMT offset for this target instance (-7 or -04:00 are acceptable formats).
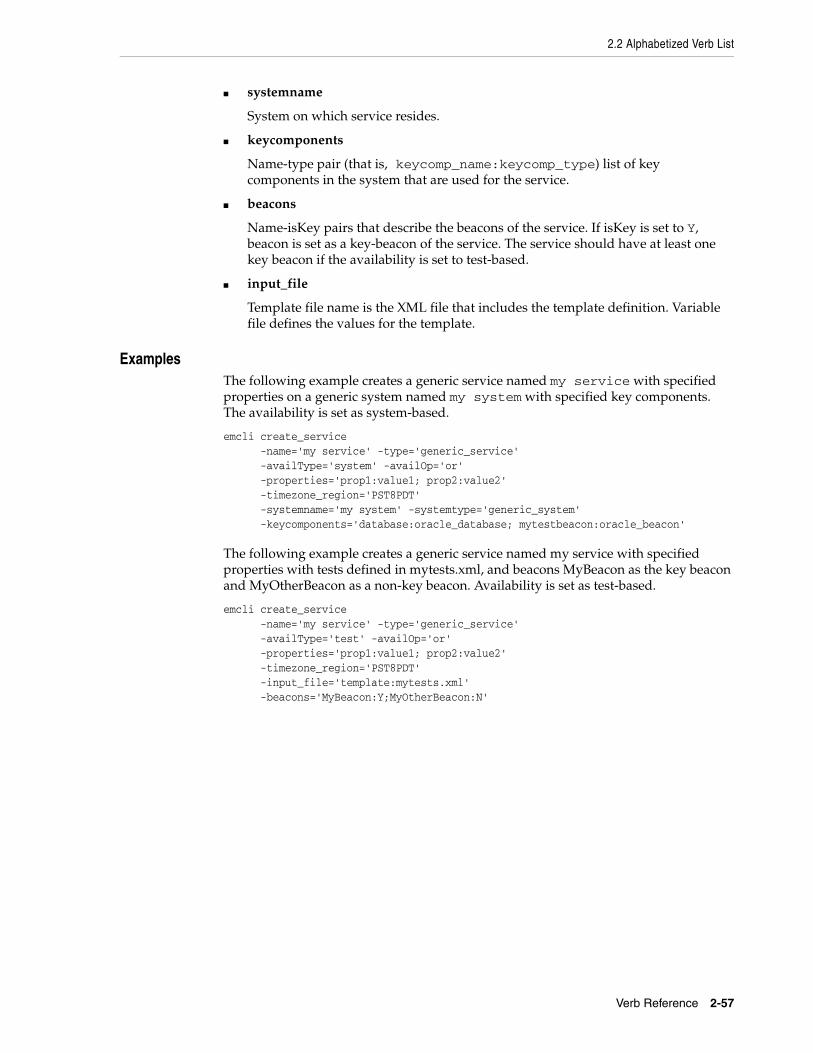
2.2 Alphabetized Verb List
Verb Reference 2-57
■ systemname
System on which service resides.
■ keycomponents
Name-type pair (that is, keycomp_name:keycomp_type) list of key components in the system that are used for the service.
■ beacons
Name-isKey pairs that describe the beacons of the service. If isKey is set to Y, beacon is set as a key-beacon of the service. The service should have at least one key beacon if the availability is set to test-based.
■ input_file
Template file name is the XML file that includes the template definition. Variable file defines the values for the template.
ExamplesThe following example creates a generic service named my service with specified properties on a generic system named my system with specified key components. The availability is set as system-based.
emcli create_service -name='my service' -type='generic_service' -availType='system' -availOp='or' -properties='prop1:value1; prop2:value2' -timezone_region='PST8PDT' -systemname='my system' -systemtype='generic_system' -keycomponents='database:oracle_database; mytestbeacon:oracle_beacon'
The following example creates a generic service named my service with specified properties with tests defined in mytests.xml, and beacons MyBeacon as the key beacon and MyOtherBeacon as a non-key beacon. Availability is set as test-based.
emcli create_service -name='my service' -type='generic_service' -availType='test' -availOp='or' -properties='prop1:value1; prop2:value2' -timezone_region='PST8PDT' -input_file='template:mytests.xml' -beacons='MyBeacon:Y;MyOtherBeacon:N'
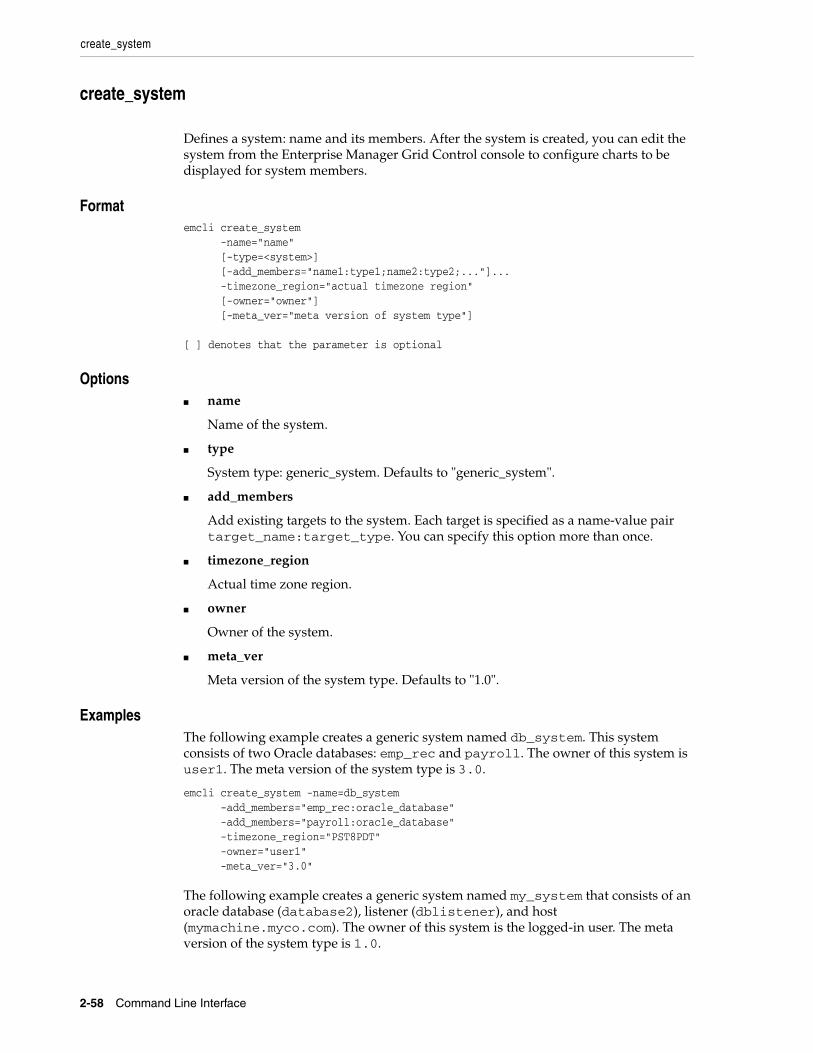
create_system
2-58 Command Line Interface
create_system
Defines a system: name and its members. After the system is created, you can edit the system from the Enterprise Manager Grid Control console to configure charts to be displayed for system members.
Formatemcli create_system -name="name" [-type=<system>] [-add_members="name1:type1;name2:type2;..."]... -timezone_region="actual timezone region" [-owner="owner"] [-meta_ver="meta version of system type"]
[ ] denotes that the parameter is optional
Options■ name
Name of the system.
■ type
System type: generic_system. Defaults to "generic_system".
■ add_members
Add existing targets to the system. Each target is specified as a name-value pair target_name:target_type. You can specify this option more than once.
■ timezone_region
Actual time zone region.
■ owner
Owner of the system.
■ meta_ver
Meta version of the system type. Defaults to "1.0".
ExamplesThe following example creates a generic system named db_system. This system consists of two Oracle databases: emp_rec and payroll. The owner of this system is user1. The meta version of the system type is 3.0.
emcli create_system -name=db_system -add_members="emp_rec:oracle_database" -add_members="payroll:oracle_database" -timezone_region="PST8PDT" -owner="user1" -meta_ver="3.0"
The following example creates a generic system named my_system that consists of an oracle database (database2), listener (dblistener), and host (mymachine.myco.com). The owner of this system is the logged-in user. The meta version of the system type is 1.0.

2.2 Alphabetized Verb List
Verb Reference 2-59
emcli create_system -name=my_system -add_members="database2:oracle_database;dblistener:oracle_listener -add_members="mymachine.myco.com:host" -timezone_region="PST8PDT"
create_user
2-60 Command Line Interface
create_user
Creates a new Enterprise Manager administrator.
Formatemcli create_user -name="name" -type="type of user" -password="password" [-roles="role1;role2;..."] [-email="email1;email2;..."] [-privilege="name;[[target_name:target_type]|jobid]"]... [-profile="profile_name"] [-desc="user_description"] [-expired="true|false"] [-prevent_change_password="true|false"] [-input_file="arg_name:file_path"]
Options■ name
Administrator name.
■ Type
Type of User. The Default value of this parameter is EM_USER. Possible values for this parameter are:
– EM_USER
– EXTERNAL_USER
– DB_EXTERNAL_USER
■ password
Administrator password.
■ roles
List of roles to grant to this administrator. Currently, the built-in roles include PUBLIC.
List of e-mail addresses for this administrator.
■ privilege
Privilege to grant to this administrator. You can specify this option more than once.
The following system privileges do not require a target or a job ID:
– CREATE_TARGET
– VIEW_ANY_TARGET
– USE_ANY_BEACON
– EM_MONITOR
– SUPER_USER
The following target privileges require specifying target_name:target_type:
2.2 Alphabetized Verb List
Verb Reference 2-61
– VIEW_TARGET
– OPERATOR_TARGET
– FULL_TARGET
The following job privileges require specifying jobid:
– VIEW_JOB
– FULL_JOB
■ profile
Database profile name. It uses DEFAULT as the default profile name.
■ desc
User description for the user being added.
■ expired
Use this to expire the password immediately. False is the default.
■ prevent_change_password
When set to true, you cannot change your own password. False is the default.
■ input_file
Allow the administrator to provide the value of any argument in a file. The format of the value will be the name_of_argument:file_path_with_file_name. You can specify this option more than once.
ExamplesThe following example creates an Enterprise Manager administrator named new_admin. This administrator has two privileges: the ability to view the job with ID 923470234ABCDFE23018494753091111 and the ability to view the target host1.us.oracle.com:host. The administrator new_admin is granted the PUBLIC role.
emcli create_user -name="new_admin" -password="oracle" -email="[email protected];[email protected]" -roles="public" -privilege="view_job;923470234ABCDFE23018494753091111" -privilege="view_target;host1.us.oracle.com:host"
For more examples, see the online help for this verb.

delete_blackout
2-62 Command Line Interface
delete_blackout
Deletes a blackout that has already ended or has been fully stopped. You cannot delete a blackout that is either in progress or currently scheduled. You need to first run stop_blackout.
Formatemcli delete_blackout -name="name" [-createdby="blackout_creator" (default is current user)]
[ ] denotes that the parameter is optional
Options■ name
Name of the blackout to delete.
■ createdby
Enterprise Manager user who created the blackout. The SUPER_USER privilege is required to delete a blackout created by another user.
ExamplesThe following example deletes blackout backup_monthly created by the current user.
emcli delete_blackout -name=backup_monthly
The following example deletes blackout db_maintenance that was created by Enterprise Manager administrator sysadmin2. The current user must either be user sysadmin2 or a user with the SUPER_USER privilege.
emcli delete_blackout -name=db_maintenance -createdby=sysadmin2
2.2 Alphabetized Verb List
Verb Reference 2-63
delete_guest_vm
Deletes a guest virtual machine. To delete the guest virtual machine, it should be in the Halted state.
Formatemcli delete_guest_vm -guest_vm_name=Virtual Machine Name -server_pool_name=Server Pool Name
Options■ guest_vm_name
Name of the guest Virtual Machine.
■ server_pool_name
Name of the server pool.
ExamplesThe following example deletes the guest VM dom15, which is in the Oracle Server Pool.
emcli delete_guest_vm -guest_vm_name="dom15" -server_pool_name="Oracle Server Pool"
delete_group
2-64 Command Line Interface
delete_group
Deletes a group. Deleting a non-existent group generates the error "Group X does not exist."
Formatemcli delete_group -name="name" [-type=<group>]
[ ] denotes that the parameter is optional
Options■ name
Name of the group to delete.
■ type
Group type: group. Defaults to "group".
ExamplesThe following example removes the group payroll_group that consists of database target types.
emcli delete_group -name=payroll_group
The following example removes the group my_hosts that consists of host target types.
emcli delete_group -name=my_hosts
The following example removes the group my_group that consists of mixed target types.
emcli delete_group -name=my_group

2.2 Alphabetized Verb List
Verb Reference 2-65
delete_instance
Deletes a specified job. A job cannot be deleted if any of its executions are in the EXECUTING (Running) state. Use the get_jobs verb to obtain a list of existing jobs along with their job IDs and statuses.
Formatemcli delete_job -job_id="jobID" | -name="jobName"
Options■ job_id
Job ID of the job to delete.
■ name
Name of the job to delete. To uniquely identify the job, the current user is used.
ExamplesThe following example deletes an existing job with the job ID 12345678901234567890123456789012.
emcli delete_job -job_id=12345678901234567890123456789012
The following example deletes an existing job named my_job, which belongs to the current Enterprise Manager user.
emcli delete_job -name=my_job
delete_job
2-66 Command Line Interface
delete_job
Deletes a specified job. A job cannot be deleted if any of its executions are in the EXECUTING (Running) state. Use the get_jobs verb to obtain a list of existing jobs along with their job IDs and statuses.
Formatemcli delete_job -job_id="jobID" | -name="jobName"
Options■ job_id
Job ID of the job to delete.
■ name
Name of the job to delete. To uniquely identify the job, the current user is used.
ExamplesThe following example deletes an existing job with the job ID 12345678901234567890123456789012.
emcli delete_job -job_id=12345678901234567890123456789012
The following example deletes an existing job named my_job, which belongs to the current Enterprise Manager user.
emcli delete_job -name=my_job
2.2 Alphabetized Verb List
Verb Reference 2-67
delete_metric_promotion
Deletes a promoted metric.
Formatemcli delete_metric_promotion -name=Service target name -type=Service target type -promotedMetricKey = Key Value of the promoted metric [-category = Usage/Performance/Business] [-promotedMetricName = Promoted Metric] [-promotedMetricColumn = Promoted Metric Column]
[ ] denotes that the parameter is optional
Options■ name
Name of the service target.
■ type
Name of the service type.
■ promotedMetricKey
Required argument that determines the key value of the promoted metric. It is equivalent to the displayed name of the promoted metric in the UI.
■ category
Defines whether the promoted metric is a usage or a performance metric of a service. This option is used to determine the promoted metric name and metric column. If you do not specify this option, the promotedMetricName and promotedMetricColumn options must be specified.
■ promotedMetricName
Promoted metric name. This is optional if you specify the category option.
■ promotedMetricColumn
Promoted metric column. This is optional if you specify the category option.
ExamplesThe following example deletes the promoted Performance metric with key value mymetric1 on service MyTarget.
emcli delete_metric_promotion -name='MyTarget' -type='generic_service' -category=Performance -promotedMetricKey=mymetric1
delete_privilege_delegation_settings
2-68 Command Line Interface
delete_privilege_delegation_settings
Deletes Sudo or PowerBroker settings.
Formatemcli delete_privilege_delegation_settings -setting_names="setting_name1;setting_name2;setting_name3;"
Options■ setting_names
Name of the settings you want to delete.
ExampleThe following example deletes the privilege settings for the names setting_name1, setting_name2, and setting_name3.
emcli delete_privilege_delegation_settings -setting_names="sudo_setting1;sudo_setting2;pbSetting1

2.2 Alphabetized Verb List
Verb Reference 2-69
delete_role
Deletes an existing Enterprise Manager administrator role.
Formatemcli delete_role -name="role_name"
Options■ name
Role name.
ExamplesThe following example deletes the role name existing_role.
emcli delete_role -name="existing_role"
delete_system
2-70 Command Line Interface
delete_system
Deletes a system.
Formatemcli delete_system -name="name" [-type=<generic_system>]
[ ] denotes that the parameter is optional
Options■ name
Name of the system to delete.
■ type
System type: generic_system. Defaults to "generic_system".
ExamplesThe following example deletes the system my_system.
emcli delete_system -name=my_system
2.2 Alphabetized Verb List
Verb Reference 2-71
delete_target
Deletes a specified target from the Enterprise Manager Grid Control monitoring framework. Deleting a target removes it from the Management Repository and does not physically remove the target itself.
You can use the get_targets verb to obtain a list of available targets and their respective types.
Formatemcli delete_target -name="name" -type="type" -delete_monitored_targets
Options■ name
Target name.
■ type
Target type.
■ delete_monitored_targets
Delete the targets monitored by the specified the Agent. Applicable only with the oracle_emd target type.
ExamplesThe following example deletes the oracle_database target with the name database.
emcli delete_target -name="database" -type="oracle_database"
delete_test
2-72 Command Line Interface
delete_test
Deletes a Services test along with its constituent steps and stepgroups.
Formatemcli delete_test -name=<target_name> -type=<target_type> -testname=<test_name> -testtype=<test_type>
Options■ name
Service target name.
■ type
Service target type.
■ testname
Name of the test.
■ testtype
Type of test.
ExamplesThe following example deletes the HTTP test named MyTest for the generic_service target named MyTarget.
emcli delete_test -name='MyTarget' -type='generic_service' -testname='MyTest' -testtype='HTTP'
2.2 Alphabetized Verb List
Verb Reference 2-73
delete_test_threshold
Deletes a test threshold.
Formatemcli delete_test_threshold -name=<target_name> -type=<target_type> -testname=<test_name> -testtype=<test_type> -metricName=<metric_name> -metricColumn=<metric_column> [-beaconName=<beacon_name>] [-stepName=<step_name>] [-stepGroupName=<stepgroupname>]
[ ] denotes that the parameter is optional
Options■ name
Service target name.
■ type
Service target type.
■ testname
Test name.
■ testtype
Test type.
■ metricName
Metric name.
■ metricColumn
Metric column.
■ beaconName
Beacon name.
■ stepName
Step name.
■ stepGroupName
Step group name.
Examplesemcli delete_test_threshold -name="Service Name" -type="generic_service" -testname="Test Name" -testtype="HTTP" -metricName="http_response" -metricColumn="timing"
delete_user
2-74 Command Line Interface
delete_user
Deletes an existing Enterprise Manager administrator.
When a user is deleted, all jobs the user creates are stopped and deleted. Also, any blackouts the user creates are deleted. However, a user cannot be deleted if any blackouts created by the user are active at the time the call to delete the user is issued. This situation is considered an invalid state from which to delete a user. First, all of these active blackouts must be stopped, and a thwarted delete user call must be reissued.
Formatemcli delete_user -name="user_name"
Options■ name
Administrator name.
ExamplesThe following example deletes the Enterprise Manager administrator named sysman3.
emcli delete_user -name=sysman3

2.2 Alphabetized Verb List
Verb Reference 2-75
disable_audit
Disables auditing for all user operations.
Formatemcli disable_audit
disable_test
2-76 Command Line Interface
disable_test
Disables monitoring of a Services test.
Formatemcli disable_test -name=<target name> -type=<target type> -testname=<test name> -testtype=<test type>
Options■ name
Service target name.
■ type
Service target type.
■ testname
Test name.
■ testtype
Test type.
ExamplesThe following example disables the HTTP test named MyTest for the generic_service target named MyTarget.
emcli disable_test -name='MyTarget' -type='generic_service' -testname='MyTest' -testtype='HTTP'
2.2 Alphabetized Verb List
Verb Reference 2-77
enable_audit
Enables auditing for all user operations.
Formatemcli enable_audit [-level=basic]
[ ] denotes that the parameter is optional
Options■ -level=basic
Enables auditing for LOGIN, LOGOUT, DB_LOGIN, and DB_LOGOUT.
Examples
Example 1The following example enables auditing for all operations:
emcli enable_audit
Example 2The following example enables auditing for LOGIN, LOGOUT, DB_LOGIN, and DB_LOGOUT:
emcli enable_audit [-level=basic]
enable_test
2-78 Command Line Interface
enable_test
Enables monitoring of a Services test. It pushes the Service test collection to all the beacons.
Formatemcli enable_test -name=<target name> -type=<target type> -testname=<test name> -testtype=<test type>
Options■ name
Service target name.
■ type
Service target type.
■ testname
Test name.
■ testtype
Test type.
ExamplesThe following example enables the HTTP test named MyTest for the generic_service target named MyTarget.
emcli enable_test -name='MyTarget' -type='generic_service' -testname='MyTest' -testtype='HTTP'
2.2 Alphabetized Verb List
Verb Reference 2-79
execute_hostcmd
Executes a host command across a set of targets.
Formatemcli execute_hostcmd -cmd="host command" -osscript="os script to be executed with "cmd" " -targets="name1:type1;name2:type2;..." -credential_set_name="name" [-input_file="parameter_tag:script_file"]
[ ] denotes that the parameter is optional
Options■ cmd
"host command" can be any valid host command or group of host commands.
■ targets
List of target-name, target-type pairs. The host command is executed across this list of Enterprise Manager targets. All targets must be of the type host or composite, which represents a group of targets. If it is a group, the group is expanded to extract all the host targets, and the host command is executed across these host targets.
■ credential_set_name
The credential_set_name parameter refers to the set name of the preferred credentials stored in the Enterprise Manager repository. If this parameter is not present, HostCredsNormal is used for executing host commands. For the host target type, two credential sets exist:
– HostCredsNormal — Default unprivileged credential set for a host target
– HostCredsPriv — Privileged credential set for a host target
The credential set parameter can only be specified when the override credential parameters such as username and password are not present.
If provided, the you must fully specify the override credential parameters. For host command, username and password must be specified together.
■ input_file
Used in conjunction with the -osscript option, this option enables you to load the contents of an OS script. The -input_file option specifies a mapping between a tag and a local file path. The tag is specified in lieu of actual osscript contents of the -osscript option. The tag must not contain colons ( : ) or semi-colons ( ; ).
ExamplesThe following example executes the host command ls -l; against the target stach.us.oracle.com:host and host targets contained in the group grp. The stored HostCredsPriv preferred credentials are used for all the targets.
emcli execute_hostcmd -cmd="ls -l;"
execute_hostcmd
2-80 Command Line Interface
-credential_set_name="HostCredsPriv" -targets="stach.us.oracle.com:host;grp:composite"
The following example loads the contents of the script /scratch/dba_scripts/shellscript.sh into the value of option -osscript and executes it against target reference.us.oracle.com:host and host targets contained in the group grp. The stored HostCredsNormal preferred credentials are used for all the targets.
emcli execute_hostcmd -cmd="/bin/sh -s" -osscript="FILE" -input_file="FILE:/scratch/dba_scripts/shellscript.sh" -credential_set_name="HostCredsNormal" -targets="reference.us.oracle.com:host;grp:composite"
2.2 Alphabetized Verb List
Verb Reference 2-81
execute_sql
Executes a SQL command across a set of targets.
Formatemcli execute_sql -sql="sql command" -targets="name1:type1;name2:type2;..." -credential_set_name="name" [-input_file="parameter_tag:script_file"]
[ ] denotes that the parameter is optional
Options■ sql
"sql command" is a single SQL statement.
■ targets
List of target-name, target-type pairs. The SQL command executes across this list of Enterprise Manager targets. All targets must be of the type oracle_database or composite, which represents a group of targets. If it is a group, the group expands to extract all the database targets, and the SQL command is executed across these database targets.
■ credential_set_name
Refers to the set name of the preferred credentials stored in the Enterprise Manager repository. If this parameter is not present, the DBCredsNormal and DBHostCreds credential set is used for executing SQL commands. For each target type, several credential sets exist:
– HostCredsNormal — Default unprivileged credential set for a host target
– HostCredsPriv — Privileged credential set for a host target
– DBHostCreds — Host credential set for an oracle_database target
– DBCredsNormal — Default normal credential set for an oracle_database target
– DBCredsSYSDBA — sysdba credential set for an oracle_database target
You can only specify the credential_set_name parameter when the override credential parameters such as [db_|host_]username and [db_|host_]password are not present. If provided, the override credential parameters must be specified fully. For the SQL commands, db_username, db_password, db_role, host_username, and host_password must be present.
■ input_file
Used in conjunction with the -sql option, this option enables you to load the contents of a SQL script. The -input_file option specifies a mapping between a tag and a local file path. The tag is specified in lieu of an actual SQL command for the -sql option. The tag must not contain colons ( : ) or semi-colons ( ; ).
ExamplesThe following example executes the SQL command select * from sysman.mgmt_targets; against the target database:oracle_database and
execute_sql
2-82 Command Line Interface
database targets contained in the group grp. The stored SYSDBA preferred credentials are used for all the targets.
emcli execute_sql -sql="select * from sysman.mgmt_targets;" -credential_set_name="DBCredsSYSDBA" -targets="database:oracle_database;grp:composite"
The following example loads the contents of the script /scratch/dba_scripts/enterprise_schema.sql into the value of option -sql, and executes it against target database:oracle_database and database targets contained in the group grp. The stored SYSDBA preferred credentials are used for all the targets.
emcli execute_sql -sql="FILE" -input_file="FILE:/scratch/dba_scripts/enterprise_schema.sql" -credential_set_name="DBCredsSYSDBA" -targets="database:oracle_database;grp:composite"

2.2 Alphabetized Verb List
Verb Reference 2-83
export_report
Exports a report definition and all of its element definitions given its title and owner.
Formatemcli export_report -title="<report-title>" -owner="<report-owner>" -output_file="<file>"
Options■ title
Title of the report to export.
■ owner
The owner of the report to export. The logged-in emcli user must have view privilege for the report. Target names are not exported. The report is uniquely defined using title and owner, so both must be supplied.
■ output_file
Name of the exported file.
Examples emcli export_report -title="maintenance report" -owner="SHIFT1_OPERATOR" -output_file="$HOME/reports/maint_report.xml"
export_template
2-84 Command Line Interface
export_template
Exports a monitoring template and also exports UDMs in the template. You can export a template to the file system in the form of an XML file, or you can print it on standard output in XML form.
Formatemcli export_template -name="name" -target_type="target_type" [-output_file=<File to which template will be exported>]
[ ] denotes that the parameter is optional
Options■ name
Name of the template. The name and target type uniquely identify a template.
■ target_type
Target type of the template.
■ output_file
Specifies the file to output the template. If not specified, the template prints to stdout.
ExamplesThe following example shows that template XML specified by name HOST_TEMP1 and target type host will be output to the screen.
emcli export_template -name=HOST_TEMP1 -target_type=host
The following example shows that template XML specified by name HOST_TEMP1 and target type host will be created in the test.xml file.
emcli export_template -name=HOST_TEMP1 -target_type=host -output_file=test.xml
2.2 Alphabetized Verb List
Verb Reference 2-85
extend_as_home
Clones the specified Application Server Oracle Home or Software Library component from the target host to specified destinations. The new hosts join an existing cluster. For a Portal and Wireless install, OID user and password are also needed. For a J2EE instance connected to only a database-based repository, a DCM Schema password is needed.
Passing Variables Through EMCLIWhen working with variables such as %perlbin% or %oracle_home%, EM CLI passes variable values from the current local environment instead of the variables themselves. To pass variables through an EM CLI command, as might be the case when using the -prescripts or -postscripts options, you can place the EM CLI command in a batch file and replace all occurrences of % with %%.
Formatemcli extend_as_home -input_file="dest_properties:file_path" -list_exclude_files="list of files to exclude" -isSwLib="true/false" -tryftp_copy="true/false" -jobname="name of cloning job" -iasInstance=instance -clustername=name of the cluster to join -oldIASAdminPassword=oldpass -newIASAdminPassword=newpass [-oiduser=oid admin user] [-oidpassword=oid admin password] [-dcmpassword=dcm schema password] [-prescripts=script name to execute"] [-run_prescripts_as_root="true/false"] [-postscripts=script to execute"] [-run_postscripts_as_root="true/false"] [-rootscripts=script name to execute"] [-swlib_component ="path:path to component;version:rev"] [-source_params="TargetName:name;HomeLoc:loc;HomeName:name; ScratchLoc:Scratch dir Location" [-jobdesc="description"]
[ ] denotes that the parameter is optional
Options■ dest_properties
File containing information regarding the targets. Each line in the file corresponds to information regarding one destination.
Format:
Destination Host Name1;Destination Home Loc; Home Name; Scratch Location;
■ list_exclude_files
Comma-separated list of files to exclude. This is not required if the source is a Software Library. You can use an asterisk "*" as a wildcard.
extend_as_home
2-86 Command Line Interface
■ isSwLib
Specifies whether it is an Oracle Home database or Software Library.
■ tryftp_copy
Try FTP to copy or not. You should set the FTP copy option to false when using EM CLI from the command line.
■ jobname
Name of the cloning job.
■ iasInstance
Application Server instance.
■ clustername
Name of the cluster to join.
■ oldIASAdminPassword
Old Application Server administrator password.
■ newIASAdminPassword
New Application Server administrator password.
■ oiduser
OID administrator user.
■ oidpassword
OID administrator password.
■ dcmpassword
DCM schema password.
■ prescripts
Path of the script to execute.
■ run_prescripts_as_root
Run prescripts as root. By default, this option is set to false.
■ postscripts
Path of the script to execute.
■ run_postscripts_as_root
Runs postscripts as root. By default, this option is set to false.
■ rootscripts
Path of the script to execute. You can use the job system environment variables (%oracle_home%, %perl_bin%) to specify script locations.
■ swlib_component
Path to the Software Library to be cloned. isSwLib must be true in this case.
Note: Double-quoted parameters can be passed using an escape (\) sequence. For example:
prescripts=" <some value here>=\"some value here\" "

2.2 Alphabetized Verb List
Verb Reference 2-87
■ source_params
Source Oracle home information. isSwLib must be false in this case.
■ jobdesc
Description of the job. If not specified, a default description is generated automatically.
extend_crs_home
2-88 Command Line Interface
extend_crs_home
Extends an Oracle Clusterware cluster, using an Oracle Clusterware source home location or an Oracle Clusterware Software Library component, to specified destinations. If a component is used, you must provide information for a host that is part of the current cluster, along with the Oracle Home name and home location. When cloning from a source home, you do not need to pass source information twice (-srchost, -home_name, and -home_location). This information is extracted from the home. These are only needed when cloning from a Software Library component.
Format emcli extend_crs_home -input_file="dest_properties:file_path" -list_exclude_files="list of files to exclude" -clusternodes="node1;node2;node3;node4" -clustername="name of cluster to create" -isSwLib="true/false" -tryftp_copy="true/false" -jobname="name of cloning job" [-srchost=name of a host node present on the cluster being extended"] [-home_name="home name on a host for the existing Oracle Clusterware cluster"] [-home_location="location on a host for the existing Oracle Clusterware cluster"] [-prescripts=script name to execute"] [-run_prescripts_as_root="true/false"] [-postscripts=script to execute"] [-run_postscripts_as_root="true/false"] [-rootscripts=script name to execute"] [-swlib_component ="path:path to component;version:rev"] [-source_params="TargetName:name;HomeLoc:loc;HomeName:name; ScratchLoc:Scratch dir Location"] [-jobdesc="description"]
[ ] denotes that the parameter is optional
Options■ dest_properties
File containing information regarding the targets. Each line in the file corresponds to information regarding one destination.
Format:
Destination Host Name1;Destination Node Name;Scratch Location;PVTIC;VirtualIP;
■ list_exclude_files
Comma-separated list of files to exclude. Not required if the source is a Software Library. You can use an asterisk "*" as a wildcard.
■ clusternodes
List of current nodes in the cluster.
■ clustername
Name of the cluster to create.
2.2 Alphabetized Verb List
Verb Reference 2-89
■ isSwLib
Specifies whether it is an Oracle Home database or Software Library.
■ tryftp_copy
Try FTP to copy or not. You should set the FTP copy option to false when using EM CLI from the command line.
■ jobname
Name of the Cloning job.
■ srchost
Name of a host that is part of the Oracle Clusterware cluster being extended.
■ home_name
Name of home used by all the current Oracle Clusterware cluster nodes.
■ home_location
Home location used by all the current Oracle Clusterware cluster nodes.
■ prescripts
Path of the script to execute.
■ run_prescripts_as_root
Run prescripts as root. By default, this option is set to false.
■ postscripts
Path of the script to execute.
■ run_postscripts_as_root
Run postscripts as root. By default, this option is set to false.
■ rootscripts
Path of the script to execute. You can use the job system environment variables (%oracle_home%, %perl_bin%) to specify script locations.
■ swlib_component
Path to the Software Library to be cloned. isSwLib must be true in this case.
■ source_params
Source Oracle home info. isSwLib must be false in this case.
■ jobdesc
Description of the job. If not specified, a default description is generated automatically.
Examplesemcli extend_crs_home -input_file="dest_properties:crs.prop" -list_exclude_files=""
Note: Double-quoted parameters can be passed using an escape (\) sequence. For example:
prescripts=" <some value here>=\"some value here\" "
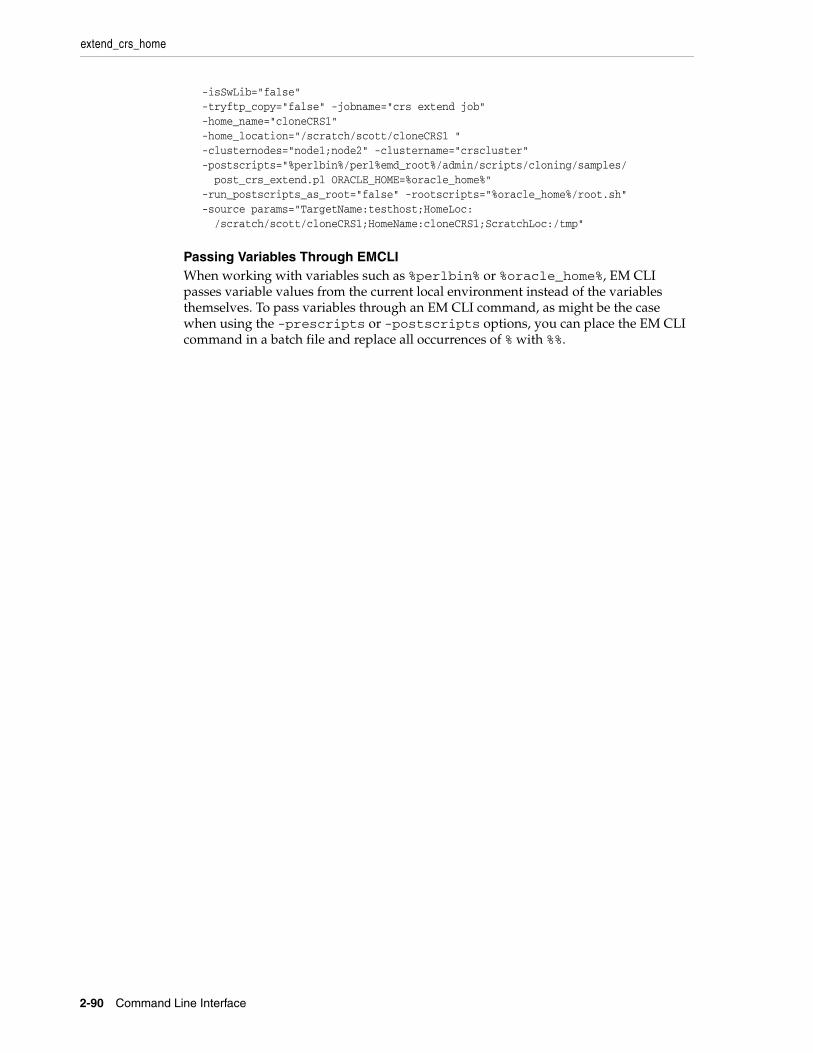
extend_crs_home
2-90 Command Line Interface
-isSwLib="false" -tryftp_copy="false" -jobname="crs extend job" -home_name="cloneCRS1" -home_location="/scratch/scott/cloneCRS1 " -clusternodes="node1;node2" -clustername="crscluster" -postscripts="%perlbin%/perl%emd_root%/admin/scripts/cloning/samples/ post_crs_extend.pl ORACLE_HOME=%oracle_home%" -run_postscripts_as_root="false" -rootscripts="%oracle_home%/root.sh" -source params="TargetName:testhost;HomeLoc: /scratch/scott/cloneCRS1;HomeName:cloneCRS1;ScratchLoc:/tmp"
Passing Variables Through EMCLIWhen working with variables such as %perlbin% or %oracle_home%, EM CLI passes variable values from the current local environment instead of the variables themselves. To pass variables through an EM CLI command, as might be the case when using the -prescripts or -postscripts options, you can place the EM CLI command in a batch file and replace all occurrences of % with %%.
2.2 Alphabetized Verb List
Verb Reference 2-91
extend_rac_home
Extends a RAC cluster by cloning a specified Oracle Home location or a RAC Software Library component to specified destinations. If a component is used, you must provide information for a host that is part of the current cluster, along with the Oracle Home name and home location. When cloning from a source home, this information is automatically extracted from the home.
Formatemcli extend_rac_home -input_file="dest_properties:file_path" -list_exclude_files="list of files to exclude" -isSwLib="true/false" -tryftp_copy="true/false" -jobname="name of cloning job" -clusternodes="node1;node2;node3;node4" [-srchost=name of a host node present on the RAC cluster being extended"] [-home_name="home name on a host for the existing RAC cluster"] [-home_location="location on a host for the existing RAC cluster"] [-prescripts="script name to execute"] [-run_prescripts_as_root="true/false"] [-postscripts="script to execute"] [-run_postscripts_as_root="true/false"] [-rootscripts="script name to execute"] [-swlib_component ="path:path to component;version:rev"] [-source_params="TargetName:name;HomeLoc:loc;HomeName:name; ScratchLoc:Scratch dir Location"] [-jobdesc="description"]
[ ] denotes that the parameter is optional
Options■ dest_properties
File containing information regarding the targets. Each line in the file corresponds to information regarding one destination.
Format:
Destination Host Name;Destination Node Name;Scratch Location;
■ list_exclude_files
Comma-separated list of files to exclude. Not required if the source is a Software Library. You can use an asterisk "*" as a wildcard.
■ isSwLib
Specifies whether it is an Oracle Home database or Software Library.
■ tryftp_copy
Try FTP to copy or not. You should set the FTP copy option to false when using EM CLI from the command line.
■ jobname
Name of the cloning job.
extend_rac_home
2-92 Command Line Interface
■ clusternodes
Current nodes in the cluster.
■ srchost
Name of a host that is part of the RAC cluster being extended.
■ home_name
Name of the home used by all the current RAC cluster nodes.
■ home_location
Home location used by all the current RAC cluster nodes.
■ prescripts
Path of the script to execute.
■ run_prescripts_as_root
Run prescripts as root. By default, this option is set to false.
■ postscripts
Path of the script to execute.
■ run_postscripts_as_root
Run postscripts as root. By default, this option is set to false.
■ rootscripts
Path of the script to execute.
■ swlib_component
Path to the Software Library being cloned. isSwLib must be true in this case.
■ source_params
Source Oracle home info. isSwLib must be false in this case.
■ jobdesc
Description of the job. If not specified, a default description is generated automatically.
Examplesemcli extend_rac_home -input_file="dest_properties:clonedestinations" -list_exclude_files="*.log,*.dbf,sqlnet.ora,tnsnames.ora,listener.ora" -isSwLib="false" -tryftp_copy="false" -jobname="clone database home" -clusternodes="node1;node2" -prescripts="/home/joe/myScript" -run_prescripts_as_root="true" -rootscripts="%oracle_home%/root.sh" -source_params="TargetName:host.domain.com;HomeLoc:/oracle/database1;
Note: Double-quoted parameters can be passed using an escape (\) sequence. For example:
prescripts=" <some value here>=\"some value here\" "

2.2 Alphabetized Verb List
Verb Reference 2-93
HomeName:OUIHome1;ScratchLoc:/tmp"
Passing Variables Through EMCLIWhen working with variables such as %perlbin% or %oracle_home%, EM CLI passes variable values from the current local environment instead of the variables themselves. To pass variables through an EM CLI command, as might be the case when using the -prescripts or -postscripts options, you can place the EM CLI command in a batch file and replace all occurrences of % with %%.
extract_template_tests
2-94 Command Line Interface
extract_template_tests
Extracts variables and test definitions from a repository template into a local file.
Formatemcli extract_template_tests -templateName=<template name> -templateType=<template type> -output_file=<output filename> [-encryption_key=<key>]
[ ] denotes that the parameter is optional
Options■ templateName
Name of the template.
■ templateType
Type of template.
■ output_file
Name of the output file. If the file does not exist, it will be created; if it already exists, it will be overwritten. (This is assuming the extract operation was successful; if the operation fails, no files are created, and any existing files are left unchanged.)
■ encryption_key
Key to encrypt the file contents. The same key should be used to decrypt the file.
ExamplesThe following example creates a file named my_template.xml containing the variable values and test definitions of the Web Application template my_template. The file contents are encrypted using the key my_password.
emcli extract_template_tests -templateName='my_template' -templateType='website' -output_file='my_template.xml' -encryption_key='my_password'
Note the following points about this example:
■ The emcli user must have operator privilege on the repository template to perform this operation.
■ Beacon-related information is not exported to the file. In particular, the list of monitoring beacons, as well as any beacon-specific properties or thresholds, are not exported.
■ The values of password variables are not exported.
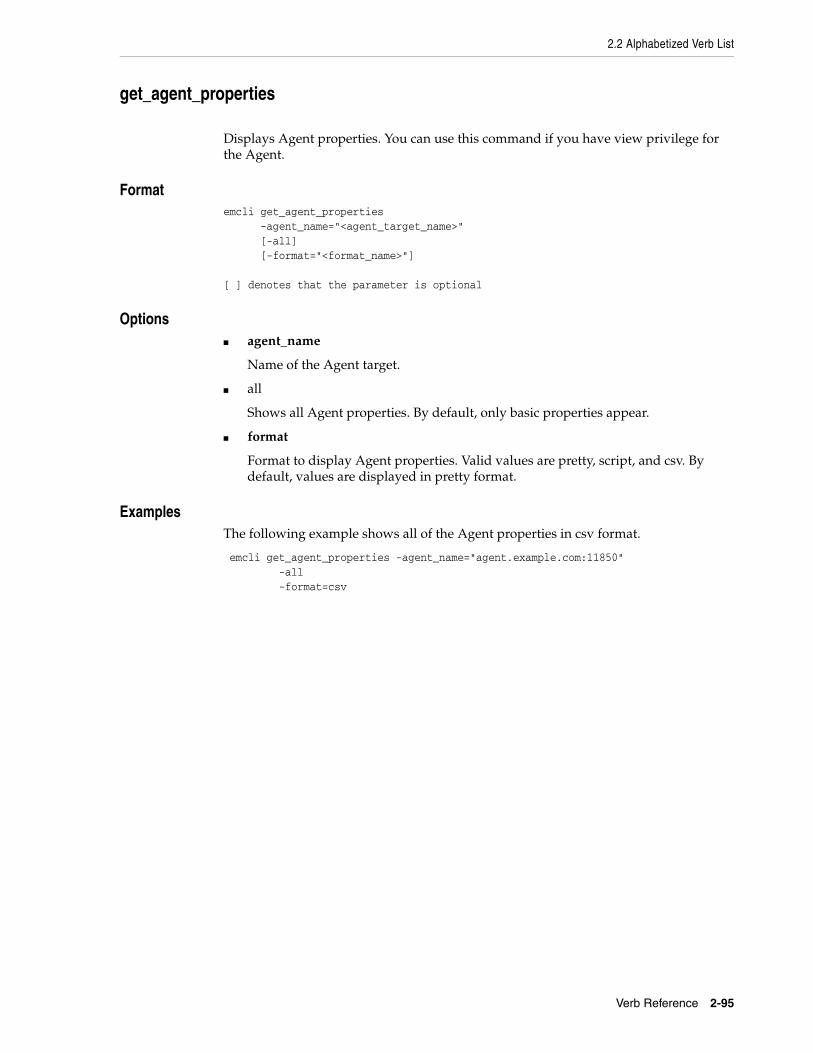
2.2 Alphabetized Verb List
Verb Reference 2-95
get_agent_properties
Displays Agent properties. You can use this command if you have view privilege for the Agent.
Formatemcli get_agent_properties -agent_name="<agent_target_name>" [-all] [-format="<format_name>"]
[ ] denotes that the parameter is optional
Options■ agent_name
Name of the Agent target.
■ all
Shows all Agent properties. By default, only basic properties appear.
■ format
Format to display Agent properties. Valid values are pretty, script, and csv. By default, values are displayed in pretty format.
ExamplesThe following example shows all of the Agent properties in csv format.
emcli get_agent_properties -agent_name="agent.example.com:11850" -all -format=csv

get_agent_property
2-96 Command Line Interface
get_agent_property
Displays the value of a specific Agent property. You can use this command if you have view privilege for the Agent.
Formatemcli get_agent_property -agent_name="<agent_target_name>" -name="<agent_property_name>"
Options■ agent_name
Name of the Agent target.
■ name
Name of the Agent property.
ExamplesThe following example shows the current value of the UploadInterval property in emd.properties.
emcli get_agent_property -agent_name="agent.example.com:11850" -name=UploadInterval
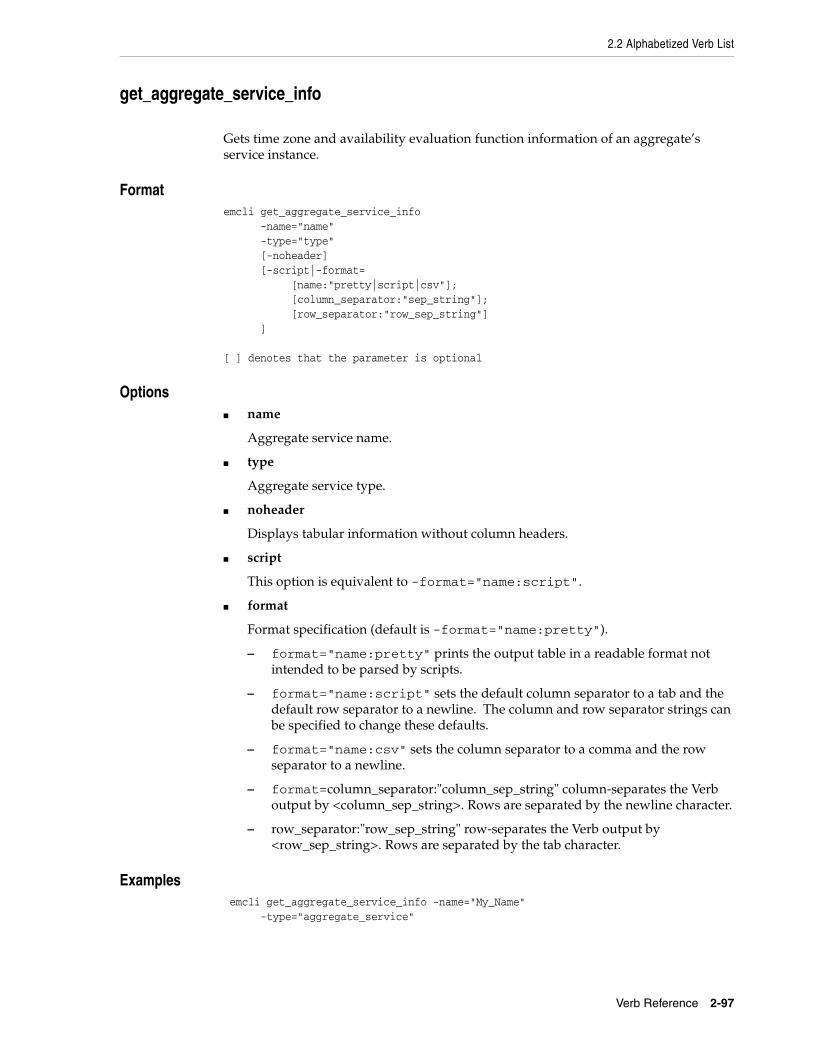
2.2 Alphabetized Verb List
Verb Reference 2-97
get_aggregate_service_info
Gets time zone and availability evaluation function information of an aggregate’s service instance.
Formatemcli get_aggregate_service_info -name="name" -type="type" [-noheader] [-script|-format= [name:"pretty|script|csv"]; [column_separator:"sep_string"]; [row_separator:"row_sep_string"] ]
[ ] denotes that the parameter is optional
Options■ name
Aggregate service name.
■ type
Aggregate service type.
■ noheader
Displays tabular information without column headers.
■ script
This option is equivalent to -format="name:script".
■ format
Format specification (default is -format="name:pretty").
– format="name:pretty" prints the output table in a readable format not intended to be parsed by scripts.
– format="name:script" sets the default column separator to a tab and the default row separator to a newline. The column and row separator strings can be specified to change these defaults.
– format="name:csv" sets the column separator to a comma and the row separator to a newline.
– format=column_separator:"column_sep_string" column-separates the Verb output by <column_sep_string>. Rows are separated by the newline character.
– row_separator:"row_sep_string" row-separates the Verb output by <row_sep_string>. Rows are separated by the tab character.
Examples emcli get_aggregate_service_info -name="My_Name" -type="aggregate_service"
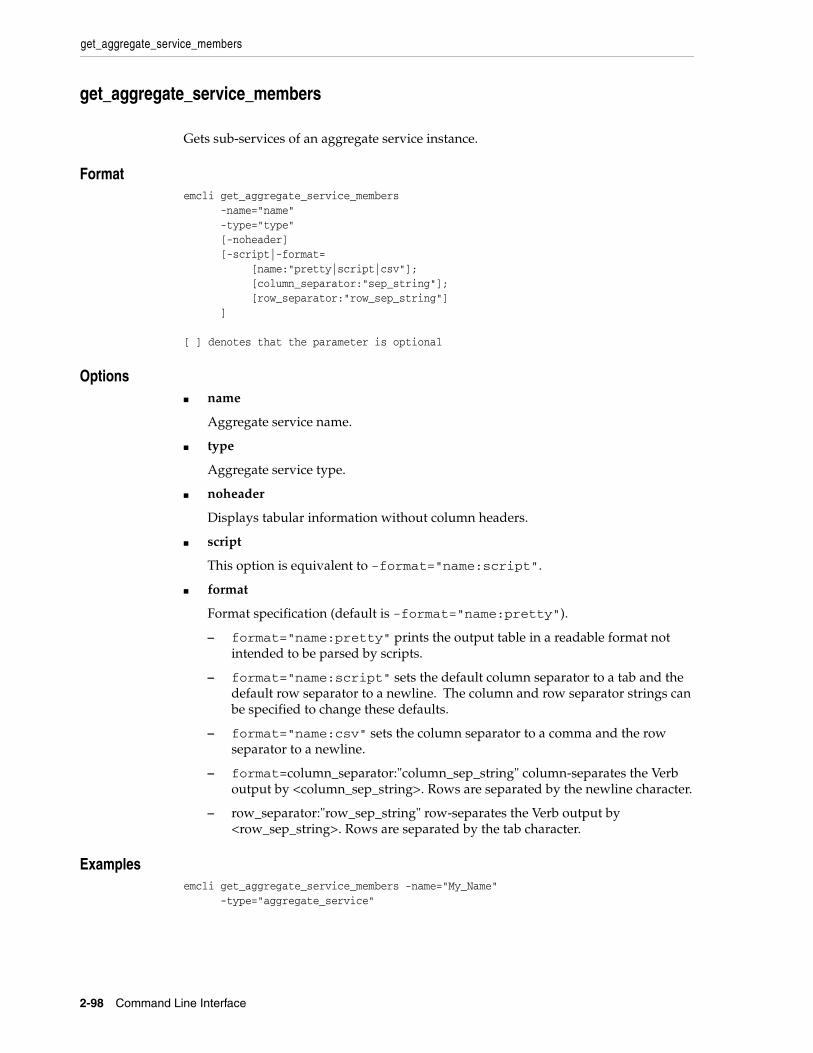
get_aggregate_service_members
2-98 Command Line Interface
get_aggregate_service_members
Gets sub-services of an aggregate service instance.
Formatemcli get_aggregate_service_members -name="name" -type="type" [-noheader] [-script|-format= [name:"pretty|script|csv"]; [column_separator:"sep_string"]; [row_separator:"row_sep_string"] ]
[ ] denotes that the parameter is optional
Options■ name
Aggregate service name.
■ type
Aggregate service type.
■ noheader
Displays tabular information without column headers.
■ script
This option is equivalent to -format="name:script".
■ format
Format specification (default is -format="name:pretty").
– format="name:pretty" prints the output table in a readable format not intended to be parsed by scripts.
– format="name:script" sets the default column separator to a tab and the default row separator to a newline. The column and row separator strings can be specified to change these defaults.
– format="name:csv" sets the column separator to a comma and the row separator to a newline.
– format=column_separator:"column_sep_string" column-separates the Verb output by <column_sep_string>. Rows are separated by the newline character.
– row_separator:"row_sep_string" row-separates the Verb output by <row_sep_string>. Rows are separated by the tab character.
Examplesemcli get_aggregate_service_members -name="My_Name" -type="aggregate_service"
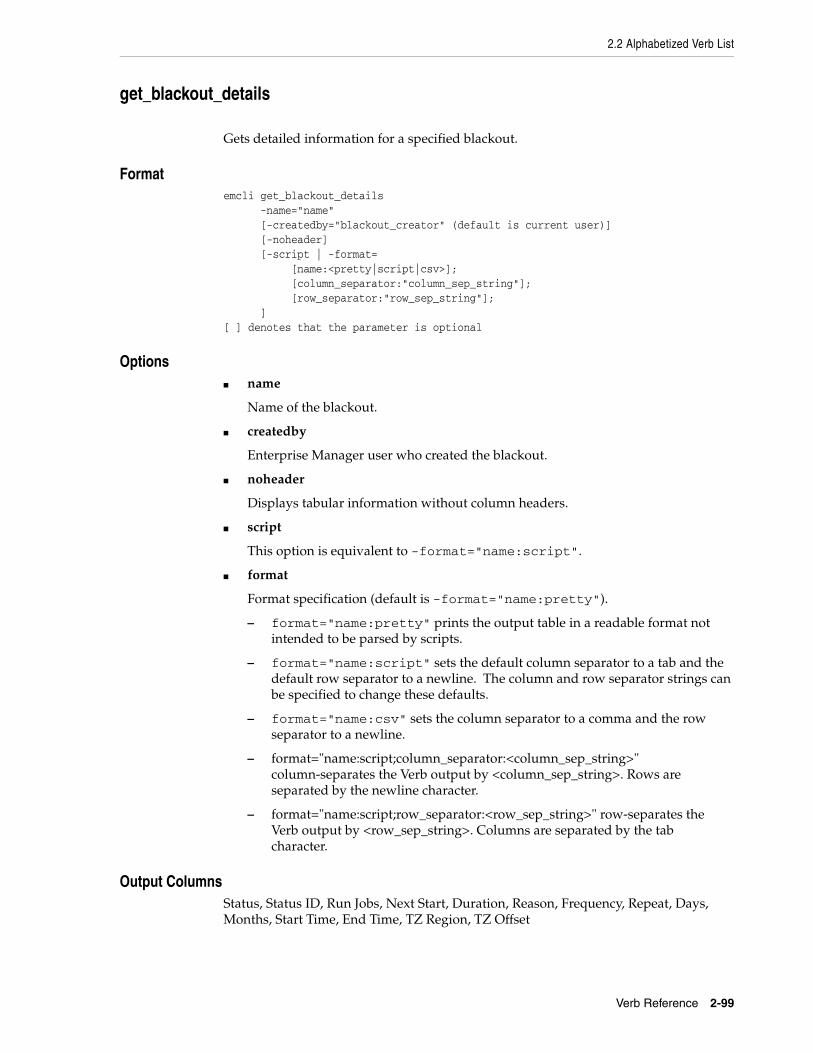
2.2 Alphabetized Verb List
Verb Reference 2-99
get_blackout_details
Gets detailed information for a specified blackout.
Formatemcli get_blackout_details -name="name" [-createdby="blackout_creator" (default is current user)] [-noheader] [-script | -format= [name:<pretty|script|csv>]; [column_separator:"column_sep_string"]; [row_separator:"row_sep_string"]; ][ ] denotes that the parameter is optional
Options■ name
Name of the blackout.
■ createdby
Enterprise Manager user who created the blackout.
■ noheader
Displays tabular information without column headers.
■ script
This option is equivalent to -format="name:script".
■ format
Format specification (default is -format="name:pretty").
– format="name:pretty" prints the output table in a readable format not intended to be parsed by scripts.
– format="name:script" sets the default column separator to a tab and the default row separator to a newline. The column and row separator strings can be specified to change these defaults.
– format="name:csv" sets the column separator to a comma and the row separator to a newline.
– format="name:script;column_separator:<column_sep_string>" column-separates the Verb output by <column_sep_string>. Rows are separated by the newline character.
– format="name:script;row_separator:<row_sep_string>" row-separates the Verb output by <row_sep_string>. Columns are separated by the tab character.
Output ColumnsStatus, Status ID, Run Jobs, Next Start, Duration, Reason, Frequency, Repeat, Days, Months, Start Time, End Time, TZ Region, TZ Offset
get_blackout_details
2-100 Command Line Interface
ExamplesThe following example shows detailed information for blackout blackout1 that the current user created.
emcli get_blackout_details -name=blackout1
The following example shows detailed information for blackout blackout1 that user joe created.
emcli get_blackout_details -name=blackout1 -createdby=joe
2.2 Alphabetized Verb List
Verb Reference 2-101
get_blackout_reasons
Lists all blackout reasons, one per line.
Formatemcli get_blackout_reasons
ExamplesThe following example lists all blackout reasons, one per line.
emcli get_blackout_reasons
get_blackout_targets
2-102 Command Line Interface
get_blackout_targets
Lists targets for a specified blackout.
Formatemcli get_blackout_targets -name="name" [-createdby="blackout_creator" (default is current user)] [-noheader] [-script | -format= [name:<pretty|script|csv>]; [column_separator:"column_sep_string"]; [row_separator:"row_sep_string"]; ]
[ ] denotes that the parameter is optional
Options■ name
Name of the blackout.
■ createdby
Enterprise Manager user who created the blackout.
■ noheader
Displays tabular information without column headers.
■ script
This option is equivalent to -format="name:script".
■ format
Format specification (default is -format="name:pretty").
– format="name:pretty" prints the output table in a readable format not intended to be parsed by scripts.
– format="name:script" sets the default column separator to a tab and the default row separator to a newline. The column and row separator strings can be specified to change these defaults.
– format="name:csv" sets the column separator to a comma and the row separator to a newline.
– format="name:script;column_separator:<column_sep_string>" column-separates the Verb output by <column_sep_string>. Rows are separated by the newline character.
– format="name:script;row_separator:<row_sep_string>" row-separates the Verb output by <row_sep_string>. Columns are separated by the tab character.
Output ColumnsTarget Name, Target Type, Status, Status ID

2.2 Alphabetized Verb List
Verb Reference 2-103
ExamplesThe following example lists targets in the blackout blackout1 the current user created.
emcli get_blackout_targets -name=blackout1
The following example lists targets in the blackout blackout1 that user joe created.
emcli get_blackout_targets -name=blackout1 -createdby=joe
get_blackouts
2-104 Command Line Interface
get_blackouts
Lists all blackouts or just those for a specified target or one or more hosts. Only the blackouts the user has privilege to view are listed.
Formatemcli get_blackouts [-target="name1:type1" | -hostnames="host1;host2;..."] [-noheader] [-script | -format= [name:<pretty|script|csv>]; [column_separator:"column_sep_string"]; [row_separator:"row_sep_string"]; ]
[ ] denotes that the parameter is optional
Options■ target
Lists blackouts for this target. When neither this option nor the -hostnames option is specified, all blackouts the user has privilege to view are listed.
■ hostnames
Lists blackouts that have a target on one of the specified hosts. The host name is just the target name part of the host target. For example, specify host.us.oracle.com, rather than host.us.oracle.com:host. When neither this option nor the -target option is specified, all blackouts the user has privilege to view are listed.
■ noheader
Displays tabular information without column headers.
■ script
This option is equivalent to -format="name:script".
■ format
Format specification (default is -format="name:pretty").
– format="name:pretty" prints the output table in a readable format not intended to be parsed by scripts.
– format="name:script" sets the default column separator to a tab and the default row separator to a newline. The column and row separator strings can be specified to change these defaults.
– format="name:csv" sets the column separator to a comma and the row separator to a newline.
– format="name:script;column_separator:<column_sep_string>" column-separates the Verb output by <column_sep_string>. Rows are separated by the newline character.
– format="name:script;row_separator:<row_sep_string>" row-separates the Verb output by <row_sep_string>. Columns are separated by the tab character.
2.2 Alphabetized Verb List
Verb Reference 2-105
Output ColumnsName, Created By, Status, Status ID, Next Start, Duration, Reason, Frequency, Repeat, Start Time, End Time, Previous End, TZ Region, TZ Offset
ExamplesThe following example shows all blackouts with some details.
emcli get_blackouts
The following example shows all blackouts that cover the target database2:oracle_database.
emcli get_blackouts -target=database2:oracle_database
The following example shows all blackouts that cover some target on host myhost.us.oracle.com.
emcli get_blackouts -hostnames=myhost.us.oracle.com
The following example shows all blackouts that cover some target on host myhost.us.oracle.com or on host yourhost.us.oracle.com.
emcli get_blackouts -hostnames="myhost.us.oracle.com"-hostnames="yourhost.us.oracle.com"
get_ca_info
2-106 Command Line Interface
get_ca_info
Displays information about all of the Certificate Authorities (CA) created since the Grid Control installation. It also displays the Agent names whose certificates are issued by the CA(s) when you specify the -details option. The following information is retrieved from the Grid Control repository:
■ Unique identifier of the Certificate Authority (CA) in the Grid Control repository
■ CA description
■ CA creation date
■ CA expiration date
■ Number of Agents registered to this CA
■ Number of secured Agents not registered to any CA
Formatemcli get_ca_info [-ca_id="id1;id2;..."] [-details]
[ ] denotes that the parameter is optional
Options■ ca_id
Specifies the Certificate Authority ID.
■ details
For each Certificate Authority, displays the list of Agent names whose certificates are issued by it.
ExamplesThe following example shows output for for the CA with the ID of 2 specified.
emcli get_ca_info -ca_id=2 Info about CA with ID: 2 CA is configured DN: [email protected], CN=myomshost.mycompany.com, OU=EnterpriseManager on myomshost.mycompany.com, O=EnterpriseManager on myomshost.mycompany.com, L=EnterpriseManager on myomshost.mycompany.com1, ST=CA, C=US, DC=com Serial# : 87539237298512593900 Valid From: Mon Oct 25 17:01:15 UTC 2010 Valid Till: Thu Oct 22 17:01:12 UTC 2020 Number of Agents registered with CA ID 2 is 1 Number of Agents to be re-secured, as OMS is secured using force_newca option: 1
Note: This command is only available with patch 10372083 or patch 10034237 applied.
2.2 Alphabetized Verb List
Verb Reference 2-107
Regarding the force_newca option in the last line, the output shows that a new certificate was created with the ID of 2. Two agents have been re-secured to be registered with this new certificate. The OMS running on myomshost.mycompany.com has been re-secured to be registered with the new certificate created. The command "emctl secure oms" failed because a secured Agent was not registered to the new CA, hence the command "emctl secure oms force-newca" to secure the OMS anyway. There is still an Agent that needs to be secured to be registered to the new certificate. To retrieve the Agent name, you need to run the command "emcli get_ca_info -ca_id=2 -details," which is shown in the next example.
The following example displays the Agent names registered with the CA(s) for ID 2.
emcli get_ca_info -ca_id=2 -details Info about CA with ID: 2 CA is configured DN: [email protected], CN=myomshost.mycompany.com, OU=EnterpriseManager on myomshost.mycompany.com, O=EnterpriseManager on myomshost.mycompany.com, L=EnterpriseManager on myomshost.mycompany.com2, ST=CA, C=US, DC=com Serial# : 87539237298512593900 Valid From: Mon Oct 25 17:01:15 UTC 2010 Valid Till: Thu Oct 22 17:01:12 UTC 2020 Number of Agents registered with CA ID 2 is 1 usagent1.mycompany.com:20872 Following Agents needs to be re-secured, as OMS is secured using force_newca option:
ukagent1.mycompany.com:1830
get_guest_vm_status
2-108 Command Line Interface
get_guest_vm_status
Gets the status of the guest virtual machine.
Formatemcli get_guest_vm_status -guest_vm_name=<Guest VM Name> -server_pool_name=<Server Pool Name>
Options■ guest_vm_name
Name of the guest Virtual Machine.
■ server_pool_name
Name of the server pool.
Output ColumnStatus
ExamplesThe following example gets the guest status for VM st-vs1.us.oracle.com.
emcli get_guest_vm_status -guest_vm_name="st-vs1.us.oracle.com" -server_pool_name="Oracle Server Pool"
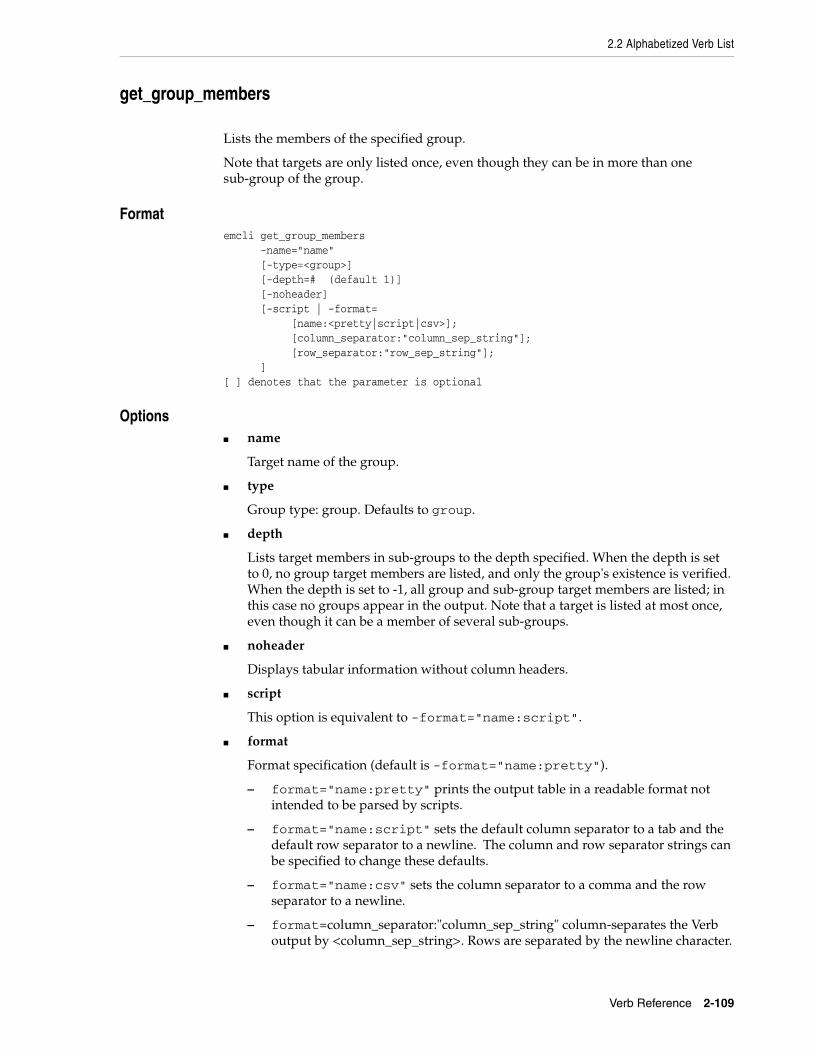
2.2 Alphabetized Verb List
Verb Reference 2-109
get_group_members
Lists the members of the specified group.
Note that targets are only listed once, even though they can be in more than one sub-group of the group.
Formatemcli get_group_members -name="name" [-type=<group>] [-depth=# (default 1)] [-noheader] [-script | -format= [name:<pretty|script|csv>]; [column_separator:"column_sep_string"]; [row_separator:"row_sep_string"]; ][ ] denotes that the parameter is optional
Options■ name
Target name of the group.
■ type
Group type: group. Defaults to group.
■ depth
Lists target members in sub-groups to the depth specified. When the depth is set to 0, no group target members are listed, and only the group's existence is verified. When the depth is set to -1, all group and sub-group target members are listed; in this case no groups appear in the output. Note that a target is listed at most once, even though it can be a member of several sub-groups.
■ noheader
Displays tabular information without column headers.
■ script
This option is equivalent to -format="name:script".
■ format
Format specification (default is -format="name:pretty").
– format="name:pretty" prints the output table in a readable format not intended to be parsed by scripts.
– format="name:script" sets the default column separator to a tab and the default row separator to a newline. The column and row separator strings can be specified to change these defaults.
– format="name:csv" sets the column separator to a comma and the row separator to a newline.
– format=column_separator:"column_sep_string" column-separates the Verb output by <column_sep_string>. Rows are separated by the newline character.
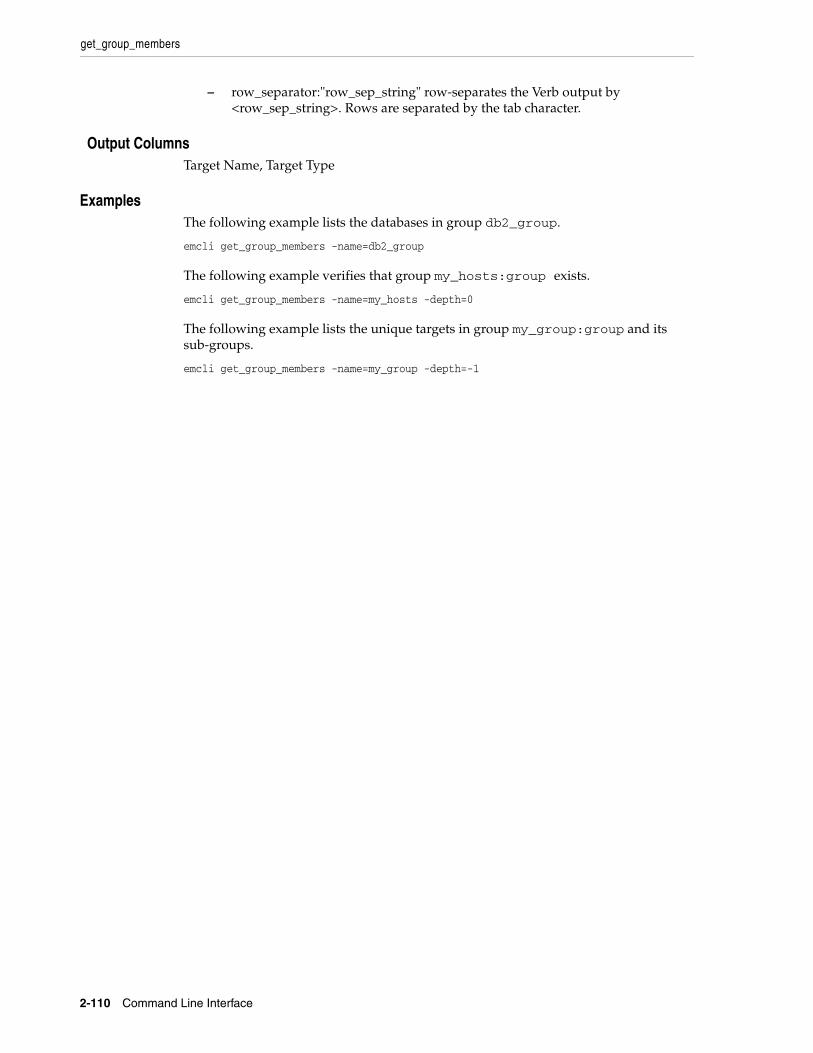
get_group_members
2-110 Command Line Interface
– row_separator:"row_sep_string" row-separates the Verb output by <row_sep_string>. Rows are separated by the tab character.
Output ColumnsTarget Name, Target Type
ExamplesThe following example lists the databases in group db2_group.
emcli get_group_members -name=db2_group
The following example verifies that group my_hosts:group exists.
emcli get_group_members -name=my_hosts -depth=0
The following example lists the unique targets in group my_group:group and its sub-groups.
emcli get_group_members -name=my_group -depth=-1

2.2 Alphabetized Verb List
Verb Reference 2-111
get_groups
Lists all groups.
Formatemcli get_groups [-noheader] [-script | -format= [name:<pretty|script|csv>]; [column_separator:"column_sep_string"]; [row_separator:"row_sep_string"]; ]
[ ] denotes that the parameter is optional
Options■ noheader
Displays tabular information without column headers.
■ script
This option is equivalent to -format="name:script".
■ format
Format specification (default is -format="name:pretty").
– format="name:pretty" prints the output table in a readable format not intended to be parsed by scripts.
– format="name:script" sets the default column separator to a tab and the default row separator to a newline. The column and row separator strings can be specified to change these defaults.
– format="name:csv" sets the column separator to a comma and the row separator to a newline.
– format=column_separator:"column_sep_string" column-separates the Verb output by <column_sep_string>. Rows are separated by the newline character.
– row_separator:"row_sep_string" row-separates the Verb output by <row_sep_string>. Rows are separated by the tab character.
Output ColumnsTarget Name, Target Type
ExamplesThe following example lists all groups.
emcli get_groups
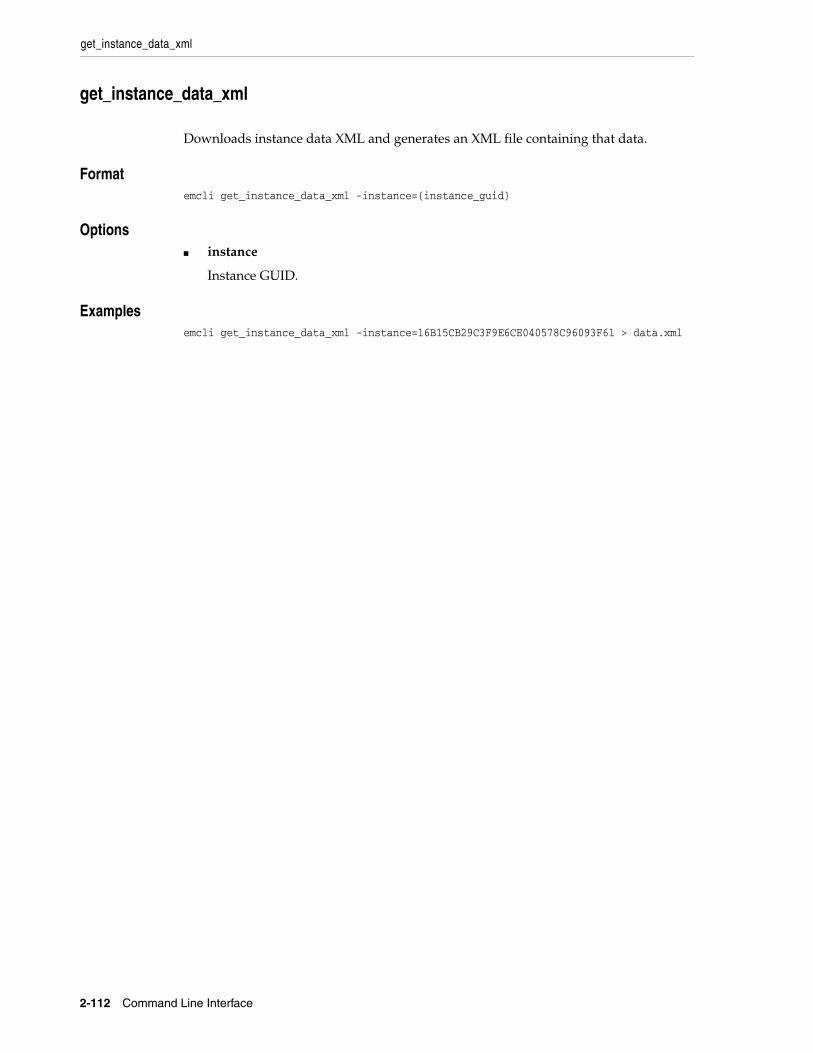
get_instance_data_xml
2-112 Command Line Interface
get_instance_data_xml
Downloads instance data XML and generates an XML file containing that data.
Formatemcli get_instance_data_xml -instance={instance_guid}
Options■ instance
Instance GUID.
Examplesemcli get_instance_data_xml -instance=16B15CB29C3F9E6CE040578C96093F61 > data.xml
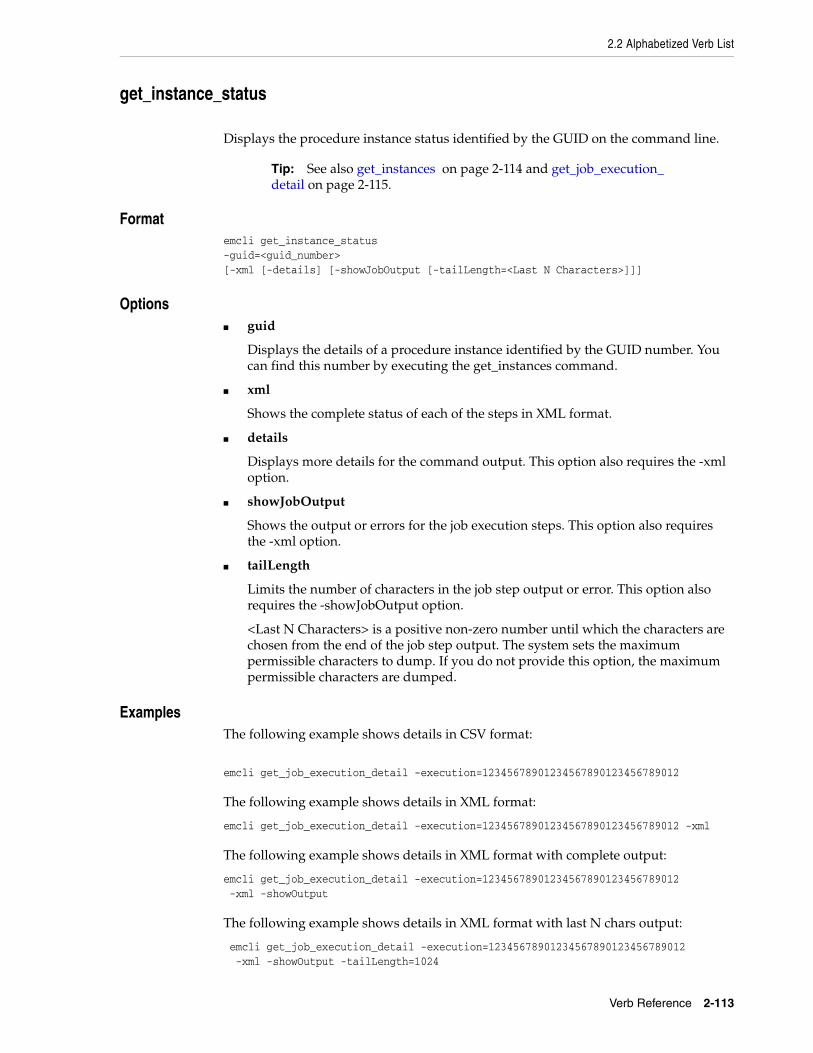
2.2 Alphabetized Verb List
Verb Reference 2-113
get_instance_status
Displays the procedure instance status identified by the GUID on the command line.
Formatemcli get_instance_status-guid=<guid_number>[-xml [-details] [-showJobOutput [-tailLength=<Last N Characters>]]]
Options■ guid
Displays the details of a procedure instance identified by the GUID number. You can find this number by executing the get_instances command.
■ xml
Shows the complete status of each of the steps in XML format.
■ details
Displays more details for the command output. This option also requires the -xml option.
■ showJobOutput
Shows the output or errors for the job execution steps. This option also requires the -xml option.
■ tailLength
Limits the number of characters in the job step output or error. This option also requires the -showJobOutput option.
<Last N Characters> is a positive non-zero number until which the characters are chosen from the end of the job step output. The system sets the maximum permissible characters to dump. If you do not provide this option, the maximum permissible characters are dumped.
ExamplesThe following example shows details in CSV format:
emcli get_job_execution_detail -execution=12345678901234567890123456789012
The following example shows details in XML format:
emcli get_job_execution_detail -execution=12345678901234567890123456789012 -xml
The following example shows details in XML format with complete output:
emcli get_job_execution_detail -execution=12345678901234567890123456789012 -xml -showOutput
The following example shows details in XML format with last N chars output:
emcli get_job_execution_detail -execution=12345678901234567890123456789012 -xml -showOutput -tailLength=1024
Tip: See also get_instances on page 2-114 and get_job_execution_detail on page 2-115.
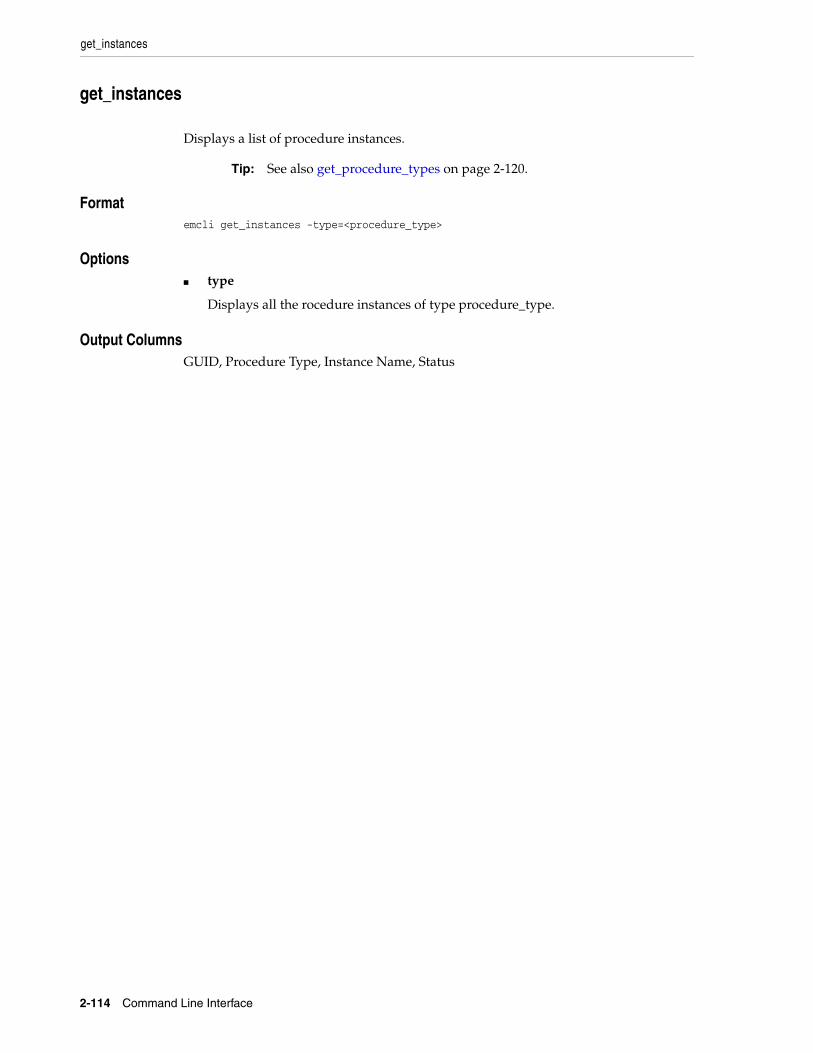
get_instances
2-114 Command Line Interface
get_instances
Displays a list of procedure instances.
Formatemcli get_instances -type=<procedure_type>
Options■ type
Displays all the rocedure instances of type procedure_type.
Output ColumnsGUID, Procedure Type, Instance Name, Status
Tip: See also get_procedure_types on page 2-120.
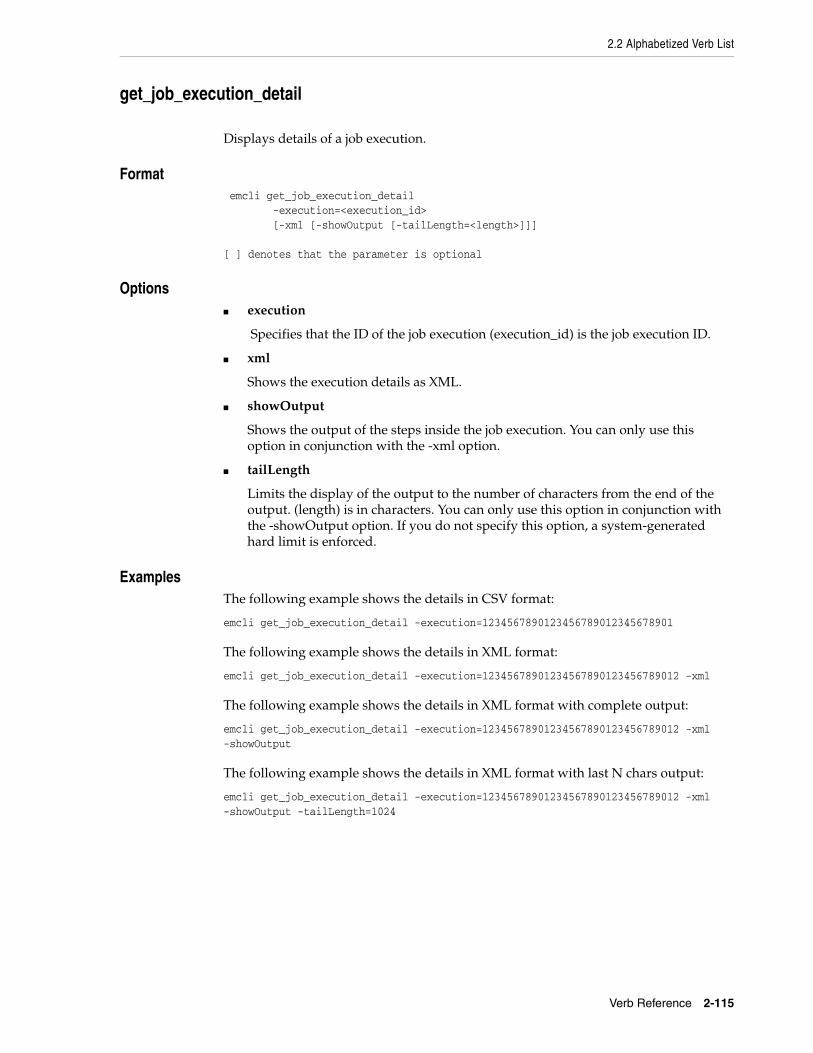
2.2 Alphabetized Verb List
Verb Reference 2-115
get_job_execution_detail
Displays details of a job execution.
Format emcli get_job_execution_detail -execution=<execution_id> [-xml [-showOutput [-tailLength=<length>]]]
[ ] denotes that the parameter is optional
Options■ execution
Specifies that the ID of the job execution (execution_id) is the job execution ID.
■ xml
Shows the execution details as XML.
■ showOutput
Shows the output of the steps inside the job execution. You can only use this option in conjunction with the -xml option.
■ tailLength
Limits the display of the output to the number of characters from the end of the output. (length) is in characters. You can only use this option in conjunction with the -showOutput option. If you do not specify this option, a system-generated hard limit is enforced.
ExamplesThe following example shows the details in CSV format:
emcli get_job_execution_detail -execution=1234567890123456789012345678901
The following example shows the details in XML format:
emcli get_job_execution_detail -execution=12345678901234567890123456789012 -xml
The following example shows the details in XML format with complete output:
emcli get_job_execution_detail -execution=12345678901234567890123456789012 -xml -showOutput
The following example shows the details in XML format with last N chars output:
emcli get_job_execution_detail -execution=12345678901234567890123456789012 -xml -showOutput -tailLength=1024
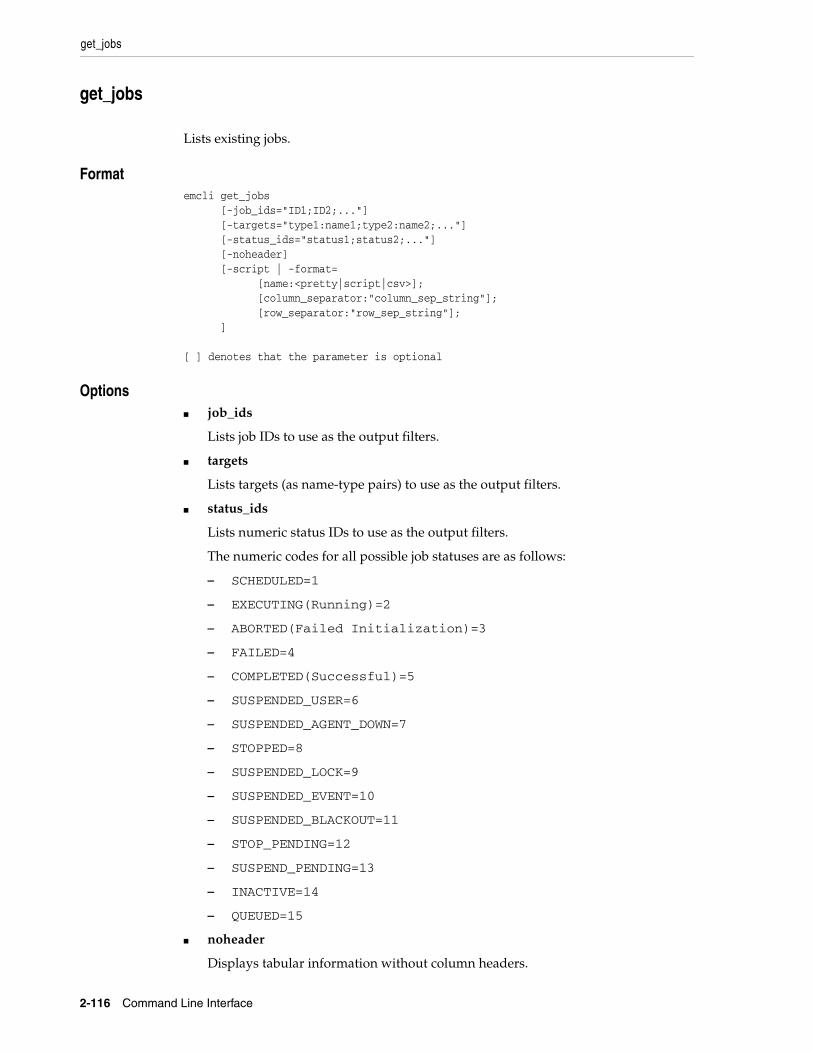
get_jobs
2-116 Command Line Interface
get_jobs
Lists existing jobs.
Formatemcli get_jobs [-job_ids="ID1;ID2;..."] [-targets="type1:name1;type2:name2;..."] [-status_ids="status1;status2;..."] [-noheader] [-script | -format= [name:<pretty|script|csv>]; [column_separator:"column_sep_string"]; [row_separator:"row_sep_string"]; ]
[ ] denotes that the parameter is optional
Options■ job_ids
Lists job IDs to use as the output filters.
■ targets
Lists targets (as name-type pairs) to use as the output filters.
■ status_ids
Lists numeric status IDs to use as the output filters.
The numeric codes for all possible job statuses are as follows:
– SCHEDULED=1
– EXECUTING(Running)=2
– ABORTED(Failed Initialization)=3
– FAILED=4
– COMPLETED(Successful)=5
– SUSPENDED_USER=6
– SUSPENDED_AGENT_DOWN=7
– STOPPED=8
– SUSPENDED_LOCK=9
– SUSPENDED_EVENT=10
– SUSPENDED_BLACKOUT=11
– STOP_PENDING=12
– SUSPEND_PENDING=13
– INACTIVE=14
– QUEUED=15
■ noheader
Displays tabular information without column headers.
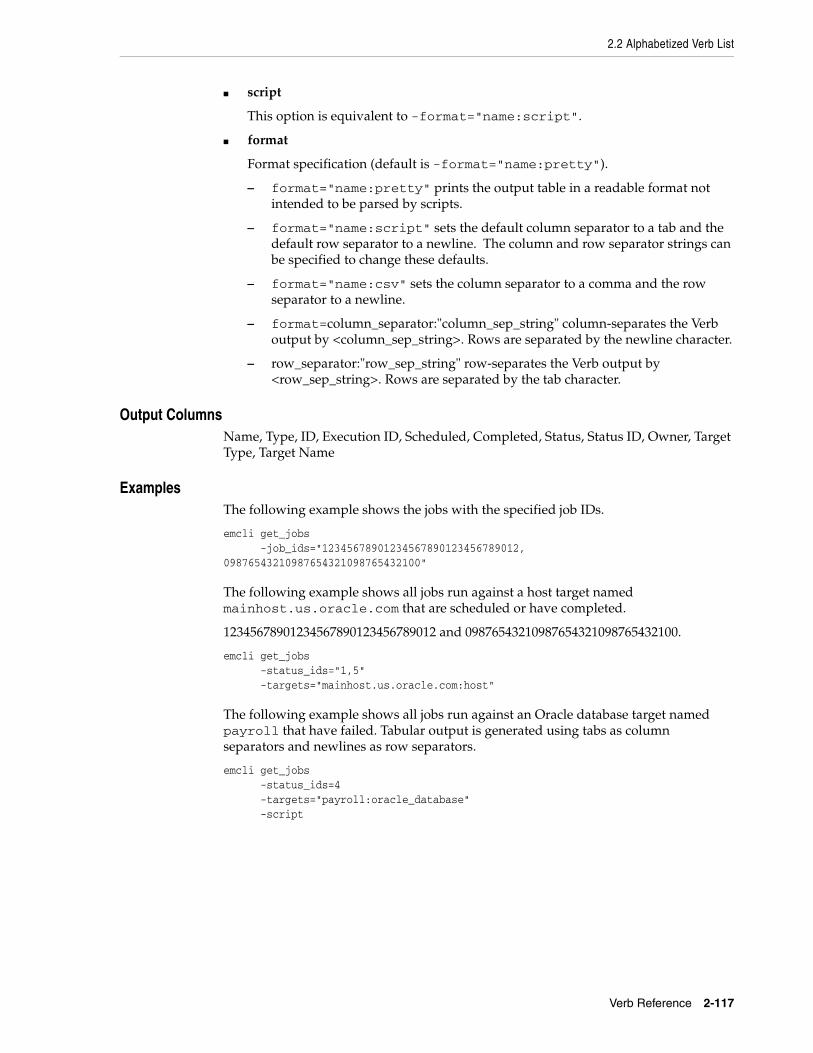
2.2 Alphabetized Verb List
Verb Reference 2-117
■ script
This option is equivalent to -format="name:script".
■ format
Format specification (default is -format="name:pretty").
– format="name:pretty" prints the output table in a readable format not intended to be parsed by scripts.
– format="name:script" sets the default column separator to a tab and the default row separator to a newline. The column and row separator strings can be specified to change these defaults.
– format="name:csv" sets the column separator to a comma and the row separator to a newline.
– format=column_separator:"column_sep_string" column-separates the Verb output by <column_sep_string>. Rows are separated by the newline character.
– row_separator:"row_sep_string" row-separates the Verb output by <row_sep_string>. Rows are separated by the tab character.
Output ColumnsName, Type, ID, Execution ID, Scheduled, Completed, Status, Status ID, Owner, Target Type, Target Name
ExamplesThe following example shows the jobs with the specified job IDs.
emcli get_jobs -job_ids="12345678901234567890123456789012, 09876543210987654321098765432100"
The following example shows all jobs run against a host target named mainhost.us.oracle.com that are scheduled or have completed.
12345678901234567890123456789012 and 09876543210987654321098765432100.
emcli get_jobs -status_ids="1,5" -targets="mainhost.us.oracle.com:host"
The following example shows all jobs run against an Oracle database target named payroll that have failed. Tabular output is generated using tabs as column separators and newlines as row separators.
emcli get_jobs -status_ids=4 -targets="payroll:oracle_database" -script
get_metrics_for_stateless_alerts
2-118 Command Line Interface
get_metrics_for_stateless_alerts
For the specified target type, lists the metrics whose alerts are stateless and thus can be manually cleared. Both the metric name and metric internal name are provided in the output of this command. To clear the stateless alerts associated with the specified metric, use the clear_stateless_alerts verb.
Formatemcli get_metrics_for_stateless_alerts -target_type=type
Options■ target_type
Internal target type identifier, such as host, oracle_database, oc4j, oracle_emrep, and oracle_emd.
ExamplesThe following example provides a list of all metrics for which stateless alerts can be manually cleared for any Oracle database (internal name for the target type isoracle_database).
emcli get_metrics_for_stateless_alerts -target_type=oracle_database
2.2 Alphabetized Verb List
Verb Reference 2-119
get_on _demand_metrics
Gets a list of metrics that can be immediately collected with the collect_metric EMCLI verb. From this list, identify the metric you are interested in under the Metric Name column, then use its corresponding Metric Internal name in the collect_metric verb.
Formatemcli get_on_demand_metrics -target_type=type -target_name=name
Options■ target_type
Internal target type identifier, such as host, oracle_database, oc4j, oracle_emrep, and oracle_emd.
■ target_name
Name of the target.
ExamplesThe following example shows a list of collectible metrics for the host target called hostname.oracle.com.
emcli get_on_demand_metrics -target_type=host -target_name=hostname.oracle.com
get_procedure_types
2-120 Command Line Interface
get_procedure_types
Gets the list of all Deployment Procedure types.
Formatemcli get_procedure_types
Output ColumnProcedure Type
2.2 Alphabetized Verb List
Verb Reference 2-121
get_procedure_xml
Gets the Deployment Procedure XML file. XML is printed on standard output.
Formatemcli get_procedure_xml -procedure={procedure guid}
Options■ procedure
Procedure GUID.
OutputThe Deployment Procedure XML.
Examplesemcli get_procedure_xml -procedure=16B15CB29C3F9E6CE040578C96093F61 > proc.xml
get_procedures
2-122 Command Line Interface
get_procedures
Gets a list of Deployment Procedures.
Formatemcli get_procedures [-type=<procedure_type>]
[ ] denotes that the parameter is optional
Options■ type
Display all the Deployment Procedures of type procedure_type.
Output ColumnsGUID, Procedure Type, Name, Version, Created By
Tip: See also get_procedure_types on page 2-249.
2.2 Alphabetized Verb List
Verb Reference 2-123
get_reports
Returns a list of reports owned by or viewable by all users or a specified user. The output of this report is space-separated, quoted strings for the report title and owner, with each report on its own line.
Formatemcli get_reports [-owner="<report-owner>"]
[ ] denotes that the parameter is optional
Options■ owner
Enables listing of viewable reports that a specific Enterprise Manager owns.
Examplesemcli get_reports –owner=username“report 1”,”username”“example report 2”,”username”
emcli get_reports“report A”,”username1”“report 1”,”username2”“example report 2”,”username2
get_retry_arguments
2-124 Command Line Interface
get_retry_arguments
Get arguments of failed steps that can be retried.
Formatemcli get_retry_arguments -instance=<instance_guid> [-stateguid=<state_guid>]
[ ] denotes that the parameter is optional
Options■ instance
Instance GUID.
■ stateguid
State GUID.
Examplesemcli get_retry_arguments -instance=16B15CB29C3F9E6CE040578C96093F61
emcli get_retry_arguments -instance=16B15CB29C3F9E6CE040578C96093F61 -stateguid=51F762417C4943DEE040578C4E087168
2.2 Alphabetized Verb List
Verb Reference 2-125
get_system_members
Lists the members of the specified system.
Formatemcli get_system_members -name="name" [-type=<generic_system>] [-depth=# (default 1)] [-noheader] [-script | -format= [name:<pretty|script|csv>]; [column_separator:"column_sep_string"]; [row_separator:"row_sep_string"]; ]
[ ] denotes that the parameter is optional
Options■ name
Target name of the system.
■ type
System type: generic_system. Defaults to generic_system.
■ depth
Lists target members in sub-systems to the specified depth. When the depth is set to 0, no system target members are listed, and only the system's existence is verified. When the depth is set to -1, all system and sub-system target members are listed.
■ noheader
Displays tabular information without column headers.
■ script
This option is equivalent to -format="name:script".
■ format
Format specification (default is -format="name:pretty").
– format="name:pretty" prints the output table in a readable format not intended to be parsed by scripts.
– format="name:script" sets the default column separator to a tab and the default row separator to a newline. The column and row separator strings can be specified to change these defaults.
– format="name:csv" sets the column separator to a comma and the row separator to a newline.
– format=column_separator:"column_sep_string" column-separates the Verb output by <column_sep_string>. Rows are separated by the newline character.
– row_separator:"row_sep_string" row-separates the Verb output by <row_sep_string>. Rows are separated by the tab character.
get_system_members
2-126 Command Line Interface
Output ColumnsSource Target Name, Member Target Name, Member Target Type, Level
ExamplesThe following example lists the databases in system db2_system.
emcli get_system_members -name=db2_system
The following example verifies that system my_system:generic_system exists.
emcli get_system_members -name=my_system -depth=0
The following example lists the unique targets in system my_system:generic_system and its sub-systems.
emcli get_system_members -name=my_system -depth=-1
2.2 Alphabetized Verb List
Verb Reference 2-127
get_target_properties
Lists all the property names for the target type provided.
Formatemcli get_target_properties -target_type="target_type"
Options■ target_type
Target type for which you want to list user-defined property names.
Examplesemcli get_target_properties -target_type="host"
CommentContactDeployment TypeLine of BusinessLocationTarget properties fetched successfully
get_targets
2-128 Command Line Interface
get_targets
Gets status and alert information for targets.
Formatemcli get_targets [-targets="[name1:]type1;[name2:]type2;..."] [-alerts] [-noheader] [-script | -format= [name:<pretty|script|csv>]; [column_separator:"column_sep_string"]; [row_separator:"row_sep_string"]; ]
[ ] denotes that the parameter is optional
Options■ targets=name:type
Name or type can be either a full value or a pattern match using %. Also, name is optional, so the type can be specified alone.
■ alerts
Shows the count of critical and warning alerts for each target.
■ noheader
Display tabular output without column headers.
■ script
This option is equivalent to -format="name:script".
■ format
Format specification (default is -format="name:pretty").
– format="name:pretty" prints the output table in a readable format not intended to be parsed by scripts.
– format="name:script" sets the default column separator to a tab and the default row separator to a newline. The column and row separator strings can be specified to change these defaults.
– format="name:csv" sets the column separator to a comma and the row separator to a newline.
– format=column_separator:"column_sep_string" column-separates the Verb output by <column_sep_string>. Rows are separated by the newline character.
– row_separator:"row_sep_string" row-separates the Verb output by <row_sep_string>. Rows are separated by the tab character.
Output ColumnsStatus ID, Status, Target Type, Target Name, Critical, Warning
2.2 Alphabetized Verb List
Verb Reference 2-129
ExamplesThe following example shows all targets. Critical and Warning columns are not included.
emcli get_targets
The following example shows all targets. Critical and Warning columns are shown.
emcli get_targets -alerts
The following example shows all oracle_database targets.
emcli get_targets -targets="oracle_database"
The following example shows all targets whose type contains the string oracle.
emcli get_targets -targets="%oracle%"
The following example shows all targets whose name starts with databa and type contains oracle.
emcli get_targets -targets="databa%:%oracle%"
The following example shows status and alert information on the Oracle database named database3.
emcli get_targets -targets="database3:oracle_database" -alerts
get_test_thresholds
2-130 Command Line Interface
get_test_thresholds
Shows test thresholds.
Format emcli get_test_thresholds -name=<target_name> -type=<target_type> -testname=<test_name> -testtype=<test_type> [-script|-format= [name:"pretty|script|csv"]; [column_separator:"sep_string"]; [row_separator:"row_sep_string"] ]
[ ] denotes that the parameter is optional
Options■ name
Target name.
■ type
Target type.
■ testname
Test name.
■ testtype
Test type.
■ script
This option is equivalent to -format="name:script".
■ format
Format specification (default is -format="name:pretty").
– format="name:pretty" prints the output table in a readable format not intended to be parsed by scripts.
– format="name:script" sets the default column separator to a tab and the default row separator to a newline. The column and row separator strings can be specified to change these defaults.
– format="name:csv" sets the column separator to a comma and the row separator to a newline.
– format=column_separator:"column_sep_string" column-separates the Verb output by <column_sep_string>. Rows are separated by the newline character.
– row_separator:"row_sep_string" row-separates the Verb output by <row_sep_string>. Rows are separated by the tab character.

2.2 Alphabetized Verb List
Verb Reference 2-131
Examplesemcli get_test_thresholds -name="Service Name" -type="generic_service" -testname="Test Name" -testtype="HTTP"

get_unsync_alerts
2-132 Command Line Interface
get_unsync_alerts
Gets a list of alerts that are out-of-sync between the Agent and the repository for the specified target. You would typically use this command when you think that the Agent has not uploaded the latest alert to the repository. Under these circumstances, the repository would be out-of-sync with the Agent state.
Format emcli get_unsync_alerts -target_type="type" -target_name="name"
Options■ target_type
Internal target type identifier, such as host, oracle_database, emrep, and so forth.
■ target_name
Name of the target.
Output ColumnStatus
ExamplesThe following example shows the out-of-sync alert states for the host target type and abc.oracle.com target name:
emcli get_unsync_alerts -target_type=host -target_name=abc.oracle.com
2.2 Alphabetized Verb List
Verb Reference 2-133
get_virtual_server_status
Gets the status of the virtual server.
Format emcli get_virtual_server_status -server_name=<Virtual Server Name>
Options■ server_name
Name of the virtual server.
Output ColumnStatus
ExamplesThe following example gets the status of the virtual server st-vs1.us.oracle.com.
emcli get_virtual_server_status -server_name="st-vs1.us.oracle.com"
grant_license_no_validation
2-134 Command Line Interface
grant_license_no_validation
Grants licenses on a set of user-specified packs or all packs to a set of user-specified targets or all targets belonging to the input licensable target type. You can only enable or disable database diagnostics and/or tuning packs for 11g database targets through the UI.
Formatemcli grant_license_no_validation -type="target_type" [-targets="tname1;tname2;..."] [-packs="pack1;pack2;..."] [-file="file_name"] [-displayAllMessages] [ ] denotes that the parameter is optional
Options■ type
Target type as it exists in the database. Names cannot contain colons ( : ), semi-colons ( ; ), or any leading or trailing blanks. You can specify only one target type at a time; for example, -type="oracle_database".
■ targets
Targets should be specified in the following sequence:
TargetName1;TargetName2;
For example:
-targets="database1;database2;database3;"
The semi-colon ( ; ) is the target separator.
See the "Examples" section below for information about providing arguments for the targets option.
■ packs
License packs should be specified in the following sequence:
pack1;pack2;
For example:
-packs="db_diag;db_config;"
The semi-colon ( ; ) is the pack separator.
See the "Examples" section below for information about providing arguments for the packs option.
■ file
Specify the file name, including the complete path. For example:
-file="/usr/admin1/db_license.txt"
The file should contain the list of targets and packs according to the following cases:
2.2 Alphabetized Verb List
Verb Reference 2-135
– If you only need to provide a list of targets, use the following format:
targets=database1;database2;database3;
– If you only need to provide a list of packs, use the following format:
packs=db_diag;db_config;
– If you need to provide a list of both targets and packs, use the following format:
targets=database1;database2;database3;packs=db_diag;db_config;
■ displayAllMessages
Displays all messages. Only error messages are displayed by default. "=value" is not allowed on the command line.
ExamplesExample 1 and Example 2 below grant licenses to specific packs for specific targets. In order to know which target types and pack names you can pass as arguments, you can use the view named mgmt_license_view to see a list of licensable targets, their target types, and the list of packs licensed on them.
To obtain this information, do the following:
1. Access SQL*Plus with your username and password, using sysman or other user that has access to sysman.mgmt_license_view.
2. Select a distinct pack name from sysman.mgmt_license_view, where:
target_type=<oracle_database>
The following example shows pack names for an Oracle database you specify as the target type.
PACK_NAME-------------------db_configprovisioningdb_sadmdb_tuningdb_diagprovisioning_dbdb_chgmgt 7 rows selected.
Based on this information, to grant a license to the database1 target for the db_chgmgt pack, you would enter the following command:
emcli grant_license_no_validation -type="oracle_database" -targets="database1" -packs="db_chgmgt"
The only limitation of mgmt_license_view is that it only lists the packs for a target type where the pack is granted to at least one target of that type. That is, if the pack is not granted to any target of that type, mgmt_license_view cannot provide any information.
The following example grants the license to the db_diag and db_config packs to database1, database2, and database3 targets (oracle_database target type):

grant_license_no_validation
2-136 Command Line Interface
emcli grant_license_no_validation -type="oracle_database" -targets="database1;database2;database3;" -packs="db_diag;db_config;"
The following example grants the license to the db_diag and db_config packs to all database targets in the setup:
emcli grant_license_no_validation -type="oracle_database" -packs="db_diag;db_config;"
The following example grants the license to all packs (applicable to database targets) to database1, database2, and database3 targets in the setup:
emcli grant_license_no_validation -type="oracle_database" -targets="database1;database2;database3;"
The following example grants the license to all packs (applicable to database targets) to all database targets in the setup:
emcli grant_license_no_validation -type="oracle_database"
The following example uses a text file to pass targets and pack names as the argument. It grants the license to the db_diag and db_config packs to the database1, database2, and database3 targets (oracle_database target type):
emcli grant_license_no_validation -type="oracle_database" -file="/usr/admin1/db_license.txt" targets=database1;database2;database3; packs=db_diag;db_config;
where the content of the "/usr/admin1/license/db_license.txt" file is as follows:
targets=database1;database2;database3;packs=db_diag;db_config;

2.2 Alphabetized Verb List
Verb Reference 2-137
grant_license_with_validation
Grants licenses on a set of user-specified packs, or all packs to a set of user-specified targets, or all targets belonging to the input licensable target type as per business rules. You can only enable or disable database diagnostics and/or tuning packs for 11g database targets through the UI.
Formatemcli grant_license_with_validation -type="target_type" [-targets="tname1;tname2;..."] [-packs="pack1;pack2;..."] [-file="file_name"] [-displayAllMessages]
[ ] denotes that the parameter is optional
Options■ type
Target type as it exists in the database. Names cannot contain colons ( : ), semi-colons ( ; ), or any leading or trailing blanks. You can specify only one target type at a time; for example, -type="oracle_database".
■ targets
Targets should be specified in the following sequence:
TargetName1;TargetName2;
For example:
-targets="database1;database2;database3;"
The semi-colon ( ; ) is the target separator.
See the "Examples" section below for information about providing arguments for the targets option.
■ packs
License packs should be specified in the following sequence:
pack1;pack2;
For example:
-packs="db_diag;db_config;"
The semi-colon ( ; ) is the pack separator.
See the "Examples" section below for information about providing arguments for the packs option.
■ file
Specify the file name, including the complete path. For example:
-file="/usr/admin1/db_license.txt"
The file should contain the list of targets and packs according to the following cases:
grant_license_with_validation
2-138 Command Line Interface
– If you only need to provide a list of targets, use the following format:
targets=database1;database2;database3;
– If you only need to provide a list of packs, use the following format:
packs=db_diag;db_config;
– If you need to provide a list of both targets and packs, use the following format:
targets=database1;database2;database3; packs=db_diag;db_config;
■ displayAllMessages
Displays all messages. Only error messages are displayed by default. "=value" is not allowed on the cmd line.
ExamplesExample 1 and Example 2 below grant licenses to specific packs for specific targets. In order to know which target types and pack names you can pass as arguments, you can use the view named mgmt_license_view to see a list of licensable targets, their target types, and the list of packs licensed on them.
To obtain this information, do the following:
1. Access SQL*Plus with your username and password, using sysman or other user that has access to sysman.mgmt_license_view.
2. Select a distinct pack name from sysman.mgmt_license_view, where:
target_type=<oracle_database>
The following example shows pack names for an Oracle database you specify as the target type.
PACK_NAME-------------------db_configprovisioningdb_sadmdb_tuningdb_diagprovisioning_dbdb_chgmgt 7 rows selected.
Based on this information, to grant a license to the database1 target for the db_chgmgt pack, you would enter the following command:
emcli grant_license_with_validation -type="oracle_database" -targets="database1" -packs="db_chgmgt"
The only limitation of mgmt_license_view is that it only lists the packs for a target type where the pack is granted to at least one target of that type. That is, if the pack is not granted to any target of that type, mgmt_license_view cannot provide any information.
The following example grants a license to the db_diag and db_config packs to database1, database2, and database3 targets (oracle_database target type):

2.2 Alphabetized Verb List
Verb Reference 2-139
emcli grant_license_with_validation -type="oracle_database" -targets="database1;database2;database3;" -packs="db_diag;db_config;"
The following example grants a license to the db_diag and db_config packs to all database targets in the setup:
emcli grant_license_with_validation -type="oracle_database" -packs="db_diag;db_config;"
The following example grants a license to all packs (applicable to database targets) to database1, database2, and database3 targets in the setup:
emcli grant_license_with_validation -type="oracle_database" -targets="database1;database2;database3;"
The following example grants a license to all packs (applicable to database targets) to all database targets in the setup:
emcli grant_license_with_validation -type="oracle_database"
The following example uses a text file to pass targets and pack names as the argument. It grants a license to the db_diag and db_config packs to the database1, database2, and database3 targets (oracle_database target type):
emcli grant_license_with_validation -type="oracle_database" -file="/usr/admin1/db_license.txt" targets=database1;database2;database3; packs=db_diag;db_config;
where the content of the "/usr/admin1/license/db_license.txt" file is as follows:
targets=database1;database2;database3;packs=db_diag;db_config;
grant_privs
2-140 Command Line Interface
grant_privs
Grants the privileges to the existing Enterprise Manager user or Enterprise Manager Role.
Formatemcli grant_privs -name="username/rolename" [-privilege="name;[[target_name:target_type]|jobid]"]...
[ ] denotes that the parameter is optional
Options■ name
User name or role name to which privileges will be assigned.
■ privilege
Privilege, which will be granted to the Enterprise Manager user or role. This option can be specified more than once.
The following system privileges do not require a target or a job ID:
VIEW_ANY_TARGET
USE_ANY_BEACON
EM_MONITOR
The following target privileges require specifying target_name:target_type:
VIEW_TARGET
OPERATOR_TARGET
FULL_TARGET
The following job privileges require specifying jobid:
VIEW_JOB
FULL_JOB
ExamplesThe following example grants these privileges to user1:
■ Privilege to use any beacon
■ Full control of the jobs with ID 923470234ABCDFE23018494753091111
■ Full control on the target host1.us.oracle.com:host
emcli grant_privs -name="user1" -privilege="USE_ANY_BEACON" -privilege="FULL_JOB;923470234ABCDFE23018494753091111"
Note: To replace an existing Enterprise Manager administrator role, use the modify_role verb.

2.2 Alphabetized Verb List
Verb Reference 2-141
-privilege="FULL_TARGET;host1.us.oracle.com:host"
The following example grants target privileges to EM Role : Role1:
emcli grant_privs -name="Role1" -privilege="FULL_TARGET;host1.us.oracle.com:host"

grant_roles
2-142 Command Line Interface
grant_roles
Grants roles to an existing Enterprise Manager user or Enterprise Manager role.
Formatemcli grant_roles -name="username/rolename" [-roles="role1;role2;..."]
[ ] denotes that the parameter is optional
Options■ name
User name or role name to which roles will be assigned.
■ roles
Roles that will be granted to an Enterprise Manager user or role. You can specify this option more than once.
Examplesemcli grant_roles -name="user1" -roles="SUPER_USER"
emcli grant_roles -name="Role1" -roles="BLACKOUT_ADMIN;MAINTAIN_TARGET"

2.2 Alphabetized Verb List
Verb Reference 2-143
help
Shows a summary of all verbs or command line help for individual EM CLI verbs.
Formatemcli help [verbname]
[ ] denotes that the parameter is optional
OptionsNone.
ExamplesThe following example provides an overview for all available verbs:
emcli help
The following example provides the description, syntax, and usage examples for the add_target verb:
emcli help add_target
Note: EM CLI must be set up and configured before command line help is available for all verbs.
ignore_instance
2-144 Command Line Interface
ignore_instance
Ignores a failed step.
Formatemcli ignore_instance-instance=<instance_guid> [-stateguid=<state_guid>]
[ ] denotes that the parameter is optional
Options■ instance
Instance GUID.
■ stateguid
Comma-separated list of state GUIDs.
Examplesemcli ignore_instance -instance=16B15CB29C3F9E6CE040578C96093F61 -stateguid=51F762417C4943DEE040578C4E087168
emcli ignore_instance -instance=16B15CB29C3F9E6CE040578C96093F61 -stateguid='51F762417C4943DEE040578C4E087168,51F762417C4944DEE040578C4E087168'
2.2 Alphabetized Verb List
Verb Reference 2-145
import_report
Imports one or more report definitions from an XML file(s) using the title in the XML file and the currently logged-in CLI user as the owner of the report. If the report/owner already exists, the operation fails for this report with an accompanying error message. (You can override this with the optional -force option.) The report will be changed to a just-in-time report with the target type from the exported report.
You will need to edit schedules and access privileges using the UI. The system enforces title/owner uniqueness, so an error occurs if a report with the same title and owner already exists.
Formatemcli import_report [-force] -files="file1;file2;..."
Options■ force
First delete the report (and all jobs and saved copies) if a report with the same title/owner exists.
■ files
List of path/file name(s) of XML file(s) that contain valid report definition(s).
Examplesemcli import_report \ -files="$HOME/reports/maint_report1.xml;$HOME/reports/file2.xml"
import_template
2-146 Command Line Interface
import_template
Imports a monitoring template from an XML file. The resulting definition is saved in the repository.
Formatemcli import_template -files="file1;file2;..."
Options■ files
Path/file name of an XML file, which contains a valid template definition. You can specify multiple files this option by separating each file with a semi-colon ( ; ).
ExamplesThe following example imports a template from template.xml.
emcli import_template -files="template.xml"
The following example imports three templates — one from each of the files specified.
emcli import_template -files="e1.xml;e2.xml;e3.xml"
2.2 Alphabetized Verb List
Verb Reference 2-147
list_guest_vm
Lists all guest virtual machines.
Formatemcli list_guest_vm [-server_pool_name=<Server Pool Name>] [-server_name=<Virtual Server Name>] [-operating_system=<Operating system name>]
[ ] denotes that the parameter is optional
Options■ server_pool_name
Name of the server pool.
■ server_name
Name of the virtual server.
■ operating_system
Guest VM's operating system name.
Output ColumnsName, Status, Operating system, VNC url, Server name, Server pool name
Examples emcli list_guest_vm -server_pool_name="Oracle Server Pool" emcli list_guest_vm -server_name="st-vs1.oracle.com" emcli list_guest_vm -operating_system="Linux" emcli list_guest_vm -server_pool_name="Oracle Server Pool" -server_name="st-vs1.oracle.com" -operating_system="Linux"
list_privilege_delegation_settings
2-148 Command Line Interface
list_privilege_delegation_settings
Lists privilege delegation setting templates available on the server that apply to targets.
Formatemcli list_privilege_delegation_settings [-setting_type="SUDO/POWERBROKER]" [-noheader] [-script | -format= [name:<pretty|script|csv>]; [column_separator:"column_sep_string"]; [row_separator:"row_sep_string"]; ]
[ ] denotes that the parameter is optional
Options■ setting_type
Setting type. All applicable settings are displayed if you do not specify this option.
■ noheader
Displays tabular information without column headers.
■ script
This option is equivalent to -format="name:script".
■ format
Format specification (default is -format="name:pretty").
– format="name:pretty" prints the output table in a readable format not intended to be parsed by scripts.
– format="name:script" sets the default column separator to a tab and the default row separator to a newline. The column and row separator strings can be specified to change these defaults.
– format="name:csv" sets the column separator to a comma and the row separator to a newline.
– format=column_separator:"column_sep_string" column-separates the Verb output by <column_sep_string>. Rows are separated by the newline character.
– row_separator:"row_sep_string" row-separates the Verb output by <row_sep_string>. Rows are separated by the tab character.
Examples emcli list_privilege_delegation_settings -setting_type="SUDO"
2.2 Alphabetized Verb List
Verb Reference 2-149
list_target_privilege_delegation_settings
Lists current privilege delegation settings for targets.
Formatemcli list_target_privilege_delegation_settings -target_names="name1;name2;name3" [-input_file="FILE:file_path"] [-noheader] [-script | -format= [name:<pretty|script|csv>]; [column_separator:"column_sep_string"]; [row_separator:"row_sep_string"]; ]
[ ] denotes that the parameter is optional
Options■ target_names
List of targets. All targets must be of the host type. Either target_names or input_file must be present.
■ input_file
Path of the file that has the list of targets. The file should have one target name per line.
■ noheader
Display tabular information without column headers.
■ script
This option is equivalent to -format="name:script".
■ format
Format specification (default is -format="name:pretty").
– format="name:pretty" prints the output table in a readable format not intended to be parsed by scripts.
– format="name:script" sets the default column separator to a tab and the default row separator to a newline. The column and row separator strings can be specified to change these defaults.
– format="name:csv" sets the column separator to a comma and the row separator to a newline.
– format=column_separator:"column_sep_string" column-separates the Verb output by <column_sep_string>. Rows are separated by the newline character.
– row_separator:"row_sep_string" row-separates the Verb output by <row_sep_string>. Rows are separated by the tab character.
Examples emcli list_target_privilege_delegation_settings -target_names="host.oracle.com;host2.oracle.com; emcli list_target_privilege_delegation_settings

list_target_privilege_delegation_settings
2-150 Command Line Interface
-input_file="FILE:/home/nqureshi/targets.txt"
emcli list_target_privilege_delegation_settings -target_names="host.oracle.com;host2.oracle.com;
2.2 Alphabetized Verb List
Verb Reference 2-151
list_virtual_server
Lists all virtual servers.
Formatemcli list_virtual_server [-server_pool_name=<Server Pool Name>]
[ ] denotes that the parameter is optional
Options■ server_pool_name
Name of the server pool. Lists all virtual servers in the specified virtual server pool.
Output ColumnsName, Server type, Status, Server pool name, Is master, Monitoring server name
Examplesemcli list_virtual_server -server_pool_name="Oracle Server Pool"
list_virtual_server_pool
2-152 Command Line Interface
list_virtual_server_pool
Lists all virtual server pools.
Formatemcli list_virtual_server_pool
Output ColumnsName, Type, Is HA enabled, Master virtual server
2.2 Alphabetized Verb List
Verb Reference 2-153
loader_perf
Executes a performance test to determine the network bottleneck between OMS and the Enterprise Manager repository. Only a SYSMAN user can execute this verb.
Formatemcli loader_perf[-batchSize="batch size 1" -batchSize="batch size 3" -batchSize="batch size 3" ...][-commitSize="commit size 1" -commitSize="commit size 2" -commitSize="commit size 3" ...][-dataSize="data size"]
[ ] denotes that the parameter is optional
Options■ batchSize
Batch size for the performance test. Multiple values are allowed. The Default values are {14,50,1}.
■ commitSize
Batch size for the performance test. Multiple values are allowed. Default values are {14,50,1}.
■ dataSize
Number of records to be inserted for a test, which should be greater than a multiple of 100. If not a multiple of 100, a multiple of 100 less than the given value is considered the dataSize value. The default value is 10000.
ExampleThe following example displays the time taken to load 10000 records for the default values of batchSize and commitSize.
emcli loader_perf
The following example displays the time taken to load 100000 records for batchSize as {15,40} and commitSize as {10,100}..
emcli loader_perf -b=15 -b=40 -c=10 -c=100 -d=100000
login
2-154 Command Line Interface
login
Establishes a new session between the OMS and the EM CLI client. This verb and the Logout verb are useful when you need to run a particular verb as a different user.
The login verb requires Enterprise Manager credentials (or Single Sign-On credentials or both) to log in and establish a session. You do not need to provide the same credentials you provided during setup. The credentials you provide during emcli login overwrite the setup credentials.
Always provide the exact credentials. Providing extra credentials may cause erroneous behavior that you can usually resolve by running emcli setup.
If Enterprise Manager is not SSO-enabled, you should only provide Enterprise Manager credentials using the -username and -password options. For an SSO-enabled Enterprise Manager, if the SSO user is also the Enterprise Manager user, you should only provide SSO credentials with the -ssousername and -ssopassword options. Otherwise, you must provide both Enterprise Manager credentials and SSO credentials.
Formatemcli login -username=<EM Console Username> [-password=<EM Console Password>] [-ssousername=<EM SSO Username>] [-ssopassword=<EM SSO Password>] [-force]
■ Non SSO-enabled Enterprise Manager:
emcli login -user=<user_name> -pass=<user_password>
■ SSO-enabled Enterprise Manager — SSO user is also Enterprise Manager user:
emcli login -ssouser=<sso_user_name> -ssopass=<sso_user_password>
■ SSO-enabled Enterprise Manager — SSO user is not the Enterprise Manager user:
emcli login -user=<user_name> -ssouser=<sso_user_name> -pass=<user_password>-ssopass=<sso_user_password>
Options■ username
Enterprise Manager user name to be used by all subsequent emcli commands when contacting the OMS.
Note: To avoid an uncommon occurrence in which multiple emcli sessions are created on the OMS, Oracle recommends that you enter the login command before running a script containing EMCLI commands.
Tip: See also logout on page 2-156.
2.2 Alphabetized Verb List
Verb Reference 2-155
■ password
Enterprise Manager user password. If you do not specify this option, you are prompted for the password interactively.
■ ssousername
Enterprise Manager SSO user name to be used by all subsequent emcli commands when contacting the OMS. Provide this value only if Enterprise Manager is configured to use SSO.
■ ssopassword
Enterprise Manager SSO password. If you do not specify this option, you are prompted for the password interactively.
■ force
Force a login even if there is an existing session.
ExampleThe following example shows a login as a different user for a non SSO-enabled Enterprise Manager using newly specified credentials, then a subsequent login using the previous credentials.
emcli logutemcli login -user=new_user -pass=new_user_passemcli <verb-name>emcli logoutemcli login -user=old_user -pass=old_user_pass
Note: Providing a password on the command line is insecure and should be avoided.
Note: Providing a password on the command line is insecure and should be avoided.
logout
2-156 Command Line Interface
logout
Terminates the existing session with the OMS. This verb and the Login verb are useful when you need to run a particular verb as a different user. After a logout, you need to invoke either the Setup verb or Login verb before invoking any other emcli verb.
Formatemcli logout
OptionsNone.
ExamplesThe following example shows a login as a different user for a non SSO-enabled Enterprise Manager using newly specified credentials, then a subsequent login using the previous credentials.
emcli logutemcli login -user=new_user -pass=new_user_passemcli <verb-name>emcli logoutemcli login -user=old_user -pass=old_user_pass
Tip: See also login on page 2-154.
2.2 Alphabetized Verb List
Verb Reference 2-157
modify_aggregate_service
Modifies an aggregate service instance.
Formatemcli modify_aggregate_service -name="name" -type="type" [-add_sub_services="name1:type1;name2:type2;..."] [-del_sub_services="name1:type1;name2:type2;..."] [-avail_eval_func="function to evaluate availability."] [-timezone_region="timezone region"]
[ ] denotes that the parameter is optional
Options■ name
Aggregate service name.
■ type
Aggregate service type.
■ add_sub_services
Sub-services to be added.
■ del_sub_services
Sub-services to be deleted.
■ avail_eval_func
PL/SQL function to evaluate the availability of the aggregate service. Use [or|and] for predefined evaluation helper function.
■ timezone_region
Time Zone Region of the service.
Examplesemcli modify_aggregate_service -name="My_Name" -type="aggregate_service" -add_sub_services="sub1:type1;sub2:type2" -del_sub_services="sub3:type3" -avail_eval_func="my_pkg.my_eval_func" -timezone_region="CST"
modify_collection_schedule
2-158 Command Line Interface
modify_collection_schedule
Modifies the collection schedule of a collection setup for metrics and policies for the specified set of targets. Combining all the metrics, running a script, and collecting the data is referred to as a collection. The collection has various attributes associated with it, such as the collection schedule, upload frequency, and so forth.
Formatemcli modify_collection_schedule -targetType=ttype -targetNames=tname1;tname2;tname3... -collectionName=collname [-collectionStatus=Enabled or Disabled] [-freqType={Minute}{Hour}{Day}{Week}{Weekly}{Month} [-freqValue={any integer value for Minute/Hour/Day/Week}{One or more from Mon...Sun for Weekly}{One or more from 1;2..31 or Last for Month} [-preview=Y or N]
[ ] denotes that the parameter is optional{ } denotes that you can select one of the options in the series shown
Note: All of the parameters and choices are case-insensitive
Options■ targetType
You must specify a single target type value, and it should be the same as specified in the repository.
■ targetNames
The target name should be the same as exists in the repository. All of the targets should be the same target type you specified in the targetType parameter. Use a semicolon ( ; ) to separate the names. Changes to the collection schedule will be executed for only valid target name and target type combinations. For example:
host1;host2;host3
■ collectionName
The collection name should be exactly the same as exists in the repository or the corresponding collections .xml file present on the Agent.
Access files from the following locations to determine the collection to be modified. Select the desired collection and provide it as input to the emcli utility.
– $AGENT_HOME/sysman/admin/metadata/<targetType>.xml
This file is shipped as a part of the setup and contains information regarding the metrics for this target type.
– $AGENT_HOME/sysman/admin/default_collection/<targetType>.xml
This file is shipped as a part of the setup and contains the collections shipped by default.
Note: Only individual target types are currently supported.
2.2 Alphabetized Verb List
Verb Reference 2-159
– $AGENT_HOME/sysman/emd/collection/<targetType_targetName>.xml
Whenever changes have occurred for any particular target, this file is automatically generated. Collections for user-defined metrics are available in this file.
■ collectionStatus
Enables or disables the collection. The default is Enabled. If Disabled, freqType and freqValue are ignored.
■ freqType
You can specify one of the following values:
Minute (default)HourDayWeekWeeklyMonth
For Week, you must specify an integer value as the frequency value. For instance, if you specify freqType='WEEK' and freqValue='2', the collection occurs every two weeks.
For Weekly, the possible values are Mon, Tue, Wed, Thu, Fri, Sat, Sun. For instance, if you specify freqType='Weekly' and freqValue='Tue;Thu;Sun', the collection occurs every Tuesday, Thursday and Sunday of a week.
The schedule is modified based on your selection. You do not need to specify a value (and the value will be ignored) if the collectionStatus parameter is set to Disabled.
If you use this parameter, you must also use the freqValue parameter.
■ freqValue
You can specify one of the following values:
– You must specify an integer value if the freqType is any one of Minute, Hour, Day, or Week. The default value is 5.
– For Weekly, specify one or more choices from Mon, Tue, Wed, Thu, Fri, Sat, and Sun. If the collection occurs on any particular day(s) of the week, you must specify the corresponding value(s) against the Weekly option.
– For Monthly, specify one or more choices from 1...31 or Last. If the collection occurs on any particular date(s) in a month, you must specify the corresponding value(s) against the Monthly option.
You do not need to specify a value (and the value will be ignored) if the collectionStatus parameter is set to Disabled.
If you use this parameter, you must also use the freqType parameter.
■ preview
Provides a preview of the changes that would occur if this verb is executed. The default value for this option is Y (Yes), whether you specify the option or not. If you specify N, the changes to the collection schedule are executed for both the repository and Agent.
modify_collection_schedule
2-160 Command Line Interface
ExamplesThe following example changes the collection schedule to collect once every 5 minutes for hosts host1, host2, and host3. DiskActivity is a collection item associated with a host target type. The preview flag is set to Y, so the changes are not executed, but you can see the metrics affected if the changes were implemented.
emcli modify_collection_schedule -targetType="host" -targetNames="host1;host2;host3" -collectionName="DiskActivity" -freqType="Minute" -freqValue="5" -preview="Y"
The following example changes the collection schedule to collect once every 15 hours for host host1. Inventory is a collection item associated with a host target type. The preview flag is set to N, so the changes are executed for the associated metrics for both the repository and Agent.
emcli modify_collection_schedule -targetType="host" -targetNames="host1" -collectionName="Inventory" -freqType="Hour" -freqValue="15" -preview="N"
The following example changes the collection schedule to collect on Monday and Thursday every week for hosts host1 and host2. Inventory is a collection item associated with a host target type. The preview option is not specified, but since the value is Y whether you specify the option or not, the changes are not executed, but you can see the metrics affected if the changes were implemented.
emcli modify_collection_schedule -targetType="host" -targetNames="host1;host2" -collectionName="Inventory" -freqType="Weekly" -freqValue="Mon;Thu"
The following example changes the collection schedule to collect on the 1st, 5th, 23rd, and last day of every month for hosts host1 and host2. Inventory is a collection item associated with a host target type.
emcli modify_collection_schedule -targetType="host" -targetNames="host1;host2" -collectionName="Inventory" -freqType="Month" -freqValue="1;5;23;Last"
The following example disables the collection schedule for hosts host1 and host2. Inventory is a collection item associated with a host target type.
emcli modify_collection_schedule -targetType="host" -targetNames="host1;host2" -collectionName="Inventory" -collectionStatus="Disabled"
2.2 Alphabetized Verb List
Verb Reference 2-161
modify_group
Adds or removes targets from an existing group.
An error is not generated when attempting to delete a non-existent target in the group or when attempting to add a target that already exists in the group.
Formatemcli modify_group -name="name" [-type=<group>] [-add_targets="name1:type1;name2:type2;..."]... [-delete_targets="name1:type1;name2:type2;..."]...
[ ] denotes that the parameter is optional
Options■ name
Target name of the group to modify.
■ type
Group type: group. Defaults to group.
■ add_targets
Targets to add, each specified as target_name:target_type. You can specify this option more than once.
■ delete_targets
Targets to delete, each specified as target_name:target_type. You can specify this option more than once.
ExamplesThe following example modifies group db2_group by adding database database:oracle_database and deleting database database2:oracle_database from the group.
emcli modify_group -name=db2_group -add_targets=database:oracle_database -delete_targets=database2:oracle_database
The following example modifies group my_hosts by adding host yourhost.us.oracle.com:host to the group.
emcli modify_group -name=my_hosts -add_targets=yourhost.us.oracle.com:host
The following example modifies group my_group by adding targets group_a:group and database:oracle_database and deleting the nonexistent target nogroup:group from the group.
emcli modify_group -name=my_group -add_targets=group_a:group -add_targets=database:oracle_database -delete_targets=nogroup:group
modify_red_group
2-162 Command Line Interface
modify_red_group
Adds or removes targets from an existing redundancy group.
An error is not generated when attempting to delete a non-existent target in the redundancy group.
Formatemcli modify_red_group -name="name" -type=<generic_redundancy_group> [-add_targets="name1:type1;name2:type2;..."]... [-delete_targets="name1:type1;name2:type2;..."]... [-owner=<Redundancy Group Owner>]
[ ] denotes that the parameter is optional
Options■ name
Target name of the group to modify.
■ type
Redundancy Group type: generic_redundancy_group. Defaults to generic_redundnacy_group.
■ add_targets
Targets to add, each specified as target_name:target_type. You can specify this option more than once.
■ delete_targets
Targets to delete, each specified as target_name:target_type. You can specify this option more than once.
■ owner
Owner of the redundancy group.
ExamplesThe following example modifies redundancy group servers by adding Oracle Apache Server1:oracle_apache and deleting Oracle Apache Server5:oracle_apache from the redundancy group.
emcli modify_red_group -name=Servers -add_targets=HTTP_Server1:oracle_apache -delete_targets=Server5:oracle_apache
2.2 Alphabetized Verb List
Verb Reference 2-163
modify_redundancy_group
Modifies a redundancy group.
Formatemcli modify_redundancy_group -redundancyGroupName="redGrpName" [-owner="new owner"] [-memberTargetType="tType"] [-add_targets="tName1;tName2"] [-delete_targets="tName3;tName4"] [-group_status_criterion="NUMBER" or "PERCENTAGE"] [-group_status_tracked="UP" or "DOWN"] [-group_status_value=(see the Options section)]
[ ] denotes that the parameter is optional
Options■ redundancyGroupName
Name of the redundancy group.
■ owner
Valid owner to be specified.
■ memberTargetType
Target type of the constituent member targets. You need to specify this parameter if you specify either add_targets or delete_targets.
■ add_targets
Member targets to be added to this redundancy group.
■ delete_targets
Member targets to be deleted from this redundancy group.
■ group_status_criterion
This option and the next two calculate the status of the Redundancy Group. Consequently, you need to specify all three options together. If this is not to be a capacity group, you need to specify the following combination:
-group_status_criterion='NUMBER' -group_status_tracked='UP' -group_status_value='1']
■ group_status_tracked
See the option above.
■ group_status_value
See the group_status_criterion option.
You can specify any value between 1 and 100 if -group_status_criterion= "PERCENTAGE", or any value between 1 and the number of targets present if -group_status_criterion="NUMBER".
modify_redundancy_group
2-164 Command Line Interface
■ timezone_region
Time zone region of this redundancy group. For a list of valid time zone regions, enter the following command at SQLPLUS:
SELECT TZNAME FROM V$TIMEZONE_NAMES
You may need to have the SELECT_CATALOG_ROLE role to execute this command.
ExamplesThe following example changes the configuration of the 'redGrp1' redundancy group to add listener, listener2, and listener3 to its existing members, and delete listener4 and listener5 from its existing members.
emcli modify_redundancy_group -redundancyGroupName='redGrp1' -memberTargetType='oracle_listener' -add_targets='listener;listener2;listener3' -delete_targets='listener4;listener5' -group_status_criterion='NUMBER' -group_status_tracked='UP' -group_status_value='2'
2.2 Alphabetized Verb List
Verb Reference 2-165
modify_role
Modifies an existing Enterprise Manager administrator role.
Formatemcli modify_role -name="role_name" [-description="description"] [-roles="role1;role2;..."] [-privilege="name;[[target_name:target_type]|jobid]"]... [-users="user1;user2;..."]
[ ] denotes that the parameter is optional
Options■ name
Role name.
■ description
Replaces the description of the role.
■ roles
Replaces the list of roles assigned to this existing role. Currently, the only built-in role is PUBLIC.
■ users
Replaces the list of users to whom this role is assigned.
■ privilege
Replaces privileges granted to this role. You can specify this option more than once.
Note: Privileges are case-insensitive.
The following system privileges do not require a target or a job ID:
– CREATE_ANY_ROLE
– CREATE_ANY_PRIVILEGE
– MANAGE_CREDENTIAL_GROUP
– CREATE_TARGET
– DELETE_ANY_TARGET
– VIEW_ANY_TARGET
– USE_ANY_BEACON
– EM_MONITOR
– SUPER_USER
The following target privileges require specifying target_name:target_type:
Note: Omit an argument to leave its value unchanged.
To update a role and add targets to the role, use the grant_privs verb.
modify_role
2-166 Command Line Interface
– VIEW_TARGET
– OPERATOR_TARGET
– MAINTAIN_TARGET
– CLONE_FROM_TARGET
– FULL_TARGET
The following group privileges require specifying target_name:target_type:
– CREATE_TARGET_IN_GROUP
The following job privileges require specifying jobid:
– VIEW_JOB
– FULL_JOB
ExamplesThe following example modifies a role named existing_role with the one-sentence description This role was changed. The role combines three existing roles: role1, role2, and role3. The role also has two added privileges: to view the job with ID 923470234ABCDFE23018494753091111 and to view the target host1.us.oracle.com:host. The role is granted to johndoe and janedoe.
emcli modify_role -name="existing_role" -desc="This role was changed" -roles="role1;role2;role3" -privilege="view_job;923470234ABCDFE23018494753091111" -privilege="view_target;host1.us.oracle.com:host" -users="johndoe;janedoe"
The following example modifies a role named existing_role by assigning role4, role5, and role6 to it. The description, privileges, and users associated with this role remain unchanged.
emcli modify_role -name="existing_role" -roles="role4;role5;role6"
2.2 Alphabetized Verb List
Verb Reference 2-167
modify_system
Adds or removes targets from an existing system.
An error is not generated when attempting to delete a non-existent target in the system or when attempting to add a target that already exists in the system.
If you specify both the -add_members and -delete_members options in the same command, the members specified by -delete_members are deleted first, then the members specified by -add_members are added.
Formatemcli modify_system -name="name" [-type=<generic_system>] [-add_members="name1:type1;name2:type2;..."]... [-delete_members="name1:type1;name2:type2;..."]... [-owner="new_owner"]
[ ] denotes that the parameter is optional
Options■ name
Target name of the system to modify.
■ type
System type: generic_system. Defaults to generic_system.
■ add_members
Targets to add, each specified as target_name:target_type. You can specify this option more than once.
■ delete_members
Targets to delete, each specified as target_name:target_type. You can specify this option more than once.
■ owner
New owner of the system.
ExamplesThe following example modifies system db2_system by adding database database:oracle_database and deleting database database2:oracle_database from the system. The new owner of the system is user2.
emcli modify_system -name=db2_system -add_members=database:oracle_database -delete_members=database2:oracle_database -owner=user2
The following example modifies system my_hosts by adding host yourhost.us.oracle.com:host to the system.
emcli modify_system -name=my_hosts -add_members=yourhost.us.oracle.com:host

modify_system
2-168 Command Line Interface
The following example modifies system my_system by adding targets system_a:generic_system and database:oracle_database, and deleting the nonexistent target nosystem:generic_system from the system.
emcli modify_system -name=my_system -add_members=system_a:generic_system -add_members=database:oracle_database -delete_members=nosystem:generic_system
2.2 Alphabetized Verb List
Verb Reference 2-169
modify_target
Modifies a target instance definition.
Formatemcli modify_target -name="name" -type="type" [-properties="pname1:pval1;pname2:pval2;..."]... [-separator=properties="sep_string"] [-subseparator=properties="subsep_string"] [-credentials="userpropname:username;pwdpropname:password;..."] [-input_file="parameter_tag:file_path"] [-display_name="display name"] [-on_agent]
[ ] denotes that the parameter is optional
Options■ name
Target name.
■ type
Target type.
■ properties
Name-value pair list of properties for the target instance. The "name"(s) are identified in the target-type metadata definition. They must appear exactly as they are defined in that file. Metadata files are located in $AGENT_ORACLE_HOME/sysman/admin/metadata.
■ separator=properties
Specifies a string delimiter to use between name-value pairs for the value of the -properties option. The default separator delimiter is ";".
■ subseparator=properties
Specifies a string delimiter to use between name and value in each name-value pair for the value of the -properties option. The default subseparator delimiter is ":".
■ credentials
Monitoring credentials (name-value pairs) for the target instance. The "name"(s) are identified in the target-type metadata definition as credential properties. They must appear exactly as they are defined in that file. Metadata files are located in $AGENT_ORACLE_HOME/sysman/admin/metadata.
■ input_file
Used in conjunction with the -credentials option, this option enables you to store specific target monitoring credential values, such as passwords, in a separate file. The -input_file option specifies a mapping between a tag and a local file path. The tag is specified in lieu of specific monitoring credentials of the -credentials option. The tag must not contain colons ( : )or semi-colons ( ; ).
modify_target
2-170 Command Line Interface
■ display_name
Sets the target display name.
■ on_agent
Propagates changes to the Management Agent collecting this target's metrics.
ExamplesThe following example modifies the display name to New Name DB for the database with the internal name database.
emcli modify_target -name="database" -type="oracle_database" -display_name="New Name DB"
The following example modifies the credentials for the oracle_database target with the name database. This example illustrates the use of the input_file to camouflage the credentials. The password is actually in a file named at_pwd_file. The input_file argument replaces PWD_FILE with the contents of the at_pwd_file in the credentials argument. The on_agent flag ensures that the changes are propagated to the Management Agent collecting for this target.
emcli modify_target -name="database" -type="oracle_database" -credentials="UserName:newuser;password:PWD_FILE;Role:SYSDBA" -input_file="PWD_FILE:at_pwd_file" -on_agent
The following example modifies the display name and properties for the oracle_database target with the name database. The on_agent flag ensures that the changes are propagated to the Management Agent collecting for this target.
emcli modify_target -name="database" -type="oracle_database" -display_name="New Name DB" -properties="SID=newsid|Port=15091|OracleHome=/oracle" -properties="MachineName=smpamp-sun1.us.oracle.com" -separator=properties="|" -subseparator=properties="=" -on_agent
The following example modifies an oracle_database target type with the name payroll_db. In this example, the display name for this database (target name that is displayed in the Enterprise Manager UI) is being changed to payroll. The port number is being changed to 15067, and the Oracle Home is being changed to /oradb. The administrator (dbsnmp), whose previous default role was normal, is being changed to sysdba. This example also illustrates the use of the input_file to camouflage the credentials. The password is actually in a file named at_pwd_file. The -input_file argument replaces PWD_FILE with the contents of at_pwd_file in the -credentials option.
emcli modify_target -name="payroll_db" -type="oracle_database" -credentials="UserName:Fred;password:PWD_FILE;Role:sysdba" -properties="Port:15067;OracleHome:/oradb"

2.2 Alphabetized Verb List
Verb Reference 2-171
-input_file="PWD_FILE:at_pwd_file" -display_name=payroll -on_agent
modify_user
2-172 Command Line Interface
modify_user
Modifies an existing Enterprise Manager administrator.
Formatemcli modify_user -name="name" [-password="password"] [-roles="role1;role2;..."] [-email="email1;email2;..."] [-privilege="name;[[target_name:target_type]|jobid]"]... [-profile="profile_name"] [-desc="user_description"] [-expired="true/false"] [-prevent_change_password="true/false"]
[ ] denotes that the parameter is optional
Options■ name
Administrator name.
■ password
Replaces the administrator password with the specified password.
■ roles
Replaces current roles with the specified list of Enterprise Manager roles to grant to this administrator. Currently, the built-in roles include PUBLIC.
Replaces current email addresses for this administrator with the specified list. To delete all email addresses for this administrator, specify an empty string.
■ privilege
Privilege to grant to this administrator. You can specify this option more than once. The original administrator privileges will be revoked.
The following system privileges do not require a target or a job ID:
– CREATE_ANY_ROLE
– CREATE_ANY_PRIVILEGE
– MANAGE_CREDENTIAL_GROUP
– CREATE_TARGET
– DELETE_ANY_TARGET
– VIEW_ANY_TARGET
– USE_ANY_BEACON
– EM_MONITOR
– SUPER_USER
The following target privileges require specifying target_name:target_type:
– VIEW_TARGET
2.2 Alphabetized Verb List
Verb Reference 2-173
– OPERATOR_TARGET
– MAINTAIN_TARGET
– CLONE_FROM_TARGET
– FULL_TARGET
The following group privileges require specifying target_name:target_type:
– CREATE_TARGET_IN_GROUP
The following job privileges require specifying jobid:
– VIEW_JOB
– FULL_JOB
■ profile
Database profile name. When not passed, this value is not altered.
■ desc
User description
■ expired
True immediately expires the password. The default is false.
■ prevent_change_password
True prevents a user from updating his/her password. The default is false.
ExamplesThe following example modifies the new_admin administrator. The user will have two privileges: to view the job with ID 923470234ABCDFE230184947530911111 and to view the target host1.us.oracle.com:host. The user will also be granted role PUBLIC. The user email addresses will be set to [email protected] and [email protected].
emcli modify_user -name="new_admin" -password="oracle" -email="[email protected];[email protected]" -roles="public" -privilege="view_job;923470234ABCDFE230184947530911111" -privilege="view_target;host1.us.oracle.com:host"
The following example deletes all the email addresses and privileges for administrator new_admin. Note that -privilege="" and -privilege are equivalent if specified at the command line in a UNIX shell.
emcli modify_user -name="new_admin" -email="" -privilege=""
pause_guest_vm
2-174 Command Line Interface
pause_guest_vm
Pauses a guest Virtual Machine. To pause the guest Virtual Machine, it should be in the Running state.
Formatemcli pause_guest_vm -guest_vm_name=<Virtual Machine Name> -server_pool_name=<Server Pool Name>
Options■ guest_vm_name
Name of the guest Virtual Machine.
■ server_pool
Name of the guest server pool.
ExamplesThe following example pauses the dom15 guest Virtual Machine.
emcli pause_guest_vm -guest_vm_name="dom15" -server_pool_name="Oracle Server Pool"
Tip: See also unpause_guest_vm on page 2-249.

2.2 Alphabetized Verb List
Verb Reference 2-175
provision
Provisions a hardware server using configuration properties from the input file. The configuration properties required for a component can be viewed from the Grid Control console. After you make a provisioning request, you can view the status of the request from the Enterprise Manager Grid Control console by using the assignment name (specified by you or the automatically generated name returned to you).
Formatemcli provision -image="path to the image" -network="network profile path" -bootserver="boot server name" -stageserver="stage server name" -stgcredentials="username" -schedule="type:immediate/onetime;timezone:zone; startdt:startdate;starttm:time" -resettimeout="time" -target="hardware server label" -input_file="config_properties:file_path" -assignment="assignment name" [-desc="assignment description"]
[ ] denotes that the parameter is optional
Options■ image
Path to the image (includes the image name). This is the image used for provisioning.
■ network
Path name of the network profile.
■ bootserver
Name of the boot server.
Format: hostName:Directory Path
■ stageserver
Name of the stage server. hostName:Directory Path.
■ Stgcredentials
User name of the stage server.
■ schedule
Time when provisioning should be scheduled. This is a string argument that contains multiple name-value pairs separated by `;'. This is used to schedule the provisioning operation. "type" can be `immediate' or `onetime'. If "type" is not immediate, the other values are expected in the Time Zone: string, which is a timezone ID of the format:
zone Sign TwoDigitHours:Minutes
zone: Time zone ID (GMT, PDT, and so forth)
Sign: one of "+ -"
provision
2-176 Command Line Interface
TwoDigitHours: Digit Digit
Minutes: Digit Digit
Digit: One of 0 1 2 3 4 5 6 7 8 9
Startdt: Date string of the format: MM/DD/YY
Starttm: Time string of the format: HH:MM
■ resettimeout
Reset timeout for the hardware server in minutes.
■ target
Target hardware server is specified using the hardware label type.
■ input_file
File containing configuration properties.
■ assignment
Name of the assignment.
■ desc
Assignment description. The description is automatically generated if not specified.
ExamplesThe following example submits a job to provision myimage on a target with the label of mylabel. The job runs immediately with a reset timeout of 100 minutes. Image properties are picked from properties.txt that overrides the default image. properties.stageserver is used as the staging server, and /private/share as the staging storage with joe as the user name.
emcli provision -image="Images/myimage" -network="Networks/networkprofile" -bootserver="booservername.us.oracle.com" -stageserver="stageserver.us.oracle.com:/private/share" -stgcredentials="joe" -schedule="type:immediate" -resettimeout="100" -target="mylabel" -input_file="config_properties:properties.txt" -assignment="provision mylabel"
2.2 Alphabetized Verb List
Verb Reference 2-177
reboot_guest_vm
Reboots a guest virtual machine. To reboot the guest virtual machine, it should be in the Running state.
Formatemcli reboot_guest_vm -guest_vm_name=<Virtual Machine Name> -server_pool_name=<Server Pool Name>
Options■ guest_vm_name
Name of the guest Virtual Machine name.
■ server_pool_name
Name of the server pool.
ExamplesThe following example reboots the dom15 guest Virtual Machine.
emcli reboot_guest_vm -guest_vm_name="dom15" -server_pool_name="Oracle Server Pool"
reboot_virtual_server
2-178 Command Line Interface
reboot_virtual_server
Reboots a virtual server. To reboot the virtual server, it should be in the Up state.
Formatemcli reboot_virtual_server -server_name=Server name
Options■ server_name
Name of the virtual server.
ExamplesThe following example reboots the st-vs1.us.oracle.com virtual server.
emcli reboot_virtual_server -server_name="st-vs1.us.oracle.com"
2.2 Alphabetized Verb List
Verb Reference 2-179
relocate_targets
Formatemcli relocate_targets -src_agent=<source agent target name> -dest_agent=<dest agent target name> -target_name=<name of the target to be relocated> -target_type=<type of target to be relocated> -changed_param=<propName>:<propValue> -input_file:dupTargets=<targets contents> -input_file:moveTargets="complete path to file containing targets with overridden property values" -copy_from_src [-changed_param=<propName>:<propValue>]* [-ignoreTimeSkew=yes] [-force=yes]
[ ] denotes that the parameter is optional
ModesThere are two modes for this verb:
■ Create Mode
This mode creates a list of targets on the destination Agent that already exists and is monitored by the source Agent in Enterprise Manager. It moves all the collections and blackouts for these targets from the source Agent to the destination Agent, and makes the destination Agent the monitoring Agent for these targets in Enterprise Manager.
emcli relocate_targets -src_agent=<source agent> -dest_agent=<destination agent> -input_file=dupTarget:<complete path to file>; [-ignoreTimeSkew=yes]
■ Exist Mode
In this mode, the target also exists at the destination.
emcli relocate_targets -src_agent=<source agent target name> -dest_agent=<destination agent target name> -target_name=<target name> -target_type=<target type> [-ignoreTimeSkew=yes] [-force=yes]
In all cases, relocation moves all collections and blackouts for these targets from the source Agent to destination Agent, and makes the destination Agent the monitoring Agent for these targets in Enterprise Manager.
Note: To relocate a composite target, you must specify theinput_file:dupTargets option, and you must not combine -target_type or -target_name.
Tip: See the Examples section for more samples of the create mode.
relocate_targets
2-180 Command Line Interface
Options■ src_agent
Agent currently monitoring the targets. If srcAgent is not known, enter currentOwner as the argument.
■ dest_agent
Agent that should monitor the targets.
■ target_name
Name of the target that needs to be moved.
■ target_type
Type of target that needs to be moved.
■ changed_param
The value of the propName property in the target should be changed to propValue.
■ input_file=dupTargets
Takes a file name that contains all the targets and its properties as seen in targets.xml. The contents of the file must have the same format as targets.xml.
To relocate a composite target, you must specify the input_file:dupTargets option, and you must not combine -target_type or -target_name.
■ input_file=moveTargets
Takes a file name that contains a list of targets, one per line, in the following format:
<targetType>:<targetName>[;<propName>=<propValue>]*
■ copy_from_src
Target properties should be copied from the source Agent
■ ignoreTimeSkew
If specified, the target is relocated, ignoring the time skew between the source and destination Agent.
■ force
If the command is executed with the -force=yes switch, the composite target is automatically relocated with its related targets. If the command is executed without this switch, an error message appears if it is a composite target.
Examples
Example 1The following Create Mode example creates a target on the destination Agent by copying the target property content from the source Agent, while allowing some property values to be changed.
emcli relocate_targets -src_agent=<source agent> -dest_agent=<destination agent> -target_name=<target name> -target_type=<target type>
2.2 Alphabetized Verb List
Verb Reference 2-181
-copy_from_src [-ignoreTimeSkew=yes] [-changed_param=<Propname>:<Value>]*
Example 2The following Create Mode example creates a list of targets on the destination Agent specified in the moveTargets file. You can specify property value overrides.
emcli relocate_targets -src_agent=<source agent> -dest_agent=<destination agent> -input_file=moveTargets:<complete file path> [-ignoreTimeSkew=yes]
remove_beacon
2-182 Command Line Interface
remove_beacon
Removes a beacon from the monitoring set of beacons.
Formatemcli remove_beacon -name=target name -type=target type -bcnName=beacon name [-forceRemove]
[ ] denotes that the parameter is optional
Options■ name
Service target name.
■ type
Service target type.
■ bcnName
Beacon name to remove.
■ forceRemove
If specified, skips the sanity checks for availability definition.
ExamplesThe following example removes MyBeacon from the MyTarget service target of type generic_service.
emcli remove_beacon -name='MyTarget' -type='generic_service' -bcnName='MyBeacon'
2.2 Alphabetized Verb List
Verb Reference 2-183
remove_service_system_assoc
Removes the system for a given service.
Formatemcli remove_service_system_assoc -name='name' -type='type'
Options■ name
Service name.
■ type
Service type.
ExamplesThe following example removes the system for the generic service named my service.
emcli remove_service_system_assoc -name='my service' -type='generic_service'
remove_target_property
2-184 Command Line Interface
remove_target_property
Removes the target property from all targets of the specified target type. This also removes all values associated with this target property.
Formatemcli remove_target_property -target_type="target_type" -property="property_name"
Options■ target_type
Target type for which you want to remove this property. To remove this property from all target types for which it is defined, you can specify the "*" wildcard character.
■ property
Name of the property you want to remove. Property names are case-sensitive. You cannot remove the following Oracle-provided target properties:
Comment, Deployment Type, Line of Business, Location, Contact
ExamplesThe following example removes the target property Owner from all targets of type oracle_database. This also removes all values associated with this target property.
emcli remove_target_property -target_type="oracle_database" -property="Owner"
The following example removes the target property Owner from all targets. This also removes all values associated with this property for all target types.
emcli remove_target_property -target_type="*" -property="Owner"
2.2 Alphabetized Verb List
Verb Reference 2-185
reschedule_instance
Reschedules a submitted procedure instance. You can only reschedule scheduled instances.
Formatemcli reshedule_instance -instance={instance guid} -schedule= start_time:yyyy/MM/dd HH:mm; [tz:{java timezone ID}]; [grace_period:xxx]
Options■ instance
GUID of the instance to execute.
■ schedule
Schedule for the procedure instance:
– start_time — When the procedure should start.
– tz — Optional time zone ID.
– grace_period — Optional grace period in minutes.
Examplesemcli reschedule_instance -instance=16B15CB29C3F9E6CE040578C96093F61 -schedule="start_time:2006/6/21 21:23;tz:America/New_York;grace_period:60"
resume_guest_vm
2-186 Command Line Interface
resume_guest_vm
Resumes a guest Virtual Machine. To resume the guest Virtual Machine, it should be in the Suspended state.
Formatemcli resume_guest_vm -guest_vm_name=<Virtual Machine Name> -server_pool_name=<Server Pool Name>
Options■ guest_vm_name
Name of the guest Virtual Machine.
■ server_pool_name
Name of the server pool.
ExamplesThe following example resumes the dom15 guest Virtual Machine.
emcli resume_guest_vm -guest_vm_name="dom15" -server_pool_name="Oracle Server Pool"
Tip: See also suspend_guest_vm on page 2-245.

2.2 Alphabetized Verb List
Verb Reference 2-187
resume_instance
Resumes a suspended deployment instance.
Formatemcli resume_instance -instance={instance_guid}
Options■ instance
GUID of the instance.
Examplesemcli resume_instance -instance=16B15CB29C3F9E6CE040578C96093F61
resync_agent
2-188 Command Line Interface
resync_agent
Performs an Agent recovery. A message is issued if the specified Agent does not exist.
Format emcli resyncAgent -agent="Agent Name" [-keep_blocked]
[ ] denotes that the parameter is optional
Options■ agent
Name of the Agent for which to perform the Agent recovery.
■ keep_blocked
Leaves the Agent blocked even if the resync succeeds. By default, the Agent becomes unblocked if the resync is successful.
Examplesemcli resyncAgent -agent="Agent Name"
2.2 Alphabetized Verb List
Verb Reference 2-189
retry_instance
Retries a failed instance or failed step.
Formatemcli retry_instance -instance=<instance_guid> [-stateguid=<state_guid>]
[ ] denotes that the parameter is optional
Options■ instance
GUID of the instance.
■ stateguid
Comma-separated list of state GUIDs.
Examplesemcli retry_instance -instance=16B15CB29C3F9E6CE040578C96093F61 -stateguid=51F762417C4943DEE040578C4E087168
emcli retry_instance -instance=16B15CB29C3F9E6CE040578C96093F61 -stateguid='51F762417C4943DEE040578C4E087168,51F762417C4944DEE040578C4E087168'
retry_job
2-190 Command Line Interface
retry_job
Restarts a previously failed job execution.
Formatemcli retry_job -exec_id="executionID" [-noheader] [-script | -format= [name:<pretty|script|csv>]; [column_separator:"column_sep_string"]; [row_separator:"row_sep_string"]; ]
[ ] denotes that the parameter is optional
Options■ exec_id
ID of the job execution to be retried. Use the get_jobs verb to obtain specific job execution IDs.
■ noheader
Displays tabular information without column headers.
■ script
This option is equivalent to -format="name:script".
■ format
Format specification (default is -format="name:pretty").
– format="name:pretty" prints the output table in a readable format not intended to be parsed by scripts.
– format="name:script" sets the default column separator to a tab and the default row separator to a newline. The column and row separator strings can be specified to change these defaults.
– format="name:csv" sets the column separator to a comma and the row separator to a newline.
– format=column_separator:"column_sep_string" column-separates the Verb output by <column_sep_string>. Rows are separated by the newline character.
– row_separator:"row_sep_string" row-separates the Verb output by <row_sep_string>. Rows are separated by the tab character.
Output Columns:Execution ID
ExamplesThe following example restarts the job execution with Id 12345678901234567890123456789012 and displays a new execution ID.
emcli retry_job -exec_id=12345678901234567890123456789012
2.2 Alphabetized Verb List
Verb Reference 2-191
revoke_license_no_validation
Revokes licenses on a set of user-specified packs, or all packs to a set of user-specified targets, or all targets belonging to the input licensable target type. You can only enable or disable database diagnostics and/or tuning packs for 11g database targets through the UI.
Formatemcli revoke_license_no_validation -type="target_type" [-targets="tname1;tname2;..."] [-packs="pack1;pack2;..."] [-file="file_name"] [-displayAllMessages]
[ ] denotes that the parameter is optional
Options■ type
Target type as it exists in the database. Names cannot contain colons ( : ), semi-colons ( ; ), or any leading or trailing blanks. You can specify only one target type at a time; for example, -type="oracle_database".
■ targets
Targets should be specified in the following sequence:
TargetName1;TargetName2;
For example:
-targets="database1;database2;database3;"
The semi-colon ( ; ) is the target separator.
See the "Examples" section below for information about providing arguments for the targets option.
■ packs
License packs should be specified in the following sequence:
pack1;pack2;
For example:
-packs="db_diag;db_config;"
The semi-colon ( ; ) is the pack separator.
See the "Examples" section below for information about providing arguments for the packs option.
■ file
Specify the file name, including the complete path. For example:
-file="/usr/admin1/db_license.txt"
The file should contain the list of targets and packs according to the following cases:
revoke_license_no_validation
2-192 Command Line Interface
– If you only need to provide a list of targets, use the following format:
targets=database1;database2;database3;
– If you only need to provide a list of packs, use the following format:
packs=db_diag;db_config;
– If you need to provide a list of both targets and packs, use the following format:
targets=database1;database2;database3; packs=db_diag;db_config;
■ displayAllMessages
Displays all messages. Only error messages are displayed by default. "=value" is not allowed on the command line.
ExamplesExample 1 and Example 2 below revoke licenses of specific packs for specific targets. In order to know which target types and pack names you can pass as arguments, you can use the view named mgmt_license_view to see a list of licensable targets, their target types, and the list of packs licensed on them.
To obtain this information, do the following:
1. Access SQL*Plus with your username and password, using sysman or other user that has access to sysman.mgmt_license_view.
2. Select a distinct pack name from sysman.mgmt_license_view, where:
target_type=<oracle_database>
The following example shows pack names for an Oracle database you specify as the target type.
PACK_NAME-------------------db_configprovisioningdb_sadmdb_tuningdb_diagprovisioning_dbdb_chgmgt 7 rows selected.
Based on this information, to revoke a license to the database1 target for the db_chgmgt pack, you would enter the following command:
emcli revoke_license_no_validation -type="oracle_database" -targets="database1" -packs="db_chgmgt"
The only limitation of mgmt_license_view is that it only lists the packs for a target type where the pack is granted to at least one target of that type. That is, if the pack is not granted to any target of that type, mgmt_license_view cannot provide any information.
The following example revokes the license of the db_diag and db_config packs to database1, database2, and database3 targets (oracle_database target type):
2.2 Alphabetized Verb List
Verb Reference 2-193
emcli revoke_license_no_validation -type="oracle_database" -targets="database1;database2;database3;" -packs="db_diag;db_config;"
The following example revokes the license of the db_diag and db_config packs to all database targets in the setup:
emcli revoke_license_no_validation -type="oracle_database" -packs="db_diag;db_config;"
The following example revokes the license of all packs (applicable to database targets) to database1, database2, and database3 targets in the setup:
emcli revoke_license_no_validation -type="oracle_database" -targets="database1;database2;database3;"
The following example revokes the license of all packs (applicable to database targets) to all database targets in the setup:
emcli revoke_license_no_validation -type="oracle_database"
The following example uses a text file to pass targets and pack names as the argument. It revokes the license to the db_diag and db_config packs to the database1, database2, and database3 targets (oracle_database target type):
emcli revoke_license_no_validation -type="oracle_database" -file="/usr/admin1/db_license.txt" targets=database1;database2;database3; packs=db_diag;db_config;
where the content of the "/usr/admin1/license/db_license.txt" file is as follows:
targets=database1;database2;database3;packs=db_diag;db_config;
revoke_license_with_validation
2-194 Command Line Interface
revoke_license_with_validation
Revokes licenses on a set of user-specified packs, or all packs to a set of user-specified targets, or all targets belonging to the input licensable target type as per business rules. You can only enable or disable database diagnostics and/or tuning packs for 11g database targets through the UI.
Formatemcli revoke_license_with_validation -type="target_type" [-targets="tname1;tname2;..."] [-packs="pack1;pack2;..."] [-file="file_name"] [-displayAllMessages]
[ ] denotes that the parameter is optional
Options■ type
Target type as it exists in the database. Names cannot contain colons ( : ), semi-colons ( ; ), or any leading or trailing blanks. You can specify only one target type at a time; for example, -type="oracle_database".
■ targets
Targets should be specified in the following sequence:
TargetName1;TargetName2;
For example:
-targets="database1;database2;database3;"
The semi-colon ( ; ) is the target separator.
See the "Examples" section below for information about providing arguments for the targets option.
■ packs
License packs should be specified in the following sequence:
pack1;pack2;
For example:
-packs="db_diag;db_config;"
The semi-colon ( ; ) is the packs separator.
See the "Examples" section below for information about providing arguments for the packs option.
■ file
Specify the file name, including the complete path. For example:
-file="/usr/admin1/db_license.txt"
The file should contain the list of targets and packs according to the following cases:

2.2 Alphabetized Verb List
Verb Reference 2-195
– If you only need to provide a list of targets, use the following format:
targets=database1;database2;database3;
– If you only need to provide a list of packs, use the following format:
packs=db_diag;db_config;
– If you need to provide a list of both targets and packs, use the following format:
targets=database1;database2;database3; packs=db_diag;db_config;
■ displayAllMessages
Displays all messages. Only error messages are displayed by default. "=value" is not allowed on the command line.
ExamplesExample 1 and Example 2 below revoke licenses of specific packs for specific targets. In order to know which target types and pack names you can pass as arguments, you can use the view named mgmt_license_view to see a list of licensable targets, their target types, and the list of packs licensed on them.
To obtain this information, do the following:
1. Access SQL*Plus with your username and password, using sysman or other user that has access to sysman.mgmt_license_view.
2. Select a distinct pack name from sysman.mgmt_license_view, where:
target_type=<oracle_database>
The following example shows pack names for an Oracle database you specify as the target type.
PACK_NAME-------------------db_configprovisioningdb_sadmdb_tuningdb_diagprovisioning_dbdb_chgmgt 7 rows selected.
Based on this information, to revoke a license to the database1 target for the db_chgmgt pack, you would enter the following command:
emcli revoke_license_with_validation -type="oracle_database" -targets="database1" -packs="db_chgmgt"
The only limitation of mgmt_license_view is that it only lists the packs for a target type where the pack is granted to at least one target of that type. That is, if the pack is not granted to any target of that type, mgmt_license_view cannot provide any information.
The following example revokes the license of the db_diag and db_config packs to database1, database2, and database3 targets (oracle_database target type):
revoke_license_with_validation
2-196 Command Line Interface
emcli revoke_license_with_validation -type="oracle_database" -targets="database1;database2;database3;" -packs="db_diag;db_config;"
The following example revokes the license of the db_diag and db_config packs to all database targets in the setup:
emcli revoke_license_with_validation -type="oracle_database" -packs="db_diag;db_config;"
The following example revokes the license of all packs (applicable to database targets) to database1, database2, and database3 targets in the setup:
emcli revoke_license_with_validation -type="oracle_database" -targets="database1;database2;database3;"
The following example revokes the license of all packs (applicable to database targets) to all database targets in the setup:
emcli revoke_license_with_validation -type="oracle_database"
The following example uses a text file to pass targets and pack names as the argument. It revokes the license of the db_diag and db_config packs to the database1, database2, and database3 targets (oracle_database target type):
emcli revoke_license_with_validation -type="oracle_database" -file="/usr/admin1/db_license.txt" targets=database1;database2;database3; packs=db_diag;db_config;
where the content of the "/usr/admin1/license/db_license.txt" file is as follows:
targets=database1;database2;database3;packs=db_diag;db_config;
2.2 Alphabetized Verb List
Verb Reference 2-197
revoke_privs
Revokes the privileges from an existing Enterprise Manager User or Enterprise Manager Role.
Formatemcli revoke_privs -name="username/rolename" [-privilege="name;[[target_name:target_type]|jobid]"]...
Options■ name
User Name or Role Name from which privileges will be revoked.
■ privilege
Privilege, which will be revoked from Enterprise Manager User or Role. You can specify this option more than once.
The following system privileges do not require a target or a job ID:
VIEW_ANY_TARGET
USE_ANY_BEACON
EM_MONITOR
The following target privileges require specifying target_name:target_type:
VIEW_TARGET
OPERATOR_TARGET
FULL_TARGET
The following job privileges require specifying jobid:
VIEW_JOB
FULL_JOB
ExamplesFor user1, the following example revokes full control of the jobs with ID 923470234ABCDFE23018494753091111, and revokes full control on the target host1.us.oracle.com:host:
emcli revoke_privs -name="user1" -privilege="FULL_JOB;923470234ABCDFE23018494753091111" -privilege="FULL_TARGET;host1.us.oracle.com:host"
The following example revokes the target privileges from EM Role : Role1:
emcli revoke_privs -name="Role1" -privilege="FULL_TARGET;host1.us.oracle.com:host"
revoke_roles
2-198 Command Line Interface
revoke_roles
Revokes the roles to existing an Enterprise Manager user or Enterprise Manager role.
Formatemcli revoke_roles -name="username/rolename" [-roles="role1;role2;..."]
[ ] denotes that the parameter is optional
Options■ name
User name or role name from which roles will be revoked.
■ roles
Roles, which will be revoked from Enterprise Manager user or role. You can specify this option more than once.
Examplesemcli revoke_roles -name="user1" -roles="SUPER_USER"
emcli revoke_roles -name="Role1" -roles="BLACKOUT_ADMIN;MAINTAIN_TARGET"
2.2 Alphabetized Verb List
Verb Reference 2-199
run_avail_diag
Runs diagnostics for an availability algorithm for a test-based service. This is mostly useful when the "last calculated" time stamp is running behind the current time and the service status has been unresponsive for some time.
Formatemcli run_avail_diag -name=<target_name> -type=<target_type>
Options■ name
Service target name.
■ type
Service target type.
Examplesemcli run_avail_diag -name='MyTarget' -type='generic_service'
run_promoted_metric_diag
2-200 Command Line Interface
run_promoted_metric_diag
Runs promoted metric diagnostics.
Formatemcli run_promoted_metric_diag -name=<target_name> -type=<target_type> -promotedMetricName=<metric_name> -promotedColumn=<metric_type>
Options■ name
Service target name.
■ type
Service target type.
■ promotedMetricName
Promoted metric name.
■ promotedColumn
Promoted metric type.
Examplesemcli run_promoted_metric_diag -name='MyTarget' -type='generic_service'-promotedMetricName='metric1' -promotedColumn='Performance'

2.2 Alphabetized Verb List
Verb Reference 2-201
secure_agents
Re-secures up to 50 Grid Control Management Agents after you create a new Certificate Authority for the Grid Control Management Servers.
Agents can be secured by providing a list of Agent names, a group name, or with an input file. If you provide a group name, Enterprise Manager resolves that to a list of Agents that monitor targets in the group. You can also provide an Agent list with an input file to this EMCLI command. For all of these options, you must either provide a username/password, or the user must have been configured with preferred credentials on Agent targets.
The verb submits a job with the list of Agents and the credntials provided as input, and ouputs the Job Name and Job ID, which can be used track the status of the job. This verb also calculates the list of Agents to resecure by filtering out invalid Agents, insecure Agents, Agents that are down, and Agents that already have an active job execution. This verb also filters out Agents that are already secured by the correct Certifcate Authority, but you can disable this filter by using the -disable_ca_check option.
Note the following additional points about this verb:
■ Does not secure Agents that are not already secured. If you want to secure Agents not currently secured, you need to execute the command "emctl secure agent" from the Grid Control Management Agent in $ORACLE_HOME/bin.
■ Removes down Agents from the list of Agents to be re-secured. emcli requires the Agent to be up and running.
■ Removes down Agents from the list of Agents to be re-secured. emcli requires the Agent to be up and running.
■ Removes invalid Agents from the list of Agents to be re-secured.
■ Removes duplicate Aagents from the list of Agents to be re-secured if an Agent has been provided several times in the list.
■ Re-secures up to 50 Agents at one time. If you specify a list of more than 50 Agents to be re-secured, emcli just re-secures the first 50 Agents from the list and ignores the Agents with a rank greater than 50 in the list.
■ Filters out an Agent that is already busy running a job execution.
■ Filters out an Agent to be re-secured if the Agent is already secured with the latest Certificate. However, you can remove this restriction with the -disable_ca_check flag.
■ Needs to connect to the Grid Control Management Agent with either the preferred credentials set at the Agent level in the Grid Control repository, or with the user name and password provided.
■ If you execute this command with the option -use_pref_creds, emcli filters out from the list of Agents to be re-secured all of the Agents with preferred credentials not set or incorrectly set.
Note: This command is only available with patch 10372083 or patch 10034237 applied.
secure_agents
2-202 Command Line Interface
■ If you execute this command with the -username and -password options, emcli filters out from the list of Agents to be re-secured all of the Agents that cannot be contacted with the user name and password provided.
Formatemcli secure_agents [-agt_names="agt1;agt2;..."] [-agt_names_file="<file>"] [-group_name="group_name"] [-use_pref_creds] [-username="username"] [-password="password"] [-disable_ca_check]
Options■ agt_names
Semicolon-separated list of Agent names.
■ agt_names_file
Absolute path of the file containing the list of Agent names, each on a new line.
■ group_name
Identifies the list of Agents to secure. Enterprise Manager resolves the list of Agents that monitor (not just members of the group) the list of targets in the group.
■ use_pref_creds
Use preferred credentials configured for the Agent to execute the secureAgent job.
■ username
User name to execute the secureAgent job at the Agent.
■ password
Password to execute the secureAgent job at the Agent.
■ disable_ca_check
Flag to disable the check to verify if the Agents are secured with the latest Certificate Authority.
ExamplesThe following example assumes that the Grid Control Management Agents are installed with the user oracle on all hosts with the same password.
emcli secure_agents -agt_names="ushost1.mycompany.com:3872;ushost2.mycompany.com:3872;ushost1.mycompany.com:3872" -username="oracle" -password="mypwd"Summary :Number of valid agents provided for secure : 2, Filtered : 0, Selected : 2Details :Number of agents provided for secure (input) : 3After merging and removing invalid/duplicate agents : 2 Job "SECUREAGENTS JOB 2010-Dec-15 16:08:45" submitted for securing 2 agentsJob ID: DE404669C52F43AC805151306F4B138DExecution ID: 47225EF8C9A8455FBDFB817BF8722FFF

2.2 Alphabetized Verb List
Verb Reference 2-203
The following example re-secures the Agents, even if they are already registered to the latest certificate.
emcli secure_agents -agt_names="ushost1.mycompany.com:3872;ushost2.mycompany.com:3872;ushost3.mycompany.com:3872" -username="oracle" -disable_ca_check
set_agent_property
2-204 Command Line Interface
set_agent_property
Modifies a specific Agent property. You can use this command if you have operator privilege for the Agent.
Formatemcli set_agent_property -agent_name="<agent_target_name>" -name="<agent_property_name>" -value="<agent_property_value>"
Options■ agent_name
Name of the Agent target.
■ name
Name of the Agent property you want to modify.
■ value
New value for the Agent property.
ExamplesThe following example sets the value of the UploadInterval property to 15.
emcli get_agent_property -agent_name="agent.example.com:11850" -name=UploadInterval -value=15
2.2 Alphabetized Verb List
Verb Reference 2-205
set_availability
Changes the availability definition of a given service.
Format emcli set_availability -name=target name -type=target type -availType=availability type (can be 'test' or 'system') -availOp=availability operator (can be 'and' or 'or)
Options■ -name=target name
Service target name.
■ -type=target type
Service target type.
■ -availType=availability type
Switches the availability to either test-based or system-based.
■ -availOp=availability operator
If and, it uses all key tests/components to decide availability.
If or, it uses any key tests/components to decide availability.
ExamplesThe following example sets the availability of the service MyTarget to be based on all key tests:
emcli set_availability -name='MyTarget' type='generic_service' -availType='test' -availOp='and'
The following example sets the availability of the service MyTarget to be based on any key test:
emcli set_availability -name='MyTarget' type='generic_service' -availType='test' -availOp='or'
set_credential
2-206 Command Line Interface
set_credential
Sets preferred credentials for given users.
Formatemcli set_credential -target_type="ttype" [-target_name="tname"] -credential_set="cred_set" [-user="user"] -columns="col1:newval1;col2:newval2;PDP:SUDO/POWERBROKER;RUNAS:oracle; PROFILE:user1..." [-input_file="tag1:file_path1;tag2:file_path2;..."] [-oracle_homes="home1;home2"] [-monitoring]
[ ] denotes that the parameter is optional
Options■ target_type
Type of target. The must be "host" if the -oracle_homes parameter is specified.
■ target_name
Name of the target. Omit this argument to set enterprise preferred credentials. This must be the host name if the -oracle_homes parameter is specified.
■ credential_set
Credential set affected.
■ user
Enterprise Manager user whose credentials are affected. If omitted, the current user's credentials are affected.
■ columns
Name and new value of the column(s) to set. Every column of the credential set must be specified. Alternatively, a tag from the -input_file argument can be used so that the credential values are not seen on the command line. You can specify this argument more than once.
■ input_file
Path of the file that has the -columns argument(s). This option is used to hide passwords. Each path must be accompanied by a tag referenced in the -columns parameter. You can specify this option more than once.
■ oracle_homes
Name of oracle homes on the target host. Credentials will be added/updated for all specified homes.
Note: The list of columns and the credential sets they belong to is included in the metadata file for each target type. This and other credential information is in the <CredentialInfo> section of the metadata.
2.2 Alphabetized Verb List
Verb Reference 2-207
■ monitoring
Flag indicating that credentials affected are monitoring credentials. If omitted, the credentials affected are preferred credentials. Monitoring credentials require specifying the target_name option.
ExamplesExample 1:
emcli set_credential -target_type=oracle_database -target_name=myDB -credential_set=DBCredsNormal -user=admin1 -column="username:joe;password:newPass;role:newRole"
Example 2:
In Example 2, FILE1 is a tag used to refer to the contents of passwordFile. Note that Example 2 has the same effect as Example 1.
emcli set_credential -target_type=oracle_database -target_name=myDB -credential_set=DBCredsNormal -user=admin1 -column=FILE1 -input_file=FILE1:passwordFile
Contents of the passwordFile: username:joe;password:newPass;role:newRole
Example 3:
emcli set_credential -target_type=host -target_name=host.us.oracle.com -credential_set=OHCreds -user=admin1 -column="OHUsername:joe;OHPassword:newPass" -oracle_homes="database1;mydb"
set_instance_jobgrants
2-208 Command Line Interface
set_instance_jobgrants
Defines key beacons and tests of the service.
Formatemcli set_instance_jobgrants -instance_guid=<instance guid> -grants=<user:privilege>
Options■ instance_guid
GUID of the instance.
■ grants
String of user:privilege pairs each separated by a semi-colon ( ; ) , where:
user = em user name privilege = VIEW_JOB or FULL_JOB
Examplesemcli set_instance_jobgrants -instance_guid=16B15CB29C3F9E6CE040578C96093F61 -grants="user1:VIEW_JOB;user2:FULL_JOB"
2.2 Alphabetized Verb List
Verb Reference 2-209
set_key_beacons_tests
Defines key beacons and tests of the service.
Formatemcli set_key_beacons_tests -name=target name -type=target type [-beacons=beacon names]+ [-tests='test1:type1;test2:type2;...']+ [-removeKey]
[ ] denotes that the parameter is optional
Options■ name
Service target name.
■ type
Service target type.
■ beacons
Names of beacons to set as key (or non-key).
■ tests
Names and types of tests to set as key (or non-key).
■ removeKey
If specified, the mode is (remove key); that is, the specified tests and beacons will be set as non-key.
If not specified, the mode is (add key); that is, the specified tests and beacons will be set as key.
ExamplesThe following example sets MyTest/HTTP, MyTest2/FTP and MyBeacon as non-key elements of service MyTarget/generic_service.
emcli set_key_beacons_tests -name='MyTarget' -type='generic_service' -tests='MyTest:HTTP;MyTest2:FTP' -beacons='MyBeacon' -removeKey
The following example sets MyBeacon and MyBeacon2 as key beacons of service MyTarget/generic_service.
emcli set_key_beacons_tests -name='MyTarget' -type='generic_service' -beacons='MyBeacon;MyBeacon2'
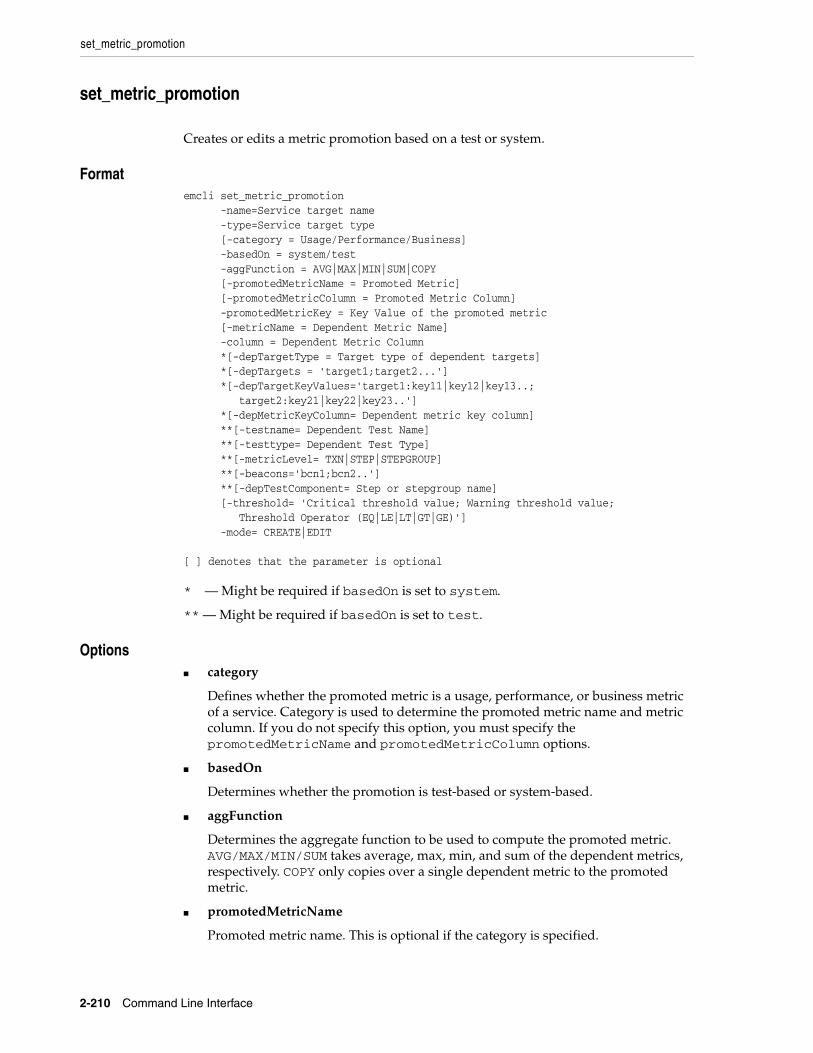
set_metric_promotion
2-210 Command Line Interface
set_metric_promotion
Creates or edits a metric promotion based on a test or system.
Formatemcli set_metric_promotion -name=Service target name -type=Service target type [-category = Usage/Performance/Business] -basedOn = system/test -aggFunction = AVG|MAX|MIN|SUM|COPY [-promotedMetricName = Promoted Metric] [-promotedMetricColumn = Promoted Metric Column] -promotedMetricKey = Key Value of the promoted metric [-metricName = Dependent Metric Name] -column = Dependent Metric Column *[-depTargetType = Target type of dependent targets] *[-depTargets = 'target1;target2...'] *[-depTargetKeyValues='target1:key11|key12|key13..; target2:key21|key22|key23..'] *[-depMetricKeyColumn= Dependent metric key column] **[-testname= Dependent Test Name] **[-testtype= Dependent Test Type] **[-metricLevel= TXN|STEP|STEPGROUP] **[-beacons='bcn1;bcn2..'] **[-depTestComponent= Step or stepgroup name] [-threshold= 'Critical threshold value; Warning threshold value; Threshold Operator (EQ|LE|LT|GT|GE)'] -mode= CREATE|EDIT
[ ] denotes that the parameter is optional
* — Might be required if basedOn is set to system.
** — Might be required if basedOn is set to test.
Options■ category
Defines whether the promoted metric is a usage, performance, or business metric of a service. Category is used to determine the promoted metric name and metric column. If you do not specify this option, you must specify the promotedMetricName and promotedMetricColumn options.
■ basedOn
Determines whether the promotion is test-based or system-based.
■ aggFunction
Determines the aggregate function to be used to compute the promoted metric. AVG/MAX/MIN/SUM takes average, max, min, and sum of the dependent metrics, respectively. COPY only copies over a single dependent metric to the promoted metric.
■ promotedMetricName
Promoted metric name. This is optional if the category is specified.
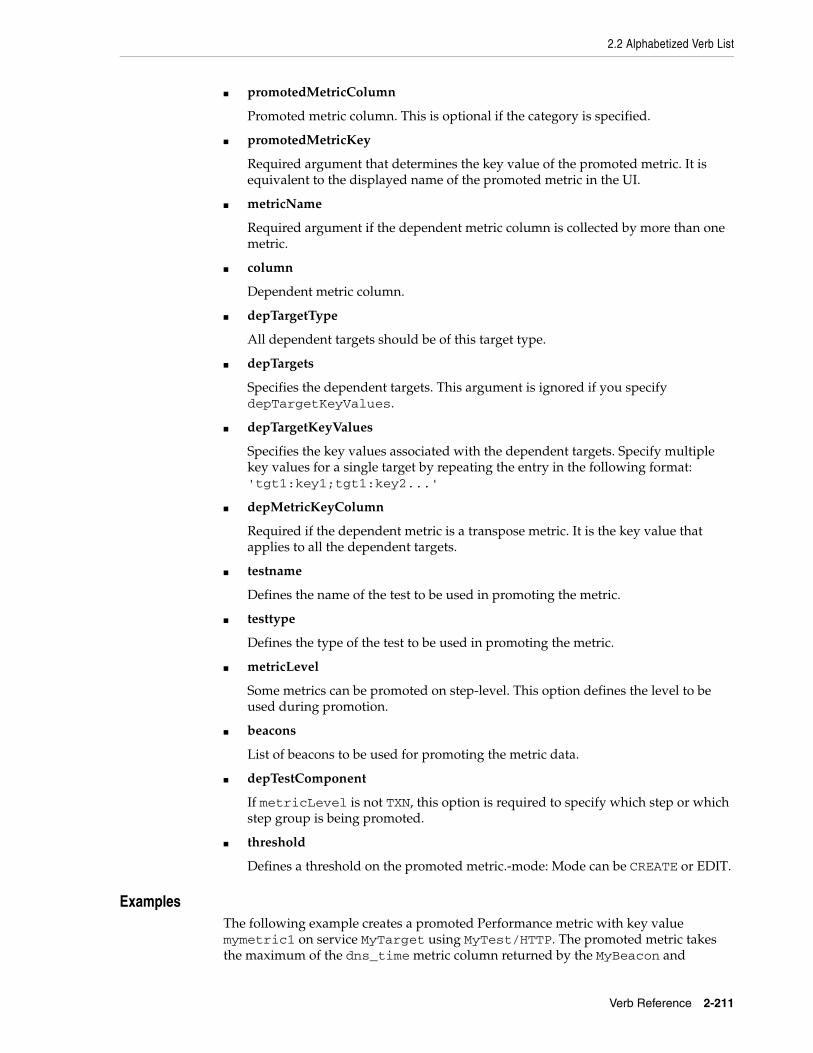
2.2 Alphabetized Verb List
Verb Reference 2-211
■ promotedMetricColumn
Promoted metric column. This is optional if the category is specified.
■ promotedMetricKey
Required argument that determines the key value of the promoted metric. It is equivalent to the displayed name of the promoted metric in the UI.
■ metricName
Required argument if the dependent metric column is collected by more than one metric.
■ column
Dependent metric column.
■ depTargetType
All dependent targets should be of this target type.
■ depTargets
Specifies the dependent targets. This argument is ignored if you specify depTargetKeyValues.
■ depTargetKeyValues
Specifies the key values associated with the dependent targets. Specify multiple key values for a single target by repeating the entry in the following format: 'tgt1:key1;tgt1:key2...'
■ depMetricKeyColumn
Required if the dependent metric is a transpose metric. It is the key value that applies to all the dependent targets.
■ testname
Defines the name of the test to be used in promoting the metric.
■ testtype
Defines the type of the test to be used in promoting the metric.
■ metricLevel
Some metrics can be promoted on step-level. This option defines the level to be used during promotion.
■ beacons
List of beacons to be used for promoting the metric data.
■ depTestComponent
If metricLevel is not TXN, this option is required to specify which step or which step group is being promoted.
■ threshold
Defines a threshold on the promoted metric.-mode: Mode can be CREATE or EDIT.
ExamplesThe following example creates a promoted Performance metric with key value mymetric1 on service MyTarget using MyTest/HTTP. The promoted metric takes the maximum of the dns_time metric column returned by the MyBeacon and
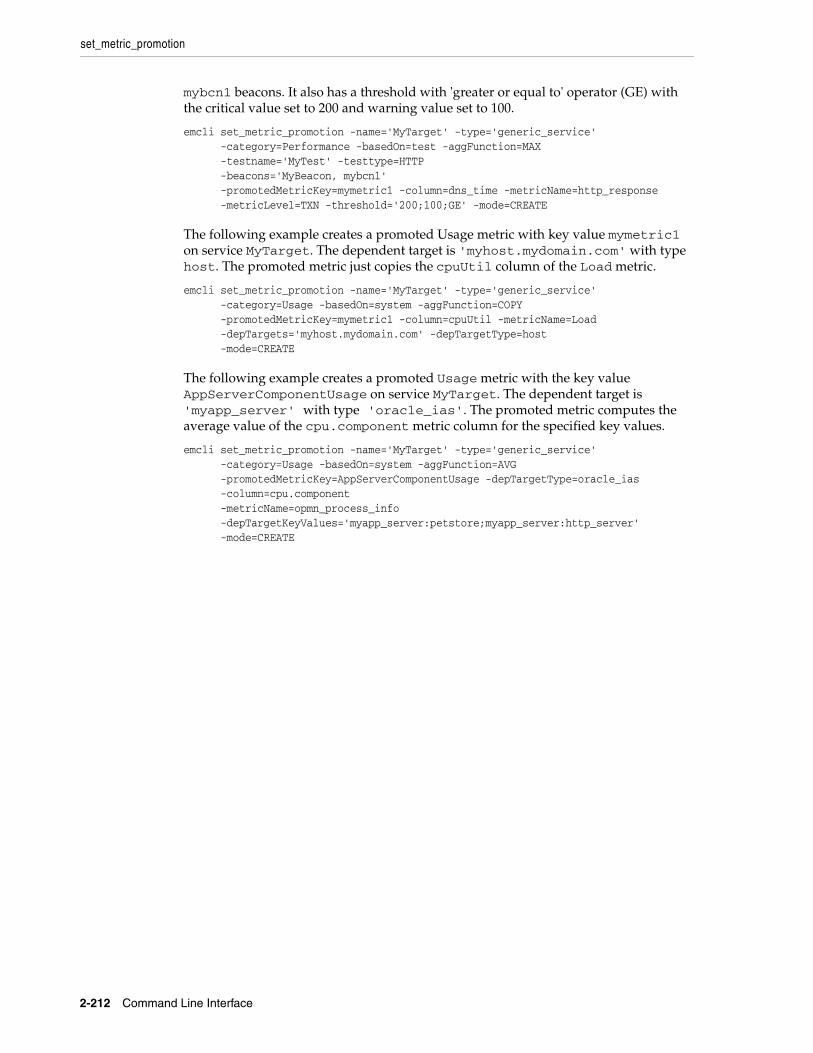
set_metric_promotion
2-212 Command Line Interface
mybcn1 beacons. It also has a threshold with 'greater or equal to' operator (GE) with the critical value set to 200 and warning value set to 100.
emcli set_metric_promotion -name='MyTarget' -type='generic_service' -category=Performance -basedOn=test -aggFunction=MAX -testname='MyTest' -testtype=HTTP -beacons='MyBeacon, mybcn1' -promotedMetricKey=mymetric1 -column=dns_time -metricName=http_response -metricLevel=TXN -threshold='200;100;GE' -mode=CREATE
The following example creates a promoted Usage metric with key value mymetric1 on service MyTarget. The dependent target is 'myhost.mydomain.com' with type host. The promoted metric just copies the cpuUtil column of the Load metric.
emcli set_metric_promotion -name='MyTarget' -type='generic_service' -category=Usage -basedOn=system -aggFunction=COPY -promotedMetricKey=mymetric1 -column=cpuUtil -metricName=Load -depTargets='myhost.mydomain.com' -depTargetType=host -mode=CREATE
The following example creates a promoted Usage metric with the key value AppServerComponentUsage on service MyTarget. The dependent target is 'myapp_server' with type 'oracle_ias'. The promoted metric computes the average value of the cpu.component metric column for the specified key values.
emcli set_metric_promotion -name='MyTarget' -type='generic_service' -category=Usage -basedOn=system -aggFunction=AVG -promotedMetricKey=AppServerComponentUsage -depTargetType=oracle_ias -column=cpu.component -metricName=opmn_process_info -depTargetKeyValues='myapp_server:petstore;myapp_server:http_server' -mode=CREATE
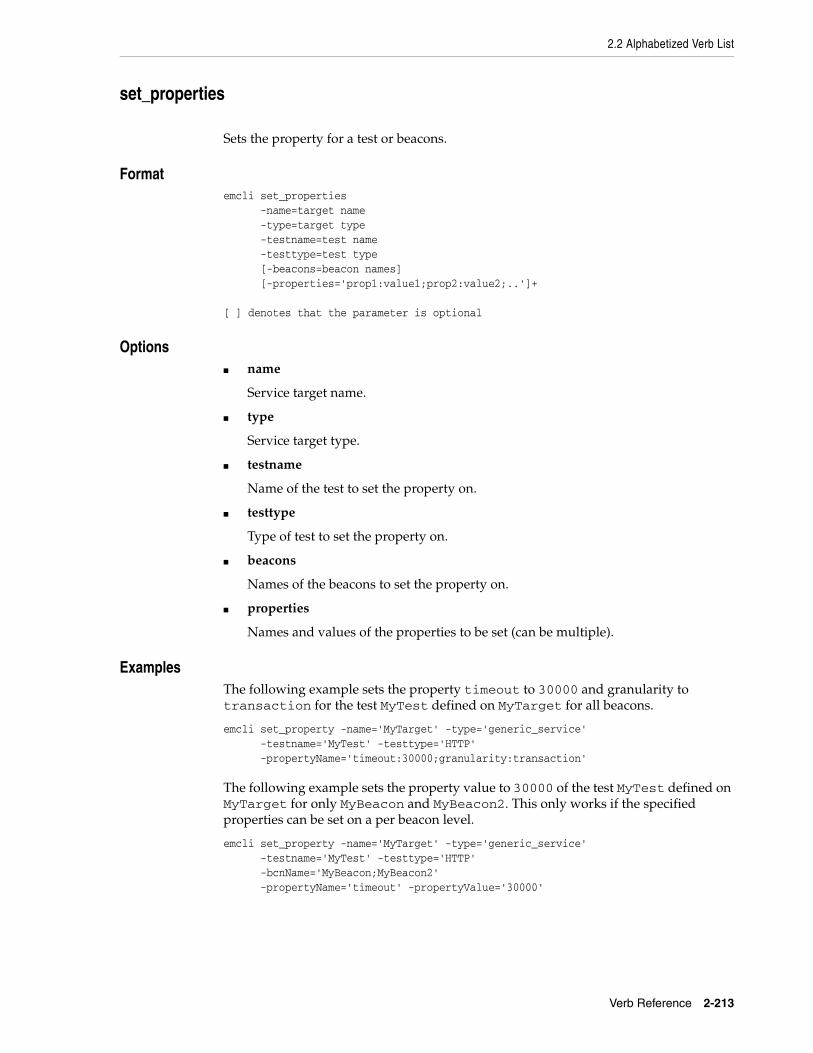
2.2 Alphabetized Verb List
Verb Reference 2-213
set_properties
Sets the property for a test or beacons.
Formatemcli set_properties -name=target name -type=target type -testname=test name -testtype=test type [-beacons=beacon names] [-properties='prop1:value1;prop2:value2;..']+
[ ] denotes that the parameter is optional
Options■ name
Service target name.
■ type
Service target type.
■ testname
Name of the test to set the property on.
■ testtype
Type of test to set the property on.
■ beacons
Names of the beacons to set the property on.
■ properties
Names and values of the properties to be set (can be multiple).
ExamplesThe following example sets the property timeout to 30000 and granularity to transaction for the test MyTest defined on MyTarget for all beacons.
emcli set_property -name='MyTarget' -type='generic_service' -testname='MyTest' -testtype='HTTP' -propertyName='timeout:30000;granularity:transaction'
The following example sets the property value to 30000 of the test MyTest defined on MyTarget for only MyBeacon and MyBeacon2. This only works if the specified properties can be set on a per beacon level.
emcli set_property -name='MyTarget' -type='generic_service' -testname='MyTest' -testtype='HTTP' -bcnName='MyBeacon;MyBeacon2' -propertyName='timeout' -propertyValue='30000'
set_target_property_value
2-214 Command Line Interface
set_target_property_value
Sets the value of a target property for a specified target. Any prior values of the target property are overwritten. When assigning values to the Oracle-provided target properties, use the English names of these target properties:
Comment, Deployment Type, Line of Business, Location, Contact
Formatemcli set_target_property_value -property_records="target_name:target_type:property_name:property_value" [-separator=property_records="sep_string"] [-subseparator=property_records="subsep_string"] [-input_file="parameter_tag:file_path"]
[ ] denotes that the parameter is optional
Options■ property_records
List of property records. The following parts comprise each property record:
<target_name>:<target_type>:<property_name>:property_value>
– target_name — Target name of the target for which you want to update the property.
– target_type — Target type of the target.
– property_name — Name of the property whose value you want to update. Property names are case sensitive.
– property_value — Value to be assigned/updated for the property.
■ separator
When specifying multiple property records, use the separator string delimiter as a delimiter between property records. The default separator delimiter is ";".
■ subseperator
String delimiter to be used between parts of a property record. The default subseparator delimiter is ":".
■ input_file
Used in conjunction with the -property_records option, this option enables you to provide the property records in a file. This option specifies a mapping between a tag and a local file path. The tag is specified in lieu of property records. The tag cannot contain colons ( : ) or semi-colons ( ; ) .
ExamplesThe following example sets the 'Owner Name' property to Jane Smith for the database test_database.
emcli set_target_property_value -property_records="test_database:oracle_database:Owner Name:Jane Smith"
The following example sets the Owner property to Jane Smith for the database test_db and also sets the Asset Number property to 100 for the database test_db1.
2.2 Alphabetized Verb List
Verb Reference 2-215
emcli set_target_property_value -property_records="test_db:oracle_database:Owner:Jane Smith; test_db1:oracle_database:Asset Number:100"
The following example takes the input of the property records from the specified file /temp/rec_file.
emcli set_target_property_value -property_records="REC_FILE" -input_file="REC_FILE:/temp/rec_file"
The file /temp/rec_file would contain entries such as:
test_db:oracle_database:Owner:Jane Smith;test_db1:oracle_database:Asset Number:100
For the database test_db, this sets the Owner property to Jane Smith.For the database test_db1, this sets the Asset Number property to 100.
emcli set_target_property_value -property_records="test_db@oracle_database@Owner@ Jane Smith,test_db1@oracle_database@AssetNumber@100"
For the database test_db, this sets the Owner property to Jane Smith.For the database test_db1, this sets the Asset Number property to 100.The separator used within the records is "," and the subseparator is "@" .
set_test_threshold
2-216 Command Line Interface
set_test_threshold
Sets a test threshold.
Formatemcli set_test_threshold -name=<target_name> -type=<target_type> -testname=<test_name> -testtype=<test_type> -metricName=<metric_name> -metricColumn=<metric_column> -occurrences=<occurrences> [-warningThres=<warning_threshold>] [-criticalThres=<critical_threshold>] [-operator=<operator>] [-beaconName=<beacon_name>] [-stepName=<step_name>] [-stepGroupName=<stepgroup_name>]
[ ] denotes that the parameter is optional
Examplesemcli set_test_threshold -name="Service Name" -type="generic_service" -testname="Test Name" -testtype="HTTP" -metricName="http_response" -metricColumn="timing" -occurrences=1 -warningThres=100000
2.2 Alphabetized Verb List
Verb Reference 2-217
setup
Configures EM CLI to work with a specific management server.
The default mode stores the credentials, which is inherently insecure because of backward compatibility reasons. For a secure setup, you need to specify the noautologin option. See noautologin in the Options section for more information.
Format emcli setup -url="http[s]://host:port/em/" -username=<EM Console Username> [-password=<EM Console Password>] [-ssousername=<EM SSO Username>] [-ssopassword=<EM SSO Password>] [-licans=yes|no] [-dir=<local emcli configuration directory>] [-trustall] [-novalidate] [-noautologin] [-custom_attrib_file=<Custom attribute file path>] [-nocertvalidate]
[ ] denotes that the parameter is optional
Options■ url="http[s]://host:port/em/"
URL of the Oracle management server (OMS). host specifies the host of the OMS. port specifies the listening port of the OMS. Both http and https protocols are supported. (https is recommended for security reasons).
■ username
Enterprise Manager user name to be used by all subsequent emcli commands when contacting the OMS.
■ password
Enterprise Manager user password. If you do not specify this option, you are prompted for the password interactively.
■ ssousername
SSO user name to be used by all subsequent emcli commands when contacting the OMS. Its value must be provided only if Enterprise Manager is configured to use SSO. When the SSO user is not the Enterprise Manager user, you must provide both the username and ssousername. For example:
emcli setup -username=myusername -ssousername=myssouser -url=https://abc.us.oracle.com:4566/em/
Note: Providing a password on the command line is insecure and should be avoided.
setup
2-218 Command Line Interface
■ ssopassword
SSO user password. If you do not specify this option, you are prompted for the password interactively.
■ licans
Indicates whether the license is accepted or not accepted by the user. Specify yes to accept the license, or specify no to not accept the license.
■ dir
Directory where an emcli configuration directory will be created. This directory must be on a locally mounted file system. A warning and confirmation is issued for an HTTPS URL if the directory is not heuristically identified as such (unless you specify trustall). The directory can be relative to the working directory where setup is called, or it can be absolute. This option defaults to the user's home directory.
■ trustall
Automatically accepts any server certificate from the OMS, which results in lower security.
■ novalidate
Does not authenticate the Enterprise Manager user name or SSO user name against the OMS. Assume the given user name is valid.
■ noautologin
Set up the emcli client in this mode. If used, secure mode is implemented, which does not store any Enterprise Manager or SSO password on the client disk. The credentials are provided once at the time of setup after which a session is established between the client and OMS. All the subsequent verbs will use this session. Inactivity or an explicit logout (using the Logout verb) terminates this session, and a re-setup or explicit login (using the Login verb) is required before invoking any new verb.
In the default case, you do not need to explicitly log in when the session expires. Enterprise Manager user or SSO credentials are stored on the client system, and the client implicitly logs in again using these credentials when the session expires. No user intervention is required in case of session expiration.
■ custom_attrib_file
Path name of a file containing Audit Custom Attribute values. This option is required when the OMS is configured for Audit Custom Attributes. If you do not provide custom_attrib_file, you are prompted to enter the values of the custom attributes.
The file can contain up to three lines, each containing the description of one custom attribute. Each line should be of the form:
<attr-name>#<attr-displayname>#<isMandatory>#<attr-value>
– # — Field separator.
– attr-name — Name of the attribute.
Note: Providing a password on the command line is insecure and should be avoided.
2.2 Alphabetized Verb List
Verb Reference 2-219
– attr-displayname — Display name of the attribute.
– isMandatory — 1 if the attribute is mandatory, otherwise 0.
– attr-value — Value of the custom attribute.
■ nocertvalidate
Does not validate the host name in the SSL Certificate that the OMS provides.
Examplesemcli setup -url=http://myworkstation.us.oracle.com:7770/em -username=sysman
To configure the EM CLI Client to function with multiple OMSs by implementing multiple setups, do the following:
1. Set up the EM CLI client for OMS1 at location dir1:
emcli setup -dir=<dir1> -url=<Url of OMS1> -user=<EM Username for OMS1>
2. Set up the EM CLI client for OMS2 at location dir2:
emcli setup -dir=<dir2> -url=<Url of OMS1> -user=<EM Username for OMS2>
3. Set the environment variable EMCLI_STATE_DIR to point to the setup directory for OMS1:
setenv EMCLI_STATE_DIR <dir1>
This sets the EM CLI Client to function with OMS1.
4. Set the environment variable EMCLI_STATE_DIR to point to the setup directory for OMS2:
setenv EMCLI_STATE_DIR <dir2>
This sets the EM CLI Client to function with OMS2.

show_audit_settings
2-220 Command Line Interface
show_audit_settings
Shows details of the current audit settings.
Formatemcli show_audit_settings
2.2 Alphabetized Verb List
Verb Reference 2-221
show_credential_set_info
Displays the parameters of credential sets defined with target types.
Formatemcli show_credential_set_info [-target_type="<target_type>"] [-set_name="<credential_set_name>"]
[ ] denotes that the parameter is optional
Options■ target_type
Type of target. The default is to display the credential set defined for all target types.
■ set_name
Name of the credential set. The default is to display all credential sets defined for a target type.
ExamplesThe following example displays the details of all credential sets defined with all target types:
emcli show_credential_set_info
The following example displays all credential sets defined with the oracle_database target type:
emcli show_credential_set_info -target_type=oracle_database
The following example displays the details of the HostUDMCreds credential set defined for the host target type.
emcli show_credential_set_info -target_type=host -set_name=HostUDMCreds
show_credential_type_info
2-222 Command Line Interface
show_credential_type_info
Displays the parameters of credential types defined for target types.
Formatemcli show_credential_type_info [-target_type="<target_type>"] [-type_name="<credential_type_name>"]
[ ] denotes that the parameter is optional
Options■ target_type
Type of target. The default is to display the credential set defined for all target types.
■ type_name
Name of the credential type. The default is to display all credential types defined for a target type.
ExamplesThe following example displays the details of all credential types defined with all target types:
emcli show_credential_type_info
The following example displays all credential types defined with the oracle_database target type:
emcli show_credential_type_info -target_type=oracle_database
The following example displays the details of the HostUDMCreds credential type defined for the oracle_database target type.
emcli show_credential_type_info -target_type=oracle_database -type_name=HostUDMCreds

2.2 Alphabetized Verb List
Verb Reference 2-223
show_operations_list
Shows the list of all auditable Enterprise Manager operations names.
Formatemcli show_operations_list

start_guest_vm
2-224 Command Line Interface
start_guest_vm
Starts a guest virtual machine. To start the guest virtual machine, it should be in the Halted state.
Formatemcli start_guest_vm -guest_vm_name=<Virtual Machine Name> -server_pool_name=<Server Pool Name>
Options■ guest_vm_name
Name of the guest Virtual Machine.
■ server_pool_name
Name of the server pool.
ExamplesThe following example starts the dom15 guest Virtual Machine.
emcli start_guest_vm -guest_vm_name="dom15" -server_pool_name="Oracle Server Pool"
2.2 Alphabetized Verb List
Verb Reference 2-225
start_paf_daemon
Starts the Deployment Procedure Manager Daemon.
Formatemcli start_paf_daemon -interval=<number in minutes>
Options■ interval
Number in minutes that the Deployment Procedure Manager Daemon should wait between each run.
start_vt_daemon
2-226 Command Line Interface
start_vt_daemon
Starts the virtualization daemon.
Formatemcli start_vt_daemon
OptionsNone.
Tip: See also stop_vt_daemon on page 2-235.

2.2 Alphabetized Verb List
Verb Reference 2-227
status_paf_daemon
Gets the Deployment Procedure Manager Daemon status.
Formatemcli status_paf_daemon
OptionsNone.
status_vt_daemon
2-228 Command Line Interface
status_vt_daemon
Gets the status of the virtualization daemon.
Formatemcli status_vt_daemon
OptionsNone.
2.2 Alphabetized Verb List
Verb Reference 2-229
stop_blackout
Stops a blackout.
You can stop a blackout before it has fully started, for example, when it has a "Scheduled" status. You can also stop a blackout while it is in effect.
Formatemcli stop_blackout -name="name" [-createdby="blackout_creator"]
[ ] denotes that the parameter is optional
Options■ name
Name of the blackout to stop.
■ createdby
Enterprise Manager user who created the blackout. The default is the current user. The SUPER_USER privilege is required to stop a blackout created by another user.
ExamplesThe following example stops blackout backup_db3 created by the current user.
emcli stop_blackout -name=backup_db3
The following example stops blackout weekly_maint created by user joe. The current user must either be user joe or a user with the SUPER_USER privilege.
emcli stop_blackout -name=weekly_maint -createdby=joe
stop_guest_vm
2-230 Command Line Interface
stop_guest_vm
Stops a guest Virtual Machine. To stop the guest Virtual Machine, it should be in the Running state.
Formatemcli stop_guest_vm -guest_vm_name=<Virtual Machine Name> -server_pool_name=<Server Pool Name>
Options■ guest_vm_name
Name of the guest Virtual Machine.
■ server_pool_name
Name of the server pool.
ExamplesThe following example stops the dom15 guest Virtual Machine.
emcli stop_guest_vm -guest_vm_name="dom15" -server_pool_name="Oracle Server Pool"
2.2 Alphabetized Verb List
Verb Reference 2-231
stop_instance
Stops a scheduled, failed, or running deployment instance.
Formatemcli stop_instance -instance={instance_guid}
Options■ instance
GUID of the instance.
Examplesemcli stop_instance -instance=16B15CB29C3F9E6CE040578C96093F61
stop_job
2-232 Command Line Interface
stop_job
Stops a specified job. You can use the get_jobs verb to obtain a list of job IDs and names.
Formatemcli stop_job -job_id="jobID" | -name="jobName"
Options■ job_id
Job ID to identify the job to stop.
■ name
Name of the job to stop. To uniquely identify the job, the current administrator is used.
ExamplesThe following example stops a job with the specified ID.
emcli stop_job -job_id=12345678901234567890123456789012
The following example stops a job named Backup_Wednesday, which is owned by the current Enterprise Manager administrator and scheduled to execute in the future.
emcli stop_job -name=Backup_Wednesday
2.2 Alphabetized Verb List
Verb Reference 2-233
stop_paf_daemon
Stops the Deployment Procedure Manager Daemon.
Formatemcli stop_paf_daemon
OptionsNone.
stop_virtual_server
2-234 Command Line Interface
stop_virtual_server
Stops a virtual server. To stop the virtual server, it should be in the Up state.
Formatemcli stop_virtual_server -server_name=Server name
Options■ server_name
Name of the virtual server.
ExamplesThe following example stops the st-vs1.us.oracle.com virtual server.
emcli stop_virtual_server -server_name="st-vs1.us.oracle.com"
2.2 Alphabetized Verb List
Verb Reference 2-235
stop_vt_daemon
Stops the virtualization daemon.
Formatemcli stop_vt_daemon
OptionsNone.
Tip: See also start_vt_daemon on page 2-226.
submit_job
2-236 Command Line Interface
submit_job
Creates and submits a job.
Formatemcli submit_job -job="name:type" -targets="name1:type1;name2:type2;..." -parameters="name1:value1;name2:value2;PDP:SUDO/POWERBROKER;RUNAS:oracle; PROFILE:user1..." [-input_file="parameter_tag:file_path"] [-desc="job_description"] [-schedule= [frequency:<once|interval|weekly|monthly|yearly>]; [start_time:<yy-MM-dd HH:mm>]; [end_time:<yy-MM-dd HH:mm>]; [repeat:<#m|#h|#d|#w|#M|#Y>]; [months:<#,#,...>]; [days:<#,#,...>]; [tzoffset:#|[-][HH][:mm]] [tzregion:<...>] [tzinfo:<repository|target|specified>]; ] [-noheader] [-script | -format= [name:<pretty|script|csv>]; [column_separator:"column_sep_string"]; [row_separator:"row_sep_string"]; ]
[ ] denotes that the parameter is optional
Constraints on schedule arguments:
frequency:onceoptional => start_time, tzinfo, tzoffset
frequency:intervalrequires => repeat
optional => start_time, end_time, tzinfo, tzoffset
frequency:weeklyrequires => days
optional => repeat in #w, start_time, end_time, tzinfo, tzoffset
frequency:monthlyrequires => days
optional => repeat in #M, start_time, end_time, tzinfo, tzoffset
frequency:yearlyrequires => days, months
optional => repeat in #Y, start_time, end_time, tzinfo, tzoffset
Options■ job
name represents the name for the submitted job.
2.2 Alphabetized Verb List
Verb Reference 2-237
type represents the type of submitted job. The supported job types are OSCommand and SQLScript, which are already pre-defined in the Enterprise Manager job system. The specified job type determines which targets and which parameters can be specified for the -targets and -parameters arguments.
■ targets
A list of target-name, target-type pairs. The newly submitted job will apply to this list of Enterprise Manager targets. All targets must be of the same type. The target list must not contain more than one element if the element's target type is group. The OSCommand jobs are allowed to be submitted against targets of type host, oracle_database, and group (if it contains host targets). The SQLScript jobs are allowed to be submitted against targets of type oracle_database and group.
■ parameters
List of name-value pairs that represent the parameters required by the job type for this job. The OSCommand jobs support the parameters named command, args, os_script, username, password, and credential_set_name. command is the only required parameter.
The SQLScript jobs support the parameters named sql_script, db_username, db_password, db_role, host_username, host_password, and credential_set_name. The required parameter is sql_script.
The credential_set_name parameter refers to the set name of the preferred credentials stored in the Enterprise Manager repository. For each target type, several credential sets exist:
– HostCredsNormal — Default unprivileged credential set for a host target
– HostCredsPriv — Privileged credential set for a host target
– DBHostCreds — Host credential set for an oracle_database target
– DBCredsNormal — Default normal credential set for an oracle_database target
– DBCredsSYSDBA: sysdba credential set for an oracle_database target
You can only specify the credential_set_name parameter when the override credential parameters such as [db_|host_]username and [db_|host_]password are not present. If provided, the override credential parameters must be specified fully for each job type. For the OSCommand type, username and password must be specified together. For the SQLScript type, db_username, db_password, db_role, host_username, and host_password must be present.
■ input_file
Used in conjunction with the -parameters option, this option enables you to store specific job parameter values, such as passwords or SQL scripts, in a separate file. The -input_file option specifies a mapping between a tag and a local file path. The tag is specified in lieu of specific job parameter values of the -parameters option. The tag must not contain colons ( : ) or semi-colons ( ; ).
■ desc
Job description.
submit_job
2-238 Command Line Interface
■ schedule
Job schedule. The frequency argument determines which other arguments are required or optional.
■ schedule=frequency
The type of job schedule (default is once).
■ schedule=start_time
Start date and time of the job. The default value is the current date/time. The format of the value is "yy-MM-dd HH:mm". For example: "2007-09-25 18:34".
■ schedule=end_time
Last date and time of the job. No job executions are scheduled after this date and time. When frequency is weekly, monthly, or yearly, only the date portion is used. When frequency is interval or once, the date and time are considered. The format of the value is "yy-MM-dd HH:mm". For example: "2007-09-25 18:34".
■ schedule=repeat
Time between successive start times when the job is scheduled. The letter following the number value represents the time units: "m" is minutes, "h" is hours, "d" is days, "w" is weeks.
■ schedule=months
List of integer month values in the range 1-12. Each value must have a corresponding "day" value, to fully specify (month,day) pairs that indicate the days of the year the job is scheduled.
■ schedule=days
When frequency is weekly, this is a list of integer day-of-week values in the range 1-7 (1 is Sunday). When frequency is monthly, this is a list of integer day-of-month values in the range 1-31 or -1 (last day of month). When frequency is yearly, this is a list of integer day-of-month values in the range 1-31 or -1 (last day of month); in this case, the month is taken as the corresponding month value for each (month,day) pair.
■ schedule=tzoffset
Value of the timezone. When you do not specify the tzinfo argument or it is repository, the timezone value is the repository time zone. In this case, you cannot specify the tzoffset argument. Otherwise, the tzoffset argument is required. When you set tzinfo to specified, the tzoffset argument specifies the offset in hours and minutes between GMT and the time zone. When you set tzinfo is set to target, the tzoffset argument specifies an integer index (the first is 1) into the list of targets passed as arguments. For example, for a tzoffset setting of 1, the timezone of the first target specified in the -add_targets option is used.
Note that the time zone is applied to the start time and the end time of the job schedule. The time zones associated with each target are not considered when scheduling the job (except that when you set tzinfo to target, the specified target's timezone is used for the job schedule).
■ schedule=tzregion
Time zone region to use. When you specify the tzinfo option, this argument determines which time zone to use for the job schedule. Otherwise, it is ignored. The default is GMT.
2.2 Alphabetized Verb List
Verb Reference 2-239
■ schedule=tzinfo
The type of timezone. The tzinfo argument is used in conjunction with tzoffset. Available timezone types are: specified (offset between GMT and the target timezone), target (timezone of the specified target), and repository (repository timezone — default setting when tzinfo is not specified). See -schedule=tzoffset for more information.
■ noheader
Displays tabular information without column headers.
■ script
This option is equivalent to -format="name:script".
■ format
Format specification (default is -format="name:pretty").
– format="name:pretty" prints the output table in a readable format not intended to be parsed by scripts.
– format="name:script" sets the default column separator to a tab and the default row separator to a newline. The column and row separator strings can be specified to change these defaults.
– format="name:csv" sets the column separator to a comma and the row separator to a newline.
– format=column_separator:"column_sep_string" column-separates the Verb output by <column_sep_string>. Rows are separated by the newline character.
– row_separator:"row_sep_string" row-separates the Verb output by <row_sep_string>. Rows are separated by the tab character.
Output ColumnsJob ID, Execution ID
ExamplesThe following example submits a job that runs ls -l against target "hostname.oracle.com:host". The job runs under OS username joe with a password of greetings.
emcli submit_job -job="job_host_0:OSCommand" -parameters="command:ls;args:-l;username:joe;password:greetings" -targets="hostname.us.oracle.com:host"
The following example submits a job that runs the shell (/bin/sh) script specified by the parameter large_os_script against targets hostname1.oracle.com:host and hostname2.oracle.com:host. The targets' preferred credentials are used to run this job. Here, large_os_script can be up to 4 GB.
emcli submit_job -job="job_host_1:OSCommand" -parameters='command:/bin/sh;args:-x;large_os_script:LARGE_SCRIPT_FILE' -input_file="LARGE_SCRIPT_FILE:very_large_os_script.sql" -targets="hostname1.oracle.com:host;hostname2.oracle.com:host"
The following example submits a job that runs the SQL script specified in the file ./very_large_script.sql against the target database:oracle_database.

submit_job
2-240 Command Line Interface
The target's preferred credentials are used to run this job. Here, large_sql_script can be up to 4 GB.
emcli submit_job -job="job_db_1:SQLScript" -parameters="large_sql_script:LARGE_SQL_FILE" -targets="database:oracle_database" -input_file="LARGE_SQL_FILE:very_large_script.sql"
2.2 Alphabetized Verb List
Verb Reference 2-241
submit_agent_patch
Patches the Agent. All of the inputs should be present in the targets_file.xml file.
Formatemcli submit_agent_patch-input_file="data:targets_file.xml"-schedule="start_time:<value>;tz:<value>;grace_period:<value>"
Options■ input_file
XML file name containing the necessary input.
■ schedule
Specify the starting time, time zone, and grace period.
Examplesemcli submit_agent_patch -input_file="data:targets_file.xml" -schedule="start_time:2006/6/21 21:23;tz:America/New_York;grace_period:15"
submit_procedure
2-242 Command Line Interface
submit_procedure
Submits a Deployment Procedure.
Formatemcli submit_procedure -procedure="guid of the procedure" -input_file="data:{file_path}" [-instance_name="name for the procedure instance"] [-schedule=start_time:yyyy/MM/dd HH:mm;tz:{java timezone ID}];]
[ ] denotes that the parameter is optional
Options■ procedure
GUID of the procedure to execute.
■ input_file=data:file_path
Input data for the Deployment Procedure. The file_path should point to a file containing the data XML file.
■ instance_name
Name of the procedure instance.
■ schedule
Schedule for the Deployment Procedure. If not specified, the procedure is executed immediately.
start_time — When the procedure should start
tz — Optional time zone ID
Output ColumnsInstance GUID
Examplesemcli submit_procedure -input_file=data:data.xml -procedure=16B15CB29C3F9E6CE040578C96093F61 -schedule="start_time:2006/6/21 21:23;tz:America/New_York"

2.2 Alphabetized Verb List
Verb Reference 2-243
subscribeto_rule
Subscribes the user to a rule with email notification.
It is not an error to specify email addresses that are already in the assignto user's preferences.
A message appears if the outgoing mail server (SMTP) has not been set up. When you specify the option -fail_if_no_mail_server, this condition is an error and prevents the subscribe from occurring; otherwise, this condition is a warning that does not affect the success of this command.
Formatemcli subscribeto_rule -name="rule_name" -owner="rule_owner" [-assignto="em_username" (default is current user)] [-email="email_address";...] [-fail_if_no_mail_server]
[ ] denotes that the parameter is optional
Options■ name
Name of the notification rule.
■ owner
Owner of the notification rule.
■ assignto
User to subscribe to the notification rule. If the assignto user is not the current user, or if the owner of the rule is not the current user, the super-user privilege is needed.
List of email addresses to associate with the rule to which the assignto user is being subscribed. These addresses are first added to the preferences of the assignto user (duplicates are ignored) before being assigned to the notification rule. The email addresses are added only if the current user has the privilege to subscribe the assignto user to the rule.
■ fail_if_no_mail_server
A message appears if the outgoing mail server (SMTP) has not been set up. When you specify the option -fail_if_no_mail_server is specified, this condition is an error and prevents the subscribe from occurring; otherwise, this condition is a warning that does not affect the success of this command.
ExamplesThe following example subscribes the current user to the rule "Agent Upload Problems" using the current user's email addresses for notification. The current user must have the SUPER_USER (or have sysman) privilege for this to succeed, since sysman owns the rule. Also, the current user must already have at least one email address in his/her preferences for this command to succeed.

subscribeto_rule
2-244 Command Line Interface
emcli subscribeto_rule -name="Agent Upload Problems" -owner=sysman
The following example first adds the two specified email addresses to the preferences for user joe. Then user joe is subscribed to the rule "Agent Upload Problems" using joe's email addresses for notification. The current user must have SUPER_USER privilege (or be joe) for this command to succeed.
emcli subscribeto_rule -name="Agent Upload Problems" -owner=sysma -assignto=joe -email="[email protected];[email protected]"
2.2 Alphabetized Verb List
Verb Reference 2-245
suspend_guest_vm
Suspends a guest Virtual Machine. To suspend the guest Virtual Machine, it should be in the Running state.
Formatemcli suspend_guest_vm -guest_vm_name=<Virtual Machine Name> -server_pool_name=<Server Pool Name>
Options■ guest_vm_name
Name of the guest Virtual Machine.
■ server_pool_name
Name of the server pool.
ExamplesThe following example suspends the dom15 guest Virtual Machine.
emcli suspend_guest_vm -guest_vm_name="dom15" -server_pool_name="Oracle Server Pool"
Tip: See also resume_guest_vm on page 2-186.
suspend_instance
2-246 Command Line Interface
suspend_instance
Suspends a running deployment instance.
Formatemcli suspend_instance -instance={instance_guid}
Options■ instance
GUID of the instance.
Examplesemcli suspend_instance -instance=16B15CB29C3F9E6CE040578C96093F61

2.2 Alphabetized Verb List
Verb Reference 2-247
sync
Synchronizes the EM CLI client with an OMS. After synchronization, all verbs and associated command line help available to this OMS become available at the EM CLI client.
Synchronization occurs automatically during a call to setup.
Formatemcli sync
OptionsNone.
Examplesemcli sync
sync_beacon
2-248 Command Line Interface
sync_beacon
Synchronizes a beacon that is monitoring the target (reloads all collections to beacon).
Formatemcli sync_beacon -name=target name -type=target type -bcnName=beacon name
Options■ name
Service target name.
■ type
Service target type.
■ bcnName
Beacon name to synchronize.
ExamplesThe following example synchronizes MyBeacon, which is monitoring the MyTarget target of type generic_service.
emcli sync_beacon -name='MyTarget' -type='generic_service' -bcnName='MyBeacon'
2.2 Alphabetized Verb List
Verb Reference 2-249
unpause_guest_vm
Unpauses a paused guest virtual machine. To unpause the guest virtual machine, it should be in the Paused state.
Formatemcli unpause_guest_vm -guest_vm_name=<Virtual Machine Name> -server_pool_name=<Server Pool Name>
Options■ guest_vm_name
Name of the guest Virtual Machine.
■ server_pool
Name of the guest server pool.
ExamplesThe following example unpauses the paused dom15 guest Virtual Machine.
emcli pause_guest_vm -guest_vm_name="dom15" -server_pool_name="Oracle Server Pool"
Tip: See also pause_guest_vm on page 2-174.
update_audit_settings
2-250 Command Line Interface
update_audit_settings
Updates the current audit settings in the repository and restarts the OMS.
Formatemcli update_audit_settings -audit_switch="ENABLE/DISABLE" -operations_to_enable="<name_of_operations_to_enable>" -operations_to_disable="<name-of_operations_to_disable>" [-externalization_switch="ENABLE/DISABLE"] -directory_name="<database_directory_name>" -file_prefix="<file_prefix>" -file_size="<file_size (Bytes)>" -data_retention_period="<data_retention_period (Days)>"
[ ] denotes that the parameter is optional
Options■ audit_switch
Enables auditing across Enterprise Manager. The default value is DISABLE.
■ operations_to_enable
Enables auditing for specified operations. Specify ALL for all operations.
■ operations_to_disable
Disables auditing for specified operations. Specify ALL for all operations.
■ externalization_switch
Enables the audit data export service. The default value is DISABLE.
■ directory_name
Database directory that should be configured with an OS directory where the export service archives the audit data files.
■ file_prefix
File prefix to be used by export service to create the file name where audit data is to be written. The default value is em_audit.
■ file_size
Maximum value of each file size. The default value of this option is 5000000 bytes.
■ data_retention_period
Maximum period the Enterprise Manager repository stores audit data. The default value is 365 days.
Examples
Example 1The following example enables all operations except LOGIN and LOGOUT:
Note: As of PSU3, operations are only audited if their operational level audit switch is enabled.

2.2 Alphabetized Verb List
Verb Reference 2-251
emcli update_audit_settings -audit_switch="ENABLE" -operations_to_enable="ALL" -operations_to_disable="LOGIN;LOGOUT"
Example 2emcli update_audit_settings -externalization_switch="ENABLE" -directory="EM_DIR" -file_prefix="my_audit" -file_size="10000" -data_retention_period="60"
update_and_retry_step
2-252 Command Line Interface
update_and_retry_step
Updates arguments of the failed step and retries it.
Formatemcli update_and_retry_step -instance={instance_guid} -stateguid={state_guid} [-args="command1:value1;command2:value2;..."]
[ ] denotes that the parameter is optional
Options■ instance
GUID of the instance.
■ stateguid
State GUID.
■ args
Arguments of the step to be updated during retry. For the full list of arguments that can be updated, see the get_retry_arguments verb.
Examplesemcli update_and_retry_step -instance=16B15CB29C3F9E6CE040578C96093F61 -stateguid=51F762417C4943DEE040578C4E087168 -args="command:ls"
2.2 Alphabetized Verb List
Verb Reference 2-253
update_db_password
Updates the target database password change in the Enterprise Manager Credential sub-system and can change the password on the target database as well. This verb also propagates the collection or monitoring credentials to Enterprise Manager Agents.
Formatemcli update_db_password -target_name="tname" -user_name="user_name" [-target_type="ttype"] [-change_all_references="yes/no"] [-change_at_target="yes/no"] [-input_file="tag1:file_path1;tag2:file_path2;..."]
[ ] denotes that the parameter is optional
Options■ target_name
Name of the target.
■ user_name
Name of the database user.
■ target_type
Type of target. The possible values for target type in this verb are -oracle_database and - rac_database. The default value for this parameter is oracle_database.
■ change_all_references
Specify if the password must be changed for all references in Enterprise Manager. Possible values are:
– yes — Update all password references in Enterprise Manager for a DBSNMP user who has an old password that matches the new password.
– no — Update the password for the currently logged in user.
The default value of this option is Yes.
■ change_at_target
Specify whether the password must also be changed on the target. This option is not supported for a SYS user.
– yes — Change the password on the target database.
– no — Update the password only on Enterprise Manager.
The default value of this option is No.
■ input_file
Path of the file that has old and new passwords. Use this option to hide passwords displayed on the command line. You must accompany each path with a tag referenced in the password options.
When you execute this verb with the input_file option, you are prompted to enter the following values in non-echo mode:
update_db_password
2-254 Command Line Interface
-old_password-new_password-retype_new_password
Examplesemcli update_db_password -target_name=myDB -user_name=Admin1
emcli update_db_password -target_name=myDB -user_name=Admin1 -change_at_target=yes
2.2 Alphabetized Verb List
Verb Reference 2-255
update_host_password
Updates the changed host password in the credential sub-system. For collection or monitoring credentials, the password change is also propagated to the Enterprise Manager Agent.
Formatemcli update_host_password -target_name="tname" -user_name="user_name" [-change_all_references="yes/no"] [-input_file="tag1:file_path1;tag2:file_path2;..."]
[ ] denotes that the parameter is optional
Options■ target_name
Name of the target.
■ user_name
Name of the database user.
■ change_all_references
Specifies if the password must be changed for all references in Enterprise Manager for the given user.
Possible values are:
– Yes — Updates all references in Enterprise Manager for this password.
– No — Updates the password for the current logged-in user. This is the default.
■ input_file
File path that has old and new passwords. This option hides passwords. You must accompany each path with a tag referenced in the password options.
ExamplesThe following example asks the user to enter the values of the old and new passwords, then retype the new password to update the new password in Enterprise Manager for this target reference.
emcli update_host_password -target_name=myHost -user_name=Admin1
Note: When you execute this verb, you are prompted to enter the following values in non-echo mode:
-old_password-new_password-retype_new_password

update_host_password
2-256 Command Line Interface
The following example asks the user to enter the values of the old and new passwords, then retype the new password to update the new password in Enterprise Manager for all users’ credentials referenced with the myHost target name and Admin1 user name.
emcli update_host_password -target_name=myHost -user_name=Admin1 -change_all_references=yes

2.2 Alphabetized Verb List
Verb Reference 2-257
update_password
Updates passwords (or other credentials) for a given target.
Formatemcli update_password -target_type="ttype" -target_name="tname" -credential_type="cred_type" -key_column="column_name:column_value" -non_key_column="col:oldvalue:newvalue;..." [-input_file="tag1:file_path1;tag2:file_path2;..."]
[ ] denotes that the parameter is optional
Options■ target_type
Type of target.
■ target_name
Name of the target.
■ credential_type
Credential type to use. The type must be a base type, not a derived type. A derived type contains the XML tag <CredentialTypeRef> within its definition.
■ key_column
Name and value of the key column for the credential type. Usually, the key column represents the user name.
■ non_key_column
Name, old value, and new value of the non-key column(s) to modify. Usually, this is the name of the password column. Alternatively, you can use a tag from the -input_file argument so that the credential values are not seen on the command line. You can specify this argument more than once.
■ input_file
Path of the file that has -non_key_column argument(s). This option is available for hiding passwords. You must accompany each path by a tag referenced in the -non_key_column argument. You can specify this argument more than once.
Note: The list of columns and the credential types they belong to is included in the metadata file for each target type. This and other credential information is in the <CredentialInfo> section of the metadata.
Host ExampleFor credentials associated with host targets, use the following arguments for the command.
target_type=hostcredential_type = HostCredskey_column=HostUserName:<OSUserName>non_key_column=HostPassword:<oldPassword>:<newPassword>
update_password
2-258 Command Line Interface
The following example changes the password associated with the OS user sysUser from sysUserOldPassword to sysUserNewPasword in all features of EM that use this OS username. This includes preferred credentials, corrective actions, jobs, and OS user-defined metrics.
update_password -target_type=host -target_name=MyHost -credential_type=HostCreds -key_column=HostUserName:sysUser-non_key_column=HostPassword:sysUserOldPassword:sysUserNewPassword
Oracle Database ExamplesFor credentials associated with database targets, use the following arguments for the command.
target_type=oracle_databasecredential_type = DBCredskey_column=DBUserName:<DBUser>non_key_column=DBPassword:<oldPassword>:<newPassword> ORnon_key_column=DBPassword:<oldPassword>:<newPassword>:<DBRole>
The following example changes the password associated with the database user scott from tiger to tiger2 for all features of Enterprise Manager that use this database user name. This includes preferred credentials, corrective actions, jobs, SQL user-defined metrics, and the monitoring configuration for this database target in Enterprise Manager.
update_password -target_type=oracle_database -target_name=ORCL -credential_type=DBCreds -key_column=DBUserName:scott-non_key_column=DBPassword:tiger:tiger2
The following example changes the password associated with the database user sys from sysPassword to sysNewPassword for all features of Enterprise Manager that use this database username. This includes preferred credentials, corrective actions, jobs, SQL user-defined metrics, and the monitoring configuration for this database target in Enterprise Manager.
update_password -target_type=oracle_database -target_name=ORCL -credential_type=DBCreds -key_column=DBUserName:sys-non_key_column=DBPassword:sysPassword:sysNewPassword:DBAROLE
Oracle Listener ExampleFor credentials associated with Listener targets, use the following arguments for the command.
target_type=oracle_listenercredential_type = LsnrCredskey_column (not applicable)non_key_column=Password:<oldPassword>:<newPassword>
The following example changes the password associated with the Listener from oldListenerPassword to newListenerPassword for all features of Enterprise Manager that use this password. This includes preferred credentials, corrective actions, jobs, and the monitoring configuration for this Listener target in Enterprise Manager.
update_password -target_type=oracle_listener -target_name=MyListener -credential_type=LsnrCreds-non_key_column=Password:oldListenerPassword:newListenerPassword
2.2 Alphabetized Verb List
Verb Reference 2-259
update_target_password
Updates the changed host password in the credential sub-system. For collection or monitoring credentials, the password change is also propagated to the Enterprise Manager Agent.
Formatemcli update_host_password -target_type="ttype" -target_name="tname" -key_column="column_name:column_value" [-change_all_references="yes/no"] [-input_file="tag1:file_path1;tag2:file_path2;..."]
[ ] denotes that the parameter is optional
Options■ target_type
Type of target.
■ target_name
Name of the target.
■ key_column
Name and value of the key column for the credential type. The key column usually represents the user name.
To obtain the key column for a target type, enter the following command:
emcli get_credential_type_info -target_type=<target_type>"
To obtain the key column for all target types, enter the following command:
emcli get_credential_type_info
■ change_all_references
Specifies if the password must be changed for all references in Enterprise Manager for the given user.
Possible values are:
– Yes — Updates all references in Enterprise Manager for this password.
– No — Updates the password for the current logged-in user. This is the default.
■ input_file
File path that has old and new passwords. This option hides passwords. You must accompany each path with a tag referenced in the password options.
Note: When you execute this verb, you are prompted to enter the following values in non-echo mode:
-old_password-new_password-retype_new_password
update_target_password
2-260 Command Line Interface
ExamplesThe following example asks the user to enter the values of the old and new passwords, then retype the new password to update the new password in Enterprise Manager for this target reference.
emcli update_target_password -target_type=host -target_name=myHost -key_column=HostUserName:Admin1
The following example asks the user to enter the values of the old and new passwords, then retype the new password to update the new password in Enterprise Manager for all users’ credentials referenced with the mydb target name and Admin1 user name.
emcli update_target_password -target_type=oracle_database -target_name=mydb -key_column=DBUserName:Admin1 -change_all_references=yes
2.2 Alphabetized Verb List
Verb Reference 2-261
view_redundancy_group
Shows the present configuration of the redundancy group.
Formatemcli view_redundancy_group -redundancyGroupName="redGrpName"
Options■ redundancyGroupName
You must specify a single redundancy group name. The target name should be the same as present in the repository, and it should be of target type="generic_redundancy_group".
ExamplesThe following example shows the details for the 'redGrp1' Redundancy Group.
emcli view_redundancy_group -redundancyGroupName='redGrp1'

view_redundancy_group
2-262 Command Line Interface
Error Code Reference 3-1
3Error Code Reference
This chapter documents errors and associated codes returned by EM CLI. You can use EM CLI return codes to manage the control flow in a workflow/scripting environment. EM CLI return codes for Verb errors are positive integers. A Verb returns either 0 (successful execution) or an error number.
The following sections provide reference tables for these types of errors:
■ EM CLI infrastructure
■ OMS connection
■ File-fed option
■ Built-in verb
3.1 EM CLI Infrastructure ErrorsAny execution of the EM CLI client could result in the following errors.
3.2 OMS Connection ErrorsVerbs that execute at the OMS return these error codes as indicated in the listing for each applicable Verb.
Table 3–1 Infrastructure Errors
Error Code Description
242 A Verb has encountered a problem with a dependency specific to the implementation of the Verb (INSIDE of its abstraction barrier) unrelated to the Verb’s semantics.
248 Configuration files are corrupt or inaccessible.
253 The command name is not recognized.
254 Internal system error.
Table 3–2 OMS Connection Errors
Error Code Description
243 License has not been accepted by the current user.
249 Cannot connect to the OMS.
250 Wrong credentials for log in to the OMS.
File-fed Option Errors
3-2 Command Line Interface
3.3 File-fed Option ErrorsVerbs that allow for file-fed options (rather than options where the values are explicitly defined on the command line) can return the following error codes.
3.4 Built-in Verb ErrorsThe following error codes are returned by each Verb (not including EM CLI infrastructure errors that apply to all Verbs).
Table 3–3 File-Fed Option Errors
Error Code Description
244 Cannot find an option value file.
245 Cannot read in an option value file.
246 An option value file is too big.
Table 3–4 Built-In Verb Errors
Verb Error Code
add_beacon 0—Beacon added successfully.
129— Syntax Error. The displayed message indicates which argument is syntactically incorrect.
170—Service does not exist.
173—Beacon does not exist.
201—Beacon is already in the monitoring beacons list.
230—Insufficient privileges.
255—Back-end error. Verb failed.
add_group_to_mpa 2—I/O error occurred while writing to the MPA file.
3—The specified MP already exists in the MPA.
4—The group name is empty or not specified.
223—The supplied options are syntactically incorrect.
add_mp_to_mpa 1—File does not exist, is unreadable, or an I/O error occurred.
2—I/O error occurred while writing to the MPA file.
3—The specified MP already exists in the MPA.
4—The target-type definition file cannot be parsed.
5—The MPA filename is not between 1 and 255 characters.
6 —A file of a particular file type is required for another file.
223—The supplied options are syntactically incorrect.
Built-in Verb Errors
Error Code Reference 3-3
add_target 1—The supplied target type does not exist. Unable to retrieve target metadata from the specified host's Management Agent.
2—Host does not exist.
3—Agent does not exist.
4—Group does not exist.
5—No monitoring credentials set found for target in the repository.
6—Target instance already exists in the repository.
7—The supplied target properties are incomplete.
8—One or more of the supplied target properties are invalid.
15—Target deletion in progress.
20—Unable to connect to the specified host's Agent.
21—Unable to save the target instance to the specified host's Agent.
22—Cannot add more than one Agent target for a single Agent URL.
23—Unable to add an instance of an Agent target without a URL.
219—Insufficient privileges to add the target to the group.
223—Unable to parse command line correctly. Invalid argument value.
File-Fed Option Errors—The errors associated with file-fed options.
OMS Connection Errors—The errors associated with connecting to the executing OMS.
apply_privilege_delegation_setting
0—Setting successfully applied.
2—Setting does not exist.
3—All or some of the targets are invalid.
129—Syntax error. The displayed message indicates which argument is syntactically incorrect.
apply_template_tests 1—Error processing input XML file.
4—Insufficient privileges for apply template.
6—Target does not exist.
7—Incompatible template and target types during apply.
8—Test(s) specified for overwriteExisting do not exist in the template.
9—Key test(s) specified as disabled for apply.
10—Stepgroup contains a step that does not exist in the file.
11—Some text property in file does not conform to valid syntax.
12—Some text property contains variable but variable value is missing.
13—Some transaction property/threshold/collection setting does not conform to required restrictions.
50—Generic error.
Table 3–4 (Cont.) Built-In Verb Errors
Verb Error Code
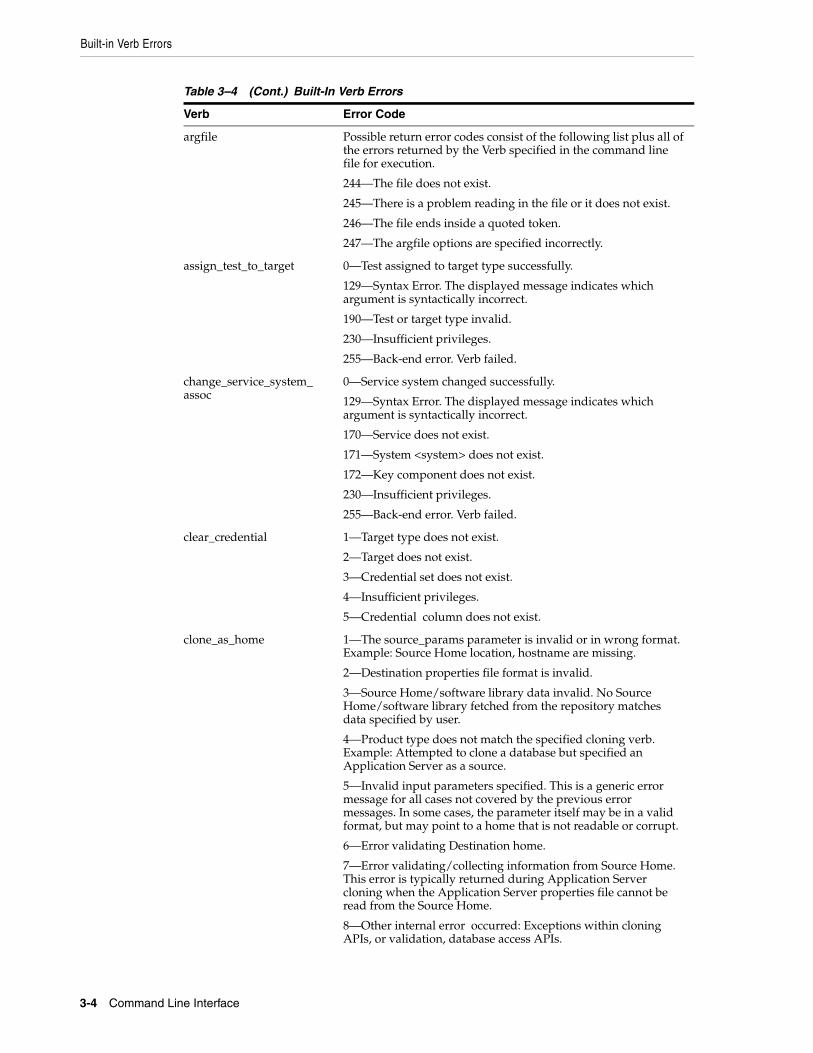
Built-in Verb Errors
3-4 Command Line Interface
argfile Possible return error codes consist of the following list plus all of the errors returned by the Verb specified in the command line file for execution.
244—The file does not exist.
245—There is a problem reading in the file or it does not exist.
246—The file ends inside a quoted token.
247—The argfile options are specified incorrectly.
assign_test_to_target 0—Test assigned to target type successfully.
129—Syntax Error. The displayed message indicates which argument is syntactically incorrect.
190—Test or target type invalid.
230—Insufficient privileges.
255—Back-end error. Verb failed.
change_service_system_assoc
0—Service system changed successfully.
129—Syntax Error. The displayed message indicates which argument is syntactically incorrect.
170—Service does not exist.
171—System <system> does not exist.
172—Key component does not exist.
230—Insufficient privileges.
255—Back-end error. Verb failed.
clear_credential 1—Target type does not exist.
2—Target does not exist.
3—Credential set does not exist.
4—Insufficient privileges.
5—Credential column does not exist.
clone_as_home 1—The source_params parameter is invalid or in wrong format. Example: Source Home location, hostname are missing.
2—Destination properties file format is invalid.
3—Source Home/software library data invalid. No Source Home/software library fetched from the repository matches data specified by user.
4—Product type does not match the specified cloning verb. Example: Attempted to clone a database but specified an Application Server as a source.
5—Invalid input parameters specified. This is a generic error message for all cases not covered by the previous error messages. In some cases, the parameter itself may be in a valid format, but may point to a home that is not readable or corrupt.
6—Error validating Destination home.
7—Error validating/collecting information from Source Home. This error is typically returned during Application Server cloning when the Application Server properties file cannot be read from the Source Home.
8—Other internal error occurred: Exceptions within cloning APIs, or validation, database access APIs.
Table 3–4 (Cont.) Built-In Verb Errors
Verb Error Code
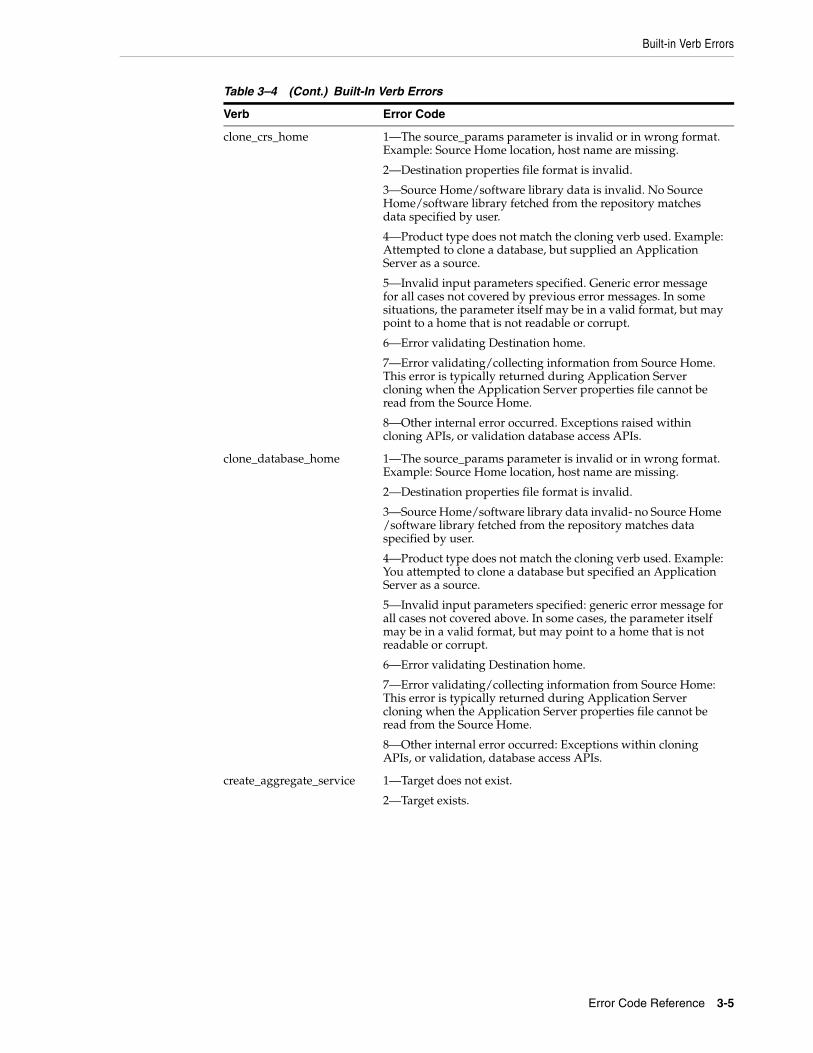
Built-in Verb Errors
Error Code Reference 3-5
clone_crs_home 1—The source_params parameter is invalid or in wrong format. Example: Source Home location, host name are missing.
2—Destination properties file format is invalid.
3—Source Home/software library data is invalid. No Source Home/software library fetched from the repository matches data specified by user.
4—Product type does not match the cloning verb used. Example: Attempted to clone a database, but supplied an Application Server as a source.
5—Invalid input parameters specified. Generic error message for all cases not covered by previous error messages. In some situations, the parameter itself may be in a valid format, but may point to a home that is not readable or corrupt.
6—Error validating Destination home.
7—Error validating/collecting information from Source Home. This error is typically returned during Application Server cloning when the Application Server properties file cannot be read from the Source Home.
8—Other internal error occurred. Exceptions raised within cloning APIs, or validation database access APIs.
clone_database_home 1—The source_params parameter is invalid or in wrong format. Example: Source Home location, host name are missing.
2—Destination properties file format is invalid.
3—Source Home/software library data invalid- no Source Home /software library fetched from the repository matches data specified by user.
4—Product type does not match the cloning verb used. Example: You attempted to clone a database but specified an Application Server as a source.
5—Invalid input parameters specified: generic error message for all cases not covered above. In some cases, the parameter itself may be in a valid format, but may point to a home that is not readable or corrupt.
6—Error validating Destination home.
7—Error validating/collecting information from Source Home: This error is typically returned during Application Server cloning when the Application Server properties file cannot be read from the Source Home.
8—Other internal error occurred: Exceptions within cloning APIs, or validation, database access APIs.
create_aggregate_service 1—Target does not exist.
2—Target exists.
Table 3–4 (Cont.) Built-In Verb Errors
Verb Error Code
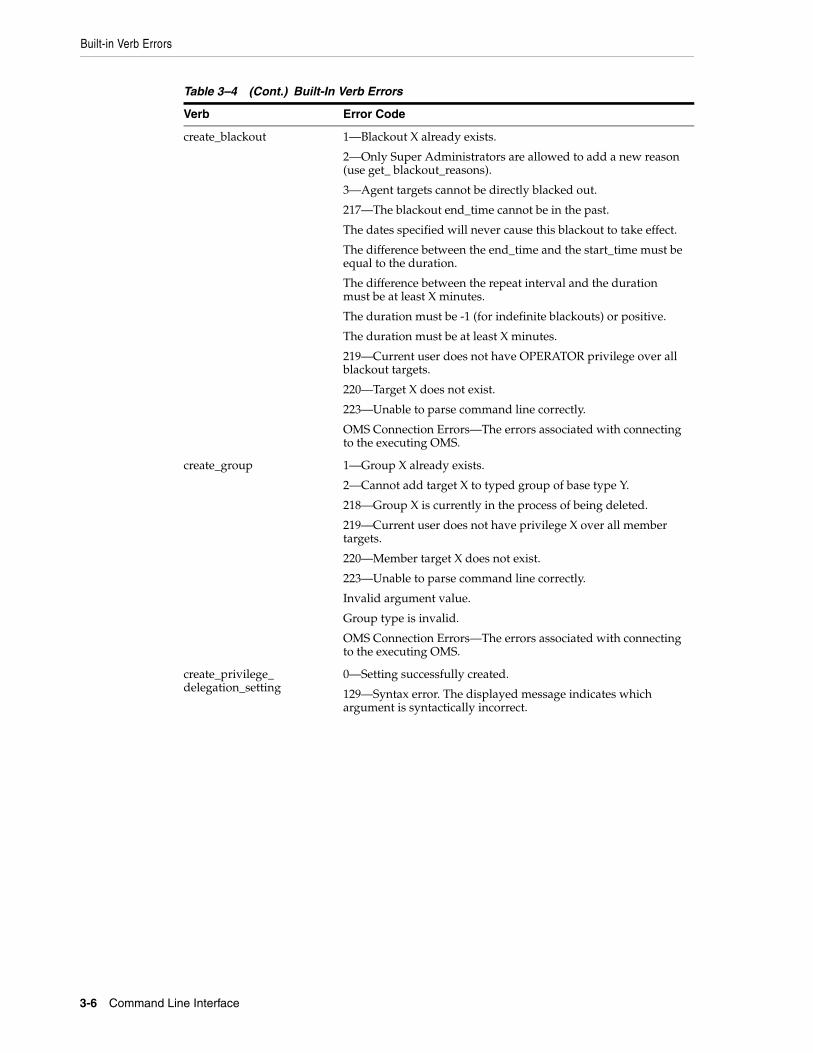
Built-in Verb Errors
3-6 Command Line Interface
create_blackout 1—Blackout X already exists.
2—Only Super Administrators are allowed to add a new reason (use get_ blackout_reasons).
3—Agent targets cannot be directly blacked out.
217—The blackout end_time cannot be in the past.
The dates specified will never cause this blackout to take effect.
The difference between the end_time and the start_time must be equal to the duration.
The difference between the repeat interval and the duration must be at least X minutes.
The duration must be -1 (for indefinite blackouts) or positive.
The duration must be at least X minutes.
219—Current user does not have OPERATOR privilege over all blackout targets.
220—Target X does not exist.
223—Unable to parse command line correctly.
OMS Connection Errors—The errors associated with connecting to the executing OMS.
create_group 1—Group X already exists.
2—Cannot add target X to typed group of base type Y.
218—Group X is currently in the process of being deleted.
219—Current user does not have privilege X over all member targets.
220—Member target X does not exist.
223—Unable to parse command line correctly.
Invalid argument value.
Group type is invalid.
OMS Connection Errors—The errors associated with connecting to the executing OMS.
create_privilege_delegation_setting
0—Setting successfully created.
129—Syntax error. The displayed message indicates which argument is syntactically incorrect.
Table 3–4 (Cont.) Built-In Verb Errors
Verb Error Code
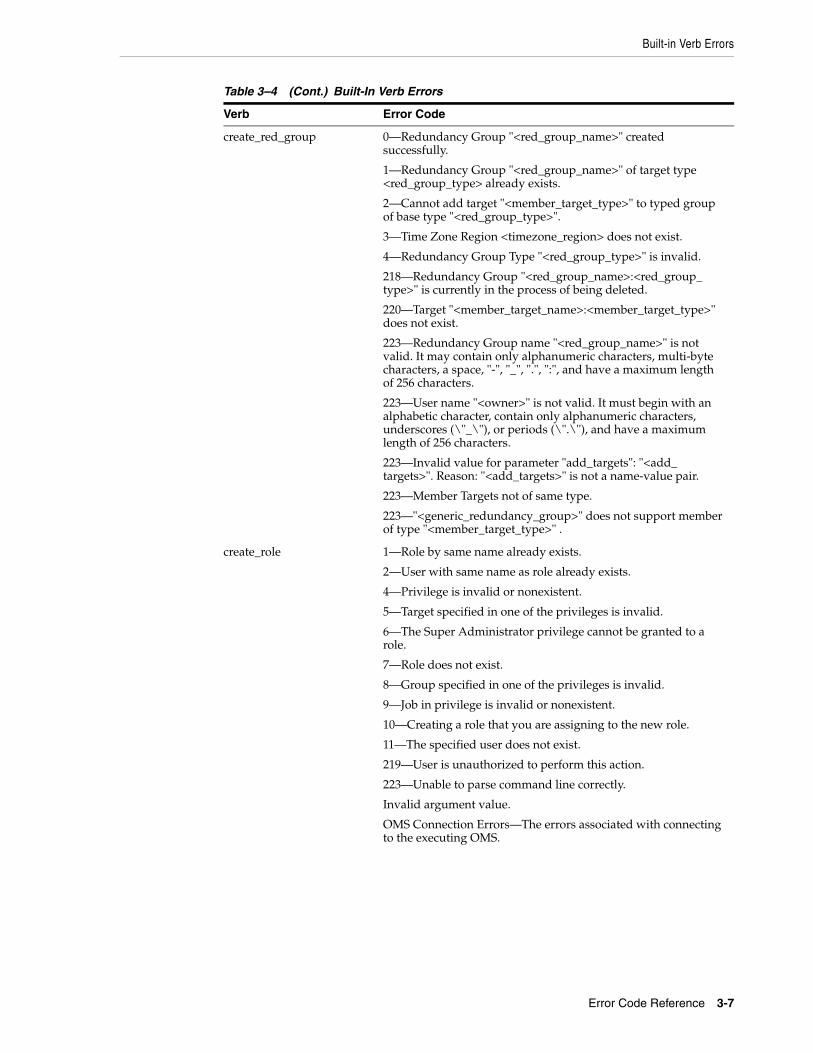
Built-in Verb Errors
Error Code Reference 3-7
create_red_group 0—Redundancy Group "<red_group_name>" created successfully.
1—Redundancy Group "<red_group_name>" of target type <red_group_type> already exists.
2—Cannot add target "<member_target_type>" to typed group of base type "<red_group_type>".
3—Time Zone Region <timezone_region> does not exist.
4—Redundancy Group Type "<red_group_type>" is invalid.
218—Redundancy Group "<red_group_name>:<red_group_type>" is currently in the process of being deleted.
220—Target "<member_target_name>:<member_target_type>" does not exist.
223—Redundancy Group name "<red_group_name>" is not valid. It may contain only alphanumeric characters, multi-byte characters, a space, "-", "_", ".", ":", and have a maximum length of 256 characters.
223—User name "<owner>" is not valid. It must begin with an alphabetic character, contain only alphanumeric characters, underscores (\"_\"), or periods (\".\"), and have a maximum length of 256 characters.
223—Invalid value for parameter "add_targets": "<add_targets>". Reason: "<add_targets>" is not a name-value pair.
223—Member Targets not of same type.
223—"<generic_redundancy_group>" does not support member of type "<member_target_type>" .
create_role 1—Role by same name already exists.
2—User with same name as role already exists.
4—Privilege is invalid or nonexistent.
5—Target specified in one of the privileges is invalid.
6—The Super Administrator privilege cannot be granted to a role.
7—Role does not exist.
8—Group specified in one of the privileges is invalid.
9—Job in privilege is invalid or nonexistent.
10—Creating a role that you are assigning to the new role.
11—The specified user does not exist.
219—User is unauthorized to perform this action.
223—Unable to parse command line correctly.
Invalid argument value.
OMS Connection Errors—The errors associated with connecting to the executing OMS.
Table 3–4 (Cont.) Built-In Verb Errors
Verb Error Code
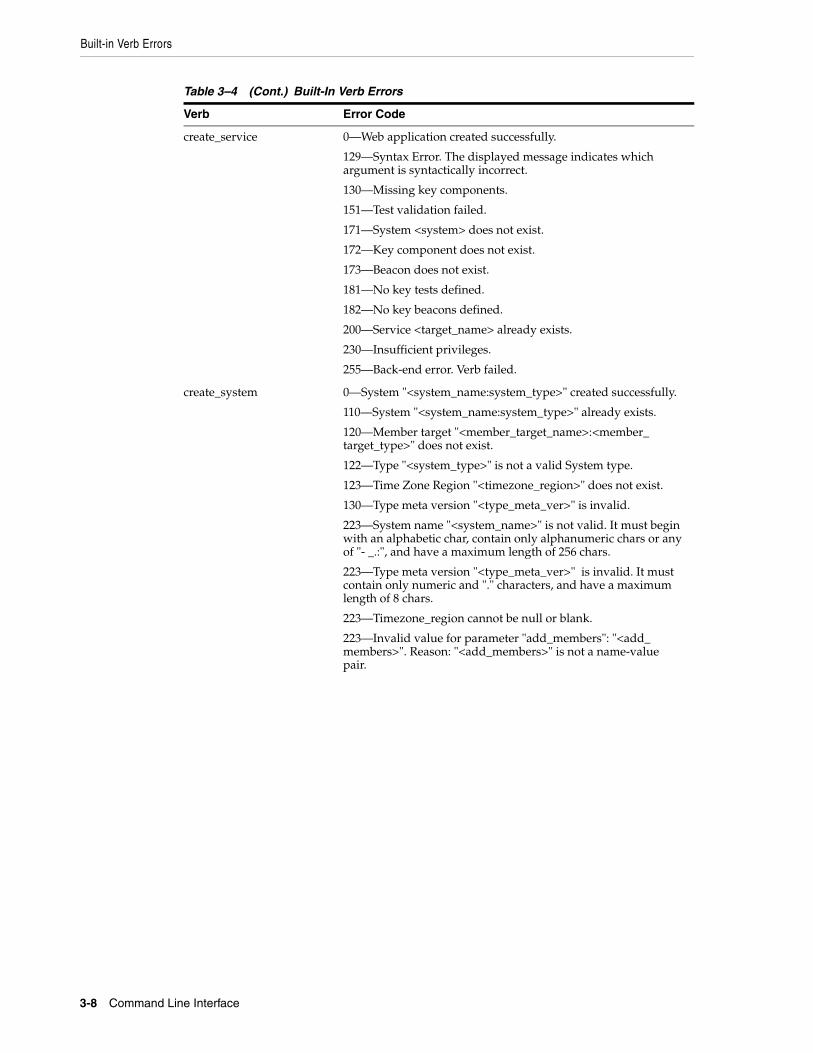
Built-in Verb Errors
3-8 Command Line Interface
create_service 0—Web application created successfully.
129—Syntax Error. The displayed message indicates which argument is syntactically incorrect.
130—Missing key components.
151—Test validation failed.
171—System <system> does not exist.
172—Key component does not exist.
173—Beacon does not exist.
181—No key tests defined.
182—No key beacons defined.
200—Service <target_name> already exists.
230—Insufficient privileges.
255—Back-end error. Verb failed.
create_system 0—System "<system_name:system_type>" created successfully.
110—System "<system_name:system_type>" already exists.
120—Member target "<member_target_name>:<member_target_type>" does not exist.
122—Type "<system_type>" is not a valid System type.
123—Time Zone Region "<timezone_region>" does not exist.
130—Type meta version "<type_meta_ver>" is invalid.
223—System name "<system_name>" is not valid. It must begin with an alphabetic char, contain only alphanumeric chars or any of "- _.:", and have a maximum length of 256 chars.
223—Type meta version "<type_meta_ver>" is invalid. It must contain only numeric and "." characters, and have a maximum length of 8 chars.
223—Timezone_region cannot be null or blank.
223—Invalid value for parameter "add_members": "<add_members>". Reason: "<add_members>" is not a name-value pair.
Table 3–4 (Cont.) Built-In Verb Errors
Verb Error Code
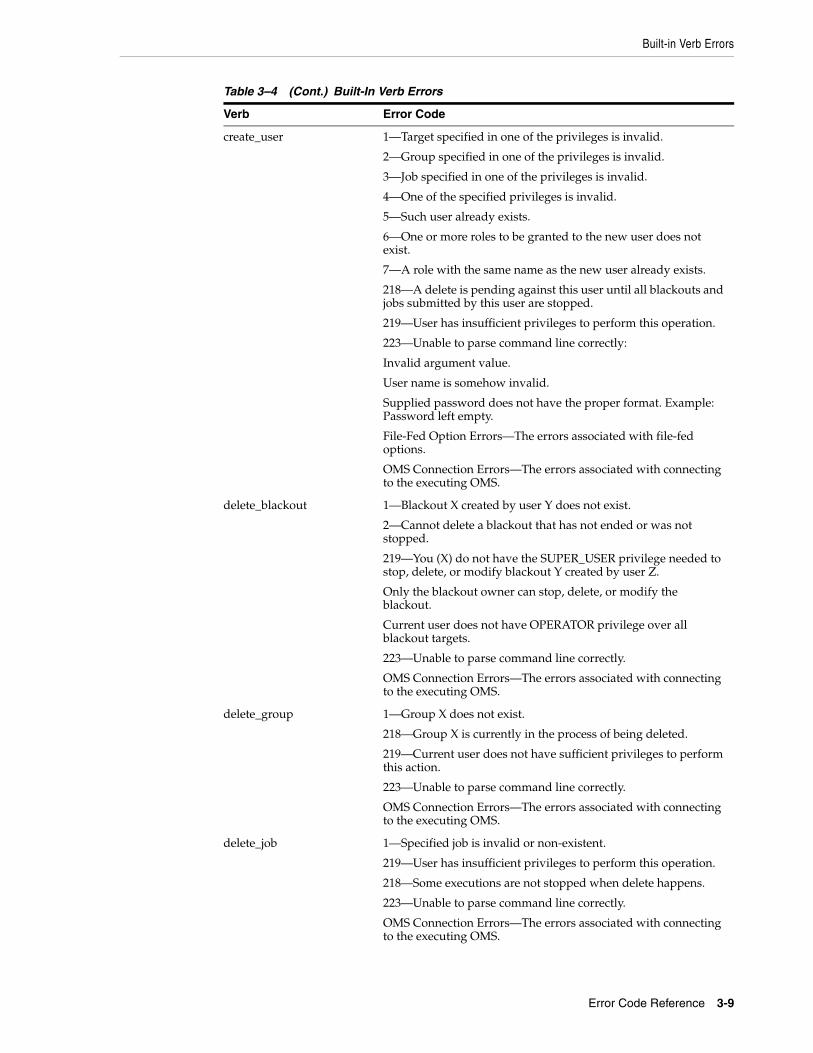
Built-in Verb Errors
Error Code Reference 3-9
create_user 1—Target specified in one of the privileges is invalid.
2—Group specified in one of the privileges is invalid.
3—Job specified in one of the privileges is invalid.
4—One of the specified privileges is invalid.
5—Such user already exists.
6—One or more roles to be granted to the new user does not exist.
7—A role with the same name as the new user already exists.
218—A delete is pending against this user until all blackouts and jobs submitted by this user are stopped.
219—User has insufficient privileges to perform this operation.
223—Unable to parse command line correctly:
Invalid argument value.
User name is somehow invalid.
Supplied password does not have the proper format. Example: Password left empty.
File-Fed Option Errors—The errors associated with file-fed options.
OMS Connection Errors—The errors associated with connecting to the executing OMS.
delete_blackout 1—Blackout X created by user Y does not exist.
2—Cannot delete a blackout that has not ended or was not stopped.
219—You (X) do not have the SUPER_USER privilege needed to stop, delete, or modify blackout Y created by user Z.
Only the blackout owner can stop, delete, or modify the blackout.
Current user does not have OPERATOR privilege over all blackout targets.
223—Unable to parse command line correctly.
OMS Connection Errors—The errors associated with connecting to the executing OMS.
delete_group 1—Group X does not exist.
218—Group X is currently in the process of being deleted.
219—Current user does not have sufficient privileges to perform this action.
223—Unable to parse command line correctly.
OMS Connection Errors—The errors associated with connecting to the executing OMS.
delete_job 1—Specified job is invalid or non-existent.
219—User has insufficient privileges to perform this operation.
218—Some executions are not stopped when delete happens.
223—Unable to parse command line correctly.
OMS Connection Errors—The errors associated with connecting to the executing OMS.
Table 3–4 (Cont.) Built-In Verb Errors
Verb Error Code

Built-in Verb Errors
3-10 Command Line Interface
delete_metric_promotion 0—SUCCESS
223—SYNTAX_ERRNUM: Input is malformed.
255—VERB_FAILED_ERRNUM: Back-end validation fails.
delete_privilege_delegation_settings
0—Setting successfully deleted.
2—All or some of the names are invalid.
129—Syntax error. The displayed message indicates which argument is syntactically incorrect.
delete_role 1—Role does not exist.
219—User is unauthorized to perform this action.
223—Unable to parse command line correctly.
OMS Connection Errors—The errors associated with connecting to the executing OMS.
delete_system 0—System "<system_name:system_type>" deleted successfully.
121—System "<system_name:system_type>" does not exist.
122—Type "<system_type>" is not a valid System type.
219—Current user does not have sufficient privileges to perform this action.
223—System name "<system_name>" is not valid. It must begin with an alphabetic character, contain only alphanumeric characters or any of "- _.:", and have a maximum length of 256 chars.
delete_target 15—Target deletion in progress.
219—Insufficient privileges to delete specified target.
220—Target does not exist.
223—Unable to parse command line correctly.
OMS Connection Errors—The errors associated with connecting to the executing OMS.
delete_test 0—Test deleted successfully.
129—Syntax Error. The displayed message indicates which argument is syntactically incorrect.
170—Service does not exist.
174—Test does not exist.
230—Insufficient privileges.
255—Back-end error. Verb failed.
delete_user 1—Cannot delete the repository owner.
2—Specified user does not exist.
3—Cannot delete the current user.
218—A delete is pending against this user until all blackouts and jobs submitted by this user are stopped.
219—User has insufficient privileges to perform this operation.
223—Unable to parse command line correctly.
OMS Connection Errors—The errors associated with connecting to the executing OMS.
disable_audit 223—Syntax Error.
Table 3–4 (Cont.) Built-In Verb Errors
Verb Error Code
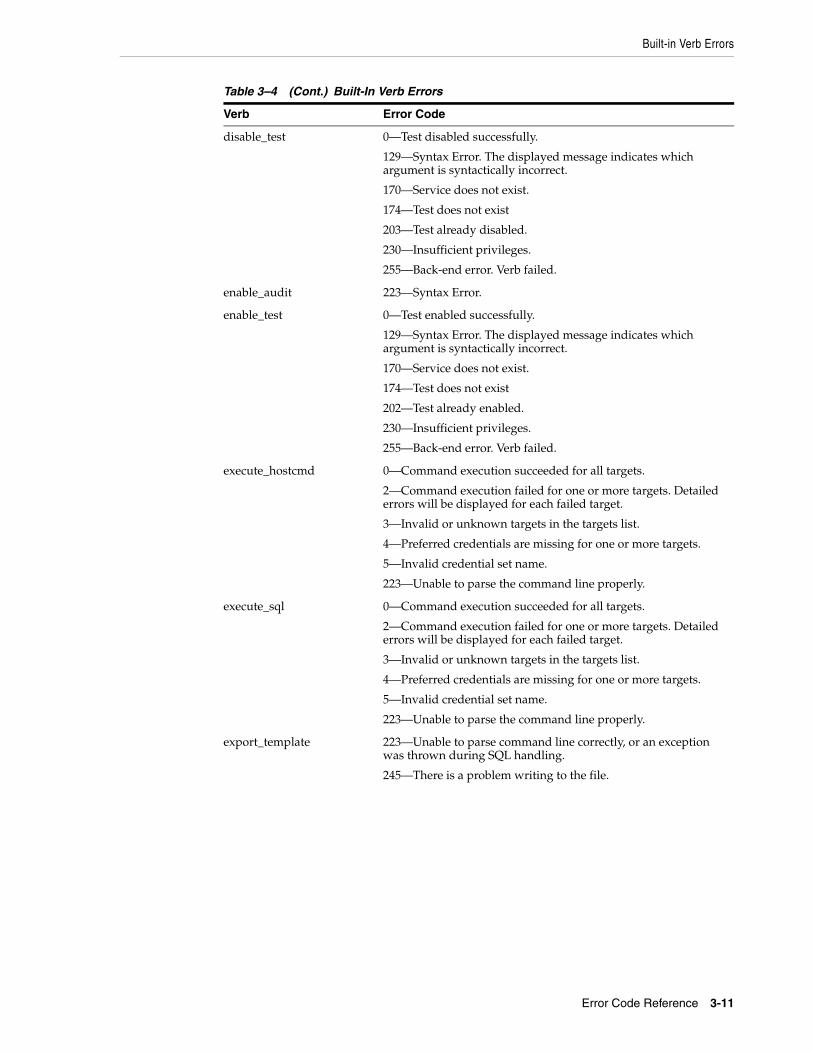
Built-in Verb Errors
Error Code Reference 3-11
disable_test 0—Test disabled successfully.
129—Syntax Error. The displayed message indicates which argument is syntactically incorrect.
170—Service does not exist.
174—Test does not exist
203—Test already disabled.
230—Insufficient privileges.
255—Back-end error. Verb failed.
enable_audit 223—Syntax Error.
enable_test 0—Test enabled successfully.
129—Syntax Error. The displayed message indicates which argument is syntactically incorrect.
170—Service does not exist.
174—Test does not exist
202—Test already enabled.
230—Insufficient privileges.
255—Back-end error. Verb failed.
execute_hostcmd 0—Command execution succeeded for all targets.
2—Command execution failed for one or more targets. Detailed errors will be displayed for each failed target.
3—Invalid or unknown targets in the targets list.
4—Preferred credentials are missing for one or more targets.
5—Invalid credential set name.
223—Unable to parse the command line properly.
execute_sql 0—Command execution succeeded for all targets.
2—Command execution failed for one or more targets. Detailed errors will be displayed for each failed target.
3—Invalid or unknown targets in the targets list.
4—Preferred credentials are missing for one or more targets.
5—Invalid credential set name.
223—Unable to parse the command line properly.
export_template 223—Unable to parse command line correctly, or an exception was thrown during SQL handling.
245—There is a problem writing to the file.
Table 3–4 (Cont.) Built-In Verb Errors
Verb Error Code
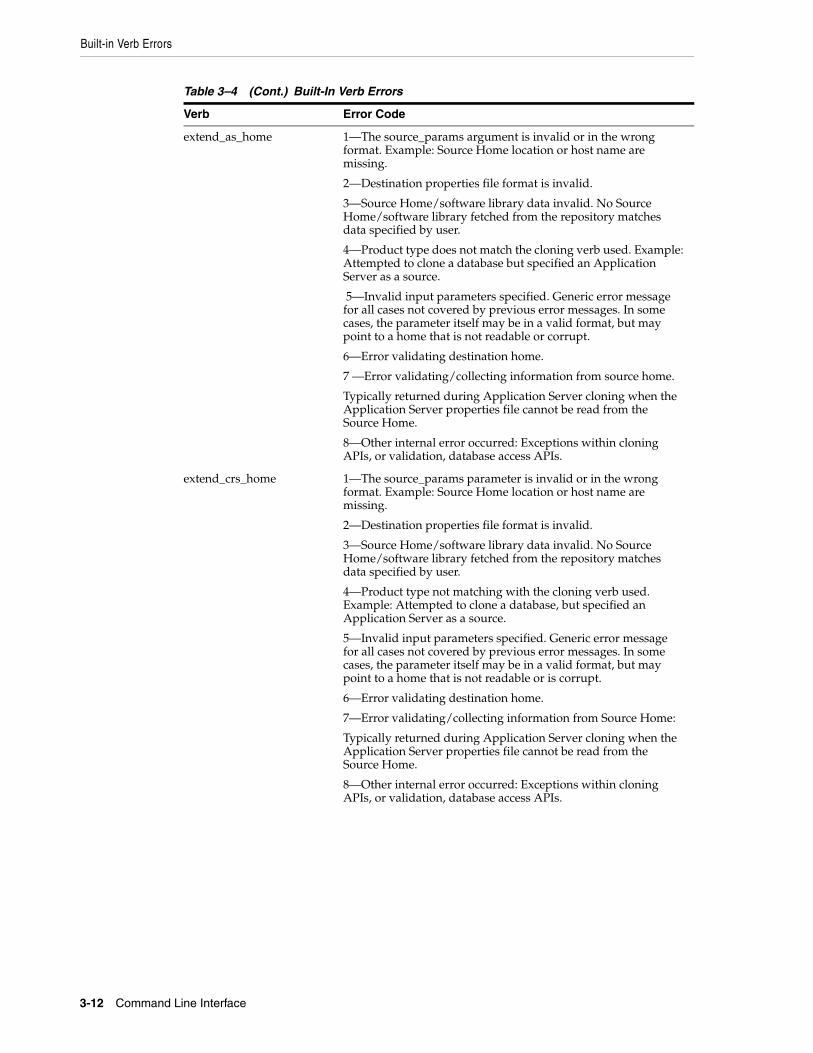
Built-in Verb Errors
3-12 Command Line Interface
extend_as_home 1—The source_params argument is invalid or in the wrong format. Example: Source Home location or host name are missing.
2—Destination properties file format is invalid.
3—Source Home/software library data invalid. No Source Home/software library fetched from the repository matches data specified by user.
4—Product type does not match the cloning verb used. Example: Attempted to clone a database but specified an Application Server as a source.
5—Invalid input parameters specified. Generic error message for all cases not covered by previous error messages. In some cases, the parameter itself may be in a valid format, but may point to a home that is not readable or corrupt.
6—Error validating destination home.
7 —Error validating/collecting information from source home.
Typically returned during Application Server cloning when the Application Server properties file cannot be read from the Source Home.
8—Other internal error occurred: Exceptions within cloning APIs, or validation, database access APIs.
extend_crs_home 1—The source_params parameter is invalid or in the wrong format. Example: Source Home location or host name are missing.
2—Destination properties file format is invalid.
3—Source Home/software library data invalid. No Source Home/software library fetched from the repository matches data specified by user.
4—Product type not matching with the cloning verb used. Example: Attempted to clone a database, but specified an Application Server as a source.
5—Invalid input parameters specified. Generic error message for all cases not covered by previous error messages. In some cases, the parameter itself may be in a valid format, but may point to a home that is not readable or is corrupt.
6—Error validating destination home.
7—Error validating/collecting information from Source Home:
Typically returned during Application Server cloning when the Application Server properties file cannot be read from the Source Home.
8—Other internal error occurred: Exceptions within cloning APIs, or validation, database access APIs.
Table 3–4 (Cont.) Built-In Verb Errors
Verb Error Code

Built-in Verb Errors
Error Code Reference 3-13
extend_rac_home 1—The source_params parameter is invalid or in wrong format. Example: Source Home location, host name are missing.
2—Destination properties file format is invalid.
3—Source Home/software lib data invalid- no Source Home /software library fetched from the repository matches data specified by user.
4—Product type does not match the cloning verb used. Example: tried to clone database, but gave app server as source.
5—Invalid input parameters specified: generic error message for all cases not covered above. In some cases the parameter itself may be in a valid format, but may point to a home which is not readable or corrupt.
6—Error validating destination home.
7—Error validating/collecting information from Source Home:
Typically returned during Application Server cloning when the Application Server properties file cannot be read from the Source Home.
8—Other internal error occurred: Exceptions within cloning APIs, or validation, database access APIs.
extract_template_tests 2—Error serializing XML output.
3—Insufficient privileges for extract template.
5—Template does not exist in repository.
50—Generic error.
get_aggregate_service_info 1—Target does not exist.
2—Target exists.
get_aggregate_service_members
1—Target does not exist.
2—Target exists.
get_blackout_details 1—Blackout X created by user Y does not exist.
223—Unable to parse command line correctly.
OMS Connection Errors—The errors associated with connecting to the executing OMS.
get_blackout_reasons OMS Connection Errors—The errors associated with connecting to the executing OMS.
get_blackout_targets 1—Host X does not exist.
223—Unable to parse command line correctly.
220—Target X does not exist.
get_blackouts 1—Host X does not exist.
220—Target X does not exist.
223—Unable to parse command line correctly.
OMS Connection Errors—The errors associated with connecting to the executing OMS.
get_group_members 1—Group X does not exist.
223—Unable to parse command line correctly.
OMS Connection Errors—The errors associated with connecting to the executing OMS.
Table 3–4 (Cont.) Built-In Verb Errors
Verb Error Code
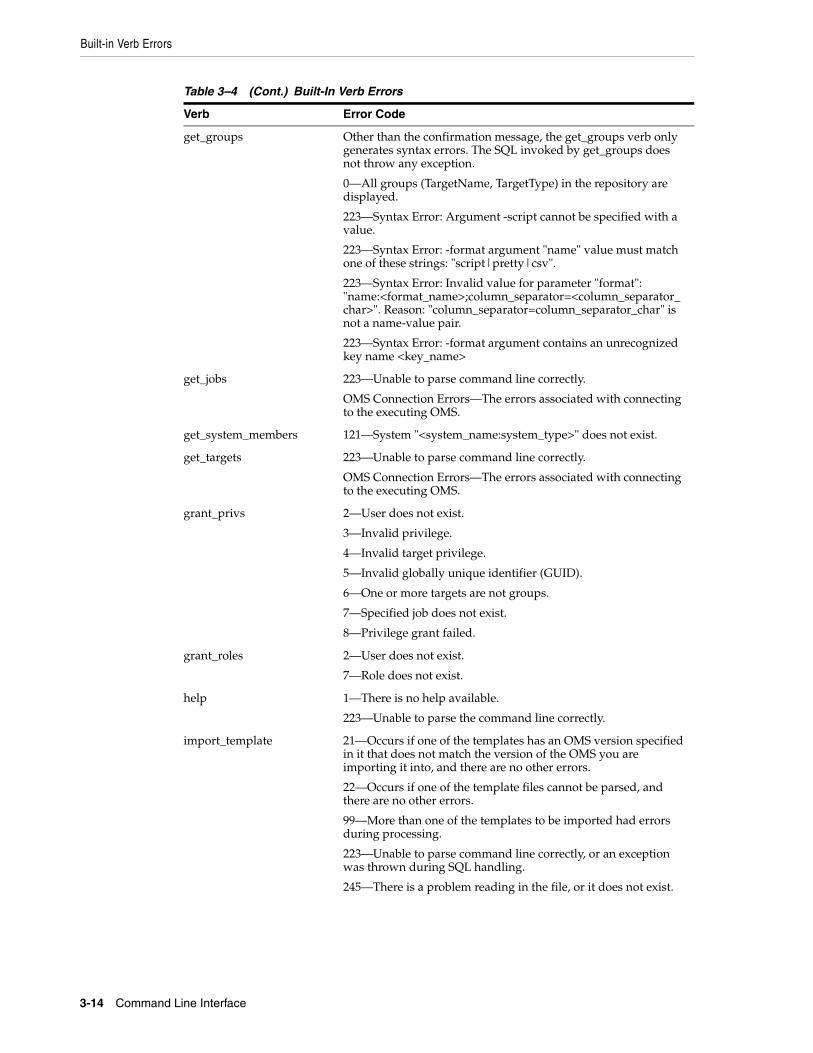
Built-in Verb Errors
3-14 Command Line Interface
get_groups Other than the confirmation message, the get_groups verb only generates syntax errors. The SQL invoked by get_groups does not throw any exception.
0—All groups (TargetName, TargetType) in the repository are displayed.
223—Syntax Error: Argument -script cannot be specified with a value.
223—Syntax Error: -format argument "name" value must match one of these strings: "script|pretty|csv".
223—Syntax Error: Invalid value for parameter "format": "name:<format_name>;column_separator=<column_separator_char>". Reason: "column_separator=column_separator_char" is not a name-value pair.
223—Syntax Error: -format argument contains an unrecognized key name <key_name>
get_jobs 223—Unable to parse command line correctly.
OMS Connection Errors—The errors associated with connecting to the executing OMS.
get_system_members 121—System "<system_name:system_type>" does not exist.
get_targets 223—Unable to parse command line correctly.
OMS Connection Errors—The errors associated with connecting to the executing OMS.
grant_privs 2—User does not exist.
3—Invalid privilege.
4—Invalid target privilege.
5—Invalid globally unique identifier (GUID).
6—One or more targets are not groups.
7—Specified job does not exist.
8—Privilege grant failed.
grant_roles 2—User does not exist.
7—Role does not exist.
help 1—There is no help available.
223—Unable to parse the command line correctly.
import_template 21—Occurs if one of the templates has an OMS version specified in it that does not match the version of the OMS you are importing it into, and there are no other errors.
22—Occurs if one of the template files cannot be parsed, and there are no other errors.
99—More than one of the templates to be imported had errors during processing.
223—Unable to parse command line correctly, or an exception was thrown during SQL handling.
245—There is a problem reading in the file, or it does not exist.
Table 3–4 (Cont.) Built-In Verb Errors
Verb Error Code
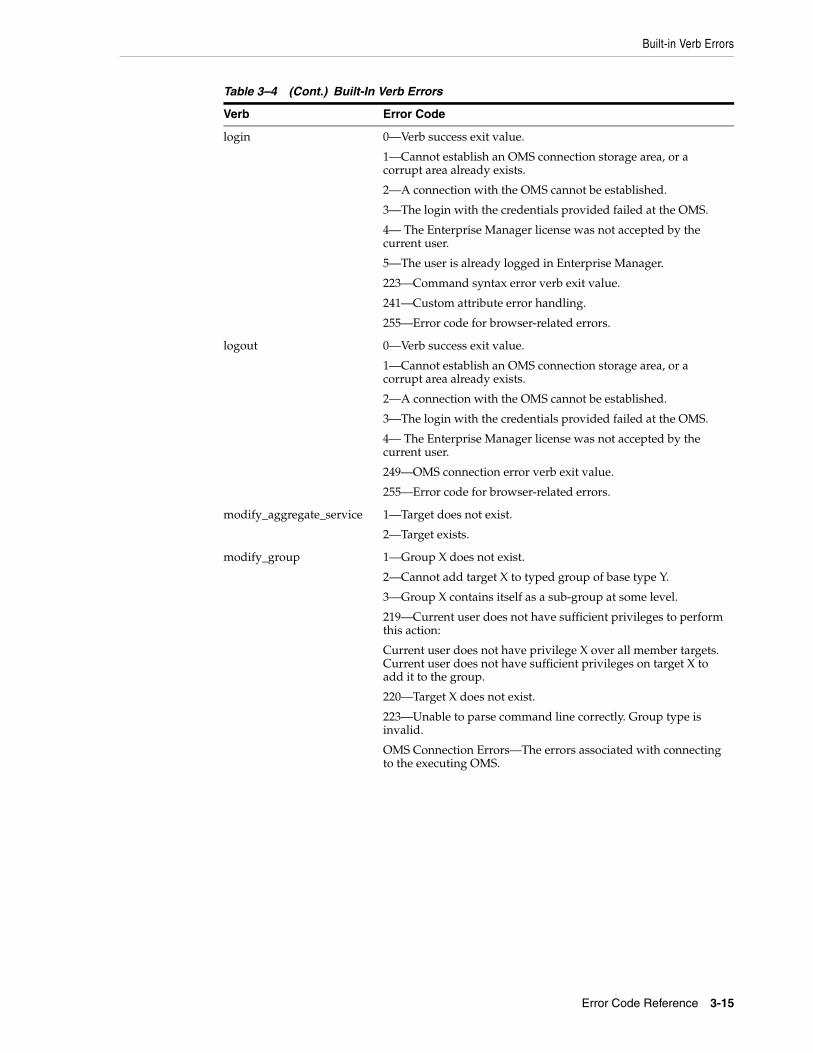
Built-in Verb Errors
Error Code Reference 3-15
login 0—Verb success exit value.
1—Cannot establish an OMS connection storage area, or a corrupt area already exists.
2—A connection with the OMS cannot be established.
3—The login with the credentials provided failed at the OMS.
4— The Enterprise Manager license was not accepted by the current user.
5—The user is already logged in Enterprise Manager.
223—Command syntax error verb exit value.
241—Custom attribute error handling.
255—Error code for browser-related errors.
logout 0—Verb success exit value.
1—Cannot establish an OMS connection storage area, or a corrupt area already exists.
2—A connection with the OMS cannot be established.
3—The login with the credentials provided failed at the OMS.
4— The Enterprise Manager license was not accepted by the current user.
249—OMS connection error verb exit value.
255—Error code for browser-related errors.
modify_aggregate_service 1—Target does not exist.
2—Target exists.
modify_group 1—Group X does not exist.
2—Cannot add target X to typed group of base type Y.
3—Group X contains itself as a sub-group at some level.
219—Current user does not have sufficient privileges to perform this action:
Current user does not have privilege X over all member targets. Current user does not have sufficient privileges on target X to add it to the group.
220—Target X does not exist.
223—Unable to parse command line correctly. Group type is invalid.
OMS Connection Errors—The errors associated with connecting to the executing OMS.
Table 3–4 (Cont.) Built-In Verb Errors
Verb Error Code
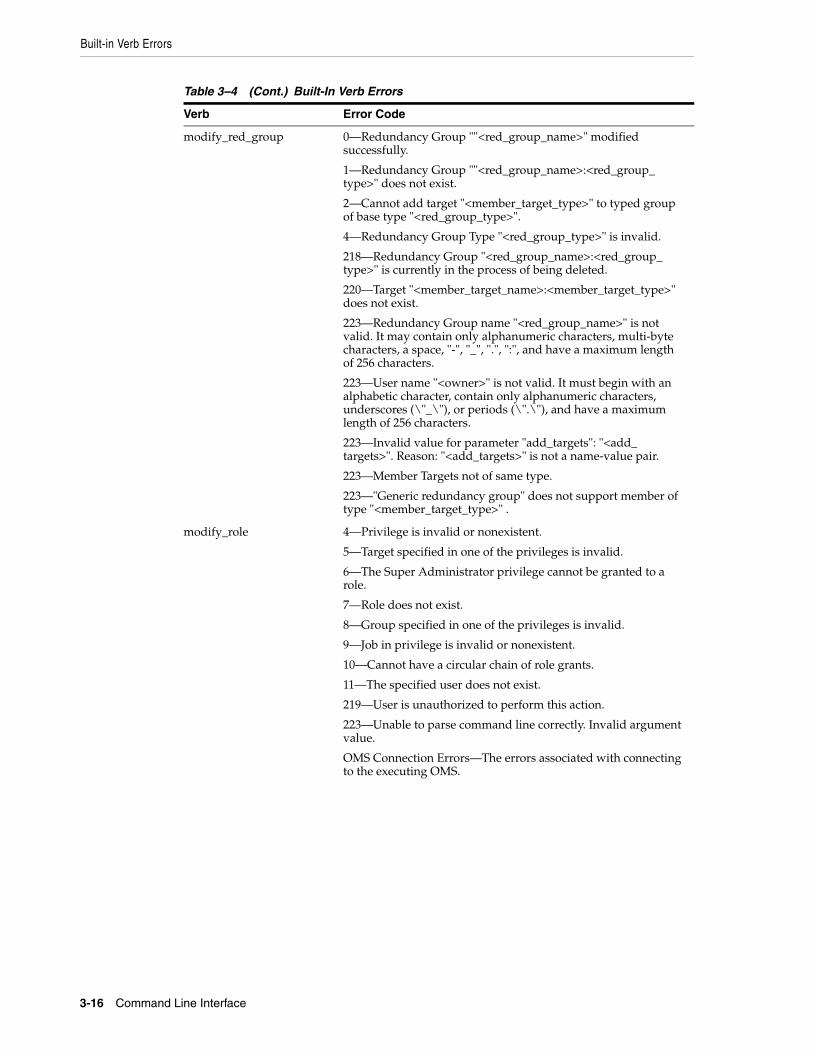
Built-in Verb Errors
3-16 Command Line Interface
modify_red_group 0—Redundancy Group ""<red_group_name>" modified successfully.
1—Redundancy Group ""<red_group_name>:<red_group_type>" does not exist.
2—Cannot add target "<member_target_type>" to typed group of base type "<red_group_type>".
4—Redundancy Group Type "<red_group_type>" is invalid.
218—Redundancy Group "<red_group_name>:<red_group_type>" is currently in the process of being deleted.
220—Target "<member_target_name>:<member_target_type>" does not exist.
223—Redundancy Group name "<red_group_name>" is not valid. It may contain only alphanumeric characters, multi-byte characters, a space, "-", "_", ".", ":", and have a maximum length of 256 characters.
223—User name "<owner>" is not valid. It must begin with an alphabetic character, contain only alphanumeric characters, underscores (\"_\"), or periods (\".\"), and have a maximum length of 256 characters.
223—Invalid value for parameter "add_targets": "<add_targets>". Reason: "<add_targets>" is not a name-value pair.
223—Member Targets not of same type.
223—"Generic redundancy group" does not support member of type "<member_target_type>" .
modify_role 4—Privilege is invalid or nonexistent.
5—Target specified in one of the privileges is invalid.
6—The Super Administrator privilege cannot be granted to a role.
7—Role does not exist.
8—Group specified in one of the privileges is invalid.
9—Job in privilege is invalid or nonexistent.
10—Cannot have a circular chain of role grants.
11—The specified user does not exist.
219—User is unauthorized to perform this action.
223—Unable to parse command line correctly. Invalid argument value.
OMS Connection Errors—The errors associated with connecting to the executing OMS.
Table 3–4 (Cont.) Built-In Verb Errors
Verb Error Code
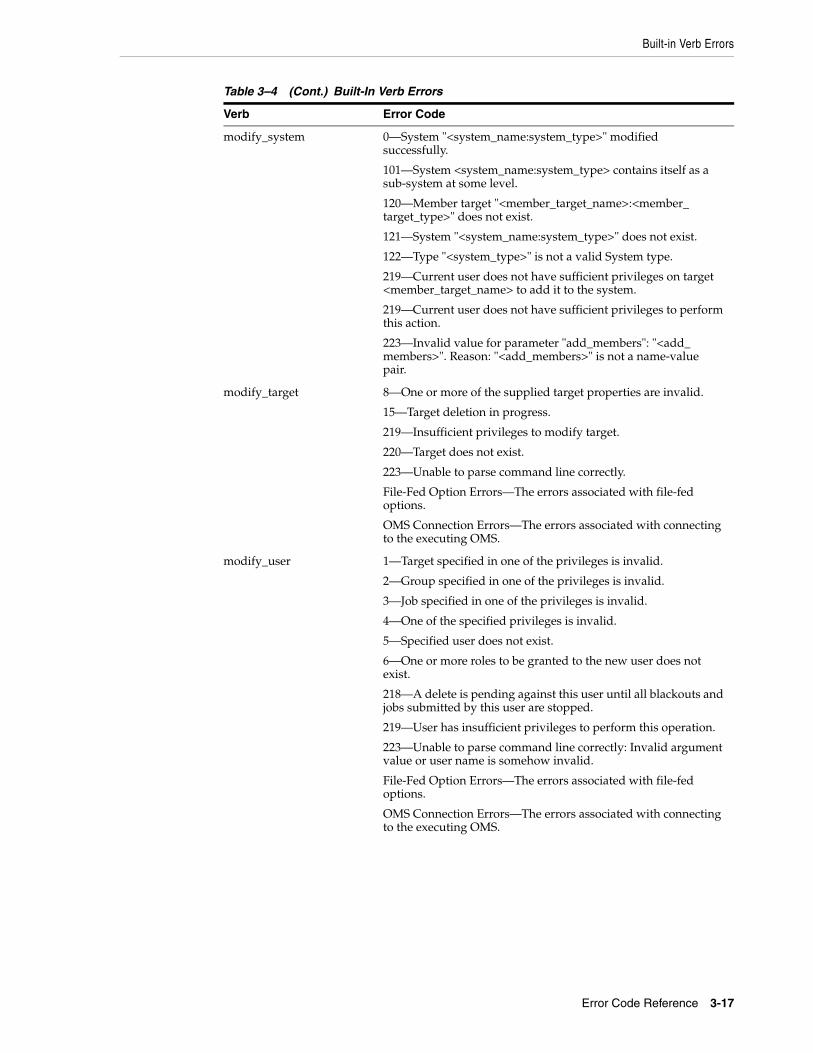
Built-in Verb Errors
Error Code Reference 3-17
modify_system 0—System "<system_name:system_type>" modified successfully.
101—System <system_name:system_type> contains itself as a sub-system at some level.
120—Member target "<member_target_name>:<member_target_type>" does not exist.
121—System "<system_name:system_type>" does not exist.
122—Type "<system_type>" is not a valid System type.
219—Current user does not have sufficient privileges on target <member_target_name> to add it to the system.
219—Current user does not have sufficient privileges to perform this action.
223—Invalid value for parameter "add_members": "<add_members>". Reason: "<add_members>" is not a name-value pair.
modify_target 8—One or more of the supplied target properties are invalid.
15—Target deletion in progress.
219—Insufficient privileges to modify target.
220—Target does not exist.
223—Unable to parse command line correctly.
File-Fed Option Errors—The errors associated with file-fed options.
OMS Connection Errors—The errors associated with connecting to the executing OMS.
modify_user 1—Target specified in one of the privileges is invalid.
2—Group specified in one of the privileges is invalid.
3—Job specified in one of the privileges is invalid.
4—One of the specified privileges is invalid.
5—Specified user does not exist.
6—One or more roles to be granted to the new user does not exist.
218—A delete is pending against this user until all blackouts and jobs submitted by this user are stopped.
219—User has insufficient privileges to perform this operation.
223—Unable to parse command line correctly: Invalid argument value or user name is somehow invalid.
File-Fed Option Errors—The errors associated with file-fed options.
OMS Connection Errors—The errors associated with connecting to the executing OMS.
Table 3–4 (Cont.) Built-In Verb Errors
Verb Error Code
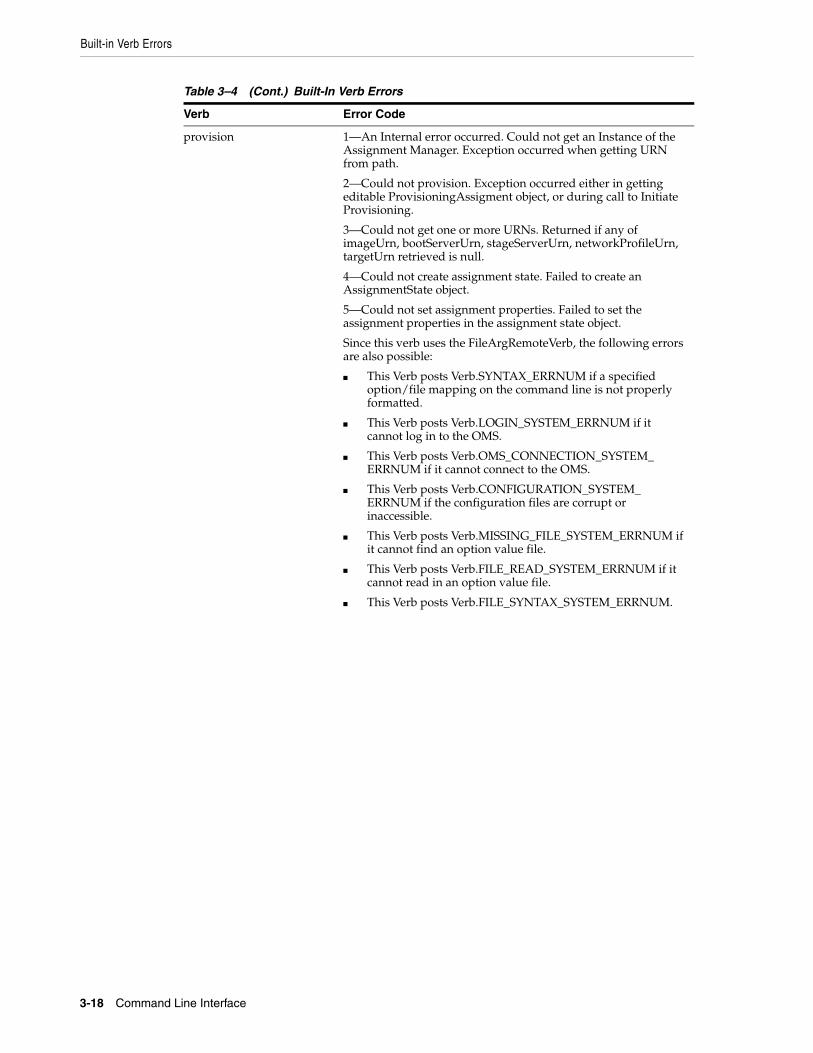
Built-in Verb Errors
3-18 Command Line Interface
provision 1—An Internal error occurred. Could not get an Instance of the Assignment Manager. Exception occurred when getting URN from path.
2—Could not provision. Exception occurred either in getting editable ProvisioningAssigment object, or during call to Initiate Provisioning.
3—Could not get one or more URNs. Returned if any of imageUrn, bootServerUrn, stageServerUrn, networkProfileUrn, targetUrn retrieved is null.
4—Could not create assignment state. Failed to create an AssignmentState object.
5—Could not set assignment properties. Failed to set the assignment properties in the assignment state object.
Since this verb uses the FileArgRemoteVerb, the following errors are also possible:
■ This Verb posts Verb.SYNTAX_ERRNUM if a specified option/file mapping on the command line is not properly formatted.
■ This Verb posts Verb.LOGIN_SYSTEM_ERRNUM if it cannot log in to the OMS.
■ This Verb posts Verb.OMS_CONNECTION_SYSTEM_ERRNUM if it cannot connect to the OMS.
■ This Verb posts Verb.CONFIGURATION_SYSTEM_ERRNUM if the configuration files are corrupt or inaccessible.
■ This Verb posts Verb.MISSING_FILE_SYSTEM_ERRNUM if it cannot find an option value file.
■ This Verb posts Verb.FILE_READ_SYSTEM_ERRNUM if it cannot read in an option value file.
■ This Verb posts Verb.FILE_SYNTAX_SYSTEM_ERRNUM.
Table 3–4 (Cont.) Built-In Verb Errors
Verb Error Code
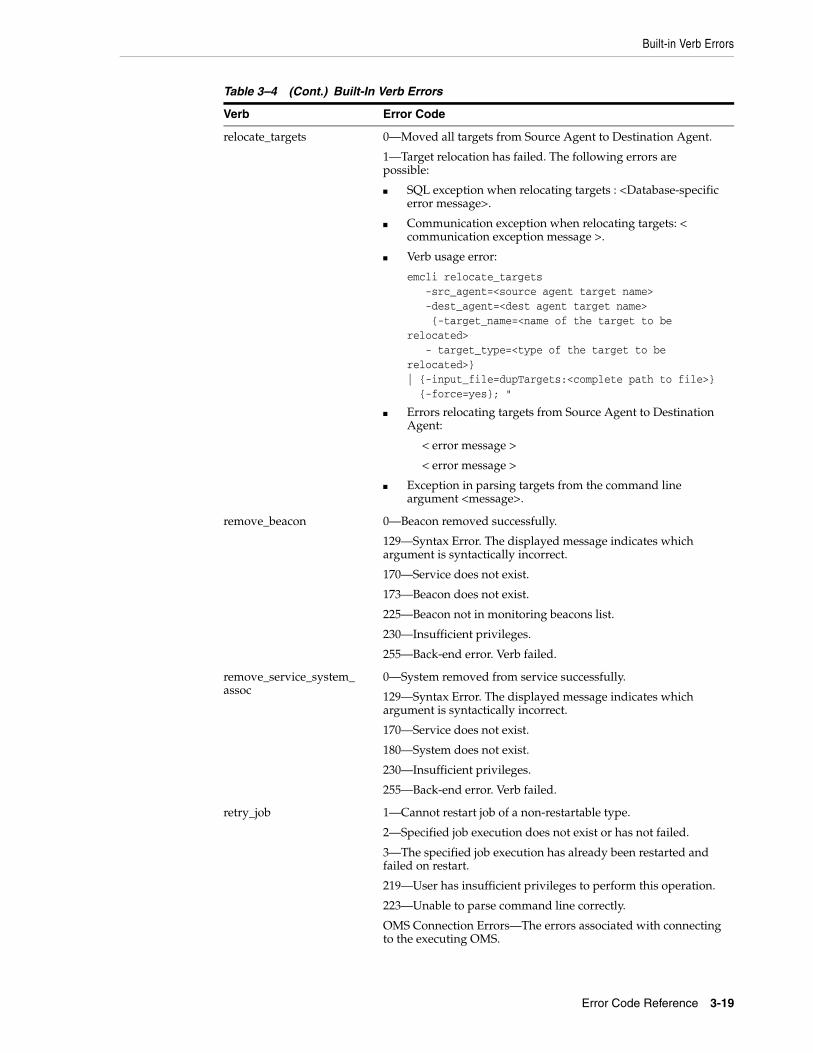
Built-in Verb Errors
Error Code Reference 3-19
relocate_targets 0—Moved all targets from Source Agent to Destination Agent.
1—Target relocation has failed. The following errors are possible:
■ SQL exception when relocating targets : <Database-specific error message>.
■ Communication exception when relocating targets: < communication exception message >.
■ Verb usage error:
emcli relocate_targets -src_agent=<source agent target name> -dest_agent=<dest agent target name> {-target_name=<name of the target to be relocated> - target_type=<type of the target to be relocated>}| {-input_file=dupTargets:<complete path to file>} {-force=yes}; "
■ Errors relocating targets from Source Agent to Destination Agent:
< error message >
< error message >
■ Exception in parsing targets from the command line argument <message>.
remove_beacon 0—Beacon removed successfully.
129—Syntax Error. The displayed message indicates which argument is syntactically incorrect.
170—Service does not exist.
173—Beacon does not exist.
225—Beacon not in monitoring beacons list.
230—Insufficient privileges.
255—Back-end error. Verb failed.
remove_service_system_assoc
0—System removed from service successfully.
129—Syntax Error. The displayed message indicates which argument is syntactically incorrect.
170—Service does not exist.
180—System does not exist.
230—Insufficient privileges.
255—Back-end error. Verb failed.
retry_job 1—Cannot restart job of a non-restartable type.
2—Specified job execution does not exist or has not failed.
3—The specified job execution has already been restarted and failed on restart.
219—User has insufficient privileges to perform this operation.
223—Unable to parse command line correctly.
OMS Connection Errors—The errors associated with connecting to the executing OMS.
Table 3–4 (Cont.) Built-In Verb Errors
Verb Error Code
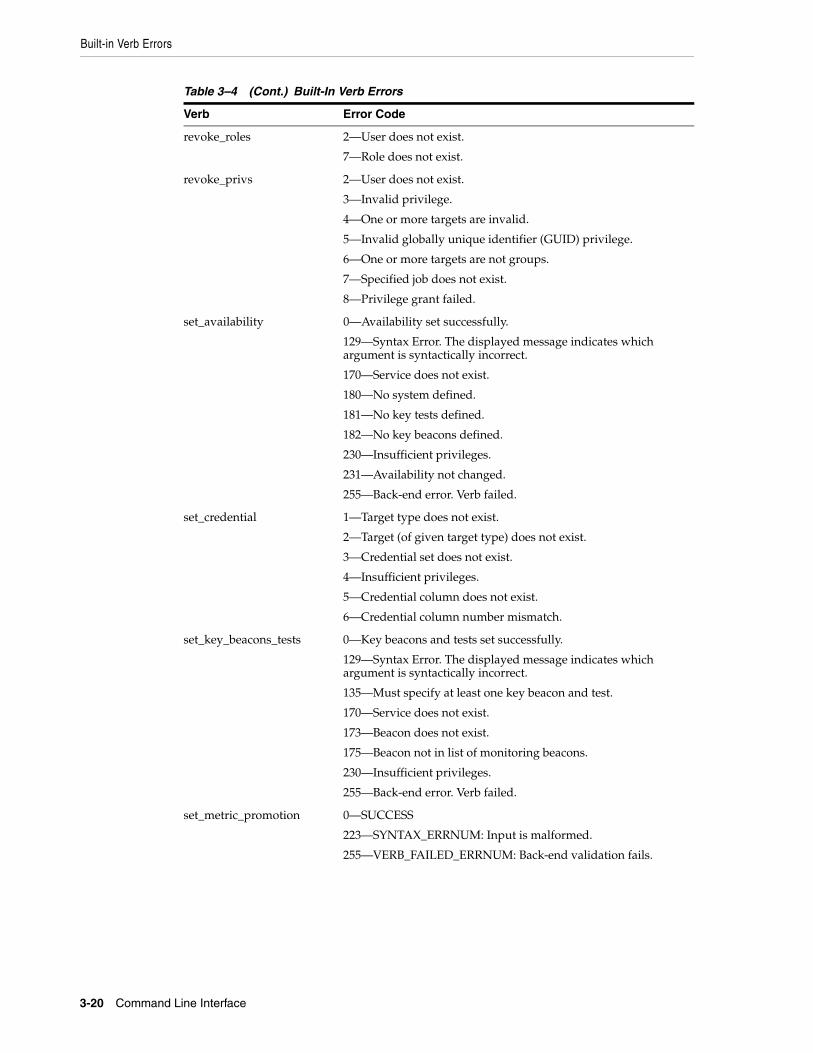
Built-in Verb Errors
3-20 Command Line Interface
revoke_roles 2—User does not exist.
7—Role does not exist.
revoke_privs 2—User does not exist.
3—Invalid privilege.
4—One or more targets are invalid.
5—Invalid globally unique identifier (GUID) privilege.
6—One or more targets are not groups.
7—Specified job does not exist.
8—Privilege grant failed.
set_availability 0—Availability set successfully.
129—Syntax Error. The displayed message indicates which argument is syntactically incorrect.
170—Service does not exist.
180—No system defined.
181—No key tests defined.
182—No key beacons defined.
230—Insufficient privileges.
231—Availability not changed.
255—Back-end error. Verb failed.
set_credential 1—Target type does not exist.
2—Target (of given target type) does not exist.
3—Credential set does not exist.
4—Insufficient privileges.
5—Credential column does not exist.
6—Credential column number mismatch.
set_key_beacons_tests 0—Key beacons and tests set successfully.
129—Syntax Error. The displayed message indicates which argument is syntactically incorrect.
135—Must specify at least one key beacon and test.
170—Service does not exist.
173—Beacon does not exist.
175—Beacon not in list of monitoring beacons.
230—Insufficient privileges.
255—Back-end error. Verb failed.
set_metric_promotion 0—SUCCESS
223—SYNTAX_ERRNUM: Input is malformed.
255—VERB_FAILED_ERRNUM: Back-end validation fails.
Table 3–4 (Cont.) Built-In Verb Errors
Verb Error Code
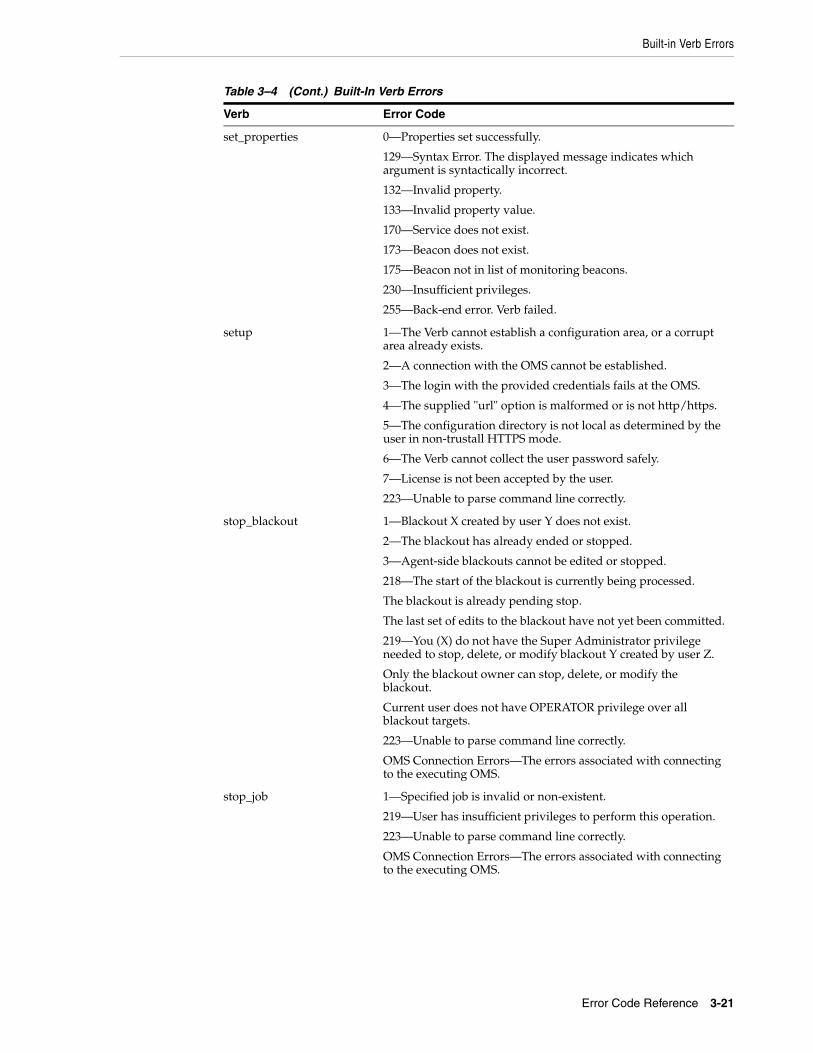
Built-in Verb Errors
Error Code Reference 3-21
set_properties 0—Properties set successfully.
129—Syntax Error. The displayed message indicates which argument is syntactically incorrect.
132—Invalid property.
133—Invalid property value.
170—Service does not exist.
173—Beacon does not exist.
175—Beacon not in list of monitoring beacons.
230—Insufficient privileges.
255—Back-end error. Verb failed.
setup 1—The Verb cannot establish a configuration area, or a corrupt area already exists.
2—A connection with the OMS cannot be established.
3—The login with the provided credentials fails at the OMS.
4—The supplied "url" option is malformed or is not http/https.
5—The configuration directory is not local as determined by the user in non-trustall HTTPS mode.
6—The Verb cannot collect the user password safely.
7—License is not been accepted by the user.
223—Unable to parse command line correctly.
stop_blackout 1—Blackout X created by user Y does not exist.
2—The blackout has already ended or stopped.
3—Agent-side blackouts cannot be edited or stopped.
218—The start of the blackout is currently being processed.
The blackout is already pending stop.
The last set of edits to the blackout have not yet been committed.
219—You (X) do not have the Super Administrator privilege needed to stop, delete, or modify blackout Y created by user Z.
Only the blackout owner can stop, delete, or modify the blackout.
Current user does not have OPERATOR privilege over all blackout targets.
223—Unable to parse command line correctly.
OMS Connection Errors—The errors associated with connecting to the executing OMS.
stop_job 1—Specified job is invalid or non-existent.
219—User has insufficient privileges to perform this operation.
223—Unable to parse command line correctly.
OMS Connection Errors—The errors associated with connecting to the executing OMS.
Table 3–4 (Cont.) Built-In Verb Errors
Verb Error Code
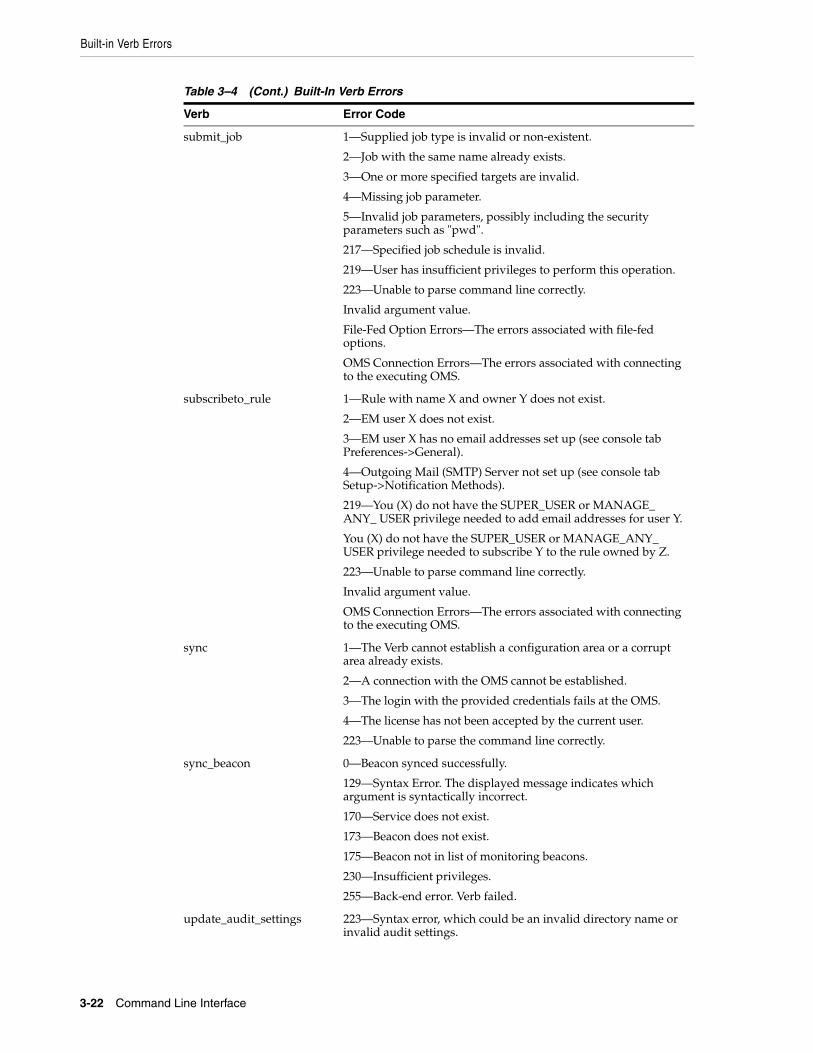
Built-in Verb Errors
3-22 Command Line Interface
submit_job 1—Supplied job type is invalid or non-existent.
2—Job with the same name already exists.
3—One or more specified targets are invalid.
4—Missing job parameter.
5—Invalid job parameters, possibly including the security parameters such as "pwd".
217—Specified job schedule is invalid.
219—User has insufficient privileges to perform this operation.
223—Unable to parse command line correctly.
Invalid argument value.
File-Fed Option Errors—The errors associated with file-fed options.
OMS Connection Errors—The errors associated with connecting to the executing OMS.
subscribeto_rule 1—Rule with name X and owner Y does not exist.
2—EM user X does not exist.
3—EM user X has no email addresses set up (see console tab Preferences->General).
4—Outgoing Mail (SMTP) Server not set up (see console tab Setup->Notification Methods).
219—You (X) do not have the SUPER_USER or MANAGE_ANY_ USER privilege needed to add email addresses for user Y.
You (X) do not have the SUPER_USER or MANAGE_ANY_ USER privilege needed to subscribe Y to the rule owned by Z.
223—Unable to parse command line correctly.
Invalid argument value.
OMS Connection Errors—The errors associated with connecting to the executing OMS.
sync 1—The Verb cannot establish a configuration area or a corrupt area already exists.
2—A connection with the OMS cannot be established.
3—The login with the provided credentials fails at the OMS.
4—The license has not been accepted by the current user.
223—Unable to parse the command line correctly.
sync_beacon 0—Beacon synced successfully.
129—Syntax Error. The displayed message indicates which argument is syntactically incorrect.
170—Service does not exist.
173—Beacon does not exist.
175—Beacon not in list of monitoring beacons.
230—Insufficient privileges.
255—Back-end error. Verb failed.
update_audit_settings 223—Syntax error, which could be an invalid directory name or invalid audit settings.
Table 3–4 (Cont.) Built-In Verb Errors
Verb Error Code
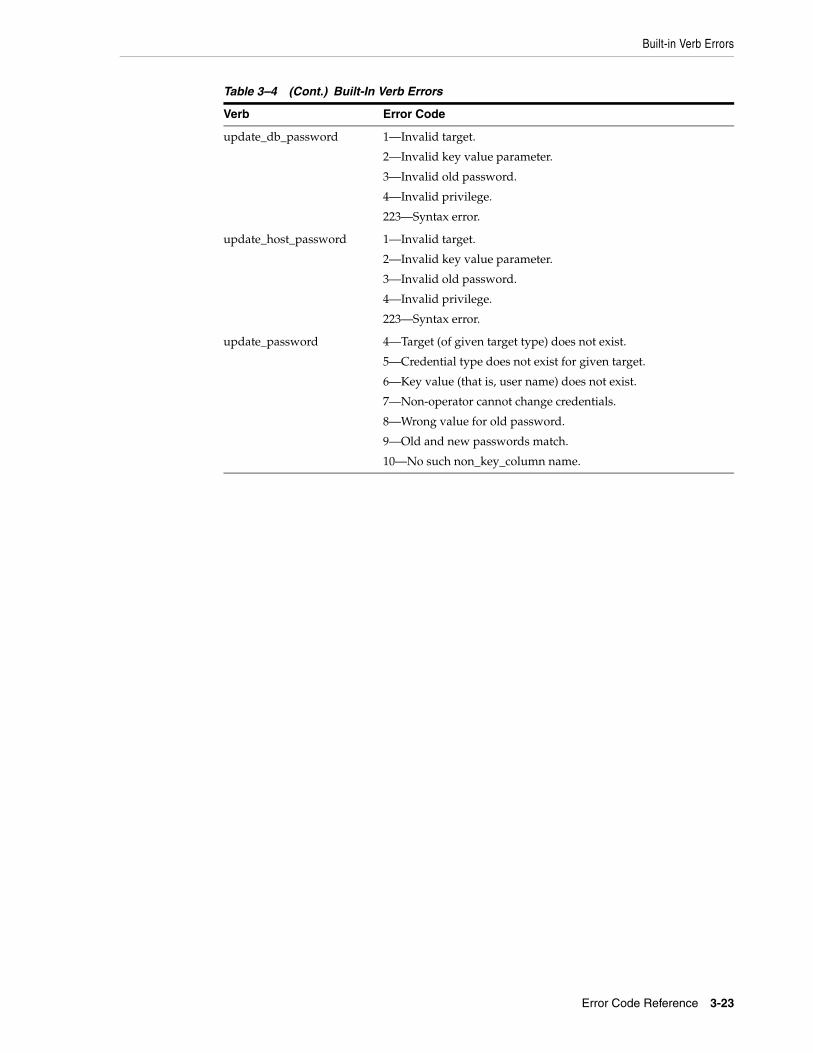
Built-in Verb Errors
Error Code Reference 3-23
update_db_password 1—Invalid target.
2—Invalid key value parameter.
3—Invalid old password.
4—Invalid privilege.
223—Syntax error.
update_host_password 1—Invalid target.
2—Invalid key value parameter.
3—Invalid old password.
4—Invalid privilege.
223—Syntax error.
update_password 4—Target (of given target type) does not exist.
5—Credential type does not exist for given target.
6—Key value (that is, user name) does not exist.
7—Non-operator cannot change credentials.
8—Wrong value for old password.
9—Old and new passwords match.
10—No such non_key_column name.
Table 3–4 (Cont.) Built-In Verb Errors
Verb Error Code

Built-in Verb Errors
3-24 Command Line Interface
Index-1
Index
Aadd_beacon, 2-11add_mp_to_mpa, 2-12, 2-13add_target, 2-15add_target_property, 2-18apply_prilege_delegation_setting, 2-19apply_template, 2-21apply_template_tests, 2-24argfile, 2-26assign_test_to_target, 2-27authentication, 1-7
Bbuilt-in verb errors, 3-2
Cchange_service_system_assoc, 2-28clear_credential, 2-29clear_stateless_alerts, 2-30Client-side Controller, 1-2
setting up, 1-5clone_as_home, 2-31clone_crs_home, 2-34clone_database_home, 2-38collect_metric, 2-37Complex Separator, 1-10confirm_instance, 2-41create_aggregate_service, 2-42create_blackout, 2-43create_group, 2-48, 2-49create_red_group, 2-51create_redundancy_group, 2-52create_role, 2-54create_service, 2-56create_system, 2-58create_user, 2-60
Ddelete_blackout, 2-62delete_group, 2-64delete_guest_vm, 2-63delete_instance, 2-65delete_job, 2-66
delete_metric_promotion, 2-67delete_role, 2-68, 2-69delete_system, 2-70delete_target, 2-71delete_test, 2-72delete_test_threshold, 2-73delete_user, 2-74disable_audit, 2-75disable_test, 2-76
EEM CLI Client, 1-3EM CLI Oracle Management Service Extension, 1-3EM CLI usage examples, 1-1EMCLI_OPTS, 1-6emclikit.jar file, 1-4enable_audit, 2-77enable_test, 2-78errors
built-in, 3-2connection, 3-1file-fed option, 3-2infrastructure, 3-1
execute_hostcmd, 2-79execute_sql, 2-81export_report, 2-83export_template, 2-84extend_as_home, 2-85extend_crs_home, 2-88extend_rac_home, 2-91extract_template_tests, 2-94
Ffile-fed option errors, 3-2format, 1-9format, output, 1-10
Gget_agent_properties, 2-95get_agent_property, 2-96get_aggregate_service_info, 2-97get_aggregate_service_members, 2-98get_blackout_details, 2-99
Index-2
get_blackout_reasons, 2-101get_blackout_targets, 2-102get_blackouts, 2-104get_ca_info, 2-106get_group_members, 2-109get_groups, 2-111get_guest_vm_status, 2-108get_instance_data_xml, 2-112get_instance_status, 2-113get_instances, 2-114get_job_execution_detail, 2-115get_jobs, 2-116get_metrics_for_stateless_alerts, 2-118get_on_demand_metrics, 2-119get_procedure_types, 2-120get_procedure_xml, 2-121get_procedures, 2-122get_reports, 2-123get_retry_arguments, 2-124get_system_members, 2-125get_target_properties, 2-127, 2-184get_targets, 2-128get_test_thresholds, 2-130get_unsync_alerts, 2-132get_virtual_target_status, 2-133grant_license_no_validation, 2-134grant_license_with_validation, 2-137grant_privs, 2-140grant_roles, 2-142
Hhelp for verbs, 1-7help verb, 2-143HTTPS, 1-8
Iignore_instance, 2-144import_report, 2-145import_template, 2-146infrastructure errors, 3-1installation of EM CLI, 1-4
Llist_guest_vm, 2-147list_privilege_delegation_settings, 2-148list_target_privilege_delegation_settings, 2-149list_virtual_server, 2-151, 2-152loader_perf, 2-153log files, 1-6login, 2-154logout, 2-156
Mmodify_aggregate_service, 2-157modify_collection_schedule, 2-158modify_group, 2-161modify_red_group, 2-162
modify_redundancy_group, 2-163modify_role, 2-165modify_system, 2-167modify_target, 2-169modify_user, 2-172
OOMS connection errors, 3-1OMS-side Controller, 1-2
Ppause_guest_vm, 2-174provision, 2-175
Qquick starting process, 1-3
Rreboot_guest_vm, 2-177reboot_virtual_server, 2-178relocate_targets, 2-179remove_beacon, 2-182remove_service_system_assoc, 2-183reschedule_instance, 2-185resume_guest_vm, 2-186resume_instance, 2-187resync_agent, 2-188retry_instance, 2-189retry_job, 2-190revoke_license_no_validation, 2-191revoke_license_with_validation, 2-194revoke_privs, 2-197revoke_roles, 2-198run_avail_diag, 2-199run_promoted_metric_diag, 2-200
Sscript, 1-9secure_agents, 2-201Security, 1-7set_agent_property, 2-204set_availability, 2-205set_credential, 2-206set_instance_jobgrants, 2-208set_key_beacons_tests, 2-209set_metric_promotion, 2-210set_properties, 2-213set_target_property_value, 2-214set_test_threshold, 2-216setup, 2-217show_audit_settings, 2-220show_credential_set_info, 2-221show_credential_type_info, 2-222show_operations_list, 2-223start_guest_vm, 2-224start_paf_daemon, 2-225
Index-3
start_vt_daemon, 2-226starting process, 1-3status_paf_daemon, 2-227status_vt_daemon, 2-228stop_blackout, 2-229stop_guest_vm, 2-230stop_instance, 2-231stop_job, 2-232stop_paf_daemon, 2-233stop_virtual_server, 2-234stop_vt_daemon, 2-235submit_agent_patch, 2-241submit_job, 2-236submit_procedure, 2-242subscribeto_rule, 2-243suspend_guest_vm, 2-245suspend_instance, 2-246sync, 2-247sync_beacon, 2-248
TTrusted Certificate Management, 1-8
Uunpause_guest_vm, 2-249update_and_retry_step, 2-252update_audit_settings, 2-250update_db_password, 2-253update_host_password, 2-255update_password, 2-257update_target_password, 2-259usage examples of EM CLI, 1-1
Vvariables, passing, 2-31view_redundancy_group, 2-261

Index-4
Recommended