�
BASS RIYAZ – The Practice Workbook For Mastery Of The 4, 5, And 6-string Electric Bass Guitar.
�
Chapter 1 - Introduction
CHAPTER ONE: INTRODUCTION The term “Riyaz” comes from India where it means the all-embracing
art of practice, with all its associated ritual, discipline, teacher-mentorship
and sheer hard work. There are countless stories about the superhuman
dedication and energy put into Indian musicians’ practice regiments in
order to achieve virtuosic levels of artistry.
Bass Riyaz takes a wholistic approach to the development of craft
on the electric bass guitar. Mastery of any instrument is not only about
development of physical “technique”, but is also about the mastery of Self.
It is necessary to consider emotional, philosophical, psychological, and
physical aspects necessary to master oneself and one’s instrument.
It is with this attitude that I teach myself, teach my students, and wrote this
book. I certainly don’t believe any one book can be the “complete” method,
but I hope that Bass Riyaz serves not only as a reference book kept on your
bookshelf, but as a workbook that is a companion to your practice every day.
It is important to realize that you can always benefit from the obser-
vations and guidance of another more experienced person - even if you’re
endowed with such a book as this! So it is encouraged that the developing
bassist seek professional tutelage on many of this book’s topics, in parallel
with independent study and practice. This book developed in a similar way:
over the course of years of experience in teaching, learning and perform-
ing with numerous people in a variety of situations.
The exercises contained herein are often notated from C, but this
serves as only a starting-point. It is assumed that the bassist will transpose
the appropriate exercises to other keys and across the range of the instru-
ment, for added benefit. It is also assumed that the exercises are repeated
several times consecutively, even if repeat signs do not appear. In India
material that can be read and rendered once correctly is not considered
mastered. Repetitions ad infinitum must be rendered at a multitude of
speeds before material is truly “owned” by the player. Only then can the
student humbly take their skills and attempt to apply them in performance
situations.
The broad range of topics contained herein are relevant to musi-
cians of any instrument, and so I encourage non-bassists to dig into these
concepts and see if the meaning of “Riyaz” comes through to them also.
Composers may also find certain concepts relevant to them. Broad as the
range of topics are, however, as I said it is not possible for any one book to
cover every conceivable topic. My bibliography should serve as a starting
point for further reading, and for enriching your library.
The chapters are not laid out in any strict order. Apart from the Warm
Up chapter, which is intrinsically rudimentary and follows this Introduction,
you may skip around to whatever chapters you fancy. I do recommend that
beginning and intermediate level musicians consult Chapter 12 for some
ideas on how to develop an effective practice routine.
A word on the notation in this book: conventional musical notation is
used, not tablature (tab). This was a conscious decision, because I believe
that developing general musicianship involves being literate - being able to
read and write. Music is not written using tab, only shapes and patterns
for guitar and bass use this shorthand. If you have until now avoided
learning to read music, please take this opportunity to start learning now!
Your bass playing will benefit from the improvement of your literacy and
musicianship.
I also have used English (rather than American) spellings for some
words. I realize that some readers will be in the USA and wonder what
I mean by “colour”, but alas I am a creature of habit and was originally
taught that English has such silent letters. Just because. Such is life.
I encourage feedback on any aspect or issue related to this book. To
facilitate this, I have dedicated a section of my web-site to Bass Riyaz. This
online facility is designed to maximize the utility and currency of this book
via an online forum for question-and-answer sessions between readers like
you, and myself. Bass Riyaz online will develop and change over time, so
please keep in touch. Log on to: www.jonathandimond.com
It is my intention to record and release a Compact Disc to accom-
pany future editions of Bass Riyaz. Please e-mail if you are interested in
receiving this CD in the future.

12
BASS RIYAZ – The Practice Workbook For Mastery Of The 4, 5, And 6-string Electric Bass Guitar.
13
Chapter 2 - Warming Up
CHAPTER TWO: WARMING UPTUNING UP The fretted electric bass is equally tempered along each string,
which means the 12 semitones per octave are of equal size. This tuning
system allows for rapid and acceptable-sounding changes of keys, which
is required by most of the jazz, rock, and related contemporary musics for
which the instrument is designed and mostly used. Intervals played across
different strings, however, may reveal slight intonation problems even
when the bass is considered “in tune”. This is due to a variety of reasons,
including the physical condition of your bass and also acoustic phenomena
which are introduced in Chapter 16, but whose details are outside of the
scope of this book. You may also experience intonation variations when
playing with other instruments, as they may not be using exactly the same
temperament or tuning system.
There are three methods for effectively tuning your bass: with a
tuner; from a reliable reference; and/or using harmonics. Regardless of
the method you choose, the process should be approached slowly and
carefully, so that you are tuned accurately. This approach also sets the
right mood for the rest of your performance or practice. Tuning that is done
hastily and as a mere formality does not give the ears and mind time to
focus on the sound you create. So again, take your time during tuning.
Electronic Tuner
Using an electronic tuner for the open strings results in a good
equally-tempered tuning, whereby the same notes on different strings
match as the manufacturer intended. Make sure your volume is fully
up when you plug into the tuner, and remember to turn the unit off
afterwards. Note that for players of 5- or 6-string instruments, the low B
is below the range of most tuners, and tuning the 12th-fret harmonic is
necessary instead. Tuning any of the strings with 12th-fret harmonics will
always yield precisely the same result as tuning the open strings, as the
notes are a perfect octave higher. (See Chapter 16 for more information on
harmonics.) For beginning and progressing bassists, I would suggest that
this method be alternated or combined with the others so that your ears
are given a chance to be involved in the process, not just your eyes. You
could also plug in your amplifier to the tuner’s output to hear the strings as
you tune.
Reference Note
Tuning from a reference note involves the aural comparison of one of
your strings with a reliable reference. This could be a note from the pianist
or guitarist, if they’re tuned up! One possible reference is a tuning fork in E,
A, D, or G. Touch it on the pickup and match the sound of the appropriate
string. Listen to whether the string is lower or higher than the reference
and turn the machine head accordingly. This is a skill that may take some
time but is worth developing. At first you may notice a tuning discrepancy
but feel unsure as to whether the note being tuned is flat or sharp
compared to the reference. Listen for the oscillations in the composite
sound as the two out-of-tune notes destructively interfere with each other.
Take an educated guess and turn the tuning peg one direction (decreasing
tension if the note seems sharp or increasing tension if it seems flat).
Notice the change in speed of the oscillations - they slow down towards a
zero beat as the two pitches reach equality. If the oscillations accelerate,
you’re moving in the wrong direction! Once one string is matched,
the others can be matched from that string in one of two ways: using
harmonics (discussed below) or using fretted notes. The latter method
involves matching the open reference string against a fretted version of the
same note (or the same note an octave away) on the string to be tuned. For
example, if you tuned your open G string, you can play that and compare
the 5th-fret G on the D string. Listen for the beating phenomenon again.
Harmonics
The most popular harmonic method usually involves comparing
the 5th-fret harmonic of one string with the 7th-fret harmonic of the
string above. These should produce the same note. The untuned string
is matched with the tuned one by making them zero beat in the same
manner as discussed above. Note that the harmonic method creates slight
discrepancies with equal temperament, because the intonation of the notes
of the harmonic series differs from equally-tempered notes. (The reasons
for this are discussed in Chapter 16.). What this means is that each of your

50
BASS RIYAZ – The Practice Workbook For Mastery Of The 4, 5, And 6-string Electric Bass Guitar.
51
Chapter 3 - Working With A Metronome
..
..
4444
q=120+?bb
Bb^7Walking bass line - Parker Blues in Bb
œ œ œ œ
A-7b5
œ œD7b9
œ
EXERCISE 3-1
œ#G-7œ œ C7œ
œnF-7œ œb
Bb7œœ
? œ ¿ œ ¿ œ ¿ œ ¿ œ ¿ œ ¿ œ ¿ œ ¿sim...
?bbEb7
œ œb œ œEb-7
œ œbAb7œb œ
D-7œ œ
G7
œ œn
Db-7
œb œbGb7œb œ
..?bbC-7
œ œ œ œnF7œ œ œ œ
Bb^7
œ œG-7
œ œC-7
œ œF7œ
œ
..
..
..
..
..
24
24
24
24
24
..
..
..
..
..
?Redefining the click - 4 phases
œ œ œ œ œ. œ. ≈ œ œ œ
EXERCISE 3-2
œ. œ. œ œ œ œ œ. œ.
≈ œ œ œ œ. œ.
? ¿ ¿ ¿ ¿ ¿ ¿ ¿ ¿
? ≈ ¿.J
≈ ¿.J
≈ ¿.J
≈ ¿.J
≈ ¿.J
≈ ¿.J
≈ ¿.J
≈ ¿.J
? ‰ ¿J
‰ ¿J
‰ ¿J
‰ ¿J
‰ ¿J
‰ ¿J
‰ ¿J
‰ ¿J
? ‰. ¿R‰. ¿
R‰. ¿
R‰. ¿
R‰. ¿
R‰. ¿
R‰. ¿
R‰. ¿
R
..
..
4444
q=120+?bb
Bb^7Walking bass line - Parker Blues in Bb
œ œ œ œ
A-7b5
œ œD7b9
œ
EXERCISE 3-1
œ#G-7œ œ C7œ
œnF-7œ œb
Bb7œœ
? œ ¿ œ ¿ œ ¿ œ ¿ œ ¿ œ ¿ œ ¿ œ ¿sim...
?bbEb7
œ œb œ œEb-7
œ œbAb7œb œ
D-7œ œ
G7
œ œn
Db-7
œb œbGb7œb œ
..?bbC-7
œ œ œ œnF7œ œ œ œ
Bb^7
œ œG-7
œ œC-7
œ œF7œ
œ
..
..
..
..
..
24
24
24
24
24
..
..
..
..
..
?Redefining the click - 4 phases
œ œ œ œ œ. œ. ≈ œ œ œ
EXERCISE 3-2
œ. œ. œ œ œ œ œ. œ.
≈ œ œ œ œ. œ.
? ¿ ¿ ¿ ¿ ¿ ¿ ¿ ¿
? ≈ ¿.J
≈ ¿.J
≈ ¿.J
≈ ¿.J
≈ ¿.J
≈ ¿.J
≈ ¿.J
≈ ¿.J
? ‰ ¿J
‰ ¿J
‰ ¿J
‰ ¿J
‰ ¿J
‰ ¿J
‰ ¿J
‰ ¿J
? ‰. ¿R‰. ¿
R‰. ¿
R‰. ¿
R‰. ¿
R‰. ¿
R‰. ¿
R‰. ¿
R
CHAPTER THREE: WORKING WITH A METRONOME Much debate occurs over the utility of a metronome. My recommendation is that since the elec-
tric bass is an instrument of both harmonic and timing reference for the rest of the ensemble, it is a
requirement to have metronomic ability. This ability can be improved by working with a metronome or
drum machine. I prefer drum machines most of the time as they are far more flexible in their provision
of tempos, cyclical forms, various metres and subdivisions. (For programming drum machines, check
out the rhythm table at the end of the Glossary).
The important thing to remember is not to use any kind of machine as a crutch: the device’s
purpose is to help build your “internal clock” and to assist in mastery of techniques in the absence of a
perfectly metronomic human practice partner! Get to know the device and then keep changing its role
in a creative manner. In this way, it will become creatively integrated into your practice, and there is no
fear of over-reliancy. This chapter aims to provide “food for thought” in this respect.
For example, begin by practicing a walking bass line with the metronome clicking every beat (see
Exercise 3-1). Then try changing the metronome to half the tempo, and define those beats as 2 and 4.
(These are notated as crossed note-heads.) Then try defining those beats as 1 and 3. (These are notated
as regular note-heads.) Then try halving it again and defining the click as the downbeat (beat 1) of each
bar. Redefine it as beat 2 of each bar. Then try halving it again and defining it as the downbeat of every
second bar. Then keep the metronome at this slowest tempo and play only with the notes that coincide
with the click; then twice per click; four times, eight times; etc. You are building the texture up again.
Imagine the notes that you are not playing. The strategy here is to practice systematically “weaning”
yourself off the metronome, so that you have to rely on your internal clock. Even this simple exercise
can take quite some time to perfect.
In summary, the concept here is to use a metronome to click on the whole rhythmic spectrum
- from individual subdivisions/pulses through to downbeats of multiple-bar phrases.
This previous exercise illustrates the need to be flexible in your ability to “define” what the click
is articulating. We all know how lost we can feel when we listen to music and don’t know where beat
“1” is, or we think we do and then are told that it’s actually elsewhere! To bridge to the new perspective
takes flexibility and strength - we have to be able to leave our initial definition and grasp the new one.
Players skilled in this area are able to play with syncopation in such a way that the form of a piece can
become completely ambiguous and yet they know “where it is”.
Exercise 3-2 is a redefinition exercise to further illustrate this point. It starts with a 2/4 click and a
4-bar cycle with a latin feel. Begin at 60 b.p.m. (beats per minute). Then define the same click not as the
beat but as quarter notes starting on the second sixteenth-note. This means that you have to start your
first phrase one sixteenth-note prior to each click you hear. (Note that bars 2 and 4 will start with this
displaced click.) Then redefine the beat again - the click now shifts to the off-beats (one eighth note after
each beat). Then again - the click now shifts to the last sixteenth-note of each beat. One more redefini-
tion causes you to return to your starting point, thus completing a 4-part phase. When practicing such
an exercise, subdivide in your head, aim for even note-lengths and try to segue from one phrase to the
next without having to stop and think.
What you should start experiencing is a sense that each displaced version of the original has its
own unique sound, but yet of course is also clearly derived from the original.
54
BASS RIYAZ – The Practice Workbook For Mastery Of The 4, 5, And 6-string Electric Bass Guitar.
55
Chapter 4 - Speed
CHAPTER FOUR: SPEED The quest for speed in playing any instrument often causes frustration, musical imbalance and
even physical problems. Nevertheless, just as we should be able to play at a range of dynamics, and
to play over the entire pitch range of our instrument, we should possess the skill to render phrases of
all speeds. By calling this chapter “speed” I am not just concerned with “playing fast”, but rather with
developing facility at all velocities. I have broken down the technical requirements into: left hand agility;
right hand agility; synchronization of the two hands; stamina; motor memory; and subdividing ability.
As a source of inspiration, I often refer to the stamina and agility which masters of Indian percussion
and string instruments achieve. If you have ever been to an authentic Indian classical performance,
you will know what I mean, when after a couple of hours of playing the tempo has increased to a point
where the motion in the musicians’ hands is just a blur, and yet the players maintain the utmost in con-
trol, poise, and happy expressions! It is also interesting to note that I have never heard of the physical
problems of carpal tunnel or tendonitis in these performers, which goes to show that the process of
achieving speed is all-important.
In the practice of these technical exercises, it is important to maintain a healthy posture, and to have
warmed up sufficiently. Gradually increasing the tempo over a period of time will yield good results.
Fast, messy playing will result if the tempo of these exercises is increased prematurely, so aim for
accuracy and mastery before increasing the tempo. Take breaks frequently during the more grueling
exercises. Even a few seconds of dropping the arms and shaking the wrists with loose hands can give
the muscles time to recuperate.
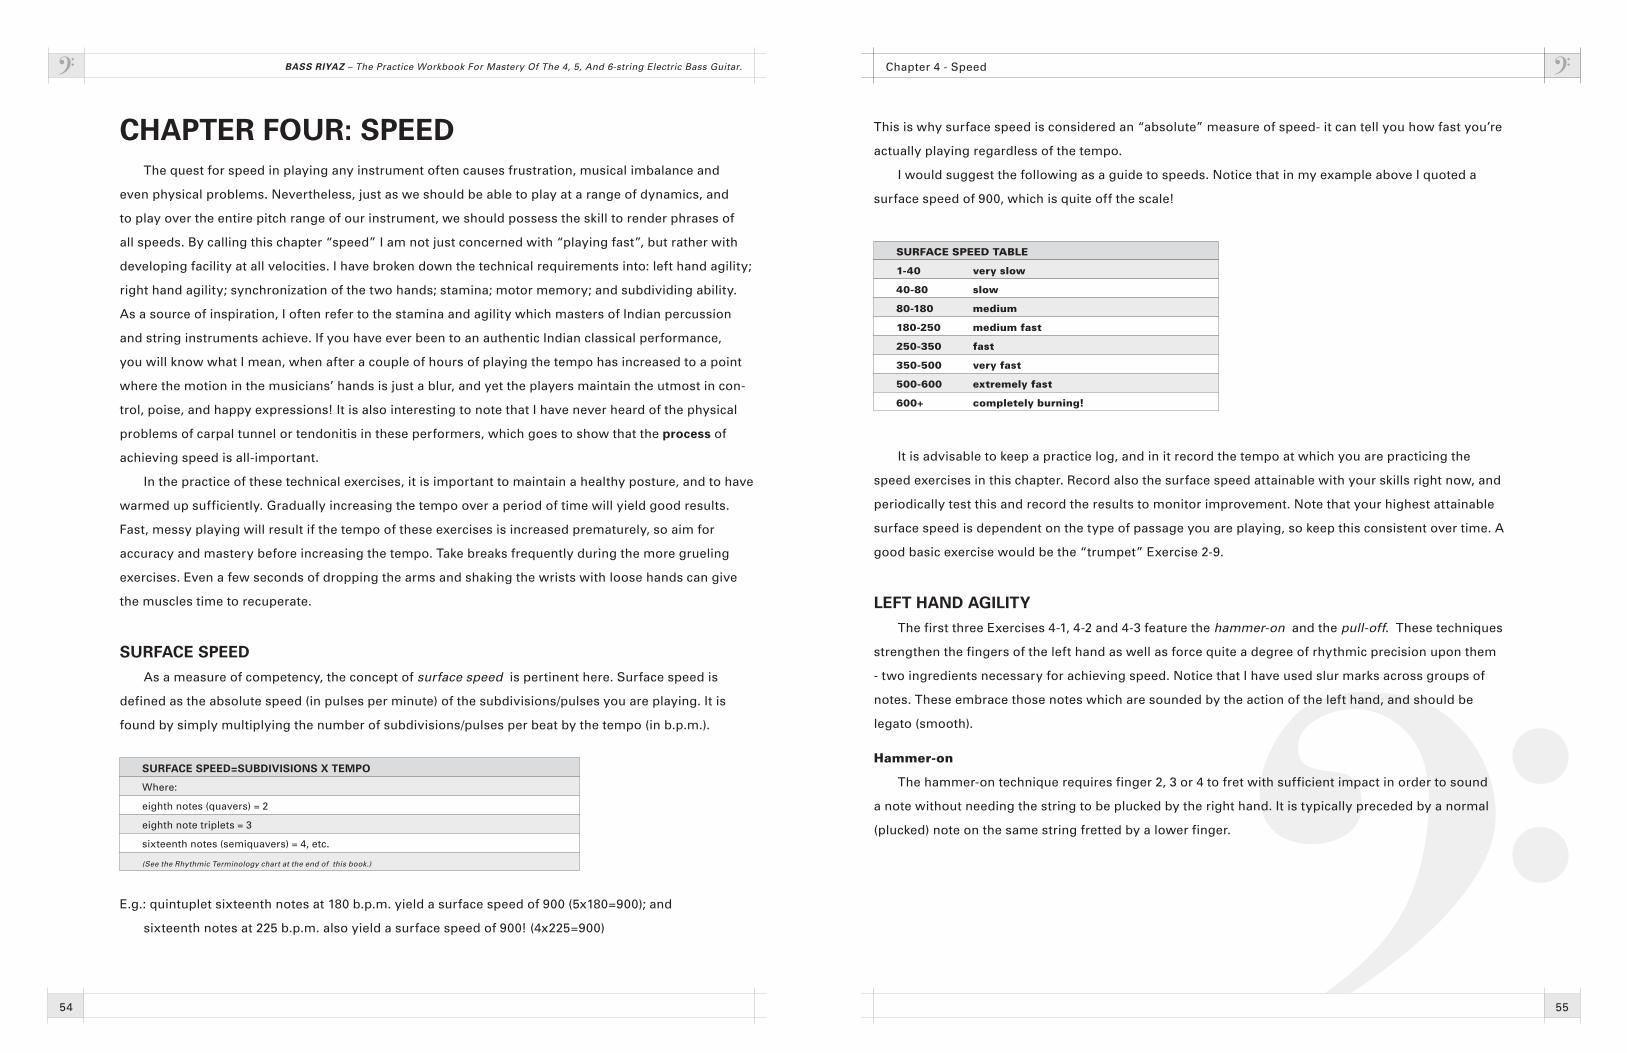
SURFACE SPEED As a measure of competency, the concept of surface speed is pertinent here. Surface speed is
defined as the absolute speed (in pulses per minute) of the subdivisions/pulses you are playing. It is
found by simply multiplying the number of subdivisions/pulses per beat by the tempo (in b.p.m.).
This is why surface speed is considered an “absolute” measure of speed- it can tell you how fast you’re
actually playing regardless of the tempo.
I would suggest the following as a guide to speeds. Notice that in my example above I quoted a
surface speed of �00, which is quite off the scale!
SURFACE SPEED=SUBDIVISIONS X TEMPO
Where:
eighth notes (quavers) = 2
eighth note triplets = 3
sixteenth notes (semiquavers) = 4, etc.
(See the Rhythmic Terminology chart at the end of this book.)
E.g.: quintuplet sixteenth notes at 1�0 b.p.m. yield a surface speed of �00 (5x1�0=�00); and
sixteenth notes at 225 b.p.m. also yield a surface speed of �00! (4x225=�00)
SURFACE SPEED TABLE
1-40 very slow
40-80 slow
80-180 medium
180-250 medium fast
250-350 fast
350-500 very fast
500-600 extremely fast
600+ completely burning!
It is advisable to keep a practice log, and in it record the tempo at which you are practicing the
speed exercises in this chapter. Record also the surface speed attainable with your skills right now, and
periodically test this and record the results to monitor improvement. Note that your highest attainable
surface speed is dependent on the type of passage you are playing, so keep this consistent over time. A
good basic exercise would be the “trumpet” Exercise 2-�.
LEFT HAND AGILITy The first three Exercises 4-1, 4-2 and 4-3 feature the hammer-on and the pull-off. These techniques
strengthen the fingers of the left hand as well as force quite a degree of rhythmic precision upon them
- two ingredients necessary for achieving speed. Notice that I have used slur marks across groups of
notes. These embrace those notes which are sounded by the action of the left hand, and should be
legato (smooth).
Hammer-on
The hammer-on technique requires finger 2, 3 or 4 to fret with sufficient impact in order to sound
a note without needing the string to be plucked by the right hand. It is typically preceded by a normal
(plucked) note on the same string fretted by a lower finger.

�0
BASS RIYAZ – The Practice Workbook For Mastery Of The 4, 5, And 6-string Electric Bass Guitar.
�1
Chapter 5 - Polyrhythm
CHAPTER FIVE: POLyRHyTHMDEFINITION OF TERMS Polyrhythm literally translated means “many rhythms” but this is a bit vague. “Polymetre” comes
closer to actual meaning. Whatever you call it, it is only after conceptualization and proper practice that
the complete meaning can be realized. Firstly, we need to clear up some related terms:
Pulse – The “atomic” unit of time which is the smallest value needed to add up to make any of the
durations of notes in a piece or phrase. Also known as the subdivision or grid.
Beat – Regular groupings of pulse that combine and repeat to create a dominant “surge” or “step” to
every bar or phrase in the music. It’s usually the beat that we’ll tap our foot to - unless it’s very fast, and
then we may tap to groups of two or three beats.
Grouping – Additions of pulses that sum to create a note of a larger duration are called a grouping.
Groupings may contain sub-groupings, such as the summation of 2 pulses and 3 pulses to make a
grouping of 5 pulses. This process is the basis of additive rhythm.
Duration – The total size of a group of pulses. Also known as the value of a note.
Additive Rhythm – The rhythmic scheme that approaches rhythm from the opposite perspective to
divisive rhythm. That is, rather than starting with a large duration (such as a whole note that fills each
bar of 4/4), and dividing that progressively (usually by a division of 2, or occasionally 3), we build up
groupings of pulses to create the larger durations we require.
Exercise 5-1 illustrates the rhythm tree - the classic model of divisive rhythm we’re initially taught in
Western music theory. It commences with a whole note at the top and each line below halves the dura-
tion of the note above it, and contains double the number of notes to fill the same overall duration (1
bar of 4/4 metre). I have written the British and American labels for these durations on the left and right
columns respectively; you can see from the latter the factor involved.
A typical phrase in divisive rhythm orders the bar into parts that are similarly organized into two
halves, such as in Exercise 5-2.
Compare this with a typical phrase in additive rhythm, such as in Exercise 5-3. With a divisive
approach, this example is much more difficult to sight-read. It doesn’t fall into the “normal” groupings
of divisive rhythm, yet it is based on the same pulse or subdivision (16th-notes).
Can you see the order in this rather disjointed phrase? A little examination reveals groupings of
16th-notes in the following pattern:
2+3+4+3+2 and then 6+5+4+3.
44?The Rhythm Tree
semibreve
EXERCISE 5-1
˙whole note
?
minims
˙ ˙half notes
?
crotchets
œ œ œ œquarter notes
?
quavers
œ œ œ œ œ œeighth notes
œ œ
?
semiquavers
œ œ œ œ œ œ œ œ œ œ œ œsixteenth notes
œ œ œ œ
44?Divisive Rhythm
œ œ œ
EXERCISE 5-2
œ. œ œ œ œ œ œ œ. œ œ
44?Additive Rhythm
œ œ. œ œ.J
EXERCISE 5-3
œ œ œ œ œR œ œ.
J
24
24
°
¢
?3:2 3
EXERCISE 5-4
œ œ œ3
œ œ œ
? œ œ
34
34
°
¢
?2:3
œ œ
EXERCISE 5-5
œ œ œ œ
? œ œ œ
This pattern of numbers in Exercise 5-3 reveals one of the primary characteristics of phrases that
are additive: they can contain numerical processes. The mathematical design behind Exercise 5-3 con-
tains an expanding-contracting sequence of numbers (incrementing by a single pulse from 2 up to 4 and
back), followed by a descending (contracting) sequence from 6 down to 3. These sequences can take on
a visual aspect that can be quite geometric in appearance. Such shapes are behind a particular Indian
rhythmic process called Yati. More on these South Indian rhythmic patterns later in this chapter!
44?The Rhythm Tree
semibreve
EXERCISE 5-1
˙whole note
?
minims
˙ ˙half notes
?
crotchets
œ œ œ œquarter notes
?
quavers
œ œ œ œ œ œeighth notes
œ œ
?
semiquavers
œ œ œ œ œ œ œ œ œ œ œ œsixteenth notes
œ œ œ œ
44?Divisive Rhythm
œ œ œ
EXERCISE 5-2
œ. œ œ œ œ œ œ œ. œ œ
44?Additive Rhythm
œ œ. œ œ.J
EXERCISE 5-3
œ œ œ œ œR œ œ.
J
24
24
°
¢
?3:2 3
EXERCISE 5-4
œ œ œ3
œ œ œ
? œ œ
34
34
°
¢
?2:3
œ œ
EXERCISE 5-5
œ œ œ œ
? œ œ œ
106
BASS RIYAZ – The Practice Workbook For Mastery Of The 4, 5, And 6-string Electric Bass Guitar.
107
Chapter 6 - Time Feel
So it can be seen that a good “groove”-player might sound great on their own but could be a
nightmare to play with if they stubbornly refuse to cooperate with other musicians’ time feels. A player
who has a good time feel and an ability to “lock in” to other musicians is a type of player who would be
a good freelance and studio player, because they may be better at creating different ensemble sounds
and harmonizing with diverse players.
Regardless of all this, you are not going to have a good time feel if you don’t listen with open ears
and have a technique that will allow you to relax and flow. Listen to the legendary bassists for their time
feel. I especially recommend the genres of Motown and Rhythm ‘n’ Blues (R&B), as the role of the bass-
ist in this music was such that it exposed and featured their groove in a harmonically clear and melodic
setting.
PUSHING AND DRAGGING Though we do a lot of practice with the metronome, and generally try to model its perfection in
its stability of time, humans will always produce some amount of microscopic tempo fluctuations within
a bar or phrase. These fluctuations are largely responsible for the type of time feel which distinguishes
humans from machines, and in the case of advanced musicians, are actually considered beautiful
temporal colourations. Many sequencers and drum machines these days have a “humanizing” function
which allow some degree of randomization or complex quantization to be applied to otherwise mechan-
ically-perfect time. In some cases we can learn from these machines - to see how they try to imitate
what comes naturally to us!
One method is by pushing and/or dragging certain beats in a bar.
Pushing - Sounding a beat/s slightly earlier than their correct placement. Builds excitement as the
tempo feels like it is increasing slightly.
Dragging - Sounding a beat/s slightly later than their correct placement. Creates relaxation as the
tempo feels like it is decreasing slightly.
Note that by pushing a beat, the correct placement of the next beat will seem relatively late. Also
realize that at slower tempos, a smaller amount of time fluctuation is required to create a discernible
push or drag of beats. This is why it is actually easier to perform rhythmically precisely at fast tempos,
as the margin for error is less. (All the more reason to practice more ballads!) Just like using chromati-
cism in functional harmony only after chord-scale tones are learnt, it is best to firmly establish what is
on the beat before messing too much with time feel in this way.
CHAPTER SIX: TIME FEEL The issue of “feel” is more subjective than the other rhythmic concepts in this book. This chapter
should serve as inspiration to fine-tune your own awareness of time, using both practical and abstract
concepts.
In the area of time, there is much that can be said about how to measure and count it. However, all
these mathematical abstractions are a means not an end: Time is a parameter of music that will remain
to be illusive if such theoretical concepts are not experienced. You’ve just got to spend many hours on
your instrument playing with time to teach yourself how to harmonize with this musical dimension. Just
like learning harmony, over the years your aural awareness of time becomes more refined, and there are
deeper and more sensitive levels which you can begin to control. Remember: there are always deeper
levels for all of us to learn about!
The Six Aspects of Time Feel
Musicians with good time feel possess the following skills:
1. an ability to recognize a tempo and communicate it effectively and with stability;
2. an ability to strongly define the beat and pulse regardless of what is going on around them;
3. flexibility with musical motives, their development and rhythmic placement;
4. flexibility with subdivision and mixtures of subdivision;
5. stability of tempo and pulse during syncopated passages;
6. an overall innate “feel” for time and the way it flows.
All the above are interrelated, but are broken down in order for us to focus on the different aspects of
time feel, and to generate exercises to improve our abilities. The Practice Plan section at the end of this
chapter offers some strategies to tackle these aspects. You may also refer back to Chapter 3, which con-
tains related work with the metronome.
LOCK AND GROOVE Firstly, I’d like to offer definitions of terms which are casually used at gigs and in rehearsals:
Groove - An innate sense of time which gives the musician independent strength in the area of time
and rhythm. Usually characterized by a steady tempo and a precise ability to render subdivisions
and their groupings. Articulation and dynamics are integral to rendering a “groovy” musical line.
Musicians that can groove are said to be playing “in the pocket”.
Lock - An ability for one musician to be able to synchronize their internal clock with other musicians to
create a homogeneous and communal time feel. This does not necessarily mean the exact copying
of another’s time feel, but the ability to perceive the prevailing time feel and compliment it musically.
11�
BASS RIYAZ – The Practice Workbook For Mastery Of The 4, 5, And 6-string Electric Bass Guitar.
11�
Chapter 7 - Chord-Scale Relationships
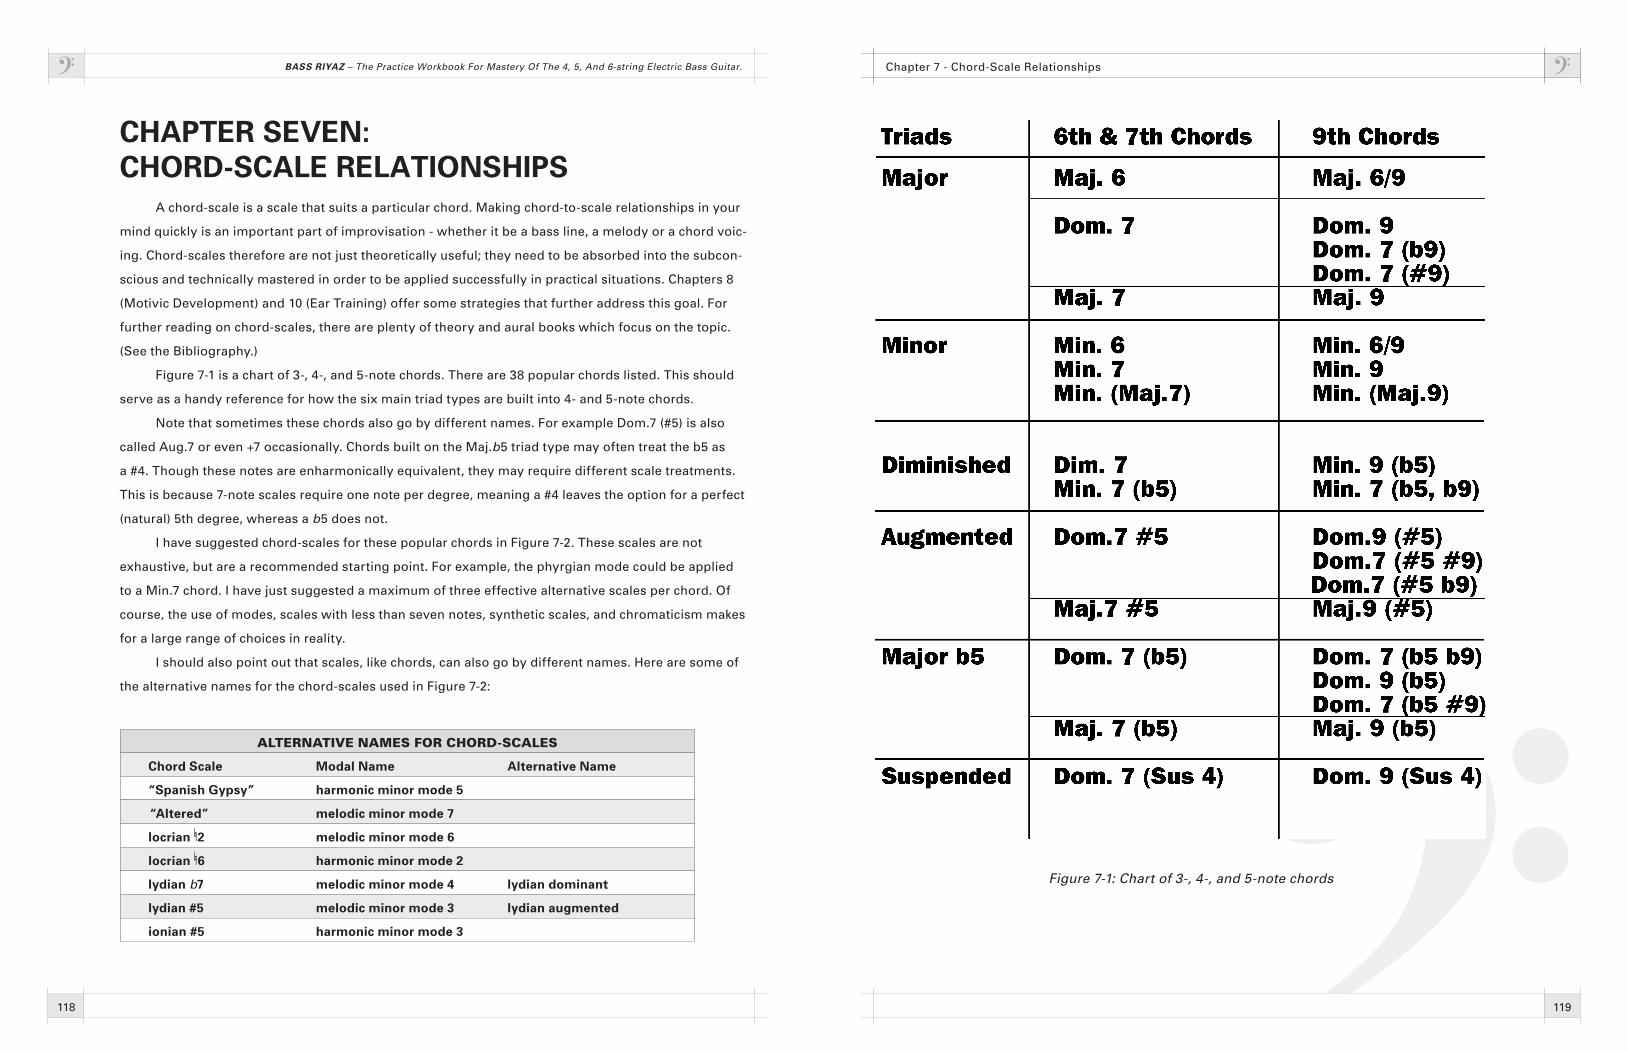
Figure 7-1: Chart of 3-, 4-, and 5-note chords
CHAPTER SEVEN:CHORD-SCALE RELATIONSHIPS A chord-scale is a scale that suits a particular chord. Making chord-to-scale relationships in your
mind quickly is an important part of improvisation - whether it be a bass line, a melody or a chord voic-
ing. Chord-scales therefore are not just theoretically useful; they need to be absorbed into the subcon-
scious and technically mastered in order to be applied successfully in practical situations. Chapters �
(Motivic Development) and 10 (Ear Training) offer some strategies that further address this goal. For
further reading on chord-scales, there are plenty of theory and aural books which focus on the topic.
(See the Bibliography.)
Figure 7-1 is a chart of 3-, 4-, and 5-note chords. There are 3� popular chords listed. This should
serve as a handy reference for how the six main triad types are built into 4- and 5-note chords.
Note that sometimes these chords also go by different names. For example Dom.7 (#5) is also
called Aug.7 or even +7 occasionally. Chords built on the Maj.b5 triad type may often treat the b5 as
a #4. Though these notes are enharmonically equivalent, they may require different scale treatments.
This is because 7-note scales require one note per degree, meaning a #4 leaves the option for a perfect
(natural) 5th degree, whereas a b5 does not.
I have suggested chord-scales for these popular chords in Figure 7-2. These scales are not
exhaustive, but are a recommended starting point. For example, the phyrgian mode could be applied
to a Min.7 chord. I have just suggested a maximum of three effective alternative scales per chord. Of
course, the use of modes, scales with less than seven notes, synthetic scales, and chromaticism makes
for a large range of choices in reality.
I should also point out that scales, like chords, can also go by different names. Here are some of
the alternative names for the chord-scales used in Figure 7-2:
ALTERNATIVE NAMES FOR CHORD-SCALES
Chord Scale Modal Name Alternative Name
“Spanish Gypsy” harmonic minor mode 5
“Altered” melodic minor mode 7
locrian §2 melodic minor mode 6
locrian §6 harmonic minor mode 2
lydian b7 melodic minor mode 4 lydian dominant
lydian #5 melodic minor mode 3 lydian augmented
ionian #5 harmonic minor mode 3
130
BASS RIYAZ – The Practice Workbook For Mastery Of The 4, 5, And 6-string Electric Bass Guitar.
131
Chapter � - Motivic Development
Form is typically notated using capital letters to stand for each section. A section can be a group-
ing of pulses, motive, phrase, regular group of bars, chorus, or anything at all! Part of the challenge
here is deciding what resolution is the most meaningful to examine the piece. It is possible that you
need to look more micro- or macroscopically in order to find true meaning in the form or structure.
Here are some examples of the formal elements represented by letters:
1. Repetition: A A A
2. Contrast: A B C D E
3. Development: A A’ A”
Of course, most forms combine all three elements. Take a typical song form,
for example: A A’ B A”
As an illustration of how a change in resolution of analysis can bring meaning to a form, take the
following example, which is my analysis of the form of a tabla composition:
A B A C D A B A E F A B A C D A
Can you decrease the resolution to a form with only � letters? From this form can you further decrease
the resolution to something with only 3 letters?!
In classical music theory there are terms for different classic forms, such as binary (AB), ternary
(ABA), rondo (ABACA), arch (ABCBA), etc. These forms are good to know as they appear in other styles too.
WHAT IS A MOTIVE? At the heart of motivic development is the motive - the “seed” idea which is first established and
then referred back to. In musical terms, this idea is typically a gestural phrase with a particular rhythm
and pitch contour or shape. It is important that the musician learns how to create motives which are just
the right length and complexity: too long, and the idea is too mature to be developed further; too short,
and the motive will not have enough character to inspire further thought. I suggest a good, typical
motive is approximately 3 to 5 notes long.
Apart from its length, you may ask what constitutes a good, memorable motive? Good question!
To get a “feel” for what constitutes a good motive, I recommend that bassists listen to the more lyrical
improvisers and songwriters, of which there are many. Start by listening to the piano solos of Bill Evans,
the lyrics of Sting, the Chorales of J.S. Bach, the symphonies of the great Classical composers, the
improvisations of Indian Classical musicians, the bass lines of Oscar Pettiford, and the guitar solos of
Jim Hall. More sophisticated motives can often be heard in the lyrics of Björk and Joni Mitchell, and the
solos of Eric Dolphy. There are many examples of great motives!
CHAPTER EIGHT: MOTIVIC DEVELOPMENT This chapter serves as a reference for bassists who improvise or compose. I believe that this
should apply to all bassists, and indeed should also be of interest to all musicians. Improvisation and
composition are integral parts of total musicianship.
It is my deep belief that satisfaction in improvisation and composition comes to the musician
not only from the content of the story which is told, but also the clarity with which the ideas are com-
municated. That is, the process is as important as the content itself. It is my aim to use a language of
expression which is both sophisticated and clear. I believe musicians should strive for optimal clarity in
their expression regardless of the depth, type or complexity of the emotions felt. Furthermore, as each
person is different, we should all strive to foster our unique personal styles which bear our characteris-
tic “stamp”.
THE ELEMENTS OF FORM Motivic development has primary importance in creating satisfying improvisations and compo-
sitions. In order to support this postulation, we need talk about form. Any creative work (be it music,
architecture, or poetry) has a form or structure. This form is the product of three fundamental
elements:
1. Repetition
2. Contrast
3. Development
The balance and interplay of these three elements create a form which we may find pleasing,
boring, exciting, tiring, etc. It might even be totally unintelligible! It can be said that the first element,
that of repetition, is relatively easy to induce into a form. It just requires saying the same thing over and
over again. A uniformly coloured brick wall is an example of a building structure that repeats the same
brick layout over and over. Similarly, the second element of contrast seems to occur easily, as it takes
little thought to string together a host of unrelated words or concepts. The element of development,
however, occupies most creative artists’ focus and energy. It is with this element that a sense of journey
or the passing of time can be really created and communicated to an audience. In development, an idea
grows and takes on new aspects while referring to its starting point. Development contains within it
both the elements of repetition (the familiar) and contrast (the new).

13�
BASS RIYAZ – The Practice Workbook For Mastery Of The 4, 5, And 6-string Electric Bass Guitar.
13�
Chapter � - Summary of Articulations
over the string to be plucked. The speed with which the fingers alternate determines the duration.
3. Dead Notes
Dead notes have little or no pitch content, and are excessively dampened by the undersides of the
fingers of the left hand and/or right hand palm or fingers. Dead notes are notated with a crossed-
out note-head. (See Chapters 4 and 1�.) Try Exercises �-� and �-� for examples of how to apply
dead notes in a non-slapping style.
The different types of dead notes are:
A) Dead notes via left-hand dampening: Two or more finger tips/undersides touch the
string being plucked in order to prevent either a true note or a harmonic from sounding.
B) Dead notes via palm muting: This technique probably yields the most pitch content,
and can be heard sometimes in the bass lines of motown, reggae, ska and salsa, where there is
pitch but little or no sustain. The outside edge of the right palm lies across the strings while the
thumb and the first finger share the plucking. This tends to be less agile than walking, but can
be used as a nice contrast. Consider adding more bass via your EQ settings to compensate for
the sound lost by the muting. See Photograph �-1.
Photograph 9-1: Palm muting.
CHAPTER NINE:
SUMMARy OF ARTICULATIONS You have probably noticed that a lot of variety exists in the way people say the same words in
English. Sometimes it enables you to recognize the person from a simple “hello” on the telephone. Part
of this ability comes from the distinctive patterns of articulation that the person has developed. In the
same way, articulation is largely responsible for creating the distinctive “voice” a musician has on their
instrument. Articulation is not just about being clear or unclear, but about how to deliver phrases in an
interesting and meaningful way. Work towards mastery of the various methods of articulation, and use
your ears to observe them in music.
Following is a summary of the variety of articulations used on the electric bass. Though it doesn’t
list some of the more experimental methods people sometimes use to create exotic noises, it is other-
wise pretty exhaustive. I have cross-referenced these techniques to other chapters for further informa-
tion and application. 6-string bassists should refer also to Chapter 17.
1. Legato Walking
Normal alternating finger articulation featuring an inbuilt raking action, where one finger plucks
a string and comes to rest on the string below. The next finger to be plucked should usually move
off the lower string when the previous one comes to rest, and prepare to pluck the following note
in the series. Notice that the fingers thus are required to move rapidly, even in slow musical pas-
sages. (See Chapters 2, 3, and 4.) Musical passages that are particularly intended to be played
legato are notated with either short, straight lines over each note-head or slur lines over the entire
phrase. Such phrases should sound lyrical, as if they were sung on the one breath.
2. Staccato Walking
Left- and right-hand dampening can be incorporated in order to create shorter durations. Staccato
notes are notated with a dot over each note-head.
A) Staccato via left-hand dampening: The finger fretting the note immediately lifts part-
way, stopping the pitch and further vibration on the string. It is best also to lower the tips or
undersides of the one or more other fingers of the left hand in order to successfully dampen
without harmonics. Therefore, it is a good habit to keep the fingers that are not fretting
hovering low over the strings.
B) Staccato via right-hand dampening: The first and second fingers of the right hand
quickly alternate and rest on the plucked string, stopping vibration a moment after being
plucked. This is in contrast to the normal legato technique where the next finger to pluck hovers

166
BASS RIYAZ – The Practice Workbook For Mastery Of The 4, 5, And 6-string Electric Bass Guitar.
167
Chapter 10 - Ear Training
and your ears develop. Speak the letter-name of each pitch in an exercise, or label them numeri-
cally. Solfege can be useful for this process also, and would involve a pitched (rather than spoken)
voice.
5. Self duets
Singing and playing two independent lines is a great challenge. Play a bass line for a tune you
know very well and try singing the melody, or improvising a solo over the top. Notice how it
changes what you play! Now reverse the roles and play the top line and sing the bass line. Is this
more difficult? Try reading some two-part contrapuntal music, such as Bach or Telemann. You
could even get together with a friend guitarist or bassist and try doing all four parts of the Bach
Chorales together!
6. Tune up
Instead of using an electronic tuner for all of your strings, just tune one and then plug into your
amplifier. Play the correctly tuned string and then each of the others, as open strings one at a
time, comparing them all back to the tuned one. Tune each as guided by your ear and then check
them on the tuner for accuracy. Depending how many strings are on your bass, and which string
you tuned up first, you’ll be tuning intervals of ascending and descending fourths, minor sev-
enths, minor tenths, and possibly minor 13ths and minor 16ths!
You could also try using your ears before your eyes when setting up your bass. Compare 12th-fret
harmonics with fretted notes as described in Chapter 14, “Setting up your bass”.
7. Transcribe
Transcribing is a personal process that you have to establish for yourself. It takes years of patient
practice to develop to a point where you can transcribe a reasonable portion of what you can
actually play! It is a worthy challenge, though, as it gives you deep insight into music, composi-
tional and improvisational ideas, and of course it develops your ears.
Steps for successful transcription.
A) Choose a recording. If you are new to transcribing, choose a recording which contains
clear and slow or moderately-paced playing. It can be something you like, or something you
would like to understand better and be able to play, or it could just be a piece that would suit
a transcription purely for the exercise. Bass lines are not the only things you can benefit from
transcribing. Consider also melody lines, harmony parts, improvised solos, chord progressions,
and individual parts of a drum kit (e.g. the ride cymbal.)
CHAPTER TEN: EAR TRAINING The topic of ear training in a bass book might seem a little out of place, but I believe its inclusion
is justified. Quite frankly the instrument, like the guitar, is so visual that for some players finger patterns
overtake the ears during the formative years of development. It is absolutely necessary to be able to
internally hear what you play. Vocalizing is used a lot in ear training because the voice connects with the
ear in the most direct manner, and represents what you are hearing most clearly. So don’t be shy - sing!
Finger patterns are great, and a necessary part of learning to play bass. You won’t forget them if
you slow down and let your ears catch up with what you are playing for a while. The result will give you
a greater feeling of satisfaction because you’ll know and hear what you’re playing! For those bassists
looking for ways to build ear training into their daily routines, I include some ideas that have proven
useful for myself and many of my students.
PRACTICE PLAN: EAR TRAINING
1. Sing it first
Try to predict the note/s you are about to play. If necessary play the first note and then sing the
rest of the phrase. Sing slow enough to be accurate. For longer phrases, pick out some of the
notes simultaneously on the bass. Try using a tuner to check your voice’s intonation on a few long
notes.
2. Sing your solos
Singing and playing the same improvised line can be good ear-training and also can sound good.
A play-a-long accompaniment is useful for this. Try just singing, just playing and then both at
once. Does your pitch choice change when you sing? Is your phrasing more natural when you
have to sing? Do your lines “breathe” more when you have to?
3. Practice chord-scales
Select a tune and follow along the chord progression slowly. Hold down a root-and-fifth on the
bass, and possibly a 7th, 10th or other colour tone for each chord and sing the appropriate chord-
scale up and down over this drone. Sing slowly so you don’t “gloss over” any pitches. Refer to
Chapter 7 for advice on chord-scale choice.
4. Notice the notes
Making pitch letter-name and degree-number associations to the notes you play makes for
more meaningful and well-planned bass lines and solos. Though it slows you down a lot, care-
ful practice will ensure the process becomes automatic when your theory becomes internalized
170
BASS RIYAZ – The Practice Workbook For Mastery Of The 4, 5, And 6-string Electric Bass Guitar.
171
Chapter 11 - Repertoire
It is important to consider the impermanence of notated music, also. That is, just because some-
thing is written down doesn’t mean it is “set in stone” and can’t be changed or interpreted! Even when
I am learning strict classical pieces for concert performance, the role of spontaneity and interpretation
doesn’t leave me. Difficult passages, for example, can be extracted and expanded upon in order to drill
a particular technique or musical idea. This can be a springboard into a whole new piece of repertoire,
which is your own creation! (This approach is common in the study of strict classical tabla composi-
tions.)
As a bass player with plenty of friends and social engagements (!) you will no doubt one day be
asked to play spontaneously in an unaccompanied situation. You’ll turn up to a dinner party with your
bass on your back from your rehearsal or gig, and some drunken uncle will say “play something for us”,
and the rest of the congregation will chime in “Yes, play us a sooong!”. Much of our practice regimen
involves work with a metronome, drum machine, play-a-long records, or us imagining our part fitting
with drums and other instruments. However, the bass can perform as a beautiful stand-alone instru-
ment too. You should have a couple of ideas prepared that will enable you to perform something spon-
taneously that doesn’t sound like it needs any accompaniment!
CHAPTER ELEVEN: REPERTOIRE Repertoire is the stock of material which you can use in group, solo and practice situations. I
recommend that the bassist has a special folder which is the one book that always appears in his/her
practice session. This folder contains the work currently of priority, along with some manuscript paper
and note paper for the spontaneous note-taking of ideas. This folder may include a daily log of mate-
rial practiced, along with notes on problems experienced, overcome, and the strategies developed to
improve weaknesses. Of course, “Bass Riyaz” and a host of other texts should also come out of the
bookshelf! All other music can be referred to generically as “repertoire”. You should use repertoire to
apply the concepts presented in this book.
The categories of repertoire that I find useful include the following:
• Band music. The tunes you are currently rehearsing with others in groups. These may include
original compositions of your own.
• Classical music. Any music from the Western classical tradition, written for various instru-
ments in treble or bass clefs. You can use this material as sight-reading practice, and also for
the extension of technique on your bass. For example, guitar pieces can challenge you with
their chordal work, violin pieces can be challenging because they are often melodically agile,
etc. I personally use a lot of music by Bach, and also have found pieces by such composers as
Messiaen, Telemann, Kreutzer, and Carcassi very stimulating.
• Sight reading. New repertoire that is solely for reading. Try bass and treble clefs, in various
keys, tempi, styles and metres. Buy sheet music from used music stores, research the web
and swap with friends.
• Lead sheets. A “Real Book” or similar collection of standard jazz or contemporary tunes will
expand your general repertoire and provide most of the chord and melody-line practice you’ll
need in a practice session. Lead sheets are also good material to learn and use in paid per-
formance opportunities. Most bassists use lead sheets to practice rendering bass lines from
chord progressions, but don’t forget to also use them for learning melodies.
Though all of the above repertoire is written down, try memorizing portions of it during your
practice, and seeing if you can remember it later. New repertoire can be developed through non-
written means. A tape recorder is handy for recording ideas. I personally prefer to formalize aural
ideas at some point with pen and paper, even it is just to sketch the form of memorized sections of
material.

172
BASS RIYAZ – The Practice Workbook For Mastery Of The 4, 5, And 6-string Electric Bass Guitar.
173
Chapter 12 - How to Practice
THE FOUR FACULTIES There are four faculties that are involved in the practice and learning of music. Quality practice
involves a healthy awareness and employment of each.
1. Kinesthetic faculties
Motor skills are typically the focus of most people’s practice. They are also what most people
teach, simply because they are more tangible and easier to see, talk and write about. Physical
coordination and dexterity is what most people call “technique”. Personally, I regard technique as
a conduit, and think little of musicians who can play very fast, but have developed nothing or little
in the other areas.
2. Intellectual faculties
I believe the brain processes and remembers all the information which it is fed. The brain works
with patterns, and works to recognize and make sense of the new information it gathers. Con-
scious engagement of the analytical mind in order to understand new concepts and theories is
an important practice skill. Written and verbal analysis works well in conjunction with listening.
Again, the brain works with patterns, and it is patterns of coordination which ultimately form
good or bad habits in music.
3. Aural faculties
This is the faculty of primary importance when it comes to learning music. This is the basic prem-
ise of the Third Stream pedagogy. (See Ran Blake’s article “The Primacy of the Ear” in the Bibliog-
raphy.)
4. Visual faculties
The eyes are very useful and are naturally the primary receptors for most people. The success
that blind people have in playing music is testament to the fact that the ears are actually more
important.
CHAPTER TWELVE: HOW TO PRACTICEWHAT IS PRACTICE? Ironically, rule number one is this: There are no rules! Nobody can tell you exactly how to prac-
tice, and people will have different views on exactly what practice “is”. Having said that though, I have
found certain fundamentals to be of importance to many people whom I respect for their achievements
in music and their ongoing dedication to pursuit of excellence. I will outline these fundamentals below,
but first I would like to define practice in the way I see it.
Practice is the act of self-teaching, with the aim of developing oneself.
Good practice applies the sum total of your experiences
and integrates all of your faculties and aspects of your Being.
The riyaz perspective of practice recognizes that it draws upon your entire experience as
a musician and a person, and consequently involves your whole Being. This includes your aural,
tactile/physical, visual, and mental senses and skills. The best practice is a coordinated activity
involving mind, emotions, body and spirit. The self-teaching aspect means that the activation of
these parts of your Being all create sensations which feedback to each other, and in monitoring
these, you are able to direct the activity toward an intended, desirable result.
Music students over the centuries have always enlisted the services of a teacher to aid them in
their improvement. Learning how to practice is learning how to be your own teacher, which means that
a certain level of objectivity is attained whether you are in the presence of a mentor or not. The best
teachers become guides as the student advances, setting up challenges, setting up discoveries on their
pathway, monitoring progress, and sometimes holding a mirror up to the student in order to allow for
self-realization. In this way, a good teacher is a truly remarkable mentor who may well admit that the
teaching process allows them to learn almost as much as their advanced students! Practice means
striving to be your own teacher.
If there were a single indispensable ingredient that made good practice or riyaz for me, it would
have to be this: coordination. And the glue that holds the various faculties together in the learning
process is concentration.

17�
BASS RIYAZ – The Practice Workbook For Mastery Of The 4, 5, And 6-string Electric Bass Guitar.
17�
Chapter 13 - Flow
• Visualize good flow without your instrument. Maintain that positive feeling when you pick
up your instrument. If the feeling disappears, put down the instrument, return to this positive
“space” and try again. When visualizing, you can move your limbs freely like a child might
if she/he were trying to play your instrument - without technical facility but with innocent
freedom. Do not be concerned with the outcome (i.e. how you sound) but rather just enjoy the
process.
• Move your focus. While maintaining a group-centred awareness, gently self-refer to monitor
yourself and practice getting back into the flow when you sense it is lost. This should be done
while the rest of the music flows along - you should not need to cease the music to get back
“on board”.
• Record yourself. Use recordings and video to relive the feeling of the flow and recognize how
it sounds when it is broken.
• Get back to nature. Take time out to experience flow in the natural order.
• Quieten the mind. A busy mind will never maintain the flow. Practice sitting still and meditat-
ing. The more familiar you are with stillness of self, the easier it will be to access this “space”
when playing music.
• See the masters. Respected creative artists - particularly ones that improvise or spontane-
ously create in public - are all masters of flow.
• Exercise. A fit body knows how to flow. Physical fitness boosts confidence and self-esteem
- good traits to attain. I recommend swimming, yoga, dancing and martial arts. All sports are
good stress-reliefs.
• Breathe. Be aware of how you are breathing. A short or shallow breath is at odds with flow.
Good breathing habits are assisted by regular exercise, and are symbolic of the circular,
dynamic and uninterrupted nature of flow.
CHAPTER THIRTEEN: FLOW The element of flow is critical and yet seems rarely articulated in the normal development and
practice of music. Flow is particularly important in music which incorporates improvisation or that calls
on long-term memory. So what is flow?
Flow is a dynamic state of hyperawareness which is in touch with
the progress of actions, emotions and energies during
every moment, and is able to coordinate and control
them without impeding them.
“Going with the flow” ultimately means operating creatively and harmoniously in the present
moment. Problems such as asyncronization within an ensemble, memory blocks, performance anxi-
ety and contrived improvisation are indicators that the flow is impeded! Fear is one of flow’s biggest
enemies, as it distracts you from the moment by impressing the importance of the past or future.
I have attempted here to articulate ways I think flow can be improved:
• Put group above self. Your focus should not be self-centred, but rather aware of the other
people in the group, and of the overall group sound.
• Flow is more important than speed. The technical demands of speed require flow, but speed
is not as important as flow itself. Though you must practice technical facility, you must also
practice flow. Try practicing it in contexts where you must aim for and achieve predetermined
structural/rhythmic destinations in a relaxed and free manner. Try also practicing it in con-
texts where you can be free-flowing without specific goals apart from the flow itself. (Here,
you must suspend judgment on how you sound.) If the freedom is not there, slow down and
consider other points made here.
• Consider your posture. Stand sure-footed. Like flow itself, posture should not be rigid, but
should be an elastic, organic stance. Neck, shoulder and mouth tensions typically indicate
“trying” too much, which is an unconnected, self-centred action.

1�0
BASS RIYAZ – The Practice Workbook For Mastery Of The 4, 5, And 6-string Electric Bass Guitar.
1�1
Chapter 14 - Bass Physiology
become, as I said, overwhelming! If you are a beginner, bear in mind that the “traditional” bass look and
sound is still the classic 4-string fretted Fender Precision. You might be best learning on this instrument
(or one of its many clones by other companies) and seeing how things develop over time.
Number of strings
The first choice for many is 4-string or more-string?! Remember that more strings means more
range and possibly less position-changing, but the choice may be intertwined with other factors such
as string spacing and scale, so consider these aspects too. (I will discuss these factors below). More
strings also means more strings to keep dampened from unintentional vibration, so they come with a
significant technical requirement (see Chapter 17). So you need to ask yourself what kind of music you
are going to be mostly playing on the bass, and what kind of sound you are trying to produce. Do some
research of your mentors and idols and see what they play. If you are looking for an extended-range
instrument, you may also find unusual types such as 7- or �-string basses from time to time.
Fretless
Playing a fretless bass guitar rather than a fretted bass obviously requires skill in intonation as
you play over the fingerboard. Even playing across the strings in the same position can be challenging,
as using multiple fingers on the same “fret” creates tuning discrepancies - it is almost impossible to line
up fingers precisely behind each other.
The action of fretless basses is often set up lower as there is no danger of fret-buzz. It is probably
more critical to choose an instrument with a straight neck and flat fingerboard than with a fretted bass.
Fretless fingerboards are sometimes marked with fret lines, and sometimes are left blank. For 4-
string fretless basses I believe it’s a personal choice, but I strongly recommend fret lines on instruments
with more strings. (Jaco Pastorius’ Fender was originally fretted, so he had lines remaining where the
frets used to be!)
Some fretless bassists choose to get their fingerboard coated with polyurethane (an epoxy resin
that creates a hard, glassy finish) in order to protect the rosewood or ebony from the abrasive action
of the strings. This does change the sound significantly, in that it becomes more “trebly” and less
“woody”. The fingerboard, whether coated or not, needs to contact the string cleanly in one spot, oth-
erwise you will hear “dead spots” up and down the instrument where the timbre changes from a bright
sound to one that is suddenly dark and non-sustained.
There are several advantages of playing a fretless instrument. One is the variety of articula-
tions achievable by depressing the fingers of the left hand with varying pressure. The absence of frets
eliminates the risk of buzz as the string partly contacts the fingerboard. The nuances of the string being
fretted by flesh rather than steel (frets) make for a more lyrical sound which can be shaped during the
note’s decay by subtle left-hand vibrato. Portamento (slides) can of course be applied to just about any-
CHAPTER FOURTEEN: BASS PHySIOLOGy Figure 14-1 identifies the main components of the electric bass. You may find slight differences
in the design of your bass, but the physique remains basically identical. The goal of this chapter is to
examine these parts in detail so that you will be better equipped to maintain your instrument, and also
more informed when you are in the market to purchase a new or used instrument. I hope that in the pro-
cess, some aspects of the bass and its construction will be demystified for you, while others that you
simply took for granted will now create a sense of new awareness and awe!
Figure 14-1: The bass guitar and its main components
Please note that in string descriptions and luthier-related terms, measurements can be made in
the metric or imperial systems. An inch is symbolized by the quotation symbol (“), and millimetres are
abbreviated mm. It is best to carry any of the work mentioned in this chapter in brightly lit conditions,
so that you can see what you’re doing. The work area should be clear of debris so that you don’t lose
screws and other items that you may remove. The work surface should be felted or of a non-scratch-
ing material. Don’t attempt any adjustments without the proper tools, and if you feel the task is beyond
your ability, don’t do it! (I don’t want to receive bags of parts in the mail with letters asking for your
bass to be reassembled!)
For detailed information on 6-string basses, and their physical considerations as compared to 5-
and 4-string basses, please refer to Chapter 17.
BREEDS OF ELECTRIC BASS It can be overwhelming trying to choose a new instrument, as there are so many breeds of bass.
The 4-string fretted variety is still the most common, but 5- and 6-string basses are also to be found in
most major stores and are featured in all kinds of bands. Apart from the number of strings, there are
fretless versions of all these as well. And when you start to consider woods, types of pickups, etc. it can
206
BASS RIYAZ – The Practice Workbook For Mastery Of The 4, 5, And 6-string Electric Bass Guitar.
207
Chapter 15 - Performance Pointers
different mix to the drummer and the other musicians on stage. This would also apply to headphone
mixes in the studio. Resources are usually limited in this regard, so be prepared for some compromise
- you may have to receive the same mix as the drummer or even the lead vocalist.
More often than not, the sound from your cabinet will be better than anything that might come
out of the P.A. system’s foldback monitors, and although I like to have a monitor near me for the other
sounds, I prefer to have no bass in it. The worst scenario occurs when the front of house (F.O.H.) speak-
ers are so loud that the room sound of the bass overpowers your own stage sound. To me this never
makes me play well, and alterations in the F.O.H. mix during my performance are distracting. In a nut-
shell, it is better to be in control of your own sound in the band, even if your good on-stage sound fails
to be equaled in the audience.
I prefer a decent amount of space around me, especially behind, so that the bass cabinet can
project to me. 4m2 is ample space for yourself and your rig, most likely. I like to elevate the cabinet so to
enhance its projection, often at an angle towards my ears. Milk crates or a guitar amp stand can provide
this elevation. It is good to know the size of the venue and audience so you can bring the appropriate
amplifier, if you have choice. I bought a small combo amp for small gigs and rehearsals and my back is
very thankful for this. Remember that the sound produced by a small amp mightn’t be as good as the
big rig, but spinal cords are expensive these days!
I also like to have a well-lit space, especially from white-ish lighting directly above, as it aids my
reading and peripheral vision of the fingerboard. When performing in a black stage pit where the only
light comes from music stand lights (sconces), I set up an extra sconce on a high stand above the neck
of my bass, to throw light down onto me.
Lastly, try to keep the floor area free of cables, so that they are not repeatedly stood on. Gaf tape
any that are near thoroughfares or well-travelled routes.
THE SIGNAL CHAIN It is important to understand the basics of how the electronic representation of your sound flows.
This is important to maintain the best sound quality and is also useful for troubleshooting.
The flowchart in Figure 15-1 illustrates one possible pathway your signal takes from the moment
the strings’ vibrations are picked up, through to the delivery of the sound to the audience’s ears. This
illustration might seem complex, but it does not account for the numerous microscopic pathways that
are either rare causes for technical problems or are so small as being out of the scale of this flowchart.
Always address problems with signal flow in a systematic manner that follows along this flowchart.
The golden rule with signal chains and a quality sound is this: garbage in = garbage out. You’ll
hear sound engineers talk of “signal-to-noise ratios”, which are about maximizing signal in relation to
noise. This doesn’t mean boosting signals to the point of distortion! It means reaching some optimum
CHAPTER FIFTEEN:PERFORMANCE POINTERS Having a great performance is for most musicians what keeps them persisting in their practice,
and generally feeling motivated about music. But satisfying performances are not entirely reliant on
good habits in the practice room. There are other considerations, some of which we can have direct
control over, and which can be “practiced” in a broad manner of speaking.
The following performance pointers are aimed at creating more enjoyable and effective perfor-
mances. Some of these can also be applied to band rehearsals, studio recordings and private practice.
PHySICAL SETUPThe general aspects that combine to create your physical setup at a performance are:
• location on stage in relation to other instruments
• location of foldback monitors (if any) and the number of auxiliary sends
• surface area allowed for the bass player and his/her equipment
• audience size
• venue size
• lighting
• access (ramps/lifts/stairs)
It is wise to think about where you are going to be positioned, in relation to the stage, the other
musicians and the audience, before you start lifting all of your equipment, and before you pack for the
gig. Talk to the relevant people about your setup and try to imagine your position on stage. It may be
that the sound and lighting people have a different idea than yourself or your band leader, so it’s better
to have a discussion and reach an agreement in advance of the actual performance or rehearsal.
My personal preference is to have a position that gives me visual lines to the drummer and gui-
tarist and/or keyboard-player. I like to stand on the right-hand side of the drummer, which means my
natural leftward gaze takes in their drum kit. I know other bassists who prefer to be next to the high-hat,
which usually means being on the drummer’s left-hand side. I am still able to see the drummer’s high-
hat very clearly from the right-hand position however, and for jazz I am in a good position - near the ride
cymbal.
For larger shows, it is important to see where the P.A. system’s foldback monitors are, where they
are pointed, and whether they can be moved at all if they are not close to your ideal position. It is also
good to know how many auxiliary sends the P.A. desk has for foldback, before you start demanding a
• E

216
BASS RIYAZ – The Practice Workbook For Mastery Of The 4, 5, And 6-string Electric Bass Guitar.
217
Chapter 16 - Harmonics
The harmonic series, though largely a special effect on bass, is actually intrinsic to the operation
of many other instruments, including the trumpet, trombone, and french horn. It is also intrinsic to the
style of singing found in countries such as Tibet and Tuva. “Mongolian throat singing”, also known as
“harmonic singing”, involves a droning tonic pitch underneath a melody fashioned from the notes of the
harmonic series, emphasized from the strong tonic pitch by manipulating the resonating cavities in the
vocal tract.
CHAPTER SIXTEEN: HARMONICSWHAT ARE HARMONICS? Harmonics are theoretically speaking always a part of our sound. In fact, they are an integral part
of any sound. They are the notes or overtones which sound above every fundamental pitch, except for
that of a pure sine wave. Harmonics contribute to the timbre or tone-colour of a note, which allows us to
distinguish a violin from a trumpet, or an A played on our E string or the same pitch played as an open
A string. In the technique of playing harmonics on the bass, we are concerned with the emphasis or
isolation of certain harmonics.
THE HARMONIC SERIES Each note we play contains not one but a series of harmonics rising above it. The harmonic series
is a natural acoustic phenomenon that is universal for all pitched sounds and instruments. What differs
between sounds and instruments is the relative presence or volume of the different harmonics in the
series, which combine to create a mix which is characteristic to that particular instrument or sound. This
mix is generally referred to as the timbre, and when graphed creates a characteristic waveform. Spec-
tral analysis shows that a flute’s waveform is far different to a piano’s, for instance. To be completely
accurate, two sounds are not only differentiated by their waveforms but also by the different combina-
tions of attack and decay they possess, and also due to the presence of various noise components in
the sounds (wind from the breath, hammer action, etc.). To complicate matters more, the harmonic
series mix is not fixed for each instrument or even each note on each instrument, but rather changes
over the duration of each sounded note, and over the registers and dynamic range of the instrument.
Herein lies the difficulty of effectively synthesizing and electronically reproducing the sound of acoustic
instruments!
The harmonic series was discovered simultaneously in China by using overblown flutes, and in
Greece by using a distant predecessor of the electric bass guitar - the monochord! The monochord
was simply a string terminated at both ends, mounted on a box, and put under tension with a movable
bridge. The Greeks (including Pythagoras) discovered the musical ratios that form the basis of acous-
tics, and found that by touching the vibrating string at certain points, alternative higher notes would
ring out. “Ring” is the operative word, as harmonics have a bell-like effect, as you will discover.
The harmonic series is notated in Exercise 16-1 from B, E, A, D, and G, up to the �th harmonic. I
have numbered the harmonics and also the function of the pitches in terms of the first. Play these notes
in order, changing octaves when necessary and fretting them anywhere you like. Listen to the melody
contained within the series. Do you recognize any part of it? Doesn’t it sound very major-scale-like and
melodious?

236
BASS RIYAZ – The Practice Workbook For Mastery Of The 4, 5, And 6-string Electric Bass Guitar.
237
Chapter 17 - 6-String Bass
CHAPTER SEVENTEEN: THE 6-STRING BASS Extended-range instruments pose special challenges for the bassist, yet such instruments yield
rewarding results if these challenges are overcome. 4-string bass players may be attracted to a 5- or
6-string instrument through inspiration by our popular stars of the instrument today - such as John Pati-
tucci and Anthony Jackson (the inventor of the “6-string electric contrabass guitar”). As these artists
demonstrate, the 6-string bass gives them the ability to feature themselves melodically and chordally,
as if they were a guitarist, as well as to render those deep gutsy bass lines that descend below low E.
Like a chameleon, the master 6-string bassist can change colours and roles quickly, and be a versatile
addition to countless formats of ensemble.
CHOOSING A 6-STRING BASS Consider the following points when shopping for a 6-string bass. A general discussion of bass
physiology is made in Chapter 14, but the particular items listed below come into play more critically
with 6-string basses. Always try a new instrument several times to see how it feels before you buy it.
Use your own amplifier if possible and get impartial advice from other players. Please note that the
quoted specifications are subject to change as manufactures modify their models over time.
Number of frets
These instruments almost always have 24 frets, and some have 26, so the sheer range is
staggering!
NUMBER OF FRETS ON DIFFERENT BASSES
Bass Frets
6-string Warwick Thumb 26
6-string yamaha TRBJPII 26
6-string yamaha TRBJP 24
5-string Music Man Sting Ray 22
4-string Music Man Sting Ray 21
4-string Fender Precision 20
Weight
More wood and more metal means more kilograms on your shoulder! This makes a good, wide
strap very important. It also means that maintaining a healthy posture is critical. When choosing a
6-string bass, its own balance is an important factor in its playability. The shape of the horns of the
body, and the size and weight of the headstock and machine heads all contribute to the instrument’s
balance.
WEIGHTS OF DIFFERENT BASSES
Bass Weight
6-string Warwick Thumb 5.4 kg (12 lbs)
4-string Warwick Thumb 3.5 kg (7.7 lbs)
4-string Ken Smith 4 kg (9 lbs)
6-string Ken Smith 5 kg (11 lbs)
4-string Music Man 4 kg (9 lbs)
5-string Sadowsky PJ 4 kg (9 lbs)
STRING SPACING OF DIFFERENT BASSES (as measured at the bridge)
Bass Spacing
6-string basses 17-19mm
5-string basses 18-19mm
4-string basses 20mm (“traditional” spacing, as in the 4-string Fender)
String spacing
In choosing a 6-string bass, one should be aware that the string spacing is typically narrower than
that of a 4-string, though there are no real conventions about how much narrower. If one wishes to slap
a lot, it is better to go for a more widely spaced instrument (such as the Ken Smith BSR6GN or Patitucci-
signature Yamaha TRBJP) rather than a narrow one. Herein lies the first difficulty of playing a 6-string:
getting used to the string spacing. The change in number of strings can be disorientating at first, espe-
cially when you wish to continue playing your 4-string!
In terms of the challenge presented to the left hand by the string spacing of a 6-string bass, the
new player should be ever-aware of the need to keep the left hand technique in good form. I.e. the
thumb should remain behind the neck and the fingers should curl to reach the lower strings.
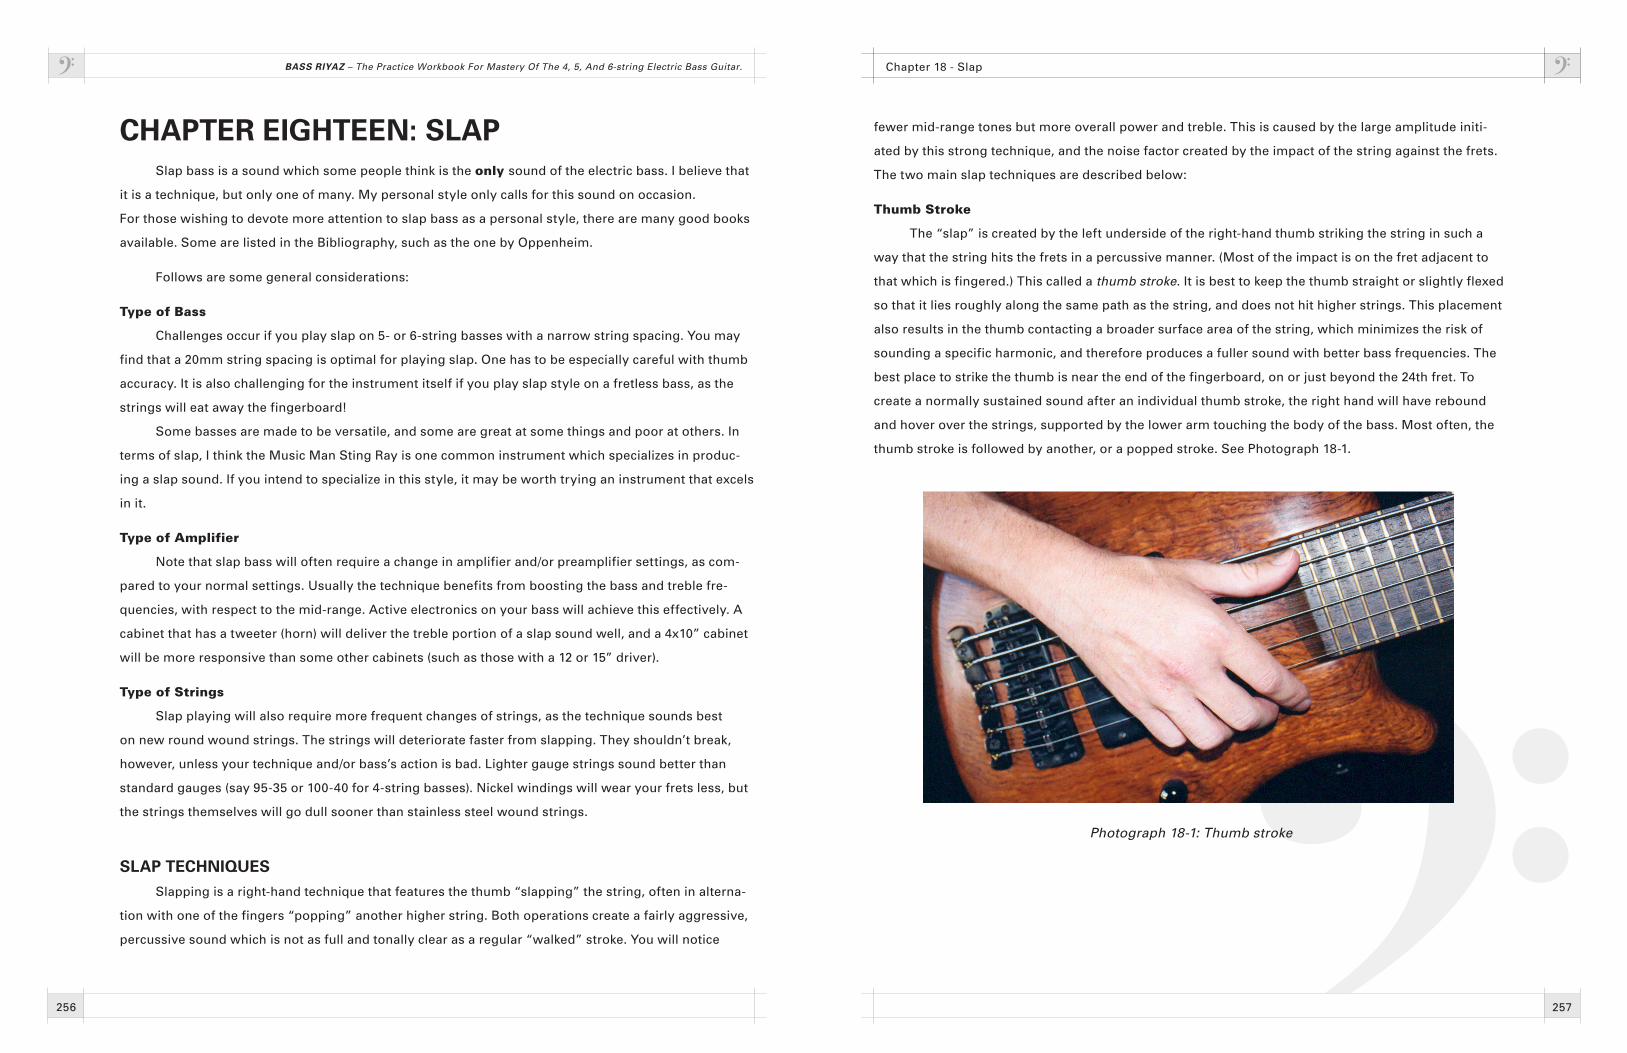
256
BASS RIYAZ – The Practice Workbook For Mastery Of The 4, 5, And 6-string Electric Bass Guitar.
257
Chapter 1� - Slap
CHAPTER EIGHTEEN: SLAP Slap bass is a sound which some people think is the only sound of the electric bass. I believe that
it is a technique, but only one of many. My personal style only calls for this sound on occasion.
For those wishing to devote more attention to slap bass as a personal style, there are many good books
available. Some are listed in the Bibliography, such as the one by Oppenheim.
Follows are some general considerations:
Type of Bass
Challenges occur if you play slap on 5- or 6-string basses with a narrow string spacing. You may
find that a 20mm string spacing is optimal for playing slap. One has to be especially careful with thumb
accuracy. It is also challenging for the instrument itself if you play slap style on a fretless bass, as the
strings will eat away the fingerboard!
Some basses are made to be versatile, and some are great at some things and poor at others. In
terms of slap, I think the Music Man Sting Ray is one common instrument which specializes in produc-
ing a slap sound. If you intend to specialize in this style, it may be worth trying an instrument that excels
in it.
Type of Amplifier
Note that slap bass will often require a change in amplifier and/or preamplifier settings, as com-
pared to your normal settings. Usually the technique benefits from boosting the bass and treble fre-
quencies, with respect to the mid-range. Active electronics on your bass will achieve this effectively. A
cabinet that has a tweeter (horn) will deliver the treble portion of a slap sound well, and a 4x10” cabinet
will be more responsive than some other cabinets (such as those with a 12 or 15” driver).
Type of Strings
Slap playing will also require more frequent changes of strings, as the technique sounds best
on new round wound strings. The strings will deteriorate faster from slapping. They shouldn’t break,
however, unless your technique and/or bass’s action is bad. Lighter gauge strings sound better than
standard gauges (say �5-35 or 100-40 for 4-string basses). Nickel windings will wear your frets less, but
the strings themselves will go dull sooner than stainless steel wound strings.
SLAP TECHNIQUES Slapping is a right-hand technique that features the thumb “slapping” the string, often in alterna-
tion with one of the fingers “popping” another higher string. Both operations create a fairly aggressive,
percussive sound which is not as full and tonally clear as a regular “walked” stroke. You will notice
fewer mid-range tones but more overall power and treble. This is caused by the large amplitude initi-
ated by this strong technique, and the noise factor created by the impact of the string against the frets.
The two main slap techniques are described below:
Thumb Stroke
The “slap” is created by the left underside of the right-hand thumb striking the string in such a
way that the string hits the frets in a percussive manner. (Most of the impact is on the fret adjacent to
that which is fingered.) This called a thumb stroke. It is best to keep the thumb straight or slightly flexed
so that it lies roughly along the same path as the string, and does not hit higher strings. This placement
also results in the thumb contacting a broader surface area of the string, which minimizes the risk of
sounding a specific harmonic, and therefore produces a fuller sound with better bass frequencies. The
best place to strike the thumb is near the end of the fingerboard, on or just beyond the 24th fret. To
create a normally sustained sound after an individual thumb stroke, the right hand will have rebound
and hover over the strings, supported by the lower arm touching the body of the bass. Most often, the
thumb stroke is followed by another, or a popped stroke. See Photograph 1�-1.
Photograph 18-1: Thumb stroke
Recommended