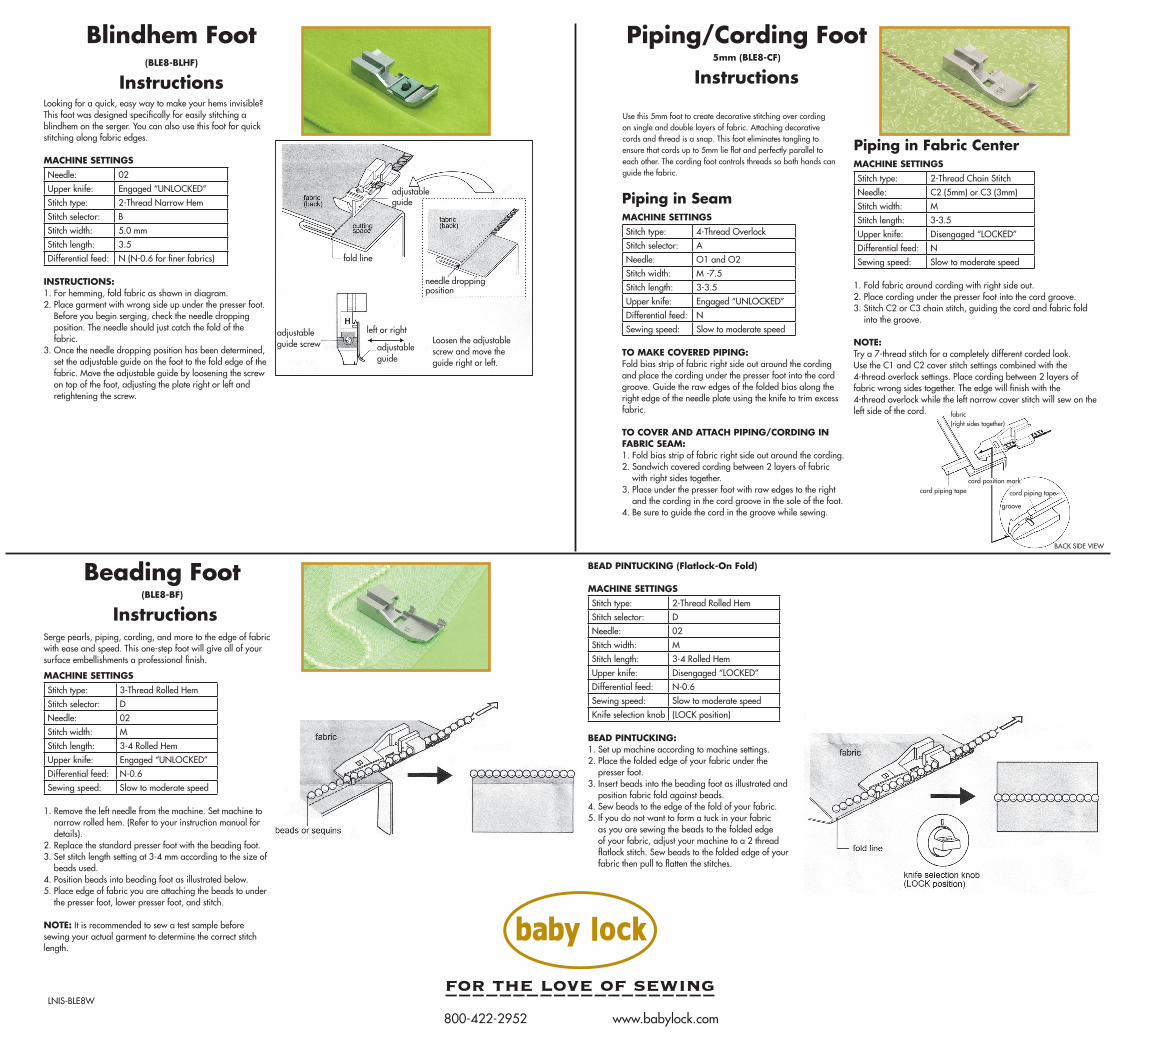
Looking for a quick, easy way to make your hems invisible? This foot was designed specifically for easily stitching a blindhem on the serger. You can also use this foot for quick stitching along fabric edges.
Machine SettingS
Needle: 02
Upper knife: Engaged “UNLOCKED”
Stitch type: 2-Thread Narrow Hem
Stitch selector: B
Stitch width: 5.0 mm
Stitch length: 3.5
Differential feed: N (N-0.6 for finer fabrics)
inStructionS:1. For hemming, fold fabric as shown in diagram.2. Place garment with wrong side up under the presser foot.
Before you begin serging, check the needle dropping position. The needle should just catch the fold of the fabric.
3. Once the needle dropping position has been determined, set the adjustable guide on the foot to the fold edge of the fabric. Move the adjustable guide by loosening the screw on top of the foot, adjusting the plate right or left and retightening the screw.
Blindhem Foot(BLe8-BLhF)
instructions
Machine SettingS
Stitch type: 3-Thread Rolled Hem
Stitch selector: D
Needle: 02
Stitch width: M
Stitch length: 3-4 Rolled Hem
Upper knife: Engaged “UNLOCKED”
Differential feed: N-0.6
Sewing speed: Slow to moderate speed
1. Remove the left needle from the machine. Set machine to narrow rolled hem. (Refer to your instruction manual for details).
2. Replace the standard presser foot with the beading foot. 3. Set stitch length setting at 3-4 mm according to the size of
beads used. 4. Position beads into beading foot as illustrated below.5. Place edge of fabric you are attaching the beads to under
the presser foot, lower presser foot, and stitch.
note: It is recommended to sew a test sample before sewing your actual garment to determine the correct stitch length.
Serge pearls, piping, cording, and more to the edge of fabric with ease and speed. This one-step foot will give all of your surface embellishments a professional finish.
Beading Foot(BLe8-BF)
instructions
BeaD PintucKing (Flatlock-on Fold)
Machine SettingS
Stitch type: 2-Thread Rolled Hem
Stitch selector: D
Needle: 02
Stitch width: M
Stitch length: 3-4 Rolled Hem
Upper knife: Disengaged “LOCKED”
Differential feed: N-0.6
Sewing speed: Slow to moderate speed
Knife selection knob (LOCK position) BeaD PintucKing: 1. Set up machine according to machine settings.2. Place the folded edge of your fabric under the
presser foot.3. Insert beads into the beading foot as illustrated and
position fabric fold against beads.4. Sew beads to the edge of the fold of your fabric.5. If you do not want to form a tuck in your fabric
as you are sewing the beads to the folded edge of your fabric, adjust your machine to a 2 thread flatlock stitch. Sew beads to the folded edge of your fabric then pull to flatten the stitches.
Machine SettingS
Stitch type: 4-Thread Overlock
Stitch selector: A
Needle: O1 and O2
Stitch width: M -7.5
Stitch length: 3-3.5
Upper knife: Engaged “UNLOCKED”
Differential feed: N
Sewing speed: Slow to moderate speed
to MaKe covereD PiPing:Fold bias strip of fabric right side out around the cording and place the cording under the presser foot into the cord groove. Guide the raw edges of the folded bias along the right edge of the needle plate using the knife to trim excess fabric.
to cover anD attach PiPing/corDing in FaBric SeaM:1. Fold bias strip of fabric right side out around the cording. 2. Sandwich covered cording between 2 layers of fabric
with right sides together.3. Place under the presser foot with raw edges to the right
and the cording in the cord groove in the sole of the foot. 4. Be sure to guide the cord in the groove while sewing.
Piping/cording Foot5mm (BLe8-cF)
instructions
Machine SettingS
Stitch type: 2-Thread Chain Stitch
Needle: C2 (5mm) or C3 (3mm)
Stitch width: M
Stitch length: 3-3.5
Upper knife: Disengaged “LOCKED”
Differential feed: N
Sewing speed: Slow to moderate speed
1. Fold fabric around cording with right side out. 2. Place cording under the presser foot into the cord groove.3. Stitch C2 or C3 chain stitch, guiding the cord and fabric fold
into the groove.
note:Try a 7-thread stitch for a completely different corded look.Use the C1 and C2 cover stitch settings combined with the 4-thread overlock settings. Place cording between 2 layers of fabric wrong sides together. The edge will finish with the 4-thread overlock while the left narrow cover stitch will sew on the left side of the cord.
Piping in Fabric center
Piping in Seam
800-422-2952 www.babylock.com
fold line
adjustable guide screw
left or right
adjustable guide
Loosen the adjustable screw and move the guide right or left.
adjustable guide
needle dropping position
BACK SIDE VIEW
groove
cord piping tape
cord position mark
fabric(right sides together)
LNIS-BLE8W
Use this 5mm foot to create decorative stitching over cording on single and double layers of fabric. Attaching decorative cords and thread is a snap. This foot eliminates tangling to ensure that cords up to 5mm lie flat and perfectly parallel to each other. The cording foot controls threads so both hands can guide the fabric.
cord piping tape
inStructionS For eLaStic Foot:1. Before attaching the elastic foot to the machine, loosen
the elastic pressure adjustment screw, raise the pressure plate and insert the elastic until it reaches behind the foot (see illustration). Tighten the elastic pressure adjustment screw slightly.
note: The lines on the screw are for elastic tension reference on future projects.
2. Replace the standard foot on the machine with the elastic foot and elastic.
3. While stitching elastic onto your test fabric, adjust the elastic pressure adjustment screw until the desired effect is achieved.
note: To insert elastic while elastic foot is on the machine, raise presser foot. Loosen elastic pressure adjustment screw, raise the pressure plate and insert elastic until it touches the needle. Stitch until the elastic passes the needle. Position fabric and then adjust pressure screw as needed.
elastic Foot(BLe8-eF)
instructionsConfidently serge elastic by letting this foot take care of all the work. This foot provides even pressure on the elastic every time to prevent pulling and tugging on the needles. The adjustable guide and tension dial allow you to serge elastic with a finished uniform stretch. The guide holes provide control for projects requiring fishing line.
attaching eLaStic uSing the eLaStic Foot:
Machine SettingS
Stitch type: 4-Thread Overlock
Needle: 01and 02
Stitch width: M-7.5
Stitch length: 4.0
Upper knife: Engaged “UNLOCKED”
Differential feed: 0.5
Sewing speed: Slow speed
1. Insert elastic into elastic foot (see instructions for elastic foot).2. Set up machine according to above chart.3. Slightly raise the pressure plate of the foot and insert elastic
between the plate and lower support bar until the edge of elastic reaches the feed teeth. (It may be necessary to loosen the elastic pressure adjustment screw to feed to the elastic through.)
4. Loosen the screw on the adjustable tape guide to accommodate the width of your elastic, and then re-tighten the screw.
5. Sew the elastic for about an inch or so to ensure it is feeding properly.
6. Place the fabric under the foot and sew elastic to fabric.7. Adjust the elastic pressure adjustment screw so that the desired
finish can be obtained. a. Tighter tension on the elastic gives more elasticity of the fabric
after it is sewn. b. Looser tension on the elastic gives less elasticity of the fabric.
coverStitch:
Machine SettingS
Stitch type: Triple Cover Stitch or Wide Cover Stitch
Needles: Triple Cover Stitch-C1,C2,C3 Wide Cover Stitch-C1,C3
Stitch length: 4
Stitch width: M
Differential feed: Normal
Upper knife: Disengaged “LOCKED”
Sewing table: Remove knife cover and snap on sewing table
Sewing speed: Slow
inSerting FiShing Line uSing the eLaStic Foot:
Machine SettingS
Stitch type: 3-Thread Rolled Hem
Needle: 02
Stitch selector: D
Stitch width: 5.0
Stitch length: 1.5R (Rolled hem setting)
Differential feed: 0.6
Upper knife: Engaged "Unlocked"
Sewing speed: Slow
1. Thread your serger for a 3-thread rolled edge using decorative threads in the upper looper.
2. Slide the fishline through the guide holes on the right side of the elastic foot and then under the back of the foot leaving a 3" to 4" tail in the back.
3. Snap the foot on the machine and place the fabric under the foot with the fishline to the right of the needle.
4. Begin serging, making sure the fishline is caught in the stitching as the edge is being rolled.
5. When you have finished serging, carefully remove the fabric and fishline from under the presser foot being careful not to pull the fishline out of the seam.
elastic tape
tension adjuster screw
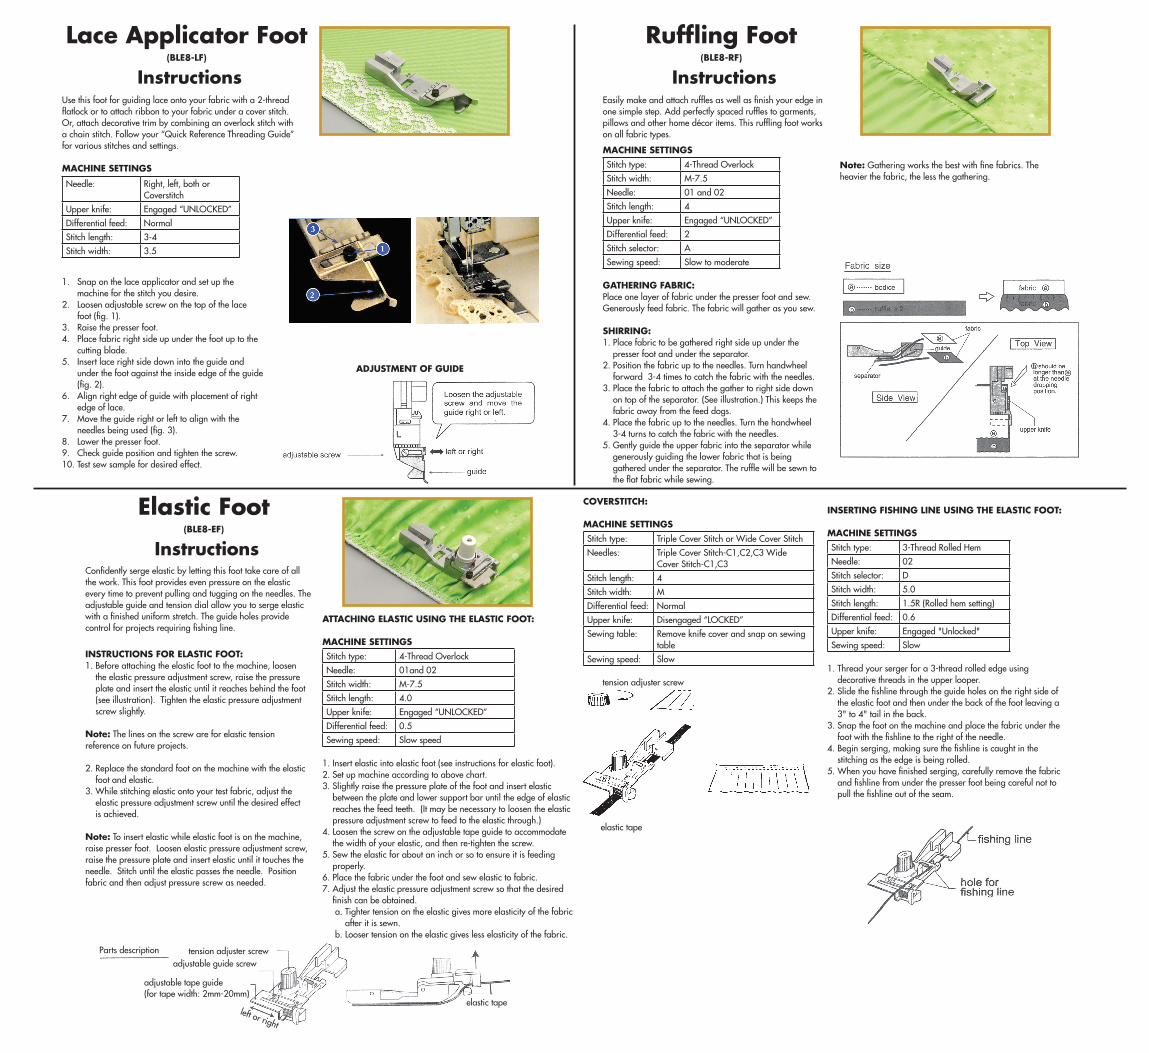
Use this foot for guiding lace onto your fabric with a 2-thread flatlock or to attach ribbon to your fabric under a cover stitch. Or, attach decorative trim by combining an overlock stitch with a chain stitch. Follow your “Quick Reference Threading Guide” for various stitches and settings.
Machine SettingS
Lace applicator Foot (BLe8-LF)
instructions
1. Snap on the lace applicator and set up the machine for the stitch you desire.
2. Loosen adjustable screw on the top of the lace foot (fig. 1).
3. Raise the presser foot.4. Place fabric right side up under the foot up to the
cutting blade.5. Insert lace right side down into the guide and
under the foot against the inside edge of the guide (fig. 2).
6. Align right edge of guide with placement of right edge of lace.
7. Move the guide right or left to align with the needles being used (fig. 3).
8. Lower the presser foot. 9. Check guide position and tighten the screw.10. Test sew sample for desired effect.
aDjuStMent oF guiDe
Needle: Right, left, both or Coverstitch
Upper knife: Engaged “UNLOCKED”
Differential feed: Normal
Stitch length: 3-4
Stitch width: 3.5
Machine SettingS
Stitch type: 4-Thread Overlock
Stitch width: M-7.5
Needle: 01 and 02
Stitch length: 4
Upper knife: Engaged “UNLOCKED”
Differential feed: 2
Stitch selector: A
Sewing speed: Slow to moderate gathering FaBric:Place one layer of fabric under the presser foot and sew. Generously feed fabric. The fabric will gather as you sew.
Shirring:1. Place fabric to be gathered right side up under the
presser foot and under the separator. 2. Position the fabric up to the needles. Turn handwheel
forward 3-4 times to catch the fabric with the needles.3. Place the fabric to attach the gather to right side down
on top of the separator. (See illustration.) This keeps the fabric away from the feed dogs.
4. Place the fabric up to the needles. Turn the handwheel 3-4 turns to catch the fabric with the needles.
5. Gently guide the upper fabric into the separator while generously guiding the lower fabric that is being gathered under the separator. The ruffle will be sewn to the flat fabric while sewing.
Easily make and attach ruffles as well as finish your edge in one simple step. Add perfectly spaced ruffles to garments, pillows and other home décor items. This ruffling foot works on all fabric types.
ruffling Foot(BLe8-rF)
instructions
note: Gathering works the best with fine fabrics. The heavier the fabric, the less the gathering.
tension adjuster screwadjustable guide screw
left or right
adjustable tape guide(for tape width: 2mm-20mm)
Parts description
elastic tape
Recommended