BitGravity Live Streaming
Information Guide
Version: Iris
Kaltura Business Headquarters
250 Park Avenue South, 10th Floor, New York, NY 10003
Tel.: +1 800 871 5224
Copyright © 2014 Kaltura Inc. All Rights Reserved. Designated trademarks and brands are the property of their respective owners.
Use of this document constitutes acceptance of the Kaltura Terms of Use and Privacy Policy.
BitGravity Live Streaming Information Guide 3
Contents
Configuring Live Streaming on a KMC Account Using a BitGravity Account ......................................... 4
Creating a Live Streaming Entry in the KMC (non DVR) .................................................................. 5
Adjusting the Live Stream for HDS and RTMP Support ............................................................. 6
Creating a DVR Enabled Live Streaming Entry Using the APIs ....................................................... 8
BitGravity Live Streaming Information Guide 4
Configuring Live Streaming on a KMC Account Using a BitGravity Account
This article describes the required steps to create a live streaming feed inside a customer’s KMC account using their BitGravity account.
The following topics are described:
Creating a Live Streaming Entry in the KMC (non DVR)
Creating a DVR Enabled Live Streaming Entry Using the APIs
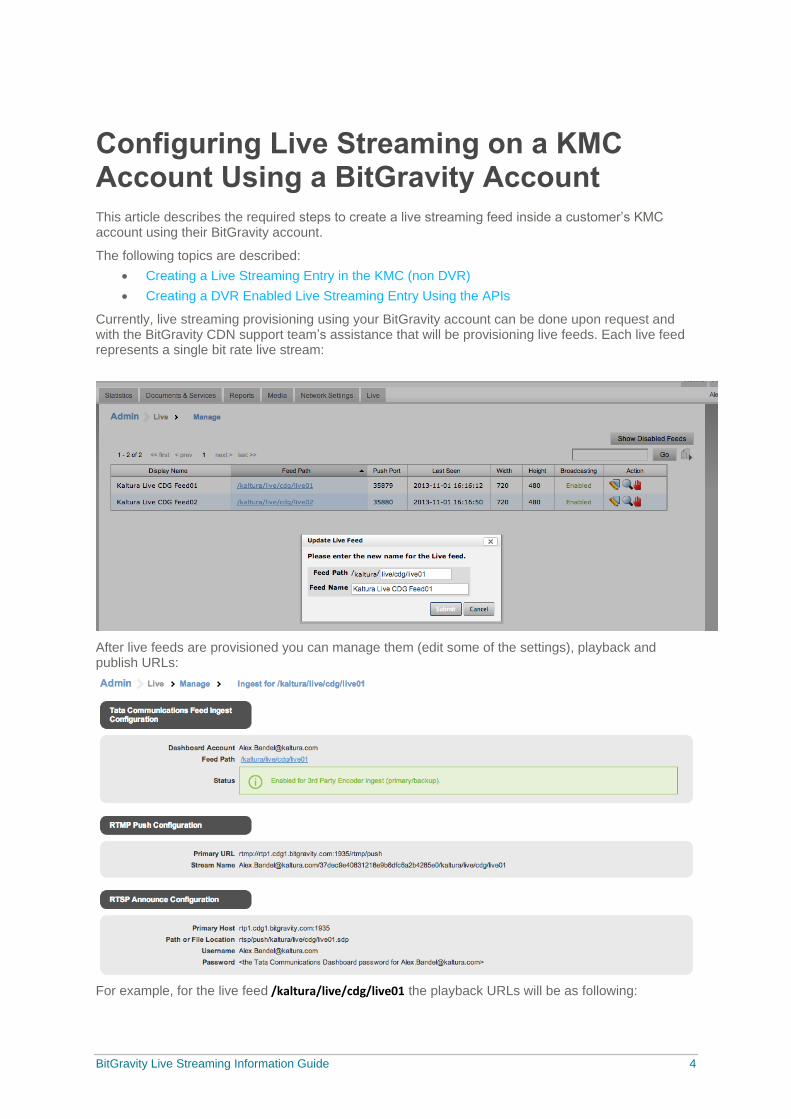
Currently, live streaming provisioning using your BitGravity account can be done upon request and with the BitGravity CDN support team’s assistance that will be provisioning live feeds. Each live feed represents a single bit rate live stream:
After live feeds are provisioned you can manage them (edit some of the settings), playback and publish URLs:
For example, for the live feed /kaltura/live/cdg/live01 the playback URLs will be as following:
Configuring Live Streaming on a KMC Account Using a BitGravity Account
BitGravity Live Streaming Information Guide 5
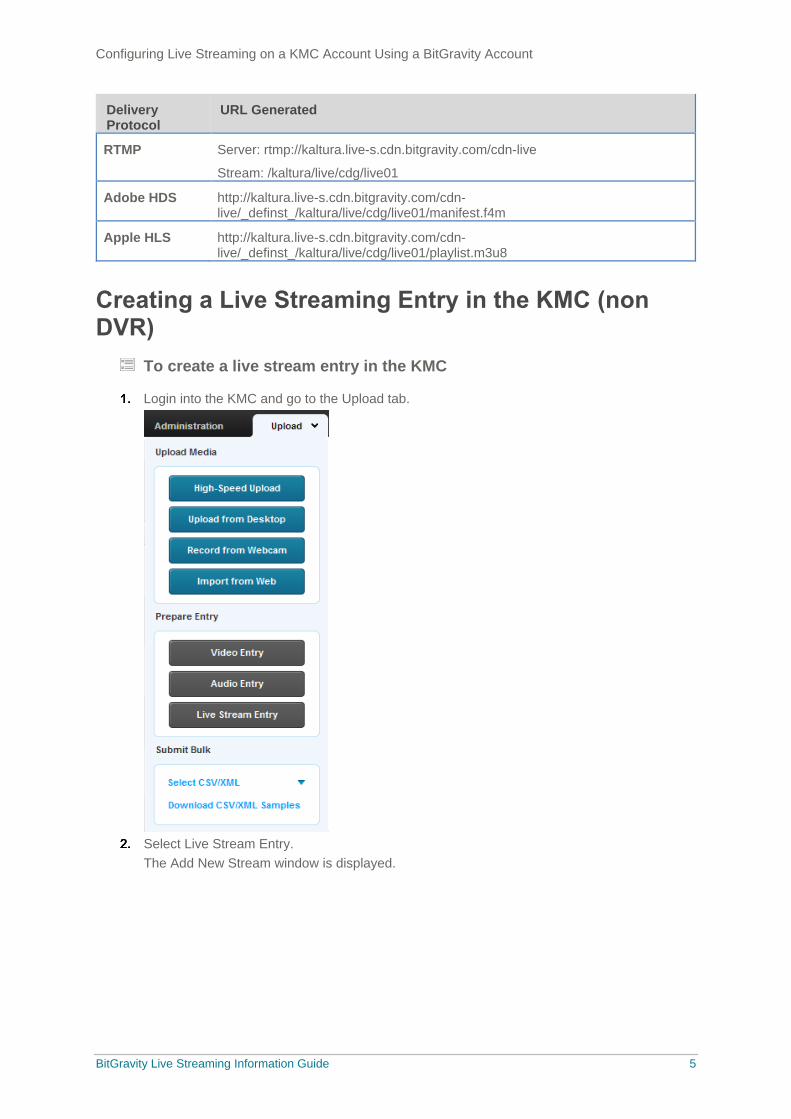
Delivery Protocol
URL Generated
RTMP Server: rtmp://kaltura.live-s.cdn.bitgravity.com/cdn-live
Stream: /kaltura/live/cdg/live01
Adobe HDS http://kaltura.live-s.cdn.bitgravity.com/cdn-live/_definst_/kaltura/live/cdg/live01/manifest.f4m
Apple HLS http://kaltura.live-s.cdn.bitgravity.com/cdn-live/_definst_/kaltura/live/cdg/live01/playlist.m3u8
Creating a Live Streaming Entry in the KMC (non DVR)
To create a live stream entry in the KMC
Login into the KMC and go to the Upload tab.
Select Live Stream Entry.
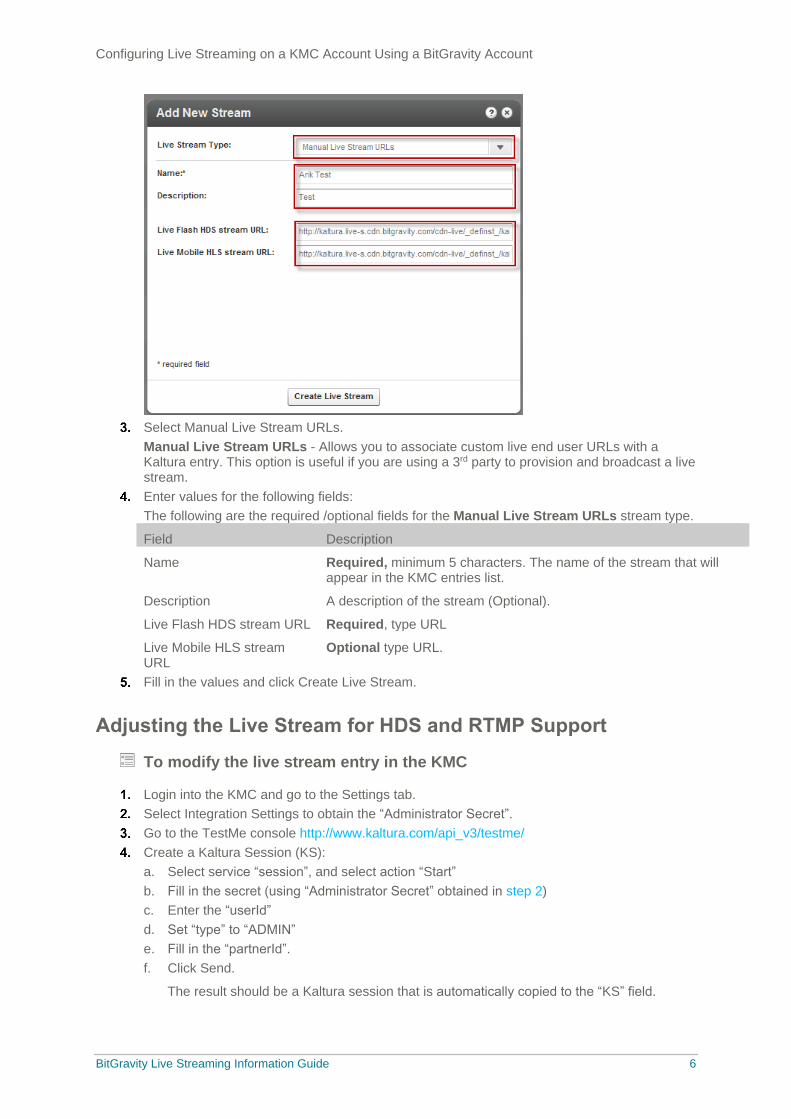
The Add New Stream window is displayed.
Configuring Live Streaming on a KMC Account Using a BitGravity Account
BitGravity Live Streaming Information Guide 6
Select Manual Live Stream URLs.
Manual Live Stream URLs - Allows you to associate custom live end user URLs with a Kaltura entry. This option is useful if you are using a 3rd party to provision and broadcast a live stream.
Enter values for the following fields:
The following are the required /optional fields for the Manual Live Stream URLs stream type.
Field Description
Name Required, minimum 5 characters. The name of the stream that will appear in the KMC entries list.
Description A description of the stream (Optional).
Live Flash HDS stream URL Required, type URL
Live Mobile HLS stream URL
Optional type URL.
Fill in the values and click Create Live Stream.
Adjusting the Live Stream for HDS and RTMP Support
To modify the live stream entry in the KMC
Login into the KMC and go to the Settings tab.
Select Integration Settings to obtain the “Administrator Secret”.
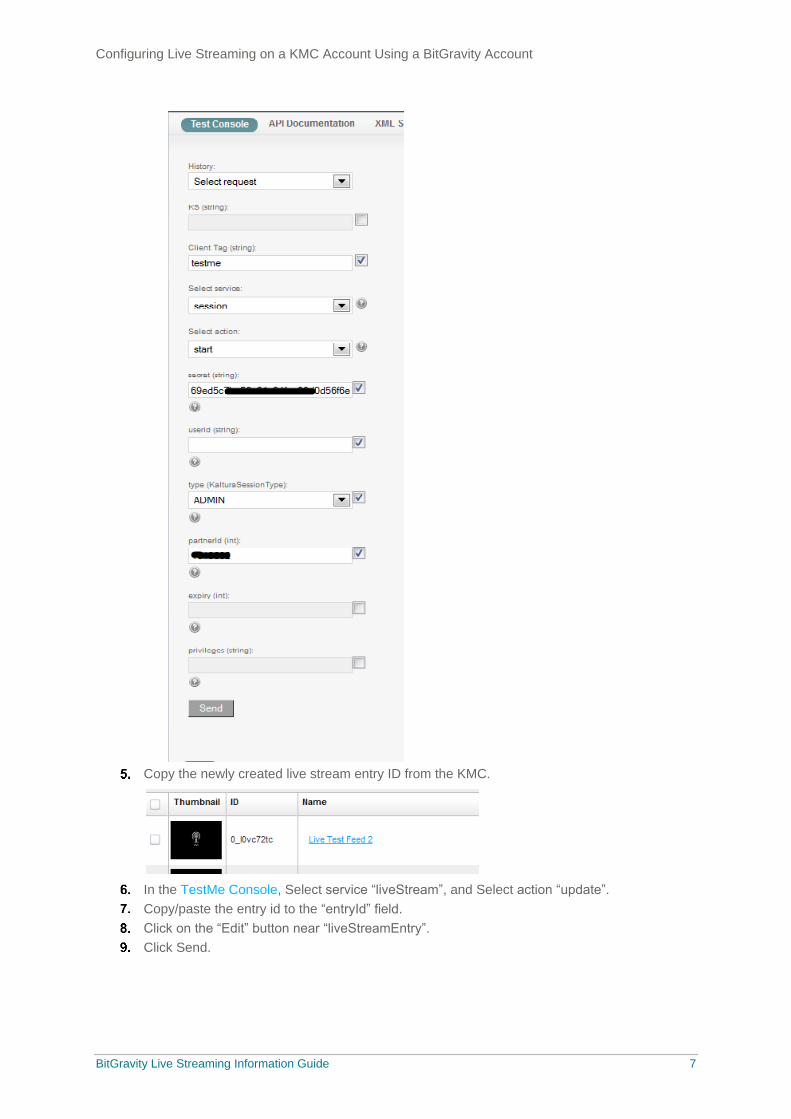
Go to the TestMe console http://www.kaltura.com/api_v3/testme/
Create a Kaltura Session (KS):
a. Select service “session”, and select action “Start”
b. Fill in the secret (using “Administrator Secret” obtained in step 2)
c. Enter the “userId”
d. Set “type” to “ADMIN”
e. Fill in the “partnerId”.
f. Click Send.
The result should be a Kaltura session that is automatically copied to the “KS” field.
Configuring Live Streaming on a KMC Account Using a BitGravity Account
BitGravity Live Streaming Information Guide 7
Copy the newly created live stream entry ID from the KMC.
In the TestMe Console, Select service “liveStream”, and Select action “update”.
Copy/paste the entry id to the “entryId” field.
Click on the “Edit” button near “liveStreamEntry”.
Click Send.

Configuring Live Streaming on a KMC Account Using a BitGravity Account
BitGravity Live Streaming Information Guide 8
To adjust the livestream for HDS support
Under “liveStreamConfigurations array” click “Add” to add an item for live stream configuration (if you don’t see it then scroll down):
Edit the item (item0)
a. Set the “protocol” to “HDS”.
b. Fill the “URL” for HDS playback taken from the BitGravity dashboard (The same one that was used to create the manual live stream entry in the KMC).
To add RTMP support to the livestream
Enter the “streamName” with the name of the stream, taken from the BitGravity dashboard. For example: /customerid/live/feed01
Enter the “streamUrl” with the base URL of the stream, taken from the BitGravity dashboard. For example: rtmp://customerid.live-s.cdn.bitgravity.com/cdn-live
Creating a DVR Enabled Live Streaming Entry Using the APIs
The Digital Video Recorder (DVR) feature provides the ability to seek within the recorded video up to 24 hours prior to your existing point of the live stream. DVR controls allow you to scrub back in time, while the live stream is still in progress, to replay a highlight or check out a clip that may have missed.
Configuring Live Streaming on a KMC Account Using a BitGravity Account
BitGravity Live Streaming Information Guide 9
To create a DVR enabled live streaming entry using the APIs
Obtain an “Administrator Secret” from the KMC > Settings > Integration Settings.
Go to the Kaltura TestMe Console.
Create a Kaltura Session (KS).
Set up the liveStream service.
The new DVR enabled live entry is displayed in the KMC.
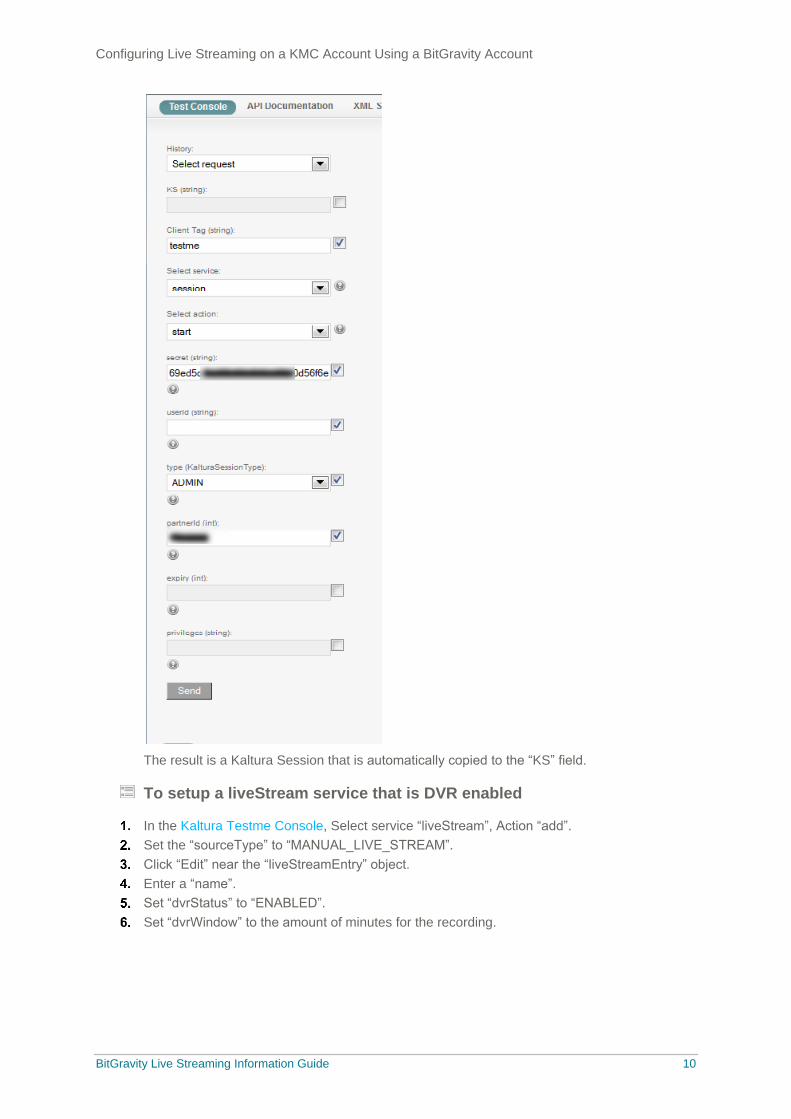
To create a Kaltura Session (KS)
In the KalturaTestme Console, Select service “session”, Action “start”.
Enter the secret (using “Administrator Secret” described here).
Enter the “userId”.
Set “type” to “ADMIN”.
Fill in the “partnerId”.
Click Send.
Configuring Live Streaming on a KMC Account Using a BitGravity Account
BitGravity Live Streaming Information Guide 10
The result is a Kaltura Session that is automatically copied to the “KS” field.
To setup a liveStream service that is DVR enabled
In the Kaltura Testme Console, Select service “liveStream”, Action “add”.
Set the “sourceType” to “MANUAL_LIVE_STREAM”.
Click “Edit” near the “liveStreamEntry” object.
Enter a “name”.
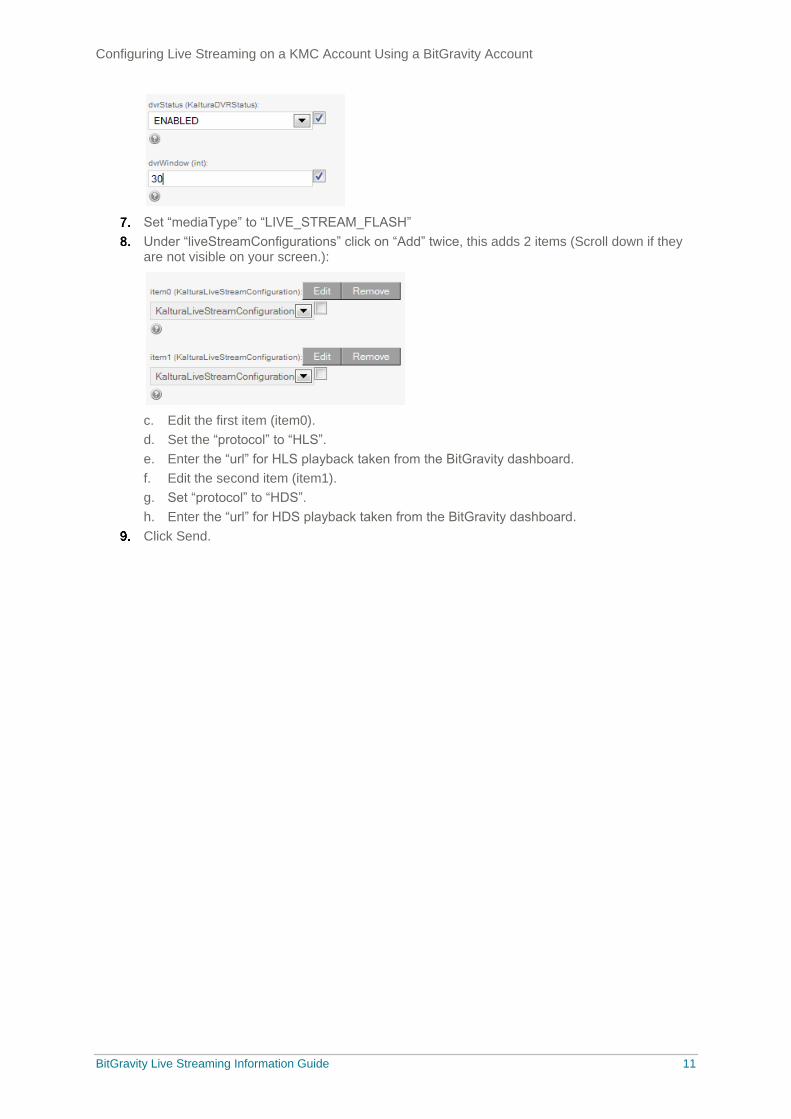
Set “dvrStatus” to “ENABLED”.
Set “dvrWindow” to the amount of minutes for the recording.
Configuring Live Streaming on a KMC Account Using a BitGravity Account
BitGravity Live Streaming Information Guide 11
Set “mediaType” to “LIVE_STREAM_FLASH”
Under “liveStreamConfigurations” click on “Add” twice, this adds 2 items (Scroll down if they are not visible on your screen.):
c. Edit the first item (item0).
d. Set the “protocol” to “HLS”.
e. Enter the “url” for HLS playback taken from the BitGravity dashboard.
f. Edit the second item (item1).
g. Set “protocol” to “HDS”.
h. Enter the “url” for HDS playback taken from the BitGravity dashboard.
Click Send.
Recommended


![[Samba Tech] Live Streaming](https://img.pdfslide.us/doc/110x75/555ec741d8b42a74708b53d5/samba-tech-live-streaming.jpg)