Page 1 of 34
Copyright 2009 Solution Beacon, LLC All Rights Reserved Any other commercial product names herein are trademark, registered
trademarks or service marks of their respective owners.
Collaborate 09 - OAUG Forum
BI Publisher Quick Start Guide
Karen Brownfield Susan Behn Solution Beacon, LLC
Reports provided with Oracle Applications are not often in a format that is required by the end users. The data is there, but the users need it in a different format or need to add logos, grafts and/or other material not included in the seeded report. Unfortunately, modifying the underlying Oracle Report is difficult, time consuming and requires extensive knowledge of the tool used to develop the report. BI Publisher removes this limitation. BI Publisher separates the extract of the data from the presentation of the data. While BI Publisher also provides the ability to extract the data, this presentation will focus on using a standard report from Oracle E–Business Suite and using BI Publisher to tailor the look of the report without customizing Oracle’s code.
Overview
BI Publisher separates extracting data from the database from the presentation of that data in a report. This provides several advantages
• The same data file can be used for multiple reports • Output can be set to be Word, PDF, Excel, XBRL, XML without changing program that extracted
the data • Anybody proficient in Word, Excel can design the output
The program that produces the XML file is called the Data Template. The portion of BI Publisher that takes the XML file as input and creates the report is the Report Template or Presentation Template. Since both pieces have template in the name, this can cause confusion.
Any tool that can output XML can create the Data Template. This can be Oracle Reports, JDeveloper, PL/SQL etc. Data Templates can even contain embedded SQL to do further extracts.
Presentation Templates cannot create XML, cannot contain SQL, and cannot add data to the template. Within limits, they can reorder the data, can reformat it, and add conditions to exclude data in the XML file.
Presentation Templates can be created with common desktop tools like Microsoft Word or Adobe Acrobat. BI Publisher works with Office 2000, 2003 and 2007. This paper will use Microsoft Word 2007 to build the sample template. If you are using Office 2000 or 2003, the menus will be slightly different.
There are three versions of BI Publisher. One version is the Desktop version, more commonly called the Template Builder. This is the add-in to Word or Adobe that allows you to build the templates. You can download the Enterprise version of the desktop BI Publisher from OTN (current version is 10.1.3.4) and use it against the E-Business Suite embedded version as long as you don’t need to use pivot tables. Or you can download the E-Business Suite client side version from MetaLink. This will actually download version 10.1.3.2 of the Enterprise version. This presentation will be using the E-Business Suite BI Publisher Desktop.
The other two versions reside on the database and are also called the Processing Engine. One is embedded in E-Business Suite. You may also hear this version referenced as XML Publisher or BI Publisher 5.6.3. This version of BI Publisher is included in your E-Business Suite license as long as you do not reference any custom tables or any custom columns added to Oracle tables.
The second version that resides at the database level is BI Publisher Enterprise Edition. This version allows you to use any field in any table, but requires additional licensing.
Whether you use the E-Business Suite embedded version or the Enterprise version, it is this processing engine that merges the XML data with the Presentation or Report Template. The following three diagrams represent how the processing engine works

Page 2 of 34
Copyright 2009 Solution Beacon, LLC All Rights Reserved Any other commercial product names herein are trademark, registered
trademarks or service marks of their respective owners.
Collaborate 09 - OAUG Forum
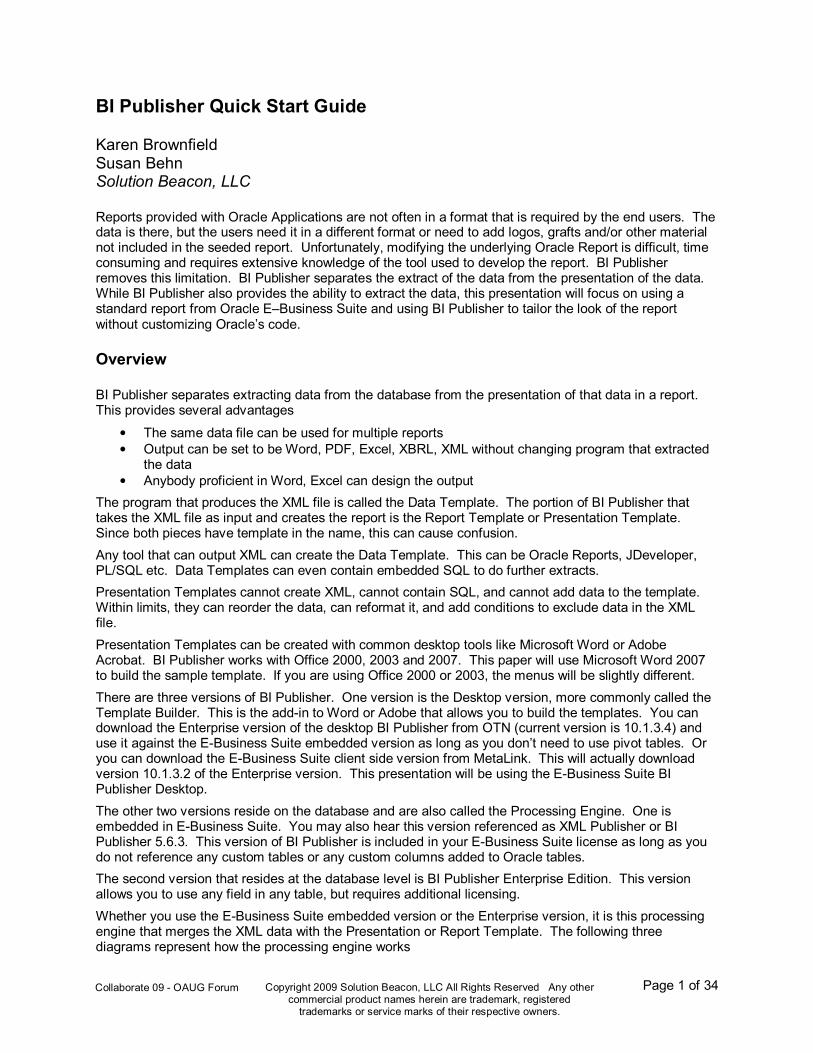
The following picture shows just a few of the formats that you can produce using the Template Builder. The Template Builder supports special formatting such as logos, charts and graphs, tables, and bar codes. It also supports the use of any special formatting offered by Word or Adobe.
The Processing Engine supports multiple methods of report delivery such as print, fax, email, and web. Reports can be burst according to your defined criteria and each section delivered to a different person.
BI Publisher is a tremendous improvement over the traditional method of writing and delivering reports.
Page 3 of 34
Copyright 2009 Solution Beacon, LLC All Rights Reserved Any other commercial product names herein are trademark, registered
trademarks or service marks of their respective owners.
Collaborate 09 - OAUG Forum
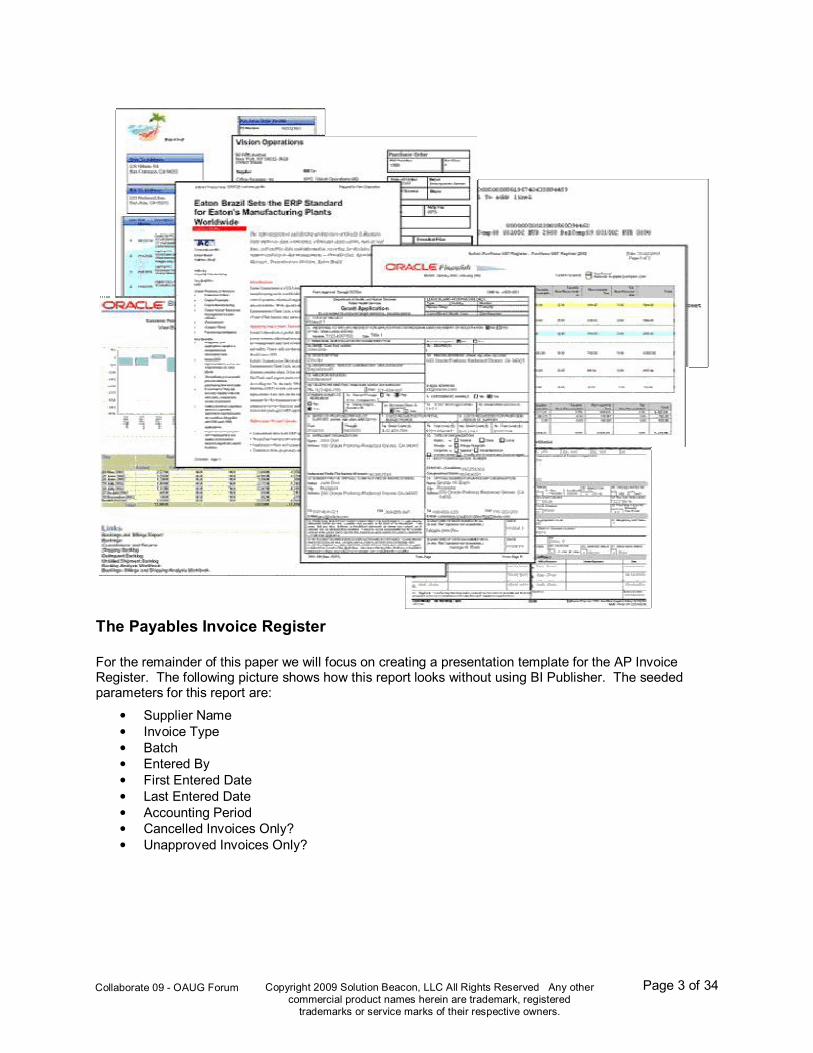
The Payables Invoice Register
For the remainder of this paper we will focus on creating a presentation template for the AP Invoice Register. The following picture shows how this report looks without using BI Publisher. The seeded parameters for this report are:
• Supplier Name • Invoice Type • Batch • Entered By • First Entered Date • Last Entered Date • Accounting Period • Cancelled Invoices Only? • Unapproved Invoices Only?
Page 4 of 34
Copyright 2009 Solution Beacon, LLC All Rights Reserved Any other commercial product names herein are trademark, registered
trademarks or service marks of their respective owners.
Collaborate 09 - OAUG Forum
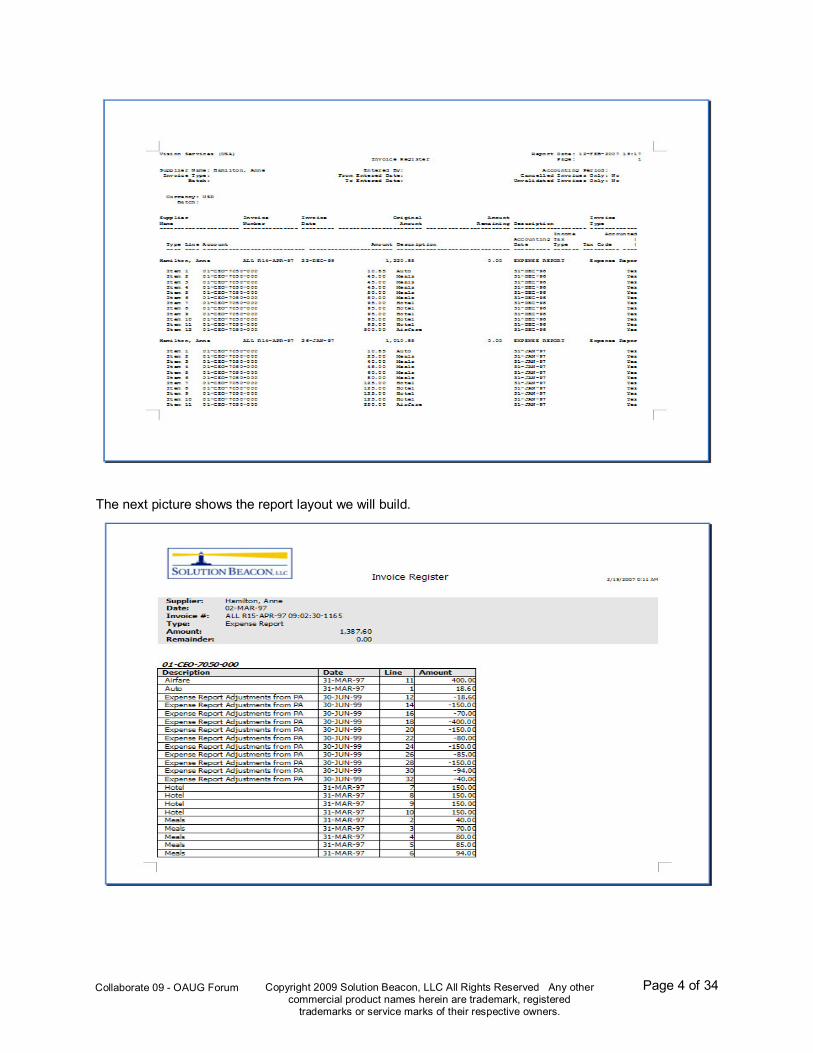
The next picture shows the report layout we will build.
Page 5 of 34
Copyright 2009 Solution Beacon, LLC All Rights Reserved Any other commercial product names herein are trademark, registered
trademarks or service marks of their respective owners.
Collaborate 09 - OAUG Forum
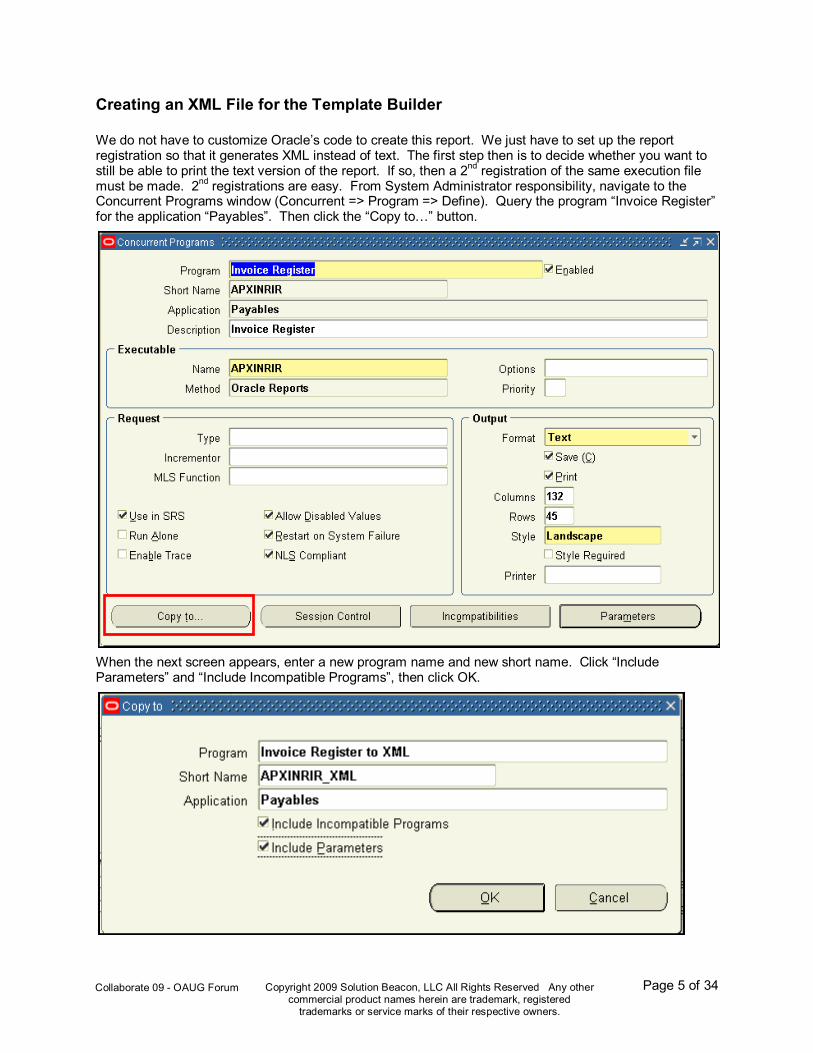
Creating an XML File for the Template Builder
We do not have to customize Oracle’s code to create this report. We just have to set up the report registration so that it generates XML instead of text. The first step then is to decide whether you want to still be able to print the text version of the report. If so, then a 2
nd registration of the same execution file
must be made. 2nd registrations are easy. From System Administrator responsibility, navigate to the
Concurrent Programs window (Concurrent => Program => Define). Query the program “Invoice Register” for the application “Payables”. Then click the “Copy to…” button.
When the next screen appears, enter a new program name and new short name. Click “Include Parameters” and “Include Incompatible Programs”, then click OK.
Page 6 of 34
Copyright 2009 Solution Beacon, LLC All Rights Reserved Any other commercial product names herein are trademark, registered
trademarks or service marks of their respective owners.
Collaborate 09 - OAUG Forum
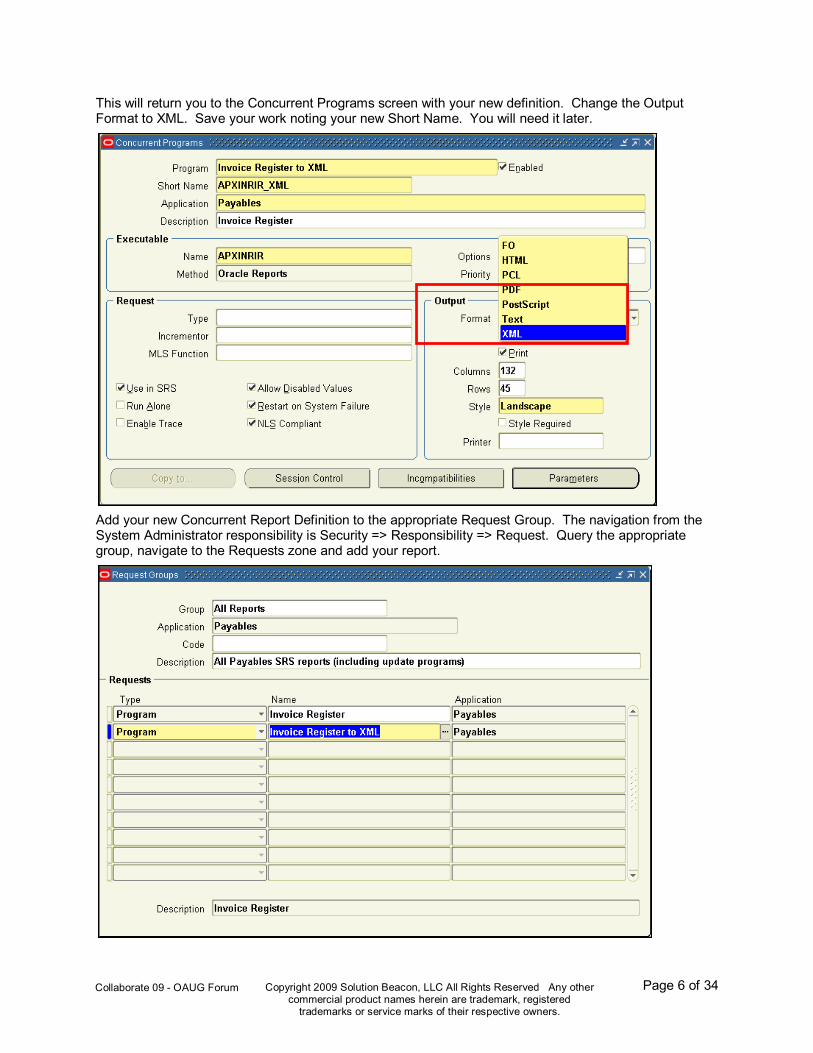
This will return you to the Concurrent Programs screen with your new definition. Change the Output Format to XML. Save your work noting your new Short Name. You will need it later.
Add your new Concurrent Report Definition to the appropriate Request Group. The navigation from the System Administrator responsibility is Security => Responsibility => Request. Query the appropriate group, navigate to the Requests zone and add your report.
Page 7 of 34
Copyright 2009 Solution Beacon, LLC All Rights Reserved Any other commercial product names herein are trademark, registered
trademarks or service marks of their respective owners.
Collaborate 09 - OAUG Forum
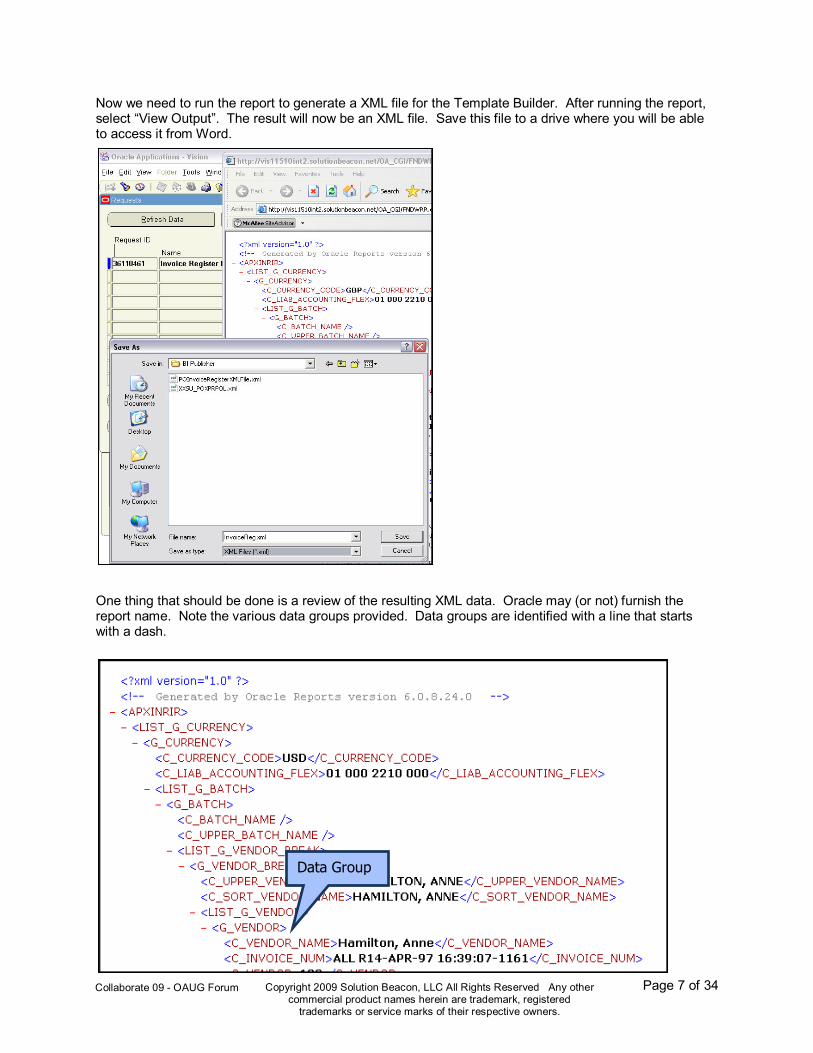
Now we need to run the report to generate a XML file for the Template Builder. After running the report, select “View Output”. The result will now be an XML file. Save this file to a drive where you will be able to access it from Word.
One thing that should be done is a review of the resulting XML data. Oracle may (or not) furnish the report name. Note the various data groups provided. Data groups are identified with a line that starts with a dash.
Data Group
Page 8 of 34
Copyright 2009 Solution Beacon, LLC All Rights Reserved Any other commercial product names herein are trademark, registered
trademarks or service marks of their respective owners.
Collaborate 09 - OAUG Forum
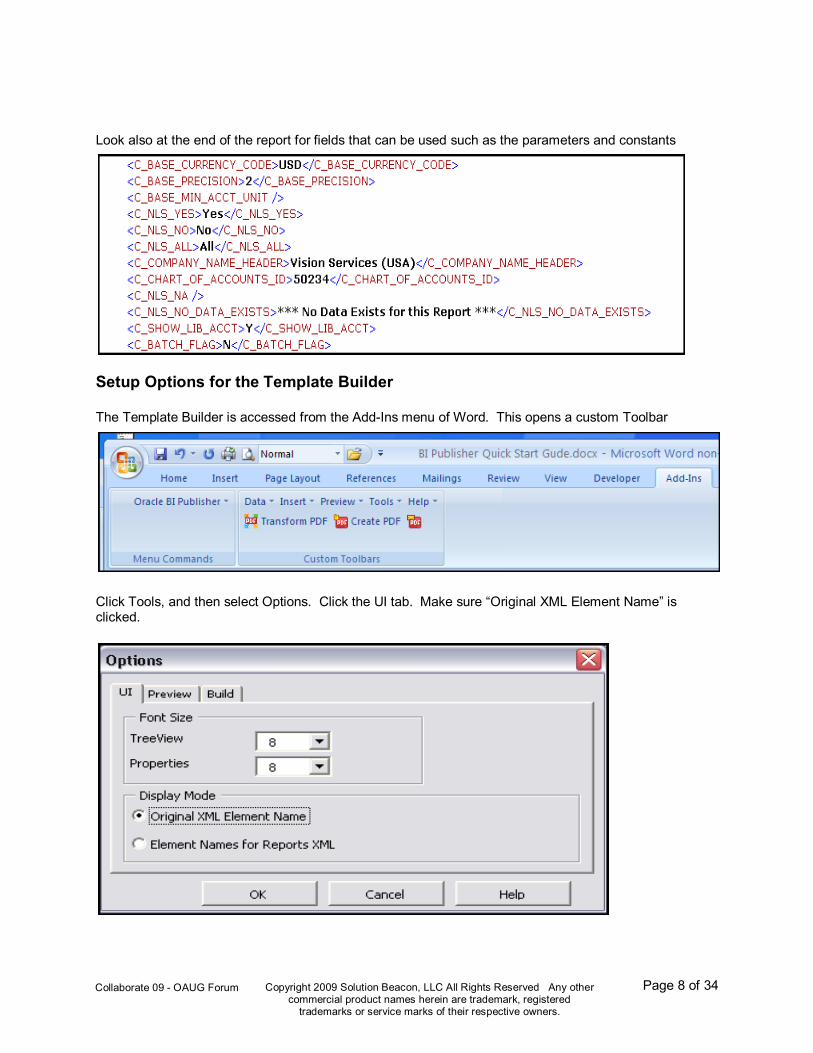
Look also at the end of the report for fields that can be used such as the parameters and constants
Setup Options for the Template Builder
The Template Builder is accessed from the Add-Ins menu of Word. This opens a custom Toolbar
Click Tools, and then select Options. Click the UI tab. Make sure “Original XML Element Name” is clicked.
Page 9 of 34
Copyright 2009 Solution Beacon, LLC All Rights Reserved Any other commercial product names herein are trademark, registered
trademarks or service marks of their respective owners.
Collaborate 09 - OAUG Forum
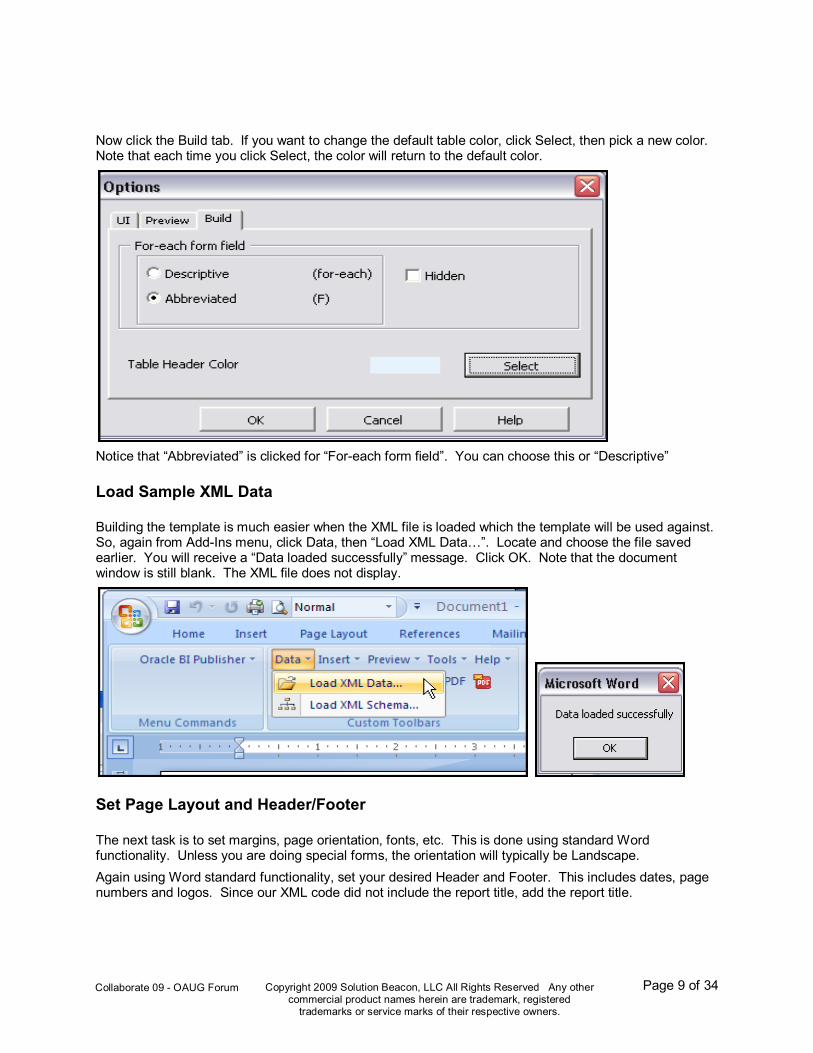
Now click the Build tab. If you want to change the default table color, click Select, then pick a new color. Note that each time you click Select, the color will return to the default color.
Notice that “Abbreviated” is clicked for “For-each form field”. You can choose this or “Descriptive”
Load Sample XML Data
Building the template is much easier when the XML file is loaded which the template will be used against. So, again from Add-Ins menu, click Data, then “Load XML Data…”. Locate and choose the file saved earlier. You will receive a “Data loaded successfully” message. Click OK. Note that the document window is still blank. The XML file does not display.
Set Page Layout and Header/Footer
The next task is to set margins, page orientation, fonts, etc. This is done using standard Word functionality. Unless you are doing special forms, the orientation will typically be Landscape.
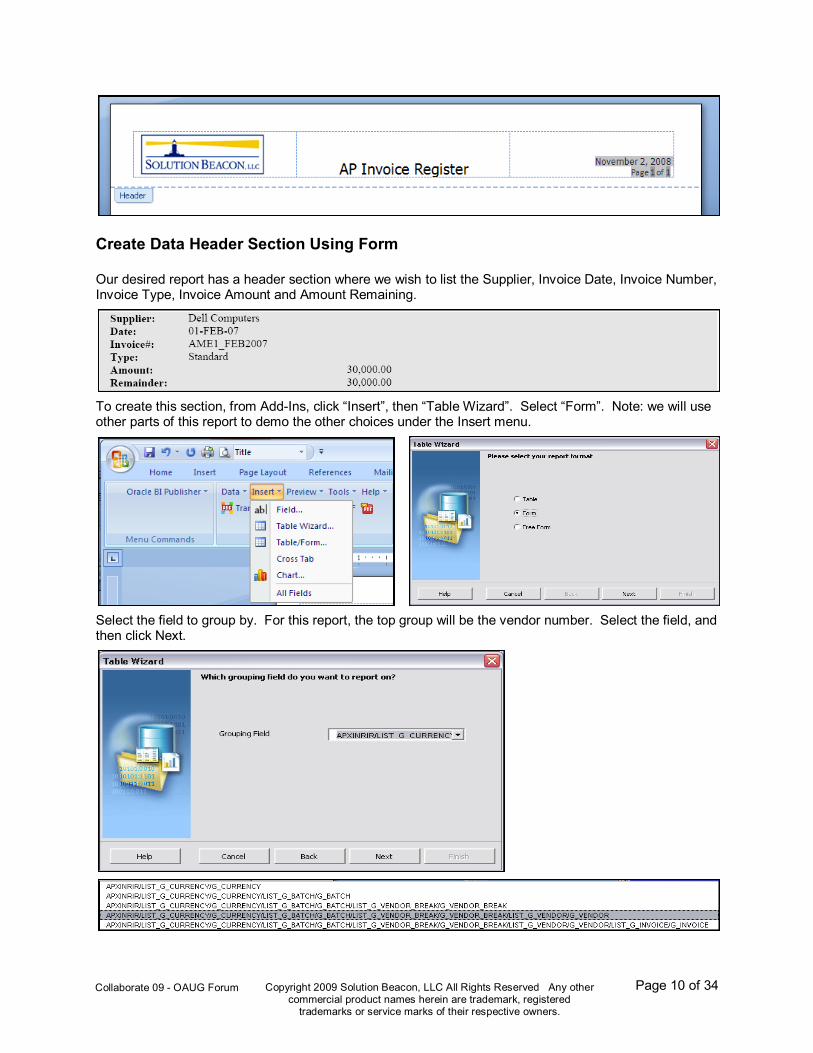
Again using Word standard functionality, set your desired Header and Footer. This includes dates, page numbers and logos. Since our XML code did not include the report title, add the report title.
Page 10 of 34
Copyright 2009 Solution Beacon, LLC All Rights Reserved Any other commercial product names herein are trademark, registered
trademarks or service marks of their respective owners.
Collaborate 09 - OAUG Forum
Create Data Header Section Using Form
Our desired report has a header section where we wish to list the Supplier, Invoice Date, Invoice Number, Invoice Type, Invoice Amount and Amount Remaining.
To create this section, from Add-Ins, click “Insert”, then “Table Wizard”. Select “Form”. Note: we will use other parts of this report to demo the other choices under the Insert menu.
Select the field to group by. For this report, the top group will be the vendor number. Select the field, and then click Next.
Page 11 of 34
Copyright 2009 Solution Beacon, LLC All Rights Reserved Any other commercial product names herein are trademark, registered
trademarks or service marks of their respective owners.
Collaborate 09 - OAUG Forum
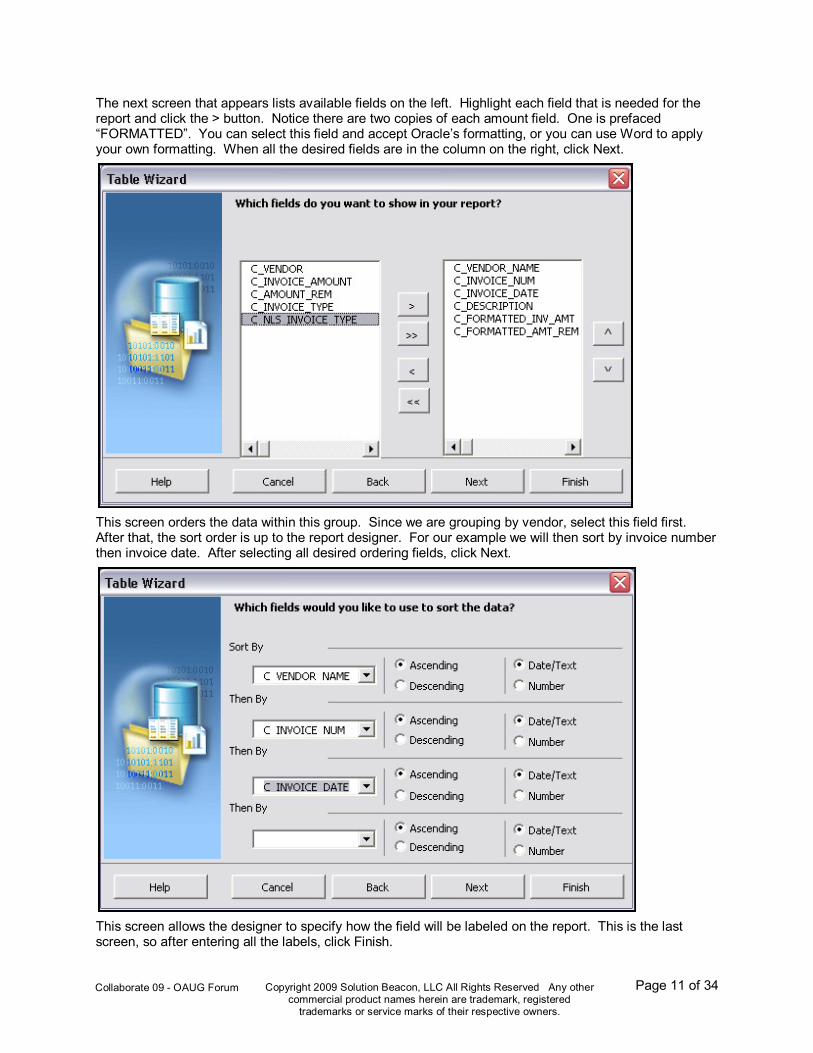
The next screen that appears lists available fields on the left. Highlight each field that is needed for the report and click the > button. Notice there are two copies of each amount field. One is prefaced “FORMATTED”. You can select this field and accept Oracle’s formatting, or you can use Word to apply your own formatting. When all the desired fields are in the column on the right, click Next.
This screen orders the data within this group. Since we are grouping by vendor, select this field first. After that, the sort order is up to the report designer. For our example we will then sort by invoice number then invoice date. After selecting all desired ordering fields, click Next.
This screen allows the designer to specify how the field will be labeled on the report. This is the last screen, so after entering all the labels, click Finish.

Page 12 of 34
Copyright 2009 Solution Beacon, LLC All Rights Reserved Any other commercial product names herein are trademark, registered
trademarks or service marks of their respective owners.
Collaborate 09 - OAUG Forum
BI Publisher will drop a table at the top of our report under the header with the results. You can now apply additional formatting, such as font size and type, and/or table borders. Note that the shading for the table comes from the default specified earlier. It can be changed. In the picture below the width of the 1
st
column was adjusted and the alignment for the amount columns was changed to right-justified. Additionally those cells were split so that the amount would still stay close to the text identifying the amount.
What is that F and E
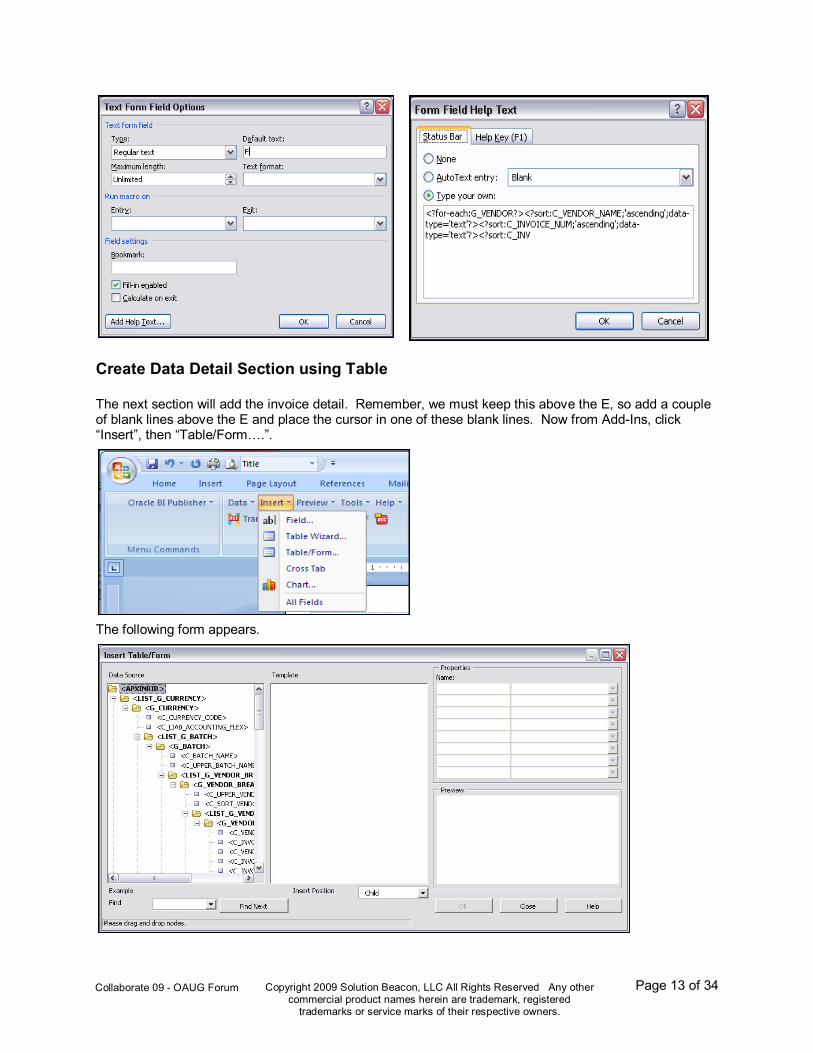
You may be wondering what the F is above the table and the E below the table. These marks indicate the beginning and end of the group. Remember we set our Build tab options to Abbreviated. If we had set the option to Descriptive, you would see “for-each” instead of F and “end” instead of E. If you interested in seeing the “code” behind this field, double-click the field, which opens the “Properties Page”, then click “Add Help Text”. Now you can see that this contains the group and sort criteria we defined earlier.
This F and E are the outer bounds of the report. Anything that is place either before the F or after the E will not repeat as vendor names change. Keep this in mind as we add further information.
For Each
End For Each
Page 13 of 34
Copyright 2009 Solution Beacon, LLC All Rights Reserved Any other commercial product names herein are trademark, registered
trademarks or service marks of their respective owners.
Collaborate 09 - OAUG Forum
Create Data Detail Section using Table
The next section will add the invoice detail. Remember, we must keep this above the E, so add a couple of blank lines above the E and place the cursor in one of these blank lines. Now from Add-Ins, click “Insert”, then “Table/Form….”.
The following form appears.
Page 14 of 34
Copyright 2009 Solution Beacon, LLC All Rights Reserved Any other commercial product names herein are trademark, registered
trademarks or service marks of their respective owners.
Collaborate 09 - OAUG Forum
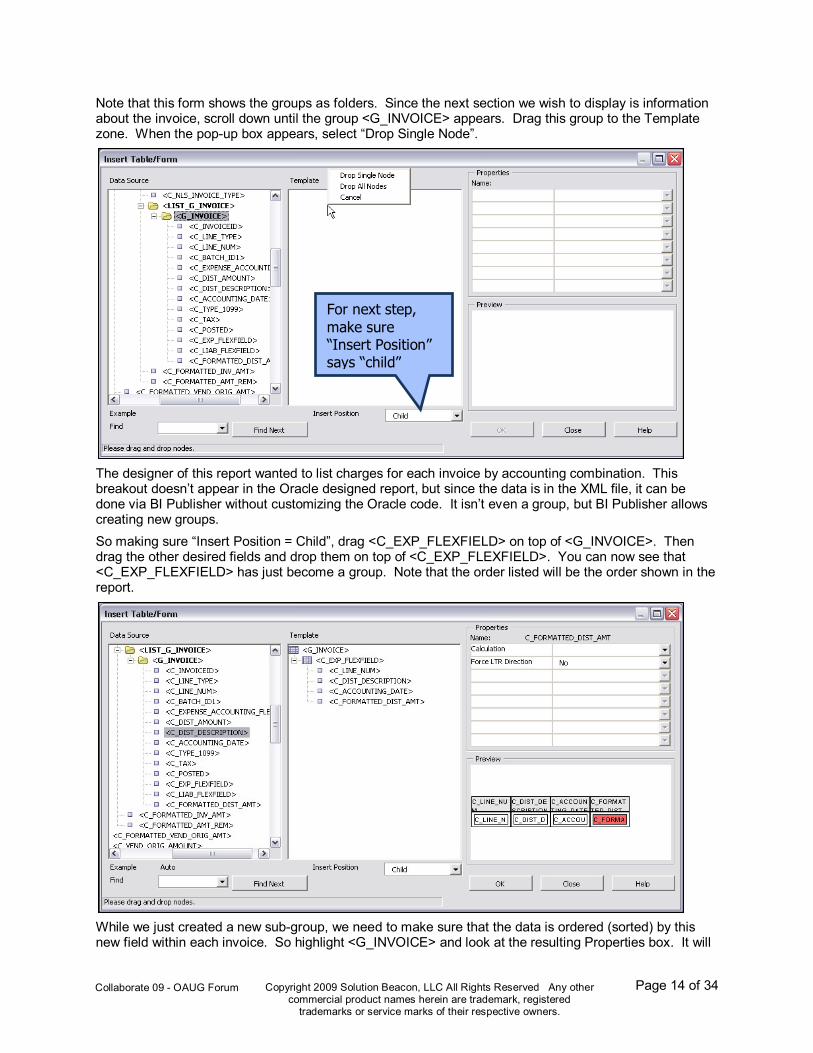
Note that this form shows the groups as folders. Since the next section we wish to display is information about the invoice, scroll down until the group <G_INVOICE> appears. Drag this group to the Template zone. When the pop-up box appears, select “Drop Single Node”.
The designer of this report wanted to list charges for each invoice by accounting combination. This breakout doesn’t appear in the Oracle designed report, but since the data is in the XML file, it can be done via BI Publisher without customizing the Oracle code. It isn’t even a group, but BI Publisher allows creating new groups.
So making sure “Insert Position = Child”, drag <C_EXP_FLEXFIELD> on top of <G_INVOICE>. Then drag the other desired fields and drop them on top of <C_EXP_FLEXFIELD>. You can now see that <C_EXP_FLEXFIELD> has just become a group. Note that the order listed will be the order shown in the report.
While we just created a new sub-group, we need to make sure that the data is ordered (sorted) by this new field within each invoice. So highlight <G_INVOICE> and look at the resulting Properties box. It will
For next step,
make sure “Insert Position” says “child”
Page 15 of 34
Copyright 2009 Solution Beacon, LLC All Rights Reserved Any other commercial product names herein are trademark, registered
trademarks or service marks of their respective owners.
Collaborate 09 - OAUG Forum
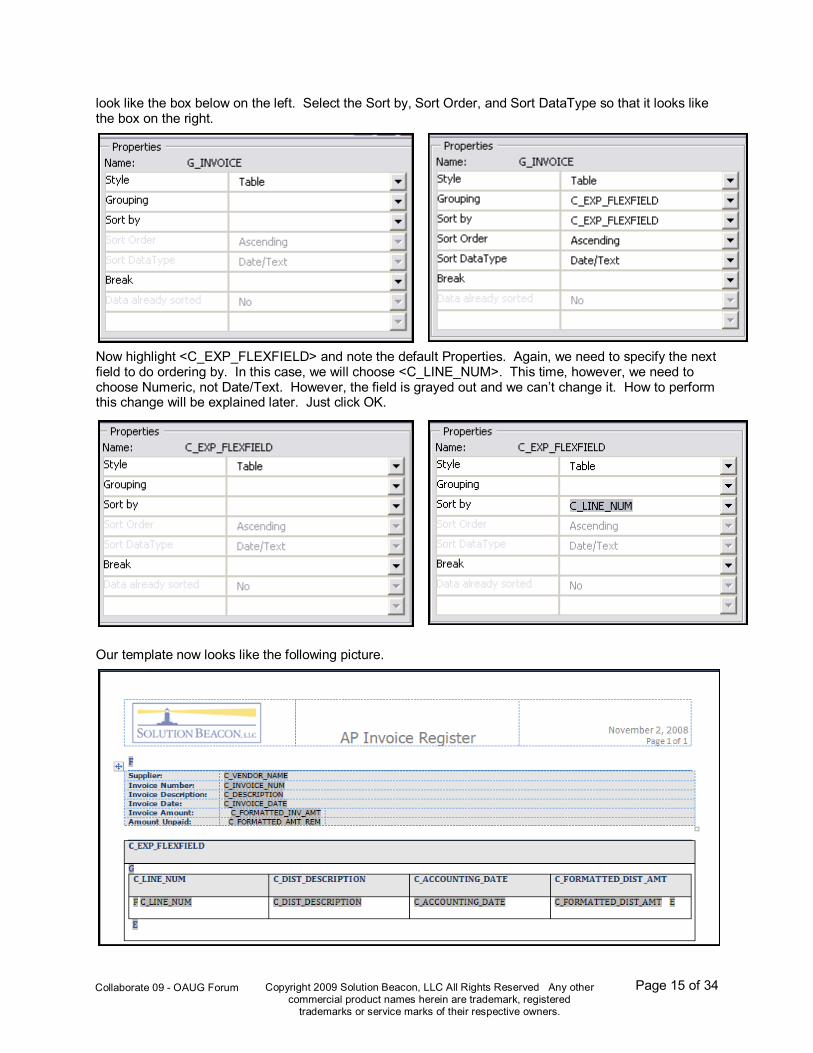
look like the box below on the left. Select the Sort by, Sort Order, and Sort DataType so that it looks like the box on the right.
Now highlight <C_EXP_FLEXFIELD> and note the default Properties. Again, we need to specify the next field to do ordering by. In this case, we will choose <C_LINE_NUM>. This time, however, we need to choose Numeric, not Date/Text. However, the field is grayed out and we can’t change it. How to perform this change will be explained later. Just click OK.
Our template now looks like the following picture.
Page 16 of 34
Copyright 2009 Solution Beacon, LLC All Rights Reserved Any other commercial product names herein are trademark, registered
trademarks or service marks of their respective owners.
Collaborate 09 - OAUG Forum
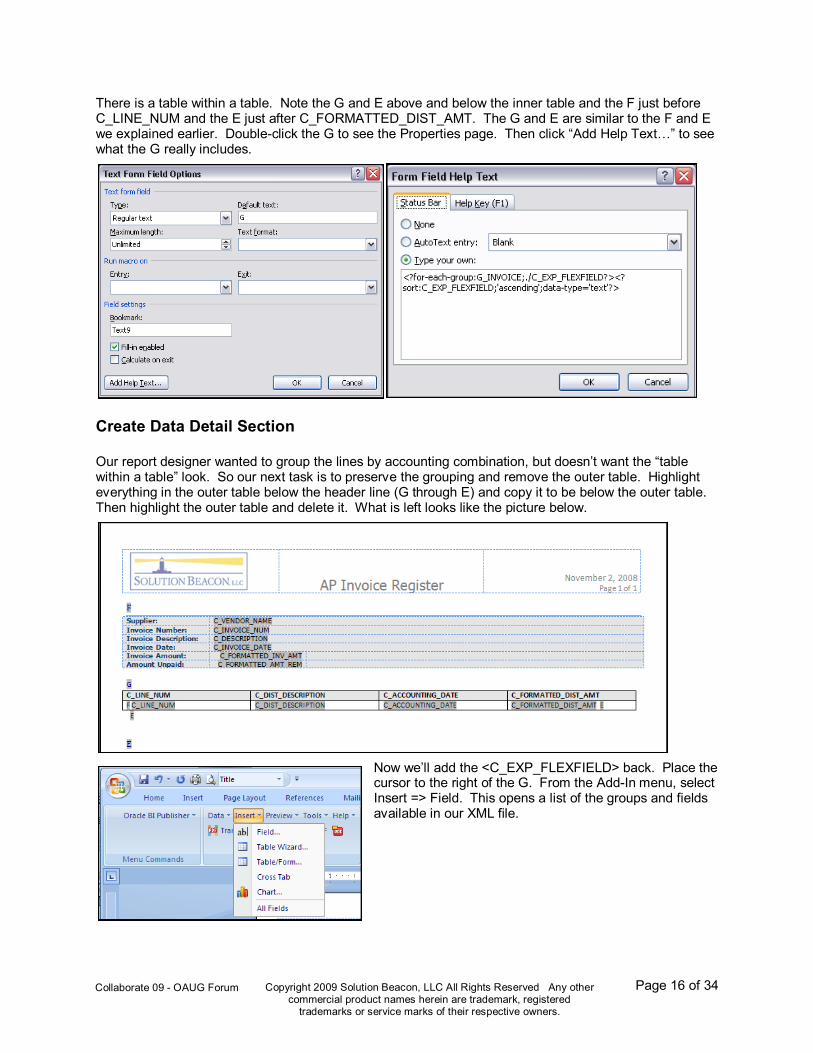
There is a table within a table. Note the G and E above and below the inner table and the F just before C_LINE_NUM and the E just after C_FORMATTED_DIST_AMT. The G and E are similar to the F and E we explained earlier. Double-click the G to see the Properties page. Then click “Add Help Text…” to see what the G really includes.
Create Data Detail Section
Our report designer wanted to group the lines by accounting combination, but doesn’t want the “table within a table” look. So our next task is to preserve the grouping and remove the outer table. Highlight everything in the outer table below the header line (G through E) and copy it to be below the outer table. Then highlight the outer table and delete it. What is left looks like the picture below.
Now we’ll add the <C_EXP_FLEXFIELD> back. Place the cursor to the right of the G. From the Add-In menu, select Insert => Field. This opens a list of the groups and fields available in our XML file.
Page 17 of 34
Copyright 2009 Solution Beacon, LLC All Rights Reserved Any other commercial product names herein are trademark, registered
trademarks or service marks of their respective owners.
Collaborate 09 - OAUG Forum
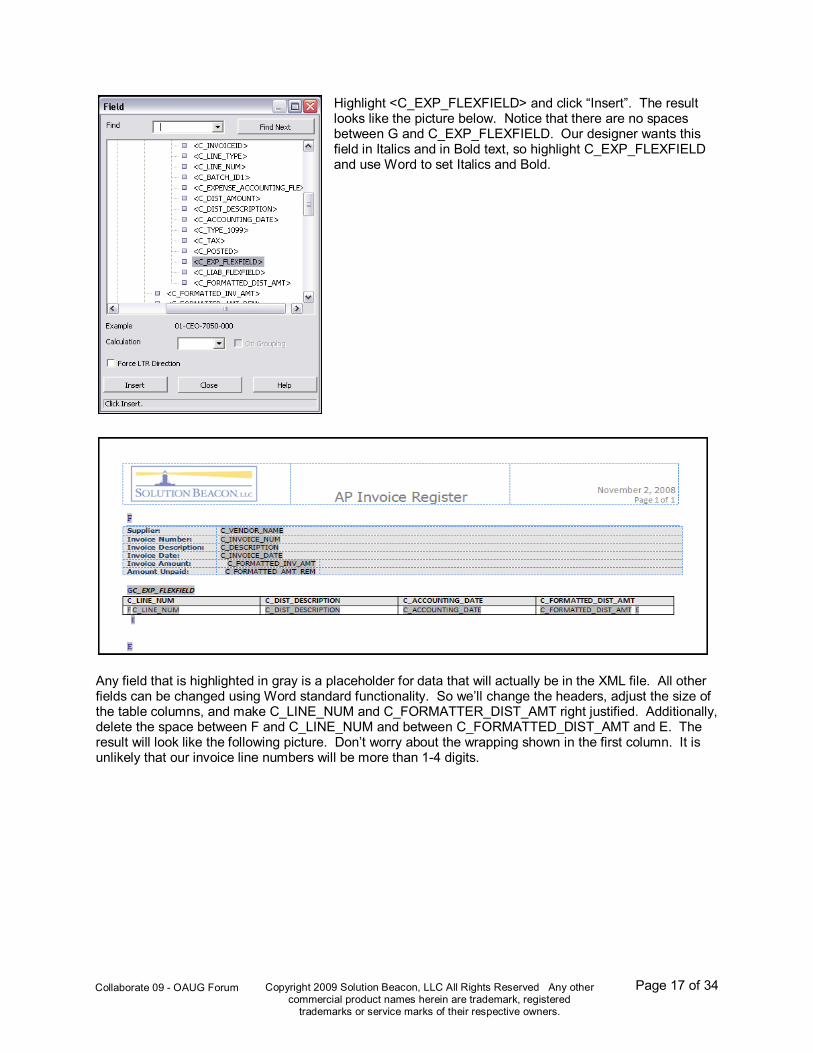
Highlight <C_EXP_FLEXFIELD> and click “Insert”. The result looks like the picture below. Notice that there are no spaces between G and C_EXP_FLEXFIELD. Our designer wants this field in Italics and in Bold text, so highlight C_EXP_FLEXFIELD and use Word to set Italics and Bold.
Any field that is highlighted in gray is a placeholder for data that will actually be in the XML file. All other fields can be changed using Word standard functionality. So we’ll change the headers, adjust the size of the table columns, and make C_LINE_NUM and C_FORMATTER_DIST_AMT right justified. Additionally, delete the space between F and C_LINE_NUM and between C_FORMATTED_DIST_AMT and E. The result will look like the following picture. Don’t worry about the wrapping shown in the first column. It is unlikely that our invoice line numbers will be more than 1-4 digits.
Page 18 of 34
Copyright 2009 Solution Beacon, LLC All Rights Reserved Any other commercial product names herein are trademark, registered
trademarks or service marks of their respective owners.
Collaborate 09 - OAUG Forum
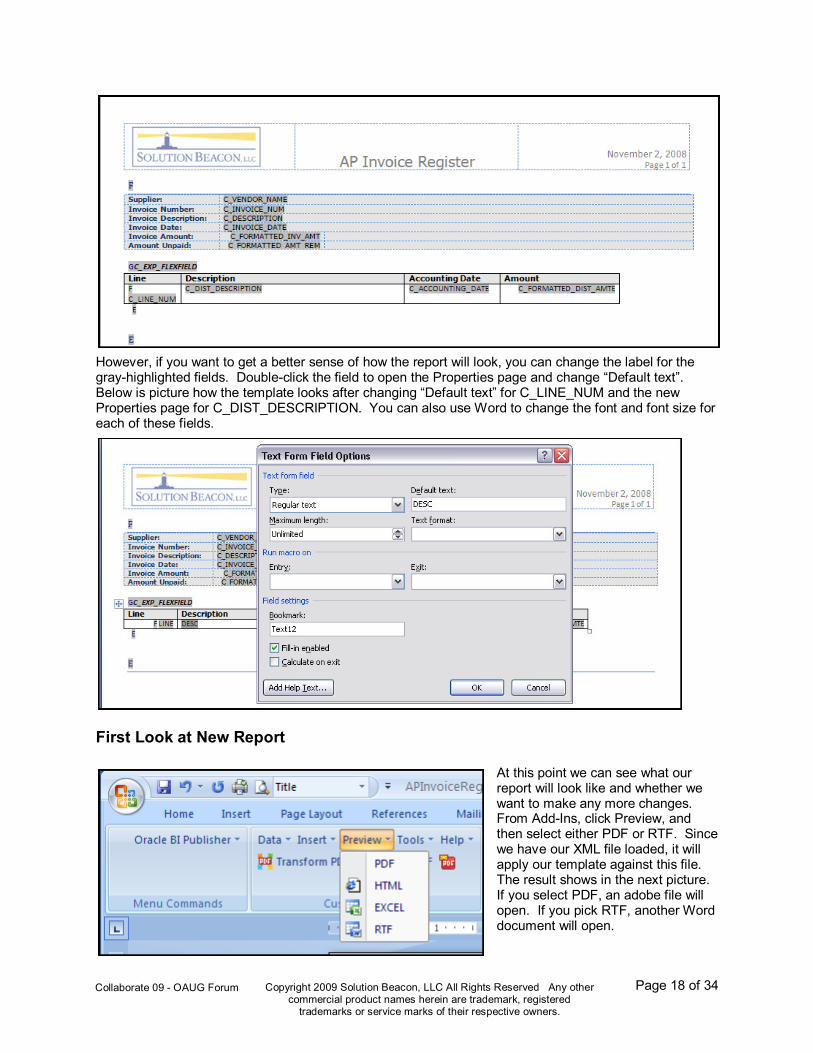
However, if you want to get a better sense of how the report will look, you can change the label for the gray-highlighted fields. Double-click the field to open the Properties page and change “Default text”. Below is picture how the template looks after changing “Default text” for C_LINE_NUM and the new Properties page for C_DIST_DESCRIPTION. You can also use Word to change the font and font size for each of these fields.
First Look at New Report
At this point we can see what our report will look like and whether we want to make any more changes. From Add-Ins, click Preview, and then select either PDF or RTF. Since we have our XML file loaded, it will apply our template against this file. The result shows in the next picture. If you select PDF, an adobe file will open. If you pick RTF, another Word document will open.
Page 19 of 34
Copyright 2009 Solution Beacon, LLC All Rights Reserved Any other commercial product names herein are trademark, registered
trademarks or service marks of their respective owners.
Collaborate 09 - OAUG Forum
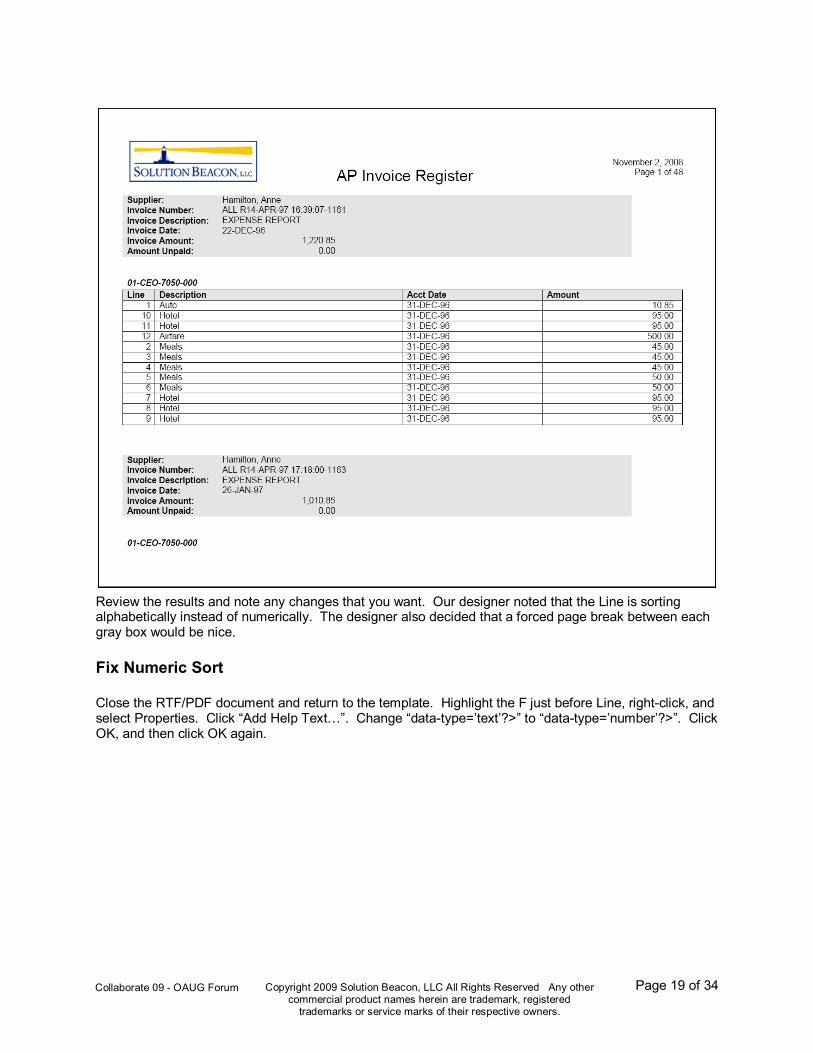
Review the results and note any changes that you want. Our designer noted that the Line is sorting alphabetically instead of numerically. The designer also decided that a forced page break between each gray box would be nice.
Fix Numeric Sort
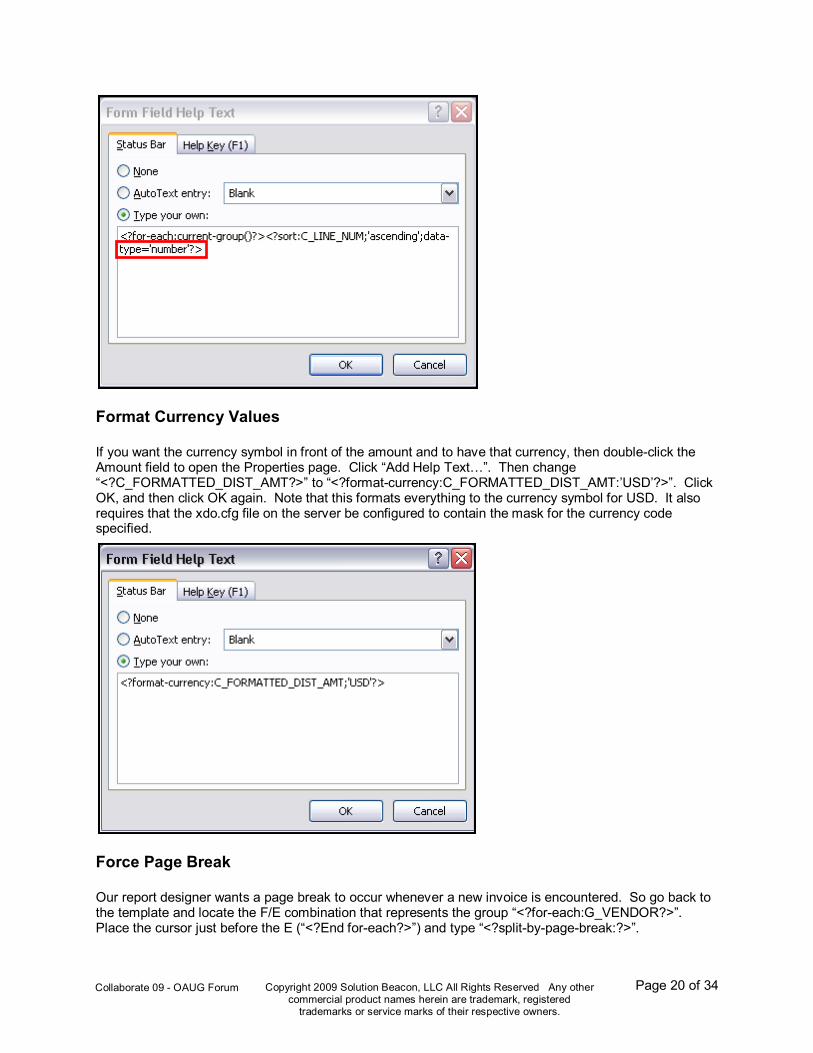
Close the RTF/PDF document and return to the template. Highlight the F just before Line, right-click, and select Properties. Click “Add Help Text…”. Change “data-type=’text’?>” to “data-type=’number’?>”. Click OK, and then click OK again.
Page 20 of 34
Copyright 2009 Solution Beacon, LLC All Rights Reserved Any other commercial product names herein are trademark, registered
trademarks or service marks of their respective owners.
Collaborate 09 - OAUG Forum
Format Currency Values
If you want the currency symbol in front of the amount and to have that currency, then double-click the Amount field to open the Properties page. Click “Add Help Text…”. Then change “<?C_FORMATTED_DIST_AMT?>” to “<?format-currency:C_FORMATTED_DIST_AMT:’USD’?>”. Click OK, and then click OK again. Note that this formats everything to the currency symbol for USD. It also requires that the xdo.cfg file on the server be configured to contain the mask for the currency code specified.
Force Page Break
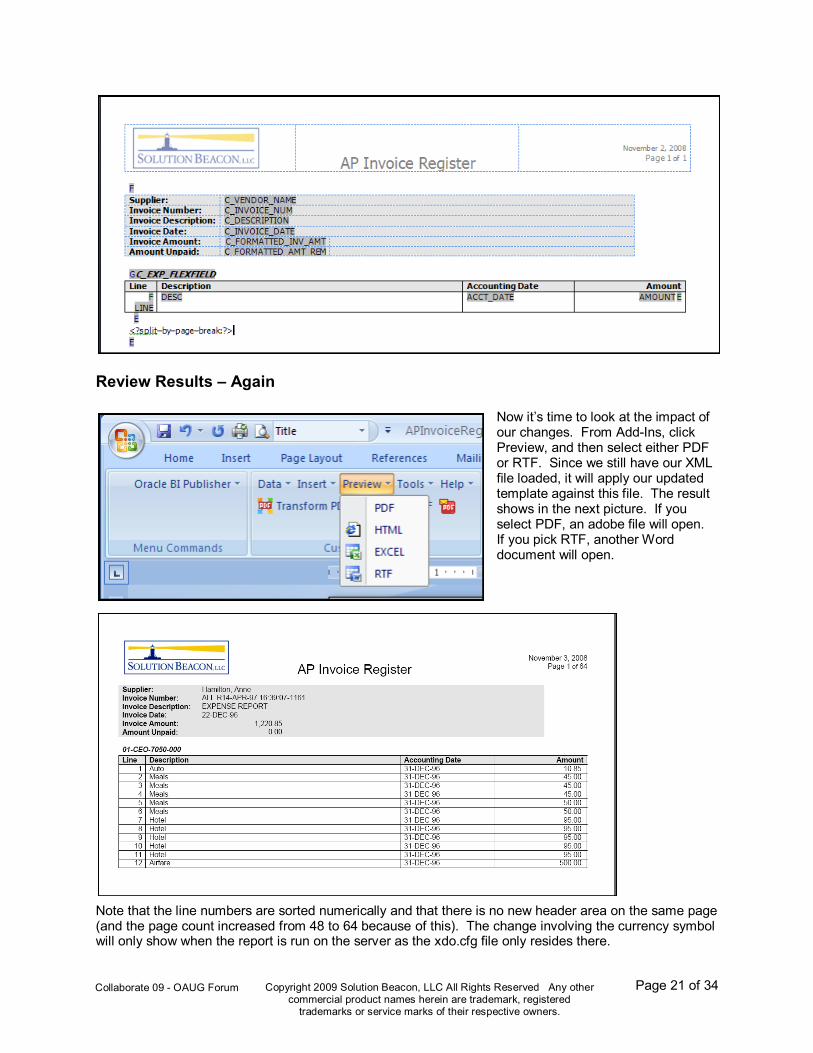
Our report designer wants a page break to occur whenever a new invoice is encountered. So go back to the template and locate the F/E combination that represents the group “<?for-each:G_VENDOR?>”. Place the cursor just before the E (“<?End for-each?>”) and type “<?split-by-page-break:?>”.
Page 21 of 34
Copyright 2009 Solution Beacon, LLC All Rights Reserved Any other commercial product names herein are trademark, registered
trademarks or service marks of their respective owners.
Collaborate 09 - OAUG Forum
Review Results – Again
Now it’s time to look at the impact of our changes. From Add-Ins, click Preview, and then select either PDF or RTF. Since we still have our XML file loaded, it will apply our updated template against this file. The result shows in the next picture. If you select PDF, an adobe file will open. If you pick RTF, another Word document will open.
Note that the line numbers are sorted numerically and that there is no new header area on the same page (and the page count increased from 48 to 64 because of this). The change involving the currency symbol will only show when the report is run on the server as the xdo.cfg file only resides there.
Page 22 of 34
Copyright 2009 Solution Beacon, LLC All Rights Reserved Any other commercial product names herein are trademark, registered
trademarks or service marks of their respective owners.
Collaborate 09 - OAUG Forum
Adding a Data Filter
Our report designer is happy with the layout, but really wants to restrict the data to unpaid invoices. The standard Oracle report does not contain a profile option that will limit the results this way and our designer does not want to customize Oracle’s code. BI Publisher allows you to add filters in the template to handle this kind of situation.
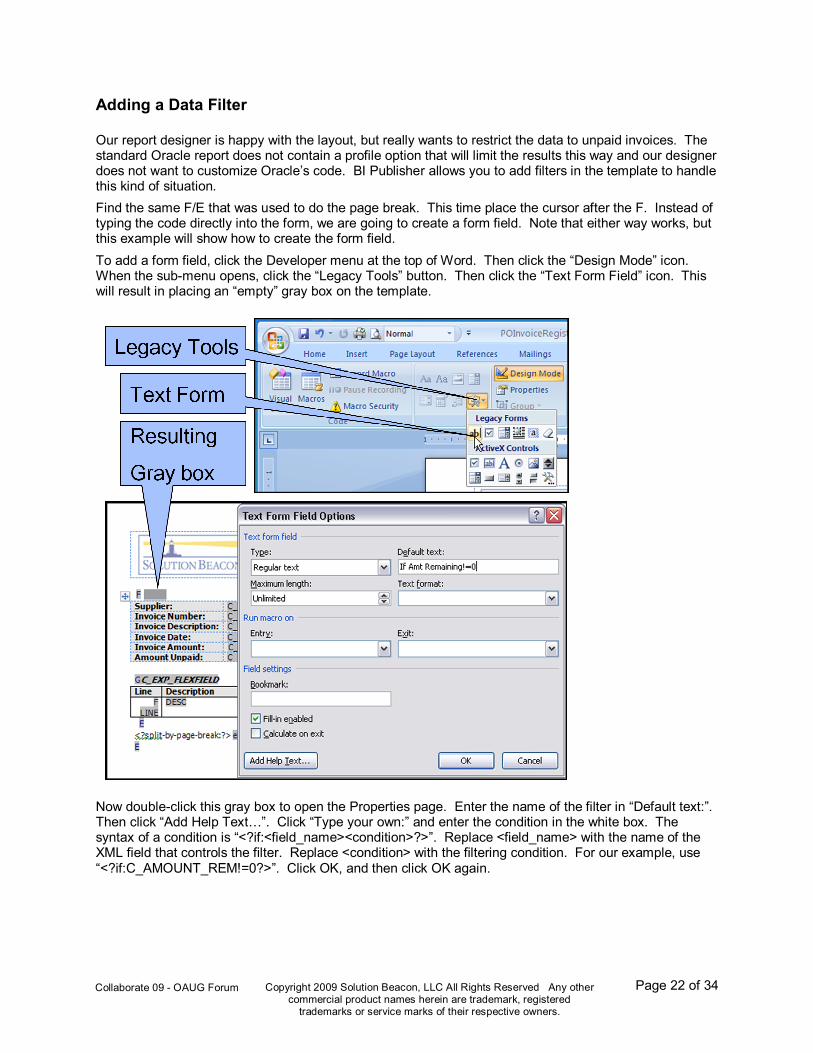
Find the same F/E that was used to do the page break. This time place the cursor after the F. Instead of typing the code directly into the form, we are going to create a form field. Note that either way works, but this example will show how to create the form field.
To add a form field, click the Developer menu at the top of Word. Then click the “Design Mode” icon. When the sub-menu opens, click the “Legacy Tools” button. Then click the “Text Form Field” icon. This will result in placing an “empty” gray box on the template.
Now double-click this gray box to open the Properties page. Enter the name of the filter in “Default text:”. Then click “Add Help Text…”. Click “Type your own:” and enter the condition in the white box. The syntax of a condition is “<?if:<field_name><condition>?>”. Replace <field_name> with the name of the XML field that controls the filter. Replace <condition> with the filtering condition. For our example, use “<?if:C_AMOUNT_REM!=0?>”. Click OK, and then click OK again.
Page 23 of 34
Copyright 2009 Solution Beacon, LLC All Rights Reserved Any other commercial product names herein are trademark, registered
trademarks or service marks of their respective owners.
Collaborate 09 - OAUG Forum
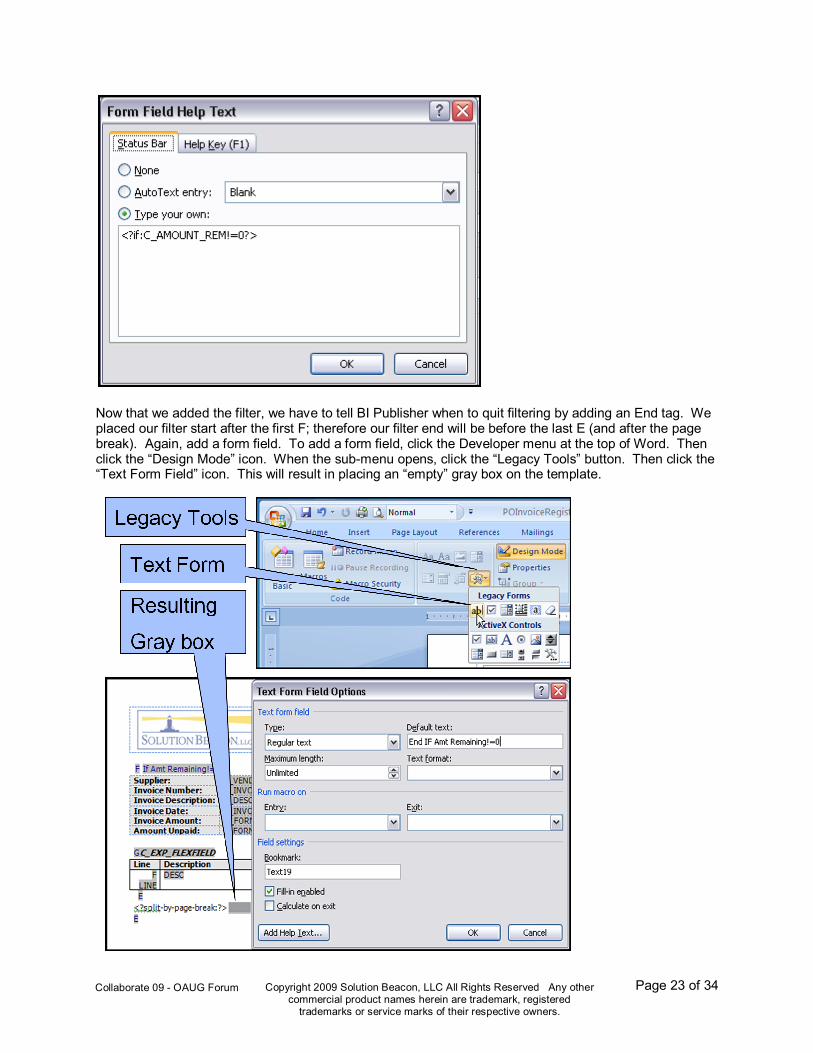
Now that we added the filter, we have to tell BI Publisher when to quit filtering by adding an End tag. We placed our filter start after the first F; therefore our filter end will be before the last E (and after the page break). Again, add a form field. To add a form field, click the Developer menu at the top of Word. Then click the “Design Mode” icon. When the sub-menu opens, click the “Legacy Tools” button. Then click the “Text Form Field” icon. This will result in placing an “empty” gray box on the template.
Page 24 of 34
Copyright 2009 Solution Beacon, LLC All Rights Reserved Any other commercial product names herein are trademark, registered
trademarks or service marks of their respective owners.
Collaborate 09 - OAUG Forum
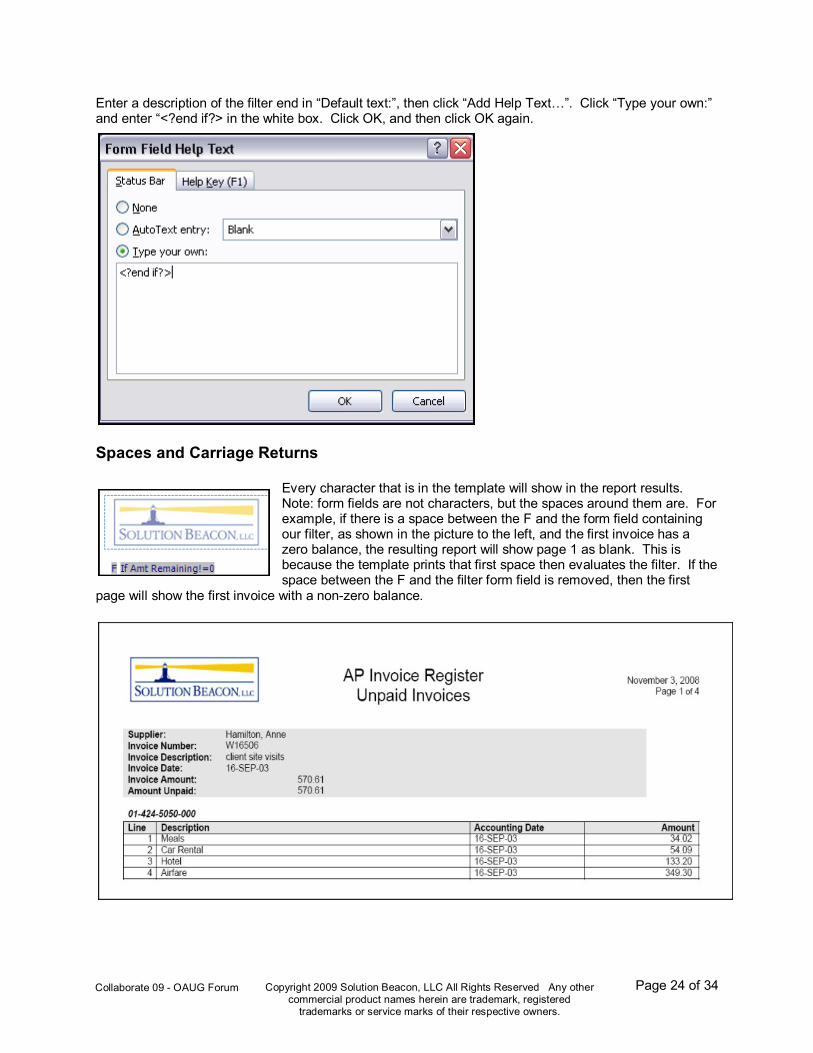
Enter a description of the filter end in “Default text:”, then click “Add Help Text…”. Click “Type your own:” and enter “<?end if?> in the white box. Click OK, and then click OK again.
Spaces and Carriage Returns
Every character that is in the template will show in the report results. Note: form fields are not characters, but the spaces around them are. For example, if there is a space between the F and the form field containing our filter, as shown in the picture to the left, and the first invoice has a zero balance, the resulting report will show page 1 as blank. This is because the template prints that first space then evaluates the filter. If the space between the F and the filter form field is removed, then the first
page will show the first invoice with a non-zero balance.
Page 25 of 34
Copyright 2009 Solution Beacon, LLC All Rights Reserved Any other commercial product names herein are trademark, registered
trademarks or service marks of their respective owners.
Collaborate 09 - OAUG Forum
Final Check
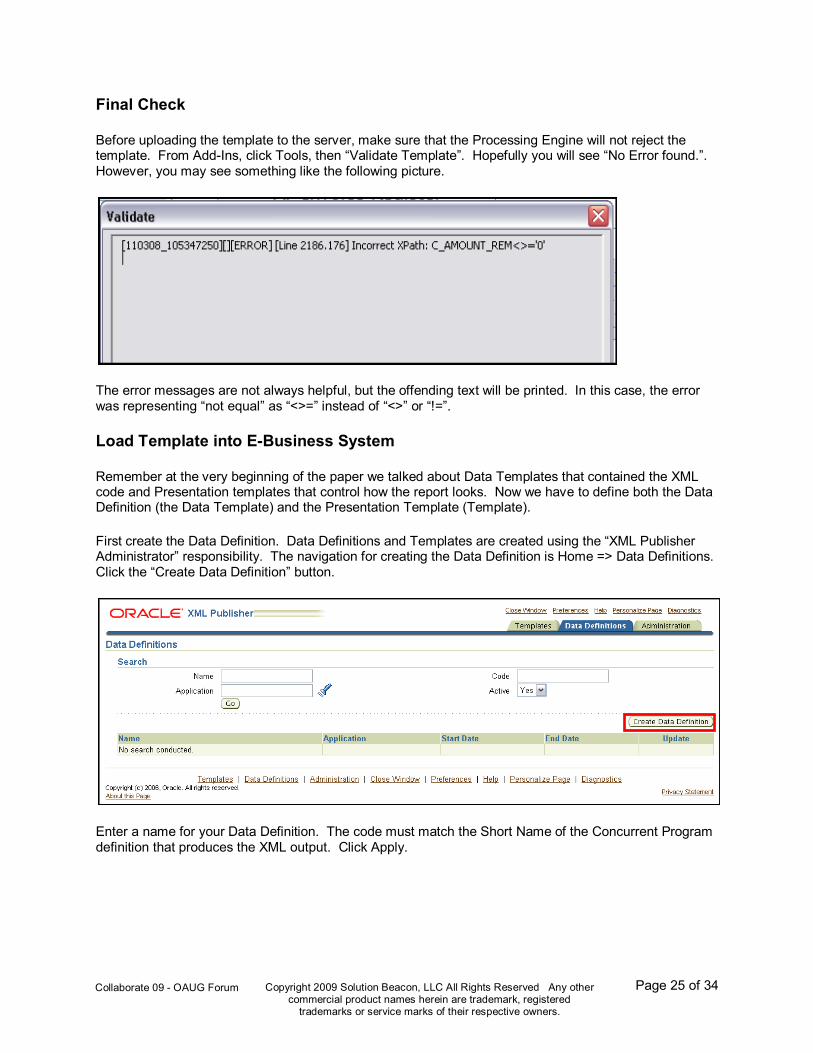
Before uploading the template to the server, make sure that the Processing Engine will not reject the template. From Add-Ins, click Tools, then “Validate Template”. Hopefully you will see “No Error found.”. However, you may see something like the following picture.
The error messages are not always helpful, but the offending text will be printed. In this case, the error was representing “not equal” as “<>=” instead of “<>” or “!=”.
Load Template into E-Business System
Remember at the very beginning of the paper we talked about Data Templates that contained the XML code and Presentation templates that control how the report looks. Now we have to define both the Data Definition (the Data Template) and the Presentation Template (Template).
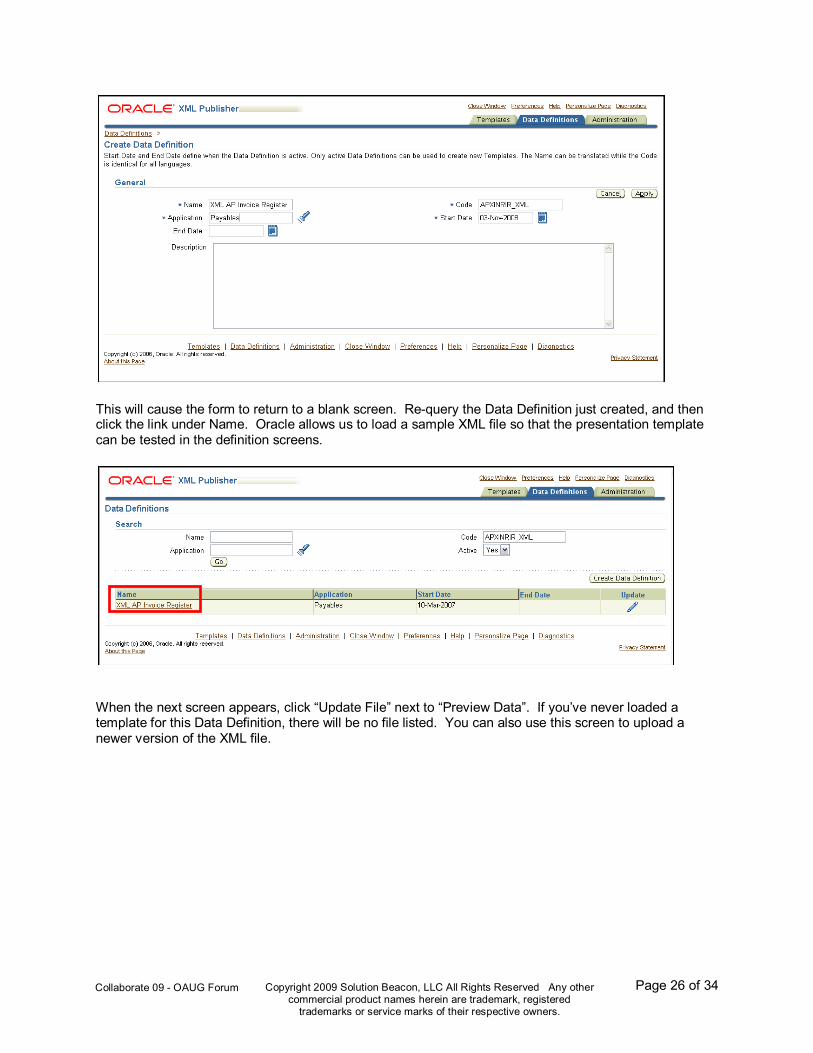
First create the Data Definition. Data Definitions and Templates are created using the “XML Publisher Administrator” responsibility. The navigation for creating the Data Definition is Home => Data Definitions. Click the “Create Data Definition” button.
Enter a name for your Data Definition. The code must match the Short Name of the Concurrent Program definition that produces the XML output. Click Apply.
Page 26 of 34
Copyright 2009 Solution Beacon, LLC All Rights Reserved Any other commercial product names herein are trademark, registered
trademarks or service marks of their respective owners.
Collaborate 09 - OAUG Forum
This will cause the form to return to a blank screen. Re-query the Data Definition just created, and then click the link under Name. Oracle allows us to load a sample XML file so that the presentation template can be tested in the definition screens.
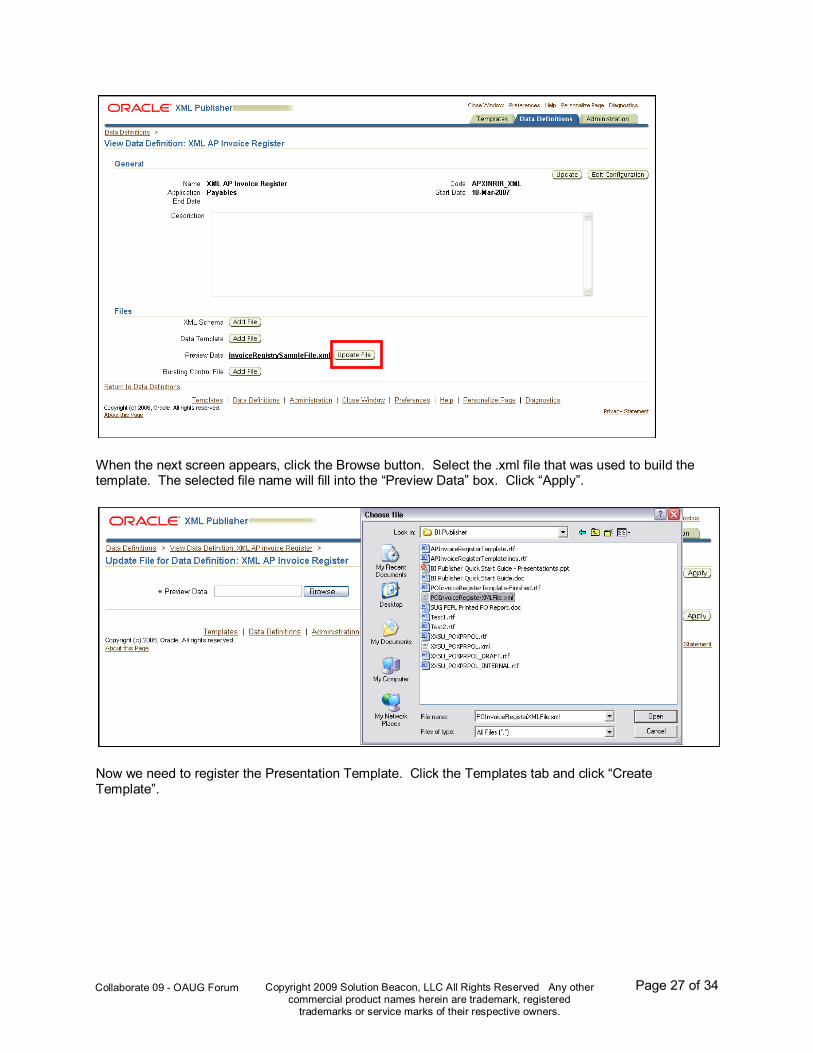
When the next screen appears, click “Update File” next to “Preview Data”. If you’ve never loaded a template for this Data Definition, there will be no file listed. You can also use this screen to upload a newer version of the XML file.
Page 27 of 34
Copyright 2009 Solution Beacon, LLC All Rights Reserved Any other commercial product names herein are trademark, registered
trademarks or service marks of their respective owners.
Collaborate 09 - OAUG Forum
When the next screen appears, click the Browse button. Select the .xml file that was used to build the template. The selected file name will fill into the “Preview Data” box. Click “Apply”.
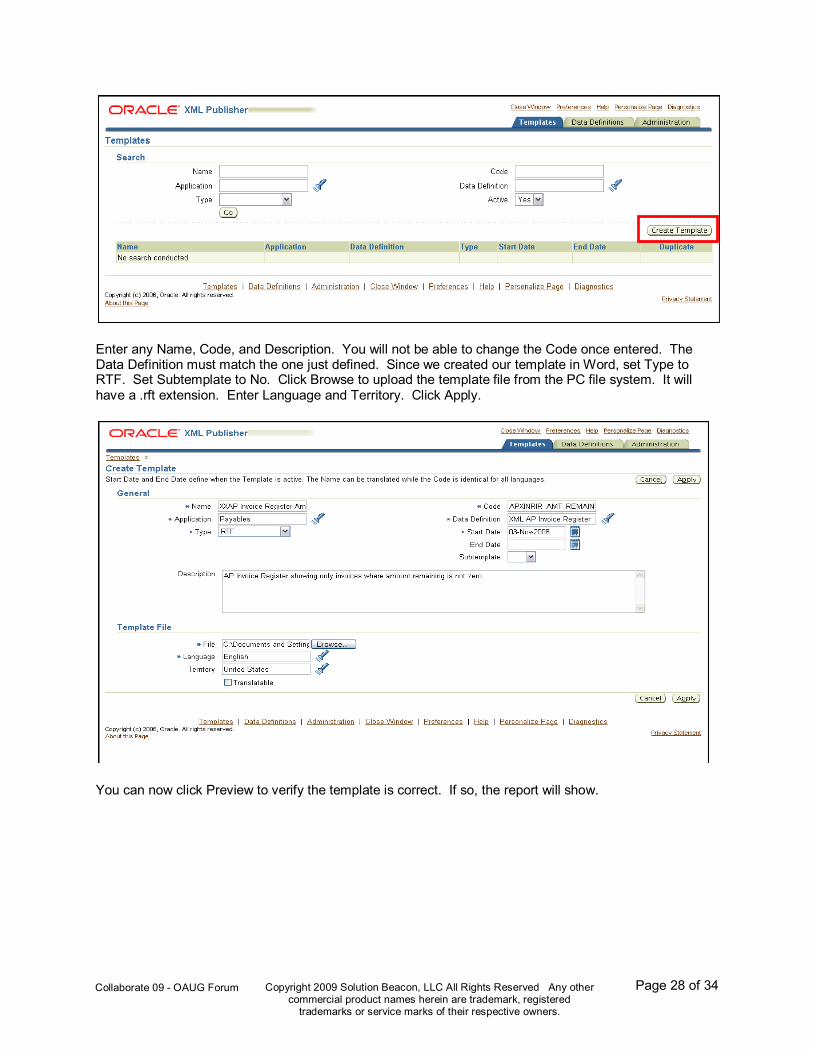
Now we need to register the Presentation Template. Click the Templates tab and click “Create Template”.
Page 28 of 34
Copyright 2009 Solution Beacon, LLC All Rights Reserved Any other commercial product names herein are trademark, registered
trademarks or service marks of their respective owners.
Collaborate 09 - OAUG Forum
Enter any Name, Code, and Description. You will not be able to change the Code once entered. The Data Definition must match the one just defined. Since we created our template in Word, set Type to RTF. Set Subtemplate to No. Click Browse to upload the template file from the PC file system. It will have a .rft extension. Enter Language and Territory. Click Apply.
You can now click Preview to verify the template is correct. If so, the report will show.

Page 29 of 34
Copyright 2009 Solution Beacon, LLC All Rights Reserved Any other commercial product names herein are trademark, registered
trademarks or service marks of their respective owners.
Collaborate 09 - OAUG Forum
Test Report Through Concurrent Manager
Now return to the responsibility assigned to the report group where the report was added. Select the report. Verify that our newly defined template shows in the Layout field.
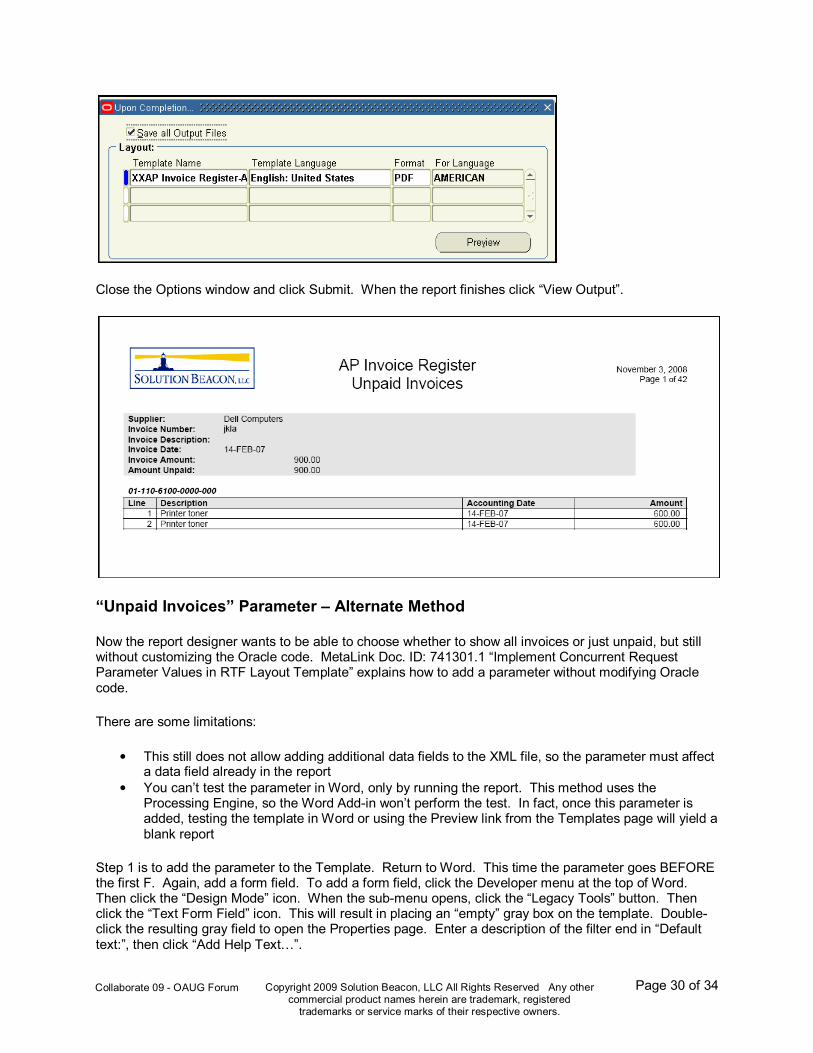
Click Options and verify “Template Language” and “Format”.
Page 30 of 34
Copyright 2009 Solution Beacon, LLC All Rights Reserved Any other commercial product names herein are trademark, registered
trademarks or service marks of their respective owners.
Collaborate 09 - OAUG Forum
Close the Options window and click Submit. When the report finishes click “View Output”.
“Unpaid Invoices” Parameter – Alternate Method
Now the report designer wants to be able to choose whether to show all invoices or just unpaid, but still without customizing the Oracle code. MetaLink Doc. ID: 741301.1 “Implement Concurrent Request Parameter Values in RTF Layout Template” explains how to add a parameter without modifying Oracle code.
There are some limitations:
• This still does not allow adding additional data fields to the XML file, so the parameter must affect a data field already in the report
• You can’t test the parameter in Word, only by running the report. This method uses the Processing Engine, so the Word Add-in won’t perform the test. In fact, once this parameter is added, testing the template in Word or using the Preview link from the Templates page will yield a blank report
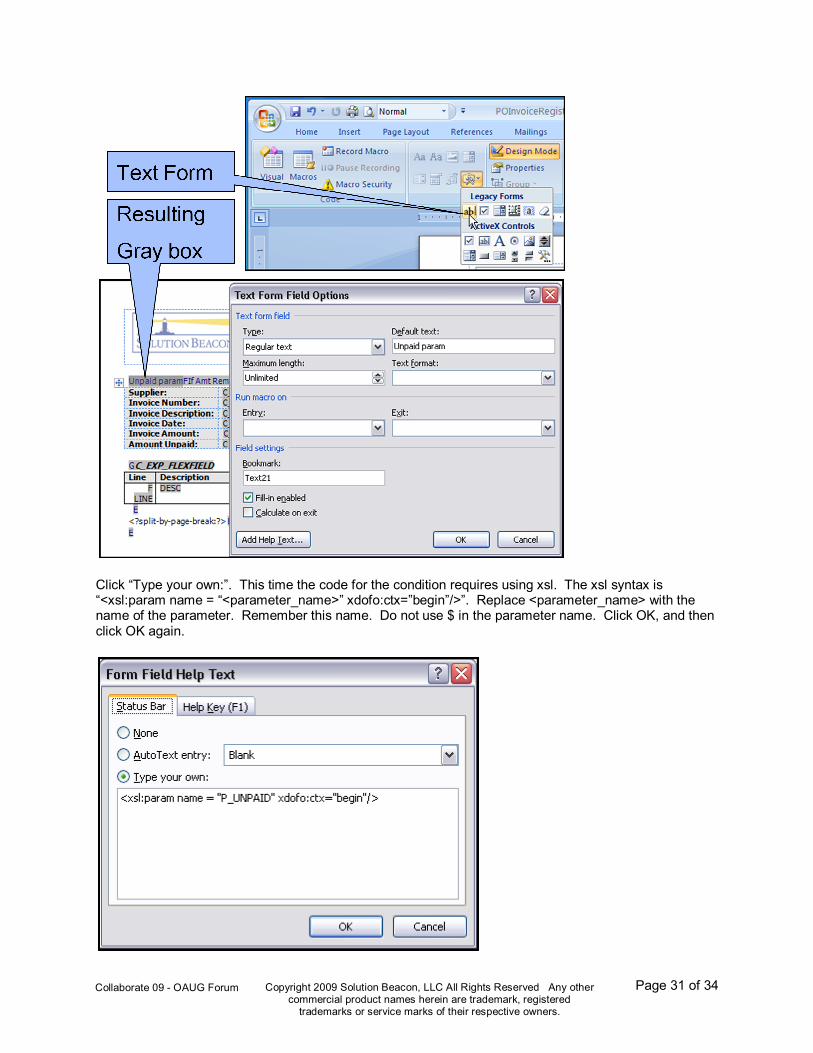
Step 1 is to add the parameter to the Template. Return to Word. This time the parameter goes BEFORE the first F. Again, add a form field. To add a form field, click the Developer menu at the top of Word. Then click the “Design Mode” icon. When the sub-menu opens, click the “Legacy Tools” button. Then click the “Text Form Field” icon. This will result in placing an “empty” gray box on the template. Double-click the resulting gray field to open the Properties page. Enter a description of the filter end in “Default text:”, then click “Add Help Text…”.
Page 31 of 34
Copyright 2009 Solution Beacon, LLC All Rights Reserved Any other commercial product names herein are trademark, registered
trademarks or service marks of their respective owners.
Collaborate 09 - OAUG Forum
Click “Type your own:”. This time the code for the condition requires using xsl. The xsl syntax is “<xsl:param name = “<parameter_name>” xdofo:ctx=”begin”/>”. Replace <parameter_name> with the name of the parameter. Remember this name. Do not use $ in the parameter name. Click OK, and then click OK again.
Page 32 of 34
Copyright 2009 Solution Beacon, LLC All Rights Reserved Any other commercial product names herein are trademark, registered
trademarks or service marks of their respective owners.
Collaborate 09 - OAUG Forum
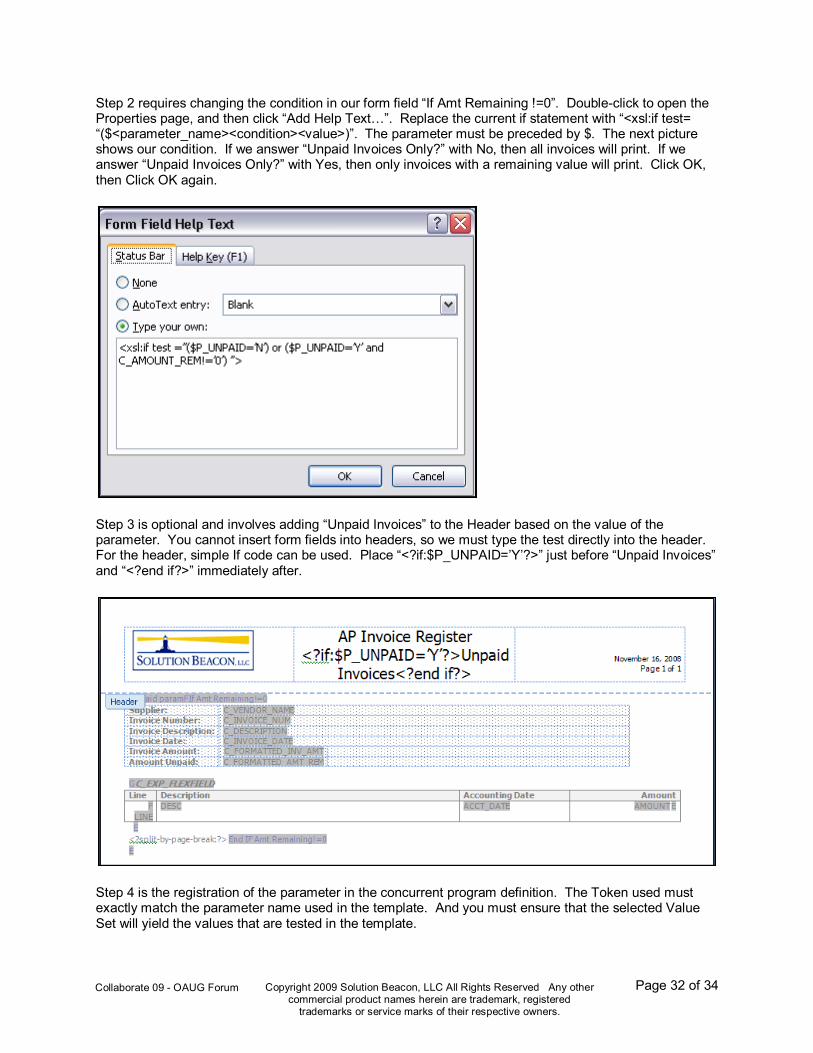
Step 2 requires changing the condition in our form field “If Amt Remaining !=0”. Double-click to open the Properties page, and then click “Add Help Text…”. Replace the current if statement with “<xsl:if test= “($<parameter_name><condition><value>)”. The parameter must be preceded by $. The next picture shows our condition. If we answer “Unpaid Invoices Only?” with No, then all invoices will print. If we answer “Unpaid Invoices Only?” with Yes, then only invoices with a remaining value will print. Click OK, then Click OK again.
Step 3 is optional and involves adding “Unpaid Invoices” to the Header based on the value of the parameter. You cannot insert form fields into headers, so we must type the test directly into the header. For the header, simple If code can be used. Place “<?if:$P_UNPAID=’Y’?>” just before “Unpaid Invoices” and “<?end if?>” immediately after.
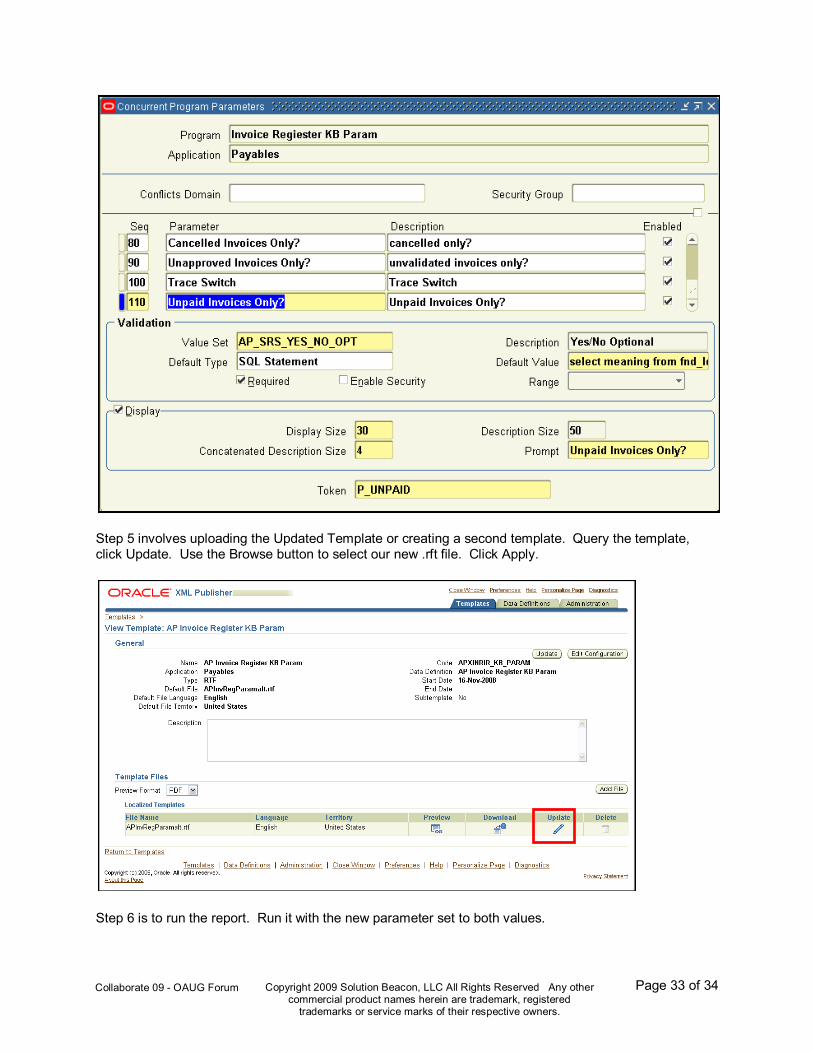
Step 4 is the registration of the parameter in the concurrent program definition. The Token used must exactly match the parameter name used in the template. And you must ensure that the selected Value Set will yield the values that are tested in the template.
Page 33 of 34
Copyright 2009 Solution Beacon, LLC All Rights Reserved Any other commercial product names herein are trademark, registered
trademarks or service marks of their respective owners.
Collaborate 09 - OAUG Forum
Step 5 involves uploading the Updated Template or creating a second template. Query the template, click Update. Use the Browse button to select our new .rft file. Click Apply.
Step 6 is to run the report. Run it with the new parameter set to both values.
Page 34 of 34
Copyright 2009 Solution Beacon, LLC All Rights Reserved Any other commercial product names herein are trademark, registered
trademarks or service marks of their respective owners.
Collaborate 09 - OAUG Forum
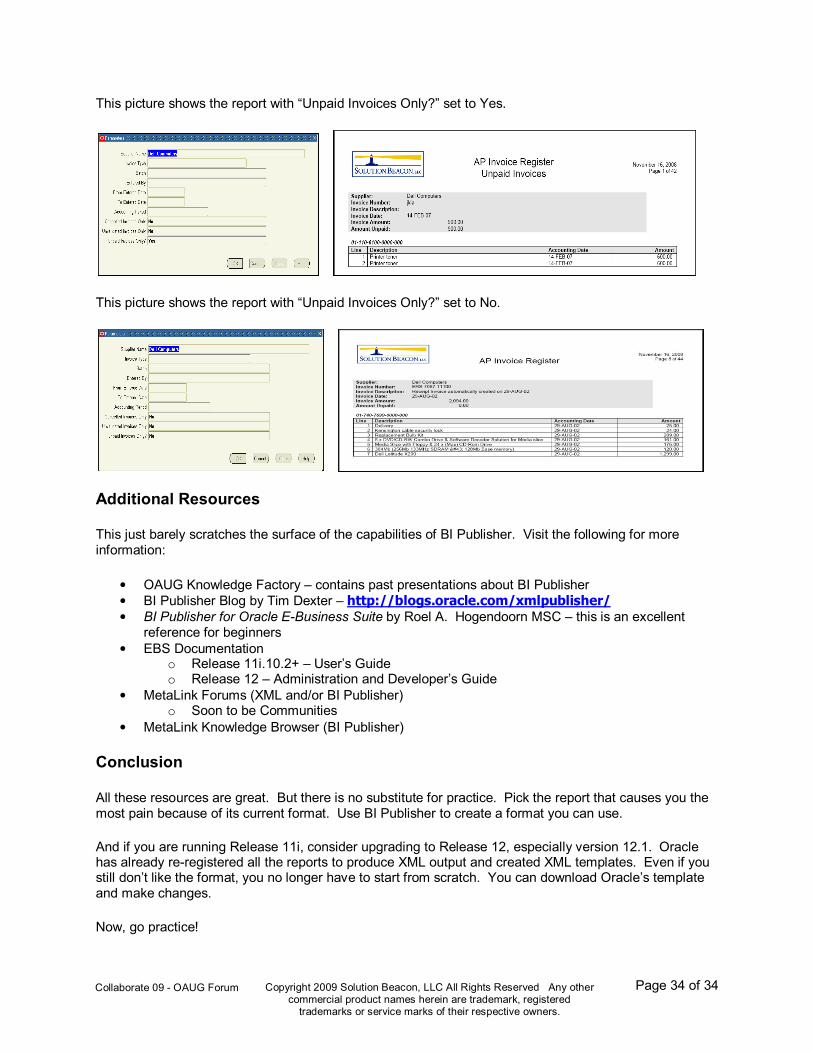
This picture shows the report with “Unpaid Invoices Only?” set to Yes.
This picture shows the report with “Unpaid Invoices Only?” set to No.
Additional Resources
This just barely scratches the surface of the capabilities of BI Publisher. Visit the following for more information:
• OAUG Knowledge Factory – contains past presentations about BI Publisher • BI Publisher Blog by Tim Dexter – http://blogs.oracle.com/xmlpublisher/ • BI Publisher for Oracle E-Business Suite by Roel A. Hogendoorn MSC – this is an excellent
reference for beginners • EBS Documentation
o Release 11i.10.2+ – User’s Guide o Release 12 – Administration and Developer’s Guide
• MetaLink Forums (XML and/or BI Publisher) o Soon to be Communities
• MetaLink Knowledge Browser (BI Publisher)
Conclusion
All these resources are great. But there is no substitute for practice. Pick the report that causes you the most pain because of its current format. Use BI Publisher to create a format you can use.
And if you are running Release 11i, consider upgrading to Release 12, especially version 12.1. Oracle has already re-registered all the reports to produce XML output and created XML templates. Even if you still don’t like the format, you no longer have to start from scratch. You can download Oracle’s template and make changes.
Now, go practice!
Recommended