Beat the Goalie
IntroductionIn this project you’ll learn how to create a football game in which you have toscore as many goals as you can in 30 seconds.
Step 1: Moving the footballLet’s code the ball to move across the bottom of the stage.
Activity Checklist
Open the ‘Beat the Goalie’ Scratch project. Your club leader will giveyou a copy of this project, or you can open it online at jumpto.cc/goalie-
resources.
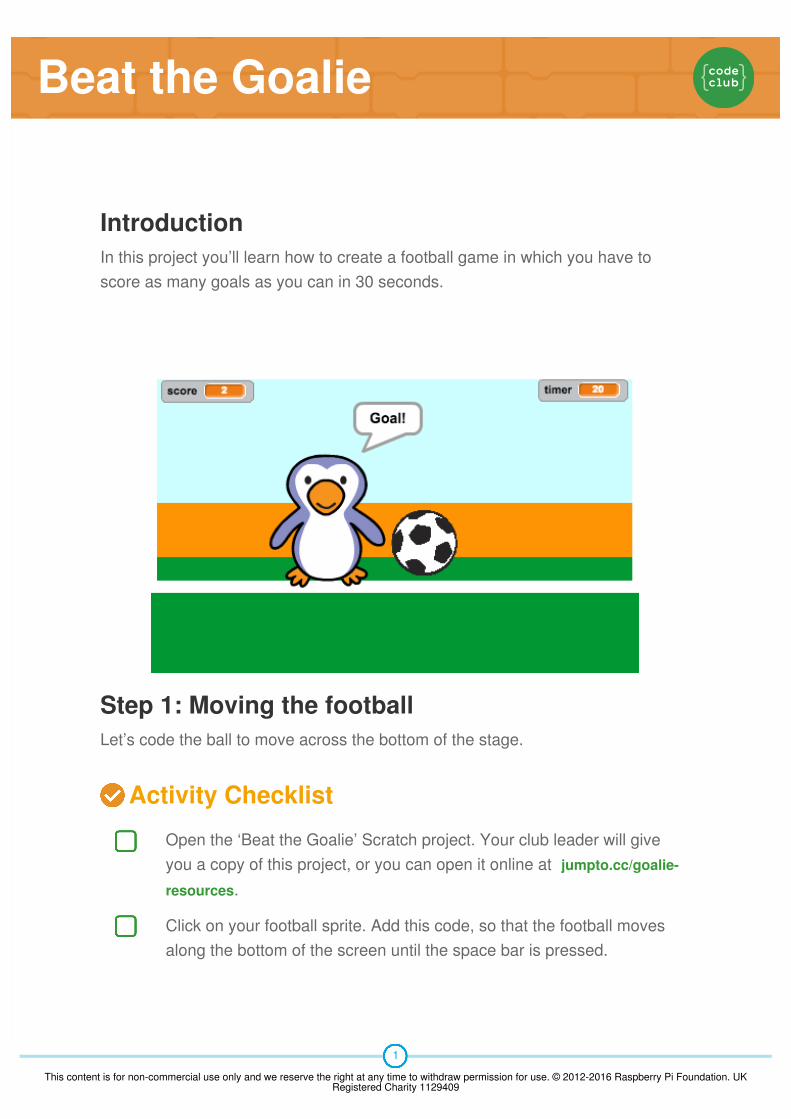
Click on your football sprite. Add this code, so that the football movesalong the bottom of the screen until the space bar is pressed.
1
This content is for non-commercial use only and we reserve the right at any time to withdraw permission for use. © 2012-2016 Raspberry Pi Foundation. UKRegistered Charity 1129409
Click the green flag to test your project. Your football should bouncealong the bottom of the screen until the space bar is pressed.
Add this code to your football sprite, so that the football moves towardsthe goal after the space bar has been pressed.
Click the green flag to test your code. This time, press the space bar
2
This content is for non-commercial use only and we reserve the right at any time to withdraw permission for use. © 2012-2016 Raspberry Pi Foundation. UKRegistered Charity 1129409
Save your project
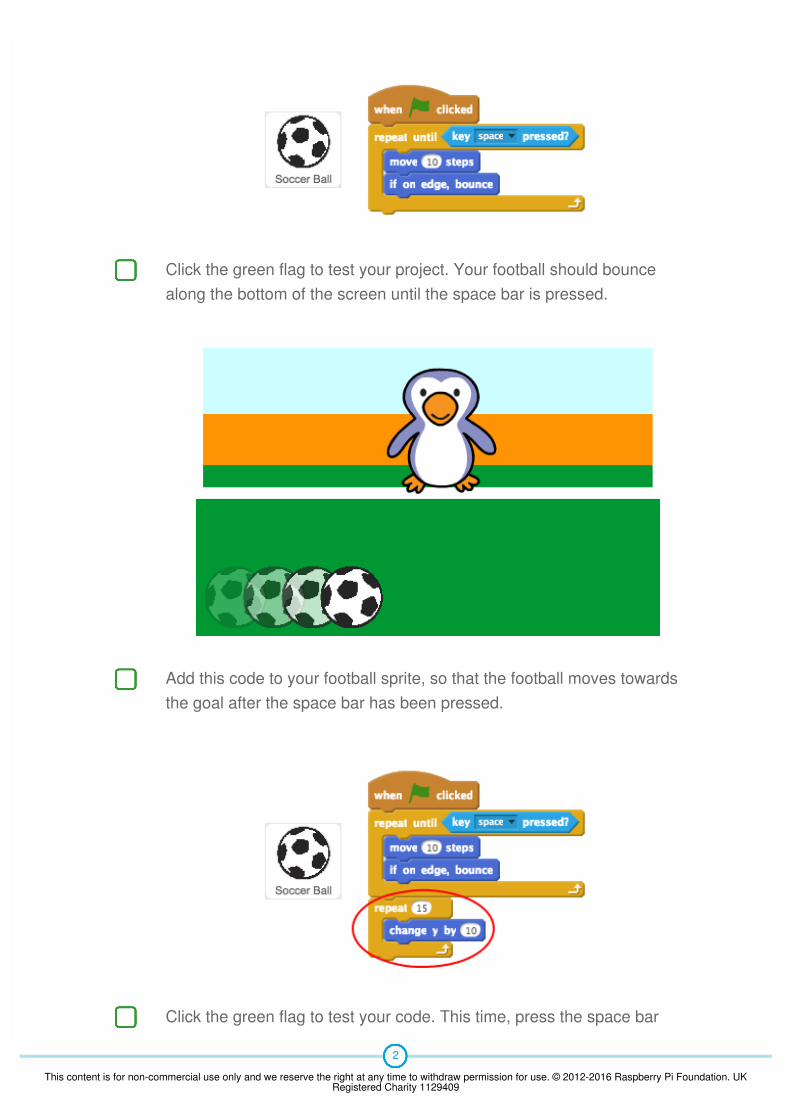
Step 2: Was it a goal?Once the ball has reached the goal, there’s a decision to make. If the ball istouching the goalie then it has been saved, else it’s a goal.
Activity Checklist
and your football should move towards the goal.
Click the green flag to test your code. What happens if you click the flaga second time? Can you use this block to fix the problem?
go to x: -180 y: -140
Add this code to the end of your football sprite code, so that you cancheck whether the ball is touching the goalie.
3
This content is for non-commercial use only and we reserve the right at any time to withdraw permission for use. © 2012-2016 Raspberry Pi Foundation. UKRegistered Charity 1129409
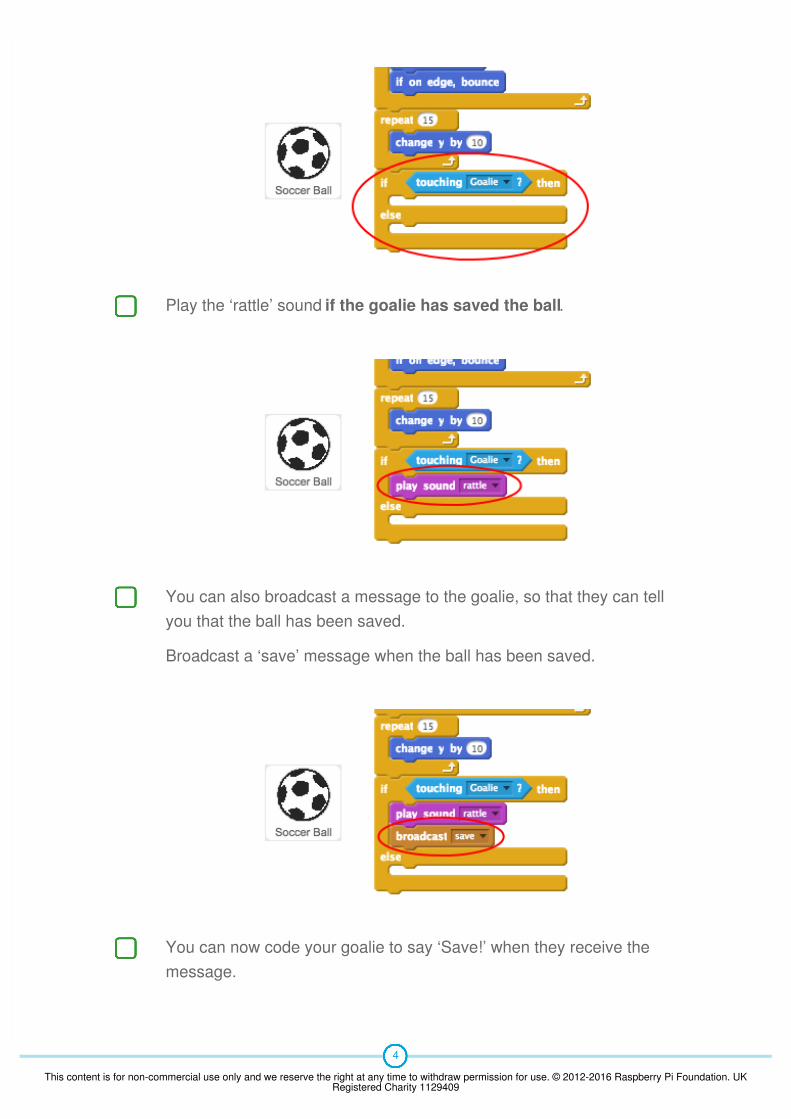
Play the ‘rattle’ sound if the goalie has saved the ball.
You can also broadcast a message to the goalie, so that they can tellyou that the ball has been saved.
Broadcast a ‘save’ message when the ball has been saved.
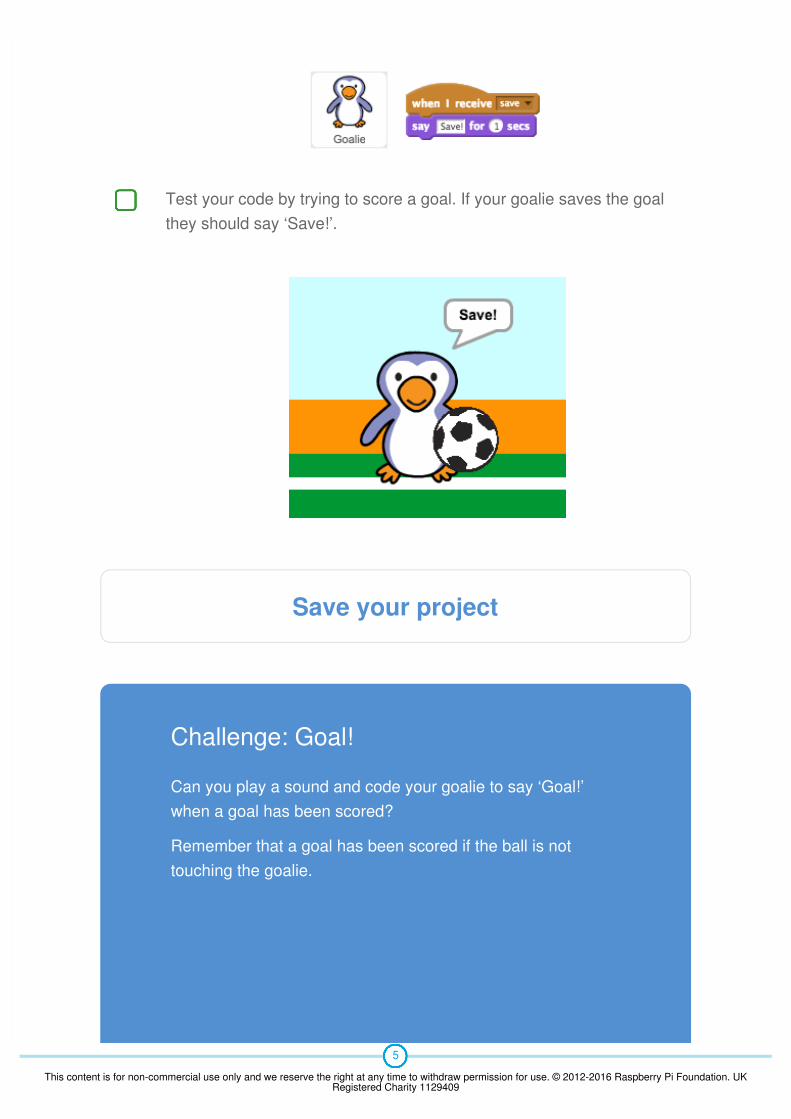
You can now code your goalie to say ‘Save!’ when they receive themessage.
4
This content is for non-commercial use only and we reserve the right at any time to withdraw permission for use. © 2012-2016 Raspberry Pi Foundation. UKRegistered Charity 1129409
Save your project
Challenge: Goal!
Can you play a sound and code your goalie to say ‘Goal!’when a goal has been scored?
Remember that a goal has been scored if the ball is nottouching the goalie.
Test your code by trying to score a goal. If your goalie saves the goalthey should say ‘Save!’.
5
This content is for non-commercial use only and we reserve the right at any time to withdraw permission for use. © 2012-2016 Raspberry Pi Foundation. UKRegistered Charity 1129409
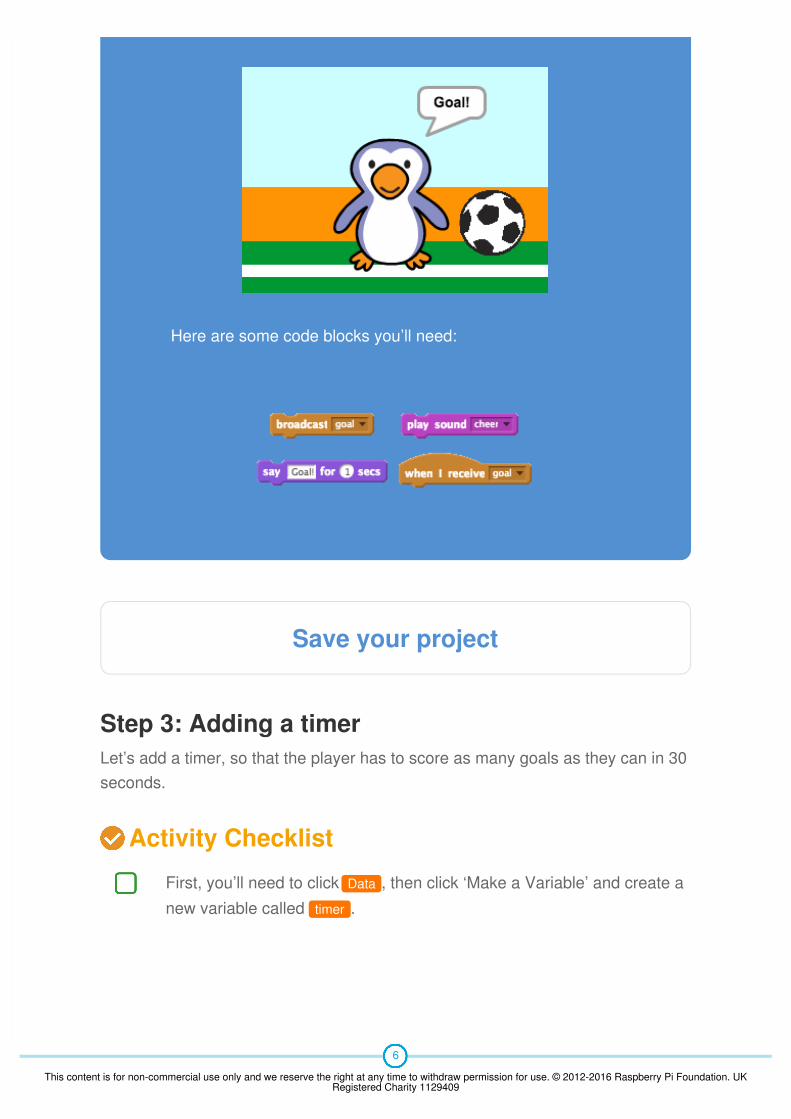
Here are some code blocks you’ll need:
Save your project
Step 3: Adding a timerLet’s add a timer, so that the player has to score as many goals as they can in 30seconds.
Activity Checklist
First, you’ll need to click Data , then click ‘Make a Variable’ and create a
new variable called timer .
6
This content is for non-commercial use only and we reserve the right at any time to withdraw permission for use. © 2012-2016 Raspberry Pi Foundation. UKRegistered Charity 1129409
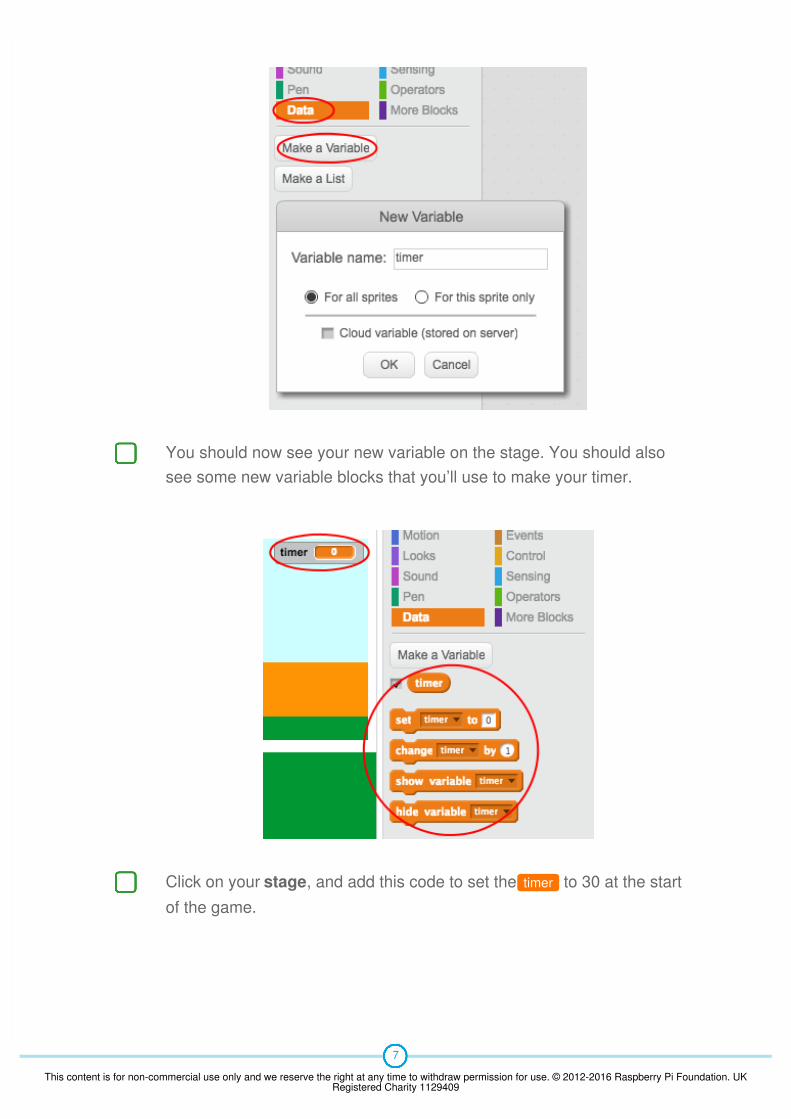
You should now see your new variable on the stage. You should alsosee some new variable blocks that you’ll use to make your timer.
Click on your stage, and add this code to set the timer to 30 at the start
of the game.
7
This content is for non-commercial use only and we reserve the right at any time to withdraw permission for use. © 2012-2016 Raspberry Pi Foundation. UKRegistered Charity 1129409
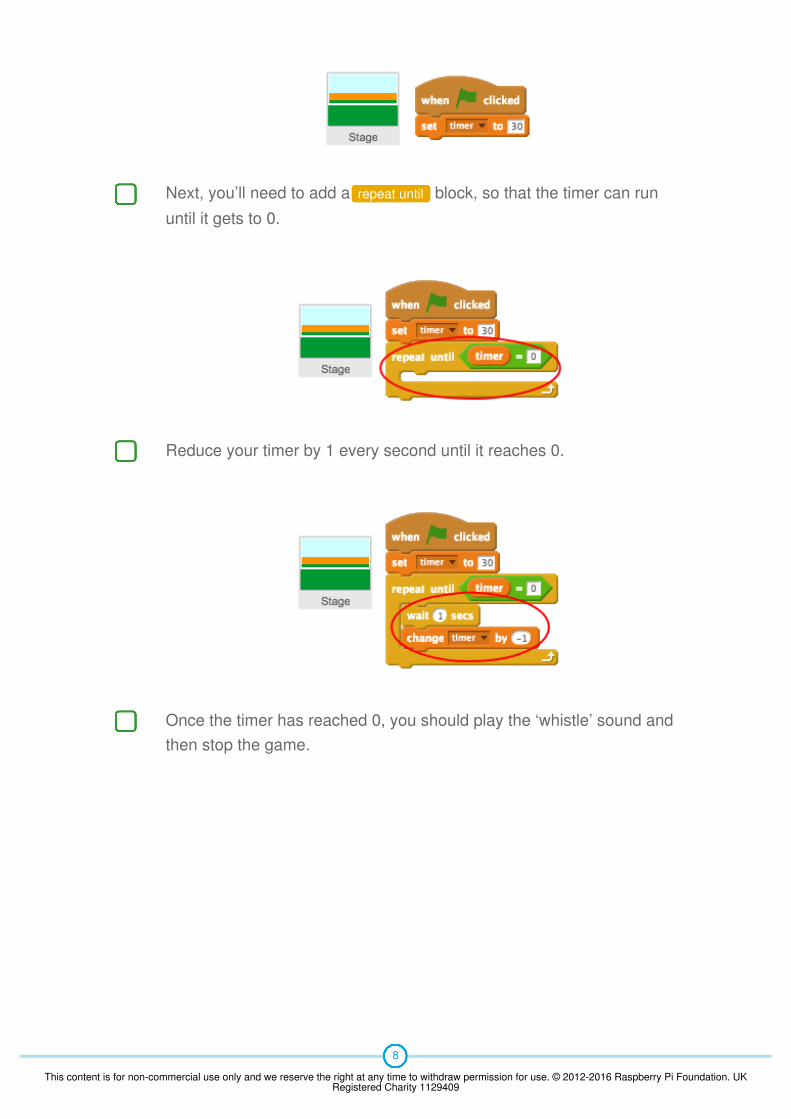
Next, you’ll need to add a repeat until block, so that the timer can run
until it gets to 0.
Reduce your timer by 1 every second until it reaches 0.
Once the timer has reached 0, you should play the ‘whistle’ sound andthen stop the game.
8
This content is for non-commercial use only and we reserve the right at any time to withdraw permission for use. © 2012-2016 Raspberry Pi Foundation. UKRegistered Charity 1129409
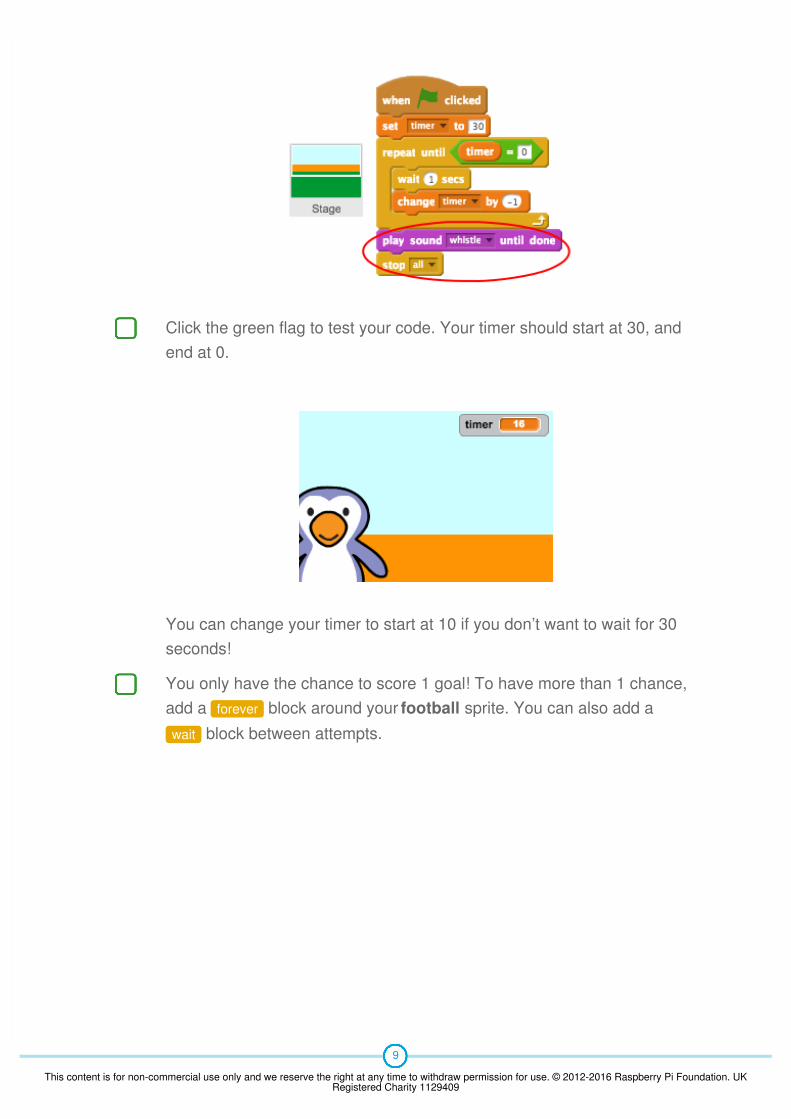
Click the green flag to test your code. Your timer should start at 30, andend at 0.
You can change your timer to start at 10 if you don’t want to wait for 30seconds!
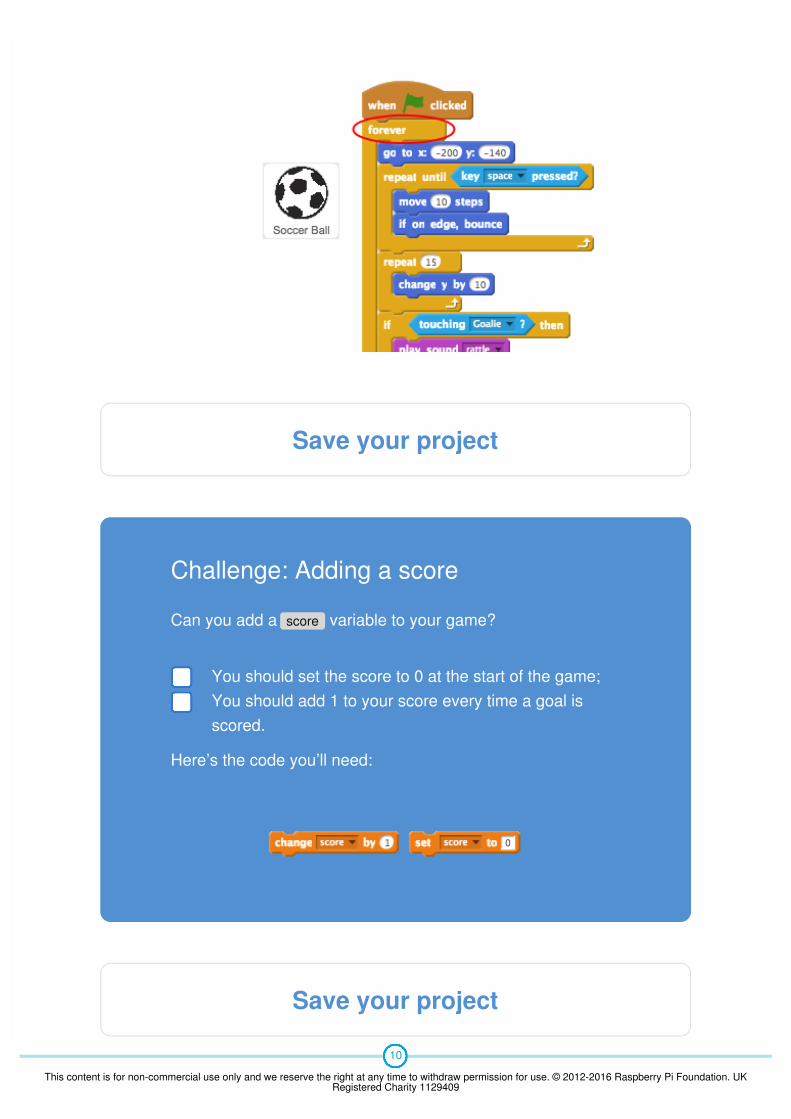
You only have the chance to score 1 goal! To have more than 1 chance,add a forever block around your football sprite. You can also add a
wait block between attempts.
9
This content is for non-commercial use only and we reserve the right at any time to withdraw permission for use. © 2012-2016 Raspberry Pi Foundation. UKRegistered Charity 1129409
Save your project
Challenge: Adding a score
Can you add a score variable to your game?
Here’s the code you’ll need:
Save your project
You should set the score to 0 at the start of the game;You should add 1 to your score every time a goal isscored.
10
This content is for non-commercial use only and we reserve the right at any time to withdraw permission for use. © 2012-2016 Raspberry Pi Foundation. UKRegistered Charity 1129409
Step 4: Control the goalieIt’s far too easy to score a goal! Let’s allow a second player to try and save goals.
Activity Checklist
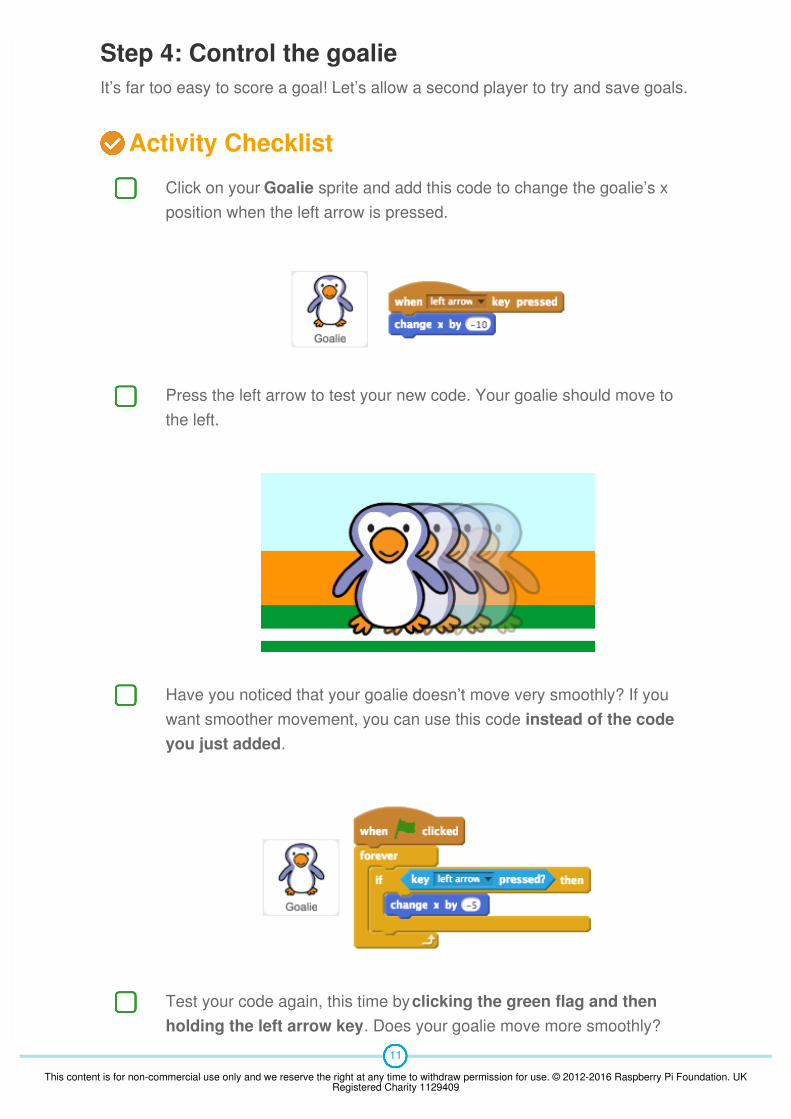
Click on your Goalie sprite and add this code to change the goalie’s xposition when the left arrow is pressed.
Press the left arrow to test your new code. Your goalie should move tothe left.
Have you noticed that your goalie doesn’t move very smoothly? If youwant smoother movement, you can use this code instead of the codeyou just added.
Test your code again, this time by clicking the green flag and thenholding the left arrow key. Does your goalie move more smoothly?
11
This content is for non-commercial use only and we reserve the right at any time to withdraw permission for use. © 2012-2016 Raspberry Pi Foundation. UKRegistered Charity 1129409
Save your project
Challenge: More controls
Can you code your goalie to move to the right when the rightarrow key is pressed? You can use either of the 2 waysabove.
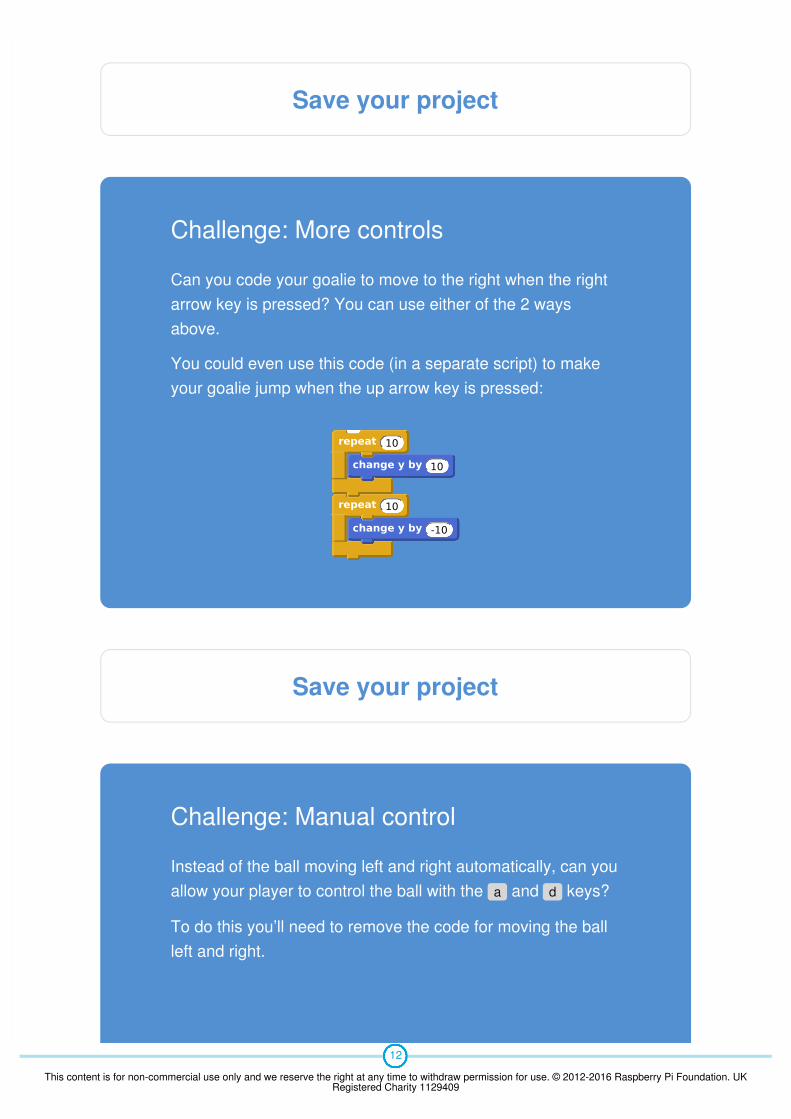
You could even use this code (in a separate script) to makeyour goalie jump when the up arrow key is pressed:
Save your project
Challenge: Manual control
Instead of the ball moving left and right automatically, can youallow your player to control the ball with the a and d keys?
To do this you’ll need to remove the code for moving the ballleft and right.
repeat 10
change y by 10
repeat 10
change y by -10
12
This content is for non-commercial use only and we reserve the right at any time to withdraw permission for use. © 2012-2016 Raspberry Pi Foundation. UKRegistered Charity 1129409
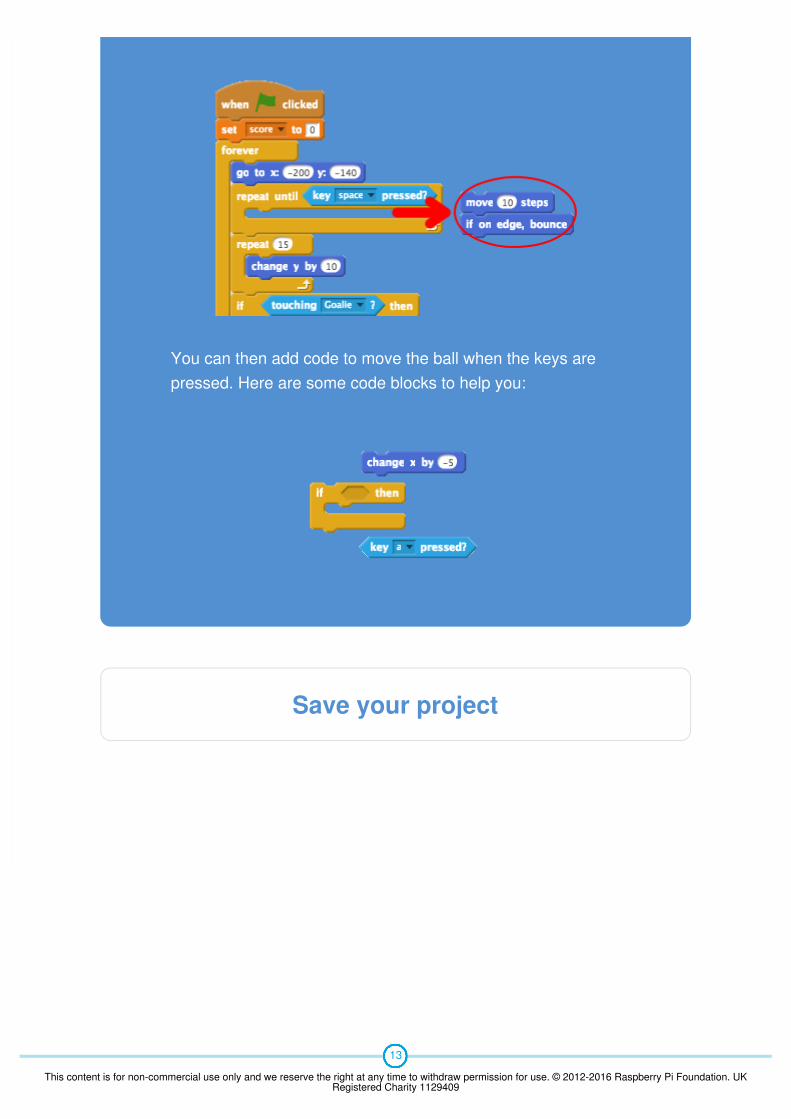
You can then add code to move the ball when the keys arepressed. Here are some code blocks to help you:
Save your project
13
This content is for non-commercial use only and we reserve the right at any time to withdraw permission for use. © 2012-2016 Raspberry Pi Foundation. UKRegistered Charity 1129409
Recommended