Bathroom Design, Fabrication & Installation Guide

TERMS AND CONDITIONS
Caesarstone® provides this Technical Support Manual as a service to design professionals, fabricators and installers. It is intended
and offered as recommended guidelines.
By entering, reading or using this Technical Support Manual you are deemed to have accepted, agreed to comply with and be bound by
the following terms and conditions of use (“Terms”). Caesarstone® reserves the right to modify or update them at any time without notice.
COPYRIGHT AND GENERAL TERMS
The operations, businesses, and properties described in this manual are owned or operated by Caesarstone® or by various affiliates and
subsidiaries of Caesarstone®. The terms "Caesarstone®" "company," "we," "our," and "its" when referring to these entities are used
only for convenience and are not intended to be an accurate description of ownership, operation or corporate/legal relationships.
As between Caesarstone® and you, Caesarstone® is the sole owner of all content on this Technical Support Manual including,
without limitation, all applicable patents, trademarks, copyrights (including, but not limited to, selections, collections, compilations,
and arrangements), and other intellectual property rights thereto. The copyright in the contents of the Technical Support Manual is
owned by Caesarstone®.
You are permitted to access and read this Technical Support Manual in compliance with the following terms and conditions:
1. The contents of this Technical Support Manual may be used for informational, non-commercial purposes only. The Technical
Support Manual is intended to provide information about Caesarstone® products to fabricators and installers.
2. Except as otherwise provided in these Terms, you may not copy this Technical Support Manual or any portion thereof, for any
purpose. No part of the contents of this Technical Support Manual may be distributed, modified, transmitted, reused, reposted,
translated into any language or any computer language or otherwise used without the express written permission of Caesarstone®
except as provided herein.
3. While Caesarstone® uses reasonable efforts to include accurate and up-to-date information in the Technical Support Manual,
Caesarstone® makes no warranties or representations as to its accuracy or its suitability. Caesarstone® assumes no liability or
responsibility for any typographical or other errors or omissions in the content. Except to the extent expressly stated in a specific
warranty certificate provided by Caesarstone® with its products (and subject to the exclusions provided therein) or otherwise
required or prohibited by applicable law, Caesarstone® disclaims all warranties and representations, expressed or implied, statutory
or otherwise, including without limitation, any implied or expressed warranties of merchantability or fitness for a particular purpose,
and shall not, to the extent permitted by law, be responsible or liable, in either contract or tort, for any loss and/or damage,
including, without limitation, direct, indirect, special, consequential or incidental damages, arising out of any installation, the use
and/or inability to use and/or delays in installation of, or repairs to the products provided or to be provided by Caesarstone®. In
any event and without derogating from the above, Caesarstone® Sdot-Yam Ltd. does not accept any responsibility for any damage
caused to its products by unauthorised and/or non-certificated personnel.
Accessing and/or using this Technical Support Manual indicates that you accept these Terms.
Trademarks
Caesarstone®, Caesarstone® logo, Caesarstone® graphics, photos and other icons and graphic symbols are registered trademarks
and/or service marks of Caesarstone®. Nothing contained in the Technical Support Manual should be construed as granting, by
implication or otherwise, any license or the right to use these marks without express written permission of Caesarstone®.
©2013 All rights reserved.
Caesarstone Australia Pty Ltd
Unit 3, 1 Secombe Place
Moorebank NSW 2170
Telephone: 1300 279 927
Email: [email protected]

Contents1. Introduction....................................................................................................3
2. Wall Panelling.................................................................................................4
2.1 Wall Panel Design Considerations..........................................................4
2.2 Wall Substrates – Pre-installation Preparation........................................6
2.3 Wall to Floor Details..............................................................................6
2.4 Wall Panelling – Corner Detail...............................................................7
2.5 Wall Panelling – Vertical and Horizontal Edge Joins................................8
3. Wall Panelling Fabrication Guidelines..............................................................9
3.1 Storage..................................................................................................9
3.2 Drilling Holes..........................................................................................9
3.3 Polishing Edges.......................................................................................9
3.4 Cutouts..................................................................................................9
3.5 L-shapes.................................................................................................9
3.6 Fixing Accessories......................................................................................9
3.6.1 Mechanical Attachment of Accessories
3.6.2 Adhesive Attachment of Accessories
3.6.3 Combined Mechanical and Adhesive Attachment
4. Wall Panelling Installation.............................................................................11
4.1 Dry Fitting............................................................................................11
4.2 Gluing into Place..................................................................................12
4.3 Application of Silicone.........................................................................13
5. Showers and Flooring...................................................................................14
6. Apertures.....................................................................................................15
6.1 Inset Shelf Details..................................................................................16
7. Bath and Spa Details.....................................................................................18
7.1 Overmount Bath..................................................................................19
7.2 Undermount Bath................................................................................20
8. Installing Sinks in Vanities.............................................................................22
9. Commercial Wall Panelling...........................................................................23
10. Care & Maintenance.....................................................................................24
11. Technical Data..............................................................................................25

2
1. IntroductionCaesarstone® quartz surfaces – Classico™, Supremo™ and Motivo™ collections – are virtually non-porous and waterproof, mould and mildew resistant, making them ideal for use as wet area wall panelling in shower recesses, bathroom walls and other indoor wet area environments such as wet rooms, laundries and spas.
Large panels mean that walls can have less joins, meaning less time cleaning and no need for harsh chemicals.
For bathrooms and other wet area wall panelling, we recommend the use of 13 mm Caesarstone slabs. However, 20 mm slabs are also suitable for wall panelling and flooring.
Anti-slip treatment must be applied to Caesarstone flooring if so advised by the construction engineer or if required by local regulations.
The nominal dimensions of Caesarstone slabs are 3060 mm x 1440 mm, enabling greater design flexibility and maximum utilization of the product when cut to smaller panel sizes.
The Caesarstone Bathroom Design, Fabrication & Installation Guide is intended to assist design professionals and other trade professionals in the design, fabrication and installation of Caesarstone wall panelling.
Caesarstone slabs can be cut into panels for use as large format flooring. However, Caesarstone Australia Pty does not warrant the use of Caesarstone surfaces in flooring applications and, due to its highly polished surface, designers will need to deem whether it is suitable for specific applications, especially in wet areas.
For comprehensive instructions regarding fabrication and installation of all types of Caesarstone quartz surfaces, please refer to the Caesarstone Fabrication & Health Protection Guide, which can be downloaded from www.caesarstone.com.au.
Important! All installations must be designed and constructed in strict compliance with all relevant provisions of the Building Code of Australia, regulations and relevant Standards.
Fabrication and installation must be performed by appropriately qualified stonemasons.
All fabrication of Caesarstone products must be performed in strict adherence to the Caesarstone Fabrication & Health Protection Guide.
Caesarstone quartz surfaces are intended for internal use only.
In bathrooms and all other wet area applications it is essential that waterproofing is completed as per the relevant Building Code of Australia and any applicable Australian Standards by a qualified tradesperson using the appropriate compatible adhesive system.
Any installation using adhesives and other installation products must be performed strictly in accordance with the guidelines stipulated by the relevant manufacturers.
3
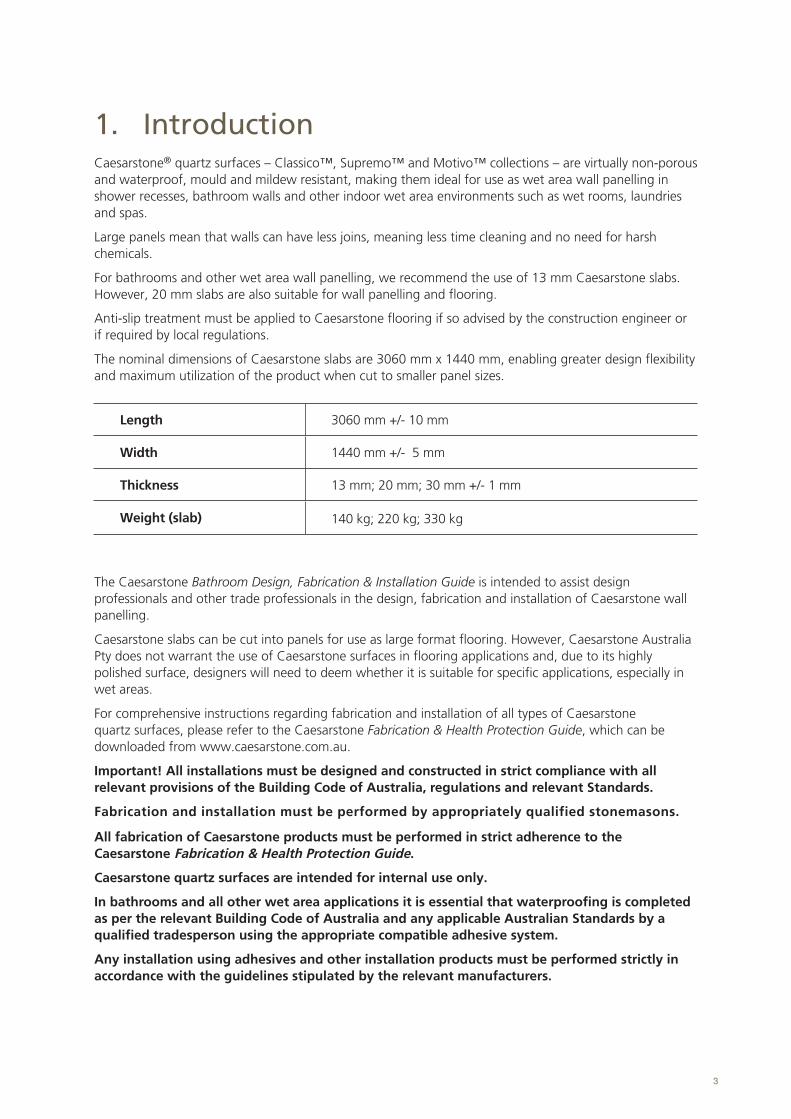
Length 3060 mm +/- 10 mm
Width 1440 mm +/- 5 mm
Thickness 13 mm; 20 mm; 30 mm +/- 1 mm
Weight (slab) 140 kg; 220 kg; 330 kg

4
2.1 Wall Panel Design ConsiderationsA significant advantage of Caesarstone wall panelling is the possibility of using large panels, which minimizes joins and speeds up the construction process.
It is important to use Caesarstone slabs for wall panelling projects from the same batch for the whole job, or carefully match the shade when using slabs from different batches.
We always recommend, wherever possible, the use of vertical floor-to- ceiling panel joins with the weight of the panel taken by the floor substrate.
In shower recesses, we recommend the use of a vertical panel layout to eliminate joins – apart from the corner join.
If you are using Motivo as wall panels, please refer to the Motivo Design & Fabrication Information manual for pattern layout and direction information.
Whilst not our recommended approach, large Caesarstone slabs can also be cut into smaller panels.
The weight of any panels close to the floor should be transferred to the floor substrate, whereas the higher level panels should be supported with an appropriate mechanical fixture along the bottom edges of the panels. The weight of the upper panels should not be supported by the lower panels.
2. Wall Panelling
5
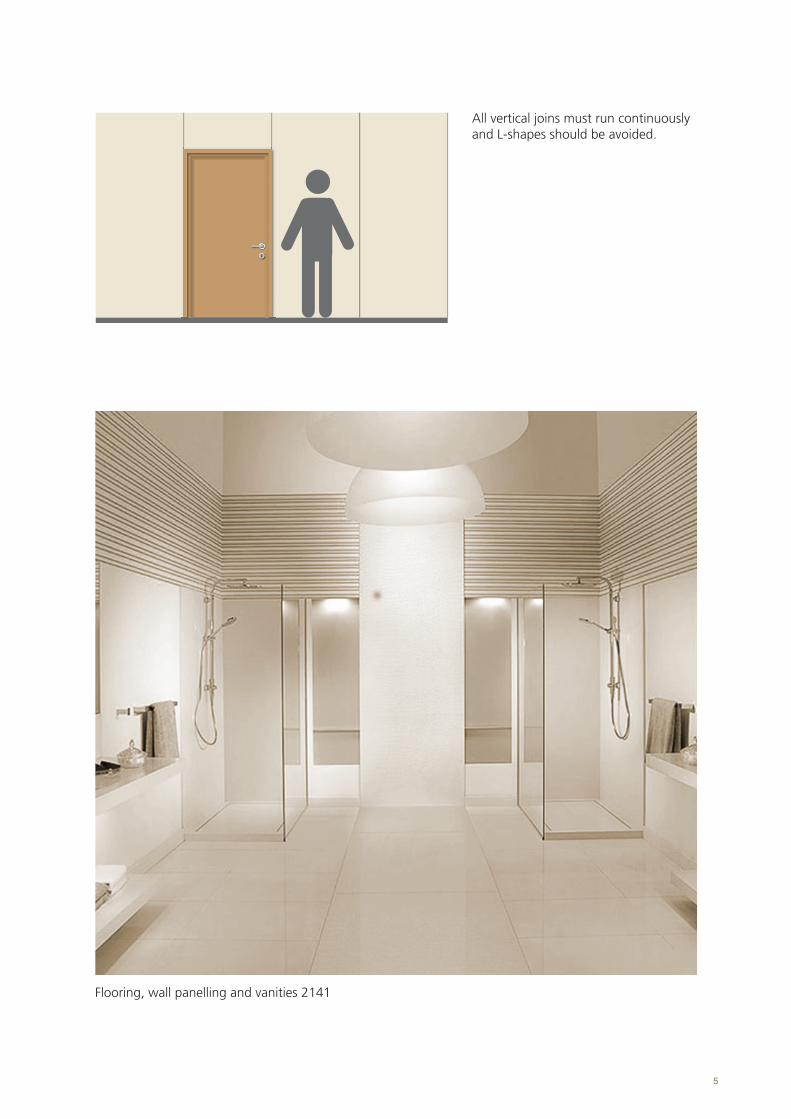
All vertical joins must run continuously and L-shapes should be avoided.
Flooring, wall panelling and vanities 2141

6
2.2 Wall Substrates – Pre-installation PreparationAll substrates to receive Caesarstone surfaces must be designed and constructed in strict compliance with all relevant provisions of the Building Code of Australia, relevant Australian Standards and any other regulations.
If Caesarstone quartz surfaces are bonded to fibre cement sheeting, it must be prepared and installed as per the relevant manufacturer’s guidelines. The weight of the Caesarstone panel that is attached to the fibre cement wall must not exceed the fibre cement wall system’s recommended maximum weight-bearing capacity.
If Caesarstone wall panelling is adhered to block or fully cured, rendered walls, these substrates must always be prepared in accordance with the relevant recommendations from the adhesive company.
Due to the large panel size of Caesarstone quartz surfaces, it is essential that all wall surfaces be prepared flat and true. All substrates must be flat and level to within ± 2 mm per 1 m length.
Prior to installation, it is essential that the temperature, moisture and other environmental conditions meet the adhesive manufacturer’s guidelines for the products selected.
Important! Verify that all the Caesarstone pieces are the required colour, batch consistency, size and thickness before permanently fixing to the substrate.
We recommend installing Caesarstone wall panelling before the flooring to avoid damage to the flooring during the installation process. Ensure that the wall panelling is adequately bedded and aligned and the weight is transferred evenly to the supporting floor structure.
2.3 Wall to Floor Details
We recommend installing all wall panelling prior to any flooring materials.
The weight of all floor-to-ceiling Caesarstone panels must be supported directly by the floor substrate.
During installation of wall panelling, normal industry practices must be applied to all aspects of the construction and fitout.
Any required mechanical fixing must be performed in consultation with a building engineer and per the mechanical fixing supplier’s instructions.
Floor Detail subwall per manufacturer’s instructions
waterproofing membrane (if required)
adhesive
Caesarstone material
colour-matched silicone
mortar bed
floor substrate
flooring material
waterproofing membrane (if required)

7
2.4 Wall Panelling – Corner DetailExpansion joins should be filled with colour-matched silicone.
External Corner Option 1
External Corner Option 2
subwall
subwall
waterproofing membrane (if required)
waterproofing membrane (if required)
adhesive
adhesive
expansion join
glued mitre join
Caesarstone material
Caesarstone material

8
We always recommend allowing an expansion gap of 1 mm for every metre in wall length in all internal and external corner junctions to allow for the small expansion and contraction that is inherent in Caesarstone quartz surfaces. This is in addition to expansion joins required between wall panels.
subwall
subwall
1 m
m
1 mm
expansion join no less than 3 mm, filled with colour-matched silicone
expansion join no less than 3 mm, filled with colour-matched silicone
adhesive
Caesarstone material
waterproofing membrane (if required)
waterproofing (if required)
Internal Corner
Edge Joins
2.5 Wall Panelling – Vertical and Horizontal Edge JoinsWhere two wall panel edges butt together to form a join, we recommend creating a minimum expansion join width of no less than 3 mm.
We recommend that the edges of the vertical join be polished and then arrised to minimise dirt collecting in the join. We recommend a 1 mm x 1 mm arris.
Expansion joins should be filled with colour-matched neutral cure silicone.
adhesive
Caesarstone material
Allow a wall panel expansion gap of no less than 8 mm

9
3. Wall Panelling Fabrication Guidelines The fabrication guidelines provided here are general only. Perform all cutting, polishing and fabrication required during the installation of wall panelling as per full instructions provided in the Caesarstone Fabrication & Health Protection Guide.
3.1 StorageStore Caesarstone quartz surface wall panels in a manner that does not expose them to extremes of temperature or contamination by water. Store all products indoors, in a cool, dry place, as per instructions in the Caesarstone Fabrication & Health Protection Guide. If site conditions do not allow for proper vertical storage as per these instructions, it is preferable to store the slabs flat.
3.2 Drilling Holes
It is recommended that all holes be drilled with water-cooled, diamond-tipped drill bits or core drills, with no hammer action. The edge of holes must be no closer than 50 mm from the edge of the slab. The diameter of any hole penetrating the material must be greater than any protrusion or fixing to allow for movement.
3.3 Polishing Edges
All exposed, visible edges must be polished with polishing pads and sharp corners must be rounded. Start polishing with 60 grit and progress through the finer pads to 1500 grit. Do not polish the surface of the material.
3.4 CutoutsCore drill cutouts for items such as power points and accessories to produce a radius on all internal corners. Avoid cross cutting at all times. The edge of cutouts must be no closer than 50 mm from the edge of the slab.
Any cutouts required for windows, shelf recesses or access panels in a large single panel must be cut out as per the Caesarstone Fabrication & Health Protection Guide.
L-shapes should not be fabricated in one solid piece as this does not allow for movement due to thermal expansion.
X
3.5 L-shapes
3.6 Fixing Accessories
It is often necessary to attach accessories and fixtures to Caesarstone material, such as sinks, cisterns, lavatories, bidets, taps, soap dispensers, mirrors, handles, light fittings, heaters, etc.
Accessories and fixtures can be attached to Caesarstone material by mechanical anchoring, adhesive anchoring, or a combination of both methods:

10 11
3.6.1 Mechanical Attachment of Accessories
Drill a hole of the required size and shape through the material, preferably before the slab is installed.
When the back of the slab is accessible (e.g., sink surrounds, countertops and vanities), slot the accessory through the hole and secure it to the back of the slab with the appropriate nut or fastener supplied by the accessory manufacturer.
Important! Take care not to apply excessive pressure when tightening the nut as this may damage the surface.
Important! Use a washer or other pressure disperser to avoid creating undue pressure on a small area.
When the back of the slab is inaccessible (e.g., wall panelling), attach the accessory to the substrate behind the material with anti-corrosive screws or bolts of the appropriate size and strength, with the screws or bolts slip-fitted through the material.
Important! Do not attach mechanical fasteners (screws, nails, etc.) directly into Caesarstone surfaces.
For both types of mechanical attachment, the hole diameter must be slightly larger than the fitting to allow for movement. For holes of up to approximately 40 mm, leave a minimum of 50 mm between the edge of the hole and the edge of the surface/cutout to maintain the strength of the surface. For larger holes, the minimum remaining surrounding surface must be proportionately larger.
3.6.2 Adhesive Attachment of Accessories
Most accessories are supplied with an integral self-adhesive pad, which can be attached directly to the surface.
If the accessory is not supplied with a self-adhesive pad, attach the accessory to the surface with an appropriate adhesive, e.g., neutral cure 100% silicone.
The larger the area of adhesion, the stronger the bonding.
3.6.3 Combined Mechanical and Adhesive Attachment
Use a combination of the methods above to attach heavy fixtures to Caesarstone material.

Substrates must be flat and level to within 2 mm per 1 m length.
Plan the stages of the application, e.g., the starting point of the wall panelling, height of wall panelling, parallel lines, joins between panels, matching of joins to structural expansion joins and circumferential gaps, and positioning of pieces for aesthetic considerations.
Prior to installation, ensure that the temperature, moisture and other environmental conditions meet the adhesive manufacturer’s guidelines for the products selected.
Depending on its size and weight, more than one person may be required to lift and position the panel, in keeping with relevant Occupational Health & Safety guidelines.
When dry fitting, take into account that expansion joins of 3 mm are required between all edges of wall panelling.
4. Wall Panelling Installation All substrates to receive Caesarstone surfaces, including framing and sheeting, must be designed and constructed in strict compliance with guidelines from wall substrate manufacturers and all relevant provisions of the Building Code of Australia and applicable Australian Standards, and importantly be capable of bearing the weight of Caesarstone material.
For new constructions, Caesarstone recommends installing wall panels only when the building is at the “lock-up” stage, i.e., after all windows and doors have been fitted and the building is secure and watertight.
Substrates must be dry, stable, solid and clean of dirt and debris before installing Caesarstone material. These factors directly affect the quality of the installation.
4.1 Dry FittingDry fit all Caesarstone wall panelling to check edge alignment prior to fixing in place.
Level as required
11

12
Lift the wall panels carefully and gently into place.
Create minimum expansion joins of 3 mm between all panel edges using plastic spacers or shims. Remove the spacers once the adhesive has set.
Apply colour-matched silicone between the edges of wall panels of any size.
4.2 Gluing into PlaceApply the adhesive as per the relevant manufacturer’s instructions. Typically it will require the adhesive to be applied to the entire substrate surface and the entire back of the Caesarstone panel.
Important! Due to the nature of Caesarstone quartz surfaces and their low porosity it is critical that only manufacturer tested and recommended waterproofing and adhesive systems are used to fix Caesarstone wall panelling to the substrate. Please consult the relevant adhesive system manufacturer for their recommended systems and installation procedures.
Level and plumb the wall panels flat in relation to each other. Hold the panels in place using standard industry practice, which may require bracing of some form.
In addition, a qualified stonemason may choose to use other industry standard hidden mechanical fixing systems.
Spacer

13
Surface Preparation
Thoroughly clean and dry surfaces to be sealed. Use clean cloths and change them frequently. Use a suitable solvent such as white spirits. Remove all dirt, grease, detergents and other loose materials. There must be no foreign substances in the join. Protect faces of each panel with masking tape if required. Application
Curing
Caesarstone colour-matched neutral cure silicone cures by absorbing atmospheric moisture. It skins over in 9 minutes and cures to a depth of 7 mm in 7 days. Storage and Shelf Life
Always store the silicone in a cool, dry place. Ideal storage temperature is not more than 25°C. Prolonged storage at high temperatures may affect shelf life and ultimate performance. The shelf life of Caesarstone colour-matched neutral cure silicone is 9 months from the date of manufacture when stored below 25°C and below 50% relative humidity.
Technical data and Material Safety Data sheets can be downloaded from www.caesarstone.com.au.
colour-matched silicone sealant
1. Cut off the cartridge tip.
2. Fit the nozzle and cut the end of the nozzle to the desired thickness at a 45° angle.
3. Place a cartridge in a standard caulking gun.
4. Force silicone deep into the base of the join and fill with a continuous steady flow, pushing the silicone ahead of the nozzle. Smooth the surface with a sealant tool or finger dipped in soapy water before the sealant skins.
We recommend the use of colour-matched neutral cure silicone:
in all joins between wall panels•
between wall panels and the perimeter •of floor substrates
around any fitting that penetrates •
surface panels, such as tap holes, etc.
4.3 Application of Silicone
1 mm
1 mm

14
5. Showers and Flooring Caesarstone’s 20 mm thickness material can be used for shower bases on condition that anti-slip treatment is applied. Like any material used in a shower base, Caesarstone material must always be installed as per the relevant regulations and all applicable standards, especially in relation to waterproofing and surface slip resistance.
If Caesarstone material is chosen as an overall bathroom floor surface, we recommend that 20 mm thickness flooring panels are precision cut by a stonemason ensuring dimensional and diagonal accuracy, in a square format and no less than 600 x 600 mm size. All panel edges should incorporate a 1 mm x 1 mm aris on all edges. Floor panels should be laid in strict accordance with the adhesive manufacturer’s recommendations, taking into account the environment, especially if underfloor heating is being installed. In addition to expansion joins between floor panels, adequate perimeter expansion should be provided.
Important! Use of any drainage grate system should always be per manufacturer’s instructions and relevant building codes.
Flooring and block bench 4230; wall panelling 2141
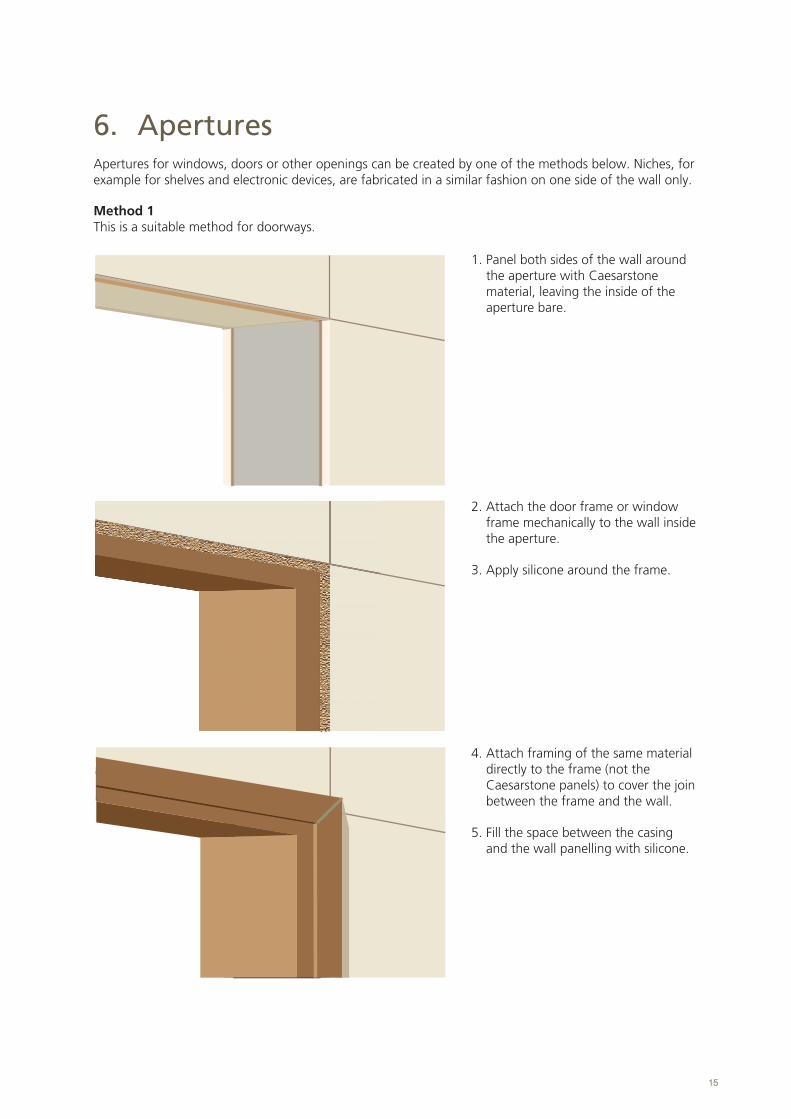
6. Apertures Apertures for windows, doors or other openings can be created by one of the methods below. Niches, for example for shelves and electronic devices, are fabricated in a similar fashion on one side of the wall only.
Method 1 This is a suitable method for doorways.
1. Panel both sides of the wall around the aperture with Caesarstone material, leaving the inside of the aperture bare.
2. Attach the door frame or window frame mechanically to the wall inside the aperture.
3. Apply silicone around the frame.
4. Attach framing of the same material directly to the frame (not the Caesarstone panels) to cover the join between the frame and the wall.
5. Fill the space between the casing and the wall panelling with silicone.
15

16
Method 2 Use this method when an open aperture or doorway is required.
1. Panel the wall around the aperture with Caesarstone material.
2. Line the inside of the aperture with Caesarstone material.
Plan the width of the aperture panel to protrude slightly over the wall panels after installation.
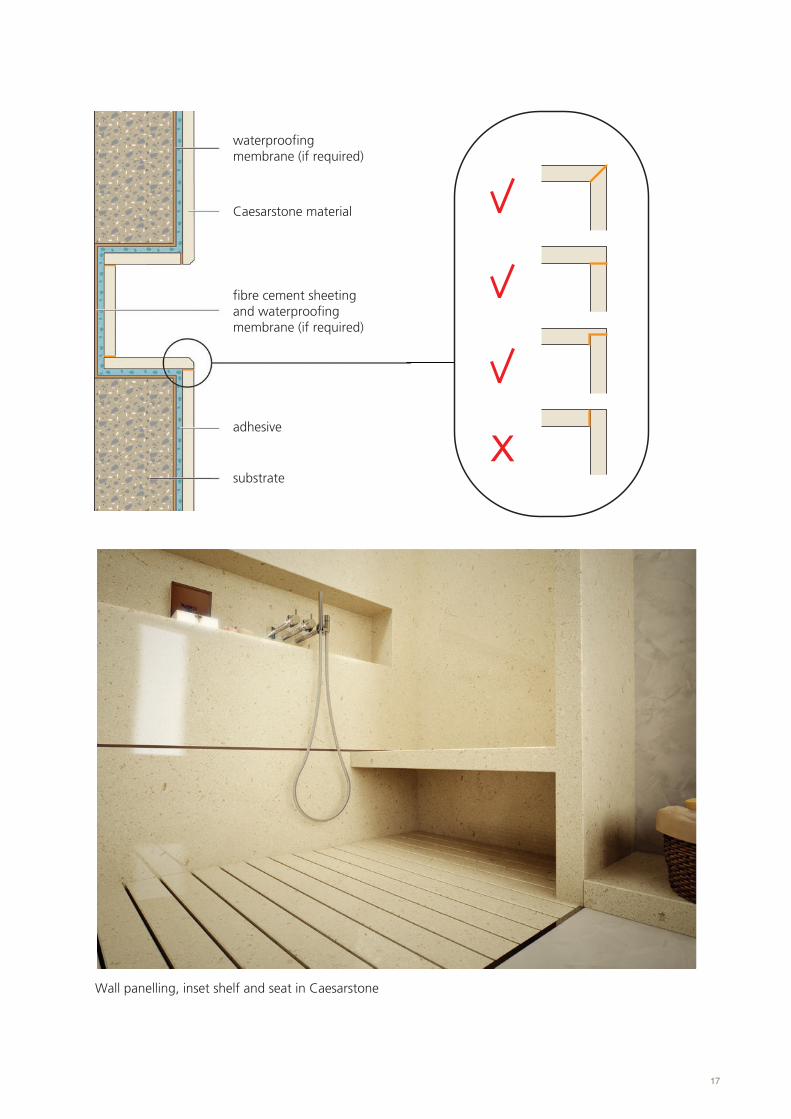
6.1 Inset Shelf DetailsInset recesses and shelves can be incorporated into a bathroom fitout. All cutouts are to be made waterproof with the appropriate application of flashing and/or waterproof membranes and sealants.
3-5 mm
17
Wall panelling, inset shelf and seat in Caesarstone
substrate
adhesive
fibre cement sheeting and waterproofing membrane (if required)
Caesarstone material
waterproofing membrane (if required)
X

18
7. Bath and Spa Details Caesarstone material is ideal for use as horizontal hobs and vertical fascia panels.
The bath must always be firmly secured and glued into place, and silicone used between the rim of the bath and the Caesarstone material. It is recommended to install the bath at a late stage of the bathroom installation in order to avoid damage.
With spas, ensure that apertures for maintenance of the pump and spa system are executed correctly.
Execute the join between the hob and the fascia according to regular fabrication methods as detailed in the Caesarstone Fabrication & Health Protection Guide. Fabricate external edges with a minimum radius of 4 mm, and internal edges (for undermount baths) with a minimum radius of 6 mm.
The most common methods of installing prefabricated baths with Caesarstone material are detailed on the following pages.
Bath surround in Organic White and Raven by Mim Design

7.1 Overmount Bath In this method of installation, the bath rim rests on top of the Caesarstone hob. In addition, it may feature a vertical fascia panel of Caesarstone. 1. Fabricate the horizontal deck and/or the vertical panel according to the requred dimensions. 2. Create a frame of concrete blocks to which the Caesarstone will be attached. 3. Install the vertical panel. 4. Install the horizontal bath hob. 5. Install the bath on a bed of cement and silicone bath to hob join.
Overmount Bath with Caesarstone Material Hob and Fascia Panel
colour-matched silicone
minimum external edge radius 4 mm
Caesarstone material
19

20
7.2 Undermount BathUndermount Bath with Caesarstone Material Hob and Fascia Panel
colour-matched silicone
minimum external edge radius 4 mm
minimum internal edge radius 6 mm
Caesarstone material
Important! For extra protection against water penetration, stick Caesarstone strips to the hob, positioned where the bath rim will cover them; see detail below.
Overmount Bath with Vertical Panel Only Overmount Bath with Hob and Vertical Panel
substrate and support as required

Undermount Bath with Exposed Rim
This method is often used when the bath rim has a large radius.
Undermount Bath with Concealed Rim
This method is often used when the bath rim has a small radius. The bath hob may protrude slightly over the edge of the bath in order to conceal the join between the bath rim and the deck.
21

22
8. Installing Sinks in Vanities There are three main methods of installing sinks or basins in vanities or other surfaces, each of which requires a different type of cutout fabrication:
Undermount Installation
In undermount installation, the sink is •positioned underneath the surface.
Fabricate the cutout slightly smaller •than the sink so that the join between the sink and the surface is not visible. Round or bevel the edge. Polish the
edges of the cutout.
Overmount Installation
In overmount installation, the lip of •the sink extends above the surface and rests on it.
Smooth the edge of the cutout •with a grinding wheel and leave it unpolished. Leave a small gap between the sink surface and overlapping benchtop.
Flush Installation
In flush installation, the sink is •installed almost or completely flush with the surface by a method resembling fitting a cone into a cone. The lip of the sink is slightly wider at its top edge than at its bottom edge.
Fabricate the cutout in the surface •on a slight angle to create a cone shape, so that the top of the cutout is wider than the bottom of the cutout. The sink can then be slotted into the cutout. The size of the cutout determines the position of the sink relative to the surface.

9. Commercial Wall Panelling Caesarstone quartz surfaces are suitable for internal application in entrance foyers, hotel lobbies, shopping centres and living areas. Wall panelling may be installed by adhesion only, by adhesion and mechanical fixing, or by mechanical fixing alone.
With a wide variety of potential project applications we always recommend that the method of installation and specifications of the wall panelling be determined by the construction engineer in line with building regulations and technical information and guidelines from manufacturers and suppliers of mechanical fixing systems.
23

10. Care & Maintenance Caesarstone requires very little maintenance to keep the surface looking like new. For every day, routine cleaning of Caesarstone we recommend wiping the surface with warm soapy water (a mild detergent) and a damp cloth or alternatively use a quality spray and wipe type cleaner.
Caesarstone Cream Cleanser has been specially formulated to remove the most stubborn stains while taking care of your Caesarstone surfaces. It is also suitable for cleaning sinks and taps, baths and basins, shower recesses and tile surfaces.
As Caesarstone is virtually non-porous it will keep its lustrous gloss and ultra-smooth surface without polishing and it never needs sealing.
Extra stubborn dried spills and stains
For removal of these, or if you wish to give your Caesarstone surface a thorough clean, we recommend Caesarstone brand Cream Cleanser and a 3M™ Scotchbrite™ Never Scratch™ All-Purpose Scrubber which can be used without damaging the stone, or alternatively applied to a soft, damp cloth.
When using Caesarstone Cream Cleanser we recommend using a small amount of the Cream Cleanser on a 3M™ Scotchbrite™ Never Scratch™ All-Purpose Scrubber which has been thoroughly soaked in warm water. For Motivo™ pattern textured collection it may also be necessary to use a non-abrasive soft bristle brush for extra stubborn stains.
To remove adhered materials like food, gum and nail polish, first scrape away the excess with a sharp blade. If there are any grey metal marks on the surface, a mild detergent will remove it. Household bleach can generally be used as an effective cleaner to remove stubborn marks, but care should be taken as some products are considerably stronger than others.
Tough? Yes. Indestructible? No.
As with any surface, Caesarstone can be permanently damaged by exposure to strong chemicals and solvents that undermine its physical properties. Do not use products that contain trichlorethane or methylene chloride, such as paint removers or stripper. Avoid any highly aggressive cleaning agents like oven cleaner that have high alkaline/pH levels. Should the surface be accidentally exposed to any of these damaging products, rinse immediately with water to neutralize the effect.
Heat Resistance
24
Heat Resistance
Caesarstone will tolerate brief exposures to moderately hot temperatures. However, prolonged direct contact with, or radiated heat can cause thermal shock, discolouration or damage.
Warranty Registration
Have you registered your Caesarstone 10 Year Limited Warranty yet? Do it online at www.caesarstone.com.au to receive a free Caesarstone cleaning kit.

11. Technical Data Test Performed Test Standard ResultsPHYSICAL PROPERTIES Water Absorption ASTM C97* <0.05%
DensityASTM C97* 2.2-2.4 gr/cm3
EN 14617-1* 2.2-2.4 gr/cm3
Flexural StrengthASTM C880 6,500-10,770 psi; 44.8-74.3 MPa
EN 14617-2* 57.6 -70.0 MPa
Dimensional Stability EN 14617-12* Class A
Electrical Resistivity EN 14617-13*Volume resistance (Rv) = 0.92 x 10¹⁴ ΩVolume resistivity (ρv) = 4.88 x 10¹² Ωm
DURABILITY
Impact ResistanceASTM D1709* 26.3 lbs (117N)EN 14617-9* 4,000 - 10,000 [J]
Compressive StrengthASTM C170* 21,312- 27,133 psiEN 14617-15* 178.3-210.6 MPa
AbrasionASTM C501* 216-696ASTM C1243 Volume of chord: V=132-244 mm3
EN 14617-4* Groove length = 21.8 mm or V=86 mm3
Freeze-Thaw ResistanceASTM C1026* No defects after 15 freeze-thaw cyclesEN 14617-5* No defects after 25 freeze-thaw cycles
Mohs Hardness 6.5-7STAIN AND CHEMICAL RESISTANCE AND CLEANABILITY
Stain Resistance** ANSI Z 124.6 Pass
Wear and Cleanability ANSI Z 124.6 Pass
Chemical ResistanceANSI Z 124.6 Pass
EN 14617-10* Class C4
STAIN AND CHEMICAL RESISTANCE AND CLEANABILITY
Stain Resistance** ANSI Z 124.6 Pass
Wear and Cleanability ANSI Z 124.6 Pass
Chemical Resistance ANSI Z 124.6 Pass
EN 14617-10* Class C4
THERMAL PROPERTIES
Linear Thermal ExpansionASTM D696 -30 to +30°C: 1.3-1.9 x 10⁻⁵ cm/cm/°CEN 14617-11* -30 to +30°C: 2.1 x 10⁻⁵ (°C-1); -30 to +60°C: 2.7 x 10⁻⁵ (°C-1)
Thermal Conductivity EN 12664/ISO 8301* 1.75 W/m. oK (mean T of 10oC)
Thermal Shock EN 14617-6* No visual defects after 10 cycles; Loss in mass = 0.02%-0.05%Loss in flexural strength = 0.7%-1.1%
Boiling Water Resistance NEMA LD3-3.5 PassHigh Temperature Resistance NEMA LD3-3.6 PassSAFETYCigarette Test ANSI Z 124.6 PassSurface Burning ASTM E84* Class 1 and Class A Fire Classification EN 13501-1* Wall cladding: B-s1-d0; Flooring and stairs: B-fl-s1
Static Coefficient of Friction ASTM C1028* As received – Dry: 0.8; Wet: 0.6As renovated – Dry: 0.9; Wet: 0.6
Slip Resistance DIN 51130* Oil wet ramp: R9-10DIN 51097* Wet barefoot ramp: CEN 14231* Wet: 13-21 SRV; Dry: 43-53 SRV
AS/NZS 4586*Four S rubber pendulum: 25-30 BPNWet barefoot ramp: B Oil wet ramp: R10
Radiation ANSI/N42.14 226Ra = 1.4-6.8; 232Th = 1.4-3.7; 40K = <3-30.3 (Bq/kg dry weight)
25

Go on, express yourself with Caesarstone.We’d love to hear from you. For more design ideas, information and for your
nearest showroom, visit our website: www.caesarstone.com.au
or call us on 1300 119 119
©C
opyr
ight
Cae
sars
tone
® 2
013.
Cae
sars
tone
® a
nd o
ther
Cae
sars
tone
® m
arks
are
tra
de m
arks
of
Cae
sars
tone
® S
dot-
Yam
Lim
ited
and
they
are
use
d un
der
licen
ce b
y C
aesa
rsto
ne® A
ustr
alia
Pty
Ltd
.
Prin
ted
Apr
il 20
13 a
nd s
uper
sede
s al
l pre
viou
s ve
rsio
ns a
nd s
ubje
ct t
o ch
ange
with
out
notic
e. C
aesa
rsto
ne® A
ustr
alia
Pty
Ltd
AC
N 1
21 8
19 9
76
Recommended