Back Button Focus - Sharp Focus Photography Guide
Have you ever dialed in the focus perfectly, pressed the shutter button, and the focus automatically changed, creating an out of focus image?
Using back button focus, you'll never have this problem again.
Back button focus ensures sharp focus, 100% of the time, providing precise control over focus, exposure, shutter speed, and depth of field, producing higher quality images.
Below, you'll learn five, step by step, back button focus techniques, for sharp focus in any shooting scenario.
www.DaveMorrowPhotography.com Page 2
Table of Contents
Table of Contents 2
Back Button Focus Video & Camera Technique 3
Back Button Focus - Why You Need It 3
Benefits of Back Button Focus 4
Problems with Shutter Button Autofocus 5
Problem 1: Unwanted Change in Focal Point, Exposure Settings & Metering 5
Problem 2: Delay in High-Speed Continuous Shooting 7
Focal Point & Focal Range Basics 9
The Best Autofocus Settings for Landscape Photography 12
Overview of this Section 15
Focus Method 1: Hyperfocal Distance Technique 16
How to Find the Hyperfocal Distance - Step by Step 20
Caveats to this Focusing Method 21
Why Not Shoot at f/16 or f/22? 22
Why Not Use a Hyperfocal Distance App? 22
Focus Method 2: One Third Focal Point 23
Caveats to this Focusing Method 25
Focus Method 3: Direct Center Focal Point 25
Caveats to this Focusing Method 27
Focus Method 4: Single Subject Focal Point 27
Caveats to this Method of Focusing 28
Focus Method 5: Focus Stacking & Back Button Focus 29
Closing Comments 31
Useful Links & Information 31
Start Here | Learn Photography | View Photos | Workshops & Tours

www.DaveMorrowPhotography.com Page 3
Back Button Focus Video & Camera Technique
Both of the following videos teach my back button focus techniques for sharp images.
Watch them in order, then scroll down & read the guide.
https://www.youtube.com/watch?v=vQDhOWcy6f0
https://www.youtube.com/watch?v=Jqyh_ijbVZc
Back Button Focus - Why You Need It
Out of the box, cameras control autofocus using the shutter button, which also takes the image.
When the autofocus button and the shutter button are one and the same, the camera has to guess between two choices.
Should it:
1. Take the photo? 2. Focus on the subject?
The camera’s guess is often incorrect leading to out of focus images & incorrect settings.
Moving the autofocus button to the back of the camera removes this guesswork giving the photographer complete control & sharper images on a consistent basis.
Start Here | Learn Photography | View Photos | Workshops & Tours

www.DaveMorrowPhotography.com Page 4
Now, the photographer can control focus with a single button and take the image with a single button.
Benefits of Back Button Focus
Each important camera setting should be controlled by a single button, no more.
This way the camera never has to guess why you're pushing a specific button.
Here are the main benefits of back button focus. Each is described in more detail lower on this page.
1. Photographer has complete control of focal point location and focus prior to taking the image.
2. Photographer has complete control over metering prior to taking the image. 3. Photographer has complete control over exposure triangle settings prior to
taking the image. 4. The camera never guesses what the photographer wants. 5. Photographer has complete control over the camera & lens.
When the photographer wants to focus, they press the back button.
When the photographer wants to capture an image, they press the shutter button.
It's that simple.
Let's discuss...
Start Here | Learn Photography | View Photos | Workshops & Tours

www.DaveMorrowPhotography.com Page 5
Back button focus was used to capture this shot, handheld, on an 8-day mountain expedition.
Problems with Shutter Button Autofocus
Here are some of the problems produced by having the autofocus button assigned to the shutter button.
These are the main reasons to start using back button focus.
Problem 1: Unwanted Change in Focal Point, Exposure Settings & Metering
Using the shutter button to focus often produces the incorrect focal point, exposure/image brightness, and shutter speed, rending the image useless.
Start Here | Learn Photography | View Photos | Workshops & Tours

www.DaveMorrowPhotography.com Page 6
Here’s an Example:
After selecting the correct settings, f-stop, shutter speed, ISO, and focus, the photographer reviews the image, prior to pressing the shutter button.
When pressing the shutter button, the camera tries to refocus and meter the amount of light in the scene.
Although both tasks have already been accomplished by the photographer, the camera has no way of knowing this.
Without the photographer being able to review these newly selected settings, the camera captures the image.
Since the camera was guessing at the new settings, without the photographer's final review, the image was out of focus with the incorrect focal point and exposure.
None of these problems exist using back button focus.
After selecting the correct focal point, using the back button, the photographer selects the exposure settings & presses the shutter button.
The shutter button takes the image, nothing more, nothing less.
The results are sharp focus and the correct exposure settings, consistently.
Start Here | Learn Photography | View Photos | Workshops & Tours

www.DaveMorrowPhotography.com Page 7
Captured using back button focus & a tripod to ensure sharp focus.
Problem 2: Delay in High-Speed Continuous Shooting
When the autofocus button and shutter button are one and the same the camera may not take the photo at the precise moment the shutter button is pressed.
At times, when the photographer wants to take a large number of photos, quickly, in sequence, as often happens in wildlife or nature photography, the camera may not take the image.
Instead of taking the image, the camera tries to refocus, delaying the image.
The photographer, in turn, misses the shot.
Start Here | Learn Photography | View Photos | Workshops & Tours

www.DaveMorrowPhotography.com Page 8
Here’s an Example:
The photographer has selected the perfect focus, exposure settings and focal point within the scene, preparing to take an image of birds flying by very quickly.
● The shutter button must take the image the instant it’s pressed or the birds will be gone.
● The camera doesn’t know if the photographer is trying to take the image or focus on the birds.
● The photographer knows he/she is ready to take the image but the camera does not.
The camera guesses and tries to focus on the birds, therefore it does not take the image the instant the shutter button is pressed.
It may try to refocus, for seconds, missing the shot entirely.
When holding the shutter button down to take a series of images, in quick succession, the camera may or may not try to refocus each time. It’s a guess!
● The photographer knew the image was in focus and only wanted to capture the shot.
● There was no way to communicate this to the camera so it guessed & tried to refocus.
By moving the autofocus button to the back button, the camera no longer delays or tries to focus when the shutter button is pressed.
The camera knows that the photographer will control the focus with the back button so it takes the shot at the precise moment the shutter button is pressed.
● The autofocus button should be placed on the back of the camera, preferably accessed by the right thumb.
● The shutter button should only take the photo.
Start Here | Learn Photography | View Photos | Workshops & Tours

www.DaveMorrowPhotography.com Page 9
Focal Point & Focal Range Basics
Supplemental Knowledge for This Section: F-Stop & Depth of Field Photography Guide
Landscape & outdoor photographers require the ultimate control over their camera, lens, and settings, at all times.
They depend on their eyes for focus & the histogram to determine the correct exposure triangle settings.
Autofocus is a great tool for landscape photographers, given that it is set up correctly, and used in the correct situations.
Autofocus SHOULD NEVER be allowed to guess the photographers desired focal point within the composition.
The focal point is a single point within the composition where the lens is perfectly focused, denoted by the red box in the graphic below.
The following image was taken at f/2.8, which produces a very short focal range, to enhance your understanding.
Start Here | Learn Photography | View Photos | Workshops & Tours

www.DaveMorrowPhotography.com Page 10
The focal range extends in front of and behind the focal point as denoted by the red lines in the graphic above.
Focal range can also be denoted as depth of field.
The extent of this focal range is determined by the lens focal length and f-stop settings.
● As the f-stop number increases the focal range also increases, extending further and further in front of and in back of the focal point.
● As the focal point moves forward or backward within the image, the focal range also moves to match.
The first image above shows a focal point which was selected very close to the bottom of the image.
The focal range extends in front of and beyond the focal point.
Start Here | Learn Photography | View Photos | Workshops & Tours

www.DaveMorrowPhotography.com Page 11
In the following image, all exposure settings remain the same.
The focal point (red box) was shifted into the middle of the image, moving the focal range.
The last image shows a new focal point (red box) moved even further back in the image.
Start Here | Learn Photography | View Photos | Workshops & Tours

www.DaveMorrowPhotography.com Page 12
The photographer's goal is to select the correct combination of focal point location and f-stop settings to produce a sharp image, as taught below.
Next, you’ll learn the best autofocus settings for selecting the correct focal point within the image.
The Best Autofocus Settings for Landscape Photography
Some autofocus settings allow the camera to guess the photographer’s desired focal point within the scene.
Allowing the camera to guess never provides optimal results on a consistent basis.
Start Here | Learn Photography | View Photos | Workshops & Tours

www.DaveMorrowPhotography.com Page 13
Single point spot focus is the best autofocus setting for landscape & outdoor photographers.
Depending on your camera this may be called single point focus, spot focus, or a combination of both.
Nikon Denotes this as AF-S with the Setting "S".
A google search of your camera model and "single point autofocus" will point you in the right direction for setting up your camera.
I'll use the words single point focus, or single point spot focus, interchangeably in this guide.
As long as the following paragraph holds true, the words used to describe the functionality don’t matter.
● Single point spot focus allows the photographer to choose a single location for the desired focal point within the composition, as shown by the small red box in the graphic below.
● The photographer can choose exactly where this single focus point lies within the composition using the directional pad on the camera.
● Upon selection, this focal point will not move until directed to do so by the photographer.
In the graphic below, the red lines above and below the focal point (red box) denote the approximate extent of the focal range. This example was shot at f/11.
Start Here | Learn Photography | View Photos | Workshops & Tours

www.DaveMorrowPhotography.com Page 14
The goal is to optimize the focal point’s location within the image so the focal range extends from foreground to background, keeping everything in focus.
1. Upon selecting the focal point, back button autofocus is used to focus the lens on this selected focal point.
2. After completion of back button autofocus the photographer double checks to make sure the image is sharp.
3. Manual adjustments to the focal ring can be made if the image isn’t perfectly in focus.
4. The focal point will not move unless the photographer determines that it should.
5. Therefore the photographer must know the optimal location for this focal point within the image.
In the following section, you will learn to select the correct focal point for any composition, providing sharply focused images.
Start Here | Learn Photography | View Photos | Workshops & Tours

www.DaveMorrowPhotography.com Page 15
Overview of this Section
● Single point spot focus should be used for landscape & outdoor photography.
● Never allow autofocus to determine your focal point. ● The focal point should always be selected by the photographer. ● The photographer must know where the optimal focal point lies for any
given composition. (Taught below) ● Upon selecting the focal point, back button autofocus can be used to provide
initial focus. ● Upon focusing at the selected focal point using autofocus the photographer
must zoom in and verify that this focal point is in focus. (Reference first video above)
Back button focus & a tripod were used to capture this image in the forest.
Start Here | Learn Photography | View Photos | Workshops & Tours

www.DaveMorrowPhotography.com Page 16
Focus Method 1: Hyperfocal Distance Technique
Back button focus is used to initiate and refine each of the following focusing methods.
Approximate Focal Length Range: 10mm - 100mm (full frame equivalent)
Shooting Scenarios: Landscape & nature photography scenes shot with wide angle and zoom lenses.
Hyperfocal distance is the closest point, within the composition, on which the photographer can focus, where the entire composition beyond that point maintains sharp focus.
Half the distance from this focal point, back towards the camera will also be in focus.
The focus will linearly decrease from that halfway point until it reaches the bottom of the composition.
Technically, Hyperfocal Distance is the most efficient focal point within the composition.
In the graphic below the hyperfocal distance was selected, then a single point spot focus (red box) was used to focus directly on this hyperfocal point.
The focal range is shown between the red horizontal lines.
Start Here | Learn Photography | View Photos | Workshops & Tours

www.DaveMorrowPhotography.com Page 17
The focal range above extends from the close foreground, beyond the mountains in the distance, keeping the entire image in focus.
If the photographer selects a focal point (red box) above/beyond the hyperfocal point, then the image will drop off in sharpness in the foreground, and waste valuable focus range beyond the most distant part of the composition.
This situation is shown in the graphic below, where the focal point has been shifted slightly upwards / towards the back of the scene.
Start Here | Learn Photography | View Photos | Workshops & Tours

www.DaveMorrowPhotography.com Page 18
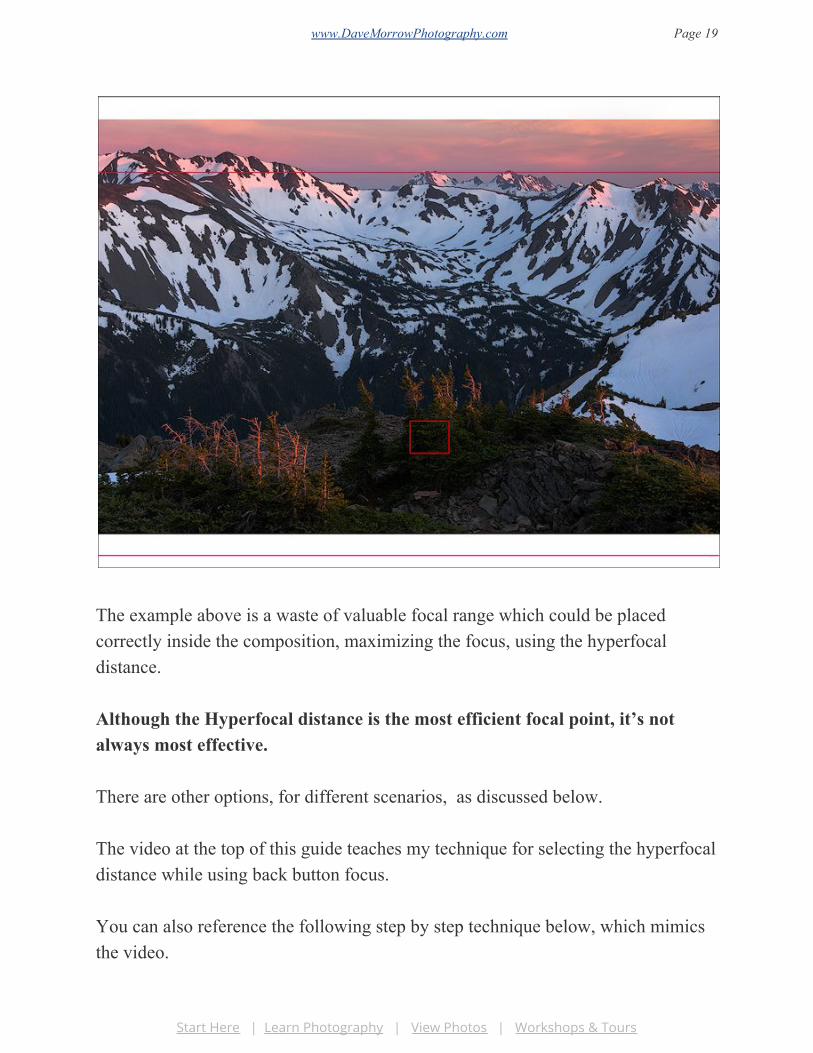
The same holds true if the photographer focuses (red box) in front of/below the hyperfocal distance, as shown below.
In this scenario, the image will be slightly out of focus in the distant background and the focal range will extend forward, outside the composition's foreground.
Start Here | Learn Photography | View Photos | Workshops & Tours
www.DaveMorrowPhotography.com Page 19
The example above is a waste of valuable focal range which could be placed correctly inside the composition, maximizing the focus, using the hyperfocal distance.
Although the Hyperfocal distance is the most efficient focal point, it’s not always most effective.
There are other options, for different scenarios, as discussed below.
The video at the top of this guide teaches my technique for selecting the hyperfocal distance while using back button focus.
You can also reference the following step by step technique below, which mimics the video.
Start Here | Learn Photography | View Photos | Workshops & Tours

www.DaveMorrowPhotography.com Page 20
How to Find the Hyperfocal Distance - Step by Step
1. Set up camera & composition. 2. Pick any point/object at the very bottom center of the composition. This
would be seen at the very bottom center of the viewfinder or live view. WATCH THE VIDEO FOR CLARIFICATION.
3. Measure/approximate the distance (straightforward, not side to side) from the camera, to that object or point selected in step 2.
4. Double the distance found in step 3. This is the approximate hyperfocal distance, as measured from the camera location.
5. Focus on this newly found distance ( step 4 ), and set the f-stop to f/8 - f/11. The image should be sharply focused.
6. Review the image. Check to make sure the focal point is in focus. Now move up and down in the image in a straight line checking the points directly above and below the focal point, ensuring they are in focus.
7. If the foreground is out of focus, but the remaining image is not, reference Method 5 below.
This is not an exact science, if you focus a few inches in front of or behind this point, no harm done!
It’s key to experiment and test this method using different lenses and focal lengths.
Start Here | Learn Photography | View Photos | Workshops & Tours

www.DaveMorrowPhotography.com Page 21
Back button focus can be used at night as well as during the day. Just shine a headlamp on your hyperfocal point while focusing.
Caveats to this Focusing Method
When shooting with lenses of approximately 100mm focal length or larger, it’s very hard to approximate where the hyperfocal point will be, due to the long distance between you and this point.
For larger focal length lenses, reference the next methods below.
Start Here | Learn Photography | View Photos | Workshops & Tours

www.DaveMorrowPhotography.com Page 22
Why Not Shoot at f/16 or f/22?
F/22 & f/16 will obtain a larger depth of field / focal range, but degrades image sharpness, due to lens diffraction.
Why Not Use a Hyperfocal Distance App?
An app is a great tool to use for practice and learning. It's not a great tool to depend on for sharp focus.
An app has the ability to fail and if you depend on it, your shots will also fail.
An app also keeps you from actually learning the correct focus methods, since you depend on the app to give you a correct answer.
It's better to learn the actual techniques that the app is built upon and master your craft.
Using back button focus this pano was created with 5 horizontal images combined in Photoshop.
Start Here | Learn Photography | View Photos | Workshops & Tours

www.DaveMorrowPhotography.com Page 23
Focus Method 2: One Third Focal Point
Back button focus is used to initiate and refine each of the following focusing methods.
Approximate Focal Length Range: 100mm - 150mm (full frame equivalent)
Shooting Scenarios: Situations where there isn't time to use/find the Method 1 hyperfocal distance.
Some photographers say that you should focus ⅓ of the way into the composition for the best focus.
Technically, this is incorrect since it doesn’t work well for all focal lengths.
This method only works well for the approximate focal length range of 100mm - 150mm due to the fact that the hyperfocal distance for these focal lengths is very close to ⅓ of the way into the composition, on the vertical. (Intersection of lines in the graphic below)
Start Here | Learn Photography | View Photos | Workshops & Tours

www.DaveMorrowPhotography.com Page 24
Method 1 is preferred over this method, but it's still a great technique to master.
Here is the process for shooting with this method:
1. Set up camera & composition. 2. Assign the single point spot focus on in the direct horizontal center of the
image 1/3 of the way up the vertical center line from the bottom. See graphic above
3. Use back button focus to focus on this focal point & meter the scene. 4. Provided enough time, manually zoom in and verify that the autofocus
worked, and a sharp focal point has been obtained. 5. Take the image. 6. Review the image for sharpness.
Start Here | Learn Photography | View Photos | Workshops & Tours

www.DaveMorrowPhotography.com Page 25
Caveats to this Focusing Method
As the focal length increases, the hyperfocal distance will move closer and closer to the vertical center of the composition.
Focusing ⅓ of the way into the composition won’t generally yield sharp images for focal lengths beyond 150mm.
I highly recommend using the hyperfocal distance method over this method, although, it will work in scenarios when you need to get a shot off quickly and don’t know the exact hyperfocal distance.
As always, test and experiment with varying focal lengths and compositions to see what works best.
Focus Method 3: Direct Center Focal Point
Back button focus is used to initiate and refine each of the following focusing methods.
Approximate Focal Length Range: 150mm+ (full frame equivalent)
Shooting Scenarios: Ideal when there isn’t time to find the correct hyperfocal distance. Also works well for lens focal lengths beyond 150mm when hyperfocal is hard to approximate.
The direct center method is not as precise as the hyperfocal shooting method.
It is worth knowing for time-sensitive situations where a quick, semi-accurate focal point is required.
Start Here | Learn Photography | View Photos | Workshops & Tours

www.DaveMorrowPhotography.com Page 26
This focusing method selects a focal point where the vertical center line and the horizontal centerline meet, in the direct center of the composition. (graphic below)
In most cases, this focusing method will work very well for vast landscapes, cityscapes and nature scenes where f-stop values, f/11 or larger, are used.
1. Setup camera & composition. 2. Assign the single point spot focus to the direct center of the image. See
graphic above. 3. Use back button focus to quickly focus on this focal point & meter the scene. 4. Provided enough time, manually zoom in and verify that the autofocus
worked, and a sharp focal point has been obtained. 5. Take the image. 6. Verify that the entire image is in focus.
Start Here | Learn Photography | View Photos | Workshops & Tours

www.DaveMorrowPhotography.com Page 27
Caveats to this Focusing Method
Focusing with this method sometimes leaves immediate foreground objects slightly out of focus. Using f-stop values of f/8 to f/11 will help to keep these objects in focus.
In the case that these objects are still out of focus, and need to be in focus, increase the f-stop to f/16 or combine the hyperfocal distance and focus stacking methods as taught in Focus Method 5, below.
Focus Method 4: Single Subject Focal Point
Back button focus is used to initiate and refine each of the following focusing methods.
Approximate Focal Length Range: Any
Shooting Scenarios: Scenes with a single subject of importance which receives all the focus.
This method works best with low f-stop values and/or large focal lengths which provide sharp focus on the subject, while leaving the rest of the scene slightly out of focus.
Examples are nature images of animals in the wild or action shots as seen below.
Start Here | Learn Photography | View Photos | Workshops & Tours

www.DaveMorrowPhotography.com Page 28
Here are the steps:
1. Setup camera & composition. 2. Assign the single point spot focus to the most important subject in the scene.
See graphic above. 3. Use back button focus to quickly focus on this focal point & meter the scene. 4. Provided enough time, manually zoom in and verify that the autofocus
worked, and a sharp focal point has been obtained. 5. Take the image. 6. Verify sharp focus at the focal point and throughout the image.
Caveats to this Method of Focusing
When there is a single object that requires focus this is the only method that will create the desired result. There are no downsides to using it, but perfecting it takes time and practice.
Start Here | Learn Photography | View Photos | Workshops & Tours

www.DaveMorrowPhotography.com Page 29
Focus Method 5: Focus Stacking & Back Button Focus
(The second video at the top of this page shows this method step by step)
This is an advanced technique. Master the photography fundamentals prior to learning this technique.
Approximate Focal Length Range: Any
Shooting Scenarios: The focus range/depth of field requirement for some compositions extends beyond what is physically possible for the specific lens to capture in a single image.
In this case, the photographer needs to capture two different images, of the same composition, with two different focal points.
These images are then combined in Photoshop to produce an extended depth of field, producing a sharp image, foreground to background.
This method may only be required 1-2% of the time but it’s well worth knowing for these edge cases.
It is called focus stacking.
Focus stacking allows you to extend your picture’s Depth of Field (DOF) for scenes where there is an important subject in the immediate foreground, and another important subject in the distant background, both of which must be in focus.
Without focus stacking, it’s only possible to focus on the immediate foreground, centerground, or distant background.
Start Here | Learn Photography | View Photos | Workshops & Tours

www.DaveMorrowPhotography.com Page 30
I would highly recommend watching the second video at the top of this page, prior to reading this step by step process. It explains everything.
The first image will be captured using the standard hyperfocal distance, Method 1, as follows:
1. Set up camera & composition. 2. Pick any point/object at the very bottom center of the composition. This
would be seen at the very bottom center of the viewfinder or live view. Watch the video for clarification.
3. Measure/approximate the distance (straightforward, not side to side) from the camera, to that object or point selected in step 2.
4. Double the distance found in step 3. This is the approximate hyperfocal distance, as measured from the camera location.
5. Focus on this newly found distance (step 4), and set the f-stop to f/8 - f/11. The image should be sharply focused.
6. Review the image. Check to make sure the focal point is in focus. Now move up and down in the image in a straight line checking the points directly above and below the focal point, ensuring they are in focus.
If the image becomes out of focus between the hyperfocal point and the bottom of the image, use these steps to capture a second exposure:
1. Move the single point spot focus, directly down, halfway between the hyperfocal point and the bottom of the composition. This exposure will capture sharp focus in the very bottom of the scene only.
2. Using the back button, focus on this focal point. 3. Press the shutter button and take the image. 4. Review the image. First, make sure the focal point is in focus. Now, check
directly above it and make sure the image is in focus, extending to the hyperfocal point, at minimum.
5. Also, check directly below the focus point ensuring sharp focus to the very bottom of the image.
6. Using Photoshop, both of these images can be easily combined to produce a single image with an extended depth of field, keeping everything in focus.
Start Here | Learn Photography | View Photos | Workshops & Tours

www.DaveMorrowPhotography.com Page 31
The Photoshop technique is also covered in the focus stacking video at the top of this guide.
Closing Comments
Thanks for taking the time to read this entire tutorial, I really hope you enjoyed it:)
I’ve provided a few more links below which contain other useful photography tips & tutorials.
Cheers & Have fun out there,
Dave Morrow - About Me Page
Useful Links & Information
● The Learn Photography Page - Complete Tutorial Library ● Photography Workshops & Tours
Start Here | Learn Photography | View Photos | Workshops & Tours
Recommended