CSCI 360: Introduction to Operating System
1 | P a g e
Assignment 2: Multithreaded Sudoku
Solution Validator
Objectives 1. Learn multithreaded programming.
2. Learn POSIX pthread library functions: pthread_create(), pthread_join(), and
pthread_exit()
3. Implement a Multithreaded Sudoku Solution Validator using POSIX thread library.
Specifications This assignment consists of designing a multithreaded application that determines whether the solution
to a Sudoku puzzle is valid.
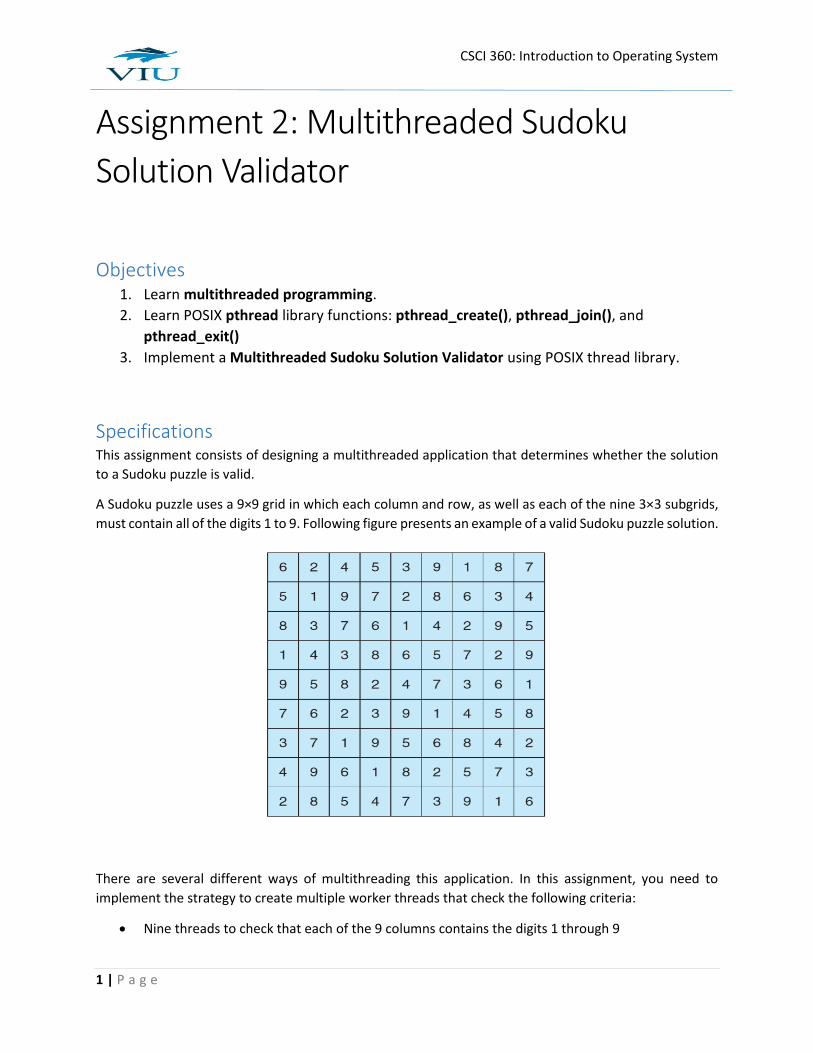
A Sudoku puzzle uses a 9×9 grid in which each column and row, as well as each of the nine 3×3 subgrids,
must contain all of the digits 1 to 9. Following figure presents an example of a valid Sudoku puzzle solution.
There are several different ways of multithreading this application. In this assignment, you need to
implement the strategy to create multiple worker threads that check the following criteria:
Nine threads to check that each of the 9 columns contains the digits 1 through 9

CSCI 360: Introduction to Operating System
2 | P a g e
Nine threads to check that each of the 9 rows contains the digits 1 through 9
Nine threads to check that each of the 3×3 subgrids contains the digits 1 through 9
This would result in a total of 27 separate worker threads for validating a Sudoku puzzle solution.
The parent thread will create the worker threads, passing each worker thread the area of the puzzle that
it must check in the Sudoku grid. The areas: column, row, and subgrid can be represented by the row and
the column values of the first cell of the column, row, and subgrid respectively. For example, the area
column 5 is [0, 4], the area row 5 is [4, 0], and the area of the last subgrid is [6, 6]. A data structure using
a struct can be created to represent the areas. For example, a structure to pass the thread number and
the row and the column values of the first cell where a thread must begin validating might be as follows:
/* structure for passing data to threads */
typedef struct {
int thread_no;
int puzzle_row;
int puzzle_col;
} thread_parameter_t;
Function pthread_create() from <pthread> library can be used to create each worker thread. The code
that will be executed under a worker thread is passed as a function pointer parameter to pthread_create()
function. The parameters necessary to the worker function are also passed as a pointer parameter to
pthread_create() function. Three different types of worker functions will be required to solve this
problem. One worker function will check the validity of a specific column. Another worker function will
check the validity of a specific row, and the third worker function will check the validity of a specific
subgrid. Each worker thread is assigned the task of determining the validity of a particular region of the
Sudoku puzzle. Once a worker has performed this check, it must pass its results back to the parent. One
good way to handle this is to create an array of integer values that is visible to each thread. The ith index
in this array corresponds to the ith worker thread. If a worker sets its corresponding value to 1, it is
indicating that its region of the Sudoku puzzle is valid. A value of 0 would indicate otherwise. When all
worker threads have completed, the parent thread checks each entry in the result array to determine if
the Sudoku puzzle is valid.
Your program must accept the name of a file as an argument and read a Sudoku puzzle solution from
that file. Your program must handle error while reading from file.
Tasks 1. You will submit this assignment using GIT submission system. A central repository
named ‘assignment2” has been created for this assignment.
2. Create your own fork of assignment2 on the central GIT repository using following
command:
ssh csci fork csci360/assignment2 csci360/$USER/assignment2

CSCI 360: Introduction to Operating System
3 | P a g e
3. Go into your csci360 folder that you have created in assignment1 and create a clone of
your forked assignment2 repository using following command:
git clone csci:csci360/$USER/assignment2
4. Repository assignment2 has been organized as follows:
assignment2
bin
build
include
resource
src
Makefile
README
example
bin
A README file template has been placed in the root of the application development folder. The
README file gives a general idea of the application, technologies used in developing the application,
how to build and install the application, how to use the application, list of contributors to the
application, and what type of license is given to the users of the application. You will need to complete
the README file before your final submission.
The specifications or header files (sudoku_checker.h, sudoku_logger.h, sudoku_param.h,
sudoku_thread.h) has been placed in include sub folder.
All source codes (sudoku_checker.c, sudoku_logger.c, sudoku_thread.c, and main.c) go into src sub folder. You need to implement all the functions defined in the header files (sudoku_checker.h, sudoku_logger.h, sudoku_thread.h) in your corresponding source files (sudoku_checker.c, sudoku_logger.c, sudoku_thread.c). The main.c file in the src folder will use the functions from your source code in sudoku_checker.c. You need to complete main.c file.

CSCI 360: Introduction to Operating System
4 | P a g e
All object files will be placed in build sub folder and executable files in bin sub folder by make.
Two data files sudoku_valid.txt and sudoku_invalid.txt have been placed in resource folder. File
sudoku_valid.txt contains a valid Sudoku solution and file sudoku_invalid.txt contains an invalid
Sudoku solution.
A Makefile has been placed in the root of the application development folder. The Makefile does the
followings and you don’t need to and must not modify Makefile:
a) Defines and uses macros for each GCC flag that you are going to use to compile the codes and objects.
b) Defines and uses macros for each sub folder of the application, e.g., src, include, resource, build, and bin.
c) Uses GCC debug flag to facilitate debugging using gdb. d) Uses GCC include flag to specify the path of application’s custom header files so that the
code does not need to specify relative path of these header files in #include pre-processor macro.
e) Creates individual object file (*.o) into build folder from each source (*.c) file of src folder. f) Links the necessary object files from the build folder into a single executable file in bin
folder. g) Runs the main executable of the application from bin folder. h) Cleans or removes files from both build and bin folders using PHONY target named clean.
5. One example executable (sudoku_checker) of this application has been placed in the example/bin
folder. You can run this executable to get an idea what is expected from you in this assignment. To
run the example executable with valid solution separately type followings:
make clean-log
make run-example-valid
To run the example executable with invalid sudoko solution type followings:
make clean-log
make run-example-invalid
To run the example executable with valid and invalid sudoko solutions one after another type
followings:
make run-example
This example executable has been built and tested in Linux Debian machines available in the labs. Run
this executable in other kind of machines at your own risks. Make clean command will not delete this
example executable and you should not delete it either.

CSCI 360: Introduction to Operating System
5 | P a g e
6. Type following at the command prompt to clean previously built artefacts (binary and object files) of
the application:
make clean
7. Type following at the command prompt to build the application from your own source code:
make
8. Type followings at the command prompt to run your own application with valid sudoko solution:
make clean-log
make run-valid
Type followings at the command prompt to run your own application with invalid sudoko solution:
make clean-log
make run-invalid
Type followings at the command prompt to run your own application with valid and invalid sudoko
solutions one after another:
make run
9. Make sure you can compile, link, run, and test this application error and warning free.
10. Complete the README file. Therefore, you need to give the general description of the application,
technologies that are used in the application, how a user can build (compile and link) and install the
application, how a user can run the application after the installation. Mention instructor’s name and
your name in the list of contributors. Give GPL license to the users to use the application. You can
google to find README examples if you are not sure how to write one.
11. Organize and comment your code to make it easy to understand. Make sure you have typed your
name and student number in the top comment section in each .c file. Make sure you have deleted all
debugging print codes that you were using to debug your code during your development time but not
necessary in the final code. Also, make sure you have deleted all commented out codes from your
final submission.
12. Continue your work in your cloned or local assignment2 repository and commit and
push your work to your central assignment2 repository as it progresses.

CSCI 360: Introduction to Operating System
6 | P a g e
Deadline and Submission
The deadline to demonstrate this assignment in the lab is October 21, 2021 and the deadline to submit
the code of this assignment is 11:00 PM on October 21, 2021.
Commit and push your work from your local repository to your remote repository regularly.
Use following git commands to commit and push your work from your local repository to your
remote repository from your project’s root folder:
git add --all
git commit –am”Commit message”
git push origin master
Remember ‘git add --all’ has double dashes before ‘all’. You can also use ‘git add .’ dot option
instead of ‘all’ option. Both options do the same, add all the new and the modified files into the
commit index. If you want to add only a specific file into the commit index, you can specify the
relative path of the file instead of dot or ‘all’ option. For example, if you want to add only prog.cpp
file of the src folder into the commit index, you can use ‘git add src/prog.cpp’ command. You can
also include multiple files or paths separated by space in the same ‘git add’ command instead of
using multiple ‘git add’ commands. Command ‘git add’ is necessary before each ‘git commit’
command. If you skip ‘git add’ command before a ‘git commit’ command, it does not perform the
actual commit of the new and modified files into the repository. Always type a meaningful
message in your ‘git commit’ command’s ‘-m’ option. For example, if you are committing after
adding all the necessary comments into your ‘Makefile’, use ‘git commit –m“Added Makefile
comments”’. Remember there is a single dash before m in ‘git commit’ command. It is not
recommended to make a huge commit instead of a number of small commits. It is also
recommended to avoid unnecessary commits. Commits should reflect the check points of your
software development milestones. Command ‘git push’ is necessary to push the local commit to
the remote repository. If you skip ‘git push’ after a ‘git commit’, your local and remote repository
will become unsynchronized. You must keep your local and remote repositories synchronized
with each other using ‘git push’ after each ‘git commit’.
You will find most useful git commands in this git cheat sheet from GitLab. You will be allowed
to commit and push until the deadline is over. Incremental and frequent commits and pushes
are highly expected and recommended in this assignment.

CSCI 360: Introduction to Operating System
7 | P a g e
Evaluation
Module Functions Marks
sudoku_checker.c read_from_file() 5.0
show_puzzle() 5.0
check_status_map() 5.0
sudoku_thread.c create_thread_parameter() 5.0
clear_thread_parameters() 5.0
create_column_threads() 5.0
create_row_threads() 5.0
create_subgrid_threads() 5.0
row_thread() 5.0
col_thread() 5.0
subgrid_thread() 5.0
sudoku_logger.c create_message() 2.0
create_subgrid_message() 2.0
log_message() 2.0
log_show() 4.0
log_save() 5.0
main.c main() 10
README 05
Code Quality and Comments
15
Total 100
Recommended