Fall 2007 �
Fall 2007
advances in Engineering Education
an Online Database and User Community for Physical Models in the Engineering Classroom
Ronald W. Welch
department of civil engineering
University of Texas at Tyler
J. ledlie KlosKy
department of civil and Mechanical engineering
United states Military academy
abstract
This paper will present information about the Web site — www.handsonmechanics.com, the
process to develop the Web site, the vetting and management process for inclusion of physical
models by the faculty at West Point, and how faculty at other institutions can add physical mod-
els and participate in the site as it grows. Each physical model has a description of the model,
the theoretical background, pictures and/or video of the set-up and use of the demonstration, a
parts list (or order location), and building plans, as well as that something extra about where else
the physical model can be used, how to elicit greater student insight and bringing drama into the
classroom using the model or demonstration. Course assessment data is provided to demonstrate
the impact of physical models on student learning. [1]
Keywords: physical, models, hands-on
I. INtrODUctION
The department of civil and Mechanical engineering at the United states Military academy
(UsMa) has partnered with McGraw-hill to develop a Web site that will list many of the physical
models and hands-on-demonstrations currently used at UsMa to teach introductory courses in stat-
ics, dynamics, Mechanics of Materials, Material science, Thermodynamics, Fluids, heat Transfer and
structural analysis. McGraw-hill approached West Point because of the numerous papers written
and presented at asee and other venues on the use of physical models to include the asee Best
Zone Paper in 2004 [1]. The inspiration for the project comes from the authors’ strong belief that
the basic concepts in mechanics courses must be driven home if students are to become engineers
2 Fall 2007
advanCEs in EnginEEring EduCaTion
an online database and user Community for Physical Models
and designers rather than technicians. For most students, particularly visual and sensory learners,
classroom demonstrations are essential to understanding these “abstract” concepts. students crave
concrete experiences when confronting engineering topics for the first time; in a sense, they say
“don’t Tell me, shoW me!”
Physical models are a great way to both educate and motivate the student and can significantly
improve student learning. Physical models feed many of the fifteen methods that Wankat and
oreovicz [2] cite in their excellent compendium of what works in the classroom. hands-on demon-
strations use visual learning; they ensure that the student is active and, when done right, clearly show
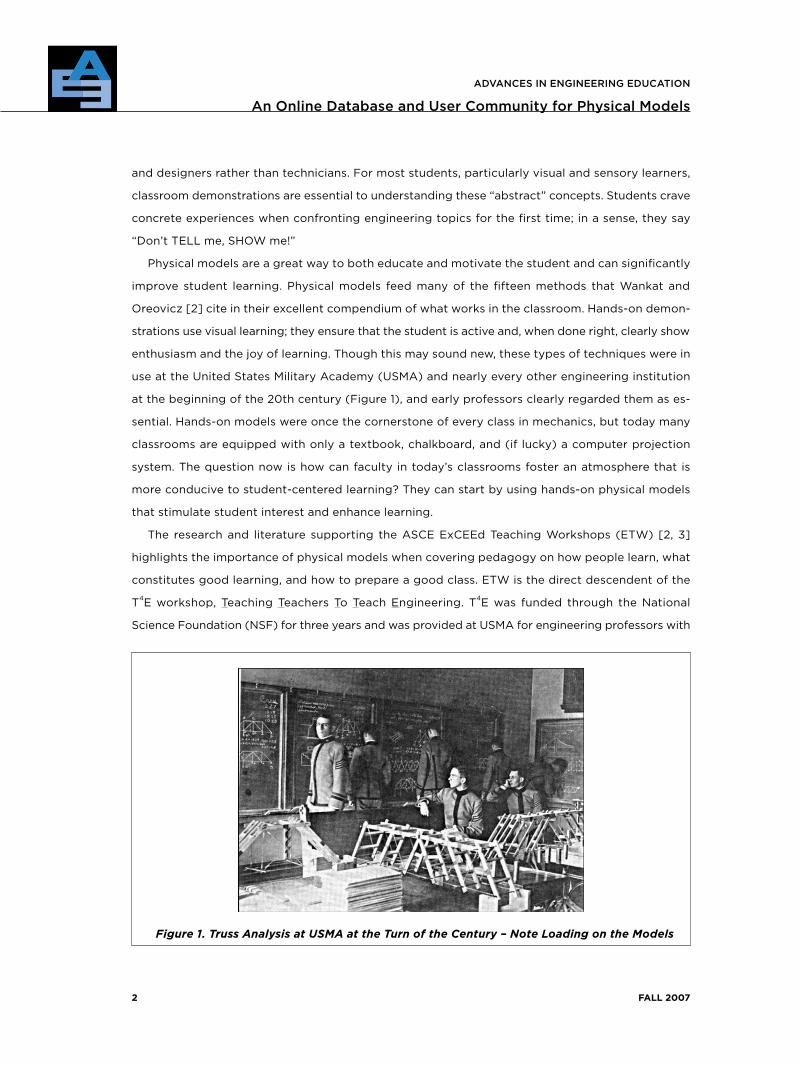
enthusiasm and the joy of learning. Though this may sound new, these types of techniques were in
use at the United states Military academy (UsMa) and nearly every other engineering institution
at the beginning of the 20th century (Figure 1), and early professors clearly regarded them as es-
sential. hands-on models were once the cornerstone of every class in mechanics, but today many
classrooms are equipped with only a textbook, chalkboard, and (if lucky) a computer projection
system. The question now is how can faculty in today’s classrooms foster an atmosphere that is
more conducive to student-centered learning? They can start by using hands-on physical models
that stimulate student interest and enhance learning.
The research and literature supporting the asce exceed Teaching Workshops (eTW) [2, 3]
highlights the importance of physical models when covering pedagogy on how people learn, what
constitutes good learning, and how to prepare a good class. eTW is the direct descendent of the
T4e workshop, Teaching Teachers To Teach engineering. T4e was funded through the national
science Foundation (nsF) for three years and was provided at UsMa for engineering professors with
Figure 1. Truss Analysis at USMA at the Turn of the Century – Note Loading on the Models

Fall 2007 �
advanCEs in EnginEEring EduCaTion
an online database and user Community for Physical Models
less than four years of teaching experience, i.e., civil, mechanical, aerospace, electrical, chemical,
etc. T4e was such a huge success that asce decided to continue the program under the exceed
Teaching Workshop moniker with one caveat: the program was offered only to civil engineering
professors. each workshop hosts 24 faculty. Throughout the workshop physical models are stressed,
to include having physical models displayed throughout the seminar room, providing a tour of the
large physical models storage area at the UsMa, and the use of 25–30 physical models during the
three demonstration classes (Figure 2). Videos displaying the use of this demo and others discussed
later are located at http://www.handsonmechanics.com. all participants are strongly encouraged
to try all new techniques presented in the workshop during their practice classes, especially the
use of physical models. Workshops conducted through the summer of 2006 bring the program to
an eight year total of 17 workshops with 378 civil engineering faculty graduates from 183 different
colleges and universities. Many civil engineering department heads are requiring this workshop
for all new faculty they hire.
Where do engineering students most often struggle with new concepts? They most often have
difficulty grasping the reality of what is being discussed in introductory Mechanics courses. For
some students, especially those who are struggling, physical reality becomes mired in seemingly
endless equations and an apparent mish-mash of theory and practical application. This doesn’t have
to happen, since fundamental elements of Mechanics are constantly demonstrated in everyday life.
students therefore bring considerable instinctive knowledge (bigger is stronger, things deform in
an observable way when loaded, etc.) to the courses, and this natural knowledge can be a spring-
board for learning. The key is to exploit this natural knowledge by linking the theoretical solutions to
what the students instinctively know to be true. The authors have observed and pedagogy supports
Figure 2. Demonstration Class in the ExCEEd Teaching Workshop
http://advances.asee.org/vol01/issue01/media/06-media03.cfm (Part 1)
http://advances.asee.org/vol01/issue01/media/06-media04.cfm (Part 2)

� Fall 2007
advanCEs in EnginEEring EduCaTion
an online database and user Community for Physical Models
the assertion that classroom demonstrations and physical models do an excellent job of bridging
the gap between natural knowledge and theory. Further, formal and informal student feedback
consistently reinforces the effectiveness of hands-on demonstrations in driving home key points
in Mechanics [1, 4].
additionally, two common student attitudes about almost any engineering course are; the course
is cryptic (“i’ll never understand this complex stuff!”), and the course is boring (“how can anyone
actually liKe studying this?”). in the experience of the authors, maintaining intellectual excitement
in the classroom is the key to suppressing these two typical reactions. That said, preparation of
notes, instructor enthusiasm and excitement can only go so far. once a student begins to lose con-
nection to the topic, the likelihood of seeing one or both of the attitudes above is high, and both
authors heard and experienced these attitudes during their first semesters of teaching Mechanics.
Therefore, seeking ways to engage student interest, build enthusiasm, and at the same time reinforce
basic knowledge in Mechanics led to direct, interactive demonstrations of basic principles which
were a good way to:
1. push students towards an active mode of learning,
2. excite interest in the topic,
3. link theory to the student’s natural knowledge, and
4. engage global learners fully.
numerous authors contend that classroom demonstrations, or “hands-on” learning methods,
are critical to student understanding. [5, 6, 7] students tend to remember what they see. lowman
contends that demonstrations, which he calls lecture-demonstration classes, are essential in engi-
neering and science courses. [6]
it is worth noting that many of the articles returned during a literature search under “classroom
demonstration” on both the asee and compendex search engines dealt with software rather than
benchtop-based demonstrations. While some of these software tools are excellent, the authors were
struck by the predominance of simulations as opposed to demonstrations, given that engineering is
inherently a hands-on profession. [9, 10] Further, compendex searches on the phrase “virtual demon-
stration” and “engineering” came up with more than 1200 hits, while “classroom demonstration” and
“engineering” produced only about 170 hits (many of which related to software tools for classroom
demonstrations!). [11] The authors strongly advocate the use of real, tangible, hold-it-in-your-hand
demonstrations over computer simulations of system behavior, particularly in the face of a younger
generation of students who know that digital images can be manipulated to defy physical laws.
campbell stated that active learning significantly enhances student retention, with lecture/
demonstration combination classes roughly doubling student retention of information versus lecture
alone, and direct student involvement in the generation of knowledge roughly redoubling retention

Fall 2007 �
advanCEs in EnginEEring EduCaTion
an online database and user Community for Physical Models
when combined with lectures and demonstrations. [8] This need for physical reality is certainly not
new; an oft-repeated chinese proverb (confucius) is “i hear and i forget. i see and i remember. i do
and i understand.” The authors of this paper concur, and will provide both anecdotal and statistical
data to support this contention.
II. PrEParatION
success in any endeavor requires proper organization. This is especially true in higher education.
Without organization and structure, teaching can easily lose priority relative to research. Preparation
and presentation without organization will miss the desired goal of properly educating and then
motivating the students to continue in the discipline as a student, an educator, a researcher or a
practitioner. according to lowman, “Most excellent instructors plan very seriously, fully aware that
alternative ways of organizing class sessions are available, which go beyond the mere presentation
of material to the promotion of active higher-order learning and motivation.”[12] The planning for
the proper use of physical models and hands-on demonstrations must be considered.
There are only a set number of lessons during each semester for professors to properly cultivate
learning within their students. When a professor walks into class, opens up the course folder to the
sticky note marking the spot the previous lesson stopped, and begins at that moment to try and
determine what to discuss in class and how to illustrate his points, precious student contact time
is wasted. [13] The lesson can quickly disintegrate into a stream of consciousness or simple litany
of facts with an occasional concept being placed in any empty space available on the chalkboard.
What is needed is a “grabber”—something to stimulate the student’s curiosity for the current lesson,
to set the concept being presented in context and to call forward the student’s natural knowledge.
[14] Physical demonstrations can provide just that; it’s like a play where the props greatly assist in
the effectiveness of the performance, except here the professor is the sole performer. [15]
after deciding to create demonstrations for Mechanics, the authors and others at UsMa built
and tested a number of classroom apparatus and experiments, not all of which were immediately
successful. There were a number of difficulties encountered and lessons learned. First and foremost,
making a demonstration simple, quick and correct is essential to success. This can be very challeng-
ing. Problems with device machining tolerances, inelastic behavior, unexpected interferences, etc.,
plagued the efforts. some of the difficulties encountered are described later in the paper and on
the www.handsonmechanics.com Web site.
These difficulties led to the second guiding principle of using classroom demonstrations: test
everything carefully and repeatedly! The last thing one wants to do in the classroom is provide an
example that is counter to theory, or that has be explained with a lot of hand waving and “The result

� Fall 2007
advanCEs in EnginEEring EduCaTion
an online database and user Community for Physical Models
would have been more obvious if…” even seemingly simple demonstrations can hide unexpected
interferences, so careful testing is essential. some time is usually required to have a proper model
prepared or a demonstration set-up in time for a given lesson. [16]
Finally, a good demonstration should be dramatic. Think about the basics of theatrical staging.
Make sure the students can see the demonstration, get students to PaRTiciPaTe in the demonstra-
tion, make everything bigger than life and see-through to emphasize key points, and encourage
student excitement during the experiment/demonstration. Paying attention to these basic theatrical
rules will help greatly with student retention and the desire to learn more. some might say, “Why
change what i am doing now to add physical models?” The simple fact is, physical models can have
a highly positive impact, especially in terms of building rapport with students. however, there are
many who feel that developing rapport with the students in each course they teach is unnecessary
or too time-consuming; however, consider that those students who enjoy the time they spend with
their professor will enjoy the classroom environment. They are actively engaged in class and feel
they learn more. [17] lowman considered interpersonal rapport so important that it became one
dimension of his two-dimensional model for effective teaching. [18]
a lesson is generally considered fully prepared once the professor has developed lesson
objectives, studied the material, planned exactly what he or she intends to place where on the
chalkboard, acquired the lesson materials (handouts, structural plans, models, etc.), constructed
physical models, rehearsed the class, planned in-class group or individual exercises, planned
possible in-class assessments, and prepared the associated homework. according to lowman,
“Teachers who carefully consider what content should be presented and how learning should be
organized are more likely to orchestrate virtuoso performances than those who leave much to
improvisation.” [19] The area most often ignored or overlooked is constructing or locating work-
ing physical models.
active education implies engaged students throughout the lesson. Try asking a tough question
on the theory you are covering. Then demonstrate and/or have the students play with a physical
model which brings the theory alive, and ask the tough question again. For visual and sensory learn-
ers, theory and actual application have become one. Get students out of their seats to work with
physical models and to participate directly in the creation of new knowledge in themselves and their
fellow students. some professors are reluctant to ask students questions in class. With a physical
model present, prompting thought through questions on the model is only natural. open discussion
and answering student questions using the physical model is an effective way to generate positive
rapport and inspire learning. once the professor asks questions, the students will eventually be
encouraged to ask the professor questions based on intriguing course material — and then true
learning begins. [20]

Fall 2007 7
advanCEs in EnginEEring EduCaTion
an online database and user Community for Physical Models
III. tHE WEb sItE
The Web site came about through a discussion over a meal at The McGraw hill statics and
dynamics symposium in september 2004. Ron Welch was an invited guest and spoke strongly dur-
ing the meetings for the need to have physical models rather than just computer simulations form-
ing an integral part of every engineering student’s education. The ensuing discussion over the next
months and the recruiting of led Klosky to serve as co-editor with Ron Welch led to a partnership
with the United states Military academy to develop and populate the following topics with their
current physical models: statics, dynamics, Mechanics of Materials, Material science, Thermodynam-
ics, Fluid dynamics, heat Transfer, and structural analysis.
When you visit the Web site (www.handsonmechanics.com) you will see a welcome page. on that
page, each topic icon is a link to the list of available physical models under that topic area. There is
no need to register to see the physical models. however, registering will allow users to participate
more fully (adding comments, receiving notification of new postings, participating as a reviewer,
submitting demonstrations, etc). Many areas of the site are populated with demonstrations and
some areas are open for submission of new demonstrations from interested parties outside of the
UsMa.
The vision is to provide one-stop shopping for educators interested in learning about and build-
ing physical models to enhance the quality of the learning in their classrooms. The list of physical
models available in each topic will have a picture of each model along with the submitted title which
serves as the link button. The page for each physical model will contain the name of the person(s)
who submitted the physical model, a Bottom Line Up Front (short model description), pictures
and/or videos of the model being used, Principle (theory supported by the physical model), What
You Need (the parts list and how to build it, if needed), How It’s Done (how the submitter uses the
physical models in class to include before and in-class instructions), and That Little Extra (how to
generate some drama or humor with the physical model, how it is tied to other concepts or future
courses, etc.). Figure 3 shows a partial snapshot of one of the demonstrations. The reader is encour-
aged to surf to the site and take a look at available demonstrations.
once the UsMa team agreed to be part of the process, the first step was to develop an initial
framework for the content and look of the Web site. of course, the next step was to try and agree on
a look and feel for the site. This is not an easy task, especially considering the variety of viewpoints
and objectives brought to the project by the involved parties. The UsMa team developed a few
example web-pages to stimulate discussion with the McGraw-hill team and the developers of the
Web site infrastructure (hunt and Gather, inc.). Throughout the development of the site, the UsMa
team reviewed the progress and provided feedback on what they would like to see on (added to)

� Fall 2007
advanCEs in EnginEEring EduCaTion
an online database and user Community for Physical Models
the site and how it should work. once the site was uploaded onto the McGraw-hill server, the UsMa
team began alpha-testing it and providing feedback. The feedback loop continues running in an
effort to improve the workability of the site for the content providers and the administrators. Team-
work was essential throughout the development process, and the finished site reflects extensive
cooperation between the publisher (McGraw-hill), the developers (hunt and Gather, inc.) and the
content providers/editors (the authors and the UsMa).
The procedures currently being used with the UsMa will continue once the site is open to all
for physical model submission. if you provide a physical model, you must be willing to serve as a
reviewer for another submitted physical model before your model will be posted. once a physi-
cal model is submitted and the admin team reviews it to ensure that all of the required content
appears to be available, technical reviewers are assigned. once a reviewer is assigned, an e-mail
is generated to alert the reviewer that he/she has been assigned a physical model to review. The
reviewer’s mission is to pull down the physical model, build it, and verify that it demonstrates the
Figure 3. A Snapshot of a Demonstration Page at www.handsonmechanics.com
Fall 2007 �
advanCEs in EnginEEring EduCaTion
an online database and user Community for Physical Models
desired concept and supports the presented theory. all content is then copy-edited and approved
final by the website editors.
IV. PractIcal ENGINEErING classrOOM DEMONstratIONs
This section presents three examples of classroom-tested demonstrations in engineering. obvi-
ously, the point of the website is to present a comprehensive catalog, and the three provided here
are intended to give the readers a taste of the website content. The examples given here are taken
without major modification from the website, and the reader will note that the tone is informal, with
the clear intent being accessibility rather than strict technical writing. demonstrations in mechanics
have also been published by Vander schaaf and Klosky. [1, 4]
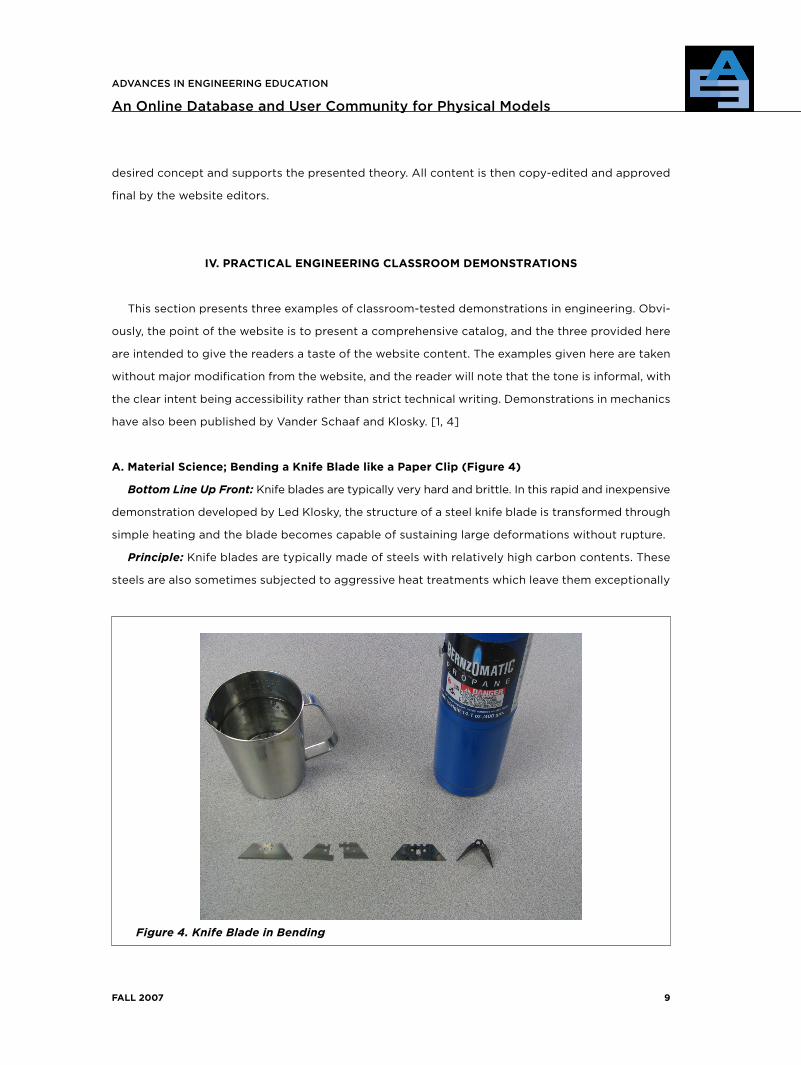
a. Material science; bending a Knife blade like a Paper clip (Figure �)
Bottom Line Up Front: Knife blades are typically very hard and brittle. in this rapid and inexpensive
demonstration developed by led Klosky, the structure of a steel knife blade is transformed through
simple heating and the blade becomes capable of sustaining large deformations without rupture.
Principle: Knife blades are typically made of steels with relatively high carbon contents. These
steels are also sometimes subjected to aggressive heat treatments which leave them exceptionally
Figure 4. Knife Blade in Bending
�0 Fall 2007
advanCEs in EnginEEring EduCaTion
an online database and user Community for Physical Models
hard, strong and brittle. This is particularly true of utility knife blades, which are resistant to deforma-
tion (keeping them sharp longer) due to their hardness but have little toughness and thus rupture
when subjected to large deformations. By heating the steel utility knife blade to an orange-hot
state (perhaps 650 to 700 degrees celsius), the steel is allowed to go through the initial stages of
the annealing process, most likely leading to spheroid structure within the blade. it should be noted
that this demonstration is qualitative rather than quantitative, since knowing the initial state of the
blade in terms of carbon content or percent martensite, as well as what tempering and annealing
went on during manufacturing, is very difficult to determine. still, the demonstration brings out
two key theoretical points. First, the heating and quenching of a sample will not lead to martensitic
steels if the heat is insufficient for the formation of austenite. second, the very simple processes
can lead to radical changes in material behavior, and engineers must be aware of these potential
transformations when designing machines, especially for high-heat settings.
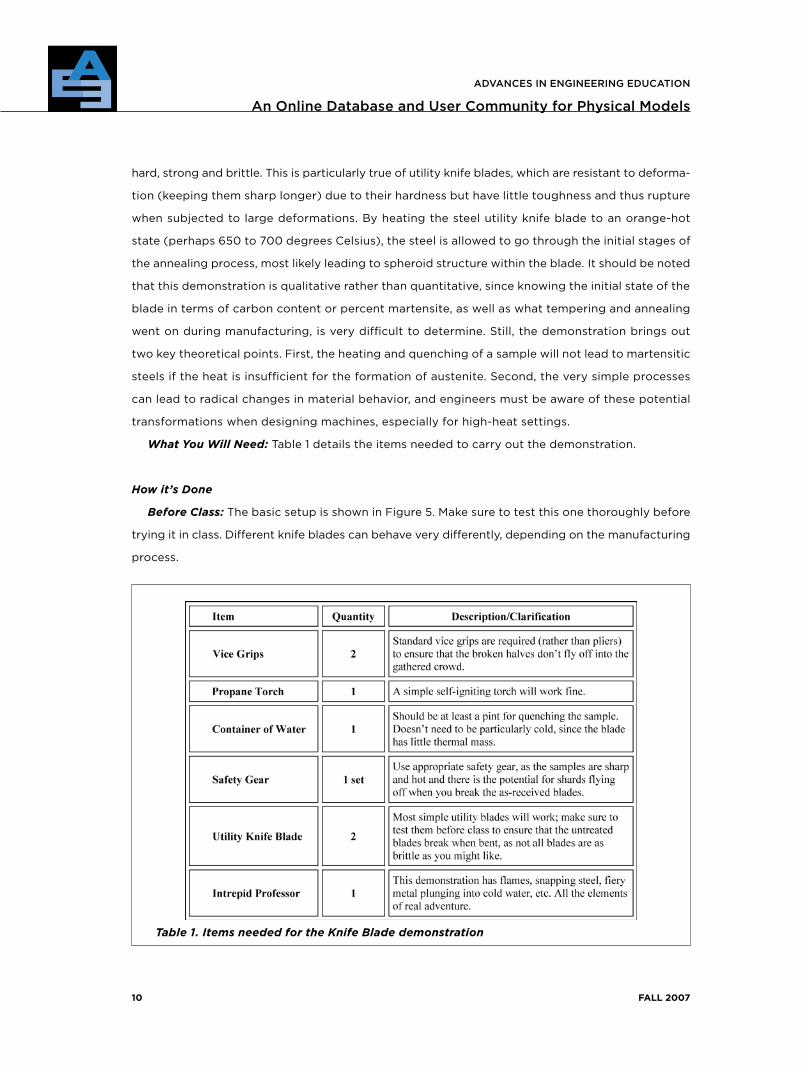
What You Will Need: Table 1 details the items needed to carry out the demonstration.
How it’s Done
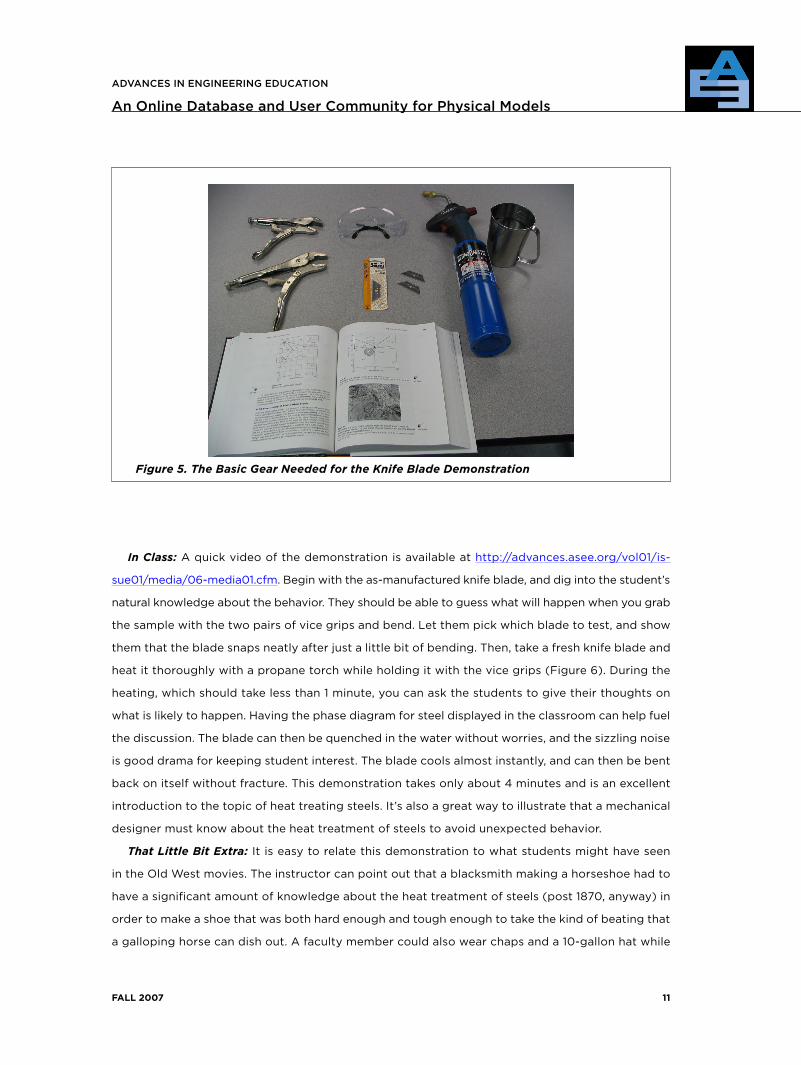
Before Class: The basic setup is shown in Figure 5. Make sure to test this one thoroughly before
trying it in class. different knife blades can behave very differently, depending on the manufacturing
process.
Table 1. Items needed for the Knife Blade demonstration
Fall 2007 ��
advanCEs in EnginEEring EduCaTion
an online database and user Community for Physical Models
In Class: a quick video of the demonstration is available at http://advances.asee.org/vol01/is-
sue01/media/06-media01.cfm. Begin with the as-manufactured knife blade, and dig into the student’s
natural knowledge about the behavior. They should be able to guess what will happen when you grab
the sample with the two pairs of vice grips and bend. let them pick which blade to test, and show
them that the blade snaps neatly after just a little bit of bending. Then, take a fresh knife blade and
heat it thoroughly with a propane torch while holding it with the vice grips (Figure 6). during the
heating, which should take less than 1 minute, you can ask the students to give their thoughts on
what is likely to happen. having the phase diagram for steel displayed in the classroom can help fuel
the discussion. The blade can then be quenched in the water without worries, and the sizzling noise
is good drama for keeping student interest. The blade cools almost instantly, and can then be bent
back on itself without fracture. This demonstration takes only about 4 minutes and is an excellent
introduction to the topic of heat treating steels. it’s also a great way to illustrate that a mechanical
designer must know about the heat treatment of steels to avoid unexpected behavior.
That Little Bit Extra: it is easy to relate this demonstration to what students might have seen
in the old West movies. The instructor can point out that a blacksmith making a horseshoe had to
have a significant amount of knowledge about the heat treatment of steels (post 1870, anyway) in
order to make a shoe that was both hard enough and tough enough to take the kind of beating that
a galloping horse can dish out. a faculty member could also wear chaps and a 10-gallon hat while
Figure 5. The Basic Gear Needed for the Knife Blade Demonstration

�2 Fall 2007
advanCEs in EnginEEring EduCaTion
an online database and user Community for Physical Models
doing this demonstration, but only if truly inspired to go quite that far…
b. statics: the amazing Weight-loss Program!!
Bottom Line Up Front: This is a simple demonstration of the perpendicular and parallel compo-
nents of a force vector on an inclined plane submitted by Tom Messervey and John Richards. By
weighing a student or instructor first on the floor and then at some inclination, a “loss of weight”
is observed (Figure 7).
Principle
The spring scale is designed to measure the force component perpendicular to the ramp or in-
clination. This begs the question of where the rest of the force goes (the parallel component down
the ramp resisted by the force of friction). one can show the trigonometric relationship between
the angle of inclination and the similar triangle formed by the weight vector and its components in
as much detail as desired. From trigonometry one shows:
What You Need: Table 2 details the items needed to carry out the demonstration.
How It’s Done: a video of this demonstration is shown at http://advances.asee.org/vol01/is-
sue01/media/06-media02.cfm. This is typically conducted on lesson one as a warm up. simply
pre-position the title “amazing weight loss program” somewhere in the classroom with the scale
nearby to get students curious. have a student read off your weight while standing with the scale
Figure 6. Heating the Knife Blade in Class

Fall 2007 ��
advanCEs in EnginEEring EduCaTion
an online database and user Community for Physical Models
flat on the floor. Then, place the scale on the ramp, have the student read your weight again, and
have everyone applaud your ingenious weight loss program (Figure 8). depending on your student
population or how long the summer/winter break has been, students can struggle with how the
angle of inclination relates to the similar triangle formed by the weight vector. Be ready to work
through the derivation.
That Little Extra: Prior to the scale demo, the instructor should emphasize that statics is a sub-
ject in which the student will be touching, measuring, and investigating the world around them. as
a warm up and trigonometry review, the instructor could state that a sloppy design partner left a
dimension missing off the ramp. Using only a protractor, the instructor could challenge the student
Table 2. Items needed for the Amazing Weight loss!!
Figure 7. The Amazing Weight-Loss Program

�� Fall 2007
advanCEs in EnginEEring EduCaTion
an online database and user Community for Physical Models
to find the missing dimension. inevitably, students struggle with where to put the protractor and
some will need the refresher on basic trigonometry. surprisingly to some, many of the students really
benefit from the review, and some students profess to little or no prior knowledge of the most basic
geometric functions. While it is highly unlikely that they haven’t seen cosines and the like before,
the demonstration clearly helps to refresh that knowledge.
Figure 8. a) Board discussion of theory associated with weight loss demo, b) weight with
scale on a horizontal surface, c) weight with scale placed on the ramp
Figure 9. The zero-force demonstrator

Fall 2007 ��
advanCEs in EnginEEring EduCaTion
an online database and user Community for Physical Models
c. statics: truss Me on this; the Zero Force Member Demonstrator
Bottom Line Up Front: This is a simple model submitted by Ron Welch that will demonstrate
the use of zero force members (ZFM) in trusses. Wooden beams are attached with dowels to form
a simple truss, which is acted on by an external force. The zero force members are determined by
removing pins and seeing if the truss is affected.
Principle
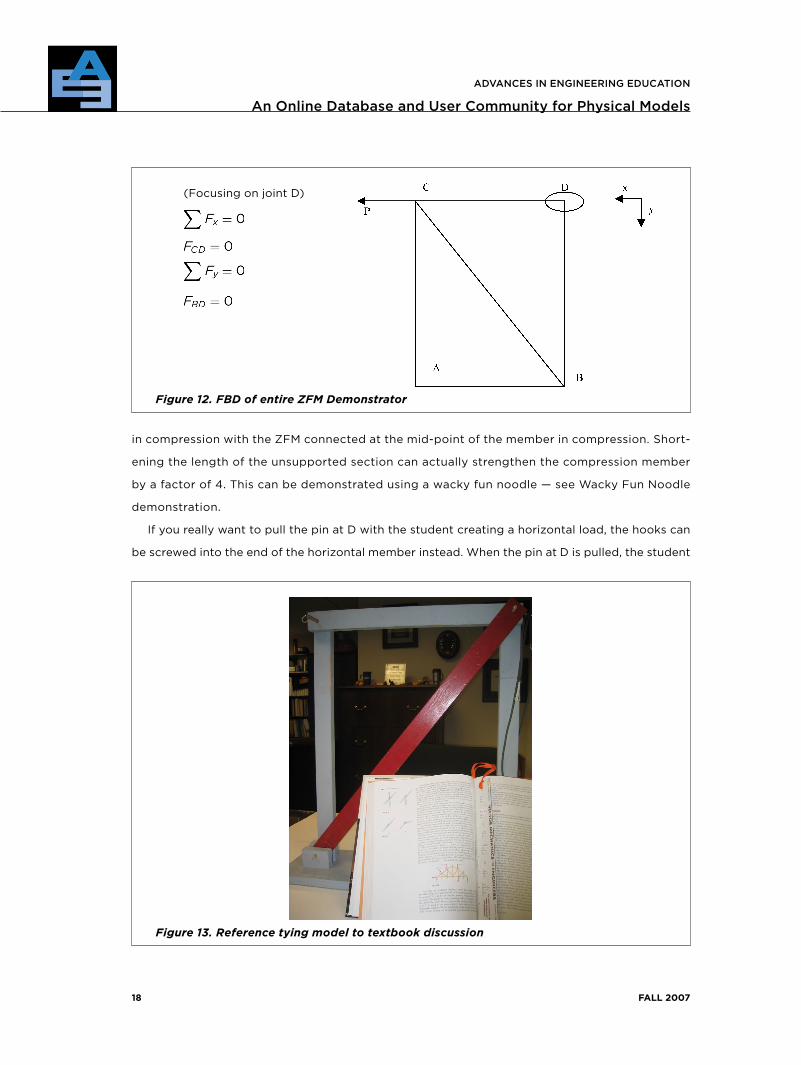
The basic equations for equilibrium of a truss joint (Method of Joints) are:
and
where the sum of the forces in the x and y direction both equal zero. Truss analysis is covered on
pages 286–305, Vector Mechanics for engineers, statics, Beer, Johnston, and eisenberg, 8th edition,
McGraw-hill, 2007. Zero-force members are specifically covered on pages 291–293.
What You Need
How It’s Done
Before Class: Prepare the wooden truss for class and check with test loads to see that it can
support a student without risk. Make sure the dowels are in place properly and won’t break.
In Class: ask for a student volunteer to be the load through the string attached to the hook (on
the vertical member) on the joint of the truss where three members intersect (Joint c). have her
lean back and close her eyes (drama!). ask the class what they think would happen if you pulled
out any dowel. The dowel at Joint d? you can possibly lead the students to see that the load will
flow through the horizontal member to joint d and then down the vertical member (not true, but
sets up the drama and the learning point). hopefully the students will conclude that the student
inducing the load will fall down when the pin is pulled. at this point, you may have to work on get-
ting the student to keep her eyes closed. Tell her to trust you since you work for the government
(university). Tell her you are about to pull out one of the dowels and to let you know if she feels you
pulling it out with pliers. you should be able to pull out the dowel at joint d easily since there is no
load in members Bd and cd. after a few seconds of continuous talking and with the dowel out and
the members dangling (lower by hand so the student cannot feel the movement), tell her to open
her eyes with you holding the dowel for everyone to see. ask her to take her seat and address the

�� Fall 2007
advanCEs in EnginEEring EduCaTion
an online database and user Community for Physical Models
Figure 10. Joint B and C
Fall 2007 �7
advanCEs in EnginEEring EduCaTion
an online database and user Community for Physical Models
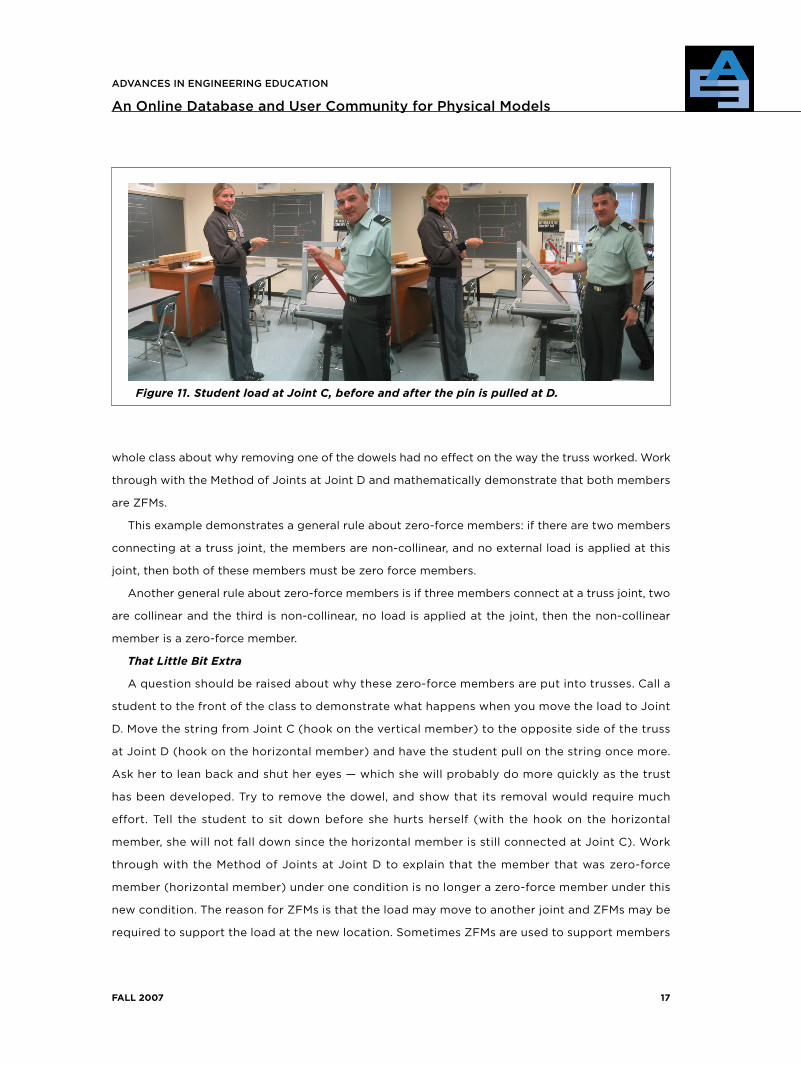
whole class about why removing one of the dowels had no effect on the way the truss worked. Work
through with the Method of Joints at Joint d and mathematically demonstrate that both members
are ZFMs.
This example demonstrates a general rule about zero-force members: if there are two members
connecting at a truss joint, the members are non-collinear, and no external load is applied at this
joint, then both of these members must be zero force members.
another general rule about zero-force members is if three members connect at a truss joint, two
are collinear and the third is non-collinear, no load is applied at the joint, then the non-collinear
member is a zero-force member.
That Little Bit Extra
a question should be raised about why these zero-force members are put into trusses. call a
student to the front of the class to demonstrate what happens when you move the load to Joint
d. Move the string from Joint c (hook on the vertical member) to the opposite side of the truss
at Joint d (hook on the horizontal member) and have the student pull on the string once more.
ask her to lean back and shut her eyes — which she will probably do more quickly as the trust
has been developed. Try to remove the dowel, and show that its removal would require much
effort. Tell the student to sit down before she hurts herself (with the hook on the horizontal
member, she will not fall down since the horizontal member is still connected at Joint c). Work
through with the Method of Joints at Joint d to explain that the member that was zero-force
member (horizontal member) under one condition is no longer a zero-force member under this
new condition. The reason for ZFMs is that the load may move to another joint and ZFMs may be
required to support the load at the new location. sometimes ZFMs are used to support members
Figure 11. Student load at Joint C, before and after the pin is pulled at D.
�� Fall 2007
advanCEs in EnginEEring EduCaTion
an online database and user Community for Physical Models
in compression with the ZFM connected at the mid-point of the member in compression. short-
ening the length of the unsupported section can actually strengthen the compression member
by a factor of 4. This can be demonstrated using a wacky fun noodle — see Wacky Fun noodle
demonstration.
if you really want to pull the pin at d with the student creating a horizontal load, the hooks can
be screwed into the end of the horizontal member instead. When the pin at d is pulled, the student
Figure 13. Reference tying model to textbook discussion
Figure 12. FBD of entire ZFM Demonstrator
(Focusing on joint d)

Fall 2007 ��
advanCEs in EnginEEring EduCaTion
an online database and user Community for Physical Models
is still supported by the horizontal member that is still connected to the stable triangular truss
structure at Joint c.
V. assEssMENt
in Fall 2002 and again in Fall 2003, Vander schaaf and Klosky [1] resuscitated, developed, and/or
instituted many of the demonstrations that will be part of the Mechanics of Materials section of the
hands-on Mechanics Website; however, many were not used in Fall 2001. a number of qualitative
measures of student responses indicate that the addition of classroom demonstrations was highly
effective.
Figure 14. Possible sequence of events when pulling the pin at Joint D; top left—pin in
place, top right—student leaning back with eyes closed, bottom left—pin pulled and student
no longer supported, lower right—where the trusting student may end up once the pin is
pulled

20 Fall 2007
advanCEs in EnginEEring EduCaTion
an online database and user Community for Physical Models
1. semester-end survey questions related to visual connection showed a strong upward trend
between 2001 and the subsequent two semesters (see Figure 15). This is significant because the
instructors, course content and student population composition remained fairly constant during
the three terms (Vander schaaf and Klosky taught Mechanics all three terms). Questions a2, B1, B7,
c5 and c10, detailed in Figure 15, all related directly to the effectiveness of the instructor and thus
indirectly to the effectiveness of the classroom demonstrations. student rating for these questions
showed gains on the order of 0.2 points out of 5, which is considerable given that the majority of
the ratings were already above 4 and thus had less upward sensitivity. Question a6 asked students
about their motivation to learn and continue learning because of this course, and both authors saw
a very strong gain in this very important category, with ratings increasing on the order of 0.5 points
out of 5 possible.
2. student excitement was clearly higher during the demonstrations, and the demonstrations
always inspire a high volume of questions, a clear sign of student engagement. an additional benefit
of the demonstrations is they break up the normal pace of the class and generate a higher level of
student interaction for the rest of that class.
3. in speaking with students in the semester following the Mechanics of Materials course, the
strongest recollections tend to be of the physical demonstrations rather than equations or even
Figure 15. Results of Student Feedback on Demonstrations

Fall 2007 2�
advanCEs in EnginEEring EduCaTion
an online database and user Community for Physical Models
general concepts. speaking with former students follows a predictable path: reminding the student
of the demonstration elicits a strong recollection of the physical demonstration, which usually leads
to a recollection of the physical phenomenon.
student comments also supported the use of demonstrations, though usually not in a direct way.
in general, students were very positive about how the course related to real-world applications and
physical understanding, areas which are clearly influenced by the demonstrations. a few examples
of positive student comments related to the use of demonstrations follow:
l “The instructor uses extremely effective learning tools in class, and they really helped me to
better understand the material presented.”
l “This has been my favorite class... . even though it was more work than any other class, it really
stimulated my learning and excitement of being a civil major.”
l “Good visual aids”
l “it was very possible to visualize all the concepts so it was easier to realize what was going
on.”
l “The models used to illustrate concepts were useful.”
l “The material was relative and interesting.”
l Q: strengths of course. a: “The instructor demos and visual aids”; “Practical applications”;
“interesting material, vital to civil and Mechanical majors”; “Made difficult concepts easy and
applicable”; “Relevance to practical applications/life”; “very practical material”.
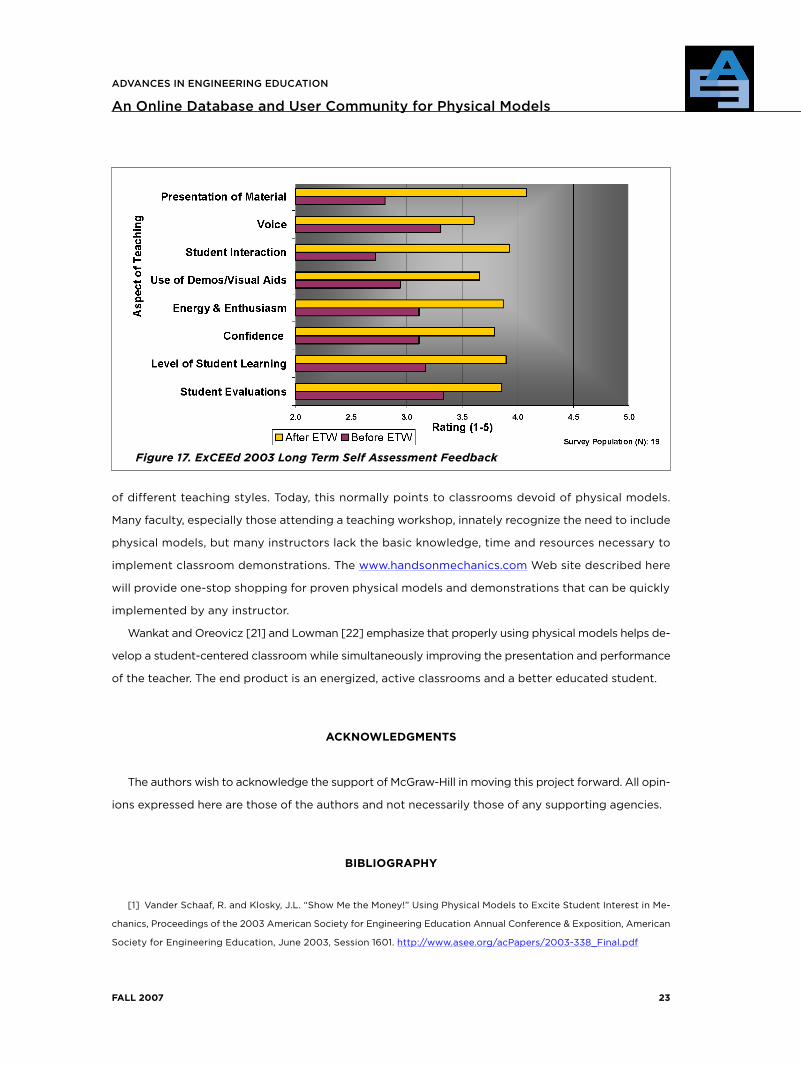
six years of long-term assessment data from exceed participants reveals insight as to the
use of physical models as well. Figure 16 presents the survey data collected from participants
during their second semester after attending exceed at West Point (1-none, 2- small, 3- mod-
erate, 4- high, 5- very high). For each topic they note the contribution of each major area of
the exceed Teaching Workshop to their overall success. Key areas that can be attributed to or
partly to the use of physical models are student interaction and presentation of material, and
of course use of demos/visual aids. Generally it could be noted that the group in 2003 possibly
experienced less contribution from the use of physical models for their success. however, the real
measure must take into consideration the start point of the participants before eTW as shown
in Figure 17. Upon comparison of the long-term results for each group of participants, the delta
between before and after for each category has been relatively consistent since the workshop
started in 1999.
The obvious result is that the exposure of exceed participants to demonstrations of excellent
teaching using physical models and practicing the use of physical models and demonstrations by
participants under the watchful gaze of a mentor is key. some of the specific comments by recent
exceed Teaching Workshop Graduates are:

22 Fall 2007
advanCEs in EnginEEring EduCaTion
an online database and user Community for Physical Models
l Toys help me (the instructor) to see the concepts more clearly
l i need one (physical models) for every lesson
l i need to include more physical models even though i was not taught that way
Teaching takes place only when the students are learning. Many equate teaching with the act of
presenting material in a lecture. however physical models and hands-on-demonstrations are a big
part of student learning, especially in engineering.
VI. cONclUsIONs
each physical model on the web has a description of the model, the theoretical background,
pictures and/or video of the set-up and use of the demonstration, a parts list (or order location),
and building plans, as well as that something extra about the demonstration.
Based on feedback from exceed participants using physical models at their home universities
as well as our own student feedback and experience with the use of physical models, the inclusion
of physical models in each class will enhance student learning — especially for more difficult topics.
Most professors simply try to emulate observed styles without any justification as to the effectiveness
Figure 16. Contribution of ETW to Success
Fall 2007 2�
advanCEs in EnginEEring EduCaTion
an online database and user Community for Physical Models
of different teaching styles. Today, this normally points to classrooms devoid of physical models.
Many faculty, especially those attending a teaching workshop, innately recognize the need to include
physical models, but many instructors lack the basic knowledge, time and resources necessary to
implement classroom demonstrations. The www.handsonmechanics.com Web site described here
will provide one-stop shopping for proven physical models and demonstrations that can be quickly
implemented by any instructor.
Wankat and oreovicz [21] and lowman [22] emphasize that properly using physical models helps de-
velop a student-centered classroom while simultaneously improving the presentation and performance
of the teacher. The end product is an energized, active classrooms and a better educated student.
acKNOWlEDGMENts
The authors wish to acknowledge the support of McGraw-hill in moving this project forward. all opin-
ions expressed here are those of the authors and not necessarily those of any supporting agencies.
bIblIOGraPHY
[1] Vander schaaf, R. and Klosky, J.l. “show Me the Money!” Using Physical Models to excite student interest in Me-
chanics, Proceedings of the 2003 american society for engineering education annual conference & exposition, american
society for engineering education, June 2003, session 1601. http://www.asee.org/acPapers/2003-338_Final.pdf
Figure 17. ExCEEd 2003 Long Term Self Assessment Feedback

2� Fall 2007
advanCEs in EnginEEring EduCaTion
an online database and user Community for Physical Models
[2] Wankat, P.c. and F.s. oreovicz, “Teaching engineering,” McGraw-hill, new york, ny, 1993, p. 6, 7.
[3] Welch, R.W., Baldwin, J.l., Bentler, d.J., clarke, d.B., Gross, s.P., and hitt, J.K. “The exceed Teaching Workshop:
Participants’ Perspective and assessment,” Proceedings of the 2001 american society of engineering education
annual conference & exposition, american society for engineering education, June 2001. http://www.asee.org/
acPapers/00375_2001.PdF
[4] Welch, R.W. and estes, a.c. “Teaching Pedagogy 101,” Proceedings of the american society for engineering
education annual conference, american society for engineering education, Portland, oR, 12–15 June 2005. http://www.
asee.org/acPapers/2005-484_Final.pdf
[5] Vander schaaf, R. and Klosky, J. l. “classroom demonstrations in introductory Mechanics,” Journal of Professional
Issues in Engineering Education and Practice, 131(2), 83–89.
[6] lowman, Joseph, “Mastering the Techniques of Teaching,” Jossey-Bass, san Francisco, ca, 1995, p. 132.
[7] schmucker, douglas G. “Models, models, models: the use of physical models to enhance the structural engineer-
ing experience,” Proceedings of the 1998 american society of engineering education annual conference & exposition,
american society for engineering education, June 1998. http://www.asee.org/acPapers/00389.pdf
[8] campbell, Mark, “oh, now i Get it!” Proceedings of the 1999 american society of engineering education annual
conference & exposition, american society for engineering education, June 1999.
[9] oglesby, d.B., carney, e.R., Prissovsky, M., and crites, d., “statics on-line: a project review,” Proceedings of the
1998 american society of engineering education annual conference & exposition, american society for engineering
education, June 1998. http://www.asee.org/acPapers/00525.pdf
[10] Rais-Rohani, M. and Brown, d.T. “development of a Virtual laboratory for the study of Mechanics,” Proceedings
of the 2000 american society of engineering education annual conference & exposition, american society for engi-
neering education, June 2000. http://www.asee.org/acPapers/20163.pdf
[11] compendex search engine, copyright (c) 2003 by elsevier engineering information inc., hoboken, new Jersey, U.s.a.
[12] lowman, Joseph, op. cit., p. 194.
[13] Wankat, P.c. and F.s. oreovicz, op. cit., p. 94.
[14] lowman, Joseph, op. cit., p. 138.
[15] Wankat, P.c. and F.s. oreovicz, “Teaching engineering,” McGraw-hill, new york, ny, 1993, op. cit., p. 94.
[16] Vander schaaf, R. and Klosky, l. op. cit.
[17] astin, a.W. “achieving educational excellence,” Jossey-Boss, san Francisco, 1985.
[18] lowman, Joseph, op. cit., p. 33.
[19] lowman, Joseph, ibid., p. 194.
[20] estes, a, R.W. Welch, and s.J. Ressler (2004). “Questioning: Bring your students along on the Journey,” Journal
of Professional issues in engineering education and Practice, 130 (4), 237–242.
[21] Wankat, P.c. and oreovicz, F.s. op. cit.
[22] lowman, Joseph, op. cit.
aUtHOrs
ronald W. Welch has been a group and program director at the U.s. Military academy for the
past seven years. his research interests are in infrastructure assessment and engineering education.

Fall 2007 2�
advanCEs in EnginEEring EduCaTion
an online database and user Community for Physical Models
he earned a Ph.d. in structural engineering and a M.s. in civil engineering from the University of
illinois in 1999 and 1991, respectively. he has served as an aBeT evaluator for two years. col Welch
is retiring from the army and joining the faculty at the University of Texas at Tyler as the head of
the department of civil engineering, effective January 2007. http://ce.uttyler.edu
Dr. led Klosky is an associate professor and director of the Mechanics Group in the department
of civil and Mechanical engineering at the U.s. Military academy at West Point. his research interests
are principally related to army operations, infrastructure assessment and education. he earned a
Ph.d. in geotechnical engineering at the University of colorado, Boulder, in 1997 and an M.s. from
Virginia Tech in 1988. he can be contacted via e-mail at [email protected].
address correspondence to:
Ronald W. Welch
head, department of civil engineering
RBs 1005
The University of Texas at Tyler
3900 University Blvd., Tyler, TX 75799
Recommended


![Advances in Engineering Education the formation of the Center for Advanced Study of Engineering Education ... to engineering education [12, 13]. Yet Engineer 2020 and ... mathematics](https://img.pdfslide.us/doc/110x75/5b08a3757f8b9a404d8ca5fb/advances-in-engineering-education-the-formation-of-the-center-for-advanced-study.jpg)