Act 51 Distribution and Reporting System (ADARS)
City/Village User’s Guide
Michigan Department of Transportation (MDOT)
Revised December 2013 MDOT Bureau of Finance and Administration Financial Operations Division Act 51 Financial Outreach Unit
ADARS Street Financial Report Guide Page 2
Contents
CHAPTER 1 – OVERVIEW .................................................................................................................................. 4
Act 51 Reporting System for Cities and Villages (Agencies) ............................................................................ 4 Business Purpose ........................................................................................................................................................... 4
System Requirements ..................................................................................................................................................... 4
About This User Guide....................................................................................................................................... 5 Intended Audience .......................................................................................................................................................... 5
Purpose ........................................................................................................................................................................... 5
Contents .......................................................................................................................................................................... 5
CHAPTER 2 - GETTING STARTED ..................................................................................................................... 6
Register to Use the Act 51 Distribution and Reporting System (ADARS) ......................................................... 6 Registration is Required .................................................................................................................................................. 6
One Time Only ............................................................................................................................................................................................. 6 First Steps ...................................................................................................................................................................................................... 6
Register in SSO............................................................................................................................................................... 8
Change SSO Password ................................................................................................................................................ 11
Subscribe to ADARS in SSO ....................................................................................................................................... 14
Request a User Role ..................................................................................................................................................... 16
Access ADARS ................................................................................................................................................. 20 Business As Usual ....................................................................................................................................................... 20
More Information about Act 51 ....................................................................................................................... 22
Data Security ................................................................................................................................................... 22
Features and Functions ................................................................................................................................... 22 Home Page .................................................................................................................................................................. 23
Screens and Pages ........................................................................................................................................................ 23
Links ............................................................................................................................................................................ 23
Home Page Links ........................................................................................................................................................ 23
Links on Every Page ................................................................................................................................................... 24 Menu Bar ..................................................................................................................................................................... 24
Click Tabs to Navigate................................................................................................................................................. 24 Data Formats................................................................................................................................................................ 25
Data Displays ............................................................................................................................................................... 26
Save Button ................................................................................................................................................................. 26
Success Messages ....................................................................................................................................................... 26
Error Messages ............................................................................................................................................................ 27
CHAPTER 3 - NOTICES ...................................................................................................................................... 28
Notices about Reporting .............................................................................................................................................. 28
Next Steps .................................................................................................................................................................... 28
CHAPTER 4 - REPORT CONTACTS ................................................................................................................ 29
Update Your Contacts .................................................................................................................................................. 29
ADARS Street Financial Report Guide Page 3
CHAPTER 5 – COMPLETE, VERIFY AND SUBMIT THE STREET FINANCIAL REPORT .................. 31
Accounting and ADARS ........................................................................................................................................................................... 31
If You Need an Extension ............................................................................................................................... 31
Open the Report You Want to Work On .......................................................................................................... 32
Print Reports from the Report Status Screen .................................................................................................. 35
Navigate Between Screens .............................................................................................................................. 36 Street Financial Report Tabs ........................................................................................................................................ 36
Go to the Next Page .................................................................................................................................................... 36
Click Menu Tabs to Navigate Between Pages ............................................................................................................. 36
Save Your Work .......................................................................................................................................................... 37
Features of Street Financial Report Screens .................................................................................................. 37 Display Online Help .................................................................................................................................................... 37
Highlight the Current Field .......................................................................................................................................... 37
Move Between Fields .................................................................................................................................................. 37
Enter Data Into Fields .................................................................................................................................................. 38
Shaded Fields on Report Pages .................................................................................................................................... 38 Use the Subledger ........................................................................................................................................................ 38
Read System Calculated Totals ................................................................................................................ 42
Grids on Report Pages ................................................................................................................................................ 43
Enter Information in a Grid ......................................................................................................................................... 43
Shaded Fields in Grids ................................................................................................................................................. 44
Edit Data in Grids ........................................................................................................................................................ 44
Delete Items from Grids ............................................................................................................................................. 45
Save Your Work .......................................................................................................................................................... 45
Generate Reports ........................................................................................................................................................ 46
Complete the Asset Management Page .......................................................................................................... 47
Verify/Submit the Report ................................................................................................................................ 49 Correct Errors and Warnings ....................................................................................................................................... 49
CHAPTER 6 - CHANGE AGENCY FISCAL YEAR (FY) ................................................................................ 51
Change FY End Date ..................................................................................................................................... 51
CHAPTER 7 - ANNUAL REPORTS DOWNLOAD ............................................................................................................... 53
Generate Excel ............................................................................................................................................................. 54
Generate PDF............................................................................................................................................................... 57
ADARS Street Financial Report Guide Page 4
Chapter 1 – Overview Act 51 Reporting System for Cities and Villages (Agencies)
Business
Purpose
Recipients of Michigan Transportation Funds (MTF) are required to
report their annual earnings and expenditures to the Michigan Department
of Transportation (MDOT). The Act 51 Distribution and Reporting
System (ADARS) is a Web-based computer application designed to
facilitate this reporting.
• Michigan cities and villages (agencies) use ADARS to complete the
Street Financial Report (SFR).
• MDOT reviews the SFRs submitted by agencies, and determines
compliance with reporting requirements.
System
Requirements • Agencies must use one of the following Web browsers to access
ADARS and complete the SFR:
o Internet Explorer 7 or 8 or higher o Firefox o Chrome
• Adobe Acrobat Reader must be installed so that users can download
the reports generated in ADARS.
• A means of opening (unzipping) compressed (zipped) files is
required. Microsoft WinZip and 7-Zip are examples.
ADARS Street Financial Report Guide Page 5
About This User Guide
Intended
Audience
This guide is written for City/Village street administrators and
chief financial officers/treasurers.
Purpose This guide provides brief training, references, and helpful material.
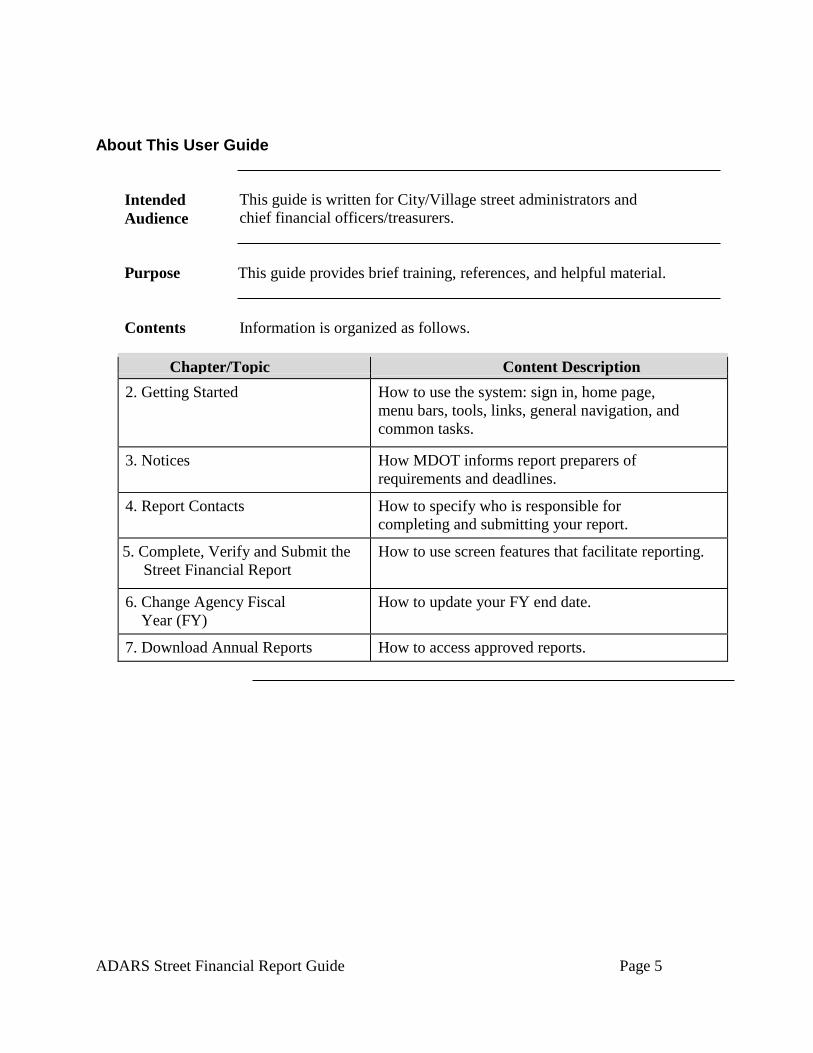
Contents Information is organized as follows.
Chapter/Topic Content Description 2. Getting Started How to use the system: sign in, home page,
menu bars, tools, links, general navigation, and
common tasks.
3. Notices How MDOT informs report preparers of
requirements and deadlines.
4. Report Contacts How to specify who is responsible for
completing and submitting your report.
5. Complete, Verify and Submit the
Street Financial Report
How to use screen features that facilitate reporting.
6. Change Agency Fiscal
Year (FY)
How to update your FY end date.
7. Download Annual Reports How to access approved reports.
ADARS Street Financial Report Guide Page 6
Chapter 2 - Getting Started Register to Use the Act 51 Distribution and Reporting System (ADARS)
Registration is
Required
Users must register in the State of Michigan Single Sign On (SSO)
system in order to get access to state applications in general. After
access is granted, users must request access to specific applications in the
SSO system.
One Time
Only
The following procedures, which you do only one time for registration,
provide you with data security and the ADARS user role(s) needed to do
your job.
• First Steps
• Register in SSO
• Change SSO Password
• Subscribe to ADARS in SSO
• Request a User Role
After you have completed these procedures, use the Access ADARS
procedure for business as usual.
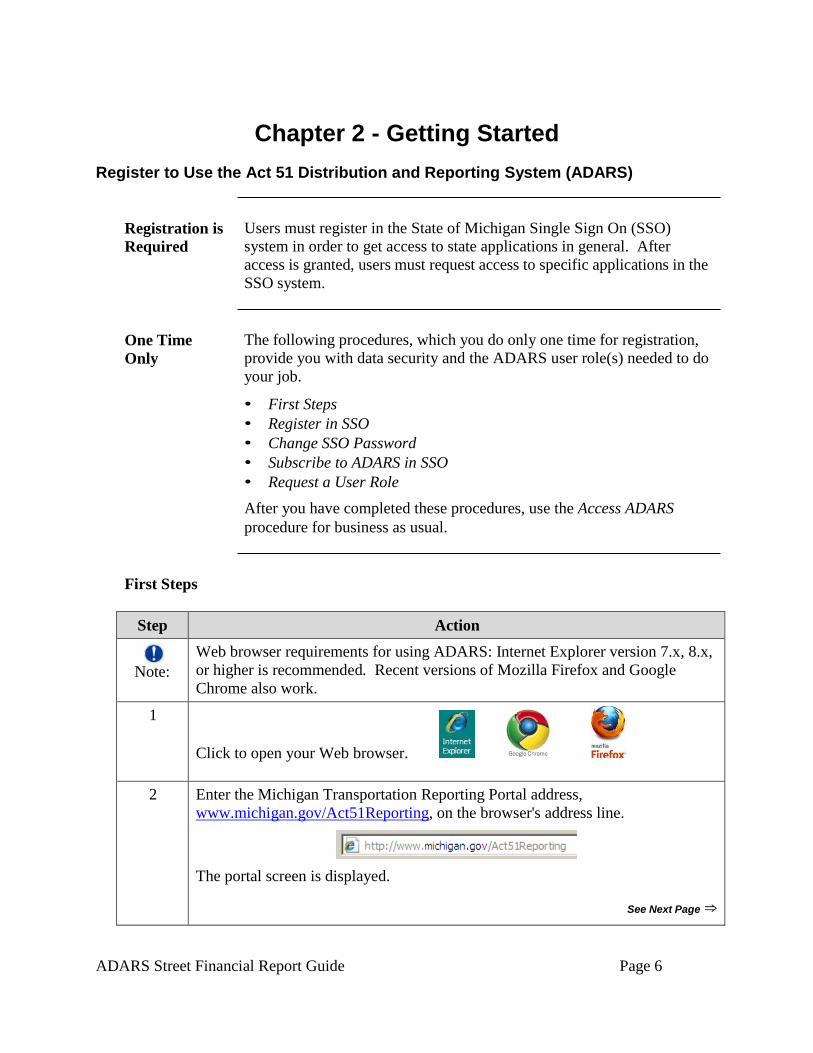
First Steps
Step Action
Note:
Web browser requirements for using ADARS: Internet Explorer version 7.x, 8.x,
or higher is recommended. Recent versions of Mozilla Firefox and Google
Chrome also work.
1
Click to open your Web browser.
2 Enter the Michigan Transportation Reporting Portal address,
www.michigan.gov/Act51Reporting, on the browser's address line.
The portal screen is displayed.
See Next Page ⇒
ADARS Street Financial Report Guide Page 7
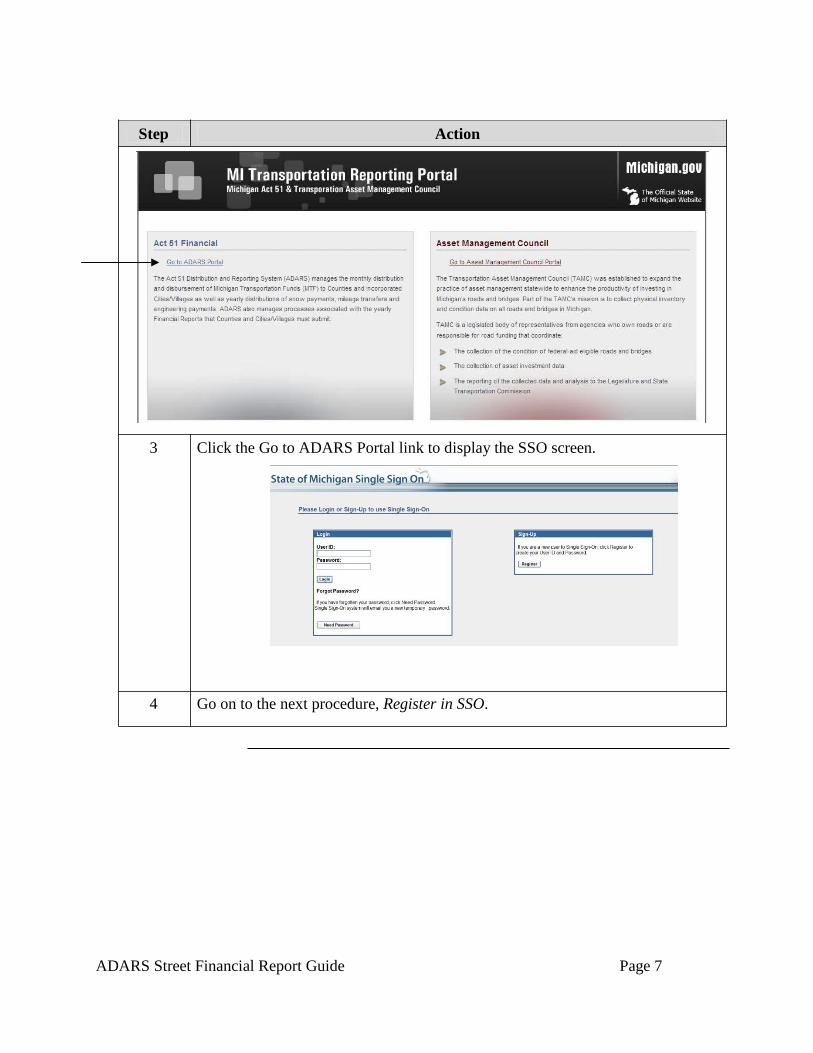
Step Action
3 Click the Go to ADARS Portal link to display the SSO screen.
4 Go on to the next procedure, Register in SSO.

ADARS Street Financial Report Guide Page 8
Register in
SSO
Use the following procedure to register in SSO.
Step Action
1
Click the Register button.
The Registration - Step 1 screen is displayed.
2 Enter your name and email address.
See Next Page ⇒
ADARS Street Financial Report Guide Page 9
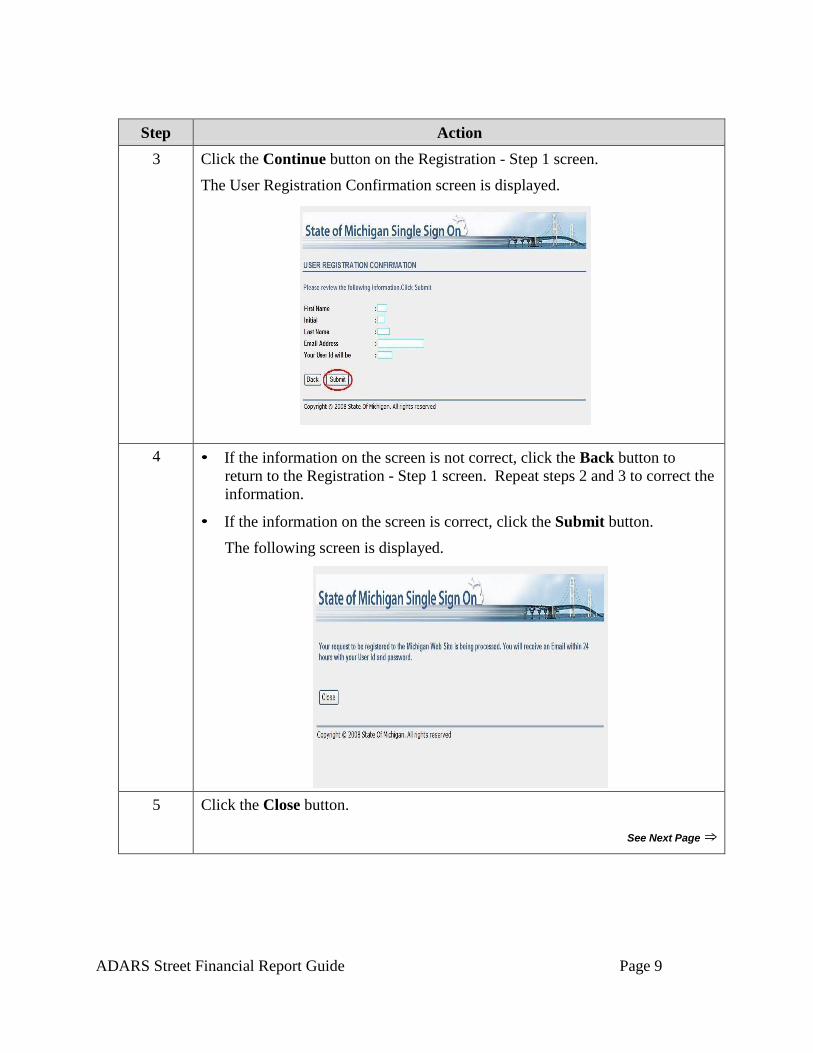
Step Action
3 Click the Continue button on the Registration - Step 1 screen.
The User Registration Confirmation screen is displayed.
4 • If the information on the screen is not correct, click the Back button to
return to the Registration - Step 1 screen. Repeat steps 2 and 3 to correct the
information.
• If the information on the screen is correct, click the Submit button.
The following screen is displayed.
5 Click the Close button.
See Next Page ⇒
ADARS Street Financial Report Guide Page 10
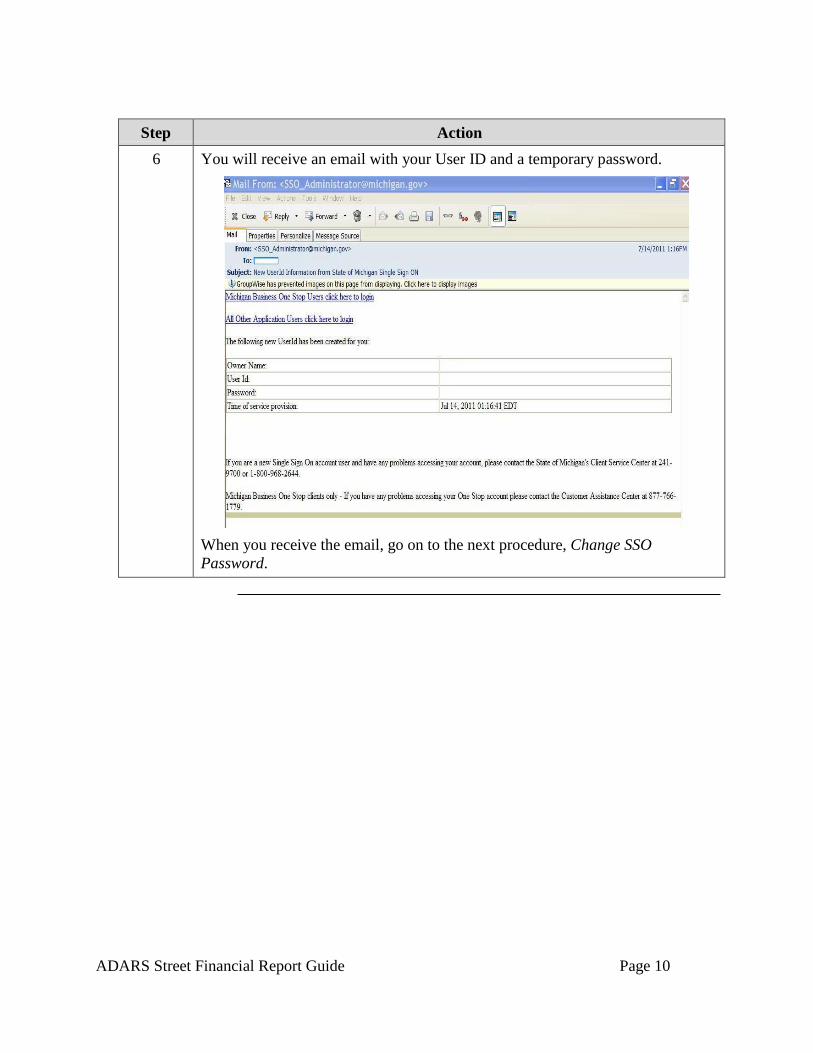
Step Action
6 You will receive an email with your User ID and a temporary password.
When you receive the email, go on to the next procedure, Change SSO
Password.
ADARS Street Financial Report Guide Page 11
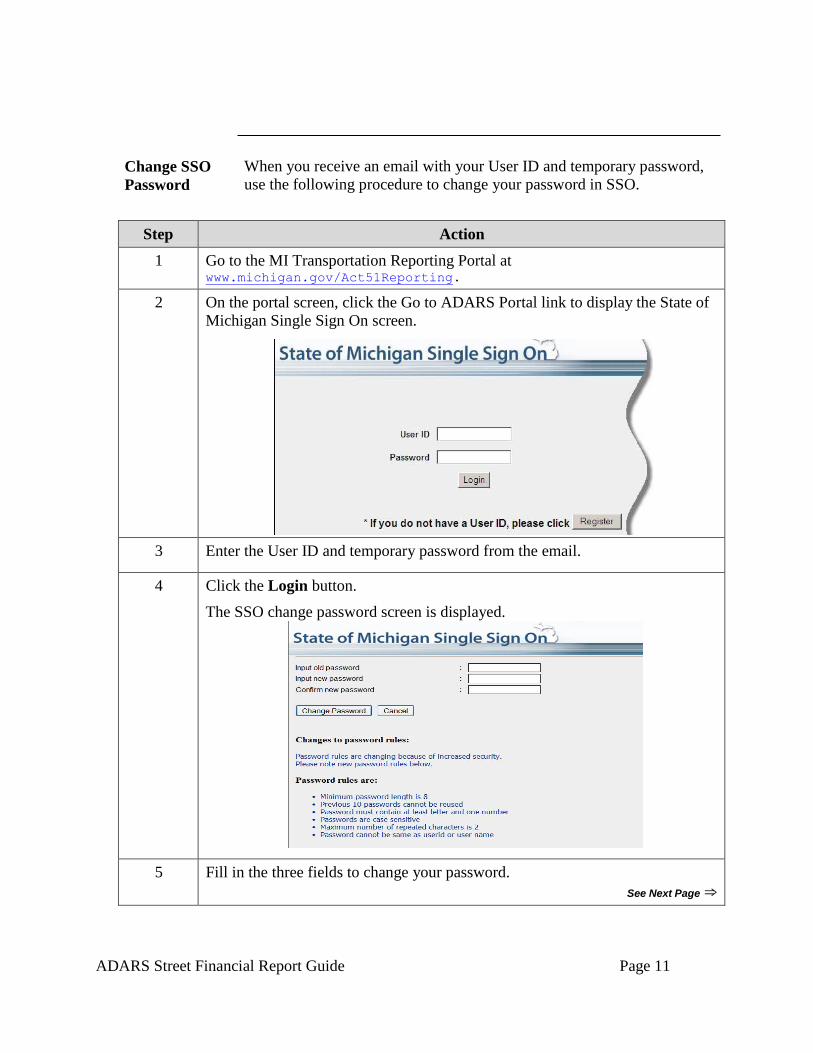
Change SSO
Password
When you receive an email with your User ID and temporary password,
use the following procedure to change your password in SSO.
Step Action
1 Go to the MI Transportation Reporting Portal at www.michigan.gov/Act51Reporting.
2 On the portal screen, click the Go to ADARS Portal link to display the State of
Michigan Single Sign On screen.
3 Enter the User ID and temporary password from the email.
4 Click the Login button.
The SSO change password screen is displayed.
5 Fill in the three fields to change your password.
See Next Page ⇒

ADARS Street Financial Report Guide Page 12
Step Action
6 Click the Change Password button.
The Change Challenge/Response Answers screen is displayed.
7 Answer the questions on the screen.
TIP: Remember your answers. If you forget your password, you will be asked to
provide them.
8 Click the OK button.
The following screen is displayed.
See Next Page ⇒
ADARS Street Financial Report Guide Page 13
Step Action
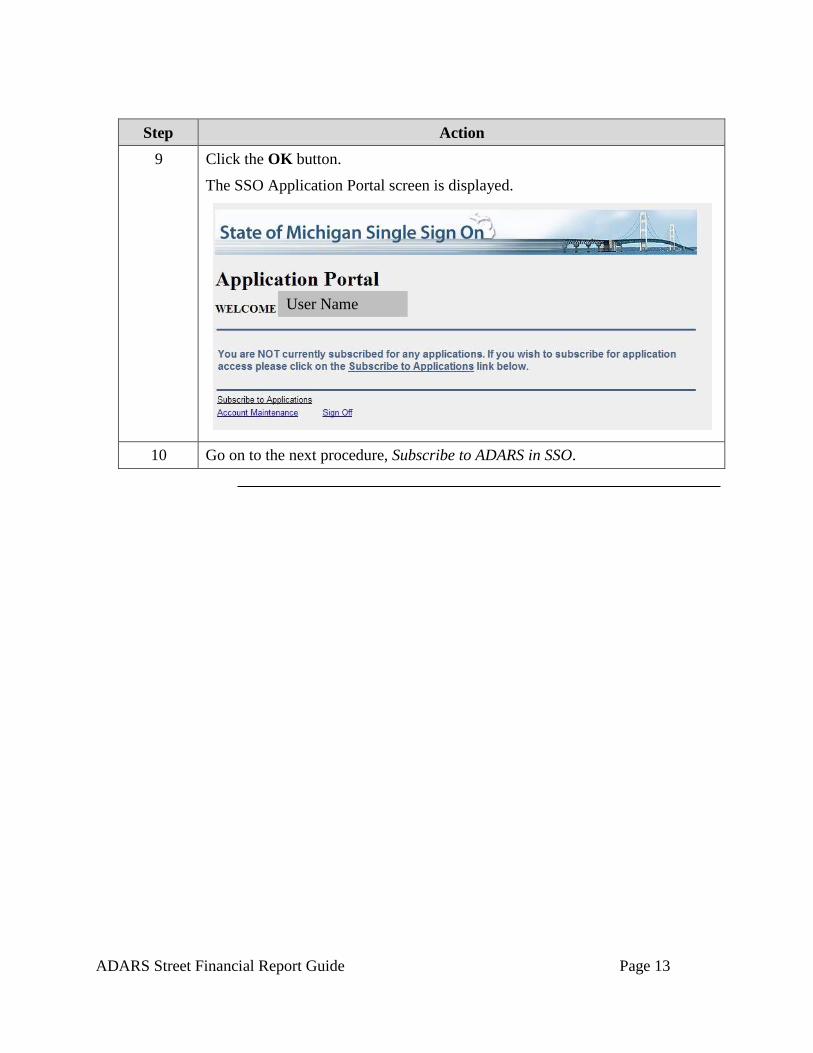
9 Click the OK button.
The SSO Application Portal screen is displayed.
User Name
10 Go on to the next procedure, Subscribe to ADARS in SSO.
ADARS Street Financial Report Guide Page 14
Subscribe to
ADARS in
SSO
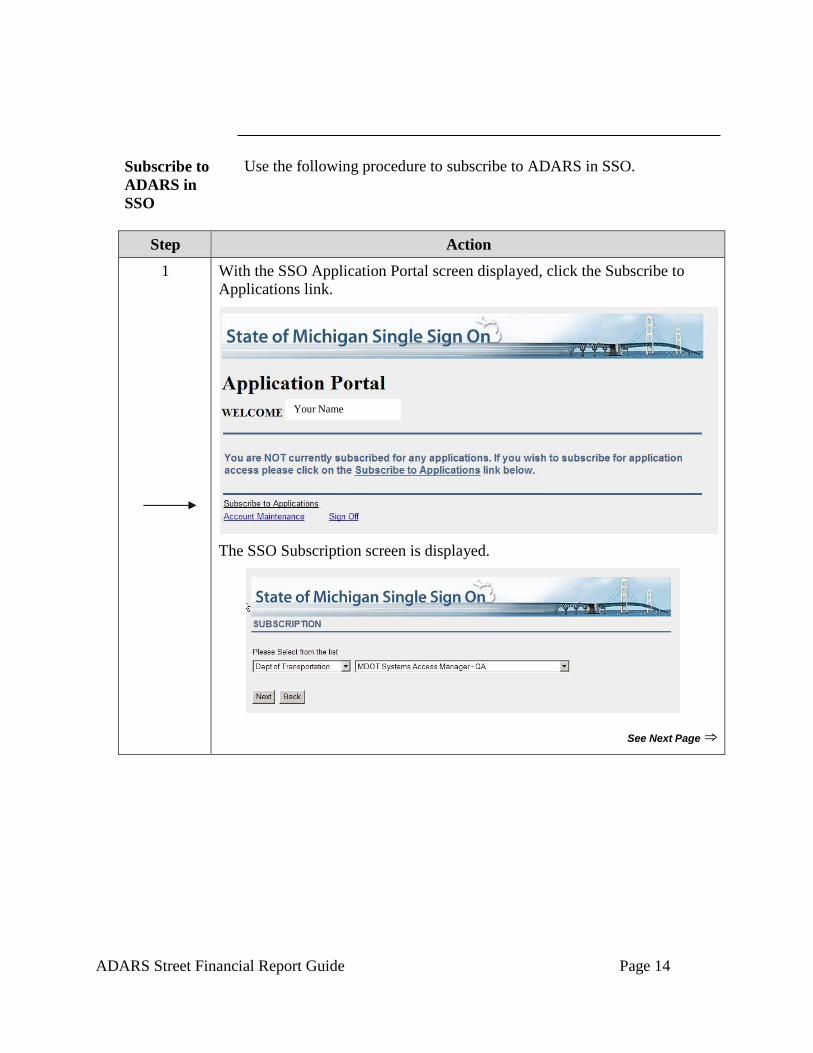
Use the following procedure to subscribe to ADARS in SSO.
Step Action
1 With the SSO Application Portal screen displayed, click the Subscribe to
Applications link.
Your Name
The SSO Subscription screen is displayed.
See Next Page ⇒
ADARS Street Financial Report Guide Page 15
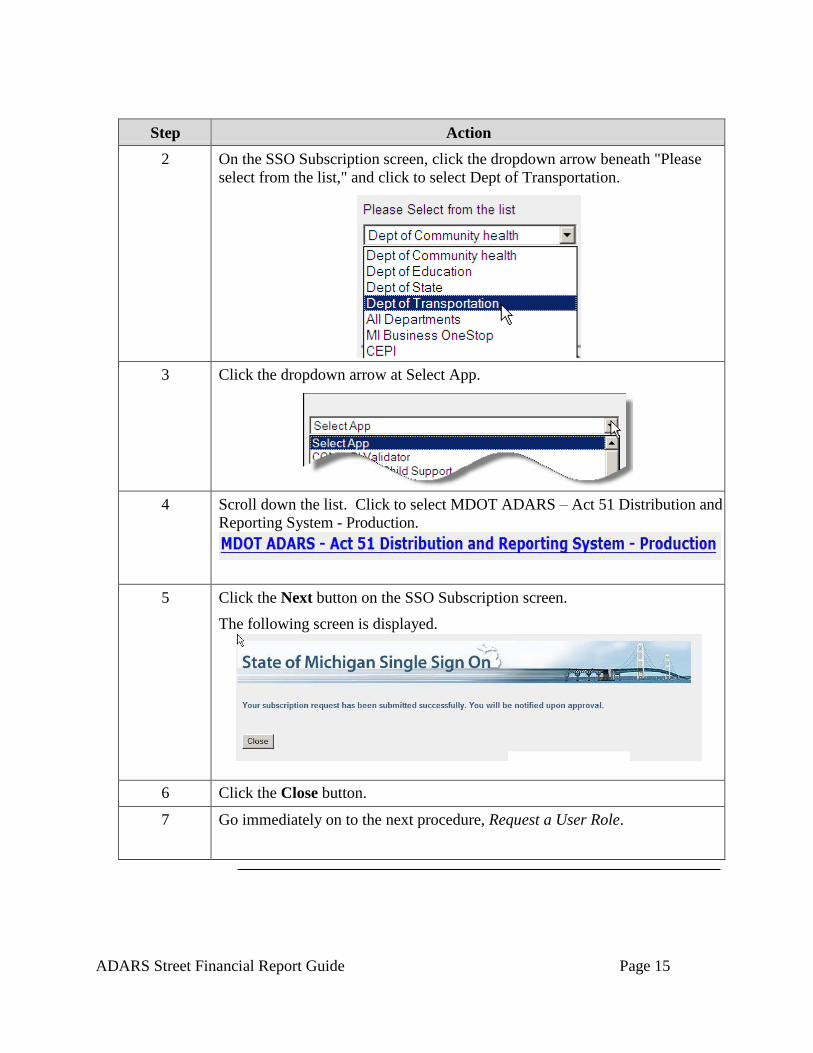
Step Action
2 On the SSO Subscription screen, click the dropdown arrow beneath "Please
select from the list," and click to select Dept of Transportation.
3 Click the dropdown arrow at Select App.
4 Scroll down the list. Click to select MDOT ADARS – Act 51 Distribution and
Reporting System - Production.
5 Click the Next button on the SSO Subscription screen.
The following screen is displayed.
6 Click the Close button.
7 Go immediately on to the next procedure, Request a User Role.
ADARS Street Financial Report Guide Page 16
Request a User
Role
Use the following procedure to request an ADARS user role.
Step Action
1 Go to the MI Transportation Reporting Portal at www.michigan.gov/Act51Reporting.
2 On the portal screen, click the Go to ADARS Portal link to display the State
of Michigan Single Sign On screen.
See Next Page ⇒
ADARS Street Financial Report Guide Page 17
Step Action
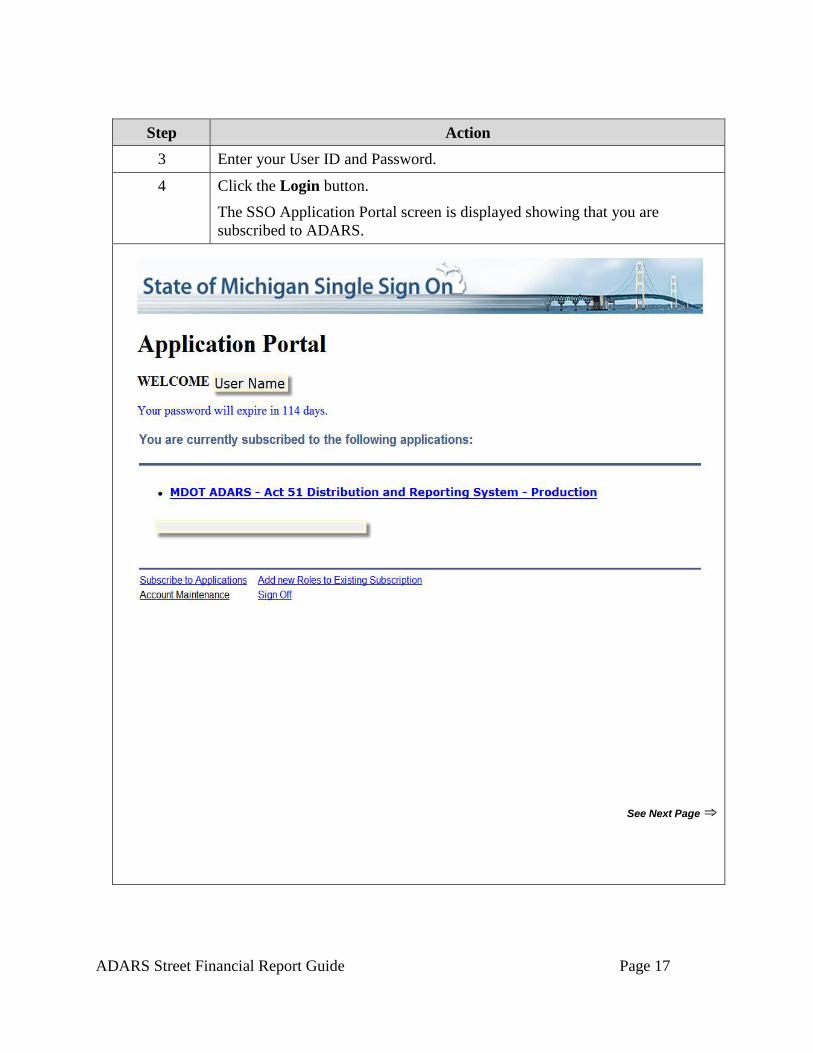
3 Enter your User ID and Password.
4 Click the Login button.
The SSO Application Portal screen is displayed showing that you are
subscribed to ADARS.
See Next Page ⇒
ADARS Street Financial Report Guide Page 18
Step Action
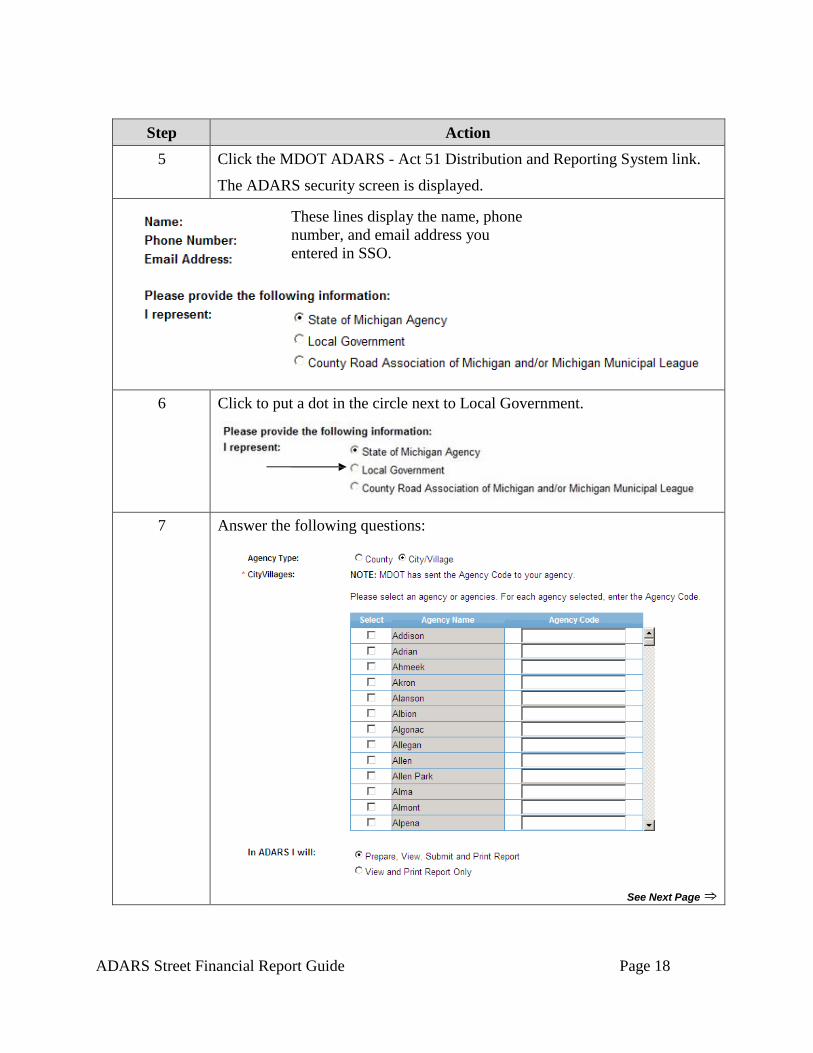
5 Click the MDOT ADARS - Act 51 Distribution and Reporting System link.
The ADARS security screen is displayed.
These lines display the name, phone
number, and email address you
entered in SSO.
6 Click to put a dot in the circle next to Local Government.
7 Answer the following questions:
See Next Page ⇒
ADARS Street Financial Report Guide Page 19
Step Action
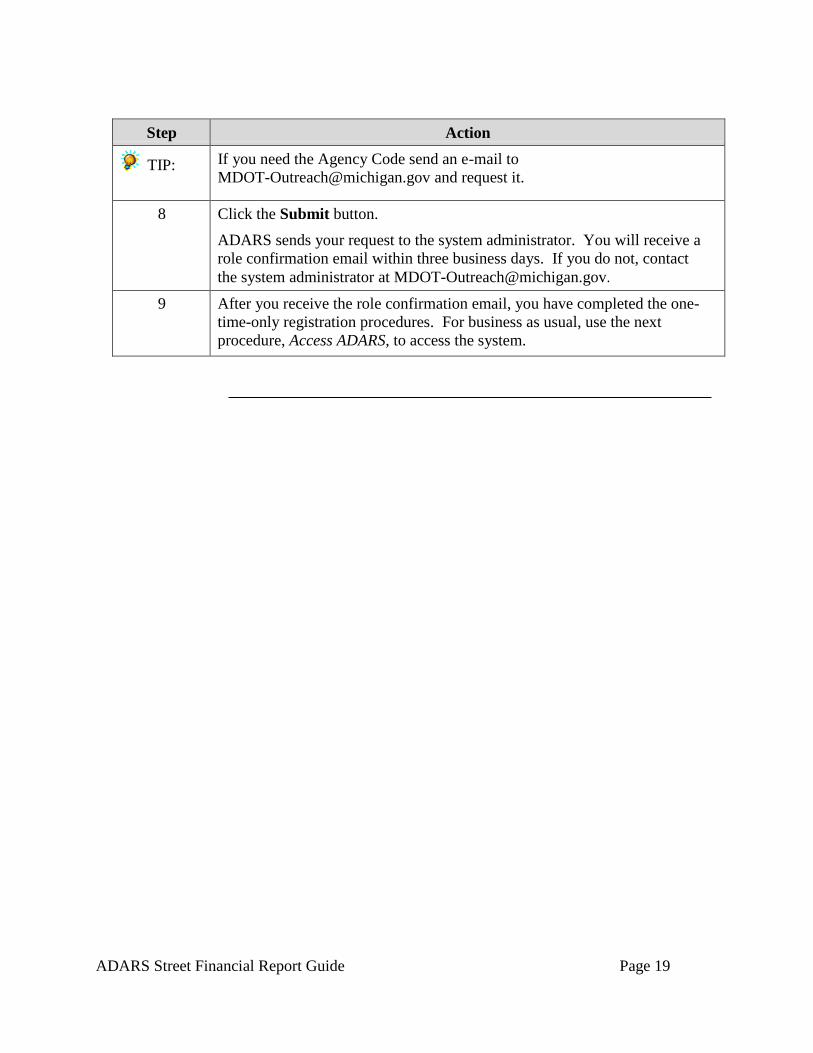
TIP: If you need the Agency Code send an e-mail to
[email protected] and request it.
8 Click the Submit button.
ADARS sends your request to the system administrator. You will receive a
role confirmation email within three business days. If you do not, contact
the system administrator at [email protected].
9 After you receive the role confirmation email, you have completed the one-
time-only registration procedures. For business as usual, use the next
procedure, Access ADARS, to access the system.
ADARS Street Financial Report Guide Page 20
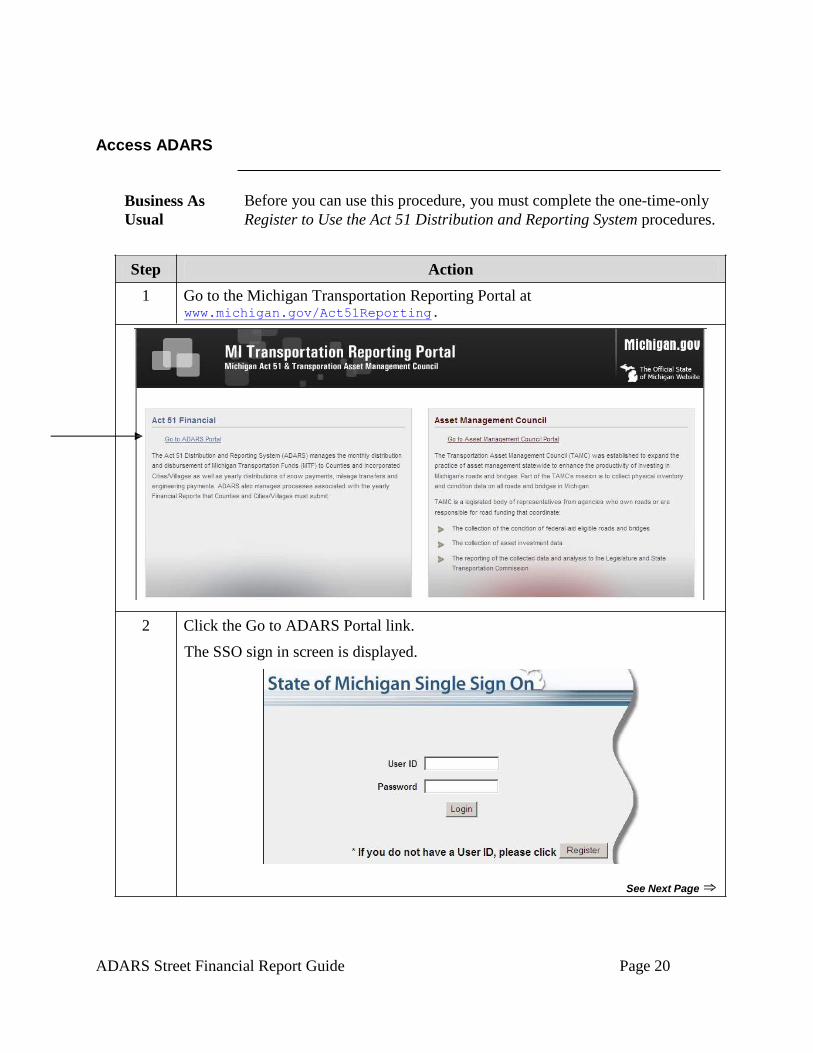
Access ADARS
Business As
Usual
Before you can use this procedure, you must complete the one-time-only
Register to Use the Act 51 Distribution and Reporting System procedures.
Step Action
1 Go to the Michigan Transportation Reporting Portal at www.michigan.gov/Act51Reporting.
2 Click the Go to ADARS Portal link.
The SSO sign in screen is displayed.
See Next Page ⇒
ADARS Street Financial Report Guide Page 21
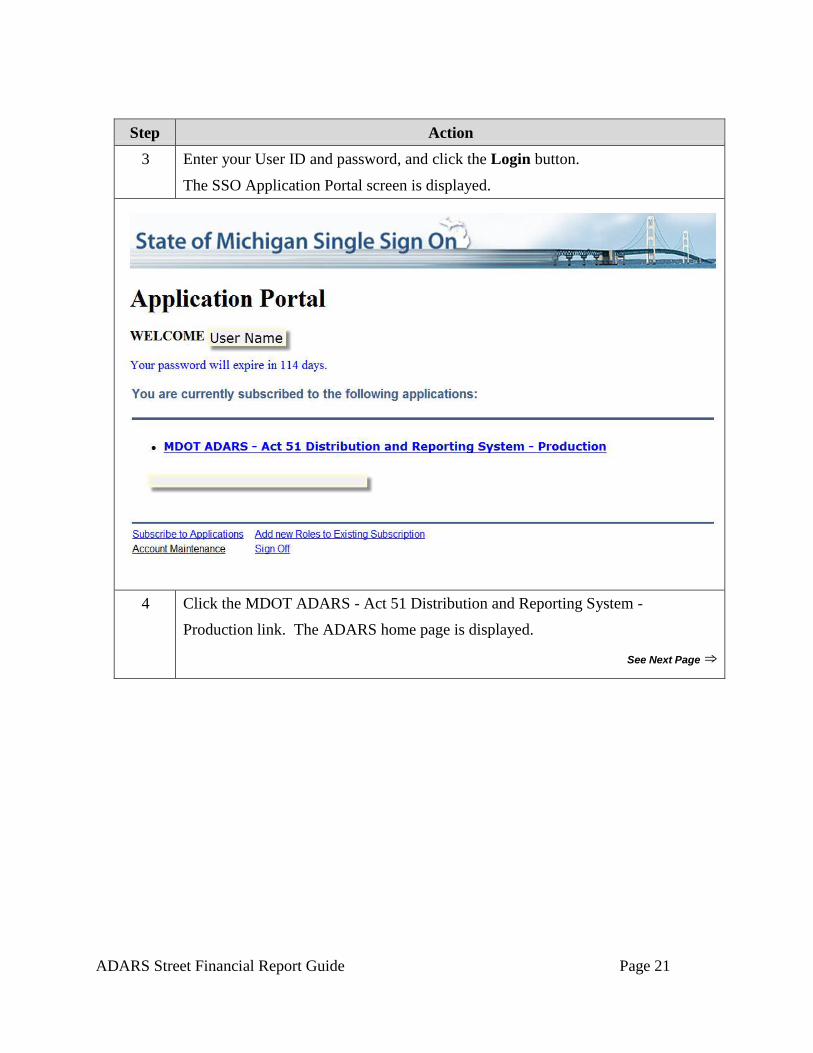
Step Action
3 Enter your User ID and password, and click the Login button.
The SSO Application Portal screen is displayed.
4 Click the MDOT ADARS - Act 51 Distribution and Reporting System -
Production link. The ADARS home page is displayed.
See Next Page ⇒
ADARS Street Financial Report Guide Page 22
Step Action
More Information about Act 51
More information about Act 51 and the SFR for cities and villages is
available at this link: www.michigan.gov/act51.
Data Security
Your User ID and password secure your report until you submit it to
MDOT.
Features and Functions
The following topics describe features and functions available throughout
ADARS. These are all designed to facilitate your reporting tasks.
ADARS Street Financial Report Guide Page 23
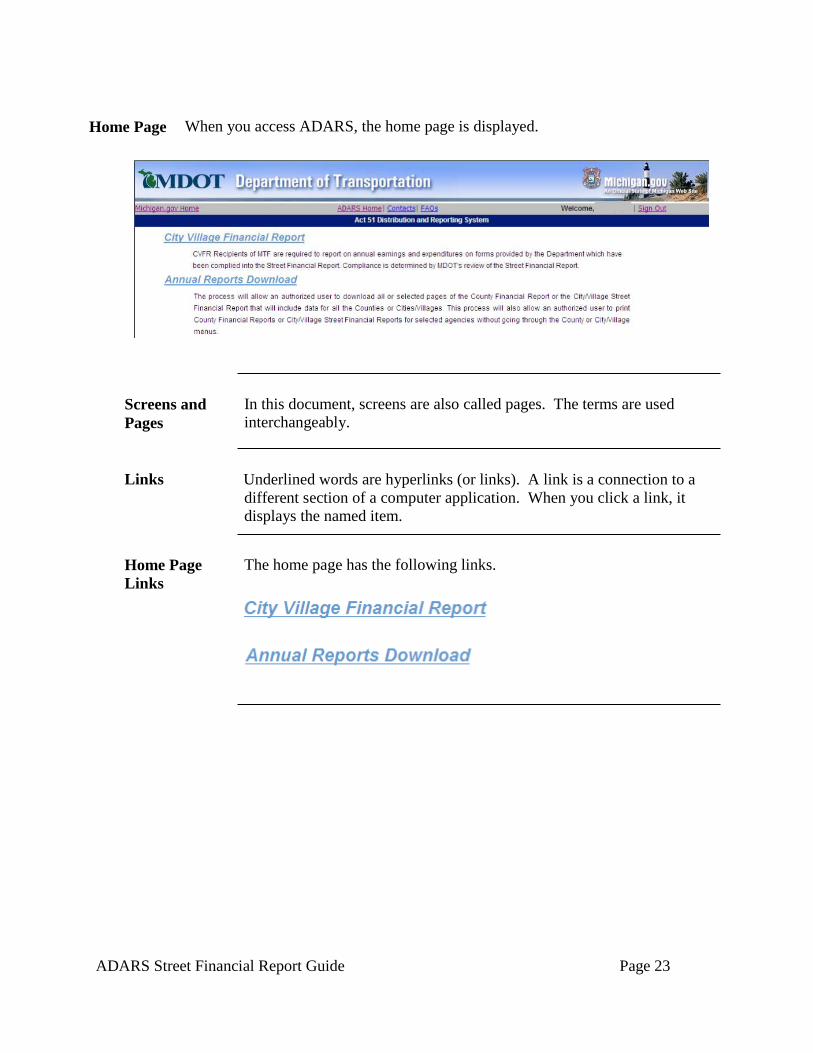
Home Page When you access ADARS, the home page is displayed.
Screens and
Pages
In this document, screens are also called pages. The terms are used
interchangeably.
Links Underlined words are hyperlinks (or links). A link is a connection to a
different section of a computer application. When you click a link, it
displays the named item.
Home Page
Links
The home page has the following links.
ADARS Street Financial Report Guide Page 24
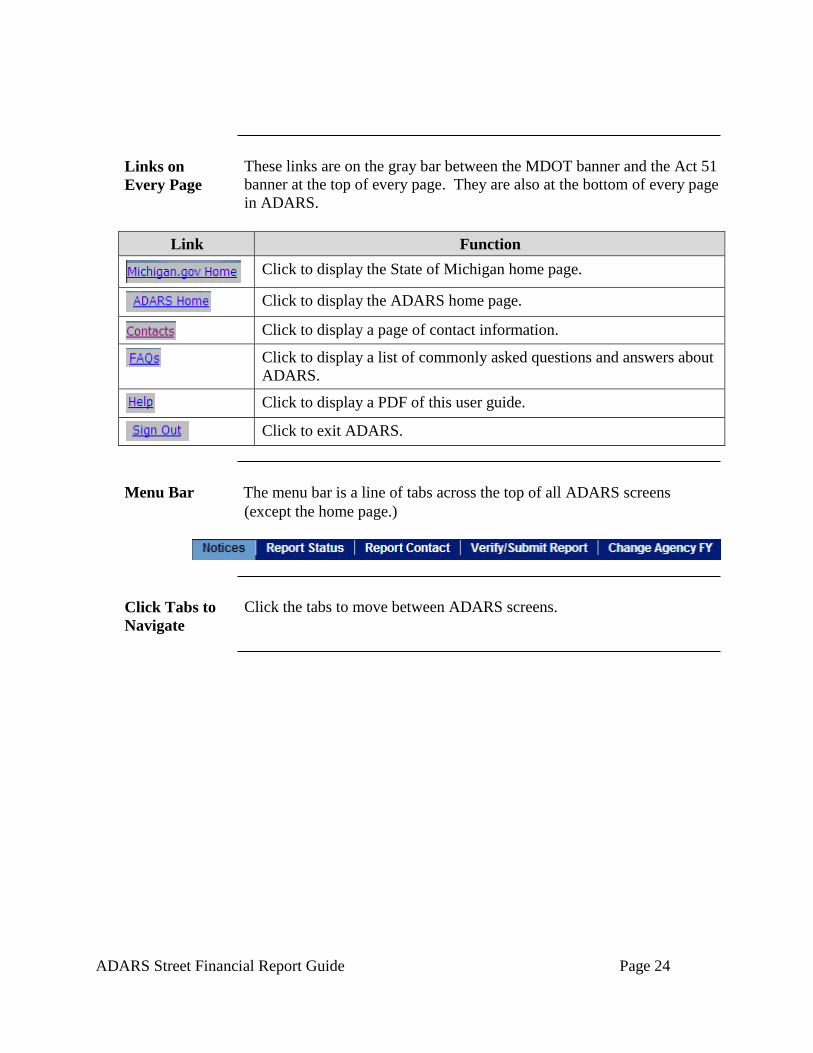
Links on
Every Page
These links are on the gray bar between the MDOT banner and the Act 51
banner at the top of every page. They are also at the bottom of every page
in ADARS.
Link Function
Click to display the State of Michigan home page.
Click to display the ADARS home page.
Click to display a page of contact information.
Click to display a list of commonly asked questions and answers about
ADARS.
Click to display a PDF of this user guide.
Click to exit ADARS.
Menu Bar The menu bar is a line of tabs across the top of all ADARS screens
(except the home page.)
Click Tabs to
Navigate
Click the tabs to move between ADARS screens.
ADARS Street Financial Report Guide Page 25
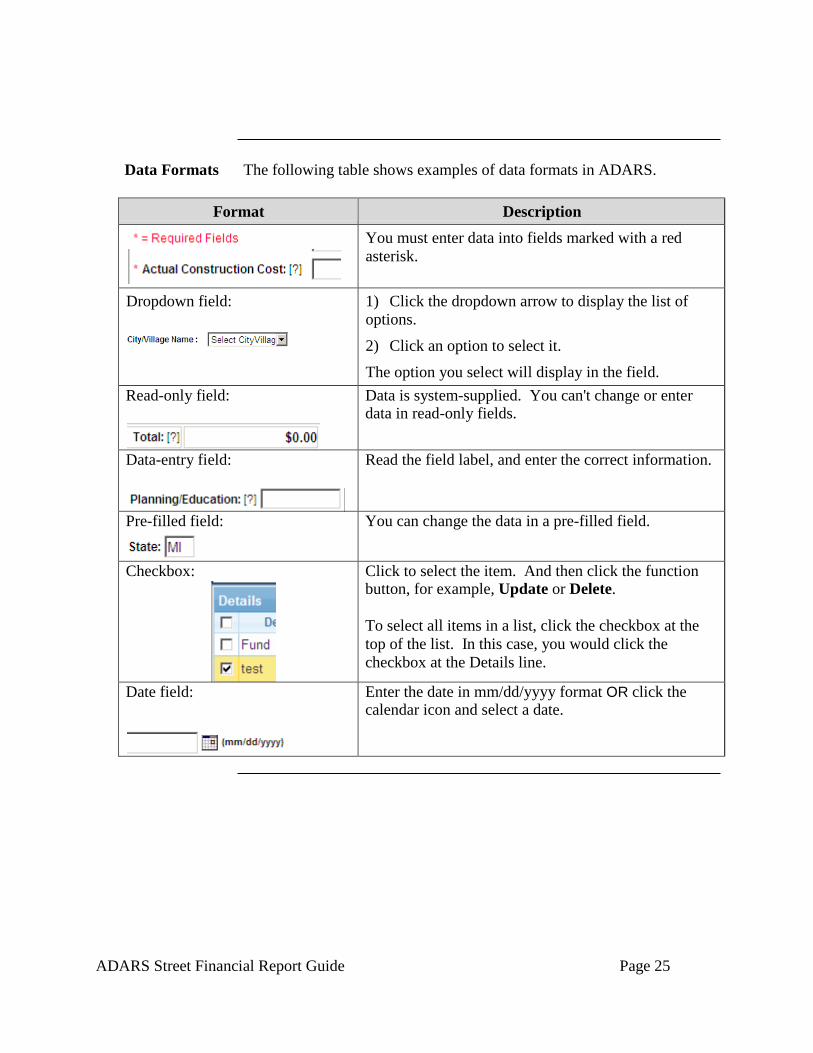
Data Formats The following table shows examples of data formats in ADARS.
Format Description
You must enter data into fields marked with a red
asterisk.
Dropdown field: 1) Click the dropdown arrow to display the list of
options.
2) Click an option to select it.
The option you select will display in the field.
Read-only field: Data is system-supplied. You can't change or enter data in read-only fields.
Data-entry field: Read the field label, and enter the correct information.
Pre-filled field: You can change the data in a pre-filled field.
Checkbox: Click to select the item. And then click the function button, for example, Update or Delete.
To select all items in a list, click the checkbox at the
top of the list. In this case, you would click the
checkbox at the Details line.
Date field: Enter the date in mm/dd/yyyy format OR click the calendar icon and select a date.
ADARS Street Financial Report Guide Page 26
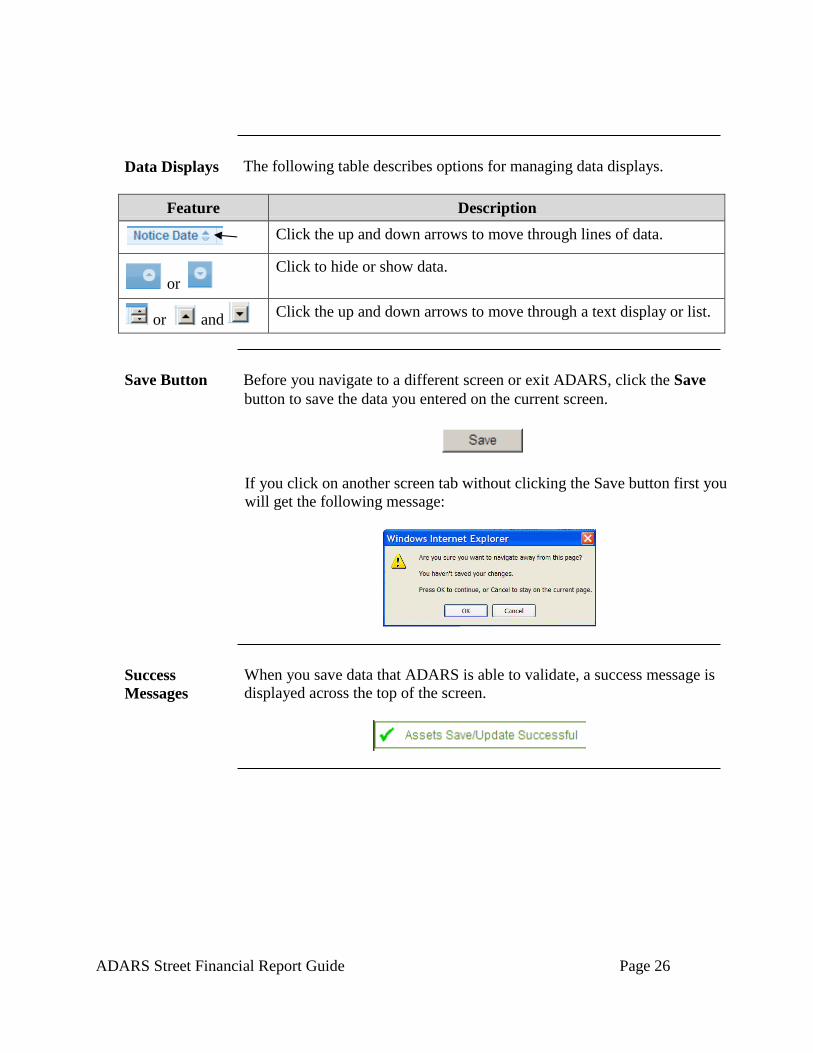
Data Displays The following table describes options for managing data displays.
Feature Description
Click the up and down arrows to move through lines of data.
or Click to hide or show data.
or and Click the up and down arrows to move through a text display or list.
Save Button Before you navigate to a different screen or exit ADARS, click the Save
button to save the data you entered on the current screen.
If you click on another screen tab without clicking the Save button first you
will get the following message:
Success
Messages
When you save data that ADARS is able to validate, a success message is
displayed across the top of the screen.
ADARS Street Financial Report Guide Page 27
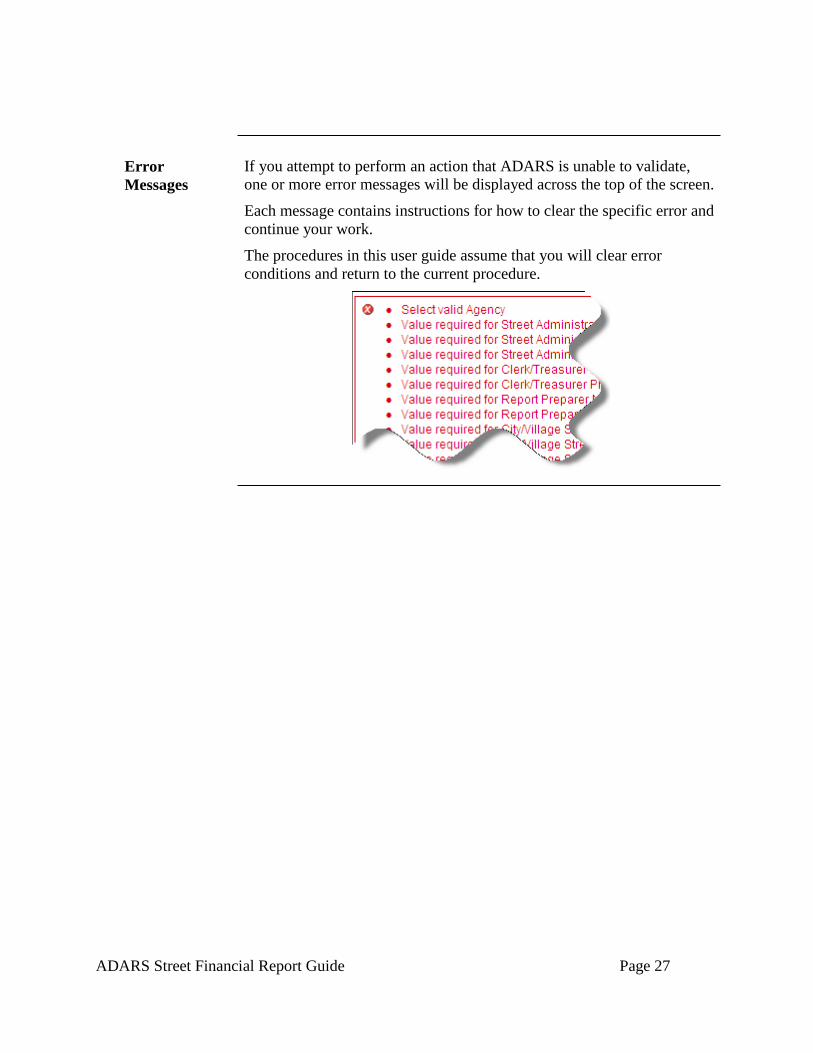
Error
Messages
If you attempt to perform an action that ADARS is unable to validate,
one or more error messages will be displayed across the top of the screen.
Each message contains instructions for how to clear the specific error and
continue your work.
The procedures in this user guide assume that you will clear error
conditions and return to the current procedure.
ADARS Street Financial Report Guide Page 28
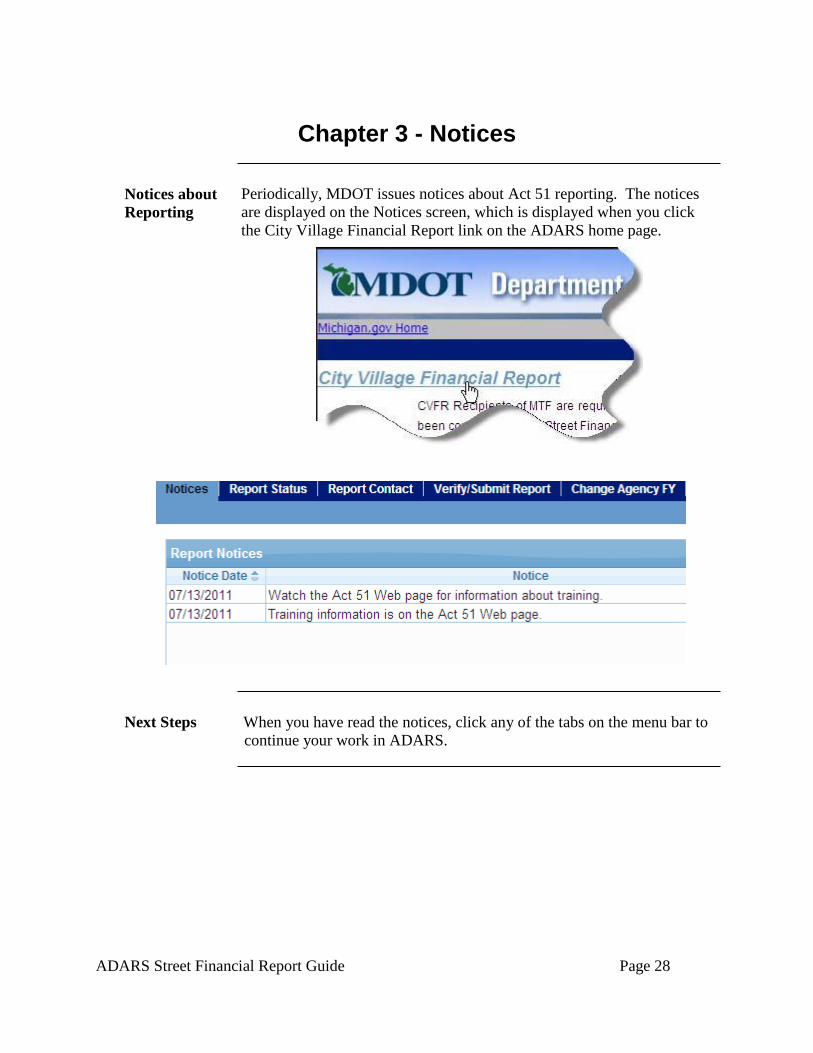
Chapter 3 - Notices
Notices about
Reporting
Periodically, MDOT issues notices about Act 51 reporting. The notices
are displayed on the Notices screen, which is displayed when you click
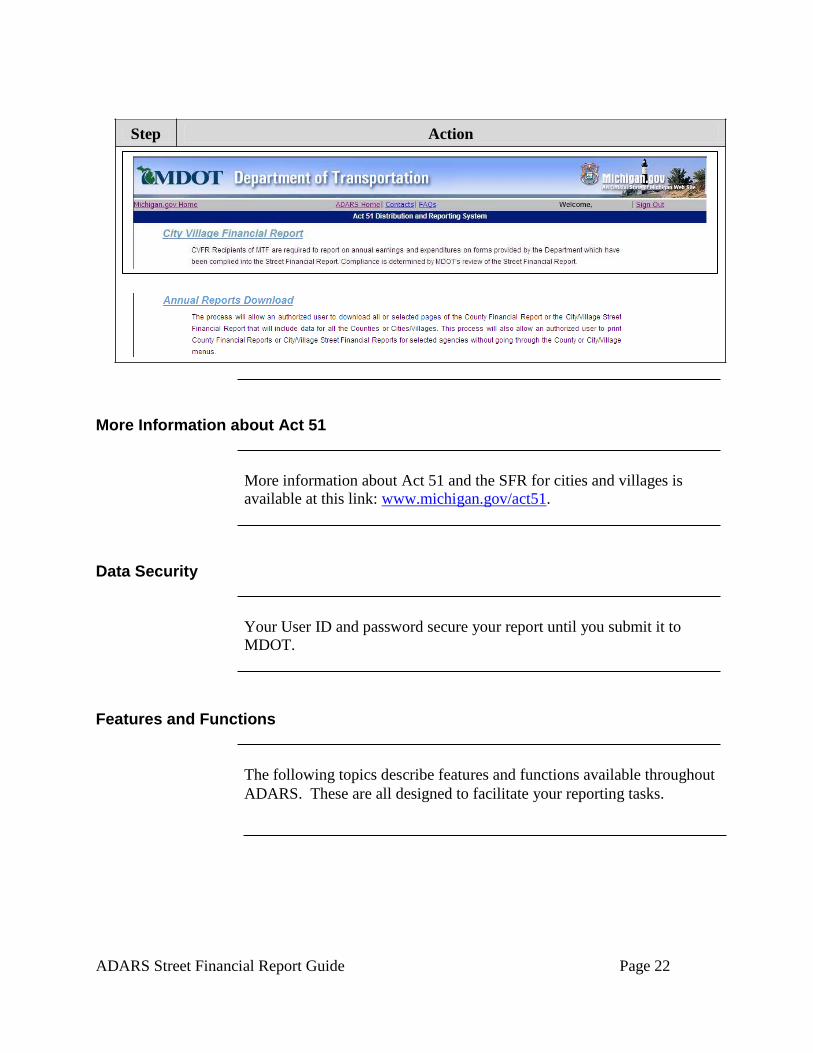
the City Village Financial Report link on the ADARS home page.
Next Steps When you have read the notices, click any of the tabs on the menu bar to
continue your work in ADARS.
ADARS Street Financial Report Guide Page 29
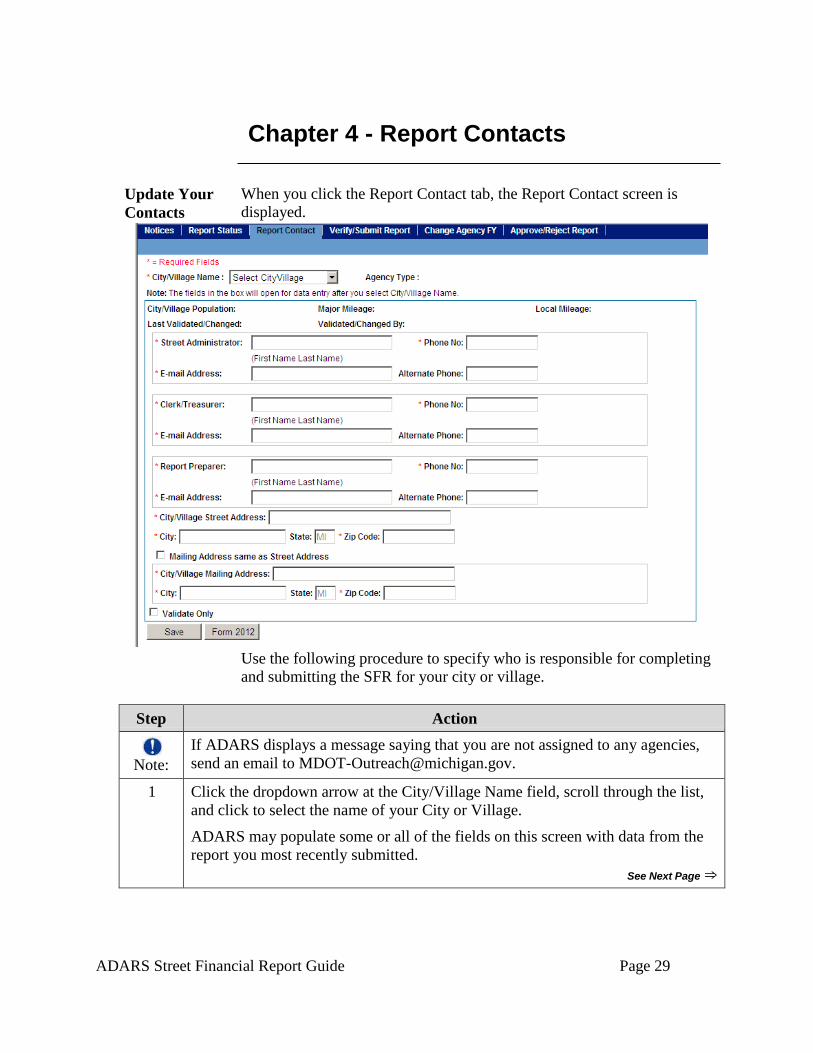
Chapter 4 - Report Contacts
Update Your
Contacts
When you click the Report Contact tab, the Report Contact screen is
displayed.
Use the following procedure to specify who is responsible for completing
and submitting the SFR for your city or village.
Step Action
Note:
If ADARS displays a message saying that you are not assigned to any agencies,
send an email to [email protected].
1 Click the dropdown arrow at the City/Village Name field, scroll through the list,
and click to select the name of your City or Village.
ADARS may populate some or all of the fields on this screen with data from the
report you most recently submitted.
See Next Page ⇒
ADARS Street Financial Report Guide Page 30
Step Action
2 All the fields on this screen are required. You must validate and save all fields
before you can begin to work on the SFR.
3 If all the pre-filled data is accurate, click to put a check in the Validate Only box
at the lower left of the screen.
4 If you change the Street Administrator field, you must complete, print, sign, and
mail Form 2012 to MDOT, Financial Operations Division, P.O. Box 30050,
Lansing, MI 48909.
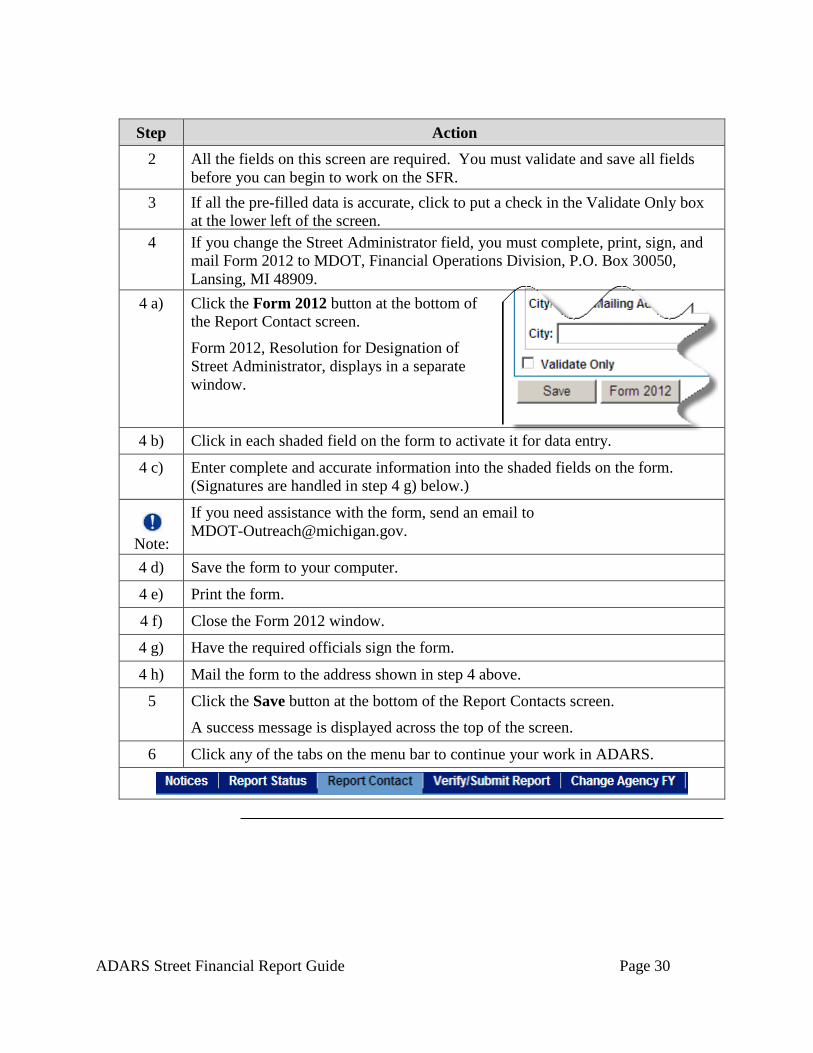
4 a) Click the Form 2012 button at the bottom of
the Report Contact screen.
Form 2012, Resolution for Designation of
Street Administrator, displays in a separate
window.
4 b) Click in each shaded field on the form to activate it for data entry.
4 c) Enter complete and accurate information into the shaded fields on the form.
(Signatures are handled in step 4 g) below.)
Note:
If you need assistance with the form, send an email to
4 d) Save the form to your computer.
4 e) Print the form.
4 f) Close the Form 2012 window.
4 g) Have the required officials sign the form.
4 h) Mail the form to the address shown in step 4 above.
5 Click the Save button at the bottom of the Report Contacts screen.
A success message is displayed across the top of the screen.
6 Click any of the tabs on the menu bar to continue your work in ADARS.
ADARS Street Financial Report Guide Page 31
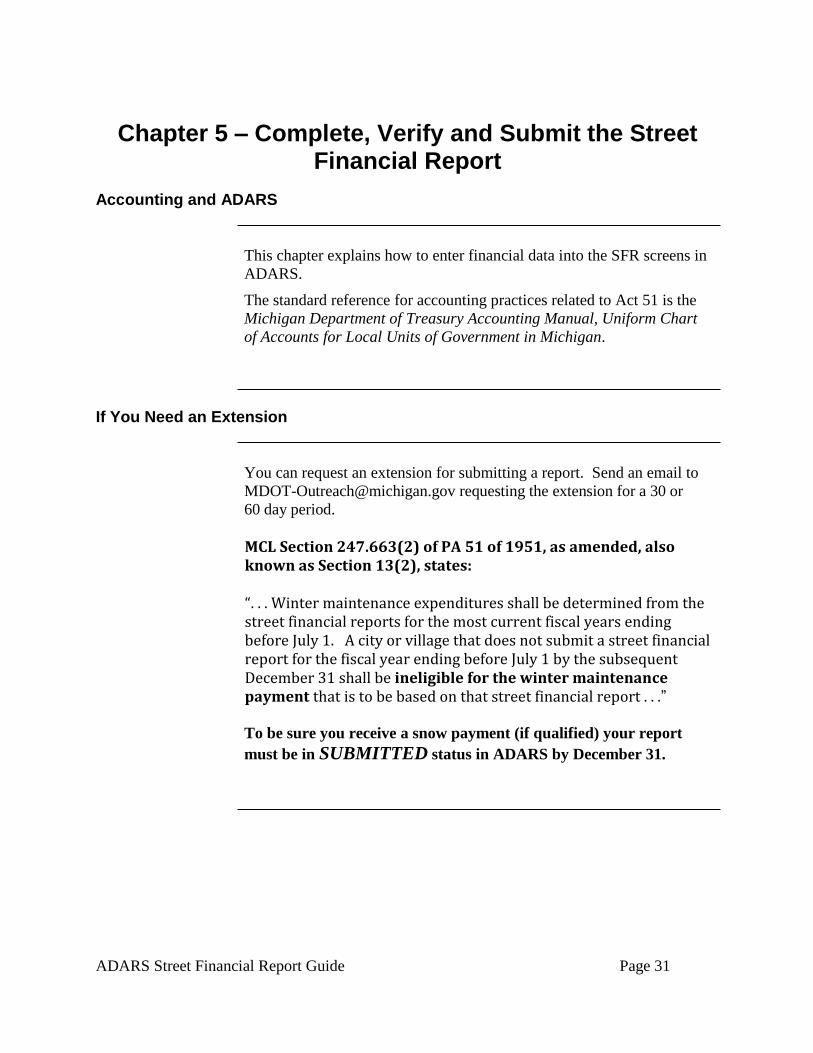
Chapter 5 – Complete, Verify and Submit the Street Financial Report
Accounting and ADARS
This chapter explains how to enter financial data into the SFR screens in
ADARS.
The standard reference for accounting practices related to Act 51 is the
Michigan Department of Treasury Accounting Manual, Uniform Chart
of Accounts for Local Units of Government in Michigan.
If You Need an Extension
You can request an extension for submitting a report. Send an email to
[email protected] requesting the extension for a 30 or
60 day period.
MCL Section 247.663(2) of PA 51 of 1951, as amended, also known as Section 13(2), states:
“. . . Winter maintenance expenditures shall be determined from the street financial reports for the most current fiscal years ending before July 1. A city or village that does not submit a street financial report for the fiscal year ending before July 1 by the subsequent December 31 shall be ineligible for the winter maintenance payment that is to be based on that street financial report . . .”
To be sure you receive a snow payment (if qualified) your report
must be in SUBMITTED status in ADARS by December 31.
ADARS Street Financial Report Guide Page 32
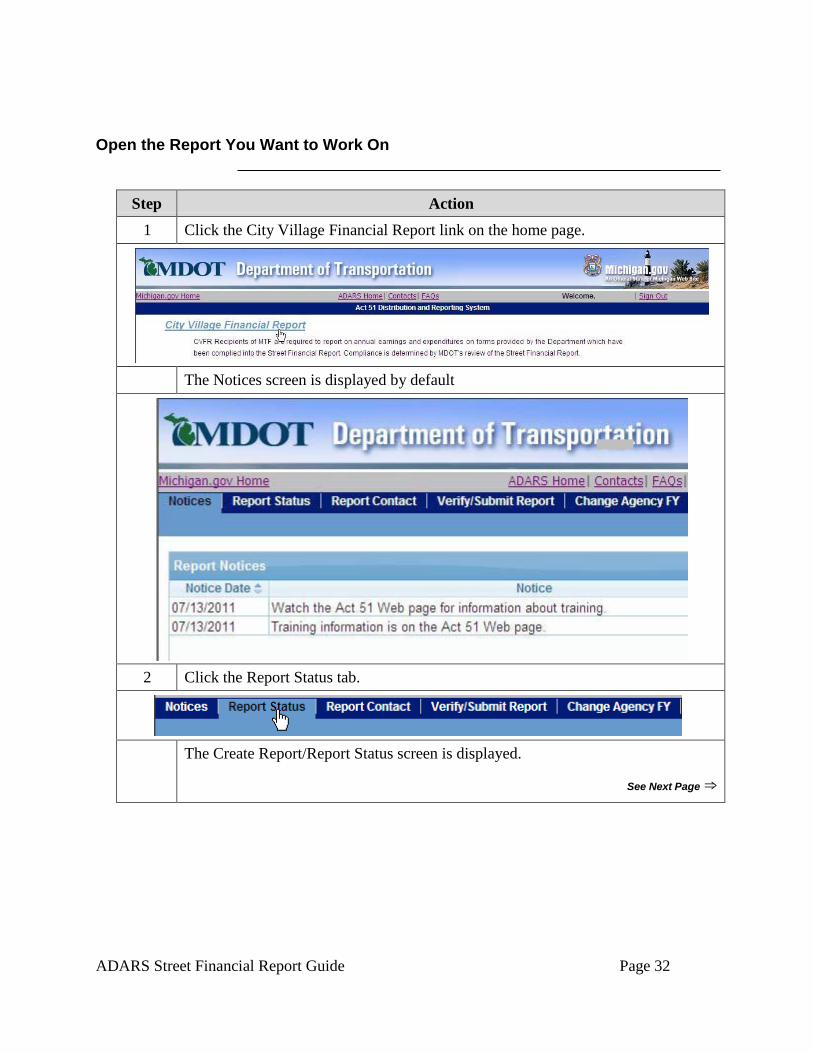
Open the Report You Want to Work On
Step Action
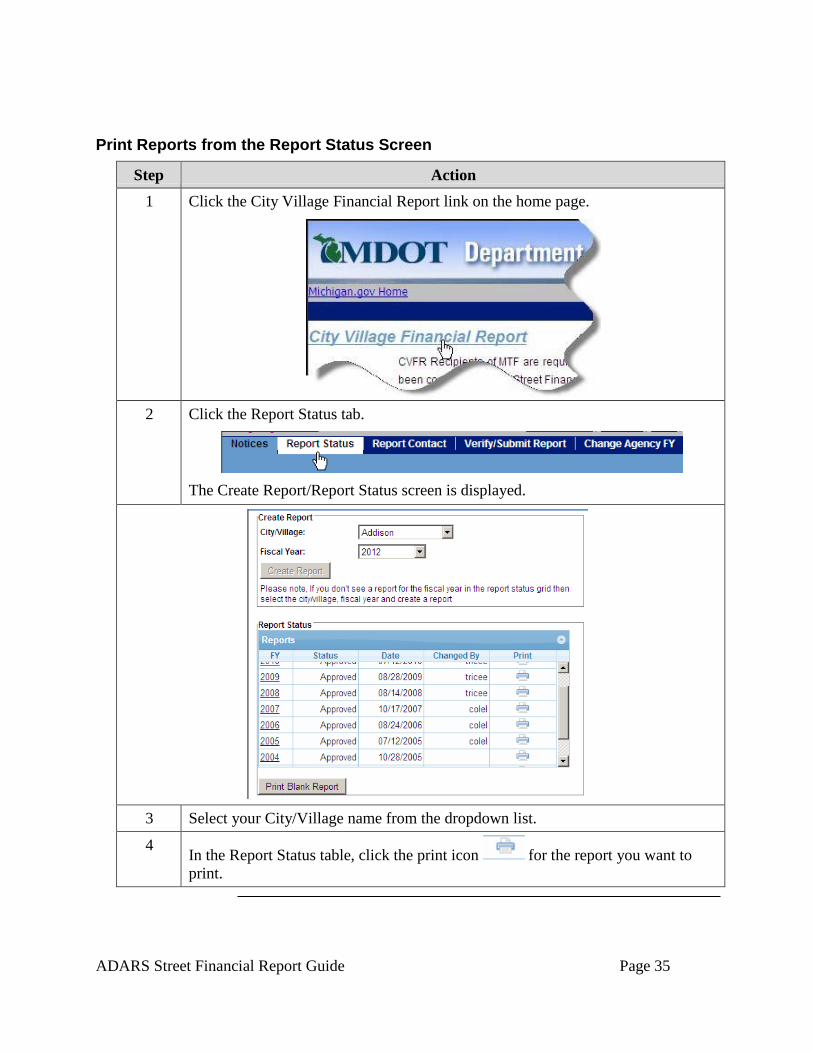
1 Click the City Village Financial Report link on the home page.
The Notices screen is displayed by default
2 Click the Report Status tab.
The Create Report/Report Status screen is displayed.
See Next Page ⇒
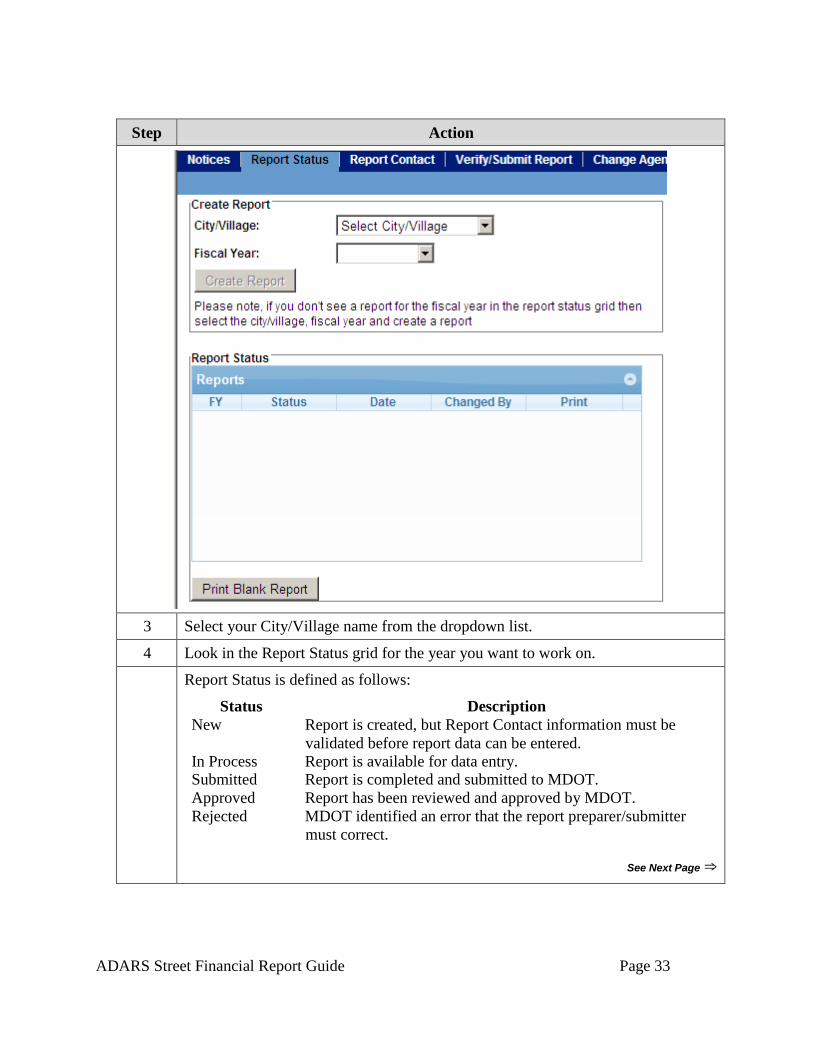
ADARS Street Financial Report Guide Page 33
Step Action
3 Select your City/Village name from the dropdown list.
4 Look in the Report Status grid for the year you want to work on.
Report Status is defined as follows:
Status Description
New Report is created, but Report Contact information must be
validated before report data can be entered.
In Process Report is available for data entry. Submitted Report is completed and submitted to MDOT.
Approved Report has been reviewed and approved by MDOT.
Rejected MDOT identified an error that the report preparer/submitter
must correct.
See Next Page ⇒
ADARS Street Financial Report Guide Page 34
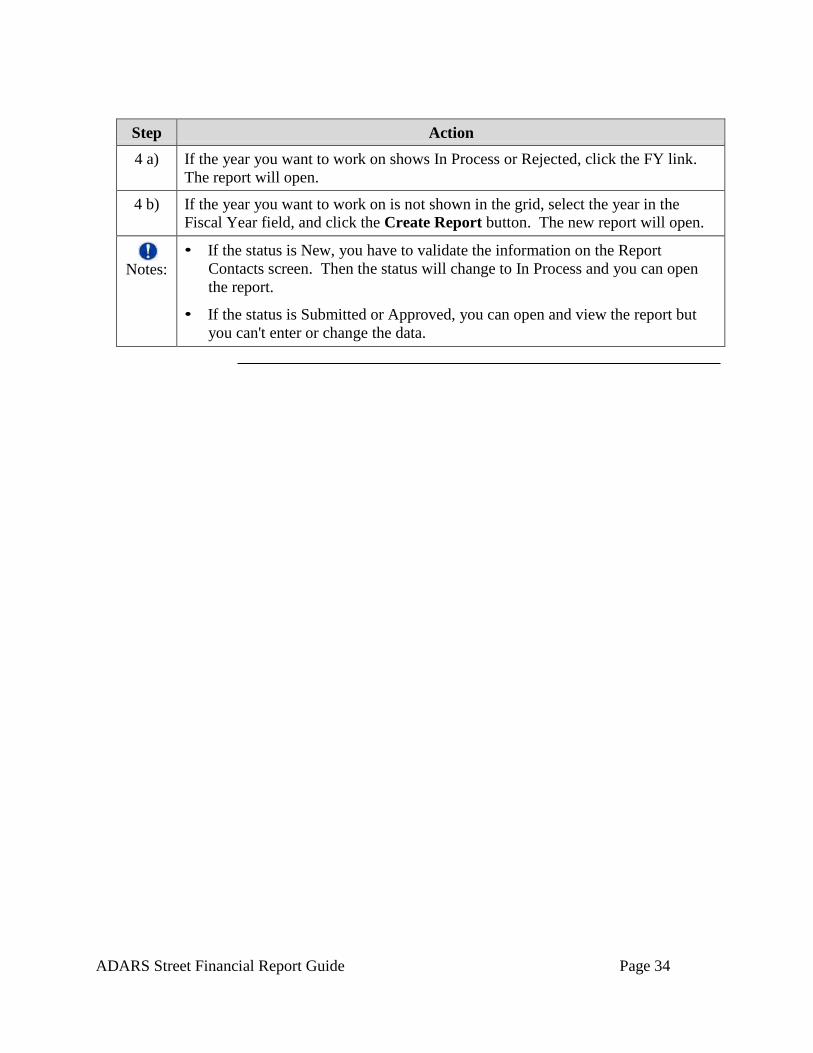
Step Action
4 a) If the year you want to work on shows In Process or Rejected, click the FY link.
The report will open.
4 b) If the year you want to work on is not shown in the grid, select the year in the
Fiscal Year field, and click the Create Report button. The new report will open.
Notes:
• If the status is New, you have to validate the information on the Report
Contacts screen. Then the status will change to In Process and you can open
the report.
• If the status is Submitted or Approved, you can open and view the report but
you can't enter or change the data.
ADARS Street Financial Report Guide Page 35
Print Reports from the Report Status Screen
Step Action
1 Click the City Village Financial Report link on the home page.
2 Click the Report Status tab.
The Create Report/Report Status screen is displayed.
3 Select your City/Village name from the dropdown list.
4 In the Report Status table, click the print icon for the report you want to
print.
ADARS Street Financial Report Guide Page 36
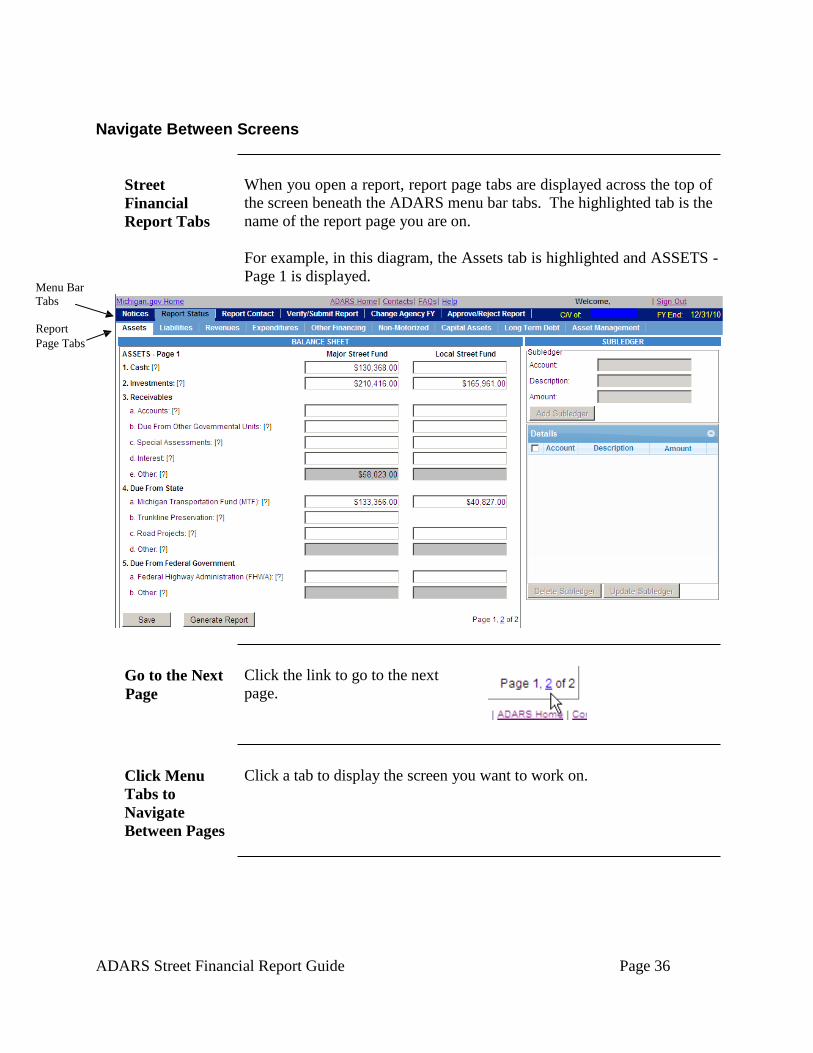
Navigate Between Screens
Menu Bar
Tabs
Report
Page Tabs
Street
Financial
Report Tabs
When you open a report, report page tabs are displayed across the top of
the screen beneath the ADARS menu bar tabs. The highlighted tab is the
name of the report page you are on.
For example, in this diagram, the Assets tab is highlighted and ASSETS -
Page 1 is displayed.
Go to the Next
Page
Click the link to go to the next
page.
Click Menu
Tabs to
Navigate
Between Pages
Click a tab to display the screen you want to work on.
ADARS Street Financial Report Guide Page 37
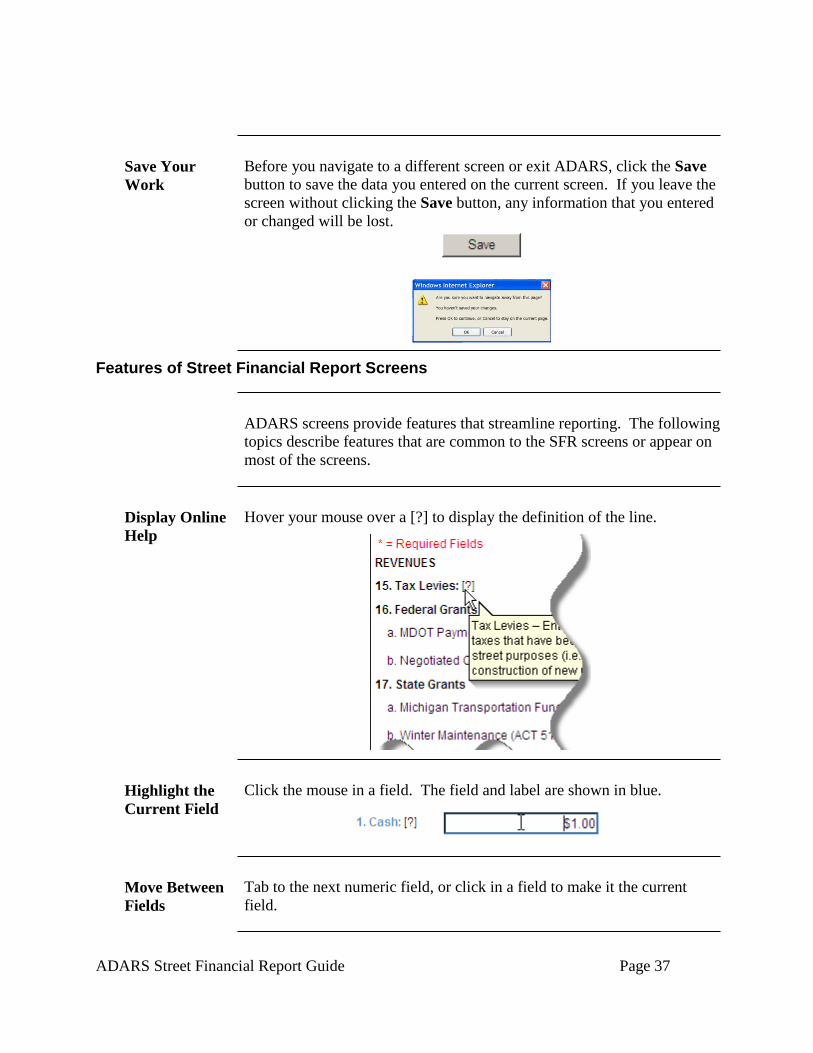
Save Your
Work
Before you navigate to a different screen or exit ADARS, click the Save
button to save the data you entered on the current screen. If you leave the
screen without clicking the Save button, any information that you entered
or changed will be lost.
Features of Street Financial Report Screens
ADARS screens provide features that streamline reporting. The following
topics describe features that are common to the SFR screens or appear on
most of the screens.
Display Online
Help
Highlight the
Current Field
Move Between
Fields
Hover your mouse over a [?] to display the definition of the line.
Click the mouse in a field. The field and label are shown in blue.
Tab to the next numeric field, or click in a field to make it the current
field.
ADARS Street Financial Report Guide Page 38
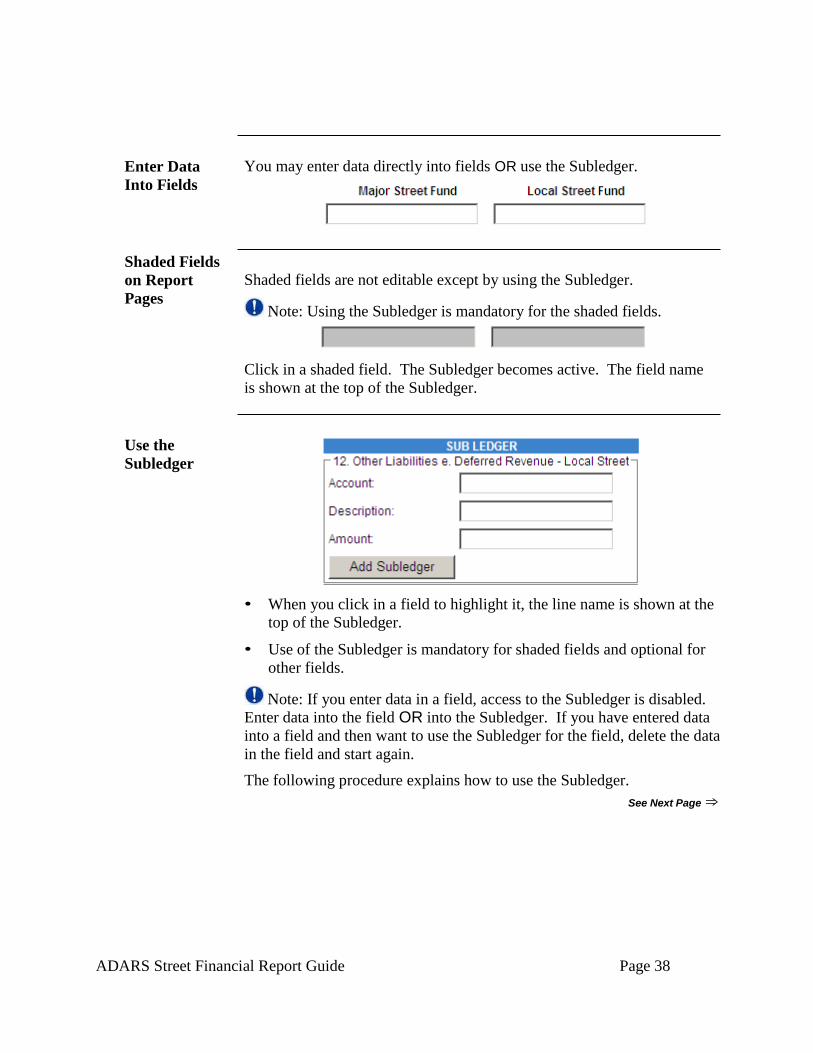
Enter Data
Into Fields
Shaded Fields
on Report
Pages
You may enter data directly into fields OR use the Subledger.
Shaded fields are not editable except by using the Subledger.
Note: Using the Subledger is mandatory for the shaded fields.
Click in a shaded field. The Subledger becomes active. The field name
is shown at the top of the Subledger.
Use the
Subledger
• When you click in a field to highlight it, the line name is shown at the
top of the Subledger.
• Use of the Subledger is mandatory for shaded fields and optional for
other fields.
Note: If you enter data in a field, access to the Subledger is disabled.
Enter data into the field OR into the Subledger. If you have entered data
into a field and then want to use the Subledger for the field, delete the data
in the field and start again.
The following procedure explains how to use the Subledger.
See Next Page ⇒
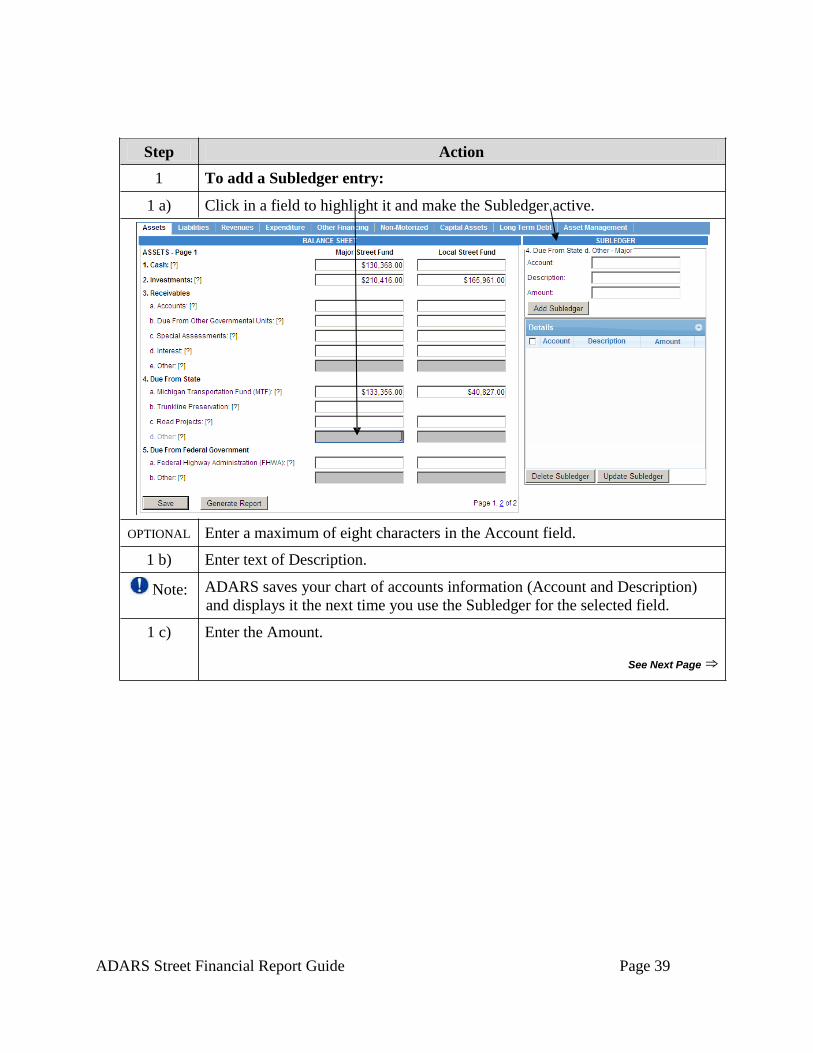
ADARS Street Financial Report Guide Page 39
Step Action
1 To add a Subledger entry:
1 a) Click in a field to highlight it and make the Subledger active.
OPTIONAL Enter a maximum of eight characters in the Account field.
1 b) Enter text of Description.
Note: ADARS saves your chart of accounts information (Account and Description) and displays it the next time you use the Subledger for the selected field.
1 c) Enter the Amount.
See Next Page ⇒
ADARS Street Financial Report Guide Page 40
Step Action
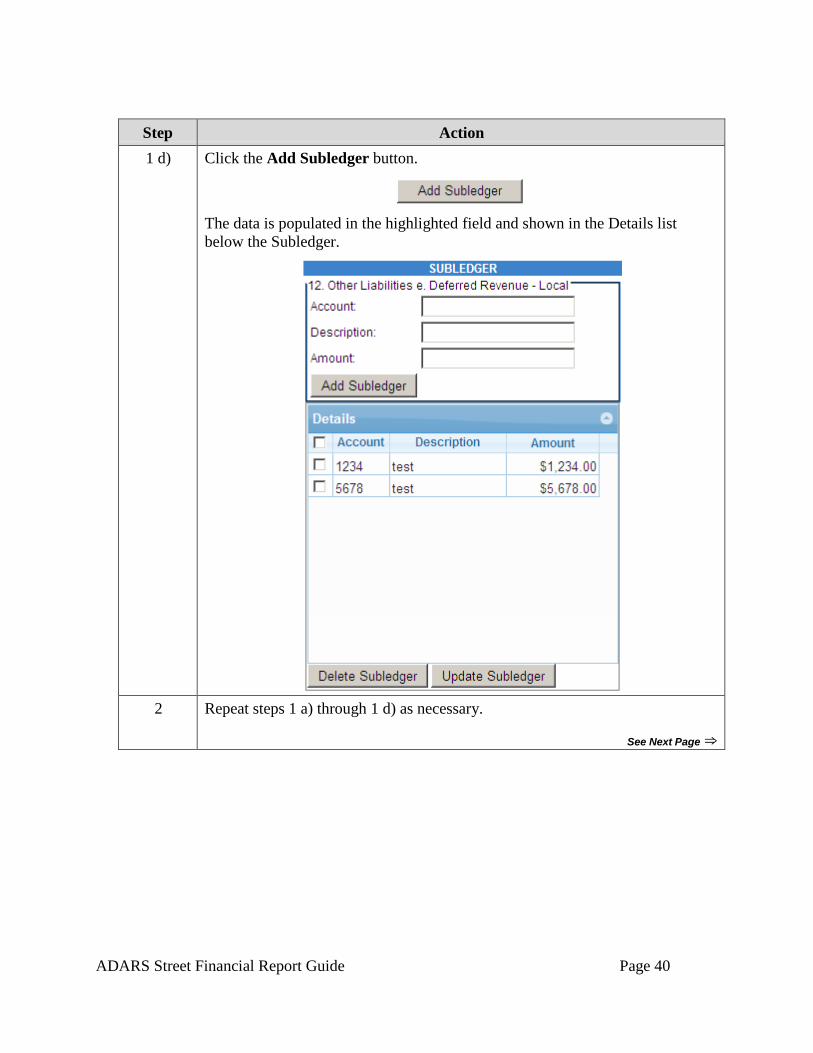
1 d) Click the Add Subledger button.
The data is populated in the highlighted field and shown in the Details list
below the Subledger.
2 Repeat steps 1 a) through 1 d) as necessary.
See Next Page ⇒
ADARS Street Financial Report Guide Page 41
Step Action
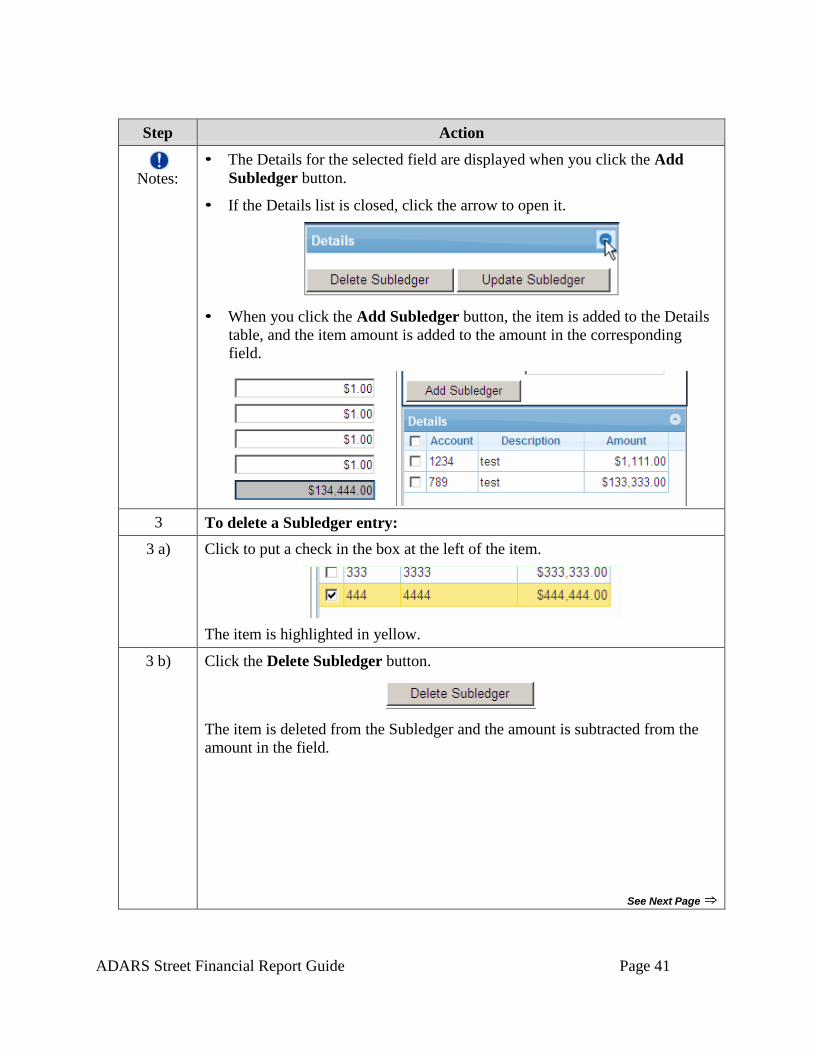
Notes:
• The Details for the selected field are displayed when you click the Add
Subledger button.
• If the Details list is closed, click the arrow to open it.
• When you click the Add Subledger button, the item is added to the Details
table, and the item amount is added to the amount in the corresponding
field.
3 To delete a Subledger entry:
3 a) Click to put a check in the box at the left of the item.
The item is highlighted in yellow.
3 b) Click the Delete Subledger button.
The item is deleted from the Subledger and the amount is subtracted from the
amount in the field.
See Next Page ⇒

ADARS Street Financial Report Guide Page 42
Step Action
4 To update a Subledger entry:
4 a) Click in the field.
The field becomes editable.
4 b) Edit the field.
4 c) Click the Update Subledger button.
The Subledger and the field are updated
Read System
Calculated
Totals
Total lines are system calculated when you enter data. They are shown in
bold, and can't be edited directly.
Note: Total lines in grids are calculated after you click the Save
button.

ADARS Street Financial Report Guide Page 43
Grids on Report
Pages
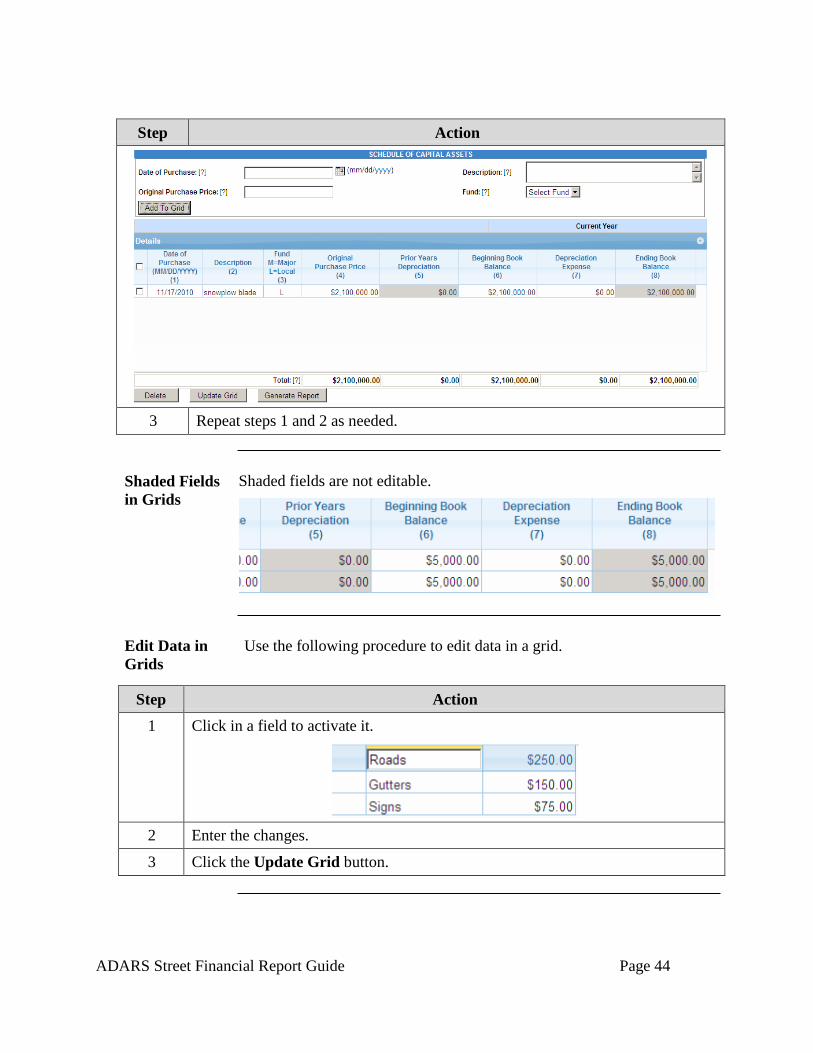
Some report pages have detail tables that are called grids. The
following diagram is an example. Grids enable you to make multiple
entries on a schedule.
Enter
Information in
a Grid
Use the following procedure with any grid in ADARS.
Step Action
1 Enter information in the description fields on the top part of the screen.
2 Click the Add to Grid button.
The information you entered in the fields is transferred to the grid.
The description fields at the top of the screen are cleared so that you can enter
additional items.
See Next Page ⇒
ADARS Street Financial Report Guide Page 44
Step Action
3 Repeat steps 1 and 2 as needed.
Shaded Fields
in Grids
Edit Data in
Grids
Shaded fields are not editable.
Use the following procedure to edit data in a grid.
Step Action
1 Click in a field to activate it.
2 Enter the changes.
3 Click the Update Grid button.
ADARS Street Financial Report Guide Page 45
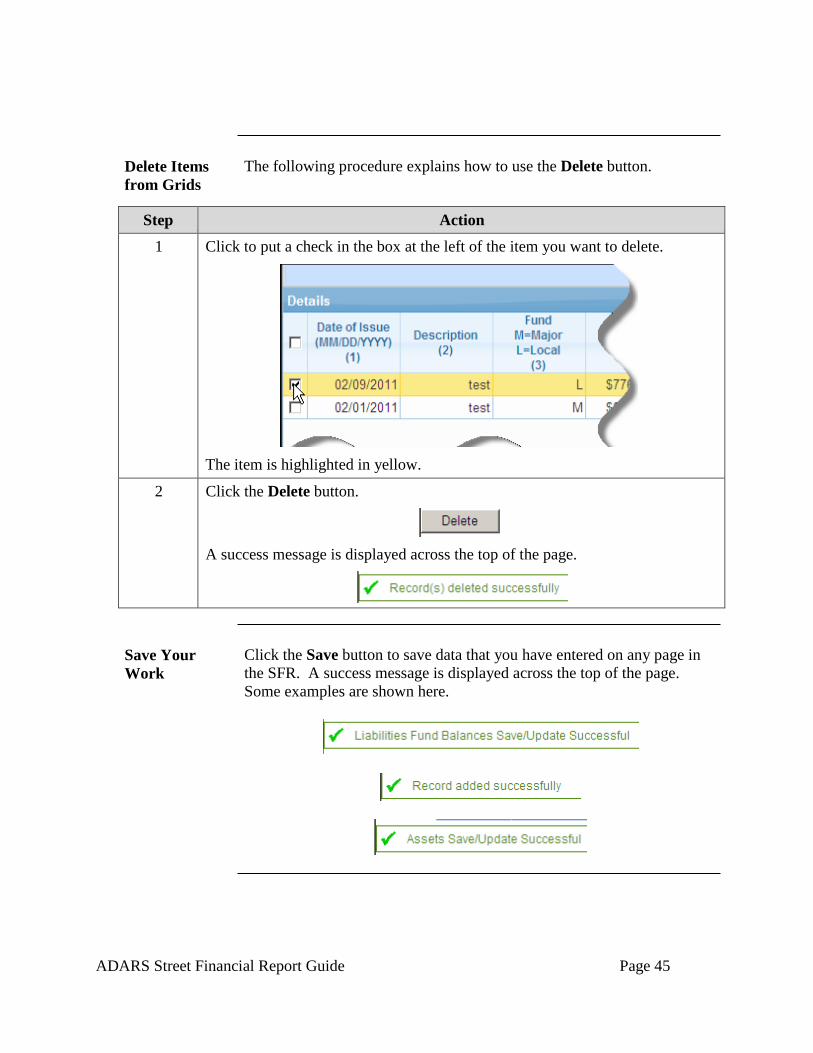
Delete Items
from Grids
The following procedure explains how to use the Delete button.
Step Action
1 Click to put a check in the box at the left of the item you want to delete.
The item is highlighted in yellow.
2 Click the Delete button.
A success message is displayed across the top of the page.
Save Your
Work
Click the Save button to save data that you have entered on any page in
the SFR. A success message is displayed across the top of the page.
Some examples are shown here.
ADARS Street Financial Report Guide Page 46
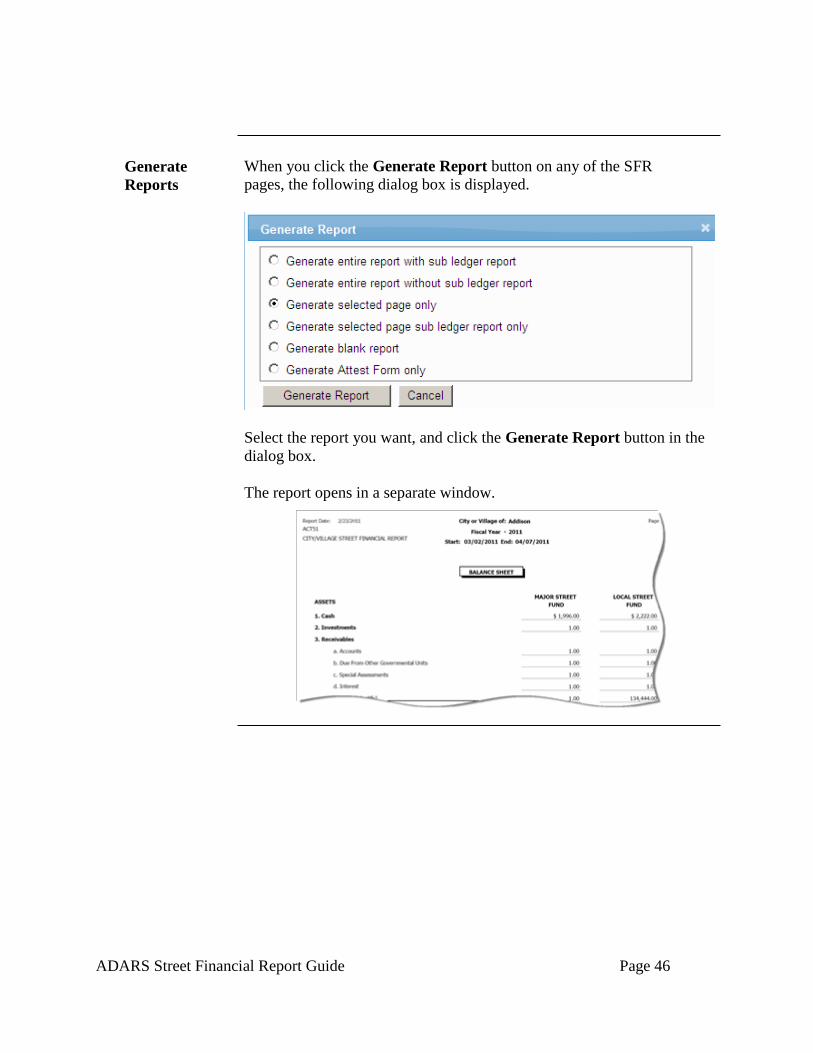
Generate
Reports
When you click the Generate Report button on any of the SFR
pages, the following dialog box is displayed.
Select the report you want, and click the Generate Report button in the
dialog box.
The report opens in a separate window.
ADARS Street Financial Report Guide Page 47
Complete the Asset Management Page
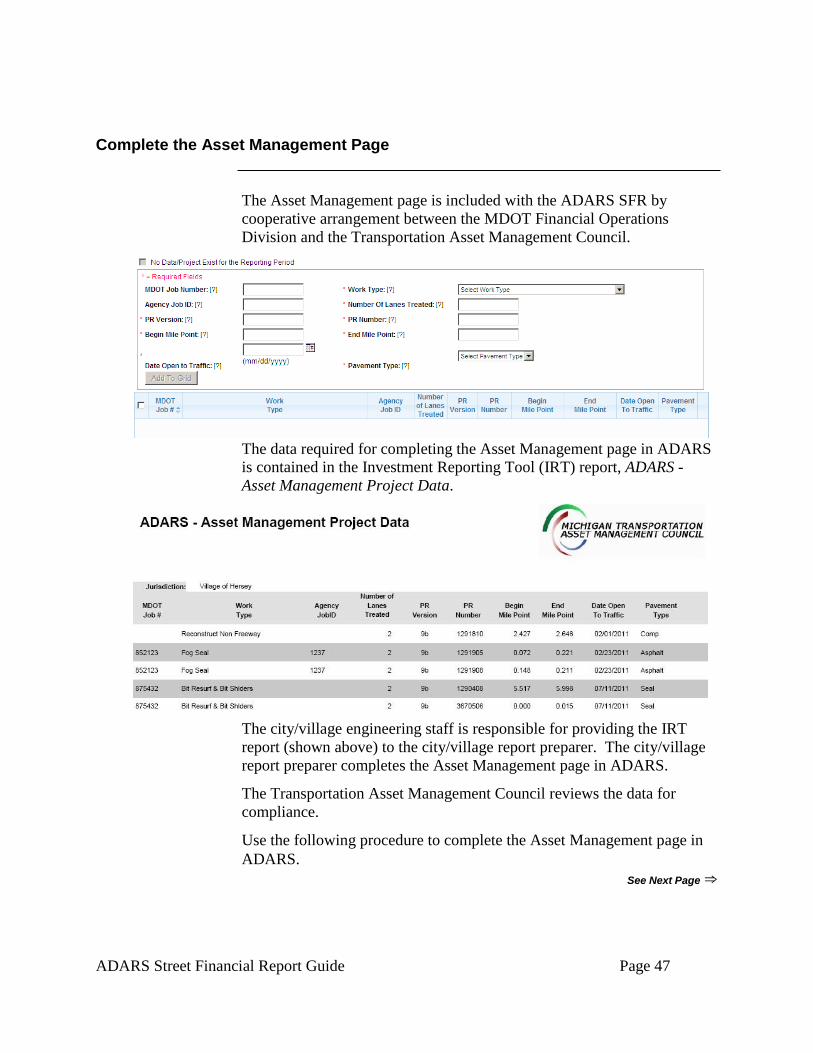
The Asset Management page is included with the ADARS SFR by
cooperative arrangement between the MDOT Financial Operations
Division and the Transportation Asset Management Council.
The data required for completing the Asset Management page in ADARS
is contained in the Investment Reporting Tool (IRT) report, ADARS -
Asset Management Project Data.
The city/village engineering staff is responsible for providing the IRT
report (shown above) to the city/village report preparer. The city/village
report preparer completes the Asset Management page in ADARS.
The Transportation Asset Management Council reviews the data for
compliance.
Use the following procedure to complete the Asset Management page in
ADARS.
See Next Page ⇒
ADARS Street Financial Report Guide Page 48
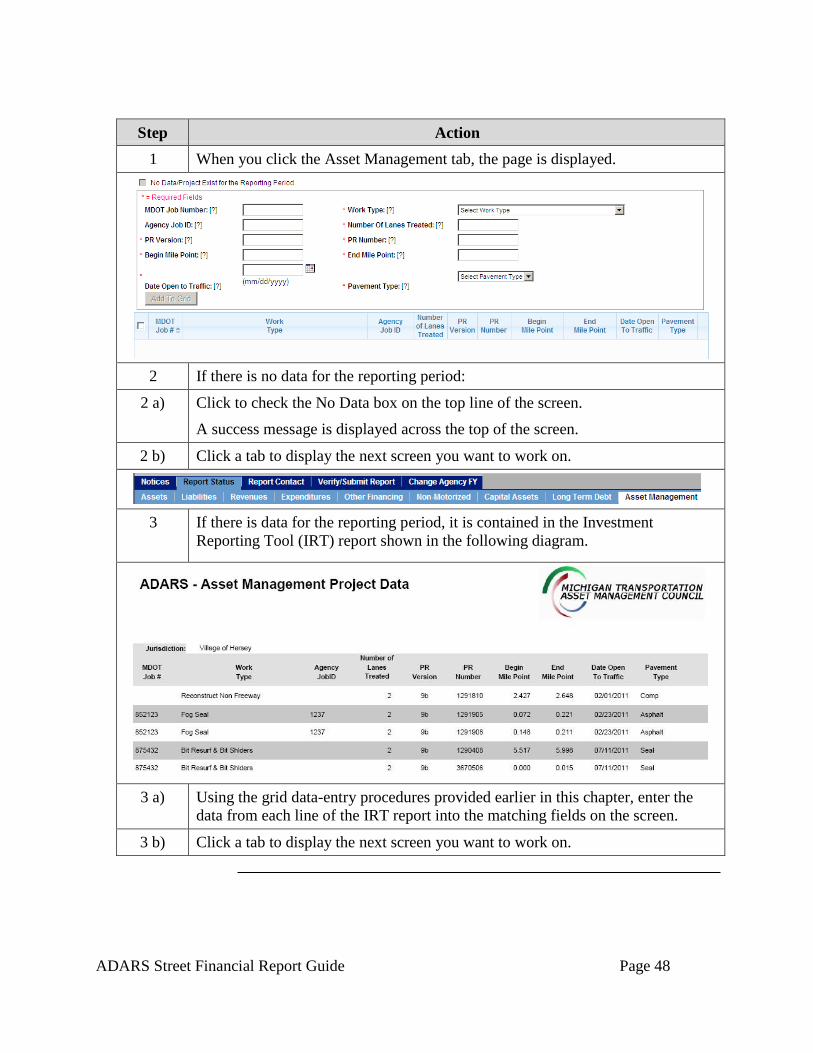
Step Action
1 When you click the Asset Management tab, the page is displayed.
2 If there is no data for the reporting period:
2 a) Click to check the No Data box on the top line of the screen.
A success message is displayed across the top of the screen.
2 b) Click a tab to display the next screen you want to work on.
3 If there is data for the reporting period, it is contained in the Investment
Reporting Tool (IRT) report shown in the following diagram.
3 a) Using the grid data-entry procedures provided earlier in this chapter, enter the
data from each line of the IRT report into the matching fields on the screen.
3 b) Click a tab to display the next screen you want to work on.
ADARS Street Financial Report Guide Page 49
Verify/Submit the Report
Note: Submit annual financial reports one at a time, oldest first. Click the Report Status tab and review the Status column in the table. Reports for previous years must be in Submitted or Approved status.
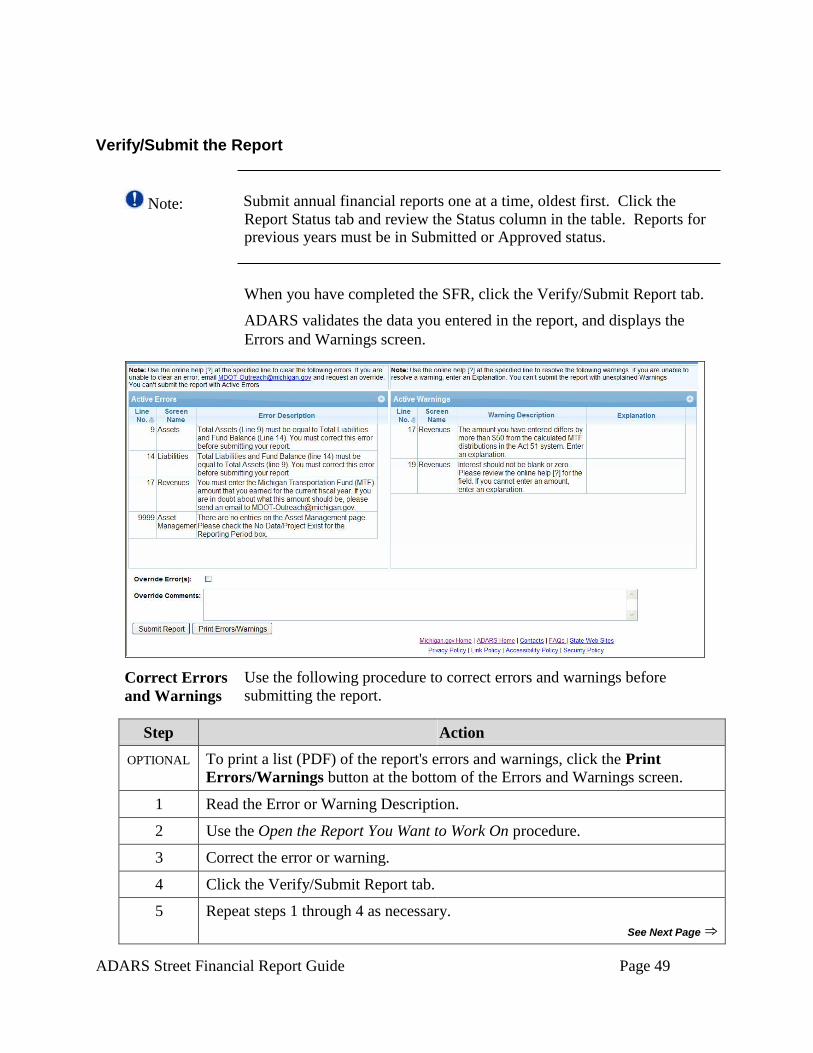
When you have completed the SFR, click the Verify/Submit Report tab.
ADARS validates the data you entered in the report, and displays the
Errors and Warnings screen.
Correct Errors
and Warnings
Use the following procedure to correct errors and warnings before
submitting the report.
Step Action
OPTIONAL To print a list (PDF) of the report's errors and warnings, click the Print
Errors/Warnings button at the bottom of the Errors and Warnings screen.
1 Read the Error or Warning Description.
2 Use the Open the Report You Want to Work On procedure.
3 Correct the error or warning.
4 Click the Verify/Submit Report tab.
5 Repeat steps 1 through 4 as necessary.
See Next Page ⇒
ADARS Street Financial Report Guide Page 50
Step Action
6 You cannot submit a report with an active error. If your report has an error that
you cannot correct, send an email to [email protected].
7 You can submit a report with active warnings, but you must enter an
explanation for each one.
8 Click the Submit Report button at the bottom of the Errors and Warnings
screen.
ADARS Street Financial Report Guide Page 51
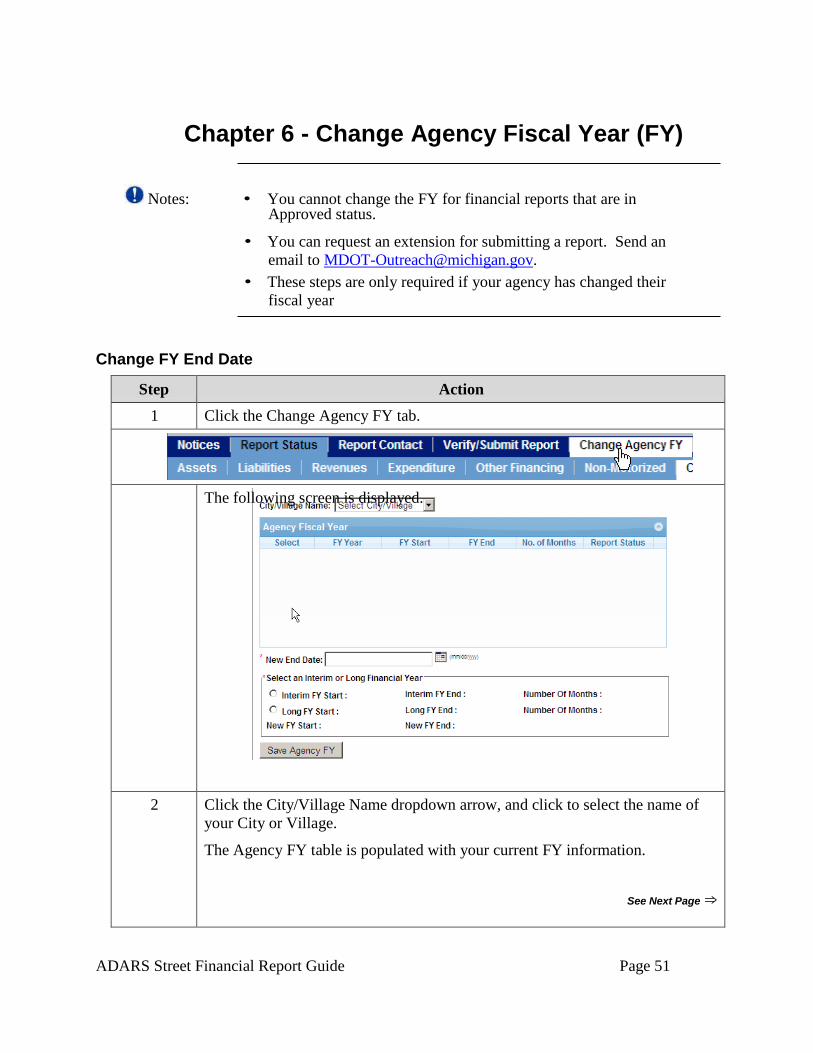
Chapter 6 - Change Agency Fiscal Year (FY)
Notes: • You cannot change the FY for financial reports that are in Approved status.
• You can request an extension for submitting a report. Send an
email to [email protected].
• These steps are only required if your agency has changed their
fiscal year
Change FY End Date
Step Action
1 Click the Change Agency FY tab.
The following screen is displayed.
2 Click the City/Village Name dropdown arrow, and click to select the name of
your City or Village.
The Agency FY table is populated with your current FY information.
See Next Page ⇒
ADARS Street Financial Report Guide Page 52
Step Action
Note: You can change the FY for the financial report you currently have In
Process in ADARS (and moving forward). You must have the approval of the
Department of Treasury to change your FY and it must be submitted to MDOT
for our records.
3 Click the circle in the Select column to select the FY you want to change.
4 Enter the New (FY) End Date, or click the calendar icon and select it.
The system populates the fields in the Interim and Long FY area of the screen.
5 Click to select Interim FY or Long FY.
The system populates the New FY Start and New FY End dates.
6 Click the Save Agency FY button to save the change.
The system displays the new data in the Agency FY table on the screen.
ADARS Street Financial Report Guide Page 53
Chapter 7 - Annual Reports Download
The Annual Reports Download function enables users to download data
from approved Act 51 SFRs.
These procedures describe the annual reports download options:
• The Generate Excel option enables download of selected data from
approved annual financial reports to an Excel format.
• The Generate PDF option enables download of one entire approved
annual financial report to a PDF format (not editable).
If the reporting function is not active for your user name, please e-mail
[email protected] to request access to this function.
ADARS Street Financial Report Guide Page 54
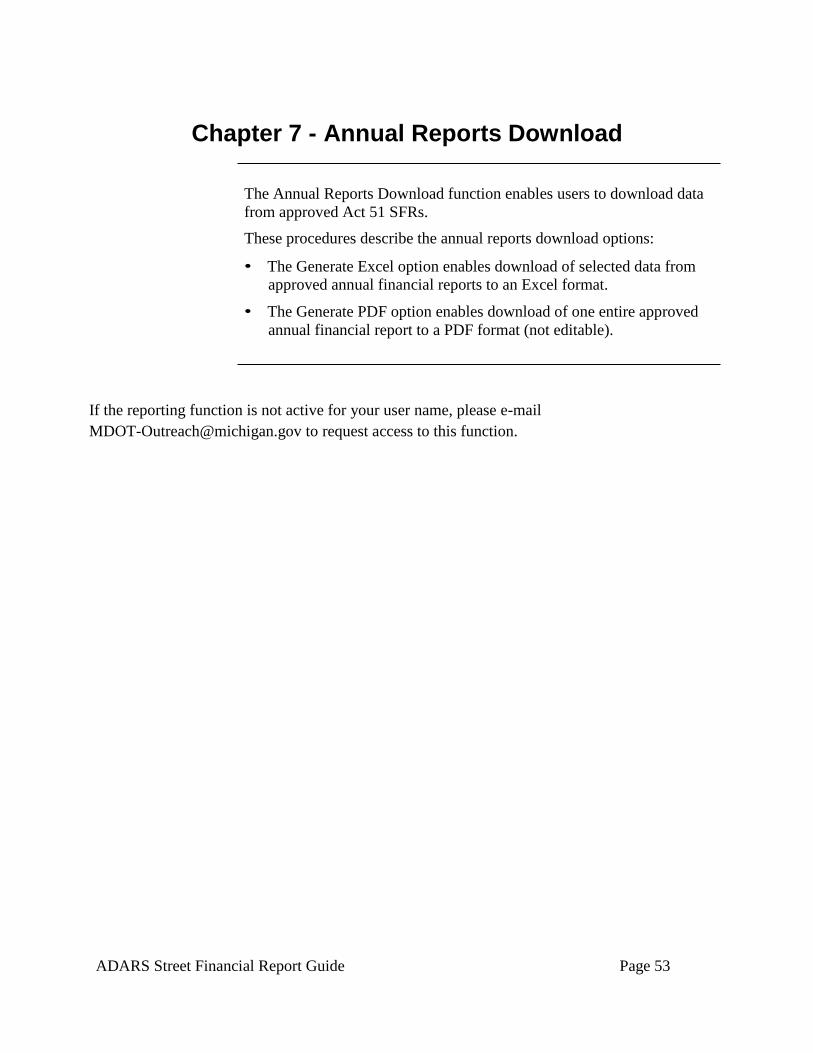
Generate Excel When you click the Annual Reports Download link, the default is
Generate Excel. Use the following procedure.
Step Action
Note: The Annual Reports Download features are available upon request.
1 Click the Annual Reports Download link on the ADARS main menu.
The Generate Excel tab is displayed.
Note: If you want data from only one year, enter the same year in both Year fields.
2 Select Begin Year and End Year.
3 Click the Agency Type dropdown arrow, and select City/Village or County.
The Select Report Pages panel lists the pages in the financial report.
Note: Do either step 4 or step 5.
See Next Page ⇒
ADARS Street Financial Report Guide Page 55
Step Action
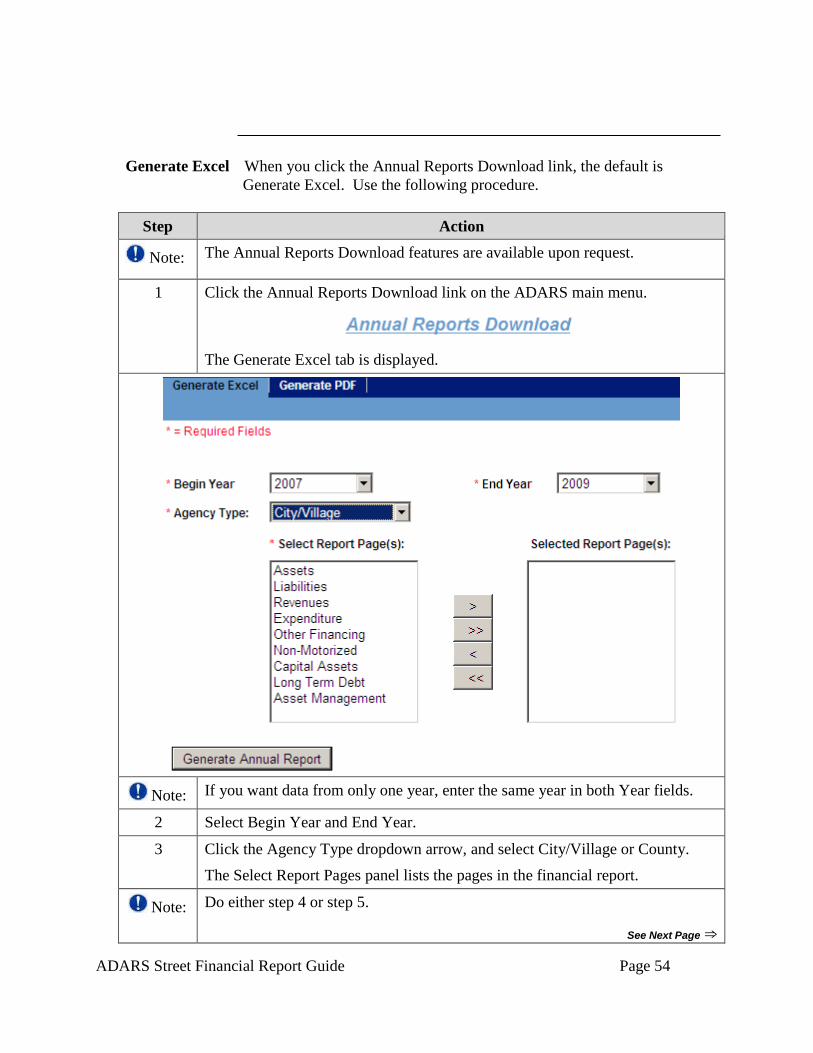
4 If you want all the pages, click the right double arrow . The page names
move to the Selected Report Pages panel.
5 If you want specific pages:
5 a) Click to highlight (select) the name of a page you want.
5 b) To select an additional page or pages, hold the Ctrl key and click the page
name(s).
5 c) Click the right arrow to move the selected page(s) to the Selected Report
Pages panel.
OPTIONAL • To remove a page or pages from the Selected panel, select the page or
pages, and click the left arrow .
OR
• To remove all pages from the Selected panel, click the left double arrow
.
6 When the pages that you want are listed in the Selected Report Pages panel,
click the Generate Annual Report button.
The File Download dialog box is displayed.
See Next Page ⇒
ADARS Street Financial Report Guide Page 56
Step Action
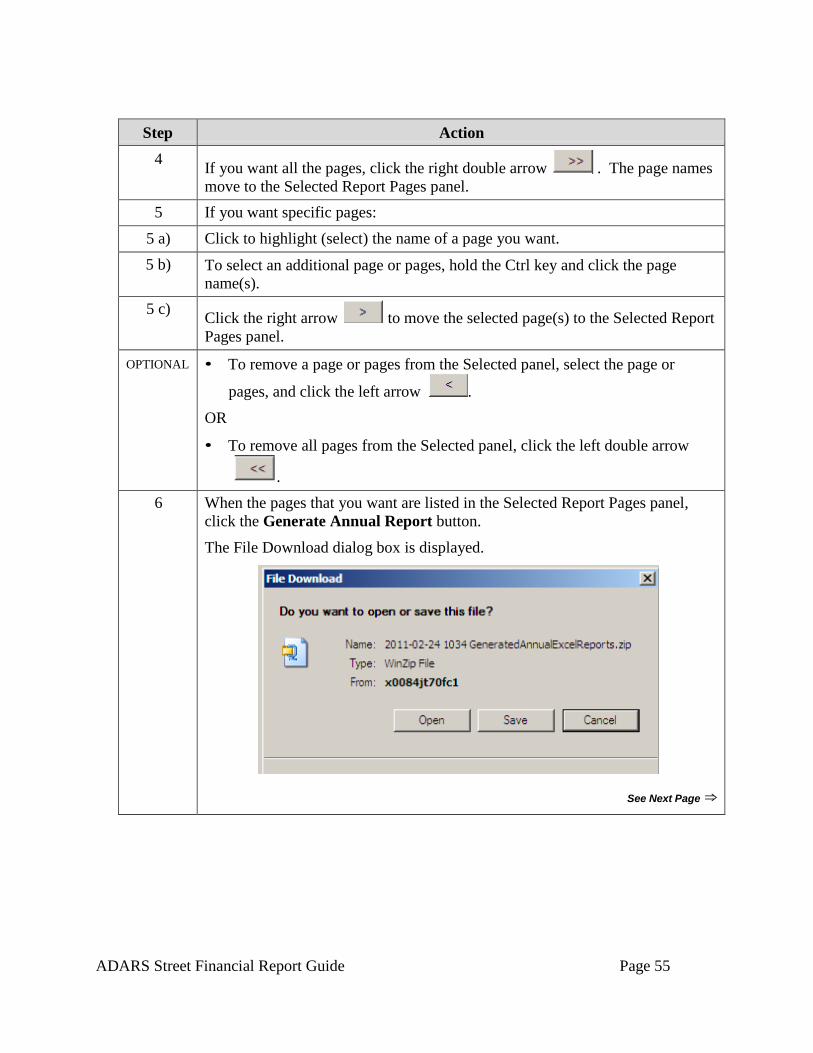
7 Click the Save button in the File Download dialog box.
The Save As dialog box is displayed.
8 Navigate to where you want to save the file.
Optional Rename the file.
Note: You can't change the file type, WinZip File, or the file extension, .zip.
9 Click the Save button in the Save As dialog box.
ADARS Street Financial Report Guide Page 57
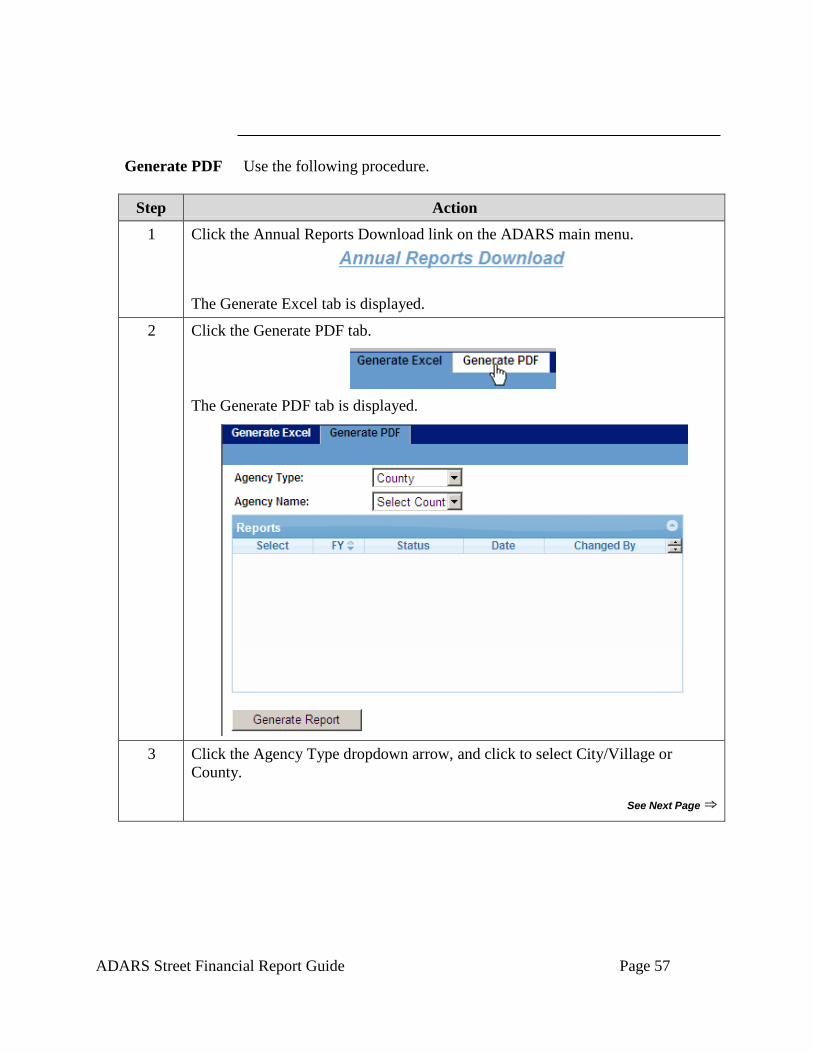
Generate PDF Use the following procedure.
Step Action
1 Click the Annual Reports Download link on the ADARS main menu.
The Generate Excel tab is displayed.
2 Click the Generate PDF tab.
The Generate PDF tab is displayed.
3 Click the Agency Type dropdown arrow, and click to select City/Village or
County.
See Next Page ⇒
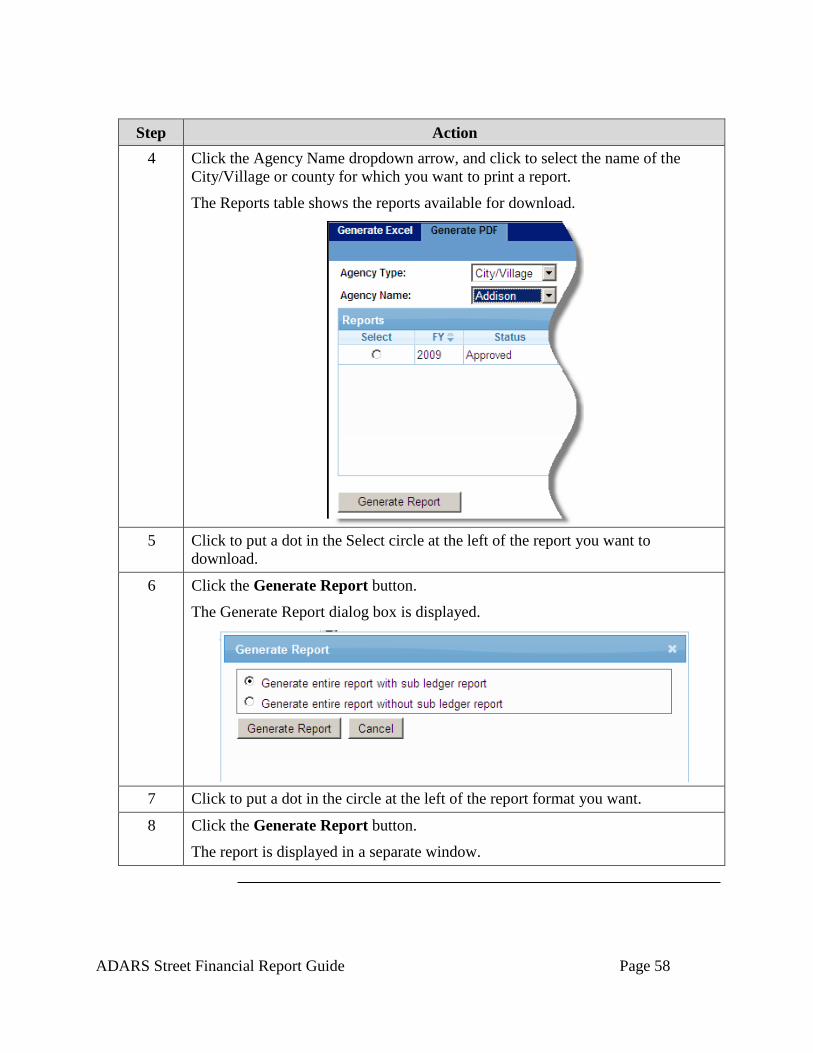
ADARS Street Financial Report Guide Page 58
Step Action
4 Click the Agency Name dropdown arrow, and click to select the name of the
City/Village or county for which you want to print a report.
The Reports table shows the reports available for download.
5 Click to put a dot in the Select circle at the left of the report you want to
download.
6 Click the Generate Report button.
The Generate Report dialog box is displayed.
7 Click to put a dot in the circle at the left of the report format you want.
8 Click the Generate Report button.
The report is displayed in a separate window.
Recommended