Vollstädt-Diamant GmbH DiaInspect.OSM 2010 Microscope manual, page 1
DiaInspect.OSM 2010
Automated particle analysis for superabrasives and
surface analysis
Operation guide
Version 1.2.8
VOLLSTÄDT DIAMANT GmbH
Vollstädt-Diamant GmbH DiaInspect.OSM 2010 Microscope manual, page 2
Content
Main components:................................................................................................................................................................................ 3
Precautions ........................................................................................................................................................................................... 4
Cleaning instructions .......................................................................................................................................................................... 4
Safety instructions ............................................................................................................................................................................... 4
Operating the hardware and the electronic controls ..................................................................................................................... 5
Optics swivel changer ........................................................................................................................................................................ 5
Pixel width.................................................................................................................................................................. 5
motor driven Z-axis and focus knobs............................................................................................................................................... 6
Changing the optical setup ................................................................................................................................................................ 6
Sample preparation.............................................................................................................................................................................. 8
Operating the microscope ................................................................................................................................................................10
Adjusting light source and camera.................................................................................................................................................11
Image processing options ................................................................................................................................................................12
Scanning a slide with particles ........................................................................................................................................................16
Multifocus operation..........................................................................................................................................................................17
Vollstädt-Diamant GmbH DiaInspect.OSM 2010 Microscope manual, page 3
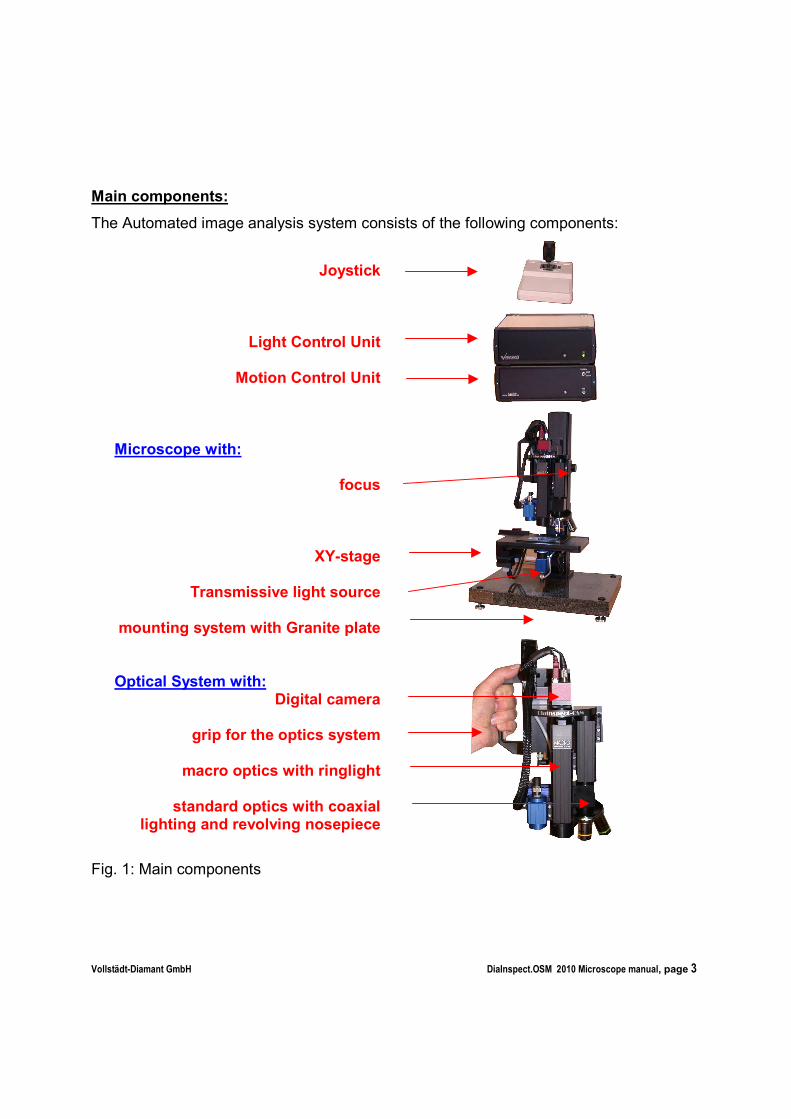
Main components:
The Automated image analysis system consists of the following components:
Joystick
Light Control Unit
Motion Control Unit
Microscope with:
focus
XY-stage
Transmissive light source
mounting system with Granite plate Optical System with:
Digital camera
grip for the optics system
macro optics with ringlight
standard optics with coaxial lighting and revolving nosepiece
Fig. 1: Main components

Vollstädt-Diamant GmbH DiaInspect.OSM 2010 Microscope manual, page 4
Precautions
CAUTION This microscope is a high precision instrument. Please handle it gently.
Strong shocks and forcible operation will damage the instrument. Move and locate this
microscope with caution. This microscope weighs approximately 25kg.
• When carring the microscope , hold it at his granite plate.
• When carring the Optic System, hold it at his grip (Fig 1).
• Do not use cabel as grip to shift the optics (Fig 4).
Fig 4: Forbidden
Cleaning instructions
CAUTION: Please pay attention at the surface of the XY-stage. It must be free of
diamonds at the working time. Use an air-brush for cleaning the XY-stage and all optical
systems! Never use fluids for cleaning the optics!
Use alcohol or air-brush for cleaning of the metallic surfaces. Never use water!
Safety instructions
Protect yourself and your environment against danger of accidents by suitable
precautions and follow the following hints in your own interest.
• This device must be operated and maintained only by instructed persons.
• The operator has to ensure appropriate operation.
• At all maintenance- and repair works: before starting to work always pull out the power

Vollstädt-Diamant GmbH DiaInspect.OSM 2010 Microscope manual, page 5
plug.
• Danger of hands being hurt. When the tray is moving, do not put your hands between the
fixed frames and moving parts. Altough we have set the power to the motors to very
low values it might be painful when a finger is squeezed between a glass plate
and a part of the moving stage.
Operating the hardware and the electronic controls
There are some parts of the microscope which need manual handling:
The lens system is swivel-mounted and can be swivelled from macro-optics to standard
microscope optics and back. The microscope lenses are mounted on a revolving
nosepiece, which is manually operated as well.
Optics swivel changer
Manually you can switch between macro and microscope resolution (see Fig.5)
CAUTION: Please never use the cable as a handle to change the optics!
Lens Image width Pixel width Object distance
MACRO 11.9 9.3 µm 35 mm
5x 2.2 mm 1.7 µm 20 mm
10x 1.1 mm 0.85 µm 10 mm
20x 0.55 mm 0.41 µm 1 mm
50x 0.22 mm 0.17 µm < 1 mm
Fig. 5
It should be mentioned that a magnification value of 50x as given on the lens corresponds with a system magnification of roughly
2160x when using a 22” monitor with 1680x1050 resolution.

Vollstädt-Diamant GmbH DiaInspect.OSM 2010 Microscope manual, page 6
motor driven Z-axis and focus knobs
CAUTION: When using focus knobs by hand please have a look
at the object distance.
CAUTION: short-working-distance objectives such as 20x or 50x
Changing the optical setup
The new design with increased depth of field for the macro optics and longer working
distances provides more flexibility than before. The new optics head with integrated
focus drive can be mounted on the front side of the microscope mounting bar for working
together with the XY-stage or at the back side for the observation of bulky objects.

Vollstädt-Diamant GmbH DiaInspect.OSM 2010 Microscope manual, page 7
Fixed
Loose
All other operations of the microscope are controlled by the PC, there is one additional
“CONTROL” switch at the motor control unit. Position “MAN” means you can use the
motion control unit by joystick without PC. In position “AUTO” the motor controller is fully
controlled by the program.

Vollstädt-Diamant GmbH DiaInspect.OSM 2010 Microscope manual, page 8
The light sources have no manual adjustment, the program will set the light intensity
along with the camera shutter and gain automatically. The program remembers the
setting for every combination of lens and lightsource and restores the values when the
user notifies the program about a lens change.
This makes the handling of the microscope easy, no need to adjust the brightness of the
light sources or the cameras exposure time everytime when the lens has been changed.
The rough height adjustment of the optics unit must be done with care. Please have in
mind that the stage where the sample is mounted will immediately move to its zero
position everytime the microscope control panel is opened. Please make sure there’s
enough space between the lenses and the sample!
Sample preparation
For carrying the particles we use microscope slides 76x26x1 mm (3”x1”). They are
intended for one way use, once you have sputtered abrasive powder onto the plate don´t
try to remove it. Throw the used plate away.
It requires some training to obtain a good particle distribution on the plate.
Preparation of Coarse grit (>150µm):
Coarse grit is best carried on the special glass plate
equipped with a metallic border. Coarse material can be
removed easily from there by means of a soft brush.
CONTROL SWITCH
POWER ON LED
Vollstädt-Diamant GmbH DiaInspect.OSM 2010 Microscope manual, page 9
Therefore the plate can be used many times.
Preparation of powders (20...150µm):
When investigating powder in the size range from ~20
µm up to ~150 µm it works fine when you take a very
small amount of powder onto the tip of a knife and
sprinkle it from a certain height ( 10.. 20 cm) onto the
plate. During the free fall most of the particles will separate.
Preparation of micron powders(< 20 µm):
When working on micron powder wet application is recommended. The reason is the
formation of agglomerates due to the influence of small grains of < 1µm.
Prepare a solution of 1% K4P2O7 in distilled water. Shake the solution well till the powder
is dissolved.
Take a small amount of this solution (about 5 - ml) into a separate dish with closure. Put
a small amount of the micron powder (depending on the grain size - the smaller the
grain size the smaller the amount) to the solution and shake it well.
Depending on the grain size, the dish solution has to be set into an ultrasonic bath. For
grain sizes smaller than 5 µm this step is necessary, for larger grains it is not necessary,
but does not disturb. About max. 60 minutes of ultrasonic treatment for the smallest
grain sizes should be enough in most cases.
Put a drop of the solution onto the plate and distribute it a bit.
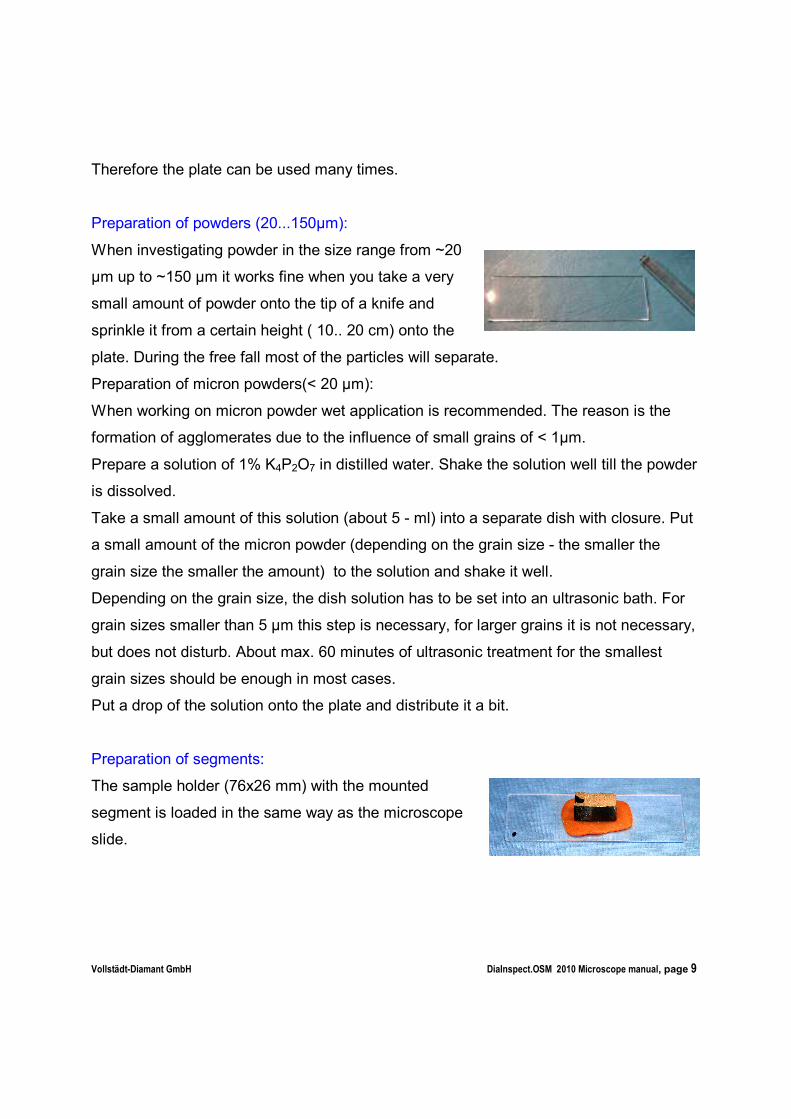
Preparation of segments:
The sample holder (76x26 mm) with the mounted
segment is loaded in the same way as the microscope
slide.

Vollstädt-Diamant GmbH DiaInspect.OSM 2010 Microscope manual, page 10
Operating the microscope
The operator has to switch on the Light Control Unit and the Motion Control Unit
(at the rear side of each control block).
All the next steps were done by means of the DiaInspect.OSM program and the joystick
attached to the Motion Controler.
Please launch the DiaInspect.OSM program.
On the main panel push the button OSM, this
leads you to the microscope control panel.
We will come back to the main panel later in the manual.
The microscope control panel shows up while the stage is intitialized. The stage will
travel to the zero position of the scan area, after having finished this it will wait in start
position, waiting for your input. The drop down list for the microscope magnification is
blinking red, showing that input is required. The three light sources are flashing. You
have to set the magnification selector according to the value written on the lens. All other
computation and scaling is done internally in the program, no need to worry about.
The operation panel shows 6 sections with controls aligned on top, the area below is
used for displaying the camera picture.
For the next few steps we need to use the joystick. Please try to move the stage by
joystick control in X and Y direction. Turning the knob left and right will operate the focus
drive. If the stage doesn’t move check the joystick sybol in the section “Stage control”, it
must appear in black, not grey. You can toggle the state (active/inactive) by clicking the
symbol.
Vollstädt-Diamant GmbH DiaInspect.OSM 2010 Microscope manual, page 11
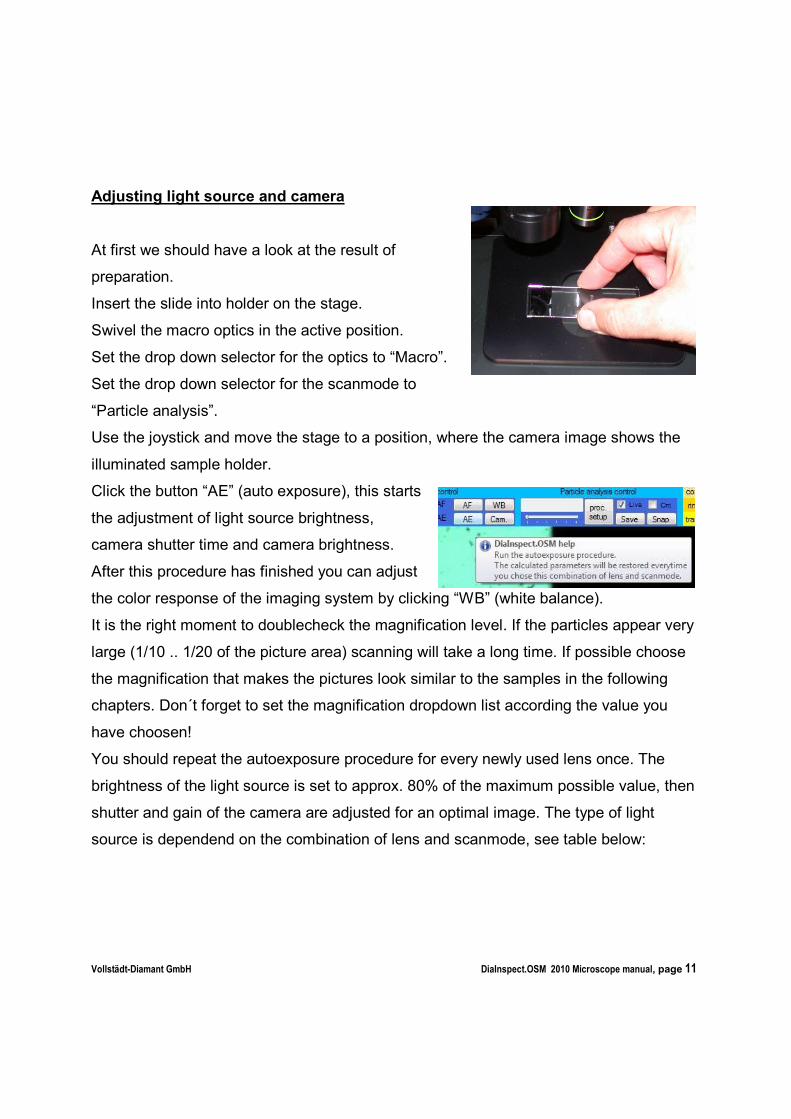
Adjusting light source and camera
At first we should have a look at the result of
preparation.
Insert the slide into holder on the stage.
Swivel the macro optics in the active position.
Set the drop down selector for the optics to “Macro”.
Set the drop down selector for the scanmode to
“Particle analysis”.
Use the joystick and move the stage to a position, where the camera image shows the
illuminated sample holder.
Click the button “AE” (auto exposure), this starts
the adjustment of light source brightness,
camera shutter time and camera brightness.
After this procedure has finished you can adjust
the color response of the imaging system by clicking “WB” (white balance).
It is the right moment to doublecheck the magnification level. If the particles appear very
large (1/10 .. 1/20 of the picture area) scanning will take a long time. If possible choose
the magnification that makes the pictures look similar to the samples in the following
chapters. Don´t forget to set the magnification dropdown list according the value you
have choosen!
You should repeat the autoexposure procedure for every newly used lens once. The
brightness of the light source is set to approx. 80% of the maximum possible value, then
shutter and gain of the camera are adjusted for an optimal image. The type of light
source is dependend on the combination of lens and scanmode, see table below:

Vollstädt-Diamant GmbH DiaInspect.OSM 2010 Microscope manual, page 12
You are free to use any mix of light source intensities which are suitable for the selected
lens, for example for the 5x lens 80% transmissive light + 20% coaxial light. The
program will remember these settings and will apply them the next time you chose the
5x lens.
Image processing options
As easy as it is for the human eye to locate the abrasive particles on the display, as
difficult it is for the computer program. We have to describe what part of the image
should be treated as single particle. The button “Proc setup” brings up the setup panel
for the image processing and analysis options.
At first it is obviously that in the microscope the particle appears darker than the
background. The threshold between dark particle and bright background is defined by
Scanmode /
Lens
Macro 5x 10x 20x 50x
Particle analysis Transmissive Transmissive Transmissive Transmissive Transmissive
Porosity analysis Ring light Coaxial light Coaxial light Coaxial light Coaxial light
Surface scan Ring light Coaxial light Coaxial light Coaxial light Coaxial light

Vollstädt-Diamant GmbH DiaInspect.OSM 2010 Microscope manual, page 13
the BW–slider. The setting of this slider should be approximately 210 units. If necessary
you can let the program compute thethreshold level automatically by setting the slider to
zero.
The left picture was processed with a b/w threshold
too low, parts of the red marked particle were counted
as background. The picture on the right side show
processing with a properly adjusted threshold slider. You can try out this behaviour
easily, because everytime you operate the Snap button an image is acquired and
processed with the current settings.
Now the program is able to find parts of the image which maybe represent single
particles, maybe two or more particles touching each other or maybe particles of dust or
a hair of the brush. Some more filtering is necessary in order to remove all things from
being counted and analysed, which are not single, clearly painted members of the batch
we want to analyse.
DiaInspect.OSM comes with a some predefined combinations of filter parameters, these
are listed in the left field of the “Processing options” panel. You can define new filters,
delete unnecessary filter or modify existing filters. Just enter the desired values and click
on “Apply and save”. At the end of this manual you find a more detailed explanation of
what the used parameters describe and how the calculation is performed.
The workflow inside the image processing and analysis can be roughly described as
follows:
• Separate foreground (what is maybe particle) from background
• Calculate the parameters used in “first step options” and exclude all parts of the
foreground that do not pass through the first step options.
• Compute and apply separation lines between touching particles, if desired
• Compute the whole parameter set for all remaining parts of the image that pass
through the “second step options”

Vollstädt-Diamant GmbH DiaInspect.OSM 2010 Microscope manual, page 14
• Draw a green line around particles which passed through the options
• Draw a red line around particles which did not pass through the second step
options
The graphical result is immediately visible on the computers screen, when you click
inside a particle also the properties appear on the screen. Red parameter values
indicate that the value is higher than the limit in the filter, blue indicates too low values.
The sample image above was analysed without the automatic separation feature
enabled. Please compare below the results with automatic separation enabled.
Interactive evaluation of the particle analysis filters (no automatic separation)

Vollstädt-Diamant GmbH DiaInspect.OSM 2010 Microscope manual, page 15
It is easy to fine tune the filter settings. Once you have finished a filter store it using
“Apply and save” into the filter database for future application.
Attention: Automatic separation works fine on well shaped convex particles, but please
be careful when applying this method on other ones.
Left picture:Separation mismatch!
Interactive evaluation of the particle analysis filters (automatic separation active)
Vollstädt-Diamant GmbH DiaInspect.OSM 2010 Microscope manual, page 16
You can set the program into a continuous analysis
mode and move the slide with the particles on it with
the joystick forth and back. The image will be
acquired and analysed continuously until you
uncheck the box “Cnt”.
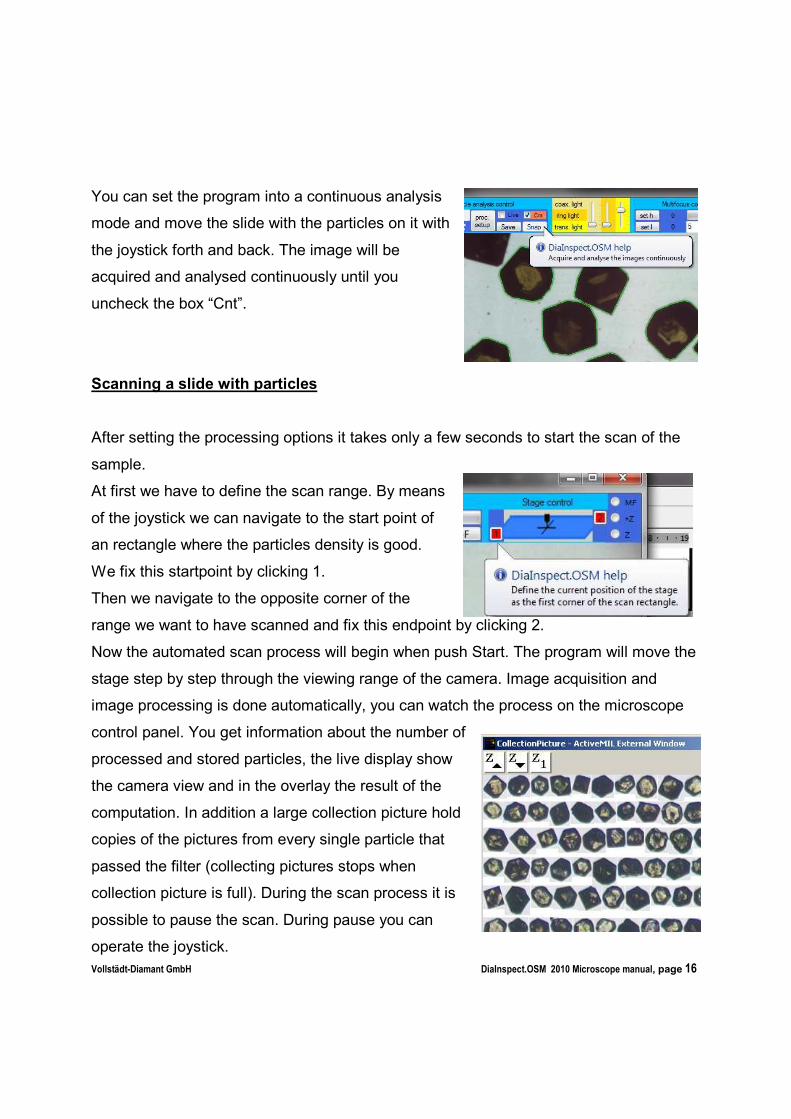
Scanning a slide with particles
After setting the processing options it takes only a few seconds to start the scan of the
sample.
At first we have to define the scan range. By means
of the joystick we can navigate to the start point of
an rectangle where the particles density is good.
We fix this startpoint by clicking 1.
Then we navigate to the opposite corner of the
range we want to have scanned and fix this endpoint by clicking 2.
Now the automated scan process will begin when push Start. The program will move the
stage step by step through the viewing range of the camera. Image acquisition and
image processing is done automatically, you can watch the process on the microscope
control panel. You get information about the number of
processed and stored particles, the live display show
the camera view and in the overlay the result of the
computation. In addition a large collection picture hold
copies of the pictures from every single particle that
passed the filter (collecting pictures stops when
collection picture is full). During the scan process it is
possible to pause the scan. During pause you can
operate the joystick.

Vollstädt-Diamant GmbH DiaInspect.OSM 2010 Microscope manual, page 17
The scan stops when the rectangle is completely scanned, when then collection image
is filled completely or when you push Stop. If the collection picture holds not enough
particles you should prepare another slide with particles from the batch, place it on the
sample holder and push “Add”. This slide will be scanned and analysed applying the
same settings as for the previous slide. The particles will be added to the collection.
You can check now the content of the collection picture. If you are convinced that the
measured particles represent the batch quite good, you can press Exit for leaving the
microscope control.
Please note:
It is recommended to set the restrictions (the processing filters) not too narrow during the
scan. It is no problem if the collection picture contains some touching groups of particles
or some parts which don’t belong to the batch. You can easily run a new analysis of the
collection picture later on at any time. On the other hand: every particle which was not
collected into the collection picture due to tight restrictions is not available forever in
future calculations!
Multifocus operation
The microscope lenses have a short depth of field. Threedimensonal objects may
appear only partially sharp and clear. Diainspect.OSM provides an easy way to
overcome this limitation. In the so called
“multifocus mode” the program acquires a
series of images at different distances
between lens and object and generates a
sharp picture of the object. As useful side-
effect a height map of the object is produced
as well. The operation quite simple: use the focus to focus on the topmost part of the
object, click “set h” to store this value of the focus height. Then focus on the lowest part
of the object, click “set l”. The dropdown list allows to chose the number of pictures to
take and process. The button “MF” starts the multifocus procedure. The focus drive

Vollstädt-Diamant GmbH DiaInspect.OSM 2010 Microscope manual, page 18
moves to start position and then travels in one smooth move to the target position. The
program acquires the requested number of images at exactly defined focus levels. The
multifocus image is available immediately after the scan has finished. The radiobuttons
“”MF”, “+Z” and “Z” select the display of the pure multifocus picture (MF), the multifocus
picture together with color coded height information (+Z) or the pure height information
(Z). Please note that the height resolution depends on the number of images, i.e. the
number of discrete height levels where information was acquired. It also depends on the
image content. Regions with no contrast will produce no useful information.
Dragging a line with the mouse on the display will produce a length marker, whose
length is displayed.
At this point the explanaton of the microscope control closes. The further inspection of
results is the same as in DiaInspect. The only exception is that we return to a main panel
which is no longer empty, but filled with all the data we have measured using the
microscope.
Recommended