1GridNexus © 2007 Clayton S. Ferner
GridNexusUNCW GUI for Workflow Management
www.gridnexus.org
Clayton [email protected]

2GridNexus © 2007 Clayton S. Ferner
Outline Basics
Getting Started
Simple workflows
A little bit about JXPL
Libraries
Composites
Ports
User Library
Splitting Relations
Examples Prog
Cond
Defun
Recursion
Iteration Services
Web Services
Grid Services
3GridNexus © 2007 Clayton S. Ferner
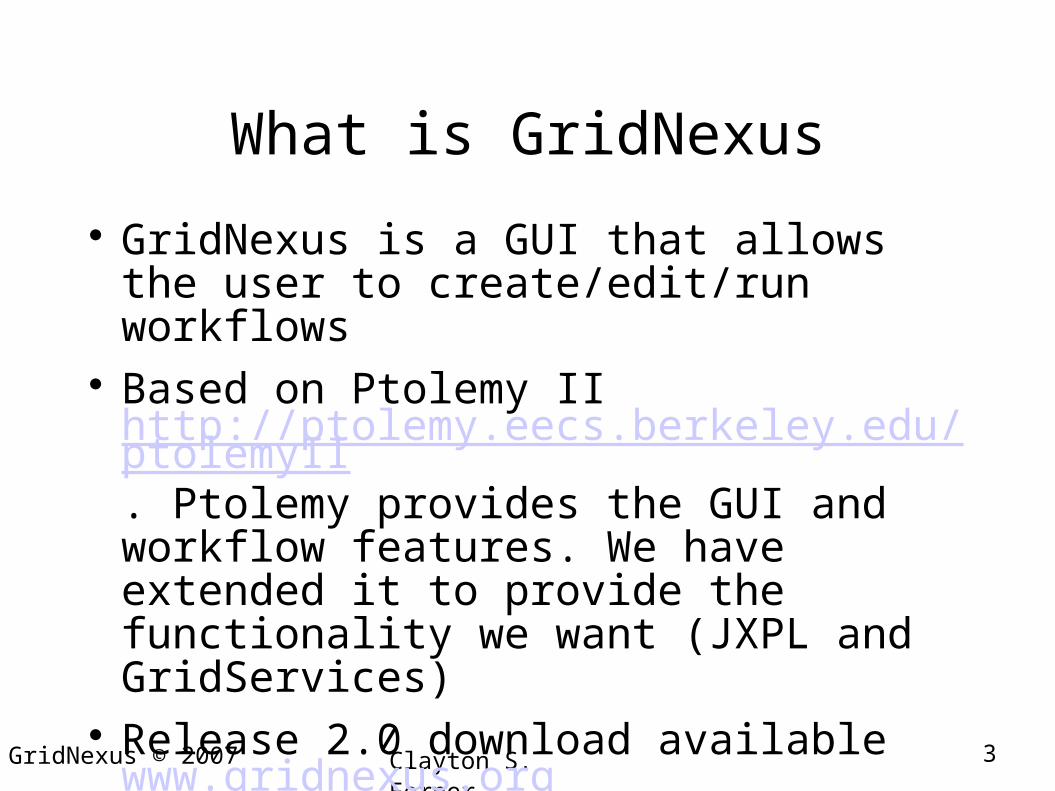
What is GridNexus
GridNexus is a GUI that allows the user to create/edit/run workflows
Based on Ptolemy II http://ptolemy.eecs.berkeley.edu/ptolemyII. Ptolemy provides the GUI and workflow features. We have extended it to provide the functionality we want (JXPL and GridServices)
Release 2.0 download available www.gridnexus.org
4GridNexus © 2007 Clayton S. Ferner
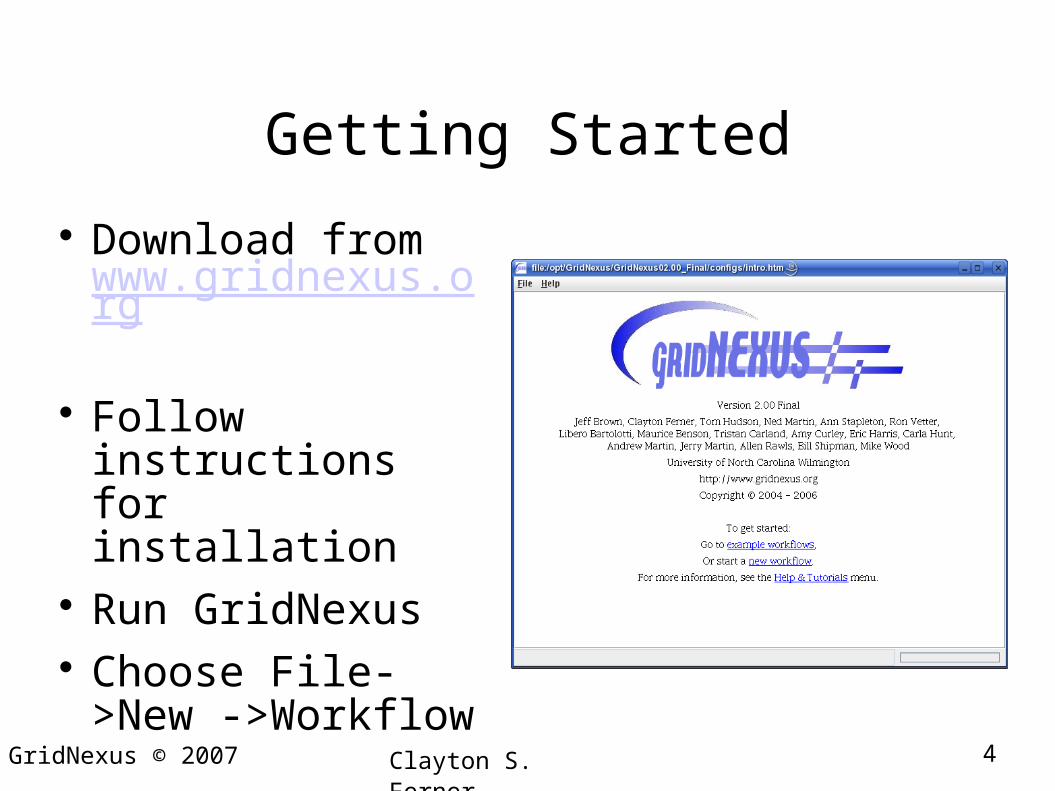
Getting Started
Download from www.gridnexus.org
Follow instructions for installation
Run GridNexus Choose File->New -
>Workflow
5GridNexus © 2007 Clayton S. Ferner
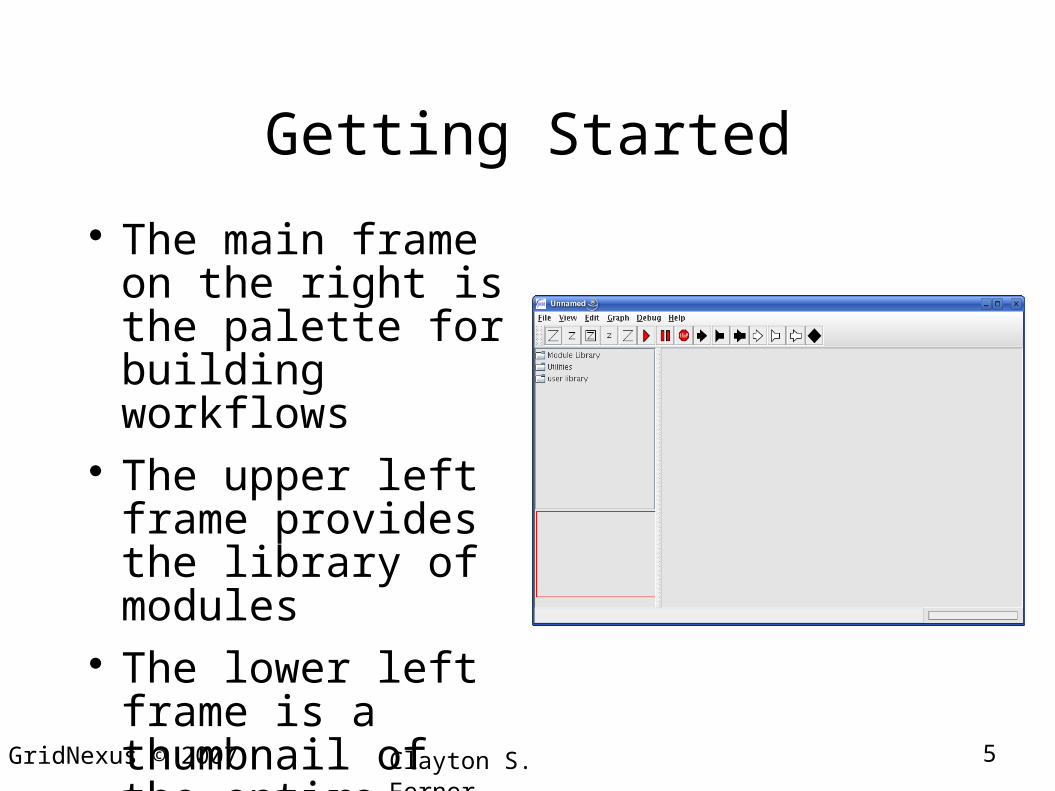
Getting Started
The main frame on the right is the palette for building workflows
The upper left frame provides the library of modules
The lower left frame is a thumbnail of the entire workflow
6GridNexus © 2007 Clayton S. Ferner
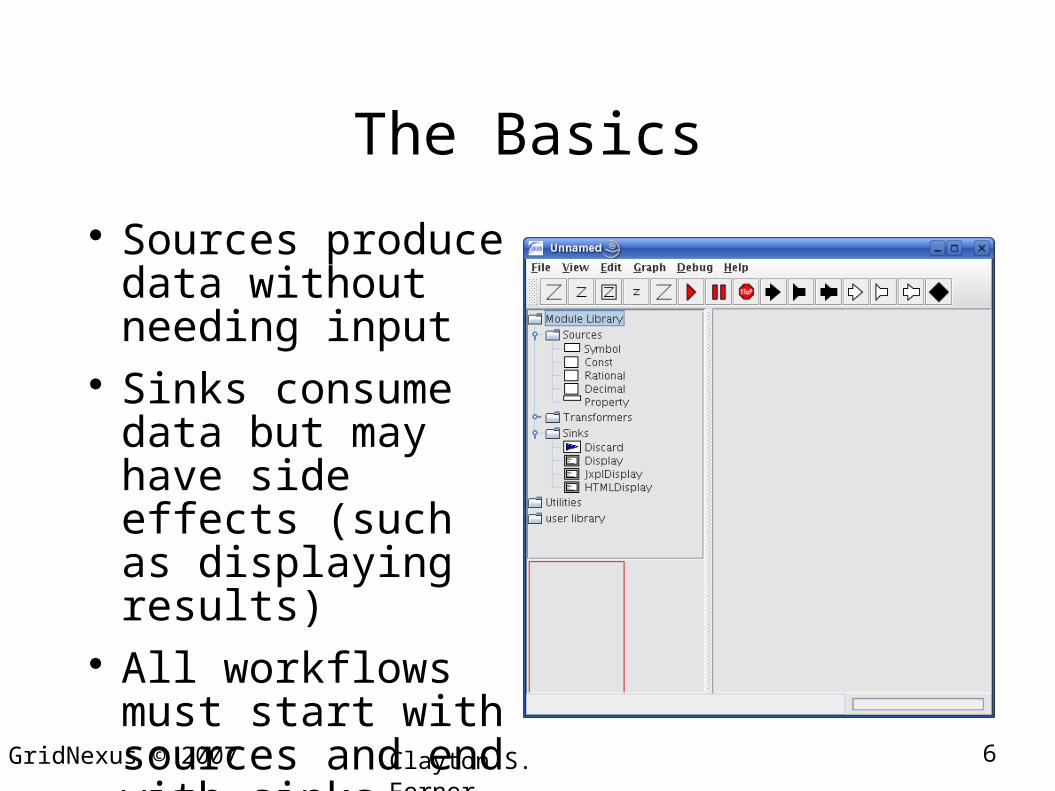
The Basics
Sources produce data without needing input
Sinks consume data but may have side effects (such as displaying results)
All workflows must start with sources and end with sinks
7GridNexus © 2007 Clayton S. Ferner
Simple Example 1
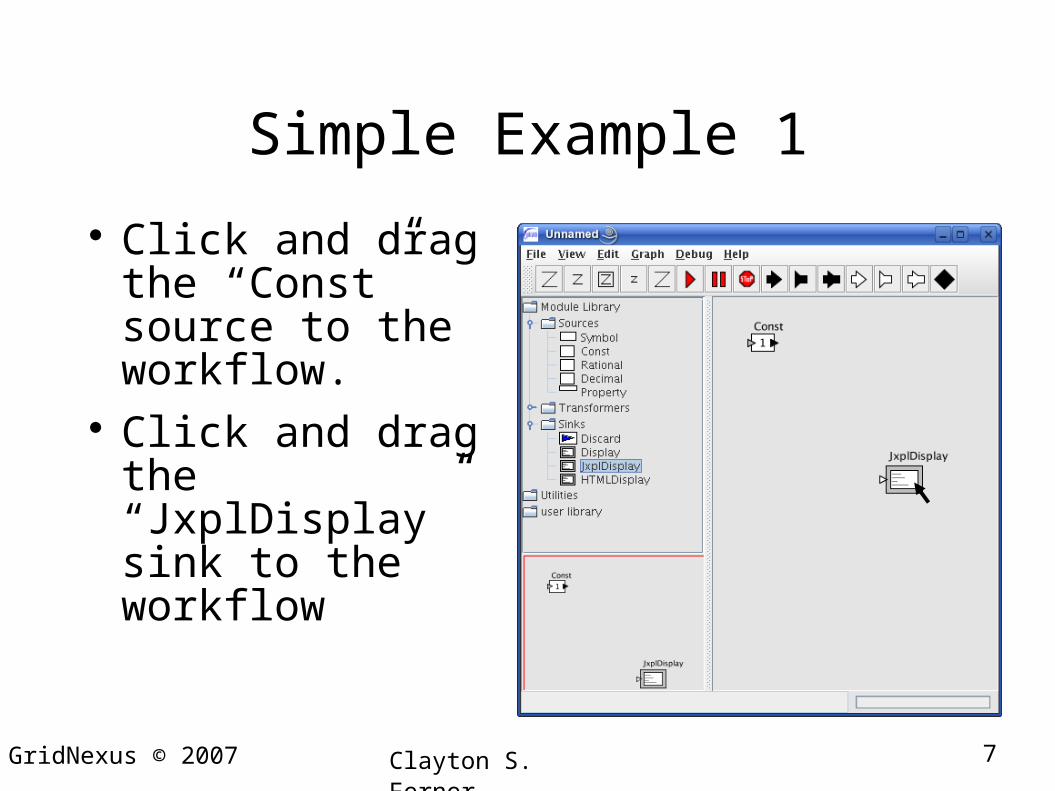
Click and drag the “Const” source to the workflow.
Click and drag the “JxplDisplay” sink to the workflow
8GridNexus © 2007 Clayton S. Ferner
Simple Example 1
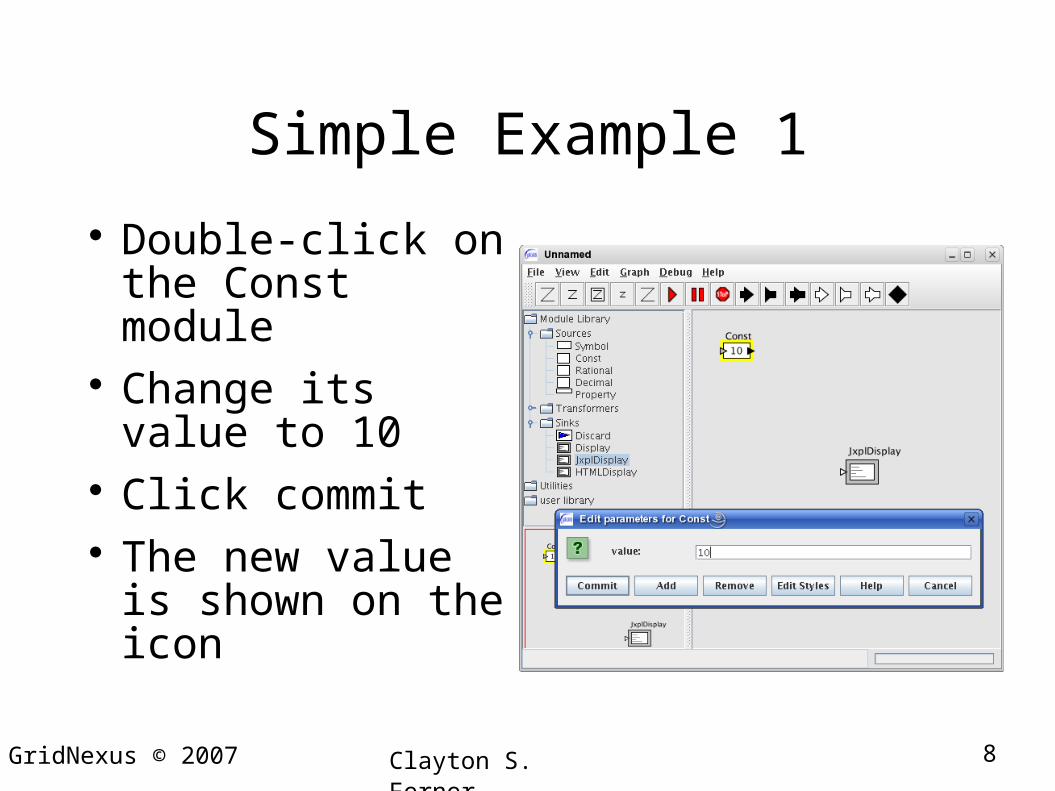
Double-click on the Const module
Change its value to 10 Click commit The new value is
shown on the icon
9GridNexus © 2007 Clayton S. Ferner
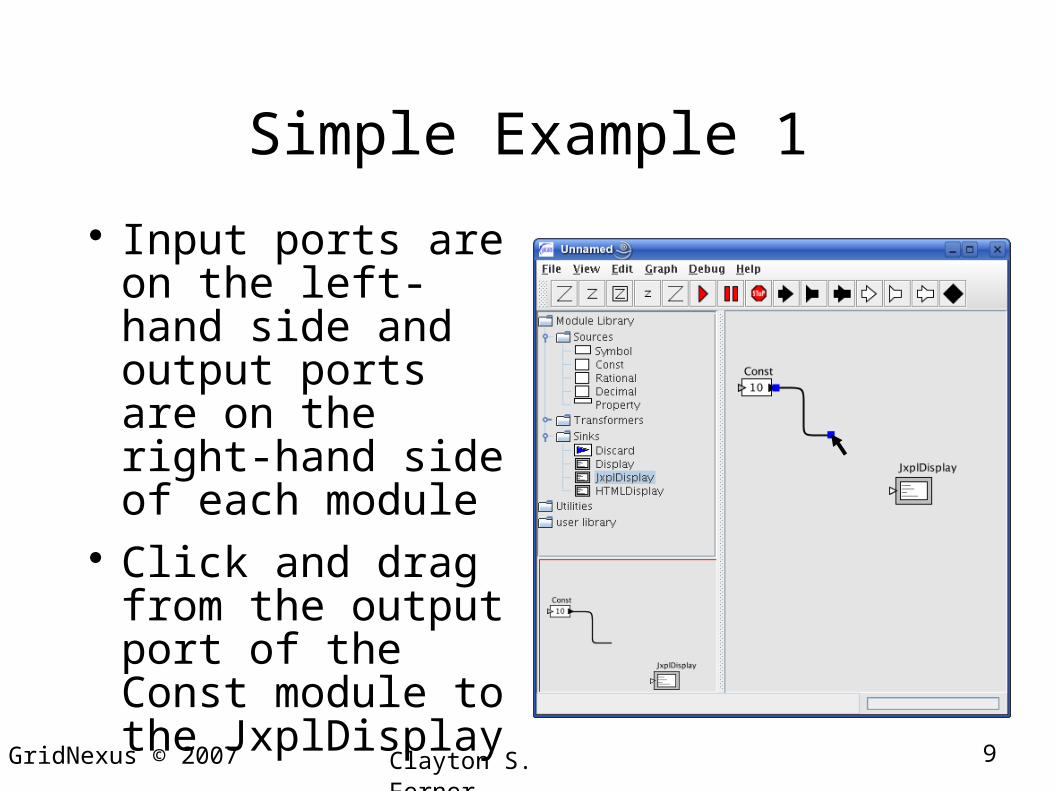
Simple Example 1
Input ports are on the left-hand side and output ports are on the right-hand side of each module
Click and drag from the output port of the Const module to the JxplDisplay
10GridNexus © 2007 Clayton S. Ferner
Simple Example 1
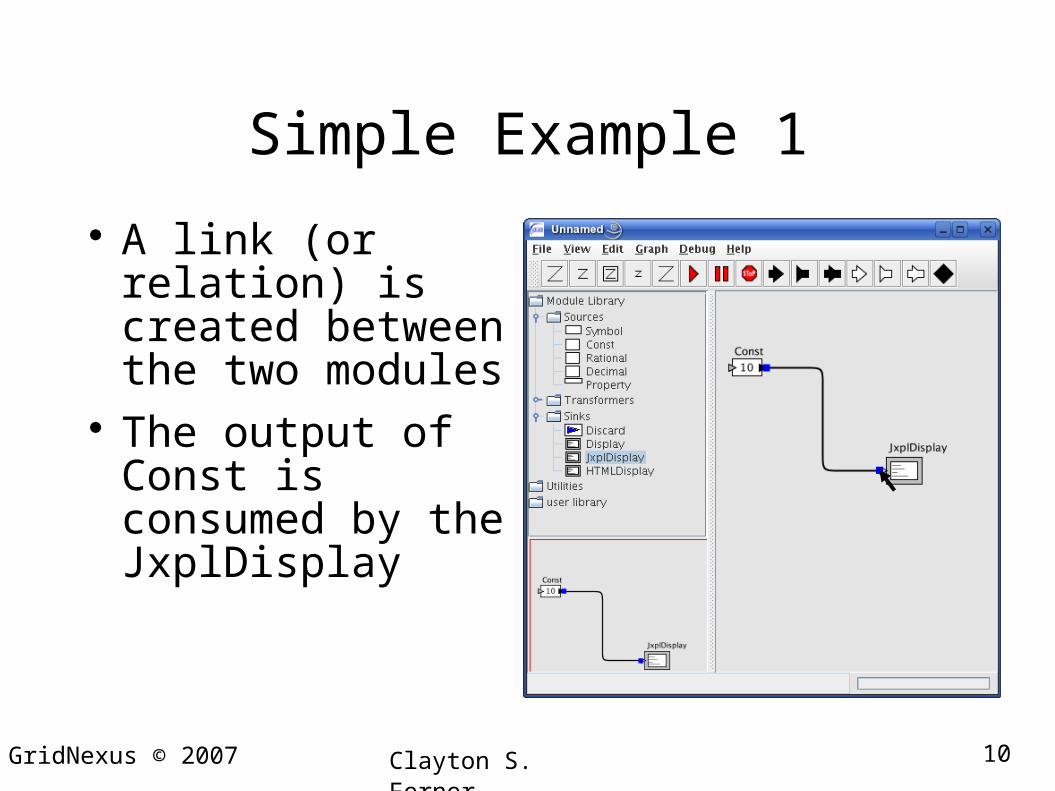
A link (or relation) is created between the two modules
The output of Const is consumed by the JxplDisplay
11GridNexus © 2007 Clayton S. Ferner
Simple Example 1
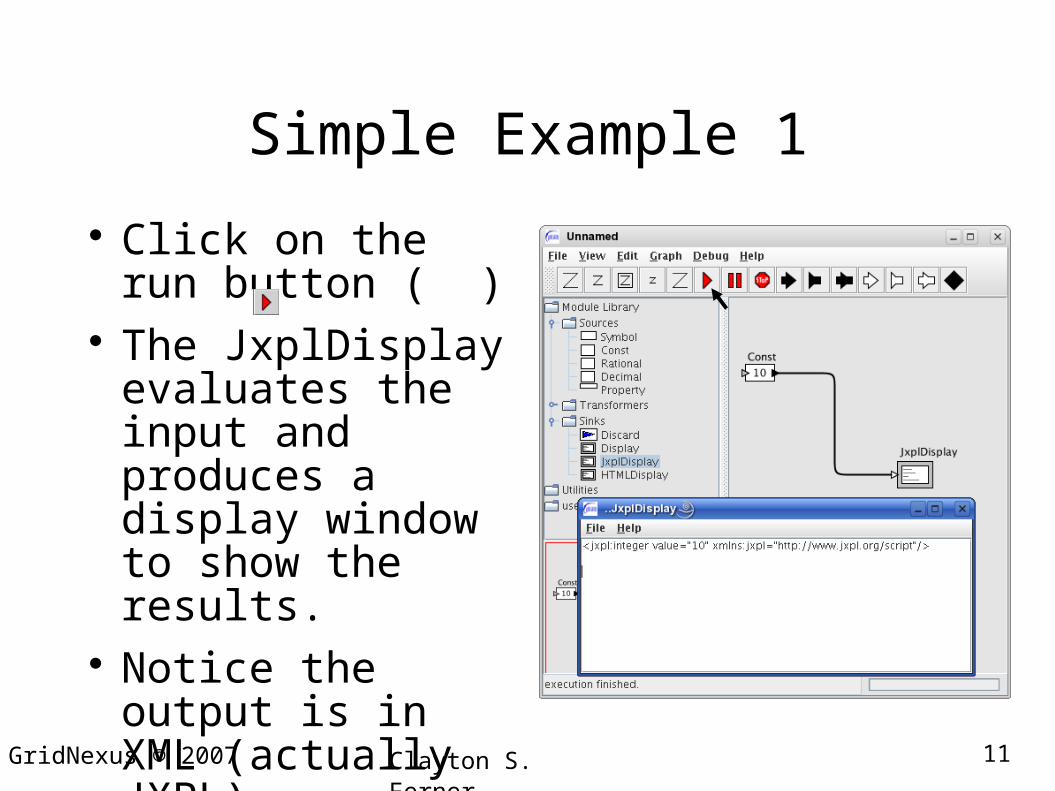
Click on the run button ( )
The JxplDisplay evaluates the input and produces a display window to show the results.
Notice the output is in XML (actually JXPL)
12GridNexus © 2007 Clayton S. Ferner
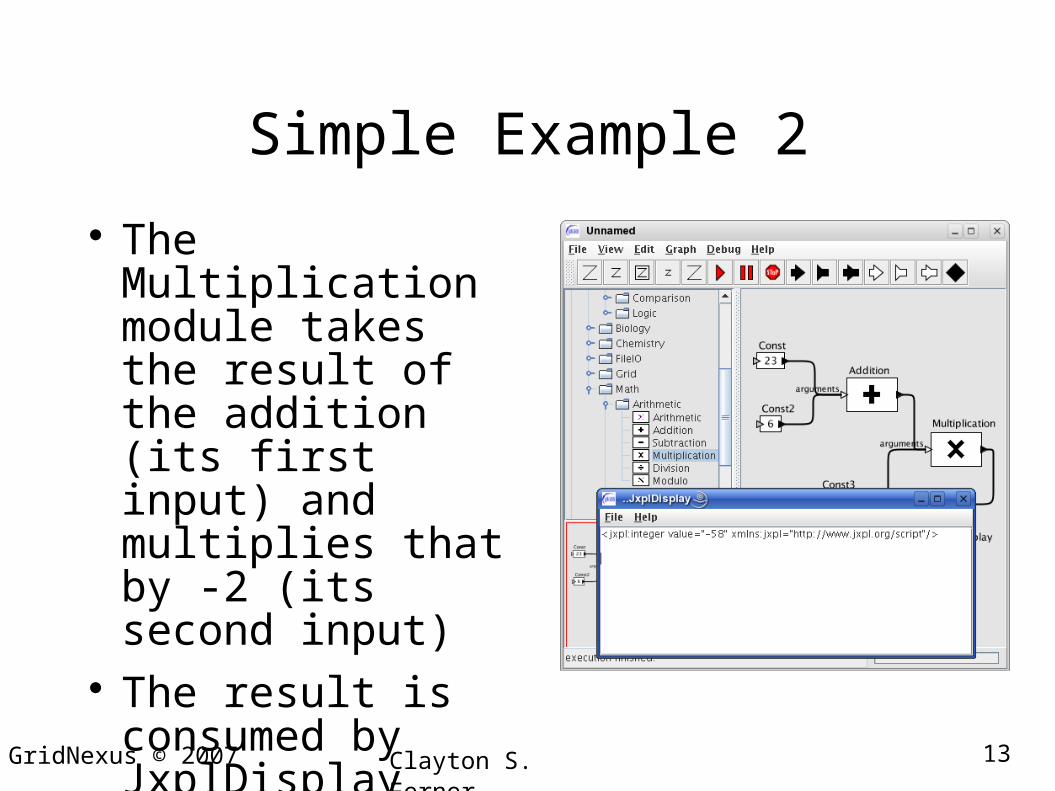
Simple Example 2
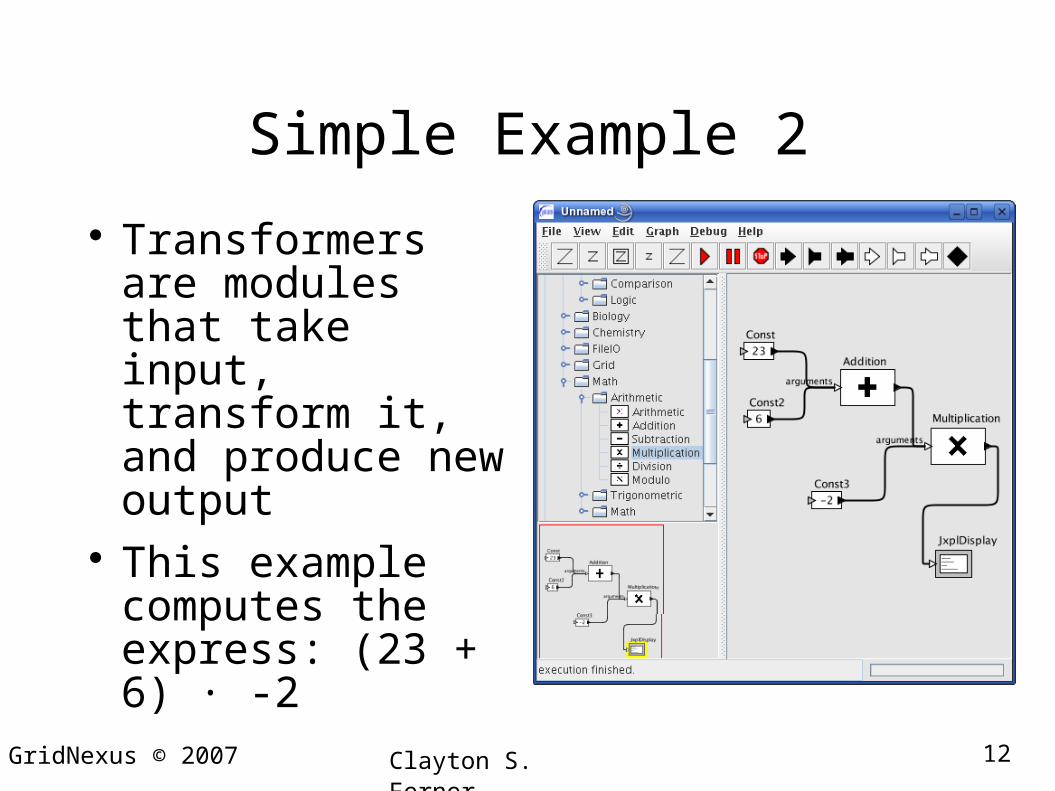
Transformers are modules that take input, transform it, and produce new output
This example computes the express: (23 + 6) ∙ -2
13GridNexus © 2007 Clayton S. Ferner
Simple Example 2
The Multiplication module takes the result of the addition (its first input) and multiplies that by -2 (its second input)
The result is consumed by JxplDisplay
14GridNexus © 2007 Clayton S. Ferner
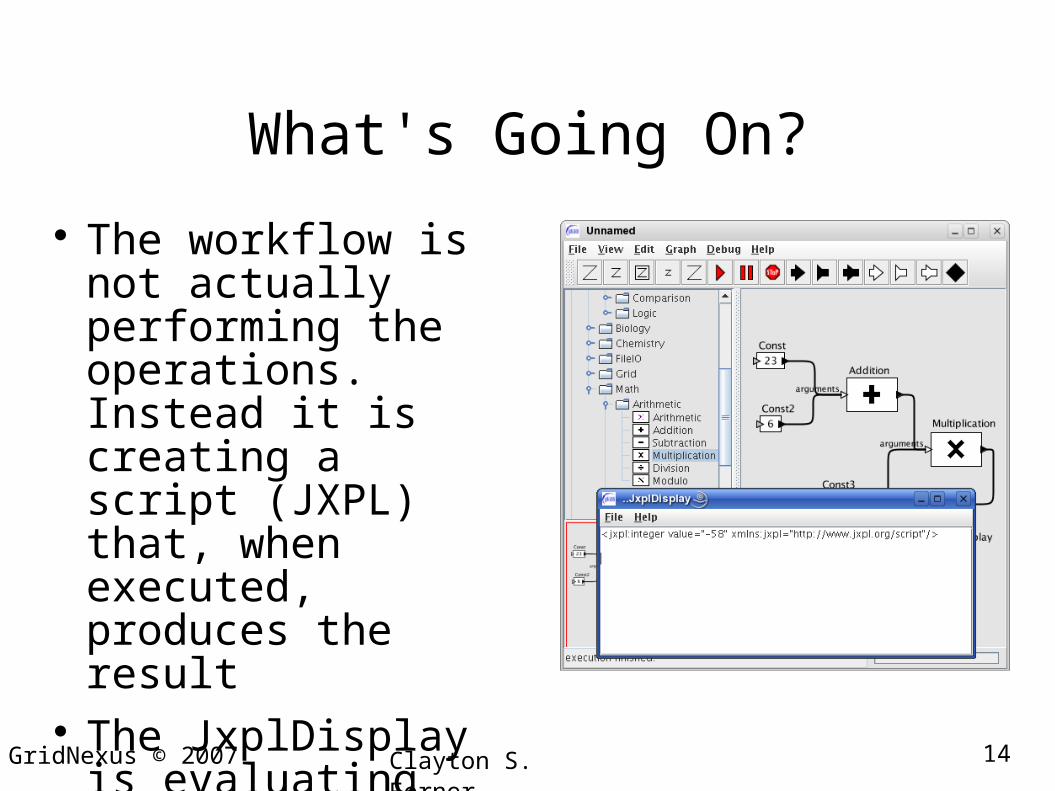
What's Going On?
The workflow is not actually performing the operations. Instead it is creating a script (JXPL) that, when executed, produces the result
The JxplDisplay is evaluating the script and displaying the results
15GridNexus © 2007 Clayton S. Ferner
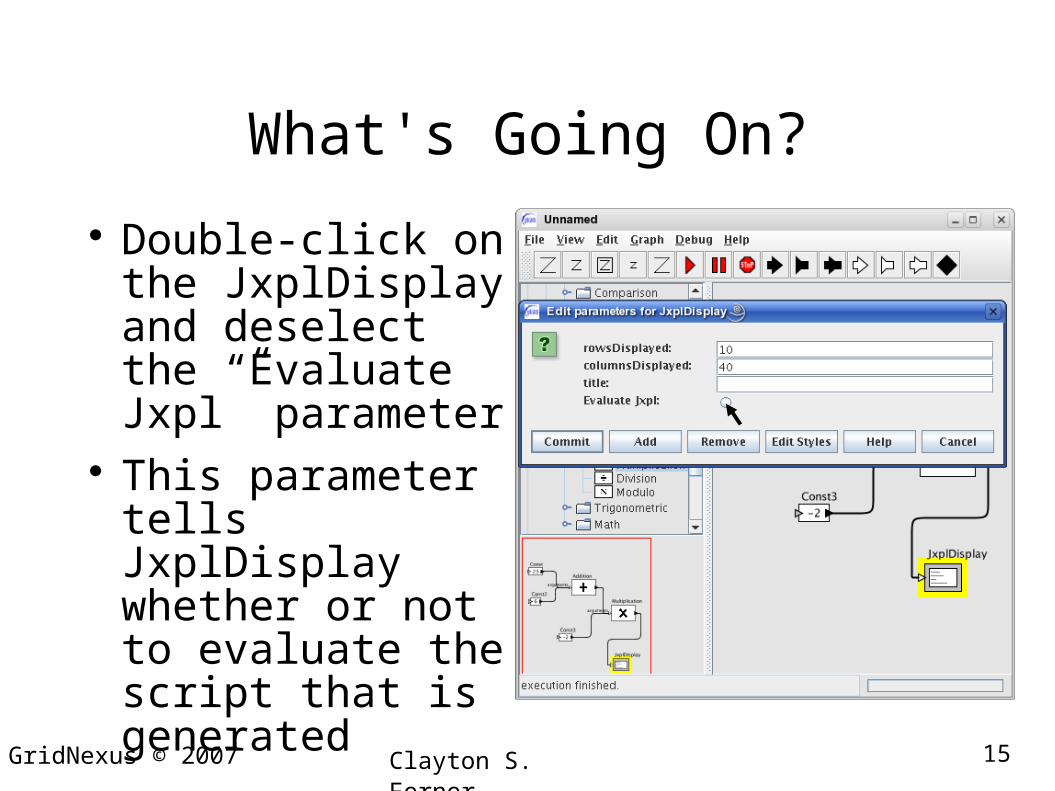
What's Going On?
Double-click on the JxplDisplay and deselect the “Evaluate Jxpl” parameter
This parameter tells JxplDisplay whether or not to evaluate the script that is generated
16GridNexus © 2007 Clayton S. Ferner
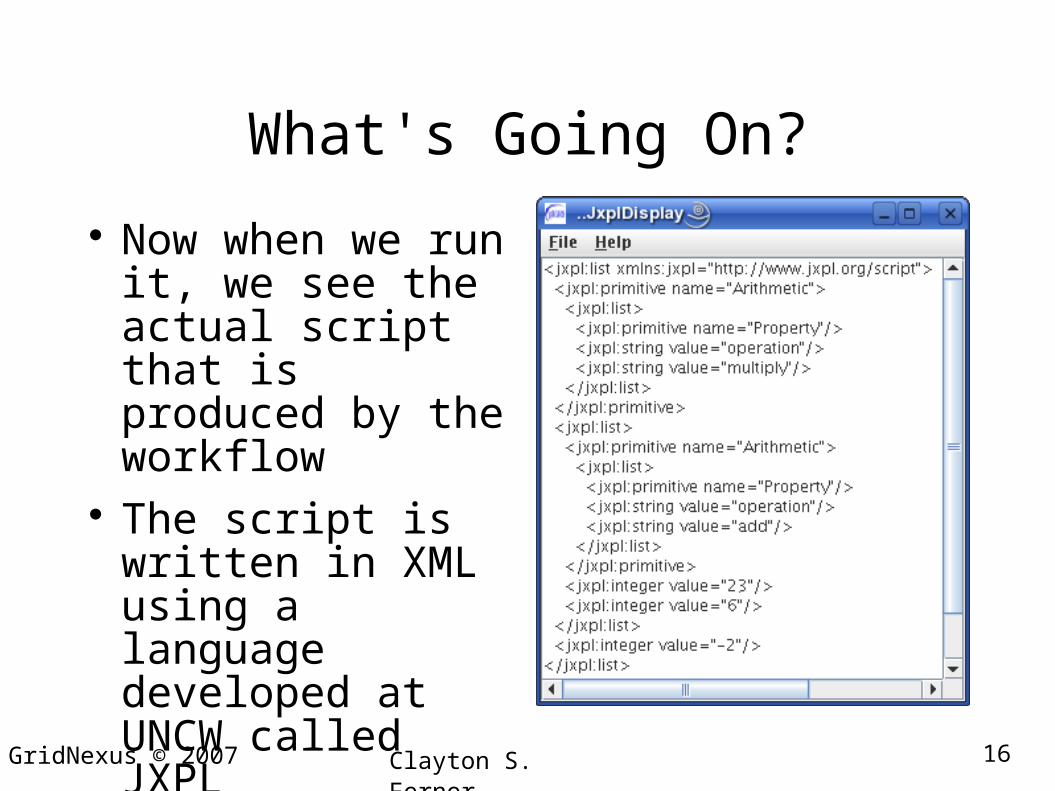
What's Going On?
Now when we run it, we see the actual script that is produced by the workflow
The script is written in XML using a language developed at UNCW called JXPL
17GridNexus © 2007 Clayton S. Ferner
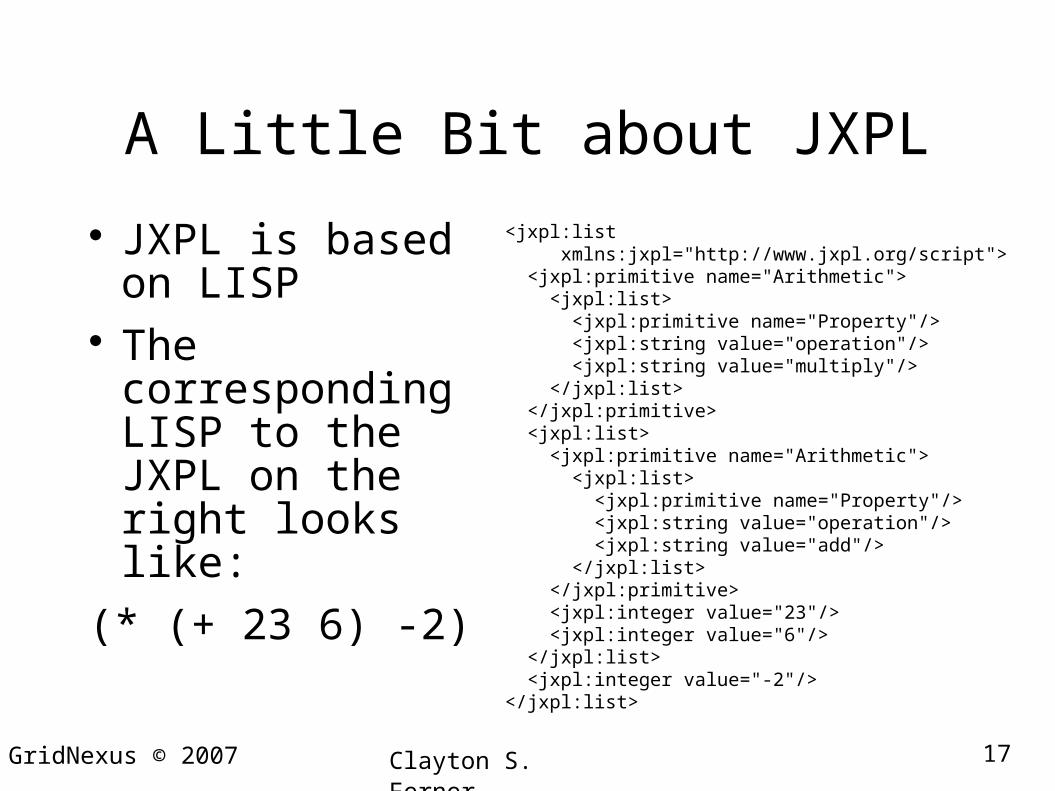
A Little Bit about JXPL
JXPL is based on LISP The corresponding
LISP to the JXPL on the right looks like:
(* (+ 23 6) -2)
<jxpl:list xmlns:jxpl="http://www.jxpl.org/script"> <jxpl:primitive name="Arithmetic"> <jxpl:list> <jxpl:primitive name="Property"/> <jxpl:string value="operation"/> <jxpl:string value="multiply"/> </jxpl:list> </jxpl:primitive> <jxpl:list> <jxpl:primitive name="Arithmetic"> <jxpl:list> <jxpl:primitive name="Property"/> <jxpl:string value="operation"/> <jxpl:string value="add"/> </jxpl:list> </jxpl:primitive> <jxpl:integer value="23"/> <jxpl:integer value="6"/> </jxpl:list> <jxpl:integer value="-2"/></jxpl:list>
18GridNexus © 2007 Clayton S. Ferner
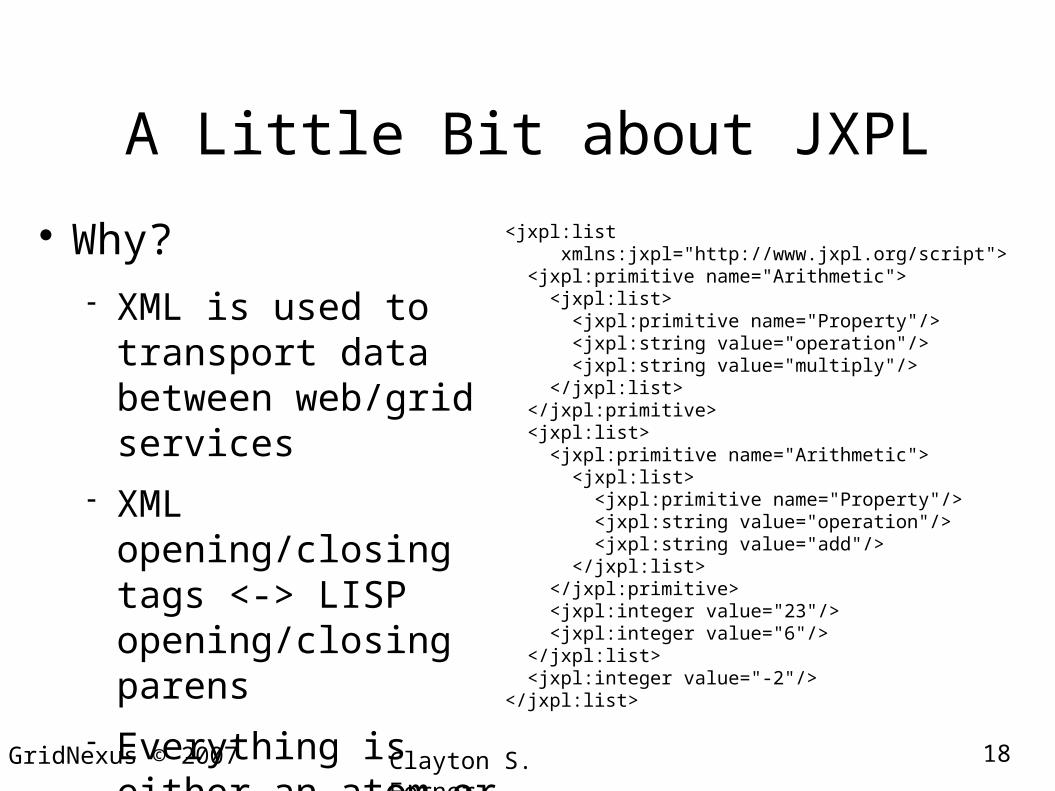
A Little Bit about JXPL
Why? XML is used to transport
data between web/grid services
XML opening/closing tags <-> LISP opening/closing parens
Everything is either an atom or a list (functions, Data Structures)
<jxpl:list xmlns:jxpl="http://www.jxpl.org/script"> <jxpl:primitive name="Arithmetic"> <jxpl:list> <jxpl:primitive name="Property"/> <jxpl:string value="operation"/> <jxpl:string value="multiply"/> </jxpl:list> </jxpl:primitive> <jxpl:list> <jxpl:primitive name="Arithmetic"> <jxpl:list> <jxpl:primitive name="Property"/> <jxpl:string value="operation"/> <jxpl:string value="add"/> </jxpl:list> </jxpl:primitive> <jxpl:integer value="23"/> <jxpl:integer value="6"/> </jxpl:list> <jxpl:integer value="-2"/></jxpl:list>
19GridNexus © 2007 Clayton S. Ferner
A Little Bit about JXPL
The transformer library is LISP-centric More on JXPL later See www.gridnexus.org
20GridNexus © 2007 Clayton S. Ferner
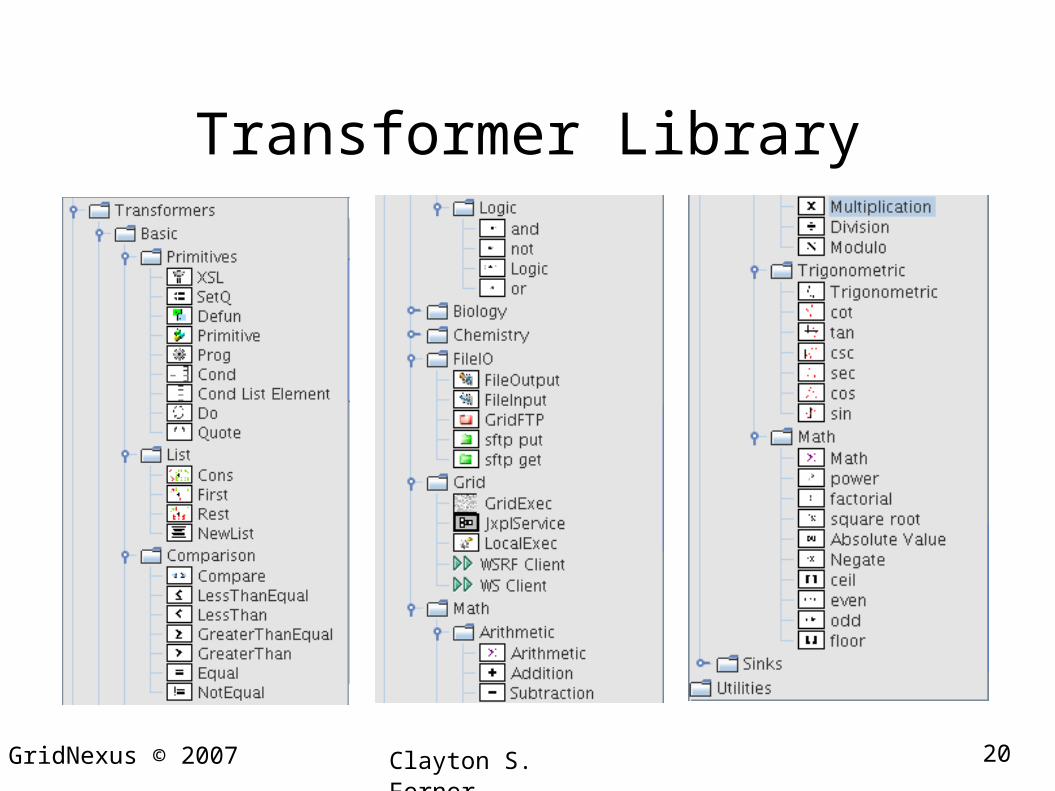
Transformer Library
21GridNexus © 2007 Clayton S. Ferner
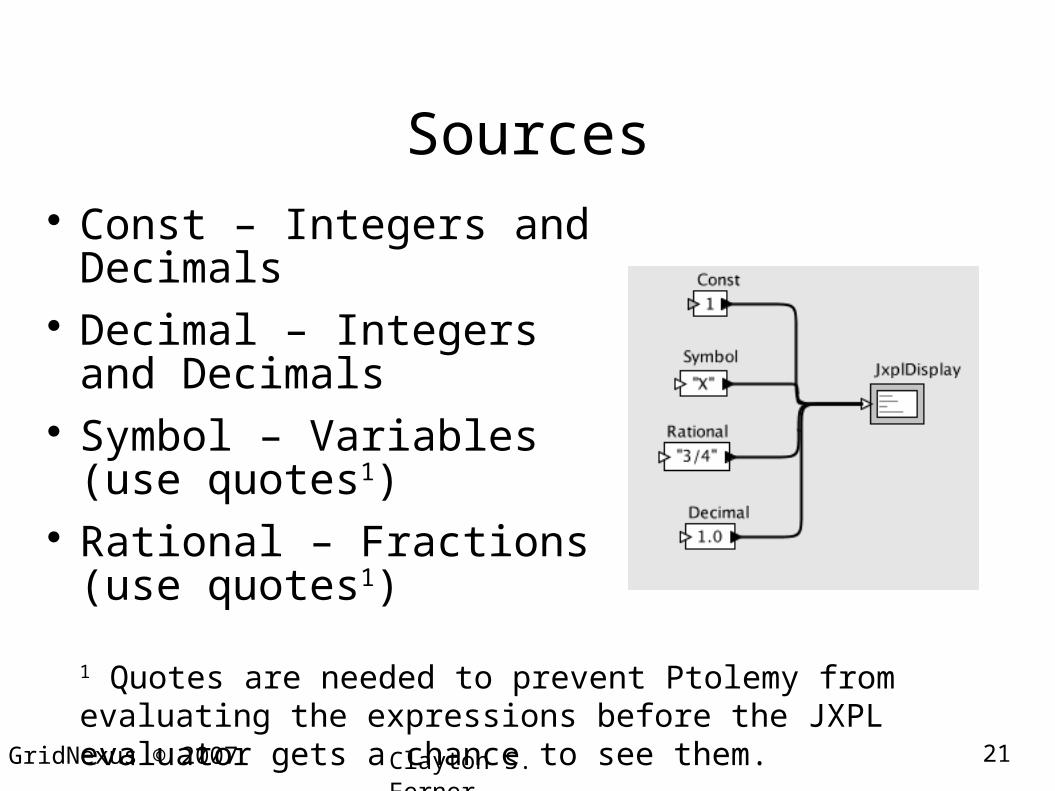
Sources Const – Integers and Decimals Decimal – Integers and
Decimals Symbol – Variables (use
quotes1) Rational – Fractions (use
quotes1)
1 Quotes are needed to prevent Ptolemy from evaluating the expressions before the JXPL evaluator gets a chance to see them.
22GridNexus © 2007 Clayton S. Ferner
Examples
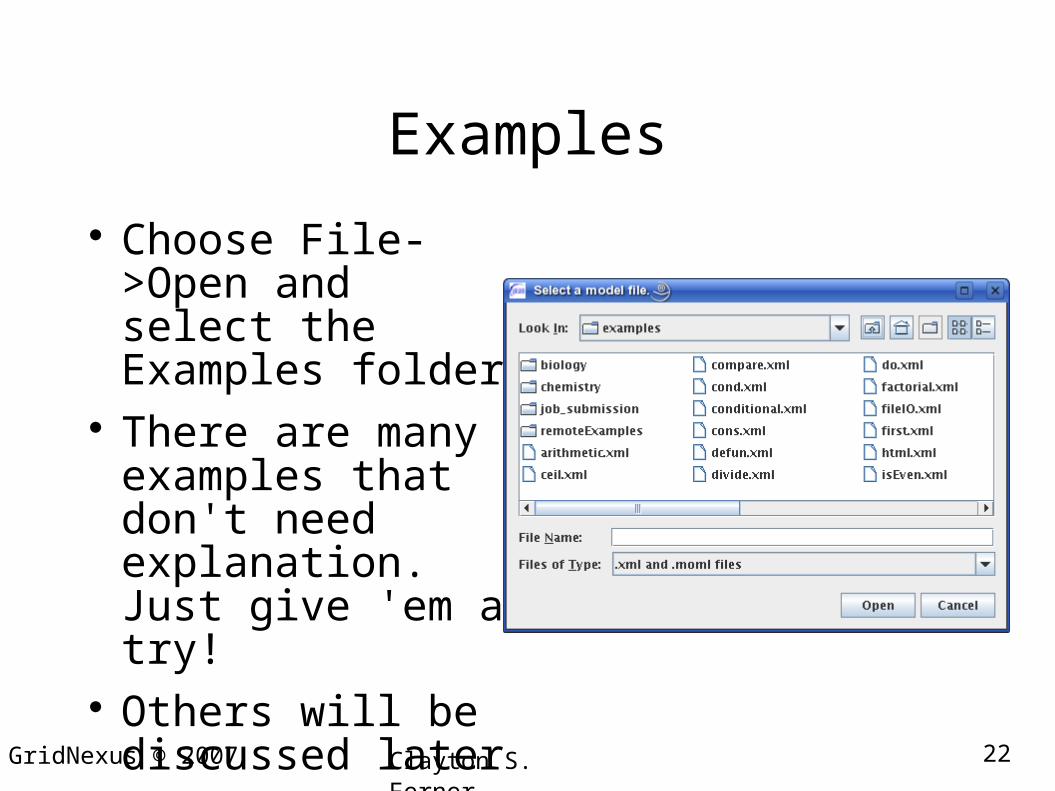
Choose File->Open and select the Examples folder
There are many examples that don't need explanation. Just give 'em a try!
Others will be discussed later
23GridNexus © 2007 Clayton S. Ferner
Composites
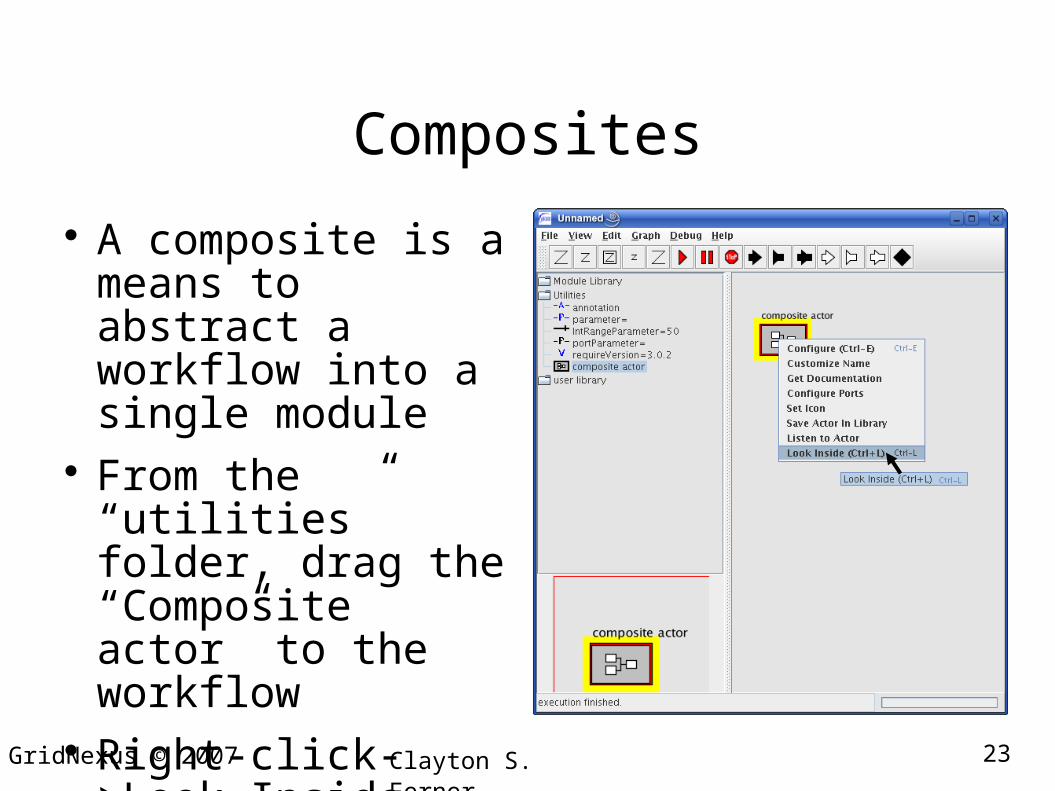
A composite is a means to abstract a workflow into a single module
From the “utilities” folder, drag the “Composite actor” to the workflow
Right-click->Look Inside

24GridNexus © 2007 Clayton S. Ferner
Composites
This opens a new window in which we create the workflow that defines the new module
First we need ports Single ports take or
produce single values
Multi ports take or produce multiple values
25GridNexus © 2007 Clayton S. Ferner
Composites
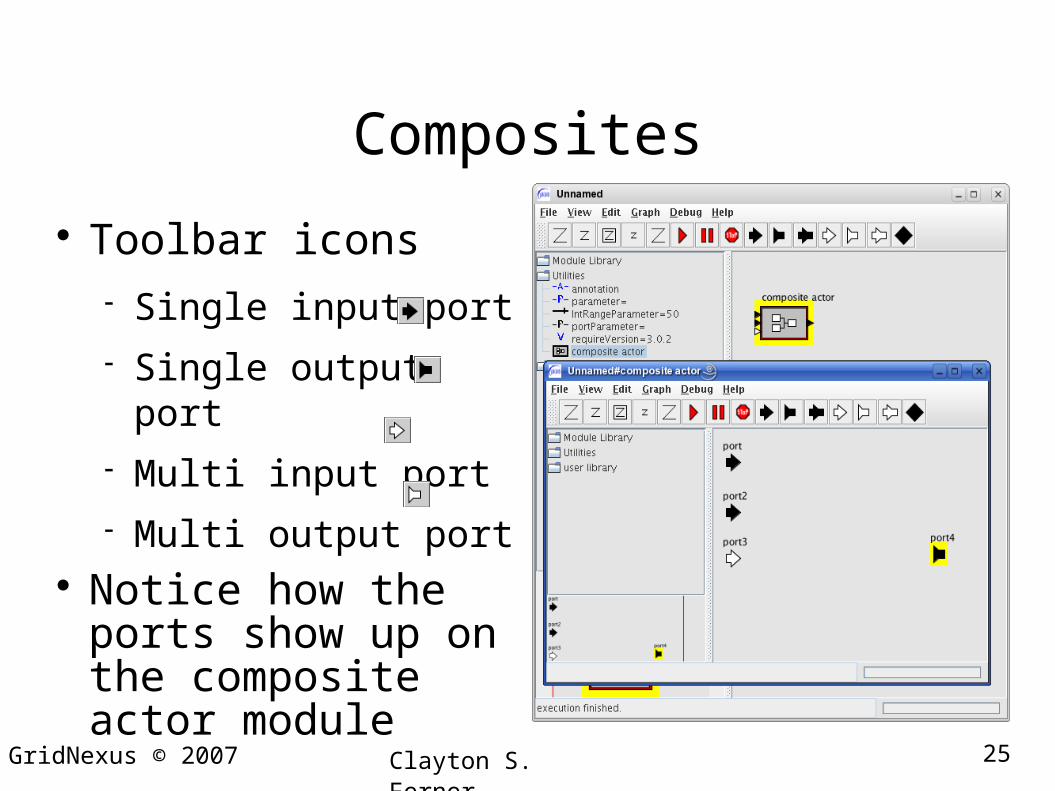
Toolbar icons Single input port
Single output port
Multi input port
Multi output port Notice how the ports
show up on the composite actor module
26GridNexus © 2007 Clayton S. Ferner
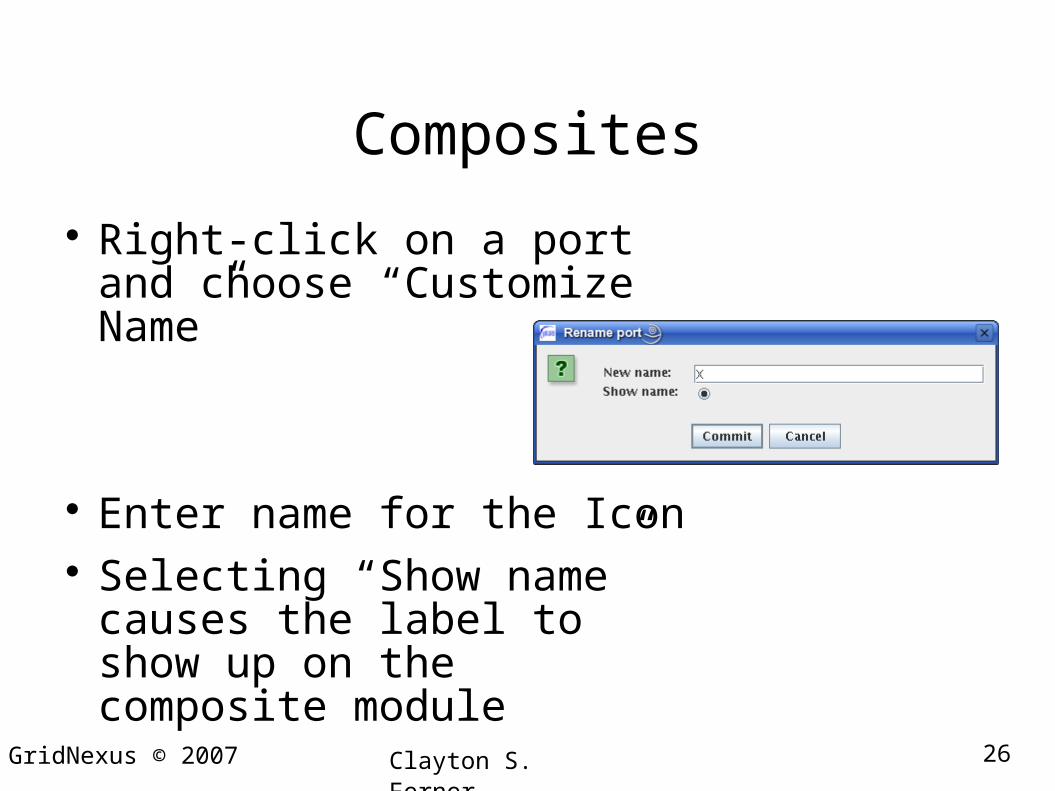
Composites
Right-click on a port and choose “Customize Name”
Enter name for the Icon Selecting “Show name” causes
the label to show up on the composite module
27GridNexus © 2007 Clayton S. Ferner
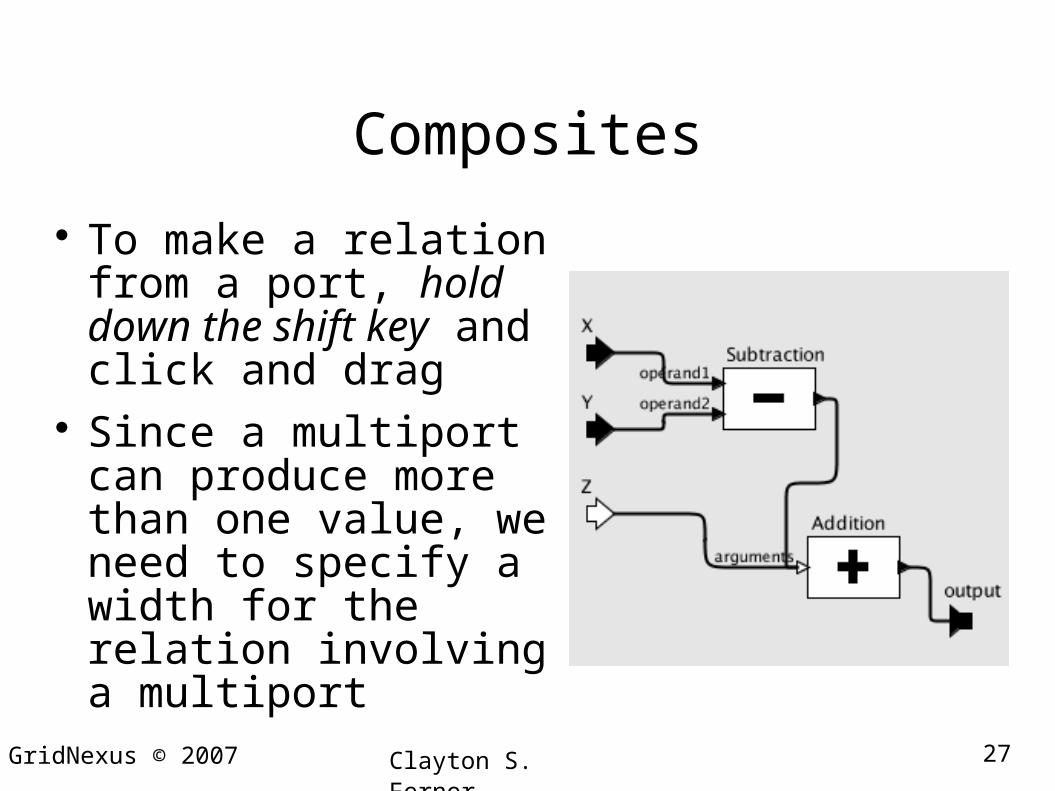
Composites
To make a relation from a port, hold down the shift key and click and drag
Since a multiport can produce more than one value, we need to specify a width for the relation involving a multiport
28GridNexus © 2007 Clayton S. Ferner
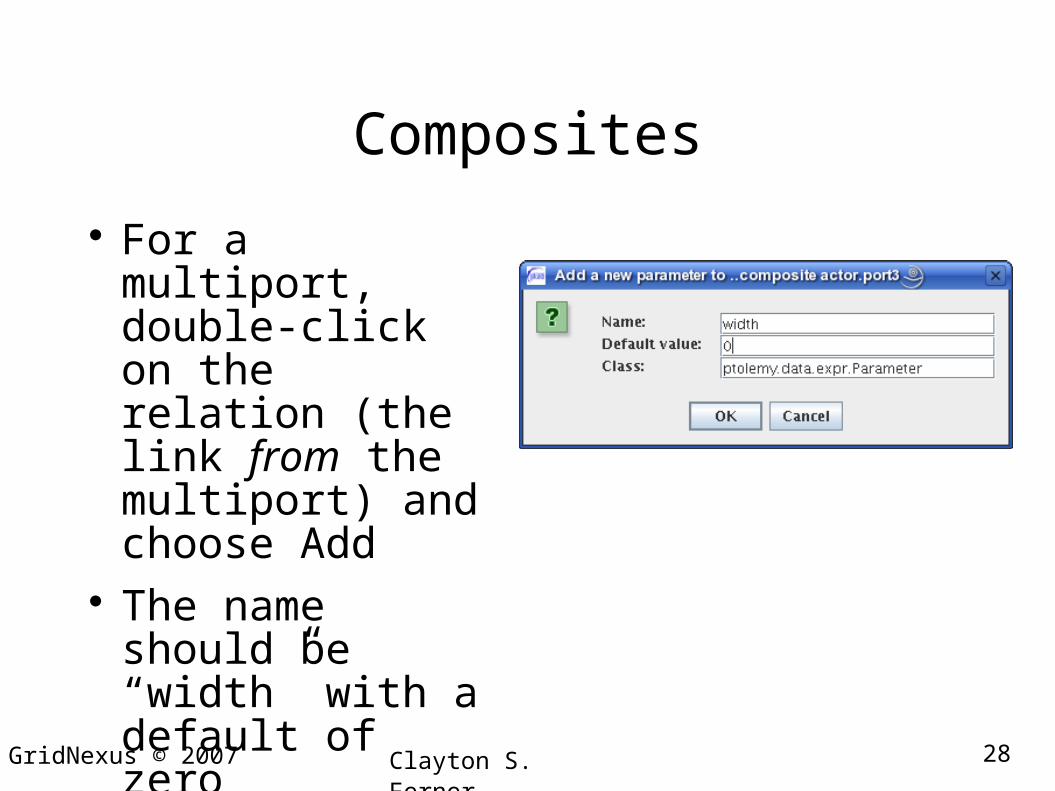
Composites
For a multiport, double-click on the relation (the link from the multiport) and choose Add
The name should be “width” with a default of zero
29GridNexus © 2007 Clayton S. Ferner
Composites
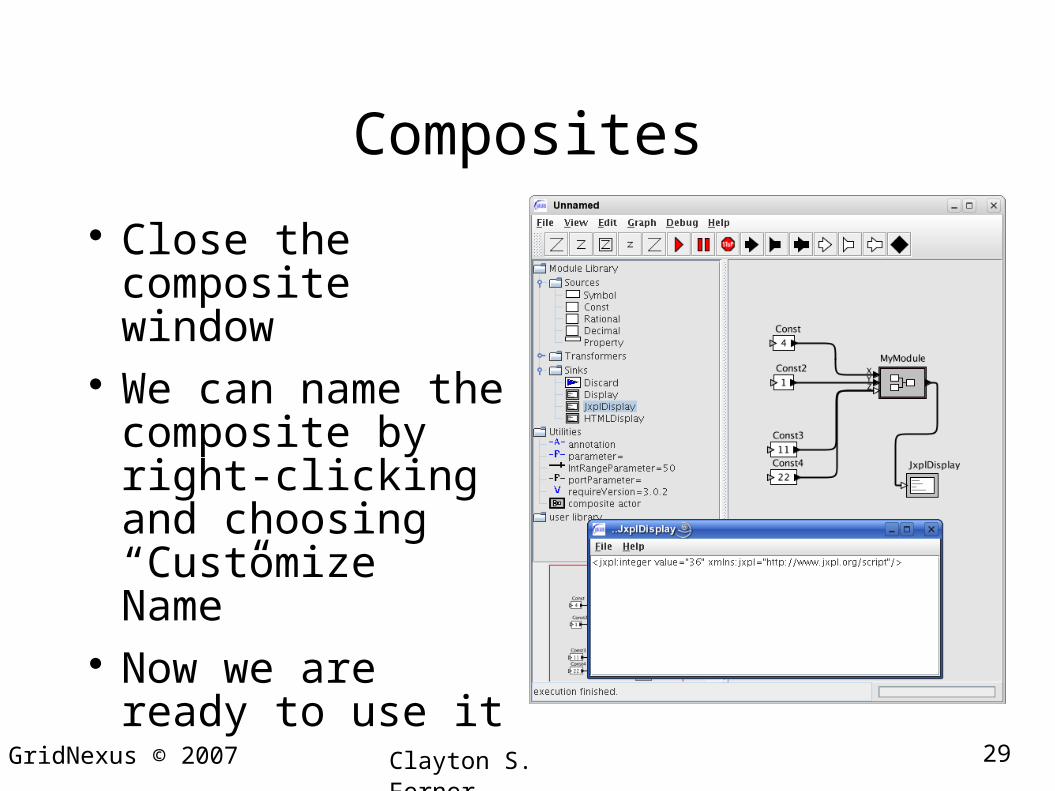
Close the composite window
We can name the composite by right-clicking and choosing “Customize Name”
Now we are ready to use it
30GridNexus © 2007 Clayton S. Ferner
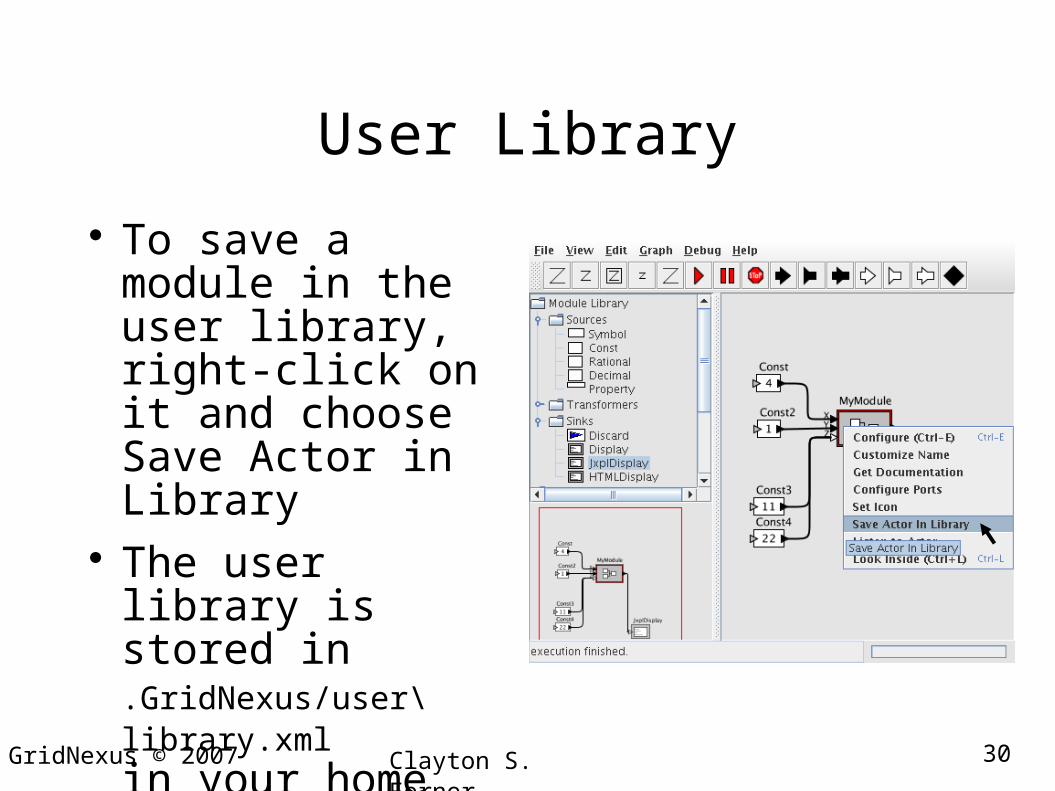
User Library
To save a module in the user library, right-click on it and choose Save Actor in Library
The user library is stored in .GridNexus/user\ library.xml in your home directory
31GridNexus © 2007 Clayton S. Ferner
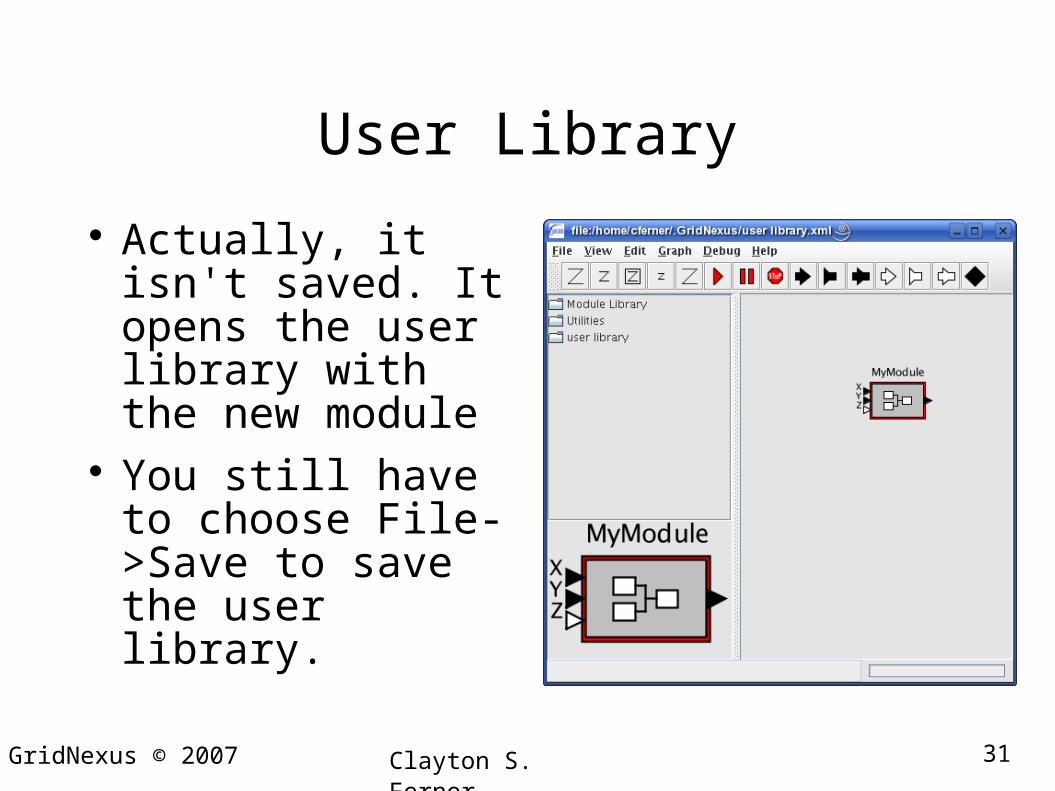
User Library
Actually, it isn't saved. It opens the user library with the new module
You still have to choose File->Save to save the user library.
32GridNexus © 2007 Clayton S. Ferner
User Library
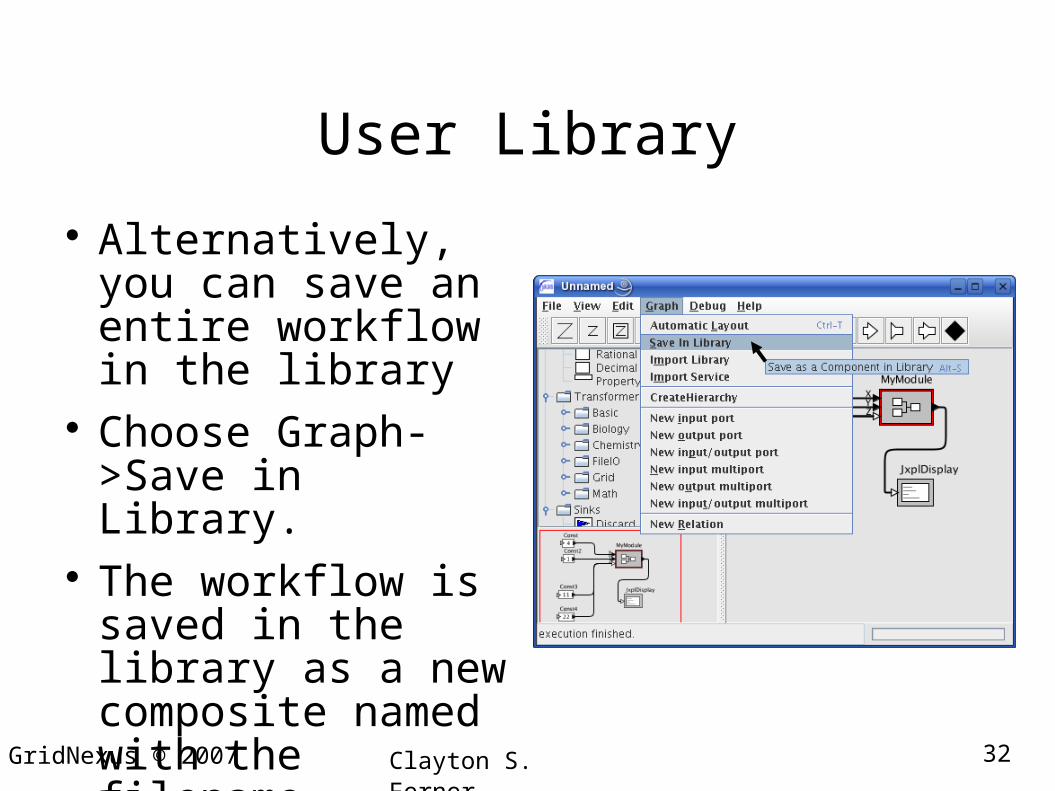
Alternatively, you can save an entire workflow in the library
Choose Graph->Save in Library.
The workflow is saved in the library as a new composite named with the filename
33GridNexus © 2007 Clayton S. Ferner
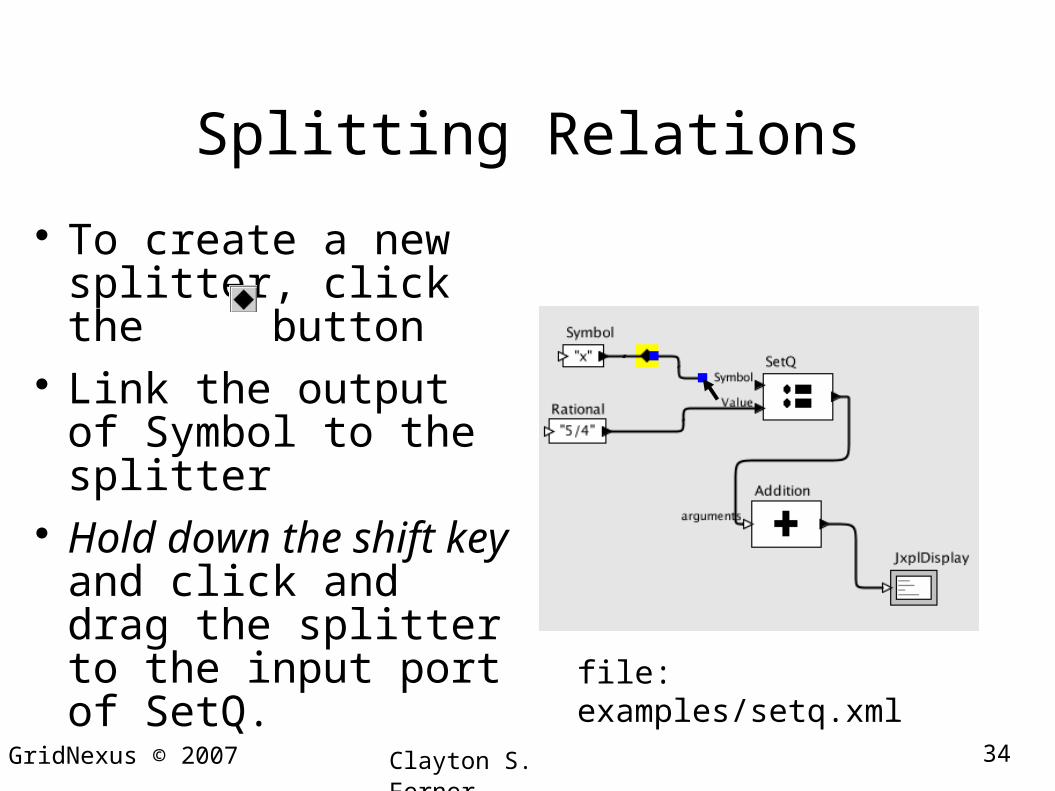
Splitting Relations
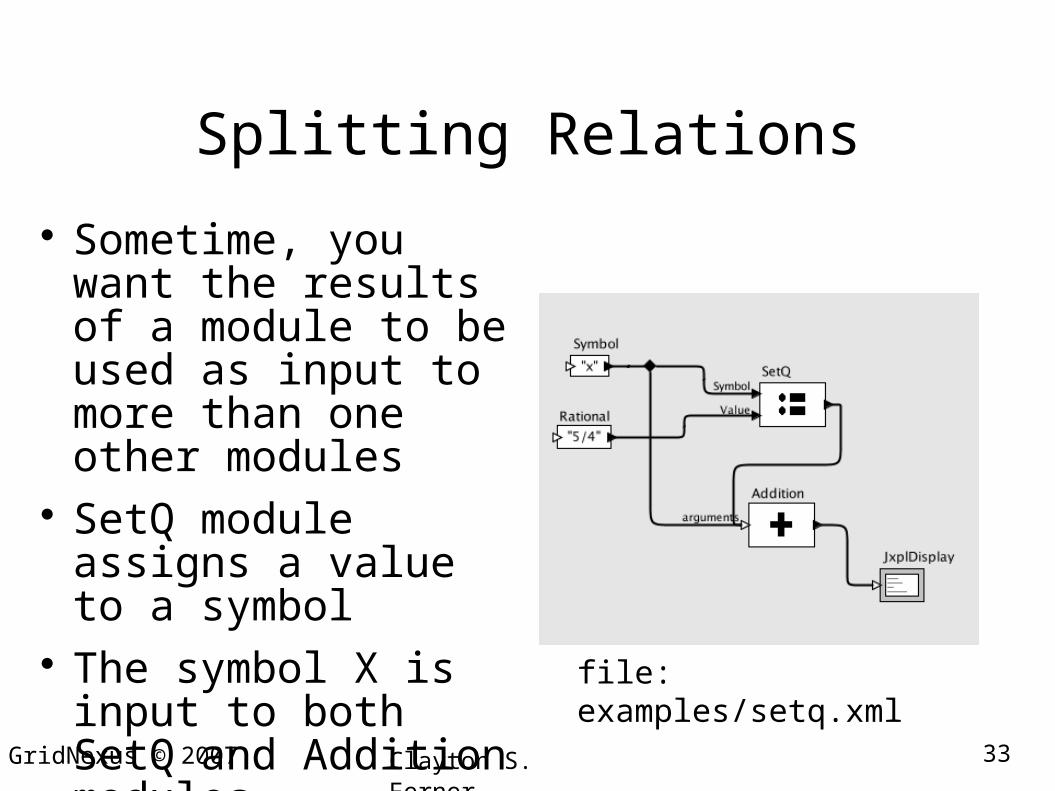
Sometime, you want the results of a module to be used as input to more than one other modules
SetQ module assigns a value to a symbol
The symbol X is input to both SetQ and Addition modules
file: examples/setq.xml
34GridNexus © 2007 Clayton S. Ferner
Splitting Relations
To create a new splitter, click the button
Link the output of Symbol to the splitter
Hold down the shift key and click and drag the splitter to the input port of SetQ.
file: examples/setq.xml
35GridNexus © 2007 Clayton S. Ferner
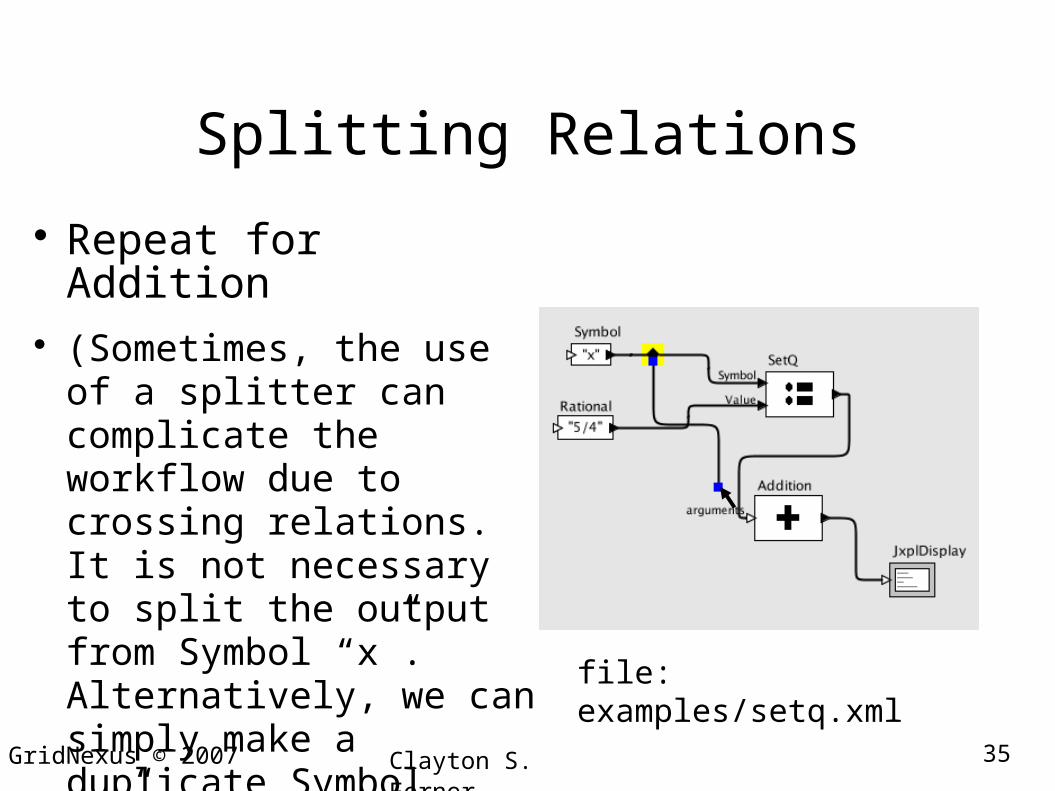
Splitting Relations
Repeat for Addition (Sometimes, the use of a
splitter can complicate the workflow due to crossing relations. It is not necessary to split the output from Symbol “x”. Alternatively, we can simply make a duplicate Symbol “x”.)
file: examples/setq.xml
36GridNexus © 2007 Clayton S. Ferner
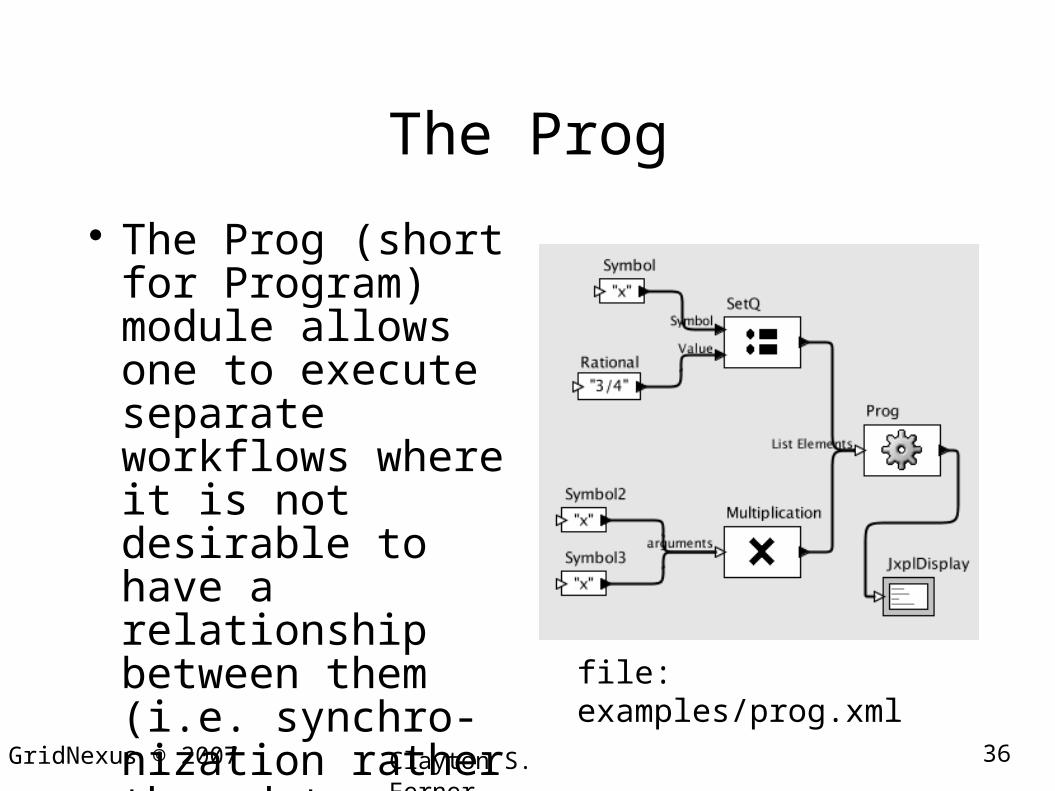
The Prog
The Prog (short for Program) module allows one to execute separate workflows where it is not desirable to have a relationship between them (i.e. synchro-nization rather than data dependency)
file: examples/prog.xml

37GridNexus © 2007 Clayton S. Ferner
The Prog
The Prog primitive evaluates each of its inputs in turn
It returns the results of the last one evaluated (in this case this case it returns 2x).
file: examples/prog.xml
38GridNexus © 2007 Clayton S. Ferner
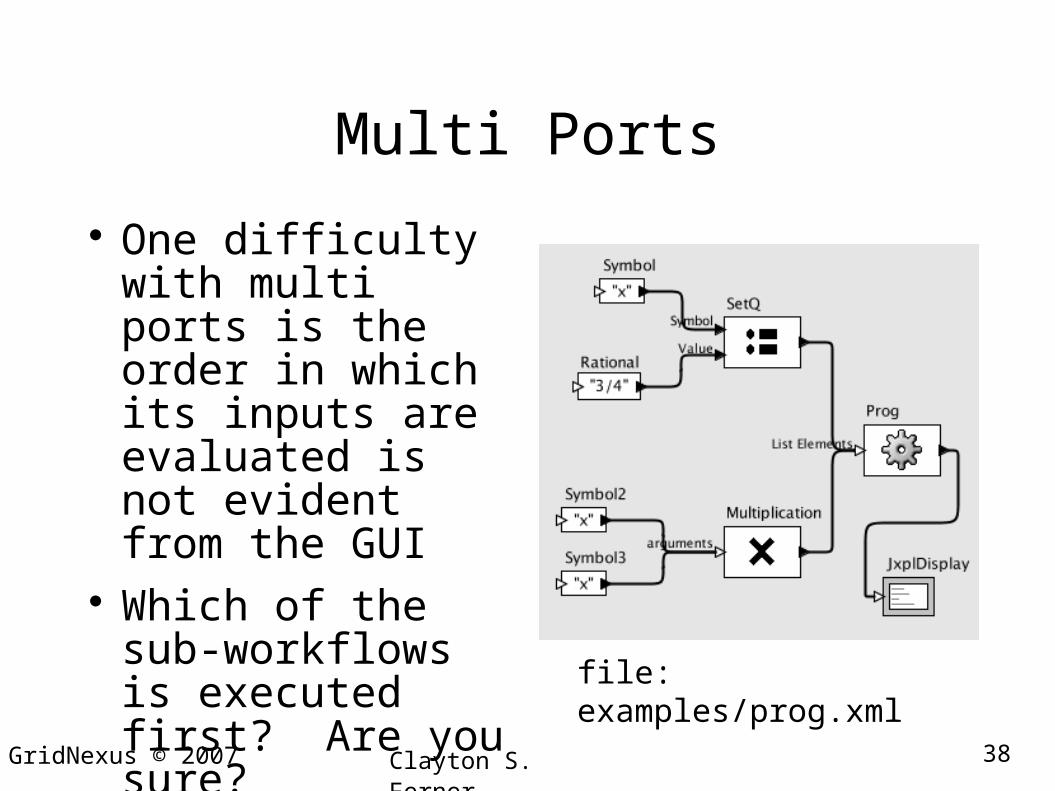
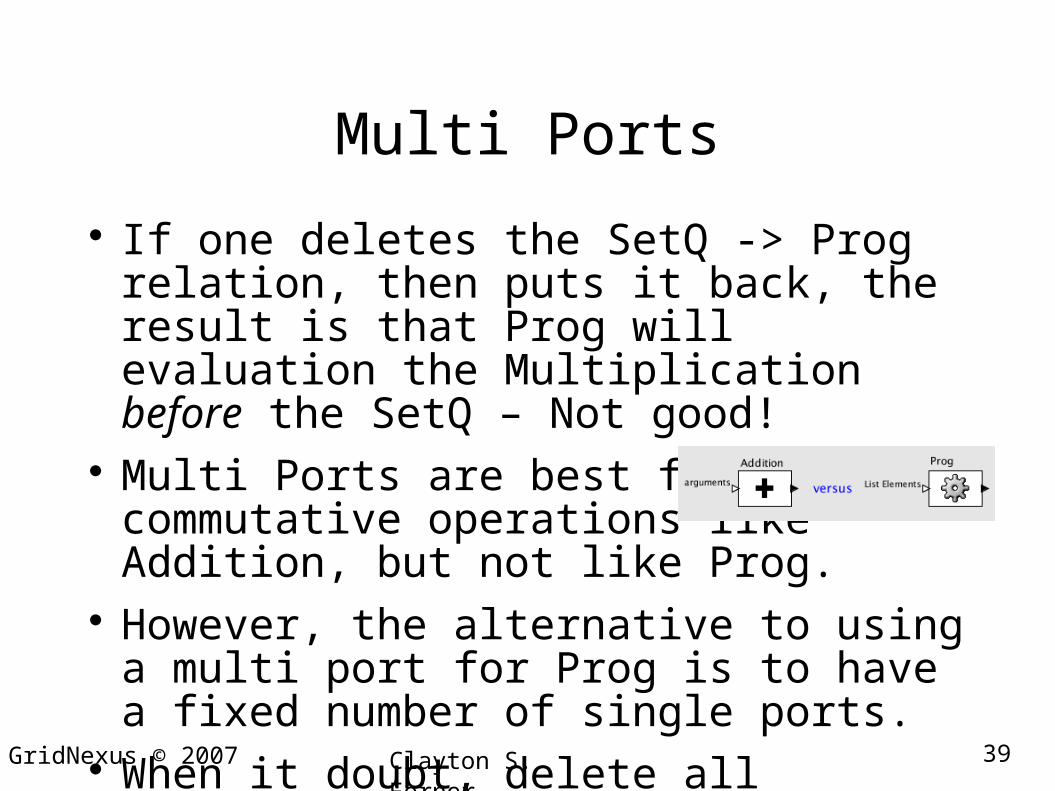
Multi Ports
One difficulty with multi ports is the order in which its inputs are evaluated is not evident from the GUI
Which of the sub-workflows is executed first? Are you sure?
file: examples/prog.xml
39GridNexus © 2007 Clayton S. Ferner
Multi Ports
If one deletes the SetQ -> Prog relation, then puts it back, the result is that Prog will evaluation the Multiplication before the SetQ – Not good!
Multi Ports are best for commutative operations like Addition, but not like Prog.
However, the alternative to using a multi port for Prog is to have a fixed number of single ports.
When it doubt, delete all relations to a multi port and redo them
40GridNexus © 2007 Clayton S. Ferner
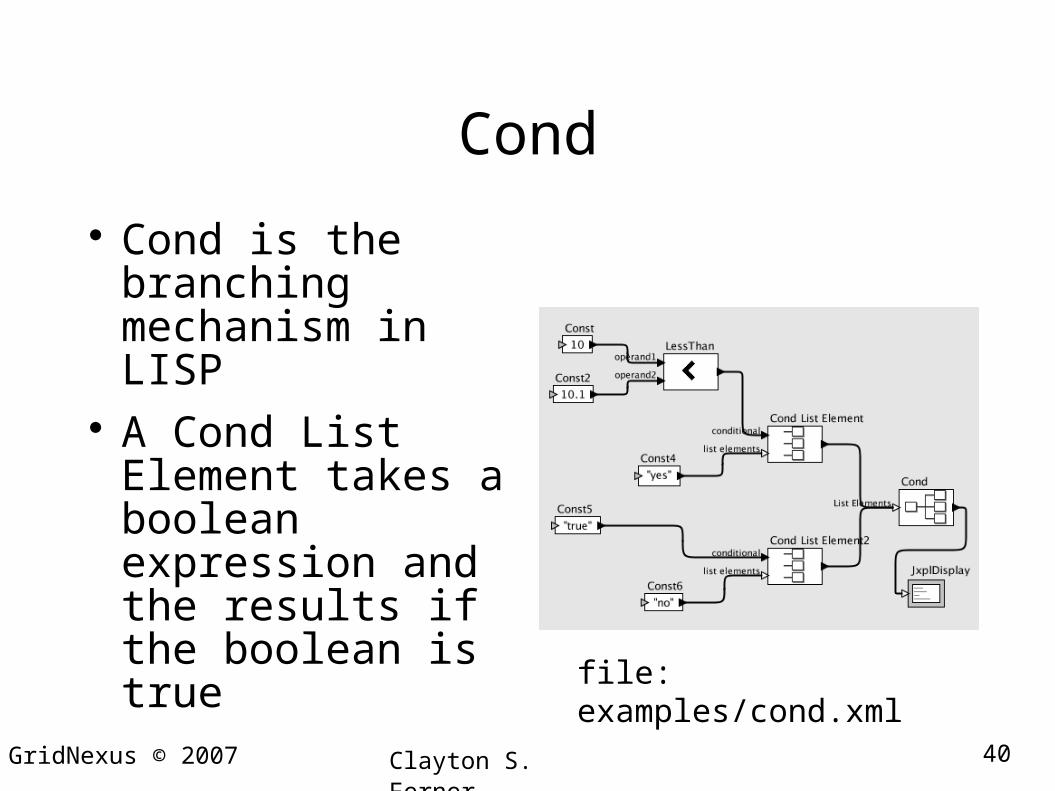
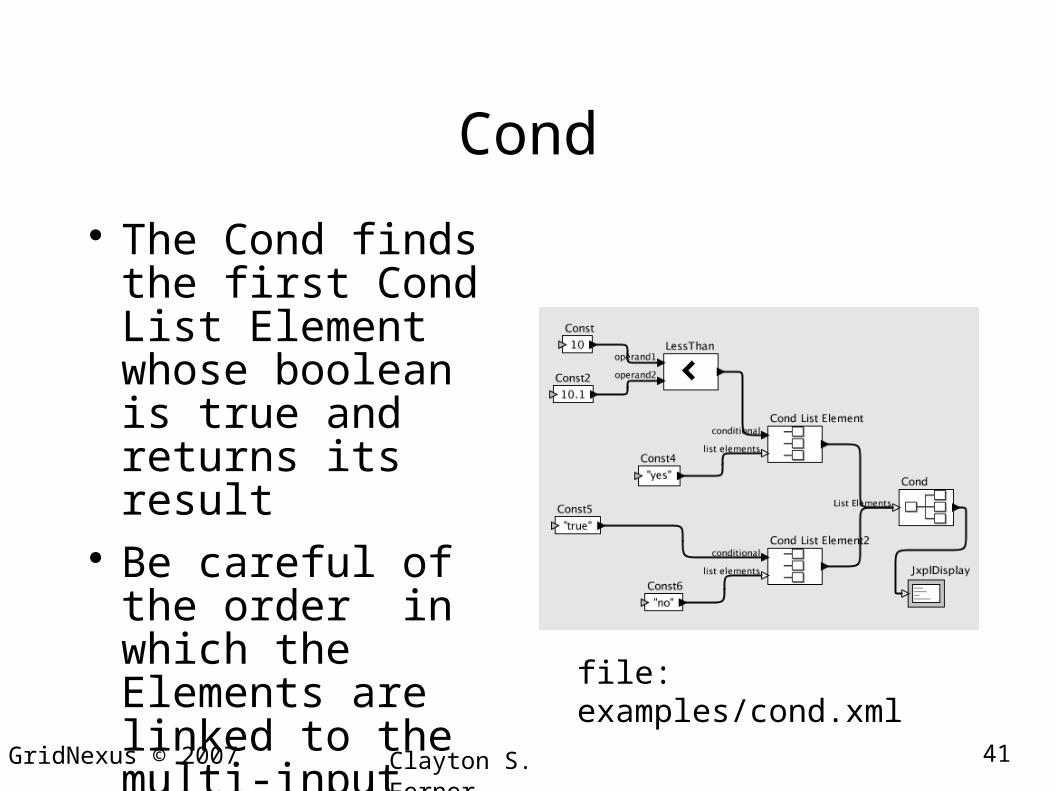
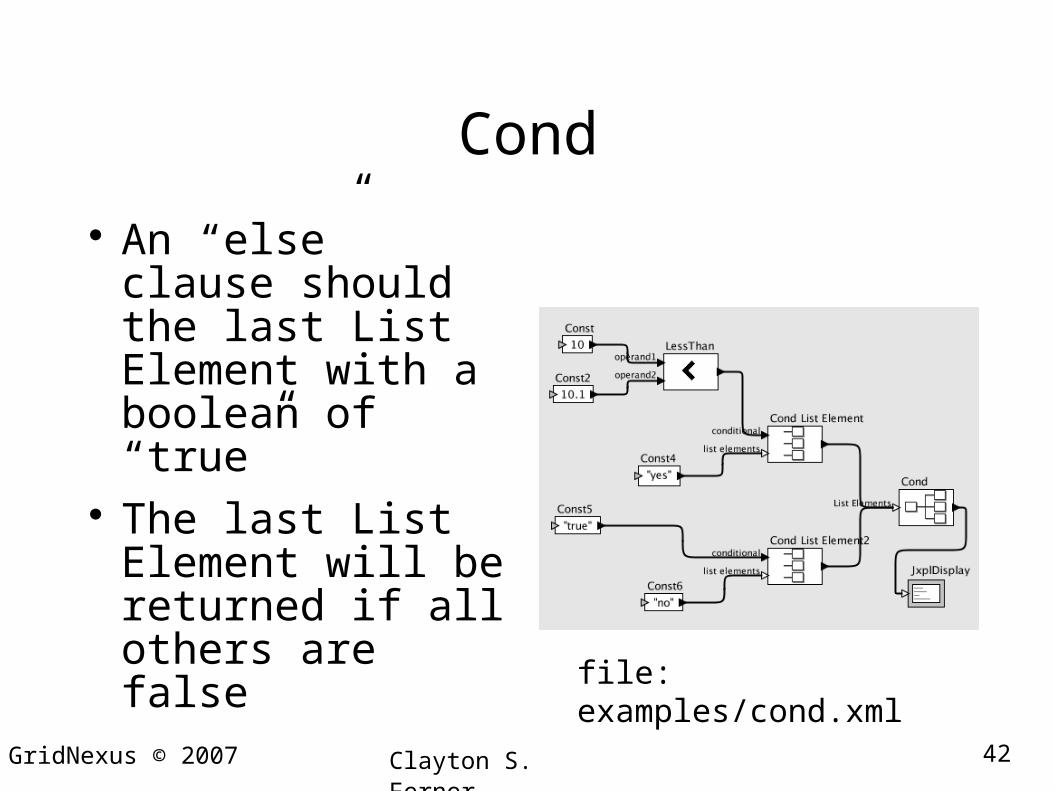
Cond
Cond is the branching mechanism in LISP
A Cond List Element takes a boolean expression and the results if the boolean is true
file: examples/cond.xml
41GridNexus © 2007 Clayton S. Ferner
Cond
The Cond finds the first Cond List Element whose boolean is true and returns its result
Be careful of the order in which the Elements are linked to the multi-input port
file: examples/cond.xml
42GridNexus © 2007 Clayton S. Ferner
Cond
An “else” clause should the last List Element with a boolean of “true”
The last List Element will be returned if all others are false
file: examples/cond.xml
43GridNexus © 2007 Clayton S. Ferner
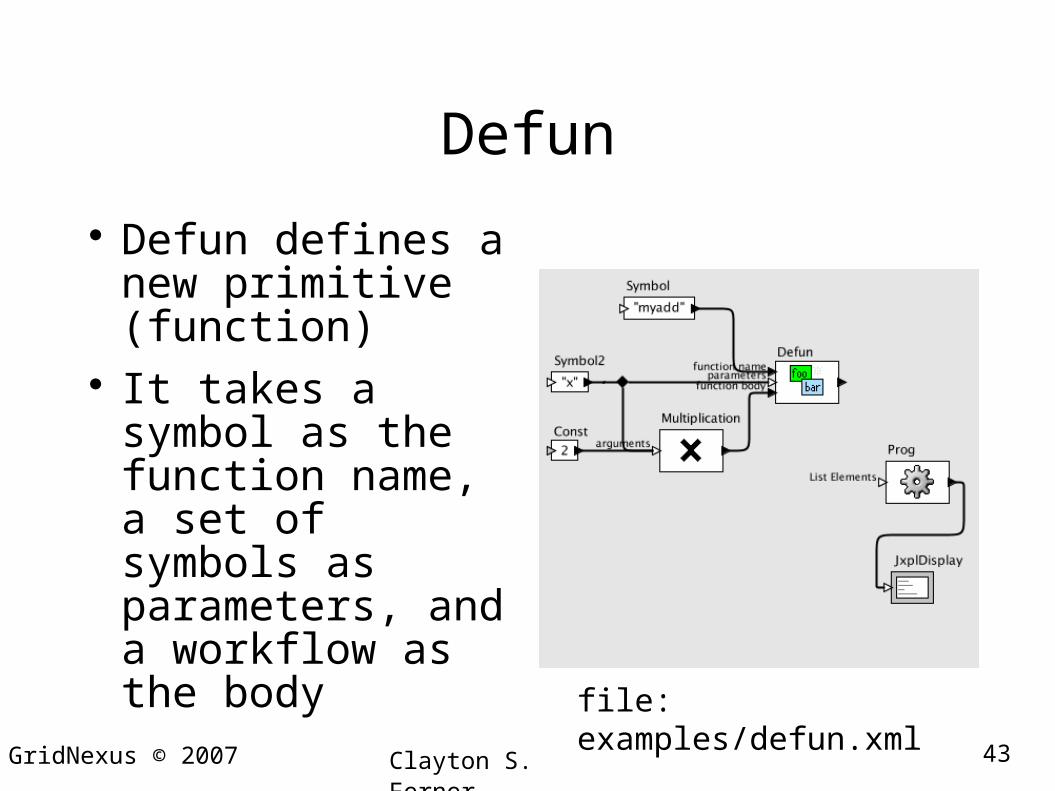
Defun
Defun defines a new primitive (function)
It takes a symbol as the function name, a set of symbols as parameters, and a workflow as the body
file: examples/defun.xml
44GridNexus © 2007 Clayton S. Ferner
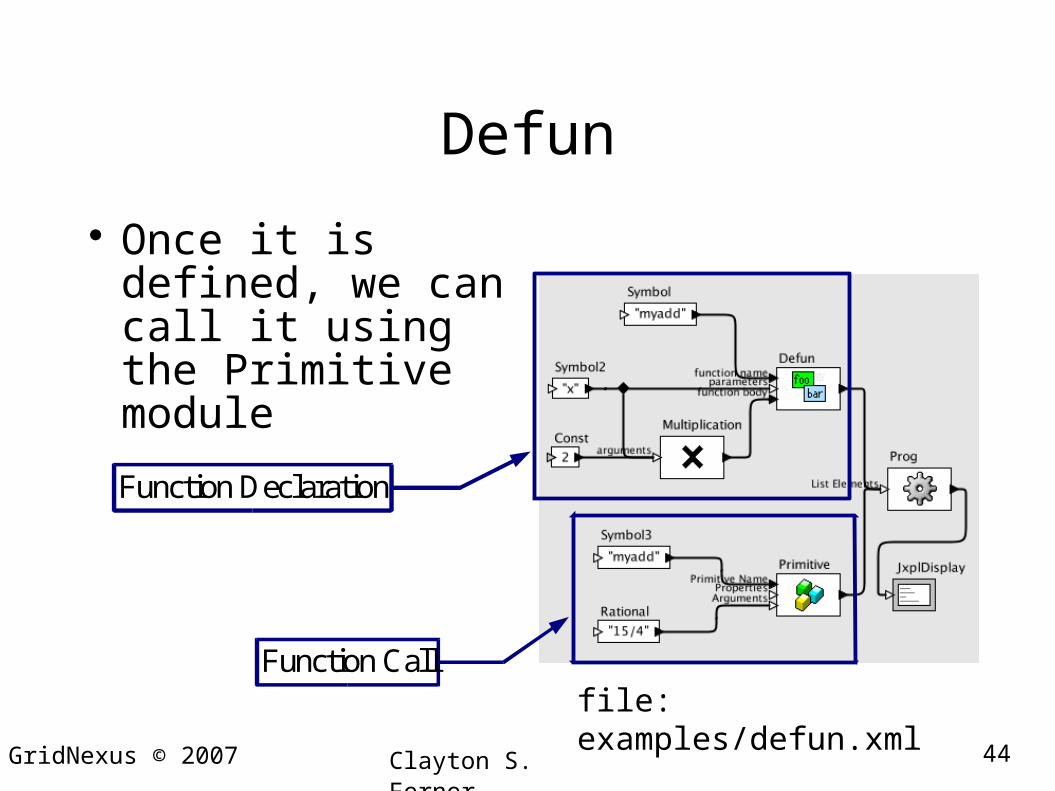
Defun
Once it is defined, we can call it using the Primitive module
file: examples/defun.xmlFunction Call
Function Declaration
45GridNexus © 2007 Clayton S. Ferner
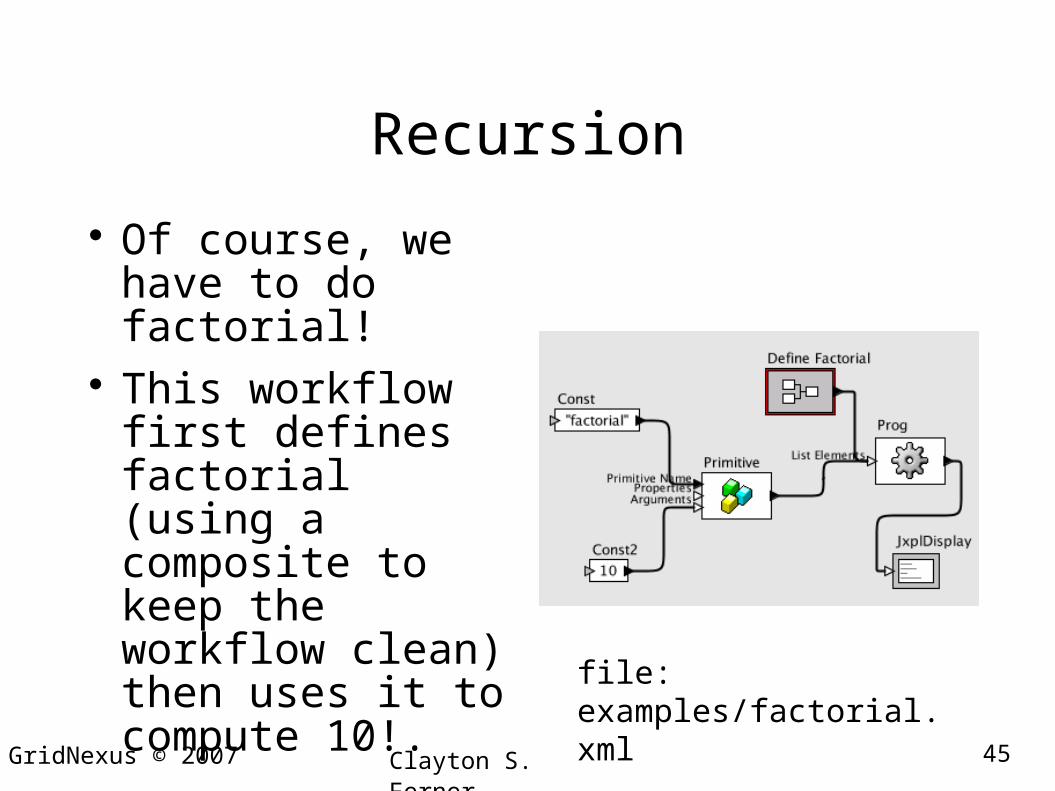
Recursion
Of course, we have to do factorial!
This workflow first defines factorial (using a composite to keep the workflow clean) then uses it to compute 10!.
file: examples/factorial.xml
46GridNexus © 2007 Clayton S. Ferner
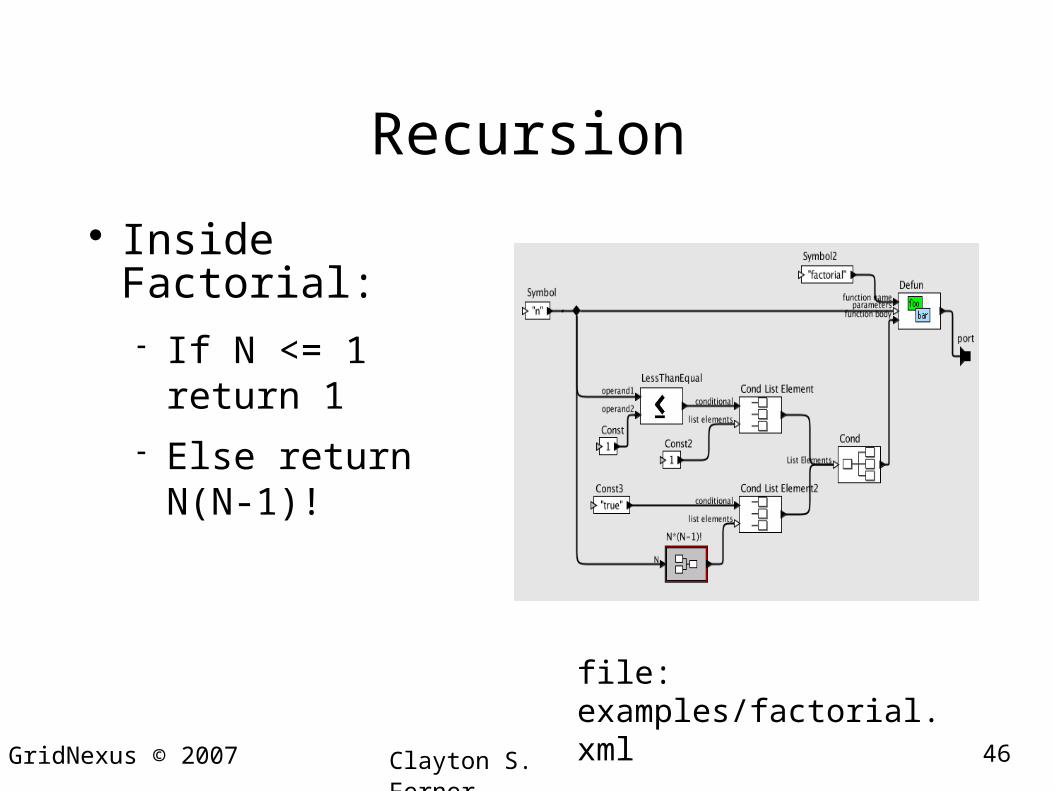
Recursion
Inside Factorial: If N <= 1 return 1
Else return N(N-1)!
file: examples/factorial.xml
47GridNexus © 2007 Clayton S. Ferner
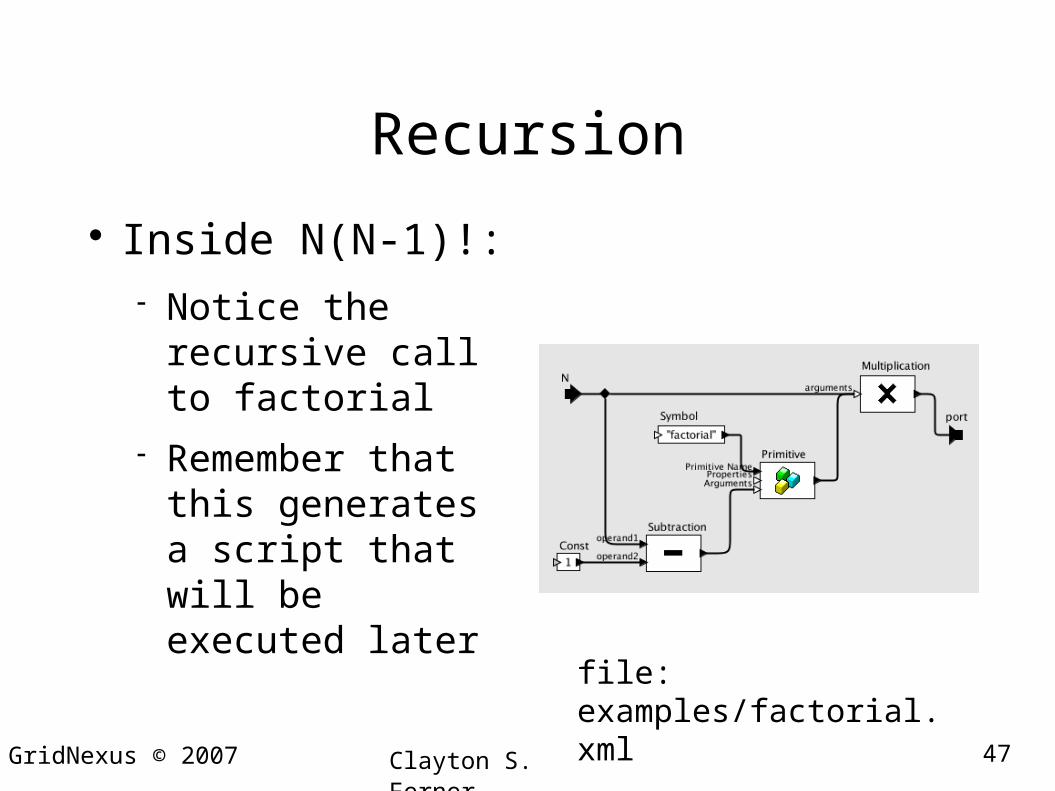
Recursion
Inside N(N-1)!: Notice the recursive
call to factorial
Remember that this generates a script that will be executed later
file: examples/factorial.xml
48GridNexus © 2007 Clayton S. Ferner
Iteration
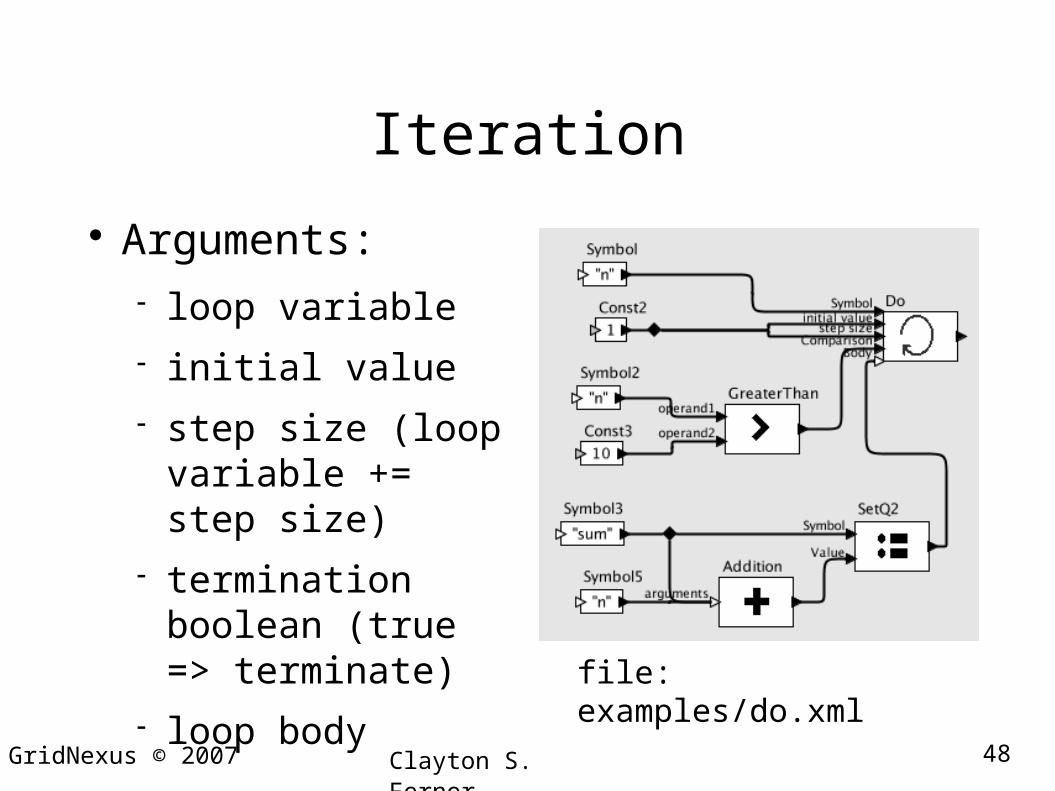
Arguments: loop variable
initial value
step size (loop variable += step size)
termination boolean (true => terminate)
loop bodyfile: examples/do.xml
49GridNexus © 2007 Clayton S. Ferner
Web Services
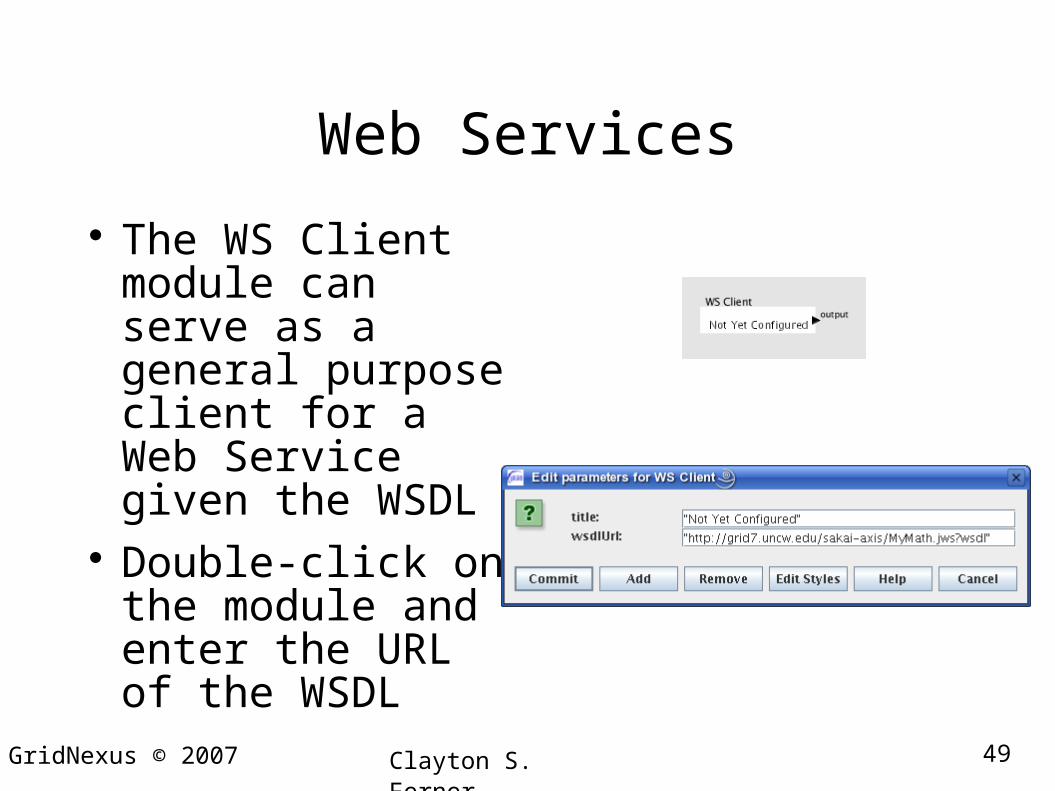
The WS Client module can serve as a general purpose client for a Web Service given the WSDL
Double-click on the module and enter the URL of the WSDL

50GridNexus © 2007 Clayton S. Ferner
Web Services
The icon is set with the name of the service
Ports are added for the methods of the service
Only the method with input will be called
file: examples/wsclient.xml

51GridNexus © 2007 Clayton S. Ferner
Grid Services
First, you need the jars of the Grid Service. E.g.:edu_uncw_math_mathservice.jar edu_uncw_math_mathservice_stubs.jar
These are found in $GLOBUS_LOCATION/lib on the server
Put in $GRIDNEXUS_HOME/lib (Linux) or C:\Program Files\GridNexus2.xx\lib (Windows)
You will need to restart GridNexus so that it will reset the classpath
52GridNexus © 2007 Clayton S. Ferner
Grid Services
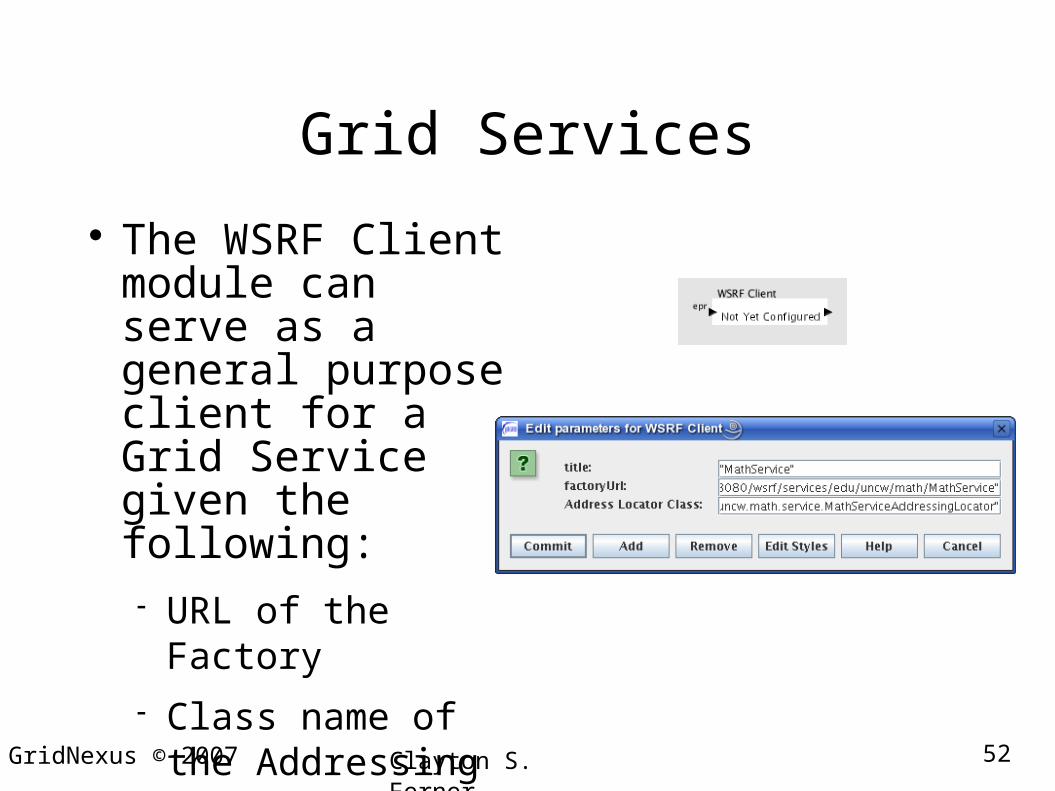
The WSRF Client module can serve as a general purpose client for a Grid Service given the following: URL of the Factory
Class name of the Addressing Locator class
53GridNexus © 2007 Clayton S. Ferner
Grid Services
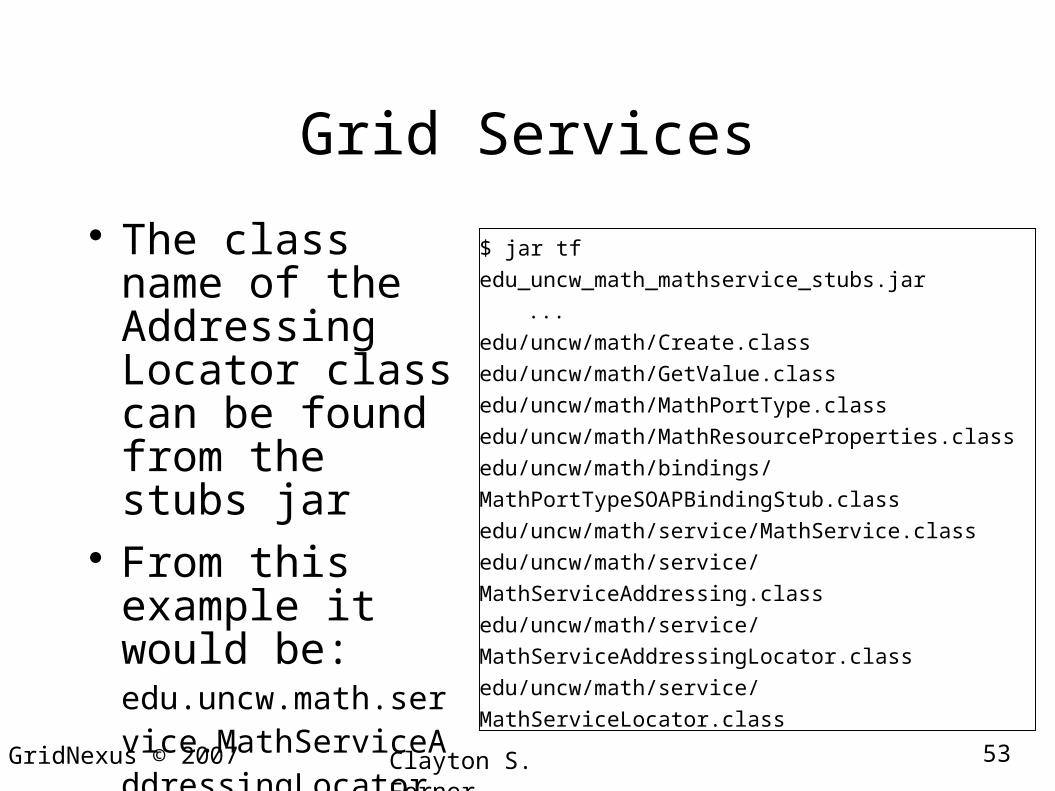
The class name of the Addressing Locator class can be found from the stubs jar
From this example it would be: edu.uncw.math.service.MathServiceAddressingLocator
$ jar tf edu_uncw_math_mathservice_stubs.jar
...
edu/uncw/math/Create.class
edu/uncw/math/GetValue.class
edu/uncw/math/MathPortType.class
edu/uncw/math/MathResourceProperties.class
edu/uncw/math/bindings/MathPortTypeSOAPBindingStub.class
edu/uncw/math/service/MathService.class
edu/uncw/math/service/MathServiceAddressing.class
edu/uncw/math/service/MathServiceAddressingLocator.class
edu/uncw/math/service/MathServiceLocator.class
54GridNexus © 2007 Clayton S. Ferner
Grid Services
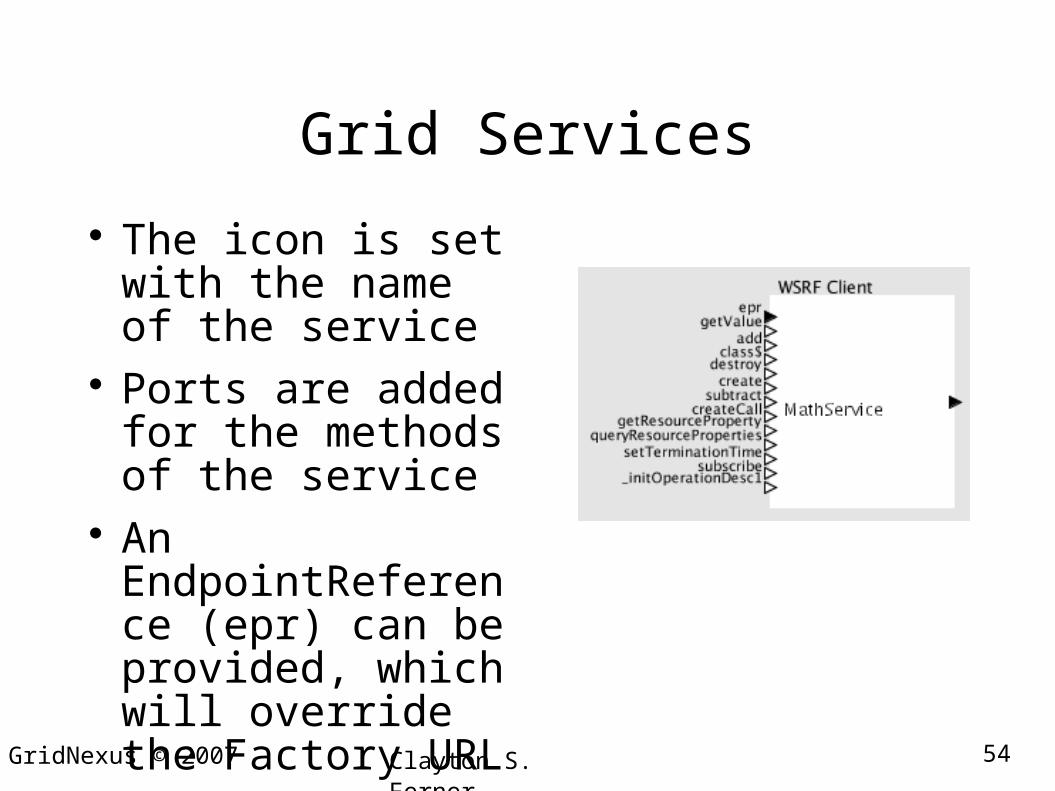
The icon is set with the name of the service
Ports are added for the methods of the service
An EndpointReference (epr) can be provided, which will override the Factory URL
55GridNexus © 2007 Clayton S. Ferner
Grid Services
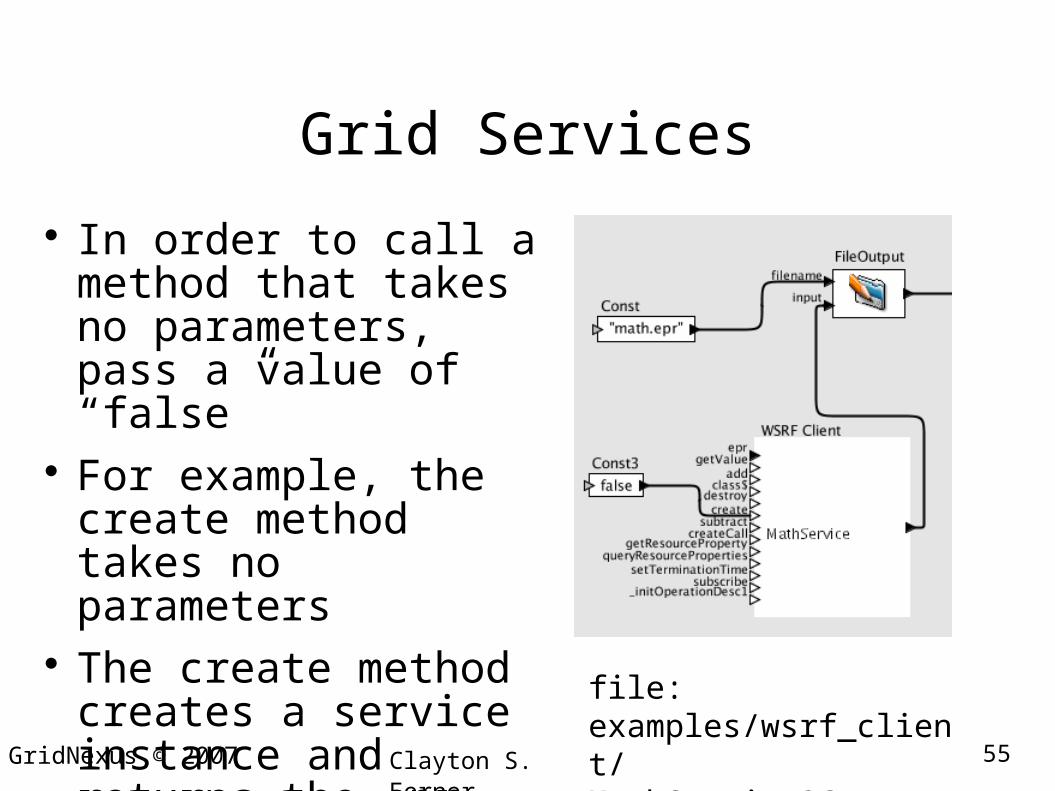
In order to call a method that takes no parameters, pass a value of “false”
For example, the create method takes no parameters
The create method creates a service instance and returns the epr
file: examples/wsrf_client/ MathService2Create.xml
56GridNexus © 2007 Clayton S. Ferner
Grid Services
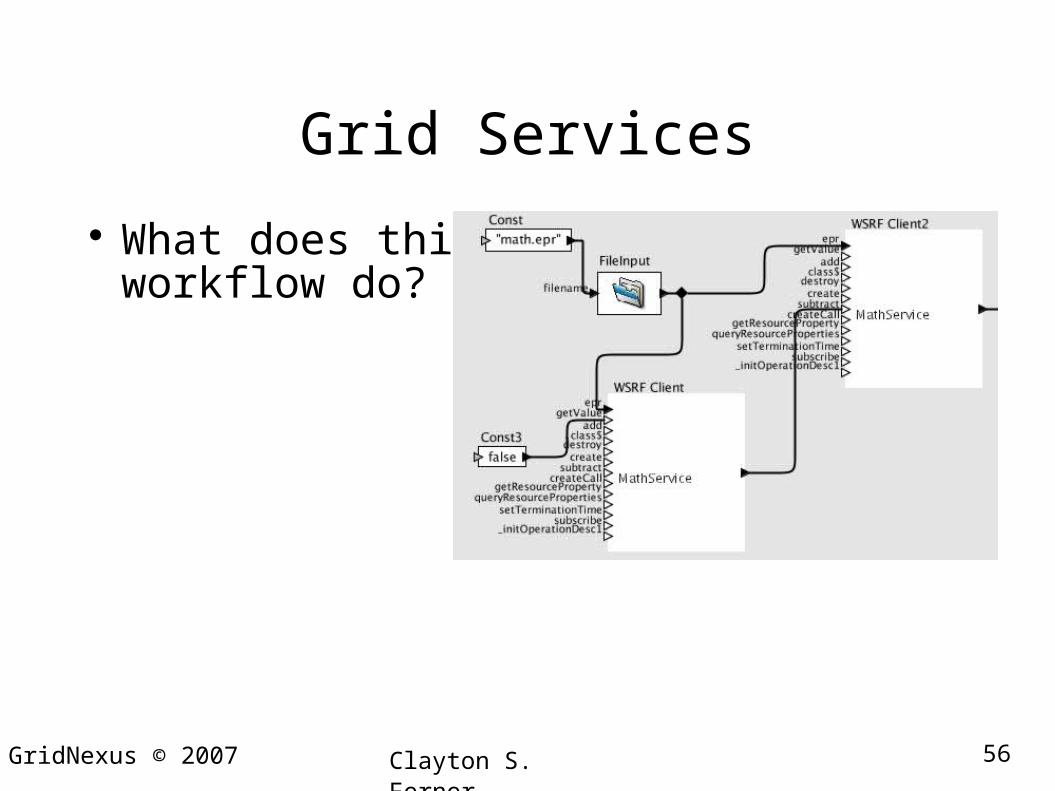
What does this workflow do?
57GridNexus © 2007 Clayton S. Ferner
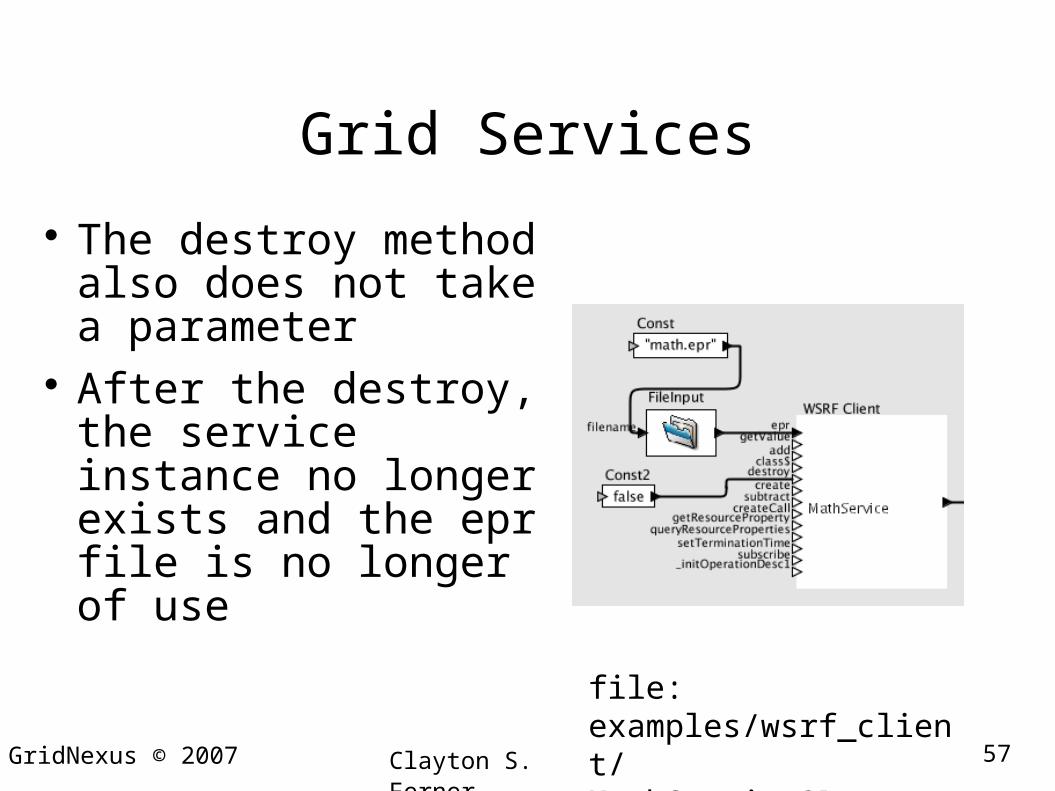
Grid Services
The destroy method also does not take a parameter
After the destroy, the service instance no longer exists and the epr file is no longer of use
file: examples/wsrf_client/ MathService2Destroy.xml
58GridNexus © 2007 Clayton S. Ferner
User Library
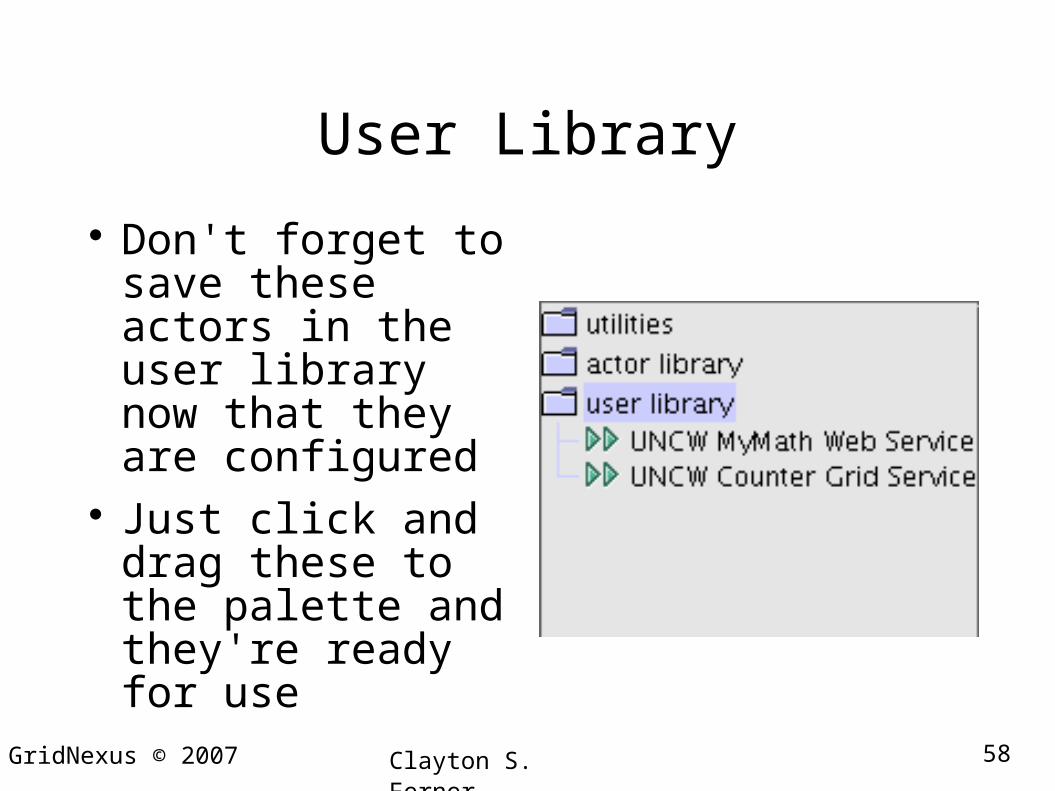
Don't forget to save these actors in the user library now that they are configured
Just click and drag these to the palette and they're ready for use
59GridNexus © 2007 Clayton S. Ferner
GridExec (GRAM Client)
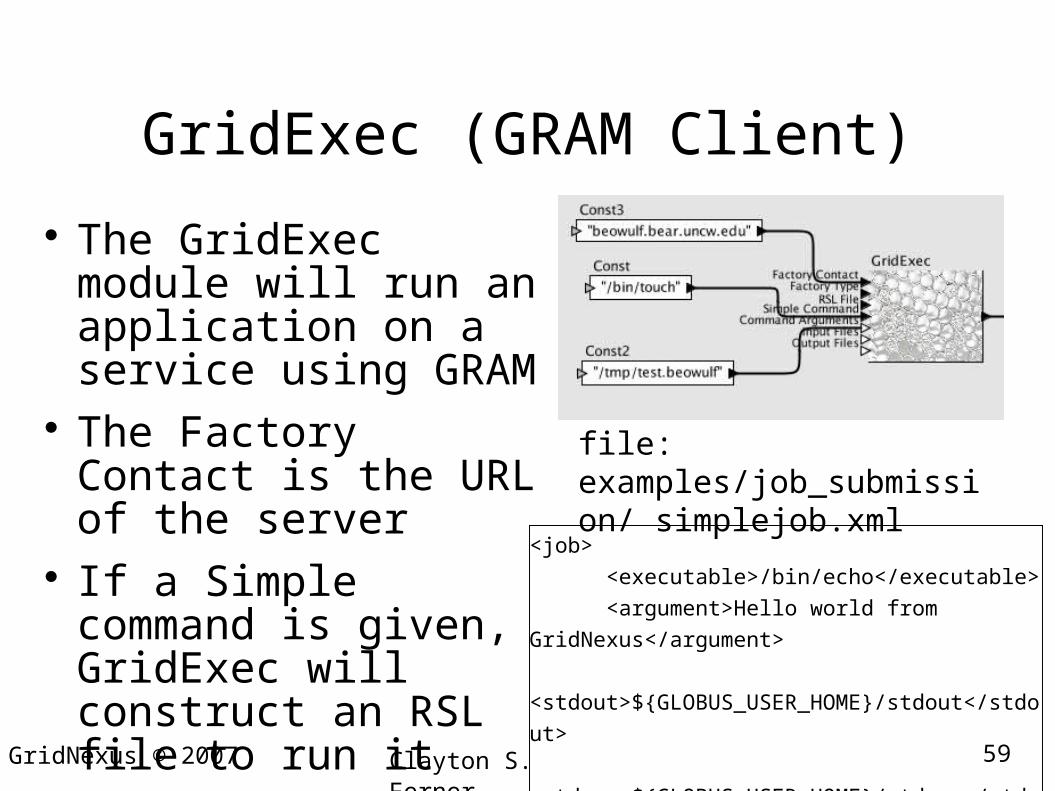
The GridExec module will run an application on a service using GRAM
The Factory Contact is the URL of the server
If a Simple command is given, GridExec will construct an RSL file to run it
file: examples/job_submission/ simplejob.xml
<job>
<executable>/bin/echo</executable>
<argument>Hello world from GridNexus</argument>
<stdout>${GLOBUS_USER_HOME}/stdout</stdout>
<stderr>${GLOBUS_USER_HOME}/stderr</stderr>
</job>
60GridNexus © 2007 Clayton S. Ferner
GridExec (GRAM Client)
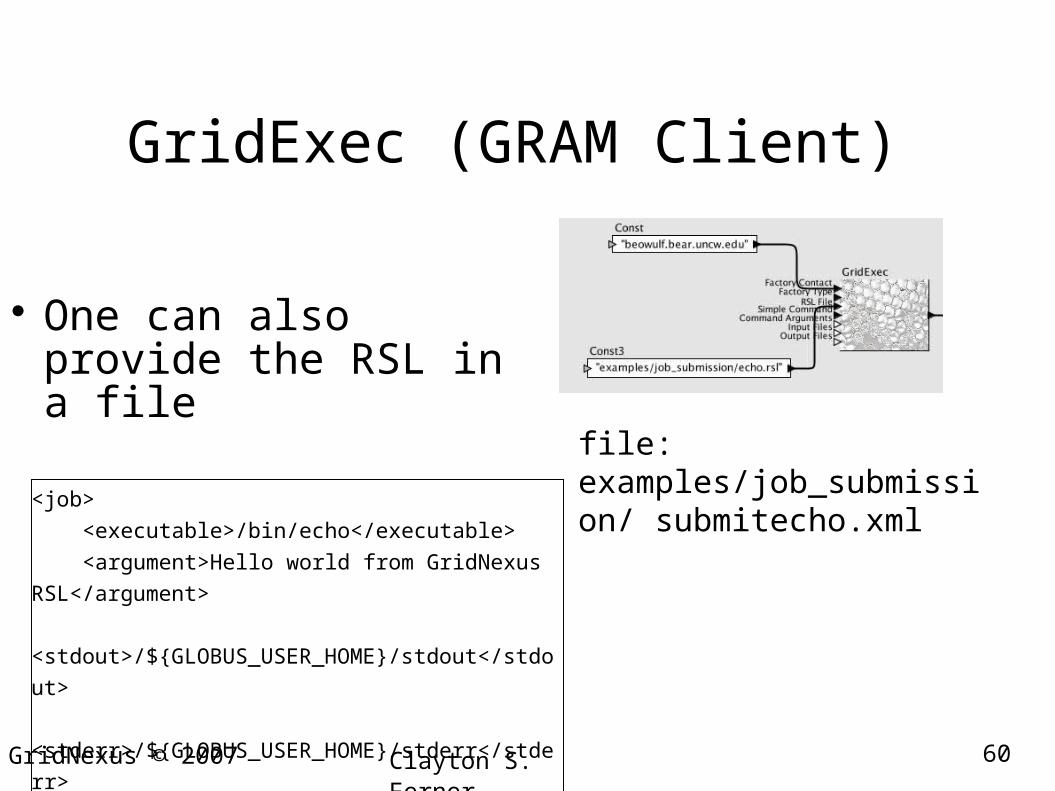
One can also provide the RSL in a file
file: examples/job_submission/ submitecho.xml
<job>
<executable>/bin/echo</executable>
<argument>Hello world from GridNexus RSL</argument>
<stdout>/${GLOBUS_USER_HOME}/stdout</stdout>
<stderr>/${GLOBUS_USER_HOME}/stderr</stderr>
</job>
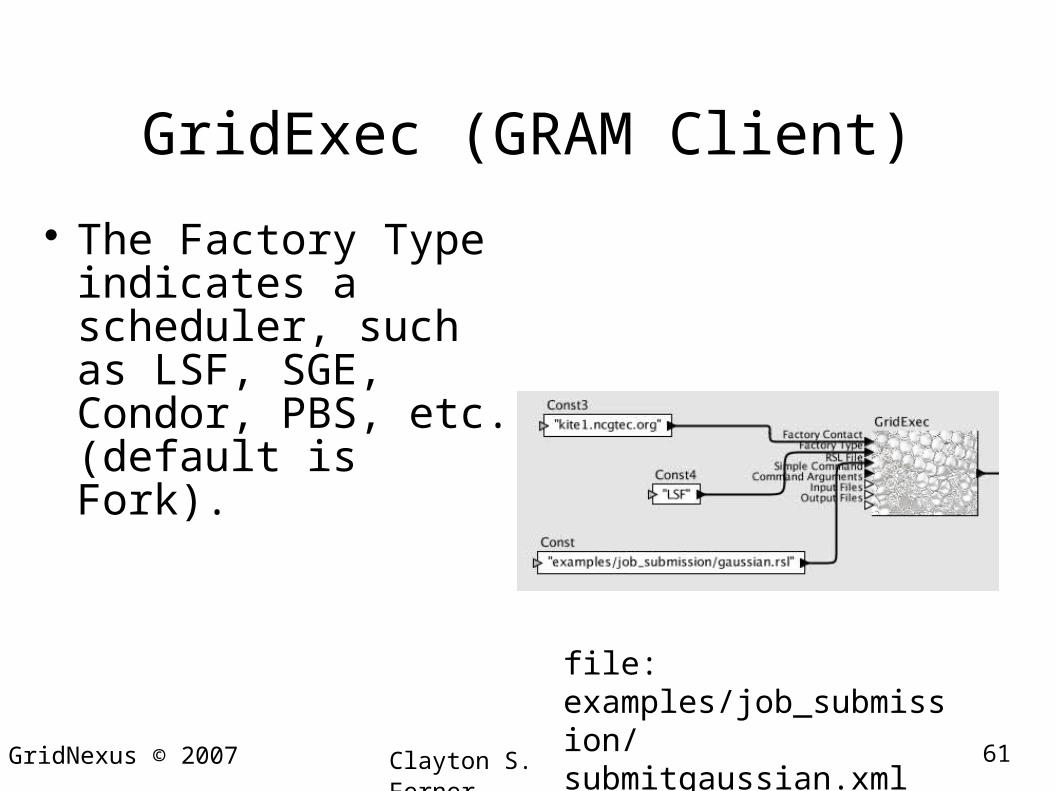
61GridNexus © 2007 Clayton S. Ferner
GridExec (GRAM Client)
The Factory Type indicates a scheduler, such as LSF, SGE, Condor, PBS, etc. (default is Fork).
file: examples/job_submission/ submitgaussian.xml
62GridNexus © 2007 Clayton S. Ferner
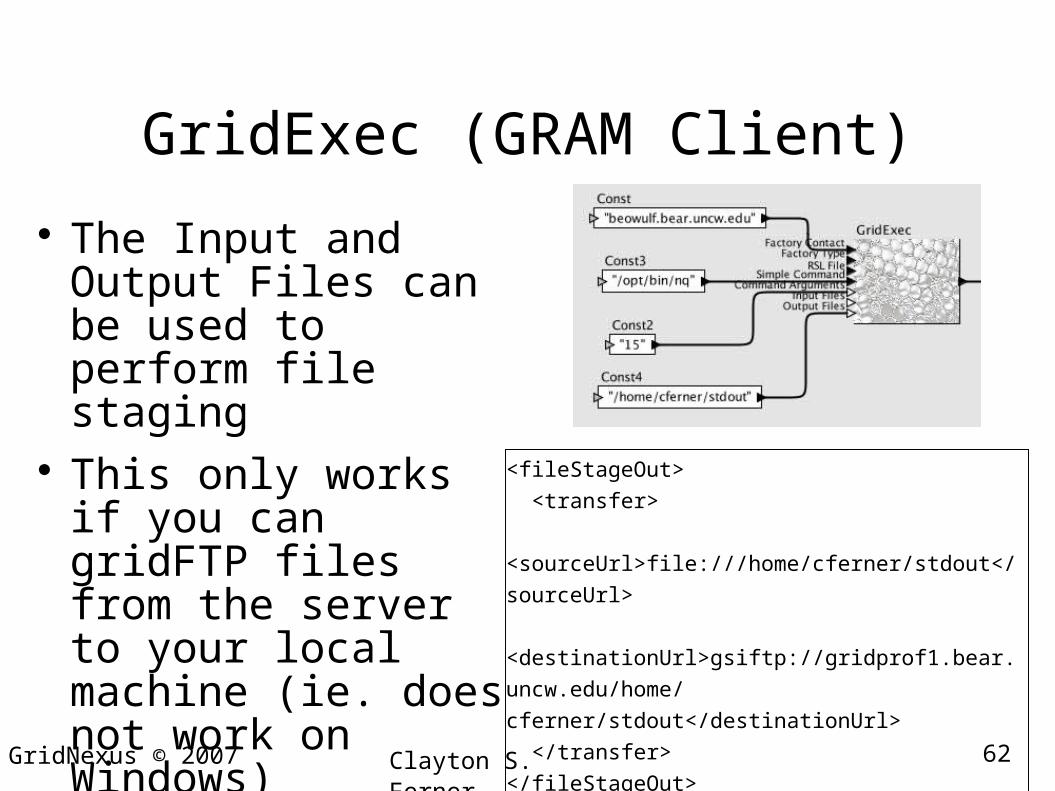
GridExec (GRAM Client)
The Input and Output Files can be used to perform file staging
This only works if you can gridFTP files from the server to your local machine (ie. does not work on Windows)
<fileStageOut>
<transfer>
<sourceUrl>file:///home/cferner/stdout</sourceUrl>
<destinationUrl>gsiftp://gridprof1.bear.uncw.edu/home/
cferner/stdout</destinationUrl>
</transfer>
</fileStageOut>

63GridNexus © 2007 Clayton S. Ferner
File Transfer via GridFTP
The first argument is the source and the second is the destination
“gsftp://” indicates a fully qualified URL
“file://” indicates a local file
file: examples/job_submission/ gridFTP.xml
64GridNexus © 2007 Clayton S. Ferner
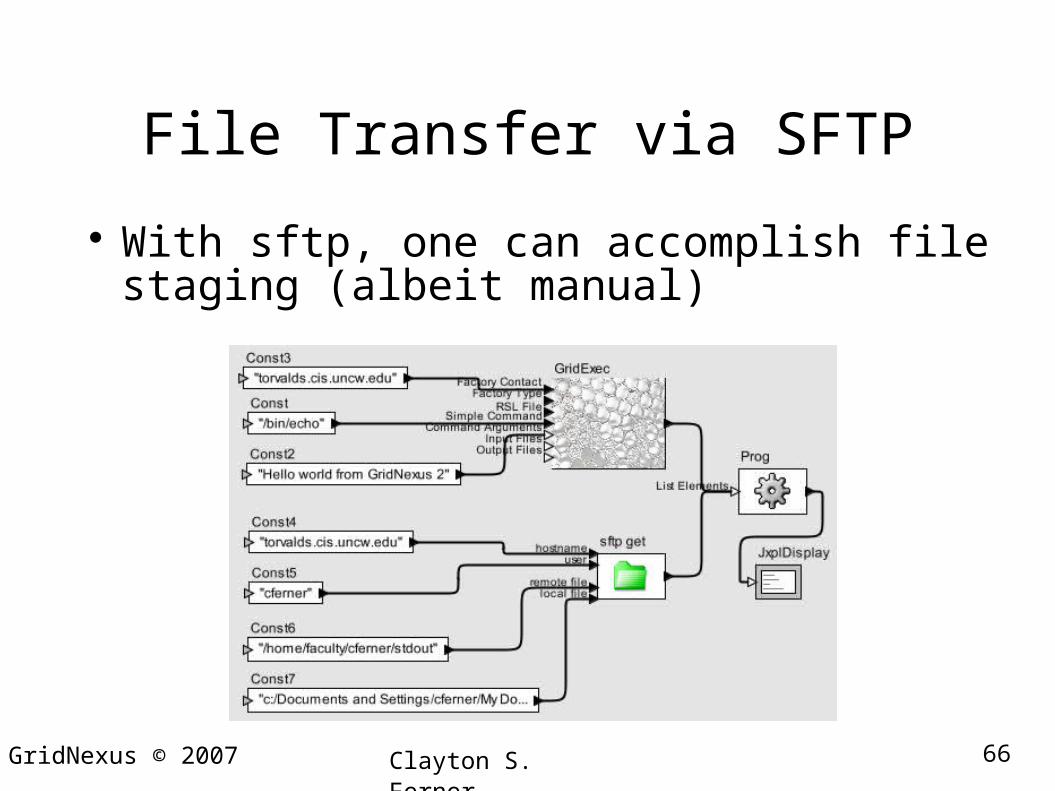
File Transfer via SFTP
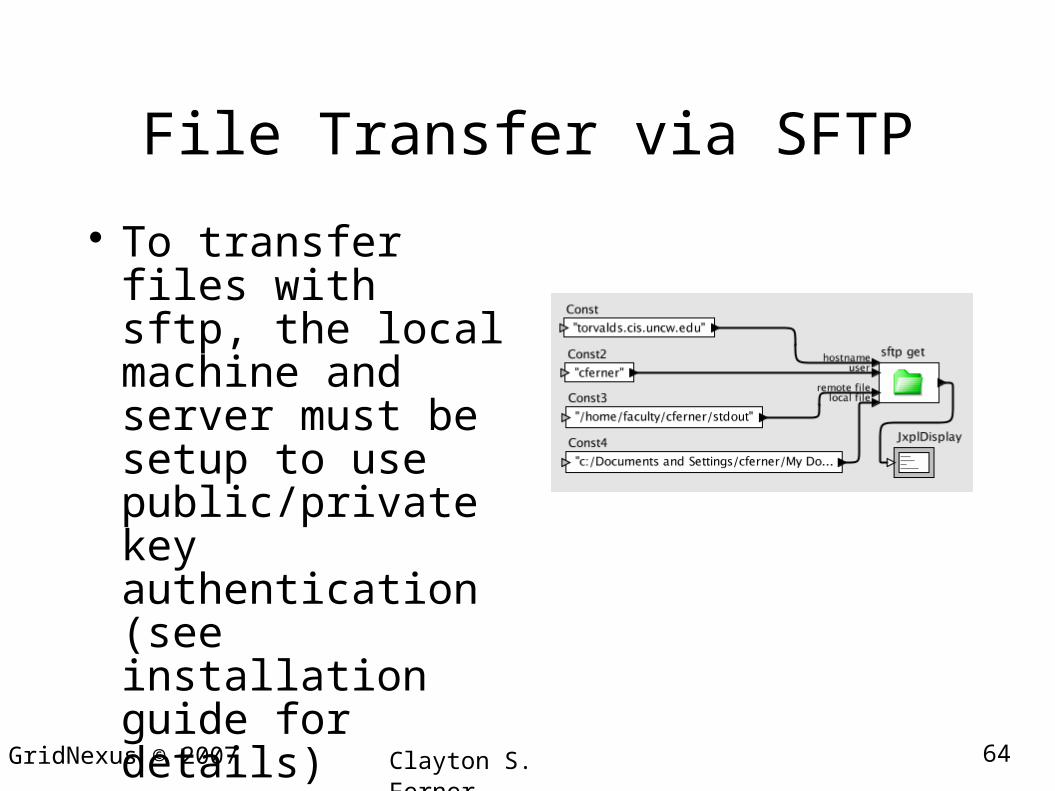
To transfer files with sftp, the local machine and server must be setup to use public/private key authentication (see installation guide for details)
65GridNexus © 2007 Clayton S. Ferner
File Transfer via SFTP
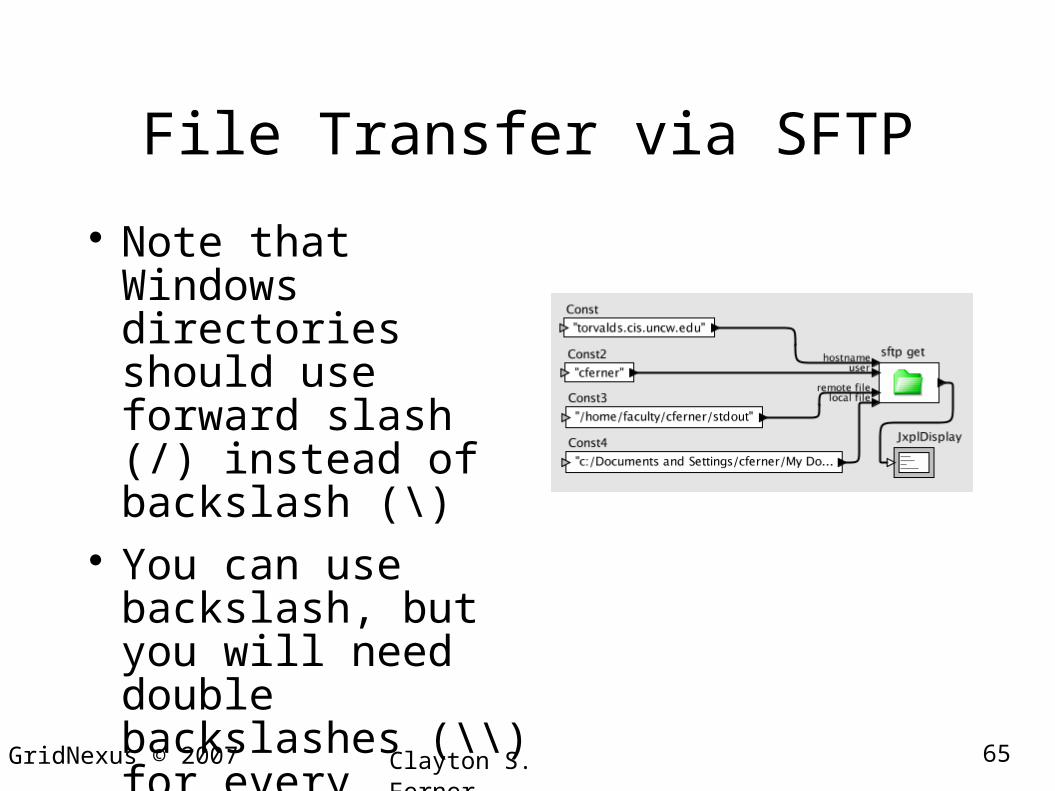
Note that Windows directories should use forward slash (/) instead of backslash (\)
You can use backslash, but you will need double backslashes (\\) for every backslash.
66GridNexus © 2007 Clayton S. Ferner
File Transfer via SFTP
With sftp, one can accomplish file staging (albeit manual)
67GridNexus © 2007 Clayton S. Ferner
GridNexusUNCW GUI for Workflow Management
www.gridnexus.org
Clayton [email protected]
Recommended