Embed Size (px)
Citation preview

ZUMEX MINEX

The following Manual refers to the model Minex.
Please read the instructions carefully in order to make the most of your machine.
23E
N
2
24
27
28
36
38
GENERAL INDEXFIGURES
IMPORTANT GENERAL INFORMATION
TECHNICAL FEATURES
USAGE INSTRUCTIONS
FAULT DETECTION
EU DECLARATION OF CONFORMITY
Zumex reserves the right to modify the informationcontained in this manual without prior notice.
GENERAL DESCRIPTION
PREPARATION
OPERATION
CLEANING
28
29
29
33

IMPORTANT GENERAL INFORMATION
• The specific particulars about your Zumex juicer (voltage, frequency and other data of interest) are stated on the Identification Label on the machine itself.
• Remember that for any technical consultation you should get in touch with your usual Distributor/ Official Technical Assistance Service, always stating the Serial number of the machine’s Identification Label.
• In Spain Zumex adopts the measures required to ensure that the machines put into the market are subject to selective collecti0on and have correct environmental management. Please get in touch with your authorised Zumex distributor to dispose of these machines correctly.
• If the power cable is damaged, it must be replaced by its manufacturer, by its after-sales service or by similar qualified personnel to avoid hazards.
• Before cleaning the machine or carrying out any maintenance, always unplug from the mains.
• This is not a toy, so prevent children from playing with the appliance.
• This appliance can be used by children over the age of 8 or older, if they are supervised or if they have received instructions relating to the safe use of the appliance and they can understand the risks entailed. User cleaning and maintenance must not be carried out by children, unless

25E
N
they are 8 years of age or older and they are supervised. Keep the appliance and its cable out of reach of children under the age of 8.
• This appliance can be used by people with impaired physical, sensorial or mental capacities or who lack experience or knowledge, if they are supervised or have received adequate training with respect to the safe operation of the appliance and they understand the risks entailed.
• Do not spray the appliance with water to clean it.
• This machine is designed for squeezing the fruit and the sizes indicated in this manual.
• Do not use other different fruit to that specified in the manual.
• When you clean, perform maintenance or replace parts, make sure that you have always unplugged the power cable from the socket and it is visible.
• Use the cutting elements with great care, to avoid possible cuts.
• The parts that are in contact with food must be cleaned according to the instructions that you can read in the cleaning chapter.
• Do not manipulate the machine in such a way that it works without safety elements.
• This appliance is intended to be used in household and similar applications such as:
• Staff kitchen areas in shops, offices and other working environments;
• Farm houses;• By clients in hotels, motels and other residential type
environments;• Bed and breakfast type environments.
If you have any suggestion or comment to improve our machines or service network, please get in touch with Zumex directly at the address below:
ZUMEX GROUP, S.A.
Polígono Ind. Moncada III C/Molí 2. 46113 Moncada. Valencia. Spain.
Tel. +34 961 301 251 Fax: +34 961 301 255
[email protected] / www.zumex.com

27E
N
TECHNICAL FEATURES
ZUMEX MINEX
Oranges per minute: 13
Dimensions (cm - inches): 36,5 x 36 x 72 cm I 14” x 14” x 28”
Net Weight (Kg - lb): 19,5 Kg I 43 lb
Power: 44 W
Consumption: 0.45 A
Voltage: Multitension 100-240 V ı 50-60 Hz
Anti-humidity Protection: IPX0
Sound pressure level: Less than 70 dB
Safety: 3 detectors and electronic protection
Maximum fruit size:To 80 mm(Recommended 65 y 78mm).
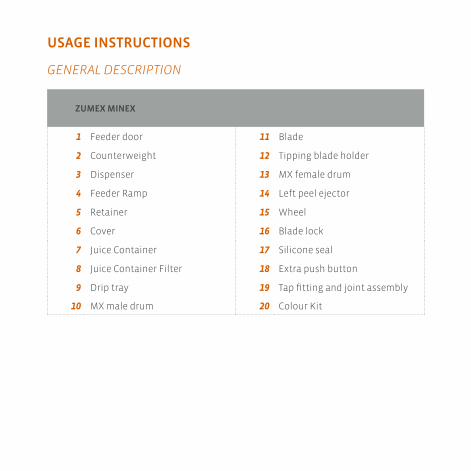
ZUMEX MINEX
1 Feeder door 11 Blade
2 Counterweight 12 Tipping blade holder
3 Dispenser 13 MX female drum
4 Feeder Ramp 14 Left peel ejector
5 Retainer 15 Wheel
6 Cover 16 Blade lock
7 Juice Container 17 Silicone seal
8 Juice Container Filter 18 Extra push button
9 Drip tray 19 Tap fitting and joint assembly
10 MX male drum 20 Colour Kit
USAGE INSTRUCTIONS
GENERAL DESCRIPTION
29E
N
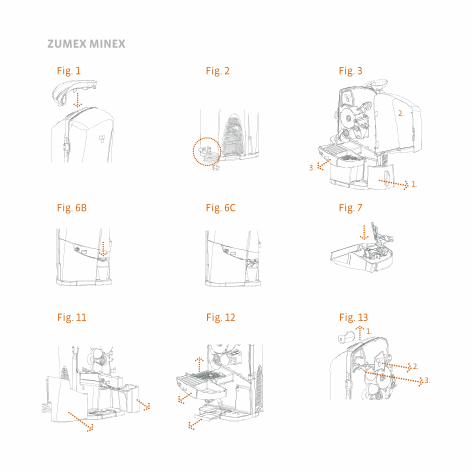
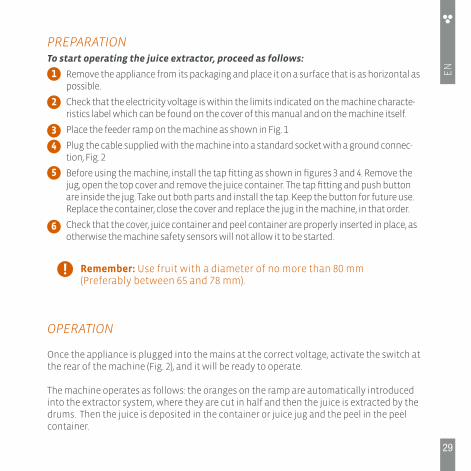
PREPARATIONTo start operating the juice extractor, proceed as follows:
Remove the appliance from its packaging and place it on a surface that is as horizontal as possible.
Check that the electricity voltage is within the limits indicated on the machine characte-ristics label which can be found on the cover of this manual and on the machine itself.
Place the feeder ramp on the machine as shown in Fig. 1
Plug the cable supplied with the machine into a standard socket with a ground connec-tion, Fig. 2
Before using the machine, install the tap fitting as shown in figures 3 and 4. Remove the jug, open the top cover and remove the juice container. The tap fitting and push button are inside the jug. Take out both parts and install the tap. Keep the button for future use. Replace the container, close the cover and replace the jug in the machine, in that order.
Check that the cover, juice container and peel container are properly inserted in place, as otherwise the machine safety sensors will not allow it to be started.
OPERATION
Once the appliance is plugged into the mains at the correct voltage, activate the switch at the rear of the machine (Fig. 2), and it will be ready to operate.
The machine operates as follows: the oranges on the ramp are automatically introduced into the extractor system, where they are cut in half and then the juice is extracted by the drums. Then the juice is deposited in the container or juice jug and the peel in the peel container.
1
2
3
4
Remember: Use fruit with a diameter of no more than 80 mm (Preferably between 65 and 78 mm).
5
6
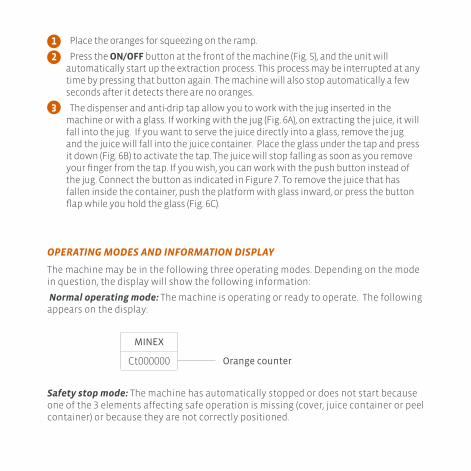
Place the oranges for squeezing on the ramp.
Press the ON/OFF button at the front of the machine (Fig. 5), and the unit will automatically start up the extraction process. This process may be interrupted at any time by pressing that button again. The machine will also stop automatically a few seconds after it detects there are no oranges.
The dispenser and anti-drip tap allow you to work with the jug inserted in the machine or with a glass. If working with the jug (Fig. 6A), on extracting the juice, it will fall into the jug. If you want to serve the juice directly into a glass, remove the jug and the juice will fall into the juice container. Place the glass under the tap and press it down (Fig. 6B) to activate the tap. The juice will stop falling as soon as you remove your finger from the tap. If you wish, you can work with the push button instead of the jug. Connect the button as indicated in Figure 7. To remove the juice that has fallen inside the container, push the platform with glass inward, or press the button flap while you hold the glass (Fig. 6C).
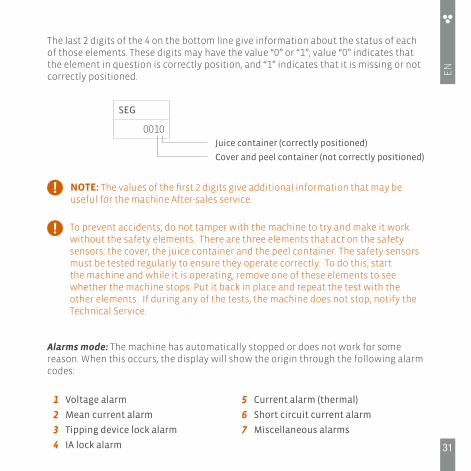
OPERATING MODES AND INFORMATION DISPLAY
The machine may be in the following three operating modes. Depending on the mode in question, the display will show the following information:
Normal operating mode: The machine is operating or ready to operate. The following appears on the display:
Safety stop mode: The machine has automatically stopped or does not start because one of the 3 elements affecting safe operation is missing (cover, juice container or peel container) or because they are not correctly positioned.
1
2
3
MINEX
Ct000000 Orange counter
31E
N
NOTE: The values of the first 2 digits give additional information that may be useful for the machine After-sales service.
The last 2 digits of the 4 on the bottom line give information about the status of each of those elements. These digits may have the value “0” or “1”; value “0” indicates that the element in question is correctly position, and “1” indicates that it is missing or not correctly positioned.
SEG
0010Juice container (correctly positioned)
Cover and peel container (not correctly positioned)
To prevent accidents, do not tamper with the machine to try and make it work without the safety elements. There are three elements that act on the safety sensors: the cover, the juice container and the peel container. The safety sensors must be tested regularly to ensure they operate correctly. To do this, start the machine and while it is operating, remove one of these elements to see whether the machine stops. Put it back in place and repeat the test with the other elements. If during any of the tests, the machine does not stop, notify the Technical Service.
Alarms mode: The machine has automatically stopped or does not work for some reason. When this occurs, the display will show the origin through the following alarm codes:
1 Voltage alarm 5 Current alarm (thermal)
2 Mean current alarm 6 Short circuit current alarm
3 Tipping device lock alarm 7 Miscellaneous alarms
4 IA lock alarm
To restart the machine after a safety stop or following an alarm, eliminate the cause (remove jammed oranges,...) and restore the safety elements (cover, juice container or peel container). After doing this, press the ON/OFF button and the machine will start the extraction cycle.
If the blade assembly has been dismantled to eliminate a blockage and you find it difficult to reassemble, this is because the machine must be in the start position to perform the mounting operation. To put it at that position, keep the ON/OFF button pressed (with the containers and cover correctly positioned) until the machine stops, and then you can assemble the blade unit with no problem and continue operating.
If the power cable is damaged, it must be replaced by a special cable or unit supplied by the manufacturer or official dealer.
33E
N
CLEANING
Zumex recommends cleaning the machine at least once or twice a day, depending on
how much it is used in order to maintain optimal food hygiene conditions.
The following are the steps for correctly cleaning the juice extractor:
With the machine stopped, unplug it from the mains by pulling out the pin (not
the cable).
Dismantle the front cover (Fig. 8).
Dismantle the unit composed by twirler blade and support (Fig. 9) turning
the selector clockwise to position and pull gently towards you.
For more thorough cleaning, separate the parts as follows:
• After removing the unit from the machine, turn the selector to position to
remove the blade block.
• To remove the twirler blade, move the blade to a vertical position until the ▼
mark on the blade and support coincide. In this position it should come away
easily.
1
2
3
Warning! Handle this part with
care to avoid cuts. The support,
twirler blade and blade block unit
must always be assembled and
dismantled as one piece.closed open
dismantling
Blade lock positions
Dismantling the tipping blade
Remove the peel ejector from its holder, unscrew the wheels and dismantle the
extraction drums (Fig. 10).
Dismantle the peel container and jug (Fig. 11).
Dismantle the juice container and its filter, and then dismantle the drip tray
(Fig. 12).
Dismantle the dispenser with the anti-drip tap as shown in figure A. After
dismantling the tap, it can be washed by hand or in the dishwasher. It is not
advisable to put the tap and container unit into the dishwasher without
separating them, as the water will not reach the inside of the tap and clean it
properly.
From time to time, dismantle the tap as shown in B to ensure more exhaustive
cleaning. If the mobile part is stuck due to accumulated dry juice, proceed as
indicated in figures C and D.
• All the parts can be put in the dishwasher EXCEPT THE CONTAINER.
• To clean the extraction zone and the container, use a soft cloth dampened in water
and a detergent that is suitable for use washing dishes.
• Then rinse with running water to remove all traces of soap.
• After clearing the machine, reassemble all the elements in the reverse order
followed for dismantling them. Check that all the parts are properly assembled and
secured.
REMEMBER
Do not put the container in the dishwasher. To clean it use a soft cloth dampened
with water and a detergent that is suitable for washing dishes. Never use abrasive
products or lime-scale removers.
When replacing the peel ejector (Fig. 10), make sure it fits into its holder or pivots
correctly and that the ejector blade enters the male extractor drum groove as far as it
can go.
4
6
5
7
35E
N
4
6
5
• To replace the blade holder unit, first insert the interior part of it, ensuring that it
enters as far as it can go and then insert the clip on the external part (See figure 9). If
you find it difficult to replace, the machine might have stopped halfway through a
cycle. Keep the ON/OFF pressed (with the containers and cover correctly positioned)
until the machine stops and you will then be able to assemble the blade unit with no
difficulty and carry on operating.
• Do not forget to clean the fruit feeding area regularly (Fig. 1), as otherwise a waxy
layer could form that is very difficult to remove. To do this proceed as follows:
Unplug the machine from the mains.
Dismantle the ramp by pulling it upwards, it is only inserted (Fig. 1).
Dismantle the feeder tube by pulling it in the indicated direction (Fig. 13).
If it is very dirty, dismantle the counterweight and dispenser (Fig. 13).
Wipe the whole cavity with a cloth dampened with water and detergent that
is suitable for washing dishes. Clean the dismantled parts and then rinse with
running water to remove all traces of soap.
Assemble the parts in reverse order of assembly.
1
2
3
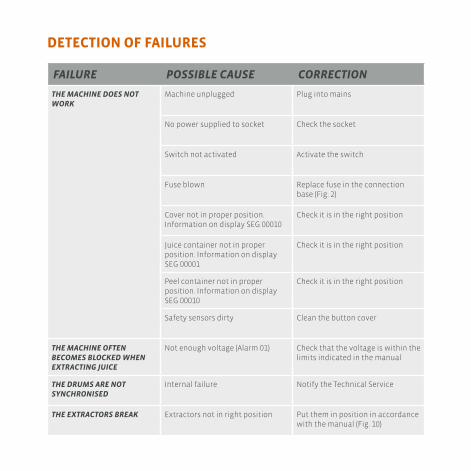
DETECTION OF FAILURES
FAILURE POSSIBLE CAUSE CORRECTION
THE MACHINE DOES NOT WORK
Machine unplugged Plug into mains
No power supplied to socket Check the socket
Switch not activated Activate the switch
Fuse blown Replace fuse in the connection base (Fig. 2)
Cover not in proper position.Information on display SEG 00010
Check it is in the right position
Juice container not in proper position. Information on display SEG 00001
Check it is in the right position
Peel container not in proper position. Information on display SEG 00010
Check it is in the right position
Safety sensors dirty Clean the button cover
THE MACHINE OFTEN BECOMES BLOCKED WHEN EXTRACTING JUICE
Not enough voltage (Alarm 01) Check that the voltage is within the limits indicated in the manual
THE DRUMS ARE NOT SYNCHRONISED
Internal failure Notify the Technical Service
THE EXTRACTORS BREAK Extractors not in right position Put them in position in accordance with the manual (Fig. 10)
37E
N
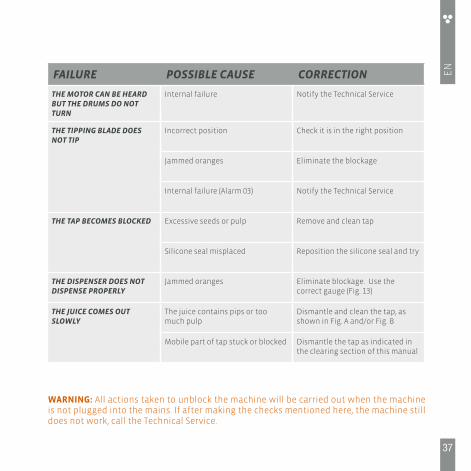
WARNING: All actions taken to unblock the machine will be carried out when the machine is not plugged into the mains. If after making the checks mentioned here, the machine still does not work, call the Technical Service.
FAILURE POSSIBLE CAUSE CORRECTION
THE MOTOR CAN BE HEARD BUT THE DRUMS DO NOT TURN
Internal failure Notify the Technical Service
THE TIPPING BLADE DOES NOT TIP
Incorrect position Check it is in the right position
Jammed oranges Eliminate the blockage
Internal failure (Alarm 03) Notify the Technical Service
THE TAP BECOMES BLOCKED Excessive seeds or pulp Remove and clean tap
Silicone seal misplaced Reposition the silicone seal and try
THE DISPENSER DOES NOT DISPENSE PROPERLY
Jammed oranges Eliminate blockage. Use the correct gauge (Fig. 13)
THE JUICE COMES OUT SLOWLY
The juice contains pips or too much pulp
Dismantle and clean the tap, as shown in Fig. A and/or Fig. B
Mobile part of tap stuck or blocked Dismantle the tap as indicated in the clearing section of this manual

DECLARATION OF CONFORMITY EUZUMEX GROUP S.A. c., whose registered offices are situated at Polígono Industrial de
Moncada III, C/ Molí, 2 - 46113 Moncada, Valencia (Spain) does here by declare, under
its sole responsibility, that the Minex juicer machine models conform to the following
harmonised standards:
en 60335-1+ a11
20122014
Safety of household electrical appliances and similar. Part 1: General requirements
en 60335-2-14+ a1 + a11
200620082012
Household and similar electrical appliances - Safety - Part 2-14: Particular requirements for kitchen machines
en 62233 2008 Measurement methods for electromagnetic fields of household appliances and similar apparatus with regard to human exposure
en 55014-1 2006 Electromagnetic compatibility - Requirements for household appliances, electric tools and similar apparatus - Part 1: Emission
en 55014-2+ a1
19972001
Electromagnetic compatibility - Requirements for household appliances, electric tools and similar apparatus - Part 2: Immunity - Product family standard
en 61000-3-2 2006 Electromagnetic compatibility (EMC) - Part 3-2: Limits - Limits for harmonic current emissions (equipment input current <= 16 A per phase)
en 61000-3-3+ a1+ a2
199520012005
Electromagnetic compatibility (EMC) - Part 3-3: Limits - Limitation of voltage changes, voltage fluctuations and flicker in public low-voltage supply systems, for equipment with rated current <= 16 A per phase and not subject to conditional connection
nsf/ansi 8 2012 National Sanitation Foundation - Commercial powered food preparation equipment
nsf/ansi 51 2014 National Sanitation Foundation - Food equipment materials
39E
N
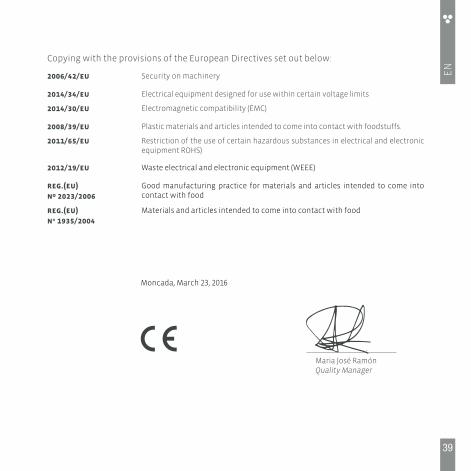
Copying with the provisions of the European Directives set out below:
2006/42/eu Security on machinery
2014/34/eu Electrical equipment designed for use within certain voltage limits
2014/30/eu Electromagnetic compatibility (EMC)
2008/39/eu Plastic materials and articles intended to come into contact with foodstuffs.
2011/65/eu Restriction of the use of certain hazardous substances in electrical and electronic equipment ROHS)
2012/19/eu Waste electrical and electronic equipment (WEEE)
reg.(eu) nº 2023/2006
Good manufacturing practice for materials and articles intended to come into contact with food
reg.(eu) n° 1935/2004
Materials and articles intended to come into contact with food
Moncada, March 23, 2016
Maria José RamónQuality Manager
WARRANTY
SCOPE OF THE WARRANTY: The unit has a two-year warranty against defects and construction problems
that could harm the correct operation, provided that the inner parts or mechanisms have not been mani-
pulated. The following are excluded from the warranty.
EXCLUSIONS: Labor, trips, transport, parts that have become deteriorated due to natural wear as a con-
sequence of use, as well as any damage resulting from the incorrect usage or installation of the unit and
faults caused as a result of force majeure.
Any incorrect handling of the ID Label will make the Warranty void. Likewise, the warranty will also be
void if other persons handle the unit, since only the Official Technical Support Service is qualified and
authorized to do so.
Always provide the SERIAL Nr. on the ID Label when contacting the Technical Support Service.

www.zumex.com
www.zumex.com 03791:01
Zumex Group, S.A. Headquarters
Polígono Ind. Moncada III C/ Molí, 2 46113 Moncada, Valencia, Spain
Tel. +34 961 301 251 Fax.+34 961 301 255
Zumex USA Inc. USA & Canada
1573 NW 82nd Ave, Miami, FL 33126 USATel. +1 305 591 0061 Fax. +1 305 591 0062
Technical Assistance: 1-877-ZUMEX-TA (+1 877 986 3982)
Zumex México
Uxmal 616. Colonia Vertiz NarvarteDelegación Benito Juárez CP 03600 México D.F. México
Tel. (55) 5212-0619 / 5212-11715212-1185 / 5212-1184