Embed Size (px)
Citation preview
1
ZTE F451
Quick Start Guide
2
LEGAL INFORMATION
Copyright © 2011 ZTE CORPORATION.
All rights reserved.
No part of this publication may be quoted, reproduced, translated or used in any form or by any means, electronic or mechanical, including photocopying and microfilm, without the prior written permission of ZTE Corporation.
ZTE Corporation reserves the right to make modifications on print errors or update specifications in this guide without prior notice.
Version No. : V1.0 Edition Time : 09-2011
3
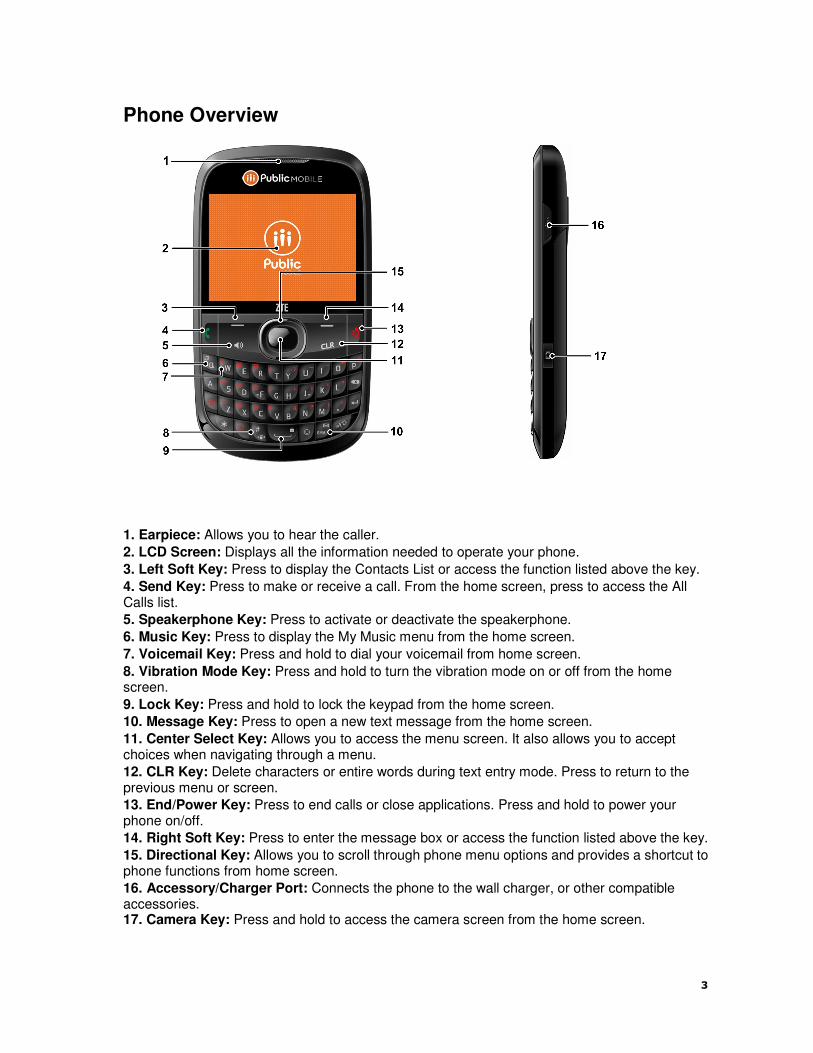
Phone Overview 1. Earpiece: Allows you to hear the caller.
2. LCD Screen: Displays all the information needed to operate your phone.
3. Left Soft Key: Press to display the Contacts List or access the function listed above the key.
4. Send Key: Press to make or receive a call. From the home screen, press to access the All Calls list.
5. Speakerphone Key: Press to activate or deactivate the speakerphone.
6. Music Key: Press to display the My Music menu from the home screen.
7. Voicemail Key: Press and hold to dial your voicemail from home screen.
8. Vibration Mode Key: Press and hold to turn the vibration mode on or off from the home screen.
9. Lock Key: Press and hold to lock the keypad from the home screen.
10. Message Key: Press to open a new text message from the home screen.
11. Center Select Key: Allows you to access the menu screen. It also allows you to accept choices when navigating through a menu.
12. CLR Key: Delete characters or entire words during text entry mode. Press to return to the previous menu or screen.
13. End/Power Key: Press to end calls or close applications. Press and hold to power your phone on/off.
14. Right Soft Key: Press to enter the message box or access the function listed above the key.
15. Directional Key: Allows you to scroll through phone menu options and provides a shortcut to phone functions from home screen.
16. Accessory/Charger Port: Connects the phone to the wall charger, or other compatible accessories. 17. Camera Key: Press and hold to access the camera screen from the home screen.
4
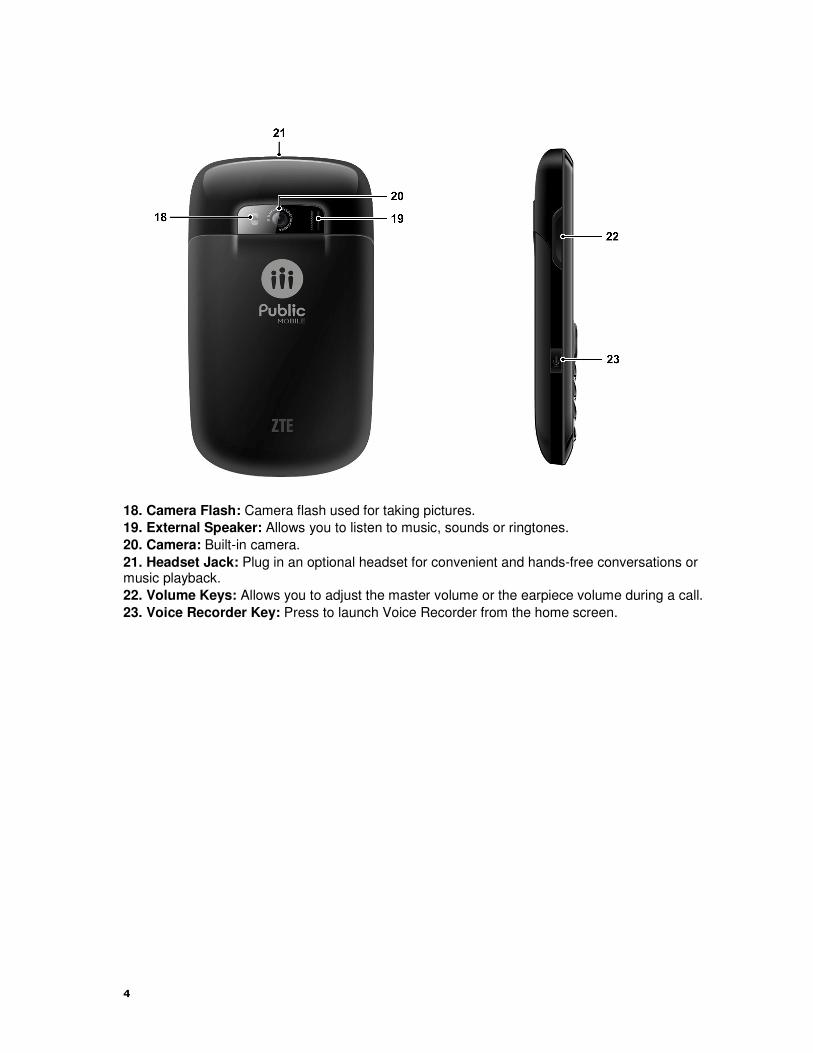
18. Camera Flash: Camera flash used for taking pictures.
19. External Speaker: Allows you to listen to music, sounds or ringtones.
20. Camera: Built-in camera.
21. Headset Jack: Plug in an optional headset for convenient and hands-free conversations or music playback.
22. Volume Keys: Allows you to adjust the master volume or the earpiece volume during a call.
23. Voice Recorder Key: Press to launch Voice Recorder from the home screen.
5
Getting Started
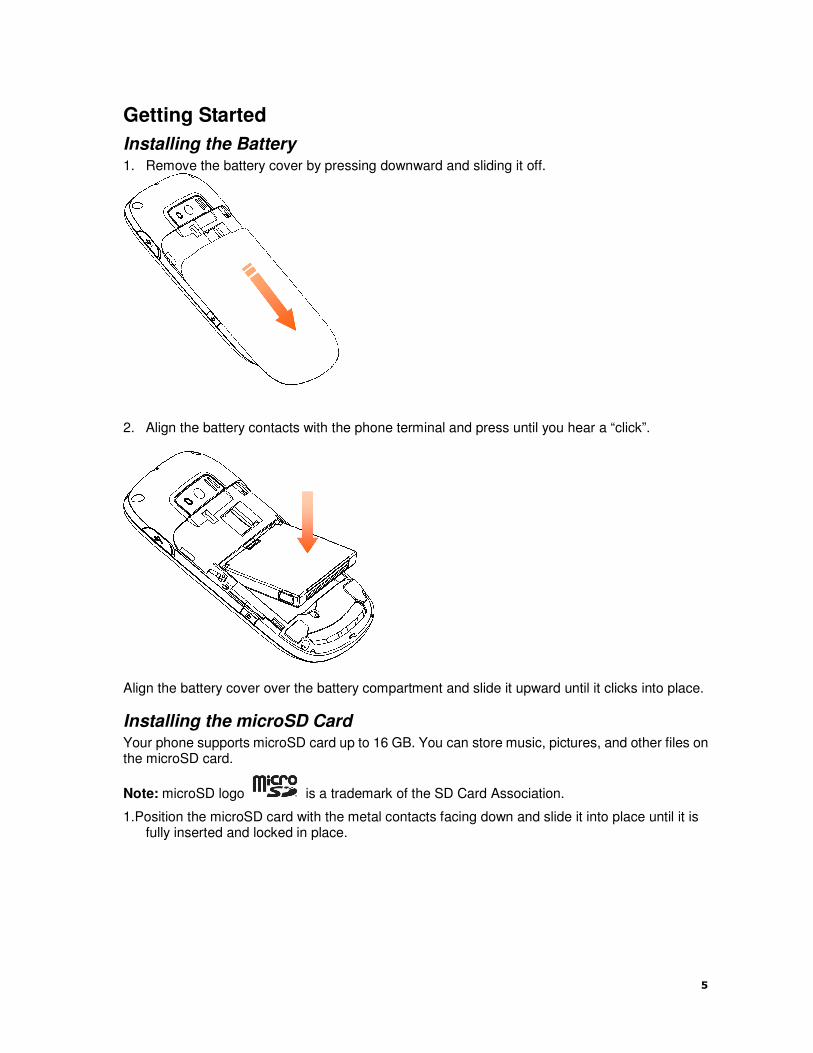
Installing the Battery 1. Remove the battery cover by pressing downward and sliding it off.
2. Align the battery contacts with the phone terminal and press until you hear a “click”.
Align the battery cover over the battery compartment and slide it upward until it clicks into place.
Installing the microSD Card Your phone supports microSD card up to 16 GB. You can store music, pictures, and other files on the microSD card.
Note: microSD logo is a trademark of the SD Card Association.
1.Position the microSD card with the metal contacts facing down and slide it into place until it is fully inserted and locked in place.
6
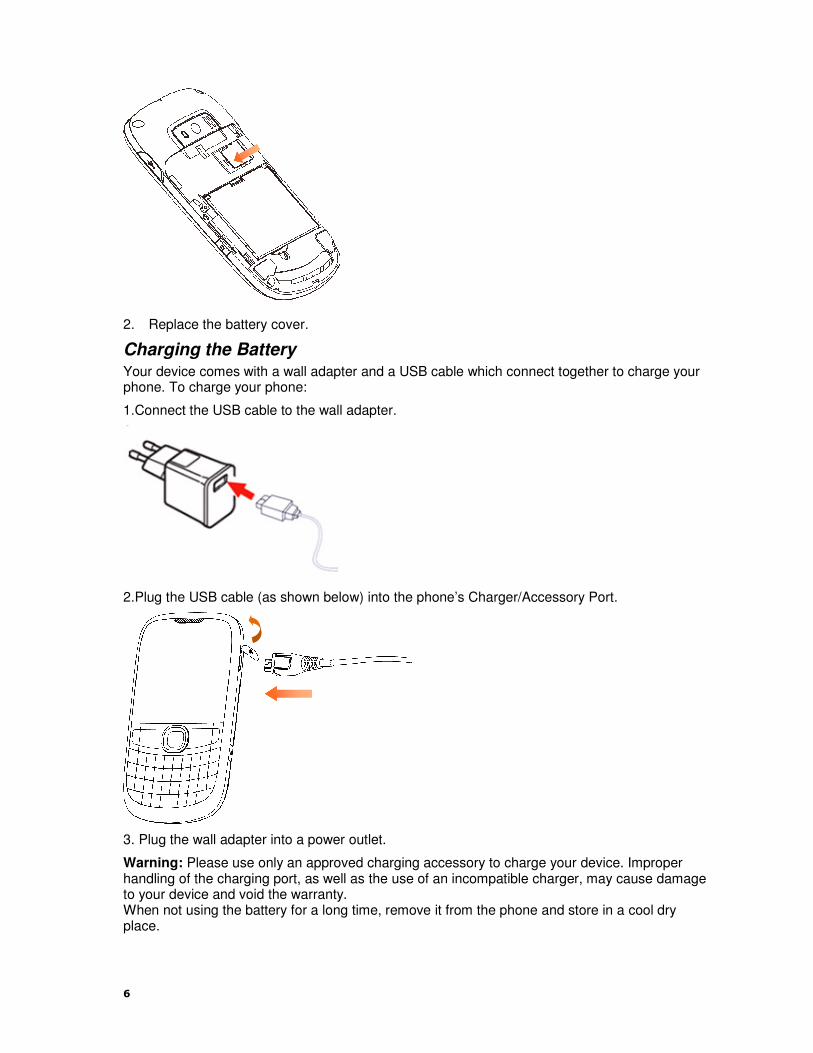
2. Replace the battery cover.
Charging the Battery Your device comes with a wall adapter and a USB cable which connect together to charge your phone. To charge your phone:
1.Connect the USB cable to the wall adapter.
2.Plug the USB cable (as shown below) into the phone’s Charger/Accessory Port.
3. Plug the wall adapter into a power outlet.
Warning: Please use only an approved charging accessory to charge your device. Improper handling of the charging port, as well as the use of an incompatible charger, may cause damage to your device and void the warranty. When not using the battery for a long time, remove it from the phone and store in a cool dry place.
7
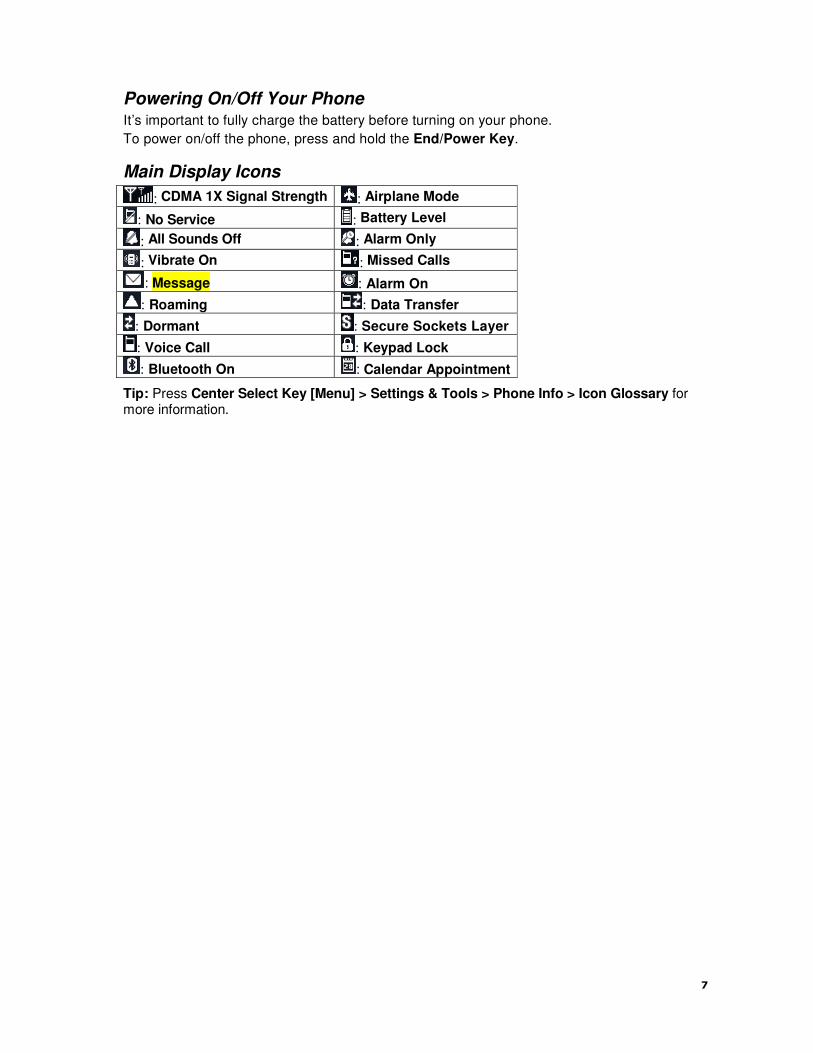
Powering On/Off Your Phone It’s important to fully charge the battery before turning on your phone.
To power on/off the phone, press and hold the End/Power Key.
Main Display Icons
: CDMA 1X Signal Strength : Airplane Mode
: No Service : Battery Level
: All Sounds Off : Alarm Only
: Vibrate On : Missed Calls
: Message : Alarm On
: Roaming : Data Transfer
: Dormant : Secure Sockets Layer
: Voice Call : Keypad Lock
: Bluetooth On : Calendar Appointment
Tip: Press Center Select Key [Menu] > Settings & Tools > Phone Info > Icon Glossary for more information.
8
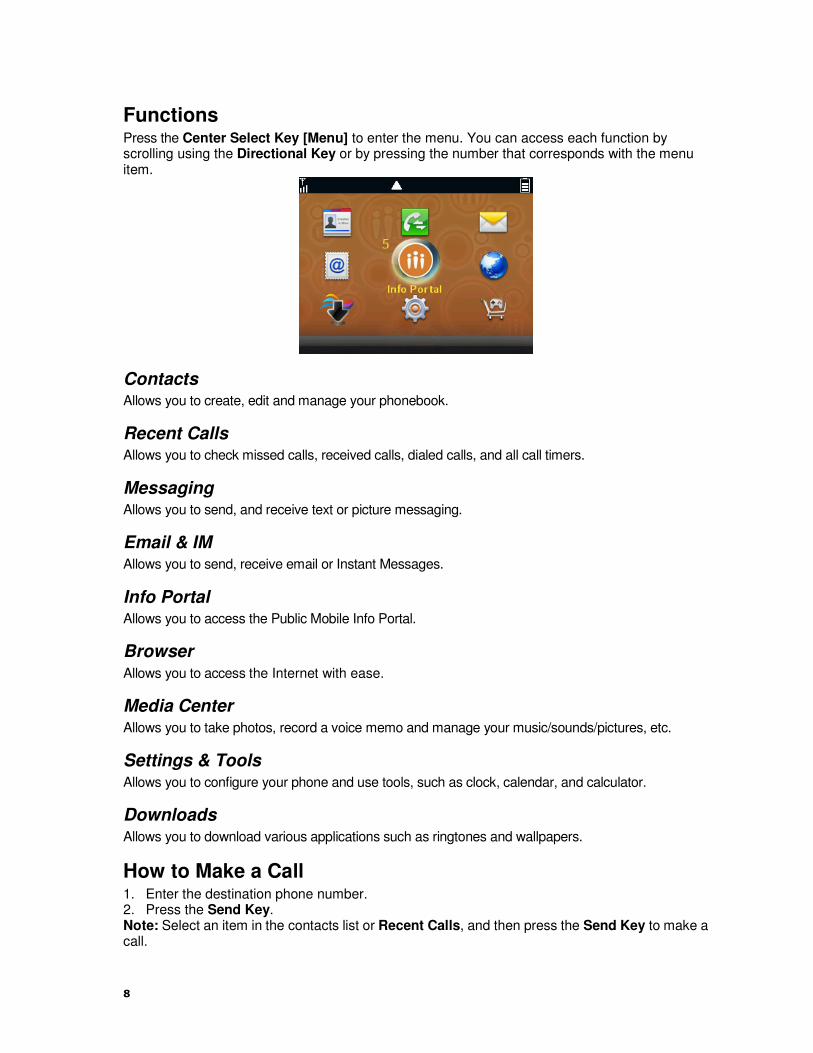
Functions Press the Center Select Key [Menu] to enter the menu. You can access each function by scrolling using the Directional Key or by pressing the number that corresponds with the menu item.
Contacts Allows you to create, edit and manage your phonebook.
Recent Calls Allows you to check missed calls, received calls, dialed calls, and all call timers.
Messaging Allows you to send, and receive text or picture messaging.
Email & IM Allows you to send, receive email or Instant Messages.
Info Portal Allows you to access the Public Mobile Info Portal.
Browser Allows you to access the Internet with ease.
Media Center Allows you to take photos, record a voice memo and manage your music/sounds/pictures, etc.
Settings & Tools Allows you to configure your phone and use tools, such as clock, calendar, and calculator.
Downloads Allows you to download various applications such as ringtones and wallpapers.
How to Make a Call 1. Enter the destination phone number. 2. Press the Send Key. Note: Select an item in the contacts list or Recent Calls, and then press the Send Key to make a call.
9
How to Send a Message 1. Press the Center Select Key [Menu] > Messaging > New Message > Txt Message/
Multimedia Message to choose the message type.
2. Finish all the necessary fields, and then press the Centre Select Key [Send] or the Send Key to send the message.
How to Access E-mail 1. Press the Center Select Key [Menu] > Email & IM.
2. Read the introduction and click Next.
3. Select Email service and click Next.
4. Follow the on-screen prompts to finish the procedure.
Tips:
For detailed instructions on your phone, please refer to the user guide.