Embed Size (px)
Citation preview

Telemecanique
Zelio-LogicSmart Relay
User’s GuideJune 2002
ZELIO2_FR.book Page 1 Jeudi, 11. juillet 2002 7:30 19

Preliminary Advice on Installing Smart Relays
Power down the device.
Take all necessary measures to avoid unwanted relay triggering.
Check to ensure that no voltage is present.
Make the necessary ground and short circuit connections.
Always follow the instructions stated in this user’s guide.
Remember that only qualified personnel are authorized to implement the smart relay.
Automation and control devices must be installed so that they are protected against any risk of involuntary actuation.
It is essential to ensure that all control system connections meet applicable safety standards.
Fluctuations or variations in the supply voltage should not exceed the tolerance thresholds stated in the technical characteristics, as they may cause operating failures and lead to potentially dangerous situations.
Take care to meet the standards that apply to emergency stop systems in order to avoid potentially dangerous situations. Ensure that releasing the emergency stop system does not cause the automated system to suddenly restart.
Take all necessary measures to ensure that an application interrupted by a break in the supply voltage can continue correctly and also ensure that no dangerous states, no matter how brief, may occur.
ZELIO2_FR.book Page 2 Jeudi, 11. juillet 2002 7:30 19

Smart Relay
Contents
You would like to know how your new smart relay works and discover its main characteristics.
1 - Powering up and Discovering the Smart Relay
You require detailed information on, for example, implementing a Ladder diagram using a smart relay.
2 - Implementinga Typical Application
You would like to know all of the smart relay’s configuration options. 3 - Configuration Menu
You would like to know all of the elements in the Ladder diagram that are recognized and used by the smart relay.
4 - Ladder Diagrams
You would like to learn to enter a complete Ladder diagram using the smart relay.
5 - Entering Ladder Diagrams
You would like to know what smart relay control capabilities are offered during operation and how power breaks are handled.
6 - Debugging
You would like to improve your understanding of the smart relay using a complete example.
7 - Application Example
You have an operating problem and you would like to find the solution. 8 - Troubleshooting
You would like to backup, transfer or duplicate your application. 9 - Transferring Ladder Diagrams
You will be using the smart relay connected to an ASi system. 10 - Using the ASi Connection
You are looking for tools to assist with application design: entry forms. Appendix
You are looking for a specific word. Index
4
18
32
40
62
70
109
86
93
107
97
Page
80
ZELIO2_FR.book Page 3 Jeudi, 11. juillet 2002 7:30 19

4 Smart Relay, Chapter 1
Chapter 1 - ContentsPowering up and Discovering the Smart Relay
This Chapter covers the following subjects:
1. Presentation ____________________________________________________ 5
2. Characteristics and Connections ___________________________________ 6
Characteristics of DC smart relays ___________________________________ 6Characteristics of AC smart relays ___________________________________ 7Connecting DC smart relays ________________________________________ 8Connecting three-wire detectors _____________________________________ 9Connecting analog inputs __________________________________________ 9Connecting AC smart relays _______________________________________ 10
3. Command Keys _________________________________________________ 11
Description of keys ______________________________________________ 11
4. Examples ______________________________________________________ 12
5. Main Functions _________________________________________________ 14
Main menu functions _____________________________________________ 15Configuration menu functions ______________________________________ 17
ZELIO2_FR.book Page 4 Jeudi, 11. juillet 2002 7:30 19

Smart Relay - Chapter 1 5
1. Presentation
Smart relays are designed to simplify the electrical wiring of intelligent solutions. A smart relay is very simple to implement. Its flexibility and its high performance allows users to save significant amounts of time and money.
This User’s Guide is intended for people who do not have an in-depth knowledge of automation systems and who would like to be able to implement smart relays.
1-Retractable mounting feet2-Screw terminal block for the power supply 3-LCD, 4 lines, 12 characters4-Screw terminal block for inputs 5-Screw terminal block for 0-10 Volt analog inputs usable in discrete mode on some models6-Delete key7-Insert line key8-Arrow keys or after first configuring them, Z pushbuttons9-Selection and validation key10-Escape key11-Connector for backup memory or PC connection cable12-Relay output screw terminal block13-Slot for re-writable label
1-Input status display (b and c represent the analog inputs)2-Operating mode display (RUN/STOP)3-Parameter display, by default the day and time for models with a clock4-Output status display5-Z key function display, when these keys are activated.
The smart relay’s reference number and version level are shown on the label that can be seen on the side of the smart relay.
+ 0V I1 I2 I3 I4
24VDC
Output4 x relay 240V / 10A
Esc. Sel./ OK
Del. Ins. line
I5 I6 IB IC
I1…I6 =inputs 24 VDC
IB...IC = inputs : analog0...10VDCor 24VDC
1 2Q1 Q2 Q3 Q4
1 2 1 2 1 2
z1
z3z4 z2
SR1 B121BD
1 2 3 4 5
6
7
8
9
10
1
1213
11
21
3
4
5
SR1...
V1.XX
VersionReference
ZELIO2_FR.book Page 5 Jeudi, 11. juillet 2002 7:30 19

6 Smart Relay - Chapter 1
2. Characteristics and Connections
Characteristics of DC smart relays
Supply 24 VDC (min. 19.2 V/max. 30 V)Reference numbers SR1-A101BD SR1-B121BD SR1-B122BD
Number of I/O 10 12
Weekly clock NO YES
Rated input current 83 mA 45 mA
Nbr. of discrete inputs 6 6
Rated voltage 24 V c
Rated current I1 to I6: 3 mA IB, IC: 0.62 mA
Nbr. of 0-10 V* analog inputs
0 2
Nbr. of outputs and type 4 relay outputs 4 transistor outputs
Switching voltage 5-150 Vc / 24-250 Va 24 Vc / 0.5 A
Max. switching current 8 A 0.5 A
AC15 switching capacity 0.9 A / 230 Va -
DC13 switching capacity 0.6 A / 24 Vc 0.5 A / 24 Vc
Supply 24 VDC (min. 19.2 V/max. 30 V)12 VDC
(min. 10.4 V/max. 14.4 V)
Reference numbers SR1-A201BD SR1-B201BD SR1-B121JD
Number of I/O 20 12
Weekly clock NO YES
Rated supply current 130 mA 105 mA
Nbr. of discrete inputs 12 10 6
Rated voltage 24 V c 12 V c
Rated current I1 to IA: 3 mA IB, IC: 0.62 mAI1 to I6: 3 mA
IB, IC: 0.21 mA
Nbr. of 0-10 V* analog inputs
0 2
Nbr. of outputs and type 8 relay outputs 4 relay outputs
Switching voltage 5-150 Vc / 24-250 Va
Max. switching current 8 A
AC15 switching capacity 0.9 A / 230 Va
DC13 switching capacity 0.6 A / 24 Vc
* Each analog input is also usable in discrete I/O mode
ZELIO2_FR.book Page 6 Jeudi, 11. juillet 2002 7:30 19

Smart Relay - Chapter 1 7
2. Characteristics and Connections
Characteristics of AC smart relays
Supply 100-240 Va (min. 85 V/max. 264 V)Reference numbers SR1-A101FU SR1-B101FU SR1-A201FU SR1-B201FU
Number of I/O 10 20
Weekly clock NO YES NO YES
Rated supply current < 50 mA to 100 Va < 27 mA to 240 Va
< 80 mA to 100 Va< 40 mA to 240 Va
Nbr. of discrete inputs 6 12
Rated voltage 100-240 Va 50-60 Hz
Rated current 0.65 mA to 115 Va 1.3 mA to 240 Va
Nbr. of outputs and type 4 relay outputs 8 relay outputs
Switching voltage 5-150 Vc / 24-250 Va
Max. switching current 8 A
AC15 switching capacity 0.9 A / 230 Va
DC13 switching capacity 0.6 A / 24 Vc
Supply 24 Va (min. 19.2 V/max. 26.4 V)Reference numbers SR1-B101B SR1-B201B
Number of I/O 10 20
Weekly clock YES
Rated supply current 75 mA (outputs disabled)200 mA (all outputs enabled)
82 mA (outputs disabled)300 mA (all outputs enabled)
Nbr. of discrete inputs 6 12
Rated voltage 24 V c 50-60 Hz
Rated current 3 mA
Nbr. of outputs and type 4 relay outputs 8 relay outputs
Switching voltage 5-150 Vc / 24-250 Va
Max. switching current 8 A
AC15 switching capacity 0.9 A / 230 Va
DC13 switching capacity 0.6 A / 24 Vc
ZELIO2_FR.book Page 7 Jeudi, 11. juillet 2002 7:30 19

8 Smart Relay - Chapter 1
2. Characteristics and Connections
Connecting DC smart relays
SR1- BD or SR1B122BD
+
-
UR 1A fuse
xx VDC
+ - I1
1 Q1 2 1 Q2 2 1 Q3 2 1 Q4 2
I2 I3 I4
InputsI1 I6xx VDC
IB IC =xx VDC or xxVDC
I5 I6 IB IC
12 240V 50 / 60 Hzor 12 125Va
L / +
N / - UU
12 240V 50 / 60 Hz
12 125V
FuseInductive load Inductive load
I7
Inputs IB IC =xx VDC or xx VDC
I8 I9 IBIA ICI6
Q3 Q4 Q5 Q61
Q7 21 21 21 21 2 1 2Q8
+24Vdc
24 V
-
+
-
UR 1A fuse
24 VDC
+ - I1
Q1+
Outputs4 x transistors 24VDC/0,5A
Q2 Q3 Q4
I2 I3 I4
InputsI1 I624 VDC
IB IC =0 10 VDC or 24 VDC
I5 I6 IB IC
Rectified not filtred
Regulated
Rectified and filtered
NEVER
PREFERABLE
POSSIBLE
U min
U max
220 V~ABL7R...
24 V=~/=
SR1...JDUmax < 14.2 VU min > 10.4 V
SR1...BDUmax < 30 V
U min > 19.2 V
ZELIO2_FR.book Page 8 Jeudi, 11. juillet 2002 7:30 19

Smart Relay - Chapter 1 9
2. Characteristics and Connections
Connecting three-wire detectors
Connecting analog inputs
SR1- BD or SR1B121JD
SR1-B BDSR1-B121JD - SR1E121BD
+
-
Fuse
xx VDC
+ - I1 I2 I3 I4 I5 I6 IB IC
BN
BK
BLBN
BK
BL
Inputs I1 I6 =
xx VDC
IB IC =
xx VDC or xxVDC
I7 I8 I9 IA ICIBI6
+
-
Fuse
Ca / Ta1
Ca / Ta2
xx VDC
+ - I1 I2 I3 I4 I5 I6 IB IC
0 -10 V ANALOG
+24 VDC
-
Ca / Ta1
Ca / Ta2
24 VDC
+ - I1 I2 I3 I4 IB IC
0 -10 V ANALOG
Inputs I1 I6 =
xx VDC
IB IC =
xx VDC or xxVDC
Inputs I1 I6 =
24 VDC
IB IC =
0 10 VDC or 24 VDC
Fuse
- -
ZELIO2_FR.book Page 9 Jeudi, 11. juillet 2002 7:30 19

10 Smart Relay - Chapter 1
2. Characteristics and Connections
Connecting AC smart relays
SR1- FU
L N I1 I2 I3 I4
I1 I6 =
I5 I6100 240 V50 / 60 Hz
L
N
inputs 100 240VAC
UR 1A fuse
12 240 V50 / 60 Hzor 12 125 V
L / +
N / - UU
12 240 V50 / 60 Hz
12 125 V
Fuse
Inductiveload
100...240 VAC
I7 I8 I9 IA ICIBI6
1 Q1 2 1 Q2 2 1 Q3 2 1 Q4 2 Q3 Q4 Q5 Q61
Q7 21 21 21 21 2 1 2Q8
24 V50 / 60 Hz
Inductiveload
ZELIO2_FR.book Page 10 Jeudi, 11. juillet 2002 7:30 19

Smart Relay - Chapter 1 11
3. Command Keys
Description of keys (not available on Blind modules)
The keys located on the front of the smart relay are used to configure, program and control the application. They perform the following actions:
Key Description
Press this key to delete a Ladder diagram element or line.
Press this key to insert a Ladder diagram line.
Press this key to: Make a selection,Enter the parameter page for an element,Enter a display page,Validate a selection.
To use the smart relay, the first action required is to press this key to access the main menu.
Press this key to exit a menu or a selection.
The arrow keys are used to move up, left, down and right. The position on screen is shown by the ">" indicator, a " " or " " cursor or the blinking text "Ini".
ZELIO2_FR.book Page 11 Jeudi, 11. juillet 2002 7:30 19

12 Smart Relay - Chapter 1
4. Examples
This sub-section details how to use the smart relay’s keys.This does not apply to Blind modules.
Example 1: Language selection - The procedure described below is always the same as long as the module has keys.
Description/Action Display
Initial power up or power up after initialization by the manufacturer:
The "ENGLISH" option blinks.
Select the required language using keys Z1 and Z3, then press Sel./ OK to validate.
or +
The Sel./ OK button is ued to validate the choice of a new language (as shown by the lozange symbol and by the text blinking).
To continue or complete the initial power up procedure.
There are two possible cases:Product with a clock, e.g. SR1-B
Now the time must be set(refer to the example on the next page).
Product without a clock,e.g. SR1-A
The smart relay’s main screen is displayed (in this case a SR1-A101FU smart relay).
ZELIO2_FR.book Page 12 Jeudi, 11. juillet 2002 7:30 19

Smart Relay - Chapter 1 13
4. Examples
Example 2: Changing the date and time when first powered up or after a long lasting power break.(V ≤ 1.6: 72 hours) or (V ≥ 1.7: 150 hours)
The hours, minutes and day of the week settings can be changed in the same way, using the smart relay keys.
To return to the main menu, press:
Note: The or keys are used to move from one field to another while the other two arrow keys are used to change the displayed values.
Important: There is no automatic SUMMER/WINTER time change function. Whenever a change between winter and summer time takes place, you will need to change the SUMMER/WINTER value. The current time will then be automatically updated (+ or - 1 hour).
Description/Action Display/Comments
After choosing the language, the following screen is brought up:
The black colored cursor blinks.
To enter Modify mode.
The text to change blinks ("WINTER" in this case). You can then change it using:
or then Pressing Sel./OK validates the changes and the cursor moves to the next field, "MO" (Monday) in this case.
ZELIO2_FR.book Page 13 Jeudi, 11. juillet 2002 7:30 19

14 Smart Relay - Chapter 1
5. Main Functions
These are grouped in a main menu.
The ">" indicator located to the left of the text shows the setting of your choice.
An upwards triangle shows that there are more options available if you scroll up, while a downwards triangle shows that there are more options available if you scroll down.
Note: The functions provided by the various menus may vary according to product reference number and software release level.
ZELIO2_FR.book Page 14 Jeudi, 11. juillet 2002 7:30 19

Smart Relay - Chapter 1 15
5. Main Functions
Main menu functions
Menu Description
TIME SET
This function is used to set the date and time:Summer/winter timeDay of the weekHours-Minutes
PROGRAM.
This function lets the user enter the Ladder diagram that will make the smart module work. This program is written using a Ladder diagram. For information on how to program a Ladder diagram, refer to the next chapter. This function may be password protected.
PARAMET.This function lets the user display and change unlocked values in function block parameters entered in the Ladder diagram.
VISU.
This function lets the user display and change unlocked function block parameters entered in the Ladder diagram. It also lets the user select data that will be displayed on the third display line on the smart relay screen.
RUN/STOP
This function lets the user start or stop the program contained in the smart relay:RUN: the program is started.STOP: the program is stopped and the outputs disabled. Counters and timers are reset.
CONFIG. This function comprises all of the smart relay configuration options (refer to the next table).
CLEAR PROG. This function will clear the entire Ladder diagram stored in the smart relay. This function may be password protected.
TRANSFER.
This function will transfer the contents of the smart relay memory.Modul. -> PC: transfer to the programming software,PC -> Modul.: loading by the programming software,Modul. -> Mem: transfer to the unpluggable EEPROM*,Mem -> Modul.: loading from the unpluggable EEPROM*.
ZELIO2_FR.book Page 15 Jeudi, 11. juillet 2002 7:30 19

16 Smart Relay - Chapter 1
5. Main Functions
Main menu functions
* The unpluggable EEPROM allows transferring the contents of the smart relay memory without the need for the programming software and without the need to enter an identical application in another smart relay. However, the smart relay can still work without an EEPROM fitted.
PROG. INFO.orSOFT
This function will display all of the components required for entering a Ladder diagram.Versions ≤ V1.6
Reminder of the smart relay’s internal software release level.Versions ≥ V1.7
ZELIO2_FR.book Page 16 Jeudi, 11. juillet 2002 7:30 19

Smart Relay - Chapter 1 17
5. Main Functions
Configuration menu functions
The various configuration menu options are detailed in Chapter 3, page 31.
Menu Description
PASSWORD Allows or denies access to certain functions.
LANGUAGE Language selection.
FILT. Input filtering mode selection (fast inputs only on SR1.....D). This function may be password protected.
Zx=KEYS Enable/disable Zx arrow keys. This function may be password protected.
HELP Only available on versions ≤≤≤≤ V1.6.Enable/disable automatic help.
REMANENZ
Only available on versions ≥≥≥≥ V1.7.Select the counter, timer and auxiliary relay function blocks with a value to save if a power break occurs. By default, no variable is saved.
ZELIO2_FR.book Page 17 Jeudi, 11. juillet 2002 7:30 19

18 Smart Relay - Chapter 2
Chapter 2 - ContentsImplementing a Basic Application
This Chapter covers the following subjects:
1. Ladder Diagram Presentation _____________________________________ 19
2. Using the Reverse Function _______________________________________ 20
Practical Example _______________________________________________ 20General Case __________________________________________________ 21
3. Notation Used by the Smart Relay _________________________________ 22
4. Application: Implementing a Two-way Switch ________________________ 24
Entering the Ladder Diagram ______________________________________ 24
ZELIO2_FR.book Page 18 Jeudi, 11. juillet 2002 7:30 19

Smart Relay - Chapter 2 19
1. Ladder Diagram Presentation
If you already know how Ladder diagrams work, you can skip straight to section 3 of this chapter.In this section, we will use a simple example to understand how a Ladder diagram works: a two-way switch.
Using a smart relay means that ordinary switches (with open or closed positions) can be used in place of two position switches.
The switches are identified as S1 and S2 in the wiring diagram opposite.
S1 and S2 are connect-ed to inputs I1 and I2 on the smart relay.
The operating principle is as follows: Each time inputs I1 and I2 change state, this causes a change in state on output Q1 which controls light L1.
The Ladder diagram uses basic features like placing contacts in parallel and in series along with the reverse function identified as i1 and i2 (the reverse function is described on the next page).
Note: The implementation of a two-way switch is optimum when remote control relay coils are used (refer to page 42).
Normal electrical diagram Ladder diagram
The two position switches identified as VV1 and VV2 control light L1.
I1 and I2 are two contacts representing inputs 1 and 2 on the smart relay.Q1 is a coil that corresponds to output 1 from the smart relay.
L N I1
1 Q1 2 1 Q2 2 1 Q3 2 1 Q4 2
I2 I3 I4
I1-I6 =
I5 I6
inputs 100 240VAC100...240 VAC
Fuse 1
Fuse 2
L100-240 VAC
50 / 60 HzN S1 S2
L1
ZELIO2_FR.book Page 19 Jeudi, 11. juillet 2002 7:30 19
20 Smart Relay - Chapter 2
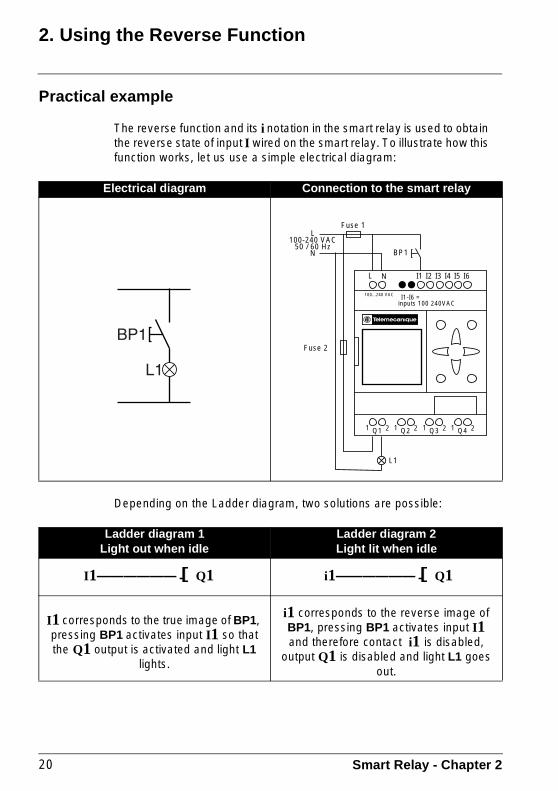
2. Using the Reverse Function
Practical example
The reverse function and its i notation in the smart relay is used to obtain the reverse state of input I wired on the smart relay. To illustrate how this function works, let us use a simple electrical diagram:
Depending on the Ladder diagram, two solutions are possible:
Electrical diagram Connection to the smart relay
Ladder diagram 1Light out when idle
Ladder diagram 2Light lit when idle
I1—————— Q1 i1—————— Q1
I1 corresponds to the true image of BP1, pressing BP1 activates input I1 so that the Q1 output is activated and light L1
lights.
i1 corresponds to the reverse image of BP1, pressing BP1 activates input I1 and therefore contact i1 is disabled,
output Q1 is disabled and light L1 goes out.
L N I1
1 Q1 2 1 Q2 2 1 Q3 2 1 Q4 2
I2 I3 I4
I1-I6 =
I5 I6
inputs 100 240VAC100...240 VAC
Fuse 1
BP1
Fuse 2
L100-240 VAC
50 / 60 HzN
L1
ZELIO2_FR.book Page 20 Jeudi, 11. juillet 2002 7:30 19

Smart Relay - Chapter 2 21
2. Using the Reverse Function
General case
The table below illustrates the operation of a pushbutton connected to the smart relay. Pushbutton BP1 is connected to input I1 and light L1 is connected to output Q1 on the smart relay.
Note: The reverse function applies to all of the contacts in a Ladder diagram, whether they represent outputs, auxiliary relays or function blocks.
Idle OperatingElectrical diagram
Zeliosymbol
Electrical diagram
Zeliosymbol
I1 = 0
i1 = 1
I1 = 1
i1 = 0
I1 = 1
i1 = 0
I1 = 0
i1 = 1
ZELIO2_FR.book Page 21 Jeudi, 11. juillet 2002 7:30 19

22 Smart Relay - Chapter 2
3. Notation Used by the Smart Relay
The smart relay has a four line display used to show Ladder diagrams.
Note: The ZelioSoft application lets you represent Ladder diagrams in three different formats.
Electricalsymbol
Ladder diagramsymbol
Zelio smart relaysymbol
or
"C" "O"
or
I1 or i1
I1 or i1
Q1
Set coil (SET)
S Q1
Reset coil (RESET)
R Q1
1413
2221
A2
A1
A2
A1
A2
A1
ZELIO2_FR.book Page 22 Jeudi, 11. juillet 2002 7:30 19

Smart Relay - Chapter 2 23
3. Notation Used by the Smart Relay
Other elements are also available using a smart relay:
Timer function block: used to delay, prolong and control and action for a set length of time.Counter function block: used to count the pulses received on an input.Clock function block: used to trigger or release actions on precise days or at precise times.Analog comparator function block: used to compare an analog value with a reference value or with another analog value after allowing for a hysteresis factor.Auxiliary relays: these are used to save or relay the status of the smart relay.Z keys: after confirming this function, Z keys can be used as pushbuttons.
Note: For more information on all of the Ladder diagram elements available when using a smart relay, refer to Chapter 4, page 40, for a detailed description.
ZELIO2_FR.book Page 23 Jeudi, 11. juillet 2002 7:30 19

24 Smart Relay - Chapter 2
4. Application: Implementing a Two-way Switch
Entering the Ladder diagram
By following the indications in the table below, the user can enter the two-way switch Ladder diagram.
From the main screen (the one shown on power-up), follow the instructions in the "Action" column and press the specified button.
The "Screen" column shows what the user will see on the smart relay display screen.
The "Comments" column provides some additional information on entry and display actions.
Action Screen CommentsThe main menu is displayed, the ">" symbol shows that the "PROGRAM." option is selected. This option blinks.
After briefly displaying "LINE 1" (for approx. two seconds), a blinking cursor is displayed.
I1 The I blinks. The smart relay prompts the user to select the type of contact.
I1 The 1 blinks.The user has implicitly selected a contact assigned to an input (I), the smart relay now prompts the user to select the input number.
ZELIO2_FR.book Page 24 Jeudi, 11. juillet 2002 7:30 19

Smart Relay - Chapter 2 25
4. Application: Implementing a Two-way Switch
Action Screen Comments
I1 The blinks.You have just validated the contact entry to assign to input I1. The is moved ready to enter the second contact.
I1—I1 The right hand I blinks.The smart relay prompts you to select the type of contact.
I1—i1 The i blinks. You have just selected the reverse contact assigned to an input.
I1—i1 The right hand 1 blinks. Now enter the input number.
I1—i2 The 2 blinks. Now simply validate this selection.
or
I1—i2 The blinks.Move to the end of the line ready to enter the coil.
I1—i2 The blinks, indicating a link point for linking connections.
I1—i2 The blinks.Now enter the coil.
I1—i2———— Q1The Q blinks.Now all that remains is to select the other parameters for this coil.
ZELIO2_FR.book Page 25 Jeudi, 11. juillet 2002 7:30 19

26 Smart Relay - Chapter 2
4. Application: Implementing a Two-way Switch
Action Screen Comments
I1—i2———— Q1The 1 blinks.Coil Q is validated.
I1—i2———— Q1 The blinks.The coil number is validated.
I1—i2———— Q1The blinks.The coil is validated in contact position.The moves down a line and the links are displayed automatically.
I1—i2———— Q1I1 The I located on the
second line blinks.
I1—i2———— Q1i1 The i located on the
second line blinks.
I1—i2———— Q1i1 The 1 located on the
second line blinks.
I1—i2———— Q1i1 The blinks.
I1—i2———— Q1i1—I1 The I located on the
second line blinks.
I1—i2———— Q1i1—I1 The second 1 in the
second line blinks.
I1—i2———— Q1i1—I2 The 2 located on the
second line blinks.
ZELIO2_FR.book Page 26 Jeudi, 11. juillet 2002 7:30 19

Smart Relay - Chapter 2 27
4. Application: Implementing a Two-way Switch
Action Screen Comments
I1—i2———— Q1i1 I2
The blinks.Now enter the link between the two lines.
I1—i2———— Q1i1—I2
The blinks. This shows that it is possible to connect a link at this point.
I1—i2———— Q1i1—I2 +
The has changed into a blinking + and this shows that it is now possible to set the link between the two lines.
The contact point blinks showing a + sign. Now validate this change.
The contact point blinks showing a sign. The validation is made, now exit the diagram zone.
The screen displays the main menu. Now start the smart relay (set to RUN).
Press the key three timesThe ">" sign indicates that the "RUN / STOP" option is selected. This option blinks. Now simply validate the setting to RUN.
The smart relay prompts you to validate the setting to RUN.
ZELIO2_FR.book Page 27 Jeudi, 11. juillet 2002 7:30 19

28 Smart Relay - Chapter 2
4. Application: Implementing a Two-way Switch
This simple application example teaches the user how to enter a Ladder diagram. The following points should be remembered:
When a or a blinks, use the Sel/OK button to add an element (contact, coil or graphic link element).
When an element blinks (I, Q, No., , …), it is possible to use the Z1 and Z3 arrows on the arrow key pad to select the required element.
It is also possible to use the Z2 or Z4 arrows on the arrow key pad to select the previous or the next element (or the next part of the currently selected element).
Action Screen Comments
The smart relay is now set to RUN. To monitor its operation, return to the main screen.
This screen lets you display two-way switch operation (switch action, indicator lights on or off, light on or off).
ZELIO2_FR.book Page 28 Jeudi, 11. juillet 2002 7:30 19

Smart Relay - Chapter 2 29
ZELIO2_FR.book Page 29 Jeudi, 11. juillet 2002 7:30 19

30 Smart Relay - Chapter 3
Chapter 3 - ContentsConfiguration Menu
This Chapter covers the following subjects:
1. Password Function "PASSWORD" _________________________________ 31
Password purpose _______________________________________________ 31Entering the password ____________________________________________ 31Cancelling password protection _____________________________________ 31Changing the password ___________________________________________ 31
2. Language Selection Function "LANGUAGE" _________________________ 32
Using the "Ini." function ___________________________________________ 32
3. Fast Input Function "FILT." _______________________________________ 33
4. Arrow Keys Function "Zx=KEYS" __________________________________ 34
5. Help Function "HELP" ___________________________________________ 35
6. Data Backup Function "REMANENZ" _______________________________ 36
ZELIO2_FR.book Page 30 Jeudi, 11. juillet 2002 7:30 19

Smart Relay - Chapter 3 31
1. Password Function "PASSWORD"
Password purpose
The password secures access to the following main menu options: "PROGRAM", "CLEAR. PROG", "FILT.", "REMANENZ", "Zx=KEYS", as well as to the two application transfer options Module to PC and Module to EEPROM.
Note: This password comprises four digits from 0 to 9. It is entered using the keys on the smart relay. By default it is disabled.
Entering the password
Canceling password protection
To cancel password protection, simply enter the current password (see above). The password is inhibited and the smart relay displays a transitory screen showing an open padlock symbol. If you have forgotten your password, refer to Chapter 8, page 88.
Changing the password
To change the password, simply cancel the former one and enter a new one (refer to the method described above).
Action Display Comments
Select the "PASSWORD" option from the
"CONFIG." menu.
PASSWORD
? ? ? ?
The means that no password is set yet.
PASSWORD
0 0 0 0
The 0 on the right blinks. Now enter the password.
Enter the password using the arrow keys Z1, Z2, Z3,
Z4.
PASSWORD
3 0 2 0
The digit being changed blinks. Now validate the entry made.
PASSWORD This screen is displayed for two seconds (the password is activated) and the user is returned to the main menu.
ZELIO2_FR.book Page 31 Jeudi, 11. juillet 2002 7:30 19
32 Smart Relay - Chapter 3
2. Language Selection Function "LANGUAGE"
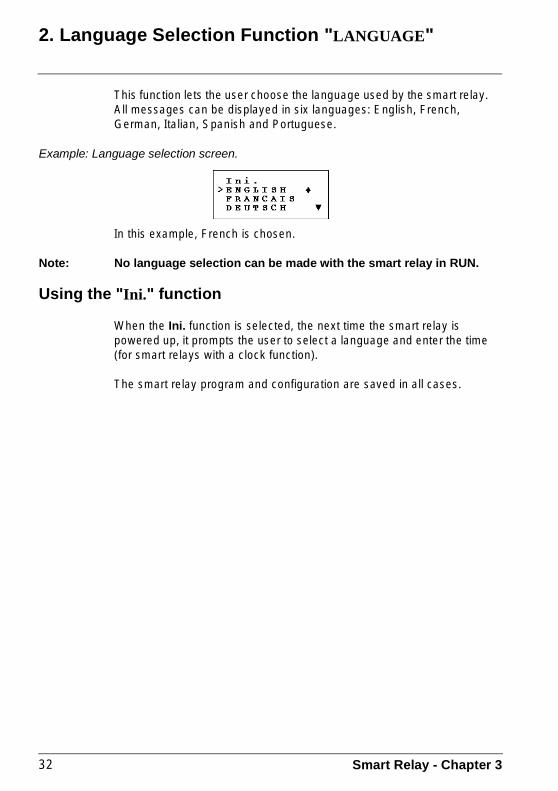
This function lets the user choose the language used by the smart relay. All messages can be displayed in six languages: English, French, German, Italian, Spanish and Portuguese.
Example: Language selection screen.
In this example, French is chosen.
Note: No language selection can be made with the smart relay in RUN.
Using the "Ini." function
When the Ini. function is selected, the next time the smart relay is powered up, it prompts the user to select a language and enter the time (for smart relays with a clock function).
The smart relay program and configuration are saved in all cases.
ZELIO2_FR.book Page 32 Jeudi, 11. juillet 2002 7:30 19
Smart Relay - Chapter 3 33
3. Fast Input Function "FILT."
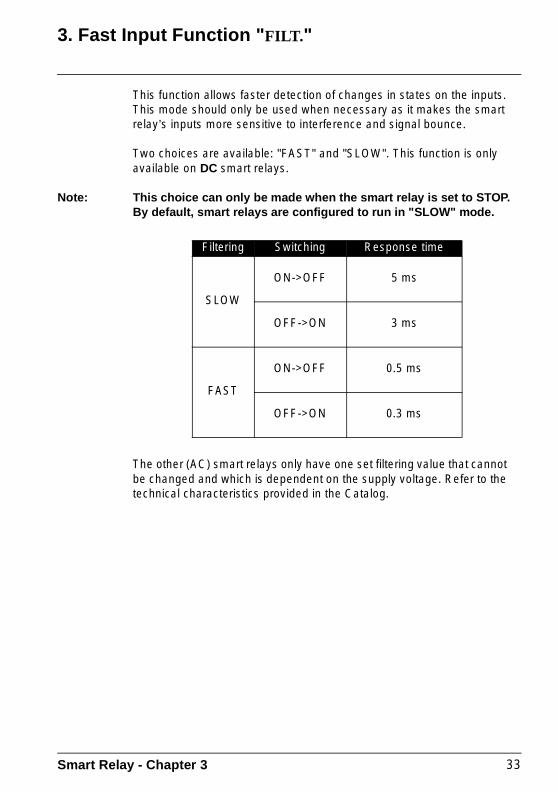
This function allows faster detection of changes in states on the inputs. This mode should only be used when necessary as it makes the smart relay’s inputs more sensitive to interference and signal bounce.
Two choices are available: "FAST" and "SLOW". This function is only available on DC smart relays.
Note: This choice can only be made when the smart relay is set to STOP. By default, smart relays are configured to run in "SLOW" mode.
The other (AC) smart relays only have one set filtering value that cannot be changed and which is dependent on the supply voltage. Refer to the technical characteristics provided in the Catalog.
Filtering Switching Response time
SLOW
ON->OFF 5 ms
OFF->ON 3 ms
FAST
ON->OFF 0.5 ms
OFF->ON 0.3 ms
ZELIO2_FR.book Page 33 Jeudi, 11. juillet 2002 7:30 19

34 Smart Relay - Chapter 3
4. Arrow Keys Function "Zx=KEYS"
The "Zx=KEYS" option lets the user enable or disable the use of arrow keys as pushbuttons. When these keys are disabled, they are only available for setting parameters, configuring and programming the smart relay.When they are enabled, it is also possible to use them in a Ladder diagram.They work like pushbuttons without the need to use a terminal block input contact.When the arrow keys are used as pushbuttons and the user calls up a menu, priority is given to moving around the menus.
Note: By default, this function is disabled.Refer also to Chapter 6.2 for how to use them dynamically.
Representation Function No. Description
ZNo.Normally
open
1 to 4
Representation of the smart relay’s arrow keys, this contact shows the state of the corresponding key.Z1 Up arrowZ2 Right arrowZ3 Down arrowZ4 Left arrow
zNo.Normally closed
ZELIO2_FR.book Page 34 Jeudi, 11. juillet 2002 7:30 19

Smart Relay - Chapter 3 35
5. Help Function "HELP"
Available on smart relay versions ≤ V1.6.
This function lets the user enable or disable the automatic help funciton when performing a smart relay parameter setting or programming action.
When the help function is enabled, simply remain on the required element for a few seconds without pressing on a key and help will be displayed in the form of an explanation screen.
To exit the screen, press the or buttons.
Example of a help screen:
When setting function block parameters, holding position over the padlock symbol will cause the "modif. param." message to appear.Locking does indeed stop the function block from being displayed in the parameter window.
ZELIO2_FR.book Page 35 Jeudi, 11. juillet 2002 7:30 19

36 Smart Relay - Chapter 3
6. Data Backup Function "REMANENZ"
Available on smart relay versions ≥ V1.7.
This function is used to backup the following data in the event of a power break:
- The status of the M auxiliary relays used in pulse mode MNo. or in Set/Reset R MNo and S MNo. mode.
- The count values for counters C1 to C5.- The elapsed time values for timers T1 and T2.
By default, no data is backed up and stopping the smart relay resets all of the values including the values backed up from the REMANENZ menu.
Example:
To backup the status of auxiliary relay M4 and the counting value from counter C1.
Note: This operation can only be performed when the smart relay is stopped.
Action Display Comments
Using the Sel./OK key and keys Z1 and Z3, go to the
main menu and select "CONFIG."
"CONFIG." blinks as it is
selected.
Using the Sel./OK key and the Z3 key, select
"REMANENZ" "REMANENZ" blinks as it is selected.
Data that can be backed up is displayed in reverse video if already backed up.
ZELIO2_FR.book Page 36 Jeudi, 11. juillet 2002 7:30 19

Smart Relay - Chapter 3 37
6. Data Backup Function "REMANENZ"
Action Display Comments
Line Mx no longer blinks, only the 1 corresponding
to M1 blinks.
Press Z2three timesto reach 4
The 4 corresponding to M4 blinks.
or Data shown in reverse video is backed up, M4 in this case.
The entire Mx line blinks.
Press Z3three times
to reach CxThe entire Cx line blinks.
The 1 corresponding to C1 blinks.
Data shown in reverse video is backed up, M4 and C1 in this case.
then 3 x Back to the main screen.
ZELIO2_FR.book Page 37 Jeudi, 11. juillet 2002 7:30 19

38 Smart Relay - Chapter 4
Chapter 4 - ContentsLadder Diagrams
This Chapter covers the following subjects:
1. Introduction ____________________________________________________ 39
2. Discrete Inputs _________________________________________________ 40
3. Discrete Outputs ________________________________________________ 41
Used as a coil __________________________________________________ 41Used as a contact _______________________________________________ 41Example - Using a remote control relay ______________________________ 42Example - Using Set and Reset coils ________________________________ 42
4. Auxiliary Relays ________________________________________________ 43
Example - Using an auxiliary relay __________________________________ 43Behavior of the Set, Reset and Remote relay coils after a power break ______ 43
5. Arrow Keys ____________________________________________________ 44
Example - Using the "Up Arrow" key _________________________________ 44
6. Clock Function Block ____________________________________________ 45
Clock function block contacts ______________________________________ 45Clock function block parameters ____________________________________ 46Example - Time management using a Clock function block _______________ 47
7. Counter Function Block __________________________________________ 49
Counter function block contacts ____________________________________ 49Counter function block coils and parameters __________________________ 49
8. Timer Function Block ____________________________________________ 52
Timer function block contacts ______________________________________ 52Timer function block coils and parameters ____________________________ 52Example - Using a Timer function block ______________________________ 55Behavior after a power break ______________________________________ 56
9. Analog Function Block ___________________________________________ 57
Analog funtion block contacts ______________________________________ 57Analog function block parameters ___________________________________ 59
ZELIO2_FR.book Page 38 Jeudi, 11. juillet 2002 7:30 19

Smart Relay - Chapter 4 39
1. Introduction
This Section details all possible elements in a Ladder diagram that are recognized and used by the smart relays.To better understand the functions performed by each element, where necessary a directly usable example is included.
The logic modules accept 60 line Ladder diagrams for 10 I/O and 12 I/O smart relays and 80 line ones for 20 I/O smart relays.
Note: Each line comprises a maximum of three contacts and must always include a coil. When the application requires more than three contacts to activate an action, the auxiliary relays can be used as shown in the example below.
Ladder diagram example:
ZELIO2_FR.book Page 39 Jeudi, 11. juillet 2002 7:30 19

40 Smart Relay - Chapter 4
2. Discrete Inputs
A discrete input can only be used as a contact.
Example 1:
I1—————— Q1When input I1 contact is closed, output Q1 is activated.
Example 2:
i1—————— Q1When input I1 contact is open, output Q1 is activated.
Note: When analog inputs Ib and Ic are entered as contacts, they automatically operate as discrete inputs.
Representation FunctionNo. on
terminalsDescription
INo.Normally
open1 to C
depending on smart
relay
The physical input to the smart relay.This contact gives the state of the sensor (switch, detector,…) connected to the corresponding input.
iNo.Normally closed
ZELIO2_FR.book Page 40 Jeudi, 11. juillet 2002 7:30 19

Smart Relay - Chapter 4 41
3. Discrete Outputs
A discrete output can be used either as a coil or a contact.
Used as a coil
Used as a contact
Example 1:
Q1—————— Q2When output Q1 is activated, output Q2 is also activated.
Example 2:
q1—————— Q2When output Q1 is disabled, output Q2 is activated. Output Q2 will always take the reverse state to output Q1.
Usage mode
No. ont. block
Description
QNo.
1 to 8 depend-ing on smart relay
The coil is energized if the contacts that it is connected to are closed ones, else it is not energized.
QNo.Pulse supply, the coil is energized by a change of state. This is the same as an alternating control relay.
S QNo.
"Set" (latch) or triggered coil. This coil is triggered as soon as the contacts that are connected to it are closed. It remains triggered even if the contacts are no longer closed.
R QNo.
"Reset" (Unlatch) coil, also called a release coil. This coil is disabled when the contacts that are connected to it are closed. It remains idle even if the contacts are no longer closed.
Representation FunctionNo. ont. block
Description
QNo.Normally
open1 to 8
depending on smart
relay
The physical output from the smart relay. An output can be used as a contact to determine its state at a given time.qNo.
Normally closed
ZELIO2_FR.book Page 41 Jeudi, 11. juillet 2002 7:30 19

42 Smart Relay - Chapter 4
3. Discrete Outputs
Note: The and , SET (Latch) and RESET (Unlatch) functions must be used once and once only for each coil in a Ladder diagram.
Additionally, if you use a SET (Latch) coil (S function), a Ladder diagram line must always be provided for disabling this coil using a RESET (Unlatch) (R function).
If not, then during operaton there is always the risk of generating unexpected switching states.
Example - Using a remote (alternating) control relay
I1—————— Q1
This is a very handy function that allows lighting and extinguishing a light using a pushbutton. If a pushbutton is connected to input I1 and a light to output Q1, then each time the button is pressed, the light will come on if it was off or it will go off if it was on. To set up a two-way switch, simply connect the inputs in parallel and connect a pushbutton to each input.
Example - Using Set (Latch) and Reset (Unlatch) coils
To control the power supply to a device using a pushbutton to cut off the power supply to the same device. The following solution is applied:
Pushbutton BP2 is connected to the smart relay, to input I2 and pushbutton BP3 to input I3. The device to control, in this case a light bulb called L1 is connected to output Q2. Pressing pushbutton BP2 will light the bulb.Pressing pushbutton BP3 will extinguish the bulb.
Note: The RESET (Unlatch) order takes priority over the SET (Latch) order.
Electrical diagram Smart relay solution
ZELIO2_FR.book Page 42 Jeudi, 11. juillet 2002 7:30 19

Smart Relay - Chapter 4 43
4. Auxiliary Relays
The auxiliary relays, M in the notation used, operate just like the output coils Q. The only difference is that they do not have any connection terminals.
There are 15 auxilary relays (numbered in hexadecimal notation from 1 to 9 and from A to F).
They are used to save or forward a state. The saved or forwarded state will then be used as the asigned contact.
Example - Using an auxiliary relay
Using two auxiliary relays to save the position of a number of inputs. The forwarded state is then used to control a coil.
This type of Ladder diagram is often used to control the various states of a device.
Behavior of the Set, Reset and Remote relay coils after a power break
When power returns, all of these coils are automatically reset and therefore disabled.If the application requires it, their state may be saved so that it can be retrieved after power returns.This feature is offered by smart relays running software version ≥ V1.7. (refer to Chapter 3.6 Data Backup Function - "REMANENZ" Menu).
ZELIO2_FR.book Page 43 Jeudi, 11. juillet 2002 7:30 19

44 Smart Relay - Chapter 4
5. Arrow Keys (Not allowed on Blind modules)
The arrow keys work just like the physical inputs I. The only difference is that they do not have any connection terminals.
There are four arrow keys (Z1, Z2, Z3, Z4).
They are used as pushbuttons.
They can only be used as contacts :
Note: So that the arrow keys may be used in this way, first check that they are activated in the "Zx=KEYS" option in the "CONFIG." menu. Z? will then be displayed on the operating display.If not, when the smart relay is in RUN mode, these keys are only used to move within the menus.
Access to the "Zx=KEYS" function is locked out when password protection is activated.
Example - Using the "Up Arrow" key
This example shows how to set up a remote (alternating) control relay that will work using key Z1 and output Q1.
Z1—————— Q1
Output Q1 changes state each time you press
Representation FunctionNo. on the
s. relayDescription
ZNo.Normally
open
1 to 4
Representation of the arrow keys on the smart relay. This contact gives the state of the corresponding key.Z1 Up arrowZ2 Right arrowZ3 Down arrowZ4 Left arrow
zNo.Normally closed
ZELIO2_FR.book Page 44 Jeudi, 11. juillet 2002 7:30 19

Smart Relay - Chapter 4 45
6. Clock Function Block
The Clock function block is used to validate time slots during which actions can be performed. It acts just like a programmable weekly timer and has four operating ranges (A, B, C, D) used to control its output.
The block’s parameter settings are accessible in two ways: - When entering a Ladder diagram line,- From the "PARAMET." menu, if the function block is
not padlocked.
The following contacts can be used in a Ladder diagram:
Clock function block contacts
Representation Function No. Description
No.Normally
open
1 to 4
The contact is closed when the Clock is in an enabled period.
No.Normally closed
The contact is closed when the Clock is not in an enabled period.
ZELIO2_FR.book Page 45 Jeudi, 11. juillet 2002 7:30 19

46 Smart Relay - Chapter 4
6. Clock Function Block
Clock function block parameters
1 - Block number2 - Operating ranges 3 - Current date and time4 - Start day5 - End day6 - Start time7 - Stop time8 - Block locking .
When validating Clock block parameters (exiting the screen using the Esc key), the smart relay displays a summary of the block’s validity ranges so that the user can check the data that they entered.
Parameter Description
Block number
Four blocks can be used, numbered from 1 to 4. This parameter cannot be changed in the screen shown above. It is chosen when the block is entered in the Ladder diagram line.
Operating ranges
Four operating ranges are available: A, B, C, D. During operation, these ranges are cumulated: the block is valid over all of the selected ranges.
Current date and timeThis date corresponds to the day of the week (Monday to Sunday).
Start dayFor each range, a start of validity day (Monday to Sunday) is specified.
End dayFor each range, an end of validity day (Monday to Sunday) is specified.
Start timeFor each range, a start operating time (00:00 to 23:59) is specified.
End timeFor each range, a stop operating time (00:00 to 23:59) is specified.
Block locking
Each Clock block may be locked or left unlocked. When locked, the Clock function block no longer appears in the "PARAMET." menu.
1 2 3 4
8 7 6 5
1
2
3
4
5
6
7
8
ZELIO2_FR.book Page 46 Jeudi, 11. juillet 2002 7:30 19

Smart Relay - Chapter 4 47
6. Clock Function Block
Example - Time management using a Clock function block
To control a device from Monday to Saturday during two time slots: from 09:00 to 13:00 and from 15:00 to 19:00. The device is connected to smart relay output Q2 and Clock function block 1 is used.
The Ladder diagram control line is as follows:
1—————— Q2
When 1 is entered, the user must specify the operating ranges.
Note: The following keys are used, Sel./OK to select or validate a parameter, Z1 and Z3 to change the value of the selected parameter, Z2 and Z4 to move from one parameter to another.
Note: The example described in Chapter 7 describes another way of using time slots. It is possible to mix the two in order to resolve complex cases.
Screen Comments
First data entry screen. It is displayed blank and its various parameters are filled-in using the arrow keys.
The first range (A) has just been entered: from Monday to Saturday from 09:00 to 13:00. Now enter the second range.
The second range has now been chosen. It is displayed blank. Now enter the times for this new range.
The second range has just been entered: from Monday to Saturday from 15:00 to 19:00. Now simply exit the data entry screen by pressing Esc.
ZELIO2_FR.book Page 47 Jeudi, 11. juillet 2002 7:30 19

48 Smart Relay - Chapter 4
6. Clock Function Block
Once data entry is complete, the smart relay displays a summary table that shows all of the operating ranges. To scroll it, use the arrow keys.
The example entered on the previous page results in the following summary table:
To return to entering Ladder diagram lines, press Esc.
ZELIO2_FR.book Page 48 Jeudi, 11. juillet 2002 7:30 19

Smart Relay - Chapter 4 49
7. Counter Function Block
The Counter function block is used to up or down count pulses. It can be reset and a graphic element used as a contact will show whether the preset value has been reached.
Function block parameter setting can be accessed: when entering the coil that represents the counter input (CCNo. in the notiation used) in the Ladder diagram line.The "PARAMET." menu is used to change the preset value if the function block is not padlocked.
Counter function block contacts
Counter function block coils and parameters
1 – Counter input2 – Reset input3 – Counter output - when the preset is reached4 – Value to reach - also called the preset value5 – Block preset value locking6 – Counter direction input (up/down counting)
Note: This screen is only displayed when the coil corresponding to the counter input is entered.The only parameter that can be changed is the preset value. Its value is between 0 and 9999.
When a point is displayed in this screen, it indicates that the element was not used in the Ladder diagram lines.
Representation Function No. Description
CNo. Normally open 1 to 8
(1 to A on Version ≥
1.7)
The contact is closed when the counter reaches the preset value.
cNo. Normally closed
The contact is closed until the counter has reached the preset value.
1 2 3
456
ZELIO2_FR.book Page 49 Jeudi, 11. juillet 2002 7:30 19

50 Smart Relay - Chapter 4
7. Counter Function Block
Element Description/Use Example
CC
Used as a coil in a Ladder diagram, this element represents the block’s counter input. Each time the coil is triggered, the counter increments or decrements by 1, depending on the chosen counting direction.
Application example: Upcounting on the input to the Counter No.1 function block.I1—————— CC1
RC
Used as a coil in a Ladder diagram, this element represents the reset input for the Counter block. Triggering the coil will reset the current count value to zero.
Application example: Resets Counter No.1 when the Up Arrow key is pressed on the arrow keypad:Z1—————— RC1
DC
Used as a coil in a Ladder diagram, this element represents the counter input that determines the direction of counting. If this coil is triggered, the function block downcounts, if not the function block counts. By default (this input is not wired) the function block counts.
Application example: Up or downcounting, depending on the status of a smart relay input.I2—————— DC1
p=0000
Value to reach. This value is also called the preset value. When the current counter value equals the preset value, then the counter C contact is closed. This value can be changed from the previously described screen and also from the "PARAMET." menu.
This parameter is used to lock the Counter function block’s preset value. When the function block is locked, the preset value no longer appears in the "PARAMET." menu.
C or cUsed as a contact, this Counter function block element indicates that the preset value and the current value are equal.
Application example: Lighting an indicator light connected to smart relay output Q1 when the preset value is reached. Else the indicator light is out.C1—————— Q1
ZELIO2_FR.book Page 50 Jeudi, 11. juillet 2002 7:30 19

Smart Relay - Chapter 4 51
7. Counter Function Block
Example - Using a Counter function block
Note: On power return after a power break, the counting values are reset. It is possible to save the number of pulses already counted by smart relay versions ≥≥≥≥ V1.7 (refer to Chapter 3.6 Data Backup Function "REMANENZ" Menu).
The preset values (values to reach) are always backed up regardless of the smart relay version level.
The maximum frequency of count pulses is:- 60 Hz for DC supplied smart relays- 10 Hz for AC supplied smart relays
Screen Description
Upcount and reset: The counter is incremented each time input I1 is activated.The counter is reset when input I2 is activated.
Downcount and reset: The counter is decremented each time input I1 is activated.The counter is reset when input I2 is activated.
Upcount, downcount and reset: The counter is incremented each time input I1 is activated.The counter is decremented each time input I3 is activated.The counter is reset each time input I2 is activated.
ZELIO2_FR.book Page 51 Jeudi, 11. juillet 2002 7:30 19

52 Smart Relay - Chapter 4
8. Timer Function Block
The Timer function block is used to delay, prolong and control actions during a set period of time. It has a reset input, a command input and an output used to indicate timer time-out.
The function block’s parameter settings can be accessed when entering the control coil (TTNo. in the notation used) in the Ladder diagram line.The "PARAMET." menu is used to change the preset value if the function block is not padlocked.
Timer function block contacts
Timer function block coils and parameters
1 – Timer control input 2 – Timer reset input3 – Timer output (or when the Preset time is reached)4 – Type of Timer (eight possible types, refer to the next page)5 – Preset time unit6 – Preset time, the time value to be reached7 – Timer preset value lock
Nota : This screen is only displayed when the coil corresponding to the Timer control input is entered.
When a point is displayed in this screen, it indicates that the element was not used in the Ladder diagram lines.
Representation Function No. Description
TNo.Normally
open 1 to 8(1 to A forVersion ≥
1.7)
The operation of this output contact depends on Timer parameter settings. The possible parameter settings are described in the remainder of this paragraph.tNo.
Normally closed
1 2 3 4
567
ZELIO2_FR.book Page 52 Jeudi, 11. juillet 2002 7:30 19
Smart Relay - Chapter 4 53
8. Timer Function Block
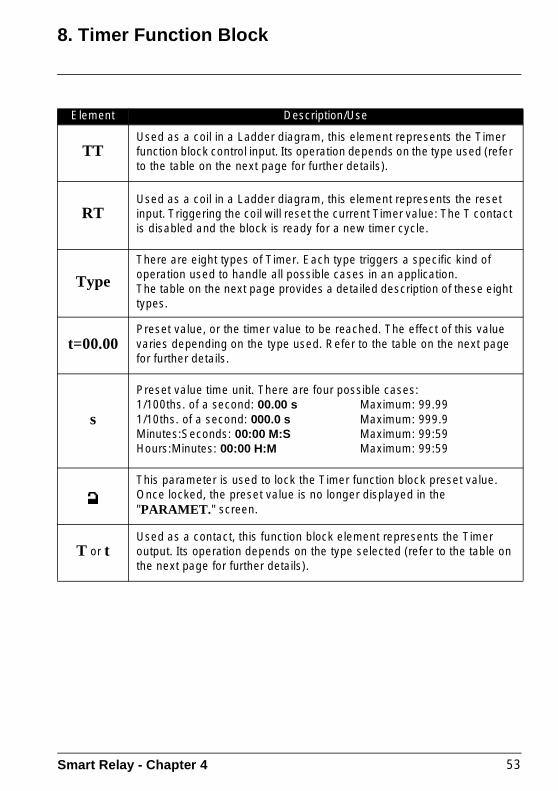
Element Description/Use
TTUsed as a coil in a Ladder diagram, this element represents the Timer function block control input. Its operation depends on the type used (refer to the table on the next page for further details).
RTUsed as a coil in a Ladder diagram, this element represents the reset input. Triggering the coil will reset the current Timer value: The T contact is disabled and the block is ready for a new timer cycle.
Type
There are eight types of Timer. Each type triggers a specific kind of operation used to handle all possible cases in an application.The table on the next page provides a detailed description of these eight types.
t=00.00Preset value, or the timer value to be reached. The effect of this value varies depending on the type used. Refer to the table on the next page for further details.
s
Preset value time unit. There are four possible cases:1/100ths. of a second: 00.00 s Maximum: 99.991/10ths. of a second: 000.0 s Maximum: 999.9Minutes:Seconds: 00:00 M:S Maximum: 99:59 Hours:Minutes: 00:00 H:M Maximum: 99:59
This parameter is used to lock the Timer function block preset value. Once locked, the preset value is no longer displayed in the "PARAMET." screen.
T or tUsed as a contact, this function block element represents the Timer output. Its operation depends on the type selected (refer to the table on the next page for further details).
ZELIO2_FR.book Page 53 Jeudi, 11. juillet 2002 7:30 19

54 Smart Relay - Chapter 4
8. Timer Function Block
Type Description
Type A: Trigger delay (working contact delay). Example: To delay triggering a contactor to limit the current level required.
Type a: Trigger delay on a control pulse rising edge with reset.
Type C: Trigger delay (idle contact delay). Example: To maintain fan operation after stopping the engine.
Type B: Calibrated pulse on the control input rising edge (passage contact). Example: To trigger a timed lighting circuit using a pushbutton and a timer.
Type W: Calibrated pulse on the control input falling edge. Example: A pulse triggered brake control function triggered after a power supply break.
Type D: Symmetrical blinker. Example: Indicating a failure using a flashing light.
Type d: Symmetrical blinker triggered by the rising edge on the control input with a reset function. Example: A blinking alarm indicator and acknowledgment function.
Type T: A totalizing count with reset. Example: To request the replacement of a filter when the recommended service life is exceeded.(Function not available on versions ≥≥≥≥ V1.7)
ZELIO2_FR.book Page 54 Jeudi, 11. juillet 2002 7:30 19
Smart Relay - Chapter 4 55
8. Timer Function Block
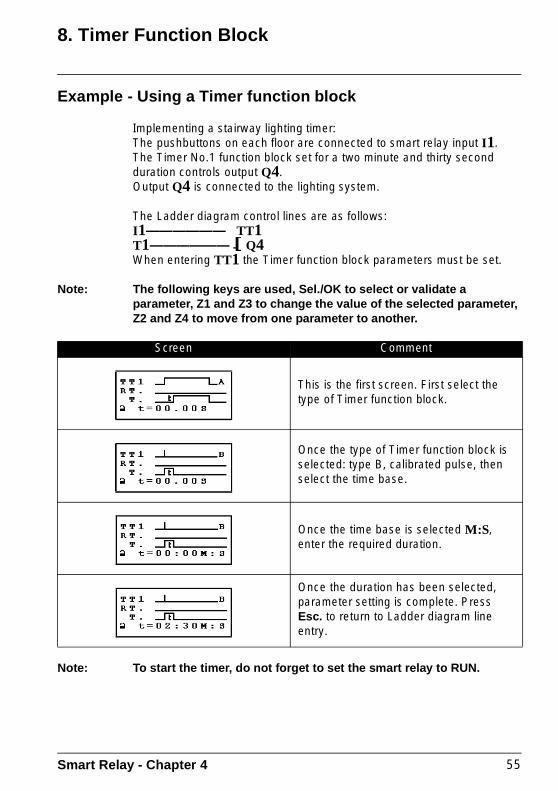
Example - Using a Timer function block
Implementing a stairway lighting timer: The pushbuttons on each floor are connected to smart relay input I1.The Timer No.1 function block set for a two minute and thirty second duration controls output Q4.Output Q4 is connected to the lighting system.
The Ladder diagram control lines are as follows: I1—————— TT1T1—————— Q4When entering TT1 the Timer function block parameters must be set.
Note: The following keys are used, Sel./OK to select or validate a parameter, Z1 and Z3 to change the value of the selected parameter, Z2 and Z4 to move from one parameter to another.
Note: To start the timer, do not forget to set the smart relay to RUN.
Screen Comment
This is the first screen. First select the type of Timer function block.
Once the type of Timer function block is selected: type B, calibrated pulse, then select the time base.
Once the time base is selected M:S, enter the required duration.
Once the duration has been selected, parameter setting is complete. Press Esc. to return to Ladder diagram line entry.
ZELIO2_FR.book Page 55 Jeudi, 11. juillet 2002 7:30 19

56 Smart Relay - Chapter 4
8. Timer Function Block
Behavior after a power break
If a power break occurs while a timer function block is running, any time already passed is lost.When the supply voltage returns, the time function block is initialized for a new operating cycle.
If the application requires it, the time already passed can be saved before the power break occurs on smart relay version ≥ V1.7 (refer to Chapter 3.6 Data Backup Function "REMANENZ" Menu).
Stopping the smart relay will initialize the timer function blocks.
ZELIO2_FR.book Page 56 Jeudi, 11. juillet 2002 7:30 19

Smart Relay - Chapter 4 57
9. Analog Function Block
Analog function blocks can be used with smart relays equipped with a clock and supplied by DC.These smart relays allow the use of two discrete inputs called IB and IC that can accept values from 0 to 10V.
Analog function blocks are used to compare a measured analog value with an internal reference value and also to compare two measured analog values.The result obtained from this comparison is used in the form of a contact.
Function block parameter settings can be accessed when entering the contact representing the analog function block (ANo.) in the Ladder diagram line.The "PARAMET." menu lets the user change the reference or the hysteresis value depending on the type of function block chosen, if the function block is not padlocked.
Analog function block contacts
Note: An analog function block is only used as a contact.
Representation Function No. Description
ANo.Normally
open
1 to 8
The contact shows the position of a measured analog value in relation to a reference value or it represents a comparison between two measured analog values. It’s value depends on the type of analog function block chosen and configured.
aNo.Normally closed
ZELIO2_FR.book Page 57 Jeudi, 11. juillet 2002 7:30 19

58 Smart Relay - Chapter 4
9. Analog Function Block
Example - Using an analog function block
To control a heating element using smart relay output Q1 when the temperature level is below 20°C.
A temperature sensor is used, providing a 0-10 volt signal for a -10° to +40°C temperature range.
A temperature of 20°C corresponds to a voltage level of 6 volts on the sensor.
Screen Comments
Analog function block contact A1 is used to control output Q1.
Analog function block contact A1 is configured as follows:Ib >= ReferenceReference voltage = 6.0 volts
ZELIO2_FR.book Page 58 Jeudi, 11. juillet 2002 7:30 19

Smart Relay - Chapter 4 59
9. Analog Function Block
Analog function block parameters
When entering a contact in a Ladder diagram line, the user must state the type of analog function block used. Each type has its own specific parameters and operating mode described in the table below.
The (padlock) is used to lock the analog function block. If this block is locked, the reference voltage or the hysteresis value (depending on the chosen type) no longer appears in the "PARAMET." menu.When the function block is unlocked, the admissible values are between 0 and 9.9 Volts.
Type of function block Description
Contact A1 is closed when the value of analog input Ib does not exceed the reference voltage entered in the Ref. field, 4.9 V in this example.
Contact A1 is closed when the value of analog input Ib equals or exceeds the reference voltage entered in the Ref. field, 4.9 V in this example.
Contact A1 is closed when the value of analog input Ic does not exceed the reference voltage entered in the Ref. field, 4.9 V in this example.
Contact A1 is closed when the value of analog input Ic equals or exceeds the reference voltage entered in the Ref. field, 4.9 V in this example.
Contact A1 is closed when the value of analog input Ib does not exceed the value of analog input Ic.
Contact A1 is closed when the value of analog input Ib equals or exceeds the value of analog input Ic.
Contact A1 is closed when the value of analog input Ib is between Ic-H and Ic+H.H (hysteresis) is entered in the H field, 4.9 V in this example.
ZELIO2_FR.book Page 59 Jeudi, 11. juillet 2002 7:30 19

60 Smart Relay - Chapter 5
Chapter 5 - ContentsEntering Ladder Diagrams
This Chapter covers the following subjects:
1. Rules for Entering Ladder Diagrams ________________________________ 61
2. Editor Environment ______________________________________________ 63
3. Element Entry Method ___________________________________________ 64
Entering an element _____________________________________________ 64Deleting an element _____________________________________________ 64
4. Link Entry Method _______________________________________________ 65
Deleting links between elements ____________________________________ 65Replacing a link with a contact _____________________________________ 65
5. Function Block Parameter Entry Method ____________________________ 66
6. Deleting and Inserting Ladder Diagram Lines ________________________ 67
Deleting a Ladder diagram line _____________________________________ 67Inserting a Ladder diagram line _____________________________________ 67
ZELIO2_FR.book Page 60 Jeudi, 11. juillet 2002 7:30 19

Smart Relay - Chapter 5 61
1. Rules for Editing Ladder Diagrams
A smart relay lets you enter 60 line (with SR1.1 smart relays) or 80 line (with SR1.2 smart relays) Ladder diagrams. The smart relay’s display screen can be used to display these lines, four at a time, in the following way:
Each line comprises three fields each with two characters reserved for contacts (= conditions). The middle two columns can also be used to host links. The last three character column is reserved for coils(= actions).
Links must be entered between the contact and coil columns.
Rules Incorrect Correct
Each coil must only be entered once in the right hand column
Contacts and coils can be entered as many times as necessary in the three left hand columns
Links must always run from left to right
Columnreservedfor contactsor conditions
Columnsreservedfor contactsor conditionsand links
Columnreservedfor coils(actions)
Columns reserved for links
ZELIO2_FR.book Page 61 Jeudi, 11. juillet 2002 7:30 19

62 Smart Relay - Chapter 5
1. Rules for Editing Ladder Diagrams
Note: Smart relays run programs from top to bottom and from left to right. Sampling time is approx. 6 ms for 60 Ladder diagram lines and 8 ms for 80 lines.
Rules for entering control diagrams
R (Reset) (Unlatch) coils always have priority over S (Set) (Latch) coils
To save Ladder diagram lines, proceed as follows
If S (Set) (Latch) coils are used in a Ladder diagram
If no R (Reset) (Unlatch) coils are used, the corresponding coil will always be set to 1.
An R (Reset) (Unlatch) coil must be used for reset purposes.
If function blocks are used in a Ladder diagram
If no parameters are set, the contacts assigned to the block are always idle.
The block must be configured to obtain the required operation.
I1 = 1 I2 = 1 => Q1 = 0
ZELIO2_FR.book Page 62 Jeudi, 11. juillet 2002 7:30 19

Smart Relay - Chapter 5 63
2. Editor Environment
A Ladder diagram is entered into the smart relay using the front panel keys. The key functions are listed in the table below:
In the remainder of this Chapter, these keys will be referred to as Del., Ins. Line, Sel./ OK, Esc.,Z1, Z2, Z3 and Z4.
Key Description
Press this key to delete a Ladder diagram element or line.
Press this key to insert a Ladder diagram line.
Press this key to: - Make a selection,- Edit an element’s parameter page,- Edit a display page,- Validate a selection made.
For example, when a blinking is displayed while entering a Ladder diagram, pressing this key will call-up the "selection" mode used to choose the required contact or coil.
Press this key to exit the current screen after making the required changes or to cancel the current Ladder diagram entry.For example, after changing a function block’s parameters, press this key to return to Ladder diagram entry mode.
When entering a Ladder diagram, using the arrow key pad lets the user move from one element to another using the Z4 and Z2 keys, and then change the value using the Z1 and Z3 keys.
ZELIO2_FR.book Page 63 Jeudi, 11. juillet 2002 7:30 19

64 Smart Relay - Chapter 5
3. Element Entry Method
Entering an element
It is only possible to position an element (contact or coil) when the blinking cursor is displayed on screen.Contacts are entered in the three left hand columns and coils can only be entered in the last column.
Entering a contact1- Place the blinking cursor in the required position.2- Press Sel./ OK.3- Choose the required contact type using keys Z1 and Z3. 4- Use the Z2 key to call-up the number.5- Choose the number using keys Z1 and Z3.6- Press Sel./ OK or Z2 to validate.
Entering a coil1-Place the blinking cursor in the required position.2-Press Sel./ OK.3-Choose the required coil type using keys Z1 and Z3. 4-Use the Z2 key to call-up the number.5-Choose the number using keys Z1 and Z3.6- Use the Z2 key to move to the coil function.7-Choose the coil function using keys Z1 and Z3.8-Press Sel./ OK to validate.
Validating some function block coils will bring-up a function block parameter setting screen. For information on parameter characteristics and data entry methodology, refer to Chapter 4, page 40.
Changing an element
To change an element in an existing Ladder diagram, simply move to the element to be changed and follow the same procedure as when entering a new element.
Deleting an element
To delete an element, simply place the cursor on the required element the press Del. Generally, the deleted element must be replaced by a link.
ZELIO2_FR.book Page 64 Jeudi, 11. juillet 2002 7:30 19

Smart Relay - Chapter 5 65
4. Link Entry Method
Entering links between elements
In most cases, links are automatically entered by the smart relay. However, to enter a link manually, proceed as follows.
Links can only be entered when the blinking cursor is displayed.
1- Place the blinking cursor at the desired location.2- Press Sel./ OK to start the link (the "+" cursor).3- Draw the link by moving the "+" cursor to the desired location using
the Z1, Z2, Z3 or Z4 keys.4- Press Sel./ OK to validate the link.
Repeat this action as many times as necessary to link the elements together as required.
Deleting links between elements
To delete a link, simply move the or cursor onto the link to delete and press Del.
Replacing a link with a contact
To replace a link with a contact, simply place the cursor at the required location and enter the contact as described on the previous page.
ZELIO2_FR.book Page 65 Jeudi, 11. juillet 2002 7:30 19

66 Smart Relay - Chapter 5
5. Function Block Parameter Entry Method
When entering a Ladder diagram, the function block parameters must be filled in. These parameter setting screens are displayed for:
Entering a Clock function block,Entering an Analog function block,Entering a command input to a Timer function block,Entering a count input to a Counter function block.
Regardless which parameter setting screen is displayed, the parameter entry principle is the same:
1-Use the Z2 and Z4 keys to move the blinking cursor onto the parameter to change.
2-Select the parameter by pressing Sel./ OK.
3-Change the parameter value using the Z1, Z3 and Z2, Z4 keys.
4-Validate the value obtained by pressing Sel./ OK.
5-Finish data entry by pressing Esc. to return to Ladder diagram entry.
ZELIO2_FR.book Page 66 Jeudi, 11. juillet 2002 7:30 19

Smart Relay - Chapter 5 67
6. Deleting and Inserting Ladder Diagram Lines
Deleting a Ladder diagram line
Ladder diagram lines are deleted line by line. Proceed as follows.
1-Move the cursor to a blank space in the line (where there are no links or no element). If necessary, delete an element to create the necessary blank space.
2- Press Del.3- A delete validation menu is displayed. Select the appropriate choice
using the Z1 and Z3 keys.4- Validate the choice by pressing Sel./ OK.
The line is deleted.
Note: It is possible to delete all of the Ladder diagram lines stored in a smart relay. To do this, call up the "CLEAR PROG." option in the main menu and validate the deletion of all Ladder diagram lines.
Inserting a Ladder diagram line
To insert a Ladder diagram line, simply move to the line immediately above the one to create and press Ins. Line.
ZELIO2_FR.book Page 67 Jeudi, 11. juillet 2002 7:30 19

68 Smart Relay - Chapter 6
Chapter 6 - ContentsDebugging
This Chapter covers the following subjects:
1. Introduction ____________________________________________________ 69
2. Dynamic Mode Ladder Diagrams __________________________________ 70
Displaying Ladder diagrams _______________________________________ 70Changing Ladder diagrams ________________________________________ 70Using Z keys as pushbuttons ______________________________________ 70
3. Dynamic Mode Function Block Parameters __________________________ 71
Displaying function block parameters ________________________________ 71Changing function blocs parameters _________________________________ 72
4. Dynamic Mode Menus ___________________________________________ 73
5. Smart Relay Reaction to a Power Break _____________________________ 74
Smart relay version ≤ V1.6 ________________________________________ 74Smart relay version > V1.7 ________________________________________ 75Safety mode ___________________________________________________ 76
ZELIO2_FR.book Page 68 Jeudi, 11. juillet 2002 7:30 19

Smart Relay - Chapter 6 69
1. Introduction
Once an application has been entered in Ladder diagram form, debugging tests still remain to be run.
The first step is to set the smart relay to RUN. To do this, select the "RUN/STOP" option from the main menu and validate the RUN mode selection made.
From this moment on, the smart relay handles the physical inputs and outputs according to the instructions entered in the Ladder diagram.
1-Display input status (B and C represent analog inputs)2-Display the operating mode (RUN/STOP)3-Display a parameter, by default the day and time for products with a clock function (see example)4-Display the output status
When inputs or outputs are activated, they appear in reverse video (using white on a black background).
This concept is referred to as the dynamic operation of smart relay functions. The terms RUN and dynamic have a similar meaning in the remainder of this publication.
Viewing a parameter on the main screen
Simply call up the "VISU." menu and use the Z1 and Z3 keys to select the required parameter and confirm the selection using the Sel./ OK key. Pressing Esc twice returns you to the main screen.
Viewing the value of counter C2:
1
2
3
4
ZELIO2_FR.book Page 69 Jeudi, 11. juillet 2002 7:30 19

70 Smart Relay - Chapter 6
2. Dynamic Mode Ladder Diagrams
Displaying Ladder diagrams
The smart relay can dynamically display the performance of a Ladder diagram. To do so, simply call up the "PROGRAM." option and select the lines to display using the cursor keys.
Each closed contact or energized coil is displayed in reverse video mode (using white on a black background).
To change smart relay performance, the user can change or display some of the function block parameters.
Changing Ladder diagrams
Note: It is ABSOLUTELY IMPOSSIBLE to change Ladder diagram lines in RUN mode. It is however possible to change function block parameters.In RUN mode, the Del. and Ins. Line keys are not available.The Sel./ OK key is only usable for function blocks.
Using Z keys as pushbuttons
When the menus are called up, the Z can no longer be used as pushbuttons. To test the Ladder diagram in dynamic mode and observe the effect of the Z keys, the user must:
1 -Display the Ladder diagram (see below),2 -Place the cursor on a "Z" key,3 -Press the Sel./OK key.
To disable pushbutton mode operation, simply press the Esc key.
ZELIO2_FR.book Page 70 Jeudi, 11. juillet 2002 7:30 19

Smart Relay - Chapter 6 71
3. Dynamic Mode Function Block Parameters
Displaying function block parameters
In RUN mode, additional functions are available. It is therefore possible to display function block parameters.
The following elements can be displayed:
1- The current and preset values of a Counter.2- The status of Counter inputs and outputs.3- The current and preset values of a Timer.4- All of the parameters of a Clock function block.5- The reference voltage for an Analog function block.6- The hysteresis value for an Analog function block.7- The values measured on the analog inputs.
To do this, simply call up the "PROGRAM." option and select the required function block, then press Sel./ OK.
A new screen is called up showing the function block’s parameters. The procedure is the same as the one used to change function block parameters.
Screen example:
Displayed parameters Screen Displayed parameters
Counter contactstate
Counter coil state
Current counter value
Counter preset value
Compared voltage level valuesComparison contactstate
Type of Analogfunction blockReference value
Timer coil state
Timer contactstate
Timer time out
Preset duration value
ZELIO2_FR.book Page 71 Jeudi, 11. juillet 2002 7:30 19

72 Smart Relay - Chapter 6
3. Dynamic Mode Function Block Parameters
Changing function block parameters
In RUN mode a function block preset value can be changed dynamically if it is not locked.
The following actions are allowed:
1- Changing a Counter preset value.2- Changing a Timer preset value.3- Changing Clock function block parameters.3- Changing the reference voltage for an Analog function block.4- Changing the hysteresis value for an Analog function block.
To do this, the simplest way is to:1- Select "PARAMET." from the main menu.2- Press Sel./ OK.3- Choose the required parameter using the Z1 and Z3 keys.4- Press Sel./ OK.5- Modify the parameter value using the Z1, Z3 and Z2, Z4 keys.6- Validate by pressing Sel./ OK.
It is also possible to change a parameter value by selecting the "PROGRAM." function and then selecting the required function block by pressing Sel./ OK.
ZELIO2_FR.book Page 72 Jeudi, 11. juillet 2002 7:30 19

Smart Relay - Chapter 6 73
4. Dynamic Mode Menus
Some menus are accessible in RUN mode, while others are not. Here is a summary table.
* Dynamic program display in RUN mode, modification in STOP mode.
** Program transfer from the module to a PC in RUN mode, while all other transfers are done in STOP mode.
MenuAccess in
STOP modeAccess in
RUN mode
TIME SET Yes Yes
PROGRAM. Yes Yes*
PARAMET. Yes Yes
VISU. Yes Yes
RUN/STOP Yes Yes
CONFIG. Yes Yes
CLEAR PROG. Yes No
TRANSFER. Yes Yes**
PROG. INFO or SOFT Yes Yes
Configuration menu
PASSWORD Yes Yes
LANGUAGE Yes No
FILT. Yes No
Zx=KEYS Yes No
HELP Yes Yes
REMANENZ Yes No
ZELIO2_FR.book Page 73 Jeudi, 11. juillet 2002 7:30 19

74 Smart Relay - Chapter 6
5. Smart Relay Reaction to a Power Break
A power break may cause the smart relay to restart and loose any data not saved. Depending on their version level, smart relays have a battery back up lasting 72 or 150 hours. To ensure this endurance, the smart relay must have been powered up for approximately two hours.The tables below show how the smart relays react depending on their version level (which can be read from the module label).
Smart relay version ≤≤≤≤ V1.6
Note: Smart relays without clocks automatically restart in RUN mode after a power break, regardless of its duration.
Smart relays with clocks restart in RUN mode as long as the current time is saved (for at least 72 hours). If the current time is lost, then the smart relay is set to STOP mode and displays the time setting screen.
Version ≤≤≤≤ V1.6
Power break duration< 1 ms (DC)<10 ms (AC)
< 72 hours > 72 hours
Program Saved Saved Saved
ParametersCounters (preset)Timers (preset)Clock (parameters)
Saved Saved Saved
Date and Time Saved Saved (see Note)
Current valuesCurrent counter valuesTimer elapsed time value
Saved Reset to zero on restart
Coil statesAuxiliary relays (Mx)Set coils (SQx)Two position coils ( Qx)
Saved Reset to zero on restart
ZELIO2_FR.book Page 74 Jeudi, 11. juillet 2002 7:30 19

Smart Relay - Chapter 6 75
5. Smart Relay Reaction to a Power Break
Smart relay version ≥≥≥≥ V1.7
Smart relays version levels V1.7 or higher have the ability to save the current time for at least 150 hours.In addition, it is also possible to back up the variables defined in the "REMANENZ" menu.Voir “6. Data Backup Function "REMANENZ"”, page 36.
Note: Smart relay versions ≥≥≥≥ V1.7 always restart in RUN mode (if the RUN mode was selected before the power break).
When the current time setting is lost (after a power break exceeding 150 hours), the third line in the main screen blinks and the clock function blocs are not activated in the Ladder diagram. Pressing "Sel./ OK" will display the screen used to update the date and time setting. Pressing "Esc" after updating the date and time will return you to the main screen. Clock function blocks become active once again.
Version ≥ V1.6
Power break duration< 1 ms (DC)<10 ms (AC)
< 150 H > 150 H
Program Saved Saved Saved
ParametersCounters (preset)Timers (preset)Clock (parameters)
Saved Saved Saved
Date and Time Saved Saved (see Note)
Valeurs courantesCurrent counter valuesTimer elapsed time value
SavedSaved if defined in the "REMANENZ" menu
Coil statesAuxiliary relays (Mx)Set coils (SQx)Two position coils ( Qx)
SavedSaved if defined in the "REMANENZ" menu
ZELIO2_FR.book Page 75 Jeudi, 11. juillet 2002 7:30 19

76 Smart Relay - Chapter 6
5. Smart Relay Reaction to a Power Break
Safety mode
If loosing the time setting is to lock coil control in smart relay versions ≥≥≥≥ V1.7, then simply use a clock contact without a stop order in series with the action coils.
Screen Comments
The contact line for coil Q1 will be active even if the time and date setting is lost.
The contact line for coil Q2 will only be active after setting the clock.
Parameter setting screen for clock function block 1.
ZELIO2_FR.book Page 76 Jeudi, 11. juillet 2002 7:30 19

Smart Relay - Chapter 6 77
ZELIO2_FR.book Page 77 Jeudi, 11. juillet 2002 7:30 19

78 Smart Relay - Chapter 7
Chapter 7 - ContentsApplication Example
This Chapter covers the following subjects:
1. Specifications __________________________________________________ 79
2. Specification Analysis ___________________________________________ 80
3. Implementing the Solution ________________________________________ 81
Implementing the Ladder diagram ___________________________________ 81Configuring the function blocks _____________________________________ 82
ZELIO2_FR.book Page 78 Jeudi, 11. juillet 2002 7:30 19

Smart Relay - Chapter 7 79
1. Specifications
The specification seeks to enhance and centralize the control system in the underground car park of an office building. The vehicle entrance and exit to and from the car park are controlled by a typical automatic barrier that handles the normal standard functions such as opening and closing time delays to allow vehicles to pass, processing payment tickets, a built-in security interphone, external barrier locking in the closed position...
In addition, the new specification calls for adding a function to count the number of vehicles parked in the car park and control a light up display informing users that all of the parking spaces are taken and stopping new entries by locking the barrier in the closed position. Drivers then know to look for a parking space elsewhere. It must also be possible to override this function when it is necessary to allow the emergency services to intervene (fire department, emergency medical service...).
The specification also calls for being able to inhibit access to the car park outside of working hours and to allow the security personnel to override this function for exceptional events. The normal working hours are: Monday to Friday from 08:30 to 17:30, Saturday, from 09:30 to 12:00 and complete closure on Sundays.
For safety reasons, it is also necessary to exhaust toxic emissions such as carbon dioxide using a fan when the concentration levels measured exceed permissible levels (using a dedicated sensor that provides an output value between 0 and 10V).
There is also a requirement to control lighting triggered by a vehicle arriving and through pushbutton switches placed near all of the pedestrian access points. For power saving reasons, the lighting will be switched off after a delay of 10 minutes, the length of time normally observed to be adequate for a user to park, leave their vehicle and take the elevator or return to their vehicle and leave the car park.
To complement this system, manual intervention should allow updating the number of vehicles in the car park by incrementing or decrementing the number of vehicles as determined by the smart relay.
ZELIO2_FR.book Page 79 Jeudi, 11. juillet 2002 7:30 19

80 Smart Relay - Chapter 7
2. Specification Analysis
Note: To implement this solution, a smart relay with analog inputs, Clock function blocks and at least four discrete inputs and outputs. The ideal smart relay is an SR1 B 12 1 BD.
Smart relay label Description
Input I1 Vehicle entry detection.
Input I2 Vehicle exit detection.
Counter C1 Counts the number of vehicles in the car park (93 maximum).
Output Q1 Indicates when the car park is full.
Output Q2Locks the entry barrier (inhibits entry barrier opening) when the car park is full of outside of office hours.
Function key Z4 Manually releases the entrance barrier.
Function key Z2 Resumes automatic entry control.
Function key Z1 Manually increments the number of vehicles in the car park.
Function key Z3 Manually decrements the number of vehicles in the car park.
Clock function block No. 1 Manages car park access hours.
Inputs I3 and I4
Pushbuttons at pedestrian access points used to light car park lighting. One for the elevator and one for the stairway (no pedestrian access is allowed via the vehicle entrance).
Output Q3 Control lighting.
Timer function block No. 1 Lighting timer (10 minutes).
Analog input IB Carbon dioxide level sensor.
Analog function block A1, the authorized threshold value corresponds to 8.5 Volts.
Compairs the carbon dioxide level measured with the allowable threshold.
Output Q4 Controls the polluted air extraction fan control.
Timer function block No. 2 Fan timer (15 minutes).
ZELIO2_FR.book Page 80 Jeudi, 11. juillet 2002 7:30 19

Smart Relay - Chapter 7 81
3. Implementing the Solution
Implementing the Ladder diagram
Counting vehicles in, subtracting vehicles out and manually updating the number of vehicles actually in the car park.
Starting the lighting timer.
Starting the fan timer.
Handling the manual release function.
Controlling outputs: Car park full indicator, blocking the input, lighting the car park and running the extraction fan.
Note: When upcounting and downcounting, the counter locks up when the car park becomes full (no spurious detection or counting actions take place if vehicles are allowed to enter in manual release mode). IMPORTANT: For a given counter, the CC and DC coils should only appear once in a Ladder diagram.
In addition, output Q2 is triggered when entry into the car park is not allowed. This leads to the use of an auxiliary relay to manually lock or unlock the access barrier using the arrow keys.
ZELIO2_FR.book Page 81 Jeudi, 11. juillet 2002 7:30 19

82 Smart Relay - Chapter 7
3. Implementing the Solution
Setting function block parameters
Function block Comments
Counter function block C1 The preset value is 93 (the maximum number of vehicles allowed in this car park). Where necessary, this value can be changed during operation.
Clock function block 1
Opening hours: Monday to Friday from 08:30 to 17:30, Saturday from 09:30 to 12:00 and closed all day on Sunday. Two ranges are used.
Timer function block T1
Car park lighting timer (10 minutes).
Analog function block A1Compares the measured carbon dioxide level with the threshold value (8.5 V).
Timer function block T2Fan operating duration if the carbon dioxide threshold is exceeded.
ZELIO2_FR.book Page 82 Jeudi, 11. juillet 2002 7:30 19

Smart Relay - Chapter 7 83
ZELIO2_FR.book Page 83 Jeudi, 11. juillet 2002 7:30 19

84 Smart Relay - Chapter 8
Chapter 8 - ContentsTroubleshooting
This Chapter covers the following subjects:
1. Smart Relay Messages ___________________________________________ 85
2. Frequently Asked Questions ______________________________________ 87
ZELIO2_FR.book Page 84 Jeudi, 11. juillet 2002 7:30 19

Smart Relay - Chapter 8 85
1. Smart Relay Messages
Explanation of the messages returned by the smart relay. These messages generally indicate incompatible actions requested by the user.
Message Cause Corrective action
ERR. RUN MODE
User requested access to a fuction that is only available when the smart relay is stopped.
Return to the main menu, select the "RUN/STOP" option, stop the smart relay, then return to where the message occurred.
NO PARAMET.
User requested access to the "PARAMET." option when no parameter is available (the Ladder diagram does not include any elements with parameters).
Go to the Ladder diagram to check that it was correctly entered and that it comprises elements with parameter settings: Counters, Timers, Time/Date functions, Analog function blocks.
NO PARAMET.
The user requested access to the "VISU." option when no element that can be displayed has been entered in the diagram.
Go to the Ladder diagram to check that it was correctly entered and that it comprises at least one function block.
PROGRAM.INCOMPAT.
The user requested the transfer of a program that does not match the characteristics of the target smart relay, e.g. different clocks, analog inputs, software version level).
Check the origin of the program to transfer and choose a program that is compatible with the appropriate smart relay.
TRANSF.ERR.A transfer was in progress and the link with the PC went down unexpectedly.
Refer to the documentation for the smart relay PC programming application called ZelioSoft.
TRANSF.ERR.
A transfer to the EEPROM was requested and the EEPROM is not present or incorrectly located.
Check the presence and correct location of the EEPROM.
Outputs are displayed blinking on the main screen
One or more static outputs have shorted or overloaded.
Troubleshoot, then stop the smart relay to end the blinking before selecting RUN mode again (automatic reset).
ZELIO2_FR.book Page 85 Jeudi, 11. juillet 2002 7:30 19

86 Smart Relay - Chapter 8
1. Smart Relay Messages
Message Cause Corrective action
PROGRAM. ERR. Internal smart relay problem.
- Clear the program- If the problem remains, swap the smart relay for a version level ≥ V1.6
RTC IC ERRORThe smart relay’s internal clock component does not work correctly.
- Power down the smart relay- Power up the smart relay once again- If the problem remains, swap the smart relay
ZELIO2_FR.book Page 86 Jeudi, 11. juillet 2002 7:30 19

Smart Relay - Chapter 8 87
2. Frequently Asked Questions
To assist the user in understanding the smart relay, the table below details frequently asked questions.
Question Answer
I cannot access some parameters.
Some parameters are not accessible, refer to the documentation to determine whether these elements can be changed. Example of an element that cannot be changed: Counter function block counting direction. This element is only accessible by wiring in a Ladder diagram line.
I still cannot access some parameters
To access the parameters, use the Z4 and Z2 keys on the arrow key pad to select them (the Z1 and Z3 keys are only used to change their value). Then press Sel./ OK to change the selected element using the Z1 and Z3 keys.
When I try to change a parameter, the Z1 and Z3 keys on the arrow key pad do not work.
This is normal. To enter the modification mode, first press the Sel./ OK key (the parameter blinks). Then the Z1 and Z2 keys become effective.
I cannot STOP my smart relay despite validating the RUN/STOP option in the main menu using the Sel./ OK key.
BE SURE to correctly read the message text and confirm the correct option.
My Ladder diagram comprises 67 lines and it takes quite a long time to reach the last line. What can I do to speed things up?
To move around faster, simply press the Z1 or Z3 keys on the arrow key pad for a longer length of time. You can then scroll five lines at a time.
I would like to change my Ladder diagram lines but the Sel./ OK key no longer works.
Ensure that the smart relay is indeed stopped. Changing in RUN mode are not allowed.
When I try to change my Ladder diagram lines, the smart relay shows me a blank screen. Have I lost everything I did?
Not necessarily, this situation may occur if blank lines have been inserted at the start of the Ladder diagram. Press Z3 to check whether your program lines are not located further down.
ZELIO2_FR.book Page 87 Jeudi, 11. juillet 2002 7:30 19

88 Smart Relay - Chapter 8
2. Frequently Asked Questions
Question AnswerI have a Counter function block called C1 used in a Ladder diagram line to count and it downcounts on another line. Only the downcount funciton works. Why?
This is perfectly normal, a Counter’s CC coil must appear once and once only in the Ladder diagram. To understand the method, refer to the example in Chapter 7 page 81.
I have forgotten by password and I can no longer access my smart relay functions. What can I do?
To delete a password with the smart relay stopped, from the CONFIG menu, call up the password entry screen an simultaneously press Z1, Z4, Z3, Z2. To guarantee confidentiality, the program will be erased.
I have a Ladder diagram that uses a Z key as a pushbutton. I would like to test it but when I display the Ladder diagram in on-line mode, the Z key is no longer operational. What can I do?
To use the Z keys as pushbuttons when displaying a Ladder diagram in real-time mode, simply move the cursor onto a "Z" key and press Sel.OK when the Ladder diagram is displayed. To disable pushbutton mode, simply press Esc.
I generated a Ladder diagram on a module with a clock function. Can I use an EEPROM to transfer it to a smart relay without a clock?
No this is impossible.(Refer to the Transfer rules on page 92).
When entering a Ladder diagram, the Clock function blocks do not appear when choosing the contacts. Is this normal?
It is highly probable that the smart relay does not have a clock and that therefore the Clock function blocks cannot be accessed. Check the product reference numbers.
When entering a Ladder diagram, the Analog function blocks do not appear when choosing the contacts. Is this normal?
It is highly probable that the smart relay does not have analog inputs and that therefore Analog function blocks cannot be accessed. Check the product reference numbers.
It is not possible to draw a connection line to Contact zone 1 to set up a permanent command state.
To set up a permanent command state, you need to use an auxiliary relay coil Mx or an Ix input in normally closed state after ensuring tha this coil is not used elsewhere in the program.
ZELIO2_FR.book Page 88 Jeudi, 11. juillet 2002 7:30 19

Smart Relay - Chapter 8 89
ZELIO2_FR.book Page 89 Jeudi, 11. juillet 2002 7:30 19

90 Smart Relay - Chapter 9
Chapter 9 - ContentsTransferring Ladder Diagrams
This Chapter covers the following subjects:
1. How to Transfer an Application ____________________________________ 91
Smart relay -> PC transfer _________________________________________ 91PC -> Smart relay transfer _________________________________________ 91Smart relay -> EEPROM transfer ___________________________________ 92EEPROM -> Smart relay transfer ___________________________________ 92
ZELIO2_FR.book Page 90 Jeudi, 11. juillet 2002 7:30 19

Smart Relay - Chapter 9 91
1. How to Transfer an Application
Smart relay -> PC transfer
The Zelio smart relay can be configured and programmed using the ZelioSoft program. This transfer function lets the user retrieve an application from a smart relay using the program.
The following method is used:
1- Select the "TRANSFER." function from the main menu.2- Press the Sel./ OK key to validate.3- Select the "Modul.->PC" function.4- Press the Sel./ OK key to validate.5- Enter the password if necessary.6- The smart relay displays "READY" and the transfer is performed as
soon as the program is ready.
PC -> Smart relay transfer
This transfer function is used to load an application developed using ZelioSoft into a smart relay.
The following method is used:
1- Select the "TRANSFER." function from the main menu.2- Press the Sel./ OK key to validate.3- Select the "PC->Modul." function.4- Press the Sel./ OK key to validate.5- When prompted to "Change Prog?" select the answer "YES" by
pressing the Z1 key.6- Press the Sel./ OK key to validate.7- The smart relay displays "READY" and the transfer is performed as
soon as the software requests it.
Note: The comments fields and and any notes entered in the ZelioSoft programming application are not transferred to the smart relay and will therefore be lost when a logic module is transferred to a PC.
For smart relay versions ≥≥≥≥ V1.7, the ZelioSoft application automatically takes over and the transfer can take place without the need for any intervention on the smart relay.
ZELIO2_FR.book Page 91 Jeudi, 11. juillet 2002 7:30 19
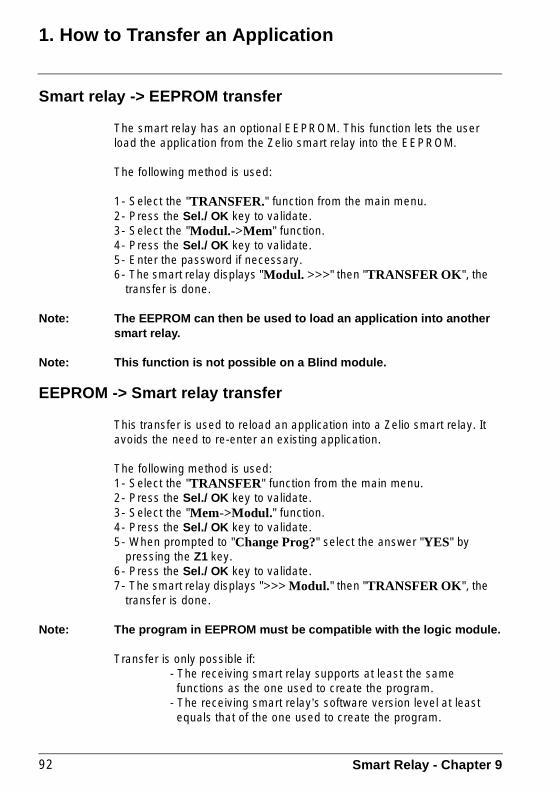
92 Smart Relay - Chapter 9
1. How to Transfer an Application
Smart relay -> EEPROM transfer
The smart relay has an optional EEPROM. This function lets the user load the application from the Zelio smart relay into the EEPROM.
The following method is used:
1- Select the "TRANSFER." function from the main menu.2- Press the Sel./ OK key to validate.3- Select the "Modul.->Mem" function.4- Press the Sel./ OK key to validate.5- Enter the password if necessary.6- The smart relay displays "Modul. >>>" then "TRANSFER OK", the
transfer is done.
Note: The EEPROM can then be used to load an application into another smart relay.
Note: This function is not possible on a Blind module.
EEPROM -> Smart relay transfer
This transfer is used to reload an application into a Zelio smart relay. It avoids the need to re-enter an existing application.
The following method is used:1- Select the "TRANSFER" function from the main menu.2- Press the Sel./ OK key to validate.3- Select the "Mem->Modul." function. 4- Press the Sel./ OK key to validate.5- When prompted to "Change Prog?" select the answer "YES" by
pressing the Z1 key.6- Press the Sel./ OK key to validate.7- The smart relay displays ">>> Modul." then "TRANSFER OK", the
transfer is done.
Note: The program in EEPROM must be compatible with the logic module.
Transfer is only possible if:- The receiving smart relay supports at least the same functions as the one used to create the program.- The receiving smart relay’s software version level at least equals that of the one used to create the program.
ZELIO2_FR.book Page 92 Jeudi, 11. juillet 2002 7:30 19

Smart Relay - Chapter 9 93
1. How to Transfer an Application
Note: On Blind modules without clocks, the program on the EEPROM will automatically down load into the module providing no program exists in the module. On Blind modules with clocks, this function is not possible.
ZELIO2_FR.book Page 93 Jeudi, 11. juillet 2002 7:30 19

94 Smart Relay - Chapter 10
Chapter 10 - ContentsUsing the ASi Connection
This Chapter covers the following subjects:
1. Presentation ___________________________________________________ 95
2. Characteristics and Connections __________________________________ 96
ASi relay characteristics __________________________________________ 96ASi relay connections ____________________________________________ 97
3. ASi Menu_______________________________________________________ 98
Access ________________________________________________________ 98Configuration ___________________________________________________ 98Addressing ____________________________________________________ 99
4. ASi Objects Accessible from the Master ___________________________ 100
5. Usage and Configuration Examples _______________________________ 101
6. Debugging - Troubleshooting ____________________________________ 102
ZELIO2_FR.book Page 94 Jeudi, 11. juillet 2002 7:30 19

Smart Relay - Chapter 10 95
1. Presentation
Intended for use as peripherals in a more complex installation, the ASISR1470R and ASISR1470T smart relays allow direct connection to the ASi system.
1-Screw terminal block for 24 VDC supply2-LCD, 4 lines, 12 characters3-Screw terminal bloc for 24 VDC inputs4-Screw terminal blocks for 0-10 Volt analog inputs that can be used in 24 VDC I/O mode5-Screw terminal block for connection to the ASi line6-Delete key7-Insert line key8-Arrow keys or after first configuring them, Z pushbuttons9-Green LED confirming that the ASi line is powered up10-Red ASI line failure LED11-Infrared remote control for addressing by terminal12-Selection and validation key13-Escape key14-Connector for backup memory or PC connection cable15-Screw terminal block for relay outputs on ASISR1470R or for transistor outputs on ASISR1470T16-Slot for re-writable label
1-Input status display (B and C represent the analog inputs)2-Operating mode display (RUN/STOP)3-Display showing ASi data, date and time or a parameter4-Display showing the status of local outputs5-Smart relay address (on condition that it was entered for display)
+ 0V I1 I2 I3 I4
24VDC
Output4 x relay 240V / 10A
Esc. Sel./ OK
Del. Ins. line
I5 I6 IB IC
I1…I6 =inputs 24 VDC
IB...IC = inputs : analog0...10VDCor 24VDC
1 2Q1 Q2 Q3 Q4
1 2 1 2 1 2
z1
z3z4 z2
ASiSR1470R
1 2 3 4 5
6
7
8
12
13
1516
14
ASi+ ASi-
Fault
Power 9
10
11
1
2
34
5
ZELIO2_FR.book Page 95 Jeudi, 11. juillet 2002 7:30 19

96 Smart Relay - Chapter 10
2. Characteristics and Connections
ASi relay characteristics
* Each analog input can also be used in 24 Vc discrete I/O mode.
Supply 24 VDC (min. 19.2 V /max. 30 V)Reference numbers ASISR1470R ASISR1470T
Number of I/O 14
Built-in ASi interface 7FE profile
Weekly clock YES
Rated supply current 80 - 100 mA
Nbr. of discrete inputs 6
Rated voltage 24 V c
Rated current 3 mA
Nbr. of analog inputs0-10V* 2
Nbr. of outputs 6 relay outputs 6 transistor outputs
Switching voltage 5-150 Vc / 24-250 Va 24 Vc / 0.5 A
Max. switching current 5 A 0.5 A
AC 15 switching capacity 0.9 A / 230 Va -
DC 13 switching capacity 0.6 A / 24 Vc 0.5 A / 24 Vc
ZELIO2_FR.book Page 96 Jeudi, 11. juillet 2002 7:30 19
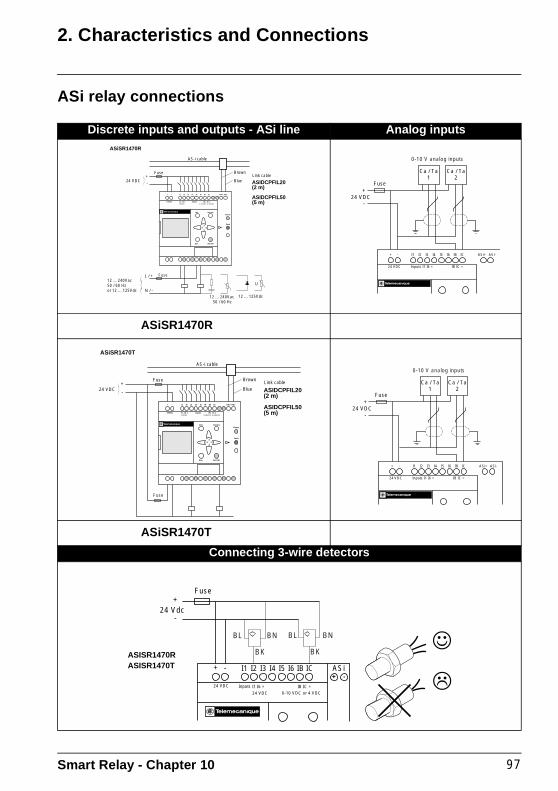
Smart Relay - Chapter 10 97
2. Characteristics and Connections
ASi relay connections
Discrete inputs and outputs - ASi line Analog inputs
ASiSR1470R
ASiSR1470T
Connecting 3-wire detectors
+ 24 VDC
AS-i cable
Brown
Blue-
Fuse
12 ... 240Vac 50 / 60 Hzor 12 ... 125Vdc
L / +
N / -
12 ... 240Vac 50 / 60 Hz
Fuse
I1 I2+ - I3 I4 I5 I6 ASi+
Del.
z1
z3z4 z2
Ins.line
Fault
Power
Esc. Sel./OK
IB IC ASi-
24VDC I1…I6 =24VDC
Inputs IB…IC =0-10VDC or 24VDC
ASiSR1470R
U
12 ... 125Vdc
Link cable
ASIDCPFIL20(2 m)
ASIDCPFIL50(5 m)
24 VDC+
-
Fuse
Ca / Ta1
Ca / Ta2
0-10 V analog inputs
I1 I2+ - I3 I4 I5 I6 ASi+IB IC ASi-
24 VDC Inputs I1 I6 = IB IC =
+24 VDC
AS-i cable
Link cable
ASiSR1470T
ASIDCPFIL20(2 m)
ASIDCPFIL50(5 m)
Brown
Blue-
Fuse
Fuse
I1 I2+ - I3 I4 I5 I6 ASi+
Del.
z1
z3z4 z2
Ins.line
Fault
Power
Esc. Sel./OK
IB IC ASi-
24VDC I1…I6 =24VDC
Inputs IB…IC =0 10VDC or 24VDC
24 VDC+
-
Fuse
Ca / Ta1
Ca / Ta2
0-10 V analog inputs
I1 I2+ - I3 I4 I5 I6 ASi+IB IC ASi-
24 VDC Inputs I1 I6 = IB IC =
24 Vdc
ASISR1470RASISR1470T
+
-
Fuse
24 VDC
+ - I1 I2 I3 I4 I5 I6 IB IC
BN
BK
BLBN
BK
BL
Inputs I1 I6 =
24 VDC
IB IC =
0-10 VDC or 4 VDC
ASi+ -
ZELIO2_FR.book Page 97 Jeudi, 11. juillet 2002 7:30 19
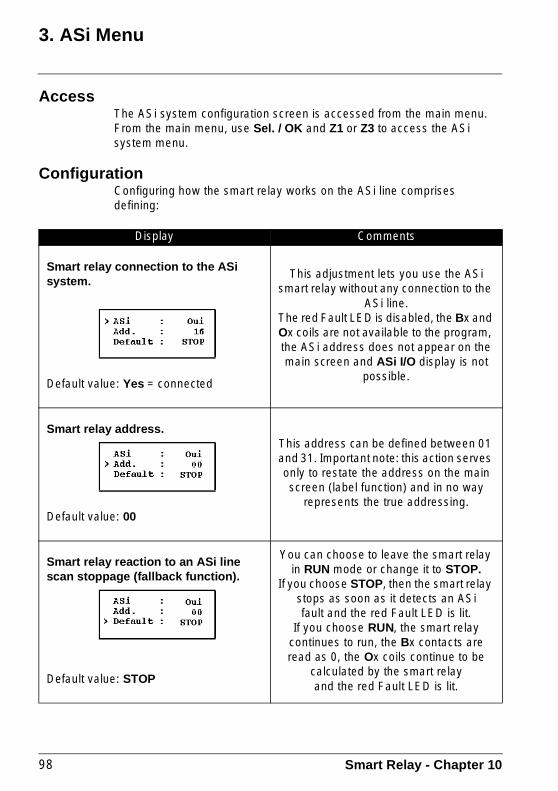
98 Smart Relay - Chapter 10
3. ASi Menu
AccessThe ASi system configuration screen is accessed from the main menu.From the main menu, use Sel. / OK and Z1 or Z3 to access the ASi system menu.
ConfigurationConfiguring how the smart relay works on the ASi line comprises defining:
Display Comments
Smart relay connection to the ASi system.
Default value: Yes = connected
This adjustment lets you use the ASi smart relay without any connection to the
ASi line.The red Fault LED is disabled, the Bx and Ox coils are not available to the program, the ASi address does not appear on the main screen and ASi I/O display is not
possible.
Smart relay address.
Default value: 00
This address can be defined between 01 and 31. Important note: this action serves only to restate the address on the main screen (label function) and in no way
represents the true addressing.
Smart relay reaction to an ASi line scan stoppage (fallback function).
Default value: STOP
You can choose to leave the smart relay in RUN mode or change it to STOP.
If you choose STOP, then the smart relay stops as soon as it detects an ASifault and the red Fault LED is lit.
If you choose RUN, the smart relay continues to run, the Bx contacts are read as 0, the Ox coils continue to be
calculated by the smart relayand the red Fault LED is lit.
ZELIO2_FR.book Page 98 Jeudi, 11. juillet 2002 7:30 19

Smart Relay - Chapter 10 99
3. ASi Menu
Addressing
Addressing can be performed:- Using a terminal that may or may not be fitted with an infrared interface. This is recommended for a new installation.- Automatically by the master. This mode is recommended for replacing or adding to an existing installation.
SituationRecommended
addressing mode
What do I do?
New installation:The smart relay’s ASi+ and ASi- terminals are already connected to the ASi line(products are already wired to the machine).
Addressing "on the machine" using the ASITERV2 terminal
fitted with its ASITERIR1 infra-red
interface.
- Power up the smart relay’s + and - (power supply) terminals.- Power up the ASi line without connecting the master or switch the master from "Run" to mode "Offline" mode leaving it connected to the line.- Connect the infra-red interface on the right hand side of the smart relay.- Use the addressing procedure provided with the ASITERV2 terminal.- Briefly cut the voltage on the ASi line before placing the master into service.- Copy the address to the smart relay for display puposes (see page 98, ASi Configuration).
New installation:The smart relay’s ASi+ and ASi- terminals are already connected to the ASi line(products are already wired to the machine).No infra-red interface available (XZMC11 terminal or ASITERV2 terminal without an infra-red interface).
Addressing "on the machine" using a
terminal fitted with an accessory for direct
connection to the ASi line (XZCP1564L1 for
example).
- Only connect one unaddressed smart relay (one that has a zero address) on the ASi line.- Power up the ASi line without connecting the master or switch the master from "Run" to mode "Offline" mode leaving it connected to the line.- Connect the ASITERV2 terminal to the line.- Use the addressing procedure provided with the ASITERV2 terminal.- Copy the address to the smart relay for display puposes (see page 98, ASi Configuration).
New installation:The Zelio smart relay is not yet wired.
Addressin "by table" using an ASITERV2 or XZMC11 terminal and an accessory for direct connecton to
the line (XZCP1564L1 for
example).
- Connect the terminal to the ASi+ and ASi- terminals on the smart relay.- Use the addressing procedure provided with the terminal.- Copy the address to the smart relay for display puposes (see page 98, ASi Configuration).
Note: there is no need to supply the + and - terminals on the smart relay.
Exchanged for an existing smart relay.
Automatic addressing by the master.
- Refer to the documentation on the master.- Copy the address to the smart relay for display puposes (see page 98, ASi Configuration).
ZELIO2_FR.book Page 99 Jeudi, 11. juillet 2002 7:30 19

100 Smart Relay - Chapter 10
4. ASi Objects Accessible from the Master
ASi data bits
The built-in ASi interface allows, in addition to handling the smart relay’s local I/O, receiving commands from a master ASi and returning states to it.
When a Schneider PLC is used as the ASi master the following correspondence will apply:
Where "rack module" = is the location of the master module in the PLC.Where "x" = smart relay address on the ASi line.
Display Function No. Description
ONo.Normally
open1 to 4
Status information for the ASi master. This can be used in the smart relay program like Q outputs, as coils or contacts.oNo.
Normally closed
BNo.Normally
open1 to 4
Commands from the ASi master. These can be used in the smart relay program as I input contacts.bNo.
Normally closed
Smart relay address bits ASi master bit address
O1 %I \ rack module.0 \ x.0
O2 %I \ rack module.0 \ x.1
O3 %I \ rack module.0 \ x.2
O4 %I \ rack module.0 \ x.3
B1 %Q \ rack module.0 \ x.0
B2 %Q \ rack module.0 \ x.1
B3 %Q \ rack module.0 \ x.2
B4 %Q \ rack module.0 \ x.3
ZELIO2_FR.book Page 100 Jeudi, 11. juillet 2002 7:30 19
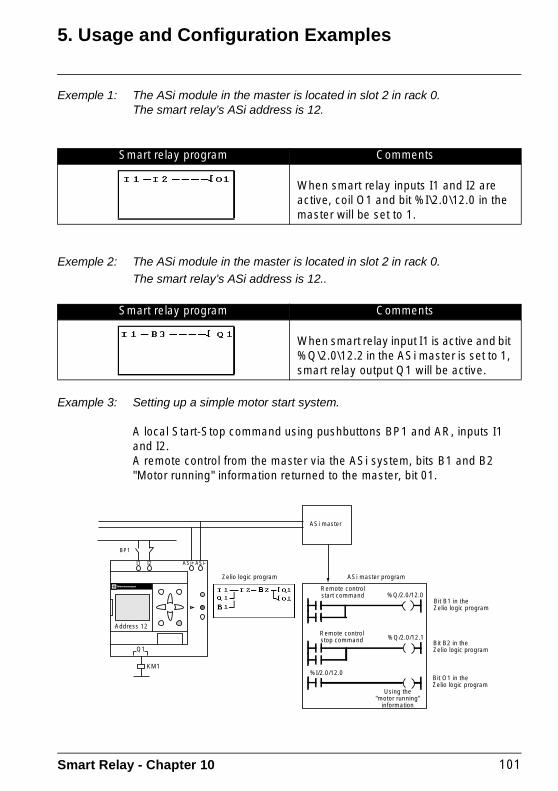
Smart Relay - Chapter 10 101
5. Usage and Configuration Examples
Exemple 1: The ASi module in the master is located in slot 2 in rack 0.The smart relay’s ASi address is 12.
Exemple 2: The ASi module in the master is located in slot 2 in rack 0.The smart relay’s ASi address is 12..
Example 3: Setting up a simple motor start system.
A local Start-Stop command using pushbuttons BP1 and AR, inputs I1 and I2.A remote control from the master via the ASi system, bits B1 and B2"Motor running" information returned to the master, bit 01.
Smart relay program Comments
When smart relay inputs I1 and I2 are active, coil O1 and bit %I\2.0\12.0 in the master will be set to 1.
Smart relay program Comments
When smart relay input I1 is active and bit %Q\2.0\12.2 in the ASi master is set to 1, smart relay output Q1 will be active.
Zelio logic program ASi master program
Bit B1 in theZelio logic program
Bit B2 in theZelio logic program
Bit O1 in theZelio logic program
%Q/2.0/12.1
Remote controlstart command
Remote controlstop command
ASi master
BP1
KM1
Q1
Address 12
I1 I2 ASi+ASi-
%I/2.0/12.0
Using the"motor running"
information
%Q/2.0/12.0
ZELIO2_FR.book Page 101 Jeudi, 11. juillet 2002 7:30 19

102 Smart Relay - Chapter 10
6. Debugging - Troubleshooting
ASi indicator lightsThe built-in ASi interface comprises two indicator lights that are used for troubleshooting the ASi link.
Displaying contacts and coils
The main screen can be configured to display the values of the Bx contacts and Ox coils.
From the main menu, call up the "VISU" menu.
Indicator lights State Description
Power
ASi system powered up. Important note: The Zelio smart relay is not supplied by the ASi line. Its power supply inputs must be connected to a 24 Vdc power supply.The ASi line is powered down. The module remains in RUN or changes to STOP depending on its configuration.
Fault
The ASi system has an error condition.
The ASi system is operating correctly.
Fault detected:Zelio smart relay not supplied.Error in the program.Time not set.Transistor output has failed.
Smart relay program Comments
By default, the time and the date are displayed on the smart relay’s main screen.Using the Z1 and Z3 keys, select the ASi I/O line.Use Sel./OK to validate.
Use Esc to return to the main screen display to view the values of the ASi contacts and coils.
ZELIO2_FR.book Page 102 Jeudi, 11. juillet 2002 7:30 19

Smart Relay - Chapter 10 103
ZELIO2_FR.book Page 103 Jeudi, 11. juillet 2002 7:30 19

104 Smart Relay - Appendix
Appendix - Contents
This Chapter covers the following subjects:
1. Forms ____________________________________________________page 105
Clock function block ____________________________________________ 106Counter function block ___________________________________________ 106Timer function block ____________________________________________ 106Analog function block ___________________________________________ 107Arrow keys ____________________________________________________ 107User’s quick reference ___________________________________________ 107
ZELIO2_FR.book Page 104 Jeudi, 11. juillet 2002 7:30 19

Smart Relay - Appendix 105
1. Forms
LADDER DIAGRAM Application:_________________________
Date: ___________ Version: _______
Comments: _________________________
____________________________________________________
Title page: _________________________
ZELIO2_FR.book Page 105 Jeudi, 11. juillet 2002 7:30 19

106 Smart Relay - Appendix
1. Forms
Clock function block
Counter function block
Timer function block
A B C D A B C D A B C D A B C D
- - - -
ON: ON: ON: ON:
OFF: OFF: OFF: OFF:
C C C C
DC DC DC DC
T T T T
Type Type Type Type
ZELIO2_FR.book Page 106 Jeudi, 11. juillet 2002 7:30 19

Smart Relay - Appendix 107
1. Forms
Analog function block
Arrow keys
User’s quick referenceReminder - Parameter displayTo display parameters, press Sel./ OK to bring up the "PARAMET." menu, then scroll the parameters using the Z1 and Z3 keys.
Reminder - Changing parametersTo change the parameters, simply move to the required parameter in the "PARAMET." menu, press Sel./ OK, then change the parameter.
Reminder - Using the display screenTo monitor the state of an element on the main screen in real-time: bring up the "VISU." menu, move to the element to display, then validate the selection by pressing Sel./ OK. Return to the main screen by pressing Esc.
A A A A
Analog Analog Analog Analog
z1
z3z4 z2
z1
z3z4 z2
ZELIO2_FR.book Page 107 Jeudi, 11. juillet 2002 7:30 19

108 Smart Relay - Appendix
ZELIO2_FR.book Page 108 Jeudi, 11. juillet 2002 7:30 19

INDEX
AAnalog
contact 57parameters 59
ASi 93, 96, 97Auxiliary relay 43BBehavior 43CCalibrated pulse 54Clock
contact 45entry 47number of 45operation 45parameters 46summary 48
Coilcounter 49entry 64output 41remote control 41, 42RESET 41, 42SET 41, 42
Coilstimer 52
Configurationmenu 15, 17
Connectiondiscrete 8, 95PC 5, 93
Contactanalog 57clock 45counter 49entry 64input 40output 41timer 52
Control diagramdelete 67
entry 24insert 67nbr. of lines 39notation 22operation 19practical example 81visualization in RUN 70
Countercontact 49downcount 50number 49parameters 49preset 50reset 50upcount 50
DDate
modify 13, 15Debugging 69Delete
element 11Ladder diagram 15line 11program 15
Diagnostics 85Display 5, 93
menu 15EEEPROM
slot 5, 93transfer 15
Electrical diagramnotation 22
ERR. RUN MODE 85Example
specifications 79FFast input
menu 17Filtering 33Function
Ini. 32Function block
analog 57clock 45counter 49
ZELIO2_FR.book Page 109 Jeudi, 11. juillet 2002 7:30 19

timer 52HHelp
automatic 35menu 16, 17
Hysteresis 59IIb 59Ic 59Ini. 12, 96, 98, 99, 100Inputs
analog 5, 59, 93connecting 8, 10, 95contact 40current 6, 7, 94discrete 6, 7, 40, 94fast 33filtering 17number of 6, 7, 40, 94visualize 5, 69, 93voltage 6, 7, 94
Insert line 11KKeys
arrow 5, 93delete 5, 11, 93esc 5, 11, 93insert 5, 11, 93pushbutton 5, 70, 93select 5, 11, 93Z 17, 34, 36, 44, 70
LLabel 5, 93Ladder diagram
notation 22Language
choice of 12menu 17modify 32number of 32
Linkentry 65
Locking 35MMenu
in RUN 73
Menu, mainaccess to 11description of 14
Messages 85Modifying
a field 13an element value 13
Mounting 5NNO PARAMET. 85OObjects, ASi 98Operating ranges 46Outputs
coil 41contact 41discrete 41number of 41
PParameters
analog 59Clock function block 46counter 49display 5, 69, 93display in RUN 71entry 66menu 15modify 72timer 52
Passwordcancel 31effect 31enter 31menu 17modify 31
Power supplygeneral 5, 93
Presetcounter 50timer 53
Programmenu 15
PROGRAM. INCOMPAT. 85QQuestions 86
ZELIO2_FR.book Page 110 Jeudi, 11. juillet 2002 7:30 19

RREMANENZ 17, 36Remote control relay 41RUN
menu 15set to RUN 27visualize 5, 69, 93
SSTOP
menu 15set to 27
Symmetrical blinker 54TTerminal block
inputs 5, 93outputs 5, 93
Timemodify 13
Time basetimer 53
Timer
contact 52control of 53number of 52parameters 52preset 53reset 53time base 53type 51, 53, 54
Timer active 54Timer idle 54Totalizing function 54TRANSF.ERR 85Transfer
EEPROM 15, 90PC 15, 89
Two way switchentry 24
VValidate 11Visualize (Visu.)
menu 15
ZELIO2_FR.book Page 111 Jeudi, 11. juillet 2002 7:30 19

The products, equipment and services presented in this document are subject to change at any time in their presentation,operating or usage characteristics. Their description cannot be considered contractually binding.© Copyright Telemecanique 2002. All rights reserved. This document may not be reproduced or copied, in whole or inpart, in any form or by any means, whether photographic, magnetic or other, including any transcription in whole or in partthat is readable on an electronic device.
SR1 MAN01EN W9 156 9786 0211 A02
06/ 2002
ZELIO2_FR.book Page 112 Jeudi, 11. juillet 2002 7:30 19