Embed Size (px)
Citation preview

Hilenski October 23, 2014 http://medicine.emory.edu/MIMCore
1
Zeiss LSM 510 META ZEN
Microscopy in Medicine (MiM) Core
Emory University Department of Medicine
Hilenski October 23, 2014 http://medicine.emory.edu/MIMCore
2
OPERATION OF THE ZEISS LSM 510 META ZEN Version
YOU MUST SIGN UP TO USE THE MICROSCOPE OR COMPUTER EVERY TIME—NO EXCEPTIONS
Before attempting to use the microscope:
you should read information on fixatives for biological material, on photobleaching and anti-fade agents, and on mounting media so that your samples are well-prepared and artifacts are minimized. See Confocal Notebook under the file “Preparation of Sample.” It is best to grow specimens on glass coverslips.
you should also know the excitation and emission spectra for your particular fluorochromes so that you can select the proper configurations available in the software. See Confocal Notebook under the file “Selection of Fluorochromes and Selection of Filters.” The Zeiss LSM 510 META has three lasers with the following emission lines for excitation: (1) a BLUE DIODE LASER: 405 nm; (2) an ARGON LASER: 458, 477, 488 and 514 nm; (3) a GREEN HeNe LASER: 543 nm; and (4) a RED HeNe LASER: 633 nm.
you should familiarize yourself with the choices of objectives on the microscope and the meanings of the markings on the objectives (e.g., the magnification, the numerical aperture (NA), the coverslip thickness requirements). See Confocal Notebook under the file “Objectives” to learn these markings and their meaning.
A Zeiss LSM 510 META OPERATING MANUAL is available on the book shelf to read for more detailed discussions of the microscope operation. Also available are the revised edition of HANDBOOK OF BIOLOGICAL CONFOCAL MICROSCOPY edited by James B. Pawley for reading on the theory of confocal imaging systems (a newer 2nd edition is available from the Emory Woodruff Library) and CONFOCAL MICROSCOPY FOR BIOLOGISTS by Alan Hibbs.
A good introduction to light microscopy is OPTIMIZING LIGHT MICROSCOPY FOR BIOLOGICAL AND CLINICAL LABORATORIES by Barbara Foster available on book shelf (Hilenski personal copy, so please return).
A good introduction to image acquisition is North, A.J. 2006. Seeing is believing? A beginners’ guide to practical pitfalls in image acquisition. J Cell Biol 172:9-18. Copies are also available in the MiM Core. What users should consider purchasing: Mounting Media
Fluoromount G #17984-25 (Electron Microscopy Sciences, P.O. Box 251, 321 Morris Road, Ft. Washington, PA 19034; Phone 215-646-1566; www.emsdiasum.com)
Hilenski October 23, 2014 http://medicine.emory.edu/MIMCore
3
Vectashield #H-1000 (Vector Laboratories, Inc., 30 Ingold Road, Burlingame, CA 94010; Phone 650-697-3600 (10 ml=$45.00 as of 8/2001) SlowFade Antifade Kit # S-2828 (Molecular Probes, Eugene, OR)
Glass Coverslips (# 1.5) Glass Slides Blank CDs and DVDs
Clear Fingernail Polish (Wet ‘n’ Wild Clear Nail Protector is recommended—other brands contain ethyl acetate/acetone which will lead to loss of fluorescence signal) Glass Bottom 35 mm Dishes (MatTek Corporation, 200 Homer Ave., Ashland, MA 01721; Phone 508-881-6771; FAX 508-879-1532) (used for viewing live cells/living tissue in a fluid). Order coverglass thickness 1.5. Chambered coverglasses (available from Applied Scientific at 650-244-9851 or http://www.appliedsci.com for part #’s AS-4851 one-chamber; AS-4852 two- chambers; AS-4854 four-chambers; AS-4858 eight-chambers) (used for viewing live cells) NOTE: Petri dishes are NOT optically clear and can only be used for low magnification (10X, 20X) work. Standard chamber slides will NOT work as they have glass slide bottoms which are too thick to be imaged through.
IMPORTANT NOTE: Please read the contents of the folder on Digital Image Manipulation containing information from Nature (Guide for Digital Images), Journal of Cell Biology and the Microscopy Society of America on the acquisition, storage and image processing of digital images taken on the Zeiss LSM 510 META system.
We advise you to save your original digital images exactly as they were acquired and to record your instrument settings.
BEFORE USING THE SYSTEM, YOU MUST CONTACT:
LU HILENSKI (WMB 329, 7-8116, [email protected])
You can download a free version of the ZEN 2011 Lite software at the following website: http://www.zeiss.de/micro. Click on Downloads>ZEN>ZEN 2011 Lite for Windows>Download. Follow the instructions for the download (you will be asked to submit a Download Form for ZEN). If you do not have Administrator rights to your lab computer, you must contact the DOM IT ([email protected]) or 404-712-1443 for help with installation of the free ZEN 2011 Lite software. You can also use the ZEN full software on the WMB 306 workstation computer. Please check out the dongle from WMB 303.
Hilenski October 23, 2014 http://medicine.emory.edu/MIMCore
4
The following instructions are taken from the Zeiss LSM 510 META Operating Manual and from the Wright Cell Imaging Facility (www.uhnresearch.ca/wcif).
POWER UP Procedure for LSM 510 ZEN 2008
Record Each Step Below on the LSM 510 POWER UP LOG
SHEET
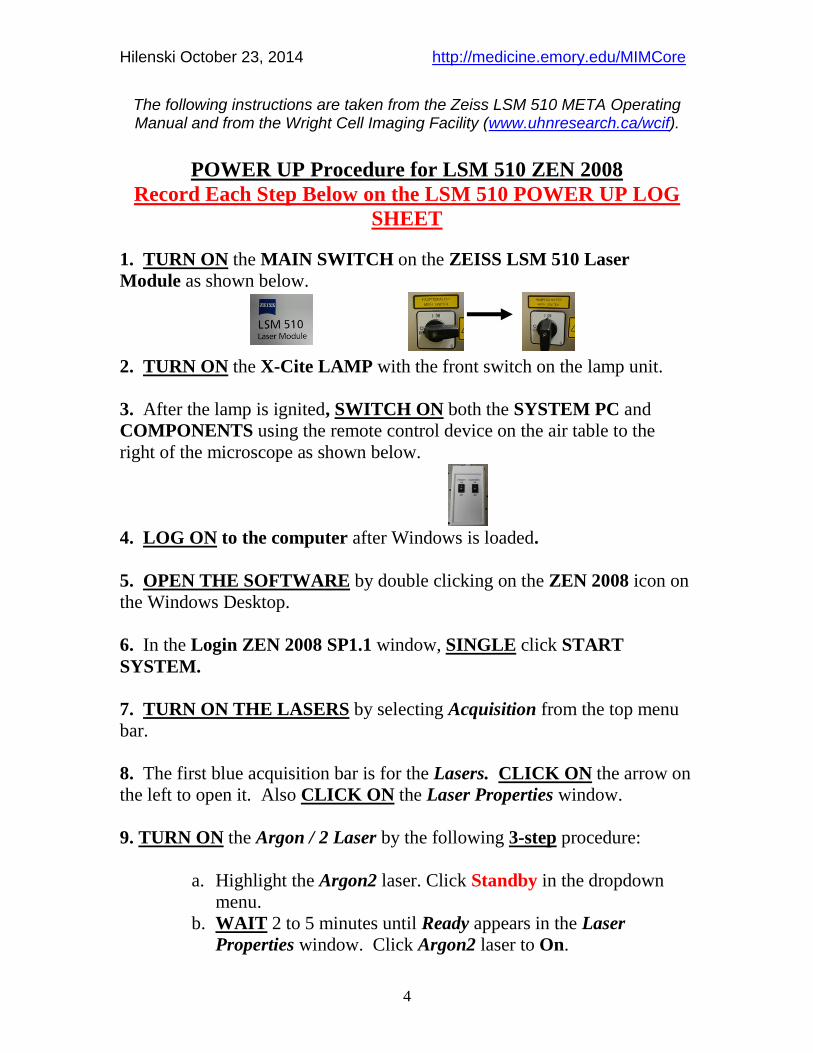
1. TURN ON the MAIN SWITCH on the ZEISS LSM 510 Laser
Module as shown below.
2. TURN ON the X-Cite LAMP with the front switch on the lamp unit.
3. After the lamp is ignited, SWITCH ON both the SYSTEM PC and
COMPONENTS using the remote control device on the air table to the
right of the microscope as shown below.
4. LOG ON to the computer after Windows is loaded.
5. OPEN THE SOFTWARE by double clicking on the ZEN 2008 icon on
the Windows Desktop.
6. In the Login ZEN 2008 SP1.1 window, SINGLE click START
SYSTEM.
7. TURN ON THE LASERS by selecting Acquisition from the top menu
bar.
8. The first blue acquisition bar is for the Lasers. CLICK ON the arrow on
the left to open it. Also CLICK ON the Laser Properties window.
9. TURN ON the Argon / 2 Laser by the following 3-step procedure:
a. Highlight the Argon2 laser. Click Standby in the dropdown
menu.
b. WAIT 2 to 5 minutes until Ready appears in the Laser
Properties window. Click Argon2 laser to On.

Hilenski October 23, 2014 http://medicine.emory.edu/MIMCore
5
c. Set Output [%] with arrow button slowly to increase power
stepwise until Tube Current is 50% of output power.
10. TURN ON the Diode 405 Laser (for DAPI, UV) by clicking on
Standby. When status is Ready, click the ON button.
11. TURN ON one or both of the HeNe Lasers (543 and 633 nm) by
clicking the ON buttons.
Hilenski October 23, 2014 http://medicine.emory.edu/MIMCore
6
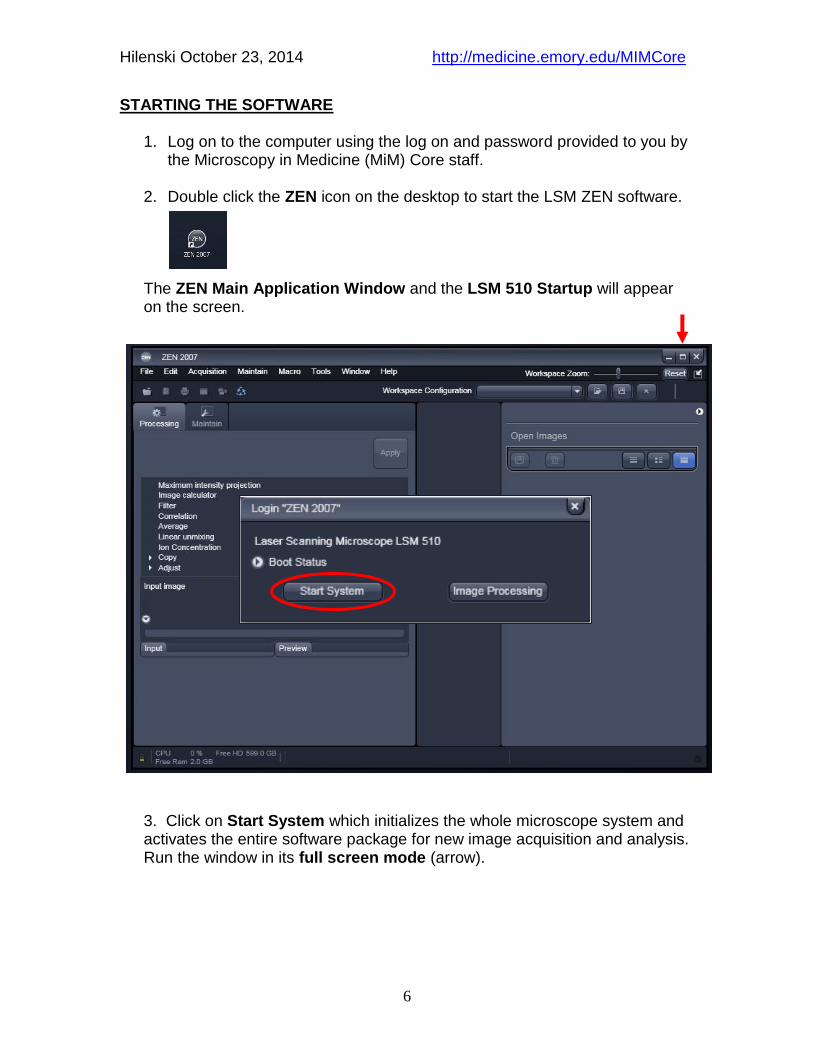
STARTING THE SOFTWARE 1. Log on to the computer using the log on and password provided to you by
the Microscopy in Medicine (MiM) Core staff. 2. Double click the ZEN icon on the desktop to start the LSM ZEN software.
The ZEN Main Application Window and the LSM 510 Startup will appear on the screen. 3. Click on Start System which initializes the whole microscope system and activates the entire software package for new image acquisition and analysis. Run the window in its full screen mode (arrow).
Hilenski October 23, 2014 http://medicine.emory.edu/MIMCore
7
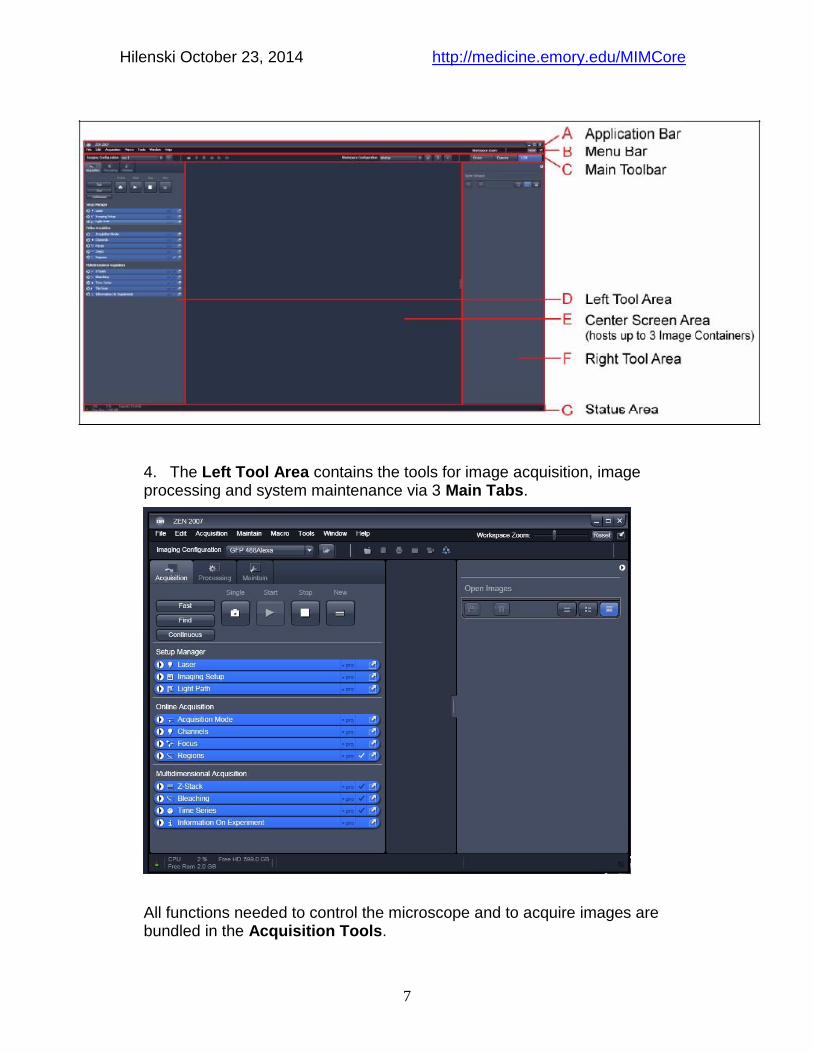
4. The Left Tool Area contains the tools for image acquisition, image processing and system maintenance via 3 Main Tabs.
All functions needed to control the microscope and to acquire images are bundled in the Acquisition Tools.
Hilenski October 23, 2014 http://medicine.emory.edu/MIMCore
8
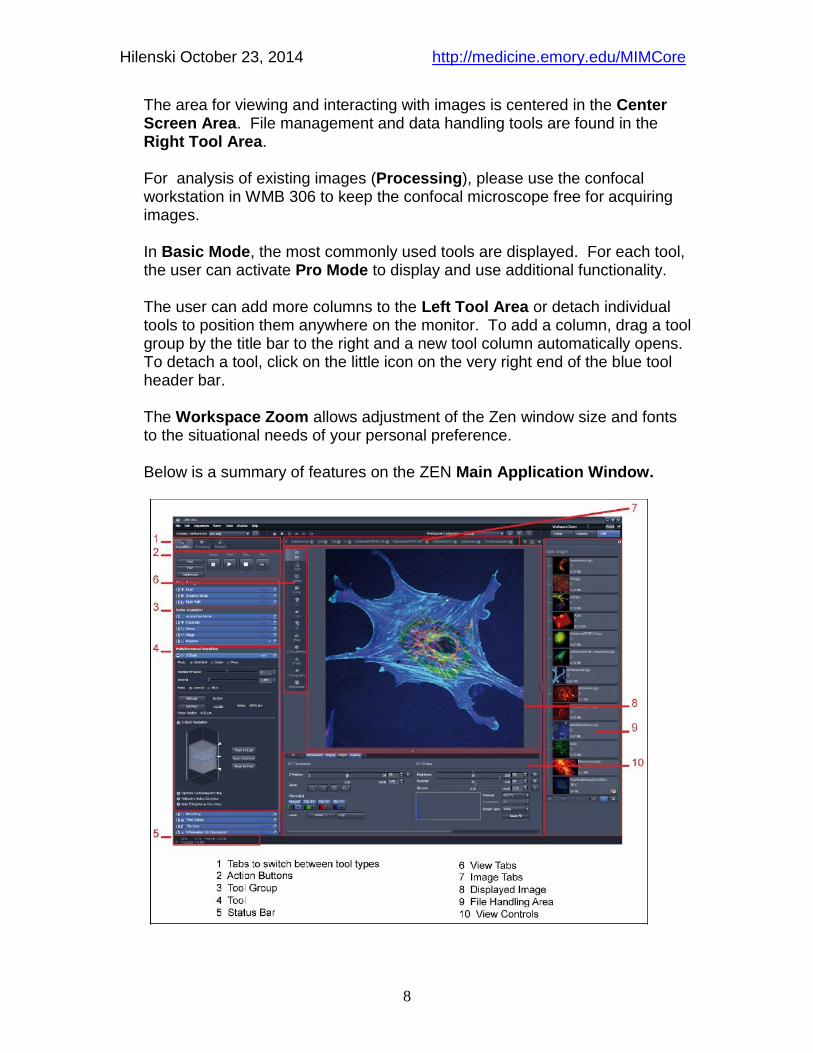
The area for viewing and interacting with images is centered in the Center Screen Area. File management and data handling tools are found in the Right Tool Area. For analysis of existing images (Processing), please use the confocal workstation in WMB 306 to keep the confocal microscope free for acquiring images. In Basic Mode, the most commonly used tools are displayed. For each tool, the user can activate Pro Mode to display and use additional functionality. The user can add more columns to the Left Tool Area or detach individual tools to position them anywhere on the monitor. To add a column, drag a tool group by the title bar to the right and a new tool column automatically opens. To detach a tool, click on the little icon on the very right end of the blue tool header bar. The Workspace Zoom allows adjustment of the Zen window size and fonts to the situational needs of your personal preference. Below is a summary of features on the ZEN Main Application Window.
Hilenski October 23, 2014 http://medicine.emory.edu/MIMCore
9
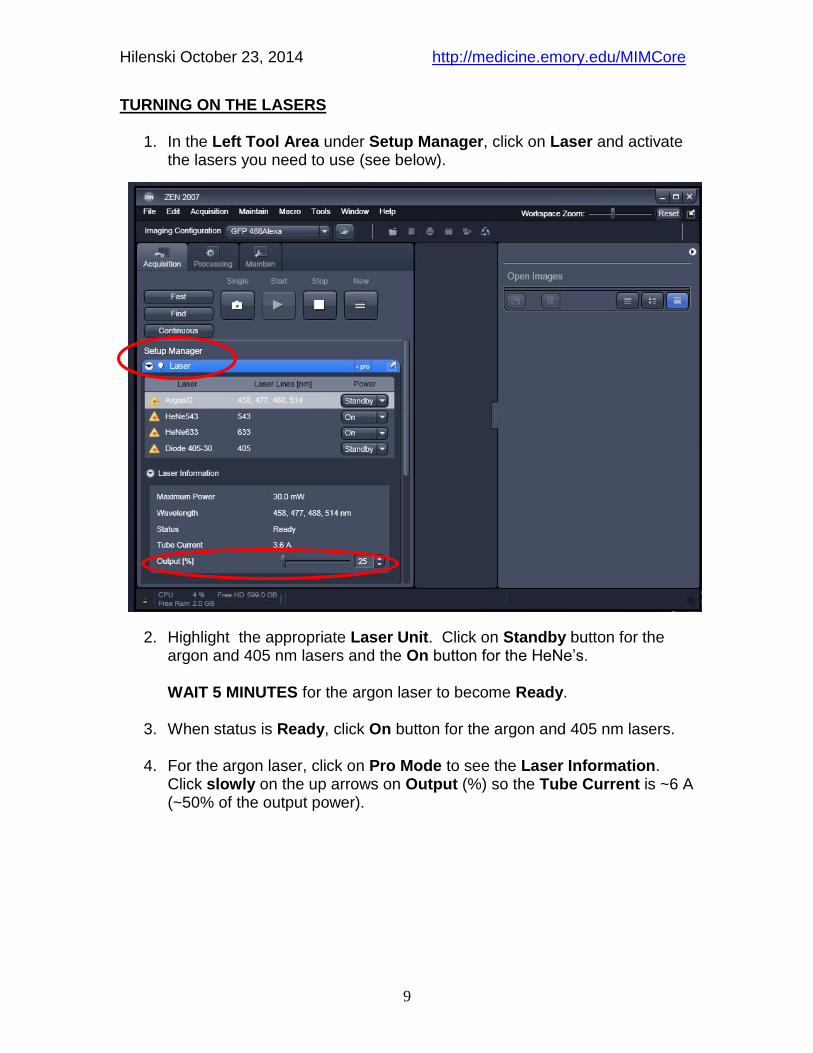
TURNING ON THE LASERS
1. In the Left Tool Area under Setup Manager, click on Laser and activate the lasers you need to use (see below).
2. Highlight the appropriate Laser Unit. Click on Standby button for the argon and 405 nm lasers and the On button for the HeNe’s.
WAIT 5 MINUTES for the argon laser to become Ready. 3. When status is Ready, click On button for the argon and 405 nm lasers.
4. For the argon laser, click on Pro Mode to see the Laser Information.
Click slowly on the up arrows on Output (%) so the Tube Current is ~6 A (~50% of the output power).
Hilenski October 23, 2014 http://medicine.emory.edu/MIMCore
10
SETTING UP THE MICROSCOPE
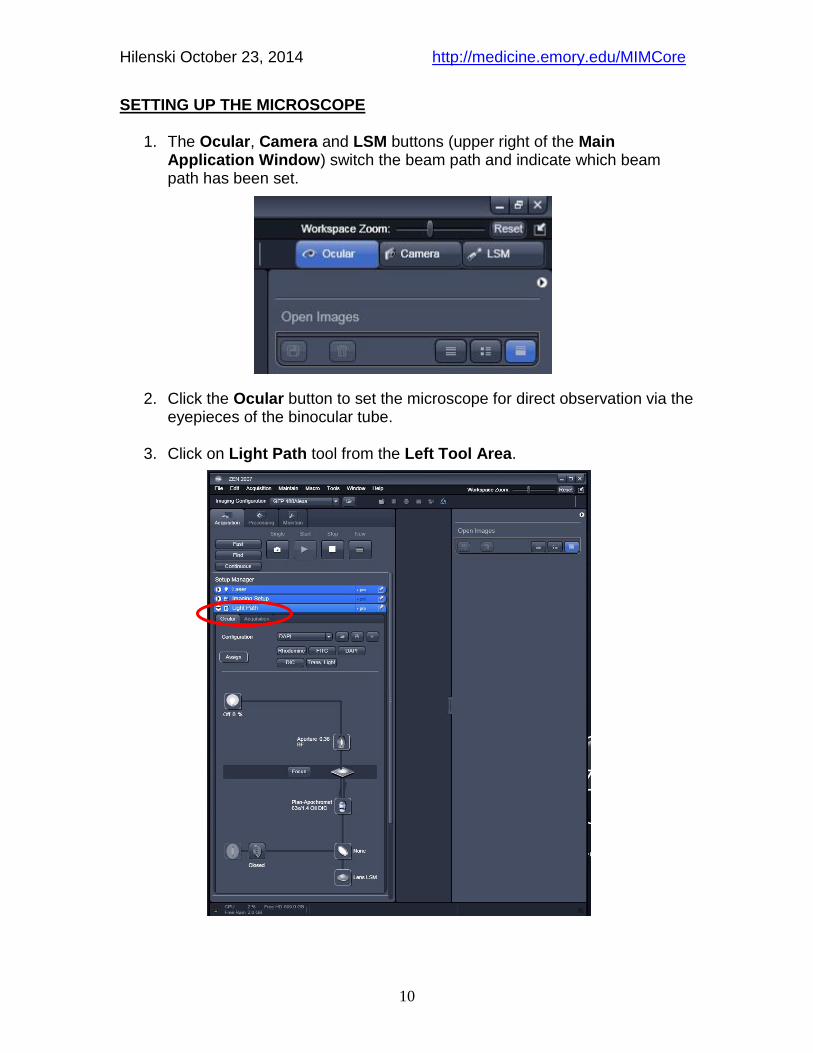
1. The Ocular, Camera and LSM buttons (upper right of the Main Application Window) switch the beam path and indicate which beam path has been set.
2. Click the Ocular button to set the microscope for direct observation via the eyepieces of the binocular tube.
3. Click on Light Path tool from the Left Tool Area.
Hilenski October 23, 2014 http://medicine.emory.edu/MIMCore
11
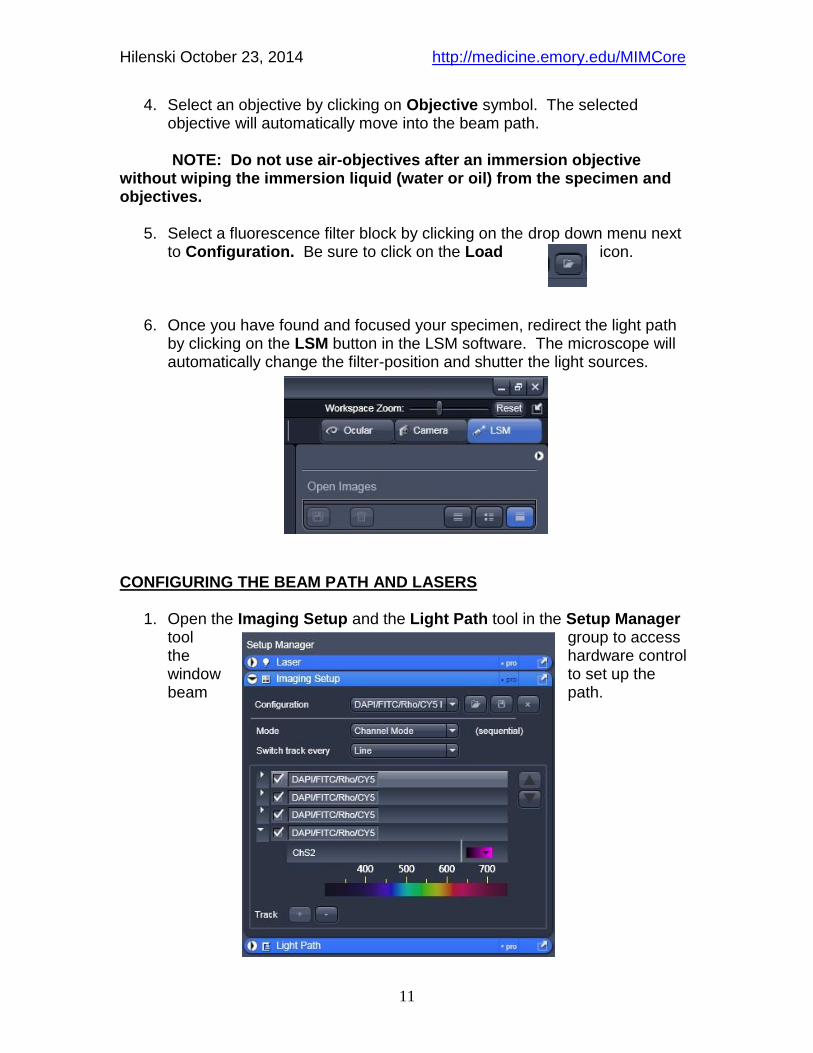
4. Select an objective by clicking on Objective symbol. The selected objective will automatically move into the beam path.
NOTE: Do not use air-objectives after an immersion objective without wiping the immersion liquid (water or oil) from the specimen and objectives.
5. Select a fluorescence filter block by clicking on the drop down menu next to Configuration. Be sure to click on the Load icon.
6. Once you have found and focused your specimen, redirect the light path
by clicking on the LSM button in the LSM software. The microscope will automatically change the filter-position and shutter the light sources.
CONFIGURING THE BEAM PATH AND LASERS
1. Open the Imaging Setup and the Light Path tool in the Setup Manager tool group to access the hardware control window to set up the beam path.
Hilenski October 23, 2014 http://medicine.emory.edu/MIMCore
12
2. Click Configuration button in the Imaging Setup window to use one of the pre-programmed track configurations.
3. Load the configuration that matches your fluorophores (referred to as
“tracks”). Click on the drop-down box and select a desired configuration, then click on the Load icon.
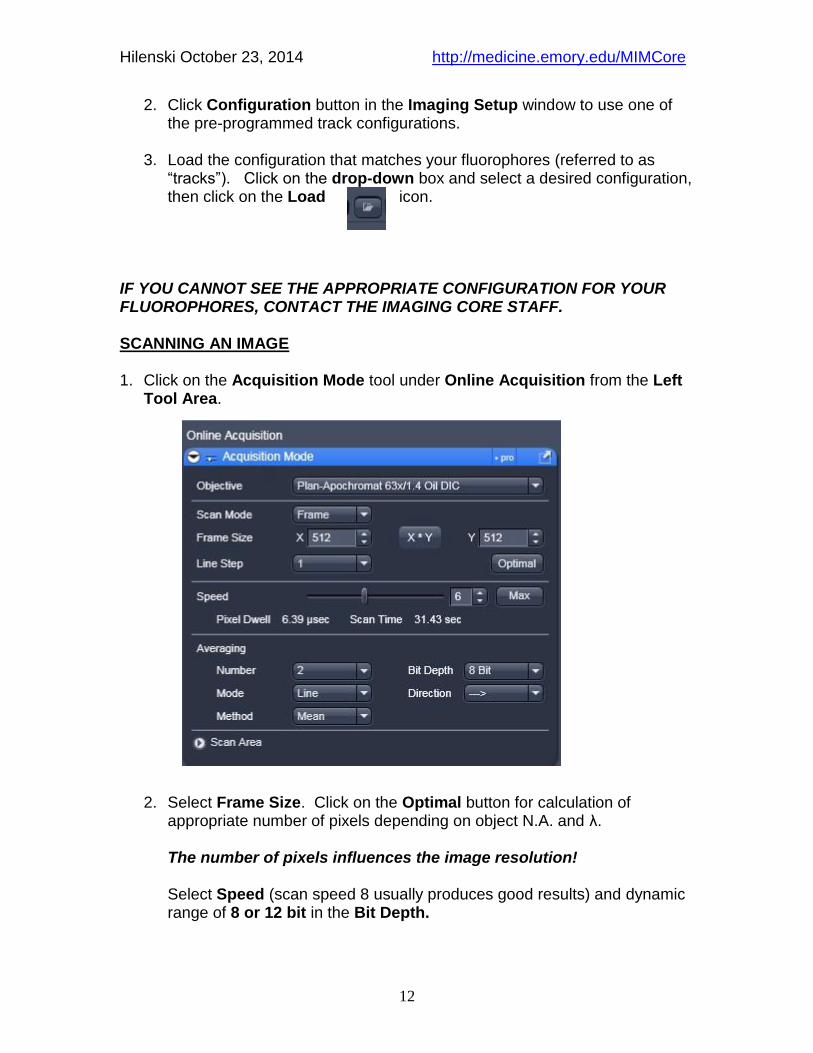
IF YOU CANNOT SEE THE APPROPRIATE CONFIGURATION FOR YOUR FLUOROPHORES, CONTACT THE IMAGING CORE STAFF. SCANNING AN IMAGE 1. Click on the Acquisition Mode tool under Online Acquisition from the Left
Tool Area.
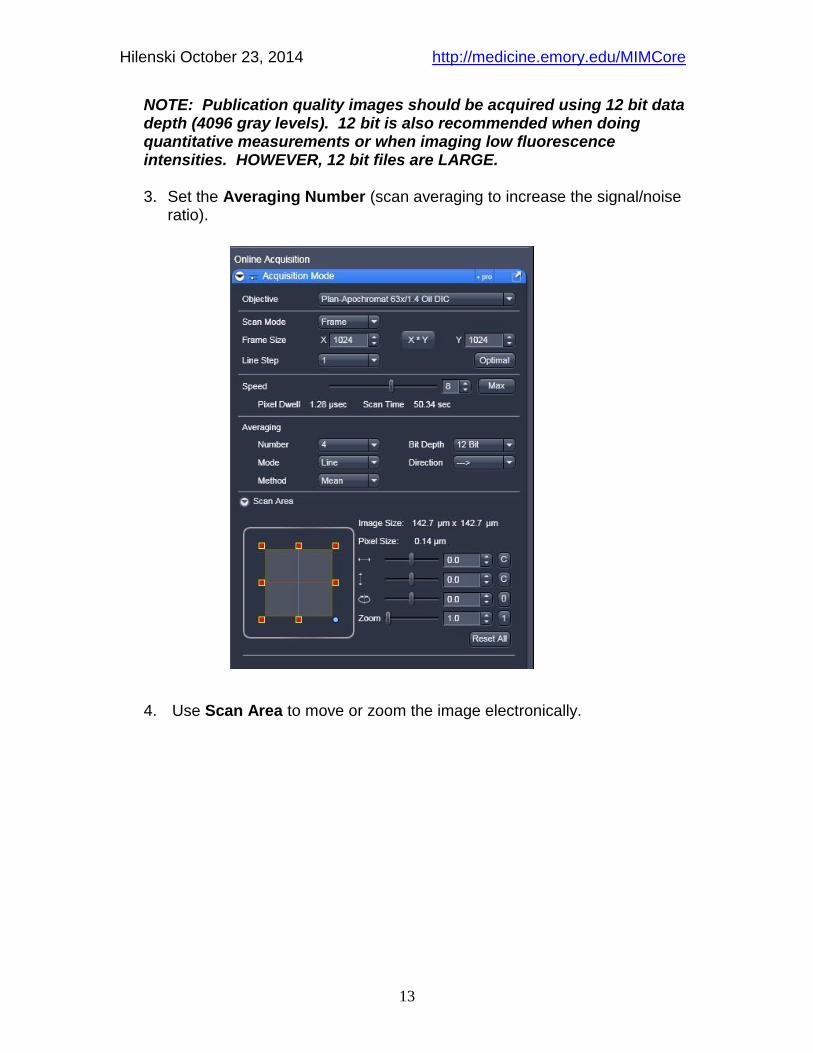
2. Select Frame Size. Click on the Optimal button for calculation of appropriate number of pixels depending on object N.A. and λ. The number of pixels influences the image resolution!
Select Speed (scan speed 8 usually produces good results) and dynamic range of 8 or 12 bit in the Bit Depth.
Hilenski October 23, 2014 http://medicine.emory.edu/MIMCore
13
NOTE: Publication quality images should be acquired using 12 bit data depth (4096 gray levels). 12 bit is also recommended when doing quantitative measurements or when imaging low fluorescence intensities. HOWEVER, 12 bit files are LARGE. 3. Set the Averaging Number (scan averaging to increase the signal/noise
ratio).
4. Use Scan Area to move or zoom the image electronically.
Hilenski October 23, 2014 http://medicine.emory.edu/MIMCore
14
IMAGE ACQUISITION
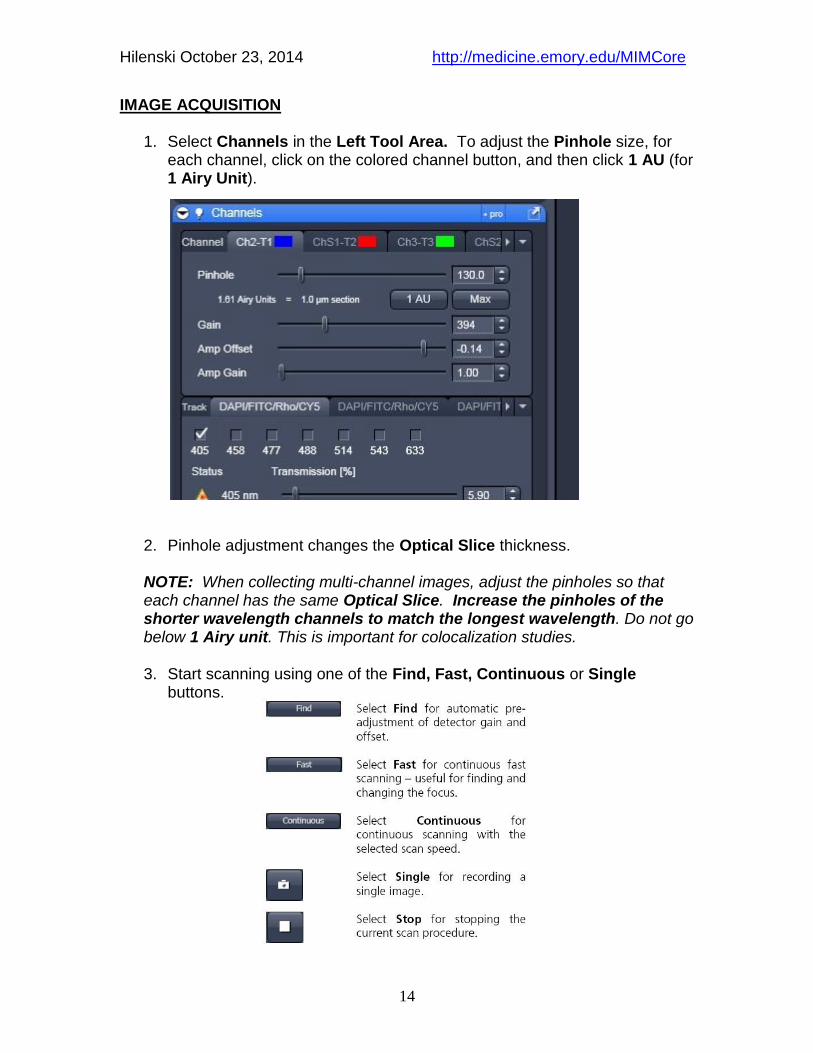
1. Select Channels in the Left Tool Area. To adjust the Pinhole size, for each channel, click on the colored channel button, and then click 1 AU (for 1 Airy Unit).
2. Pinhole adjustment changes the Optical Slice thickness.
NOTE: When collecting multi-channel images, adjust the pinholes so that each channel has the same Optical Slice. Increase the pinholes of the shorter wavelength channels to match the longest wavelength. Do not go below 1 Airy unit. This is important for colocalization studies. 3. Start scanning using one of the Find, Fast, Continuous or Single
buttons.
Hilenski October 23, 2014 http://medicine.emory.edu/MIMCore
15
4. Click Stop button to stop the current scan.
IMAGE OPTIMIZATION
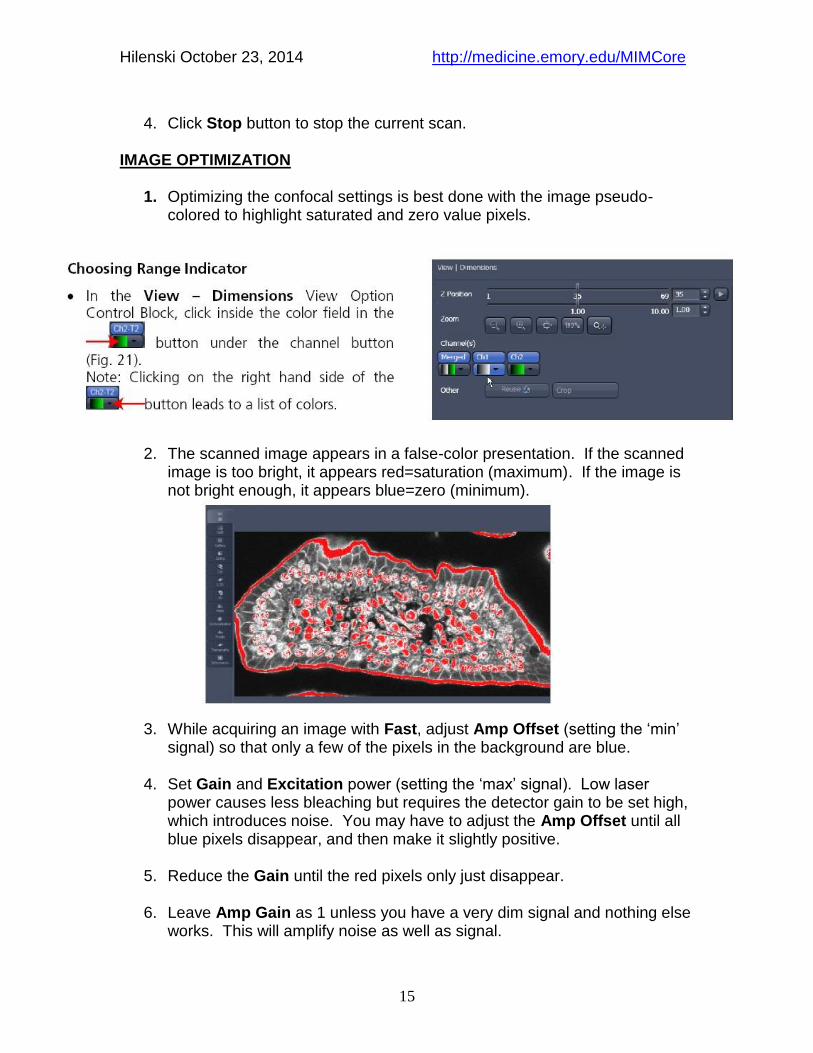
1. Optimizing the confocal settings is best done with the image pseudo-colored to highlight saturated and zero value pixels.
2. The scanned image appears in a false-color presentation. If the scanned
image is too bright, it appears red=saturation (maximum). If the image is not bright enough, it appears blue=zero (minimum).
3. While acquiring an image with Fast, adjust Amp Offset (setting the ‘min’ signal) so that only a few of the pixels in the background are blue.
4. Set Gain and Excitation power (setting the ‘max’ signal). Low laser
power causes less bleaching but requires the detector gain to be set high, which introduces noise. You may have to adjust the Amp Offset until all blue pixels disappear, and then make it slightly positive.
5. Reduce the Gain until the red pixels only just disappear.
6. Leave Amp Gain as 1 unless you have a very dim signal and nothing else
works. This will amplify noise as well as signal.
Hilenski October 23, 2014 http://medicine.emory.edu/MIMCore
16
REMEMBER: A few red speckles; a few blue speckles in each channel. 7. After you have optimized the first channel, stop scanning by clicking Stop.
8. Turn off the optimized channel in the Configuration window. Turn on the
next channel and optimize these settings for this channel. 9. To regain pseudo colors, click on in View/Dimensions.
ADDING A SCALE BAR
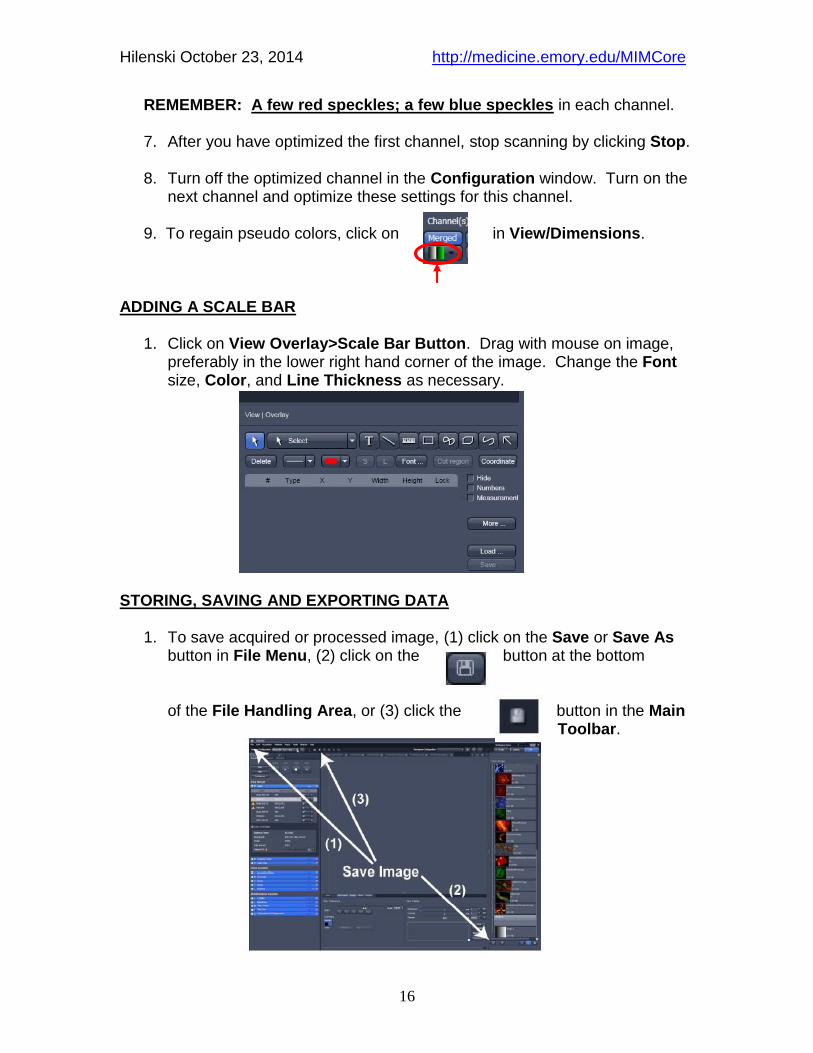
1. Click on View Overlay>Scale Bar Button. Drag with mouse on image, preferably in the lower right hand corner of the image. Change the Font size, Color, and Line Thickness as necessary.
STORING, SAVING AND EXPORTING DATA 1. To save acquired or processed image, (1) click on the Save or Save As
button in File Menu, (2) click on the button at the bottom of the File Handling Area, or (3) click the button in the Main
Toolbar.
Hilenski October 23, 2014 http://medicine.emory.edu/MIMCore
17
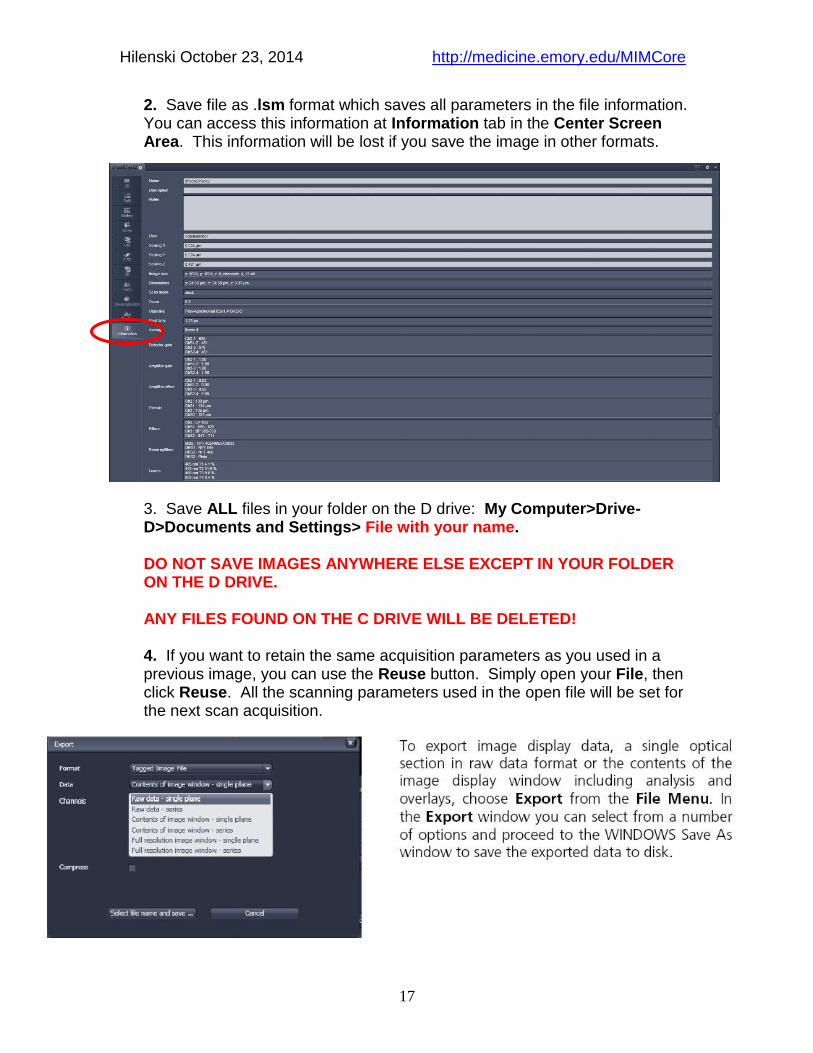
2. Save file as .lsm format which saves all parameters in the file information. You can access this information at Information tab in the Center Screen Area. This information will be lost if you save the image in other formats. 3. Save ALL files in your folder on the D drive: My Computer>Drive-D>Documents and Settings> File with your name. DO NOT SAVE IMAGES ANYWHERE ELSE EXCEPT IN YOUR FOLDER ON THE D DRIVE. ANY FILES FOUND ON THE C DRIVE WILL BE DELETED! 4. If you want to retain the same acquisition parameters as you used in a previous image, you can use the Reuse button. Simply open your File, then click Reuse. All the scanning parameters used in the open file will be set for the next scan acquisition.
Hilenski October 23, 2014 http://medicine.emory.edu/MIMCore
18
SCANNING A Z STACK
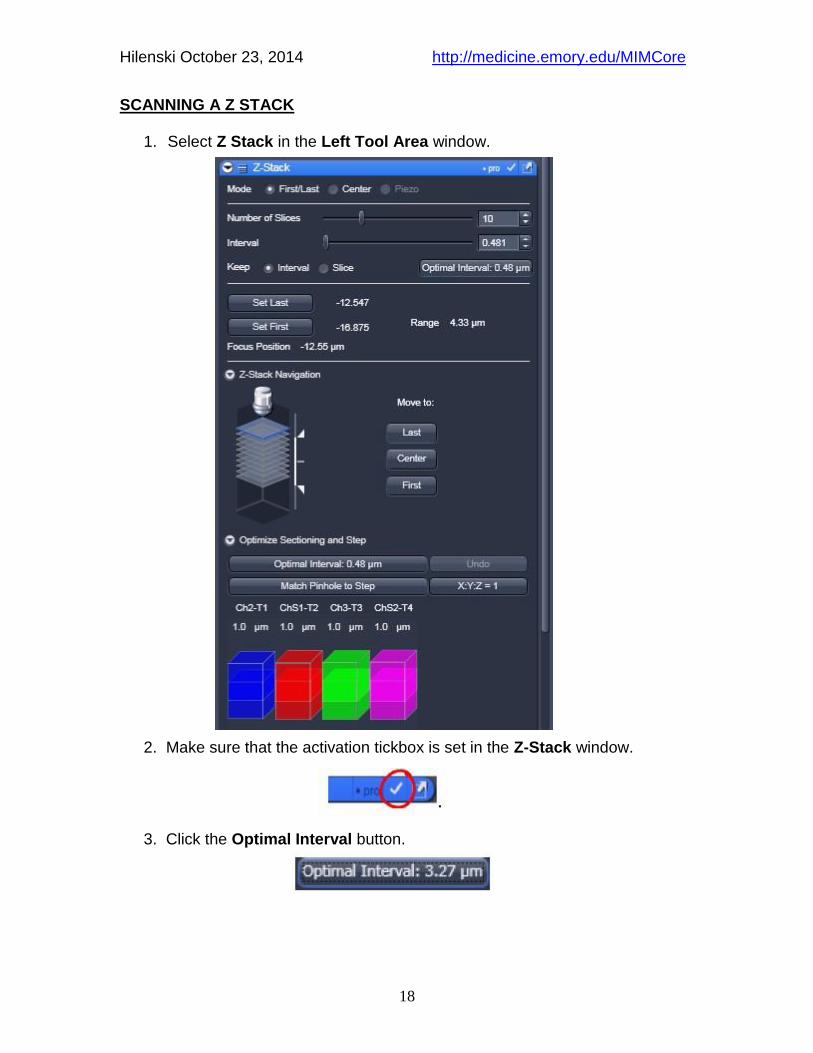
1. Select Z Stack in the Left Tool Area window.
2. Make sure that the activation tickbox is set in the Z-Stack window.
3. Click the Optimal Interval button.
Hilenski October 23, 2014 http://medicine.emory.edu/MIMCore
19
4. Using Fast, focus up and down with the microscope focus wheel to ensure your specimen is in the center of the field of view and the microscope is focused in the middle of the specimen (or where ever fluorescence is brightest). 5. Optimize image acquisition parameters as above (under IMAGE OPTIMIZATION). 6. Use the manual fine focusing drive of the microscope to focus on the upper position of the specimen area where the Z stack is to start.
7. Click on the Set First button to set the upper position of the Z stack.
8. Focus on the lower specimen area where the recording of the Z stack is to end.
9. Click on the Set Last button to set this lower position. 10. Check that the optical section for each channel is the same. If your optical sections are different for each wavelength, go to Mode/Channels and adjust the Pinhole so that each channel has the same optical section around 1 Airy Unit, but one channel will have to be slightly larger.
11. Click on the Start button
to start the recording of the Z stack. You can check progress by selecting Gallery button on the image window sidebar.
Hilenski October 23, 2014 http://medicine.emory.edu/MIMCore
20
SHUT DOWN Procedure for LSM 510
Leave the system ON unless you are the last person in the day
If another user is signed up after you, follow these steps:
1. Exit the ZEN software.
2. Click OK in the WARNING window (the Lasers are still
ON--DO NOT TURN THE LASERS OFF UNLESS YOU ARE
THE LAST PERSON IN THE DAY).
3. Click , then Log Off.
4. COPY your images to the Western Digital external hard drive WD My
Book (I). Disconnect the My Book from the Zeiss LSM computer, connect
the My Book to the workstation computer in WMB 303 and then copy your
data to your PI’s folder either on the Emory or BME servers. Return and
reconnect the My Book to the Zeiss LSM computer.
DO NOT LEAVE IMAGES ON THE D DRIVE for extensive periods of
time or THEY MAY BE DELETED BY THE CORE STAFF. DO NOT
USE USB DRIVES TO COPY DATA.
OR
If you are the last person in the day, follow these steps:
Record Each Step Below on the LSM 510 SHUT DOWN LOG
SHEET
1. BEFORE exiting the ZEN software, TURN OFF all the Lasers by
clicking OFF in the Lasers drop-down menu for each laser. WAIT at least
5 MINUTES before exiting the ZEN software (to allow the argon laser to
cool down).
2. While the argon laser is cooling down, REMOVE and CLEAN your
slides and put them away. WIPE THE OIL OBJECTIVES with LENS
PAPER, then clean the objective lens with lens paper moistened with
Sparkle.
3. EXIT the ZEN software by FILE >EXIT. If you see a pop-up window
asking you to wait 5 minutes before shutting down, click OK, then WAIT
before switching off the Remotes (see step #6 below).
Hilenski October 23, 2014 http://medicine.emory.edu/MIMCore
21
4. COPY your images to the Western Digital external hard drive WD My
Book (I). Disconnect the My Book from the Zeiss LSM computer, connect
the My Book to the workstation computer in WMB 303 and then copy your
data to your PI’s folder either on the Emory or BME servers. Return and
reconnect the My Book to the Zeiss LSM computer.
DO NOT LEAVE IMAGES ON THE D DRIVE for extensive periods of
time or THEY MAY BE DELETED BY THE CORE STAFF. DO NOT
USE USB DRIVES TO COPY DATA.
5. SHUT DOWN the computer using the START menu at the bottom of
the desktop.
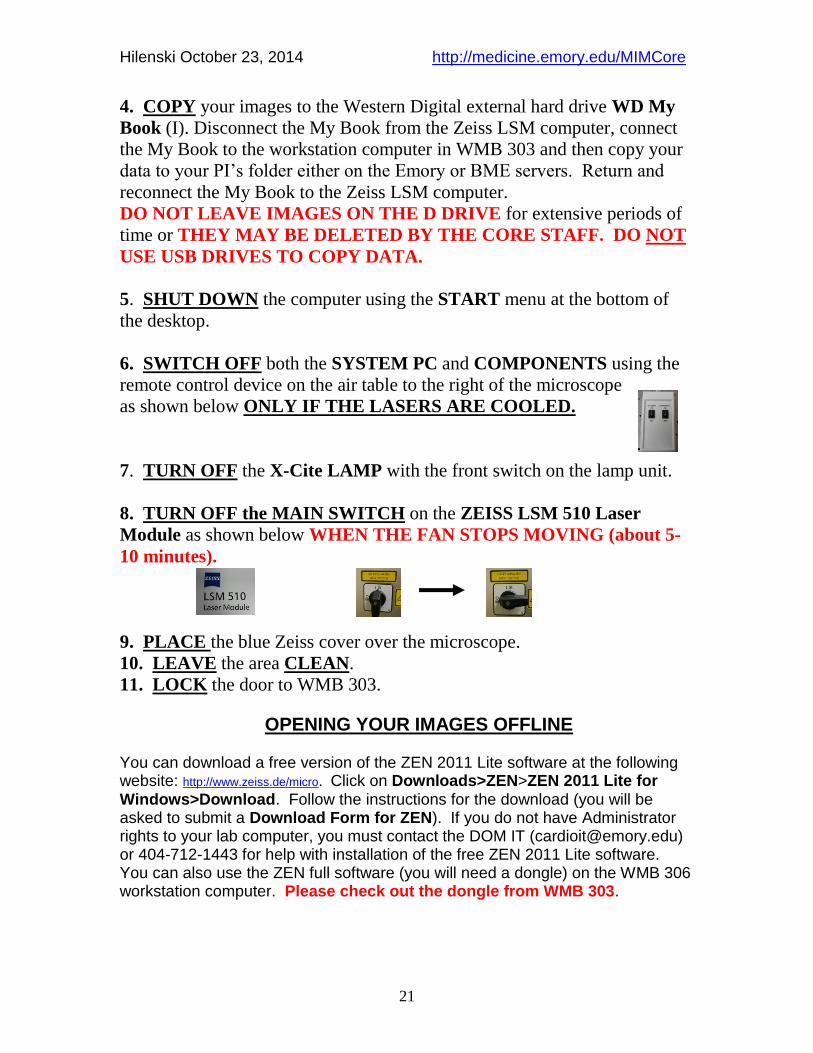
6. SWITCH OFF both the SYSTEM PC and COMPONENTS using the
remote control device on the air table to the right of the microscope
as shown below ONLY IF THE LASERS ARE COOLED.
7. TURN OFF the X-Cite LAMP with the front switch on the lamp unit.
8. TURN OFF the MAIN SWITCH on the ZEISS LSM 510 Laser
Module as shown below WHEN THE FAN STOPS MOVING (about 5-
10 minutes).
9. PLACE the blue Zeiss cover over the microscope.
10. LEAVE the area CLEAN.
11. LOCK the door to WMB 303.
OPENING YOUR IMAGES OFFLINE
You can download a free version of the ZEN 2011 Lite software at the following website: http://www.zeiss.de/micro. Click on Downloads>ZEN>ZEN 2011 Lite for Windows>Download. Follow the instructions for the download (you will be asked to submit a Download Form for ZEN). If you do not have Administrator rights to your lab computer, you must contact the DOM IT ([email protected]) or 404-712-1443 for help with installation of the free ZEN 2011 Lite software. You can also use the ZEN full software (you will need a dongle) on the WMB 306 workstation computer. Please check out the dongle from WMB 303.