Embed Size (px)
Citation preview

THE LEGENDARY PERFORMANCE OFYOUR ADVENTURE UNFOLDS
Feathercraft Products Ltd. 4-1244 Cartwright Street on Granville Island, Vancouver, British Columbia, Canada V6H 3R8 Telephone: (604) 681-8437 Toll Free: 1-888-681-8437 Fax: (604) 681-7282 www.Feathercraft.com [email protected]
Khatsalanowith built-in coaming
KhatsEnglish_Coaming.xpr 2/8/06 4:14 PM Page 1
ContentsKhatsalano Single Folding Kayak ..........................................Page 2
Specifications ........................................................................Page 3
Khatsalano Frame..................................................................Page 4
Care and Maintenance ..........................................................Page 5
Khatsalano Assembly Instructions.........................................Page 7
Disassembly ..........................................................................Page 29
Feathercraft Khatsalano 1
KhatsEnglish_Coaming.xpr 2/8/06 4:14 PM Page 1

Khatsalano Single Folding Kayak
Feathercraft Khatsalano 2
KhatsEnglish_Coaming.xpr 2/8/06 4:14 PM Page 2
Feathercraft Khatsalano 3
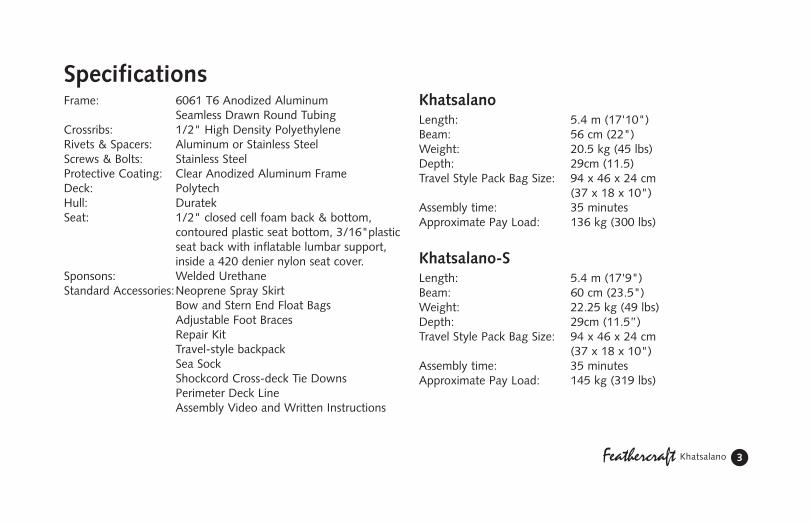
KhatsalanoLength: 5.4 m (17'10")Beam: 56 cm (22")Weight: 20.5 kg (45 lbs)Depth: 29cm (11.5)Travel Style Pack Bag Size: 94 x 46 x 24 cm
(37 x 18 x 10")Assembly time: 35 minutesApproximate Pay Load: 136 kg (300 lbs)
Khatsalano-SLength: 5.4 m (17'9")Beam: 60 cm (23.5")Weight: 22.25 kg (49 lbs)Depth: 29cm (11.5”)Travel Style Pack Bag Size: 94 x 46 x 24 cm
(37 x 18 x 10")Assembly time: 35 minutesApproximate Pay Load: 145 kg (319 lbs)
SpecificationsFrame: 6061 T6 Anodized Aluminum
Seamless Drawn Round TubingCrossribs: 1/2" High Density PolyethyleneRivets & Spacers: Aluminum or Stainless SteelScrews & Bolts: Stainless SteelProtective Coating: Clear Anodized Aluminum FrameDeck: PolytechHull: DuratekSeat: 1/2" closed cell foam back & bottom,
contoured plastic seat bottom, 3/16"plasticseat back with inflatable lumbar support,inside a 420 denier nylon seat cover.
Sponsons: Welded UrethaneStandard Accessories:Neoprene Spray Skirt
Bow and Stern End Float BagsAdjustable Foot BracesRepair KitTravel-style backpackSea Sock Shockcord Cross-deck Tie DownsPerimeter Deck LineAssembly Video and Written Instructions
KhatsEnglish_Coaming.xpr 2/8/06 4:14 PM Page 3

Feathercraft Khatsalano 4
Crossribs handcrafted from High Density Polyethylene
Welded Aluminum keel(both bow and stern)
Stern deck bar/vertical lever
Total of five extension bars: keel, chines, gunwales
Secure bracing on diagonal truss bars
Reinforcement bars
Adjustable foot braces
Khatsalano Frame
KhatsEnglish_Coaming.xpr 2/8/06 4:14 PM Page 4
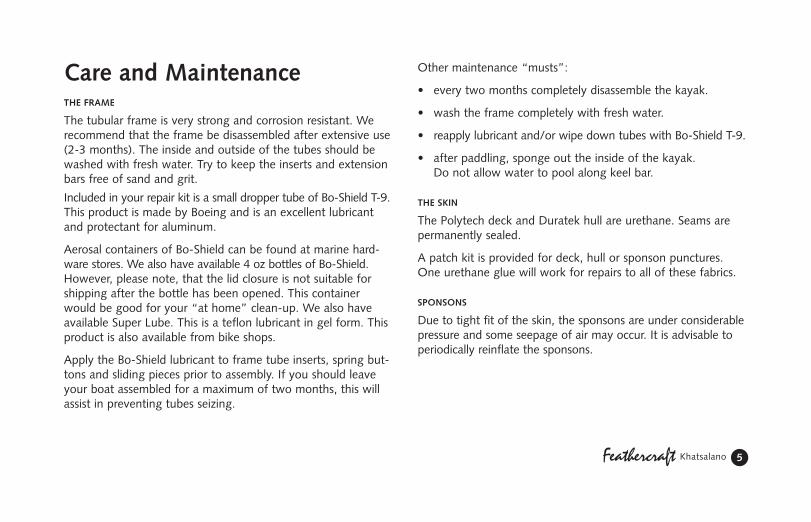
Care and MaintenanceTHE FRAME
The tubular frame is very strong and corrosion resistant. Werecommend that the frame be disassembled after extensive use(2-3 months). The inside and outside of the tubes should bewashed with fresh water. Try to keep the inserts and extensionbars free of sand and grit.
Included in your repair kit is a small dropper tube of Bo-Shield T-9.This product is made by Boeing and is an excellent lubricantand protectant for aluminum.
Aerosal containers of Bo-Shield can be found at marine hard-ware stores. We also have available 4 oz bottles of Bo-Shield.However, please note, that the lid closure is not suitable forshipping after the bottle has been opened. This containerwould be good for your “at home” clean-up. We also haveavailable Super Lube. This is a teflon lubricant in gel form. Thisproduct is also available from bike shops.
Apply the Bo-Shield lubricant to frame tube inserts, spring but-tons and sliding pieces prior to assembly. If you should leaveyour boat assembled for a maximum of two months, this willassist in preventing tubes seizing.
Other maintenance “musts”:
• every two months completely disassemble the kayak.
• wash the frame completely with fresh water.
• reapply lubricant and/or wipe down tubes with Bo-Shield T-9.
• after paddling, sponge out the inside of the kayak. Do not allow water to pool along keel bar.
THE SKIN
The Polytech deck and Duratek hull are urethane. Seams arepermanently sealed.
A patch kit is provided for deck, hull or sponson punctures.One urethane glue will work for repairs to all of these fabrics.
SPONSONS
Due to tight fit of the skin, the sponsons are under considerablepressure and some seepage of air may occur. It is advisable toperiodically reinflate the sponsons.
Feathercraft Khatsalano 5
KhatsEnglish_Coaming.xpr 2/8/06 4:14 PM Page 5
TO REPAIR/REPLACE SPONSON
The sponsons can be completely removed from the sleeve sewnto the inside of the skin. Turn the skin inside out. The sponsonchamber is open at bow and stern ends. Tie a long stringthrough the hole in the tab at each end of sponson. Pull spon-son through the center opening of the chamber (where sponsonhose is attached). To reinstall, pull the cord attached to the newsponson back through the chamber. Ensure sponson is nottwisted in the chamber. Urethane glue and patches are includedin the repair kit. Duct tape works well on the sponsons.
STORAGE
Once clean and dry, the kayak can be stored assembled or disassembled in a shaded, dry place. When storing the kayakdisassembled, take extension bars apart.
Feathercraft Khatsalano 6
KhatsEnglish_Coaming.xpr 2/8/06 4:14 PM Page 6

1. Bow End
2. Mid Bow
3. Bow Cockpit
Hatch rims
5. Mid Stern
4. Stern Cockpit
Horizontal leverwith foot track
6. Stern End
Keel Section(Note: Keel bar is bent)
Feathercraft Khatsalano 7
1 SET OUT FRAME PARTS AS ILLUSTRATED.
Skin
Calf Plates
Cockpit Rim Inserts
KhatsEnglish_Coaming.xpr 2/8/06 4:14 PM Page 7
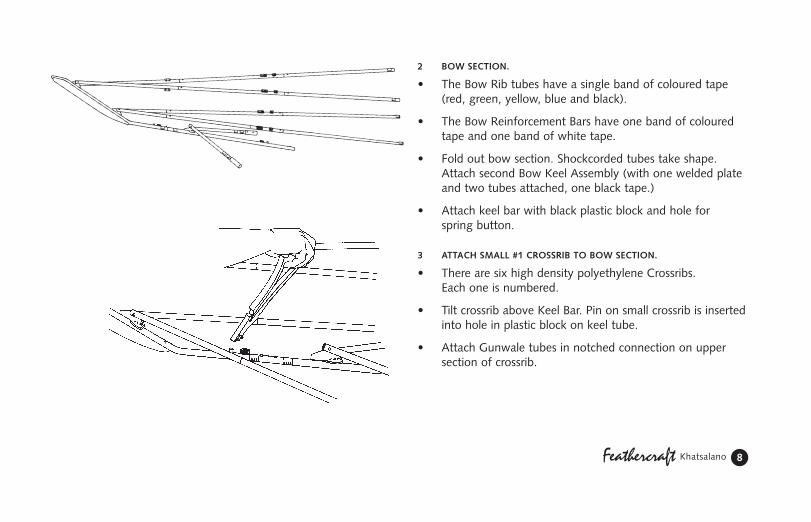
2 BOW SECTION.
• The Bow Rib tubes have a single band of coloured tape(red, green, yellow, blue and black).
• The Bow Reinforcement Bars have one band of colouredtape and one band of white tape.
• Fold out bow section. Shockcorded tubes take shape.Attach second Bow Keel Assembly (with one welded plateand two tubes attached, one black tape.)
• Attach keel bar with black plastic block and hole for spring button.
3 ATTACH SMALL #1 CROSSRIB TO BOW SECTION.
• There are six high density polyethylene Crossribs. Each one is numbered.
• Tilt crossrib above Keel Bar. Pin on small crossrib is insertedinto hole in plastic block on keel tube.
• Attach Gunwale tubes in notched connection on uppersection of crossrib.
Feathercraft Khatsalano 8
KhatsEnglish_Coaming.xpr 2/8/06 4:14 PM Page 8
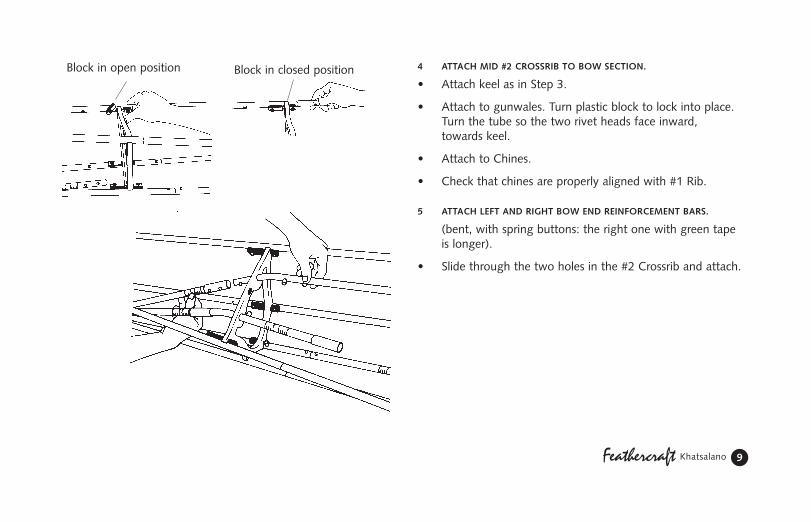
4 ATTACH MID #2 CROSSRIB TO BOW SECTION.
• Attach keel as in Step 3.
• Attach to gunwales. Turn plastic block to lock into place.Turn the tube so the two rivet heads face inward, towards keel.
• Attach to Chines.
• Check that chines are properly aligned with #1 Rib.
5 ATTACH LEFT AND RIGHT BOW END REINFORCEMENT BARS.
(bent, with spring buttons: the right one with green tapeis longer).
• Slide through the two holes in the #2 Crossrib and attach.
Feathercraft Khatsalano 9
Block in open position Block in closed position
KhatsEnglish_Coaming.xpr 2/8/06 4:14 PM Page 9

6 ASSEMBLE STERN SECTION.
• The Stern Rib tubes have two bands of coloured tape (red,green, yellow, blue).
• The Stern Reinforcement Bars have two bands of colouredtape and one band of white tape. The white tape of allReinforcement Bars is always oriented towards the bow ofthe kayak frame.
• Repeat Steps #2,#3,#4, and #5.
7 ROLL OUT SKIN.
• Slide Bow and Stern sections into skin. (Feathercraft labelis on the bow end).
• Ensure that the frame is centered in the skin!
• Attach the two velcro closures on the inside keel of thehull to keep the frame in place.
Feathercraft Khatsalano 10
Bow Stern
KhatsEnglish_Coaming.xpr 2/8/06 4:14 PM Page 10
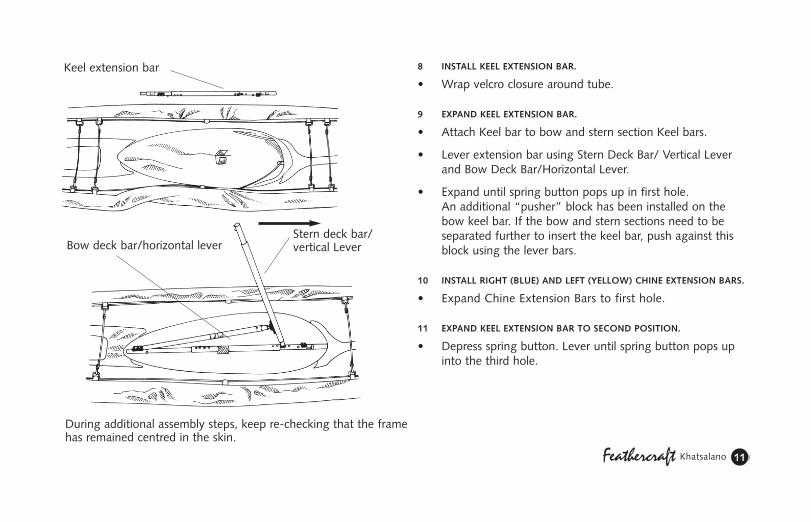
8 INSTALL KEEL EXTENSION BAR.
• Wrap velcro closure around tube.
9 EXPAND KEEL EXTENSION BAR.
• Attach Keel bar to bow and stern section Keel bars.
• Lever extension bar using Stern Deck Bar/ Vertical Leverand Bow Deck Bar/Horizontal Lever.
• Expand until spring button pops up in first hole. An additional “pusher” block has been installed on thebow keel bar. If the bow and stern sections need to beseparated further to insert the keel bar, push against thisblock using the lever bars.
10 INSTALL RIGHT (BLUE) AND LEFT (YELLOW) CHINE EXTENSION BARS.
• Expand Chine Extension Bars to first hole.
11 EXPAND KEEL EXTENSION BAR TO SECOND POSITION.
• Depress spring button. Lever until spring button pops upinto the third hole.
Keel extension bar
Bow deck bar/horizontal leverStern deck bar/vertical Lever
During additional assembly steps, keep re-checking that the framehas remained centred in the skin.
Feathercraft Khatsalano 11
KhatsEnglish_Coaming.xpr 2/8/06 4:14 PM Page 11
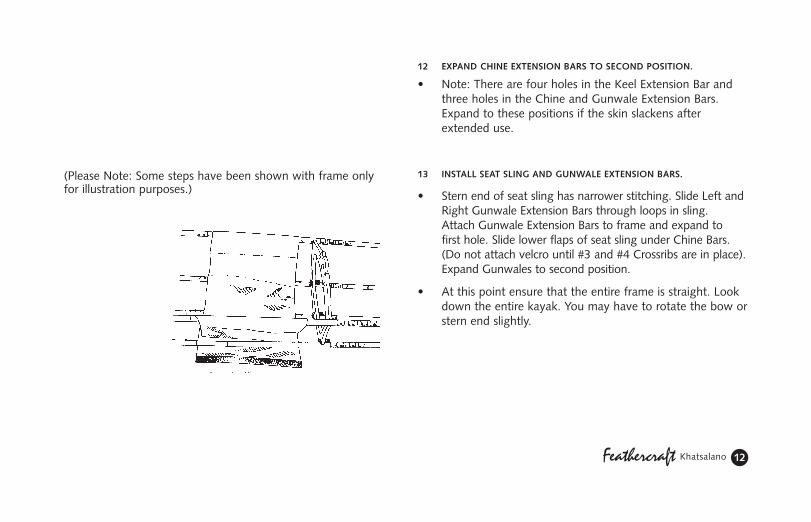
12 EXPAND CHINE EXTENSION BARS TO SECOND POSITION.
• Note: There are four holes in the Keel Extension Bar andthree holes in the Chine and Gunwale Extension Bars.Expand to these positions if the skin slackens after extended use.
13 INSTALL SEAT SLING AND GUNWALE EXTENSION BARS.
• Stern end of seat sling has narrower stitching. Slide Left andRight Gunwale Extension Bars through loops in sling. Attach Gunwale Extension Bars to frame and expand to first hole. Slide lower flaps of seat sling under Chine Bars. (Do not attach velcro until #3 and #4 Crossribs are in place).Expand Gunwales to second position.
• At this point ensure that the entire frame is straight. Lookdown the entire kayak. You may have to rotate the bow orstern end slightly.
Feathercraft Khatsalano 12
(Please Note: Some steps have been shown with frame onlyfor illustration purposes.)
KhatsEnglish_Coaming.xpr 2/8/06 4:14 PM Page 12

14 INSTALL #3 CROSSRIB.
• Place Crossrib directly above the keel and chine bars (forward of the seat sling) and push down.
• Tilt the Crossrib back towards the Stern and engage the twoGunwale bars.
• Straighten the crossrib and slide forward until it is near thespring buttons that protrude from the keel and chine extension bars.
• Rotate the keel and chine extension bars until the screwsthat protrude from the crossrib align with the holes in theblack plastic blocks.
Note: (The lever bar can be used to help rotate tubes.Insert pin into hole used when you extended the frame.Rotate to align.)
• Rotate the two gunwale extension bars until the black blocksattached to them face towards the middle of the cockpit.
• Depress one of the gunwale spring buttons and slide thecrossrib over it. Do the same with the chine and keel barsand then the other gunwale and chine bars.
CALF PLATES
• Install the plastic plate supports by wrapping Velcroaround Crossrib #3.
Feathercraft Khatsalano 13
Calf Plates
KhatsEnglish_Coaming.xpr 2/8/06 4:14 PM Page 13
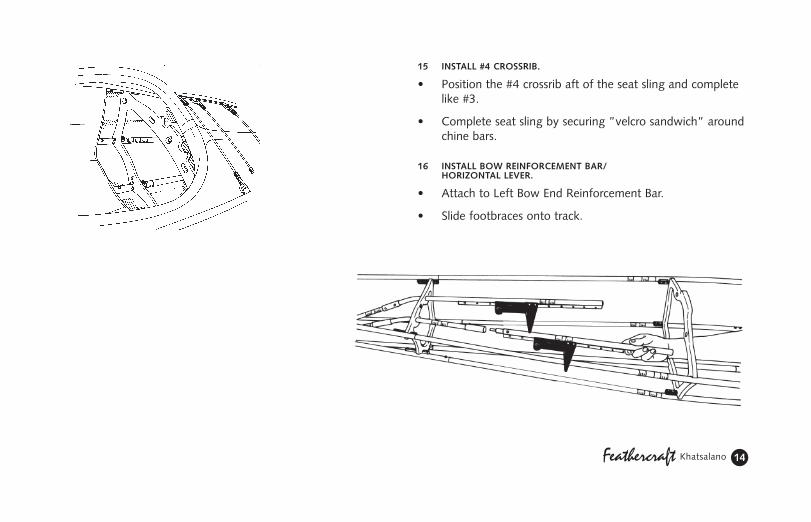
15 INSTALL #4 CROSSRIB.
• Position the #4 crossrib aft of the seat sling and completelike #3.
• Complete seat sling by securing ”velcro sandwich” aroundchine bars.
16 INSTALL BOW REINFORCEMENT BAR/ HORIZONTAL LEVER.
• Attach to Left Bow End Reinforcement Bar.
• Slide footbraces onto track.
Feathercraft Khatsalano 14
KhatsEnglish_Coaming.xpr 2/8/06 4:14 PM Page 14

17 INSTALL BOW COCKPIT REINFORCEMENT BARS.
• Slide the two bars from the cockpit through the large holesin the #3 Crossrib. Attach to the bow reinforcement bars.
18 INSTALL STERN COCKPIT REINFORCEMENT BARS.
• Slide the two bars from the cockpit through the large holesin the #4 crossrib. Attach to stern end reinforcement bars.
Feathercraft Khatsalano 15
KhatsEnglish_Coaming.xpr 2/8/06 4:14 PM Page 15

19 CONNECT THE COCKPIT REINFORCEMENT BARS.
• Slide the sleeve on the stern bars over the bow bars untilthe spring buttons pop up in the first holes.
• (The technique shown works best.)
20 INSTALL RIM INSERTS.
• Webbing strap wraps around gunwale and thigh brace.
Feathercraft Khatsalano 16
Stern
Rim Insert
Slide into pocket on underside of coaming rim
Gunwale BarThigh Brace
pull tightly
KhatsEnglish_Coaming.xpr 2/8/06 4:14 PM Page 16
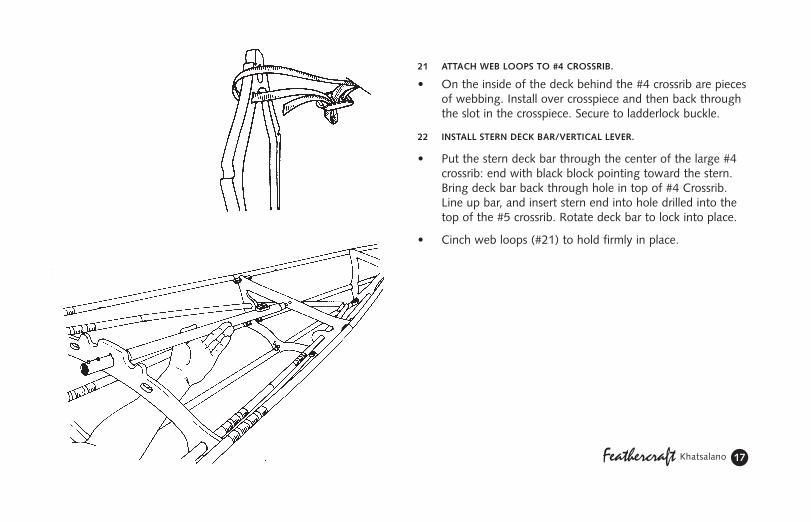
21 ATTACH WEB LOOPS TO #4 CROSSRIB.
• On the inside of the deck behind the #4 crossrib are piecesof webbing. Install over crosspiece and then back throughthe slot in the crosspiece. Secure to ladderlock buckle.
22 INSTALL STERN DECK BAR/VERTICAL LEVER.
• Put the stern deck bar through the center of the large #4crossrib: end with black block pointing toward the stern.Bring deck bar back through hole in top of #4 Crossrib.Line up bar, and insert stern end into hole drilled into thetop of the #5 crossrib. Rotate deck bar to lock into place.
• Cinch web loops (#21) to hold firmly in place.
Feathercraft Khatsalano 17
KhatsEnglish_Coaming.xpr 2/8/06 4:14 PM Page 17

23 ATTACH HATCH RIMS.
Place the small plastic bow hatch rim over the opening onthe bow deck, with the small end towards the bow. Rollthe fabric over the rim. Repeat with the larger stern hatch.
Note: Remove hatch rim when rolling up skin.
Feathercraft Khatsalano 18
KhatsEnglish_Coaming.xpr 2/8/06 4:14 PM Page 18
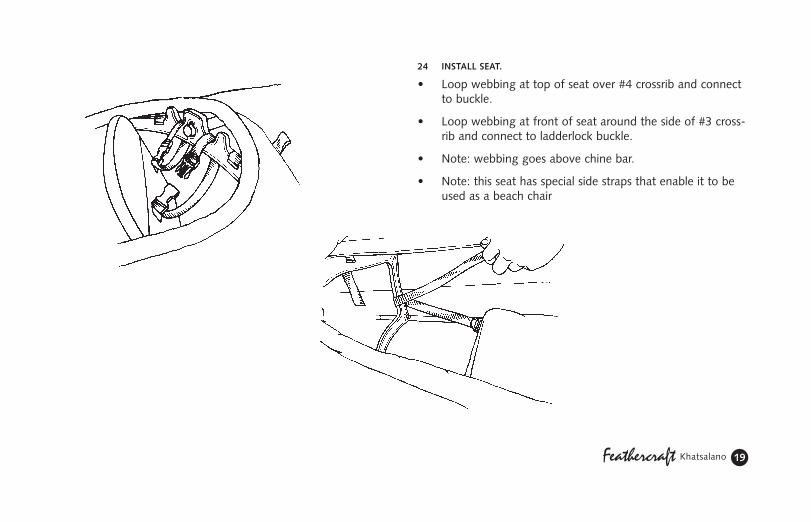
24 INSTALL SEAT.
• Loop webbing at top of seat over #4 crossrib and connectto buckle.
• Loop webbing at front of seat around the side of #3 cross-rib and connect to ladderlock buckle.
• Note: webbing goes above chine bar.
• Note: this seat has special side straps that enable it to beused as a beach chair
Feathercraft Khatsalano 19
KhatsEnglish_Coaming.xpr 2/8/06 4:14 PM Page 19
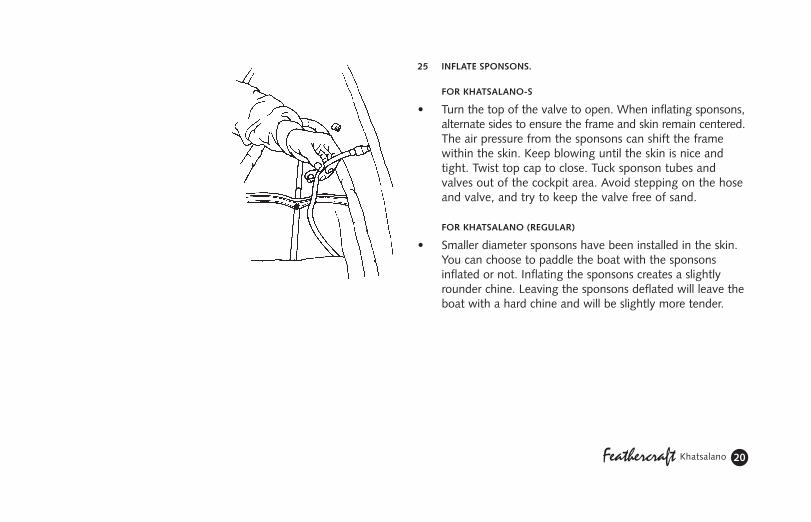
25 INFLATE SPONSONS.
FOR KHATSALANO-S
• Turn the top of the valve to open. When inflating sponsons,alternate sides to ensure the frame and skin remain centered.The air pressure from the sponsons can shift the framewithin the skin. Keep blowing until the skin is nice andtight. Twist top cap to close. Tuck sponson tubes andvalves out of the cockpit area. Avoid stepping on the hoseand valve, and try to keep the valve free of sand.
FOR KHATSALANO (REGULAR)
• Smaller diameter sponsons have been installed in the skin.You can choose to paddle the boat with the sponsonsinflated or not. Inflating the sponsons creates a slightlyrounder chine. Leaving the sponsons deflated will leave theboat with a hard chine and will be slightly more tender.
Feathercraft Khatsalano 20
KhatsEnglish_Coaming.xpr 2/8/06 4:14 PM Page 20

26 INFLATE FLOTATION BAGS.
• Insert the two end flotation bags through the bow andstern hatches and inflate. Always use these bags unless thebow and stern are filled with gear in water-proof bags.
• We recommend that you also insert and inflate the option-al mid bow and main stern flotation bags.
You can’t have too much flotation!
• Secure hatch cover.
Feathercraft Khatsalano 21
KhatsEnglish_Coaming.xpr 2/8/06 4:14 PM Page 21
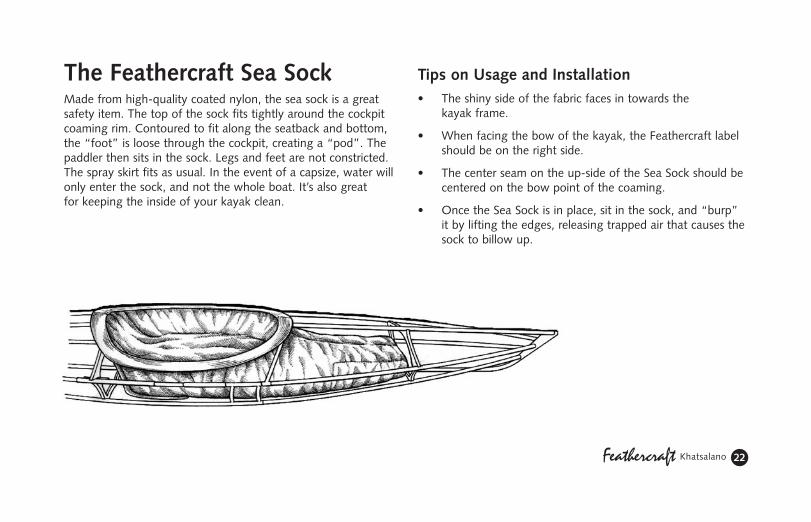
The Feathercraft Sea SockMade from high-quality coated nylon, the sea sock is a greatsafety item. The top of the sock fits tightly around the cockpitcoaming rim. Contoured to fit along the seatback and bottom,the “foot” is loose through the cockpit, creating a “pod”. Thepaddler then sits in the sock. Legs and feet are not constricted.The spray skirt fits as usual. In the event of a capsize, water willonly enter the sock, and not the whole boat. It’s also great for keeping the inside of your kayak clean.
Tips on Usage and Installation• The shiny side of the fabric faces in towards the
kayak frame.
• When facing the bow of the kayak, the Feathercraft labelshould be on the right side.
• The center seam on the up-side of the Sea Sock should becentered on the bow point of the coaming.
• Once the Sea Sock is in place, sit in the sock, and “burp”it by lifting the edges, releasing trapped air that causes thesock to billow up.
Feathercraft Khatsalano 22
KhatsEnglish_Coaming.xpr 2/8/06 4:14 PM Page 22
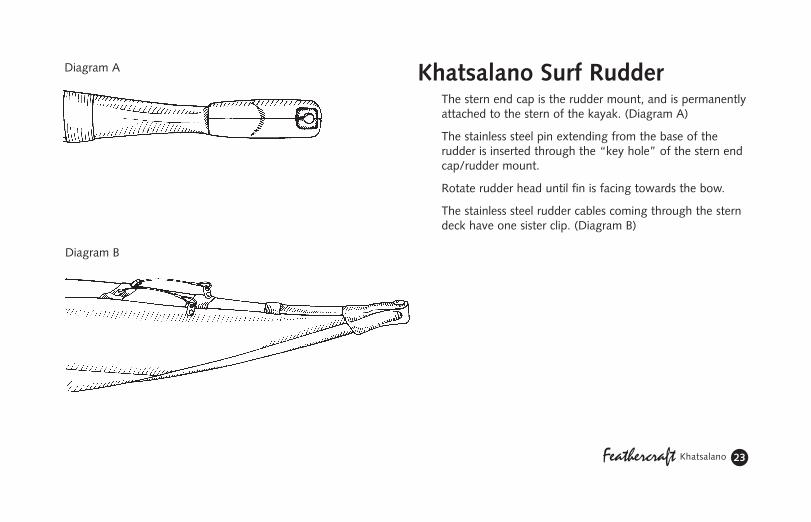
Khatsalano Surf RudderThe stern end cap is the rudder mount, and is permanentlyattached to the stern of the kayak. (Diagram A)
The stainless steel pin extending from the base of the rudder is inserted through the “key hole” of the stern endcap/rudder mount.
Rotate rudder head until fin is facing towards the bow.
The stainless steel rudder cables coming through the sterndeck have one sister clip. (Diagram B)
Feathercraft Khatsalano 23
Diagram A
Diagram B
KhatsEnglish_Coaming.xpr 2/8/06 4:14 PM Page 23
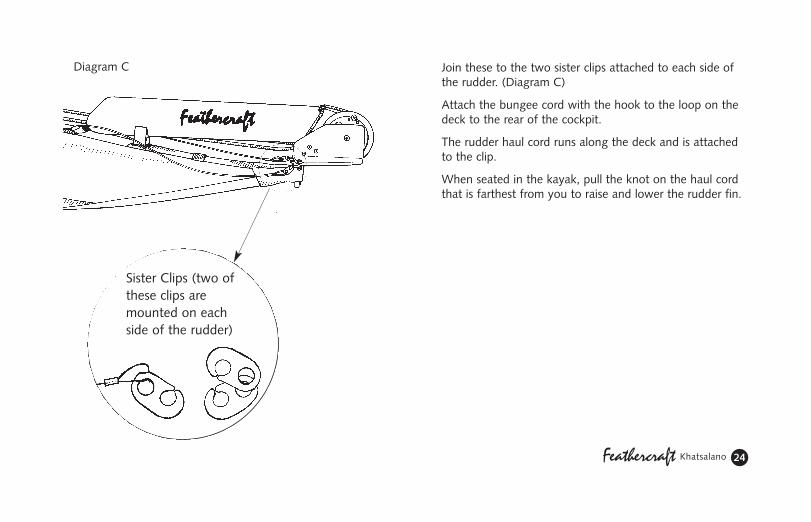
Join these to the two sister clips attached to each side ofthe rudder. (Diagram C)
Attach the bungee cord with the hook to the loop on thedeck to the rear of the cockpit.
The rudder haul cord runs along the deck and is attachedto the clip.
When seated in the kayak, pull the knot on the haul cordthat is farthest from you to raise and lower the rudder fin.
Feathercraft Khatsalano 24
Sister Clips (two ofthese clips aremounted on eachside of the rudder)
Diagram C
KhatsEnglish_Coaming.xpr 2/8/06 4:14 PM Page 24
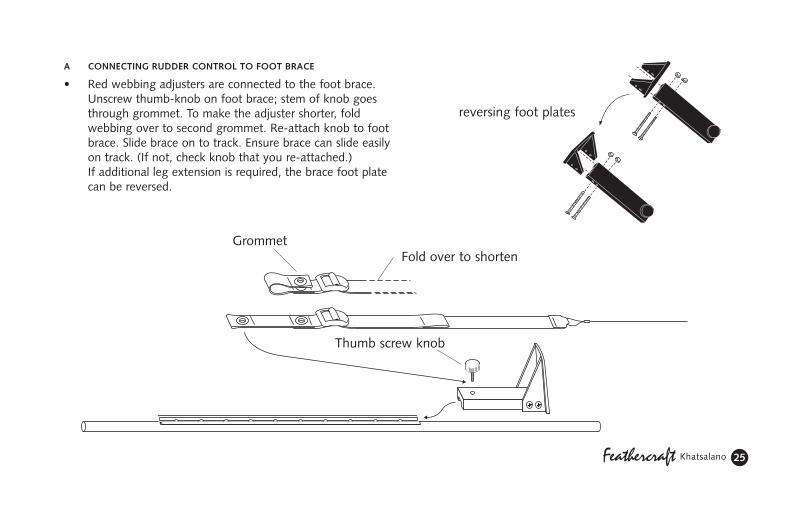
A CONNECTING RUDDER CONTROL TO FOOT BRACE
• Red webbing adjusters are connected to the foot brace.Unscrew thumb-knob on foot brace; stem of knob goesthrough grommet. To make the adjuster shorter, fold webbing over to second grommet. Re-attach knob to footbrace. Slide brace on to track. Ensure brace can slide easilyon track. (If not, check knob that you re-attached.) If additional leg extension is required, the brace foot platecan be reversed.
Feathercraft Khatsalano 25
GrommetFold over to shorten
Thumb screw knob
reversing foot plates
KhatsEnglish_Coaming.xpr 2/8/06 4:14 PM Page 25

B CONNECT CABLE ADJUSTER TO STAINLESS STEEL CABLE.
• This is to attach the adjuster if you have installed the rudder from a kit.
• Slide end of webbing through slider buckle. Thread thewebbing through the loop in the stainless steel ruddercable. Fold or “pinch” webbing to make a V. Re-threadwebbing through slider buckle.
C CABLE LENGTH ADJUSTMENT
• To shorten cable length, pull on tab of webbing with loop;to lengthen, lift tab of ladder-lock buckle.
Feathercraft Khatsalano 26
Slider buckle
Fold webbing tomake a V
Ladder-lock buckleTab with loop
KhatsEnglish_Coaming.xpr 2/8/06 4:14 PM Page 26
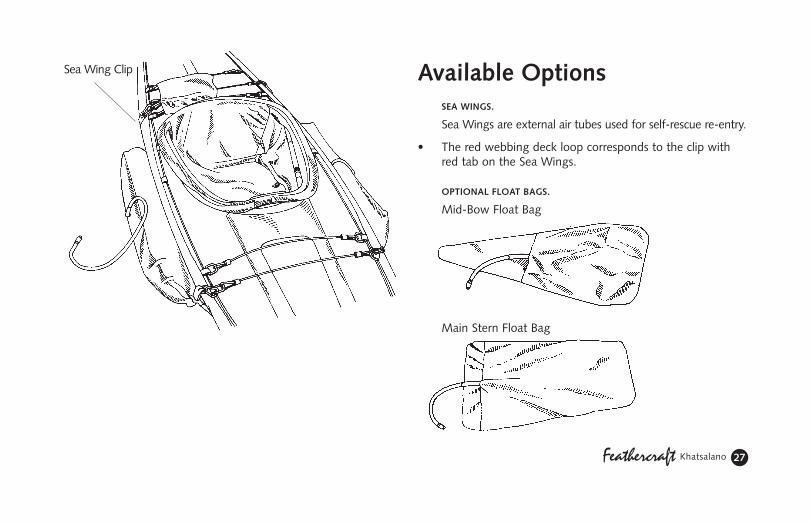
Available OptionsSEA WINGS.
Sea Wings are external air tubes used for self-rescue re-entry.
• The red webbing deck loop corresponds to the clip withred tab on the Sea Wings.
OPTIONAL FLOAT BAGS.
Mid-Bow Float Bag
Main Stern Float Bag
Feathercraft Khatsalano 27
Sea Wing Clip
KhatsEnglish_Coaming.xpr 2/8/06 4:14 PM Page 27
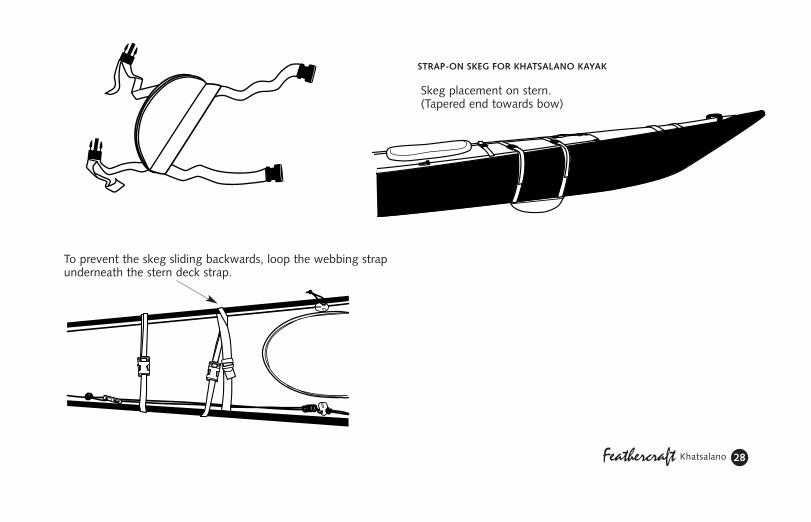
STRAP-ON SKEG FOR KHATSALANO KAYAK
Feathercraft Khatsalano 28
To prevent the skeg sliding backwards, loop the webbing strapunderneath the stern deck strap.
Skeg placement on stern.(Tapered end towards bow)
KhatsEnglish_Coaming.xpr 2/8/06 4:14 PM Page 28

DisassemblyTo disassemble, remove rim inserts and hatch rims.
Then reverse the order of the assembly steps. When takingdown the five extension bars, start with the two gunwale barsfirst, then the two chine bars, and finish with the keel extensionbar. To depress the spring buttons, the stainless steel pin oneither of the Lever Bars can be pushed against them. For thefinal Keel Extension Bar it is best to set up the Lever system asin Step #9 to release tension.
Folding the SkinPull out the hoses attached to the sponsons and open thevalves. Remove hatch rims. Fold the bow and stern endstowards the middle of the skin. Fold half of the skin over ontothe other half. Roll up the skin toward the mid point where thesponson hoses are located. This will ensure that air in the spon-sons is forced out. Close the valves on the sponson hoses andtie the skin. Roll up tight and snug.
Packing the kayak in the bag• Put the seat cushion in the bag first, with the cushion
facing down, to give padding for your back.
• Next arrange the white plastic crossribs and hatch rimsover the seat.
• Roll the kayak skin up tightly—fold the ends to the center of the kayak; fold in half; roll tightly; secure with webbing ties.
• Put the bow frame parts on one side of the bag, and thestern parts on the other.
• Place the folded skin between the frame parts.
• All the remaining tube frame parts are then placed overthe bow and stern section bundles.
• Place the flotation bags over the frame parts.
• Spread the sea sock over the frame parts to protect the tubes.
Feathercraft Khatsalano 29
KhatsEnglish_Coaming.xpr 2/8/06 4:14 PM Page 29

© Feathercraft Products Limited 1998Printed in Canada 12.2005Recycled paper
KhatsEnglish_Coaming.xpr 2/8/06 4:14 PM Page 30