Embed Size (px)
DESCRIPTION
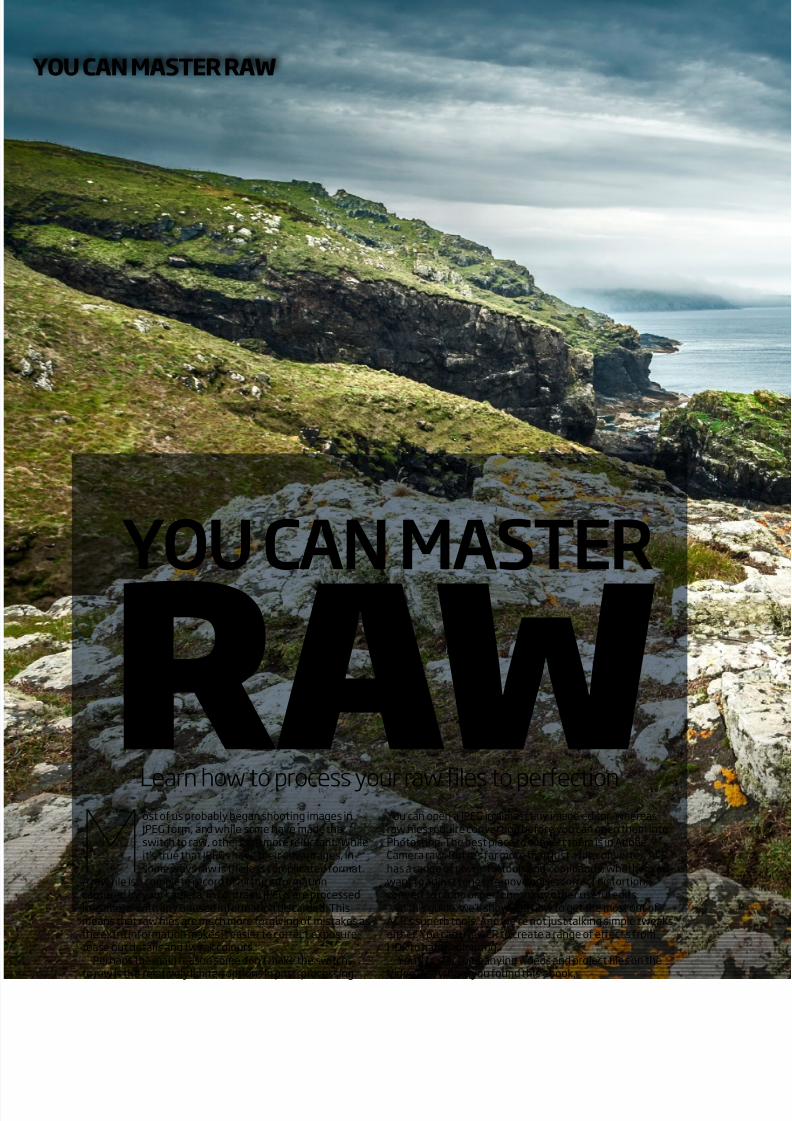
You can master RAW
Citation preview

7/17/2019 You can master RAW
http://slidepdf.com/reader/full/you-can-master-raw 1/17
RAW
YOU CAN MASTER
P R E S E N T S
7/17/2019 You can master RAW
http://slidepdf.com/reader/full/you-can-master-raw 2/17
ost of us probably began shooting images in JPEG form, and while some have made theswitch to raw, others are more reluctant. Whileit’s true that JPEGs have their advantages, insome ways raw is the less complicated format.
A raw file is a complete record of all the informationcaptured by your camera. In contrast, JPEGs are processedin-camera, with any unused information discarded. Thismeans that raw files are much more forgiving of mistakes asthe extra information makes it easier to correct exposure,tease out details and tweak colours.
Perhaps the main reason some don’t make the switchto raw is the relatively limited options in post-processing.
You can open a JPEG in almost any image editor, whereasraw files require converting before you can open them intoPhotoshop. The best place to convert them is in AdobeCamera raw. But it ’s far more than just a file converter. ACRhas a range of powerful tools and commands, whether youwant to adjust tones, remove noise, correct distortion,convert to mono or perform many other useful edits.
In this guide, we’ll show you how to get the most out ofACR’s superb tools. And we’re not just talking simple tweakseither. You can use ACR to create a range of effect s fromHDR to hand-colouring.
You’ll find accompanying videos and project files on theVideo Disc where you found this ebook.
Learn how to process your raw files to perfection
M
YOU CAN MASTER RAW
RAWYOU CAN MASTER
7/17/2019 You can master RAW
http://slidepdf.com/reader/full/you-can-master-raw 3/17
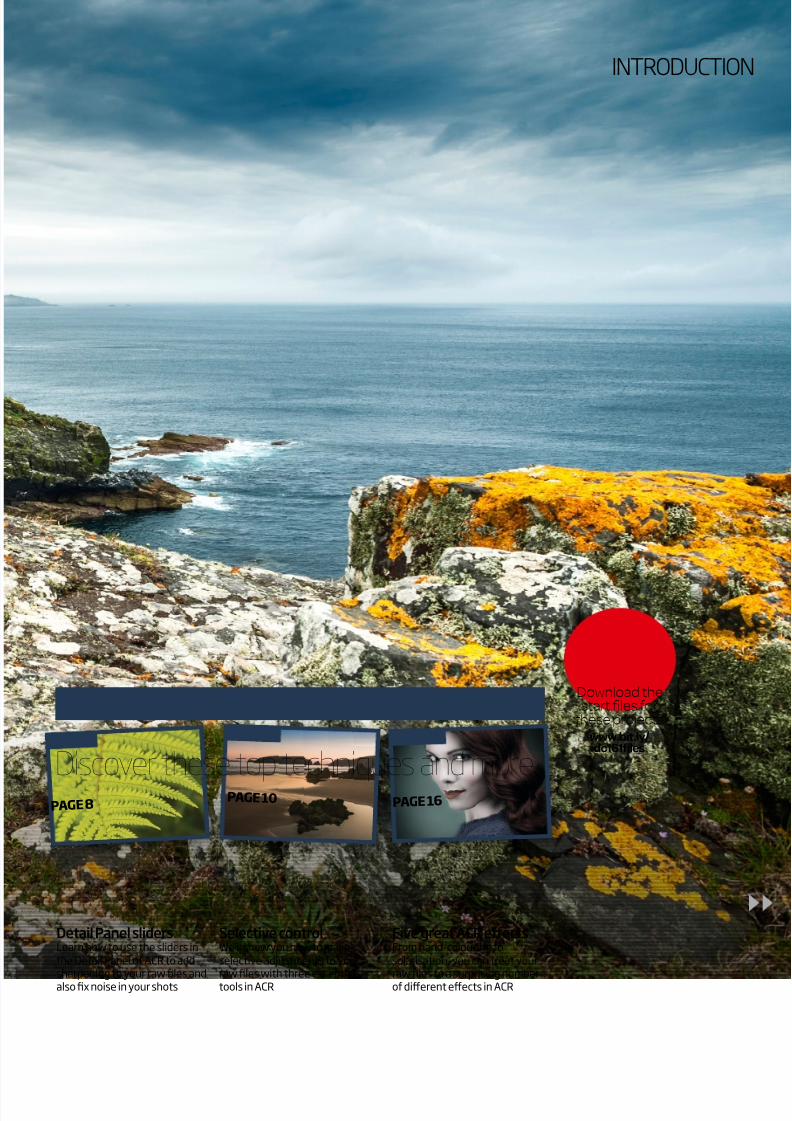
Detail Panel slidersLearn how to use the sliders inthe Detail Panel of ACR to addsharpening to your raw files andalso fix noise in your shots
Selective controlWe’ll show you how to makeselective adjustments to yourraw files with three essentialtools in ACR
Five great ACR effectsFrom hand-colouring tosolarisation, you can treat yourraw files to a surprising numberof different effects in ACR
PAGE 8PAGE 10 PAGE 16
Discover these top techniques and more...
INTRODUCTION
Download thestart files for
these projectswww.bit.ly / dc161files

7/17/2019 You can master RAW
http://slidepdf.com/reader/full/you-can-master-raw 4/17
Get familiar with the interface and tools youneed to improve your raw photos
CAMERA RAW INTERFACEACR has a simple layout. All of the main controlsand settings are on the right-hand side of thedisplay, with a toolbar along the top. You can
use these tools and settings to take advantageof a raw file’s greater range of tones and detail.Every move you make in ACR is reversible, soyou’re free to try out any combination ofsettings you like. You can close the image, thencome back to it later and all the settings remaineditable. And while Photoshop offers similartools, doing the job in ACR will ensure themaximum possible quality.
1 SELECT ALLIf you have multiple files open, click the
Select All button to make universal changesto the whole set. This is great for processingmultiple images. For example, to correct a
recurring sensor mark, open the set of images,click Select All, then simply remove the markin one image with the Spot Removal tool.
2 SYNCHRONISEIf you’ve made a series of adjustments
that you really like, and you want to apply
them to the rest of your image set, click theSynchronise button to apply them to the otherimages. You can choose exactly which settingsto include or omit from the synchronisation.
3
ZOOM AND HAND TOOLSYou can use these tools to zoom in and out,
and pan around your image, or alternatively,you can use the trusty keyboard shortcutsCtrl/Cmd and + or - to zoom in or out, and theSpace Bar to pan. Double-click the Zoom tool tozoom to 100%, and double-click the Hand toolto pull back to full-screen.
4
THE TARGETEDADJUSTMENT TOOL
This powerful tool enables you to target andadjust particular tones and colours in yourimage simply by dragging left or right overthem. Click and hold over the tool to choosefrom Parametric Curve, Hue, Saturation,Luminosity or Grayscale Mix.
5
CROP TOOLClick and hold the Crop tool to choose from
a handy list of crop ratios such as 1 to 1 and 2 to3. Nothing is irreversible in ACR, so if youchange your mind about a crop, click back onthe tool to re-adjust it.
6
SPOT REMOVAL TOOLFix small marks and blemishes with the
Spot Removal tool. It’s useful for removing arecurring sensor mark from a batch of images,but for most ordinary t asks the Healing Brushand Clone Stamp tools in Photoshop offer moreflexibility.
7
ADJUSTMENT BRUSH ANDGRADUATED FILTER
Two of the most powerful tools in ACR, theAdjustment Brush and Graduated Filter enableyou to make selective adjustments to colours,tones and detail across your image. TheGraduated Filter is especially useful forimproving dull, flat skies.
8
SAVE IMAGESThis is really more like a ‘Save As’
command. Click the button to access yoursaving options. It’s great if you need to batchrename files, save a set of raw files as JPEGs, orconvert a manufacturer’s raw file (such asNikon’s NEF) to Adobe’s DNG format.
9
WORKFLOW OPTIONSClick here to access output options such as
Bit Depth. Choosing 16 Bit s/Channel willensure the image has the maximum number ofcolours when you open it in Photoshop (somany, in fact, that your monitor and printer are
VERSIONS OF ACRACR is regularly updated with newdata and tweaks to the settings, somake sure you keep Photoshop up todate (Help>Updates). Your version ofCamera raw will depend on your copyof Photoshop. For example, if you haveCS5 you will have version 6.7, whereasCS6 owners can use version 7.1. Some
of the slider names have been changed,but the majority of the features remainthe same in all versions. Elements userscan also edit their raw files in the ACRplug-in, but the Elements version ismore basic, with access to three panels:Basic, Detail and Camera Calibration.A few tools are also missing, including
the Adjustment Brush. It’sstill a powerful plug-in (theBasic panel alone makes itan essential step in yourworkflow) but you’ll have toenter the main interface formore advanced adjustments.
3
8
54
1
2
YOU CAN MASTER RAW

7/17/2019 You can master RAW
http://slidepdf.com/reader/full/you-can-master-raw 5/17
incapable of displaying them all). But it will alsolimit your image-editing options. Selecting 8Bits/Channel will give you fewer colours, butmore options. You can also alter the bit depthin the main editor interface.
10
HISTOGRAMThe histogram displays the image’s
tonal range from shadows on the left, tohighlights on the right. The height of the graphat any point indicates the number of pixelswith a certain brightness value. For mostimages, a healthy histogram should taper off atboth ends. If it intersects the side of the box, it
means areas of the image are lack ing detail,having been clipped to pure black or white.If this is the case, you may be able to r ecoverdetail using the sliders in the Basic Panel.
11
CLIPPING WARNINGSYou can toggle flashing clipping
warnings on or off by pressing U for shadows(think under-exposed) and O for highlights(think over-exposed). Alternatively, hold downAlt while dragging the Exposure, Shadows,Highlights, Whites or Blacks sliders in the BasicPanel to see the clipped pixels overlaid on theimage as you adjust the settings.
12
SLIDERSMost panels display a set of sliders. You
can double-click a slider to reset it, so you canget a handy before and after by holding yourmouse still over a point on the slider thenalternating between a single and double-click.
13
OPEN IMAGEClick this button to open the file into
Photoshop, or hold down Shift and click toopen the image as a Smart Object, whichenables you to go back and edit the file in ACRby clicking the Smart Object ’s thumbnailin Photoshop’s Layers Panel.
106
9
12
11
13
7
THE CAMERA RAW INTERFACE
7/17/2019 You can master RAW
http://slidepdf.com/reader/full/you-can-master-raw 6/17
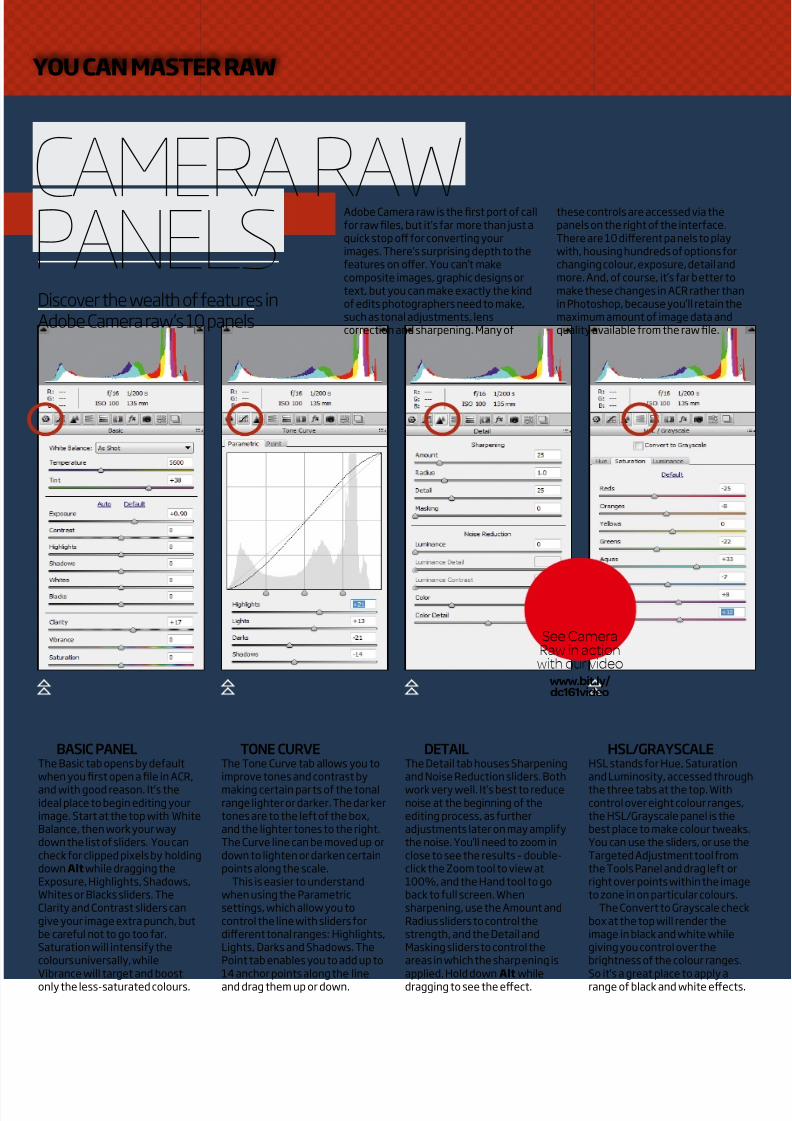
Discover the wealth of features inAdobe Camera raw’s 10 panels
CAMERA RAWPANELSAdobe Camera raw is the first port of callfor raw files, but it’s far more than just aquick stop off for converting yourimages. There’s surprising depth to thefeatures on offer. You can’t makecomposite images, graphic designs ortext, but you can make exactly the kindof edits photographers need to make,such as tonal adjustments, lenscorrection and sharpening. Many of
these controls are accessed via thepanels on the right of the interface.There are 10 different panels to playwith, housing hundreds of options forchanging colour, exposure, detail andmore. And, of course, it’s far better tomake these changes in ACR rather thanin Photoshop, because you’ll retain themaximum amount of image data andquality available from the raw file.
BASIC PANELThe Basic tab opens by defaultwhen you first open a file in ACR,
and with good reason. It’s theideal place to begin editing yourimage. Start at the top with WhiteBalance, then work your waydown the list of sliders. You cancheck for clipped pixels by holdingdown Alt while dragging theExposure, Highlights, Shadows,Whites or Blacks sliders. TheClarity and Contrast sliders cangive your image extra punch, butbe careful not to go too far.Saturation will intensify thecolours universally, whileVibrance will target and boostonly the less-saturated colours.
TONE CURVEThe Tone Curve tab allows you toimprove tones and contrast by
making certain par ts of the tonalrange lighter or darker. The dar kertones are to the left of the box,and the lighter tones to the right.The Curve line can be moved up ordown to lighten or darken certainpoints along the scale.
This is easier to understandwhen using the Parametricsettings, which allow you tocontrol the line with sliders fordifferent tonal ranges: Highlights,Lights, Darks and Shadows. ThePoint tab enables you to add up to14 anchor points along the lineand drag them up or down.
DETAILThe Detail tab houses Sharpeningand Noise Reduction sliders. Both
work very well. It’s best to reducenoise at the beginning of theediting process, as furtheradjustments later on may amplifythe noise. You’ll need to zoom inclose to see the results – double-click the Zoom tool to view at100%, and the Hand tool to goback to full screen. Whensharpening, use the Amount andRadius sliders to control thestrength, and the Detail andMasking sliders to control theareas in which the sharpening isapplied. Hold down Alt whiledragging to see the effect.
HSL/GRAYSCALEHSL stands for Hue, Saturationand Luminosity, accessed through
the three tabs at the top. Withcontrol over eight colour ranges,the HSL/Grayscale panel is thebest place to make colour tweaks.You can use the sliders, or use theTargeted Adjustment tool fromthe Tools Panel and drag left orright over points within the imageto zone in on particular colours.
The Convert to Grayscale checkbox at the top will render theimage in black and white whilegiving you control over thebrightness of the colour ranges.So it’s a great place to apply arange of black and white effects.
YOU CAN MASTER RAW
See CameraRaw in action
with our videowww.bit.ly / dc161video
7/17/2019 You can master RAW
http://slidepdf.com/reader/full/you-can-master-raw 7/17
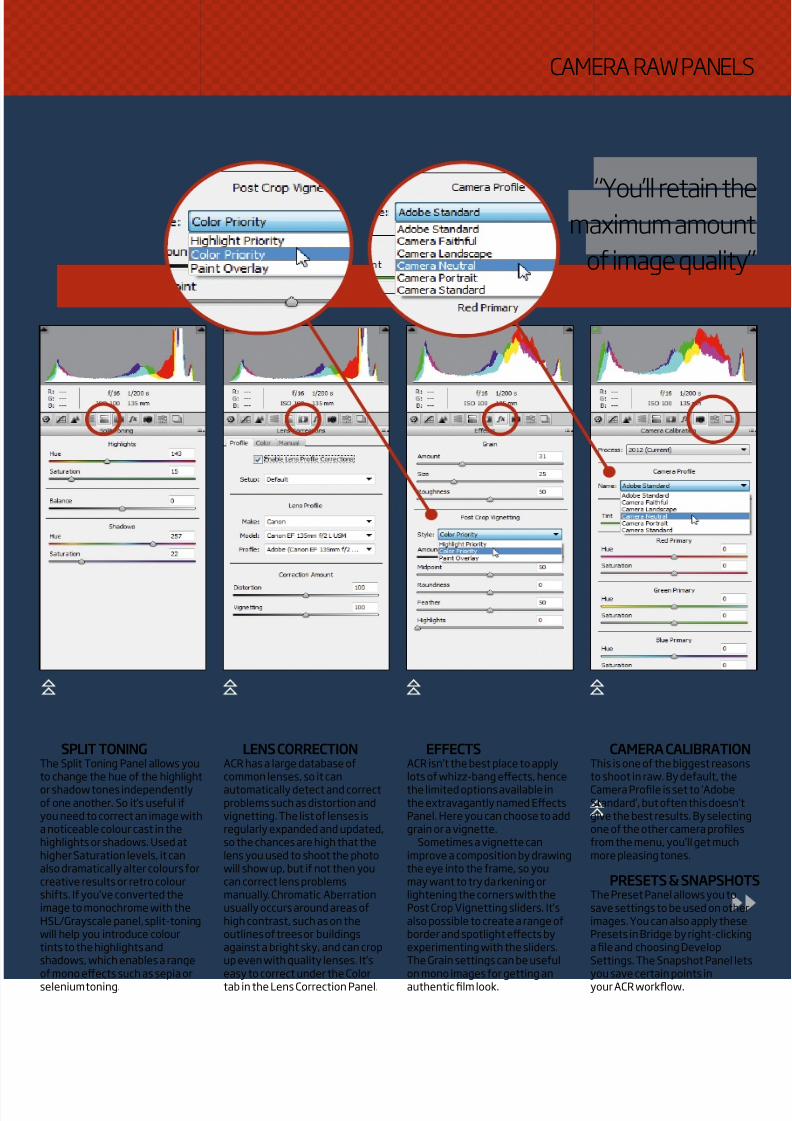
SPLIT TONINGThe Split Toning Panel allows youto change the hue of the highlight
or shadow tones independentlyof one another. So it’s useful ifyou need to correct an image witha noticeable colour cast in thehighlights or shadows. Used athigher Saturation levels, it canalso dramatically alter colours forcreative results or retro colourshifts. If you’ve converted theimage to monochrome with theHSL/Grayscale panel, split-toningwill help you introduce colourtints to the highlights andshadows, which enables a rangeof mono effects such as sepia orselenium toning.
LENS CORRECTIONACR has a large database ofcommon lenses, so it can
automatically detect and correctproblems such as distortion andvignetting. The list of lenses isregularly expanded and updated,so the chances are high that thelens you used to shoot the photowill show up, but if not then youcan correct lens problemsmanually. Chromatic Aberrationusually occurs around areas ofhigh contrast, such as on theoutlines of trees or buildingsagainst a bright sky, and can cropup even with quality lenses. It’seasy to correct under the Colortab in the Lens Correction Panel.
EFFECTSACR isn’t the best place to applylots of whizz-bang effects, hence
the limited options available inthe extravagantly named EffectsPanel. Here you can choose to addgrain or a vignette.
Sometimes a vignette canimprove a composition by drawingthe eye into the frame, so youmay want to try darkening orlightening the corners with thePost Crop Vignetting sliders. It’salso possible to create a range ofborder and spotlight effects byexperimenting with the sliders.The Grain settings can be usefulon mono images for getting anauthentic film look.
CAMERA CALIBRATIONThis is one of the biggest reasonsto shoot in raw. By default, the
Camera Profile is set to ‘AdobeStandard’, but often this doesn’tgive the best results. By selectingone of the other camera profilesfrom the menu, you’ll get muchmore pleasing tones.
PRESETS & SNAPSHOTSThe Preset Panel allows you tosave settings to be used on otherimages. You can also apply thesePresets in Bridge by right-clickinga file and choosing DevelopSettings. The Snapshot Panel letsyou save certain points inyour ACR workflow.
“You’ll retain themaximum amount
of image quality”
CAMERA RAW PANELS

7/17/2019 You can master RAW
http://slidepdf.com/reader/full/you-can-master-raw 8/17
Sharpening your raw filesSharpening is an essential step in the image-editing
process, particularly when working with raw files, whichare usually softer than JPEGs – due to JPEGs beingsharpened in-camera. There are two types of sharpening:Capture and Output. In ACR, we apply initial Capturesharpening to fix an inherent softness in most digitalimages. Output sharpening is usually done at the end,before making a print or pr esenting on-screen, so it’s bestcarried out in Photoshop.
Sharpening works by increasing contrast around edgeswhere lighter tones meet darker tones. At the edge, thelight tones will be lightened, and the shadow tones will bedarkened. To the eye, this makes the edge crisper. But pushit too far and you begin to see edge halos.
Most images will benefit from a certain amount ofsharpening. But how much?
In general, images with fine detail such as landscapesrequire less sharpening than images with soft detail, suchas portraits. So for por traits, a typical setting would beAmount 35, Radius 1.2, Detail 20, Masking 70. Forlandscapes, try Amount 40, Radius 0.8, Detail 50, Masking0. Of course, these settings are just a starting point. Thelevel of sharpening required will depend on your subjectmatter and the camera resolution.
Find out exactly what each slider in theDetail Panel does, and when to use them
SHARPENING ANDNOISE REDUCTION
AmountControls the strength of the sharpeningeffect. View the image at 100% when
judging the amount. Double-click the Zoomtool to jump to 100%.
DetailLow Detail settings restrict sharpening to themore obvious edges. High settings willenhance finer details and texture.
RadiusDetermines the number of pixels aroundthe edge in which the sharpening effect isapplied. A larger radius increases the chanceof unwanted halos.
MaskingAllows you to restrict sharpening in lessdetailed areas of the image. Hold downAlt while dragging the slider to see themasked areas in black.
BEFORE
AFTER
YOU CAN MASTER RAW

7/17/2019 You can master RAW
http://slidepdf.com/reader/full/you-can-master-raw 9/17
Fixing noiseIf you’re shooting atISO 100 then noise isn’ta problem for moderndigital sensors, but if youhave to push ISO to 400or higher, or use a longexposure, then it’s likelyyou’ll begin to see more and more noise in your images. Theforest scene here was shot at ISO 3,200, so the noise isvery visible, particularly in the shadow areas.
A bit of noise isn’t necessarily a bad thing; it can add
atmosphere to landscapes or create a gritty documentar y-style effect. But large levels of noise can spoil a shot.
Fortunately, ACR has a range of excellent sliders thatcombat noise. The main tools for noise reduction in ACR arethe Luminance and Color sliders. Luminance reduces grainand blotchy dots, w hile Color reduces unsightly spots ofrandom colour. The trade-off to noise reduction can beslight blurring and loss of detail, so you’ll need to decidewhether to accept the noise, or attempt to correct it.
Sharpening and noise reduction are two sides of thesame coin, so if you sharpen a noisy image it ’s likely thatyou’ll increase the visibility of the noise. You’ll need tostrike the right balance between sharpening and noisereduction by experimenting with different sharpeningamount and luminance settings. Toggle the Preview box onand off to judge the results.
Luminance DetailHigher luminance detail values can help topreserve details, but may increase noise.Lower values will give cleaner results butdecrease image detail and texture.
ColorTargets and removes specks of colour noise.You can be more aggressive with Colorthan Luminance, as it doesn’t affect detailsin the same way.
Luminance ContrastA higher setting will increase contrast butcan give blotchy results. Lower values willsmooth details.
Color DetailHigher values preserve colour in edge detailbut can lead to unnatural colour spots.Lower settings help to remove spots butcan result in bleeding colours.
LuminanceThe primary slider for noise reduction. Usethis to reduce the effects of monochromaticnoise, most often seen in shadows and areasof even tone.
BEFORE
AFTER
SHARPENING AND NOISE REDUCTION
7/17/2019 You can master RAW
http://slidepdf.com/reader/full/you-can-master-raw 10/17
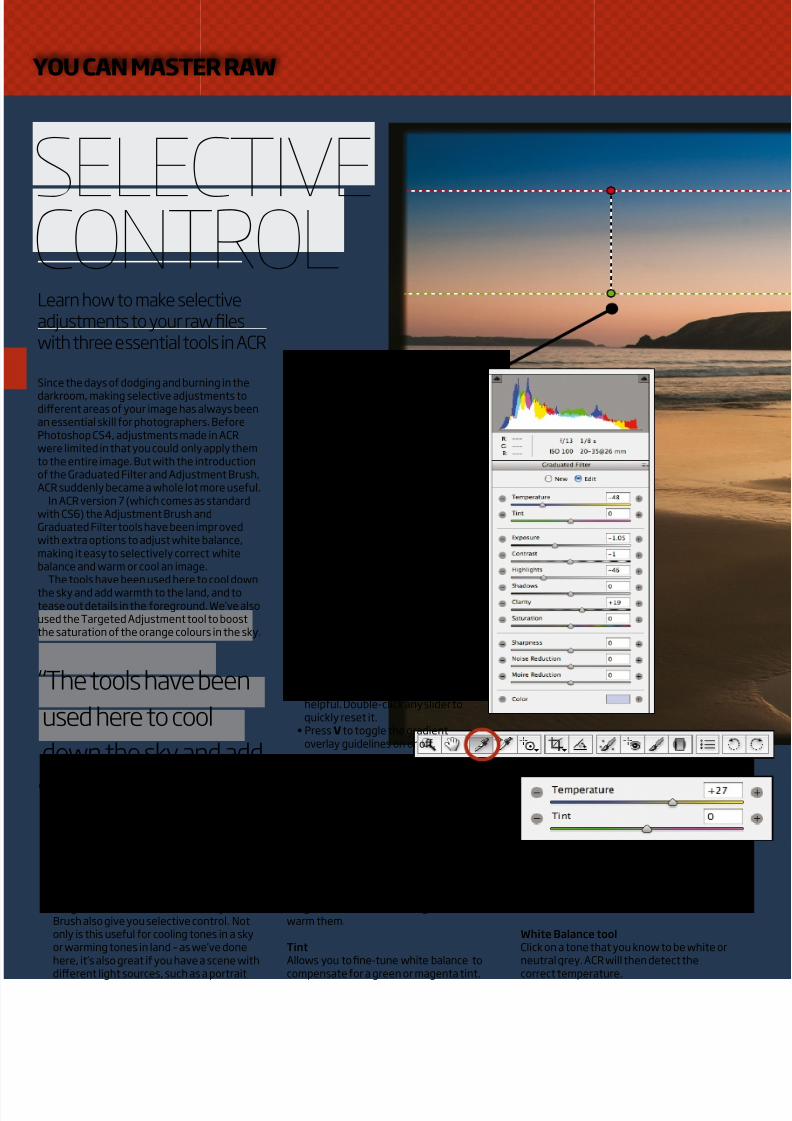
Since the days of dodging and burning in the
darkroom, making selective adjustments todifferent areas of your image has always beenan essential skill for photographers. BeforePhotoshop CS4, adjustments made in ACRwere limited in that you could only apply themto the entire image. But with the introductionof the Graduated Filter and Adjustment Brush,ACR suddenly became a whole lot more useful.
In ACR version 7 (which comes as standardwith CS6) the Adjustment Brush andGraduated Filter tools have been impr ovedwith extra options to adjust white balance,making it easy to selectively correct whitebalance and warm or cool an image.
The tools have been used here to cool down
the sky and add warmth to the land, and totease out details in the foreground. We’ve alsoused the Targeted Adjustment tool to boostthe saturation of the orange colours in the sky.
Learn how to make selectiveadjustments to your raw fileswith three essential tools in ACR
SELECTIVECONTROL
“The tools have been
used here to cool
down the sky and add
warmth to the land ”
YOU CAN MASTER RAW
WHITE BALANCEACR is the best place to correct white balancefor realistic-looking colours. But as well asadjusting white balance over the wholeimage, the Graduated Filter and AdjustmentBrush also give you selective control. Notonly is this useful for cooling tones in a skyor warming tones in land – as we’ve donehere, it’s also great if you have a scene withdifferent light sources, such as a portrait
captured with a mix of daylight andtungsten lighting.
White Balance controlsTemperatureDrag left to cool tones and r ight towarm them.
TintAllows you to fine-tune white balance tocompensate for a green or magenta tint.
White Balance toolClick on a tone that you know to be white orneutral grey. ACR will then detect thecorrect temperature.
GRADUATED FILTERThe Graduated Filter lets you plot agradient over an area then changethe tones. As well as alteringexposure, you can also makeuseful tweaks to things like whitebalance, sharpness and coloursaturation. What’s more, you canset more than one gradient, whichmakes it easy to change differentareas or create a retro film-styleborder as we’ve done here.
Graduated Filter tips• Hold Shift while dragging agradient to keep it perfectlyhorizontal, vertical or at a45-degree angle.
• Click a gradient to alter any setting,or press Delete to remove it.
• The tool remembers the last-usedsettings, which isn’t alwayshelpful. Double-click any slider toquickly reset it.
• Press V to toggle the gradientoverlay guidelines on or off.
7/17/2019 You can master RAW
http://slidepdf.com/reader/full/you-can-master-raw 11/17
SELECTIVE CONTROL
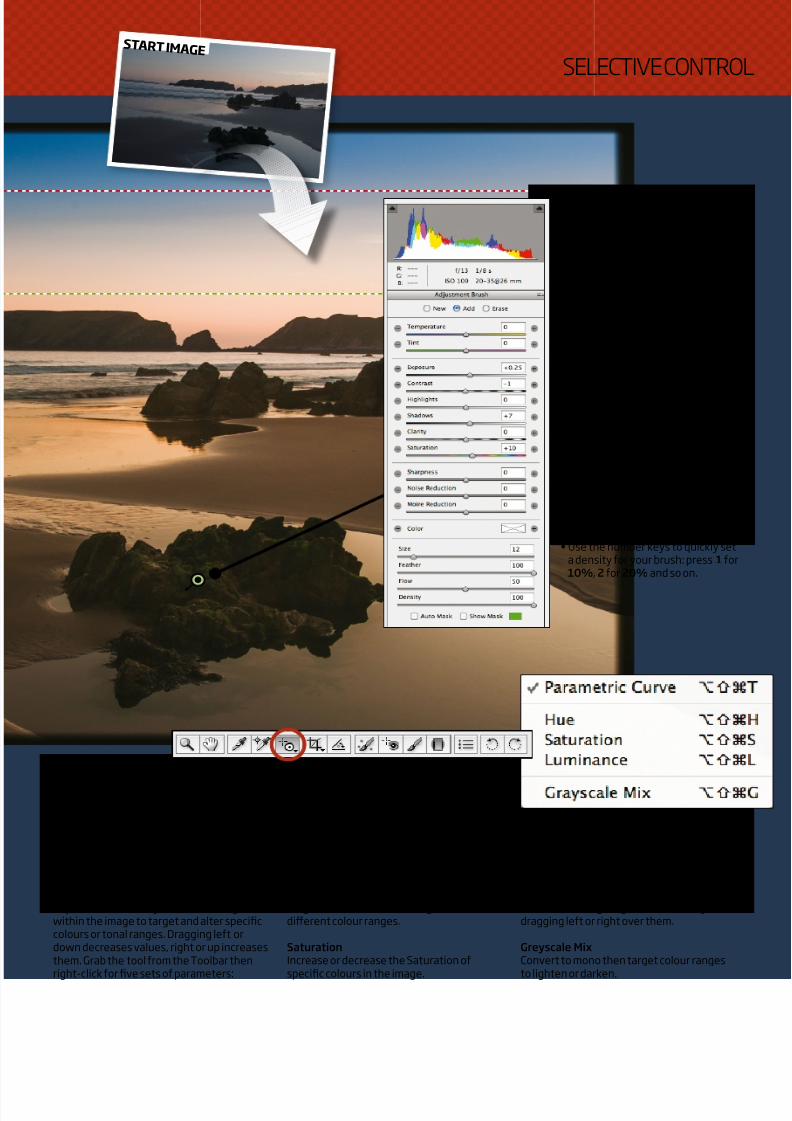
TARGETED ADJUSTMENTSACR’s sliders aren’t the only method foradjusting tones. If you prefer interactivecontrol, there is an alternative. The TargetedAdjustment tool lets you click and dragwithin the image to target and alter specificcolours or tonal ranges. Dragging left ordown decreases values, right or up increasesthem. Grab the tool from the Toolbar thenright-click for five sets of parameters:
Parametric CurveDrag to lighten or darken Highlights, Lights,Darks, or Shadows.
HueTarget and alter the Hue of eightdifferent colour ranges.
SaturationIncrease or decrease the Saturation ofspecific colours in the image.
LuminanceMake colour ranges lighter or darker bydragging left or right over them.
Greyscale MixConvert to mono then target colour rangesto lighten or darken.
ADJUSTMENT BRUSHThe Adjustment Brush is perhaps themost powerful tool in ACR. Use it toselectively alter areas of an image.It behaves in much the same way asthe Graduated Filter (note that thetonal settings for each are identical).Except rather than plot a gradient,you paint a mask. Each mask isrepresented by a pin. These pinsand their masks can be added to,altered, or deleted.
Adjustment Brush tips• Tick New to start painting a
fresh mask, Add to continuepainting a mask, and Erase toremove parts of it.
• Press Y to toggle the visibility ofthe selected mask overlay.
• Tick Auto Mask for automatedassistance when painting a mask.The tool will snap onto edges, linesand shapes.
• Use the number keys to quickly seta density for your brush: press 1 for 10%, 2 for 20% and so on.
ST ART IMAGE
7/17/2019 You can master RAW
http://slidepdf.com/reader/full/you-can-master-raw 12/17
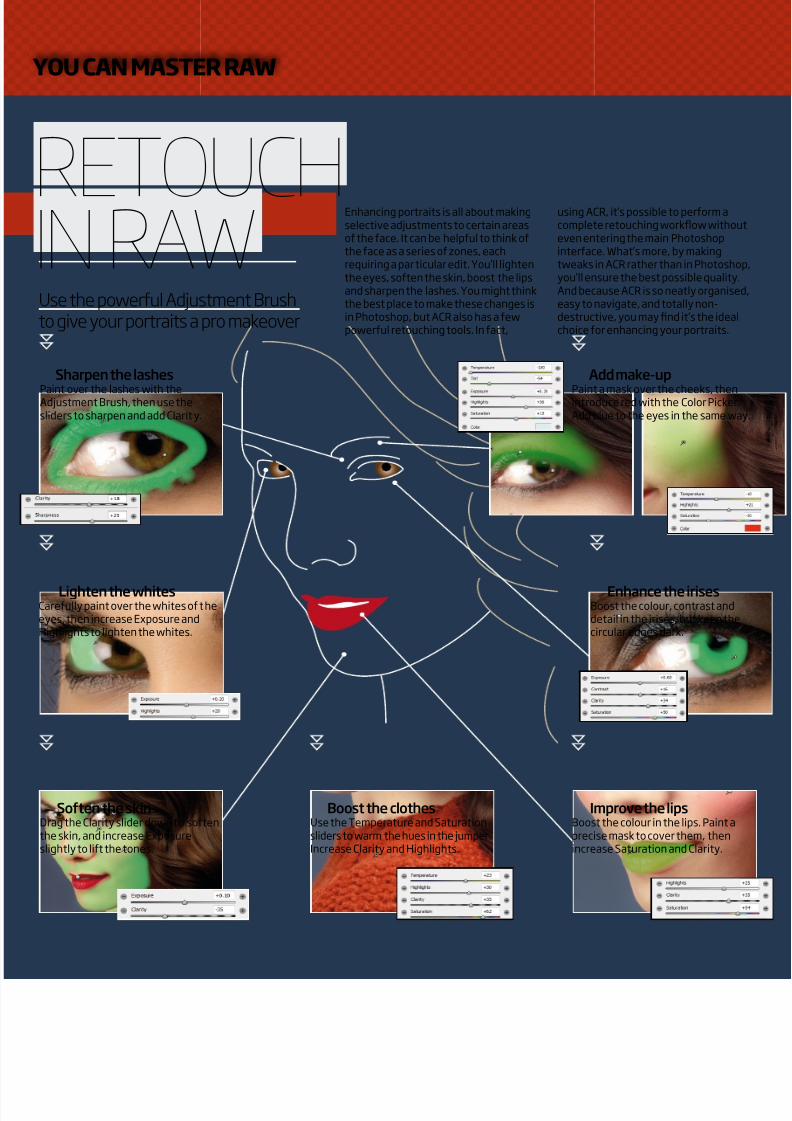
Enhance the irisesBoost the colour, contrast anddetail in the irises, but keep thecircular edges dark.
Enhancing portraits is all about makingselective adjustments to certain areasof the face. It can be helpful to think ofthe face as a series of zones, eachrequiring a par ticular edit. You’ll lightenthe eyes, soften the skin, boost the lipsand sharpen the lashes. You might thinkthe best place to make these changes isin Photoshop, but ACR also has a fewpowerful retouching tools. In fact,
using ACR, it’s possible to perform acomplete retouching workflow withouteven entering the main Photoshopinterface. What’s more, by makingtweaks in ACR rather than in Photoshop,you’ll ensure the best possible quality.And because ACR is so neatly organised,easy to navigate, and totally non-destructive, you may find it’s the idealchoice for enhancing your portraits.
Use the powerful Adjustment Brushto give your portraits a pro makeover
RETOUCHIN RAW
Sharpen the lashes
Soften the skin Boost the clothes
Add make-up
Lighten the whites
Improve the lips
Paint over the lashes with theAdjustment Brush, then use thesliders to sharpen and add Clarit y.
Drag the Clarity slider down to softenthe skin, and increase Exposureslightly to lift the tones.
Use the Temperature and Saturationsliders to warm the hues in the jumper.Increase Clarity and Highlights.
Paint a mask over the cheeks, thenintroduce red with the Color Picker.Add blue to the eyes in the same way.
Carefully paint over the whites of t heeyes, then increase Exposure andHighlights to lighten the whites.
Boost the colour in the lips. Paint aprecise mask to cover them, thenincrease Saturation and Clarity.
YOU CAN MASTER RAW
7/17/2019 You can master RAW
http://slidepdf.com/reader/full/you-can-master-raw 13/17
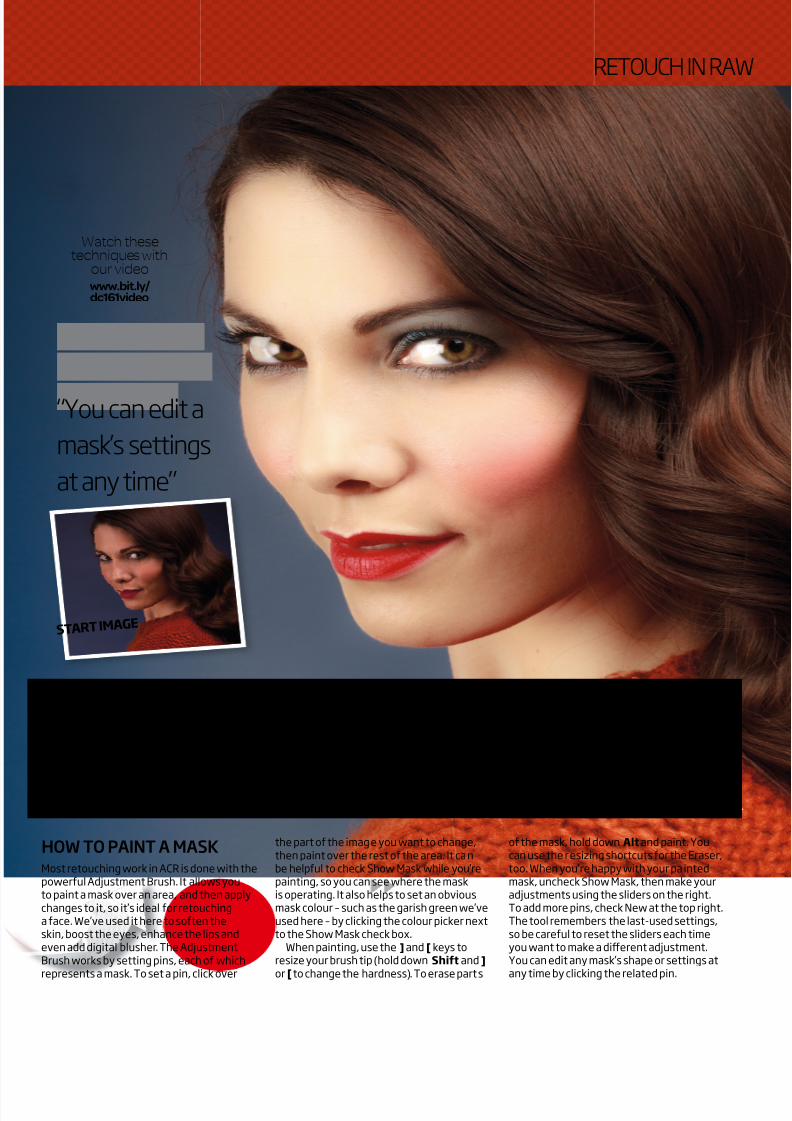
“You can edit a
mask’s settings
at any time”
HOW TO PAINT A MASKMost retouching work in ACR is done with thepowerful Adjustment Brush. It allows youto paint a mask over an area, and then applychanges to it, so it’s ideal for retouchinga face. We’ve used it here to soften theskin, boost the eyes, enhance the lips andeven add digital blusher. The AdjustmentBrush works by setting pins, each of whichrepresents a mask. To set a pin, click over
the part of the image you want to change,then paint over the rest of the area. It canbe helpful to check Show Mask while you’repainting, so you can see where the maskis operating. It also helps to set an obviousmask colour – such as the garish green we’veused here – by clicking the colour picker nextto the Show Mask check box.
When painting, use the ] and [ keys toresize your brush tip (hold down Shift and ] or [ to change the hardness). To erase part s
of the mask, hold down Alt and paint. Youcan use the r esizing shortcuts for the Eraser,too. When you’re happy with your paintedmask, uncheck Show Mask, then make youradjustments using the sliders on the right.To add more pins, check New at the top right.The tool remembers the last-used settings,so be careful to reset the sliders each timeyou want to make a different adjustment.You can edit any mask’s shape or settings atany time by clicking the related pin.
S TAR T IMAGE
RETOUCH IN RAW
Watch thesetechniques with
our videowww.bit.ly / dc161video

7/17/2019 You can master RAW
http://slidepdf.com/reader/full/you-can-master-raw 14/17
Open start image Remove Chromatic Aberration
1
Open ‘coast_before.DNG’ from our project files into ACR then setTemperature to 5000, Tint -7, and Vibrance +50. 2
Go to the Lens Correction option in the menu and then tick ‘RemoveChromatic Aberration’.
Get to grips with image blending usingone raw file and Smart Objects
RAW SMARTOB JECTSRaw files processed through ACR canbe opened into Photoshop as SmartObjects. This means that you havethe option to bring the image fromPhotoshop back into ACR at any time,simply by double-clicking the SmartObject thumbnail in the Layers Panel.
There are several advantages toworking this way. First and foremost, itmeans you can change your mind about
any edits made in ACR, such as a crop orsharpening settings. But it also opensup more creative possibilities. Byduplicating the Smart Object layer, youcan combine different treatments madein ACR using Blend Modes. Don’t worry ifthis sounds complicated, in practice it’svery easy. Within minutes you cantransform a flat scene into a punchy,detailed landscape. Here’s how it’s done.
TA R T I MAG E
YOU CAN MASTER RAW
Process a rawimage withour videowww.bit.ly / dc161video
7/17/2019 You can master RAW
http://slidepdf.com/reader/full/you-can-master-raw 15/17
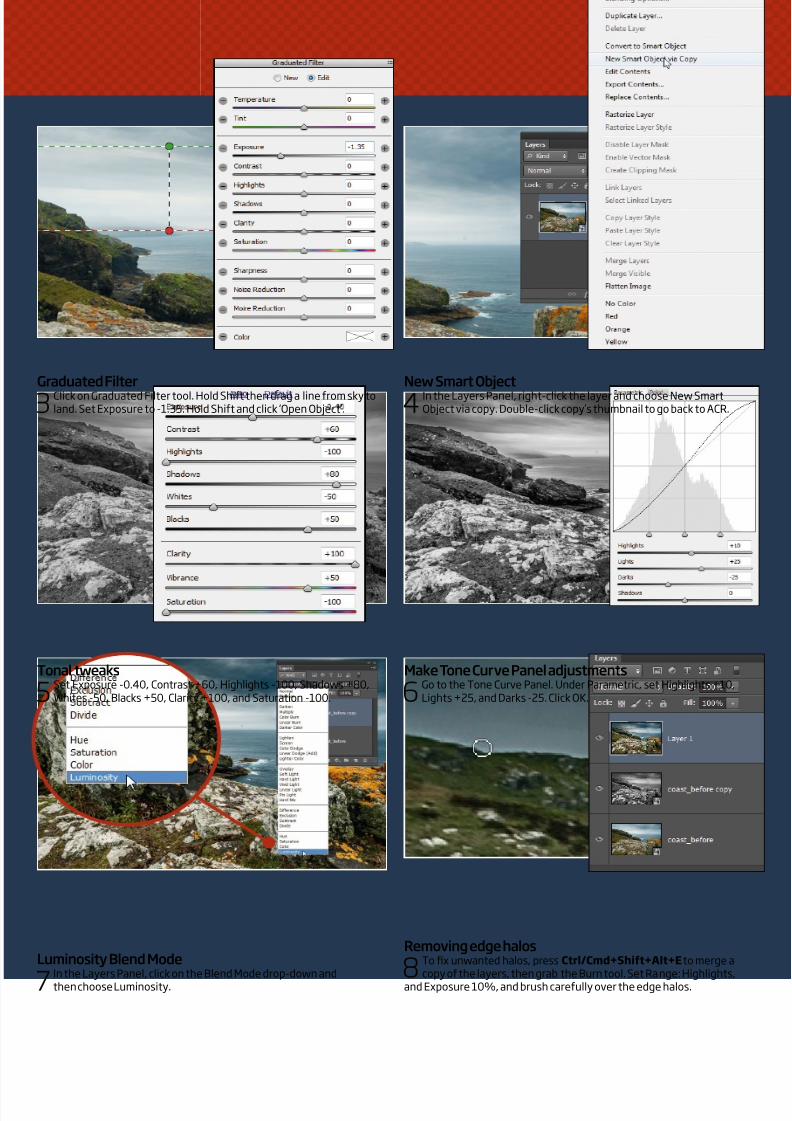
Graduated Filter
Tonal tweaks
Luminosity Blend Mode
New Smart Object
Make Tone Curve Panel adjustments
Removing edge halos
3
Click on Graduated Filter tool. Hold Shift then drag a line from sky toland. Set Exposure to -1.35. Hold Shift and click ‘Open Object’.
5 Set Exposure -0.40, Contrast +60, Highlights -100, Shadows +80,Whites -50, Blacks +50, Clarity +100, and Saturation -100.
7
In the Layers Panel, click on the Blend Mode drop-down andthen choose Luminosity.
4
In the Layers Panel, right-click the layer and choose New SmartObject via copy. Double-click copy’s thumbnail to go back to ACR.
6 Go to the Tone Curve Panel. Under Parametric, set Highlights +10,Lights +25, and Darks -25. Click OK.
8
To fix unwanted halos, press Ctrl/Cmd+Shift+Alt+E to merge acopy of the layers, then grab the Burn tool. Set Range: Highlights,
and Exposure 10%, and brush carefully over the edge halos.

7/17/2019 You can master RAW
http://slidepdf.com/reader/full/you-can-master-raw 16/17
FIVE CREATIVERAW EFFECTSBlack and white
Solarised
1 ACR is a great place to make your mono conversions.It’s just like using a Black and White Adjustment Layer
in Photoshop.
Go to the HSL/Grayscale paneland check Convert to Grayscale box.Use the colour sliders to tweak thetones and the Adjustment Brush tosimulate the Dodge and Burn tools.
2 The inverted tones and haunting hues ofa solarised image were popularised by the
surrealist photographer Man Ray in the 1920safter a fortuitous darkroom mistake.
Go to the Tone Curve Panel and skew the curveinto an upside down U shape (see right). It’s worthexperimenting with the curve. Push and pull it toextremes and see what happens.
Learn how to add a variety of cool creative effects usingnothing more than the tools in Adobe Camera raw
S TAR T IMAGE
YOU CAN MASTER RAW
Create fivespecial effectswith our video
www.bit.ly / dc161video

7/17/2019 You can master RAW
http://slidepdf.com/reader/full/you-can-master-raw 17/17
CREATIVE EFFECTS
Cross process
Hand colour
Split tone
3 This popular technique references achemical process from the traditional
darkroom with characteristically skewed
colours, saturation and contrast.
To replicate this in ACR, go to the ToneCurve Panel and select the Point Cur vewindow. Here you can tweak the individualRed, Green and Blue channels (see left). Onceyou’re happy, save the effect as a preset.
5 It might be hard to believe, but it is possible to replicate thelook of a hand painted image in ACR.
You’ll need to make your image black and white, but do thisusing the Saturation slider in the Basic Panel rather than theHSL/Grayscale Panel. Next, select the Adjustment Brush andpaint colour with a low saturation onto the image.
4 Adding a split tone is a great way to give your mono
images a creative twist by adding different colour tintsto the highlights and shadows.
In the Split Tone Panel, usethe sliders to target differentcolours and intensity for theshadows and highlights.