Embed Size (px)
Citation preview
YOGA 510YOGA 510-14ISK/YOGA510-14AST/YOGA 510-15ISKHardware Maintenance Manual
Note:• Before using this information and the product it supports, be sure to read the general information under
“Notices” on page 79.
First Edition (April 2016)© Copyright Lenovo 2016. All rights reserved.LIMITEDANDRESTRICTEDRIGHTSNOTICE:IfdataorsoftwareisdeliveredpursuantaGeneralServicesAdministration“GSA”contract,use,reproduction,ordisclosureissubjecttorestrictionssetforthinContractNo.GS-35F-05925.©2016Lenovo
iii
ContentsAbout this manual ....................................... iv
Safety information ........................................ 1Generalsafety................................................ 2Electricalsafety.............................................. 3Safetyinspectionguide.................................. 5Handlingdevicesthataresensitivetoelectrostaticdischarge.................................... 6Groundingrequirements................................. 6Safetynotices:multilingualtranslations.......... 7Lasercompliancestatement......................... 14
Important service information ................... 16StrategyforreplacingFRUs......................... 16
Strategyforreplacingaharddiskdrive............17Importantnoticeforreplacingasystemboard................................................................17
ImportantinformationaboutreplacingRoHScompliantFRUs................................. 18
General checkout ...................................... 19Whattodofirst............................................. 20Powersystemcheckout................................ 21
CheckingtheACadapter.................................21Checkingoperationalcharging.........................21Checkingthebatterypack................................22
Related service information ...................... 23RestoringthefactorycontentsbyusingOneKeyRecovery........................................ 23
Restoreoffactorydefault.................................23Passwords.................................................... 24
Power-onpassword..........................................24Hard-diskpassword..........................................24Administratorpassword....................................24
Powermanagement..................................... 25Screenblankstate............................................25Puttingthecomputertosleeporshuttingitdown..............................................................25Puttingyourcomputertosleep.........................25Shuttingdownthecomputer.............................26
Lenovo YOGA 510-14ISK/YOGA510-14AST/ YOGA 510-15ISK ......................................... 27Specifications............................................... 27Statusindicators........................................... 29Hotkeys......................................................... 30FRUreplacementnotices............................. 31
Screwnotices..................................................31RemovingandreplacinganFRU................. 32
1010Basecover...............................................331020Batterypack.............................................36
1030PCIExpressMiniCardforwirelessLAN.....................................................381040DIMM.......................................................411050Speakers.................................................431060Harddiskdrive.........................................441070FanassemblyandHeatSinkassembly...........................................................461080IOboard,DC-incable..............................501090Systemboard............................................ 521100Uppercase...............................................541110LCDunit...................................................561120Integratedcamera,antennaassemblyandLCDhinges................................................59
Locations...................................................... 62Frontviewandright-sideview..........................62BottomandLeft-sideview...............................63
Partslist........................................................ 64Overall..............................................................65LCDFRUs........................................................7414.0-in.HDTFT................................................7515.6-in.HDTFT................................................76Miscellaneousparts..........................................77ACadapters......................................................77Screws..............................................................78
Notices......................................................... 79Trademarks.................................................. 80
iv
About this manual
Thismanual containsserviceand reference information for the followingLenovoproduct:
Lenovo YOGA 510-14ISK/YOGA510-14AST/YOGA 510-15ISKUsethismanualtotroubleshootproblems.Themanualisdividedintothefollowingsections:• Thecommonsectionsprovidegeneral information,guidelines,andsafetyinformationrequiredforservicingcomputers.
• Theproduct-specificsectionincludesservice,reference,andproduct-specificpartsinformation.
Important:This manual is intended only for trained servicers who are familiar with Lenovo products. Use this manual to troubleshoot problems effectively.Before servicing a Lenovo product, make sure to read all the information under “Safety information” on page 1 and “Important service information” on page 16.
1
Safety information
Safety information
Thischapterpresents the followingsafety information thatyouneed togetfamiliarwithbeforeyouserviceaLenovoYOGA510-14ISK/YOGA510-14AST/YOGA510-15ISKcomputer:• “Generalsafety”onpage2• “Electricalsafety”onpage3• “Safetyinspectionguide”onpage5• “Handlingdevicesthataresensitivetoelectrostaticdischarge”onpage6• “Groundingrequirements”onpage6• “Safetynotices:multilingualtranslations”onpage7• “Lasercompliancestatement”onpage14
2
YOGA 510-14ISK/YOGA510-14AST/YOGA 510-15ISK Hardware Maintenance Manual
General safetyFollowtheserulesbelowtoensuregeneralsafety:• Observeagoodhousekeeping in theareawhere themachinesareputduringandafterthemaintenance.
• Whenliftinganyheavyobject:1. Makesurethatyoucanstandsafelywithoutslipping.2. Distributetheweightoftheobjectequallybetweenyourfeet.3. Useaslowliftingforce.Nevermovesuddenlyortwistwhenyouattempt
toliftit.4. Liftitbystandingorpushingupwithyourlegmuscles;thisactioncould
avoidthestrainfromthemusclesinyourback.Donotattempttoliftanyobjectthatweighsmorethan16kg(35lb)orthatyouthinkistooheavyforyou.
• Donotperformanyaction thatcauseshazards to thecustomer,or thatmakesthemachineunsafe.
• Beforeyoustart themachine,makesurethatotherservicerepresentativesandthecustomerarenotinahazardousposition.
• Please removecoversandotherparts ina safeplace, away fromallpersonnel,whileyouareservicingthemachine.
• Keepyourtoolcaseawayfromwalkareassothatotherpeoplewillnot tripoverit.
• Donotwear looseclothingthatcanbetrapped in themovingpartsof themachine.Makesurethatyoursleevesarefastenedorrolledupaboveyourelbows.Ifyourhairislong,fastenit.
• Insert theendsofyournecktieorscarf insideclothingor fasten itwith thenonconductiveclip,about8centimeters(3inches)fromtheend.
• Donotwearjewelry,chains,metal-frameeyeglasses,ormetalfastenersforyourclothing.Attention:Metalobjectsaregoodelectricalconductors.
• Wearsafetyglasseswhenyouarehammering,drilling,soldering,cuttingwire,attachingsprings,usingsolvents,orworking inanyotherconditionsthatmaybehazardoustoyoureyes.
• Afterservice, reinstallallsafetyshields,guards, labels,andgroundwires.Replaceanysafetydevicethatiswornordefective.
• Reinstallallcoverscorrectlybeforereturningthemachinetothecustomer.• Fan louverson themachinehelp toprevent theoverheatingof internalcomponents.Donotobstruct fan louversor cover themwith labelsorstickers.
3
About this manual
Electrical safetyObservethefollowingruleswhenworkingonelectricalequipments.
Important:Use only approved tools and test equipments. Some hand tools have handles covered with a soft material that does not insulate you when working with live electrical currents.Many customers have rubber floor mats near their machines that contain small conductive fibers to decrease electrostatic discharges. Do not use such kind of mat to protect yourself from electrical shock.
• Findtheroomemergencypower-off (EPO)switch,disconnectingswitchorelectricaloutlet. Ifanelectricalaccidentoccurs,youcanthenoperate theswitchorunplugthepowercordquickly.
• Donotworkaloneunderhazardousconditionsornear theequipment thathashazardousvoltages.
• Disconnectallpowerbefore:– Performingamechanicalinspection– Workingnearpowersupplies– Removingorinstallingmainunits
• Beforeyoustart toworkon themachine,unplug thepowercord. Ifyoucannotunplug it,ask thecustomer topower-off thewallbox thatsuppliespowertothemachine,andtolockthewallboxintheoffposition.
• If youneed toworkonamachine thathasexposedelectrical circuits,observethefollowingprecautions:– Ensurethatanotherperson,familiarwiththepower-offcontrols,isnear
you. Attention:Anotherpersonmustbe there toswitchoff thepower, if
necessary.– Useonlyonehandwhenworkingwithpowered-onelectricalequipment;
keeptheotherhandinyourpocketorbehindyourback. Attention:Anelectricalshockcanoccuronlywhenthereisacomplete
circuit.Byobserving theaboverule,youmaypreventacurrent frompassingthroughyourbody.
– Whenusing testers,set thecontrolscorrectlyanduse theapprovedprobeleadsandaccessoriesforthattester.
– Standonsuitablerubbermats(obtainedlocally,ifnecessary)toinsulateyoufromgroundssuchasmetalfloorstripsandmachineframes.
Observethespecialsafetyprecautionswhenyouworkwithveryhighvoltages;instructions for theseprecautionsare in thesafetysectionsofmaintenanceinformation.Beextremelycarefulwhenyoumeasurethehighvoltages.• Regularlyinspectandmaintainyourelectricalhandtoolsforsafeoperationalcondition.
• Donotusewornorbrokentoolsandtesters.• Neverassumethatpowerhasbeendisconnectedfromacircuit.First,checkittomakesurethatithasbeenpoweredoff.
4
YOGA 510-14ISK/YOGA510-14AST/YOGA 510-15ISK Hardware Maintenance Manual
• Always lookcarefully forpossiblehazards inyourworkarea.Examplesofthesehazardsaremoistfloors,nongroundedpowerextensioncables,powersurges,andmissingsafetygrounds.
• Donot touch liveelectricalcircuitswith thereflectivesurfaceofaplasticdentalmirror.Thesurfaceisconductive;suchtouchingcancausepersonalinjuryandmachinedamage.
• Donotservicethefollowingpartswiththepoweronwhentheyareremovedfromtheirnormaloperatingplacesinamachine:– Powersupplyunits– Pumps– Blowersandfans– Motorgeneratorsandsimilarunits.(Thispracticeensurescorrectgroundingoftheunits.)
• Ifanelectricalaccidentoccurs:– Caution:donotbecomeavictimyourself.– Switchoffthepower.– Sendthevictimtogetmedicalaid.

5
About this manual
Safety inspection guideThepurposeof this inspectionguide is toassistyou in identifyingpotentialunsafeconditions.Aseachmachinewasdesignedandbuilt, requiredsafetyitemswere installed toprotectusersandservicepersonnel from injury.Thisguideaddressesonly those items.Youshouldusegood judgment to identifypotentialsafetyhazardsaccordingtotheattachmentofnon-Lenovofeaturesoroptionsnotcoveredbythisinspectionguide.
Ifanyunsafeconditionsarepresent,youmustdeterminehowserious theapparenthazardcouldbeandwhetheryoucancontinuewithoutfirstcorrectingtheproblem.
Considertheseconditionsandthesafetyhazardstheypresent:• Electricalhazards,especiallyprimarypower(primaryvoltageontheframecancauseseriousorfatalelectricalshock)
• Explosivehazards,suchasadamagedCRTfaceorabulgingcapacitor• Mechanicalhazards,suchaslooseormissinghardware
Todeterminewhether thereareanypotentialunsafeconditions,use thefollowingchecklistatthebeginningofeveryservicetask.Beginthecheckswiththepoweroff,andthepowercorddisconnected.
Checklist:1. Checkexteriorcoversfordamage(loose,broken,orsharpedges).2. Turnoffthecomputer.Disconnectthepowercord.3. Checkthepowercordfor:
a. Athird-wiregroundconnectoringoodcondition.Useametertomeasurethird-wiregroundcontinuity for0.1ohmor lessbetween theexternalgroundpinandtheframeground.
b. Thepowercordshouldbethetypespecifiedinthepartslist.c. Insulationmustnotbefrayedorworn.
4. Checkforcrackedorbulgingbatteries.5. Removethecover.6. Checkforanyobviousnon-Lenovoalterations.Usegoodjudgmentastothe
safetyofanynon-Lenovoalterations.7. Check inside theunit foranyobviousunsafeconditions,suchasmetal
filings,contamination,waterorother liquids,orsignsof fireorsmokedamage.
8. Checkforworn,frayed,orpinchedcables.9. Check that thepower-supplycover fasteners (screwsor rivets)havenot
beenremovedortamperedwith.
6
YOGA 510-14ISK/YOGA510-14AST/YOGA 510-15ISK Hardware Maintenance Manual
Handling devices that are sensitive to electrostatic dischargeAnycomputerpartcontainingtransistorsor integratedcircuits(ICs)shouldbeconsideredsensitivetoelectrostaticdischarge(ESD).ESDdamagecanoccurwhen there isadifference inchargebetweenobjects.ProtectagainstESDdamagebyequalizingthechargesothatthemachine,thepart,theworkmat,andthepersonhandlingthepartareallatthesamecharge.
Notes:1. Use product-specific ESD procedures when they exceed the requirements noted
here. 2. Make sure that the ESD protective devices you use have been certified (ISO
9000) as fully effective.
WhenhandlingESD-sensitiveparts:• Keepthepartsinprotectivepackagesuntiltheyareinsertedintotheproduct.• Avoidcontactwithotherpeople.• Wearagroundedwriststrapagainstyourskin toeliminatestaticonyourbody.
• Preventthepartfromtouchingyourclothing.Mostclothingisinsulativeandretainsachargeevenwhenyouarewearingawriststrap.
• Use theblacksideofagroundedworkmat toprovideastatic-freeworksurface.ThematisespeciallyusefulwhenhandlingESD-sensitivedevices.
• Selectagroundingsystem,suchasthoselistedbelow,toprovideprotectionthatmeetsthespecificservicerequirement.
Note:The use of a grounding system to guard against ESD damage is desirable but not necessary.
– AttachtheESDgroundcliptoanyframeground,groundbraid,orgreen-wireground.
– Whenworkingonadouble-insulatedorbattery-operatedsystem,useanESDcommongroundorreferencepoint.Youcanusecoaxorconnector-outsideshellsonthesesystems.
– Usetheroundgroundprongoftheacplugonac-operatedcomputers.
Grounding requirementsElectricalgroundingofthecomputerisrequiredforoperatorsafetyandcorrectsystemfunction.Propergroundingof theelectricaloutletcanbeverifiedbyacertifiedelectrician.
7
About this manual
Safety notices: multilingual translationsThesafetynotices in thissectionareprovided inEnglish,French,German,Hebrew,Italian,Japanese,andSpanish.
Safety notice 1 Before the computer is powered on after FRU replacement, make sure all screws, springs, and other small parts are in place and are not left loose inside the computer. Verify this by shaking the computer and listening for rattling sounds. Metallic parts or metal flakes can cause electrical shorts. Avant de remettre l’ordinateur sous tension après remplacement d’une unité en clientèle, vérifiez que tous les ressorts, vis et autres pièces sont bien en place et bien fixées. Pour ce faire, secouez l’unité et assurez-vous qu’aucun bruit suspect ne se produit. Des pièces métalliques ou des copeaux de métal pourraient causer un court-circuit. Bevor nach einem FRU-Austausch der Computer wieder angeschlossen wird, muß sichergestellt werden, daß keine Schrauben, Federn oder andere Kleinteile fehlen oder im Gehäuse vergessen wurden. Der Computer muß geschüttelt und auf Klappergeräusche geprüft werden. Metallteile oder-splitter können Kurzschlüsse erzeugen.
Prima di accendere l’elaboratore dopo che é stata effettuata la sostituzione di una FRU, accertarsi che tutte le viti, le molle e tutte le altri parti di piccole dimensioni siano nella corretta posizione e non siano sparse all’interno dell’elaboratore. Verificare ciò scuotendo l’elaboratore e prestando attenzione ad eventuali rumori; eventuali parti o pezzetti metallici possono provocare cortocircuiti pericolosi.
Antes de encender el sistema despues de sustituir una FRU, compruebe que todos los tornillos, muelles y demás piezas pequeñas se encuentran en su sitio y no se encuentran sueltas dentro del sistema. Compruébelo agitando el sistema y escuchando los posibles ruidos que provocarían. Las piezas metálicas pueden causar cortocircuitos eléctricos.
8
YOGA 510-14ISK/YOGA510-14AST/YOGA 510-15ISK Hardware Maintenance Manual
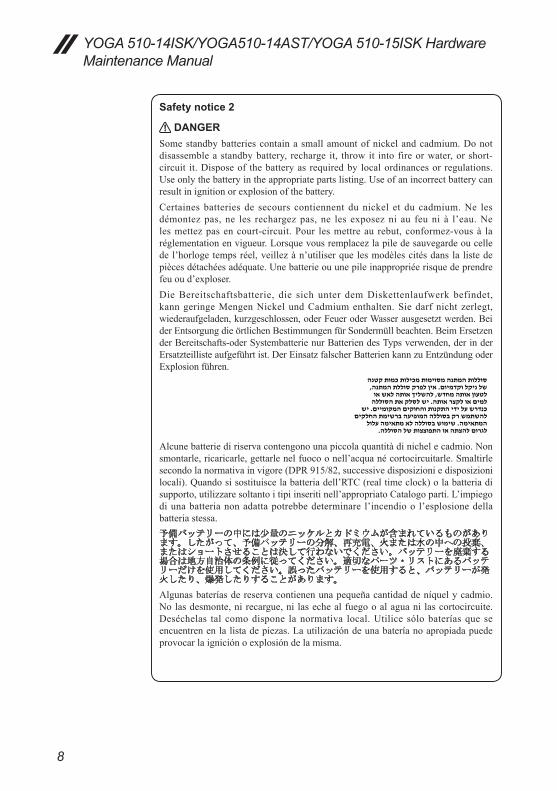
Safety notice 2
DANGERSome standby batteries contain a small amount of nickel and cadmium. Do not disassemble a standby battery, recharge it, throw it into fire or water, or short-circuit it. Dispose of the battery as required by local ordinances or regulations. Use only the battery in the appropriate parts listing. Use of an incorrect battery can result in ignition or explosion of the battery.Certaines batteries de secours contiennent du nickel et du cadmium. Ne les démontez pas, ne les rechargez pas, ne les exposez ni au feu ni à l’eau. Ne les mettez pas en court-circuit. Pour les mettre au rebut, conformez-vous à la réglementation en vigueur. Lorsque vous remplacez la pile de sauvegarde ou celle de l’horloge temps réel, veillez à n’utiliser que les modèles cités dans la liste de pièces détachées adéquate. Une batterie ou une pile inappropriée risque de prendre feu ou d’exploser.Die Bereitschaftsbatterie, die sich unter dem Diskettenlaufwerk befindet, kann geringe Mengen Nickel und Cadmium enthalten. Sie darf nicht zerlegt, wiederaufgeladen, kurzgeschlossen, oder Feuer oder Wasser ausgesetzt werden. Bei der Entsorgung die örtlichen Bestimmungen für Sondermüll beachten. Beim Ersetzen der Bereitschafts-oder Systembatterie nur Batterien des Typs verwenden, der in der Ersatzteilliste aufgeführt ist. Der Einsatz falscher Batterien kann zu Entzündung oder Explosion führen.
Alcune batterie di riserva contengono una piccola quantità di nichel e cadmio. Non smontarle, ricaricarle, gettarle nel fuoco o nell’acqua né cortocircuitarle. Smaltirle secondo la normativa in vigore (DPR 915/82, successive disposizioni e disposizioni locali). Quando si sostituisce la batteria dell’RTC (real time clock) o la batteria di supporto, utilizzare soltanto i tipi inseriti nell’appropriato Catalogo parti. L’impiego di una batteria non adatta potrebbe determinare l’incendio o l’esplosione della batteria stessa.
Algunas baterías de reserva contienen una pequeña cantidad de níquel y cadmio. No las desmonte, ni recargue, ni las eche al fuego o al agua ni las cortocircuite. Deséchelas tal como dispone la normativa local. Utilice sólo baterías que se encuentren en la lista de piezas. La utilización de una batería no apropiada puede provocar la ignición o explosión de la misma.
9
About this manual
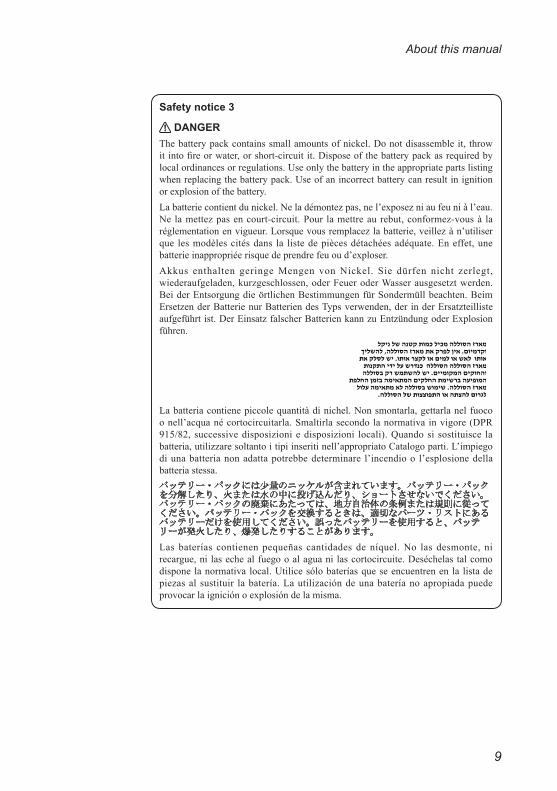
Safety notice 3
DANGERThe battery pack contains small amounts of nickel. Do not disassemble it, throw it into fire or water, or short-circuit it. Dispose of the battery pack as required by local ordinances or regulations. Use only the battery in the appropriate parts listing when replacing the battery pack. Use of an incorrect battery can result in ignition or explosion of the battery. La batterie contient du nickel. Ne la démontez pas, ne l’exposez ni au feu ni à l’eau. Ne la mettez pas en court-circuit. Pour la mettre au rebut, conformez-vous à la réglementation en vigueur. Lorsque vous remplacez la batterie, veillez à n’utiliser que les modèles cités dans la liste de pièces détachées adéquate. En effet, une batterie inappropriée risque de prendre feu ou d’exploser. Akkus enthalten geringe Mengen von Nickel. Sie dürfen nicht zerlegt, wiederaufgeladen, kurzgeschlossen, oder Feuer oder Wasser ausgesetzt werden. Bei der Entsorgung die örtlichen Bestimmungen für Sondermüll beachten. Beim Ersetzen der Batterie nur Batterien des Typs verwenden, der in der Ersatzteilliste aufgeführt ist. Der Einsatz falscher Batterien kann zu Entzündung oder Explosion führen.
La batteria contiene piccole quantità di nichel. Non smontarla, gettarla nel fuoco o nell’acqua né cortocircuitarla. Smaltirla secondo la normativa in vigore (DPR 915/82, successive disposizioni e disposizioni locali). Quando si sostituisce la batteria, utilizzare soltanto i tipi inseriti nell’appropriato Catalogo parti. L’impiego di una batteria non adatta potrebbe determinare l’incendio o l’esplosione della batteria stessa.
Las baterías contienen pequeñas cantidades de níquel. No las desmonte, ni recargue, ni las eche al fuego o al agua ni las cortocircuite. Deséchelas tal como dispone la normativa local. Utilice sólo baterías que se encuentren en la lista de piezas al sustituir la batería. La utilización de una batería no apropiada puede provocar la ignición o explosión de la misma.
10
YOGA 510-14ISK/YOGA510-14AST/YOGA 510-15ISK Hardware Maintenance Manual
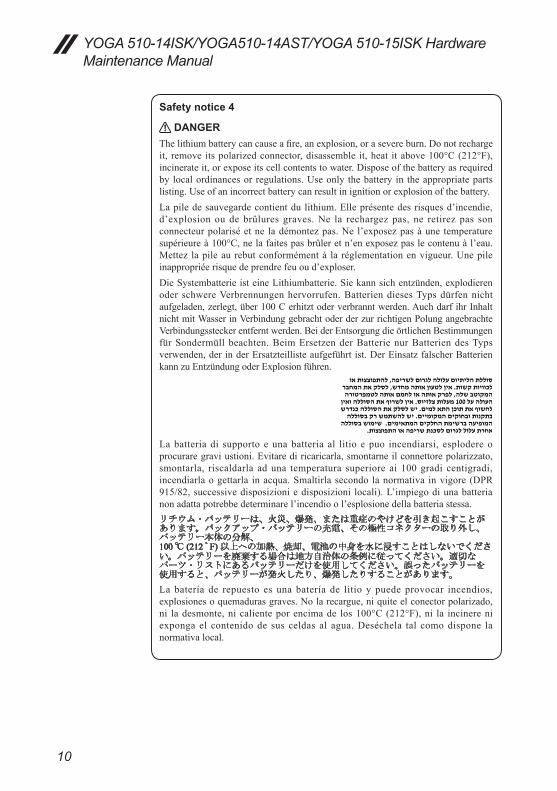
Safety notice 4
DANGERThe lithium battery can cause a fire, an explosion, or a severe burn. Do not recharge it, remove its polarized connector, disassemble it, heat it above 100°C (212°F), incinerate it, or expose its cell contents to water. Dispose of the battery as required by local ordinances or regulations. Use only the battery in the appropriate parts listing. Use of an incorrect battery can result in ignition or explosion of the battery. La pile de sauvegarde contient du lithium. Elle présente des risques d’incendie, d’explosion ou de brûlures graves. Ne la rechargez pas, ne retirez pas son connecteur polarisé et ne la démontez pas. Ne l’exposez pas à une temperature supérieure à 100°C, ne la faites pas brûler et n’en exposez pas le contenu à l’eau. Mettez la pile au rebut conformément à la réglementation en vigueur. Une pile inappropriée risque de prendre feu ou d’exploser.Die Systembatterie ist eine Lithiumbatterie. Sie kann sich entzünden, explodieren oder schwere Verbrennungen hervorrufen. Batterien dieses Typs dürfen nicht aufgeladen, zerlegt, über 100 C erhitzt oder verbrannt werden. Auch darf ihr Inhalt nicht mit Wasser in Verbindung gebracht oder der zur richtigen Polung angebrachte Verbindungsstecker entfernt werden. Bei der Entsorgung die örtlichen Bestimmungen für Sondermüll beachten. Beim Ersetzen der Batterie nur Batterien des Typs verwenden, der in der Ersatzteilliste aufgeführt ist. Der Einsatz falscher Batterien kann zu Entzündung oder Explosion führen.
La batteria di supporto e una batteria al litio e puo incendiarsi, esplodere o procurare gravi ustioni. Evitare di ricaricarla, smontarne il connettore polarizzato, smontarla, riscaldarla ad una temperatura superiore ai 100 gradi centigradi, incendiarla o gettarla in acqua. Smaltirla secondo la normativa in vigore (DPR 915/82, successive disposizioni e disposizioni locali). L’impiego di una batteria non adatta potrebbe determinare l’incendio o l’esplosione della batteria stessa.
La batería de repuesto es una batería de litio y puede provocar incendios, explosiones o quemaduras graves. No la recargue, ni quite el conector polarizado, ni la desmonte, ni caliente por encima de los 100°C (212°F), ni la incinere ni exponga el contenido de sus celdas al agua. Deséchela tal como dispone la normativa local.
11
About this manual
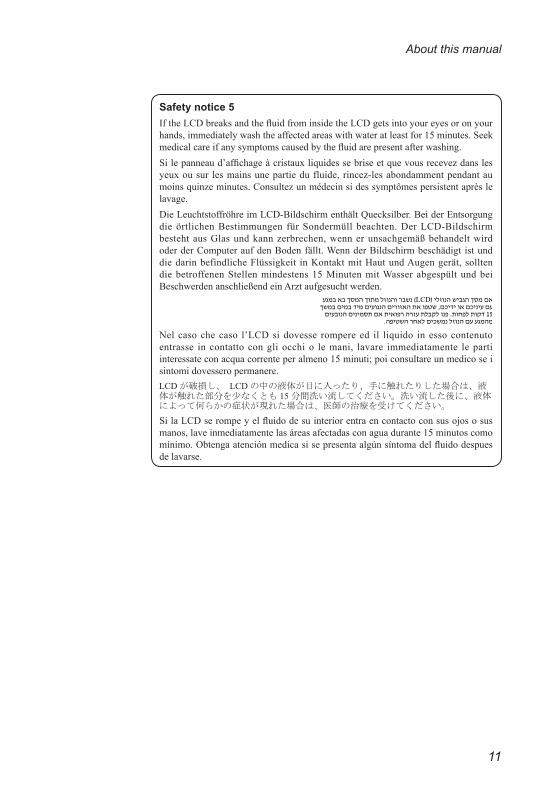
Safety notice 5If the LCD breaks and the fluid from inside the LCD gets into your eyes or on your hands, immediately wash the affected areas with water at least for 15 minutes. Seek medical care if any symptoms caused by the fluid are present after washing.Si le panneau d’affichage à cristaux liquides se brise et que vous recevez dans les yeux ou sur les mains une partie du fluide, rincez-les abondamment pendant au moins quinze minutes. Consultez un médecin si des symptômes persistent après le lavage.Die Leuchtstoffröhre im LCD-Bildschirm enthält Quecksilber. Bei der Entsorgung die örtlichen Bestimmungen für Sondermüll beachten. Der LCD-Bildschirm besteht aus Glas und kann zerbrechen, wenn er unsachgemäß behandelt wird oder der Computer auf den Boden fällt. Wenn der Bildschirm beschädigt ist und die darin befindliche Flüssigkeit in Kontakt mit Haut und Augen gerät, sollten die betroffenen Stellen mindestens 15 Minuten mit Wasser abgespült und bei Beschwerden anschließend ein Arzt aufgesucht werden.
Nel caso che caso l’LCD si dovesse rompere ed il liquido in esso contenuto entrasse in contatto con gli occhi o le mani, lavare immediatamente le parti interessate con acqua corrente per almeno 15 minuti; poi consultare un medico se i sintomi dovessero permanere.
Si la LCD se rompe y el fluido de su interior entra en contacto con sus ojos o sus manos, lave inmediatamente las áreas afectadas con agua durante 15 minutos como mínimo. Obtenga atención medica si se presenta algún síntoma del fluido despues de lavarse.

12
YOGA 510-14ISK/YOGA510-14AST/YOGA 510-15ISK Hardware Maintenance Manual
Safety notice 6
DANGERTo avoid shock, do not remove the plastic cover that protects the lower part of the inverter card.Afin d’éviter tout risque de choc électrique, ne retirez pas le cache en plastique protégeant la partie inférieure de la carte d’alimentation.Aus Sicherheitsgründen die Kunststoffabdeckung, die den unteren Teil der Spannungswandlerplatine umgibt, nicht entfernen.
Per evitare scosse elettriche, non rimuovere la copertura in plastica che avvolge la parte inferiore della scheda invertitore.
Para evitar descargas, no quite la cubierta de plástico que rodea la parte baja de la tarjeta invertida.
Safety notice 7
DANGERThough the main batteries have low voltage, a shorted or grounded battery can produce enough current to burn personnel or combustible materials. Bien que le voltage des batteries principales soit peu élevé, le court-circuit ou la mise à la masse d’une batterie peut produire suffisamment de courant pour brûler des matériaux combustibles ou causer des brûlures corporelles graves. Obwohl Hauptbatterien eine niedrige Spannung haben, können sie doch bei Kurzschluß oder Erdung genug Strom abgeben, um brennbare Materialien zu entzünden oder Verletzungen bei Personen hervorzurufen.
Sebbene le batterie di alimentazione siano a basso voltaggio, una batteria in corto circuito o a massa può fornire corrente sufficiente da bruciare materiali combustibili o provocare ustioni ai tecnici di manutenzione.
Aunque las baterías principales tienen un voltaje bajo, una batería cortocircuitada o con contacto a tierra puede producir la corriente suficiente como para quemar material combustible o provocar quemaduras en el personal.

13
About this manual
Safety notice 8
DANGERBefore removing any FRU, turn off the computer, unplug all power cords from electrical outlets, remove the battery pack, and then disconnect any interconnecting cables.Avant de retirer une unité remplaçable en clientèle, mettez le système hors tension, débranchez tous les cordons d’alimentation des socles de prise de courant, retirez la batterie et déconnectez tous les cordons d’interface.Die Stromzufuhr muß abgeschaltet, alle Stromkabel aus der Steckdose gezogen, der Akku entfernt und alle Verbindungskabel abgenommen sein, bevor eine FRU entfernt wird.
Prima di rimuovere qualsiasi FRU, spegnere il sistema, scollegare dalle prese elettriche tutti i cavi di alimentazione, rimuovere la batteria e poi scollegare i cavi di interconnessione.
Antes de quitar una FRU, apague el sistema, desenchufe todos los cables de las tomas de corriente eléctrica, quite la batería y, a continuación, desconecte cualquier cable de conexión entre dispositivos.
14
YOGA 510-14ISK/YOGA510-14AST/YOGA 510-15ISK Hardware Maintenance Manual
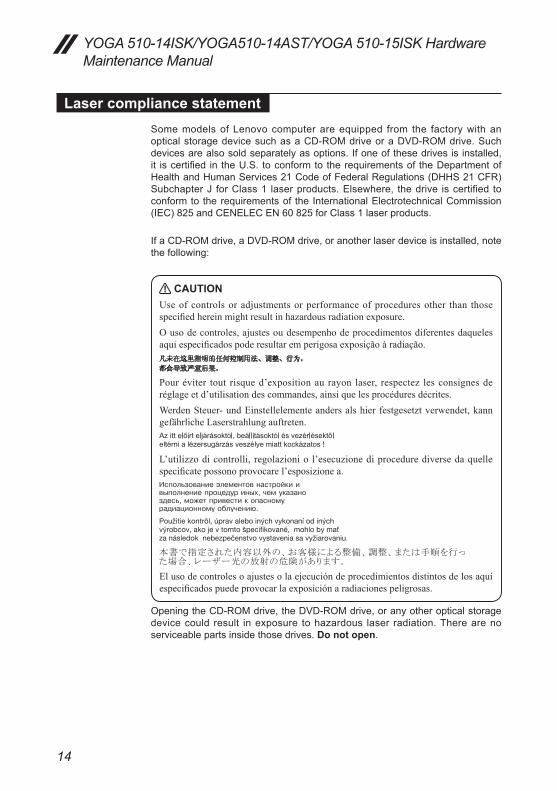
Laser compliance statementSomemodelsofLenovocomputerareequipped from the factorywithanopticalstoragedevicesuchasaCD-ROMdriveoraDVD-ROMdrive.Suchdevicesarealsosoldseparatelyasoptions.Ifoneofthesedrivesisinstalled,it iscertified in theU.S. toconformtotherequirementsof theDepartmentofHealthandHumanServices21CodeofFederalRegulations(DHHS21CFR)SubchapterJ forClass1 laserproducts.Elsewhere, thedrive iscertified toconformtotherequirementsof theInternationalElectrotechnicalCommission(IEC)825andCENELECEN60825forClass1laserproducts.
IfaCD-ROMdrive,aDVD-ROMdrive,oranotherlaserdeviceisinstalled,notethefollowing:
CAUTIONUse of controls or adjustments or performance of procedures other than those specified herein might result in hazardous radiation exposure.O uso de controles, ajustes ou desempenho de procedimentos diferentes daqueles aqui especificados pode resultar em perigosa exposição à radiação.
Pour éviter tout risque d’exposition au rayon laser, respectez les consignes de réglage et d’utilisation des commandes, ainsi que les procédures décrites.Werden Steuer- und Einstellelemente anders als hier festgesetzt verwendet, kann gefährliche Laserstrahlung auftreten.
L’utilizzo di controlli, regolazioni o l’esecuzione di procedure diverse da quelle specificate possono provocare l’esposizione a.
El uso de controles o ajustes o la ejecución de procedimientos distintos de los aquí especificados puede provocar la exposición a radiaciones peligrosas.
OpeningtheCD-ROMdrive,theDVD-ROMdrive,oranyotheropticalstoragedevicecould result inexposure tohazardous laser radiation.Therearenoserviceablepartsinsidethosedrives.Do not open.
15
About this manual
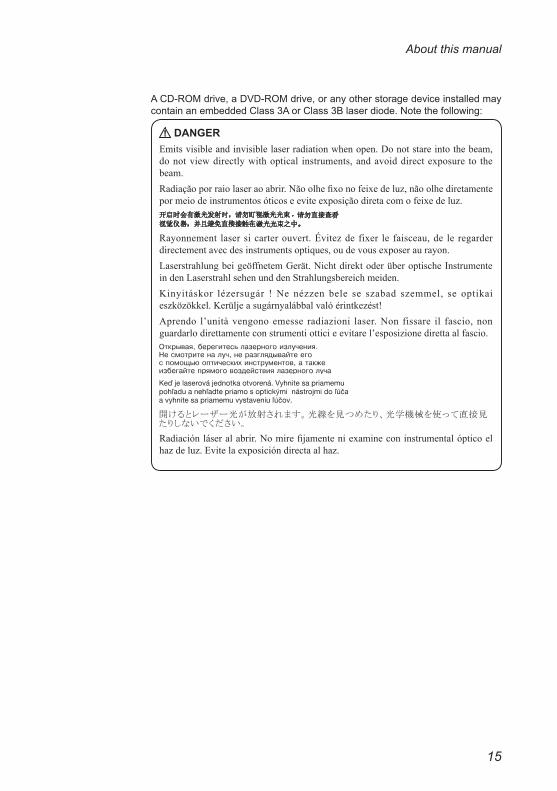
ACD-ROMdrive,aDVD-ROMdrive,oranyotherstoragedeviceinstalledmaycontainanembeddedClass3AorClass3Blaserdiode.Notethefollowing:
DANGEREmits visible and invisible laser radiation when open. Do not stare into the beam, do not view directly with optical instruments, and avoid direct exposure to the beam.Radiação por raio laser ao abrir. Não olhe fixo no feixe de luz, não olhe diretamente por meio de instrumentos óticos e evite exposição direta com o feixe de luz.
Rayonnement laser si carter ouvert. Évitez de fixer le faisceau, de le regarder directement avec des instruments optiques, ou de vous exposer au rayon.Laserstrahlung bei geöffnetem Gerät. Nicht direkt oder über optische Instrumente in den Laserstrahl sehen und den Strahlungsbereich meiden.Kinyitáskor lézersugár ! Ne nézzen bele se szabad szemmel, se optikai eszközökkel. Kerülje a sugárnyalábbal való érintkezést!Aprendo l’unità vengono emesse radiazioni laser. Non fissare il fascio, non guardarlo direttamente con strumenti ottici e evitare l’esposizione diretta al fascio.
Radiación láser al abrir. No mire fijamente ni examine con instrumental óptico el haz de luz. Evite la exposición directa al haz.
16
YOGA 510-14ISK/YOGA510-14AST/YOGA 510-15ISK Hardware Maintenance Manual
Important service information
Thischapterpresentsthefollowingimportantserviceinformation:• “StrategyforreplacingFRUs”onpage16
– “Strategyforreplacingaharddiskdrive”onpage17– “Importantnoticeforreplacingasystemboard”onpage17
• “ImportantinformationaboutreplacingRoHScompliantFRUs”onpage18
Important:BIOS and device driver fixes are customer-installable. The BIOS and device drivers are posted on the customer support site: http://support.lenovo.com.
Strategy for replacing FRUs
Before replacing parts:Makesure thatallsoftwarefixes,drivers,andBIOSdownloadsare installedbeforereplacinganyFRUslistedinthismanual.Afterasystemboardisreplaced,ensurethatthelatestBIOSisloadedtothesystemboardbeforecompletingtheserviceaction.Todownloadsoftwarefixes,drivers,andBIOS,followthestepsbelow:1. Gotohttp://support.lenovo.com.2. Enter the serial number or select a product or use Lenovo smart
downloading.3. SelecttheBIOS/Driver/Applicationsanddownload.4. Followthedirectionsonthescreenandinstallthenecessarysoftware.
17
Important service information
UsethefollowingstrategytopreventunnecessaryexpenseforreplacingandservicingFRUs:• IfyouareinstructedtoreplaceanFRU,butthereplacementdoesnotsolvetheproblem,reinstalltheoriginalFRUbeforeyoucontinue.
• Somecomputershavebothaprocessorboardandasystemboard. Ifyouareinstructedtoreplaceeitherofthem,andreplacingoneofthemdoesnotsolvetheproblem,reinstallthatboard,andthenreplacetheotherone.
• IfanadapteroradeviceconsistsofmorethanoneFRU,anyoftheFRUsmaybe thecauseof theerror.Before replacing theadapterordevice,removetheFRUsonebyonetoseeifthesymptomschange.ReplaceonlytheFRUthatchangedthesymptoms.
Attention:Thesetupconfigurationon thecomputeryouareservicingmayhavebeen customized.RunningAutomaticConfigurationmayalter thesettings.Notethecurrentconfigurationsettings(usingtheViewConfigurationoption); then,whenservicehasbeencompleted,verify that thosesettingsremainineffect.
Strategy for replacing a hard disk driveAlways try toruna low-level formatbeforereplacingaharddiskdrive.Thiswillcauseallcustomerdataon theharddisk tobe lost.Makesure that thecustomerhasacurrentbackupofthedatabeforeperformingthisaction.Attention:Thedrivestartupsequenceinthecomputeryouareservicingmayhavebeenchanged.Beextremelycarefulduringwriteoperationssuchascopying,saving,orformatting.Ifyouselectanincorrectdrive,dataorprogramscanbeoverwritten.
Important notice for replacing a system board Somecomponentsmountedonasystemboardareverysensitive. Improperhandlingcancausedamagetothosecomponents,andmaycauseasystemmalfunction.Attention:Whenhandlingasystemboard:• Donotdropthesystemboardorapplyanyexcessiveforcetoit.• Avoidroughhandlingofanykind.• Avoidbending thesystemboardandhardpushing topreventcrackingateachBGA(BallGridArray)chipset.
18
YOGA 510-14ISK/YOGA510-14AST/YOGA 510-15ISK Hardware Maintenance Manual
Important information about replacing RoHS compliant FRUs
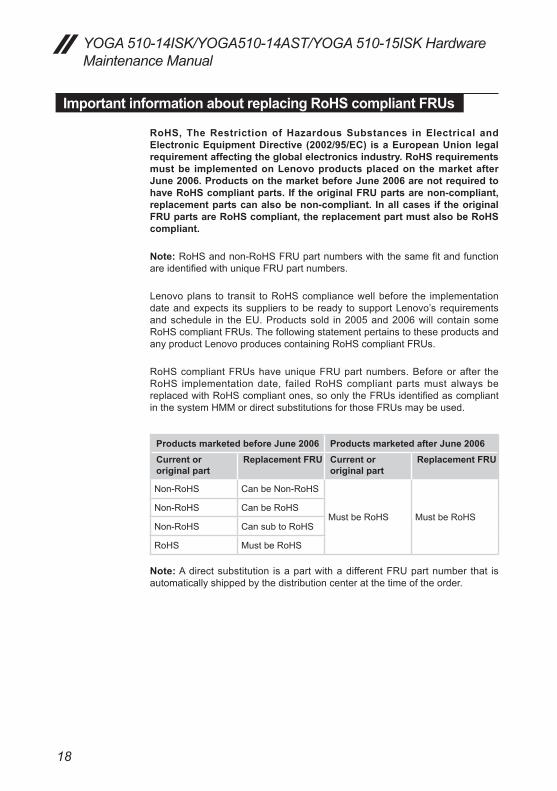
RoHS, The Restriction of Hazardous Substances in Electrical and Electronic Equipment Directive (2002/95/EC) is a European Union legal requirement affecting the global electronics industry. RoHS requirements must be implemented on Lenovo products placed on the market after June 2006. Products on the market before June 2006 are not required to have RoHS compliant parts. If the original FRU parts are non-compliant, replacement parts can also be non-compliant. In all cases if the original FRU parts are RoHS compliant, the replacement part must also be RoHS compliant.
Note:RoHSandnon-RoHSFRUpartnumberswiththesamefitandfunctionareidentifiedwithuniqueFRUpartnumbers.
Lenovoplans to transit toRoHScompliancewellbefore the implementationdateandexpects itssuppliers tobereadytosupportLenovo’srequirementsandschedule in theEU.Productssold in2005and2006willcontainsomeRoHScompliantFRUs.ThefollowingstatementpertainstotheseproductsandanyproductLenovoproducescontainingRoHScompliantFRUs.
RoHScompliantFRUshaveuniqueFRUpartnumbers.Beforeorafter theRoHS implementationdate, failedRoHScompliantpartsmustalwaysbereplacedwithRoHScompliantones,soonlytheFRUsidentifiedascompliantinthesystemHMMordirectsubstitutionsforthoseFRUsmaybeused.
Products marketed before June 2006 Products marketed after June 2006 Current or original part
Replacement FRU Current or original part
Replacement FRU
Non-RoHS CanbeNon-RoHS
MustbeRoHS MustbeRoHSNon-RoHS CanbeRoHS
Non-RoHS CansubtoRoHS
RoHS MustbeRoHS
Note:Adirectsubstitution isapartwithadifferentFRUpartnumber that isautomaticallyshippedbythedistributioncenteratthetimeoftheorder.
19
General checkout
General checkout
Thischapterpresentsthefollowinginformation:• “Whattodofirst”onpage20• “Powersystemcheckout”onpage21
Beforeyougotothecheckout,makesuretoreadthefollowingimportantnotes:
Important notes:• Onlycertifiedtrainedpersonnelcanservicethecomputer.• BeforereplacinganyFRU,readtheentirepageonremovingandreplacingFRUs.
• CarefullyremovescrewsforreusewhenreplacingFRUs.• Beextremelycarefulduringsuchwriteoperationsascopying,saving,orformatting. Drives in the computer that you are servicing sequence might have been altered. If you select an incorrect drive, data or programs might be overwritten.
• ReplaceanFRUonlywithanotherFRUof thecorrectmodel. When you replace an FRU, make sure that the machine model and the FRU part number are correct by referring to the FRU parts list.
• AnFRUshouldnotbereplacedjustbecauseofasingle,unreproduciblefailure.Single failures can occur for a variety of reasons that have nothing to do with a hardware defect, such as cosmic radiation, electrostatic discharge, or software errors. Consider replacing an FRU only when a problem recurs. If you suspect that an FRU is defective, clear the error logs and run the test again. If the error does not recur, do not replace the FRU.
• BecarefulnottoreplaceanondefectiveFRU.
20
YOGA 510-14ISK/YOGA510-14AST/YOGA 510-15ISK Hardware Maintenance Manual
What to do firstWhenyoudoreturnanFRU,youmustincludethefollowinginformationinthepartsexchangeformorpartsreturnformthatyouattachtoit:1. Nameandphonenumberofservicer2. Dateofservice3. Dateonwhichthemachinefailed4. Dateofpurchase5. ProcedureindexandpagenumberinwhichthefailingFRUwasdetected6. FailingFRUnameandpartnumber7. Machinetype,modelnumber,andserialnumber8. Customer’snameandaddress
Note for warranty:During thewarranty period, the customermay beresponsible for repaircosts if thecomputerdamagewascausedbymisuse,accident,modification, unsuitablephysical or operatingenvironment, orimpropermaintenancebythecustomer.The following isa listofsomecommon items thatarenotcoveredunderwarranty and some symptoms thatmight indicate that the systemwassubjectedtostressbeyondnormaluse.Beforecheckingproblemswiththecomputer,determinewhetherthedamageiscoveredunderthewarrantybyreferringtothefollowinglist:
The following are not covered under warranty: • LCDpanelcracked fromtheapplicationofexcessive forceor frombeingdropped
• Scratched(cosmetic)parts• Distortion,deformation,ordiscolorationofthecosmeticparts• Plasticparts,latches,pins,orconnectorsthathavebeencrackedorbrokenbyexcessiveforce
• Damagecausedbyliquidspilledintothesystem• DamagecausedbytheimproperinsertionofaPCCardortheinstallationofanincompatiblecard
• Improperdiskinsertionoruseofanopticaldrive• Diskettedrivedamagecausedbypressureon thediskettedrivecover,foreignmaterialinthedrive,ortheinsertionofadiskettewithmultiplelabels
• Damagedorbentdisketteejectbutton• Fusesblownbyattachmentofanonsupporteddevice• Forgottencomputerpassword(makingthecomputerunusable)• Stickykeyscausedbyspillingaliquidontothekeyboard• UseofanincorrectACadapteronlaptopproducts
The following symptoms might indicate damage caused by nonwarranted activities: • Missingpartsmightbeasymptomofunauthorizedserviceormodification.• Ifthespindleofaharddiskdrivebecomesnoisy,itmayhavebeensubjectedtoexcessiveforce,ordropped.
21
General checkout
Power system checkout
Toverifyasymptom,followthestepsbelow:1. Turnoffthecomputer.2. Removethebatterypack.3. ConnecttheACadapter.4. Makesurethatpowerissuppliedwhenyouturnonthecomputer.5. Turnoffthecomputer.6. DisconnecttheACadapterandinstallthechargedbatterypack.7. Makesure that thebatterypacksuppliespowerwhenyou turnon the
computer.
Ifyoususpectapowerproblem,seetheappropriateoneofthefollowingpowersupplycheckouts:• “CheckingtheACadapter”onpage21• “Checkingoperationalcharging”onpage21• “Checkingthebatterypack”onpage22
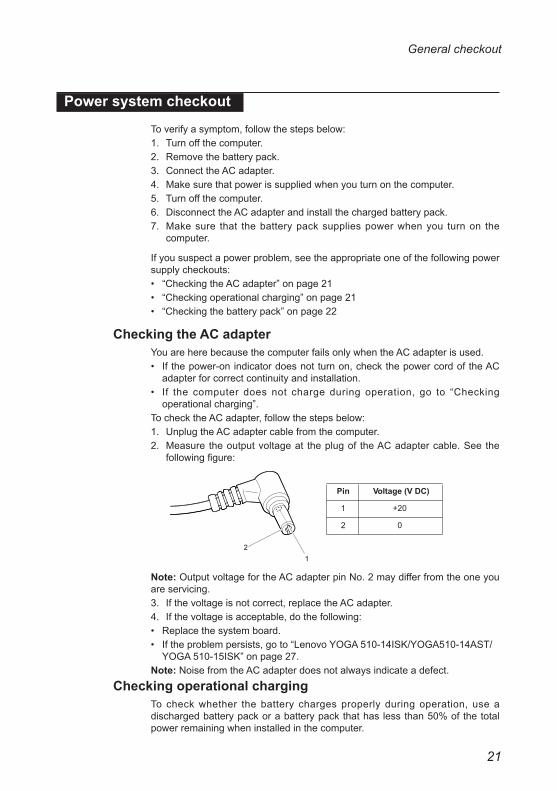
Checking the AC adapter YouareherebecausethecomputerfailsonlywhentheACadapterisused.• Ifthepower-onindicatordoesnotturnon,checkthepowercordoftheACadapterforcorrectcontinuityandinstallation.
• If the computer does not charge during operation, go to “Checkingoperationalcharging”.
TochecktheACadapter,followthestepsbelow:1. UnplugtheACadaptercablefromthecomputer.2. Measuretheoutputvoltageat theplugof theACadaptercable.Seethe
followingfigure:
21
Voltage (V DC)
+20
0
Pin
1
2
Note:OutputvoltagefortheACadapterpinNo.2maydifferfromtheoneyouareservicing.3. Ifthevoltageisnotcorrect,replacetheACadapter.4. Ifthevoltageisacceptable,dothefollowing:• Replacethesystemboard.• Iftheproblempersists,goto“LenovoYOGA510-14ISK/YOGA510-14AST/YOGA510-15ISK”onpage27.
Note:NoisefromtheACadapterdoesnotalwaysindicateadefect.Checking operational charging
Tocheckwhether thebattery chargesproperly duringoperation, useadischargedbatterypackorabatterypackthathaslessthan50%ofthetotalpowerremainingwheninstalledinthecomputer.
22
YOGA 510-14ISK/YOGA510-14AST/YOGA 510-15ISK Hardware Maintenance Manual
Performoperationalcharging. If thebatterystatus indicatoror icondoesnotlighton,removethebatterypackandletitreturntoroomtemperature.Reinstallthebatterypack. If thecharge indicatoror icon isstilloff, replacethebatterypack.
If thecharge indicatorstilldoesnot lighton,replacethesystemboard.Thenreinstallthebatterypack.Ifitisstillnotcharged,gotothenextsection.
Checking the battery packBatterychargingdoesnotstartuntilthePowerMetershowsthatlessthan95%ofthetotalpowerremains;underthisconditionthebatterypackcanchargeto100%ofitscapacity.Thisprotectsthebatterypackfrombeingoverchargedorfromhavingashortenedlife.
Tocheckyourbattery,moveyourcursor to thePowerMeter icon in the icontrayoftheWindows®taskbarandwaitforamoment(butdonotclickit),andthepercentageofbatterypowerremainingisdisplayed.Togetdetailedinformationaboutthebattery,double-clickthePowerMetericon.
Note: If thebatterypackbecomeshot, itmaynotbeable tobecharged.Removeitfromthecomputerandleaveitatroomtemperatureforawhile.Afteritcoolsdown,reinstallandrechargeit.
23
Related service information
Related service information
Thischapterpresentsthefollowinginformation:• “RestoringthefactorycontentsbyusingOneKeyRecovery”onpage23• “Passwords”onpage24• “Powermanagement”onpage25
Restoring the factory contents by using OneKey Recovery
Restore of factory defaultTheLenovoYOGA510-14ISK/YOGA510-14AST/YOGA510-15ISKcomputerscomewithpre-installedOneKeyRecoverySystem.Inordertosaveapplicationfilesand the initialbackedup filesof thesystem, theharddisk inaLenovocomputerincludesahiddenpartitionwhenit isshipped.Ifyouneedtorestorethesystemtothepointofyourfirstbootup,justenterLenovoOneKeyRecoverySystemandrunSystem Recovery.FordetailsofOneKeyRecoverySystem,seethe User Guide for Lenovo OneKey Recovery system.
Note: This will delete all the new data on the system partition (C drive), which is not recoverable. Make sure to back up your critical data before you perform this action.
Whenyouusetherecoverydiscstobootyourcomputer,thesystemwillentertheuser interfaceforsystemrecoveryautomatically.Pleasefollowtheprompttoinsertthebackupdiscstocompletethewholerecoveryprocess.
Note:The recovery process might take up to 2 hours.
24
YOGA 510-14ISK/YOGA510-14AST/YOGA 510-15ISK Hardware Maintenance Manual
Passwords
Asmanyas threepasswordsmaybeneeded foranyLenovocomputer:thepower-onpassword (POP), theharddisk password (HDP), and theadministratorpassword.Ifanyofthesepasswordshasbeenset,apromptforitappearsonthescreenwhenever thecomputer is turnedon.Thecomputerdoesnotstartuntil thepasswordisentered.
Power-on passwordApower-onpassword(POP)protects thesystemfrombeingpoweredonbyanunauthorizedperson.Thepasswordmustbeenteredbeforeanoperatingsystemcanbebooted.
Hard-disk passwordTherearetwohard-diskpasswords(HDPs):+UserHDP-fortheuser+MasterHDP- for thesystemadministrator,whocanuse it togetaccesstotheharddiskdriveeveniftheuserhaschangedtheuserHDPAttention: If theuserHDPhasbeenforgotten,checkwhetheramasterHDPhasbeenset. If ithas, itcanbeused foraccess to theharddiskdrive. IfnomasterHDP isavailable,neitherLenovonorLenovoauthorizedservicetechniciansprovideanyservicestoreseteithertheuserorthemasterHDP,ortorecoverdatafromtheharddiskdrive.Theharddiskdrivecanbereplacedforascheduledfee.
Administrator passwordAdministratorpasswordcontrols theaccessof thewholesetuputility.OnlyaftertheAdministratorpasswordhasbeensetcantheUserpasswordbeset.IfAdministratorpasswordwascleared,theUserpasswordwasclearedtoo.

25
Related service information
Power management
Note:PowermanagementmodesarenotsupportedforAPMoperatingsystem.
Toreducepowerconsumption, thecomputerhas threepowermanagementmodes:screenblank,sleep(standby),andhibernation.
Screen blank stateIf thetimesetonthe“Turnoffmonitor”timer intheoperatingsystemexpires,theLCDbacklight turnsoff.Youcanalso turnoff theLCDbacklight bypressing .
Toendscreenblankstateandresumenormaloperation,pressanykeyonthekeyboard.
Putting the computer to sleep or shutting it downWhenyouhavefinishedworkingwithyourcomputer,youcanputittosleeporshutitdown.
Putting your computer to sleepIfyouwillbeawayfromyourcomputerforonlyashorttime,putthecomputertosleep.Whenthecomputerisinsleepmode,youcanquicklywakeittoresumeuse,bypassingthestartupprocess.Toputthecomputertosleep,dooneofthefollowing:• Closethedisplaylid.• PressthePowerbutton.• Openthestartmenu,andthenselect Power → Sleep.
Note:Waituntil thepower indicator lightstartsblinking(indicating that thecomputer is insleepmode)beforeyoumoveyourcomputer.Movingyourcomputerwhile theharddisk isspinningcandamagetheharddisk,causinglossofdata.
Towakethecomputer,dooneofthefollowing:• Pressanykeyonthekeyboard.• PressthePowerbutton.
26
YOGA 510-14ISK/YOGA510-14AST/YOGA 510-15ISK Hardware Maintenance Manual
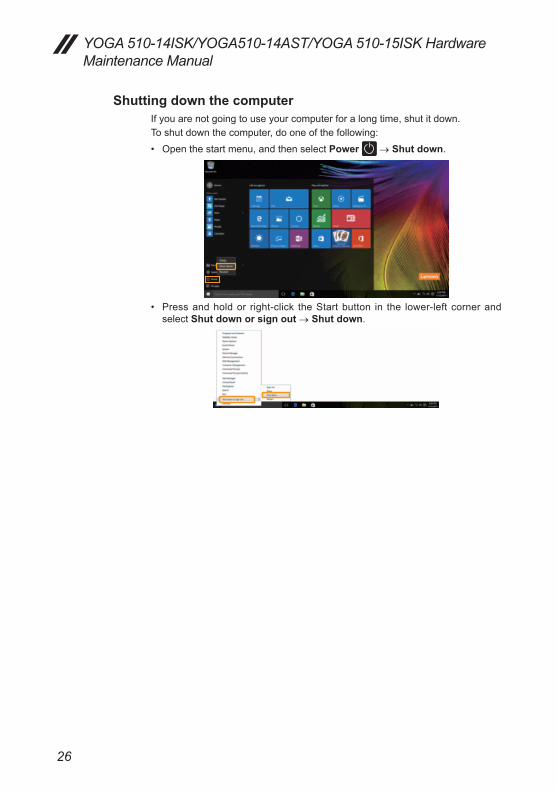
Shutting down the computerIfyouarenotgoingtouseyourcomputerforalongtime,shutitdown.Toshutdownthecomputer,dooneofthefollowing:• Openthestartmenu,andthenselectPower →Shut down.
• Pressandholdor right-click theStartbutton in the lower-leftcornerandselectShut down or sign out→Shut down.
27
Lenovo YOGA 510-14ISK/YOGA510-14AST/ YOGA 510-15ISK
Lenovo YOGA 510-14ISK/YOGA510-14AST/ YOGA 510-15ISK
Thischapterpresents the followingproduct-specificservice referencesandproduct-specificpartsinformation:• “Specifications”onpage27• “Statusindicators”onpage29• “Hotkeys”onpage30• “FRUreplacementnotices”onpage31• “RemovingandreplacinganFRU”onpage32• “Locations”onpage62• “Partslist”onpage64
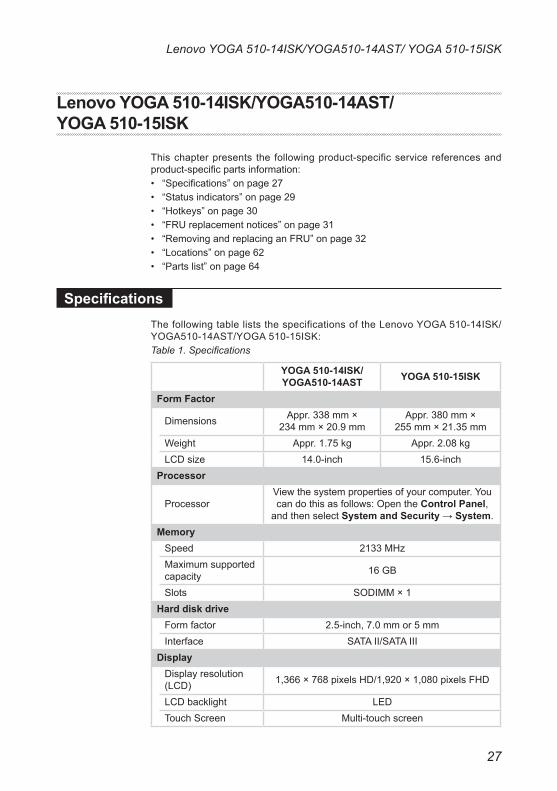
SpecificationsThefollowingtableliststhespecificationsoftheLenovoYOGA510-14ISK/YOGA510-14AST/YOGA510-15ISK:Table 1. Specifications
YOGA 510-14ISK/YOGA510-14AST YOGA 510-15ISK
Form Factor
Dimensions Appr.338mm×234mm×20.9mm
Appr.380mm×255mm×21.35mm
Weight Appr.1.75kg Appr.2.08kgLCDsize 14.0-inch 15.6-inch
Processor
ProcessorViewthesystempropertiesofyourcomputer.Youcandothisasfollows:OpentheControl Panel,andthenselectSystem and Security→System.
MemorySpeed 2133MHzMaximumsupportedcapacity 16GB
Slots SODIMM×1Hard disk driveFormfactor 2.5-inch,7.0mmor5mmInterface SATAII/SATAIII
DisplayDisplayresolution(LCD) 1,366×768pixelsHD/1,920×1,080pixelsFHD
LCDbacklight LEDTouchScreen Multi-touchscreen
28
YOGA 510-14ISK/YOGA510-14AST/YOGA 510-15ISK Hardware Maintenance Manual
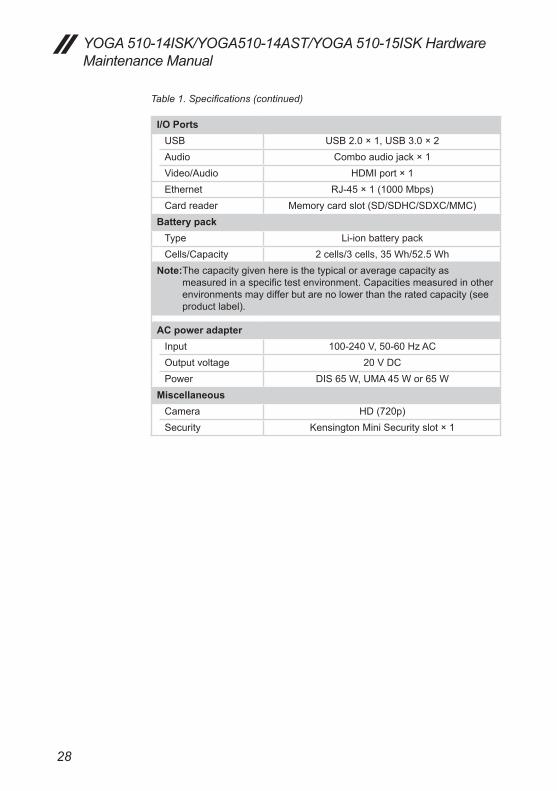
Table 1. Specifications (continued)
I/O PortsUSB USB2.0×1,USB3.0×2Audio Comboaudiojack×1Video/Audio HDMIport×1Ethernet RJ-45×1(1000Mbps)Cardreader Memorycardslot(SD/SDHC/SDXC/MMC)
Battery packType Li-ionbatterypackCells/Capacity 2cells/3cells,35Wh/52.5Wh
Note:Thecapacitygivenhereisthetypicaloraveragecapacityasmeasuredinaspecifictestenvironment.Capacitiesmeasuredinotherenvironmentsmaydifferbutarenolowerthantheratedcapacity(seeproductlabel).
AC power adapterInput 100-240V,50-60HzACOutputvoltage 20VDCPower DIS65W,UMA45Wor65W
MiscellaneousCamera HD(720p)Security KensingtonMiniSecurityslot×1
29
Lenovo YOGA 510-14ISK/YOGA510-14AST/ YOGA 510-15ISK
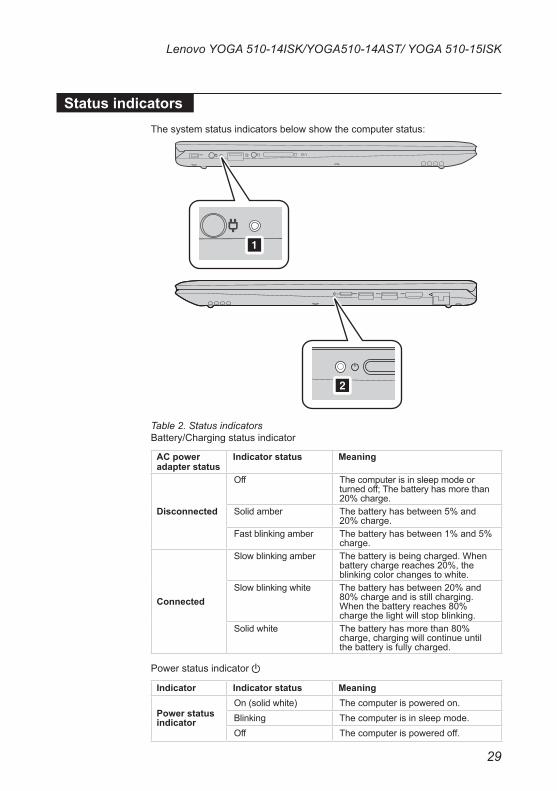
Status indicatorsThesystemstatusindicatorsbelowshowthecomputerstatus:
a
b
Table 2. Status indicators Battery/Chargingstatusindicator
AC power adapter status
Indicator status Meaning
Disconnected
Off Thecomputerisinsleepmodeorturnedoff;Thebatteryhasmorethan20%charge.
Solidamber Thebatteryhasbetween5%and20%charge.
Fastblinkingamber Thebatteryhasbetween1%and5%charge.
Connected
Slowblinkingamber Thebatteryisbeingcharged.Whenbatterychargereaches20%,theblinkingcolorchangestowhite.
Slowblinkingwhite Thebatteryhasbetween20%and80%chargeandisstillcharging.Whenthebatteryreaches80%chargethelightwillstopblinking.
Solidwhite Thebatteryhasmorethan80%charge,chargingwillcontinueuntilthebatteryisfullycharged.
Powerstatusindicator
Indicator Indicator status Meaning
Power status indicator
On(solidwhite) Thecomputerispoweredon.Blinking Thecomputerisinsleepmode.Off Thecomputerispoweredoff.
30
YOGA 510-14ISK/YOGA510-14AST/YOGA 510-15ISK Hardware Maintenance Manual
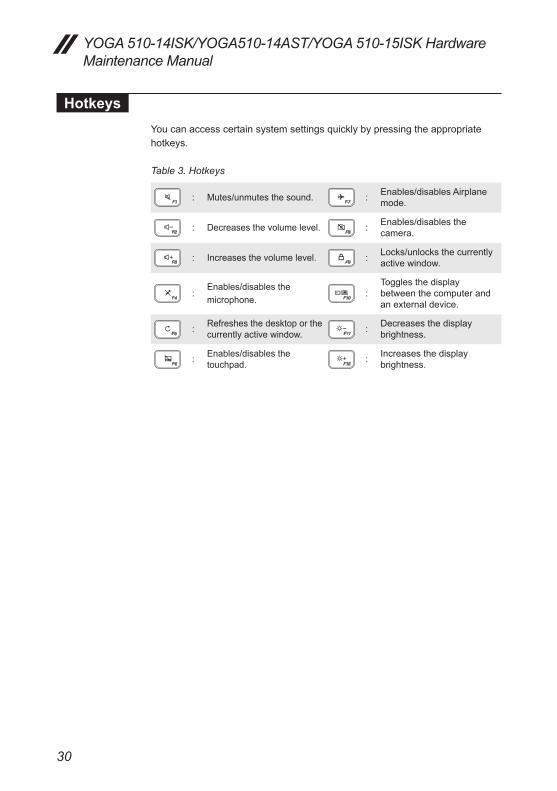
HotkeysYoucanaccesscertainsystemsettingsquicklybypressingtheappropriatehotkeys.
Table 3. Hotkeys
: Mutes/unmutesthesound. : Enables/disablesAirplanemode.
: Decreasesthevolumelevel. : Enables/disablesthecamera.
: Increasesthevolumelevel. : Locks/unlocksthecurrentlyactivewindow.
:Enables/disablesthemicrophone.
:Togglesthedisplaybetweenthecomputerandanexternaldevice.
: Refreshesthedesktoporthecurrentlyactivewindow. : Decreasesthedisplay
brightness.
: Enables/disablesthetouchpad. : Increasesthedisplay
brightness.
31
Lenovo YOGA 510-14ISK/YOGA510-14AST/ YOGA 510-15ISK
FRU replacement notices
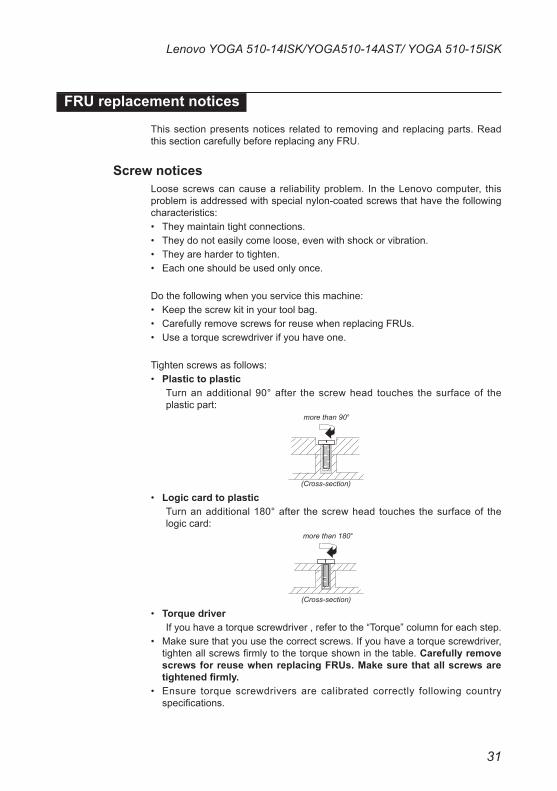
Thissectionpresentsnoticesrelated toremovingandreplacingparts.ReadthissectioncarefullybeforereplacinganyFRU.
Screw notices Loosescrewscancausea reliabilityproblem. In theLenovocomputer, thisproblemisaddressedwithspecialnylon-coatedscrewsthathavethefollowingcharacteristics:• Theymaintaintightconnections.• Theydonoteasilycomeloose,evenwithshockorvibration.• Theyarehardertotighten.• Eachoneshouldbeusedonlyonce.
Dothefollowingwhenyouservicethismachine:• Keepthescrewkitinyourtoolbag.• CarefullyremovescrewsforreusewhenreplacingFRUs.• Useatorquescrewdriverifyouhaveone.
Tightenscrewsasfollows:• Plastic to plastic Turnanadditional90°after thescrewhead touches thesurfaceof the
plasticpart:more than 90°
(Cross-section)
• Logic card to plastic Turnanadditional180°after thescrewhead touches thesurfaceof the
logiccard:more than 180°
(Cross-section)
• Torque driver Ifyouhaveatorquescrewdriver,refertothe“Torque”columnforeachstep.• Makesurethatyouusethecorrectscrews.Ifyouhaveatorquescrewdriver,tightenallscrewsfirmlytothetorqueshowninthetable.Carefully remove screws for reuse when replacing FRUs. Make sure that all screws are tightened firmly.
• Ensure torque screwdrivers are calibrated correctly following countryspecifications.
32
YOGA 510-14ISK/YOGA510-14AST/YOGA 510-15ISK Hardware Maintenance Manual
Removing and replacing an FRUThissectionpresentsexplodedfigureswiththeinstructionsto indicatehowtoremoveandreplacetheFRU.Makesuretoobservethefollowinggeneralrules:1. Donotattempttoserviceanycomputerunlessyouhavebeentrainedand
certified.Anuntrainedpersonrunstheriskofdamagingparts.2. BeforereplacinganyFRU,review“FRUreplacementnotices”onpage31.3. BeginbyremovinganyFRUsthathave toberemovedbefore the failing
FRU.AnyofsuchFRUsarelistedatthetopofthepage.Removethemintheorderinwhichtheyarelisted.
4. FollowthecorrectsequenceinthestepstoremovetheFRU,asgiveninthefiguresbythenumbersinsquarecallouts.
5. WhenturningascrewtoreplaceanFRU,turnitinthedirectionasgivenbythearrowinthefigure.
6. WhenremovingtheFRU,moveit inthedirectionasgivenbythearrowinthefigure.
7. Toput thenewFRUinplace,reversetheremovalproceduresandfollowany of the notes that pertain to replacement. For information aboutconnectingandarranginginternalcables,see“Locations”onpage62.
8. WhenreplacinganFRU,usethecorrectscrewasshownintheprocedures.
DANGERBefore removing any FRU, turn off the computer, unplug all power cords from electrical outlets, remove the battery pack, and then disconnect any of the interconnecting cables.
Attention:AfterreplacinganFRU,donotturnonthecomputeruntilyouhavemadesurethatallscrews,springs,andothersmallpartsareinplaceandnoneare looseinsidethecomputer.Verify thisbyshakingthecomputergentlyandlisteningforrattlingsounds.Metallicpartsormetalflakescancauseelectricalshortcircuits.
Attention:The systemboard is sensitive to, and can be damagedby,electrostaticdischarge.Before touching it,establishpersonalgroundingbytouchingagroundpointwithonehandorusinganelectrostaticdischarge(ESD)strap(P/N6405959)toremovepotentialshockreasons.
Note:TheillustrationsusedinthissectionareoftheLenovoYOGA510-15ISK,unlessotherwisestated.
33
Lenovo YOGA 510-14ISK/YOGA510-14AST/ YOGA 510-15ISK
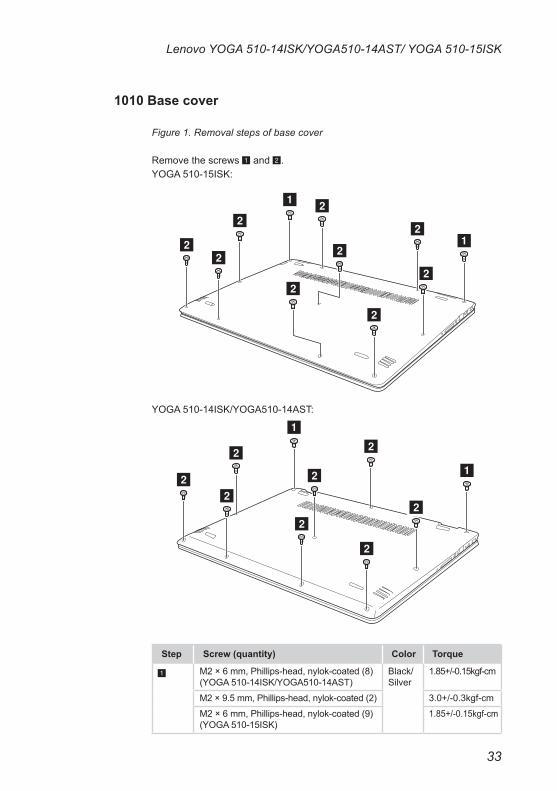
1010 Base cover
Figure 1. Removal steps of base cover
Removethescrews1and2.YOGA510-15ISK:
a
ab
b
bb
bb
b
b
b
YOGA510-14ISK/YOGA510-14AST:
a
a
b
bb
b
b
b
b
b
Step Screw (quantity) Color Torque
1 M2×6mm,Phillips-head,nylok-coated(8)(YOGA510-14ISK/YOGA510-14AST)
Black/Silver
1.85+/-0.15kgf-cm
M2×9.5mm,Phillips-head,nylok-coated(2) 3.0+/-0.3kgf-cm
M2×6mm,Phillips-head,nylok-coated(9)(YOGA510-15ISK)
1.85+/-0.15kgf-cm
34
YOGA 510-14ISK/YOGA510-14AST/YOGA 510-15ISK Hardware Maintenance Manual
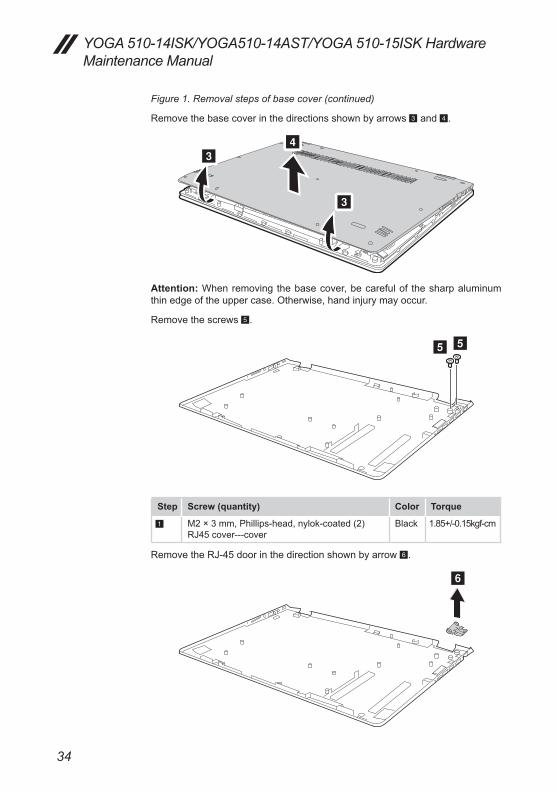
Figure 1. Removal steps of base cover (continued)
Removethebasecoverinthedirectionsshownbyarrows3and4.
d
c
c
Attention:Whenremovingthebasecover,becarefulof thesharpaluminumthinedgeoftheuppercase.Otherwise,handinjurymayoccur.
Removethescrews5.
ee
Step Screw (quantity) Color Torque
1 M2×3mm,Phillips-head,nylok-coated(2)RJ45cover---cover
Black 1.85+/-0.15kgf-cm
RemovetheRJ-45doorinthedirectionshownbyarrow6.
f
35
Lenovo YOGA 510-14ISK/YOGA510-14AST/ YOGA 510-15ISK
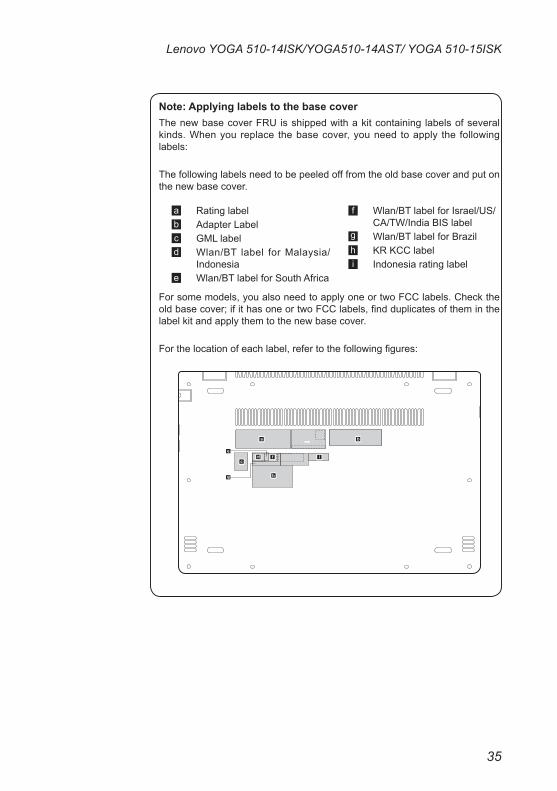
Note: Applying labels to the base coverThenewbasecoverFRUisshippedwithakitcontaining labelsofseveralkinds.Whenyoureplace thebasecover,youneed toapply the followinglabels:
Thefollowinglabelsneedtobepeeledofffromtheoldbasecoverandputonthenewbasecover.
a Ratinglabelb AdapterLabelc GMLlabeld Wlan/BT label forMalaysia/
Indonesiae Wlan/BTlabelforSouthAfrica
f Wlan/BTlabelforIsrael/US/CA/TW/IndiaBISlabel
g Wlan/BTlabelforBrazilh KRKCClabeli Indonesiaratinglabel
Forsomemodels,youalsoneedtoapplyoneortwoFCClabels.Checktheoldbasecover;ifithasoneortwoFCClabels,findduplicatesoftheminthelabelkitandapplythemtothenewbasecover.
Forthelocationofeachlabel,refertothefollowingfigures:
a
c
h
id
g
fe
b
36
YOGA 510-14ISK/YOGA510-14AST/YOGA 510-15ISK Hardware Maintenance Manual
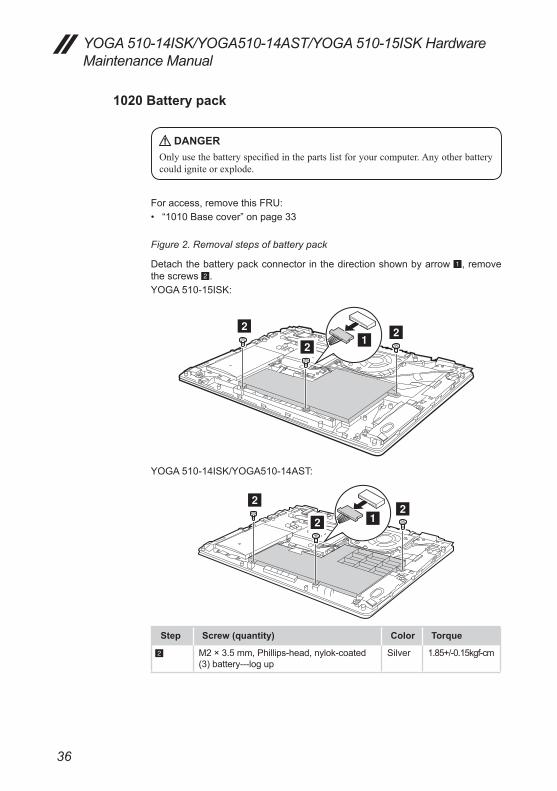
1020 Battery pack
DANGEROnly use the battery specified in the parts list for your computer. Any other battery could ignite or explode.
Foraccess,removethisFRU:• “1010Basecover”onpage33
Figure 2. Removal steps of battery pack
Detachthebatterypackconnectorinthedirectionshownbyarrow1,removethescrews2.YOGA510-15ISK:
b
ba
b
YOGA510-14ISK/YOGA510-14AST:
b
b
ab
Step Screw (quantity) Color Torque
2 M2×3.5mm,Phillips-head,nylok-coated(3)battery---logup
Silver 1.85+/-0.15kgf-cm
37
Lenovo YOGA 510-14ISK/YOGA510-14AST/ YOGA 510-15ISK
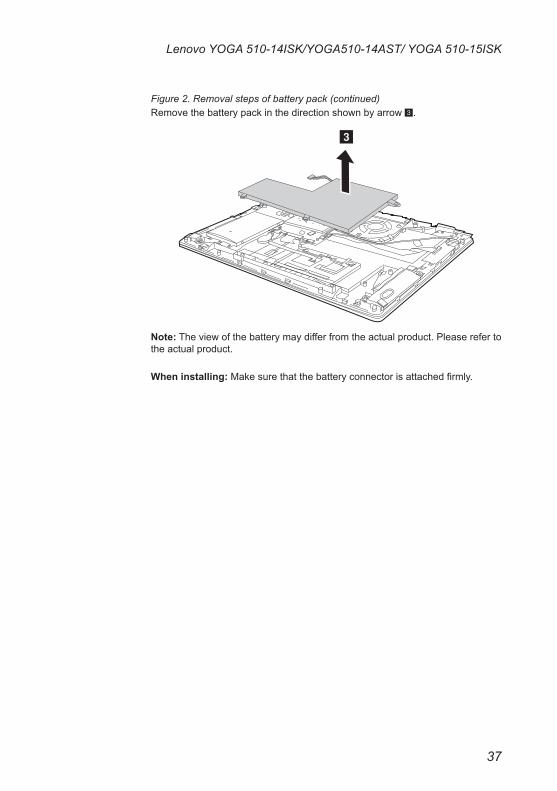
Figure 2. Removal steps of battery pack (continued)Removethebatterypackinthedirectionshownbyarrow3.
c
Note:Theviewofthebatterymaydifferfromtheactualproduct.Pleaserefertotheactualproduct.
When installing: Makesurethatthebatteryconnectorisattachedfirmly.
38
YOGA 510-14ISK/YOGA510-14AST/YOGA 510-15ISK Hardware Maintenance Manual
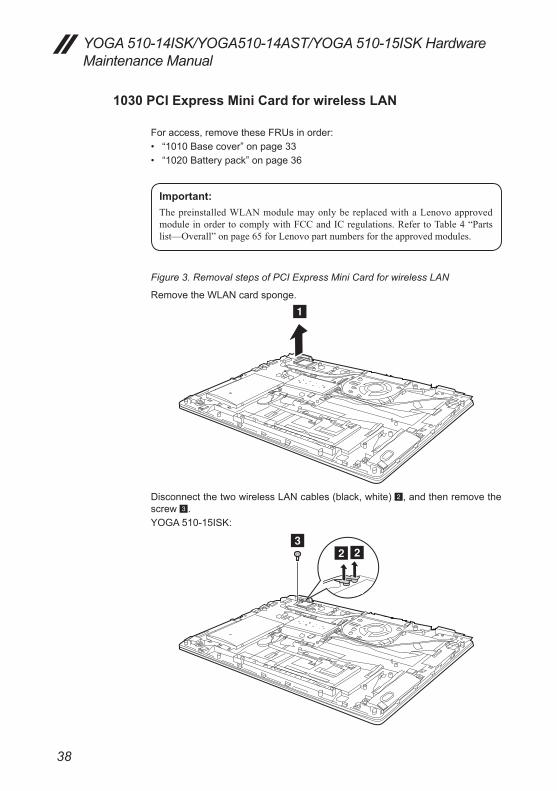
1030 PCI Express Mini Card for wireless LAN
Foraccess,removetheseFRUsinorder:• “1010Basecover”onpage33• “1020Batterypack”onpage36
Important: The preinstalled WLAN module may only be replaced with a Lenovo approved module in order to comply with FCC and IC regulations. Refer to Table 4 “Parts list—Overall” on page 65 for Lenovo part numbers for the approved modules.
Figure 3. Removal steps of PCI Express Mini Card for wireless LAN
RemovetheWLANcardsponge.
a
DisconnectthetwowirelessLANcables(black,white)2,andthenremovethescrew3.YOGA510-15ISK:
bbc

39
Lenovo YOGA 510-14ISK/YOGA510-14AST/ YOGA 510-15ISK
Figure 3. Removal steps of PCI Express Mini Card for wireless LAN (continued)YOGA510-14ISK/YOGA510-14AST:
bbc
Instep1,unplugthe jacksbyusingtheremoval toolantennaRFconnector(P/N:08K7159),orpickuptheconnectorswithyourfingersandgentlyunplugtheminthedirectionshownbythearrows.
Notes:ThewirelessLANcardhas2cablesinstep1. ThewirelessLANcardinsomemodelsmighthave3cablesinstep1.
Step Screw (quantity) Color Torque
3 M2×3mm,Phillips-head,nylok-coated(1)wirelesscard---logup
Black 1.85+/-0.15kgf-cm

40
YOGA 510-14ISK/YOGA510-14AST/YOGA 510-15ISK Hardware Maintenance Manual
Figure 3. Removal steps of PCI Express Mini Card for wireless LAN (continued)
Removethecardinthedirectionshownbyarrow4.
d
When installing:• InmodelswithawirelessLANcardthathastwoantennaconnectors,plugtheblackcable(1st)(MAIN)intothejacklabeledMAIN,andthegreycable(2nd)(AUX)intothejacklabeledAUXonthecard.
• InmodelswithawirelessLANcardthathasthreeantennaconnectors,plugtheblackcable(1st)(MAIN)intothejacklabeled1,thegreycable(3rd)intothejacklabeled3,andthewhitecable(2nd)(AUX)intothejacklabeled2onthecard.
• Applythespongetothecardasshownbelow.
41
Lenovo YOGA 510-14ISK/YOGA510-14AST/ YOGA 510-15ISK
1040 DIMM
Foraccess,removetheseFRUsinorder:• “1010Basecover”onpage33• “1020Batterypack”onpage36
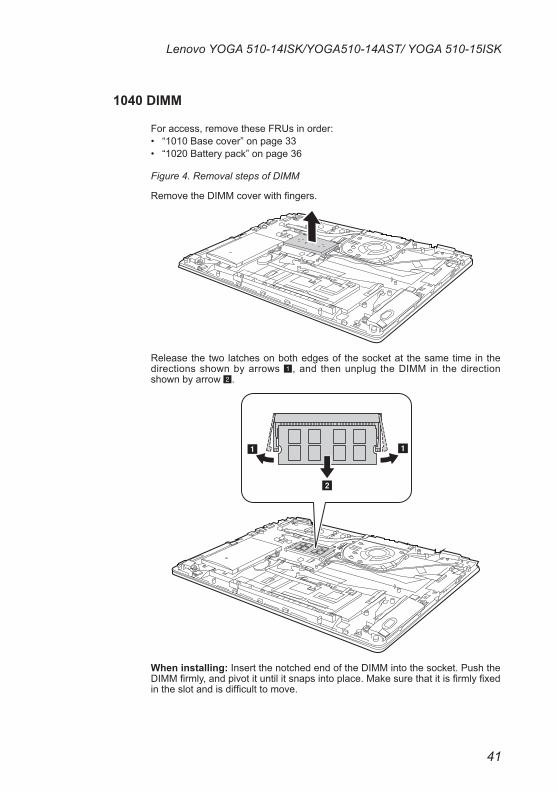
Figure 4. Removal steps of DIMM
RemovetheDIMMcoverwithfingers.
Releasethetwolatchesonbothedgesof thesocketat thesametimeinthedirectionsshownbyarrows1,and thenunplug theDIMM in thedirectionshownbyarrow2.
aa
b
When installing:InsertthenotchedendoftheDIMMintothesocket.PushtheDIMMfirmly,andpivotituntilitsnapsintoplace.Makesurethatitisfirmlyfixedintheslotandisdifficulttomove.
42
YOGA 510-14ISK/YOGA510-14AST/YOGA 510-15ISK Hardware Maintenance Manual
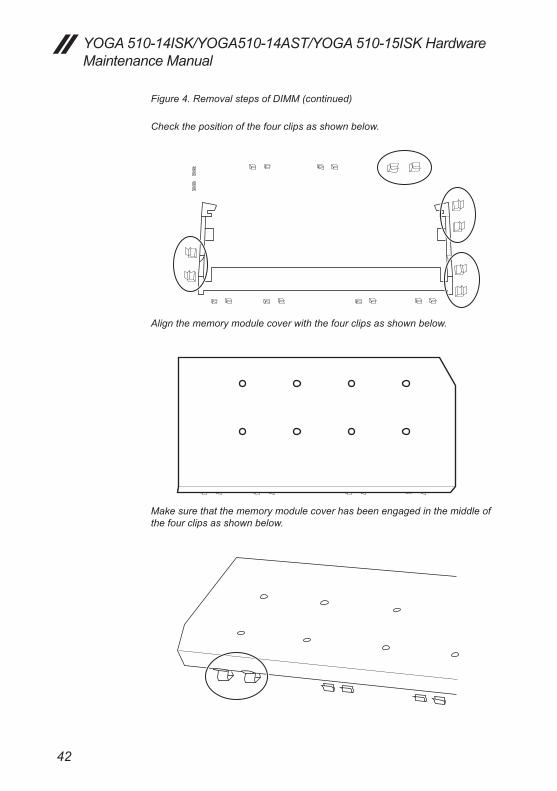
Figure 4. Removal steps of DIMM (continued)
Check the position of the four clips as shown below.
Align the memory module cover with the four clips as shown below.
Make sure that the memory module cover has been engaged in the middle of the four clips as shown below.
43
Lenovo YOGA 510-14ISK/YOGA510-14AST/ YOGA 510-15ISK
1050 Speakers
Foraccess,removetheseFRUsinorder:• “1010Basecover”onpage33• “1020Batterypack”onpage36
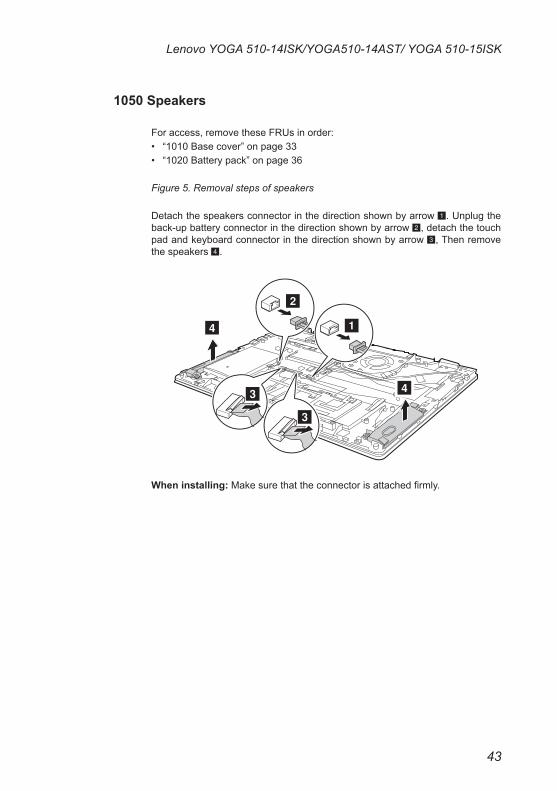
Figure 5. Removal steps of speakers
Detachthespeakersconnectorinthedirectionshownbyarrow1.Unplugtheback-upbatteryconnectorinthedirectionshownbyarrow2,detachthetouchpadandkeyboardconnectorinthedirectionshownbyarrow3,Thenremovethespeakers4.
d
d
b
a
c
c
When installing:Makesurethattheconnectorisattachedfirmly.
44
YOGA 510-14ISK/YOGA510-14AST/YOGA 510-15ISK Hardware Maintenance Manual
1060 Hard disk drive
Foraccess,removetheseFRUsinorder:• “1010Basecover”onpage33• “1020Batterypack”onpage36• “1050Speakers”onpage43
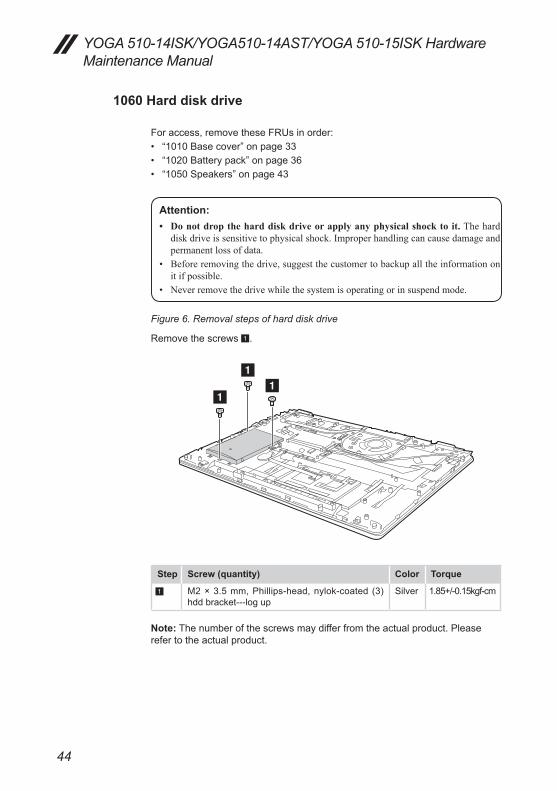
Attention: • Donotdroptheharddiskdriveorapplyanyphysicalshocktoit. The hard
disk drive is sensitive to physical shock. Improper handling can cause damage and permanent loss of data.
• Before removing the drive, suggest the customer to backup all the information on it if possible.
• Never remove the drive while the system is operating or in suspend mode.
Figure 6. Removal steps of hard disk drive
Removethescrews1.
aa
a
Step Screw (quantity) Color Torque
1 M2×3.5mm,Phillips-head,nylok-coated(3)hddbracket---logup
Silver 1.85+/-0.15kgf-cm
Note:Thenumberofthescrewsmaydifferfromtheactualproduct.Pleaserefertotheactualproduct.
45
Lenovo YOGA 510-14ISK/YOGA510-14AST/ YOGA 510-15ISK
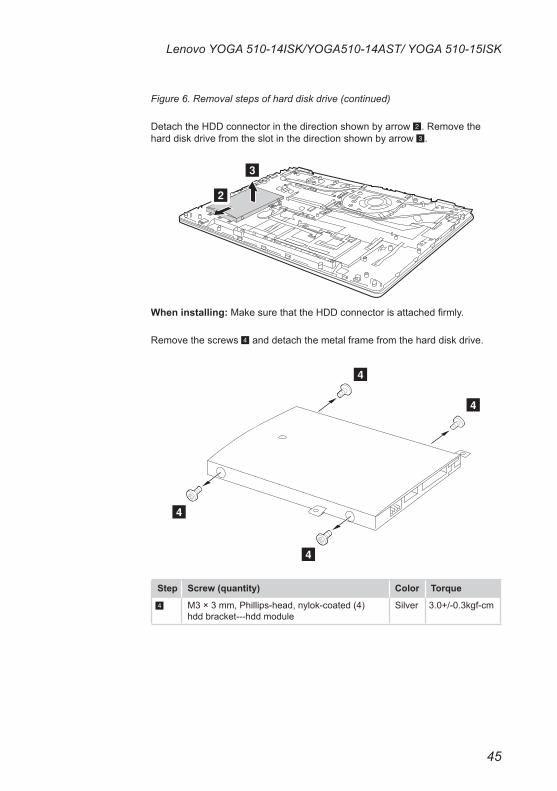
Figure 6. Removal steps of hard disk drive (continued)
DetachtheHDDconnectorinthedirectionshownbyarrow2.Removetheharddiskdrivefromtheslotinthedirectionshownbyarrow3.
b
c
When installing:MakesurethattheHDDconnectorisattachedfirmly.
Removethescrews4anddetachthemetalframefromtheharddiskdrive.
d
d
d
d
Step Screw (quantity) Color Torque
4 M3×3mm,Phillips-head,nylok-coated(4)hddbracket---hddmodule
Silver 3.0+/-0.3kgf-cm
46
YOGA 510-14ISK/YOGA510-14AST/YOGA 510-15ISK Hardware Maintenance Manual
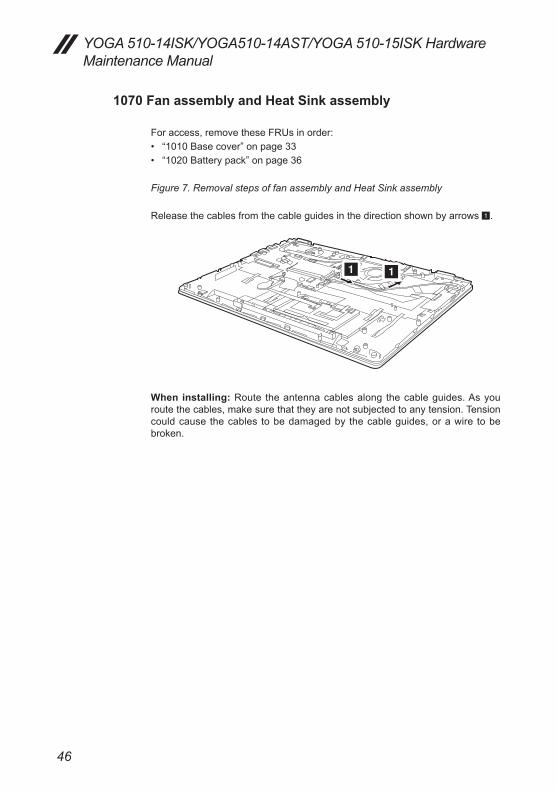
1070 Fan assembly and Heat Sink assembly
Foraccess,removetheseFRUsinorder:• “1010Basecover”onpage33• “1020Batterypack”onpage36
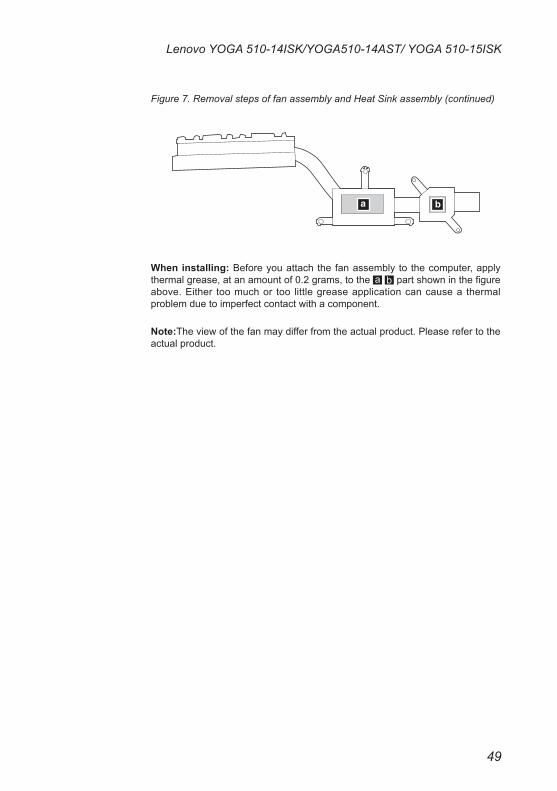
Figure 7. Removal steps of fan assembly and Heat Sink assembly
Releasethecablesfromthecableguidesinthedirectionshownbyarrows1.
a a
When installing:Route theantennacablesalong thecableguides.Asyouroutethecables,makesurethattheyarenotsubjectedtoanytension.Tensioncouldcausethecables tobedamagedby thecableguides,orawire tobebroken.
47
Lenovo YOGA 510-14ISK/YOGA510-14AST/ YOGA 510-15ISK
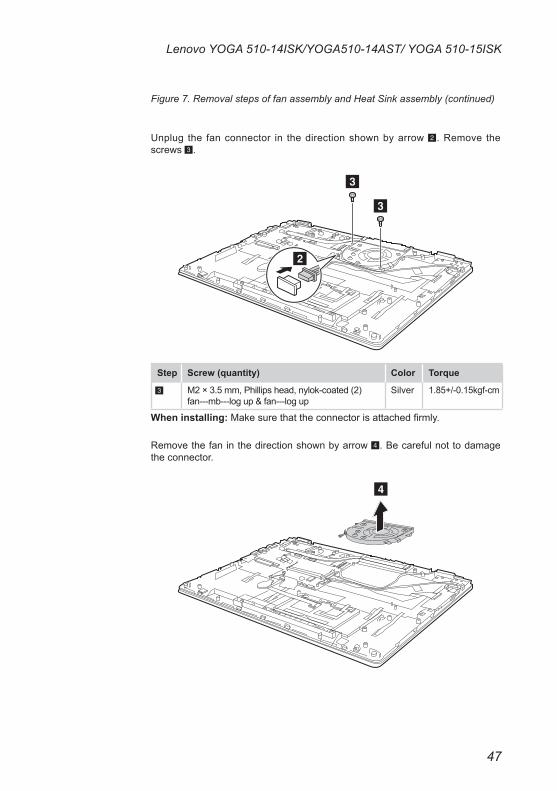
Figure 7. Removal steps of fan assembly and Heat Sink assembly (continued)
Unplug the fanconnector in thedirectionshownbyarrow2.Remove thescrews3.
c
c
b
Step Screw (quantity) Color Torque
3 M2×3.5mm,Phillipshead,nylok-coated(2)fan---mb---logup&fan---logup
Silver 1.85+/-0.15kgf-cm
When installing:Makesurethattheconnectorisattachedfirmly.
Removethefaninthedirectionshownbyarrow4.Becarefulnottodamagetheconnector.
d
48
YOGA 510-14ISK/YOGA510-14AST/YOGA 510-15ISK Hardware Maintenance Manual
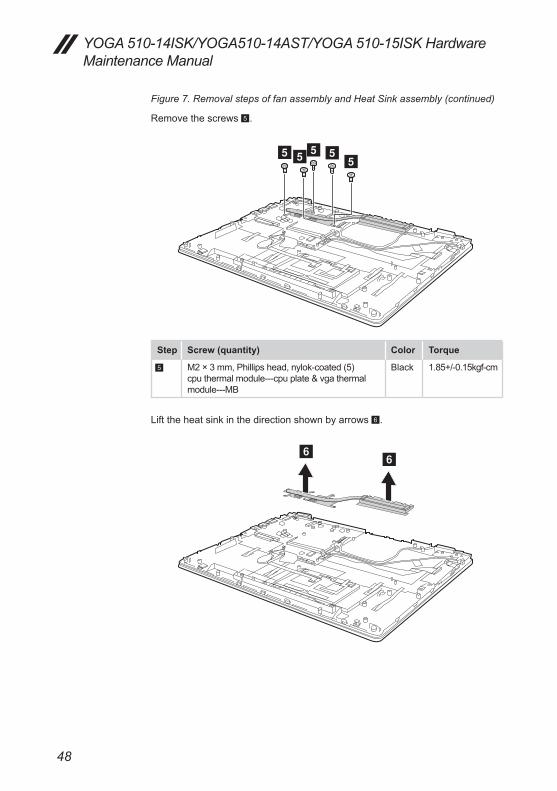
Figure 7. Removal steps of fan assembly and Heat Sink assembly (continued)
Removethescrews5.
e e eee
Step Screw (quantity) Color Torque
5 M2×3mm,Phillipshead,nylok-coated(5)cputhermalmodule---cpuplate&vgathermalmodule---MB
Black 1.85+/-0.15kgf-cm
Lifttheheatsinkinthedirectionshownbyarrows6.
ff
49
Lenovo YOGA 510-14ISK/YOGA510-14AST/ YOGA 510-15ISK
Figure 7. Removal steps of fan assembly and Heat Sink assembly (continued)
a b
When installing:Beforeyouattachthefanassemblytothecomputer,applythermalgrease,atanamountof0.2grams,tothe partshowninthefigureabove.Either toomuchor too littlegreaseapplicationcancausea thermalproblemduetoimperfectcontactwithacomponent.
Note:Theviewofthefanmaydifferfromtheactualproduct.Pleaserefertotheactualproduct.
50
YOGA 510-14ISK/YOGA510-14AST/YOGA 510-15ISK Hardware Maintenance Manual
1080 IO board, DC-in cable
Foraccess,removetheseFRUsinorder:• “1010Basecover”onpage33• “1020Batterypack”onpage36• “1070FanassemblyandHeatSinkassembly”onpage46
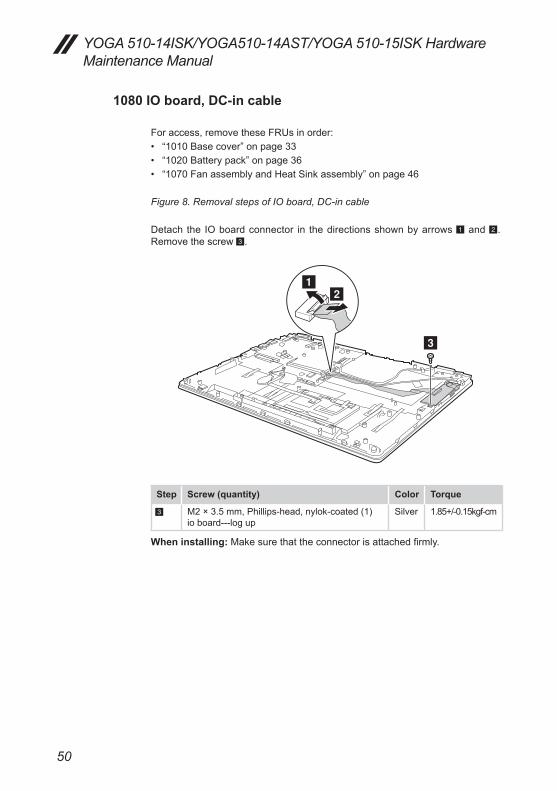
Figure 8. Removal steps of IO board, DC-in cable
Detach the IOboardconnector in thedirectionsshownbyarrows1and2.Removethescrew3.
ba
c
Step Screw (quantity) Color Torque
3 M2×3.5mm,Phillips-head,nylok-coated(1)ioboard---logup
Silver 1.85+/-0.15kgf-cm
When installing:Makesurethattheconnectorisattachedfirmly.
51
Lenovo YOGA 510-14ISK/YOGA510-14AST/ YOGA 510-15ISK
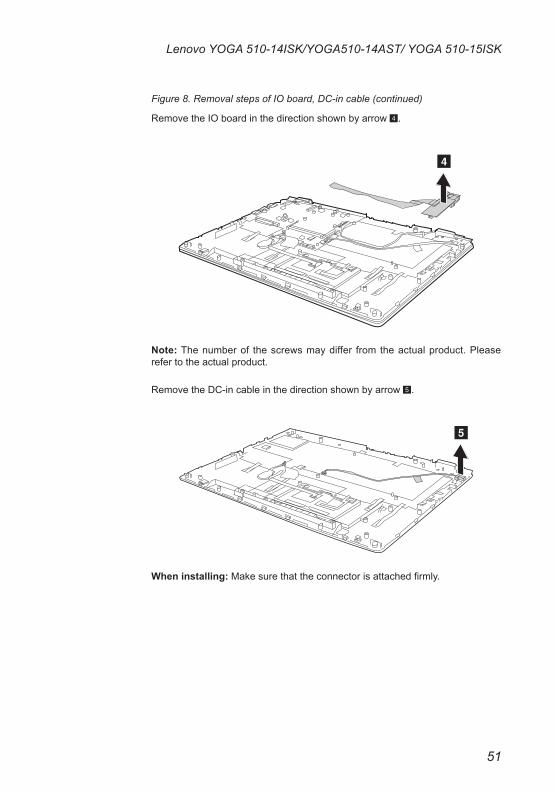
Figure 8. Removal steps of IO board, DC-in cable (continued)
RemovetheIOboardinthedirectionshownbyarrow4.
d
Note:Thenumberof thescrewsmaydiffer fromtheactualproduct.Pleaserefertotheactualproduct.
RemovetheDC-incableinthedirectionshownbyarrow5.
e
When installing:Makesurethattheconnectorisattachedfirmly.
52
YOGA 510-14ISK/YOGA510-14AST/YOGA 510-15ISK Hardware Maintenance Manual
1090 System board
Important notices for handling the system board:When handling the system board, bear the following in mind.• Be careful not to drop the system board on a bench top that has a hard surface,
such as metal, wood, or composite.• Avoid rough handling of any kind.• During the whole process, make sure not to drop or stack the system board.• If you put a system board down, make sure to put it only on a padded surface such
as an ESD mat or conductive corrugated material.
Foraccess,removetheseFRUsinorder:• “1010Basecover”onpage33• “1020Batterypack”onpage36• “1030PCIExpressMiniCardforwirelessLAN”onpage38• “1040DIMM”onpage41• “1050Speakers”onpage43• “1060Harddiskdrive”onpage44• “1070FanassemblyandHeatSinkassembly”onpage46• “1080IOboard,DC-incable”onpage50
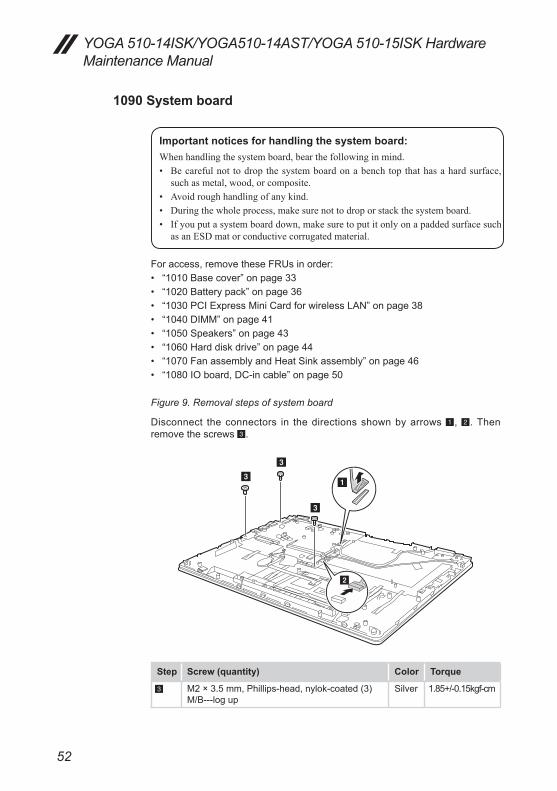
Figure 9. Removal steps of system board
Disconnect theconnectors in thedirectionsshownbyarrows1,2.Thenremovethescrews3.
b
c
c
c
a
Step Screw (quantity) Color Torque
3 M2×3.5mm,Phillips-head,nylok-coated(3)M/B---logup
Silver 1.85+/-0.15kgf-cm
53
Lenovo YOGA 510-14ISK/YOGA510-14AST/ YOGA 510-15ISK
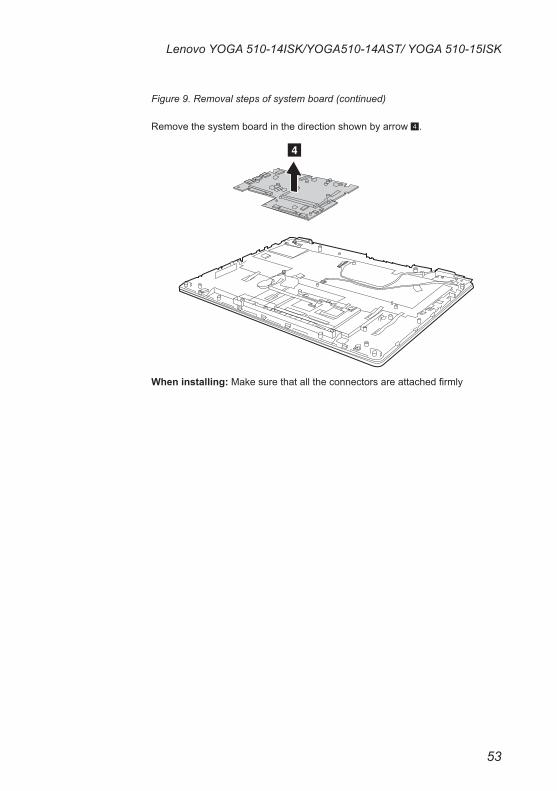
Figure 9. Removal steps of system board (continued)
Removethesystemboardinthedirectionshownbyarrow4.
d
When installing:Makesurethatalltheconnectorsareattachedfirmly
54
YOGA 510-14ISK/YOGA510-14AST/YOGA 510-15ISK Hardware Maintenance Manual
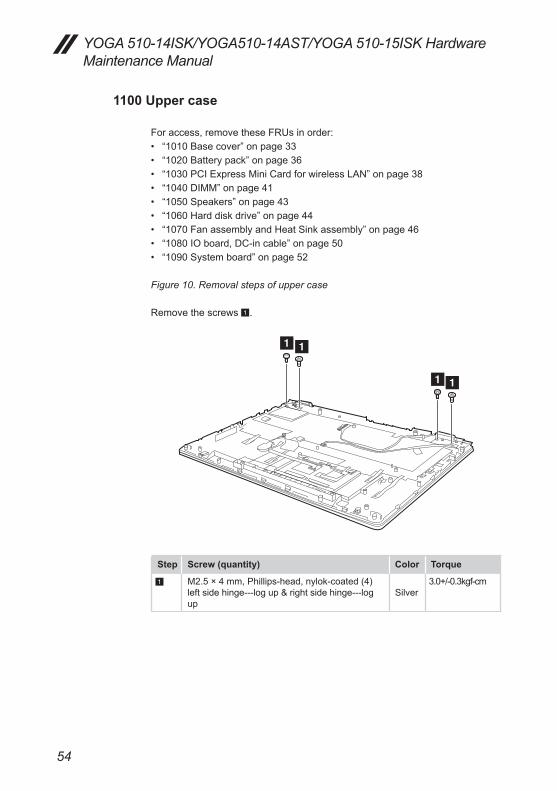
1100 Upper case
Foraccess,removetheseFRUsinorder:• “1010Basecover”onpage33• “1020Batterypack”onpage36• “1030PCIExpressMiniCardforwirelessLAN”onpage38• “1040DIMM”onpage41• “1050Speakers”onpage43• “1060Harddiskdrive”onpage44• “1070FanassemblyandHeatSinkassembly”onpage46• “1080IOboard,DC-incable”onpage50• “1090Systemboard”onpage52
Figure 10. Removal steps of upper case
Removethescrews1.
aa
aa
Step Screw (quantity) Color Torque
1 M2.5×4mm,Phillips-head,nylok-coated(4)leftsidehinge---logup&rightsidehinge---logup
Silver3.0+/-0.3kgf-cm
55
Lenovo YOGA 510-14ISK/YOGA510-14AST/ YOGA 510-15ISK
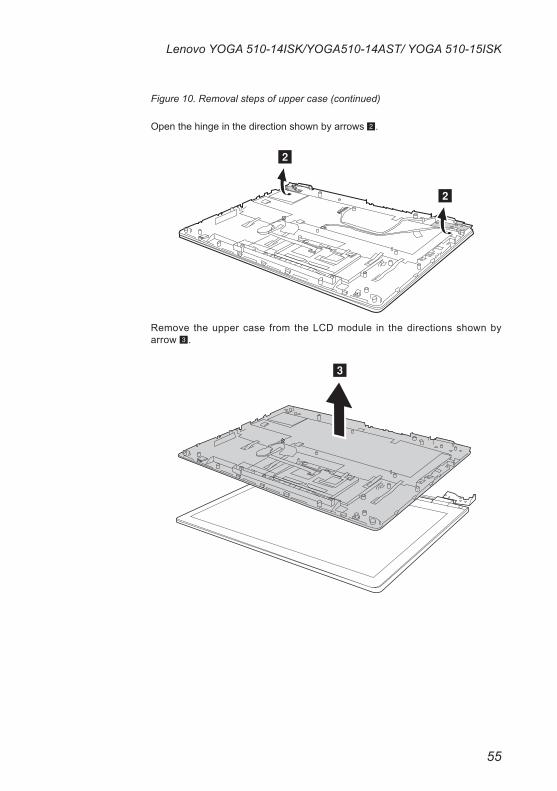
Figure 10. Removal steps of upper case (continued)
Openthehingeinthedirectionshownbyarrows2.
b
b
Remove theuppercase from theLCDmodule in thedirectionsshownbyarrow3.
c
56
YOGA 510-14ISK/YOGA510-14AST/YOGA 510-15ISK Hardware Maintenance Manual
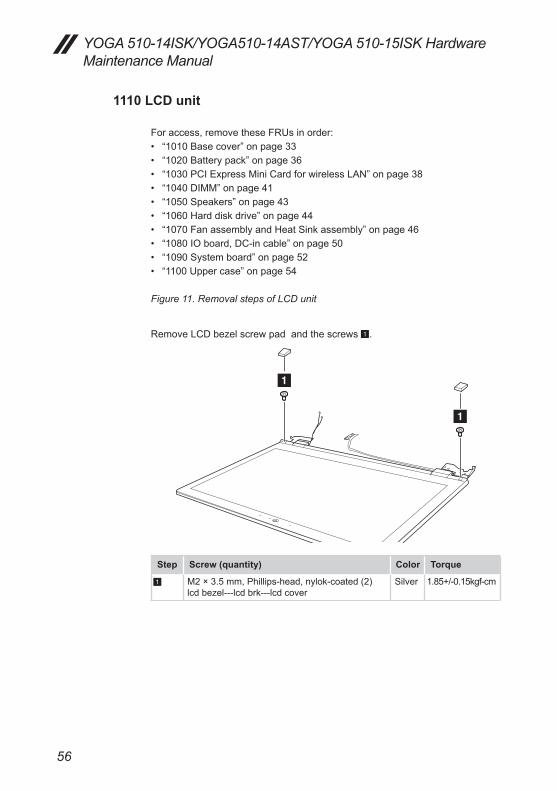
1110 LCD unit
Foraccess,removetheseFRUsinorder:• “1010Basecover”onpage33• “1020Batterypack”onpage36• “1030PCIExpressMiniCardforwirelessLAN”onpage38• “1040DIMM”onpage41• “1050Speakers”onpage43• “1060Harddiskdrive”onpage44• “1070FanassemblyandHeatSinkassembly”onpage46• “1080IOboard,DC-incable”onpage50• “1090Systemboard”onpage52• “1100Uppercase”onpage54
Figure 11. Removal steps of LCD unit
RemoveLCDbezelscrewpadandthescrews1.
a
a
Step Screw (quantity) Color Torque
1 M2×3.5mm,Phillips-head,nylok-coated(2)lcdbezel---lcdbrk---lcdcover
Silver 1.85+/-0.15kgf-cm
57
Lenovo YOGA 510-14ISK/YOGA510-14AST/ YOGA 510-15ISK
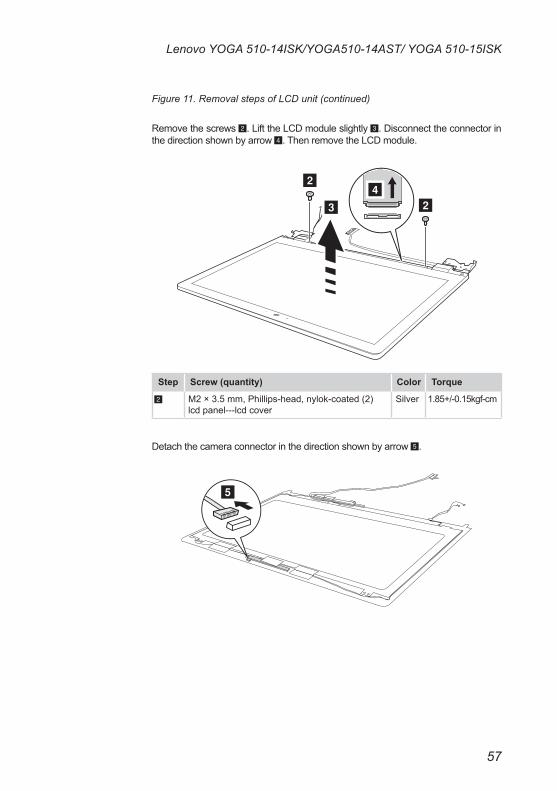
Figure 11. Removal steps of LCD unit (continued)
Removethescrews2.LifttheLCDmoduleslightly3.Disconnecttheconnectorinthedirectionshownbyarrow4.ThenremovetheLCDmodule.
b
b
c
d
Step Screw (quantity) Color Torque
2 M2×3.5mm,Phillips-head,nylok-coated(2)lcdpanel---lcdcover
Silver 1.85+/-0.15kgf-cm
Detachthecameraconnectorinthedirectionshownbyarrow5.
e
58
YOGA 510-14ISK/YOGA510-14AST/YOGA 510-15ISK Hardware Maintenance Manual
Figure 11. Removal steps of LCD unit (continued)
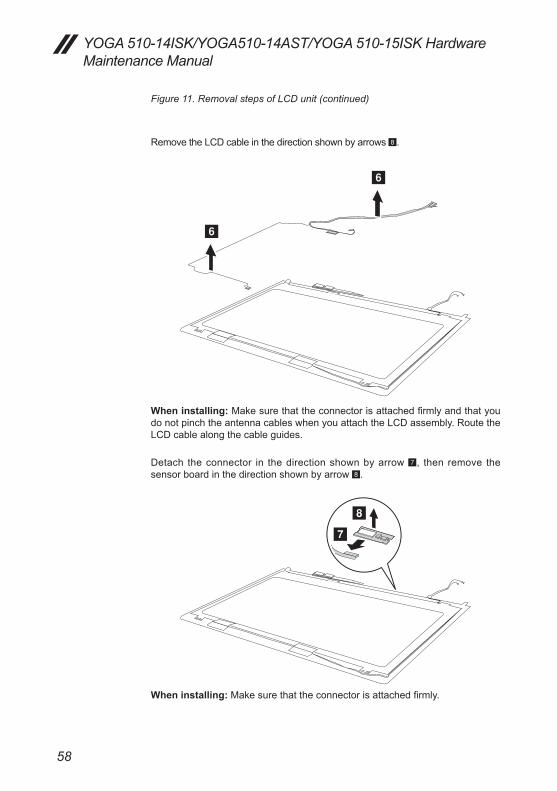
RemovetheLCDcableinthedirectionshownbyarrows8.
f
f
When installing:MakesurethattheconnectorisattachedfirmlyandthatyoudonotpinchtheantennacableswhenyouattachtheLCDassembly.RoutetheLCDcablealongthecableguides.
Detach theconnector in thedirectionshownbyarrow7, then remove thesensorboardinthedirectionshownbyarrow8.
g
h
When installing: Makesurethattheconnectorisattachedfirmly.
59
Lenovo YOGA 510-14ISK/YOGA510-14AST/ YOGA 510-15ISK
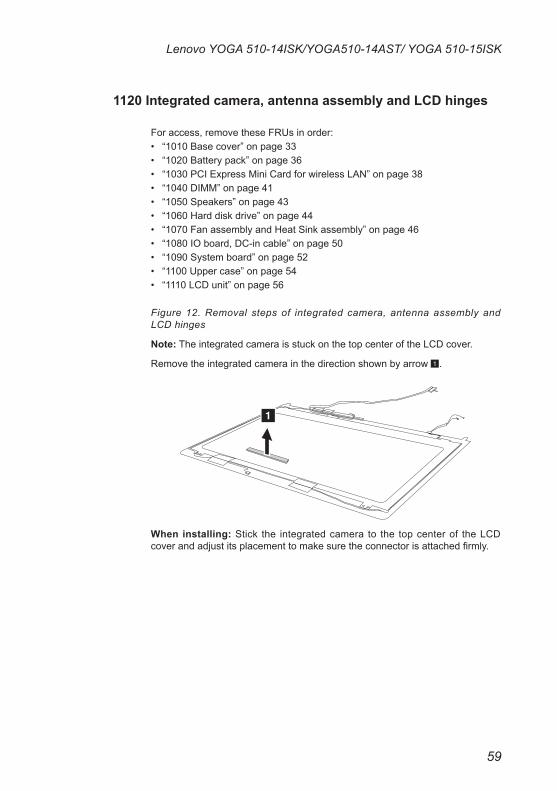
1120 Integrated camera, antenna assembly and LCD hinges
Foraccess,removetheseFRUsinorder:• “1010Basecover”onpage33• “1020Batterypack”onpage36• “1030PCIExpressMiniCardforwirelessLAN”onpage38• “1040DIMM”onpage41• “1050Speakers”onpage43• “1060Harddiskdrive”onpage44• “1070FanassemblyandHeatSinkassembly”onpage46• “1080IOboard,DC-incable”onpage50• “1090Systemboard”onpage52• “1100Uppercase”onpage54• “1110LCDunit”onpage56
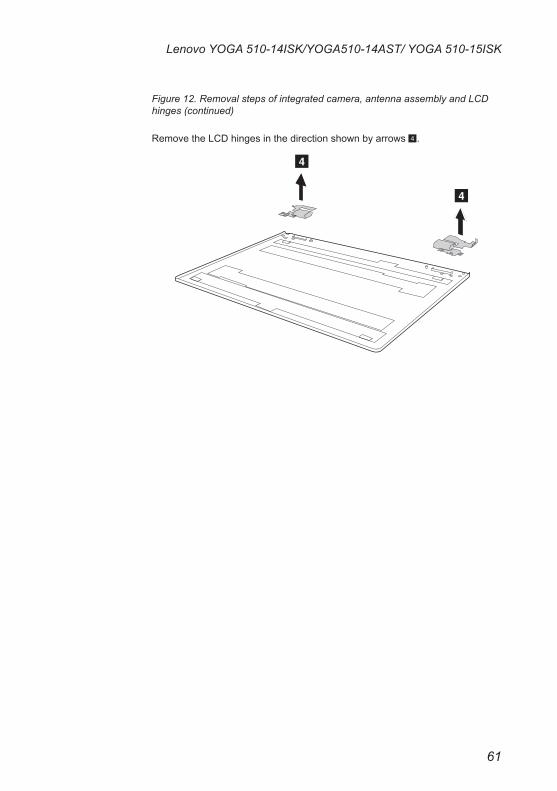
Figure 12. Removal steps of integrated camera, antenna assembly and LCD hinges
Note:TheintegratedcameraisstuckonthetopcenteroftheLCDcover.
Removetheintegratedcamerainthedirectionshownbyarrow1.
a
When installing:Stick the integratedcamera to the topcenterof theLCDcoverandadjustitsplacementtomakesuretheconnectorisattachedfirmly.
60
YOGA 510-14ISK/YOGA510-14AST/YOGA 510-15ISK Hardware Maintenance Manual
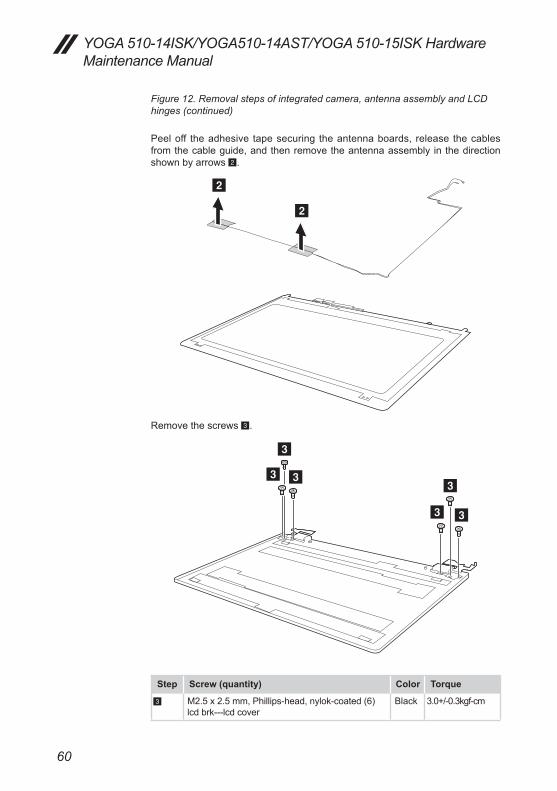
Figure 12. Removal steps of integrated camera, antenna assembly and LCD hinges (continued)
Peeloff theadhesive tapesecuring theantennaboards, release thecablesfromthecableguide,andthenremovetheantennaassembly inthedirectionshownbyarrows2.
b
b
Removethescrews3.
c
c
c
c
c
c
Step Screw (quantity) Color Torque
3 M2.5x2.5mm,Phillips-head,nylok-coated(6)lcdbrk---lcdcover
Black 3.0+/-0.3kgf-cm
61
Lenovo YOGA 510-14ISK/YOGA510-14AST/ YOGA 510-15ISK
Figure 12. Removal steps of integrated camera, antenna assembly and LCD hinges (continued)
RemovetheLCDhingesinthedirectionshownbyarrows4.
d
d
62
YOGA 510-14ISK/YOGA510-14AST/YOGA 510-15ISK Hardware Maintenance Manual
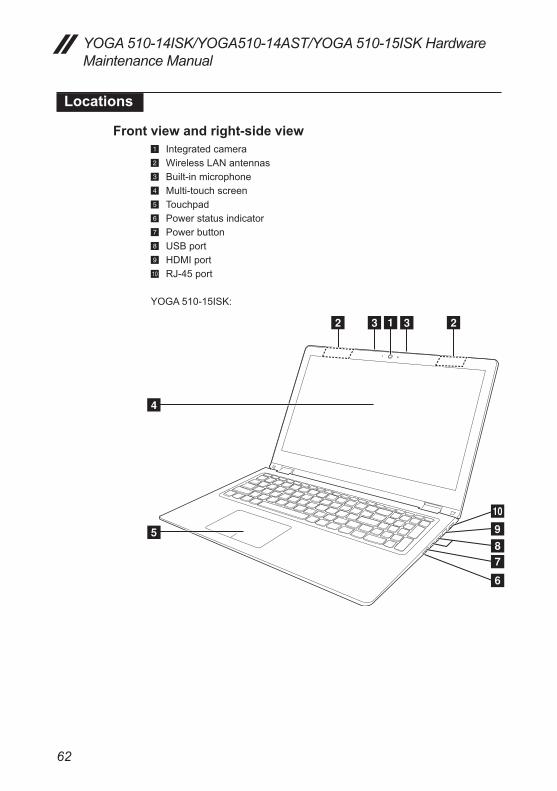
Locations
Front view and right-side view1 Integratedcamera2 WirelessLANantennas3 Built-inmicrophone4 Multi-touchscreen5 Touchpad6 Powerstatusindicator7 Powerbutton8 USBport9 HDMIportJ RJ-45port
YOGA510-15ISK:
acb c b
d
e
j
i
hg
f

63
Lenovo YOGA 510-14ISK/YOGA510-14AST/ YOGA 510-15ISK
YOGA510-14ISK/YOGA510-14AST:
acb c b
d
e
j
i
hg
f
Bottom and Left-side view 1 Speakers2 Novobutton3 Memorycardslot4 Comboaudiojack5 USBport6 Battery/ChargingstatusindicatorNote:Forthedescriptionofeachindicator,see“Statusindicators”onpage29.7 ACpoweradapterjack8 KensingtonMiniSecurityslot9 Ventilationslots
hg
fe
dc
b
a
i
a
64
YOGA 510-14ISK/YOGA510-14AST/YOGA 510-15ISK Hardware Maintenance Manual
Parts listThissectionpresentsthefollowingserviceparts:• “Overall”onpage65• “LCDFRUs”onpage74• “Miscellaneousparts”onpage77• “ACadapters”onpage77• “Screws”onpage78• “Powercords”onpage71
Note:Each FRU is available for all types or models, unless specific types or models are specified.
Attention: DonotattempttoreplaceanFRUonyourown.IfanFRUisdamaged,contactaLenovoauthorizedserviceroramarketingrepresentativeforreplacementorrepair.Onlyqualifiedtechnicianscaninspectorrepairthisproduct.
65
Lenovo YOGA 510-14ISK/YOGA510-14AST/ YOGA 510-15ISK
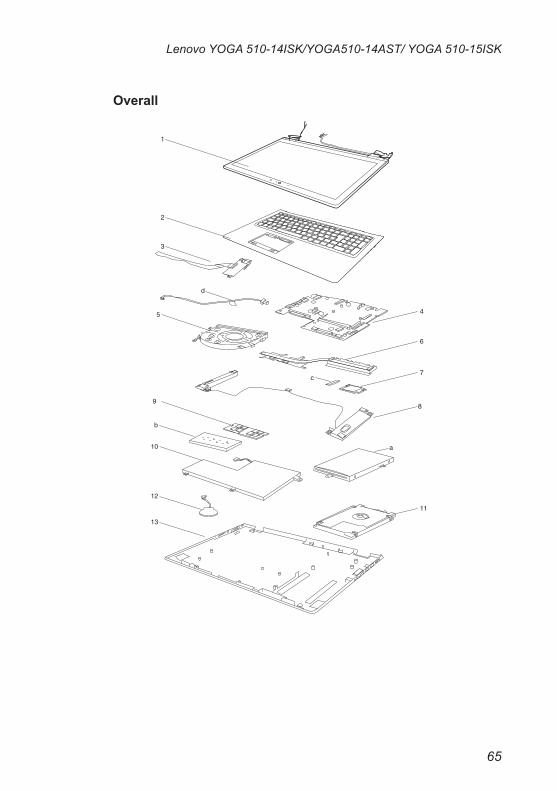
Overall
1
2
3
5
9
10
b
13
12
4
6
7
8
11
c
d
a
66
YOGA 510-14ISK/YOGA510-14AST/YOGA 510-15ISK Hardware Maintenance Manual
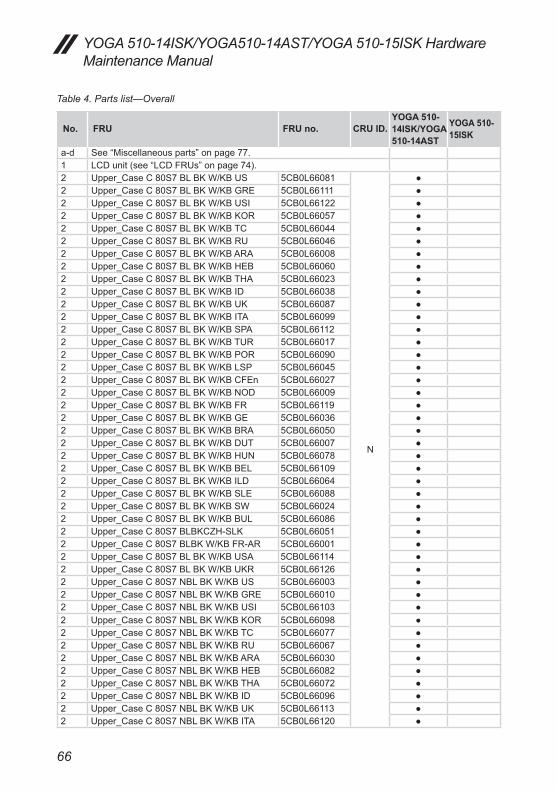
Table 4. Parts list—Overall
No. FRU FRU no. CRU ID.YOGA 510-14ISK/YOGA 510-14AST
YOGA 510-15ISK
a-d See“Miscellaneousparts”onpage77.1 LCDunit(see“LCDFRUs”onpage74).2 Upper_CaseC80S7BLBKW/KBUS 5CB0L66081
N
●2 Upper_CaseC80S7BLBKW/KBGRE 5CB0L66111 ●2 Upper_CaseC80S7BLBKW/KBUSI 5CB0L66122 ●2 Upper_CaseC80S7BLBKW/KBKOR 5CB0L66057 ●2 Upper_CaseC80S7BLBKW/KBTC 5CB0L66044 ●2 Upper_CaseC80S7BLBKW/KBRU 5CB0L66046 ●2 Upper_CaseC80S7BLBKW/KBARA 5CB0L66008 ●2 Upper_CaseC80S7BLBKW/KBHEB 5CB0L66060 ●2 Upper_CaseC80S7BLBKW/KBTHA 5CB0L66023 ●2 Upper_CaseC80S7BLBKW/KBID 5CB0L66038 ●2 Upper_CaseC80S7BLBKW/KBUK 5CB0L66087 ●2 Upper_CaseC80S7BLBKW/KBITA 5CB0L66099 ●2 Upper_CaseC80S7BLBKW/KBSPA 5CB0L66112 ●2 Upper_CaseC80S7BLBKW/KBTUR 5CB0L66017 ●2 Upper_CaseC80S7BLBKW/KBPOR 5CB0L66090 ●2 Upper_CaseC80S7BLBKW/KBLSP 5CB0L66045 ●2 Upper_CaseC80S7BLBKW/KBCFEn 5CB0L66027 ●2 Upper_CaseC80S7BLBKW/KBNOD 5CB0L66009 ●2 Upper_CaseC80S7BLBKW/KBFR 5CB0L66119 ●2 Upper_CaseC80S7BLBKW/KBGE 5CB0L66036 ●2 Upper_CaseC80S7BLBKW/KBBRA 5CB0L66050 ●2 Upper_CaseC80S7BLBKW/KBDUT 5CB0L66007 ●2 Upper_CaseC80S7BLBKW/KBHUN 5CB0L66078 ●2 Upper_CaseC80S7BLBKW/KBBEL 5CB0L66109 ●2 Upper_CaseC80S7BLBKW/KBILD 5CB0L66064 ●2 Upper_CaseC80S7BLBKW/KBSLE 5CB0L66088 ●2 Upper_CaseC80S7BLBKW/KBSW 5CB0L66024 ●2 Upper_CaseC80S7BLBKW/KBBUL 5CB0L66086 ●2 Upper_CaseC80S7BLBKCZH-SLK 5CB0L66051 ●2 Upper_CaseC80S7BLBKW/KBFR-AR 5CB0L66001 ●2 Upper_CaseC80S7BLBKW/KBUSA 5CB0L66114 ●2 Upper_CaseC80S7BLBKW/KBUKR 5CB0L66126 ●2 Upper_CaseC80S7NBLBKW/KBUS 5CB0L66003 ●2 Upper_CaseC80S7NBLBKW/KBGRE 5CB0L66010 ●2 Upper_CaseC80S7NBLBKW/KBUSI 5CB0L66103 ●2 Upper_CaseC80S7NBLBKW/KBKOR 5CB0L66098 ●2 Upper_CaseC80S7NBLBKW/KBTC 5CB0L66077 ●2 Upper_CaseC80S7NBLBKW/KBRU 5CB0L66067 ●2 Upper_CaseC80S7NBLBKW/KBARA 5CB0L66030 ●2 Upper_CaseC80S7NBLBKW/KBHEB 5CB0L66082 ●2 Upper_CaseC80S7NBLBKW/KBTHA 5CB0L66072 ●2 Upper_CaseC80S7NBLBKW/KBID 5CB0L66096 ●2 Upper_CaseC80S7NBLBKW/KBUK 5CB0L66113 ●2 Upper_CaseC80S7NBLBKW/KBITA 5CB0L66120 ●
67
Lenovo YOGA 510-14ISK/YOGA510-14AST/ YOGA 510-15ISK
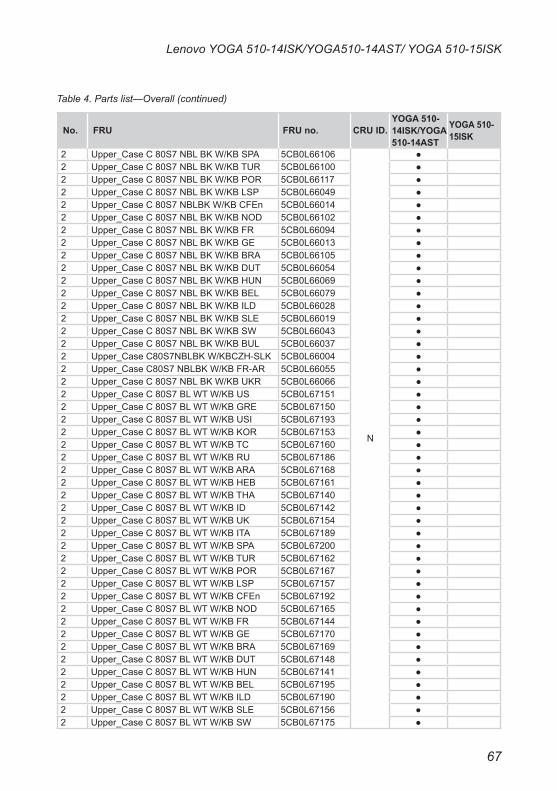
Table 4. Parts list—Overall (continued)
No. FRU FRU no. CRU ID.YOGA 510-14ISK/YOGA 510-14AST
YOGA 510-15ISK
2 Upper_CaseC80S7NBLBKW/KBSPA 5CB0L66106
N
●2 Upper_CaseC80S7NBLBKW/KBTUR 5CB0L66100 ●2 Upper_CaseC80S7NBLBKW/KBPOR 5CB0L66117 ●2 Upper_CaseC80S7NBLBKW/KBLSP 5CB0L66049 ●2 Upper_CaseC80S7NBLBKW/KBCFEn 5CB0L66014 ●2 Upper_CaseC80S7NBLBKW/KBNOD 5CB0L66102 ●2 Upper_CaseC80S7NBLBKW/KBFR 5CB0L66094 ●2 Upper_CaseC80S7NBLBKW/KBGE 5CB0L66013 ●2 Upper_CaseC80S7NBLBKW/KBBRA 5CB0L66105 ●2 Upper_CaseC80S7NBLBKW/KBDUT 5CB0L66054 ●2 Upper_CaseC80S7NBLBKW/KBHUN 5CB0L66069 ●2 Upper_CaseC80S7NBLBKW/KBBEL 5CB0L66079 ●2 Upper_CaseC80S7NBLBKW/KBILD 5CB0L66028 ●2 Upper_CaseC80S7NBLBKW/KBSLE 5CB0L66019 ●2 Upper_CaseC80S7NBLBKW/KBSW 5CB0L66043 ●2 Upper_CaseC80S7NBLBKW/KBBUL 5CB0L66037 ●2 Upper_CaseC80S7NBLBKW/KBCZH-SLK 5CB0L66004 ●2 Upper_CaseC80S7NBLBKW/KBFR-AR 5CB0L66055 ●2 Upper_CaseC80S7NBLBKW/KBUKR 5CB0L66066 ●2 Upper_CaseC80S7BLWTW/KBUS 5CB0L67151 ●2 Upper_CaseC80S7BLWTW/KBGRE 5CB0L67150 ●2 Upper_CaseC80S7BLWTW/KBUSI 5CB0L67193 ●2 Upper_CaseC80S7BLWTW/KBKOR 5CB0L67153 ●2 Upper_CaseC80S7BLWTW/KBTC 5CB0L67160 ●2 Upper_CaseC80S7BLWTW/KBRU 5CB0L67186 ●2 Upper_CaseC80S7BLWTW/KBARA 5CB0L67168 ●2 Upper_CaseC80S7BLWTW/KBHEB 5CB0L67161 ●2 Upper_CaseC80S7BLWTW/KBTHA 5CB0L67140 ●2 Upper_CaseC80S7BLWTW/KBID 5CB0L67142 ●2 Upper_CaseC80S7BLWTW/KBUK 5CB0L67154 ●2 Upper_CaseC80S7BLWTW/KBITA 5CB0L67189 ●2 Upper_CaseC80S7BLWTW/KBSPA 5CB0L67200 ●2 Upper_CaseC80S7BLWTW/KBTUR 5CB0L67162 ●2 Upper_CaseC80S7BLWTW/KBPOR 5CB0L67167 ●2 Upper_CaseC80S7BLWTW/KBLSP 5CB0L67157 ●2 Upper_CaseC80S7BLWTW/KBCFEn 5CB0L67192 ●2 Upper_CaseC80S7BLWTW/KBNOD 5CB0L67165 ●2 Upper_CaseC80S7BLWTW/KBFR 5CB0L67144 ●2 Upper_CaseC80S7BLWTW/KBGE 5CB0L67170 ●2 Upper_CaseC80S7BLWTW/KBBRA 5CB0L67169 ●2 Upper_CaseC80S7BLWTW/KBDUT 5CB0L67148 ●2 Upper_CaseC80S7BLWTW/KBHUN 5CB0L67141 ●2 Upper_CaseC80S7BLWTW/KBBEL 5CB0L67195 ●2 Upper_CaseC80S7BLWTW/KBILD 5CB0L67190 ●2 Upper_CaseC80S7BLWTW/KBSLE 5CB0L67156 ●2 Upper_CaseC80S7BLWTW/KBSW 5CB0L67175 ●

68
YOGA 510-14ISK/YOGA510-14AST/YOGA 510-15ISK Hardware Maintenance Manual
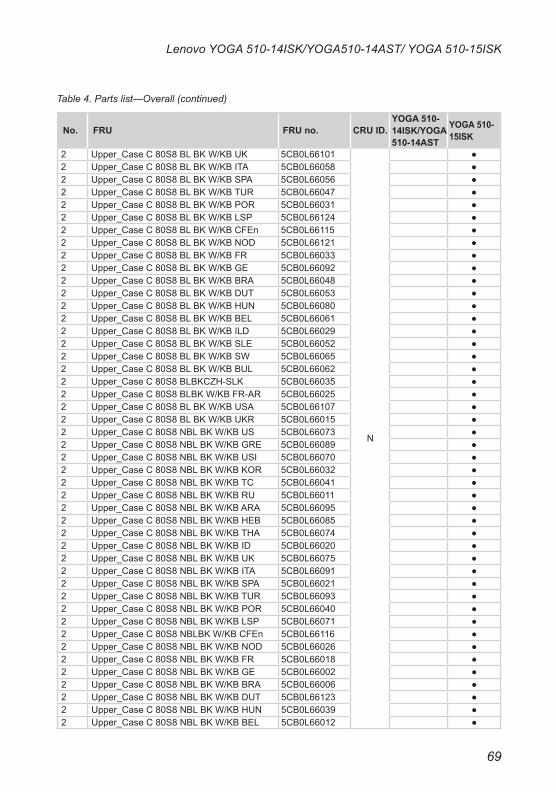
Table 4. Parts list—Overall (continued)
No. FRU FRU no. CRU ID.YOGA 510-14ISK/YOGA 510-14AST
YOGA 510-15ISK
2 Upper_CaseC80S7BLWTW/KBBUL 5CB0L67184
N
●2 Upper_CaseC80S7BLWTCZH-SLK 5CB0L67185 ●2 Upper_CaseC80S7BLWTW/KBFR-AR 5CB0L67176 ●2 Upper_CaseC80S7BLWTW/KBUSA 5CB0L67145 ●2 Upper_CaseC80S7BLWTW/KBUKR 5CB0L67159 ●2 Upper_CaseC80S7NBLWTW/KBUS 5CB0L67166 ●2 Upper_CaseC80S7NBLWTW/KBGRE 5CB0L67172 ●2 Upper_CaseC80S7NBLWTW/KBUSI 5CB0L67136 ●2 Upper_CaseC80S7NBLWTW/KBKOR 5CB0L67201 ●2 Upper_CaseC80S7NBLWTW/KBTC 5CB0L67202 ●2 Upper_CaseC80S7NBLWTW/KBRU 5CB0L67137 ●2 Upper_CaseC80S7NBLWTW/KBARA 5CB0L67187 ●2 Upper_CaseC80S7NBLWTW/KBHEB 5CB0L67149 ●2 Upper_CaseC80S7NBLWTW/KBTHA 5CB0L67197 ●2 Upper_CaseC80S7NBLWTW/KBID 5CB0L67163 ●2 Upper_CaseC80S7NBLWTW/KBUK 5CB0L67196 ●2 Upper_CaseC80S7NBLWTW/KBITA 5CB0L67146 ●2 Upper_CaseC80S7NBLWTW/KBSPA 5CB0L67152 ●2 Upper_CaseC80S7NBLWTW/KBTUR 5CB0L67188 ●2 Upper_CaseC80S7NBLWTW/KBPOR 5CB0L67171 ●2 Upper_CaseC80S7NBLWTW/KBLSP 5CB0L67173 ●2 Upper_CaseC80S7NBLWTW/KBCFEn 5CB0L67177 ●2 Upper_CaseC80S7NBLWTW/KBNOD 5CB0L67198 ●2 Upper_CaseC80S7NBLWTW/KBFR 5CB0L67183 ●2 Upper_CaseC80S7NBLWTW/KBGE 5CB0L67191 ●2 Upper_CaseC80S7NBLWTW/KBBRA 5CB0L67143 ●2 Upper_CaseC80S7NBLWTW/KBDUT 5CB0L67174 ●2 Upper_CaseC80S7NBLWTW/KBHUN 5CB0L67179 ●2 Upper_CaseC80S7NBLWTW/KBBEL 5CB0L67155 ●2 Upper_CaseC80S7NBLWTW/KBILD 5CB0L67180 ●2 Upper_CaseC80S7NBLWTW/KBSLE 5CB0L67164 ●2 Upper_CaseC80S7NBLWTW/KBSW 5CB0L67139 ●2 Upper_CaseC80S7NBLWTW/KBBUL 5CB0L67194 ●2 Upper_CaseC80S7NBLWTW/KBCZH-SLK 5CB0L67138 ●2 Upper_CaseC80S7NBLWTW/KBFR-AR 5CB0L67158 ●2 Upper_CaseC80S7NBLWTW/KBUKR 5CB0L67178 ●2 Upper_CaseC80S8BLBKW/KBUS 5CB0L66076 ●2 Upper_CaseC80S8BLBKW/KBGRE 5CB0L66083 ●2 Upper_CaseC80S8BLBKW/KBUSI 5CB0L66034 ●2 Upper_CaseC80S8BLBKW/KBKOR 5CB0L66063 ●2 Upper_CaseC80S8BLBKW/KBTC 5CB0L66068 ●2 Upper_CaseC80S8BLBKW/KBRU 5CB0L66110 ●2 Upper_CaseC80S8BLBKW/KBARA 5CB0L66084 ●2 Upper_CaseC80S8BLBKW/KBHEB 5CB0L66042 ●2 Upper_CaseC80S8BLBKW/KBTHA 5CB0L66118 ●2 Upper_CaseC80S8BLBKW/KBID 5CB0L66059 ●
69
Lenovo YOGA 510-14ISK/YOGA510-14AST/ YOGA 510-15ISK
No. FRU FRU no. CRU ID.YOGA 510-14ISK/YOGA 510-14AST
YOGA 510-15ISK
2 Upper_CaseC80S8BLBKW/KBUK 5CB0L66101
N
●2 Upper_CaseC80S8BLBKW/KBITA 5CB0L66058 ●2 Upper_CaseC80S8BLBKW/KBSPA 5CB0L66056 ●2 Upper_CaseC80S8BLBKW/KBTUR 5CB0L66047 ●2 Upper_CaseC80S8BLBKW/KBPOR 5CB0L66031 ●2 Upper_CaseC80S8BLBKW/KBLSP 5CB0L66124 ●2 Upper_CaseC80S8BLBKW/KBCFEn 5CB0L66115 ●2 Upper_CaseC80S8BLBKW/KBNOD 5CB0L66121 ●2 Upper_CaseC80S8BLBKW/KBFR 5CB0L66033 ●2 Upper_CaseC80S8BLBKW/KBGE 5CB0L66092 ●2 Upper_CaseC80S8BLBKW/KBBRA 5CB0L66048 ●2 Upper_CaseC80S8BLBKW/KBDUT 5CB0L66053 ●2 Upper_CaseC80S8BLBKW/KBHUN 5CB0L66080 ●2 Upper_CaseC80S8BLBKW/KBBEL 5CB0L66061 ●2 Upper_CaseC80S8BLBKW/KBILD 5CB0L66029 ●2 Upper_CaseC80S8BLBKW/KBSLE 5CB0L66052 ●2 Upper_CaseC80S8BLBKW/KBSW 5CB0L66065 ●2 Upper_CaseC80S8BLBKW/KBBUL 5CB0L66062 ●2 Upper_CaseC80S8BLBKCZH-SLK 5CB0L66035 ●2 Upper_CaseC80S8BLBKW/KBFR-AR 5CB0L66025 ●2 Upper_CaseC80S8BLBKW/KBUSA 5CB0L66107 ●2 Upper_CaseC80S8BLBKW/KBUKR 5CB0L66015 ●2 Upper_CaseC80S8NBLBKW/KBUS 5CB0L66073 ●2 Upper_CaseC80S8NBLBKW/KBGRE 5CB0L66089 ●2 Upper_CaseC80S8NBLBKW/KBUSI 5CB0L66070 ●2 Upper_CaseC80S8NBLBKW/KBKOR 5CB0L66032 ●2 Upper_CaseC80S8NBLBKW/KBTC 5CB0L66041 ●2 Upper_CaseC80S8NBLBKW/KBRU 5CB0L66011 ●2 Upper_CaseC80S8NBLBKW/KBARA 5CB0L66095 ●2 Upper_CaseC80S8NBLBKW/KBHEB 5CB0L66085 ●2 Upper_CaseC80S8NBLBKW/KBTHA 5CB0L66074 ●2 Upper_CaseC80S8NBLBKW/KBID 5CB0L66020 ●2 Upper_CaseC80S8NBLBKW/KBUK 5CB0L66075 ●2 Upper_CaseC80S8NBLBKW/KBITA 5CB0L66091 ●2 Upper_CaseC80S8NBLBKW/KBSPA 5CB0L66021 ●2 Upper_CaseC80S8NBLBKW/KBTUR 5CB0L66093 ●2 Upper_CaseC80S8NBLBKW/KBPOR 5CB0L66040 ●2 Upper_CaseC80S8NBLBKW/KBLSP 5CB0L66071 ●2 Upper_CaseC80S8NBLBKW/KBCFEn 5CB0L66116 ●2 Upper_CaseC80S8NBLBKW/KBNOD 5CB0L66026 ●2 Upper_CaseC80S8NBLBKW/KBFR 5CB0L66018 ●2 Upper_CaseC80S8NBLBKW/KBGE 5CB0L66002 ●2 Upper_CaseC80S8NBLBKW/KBBRA 5CB0L66006 ●2 Upper_CaseC80S8NBLBKW/KBDUT 5CB0L66123 ●2 Upper_CaseC80S8NBLBKW/KBHUN 5CB0L66039 ●2 Upper_CaseC80S8NBLBKW/KBBEL 5CB0L66012 ●
Table 4. Parts list—Overall (continued)
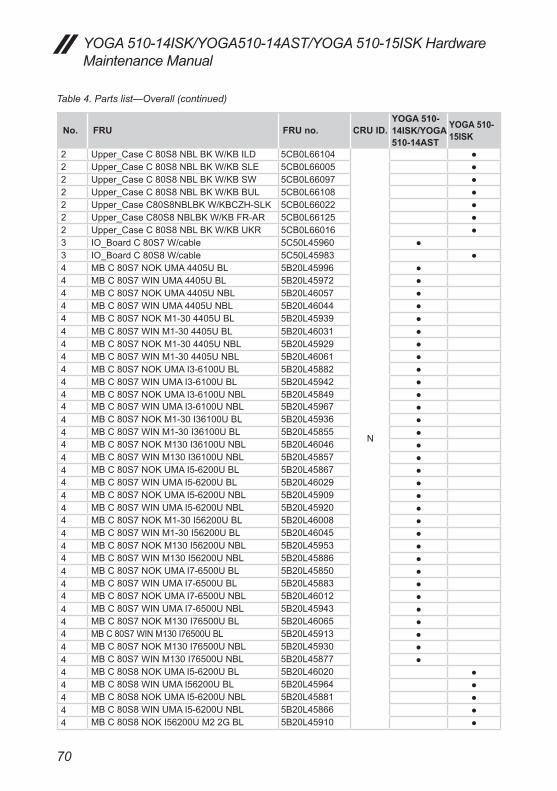
70
YOGA 510-14ISK/YOGA510-14AST/YOGA 510-15ISK Hardware Maintenance Manual
No. FRU FRU no. CRU ID.YOGA 510-14ISK/YOGA 510-14AST
YOGA 510-15ISK
2 Upper_CaseC80S8NBLBKW/KBILD 5CB0L66104
N
●2 Upper_CaseC80S8NBLBKW/KBSLE 5CB0L66005 ●2 Upper_CaseC80S8NBLBKW/KBSW 5CB0L66097 ●2 Upper_CaseC80S8NBLBKW/KBBUL 5CB0L66108 ●2 Upper_CaseC80S8NBLBKW/KBCZH-SLK 5CB0L66022 ●2 Upper_CaseC80S8NBLBKW/KBFR-AR 5CB0L66125 ●2 Upper_CaseC80S8NBLBKW/KBUKR 5CB0L66016 ●3 IO_BoardC80S7W/cable 5C50L45960 ●3 IO_BoardC80S8W/cable 5C50L45983 ●4 MBC80S7NOKUMA4405UBL 5B20L45996 ●4 MBC80S7WINUMA4405UBL 5B20L45972 ●4 MBC80S7NOKUMA4405UNBL 5B20L46057 ●4 MBC80S7WINUMA4405UNBL 5B20L46044 ●4 MBC80S7NOKM1-304405UBL 5B20L45939 ●4 MBC80S7WINM1-304405UBL 5B20L46031 ●4 MBC80S7NOKM1-304405UNBL 5B20L45929 ●4 MBC80S7WINM1-304405UNBL 5B20L46061 ●4 MBC80S7NOKUMAI3-6100UBL 5B20L45882 ●4 MBC80S7WINUMAI3-6100UBL 5B20L45942 ●4 MBC80S7NOKUMAI3-6100UNBL 5B20L45849 ●4 MBC80S7WINUMAI3-6100UNBL 5B20L45967 ●4 MBC80S7NOKM1-30I36100UBL 5B20L45936 ●4 MBC80S7WINM1-30I36100UBL 5B20L45855 ●4 MBC80S7NOKM130I36100UNBL 5B20L46046 ●4 MBC80S7WINM130I36100UNBL 5B20L45857 ●4 MBC80S7NOKUMAI5-6200UBL 5B20L45867 ●4 MBC80S7WINUMAI5-6200UBL 5B20L46029 ●4 MBC80S7NOKUMAI5-6200UNBL 5B20L45909 ●4 MBC80S7WINUMAI5-6200UNBL 5B20L45920 ●4 MBC80S7NOKM1-30I56200UBL 5B20L46008 ●4 MBC80S7WINM1-30I56200UBL 5B20L46045 ●4 MBC80S7NOKM130I56200UNBL 5B20L45953 ●4 MBC80S7WINM130I56200UNBL 5B20L45886 ●4 MBC80S7NOKUMAI7-6500UBL 5B20L45850 ●4 MBC80S7WINUMAI7-6500UBL 5B20L45883 ●4 MBC80S7NOKUMAI7-6500UNBL 5B20L46012 ●4 MBC80S7WINUMAI7-6500UNBL 5B20L45943 ●4 MBC80S7NOKM130I76500UBL 5B20L46065 ●4 MBC80S7WINM130I76500UBL 5B20L45913 ●4 MBC80S7NOKM130I76500UNBL 5B20L45930 ●4 MBC80S7WINM130I76500UNBL 5B20L45877 ●4 MBC80S8NOKUMAI5-6200UBL 5B20L46020 ●4 MBC80S8WINUMAI56200UBL 5B20L45964 ●4 MBC80S8NOKUMAI5-6200UNBL 5B20L45881 ●4 MBC80S8WINUMAI5-6200UNBL 5B20L45866 ●4 MBC80S8NOKI56200UM22GBL 5B20L45910 ●
Table 4. Parts list—Overall (continued)

71
Lenovo YOGA 510-14ISK/YOGA510-14AST/ YOGA 510-15ISK
Table 4. Parts list—Overall (continued)
No. FRU FRU no. CRU ID.YOGA 510-14ISK/YOGA 510-14AST
YOGA 510-15ISK
4 MBC80S8WINI56200UM22GBL 5B20L45937
N
●4 MBC80S8NOKI56200UM22GNBL 5B20L45859 ●4 MBC80S8WINI56200UM22GNBL 5B20L46005 ●4 MBC80S8NOKUMA4405UBL 5B20L45864 ●4 MBC80S8WINUMA4405UBL 5B20L46064 ●4 MBC80S8NOKUMA4405UNBL 5B20L45927 ●4 MBC80S8WINUMA4405UNBL 5B20L46063 ●4 MBC80S8NOK4405UM22GBL 5B20L45994 ●4 MBC80S8WIN4405UM22GBL 5B20L45932 ●4 MBC80S8NOK4405UM22GNBL 5B20L45865 ●4 MBC80S8WIN4405UM22GNBL 5B20L46016 ●4 MBC80S8NOKUMAI3-6100UBL 5B20L45871 ●4 MBC80S8WINUMAI3-6100UBL 5B20L45973 ●4 MBC80S8NOKUMAI3-6100UNBL 5B20L45848 ●4 MBC80S8WINUMAI3-6100UNBL 5B20L45901 ●4 MBC80S8NOKI36100UM22GBL 5B20L46048 ●4 MBC80S8WINI36100UM22GBL 5B20L45941 ●4 MBC80S8NOKI36100UM22GNBL 5B20L45891 ●4 MBC80S8WINI36100UM22GNBL 5B20L45887 ●4 MBC80S8NOKI76500UM22GBL 5B20L45966 ●4 MBC80S8WINI76500UM22GBL 5B20L45854 ●4 MBC80S8NOKUMAI7-6500UBL 5B20L45956 ●4 MBC80S8WINUMAI7-6500UBL 5B20L45888 ●4 MBC80S8NOKUMAI7-6500UNBL 5B20L46053 ●4 MBC80S8WINUMAI7-6500UNBL 5B20L46036 ●4 MBC80S8NOKI76500UM22GNBL 5B20L45957 ●4 MBC80S8WINI76500UM22GNBL 5B20L46024 ●5 CPUFanC80S7 5F10L45845 ●5 CPUFanC80S8 5F10L46056 ●6 Heat_sinkC80S7DIS 5H40L45978 ●6 Heat_sinkC80S7UMA 5H40L45974 ●6 Heat_sinkC80S8DIS 5H40L45907 ●6 Heat_sinkC80S8UMA 5H40L45878 ●7 Wirelesslan_WIFILtnNFA4351x1AC+BT4.0
PCIEM.2WLAN,WIFI1X1AC+BT4.0SW10A11641 ● ●
7 Wirelesslan_WIFICbtRTL8821AE1x1AC+BT4.0PCIEM.2WLAN,WIFI1X1AC+BT4.0
SW10A11648● ●
7 Wirelesslan_WIFIIntel31651x1AC+BTPCIEM.2WLANSAR,WIFI1X1AC+BT4.0
SW10H24487 ● ●
7 WirelessLan_Non_IntelLtnNFA4351x1AC+BT4.0PCIEM.2WLAN,NON-INTEL1X1AC+BT4.0
SW10A11641● ●
7 WirelessLan_Non_IntelCbtRTL8821AE1x1AC+BT4.0PCIEM.2WLAN,NON-INTEL1X1AC+BT4.0
SW10A11648● ●
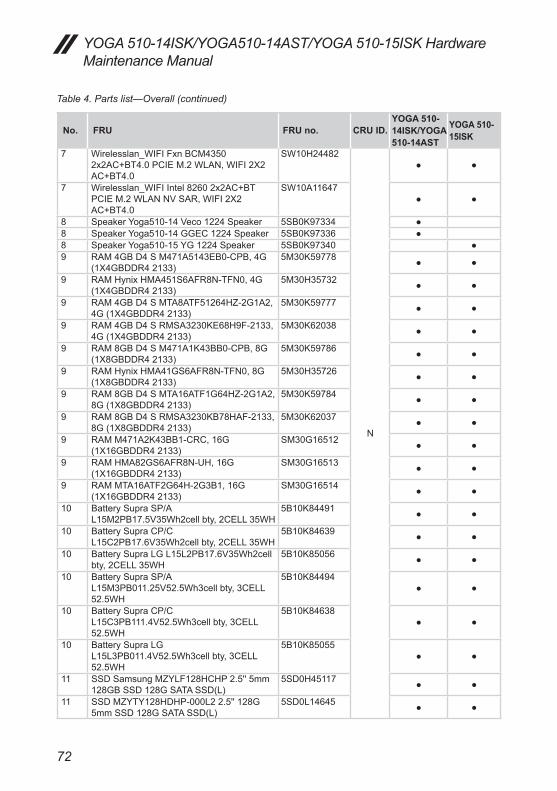
72
YOGA 510-14ISK/YOGA510-14AST/YOGA 510-15ISK Hardware Maintenance Manual
No. FRU FRU no. CRU ID.YOGA 510-14ISK/YOGA 510-14AST
YOGA 510-15ISK
7 Wirelesslan_WIFIFxnBCM43502x2AC+BT4.0PCIEM.2WLAN,WIFI2X2AC+BT4.0
SW10H24482
N
● ●
7 Wirelesslan_WIFIIntel82602x2AC+BTPCIEM.2WLANNVSAR,WIFI2X2AC+BT4.0
SW10A11647● ●
8 SpeakerYoga510-14Veco1224Speaker 5SB0K97334 ●8 SpeakerYoga510-14GGEC1224Speaker 5SB0K97336 ●8 SpeakerYoga510-15YG1224Speaker 5SB0K97340 ●9 RAM4GBD4SM471A5143EB0-CPB,4G
(1X4GBDDR42133)5M30K59778 ● ●
9 RAMHynixHMA451S6AFR8N-TFN0,4G(1X4GBDDR42133)
5M30H35732 ● ●
9 RAM4GBD4SMTA8ATF51264HZ-2G1A2,4G(1X4GBDDR42133)
5M30K59777 ● ●
9 RAM4GBD4SRMSA3230KE68H9F-2133,4G(1X4GBDDR42133)
5M30K62038 ● ●
9 RAM8GBD4SM471A1K43BB0-CPB,8G(1X8GBDDR42133)
5M30K59786 ● ●
9 RAMHynixHMA41GS6AFR8N-TFN0,8G(1X8GBDDR42133)
5M30H35726 ● ●
9 RAM8GBD4SMTA16ATF1G64HZ-2G1A2,8G(1X8GBDDR42133)
5M30K59784 ● ●
9 RAM8GBD4SRMSA3230KB78HAF-2133,8G(1X8GBDDR42133)
5M30K62037 ● ●
9 RAMM471A2K43BB1-CRC,16G(1X16GBDDR42133)
SM30G16512 ● ●
9 RAMHMA82GS6AFR8N-UH,16G(1X16GBDDR42133)
SM30G16513 ● ●
9 RAMMTA16ATF2G64H-2G3B1,16G(1X16GBDDR42133)
SM30G16514 ● ●
10 BatterySupraSP/AL15M2PB17.5V35Wh2cellbty,2CELL35WH
5B10K84491 ● ●
10 BatterySupraCP/CL15C2PB17.6V35Wh2cellbty,2CELL35WH
5B10K84639 ● ●
10 BatterySupraLGL15L2PB17.6V35Wh2cellbty,2CELL35WH
5B10K85056 ● ●
10 BatterySupraSP/AL15M3PB011.25V52.5Wh3cellbty,3CELL52.5WH
5B10K84494● ●
10 BatterySupraCP/CL15C3PB111.4V52.5Wh3cellbty,3CELL52.5WH
5B10K84638● ●
10 BatterySupraLGL15L3PB011.4V52.5Wh3cellbty,3CELL52.5WH
5B10K85055● ●
11 SSDSamsungMZYLF128HCHP2.5''5mm128GBSSD128GSATASSD(L)
5SD0H45117 ● ●
11 SSDMZYTY128HDHP-000L22.5''128G5mmSSD128GSATASSD(L)
5SD0L14645 ● ●
Table 4. Parts list—Overall (continued)
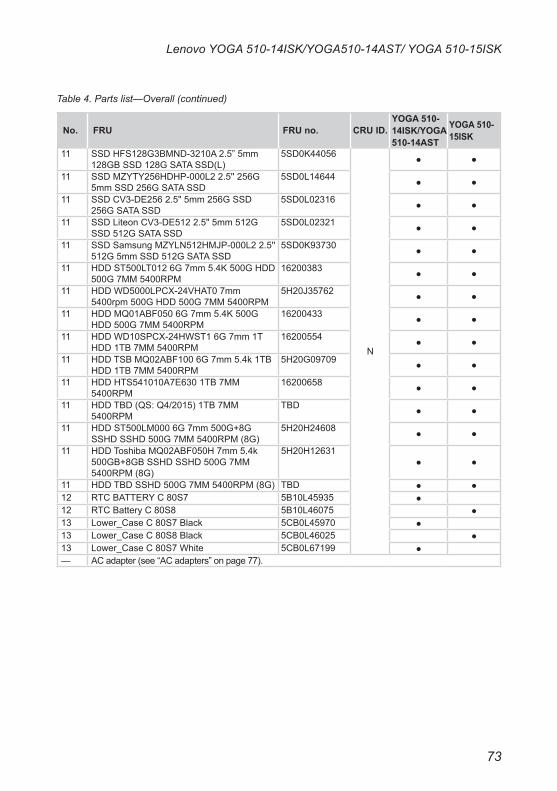
73
Lenovo YOGA 510-14ISK/YOGA510-14AST/ YOGA 510-15ISK
No. FRU FRU no. CRU ID.YOGA 510-14ISK/YOGA 510-14AST
YOGA 510-15ISK
11 SSDHFS128G3BMND-3210A2.5”5mm128GBSSD128GSATASSD(L)
5SD0K44056
N
● ●
11 SSDMZYTY256HDHP-000L22.5''256G5mmSSD256GSATASSD
5SD0L14644 ● ●
11 SSDCV3-DE2562.5"5mm256GSSD256GSATASSD
5SD0L02316 ● ●
11 SSDLiteonCV3-DE5122.5"5mm512GSSD512GSATASSD
5SD0L02321 ● ●
11 SSDSamsungMZYLN512HMJP-000L22.5''512G5mmSSD512GSATASSD
5SD0K93730 ● ●
11 HDDST500LT0126G7mm5.4K500GHDD500G7MM5400RPM
16200383 ● ●
11 HDDWD5000LPCX-24VHAT07mm5400rpm500GHDD500G7MM5400RPM
5H20J35762 ● ●
11 HDDMQ01ABF0506G7mm5.4K500GHDD500G7MM5400RPM
16200433 ● ●
11 HDDWD10SPCX-24HWST16G7mm1THDD1TB7MM5400RPM
16200554 ● ●
11 HDDTSBMQ02ABF1006G7mm5.4k1TBHDD1TB7MM5400RPM
5H20G09709 ● ●
11 HDDHTS541010A7E6301TB7MM5400RPM
16200658 ● ●
11 HDDTBD(QS:Q4/2015)1TB7MM5400RPM
TBD ● ●
11 HDDST500LM0006G7mm500G+8GSSHDSSHD500G7MM5400RPM(8G)
5H20H24608 ● ●
11 HDDToshibaMQ02ABF050H7mm5.4k500GB+8GBSSHDSSHD500G7MM5400RPM(8G)
5H20H12631● ●
11 HDDTBDSSHD500G7MM5400RPM(8G) TBD ● ●12 RTCBATTERYC80S7 5B10L45935 ●12 RTCBatteryC80S8 5B10L46075 ●13 Lower_CaseC80S7Black 5CB0L45970 ●13 Lower_CaseC80S8Black 5CB0L46025 ●13 Lower_CaseC80S7White 5CB0L67199 ●— ACadapter(see“ACadapters”onpage77).
Table 4. Parts list—Overall (continued)
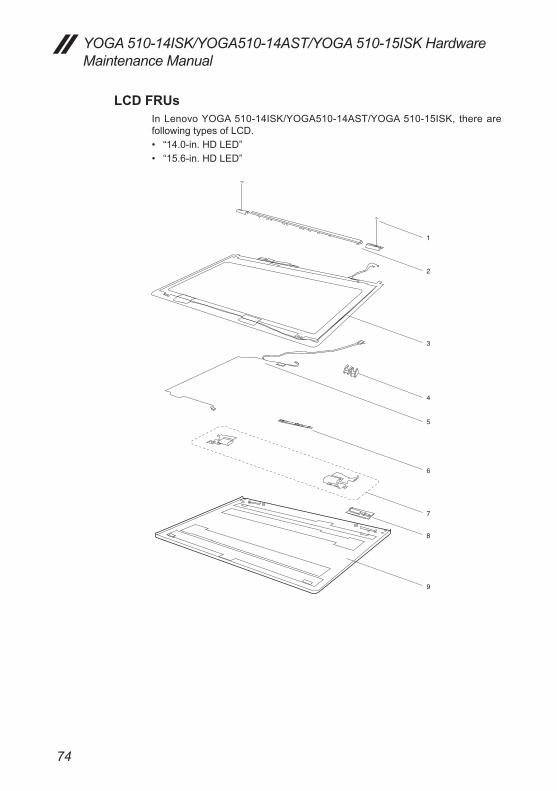
74
YOGA 510-14ISK/YOGA510-14AST/YOGA 510-15ISK Hardware Maintenance Manual
LCD FRUsInLenovoYOGA510-14ISK/YOGA510-14AST/YOGA510-15ISK, therearefollowingtypesofLCD.• “14.0-in.HDLED”• “15.6-in.HDLED”
2
1
3
4
5
6
7
9
8
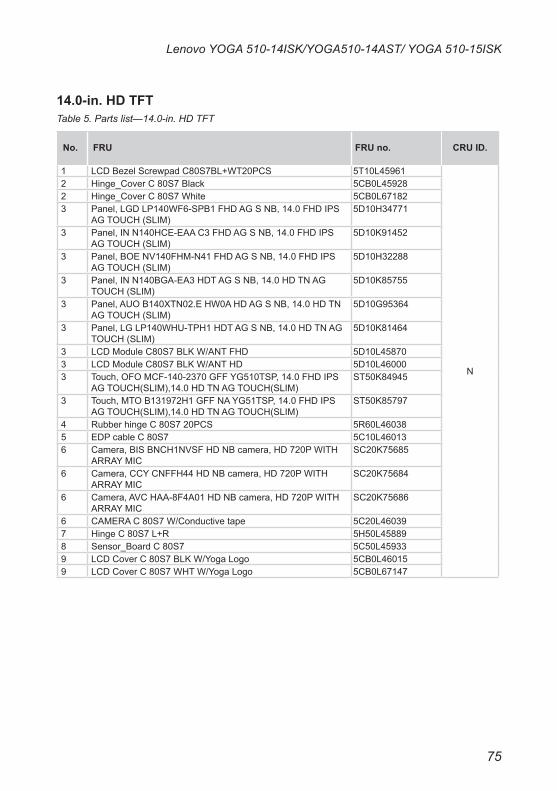
75
Lenovo YOGA 510-14ISK/YOGA510-14AST/ YOGA 510-15ISK
14.0-in. HD TFTTable 5. Parts list—14.0-in. HD TFT
No. FRU FRU no. CRU ID.
1 LCDBezelScrewpadC80S7BL+WT20PCS 5T10L45961
N
2 Hinge_CoverC80S7Black 5CB0L459282 Hinge_CoverC80S7White 5CB0L671823 Panel,LGDLP140WF6-SPB1FHDAGSNB,14.0FHDIPS
AGTOUCH(SLIM)5D10H34771
3 Panel,INN140HCE-EAAC3FHDAGSNB,14.0FHDIPSAGTOUCH(SLIM)
5D10K91452
3 Panel,BOENV140FHM-N41FHDAGSNB,14.0FHDIPSAGTOUCH(SLIM)
5D10H32288
3 Panel,INN140BGA-EA3HDTAGSNB,14.0HDTNAGTOUCH(SLIM)
5D10K85755
3 Panel,AUOB140XTN02.EHW0AHDAGSNB,14.0HDTNAGTOUCH(SLIM)
5D10G95364
3 Panel,LGLP140WHU-TPH1HDTAGSNB,14.0HDTNAGTOUCH(SLIM)
5D10K81464
3 LCDModuleC80S7BLKW/ANTFHD 5D10L458703 LCDModuleC80S7BLKW/ANTHD 5D10L460003 Touch,OFOMCF-140-2370GFFYG510TSP,14.0FHDIPS
AGTOUCH(SLIM),14.0HDTNAGTOUCH(SLIM)ST50K84945
3 Touch,MTOB131972H1GFFNAYG51TSP,14.0FHDIPSAGTOUCH(SLIM),14.0HDTNAGTOUCH(SLIM)
ST50K85797
4 RubberhingeC80S720PCS 5R60L460385 EDPcableC80S7 5C10L460136 Camera,BISBNCH1NVSFHDNBcamera,HD720PWITH
ARRAYMICSC20K75685
6 Camera,CCYCNFFH44HDNBcamera,HD720PWITHARRAYMIC
SC20K75684
6 Camera,AVCHAA-8F4A01HDNBcamera,HD720PWITHARRAYMIC
SC20K75686
6 CAMERAC80S7W/Conductivetape 5C20L460397 HingeC80S7L+R 5H50L458898 Sensor_BoardC80S7 5C50L459339 LCDCoverC80S7BLKW/YogaLogo 5CB0L460159 LCDCoverC80S7WHTW/YogaLogo 5CB0L67147

76
YOGA 510-14ISK/YOGA510-14AST/YOGA 510-15ISK Hardware Maintenance Manual
15.6-in. HD TFTTable 5. Parts list—15.6-in. HD TFT
No. FRU FRU no. CRU ID.
1 LCDBezelScrewpadC80S8BL+WT20PCS 5T10L45993
N
2 Hinge_CoverC80S8Black 5CB0L459582 HingeC80S8L+R 5H50L459483 Panel,LGLP156WF6-SPK2FHDIAGSNB15.6FHDIPS
AGTOUCH(SLIM)5D10K92393
3 Panel,SDLTN156HL09-402FHDIAGSNB15.6FHDIPSAGTOUCH(SLIM)
5D10K81462
3 Panel,BONV156FHM-N42V5FHDIAGSNB15.6FHDIPSAGTOUCH(SLIM)
5D10K18374
3 TouchSLC156021AKMOGSNAYG51TSP15.6FHDIPSAGTOUCH(SLIM)
ST50K85656
3 TouchBOESG156FBB-A12OGSYG51TSP15.6FHDIPSAGTOUCH(SLIM)
ST50K86358
3 LCDModuleC80S8BLKW/ANTFHD 5D10L460264 RubberhingeC80S820PCS 5R60L459195 EDPcableC80S8 5C10L459026 CameraC80S8W/Conductivetape 5C20L459776 Camera,BISBNCH1NVSFHDNBcamera,HD720PWITH
ARRAYMICSC20K75685
6 Camera,CCYCNFFH44HDNBcamera,HD720PWITHARRAYMIC
SC20K75684
6 Camera,AVCHAA-8F4A01HDNBcamera,HD720PWITHARRAYMIC
SC20K75686
8 Sensor_BoardC80S8 5C50L459179 LCDCoverC80S8BLKW/YogaLOGO 5CB0L45885
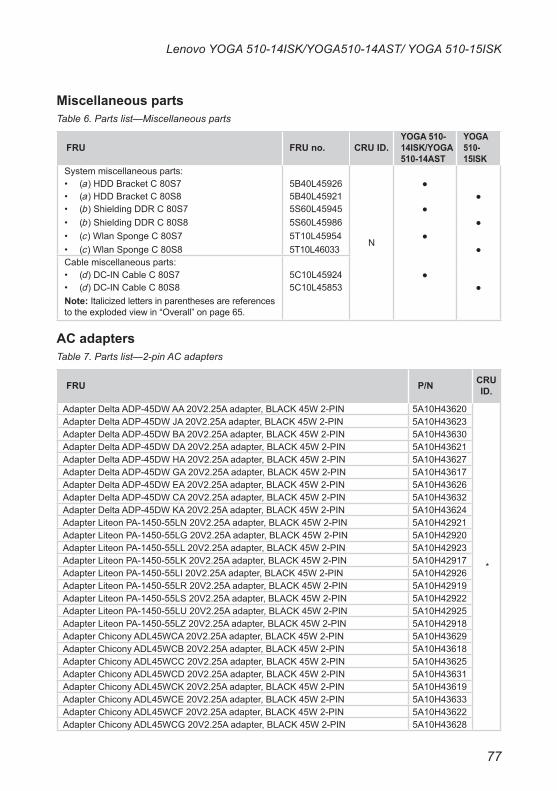
77
Lenovo YOGA 510-14ISK/YOGA510-14AST/ YOGA 510-15ISK
Miscellaneous partsTable 6. Parts list—Miscellaneous parts
FRU FRU no. CRU ID.YOGA 510-14ISK/YOGA 510-14AST
YOGA 510-15ISK
Systemmiscellaneousparts:
N
• (a)HDDBracketC80S7 5B40L45926 ●• (a)HDDBracketC80S8 5B40L45921 ●• (b)ShieldingDDRC80S7 5S60L45945 ●• (b)ShieldingDDRC80S8 5S60L45986 ●• (c)WlanSpongeC80S7 5T10L45954 ●• (c)WlanSpongeC80S8 5T10L46033 ●Cablemiscellaneousparts:• (d)DC-INCableC80S7 5C10L45924 ●• (d)DC-INCableC80S8 5C10L45853 ●Note:Italicizedlettersinparenthesesarereferencestotheexplodedviewin“Overall”onpage65.
AC adaptersTable 7. Parts list—2-pin AC adapters
FRU P/N CRU ID.
AdapterDeltaADP-45DWAA20V2.25Aadapter,BLACK45W2-PIN 5A10H43620
*
AdapterDeltaADP-45DWJA20V2.25Aadapter,BLACK45W2-PIN 5A10H43623AdapterDeltaADP-45DWBA20V2.25Aadapter,BLACK45W2-PIN 5A10H43630AdapterDeltaADP-45DWDA20V2.25Aadapter,BLACK45W2-PIN 5A10H43621AdapterDeltaADP-45DWHA20V2.25Aadapter,BLACK45W2-PIN 5A10H43627AdapterDeltaADP-45DWGA20V2.25Aadapter,BLACK45W2-PIN 5A10H43617AdapterDeltaADP-45DWEA20V2.25Aadapter,BLACK45W2-PIN 5A10H43626AdapterDeltaADP-45DWCA20V2.25Aadapter,BLACK45W2-PIN 5A10H43632AdapterDeltaADP-45DWKA20V2.25Aadapter,BLACK45W2-PIN 5A10H43624AdapterLiteonPA-1450-55LN20V2.25Aadapter,BLACK45W2-PIN 5A10H42921AdapterLiteonPA-1450-55LG20V2.25Aadapter,BLACK45W2-PIN 5A10H42920AdapterLiteonPA-1450-55LL20V2.25Aadapter,BLACK45W2-PIN 5A10H42923AdapterLiteonPA-1450-55LK20V2.25Aadapter,BLACK45W2-PIN 5A10H42917AdapterLiteonPA-1450-55LI20V2.25Aadapter,BLACK45W2-PIN 5A10H42926AdapterLiteonPA-1450-55LR20V2.25Aadapter,BLACK45W2-PIN 5A10H42919AdapterLiteonPA-1450-55LS20V2.25Aadapter,BLACK45W2-PIN 5A10H42922AdapterLiteonPA-1450-55LU20V2.25Aadapter,BLACK45W2-PIN 5A10H42925AdapterLiteonPA-1450-55LZ20V2.25Aadapter,BLACK45W2-PIN 5A10H42918AdapterChiconyADL45WCA20V2.25Aadapter,BLACK45W2-PIN 5A10H43629AdapterChiconyADL45WCB20V2.25Aadapter,BLACK45W2-PIN 5A10H43618AdapterChiconyADL45WCC20V2.25Aadapter,BLACK45W2-PIN 5A10H43625AdapterChiconyADL45WCD20V2.25Aadapter,BLACK45W2-PIN 5A10H43631AdapterChiconyADL45WCK20V2.25Aadapter,BLACK45W2-PIN 5A10H43619AdapterChiconyADL45WCE20V2.25Aadapter,BLACK45W2-PIN 5A10H43633AdapterChiconyADL45WCF20V2.25Aadapter,BLACK45W2-PIN 5A10H43622AdapterChiconyADL45WCG20V2.25Aadapter,BLACK45W2-PIN 5A10H43628
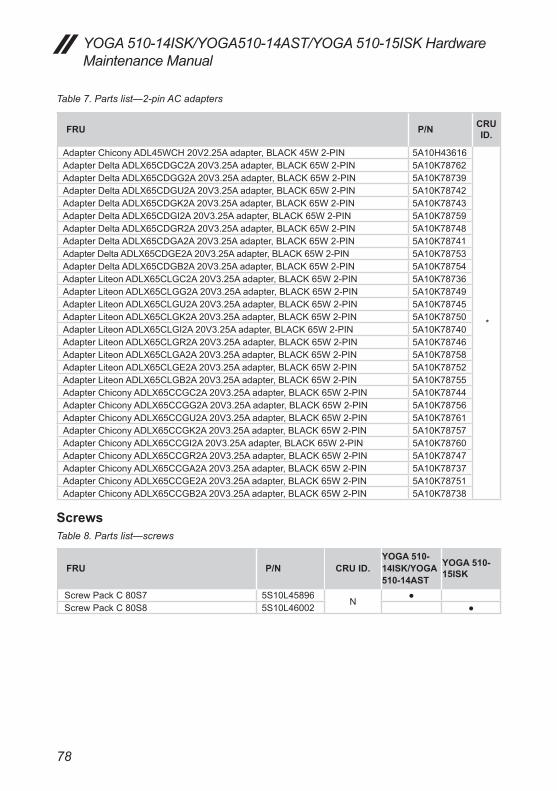
78
YOGA 510-14ISK/YOGA510-14AST/YOGA 510-15ISK Hardware Maintenance Manual
FRU P/N CRU ID.
AdapterChiconyADL45WCH20V2.25Aadapter,BLACK45W2-PIN 5A10H43616
*
AdapterDeltaADLX65CDGC2A20V3.25Aadapter,BLACK65W2-PIN 5A10K78762AdapterDeltaADLX65CDGG2A20V3.25Aadapter,BLACK65W2-PIN 5A10K78739AdapterDeltaADLX65CDGU2A20V3.25Aadapter,BLACK65W2-PIN 5A10K78742AdapterDeltaADLX65CDGK2A20V3.25Aadapter,BLACK65W2-PIN 5A10K78743AdapterDeltaADLX65CDGI2A20V3.25Aadapter,BLACK65W2-PIN 5A10K78759AdapterDeltaADLX65CDGR2A20V3.25Aadapter,BLACK65W2-PIN 5A10K78748AdapterDeltaADLX65CDGA2A20V3.25Aadapter,BLACK65W2-PIN 5A10K78741AdapterDeltaADLX65CDGE2A20V3.25Aadapter,BLACK65W2-PIN 5A10K78753AdapterDeltaADLX65CDGB2A20V3.25Aadapter,BLACK65W2-PIN 5A10K78754AdapterLiteonADLX65CLGC2A20V3.25Aadapter,BLACK65W2-PIN 5A10K78736AdapterLiteonADLX65CLGG2A20V3.25Aadapter,BLACK65W2-PIN 5A10K78749AdapterLiteonADLX65CLGU2A20V3.25Aadapter,BLACK65W2-PIN 5A10K78745AdapterLiteonADLX65CLGK2A20V3.25Aadapter,BLACK65W2-PIN 5A10K78750AdapterLiteonADLX65CLGI2A20V3.25Aadapter,BLACK65W2-PIN 5A10K78740AdapterLiteonADLX65CLGR2A20V3.25Aadapter,BLACK65W2-PIN 5A10K78746AdapterLiteonADLX65CLGA2A20V3.25Aadapter,BLACK65W2-PIN 5A10K78758AdapterLiteonADLX65CLGE2A20V3.25Aadapter,BLACK65W2-PIN 5A10K78752AdapterLiteonADLX65CLGB2A20V3.25Aadapter,BLACK65W2-PIN 5A10K78755AdapterChiconyADLX65CCGC2A20V3.25Aadapter,BLACK65W2-PIN 5A10K78744AdapterChiconyADLX65CCGG2A20V3.25Aadapter,BLACK65W2-PIN 5A10K78756AdapterChiconyADLX65CCGU2A20V3.25Aadapter,BLACK65W2-PIN 5A10K78761AdapterChiconyADLX65CCGK2A20V3.25Aadapter,BLACK65W2-PIN 5A10K78757AdapterChiconyADLX65CCGI2A20V3.25Aadapter,BLACK65W2-PIN 5A10K78760AdapterChiconyADLX65CCGR2A20V3.25Aadapter,BLACK65W2-PIN 5A10K78747AdapterChiconyADLX65CCGA2A20V3.25Aadapter,BLACK65W2-PIN 5A10K78737AdapterChiconyADLX65CCGE2A20V3.25Aadapter,BLACK65W2-PIN 5A10K78751AdapterChiconyADLX65CCGB2A20V3.25Aadapter,BLACK65W2-PIN 5A10K78738
ScrewsTable 8. Parts list—screws
FRU P/N CRU ID.YOGA 510-14ISK/YOGA 510-14AST
YOGA 510-15ISK
ScrewPackC80S7 5S10L45896N
●ScrewPackC80S8 5S10L46002 ●
Table 7. Parts list—2-pin AC adapters
79
Notices
Notices
Lenovomaynotoffer theproducts,services,or featuresdiscussed in thisdocument in all countries.Consult your local Lenovo representative forinformationontheproductsandservicescurrentlyavailable inyourarea.AnyreferencetoaLenovoproduct,program,orserviceisnot intendedtostateorimply thatonly thatLenovoproduct,program,orservicemaybeused.Anyfunctionallyequivalentproduct,program,orservice thatdoesnot infringeanyLenovointellectualpropertyrightmaybeusedinstead.However, it is theuser’sresponsibilitytoevaluateandverifytheoperationofanyotherproduct,program,orservice.Lenovomayhavepatentsorpendingpatentapplicationscoveringsubjectmatterdescribedinthisdocument.Thefurnishingofthisdocumentdoesnotgiveyouanylicensetothesepatents.
LENOVO GROUP LTD. PROVIDES THIS PUBLICATION “AS IS”WITHOUTWARRANTYOFANYKIND,EITHEREXPRESSOR IMPLIED,INCLUDING,BUTNOTLIMITEDTO,THEIMPLIEDWARRANTIESOFNON-INFRINGEMENT,MERCHANTABILITYORFITNESSFORAPARTICULARPURPOSE.Some jurisdictionsdonotallowdisclaimerofexpressor impliedwarrantiesincertaintransactions,therefore,thisstatementmaynotapplytoyou.This informationcould includetechnical inaccuraciesor typographicalerrors.Changesareperiodicallymade to the informationherein; thesechangeswillbe incorporated inneweditionsof thepublication.Lenovomaymakeimprovements and/or changes in the product(s) and/or the program(s)describedinthispublicationatanytimewithoutnotice.The products described in this document are not intended for use inimplantationorother lifesupportapplicationswheremalfunctionmayresult ininjuryordeathtopersons.TheinformationcontainedinthisdocumentdoesnotaffectorchangeLenovoproductspecificationsorwarranties.Nothing in thisdocumentshalloperateasanexpressorimpliedlicenseorindemnityundertheintellectualpropertyrightsofLenovoorthirdparties.All informationcontainedinthisdocumentwasobtainedinspecificenvironmentsandispresentedasanillustration.Theresultobtainedinotheroperatingenvironmentsmayvary.Lenovomayuseordistributeanyof the informationyousupply inanyway itbelievesappropriatewithoutincurringanyobligationtoyou.Anyreferences in thispublication tonon-LenovoWebsitesareprovidedforconvenienceonlyanddonotinanymannerserveasanendorsementofthoseWebsites.Thematerialsat thoseWebsitesarenotpartof thematerials forthisLenovoproduct,anduseofthoseWebsitesisatyourownrisk.
80
YOGA 510-14ISK/YOGA510-14AST/YOGA 510-15ISK Hardware Maintenance Manual
Anyperformancedata containedhereinwasdetermined in a controlledenvironment.Therefore, theresultobtained inotheroperatingenvironmentsmay vary significantly. Somemeasurementsmay have beenmade ondevelopment-levelsystemsandthereisnoguaranteethatthesemeasurementswill be the same on generally available systems. Furthermore, somemeasurementsmayhavebeenestimatedthroughextrapolation.Actualresultsmayvary.Usersof thisdocumentshouldverify theapplicabledata for theirspecificenvironment.
TrademarksThefollowingtermsaretrademarksorregisteredtrademarksofLenovointheUnitedStates,othercountries,orboth.
LenovoOneKey
MicrosoftandWindowsaretrademarksofMicrosoftCorporationintheUnitedStates,othercountries,orboth.
Othercompany,products,orservicenamesmaybe trademarksorservicemarksofothers.