Embed Size (px)
Citation preview

Year End Skill Builder:
PR W-2 Process
Viewpoint V 6.5.1
Page 2
Table of Contents
Processing W-2s 3
Set Up Company Information 4
Initialize W-2s 6
Initialize Header 6
Initialize Federal Information 6
Initialize State/Local Information 7
Initialize Misc Box 14 Information 8
Edit Employee W-2 Information 9
Editing Employee Information for W-2s 9
Editing Federal Information for Employee W-2s 10
Editing State and Local Information for Employee W-2s 11
Editing State-Specific Box 14 Information for Employee W-2s 12
Preview/Print W-2 Forms 12
Previewing Federal and State W-2 Reporting Information 13
Printing Employee W-2s 13
Printing State W-2s 14
Printing Local W-2s 14
Electronic Filing 15
Federal Electronic Filing 16
State Electronic Filing 17
Local Electronic Filing 18
Appendix 1: IRS Reporting Items 19
Appendix 2: W-2 Wage and Tax Statement 21
Appendix 3: PR Employee Accumulations Report 22

Viewpoint V 6.5.1
Page 3
Processing W-2s
This Job Aid provides you with the step by step process that is involved in processing W-2s in Viewpoint
V6 Software. Each year you will use the PR W-2 Process form to initialize (or reinitialize) W-2 information
for the specific year, and then generate W-2 forms or test files for electronic filing. When processing W-
2s, you will be generating files to submit to federal, state and local authorities as well as printing
employee copies.
The following image represents each step in the W-2 process. While it lists each successive step, you
may, as needed, back up to make changes.
Viewpoint V 6.5.1
Page 4
Set Up Company Information
The first step in W-2 processing is to set up your company information. You will use the Info (or Grid)
and Add’l Info tabs of the PR W-2 Process form to set up your company information for W-2 processing.
The following instructions detail how to set up your company information.
1. To set up company information, go to the Payroll module’s Programs folder and open the
PR W-2 Process form.
2. Enter the tax year in the Tax Year field and tab off. You will then see that company-specific
information will default on the form. You can edit this information as needed.
3. Enter your user identification number in the User Identification Number field if you are using
the MMREF-1 format to submit your W-2 information. This number was provided to you by the
Social Security Administration (SSA).
4. In the Preferred Method of Problem Notification Code drop-down field, select how you want
the SSA to contact you regarding problems with your W-2 filing. You can select from the
following options:
a. 1-Email/Internet: requires that you specify an email address
b. 2-Postal Service: delivery address is used
5. Check the Third Party Sick Pay Indicator box if you are a third-party sick pay provider.
6. In the Options to Initialize Retirement section, select the radio option that will determine how
the system sets the Retirement Plan checkbox in box 13 on the W-2 form. The following options
are available:
a. Check Box for All Employees: select this option to check the retirement plan box in for
all employees.
b. Only Check for Employees with Retirement Plan: select this option to check the
retirement plan for all employees whose Retirement Plan box is checked in PR
Employees.
c. Do Not Initialize for Any Employees: select this option to leave the Retirement Plan box
in PR W-2 Information unchecked for all employees.
7. Check the Resubmittal box if you are resubmitting this file. Do not check this box when
submitting this file for the first time.
8. Once you have entered/updated all information on the Info tab, click Save. See Figure A.

Viewpoint V 6.5.1
Page 5
Figure A. PR W-2 Process – Info Tab
9. Next, move to the Add’l Info tab. Maryland users should complete the fields on this tab as
applicable. For more information on each field, please refer to the F1 help. See Figure B.
Figure B. PR W-2 Process – Add’l Info Tab
Viewpoint V 6.5.1
Page 6
Initialize W-2s
The next step in the W-2 Process is to initialize the W-2s. This process will create the tables that will be
used to print the W-2s as well as defaulting Earnings, Deductions and Liability codes for the W-2. The
initialize process can be run and re-run at any time.
Initialize Header
1. After you have set up your company information on the Info and Add’l Info tabs of the W-2
Process form, you can then Initialize the Header. You can do so either by selecting the ‘Initialize
Header’ button or by going to File and selecting ‘Initialize’. Either method will access the PR W-
2 Initialization form. This will then create the tables that will be used to print W-2s. This task can
be run and re-run at any time.
2. You will then receive a message that Initialization is complete. Select Close.
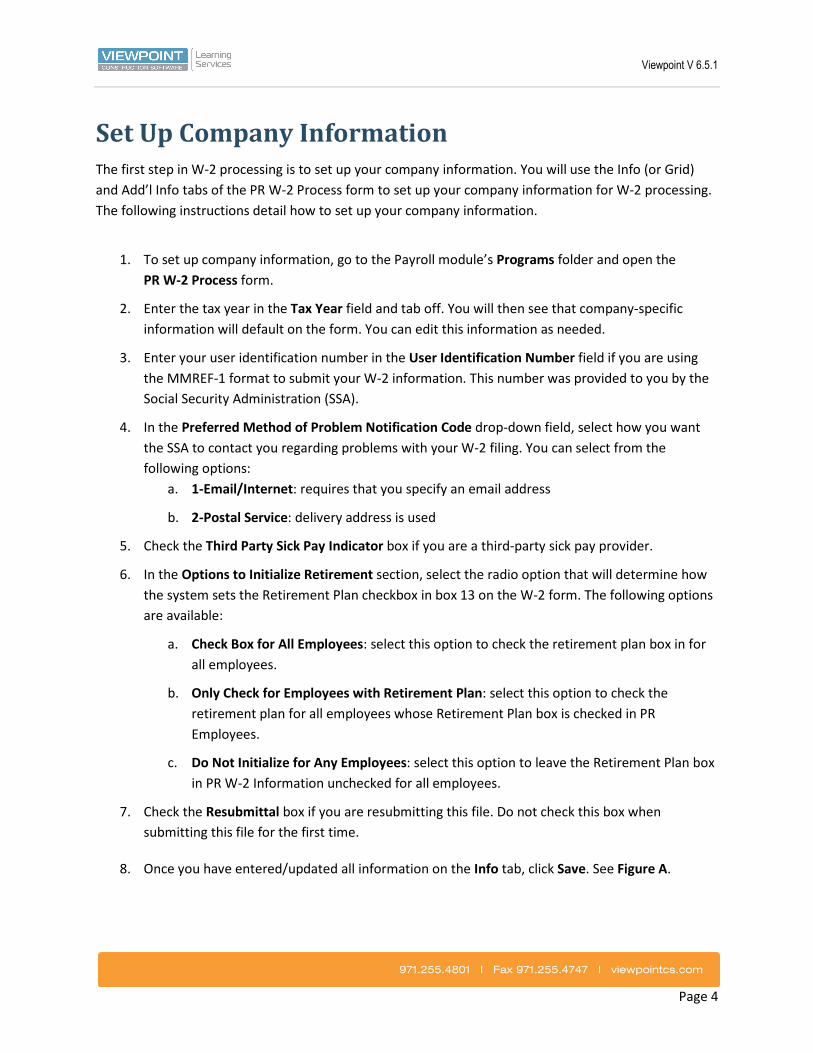
Initialize Federal Information
1. Next, select the Federal Information tab to set federal info required to print on the W-2.
2. On this tab, you will see that the system will have defaulted all of the Earning, Deduction and
Liability codes from the previous tax year. If you are initializing W-2s for the first time, the EDL
codes will not default and you must manually enter the appropriate codes.
3. To add a code, enter the item number in the Item field, or press F4 for a list of standard
reporting items.
4. In the Type field, you will need to identify whether you want an Earnings (E), Deduction (D) or a
Liability (L) code used for this item.
5. In the Code field you need to identify the Earnings, Deduction or Liability code where the
amount will be pulled from.
Note:
• Make sure you have identified all the items that are required to print on the federal
copy of the W2 including anything you want printed in box 14. You can use Box 14 to
report any other information you want to give to your employees, but is not required by
the federal government.
• Some examples might include, as suggested by the IRS, union dues, health insurance
premiums deducted, paid moving expenses, and education assistance programs. You
can enter up to eight Box 14 items on this form.
• For a list of IRS Reporting Items and a diagram of a W-2 Copy 1, please refer to Appendix
A and B of this Job Aid.
Viewpoint V 6.5.1
Page 7
• Please note that amounts for all Federal, FICA-SS, FICA-Med, and State wages and tax
amounts are drawn from the PR Employee accumulations deduction subject/eligible and
tax amounts not from the PR Employee accumulation earnings. See Appendix A and B.
6. Once you have added all Items on the Federal Information tab, click the ‘Initialize Federal’
button or go to File and select ‘Initialize Federal’. The system will then update each employee
record with federal W-2 information.
7. You will then receive a message that Initialization is complete. See Figure C.
Figure C. PR W-2 Process – Federal Information Tab
Initialize State/Local Information
1. Next, select the State/Local Information tab to specify which states and localities that should be
included in W-2 processing.
2. The grid on this tab will default the state and local codes that are set up in PR State Information
and PR Local Codes, respectively. Employee-based deductions that have been flagged to be
included as local tax in PR Deductions/Liabilities also display in the grid.
3. In the grid, the Initialize box will default as checked for each state/local code in the grid.
Uncheck this box for each state/local code that you want to exclude from W-2 processing.
4. Once you have finished setting the status of the Initialize box for each state/local code, click the
‘Initialize State’ button or go to File and select ‘Initialize State’. The system updates each
employee record with state/local W-2 information.

Viewpoint V 6.5.1
Page 8
5. You will then receive a message that Initialization is complete. See Figure D.
Figure D. PR W-2 Process – State/Local Information Tab
Initialize Misc Box 14 Information
1. Next, select the Misc Box 14 Information tab where you can enter state-specific information.
Use this tab to enter descriptions for Box 14 of state/local W-2s when you want to report state-
specific earnings, deductions or liability information. The system uses the
earnings/deduction/liability codes and types to determine where to get the amounts for each
item that you enter on this tab.
Note: Using this tab you can enter as many records as you want, but the system will only print
the first eight records with amounts greater than zero on W-2s.
2. Once you have entered all state-specific information, click the ‘Initialize Misc Box 14’ button or
go to File and select ‘Initialize Local’. The system will then update each employee record with
misc box 14 information. State specific info only displays if earnings or taxes were paid in that
state.
3. You will then receive a message that Initialization is complete. See Figure E.

Viewpoint V 6.5.1
Page 9
Figure E. PR W-2 Process – Misc Box 14 Information Tab
Edit Employee W-2 Information
Use the PR W-2 Employee Edit form to maintain/edit federal, state and local information for each
employee W-2s. In order to edit the information on this form, the tax year must have been previously
initialized.
Typically, you should not need to make changes to any of the employee information. However, there
may be situations where changes must be made (misspelled name, new address, etc.), or you may have
inadvertently added or missed something when you initialized W-2s. If this is the case, you can make the
necessary changes here. You should be aware, however, that changes made here do not update
elsewhere in the system; you must manually update all appropriate forms. Please note that if any edits
made to employees will be lost if the initialize is re-run at any point.
Editing Employee Information for W-2s
1. After you have initialized the Federal, State/Local and Misc State Box 14 information, you can
then move to the Employees tab. If you double click on any line within the grid, the PR W-2
Employee Edit form will appear.
2. In the PR W-2 Employee Edit form, you can use the Info and Additional Info tabs to edit general
information about the employee. On the Info tab you will have the ability to change the name,
address, Social Security Number, and tax state. Additionally, you can specify which boxes should

Viewpoint V 6.5.1
Page 10
be checked in Box 13 of the W-2 for the employee (Statutory, Retirement Plan, and Third Party
Sick Pay). See Figure F.
Figure F. PR W-2 Employee Edit – Info Tab
3. On the Additional Info tab, you will have the ability to enter marital information about the
employee, as well as State Unemployment Insurance (SUI) information. This tab is only
applicable to Puerto Rico residents.
Editing Federal Information for Employee W-2s
1. After you have made any adjustments to the Info and Additional Info tabs, you can then move to
the Federal Info tab.
2. This tab contains the wage and withholding information for federal W-2s. Each of the
earning/deduction/liability reporting items you selected when initializing federal information
displays in this grid. The actual wage and withholding amounts are pulled from the PR Employee
Accumulations.
3. You are able to use this tab to enter codes to display in Box 14 of the federal W-2 form. You can
use Box 14 to report any other information you want to give to your employees, but it is not
required by the federal government.
4. Click Save to save any changes made to the Federal Info tab. See Figure G.
Viewpoint V 6.5.1
Page 11
Figure G. PR W-2 Employee Edit – Federal Info Tab
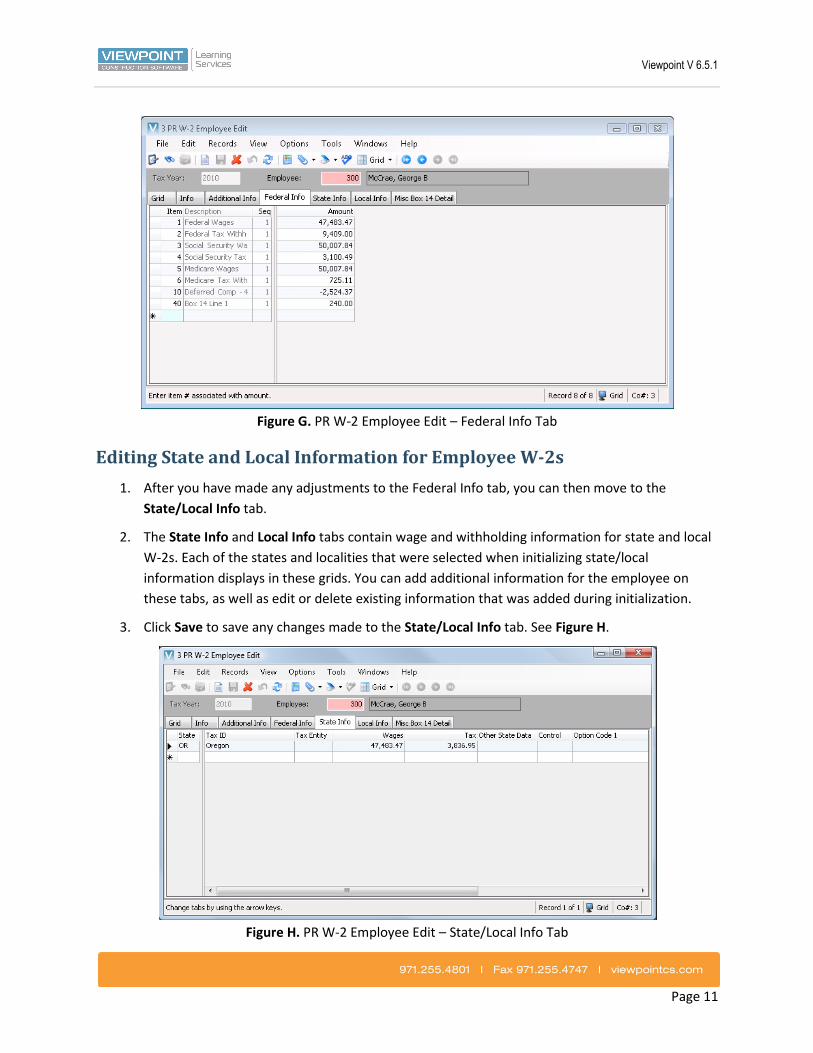
Editing State and Local Information for Employee W-2s
1. After you have made any adjustments to the Federal Info tab, you can then move to the
State/Local Info tab.
2. The State Info and Local Info tabs contain wage and withholding information for state and local
W-2s. Each of the states and localities that were selected when initializing state/local
information displays in these grids. You can add additional information for the employee on
these tabs, as well as edit or delete existing information that was added during initialization.
3. Click Save to save any changes made to the State/Local Info tab. See Figure H.
Figure H. PR W-2 Employee Edit – State/Local Info Tab

Viewpoint V 6.5.1
Page 12
Editing State-Specific Box 14 Information for Employee W-2s
1. After you have made any adjustments to the Federal Info tab, you can then move to the Misc
Box 14 Info tab.
2. This tab will contain descriptions for Box 14 of state/local W-2s for reporting state-specific
earnings, deductions or liability for the employee. Each of the items that you selected when
initializing Misc Box 14 information will display in the grid. You can add additional items for this
employee on this tab, as well as edit or delete existing information that was added during
initialization.
Preview/Print W-2 Forms
You are able to preview and print W-2s through the PR W-2 Preview and Print form. Use this form to
generate paper copies of W-2s for employees, states and localities. Additionally, you can generate a
report that allows you to review federal and state reporting information prior to generating W-2s.
To access this form, go to File in the PR W-2 Process form and select Preview/Print W2. See Figure I.
Figure I. PR W2 Preview and Print

Viewpoint V 6.5.1
Page 13
Previewing Federal and State W-2 Reporting Information
You may find it useful to review both federal and state reporting information before you print or
electronically file W-2s. You can use the PR W2 Preview and Print form to generate the PR W-2 Preview
report. The following instructions detail how to generate the PR W-2 Preview Report.
1. On the PR W2 Preview and Print form, enter the tax year for generating W-2s in the Tax Year
field.
2. In the Print Order section of the form, select how the report will sort employees, either by
Employee # or Name.
3. In the Beginning Employee and Ending Employee fields, enter a range of employees for printing.
If you leave the fields blank, the system will print all employees.
4. Select a printing option from the Print Option section of the form: Preview or Print.
5. In the W-2 Preview section, click W-2 Preview.
Note: If you selected the Preview Print option, the system displays the PR W-2 Preview Report
in the report viewer. If you selected the Print option, the system displays the Print dialog box
where you can configure the printer and print the report.
Printing Employee W-2s
You can use the PR W-2 Preview and Print form to print copies of your employees’ W-2s. The following
instructions detail how to print employee W-2s.
1. On the PR W2 Preview and Print form, enter the tax year for generating W-2s in the Tax Year
field.
2. In the Print Order section of the form, select how the report will sort employees , either by
Employee # or Name.
3. In the Beginning Employee and Ending Employee fields, enter a range of employees for printing.
If you leave the fields blank, the system will print all employees.
4. Select a printing option from the Print Option section of the form: Preview or Print.
5. In the Employee W-2s section, check the ‘Print copies to be filed with tax returns’ box if you are
printing W-2s to be filed with the employees’ tax returns.
Note: This option prints all copies of the employees’ W-2s (i.e., Copy B, Copy C, and Copy 2).
Viewpoint V 6.5.1
Page 14
6. Check the ‘Print Employee copies’ box to print copies of W-2s for your employees’ records.
Note: This option prints copy C for all of the states/localities that the employee has paid taxes to
and includes federal, state and local information.
7. Select a printing option: State=Print State Only or Local=Print State and Local.
8. Click Employee W-2s.
Printing State W-2s
You can use the PR W-2 Preview and Print form to print state copies of W-2s for each employee, which
you may send to states that don’t accept electronic filing. W-2s print by state, with each page containing
up to four employees. Note: If your state provides the option to file electronically, use the electronic
filing option in PR W-2 Process. The following instructions detail how to print state W-2s.
1. On the PR W2 Preview and Print form, enter the tax year for generating W-2s in the Tax Year
field.
2. In the Print Order section of the form, select how the report will sort employees , either by
Employee # or Name.
3. In the Beginning Employee and Ending Employee fields, enter a range of employees for printing.
If you leave the fields blank, the system will print all employees.
4. Select a printing option from the Print Option section of the form: Preview or Print.
5. In the Beginning and Ending State fields (State W-2s section), enter a range of states that should
be included when the system generates the W-2s. Leave these fields blank to include all states.
6. Click State W-2s.
Printing Local W-2s
You can use the PR W-2 Preview and Print form to print a local copy of a W-2 for each employee, which
you may send to the appropriate local agency. This option is typically used for states that pay City,
County and/or School District taxes. The following instructions detail how to print local W-2s.
1. On the PR W2 Preview and Print form, enter the tax year for generating W-2s in the Tax Year
field.
2. In the Print Order section of the form, select how the report will sort employees, either by
Employee # or Name.
Viewpoint V 6.5.1
Page 15
3. In the Beginning Employee and Ending Employee fields, enter a range of employees for printing.
If you leave the fields blank, the system will print all employees.
4. Select a printing option from the Print Option section of the form: Preview or Print.
5. In the Beginning and Ending State fields (State W-2s section), enter a range of states that should
be included when the system generates the W-2s. Leave these fields blank to include all states.
6. In the Beginning and Ending Local fields, enter a range of localities that should be included
when the system generates the W-2s. Leave these fields blank to include all localities.
7. Click Local W-2s.
Electronic Filing
You can use the PR W-2 Electronic Filing form to generate files for electronic submission of federal,
state, and local W-2s. Be aware that Viewpoint V6 Software only offers electronic filing of federal W-2s;
no paper version can be created for federal submission.
Note: Before you export your W-2 data to an electronic file, you should print the PR W-2 Preview Report
to make sure that all of the necessary information has been entered and is correct. If information has
not been set up correctly, you can recreate the W-2 files using PR W-2 Process. We suggest you create
and test your federal file with Accuwage that can be obtained at www.ssa.gov. We also suggest that you
do not send your file until after your employees have had a chance to review their copies of the W2.
Once the electronic file has been submitted any corrections need to be done with a W2C and that
process is done online.
To access this form, go to File in the PR W-2 Process form and select Electronic Filing. See Figure J.

Viewpoint V 6.5.1
Page 16
Figure J. PR W2 Electronic Filing
Federal Electronic Filing
This section details how to create an electronic file for federal W-2s.
1. Make sure that you entered the required information for filing in PR W-2 Process. This
information includes the following fields: User ID #, Contact Name, Phone, Delivery Address,
Preferred Method of Problem Notification Code, and Email (if you select 1-Email/Internet from
the Preferred Method of Problem Notification Code).
2. Go to File in the PR W-2 Process form and select ‘Electronic Filing’. The system will then open
the PR W-2 Electronic Filing form.
3. If any of your employees received sick pay from an insurance company or other third-party and
the third-party notified you of the amount of the sick pay, enter the amount in the Third Party
Income Tax Withholding field.
4. Click Export. The system will then display the Save Export File As window.

Viewpoint V 6.5.1
Page 17
5. Save the text file to a location on your computer. Note the ‘save to’ location so you are able to
find it easily after it has been saved. The system will then save the file and a message will display
informing you of the total number of federal W-2 records that were processed.
Note: The name of the text file automatically defaults as w2coXXXfederal.txt, where XXX
represents the company number. You can change the name as necessary.
6. Click Close and the system will return you to the PR W2 Electronic Filing form.
7. You will then be able to submit the electronic file to the Social Security Administration (SSA).
State Electronic Filing
This section details how to create an electronic file for state W-2s.
1. Make sure that you entered the required information for filing in PR W-2 Process. This
information includes the following fields: User ID #, Contact Name, Phone, Delivery Address,
Preferred Method of Problem Notification Code, and Email (if you select 1-Email/Internet from
the Preferred Method of Problem Notification Code).
2. Go to File in the PR W-2 Process form and select ‘Electronic Filing’. The system will then open
the PR W-2 Electronic Filing form.
3. In the State section of the form, enter the state in the State field or press F4 for a list of states.
4. If any of your employees received sick pay from an insurance company or other third-party and
the third-party notified you of the amount of the sick pay, enter the amount in the Third Party
Income Tax Withholding field.
5. Click Export. The system will then display the Save Export File As window.
Note: If you are trying to generate an electronic file for a state that does not support electronic
filing, the system will display a warning and will not generate the file.
6. Save the text file to a location on your computer. Note the ‘save to’ location so you are able to
find it easily after it has been saved. The system will then save the file and a message will display
informing you of the total number of state W-2 records that were processed.
Note: The name of the text file automatically defaults as w2coXXXstate.txt, where XXX
represents the company number. You can change the name as necessary.
7. Click Close and the system will return you to the PR W2 Electronic Filing form.
8. You will then be able to submit the electronic file to the appropriate state.
Viewpoint V 6.5.1
Page 18
Local Electronic Filing
This section details how to create an electronic file for local W-2s.
1. Make sure that you entered the required information for filing in PR W-2 Process. This
information includes the following fields: User ID #, Contact Name, Phone, Delivery Address,
Preferred Method of Problem Notification Code, and Email (if you select 1-Email/Internet from
the Preferred Method of Problem Notification Code).
2. Go to File in the PR W-2 Process form and select ‘Electronic Filing’. The system will then open
the PR W-2 Electronic Filing form.
3. In the Local section of the form, enter the state in the State field or press F4 for a list of states.
Once you enter the state, the system displays all associated local codes in the Local Code table.
4. Check the Send box for each local code that should be included in the electronic file.
5. Click Export. The system will then display the Save Export File As window.
6. Save the text file to a location on your computer. Note the ‘save to’ location so you are able to
find it easily after it has been saved. The system will then save the file and a message will display
informing you of the total number of local W-2 records that were processed.
Note: The name of the text file automatically defaults as w2coXXXstatelocal.txt, where XXX
represents the company number. You can change the name as necessary.
7. Click Close and the system will return you to the PR W2 Electronic Filing form.
8. You will then be able to submit the electronic file to the appropriate locality.
Viewpoint V 6.5.1
Page 19
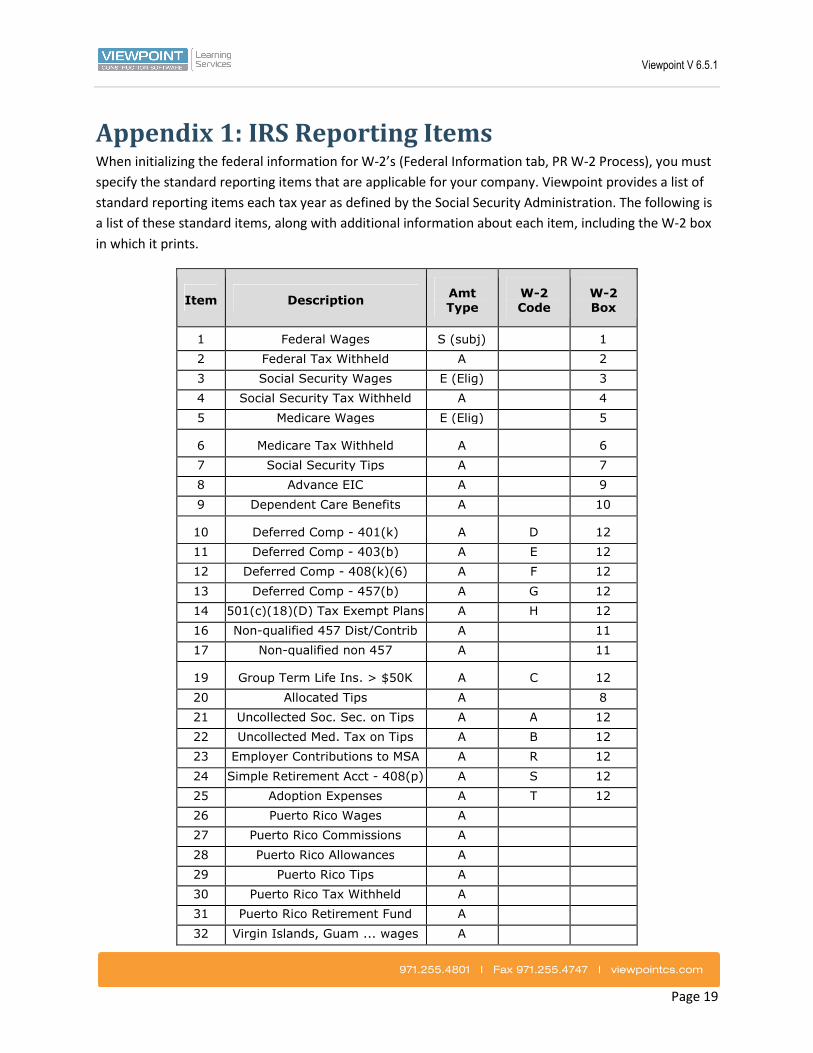
Appendix 1: IRS Reporting Items When initializing the federal information for W-2’s (Federal Information tab, PR W-2 Process), you must
specify the standard reporting items that are applicable for your company. Viewpoint provides a list of
standard reporting items each tax year as defined by the Social Security Administration. The following is
a list of these standard items, along with additional information about each item, including the W-2 box
in which it prints.
Item Description Amt
Type
W-2
Code
W-2
Box
1 Federal Wages S (subj) 1
2 Federal Tax Withheld A 2
3 Social Security Wages E (Elig) 3
4 Social Security Tax Withheld A 4
5 Medicare Wages E (Elig) 5
6 Medicare Tax Withheld A 6
7 Social Security Tips A 7
8 Advance EIC A 9
9 Dependent Care Benefits A 10
10 Deferred Comp - 401(k) A D 12
11 Deferred Comp - 403(b) A E 12
12 Deferred Comp - 408(k)(6) A F 12
13 Deferred Comp - 457(b) A G 12
14 501(c)(18)(D) Tax Exempt Plans A H 12
16 Non-qualified 457 Dist/Contrib A 11
17 Non-qualified non 457 A 11
19 Group Term Life Ins. > $50K A C 12
20 Allocated Tips A 8
21 Uncollected Soc. Sec. on Tips A A 12
22 Uncollected Med. Tax on Tips A B 12
23 Employer Contributions to MSA A R 12
24 Simple Retirement Acct - 408(p) A S 12
25 Adoption Expenses A T 12
26 Puerto Rico Wages A
27 Puerto Rico Commissions A
28 Puerto Rico Allowances A
29 Puerto Rico Tips A
30 Puerto Rico Tax Withheld A
31 Puerto Rico Retirement Fund A
32 Virgin Islands, Guam ... wages A

Viewpoint V 6.5.1
Page 20
Item Description Amt Type
W-2 Code
W-2 Box
33 Virgin Islands, Guam ... w/h A
34 Nontaxable Sick Pay A J 12
35 Tax on Goldn Parachute Paymnts A K 12
36 NontaxReimb Business Expenses A L 12
37 Uncollected Soc Sec Ins Tax A M 12
38 Uncollected Medicare Ins Tax A N 12
39 NontaxReimb Moving Expense A P 12
40 Other Line 1 A 14
41 Other Line 2 A 14
42 Nonstatutory stock options A V 12
43 Employer Contributions to HSA A W 12
44 Deferred Comp – 409A A Y 12
45 Income under 409A A Z 12
46 Other Line 3 A 14
47 Other Line 4 A 14
48 After-tax Contrib to 401(k) A AA 12
49 After-tax Contrib to 403(b) A BB 12
50 HIRE exempt wages and tips E (Elig) CC 12
51 Other Line 5 A 14
52 Other Line 6 A 14
53 Other Line 7 A 14
54 Other Line 8 A 14
Viewpoint V 6.5.1
Page 21
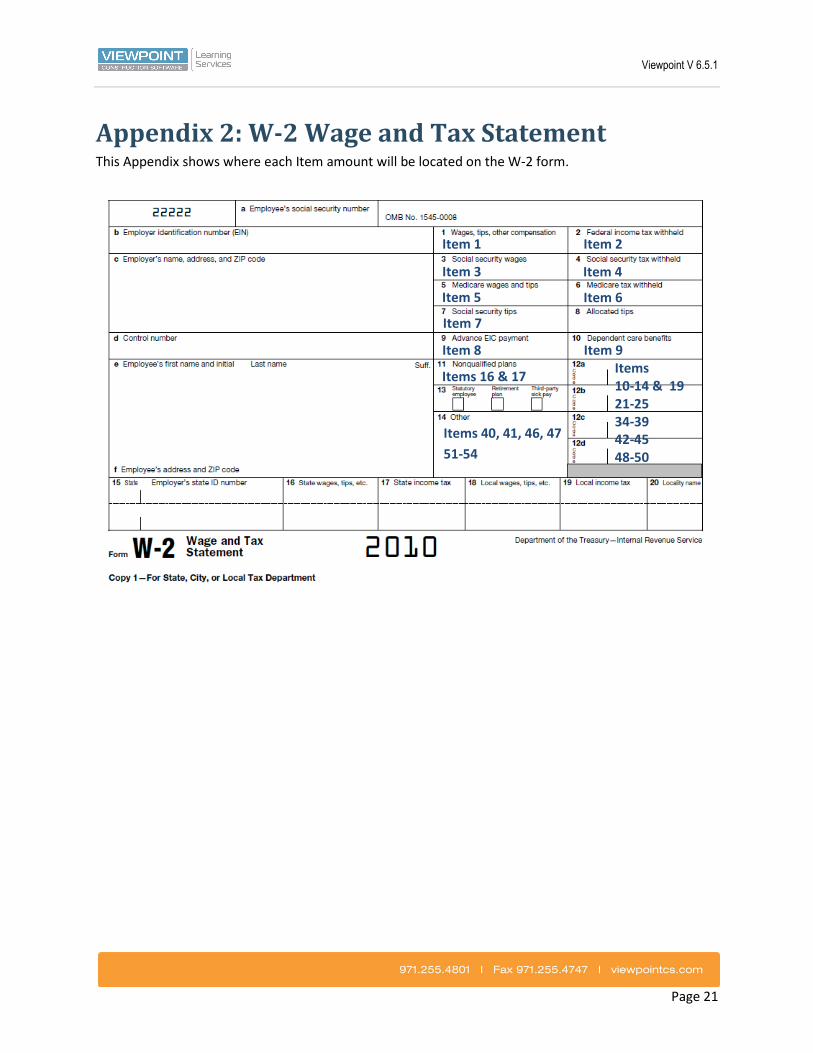
Appendix 2: W-2 Wage and Tax Statement This Appendix shows where each Item amount will be located on the W-2 form.
Item 1 Item 2
Item 3 Item 4
Item 5 Item 6
Item 7
Item 8 Item 9
Items 16 & 17 Items
10-14 & 19
21-25
34-39
42-45
48-50
Items 40, 41, 46, 47
51-54
Viewpoint V 6.5.1
Page 22
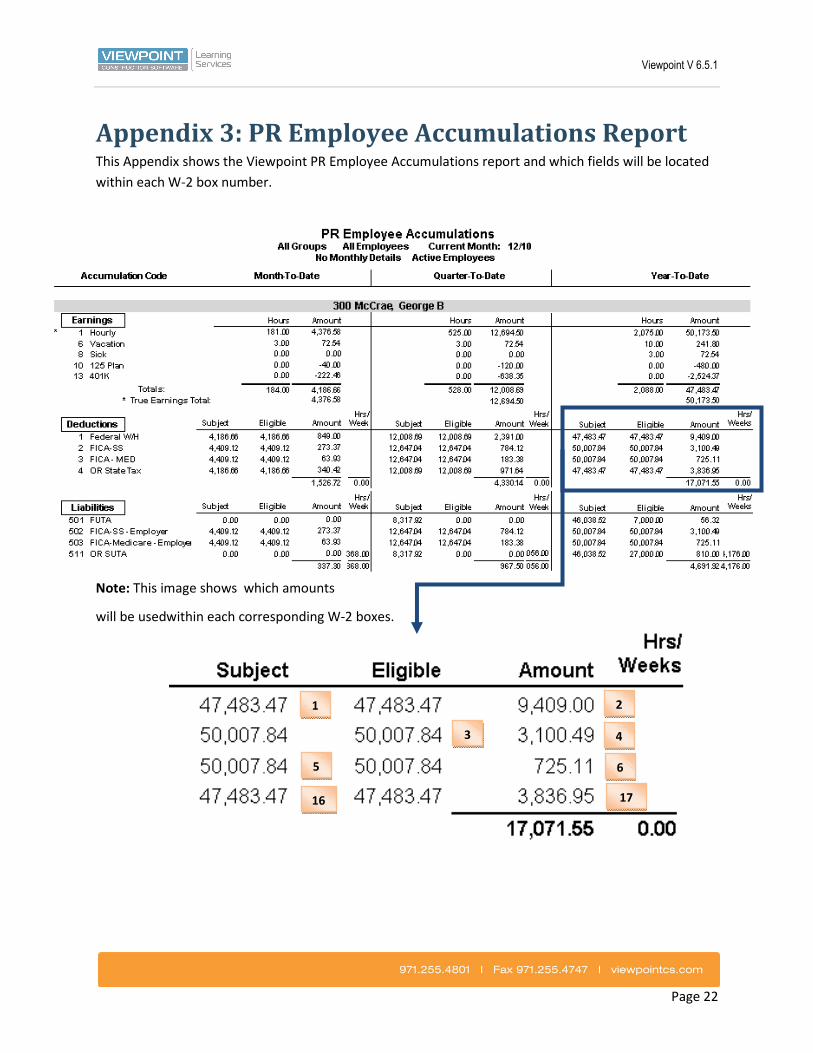
Appendix 3: PR Employee Accumulations Report This Appendix shows the Viewpoint PR Employee Accumulations report and which fields will be located
within each W-2 box number.
Note: This image shows which amounts
will be usedwithin each corresponding W-2 boxes.
1
16
5
3
2
4
6
17