Embed Size (px)
Citation preview
Schulich School of Medicine & Dentistry – Windsor Campus
University of Windsor, Dr. Murray O’Neil Medical Education Centre
Rm. 1100, 401 Sunset Avenue, Windsor, ON, Canada N9B 3P4
Telephone: 519-561-1411 Fax: 519-561-1413 www.uwindsor.ca/medicine
YEAR 3 CLINICAL CLERKSHIP
OB/GYN ORIENTATION
Table of Contents
Contact Information for Department of Obstetrics/Gynaecology
Schulich Windsor Program Administrative Staff
Schulich Windsor Program Satellite Offices
Clerk Handbook for WRH – Meds 2019
Joint SOGC APOG Policy Statement
WRH Maternal Newborn Program
Family Birthing Centre Introduces Quiet Time
Important Dates to Note: OB/GYN Oral Examination
List of London/Windsor Seminars and Objectives
OB/GYN Grand Rounds
OB/GYN Preceptors Contact Listing and Start-Times for Clinics and Offices
Telephone Dictation Instructions
Location of On-Call Rooms at WRH
Scrubs and Lockers
Appropriate Dress & Conduct
WRH (Met Campus) – Operating Room Dress Code Policy
WRH (Met Campus) – Infection Control Policy
Maintaining a Sterile Field
Points to Remember about Aseptic Technique
Putting on a Sterile Gown
Scrubbing
Needles and Sharps
Hand Washing
Contact Information:
For the Department of Obstetrics/Gynaecology
Dr. Angelina Chan
UGE Academic Director of OB/GYN
Phone: (519) 253-6033
Fax: (519) 253-6866
Pager: (519) 563-8490
Email: [email protected]
Dr. Brad Jasey
PGE Academic Director of OB/GYN
2224 Walker Road, Suite 340
Windsor, Ontario
N8W 5L7
Phone: (519) 258-1592
Fax: (519) 258-7350
Pager: (519) 818-7647
E-Mail: [email protected]
Beverly Nicholls
Education Assistant, OB/GYN
Office Location: Windsor Regional Hospital, Met Campus - Room 4306
Phone: (519) 254-5577 ext. 52507
Fax: (519) 985-2609
Email: [email protected] -or- [email protected]
OR IN CASE OF EMERGENCY
Phone: (519) 561-1411 – MEB Office
Fax: (519) 561-1413

ADMINISTRATIVE CONTACTS SCHULICH SCHOOL OF MEDICINE & DENTISTRY – WINDSOR CAMPUS ADMINISTRATIVE STAFF The Medical Education Building is located on the University of Windsor Campus on Sunset Avenue in the new three-storey building. Address: University of Windsor Medical Education Building, Rm. 1100 Main Office 401 Sunset Avenue Windsor, Ontario N9B 3P4
The Hospital Administrative Staff are listed below, together with their contact information:
Name Title Phone number Email address
Bianca Vasapolli Clinical Education Team Leader
519-254-5577 Ext. 31064
Stephanie Baker UGE/PGE Education Assistant – Medicine
519-254-5577 Ext. 33380
Gail Franklin UGE/PGE Education Assistant - Family Medicine
519-254-5577 Ext. 33964
Beverly Nicholls UGE/PGE Education Assistant – Surgery, Anaesthesia, and Ob/Gyn
519-254-5577 Ext. 52507
[email protected] -or- [email protected]
Alex Carson UGE/PGE Education Assistant – Paediatrics & Psychiatry
519-254-5577 Ext. 56424
Your Administration contacts for the hospitals are:
Windsor Regional Hospital (Metropolitan Campus) - 1995 Lens Avenue Laurie Trotti Tel: 519-254-5577 Ext. 52277 Fax: 519-254-3150 Email: [email protected] Windsor Regional Hospital (Ouellette Campus) - 1030 Ouellette Ave (entrance to hospital is on Goyeau) Renee Sperduti Tel: 519-254-5577 Ext 33148 Fax: 519-255-2121 Email: [email protected] Hotel Dieu Grace Healthcare – 1453 Prince Road Allison Brooks Tel: 519-257-5111 Ext. 76929 Fax: 519-257-5143 Email: [email protected]
Schulich Windsor Campus offices located at the Windsor Hospitals are as follows:
Windsor Regional Hospital (Met Campus) 4th floor Metropolitan Campus, Room 4303 Contact: Alex Carson, Education Assistant – Paediatrics and Psychiatry Tel: (519) 254-5577 (Ext. 56424) Email: [email protected]
Windsor Regional Hospital (Met Campus) 4th floor Metropolitan Campus, Room 4306 Contact: Bev Nicholls, Education Assistant – Surgery, Anaesthesia and OB/GYN Tel: (519) 254-5577 (Ext. 52507) Email: [email protected] A Student/Resident Lounge is located on the 4th floor at WRH – Metropolitan Campus – Room 4308. The lounge is complete with a couch, side chairs, coffee table, end tables, computer, printer/fax, microwave, fridge, 42-lockers, television and telephone. On-call room is adjacent to the lounge. To gain access to the Lounge, please press 2 and 4 together at the same time and then press 3.
Windsor Regional Hospital (Ouellette Campus) 5th floor – Room 5.536 Contact: Bianca Vasapolli, Clinical Education Team Leader Tel: (519) 254-5577 (Ext. 31064) Email: [email protected]
Windsor Regional Hospital (Ouellette Campus) – 1030 Ouellette Avenue 5th floor – Room 5.469 Contact: Stephanie Baker, Education Assistant - Medicine Tel: (519) 254-5577, Ext. 33380 Email: [email protected]
Windsor Regional Hospital (Ouellette Campus) – 1030 Ouellette Avenue 5th floor – Room 5.535 Contact: Gail Franklin, Education Assistant – Family Medicine Tel: (519) 254-5577, Ext. 33964 Email: [email protected] A Student/Resident Lounge is located on the 5th floor at Ouellette Campus. The Common area is complete with 2 desks; 2 computers; printer; fax machine & telephone. The Boardroom has a table, 10 chairs, a projection screen, white board, portable laptop, LCD, telephone and 2 side cabinets for storage. The Lounge has a couch, 2 side chairs, refrigerator, microwave, 38 lockers, coffee table, end table, and telephone.
Directions to the Suite
Take the main elevators to the 5th Floor, turn left, go through the double doors just past the vending machine – the door to the Schulich Windsor Program suite is on the right (5.469). Your Ouellette Campus proxy card will allow you swipe access to this area.
Schulich Windsor Campus administrative staff are located at both campuses. Students and Residents with issues or concerns should contact Schulich Windsor Campus staff, not Hospital Administration, if possible.
The Schulich School of Medicine & Dentistry
Department of Obstetrics & Gynecology
Clerk Handbook for WRH – Meds 2019
The following information is intended to be your map and resource while you navigate
through your rotation at Windsor Regional Hospital—Metropolitan Campus, Windsor. When
things get confusing or tough it will be the next best thing to mother. Do not throw it away!
Administration
Who do I talk to about scheduling, and day-to-day-information?
Bev Nicholls is the Schulich Windsor Program contact person at the hospital who can answer
most of the day-to-day questions. She can be reached at Windsor Regional Hospital – Met
Campus (519) 254-5577, Ext. 52507, Fax (519) 985-2609 or Email: [email protected]
Who do I contact about administrative matters, such as requests or concerns that I have
about policies or format of the rotation?
First, please attempt to have your questions answered by Bev Nicholls. Dr. Angelina Chan is the
Undergrad Academic Director of Obstetrics and Gynaecology. Her office is located at
3850 Dougall Avenue, Suite 201, Windsor. Dr. Chan can be reached at (519) 253-6033.
Dr. Brad Jasey is the Postgrad Academic Director of Obstetrics and Gynaecology for the
Schulich School of Medicine and Dentistry - Windsor Campus. His office is located at 2224
Walker Road, Suite 340, Windsor. Dr. Jasey can be reached at (519) 258-1592.
Orientation
Where do I meet for orientation to the service?
You will meet Bev Nicholls at 0730 hours on the first Monday of the rotation in the Schulich
Windsor Program Lounge, located on the 4th
floor (Room 4308) of WRH – Met Campus. After
Orientation, Bev Nicholls will take you to the 2nd
Floor of WRH to meet with Dr. Chan. If your
group starts on a Monday that is a hospital holiday, please note that your official orientation will
occur on Tuesday morning.
Where can I leave my "stuff" when I come in each day?
There is a locker change area in the Delivery Room where you can leave your belongings. We
would suggest that you leave your coats etc. there but bring any books etc. that you think you
will need to the clinic to which you are assigned that day. You will also be provided with a
Scrub-Ex Access Card for your scrubs which is located in the hallway just outside the
Obstetricians Locker Room. Please remember to bring a white coat to Windsor for the clinic
portion of the rotation.
Never leave valuables behind. Rings and watches should be removed when scrubbing and tied or
pinned onto your greens to avoid loss. Of course, don't forget them and throw them into the
laundry when you change next time!
What if I'm on-call the first day, especially if it's a holiday?
You will not be on call the first day. At your orientation, Dr. Chan will review the call schedule
and call duties.
Am I on my own once I complete the orientation?
No. You will be assigned to a clinical area for each week of your rotation. While in the delivery
room, you will work with all of the Obstetricians. When you are on the Gynaecology rotation
you will have an opportunity to work with a variety of consultants in order to get your
experience. The rotation coordinator (Dr. Chan) will act as your resource person during your
rotation.
If you have any concerns about the rotation, please feel free to contact Dr. Chan.
How am I evaluated in the Obstetrics & Gynecology rotation?
Students will be evaluated from several perspectives:
CLERKSHIP ASSESSMENT ***Successful completion of each of the assessment processes is required in order to meet the expectations of the Ob/Gyn rotation. Mid-Term Evaluation During the 3rd week of your rotation, you will be sent a reminder to set up a sit down formal meeting with one of your preceptors to do your mid-rotation assessment for your OB/GYN rotation. Any deficiencies will be identified and if you are concerned about gaps in exposure, they will be identified.
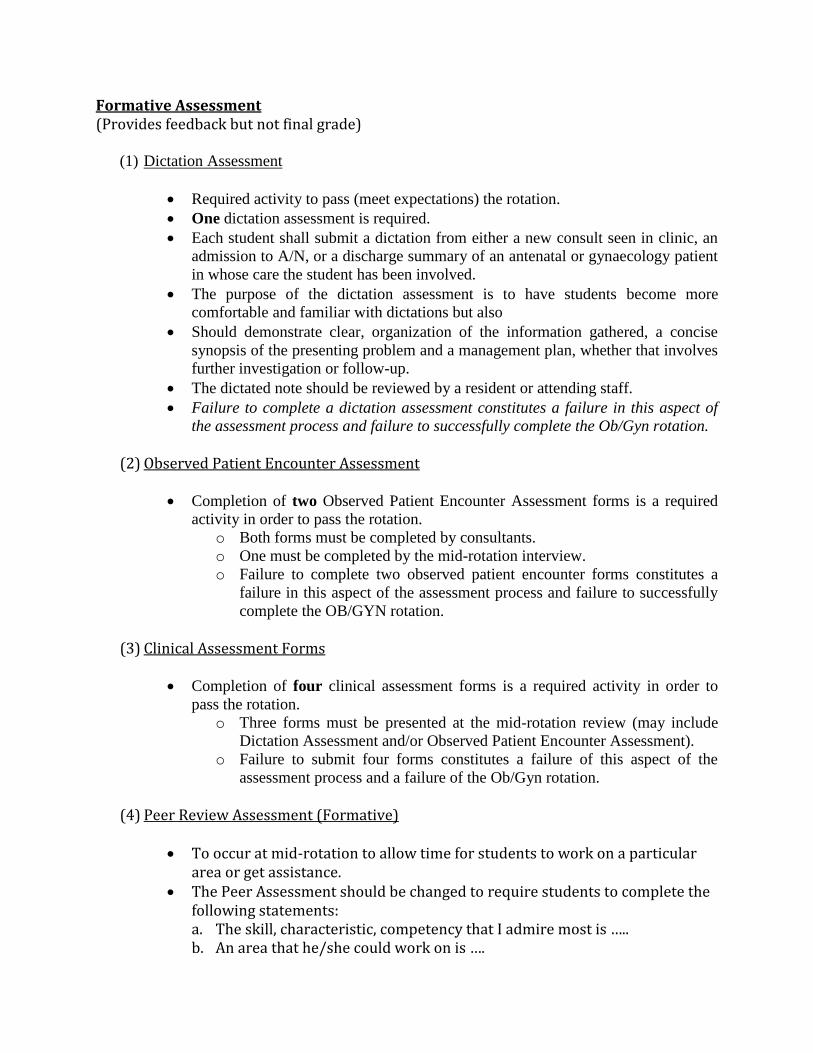
Formative Assessment (Provides feedback but not final grade)
(1) Dictation Assessment
Required activity to pass (meet expectations) the rotation.
One dictation assessment is required.
Each student shall submit a dictation from either a new consult seen in clinic, an
admission to A/N, or a discharge summary of an antenatal or gynaecology patient
in whose care the student has been involved.
The purpose of the dictation assessment is to have students become more
comfortable and familiar with dictations but also
Should demonstrate clear, organization of the information gathered, a concise
synopsis of the presenting problem and a management plan, whether that involves
further investigation or follow-up.
The dictated note should be reviewed by a resident or attending staff.
Failure to complete a dictation assessment constitutes a failure in this aspect of
the assessment process and failure to successfully complete the Ob/Gyn rotation.
(2) Observed Patient Encounter Assessment
Completion of two Observed Patient Encounter Assessment forms is a required
activity in order to pass the rotation.
o Both forms must be completed by consultants.
o One must be completed by the mid-rotation interview.
o Failure to complete two observed patient encounter forms constitutes a
failure in this aspect of the assessment process and failure to successfully
complete the OB/GYN rotation.
(3) Clinical Assessment Forms
Completion of four clinical assessment forms is a required activity in order to
pass the rotation.
o Three forms must be presented at the mid-rotation review (may include
Dictation Assessment and/or Observed Patient Encounter Assessment).
o Failure to submit four forms constitutes a failure of this aspect of the
assessment process and a failure of the Ob/Gyn rotation.
(4) Peer Review Assessment (Formative)
To occur at mid-rotation to allow time for students to work on a particular area or get assistance.
The Peer Assessment should be changed to require students to complete the following statements: a. The skill, characteristic, competency that I admire most is ….. b. An area that he/she could work on is ….
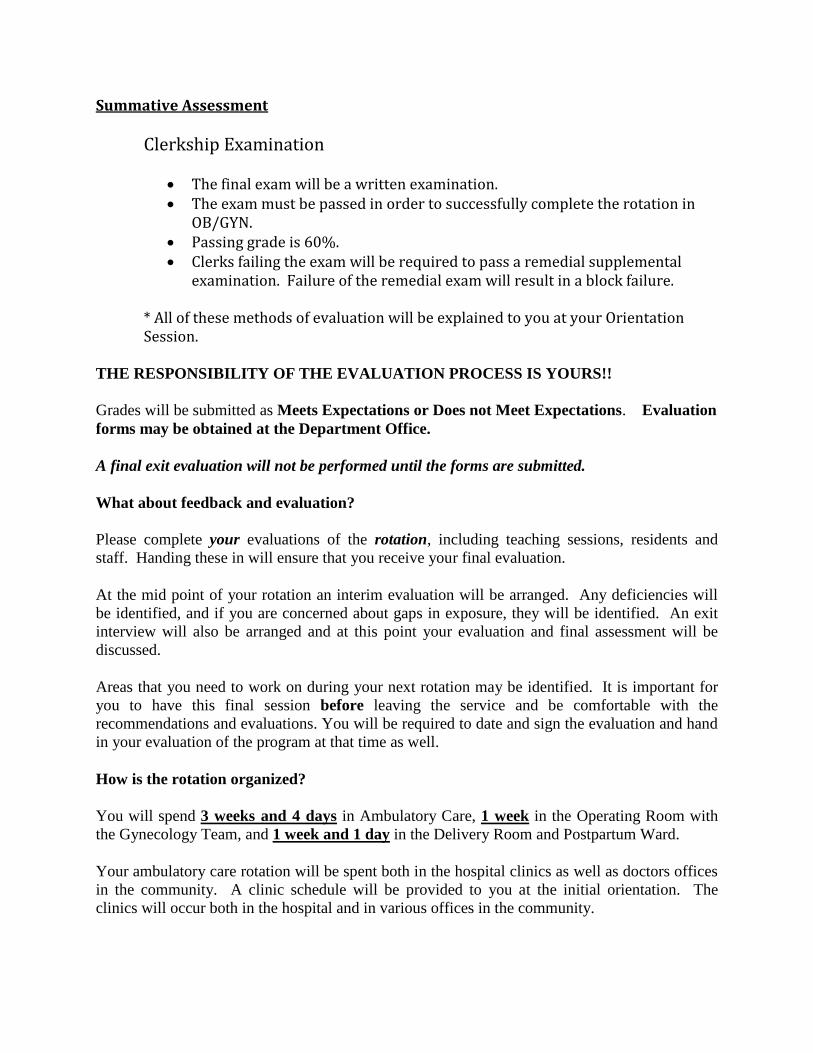
Summative Assessment
Clerkship Examination
The final exam will be a written examination. The exam must be passed in order to successfully complete the rotation in
OB/GYN. Passing grade is 60%. Clerks failing the exam will be required to pass a remedial supplemental
examination. Failure of the remedial exam will result in a block failure.
* All of these methods of evaluation will be explained to you at your Orientation Session.
THE RESPONSIBILITY OF THE EVALUATION PROCESS IS YOURS!!
Grades will be submitted as Meets Expectations or Does not Meet Expectations. Evaluation
forms may be obtained at the Department Office.
A final exit evaluation will not be performed until the forms are submitted.
What about feedback and evaluation?
Please complete your evaluations of the rotation, including teaching sessions, residents and
staff. Handing these in will ensure that you receive your final evaluation.
At the mid point of your rotation an interim evaluation will be arranged. Any deficiencies will
be identified, and if you are concerned about gaps in exposure, they will be identified. An exit
interview will also be arranged and at this point your evaluation and final assessment will be
discussed.
Areas that you need to work on during your next rotation may be identified. It is important for
you to have this final session before leaving the service and be comfortable with the
recommendations and evaluations. You will be required to date and sign the evaluation and hand
in your evaluation of the program at that time as well.
How is the rotation organized?
You will spend 3 weeks and 4 days in Ambulatory Care, 1 week in the Operating Room with
the Gynecology Team, and 1 week and 1 day in the Delivery Room and Postpartum Ward.
Your ambulatory care rotation will be spent both in the hospital clinics as well as doctors offices
in the community. A clinic schedule will be provided to you at the initial orientation. The
clinics will occur both in the hospital and in various offices in the community.
The address and phone numbers of the clinics will be given to you at orientation. You should
contact the office you are scheduled to attend on the day prior to confirm that the clinic is still
scheduled.
If you find the clinic is cancelled, contact Bev Nicholls first for an alternative and if she is
unavailable, Dr. Chan will direct you to another one.
What about Night Call?
The call schedule will be handed out at the first Monday rotation. There should only be one
clerk on call at a time. If you are on Gyn or Ambulatory rotation you should arrive at the
Delivery Room by 1730 hours. You should receive “sign over” from the clerk in the Delivery
Room and meet all the Obstetrical patients. You should also contact the consultant on call and
inform him/her that you will be on-call. You should leave your pager number on the Delivery
Room board as well.
If you have a need to change the nights that you are on-call, then you can trade with another
clerk. You must inform Dr. Chan and Bev Nicholls of any changes to the call schedule. You are
off duty at 0800 hours the day after call, provided that your clinical duties are completed and
there are no booked educational sessions.
You are dismissed from call at 1800 hours on the last evening of the rotation.
Where do I sleep?
The OB/GYN on-call room is located on the 2nd floor, 2 North in Room 2101. You can get the key from the nursing station on 2North. The spare on-call room at WRH is located on the 4th floor, Room 4301-1. It is located across the hall from the Schulich Windsor Program Office, Room 4306. You can get the key from Bev Nicholls (Ext. 52507).
How does the Gynecology service work?
You will be attending the Operating Room each day and will be assigned the cases that you are
involved in during this time. You must then follow the surgery in-patients that you encounter
there for the rest of your weekly rotation, and will be expected to make regular daily rounds on
these patients. These rounds are best done with the resident, but if this is impossible because of
other duties, you should make sure that you see “your” patients at some other time during the
day.
What am I supposed to be seeing while in the OR?
During your Gynecology rotation you are expected to see at least one of the following clinical
entities:
abdominal hysterectomy vaginal hysterectomy
pelvic prolapse repair (various surgical techniques) diagnostic laparoscopy operative laparoscopy D&C hysteroscopy endometrial ablation
If you do not see all of these procedures during your Gynecology rotation, speak to your
supervisor and make arrangements to visit the Operating Room at some point during the
remainder of your clerkship when one of these cases is being performed.
The goals of your rotation in Gynaecology are to provide exposure to and observation of
common procedures in gynaecology and improve your knowledge of important anatomic
structures as they relate to gynaecologic surgery. Hands-on experience is not the objective or
expectation of this part of the rotation. Your role in the OR will frequently be that of an
observer.
How does the Obstetrical Team work?
The OB Team provides care for OB inpatients on the antenatal ward, urgent patient assessments
in Obstetrical Triage and care for all laboring patients (low and high risk). These patients are
aware of your participation in the Delivery Room, and are appreciative of the care you provide.
On the first day of your Obstetrical rotation, please make an effort to sit down with the nurse-
manager of the Delivery Room to be oriented to this often very busy clinical area. It is important
that you arrange this meeting and learn the rules of the road so that you don't get passed by
when the activity is at its most exciting.
Your first involvement in the OB Triage or in the Delivery Room will be initial admission
assessments. You should ensure that the Antenatal 1 and 2 forms (running history forms that the
physician keeps updating throughout the pregnancy and then sends in to the Delivery Room at
term) are updated and an admission history and physical are performed.
You may write orders on these patients but only after you have reported your findings to a
consultant and have them co-sign these orders. These patients should be followed by you
throughout labour and birth.
Following patients in labour is often seen as a thankless task, but it is important to get an idea of
what constitutes normal (and abnormal) labour. Therefore, you are expected to spend time in the
Labour Room with patients to assess contractions and monitor the fetal heart. You should get the
chance to do a pelvic exam on your patients while they are in labour with help and advice from
the nurses, or consultants. Patients must always be given the opportunity to give consent when
procedures are to be done purely for the education of a trainee.
When it comes time for the delivery, you should be there also and scrub-in.
Tell me more about my role in deliveries.
You should be present early in the second stage to assist and assess progress. Make sure that the
Delivery Room nurses know where to get you for this part of the patient's care. This means that
when you leave the Delivery Room, you leave a message as to where you are going to be and for
how long . . . otherwise when you get back you will find that the delivery is done and you were
left out! Nurses are very busy and do not have time to go looking for you. Your presence and
commitment will be appreciated by patients, their families and staff.
For clarity, the clerkship objective “performs a vaginal delivery of a baby” requires that the
clerks be sitting in the chair, acting as the person primarily responsible for managing the birth
from appearance of the head to appearance of the feet. Clerk will be “hands on”, but there may
also be a resident/consultant guiding who will also have hands on.
What are the “rules of the road” in general as far as what I can do when seeing patients in
out-patient settings?
You will be expected to:
See those patients that the consultant selects for you and develop/update and record a history on the chart. You may perform the Leopold maneuvers on antenatal patients, where appropriate, and physical exams on Gyn patients, where indicated. Do not do a pelvic exam unless the consultant has spoken to the patient and determined the appropriateness of asking the patient's consent for you to do so. (See SOGC-APOG Policy statement http://www.sogc.org/guidelines/documents/gui246PS1009E.pdf) If consent is given, the consultant should remain with you during all pelvic exams. After the history and physical, you discuss the case. The two of you should determine a plan of management and discuss this with the patient. You will be responsible for completing the charting on the patient including the plan of management.
What if I have to miss part of a clinic or day on service?
You should inform Bev Nicholls as well as the consultant in advance of the reason for your
absence. If you are working on one of the services (Gynaecology or Delivery Room), you should
also inform the consultant/resident. This is important in order to avoid being labeled as either
late or absent. If there is an unexplained absence, you are at risk of failing the rotation because
of “unprofessional behaviour.”
CLINICAL CLERKS RESPONSIBILITIES WHILE ON OB/GYN ROTATION Responsibilities of Clerks on Labour & Delivery: Follow several (not necessarily all) Laboring patients to get a knowledge of what is normal labor
and be able to identify abnormal labor (latent phase, active phase and desultatory). Do pelvic
exams with supervision either with the consultant or nurse to be able to assess cervical dilatation,
effacement, station and position. It is up to the student to ensure that the nurses caring for your
patients know who and where you are in order to be an integral part of the obstetrical team.
If L&D is quiet, you should let the nurses in triage call you for patients that present with possible
early labor, possible ROM, or problems related to their pregnancy. If it is very, very quiet on
L&D you can review one or two antenatal patients on 2 north and discuss their management with
their appropriate consultants when they do rounds in the mornings.
Responsibilities of Clerks on GYN (O.R.) Rotation: Attend Operating Rooms Monday to Friday (usually 2 GYN rooms running every day). Do rounds in the a.m. with the OB resident on 2 North at 7:00 a.m. to get a grasp of post operative care, problems, and management. You will be rounding on both the Resident’s post-op patients, as well as the patients that you were involved in. Responsibilities of Clerks on Clinic Rotation: Attend to clinics either in the private offices of the consultants or appropriate clinics in hospital. You should get an exposure to a variety of ambulatory patients with both gynecological and obstetrical problems, as well as routine antenatal care. Expectations are outlined in your Clerks Handbook. If you are post call and have the day off, out of courtesy, please notify the office or clinic you were scheduled in.
Formal Teaching
What is formal teaching?
Windsor clerks will have their own Consultant Tutorial sessions which will correspond in terms
of material covered to the Tuesday and Thursday Consultant Seminars in London. You will be
informed of the time and place and date for these sessions by the Windsor consultants.
Teaching Sessions in Windsor
The Clerkship Seminar Series in Windsor, which corresponds to the material that is covered in London, will be conducted by the following consultants:
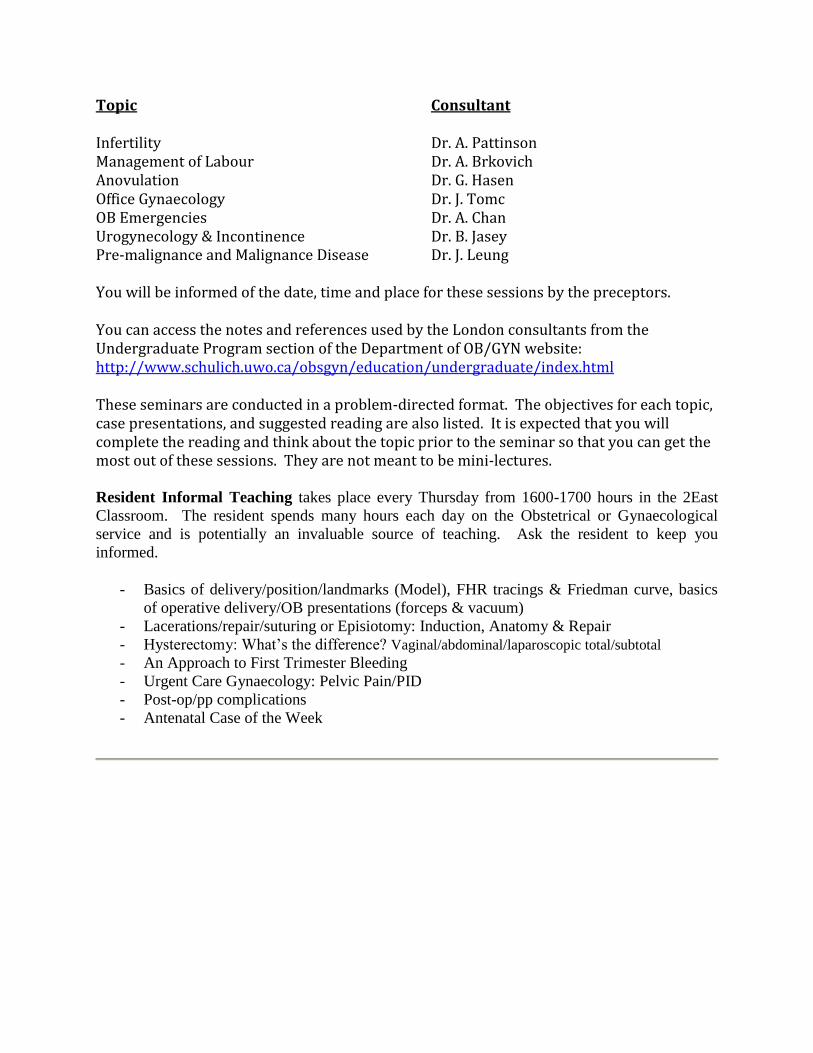
Topic Consultant
Infertility Dr. A. Pattinson Management of Labour Dr. A. Brkovich Anovulation Dr. G. Hasen Office Gynaecology Dr. J. Tomc OB Emergencies Dr. A. Chan Urogynecology & Incontinence Dr. B. Jasey Pre-malignance and Malignance Disease Dr. J. Leung
You will be informed of the date, time and place for these sessions by the preceptors.
You can access the notes and references used by the London consultants from the Undergraduate Program section of the Department of OB/GYN website: http://www.schulich.uwo.ca/obsgyn/education/undergraduate/index.html
These seminars are conducted in a problem-directed format. The objectives for each topic, case presentations, and suggested reading are also listed. It is expected that you will complete the reading and think about the topic prior to the seminar so that you can get the most out of these sessions. They are not meant to be mini-lectures.
Resident Informal Teaching takes place every Thursday from 1600-1700 hours in the 2East
Classroom. The resident spends many hours each day on the Obstetrical or Gynaecological
service and is potentially an invaluable source of teaching. Ask the resident to keep you
informed.
- Basics of delivery/position/landmarks (Model), FHR tracings & Friedman curve, basics
of operative delivery/OB presentations (forceps & vacuum)
- Lacerations/repair/suturing or Episiotomy: Induction, Anatomy & Repair
- Hysterectomy: What’s the difference? Vaginal/abdominal/laparoscopic total/subtotal
- An Approach to First Trimester Bleeding
- Urgent Care Gynaecology: Pelvic Pain/PID
- Post-op/pp complications
- Antenatal Case of the Week
Objectives
What are the objectives for this rotation?
1. The clerkship will demonstrate basic knowledge and application of skills in women’s healthcare required to function effectively as an (undifferentiated) physician.
Obstetrics:
2. Perform a focused history and physical examination in early pregnancy.
3. Establish and confirm gestational age.
4. Identify risk factors during an initial antenatal assessment.
5. Identify relevant health issues in pregnancy.
6. Counsel patients with respect to nutrition, activity and exercise, sexual activity, smoking and drug use in pregnancy.
7. Discuss the importance of routine prenatal laboratory investigations, prenatal diagnostic options (IPS, Quad screen, amniocentesis, CVS) and ultrasound assessment of fetal morphology.
8. Identify the optimal time in pregnancy to order the various prenatal diagnostic options and ultrasound.
9. Participate in ongoing antenatal care and investigations (GDM screening, Rh prophylaxis, GBS screening, term cervical assessment) to ensure maternal health and normal fetal growth.
10. Demonstrate knowledge and management of obstetrical complications seen in triage or on the antenatal ward (decreased fetal movement, preterm labour, premature rupture of fetal membranes, maternal hypertension, pre-eclampsia, antepartum bleeding).
11. Describe normal and abnormal progress of lab or full nulliparous and multiparous women.
12. Participate in intrapartum management including assessment of labour, cervical dilation, fetal position.
13. State the criteria for ensuring antenatal fetal well-being (non-stress test, biophysical profile) and intrapartum fetal health (intermittent and continuous fetal heart rate monitoring).
14. Perform a vaginal delivery under supervision and actively manage the third state of labour.
15. Participate in or observe a caesarean section.
16. Identify a first, second and third degree obstetrical laceration.
17. Define and participate in the management of post-partum haemorrhage.
18. Support women in their effort to breast-feed.
19. Identify and manage post-partum complications (voiding difficulty, nerve injury, venous thromboembolism, perineal and bowel care, depression).
20. Describe normal healing at 6 weeks post-partum.
21. Provide counselling regarding risks and success rates of VBAC (vaginal birth after caesarean section).
22. List contraceptive options post-partum.
Gynaecology:
23. Perform a focused (including menstrual, contraceptive, sexual and gynaecologic) history in ambulatory patients presenting with gynaecologic problems.
24. Perform a complete physical exam with emphasis on the gynaecologic exam (abdominal exam, bimanual pelvic exam, speculum exam and Pap smear) in ambulatory patients presenting with gynaecologic problems.
25. Develop a differential diagnosis and management plan for common gynaecologic problems (dysmenorrhea, dysfunctional uterine bleeding, contraception, infertility, pelvic mass, menopausal symptoms, post-menopausal bleeding, pelvic relaxation and urinary incontinence).
26. Outline an approach to diagnoses and management of patients presenting to emergency or urgent care with acute gynaecologic problems (first trimester bleeding, pelvic infection, pelvic pain, wound infection and acute bleeding).
27. Participate on the gynaecologic surgical team providing perioperative care and assist in common gynaecologic surgeries (laparoscopy, vaginal and abdominal hysterectomy, repair of pelvic prolapse and urinary incontinence).
28. Diagnose, investigate and manage post-operative complication (VTE, PE, UTI, infection).
29. Describe the importance of screening of cervical cancer and current screening programs.
30. Discuss the results of an abnormal PAP smear and outline appropriate follow-up or investigation.
31. Identify the signs and symptoms of gynaecologic malignancies (vulvar, cervical, endometrial, ovarian).
32. List the important investigations for gynaecologic malignancies (colposcopy, cervical or vulvar biopsy, endometrial biopsy, Ca125, pelvic exam).
33. Conduct patient-centered interviews that explore the patient’s feelings, idea, impact on function, and expectations.
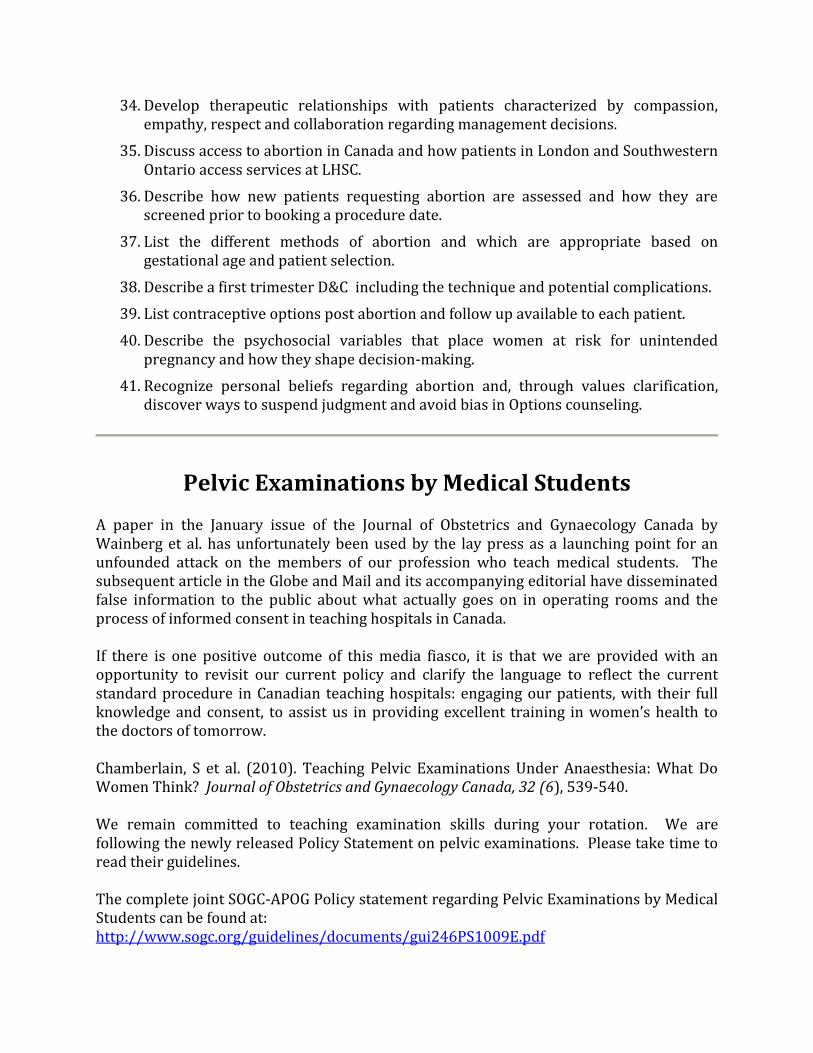
34. Develop therapeutic relationships with patients characterized by compassion, empathy, respect and collaboration regarding management decisions.
35. Discuss access to abortion in Canada and how patients in London and Southwestern Ontario access services at LHSC.
36. Describe how new patients requesting abortion are assessed and how they are screened prior to booking a procedure date.
37. List the different methods of abortion and which are appropriate based on gestational age and patient selection.
38. Describe a first trimester D&C including the technique and potential complications.
39. List contraceptive options post abortion and follow up available to each patient.
40. Describe the psychosocial variables that place women at risk for unintended pregnancy and how they shape decision-making.
41. Recognize personal beliefs regarding abortion and, through values clarification, discover ways to suspend judgment and avoid bias in Options counseling.
Pelvic Examinations by Medical Students
A paper in the January issue of the Journal of Obstetrics and Gynaecology Canada by Wainberg et al. has unfortunately been used by the lay press as a launching point for an unfounded attack on the members of our profession who teach medical students. The subsequent article in the Globe and Mail and its accompanying editorial have disseminated false information to the public about what actually goes on in operating rooms and the process of informed consent in teaching hospitals in Canada. If there is one positive outcome of this media fiasco, it is that we are provided with an opportunity to revisit our current policy and clarify the language to reflect the current standard procedure in Canadian teaching hospitals: engaging our patients, with their full knowledge and consent, to assist us in providing excellent training in women’s health to the doctors of tomorrow. Chamberlain, S et al. (2010). Teaching Pelvic Examinations Under Anaesthesia: What Do Women Think? Journal of Obstetrics and Gynaecology Canada, 32 (6), 539-540. We remain committed to teaching examination skills during your rotation. We are following the newly released Policy Statement on pelvic examinations. Please take time to read their guidelines. The complete joint SOGC-APOG Policy statement regarding Pelvic Examinations by Medical Students can be found at: http://www.sogc.org/guidelines/documents/gui246PS1009E.pdf
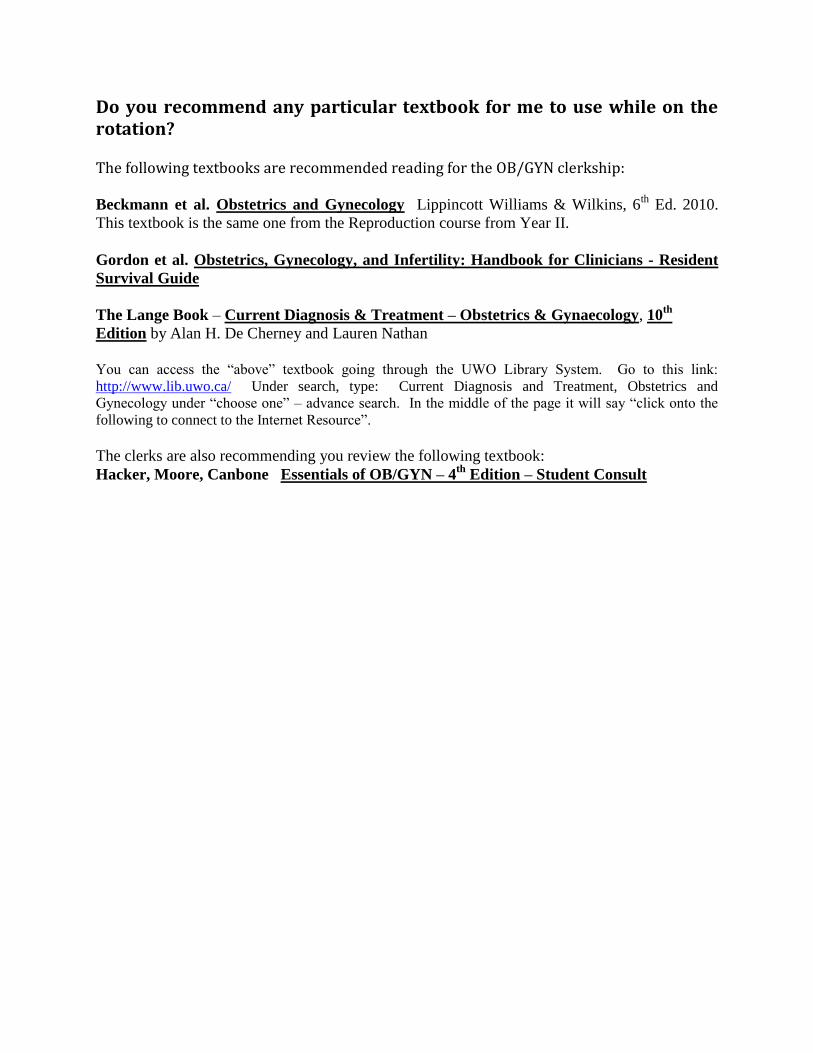
Do you recommend any particular textbook for me to use while on the rotation? The following textbooks are recommended reading for the OB/GYN clerkship: Beckmann et al. Obstetrics and Gynecology Lippincott Williams & Wilkins, 6
th Ed. 2010.
This textbook is the same one from the Reproduction course from Year II.
Gordon et al. Obstetrics, Gynecology, and Infertility: Handbook for Clinicians - Resident
Survival Guide
The Lange Book – Current Diagnosis & Treatment – Obstetrics & Gynaecology, 10
th
Edition by Alan H. De Cherney and Lauren Nathan
You can access the “above” textbook going through the UWO Library System. Go to this link:
http://www.lib.uwo.ca/ Under search, type: Current Diagnosis and Treatment, Obstetrics and
Gynecology under “choose one” – advance search. In the middle of the page it will say “click onto the
following to connect to the Internet Resource”.
The clerks are also recommending you review the following textbook:
Hacker, Moore, Canbone Essentials of OB/GYN – 4th
Edition – Student Consult
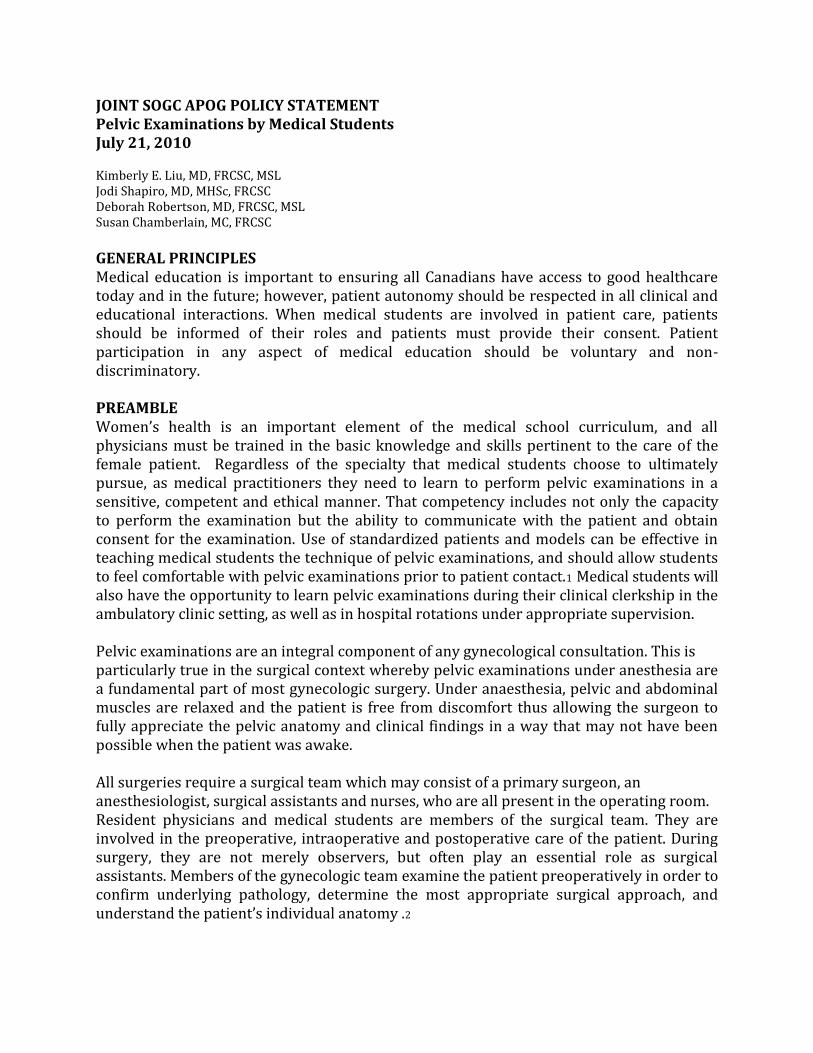
JOINT SOGC APOG POLICY STATEMENT Pelvic Examinations by Medical Students July 21, 2010 Kimberly E. Liu, MD, FRCSC, MSL Jodi Shapiro, MD, MHSc, FRCSC Deborah Robertson, MD, FRCSC, MSL Susan Chamberlain, MC, FRCSC
GENERAL PRINCIPLES Medical education is important to ensuring all Canadians have access to good healthcare today and in the future; however, patient autonomy should be respected in all clinical and educational interactions. When medical students are involved in patient care, patients should be informed of their roles and patients must provide their consent. Patient participation in any aspect of medical education should be voluntary and non-discriminatory. PREAMBLE Women’s health is an important element of the medical school curriculum, and all physicians must be trained in the basic knowledge and skills pertinent to the care of the female patient. Regardless of the specialty that medical students choose to ultimately pursue, as medical practitioners they need to learn to perform pelvic examinations in a sensitive, competent and ethical manner. That competency includes not only the capacity to perform the examination but the ability to communicate with the patient and obtain consent for the examination. Use of standardized patients and models can be effective in teaching medical students the technique of pelvic examinations, and should allow students to feel comfortable with pelvic examinations prior to patient contact.1 Medical students will also have the opportunity to learn pelvic examinations during their clinical clerkship in the ambulatory clinic setting, as well as in hospital rotations under appropriate supervision. Pelvic examinations are an integral component of any gynecological consultation. This is particularly true in the surgical context whereby pelvic examinations under anesthesia are a fundamental part of most gynecologic surgery. Under anaesthesia, pelvic and abdominal muscles are relaxed and the patient is free from discomfort thus allowing the surgeon to fully appreciate the pelvic anatomy and clinical findings in a way that may not have been possible when the patient was awake. All surgeries require a surgical team which may consist of a primary surgeon, an anesthesiologist, surgical assistants and nurses, who are all present in the operating room. Resident physicians and medical students are members of the surgical team. They are involved in the preoperative, intraoperative and postoperative care of the patient. During surgery, they are not merely observers, but often play an essential role as surgical assistants. Members of the gynecologic team examine the patient preoperatively in order to confirm underlying pathology, determine the most appropriate surgical approach, and understand the patient’s individual anatomy .2
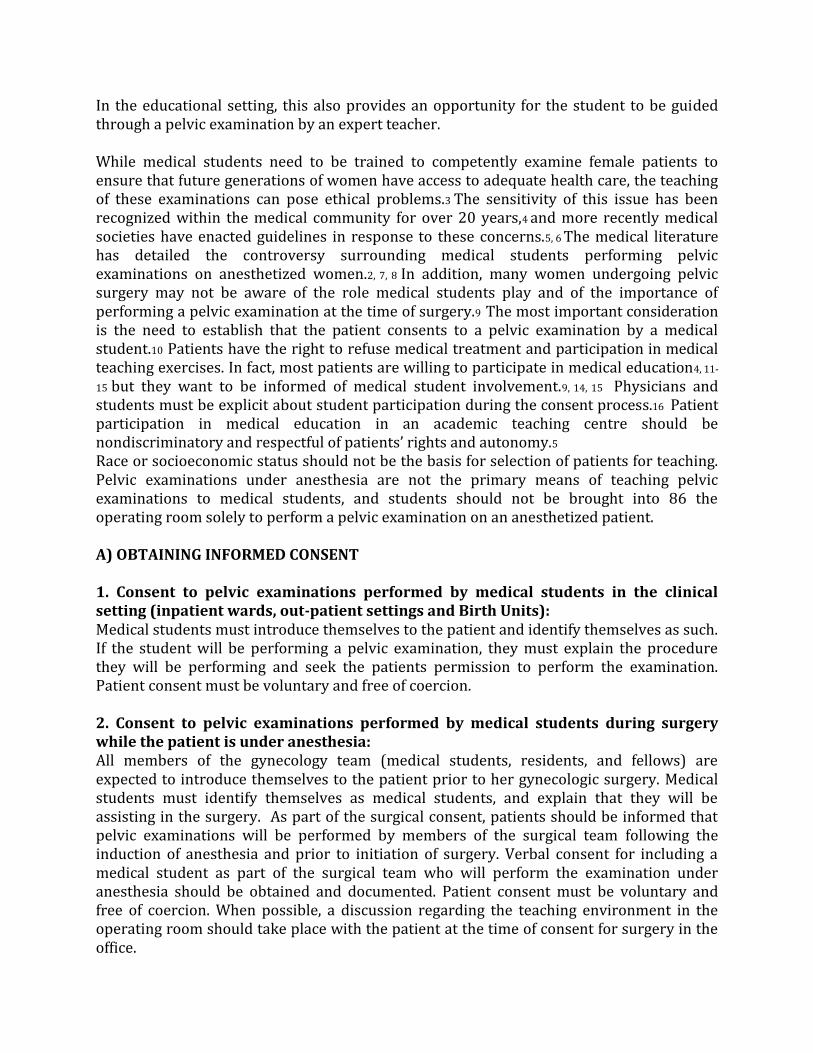
In the educational setting, this also provides an opportunity for the student to be guided through a pelvic examination by an expert teacher. While medical students need to be trained to competently examine female patients to ensure that future generations of women have access to adequate health care, the teaching of these examinations can pose ethical problems.3 The sensitivity of this issue has been recognized within the medical community for over 20 years,4 and more recently medical societies have enacted guidelines in response to these concerns.5, 6 The medical literature has detailed the controversy surrounding medical students performing pelvic examinations on anesthetized women.2, 7, 8 In addition, many women undergoing pelvic surgery may not be aware of the role medical students play and of the importance of performing a pelvic examination at the time of surgery.9 The most important consideration is the need to establish that the patient consents to a pelvic examination by a medical student.10 Patients have the right to refuse medical treatment and participation in medical teaching exercises. In fact, most patients are willing to participate in medical education4, 11-
15 but they want to be informed of medical student involvement.9, 14, 15 Physicians and students must be explicit about student participation during the consent process.16 Patient participation in medical education in an academic teaching centre should be nondiscriminatory and respectful of patients’ rights and autonomy.5
Race or socioeconomic status should not be the basis for selection of patients for teaching. Pelvic examinations under anesthesia are not the primary means of teaching pelvic examinations to medical students, and students should not be brought into 86 the operating room solely to perform a pelvic examination on an anesthetized patient. A) OBTAINING INFORMED CONSENT 1. Consent to pelvic examinations performed by medical students in the clinical setting (inpatient wards, out-patient settings and Birth Units): Medical students must introduce themselves to the patient and identify themselves as such. If the student will be performing a pelvic examination, they must explain the procedure they will be performing and seek the patients permission to perform the examination. Patient consent must be voluntary and free of coercion. 2. Consent to pelvic examinations performed by medical students during surgery while the patient is under anesthesia: All members of the gynecology team (medical students, residents, and fellows) are expected to introduce themselves to the patient prior to her gynecologic surgery. Medical students must identify themselves as medical students, and explain that they will be assisting in the surgery. As part of the surgical consent, patients should be informed that pelvic examinations will be performed by members of the surgical team following the induction of anesthesia and prior to initiation of surgery. Verbal consent for including a medical student as part of the surgical team who will perform the examination under anesthesia should be obtained and documented. Patient consent must be voluntary and free of coercion. When possible, a discussion regarding the teaching environment in the operating room should take place with the patient at the time of consent for surgery in the office.
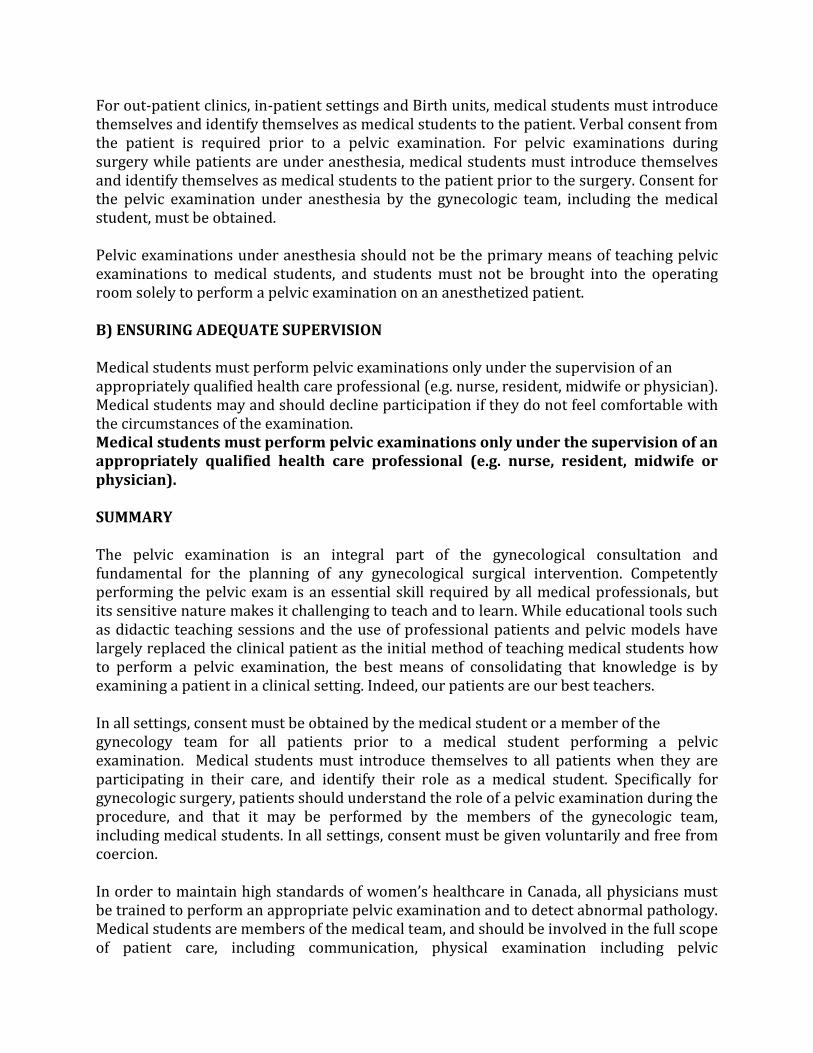
For out-patient clinics, in-patient settings and Birth units, medical students must introduce themselves and identify themselves as medical students to the patient. Verbal consent from the patient is required prior to a pelvic examination. For pelvic examinations during surgery while patients are under anesthesia, medical students must introduce themselves and identify themselves as medical students to the patient prior to the surgery. Consent for the pelvic examination under anesthesia by the gynecologic team, including the medical student, must be obtained. Pelvic examinations under anesthesia should not be the primary means of teaching pelvic examinations to medical students, and students must not be brought into the operating room solely to perform a pelvic examination on an anesthetized patient. B) ENSURING ADEQUATE SUPERVISION Medical students must perform pelvic examinations only under the supervision of an appropriately qualified health care professional (e.g. nurse, resident, midwife or physician). Medical students may and should decline participation if they do not feel comfortable with the circumstances of the examination. Medical students must perform pelvic examinations only under the supervision of an appropriately qualified health care professional (e.g. nurse, resident, midwife or physician). SUMMARY The pelvic examination is an integral part of the gynecological consultation and fundamental for the planning of any gynecological surgical intervention. Competently performing the pelvic exam is an essential skill required by all medical professionals, but its sensitive nature makes it challenging to teach and to learn. While educational tools such as didactic teaching sessions and the use of professional patients and pelvic models have largely replaced the clinical patient as the initial method of teaching medical students how to perform a pelvic examination, the best means of consolidating that knowledge is by examining a patient in a clinical setting. Indeed, our patients are our best teachers. In all settings, consent must be obtained by the medical student or a member of the gynecology team for all patients prior to a medical student performing a pelvic examination. Medical students must introduce themselves to all patients when they are participating in their care, and identify their role as a medical student. Specifically for gynecologic surgery, patients should understand the role of a pelvic examination during the procedure, and that it may be performed by the members of the gynecologic team, including medical students. In all settings, consent must be given voluntarily and free from coercion. In order to maintain high standards of women’s healthcare in Canada, all physicians must be trained to perform an appropriate pelvic examination and to detect abnormal pathology. Medical students are members of the medical team, and should be involved in the full scope of patient care, including communication, physical examination including pelvic
examinations, diagnosis and therapy. Medical students need to learn and perform pelvic examinations during their clinical rotations with adequate supervision to ensure both the safety and comfort of the patient and to optimize their learning experience. Bibliography 1. Siwe K, Wijma K, Stjernquist M, Wijma B. Medical students learning the pelvic examination: comparison of outcome in terms of skills between a professional patient and a clinical patient model. Patient Educ Couns 2007;68(3):211-7. 2. Wall LL, Brown D. Ethical issues arising from the performance of pelvic examinations by medical students on anesthetized patients. Am J Obstet Gynecol 2004;190(2):319-23. 3. Coldicott Y, Pope C, Roberts C. The ethics of intimate examinations-teaching tomorrow's doctors. Bmj 2003;326(7380):97-101. 4. Bibby J, Boyd N, Redman CW, Luesley DM. Consent for vaginal examination by students on anaesthetised patients. Lancet 1988;2(8620):1150. 5. Gynecologists TACoOa. Professional Responsibilities in Obstetric-Gyneoclogic Education. ACOG Committee Opinion 2007;No. 358:Available at: www.acog.org/from_home/publications/ethics/co358.pdf. Accessed February 15, 2010. . 6. Gynaecologists RCoOa. Gynaecological Examinations: Guidelines for Specialist Practice. Royal College of Obstetricians and Gynaecologists Press 2002;London, 2002. 7. Ubel PA, Jepson C, Silver-Isenstadt A. Don't ask, don't tell: a change in medical student attitudes after obstetrics/gynecology clerkships toward seeking consent for pelvic examinations on an anesthetized patient. Am J Obstet Gynecol 2003;188(2):575-9. 8. Hicks LK, Lin Y, Robertson DW, Robinson DL, Woodrow SI. Understanding the clinical dilemmas that shape medical students' ethical development: questionnaire survey and focus group study. Bmj 2001;322(7288):709-10. 9. Wainberg S WH, Fair J and Ross, S. . Teching pelvic examinations under anaesthesia: What Do Women Think? J Obstet Gynaecol Can 2010;32(1):49-53. 10. Wilson RF. Autonomy suspended: using female patients to teach intimate exams without their knowledge or consent. J Health Care Law Policy 2005;8(2):240-63. 11. Lawton FG, Redman CW, Luesley DM. Patient consent for gynaecological examination. Br J Hosp Med 1990;44(5):326, 9. 12. Ubel PA, Silver-Isenstadt A. Are patients willing to participate in medical education? J Clin Ethics 2000;11(3):230-5. 13. Silver-Isenstadt A, Ubel PA. Erosion in medical students' attitudes about telling patients they are students. J Gen Intern Med 1999;14(8):481-7. 14. Wilson RF. Unauthorized practice: teaching pelvic examination on women under anesthesia. J Am Med Womens Assoc 2003;58(4):217-20; discussion 21-2. 15. Magrane D, Gannon J, Miller CT. Student doctors and women in labor: attitudes and expectations. Obstet Gynecol 1996;88(2):298-302. 16. O'Flynn N, Rymer J. Consent for teaching: the experience of women attending a gynaecology clinic. Med Educ 2003;37(12):1109-14.
WRH Maternal Newborn Program
The Maternal Newborn Program is responsible and accountable for the provision of safe, skilled, family-centered maternity care to childbearing
women and their families. In family-centred maternity and newborn care, pregnancy and birth are considered normal, healthy life events.
The Family Birthing Centre is home to more than 4300 births per year. In
December 2003, the consolidation of the Maternal Newborn Program (patient/families and staff) to WRH, Met Campus was completed. The
program is located and consumes the 2nd floor. 2 East was designed for 6 high-risk LBR's. These rooms provide the option to care for the pregnant
woman throughout labour, birth, and the first few hours following birth. 2 West / 2 West Tower provide single room maternity care (30 LBRP's). These
rooms are designed to facilitate a family oriented approach in a home-like
environment from labour through to discharge of the mother. 2 North has 23 high-risk Antenatal / Postpartum rooms.
The NICU is a newly designed (Dec. 2003) regional modified Level III NICU
serving South Western Ontario. While our primary responsibility is to serve the South Western Ontario Region, we are frequently called upon to accept
infants from other regions.
2 Main provides 12 outpatient stretchers for 24/7 emergency OB triage and
scheduled appointments for NST's, elective c-section preadmissions, and preparation for inductions.
The Maternal Newborn Program also has four outpatient clinics.
The Prenatal Clinic located on 1 South provides prenatal counselling services (e.g. social work, dietary etc.) for complex obstetrical problems and for RH
immune globulin injections.
The Maternal Newborn Clinic is located on 1 South. Mother / baby assessments are provided as soon as possible after discharge to assist in
promoting effective patterns of feeding and prevent complications/readmissions.
The Neonatal Neurodevelopment Follow-Up Clinic is located on 1 South and provides post discharge care to infants born < 32 weeks gestation and those
less than 1500 grams. Medical assessments are performed at 3-month intervals for the first year, 6-month intervals for the second year, and then
yearly until the age of six.
The fourth clinic is the NICU Follow-Up Clinic. Babies that are seen in this
clinic include those who are 33 - 35.6 weeks in gestation, infants < 32. 6 weeks who require synagis immunoprophylaxis, and babies that have been
in the NICU for more than 4 days that do not have a pediatrician.
Maternal Newborn Program
Program Manager, Family Birthing Centre
Debbie Mayea-Parent
Metropolitan Campus, Ext 59227 Pager Number: (519) 995-1451
Program Manager, NICU
Lucia St. Aubin
Metropolitan Campus, Ext 57404 Pager Number: (519) 563-4782 [email protected]
Charge Nurses
High Risk/Labour & Delivery
Rhonda Faraci Metropolitan Campus, Ext 55524
2 West
Sylvia Falconio
Grace Kelly Metropolitan Campus, Ext 55529
2 North
Karen Macri Metropolitan Campus, Ext 55521
NICU
Metropolitan Campus, Ext 55526
Clinical Practice Managers
Donna Abraham
Metropolitan Campus, Ext 52416 Pager Number: (519) 563-2918 [email protected]
Cecile Cooke
Metropolitan Campus, Ext 52501
Pager Number: (519) 984-0967 [email protected]
Clinical Practice Coordinator
Nicole Delaney
Metropolitan Campus, Ext 57402
Pager Number: (519) 251-8993 [email protected]
Administrative Assistant
Diana Roberts Metropolitan Campus, Ext 57206 [email protected]
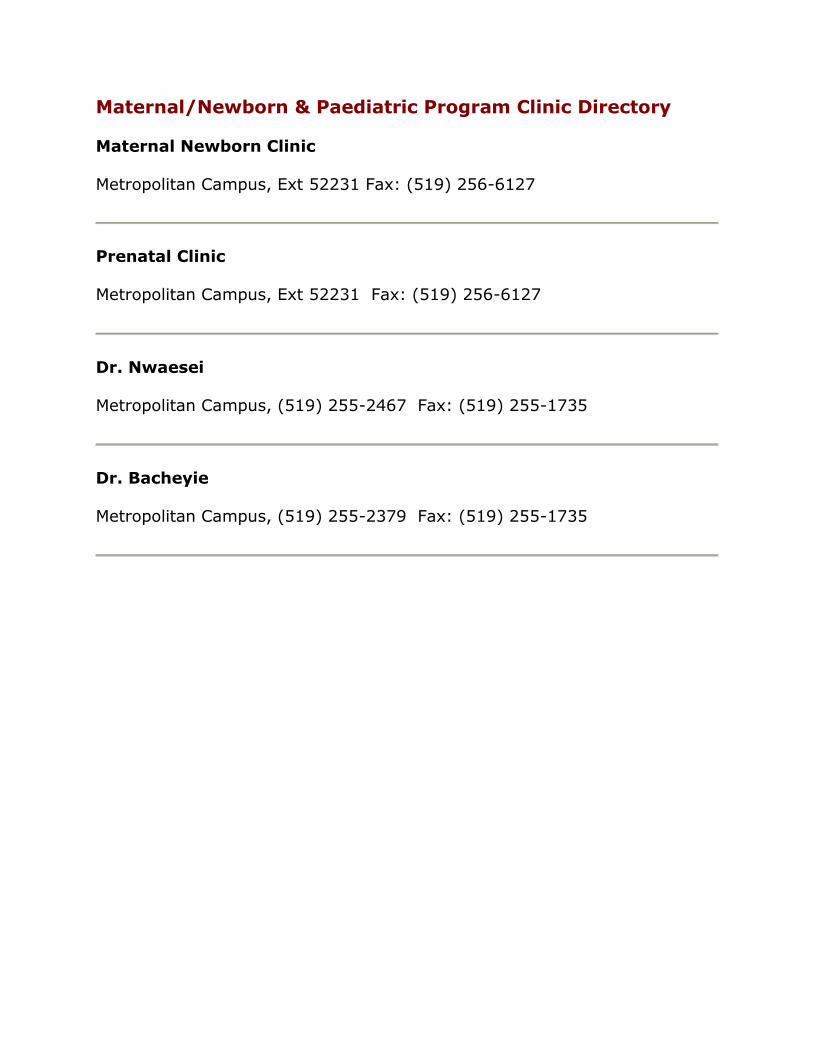
Maternal/Newborn & Paediatric Program Clinic Directory
Maternal Newborn Clinic
Metropolitan Campus, Ext 52231 Fax: (519) 256-6127
Prenatal Clinic
Metropolitan Campus, Ext 52231 Fax: (519) 256-6127
Dr. Nwaesei
Metropolitan Campus, (519) 255-2467 Fax: (519) 255-1735
Dr. Bacheyie
Metropolitan Campus, (519) 255-2379 Fax: (519) 255-1735
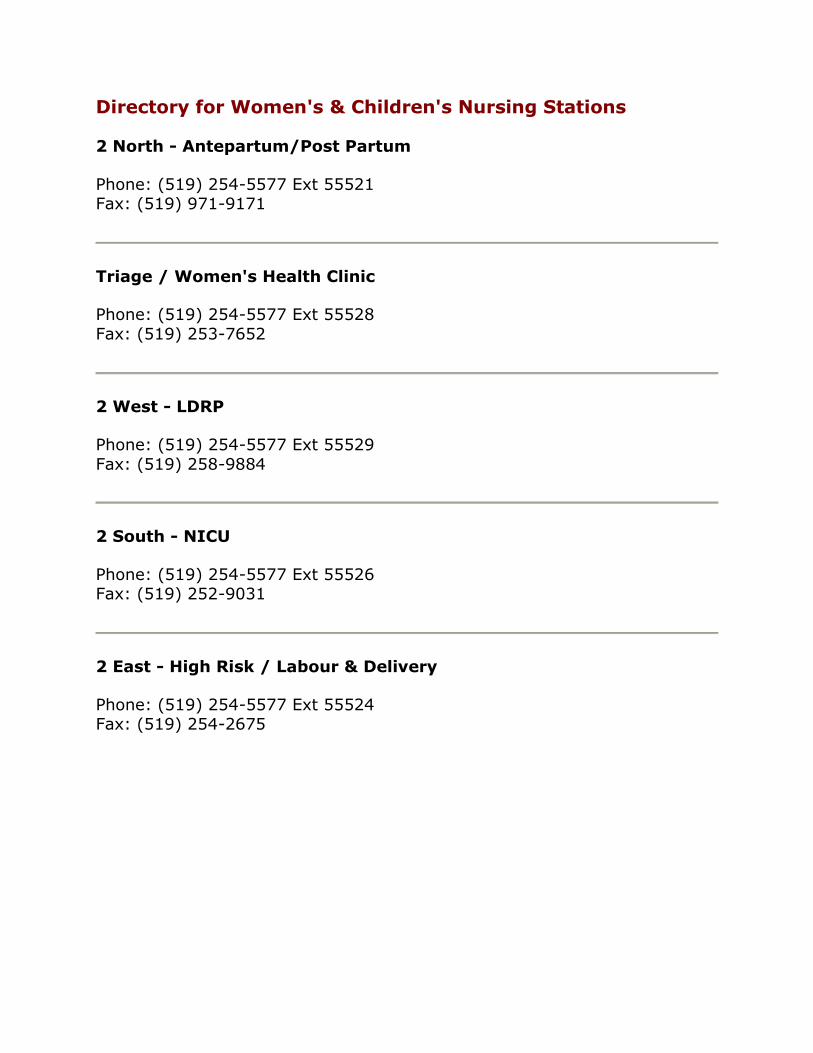
Directory for Women's & Children's Nursing Stations
2 North - Antepartum/Post Partum
Phone: (519) 254-5577 Ext 55521 Fax: (519) 971-9171
Triage / Women's Health Clinic
Phone: (519) 254-5577 Ext 55528
Fax: (519) 253-7652
2 West - LDRP
Phone: (519) 254-5577 Ext 55529
Fax: (519) 258-9884
2 South - NICU
Phone: (519) 254-5577 Ext 55526 Fax: (519) 252-9031
2 East - High Risk / Labour & Delivery
Phone: (519) 254-5577 Ext 55524 Fax: (519) 254-2675
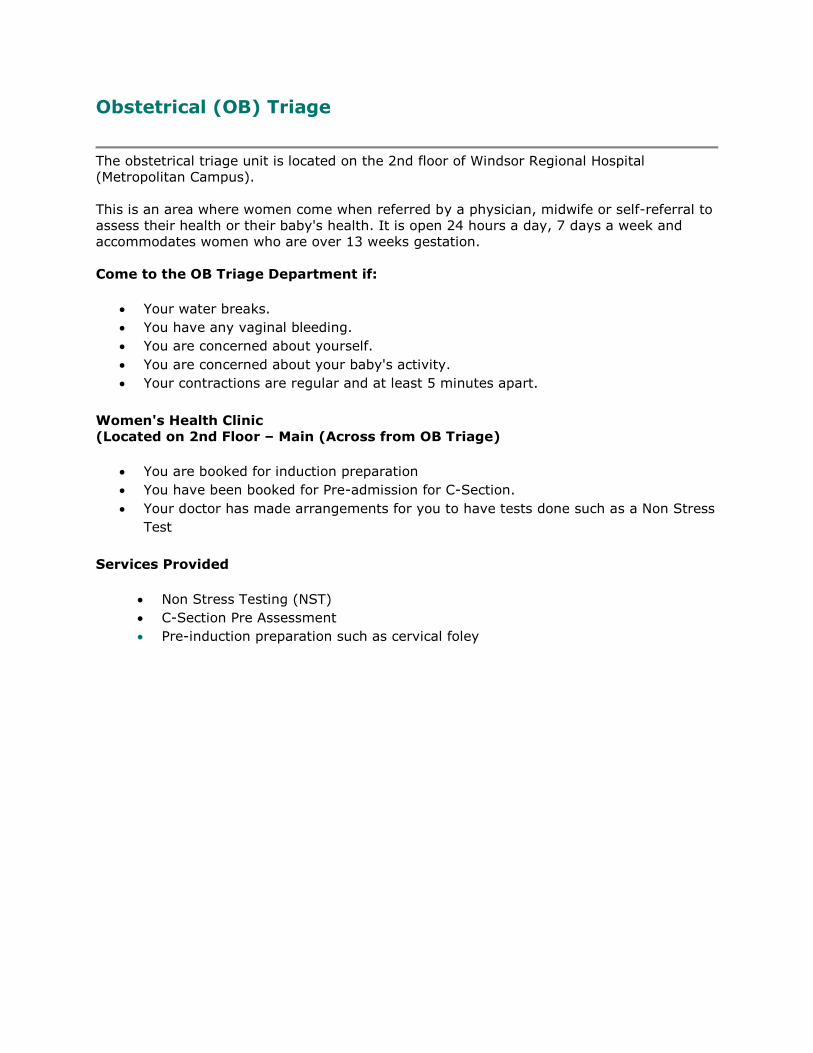
Obstetrical (OB) Triage
The obstetrical triage unit is located on the 2nd floor of Windsor Regional Hospital
(Metropolitan Campus).
This is an area where women come when referred by a physician, midwife or self-referral to
assess their health or their baby's health. It is open 24 hours a day, 7 days a week and
accommodates women who are over 13 weeks gestation.
Come to the OB Triage Department if:
Your water breaks.
You have any vaginal bleeding.
You are concerned about yourself.
You are concerned about your baby's activity.
Your contractions are regular and at least 5 minutes apart.
Women's Health Clinic
(Located on 2nd Floor – Main (Across from OB Triage)
You are booked for induction preparation
You have been booked for Pre-admission for C-Section.
Your doctor has made arrangements for you to have tests done such as a Non Stress
Test
Services Provided
Non Stress Testing (NST)
C-Section Pre Assessment
Pre-induction preparation such as cervical foley
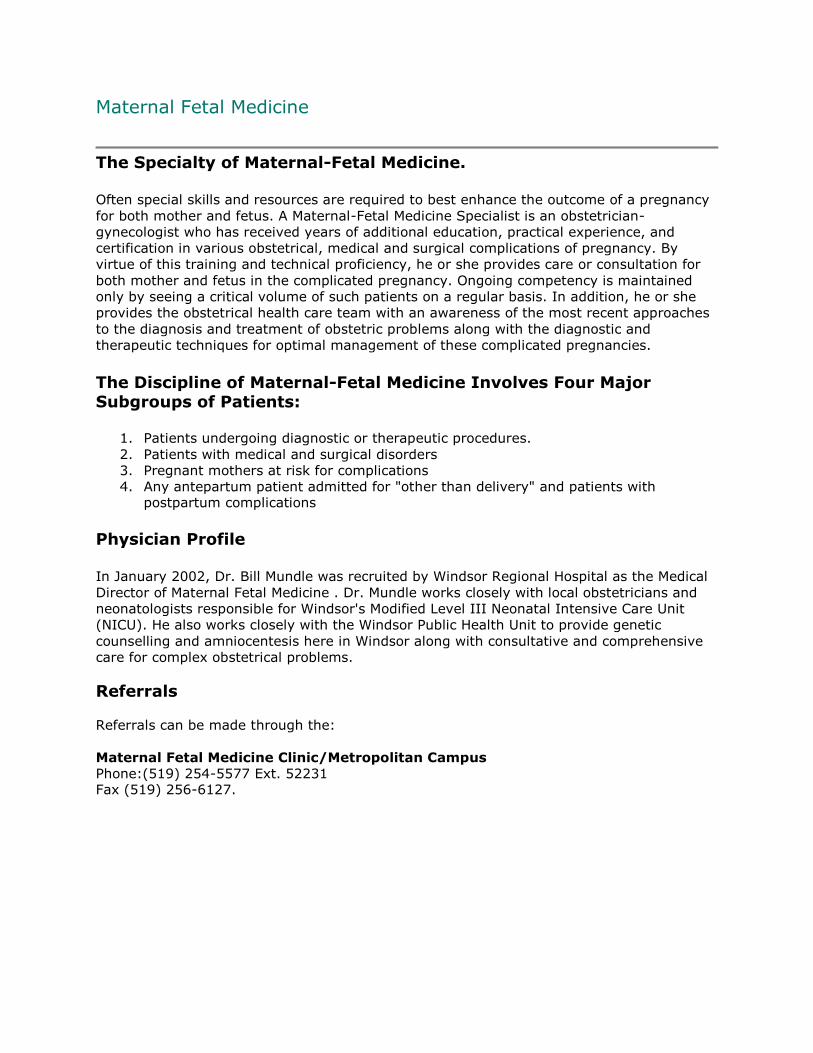
Maternal Fetal Medicine
The Specialty of Maternal-Fetal Medicine.
Often special skills and resources are required to best enhance the outcome of a pregnancy
for both mother and fetus. A Maternal-Fetal Medicine Specialist is an obstetrician-
gynecologist who has received years of additional education, practical experience, and
certification in various obstetrical, medical and surgical complications of pregnancy. By
virtue of this training and technical proficiency, he or she provides care or consultation for
both mother and fetus in the complicated pregnancy. Ongoing competency is maintained
only by seeing a critical volume of such patients on a regular basis. In addition, he or she
provides the obstetrical health care team with an awareness of the most recent approaches
to the diagnosis and treatment of obstetric problems along with the diagnostic and
therapeutic techniques for optimal management of these complicated pregnancies.
The Discipline of Maternal-Fetal Medicine Involves Four Major Subgroups of Patients:
1. Patients undergoing diagnostic or therapeutic procedures.
2. Patients with medical and surgical disorders
3. Pregnant mothers at risk for complications
4. Any antepartum patient admitted for "other than delivery" and patients with postpartum complications
Physician Profile
In January 2002, Dr. Bill Mundle was recruited by Windsor Regional Hospital as the Medical
Director of Maternal Fetal Medicine . Dr. Mundle works closely with local obstetricians and
neonatologists responsible for Windsor's Modified Level III Neonatal Intensive Care Unit
(NICU). He also works closely with the Windsor Public Health Unit to provide genetic
counselling and amniocentesis here in Windsor along with consultative and comprehensive
care for complex obstetrical problems.
Referrals
Referrals can be made through the:
Maternal Fetal Medicine Clinic/Metropolitan Campus
Phone:(519) 254-5577 Ext. 52231 Fax (519) 256-6127.
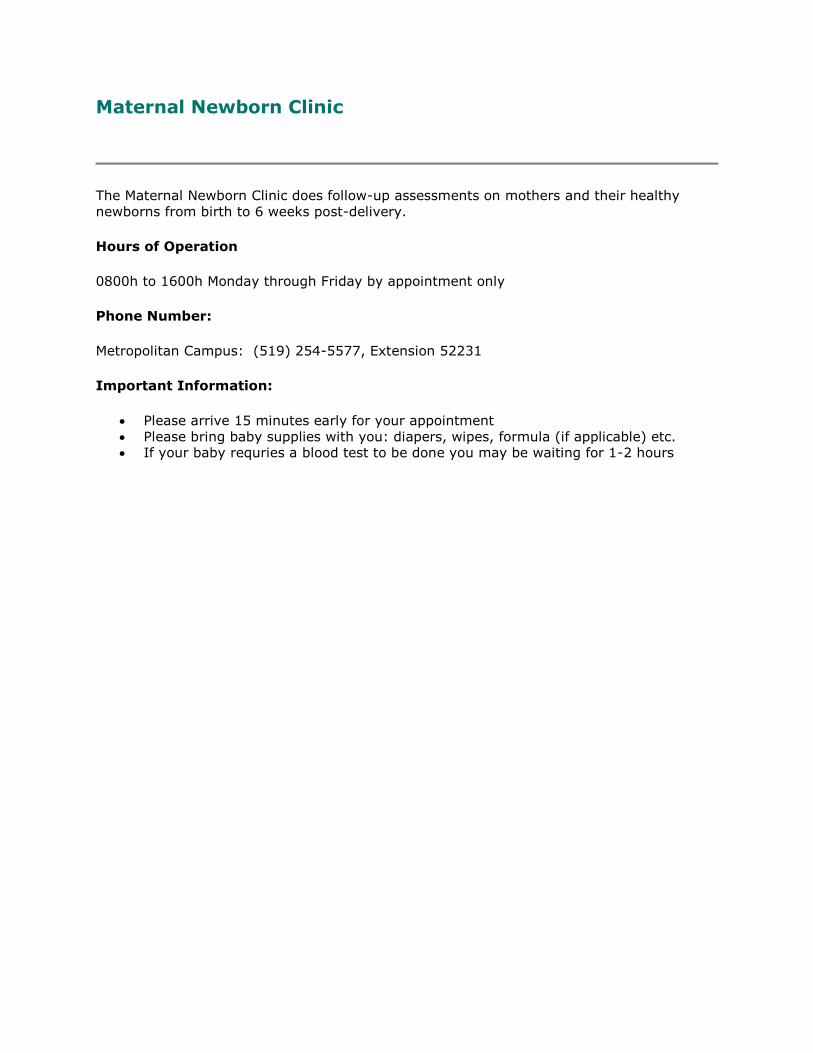
Maternal Newborn Clinic
The Maternal Newborn Clinic does follow-up assessments on mothers and their healthy
newborns from birth to 6 weeks post-delivery.
Hours of Operation
0800h to 1600h Monday through Friday by appointment only
Phone Number:
Metropolitan Campus: (519) 254-5577, Extension 52231
Important Information:
Please arrive 15 minutes early for your appointment
Please bring baby supplies with you: diapers, wipes, formula (if applicable) etc. If your baby requries a blood test to be done you may be waiting for 1-2 hours
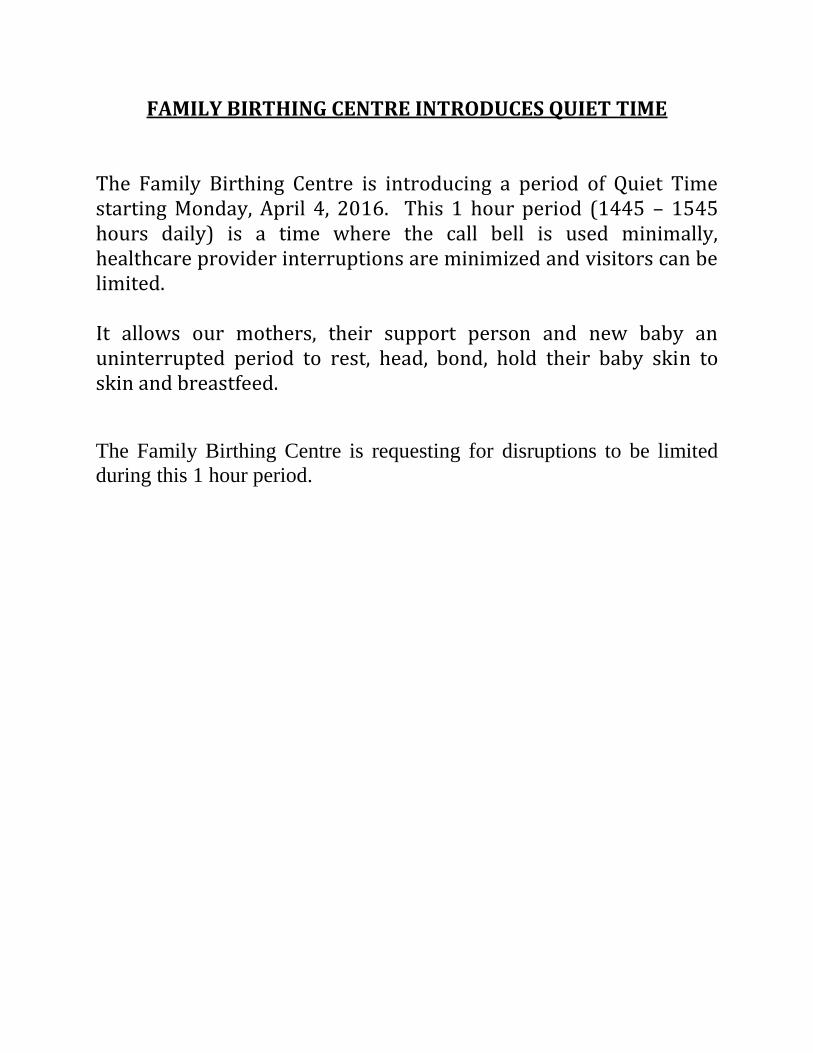
FAMILY BIRTHING CENTRE INTRODUCES QUIET TIME
The Family Birthing Centre is introducing a period of Quiet Time starting Monday, April 4, 2016. This 1 hour period (1445 – 1545 hours daily) is a time where the call bell is used minimally, healthcare provider interruptions are minimized and visitors can be limited. It allows our mothers, their support person and new baby an uninterrupted period to rest, head, bond, hold their baby skin to skin and breastfeed.
The Family Birthing Centre is requesting for disruptions to be limited
during this 1 hour period.
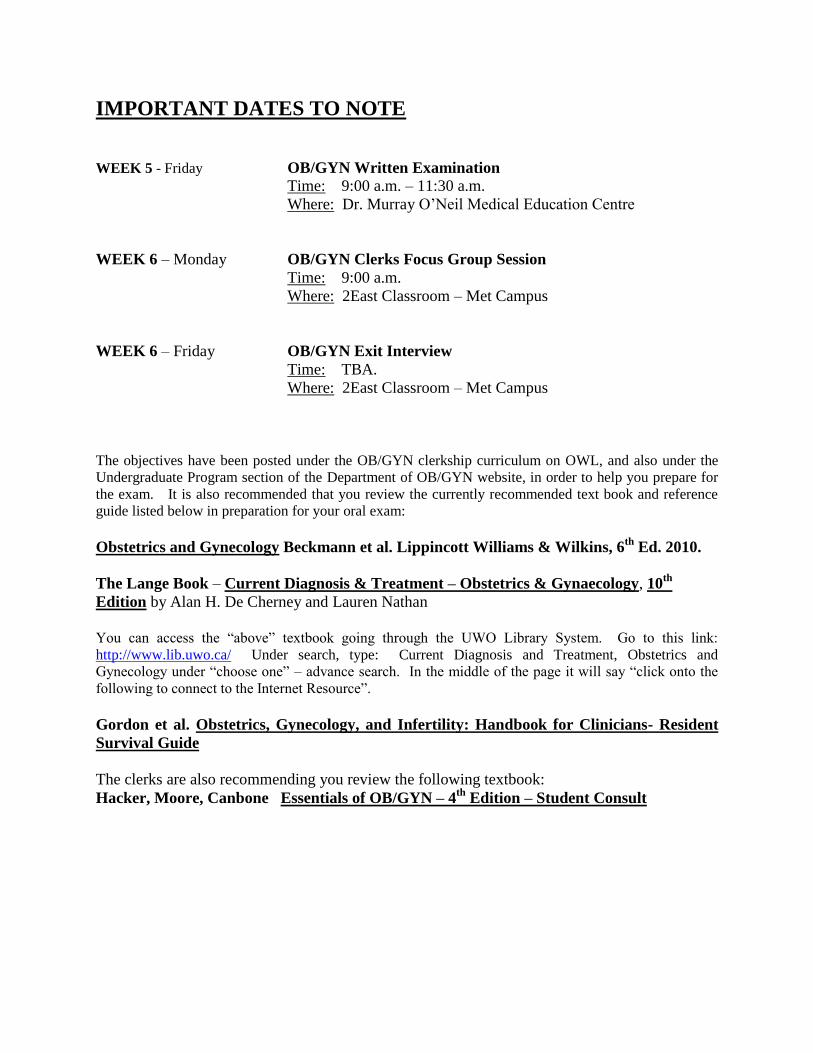
IMPORTANT DATES TO NOTE
WEEK 5 - Friday OB/GYN Written Examination
Time: 9:00 a.m. – 11:30 a.m.
Where: Dr. Murray O’Neil Medical Education Centre
WEEK 6 – Monday OB/GYN Clerks Focus Group Session
Time: 9:00 a.m.
Where: 2East Classroom – Met Campus
WEEK 6 – Friday OB/GYN Exit Interview
Time: TBA.
Where: 2East Classroom – Met Campus
The objectives have been posted under the OB/GYN clerkship curriculum on OWL, and also under the
Undergraduate Program section of the Department of OB/GYN website, in order to help you prepare for
the exam. It is also recommended that you review the currently recommended text book and reference
guide listed below in preparation for your oral exam:
Obstetrics and Gynecology Beckmann et al. Lippincott Williams & Wilkins, 6th
Ed. 2010.
The Lange Book – Current Diagnosis & Treatment – Obstetrics & Gynaecology, 10th
Edition by Alan H. De Cherney and Lauren Nathan
You can access the “above” textbook going through the UWO Library System. Go to this link:
http://www.lib.uwo.ca/ Under search, type: Current Diagnosis and Treatment, Obstetrics and
Gynecology under “choose one” – advance search. In the middle of the page it will say “click onto the
following to connect to the Internet Resource”.
Gordon et al. Obstetrics, Gynecology, and Infertility: Handbook for Clinicians- Resident
Survival Guide
The clerks are also recommending you review the following textbook:
Hacker, Moore, Canbone Essentials of OB/GYN – 4th
Edition – Student Consult
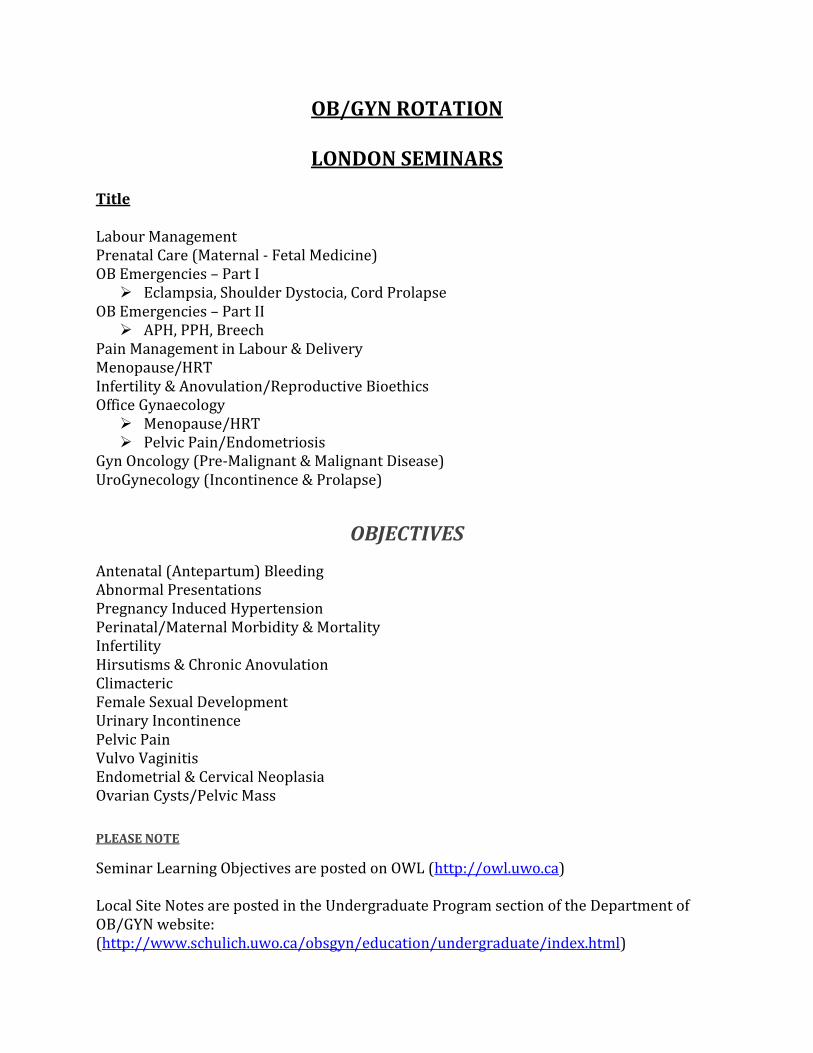
OB/GYN ROTATION
LONDON SEMINARS
Title Labour Management Prenatal Care (Maternal - Fetal Medicine) OB Emergencies – Part I
Eclampsia, Shoulder Dystocia, Cord Prolapse OB Emergencies – Part II
APH, PPH, Breech Pain Management in Labour & Delivery Menopause/HRT Infertility & Anovulation/Reproductive Bioethics Office Gynaecology
Menopause/HRT Pelvic Pain/Endometriosis
Gyn Oncology (Pre-Malignant & Malignant Disease) UroGynecology (Incontinence & Prolapse)
OBJECTIVES
Antenatal (Antepartum) Bleeding Abnormal Presentations Pregnancy Induced Hypertension Perinatal/Maternal Morbidity & Mortality Infertility Hirsutisms & Chronic Anovulation Climacteric Female Sexual Development Urinary Incontinence Pelvic Pain Vulvo Vaginitis Endometrial & Cervical Neoplasia Ovarian Cysts/Pelvic Mass
PLEASE NOTE
Seminar Learning Objectives are posted on OWL (http://owl.uwo.ca) Local Site Notes are posted in the Undergraduate Program section of the Department of OB/GYN website: (http://www.schulich.uwo.ca/obsgyn/education/undergraduate/index.html)
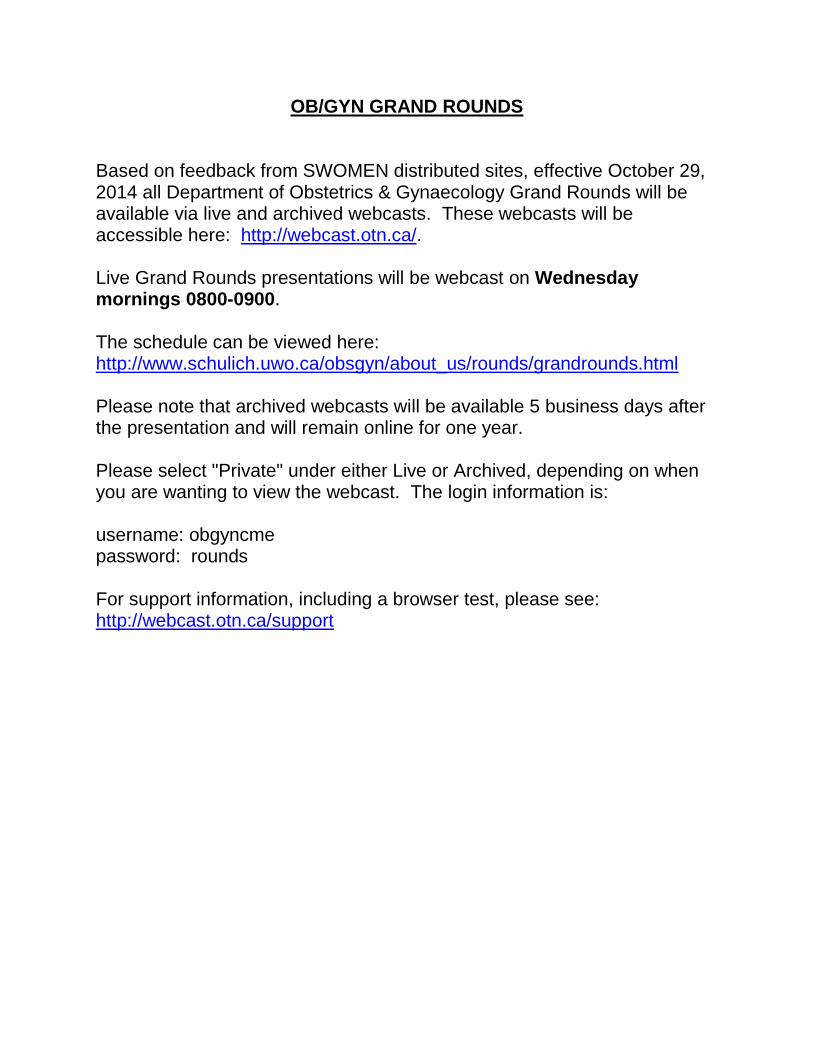
OB/GYN GRAND ROUNDS Based on feedback from SWOMEN distributed sites, effective October 29, 2014 all Department of Obstetrics & Gynaecology Grand Rounds will be available via live and archived webcasts. These webcasts will be accessible here: http://webcast.otn.ca/. Live Grand Rounds presentations will be webcast on Wednesday mornings 0800-0900. The schedule can be viewed here: http://www.schulich.uwo.ca/obsgyn/about_us/rounds/grandrounds.html Please note that archived webcasts will be available 5 business days after the presentation and will remain online for one year. Please select "Private" under either Live or Archived, depending on when you are wanting to view the webcast. The login information is: username: obgyncme password: rounds For support information, including a browser test, please see: http://webcast.otn.ca/support
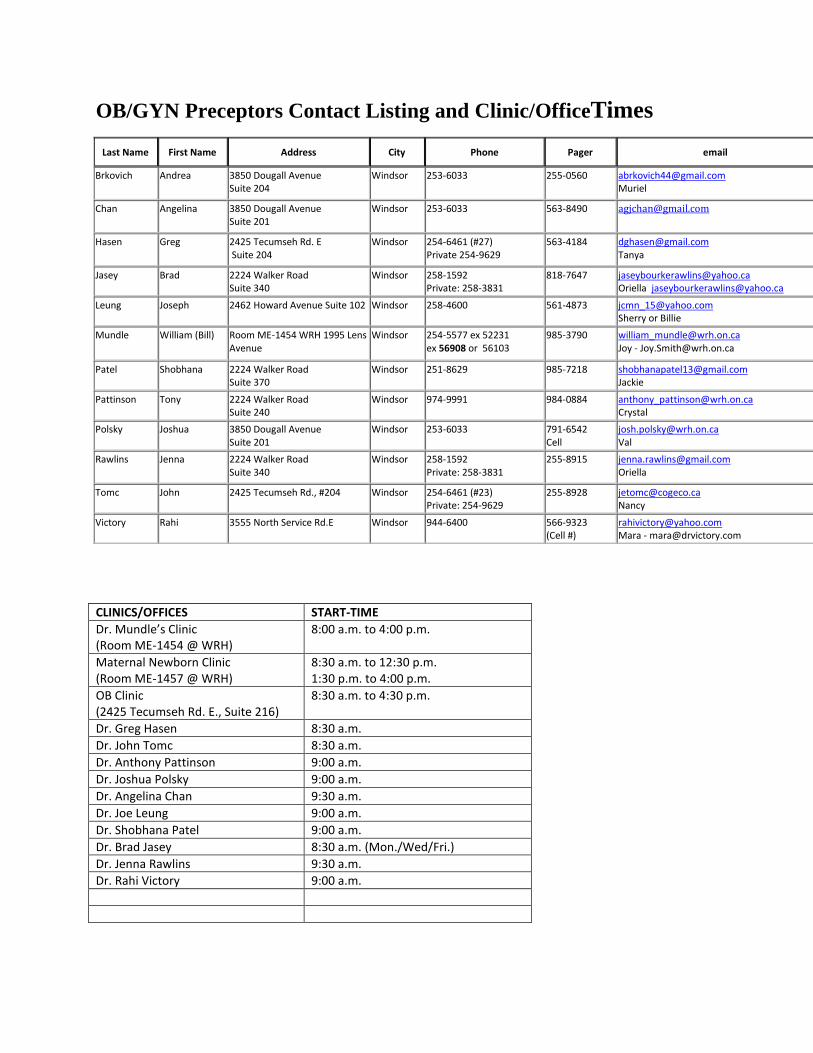
OB/GYN Preceptors Contact Listing and Clinic/OfficeTimes
CLINICS/OFFICES START-TIME
Dr. Mundle’s Clinic (Room ME-1454 @ WRH)
8:00 a.m. to 4:00 p.m.
Maternal Newborn Clinic (Room ME-1457 @ WRH)
8:30 a.m. to 12:30 p.m. 1:30 p.m. to 4:00 p.m.
OB Clinic (2425 Tecumseh Rd. E., Suite 216)
8:30 a.m. to 4:30 p.m.
Dr. Greg Hasen 8:30 a.m.
Dr. John Tomc 8:30 a.m.
Dr. Anthony Pattinson 9:00 a.m.
Dr. Joshua Polsky 9:00 a.m.
Dr. Angelina Chan 9:30 a.m.
Dr. Joe Leung 9:00 a.m.
Dr. Shobhana Patel 9:00 a.m.
Dr. Brad Jasey 8:30 a.m. (Mon./Wed/Fri.)
Dr. Jenna Rawlins 9:30 a.m.
Dr. Rahi Victory 9:00 a.m.
Last Name First Name Address City Phone Pager email
Brkovich Andrea 3850 Dougall Avenue Suite 204
Windsor 253-6033 255-0560 [email protected] Muriel
Chan Angelina 3850 Dougall Avenue Suite 201
Windsor 253-6033 563-8490 [email protected]
Hasen Greg 2425 Tecumseh Rd. E Suite 204
Windsor 254-6461 (#27) Private 254-9629
563-4184 [email protected] Tanya
Jasey Brad 2224 Walker Road Suite 340
Windsor 258-1592 Private: 258-3831
818-7647 [email protected] Oriella [email protected]
Leung Joseph 2462 Howard Avenue Suite 102 Windsor 258-4600 561-4873 [email protected] Sherry or Billie
Mundle William (Bill) Room ME-1454 WRH 1995 Lens Avenue
Windsor 254-5577 ex 52231 ex 56908 or 56103
985-3790 [email protected] Joy - [email protected]
Patel Shobhana 2224 Walker Road Suite 370
Windsor 251-8629 985-7218 [email protected] Jackie
Pattinson Tony 2224 Walker Road Suite 240
Windsor 974-9991 984-0884 [email protected] Crystal
Polsky Joshua 3850 Dougall Avenue Suite 201
Windsor
253-6033
791-6542 Cell
Rawlins Jenna 2224 Walker Road Suite 340
Windsor 258-1592 Private: 258-3831
255-8915 [email protected] Oriella
Tomc John 2425 Tecumseh Rd., #204 Windsor 254-6461 (#23) Private: 254-9629
255-8928 [email protected] Nancy
Victory Rahi 3555 North Service Rd.E Windsor 944-6400
566-9323 (Cell #)
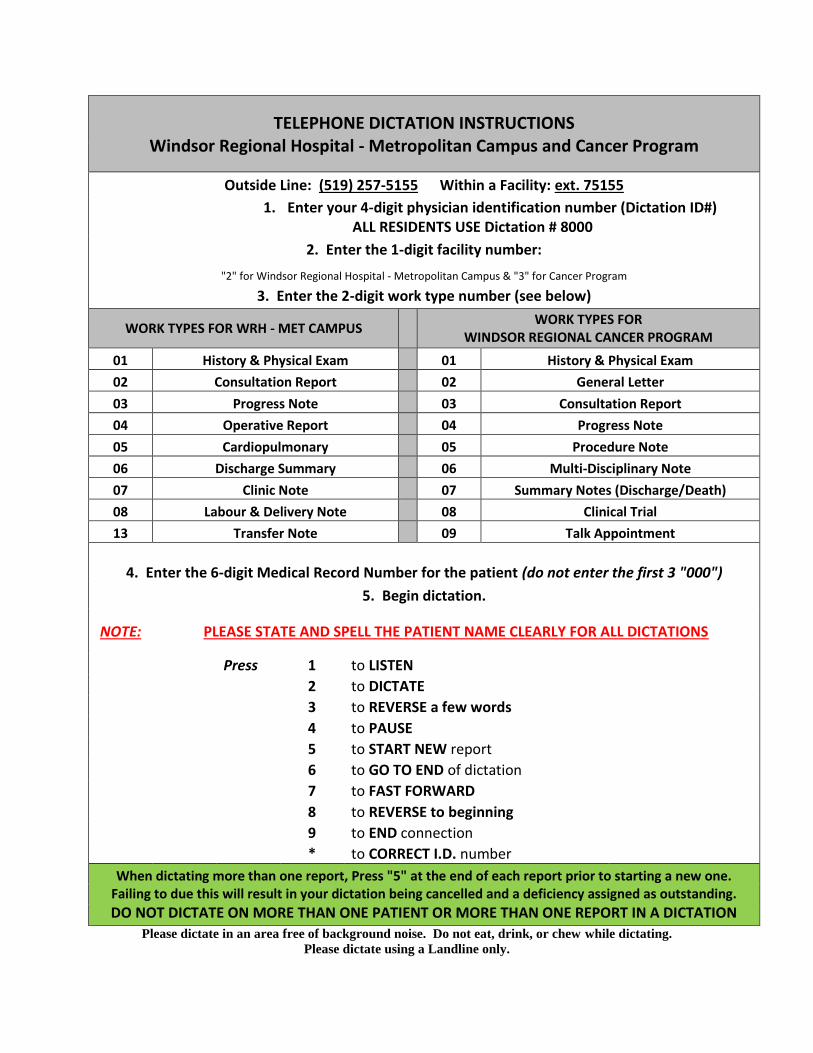
TELEPHONE DICTATION INSTRUCTIONS Windsor Regional Hospital - Metropolitan Campus and Cancer Program
Outside Line: (519) 257-5155 Within a Facility: ext. 75155
1. Enter your 4-digit physician identification number (Dictation ID#) ALL RESIDENTS USE Dictation # 8000
2. Enter the 1-digit facility number:
"2" for Windsor Regional Hospital - Metropolitan Campus & "3" for Cancer Program
3. Enter the 2-digit work type number (see below)
WORK TYPES FOR WRH - MET CAMPUS
WORK TYPES FOR WINDSOR REGIONAL CANCER PROGRAM
01 History & Physical Exam 01 History & Physical Exam
02 Consultation Report 02 General Letter
03 Progress Note 03 Consultation Report
04 Operative Report 04 Progress Note
05 Cardiopulmonary 05 Procedure Note
06 Discharge Summary 06 Multi-Disciplinary Note
07 Clinic Note 07 Summary Notes (Discharge/Death)
08 Labour & Delivery Note 08 Clinical Trial
13 Transfer Note 09 Talk Appointment
4. Enter the 6-digit Medical Record Number for the patient (do not enter the first 3 "000")
5. Begin dictation.
NOTE: PLEASE STATE AND SPELL THE PATIENT NAME CLEARLY FOR ALL DICTATIONS
Press 1 to LISTEN
2 to DICTATE
3 to REVERSE a few words
4 to PAUSE
5 to START NEW report
6 to GO TO END of dictation
7 to FAST FORWARD
8 to REVERSE to beginning
9 to END connection
* to CORRECT I.D. number
When dictating more than one report, Press "5" at the end of each report prior to starting a new one. Failing to due this will result in your dictation being cancelled and a deficiency assigned as outstanding.
DO NOT DICTATE ON MORE THAN ONE PATIENT OR MORE THAN ONE REPORT IN A DICTATION
Please dictate in an area free of background noise. Do not eat, drink, or chew while dictating.
Please dictate using a Landline only.
LOCATION OF
ON-CALL ROOMS AT
WINDSOR REGIONAL HOSPITAL
FOR OB/GYN ROTATIONS
Met Campus
The OB/GYN on-call room is located on the 2nd
floor on 2North (Room
2101). You can get the key from nursing station on 2North.
The spare on-call room at Met Campus is located on the 4th
floor, Room
4301-1. It is located across the hall from the Schulich Windsor Program
Office, Room 4306.
The Schulich Windsor Program Student Lounge is also located across
the hall in Room 4308.
Please contact Bev Nicholls at 254-5577, Ext. 52507 to obtain the key to
the on-call room.
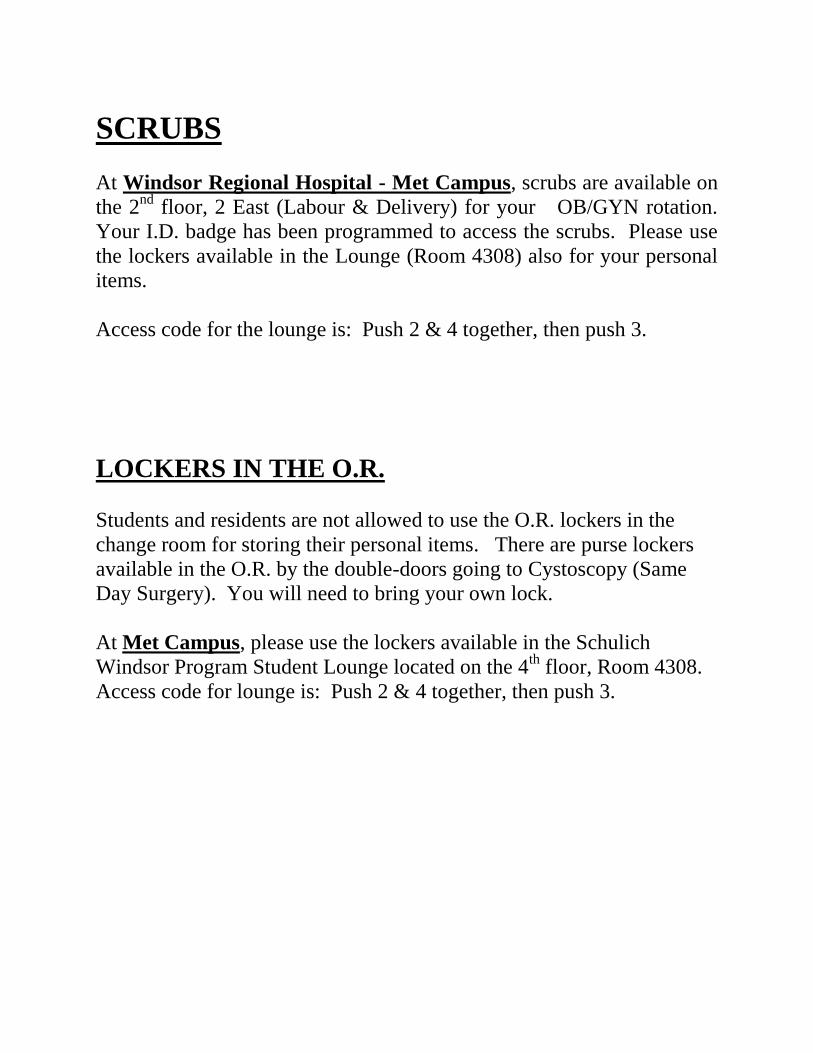
SCRUBS
At Windsor Regional Hospital - Met Campus, scrubs are available on
the 2nd
floor, 2 East (Labour & Delivery) for your OB/GYN rotation.
Your I.D. badge has been programmed to access the scrubs. Please use
the lockers available in the Lounge (Room 4308) also for your personal
items.
Access code for the lounge is: Push 2 & 4 together, then push 3.
LOCKERS IN THE O.R.
Students and residents are not allowed to use the O.R. lockers in the
change room for storing their personal items. There are purse lockers
available in the O.R. by the double-doors going to Cystoscopy (Same
Day Surgery). You will need to bring your own lock.
At Met Campus, please use the lockers available in the Schulich
Windsor Program Student Lounge located on the 4th
floor, Room 4308.
Access code for lounge is: Push 2 & 4 together, then push 3.
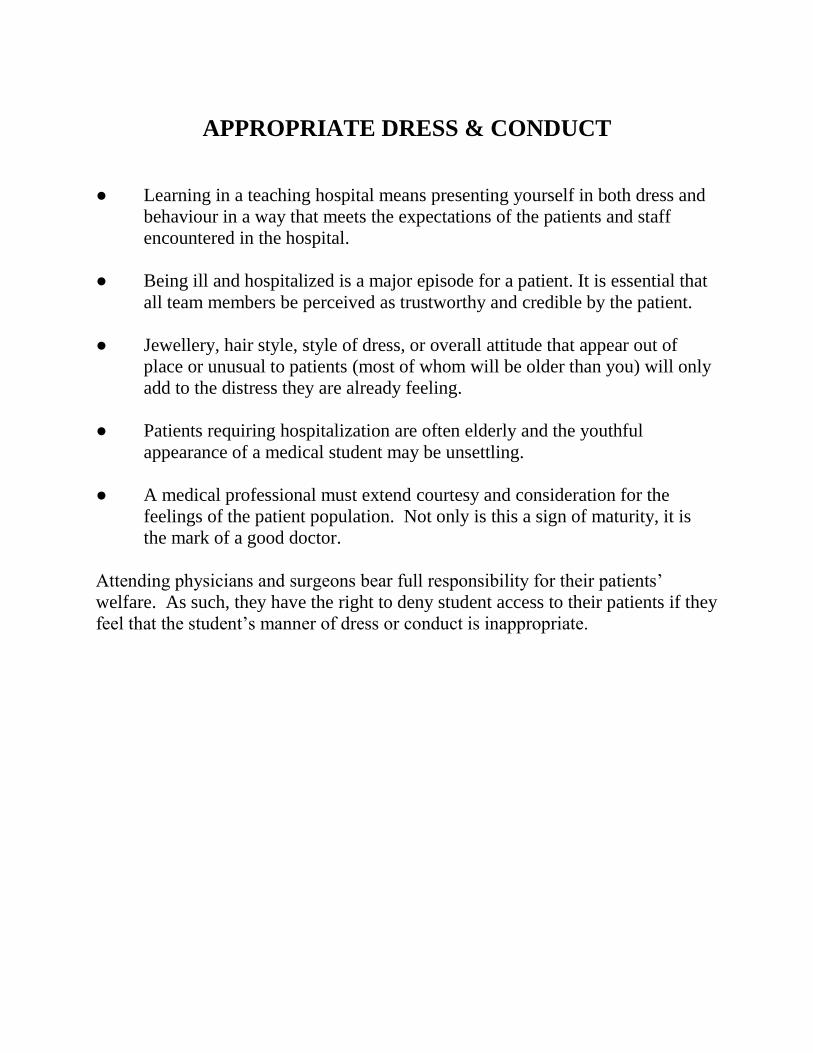
APPROPRIATE DRESS & CONDUCT
● Learning in a teaching hospital means presenting yourself in both dress and
behaviour in a way that meets the expectations of the patients and staff
encountered in the hospital.
● Being ill and hospitalized is a major episode for a patient. It is essential that
all team members be perceived as trustworthy and credible by the patient.
● Jewellery, hair style, style of dress, or overall attitude that appear out of
place or unusual to patients (most of whom will be older than you) will only
add to the distress they are already feeling.
● Patients requiring hospitalization are often elderly and the youthful
appearance of a medical student may be unsettling.
● A medical professional must extend courtesy and consideration for the
feelings of the patient population. Not only is this a sign of maturity, it is
the mark of a good doctor.
Attending physicians and surgeons bear full responsibility for their patients’
welfare. As such, they have the right to deny student access to their patients if they
feel that the student’s manner of dress or conduct is inappropriate.
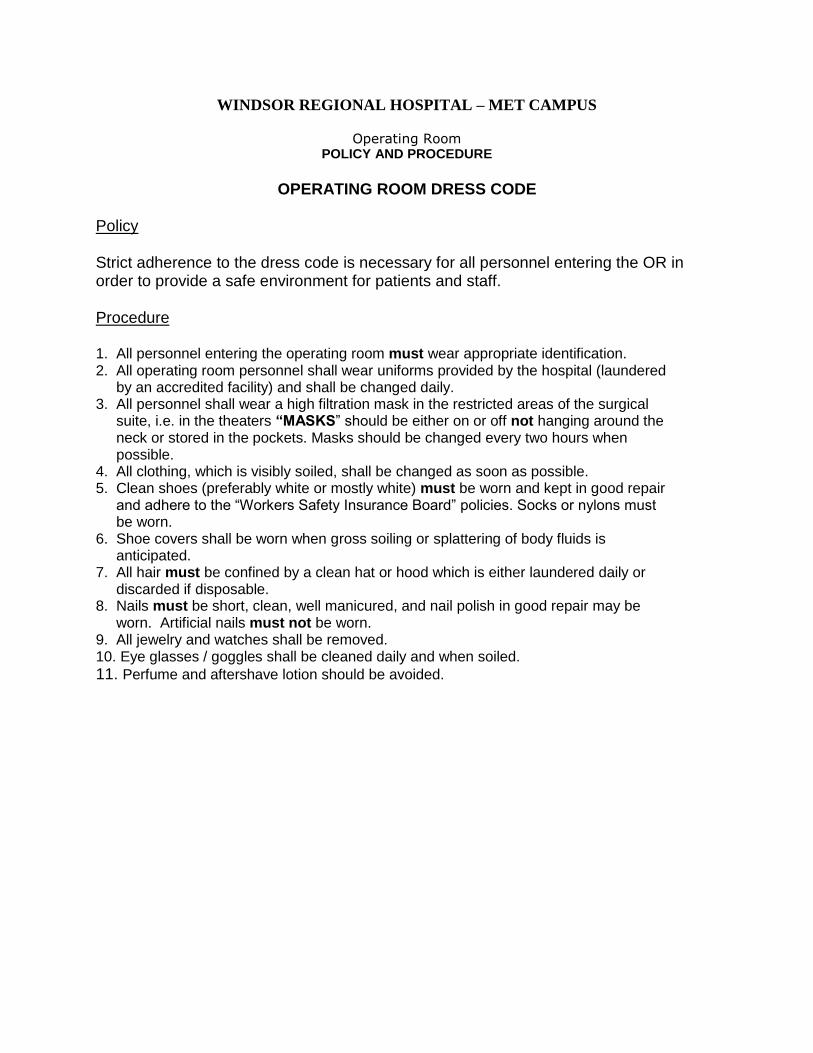
WINDSOR REGIONAL HOSPITAL – MET CAMPUS
Operating Room POLICY AND PROCEDURE
OPERATING ROOM DRESS CODE
Policy Strict adherence to the dress code is necessary for all personnel entering the OR in order to provide a safe environment for patients and staff. Procedure 1. All personnel entering the operating room must wear appropriate identification. 2. All operating room personnel shall wear uniforms provided by the hospital (laundered by an accredited facility) and shall be changed daily. 3. All personnel shall wear a high filtration mask in the restricted areas of the surgical suite, i.e. in the theaters “MASKS” should be either on or off not hanging around the neck or stored in the pockets. Masks should be changed every two hours when possible. 4. All clothing, which is visibly soiled, shall be changed as soon as possible. 5. Clean shoes (preferably white or mostly white) must be worn and kept in good repair and adhere to the “Workers Safety Insurance Board” policies. Socks or nylons must be worn. 6. Shoe covers shall be worn when gross soiling or splattering of body fluids is anticipated. 7. All hair must be confined by a clean hat or hood which is either laundered daily or discarded if disposable. 8. Nails must be short, clean, well manicured, and nail polish in good repair may be worn. Artificial nails must not be worn. 9. All jewelry and watches shall be removed. 10. Eye glasses / goggles shall be cleaned daily and when soiled.
11. Perfume and aftershave lotion should be avoided.
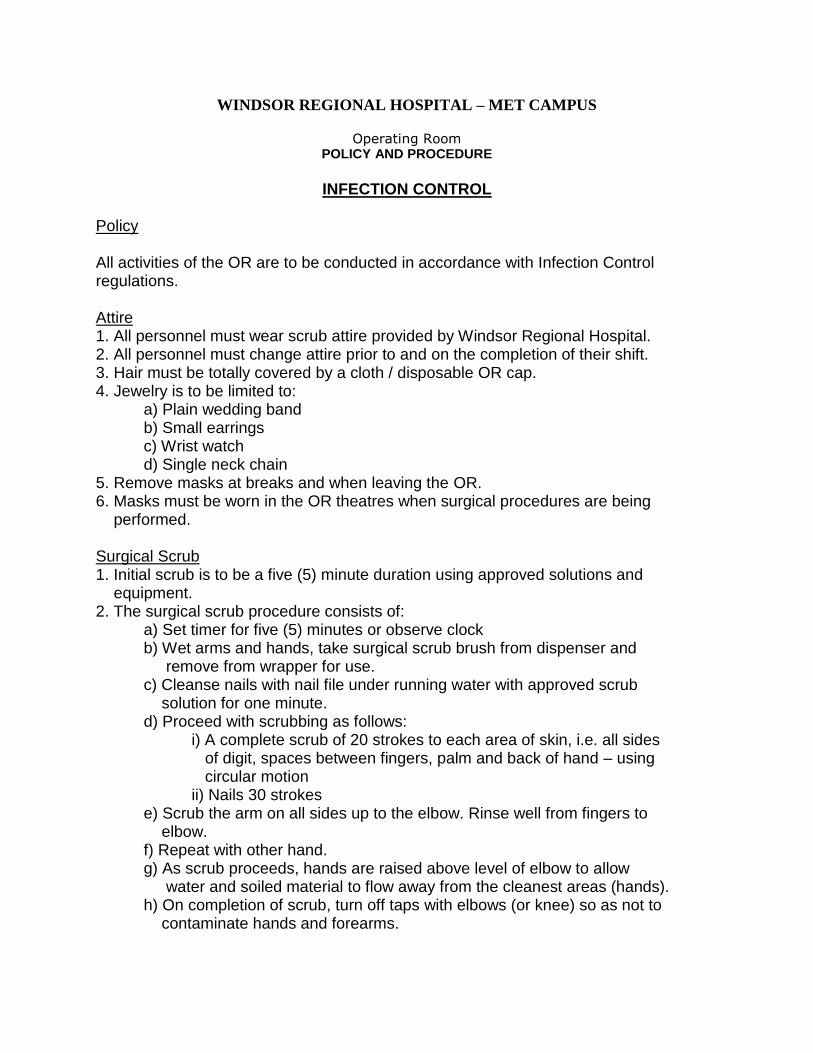
WINDSOR REGIONAL HOSPITAL – MET CAMPUS
Operating Room POLICY AND PROCEDURE
INFECTION CONTROL
Policy All activities of the OR are to be conducted in accordance with Infection Control regulations. Attire 1. All personnel must wear scrub attire provided by Windsor Regional Hospital. 2. All personnel must change attire prior to and on the completion of their shift. 3. Hair must be totally covered by a cloth / disposable OR cap. 4. Jewelry is to be limited to:
a) Plain wedding band b) Small earrings c) Wrist watch d) Single neck chain
5. Remove masks at breaks and when leaving the OR. 6. Masks must be worn in the OR theatres when surgical procedures are being performed. Surgical Scrub 1. Initial scrub is to be a five (5) minute duration using approved solutions and equipment. 2. The surgical scrub procedure consists of:
a) Set timer for five (5) minutes or observe clock b) Wet arms and hands, take surgical scrub brush from dispenser and remove from wrapper for use. c) Cleanse nails with nail file under running water with approved scrub solution for one minute. d) Proceed with scrubbing as follows:
i) A complete scrub of 20 strokes to each area of skin, i.e. all sides of digit, spaces between fingers, palm and back of hand – using circular motion ii) Nails 30 strokes
e) Scrub the arm on all sides up to the elbow. Rinse well from fingers to elbow. f) Repeat with other hand. g) As scrub proceeds, hands are raised above level of elbow to allow water and soiled material to flow away from the cleanest areas (hands). h) On completion of scrub, turn off taps with elbows (or knee) so as not to contaminate hands and forearms.
3. All subsequent scrubs are to be of three (3) minutes duration as outlined in the scrub procedures. Cleaning of Theaters Between Procedures 1. Masks and filters on gas machines will be changed for each case. Some anaesthetists prefer to change entire circuit and not use filters. 2. Laryngoscope blade is to be washed thoroughly and soaked in Glutacide solution for ten (10) minutes. 3. All waste material and linen are to be removed after each case. 4. The OR table, all flat surfaces, buckets, b/p cuffs, stethoscope, EKG leads, temp probes, pulse oximeter cords, and surgical lamps must be wiped down with Endbac solution at the end of each procedure. 5. Cleaning cloths are used once and discarded into laundry receptacle. 6. Mops are changed every four (4) hours. 7. The floor is to be wet mopped with Endbac between cases ( a 4ft perimeter around OR table unless there is gross soiling elsewhere). Terminal Daily Cleaning of OR Theaters 1. Wipe the exterior surfaces of all machines and equipment with Endbac. Pay special attention to casters, wheels, and surgical lamps. 2. Check walls for soil spots and clean with Endbac. 3. Move table from centre of room and move all furniture from walls to facilitate wet mopping of entire floor surface. 4. Clean all scrub areas, storage areas, corridors and processing areas. 5. Carbolize all patient stretchers. Monthly Cleaning of OR Theaters 1. Wash all theater walls. 2. Power scrub floors. 3. Vacuum all vents.
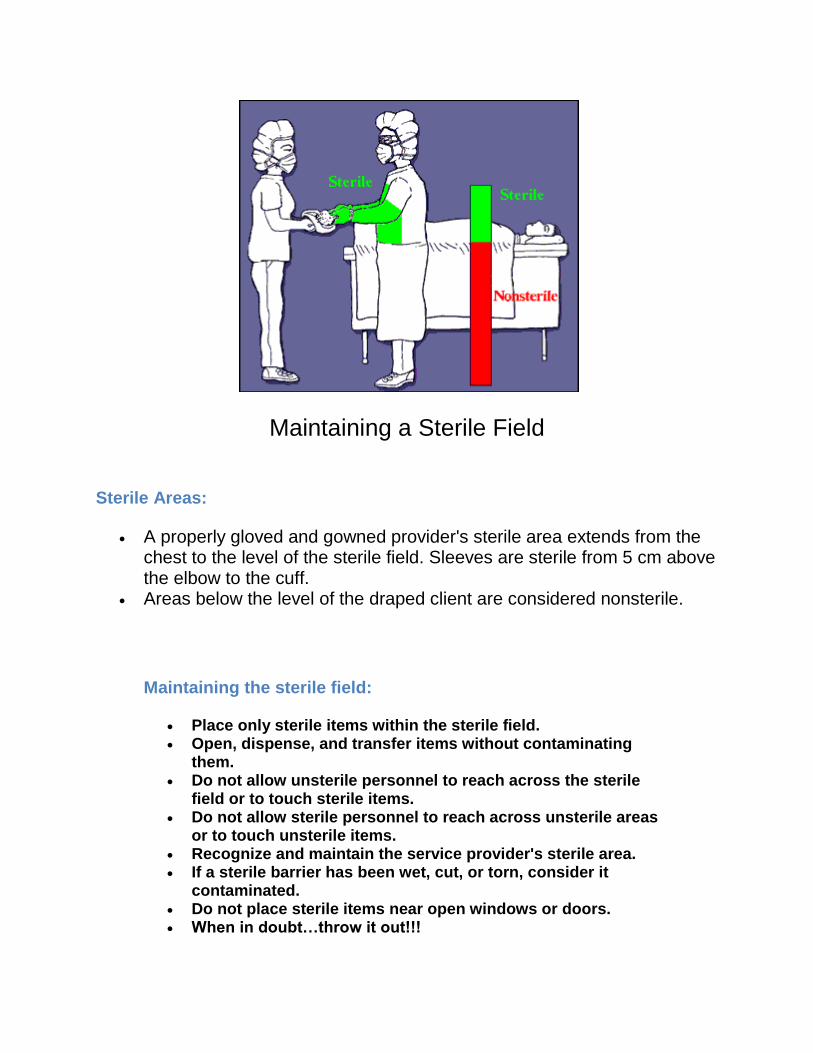
Maintaining a Sterile Field
Sterile Areas:
A properly gloved and gowned provider's sterile area extends from the chest to the level of the sterile field. Sleeves are sterile from 5 cm above the elbow to the cuff.
Areas below the level of the draped client are considered nonsterile.
Maintaining the sterile field:
Place only sterile items within the sterile field. Open, dispense, and transfer items without contaminating
them. Do not allow unsterile personnel to reach across the sterile
field or to touch sterile items. Do not allow sterile personnel to reach across unsterile areas
or to touch unsterile items. Recognize and maintain the service provider's sterile area. If a sterile barrier has been wet, cut, or torn, consider it
contaminated. Do not place sterile items near open windows or doors. When in doubt…throw it out!!!
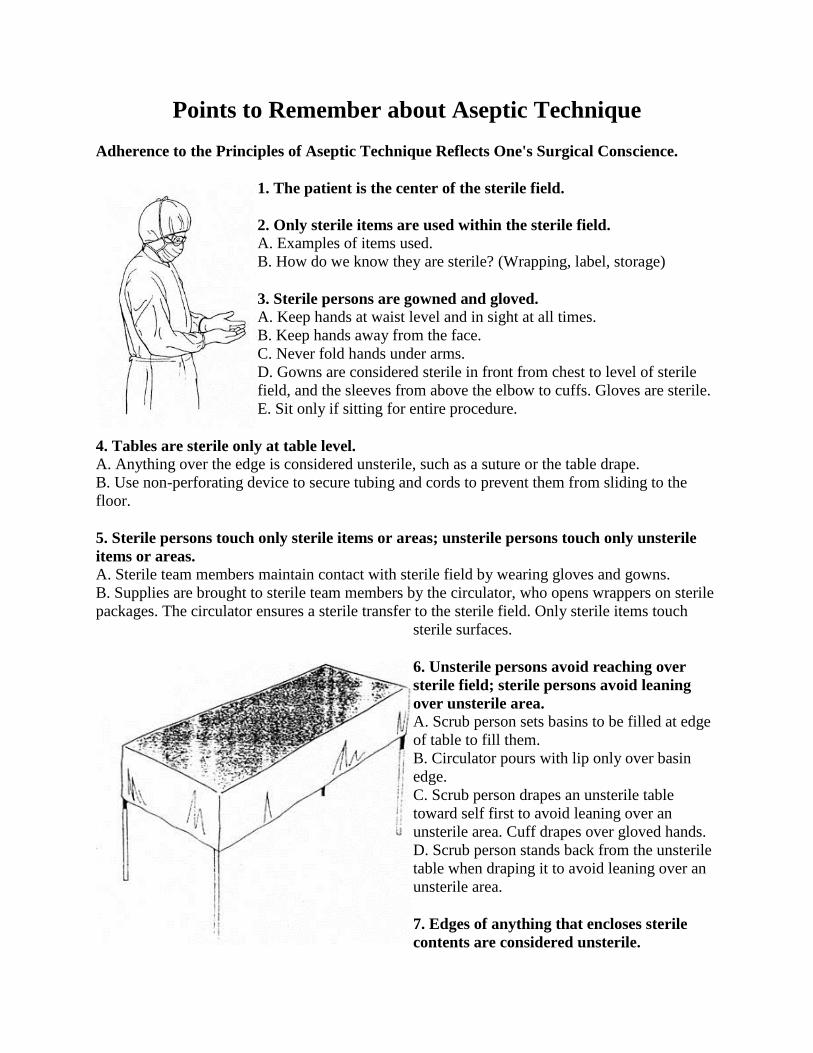
Points to Remember about Aseptic Technique
Adherence to the Principles of Aseptic Technique Reflects One's Surgical Conscience.
1. The patient is the center of the sterile field.
2. Only sterile items are used within the sterile field. A. Examples of items used.
B. How do we know they are sterile? (Wrapping, label, storage)
3. Sterile persons are gowned and gloved. A. Keep hands at waist level and in sight at all times.
B. Keep hands away from the face.
C. Never fold hands under arms.
D. Gowns are considered sterile in front from chest to level of sterile
field, and the sleeves from above the elbow to cuffs. Gloves are sterile.
E. Sit only if sitting for entire procedure.
4. Tables are sterile only at table level. A. Anything over the edge is considered unsterile, such as a suture or the table drape.
B. Use non-perforating device to secure tubing and cords to prevent them from sliding to the
floor.
5. Sterile persons touch only sterile items or areas; unsterile persons touch only unsterile
items or areas. A. Sterile team members maintain contact with sterile field by wearing gloves and gowns.
B. Supplies are brought to sterile team members by the circulator, who opens wrappers on sterile
packages. The circulator ensures a sterile transfer to the sterile field. Only sterile items touch
sterile surfaces.
6. Unsterile persons avoid reaching over
sterile field; sterile persons avoid leaning
over unsterile area. A. Scrub person sets basins to be filled at edge
of table to fill them.
B. Circulator pours with lip only over basin
edge.
C. Scrub person drapes an unsterile table
toward self first to avoid leaning over an
unsterile area. Cuff drapes over gloved hands.
D. Scrub person stands back from the unsterile
table when draping it to avoid leaning over an
unsterile area.
7. Edges of anything that encloses sterile
contents are considered unsterile.
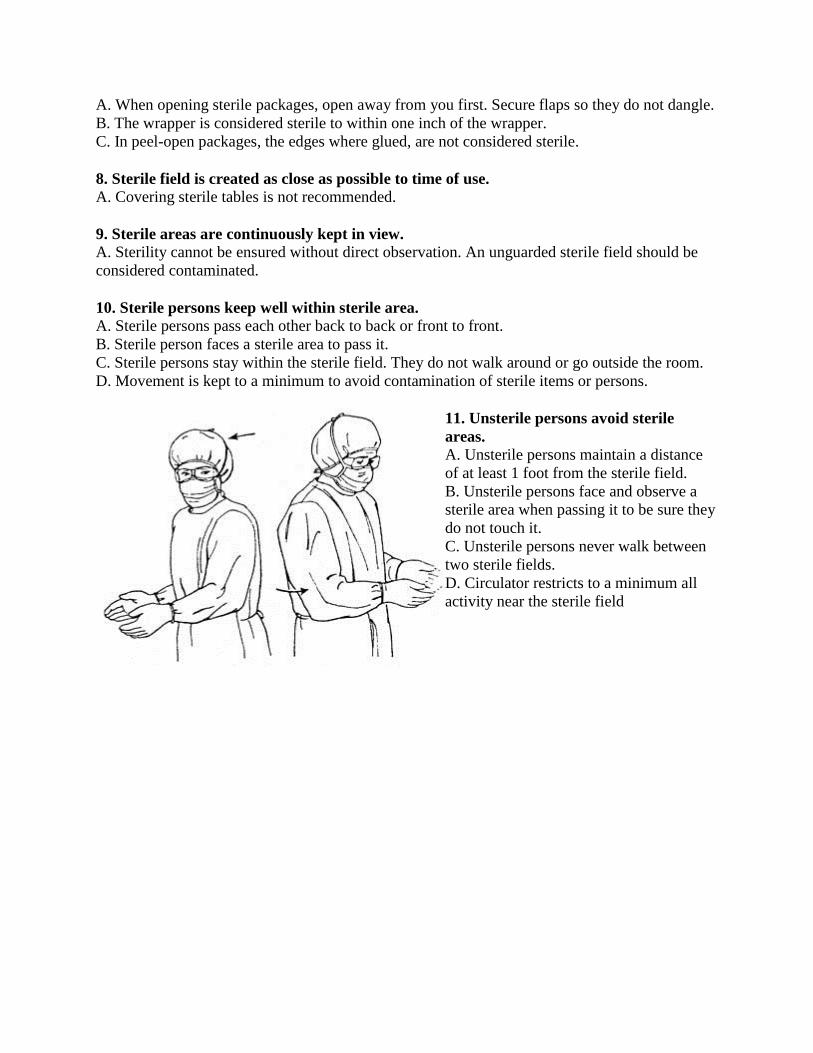
A. When opening sterile packages, open away from you first. Secure flaps so they do not dangle.
B. The wrapper is considered sterile to within one inch of the wrapper.
C. In peel-open packages, the edges where glued, are not considered sterile.
8. Sterile field is created as close as possible to time of use. A. Covering sterile tables is not recommended.
9. Sterile areas are continuously kept in view. A. Sterility cannot be ensured without direct observation. An unguarded sterile field should be
considered contaminated.
10. Sterile persons keep well within sterile area. A. Sterile persons pass each other back to back or front to front.
B. Sterile person faces a sterile area to pass it.
C. Sterile persons stay within the sterile field. They do not walk around or go outside the room.
D. Movement is kept to a minimum to avoid contamination of sterile items or persons.
11. Unsterile persons avoid sterile
areas. A. Unsterile persons maintain a distance
of at least 1 foot from the sterile field.
B. Unsterile persons face and observe a
sterile area when passing it to be sure they
do not touch it.
C. Unsterile persons never walk between
two sterile fields.
D. Circulator restricts to a minimum all
activity near the sterile field
Putting on a Sterile Gown
After entering the OR with your hands in front of you (the "I'm Scrubbed" position), stand close
to (but not right next to) the table where your gown and gloves have been opened. Carefully
pick up the corner of the towel being careful not to drip onto the sterile field; use the towel to dry
your hands. First dry your fingers, then both of your palms and the backs of your hands, then
your wrists and finally your forearms. In other words, start at your fingertips and work your way
up to your elbows. In this way, your fingertips will remain the most sterile. Dispose of the towel
in the designated receptacle.
Next carefully pick up your gown and gently shake it open and slip your arms through the
sleeves. At this point, your hands should not extend through the cuffs of the gown. Using cuffed
hands open your glove package and put on your gloves. See next page “ Putting on Your
gloves.”
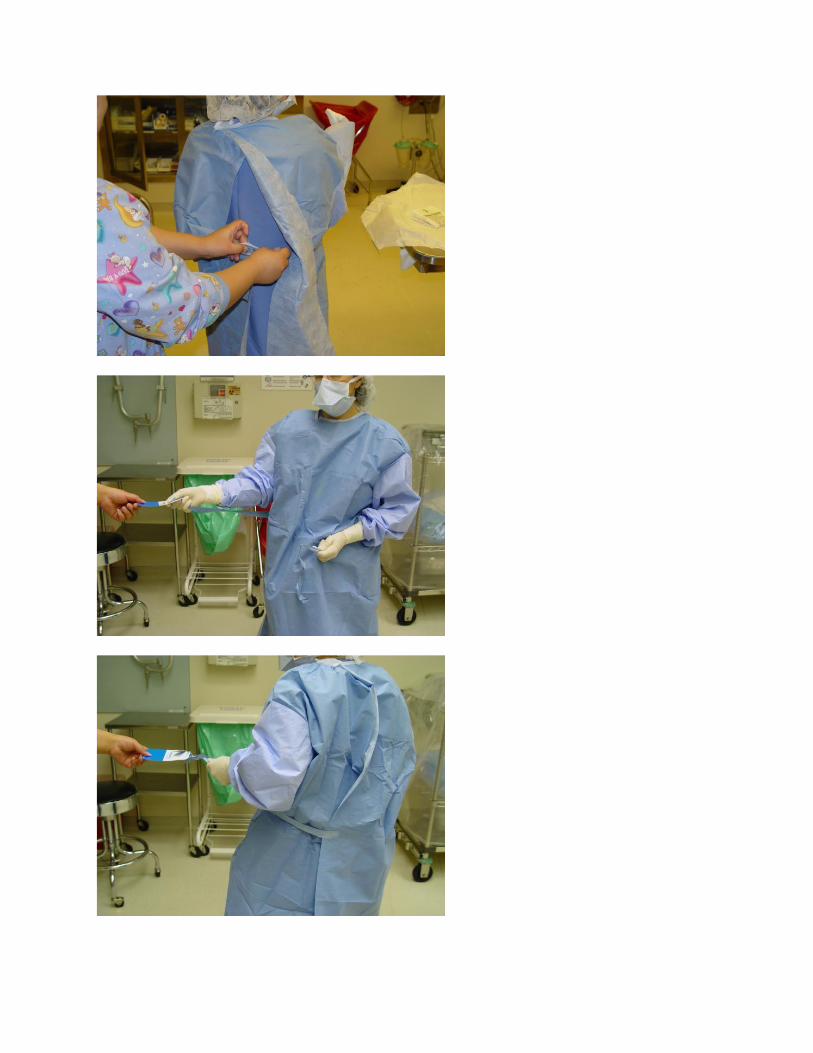
Step back from the sterile field and wait for the circulator nurse to come behind you, pull the
gown up over your shoulders and fasten it behind you at the neck and waist. Often, they will then
bend down, grasp the bottom of the gown and give it a sharp tug downward to straighten out any
wrinkles and insure that it is securely in place. Next, you must put on your gloves.
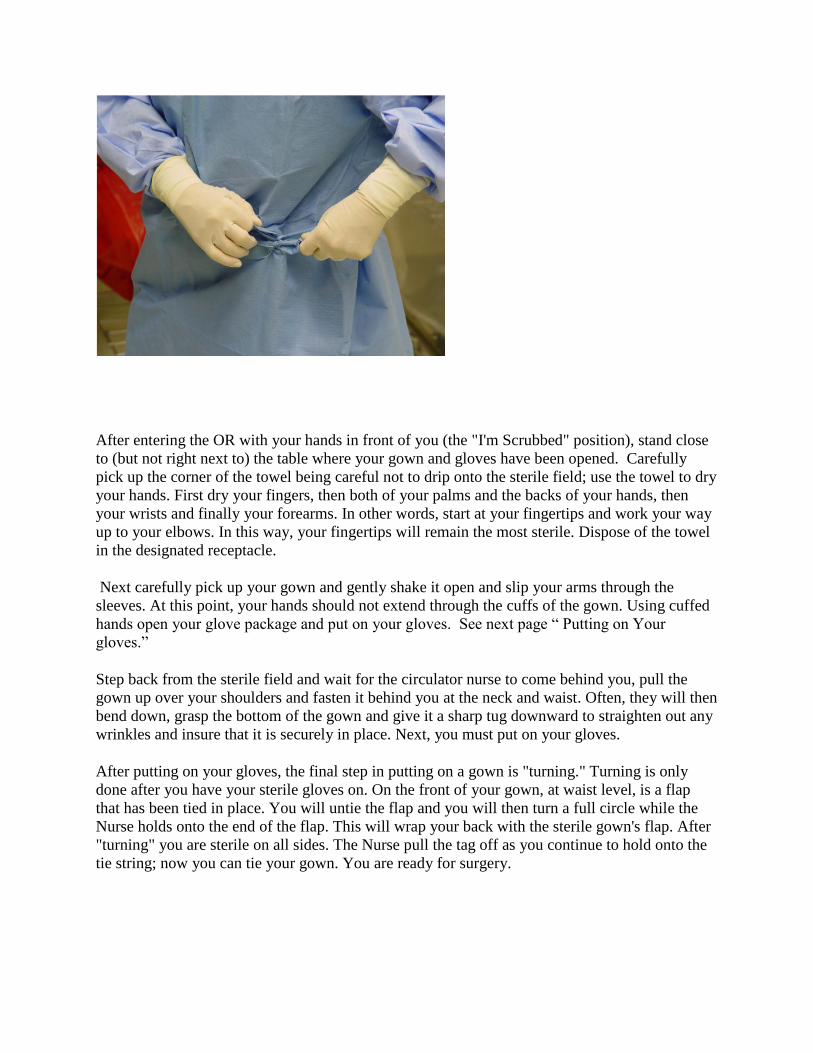
After putting on your gloves, the final step in putting on a gown is "turning." Turning is only
done after you have your sterile gloves on. On the front of your gown, at waist level, is a flap
that has been tied in place. You will untie the flap and you will then turn a full circle while the
Nurse holds onto the end of the flap. This will wrap your back with the sterile gown's flap. After
"turning" you are sterile on all sides. The Nurse pull the tag off as you continue to hold onto the
tie string; now you can tie your gown. You are ready for surgery.
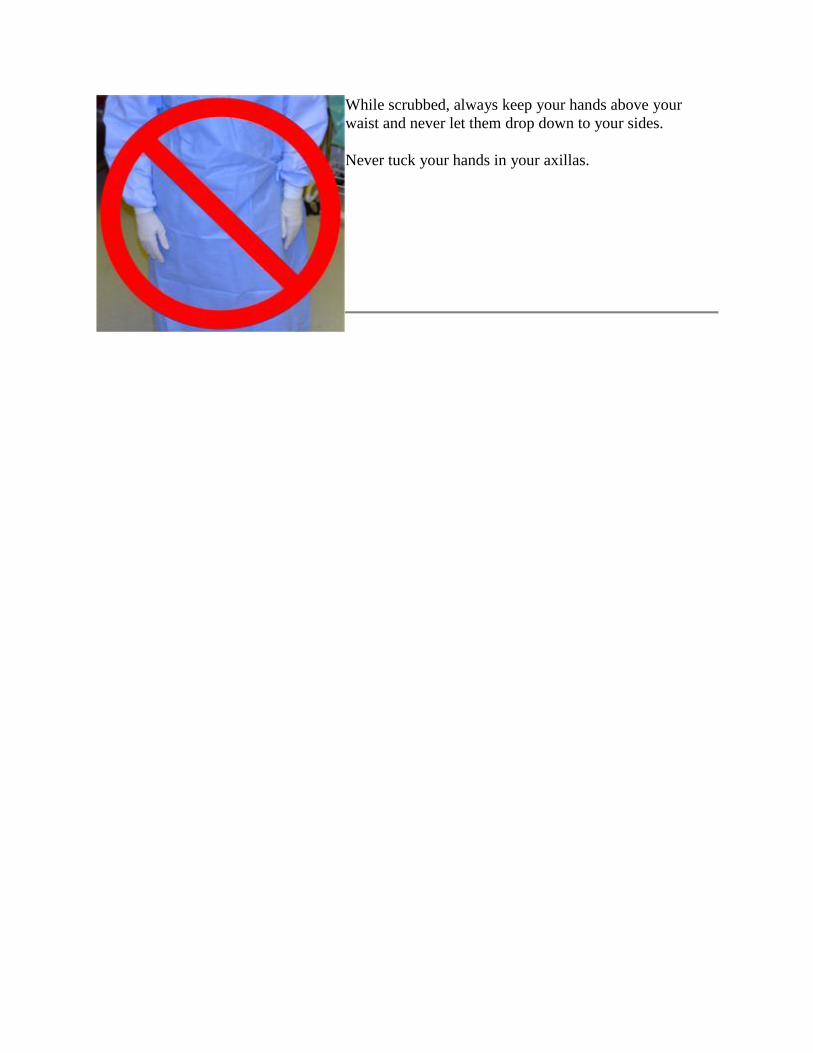
While scrubbed, always keep your hands above your
waist and never let them drop down to your sides.
Never tuck your hands in your axillas.
Removing Gown and Gloves
When surgery is finished you will need to
remove your gown and gloves in a way
that does not contaminate you.
Start by untying your outer waist strings.
Then, you may wait for the circulating
nurse to untie the inner waist strings and
neck strings. Alternatively, if you are
wearing a disposable paper gown, you
may be able to pull the gown off you
toward the front, breaking the paper
strings at your waist and neck.
Pull the gown off over your arms and
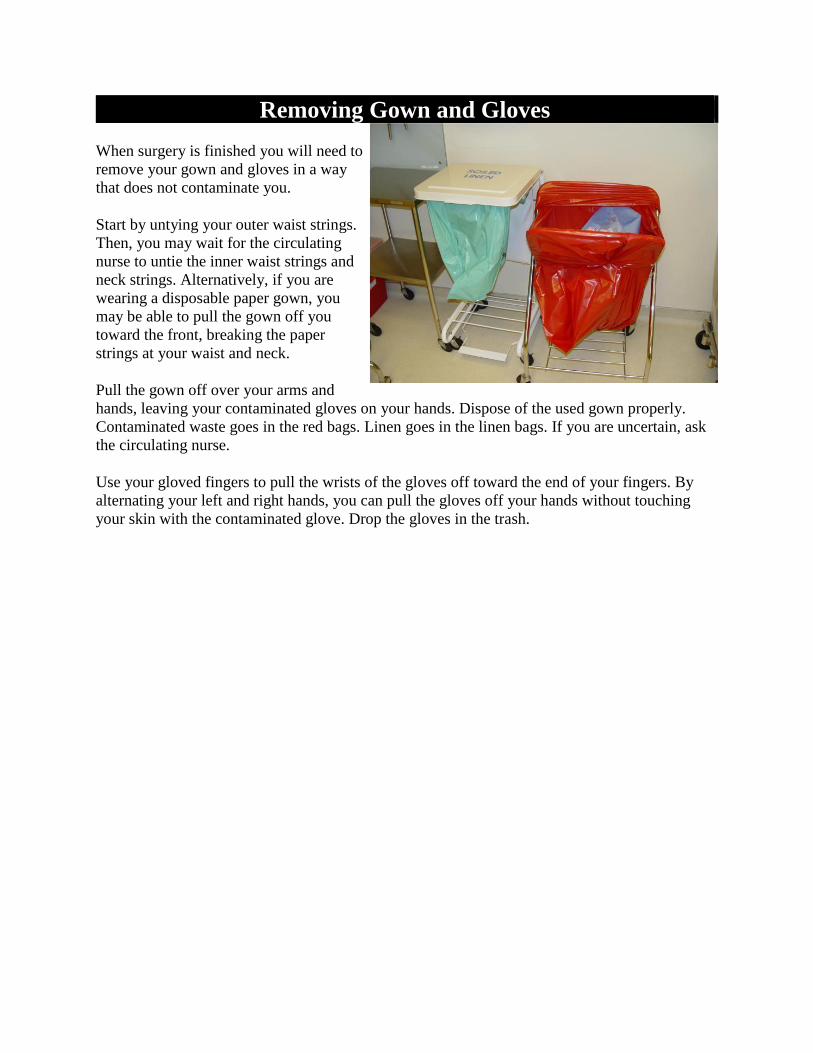
hands, leaving your contaminated gloves on your hands. Dispose of the used gown properly.
Contaminated waste goes in the red bags. Linen goes in the linen bags. If you are uncertain, ask
the circulating nurse.
Use your gloved fingers to pull the wrists of the gloves off toward the end of your fingers. By
alternating your left and right hands, you can pull the gloves off your hands without touching
your skin with the contaminated glove. Drop the gloves in the trash.
Scrubbing your Hands
Scrubbing your hands is much more than the routine hand washing we all do before examining
patients. It is a ritualistic procedure designed to increase safety for the patient and for you.
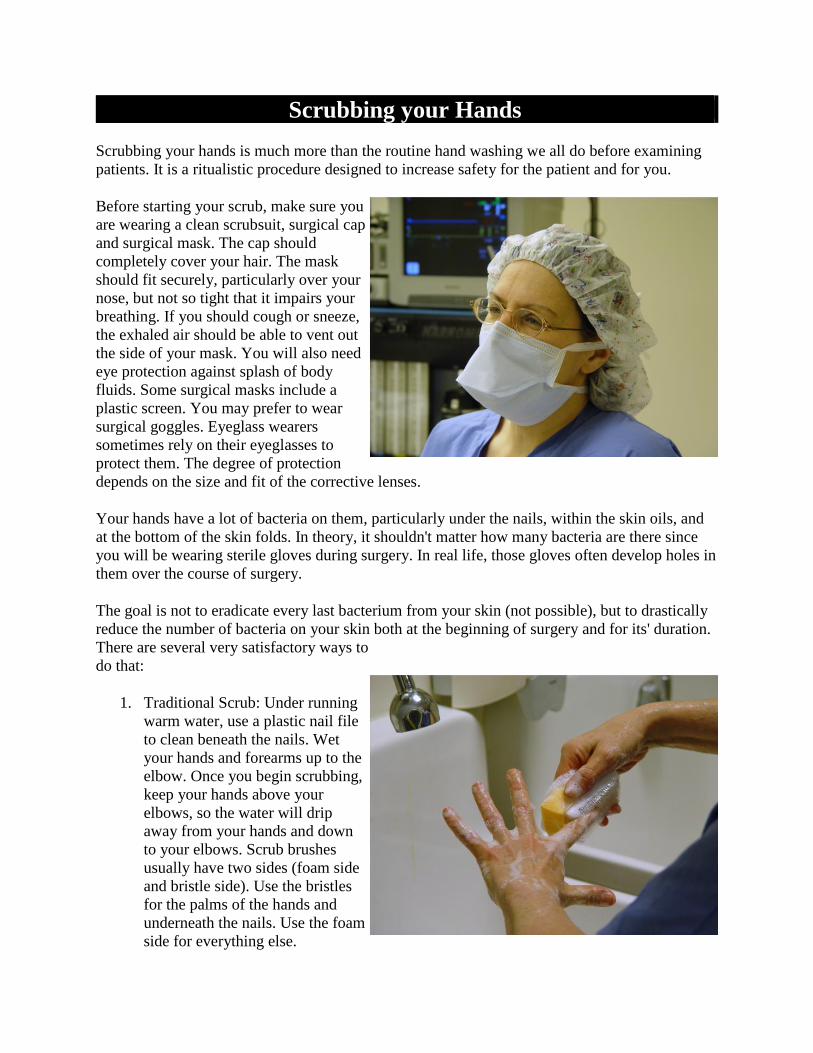
Before starting your scrub, make sure you
are wearing a clean scrubsuit, surgical cap
and surgical mask. The cap should
completely cover your hair. The mask
should fit securely, particularly over your
nose, but not so tight that it impairs your
breathing. If you should cough or sneeze,
the exhaled air should be able to vent out
the side of your mask. You will also need
eye protection against splash of body
fluids. Some surgical masks include a
plastic screen. You may prefer to wear
surgical goggles. Eyeglass wearers
sometimes rely on their eyeglasses to
protect them. The degree of protection
depends on the size and fit of the corrective lenses.
Your hands have a lot of bacteria on them, particularly under the nails, within the skin oils, and
at the bottom of the skin folds. In theory, it shouldn't matter how many bacteria are there since
you will be wearing sterile gloves during surgery. In real life, those gloves often develop holes in
them over the course of surgery.
The goal is not to eradicate every last bacterium from your skin (not possible), but to drastically
reduce the number of bacteria on your skin both at the beginning of surgery and for its' duration.
There are several very satisfactory ways to
do that:
1. Traditional Scrub: Under running
warm water, use a plastic nail file
to clean beneath the nails. Wet
your hands and forearms up to the
elbow. Once you begin scrubbing,
keep your hands above your
elbows, so the water will drip
away from your hands and down
to your elbows. Scrub brushes
usually have two sides (foam side
and bristle side). Use the bristles
for the palms of the hands and
underneath the nails. Use the foam
side for everything else.
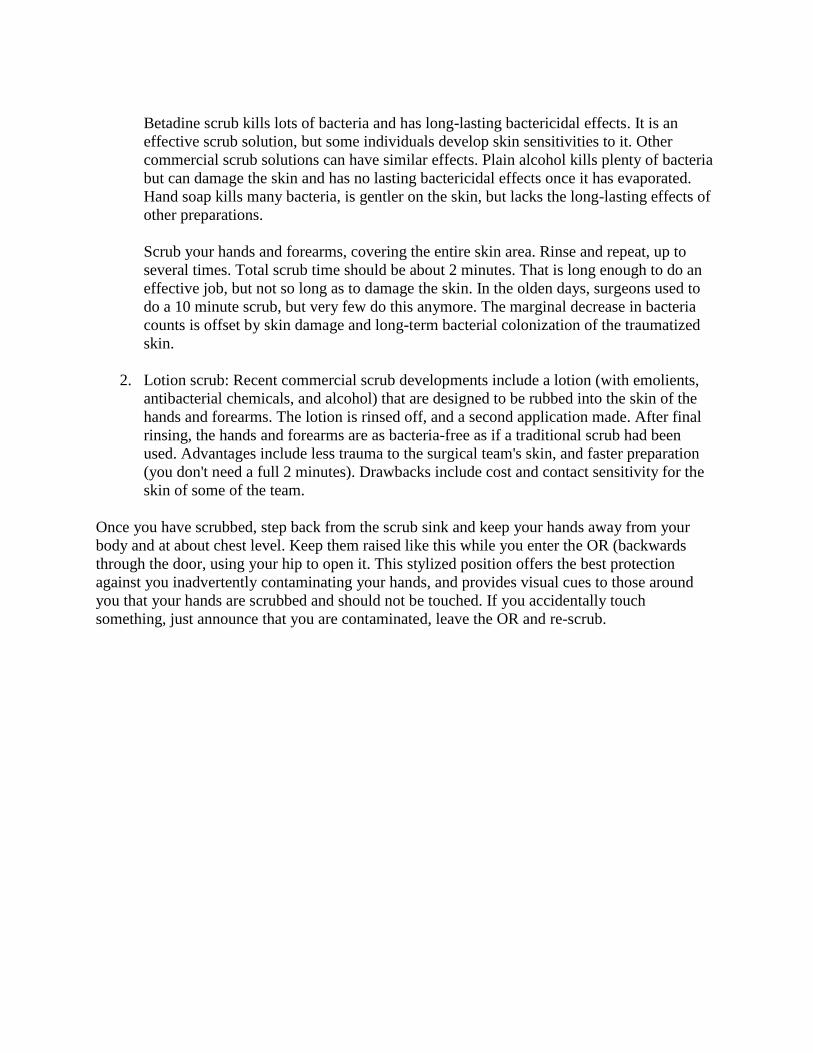
Betadine scrub kills lots of bacteria and has long-lasting bactericidal effects. It is an
effective scrub solution, but some individuals develop skin sensitivities to it. Other
commercial scrub solutions can have similar effects. Plain alcohol kills plenty of bacteria
but can damage the skin and has no lasting bactericidal effects once it has evaporated.
Hand soap kills many bacteria, is gentler on the skin, but lacks the long-lasting effects of
other preparations.
Scrub your hands and forearms, covering the entire skin area. Rinse and repeat, up to
several times. Total scrub time should be about 2 minutes. That is long enough to do an
effective job, but not so long as to damage the skin. In the olden days, surgeons used to
do a 10 minute scrub, but very few do this anymore. The marginal decrease in bacteria
counts is offset by skin damage and long-term bacterial colonization of the traumatized
skin.
2. Lotion scrub: Recent commercial scrub developments include a lotion (with emolients,
antibacterial chemicals, and alcohol) that are designed to be rubbed into the skin of the
hands and forearms. The lotion is rinsed off, and a second application made. After final
rinsing, the hands and forearms are as bacteria-free as if a traditional scrub had been
used. Advantages include less trauma to the surgical team's skin, and faster preparation
(you don't need a full 2 minutes). Drawbacks include cost and contact sensitivity for the
skin of some of the team.
Once you have scrubbed, step back from the scrub sink and keep your hands away from your
body and at about chest level. Keep them raised like this while you enter the OR (backwards
through the door, using your hip to open it. This stylized position offers the best protection
against you inadvertently contaminating your hands, and provides visual cues to those around
you that your hands are scrubbed and should not be touched. If you accidentally touch
something, just announce that you are contaminated, leave the OR and re-scrub.

Needles and “Sharps”
In health care settings, injuries from needles or other sharp instruments
are the number-one cause of occupational exposure to blood borne
infections. All staff who come in contact with sharps--from doctors and
nurses to those who dispose of the trash--are at risk of infections.
What are "sharps"?:
The term sharps refers to any sharp
instrument or object used in the delivery of
health care services--including hypodermic
needles, suture needles, scalpel blades,
sharp instruments, IV catheters, and razor
blades.
Objectives This module provides information on ways of reducing the risk of
transmitting infections when using, handling, and disposing of needles
and other sharps. When you complete this module, you should be able
to:
List ways that health care workers can become injured by sharps
Describe and demonstrate the proper procedures for use and
disposal of needles and other sharps
Describe the proper procedures for managing injuries from
sharps
NOTE Most of the documented cases
of workplace-acquired HIV and hepatitis B
and C infections have occurred through
preventable accidents, such as sticks with
needles or injuries from other sharps.
Who is at risk?
Staff: Sharps pose a serious danger to health care staff. Providers are at risk when
handling, passing, or using sharps during service delivery. Maintenance and waste-disposal staff
are at risk when sharps are not properly disposed of or when waste containing sharps is
mishandled. All staff of a health facility can be placed at risk if sharps are not disposed of
properly. Sharps can cause injury and transmission of serious infections, including HIV and
hepatitis B. If possible, all staff at risk of exposure to blood or other body fluids should be
vaccinated against hepatitis B as a precaution.
Clients: Clients can be placed at risk if improperly discarded sharps are found in unexpected
places, like linens.
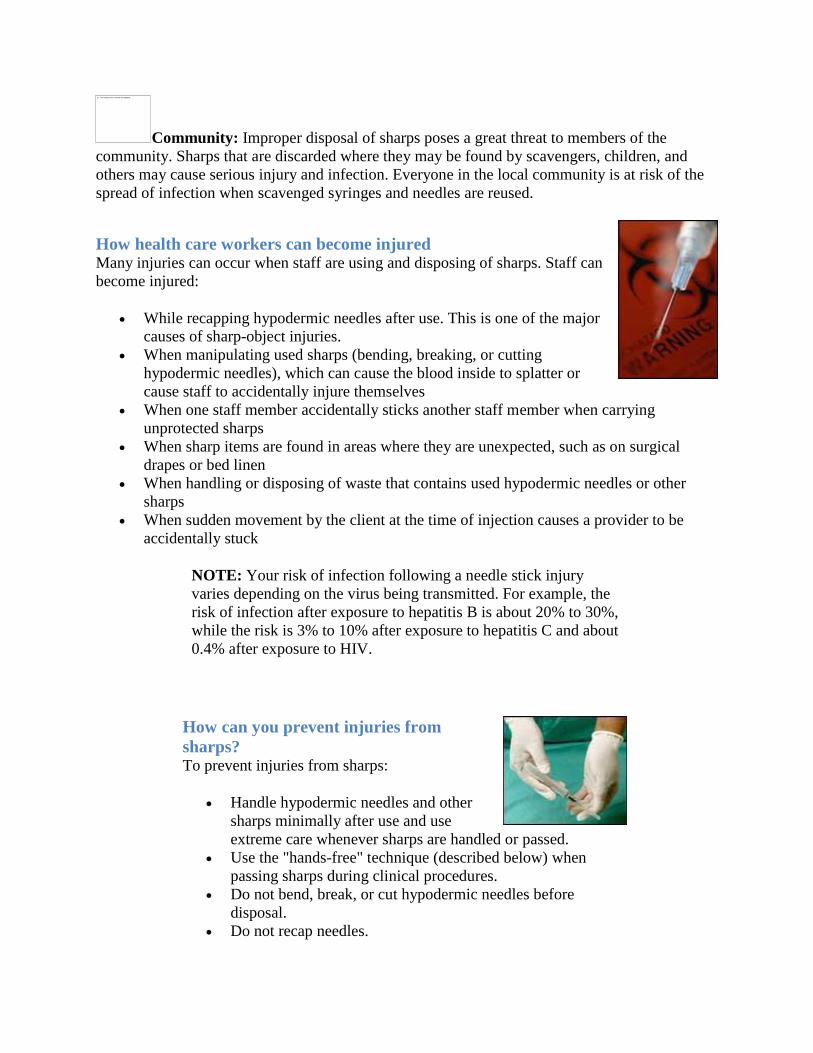
Community: Improper disposal of sharps poses a great threat to members of the
community. Sharps that are discarded where they may be found by scavengers, children, and
others may cause serious injury and infection. Everyone in the local community is at risk of the
spread of infection when scavenged syringes and needles are reused.
How health care workers can become injured Many injuries can occur when staff are using and disposing of sharps. Staff can
become injured:
While recapping hypodermic needles after use. This is one of the major
causes of sharp-object injuries.
When manipulating used sharps (bending, breaking, or cutting
hypodermic needles), which can cause the blood inside to splatter or
cause staff to accidentally injure themselves
When one staff member accidentally sticks another staff member when carrying
unprotected sharps
When sharp items are found in areas where they are unexpected, such as on surgical
drapes or bed linen
When handling or disposing of waste that contains used hypodermic needles or other
sharps
When sudden movement by the client at the time of injection causes a provider to be
accidentally stuck
NOTE: Your risk of infection following a needle stick injury
varies depending on the virus being transmitted. For example, the
risk of infection after exposure to hepatitis B is about 20% to 30%,
while the risk is 3% to 10% after exposure to hepatitis C and about
0.4% after exposure to HIV.
How can you prevent injuries from
sharps? To prevent injuries from sharps:
Handle hypodermic needles and other
sharps minimally after use and use
extreme care whenever sharps are handled or passed.
Use the "hands-free" technique (described below) when
passing sharps during clinical procedures.
Do not bend, break, or cut hypodermic needles before
disposal.
Do not recap needles.
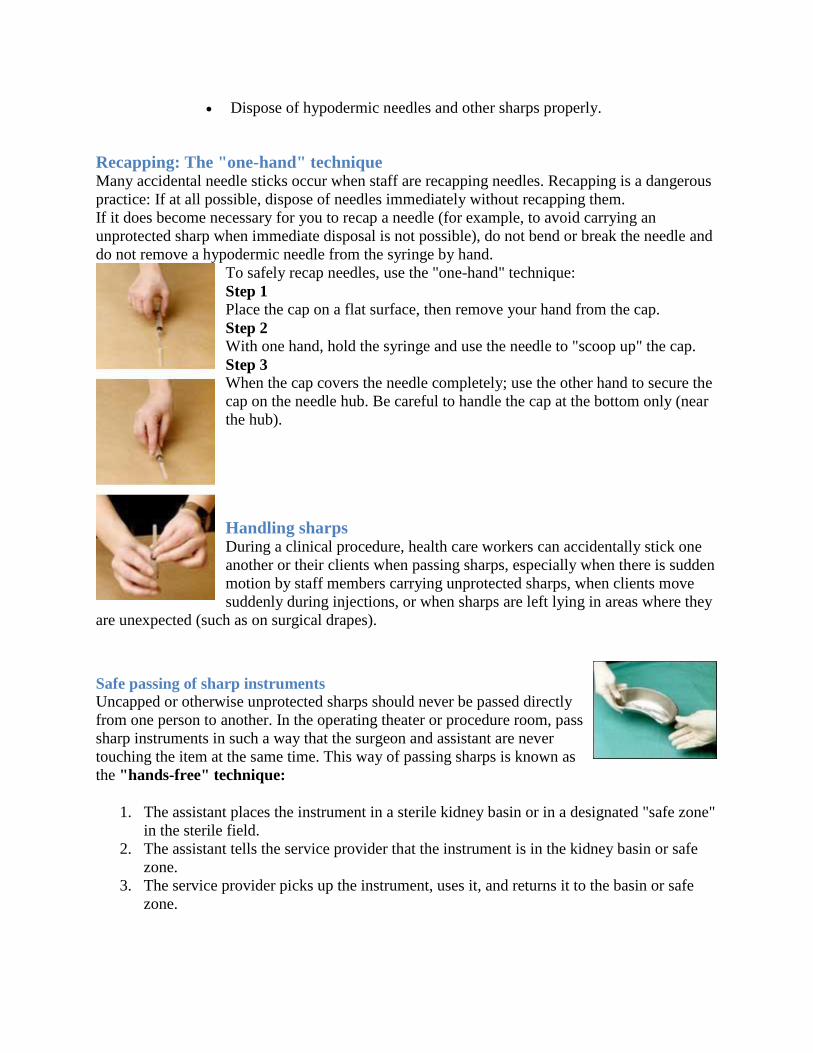
Dispose of hypodermic needles and other sharps properly.
Recapping: The "one-hand" technique Many accidental needle sticks occur when staff are recapping needles. Recapping is a dangerous
practice: If at all possible, dispose of needles immediately without recapping them.
If it does become necessary for you to recap a needle (for example, to avoid carrying an
unprotected sharp when immediate disposal is not possible), do not bend or break the needle and
do not remove a hypodermic needle from the syringe by hand.
To safely recap needles, use the "one-hand" technique:
Step 1 Place the cap on a flat surface, then remove your hand from the cap.
Step 2 With one hand, hold the syringe and use the needle to "scoop up" the cap.
Step 3 When the cap covers the needle completely; use the other hand to secure the
cap on the needle hub. Be careful to handle the cap at the bottom only (near
the hub).
Handling sharps During a clinical procedure, health care workers can accidentally stick one
another or their clients when passing sharps, especially when there is sudden
motion by staff members carrying unprotected sharps, when clients move
suddenly during injections, or when sharps are left lying in areas where they
are unexpected (such as on surgical drapes).
Safe passing of sharp instruments
Uncapped or otherwise unprotected sharps should never be passed directly
from one person to another. In the operating theater or procedure room, pass
sharp instruments in such a way that the surgeon and assistant are never
touching the item at the same time. This way of passing sharps is known as
the "hands-free" technique:
1. The assistant places the instrument in a sterile kidney basin or in a designated "safe zone"
in the sterile field.
2. The assistant tells the service provider that the instrument is in the kidney basin or safe
zone.
3. The service provider picks up the instrument, uses it, and returns it to the basin or safe
zone.
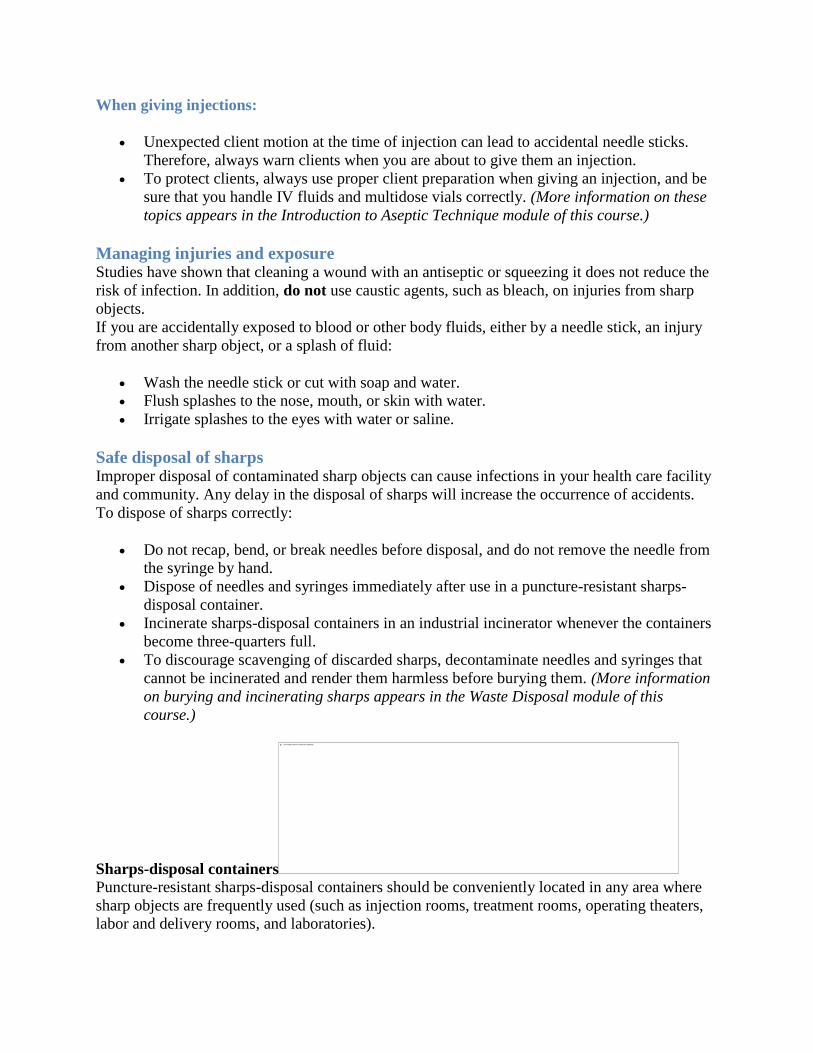
When giving injections:
Unexpected client motion at the time of injection can lead to accidental needle sticks.
Therefore, always warn clients when you are about to give them an injection.
To protect clients, always use proper client preparation when giving an injection, and be
sure that you handle IV fluids and multidose vials correctly. (More information on these
topics appears in the Introduction to Aseptic Technique module of this course.)
Managing injuries and exposure Studies have shown that cleaning a wound with an antiseptic or squeezing it does not reduce the
risk of infection. In addition, do not use caustic agents, such as bleach, on injuries from sharp
objects.
If you are accidentally exposed to blood or other body fluids, either by a needle stick, an injury
from another sharp object, or a splash of fluid:
Wash the needle stick or cut with soap and water.
Flush splashes to the nose, mouth, or skin with water.
Irrigate splashes to the eyes with water or saline.
Safe disposal of sharps Improper disposal of contaminated sharp objects can cause infections in your health care facility
and community. Any delay in the disposal of sharps will increase the occurrence of accidents.
To dispose of sharps correctly:
Do not recap, bend, or break needles before disposal, and do not remove the needle from
the syringe by hand.
Dispose of needles and syringes immediately after use in a puncture-resistant sharps-
disposal container.
Incinerate sharps-disposal containers in an industrial incinerator whenever the containers
become three-quarters full.
To discourage scavenging of discarded sharps, decontaminate needles and syringes that
cannot be incinerated and render them harmless before burying them. (More information
on burying and incinerating sharps appears in the Waste Disposal module of this
course.)
Sharps-disposal containers Puncture-resistant sharps-disposal containers should be conveniently located in any area where
sharp objects are frequently used (such as injection rooms, treatment rooms, operating theaters,
labor and delivery rooms, and laboratories).
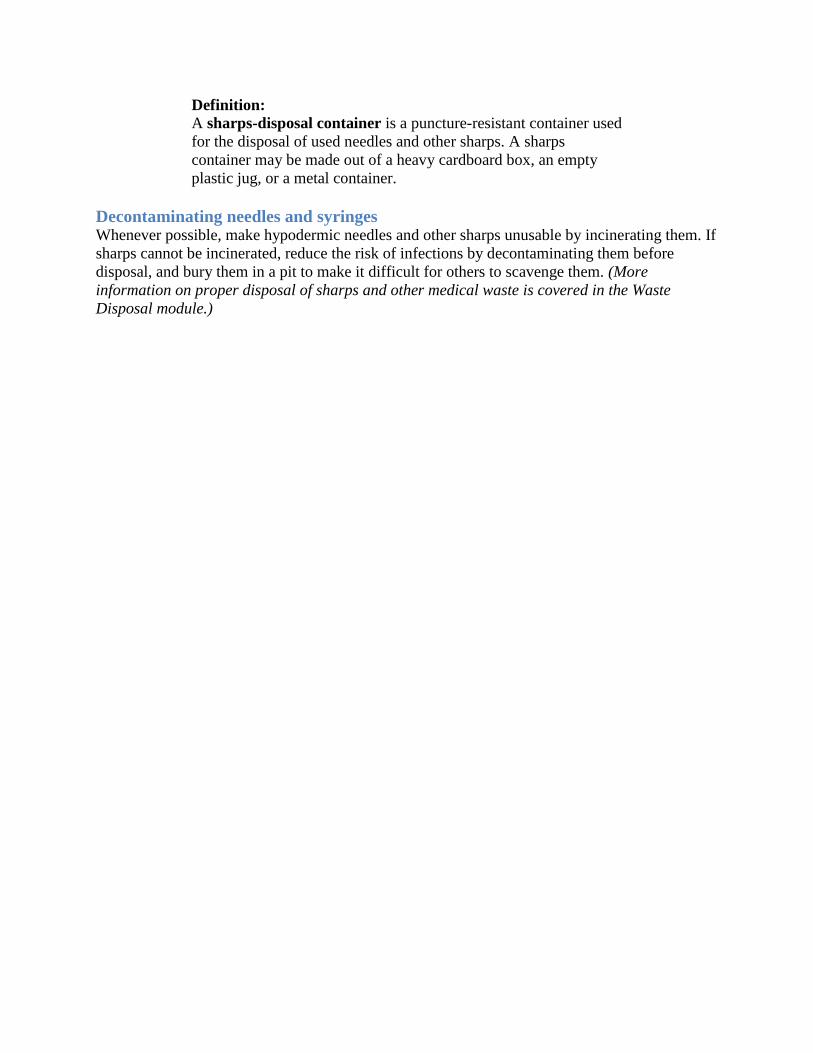
Definition:
A sharps-disposal container is a puncture-resistant container used
for the disposal of used needles and other sharps. A sharps
container may be made out of a heavy cardboard box, an empty
plastic jug, or a metal container.
Decontaminating needles and syringes Whenever possible, make hypodermic needles and other sharps unusable by incinerating them. If
sharps cannot be incinerated, reduce the risk of infections by decontaminating them before
disposal, and bury them in a pit to make it difficult for others to scavenge them. (More
information on proper disposal of sharps and other medical waste is covered in the Waste
Disposal module.)
Hand Washing
For more than 100 years, research has shown that hand washing is the most
important way to reduce the spread of infections in health care settings. However,
health care workers wash their hands only about half as often as they should.
This module provides an overview of handwashing and explains why good
handwashing practices are an essential--but often overlooked--part of infection
prevention.
Objectives When you complete this module, you should be able to:
Explain the importance of routine handwashing
List the most appropriate times to perform handwashing
Explain the three different kinds of handwashing
List the steps of routine handwashing
Name three strategies that could help improve handwashing practices at
your facility
Hands are the most common vehicle for transmitting
infections. It is essential that all staff that comes in
contact with clients understand the importance of
good handwashing practices.
How does handwashing prevent infections? Microorganisms on your skin can lead to infections. There are two types of
microorganisms:
Resident microorganisms live within the skin and are difficult to remove.
Transient microorganisms acquired during daily living can be easily
removed by handwashing with plain soap and water.
Handwashing:
Reduces the number of infectious microorganisms on your hands
Reduces client sickness and death caused by infections
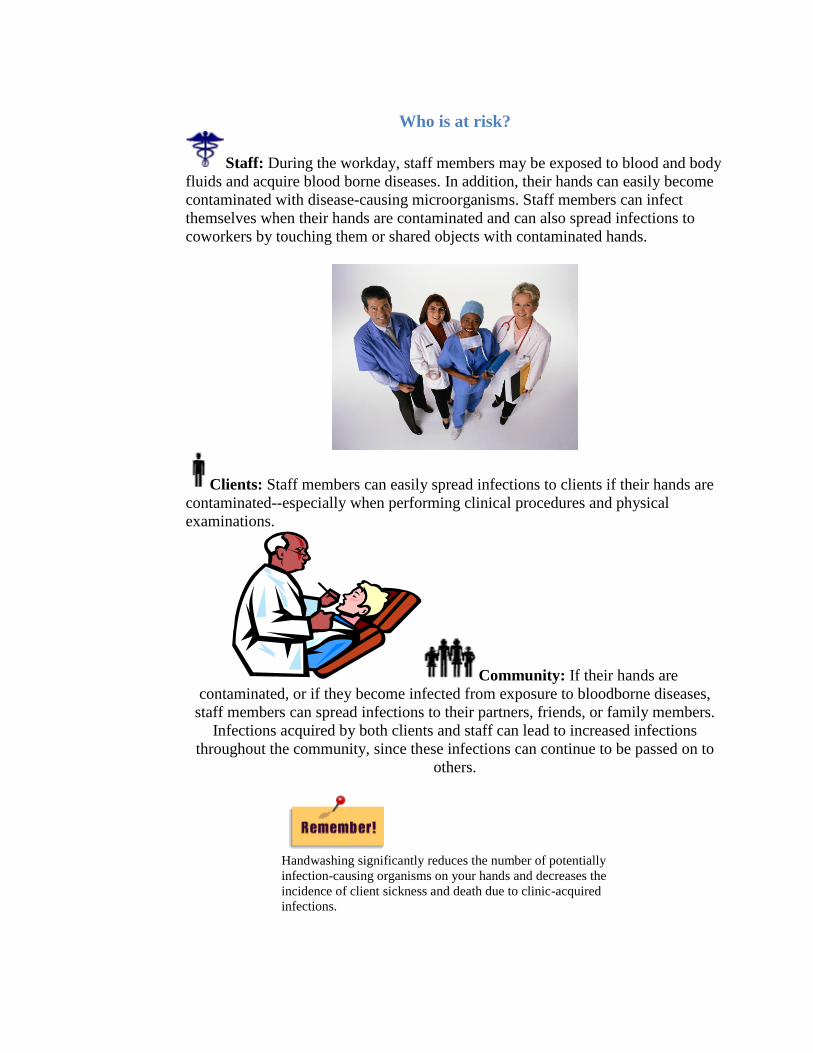
Who is at risk?
Staff: During the workday, staff members may be exposed to blood and body
fluids and acquire blood borne diseases. In addition, their hands can easily become
contaminated with disease-causing microorganisms. Staff members can infect
themselves when their hands are contaminated and can also spread infections to
coworkers by touching them or shared objects with contaminated hands.
Clients: Staff members can easily spread infections to clients if their hands are
contaminated--especially when performing clinical procedures and physical
examinations.
Community: If their hands are
contaminated, or if they become infected from exposure to bloodborne diseases,
staff members can spread infections to their partners, friends, or family members.
Infections acquired by both clients and staff can lead to increased infections
throughout the community, since these infections can continue to be passed on to
others.
Handwashing significantly reduces the number of potentially
infection-causing organisms on your hands and decreases the
incidence of client sickness and death due to clinic-acquired
infections.
When should you wash your hands? Wash your hands whenever there is a chance that your hands may
have become contaminated and whenever you are at risk of
transmitting infections to yourself or others. Always wash your
hands:
Immediately when you arrive at work
Before examining each client
After examining each client
Before putting on gloves for clinical procedures (such as a
pelvic exam or IV insertion)
After touching any instrument or object that might be
contaminated with blood or other body fluids, or after
touching mucous membranes
After you handle blood, urine, or other specimens
After removing any kind of gloves (hands can become
contaminated if gloves contain tiny holes or tears)
After using the toilet or latrine
Before leaving work
Handwashing is one of the most important
infection prevention practices, but it is often
overlooked. You can become infected yourself
or pass infections on to your clients or your
family if you don't properly wash your hands at
the appropriate times.

WE HOPE YOU
ENJOY YOUR
OB/GYN
CLERKSHIP
ROTATION!!!