Embed Size (px)
Citation preview
YCE01PC Programming SoftwarE
rEfErEnCE manual
This software is used to program the FTA-750/FTA-550 air band transceiver.With this software, you can quickly and easily program the FTA-750/FTA-550 operating channels from your personal computer.
YCE01 REfEREnCE Manual
YaEsu MusEn Co., ltd.Page 2
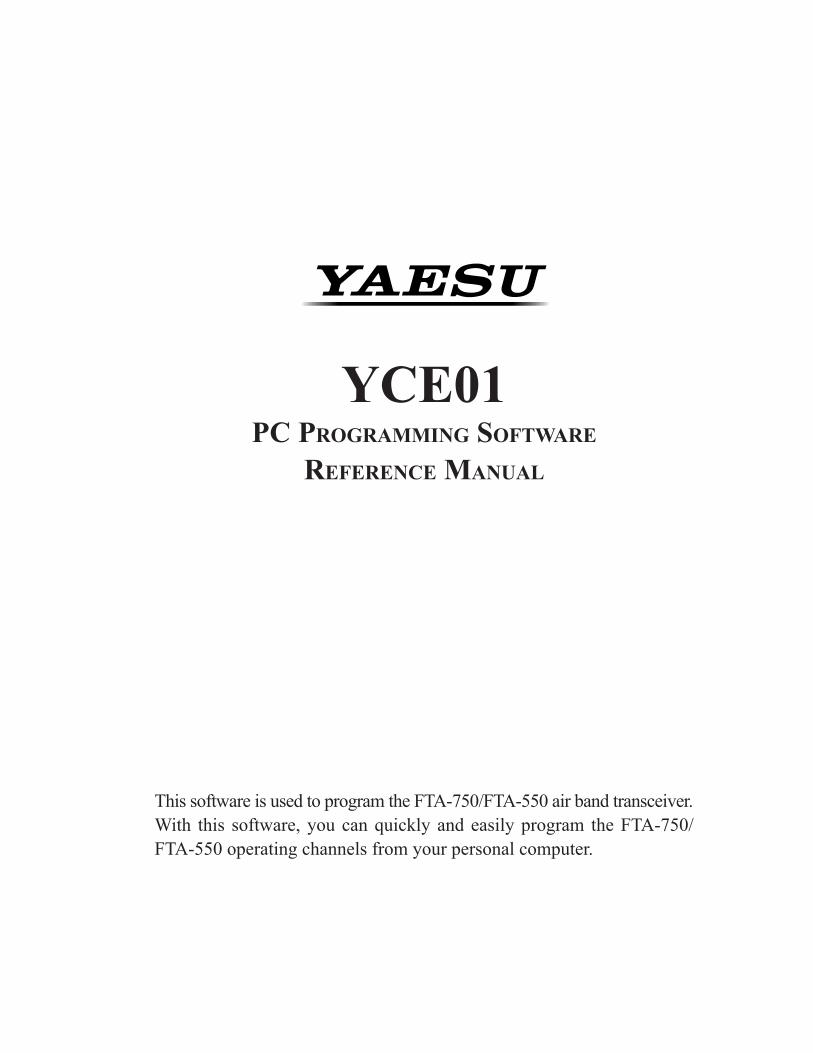
Contents
Before Using ...........................................................3Installation and Removal of the Program ...........3
To install the YCE01 ......................................3To remove the YCE01 from your computer ...3
Startup of the Program..........................................3To close the YCE01 ........................................3
Model Setup ............................................................4To select the model .........................................4To select the target region ...............................4
Main Screen ............................................................5“Setup” Category ................................................5
“Configuration” ..............................................5“COMM Setup” ..............................................7“GPS Setup” .................................................10
“Memory Book” Category ................................12Adding a New Entry .....................................12Editing a Memory Book Entry .....................12Deleting a Memory Book Entry ...................14
“Weather Channels” Category ..........................15
Main Menu ...........................................................16“File” .................................................................16“Edit” .................................................................17“Transfer” ..........................................................17“Region” ............................................................19“Option” ............................................................19
Important Notice: You assume full responsibility for the use of the YCE01.
The company and product names in this manual are trademarks and/or registered trade-marks of their respective companies.
Yaesu Musen Co., Ltd.
YCe01 RefeRenCe ManuaL
Page 3
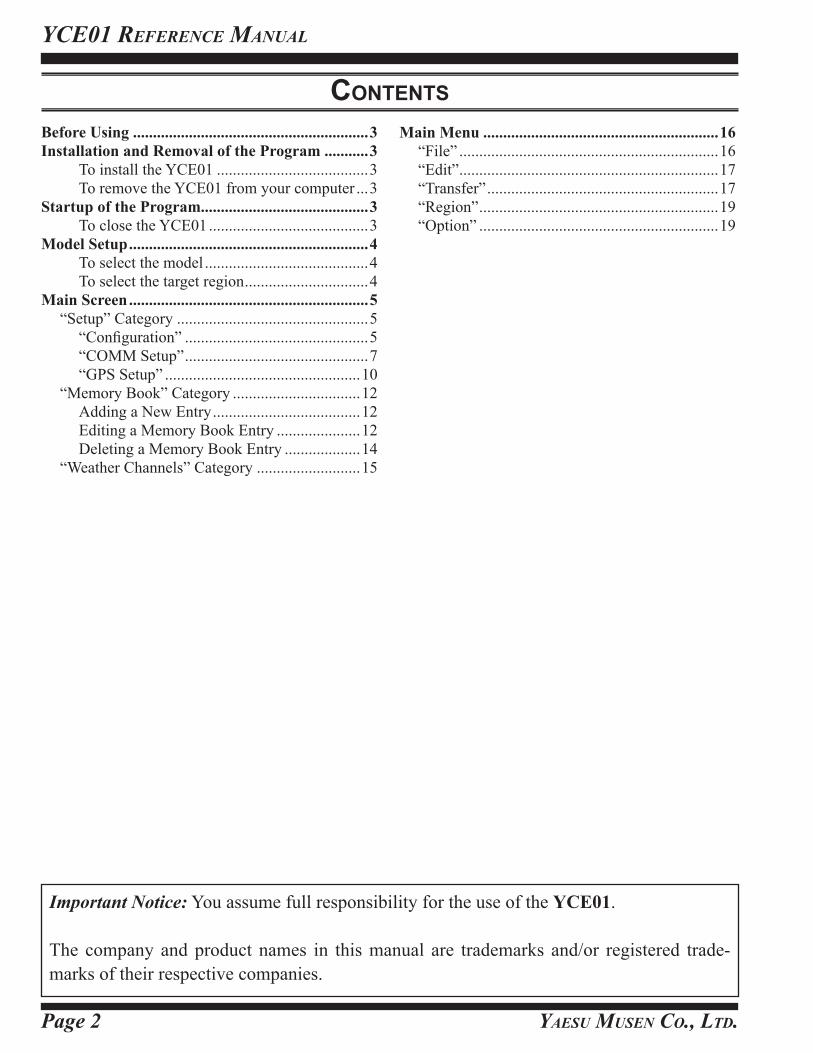
Before Using
Minimum System Requirements IBM®-compatible PC Windows Vista®, Windows 7, or Windows 8 operating system Up to 20 Megabytes of free hard disk drive space Mouse or other pointing device 256-color display adapter (24-bit color recommended) and monitor with 640 * 480 reso-
lution or higher NET Framework 3.5 or 4.0
This reference manual was created using the Windows 7 operating system. Operations and screen examples may vary based on your operating system.
Note: Support for Windows XP ends April, 2014.
installation and removal of the Program
To install the YCE011. Download the YCE01 PC Programming Software from the YAESU website and decom-
press the files to anywhere on your computer. Note that all the files must remain in the same folder.
2. Run the “setup.exe” in the same folder that you have decompressed the files.3. Follow the instructions on your computer screen. If the YCE01 is successfully installed, a shortcut icon “YCE01” will appear on the desk-
top of your computer.To remove the YCE01 from your computer1. Click the Start button and then “Control Panel”.2. Click “Programs” and then “Remove Programs”.3. Select “YCE01” then click the menu item “Remove”.
startUP of the Program
Double-click the “YCE01” icon on the desktop of your computer, or click “YCE01” in the Start menu displayed by clicking the Start button.
To close the YCE01Click the [X] button in the top right corner of the YCE01 window, or click “Exit” in the “File” menu of the YCE01.
YCE01 REfEREnCE Manual
YaEsu MusEn Co., ltd.Page 4
model setUP
Items and values available on the YCE01 depend on the model of the radio and the region of the world to be used.
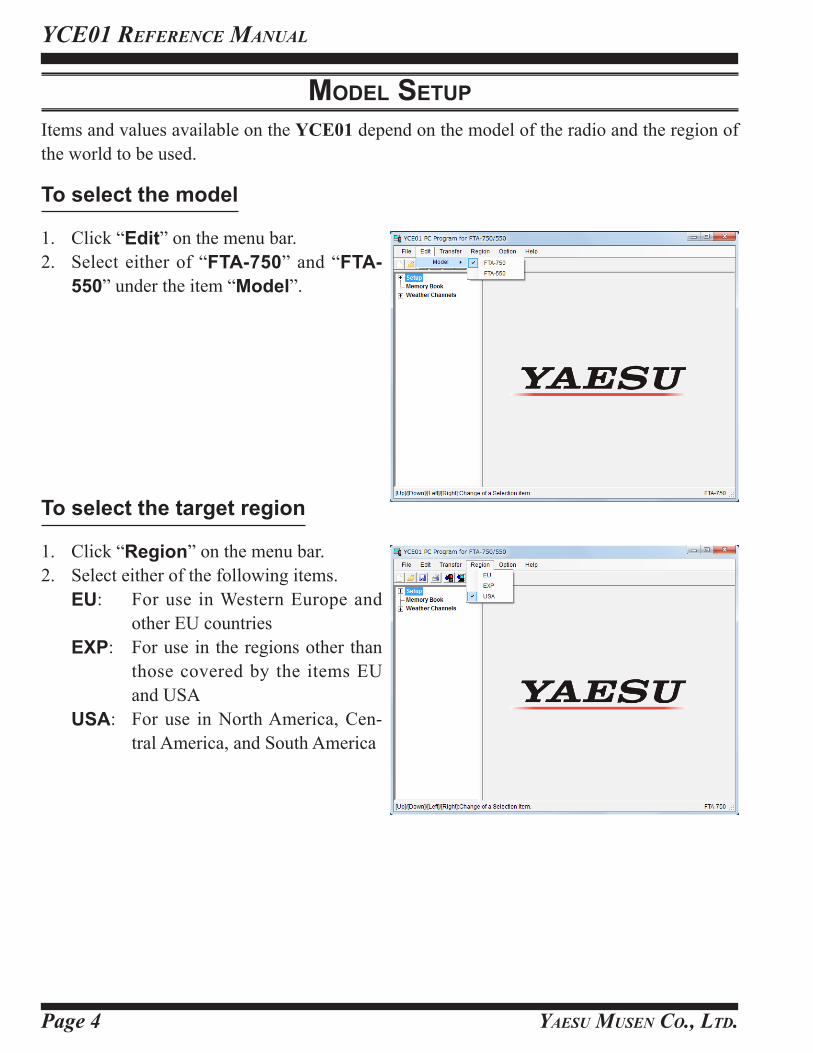
To select the model
1. Click “Edit” on the menu bar.2. Select either of “FTA-750” and “FTA-
550” under the item “Model”.
To select the target region
1. Click “Region” on the menu bar.2. Select either of the following items.
EU: For use in Western Europe and other EU countries
EXP: For use in the regions other than those covered by the items EU and USA
USA: For use in North America, Cen-tral America, and South America
Yaesu Musen Co., Ltd.
YCe01 RefeRenCe ManuaL
Page 5
main sCreen
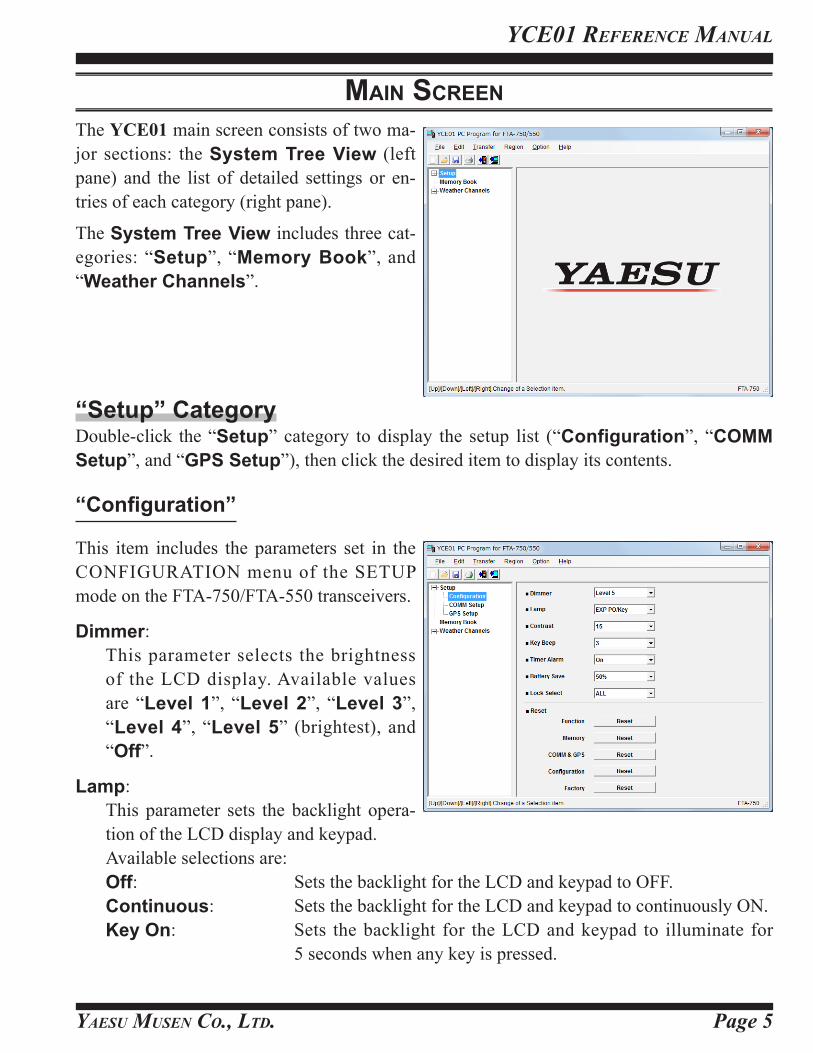
The YCE01 main screen consists of two ma-jor sections: the System Tree View (left pane) and the list of detailed settings or en-tries of each category (right pane).
The System Tree View includes three cat-egories: “Setup”, “Memory Book”, and “Weather Channels”.
“Setup” CategoryDouble-click the “Setup” category to display the setup list (“Configuration”, “COMM Setup”, and “GPS Setup”), then click the desired item to display its contents.
“Configuration”
This item includes the parameters set in the CONFIGURATION menu of the SETUP mode on the FTA-750/FTA-550 transceivers.
Dimmer: This parameter selects the brightness
of the LCD display. Available values are “Level 1”, “Level 2”, “Level 3”, “Level 4”, “Level 5” (brightest), and “Off”.
Lamp: This parameter sets the backlight opera-
tion of the LCD display and keypad. Available selections are:
Off: Sets the backlight for the LCD and keypad to OFF.Continuous: Sets the backlight for the LCD and keypad to continuously ON.Key On: Sets the backlight for the LCD and keypad to illuminate for
5 seconds when any key is pressed.
YCE01 REfEREnCE Manual
YaEsu MusEn Co., ltd.Page 6
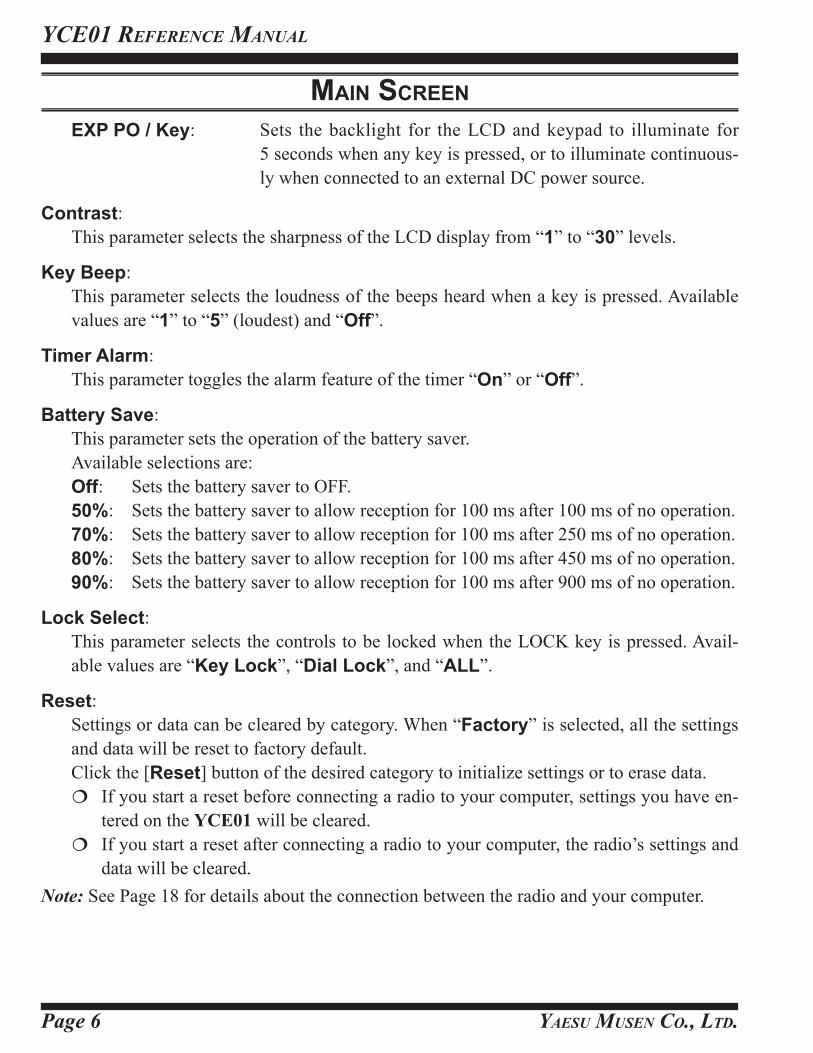
EXP PO / Key: Sets the backlight for the LCD and keypad to illuminate for 5 seconds when any key is pressed, or to illuminate continuous-ly when connected to an external DC power source.
Contrast: This parameter selects the sharpness of the LCD display from “1” to “30” levels.
Key Beep: This parameter selects the loudness of the beeps heard when a key is pressed. Available
values are “1” to “5” (loudest) and “Off”.
Timer Alarm: This parameter toggles the alarm feature of the timer “On” or “Off”.
Battery Save: This parameter sets the operation of the battery saver. Available selections are:
Off: Sets the battery saver to OFF.50%: Sets the battery saver to allow reception for 100 ms after 100 ms of no operation.70%: Sets the battery saver to allow reception for 100 ms after 250 ms of no operation.80%: Sets the battery saver to allow reception for 100 ms after 450 ms of no operation.90%: Sets the battery saver to allow reception for 100 ms after 900 ms of no operation.
Lock Select: This parameter selects the controls to be locked when the LOCK key is pressed. Avail-
able values are “Key Lock”, “Dial Lock”, and “ALL”.
Reset: Settings or data can be cleared by category. When “Factory” is selected, all the settings
and data will be reset to factory default. Click the [Reset] button of the desired category to initialize settings or to erase data. If you start a reset before connecting a radio to your computer, settings you have en-
tered on the YCE01 will be cleared. If you start a reset after connecting a radio to your computer, the radio’s settings and
data will be cleared.Note: See Page 18 for details about the connection between the radio and your computer.
main sCreen
Yaesu Musen Co., Ltd.
YCe01 RefeRenCe ManuaL
Page 7
“COMM Setup”
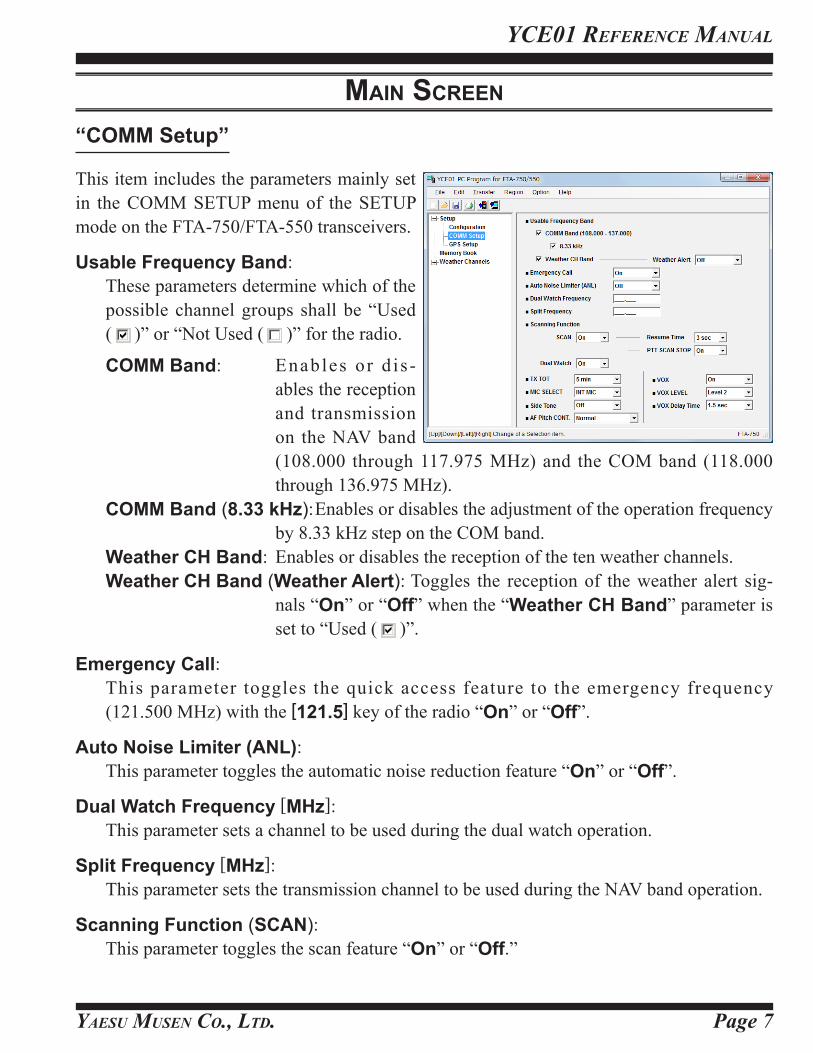
This item includes the parameters mainly set in the COMM SETUP menu of the SETUP mode on the FTA-750/FTA-550 transceivers.
Usable Frequency Band: These parameters determine which of the
possible channel groups shall be “Used ( )” or “Not Used ( )” for the radio.
COMM Band: Enables or d i s -ables the reception and transmission on the NAV band (108.000 through 117.975 MHz) and the COM band (118.000 through 136.975 MHz).
COMM Band (8.33 kHz): Enables or disables the adjustment of the operation frequency by 8.33 kHz step on the COM band.
Weather CH Band: Enables or disables the reception of the ten weather channels.Weather CH Band (Weather Alert): Toggles the reception of the weather alert sig-
nals “On” or “Off” when the “Weather CH Band” parameter is set to “Used ( )”.
Emergency Call: This parameter toggles the quick access feature to the emergency frequency
(121.500 MHz) with the [121.5] key of the radio “On” or “Off”.
Auto Noise Limiter (ANL): This parameter toggles the automatic noise reduction feature “On” or “Off”.
Dual Watch Frequency [MHz]: This parameter sets a channel to be used during the dual watch operation.
Split Frequency [MHz]: This parameter sets the transmission channel to be used during the NAV band operation.
Scanning Function (SCAN): This parameter toggles the scan feature “On” or “Off.”
main sCreen
YCE01 REfEREnCE Manual
YaEsu MusEn Co., ltd.Page 8
main sCreen
Scanning Function (Resume Time): This parameter selects the scan resume time. Available values are “0 sec”, “1 sec”,
“2 sec”, “3 sec”, and “5 sec”. When this parameter is set to “1 sec”, “2 sec”, “3 sec”, or “5 sec”, the scanner will
hold for the selected period (seconds), then resume whether or not the other station is still transmitting. When this parameter is set to “Off”, the scanner will stop when a signal is received, and will not restart.
Scanning Function (PTT SCAN STOP): This parameter defines whether the scan function shall be aborted (“On”) or not aborted
(“Off”) when the PTT switch is pressed while scanning is engaged.
Scanning Function (Dual Watch): This parameter toggles the dual watch feature “On” or “Off”.
TX TOT: This parameter selects the time-out time of the transmission. Available values are “1 min”,
“2 min”, “3 min”, “4 min”, “5 min”, and “Off”. When this parameter is set to “1 min”, “2 min”, “3 min”, “4 min”, or “5 min”, the
radio will shut off the transmission after it continues for the selected period (minutes). When this parameter is set to “Off”, the transmission will not be shut off.
MIC SELECT: This parameter toggles the operation of the internal microphone “INT MIC” or “EXT
MIC”. When this parameter is set to “EXT MIC”, the radio’s PTT switch controls the external
microphone on a headset, etc.
Side Tone: This parameter selects the side tone level when an external headset is connected to the ra-
dio. Available values are “MIN”, “Level 1”, “Level 2”, “MAX”, and “Off”.
Yaesu Musen Co., Ltd.
YCe01 RefeRenCe ManuaL
Page 9
AF Pitch CONT.: This parameter selects the operation of the audio filter. Available selections are:
Normal: Sets the audio filter to OFF.LOW CUT: Sets the audio filter to cut off the lower range of sound.HIGH CUT: Sets the audio filter to cut off the higher range of sound.HIGH AND LOW CUT: Sets the audio filter to cut off the higher and lower range of
sound.VOX: This parameter toggles the VOX feature “On” or “Off” when an external headset is con-
nected to the radio.
VOX LEVEL: This parameter is inactive until the parameter VOX is set to “On”. This parameter selects the sensitivity of the VOX system. Available values are “MIN”,
“Level 1”, “Level 2”, “Level 3”, and “MAX”.
VOX Delay Time: This parameter is inactive until the parameter VOX is set to “On”. This parameter selects the delay time of the VOX system. Available values are “0.5 sec”,
“1.0 sec”, “1.5 sec”, “2.0 sec”, and “3.0 sec”.
main sCreen
YCE01 REfEREnCE Manual
YaEsu MusEn Co., ltd.Page 10
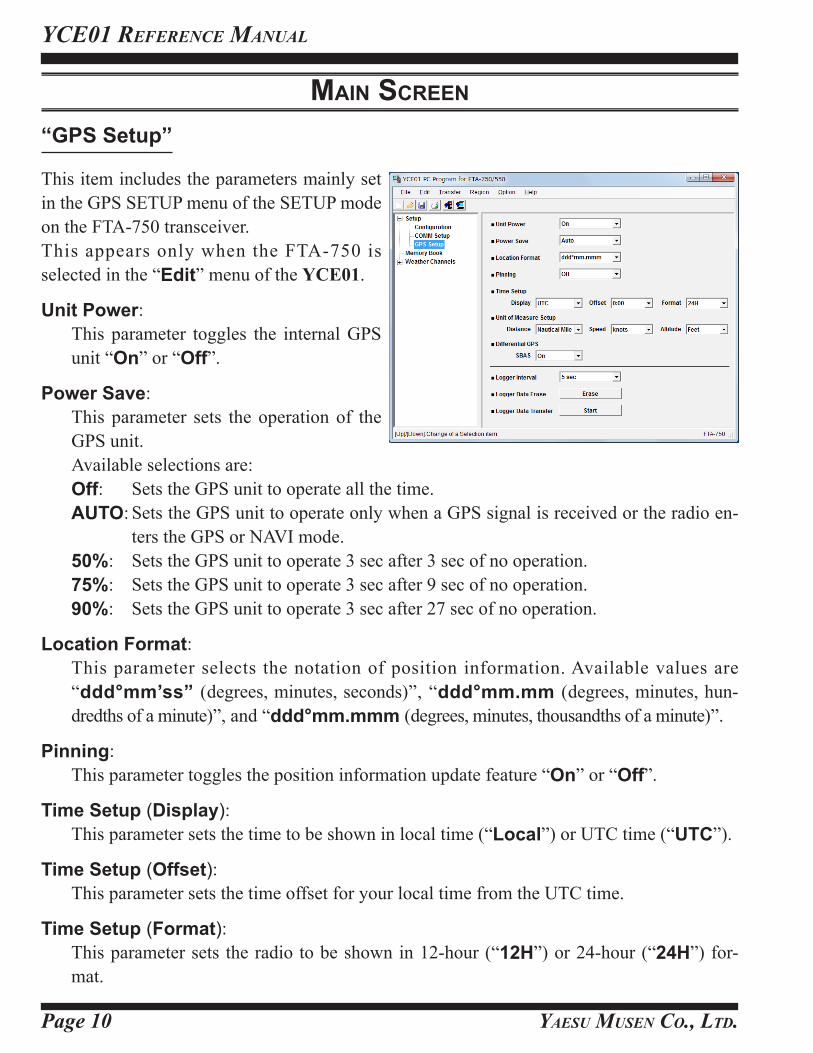
“GPS Setup”
This item includes the parameters mainly set in the GPS SETUP menu of the SETUP mode on the FTA-750 transceiver.This appears only when the FTA-750 is selected in the “Edit” menu of the YCE01.
Unit Power: This parameter toggles the internal GPS
unit “On” or “Off”.
Power Save: This parameter sets the operation of the
GPS unit. Available selections are:
Off: Sets the GPS unit to operate all the time.AUTO: Sets the GPS unit to operate only when a GPS signal is received or the radio en-
ters the GPS or NAVI mode.50%: Sets the GPS unit to operate 3 sec after 3 sec of no operation.75%: Sets the GPS unit to operate 3 sec after 9 sec of no operation.90%: Sets the GPS unit to operate 3 sec after 27 sec of no operation.
Location Format: This parameter selects the notation of position information. Available values are
“ddd°mm’ss” (degrees, minutes, seconds)”, “ddd°mm.mm (degrees, minutes, hun-dredths of a minute)”, and “ddd°mm.mmm (degrees, minutes, thousandths of a minute)”.
Pinning: This parameter toggles the position information update feature “On” or “Off”.
Time Setup (Display): This parameter sets the time to be shown in local time (“Local”) or UTC time (“UTC”).
Time Setup (Offset): This parameter sets the time offset for your local time from the UTC time.
Time Setup (Format): This parameter sets the radio to be shown in 12-hour (“12H”) or 24-hour (“24H”) for-
mat.
main sCreen
Yaesu Musen Co., Ltd.
YCe01 RefeRenCe ManuaL
Page 11
Unit of Measure Setup (Distance): This parameter selects the unit of measurement for distance between the target point and
your position. Available values are “Nautical Mile”, “Statute Mile”, and “Kilometer”.
Unit of Measure Setup (Speed): This parameter selects the unit of measurement for SOG (speed over ground). Available
values are “knots”, “mph (miles per hour)”, and “km/h (kilometers per hour)”.
Unit of Measure Setup (Altitude): This parameter selects the unit of measurement for your altitude. Available values are
“Feet” and “Meters”.
Differential GPS (SBAS): This parameter toggles the SBAS (satellite-based augmentation system) feature “On” or
“Off”.
Logger Interval: This parameter selects the interval time of logging. Available values are “1 sec”, “3 sec”,
“5 sec”, “10 sec”, and “30 sec”.
Logger Data Erase: The log data recorded in the memory of the radio can be cleared to free memory for fu-
ture recordings. Click the [Erase] button to erase the log data after connecting the radio to your comput-
er.Note: See Page 18 for details about the connection between the radio and your computer.
Logger Data Transfer: The log data recorded in the memory of the radio can be retrieved to use for mapping,
analysis, or other purpose. Click the [Start] button to copy the log data after connecting the radio to your computer.
Notes: See Page 18 for details about the connection between the radio and your computer. You may choose the file format of the log data from the NMEA and KML on the “Save
As” window displayed after clicking the [Start] button. See the reference manual of your application utilizing the log data to determine the file format.
main sCreen
YCE01 REfEREnCE Manual
YaEsu MusEn Co., ltd.Page 12
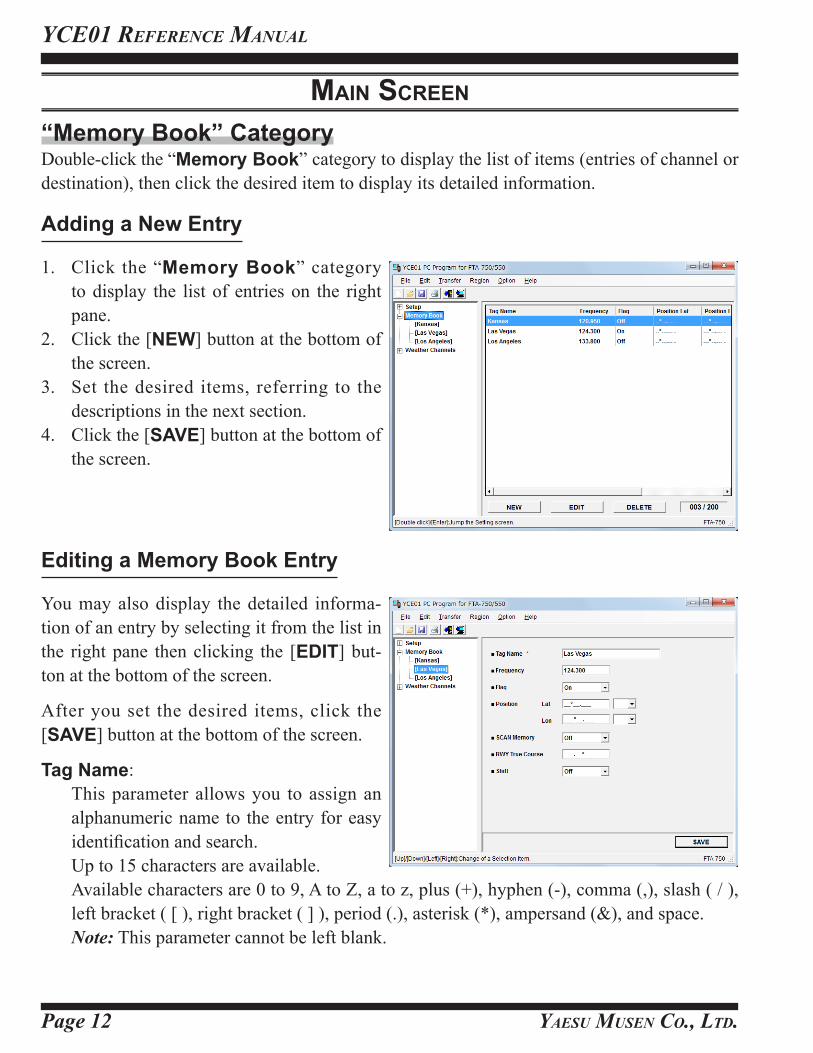
“Memory Book” CategoryDouble-click the “Memory Book” category to display the list of items (entries of channel or destination), then click the desired item to display its detailed information.
Adding a New Entry
1. Click the “Memory Book” category to display the list of entries on the right pane.
2. Click the [NEW] button at the bottom of the screen.
3. Set the desired items, referring to the descriptions in the next section.
4. Click the [SAVE] button at the bottom of the screen.
Editing a Memory Book Entry
You may also display the detailed informa-tion of an entry by selecting it from the list in the right pane then clicking the [EDIT] but-ton at the bottom of the screen.
After you set the desired items, click the [SAVE] button at the bottom of the screen.
Tag Name: This parameter allows you to assign an
alphanumeric name to the entry for easy identification and search.
Up to 15 characters are available. Available characters are 0 to 9, A to Z, a to z, plus (+), hyphen (-), comma (,), slash ( / ),
left bracket ( [ ), right bracket ( ] ), period (.), asterisk (*), ampersand (&), and space.Note: This parameter cannot be left blank.
main sCreen
Yaesu Musen Co., Ltd.
YCe01 RefeRenCe ManuaL
Page 13
main sCreen
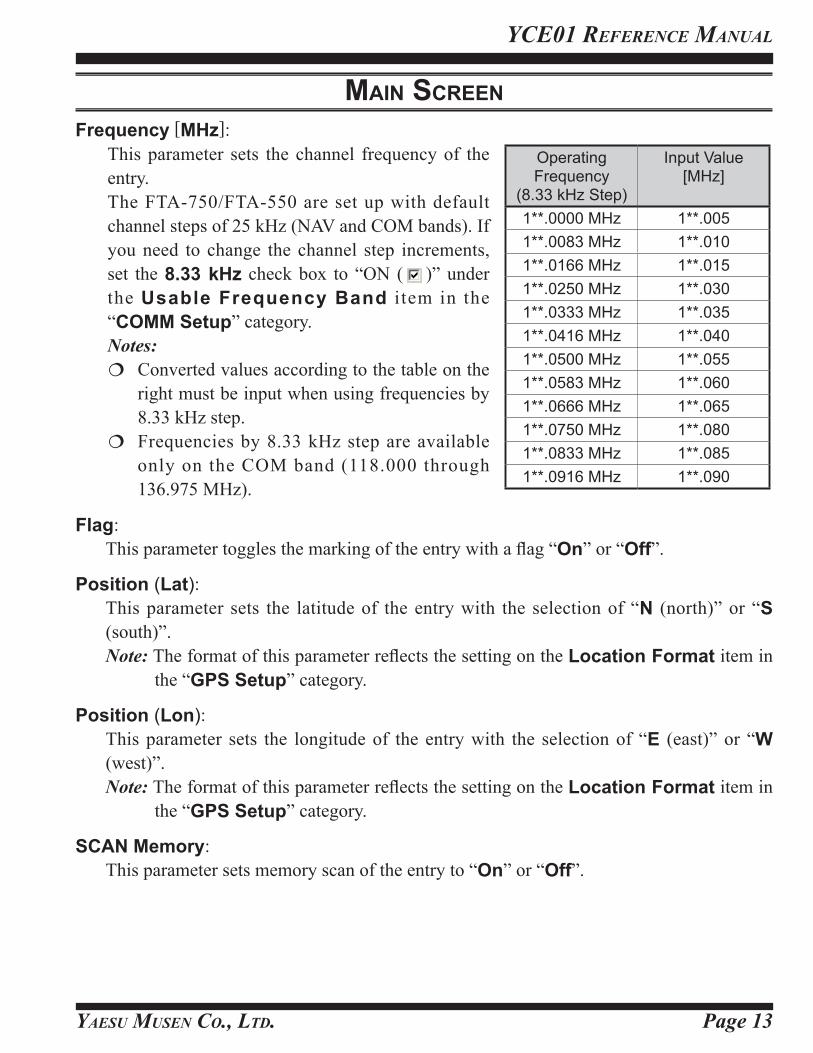
Frequency [MHz]: This parameter sets the channel frequency of the
entry. The FTA-750/FTA-550 are set up with default
channel steps of 25 kHz (NAV and COM bands). If you need to change the channel step increments, set the 8.33 kHz check box to “ON ( )” under the Usable Frequency Band i tem in the “COMM Setup” category.Notes: Converted values according to the table on the
right must be input when using frequencies by 8.33 kHz step.
Frequencies by 8.33 kHz step are available only on the COM band (118.000 through 136.975 MHz).
Operating Frequency
(8.33 kHz Step)
Input Value [MHz]
1**.0000 MHz 1**.0051**.0083 MHz 1**.0101**.0166 MHz 1**.0151**.0250 MHz 1**.0301**.0333 MHz 1**.0351**.0416 MHz 1**.0401**.0500 MHz 1**.0551**.0583 MHz 1**.0601**.0666 MHz 1**.0651**.0750 MHz 1**.0801**.0833 MHz 1**.0851**.0916 MHz 1**.090
Flag: This parameter toggles the marking of the entry with a flag “On” or “Off”.
Position (Lat): This parameter sets the latitude of the entry with the selection of “N (north)” or “S
(south)”.Note: The format of this parameter reflects the setting on the Location Format item in
the “GPS Setup” category.
Position (Lon): This parameter sets the longitude of the entry with the selection of “E (east)” or “W
(west)”.Note: The format of this parameter reflects the setting on the Location Format item in
the “GPS Setup” category.
SCAN Memory: This parameter sets memory scan of the entry to “On” or “Off”.
YCE01 REfEREnCE Manual
YaEsu MusEn Co., ltd.Page 14
RWY True Course: This parameter allows you to set the RWY True Course for ILS navigation. This allows you to display the ideal course of approach on the CDI of the radio when re-
ceiving the localizer signal of ILS on the entered channel. This appears only when the FTA-750 is selected in the “Edit” menu of the YCE01.Note: This parameter is programmable only on the YCE01.
Shift: This parameter toggles the moving of a spurious response “On” or “Off” if the frequency
of the entry is affected by the CPU clock of the radio.Note: This parameter is programmable only on the YCE01.
Deleting a Memory Book Entry1. Click the “Memory Book” category to display the list of entries on the right pane.2. Select the desired entry on the list.3. Click the [DELETE] button at the bottom of the screen.4. Click the [Yes] button on the dialog box appearing on the display.
main sCreen
Yaesu Musen Co., Ltd.
YCe01 RefeRenCe ManuaL
Page 15
main sCreen
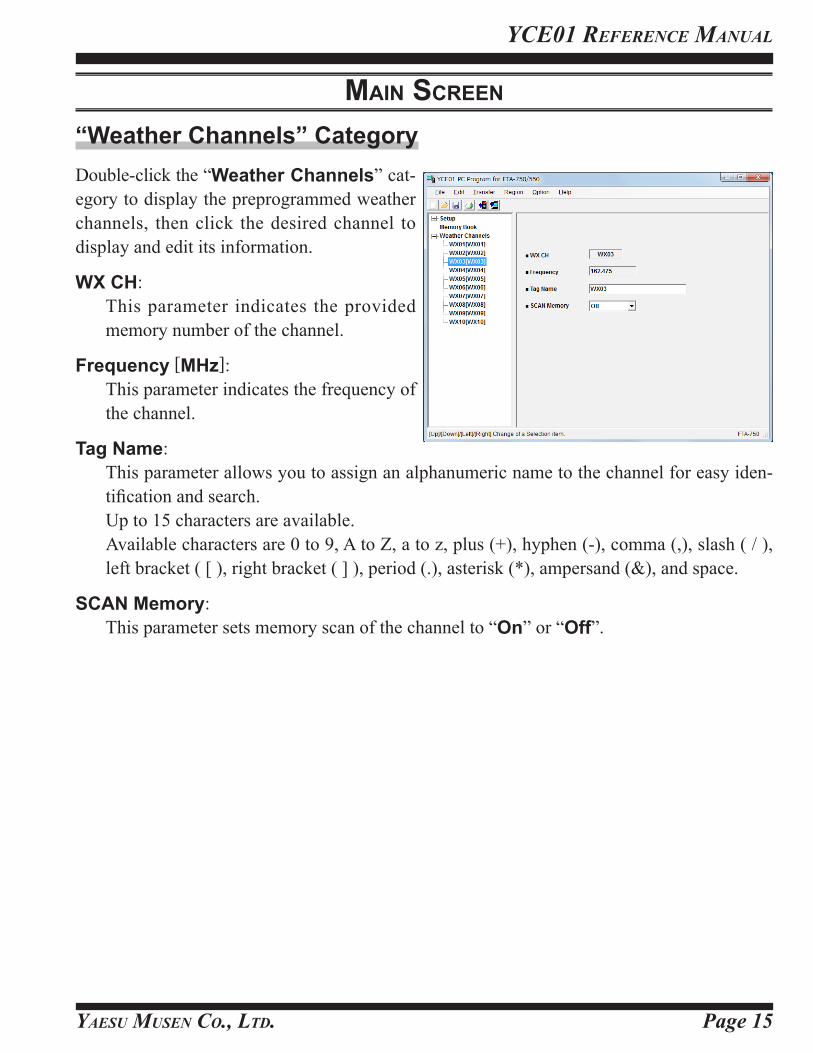
“Weather Channels” CategoryDouble-click the “Weather Channels” cat-egory to display the preprogrammed weather channels, then click the desired channel to display and edit its information.
WX CH: This parameter indicates the provided
memory number of the channel.
Frequency [MHz]: This parameter indicates the frequency of
the channel.
Tag Name: This parameter allows you to assign an alphanumeric name to the channel for easy iden-
tification and search. Up to 15 characters are available. Available characters are 0 to 9, A to Z, a to z, plus (+), hyphen (-), comma (,), slash ( / ),
left bracket ( [ ), right bracket ( ] ), period (.), asterisk (*), ampersand (&), and space.
SCAN Memory: This parameter sets memory scan of the channel to “On” or “Off”.
YCE01 REfEREnCE Manual
YaEsu MusEn Co., ltd.Page 16
main menU
The YCE01 has six menu categories, which are displayed on the menu bar of the YCE01 window. This section describes the items unique to the YCE01 under each menu.
“File”This menu performs the opening, saving, and printing of files with an extension “.dat”, which include the settings and channel memory of the radio.
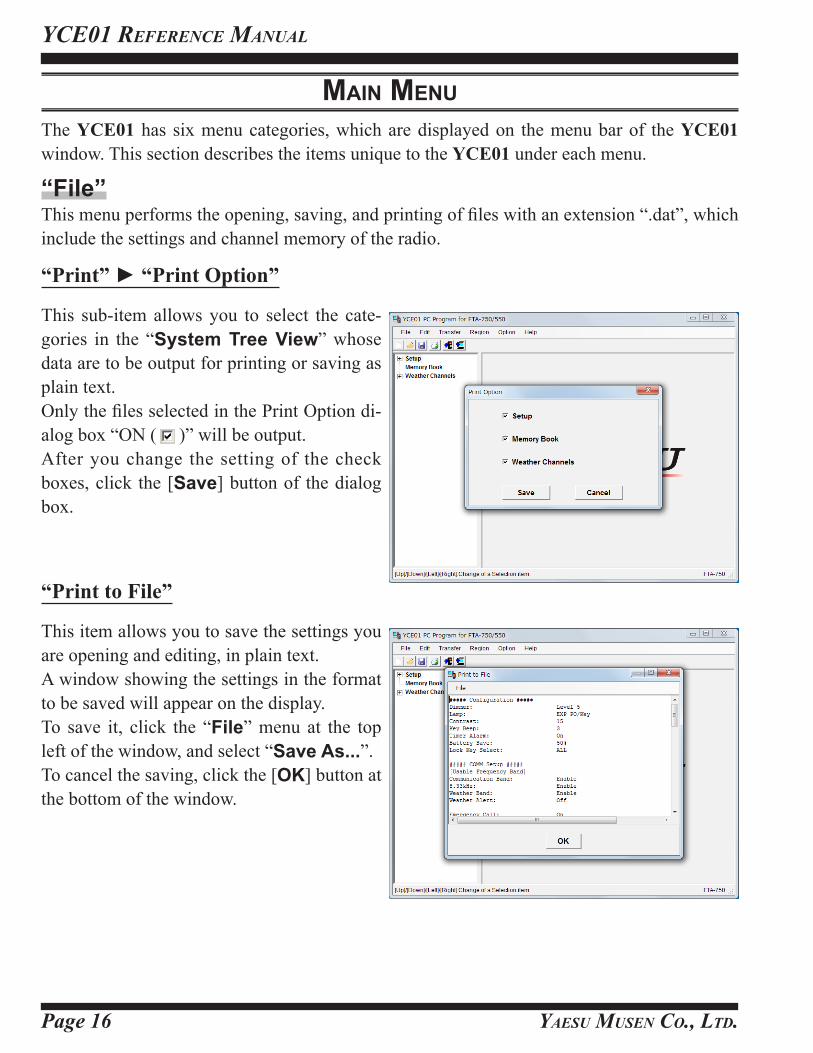
“Print” ► “Print Option”
This sub-item allows you to select the cate-gories in the “System Tree View” whose data are to be output for printing or saving as plain text.Only the files selected in the Print Option di-alog box “ON ( )” will be output.After you change the setting of the check boxes, click the [Save] button of the dialog box.
“Print to File”
This item allows you to save the settings you are opening and editing, in plain text.A window showing the settings in the format to be saved will appear on the display.To save it, click the “File” menu at the top left of the window, and select “Save As...”. To cancel the saving, click the [OK] button at the bottom of the window.
Yaesu Musen Co., Ltd.
YCe01 RefeRenCe ManuaL
Page 17
“Edit”“Model”This item allows you to select the model of radio you are going to program the settings and channel memory (see Page 4).
“Transfer”This menu performs the downloading or uploading of information to/from a radio. To down-load/upload data to/from your radio, make a proper connection between the computer and your radio (see the next page) and turn on the radio before selecting the “Transfer” menu.
“Program to Radio”
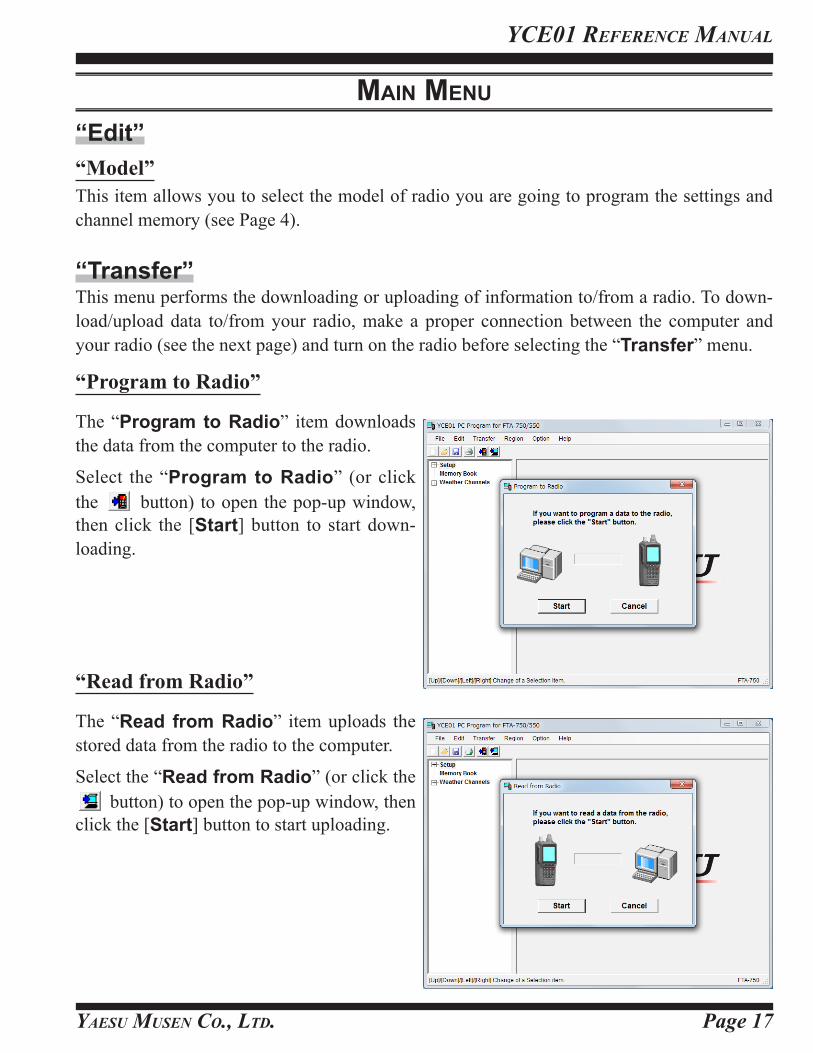
The “Program to Radio” item downloads the data from the computer to the radio.
Select the “Program to Radio” (or click the button) to open the pop-up window, then click the [Start] button to start down-loading.
“Read from Radio”
The “Read from Radio” item uploads the stored data from the radio to the computer.
Select the “Read from Radio” (or click the button) to open the pop-up window, then
click the [Start] button to start uploading.
main menU
YCE01 REfEREnCE Manual
YaEsu MusEn Co., ltd.Page 18
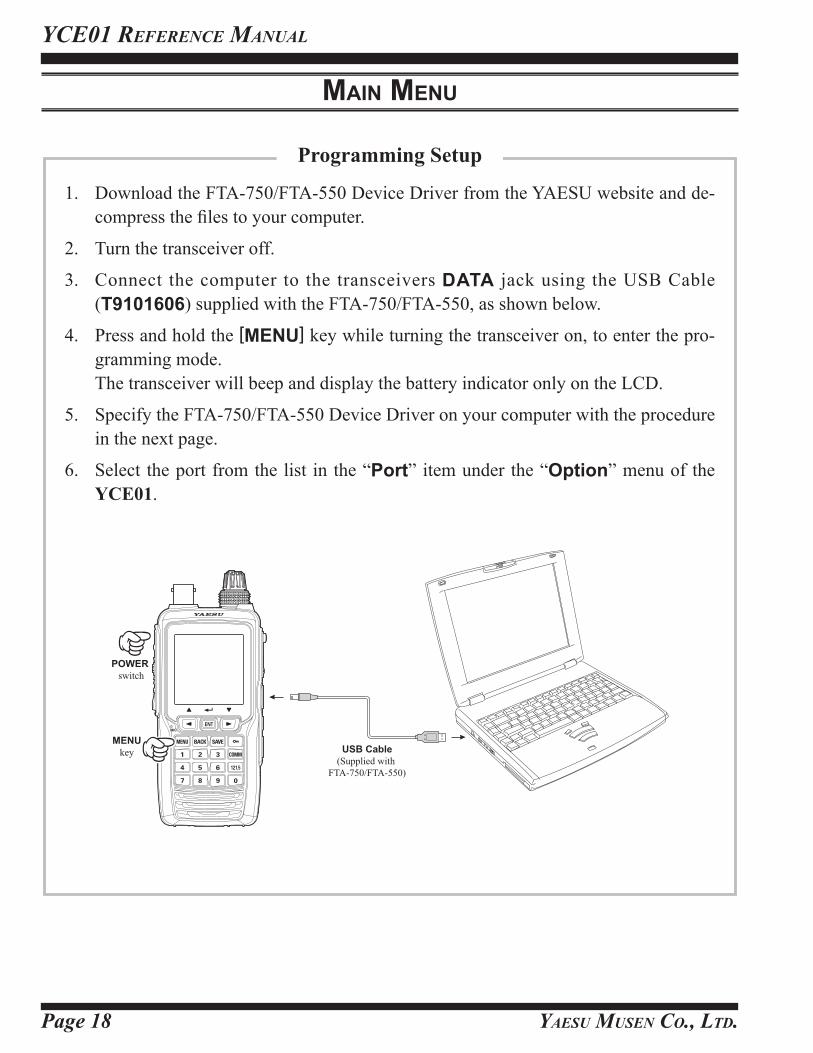
1. Download the FTA-750/FTA-550 Device Driver from the YAESU website and de-compress the files to your computer.
2. Turn the transceiver off.
3. Connect the computer to the transceivers DATA jack using the USB Cable (T9101606) supplied with the FTA-750/FTA-550, as shown below.
4. Press and hold the [MENU] key while turning the transceiver on, to enter the pro-gramming mode.
The transceiver will beep and display the battery indicator only on the LCD.
5. Specify the FTA-750/FTA-550 Device Driver on your computer with the procedure in the next page.
6. Select the port from the list in the “Port” item under the “Option” menu of the YCE01.
USB Cable(Supplied with
FTA-750/FTA-550)
POWER switch
MENUkey
Programming Setup
main menU
Yaesu Musen Co., Ltd.
YCe01 RefeRenCe ManuaL
Page 19
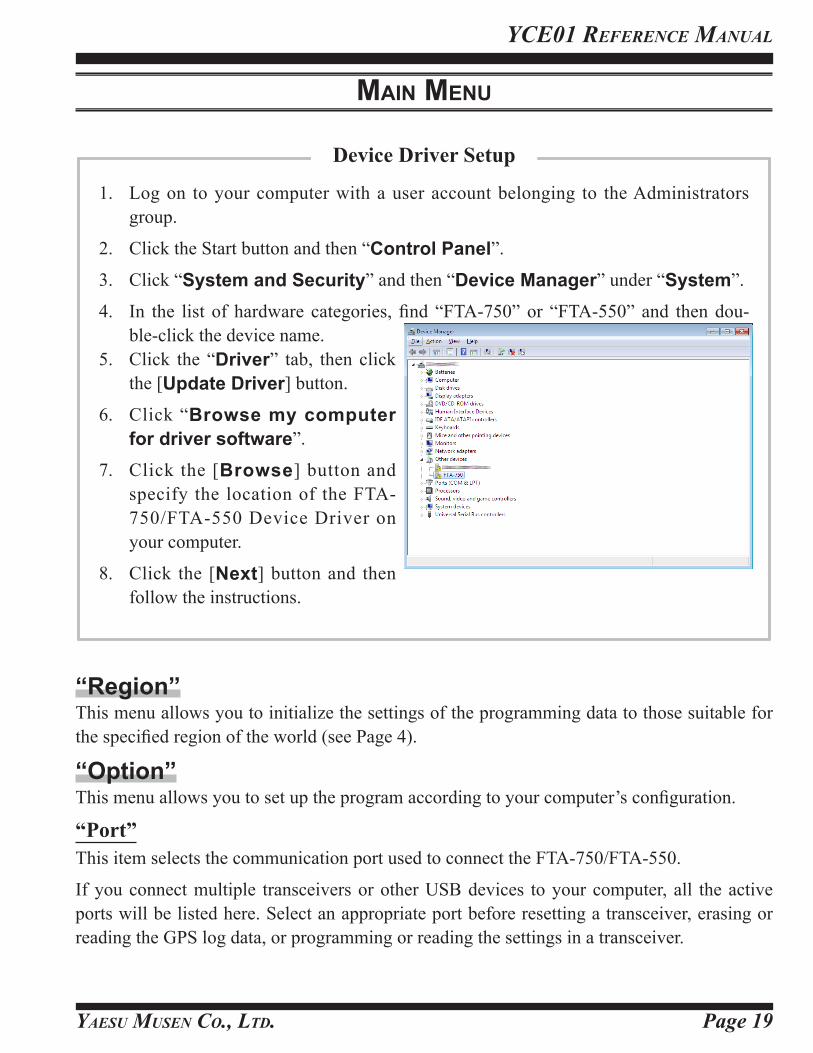
1. Log on to your computer with a user account belonging to the Administrators group.
2. Click the Start button and then “Control Panel”.
3. Click “System and Security” and then “Device Manager” under “System”.
4. In the list of hardware categories, find “FTA-750” or “FTA-550” and then dou-ble-click the device name.
5. Click the “Driver” tab, then click the [Update Driver] button.
6. Click “Browse my computer for driver software”.
7. Click the [Browse] button and specify the location of the FTA-750/FTA-550 Device Driver on your computer.
8. Click the [Next] button and then follow the instructions.
Device Driver Setup
“Region”This menu allows you to initialize the settings of the programming data to those suitable for the specified region of the world (see Page 4).
“Option”This menu allows you to set up the program according to your computer’s configuration.
“Port”This item selects the communication port used to connect the FTA-750/FTA-550.
If you connect multiple transceivers or other USB devices to your computer, all the active ports will be listed here. Select an appropriate port before resetting a transceiver, erasing or reading the GPS log data, or programming or reading the settings in a transceiver.
main menU

Copyright 2014YAESU MUSEN CO., LTD.All rights reserved.
No portion of this manual may be reproduced without the permission of YAESU MUSEN CO., LTD.