Embed Size (px)
Citation preview
more than 10 times in any given 10 minute period. After entering
into stage 2 it will enter into stage 3 if there are more than 9
activations within the next 15 minutes.
OPERATION DIAL FEATURES
OFF
Turns the sensor and valve off. Must be in this mode to install
batteries or to turn Intelligent Sensing on or off. Resets the time
delays between valve activation if Intelligent Sensing is on.
DAYActivates sensor and valve only during daylight.
NIGHTActivates sensor and valve only when dark.
ALWAYSSensor and valve are always active.
DURATION ADJUSTMENT KNOB
Adjust the duration of the water from approximately 3 seconds
to 10 seconds.
• Turn knob towards the + to increase how long the water sprays.
• Turn knob towards the – to decrease how long the water sprays.
SENSOR ADJUSTMENT KNOB
The sensor range is adjustable up to 40 ft. For smaller animals
increase the distance the sensor monitors. For larger ones
decrease the distance.
• Turn knob towards the + to increase the distance
the sensor monitors.
• Turn knob towards the – to decrease the distance
the sensor monitors.
30 MIN. WATER CYCLE BUTTON
• Press button to activate a 30 minute watering cycle.
• Press button again to stop the 30 minute watering cycle.
• A slight delay allows the user to move a safe distance
away from the unit before watering begins
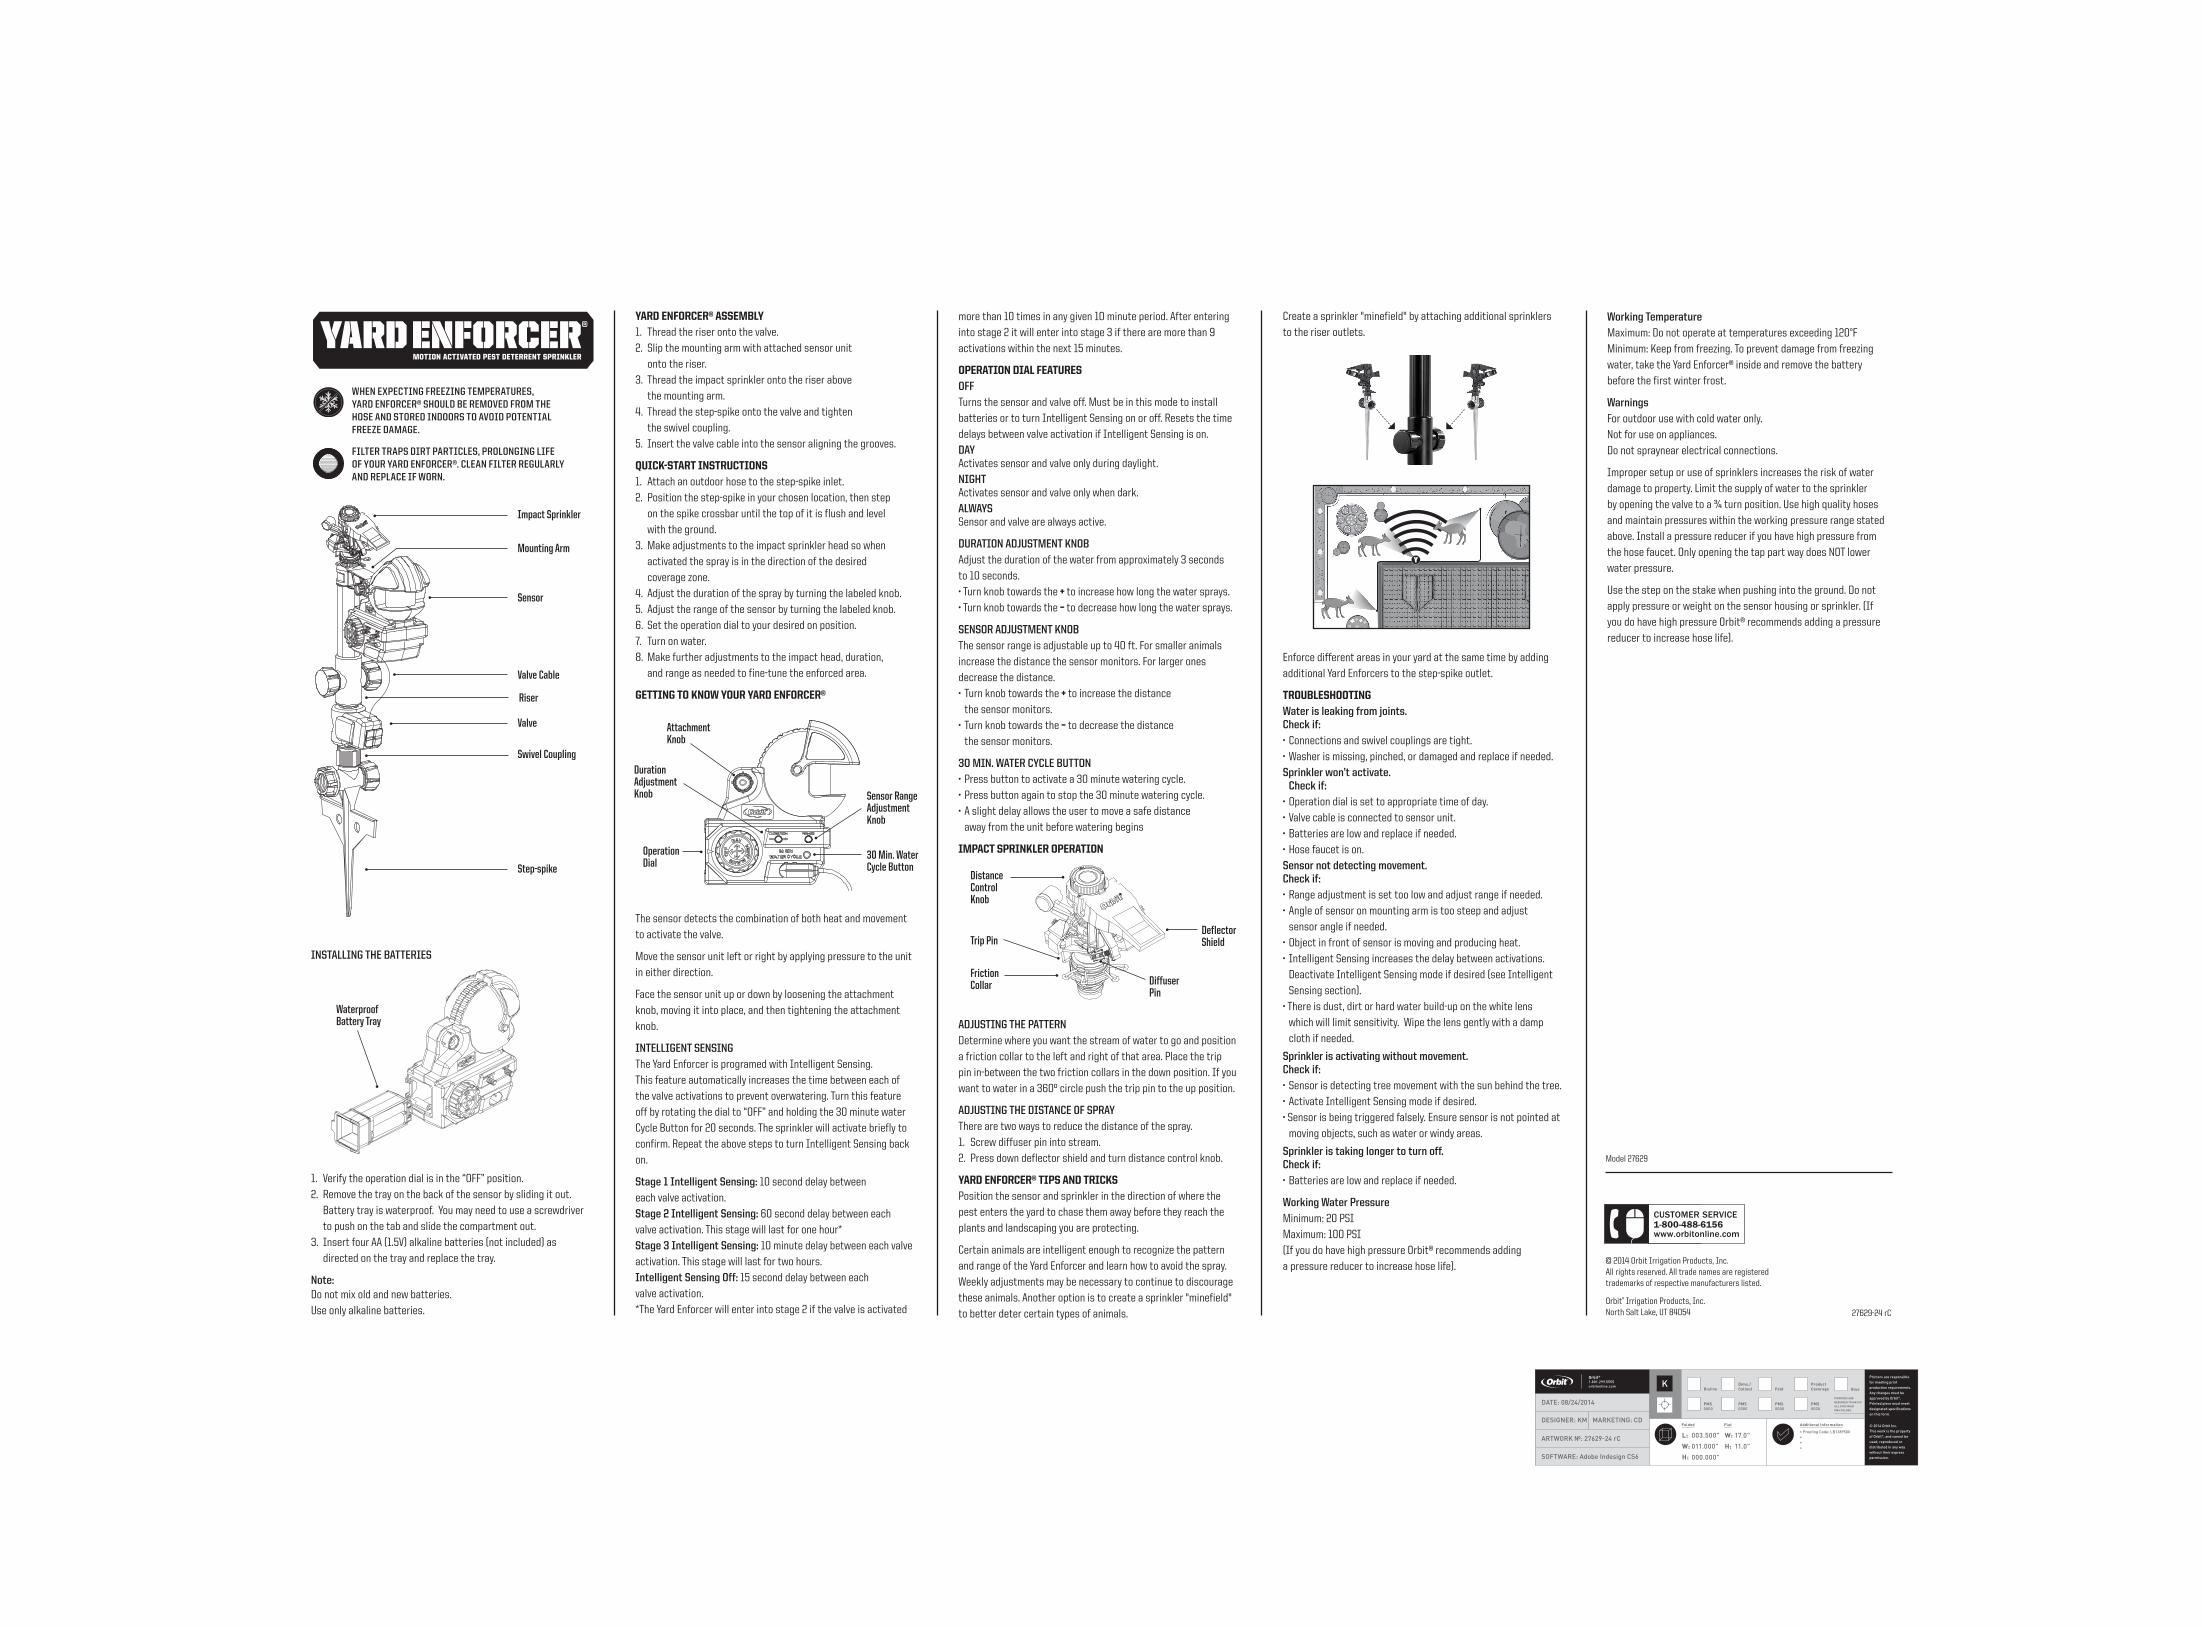
IMPACT SPRINKLER OPERATION
ADJUSTING THE PATTERN
Determine where you want the stream of water to go and position
a friction collar to the left and right of that area. Place the trip
pin in-between the two friction collars in the down position. If you
want to water in a 360º circle push the trip pin to the up position.
ADJUSTING THE DISTANCE OF SPRAY
There are two ways to reduce the distance of the spray.
1. Screw diffuser pin into stream.
2. Press down deflector shield and turn distance control knob.
YARD ENFORCER® TIPS AND TRICKS
Position the sensor and sprinkler in the direction of where the
pest enters the yard to chase them away before they reach the
plants and landscaping you are protecting.
Certain animals are intelligent enough to recognize the pattern
and range of the Yard Enforcer and learn how to avoid the spray.
Weekly adjustments may be necessary to continue to discourage
these animals. Another option is to create a sprinkler "minefield"
to better deter certain types of animals.
Create a sprinkler "minefield" by attaching additional sprinklers
to the riser outlets.
Enforce different areas in your yard at the same time by adding
additional Yard Enforcers to the step-spike outlet.
TROUBLESHOOTING
Water is leaking from joints.Check if:
• Connections and swivel couplings are tight.
• Washer is missing, pinched, or damaged and replace if needed.
Sprinkler won’t activate. Check if:
• Operation dial is set to appropriate time of day.
• Valve cable is connected to sensor unit.
• Batteries are low and replace if needed.
• Hose faucet is on.
Sensor not detecting movement. Check if:
• Range adjustment is set too low and adjust range if needed.
• Angle of sensor on mounting arm is too steep and adjust
sensor angle if needed.
• Object in front of sensor is moving and producing heat.
• Intelligent Sensing increases the delay between activations.
Deactivate Intelligent Sensing mode if desired (see Intelligent
Sensing section).
• There is dust, dirt or hard water build-up on the white lens
which will limit sensitivity. Wipe the lens gently with a damp
cloth if needed.
Sprinkler is activating without movement. Check if:
• Sensor is detecting tree movement with the sun behind the tree.
• Activate Intelligent Sensing mode if desired.
• Sensor is being triggered falsely. Ensure sensor is not pointed at
moving objects, such as water or windy areas.
Sprinkler is taking longer to turn off. Check if:
• Batteries are low and replace if needed.
Working Water Pressure
Minimum: 20 PSI
Maximum: 100 PSI
(If you do have high pressure Orbit® recommends adding
a pressure reducer to increase hose life).
YARD ENFORCER® ASSEMBLY
1. Thread the riser onto the valve.
2. Slip the mounting arm with attached sensor unit
onto the riser.
3. Thread the impact sprinkler onto the riser above
the mounting arm.
4. Thread the step-spike onto the valve and tighten
the swivel coupling.
5. Insert the valve cable into the sensor aligning the grooves.
QUICK-START INSTRUCTIONS
1. Attach an outdoor hose to the step-spike inlet.
2. Position the step-spike in your chosen location, then step
on the spike crossbar until the top of it is flush and level
with the ground.
3. Make adjustments to the impact sprinkler head so when
activated the spray is in the direction of the desired
coverage zone.
4. Adjust the duration of the spray by turning the labeled knob.
5. Adjust the range of the sensor by turning the labeled knob.
6. Set the operation dial to your desired on position.
7. Turn on water.
8. Make further adjustments to the impact head, duration,
and range as needed to fine-tune the enforced area.
GETTING TO KNOW YOUR YARD ENFORCER®
The sensor detects the combination of both heat and movement
to activate the valve.
Move the sensor unit left or right by applying pressure to the unit
in either direction.
Face the sensor unit up or down by loosening the attachment
knob, moving it into place, and then tightening the attachment
knob.
INTELLIGENT SENSING
The Yard Enforcer is programed with Intelligent Sensing.
This feature automatically increases the time between each of
the valve activations to prevent overwatering. Turn this feature
off by rotating the dial to “OFF” and holding the 30 minute water
Cycle Button for 20 seconds. The sprinkler will activate briefly to
confirm. Repeat the above steps to turn Intelligent Sensing back
on.
Stage 1 Intelligent Sensing: 10 second delay between
each valve activation.
Stage 2 Intelligent Sensing: 60 second delay between each
valve activation. This stage will last for one hour*
Stage 3 Intelligent Sensing: 10 minute delay between each valve
activation. This stage will last for two hours.
Intelligent Sensing Off: 15 second delay between each
valve activation.
*The Yard Enforcer will enter into stage 2 if the valve is activated
INSTALLING THE BATTERIES
1. Verify the operation dial is in the “OFF” position.
2. Remove the tray on the back of the sensor by sliding it out.
Battery tray is waterproof. You may need to use a screwdriver
to push on the tab and slide the compartment out.
3. Insert four AA (1.5V) alkaline batteries (not included) as
directed on the tray and replace the tray.
Note: Do not mix old and new batteries.
Use only alkaline batteries.
MOTION ACTIVATED PEST DETERRENT SPRINKLER
MOTION ACTIVATED PEST DETERRENT SPRINKLER
MOTION ACTIVATED PEST DETERRENT SPRINKLER
27629-24 rC
Orbit® Irrigation Products, Inc.North Salt Lake, UT 84054
© 2014 Orbit Irrigation Products, Inc.All rights reserved. All trade names are registered trademarks of respective manufacturers listed.
Riser
Mounting Arm
Sensor
Impact Sprinkler
Step-spike
Valve
Valve Cable
Model 27629
Waterproof Battery Tray
Operation Dial
Duration Adjustment Knob Sensor Range
Adjustment Knob
30 Min. Water Cycle Button
Attachment Knob
WHEN EXPECTING FREEZING TEMPERATURES, YARD ENFORCER® SHOULD BE REMOVED FROM THE HOSE AND STORED INDOORS TO AVOID POTENTIAL FREEZE DAMAGE.
FILTER TRAPS DIRT PARTICLES, PROLONGING LIFE OF YOUR YARD ENFORCER®. CLEAN FILTER REGULARLY AND REPLACE IF WORN.
Working Temperature
Maximum: Do not operate at temperatures exceeding 120°F
Minimum: Keep from freezing. To prevent damage from freezing
water, take the Yard Enforcer® inside and remove the battery
before the first winter frost.
Warnings
For outdoor use with cold water only.
Not for use on appliances.
Do not spraynear electrical connections.
Improper setup or use of sprinklers increases the risk of water
damage to property. Limit the supply of water to the sprinkler
by opening the valve to a ¾ turn position. Use high quality hoses
and maintain pressures within the working pressure range stated
above. Install a pressure reducer if you have high pressure from
the hose faucet. Only opening the tap part way does NOT lower
water pressure.
Use the step on the stake when pushing into the ground. Do not
apply pressure or weight on the sensor housing or sprinkler. (If
you do have high pressure Orbit® recommends adding a pressure
reducer to increase hose life).
Distance Control Knob
Trip Pin
Diffuser Pin
Deflector Shield
Friction Collar
Printers are responsible for meeting print production requirements. Any changes must be approved by Orbit®. Printed piece must meet designated specifications on this form.
© 2014 Orbit Inc. This work is the property of Orbit®, and cannot be used, reproduced or distributed in any way without their express permission.
Dieline
PMS0000
Fold
PMS0000
Product Coverage
PMS0000
Dims./ Callout
PMS0000
∙ Proofing Code: LB1389500∙∙∙
Orbit®
1.801.299.5555orbitonline.com
Glue
Folded Flat Additional Information
PRINTERS ARE REQUIRED TO MATCH ALL SPECIFIED PMS COLORS.
K
DATE: 08/24/2014
DESIGNER: KM MARKETING: CD
SOFTWARE: Adobe Indesign CS6
ARTWORK №: 27629-24 rC L:W:H:
003.500" W:H:011.000"
000.000"
17.0"11.0"
Swivel Coupling
Etapa 2 del rendimiento inteligente: Retardo de 60 segundos
entre la activación de cada válvula. Esta etapa durará una hora.*
Etapa 3 del rendimiento inteligente: Retardo de 10 minutos entre
la activación de cada válvula. Esta etapa durará dos horas.
Rendimiento inteligente desactivado : Retardo de 15 segundos
entre la activación de cada válvula.
* El Yard Enforcer entrará en la etapa 2 si la válvula se activa más
de 10 veces en un período de 10 minutos. Luego de entrar en la
etapa 2, ingresará en la etapa 3 si la válvula se activa más de 9
veces en los siguientes 15 minutos.
CARACTERÍSTICAS DEL SELECTOR DE FUNCIONAMIENTO
OFF (Apagado)
Apaga el sensor y la válvula. Debe estar en este modo para instalar
las baterías o para desactivar o activar el rendimiento inteligente.
Restablece los retardos de tiempo entre la activación de la válvula
si el rendimiento inteligente está activado.
DÍAActiva el sensor y la válvula solamente durante el día.
NOCHEActiva el sensor y la válvula solamente cuando oscurece.
SIEMPREEl sensor y la válvula están activos siempre.
PERILLA DE AJUSTE DE DURACIÓN
Ajuste la duración del agua entre 3 y 10 segundos
aproximadamente.
• Gire la perilla hacia + para incrementar la duración del tiempo de
rociado de agua.
• Gire la perilla hacia – para disminuir la duración del tiempo de
rociado de agua.
PERILLA DE AJUSTE DEL SENSOR
El rango del sensor se puede ajustar hasta 12,19 m. En caso de que
haya animales pequeños, incremente la distancia de monitoreo del
sensor. En caso de que sean animales más grandes, disminuya la
distancia.
• Gire la perilla hacia + para incrementar la distancia de monitoreo
del sensor.
• Gire la perilla hacia – para disminuir la distancia de monitoreo del
sensor.
BOTÓN DE CICLO DE RIEGO DE 30 MIN
• Presione el botón para activar un ciclo de riego de 30 minutos.
• Presione el botón nuevamente para detener el ciclo de riego de
30 minutos.
• Un breve retraso permite que el usuario se mueva a una distancia
segura lejos de la unidad antes de que comience el riego.
FUNCIONAMIENTO DEL REGADOR DE IMPACTO
AJUSTE DEL PATRÓN
Determine dónde quiere que vaya el chorro de agua y ubique un
anillo de fricción a la izquierda y a la derecha de esa área.
Coloque el pasador de desenganche entre los dos anillos de
fricción en la posición hacia abajo. Si quiere regar en un círculo
de 360°, presione el pasador de desenganche hasta la posición
hacia arriba.
AJUSTE DE LA DISTANCIA DE ROCIADO
Hay dos maneras para reducir la distancia del rociado.
1. Enrosque el pasador del difusor en el chorro.
2. Presione hacia abajo la cubierta del deflector y gire la perilla de
control de distancia.
CONSEJOS Y TRUCOS PARA USAR YARD ENFORCER®
Posicione el sensor y el regador en la dirección donde la plaga
ingresa al jardín para ahuyentarla antes de que alcance las plantas
y el jardín que está protegiendo.
Ciertos animales son lo suficientemente inteligentes como para
reconocer el patrón y el rango de Yard Enforcer y aprender cómo
evitar el rociado. Es posible que se necesiten ajustes semanales
para ahuyentar a estos animales. Otra opción es crear un “campo
minado” con el regador para desalentar a ciertos tipos de
animales.
Para crear un “campo minado” con el regador, conecte regadores
adicionales a las salidas del elevador.
Para reforzar distintas áreas en su jardín al mismo tiempo,
agregue Yard Enforcers adicionales a la salida de la estaca de
escalón.
SOLUCIÓN DE PROBLEMAS
Hay una filtración de agua en las uniones.
Revise si:
• Las conexiones y los acopladores giratorios están bien
apretados.
• La arandela falta, está cortada o dañada; reemplácela si es
necesario.
El regador no se activa. Revise si:
• El selector de funcionamiento está configurado con la hora
apropiada del día.
• El cable de la válvula está conectado a la unidad de sensor.
• Las baterías están bajas; reemplácelas si es necesario.
• El grifo para la manguera está abierto.
El sensor no detecta el movimiento. Revise si:
• El ajuste del rango está configurado demasiado bajo; realice un
ajuste del rango si es necesario.
• El ángulo del sensor en el brazo de montaje es demasiado
pronunciado; ajuste el ángulo del sensor si es necesario.
• El objeto en frente del sensor se está moviendo y está
produciendo calor.
Nota: No mezcle baterías antiguas con nuevas.
Solo use baterías alcalinas.
"ENSAMBLADO DEL YARD ENFORCER®
1. Enrosque el elevador en la válvula.
2. Deslice el brazo de montaje con la unidad de sensor fija
sobre el elevador.
3. Enrosque el regador de impacto en el elevador sobre
el brazo de montaje.
4. Enrosque la estaca de escalón en la válvula y apriete el
acoplador giratorio.
5. Conecte el cable de la válvula en el sensor alineando
las ranuras.
INSTRUCCIONES DE INICIO RÁPIDO
1. Conecte una manguera para exteriores a la entrada de la estaca
de escalón.
2. Coloque la estaca de escalón en la ubicación elegida y luego
pise la barra transversal de la estaca hasta que la parte
superior de esta esté al ras y al nivel del suelo.
3. Realice ajustes al cabezal del regador de impacto de modo que
cuando se active, el chorro se encuentre en la dirección de la
zona de cobertura deseada.
4. Para regular la velocidad del rociado, gire la perilla etiquetada.
5. Para regular el rango del sensor, gire la perilla etiquetada.
6. Coloque el selector de funcionamiento en la posición deseada.
7. Abra el paso de agua.
8. Realice ajustes adicionales al cabezal de impacto, a la
duración y al rango según sea necesario para regular el área de
cobertura con mayor precisión.
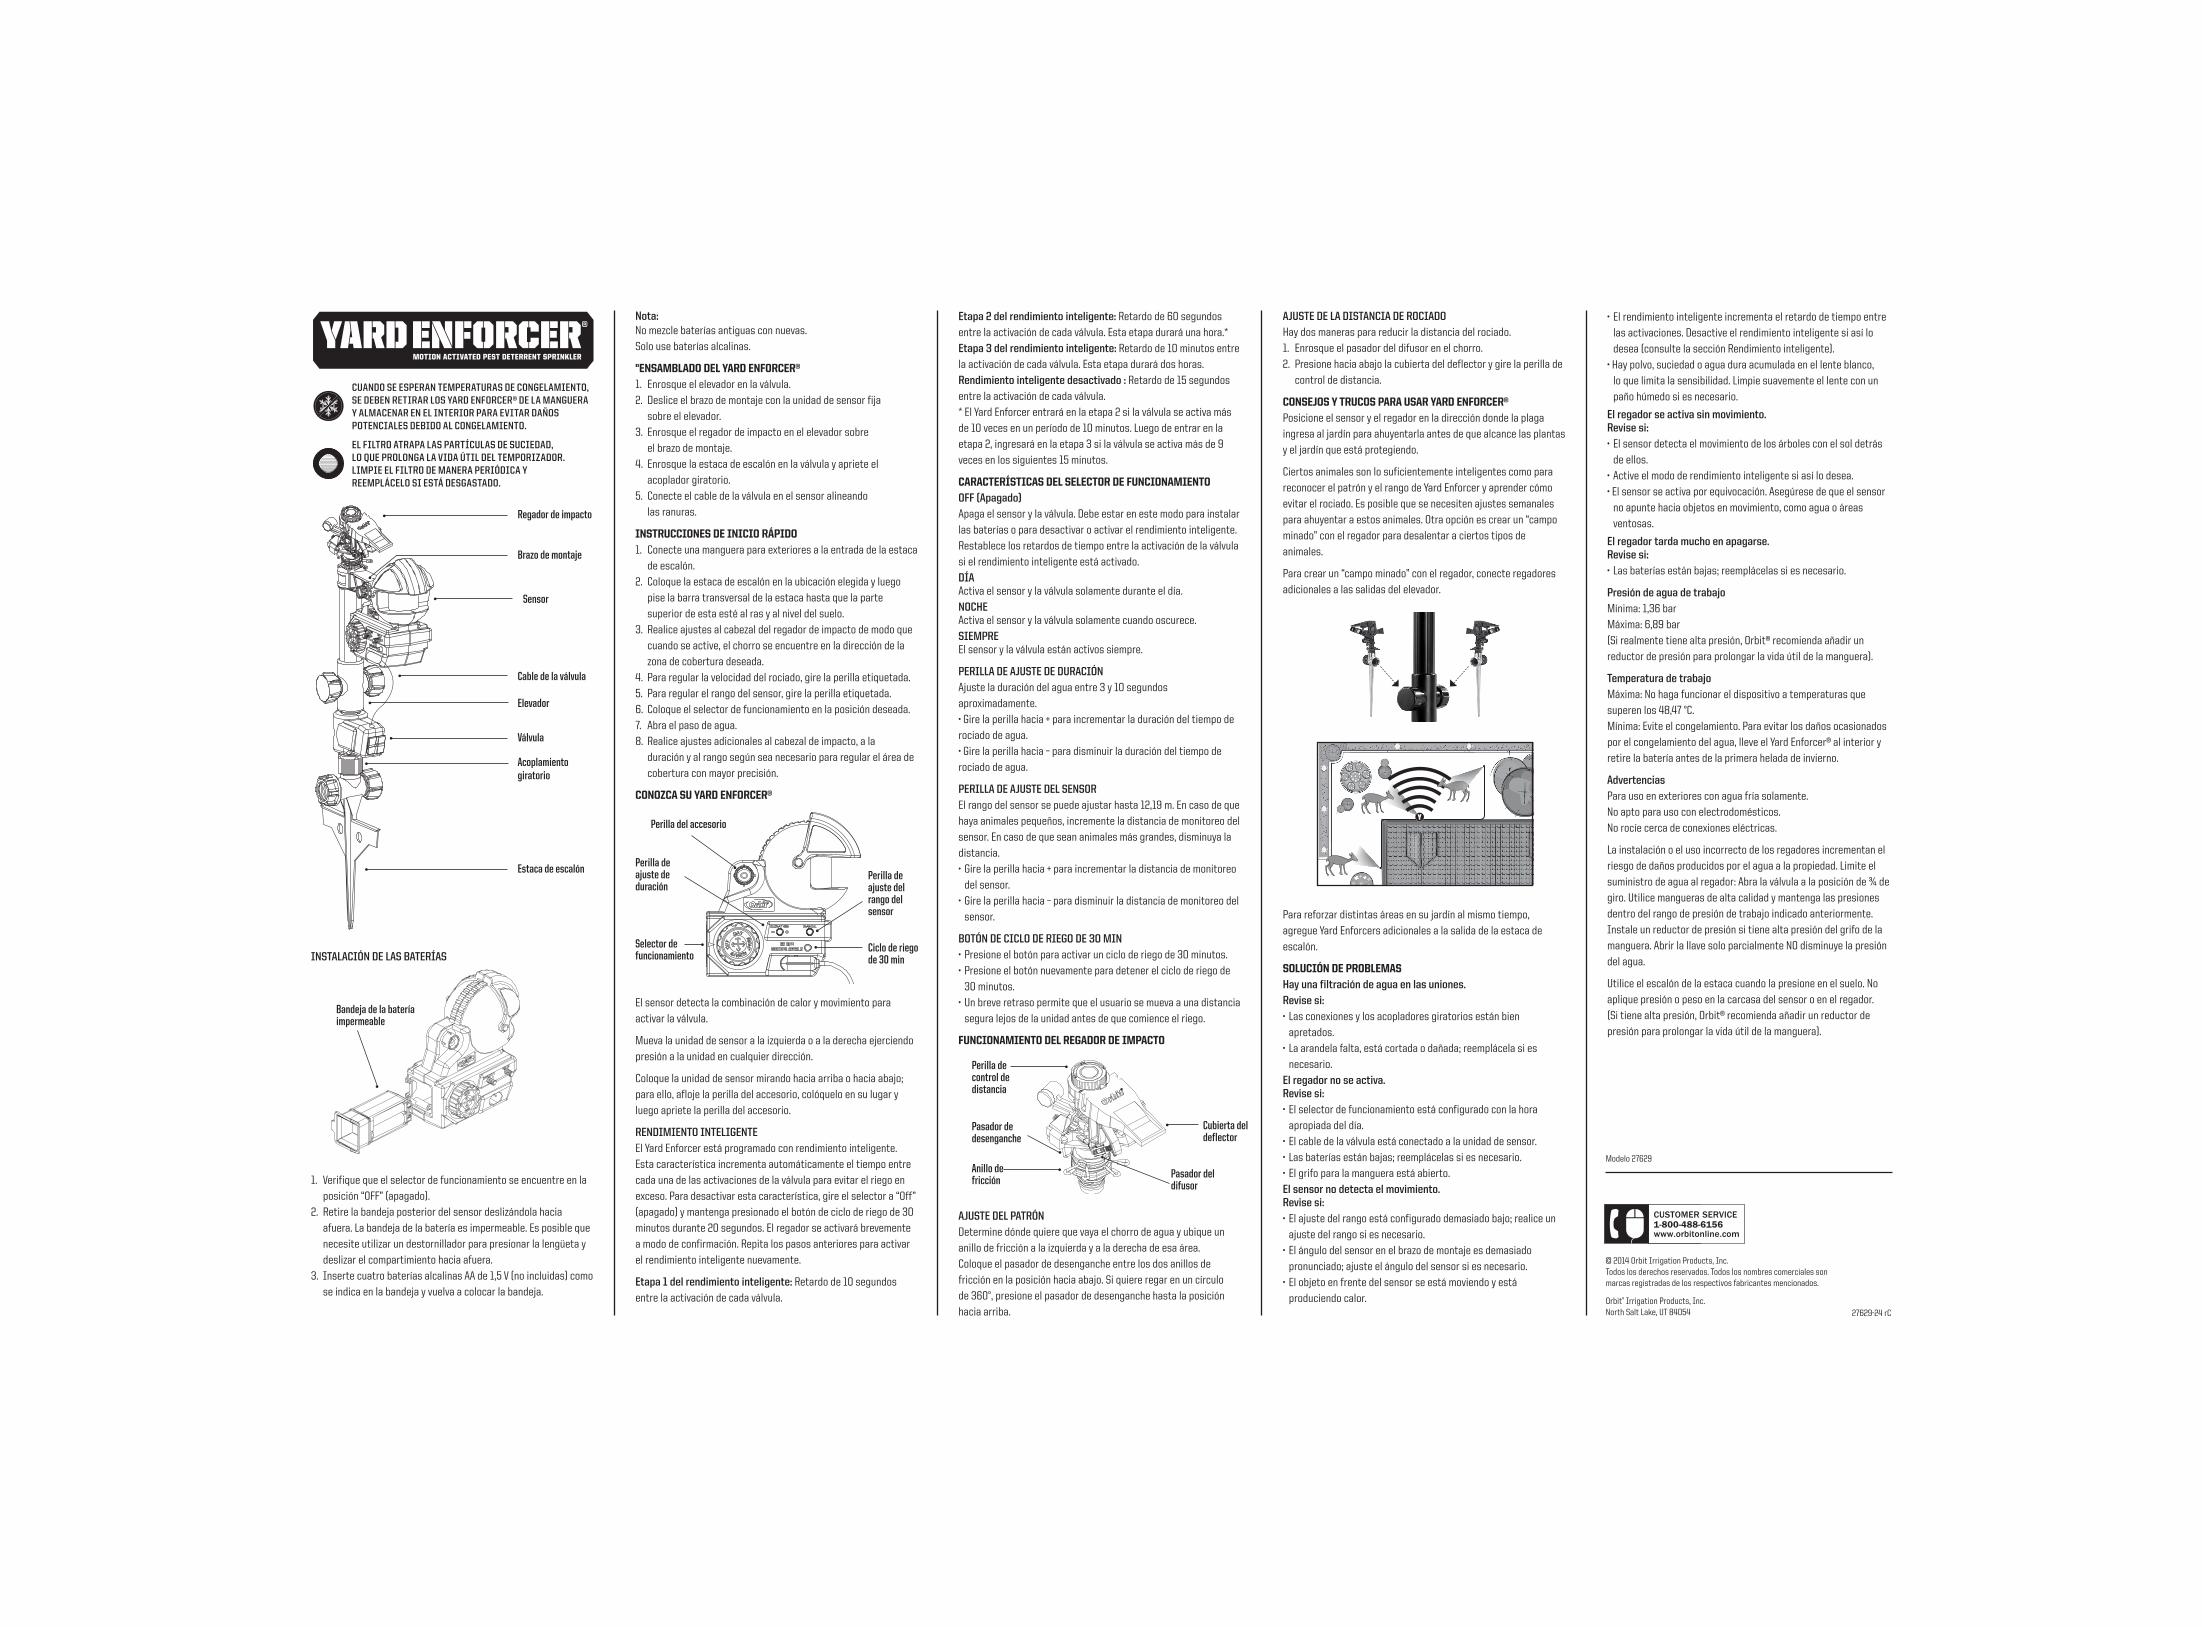
CONOZCA SU YARD ENFORCER®
El sensor detecta la combinación de calor y movimiento para
activar la válvula.
Mueva la unidad de sensor a la izquierda o a la derecha ejerciendo
presión a la unidad en cualquier dirección.
Coloque la unidad de sensor mirando hacia arriba o hacia abajo;
para ello, afloje la perilla del accesorio, colóquelo en su lugar y
luego apriete la perilla del accesorio.
RENDIMIENTO INTELIGENTE
El Yard Enforcer está programado con rendimiento inteligente.
Esta característica incrementa automáticamente el tiempo entre
cada una de las activaciones de la válvula para evitar el riego en
exceso. Para desactivar esta característica, gire el selector a “Off”
(apagado) y mantenga presionado el botón de ciclo de riego de 30
minutos durante 20 segundos. El regador se activará brevemente
a modo de confirmación. Repita los pasos anteriores para activar
el rendimiento inteligente nuevamente.
Etapa 1 del rendimiento inteligente: Retardo de 10 segundos
entre la activación de cada válvula.
INSTALACIÓN DE LAS BATERÍAS
1. Verifique que el selector de funcionamiento se encuentre en la
posición “OFF” (apagado).
2. Retire la bandeja posterior del sensor deslizándola hacia
afuera. La bandeja de la batería es impermeable. Es posible que
necesite utilizar un destornillador para presionar la lengüeta y
deslizar el compartimiento hacia afuera.
3. Inserte cuatro baterías alcalinas AA de 1,5 V (no incluidas) como
se indica en la bandeja y vuelva a colocar la bandeja.
MOTION ACTIVATED PEST DETERRENT SPRINKLER
MOTION ACTIVATED PEST DETERRENT SPRINKLER
MOTION ACTIVATED PEST DETERRENT SPRINKLER
27629-24 rC
Orbit® Irrigation Products, Inc.North Salt Lake, UT 84054
© 2014 Orbit Irrigation Products, Inc.Todos los derechos reservados. Todos los nombres comerciales son marcas registradas de los respectivos fabricantes mencionados.
Elevador
Brazo de montaje
Sensor
Regador de impacto
Estaca de escalón
Válvula
Cable de la válvula
Modelo 27629
Bandeja de la batería impermeable
Selector de funcionamiento
Perilla de ajuste de duración
Perilla de ajuste del rango del sensor
Ciclo de riego de 30 min
Perilla del accesorio
CUANDO SE ESPERAN TEMPERATURAS DE CONGELAMIENTO, SE DEBEN RETIRAR LOS YARD ENFORCER® DE LA MANGUERA Y ALMACENAR EN EL INTERIOR PARA EVITAR DAÑOS POTENCIALES DEBIDO AL CONGELAMIENTO.
EL FILTRO ATRAPA LAS PARTÍCULAS DE SUCIEDAD, LO QUE PROLONGA LA VIDA ÚTIL DEL TEMPORIZADOR. LIMPIE EL FILTRO DE MANERA PERIÓDICA Y REEMPLÁCELO SI ESTÁ DESGASTADO.
• El rendimiento inteligente incrementa el retardo de tiempo entre
las activaciones. Desactive el rendimiento inteligente si así lo
desea (consulte la sección Rendimiento inteligente).
• Hay polvo, suciedad o agua dura acumulada en el lente blanco,
lo que limita la sensibilidad. Limpie suavemente el lente con un
paño húmedo si es necesario.
El regador se activa sin movimiento. Revise si:
• El sensor detecta el movimiento de los árboles con el sol detrás
de ellos.
• Active el modo de rendimiento inteligente si así lo desea.
• El sensor se activa por equivocación. Asegúrese de que el sensor
no apunte hacia objetos en movimiento, como agua o áreas
ventosas.
El regador tarda mucho en apagarse. Revise si:
• Las baterías están bajas; reemplácelas si es necesario.
Presión de agua de trabajo
Mínima: 1,36 bar
Máxima: 6,89 bar
(Si realmente tiene alta presión, Orbit® recomienda añadir un
reductor de presión para prolongar la vida útil de la manguera).
Temperatura de trabajo
Máxima: No haga funcionar el dispositivo a temperaturas que
superen los 48,47 °C.
Mínima: Evite el congelamiento. Para evitar los daños ocasionados
por el congelamiento del agua, lleve el Yard Enforcer® al interior y
retire la batería antes de la primera helada de invierno.
Advertencias
Para uso en exteriores con agua fría solamente.
No apto para uso con electrodomésticos.
No rocíe cerca de conexiones eléctricas.
La instalación o el uso incorrecto de los regadores incrementan el
riesgo de daños producidos por el agua a la propiedad. Limite el
suministro de agua al regador: Abra la válvula a la posición de ¾ de
giro. Utilice mangueras de alta calidad y mantenga las presiones
dentro del rango de presión de trabajo indicado anteriormente.
Instale un reductor de presión si tiene alta presión del grifo de la
manguera. Abrir la llave solo parcialmente NO disminuye la presión
del agua.
Utilice el escalón de la estaca cuando la presione en el suelo. No
aplique presión o peso en la carcasa del sensor o en el regador.
(Si tiene alta presión, Orbit® recomienda añadir un reductor de
presión para prolongar la vida útil de la manguera).
Acoplamiento giratorio
Perilla de control de distancia
Pasador de desenganche
Pasador del difusor
Cubierta del deflector
Anillo de fricción