Embed Size (px)
Citation preview
XserveUser’s Guide
Includes software configuration and problem solving information for the Xserve
K
Apple Inc.© 2008 Apple Inc. All rights reserved.
Under the copyright laws, this manual may not be copied, in whole or in part, without the written consent of Apple. Your rights to the software are governed by the accompanying software license agreement.
The Apple logo is a trademark of Apple Inc., registered in the U.S. and other countries. Use of the “keyboard” Apple logo (Option-Shift-K) for commercial purposes without the prior written consent of Apple may constitute trademark infringement and unfair competition in violation of federal and state laws.
Every effort has been made to ensure that the information in this manual is accurate. Apple is not responsible for printing or clerical errors.
Apple1 Infinite LoopCupertino, CA 95014-2084408-996-1010www.apple.com
Apple, the Apple logo, FireWire, Mac, Macintosh, Mac OS, MacBook, and Xserve are trademarks of Apple Inc., registered in the U.S. and other countries.
Apple Remote Desktop, Finder, and the FireWire logo are trademarks of Apple Inc.
Intel, Intel Core, and Xeon are trademarks of Intel Corp. in the U.S. and other countries.
This product includes software developed by the University of California, Berkeley, and its contributors.
Other company and product names mentioned herein may be trademarks of their respective companies. Mention of third-party products is for informational purposes only and constitutes neither an endorsement nor a recommendation. Apple assumes no responsibility with regard to the performance or use of these products.
Simultaneously published in the United States and Canada.
019-1118/2008-01-01
3
1
Contents
Preface 4 About This Guide
Chapter 1 5 Xserve at a Glance6
Xserve at a Glance—Front Panel
8
Xserve at a Glance—Back Panel
Chapter 2 10 Starting Up the Xserve10
Turning On the Xserve for the First Time
12
Starting the Xserve
13
Choosing a Startup Method from the Front Panel
14
Shutting Down the Xserve
Chapter 3 15 Monitoring the Xserve16
Identifying the Xserve in a Rack
17
Interpreting the Xserve Status Lights
20
Using the Serial Port
21
Controlling Physical Access to the Xserve
21
Monitoring the Xserve Remotely
Chapter 4 23 Updating or Installing Software on the Xserve23
Before You Begin
23
Software Update and Installation Overview
24
Getting the Latest Software Updates
25
Reinstalling Server Software
Appendix 28 Troubleshooting28
Problems and Solutions
29
Using Apple Xserve Diagnostics Software
30
Regulatory Compliance Information
Pref
ace
4
About This Guide
This user’s guide shows you how to start up and shut down the Xserve, install and configure server software, monitor the status of the Xserve, and solve problems.
This guide contains information you might find useful after you install the Xserve: Â
An overview of Xserve features, controls, and components, in Chapter 1Â
Tips for configuring the Xserve when you start it up for the first time and instructions for routine startup and shutdown, in Chapter 2
Â
How to check the status of the Xserve, in Chapter 3Â
How to update or install the server software, in Chapter 4Â
Solutions to some common problems you might encounter while working with the Xserve and information about diagnostic software, in the Appendix
Remote Management and Lights-Out Operation
For information about remote server management, see the Server Monitor onscreen help.
Working with Mac OS X Server
As soon as you finish installing the Xserve, it’s ready to host the variety of services provided by Mac OS X Server. To help you learn more about the server software, a full set of documentation is available at www.apple.com/server/documentation.
For More Information
For information about opening the Xserve and replacing components, see the printed
Xserve Setup Guide
that comes with the Xserve.
For information about configuring and using Mac OS X Server, see
Mac OS X Server: Getting Started
on the
Admin Tools and Xserve Diagnostics
CD and
Mac OS X Server: Server Administration
at
www.apple.com/server/documentation.
The Apple Xserve Support website offers in-depth product information and technical resources, including articles, discussions, and downloadable software updates. Visit the site at www.apple.com/support/xserve.
1
5
1
Xserve at a Glance
Use the illustrations in this chapter to become familiar with the basic controls, features, and components of the Xserve.
The illustrations on the following pages identify the Xserve controls, indicators, connectors, and other features.
Note:
Some components of the Xserve may look slightly different from the illustrations shown here, depending on the configuration you purchased.
6 Chapter 1
Xserve at a Glance
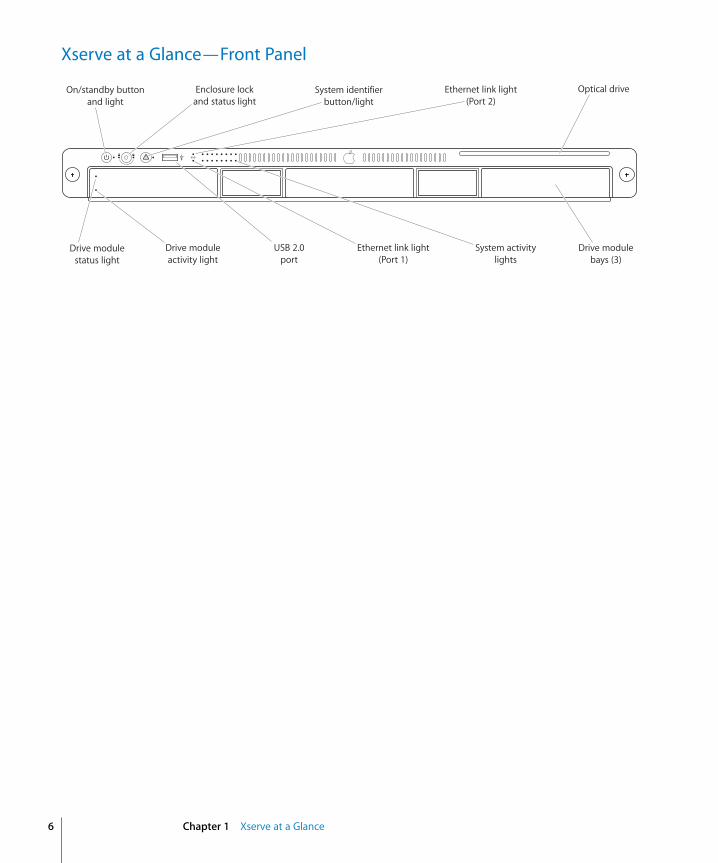
Xserve at a Glance—Front Panel
Drive moduleactivity light
Drive modulestatus light
Optical driveSystem identifierbutton/light
Enclosure lockand status light
USB 2.0port
On/standby buttonand light
Drive modulebays (3)
Ethernet link light(Port 1)
Ethernet link light(Port 2)
System activitylights
Chapter 1
Xserve at a Glance
7
®
On/standby button and light
Press to turn on the Xserve. Press for approximately 5 seconds to force the Xserve to shut down if all other shutdown methods fail. The light is bright white when the Xserve is on and not in sleep mode. When the Xserve is in sleep mode, the light pulses.
Enclosure lock and status light
The lock secures the Xserve cover and drive modules. It can be locked and unlocked with the enclosure key supplied with the Xserve. An option in the Security pane of System Preferences lets you disable a connected keyboard and mouse when the enclosure is locked. When this option is enabled and the enclosure is locked (the light is on), the Xserve doesn’t recognize a keyboard, mouse, or hot-pluggable storage device. Unlock the lock to use those devices.
System identifier button and light
The yellow system identifier light flashes if a problem is detected. You can also turn it on or off manually by pressing the button, or turn it on remotely using Server Monitor. This indicator is useful for locating a particular unit in a rack with more than one Xserve. A second system identifier button and light are on the back of the Xserve.You also use the system identifier button to select an alternative method for starting the Xserve using the front panel startup options; see “Choosing a Startup Method from the Front Panel” on page 13.
G
Ethernet link lights
Two lights indicate whether the Xserve is connected to an Ethernet network. Each light represents one of the two built-in Ethernet ports: the bottom light for port 1 and the top light for port 2.
Optical drive
You can use the slot-loading optical drive to install software on the Xserve.
Drive modules and lights
You can install up to three Serial ATA (SATA) or Serial Attached SCSI (SAS) drive modules in the Xserve. These modules can be removed and installed while the Xserve is running. Each drive module has lights showing operating status and disk activity.
System activity lights
These lights indicate the activity level of the processors.You also use these lights to select an alternative method for starting the Xserve using the front panel startup options; see “Choosing a Startup Method from the Front Panel” on page 13.
USB 2.0 port
Provides a USB 2.0 connection on the front of the Xserve. There are also two USB 2.0 ports on the back panel. The enclosure lock must be unlocked for the Xserve to recognize some devices connected to these ports.
8 Chapter 1
Xserve at a Glance
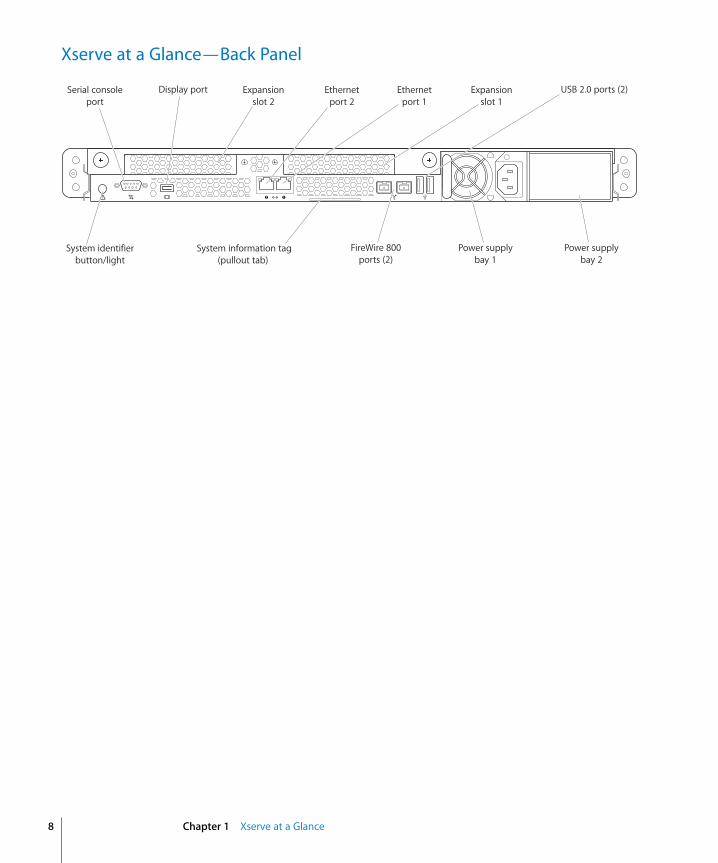
Xserve at a Glance—Back Panel
System information tag(pullout tab)
System identifierbutton/light
Power supplybay 2
Power supplybay 1
FireWire 800ports (2)
Ethernetport 2
Ethernetport 1
Expansionslot 1
Expansionslot 2
Display portSerial consoleport
USB 2.0 ports (2)
Chapter 1
Xserve at a Glance
9
Serial console port
Connect a serial device or a computer with a serial port. This port supports RS-232 connections.
Display port
You can connect a display to the Xserve using this port. The Xserve comes with a VGA adapter cable. A DVI adapter is available separately.
Expansion slots
You can install two expansion cards in the Xserve. Slot 1 accepts either a PCI Express or a PCI-X card, depending on the riser you install. Slot 2 accepts PCI Express cards. For information about installing cards, see the printed
Xserve Setup Guide
that comes with the Xserve.
G
Gigabit Ethernet ports
Connect the Xserve to a high-speed Ethernet network using the two built-in Ethernet ports. Ethernet ports adjust automatically to the transmission speed supported by the network. A green light in the upper left corner of each port indicates whether that port is connected to a live Ethernet network; a blue light on the right indicates activity.Always connect an Ethernet cable to the right port (port 1) first.
USB 2.0 ports
Connect USB devices, such as a keyboard or mouse. A USB 2.0 port is also located on the front panel. The enclosure lock must be unlocked for the Xserve to recognize some devices connected to these ports.
≤
Power supply and power supply bays
A removable power supply for the Xserve. The power cord connects here. You can install two 750W power supplies for redundancy; either supply can take over the full load for the Xserve if the other supply fails or is removed.
FireWire 800 ports
Connect FireWire devices to the Xserve. The enclosure lock must be unlocked for the Xserve to recognize devices connected to these ports.
System information tag
The Xserve serial number and the hardware (MAC) addresses of its built-in Ethernet ports are printed on this pullout tab. You’ll need the serial number when you install and set up the server software remotely.
System identifier button and light
The yellow system identifier light flashes if a problem is detected. You can also turn it on manually by pressing the button or turn it on remotely using Server Monitor. This indicator is useful for locating a particular unit in a rack with more than one Xserve. A second system identifier button and light are on the front panel.
2
10
2
Starting Up the Xserve
This chapter shows how to start up and shut down the Xserve, and includes information about configuring Mac OS X Server the first time you start up the Xserve.
Turning On the Xserve for the First Time
The first time you turn on the Xserve, the Mac OS X Server setup assistant asks for some basic information that Mac OS X Server needs in order to start up and connect to the network.
Configuring the Server Software
Be ready to provide at least the following information the first time you turn on the Xserve:Â
A server administrator account name and passwordÂ
Your Mac OS X Server software serial numberÂ
Basic network settings, including IP address, subnet mask, and DNS serversÂ
A user name, password, and network settings for the lights-out management processor
Â
Whether the Xserve will host an Open Directory domain, join an existing domain, or run standalone using its local directory
For a list of the information needed to fully configure the Xserve using the server assistant, see
Mac OS X Server: Installation and Setup Worksheet
on the Mac OS X Server installation DVD or on the server documentation website at www.apple.com/server/documentation.
For information about setting up a standard or workgroup server, see
Mac OS X Server: Getting Started
on the
Admin Tools and Xserve Diagnostics
CD. For information about setting up an advanced server including remote installation and setup, and automated setup, see
Mac OS X Server: Server Administration
at www.apple.com/server/documentation.
Chapter 2
Starting Up the Xserve
11
Configuring the Lights-Out Management Processor
When you use the Server Monitor application to start up, shut down, or monitor an Xserve, you communicate with the lights-out management processor in the Xserve. The lights-out management processor has its own administrator user name, password, and network settings. There are several ways to change these settings:Â
Step through the networking panes of the Mac OS X Server setup assistantÂ
In Server Monitor, choose Server > Configure Local MachineÂ
Use the
ipmitool
command-line tool in Terminal
Local and Remote Software Setup
If you connect a display and keyboard to the Xserve, you can use them to finish the server software setup process locally.
To set up the Xserve without a display or keyboard, you can use one of the following methods to connect to the Xserve and set it up remotely.
Serial Number for Remote Setup
To use Server Assistant to set up the Xserve remotely, you need to know the first 8 characters of the Xserve hardware serial number.
To find the Xserve serial number:m
Slide out the system information tag from the back panel by pulling the small tab.
Setting Up More than One Xserve
If you are setting up more than one or two Xserve systems, you should learn about Mac OS X Server configuration methods that simplify the task of setting up multiple servers. See the chapter about initial server setup in
Mac OS X Server: Server Administration
at www.apple.com/server/documentation.
Setup method Availability For information, see this
Screen Sharing Included with Mac OS X and Mac OS X Server version 10.5 or later
“Using Screen Sharing” on page 26
Server Assistant Included with Mac OS X Server version 10.5 or later
Mac OS X Server: Getting Started
on the
Admin Tools and Xserve Diagnostics
CD or
Mac OS X Server: Server Administration
at www.apple.com/server/documentation
Apple Remote Desktop
Sold separately
Mac OS X Server: Server Administration
at www.apple.com/server/documentation
VNC viewer software Sold separately
Mac OS X Server: Server Administration
at www.apple.com/server/documentation
Connect to the serial port on the Xserve
Included with the Xserve “Using Commands over the Serial Port to Install from the Optical Drive” on page 27
12 Chapter 2
Starting Up the Xserve
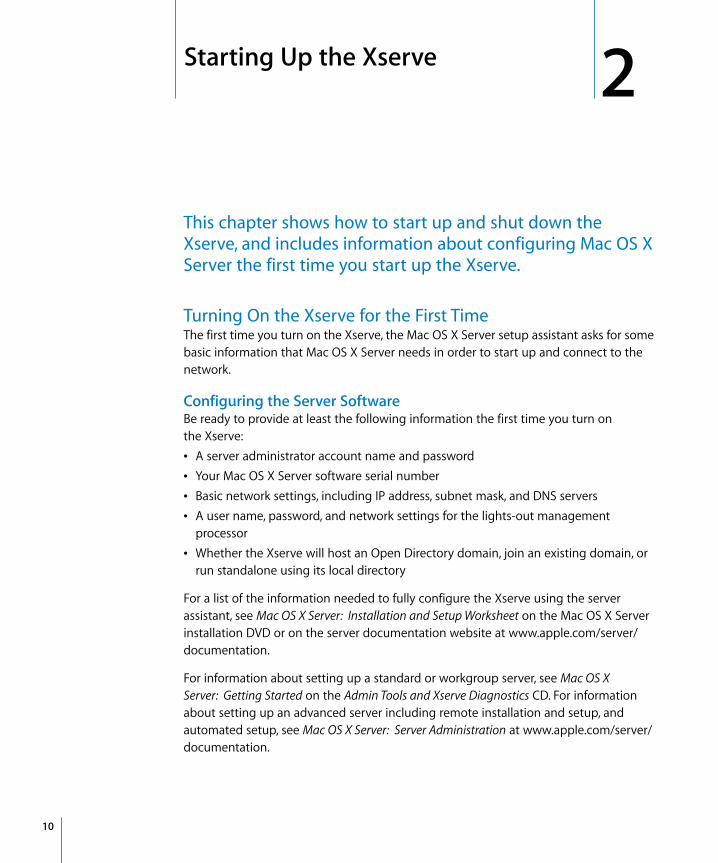
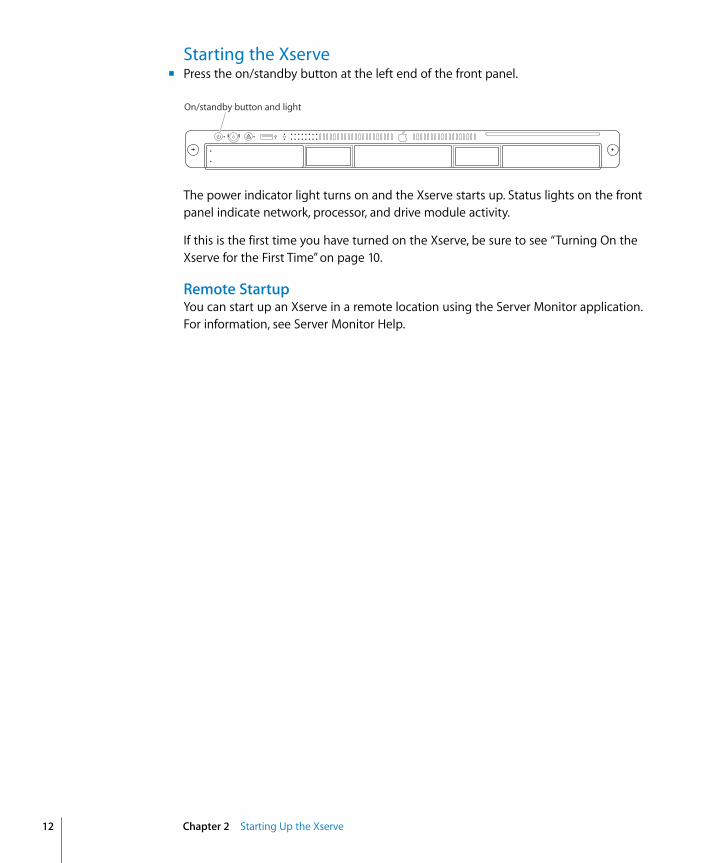
Starting the Xservem
Press the on/standby button at the left end of the front panel.
The power indicator light turns on and the Xserve starts up. Status lights on the front panel indicate network, processor, and drive module activity.
If this is the first time you have turned on the Xserve, be sure to see “Turning On the Xserve for the First Time” on page 10.
Remote StartupYou can start up an Xserve in a remote location using the Server Monitor application. For information, see Server Monitor Help.
On/standby button and light
Chapter 2 Starting Up the Xserve 13
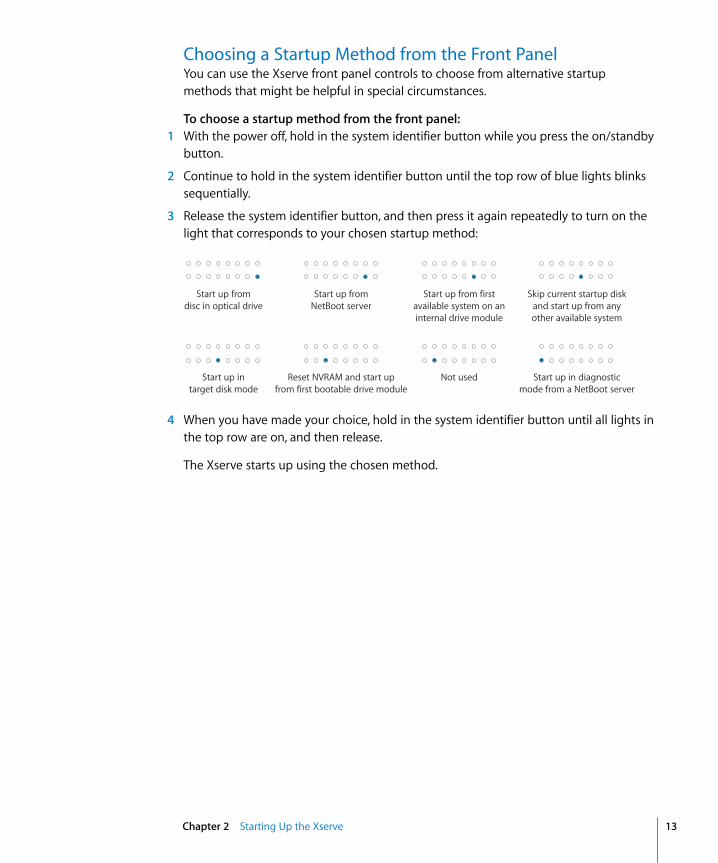
Choosing a Startup Method from the Front Panel You can use the Xserve front panel controls to choose from alternative startup methods that might be helpful in special circumstances.
To choose a startup method from the front panel:1 With the power off, hold in the system identifier button while you press the on/standby
button.
2 Continue to hold in the system identifier button until the top row of blue lights blinks sequentially.
3 Release the system identifier button, and then press it again repeatedly to turn on the light that corresponds to your chosen startup method:
4 When you have made your choice, hold in the system identifier button until all lights in the top row are on, and then release.
The Xserve starts up using the chosen method.
Start up fromdisc in optical drive
Start up fromNetBoot server
Start up from firstavailable system on aninternal drive module
Skip current startup diskand start up from anyother available system
Start up intarget disk mode
Reset NVRAM and start upfrom first bootable drive module
Not used Start up in diagnosticmode from a NetBoot server
14 Chapter 2 Starting Up the Xserve
Shutting Down the XserveThere are several ways you can shut down an Xserve.
Before You Shut Down the XserveIf the Xserve is hosting services provided by Mac OS X Server, open Server Admin or Server Preferences and stop the services. You can open these applications on the local Xserve, or use them remotely from another computer.
Shutting Down the Xserve with a Keyboard and Displaym In the Finder, choose Apple () > Shut Down.
Shutting Down the Xserve RemotelyTo shut down an Xserve with no connected keyboard and display, or an Xserve in a remote location, you can use either the Server Monitor application or the command line.
To shut down the Xserve using Server Monitor:m Open the Server Monitor application, select the Xserve in the list, and click Shut Down.
To shut down the Xserve from the command line:m Open Terminal, log in to the Xserve using SSH, and enter a shutdown command:
$ ssh -l user server
$ sudo shutdown -h now
where user is the name of an administrator account on the Xserve and server is the DNS name or IP address of the Xserve.
For information about the shutdown command and other command-line shutdown options, enter man shutdown in Terminal or see Mac OS X Server: Command-Line Administration at www.apple.com/server/documentation.
Forcing Shutdown from the Front PanelIf you can’t shut down the Xserve using the standard methods, you can force it to shut down by pressing the on/standby button on the front panel until the power light turns off (approximately 5 seconds).
3
15
3 Monitoring the Xserve
You can check the status of the Xserve whether you’re nearby or in a remote location.
This chapter shows how to check whether the Xserve is operating normally, how to get details if the Xserve detects a problem, how to interpret the hardware status lights, and how to monitor conditions such as the various internal temperatures and power supply voltages.
Checking the Status of Mac OS X Server ServicesThis chapter is about monitoring Xserve hardware status. For information about software status and how you can use the Server Admin application to check the state of individual services hosted by Mac OS X Server on an Xserve, see the Mac OS X Server documentation suite at www.apple.com/server/documentation.
Local and Remote MonitoringIf you’re near the Xserve, you can glance at the status light on the front panel and know immediately if the Xserve has detected a problem. See “Interpreting the Xserve Status Lights” on page 17.
If you connect a display and keyboard, you can open the Server Monitor application to view detailed status information for critical components. See “Using Server Monitor” on page 21.
You can also connect a terminal to the Xserve serial port and manage the Xserve using command-line tools. See “Using the Serial Port” on page 20.
If you’re away from the server rack, you can use the Admin Tools and Xserve Diagnostics CD to install server administration tools on a Mac OS X computer, turning it into an administrator computer. You can then use Server Monitor on the administrator computer to check the Xserve status, or have an email alert sent to interested individuals if the Xserve detects any of a variety of conditions. See “Using Server Monitor” on page 21.
16 Chapter 3 Monitoring the Xserve
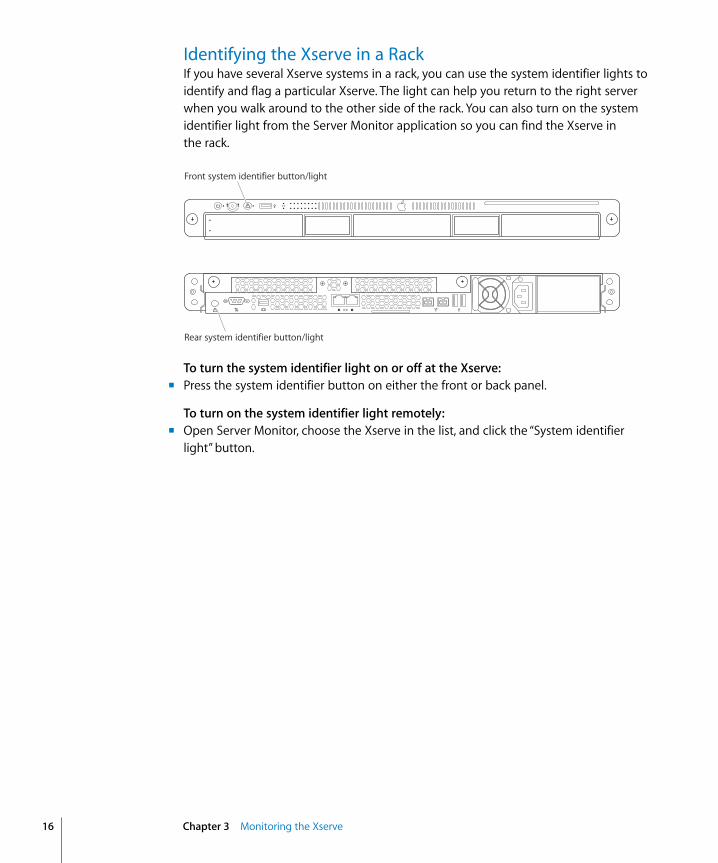
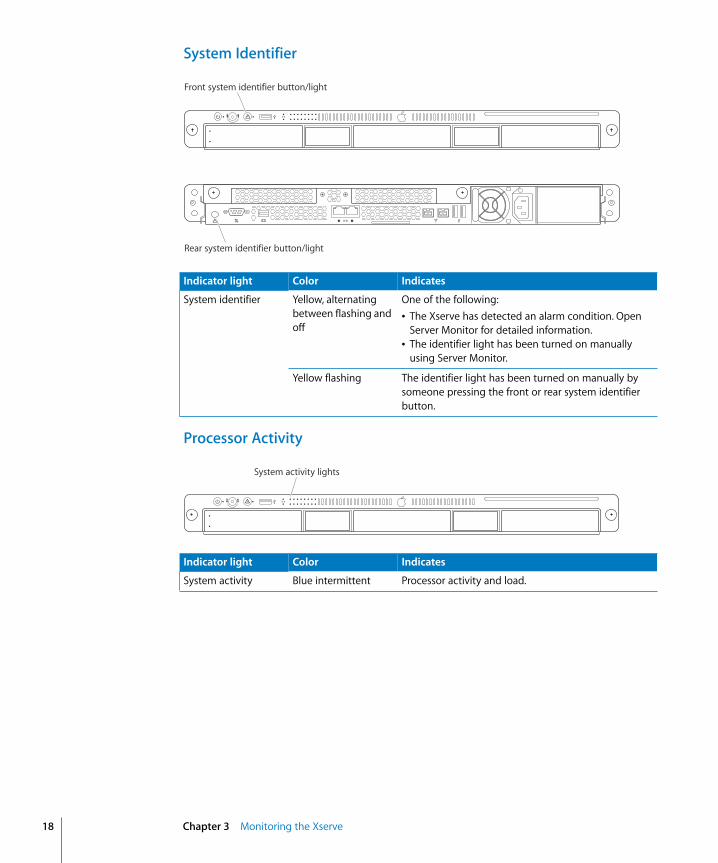
Identifying the Xserve in a RackIf you have several Xserve systems in a rack, you can use the system identifier lights to identify and flag a particular Xserve. The light can help you return to the right server when you walk around to the other side of the rack. You can also turn on the system identifier light from the Server Monitor application so you can find the Xserve in the rack.
To turn the system identifier light on or off at the Xserve:m Press the system identifier button on either the front or back panel.
To turn on the system identifier light remotely:m Open Server Monitor, choose the Xserve in the list, and click the “System identifier
light” button.
Front system identifier button/light
Rear system identifier button/light
Chapter 3 Monitoring the Xserve 17
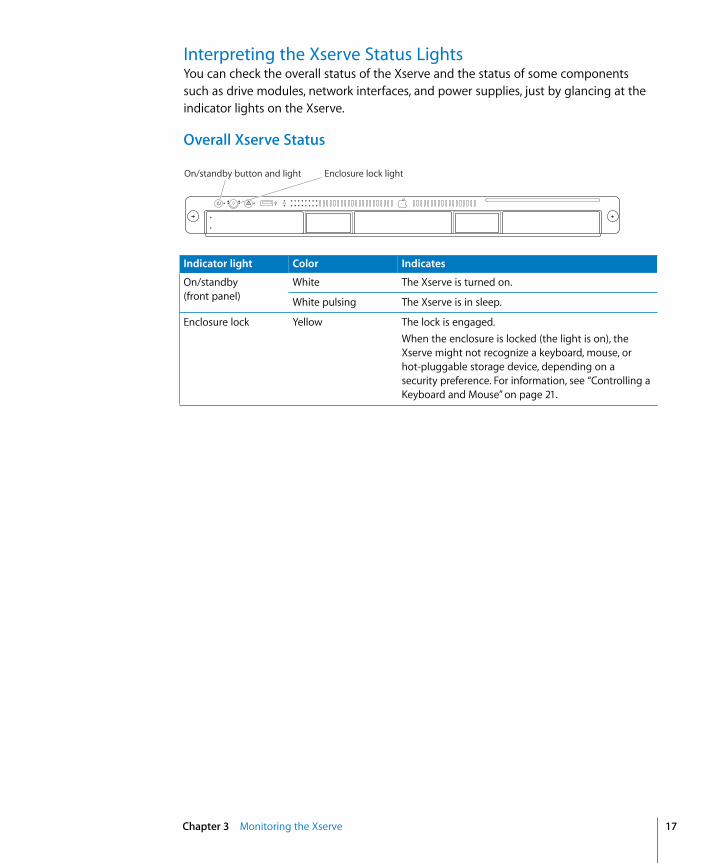
Interpreting the Xserve Status LightsYou can check the overall status of the Xserve and the status of some components such as drive modules, network interfaces, and power supplies, just by glancing at the indicator lights on the Xserve.
Overall Xserve Status
Indicator light Color Indicates
On/standby(front panel)
White The Xserve is turned on.
White pulsing The Xserve is in sleep.
Enclosure lock Yellow The lock is engaged.When the enclosure is locked (the light is on), the Xserve might not recognize a keyboard, mouse, or hot-pluggable storage device, depending on a security preference. For information, see “Controlling a Keyboard and Mouse” on page 21.
On/standby button and light Enclosure lock light
18 Chapter 3 Monitoring the Xserve
System Identifier
Processor Activity
Indicator light Color Indicates
System identifier Yellow, alternating between flashing and off
One of the following:Â The Xserve has detected an alarm condition. Open
Server Monitor for detailed information. The identifier light has been turned on manually
using Server Monitor.
Yellow flashing The identifier light has been turned on manually by someone pressing the front or rear system identifier button.
Front system identifier button/light
Rear system identifier button/light
Indicator light Color Indicates
System activity Blue intermittent Processor activity and load.
System activity lights
Chapter 3 Monitoring the Xserve 19
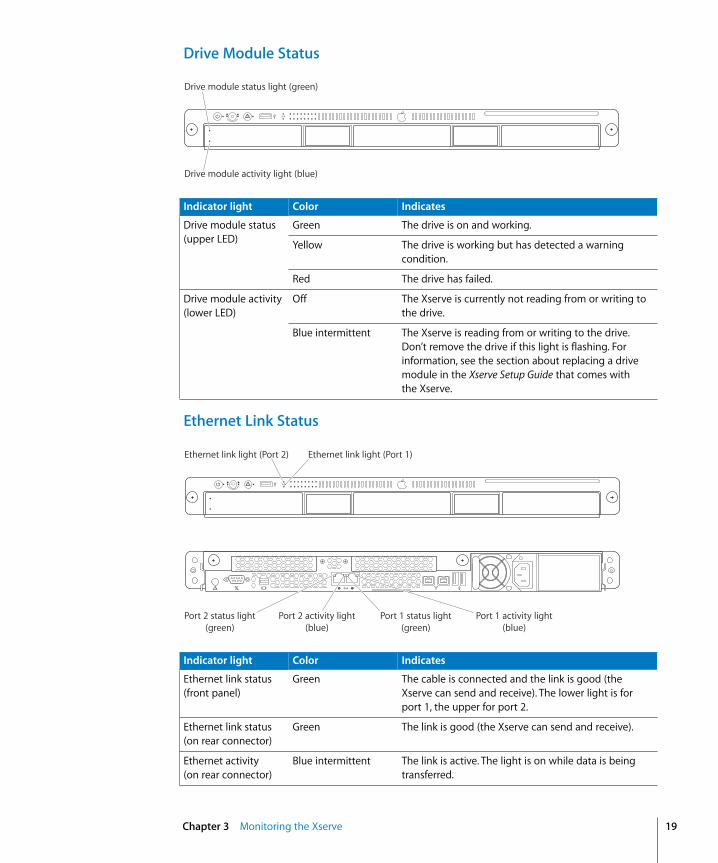
Drive Module Status
Ethernet Link Status
Indicator light Color Indicates
Drive module status(upper LED)
Green The drive is on and working.
Yellow The drive is working but has detected a warning condition.
Red The drive has failed.
Drive module activity(lower LED)
Off The Xserve is currently not reading from or writing to the drive.
Blue intermittent The Xserve is reading from or writing to the drive. Don’t remove the drive if this light is flashing. For information, see the section about replacing a drive module in the Xserve Setup Guide that comes with the Xserve.
Drive module activity light (blue)
Drive module status light (green)
Indicator light Color Indicates
Ethernet link status(front panel)
Green The cable is connected and the link is good (the Xserve can send and receive). The lower light is for port 1, the upper for port 2.
Ethernet link status(on rear connector)
Green The link is good (the Xserve can send and receive).
Ethernet activity(on rear connector)
Blue intermittent The link is active. The light is on while data is being transferred.
Port 1 status light(green)
Port 1 activity light(blue)
Port 2 status light(green)
Port 2 activity light(blue)
Ethernet link light (Port 2) Ethernet link light (Port 1)
20 Chapter 3 Monitoring the Xserve
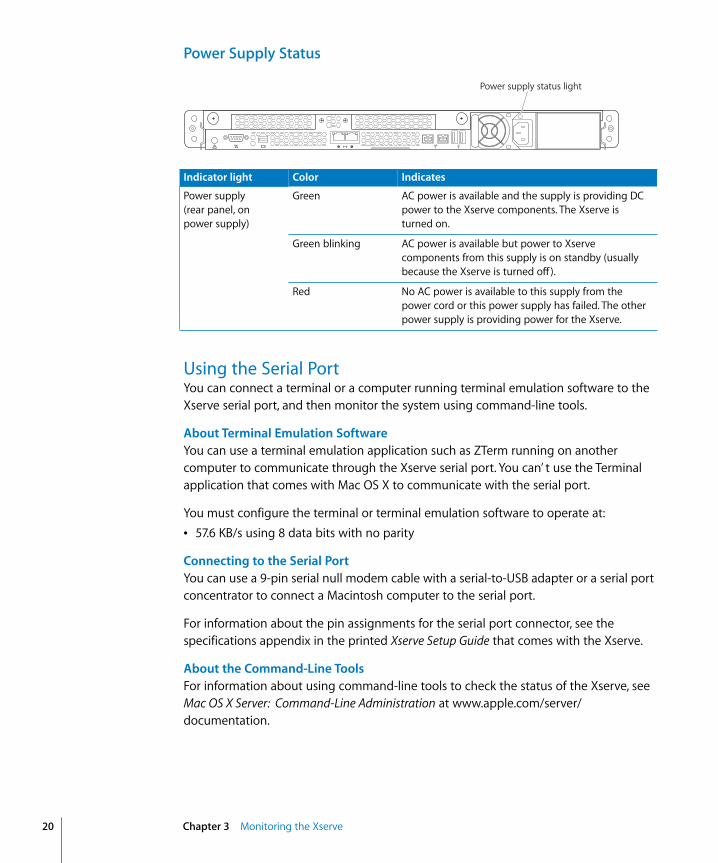
Power Supply Status
Using the Serial PortYou can connect a terminal or a computer running terminal emulation software to the Xserve serial port, and then monitor the system using command-line tools.
About Terminal Emulation SoftwareYou can use a terminal emulation application such as ZTerm running on another computer to communicate through the Xserve serial port. You can’ t use the Terminal application that comes with Mac OS X to communicate with the serial port.
You must configure the terminal or terminal emulation software to operate at:Â 57.6 KB/s using 8 data bits with no parity
Connecting to the Serial PortYou can use a 9-pin serial null modem cable with a serial-to-USB adapter or a serial port concentrator to connect a Macintosh computer to the serial port.
For information about the pin assignments for the serial port connector, see the specifications appendix in the printed Xserve Setup Guide that comes with the Xserve.
About the Command-Line ToolsFor information about using command-line tools to check the status of the Xserve, see Mac OS X Server: Command-Line Administration at www.apple.com/server/documentation.
Indicator light Color Indicates
Power supply (rear panel, on power supply)
Green AC power is available and the supply is providing DC power to the Xserve components. The Xserve is turned on.
Green blinking AC power is available but power to Xserve components from this supply is on standby (usually because the Xserve is turned off ).
Red No AC power is available to this supply from the power cord or this power supply has failed. The other power supply is providing power for the Xserve.
Power supply status light
Chapter 3 Monitoring the Xserve 21
Controlling Physical Access to the XserveYou can use the enclosure lock on the Xserve to Prevent removal of drive modules Prevent opening the top cover Disable a connected keyboard, mouse, or other USB device by setting a system
preference
Controlling a Keyboard and MouseYou can choose whether the enclosure lock disables a connected keyboard and mouse.
To disable the keyboard and mouse:m Open System Preferences, click Security, and click the checkbox “Disable mouse and
keyboard when Xserve enclosure lock is engaged.”
Monitoring the Xserve RemotelyYou can check the status of an Xserve from a remote computer using the Server Monitor application or the command line in Terminal.
Using Server MonitorThe Xserve comes with the Server Monitor application. You can find Server Monitor in /Applications/Server/ and on the Admin Tools and Xserve Diagnostics CD. You can use Server Monitor to:Â Check the current status of the Xserve and its components, including
 Drive module status Power supply status and system internal voltages Network interface status and activity level Temperatures of critical internal components Cooling fan status
 Review basic Xserve information, such as Uptime Mac OS X Server version running on the Xserve Amount and type of memory installed in each slot Model and capacity of each drive module
 Shut down, start up, or restart the Xserve Generate an Apple System Profiler report for the Xserve Send email alerts in response to changes in the status of the Xserve
You can run Server Monitor on the Xserve or on any computer that can connect to the same network.
22 Chapter 3 Monitoring the Xserve
Connecting to the XserveTo add an Intel-based Xserve to the server list in Server Monitor, you use the network address, user name, and password of the lights-out management processor in the Xserve. The lights-out management processor has its own administrator user name, password, and network settings. There are several ways to change these settings: Step through the networking panes of the Mac OS X Server setup assistant In Server Monitor, choose Server > Configure Local Machine Use the ipmitool command-line tool in Terminal
If you’re using Server Monitor on the local Xserve, add the local Xserve to server list by adding a server with the IP address of 127.0.0.1 and using the local administrator’s user name and password information.
For information about using Server Monitor, see the Server Monitor onscreen help.
Using the Command LineFor information about using SSH to connect to a remote Xserve and using command-line tools to check the status of the Xserve, see Mac OS X Server: Command-Line Administration at www.apple.com/server/documentation.
4
23
4 Updating or Installing Software on the Xserve
There are several ways to update or install server software on the Xserve.
The Xserve comes with Mac OS X Server installed on the drive module in drive bay 1.
Before You BeginBy default, the hard drives in an Xserve do not use RAID. To take advantage of RAID features, set up RAID volumes using the RAID Utility application. To use RAID Utility, start up your computer using an installation DVD for Mac OS X or Mac OS X Server version 10.5 or later. After you select your language, choose Utilities > RAID Utility.
For information about using RAID Utility to set up and manage RAID volumes, see the RAID Utility User’s Guide at www.apple.com/server/documentation.
Software Update and Installation OverviewTo update the server software, you can use: The Software Update pane of System Preferences The Server Updates pane of Server Admin The softwareupdate command-line tool The Apple Downloads website:
www.apple.com/support/downloads
If you need to reinstall the server software, you can use any of these methods:Â Install from the Mac OS X Server installation DVD (included with the Xserve) in the
Xserve optical drive. Install the software over the network, using a NetBoot image or the Apple Software
Restore (ASR) command-line tool.
Warning: Setting up RAID volumes erases all data on your hard drives. Back up all critical data before setting up RAID volumes.
24 Chapter 4 Updating or Installing Software on the Xserve
 Start up the Xserve from the optical drive and control installation from another computer using Server Assistant, Apple Remote Desktop (ARD), or other VNC viewer software.
 Move the drive module to another Xserve of the same model and configuration, install the software on that system, and then return the drive module.
 Connect a computer to the Xserve serial port and use the command line to install the server software.
Choosing the Best MethodFor information that will help you choose the best Mac OS X Server installation and configuration method for your server environment, see the installation and setup sections of Mac OS X Server: Getting Started on the Admin Tools and Xserve Diagnostics CD, and Mac OS X Server: Server Administration at www.apple.com/server/documentation.
For information about installing from the Mac OS X Server installation CD in the Xserve optical drive or from another computer using Server Assistant, see the Mac OS X Server: Getting Started. For information about installing using any of the methods, see Mac OS X Server: Server Administration.
Getting the Latest Software UpdatesIf the Xserve is connected to the Internet, you can download and install the latest software updates from Apple. If the Xserve is on a private network, you can download updates to a computer that is connected to the Internet and then copy the updates to the Xserve and install them.
To check for and install updates:m Open System Preferences and click Software Update.
On an Xserve without a display or keyboard, using Server Admin:m Open Server Admin, select the server, and click Server Updates.
On an Xserve without a display or keyboard, using Terminal:m Use Terminal and SSH to connect to the Xserve from an administrator computer and
run the softwareupdate command-line tool. For information, see Mac OS X Server: Command-Line Administration at www.apple.com/server/documentation. You can also use Apple Remote Desktop (purchased separately).
On an Xserve without Internet access or access to a Software Update server:1 Using a computer with Internet access, download updates from:
www.apple.com/support/downloads
2 Copy updates to the Xserve.
Chapter 4 Updating or Installing Software on the Xserve 25
Reinstalling Server SoftwareThe following sections show how to install Mac OS X Server on the Xserve: Using a keyboard, a display, and the Mac OS X Server installation DVD Using a NetBoot server to install over the network Using Apple Remote Desktop or other VNC viewer software Using Screen Sharing Using another Xserve to install on a swapped drive module Using commands over the serial port to install from the Xserve optical drive
When the installation finishes, you can use an administrator computer to run Server Assistant and configure the Xserve, or take advantage of the autosetup features of Mac OS X Server.
For information about setting up a standard or workgroup server, see Mac OS X Server: Getting Started on the Admin Tools and Xserve Diagnostics CD. For information about setting up an advanced server including remote installation and setup, and automated setup, see Mac OS X Server: Server Administration at www.apple.com/server/documentation.
Using a Keyboard, a Display, and the Mac OS X Server Installation DVDThis is a straightforward way to install Mac OS X Server on an Xserve that has a display and keyboard connected.
1 Insert the Mac OS X Server installation DVD in the Xserve optical drive and double-click the install icon.
2 In the authentication window, enter an administrator password and click OK.
The Xserve restarts from the installation DVD and the Server Setup application appears.
For detailed information about installing Mac OS X Server on the Xserve, including information about setting up and using an administrator computer so you can install on an Xserve that doesn’t have a display or keyboard, see Mac OS X Server: Server Administration at www.apple.com/server/documentation.
Using a NetBoot Server to Install over the NetworkYou can use a remote computer to install server software on one Xserve or to automate the process of installing on many Xserve systems. For details, see Mac OS X Server: Server Administration and Mac OS X Server: System Imaging and Software Update Administration at www.apple.com/server/documentation.
Using Apple Remote Desktop or Other VNC SoftwareApple Remote Desktop (ARD) is enabled when you start up the Xserve using the Mac OS X Server installation DVD, so you can perform the installation from another computer running Apple Remote Desktop or other VNC viewer software. For details, see Mac OS X Server: Server Administration at www.apple.com/server/documentation.
26 Chapter 4 Updating or Installing Software on the Xserve
Using Screen SharingIf you’re using a remote computer with Mac OS X or Mac OS X Server version 10.5 installed to connect to an Xserve with a static IP address, you can use Screen Sharing to install Mac OS X Server.
To install using Screen Sharing:1 Insert the Mac OS X Server installation DVD in the Xserve optical drive.
2 Use the front panel controls to start up the Xserve from the optical drive. For information, see “Choosing a Startup Method from the Front Panel” on page 13.
The Xserve starts up from the DVD in the optical drive and a login prompt appears in the Terminal window.
3 On the remote computer, open Finder and choose Go > Connect to Server.
4 In the Server Address field, enter the following, and then click Connect:
vnc://ipaddress
Replace ipaddress with the IP address or DNS name of the Xserve.
5 Don’t enter anything in the Name field. In the Password field, enter the first 8 characters of the Xserve serial number. Click Connect.
6 In the shared screen window, proceed through installation.
For more information about Screen Sharing, see Mac Help.
Using Another Xserve to Install on a Swapped Drive ModuleThis is a simple method for installing or restoring software, but you must have a second Xserve with a keyboard and display connected to it. In this method, you move the startup drive to another Xserve, install the software using that second system, and then return the drive to the original Xserve.
Important: The original Xserve should be the same model with the same hard drive configuration as the Xserve you’re installing Mac OS X Server on.
To install from a second Xserve:1 Shut down the first Xserve (the one you want to install the software on) and remove its
drive module.
2 On the second Xserve (the one you’ll use to install the software), unmount and remove one of the drive modules (or a blank module) and insert the drive module from the first Xserve.
Be sure you don’t remove the startup drive module from the second Xserve.
3 Insert the Mac OS X Server installation DVD in the optical drive of the second Xserve and double-click the installer icon.
4 In the authentication window, enter an administrator password and click OK.
Chapter 4 Updating or Installing Software on the Xserve 27
The second Xserve restarts from the installation DVD.
5 When installation is complete, the Server Setup application appears. Quit this application by choosing File > Quit and confirm that you want to shut down the second Xserve.
6 Hold down the Option key, restart the second Xserve, and select its regular startup disk from the icons onscreen.
Note: Use the Startup Disk pane in System Preferences to set the startup disk for future restarts.
7 Return the drive module with the newly installed software to the first Xserve and restart it.
Don’t forget to replace the drive module or the blank module you removed from the second Xserve.
Using Commands over the Serial Port to Install from the Optical DriveAnother way to install Mac OS X Server on the Xserve without a keyboard or display is to use the Xserve serial port and optical drive.
To use the serial port and command line to install:1 Connect a terminal or a computer running terminal emulation software to the serial
port on the back of the Xserve.
2 Insert the Mac OS X Server installation DVD in the Xserve optical drive.
3 Use the front panel controls to start up the Xserve from the optical drive. For information, see “Choosing a Startup Method from the Front Panel” on page 13.
The Xserve starts up from the DVD in the optical drive and a login prompt appears in the terminal window.
4 Log in as the user “root” with the password consisting of the first 8 characters of the Xserve serial number.
5 If necessary, use the diskutil tool to erase, format, or partition the drive you plan to install Mac OS X Server on. For help, type the command without any parameters:
$ diskutil
6 Switch to the directory on the installation DVD that contains the install packages.
$ cd /System/Installation/Packages
7 Run the installer tool, specifying the Mac OS X Server metapackage:
$ installer -pkg ./OSInstall.mpkg -target /Volumes/volume -verboseR
where volume is the name of the volume where you want to install the software.
28
App
endi
x
Troubleshooting
Look here for solutions to some common problems you might encounter while working with the Xserve and for information about using Apple Xserve Diagnostics to test the Xserve hardware.
This appendix offers solutions to some problems you might encounter using the Xserve. It also includes information about Apple Xserve Diagnostics software, which you can use to test the Xserve hardware.
If You Don’t Find a SolutionIf you don’t find a solution to a problem here, check the Apple support website at www.apple.com/support, the Xserve discussions at discussions.apple.com, or the late-breaking news topics in Mac OS X Server Help.
Problems and SolutionsIf the Xserve doesn’t start upTry starting up from the Mac OS X Server DVD that comes with the Xserve. For information about startup alternatives, see Chapter 2.
If the Xserve doesn’t start up and all 16 system activity lights flash continuouslyA memory DIMM is bad.
If the system identifier light is flashingThe Xserve has detected a problem. To find out what’s wrong, open the Server Monitor application on either the Xserve or a remote administrator computer.
If there is no image on the connected display or the display appears frozenMake sure the enclosure is not locked. If you connect a display to a running Xserve, the image on the display may be garbled or missing. If this occurs, restart the Xserve. Alternatively, you may be able to adjust the display image using a remote computer. Connect to the Xserve, open System Preferences for the Xserve, open the Displays pane, and click Detect Displays.
Appendix Troubleshooting 29
If you have difficulty removing the coverUse the enclosure key to make sure the enclosure lock on the front panel is unlocked.
If the Xserve doesn’t recognize a peripheral deviceWhen the enclosure lock on the Xserve front panel is locked and the enclosure lock preference in the Security pane of System Preferences is on, the Xserve ignores storage devices, keyboard and mouse, and other peripherals connected to the USB and FireWire ports. The light next to the enclosure lock is on when the lock is engaged.
If you have difficulty removing a drive moduleUse the enclosure key to make sure the enclosure lock on the front panel is unlocked.
If the Xserve doesn’t recognize a drive module when the Xserve is lockedOccasionally a drive module won’t be recognized if the Xserve is locked and the drive module’s handle has been opened before the system powered up. If this occurs, unlock the enclosure lock, remove the drive module and replace it, and then close the drive module’s handle. If the drive module still isn’t recognized, restart the Xserve.
If a drive module light is yellow or redIf the upper LED for a drive module is yellow or red, there is a problem with the drive. If possible, replace the drive. Check the Server Monitor application for information about the drive’s status.
If you can see the Xserve on the network but can’t access itIf the Xserve is on a closed network and your administrator computer is on both the closed network and another network, your administrator computer defaults to the other network when you try to connect to 169.254.x.x addresses. To correct this, set up a 169.254.x.x address on your administrator computer so it will have a route to the 169.254 (closed) network.
If the hard disk is erased or Xserve software is damagedReinstall the Mac OS X Server software. For information about installation methods, see Chapter 4.
If you can’t use Server Monitor to control an XserveWhen you use Server Monitor to connect remotely to an Xserve, use the administrator user name, password, and network settings (including host name and IP address) of the lights-out management processor. You specify these in the networking panes of the Mac OS X Server setup assistant or in Server Monitor. Don’t connect using the Mac OS X Server settings.
Using Apple Xserve Diagnostics SoftwareThe Xserve comes with Apple Xserve Diagnostics software that you can use to test the Xserve hardware. For information, see the Apple Xserve Diagnostics User’s Guide in the Documentation folder on the Admin Tools and Xserve Diagnostics CD.
30
Regulatory Compliance Information
FCC Compliance StatementThis equipment has been tested and found to comply with the limits for a class A digital device pursuant to Part 15 of the FCC Rules. These limits are designed to provide reasonable protection against harmful interference when the equipment is operated in a commercial environment. This equipment generates, uses, and can radiate radio frequency energy and, if not installed and used in accordance with the manufacturer's instruction manual, may cause harmful interference with radio communications. Operation of this equipment in a residential area is likely to cause harmful interference, in which case you will be required to correct the interference at your own expense.
Shielded Cable Statement & Modification Statement This product was tested for EMC compliance under conditions that included the use of Apple peripheral devices and Apple shielded cables and connectors between system components. It is important that you use Apple peripheral devices and shielded cables and connectors between system components to reduce the possibility of causing interference to radios, television sets, and other electronic devices. You can obtain Apple peripheral devices and the proper shielded cables and connectors through an Apple-authorized dealer. For non-Apple peripheral devices, contact the manufacturer or dealer for assistance.
Important: Important Changes or modifications to this product not authorized by Apple Computer, Inc., could void the EMC compliance and negate your authority to operate the product.
Industry Canada StatementComplies with the Canadian ICES-003 Class A specifications.Cet appareil numérique de la classe A est conforme à la norme NMB-003 du Canada.
VCCI Class A Statement
European CommunityComplies with European Directive 89/336/EEC.
CISPR 22 & EN55022 Statement
Taiwan Class A Warning
Korea Class A Warning
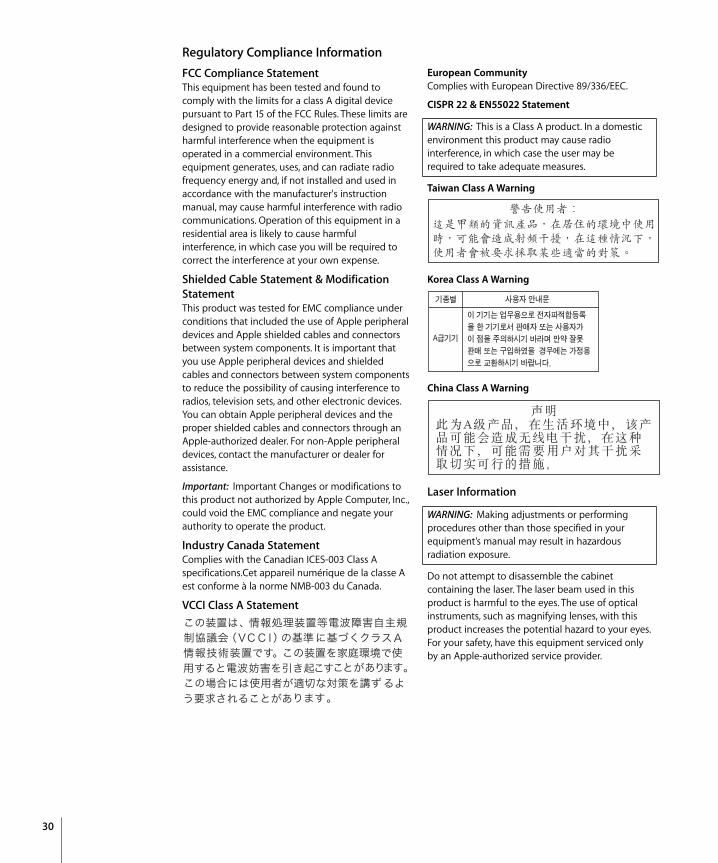
China Class A Warning
Laser Information
Do not attempt to disassemble the cabinet containing the laser. The laser beam used in this product is harmful to the eyes. The use of optical instruments, such as magnifying lenses, with this product increases the potential hazard to your eyes. For your safety, have this equipment serviced only by an Apple-authorized service provider.
WARNING: This is a Class A product. In a domestic environment this product may cause radio interference, in which case the user may be required to take adequate measures.
WARNING: Making adjustments or performing procedures other than those specified in your equipment’s manual may result in hazardous radiation exposure.
31
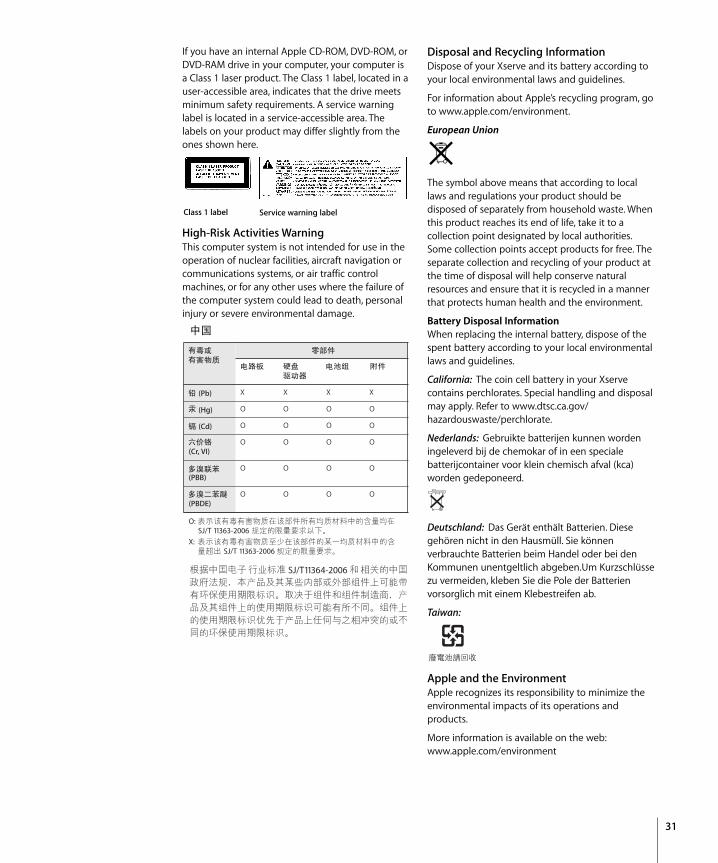
If you have an internal Apple CD-ROM, DVD-ROM, or DVD-RAM drive in your computer, your computer is a Class 1 laser product. The Class 1 label, located in a user-accessible area, indicates that the drive meets minimum safety requirements. A service warning label is located in a service-accessible area. The labels on your product may differ slightly from the ones shown here.
High-Risk Activities WarningThis computer system is not intended for use in the operation of nuclear facilities, aircraft navigation or communications systems, or air traffic control machines, or for any other uses where the failure of the computer system could lead to death, personal injury or severe environmental damage.
Disposal and Recycling InformationDispose of your Xserve and its battery according to your local environmental laws and guidelines.
For information about Apple’s recycling program, go to www.apple.com/environment.
European Union
The symbol above means that according to local laws and regulations your product should be disposed of separately from household waste. When this product reaches its end of life, take it to a collection point designated by local authorities. Some collection points accept products for free. The separate collection and recycling of your product at the time of disposal will help conserve natural resources and ensure that it is recycled in a manner that protects human health and the environment.
Battery Disposal InformationWhen replacing the internal battery, dispose of the spent battery according to your local environmental laws and guidelines.
California: The coin cell battery in your Xserve contains perchlorates. Special handling and disposal may apply. Refer to www.dtsc.ca.gov/hazardouswaste/perchlorate.
Nederlands: Gebruikte batterijen kunnen worden ingeleverd bij de chemokar of in een speciale batterijcontainer voor klein chemisch afval (kca) worden gedeponeerd.
Deutschland: Das Gerät enthält Batterien. Diese gehören nicht in den Hausmüll. Sie können verbrauchte Batterien beim Handel oder bei den Kommunen unentgeltlich abgeben.Um Kurzschlüsse zu vermeiden, kleben Sie die Pole der Batterien vorsorglich mit einem Klebestreifen ab.
Taiwan:
Apple and the EnvironmentApple recognizes its responsibility to minimize the environmental impacts of its operations and products.
More information is available on the web:www.apple.com/environment
Class 1 label Service warning label