Embed Size (px)
Citation preview
XHIBITSIGNAGEUSER MANUALThis manual will walk you through the Mvix digital signage software, XhibitSignage. If you have any questions contact support at support.mvixusa.com
Table of Contents
Adding & Creating Content Media 3
Creating a Playlist 4
Creating a Content Schedule 5
Managing Your Devices 7
Setting Up Wifi
Adding Media and Playlists to a Template 10
11
1. Adding & Creating Content Media
How to Add Media
The first thing you’ll want to do once you’ve obtained your content is to upload it to your online media library. Your media library is accessible from anywhere, as long as you’re logged into your account, and houses all of your content. Before a schedule of any sort can be programmed, you must first add content to your library. The following article explains how to upload content to your media library in a few easy steps:
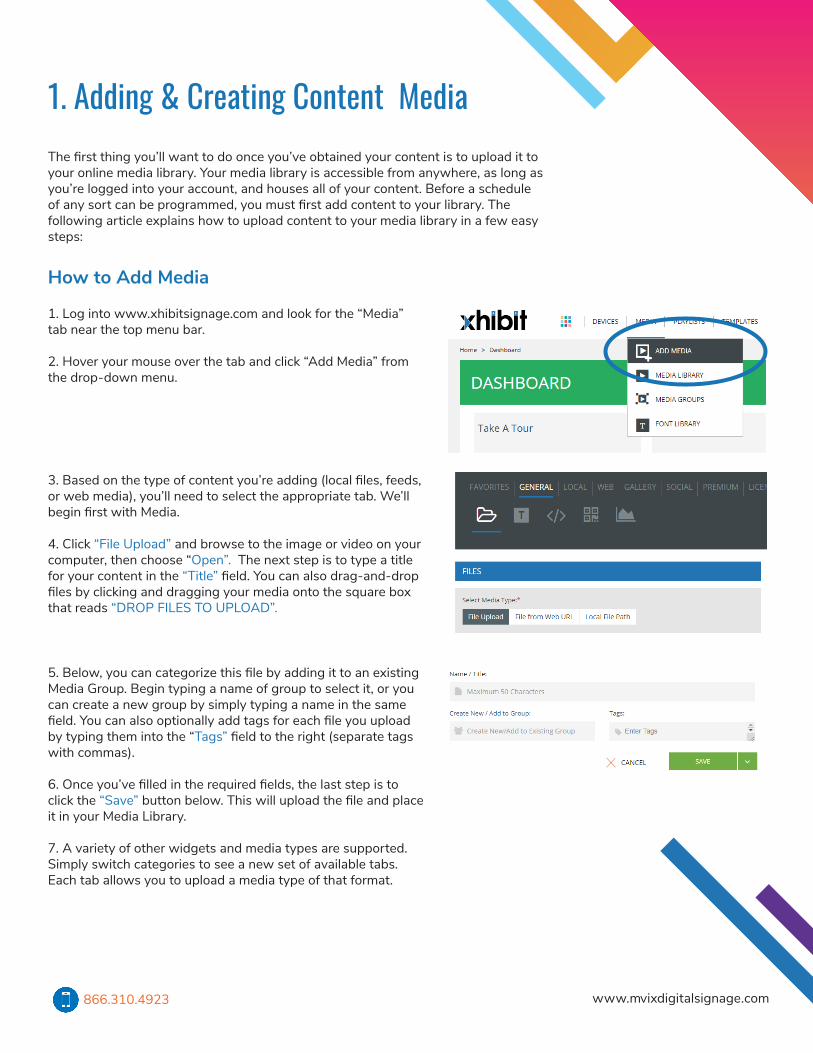
1. Log into www.xhibitsignage.com and look for the “Media” tab near the top menu bar.
2. Hover your mouse over the tab and click “Add Media” from the drop-down menu.
3. Based on the type of content you’re adding (local files, feeds, or web media), you’ll need to select the appropriate tab. We’ll begin first with Media.
4. Click “File Upload” and browse to the image or video on your computer, then choose “Open”. The next step is to type a title for your content in the “Title” field. You can also drag-and-drop files by clicking and dragging your media onto the square box that reads “DROP FILES TO UPLOAD”.
5. Below, you can categorize this file by adding it to an existing Media Group. Begin typing a name of group to select it, or you can create a new group by simply typing a name in the same field. You can also optionally add tags for each file you upload by typing them into the “Tags” field to the right (separate tags with commas).
6. Once you’ve filled in the required fields, the last step is to click the “Save” button below. This will upload the file and place it in your Media Library.
7. A variety of other widgets and media types are supported. Simply switch categories to see a new set of available tabs. Each tab allows you to upload a media type of that format.
866.310.4923 www.mvixdigitalsignage.com
2. Creating a Playlist
How to Create Playlist
After uploading content to your Media Library, you’re now ready to arrange the files together to create a playlist. Playlists allow you to manage large groups of content by combining them together under a single playlist name, which can then be added to a schedule and published very easily.
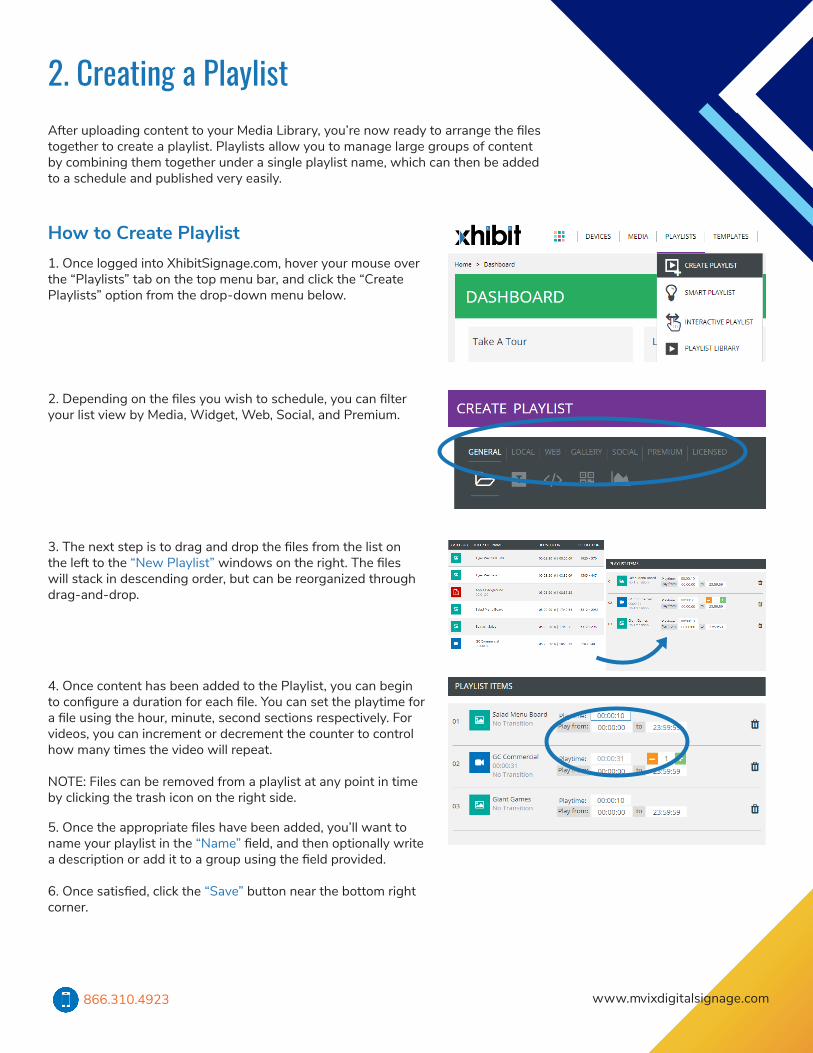
1. Once logged into XhibitSignage.com, hover your mouse over the “Playlists” tab on the top menu bar, and click the “Create Playlists” option from the drop-down menu below.
2. Depending on the files you wish to schedule, you can filter your list view by Media, Widget, Web, Social, and Premium.
3. The next step is to drag and drop the files from the list on the left to the “New Playlist” windows on the right. The files will stack in descending order, but can be reorganized through drag-and-drop.
4. Once content has been added to the Playlist, you can begin to configure a duration for each file. You can set the playtime for a file using the hour, minute, second sections respectively. For videos, you can increment or decrement the counter to control how many times the video will repeat.
NOTE: Files can be removed from a playlist at any point in time by clicking the trash icon on the right side.
5. Once the appropriate files have been added, you’ll want to name your playlist in the “Name” field, and then optionally write a description or add it to a group using the field provided.
6. Once satisfied, click the “Save” button near the bottom right corner.
866.310.4923 www.mvixdigitalsignage.com
3. Creating a Content Schedule
How to Create a Schedule
After creating a playlist, the next step is to create a schedule for your media. This will allow you to then take those media files and display them with preset timings and durations. The following knowledgebase article explains how to incorporate content into a schedule, and to then assign timing and duration settings for each file.
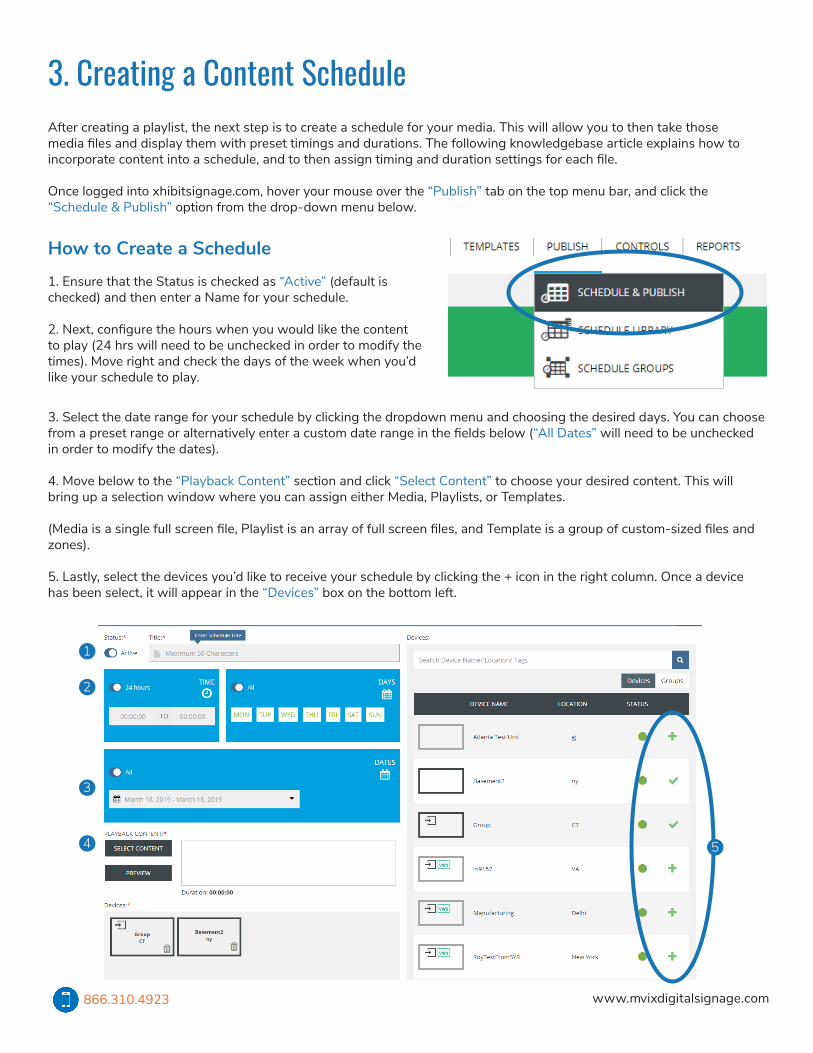
Once logged into xhibitsignage.com, hover your mouse over the “Publish” tab on the top menu bar, and click the “Schedule & Publish” option from the drop-down menu below.
1. Ensure that the Status is checked as “Active” (default is checked) and then enter a Name for your schedule.
2. Next, configure the hours when you would like the content to play (24 hrs will need to be unchecked in order to modify the times). Move right and check the days of the week when you’d like your schedule to play.
3. Select the date range for your schedule by clicking the dropdown menu and choosing the desired days. You can choose from a preset range or alternatively enter a custom date range in the fields below (“All Dates” will need to be unchecked in order to modify the dates).
4. Move below to the “Playback Content” section and click “Select Content” to choose your desired content. This will bring up a selection window where you can assign either Media, Playlists, or Templates. (Media is a single full screen file, Playlist is an array of full screen files, and Template is a group of custom-sized files and zones).
5. Lastly, select the devices you’d like to receive your schedule by clicking the + icon in the right column. Once a device has been select, it will appear in the “Devices” box on the bottom left.
866.310.4923 www.mvixdigitalsignage.com
1
2
3
4 5
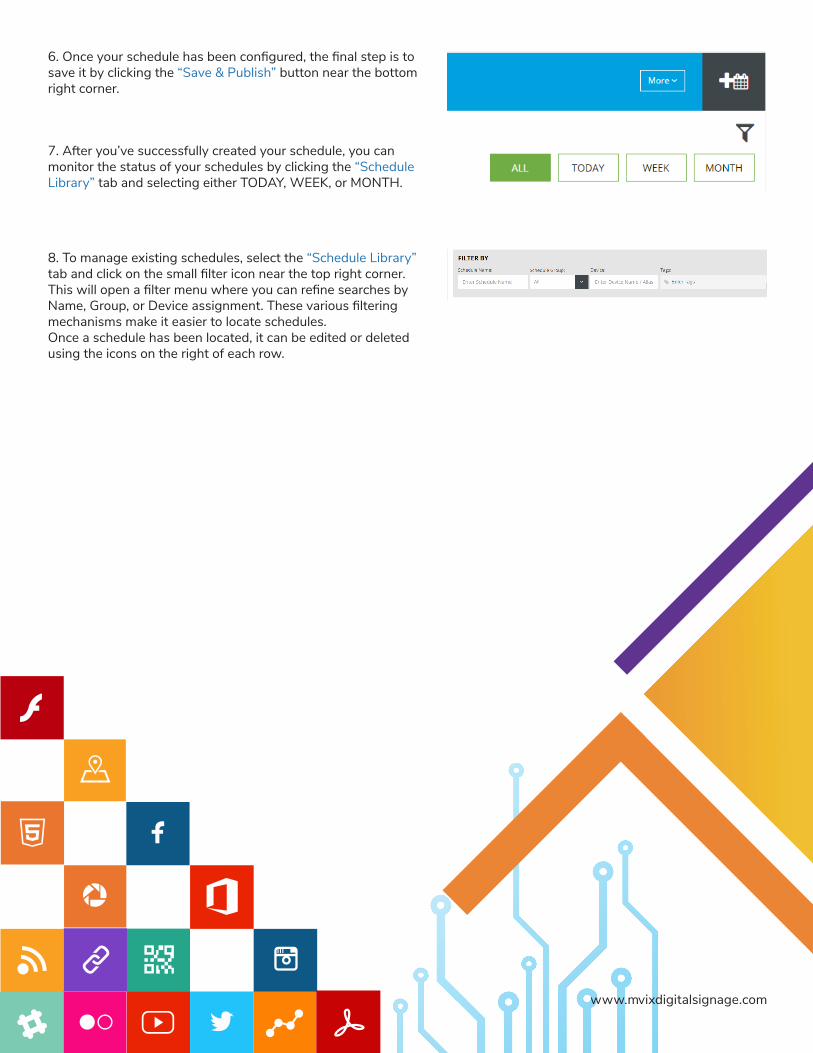
6. Once your schedule has been configured, the final step is to save it by clicking the “Save & Publish” button near the bottom right corner.
7. After you’ve successfully created your schedule, you can monitor the status of your schedules by clicking the “Schedule Library” tab and selecting either TODAY, WEEK, or MONTH.
8. To manage existing schedules, select the “Schedule Library” tab and click on the small filter icon near the top right corner. This will open a filter menu where you can refine searches by Name, Group, or Device assignment. These various filtering mechanisms make it easier to locate schedules. Once a schedule has been located, it can be edited or deleted using the icons on the right of each row.
www.mvixdigitalsignage.com
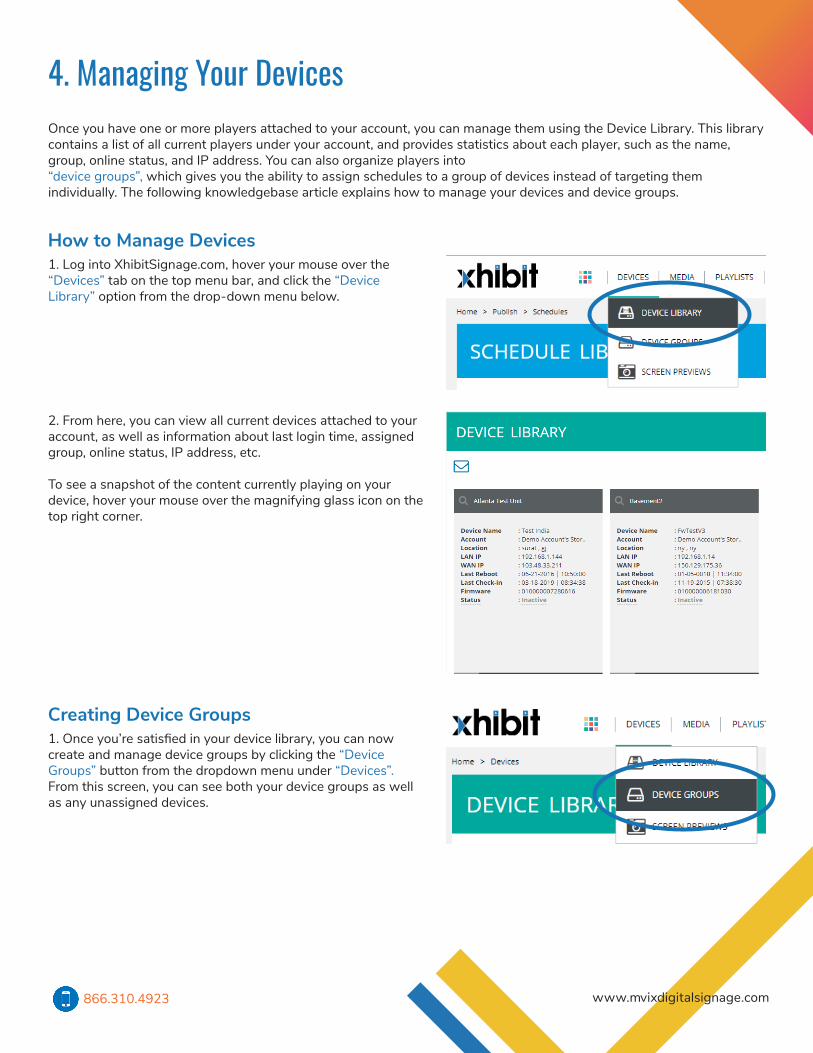
4. Managing Your Devices Once you have one or more players attached to your account, you can manage them using the Device Library. This library contains a list of all current players under your account, and provides statistics about each player, such as the name, group, online status, and IP address. You can also organize players into “device groups”, which gives you the ability to assign schedules to a group of devices instead of targeting them individually. The following knowledgebase article explains how to manage your devices and device groups.
1. Log into XhibitSignage.com, hover your mouse over the “Devices” tab on the top menu bar, and click the “Device Library” option from the drop-down menu below.
1. Once you’re satisfied in your device library, you can now create and manage device groups by clicking the “Device Groups” button from the dropdown menu under “Devices”. From this screen, you can see both your device groups as well as any unassigned devices.
2. From here, you can view all current devices attached to your account, as well as information about last login time, assigned group, online status, IP address, etc.
To see a snapshot of the content currently playing on your device, hover your mouse over the magnifying glass icon on the top right corner.
How to Manage Devices
Creating Device Groups
866.310.4923 www.mvixdigitalsignage.com
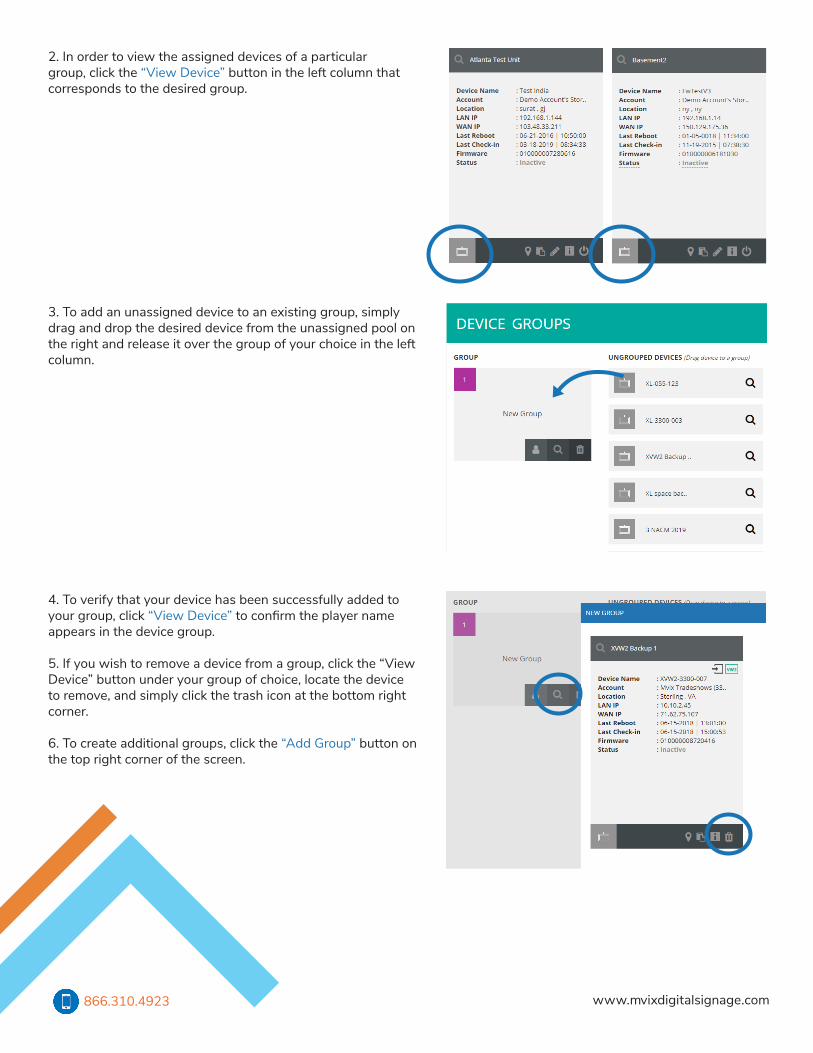
2. In order to view the assigned devices of a particular group, click the “View Device” button in the left column that corresponds to the desired group.
3. To add an unassigned device to an existing group, simply drag and drop the desired device from the unassigned pool on the right and release it over the group of your choice in the left column.
4. To verify that your device has been successfully added to your group, click “View Device” to confirm the player name appears in the device group.
5. If you wish to remove a device from a group, click the “View Device” button under your group of choice, locate the device to remove, and simply click the trash icon at the bottom right corner.
6. To create additional groups, click the “Add Group” button on the top right corner of the screen.
866.310.4923 www.mvixdigitalsignage.com
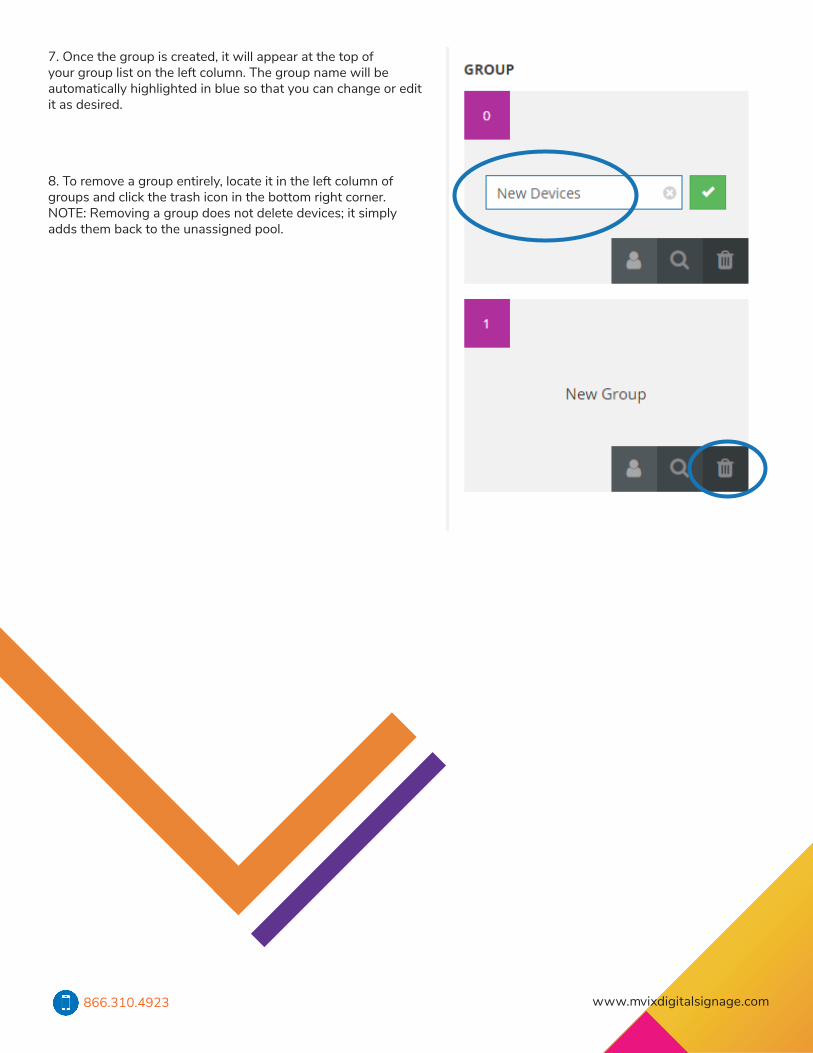
7. Once the group is created, it will appear at the top of your group list on the left column. The group name will be automatically highlighted in blue so that you can change or edit it as desired.
8. To remove a group entirely, locate it in the left column of groups and click the trash icon in the bottom right corner. NOTE: Removing a group does not delete devices; it simply adds them back to the unassigned pool.
866.310.4923 www.mvixdigitalsignage.com
5. Adding Media and Playlists to a Template
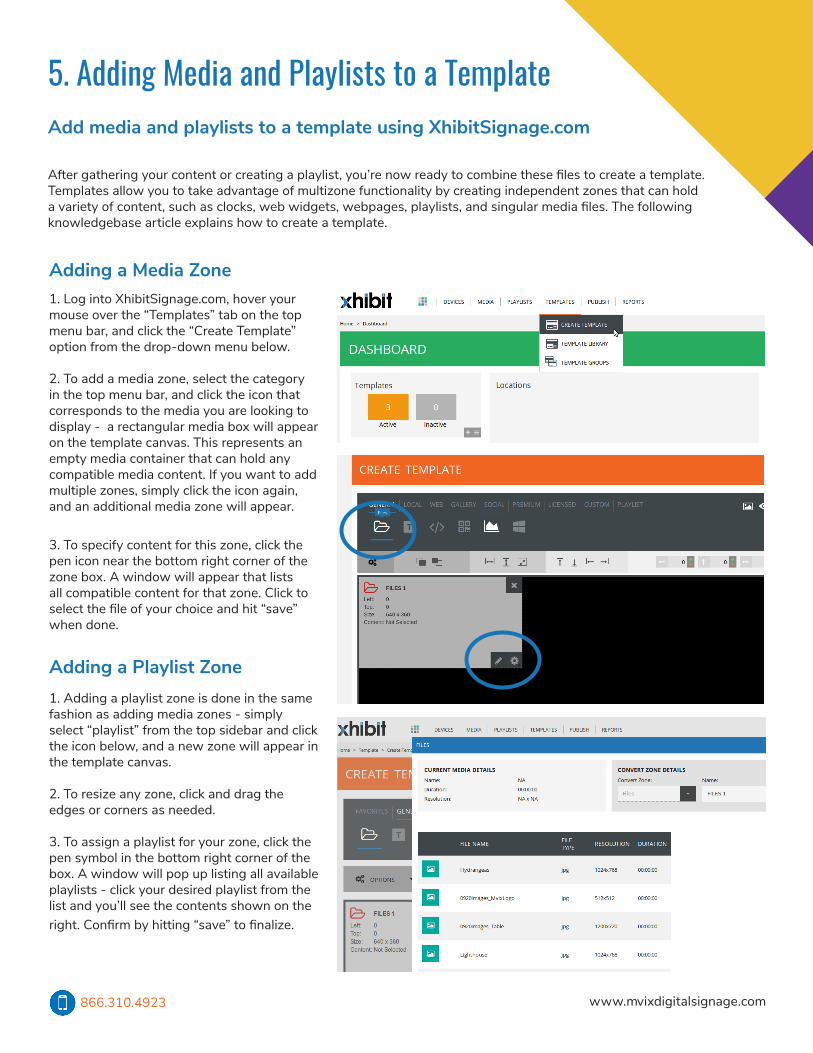
1. Log into XhibitSignage.com, hover your mouse over the “Templates” tab on the top menu bar, and click the “Create Template” option from the drop-down menu below.
2. To add a media zone, select the category in the top menu bar, and click the icon that corresponds to the media you are looking to display - a rectangular media box will appear on the template canvas. This represents an empty media container that can hold any compatible media content. If you want to add multiple zones, simply click the icon again, and an additional media zone will appear.
3. To specify content for this zone, click the pen icon near the bottom right corner of the zone box. A window will appear that lists all compatible content for that zone. Click to select the file of your choice and hit “save” when done.
1. Adding a playlist zone is done in the same fashion as adding media zones - simply select “playlist” from the top sidebar and click the icon below, and a new zone will appear in the template canvas.
2. To resize any zone, click and drag the edges or corners as needed.
3. To assign a playlist for your zone, click the pen symbol in the bottom right corner of the box. A window will pop up listing all available playlists - click your desired playlist from the list and you’ll see the contents shown on the right. Confirm by hitting “save” to finalize.
After gathering your content or creating a playlist, you’re now ready to combine these files to create a template. Templates allow you to take advantage of multizone functionality by creating independent zones that can hold a variety of content, such as clocks, web widgets, webpages, playlists, and singular media files. The following knowledgebase article explains how to create a template.
866.310.4923 www.mvixdigitalsignage.com
Add media and playlists to a template using XhibitSignage.com
Adding a Media Zone
Adding a Playlist Zone
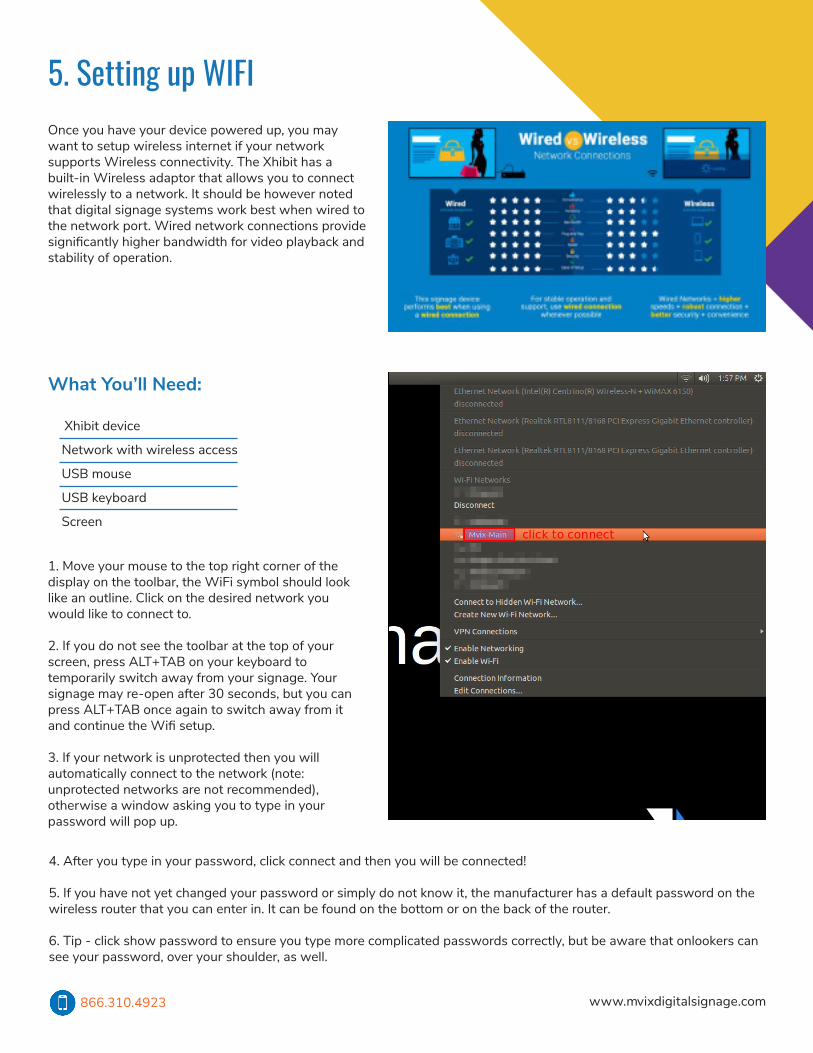
5. Setting up WIFIOnce you have your device powered up, you may want to setup wireless internet if your network supports Wireless connectivity. The Xhibit has a built-in Wireless adaptor that allows you to connect wirelessly to a network. It should be however noted that digital signage systems work best when wired to the network port. Wired network connections provide significantly higher bandwidth for video playback and stability of operation.
1. Move your mouse to the top right corner of the display on the toolbar, the WiFi symbol should look like an outline. Click on the desired network you would like to connect to. 2. If you do not see the toolbar at the top of your screen, press ALT+TAB on your keyboard to temporarily switch away from your signage. Your signage may re-open after 30 seconds, but you can press ALT+TAB once again to switch away from it and continue the Wifi setup. 3. If your network is unprotected then you will automatically connect to the network (note: unprotected networks are not recommended), otherwise a window asking you to type in your password will pop up.
What You’ll Need:
Xhibit device
Network with wireless access
USB mouse
USB keyboard
Screen
4. After you type in your password, click connect and then you will be connected! 5. If you have not yet changed your password or simply do not know it, the manufacturer has a default password on the wireless router that you can enter in. It can be found on the bottom or on the back of the router. 6. Tip - click show password to ensure you type more complicated passwords correctly, but be aware that onlookers can see your password, over your shoulder, as well.
866.310.4923 www.mvixdigitalsignage.com

23475 Rock Haven Way #125Sterling, VA 20166
mvixdigitalsignage.com(703) 382-1739