Embed Size (px)
Citation preview

XGA-5000
XGA-SERIES AMPLIFIERS
XGA-3000
Instruction Manual | Manual de instrucciones | Manuel d’instructions | Bedienungshandbuch
XGA-2000
XGA-4000
2Contents Contenidos | Sommaire | Inhaltsverzeichnis
en | es | fr | de
Contents | Contenidos | Sommaire | Inhaltsverzeichnis
Warning | Advertencia | Avertissement | Warnungen ...........................................................................................................
Diagrams | Diagramas | Diagrammes | Darstellungen .........................................................................................................
Introduction | Introducción | Introduction | Einleitung .......................................................................
Connections and System Control | Conexiones y Control de sistema
Connexions & Utilisation | Anschlüsse und Systemeinstellungen ..............................
Troubleshooting | Solución de problemas
Problèmes et solutions | Problembeseitigung....................................................................
Specifications|Especificaciones|Caractéristiquestechniques|TechnischeDaten .................................
Product Registration | Registro de Producto | Enregistrement du produit | Produktregistrierung......
Support | Servicio al cliente | Assistance | Support Kontakt ........................................................................................
3
4
5
7
16
20
22
23

WarningAdvertencia•Avertissement•Warnungen3
PLEASE READ CAREFULLY BEFORE PROCEEDING
Always follow the basic precautions listed below to avoid the possibility of serious injury or even death from electrical shock, short-circuiting, damages, fire or other hazards.
• READ INSTRUCTIONS: - All the safety and operating instructions should be read before the product is operated.• RETAIN INSTRUCTIONS: - The safety and operating instructions should be re-tained for future reference. -All the safety and operating instructions should be read before the product is operated.• HEED WARNINGS: - All warnings on the product and in the operating instructions should be adhered to.• FOLLOW INSTRUCTIONS: - All operating and use instructions should be fol-lowed.• CLEANING: - The product should be cleaned only with a polish-ing cloth or a soft dry cloth. - Never clean with furniture wax, benzine, insecti-cides or other volatile liquids since they may corrode the cabinet.• WATER AND MOISTURE: - Do not use this product near water, for example, near a bathtub, wash bowl, kitchen sink, or laundry tub; in a wet basement; or near a swimming pool; and the like. • DO NOT OPEN: - Do not open the device or attempt to disassemble the internal parts or modify them in any way. The de-vice contains no user- serviceable parts. If it should appear to be malfunctioning, discontinue use im-mediately and have it inspected by qualified GEMINI service personnel.• REPLACEMENT PARTS: - When replacement parts are required, be sure the service technician has used replacement parts speci-fied by the manufacturer or have the same character-istics as the original part. Unauthorized substitutions may result in fire, electric shock, or other hazards.
WARNING • ADVERTENCIA • AVERTISSEMENT • WARNUNGENPOR FAVOR LEA DETENIDAMENTE ANTES DE PROCEDER
Siguiendo siempre las precauciones básicas indi-cadas a continuación para evitar la posibilidad de lesiones serias incluso la muerte por descarga eléc-trica, cortocircuito, daños, fuego u otros peligros.
• LEA LAS INSTRUCCIONES:- Todas las instrucciones de seguridad y funciona-miento deben ser leídas antes de hacer funcionar el producto..• CONSERVE LAS INSTRUCCIONES:- Las instrucciones de seguridad y funcionamiento se deben conservar para futuras consultas.Todas las instrucciones de seguridad y funcionamiento deben ser leídas antes de hacer funcionar el producto.• PRESTEN ATENCION A LAS ADVERTENCIAS:- Todas las advertencias e instrucciones de funciona-miento del producto deben ser tenidas en cuenta.• SIGAN LAS INSTRUCCIONES:- Todas las instrucciones de funcionamiento y uso deben ser seguidas.• LIMPIEZA:- El producto debe ser limpiado solamente con un paño limpio o un paño seco. Nunca limpien con cera para muebles, gasolina, insecticidas u otros líquidos volátiles que puedan corroer el recinto.• AGUA Y HUMEDAD:- No use este producto cerca del agua, por ejemplo, cerca de la bañera, lavamanos, fregadero o la lava-dora; en un sótano húmedo, o cerca de una piscina; o parecidos.• NO LO HABRA:- No habrá el aparato o intente desmontar las partes internas o modificarlas de alguna manera. El aparato no contiene partes inservibles. Caso de que pareciera que no funcionara, deje de usarlo inme-diatamente y haga que sea revisado por un técnico cualificado de GEMINI. • PIEZAS DE RECAMBIO:- Cuando son necesarias piezas de recambio, tengan por seguro que el servicio técnico ha usado piezas de recambio específicas de la marca o de las mismas características como las originales. Recambios no autorizados pueden ocasionar incendios, descargas eléctricas u otros peligros.
LIRE LES INSTRUCTIONS AVANT TOUTE UTILISATION
Veuillez prendre connaissance des instructions suivantes afin de prévenir tout accident et/ou mau-vaise utilisation du produit. Le non respect de ces principes de base peut entraîner différents risques: blessure, choc électrique , court-circuit, dommage & risque d’incendie.
• LIRE LES INSTRUCTIONS: - Toutes les notifications techniques et de sécurité doivent être lues avant utilisation du produit.• CONSERVATION DU MANUEL D’INSTRUCTIONS: - Le manuel d’instructions doit être conservé à l’abri pour un usage futur. Veuillez vous y reporter en cas de nécessité et avant toute utilisation du produit.• MISES EN GARDE: - Vous devez prendre connaissance de toutes les mises en garde et y adhérer avant toute utilisation du produit. • SUIVI & RESPECT DES INSTRUCTIONS: - Toutes les instructions de fonctionnement & d’utilisation doivent être respectées.• ENTRETIEN/NETTOYAGE: - Cet appareil ne doit être nettoyé qu’avec un chif-fon légèrement humide ou tissu de polissage. Ne ja-mais utiliser de produit de nettoyage pour meuble, benzine, insecticide ou tout autre produit volatile qui pourrait entraîner une corrosion de l’enceinte. • EAU & HUMIDITE: - Ne pas utiliser cet appareil à proximité d’un robi-net, d’un évier, d’une douche, d’une baignoire, d’une piscine. Ne pas installer l’enceinte sur un sol humide. • NE PAS OUVRIR: - Ne pas démonter l’appareli afin d’accéder aux composants internes en vue d’une éventuelle ré-paration/modification. Cet appareil ne contient pas de pièces/composants qui puissent être réparés par l’utilisateur. En cas de panne/dysfonctionnement, veuillez contacter votre revendeur ou le service technique de GEMINI au 01 69 79 97 79 (FRANCE).• REMPLACEMENT DE PIECES DETACHEES: En cas d’intervention technique, veillez à ce que le technicien n’utilise que des pièces d’origine ou recommandées par le constructeur. L’utilsation de composants non spécifiés par le constructeur pour-rait entrainer un mauvais fonctionnement, ainsi que divers risques (Incendies, choc électrique, court-circuit...) & l’annulation de la garantie.
BITTE UNBEDINGT VOR INBETRIEBNAHME LESEN
Folgen Sie stets den nachfolgenden Vorsichtsmaß-nahmen, um die Möglichkeit von schweren Verletzun-gen oder gar eines tödlichen elektrischen Schlages sowie Kurzschluss, Beschädigung, Feuer oder anderer Gefahren zu verhindern.
• ANWEISUNGEN LESEN: - Lesen Sie alle Sicherheits- und Bedienungsanweisun-gen, bevor Sie mit dem Produkt arbeiten. • AUFBEWAHRUNGSHINWEIS: - Bewahren Sie alle Sicherheits- und Bedienungs an-weis ungen gut auf. • WARNHINWEISE: - Alle Warnhinweise für das Produkt und die Bedienungsan weis ungen müssen genau eingehalten werden. • ANWEISUNGEN BEFOLGEN: - Alle Anweisungen zum Betrieb des Produkts sollten be folgt werden. • REINIGUNG: - Das Produkt sollte nur mit einem Polier- oder einem weichen trockenen Tuch gereinigt werden. Benutzen Sie dazu niemals Möbelwachs, Benzine, In sekten -mittel oder andere flüchtige Reinigungsmittel, denn Sie könnten zur Korrosion des Gehäuses führen. • WASSER&FEUCHTIGKEIT: - Benutzen Sie dieses Produkt nicht in der Nähe von Was ser, z. B. in der Nähe einer Badewanne, einer Waschschüssel, eines Küchenspül beckens, eines Waschbeckens, in einem feuchten Keller, in der Nähe eines Schwimmbeckens oder an ähnlichen Orten. • NICHT ÖFFNEN: - Öffnen Sie niemals das Produkt und versuchen Sie nicht, interne Baugruppen zu entnehmen oder zu modifizieren. Das Produkt enthält keine vom Nutzer zu wechselnde Ersatzteile. Sollten Sie eine Fehlfunk-tion feststellen stellen Sie unverzüglich den Betrieb des Produktes ein und lassen Sie es von qualifiziertem GEMINI Servicepersonal prüfen.• ERSATZTEILE: - Wenn Ihr Produkt Ersatzteile benötigt, achten Sie da-rauf, dass der Servicetechniker nur vom Hersteller er-laubte Ersatzteile oder Ersatzteile, die gleichen Eigen-schaften wie die originalen Teile aufweisen, einsetzt. Falsche Ersatzteile können zu Bränden, elektrischen Schlägen oder anderen Risiken führen.

DiagramsDiagramas•Diagrammes•Darstellungen 4
AmplifierDiagramsDiagramas | Diagrammes | Darstellungen
Rearpanel•PanelposteriorFacearrière•Rückseite
Frontpanel•PanelfrontalFaceavant•Vorderseite
18
XP-3000
15 2218
1619
1721
DESIGNED AND ENGINEERED IN USA BY GEMINI, A DIVISION OF GCI TECHNOLOGIES, MANUFACTURED IN CHINA XGA-5000
5000 Watt Professional Power Amplifier
ATTENTION: RISQUE DECHOC ELECTRIQUE NE PASOUVRIR
WARNING: TO REDUCE THE RISK OF FIRE OR ELECTRIC SHOCK REPLACEONLY WITH THE SAME TYPEF15A 250V FUSE. DO NOT EXPOSE THIS EQUIPMENTTO RAIN OR MOISTURE
PINOUT SPEAKONS 3
1
13
1412
2
10
11
4
5
7
6
8
9
20
CongratulationsonpurchasingaGeminiXGA-SeriesPowerAmplifier.Thisstateoftheartpoweramplifierincludesthelatestfeaturesandisbackedbyaoneyearlimitedwarranty.Prior to use, we suggest that you carefully read all the instructions. FelicidadesporadquirirunamplificadordepotenciaXGA-SeriesdeGemini.Esteampli-ficadorincluyelasúltimascaracterísticasyestácubiertoporunagarantíalimitadaaunaño.Antesdeusarlo,lesugerimosqueleadetenidamentetodaslasinstrucciones.
Félicitationsconcernantl’achatdel’amplificateurGeminidelaSérieXGA.Cetappareilbénéficiedesavancéestechnologieslesplusrécentes,ainsiqued’unegarantiedurant1 an. Avant toute utilisation, nous vous recommandons de prendre connaissance des instructionsquisuivent.
Glückwunsch zum Kauf eines Gemini XGA-Serie Leistungsverstärkers. Diese Endstufe wurde nach dem neuesten Stand der Technik hergestellt, ist mit den modernsten Features ausgestattet und verfügt über eine limitierte 1 Jahre Garantie. Bitte lesen und beachten Sie vor der Inbetriebnahme alle folgenden Anweisungen.
YourGeminiXGA-SeriesPowerAmplifierhasbeencarefullyinspectedandtestedbeforepackingandshipping.Afterunpackingyouramplifier,carefullyinspectitforexteriordam-age and immediately report any physical damage during transit to your shipping carrier.Save the shipping boxes and all packaging materials in case the unit needs to be returned to your local dealer or GCI Technologies. Additional contents (1) Power Cord....(1) User Manual
SuamplificadordepotenciaXGA-SeriesdeGeminihasidocuidadosamenteinspeccio-nadoyprobadoantesdeembalarseyenviarse.Despuésdedesembalarsuamplificador,inspecciónelo con cuidado para detectar daños externos e informe inmediatamente de cualquierdañoproducidoduranteeltransporteasutransportista.Guardelascajasdeltransporteytodomaterialdeembalajeenelcasoquelaunidaddebaserdevueltaasuvendedor local o a GCI Technologies. Contenido adicional (1) cable de alimentación…. (1) manual del usuario
VotreamplificateurGeminidelaSérieXGAabénéficiédenombreuxtests&d’uncontrôlequalitéavantd’êtreemballé.Lorsquevousdéballerezcelui-ci,mercidevérifierqu’iln’apasétéendommagédurant le transport.Dans lecascontraire,notifier toutdommagepar écrit à votre transporteur ou revendeur. Nous vous recommandons de conserverl’emballaged’originecompletencasderetourdecetappareilsiunproblèmeouunepannevenaitàsurvenir. Accessoireslivrésavecl’appareil:(1)Cordonalimentation...(1)Moded’emploi
Ihre Gemini XGA-Serie Leistungsendstufe wurde vorsichtig geprüft und getestet bevor sieverpacktundversendetwurde.NachdemSiedenVerstärkerausgepackthaben,kontrollierenSieihnbitteaufäußerlicheBeschädigungenundmeldenSiejeglichenTransportschaden sofort Ihrem Transportunternehmen. Bewahren Sie den Originalkarton mitallemVerpackungsmaterialauf,fallsdasProduktjemalszuIhremFachhändleroderzu GCI Technologies zurückgesendet werden muss. ZusätzlicherLieferumfang(1)Netzkabel……….(1)Bedienungsanleitung
We Want You Listening For A LifetimeQueremosQueConserveSuOídoTodaLaVidaLonguevieàvosoreilles!Wirmöchten,dassSieeinganzesLebenhören!
Selectingfineaudioequipmentsuchastheunityouhavejustpurchasedisonlythestartofyourmusicalenjoyment.Nowit’stimetoconsiderhowyoucanmaximizethefunandexcitementyourequipmentoffers.ThisManufacturerandtheElectronicIndustriesAs-sociation’sConsumerElectronicsGroupwantyoutogetthemostoutofyourequipmentby playing it at a safe level. One that lets the sound come through loud and clear with-out annoying blaring or distortion-and, most importantly, without affecting your sensitive hearing. Sound can be deceiving. Over time your hearing “comfort level” adapts to higher volumes of sound. So what sounds “normal” can actually be loud and harmful to your hearing.GuardagainstthisbysettingyourequipmentatasafelevelBEFOREyourhear-ingadapts.Toestablishasafelevel:-Startyourvolumecontrolatalowsetting.-Slowlyincrease the sound until you can hear it comfortably and clearly, and without distortion. Onceyouhaveestablishedacomfortablesoundlevel:-Setthedialandleaveitthere.Taking a minute to do this now will help to prevent hearing damage or loss in the future. After all, we want you listening for a lifetime.
Usedwisely, yournewsoundequipmentwillprovidea lifetimeof funandenjoyment.Since hearing damage from loud noise is often undetectable until it is too late, this Manu-facturer and the Electronic Industries Association’s Consumer ElectronicsGroup rec-ommend you avoid prolonged exposure to excessive noise. This list of sound levels is included for your protection.
Seleccionarbienelequipodeaudio,comolaunidadqueacabadeadquirir,essóloelcomienzo de su disfrute musical. Ahora es el momento de considerar como se puede maximizarladiversiónyelentusiasmoquesuequipoleofrece.EstefabricanteylaAso-ciacióndeIndustriasElectrónicasdelGrupodeElectrónicadeConsumoquierequecon-sigalomáximodesuequipoperoutilizándoloaunnivelseguro.Unnivelquelepermitaqueelsonidolelleguealtoyclarosinestridencianidistorsiónylomásimportante,sinafectar su sensibilidad auditiva. El sonido puede ser engañoso. Con el tiempo su “nivel deconfort”deescuchaseadaptaanivelesdesonidomásaltos.Asíqueloquesuena
IntroductionIntroducción•Introduction•Einleitung5
Introduction•Presentación•Introduction•Einleitung
Unpacking•Desembalaje•Déballage•Auspacken
“normal”puedeserrealmentealtoyperjudicialparaeloído.Protéjasecontraestonive-landosuequipoaunnivelseguroANTESdequesuoídoseadapte.Paraestablecerunnivelseguro:-Inicieelcontroldelvolumenaunnivelbajo.–Lentamenteincrementeelsonidohastaquepuedaescucharloconfortablemente,conclaridadysindistorsión.Unavezhayaestablecidounniveldesonidoconfortable:-Ajusteeldialydéjeloahí.Tomarseunminutoparahacerestoahoranosayudaráaprevenirdañosopérdidadeoídoenelfuturo.Despuésdetodo,queremosqueconservesuoídotodalavida.
Usadoprudentemente,sunuevoequipodesonidoleharádisfrutarydivertirsetodalavida.Duranteañoseldañoporruidoenlosoídospuedeserindetectablehastaqueesdemasiado tarde, por eso la Asociación de Industrias Electrónicas del Grupo de Elec-trónica de Consumo recomienda evitar la exposición prolongada a un ruido excesivo. Incluimos esta lista de niveles de sonido para su protección.
Choisirunéquipementaudiodequalitételqueceluidontvousvenezdefairel’acquisition,nereprésentequ’unepartiedesréjouissancesmusicalesàvenir.Ilesttempsàprésentdedécouvrir tout leplaisirquevousprendrezaveccetéquipement.Les fabricantsetlesindustrielsdumondedel’électroniquesouhaitentquevouspuissiezobtenirdevotrematérielcequ’ilademeilleurtoutenl’utilisantàunniveausonoremodéré.Unniveaupermettantausondes’exprimeràlafoisfortementetdistinctement,sansdistorsionet,surtout,sansfragiliservotrecapacitéd’écoute.Lesonpeutparfoiss’avérerdécevant.Avec l’habitude, leniveaud’écouteauquel vousvoussentezà l’aisevousconduiraàmonterlevolume.C’estainsiqu’unniveausonorequipeutvoussembler“normal“estenréalitéfortetfragilisevosoreilles.Préservez-vousdecettetendanceenréglantvotrematérielàunniveauraisonnableAVANTquevosoreillesnes’habituent.Commenceztou-joursavecunréglagedevolumeàfaibleniveau,puisaugmentezcelui-ciprogressivementafind’atteindreleniveauaudiodésiré.Veillezànepasatteindreunniveaudedistorsionquiseraitpréjudiciableàlaqualitéaudio,aufonctionnementcorrectdel’amplificateur,ainsiqu’àvoscapacitésd’écoute.Prendreletempsd’effectuercetteopérationdèsàprésent,vouspermettrad’évitertoutefragilisationoubienmêmelapertedevotrecapitald’écoute.Aprèstout,noussouhaitonslonguevieàvosoreilles!!!
Utiliséàbonescient,votrenouveléquipementaudiovousoffriratouteuneviedeplai-sir.Parcequeleslésionsauditivesnesontdétectéesquelorsqu’ilestdéjàtroptard,leFabricantetl’associationdeconsommateursdel’industriedel’électroniquevousrecom-mandentd’évitertouteexpositionprolongéeàunniveausonoreinadapté.
DieWahlvonexzellentemAudioequipment,sowiedasGerät,fürdasSiesichentsch-iedenhaben,sindnurderStartIhresmusikalischenVergnügens.WennSieeinigeDingebeachten,werdenSienochmehrSpaßundFreudemitIhremEquipmenthaben.Dies-er Hersteller und die Electronic Industries Association´s Consumer Electronics Group möchten, dass Sie alles aus Ihren Geräten herausholen, indem Sie es mit einem sicheren Pegel betreiben. Ein Pegel, bei dem Sie den Sound laut und klar hören, ohne lästige
StörgeräuscheundVerzerrungenund-amwichtigsten-ohneIhrGehörzuschädigen.Sound kann täuschen. Hören Sie über eine gewisse Zeit mit einem “ordentlichen Level”, führtdaszugrößerenLautstärken,sodassetwas,wasSieals“normal”empfinden,schonzulautseinundIhrGehörschädigenkann.BeugenSiedemvor,indemSieIhrEquipmentaufeinensicherenLautstärkepegeleinstellen,BEVORSiemitdemHörenbeginnen.SoerreichenSieeinensicherenPegel: -BeginnenSiebeimEinstellenderLautstärkebeieinem geringen Pegel -Erhöhen Sie den Pegel nur langsam bis Sie den Sound angenehm undklarundohneVerzerrungenhören.WennSieeinenangenehmenPegelgefundenha-ben:-BelassenSiedieReglerindergefundenenPositionNehmenSiesicheineMinuteZeit dafür, um Gehörschäden in der Zukunft zu verhindern, denn wir wollen, dass Sie Ihr ganzes Leben hören.
WennSieIhrEquipmentmitBedachtverwenden,werdenSiesicheinLebenlangdaraner-freuen. Da Gehörschäden aus zu lauten Geräuschen entstehen, die leider oft erst erkannt werden, wenn es zu spät ist, empfehlen dieser Hersteller und die Electronic Industries Association´s Consumer Electronics Group, sich keinesfalls länger lauten Geräuschen auszusetzen. Wir haben zu Ihrem Schutz eine Liste mit Lautstärkepegeln zusammenges-tellt:
Sound Level (in dB) •Niveldesonido(endecibelios)Niveauaudio(EndB)• Lautstärken (in dB)
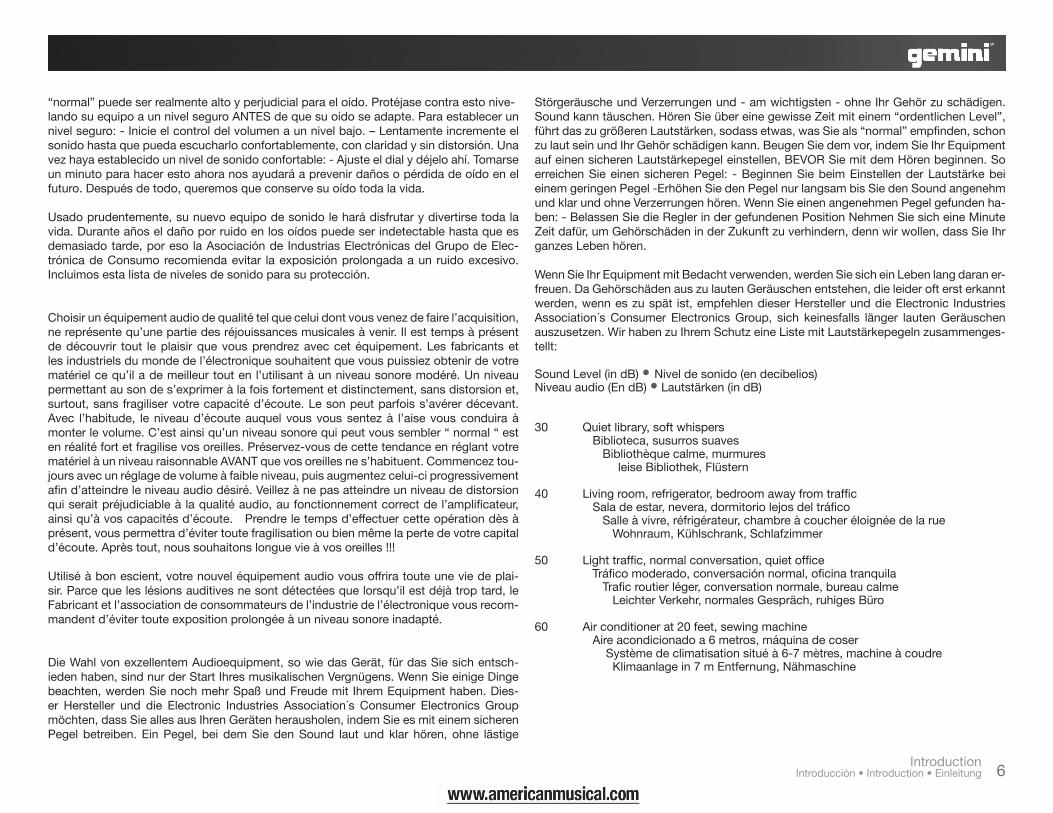
30 Quiet library, soft whispers Biblioteca, susurros suaves Bibliothèquecalme,murmures leise Bibliothek, Flüstern
40 Livingroom,refrigerator,bedroomawayfromtraffic Saladeestar,nevera,dormitoriolejosdeltráfico Salleàvivre,réfrigérateur,chambreàcoucheréloignéedelarue Wohnraum, Kühlschrank, Schlafzimmer
50 Lighttraffic,normalconversation,quietoffice Tráficomoderado,conversaciónnormal,oficinatranquila Traficroutierléger,conversationnormale,bureaucalme LeichterVerkehr,normalesGespräch,ruhigesBüro
60 Air conditioner at 20 feet, sewing machine Aireacondicionadoa6metros,máquinadecoser Systèmedeclimatisationsituéà6-7mètres,machineàcoudre Klimaanlagein7mEntfernung,Nähmaschine
IntroductionIntroducción•Introduction•Einleitung 6

70 Vacuumcleaner,hairdryer,noisyrestaurant Aspiradora, secador de pelo, restaurante ruidoso Aspirateur, sèche-cheveux, restaurant bruyant Staubsauger, Haarfön, lautes Restaurant
80Averagecitytraffic,garbagedisposals,alarmclockattwofeet Tráficoenciudad,trituradoradebasura,relojdespertadora60cms. Traficroutierdense,centredetridesordures,réveilmatinà60cm durchschnittlicher Stadtverkehr, Müllhäcksler, Wecker in 60 cm Entfernung
The following noises can be dangerous at extended exposureLossiguientesruidospuedesserpeligrososenexposicionesprolongadas:Lesbruitssuivantspeuventêtredangereuxlorsdetouteexpositionprolongée DIEFOLGENDENGERÄUSCHEKÖNNENBEILÄNGEREMKONTAKTGEFÄHRLICHSEIN
90Subway,motorcycle,trucktraffic,lawnmower Metro,motocicleta,tráficodecamiones,cortadoradecésped Métro,moto,camion,tondeuseàgazon U-Bahn,Motorrad,LKWVerkehr,Rasenmäher
100 Garbage truck, chain saw, pneumatic drill Camión de la basura, motosierra, chirriar de rueda Camionpoubelles,tronçonneuse,marteaupiqueur Müllauto, Kettensäge, Presslufthammer
120 Rock band concert in front of speakers, thunderclap Concierto de rock delante de los altavoces, trueno Concert de rock devant les enceintes, coup de tonnerre Rockkonzert vor den Lautsprechern, Donnerschlag
140 Gunshotblast,jetplane Disparo de arma de fuego, avión Jet Coup de pistolet, avion Jet Gewehrschuss,Düsenflugzeug
180 Rocket launch pad Plataforma de lanzamiento de cohetes Fuséeaudécollage Raketenstart Information courtesy of the Deafness Research Foundation.InformacióncortesíadelaFundacióndeInvestigacióndelaSordera.NousremercionslaFondationdeRecherchecontrelaSurditépourcesinformations.Mit freundlicher Genehmigung der Deafness Research Foundation
AC power section • Sección alimentación AC Section alimentation (AC) • Netzspannungsbereich
VoltageSelector(1):Pleasemakesurethatyourlocalvoltagematchesthevoltageindicatedon the unit.Selectordevoltaje(1):Porfavoraseguresequelatensióndesuzonaeslaindicadaenlaunidad.Selectiondelatensiod’utilisation(1):Assurezvousquel’appareilsoitcommutésurlaten-sionélectriqueenvigueurdansvotrepays.Spannungswahlschalter (1):StellenSiesicher,dassSiedierichtigeSpannungeingestellthaben.
Signalgroundliftswitch:signalgroundliftswitch(2)isusedtoliftthebalancedinputcon-nectors’ground/shieldfromtheamplifier’sground.Whenthesignalgroundlifted,thesoundsourcedisconnectsfromtheamplifier’sgroundpreventinggroundloopswhichcangeneratehum and noise. See the signal ground lift switch instructions for more detail.
Interruptordetomadetierra:Interruptordetomadetierra(2)seusaparasubirlasentradasbalanceadasdetomasdetierradesdelatomadelamplificador.Cuandosesubelatomadetierra,lafuentedesonidosedesconectadelatomadelamplificadorpreviniendoloquepodríaprovocarbuclesyzumbidos.Verlasinstruccionesdelaseñaldetomadetierraparamásdetalles.
Commutateur demise à la terre: Le commutateur demise à la terre (2) est utilisé pourséparerlamassedesentréessymétriquesdelaterre.Lorsquevousséparezlaterredelamasse,voussupprimezainsid’éventuellesbouclesdemassepouvantgénérerdesbruitsparasites. Suivant votre installation, vous déciderez ou non de séparer la masse de laterre.Vous référezauchapitrecommutateurdemiseà la terrepourplusd’informations.
SignalGroundliftSchalter:DerSignalGroundliftSchalter(2)wirdverwendet,umdieMassedersymmetrischenEingangsbuchsenvonderMassedesVerstärkerszutrennen.WenndieSignalmassegetrenntist(Lift=an),wirddieMassederSignalquellevonderMassedesVer-stärkers getrennt, um eventuelle Masseschleifen und damit Brummen und Störgeräusche zu beseitigen. Sheen Sie die Beschreibung des Groundlift Schalters für weitere Informationen.
ACcordoutlet:ACcordoutlet(3)isusedtoattachthepowercordtotheunit.
CableCAdesalida:cabledealimentacióndesalida(3)seutilizaparaconectarelcabledealimentación a la unidad.
7 Connections and System Control ConexionesyControldesistema•Connexions&Utilisation•AnschlüsseundSystemeinstellungen
ConnectionsandSystemControls•ConexionesySistemasdeControlConnexionsetleSystèmeContrôlent•Anschlüsse und Bedienelemente
Embase alimentation (AC): reliez le cordon d’alimentationlivréavecl’appareilàl’embased’alimentation(3).
Netzeingangsbuchse: Die Netzeingangsbuchse (3) dientzumAnschlussdesNetzkabelsandasGerät.
Input section • Sección EntradasSection Entrées • Eingangssektion
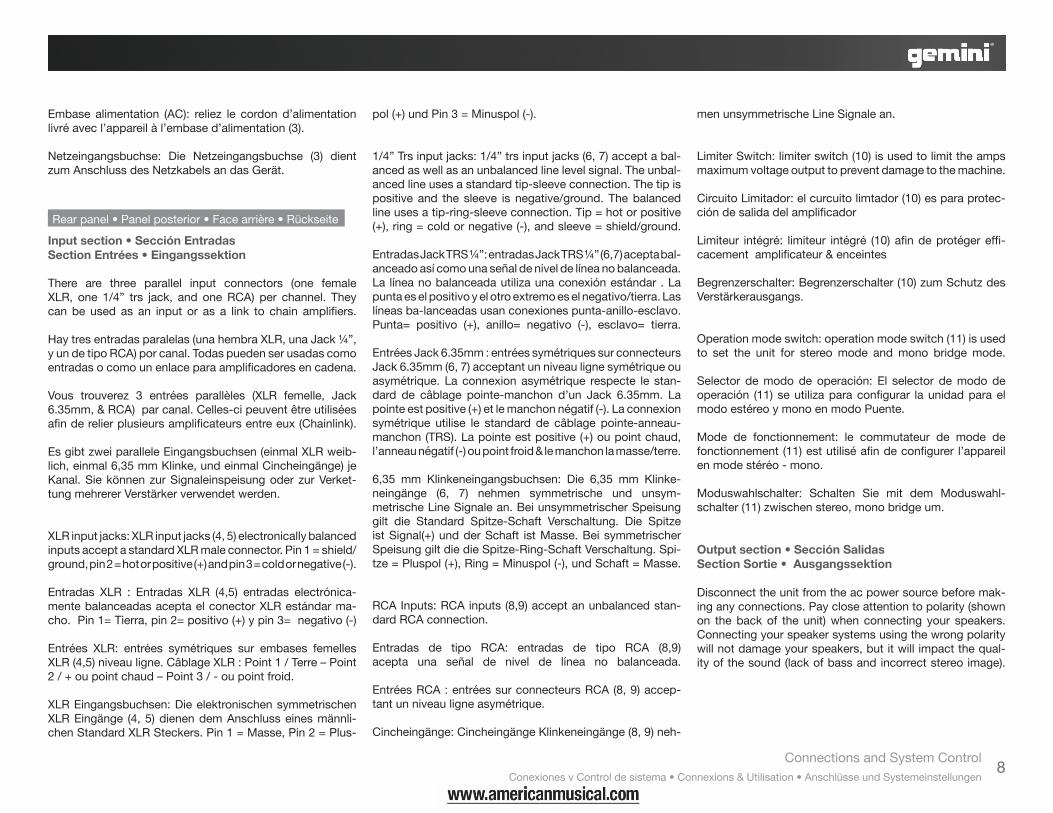
There are three parallel input connectors (one female XLR, one 1/4” trs jack, and oneRCA) per channel. Theycan be used as an input or as a link to chain amplifiers. Hay tres entradas paralelas (una hembra XLR, una Jack ¼”, y un de tipo RCA) por canal. Todas pueden ser usadas como entradasocomounenlaceparaamplificadoresencadena. Vous trouverez 3 entrées parallèles (XLR femelle, Jack6.35mm,&RCA)parcanal.Celles-cipeuventêtreutiliséesafinderelierplusieursamplificateursentreeux(Chainlink). Es gibt zwei parallele Eingangsbuchsen (einmal XLR weib-lich,einmal6,35mmKlinke,undeinmalCincheingänge)jeKanal.SiekönnenzurSignaleinspeisungoderzurVerket-tungmehrererVerstärkerverwendetwerden.
XLRinputjacks:XLRinputjacks(4,5)electronicallybalancedinputsacceptastandardXLRmaleconnector.Pin1=shield/ground, pin 2 = hot or positive (+) and pin 3 = cold or negative (-).
Entradas XLR : Entradas XLR (4,5) entradas electrónica-mentebalanceadasaceptaelconectorXLRestándarma-cho. Pin 1= Tierra, pin 2= positivo (+) y pin 3= negativo (-)
Entrées XLR: entrées symétriques sur embases femellesXLR(4,5)niveauligne.CâblageXLR:Point1/Terre–Point2/+oupointchaud–Point3/-oupointfroid.
XLREingangsbuchsen:DieelektronischensymmetrischenXLR Eingänge (4, 5) dienen dem Anschluss eines männli-chen Standard XLR Steckers. Pin 1 = Masse, Pin 2 = Plus-
pol (+) und Pin 3 = Minuspol (-).
1/4”Trsinputjacks:1/4”trsinputjacks(6,7)acceptabal-anced as well as an unbalanced line level signal. The unbal-anced line uses a standard tip-sleeve connection. The tip is positive and the sleeve is negative/ground.Thebalancedline uses a tip-ring-sleeve connection. Tip = hot or positive (+),ring=coldornegative(-),andsleeve=shield/ground.
EntradasJackTRS¼”:entradasJackTRS¼”(6,7)aceptabal-anceadoasícomounaseñaldeniveldelíneanobalanceada.Lalíneanobalanceadautilizaunaconexiónestándar.Lapuntaeselpositivoyelotroextremoeselnegativo/tierra.Laslíneasba-lanceadasusanconexionespunta-anillo-esclavo.Punta= positivo (+), anillo= negativo (-), esclavo= tierra.
EntréesJack6.35mm:entréessymétriquessurconnecteursJack6.35mm(6,7)acceptantunniveaulignesymétriqueouasymétrique.Laconnexionasymétrique respecte le stan-dard de câblage pointe-manchon d’un Jack 6.35mm. Lapointeestpositive(+)etlemanchonnégatif(-).Laconnexionsymétrique utilise le standard de câblage pointe-anneau-manchon (TRS). La pointe est positive (+) ou point chaud, l’anneaunégatif(-)oupointfroid&lemanchonlamasse/terre.
6,35 mm Klinkeneingangsbuchsen: Die 6,35 mm Klinke-neingänge (6, 7) nehmen symmetrische und unsym-metrische Line Signale an. Bei unsymmetrischer Speisung gilt die Standard Spitze-Schaft Verschaltung. Die Spitzeist Signal(+) und der Schaft ist Masse. Bei symmetrischer SpeisunggiltdiedieSpitze-Ring-SchaftVerschaltung.Spi-tze = Pluspol (+), Ring = Minuspol (-), und Schaft = Masse.
RCAInputs:RCAinputs(8,9)acceptanunbalancedstan-dard RCA connection.
Entradas de tipo RCA: entradas de tipo RCA (8,9)acepta una señal de nivel de línea no balanceada.
EntréesRCA:entréessurconnecteursRCA(8,9)accep-tantunniveauligneasymétrique.
Cincheingänge:CincheingängeKlinkeneingänge(8,9)neh-
men unsymmetrische Line Signale an.
LimiterSwitch:limiterswitch(10)isusedtolimittheampsmaximum voltage output to prevent damage to the machine. CircuitoLimitador:elcurcuitolimtador(10)esparaprotec-cióndesalidadelamplificador
Limiteur intégré: limiteur intégré (10)afindeprotégereffi-cacementamplificateur&enceintes
Begrenzerschalter:Begrenzerschalter(10)zumSchutzdesVerstärkerausgangs.
Operationmodeswitch:operationmodeswitch(11)isusedto set the unit for stereo mode and mono bridge mode.
Selector demodode operación: El selector demododeoperación (11)seutilizaparaconfigurar launidadparaelmodoestéreoymonoenmodoPuente.
Mode de fonctionnement: le commutateur de mode defonctionnement(11)estutiliséafindeconfigurerl’appareilenmodestéréo-mono.
Moduswahlschalter: Schalten Sie mit dem Moduswahl-schalter (11) zwischen stereo, mono bridge um.
Output section • Sección Salidas Section Sortie • Ausgangssektion Disconnect the unit from the ac power source before mak-ing any connections. Pay close attention to polarity (shown on the back of the unit) when connecting your speakers. Connecting your speaker systems using the wrong polarity willnotdamageyourspeakers,butitwillimpactthequal-ity of the sound (lack of bass and incorrect stereo image).
Connections and System Control ConexionesyControldesistema•Connexions&Utilisation•AnschlüsseundSystemeinstellungen
8
Rearpanel•Panelposterior•Facearrière•Rückseite
Desconectar la unidad de la fuente de alimentación CA antes de realizar las conexiones. Tener mucho cuidado con la polaridad (mostrada en la parte posterior de la uni-dad) cuando conecte sus altavoces. Conectar su sistema dealtavocesusando lapolaridadequivocadanodañarásusaltavoces,peroafectaráalacalidaddelsonido(faltadegraveseincorrectaimagenestéreo).
Débranchez l’alimentation électrique de l’appareil avantd’effectuer tout branchement. Veillez à respecter la po-larité (Telle que décrite à l’arrière de l’appareil) lors detout branchement d’enceintes. Si vous ne respectezpas scrupuleusement la polarité, vous prenez le risqued’endommagervosenceintes,maiscelaauraaussiunim-pactsurlaqualitédesonpuisquelesbassesfréquencesserontinaudibles,ainsiquesurl’imagestéréo.
TrennenSiedasGerätvomStromnetzbevorSieVerbind-ungen vornehmen. Achten Sie unbedingt auf die richtige Polarität beim Anschließen von Lautsprechern (dargestellt auf der Rückseite vom Gerät). Wenn Sie die Lautsprecher mit falscher Polarität anschließen beschädigt dies nicht IhreLautsprecher aber esbeeinträchtigt IhreTonqualität(fehlender Tieftonbereich, falsches Stereo-Bild).
Speaker outputs (12, 13, 14): speakon connectors areprovidedtoconnectspeakerstotheamplifierquicklyandeasily. They are high current rated and provide very stable and durable contacts. A third speakon connector (14) is providedtobeusediftheamplifierisinthemonobridgemode. Every speakon connector has (pin 1-) as negative and (pin 1+) as positive.
Salidasparaaltavoces(12,13,14):losconectoresspeakonsonofrecidosparaconectarlosaltavocesalamplificadorrápiday fácilmente.Tienenunagranvelocidaddecorri-ente y ofrece conexiones estables y duraderas. Hay un tercerconectorspeakon(14)parausarsielamplificadorestáenmodomonopuente.Cadaconectorspeakontiene(pin-) como negativo y (pin+) como positivo.
Sortiesenceintes(12,13,14):lesembasesspeakonper-mettentunbranchementfiable,rapide&aisédesenceintes
sur l’amplificateur. Ceci grâce à des contacts durables& constants. Une troisième embase speakon rouge (14)sertencasdefonctionnementenmodebridge.Chaqueembasespeakonpossèdeunpinnégatif(Pin1)&unpinpositif (Pin 2).
Lautsprecher Ausgänge (12, 13, 14): Mit den SpeakonAnschlüssen können Sie ihre Lautsprecher schnell und einfachandenVerstärkeranschließen.SievertragenhoheStröme und bieten stabile und dauerhafte Kontakte. Ein dritter Speakon Anschluss (14) wird verwendet wenn Ihr Verstärker im “mono gebrückt” Modus betrieben wird.JederSpeakonAnschlussistwiefolgtkonfiguriert:Pin1=(-); Pin2=(+).
Note: total speaker impedancemust not be lower than4 ohm per channel for stereo mode, or 8 ohm for mono bridge mode. The XGA-series amplifier is designed tohandle low impedence loads and will operate normally withmost4ohmspeakers/parallelspeakercombinations.However, for optimal performance and reliability we rec-ommend using speakers with higher impedence.
Nota:laimpedanciatotaldelaltavoznodebeserinferiora4ohmporcanalparamodoestéreoo8ohmparamodomonopuente.Losamplificadoresde laSerieXGAestán diseñadosparasoportarcargasdebajaimpedanciayfun-cionarannormalmenteconlamayoríadecombinacionesde altavoces/paralelos de 4 ohm. Sin embargo para unóptimorendimientoyfiabilidadserecomiendautilizaral-tavoces con mayor impedancia.
Remarque:l’impédancetotaledesenceintesconnectéesnepeutêtreinférieureà4Ohmsparcanalenmodessté-réoou8Ohmsenmodebridgemono.LesamplificateursdeSérieXGAontétéspécifiquementoptimiséspourfonc-tionner parfaitement stable sous 4 Ohms. Pour des per-formances optimales, nous recommandons des enceintes possédantuneimpédanceplusélevée.
Beachten: Die gesamte Lautsprecherimpedanz darf 4Ohm im stereo-Modus nicht unterschreiten, und 8 Ohm im mono-gebrückt-Modus. Die XGA-Serie Endstufe
wurde zur Arbeit mit niedriger Impedanz entwickelt und verträgt die meisten 4 Ohm Lautsprecher oder parallele Lautsprecher-Kombinationen. Jedoch empfehlen wir für optimale Leistung und Zuverlässigkeit die Verwendungvon Lautsprechern mit höherer Impedanz.
Powerswitch:thepowerswitch(15)turnstheunitonandoff.
Botón de encendido: el botón de encendido (15) conecta o desconecta la unidad.
Interrupteur demise sous tension (Power): l’interrupteurdemisesoustension(15)permetl’allumage&l’extinctiondel’appareil.
Netzschalter:DerNetzschalter(15)schaltetdasGeräteinund aus.
PowerLED:thepowerLED(16)lightswhenthepowerison. If the power LED does not light, refer to the trouble shooting guide.
LEDdeencendido:elLEDdeencendido (16)se iluminacuandolaunidadestáconectada.SielLEDdeencendidonose ilumina,consultar laguíapara lasolucióndepro-blemas.
LED témoin d’alimentation (Power): la LED témoind’alimentation (16) s’alllume lorsque l’amplificateur estalimenté.SicetteLEDnes’allumepas,veuillezconsulterleguidedesdysfonctionnementssituéà lafindumoded’emploi.
Betriebs-LED (Power): Die Betriebs-LED (16) leuchtet,wenn die Stromversorgung eingeschaltet ist. Sollten die LED nicht leuchten schauen Sie bitte unter Fehlerbeseiti-gung nach.
BridgeLED:thebridgeLED(17)willlightwhenyouhaveset the rear panel operation mode switch (11) for mono
Connections and System Control ConexionesyControldesistema•Connexions&Utilisation•AnschlüsseundSystemeinstellungen9
Frontpanel•Panelfrontal•Faceavant•Vorderseite
bridge operation. Always make sure that this switch is in the correct position and that all speaker connections have been made correctly for the mode of operation you wishtousebeforepoweringuptheamplifier.
LEDdemodopuente: el LEDpuente (17) se iluminarácuando haya seleccionado en la parte trasera del panel el selector de modo de operación (11) para operación monopuente.Asegúresesiempredequeésteinterruptorestáenlaposicióncorrectayquetodaslasconexionesde altavoces se han hecho correctamente en el modo de operaciónquedeseautilizarantesdeencenderelampli-ficador.
LED bridge: la LED bridge (17) s’allumera uniquementsi vous avez positionné le commutateur de mode defonctionnement (11) sur bridge. Toujours vérifier quela position de ce commutateur soit compatible avec le nombre d’enceintes et leur connexion avant demettrel’amplificateursoustension.
Bridge LED: Die LED “Bridge” (17) leuchtet, wenn Sieden Moduswahlschalter (11) auf der Rückseite auf “mono ridge” (mono gebrückt) geschaltet haben. Prüfen Sie stetsdiekorrekteStellungdiesesSchaltersunddiejew-eilige Anschlussweise Ihrer Lautsprecher bevor Sie den Verstärkereinschalten. SignalLED: thesignalLED (18) foreachchannelshowwhen a signal is present.
LED de Señal : El LED de Señal (18) para cada canalmuestraunaseñalcuandoestápresente.
LEDsignal:laLEDsignal(18)dechaquecanals’allumeenprésenced’unsignalaudio.
SignalLED:DieSignal-LED(18)zeigtfürjedenKanalan,ob ein Signal anliegt.
ClipLED:theamplifierhastrueclipLED(19)tohelpyouproperly control the amplifier’s output and achieve un-distorted sound. The clip LED (19) for each channel light when your signal level is so strong that the distortion reaches 1% THD. The clip LED (19) should not remain constantly onor flash repeatedlyduringoperation. Forclean sound reproduction, the clip LED (19) should only light occasionally for an instant. If the LED remains on orflashesrepeatedly,youwillheardistortedsoundthatcan be damaging to your speaker systems. If this oc-curs, reduce the signal level by lowering the input level control for the channel that is clipping or reduce the level at the source. If the clip LED (19) lights when no signal is present, it may indicate a DC level on the output which may cause damage to speakers (the DC level will not be audible). Please note that when you are using the ampli-fierinthemonobridgemode,bothclipLED(19)ofthebridged channels will operate simultaneously.
LEDdeClip :elamplificador tieneunLEDdeClip (19)para ayudarle a controlar adecuadamente la salida del sonido del amplificador y lograr un sonido sin distor-siones. El LED de Clip (19) para cada canal se ilumina cuandoelniveldeseñalestanfuertequeladistorsiónal-canza el 1% THD. El LED de Clip (19) no debe permanec-er encendido o parpadeando durante el funcionamiento. Para una reproducción clara del sonido, el LED de Clip (19) sólo debe iluminarse ocasionalmente un instante. Si el LED permanece encendido o parpadeando repetida-mente,oiráelsonidodistorsionadoyesopuededañarsusistema de altavoces. Si eso ocurre, reduzca el nivel de señal reduciendo el control de entrada de nivel del canal saturadooreducirelniveldelafuentedelamplificador.SielLEDdeClip(19)seiluminacuandolaseñalnoestápresente,puede indicarqueelniveldesalidadedeci-belios puede dañar los altavoces (el nivel de decibelios noseráaudible).Porfavor,tengaencuentaquecuandoutilice el amplificador en modo mono puente, ambosLEDdeClip (19)de loscanalespuente funcionaránsi-multáneamente.
LEDclip:l’amplificateurpossède2LEDstémoinsdesatu-ration/surcharge(Clip)permettantuncontrôleinstantanédelaqualitéaudio.Celles-cipréviennentdel’apparitionde distorsion & permettent de garantir un signal audio en sortiedequalitéoptimale.LesLEDsdeclip(19)clignoter-ontlorsqueleniveaudedistorsionatteindra1%(Distor-sionharmoniquetotale).LesLEDsdeclip(19)nedoiventjamaisresterconstammentallumées.Pourunereproduc-tionaudiodequalité,cesLEDsnedoiventclignoterquedefaçonoccasionnelle.SilesLEDsrestentalluméescon-stammentouclignotentdefaçonrépétée,vousrisquezd’endommagervosenceintes.Sitelestlecas,baissezleniveaud’entréeàl’aidedespotentiomètresrotatifssituésenfaceavantouréduisezleniveausurvotreconsoledemixage.SilesLEDsdeclip(19)s’allumentenl’absencedesignalaudio,celapeutsignifier laprésencedecou-rantcontinu(DC)dansl’installationquiconduiraitàunedétériorationdesenceintes(ATTENTION:laprésencedecourant continu n’est pas détectable à l’écoute). Vousnoterez,qu’enmodebridge, lesLEDsdeclip fonction-nerontdefaçonstrictementidentique.
ClipLED:DerVerstärkerverfügtübereineechteClip-LED(19),welcheIhnenhilft,denVerstärkeroptimaleinzustel-len und ohne Verzerrungen zu betreiben.DieClip LEDleuchtetjeKanalauf,wenndasSignalsostarkist,dassdieVerzerrungen1%THDerreicht.DieClipLEDsollteim Betrieb weder dauerhaft leuchten noch regelmäßig blinken.ZuroptimalenSoundqualitätsolltedieClipLEDhöchstensseltenkurzaufleuchten.WenndieLEDdauer-haft leuchtet oder regelmäßig blinkt hören Sie verzerrten Sound, welcher Ihre Lautsprecher beschädigen kann. Sollte dies auftreten vermindern Sie die Lautstärke mit dem Lautstärkedrehregler des jeweiligen Kanals odervermindern Sie die Lautstärke der Soundquelle. Solltedie Clip LED leuchten wenn kein Signal eingespeist wird könnte dies auf eine Gleichspannung am Ausgang hin-weisen, welche Ihre Lautsprecher beschädigen kann (die Gleichspannungistnichthörbar).WennSiedenVerstärk-er im Modus “mono-gebrückt” betreiben arbeiten beide Clip-LEDs simultan.
Connections and System Control ConexionesyControldesistema•Connexions&Utilisation•AnschlüsseundSystemeinstellungen 10
11
ProtectLED:protectLED(20)whenyoufirstturnontheamplifier, the protect LED light briefly during a turn-ondelay which indicates that the outputs are disconnected internally. There will be an audible click when the outputs reconnect and the protect LED (20) will turn off. Otherwise, the protect LED (20) indicates that there is a problem ei-ther in theamplifier’sexternalconnections, loador tem-perature conditions or its internal functions. If one of these situationsoccur,theamplifiersensestheproblemandau-tomatically switches into protection mode. The LED will lighttowarnyouofthetroubleandtheamplifierwillstopworking.Ifthisoccurs,switchofftheamplifierandrefertothe trouble shooting guide. If the protect LED (20) remains litwhenresumingamplifieroperation,donotusetheam-plifierandcontactanauthorizedservicetechnician.
LEDdeprotección:ElLEDdeprotección(20) laprimeravezqueenciendeelamplificador,seiluminabrevementedurante el transcurso de la conexión lo cual indica quelassalidasestándesconectadasinternamente.Habráunclic audible cuando las salidas se reconecten y el LED de protección(20)seapagará.PorotraparteelLEDdepro-tecciónLED(20)indicaquehayunproblemayaseadelasconexiones externas del amplificador, carga o tempera-tura o sus funciones internas. Si una de esas situaciones seproduce,elamplificadordetectaelproblemaycambiaautomáticamenteamododeprotección.ElLEDseilumi-naráparaavisarde losproblemas y el amplificadorde-jaráde funcionar.Siocurreesto,apagueelamplificadory consulte la guía de solución de problemas. Si el LEDde protección permanece encendido cuando reanude la operaciónconelamplificador,noutiliceelamplificadorycontacteconelserviciotécnicoautorizado.
LED de protection: les LEDs de protection (20)s’allumerontdès lamisesous tensionde l’amplificateur,puis s’éteindront progressivement indiquant une décon-nexion interne des sorties HP. Il y aura alors un clic au-dibleetlesLEDsdeprotection(20)s’éteindront.LesLEDsdeprotection (20) serventaussi à indiquerundysfonc-tionnement interne (Surcharge, surchauffe…) ou externe (Branchements enceintes). Si l’une de ces situations seproduit, l’amplificateur se mettra automatiquement enmodeprotection.LesLEDsvousavertirontdelaprésence
d’unproblème&l’amplificateurcesseraalorsdefonction-ner. Veuillez alors consulter le guidedesdysfonctionne-ments. Si les LEDs de protection (20) restent alluméesaprès avoir éteint puis rallumer l’amplificateur, n’utilisezplus ce dernier & veuillez contacter votre revendeur ou le servicetechniquedeGCITechnologies. Protect LED: Wenn Sie Ihren Verstärker einschaltenleuchtet die Protect LED (20) während des Einschaltvor-gangs und zeigt damit, dass die Lautsprecheranschlüsse noch intern getrennt sind. Sie Hören ein Klicken sobald die Lautsprecheranschlüsse wieder verbunden werden und die Protect LED geht aus. Außerdem zeigt die Protect-LED an, wenn Probleme mit der externen Beschaltung, der Belastung, Temperatur oder interne Fehlfunktionen auf-treten. Sollte eines dieser Probleme auftreten, so schaltet der Verstärker automatisch in den Protection-Modus.Die LED leuchtet auf und zeigt Ihnen damit die Störung anundderVerstärker stellt dieFunktionein.Solltedieseintreten schalten Sie den Verstärker aus und schauenSie unter “Fehlerbeseitigung” nach. Sollte die Protect LED (20) nach einem erneuten Einschalten weiterhin leuchten, so belassen Sie ihn ausgeschaltet und nehmen Sie Kontakt zu einem autorisierten Servicetechniker auf.
Level controls: level controls (21, 22) establish the inputlevelsrequiredforeachchannel.Onlythechannel1levelcontrol (20) works in mono bridge mode.
Controldeniveles:Loscontrolesdeniveles(21,22)esta-blecen la entradadeniveles requeridapara cadacanal.Sólo el canal 1 control de nivel (21) funciona en modo mono puente.
Potentiomètresdevolume:lespotentiomètresdevolume(21,22)permettentderéglerleniveaud’entréeparcanal.En mode bridge, seul le potentiomètre 1 (21) fonctionne.
Lautstärkeregler:MitdenLautstärkereglern (21,22)stel-lenSiediegewünschteEingangslautstärkefürjedenKanalein. Im Modus “mono-gebrückt” arbeiten Sie nur mit dem Regler von Kanal 1 (21).
Theamplifier’spowermustbeturnedoffwhenchangingmodes of operation.
Elamplificadordepotenciadebeestarapagadoalcam-biar los modos de funcionamiento.
Lorsque vous souhaitez modifier le mode de fonction-nement de l’amplificateur, celui-ci doit impérativementêtreéteint.
DerVerstärkermussausgeschaltetsein,bevorSiedenBetriebsmodus umschalten.
The unit has two channels for stereo operation. Each chan-nel provides a separate and discrete signal at the speaker outputs according to the signal received at the inputs. The following instructions are for applications with 8 ohm and 4 ohm speakers of matched power ratings.
La unidad tiene dos canales para estéreo. Proporcionaun canal independiente y señal en las salidas de los alta-voces de acuerdo a la señal recibida en las entradas. Las siguientes instrucciones son para aplicaciones con alta-vocesde8ohmy4ohmqueseajustenalasespecifica-cionesdepotenciadelamplificador.
L’amplificateurpossède2canauxpourunfonctionnementstéréo. Chaque canal fournit un signal séparé & discretauxenceintesconnectéesàl’amplificateurdépendantdusignalaudiostéréoreçuenentrée.Lesinstructionssuiv-antes concernent les applications sous 8 - 4 Ohms & les puissancesinhérentes.
Das Gerät hat zwei Kanäle, um stereo betrieben zu werden. Jeder Kanal verfügt über ein separates Signal amLautsprecherausgang,welcheseinEbenbilddes jew
Connections and System Control ConexionesyControldesistema•Connexions&Utilisation•AnschlüsseundSystemeinstellungen
Operatinginstructions•InstruccionesdefuncionamientoInstructionsdefonctionnement•Bedienhinweise
Stereooperation•Estéreo ModeStéréo•StereoBetrieb
eiligen Eingangssignals ist. Die folgenden Hinweise set-zen die Verwendung von 8Ohmoder 4OhmLautspre-chern oder Kombinationen mit ähnlichen Leistungswerten voraus.
1. With the power off, set the operation mode switch (11) to the stereo position. When the power is on, the bridge led (18) on the front panel will not light. If this led illumi-nates, you have the switch in the wrong position. Correct before continuing.
1. Con la unidad apagada, seleccionar con el selector de mododeoperación(11),enposiciónestéreo.Cuandosehaya encendido, el LED de modo puente(18) en el panel frontalnoseiluminará.SiesteLEDseilumina,ustedtieneelinterruptorenlaposiciónequivocada.Corrijaantesdecontinuar.
1.Avecl’amplificateuréteint(Off),positionnezlecommu-tateurdemodedefonctionnement(11)surstéréo.Enral-lumantl’amplificateur(On),laLEDbridge(18)-situéeenfaceavant-doitêtreéteinte.Sicelle-ciresteallumée,vousavezsélectionnélemauvaismodedefonctionnement.Ré-pétez l’opération en sélectionnant lemode de fonction-nementadéquatavantdepoursuivre.
1. Im ausgeschalteten Zustand schalten Sie den Betrieb-smodus (11) auf stereo. Eingeschaltet zeigt die Bridge LED (18) an, wenn Sie den Schalter in der falschen Position ha-ben. Korrigieren Sie dies vor dem Fortfahren.
2. With the power off, connect your input cables to the channel1and2inputsusingeithertheXLRinputjacks(4,5),1/4”trsinputjacks(6,7)ortheRCAinputjacks(8,9)ofeach channel. The other channel 1 and channel 2 inputs can beusedtolinktoanadditionalamplifier.
2. Con la unidad apagada, conecte sus cables de entrada en los canales de entrada 1 y 2 usando para ambos los conectores XLR de entrada (4,5), los Jack de entrada TRS ¼” (6,7), o el RCA (8,9) para cada canal. Las otras entradas del canal 1 y el canal 2 se pueden utilizar para enlazar otro
amplificadoradicional.
2. Avec l’amplificateur éteint (Off), branchez vos cordonsaudioauxcanaux1&2enutilisantlesentréesXLR(4,5),Jack6.35mm(6,7),ouRCA(8,9).Lesentréesnonutiliséespeuventalorsserviràrelierlesentréesdecetamplificateuràunautreamplificateuralimentéparlemêmesignalaudio(Chainlink).
2. Im ausgeschalteten Zustand schließen Sie Ihre Sound-quelleandieXLREingänge(4,5),6,35mmKlinkeneingänge(6, 7) oder Cincheingänge von Kanal 1 und 2 an. Die übrigen Eingänge von Kanal 1 und 2 können verwendet werden, um einenweiterenVerstärkerzuBetreiben.
3. Connect the loudspeakers to the channel 1 and channel 2 speaker outputs (12, 13). The total speaker load must be at least 4 ohms per channel. If you try to operate at a lower impedance,theamplifierwillgointoprotectionmodeandstop operation until you correct the load conditions.
3. Conectar los altavoces a las salidas de altavoces del ca-nal1ycanal2(12,13).Lacargatotaldebesercomomínimode 4 ohm por canal. Si trata de operar con una impedancia másbaja,elamplificadorsecolocaráenmododeprotec-ciónydejarádefuncionarhastaquecorrijalascondicionesde carga.
3. Connectez les enceintes aux canaux 1 & 2 via les sor-ties enceintes (12, 13). L’impédance totale des enceintesnepeutêtre inférieureà4Ohms.Sivous tentez-malgrétout-uneimpédancemoindre,l’amplificateursemettraau-tomatiquementenmodeprotection&cesseradefonction-nerjusqu’àmodificationdel’installation.
3. Schließen Sie die Lautsprecher an die Ausgänge von Ka-nal 1 und 2 an (12, 13). Die gesamte Lautsprecherlast muss mindestens4OhmjeKanalbetragen.WennSiedenBetriebmiteinerniedrigerenImpedanzversuchen,sowirdderVer-stärker in den Protection-Modus schalten und den Dienst verweigern, bis Sie die Last korrigieren.
4. With the level controls (21, 22) of both channels set to
zero (fully counterclockwise), turn the power switch (15) on. With the level controls of your mixer or other input device turnedallthewaydown,turntheamplifierlevelcontrolsuparound3/4(or75%)fordesiredloudnessfromyourspeak-ers.Note,when theclip led (19) lights, there isdistortionpresent in the amplifier’s output section. If a clip led (19)remainsonorflashesrepeatedly,reducethesignallevelbylowering the input level control for the channel that is clip-ping or reduce the level at the source.
4.Con los controles de nivel (21,22) de ambos canales a ≤ (75% de la potencia del amplificador), en primer lugarconectar la mesa de mezclas u otro dispositivo de entrada yluegoencenderelamplificadorutilizandoelinterruptordeencendido(15).Después,conloscontrolesdeniveldesumesa de mezclas u otro dispositivo de entrada nivelar el audioafindealcanzarlos0decibeliosenlosindicadoresdelamesademezclas.Nota,cuandoelLEDdeClip(19)se enciende, hay una distorsión presente en la salida del amplificador.SielLEDdeClip(19)sigueencendidoopar-padea repetidamente, reducir el nivel de la señal mediante la reducción del nivel de entrada del control por canal o reducir el nivel de origen.
4.Avec les potentiomètres (21, 22) en position 3/4 (75%de la puissance de l’amplificateur), mettez d’abord vossources & console de mixage sous tension et allumez l’amplificateur(On)à l’aidedel’interrupteurPower(15)endernier ressort. Puis avec les potentiomètres de volume devotreconsoledemixageet/oudevossourcesréglezleniveauaudiodefaçonàatteindrele0dBsurlesvu-mètresdevotreconsoledemixage.NotezquesilesLEDsdeclip(19) s’allument, cela indique laprésencededistorsionensortiedel’amplificateur.SilesLEDsdeclip(19)restentcon-stammentallumées,réduisezleniveaud’entréedelavoieoudes2voiessicelaestnécessaireouréduisezlevolumede la console de mixage ou de la source.
4. Mit den Lautstärkedrehreglern (21, 22) beider Kanäle auf Nullstellung(vollständiggegenUhrzeigersinn),schaltenSiedenNetzschalter(15)ein.RegelnSiezuerstdieLautstärkeIhrerSoundquellefallsmöglichaufeinnormalesLine-Level(0dB).DannregelnSiedieLautstärkedesVerstärkerssoweitnach oben, bis die gewünschte maximale Lautstärke Ihrer Lautsprecher erreicht ist. Wenn die Clip LED (19) leuchtet
Connections and System Control ConexionesyControldesistema•Connexions&Utilisation•AnschlüsseundSystemeinstellungen 12
tretenVerzerrungenamAusgangdesVerstärkersauf.Wenndie Clip LED (19) dauerhaft leuchtet oder regelmäßig blinkt reduzieren Sie die Signallautstärke des jeweiligen KanalsoderreduzierenSiedieLautstärkeIhrerSoundquelle.
5.Nowadjustyourmixerorotherinputsourcetoyourde-sired listening level. You also have the choice of keeping thevolumeofbothspeakersequal,orforcertainsituationsyoucanadjustthevolumesoonesidewillbelouderthanthe other.
5.Ahoraajustesumesademezclasuotrodispositivodeentradaalniveldeescuchadeseado.Tambiéntienelaop-ción de mantener igual el volumen de los altavoces, o en ciertas ocasiones puede ajustar que el volumen de unopuedasermásaltoqueelotro.
5. Maintenant réglez votre console de mixage jusqu’auniveaud’écoutedésiré.Vousavezaussilechoixderéglerlevolumedefaçonidentiquesurlesenceintesoudefaçonséparéesicelaestnécessaire.
5.NunkönnenSieanderQuelledieLautstärkenachBelie-beneinstellen,ohnejedochweiternachobenzuregelnwiezuvor.SiekönnenauchdieLautstärkejedesLautsprechersunterschiedlich einstellen. Dies beeinträchtigt die Funktion nicht.
Followtheseinstructionstobridgetheunit’soutputs.Bridg-ingtheamplifierconvertstheunittoamonophonicorsin-glechannel.Theamplifiercanbeusedwith8ohmloadsinmono bridge mode. This mode is used to provide a higher voltage with greater headroom to your speaker. Before set-ting your amplifier formonobridge operation,make surethat your speaker can handle the high power level provided bytheamplifierinmonobridgemode.
Siga estas instrucciones para las salidas de unidad en puente.Puenteandoelamplificadorconviertelaunidadenmonofónicoocanalúnico.Elamplificadorpuedeserusadocon 8 ohm en modo mono puente. Este modo es usado
paraproveerunvoltajemásaltoconunmayormargenentus altavoces. Antes de seleccionar su amplificador paraoperar como mono puente, asegurarse que su altavozpuede soportar el alto nivel de potencia suministrada por el amplificadorenmodomonopuente.
Respectez les instructions suivantes afin de configurerl’amplificateur en mode bridge. Le mode bridge permetde transformer un amplificateur à 2 voies en amplifica-teur monophonique (1 voie). L’amplificateur peut alorsfonctionner sous 8Ohms. Avant de configurer votre am-plificateurenmodebridge,assurezvousde lapuissanceadmissibleparvotreenceinteaurisquedel’endommager.
Folgen Sie diesen Anweisungen, um die Ausgänge des Gerätes zu überbrücken. Eine Brückenschaltung verwan-delt den Verstärker in einen mono/single-Verstärker. DerVerstärkerkannimmono-bridgeModusnurmiteiner4OhmLast. Dieser Modus erlaubt mit höheren Spannungen mehr Spielraum für Ihren Lautsprecher. PrüfenSie vor der Ver-wendung von mono-bridge, ob Ihr Lautsprecher die dann erhöhteLeistungdesVerstärkersverträgt.
CAUTION: VOLTAGE OVER 100 VOLTS MAY BE PRO-DUCED AT THE BRIDGE OUTPUT TERMINALS IN THISMODE.
PRECAUCION:OPERANDOENESTEMODOPUEDELLE-GARAAPARECERENLOSTERMINALESDELAMPLIFI-CADORUNVOLTAJEDEUNOS100VOLTIOS.
MISEENGARDE:UNNIVEAUDETENSIONDE100VPEUTETRE PRESENT AUX BORNES DE SORTIE EN MODEBRIDGE.
ACHTUNG: SPANNUNGVONÜBER 100 VOLTKÖNNENIN DIESEM MODUS AM BRIDGE LAUTSPRECHERAN-SCHLUSSAUFTRETEN.
1. With the power off, set the operation mode switch (11) to the bridge position. When the power is on, the bridge led (17) on the front panel will light. If the led does not illu-minate, you have the switch in the wrong position. Correct before continuing.
1.Con launidadapagada,ajusteelselectordemododeoperación (11) en posición puente. Cuando se encienda la unidad, el LED de puente (17) en frente del panel se ilumi-nará.Sinoseilumina,tieneelselectorenlaposiciónequiv-ocada.Corrijaantesdecontinuar.
1.Avecl’amplificateuréteint(Off),positionnezlecommuta-teur de mode de fonctionnement (11) sur bridge. En rallu-mantl’amplificateur(On),laLEDbridge(17)-situéeenfaceavant-doitêtreallumée.Sicelle-ciresteéteinte,vousavezsélectionnélemauvaismodedefonctionnement.Répétezl’opération en sélectionnant le mode de fonctionnementadéquatavantdepoursuivre.
1. Im ausgeschalteten Zustand schalten Sie den Betrieb-smodusschlater (11) auf die Bridge Position. Wenn einge-schaltet,zeigtIhnendieBridgeLED(17)aufderVorderseitean, dass der Bridge-Modus gewählt wurde. Leuchtet die LED nicht, korrigieren Sie bitte die Schalterstellung bevor Sie fortfahren.
2. With the power off, connect your input cables to channel 1 inputonlyusingeither theXLR input jack (4),1/4” inputjack(6),orRCA(8)ofchannel1.Theotherchannel1inputcanbeusedtolinktoanadditionalamplifier.
2. Con la unidad apagada, conecte sus cables de entrada al canal sólo utilizando el Jack de entrada XLR (4), el Jack de entrada ¼” (6), o el RCA (8) para el canal 1. La otra entrada delcanal1sepuedeutilizarparaconectaraunamplificadoradicional.
2. Avec l’amplificateur éteint (Off), branchez vos cordonsaudioaucanal1uniquementenutilisant lesentréesXLR(4),Jack6.35mm(6),ouRCA (8).L’autreentréenonutili-séepeutalorsserviràrelierl’entréedecetamplificateuràun autre amplificateur alimentépar lemêmesignal audio(Chainlink).
2. Im ausgeschalteten Zustand schließen Sie das Eingangs-signal nur an Kanal 1 mit einem XLR-Kabel (4), 6,35 mm Klinke Kabel (6), oder Cincheingänge (8) an. Die übrige Ein-gangsbuchse von Kanal 1 kann zur Speisung eines weiteren
Connections and System Control ConexionesyControldesistema•Connexions&Utilisation•AnschlüsseundSystemeinstellungen13
Monobridgeoperation•OperaciónMonoPuente Modebridge•MonoBrückenschaltung
erenVerstärkersverwendetwerden.
3. Connect the loudspeaker to the bridge speaker output (14) only. The total speaker load must be at least 8 ohms or above. If you try to operate at a lower impedance, the am-plifierwillgointoprotectionmodeandstopoperationuntilyou correct the load conditions.
3. Conecte el altavoz sólo a la salida de puente del altavoz (14).Lacarga totaldebesercomomínimode8ohmporcanal.Sitratadeoperarconunaimpedanciamásbaja,elamplificadorsecolocaráenmododeprotecciónydejarádefuncionarhastaquecorrijalascondicionesdecarga.
3. Connectez l’enceinte au canal A via la sortie enceinte(14).L’impédancetotaledel’enceintenepeutêtreinférieureà8Ohms.Sivous tentez -malgré tout -une impédancemoindre, l’amplificateur se mettra automatiquement enmodeprotection&cesseradefonctionner jusqu’àmodifi-cationdel’installation.
3. Schließen Sie den Lautsprecher nur an den Bridge Lautsprecheranschluss (14) an. Die Lautsprecherimped-anz muss mindestens 8 Ohm betragen. Wenn Sie den Betrieb mit einer niedrigeren Impedanz versuchen, so wird der Verstärker in den Protection-Modus schaltenund den Dienst verweigern, bis Sie die Last korrigieren.
4. With the channel 1 level control (21) set to zero (fully counterclockwise), turn the power switch (15) on. With the level controls of your mixer or other input device turned all thewaydown, turn theamplifier levelcontrolsup forde-siredloudnessfromyourspeakers.Note,whentheclipled(19)light,thereisdistortionpresentintheamplifier’soutputsection.Ifaclipled(19)remainsonorflashesrepeatedly,reduce the signal level by lowering the input level control for channel 1 or reduce the level at the source. During mono bridge operation, the channel 2 level is inactive, however, bothchannelsledwillflashsimultaneouslyandshowoutputconditions.
4. Con el control de nivel (21) a cero (completamente), en-
cender el interruptor (15). Con los controles de nivel de su mesademezclasuotrodispositivodeentradabajadosto-talmente.Subirahoralosnivelesdecontroldelamplificadoral volumendeseadopara susaltavoces.Nota, cuandoelLED de Clip (19) se enciende, hay una distorsión presente en lasalidadelamplificador.SielLEDdeClip (19) sigueencendido o parpadea repetidamente, reducir el nivel de la señal mediante la reducción del nivel de entrada del control por canal o reducir el nivel de origen. Durante la operación monopuente,elniveldelcanal2está inactivo,de todosmodos,enamboscanaleselLEDparpadearásimultánea-mente y muestra las condiciones de salida.
4. Avec le potentiomètre (21) en position 3/4 (75%de lapuissancede l’amplificateur),mettezd’abordvossources&consoledemixagesoustensionetallumezl’amplificateur(On)àl’aidedel’interrupteurPower(15)endernierressort.Puis avec les potentiomètres de volume de votre console demixageet/oudevossourcesréglezleniveauaudiodefaçonàatteindrele0dBsurlesvu-mètresdevotreconsoledemixage.Notezquesi lesLEDsdeclip (19)s’allument,cela indique la présence de distorsion en sortie del’amplificateur.SilesLEDsdeclip(19)restentconstammentallumées,réduisezleniveaud’entréedelavoieAsicelaestnécessaireouréduisezlevolumedelaconsoledemixageou de la source. En mode bridge mono, le canal 2 est inactif bienqueles2LEDsdesignals’allumerontdefaçonstricte-ment identique indiquant ainsi un fonctionnement correcten mode bridge.
4.MitdemLautstärkedrehreglervonKanal1(21)aufNull-stellung (vollständig gegen Uhrzeigersinn), schalten Sie denNetzschalter(15)ein.RegelnSiezuerstdieLautstärkeIhrerSoundquellefallsmöglichaufeinnormalesLine-Level(0dB).DannregelnSiedieLautstärkedesVerstärkerssoweitnach oben, bis die gewünschte maximale Lautstärke Ihrer Lautsprecher erreicht ist. Wenn die Clip LED (19) leuchtet tretenVerzerrungenamAusgangdesVerstärkersauf.Wenndie Clip LED (19) dauerhaft leuchtet oder regelmäßig blinkt reduzieren Sie die Signallautstärke von Kanal 1 oder reduz-ierenSiedieLautstärkeIhrerSoundquelle.BeieinerBrück-enschaltung ist Kanal 2 zwar inaktiv, aber die LEDs beider Kanäle zeigen identische Funktionen an.
5.Nowadjustyourmixerorotherinputsourcetoyourde-sired listening level.
5.Ahoraajustesumesademezclasuotrodispositivodeentrada al nivel de escucha deseado.
5. Maintenant réglez votre console de mixage jusqu’auniveaud’écoutedésiré.
5.NunkönnenSieanderQuelledieLautstärkenachBe-liebeneinstellen,ohne jedochweiternachobenzuregelnwie zuvor.
Dependingonyoursystemconfiguration,sometimesapply-ingthegroundwillcreateaquietersignalpath.Sometimeslifting the ground can eliminate ground loops and hum to createaquietersignalpath.
Dependiendodesusistemadeconfiguración,avecesapli-candolatomadetierracrearáunavíadeseñalmássilen-ciosa. A veces, levantar la toma de tierra puede eliminar buclesyzumbidosparacrearunavíadeseñalmássilen-ciosa.
Lecommutateurdemiseà la terreestutilisépoursépar-er lamassedesentréessymétriquesde la terre.Lorsquevous séparez la terre de lamasse, vous supprimez ainsid’éventuellesbouclesdemassepouvantgénérerdesbruitsparasites.Suivantvotreinstallation,vousdéciderezounondeséparerlamassedelaterre.
Abhängig von Ihrer Installation kann die Verbindung derMasse einen leiseren Signalpfad ermöglichen. Unter Um-ständenkanneinTrennenderMasse jedochMasseschle-ifen und Störgeräusche beseitigen und damit einen leiseren Signalpfad ermöglichen.
14Connections and System Control ConexionesyControldesistema•Connexions&Utilisation•AnschlüsseundSystemeinstellungen
Using the signal ground lift switch Usando el interruptor de toma de tierraUtilisationducommutateurdemiseàlaterre Einsatz des Signal Groundlift Schalters
15 Connections and System Control ConexionesyControldesistema•Connexions&Utilisation•AnschlüsseundSystemeinstellungen
InputEntradaEntrée
Eingang
OutputSalidaSortie
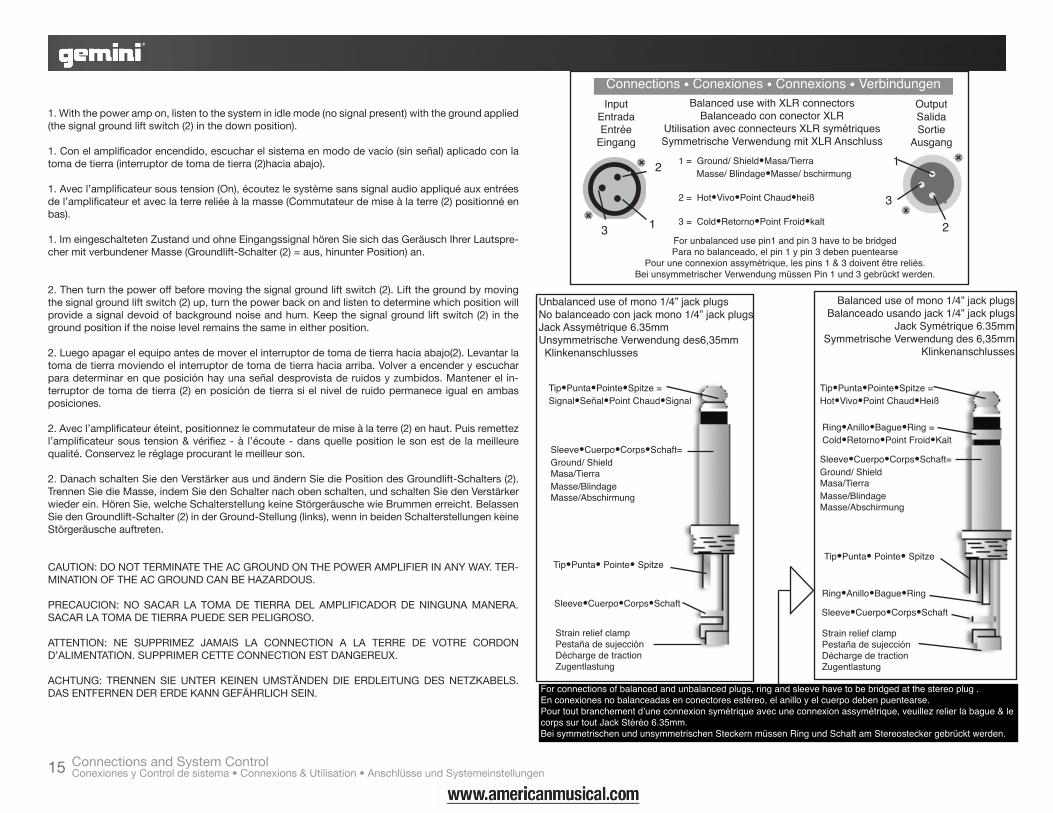
Ausgang1 = Ground/ Shield•Masa/Tierra Masse/ Blindage•Masse/ bschirmung
2 = Hot•Vivo•Point Chaud•heiß
3 = Cold•Retorno•Point Froid•kalt3
2
1 2
1
3
Unbalanced use of mono 1/4” jack plugs No balanceado con jack mono 1/4” jack plugs Jack Assymétrique 6.35mm Unsymmetrische Verwendung des6,35mm Klinkenanschlusses
Tip•Punta•Pointe•Spitze =Signal•Señal•Point Chaud•Signal
Sleeve•Cuerpo•Corps•Schaft=Ground/ ShieldMasa/TierraMasse/BlindageMasse/Abschirmung
Tip•Punta• Pointe• Spitze
Balanced use of mono 1/4” jack plugsBalanceado usando jack 1/4” jack plugs
Jack Symétrique 6.35mmSymmetrische Verwendung des 6,35mm
Klinkenanschlusses
Sleeve•Cuerpo•Corps•Schaft
Strain relief clamp Pestaña de sujección Décharge de tractionZugentlastung
Ring•Anillo•Bague•Ring =Cold•Retorno•Point Froid•Kalt
Ring•Anillo•Bague•Ring
For unbalanced use pin1 and pin 3 have to be bridgedPara no balanceado, el pin 1 y pin 3 deben puentearse
Pour une connexion assymétrique, les pins 1 & 3 doivent être reliés. Bei unsymmetrischer Verwendung müssen Pin 1 und 3 gebrückt werden.
For connections of balanced and unbalanced plugs, ring and sleeve have to be bridged at the stereo plug . En conexiones no balanceadas en conectores estéreo, el anillo y el cuerpo deben puentearse. Pour tout branchement d’une connexion symétrique avec une connexion assymétrique, veuillez relier la bague & le corps sur tout Jack Stéréo 6.35mm. Bei symmetrischen und unsymmetrischen Steckern müssen Ring und Schaft am Stereostecker gebrückt werden.
Balanced use with XLR connectors Balanceado con conector XLR
Utilisation avec connecteurs XLR symétriques Symmetrische Verwendung mit XLR Anschluss
DESIGNED AND ENGINEERED IN USA BY GEMINI, A DIVISION OF GCI TECHNOLOGIES, MANUFACTURED IN CHINA
Active 8" Bi-Amp loudspeaker, (75W+25W) 200 Wrms, 400W peak power
GX-808
Serial Number
DESIGNED AND ENGINEERED IN USA BY GEMINI, A DIVISION OF GCI TECHNOLOGIES, MANUFACTURED IN CHINA
Active 8" Bi-Amp loudspeaker, (75W+25W) 200 Wrms, 400W peak power
GX-808
Serial Number
Sleeve•Cuerpo•Corps•Schaft=Ground/ ShieldMasa/TierraMasse/BlindageMasse/Abschirmung
Tip•Punta•Pointe•Spitze =Hot•Vivo•Point Chaud•Heiß
Tip•Punta• Pointe• Spitze
Sleeve•Cuerpo•Corps•Schaft
Strain relief clamp Pestaña de sujección Décharge de tractionZugentlastung
1. With the power amp on, listen to the system in idle mode (no signal present) with the ground applied (the signal ground lift switch (2) in the down position).
1.Conelamplificadorencendido,escucharelsistemaenmododevacío(sinseñal)aplicadoconlatoma de tierra (interruptor de toma de tierra (2)haciaabajo). 1.Avecl’amplificateursoustension(On),écoutezlesystèmesanssignalaudioappliquéauxentréesdel’amplificateuretaveclaterrereliéeàlamasse(Commutateurdemiseàlaterre(2)positionnéenbas).
1. Im eingeschalteten Zustand und ohne Eingangssignal hören Sie sich das Geräusch Ihrer Lautspre-cher mit verbundener Masse (Groundlift-Schalter (2) = aus, hinunter Position) an.
2. Then turn the power off before moving the signal ground lift switch (2). Lift the ground by moving the signal ground lift switch (2) up, turn the power back on and listen to determine which position will provide a signal devoid of background noise and hum. Keep the signal ground lift switch (2) in the ground position if the noise level remains the same in either position.
2.Luegoapagarelequipoantesdemoverelinterruptordetomadetierrahaciaabajo(2).Levantarlatomadetierramoviendoelinterruptordetomadetierrahaciaarriba.Volveraencenderyescucharparadeterminarenqueposiciónhayunaseñaldesprovistaderuidosyzumbidos.Mantenerel in-terruptor de toma de tierra (2) en posición de tierra si el nivel de ruido permanece igual en ambas posiciones.
2.Avecl’amplificateuréteint,positionnezlecommutateurdemiseàlaterre(2)enhaut.Puisremettezl’amplificateursoustension&vérifiez-à l’écoute-dansquelleposition lesonestde lameilleurequalité.Conservezleréglageprocurantlemeilleurson.
2.DanachschaltenSiedenVerstärkerausundändernSiediePositiondesGroundlift-Schalters(2).TrennenSiedieMasse,indemSiedenSchalternachobenschalten,undschaltenSiedenVerstärkerwieder ein. Hören Sie, welche Schalterstellung keine Störgeräusche wie Brummen erreicht. Belassen Sie den Groundlift-Schalter (2) in der Ground-Stellung (links), wenn in beiden Schalterstellungen keine Störgeräusche auftreten.
CAUTION:DONOTTERMINATETHEACGROUNDONTHEPOWERAMPLIFIERINANYWAY.TER-MINATIONOFTHEACGROUNDCANBEHAZARDOUS.
PRECAUCION:NOSACAR LA TOMADE TIERRADELAMPLIFICADORDENINGUNAMANERA.SACAR LA TOMA DE TIERRA PUEDE SER PELIGROSO.
ATTENTION: NE SUPPRIMEZ JAMAIS LA CONNECTION A LA TERRE DE VOTRE CORDOND’ALIMENTATION.SUPPRIMERCETTECONNECTIONESTDANGEREUX.
ACHTUNG: TRENNENSIE UNTERKEINENUMSTÄNDENDIE ERDLEITUNGDESNETZKABELS.DASENTFERNENDERERDEKANNGEFÄHRLICHSEIN.
Connections • Conexiones • Connexions • Verbindungen
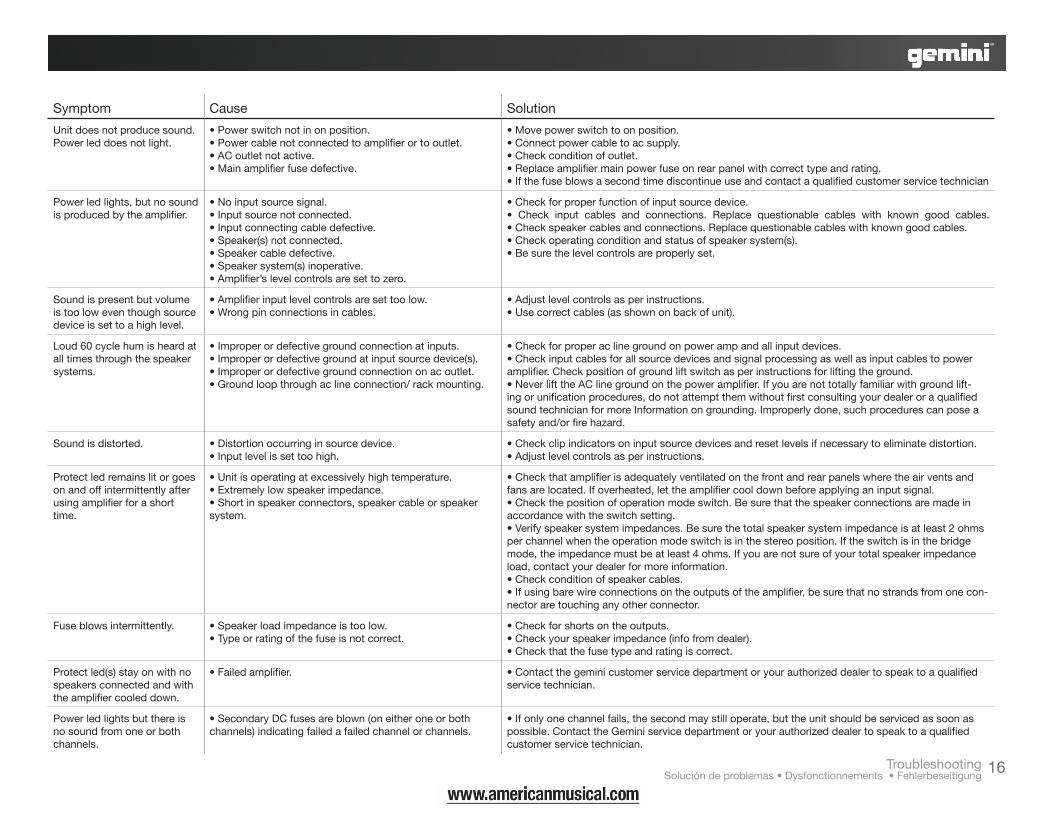
Symptom Cause Solution
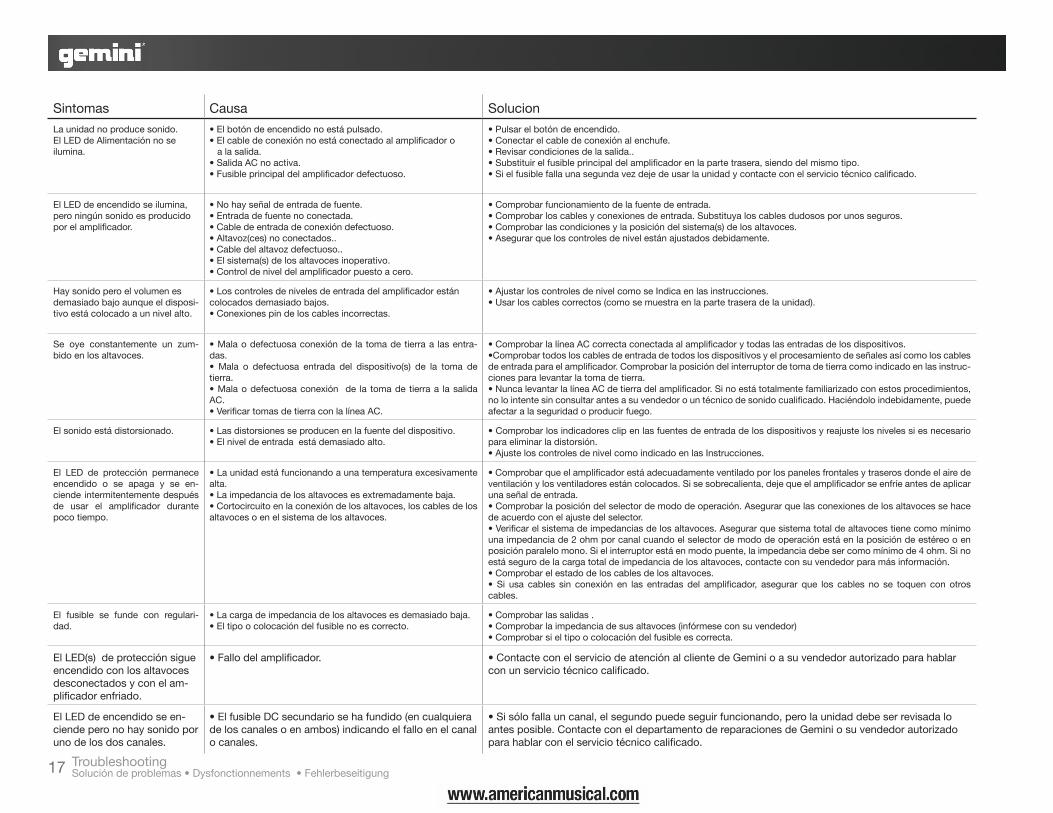
Unit does not produce sound. Power led does not light.
•Powerswitchnotinonposition.•Powercablenotconnectedtoamplifierortooutlet.•ACoutletnotactive.•Mainamplifierfusedefective.
•Movepowerswitchtoonposition.•Connectpowercabletoacsupply.•Checkconditionofoutlet.•Replaceamplifiermainpowerfuseonrearpanelwithcorrecttypeandrating.•Ifthefuseblowsasecondtimediscontinueuseandcontactaqualifiedcustomerservicetechnician
Power led lights, but no sound isproducedbytheamplifier.
•Noinputsourcesignal.•Inputsourcenotconnected.•Inputconnectingcabledefective.•Speaker(s)notconnected.•Speakercabledefective.•Speakersystem(s)inoperative.•Amplifier’slevelcontrolsaresettozero.
•Checkforproperfunctionofinputsourcedevice.• Check input cables and connections. Replace questionable cables with known good cables.•Checkspeakercablesandconnections.Replacequestionablecableswithknowngoodcables.•Checkoperatingconditionandstatusofspeakersystem(s).•Besurethelevelcontrolsareproperlyset.
Sound is present but volume is too low even though source device is set to a high level.
•Amplifierinputlevelcontrolsaresettoolow.•Wrongpinconnectionsincables.
•Adjustlevelcontrolsasperinstructions.•Usecorrectcables(asshownonbackofunit).
Loud 60 cycle hum is heard at all times through the speaker systems.
•Improperordefectivegroundconnectionatinputs.•Improperordefectivegroundatinputsourcedevice(s).•Improperordefectivegroundconnectiononacoutlet.•Groundloopthroughaclineconnection/rackmounting.
•Checkforproperaclinegroundonpowerampandallinputdevices.•Checkinputcablesforallsourcedevicesandsignalprocessingaswellasinputcablestopoweramplifier.Checkpositionofgroundliftswitchasperinstructionsforliftingtheground.•NeverlifttheAClinegroundonthepoweramplifier.Ifyouarenottotallyfamiliarwithgroundlift-ingorunificationprocedures,donotattemptthemwithoutfirstconsultingyourdealeroraqualifiedsound technician for more Information on grounding. Improperly done, such procedures can pose a safetyand/orfirehazard.
Sound is distorted. •Distortionoccurringinsourcedevice.•Inputlevelissettoohigh.
•Checkclipindicatorsoninputsourcedevicesandresetlevelsifnecessarytoeliminatedistortion.•Adjustlevelcontrolsasperinstructions.
Protect led remains lit or goes on and off intermittently after usingamplifierforashorttime.
•Unitisoperatingatexcessivelyhightemperature.•Extremelylowspeakerimpedance.•Shortinspeakerconnectors,speakercableorspeakersystem.
•Checkthatamplifierisadequatelyventilatedonthefrontandrearpanelswheretheairventsandfansarelocated.Ifoverheated,lettheamplifiercooldownbeforeapplyinganinputsignal.•Checkthepositionofoperationmodeswitch.Besurethatthespeakerconnectionsaremadeinaccordance with the switch setting.•Verifyspeakersystemimpedances.Besurethetotalspeakersystemimpedanceisatleast2ohmsper channel when the operation mode switch is in the stereo position. If the switch is in the bridge mode, the impedance must be at least 4 ohms. If you are not sure of your total speaker impedance load, contact your dealer for more information.•Checkconditionofspeakercables.•Ifusingbarewireconnectionsontheoutputsoftheamplifier,besurethatnostrandsfromonecon-nector are touching any other connector.
Fuse blows intermittently. •Speakerloadimpedanceistoolow.•Typeorratingofthefuseisnotcorrect.
•Checkforshortsontheoutputs.•Checkyourspeakerimpedance(infofromdealer).•Checkthatthefusetypeandratingiscorrect.
Protect led(s) stay on with no speakers connected and with theamplifiercooleddown.
•Failedamplifier. •Contactthegeminicustomerservicedepartmentoryourauthorizeddealertospeaktoaqualifiedservice technician.
Power led lights but there is no sound from one or both channels.
•SecondaryDCfusesareblown(oneitheroneorbothchannels) indicating failed a failed channel or channels.
•Ifonlyonechannelfails,thesecondmaystilloperate,buttheunitshouldbeservicedassoonaspossible.ContacttheGeminiservicedepartmentoryourauthorizeddealertospeaktoaqualifiedcustomer service technician.
16Troubleshooting Solucióndeproblemas•Dysfonctionnements•Fehlerbeseitigung
Sintomas Causa Solucion
La unidad no produce sonido. El LED de Alimentación no se ilumina.
•Elbotóndeencendidonoestápulsado.•Elcabledeconexiónnoestáconectadoalamplificadoro a la salida.•SalidaACnoactiva.•Fusibleprincipaldelamplificadordefectuoso.
•Pulsarelbotóndeencendido.•Conectarelcabledeconexiónalenchufe.•Revisarcondicionesdelasalida..•Substituirelfusibleprincipaldelamplificadorenlapartetrasera,siendodelmismotipo.•Sielfusiblefallaunasegundavezdejedeusarlaunidadycontacteconelserviciotécnicocalificado.
El LED de encendido se ilumina, peroningúnsonidoesproducidoporelamplificador.
•Nohayseñaldeentradadefuente.•Entradadefuentenoconectada.•Cabledeentradadeconexióndefectuoso.•Altavoz(ces)noconectados..•Cabledelaltavozdefectuoso..•Elsistema(s)delosaltavocesinoperativo.•Controldeniveldelamplificadorpuestoacero.
•Comprobarfuncionamientodelafuentedeentrada.•Comprobarloscablesyconexionesdeentrada.Substituyaloscablesdudososporunosseguros.•Comprobarlascondicionesylaposicióndelsistema(s)delosaltavoces.•Asegurarqueloscontrolesdenivelestánajustadosdebidamente.
Hay sonido pero el volumen es demasiadobajoaunqueeldisposi-tivoestácolocadoaunnivelalto.
•Loscontrolesdenivelesdeentradadelamplificadorestáncolocadosdemasiadobajos.•Conexionespindeloscablesincorrectas.
•AjustarloscontrolesdenivelcomoseIndicaenlasinstrucciones.•Usarloscablescorrectos(comosemuestraenlapartetraseradelaunidad).
Se oye constantemente un zum-bido en los altavoces.
•Malaodefectuosaconexiónde latomadetierraa lasentra-das.• Mala o defectuosa entrada del dispositivo(s) de la toma detierra.•Malaodefectuosaconexión de la tomade tierraa lasalidaAC.•VerificartomasdetierraconlalíneaAC.
•ComprobarlalíneaACcorrectaconectadaalamplificadorytodaslasentradasdelosdispositivos.•Comprobartodosloscablesdeentradadetodoslosdispositivosyelprocesamientodeseñalesasícomoloscablesdeentradaparaelamplificador.Comprobarlaposicióndelinterruptordetomadetierracomoindicadoenlasinstruc-ciones para levantar la toma de tierra.•NuncalevantarlalíneaACdetierradelamplificador.Sinoestátotalmentefamiliarizadoconestosprocedimientos,nolointentesinconsultarantesasuvendedorountécnicodesonidocualificado.Haciéndoloindebidamente,puedeafectar a la seguridad o producir fuego.
Elsonidoestádistorsionado. •Lasdistorsionesseproducenenlafuentedeldispositivo.•Elniveldeentradaestádemasiadoalto.
•Comprobarlosindicadoresclipenlasfuentesdeentradadelosdispositivosyreajustelosnivelessiesnecesariopara eliminar la distorsión.•AjusteloscontrolesdenivelcomoindicadoenlasInstrucciones.
El LED de protección permanece encendido o se apaga y se en-ciendeintermitentementedespuésde usar el amplificador durantepoco tiempo.
•Launidadestáfuncionandoaunatemperaturaexcesivamentealta.•Laimpedanciadelosaltavocesesextremadamentebaja.•Cortocircuitoenlaconexióndelosaltavoces,loscablesdelosaltavoces o en el sistema de los altavoces.
•Comprobarqueelamplificadorestáadecuadamenteventiladoporlospanelesfrontalesytraserosdondeelairedeventilaciónylosventiladoresestáncolocados.Sisesobrecalienta,dejequeelamplificadorseenfríeantesdeaplicaruna señal de entrada.•Comprobarlaposicióndelselectordemododeoperación.Asegurarquelasconexionesdelosaltavocessehacedeacuerdoconelajustedelselector.•Verificarelsistemadeimpedanciasdelosaltavoces.Asegurarquesistematotaldealtavocestienecomomínimounaimpedanciade2ohmporcanalcuandoelselectordemododeoperaciónestáenlaposicióndeestéreooenposiciónparalelomono.Sielinterruptorestáenmodopuente,laimpedanciadebesercomomínimode4ohm.Sinoestásegurodelacargatotaldeimpedanciadelosaltavoces,contacteconsuvendedorparamásinformación.•Comprobarelestadodeloscablesdelosaltavoces.• Si usa cables sin conexión en las entradas del amplificador, asegurar que los cables no se toquen con otroscables.
El fusible se funde con regulari-dad.
•Lacargadeimpedanciadelosaltavocesesdemasiadobaja.•Eltipoocolocacióndelfusiblenoescorrecto.
•Comprobarlassalidas.•Comprobarlaimpedanciadesusaltavoces(infórmeseconsuvendedor)•Comprobarsieltipoocolocacióndelfusibleescorrecta.
El LED(s) de protección sigue encendido con los altavoces desconectados y con el am-plificadorenfriado.
•Fallodelamplificador. •ContacteconelserviciodeatenciónalclientedeGeminioasuvendedorautorizadoparahablarconunserviciotécnicocalificado.
El LED de encendido se en-ciende pero no hay sonido por uno de los dos canales.
•ElfusibleDCsecundariosehafundido(encualquierade los canales o en ambos) indicando el fallo en el canal o canales.
•Sisólofallauncanal,elsegundopuedeseguirfuncionando,perolaunidaddebeserrevisadaloantes posible. Contacte con el departamento de reparaciones de Gemini o su vendedor autorizado parahablarconelserviciotécnicocalificado.
17 Troubleshooting Solucióndeproblemas•Dysfonctionnements•Fehlerbeseitigung
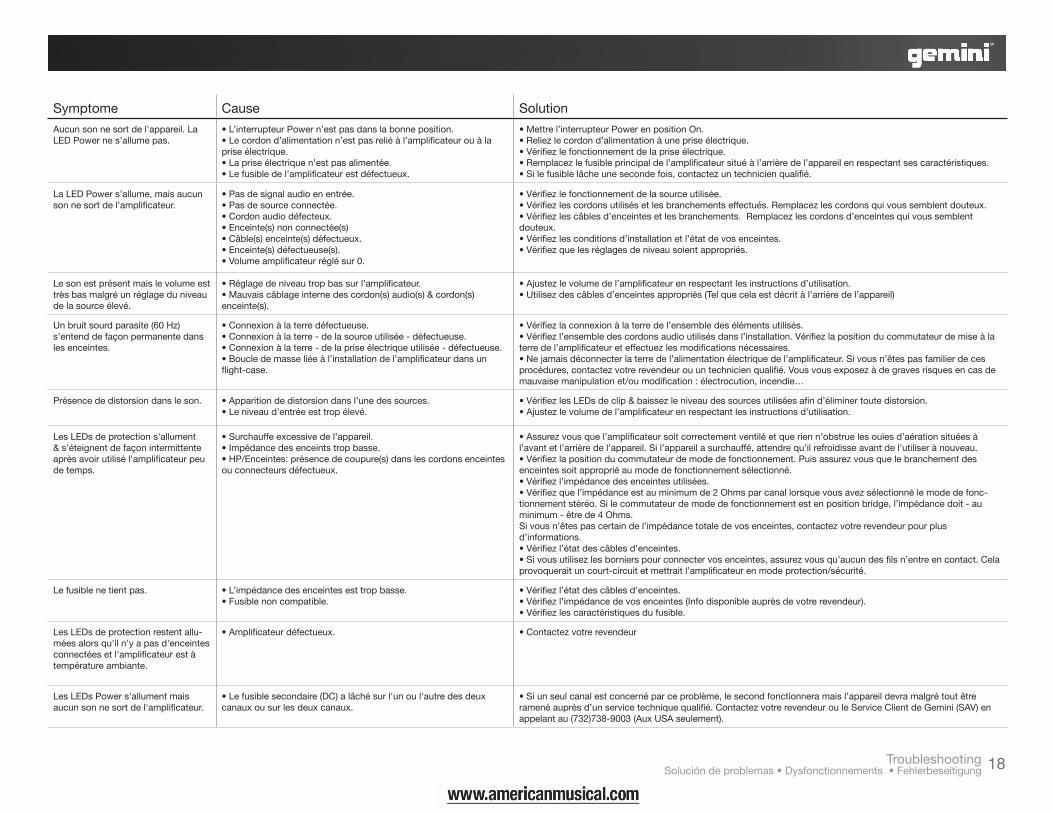
Symptome Cause Solution
Aucun son ne sort de l'appareil. La LEDPowernes’allumepas.
•L’interrupteurPowern’estpasdanslabonneposition.•Lecordond’alimentationn’estpasreliéàl’amplificateurouàlapriseélectrique.•Lapriseélectriquen’estpasalimentée.•Lefusibledel’amplificateurestdéfectueux.
•Mettrel’interrupteurPowerenpositionOn.•Reliezlecordond’alimentationàunepriseélectrique.•Vérifiezlefonctionnementdelapriseélectrique.•Remplacezlefusibleprincipaldel’amplificateursituéàl’arrièredel’appareilenrespectantsescaractéristiques.•Silefusiblelâcheunesecondefois,contactezuntechnicienqualifié.
LaLEDPowers’allume,maisaucunsonnesortdel’amplificateur.
•Pasdesignalaudioenentrée.•Pasdesourceconnectée.•Cordonaudiodéfecteux.•Enceinte(s)nonconnectée(s)•Câble(s)enceinte(s)défectueux.•Enceinte(s)défectueuse(s).•Volumeamplificateurréglésur0.
•Vérifiezlefonctionnementdelasourceutilisée.•Vérifiezlescordonsutilisésetlesbranchementseffectués.Remplacezlescordonsquivoussemblentdouteux.•Vérifiezlescâblesd’enceintesetlesbranchements.Remplacezlescordonsd’enceintesquivoussemblentdouteux. •Vérifiezlesconditionsd’installationetl’étatdevosenceintes.•Vérifiezquelesréglagesdeniveausoientappropriés.
Lesonestprésentmaislevolumeesttrèsbasmalgréunréglageduniveaudelasourceélevé.
•Réglagedeniveautropbassurl’amplificateur.•Mauvaiscâblageinternedescordon(s)audio(s)&cordon(s)enceinte(s).
•Ajustezlevolumedel’amplificateurenrespectantlesinstructionsd’utilisation.•Utilisezdescâblesd’enceintesappropriés(Telquecelaestdécritàl’arrièredel’appareil)
Un bruit sourd parasite (60 Hz) s'entend de façon permanente dans les enceintes.
•Connexionàlaterredéfectueuse.•Connexionàlaterre-delasourceutilisée-défectueuse.•Connexionàlaterre-delapriseélectriqueutilisée-défectueuse.•Boucledemasseliéeàl’installationdel’amplificateurdansunflight-case.
•Vérifiezlaconnexionàlaterredel’ensembledesélémentsutilisés.•Vérifiezl’ensembledescordonsaudioutilisésdansl’installation.Vérifiezlapositionducommutateurdemiseàlaterredel’amplificateureteffectuezlesmodificationsnécessaires.•Nejamaisdéconnecterlaterredel’alimentationélectriquedel’amplificateur.Sivousn’êtespasfamilierdecesprocédures,contactezvotrerevendeurouuntechnicienqualifié.Vousvousexposezàdegravesrisquesencasdemauvaisemanipulationet/oumodification:électrocution,incendie…
Présencededistorsiondansleson. •Apparitiondedistorsiondansl’unedessources.•Leniveaud’entréeesttropélevé.
•VérifiezlesLEDsdeclip&baissezleniveaudessourcesutiliséesafind’éliminertoutedistorsion.•Ajustezlevolumedel’amplificateurenrespectantlesinstructionsd’utilisation.
Les LEDs de protection s'allument &s'éteignentdefaçonintermittenteaprèsavoirutilisél'amplificateurpeude temps.
•Surchauffeexcessivedel’appareil.•Impédancedesenceintstropbasse.•HP/Enceintes:présencedecoupure(s)danslescordonsenceintesouconnecteursdéfectueux.
•Assurezvousquel’amplificateursoitcorrectementventiléetquerienn’obstruelesouïesd’aérationsituéesàl’avantetl’arrièredel’appareil.Sil’appareilasurchauffé,attendrequ’ilrefroidisseavantdel’utiliserànouveau.•Vérifiezlapositionducommutateurdemodedefonctionnement.Puisassurezvousquelebranchementdesenceintessoitappropriéaumodedefonctionnementsélectionné.•Vérifiezl’impédancedesenceintesutilisées.•Vérifiezquel’impédanceestauminimumde2Ohmsparcanallorsquevousavezsélectionnélemodedefonc-tionnementstéréo.Silecommutateurdemodedefonctionnementestenpositionbridge,l’impédancedoit-auminimum-êtrede4Ohms.Sivousn’êtespascertaindel’impédancetotaledevosenceintes,contactezvotrerevendeurpourplusd’informations.•Vérifiezl’étatdescâblesd’enceintes.•Sivousutilisezlesbornierspourconnectervosenceintes,assurezvousqu’aucundesfilsn’entreencontact.Celaprovoqueraituncourt-circuitetmettraitl’amplificateurenmodeprotection/sécurité.
Le fusible ne tient pas. •L’impédancedesenceintesesttropbasse.•Fusiblenoncompatible.
•Vérifiezl’étatdescâblesd’enceintes.•Vérifiezl’impédancedevosenceintes(Infodisponibleauprèsdevotrerevendeur).•Vérifiezlescaractéristiquesdufusible.
Les LEDs de protection restent allu-méesalorsqu'iln'yapasd'enceintesconnectéesetl'amplificateurestàtempératureambiante.
•Amplificateurdéfectueux. •Contactezvotrerevendeur
Les LEDs Power s'allument mais aucunsonnesortdel'amplificateur.
•Lefusiblesecondaire(DC)alâchésurl'unoul'autredesdeuxcanaux ou sur les deux canaux.
•Siunseulcanalestconcernéparceproblème,lesecondfonctionneramaisl’appareildevramalgrétoutêtreramenéauprèsd’unservicetechniquequalifié.ContactezvotrerevendeurouleServiceClientdeGemini(SAV)enappelant au (732)738-9003 (Aux USA seulement).
18Troubleshooting Solucióndeproblemas•Dysfonctionnements•Fehlerbeseitigung

Symptom Mögliche Ursache Abhilfe
Es ist kein Ton zu hören. Betriebs-LED leuchtet nicht.
•Netzschalterausgeschaltet.•NetzkabelnichtanVerstärkeroderSteckdoseverbunden.•Netzsteckdosenichtaktiv.•NetzsicherungdesVerstärkersdefekt.
•SchaltenSiedenNetzschalterein.•VerbindenSiedasNetzkabel.•PrüfenSieIhreSteckdose.•ErsetzenSiedieNetzsicherungaufderRückseitemitdemrichtigenTypundWerten.•BrenntdieSicherungerneutdurchunterbrechenSiedenBetriebundwendenSiesichaneinenqualifizirtenSer-vicetechniker.
Betriebs-LED leuchtet, aber kein Ton ist zu hören.
•keinEingangssignal.•Signalquellenichtverbunden.•Signalkabeldefekt.•Lautsprechernichtverbunden.•Lautsprecherkabeldefekt.•Lautsprecherdefekt.•LautstärkeregleraufNullposition.
•PrüfenSiedieSignalquelleaufFunktion.•PrüfenSiedieSignalkabelaufFunktionundersetzenSiedefekteKabelmitfunktionstüchtigen.•PrüfenSiedieLautsprecherkabelundVerbindungenundersetzenSiedefekteKabelmitfunktionstüchtigen.•PrüfenSiedieFunktionIhrerLautsprecher.•StellenSiedieLautstärkereglerentsprechendein.
Es ist Ton zu hören, aber mit zu geringer Lautstärke, obwohl die SignalquelleausreichendesSignalausgibt.
•LautstärkereglerdesVerstärkerszuniedrigeingestellt.•FalschePin-KonfigurationderKabel.
•StellenSiedieLautstärkereglerentsprechendein.•VerwendenSiedierichtigenKabel(DarstellungaufderRückseitedesGerätes).
LautesNetzbrummenistdauerhaftinden Lautsprechern hörbar.
•SchlechteoderdefekteMasseverbindunganSignalquellen.•SchlechteoderdefekteMasseanSignalquelle(n).•SchlechteoderdefekteErdleitunganNetzsteckdose.•MasseschleifedurchdieErdleitungbeiRackmontage.
•PrüfenSiedieErdleitungderNetzkabelvomVerstärkerundallenweiterenGeräten.•PrüfenSiealleSignalquellenundSignalkabelaufvorhandeneMasseanschlüsse.PrüfenSiediePositiondesGroundlift-Schalters wie zuvor beschrieben.•TrennenSieniemalsdieErdleitungderStromversorgung.SolltenSienichtabsolutvertrautmitGroundliftundPo-tentialausgleichseinversuchenSiesichnichtdaransondernkonsultierenSieeinenqualifiziertenTontechnikeroderIhren Fachhändler für Informationen dazu.WennSieetwasfalschmachenkanndiesSicherheitsgefährdungenund/odereinenBrandverursachen.
Ton ist verzerrt. •VerzerrungentrittinSignalquelleauf.•Eingangspegelzuhoch.
•PrüfenSiedieÜbersteuerungsanzeigenIhrerSoundquelleundkorrigierenSiedenPegelfallsnotwendig.•StellenSiedieLautstärkereglerentsprechendein.
Protect-LED bleibt an oder wechselt ständig zwischen an und aus nach kurzemBetriebdesVerstärkers.
•GerätwirdbeizuhohenTemperaturenbetrieben.•ExtremniedrigeLautsprecherimpedanz.•KurzschlussinLautsprecher,LautsprecheranschlussoderKabeln.
•PrüfenSie,obderVerstärkeraufderVorder-undRückseitegenugLuftbekommt,woLuftschlitzeundLüfterange-bracht sind. Wenn er überhitzt ist lassen Sie ihn erst abkühlen, bevor Sie wieder Signal aufschalten.•PrüfenSiedieSchalterstellungdesBetriebsarten-SchaltersundobIhreLautsprecherdementsprechendange-schlossen sind.•PrüfenSiedieImpedanzIhrerLautsprecher.VergewissernSiesich,dassdieGesamtlastdesangeschlossenenLautsprechersystems mindestens 2 Ohm im Stereo-Modus und 4 Ohm im Brücken-Modus beträgt. Wenn Sie die Impedanz Ihrer Lautsprecher nicht kennen, erfragen Sie diese bei Ihrem Fachhändler.
Sicherung brennt ständig durch. •Lautsprecherimpedanzistzuniedrig.•FalscheArtoderfalscheWertederSicherung.
•PrüfenSiedieAusgängeaufKurzschlüsse.•PrüfenSiedieImpedanzIhrerLautsprecher(InfovomFachhändler).•PrüfenSieArtundWertederverwendetenSicherung.
Protect-LED bleibt an, auch ohne verbundene Lautsprecher und nach Abkühlung
•DefekterVerstärker •KontaktierenSieIhrenFachhändleroderdenGEMINIKundenservice,ummiteinemqualifiziertenServicetechnikerzu sprechen.
Betriebs-LED leuchtet, aber auf einem oder beiden der Lautsprecher ist kein Ton zu hören.
•DieSekundärsicherungderein-oderanderenSeiteistdurchge-brannt und zeigt eine defekte Endstufe auf dem ein- oder anderen Kanal an.
•WennnureinKanalausgefallenistkannderanderenormalweiterarbeiten.JedochsolltedasGerätsobaldwiemöglichgeprüftwerden.KontaktierenSieIhrenFachhändleroderdenGEMINIKundenservice,ummiteinemqualifi-zierten Servicetechniker zu sprechen.
19 Troubleshooting Solucióndeproblemas•Dysfonctionnements•Fehlerbeseitigung
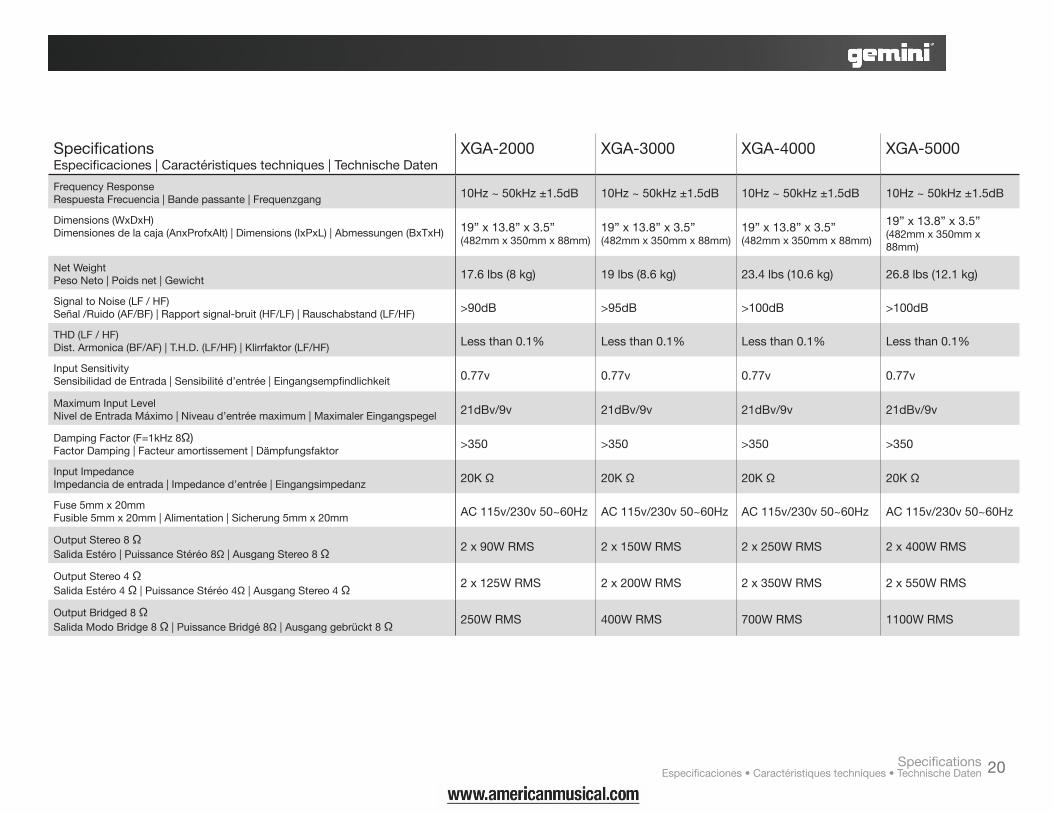
SpecificationsEspecificaciones•Caractéristiquestechniques•TechnischeDaten 20
Specifications Especificaciones|Caractéristiquestechniques|TechnischeDaten
XGA-2000 XGA-3000 XGA-4000 XGA-5000
FrequencyResponseRespuestaFrecuencia|Bandepassante|Frequenzgang 10Hz ~ 50kHz ±1.5dB 10Hz ~ 50kHz ±1.5dB 10Hz ~ 50kHz ±1.5dB 10Hz ~ 50kHz ±1.5dB
Dimensions (WxDxH)Dimensionesdelacaja(AnxProfxAlt)|Dimensions(IxPxL)|Abmessungen(BxTxH) 19” x 13.8” x 3.5”
(482mm x 350mm x 88mm)19” x 13.8” x 3.5”(482mm x 350mm x 88mm)
19” x 13.8” x 3.5”(482mm x 350mm x 88mm)
19” x 13.8” x 3.5”(482mm x 350mm x 88mm)
NetWeightPesoNeto|Poidsnet|Gewicht 17.6 lbs (8 kg) 19 lbs (8.6 kg) 23.4 lbs (10.6 kg) 26.8 lbs (12.1 kg)
SignaltoNoise(LF/HF)Señal/Ruido(AF/BF)|Rapportsignal-bruit(HF/LF)|Rauschabstand(LF/HF) >90dB >95dB >100dB >100dB
THD(LF/HF)Dist.Armonica(BF/AF)|T.H.D.(LF/HF)|Klirrfaktor(LF/HF) Less than 0.1% Less than 0.1% Less than 0.1% Less than 0.1%
Input SensitivitySensibilidaddeEntrada|Sensibilitéd’entrée|Eingangsempfindlichkeit 0.77v 0.77v 0.77v 0.77v
Maximum Input LevelNiveldeEntradaMáximo|Niveaud’entréemaximum|MaximalerEingangspegel 21dBv/9v 21dBv/9v 21dBv/9v 21dBv/9v
Damping Factor (F=1kHz 8Ω)Factor Damping | Facteur amortissement | Dämpfungsfaktor
>350 >350 >350 >350
Input ImpedanceImpedanciadeentrada|Impedanced’entrée|Eingangsimpedanz 20KΩ 20KΩ 20KΩ 20KΩ
Fuse 5mm x 20mm Fusible 5mm x 20mm | Alimentation | Sicherung 5mm x 20mm AC115v/230v50~60Hz AC115v/230v50~60Hz AC115v/230v50~60Hz AC115v/230v50~60Hz
Output Stereo 8 ΩSalidaEstéro|PuissanceStéréo8Ω|AusgangStereo8Ω
2 x 90W RMS 2 x 150W RMS 2 x 250W RMS 2 x 400W RMS
Output Stereo 4 ΩSalidaEstéro4Ω|PuissanceStéréo4Ω|AusgangStereo4Ω
2 x 125W RMS 2 x 200W RMS 2 x 350W RMS 2 x 550W RMS
Output Bridged 8 Ω Salida Modo Bridge 8 Ω|PuissanceBridgé8Ω|Ausganggebrückt8Ω
250W RMS 400W RMS 700W RMS 1100W RMS
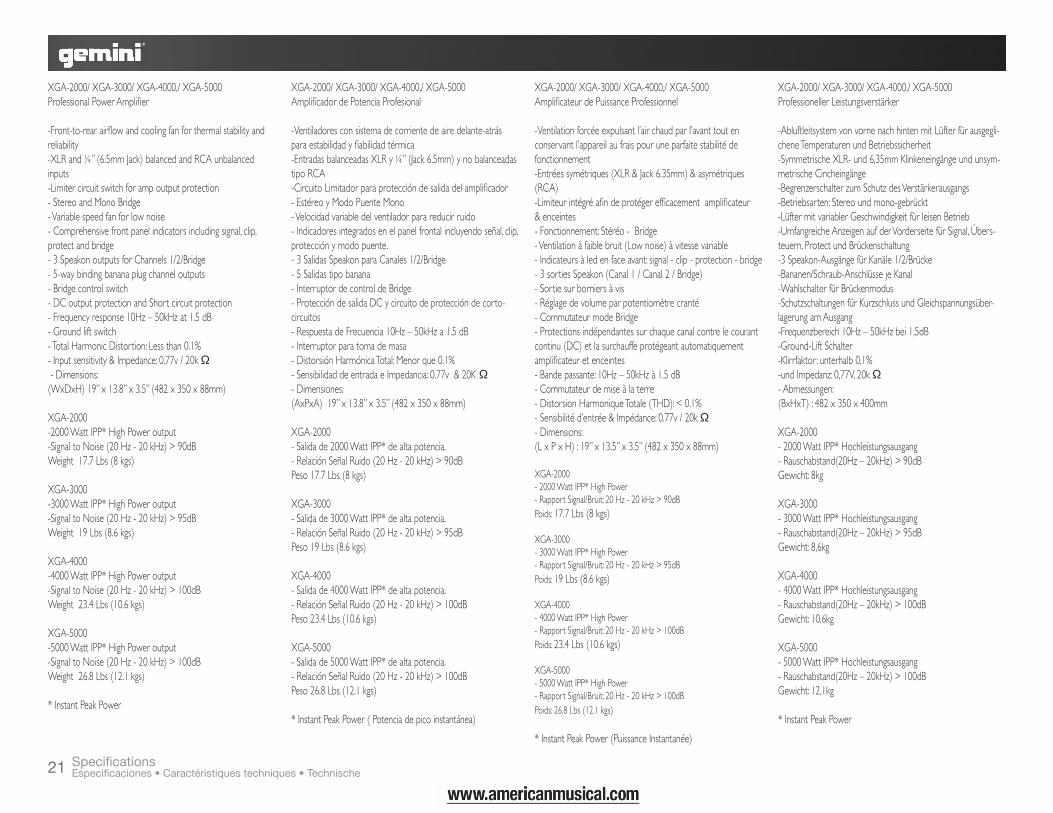
SpecificationsEspecificaciones•Caractéristiquestechniques•Technische21
XGA-2000/ XGA-3000/ XGA-4000,/ XGA-5000Professional Power Amplifier
-Front-to-rear airflow and cooling fan for thermal stability and reliability-XLR and ¼” (6.5mm Jack) balanced and RCA unbalanced inputs-Limiter circuit switch for amp output protection- Stereo and Mono Bridge- Variable speed fan for low noise- Comprehensive front panel indicators including signal, clip, protect and bridge- 3 Speakon outputs for Channels 1/2/Bridge- 5-way binding banana plug channel outputs- Bridge control switch- DC output protection and Short circuit protection- Frequency response 10Hz – 50kHz at 1.5 dB- Ground lift switch- Total Harmonic Distortion: Less than 0.1%- Input sensitivity & Impedance: 0.77v / 20k Ω - Dimensions:(WxDxH) 19” x 13.8” x 3.5” (482 x 350 x 88mm)
XGA-2000 -2000 Watt IPP* High Power output -Signal to Noise (20 Hz - 20 kHz) > 90dBWeight 17.7 Lbs (8 kgs) XGA-3000 -3000 Watt IPP* High Power output -Signal to Noise (20 Hz - 20 kHz) > 95dBWeight 19 Lbs (8.6 kgs)
XGA-4000 -4000 Watt IPP* High Power output -Signal to Noise (20 Hz - 20 kHz) > 100dBWeight 23.4 Lbs (10.6 kgs)
XGA-5000 -5000 Watt IPP* High Power output -Signal to Noise (20 Hz - 20 kHz) > 100dBWeight 26.8 Lbs (12.1 kgs)
* Instant Peak Power
XGA-2000/ XGA-3000/ XGA-4000,/ XGA-5000Amplificador de Potencia Profesional
-Ventiladores con sistema de corriente de aire delante-atrás para estabilidad y fiabilidad térmica -Entradas balanceadas XLR y ¼” (Jack 6.5mm) y no balanceadas tipo RCA-Circuito Limitador para protección de salida del amplificador- Estéreo y Modo Puente Mono - Velocidad variable del ventilador para reducir ruido- Indicadores integrados en el panel frontal incluyendo señal, clip, protección y modo puente.- 3 Salidas Speakon para Canales 1/2/Bridge- 5 Salidas tipo banana - Interruptor de control de Bridge - Protección de salida DC y circuito de protección de corto-circuitos- Respuesta de Frecuencia 10Hz – 50kHz a 1.5 dB- Interruptor para toma de masa- Distorsión Harmónica Total: Menor que 0.1%- Sensibilidad de entrada e Impedancia: 0.77v & 20KΩ- Dimensiones: (AxPxA) 19” x 13.8” x 3.5” (482 x 350 x 88mm)
XGA-2000 - Salida de 2000 Watt IPP* de alta potencia.- Relación Señal Ruido (20 Hz - 20 kHz) > 90dBPeso 17.7 Lbs (8 kgs) XGA-3000- Salida de 3000 Watt IPP* de alta potencia.- Relación Señal Ruido (20 Hz - 20 kHz) > 95dBPeso 19 Lbs (8.6 kgs)
XGA-4000- Salida de 4000 Watt IPP* de alta potencia.- Relación Señal Ruido (20 Hz - 20 kHz) > 100dBPeso 23.4 Lbs (10.6 kgs)
XGA-5000- Salida de 5000 Watt IPP* de alta potencia.- Relación Señal Ruido (20 Hz - 20 kHz) > 100dBPeso 26.8 Lbs (12.1 kgs)
* Instant Peak Power ( Potencia de pico instantánea)
XGA-2000/ XGA-3000/ XGA-4000,/ XGA-5000Amplificateur de Puissance Professionnel -Ventilation forcée expulsant l’air chaud par l’avant tout en conservant l’appareil au frais pour une parfaite stabilité de fonctionnement -Entrées symétriques (XLR & Jack 6.35mm) & asymétriques (RCA) -Limiteur intégré afin de protéger efficacement amplificateur & enceintes- Fonctionnement: Stéréo - Bridge- Ventilation à faible bruit (Low noise) à vitesse variable - Indicateurs à led en face avant: signal - clip - protection - bridge- 3 sorties Speakon (Canal 1 / Canal 2 / Bridge)- Sortie sur borniers à vis- Réglage de volume par potentiomètre cranté- Commutateur mode Bridge- Protections indépendantes sur chaque canal contre le courant continu (DC) et la surchauffe protégeant automatiquement amplificateur et enceintes - Bande passante: 10Hz – 50kHz à 1.5 dB- Commutateur de mise à la terre- Distorsion Harmonique Totale (THD): < 0.1%- Sensibilité d’entrée & Impédance: 0.77v / 20k Ω- Dimensions: (L x P x H) : 19” x 13.5” x 3.5” (482 x 350 x 88mm)
XGA-2000 - 2000 Watt IPP* High Power- Rapport Signal/Bruit: 20 Hz - 20 kHz > 90dBPoids: 17.7 Lbs (8 kgs) XGA-3000- 3000 Watt IPP* High Power- Rapport Signal/Bruit: 20 Hz - 20 kHz > 95dBPoids: 19 Lbs (8.6 kgs)
XGA-4000- 4000 Watt IPP* High Power- Rapport Signal/Bruit: 20 Hz - 20 kHz > 100dBPoids: 23.4 Lbs (10.6 kgs)
XGA-5000- 5000 Watt IPP* High Power- Rapport Signal/Bruit: 20 Hz - 20 kHz > 100dBPoids: 26.8 Lbs (12.1 kgs)
* Instant Peak Power (Puissance Instantanée)
XGA-2000/ XGA-3000/ XGA-4000,/ XGA-5000Professioneller Leistungsverstärker
-Abluftleitsystem von vorne nach hinten mit Lüfter für ausgegli-chene Temperaturen und Betriebssicherheit-Symmetrische XLR- und 6,35mm Klinkeneingänge und unsym-metrische Cincheingänge-Begrenzerschalter zum Schutz des Verstärkerausgangs-Betriebsarten: Stereo und mono-gebrückt-Lüfter mit variabler Geschwindigkeit für leisen Betrieb-Umfangreiche Anzeigen auf der Vorderseite für Signal, Übers-teuern, Protect und Brückenschaltung-3 Speakon-Ausgänge für Kanäle 1/2/Brücke-Bananen/Schraub-Anschlüsse je Kanal-Wahlschalter für Brückenmodus-Schutzschaltungen für Kurzschluss und Gleichspannungsüber-lagerung am Ausgang-Frequenzbereich 10Hz – 50kHz bei 1,5dB-Ground-Lift Schalter-Klirrfaktor: unterhalb 0,1%-und Impedanz: 0,77V, 20k Ω- Abmessungen: (BxHxT) : 482 x 350 x 400mm
XGA-2000- 2000 Watt IPP* Hochleistungsausgang- Rauschabstand(20Hz – 20kHz) > 90dBGewicht: 8kg XGA-3000- 3000 Watt IPP* Hochleistungsausgang- Rauschabstand(20Hz – 20kHz) > 95dBGewicht: 8,6kg
XGA-4000- 4000 Watt IPP* Hochleistungsausgang- Rauschabstand(20Hz – 20kHz) > 100dBGewicht: 10,6kg
XGA-5000- 5000 Watt IPP* Hochleistungsausgang- Rauschabstand(20Hz – 20kHz) > 100dBGewicht: 12,1kg
* Instant Peak Power

Register your product online at www.geminidj.com to be eligible for great prize giveaways! If you do not have internet access, fill out the form below and mail it to the appropriate address
listed at the left side of this page.
First and Last Name
Address (Number and Street) Apartment Number
City and State or Province
Country
Zip Code or Postal Code
Email Address
Telephone Number
Date of Birth
Date of Purchase
Purchase Price (Excluding Tax)
City of Purchase
Model Number (Example: CDT-05) Serial Number (Located on the back of most units)
Product RegistrationRegistrodeProducto•Enregistrementduproduit•Produktregistrierung 22
Cut
alo
ng t
he d
otte
d lin
e.
Warranty and Repair :All Gemini products are designed and manufactured to the highest standards in the industry. With proper care and maintenance, your product will provide years of reliable service. LIMITED WARRANTYA. Gemini warrants its products to be free from de-fects in materials and workmanship for One (1) year from the original purchase date. Exceptions: Laser assemblies on CD Players, cartridges, and crossfaders are covered for 90 days.
B. This limited warranty does not cover damage or failure caused by abuse, misuse, abnormal use, faulty installation, improper maintenance or any repairs other than those provided by an authorized Gemini Service Center.
C. There are no obligations of liability on the part of Gemini for consequential damages arising out of or in connection with the use or performance of the product or other indirect damages with respect to loss of property, revenues, of profit, or costs of removal, installation, or reinstallation. All implied war-ranties for Gemini, including implied warranties for fit-ness, are limited in duration to One (1) year from the original date of purchase, unless otherwise mandated by local statutes.
RETURN/REPAIRA. In the U.S.A., please call our helpful Customer Ser-vice Representatives at (732)738-9003, and they will be happy to give you a Return Authorization Number (RA#) and the address of an authorized service center closest to you.B. After receiving an RA#, include a copy of the origi-nal sales receipt, with defective product and a descrip-tion of the defect. Send by insured freight to: Gemini Sound Products Corp, and use the address provided by your customer service representative. Your RA# must be written on the outside of the package, or processing will be delayed indefinitely!C. Service covered under warranty will be paid for by Gemini and returned to you. For non-warrantied products, Gemini will repair your unit after payment is received. Repair charges do not include return freight. Freight charges will be added to the repair charges.D. On warranty service, you pay for shipping to Gemini, we pay for return shipping within the continental United States. Alaska, Hawaii, Puerto Rico, Canada, Bahamas, and the Virgin Islands will be charged for freight.E. Please allow 2-4 weeks for return of your product. Under normal circumstances your product will spend no more than 10 working days at Gemini. We are not responsible for shipping times.
Gemini Sound ProductsWorldwide Headquarters1 Mayfield AveEdison, NJ 08837 USATel: (732) 346-0061Fax: (732) 346-0065
IN THE UNITED KINGDOMIn the event that you need service on your Gemini product under warranty, simply write a letter describ-ing the problem, along with your contact information. Make sure to enclose a copy of your receipt for proof of warranty information. A return number is not required. You will be responsible for shipping charges to Gemini UK, and Gemini UK will pay to return the unit to you if it is considered under warranty.
Gemini Sound Products Unit 44 Brambles Enterprise Centre Waterlooville P07 7TH, UKTel: 087 087 00880 Fax: 087 087 00990-EN ESPAÑAEn caso de mal funcionamiento de esta unidad, por favor contacte con el Servicio de Atención al Cliente en el teléfono 93 436 37 00 que le asesorará sobre el procedimiento correcto para solucionarlo. En caso de ser necesario enviar la unidad para su reparación, el Servicio de Atención al Cliente le proveerá de un número de incidencia, así como de la dirección del Servicio de Asistencia Técnica más cercano a su residencia.
GCI Technologies S.A. Caspe, 172 - 1º A08013 Barcelona, SpainTel: 34 93 436 37 00 Fax: 34 93 347 69 61-EN FRANCEEn cas de panne, merci de contacter votre reven-deur. Tout appareil en panne doit y être retourné, accompagné de sa facture d’achat, de son emballage d’origine et d’un descriptif de panne. L’appareil sera expédié au SAV de GCI Technologies France. Tout produit reçu sans facture sera réparé hors garantie. L’appareil sera ensuite ré-expédié au revendeur.
GCI Technologies s.a.r.l2bis, rue Léon Blum91120 Palaiseau, FranceTél: + 33 1 69 79 97 70 Fax: + 33 1 69 79 97 80-IN DEUTSCHLANDDie allgemeinen gesetzlichen Gewährleistungen bleiben von den Herstellergarantien unberührt. Der Garantieanspruch erlischt bei Eingriffen durch den Käufer oder durch Dritte sowie bei unsachgemässer Behandlung. Gewährleistungsansprüche sind auss-chließlich gegenüber Ihrem Fachhändler geltend zu machen.
GCI Technologies GmbHLerchenstraße 1480995 München, GermanyTel: 089 - 319 019 8 - 0Fax: 089 - 319 019 8 - 18

In the USA: if you experience problems with this unit, call 732-346-0061 for GCI Technologies
customer service. Do not attempt to return this equipment to your dealer.
Parts of the design of this product may be protected by worldwide patents. Information in this manual is subject to change without notice and does not represent a com-mitment on the part of the vendor. GCI Technologies Corp. shall not be liable for any loss or damage whatsoever arising from the use of information or any error contained in this manual. No part of this manual may be reproduced, stored in a retrieval system or transmitted, in any form or by any means, electronic, electrical, mechanical, optical, chemical, including photocopying and recording, for any purpose without the express written permission of GCI Technologies Corp. It is recommended that all maintenance and service on this product is performed by GCI Technologies Corp. or its authorized agents. GCI Technologies Corp. will not accept liability for loss or damage caused by
maintenance or repair performed by unauthorized personnel.
Worldwide Headquarters 1 Mayfield Ave, Edison, NJ 08837, USA
Tel: (732) 346-0061 • Fax: (732) 346-0065
Latin America, Mexico, and Caribbean • GCI Technologies8320 NW 68 Street
Miami, FL 33166, USATel: (305) 592-4746 • Fax: (305) 592-4746
UK • GCI Technologies44 The Brambles Enterprise Centre, PO7 7TH Waterlooville, UK
Tel: 087 087 00880 • Fax: 087 087 00990
Spain • GCI Technologies S.A.Caspe, 172 - 1º A
08013 Barcelona, SpainTel: 34 93 436 37 00 Fax: 34 93 347 69 61
France • GCI Technologies France S.AR.L 2bis, rue Léon Blum, 91120 Palaiseau, France
Tél: + 33 1 69 79 97 70 • Fax: + 33 1 69 79 97 80
Germany • GCI Technologies GmbHLerchenstraße 14, 80995 München, Germany
Tel: 089 - 319 019 8 - 0 • Fax: 089 - 319 019 8-18
© GCI Technologies Corp. 2009 All Rights Reserved.