Embed Size (px)
DESCRIPTION
get into tools mode to adjust copi qualityset up xerox 5252 set calibration xerox 5252
Citation preview
DocuColor 5252 System Administrat ion Guide 122-1
2 Too
ls Mo
de
2. Tools Mode
Key point: Some features or options described in this chapter may not display or be selectable depending on the configuration of your machine.
Overview
The Tools Mode enables you to establish the default settings for your digital press, with or without a scanner, to fit your individual requirements. You can change the settings for a variety of features, such as the initial screen to display when the press is powered on, the language to display on the Touch Screen, special paper sizes that can be used in certain Paper Trays, timers, audio tone controls, default settings for scanner features, image quality settings, and more.
Entering and exiting Tools Mode
Key points:• If you attempt to access the Tools Mode while a job is printing,
access to the screens will be delayed until the job completes printing.
• Jobs will queue, but will not print while the Tools Mode is active.
• You cannot access the Tools Mode if the digital press is in a Fault condition.
• You cannot access the Tools Mode if the Pause key on the Control Panel has been pressed to halt a job. When the job that was stopped has been completed, Tools Mode may be accessed.
DocuColor 5252 System Administrat ion Guide2-2
Tools Mode
Entering Tools Mode
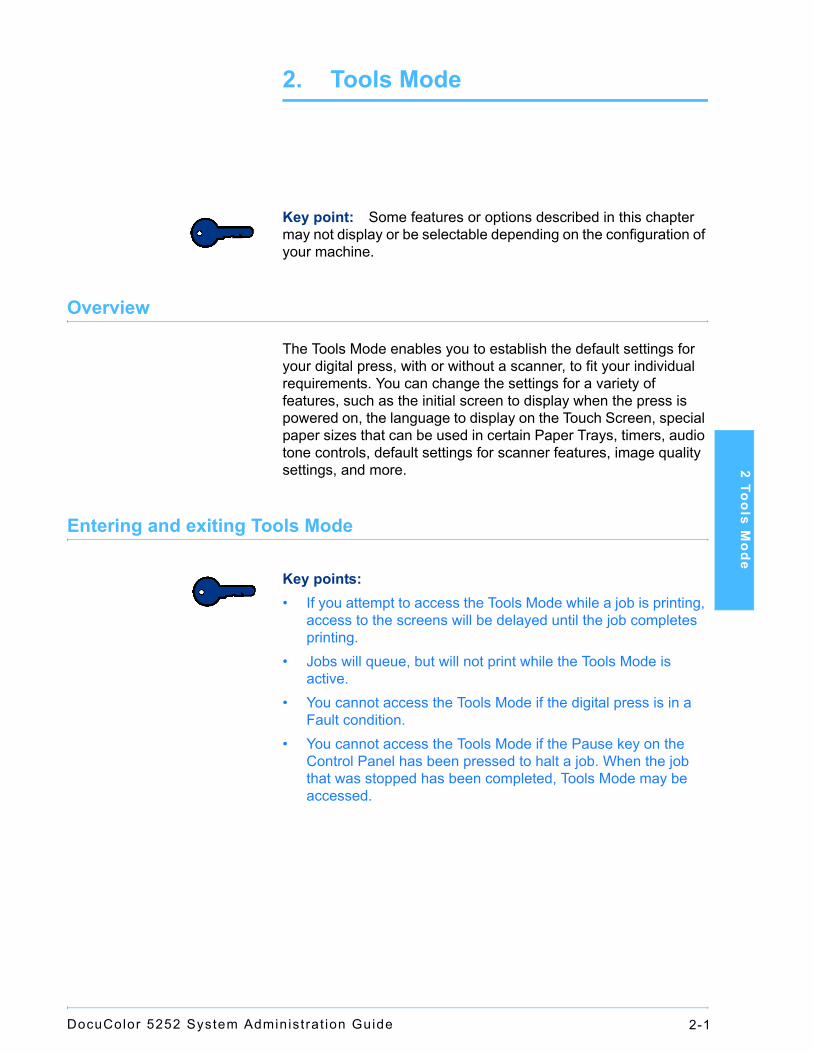
Use the following procedure to enter the Tools Mode:
1 Press the Access button on the Control Panel. The Access Password Screen appears.
2 Use the keypad to enter the Tools Mode password. The default password is five 1s (11111). For security reasons, only asterisks are displayed on the screen.
3 Touch the Enter button on the screen. The Pathway Options screen appears:
Note: It is recommended that you change the Tools password as soon as possible after installing the digital press to prevent unauthorized access to the Tools Mode. The procedure for changing the password is in the next chapter.
4 Touch the Tools Pathway button on the screen.
DocuColor 5252 System Administrat ion Guide 2-3
Tools Mode
2 Too
ls Mo
de
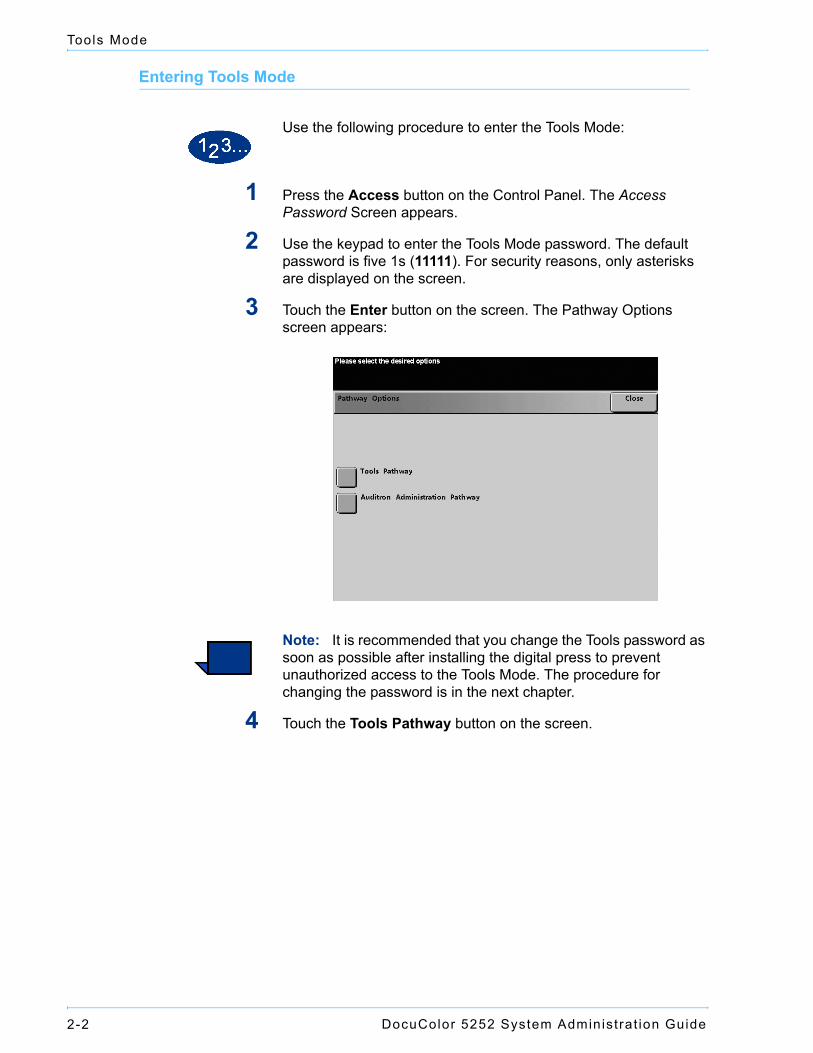
The Machine Defaults 1 screen appears.
Note: The options shown on the above screen may vary depending on whether a scanner is or is not attached to the digital press.
DocuColor 5252 System Administrat ion Guide2-4
Tools Mode
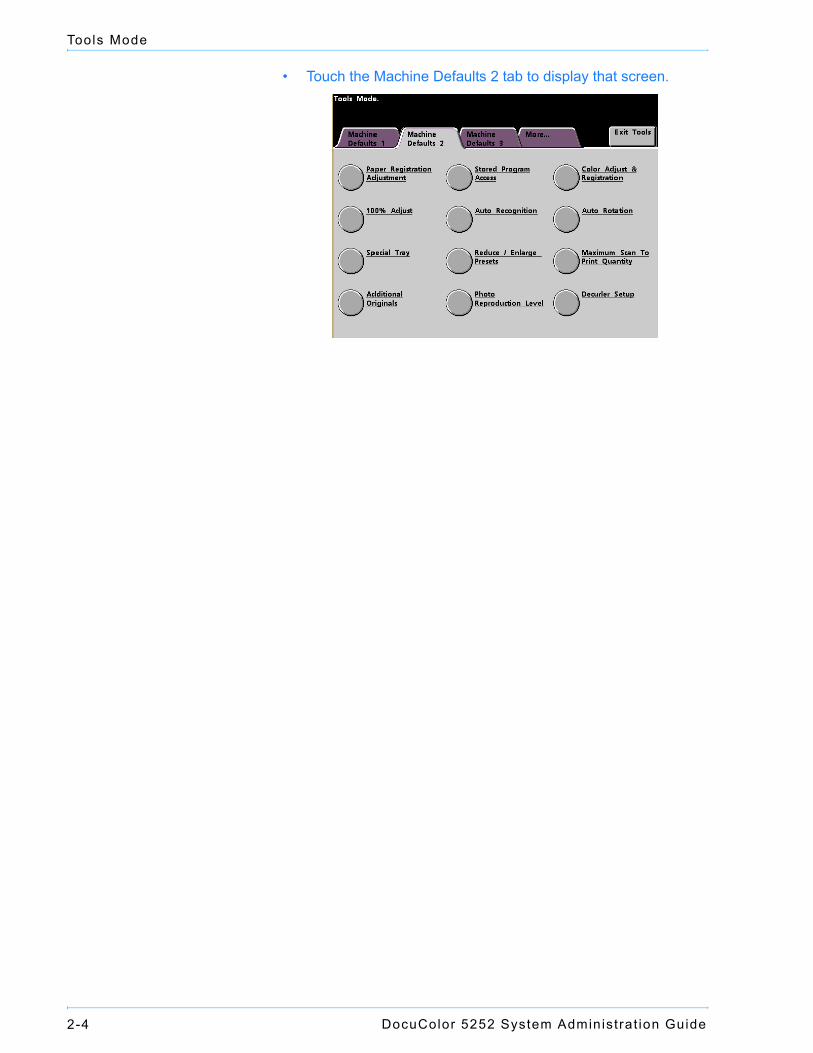
• Touch the Machine Defaults 2 tab to display that screen.
DocuColor 5252 System Administrat ion Guide 2-5
Tools Mode
2 Too
ls Mo
de
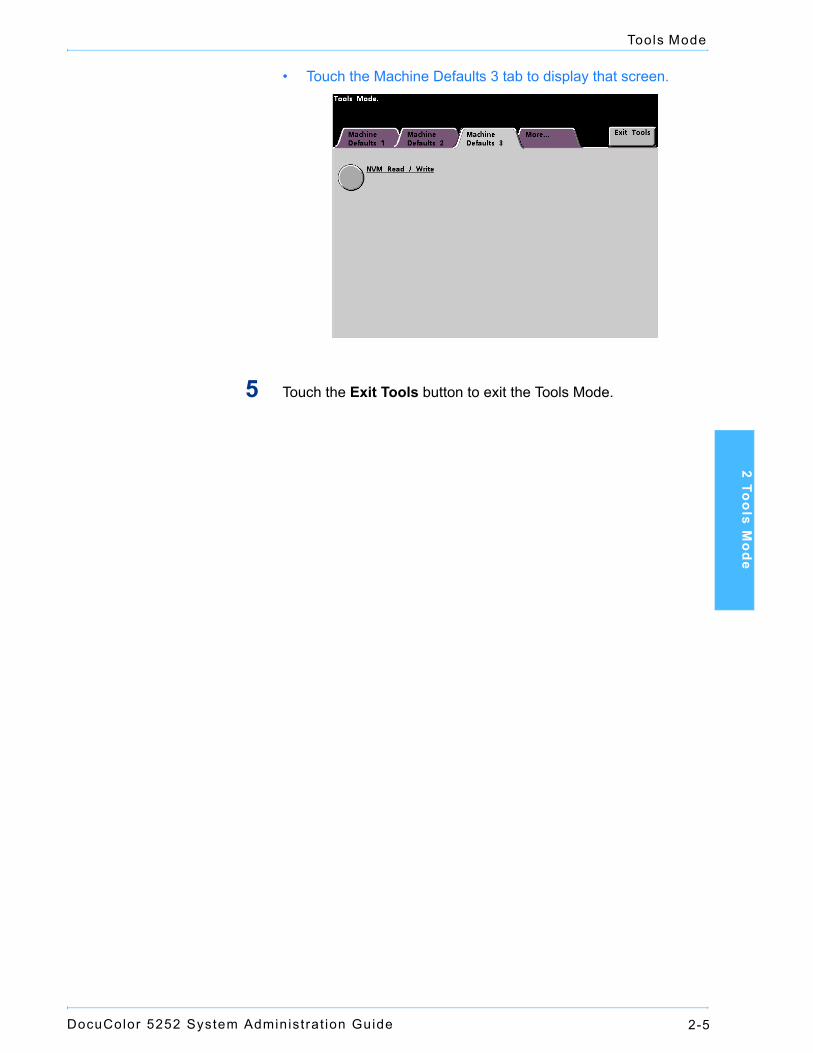
• Touch the Machine Defaults 3 tab to display that screen.
5 Touch the Exit Tools button to exit the Tools Mode.
DocuColor 5252 System Administrat ion Guide2-6
Tools Mode
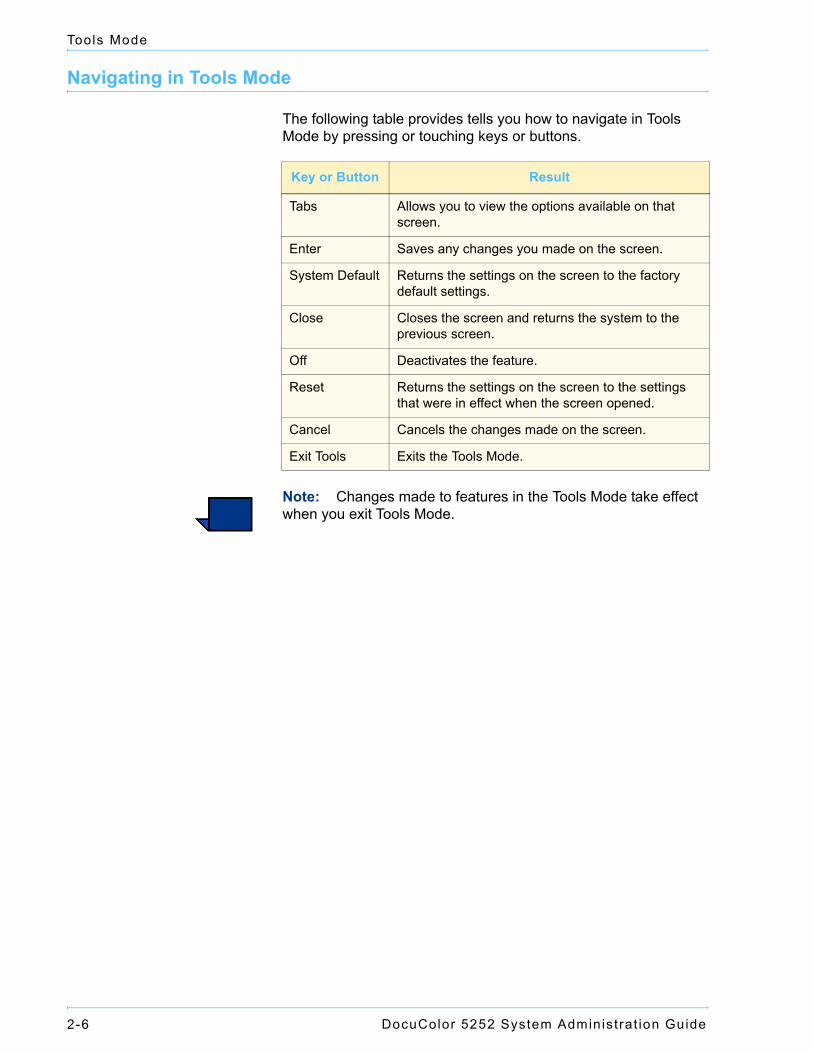
Navigating in Tools Mode
The following table provides tells you how to navigate in Tools Mode by pressing or touching keys or buttons.
Note: Changes made to features in the Tools Mode take effect when you exit Tools Mode.
Key or Button Result
Tabs Allows you to view the options available on that screen.
Enter Saves any changes you made on the screen.
System Default Returns the settings on the screen to the factory default settings.
Close Closes the screen and returns the system to the previous screen.
Off Deactivates the feature.
Reset Returns the settings on the screen to the settings that were in effect when the screen opened.
Cancel Cancels the changes made on the screen.
Exit Tools Exits the Tools Mode.
DocuColor 5252 System Administrat ion Guide 2-7
Tools Mode
2 Too
ls Mo
de
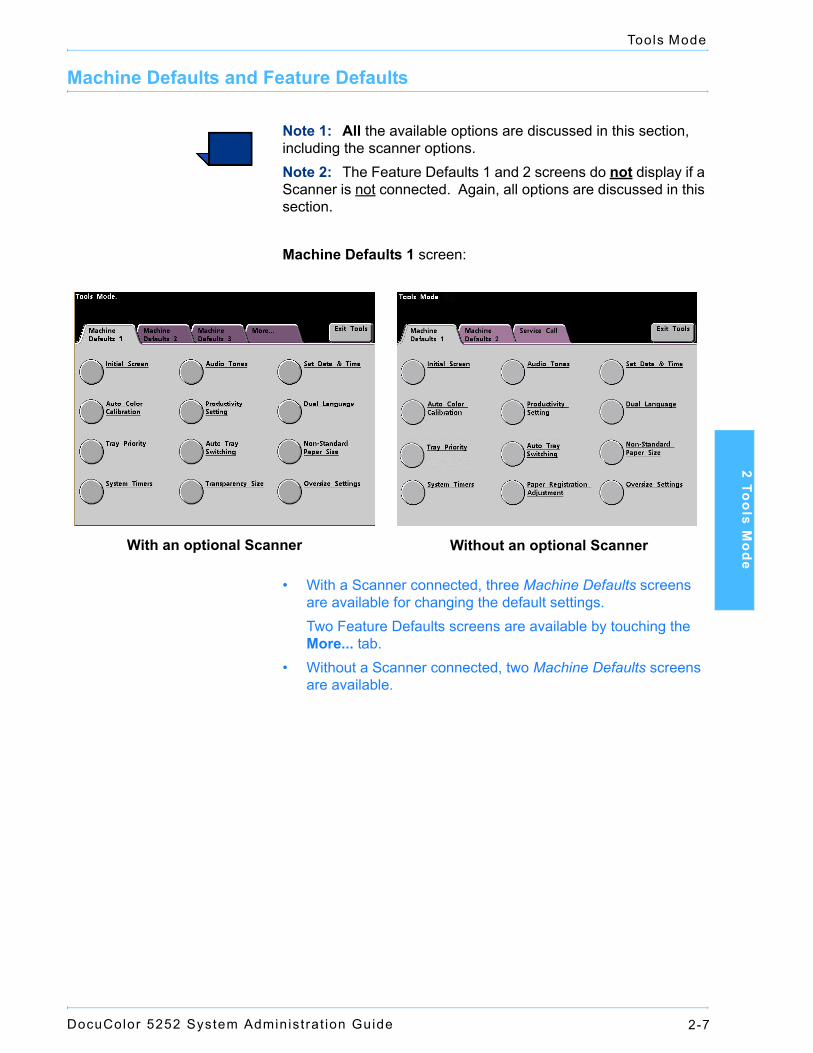
Machine Defaults and Feature Defaults
Note 1: All the available options are discussed in this section, including the scanner options.Note 2: The Feature Defaults 1 and 2 screens do not display if a Scanner is not connected. Again, all options are discussed in this section.
Machine Defaults 1 screen:
• With a Scanner connected, three Machine Defaults screens are available for changing the default settings.Two Feature Defaults screens are available by touching the More... tab.
• Without a Scanner connected, two Machine Defaults screens are available.
With an optional Scanner Without an optional Scanner
DocuColor 5252 System Administrat ion Guide2-8
Tools Mode
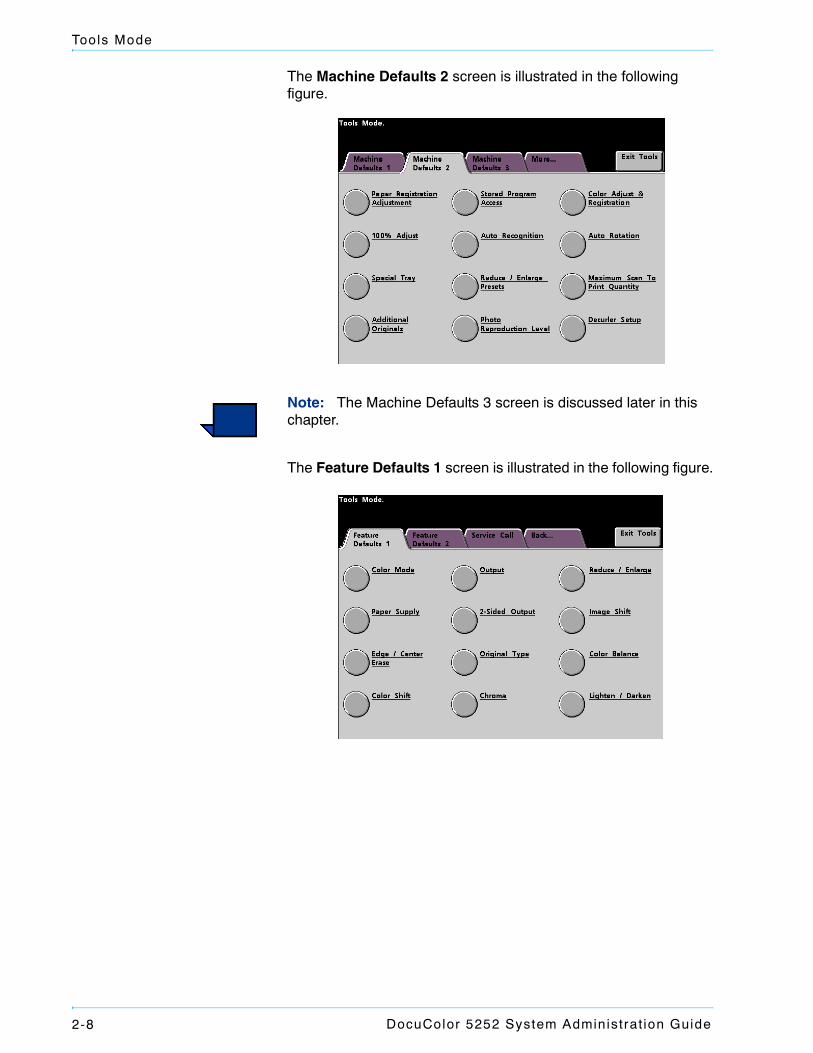
The Machine Defaults 2 screen is illustrated in the following figure.
Note: The Machine Defaults 3 screen is discussed later in this chapter.
The Feature Defaults 1 screen is illustrated in the following figure.
DocuColor 5252 System Administrat ion Guide 2-9
Tools Mode
2 Too
ls Mo
de
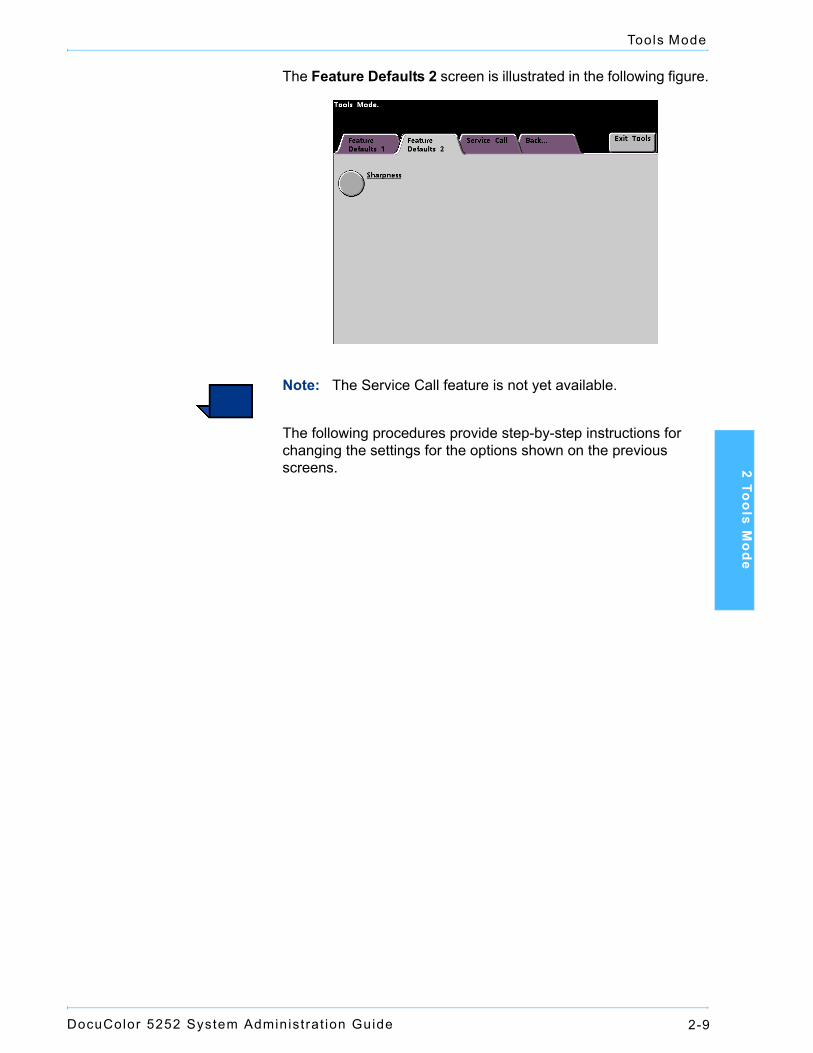
The Feature Defaults 2 screen is illustrated in the following figure.
Note: The Service Call feature is not yet available.
The following procedures provide step-by-step instructions for changing the settings for the options shown on the previous screens.
DocuColor 5252 System Administrat ion Guide2-10
Tools Mode
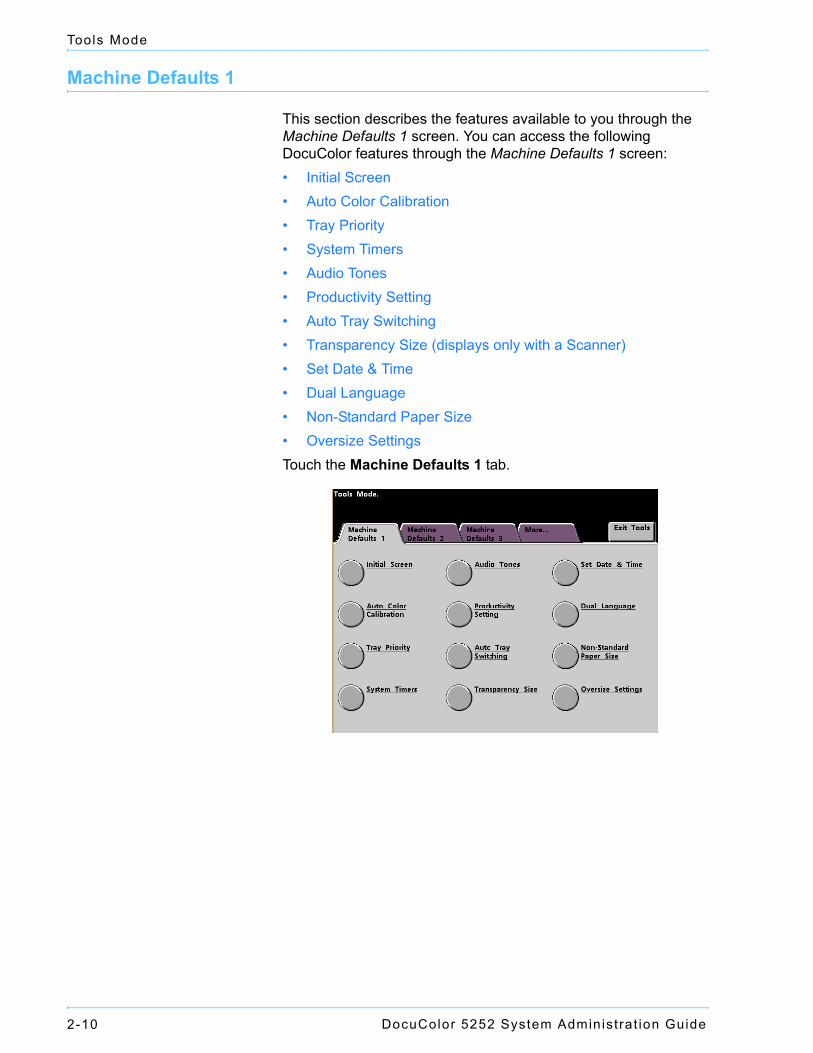
Machine Defaults 1
This section describes the features available to you through the Machine Defaults 1 screen. You can access the following DocuColor features through the Machine Defaults 1 screen:• Initial Screen• Auto Color Calibration• Tray Priority• System Timers• Audio Tones• Productivity Setting • Auto Tray Switching• Transparency Size (displays only with a Scanner)• Set Date & Time• Dual Language• Non-Standard Paper Size• Oversize SettingsTouch the Machine Defaults 1 tab.
DocuColor 5252 System Administrat ion Guide 2-11
Tools Mode
2 Too
ls Mo
de
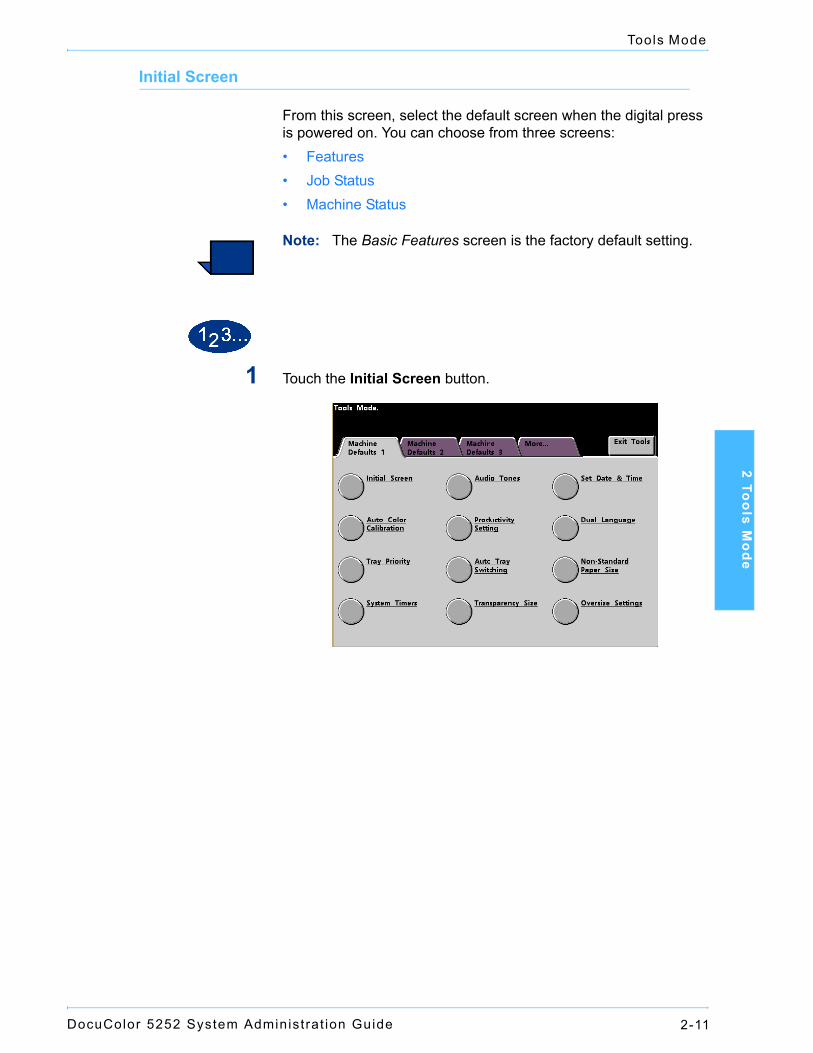
Initial Screen
From this screen, select the default screen when the digital press is powered on. You can choose from three screens:• Features• Job Status• Machine Status
Note: The Basic Features screen is the factory default setting.
1 Touch the Initial Screen button.
DocuColor 5252 System Administrat ion Guide2-12
Tools Mode
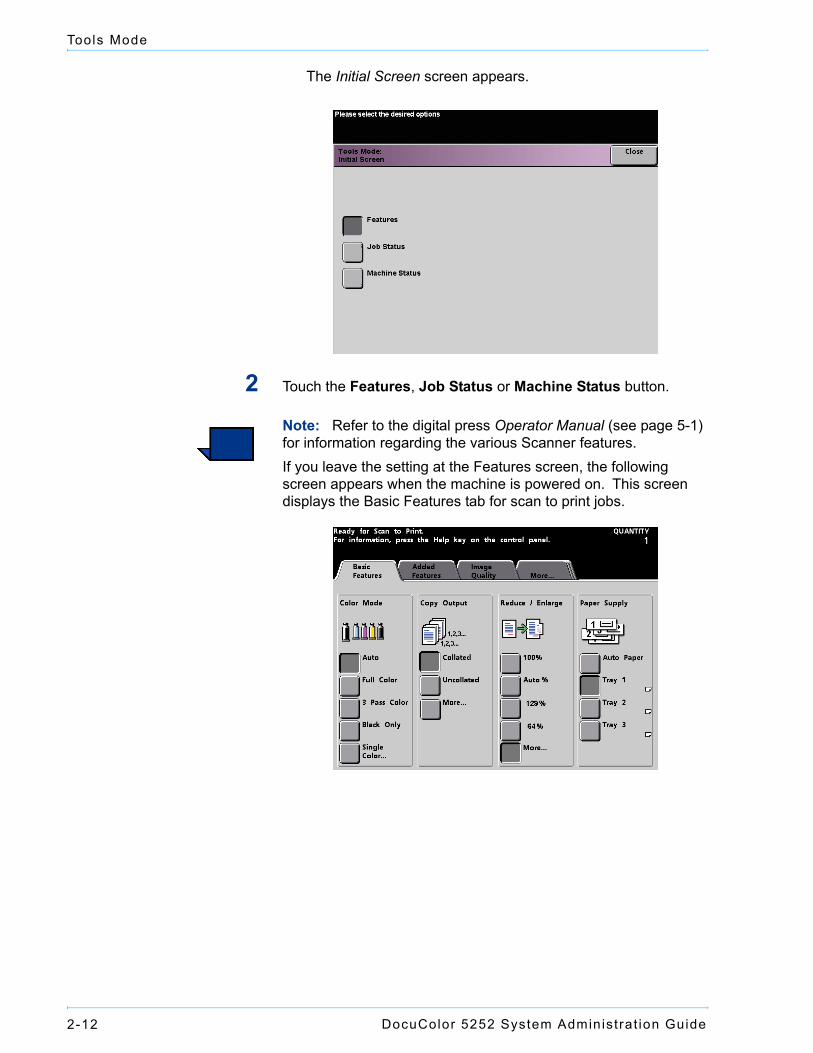
The Initial Screen screen appears.
2 Touch the Features, Job Status or Machine Status button.
Note: Refer to the digital press Operator Manual (see page 5-1) for information regarding the various Scanner features.If you leave the setting at the Features screen, the following screen appears when the machine is powered on. This screen displays the Basic Features tab for scan to print jobs.
DocuColor 5252 System Administrat ion Guide 2-13
Tools Mode
2 Too
ls Mo
de
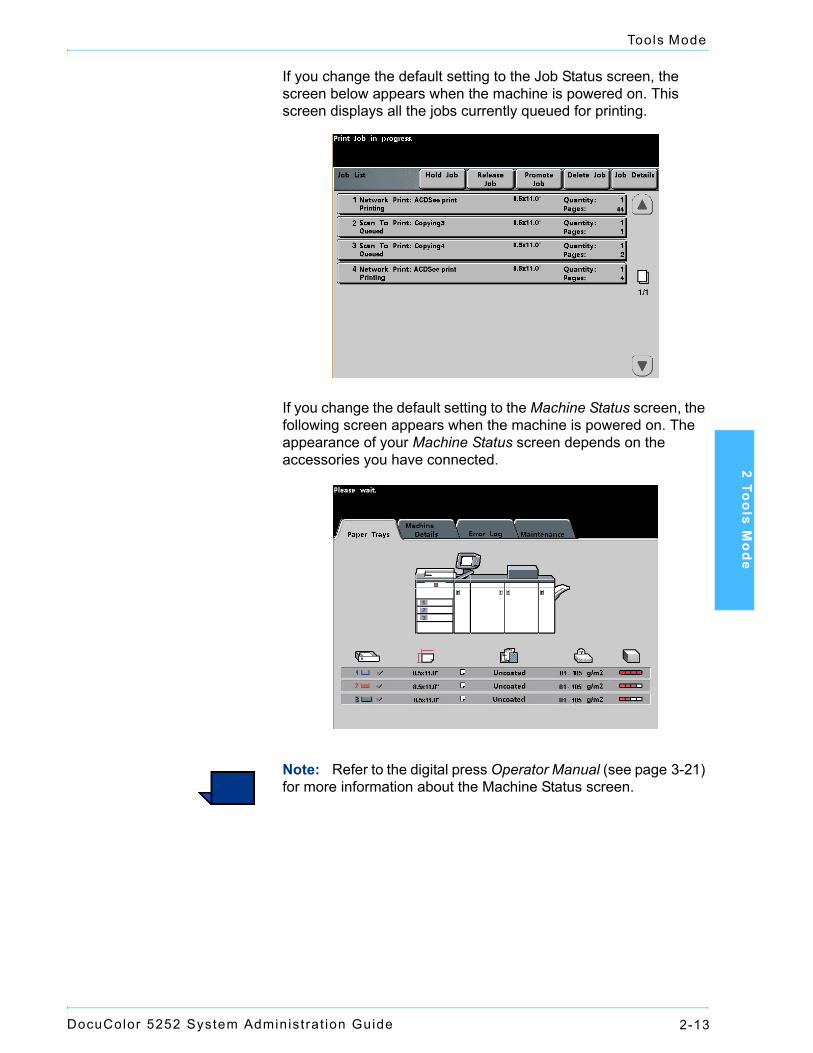
If you change the default setting to the Job Status screen, the screen below appears when the machine is powered on. This screen displays all the jobs currently queued for printing.
If you change the default setting to the Machine Status screen, the following screen appears when the machine is powered on. The appearance of your Machine Status screen depends on the accessories you have connected.
Note: Refer to the digital press Operator Manual (see page 3-21) for more information about the Machine Status screen.
DocuColor 5252 System Administrat ion Guide2-14
Tools Mode
Auto Color Calibration
Key point 1: The digital press Color Calibration procedure does not affect the quality of print jobs sent through your color server. It is for scan to print jobs only. The digital press has a number of monitoring sensors, as well as feedback and control mechanisms, that are designed to enhance overall calibration stability. Image quality is also automatically adjusted periodically during operation to keep the calibration as close as possible to the initial setup conditions. The color server connected to your digital press also has calibration procedures that you can use for network jobs.
Key point 2: Calibration targets can be printed only on A4 or letter sized paper. Ensure that your digital press has A4 or Letter paper loaded in one of the paper trays. Key point 3: You should be skilled in color science and calibration procedures before attempting to use the options available on these screens.
What to know about screening
The digital press with scanner uses an advanced proprietary screening technology to produce the colors, pictures, tints, and shades required to produce high-quality prints.PG is an abbreviation for Pattern Generator. The R in 200R refers to Rotated Line screen, and the C in 200C and 15C refers to Cluster Dot screen.
DocuColor 5252 System Administrat ion Guide 2-15
Tools Mode
2 Too
ls Mo
de
The five screening methods and what you should remember about each are described in the following table.
The color server uses information from the PostScript job and the software print driver to determine which screen is used for a particular job.
Screening Method What to Remember
150C (LPI Cluster Dot)
Provides better coverage on rough paperLarger dot provides better color stabilityReduces black and other solid color mottleProvides better black coverage due to black toner granularityDot size is better for impressions containing tints, highlights, and pastelsMost suitable for pages requirement careful control of highlightsPoorest performance on text
200C (LPI Cluster Dot)
Produces fine rosettes that can better emulate offset lithography.May leave jaggies on text (fonts)Better for creating smooth gradients with minimum contouringBest for graphics and imagesSwitch to the 200R screen if banding occurs
200R (LPI Rotated Line screen)
The angle is fixed and cannot be adjustedHas vertical screening for black, which is better for text and line art.Switch to the 200C screen if banding occurs.Best all-purpose screen.
300 LPI Line screen
Generally considered a special use screen.Better edges on colored text with fewer jaggies.Poor color stability due to small size of dot.The entire color gamut must be reproduced in two-micron area.
600 LPI Line screen
Least color stability due to small size of dot.Not recommended for most workflows.Used primarily for testing.
DocuColor 5252 System Administrat ion Guide2-16
Tools Mode
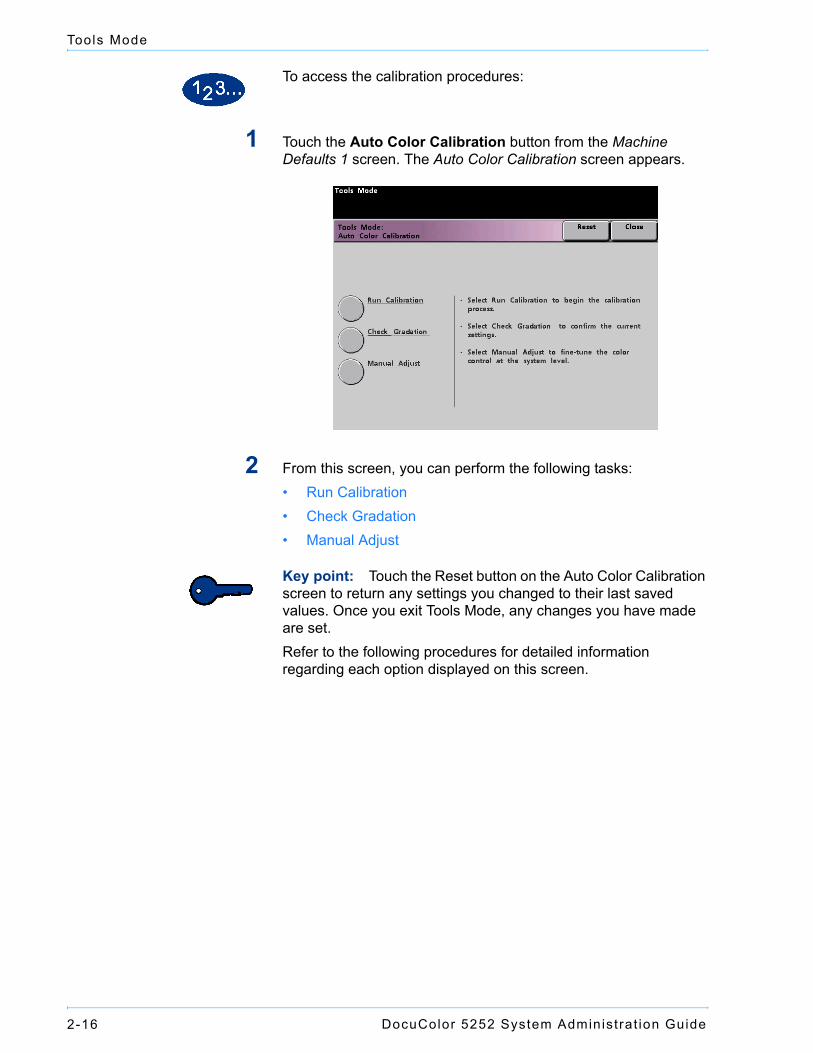
To access the calibration procedures:
1 Touch the Auto Color Calibration button from the Machine Defaults 1 screen. The Auto Color Calibration screen appears.
2 From this screen, you can perform the following tasks:• Run Calibration• Check Gradation• Manual Adjust
Key point: Touch the Reset button on the Auto Color Calibration screen to return any settings you changed to their last saved values. Once you exit Tools Mode, any changes you have made are set.Refer to the following procedures for detailed information regarding each option displayed on this screen.
DocuColor 5252 System Administrat ion Guide 2-17
Tools Mode
2 Too
ls Mo
de
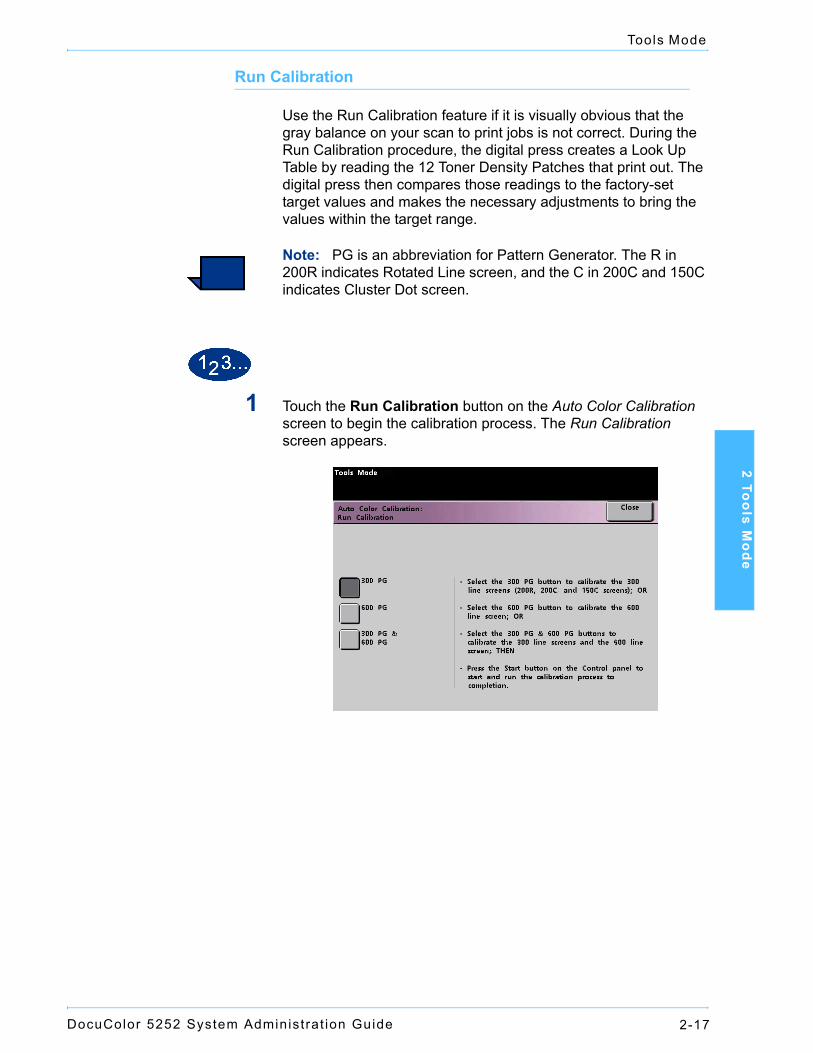
Run Calibration
Use the Run Calibration feature if it is visually obvious that the gray balance on your scan to print jobs is not correct. During the Run Calibration procedure, the digital press creates a Look Up Table by reading the 12 Toner Density Patches that print out. The digital press then compares those readings to the factory-set target values and makes the necessary adjustments to bring the values within the target range.
Note: PG is an abbreviation for Pattern Generator. The R in 200R indicates Rotated Line screen, and the C in 200C and 150C indicates Cluster Dot screen.
1 Touch the Run Calibration button on the Auto Color Calibration screen to begin the calibration process. The Run Calibration screen appears.
DocuColor 5252 System Administrat ion Guide2-18
Tools Mode
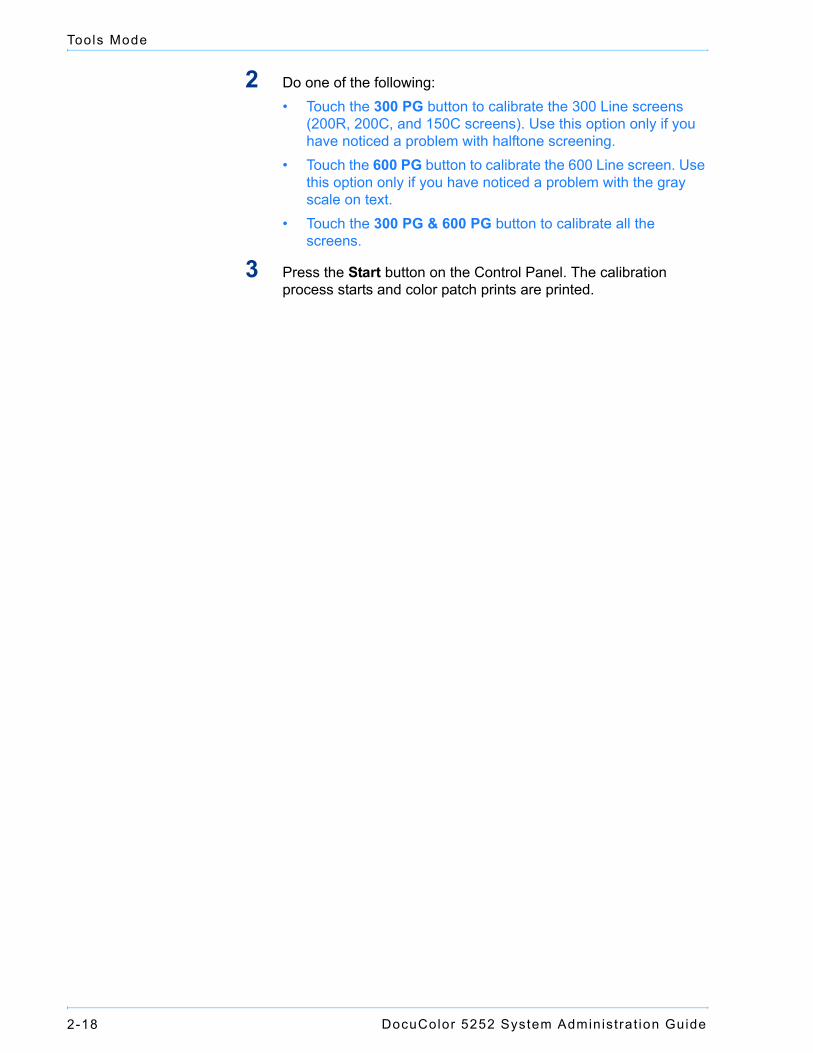
2 Do one of the following:• Touch the 300 PG button to calibrate the 300 Line screens
(200R, 200C, and 150C screens). Use this option only if you have noticed a problem with halftone screening.
• Touch the 600 PG button to calibrate the 600 Line screen. Use this option only if you have noticed a problem with the gray scale on text.
• Touch the 300 PG & 600 PG button to calibrate all the screens.
3 Press the Start button on the Control Panel. The calibration process starts and color patch prints are printed.
DocuColor 5252 System Administrat ion Guide 2-19
Tools Mode
2 Too
ls Mo
de
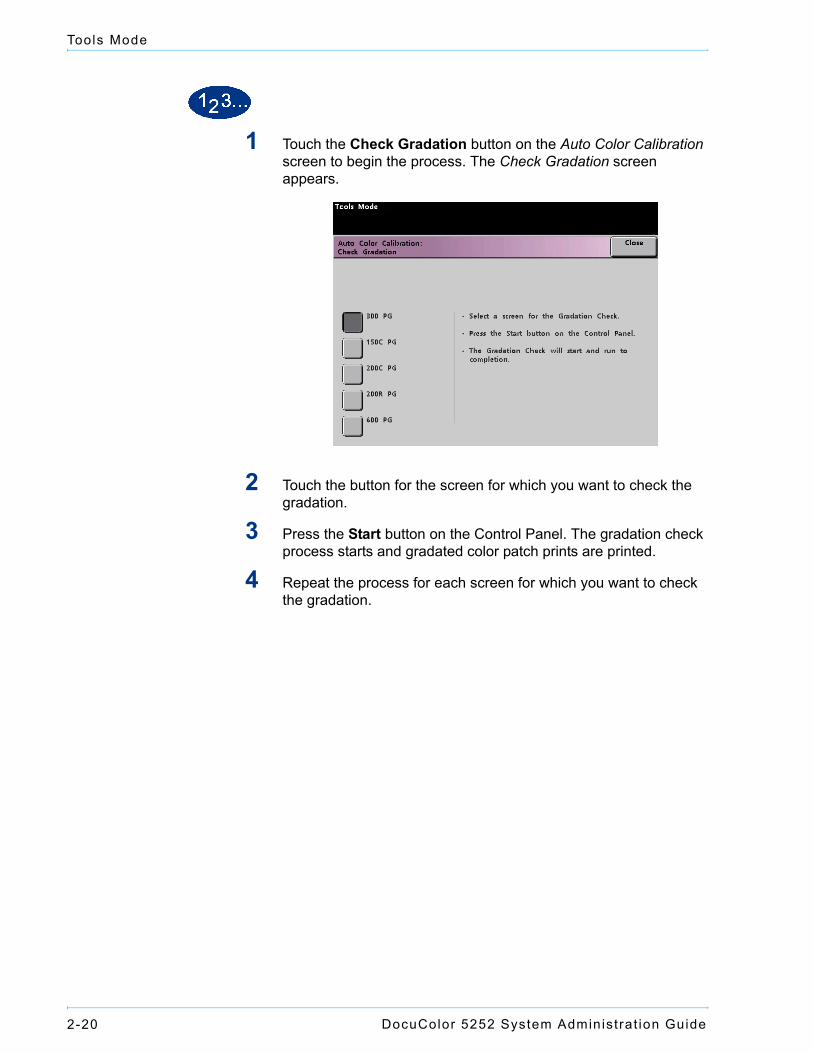
Check Gradation
The Check Gradation feature allows you to print gradated color patch prints for each line screen on the digital press. These gradated color patch prints are used to verify that the dry ink/toner densities for CMYK and Grey balance are correct. If you are dissatisfied with the appearance of any color on the print, you can manually adjust the dry ink/toner densities for Cyan, Magenta, Yellow, and Black using the Manual Adjust feature. It is recommended that you begin your calibration by calibrating the 300 PG screen first. This is the basic line screen that is used, and all other line screens are calibrated against the 300 PG screen.Use this feature daily and compare the output of gradated color patches to the color patch prints from the previous day. Under normal operating conditions, there should be no difference between them. Automatic sensors and control mechanisms in the digital press with scanner should maintain consistent calibration. If there is an obvious visual difference between two days’ color patches, run the calibration process on the color server, then run this gradation process again.
DocuColor 5252 System Administrat ion Guide2-20
Tools Mode
1 Touch the Check Gradation button on the Auto Color Calibration screen to begin the process. The Check Gradation screen appears.
2 Touch the button for the screen for which you want to check the gradation.
3 Press the Start button on the Control Panel. The gradation check process starts and gradated color patch prints are printed.
4 Repeat the process for each screen for which you want to check the gradation.
DocuColor 5252 System Administrat ion Guide 2-21
Tools Mode
2 Too
ls Mo
de
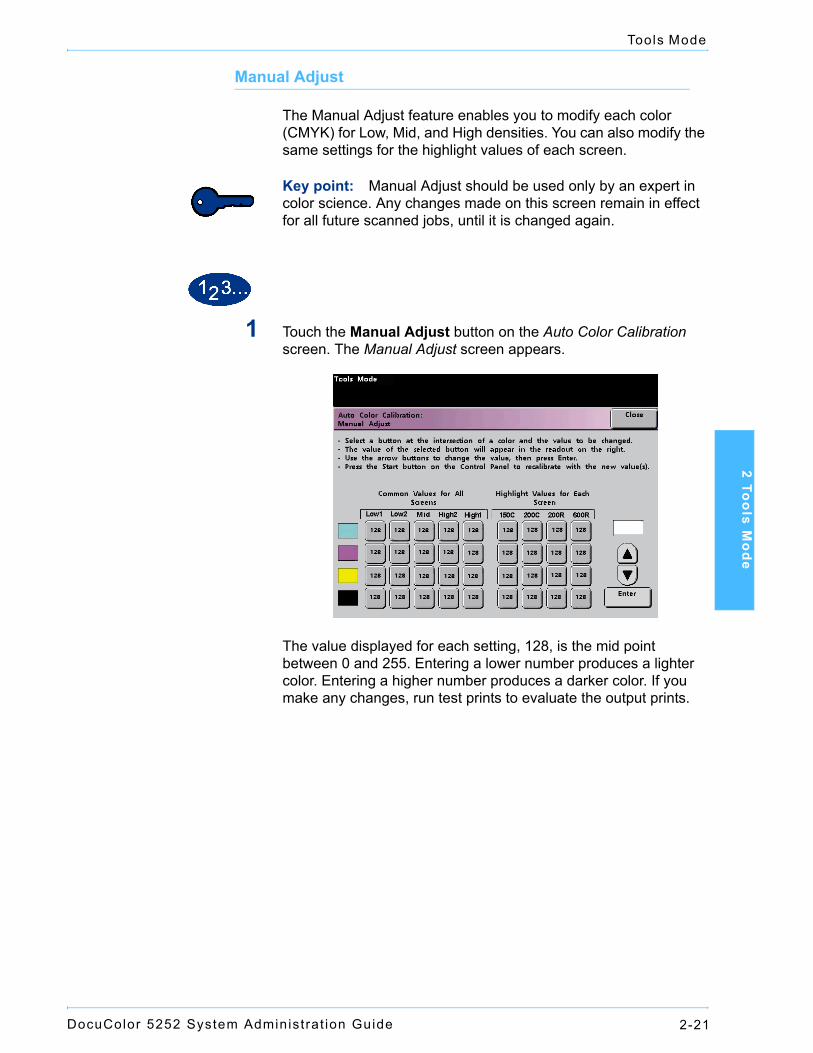
Manual Adjust
The Manual Adjust feature enables you to modify each color (CMYK) for Low, Mid, and High densities. You can also modify the same settings for the highlight values of each screen.
Key point: Manual Adjust should be used only by an expert in color science. Any changes made on this screen remain in effect for all future scanned jobs, until it is changed again.
1 Touch the Manual Adjust button on the Auto Color Calibration screen. The Manual Adjust screen appears.
The value displayed for each setting, 128, is the mid point between 0 and 255. Entering a lower number produces a lighter color. Entering a higher number produces a darker color. If you make any changes, run test prints to evaluate the output prints.
DocuColor 5252 System Administrat ion Guide2-22
Tools Mode
2 Follow the directions on the screen and touch the button for the value you wish to adjust.
3 Touch the up or down arrow buttons until the value you want is displayed in the field above the arrow buttons.
Key point: You should not adjust the value more than 5 counts at a time.
4 Touch the Enter button on the screen.
5 Repeat steps 2, 3, and 4 to enter other new values.
6 Press the Start button on the Control Panel to enter the new values into the system.
Key point: It is recommended that you run the Check Gradation procedure for the screening type that you are adjusting. Do a before and after comparison to verify your changes.
DocuColor 5252 System Administrat ion Guide 2-23
Tools Mode
2 Too
ls Mo
de
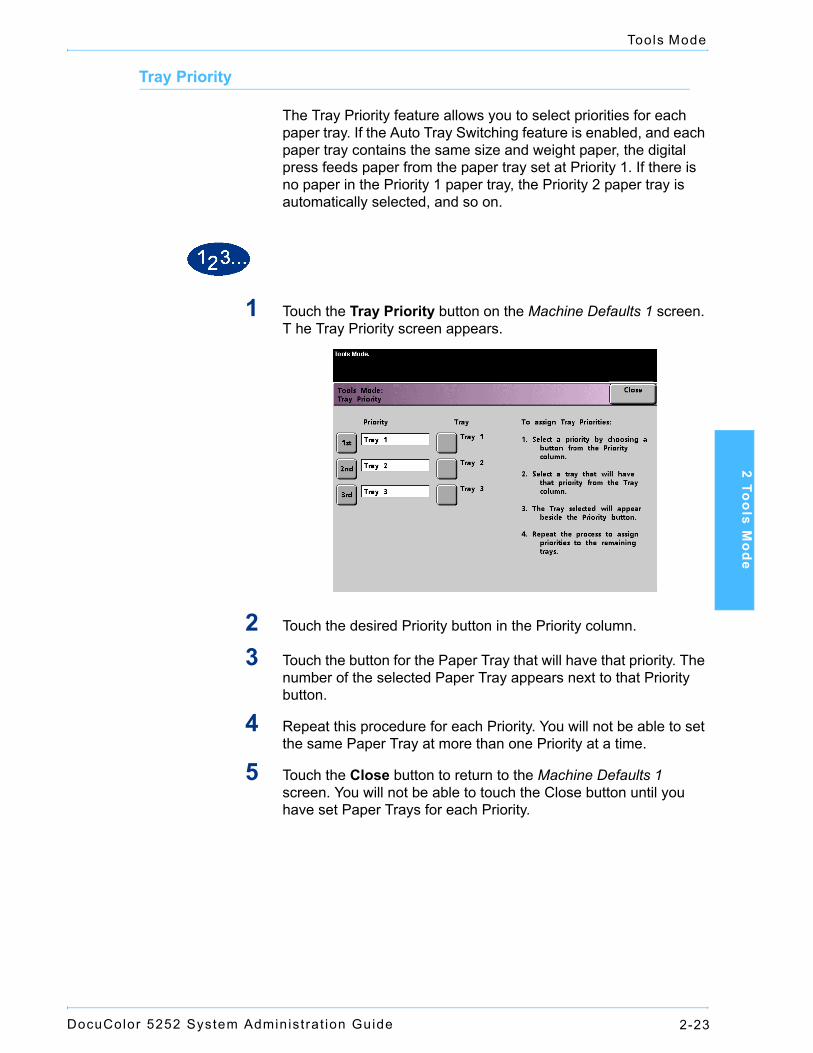
Tray Priority
The Tray Priority feature allows you to select priorities for each paper tray. If the Auto Tray Switching feature is enabled, and each paper tray contains the same size and weight paper, the digital press feeds paper from the paper tray set at Priority 1. If there is no paper in the Priority 1 paper tray, the Priority 2 paper tray is automatically selected, and so on.
1 Touch the Tray Priority button on the Machine Defaults 1 screen. T he Tray Priority screen appears.
2 Touch the desired Priority button in the Priority column.
3 Touch the button for the Paper Tray that will have that priority. The number of the selected Paper Tray appears next to that Priority button.
4 Repeat this procedure for each Priority. You will not be able to set the same Paper Tray at more than one Priority at a time.
5 Touch the Close button to return to the Machine Defaults 1 screen. You will not be able to touch the Close button until you have set Paper Trays for each Priority.
DocuColor 5252 System Administrat ion Guide2-24
Tools Mode
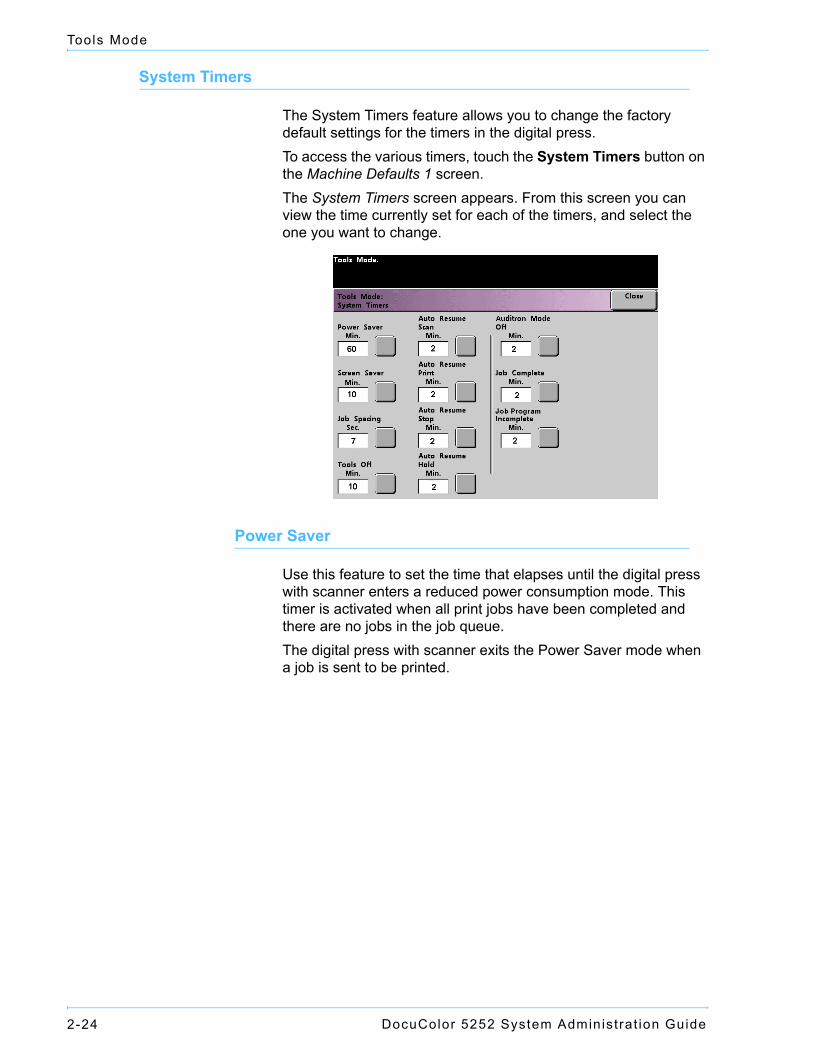
System Timers
The System Timers feature allows you to change the factory default settings for the timers in the digital press.To access the various timers, touch the System Timers button on the Machine Defaults 1 screen.The System Timers screen appears. From this screen you can view the time currently set for each of the timers, and select the one you want to change.
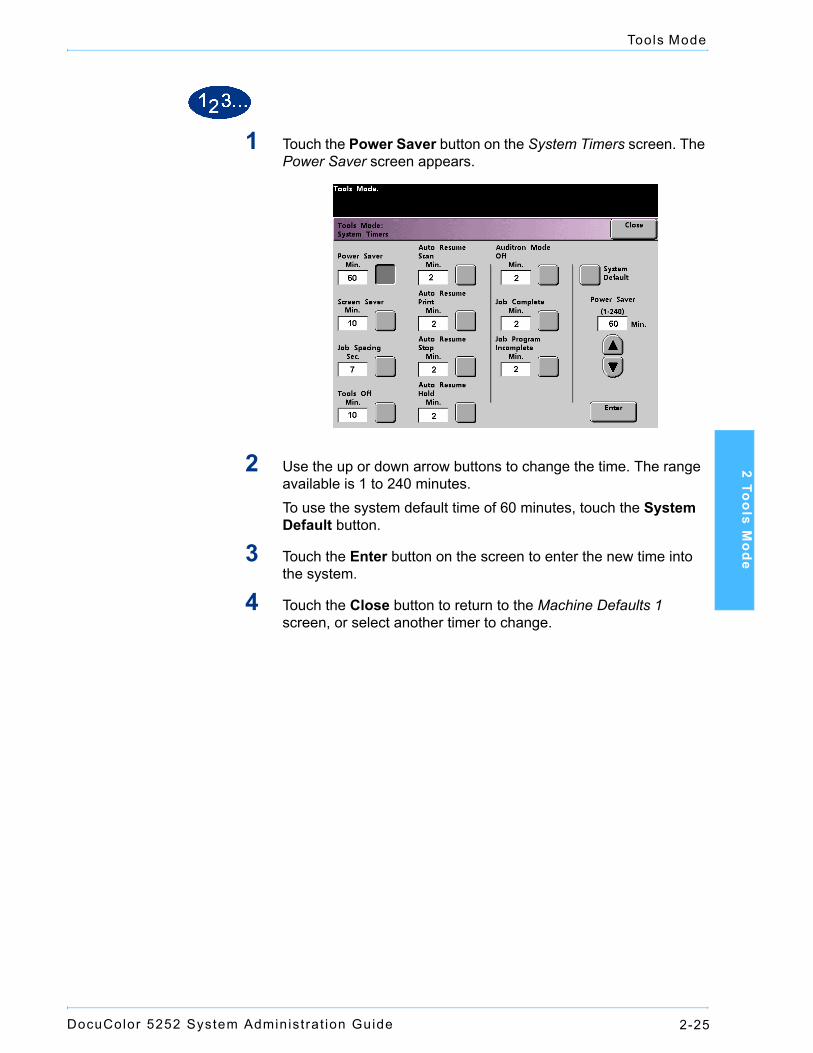
Power Saver
Use this feature to set the time that elapses until the digital press with scanner enters a reduced power consumption mode. This timer is activated when all print jobs have been completed and there are no jobs in the job queue.The digital press with scanner exits the Power Saver mode when a job is sent to be printed.
DocuColor 5252 System Administrat ion Guide 2-25
Tools Mode
2 Too
ls Mo
de
1 Touch the Power Saver button on the System Timers screen. The Power Saver screen appears.
2 Use the up or down arrow buttons to change the time. The range available is 1 to 240 minutes.To use the system default time of 60 minutes, touch the System Default button.
3 Touch the Enter button on the screen to enter the new time into the system.
4 Touch the Close button to return to the Machine Defaults 1 screen, or select another timer to change.
DocuColor 5252 System Administrat ion Guide2-26
Tools Mode
Screen Saver
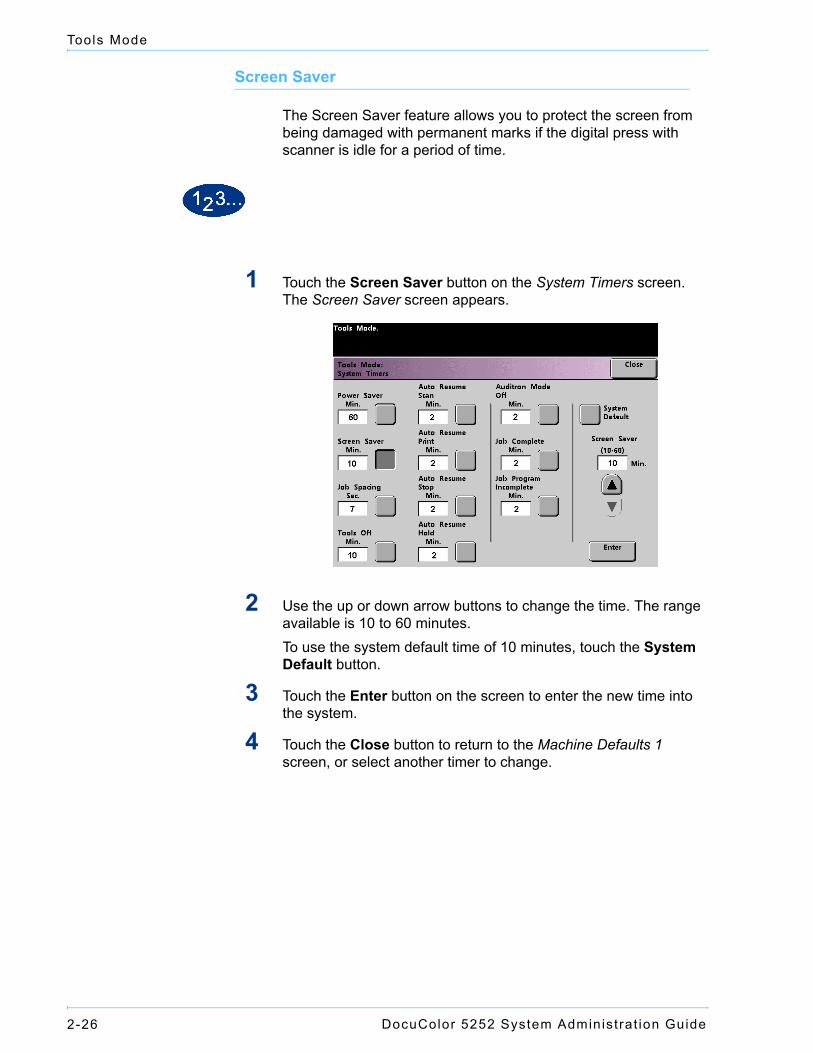
The Screen Saver feature allows you to protect the screen from being damaged with permanent marks if the digital press with scanner is idle for a period of time.
1 Touch the Screen Saver button on the System Timers screen. The Screen Saver screen appears.
2 Use the up or down arrow buttons to change the time. The range available is 10 to 60 minutes.To use the system default time of 10 minutes, touch the System Default button.
3 Touch the Enter button on the screen to enter the new time into the system.
4 Touch the Close button to return to the Machine Defaults 1 screen, or select another timer to change.

DocuColor 5252 System Administrat ion Guide 2-27
Tools Mode
2 Too
ls Mo
de
Job Spacing
Use the Job Spacing feature when there are multiple jobs queued and you would like to allow 7 seconds to unload prints from a finishing device before the next job starts printing.
1 Touch the Job Spacing button on the System Timers screen. The Job Spacing screen appears.
2 Touch the 7 Seconds button to enable the feature or touch the Off button to disable the feature.
3 Touch the Close button to return to the Machine Defaults 1 screen, or select another timer to change.
DocuColor 5252 System Administrat ion Guide2-28
Tools Mode
Tools Off
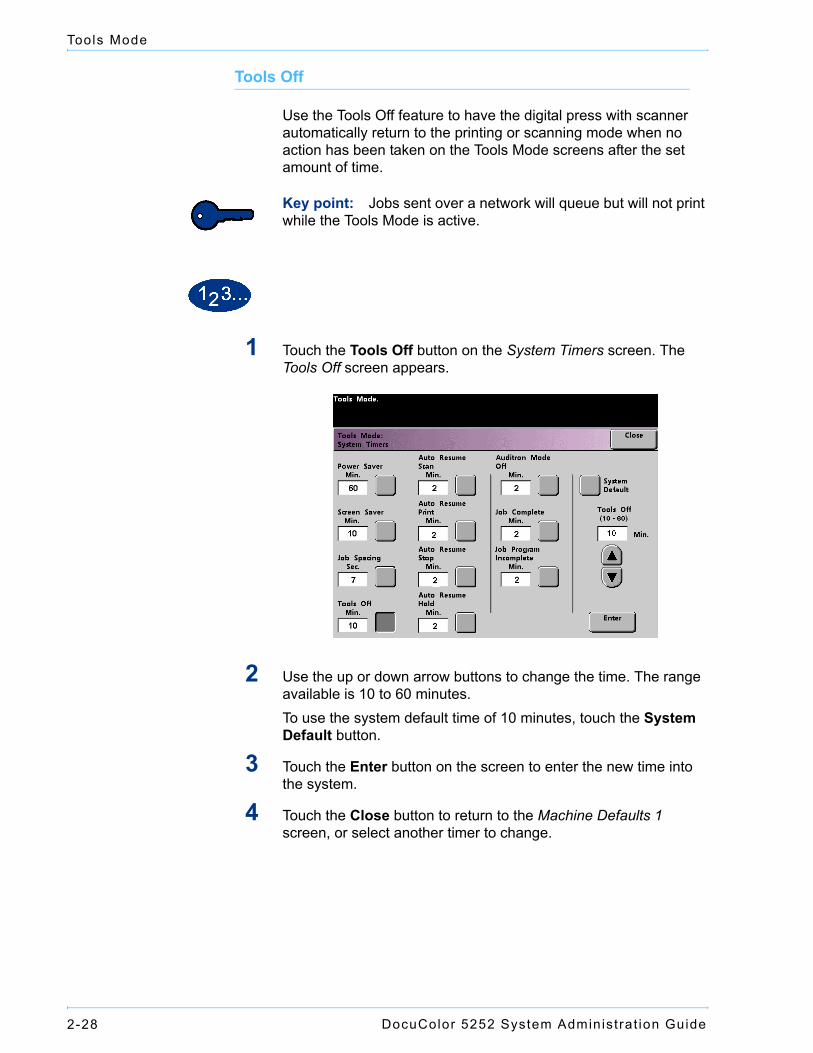
Use the Tools Off feature to have the digital press with scanner automatically return to the printing or scanning mode when no action has been taken on the Tools Mode screens after the set amount of time.
Key point: Jobs sent over a network will queue but will not print while the Tools Mode is active.
1 Touch the Tools Off button on the System Timers screen. The Tools Off screen appears.
2 Use the up or down arrow buttons to change the time. The range available is 10 to 60 minutes.To use the system default time of 10 minutes, touch the System Default button.
3 Touch the Enter button on the screen to enter the new time into the system.
4 Touch the Close button to return to the Machine Defaults 1 screen, or select another timer to change.
DocuColor 5252 System Administrat ion Guide 2-29
Tools Mode
2 Too
ls Mo
de
Auto Resume Scan
Use the Auto Resume feature to restart a copy job automatically after a fault is cleared and a scanned job is waiting for user instruction, or to restart a copy job waiting for user instruction after the Job Interrupt button on the Control Panel has been pressed.
1 Touch the Auto Resume Scan button on the System Timers screen. The Auto Resume Scan screen appears.
2 Use the up or down arrow buttons to change the time. The range available is 1 to 10 minutes.To use the system default time of 2 minutes, touch the System Default button.
3 Touch the Enter button on the screen to enter the new time into the system.
4 Touch the Close button to return to the Machine Defaults 1 screen, or select another timer to change.
DocuColor 5252 System Administrat ion Guide2-30
Tools Mode
Auto Resume Print
Use the Auto Resume Print feature to restart a job automatically after a fault is cleared and a job received over the network is waiting for user instruction, or to restart a job waiting for user instruction after the Interrupt button on the Control Panel has been pressed.
1 Touch the Auto Resume Print button on the System Timers screen. The Auto Resume Print screen appears.
2 Use the up or down arrow buttons to change the time. The range available is 1 to 10 minutes.To use the system default time of 2 minutes, touch the System Default button.
3 Touch the Enter button on the screen to enter the new time into the system.
4 Touch the Close button to return to the Machine Defaults 1 screen, or select another timer to change.

DocuColor 5252 System Administrat ion Guide 2-31
Tools Mode
2 Too
ls Mo
de
Auto Resume Stop
Use the Auto Resume Stop feature to restart a job automatically after the Pause button on the Control Panel is pressed and the job is waiting for user instruction.
1 Touch the Auto Resume Stop button on the System Timers screen. The Auto Resume Stop screen appears.
2 Use the up or down arrow buttons to change the time. The range available is 1 to 10 minutes.To use the system default time of 2 minutes, touch the System Default button.
3 Touch the Enter button on the screen to enter the new time into the system.
4 Touch the Close button to return to the Machine Defaults 1 screen, or select another timer to change.
DocuColor 5252 System Administrat ion Guide2-32
Tools Mode
Auto Resume Hold
Use the Auto Resume Hold feature to automatically proceed to print the next job in the queue if the job currently printing is waiting for user instruction to clear a certain type of fault.
1 Touch the Auto Resume Hold button on the System Timers screen. The Auto Resume Hold screen appears.
2 Use the up or down arrow buttons to change the time. The range available is 1 to 10 minutes.To use the system default time of 2 minutes, touch the System Default button.
3 Touch the Enter button on the screen to enter the new time into the system.
4 Touch the Close button to return to the Machine Defaults 1 screen, or select another timer to change.
DocuColor 5252 System Administrat ion Guide 2-33
Tools Mode
2 Too
ls Mo
de
Auditron Mode Off
Use the Auditron Mode Off feature to set the time that it takes the digital press to return to the initial Password screen after the cessation of user activity while in Auditron Mode.
1 Touch the Auditron Mode Off button on the System Timers screen. The Auditron Mode Off screen appears.
2 Use the up or down arrow buttons to change the time. The range available is 1 to 10 minutes.To use the system default time of 2 minutes, touch the System Default button.
3 Touch the Enter button on the screen to enter the new time into the system.
4 Touch the Close button to return to the Machine Defaults 1 screen, or select another timer to change.
DocuColor 5252 System Administrat ion Guide2-34
Tools Mode
Job Complete
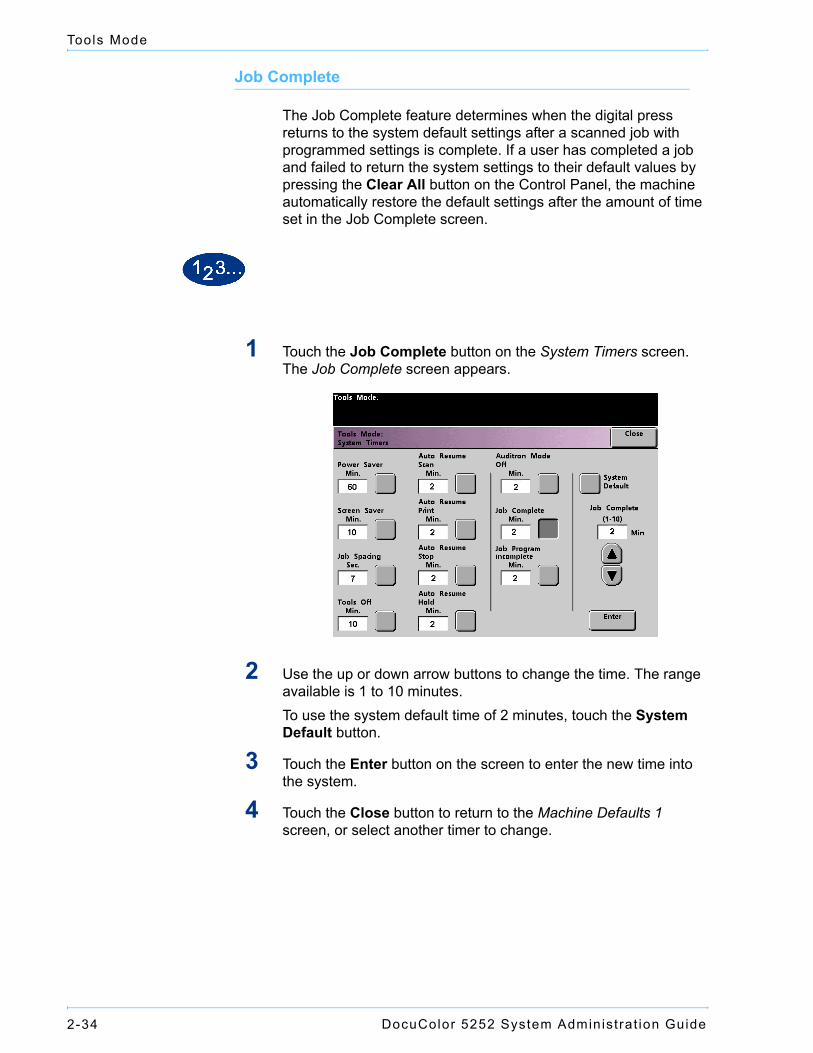
The Job Complete feature determines when the digital press returns to the system default settings after a scanned job with programmed settings is complete. If a user has completed a job and failed to return the system settings to their default values by pressing the Clear All button on the Control Panel, the machine automatically restore the default settings after the amount of time set in the Job Complete screen.
1 Touch the Job Complete button on the System Timers screen. The Job Complete screen appears.
2 Use the up or down arrow buttons to change the time. The range available is 1 to 10 minutes.To use the system default time of 2 minutes, touch the System Default button.
3 Touch the Enter button on the screen to enter the new time into the system.
4 Touch the Close button to return to the Machine Defaults 1 screen, or select another timer to change.
DocuColor 5252 System Administrat ion Guide 2-35
Tools Mode
2 Too
ls Mo
de
Job Program Incomplete
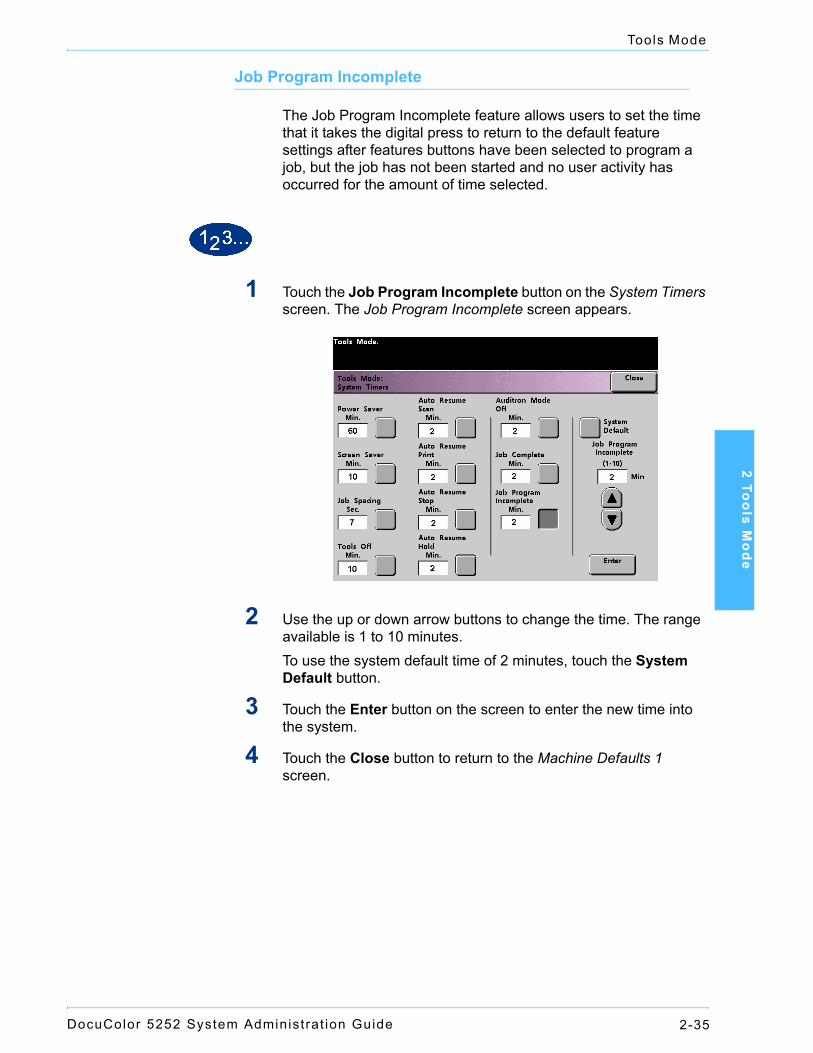
The Job Program Incomplete feature allows users to set the time that it takes the digital press to return to the default feature settings after features buttons have been selected to program a job, but the job has not been started and no user activity has occurred for the amount of time selected.
1 Touch the Job Program Incomplete button on the System Timers screen. The Job Program Incomplete screen appears.
2 Use the up or down arrow buttons to change the time. The range available is 1 to 10 minutes.To use the system default time of 2 minutes, touch the System Default button.
3 Touch the Enter button on the screen to enter the new time into the system.
4 Touch the Close button to return to the Machine Defaults 1 screen.
DocuColor 5252 System Administrat ion Guide2-36
Tools Mode
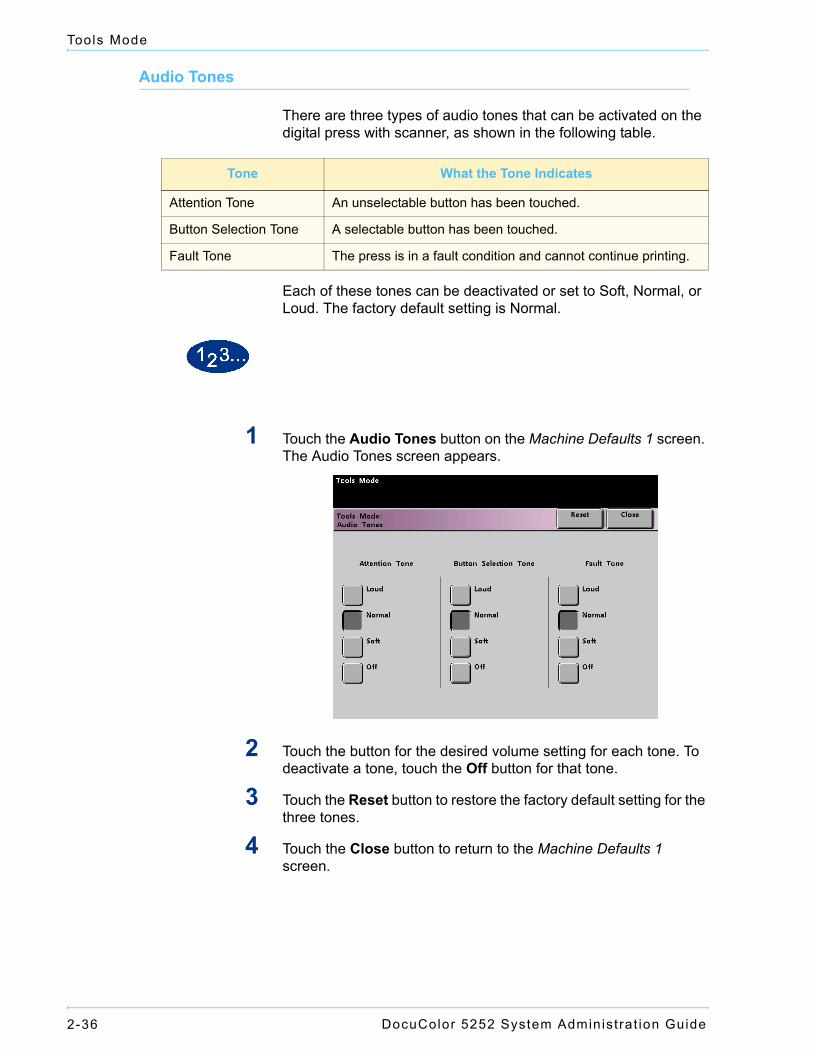
Audio Tones
There are three types of audio tones that can be activated on the digital press with scanner, as shown in the following table.
Each of these tones can be deactivated or set to Soft, Normal, or Loud. The factory default setting is Normal.
1 Touch the Audio Tones button on the Machine Defaults 1 screen. The Audio Tones screen appears.
2 Touch the button for the desired volume setting for each tone. To deactivate a tone, touch the Off button for that tone.
3 Touch the Reset button to restore the factory default setting for the three tones.
4 Touch the Close button to return to the Machine Defaults 1 screen.
Tone What the Tone Indicates
Attention Tone An unselectable button has been touched.
Button Selection Tone A selectable button has been touched.
Fault Tone The press is in a fault condition and cannot continue printing.
DocuColor 5252 System Administrat ion Guide 2-37
Tools Mode
2 Too
ls Mo
de
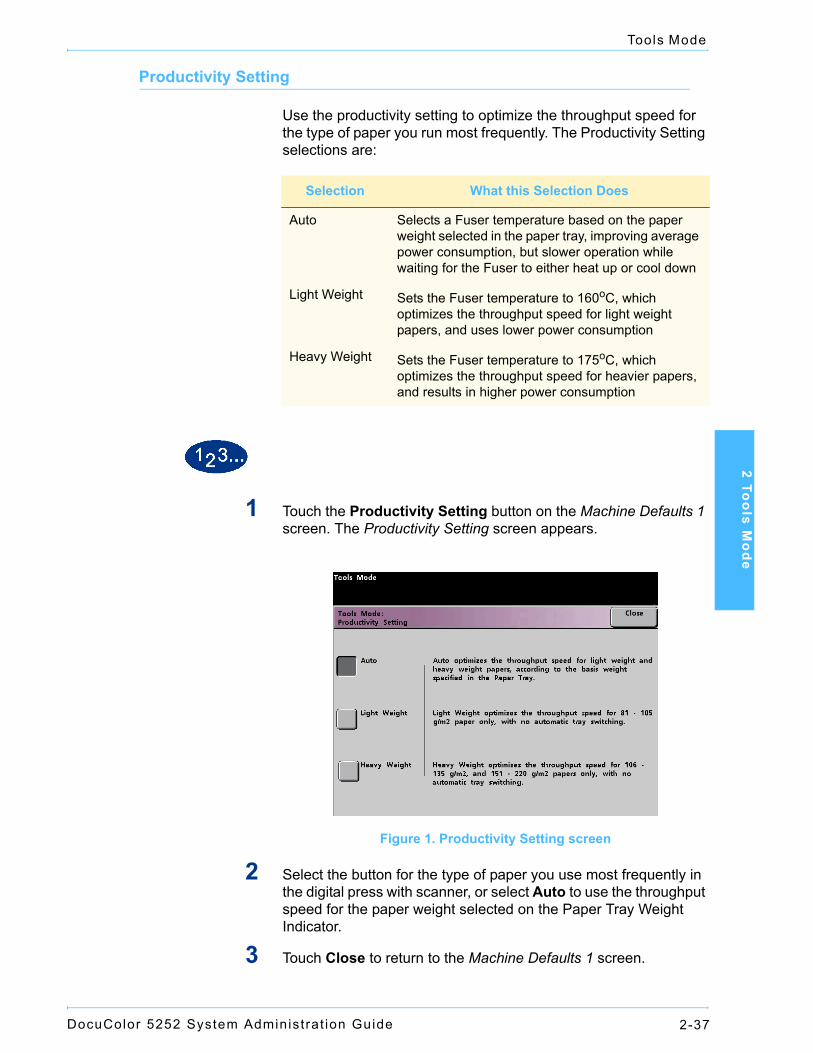
Productivity Setting
Use the productivity setting to optimize the throughput speed for the type of paper you run most frequently. The Productivity Setting selections are:
1 Touch the Productivity Setting button on the Machine Defaults 1 screen. The Productivity Setting screen appears.
Figure 1. Productivity Setting screen
2 Select the button for the type of paper you use most frequently in the digital press with scanner, or select Auto to use the throughput speed for the paper weight selected on the Paper Tray Weight Indicator.
3 Touch Close to return to the Machine Defaults 1 screen.
Selection What this Selection Does
Auto Selects a Fuser temperature based on the paper weight selected in the paper tray, improving average power consumption, but slower operation while waiting for the Fuser to either heat up or cool down
Light Weight Sets the Fuser temperature to 160oC, which optimizes the throughput speed for light weight papers, and uses lower power consumption
Heavy Weight Sets the Fuser temperature to 175oC, which optimizes the throughput speed for heavier papers, and results in higher power consumption
DocuColor 5252 System Administrat ion Guide2-38
Tools Mode
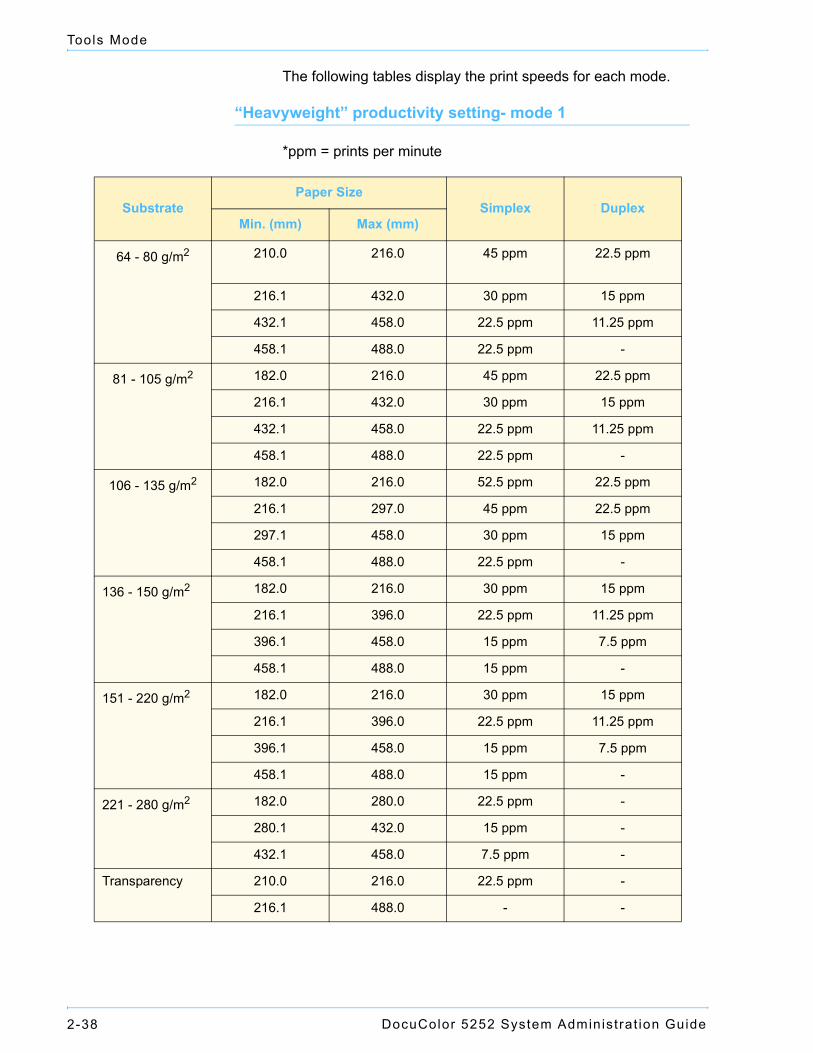
The following tables display the print speeds for each mode.
“Heavyweight” productivity setting- mode 1
*ppm = prints per minute
SubstratePaper Size
Simplex DuplexMin. (mm) Max (mm)
64 - 80 g/m2 210.0 216.0 45 ppm 22.5 ppm
216.1 432.0 30 ppm 15 ppm
432.1 458.0 22.5 ppm 11.25 ppm
458.1 488.0 22.5 ppm -
81 - 105 g/m2 182.0 216.0 45 ppm 22.5 ppm
216.1 432.0 30 ppm 15 ppm
432.1 458.0 22.5 ppm 11.25 ppm
458.1 488.0 22.5 ppm -
106 - 135 g/m2 182.0 216.0 52.5 ppm 22.5 ppm
216.1 297.0 45 ppm 22.5 ppm
297.1 458.0 30 ppm 15 ppm
458.1 488.0 22.5 ppm -
136 - 150 g/m2 182.0 216.0 30 ppm 15 ppm
216.1 396.0 22.5 ppm 11.25 ppm
396.1 458.0 15 ppm 7.5 ppm
458.1 488.0 15 ppm -
151 - 220 g/m2 182.0 216.0 30 ppm 15 ppm
216.1 396.0 22.5 ppm 11.25 ppm
396.1 458.0 15 ppm 7.5 ppm
458.1 488.0 15 ppm -
221 - 280 g/m2 182.0 280.0 22.5 ppm -
280.1 432.0 15 ppm -
432.1 458.0 7.5 ppm -
Transparency 210.0 216.0 22.5 ppm -
216.1 488.0 - -
DocuColor 5252 System Administrat ion Guide 2-39
Tools Mode
2 Too
ls Mo
de
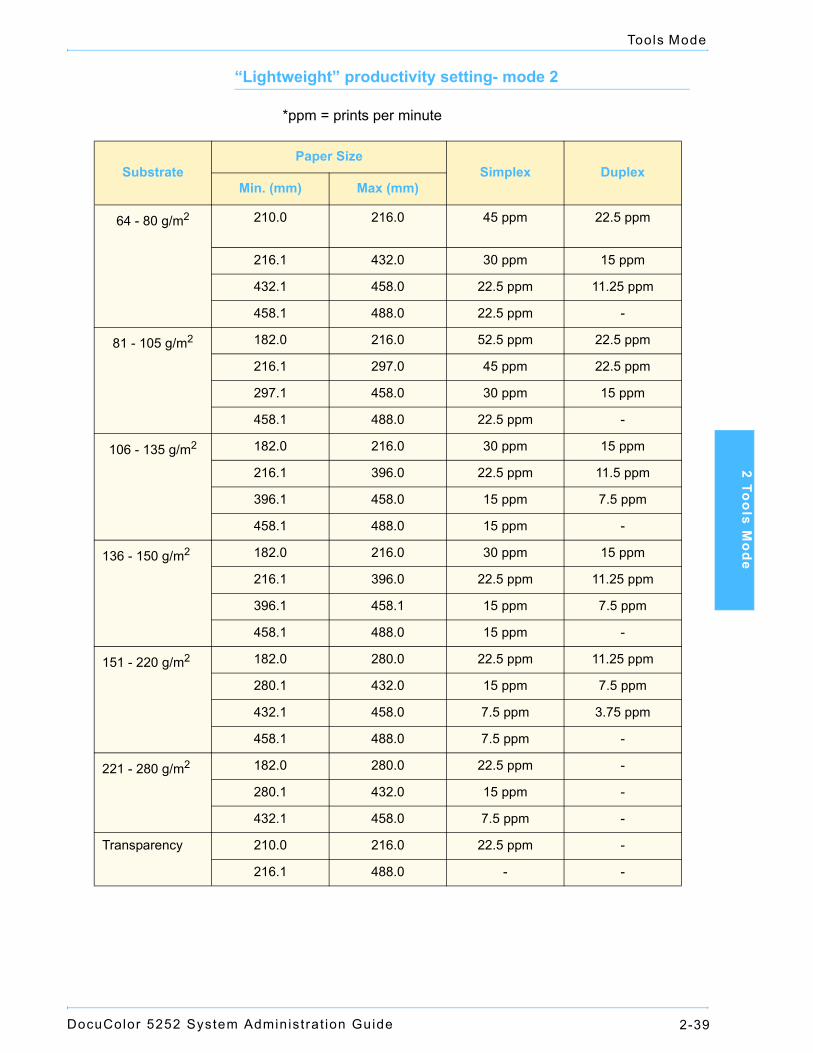
“Lightweight” productivity setting- mode 2
*ppm = prints per minute
SubstratePaper Size
Simplex DuplexMin. (mm) Max (mm)
64 - 80 g/m2 210.0 216.0 45 ppm 22.5 ppm
216.1 432.0 30 ppm 15 ppm
432.1 458.0 22.5 ppm 11.25 ppm
458.1 488.0 22.5 ppm -
81 - 105 g/m2 182.0 216.0 52.5 ppm 22.5 ppm
216.1 297.0 45 ppm 22.5 ppm
297.1 458.0 30 ppm 15 ppm
458.1 488.0 22.5 ppm -
106 - 135 g/m2 182.0 216.0 30 ppm 15 ppm
216.1 396.0 22.5 ppm 11.5 ppm
396.1 458.0 15 ppm 7.5 ppm
458.1 488.0 15 ppm -
136 - 150 g/m2 182.0 216.0 30 ppm 15 ppm
216.1 396.0 22.5 ppm 11.25 ppm
396.1 458.1 15 ppm 7.5 ppm
458.1 488.0 15 ppm -
151 - 220 g/m2 182.0 280.0 22.5 ppm 11.25 ppm
280.1 432.0 15 ppm 7.5 ppm
432.1 458.0 7.5 ppm 3.75 ppm
458.1 488.0 7.5 ppm -
221 - 280 g/m2 182.0 280.0 22.5 ppm -
280.1 432.0 15 ppm -
432.1 458.0 7.5 ppm -
Transparency 210.0 216.0 22.5 ppm -
216.1 488.0 - -
DocuColor 5252 System Administrat ion Guide2-40
Tools Mode
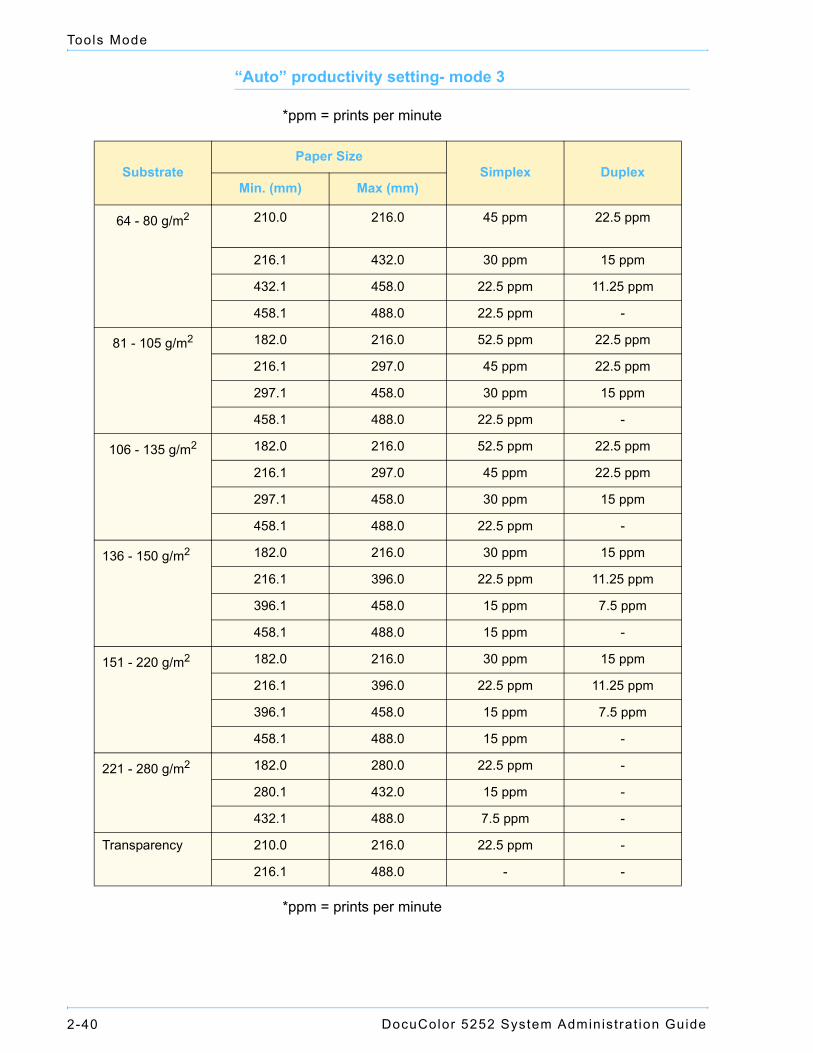
“Auto” productivity setting- mode 3
*ppm = prints per minute
*ppm = prints per minute
SubstratePaper Size
Simplex DuplexMin. (mm) Max (mm)
64 - 80 g/m2 210.0 216.0 45 ppm 22.5 ppm
216.1 432.0 30 ppm 15 ppm
432.1 458.0 22.5 ppm 11.25 ppm
458.1 488.0 22.5 ppm -
81 - 105 g/m2 182.0 216.0 52.5 ppm 22.5 ppm
216.1 297.0 45 ppm 22.5 ppm
297.1 458.0 30 ppm 15 ppm
458.1 488.0 22.5 ppm -
106 - 135 g/m2 182.0 216.0 52.5 ppm 22.5 ppm
216.1 297.0 45 ppm 22.5 ppm
297.1 458.0 30 ppm 15 ppm
458.1 488.0 22.5 ppm -
136 - 150 g/m2 182.0 216.0 30 ppm 15 ppm
216.1 396.0 22.5 ppm 11.25 ppm
396.1 458.0 15 ppm 7.5 ppm
458.1 488.0 15 ppm -
151 - 220 g/m2 182.0 216.0 30 ppm 15 ppm
216.1 396.0 22.5 ppm 11.25 ppm
396.1 458.0 15 ppm 7.5 ppm
458.1 488.0 15 ppm -
221 - 280 g/m2 182.0 280.0 22.5 ppm -
280.1 432.0 15 ppm -
432.1 488.0 7.5 ppm -
Transparency 210.0 216.0 22.5 ppm -
216.1 488.0 - -
DocuColor 5252 System Administrat ion Guide 2-41
Tools Mode
2 Too
ls Mo
de
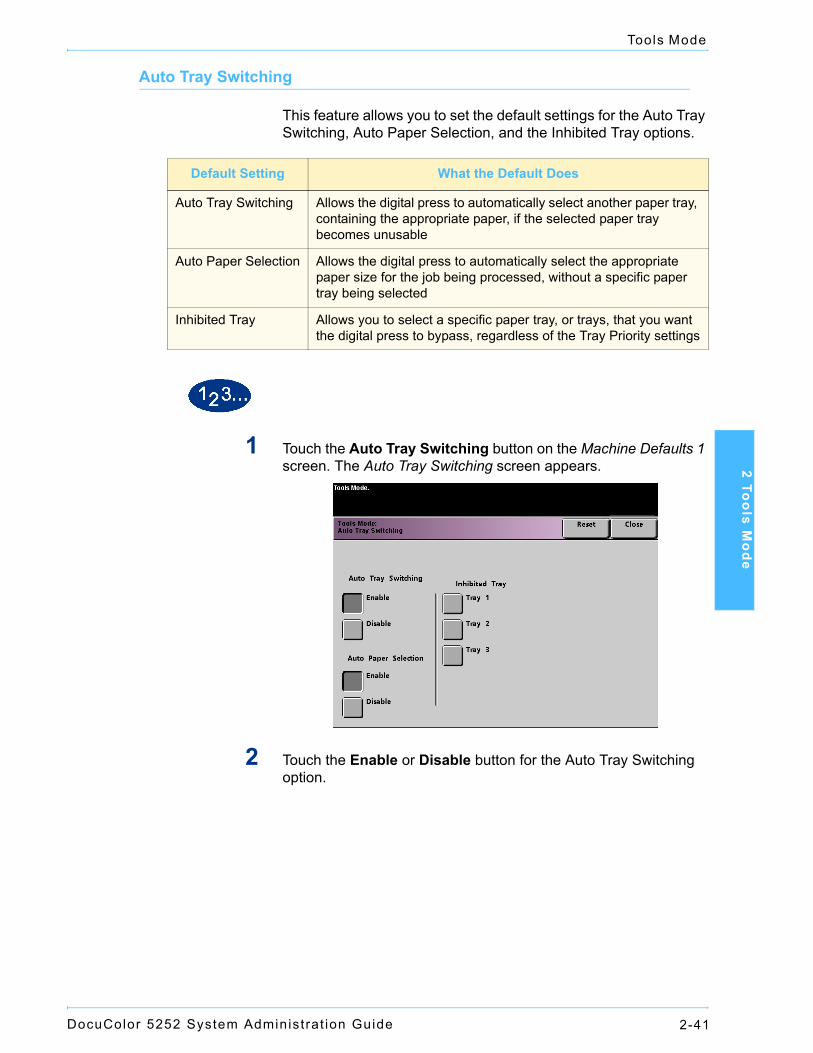
Auto Tray Switching
This feature allows you to set the default settings for the Auto Tray Switching, Auto Paper Selection, and the Inhibited Tray options.
1 Touch the Auto Tray Switching button on the Machine Defaults 1 screen. The Auto Tray Switching screen appears.
2 Touch the Enable or Disable button for the Auto Tray Switching option.
Default Setting What the Default Does
Auto Tray Switching Allows the digital press to automatically select another paper tray, containing the appropriate paper, if the selected paper tray becomes unusable
Auto Paper Selection Allows the digital press to automatically select the appropriate paper size for the job being processed, without a specific paper tray being selected
Inhibited Tray Allows you to select a specific paper tray, or trays, that you want the digital press to bypass, regardless of the Tray Priority settings
DocuColor 5252 System Administrat ion Guide2-42
Tools Mode
3 Touch the Enable or Disable button for the Auto Paper Selection option.
4 To instruct the digital press to bypass one or more of the paper trays, touch the desired Paper Tray button in the Inhibited Tray column.To deselect a paper tray, touch that Paper Tray button again.To return the settings to the last saved values, touch the Reset button.
5 Touch the Close button to return to the Machine Defaults 1 screen.
DocuColor 5252 System Administrat ion Guide 2-43
Tools Mode
2 Too
ls Mo
de
Transparency Size
Use the Transparency Size button to change the default size for printing on transparencies. Your options are 8.5 x 11.0 inch and 8.3 x 11.7 inch (or A4).
1 Touch the Transparency Size button on the Machine Defaults 1 screen. The Transparency Size screen appears.
2 Select one of the sizes displayed for the default transparency size.
3 Touch the Close button to return to the Machine Defaults 1 screen.
Note: You can also set the transparency size by adjusting paper guides in the paper trays. The machine uses the size defined by the paper tray guides only if the Transparency Options feature is not selected.
DocuColor 5252 System Administrat ion Guide2-44
Tools Mode
Set Date & Time
Use the Set Date & Time feature to set the date and time for the system. The date and time is displayed on the Error Log screen and on the Date and Time screens.
Setting the Date
1 Touch the Set Date & Time button on the Machine Defaults 1 screen. The Set Date and Time screen appears with the Set Date button selected and options for setting the date displayed on the right.
2 Select the date format you wish to use.
3 Use the up or down arrow buttons to enter the correct year, month, and day.
4 Touch the Enter button on the screen to save your selections.The next time you enter the Tools Mode, the date that you set is displayed.
DocuColor 5252 System Administrat ion Guide 2-45
Tools Mode
2 Too
ls Mo
de
Setting the Time
1 Touch the Set Date & Time button on the Machine Defaults 1 screen. The Set Date and Time screen appears with the Set Date button selected and options for setting the date displayed on the right.
2 Touch the Set Time button. Options for setting the time appear in the Set Time screen.
3 Touch the 12 Hour Clock or the 24 Hour Clock button.
4 Use the up or down arrow buttons to set the correct hour and minutes.If you selected the 12 Hour Clock, touch the AM or PM button.
5 Touch the Enter button on the screen to save your selections.The next time you enter the Tools Mode, the time that you set will be displayed.
6 Touch the Close button to return to the Machine Defaults 1 screen.
DocuColor 5252 System Administrat ion Guide2-46
Tools Mode
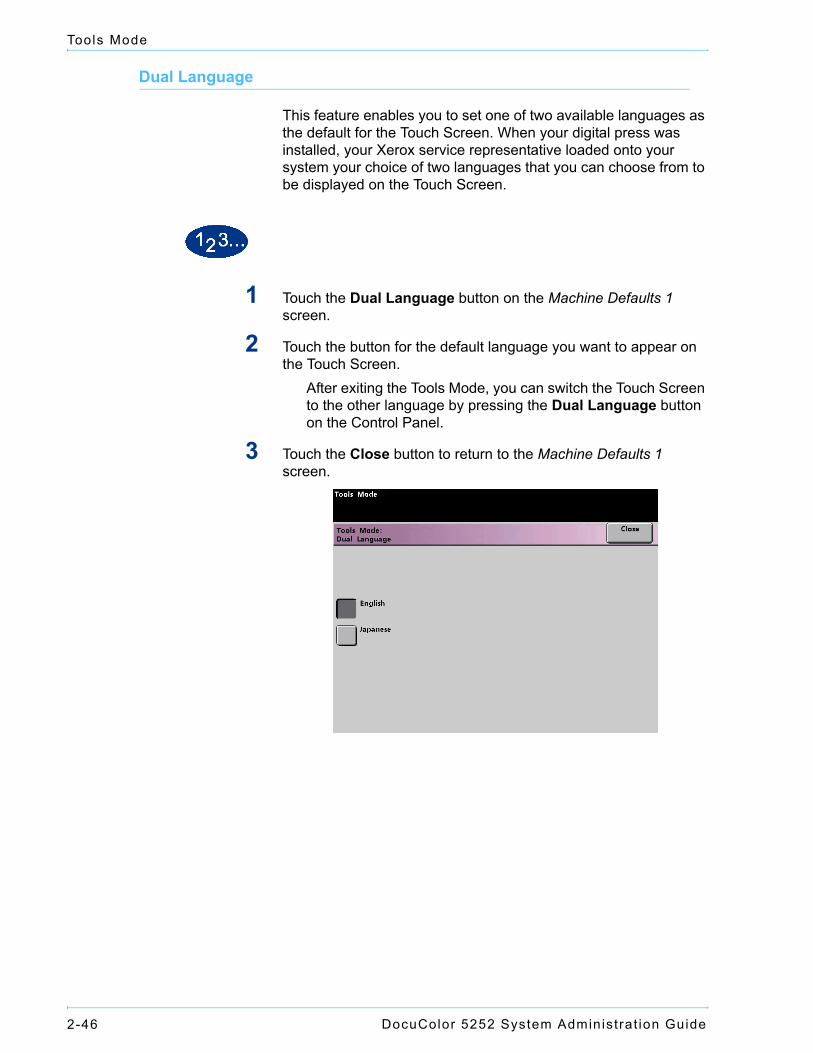
Dual Language
This feature enables you to set one of two available languages as the default for the Touch Screen. When your digital press was installed, your Xerox service representative loaded onto your system your choice of two languages that you can choose from to be displayed on the Touch Screen.
1 Touch the Dual Language button on the Machine Defaults 1 screen.
2 Touch the button for the default language you want to appear on the Touch Screen.
After exiting the Tools Mode, you can switch the Touch Screen to the other language by pressing the Dual Language button on the Control Panel.
3 Touch the Close button to return to the Machine Defaults 1 screen.
DocuColor 5252 System Administrat ion Guide 2-47
Tools Mode
2 Too
ls Mo
de
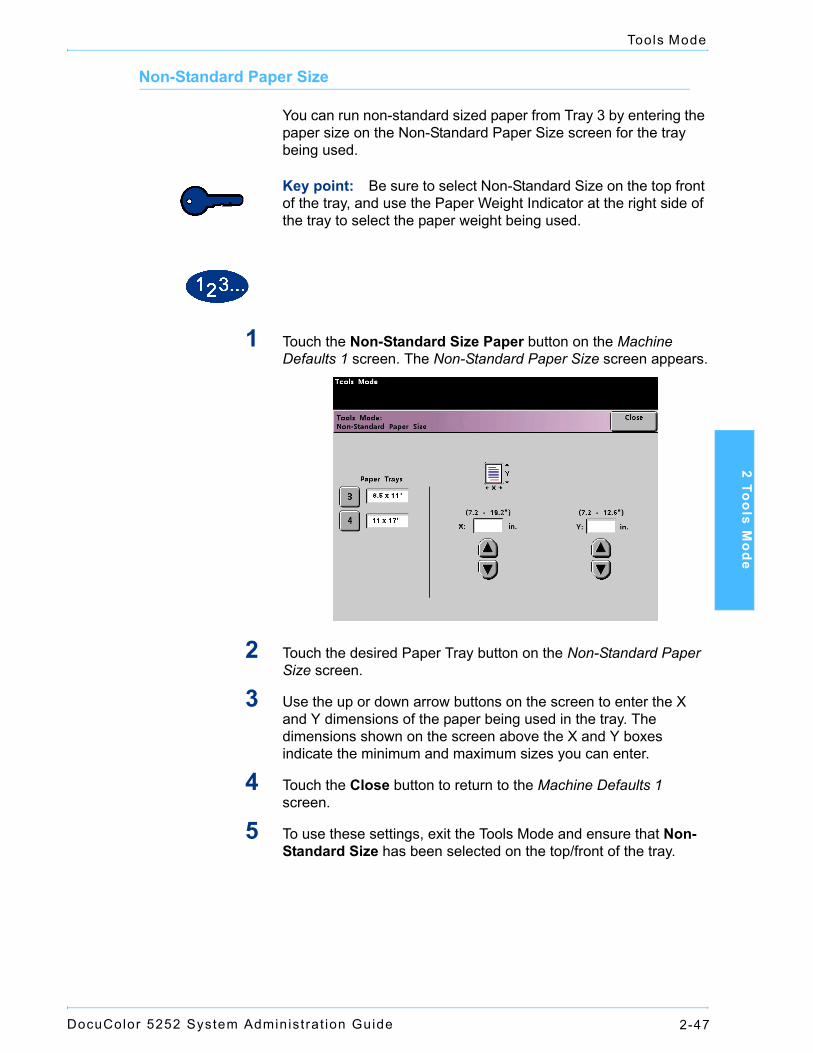
Non-Standard Paper Size
You can run non-standard sized paper from Tray 3 by entering the paper size on the Non-Standard Paper Size screen for the tray being used.
Key point: Be sure to select Non-Standard Size on the top front of the tray, and use the Paper Weight Indicator at the right side of the tray to select the paper weight being used.
1 Touch the Non-Standard Size Paper button on the Machine Defaults 1 screen. The Non-Standard Paper Size screen appears.
2 Touch the desired Paper Tray button on the Non-Standard Paper Size screen.
3 Use the up or down arrow buttons on the screen to enter the X and Y dimensions of the paper being used in the tray. The dimensions shown on the screen above the X and Y boxes indicate the minimum and maximum sizes you can enter.
4 Touch the Close button to return to the Machine Defaults 1 screen.
5 To use these settings, exit the Tools Mode and ensure that Non-Standard Size has been selected on the top/front of the tray.
DocuColor 5252 System Administrat ion Guide2-48
Tools Mode
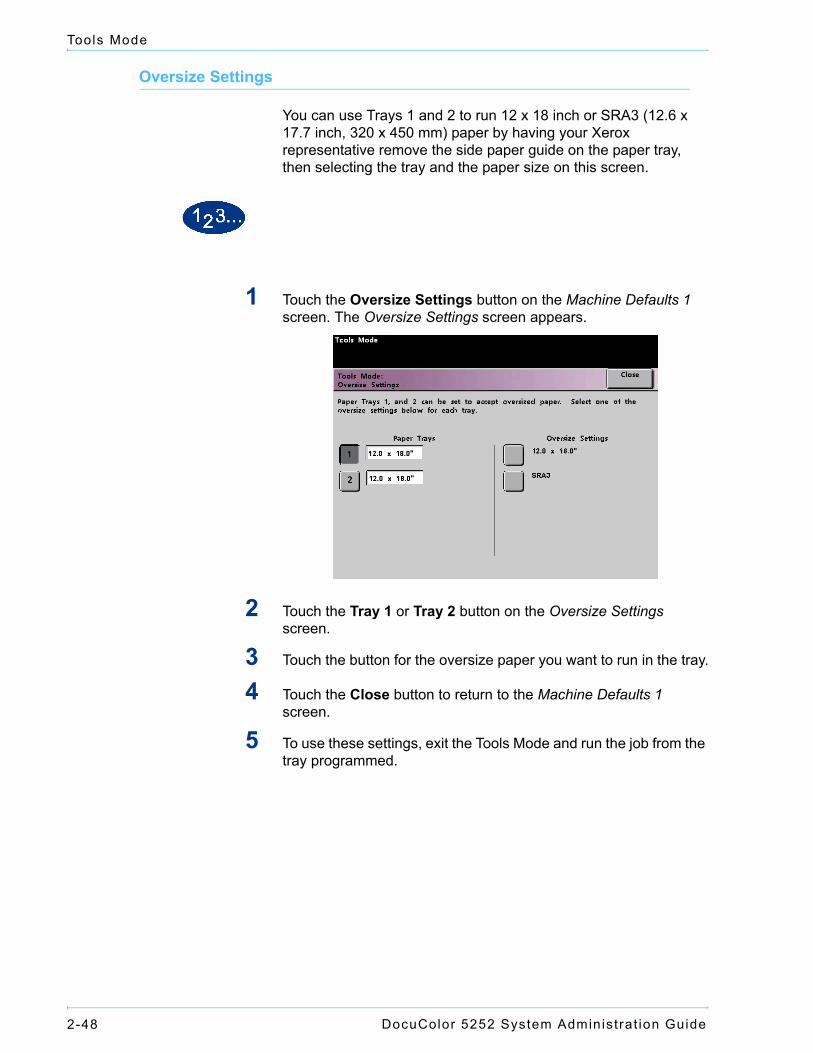
Oversize Settings
You can use Trays 1 and 2 to run 12 x 18 inch or SRA3 (12.6 x 17.7 inch, 320 x 450 mm) paper by having your Xerox representative remove the side paper guide on the paper tray, then selecting the tray and the paper size on this screen.
1 Touch the Oversize Settings button on the Machine Defaults 1 screen. The Oversize Settings screen appears.
2 Touch the Tray 1 or Tray 2 button on the Oversize Settings screen.
3 Touch the button for the oversize paper you want to run in the tray.
4 Touch the Close button to return to the Machine Defaults 1 screen.
5 To use these settings, exit the Tools Mode and run the job from the tray programmed.
DocuColor 5252 System Administrat ion Guide 2-49
Tools Mode
2 Too
ls Mo
de
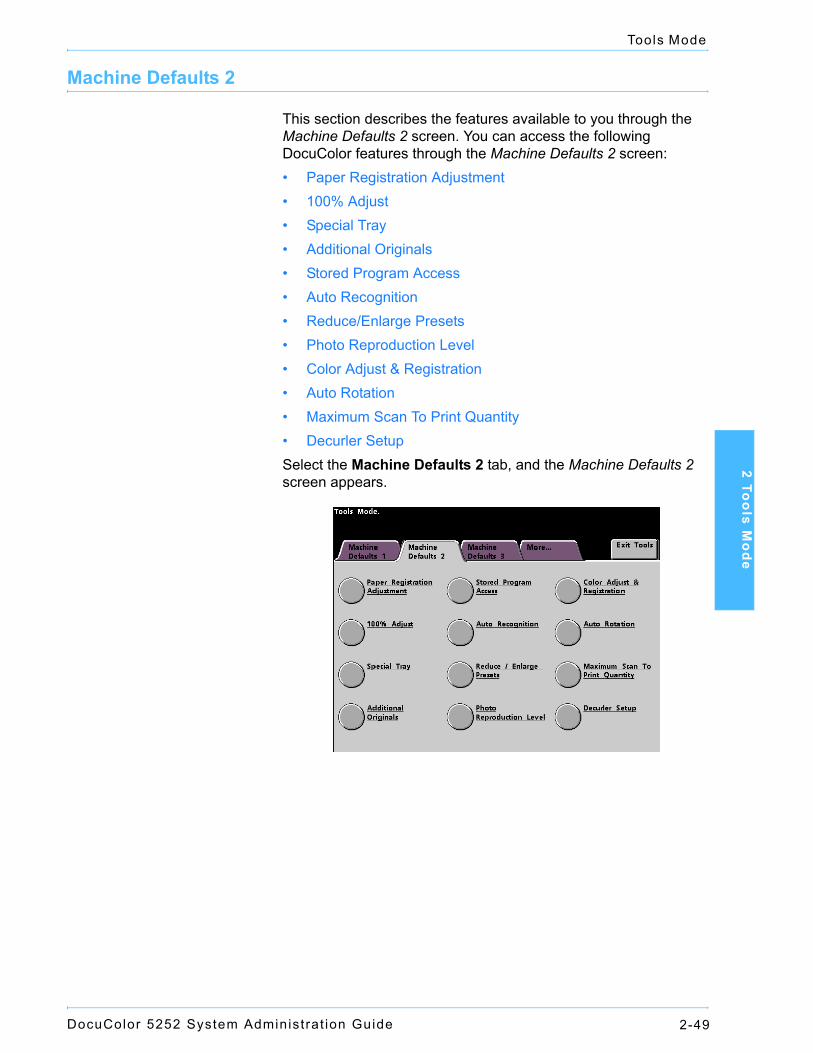
Machine Defaults 2
This section describes the features available to you through the Machine Defaults 2 screen. You can access the following DocuColor features through the Machine Defaults 2 screen:• Paper Registration Adjustment• 100% Adjust• Special Tray• Additional Originals• Stored Program Access• Auto Recognition• Reduce/Enlarge Presets• Photo Reproduction Level• Color Adjust & Registration• Auto Rotation• Maximum Scan To Print Quantity• Decurler SetupSelect the Machine Defaults 2 tab, and the Machine Defaults 2 screen appears.
DocuColor 5252 System Administrat ion Guide2-50
Tools Mode
Paper Registration Adjustment
Use the Paper Registration Adjustment feature when running duplex jobs to adjust the image position if the registration is not correct. Image adjustment may be necessary for a couple of reasons:• Paper is not always the exact same size. It may vary slightly,
with differences of plus or minus 1mm, causing the image to be misregistered. To reduce the possibility of size differences, it is recommend that you use paper from the same lot when running duplex jobs.
• During the fusing process, the heat and pressure applied to the paper causes the paper to stretch. If the images on sides one and two are the same size, the stretching of the paper will cause the image on side one to be slightly larger than the image on side two.
Some color server manufacturers have a paper registration feature that you can also use to adjust the position of the image on the paper. Refer to the documentation that came with your color server.
Use the following procedure to adjust for side one/side two registration problems:
1 Prepare the image, or images, by noting a reference point on side one, or by placing registration marks at the image border. You can use a reference point within the image or at the corner of the image.
Key point: Remember that the digital press does not print bleed edge images.
DocuColor 5252 System Administrat ion Guide 2-51
Tools Mode
2 Too
ls Mo
de
2 Output 10 duplex prints and compare the registration mark or reference point on side one to side two. Discard the first few prints, as inconsistency tends to be greater with these images. If there is misregistration, continue with this procedure.
3 Measure the distance between the registration point and the edge of the paper on both the lead edge (Y) of the paper and the side edge (X).Refer to the Measuring Misregistration figure below. The solid line registration marks indicate the reference point on side one. The dotted lines indicate the reference point on side two.
Paper Feeding Direction in the
Misalignment of reference point on side 1to side 2 (X)
Misalignment of referencepoint on side one to side 2 (Y)
Side Edge
Lead Edge of paper
of paper
DocuColor 5252 System Administrat ion Guide2-52
Tools Mode
4 Access Tools Mode and touch the Paper Registration Adjustment button on the Machine Defaults 2 screen. The Paper Registration Adjustment screen appears.
5 Select either the Side 1 or Side 2 button to adjust the registration.
Key point: Use the Oversize Paper Offset button only for papers larger than long edge feed, 8.5x11 inch or A4 paper. Refer to Step 8 if using this option.
6 On the next screen, select the tray from which the paper is feeding.
DocuColor 5252 System Administrat ion Guide 2-53
Tools Mode
2 Too
ls Mo
de
7 Use the up or down arrow buttons to enter the amount of adjustment for either edge or both edges.
Key point 1: Remember that the Lead Edge Registration adjustment is the feeding edge, or Y direction. The Side Edge Registration adjustment is the front to back, or X, direction.Key point 2: If the reference point on side two is closer to the edge of the paper compared to the reference point on side one, enter a plus figure. If the reference point on side two is further from the edge of the paper compared to side one, enter a minus figure.Key point 3: EXAMPLE: If the measurement is 1.2mm closer to the edge of the paper, enter +1.2mm.
8 If you selected the Oversize Paper Offset button to adjust the registration on paper larger than 8.5x11 inch or A4 LEF, the following screen appears.
DocuColor 5252 System Administrat ion Guide2-54
Tools Mode
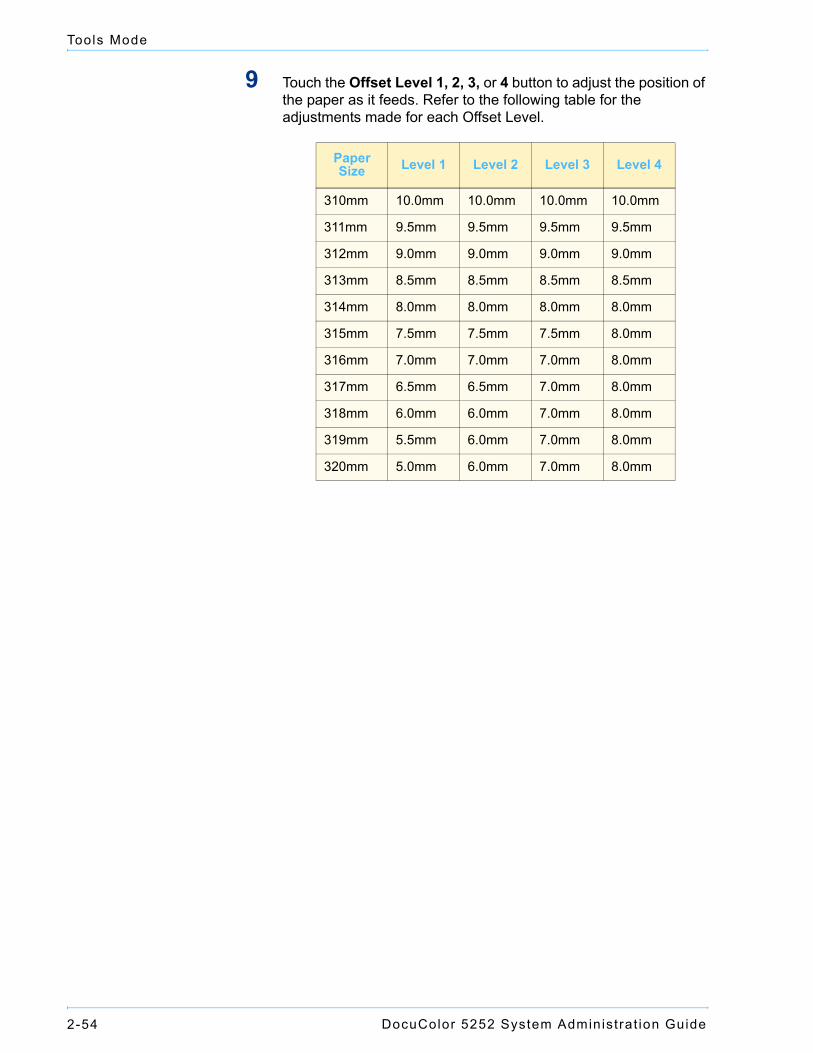
9 Touch the Offset Level 1, 2, 3, or 4 button to adjust the position of the paper as it feeds. Refer to the following table for the adjustments made for each Offset Level.
PaperSize Level 1 Level 2 Level 3 Level 4
310mm 10.0mm 10.0mm 10.0mm 10.0mm
311mm 9.5mm 9.5mm 9.5mm 9.5mm
312mm 9.0mm 9.0mm 9.0mm 9.0mm
313mm 8.5mm 8.5mm 8.5mm 8.5mm
314mm 8.0mm 8.0mm 8.0mm 8.0mm
315mm 7.5mm 7.5mm 7.5mm 8.0mm
316mm 7.0mm 7.0mm 7.0mm 8.0mm
317mm 6.5mm 6.5mm 7.0mm 8.0mm
318mm 6.0mm 6.0mm 7.0mm 8.0mm
319mm 5.5mm 6.0mm 7.0mm 8.0mm
320mm 5.0mm 6.0mm 7.0mm 8.0mm
DocuColor 5252 System Administrat ion Guide 2-55
Tools Mode
2 Too
ls Mo
de
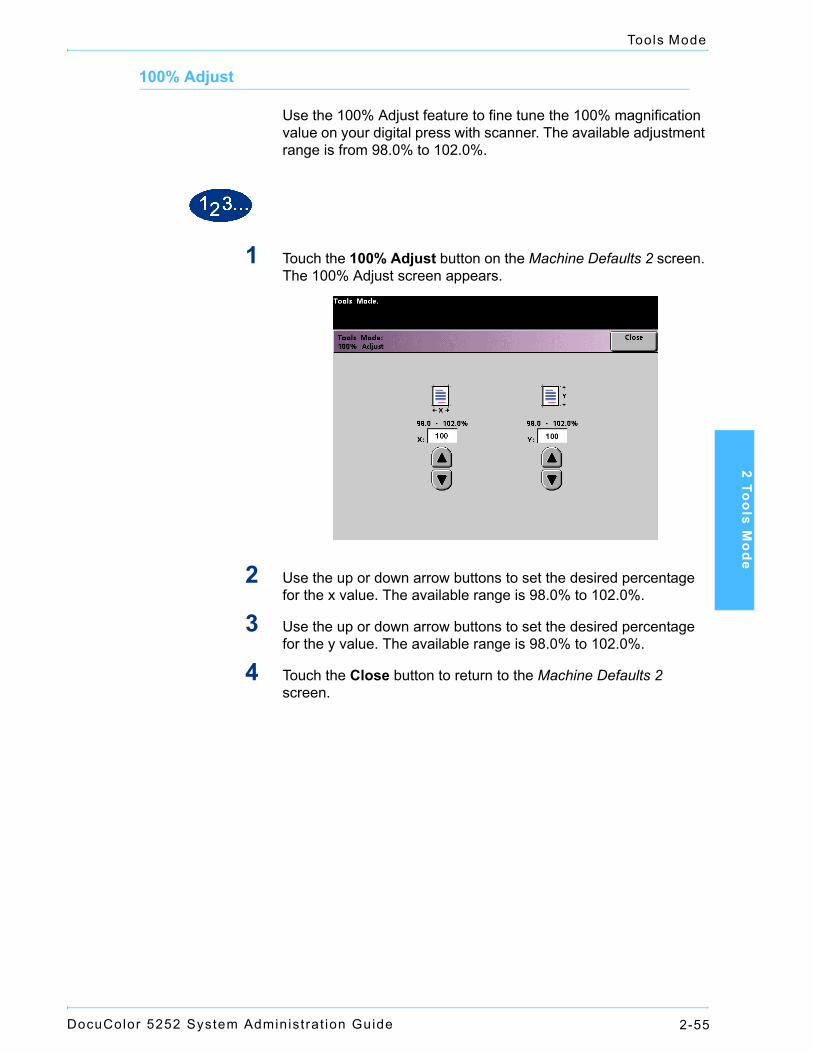
100% Adjust
Use the 100% Adjust feature to fine tune the 100% magnification value on your digital press with scanner. The available adjustment range is from 98.0% to 102.0%.
1 Touch the 100% Adjust button on the Machine Defaults 2 screen. The 100% Adjust screen appears.
2 Use the up or down arrow buttons to set the desired percentage for the x value. The available range is 98.0% to 102.0%.
3 Use the up or down arrow buttons to set the desired percentage for the y value. The available range is 98.0% to 102.0%.
4 Touch the Close button to return to the Machine Defaults 2 screen.
DocuColor 5252 System Administrat ion Guide2-56
Tools Mode
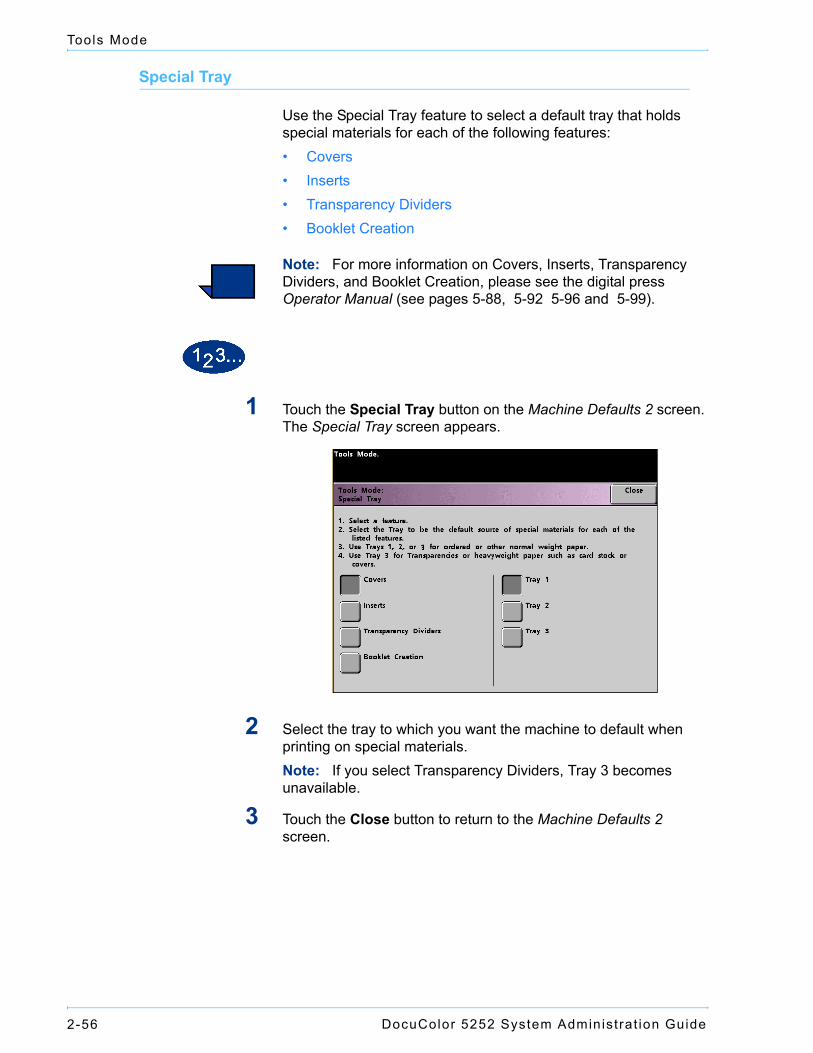
Special Tray
Use the Special Tray feature to select a default tray that holds special materials for each of the following features:• Covers• Inserts• Transparency Dividers• Booklet Creation
Note: For more information on Covers, Inserts, Transparency Dividers, and Booklet Creation, please see the digital press Operator Manual (see pages 5-88, 5-92 5-96 and 5-99).
1 Touch the Special Tray button on the Machine Defaults 2 screen. The Special Tray screen appears.
2 Select the tray to which you want the machine to default when printing on special materials.Note: If you select Transparency Dividers, Tray 3 becomes unavailable.
3 Touch the Close button to return to the Machine Defaults 2 screen.
DocuColor 5252 System Administrat ion Guide 2-57
Tools Mode
2 Too
ls Mo
de
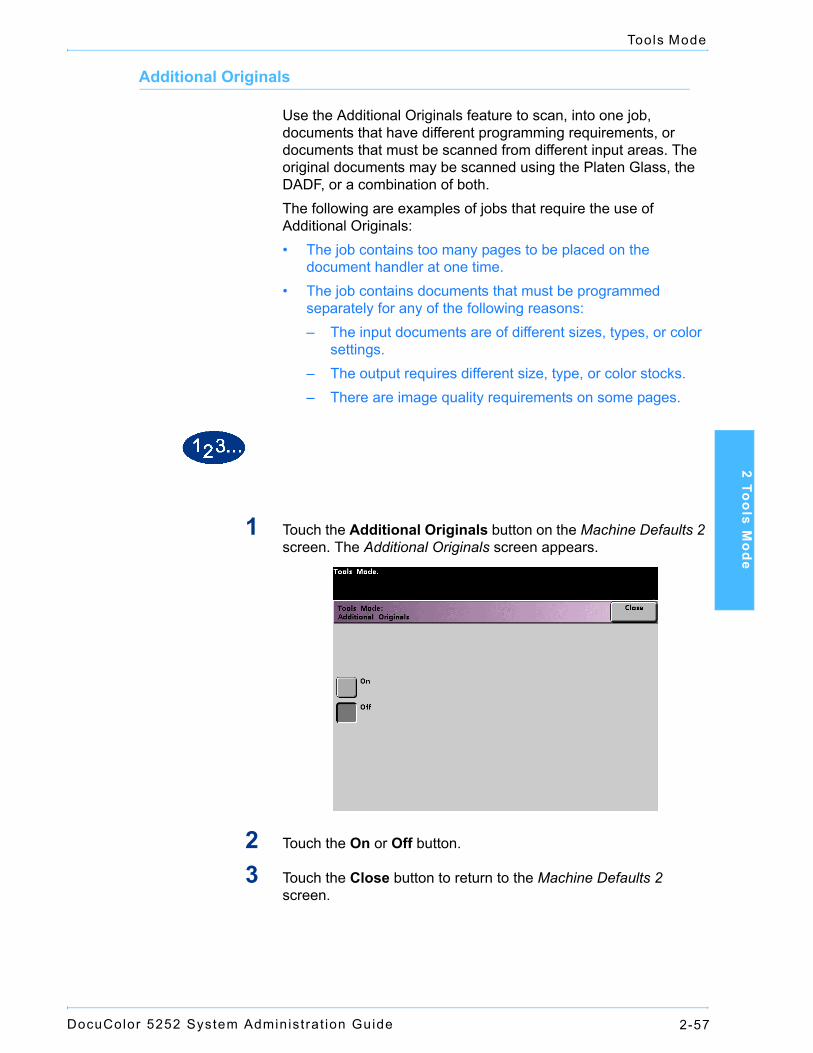
Additional Originals
Use the Additional Originals feature to scan, into one job, documents that have different programming requirements, or documents that must be scanned from different input areas. The original documents may be scanned using the Platen Glass, the DADF, or a combination of both.The following are examples of jobs that require the use of Additional Originals:• The job contains too many pages to be placed on the
document handler at one time.• The job contains documents that must be programmed
separately for any of the following reasons:– The input documents are of different sizes, types, or color
settings.– The output requires different size, type, or color stocks.– There are image quality requirements on some pages.
1 Touch the Additional Originals button on the Machine Defaults 2 screen. The Additional Originals screen appears.
2 Touch the On or Off button.
3 Touch the Close button to return to the Machine Defaults 2 screen.
DocuColor 5252 System Administrat ion Guide2-58
Tools Mode
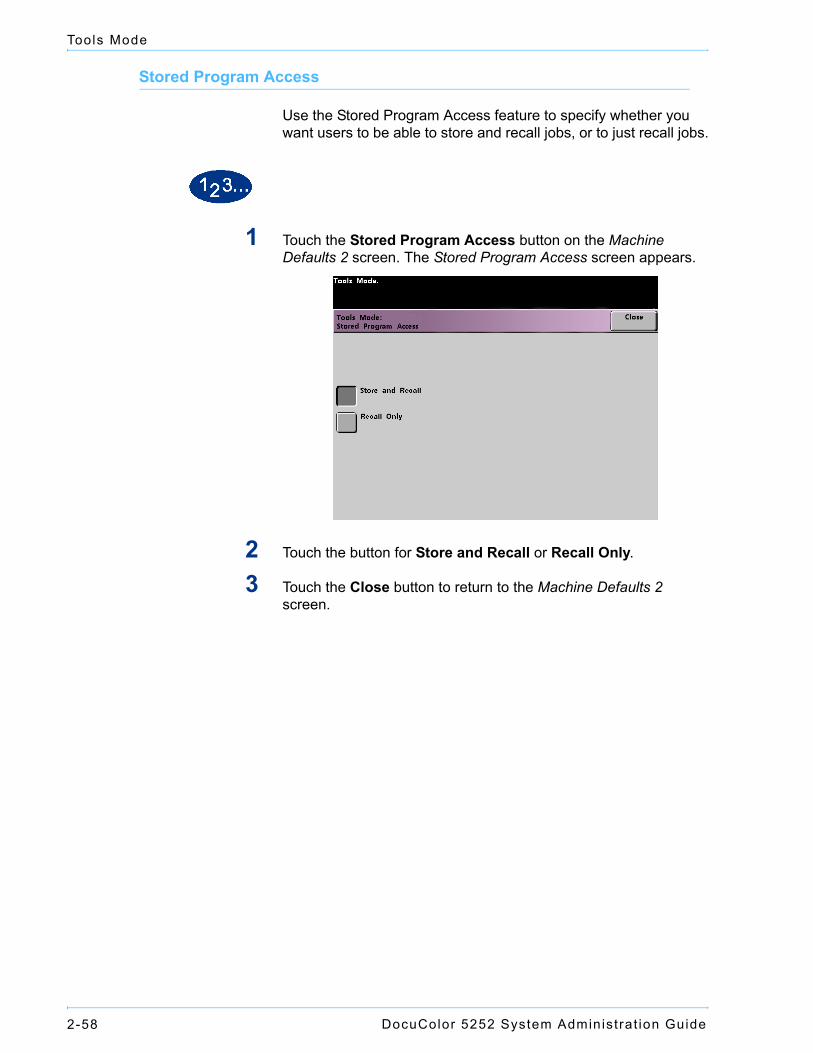
Stored Program Access
Use the Stored Program Access feature to specify whether you want users to be able to store and recall jobs, or to just recall jobs.
1 Touch the Stored Program Access button on the Machine Defaults 2 screen. The Stored Program Access screen appears.
2 Touch the button for Store and Recall or Recall Only.
3 Touch the Close button to return to the Machine Defaults 2 screen.
DocuColor 5252 System Administrat ion Guide 2-59
Tools Mode
2 Too
ls Mo
de
Auto Recognition
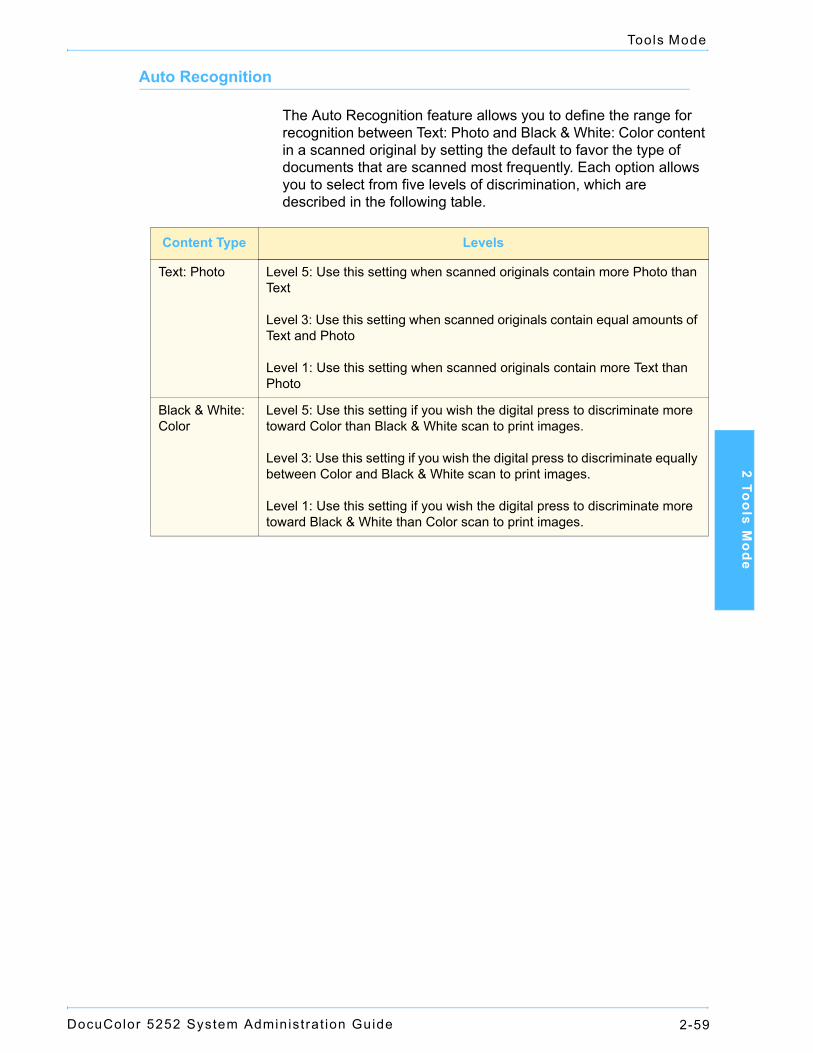
The Auto Recognition feature allows you to define the range for recognition between Text: Photo and Black & White: Color content in a scanned original by setting the default to favor the type of documents that are scanned most frequently. Each option allows you to select from five levels of discrimination, which are described in the following table.
Content Type Levels
Text: Photo Level 5: Use this setting when scanned originals contain more Photo than Text
Level 3: Use this setting when scanned originals contain equal amounts of Text and Photo
Level 1: Use this setting when scanned originals contain more Text than Photo
Black & White: Color
Level 5: Use this setting if you wish the digital press to discriminate more toward Color than Black & White scan to print images.
Level 3: Use this setting if you wish the digital press to discriminate equally between Color and Black & White scan to print images.
Level 1: Use this setting if you wish the digital press to discriminate more toward Black & White than Color scan to print images.
DocuColor 5252 System Administrat ion Guide2-60
Tools Mode
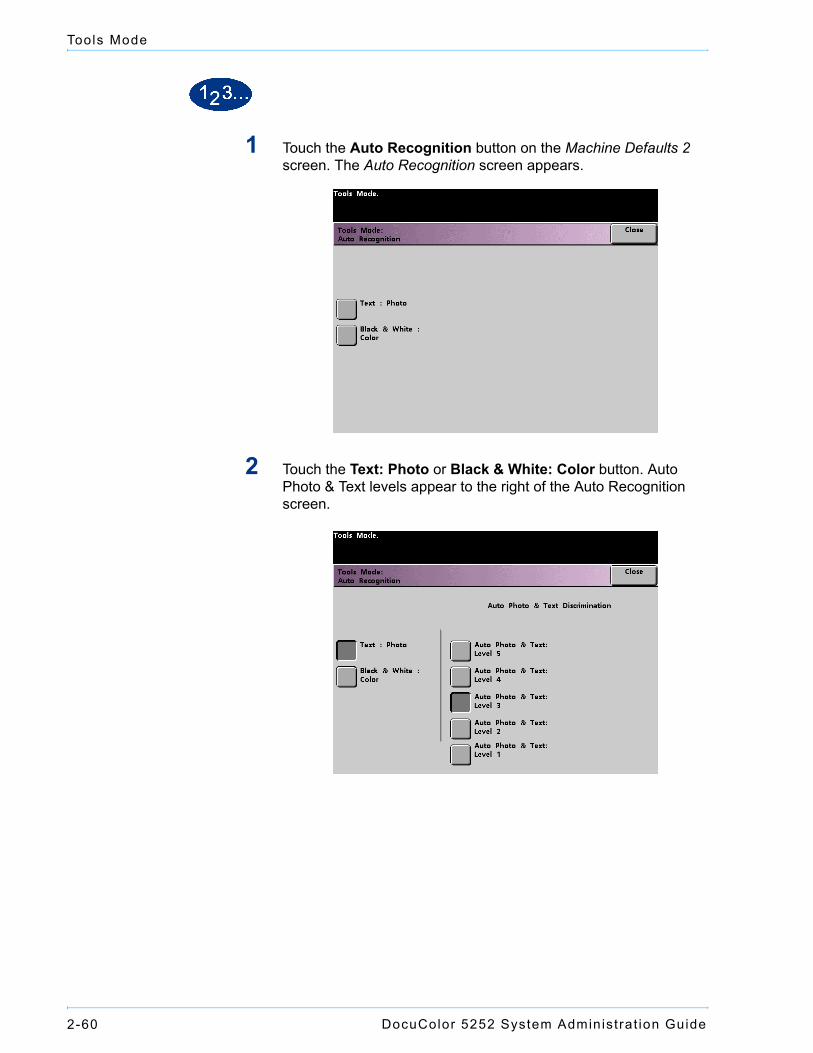
1 Touch the Auto Recognition button on the Machine Defaults 2 screen. The Auto Recognition screen appears.
2 Touch the Text: Photo or Black & White: Color button. Auto Photo & Text levels appear to the right of the Auto Recognition screen.
DocuColor 5252 System Administrat ion Guide 2-61
Tools Mode
2 Too
ls Mo
de
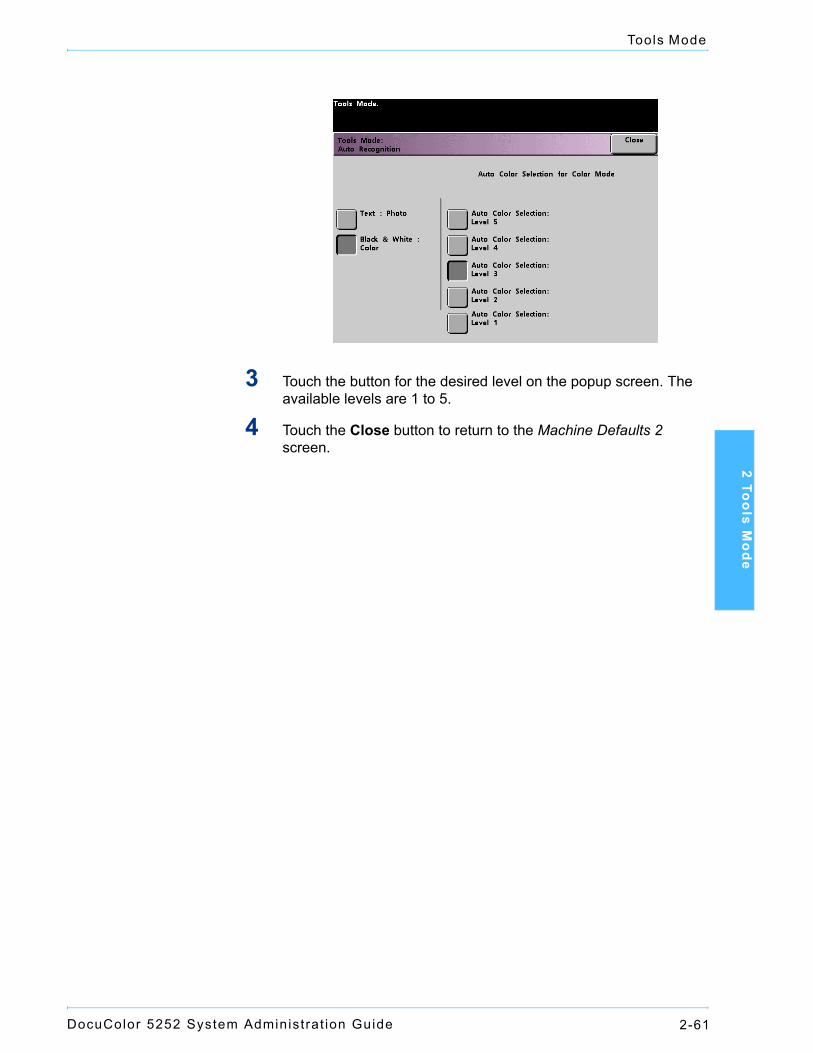
3 Touch the button for the desired level on the popup screen. The available levels are 1 to 5.
4 Touch the Close button to return to the Machine Defaults 2 screen.
DocuColor 5252 System Administrat ion Guide2-62
Tools Mode
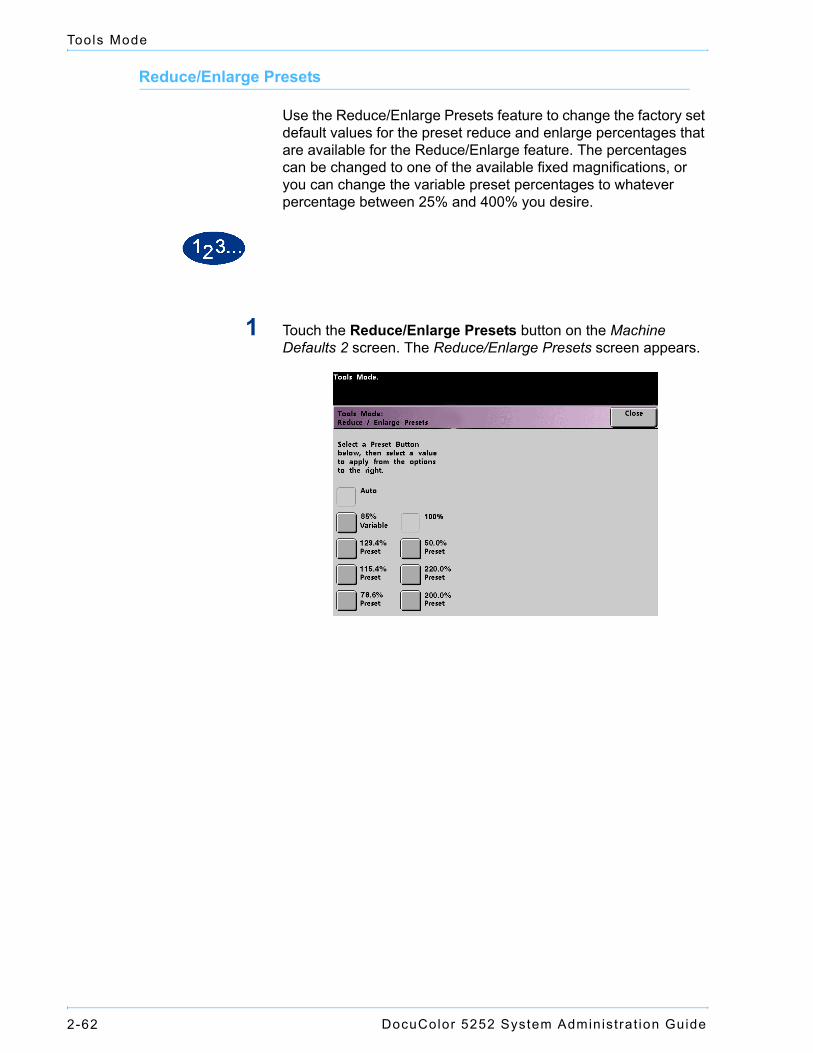
Reduce/Enlarge Presets
Use the Reduce/Enlarge Presets feature to change the factory set default values for the preset reduce and enlarge percentages that are available for the Reduce/Enlarge feature. The percentages can be changed to one of the available fixed magnifications, or you can change the variable preset percentages to whatever percentage between 25% and 400% you desire.
1 Touch the Reduce/Enlarge Presets button on the Machine Defaults 2 screen. The Reduce/Enlarge Presets screen appears.
DocuColor 5252 System Administrat ion Guide 2-63
Tools Mode
2 Too
ls Mo
de
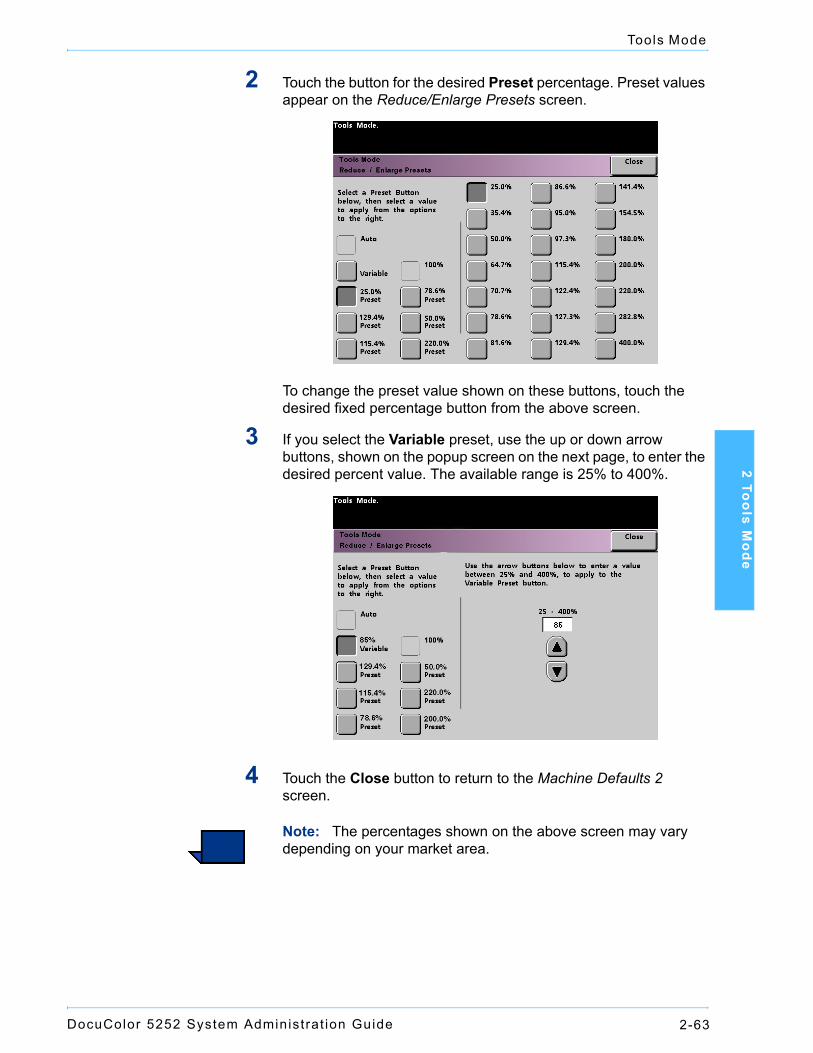
2 Touch the button for the desired Preset percentage. Preset values appear on the Reduce/Enlarge Presets screen.
To change the preset value shown on these buttons, touch the desired fixed percentage button from the above screen.
3 If you select the Variable preset, use the up or down arrow buttons, shown on the popup screen on the next page, to enter the desired percent value. The available range is 25% to 400%.
4 Touch the Close button to return to the Machine Defaults 2 screen.
Note: The percentages shown on the above screen may vary depending on your market area.
DocuColor 5252 System Administrat ion Guide2-64
Tools Mode
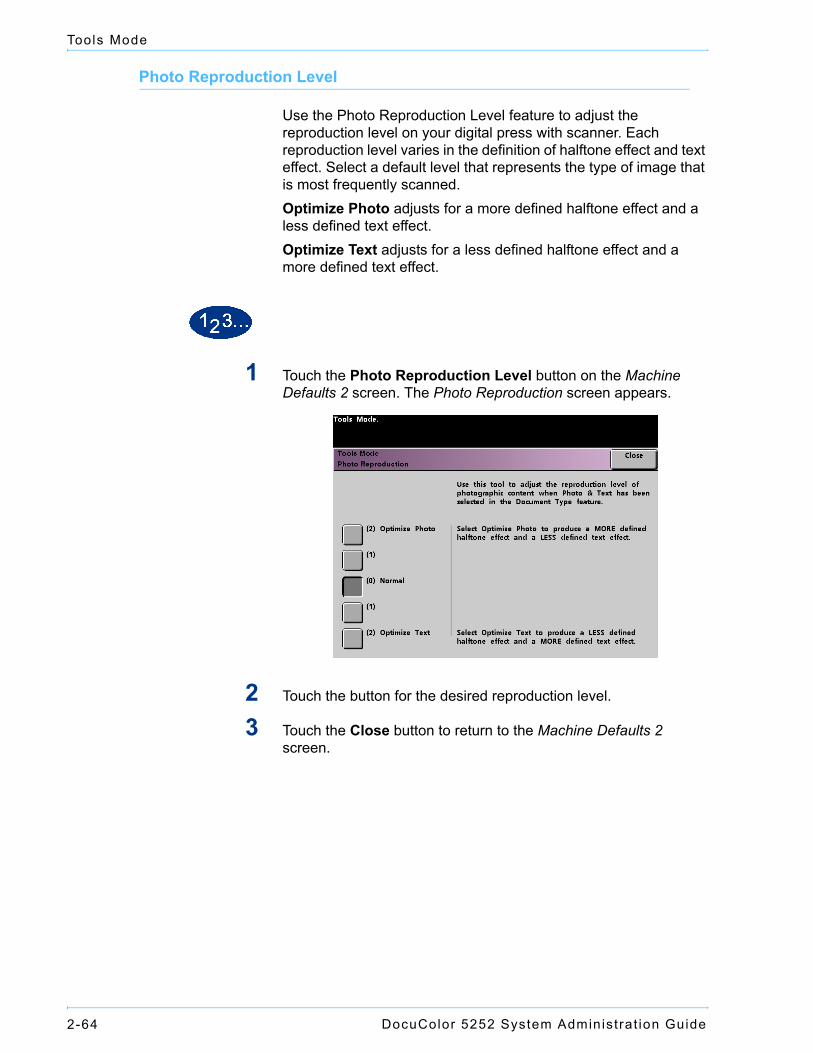
Photo Reproduction Level
Use the Photo Reproduction Level feature to adjust the reproduction level on your digital press with scanner. Each reproduction level varies in the definition of halftone effect and text effect. Select a default level that represents the type of image that is most frequently scanned. Optimize Photo adjusts for a more defined halftone effect and a less defined text effect. Optimize Text adjusts for a less defined halftone effect and a more defined text effect.
1 Touch the Photo Reproduction Level button on the Machine Defaults 2 screen. The Photo Reproduction screen appears.
2 Touch the button for the desired reproduction level.
3 Touch the Close button to return to the Machine Defaults 2 screen.
DocuColor 5252 System Administrat ion Guide 2-65
Tools Mode
2 Too
ls Mo
de
Color Adjust & Registration
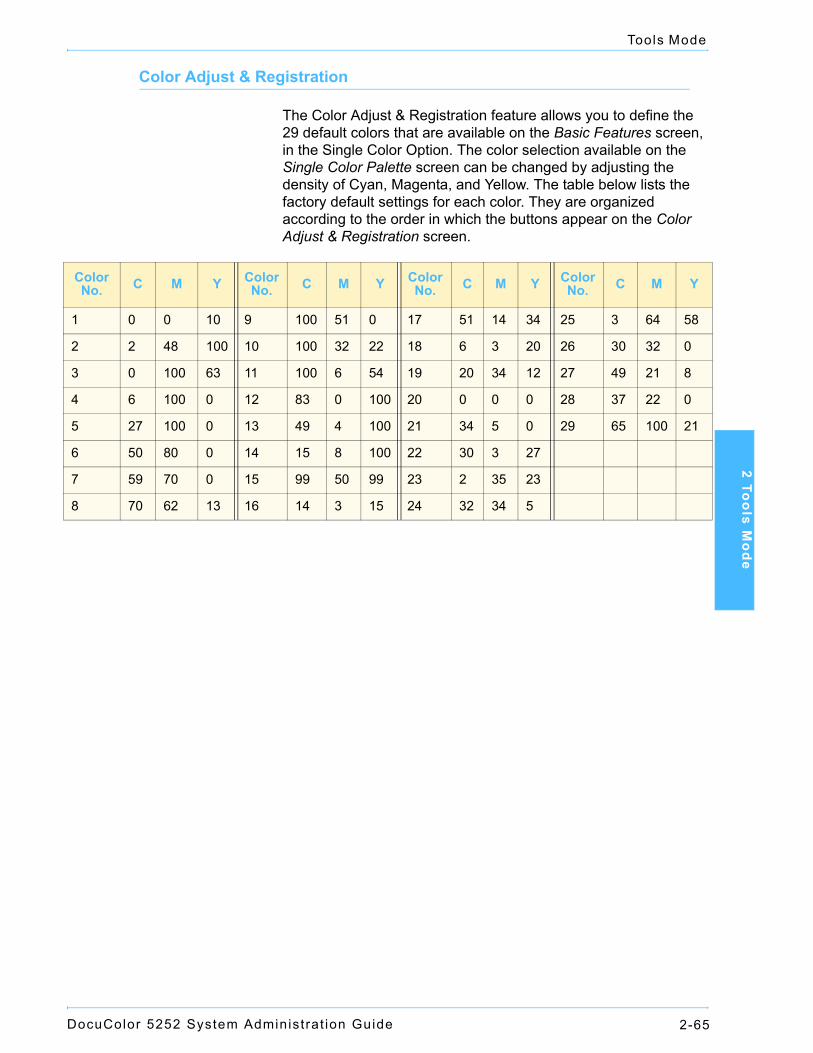
The Color Adjust & Registration feature allows you to define the 29 default colors that are available on the Basic Features screen, in the Single Color Option. The color selection available on the Single Color Palette screen can be changed by adjusting the density of Cyan, Magenta, and Yellow. The table below lists the factory default settings for each color. They are organized according to the order in which the buttons appear on the Color Adjust & Registration screen.
ColorNo. C M Y Color
No. C M Y ColorNo. C M Y Color
No. C M Y
1 0 0 10 9 100 51 0 17 51 14 34 25 3 64 58
2 2 48 100 10 100 32 22 18 6 3 20 26 30 32 0
3 0 100 63 11 100 6 54 19 20 34 12 27 49 21 8
4 6 100 0 12 83 0 100 20 0 0 0 28 37 22 0
5 27 100 0 13 49 4 100 21 34 5 0 29 65 100 21
6 50 80 0 14 15 8 100 22 30 3 27
7 59 70 0 15 99 50 99 23 2 35 23
8 70 62 13 16 14 3 15 24 32 34 5
DocuColor 5252 System Administrat ion Guide2-66
Tools Mode
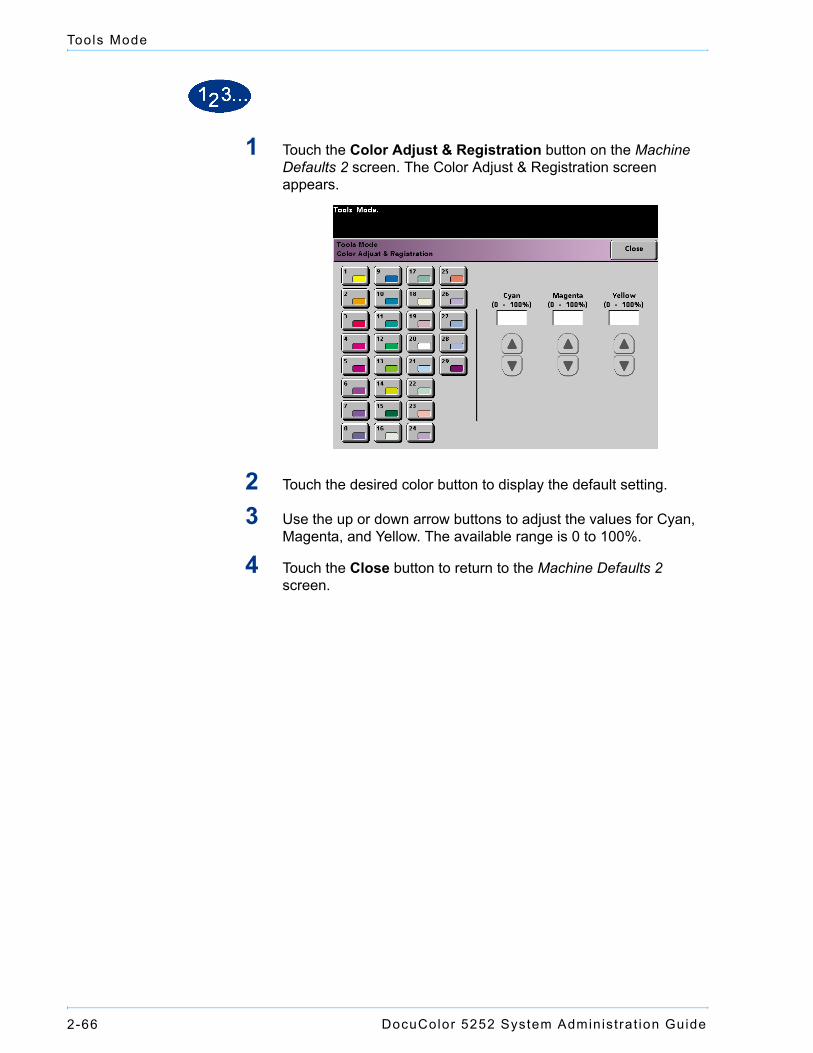
1 Touch the Color Adjust & Registration button on the Machine Defaults 2 screen. The Color Adjust & Registration screen appears.
2 Touch the desired color button to display the default setting.
3 Use the up or down arrow buttons to adjust the values for Cyan, Magenta, and Yellow. The available range is 0 to 100%.
4 Touch the Close button to return to the Machine Defaults 2 screen.
DocuColor 5252 System Administrat ion Guide 2-67
Tools Mode
2 Too
ls Mo
de
Auto Rotation
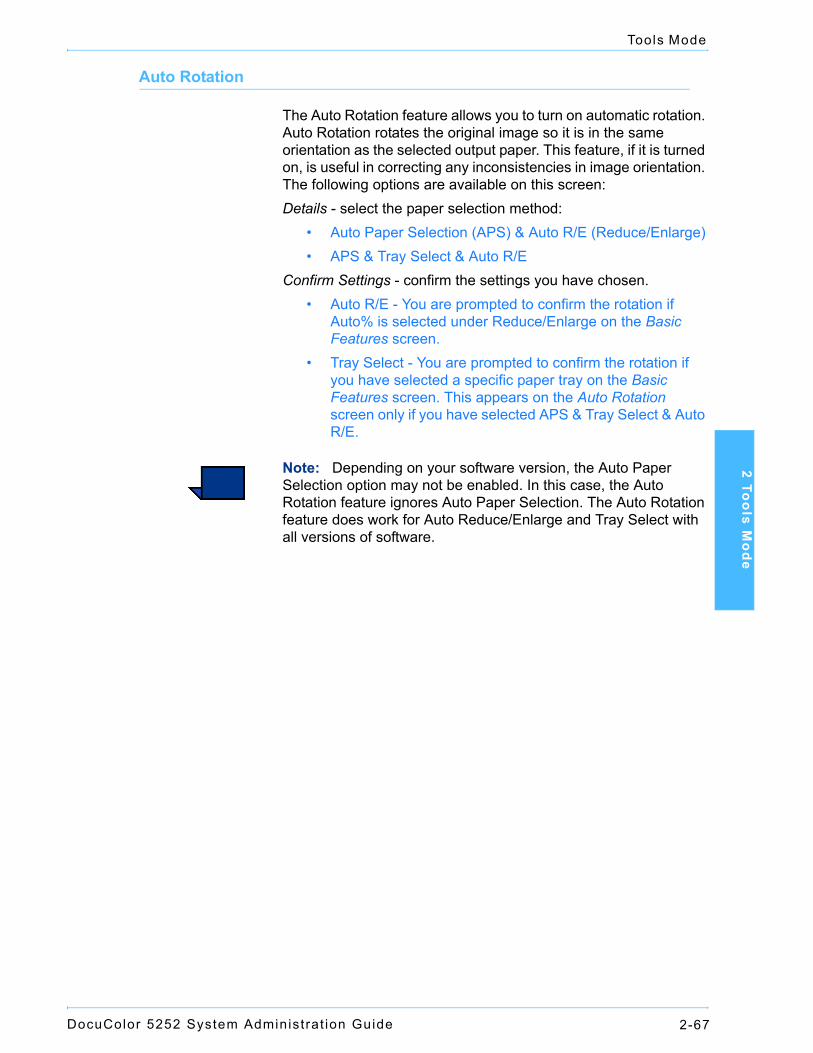
The Auto Rotation feature allows you to turn on automatic rotation. Auto Rotation rotates the original image so it is in the same orientation as the selected output paper. This feature, if it is turned on, is useful in correcting any inconsistencies in image orientation. The following options are available on this screen:Details - select the paper selection method:
• Auto Paper Selection (APS) & Auto R/E (Reduce/Enlarge)• APS & Tray Select & Auto R/E
Confirm Settings - confirm the settings you have chosen.• Auto R/E - You are prompted to confirm the rotation if
Auto% is selected under Reduce/Enlarge on the Basic Features screen.
• Tray Select - You are prompted to confirm the rotation if you have selected a specific paper tray on the Basic Features screen. This appears on the Auto Rotation screen only if you have selected APS & Tray Select & Auto R/E.
Note: Depending on your software version, the Auto Paper Selection option may not be enabled. In this case, the Auto Rotation feature ignores Auto Paper Selection. The Auto Rotation feature does work for Auto Reduce/Enlarge and Tray Select with all versions of software.
DocuColor 5252 System Administrat ion Guide2-68
Tools Mode
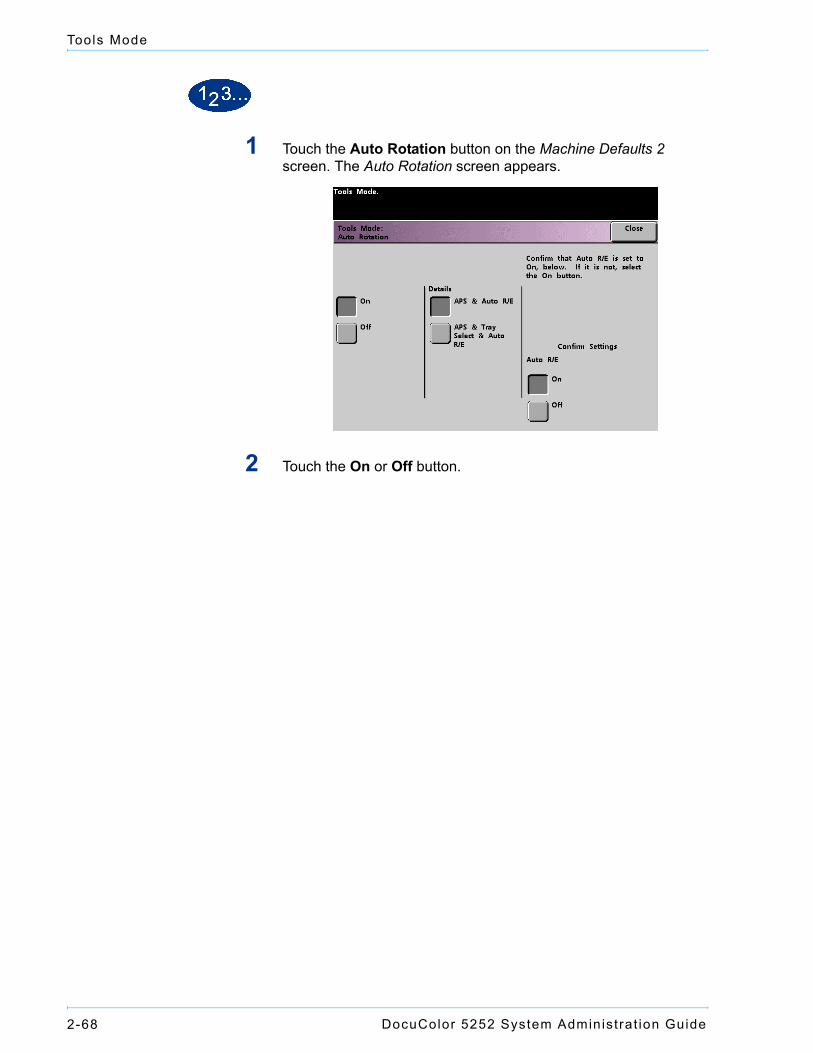
1 Touch the Auto Rotation button on the Machine Defaults 2 screen. The Auto Rotation screen appears.
2 Touch the On or Off button.
DocuColor 5252 System Administrat ion Guide 2-69
Tools Mode
2 Too
ls Mo
de
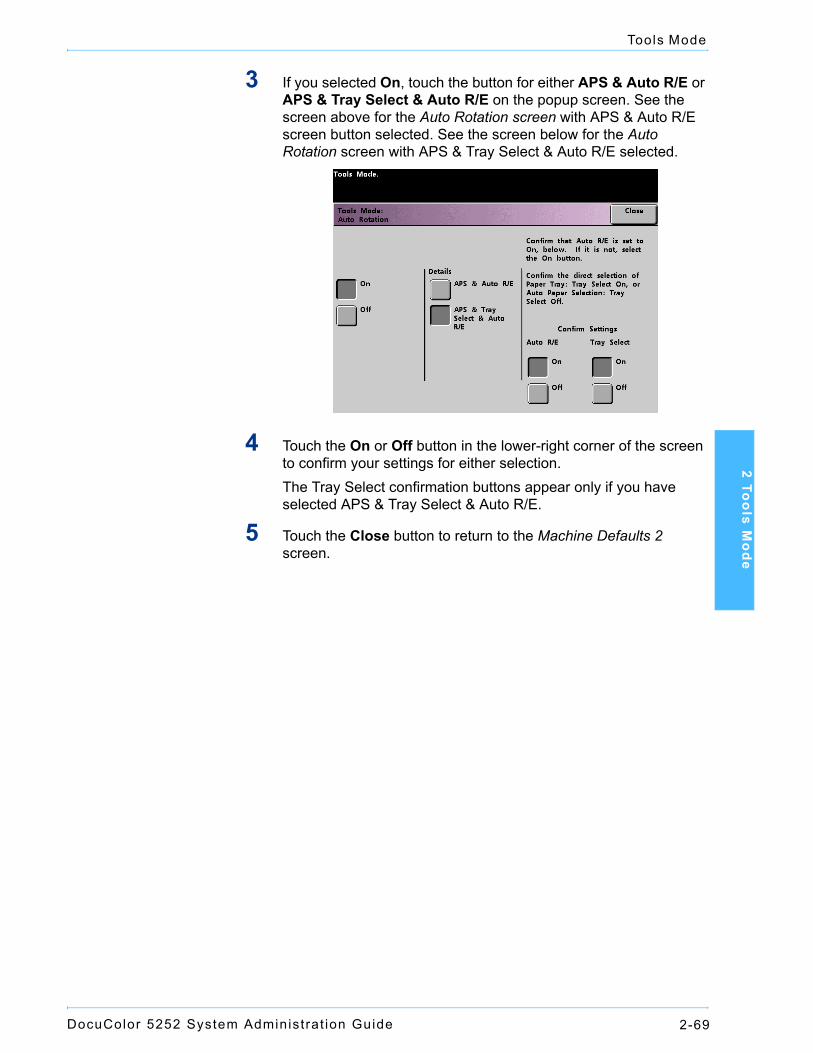
3 If you selected On, touch the button for either APS & Auto R/E or APS & Tray Select & Auto R/E on the popup screen. See the screen above for the Auto Rotation screen with APS & Auto R/E screen button selected. See the screen below for the Auto Rotation screen with APS & Tray Select & Auto R/E selected.
4 Touch the On or Off button in the lower-right corner of the screen to confirm your settings for either selection.The Tray Select confirmation buttons appear only if you have selected APS & Tray Select & Auto R/E.
5 Touch the Close button to return to the Machine Defaults 2 screen.
DocuColor 5252 System Administrat ion Guide2-70
Tools Mode
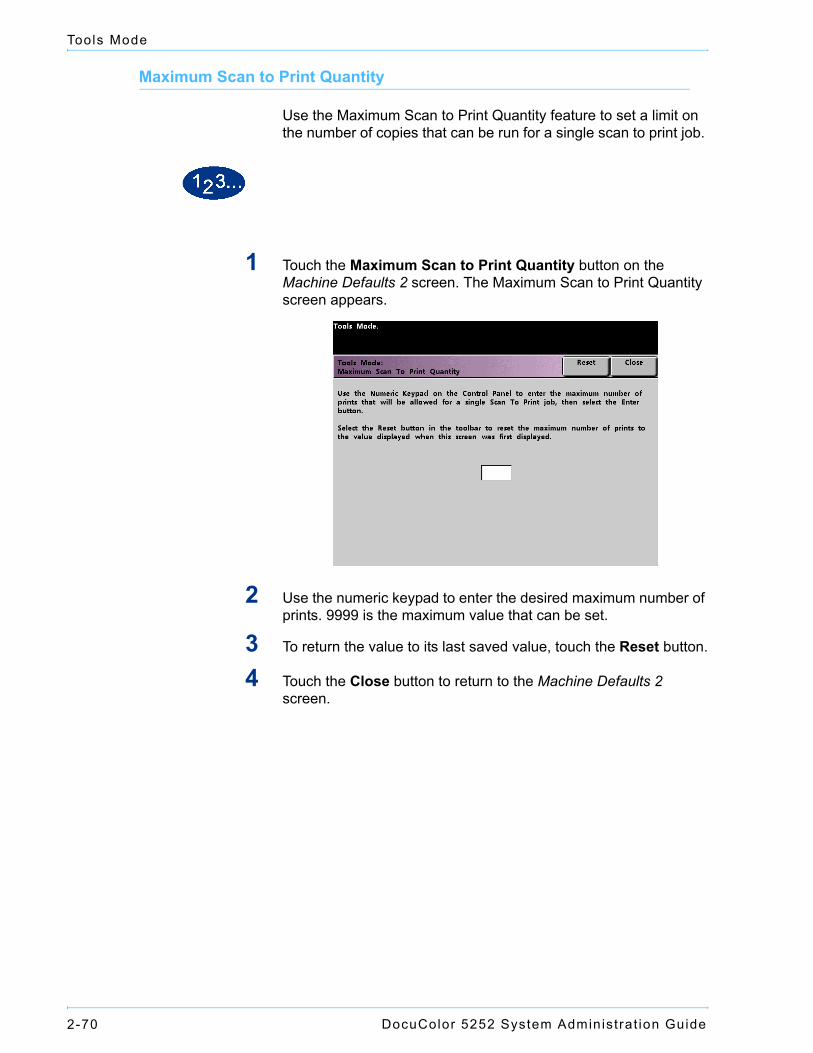
Maximum Scan to Print Quantity
Use the Maximum Scan to Print Quantity feature to set a limit on the number of copies that can be run for a single scan to print job.
1 Touch the Maximum Scan to Print Quantity button on the Machine Defaults 2 screen. The Maximum Scan to Print Quantity screen appears.
2 Use the numeric keypad to enter the desired maximum number of prints. 9999 is the maximum value that can be set.
3 To return the value to its last saved value, touch the Reset button.
4 Touch the Close button to return to the Machine Defaults 2 screen.
DocuColor 5252 System Administrat ion Guide 2-71
Tools Mode
2 Too
ls Mo
de
Decurler Setup
Use the Decurler Setup feature to compensate for paper curl in your prints.Paper curl is caused by many variables:• The manufacturer’s brand of paper and the manufacturing lot.• The weight of the paper, and if it is coated or uncoated.• The amount of dry ink/toner and the area being covered on a
sheet. The heavier the coverage, the greater the tendency to curl.
• The atmospheric conditions of the room where the paper is stored.
• The atmospheric conditions of the room where the digital press with scanner is located.
• The heat generated during the fusing processes.The digital press is equipped with an automatic curl control system that uses the variables listed above to determine the amount of pressure needed at different Decurlers to reduce the curl.
Key point: If you notice that output prints have too much curl, first try flipping over the stack of paper in the paper tray being used. You can also try running the job from a different tray. If curl is still a problem, refer to the tables below for your market area to change the default Decurler settings.
DocuColor 5252 System Administrat ion Guide2-72
Tools Mode
Decurler Specifications
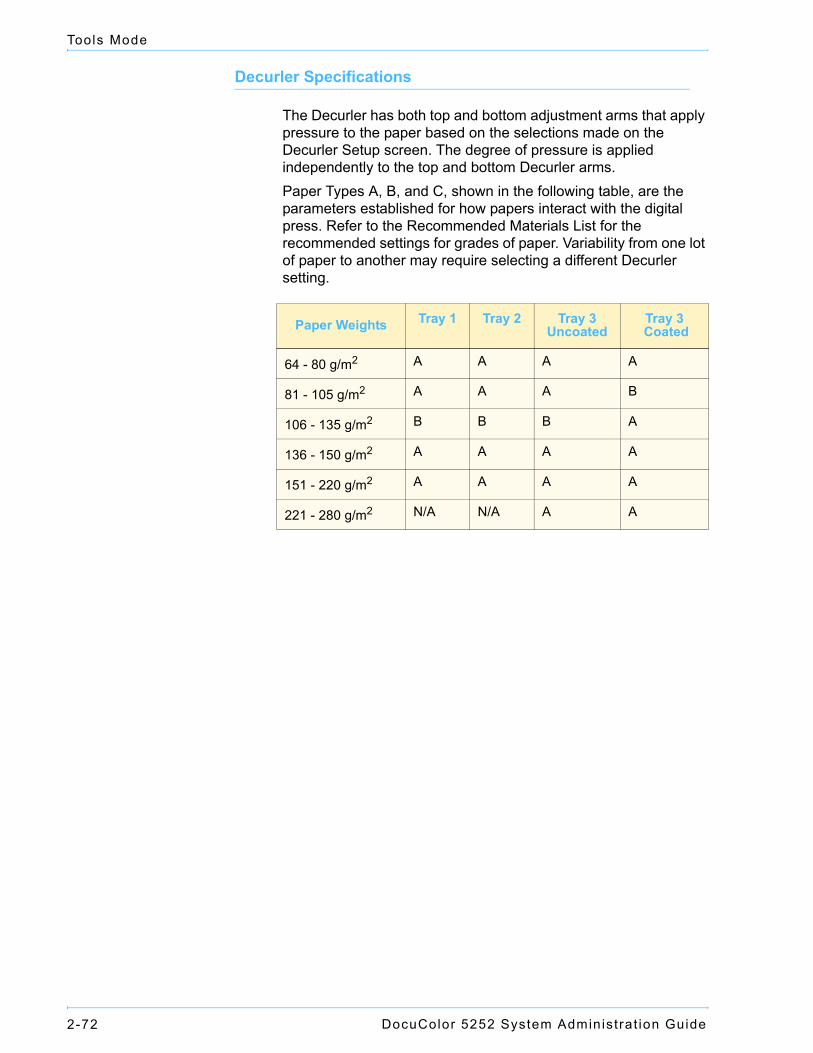
The Decurler has both top and bottom adjustment arms that apply pressure to the paper based on the selections made on the Decurler Setup screen. The degree of pressure is applied independently to the top and bottom Decurler arms.Paper Types A, B, and C, shown in the following table, are the parameters established for how papers interact with the digital press. Refer to the Recommended Materials List for the recommended settings for grades of paper. Variability from one lot of paper to another may require selecting a different Decurler setting.
Paper Weights Tray 1 Tray 2 Tray 3Uncoated
Tray 3 Coated
64 - 80 g/m2 A A A A
81 - 105 g/m2 A A A B
106 - 135 g/m2 B B B A
136 - 150 g/m2 A A A A
151 - 220 g/m2 A A A A
221 - 280 g/m2 N/A N/A A A
DocuColor 5252 System Administrat ion Guide 2-73
Tools Mode
2 Too
ls Mo
de
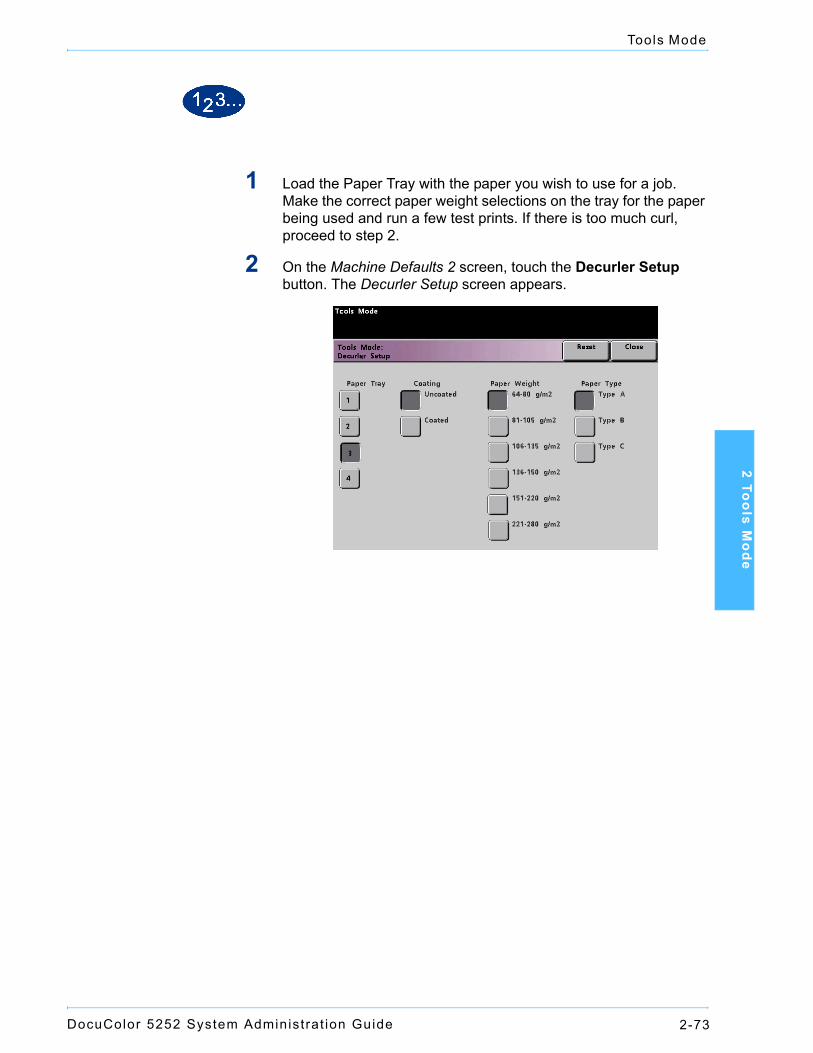
1 Load the Paper Tray with the paper you wish to use for a job. Make the correct paper weight selections on the tray for the paper being used and run a few test prints. If there is too much curl, proceed to step 2.
2 On the Machine Defaults 2 screen, touch the Decurler Setup button. The Decurler Setup screen appears.
DocuColor 5252 System Administrat ion Guide2-74
Tools Mode
3 When a Paper Tray on the screen is selected, the default selections for Paper Weight and Paper Type are automatically selected. Touch the number of the Paper Tray from which the paper is feeding.
The button for 221 - 280 g/m2 displays only for Tray 3.
4 If there is still too much paper curl after trying the tips in the Key Point on the previous page, follow the remaining steps in this procedure.
Key point: Paper Tray 3 accepts paper weights from 64 to 280 g/m2. If you select Paper Tray 3, buttons for Uncoated and Coated are displayed under the Coating heading.You may select from any of the displayed paper weights; 64 to 220 g/m2, and either coated or uncoated paper. Select the correct paper type if other than Paper Type A. Refer to the tables shown previously in this section for the default settings for various market areas.
5 Touch the Close button to save your selections and return to the Machine Defaults 2 screen. Exit the Tools Mode and run a few test prints to determine if the curl was reduced to a satisfactory level.If curl is still excessive, access the Tools Mode again and try another Paper Type setting. If you are not successful in reducing the curl, call your Xerox service representative.
6 Touch the Reset button on the Decurler Setup screen to return to the settings established when you first accessed the screen.
DocuColor 5252 System Administrat ion Guide 2-75
Tools Mode
2 Too
ls Mo
de
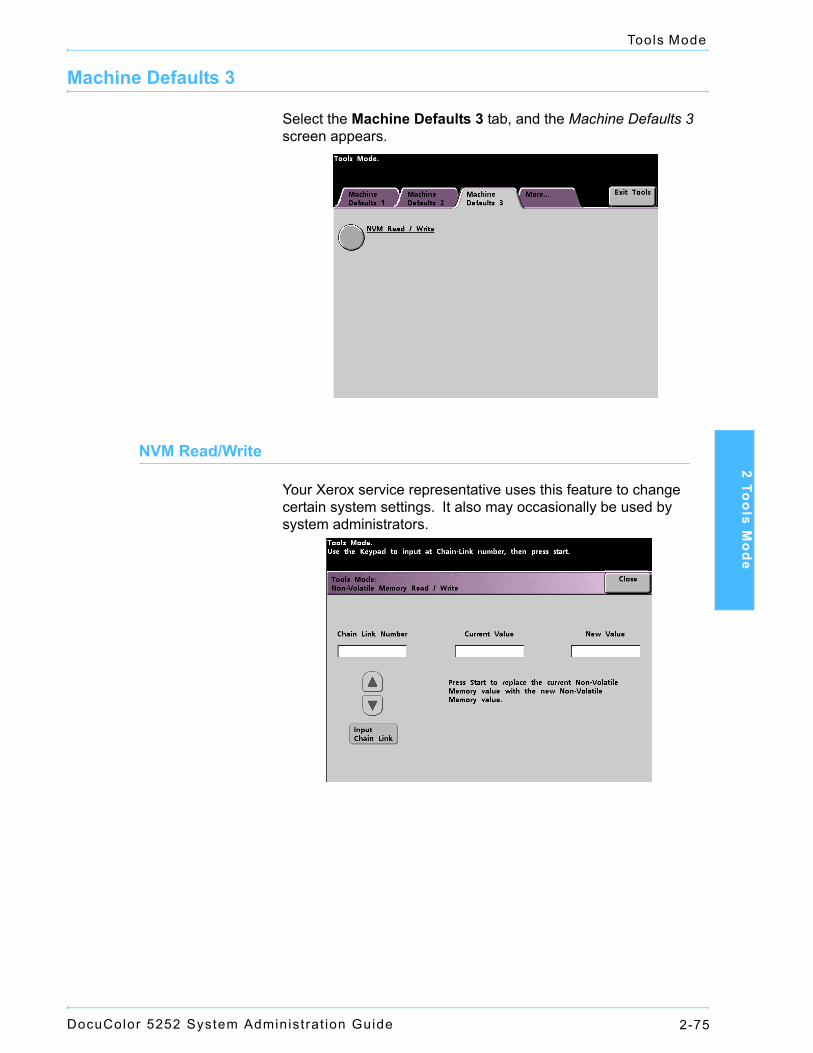
Machine Defaults 3
Select the Machine Defaults 3 tab, and the Machine Defaults 3 screen appears.
NVM Read/Write
Your Xerox service representative uses this feature to change certain system settings. It also may occasionally be used by system administrators.
DocuColor 5252 System Administrat ion Guide2-76
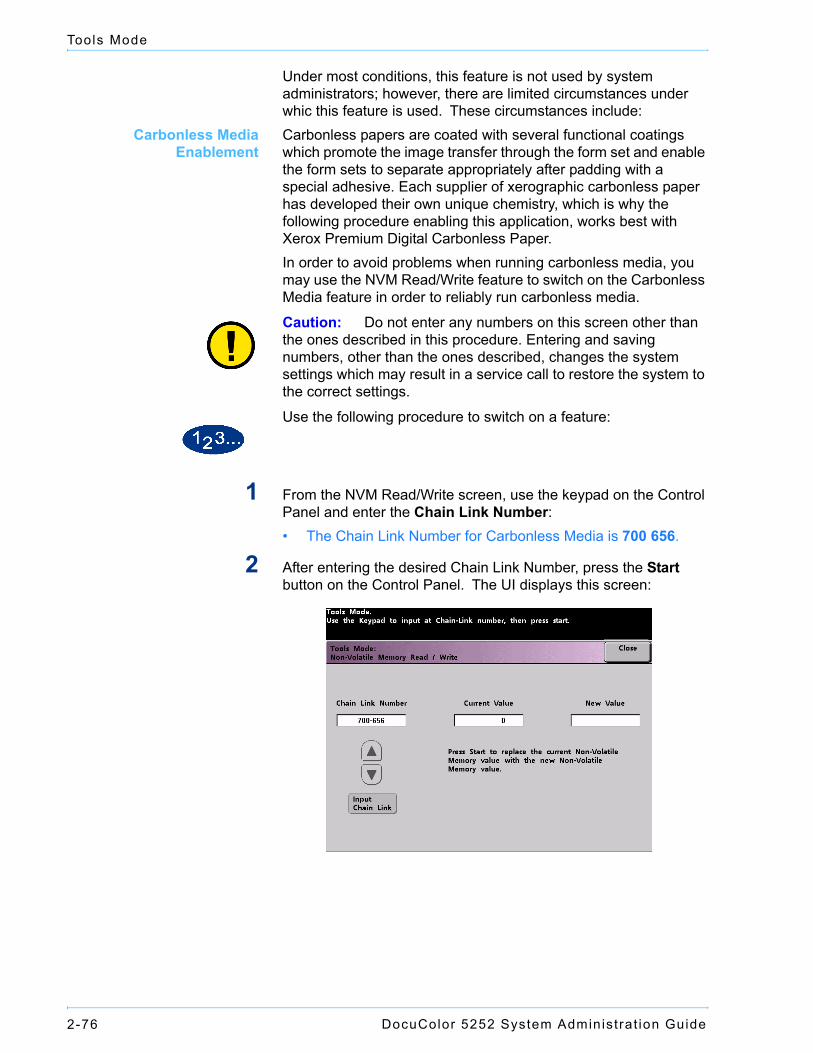
Tools Mode
Under most conditions, this feature is not used by system administrators; however, there are limited circumstances under whic this feature is used. These circumstances include:
Carbonless MediaEnablement
Carbonless papers are coated with several functional coatings which promote the image transfer through the form set and enable the form sets to separate appropriately after padding with a special adhesive. Each supplier of xerographic carbonless paper has developed their own unique chemistry, which is why the following procedure enabling this application, works best with Xerox Premium Digital Carbonless Paper.In order to avoid problems when running carbonless media, you may use the NVM Read/Write feature to switch on the Carbonless Media feature in order to reliably run carbonless media.
Caution: Do not enter any numbers on this screen other than the ones described in this procedure. Entering and saving numbers, other than the ones described, changes the system settings which may result in a service call to restore the system to the correct settings.
Use the following procedure to switch on a feature:
1 From the NVM Read/Write screen, use the keypad on the Control Panel and enter the Chain Link Number:• The Chain Link Number for Carbonless Media is 700 656.
2 After entering the desired Chain Link Number, press the Start button on the Control Panel. The UI displays this screen:
DocuColor 5252 System Administrat ion Guide 2-77
Tools Mode
2 Too
ls Mo
de
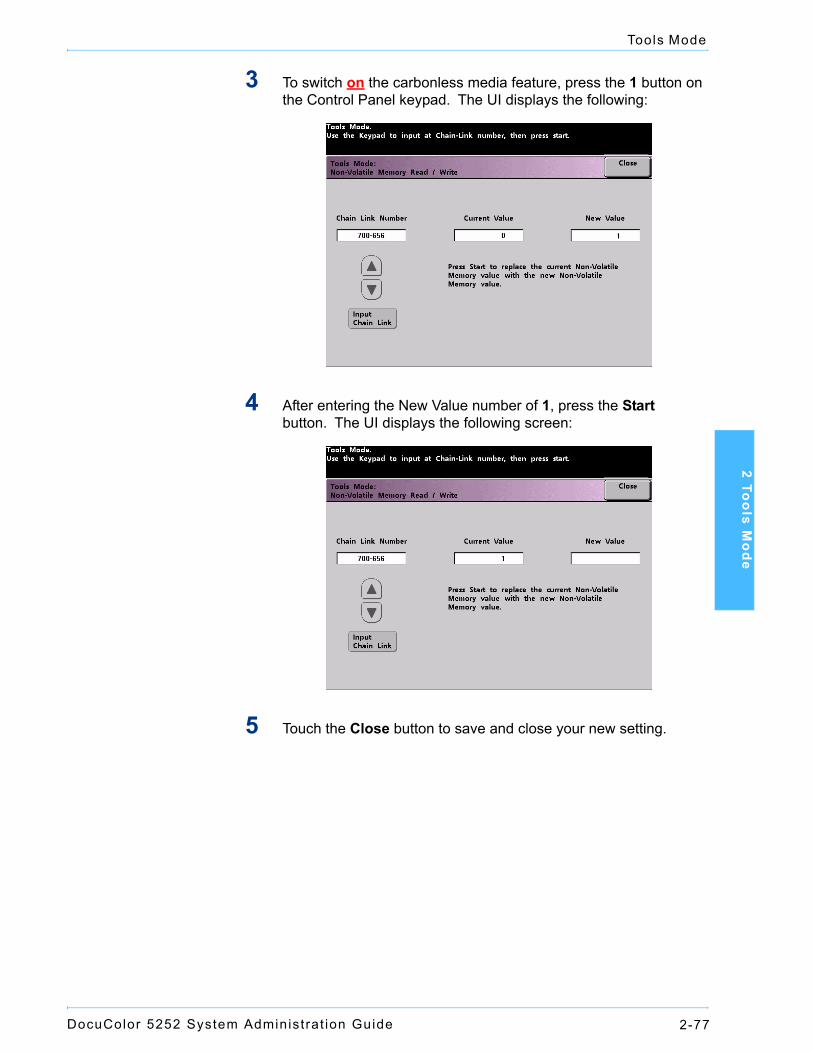
3 To switch on the carbonless media feature, press the 1 button on the Control Panel keypad. The UI displays the following:
4 After entering the New Value number of 1, press the Start button. The UI displays the following screen:
5 Touch the Close button to save and close your new setting.
DocuColor 5252 System Administrat ion Guide2-78
Tools Mode
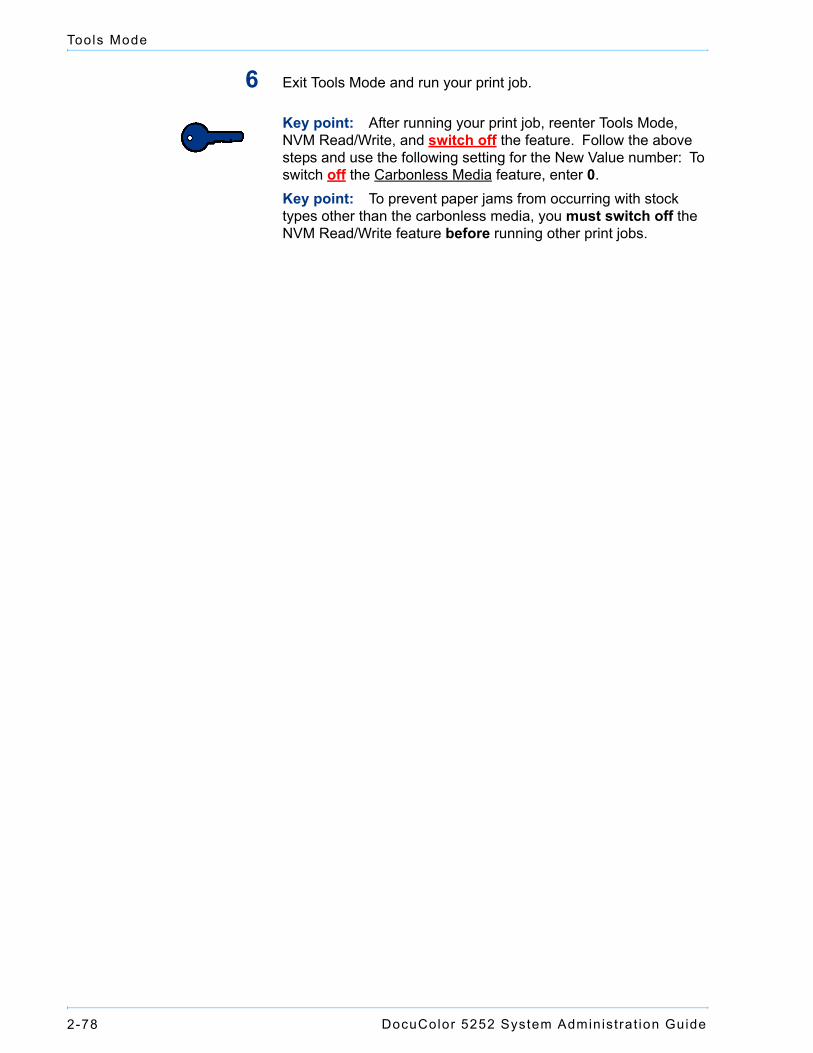
6 Exit Tools Mode and run your print job.
Key point: After running your print job, reenter Tools Mode, NVM Read/Write, and switch off the feature. Follow the above steps and use the following setting for the New Value number: To switch off the Carbonless Media feature, enter 0.Key point: To prevent paper jams from occurring with stock types other than the carbonless media, you must switch off the NVM Read/Write feature before running other print jobs.
DocuColor 5252 System Administrat ion Guide 2-79
Tools Mode
2 Too
ls Mo
de
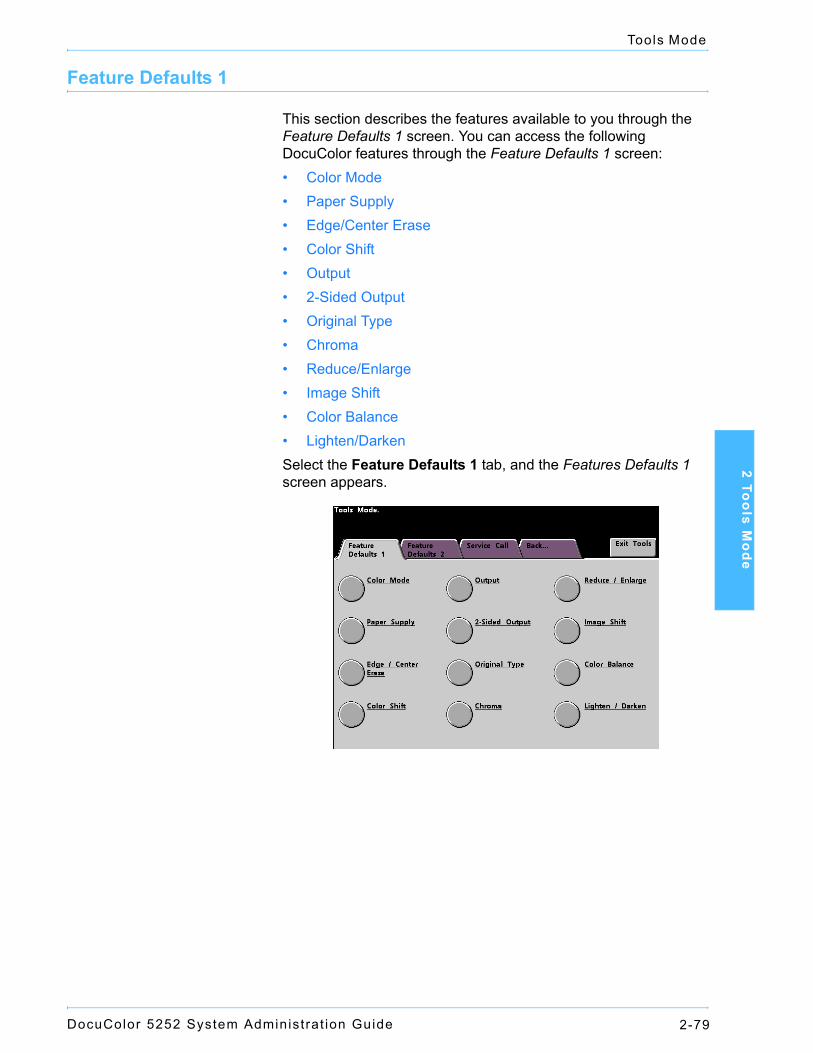
Feature Defaults 1
This section describes the features available to you through the Feature Defaults 1 screen. You can access the following DocuColor features through the Feature Defaults 1 screen:• Color Mode• Paper Supply• Edge/Center Erase• Color Shift• Output• 2-Sided Output• Original Type• Chroma• Reduce/Enlarge• Image Shift• Color Balance• Lighten/DarkenSelect the Feature Defaults 1 tab, and the Features Defaults 1 screen appears.
DocuColor 5252 System Administrat ion Guide2-80
Tools Mode
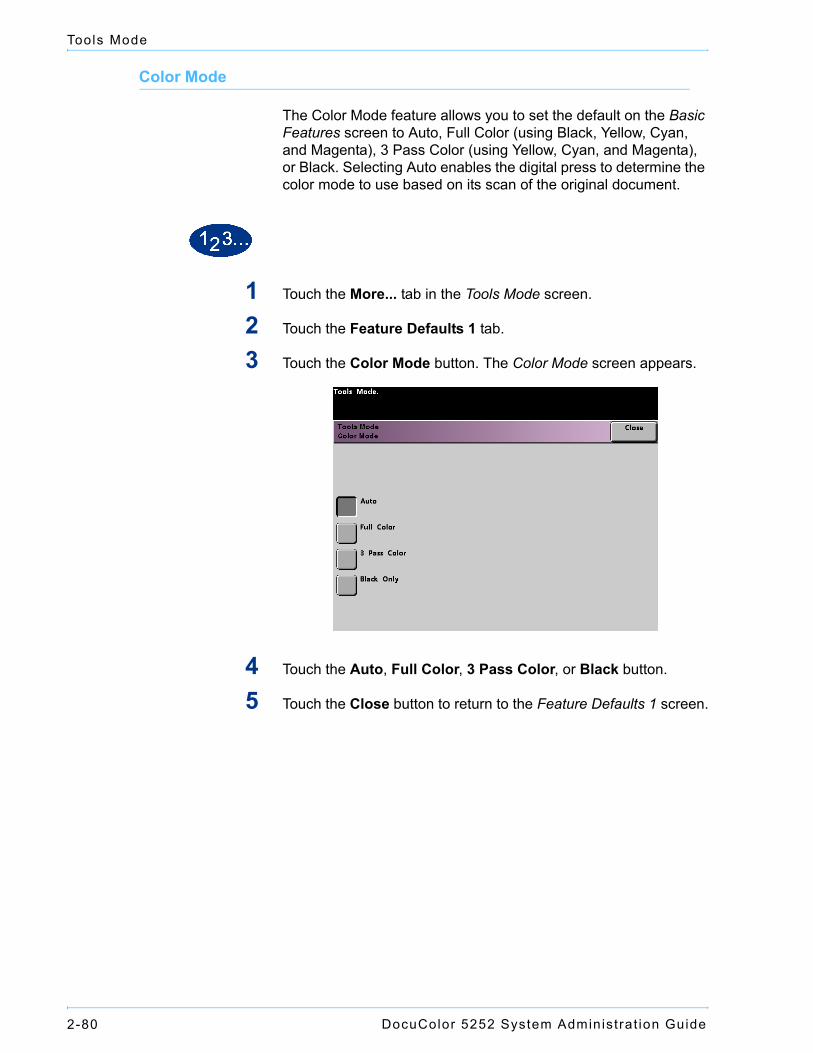
Color Mode
The Color Mode feature allows you to set the default on the Basic Features screen to Auto, Full Color (using Black, Yellow, Cyan, and Magenta), 3 Pass Color (using Yellow, Cyan, and Magenta), or Black. Selecting Auto enables the digital press to determine the color mode to use based on its scan of the original document.
1 Touch the More... tab in the Tools Mode screen.
2 Touch the Feature Defaults 1 tab.
3 Touch the Color Mode button. The Color Mode screen appears.
4 Touch the Auto, Full Color, 3 Pass Color, or Black button.
5 Touch the Close button to return to the Feature Defaults 1 screen.
DocuColor 5252 System Administrat ion Guide 2-81
Tools Mode
2 Too
ls Mo
de
Paper Supply
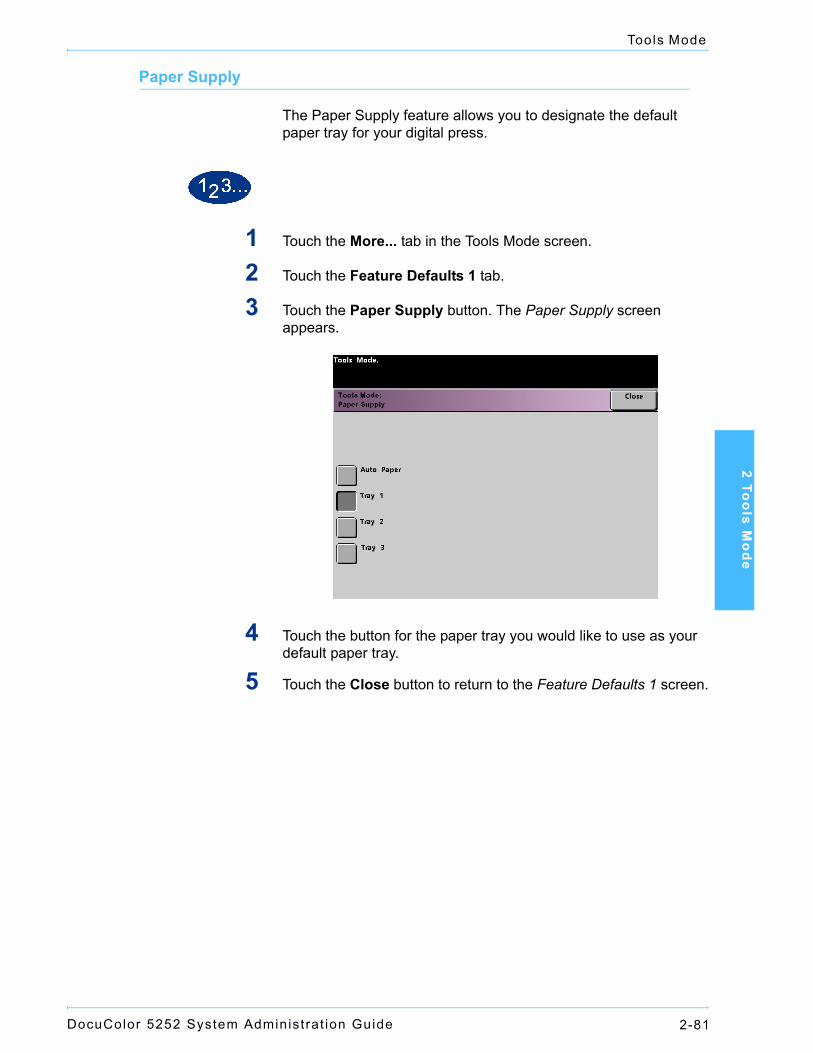
The Paper Supply feature allows you to designate the default paper tray for your digital press.
1 Touch the More... tab in the Tools Mode screen.
2 Touch the Feature Defaults 1 tab.
3 Touch the Paper Supply button. The Paper Supply screen appears.
4 Touch the button for the paper tray you would like to use as your default paper tray.
5 Touch the Close button to return to the Feature Defaults 1 screen.
DocuColor 5252 System Administrat ion Guide2-82
Tools Mode
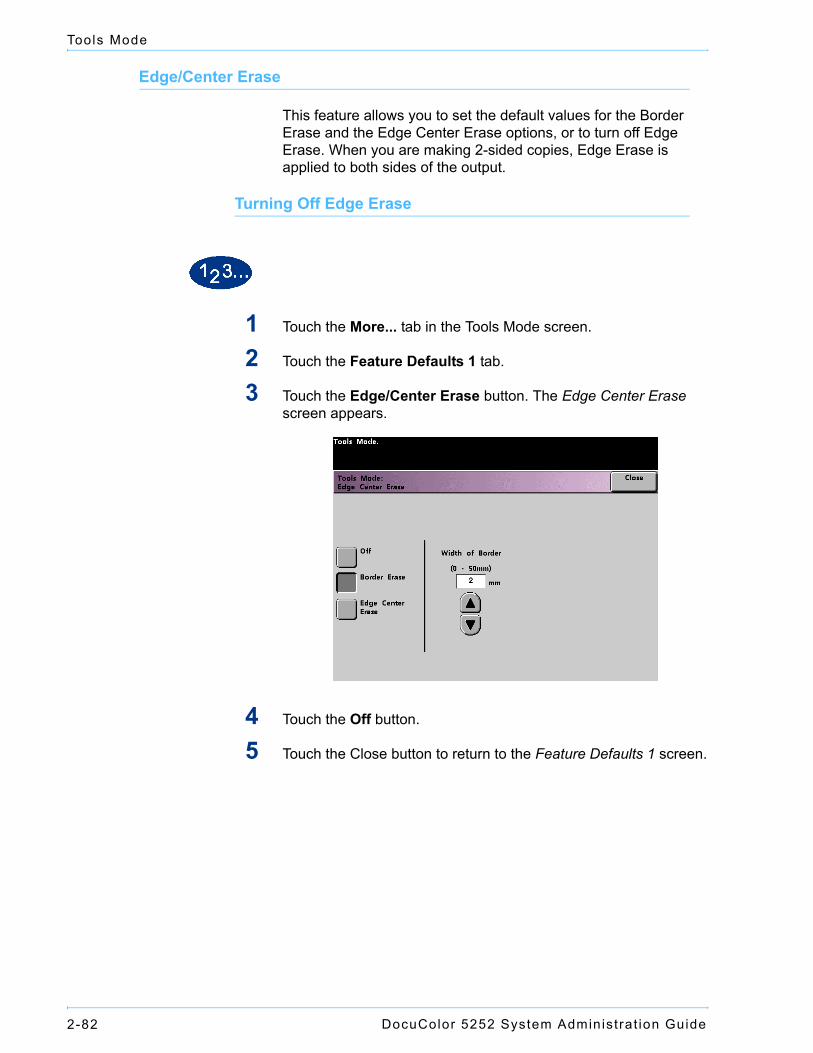
Edge/Center Erase
This feature allows you to set the default values for the Border Erase and the Edge Center Erase options, or to turn off Edge Erase. When you are making 2-sided copies, Edge Erase is applied to both sides of the output.
Turning Off Edge Erase
1 Touch the More... tab in the Tools Mode screen.
2 Touch the Feature Defaults 1 tab.
3 Touch the Edge/Center Erase button. The Edge Center Erase screen appears.
4 Touch the Off button.
5 Touch the Close button to return to the Feature Defaults 1 screen.
DocuColor 5252 System Administrat ion Guide 2-83
Tools Mode
2 Too
ls Mo
de
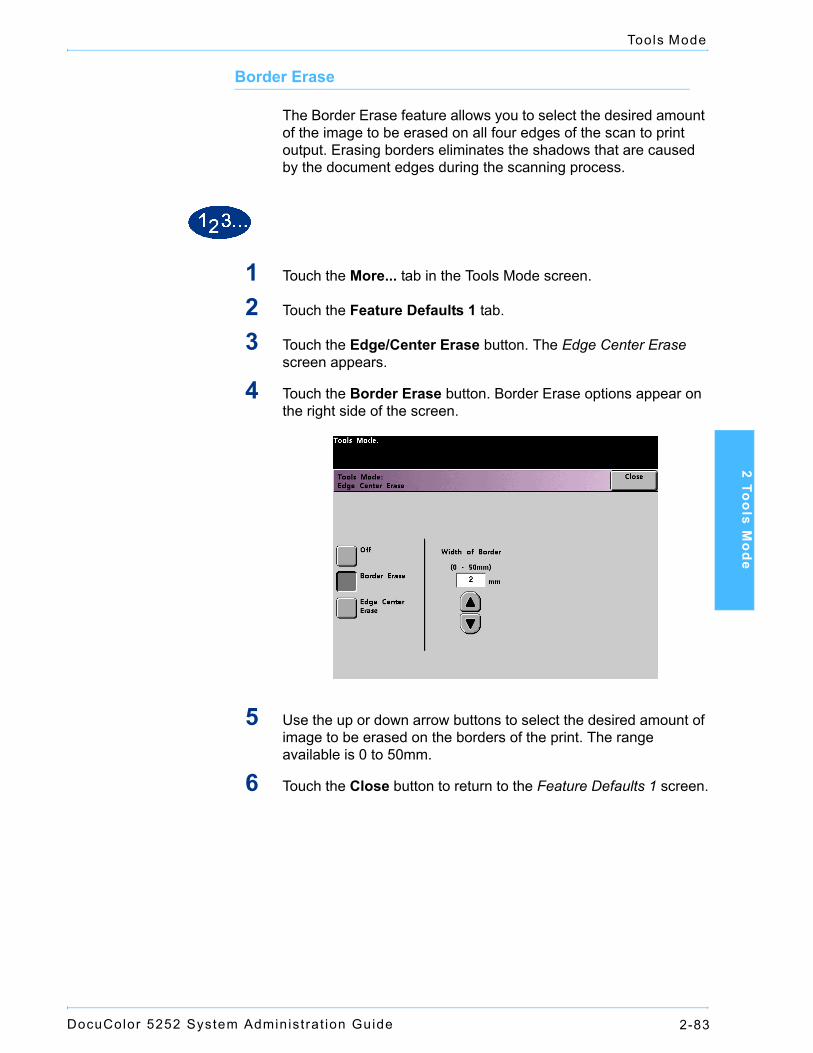
Border Erase
The Border Erase feature allows you to select the desired amount of the image to be erased on all four edges of the scan to print output. Erasing borders eliminates the shadows that are caused by the document edges during the scanning process.
1 Touch the More... tab in the Tools Mode screen.
2 Touch the Feature Defaults 1 tab.
3 Touch the Edge/Center Erase button. The Edge Center Erase screen appears.
4 Touch the Border Erase button. Border Erase options appear on the right side of the screen.
5 Use the up or down arrow buttons to select the desired amount of image to be erased on the borders of the print. The range available is 0 to 50mm.
6 Touch the Close button to return to the Feature Defaults 1 screen.
DocuColor 5252 System Administrat ion Guide2-84
Tools Mode
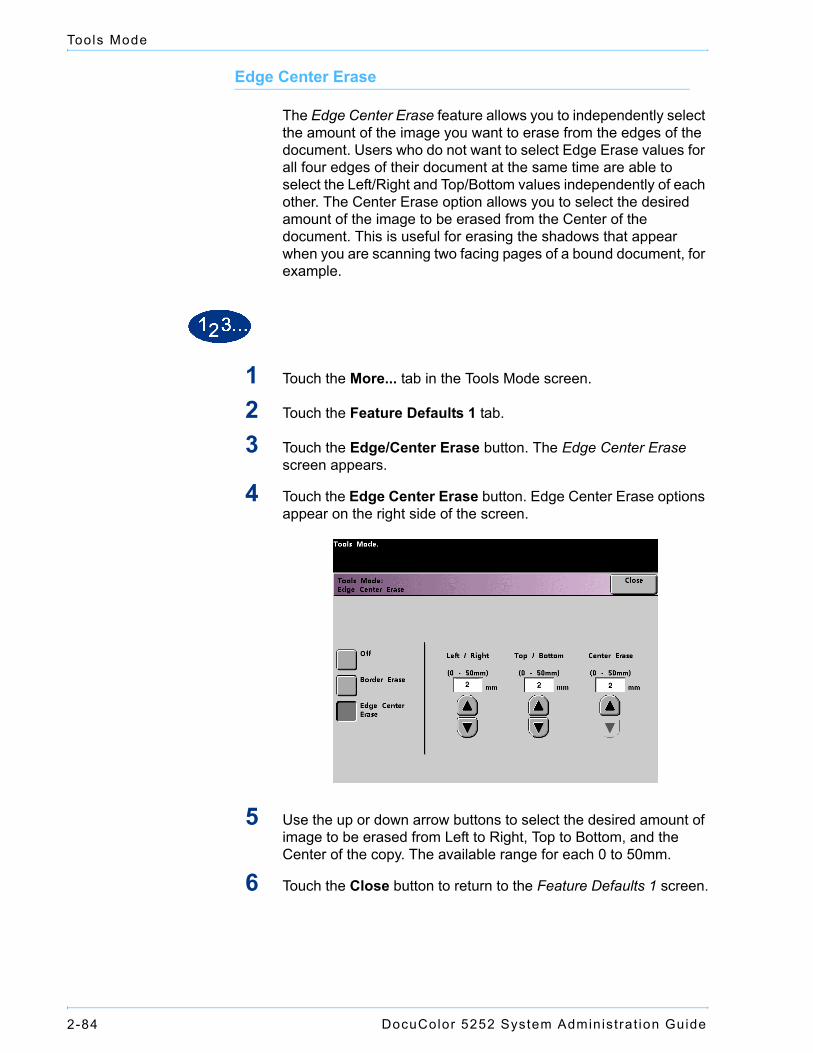
Edge Center Erase
The Edge Center Erase feature allows you to independently select the amount of the image you want to erase from the edges of the document. Users who do not want to select Edge Erase values for all four edges of their document at the same time are able to select the Left/Right and Top/Bottom values independently of each other. The Center Erase option allows you to select the desired amount of the image to be erased from the Center of the document. This is useful for erasing the shadows that appear when you are scanning two facing pages of a bound document, for example.
1 Touch the More... tab in the Tools Mode screen.
2 Touch the Feature Defaults 1 tab.
3 Touch the Edge/Center Erase button. The Edge Center Erase screen appears.
4 Touch the Edge Center Erase button. Edge Center Erase options appear on the right side of the screen.
5 Use the up or down arrow buttons to select the desired amount of image to be erased from Left to Right, Top to Bottom, and the Center of the copy. The available range for each 0 to 50mm.
6 Touch the Close button to return to the Feature Defaults 1 screen.
DocuColor 5252 System Administrat ion Guide 2-85
Tools Mode
2 Too
ls Mo
de
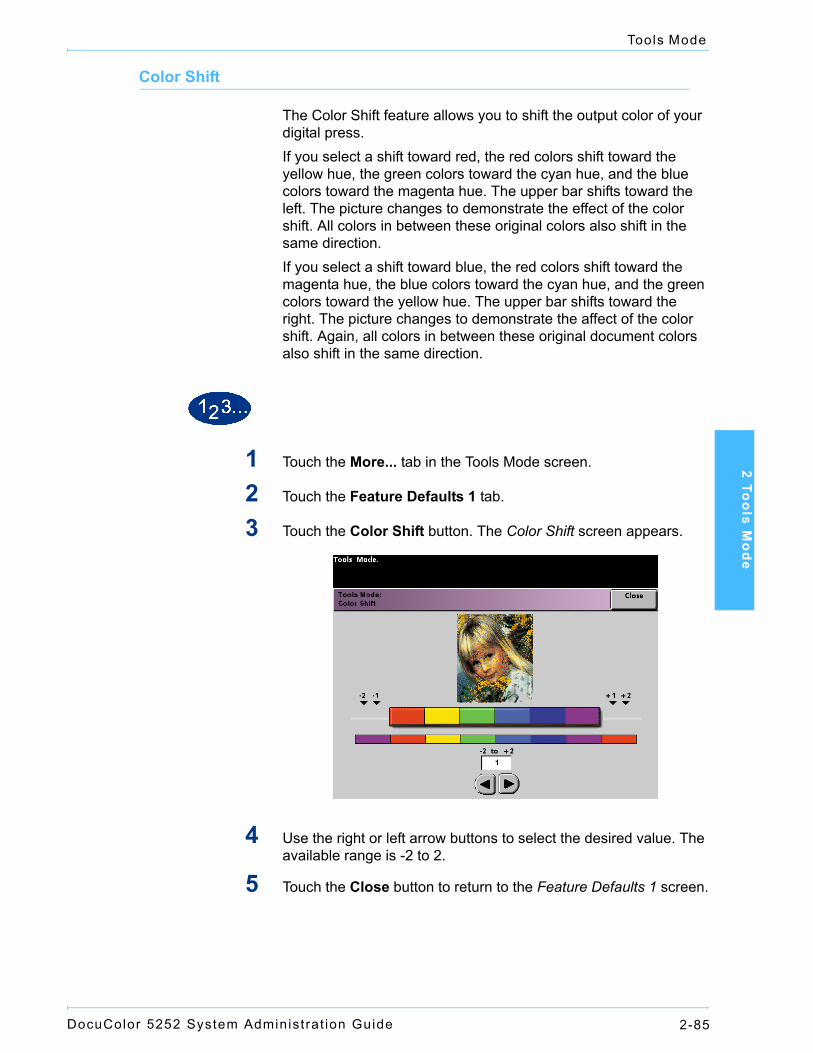
Color Shift
The Color Shift feature allows you to shift the output color of your digital press. If you select a shift toward red, the red colors shift toward the yellow hue, the green colors toward the cyan hue, and the blue colors toward the magenta hue. The upper bar shifts toward the left. The picture changes to demonstrate the effect of the color shift. All colors in between these original colors also shift in the same direction.If you select a shift toward blue, the red colors shift toward the magenta hue, the blue colors toward the cyan hue, and the green colors toward the yellow hue. The upper bar shifts toward the right. The picture changes to demonstrate the affect of the color shift. Again, all colors in between these original document colors also shift in the same direction.
1 Touch the More... tab in the Tools Mode screen.
2 Touch the Feature Defaults 1 tab.
3 Touch the Color Shift button. The Color Shift screen appears.
4 Use the right or left arrow buttons to select the desired value. The available range is -2 to 2.
5 Touch the Close button to return to the Feature Defaults 1 screen.
DocuColor 5252 System Administrat ion Guide2-86
Tools Mode
Output
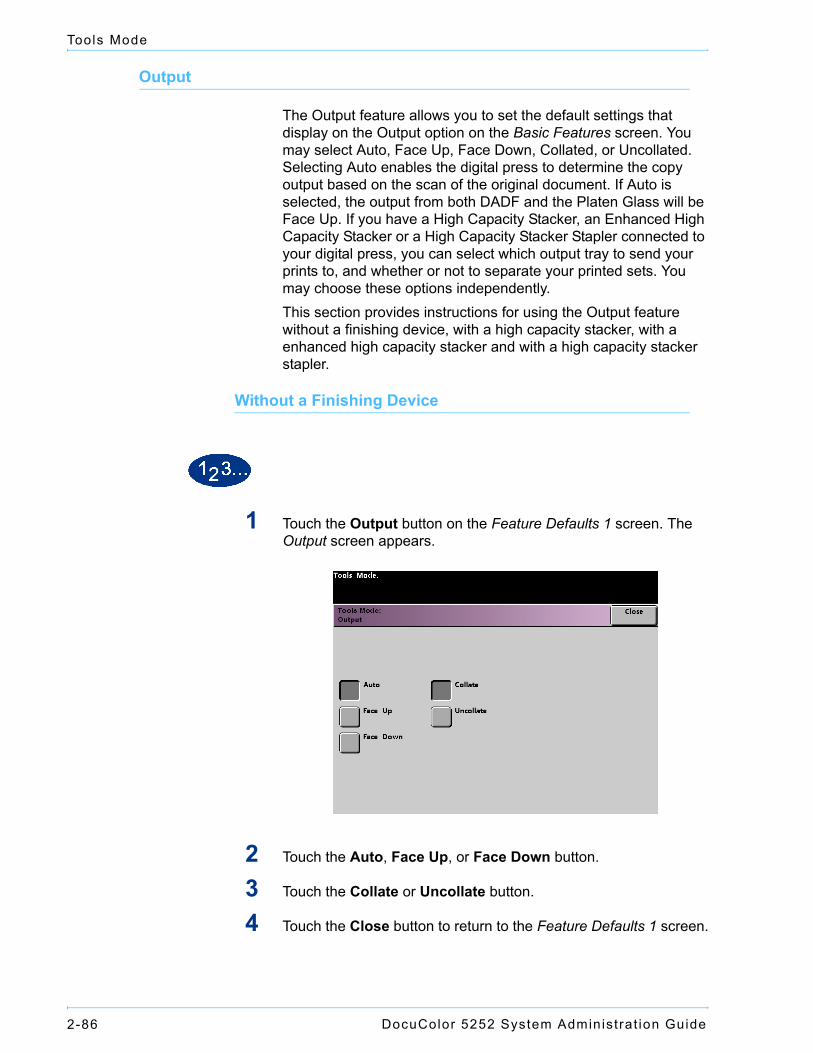
The Output feature allows you to set the default settings that display on the Output option on the Basic Features screen. You may select Auto, Face Up, Face Down, Collated, or Uncollated. Selecting Auto enables the digital press to determine the copy output based on the scan of the original document. If Auto is selected, the output from both DADF and the Platen Glass will be Face Up. If you have a High Capacity Stacker, an Enhanced High Capacity Stacker or a High Capacity Stacker Stapler connected to your digital press, you can select which output tray to send your prints to, and whether or not to separate your printed sets. You may choose these options independently.This section provides instructions for using the Output feature without a finishing device, with a high capacity stacker, with a enhanced high capacity stacker and with a high capacity stacker stapler.
Without a Finishing Device
1 Touch the Output button on the Feature Defaults 1 screen. The Output screen appears.
2 Touch the Auto, Face Up, or Face Down button.
3 Touch the Collate or Uncollate button.
4 Touch the Close button to return to the Feature Defaults 1 screen.
DocuColor 5252 System Administrat ion Guide 2-87
Tools Mode
2 Too
ls Mo
de
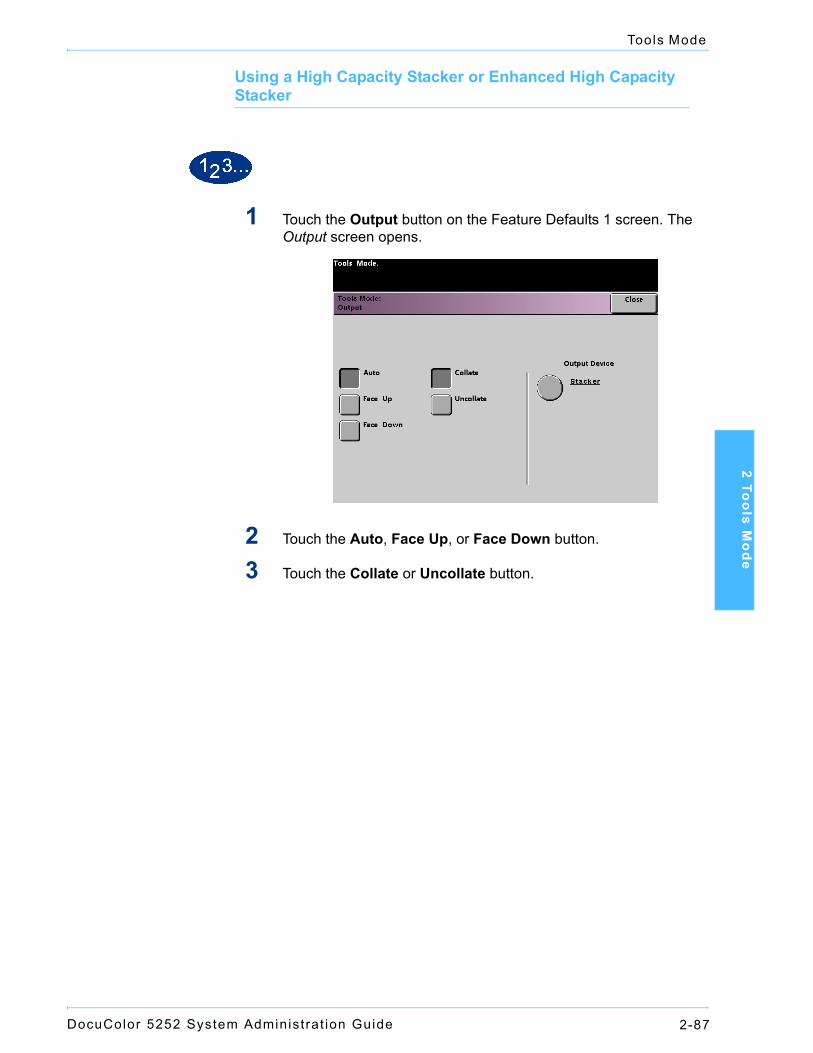
Using a High Capacity Stacker or Enhanced High Capacity Stacker
1 Touch the Output button on the Feature Defaults 1 screen. The Output screen opens.
2 Touch the Auto, Face Up, or Face Down button.
3 Touch the Collate or Uncollate button.

DocuColor 5252 System Administrat ion Guide2-88
Tools Mode
4 Touch the Stacker button. The Stacker screen appears.
5 To send output to the Stacker Tray, touch the Stacker Tray button on the popup screen. To send output to the Top Tray, touch the Top Tray button.
6 If you selected Stacker Tray, touch the Offset button to have the printer automatically separate your sets. Touch the No Offset button if you do not want your sets separated.
7 Touch the Close button to return to the Feature Defaults 1 screen.
DocuColor 5252 System Administrat ion Guide 2-89
Tools Mode
2 Too
ls Mo
de
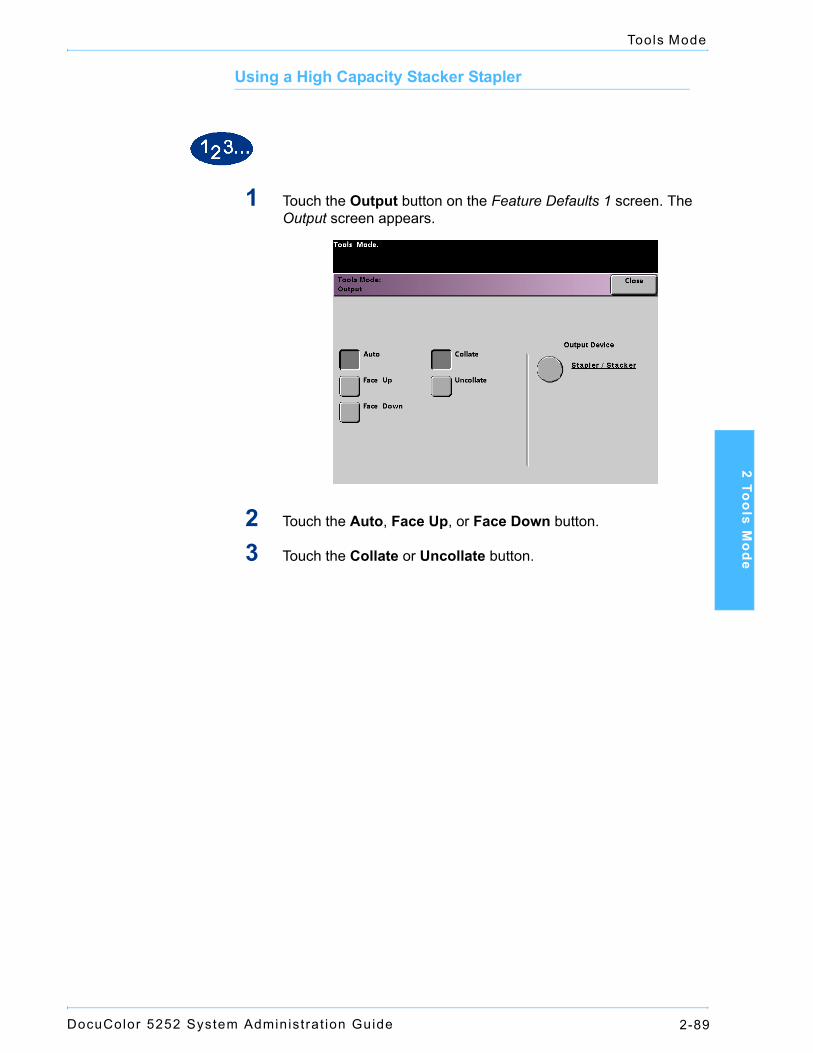
Using a High Capacity Stacker Stapler
1 Touch the Output button on the Feature Defaults 1 screen. The Output screen appears.
2 Touch the Auto, Face Up, or Face Down button.
3 Touch the Collate or Uncollate button.

DocuColor 5252 System Administrat ion Guide2-90
Tools Mode
4 Touch the Stapler/Stacker button. The Stapler/Stacker screen opens.
5 To send output to the Main Tray, touch the Main Tray button on the popup screen. To send output to the Top Tray, touch the Top Tray button.
6 If you selected Main Tray, touch the Offset button to have the printer automatically separate your sets. Touch the No Offset button if you do not want your sets separated.
7 Touch the Close button to return to the Feature Defaults 1 screen.
DocuColor 5252 System Administrat ion Guide 2-91
Tools Mode
2 Too
ls Mo
de
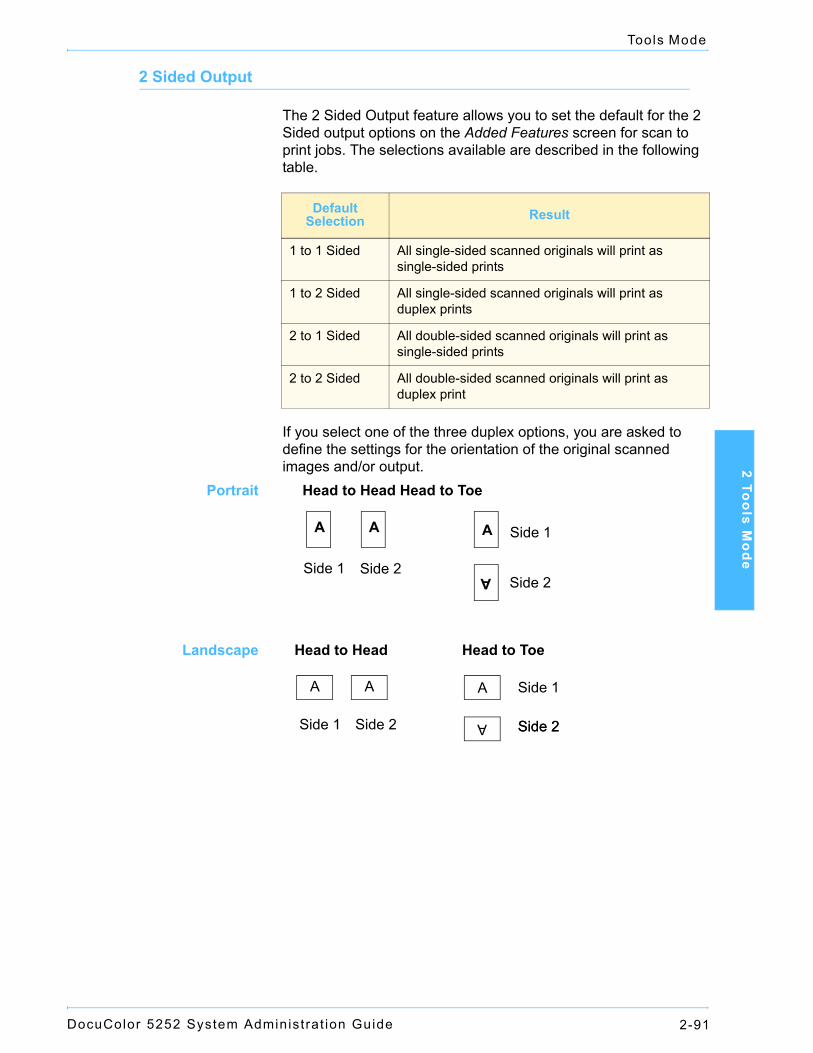
2 Sided Output
The 2 Sided Output feature allows you to set the default for the 2 Sided output options on the Added Features screen for scan to print jobs. The selections available are described in the following table.
If you select one of the three duplex options, you are asked to define the settings for the orientation of the original scanned images and/or output.
Portrait Head to Head Head to Toe
Landscape Head to Head Head to Toe
Default Selection Result
1 to 1 Sided All single-sided scanned originals will print as single-sided prints
1 to 2 Sided All single-sided scanned originals will print as duplex prints
2 to 1 Sided All double-sided scanned originals will print as single-sided prints
2 to 2 Sided All double-sided scanned originals will print as duplex print
Side 1 Side 2
A
A
A A Side 1
Side 2
A A A
A
Side 1
Side 2Side 1 Side 2 Side 2
DocuColor 5252 System Administrat ion Guide2-92
Tools Mode
1 Touch the 2-sided output button on the Feature Defaults 1 screen. The 2 Sided Output screen appears.
2 Touch the 1 to 1, 1 to 2, 2 to 2, or 2 to 1 button. The following screens show the 2 Sided Output screen with 2 to 2 Sided selected and with 2-1 Sided selected.
DocuColor 5252 System Administrat ion Guide 2-93
Tools Mode
2 Too
ls Mo
de
3 If you select one of the 2 sided options, select either Head to Head orientation or Head to Toe orientation, as described in the following table.
4 Touch the Close button to return the Feature Defaults 1 screen.
If you choose... Then select...
1 to 2 output Either the Head to Head button or the Head to Toe button to select the orientation of the images on the copies.
2 to 2 output Either the Head to Head button or the Head to Toe button to select the orientation of the images on the originals. Follow the same procedure to select the orientation of the images on the copies.
2 to 1 output Either the Head to Head button or the Head to Toe button to select the orientation of the images on the originals. Follow the same procedure to select the orientation of the images on the copies.
DocuColor 5252 System Administrat ion Guide2-94
Tools Mode
Original Type
The Original Type option allows you to set the original type default on the Image Quality screen. Set the default for the majority of the original documents that you will be scanning or printing. Based on the selection, the digital press automatically makes fine adjustments to optimize the sharpness based on the type of original selected. Original types are described in the following tables.
Default Type When to Select
Auto Photo & Text Select this setting when most original documents consist of both text and graphics. This setting allows you to select a default of Photo, Halftone, or Xerographic Copy (all with text) as the original type used in scan to print jobs.
Text Select this setting when most original documents consist of words with few detailed graphics. This setting allows you to select a default of regular Text or Light Text as the original type used in scan to print jobs.
Photo Select this setting when most original documents contain halftones or photographs. This setting allows you to select a default of Photo, Halftone, or Xerographic Copy (with no text) as the original type used in scan to print jobs.
Map Select this setting when most original documents contain intricate drawings that require a number of details to be copied with utmost precision. This setting allows you to select Map as the default original type used in scan to print jobs.
DocuColor 5252 System Administrat ion Guide 2-95
Tools Mode
2 Too
ls Mo
de
Key point: If you select either Auto Photo & Text or Photo, you should also select the detail for that original type. The details that can be selected for each of these original types described in the following table.
Detail When to Select
Photograph Select this option when most original documents will be photographs or extremely fine halftones.
Halftone Select this option when most original documents will be images that are created using a fine screen that varies the darkness and density of dots that make up the image. Examples of halftone images can be found in magazines and newspapers.
Xerographic Copy
Select this option when most jobs will use a reproduction (copy) as the original document.
DocuColor 5252 System Administrat ion Guide2-96
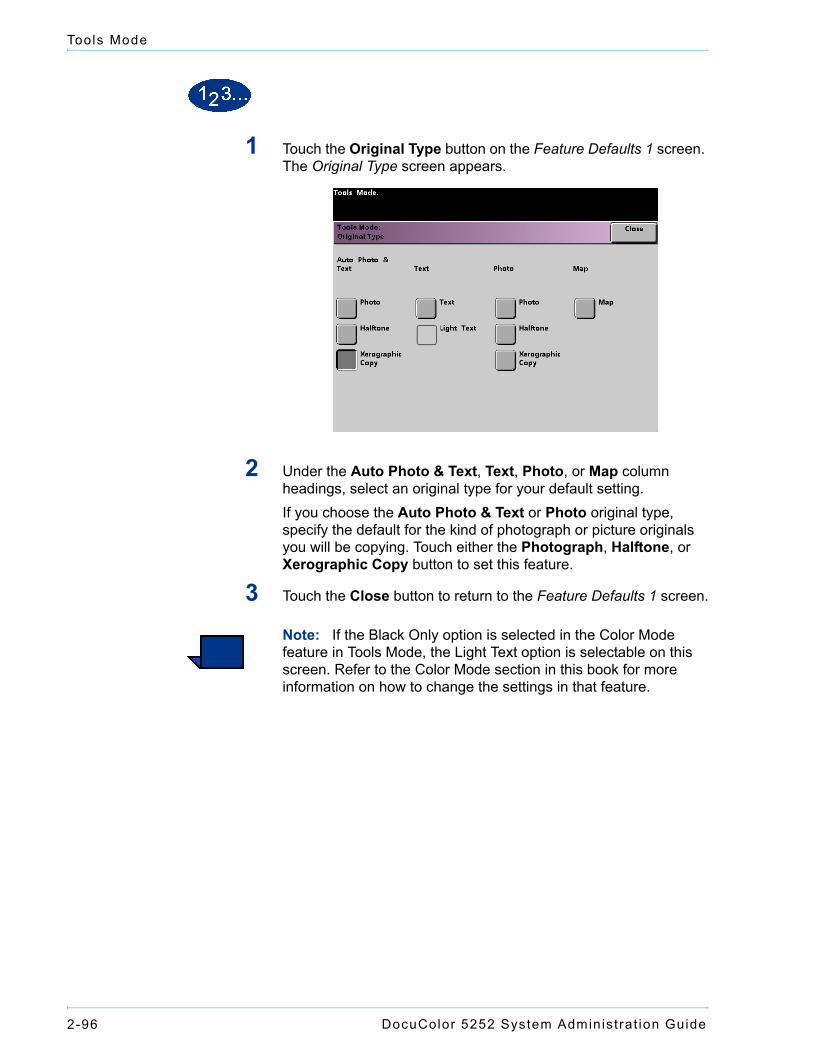
Tools Mode
1 Touch the Original Type button on the Feature Defaults 1 screen. The Original Type screen appears.
2 Under the Auto Photo & Text, Text, Photo, or Map column headings, select an original type for your default setting.If you choose the Auto Photo & Text or Photo original type, specify the default for the kind of photograph or picture originals you will be copying. Touch either the Photograph, Halftone, or Xerographic Copy button to set this feature.
3 Touch the Close button to return to the Feature Defaults 1 screen.
Note: If the Black Only option is selected in the Color Mode feature in Tools Mode, the Light Text option is selectable on this screen. Refer to the Color Mode section in this book for more information on how to change the settings in that feature.
DocuColor 5252 System Administrat ion Guide 2-97
Tools Mode
2 Too
ls Mo
de
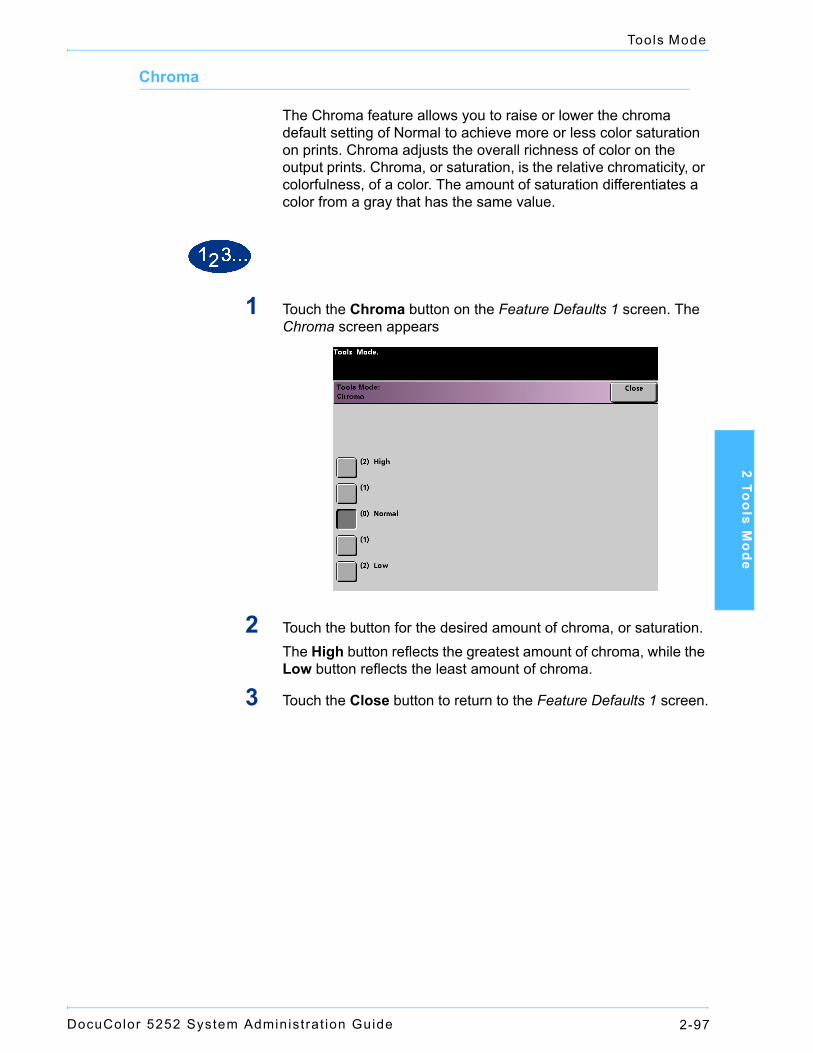
Chroma
The Chroma feature allows you to raise or lower the chroma default setting of Normal to achieve more or less color saturation on prints. Chroma adjusts the overall richness of color on the output prints. Chroma, or saturation, is the relative chromaticity, or colorfulness, of a color. The amount of saturation differentiates a color from a gray that has the same value.
1 Touch the Chroma button on the Feature Defaults 1 screen. The Chroma screen appears
2 Touch the button for the desired amount of chroma, or saturation.The High button reflects the greatest amount of chroma, while the Low button reflects the least amount of chroma.
3 Touch the Close button to return to the Feature Defaults 1 screen.

DocuColor 5252 System Administrat ion Guide2-98
Tools Mode
Reduce/Enlarge
The Reduce/Enlarge option sets the percentage value at 100%, Auto, or Preset/Variable for the default reduction or enlargement option that displays on the Basic Features screen.
100% or Auto
If you select 100%, the digital press duplicates the output print at the same size as the original document. If you select Auto, the digital press determines the reduction or enlargement percentage to use based on the size of the original document and the selected paper tray.
1 Touch the Reduce/Enlarge button on the Feature Defaults 1 screen.
2 Touch either the Auto button or the 100% button.
3 Touch the Close button to return to the Feature Defaults 1 screen.

DocuColor 5252 System Administrat ion Guide 2-99
Tools Mode
2 Too
ls Mo
de
Preset/Variable
If you select Preset/Variable, the digital press reduces or enlarges the original document at the selected value. The default percentages that you set will appear on the Preset/Variable screen, which can be accessed through the Basic Features, Reduce/Enlarge, More... screen. To change the default Preset/Variable percent settings on this screen, access the Machine Defaults 2, Reduce/Enlarge Presets screen in Tools Mode.
1 Touch the Reduce/Enlarge button on the Feature Defaults 1 screen. The Reduce / Enlarge screen appears.
2 Touch the Preset / Variable button. The settings for the Preset/Variable feature appear on the right side of the screen. (See the above figure.)
3 Touch the button for the desired preset/variable percentage.
4 Touch the Close button to return to the Feature Defaults 1 screen.
DocuColor 5252 System Administrat ion Guide2-100
Tools Mode
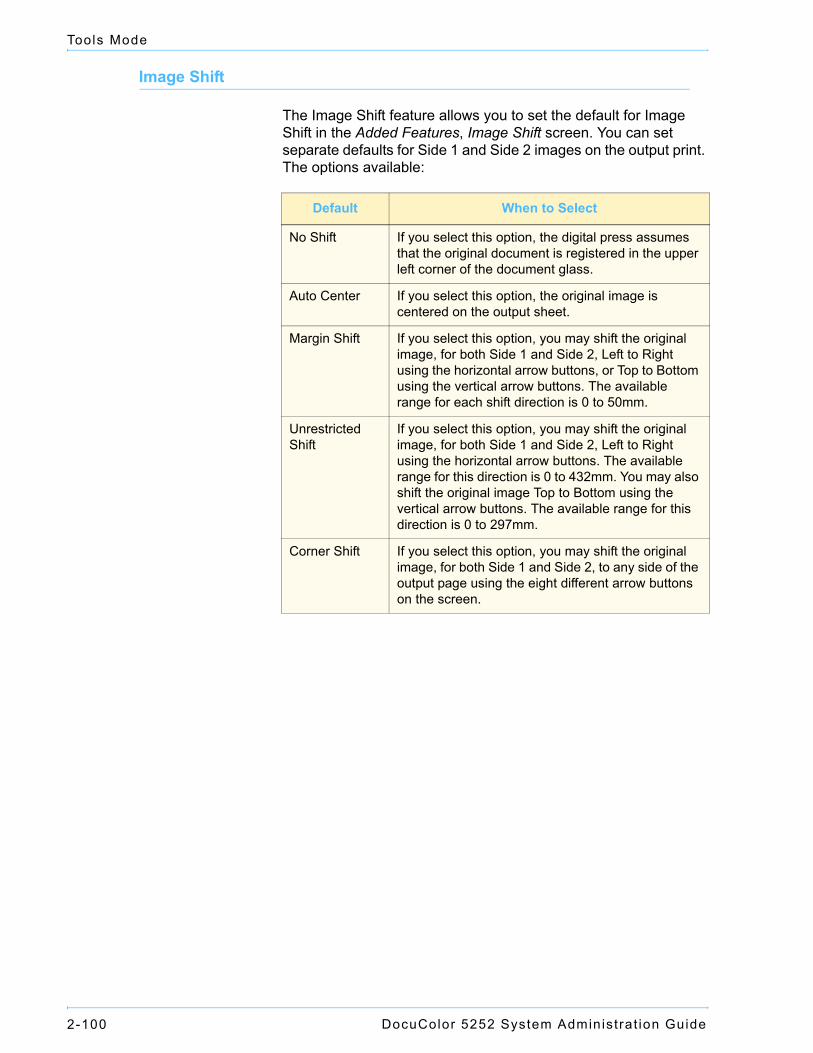
Image Shift
The Image Shift feature allows you to set the default for Image Shift in the Added Features, Image Shift screen. You can set separate defaults for Side 1 and Side 2 images on the output print. The options available:
Default When to Select
No Shift If you select this option, the digital press assumes that the original document is registered in the upper left corner of the document glass.
Auto Center If you select this option, the original image is centered on the output sheet.
Margin Shift If you select this option, you may shift the original image, for both Side 1 and Side 2, Left to Right using the horizontal arrow buttons, or Top to Bottom using the vertical arrow buttons. The available range for each shift direction is 0 to 50mm.
Unrestricted Shift
If you select this option, you may shift the original image, for both Side 1 and Side 2, Left to Right using the horizontal arrow buttons. The available range for this direction is 0 to 432mm. You may also shift the original image Top to Bottom using the vertical arrow buttons. The available range for this direction is 0 to 297mm.
Corner Shift If you select this option, you may shift the original image, for both Side 1 and Side 2, to any side of the output page using the eight different arrow buttons on the screen.
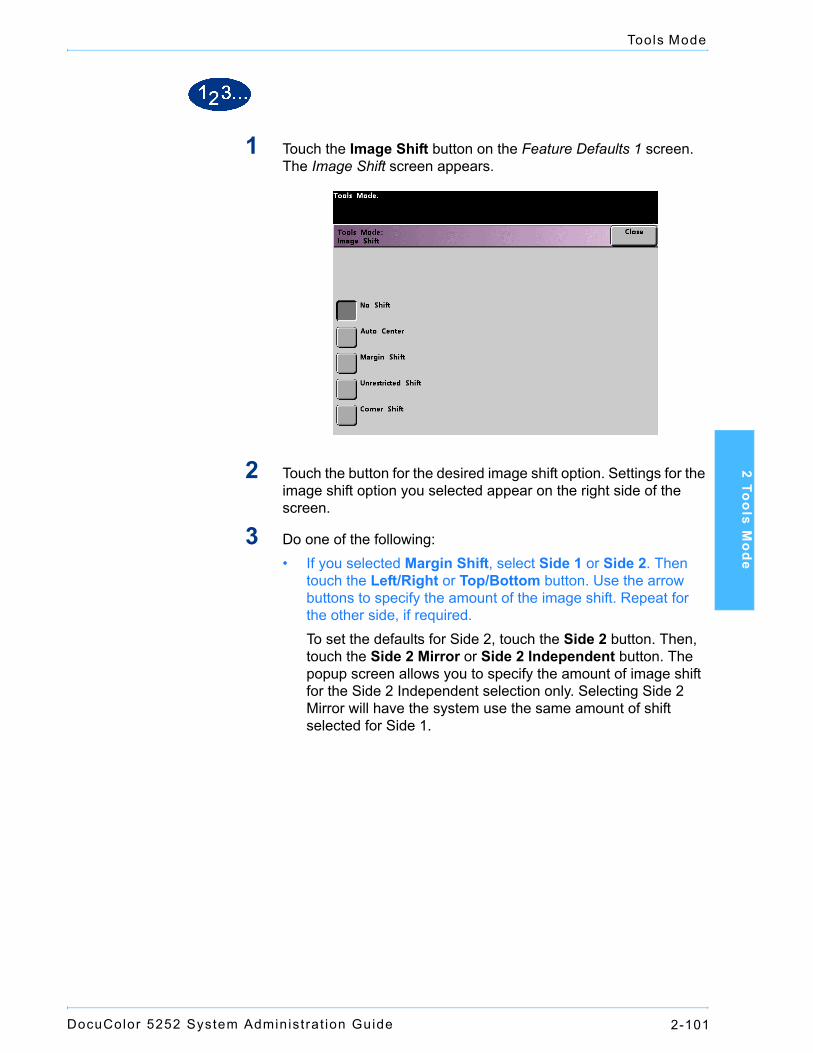
DocuColor 5252 System Administrat ion Guide 2-101
Tools Mode
2 Too
ls Mo
de
1 Touch the Image Shift button on the Feature Defaults 1 screen. The Image Shift screen appears.
2 Touch the button for the desired image shift option. Settings for the image shift option you selected appear on the right side of the screen.
3 Do one of the following:• If you selected Margin Shift, select Side 1 or Side 2. Then
touch the Left/Right or Top/Bottom button. Use the arrow buttons to specify the amount of the image shift. Repeat for the other side, if required.To set the defaults for Side 2, touch the Side 2 button. Then, touch the Side 2 Mirror or Side 2 Independent button. The popup screen allows you to specify the amount of image shift for the Side 2 Independent selection only. Selecting Side 2 Mirror will have the system use the same amount of shift selected for Side 1.
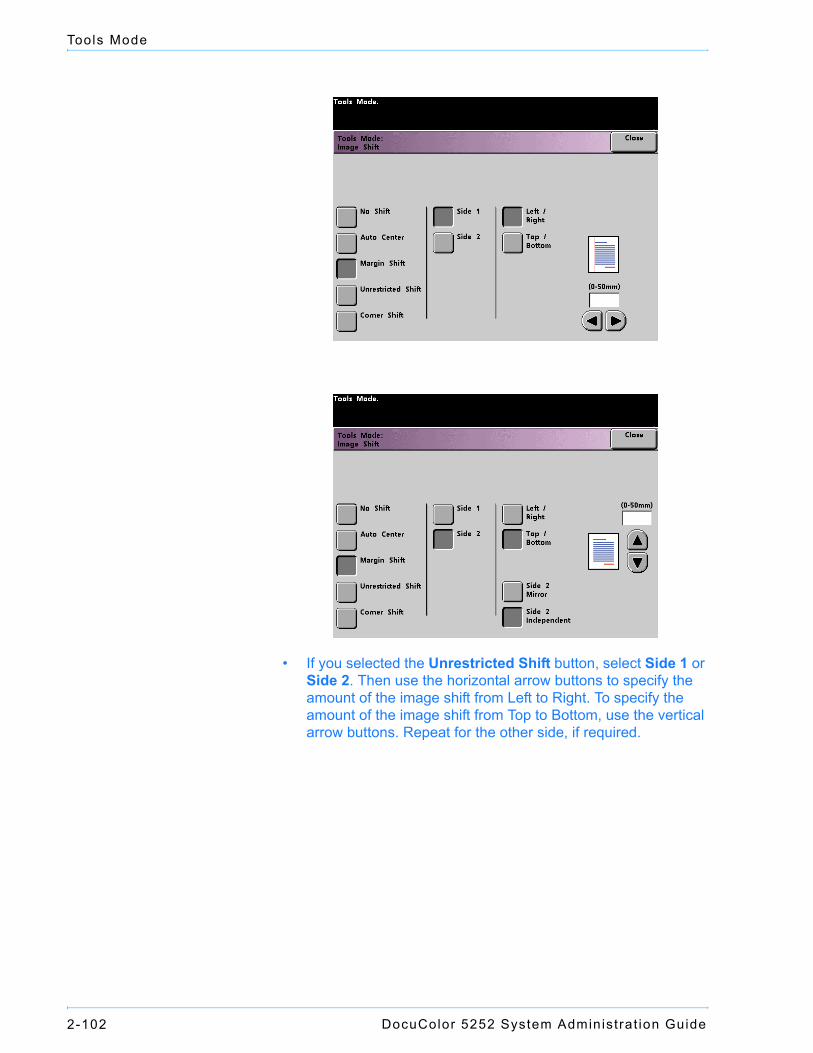
DocuColor 5252 System Administrat ion Guide2-102
Tools Mode
• If you selected the Unrestricted Shift button, select Side 1 or Side 2. Then use the horizontal arrow buttons to specify the amount of the image shift from Left to Right. To specify the amount of the image shift from Top to Bottom, use the vertical arrow buttons. Repeat for the other side, if required.
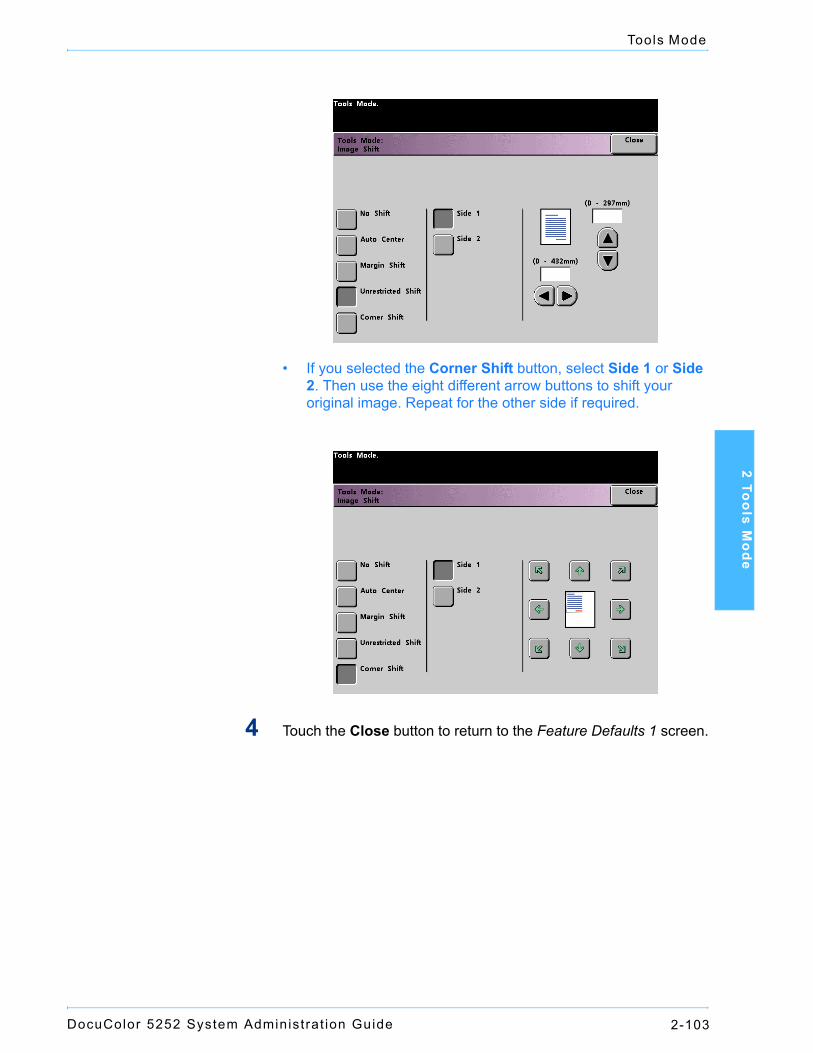
DocuColor 5252 System Administrat ion Guide 2-103
Tools Mode
2 Too
ls Mo
de
• If you selected the Corner Shift button, select Side 1 or Side 2. Then use the eight different arrow buttons to shift your original image. Repeat for the other side if required.
4 Touch the Close button to return to the Feature Defaults 1 screen.
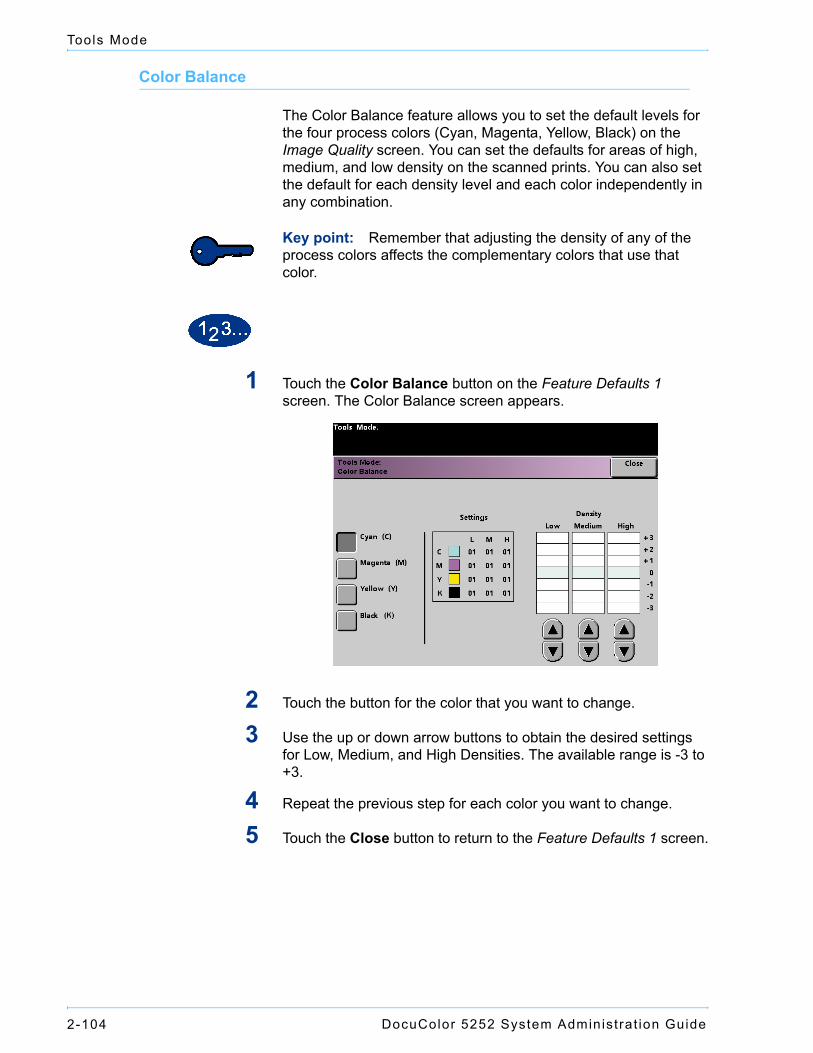
DocuColor 5252 System Administrat ion Guide2-104
Tools Mode
Color Balance
The Color Balance feature allows you to set the default levels for the four process colors (Cyan, Magenta, Yellow, Black) on the Image Quality screen. You can set the defaults for areas of high, medium, and low density on the scanned prints. You can also set the default for each density level and each color independently in any combination.
Key point: Remember that adjusting the density of any of the process colors affects the complementary colors that use that color.
1 Touch the Color Balance button on the Feature Defaults 1 screen. The Color Balance screen appears.
2 Touch the button for the color that you want to change.
3 Use the up or down arrow buttons to obtain the desired settings for Low, Medium, and High Densities. The available range is -3 to +3.
4 Repeat the previous step for each color you want to change.
5 Touch the Close button to return to the Feature Defaults 1 screen.
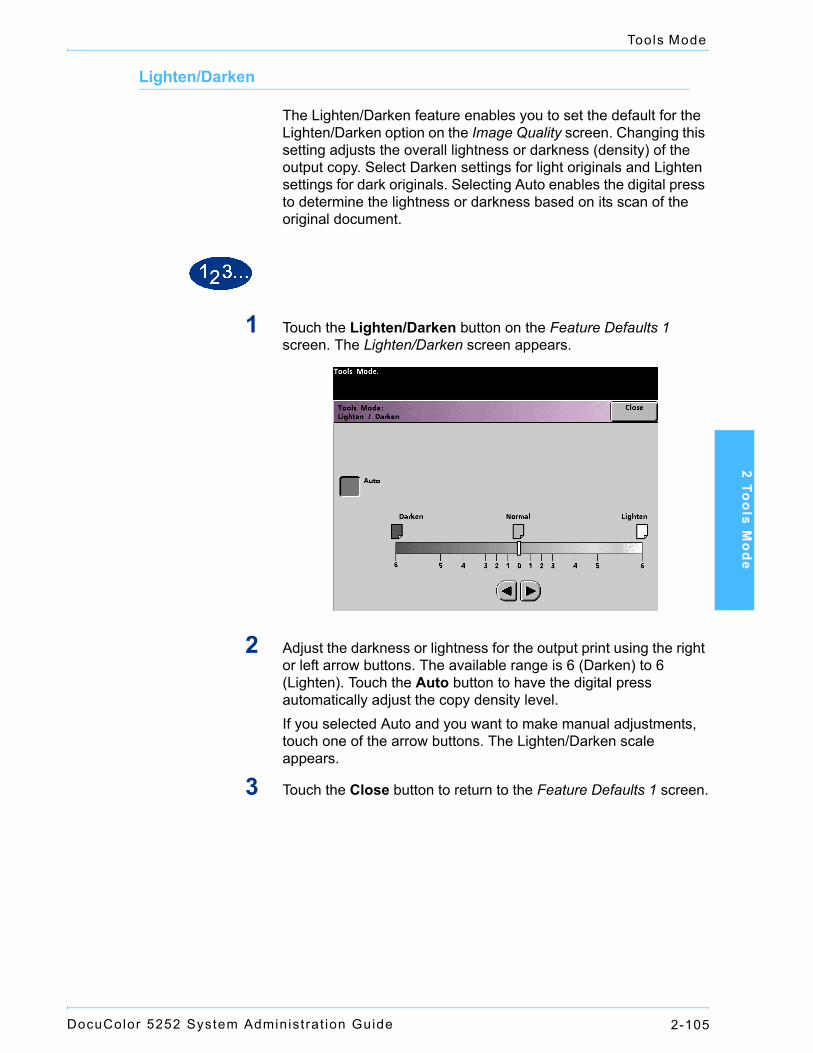
DocuColor 5252 System Administrat ion Guide 2-105
Tools Mode
2 Too
ls Mo
de
Lighten/Darken
The Lighten/Darken feature enables you to set the default for the Lighten/Darken option on the Image Quality screen. Changing this setting adjusts the overall lightness or darkness (density) of the output copy. Select Darken settings for light originals and Lighten settings for dark originals. Selecting Auto enables the digital press to determine the lightness or darkness based on its scan of the original document.
1 Touch the Lighten/Darken button on the Feature Defaults 1 screen. The Lighten/Darken screen appears.
2 Adjust the darkness or lightness for the output print using the right or left arrow buttons. The available range is 6 (Darken) to 6 (Lighten). Touch the Auto button to have the digital press automatically adjust the copy density level.If you selected Auto and you want to make manual adjustments, touch one of the arrow buttons. The Lighten/Darken scale appears.
3 Touch the Close button to return to the Feature Defaults 1 screen.
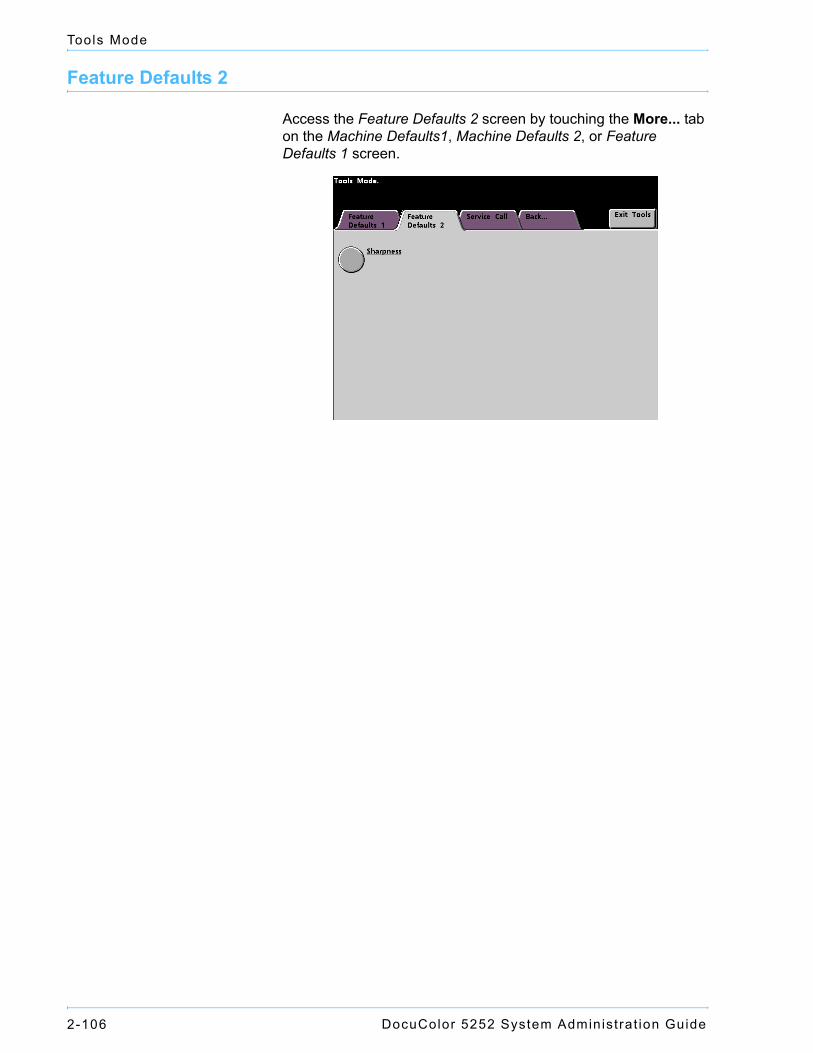
DocuColor 5252 System Administrat ion Guide2-106
Tools Mode
Feature Defaults 2
Access the Feature Defaults 2 screen by touching the More... tab on the Machine Defaults1, Machine Defaults 2, or Feature Defaults 1 screen.
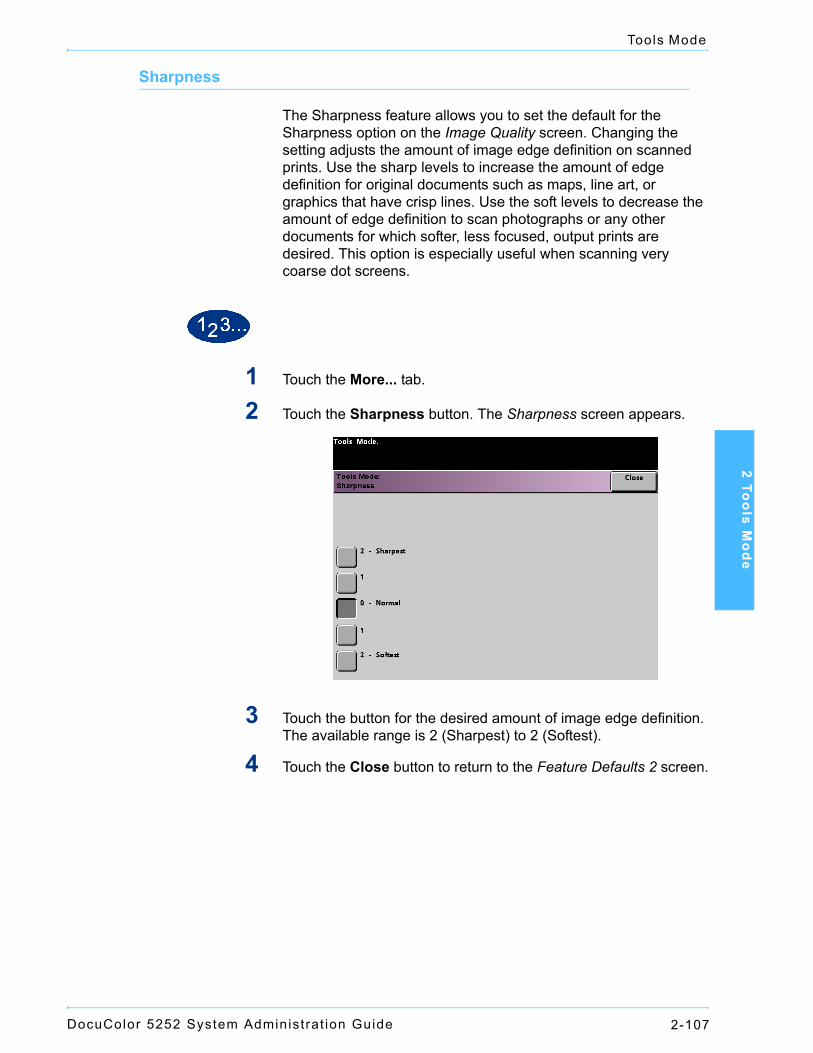
DocuColor 5252 System Administrat ion Guide 2-107
Tools Mode
2 Too
ls Mo
de
Sharpness
The Sharpness feature allows you to set the default for the Sharpness option on the Image Quality screen. Changing the setting adjusts the amount of image edge definition on scanned prints. Use the sharp levels to increase the amount of edge definition for original documents such as maps, line art, or graphics that have crisp lines. Use the soft levels to decrease the amount of edge definition to scan photographs or any other documents for which softer, less focused, output prints are desired. This option is especially useful when scanning very coarse dot screens.
1 Touch the More... tab.
2 Touch the Sharpness button. The Sharpness screen appears.
3 Touch the button for the desired amount of image edge definition. The available range is 2 (Sharpest) to 2 (Softest).
4 Touch the Close button to return to the Feature Defaults 2 screen.
DocuColor 5252 System Administrat ion Guide2-108
Tools Mode