Embed Size (px)
Citation preview
Xbox One Elite Controller (Model 1698) TriggerAssembly Replacement
A guide to help you replace the triggers and trigger rumble motors on the Xbox One Elite WirelessController.
Written By: Cara Steinke
Xbox One Elite Controller (Model 1698) Trigger Assembly Replacement Draft: 2018-01-18Guide ID: 98221 -
© iFixit — CC BY-NC-SA www.iFixit.com Page 1 of 15
INTRODUCTION
If your triggers don't vibrate, your trigger rumble motors might be defective. Here are instructions tohelp you replace your trigger assembly, including the triggers and the trigger rumble motors. Use theSoldering Iron Guide to detach and reattach the wires of the rumble motors to the motherboard.
TOOLS:iFixit Opening Tools (1)T9 Torx Screwdriver (1)Soldering Tweezers (1)Soldering Iron (1)Desoldering Braid (1)T6 Torx Screwdriver (1)Solder (1)
PARTS:Xbox One Elite Controller (1698) Triggers
(1)Xbox One Elite Controller (1698) Trigger
Rumble Motors (1)
Xbox One Elite Controller (Model 1698) Trigger Assembly Replacement Draft: 2018-01-18Guide ID: 98221 -
© iFixit — CC BY-NC-SA www.iFixit.com Page 2 of 15
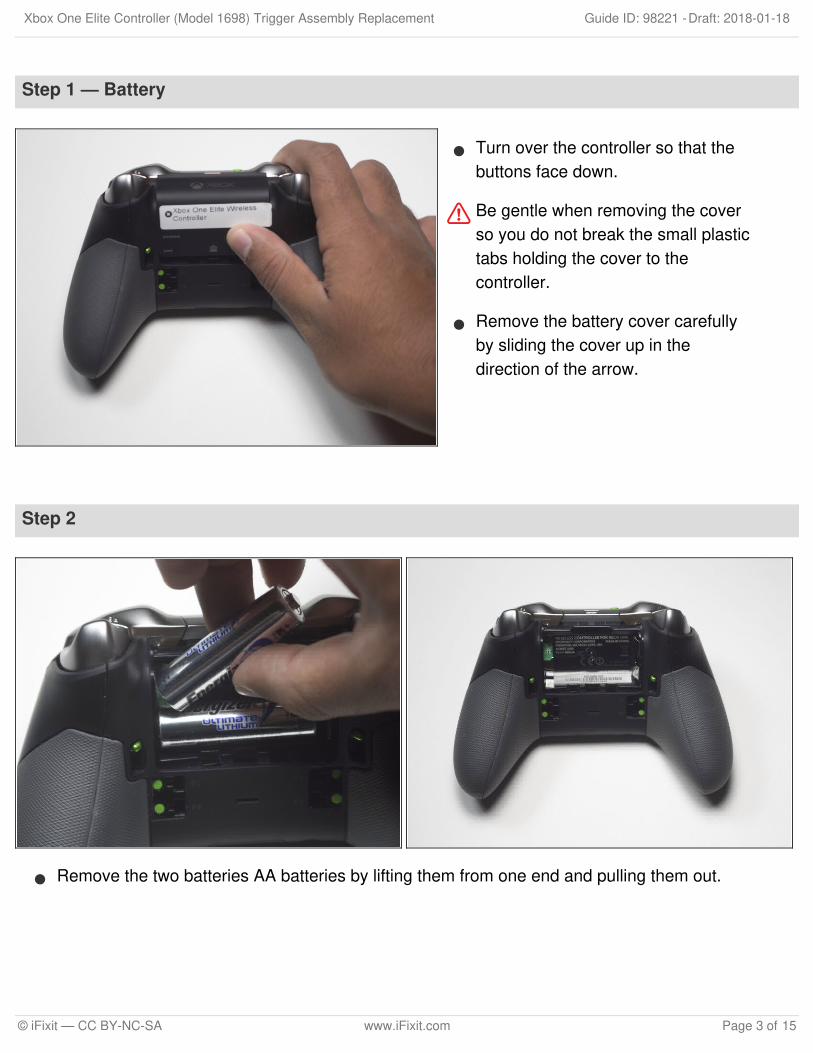
Step 1 — Battery
Turn over the controller so that thebuttons face down.
Be gentle when removing the coverso you do not break the small plastictabs holding the cover to thecontroller.
Remove the battery cover carefullyby sliding the cover up in thedirection of the arrow.
Step 2
Remove the two batteries AA batteries by lifting them from one end and pulling them out.
Xbox One Elite Controller (Model 1698) Trigger Assembly Replacement Draft: 2018-01-18Guide ID: 98221 -
© iFixit — CC BY-NC-SA www.iFixit.com Page 3 of 15

Step 3 — Rumble Motors
Be careful not to break the plastic tabs, that hold each grip cover to the back of the controller.
Remove each grip by inserting the plastic opening tool near the top of the controller.
Guide the plastic opening tool along the entire seam and gently separate the grip from thecontroller in a prying motion as you go.
Xbox One Elite Controller (Model 1698) Trigger Assembly Replacement Draft: 2018-01-18Guide ID: 98221 -
© iFixit — CC BY-NC-SA www.iFixit.com Page 4 of 15

Step 4
Remove the five 2.3 mm screws with the T8 Torx screwdriver.
Four of the screws are located at the bottom tip of each grip and at the top of each grip, near thetriggers of the controller.
The last screw is located in the center of the battery tray beneath a sticker.
Use a T8 Torx Screwdriver to puncture the sticker and remove the final screw.
Xbox One Elite Controller (Model 1698) Trigger Assembly Replacement Draft: 2018-01-18Guide ID: 98221 -
© iFixit — CC BY-NC-SA www.iFixit.com Page 5 of 15
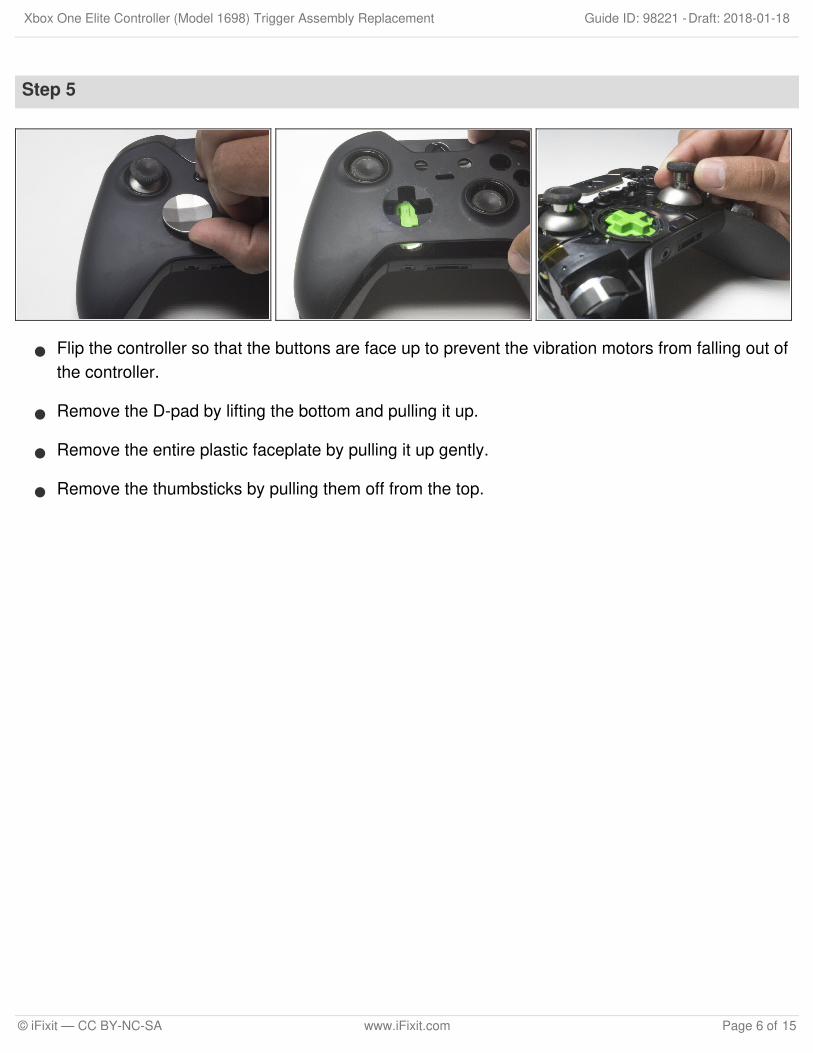
Step 5
Flip the controller so that the buttons are face up to prevent the vibration motors from falling out ofthe controller.
Remove the D-pad by lifting the bottom and pulling it up.
Remove the entire plastic faceplate by pulling it up gently.
Remove the thumbsticks by pulling them off from the top.
Xbox One Elite Controller (Model 1698) Trigger Assembly Replacement Draft: 2018-01-18Guide ID: 98221 -
© iFixit — CC BY-NC-SA www.iFixit.com Page 6 of 15
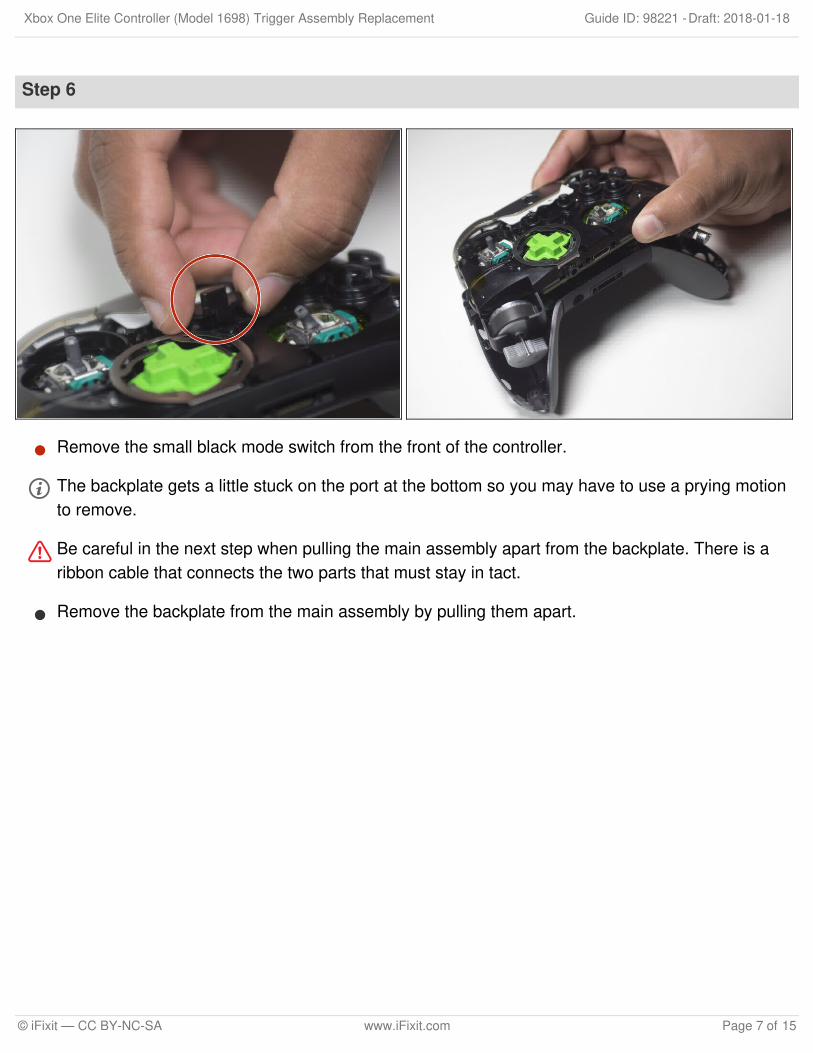
Step 6
Remove the small black mode switch from the front of the controller.
The backplate gets a little stuck on the port at the bottom so you may have to use a prying motionto remove.
Be careful in the next step when pulling the main assembly apart from the backplate. There is aribbon cable that connects the two parts that must stay in tact.
Remove the backplate from the main assembly by pulling them apart.
Xbox One Elite Controller (Model 1698) Trigger Assembly Replacement Draft: 2018-01-18Guide ID: 98221 -
© iFixit — CC BY-NC-SA www.iFixit.com Page 7 of 15
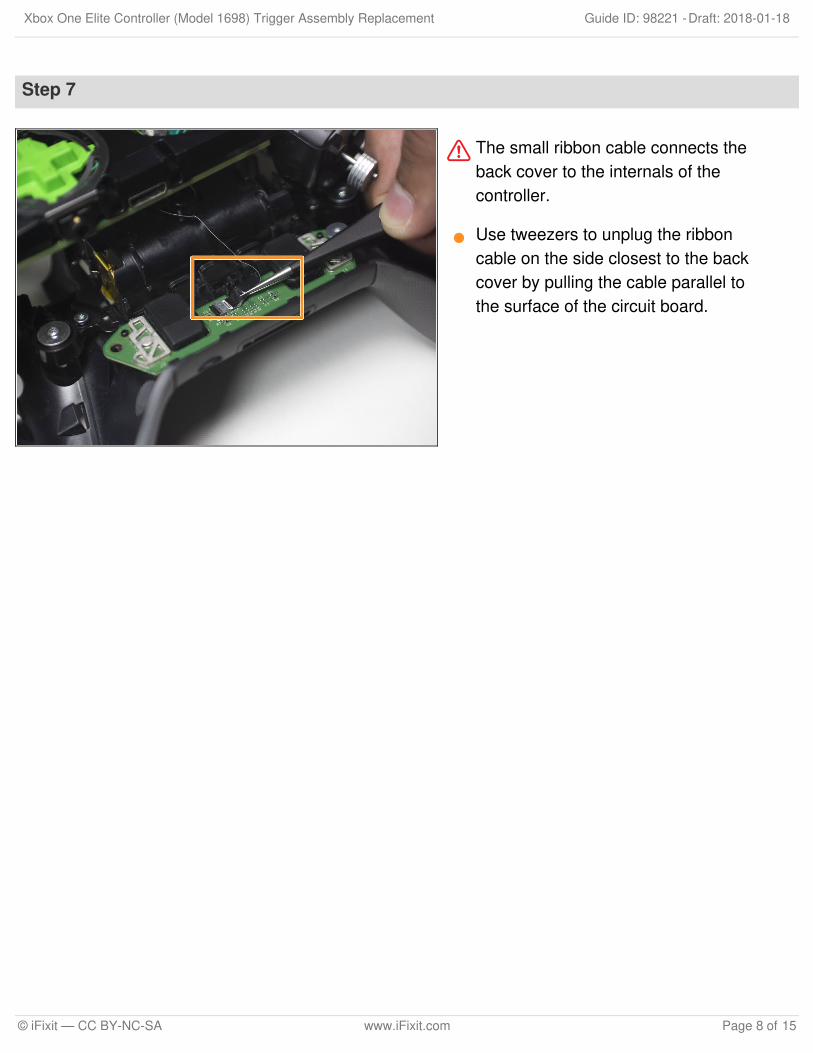
Step 7
The small ribbon cable connects theback cover to the internals of thecontroller.
Use tweezers to unplug the ribboncable on the side closest to the backcover by pulling the cable parallel tothe surface of the circuit board.
Xbox One Elite Controller (Model 1698) Trigger Assembly Replacement Draft: 2018-01-18Guide ID: 98221 -
© iFixit — CC BY-NC-SA www.iFixit.com Page 8 of 15

Step 8
Mark each motor according to where it attaches. The rumble motors are different so they will notwork if you switch them.
Take note of where the red and black motor wires attach because they should be reattached in thesame order.
Turn over the controller so that the thumbsticks are facing down.
Use tweezers and a soldering iron (Soldering Iron Guide) to remove the black and red wires fromthe motherboard.
This will release the rumble motor from the controller assembly.
Xbox One Elite Controller (Model 1698) Trigger Assembly Replacement Draft: 2018-01-18Guide ID: 98221 -
© iFixit — CC BY-NC-SA www.iFixit.com Page 9 of 15
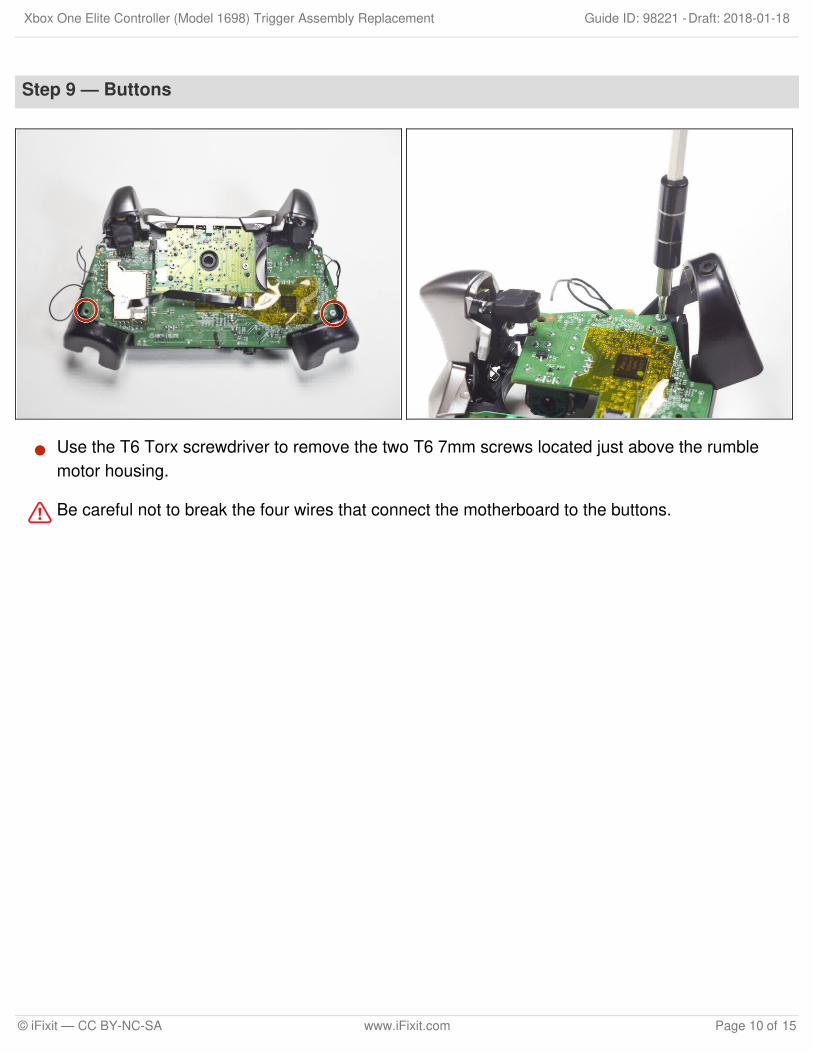
Step 9 — Buttons
Use the T6 Torx screwdriver to remove the two T6 7mm screws located just above the rumblemotor housing.
Be careful not to break the four wires that connect the motherboard to the buttons.
Xbox One Elite Controller (Model 1698) Trigger Assembly Replacement Draft: 2018-01-18Guide ID: 98221 -
© iFixit — CC BY-NC-SA www.iFixit.com Page 10 of 15
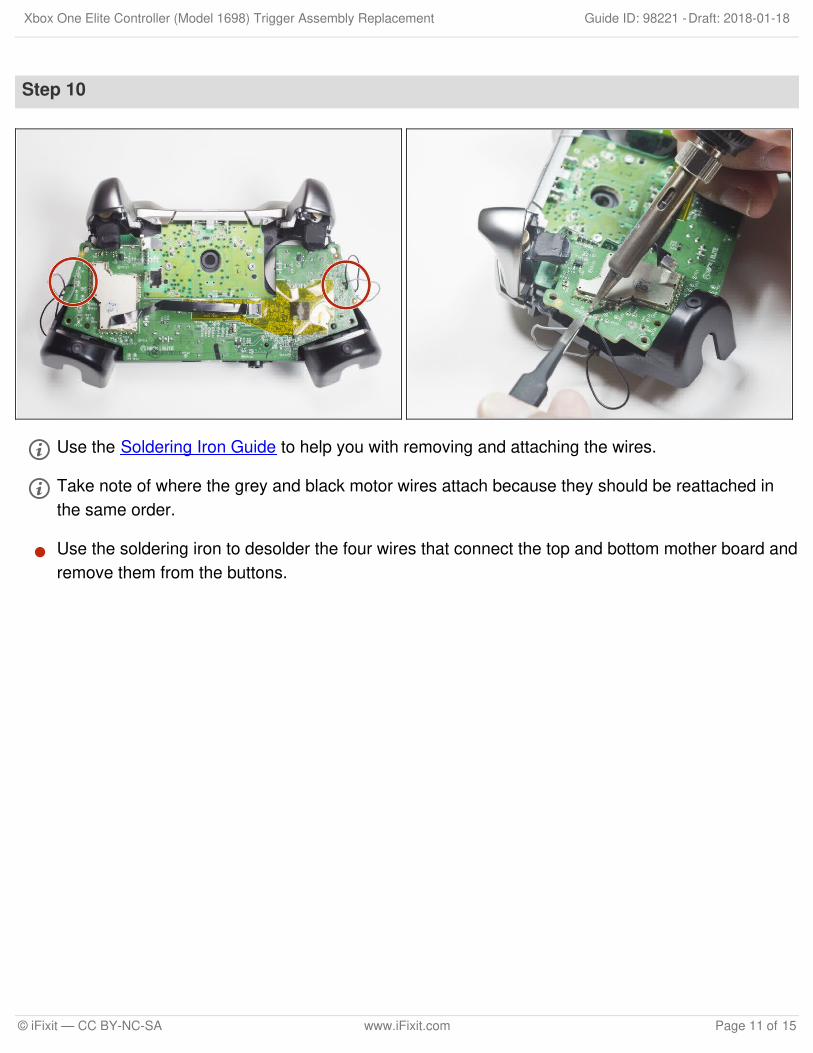
Step 10
Use the Soldering Iron Guide to help you with removing and attaching the wires.
Take note of where the grey and black motor wires attach because they should be reattached inthe same order.
Use the soldering iron to desolder the four wires that connect the top and bottom mother board andremove them from the buttons.
Xbox One Elite Controller (Model 1698) Trigger Assembly Replacement Draft: 2018-01-18Guide ID: 98221 -
© iFixit — CC BY-NC-SA www.iFixit.com Page 11 of 15

Step 11
Be careful not to lose the small 9mm audio jack housing from under the main motherboard.
Remove the top motherboard by pulling it upwards.
Remove the small 9mm audio jack by gently lifting it from the motherboard.
Xbox One Elite Controller (Model 1698) Trigger Assembly Replacement Draft: 2018-01-18Guide ID: 98221 -
© iFixit — CC BY-NC-SA www.iFixit.com Page 12 of 15
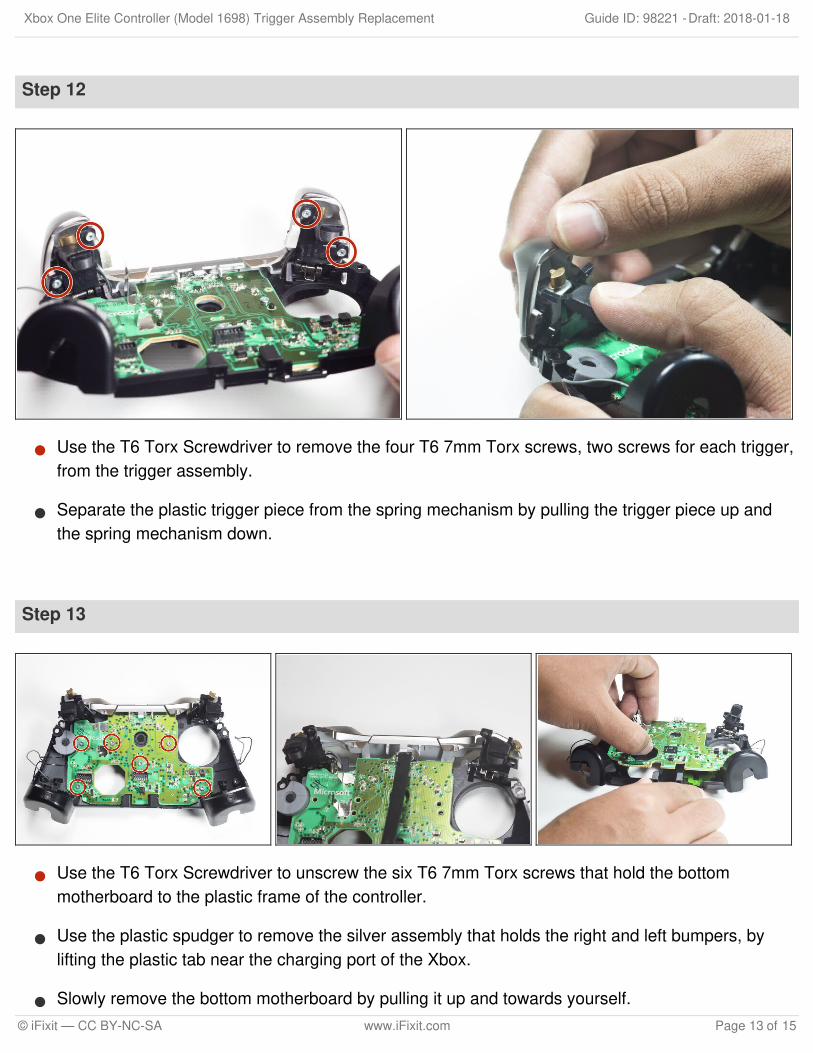
Step 12
Use the T6 Torx Screwdriver to remove the four T6 7mm Torx screws, two screws for each trigger,from the trigger assembly.
Separate the plastic trigger piece from the spring mechanism by pulling the trigger piece up andthe spring mechanism down.
Step 13
Use the T6 Torx Screwdriver to unscrew the six T6 7mm Torx screws that hold the bottommotherboard to the plastic frame of the controller.
Use the plastic spudger to remove the silver assembly that holds the right and left bumpers, bylifting the plastic tab near the charging port of the Xbox.
Slowly remove the bottom motherboard by pulling it up and towards yourself.
Xbox One Elite Controller (Model 1698) Trigger Assembly Replacement Draft: 2018-01-18Guide ID: 98221 -
© iFixit — CC BY-NC-SA www.iFixit.com Page 13 of 15

Step 14
Remove the small green plastic piece by lifting it from the silicone holding it.
Remove the soft grey silicone piece that covers the buttons by pulling upwards on it.
Step 15
Remove each button by pulling each out one at a time. There should be seven buttons total.
Each button is keyed so it only fits in a specific way.
Xbox One Elite Controller (Model 1698) Trigger Assembly Replacement Draft: 2018-01-18Guide ID: 98221 -
© iFixit — CC BY-NC-SA www.iFixit.com Page 14 of 15

To reassemble your device, follow these instructions in reverse order.
This document was last generated on 2019-07-19 09:24:34 AM.
Step 16 — Trigger Assembly
Lay controller so buttonholes face upwards and Xbox logo is furthest away from you.
Take note of where the grey and black motor wires attach because they should be reattached thesame way.
Desolder the motor wires using the soldering iron. Use the Soldering Iron Guide to help you withdesoldering.
Xbox One Elite Controller (Model 1698) Trigger Assembly Replacement Draft: 2018-01-18Guide ID: 98221 -
© iFixit — CC BY-NC-SA www.iFixit.com Page 15 of 15