Embed Size (px)
Citation preview
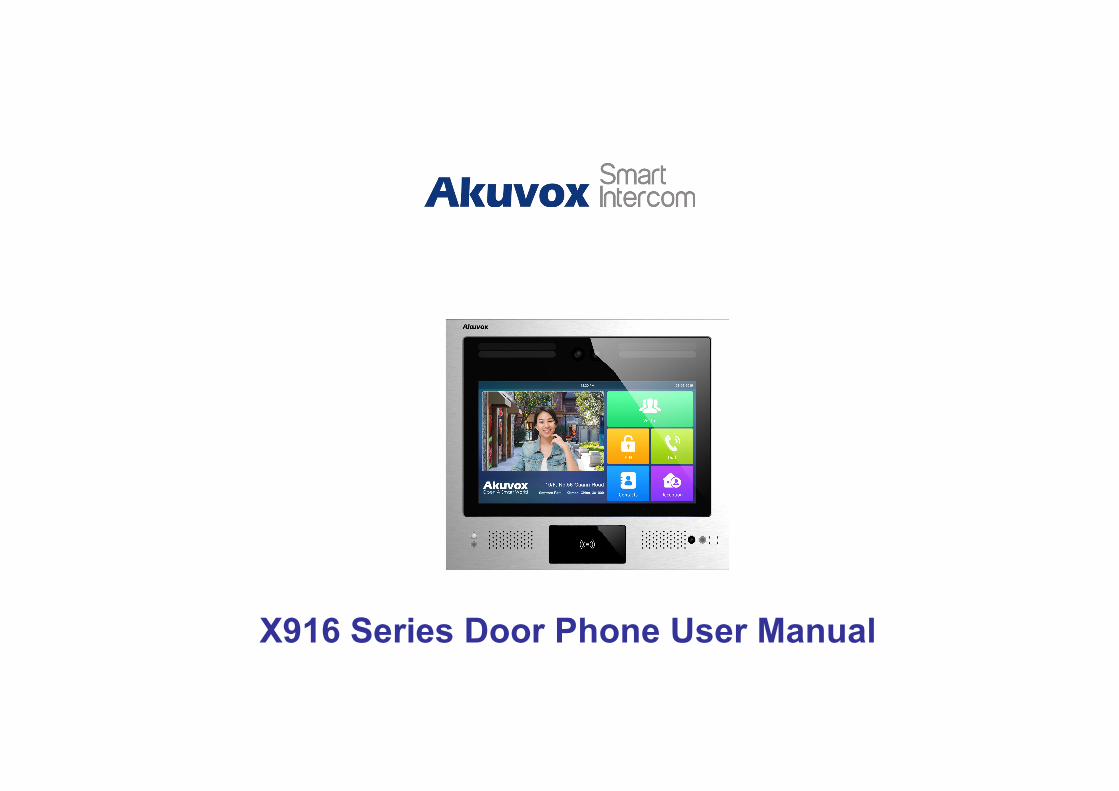
X916 Series Door Phone User Manual
About This Manual
Thank you for choosing Akuvox’s X916 series door phone. This manual is intended for end users who need to properly configure the
door phone. This manual is applicable to 916.30.1.29 version, and it provides all functions’ configurations of X916 series door phone.
Please visit Akuvox forum or consult technical support for any new information or latest firmware.
Note: Please refer to universal abbreviation form in the end of manual when meet any abbreviation letter.
Content1. Product Overview............................................................................................................................................................................................... 1
1.1. Product Instruction......................................................................................................................................................................................1
1.2. Introduction of Application Scenarios...................................................................................................................................................... 2
2. Daily use................................................................................................................................................................................................................4
2.1. Make a Call..................................................................................................................................................................................................4
2.1.1. Calling from Digital Keypad.............................................................................................................................................................4
2.1.2. Calling from Phonebook..................................................................................................................................................................5
2.1.3. Calling from Speed Dial................................................................................................................................................................6
2.1.4. No-appointment Call in VMS scenario....................................................................................................................................... 6
2.2. Receiving a Call.......................................................................................................................................................................................... 7
2.3. Unlock...........................................................................................................................................................................................................7
2.3.1. Unlock by PIN Codes.......................................................................................................................................................................7
2.3.2. Unlock by Facial Recognition......................................................................................................................................................... 8
2.3.3. Unlock by RFID cards......................................................................................................................................................................9
2.3.4. Unlock by DTMF codes................................................................................................................................................................... 9
2.3.5. Unlock by Temporary QR codes.................................................................................................................................................. 10
2.3.6. Unlock by Delivery PIN...............................................................................................................................................................11
X916User Manual
1
1.Product Overview
1.1. Product Instruction
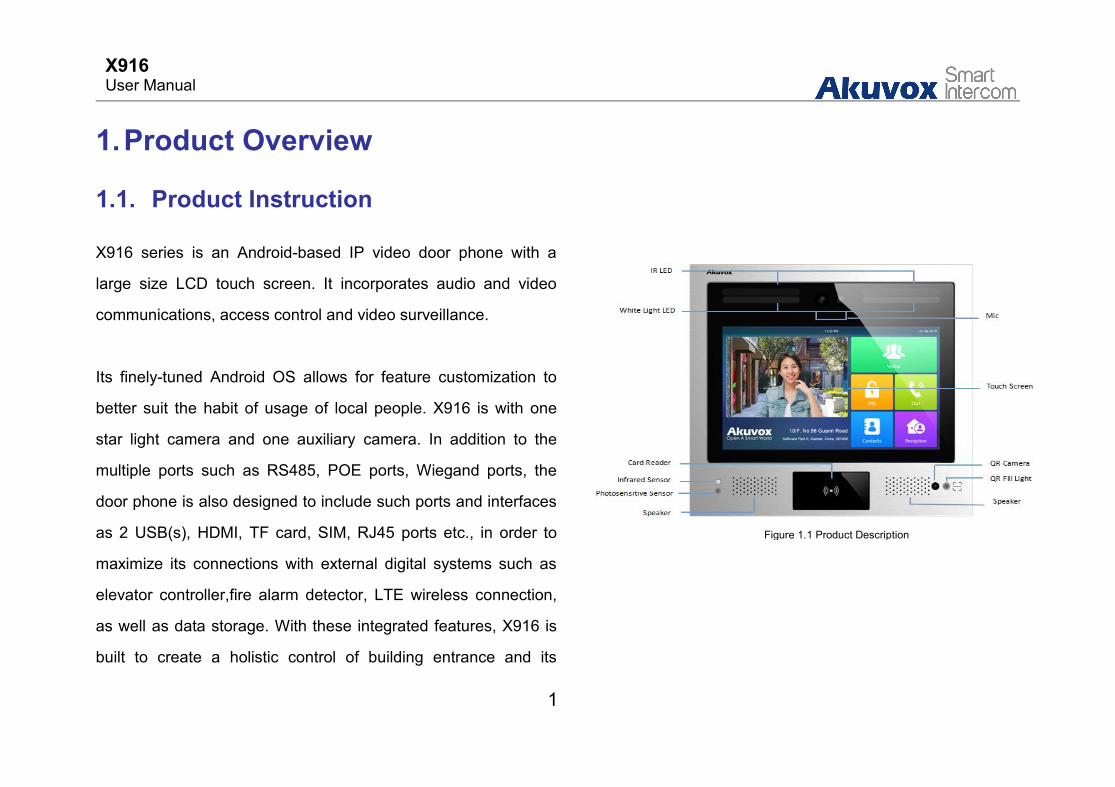
X916 series is an Android-based IP video door phone with a
large size LCD touch screen. It incorporates audio and video
communications, access control and video surveillance.
Its finely-tuned Android OS allows for feature customization to
better suit the habit of usage of local people. X916 is with one
star light camera and one auxiliary camera. In addition to the
multiple ports such as RS485, POE ports, Wiegand ports, the
door phone is also designed to include such ports and interfaces
as 2 USB(s), HDMI, TF card, SIM, RJ45 ports etc., in order to
maximize its connections with external digital systems such as
elevator controller,fire alarm detector, LTE wireless connection,
as well as data storage. With these integrated features, X916 is
built to create a holistic control of building entrance and its
Figure 1.1 Product Description
X916User Manual
2
surroundings and giving you a greater sense of security and
smart living experience.
X916 is applicable to luxurious apartment buildings for intercom
cloud application and office buildings and their complexes for
visitor management system.
1.2. Introduction of ApplicationScenarios
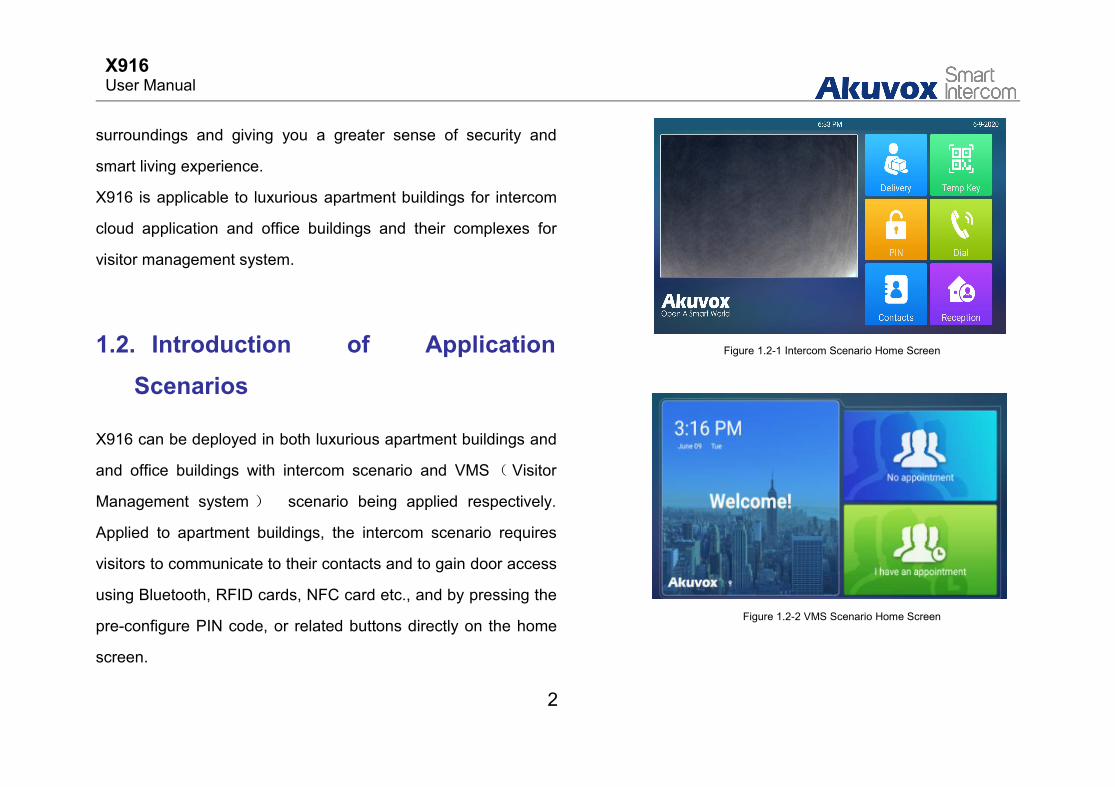
X916 can be deployed in both luxurious apartment buildings and
and office buildings with intercom scenario and VMS( Visitor
Management system ) scenario being applied respectively.
Applied to apartment buildings, the intercom scenario requires
visitors to communicate to their contacts and to gain door access
using Bluetooth, RFID cards, NFC card etc., and by pressing the
pre-configure PIN code, or related buttons directly on the home
screen.
Figure 1.2-1 Intercom Scenario Home Screen
Figure 1.2-2 VMS Scenario Home Screen

X916User Manual
3
While, visitors can not do the same thing in VMS scenario applied
in the office building for the communication and door access, they
instead need do so through appointment-based communication
and door access.
X916User Manual
4
2.Daily use
2.1. Make a Call
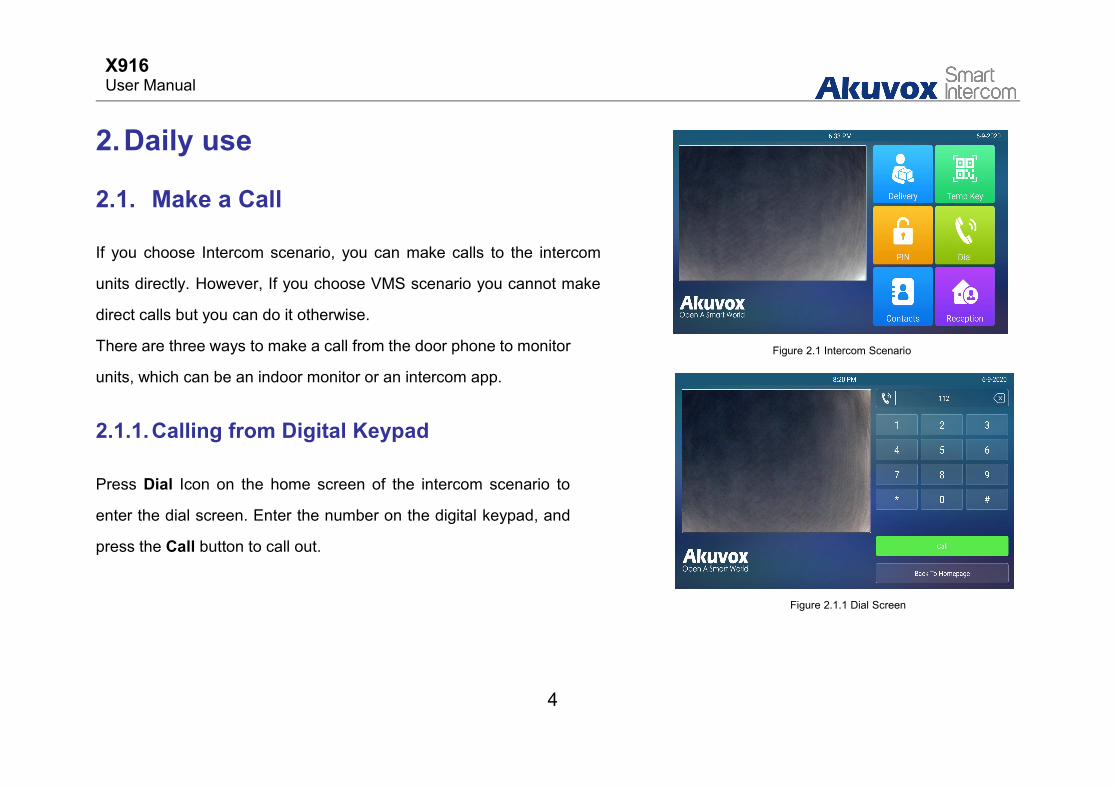
If you choose Intercom scenario, you can make calls to the intercom
units directly. However, If you choose VMS scenario you cannot make
direct calls but you can do it otherwise.
There are three ways to make a call from the door phone to monitor
units, which can be an indoor monitor or an intercom app.
2.1.1.Calling from Digital Keypad
Press Dial Icon on the home screen of the intercom scenario to
enter the dial screen. Enter the number on the digital keypad, and
press the Call button to call out.
Figure 2.1 Intercom Scenario
Figure 2.1.1 Dial Screen
X916User Manual
5
2.1.2.Calling from Phonebook
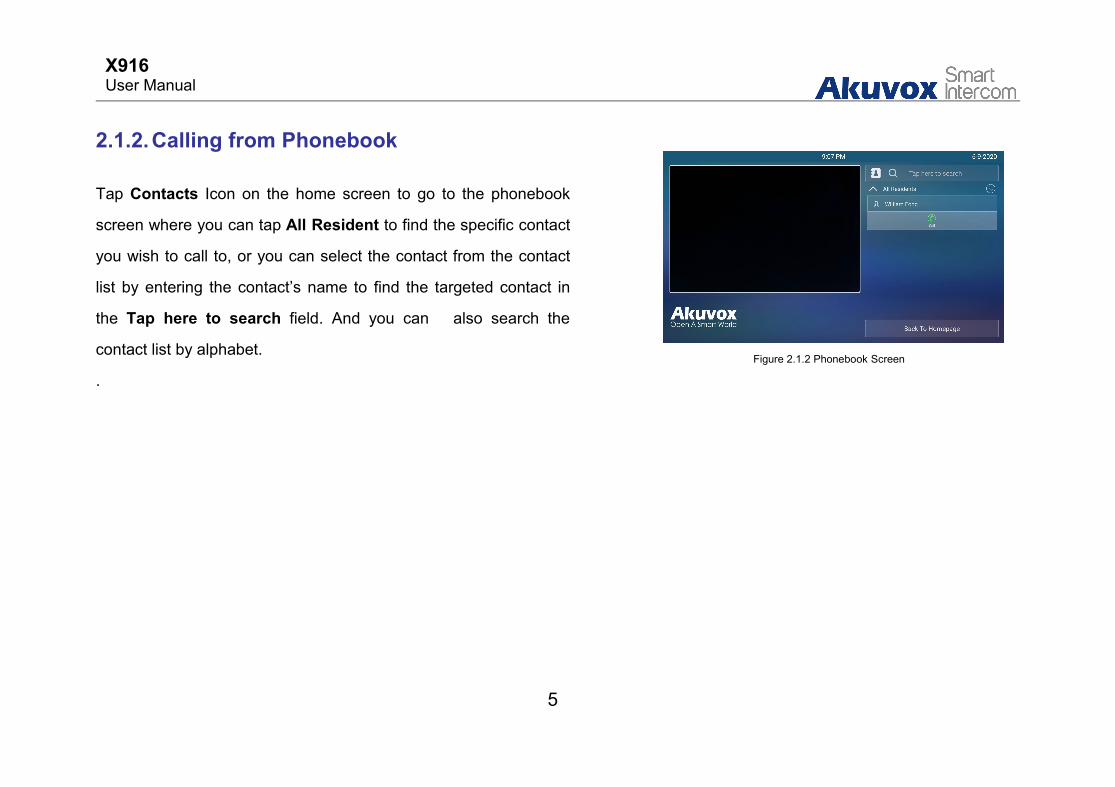
Tap Contacts Icon on the home screen to go to the phonebook
screen where you can tap All Resident to find the specific contact
you wish to call to, or you can select the contact from the contact
list by entering the contact’s name to find the targeted contact in
the Tap here to search field. And you can also search the
contact list by alphabet.
.Figure 2.1.2 Phonebook Screen
X916User Manual
6
2.1.3. Calling from Speed Dial
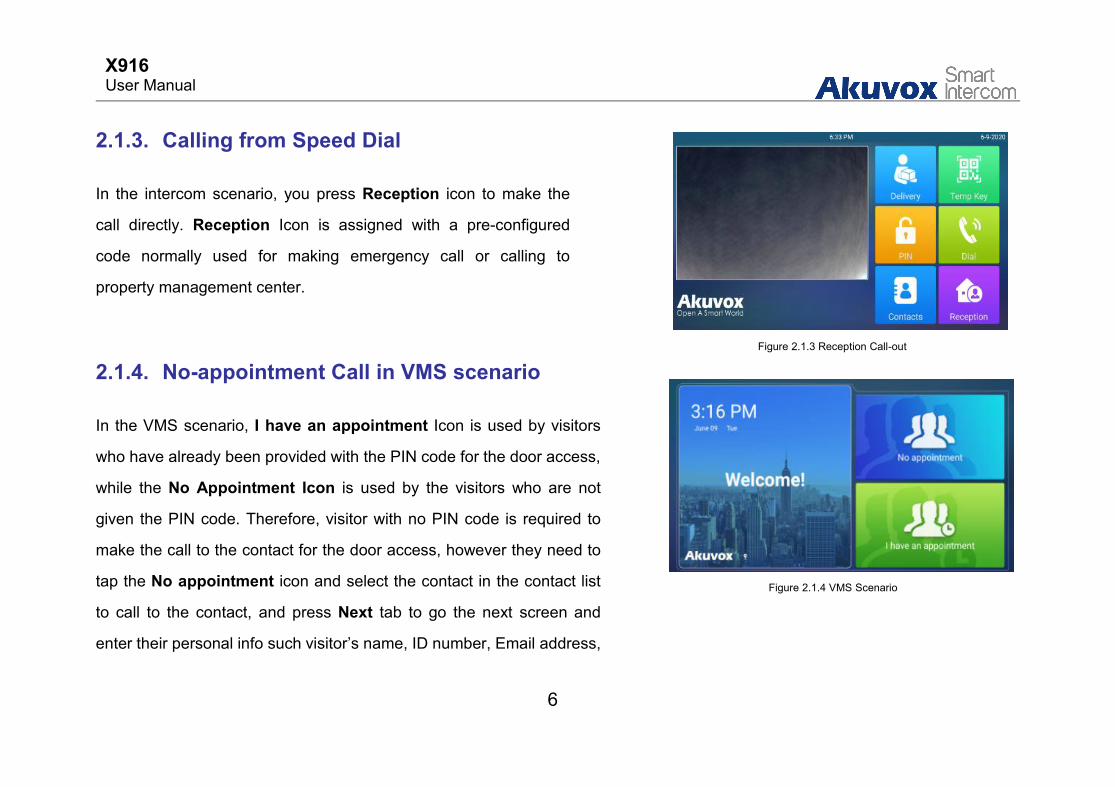
In the intercom scenario, you press Reception icon to make the
call directly. Reception Icon is assigned with a pre-configured
code normally used for making emergency call or calling to
property management center.
2.1.4. No-appointment Call in VMS scenario
In the VMS scenario, I have an appointment Icon is used by visitors
who have already been provided with the PIN code for the door access,
while the No Appointment Icon is used by the visitors who are not
given the PIN code. Therefore, visitor with no PIN code is required to
make the call to the contact for the door access, however they need to
tap the No appointment icon and select the contact in the contact list
to call to the contact, and press Next tab to go the next screen and
enter their personal info such visitor’s name, ID number, Email address,
Figure 2.1.4 VMS Scenario
Figure 2.1.3 Reception Call-out
X916User Manual
7
and the contact name before pressing the Confirm button to call out.
2.2. Receiving a Call
When a intercom unit calls the door phone, it will answer the
incoming call automatically by default without pressing any buttons
2.3. Unlock
2.3.1.Unlock by PIN Codes
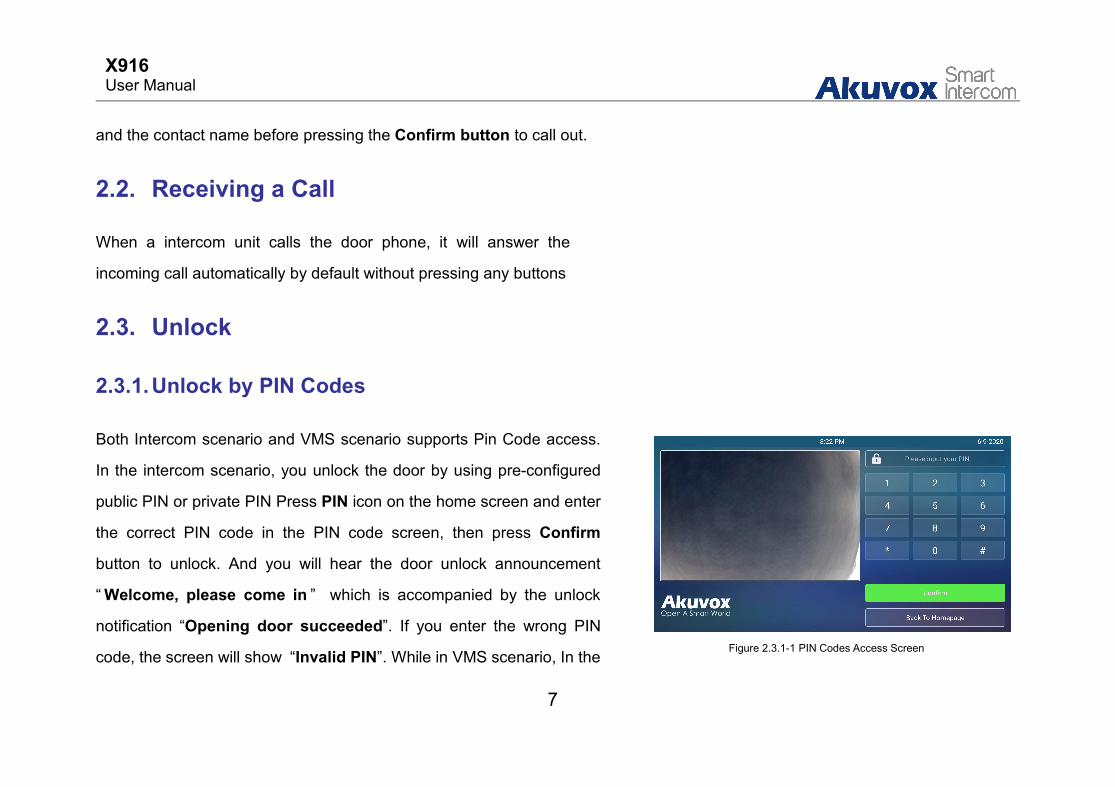
Both Intercom scenario and VMS scenario supports Pin Code access.
In the intercom scenario, you unlock the door by using pre-configured
public PIN or private PIN Press PIN icon on the home screen and enter
the correct PIN code in the PIN code screen, then press Confirm
button to unlock. And you will hear the door unlock announcement
“Welcome, please come in ” which is accompanied by the unlock
notification “Opening door succeeded”. If you enter the wrong PIN
code, the screen will show “Invalid PIN”. While in VMS scenario, In the Figure 2.3.1-1 PIN Codes Access Screen
X916User Manual
8
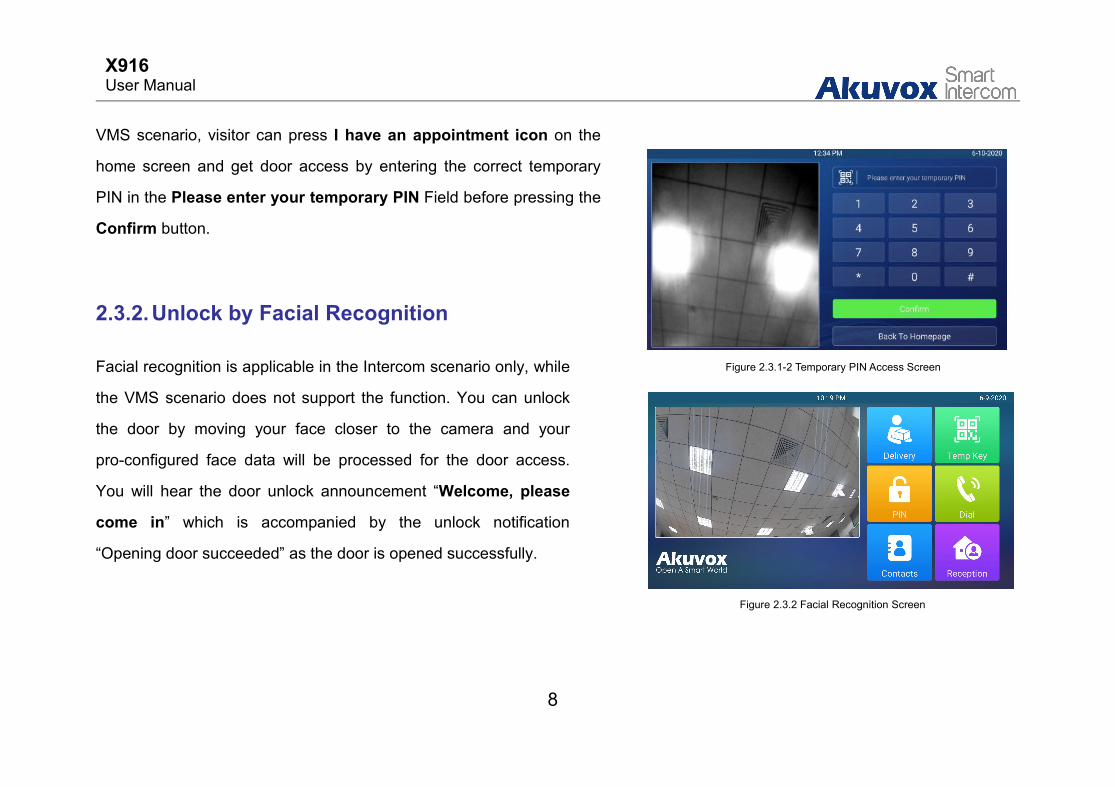
VMS scenario, visitor can press I have an appointment icon on the
home screen and get door access by entering the correct temporary
PIN in the Please enter your temporary PIN Field before pressing the
Confirm button.
2.3.2.Unlock by Facial Recognition
Facial recognition is applicable in the Intercom scenario only, while
the VMS scenario does not support the function. You can unlock
the door by moving your face closer to the camera and your
pro-configured face data will be processed for the door access.
You will hear the door unlock announcement “Welcome, please
come in” which is accompanied by the unlock notification
“Opening door succeeded” as the door is opened successfully.
Figure 2.3.1-2 Temporary PIN Access Screen
Figure 2.3.2 Facial Recognition Screen
X916User Manual
9
2.3.3.Unlock by RFID cards
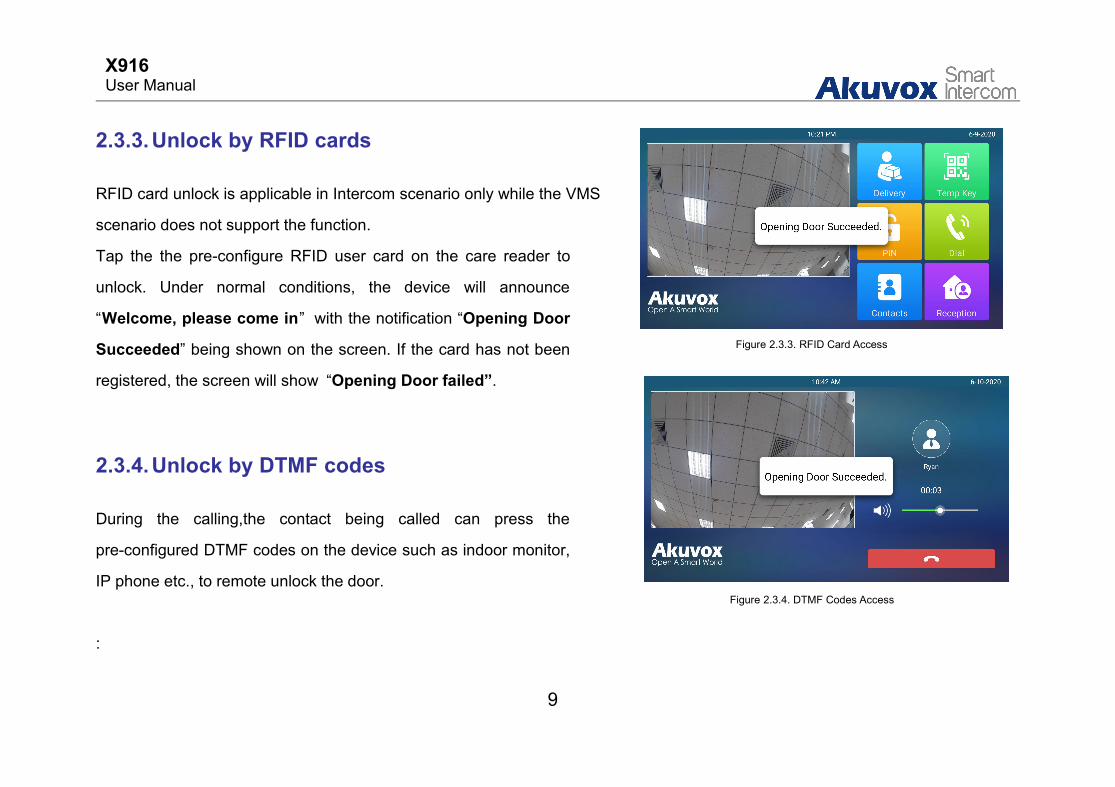
RFID card unlock is applicable in Intercom scenario only while the VMS
scenario does not support the function.
Tap the the pre-configure RFID user card on the care reader to
unlock. Under normal conditions, the device will announce
“Welcome, please come in” with the notification “Opening Door
Succeeded” being shown on the screen. If the card has not been
registered, the screen will show “Opening Door failed”.
2.3.4.Unlock by DTMF codes
During the calling,the contact being called can press the
pre-configured DTMF codes on the device such as indoor monitor,
IP phone etc., to remote unlock the door.
:
Figure 2.3.3. RFID Card Access
Figure 2.3.4. DTMF Codes Access
X916User Manual
10
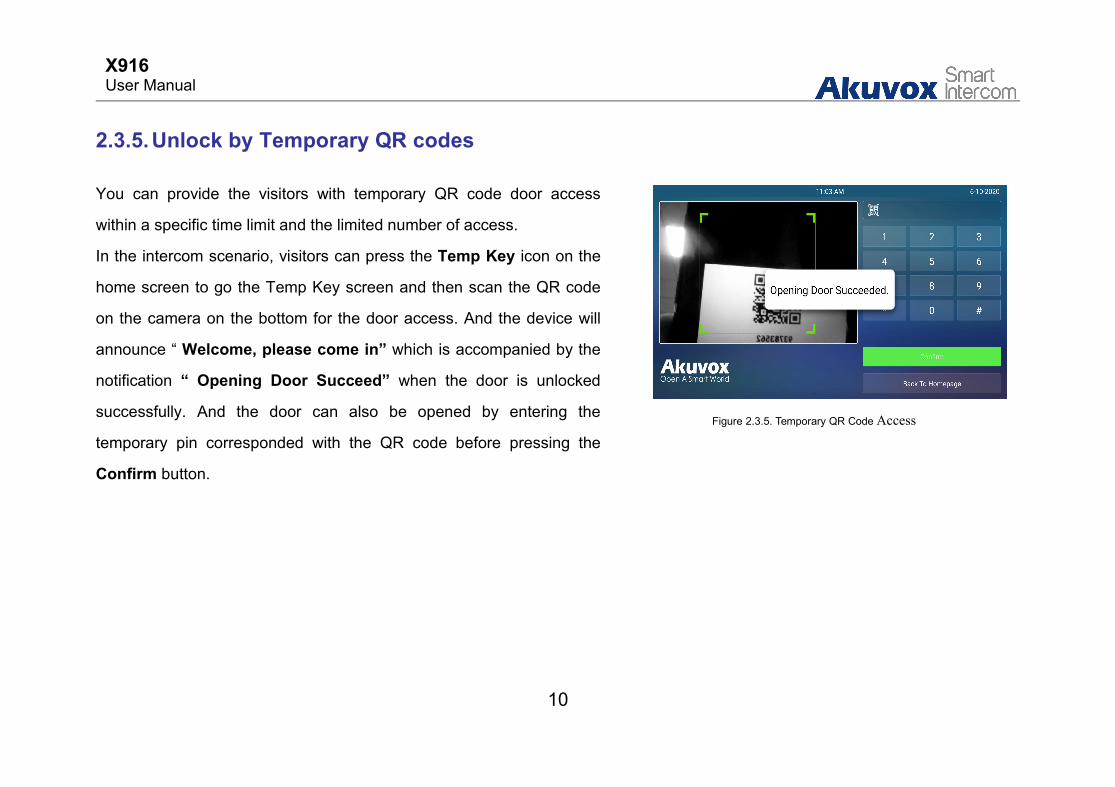
2.3.5.Unlock by Temporary QR codes
You can provide the visitors with temporary QR code door access
within a specific time limit and the limited number of access.
In the intercom scenario, visitors can press the Temp Key icon on the
home screen to go the Temp Key screen and then scan the QR code
on the camera on the bottom for the door access. And the device will
announce “ Welcome, please come in” which is accompanied by the
notification “ Opening Door Succeed” when the door is unlocked
successfully. And the door can also be opened by entering the
temporary pin corresponded with the QR code before pressing the
Confirm button.
Figure 2.3.5. Temporary QR Code Access
X916User Manual
11
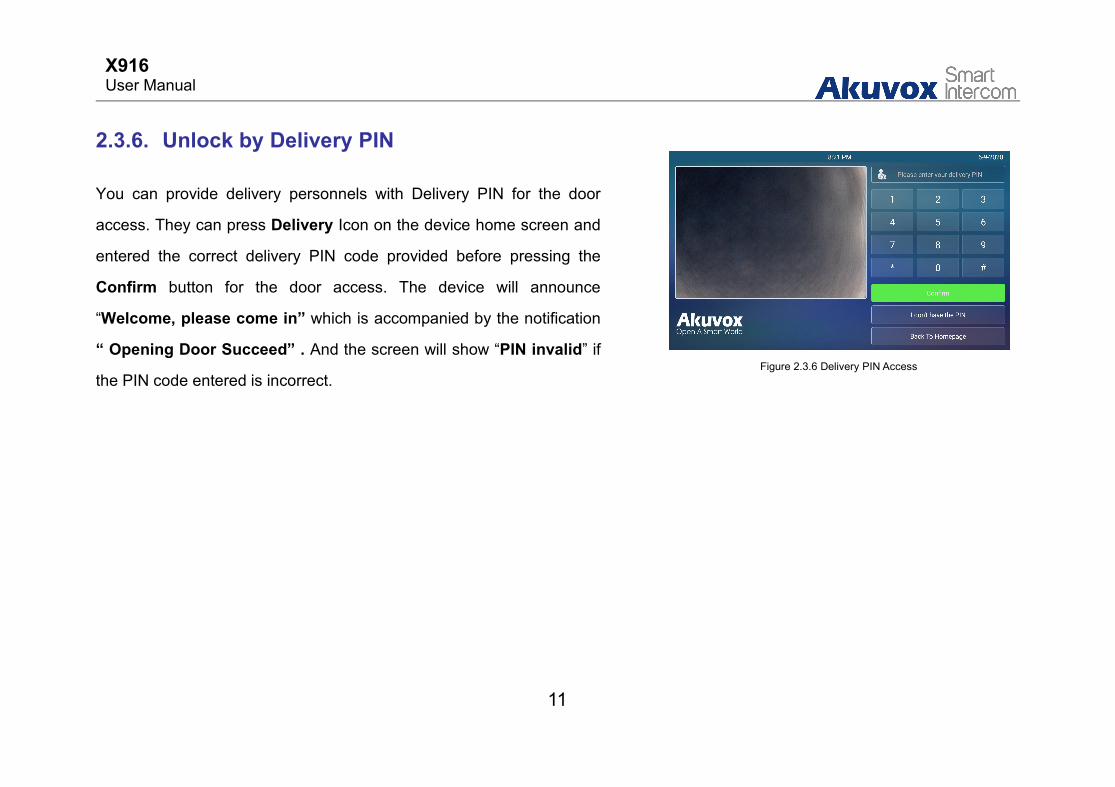
2.3.6. Unlock by Delivery PIN
You can provide delivery personnels with Delivery PIN for the door
access. They can press Delivery Icon on the device home screen and
entered the correct delivery PIN code provided before pressing the
Confirm button for the door access. The device will announce
“Welcome, please come in” which is accompanied by the notification
“ Opening Door Succeed” . And the screen will show “PIN invalid” if
the PIN code entered is incorrect.Figure 2.3.6 Delivery PIN Access
X916User Manual
12
Abbreviations
ACS: Auto Configuration Server
Auto: Automatically
AEC: Configurable Acoustic and Line Echo Cancelers
ACD: Automatic Call Distribution
Autop: Automatical Provisioning
AES: Advanced Encryption Standard
BLF: Busy Lamp Field
COM: Common
CPE: Customer Premise Equipment
CWMP: CPE WAN Management Protocol
DTMF: Dual Tone Multi-Frequency
DHCP: Dynamic Host Configuration Protocol
DNS: Domain Name System
DND: Do Not Disturb
DNS-SRV: Service record in the Domain Name System
FTP: File Transfer Protocol
GND: Ground
HTTP: Hypertext Transfer Protocol
HTTPS: Hypertext Transfer Protocol Secure
IP: Internet Protocol
ID: Identification
IR: Infrared
LCD: Liquid Crystal Display
LED: Light Emitting Diode
MAX: Maximum
POE: Power Over Ethernet
PCMA: Pulse Code Modulation A-Law
PCMU: Pulse Code Modulation µ-Law
X916User Manual
13
SIP: Session Initiation Protocol
SNMP: Simple Network Management Protocol
STUN: Session Traversal Utilities for NAT
SNMP: Simple Mail Transfer Protocol
SDMC: SIP Devices Management Center
TR069: Technical Report069
TCP: Transmission Control Protocol
TLS: Transport Layer Security
TFTP: Trivial File Transfer Protocol
UDP: User Datagram Protocol
URL: Uniform Resource Locator
VLAN: Virtual Local Area Network
WG:Wiegand
PCAP: Packet Capture
PNP: Plug and Play
RFID: Radio Frequency Identification
RTP: Real-time Transport Protocol
RTSP: Real Time Streaming Protocol
MPEG: Moving Picture Experts Group
MWI: Message Waiting Indicator
NO: Normal Opened
NC: Normal Connected
NTP: Network Time Protocol
NAT: Network Address Translation
NVR: Network Video Recorder
ONVIF: Open Network Video Interface Forum
X916User Manual
14
Contact us
For more information about the product, please visit us atwww.akuvox.com or feel free to contact us by
Sales email: [email protected]
Technical support email: [email protected]
Telephone: +86-592-2133061 ext.7694/8162
We highly appreciate your feedback about our products.