Embed Size (px)
Citation preview

X‐Trak® 3
User’s GuideExternal Antenna Variant
Internal Antenna Variant
90001256_C
2
©2012 Digi International Inc.
All Rights Reserved.
Digi, Digi International, the Digi logo, a Digi International Company, the Digi web site, iDigi, the iDigi logo, the iDigi web site, Digi ESP for Python, iDigi Device Cloud, iDigi Dia, iDigi Manager Pro, Digi X-Trak, RealPort, Digi Connect are trademarks or registered trademarks of Digi International, Inc.
All other trademarks mentioned in this document are the property of their respective owners.
Information in this document is subject to change without notice and does not represent a commitment on the part of Digi International.
Digi provides this document “as is,” without warranty of any kind, either expressed or implied, including, but not limited to, the implied warranties of fitness or merchantability for a particular purpose. Digi may make improvements and/or changes in this manual or in the product(s) and/or the program(s) described in this manual at any time.
This product could include technical inaccuracies or typographical errors. Changes are periodically made to the information herein; these changes may be incorporated in new editions of the publication.
Disclaimer
Digi International makes no representations or warranties with respect to the contents or use of this manual, any software drivers or associated application software provided with this product and specifically disclaims any expressed or implied warranties of merchantability or fitness for any particular purpose.
Digi International reserves the right to modify or revise all or part of this document, its contents, and any products described herein at any time without prior notification and shall not be responsible for any loss, cost or damage, including consequential damage, caused by reliance on these materials.

C o n t e n t s
Contents
Chapter 1: About this guide.............................................................................................................................................6
Purpose .......................................................................................................................................................................6
Audience.....................................................................................................................................................................6
Scope ..........................................................................................................................................................................6
Where to find more information.................................................................................................................................6
Digi contact information ............................................................................................................................................7
Chapter 2: Introduction ...................................................................................................................................................8
Digi X-Trak 3 .............................................................................................................................................................8
User interfaces ..................................................................................................................................................9
Chapter 3: Hardware .....................................................................................................................................................10
Digi X-Trak 3 hardware ...........................................................................................................................................10
Hardware summary.........................................................................................................................................10
Interfaces ..................................................................................................................................................................11
Serial interfaces ..............................................................................................................................................11
RS-232 connector pinouts .....................................................................................................................11
USB interface..................................................................................................................................................11
OBD-II interface.............................................................................................................................................11
Battery removal and replacement.............................................................................................................................12
Lithium-ion battery powered ..........................................................................................................................12
Battery replacement instructions ...................................................................................................................12
Warnings.........................................................................................................................................................12
SIM card and micro-SD card installation.................................................................................................................13
SIM card activation.........................................................................................................................................13
Antenna connections ...............................................................................................................................................13
Antenna specifications....................................................................................................................................13
External Antenna Variant......................................................................................................................13
Internal Antenna Variant.......................................................................................................................14
Antenna care and replacement........................................................................................................................15
Chapter 4: Configuration and Management................................................................................................................17
Configuration and management through the Digi Dashboard .................................................................................17
Open the Digi Dashboard ...............................................................................................................................17
Device Information ...............................................................................................................................17
Mobile Settings...............................................................................................................................................18
3
C o n t e n t s
Remote Management settings.........................................................................................................................20
OBD settings...................................................................................................................................................20
Python program file management...................................................................................................................21
Firmware Update ............................................................................................................................................22
Firmware update via the iDigi Device Cloud .......................................................................................23
Utilities tab......................................................................................................................................................23
Back up Device Settings to a File .........................................................................................................24
Restore Device Settings from a File .....................................................................................................24
Reboot the Digi X-Trak 3 ....................................................................................................................24
Configuration and management through iDigi Manager Pro...................................................................................24
iDigi configurations ........................................................................................................................................25
OBD-II settings ........................................................................................................................................................25
HyperTerminal settings ............................................................................................................................................26
Chapter 5: Programming...............................................................................................................................................29
Programming tools and resources ............................................................................................................................29
Digi ESP for Python .......................................................................................................................................29
Application development................................................................................................................................30
Python programming language.......................................................................................................................30
Getting Started with Digi ESP for Python......................................................................................................30
Programming Prerequisites ......................................................................................................................................31
Connecting to HyperTerminal ..............................................................................................................31
Starting Digi ESP for Python ................................................................................................................31
Creating configuration ..........................................................................................................................31
Uploading Python script using the iDigi Device Cloud........................................................................32
Chapter 6: Specifications and certifications.................................................................................................................34
Hardware specifications ...........................................................................................................................................34
Regulatory information and certifications................................................................................................................36
RF exposure statement....................................................................................................................................36
FCC certifications and regulatory information (USA only) ...........................................................................36
Radio frequency interface (RFI) (FCC 15.105) ....................................................................................36
Labeling requirements (FCC 15.19) .....................................................................................................36
Modifications (FCC 15.21) ...................................................................................................................36
CE certifications (Europe only) ......................................................................................................................36
Important safety information....................................................................................................................................37
Safety statements ............................................................................................................................................37
5.10 Ignition of flammable atmospheres...............................................................................................37
International EMC (Electromagnetic Emissions/Immunity/Safety) standards ........................................................38
4
C o n t e n t s
Chapter 7: Troubleshooting...........................................................................................................................................39
Troubleshooting resources .......................................................................................................................................39
System status LEDs..................................................................................................................................................40
Troubleshooting tips.................................................................................................................................................40
Chapter 8: Appendix A: Related Information .............................................................................................................41
Digi developer community wiki...............................................................................................................................41
Python support forum on digi.com .................................................................................................................41
iDigi Dia ........................................................................................................................................................41
iDigi Manager Pro....................................................................................................................................................42
Power consumption and management......................................................................................................................42
Sleep mode and waking ..................................................................................................................................43
5
A b o u t t h i s g u i d e
About this guide
Purpose
This guide describes and shows how to connect hardware, configure device settings, manage your device and develop programs for Digi X-Trak 3.
Audience
This guide is intended for those responsible for setting up the Digi X-Trak 3. It assumes some familiarity with networking concepts and protocols.
Scope
This guide focuses on configuration, monitoring, and administration, it does not cover hardware details beyond a certain level, application development, or customization of the Digi X-Trak 3.
Where to find more information
You will find additional product and feature information in these documents:
Online help and tutorials in the web interface for the Digi device
Quick Start Guides
RealPort® Installation Guide
Cellular 101 Tutorial
Digi Connect® Family Customization and Integration Guide
iDigi® tutorials and user’s guides
Release Notes
Cabling Guides
Product information available on the Digi website www.digi.com, and Digi's Support site at www.digi.com/support, including, support forums, Knowledge Base, datasheets / product briefs, application/solution guides, and carrier-specific documents.
Digi Wiki for developers
6

A b o u t t h i s g u i d e
Digi contact information
For more information about Digi products, or for customer service and technical support, contact Digi International.
To Contact Digi International by: Use:
Mail Digi International11001 Bren Road East
Minnetonka, MN 55343U.S.A.
World Wide Web: http://www.digi.com/support/
email http://www.digi.com/support/
Telephone (U.S.) (952) 912-3444 or (877) 912-3444
7

I n t r o d u c t i o n
Introduction C H A P T E R 1
Digi X-Trak 3
OBD II
The Digi X-Trak 3 device delivers a powerful yet cost effective asset management solution by combining a programmable telematics device with an easy-to-use development environment and iDigi management platform. The Digi X-Trak 3 can be programmed using open source Python or the iDigi Device Integration Application (iDigi® Dia). Digi also provides application developers with a familiar Eclipse-based Integrated Development Environment for rapid application development.
The device has a built-in OBD-II interface with an optional interface such as message unit. The regular version can be installed in commercial passenger cars, buses etc. The RS-232 serial ports provide a direct wired connectivity option.
8
I n t r o d u c t i o n
Digi X-Trak 3 has two variants:
Digi X-Trak 3 - External Antenna
Digi X-Trak3 - Internal Antenna
Digi X-Trak 3- External Antenna device comes with a GSM/ GPS Antenna.
Digi X-Trak 3- Internal Antenna device comes with an in-built internal antenna. However, an external antenna can be used with the device. An external antenna is provided only with the development kit of the Digi X-Trak 3- Internal Antenna device. For more information, see “Antenna connections ” on page 13.
Key features of Digi X-Trak 3 are:
Global cellular coverage with GSM/GPRS module
OBD-II Interface
Black box - data storage
RS-232 serial interface
Programmable in Python and iDigi Device Integration Application (iDigi Dia)
Note: iDigi Dia reduces development time by up to 90% using familiar Eclipse-based development environ-ment.
Hosted iDigi management and monitoring platform provides secure, economical, scalable deployments
Compact enclosure with convenient mounting tabs
iDigi management services for management and monitoring
User interfaces
There are several user interfaces for configuring, monitoring, and administering the Digi X-Trak 3 applications,, including the following:
iDigi Manager Pro™
Digi Dashboard
Note: Digi Dashboard is used for configuring, monitoring, and administering Digi X-Trak 3.
9

H a r d w a r e
6
HardwareC H A P T E R 2
This chapter details hardware requirements and recommendations. For additional information, see “System status LEDs” on page 40.
Digi X-Trak 3 hardware
Hardware summary
The figures below display the hardware features described throughout this chapter::
OBD II 54
Front View
Rear View
Back View1. OBDII LED2. Device Connector3. USB-A Connector4. GPS MMCX Connector5. GSM MMCX Connector6. Device Back Cover7. micro-SD Card Holder Back Cover8. micro-SD Card Holder9. SIM card holder10. Battery Connector
32
1
7
8
10
9
1 0
H a r d w a r e
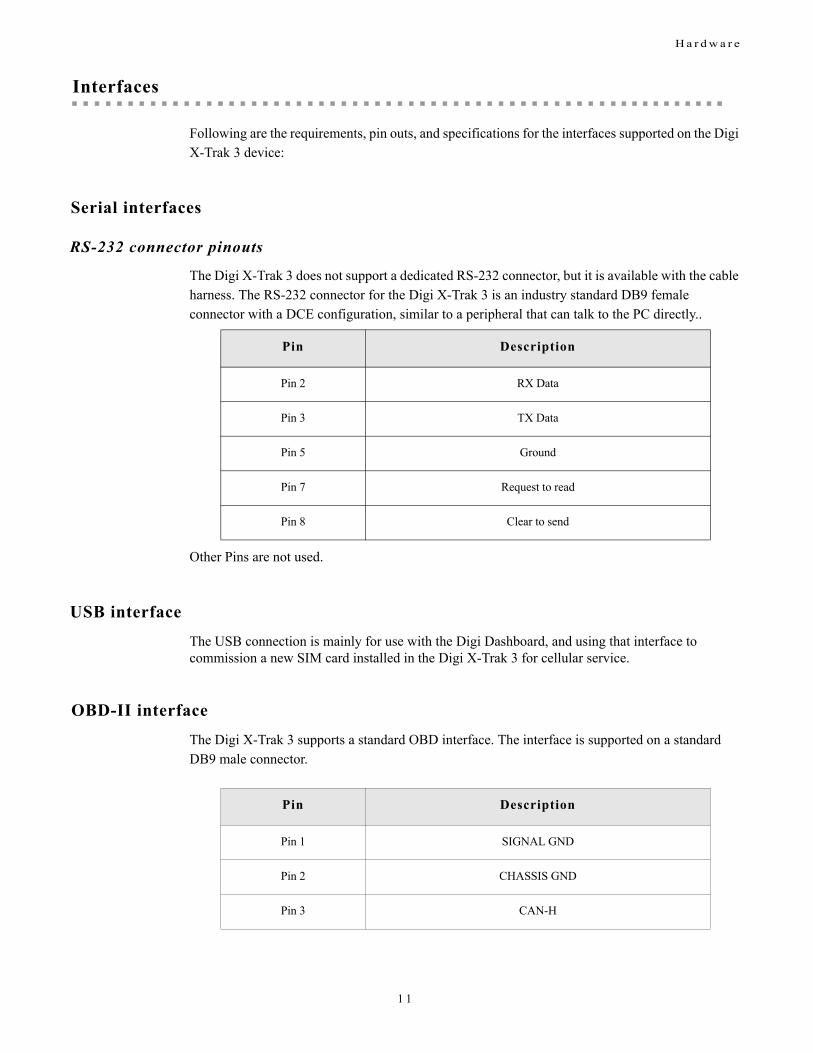
Interfaces
Following are the requirements, pin outs, and specifications for the interfaces supported on the Digi X-Trak 3 device:
Serial interfaces
RS-232 connector pinouts
The Digi X-Trak 3 does not support a dedicated RS-232 connector, but it is available with the cable harness. The RS-232 connector for the Digi X-Trak 3 is an industry standard DB9 female connector with a DCE configuration, similar to a peripheral that can talk to the PC directly..
Pin Description
Pin 2 RX Data
Pin 3 TX Data
Pin 5 Ground
Pin 7 Request to read
Pin 8 Clear to send
Other Pins are not used.
USB interface
The USB connection is mainly for use with the Digi Dashboard, and using that interface to commission a new SIM card installed in the Digi X-Trak 3 for cellular service.
OBD-II interface
The Digi X-Trak 3 supports a standard OBD interface. The interface is supported on a standard DB9 male connector.
Pin Description
Pin 1 SIGNAL GND
Pin 2 CHASSIS GND
Pin 3 CAN-H
1 1

H a r d w a r e
Battery removal and replacement
Lithium-ion battery powered
The Digi X-Trak 3 has an internal Lithium-ion battery for backup power, especially for black box applications.
Battery replacement instructions
1 Disconnect the cable harness from the device.
2 Remove the back cover of the Digi X-Trak 3.
3 Unplug the Li-ion battery and replace it with a new battery.
4 Replace the back cover and carefully tighten the screw.
Note: For more details on battery connection, refer to the Digi X-Trak 3 Quick Start Guide or Get-ting Started Guide.
Warnings
For Class 1, Division 2 installations:
To prevent ignition of a hazardous atmosphere, batteries must only be changed in an area known to be non-hazardous. Opening the box to change batteries cannot be done in a Class 1, Division 2 area.
For all battery installations:
Risk of explosion if battery is replaced by incorrect type or polarity.
Dispose of used batteries according to instructions.
Pin 4 ISO-K
Pin 5 CAN-L
Pin 6 J1850-
Pin 7 J1850+
Pin 8 ISO-L
Pin 9 VBAT
Pin Description
1 2

H a r d w a r e
SIM card and micro-SD card installation
There is a SIM card and micro-SD™ card holder inside the enclosure. Insert the SIM card and micro-SD card into the slot. When properly inserted, the SIM card and micro-SD cards can be locked into place. For more information, refer to the Digi X-Trak 3 Quick Start Guide or Getting Started Guide.
SIM card activation
Users will activate the SIM card, and then insert it into the device.
Note: During insertion, the SIM should not be protected with any passwords.
Antenna connections
This section describes antenna specifications and maintenance information.
For information on connecting antennas to the device, please refer to the Digi X-Trak 3 Quick Start Guides.
Antenna specifications
External Antenna Variant
The Digi X-Trak 3- External Antenna variant supports an external GSM/GPS antenna. The order code is GPS1890LP/P/SMA/SMA/3.0; specifications are as follows:
Antenna Specification Value
General Dimensions (without rod)
100 mm x 66 mm x 21 mm / 3.9 x 2.6 x 0.8 in.
Weight ca. 151 g / 0.35 oz.
Temperature range
-40°C – +80°C / -40°F– +176°F
Protection class IP66 (acc. IEC 60529)
1 3

H a r d w a r e
Internal Antenna Variant
The Digi X-Trak 3- Internal Antenna variant supports an external GPS antenna.
Note: The GPS Antenna is provided only with the Development Kit.
Cellular Frequency rangeAMPS/GSM 850: GSM 900: GSM 1800:GSM 1900:UMTS:
824 – 894 MHz 880 – 960 MHz 1710 – 1880 MHz 1850 – 1990 MHz 1920 – 2170 MHz
Gain 0 dBi
VSWR ≤ 2,0
Impedance 50 Ohm
Polarization linear, vertical
Load capacityMax:
10 W pulsed acc. GSM standard
Diagnostic Resistor 10 kOhm
GPSFrequency range 1,57542 GHz ± 1.023
MHz, (L1-band)
Impedance 50 Ohm
VSWR ≤ 2,0
Gain 2 dBi
Polarization RHCP
Amplification 27 ± 3 dB
Noise figure (50 Ohm)
≤ 2,5 dB
Voltage supply 3 – 5,5 VDC (remotely fed)
Current consumption
≤ 25 mA at 5 V
1 4
H a r d w a r e
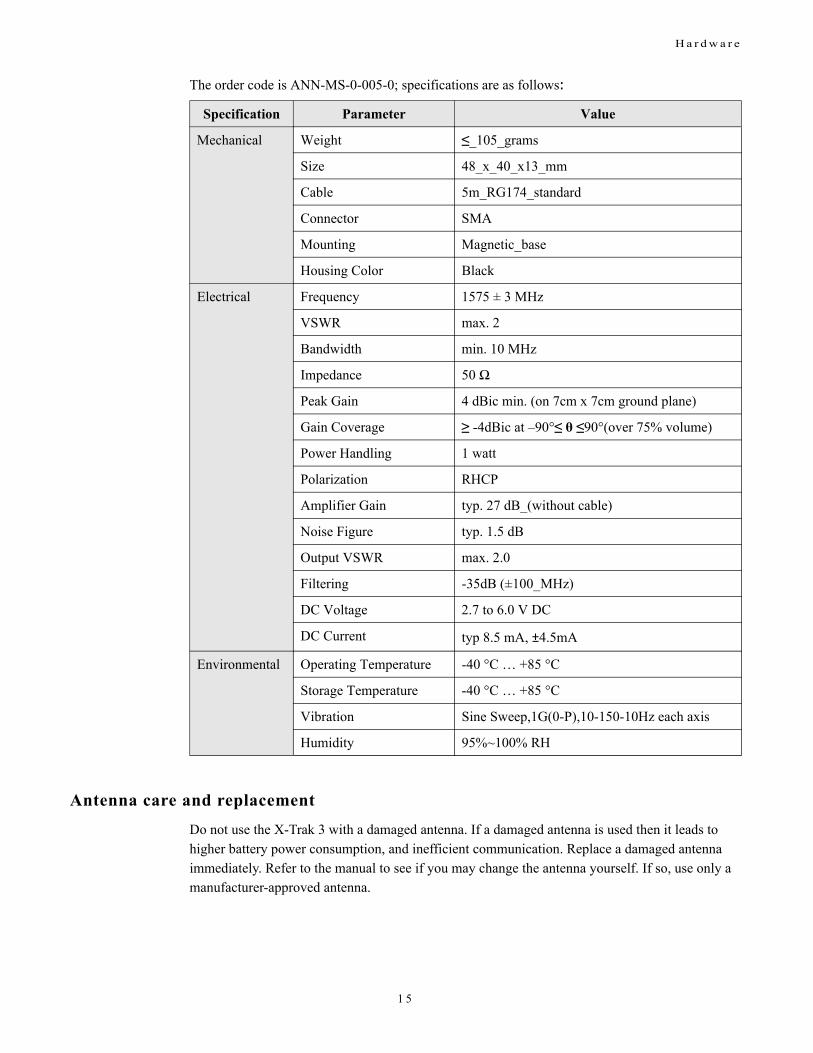
The order code is ANN-MS-0-005-0; specifications are as follows:
Antenna care and replacement
Do not use the X-Trak 3 with a damaged antenna. If a damaged antenna is used then it leads to higher battery power consumption, and inefficient communication. Replace a damaged antenna immediately. Refer to the manual to see if you may change the antenna yourself. If so, use only a manufacturer-approved antenna.
Specification Parameter Value
Mechanical Weight ≤_105_grams
Size 48_x_40_x13_mm
Cable 5m_RG174_standard
Connector SMA
Mounting Magnetic_base
Housing Color Black
Electrical Frequency 1575 ± 3 MHz
VSWR max. 2
Bandwidth min. 10 MHz
Impedance 50 Ω
Peak Gain 4 dBic min. (on 7cm x 7cm ground plane)
Gain Coverage ≥ -4dBic at –90°≤ θ ≤90°(over 75% volume)
Power Handling 1 watt
Polarization RHCP
Amplifier Gain typ. 27 dB_(without cable)
Noise Figure typ. 1.5 dB
Output VSWR max. 2.0
Filtering -35dB (±100_MHz)
DC Voltage 2.7 to 6.0 V DC
DC Current typ 8.5 mA, ±4.5mA
Environmental Operating Temperature -40 °C … +85 °C
Storage Temperature -40 °C … +85 °C
Vibration Sine Sweep,1G(0-P),10-150-10Hz each axis
Humidity 95%~100% RH
1 5

H a r d w a r e
Use only the supplied or approved antennas. Unauthorized antennas, modifications or attachments could damage the terminal and may contravene local RF emission regulations or invalidate type approval.
1 6

C o n f i g u r a t i o n a n d M a n a g e m e n t
Configuration and ManagementC H A P T E R 3
This chapter describes configuration settings using two interfaces:
Local/initial configuration and management through the Digi Dashboard
Remote configuration and management through iDigi Manager Pro.
Periodically, management and administration tasks need to be performed on the Digi X-Trak 3 device, such as:
Backing up and restoring device configurations.
Updating firmware
Restoring the device configuration to factory defaults
Rebooting the device
As with configuration, these tasks can be performed either remotely from iDigi Manager Pro (recommended), or locally from the Digi Dashboard.
Configuration and management through the Digi Dashboard
The Digi Dashboard is a simple Microsoft Windows application, providing a limited user interface for configuring basic settings for the Digi X-Trak 3, and performing common management tasks such as updating firmware and uploading files to the device.
Open the Digi Dashboard
The Digi Dashboard is opened from the Windows Start menu:
Start > Programs > Digi > Digi Dashboard > Digi Dashboard
The Digi Dashboard has several tabs including ones for configuring device settings, performing administrative tasks, and running utilities.
Device Information
The Device Information tab is the default view for the Digi Dashboard.
1 7

C o n f i g u r a t i o n a n d M a n a g e m e n t
Important fields on this tab are:
Status: The current connection status of the Digi X-Trak 3.
Firmware Version: Compare this number to the latest firmware version on Digi’s website to see if the device is running the latest version.
Serial Number (IMEI): This number is used as a device identifier. It is important to make a note of this number, as it is used when adding the device to iDigi.
Phone Number, ICCID, & IMSI: If these numbers are populated in this view, it means that:
– The SIM card is properly inserted in the SIM slot of the device.
– The mobile settings have been configured correctly.
Mobile Settings
The Mobile Settings tab is used to activate the SIM card for cellular services, also known as commissioning, and select a mobile band for cellular communication.
Mobile Service Provider Settings: In the Mobile Service Provider Settings section, enter the service plan or access point name (APN), username and password, and SIM PIN. Your mobile service provider should provide you with this information.
Note: If your device’s mobile service provider information is missing, the Digi X-Trak 3 will not be able to make a cellular connection. Your mobile service provider will inform you if addi-tional information is required to access their services.
1 8
C o n f i g u r a t i o n a n d M a n a g e m e n t
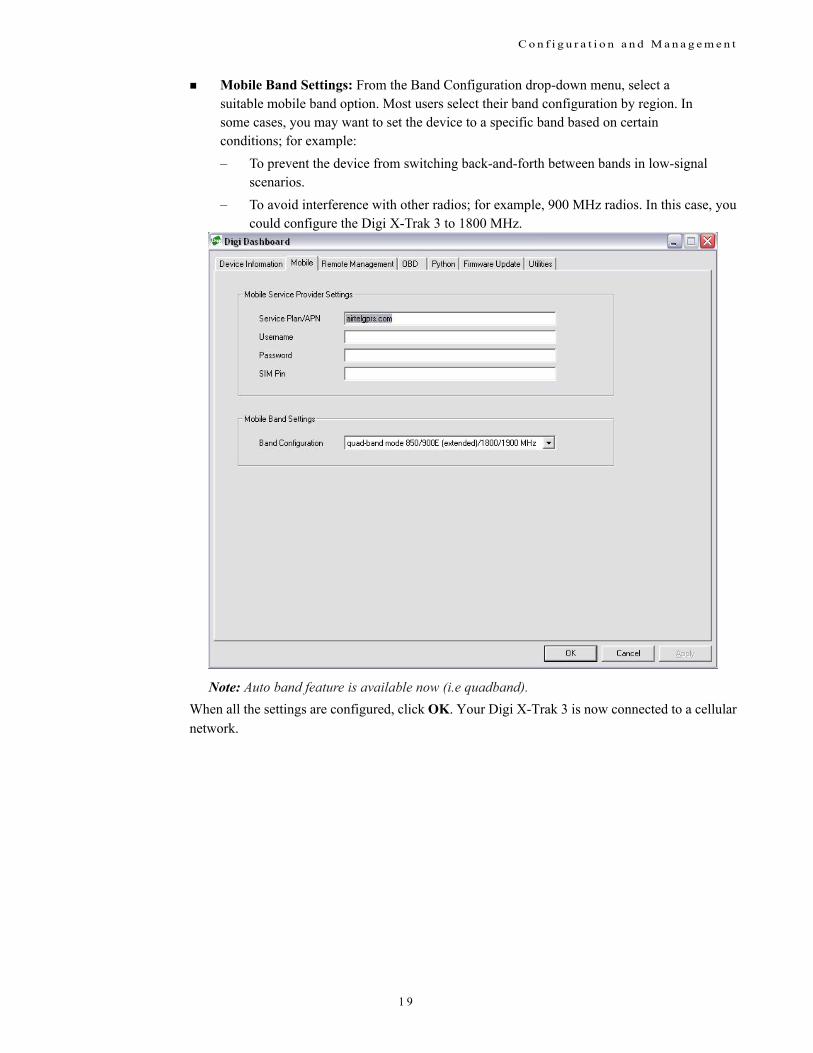
Mobile Band Settings: From the Band Configuration drop-down menu, select a suitable mobile band option. Most users select their band configuration by region. In some cases, you may want to set the device to a specific band based on certain conditions; for example:
– To prevent the device from switching back-and-forth between bands in low-signal scenarios.
– To avoid interference with other radios; for example, 900 MHz radios. In this case, you could configure the Digi X-Trak 3 to 1800 MHz.
Note: Auto band feature is available now (i.e quadband).
When all the settings are configured, click OK. Your Digi X-Trak 3 is now connected to a cellular network.
1 9
C o n f i g u r a t i o n a n d M a n a g e m e n t
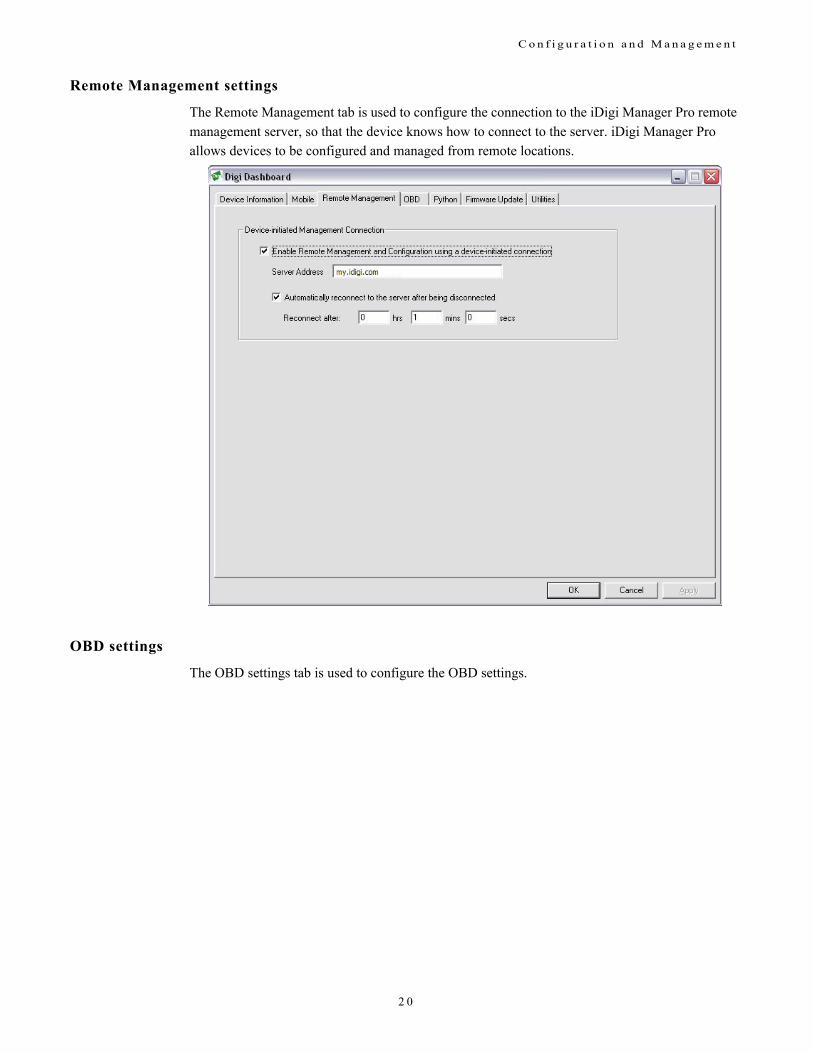
Remote Management settings
The Remote Management tab is used to configure the connection to the iDigi Manager Pro remote management server, so that the device knows how to connect to the server. iDigi Manager Pro allows devices to be configured and managed from remote locations.
OBD settings
The OBD settings tab is used to configure the OBD settings.
2 0
C o n f i g u r a t i o n a n d M a n a g e m e n t
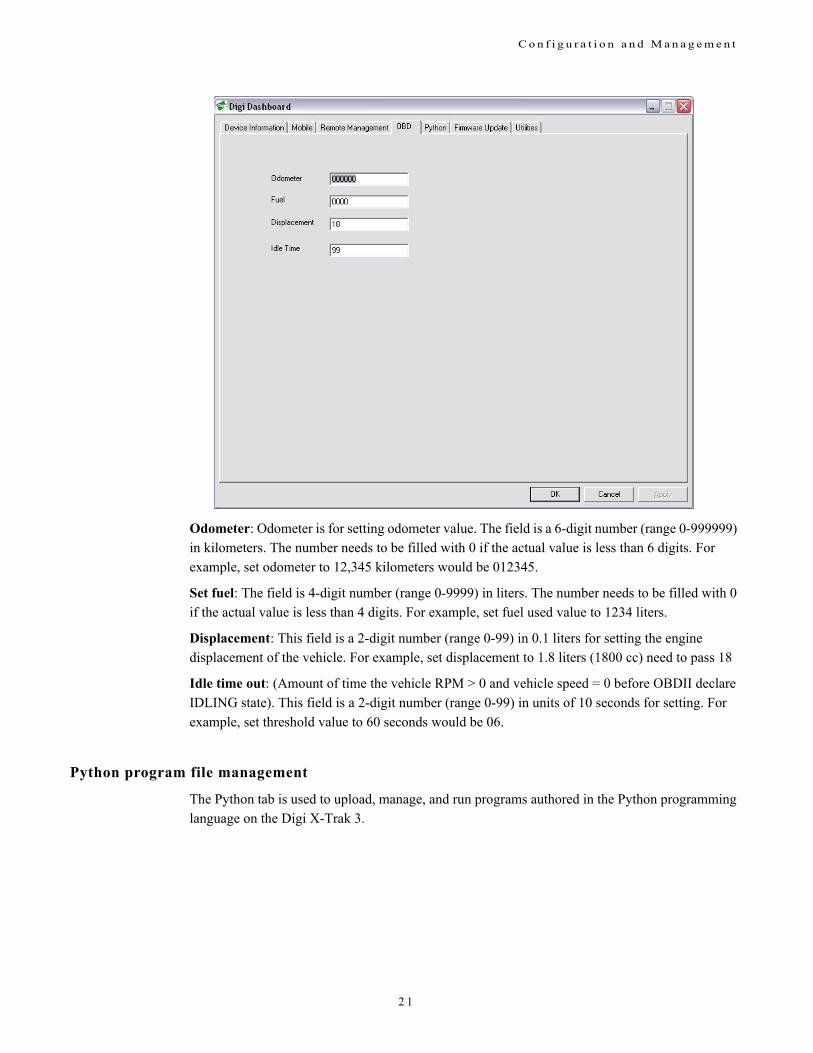
Odometer: Odometer is for setting odometer value. The field is a 6-digit number (range 0-999999) in kilometers. The number needs to be filled with 0 if the actual value is less than 6 digits. For example, set odometer to 12,345 kilometers would be 012345.
Set fuel: The field is 4-digit number (range 0-9999) in liters. The number needs to be filled with 0 if the actual value is less than 4 digits. For example, set fuel used value to 1234 liters.
Displacement: This field is a 2-digit number (range 0-99) in 0.1 liters for setting the engine displacement of the vehicle. For example, set displacement to 1.8 liters (1800 cc) need to pass 18
Idle time out: (Amount of time the vehicle RPM > 0 and vehicle speed = 0 before OBDII declare IDLING state). This field is a 2-digit number (range 0-99) in units of 10 seconds for setting. For example, set threshold value to 60 seconds would be 06.
Python program file management
The Python tab is used to upload, manage, and run programs authored in the Python programming language on the Digi X-Trak 3.
2 1

C o n f i g u r a t i o n a n d M a n a g e m e n t
Firmware Update
The Firmware Update tab is used to update the firmware on the main processor for the Digi X-Trak 3. The Firmware Version field displays the current firmware version.
2 2

C o n f i g u r a t i o n a n d M a n a g e m e n t
To upload firmware to the Digi X-Trak 3:
Note: All firmware is available on Digi’s Support site.
1 Go to: www.digi.com/support.
2 On the Support site, search for X-Trak 3.
3 On the product page, click the Firmware Update link to find the latest firmware version for your product.
4 Download the firmware file to your PC.
5 On the Firmware Update tab of the Digi Dashboard, enter the path and filename or click Browse, and navigate to the firmware file you have downloaded in step 2.
6 Click Update and wait for the update to finish. Do not unplug the device. The firmware update will take about 5 to 10 minutes to complete.
7 When the update is complete, click OK.
Firmware update via the iDigi Device Cloud
1 Navigate to https://my.idigi.com.
2 Log in to your iDigi Device Cloud account using your login credentials.
3 Select the Devices menu within the iDigi Manager Pro tab..
4 Locate your device within the Device list then right-click on it. Select Firmware, then Update Firmware.
5 Browse to the appropriate file (82002770.bin), and click Upload Firmware to upload it to the device.
Utilities tab
The Utilities tab is used to perform common administrative tasks for Digi X-Trak 3, including:
Backing up and restoring device configuration settings
Rebooting the device
2 3

C o n f i g u r a t i o n a n d M a n a g e m e n t
Back up Device Settings to a File
Once the device is configured, backing up the configuration settings is recommended in case problems occur later, firmware is updated, or hardware is added.
The backup/ restore feature can be used to simplify the configuration of multiple devices. Configuration settings of one device can be backed onto a file, then the file can be loaded onto the other devices.
Restore Device Settings from a File
The restore device settings operation restores device settings from a file stored on a PC or a server. Enter the filename or browse for the file and click Restore.
Reboot the Digi X-Trak 3
Changes to some device settings require saving the changes and rebooting the Digi device. To reboot a Digi device, click the Reboot button. The reboot process takes approximately 10 seconds to complete.
Configuration and management through iDigi Manager Pro
The iDigi Device Cloud is an on-demand service with no infrastructure requirements. Remote devices and enterprise business applications connect to the iDigi Device Cloud via standards-based Web Services.
For details on using the iDigi Device Cloud as a management interface, see the iDigi User’s Guide.
2 4
C o n f i g u r a t i o n a n d M a n a g e m e n t
iDigi configurations
To configure your device to connect and utilize the iDigi Device Cloud, follow these steps:
1 Navigate to https://my.idigi.com.
2 To login:
a. If you are a current user, login with your existing user name and password, then click the LOG IN button.
b. If you are a new user, click on the Are you a new user? link and follow the on-screen instructions to create an account.
Note: With your device connected to iDigi you can manage the device remotely.
3 Once logged in, select the Devices menu within the iDigi Manager Pro tab.
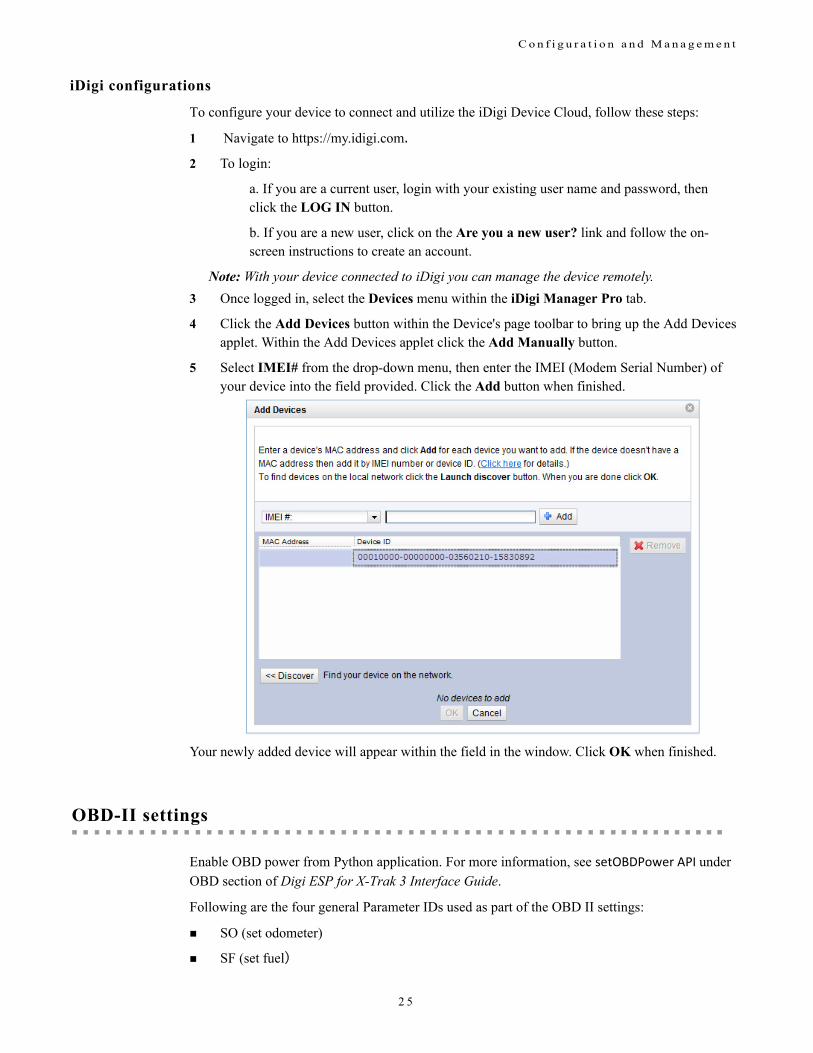
4 Click the Add Devices button within the Device's page toolbar to bring up the Add Devices applet. Within the Add Devices applet click the Add Manually button.
5 Select IMEI# from the drop-down menu, then enter the IMEI (Modem Serial Number) of your device into the field provided. Click the Add button when finished.
Your newly added device will appear within the field in the window. Click OK when finished.
OBD-II settings
Enable OBD power from Python application. For more information, see setOBDPower API under OBD section of Digi ESP for X-Trak 3 Interface Guide.
Following are the four general Parameter IDs used as part of the OBD II settings:
SO (set odometer)
SF (set fuel)
2 5
C o n f i g u r a t i o n a n d M a n a g e m e n t
DM (Displacement)
IT(idle time out).
For more information, refer to the Digi ESP for X-Trak 3 Interface Guide.
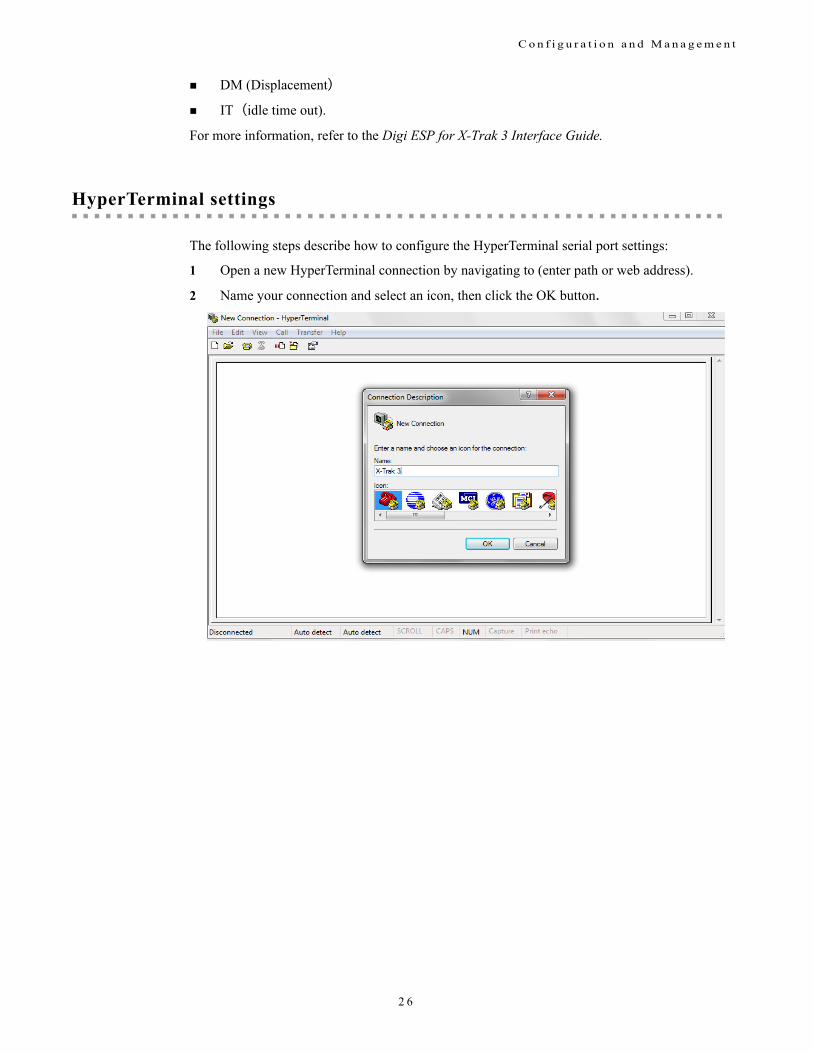
HyperTerminal settings
The following steps describe how to configure the HyperTerminal serial port settings:
1 Open a new HyperTerminal connection by navigating to (enter path or web address).
2 Name your connection and select an icon, then click the OK button.
2 6

C o n f i g u r a t i o n a n d M a n a g e m e n t
3 Enter details of the phone number you want to dial, then click the OK button.:
4 Set
Baud rate 115200
Data bits 8
Parity None
Stop bits 1
Flow control None
the configuration as shown below using the values specified in the following table:
2 7

C o n f i g u r a t i o n a n d M a n a g e m e n t
5 Click the Apply button to apply these port settings to your configuration, then click the OK button.
2 8

P r o g r a m m i n g
ProgrammingC H A P T E R 4
Programming tools and resources
Digi ESP® for Python can be used as the editor for writing Python applications on the Digi X-Trak 3 as well as for Python files management (such as uploading/downloading Python files to/from device). A separate Python API document is provided, which lists the various Python APIs provided for writing applications. Please refer to this Python API document for more details.
Digi ESP for Python
Built on the open Eclipse framework, Digi ESP for Python provides an easy-to-use and professional Python development environment with graphical user interface. It includes a source code editor, GNU compiler integration, visual source code debugging, hardware and software debug support, managed make files, and CVS source code version control integration.
Digi ESP for Python offers a wide variety of state-of-the-art development tool features that make embedded development easier and faster than ever before.
These include intelligent editor coding aids (syntax highlighting, auto-indent/bracket matching, code completion assistance), on-the-fly template insertion, powerful Python indexing/search functionality, and simple single-click initiation of project build processes and debug sessions. This development environment also includes extensive documentation, tutorials, and code samples to help you get started developing custom applications for your product.
For example, applications can be created to:
Aggregate data on the device throughout the day, then upload to iDigi once a day.
Develop a driver for a custom protocol to talk to a device connected to the Digi X-Trak 3.
Translate data, for example, from raw serial into an XML format that can be consumed by other systems, such as iDigi.
Sample tutorials and documentation can be found directly within the Digi ESP for Python software.
The latest version of Digi ESP for Python can be downloaded from the Digi website. The Digi ESP for Python package will install the following:
Digi ESP for Python editor
Appropriate Python versions
Digi dashboard
2 9
P r o g r a m m i n g
Python API document
Application development
The Digi X-Trak 3 offers a variety of interfaces that produce and/or consume data, including network sockets. These interfaces can be programmed using Python code or iDigi Dia (Device Integration Application) in a development environment called Digi ESP for Python. This allows for custom logic to control the flow of information to and from these varied interfaces. Further information on programming options can be found in the sections below.
Python programming language
The Digi X-Trak 3 incorporates a Python development environment, which is an open standard for complete control of connections to devices, manipulation of data, and event based actions.More information regarding Python scripting can be found at:
Digi’s Development Wiki: http://www.digi.com/wiki/developer/index.php/Digi_Python_Programmer%27s_Guide
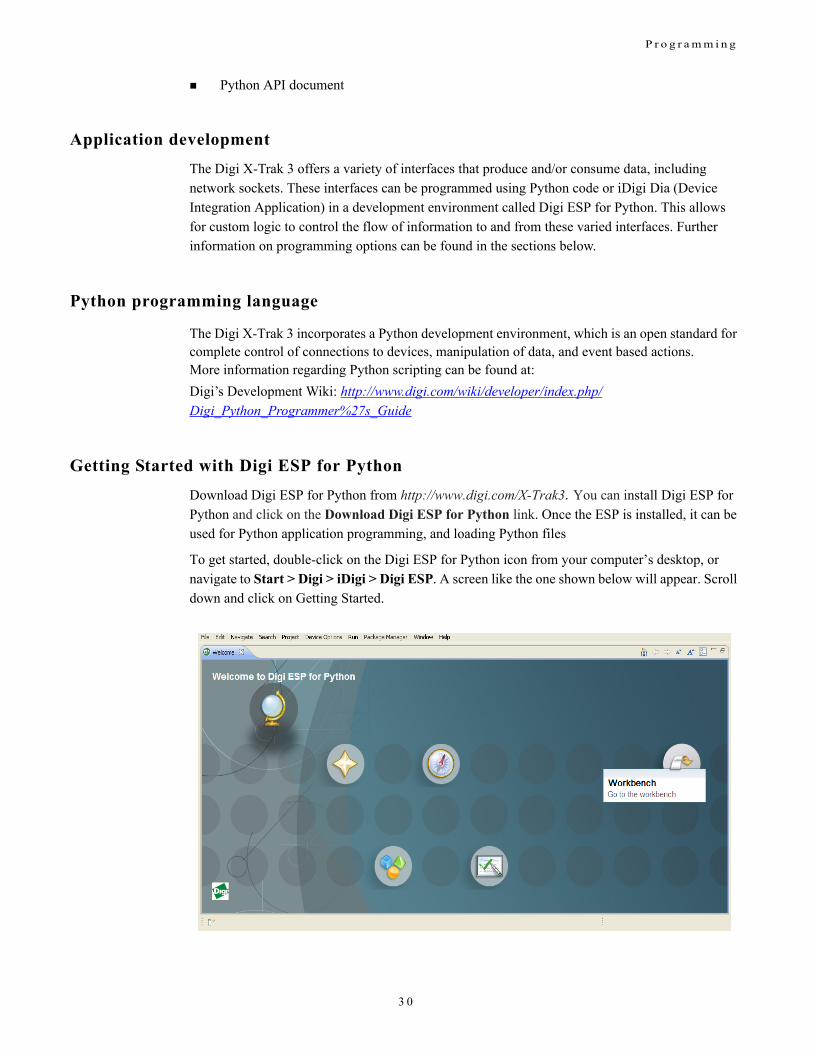
Getting Started with Digi ESP for Python
Download Digi ESP for Python from http://www.digi.com/X-Trak3. You can install Digi ESP for Python and click on the Download Digi ESP for Python link. Once the ESP is installed, it can be used for Python application programming, and loading Python files
To get started, double-click on the Digi ESP for Python icon from your computer’s desktop, or navigate to Start > Digi > iDigi > Digi ESP. A screen like the one shown below will appear. Scroll down and click on Getting Started.
3 0

P r o g r a m m i n g
For more details refer to the Help Contents section of Digi ESP for Python. You can also refer to Python API document for supported API’s and use case examples.
Programming Prerequisites
Perform the following prerequisite steps before you start programming:
Connecting to HyperTerminal
Connect the device to the PC HyperTerminal using USB cable and power on the device.
Starting Digi ESP for Python
1 Open Digi ESP for Python. Browse to appropriate workspace and click Ok.
2 Go to File > New> Digi Python Application Sample Project Wizard and select the desired sample project. For detailed information, refer to Digi X-Trak 3 Getting Started Guide.
Creating configuration
1 Release the device COM Port by pressing Disconnect on the HyperTerminal.
2 Go to Menu > Device Options > Device manger and select device discovery.
3 Select your device and click on create configurations.Select Set current.
Note: Program can be edited if needed. Program can be built and compiled. Remote file explorer will display the list of files in the device
4 Load the Python.zip file by using remote file explorer > upload image, and select the path to Python.zip file.
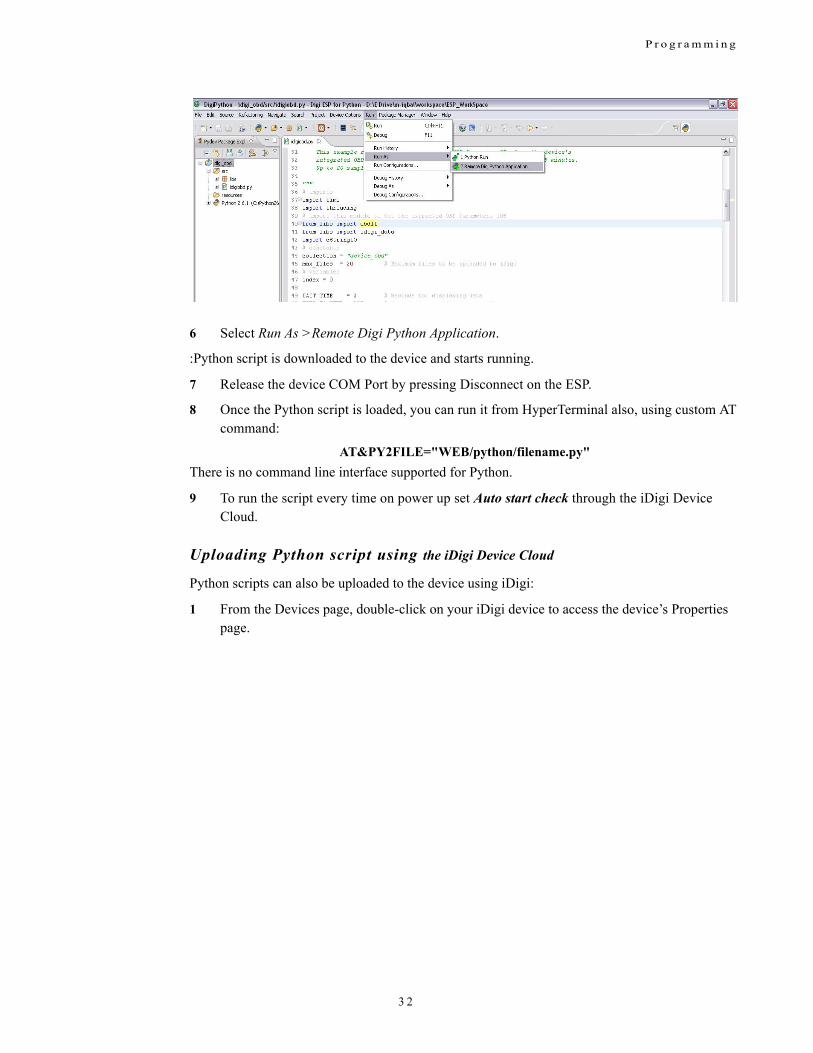
5 To run the program on device, right click on the project as shown in the image below:
3 1
P r o g r a m m i n g
6 Select Run As >Remote Digi Python Application.
:Python script is downloaded to the device and starts running.
7 Release the device COM Port by pressing Disconnect on the ESP.
8 Once the Python script is loaded, you can run it from HyperTerminal also, using custom AT command:
AT&PY2FILE="WEB/python/filename.py"
There is no command line interface supported for Python.
9 To run the script every time on power up set Auto start check through the iDigi Device Cloud.
Uploading Python script using the iDigi Device Cloud
Python scripts can also be uploaded to the device using iDigi:
1 From the Devices page, double-click on your iDigi device to access the device’s Properties page.
3 2

P r o g r a m m i n g
2 From the Devices page, double-click on your iDigi device to access the device’s Properties page.
It will retrieve the files info from the device and display.
3 Upload the required Python file to the device by choosing the upload the file option highlighted in the image above.
4 For auto-start, select the desired Python file and enable the auto-start setting by clicking the checkbox highlighted in the image above. When finished, click the Save button.
Note: To auto start, check the Auto-start Settings check box as shown in the above image.
3 3

S p e c i f i c a t i o n s a n d c e r t i f i c a t i o n s
Specifications and certificationsC H A P T E R 5
This chapter provides hardware specifications, additional feature details, and regulatory statements and certifications for the Digi X-Trak 3.
Hardware specifications
The Digi X-Trak 3 is designed to meet the following Environmental/Mechanical specifications:
Specification Value
Environment Operating temperature
With internal Lithium-ion battery-20°C to +65°C (-4°F to +149°F)
Without internal Lithium-ion battery-40°C to +85°C (-40°F to +185°F)
Storage temperature
-40°C to +85°C (-40°F to +185°F)
Relative humidity
0% to 95% (non-condensing) (SAE J1455)
Operational Shock
SAE J1455. (1) Handling drop Test, drop from height of 1m.
Mechanical Vibration
SAE J1455, (1) Swept Sine Vibration Test, 3g, 10Hz to 2000Hz, 180mins per axis. (2) Random Vibration Testing, at 10HZ (0.015g^²/Hz), 40Hz (0.0015g^²/Hz) and 500Hz (0.00015g^²/Hz). All 3 axis, each axis 3 hrs.
Power requirements
DC power input
Voltage Input:Low voltage limit: 9VHigh voltage limit:16V
3 4

S p e c i f i c a t i o n s a n d c e r t i f i c a t i o n s
Dimensions Length 13.8cm
Width 8.6cm
Depth 3.2cm
Weight 250gm
Average current consumption
Internal battery charging
250 mA
Specification Value
3 5

S p e c i f i c a t i o n s a n d c e r t i f i c a t i o n s
Regulatory information and certifications
RF exposure statement
In order to comply with RF exposure limits established in the ANSI C95.1 standards, the distance between the antenna(s) and the user should not be less than 20 cm.
FCC certifications and regulatory information (USA only)
Radio frequency interface (RFI) (FCC 15.105)
This device has been tested and found to comply with the limits for Class B digital devices pursuant to Part 15 Subpart B, of the FCC rules. These limits are designed to provide reasonable protection against harmful interference in a residential environment. This equipment generates, uses, and can radiate radio frequency energy, and if not installed and used in accordance with the instruction manual, may cause harmful interference to radio communications. However, there is no guarantee that interference will not occur in a particular installation. If this equipment does cause harmful interference to radio or television reception, which can be determined by turning the equipment off and on, the user is encouraged to try and correct the interference by one or more of the following measures:
Reorient or relocate the receiving antenna.
Increase the separation between the equipment and receiver.
Connect the equipment into an outlet on a circuit different from that to which the receiver is connected.
Consult the dealer or an experienced radio/TV technician for help.
Labeling requirements (FCC 15.19)
This device complies with Part 15 of FCC rules. Operation is subject to the following two conditions: (1) this device may not cause harmful interference, and (2) this device must accept any interference received, including interference that may cause undesired operation.
If the FCC ID is not visible when installed inside another device, then the outside of the device into which the module is installed must also display a label referring to the enclosed module FCC ID.
Modifications (FCC 15.21)
Changes or modifications to this equipment not expressly approved by Digi may void the user’s authority to operate this equipment.
CE certifications (Europe only)
X-Trak 3 complies with European union CE marking requirements.
3 6
S p e c i f i c a t i o n s a n d c e r t i f i c a t i o n s
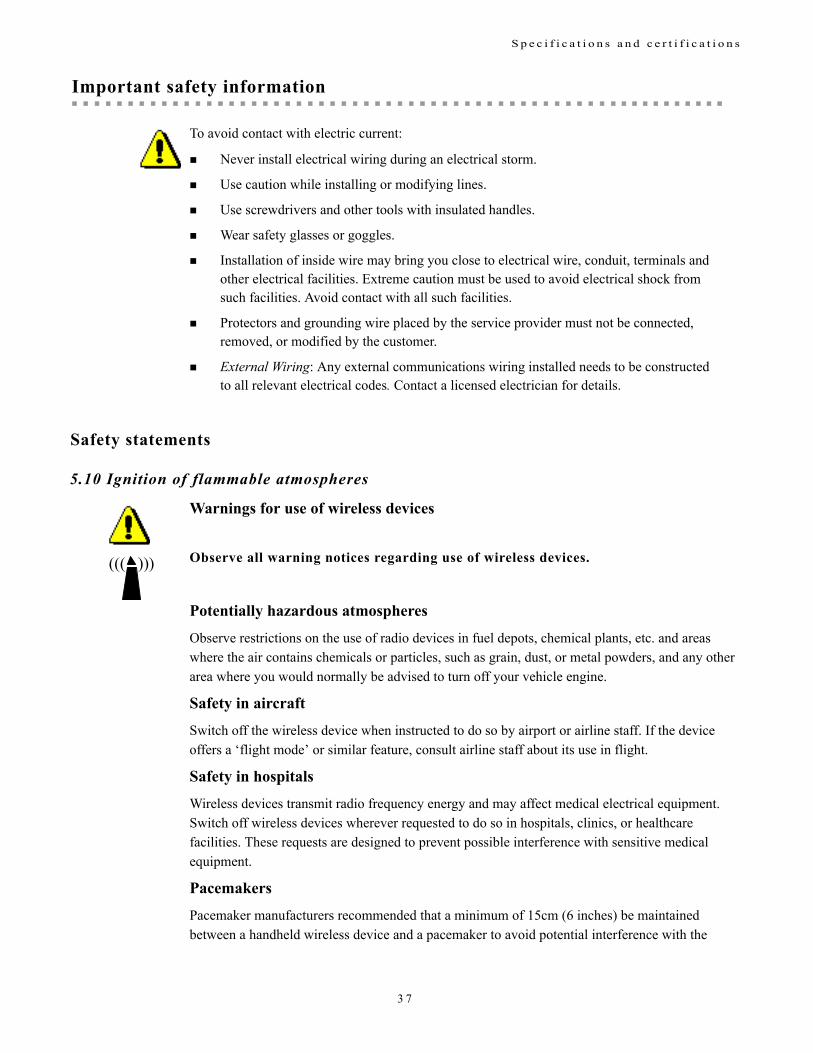
Important safety information
To avoid contact with electric current:
Never install electrical wiring during an electrical storm.
Use caution while installing or modifying lines.
Use screwdrivers and other tools with insulated handles.
Wear safety glasses or goggles.
Installation of inside wire may bring you close to electrical wire, conduit, terminals and other electrical facilities. Extreme caution must be used to avoid electrical shock from such facilities. Avoid contact with all such facilities.
Protectors and grounding wire placed by the service provider must not be connected, removed, or modified by the customer.
External Wiring: Any external communications wiring installed needs to be constructed to all relevant electrical codes. Contact a licensed electrician for details.
Safety statements
5.10 Ignition of flammable atmospheres
Warnings for use of wireless devices
Observe all warning notices regarding use of wireless devices. ((( )))
Potentially hazardous atmospheres
Observe restrictions on the use of radio devices in fuel depots, chemical plants, etc. and areas where the air contains chemicals or particles, such as grain, dust, or metal powders, and any other area where you would normally be advised to turn off your vehicle engine.
Safety in aircraft
Switch off the wireless device when instructed to do so by airport or airline staff. If the device offers a ‘flight mode’ or similar feature, consult airline staff about its use in flight.
Safety in hospitals
Wireless devices transmit radio frequency energy and may affect medical electrical equipment. Switch off wireless devices wherever requested to do so in hospitals, clinics, or healthcare facilities. These requests are designed to prevent possible interference with sensitive medical equipment.
Pacemakers
Pacemaker manufacturers recommended that a minimum of 15cm (6 inches) be maintained between a handheld wireless device and a pacemaker to avoid potential interference with the
3 7
S p e c i f i c a t i o n s a n d c e r t i f i c a t i o n s
pacemaker. These recommendations are consistent with independent research and recommendations by Wireless Technology Research.
Persons with pacemakers:
ALWAYS keep the device more than 15cm (6 inches) from their pacemaker when turned ON.
Do not carry the device in a breast pocket.
If you have any reason to suspect that the interference is taking place, turn OFF your device.
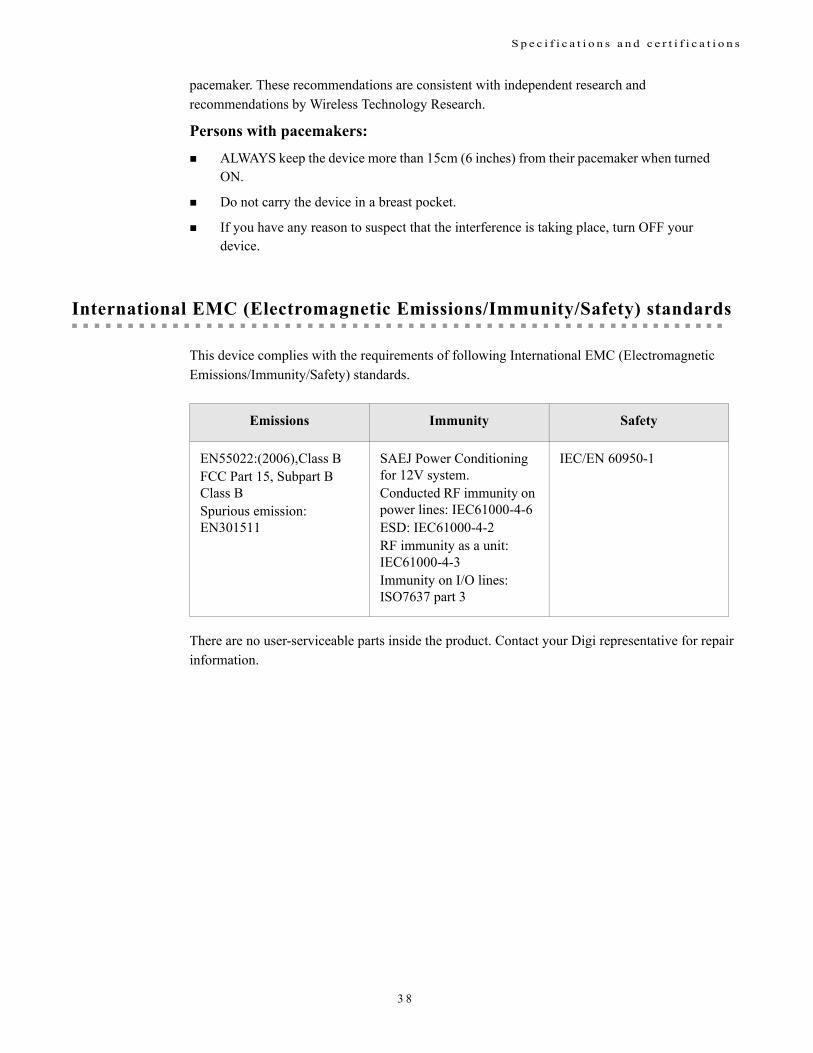
International EMC (Electromagnetic Emissions/Immunity/Safety) standards
This device complies with the requirements of following International EMC (Electromagnetic Emissions/Immunity/Safety) standards.
Emissions Immunity Safety
EN55022:(2006),Class BFCC Part 15, Subpart B Class BSpurious emission: EN301511
SAEJ Power Conditioning for 12V system.Conducted RF immunity on power lines: IEC61000-4-6ESD: IEC61000-4-2 RF immunity as a unit: IEC61000-4-3Immunity on I/O lines: ISO7637 part 3
IEC/EN 60950-1
There are no user-serviceable parts inside the product. Contact your Digi representative for repair information.
3 8

T r o u b l e s h o o t i n g
TroubleshootingC H A P T E R 6
This chapter provides information on resources and processes available for troubleshooting your Digi device.
Troubleshooting resources
There are several resources available for support of your Digi product at Digi’s Support site, http://www.digi.com/support/. Additional resources are as follows:
1 Visit Digi’s Support knowledge base at http://www.digi.com/support/kbase to look for articles related to your situation.
2 Visit our Support Forums at http://www.digi.com/support/forum/ and search for possible posts from other users with similar situations.
3 If the knowledge base or support forums do not have the information you need, fill out an online support request via http://www.digi.com/support/eservice/login.jsp?p=true. You will need to create a user account if one is not already set up.
3 9

T r o u b l e s h o o t i n g
System status LEDs
Troubleshooting tips
If you cannot connect to your device, follow one of these basic troubleshooting steps:
Verify that the power LED is ON.
Verify the cellular signal strength: LED indication on device.
AT+CSQ shall give a value between 10 and 30 (or any value around 30). This indicates that the signal strength is good.
Verify the cellular link.
LED Colour and
Light Pattern
Description
Power LED Glow Green Running from external vehicle power
Blink Red External vehicle power is disconnected
GSM LED Glow Blue Network is not available
Blink Blue Registered to the network
Glow Green GPRS transmission is active
GPS LED Glow Red No 3D location fix
Glow Green 3D location fix is available
OBD-II LED Blink Red Engine is OFF
Glow Green Engine is ON
4 0

A p p e n d i x A : R e l a t e d I n f o r m a t i o n
Appendix A: Related Information
Digi developer community wiki
The Digi Developer Community Wiki is a place to learn about developing solutions using Digi's communications portfolio, software and services, including Digi ESP for Python, iDigiDigi Device
Cloud, iDigi Dia, and more.
Digi's Developer Wiki provides information on developing solutions using Digi's communications product, software and services. The Wiki includes how-to's, example code, and M2M information to speed application development. Digi encourages an active developer community and welcomes your contributions.
http://www.digi.com/wiki/developer/index.php/Main_Page
Python support forum on digi.com
Find answers to common questions and exchange ideas and examples with other members of the Digi Python development community at:http://www.digi.com/support/forum/listforums?category=25
iDigi Dia
The iDigi Device Integration Application (iDigi Dia) is software that simplifies connecting devices (sensors, PLCs, etc.) to communication gateways. iDigi Dia includes a comprehensive library of plug-ins that work out-of-the-box with common device types and can also be extended to include new devices. Its unique architecture allows the user to add most devices in under a day.
iDigi Dia is a tested architecture that provides the core functions of remote device data acquisition, control and presentation between devices and information platforms. It collects data from any device that can communicate with a Digi gateway, and is supported over any gateway physical interface. iDigi Dia presents this data to upstream applications in fully customizable formats, significantly reducing a customer’s time to market.
Written in the Python programming language for use on Digi devices, iDigi Dia may also be executed on a PC for prototyping purposes when a suitable Python interpreter is installed.
iDigi Dia is targeted for applications that need to gather samples of data from a set of devices (ZigBee sensors, wired industrial equipment, GPS devices, etc.). It is an integral component of the iDigi platform, which customers can deploy with iDigi Dia software to build flexible, robust solutions with unprecedented speed.
4 1

A p p e n d i x A : R e l a t e d I n f o r m a t i o n
iDigi Manager Pro
iDigi Manager Pro provides for device management and access to data from network devices behind the gateway. iDigi Manager Pro provides all the tools to connect, manage, store and move from legacy communication products to the new generation of wireless gateways and modules. As an on-demand model, customers pay only for services consumed, conserving capital and requiring no infrastructure.
iDigi Manager Pro includes:
Device connector software that simplifies remote device connectivity and integration.
Management application (configure, upgrade, monitor, alarm, analyze) for Digi connectivity products including ZigBee nodes.
Application messaging engine with broadcast and receipt notification for application-to-device interaction.
Cache and permanent storage options for generation-based storage and ad hoc access to historical device samples.
Application-focused bundles with ready-to-use illustrative applications.
Illustrative applications, which launch Digi ESP for Python development environment and select a workspace.
Power consumption and management
There are several power related items and functions involved in developing programs to run on the Digi X-Trak 3.
In an effort to provide a programmatic means of reducing power consumption when there is limited work to be done, or when power is known to be budgeted, the Digi X-Trak 3 has a multi-tiered power management strategy. A single, intelligent, ultra-low power device remains powered whenever the device is connected to a power source. It is responsible for applying power to the rest of the system based on external stimulus.
The power control device is not responsible for determining when a device or its peripherals should be powered off. This intelligence is left to the applications running on the device. The following functions are supplied via the embedded Python module:
digipowercontrol
Using this function, applications can:
Independently control the power of the cellular modem (a heavy current consumer).
Determine the current state of the power sources managed by the power control module.
Turn off the system power.
Turn off the system power until a future time (scheduled wake-up).
4 2

A p p e n d i x A : R e l a t e d I n f o r m a t i o n
Sleep mode and waking
To use the lowest amount of power possible on a Digi X-Trak 3 module, applications can be designed to turn off power to the unit and turn it on again at a certain point. This is known as a timed wake-up or wake-on-timeout. Conditions that could be defined to cause the device to wake and power on include timing events.
The intent of sleep mode and waking capability is to allow programmers to turn off the device when there is no work to be done, and turn it back on when there is more work to be done, even in periodic moments where the vehicle on which it is mounted is off.
4 3