Embed Size (px)
DESCRIPTION
Manual user
Citation preview
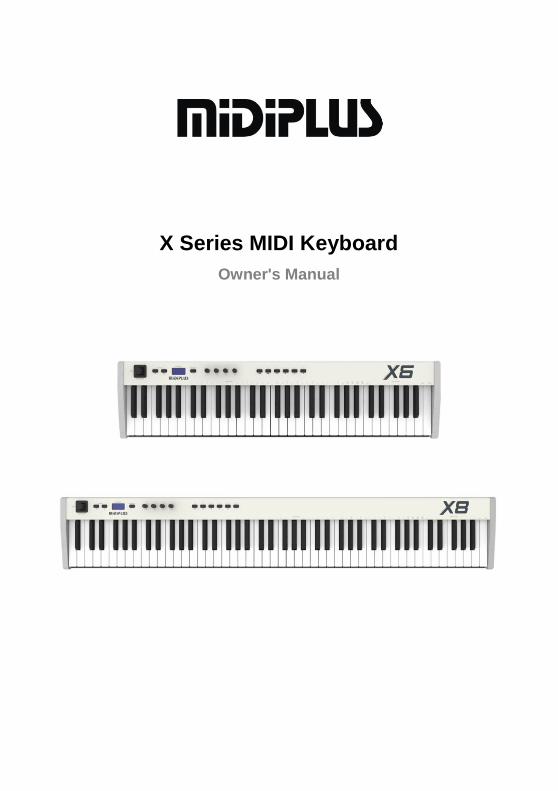
X Series MIDI Keyboard
Owner's Manual
1
1.1.1 Preface
Thank you for purchasing X series MIDI keyboard.X series MIDI keyboard
have various functions which are easy to apply.Connect a USB cable from PC
software to X series MIDI keyboard,you can enjoy the fun of music creation at any
time.This manual can help you to understand X series MIDI keyboard’s functions
and the method of operation rapidly,please to preserve the manual well so that you
can consult more convenient.
2.1.1Safety Attentions
Please pay attention to the following details,avoiding device damage or cause
personal injury.
1. Don’t put or use the device in moist environment,such as bathroom,swimming
pool etc.
2. Don’t put the device under the direct solar radiation or in high temperature
environment,such as the place near the radiator,heating sheetmetal.
3. According to the specification requirement when using external power supply.
4. Please switch off external power,if you don’t use the device for a long time. 5. Don’t let small metal objects drop into the device,avoid to cause internal short
circuit.
6. Don’t open the device by yourself,you should consult relevant professionals.
7. Don’t Prolonged power up the device.
8. Children should learn the safety items under adult’s direction.
9. Don’t let the device near to the radio,loudspeaker,television and other.
equipment when you are using it,avoid to cause electromagnetic interference.
10. Don’t use petrol,alcohol or other solubility of solvent to clean the device,avoid to
cause device damage.Scrub device in a dry or slightly damp cloth,please
unplug the external power supply and USB cable, avoid to cause electric shock.
11. Please unplug external power plug when you don’t use the external power
supply.
12. Please place this devise in a safe place,forbid to drop or throw the device.
13. Don’t use this device in the thunderstorm weather,avoid to cause a lightning
strike.
2
3.1.1Product’s Features ● X series MIDI keyboard have 61/88 dynamic keys.
● USB computer power supply,no external power supply needed.
● Plug and play,requires no driver installation.
● Connect a USB cable to the computer to form your own creation system rapidly.
● New joystick controller controls Pitch and Modulation.
● With mode toggle keys MIDI/Select and Octave tongue keys.
● 4 editable knob controllers(default):1.Volume 2.Pan 3.Expression Controller
4.Reverb.
● Providing 6 conventional tape transport functions and editable keypad controller.
● A MIDI OUT interface send MIDI data to the computer or used as a MIDI
controller.
● Providing a sustain interface.
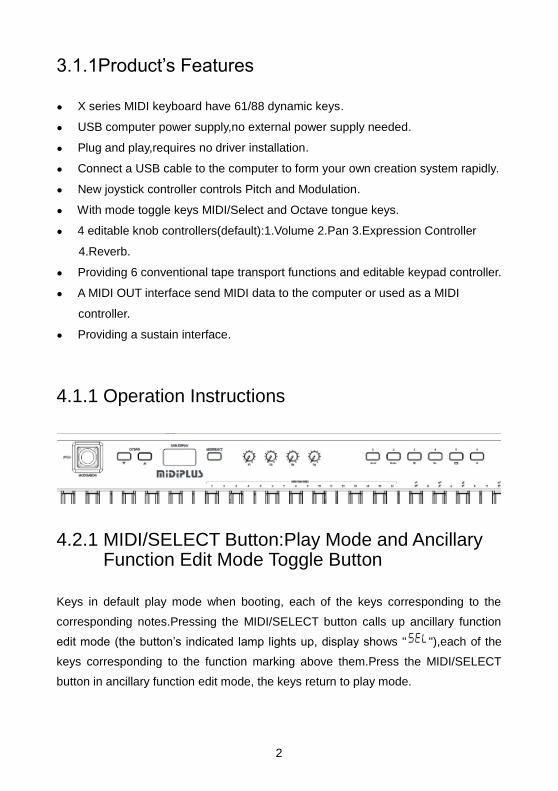
4.1.1 Operation Instructions
4.2.1 MIDI/SELECT Button:Play Mode and Ancillary Function Edit Mode Toggle Button Keys in default play mode when booting, each of the keys corresponding to the
corresponding notes.Pressing the MIDI/SELECT button calls up ancillary function
edit mode (the button’s indicated lamp lights up, display shows " "),each of the
keys corresponding to the function marking above them.Press the MIDI/SELECT
button in ancillary function edit mode, the keys return to play mode.
3
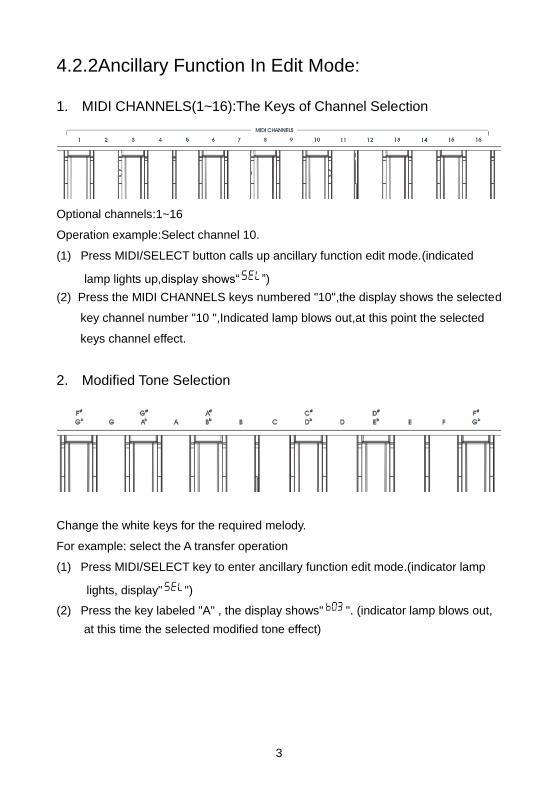
4.2.2Ancillary Function In Edit Mode: 1. MIDI CHANNELS(1~16):The Keys of Channel Selection
Optional channels:1~16
Operation example:Select channel 10.
(1) Press MIDI/SELECT button calls up ancillary function edit mode.(indicated
lamp lights up,display shows“ ”)
(2) Press the MIDI CHANNELS keys numbered "10",the display shows the selected
key channel number "10 ",Indicated lamp blows out,at this point the selected
keys channel effect.
2. Modified Tone Selection
Change the white keys for the required melody.
For example: select the A transfer operation
(1) Press MIDI/SELECT key to enter ancillary function edit mode.(indicator lamp
lights, display" ")
(2) Press the key labeled "A" , the display shows" ". (indicator lamp blows out,
at this time the selected modified tone effect)
4
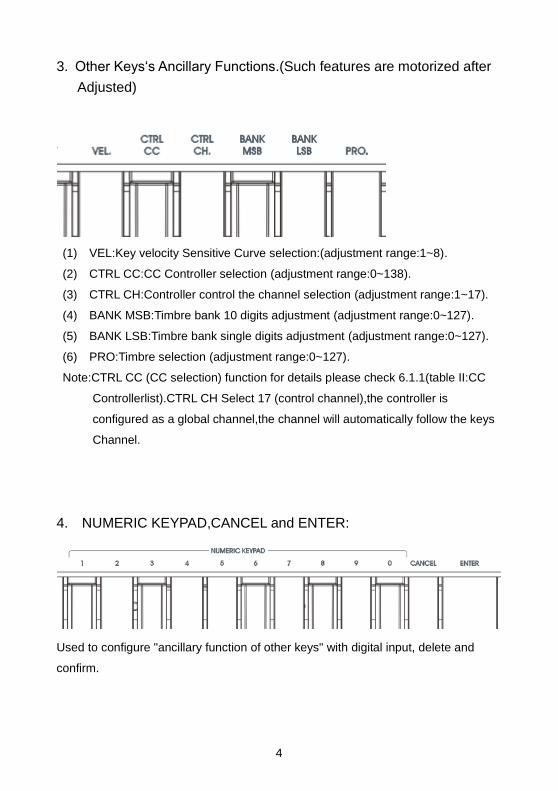
3. Other Keys‘s Ancillary Functions.(Such features are motorized after
Adjusted)
(1) VEL:Key velocity Sensitive Curve selection:(adjustment range:1~8).
(2) CTRL CC:CC Controller selection (adjustment range:0~138).
(3) CTRL CH:Controller control the channel selection (adjustment range:1~17).
(4) BANK MSB:Timbre bank 10 digits adjustment (adjustment range:0~127).
(5) BANK LSB:Timbre bank single digits adjustment (adjustment range:0~127).
(6) PRO:Timbre selection (adjustment range:0~127).
Note:CTRL CC (CC selection) function for details please check 6.1.1(table II:CC
Controllerlist).CTRL CH Select 17 (control channel),the controller is
configured as a global channel,the channel will automatically follow the keys
Channel.
4. NUMERIC KEYPAD,CANCEL and ENTER:
Used to configure "ancillary function of other keys" with digital input, delete and
confirm.
5
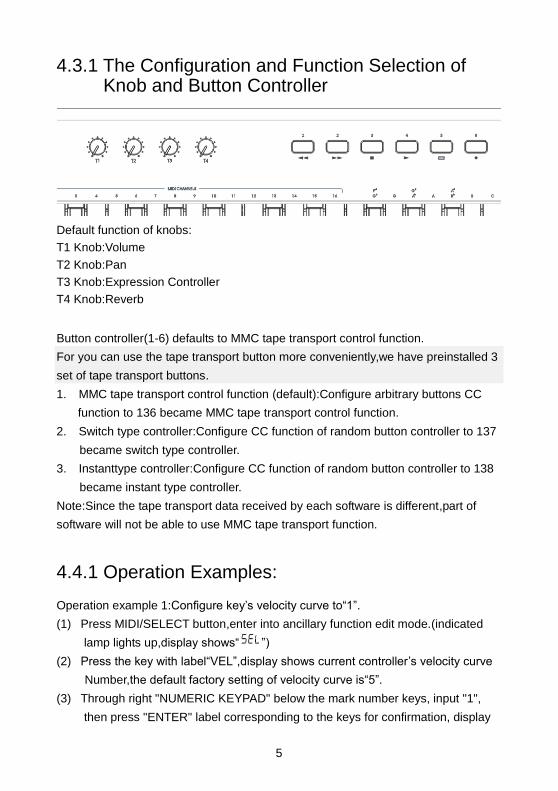
4.3.1 The Configuration and Function Selection of Knob and Button Controller
Default function of knobs:
T1 Knob:Volume
T2 Knob:Pan
T3 Knob:Expression Controller
T4 Knob:Reverb
Button controller(1-6) defaults to MMC tape transport control function.
For you can use the tape transport button more conveniently,we have preinstalled 3
set of tape transport buttons.
1. MMC tape transport control function (default):Configure arbitrary buttons CC
function to 136 became MMC tape transport control function.
2. Switch type controller:Configure CC function of random button controller to 137
became switch type controller.
3. Instanttype controller:Configure CC function of random button controller to 138
became instant type controller.
Note:Since the tape transport data received by each software is different,part of
software will not be able to use MMC tape transport function.
4.4.1 Operation Examples:
Operation example 1:Configure key’s velocity curve to“1”.
(1) Press MIDI/SELECT button,enter into ancillary function edit mode.(indicated
lamp lights up,display shows“ ”)
(2) Press the key with label“VEL”,display shows current controller’s velocity curve
Number,the default factory setting of velocity curve is“5”.
(3) Through right "NUMERIC KEYPAD" below the mark number keys, input "1",
then press "ENTER" label corresponding to the keys for confirmation, display
6
shows " ".
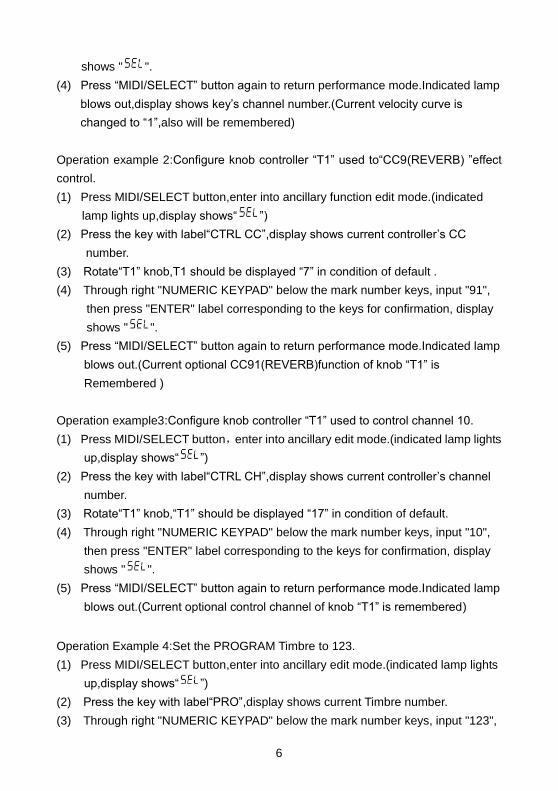
(4) Press “MIDI/SELECT” button again to return performance mode.Indicated lamp
blows out,display shows key’s channel number.(Current velocity curve is
changed to “1”,also will be remembered)
Operation example 2:Configure knob controller “T1” used to“CC9(REVERB) ”effect
control.
(1) Press MIDI/SELECT button,enter into ancillary function edit mode.(indicated
lamp lights up,display shows“ ”)
(2) Press the key with label“CTRL CC”,display shows current controller’s CC
number.
(3) Rotate“T1” knob,T1 should be displayed “7” in condition of default .
(4) Through right "NUMERIC KEYPAD" below the mark number keys, input "91",
then press "ENTER" label corresponding to the keys for confirmation, display
shows " ".
(5) Press “MIDI/SELECT” button again to return performance mode.Indicated lamp
blows out.(Current optional CC91(REVERB)function of knob “T1” is
Remembered )
Operation example3:Configure knob controller “T1” used to control channel 10.
(1) Press MIDI/SELECT button,enter into ancillary edit mode.(indicated lamp lights
up,display shows“ ”)
(2) Press the key with label“CTRL CH”,display shows current controller’s channel
number.
(3) Rotate“T1” knob,“T1” should be displayed “17” in condition of default.
(4) Through right "NUMERIC KEYPAD" below the mark number keys, input "10",
then press "ENTER" label corresponding to the keys for confirmation, display
shows " ".
(5) Press “MIDI/SELECT” button again to return performance mode.Indicated lamp
blows out.(Current optional control channel of knob “T1” is remembered)
Operation Example 4:Set the PROGRAM Timbre to 123.
(1) Press MIDI/SELECT button,enter into ancillary edit mode.(indicated lamp lights
up,display shows“ ”)
(2) Press the key with label“PRO”,display shows current Timbre number.
(3) Through right "NUMERIC KEYPAD" below the mark number keys, input "123",
7
then press "ENTER" label corresponding to the keys for confirmation, display
shows " ".(current PROGRAM takes effect)
(4) Press“MIDI/SELECT” button again to return performance mode.Indicated lamp
blows out,display shows channel number.(Current PROGRAM vale is
Remembered)
Operation Example 5:Set button controller “1” to send CC data”51”.
(1) Press MIDI/SELECT button,enter into ancillary edit mode.(indicated lamp lights
up,display shows“ ”)
(2) Press the key with label“CTRL CC”,display shows current controller‘s CC
number.
(3) Press knob“1”,“1” should be displayed “134” in condition of default.
(4) Through right "NUMERIC KEYPAD" below the mark number keys, input "51",
then press "ENTER" label corresponding to the keys for confirmation, display
shows " ".
(5) Press“MIDI/SELECT” button again to return performance mode.Indicated lamp
blows out.(Current optional CC function is remembered)
Note:Data in memory still be kept in the next boot.
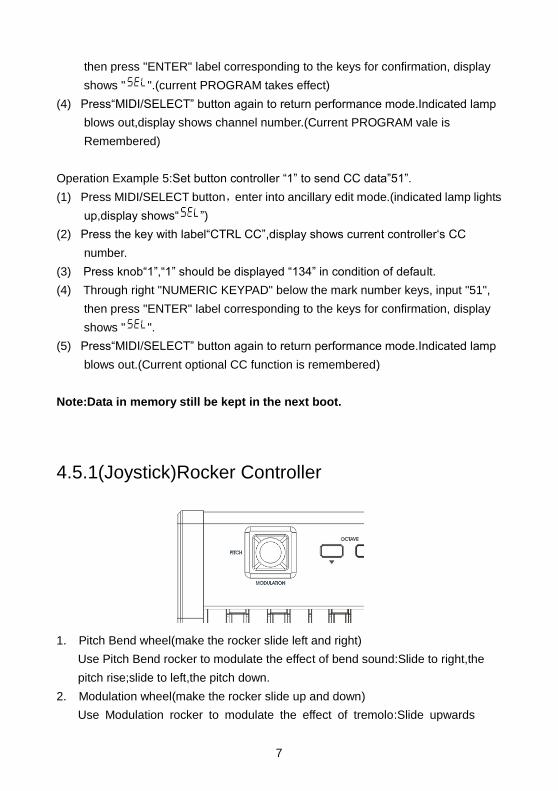
4.5.1(Joystick)Rocker Controller
1. Pitch Bend wheel(make the rocker slide left and right)
Use Pitch Bend rocker to modulate the effect of bend sound:Slide to right,the
pitch rise;slide to left,the pitch down.
2. Modulation wheel(make the rocker slide up and down)
Use Modulation rocker to modulate the effect of tremolo:Slide upwards
8
and tremolo increase,slide down tremolo decrease.
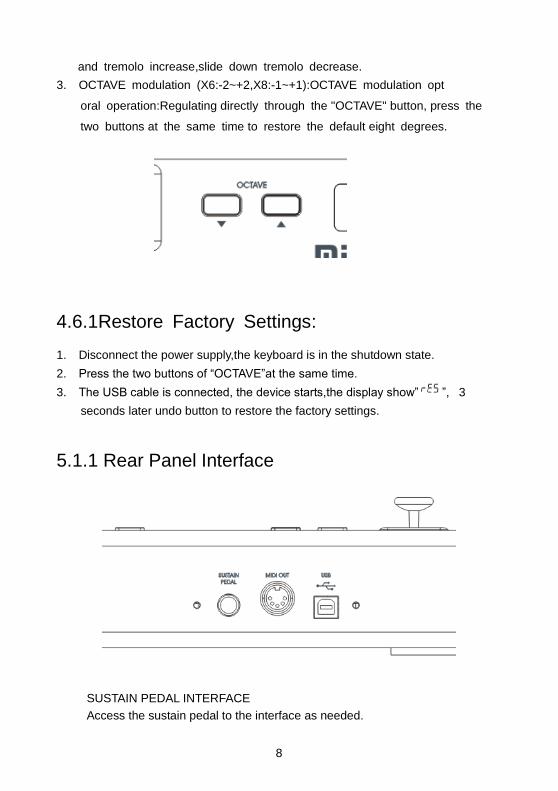
3. OCTAVE modulation (X6:-2~+2,X8:-1~+1):OCTAVE modulation opt
oral operation:Regulating directly through the "OCTAVE" button, press the
two buttons at the same time to restore the default eight degrees.
4.6.1Restore Factory Settings:
1. Disconnect the power supply,the keyboard is in the shutdown state.
2. Press the two buttons of “OCTAVE”at the same time.
3. The USB cable is connected, the device starts,the display show” ”, 3
seconds later undo button to restore the factory settings.
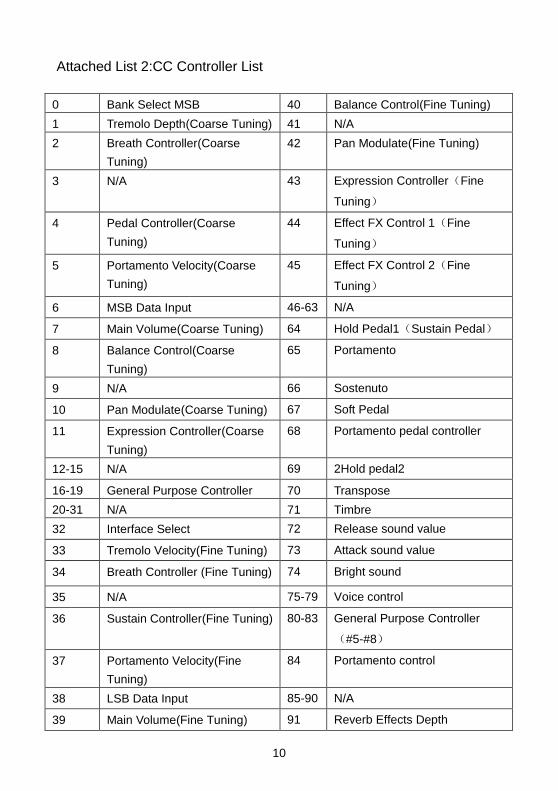
5.1.1 Rear Panel Interface
SUSTAIN PEDAL INTERFACE
Access the sustain pedal to the interface as needed.

9
MIDI OUT INTERFACE
X series MIDI keyboard equipped with a standard MIDI OUT interface, MIDI
OUT interface can send MIDI data to other devices.
USB INTERFACE
Used for X series MIDI keyboard and computer’s connection, transmit
information conveniently, also can provide the power to the device through
this interface.
6.1.1 Attached List
Attached List 1:Specifications Table
PRODUCT SPECIFICATION
Production name X6/X8
Keyboard (61/88 velocity sensitive keys)
Display 3 digit LED screen display
Button MIDI/SELECT,octave group,editable tape transport group
Knobs T1~T4 editable knobs controller
Jacks USB interface,MIDI OUT,sustain pedal
Maximum
Polyphony
64 notes
Accessory USB cable,operation instruction
Weight X6:4.75KG,X8:6.55KG
Size X6:889*78*215
X8:1267*78*215
10
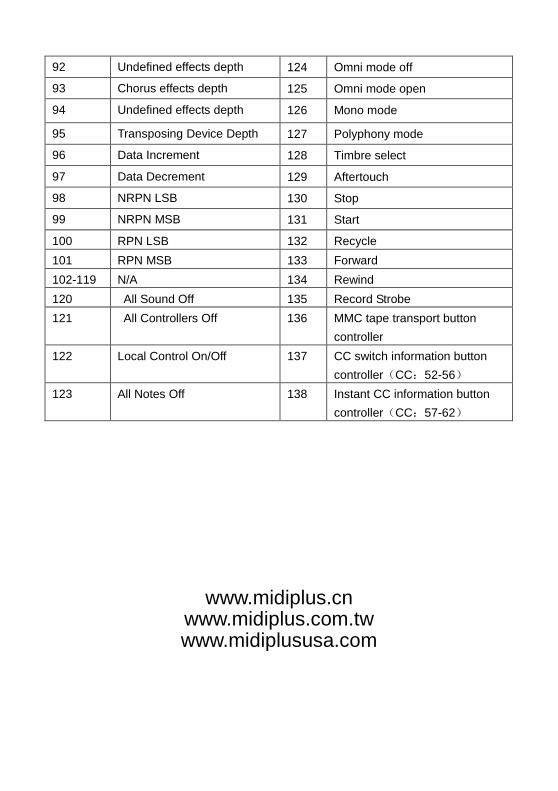
Attached List 2:CC Controller List
0 Bank Select MSB 40 Balance Control(Fine Tuning)
1 Tremolo Depth(Coarse Tuning) 41 N/A
2 Breath Controller(Coarse
Tuning)
42 Pan Modulate(Fine Tuning)
3 N/A 43 Expression Controller(Fine
Tuning)
4 Pedal Controller(Coarse
Tuning)
44 Effect FX Control 1(Fine
Tuning)
5 Portamento Velocity(Coarse
Tuning)
45 Effect FX Control 2(Fine
Tuning)
6 MSB Data Input 46-63 N/A
7 Main Volume(Coarse Tuning) 64 Hold Pedal1(Sustain Pedal)
8 Balance Control(Coarse
Tuning)
65 Portamento
9 N/A 66 Sostenuto
10 Pan Modulate(Coarse Tuning) 67 Soft Pedal
11 Expression Controller(Coarse
Tuning)
68 Portamento pedal controller
12-15 N/A 69 2Hold pedal2
16-19 General Purpose Controller 70 Transpose
20-31 N/A 71 Timbre
32 Interface Select 72 Release sound value
33 Tremolo Velocity(Fine Tuning) 73 Attack sound value
34 Breath Controller (Fine Tuning) 74 Bright sound
35 N/A 75-79 Voice control
36 Sustain Controller(Fine Tuning) 80-83 General Purpose Controller
(#5-#8)
37 Portamento Velocity(Fine
Tuning)
84 Portamento control
38 LSB Data Input 85-90 N/A
39 Main Volume(Fine Tuning) 91 Reverb Effects Depth
11
92 Undefined effects depth 124 Omni mode off
93 Chorus effects depth 125 Omni mode open
94 Undefined effects depth 126 Mono mode
95 Transposing Device Depth 127 Polyphony mode
96 Data Increment 128 Timbre select
97 Data Decrement 129 Aftertouch
98 NRPN LSB 130 Stop
99 NRPN MSB 131 Start
100 RPN LSB 132 Recycle
101 RPN MSB 133 Forward
102-119 N/A 134 Rewind
120 All Sound Off 135 Record Strobe
121 All Controllers Off 136 MMC tape transport button
controller
122 Local Control On/Off 137 CC switch information button
controller(CC:52-56)
123 All Notes Off 138 Instant CC information button
controller(CC:57-62)
www.midiplus.cn www.midiplus.com.tw www.midiplususa.com


![[VOLUME] knob PEAK indicator [KEY] knob · robot voice. You can also play the vocoder voice, or generate harmony notes. 1. Connect a MIDI keyboard or other MIDI device to the MIDI](https://img.pdfslide.us/doc/110x75/5ec9b81e5111e7740627c085/volume-knob-peak-indicator-key-knob-robot-voice-you-can-also-play-the-vocoder.jpg)