Embed Size (px)
Citation preview
P/N 331-10 1 Rev. HH 2 3 4 5
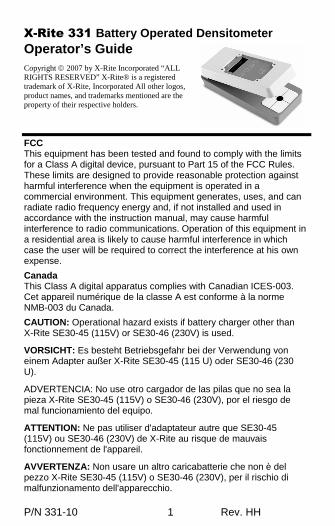
X-Rite 331 Battery Operated Densitometer Operator’s Guide Copyright © 2007 by X-Rite Incorporated “ALL RIGHTS RESERVED” X-Rite® is a registered trademark of X-Rite, Incorporated All other logos, product names, and trademarks mentioned are the property of their respective holders.
FCC This equipment has been tested and found to comply with the limits for a Class A digital device, pursuant to Part 15 of the FCC Rules. These limits are designed to provide reasonable protection against harmful interference when the equipment is operated in a commercial environment. This equipment generates, uses, and can radiate radio frequency energy and, if not installed and used in accordance with the instruction manual, may cause harmful interference to radio communications. Operation of this equipment in a residential area is likely to cause harmful interference in which case the user will be required to correct the interference at his own expense. Canada This Class A digital apparatus complies with Canadian ICES-003. Cet appareil numérique de la classe A est conforme à la norme NMB-003 du Canada. CAUTION: Operational hazard exists if battery charger other than X-Rite SE30-45 (115V) or SE30-46 (230V) is used.
VORSICHT: Es besteht Betriebsgefahr bei der Verwendung von einem Adapter außer X-Rite SE30-45 (115 U) oder SE30-46 (230 U).
ADVERTENCIA: No use otro cargador de las pilas que no sea la pieza X-Rite SE30-45 (115V) o SE30-46 (230V), por el riesgo de mal funcionamiento del equipo.
ATTENTION: Ne pas utiliser d'adaptateur autre que SE30-45 (115V) ou SE30-46 (230V) de X-Rite au risque de mauvais fonctionnement de l'appareil.
AVVERTENZA: Non usare un altro caricabatterie che non è del pezzo X-Rite SE30-45 (115V) o SE30-46 (230V), per il rischio di malfunzionamento dell'apparecchio.
USE ONLY: NICad batteries that are 600/700mAhr minimum rated, four required. Other types may burst causing personal injury.
AUFGEPASST: Verwenden Sie nur Nicad Akkus von 600/700mAhr (Milliampere/Stunde) Nennstrom (4 Stück erforderlich). Mit anderen Akkus läuft die Gefahr von Explosion und Verletzung.
ATENCION: Use solamente las pilas de NiCad (se requiere cuarto) con condiciones de funcionamiento normales 600/700mAhr (horas miliamperios). Es posible que los otros tipos puedan estallar y causar daños corporales.
ATTENTION: Utiliser seulement les batteries NICad à courant nominal de 600mAh (milliampère/heure) (4 pièces nécessaire). Il y a danger d'explosion et de blessures avec les autres types.
ATTENZIONE: Usare solamente gli accumulatori al NiCad (si richiede quattro) con le condizioni di funzionamento normali 600/700mAhr (ore milliamperi). E possibile che altri tipi possano scoppiare e causare danno personale.
CE DECLARATION Manufacturer's Name: X-Rite, Incorporated Manufacturer's Address: 4300 44th Street, S.E. Grand Rapids, Michigan 49512 U.S.A. Model Name: Densitometer Model No.: 331 Directive(s) Conformance: EMC 89/336/EEC LVD 73/23/EEC As of August 13, 2005, X-Rite products meet the European Union – Waste Electrical and Electronic Equipment (WEEE) directive. Please refer to www.xrite.com for more information on X-Rite’s compliance with the WEEE directive. Warning: This is a class A product. In a domestic environment this product may cause radio interference in which case the user may be required to take adequate measures.
Limited Warranty X-Rite, Inc. warrants each instrument manufactured by them to be free of defects in materials and workmanship for a period of 12 months. THERE ARE NO WARRANTIES OF MECHANTABILITY OR FITNESS. THIS WARRANTY OBLIGATION IS LIMITED TO SERVICING THE UNIT RETURNED TO THE FACTORY FOR THAT PURPOSE AND
EXCLUDES THE LAMPS AND BATTERIES. The instrument shall be returned with transportation charges prepaid. If the fault has been caused by misuse or abnormal conditions of operation, repair will be billed at a nominal cost. If requested, an estimate will be submitted before non warranty work is started. X-Rite, Incorporated offers a repair program for instruments out of warranty. For more information, contact X-Rite Customer Service Department. This agreement shall be interpreted in accordance with the laws of the State of Michigan and jurisdiction and venue shall lie with the courts of Michigan as selected by X-Rite, Incorporated.
1. General Information
General Description The 331 instrument is a battery operated hand-held B/W Transmission Densitometer that has achieved the accuracy and stability of our A.C. powered versions. The unique size and shape makes it an ideal totable instrument for use in the plant, the lab, or on the road. The instrument has its own light source and illumination area. Push-button control of display power, lamp, and zero make the instrument easy to use. The 331 measures Density and Density Difference. Specifications
Measuring Geometry Per ANSI PH 2.19 System Response 331 ANSI Visual 331OR Ortho Measuring Range 331 0 – 3.5D (1mm) 0 – 4.0D (2mm) 331OR 0 – 3.2D (1mm) Accuracy < ±.02D Repeatability < ± 0.01D Zero Stability ± 0.03D per 8hr max
Scale Factor (Slope) Stability ±1% per 6 months max Warm-Up Time none Measuring Location 5.5in. (14cm) throat depth Power Requirements Batteries 4 rechargeable AA Ni-Cad batteries AC Adapter 331, SE30-45 (115VAC) 50-60Hz or
331X, SE30-46 (230VAC) 50-60Hz Charge Time Approx. 14 hours Dimensions 2.0in H x 2.9in. W x 7.0in D (5.08cm H x 7.46cm W x 17.78cm D) Weight Gross 2.7lbs (1.2kg) Net 1.5lbs (0.7kg) Operating Temp. Range +10° to +40°C Storage Temp. Range -30° to +50°C Specifications and design subject to change without notice. * This product covered by U.S. Patents and patents pending.
Unpacking Remove the instrument from shipping carton. Inspect for possible damage. If any damage is noted, contact the transportation company immediately. Do nothing more until the carrier’s agent has inspected the damage. If damage is not evident, make sure the following items are included. Registration Card (complete and mail), Transmission Densitometer, Calibration Step Tablet, Soft Vinyl Carrying Case, 1mm (331) and 2mm (331) Apertures, Battery Charger, and Calibration Screwdriver. Your instrument was packaged and shipped in a specially designed carton to assure against damage. If reshipment is necessary, the instrument should be repackaged in the original carton. If the original carton is not available, contact X-Rite to have a replacement carton shipped to you.
2. Operating Instructions
Should your instrument become inoperative, refer to the troubleshooting chart on the opposite side of this sheet. If the problem cannot be rectified, refer the instrument to X-Rite or an authorized service center for proper servicing. Applying Power Your densitometer is designed to operate from its internal batteries or from the battery eliminator. As an added feature, the unit will operate on the battery eliminator with the batteries removed. AC Operation Before using: Make sure the voltage indicated on the battery eliminator complies with the AC line voltage in your area. If not contact your dealer. To apply AC power, plug in the Battery Eliminator and slide the power switch on the bottom to the "ON" position. The top On/Off button is for turning the display on or off. Battery Operation THE UNIT SHOULD BE FULLY CHARGED BEFORE USING FOR THE FIRST TIME. To apply battery power, slide the power switch on the bottom to the "ON" position. The top On and Off buttons are for turning the display on or off. If unit is stored for an extended period of time or unit is transported, it is recommended that the power switch on the bottom be turned off, to preserve battery charge. CAUTION: When the batteries are nearly discharged, a small arrow in the upper left-hand corner of the display appears as an indication that the batteries are in need of recharging. When the arrow appears on the display, the read lamp is disabled. If the arrow displays during a measurement, the data for that measurement will be incorrect. The batteries must be immediately recharged once the arrow indicator is displayed. The densitometer will not operate at all if the batteries have completely lost their charge, until the battery eliminator is plugged in.
6 7 8 9 10
Battery Charging THE UNIT SHOULD BE FULLY CHARGED BEFORE USING FOR THE FIRST TIME. The unit can be operated while the batteries are being charged. Before charging: Make sure the voltage indicated on the battery eliminator complies with the AC line voltage in your area. If not contact your dealer. 1. Turn the power off on the bottom of the unit. 2. Plug small connector end of the charger into side of unit. 3. Plug line cord end of charger in to AC wall outlet. 4. Unit should be fully charged in 14 hours. Note: If your unit
has not been used for several weeks recharge for approximately 24 hours.
A fully charged set of batteries provides approximately 600-700 measurements typical. Turn the power off (on bottom of unit) when the densitometer is not being used, to preserve battery charge. Nulling (zeroing) Procedure Null must be established each time instrument power has been removed for more than one second. This is because the electronic memory is lost with power removal. Null remains very stable (±0.02D) as long as power remains on. Null the instrument as follows: 1. Remove film from reading area. 2. Lower the reading arm. Press the "NULL" button and hold
while pressing the "MEASURE" button. 3. Hold both buttons down until the reading on the display has
stabilized.
Absolute Den Measurement Measure Absolute Density as follows: 1. Null the instrument as previously described. 2. Center the film area in question directly over the aperture
under the reading arm. If you are reading a sensitometric step, the center 1/3 of the step should be measured.
3. Lower the reading arm. Press the "MEASURE" button and hold for a few seconds until the lamp goes out.
4. Remove pressure on the MEASURE button so that the reading arm rises. The density measured will be displayed until the button is pushed again.
NOTE: When measuring density values above 2.50D, care should be taken that the reading head light seal is completely on the surface of the film being measured. Always measure density with the film emulsion side up.
Den Comparison Measurement Compare Density readings as follows: 1. Place reference film over aperture. Null the instrument as
previously described. 2. Place the film to be compared over the aperture and measure
the density. This measurement is the difference between the reference film density and the compared film density. A minus (-) display indicates the compared film is a lower density.
NOTE: The unit can zero on densities up to 1.OOD.
Light Table Illumination Illuminate the light table without making a measurement by pressing the Lamp button. Use this feature in locating film spots to be measured.
3. Calibration
Frequency of Calibration Test Under normal operating conditions, the instrument calibration test should be performed once a week. Calibration Test Calibration of this instrument should remain stable over a long period of time and over an extended range of voltage and temperature. However, if calibration is questioned a calibrated step tablet is provided to check against. Handle this tablet with care so that no dirt or fingerprints are deposited on the film surface.
Check calibration in the center of the step tablet area marked "CAL. "This measurement should be within +0.02D of the value marked on the step tablet. Always return the step tablet to its protective cover. Cal Procedure If calibration needs to be changed, proceed as follows: 1. Insert a small screwdriver into the hole on the right side of
the instrument, engaging the potentiometer slot inside. 2. Measure the calibrated step tablet in the center of the area
marked "CAL." 3. If the reading in the display does not equal that of the
calibrated step tablet, adjust the potentiometer until it does. • To increase scale factor, rotate the screwdriver
counterclockwise. 4. Check the units null (zero) and renull if necessary. 5. Repeat Steps 3 and 4 until the calibration and null settings
are exact: NOTE: The instrument measures for only a few seconds after the "MEASURE" button is pushed and held. Potentiometer changes after the bulb turns off and will not be noted until a new measurement is made.
4. Maintenance
General The densitometer is covered by a one-year limited warranty (excluding lamps and batteries) and should be referred to the factory for repair within this warranty period. Attempts to make repairs within this time frame may void the warranty. Always verify instrument calibration to assure proper instrument operation. Make sure all connections are properly made. Factory Repair X-Rite, Inc. recognizes the need to provide complete technical repair service to their customers. Because of the complexity of the circuitry, all circuitry repairs should be referred to the factory or an authorized repair station.
The manufacturer will repair any densitometer submitted past warranty. Shipping costs to the factory shall be payed by the customer and the instrument shall be submitted in its special carton as a complete unaltered unit. Lamp Replacement A spare Lamp Assembly (P/N 331-129) can be obtained from X-Rite, Inc. should your lamp fail. Replace as follows: NOTE: Refer to the illustration. 1. Remove the bottom cover from the instrument by removing
the four screws from the bottom cover. 2. Unplug the lamp connector from the P.C.B. assembly. 3. Remove the screws holding the lamp assembly. Remove the
lamp assembly. 4. Fasten the new lamp into the lamp chamber assembly with
the screws removed in Step 3. CAUTION: Make sure the new lamp surface is clean. Remove smudgemarks with alcohol on a lint-free cloth. 5. Plug the lamp connector into the respective receptacle on the
P.C.B. assembly. 6. Fasten the bottom cover to the instrument with the four
screws removed in Step 1.
Battery Replacement If it becomes necessary to replace the batteries, use only another set of batteries like the ones shipped with your densitometer. The batteries used are AA Nicad with 600mahr capacity. REPLACE ALL FOUR BATTERIES IF ONE OR MORE IS BAD. CAUTION: Use of any batteries other than those recommended above may result in damage to your densitometer and may void the warranty. NOTE: Refer to the illustration. To replace the batteries, use the following procedure: 1. Set the densitometer ON/OFF switch (located on the bottom
of unit) to OFF and disconnect the battery eliminator from the densitometer.
2. Remove the bottom cover by removing the four screws.
3. Pull out the batteries one by one, removing the batteries near the center first, then the batteries at the sides.
4. To install new batteries, insert into the two outside locations of the battery holder first. Next, place the batteries in the center positions (paying attention to proper polarity) compressing the spring as needed.
Lamp Assembly
Screws
NiCad Batteries
Battery Plug
Lamp Plug
ON/OFF Switch
P/N 331-10 1 Rev. HH 2 3 4 5
X-Rite 331 Battery Operated Densitometer Operator’s Guide Copyright © 2007 by X-Rite Incorporated “ALL RIGHTS RESERVED” X-Rite® is a registered trademark of X-Rite, Incorporated All other logos, product names, and trademarks mentioned are the property of their respective holders.
FCC This equipment has been tested and found to comply with the limits for a Class A digital device, pursuant to Part 15 of the FCC Rules. These limits are designed to provide reasonable protection against harmful interference when the equipment is operated in a commercial environment. This equipment generates, uses, and can radiate radio frequency energy and, if not installed and used in accordance with the instruction manual, may cause harmful interference to radio communications. Operation of this equipment in a residential area is likely to cause harmful interference in which case the user will be required to correct the interference at his own expense. Canada This Class A digital apparatus complies with Canadian ICES-003. Cet appareil numérique de la classe A est conforme à la norme NMB-003 du Canada. CAUTION: Operational hazard exists if battery charger other than X-Rite SE30-45 (115V) or SE30-46 (230V) is used.
VORSICHT: Es besteht Betriebsgefahr bei der Verwendung von einem Adapter außer X-Rite SE30-45 (115 U) oder SE30-46 (230 U).
ADVERTENCIA: No use otro cargador de las pilas que no sea la pieza X-Rite SE30-45 (115V) o SE30-46 (230V), por el riesgo de mal funcionamiento del equipo.
ATTENTION: Ne pas utiliser d'adaptateur autre que SE30-45 (115V) ou SE30-46 (230V) de X-Rite au risque de mauvais fonctionnement de l'appareil.
AVVERTENZA: Non usare un altro caricabatterie che non è del pezzo X-Rite SE30-45 (115V) o SE30-46 (230V), per il rischio di malfunzionamento dell'apparecchio.
USE ONLY: NICad batteries that are 600/700mAhr minimum rated, four required. Other types may burst causing personal injury.
AUFGEPASST: Verwenden Sie nur Nicad Akkus von 600/700mAhr (Milliampere/Stunde) Nennstrom (4 Stück erforderlich). Mit anderen Akkus läuft die Gefahr von Explosion und Verletzung.
ATENCION: Use solamente las pilas de NiCad (se requiere cuarto) con condiciones de funcionamiento normales 600/700mAhr (horas miliamperios). Es posible que los otros tipos puedan estallar y causar daños corporales.
ATTENTION: Utiliser seulement les batteries NICad à courant nominal de 600mAh (milliampère/heure) (4 pièces nécessaire). Il y a danger d'explosion et de blessures avec les autres types.
ATTENZIONE: Usare solamente gli accumulatori al NiCad (si richiede quattro) con le condizioni di funzionamento normali 600/700mAhr (ore milliamperi). E possibile che altri tipi possano scoppiare e causare danno personale.
CE DECLARATION Manufacturer's Name: X-Rite, Incorporated Manufacturer's Address: 4300 44th Street, S.E. Grand Rapids, Michigan 49512 U.S.A. Model Name: Densitometer Model No.: 331 Directive(s) Conformance: EMC 89/336/EEC LVD 73/23/EEC As of August 13, 2005, X-Rite products meet the European Union – Waste Electrical and Electronic Equipment (WEEE) directive. Please refer to www.xrite.com for more information on X-Rite’s compliance with the WEEE directive. Warning: This is a class A product. In a domestic environment this product may cause radio interference in which case the user may be required to take adequate measures.
Limited Warranty X-Rite, Inc. warrants each instrument manufactured by them to be free of defects in materials and workmanship for a period of 12 months. THERE ARE NO WARRANTIES OF MECHANTABILITY OR FITNESS. THIS WARRANTY OBLIGATION IS LIMITED TO SERVICING THE UNIT RETURNED TO THE FACTORY FOR THAT PURPOSE AND
EXCLUDES THE LAMPS AND BATTERIES. The instrument shall be returned with transportation charges prepaid. If the fault has been caused by misuse or abnormal conditions of operation, repair will be billed at a nominal cost. If requested, an estimate will be submitted before non warranty work is started. X-Rite, Incorporated offers a repair program for instruments out of warranty. For more information, contact X-Rite Customer Service Department. This agreement shall be interpreted in accordance with the laws of the State of Michigan and jurisdiction and venue shall lie with the courts of Michigan as selected by X-Rite, Incorporated.
1. General Information
General Description The 331 instrument is a battery operated hand-held B/W Transmission Densitometer that has achieved the accuracy and stability of our A.C. powered versions. The unique size and shape makes it an ideal totable instrument for use in the plant, the lab, or on the road. The instrument has its own light source and illumination area. Push-button control of display power, lamp, and zero make the instrument easy to use. The 331 measures Density and Density Difference. Specifications
Measuring Geometry Per ANSI PH 2.19 System Response 331 ANSI Visual 331OR Ortho Measuring Range 331 0 – 3.5D (1mm) 0 – 4.0D (2mm) 331OR 0 – 3.2D (1mm) Accuracy < ±.02D Repeatability < ± 0.01D Zero Stability ± 0.03D per 8hr max
Scale Factor (Slope) Stability ±1% per 6 months max Warm-Up Time none Measuring Location 5.5in. (14cm) throat depth Power Requirements Batteries 4 rechargeable AA Ni-Cad batteries AC Adapter 331, SE30-45 (115VAC) 50-60Hz or
331X, SE30-46 (230VAC) 50-60Hz Charge Time Approx. 14 hours Dimensions 2.0in H x 2.9in. W x 7.0in D (5.08cm H x 7.46cm W x 17.78cm D) Weight Gross 2.7lbs (1.2kg) Net 1.5lbs (0.7kg) Operating Temp. Range +10° to +40°C Storage Temp. Range -30° to +50°C Specifications and design subject to change without notice. * This product covered by U.S. Patents and patents pending.
Unpacking Remove the instrument from shipping carton. Inspect for possible damage. If any damage is noted, contact the transportation company immediately. Do nothing more until the carrier’s agent has inspected the damage. If damage is not evident, make sure the following items are included. Registration Card (complete and mail), Transmission Densitometer, Calibration Step Tablet, Soft Vinyl Carrying Case, 1mm (331) and 2mm (331) Apertures, Battery Charger, and Calibration Screwdriver. Your instrument was packaged and shipped in a specially designed carton to assure against damage. If reshipment is necessary, the instrument should be repackaged in the original carton. If the original carton is not available, contact X-Rite to have a replacement carton shipped to you.
2. Operating Instructions
Should your instrument become inoperative, refer to the troubleshooting chart on the opposite side of this sheet. If the problem cannot be rectified, refer the instrument to X-Rite or an authorized service center for proper servicing. Applying Power Your densitometer is designed to operate from its internal batteries or from the battery eliminator. As an added feature, the unit will operate on the battery eliminator with the batteries removed. AC Operation Before using: Make sure the voltage indicated on the battery eliminator complies with the AC line voltage in your area. If not contact your dealer. To apply AC power, plug in the Battery Eliminator and slide the power switch on the bottom to the "ON" position. The top On/Off button is for turning the display on or off. Battery Operation THE UNIT SHOULD BE FULLY CHARGED BEFORE USING FOR THE FIRST TIME. To apply battery power, slide the power switch on the bottom to the "ON" position. The top On and Off buttons are for turning the display on or off. If unit is stored for an extended period of time or unit is transported, it is recommended that the power switch on the bottom be turned off, to preserve battery charge. CAUTION: When the batteries are nearly discharged, a small arrow in the upper left-hand corner of the display appears as an indication that the batteries are in need of recharging. When the arrow appears on the display, the read lamp is disabled. If the arrow displays during a measurement, the data for that measurement will be incorrect. The batteries must be immediately recharged once the arrow indicator is displayed. The densitometer will not operate at all if the batteries have completely lost their charge, until the battery eliminator is plugged in.
6 7 8 9 10
Battery Charging THE UNIT SHOULD BE FULLY CHARGED BEFORE USING FOR THE FIRST TIME. The unit can be operated while the batteries are being charged. Before charging: Make sure the voltage indicated on the battery eliminator complies with the AC line voltage in your area. If not contact your dealer. 1. Turn the power off on the bottom of the unit. 2. Plug small connector end of the charger into side of unit. 3. Plug line cord end of charger in to AC wall outlet. 4. Unit should be fully charged in 14 hours. Note: If your unit
has not been used for several weeks recharge for approximately 24 hours.
A fully charged set of batteries provides approximately 600-700 measurements typical. Turn the power off (on bottom of unit) when the densitometer is not being used, to preserve battery charge. Nulling (zeroing) Procedure Null must be established each time instrument power has been removed for more than one second. This is because the electronic memory is lost with power removal. Null remains very stable (±0.02D) as long as power remains on. Null the instrument as follows: 1. Remove film from reading area. 2. Lower the reading arm. Press the "NULL" button and hold
while pressing the "MEASURE" button. 3. Hold both buttons down until the reading on the display has
stabilized.
Absolute Den Measurement Measure Absolute Density as follows: 1. Null the instrument as previously described. 2. Center the film area in question directly over the aperture
under the reading arm. If you are reading a sensitometric step, the center 1/3 of the step should be measured.
3. Lower the reading arm. Press the "MEASURE" button and hold for a few seconds until the lamp goes out.
4. Remove pressure on the MEASURE button so that the reading arm rises. The density measured will be displayed until the button is pushed again.
NOTE: When measuring density values above 2.50D, care should be taken that the reading head light seal is completely on the surface of the film being measured. Always measure density with the film emulsion side up.
Den Comparison Measurement Compare Density readings as follows: 1. Place reference film over aperture. Null the instrument as
previously described. 2. Place the film to be compared over the aperture and measure
the density. This measurement is the difference between the reference film density and the compared film density. A minus (-) display indicates the compared film is a lower density.
NOTE: The unit can zero on densities up to 1.OOD.
Light Table Illumination Illuminate the light table without making a measurement by pressing the Lamp button. Use this feature in locating film spots to be measured.
3. Calibration
Frequency of Calibration Test Under normal operating conditions, the instrument calibration test should be performed once a week. Calibration Test Calibration of this instrument should remain stable over a long period of time and over an extended range of voltage and temperature. However, if calibration is questioned a calibrated step tablet is provided to check against. Handle this tablet with care so that no dirt or fingerprints are deposited on the film surface.
Check calibration in the center of the step tablet area marked "CAL. "This measurement should be within +0.02D of the value marked on the step tablet. Always return the step tablet to its protective cover. Cal Procedure If calibration needs to be changed, proceed as follows: 1. Insert a small screwdriver into the hole on the right side of
the instrument, engaging the potentiometer slot inside. 2. Measure the calibrated step tablet in the center of the area
marked "CAL." 3. If the reading in the display does not equal that of the
calibrated step tablet, adjust the potentiometer until it does. • To increase scale factor, rotate the screwdriver
counterclockwise. 4. Check the units null (zero) and renull if necessary. 5. Repeat Steps 3 and 4 until the calibration and null settings
are exact: NOTE: The instrument measures for only a few seconds after the "MEASURE" button is pushed and held. Potentiometer changes after the bulb turns off and will not be noted until a new measurement is made.
4. Maintenance
General The densitometer is covered by a one-year limited warranty (excluding lamps and batteries) and should be referred to the factory for repair within this warranty period. Attempts to make repairs within this time frame may void the warranty. Always verify instrument calibration to assure proper instrument operation. Make sure all connections are properly made. Factory Repair X-Rite, Inc. recognizes the need to provide complete technical repair service to their customers. Because of the complexity of the circuitry, all circuitry repairs should be referred to the factory or an authorized repair station.
The manufacturer will repair any densitometer submitted past warranty. Shipping costs to the factory shall be payed by the customer and the instrument shall be submitted in its special carton as a complete unaltered unit. Lamp Replacement A spare Lamp Assembly (P/N 331-129) can be obtained from X-Rite, Inc. should your lamp fail. Replace as follows: NOTE: Refer to the illustration. 1. Remove the bottom cover from the instrument by removing
the four screws from the bottom cover. 2. Unplug the lamp connector from the P.C.B. assembly. 3. Remove the screws holding the lamp assembly. Remove the
lamp assembly. 4. Fasten the new lamp into the lamp chamber assembly with
the screws removed in Step 3. CAUTION: Make sure the new lamp surface is clean. Remove smudgemarks with alcohol on a lint-free cloth. 5. Plug the lamp connector into the respective receptacle on the
P.C.B. assembly. 6. Fasten the bottom cover to the instrument with the four
screws removed in Step 1.
Battery Replacement If it becomes necessary to replace the batteries, use only another set of batteries like the ones shipped with your densitometer. The batteries used are AA Nicad with 600mahr capacity. REPLACE ALL FOUR BATTERIES IF ONE OR MORE IS BAD. CAUTION: Use of any batteries other than those recommended above may result in damage to your densitometer and may void the warranty. NOTE: Refer to the illustration. To replace the batteries, use the following procedure: 1. Set the densitometer ON/OFF switch (located on the bottom
of unit) to OFF and disconnect the battery eliminator from the densitometer.
2. Remove the bottom cover by removing the four screws.
3. Pull out the batteries one by one, removing the batteries near the center first, then the batteries at the sides.
4. To install new batteries, insert into the two outside locations of the battery holder first. Next, place the batteries in the center positions (paying attention to proper polarity) compressing the spring as needed.
Lamp Assembly
Screws
NiCad Batteries
Battery Plug
Lamp Plug
ON/OFF Switch
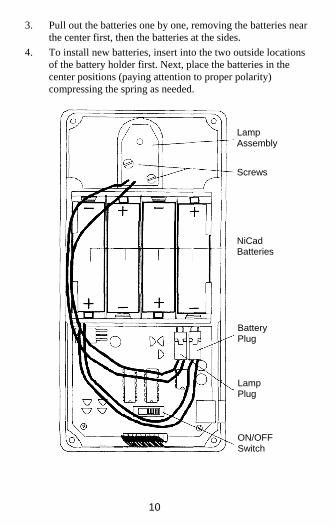
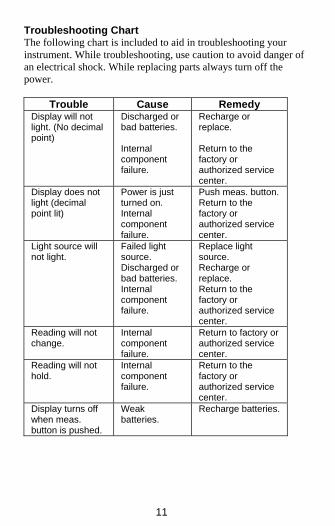
11 12
Troubleshooting Chart The following chart is included to aid in troubleshooting your instrument. While troubleshooting, use caution to avoid danger of an electrical shock. While replacing parts always turn off the power.
Trouble Cause Remedy Display will not light. (No decimal point)
Discharged or bad batteries. Internal component failure.
Recharge or replace. Return to the factory or authorized service center.
Display does not light (decimal point lit)
Power is just turned on. Internal component failure.
Push meas. button. Return to the factory or authorized service center.
Light source will not light.
Failed light source. Discharged or bad batteries. Internal component failure.
Replace light source. Recharge or replace. Return to the factory or authorized service center.
Reading will not change.
Internal component failure.
Return to factory or authorized service center.
Reading will not hold.
Internal component failure.
Return to the factory or authorized service center.
Display turns off when meas. button is pushed.
Weak batteries.
Recharge batteries.
Corporate Headquarters - USA 4300 44th Street SE Grand Rapids, Michigan 49512 Phone 1 800 248 9748 or 1 616 803 2100 Fax 1 800 292 4437 or 1 616 803 2705 Corporate Headquarters - Europe Althardstrasse 70 8105 Regensdorf Switzerland Phone (+41) 44 842 24 00 Fax (+41) 44 842 22 22 Corporate Headquarters - Asia Room 808-810 Kornhill Metro Tower, 1 Kornhill Road Quarry Bay, Hong Kong Phone (+852) 2 568 6283 Fax (+852) 2 885 8610 Please visit www.xrite.com for a local office near you.