Embed Size (px)
Citation preview
1
WyrdWars v.1.4.2 BASIC RULES Unit Characteristics 2 The Turn 3 Moving and Hiding 4
Charging 5
Shooting 6
Close Combat 7
Spells and Prayers 8
Panic Fleeing 9
Special Rules 10
CAMPAIGN
Creating a Warband 11
Arming Warriors 11
Weapons and Armour 12
Skills 16
Scenarios 20
Random Happenings 30
Post-game Sequence 34
Exploration Chart 35
Magic Items 38
Experience and Level Up 42
Victory Points 43
Injuries 43
Campaign Injury Chart 44
REFERENCE
Play Sheets and Critical Hits 45
Miscast and Misfire Charts 48
Version History 49
2
Unit Characteristics Movement (M) How far the warrior can move in inches. Weapon Skill (WS) The warrior’s ability to hit in close combat. Ballistic Skill (BS) The warrior’s ability to hit with missile weapons. Strength (S) How hard the warrior hits in close combat. Toughness (T) The warrior’s ability to withstand blows. Wounds (W) How many times the warrior can be wounded before going out of action. Initiative (I) How fast the warrior strikes in close combat, how good he is at climbing buildings, and how alert he is to the presence of hidden enemies. Attacks (A) How many blows the warrior can land in a single round of close combat. Leadership (Ld) How brave and courageous the warrior is. Characteristics Tests When the rules refer to a characteristics test, such as a “Strength test,” an “Initiative test” and so on, this is the way to test it:
Roll a D6: If the result is equal to, or lower than the warrior’s characteristic, the test is passed. Otherwise it is failed. (E.g. if the warrior has a value of 3, then 1-3 is passed and 4-6 is failed.
A natural 1 always succeeds and a natural 6 always fails, regardless of the warrior’s characteristic.
(Leadership is tested on 2D6, see below.)
Maximum and Minimum Characteristics Characteristics may be increased to any level, but cannot be reduced below 1.
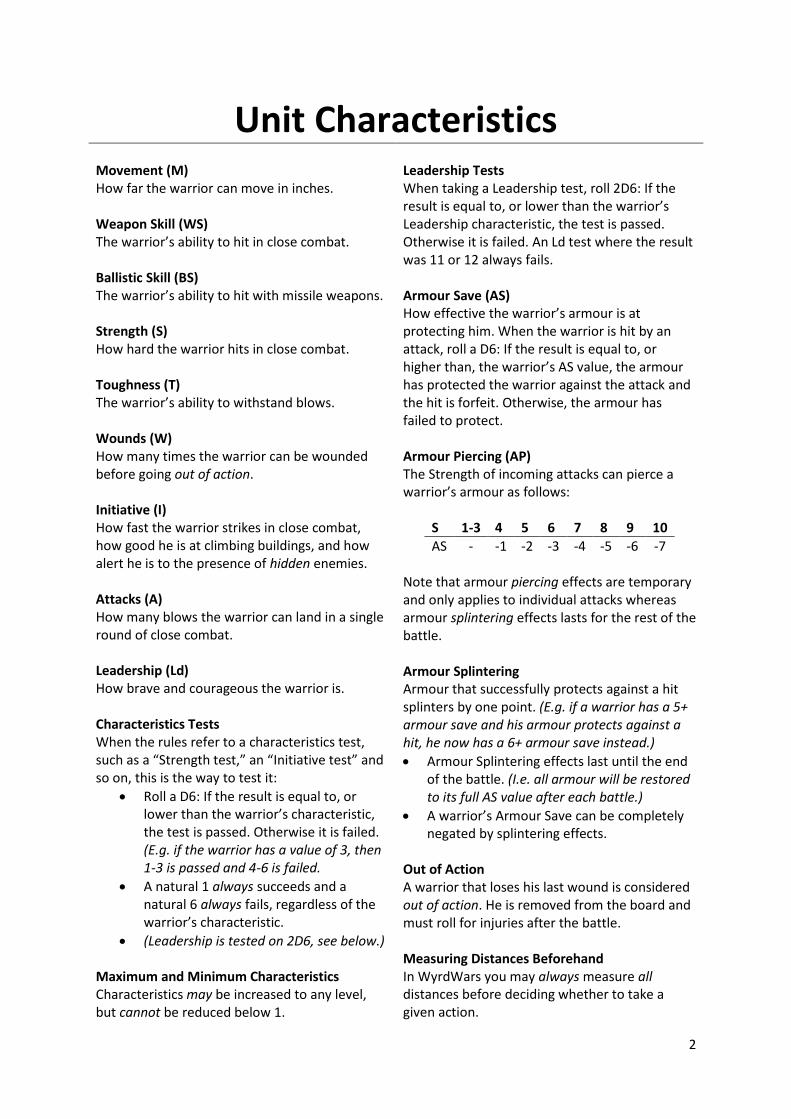
Leadership Tests When taking a Leadership test, roll 2D6: If the result is equal to, or lower than the warrior’s Leadership characteristic, the test is passed. Otherwise it is failed. An Ld test where the result was 11 or 12 always fails. Armour Save (AS) How effective the warrior’s armour is at protecting him. When the warrior is hit by an attack, roll a D6: If the result is equal to, or higher than, the warrior’s AS value, the armour has protected the warrior against the attack and the hit is forfeit. Otherwise, the armour has failed to protect. Armour Piercing (AP) The Strength of incoming attacks can pierce a warrior’s armour as follows:
S 1-3 4 5 6 7 8 9 10
AS - -1 -2 -3 -4 -5 -6 -7 Note that armour piercing effects are temporary and only applies to individual attacks whereas armour splintering effects lasts for the rest of the battle. Armour Splintering Armour that successfully protects against a hit splinters by one point. (E.g. if a warrior has a 5+ armour save and his armour protects against a hit, he now has a 6+ armour save instead.)
Armour Splintering effects last until the end of the battle. (I.e. all armour will be restored to its full AS value after each battle.)
A warrior’s Armour Save can be completely negated by splintering effects.
Out of Action A warrior that loses his last wound is considered out of action. He is removed from the board and must roll for injuries after the battle. Measuring Distances Beforehand In WyrdWars you may always measure all distances before deciding whether to take a given action.
3
The Turn 1. Power Phase
A. All of your non-fleeing Wizards automatically gain 1 Power Dice.
B. All of your non-fleeing Priests must take a Leadership test. Those that pass generate 1 Power Dice.
C. If playing with Random Happenings, the active player rolls a D6. On a roll of 1, a random happening occurs.
2. Deployment Phase Deploy all warriors that the scenario dictates. (Note that since this is after the Power Phase, Wizards and Priests do not generate Power Dice the turn they are deployed.)
In all scenarios, Wizards and Priests entering the battle on Turn 7 or later start the battle with one free Power Dice (this stacks with other abilities that cause them to start with Power Dice).
3. Charge Phase
A. Declare all charges that you wish to make. (You may measure the distance beforehand.)
B. Once all charges have been declared, work through each charge one at a time, in any order that you wish.
4. Rally Phase All your fleeing warriors may take a Leadership test if you want them to. If passed, they rally, if failed, they immediately flee 2D6” again and can do nothing else that turn.
Warriors that have rallied act as normal for the rest of the turn except that they cannot declare a charge, shoot a missile weapon, attempt to cast a spell or prayer, or generate Power Dice.
5. Movement Phase
A. Move any of your warriors that you wish, working through them one at a time, in any order that you wish.
B. Declare which of your warriors that are hiding.
6. Shooting Each of your warriors may shoot a missile weapon or attempt to cast a spell or prayer. Work through your warriors, one at a time, in any order that you wish. 7. Close Combat All warriors engaged in close combat fight.
(Wizards and Priests may fight, even if they cast a spell or prayer in the shooting phase.)
(Unlike the shooting phase, where only your own warriors get to shoot, enemy warriors get to fight back in close combat.)
© Giorgos Magakis
4
Moving and Hiding Normal Moves Warrior moves up to his Movement value in inches. Running Moves (No Enemies Within 6”) Warrior moves up to twice his Movement value in inches. He cannot hide, shoot a missile weapon, or cast spells or prayers this turn.
Warriors cannot run if there is a non-fleeing, non-hidden, visible enemy within 6” of them.
Moving over Obstacles Warriors can move over obstacles up to 1” high without using Movement or needing climb tests. Climbing Up/Down (Single I Test) Warriors can climb up to 6” up or down. There does not have to be a wall or solid surface between the start and end of the climb.
Climbing uses Movement (i.e. it counts towards the number of inches the warrior can move this turn).
To climb, a warrior must take a single Initiative test: If passed, he climbs.
Failing Climb Tests
If a warrior fails a climb up test, he stops at the foot of where he started to climb. He cannot move any further this turn, but may still shoot a missile weapon or attempt to cast a spell or prayer.
If a warrior fails a climb down test, he falls the entire distance and cannot shoot or attempt to cast spells or prayers.
Jumping Down (Multiple I Tests) A warrior that jumps down must take an Initiative test for each full 2” jumped: If he passes them all, he lands safely and may continue his turn as normal. But if he fails any of these tests, he fails the jump and falls the entire distance.
Jumping down does not use Movement (i.e. the distance jumped does not count towards the number of inches the warrior can move this turn).
Jumping Horizontally (Up to 6”) Warriors can jump over gaps that are up to 6” wide. Jumping horizontally uses Movement, but no dice rolls are required. (You may measure the distance beforehand.) Falling Warriors can only fall distances that exceed 1”. A warrior that falls may not do anything else for the rest of his turn, except fight back in close combat if he is engaged. Falling Damage (D3 SX Hits) A warrior that falls down takes D3 Strength X hits where X is equal to the distance in inches that he fell. Falling damage ignores armour saves (but not Regeneration or Ward saves). Falling off Buildings (Within 1” of Edge) Warriors that lose a Wound within 1” of an elevated edge or rooftop must pass an Initiative or fall to the floor below, taking falling damage as normal. (Warriors will not fall off edges that have railings or walls that reach up to their waists on all sides.)
Warriors do not gain Free Hacks against enemies that fall “out of” close combat in this way, but they do gain experience if they hit an enemy with an attack that causes him to fall off a building and the enemy is then taken out of action by the falling damage.
Hiding A warrior that is in cover and/or out of line of sight from all enemies may hide. Hidden warriors may move as normal, but cannot be charged, shot at, or targeted with prayers or spells. If a warrior can fly for any reason, he cannot hide at the end of a flying move. A Hidden Warrior is Automatically Un-Hidden If:
He runs, declares a charge, shoots, or attempts to cast a spell or prayer.
An enemy comes within its Initiative value in inches of him (even if he does not have line of sight).
An enemy has completely unobstructed line of sight to him (i.e. no cover).
5
Charging Must Charge to Fight Warriors can only enter close combat by successfully charging an enemy. Warriors cannot move within 1” of an enemy through normal moves or running moves. Charge Bonus (+1 Initiative to Strike Order) Warriors that successfully charge an enemy gain +1 Initiative when determining strike order in close combat that turn. (This bonus only applies to strike order, and not to climb tests, etc.) Declaring a Charge You may declare a charge against any visible, non-hidden enemy and you may measure the distance beforehand. Distance Moved when Charging When a warrior attempts a charge, roll 2D6 and add the warrior’s base Movement to the highest D6: If the total distance is enough to reach the enemy, the charge is successful. Otherwise, it is a failed charge. Charges Involving Climbing Up/Down When a charge involves climbing, the charging warrior must pass an Initiative test as described in the movement section. If the test is flailed, the charge also fails. If the warrior failed while climbing down, he also falls the entire distance. Charges Involving Jumping Down When a charge involves jumping down, the charging warrior must pass an Initiative test for each full 2” jumped as described in the movement section. If he fails any one of these tests, the charge also fails and he falls the entire distance. Diving Charges (+1 Strength and +D3 Initiative) If a charge involving Jumping Down is successful and is executed so that the charger lands within 1” of his target, the charger gains an additional +1 Strength and an additional +D3 Initiative to strike order that turn (stacks with the +1 I for charging). These bonuses may take the warrior above his racial maximums.
Charging Hidden Enemies Hidden enemies cannot be charged. Charging Enemies without Line of Sight When charging enemies without line of sight (i.e. that are around a corner, behind a wall, etc.) the charging warrior must pass a single Initiative test. If failed, he fails the charge. Charges and Climbing/ Jumping/ Line of Sight Charges can involve any combination of climbing, jumping, and charging around corners, however all Initiative tests required to do so stack. Failing a Charge Warriors that fail a charge may not shoot missile weapons or cast spells or prayers that turn.
Normally, a warrior that fails a charge is moved his base Movement value in inches towards his target (and is stopped before he would move within 1” of any enemy, if he would otherwise do so).
However, if a charge fails because of a failed climb up test, the warrior stops at the foot of where he tried to climb.
If a charge fails because of a failed climb down or jump down test, the warrior stops where he fell.
Intercepting (2”) If a warrior is within 2” of an enemy’s movement or charge path, and he is not fleeing or engaged in close combat himself, he may intercept that enemy.
The interceptor moves into the enemy’s charge path.
The enemy will count as charging the interceptor (i.e. +1 Initiative, etc.).
Each moving enemy can only be intercepted by a single interceptor.
Interceptions can be made against any kind of moves: Charging moves, normal moves, running moves, fleeing moves, and flying moves. As long as the enemy’s path comes within 2” of the interceptor, the interception is valid.
6
Shooting Who can Shoot? Warriors can shoot 360˚ around themselves, but cannot shoot if they are engaged in close combat. (You may always measure the distance between shooter and target beforehand.)
A warrior shoots just once, regardless of how many attacks he has on profile.
Warriors armed with multiple missile weapons can only shoot one of them each turn (unless he is shooting with two pistols, which will be explained later).
Targeting Shooting (Closest Enemy) When shooting a missile weapon, a warrior must target the closest visible, non-fleeing enemy.
If the closest enemy is subject to ‘to hit’ penalties, you may choose a more distant target, provided that it is easier to hit. (Note that the more distant target must be definitively easier to hit – it is not enough that it is just as easy to hit.)
Pick Target (If Elevated 2” or More) Warriors elevated a full 2” or more above ground level may target any visible enemy, not just the closest. However, if there is a visible, non-fleeing, non-hiding enemy within 6” of such a warrior, he does not get to pick his target, but must follow the normal rules for targeting missile weapons (i.e. shooting at the closest enemy). Fleeing Enemies Warriors may not target fleeing enemies as long as there is another non-fleeing enemy in range. Warriors that may pick their target ignore this constraint. Cover (-1 to Hit) For the purposes of shooting attacks, all terrain features, or other warriors that obscure the shooter’s line of sight to his target (even the slightest), will make the target count as being in cover, which gives the shooter -1 to hit them. Shooting into Close Combat Warriors cannot shoot into close combat involving members of their own warband.
Multiple Shots A warrior with multiple shots must always target the same enemy with all of his shots. (But may freely choose a new target at the start of each of his shooting phases.) If the enemy is taken out of action before all shots have been fired, some shots may go to waste. Leaning through Windows A warrior that is less than 1” from the window of a building may determine line of sight from the other side of the window, even if he is positioned inside the building. However, warriors that opt to do so may also be shot back at by any enemies able to hit the windowpane in the opponent’s next shooting phase. Cannot Shoot
Warriors cannot shoot through allied warriors.
Cannot shoot while fleeing, the same turn they rallied, or the turn they made a running move.
Cannot shoot at hidden enemies or enemies out of line of sight.
© Giorgos Magkakis

7
Close Combat Who can Fight? Warrior can fight 360˚ around themselves. All enemies within 1” of each other are considered to be engaged in combat with each other.
(However, line of sight is also required; enemies that cannot see each other cannot strike at each other in close combat.)
(Wizards and Priests also fight, even if they cast a spell or prayer in the shooting phase.)
Who Strikes First? Strike order is always resolved in Initiative order. Warriors with the highest Initiative value strike first. If Initiative values are equal, roll dice. (Chargers do not strike first for charging.)
If the same player has two fighters who are each faster than their opponent, he may not change their strike order. (E.g. if you have one fighter with I5 and one with I4, fighting an enemy with I3, the warrior with I5 must strike first.)
Switching Weapons in Close Combat Warriors that are armed with multiple weapons (and/or a Shield) may switch freely between them during each of the controlling player’s Power phases (not opponent’s). Breaking from Close Combat At the end of each of your own close combat phases (i.e. not opponent’s) you may have one or more of your warrior’s leave close combat. The warrior then flees after all blows are struck, and all non-fleeing enemies that were within 1” of him gain a Free Hack. Free Hacks (Hit Automatically) When a warrior flees, all non-fleeing enemies that are within 1” of him gain one special “Free Hack” attack.
Free Hacks are free extra attacks that do not use up the warrior’s normal Attacks.
Free Hacks hit automatically. There is no ‘to hit’ roll and thus no possibility of scoring a Critical Hit.
Fighting with Two Weapons Warriors that are fighting with two weapons gain +1 Attack but suffer -1 to hit on all attacks and cannot cause Critical Hits in close combat. Pistols in Close Combat Pistols are solely missile weapons and cannot be used in close combat at all. They can however Stand and Shoot. Stand and Shoot When a warrior is charged, he may fire up to two Pistols in his possession at a charging enemy instead of striking in close combat that turn.
If successfully charged by multiple enemies, Stand and Shoot must target the first successful charger.
Shots from ‘Stand and Shoot’ are resolved before any close combat blows are struck.
Shots from ‘Stand and Shoot’ have an additional -2 to hit. (If firing two pistols, this stacks with the -1 to hit from ‘Multiple Shots’ for -3 to hit.)
If firing two pistols, both shots must be fired at the same enemy.
Shots from ‘Stand and Shoot’ are resolved at warrior’s BS, and enemies may use the ‘Dodge: Ranged’ skill against such shots.
Warriors cannot Stand and Shoot if they are fleeing.
Fighting Unarmed Unarmed attacks suffer a -1 Strength modifier (down to a minimum of 1). Warriors with the ‘Fight Unarmed’ rule are exempt from this. Multiple Close Combat Attacks Warriors with multiple close combat attacks must always target the same enemy with all of their attacks. (But they may freely choose a new target in each round of close combat, including the opponent’s). If the enemy is taken out of action before all attacks have been made, some attacks may go to waste.
8
Spells and Prayers (1/2) Signature Spells and other Spells Wizards and Priests always know the signature spell or prayer from their lore. In addition, they start with a number of spells / prayers which is specified on their entry. Which Spells Are Known? Which spells a caster knows is randomly determined before each battle. (E.g. if a wizard knows two spells from his lore, he rolls 2D6 before each battle to determine which spells from his lore he will be able to cast in the upcoming battle, re-rolling any duplicates.) Gaining More Spells / Prayers A Wizard or Priest that rolls ‘New Skill’ for his Level Up may increase the number of spells or prayers he knows from his lore by one. Doing so uses up the skill advance. (Casting difficulties are never reduced by skill advances.) Targeting Spells / Prayers (May Pick Target) Unlike shooting attacks, spells and prayers may target warriors engaged in close combat and may target any enemy within range, not just the closest. Template spells may be cast into close combat involving friendly warriors. Casting in Close Combat (Range Reduced to 1”) Casters may fight in close combat, even if they have cast a spell or prayer in the shooting phase, but they cannot cast spells “out of” close combat: While a caster is engaged in close combat, he can only choose warriors that are within 1” of him as the target of his spells or prayers. This constriction applies to both harmful and beneficial spells and prayers. Power Dice Power Dice are normal D6. Wizards and Priests start each battle without Power Dice and generate Power as described on page 3.
There is no maximum to the amount of Power Dice a Wizard or Priest can store, though any remaining Power Dice are lost at the end of the battle.
Wizards and Priests do not generate Power Dice the turn they are deployed.
Casting Spells / Prayers Spells and prayers are cast in the controlling player’s shooting phase instead of shooting a missile weapon. Spells and prayers require line of sight to their target unless their entry says otherwise. Fleeing warriors cannot attempt to cast spells or prayers. Casters that fail their casting attempt cannot shoot a missile weapon afterwards or attempt to cast a spell or prayer again that turn. Allocating Power Dice To cast a spell or prayer, the warrior selects one of the spells or prayers that are known to him, and declares how many of his Power Dice that he is expending on the roll.
If the sum of these dice is equal to, or higher than, the spell or prayer’s Difficulty, the spell/prayer is successfully cast. Otherwise, the spell/prayer is not cast and the Power Dice are lost.
A Wizard or Priest may not use the Power Dice of other Wizards or Priests in the warband unless a rule or ability specifically states otherwise.
Bonuses and More Powerful Versions
Where a spell or prayer has both a normal version and a more powerful version, you must declare which version you are attempting to cast before rolling any dice.
Where you have the option to add bonuses to a casting roll (e.g. through Power Scrolls, etc.) you must declare that you are doing so before rolling any dice.
Spells / Prayers with ‘Remains in Play’
Are immediately dispelled if caster goes out of action, or if caster attempts to cast the same spell or prayer again. (Even if the new attempt fails, the existing spell or prayer is still dispelled.)
Remain active even if the caster flees, or the distance between caster and target exceed the spell or prayer’s original range.
Retain their original target until dispelled or successfully cast again.
9
Spells and Prayers (2/2) Saving vs. Spells / Prayers Take armour saves and other saves as normal unless the specific spell or prayer says otherwise. Spells and Armour (Wizards Only) Wizards cannot cast spells if they are wearing armour (Shields are also armour). Priests may wear armour and cast prayers.
Two or More 1s Cause a Miscast (Spells Only) If two or more 1s are rolled for a spellcasting roll, the spell always fails and the Wizard must roll on the Miscast chart. Prayers never cause miscasts. Prayers are not Spells and Vice Versa Rules that affect spells do not affect prayers and vice versa. (E.g. a warrior that has a 4+ save vs. spells cannot use this save against prayers.)
© Giorgos Magkakis
Panic and Fleeing Panic A warrior that suffers a Wound and is left with one Wound must take a Leadership test at the end of the current phase. If failed, he flees. Fleeing Movement Fleeing warriors move 2D6” instead of their normal movement, fleeing in a (roughly) straight line towards a point indicated by the scenario played.
A fleeing warrior never climbs up, but attempts to make his way around obstacles to get to his rally point.
If a warrior needs to descend from a building while fleeing, the controlling player decides whether that warrior climbs down or jumps down.
Fleeing warriors that can fly still flee only 2D6” but do not have to pass climb down or jump down tests while fleeing.
Being Charged while Fleeing If a warrior is charged while fleeing, all of the enemy’s close combat attacks hit automatically. (There is no ‘to hit’ roll and thus no chance to score critical hits.)
If the fleeing warrior survives, he will not strike back in close combat, but immediately flees a further 2D6” towards the point that he is trying to reach (as indicated by the scenario played).
Enemies do not gain Free Hacks against warriors that flee again if they were already fleeing when they were charged.

10
Special Rules Leader (6”) Other warriors in the warband that are within 6” of this warrior may use his Leadership instead of their own for fear, panic, and rally tests (but not for other purposes). This ability requires line of sight and is not active while the Leader is fleeing. Fear (-3 Initiative, -1 to Hit) At the start of all close combat rounds (i.e. both yours and opponent’s), warriors that are in close combat with enemies that cause fear must take a Leadership test: If failed, they suffer -3 Initiative to strike order, and -1 to hit, vs. all enemies this round.
Warriors that cause fear are immune to fear themselves.
A warrior only has to test for fear once per round, even if he is fighting multiple enemies that cause fear.
Hatred (+1 to Hit) A warrior that hates his enemy has +1 to hit that enemy in all rounds of close combat. (Hatred only affects close combat attacks.) Poisonous A poisonous attack may re-roll natural 1s to wound. Flammable / Flaming Hits Warriors with the ‘Flammable’ rule lose 2 Wounds instead of 1 when wounded by a flaming attack.
If an attack is both flaming and poisonous, poison has no effect.
Concussive (X) Warriors that are successfully wounded by Concussive hits lose points of Initiative in addition to Wounds. How many points of Initiative that are lost is specified under the relevant weapon’s or ability’s entry.
Concussive effects last until the end of the battle.
Armour Piercing (X) An attack with Armour Piercing pierces the enemy’s armour save by X points that in normally would.
Oversplinter (X) An attack with Oversplinter deteriorates the enemy’s armour save by X more points than it normally would. (E.g. if a warrior with a 4+ armour save saves vs. a hit with Oversplinter (1) his save deteriorates to 6+ instead of to 5+.)
Oversplinter effects only apply if the enemy’s armour actually saves against the attack. (I.e. if an attack with Armour Splinter successfully wounds an enemy, that enemy’s AS does not decline because of Oversplinter.)
Scaly Skin / Stony Skin (X+) Warriors with Scaly or Stony Skin have a natural armour save that stacks with other armour. Scaly Skin does not suffer armour splintering effects, but does suffer armour piercing effects. (I.e. it does not deteriorate each time it protects the warrior from an attack but is modified by the Strength of attack and other armour piercing effects as normal.) Regeneration Save (X+) A warrior with Regeneration has a special saving throw that he may use after his normal armour save has failed. This save does not suffer armour splintering or armour piercing effects. (I.e. it does not deteriorate each time it protects the warrior from an attack and it not modified by the Strength of the attack.)
Regeneration saves stack but cannot be increased beyond 4+.
Flaming hits ignore Regeneration.
Ward Save (X+) A warriors with a Ward save have a special saving throw that he may use after his normal armour save has failed. This save does not suffer armour splintering or armour piercing effects.
Ward saves stack but cannot be increased beyond 4+.
If a warrior has both a Ward save and a Regeneration save, he must choose which one to use.
11
Creating a Warband Warband Specifications Starting Gold: 500gc Max Warband Members: 15 Max Number of Heroes: 6 No Level Ups from Starting Experience Some warriors have starting experience. This represents the experience they have accumulated before joining the warband. Warriors do not (never ever!) gain level ups from their starting experience.
Sacking Warriors You may sack any warrior in your warband in the ‘Buy, Sell, and Reinforce’ phase of the post-battle sequence. You may sack any number of warriors in each ‘Buy, Sell, and Reinforce’ phase. Promoted Henchmen Henchmen that are promoted to heroes retain their type. (E.g. if your warband says 0-6 Marksmen under henchmen and a Marksman is promoted to a hero, that Marksman still counts towards the Marksman limit.) Henchmen that become heroes also take up one of the warband’s 6 hero slots.
© Giorgos Magkakis
Arming Warriors Number of Weapons Warriors can carry any number of weapons, but can only carry a single suit of armour and a single instance of Shield or Nets. Weapon Proficiencies Warriors are proficient with the weapons and armour specified on their weapons lists. Special Equipment Only heroes can use Special Equipment unless an entry says ‘May be given to henchmen.’ Warriors can carry any amount of Special Equipment, but can only carry one instance of each type of Special Equipment at a time. Animals never use Special Equipment.
Hand Weapons and Great Weapons Clubs, Axes, and Swords are considered Hand Weapons. Great Clubs, Great Axes, and Great Swords are considered Great Weapons. Selling Items Warbands that want to sell items receive half the item’s price in gc, rounded down. Common and Special Items All of the items that are listed in this section may be bought by any warband, even if it has no warriors that can actually use them. Conversely, special items that appear on specific warband entries can only be bought by that warband.
12
Close Combat Weapons
Club / Hammer / Mace 5gc
Concussive (1): Enemies successfully wounded by a Club also lose 1 point of Initiative for the rest of the battle.
Axe 5gc Armour Piercing (1): Additional -1 to the enemy’s armour save.
Sword 5gc Initiative Bonus: +1 I in all rounds of combat. (Fighting with a Sword and another weapon in the other hand can give a warrior two separate Initiative values when determining strike order.)
Great Club / Hammer / Mace 10gc Concussive (D3) Strength Bonus: +2 S in all rounds of combat. Initiative Penalty: -2 I in all rounds of combat. Slow Swing: Wielder cannot use this weapon for ‘Free Hack’ attacks. (I.e. if he gains a Free Hack attack while fighting with this weapon, that attack will go to waste.) Two-handed.
Great Axe 10gc Armour Piercing (D3) Strength Bonus: +2 S in all rounds of combat. Initiative Penalty: -2 I in all rounds of combat. Slow Swing Two-handed.
Great Sword 10gc
Strength Bonus: +2 S in all rounds of combat. Initiative Penalty: -1 I in all rounds of combat. Slow Swing Two-handed.
Spear 5gc
Initiative Bonus: +2 I in first round of combat. Only Shield in off hand.
Halberd 10gc Strength Bonus: +1 S in all rounds of combat. Initiative Bonus: +2 I in first round of combat. Slow Swing Two-handed.
Morning Star 10gc Strength Bonus: +1 S in first round of combat. Only Shield in off hand.
Flail 10gc
Strength Bonus: +2 S in first round of combat. Two-handed.
Combat Whip 5gc
Initiative Bonus: +2 I in all rounds of combat. Strength Penalty: -1 S in all rounds of combat. Only Club, Axe, or Sword in off hand.
Fighting Claws 10gc
Paired Weapons. Cannot be separated. Initiative Bonus: +1 I in first round of combat. Charge Bonus: Wielder may re-roll up to one failed roll ‘to hit’ the turn he charges (but not the turn he is charged – re-rolled dice cannot cause critical hits.)
(Paired Weapons are two-identical one-handed close combat weapons that cannot be separated and follow the rules for fighting with two close combat weapons in all respects, i.e. -1 to hit, cannot cause critical hits, count as two separate weapons for the purposes of poison, etc.)
© Giorgos Magkakis
13
Missile Weapons
Sling 5gc
Range: 18” Strength: 2 Concussive (1) Cannot be Poisoned.
Short Bow 5gc Range: 18” Strength: 3 Proficiency: Any warrior who can use Bows can also use Short Bows.
Bow 5gc Range: 24” Strength: 3
Long Bow 10gc
Range: 30” Strength: 3
Light Crossbow 10gc
Range: 24” Strength: 3 Armour Piercing (1)
Crossbow 20gc
Range: 30” Strength: 4 Lethal: Causes 2 Wounds instead of 1 on ‘Deathblow’ critical hits. Move or Fire.
Crossbow Pistol 10gc Range: 6” Strength: 3 Armour Piercing (1) Multiple Shots x2: May fire twice at the same target with -1 to hit on both shots if armed with two pistols. Assault: May Run and Fire. Stand and Shoot
Throwing Knives / Stars 5gc Range: 6” Strength: 2 Multiple Shots x2: May fire twice at the same target with -1 to hit on both shots. Assault: May Run and Fire.
Javelins 5gc
Range: 12” Strength: 3 Quick to Fire: No -1 to hit for moving and shooting.
Throwing Axes 10gc
Range: 6” Strength: 4 Assault: May Run and Fire. Blowpipe 10gc Range: 12” Strength: 3 Poisonous (May re-roll natural 1s to wound.) Sneaky: May re-roll failed rolls ‘to hit’ if shooter was hidden at the start of the shooting phase.
Stand and Shoot
When a warrior is charged, he may fire up to two Pistols in his possession at a charging enemy instead of striking in close combat that turn.
If successfully charged by multiple enemies, Stand and Shoot must target the first successful charger.
Shots from ‘Stand and Shoot’ are resolved before any close combat blows are struck.
Shots from ‘Stand and Shoot’ have an additional -2 to hit. (If firing two pistols, this stacks with the -1 to hit from ‘Multiple Shots’ for -3 to hit.)
If firing two pistols, these must be of the same type, and both shots must be fired at the same enemy.
Shots from ‘Stand and Shoot’ are resolved at warrior’s BS, and enemies may use the ‘Dodge: Ranged’ skill against shots from ‘Stand and Shoot.’
Warriors cannot Stand and Shoot if they are fleeing.
14
Blackpowder Weapons
Pistol 10gc
Range: 6” Strength: 4 Armour Piercing (1) Multiple Shots x2: May fire twice at the same target with -1 to hit on both shots if armed with two Pistols. Assault: May Run and Fire. Stand and Shoot
Handgun 20gc Range: 24” Strength: 4 Armour Piercing (1) Concussive (1) Lethal Move or Fire.
Blunderbuss 15gc
Range: Flame Template Strength: 3 Grapeshot: All warriors under, or partially under, the template take 1 Strength 3 hit. Blunderbuss may be targeted so it also hits friendly warriors. Can only fire once per battle.
Duelling Pistol 15gc
Same as Pistol but first shot each battle has +1 to hit. Can be used by anyone who can use Pistols.
Mastercrafted Handgun 30gc Same as Handgun but first shot each battle has +1 to hit. Can be used by anyone who can use Handguns.
Blackpowder Weapons Cannot be Poisoned.
Misfire whenever they roll a natural 1 to hit.
Blunderbusses never misfire.
When firing a Blunderbuss up or down, the template is assumed to be 1” high.
Blunderbusses follow the normal rules for targeting shooting (i.e. they must normally target the closest enemy).
Armour
Light Armour 5gc Armour Save: 6+
Heavy Armour 15gc Armour Save: 5+ Initiative Penalty: Wearer has -1 I throughout the entire battle. Even if the warrior’s armour save has completely splintered, the Initiative penalty still applies.
Shield 5gc Requires one hand to use. Armour Save: 6+ Ward Save (6+): If wearer is fighting with a Club, Axe, Sword, or Spear in the other hand, he also gains a 6+ ward save vs. all types of attacks. Cumbersome: Warriors that are also armed with weapons that have the ‘Two-handed’ rule, or with missile weapons of any kind, can only use their Shield while engaged in close combat.
Nets 5gc Requires one hand to use. Armour Save: 6+ armour save vs. close combat attacks. Snare: All enemies within 1” of this warrior suffer -1 Initiative. Not active while wielder is fleeing. Being within 1” of multiple enemies fighting with Nets stacks. Only Club, Axe, Sword, or Spear in off hand.
© Giorgos Magkakis
15
Special Equipment Rope & Hook 5gc Owner rolls 2D6 for climb tests and picks either as his result. May be given to henchmen. Lantern 5gc Owner adds +3” to the distance he spots hidden enemies and may not hide himself. May be given to henchmen. Sling Bullets 5gc Owner’s shots from Sling have +1 Strength. Last entire campaign. May be given to henchmen. Hunting Arrows 10gc Owner’s shots from any kind of Short Bow, Bow, and Long Bow have +1 Strength vs. Animals. Last entire campaign. May be given to henchmen. Heavy Rounds 10gc Owner’s shots with Handgun are Armour Piercing (2) instead of the normal Armour Piercing (1). May be given to henchmen. Aiming Scope 10gc Warrior suffers no -1 to hit for shooting further than 12” with Handguns. May be given to henchmen. Dark Venom 5gc Warrior may poison one of his weapons this battle. You may choose which. One use only. May be given to henchmen. Tears of Shallaya 5gc Drug: Warrior is immune to poison this battle. One use only. May be given to henchmen. Lucky Charm 10gc Owner may modify his next roll on the Campaign Injuries chart by +1/-1. Charm automatically lost at the end of any post-game sequence where owner went out of action, even if he chose not to modify the roll.
Power Scroll 5gc +D3 to any one spellcasting roll (declare that you are using the Scroll before rolling any dice). D3 does not contribute to miscasts. One use only. Can only be carried by Wizards. Spellbook 15gc Owner knows one more spell from his lore than he otherwise would. Can only be carried by Wizards. Holy Tome 15gc +1 to all Prayercasting rolls. Can only be carried by Priests. Holy Relic 10gc Owner has +1 to all Leadership tests to see if he generates Power Dice. Can only be carried by Priests. Crimson Shade 5gc Drug: +3 Initiative this battle. One use only. Side Effect: When warrior takes this drug, roll a D6: On a roll of 1 he takes one automatic Strength 3 hit with no saves of any kind allowed. Mandrake Root 5gc Drug: Warrior is immune to Concussive effects and has a 4+ special save vs. critical hits this battle. One use only. (If the save is successful, treat the critical hit as a normal hit instead.) Side Effect: When warrior takes this drug, roll a D6: On a roll of 1 he takes one automatic Strength 4 hit with no saves of any kind allowed. Madcap Mushrooms 5gc Drug: Warrior is immune to Fear and Panic and may not voluntarily leave close combat this battle. One use only. Side Effect: When warrior takes this drug, roll a D6: On a roll of 1-2 he takes one automatic Strength 4 hit with no saves of any kind allowed.

16
Rules for Skills Common and Special Skills Skills are divided into two categories: Common Skills and Special Skills.
Common Skills are the five generic skill lists that are available to all warbands: Combat, Shooting, Academic, Strength, and Speed.
Special Skills are warband specific and not available to every warband (e.g. Sigmarite skills for Witch Hunters and Rogue skills for Skaven).
Gaining Skills Whenever a hero rolls ‘New Skill’ on the level up chart, he may choose a skill from any of the skill lists that are available to him.
Each skill can only be taken once unless otherwise noted.
Heroes and Additional Skill Lists Some heroes have options to buy access to extra skill lists when they are hired. In such cases, this access must be bought when the warrior is first hired. It is not possible to upgrade his palette of skill lists later on through this ability. Skills and Promoted Henchmen Henchmen that are promoted to heroes gain access to three skill lists of the controlling player’s choice. These may be any of the five basic skills lists, and/or any special skill lists that the warband has access to. (Access to special skill lists is not free but counts as one of the warrior’s three choices in this regard.)
© Giorgos Magakis
17
Common Skills
Combat
Swashbuckler Warrior suffers no -1 to hit for fighting with two weapons. Buccaneer Warrior can cause critical hits while fighting with two weapons. Dodge: Close All enemy close combat attacks have an additional -1 to hit this warrior. Strike to Injure (+D3) Warrior’s close combat attacks have an additional +D3 modifier on the critical hit chart. Swordmaster Warrior may re-roll failed ‘to hit’ rolls with Swords and Great Swords the turn he charges. Sentry Warrior may re-roll failed ‘to hit’ rolls with Spears and Halberds in all turns where he was charged by an enemy and was not already engaged in close combat at the start of the turn (intercepting a charging enemy also counts as being charged). Swiftstrider Warrior rolls 3D6 instead of the normal 2D6 when determining the random distance added to his charging moves. (I.e. he rolls 3D6 and adds the highest result to his base Movement.) Sixth Sense Warrior automatically passes Initiative tests for charging enemies without line of sight. (E.g. that are behind a wall, around a corner, etc.) Weapons Training: Close Warrior can use any close combat weapons that he comes across, not just those on his list. (Shields and Nets are Armour, i.e. this skill does not grant proficiency with Shields and Nets.)
Shooting
Eagle Eyes Warrior suffers no -1 to hit for shooting at enemies with ‘Stealth.’ Crack Shot Warrior suffers no -1 to hit for shooting at enemies in cover. Skirmisher Warrior suffers no -1 to hit for moving and shooting. Aim to Injure (+D3) All of warrior’s shooting attacks have an additional +D3 modifier on the critical hit chart. Rapid Reload Warrior may move and fire with weapons that have the ‘Move or Fire’ rule. (With -1 to hit for moving and shooting as normal – may be combined with the ‘Skirmisher’ skill.) Pistolier Warrior suffers no -1 to hit for firing with two Pistols of the same type. Also applies to ‘Stand and Shoot’ attacks. Quick Shot Warrior gains both of these:
Multiple Shots x2 with Sling, Light Crossbow, Blowpipe, or any kind of Bow.
Multiple Shots x2 becomes Multiple Shots x3 with Throwing Knives / Stars.
Blackpowder Expert Whenever warrior suffers a blackpowder misfire, all his rolls on the misfire table have an additional +D3-1 modifier. Weapons Training: Ranged Warrior can use any shooting weapons that he comes across, not just those on his list.
18
Common Skills
Academic
Apothecary Warrior is Immune to Poison. Battle Tongue (6”) Warrior gains the ‘Leader (6”)’ ability. No effect if he has it already. Quartermaster (4+) Whenever this warrior uses a ‘One use only’ item (e.g. Dark Venom, Drugs, or a Power Scroll), roll a D6: On a roll of 4+, the item is not lost, but transferred to the warband’s stash. It cannot be used again until the next battle (not Pit Fight). Keen Learner Warrior immediately gains a further +D3 XP and whenever he gains an experience advance from now on, you may roll to see what that advance would have been, and then choose to keep that advance or to make it a new skill instead. Battle Meditation Must be a Wizard or Priest to take this skill:
Wizards may re-roll their first failed spellcasting roll each battle, provided it was not a miscast. (D3 from Power Scrolls are not re-rolled.)
Priests add +D3 to their first prayercasting roll each battle.
Acolyte (Ld Test, 1 Power Dice) Instead of shooting a weapon, this warrior may take an Ld test in the shooting phase if he did not run, is not fleeing, or engaged in close combat: If passed, he generates one Power Dice that can be used by any Wizard or Priest in the warband. This skill cannot be taken by warriors who are Wizards or Priests themselves. Streetwise (+1/-1) If this warrior was deployed and not out of action at the end of the battle, you may modify one exploration dice, chosen by you, by +1/-1. Multiple warriors with this skill do not stack (i.e. you can still only modify one dice by +1/-1).
Strength
Killing Blow When striking at enemies that are down to one Wound, this warrior’s attacks with Great Weapons wound automatically (if they hit) and ignore saves of any kind. Crushing Blow Warrior’s attacks with Great Clubs and Great Axes ignore ward saves granted by Shields. Indomitable Warrior gains an additional point of Armour Save in all battles (and Pit Fights). Sturdy Warrior is immune to Concussive effects. Stout Warrior suffers no Initiative penalties for wearing Heavy armour. (This skill does not grant proficiency with Heavy Armour.) Impale All of warrior’s shots with Javelins and Throwing Axes have +1 to hit and an additional +1 modifier to all rolls on the critical hits chart (stacks with other modifiers, such as the ‘Aim to Injure’ skill). Backswing Warrior ignores the ‘Slow Swing’ penalty of Great Weapons and Halberds (i.e. he may use these Weapons for ‘Free Hack’ attacks). Whirling Death Warrior may re-roll failed rolls ‘to hit’ with Flails and Morning Stars the turn he charges. Strongman Warrior gains both of these:
Warrior gains +2 Initiative to strike order when fighting with Great Weapons.
Warrior gains the Strength bonus from Morning Stars and Flails in all rounds of combat, not just the first.
19
Common Skills
Speed
Dodge: Ranged All enemy shooting attacks have an additional -1 to hit this warrior. (No effect vs. spells / prayers.) Wall Runner Warrior automatically passes Initiative tests for climbing up and down. (This skill has no effect on jumping down.) Sprint Warrior has +2” to the maximum distance moved while running, up to a maximum of 10”. (This skill has no effect on charging.) Stealth While warrior is in cover, shooting against him suffers an additional -1 to hit. Flanker All of warrior’s close combat attacks have +1 to hit the turn he charged an enemy that was already engaged in close combat at the beginning of the turn. Lightning Strike (Ignores Dodge Skills) Warrior ignores the -1 to hit penalties for striking and shooting at warriors with the ‘Dodge: Close’ and ‘Dodge: Ranged’ skills. Dashing Strike (+D3 I when Charing) Warrior gains an additional +D3 Initiative to strike order the turn he successfully charges an enemy. Nimble Strike (+1 to Hit vs. Great Weapons) All of warrior’s close combat attacks with one-handed close combat weapons that are not Spears or Morning Stars have an additional +1 to hit enemies fighting with Great Weapons in all rounds of combat. Quicksilver Enemies cannot ‘Stand and Shoot’ at this warrior or intercept him the turn he charges.
© Giorgos Magkakis
20
Scenarios Combat Groups All scenarios ask players to split their warband into Combat Groups. To do so, each player divides his warband into 3 Combat Groups. This division is done before it is determined which scenario will be played. Each Combat Group may contain 0-2 heroes and 0-3 henchmen as follows: Group 1:
Hero Henchman
Hero Henchman Henchman
Group 2:
Hero Henchman
Hero Henchman Henchman
Group 3:
Hero Henchman
Hero Henchman Henchman
Empty Combat Groups Combat Groups can contain 0 warriors. Groups with 0 warriors still count as groups for the purposes of scenarios where the player has to deploy a random warband group. (So try to make your groups equally strong or you might end up deploying zero models on turn 1!)
Determining Scenarios Unless some prior factor in the campaign has determined the next scenario, roll 2D6 and play the scenario rolled.
The First Turn Unless the scenario says otherwise, the warband with the fewest Victory Points always takes the first turn. If Victory Points are tied, roll dice.
The Seventh Turn (or Later) Wizards and Priests entering the battle on Turn 7 or later start with 1 Free Power Dice (this stacks with other free Power Dice they may start with). Tabletop Zones Many scenarios use Tabletop Zones. We recommend outlining the zones by marking the edges of these zones with coins, dice, or similar.
Holding Tabletop Zones Some scenarios refer to “holding a tabletop zone uncontested of the enemy.” To hold a zone, a warband must have at least one warrior inside that zone at the end of the game. (Warbands that lost the battle can still hold and contest zones.) Warriors that are hiding, fleeing or unable to capture scenario objectives never count as holding or contesting tabletop zones. Rout Tests Scenarios usually end when either party fails a Rout Test. To take a Rout Test, take a Leadership Test against the highest Ld value of any warrior in your warband that is currently deployed and not fleeing: If passed, your warband may stay and fight (if you want it to). If failed, your warband routs the battle and you lose the scenario. Underdog Bonuses If one warband has 3 or more Victory Points less than its opponent, it is eligible for Underdog Bonuses as follows:
Difference is 3 Victory Points: One random hero from the first Combat Group that is deployed by the underdog warband starts with +1 Wound.
Difference is 4 Victory Points: One random henchman from the third Warband Group that is deployed by the underdog’s warband starts with +1 Wound.
Difference is 5+ Victory Points: One random henchman from the second Warband Group that is deployed by the underdog’s warband starts with +1 Wound.
All Underdog Bonuses Stack (e.g. if the difference between the two warbands is 5 Victory Points or more, the underdog will gain all of the bonuses above).
Setting Up the Game When setting up the game, first define combat groups, then roll scenario, and then roll spells.
21
Scenario (2-3): Ambush Background One warband has carefully laid an ambush for another, using every trick in the book. Special Rules for Ambush The warband with the fewest Victory Points is always Red. The difference between the two warbands must be at least 4 Victory Points to play this scenario. Otherwise, re-roll the dice to see which scenario is played. Deployment 1. Both players divide their warbands into
Combat Groups as described under ‘Scenarios’.
2. Blue’s biggest Combat Group is deployed in his deployment zone on turn 1. (If several groups are of equal size, randomly determine which one is deployed.)
3. Blue deploys first and may deploy anywhere within his own deployment zone, although all warriors must be deployed on ground level.
4. Red then rolls twice to determine which two of his Combat Groups that are deployed on turn 1. Each Group must be deployed in a different Deployment zone, as detailed to the right. Red may deploy anywhere in these deployment zones, including on the upper floors of buildings, albeit not with line of sight to Blue warriors.
5. At the start of Turn 4, Blue deploys another group in the Blue Backup Zone as detailed to the right.
6. At the start of Turn 7, Blue deploys his last group in the Blue Backup Zone and Red deploys his last group in one of his deployment zones, determined at random.
7. Groups not deployed on turn 1 can be deployed no more than 8” in from the table edge.
The First Turn Red always takes the first turn.
Fleeing
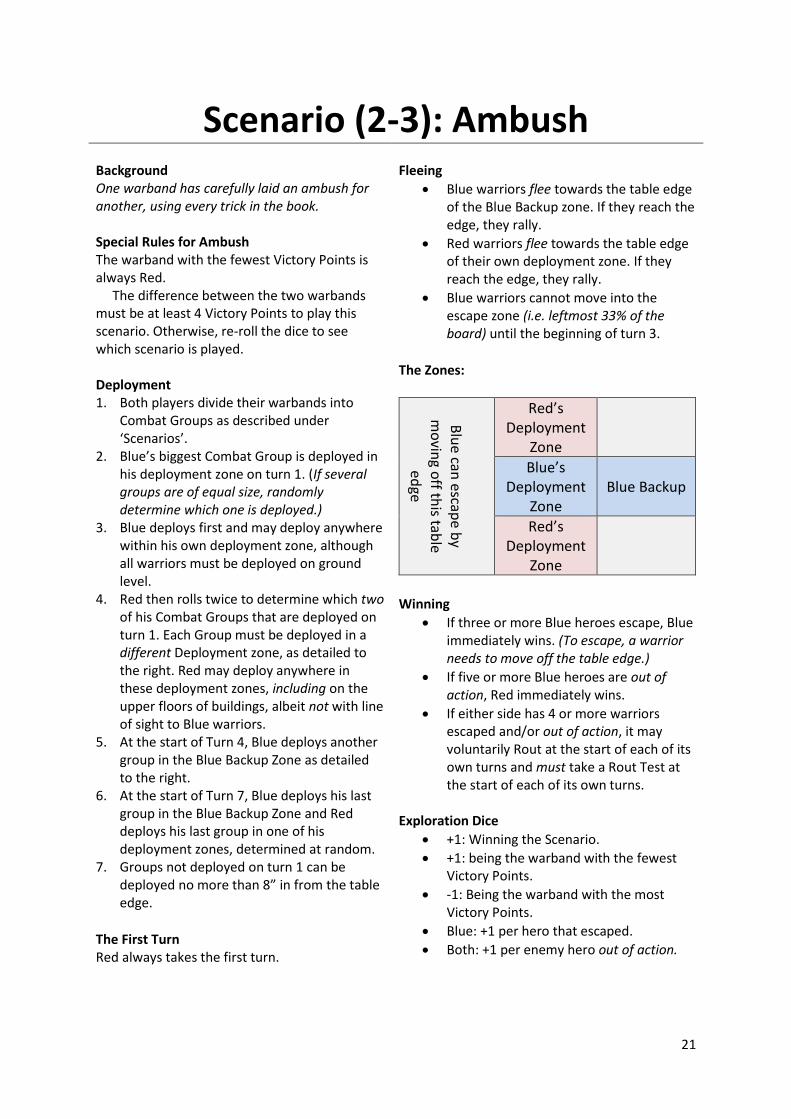
Blue warriors flee towards the table edge of the Blue Backup zone. If they reach the edge, they rally.
Red warriors flee towards the table edge of their own deployment zone. If they reach the edge, they rally.
Blue warriors cannot move into the escape zone (i.e. leftmost 33% of the board) until the beginning of turn 3.
The Zones:
Blu
e can escap
e by
mo
ving o
ff this tab
le
edge
Red’s Deployment
Zone
Blue’s Deployment
Zone Blue Backup
Red’s Deployment
Zone
Winning
If three or more Blue heroes escape, Blue immediately wins. (To escape, a warrior needs to move off the table edge.)
If five or more Blue heroes are out of action, Red immediately wins.
If either side has 4 or more warriors escaped and/or out of action, it may voluntarily Rout at the start of each of its own turns and must take a Rout Test at the start of each of its own turns.
Exploration Dice
+1: Winning the Scenario. +1: being the warband with the fewest
Victory Points. -1: Being the warband with the most
Victory Points. Blue: +1 per hero that escaped. Both: +1 per enemy hero out of action.
22
Scenario (4): Lost
Background One warband has gotten lost in the maze of the ruins. The other warbands decides to capitalize on it! Red and Blue The warband with the fewest Victory Points is always Blue.
Deployment 1. Both players divide their warbands into
Combat Groups as described under ‘Scenarios’.
2. Each player deploys two of his groups, determined at random, on turn 1.
3. Blue always deploys in his own Deployment Zone.
4. Red must deploy his first two groups in Red Deployment Zone (1) and (2); one group, determined at random, in each zone.
5. At the start of Turn 4, each player deploys his last Combat Group; Blue in his deployment zone, Red in Red Deployment Zone (3).
6. All warriors may be deployed up to 8” in from the table edge and also on the upper floors of any buildings that are within 8” of the table edge.
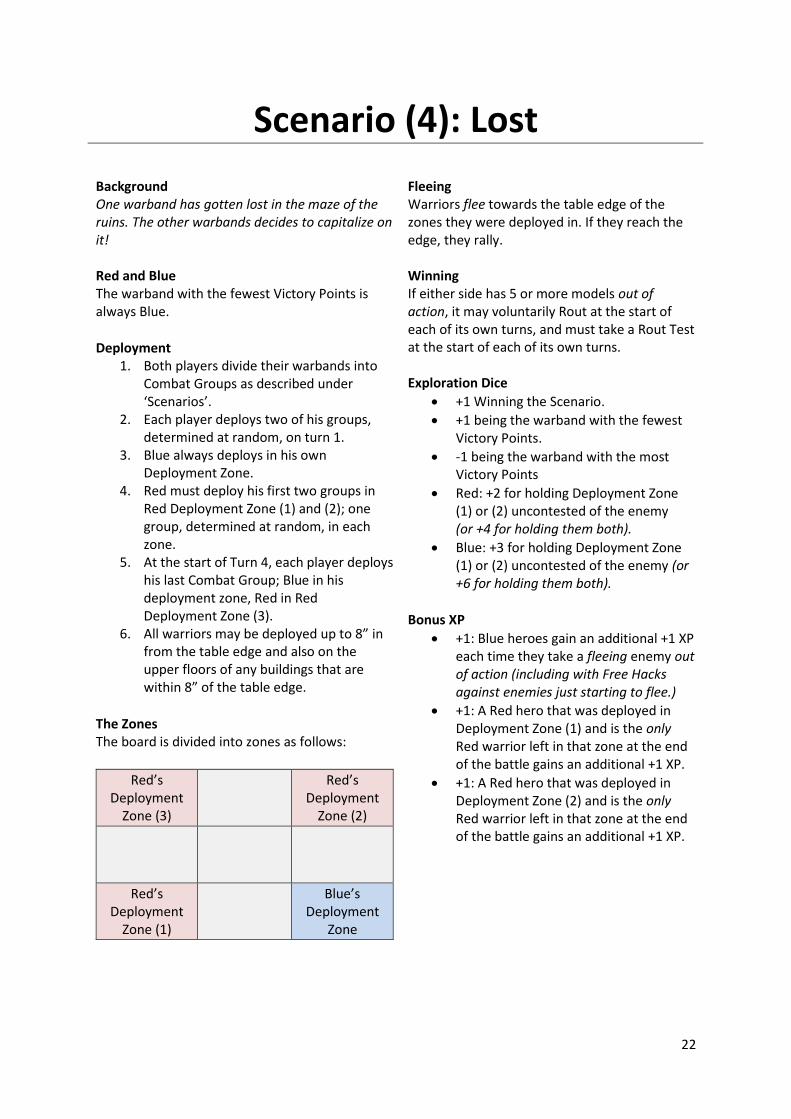
The Zones The board is divided into zones as follows:
Red’s Deployment
Zone (3)
Red’s Deployment
Zone (2)
Red’s Deployment
Zone (1)
Blue’s Deployment
Zone
Fleeing Warriors flee towards the table edge of the zones they were deployed in. If they reach the edge, they rally. Winning If either side has 5 or more models out of action, it may voluntarily Rout at the start of each of its own turns, and must take a Rout Test at the start of each of its own turns. Exploration Dice
+1 Winning the Scenario.
+1 being the warband with the fewest Victory Points.
-1 being the warband with the most Victory Points
Red: +2 for holding Deployment Zone (1) or (2) uncontested of the enemy (or +4 for holding them both).
Blue: +3 for holding Deployment Zone (1) or (2) uncontested of the enemy (or +6 for holding them both).
Bonus XP
+1: Blue heroes gain an additional +1 XP each time they take a fleeing enemy out of action (including with Free Hacks against enemies just starting to flee.)
+1: A Red hero that was deployed in Deployment Zone (1) and is the only Red warrior left in that zone at the end of the battle gains an additional +1 XP.
+1: A Red hero that was deployed in Deployment Zone (2) and is the only Red warrior left in that zone at the end of the battle gains an additional +1 XP.
23
Scenario (5): Breakthrough Background One warband has found a treasure and is guarding the passageway to the loot. Red and Blue The warband with the fewest Victory Points may choose to be either Red or Blue. Red always takes the first turn. Deployment
1. Both players divide their warbands into Combat Groups as described under ‘Scenarios’.
2. Blue deploys one of his groups, chosen by him, in the Blue Defense Zone on turn 1.
3. Red deploys one of his groups, determined at random, in the Red Deployment Zone on turn 1.
4. At the start of Turn 4, each player deploys another random Group in his own deployment zone.
5. At the start of Turn 7, each player deploys his last Group in his own deployment zone.
6. Warriors may be deployed up to 8” in from the table edge and also on the upper floors of any buildings that are within 8” of the table edge.
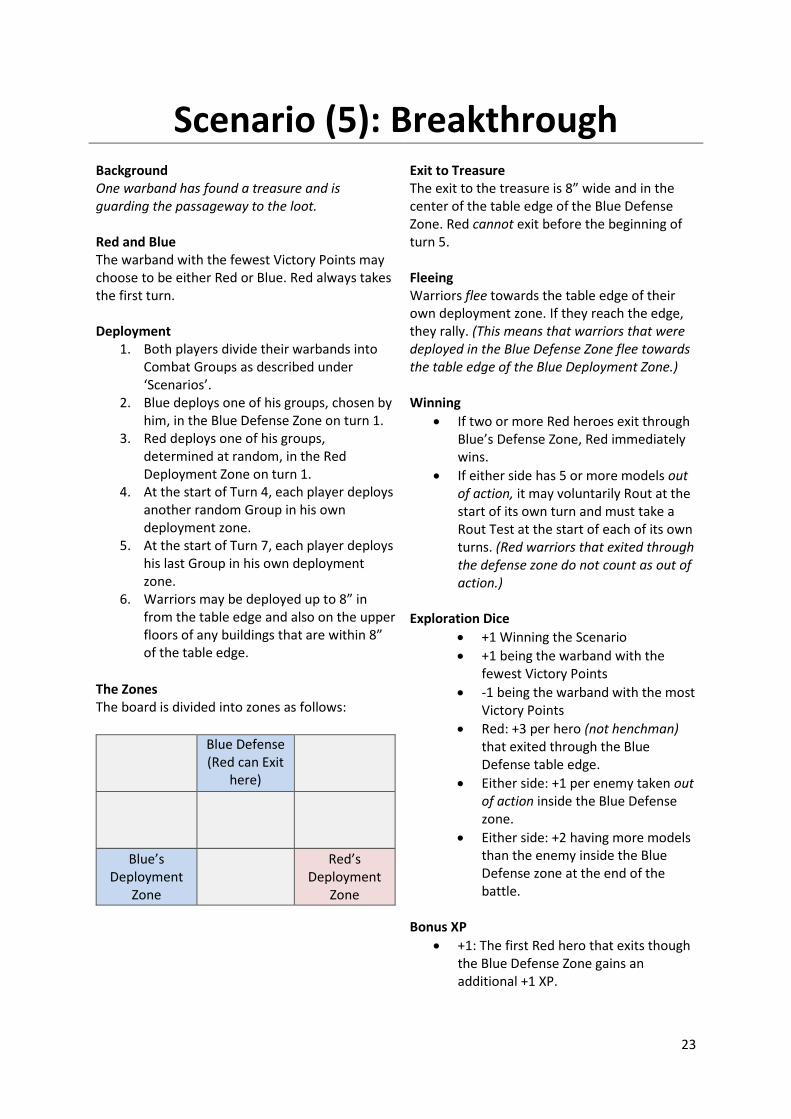
The Zones The board is divided into zones as follows:
Blue Defense (Red can Exit
here)
Blue’s Deployment
Zone
Red’s Deployment
Zone
Exit to Treasure The exit to the treasure is 8” wide and in the center of the table edge of the Blue Defense Zone. Red cannot exit before the beginning of turn 5. Fleeing Warriors flee towards the table edge of their own deployment zone. If they reach the edge, they rally. (This means that warriors that were deployed in the Blue Defense Zone flee towards the table edge of the Blue Deployment Zone.) Winning
If two or more Red heroes exit through Blue’s Defense Zone, Red immediately wins.
If either side has 5 or more models out of action, it may voluntarily Rout at the start of its own turn and must take a Rout Test at the start of each of its own turns. (Red warriors that exited through the defense zone do not count as out of action.)
Exploration Dice
+1 Winning the Scenario
+1 being the warband with the fewest Victory Points
-1 being the warband with the most Victory Points
Red: +3 per hero (not henchman) that exited through the Blue Defense table edge.
Either side: +1 per enemy taken out of action inside the Blue Defense zone.
Either side: +2 having more models than the enemy inside the Blue Defense zone at the end of the battle.
Bonus XP
+1: The first Red hero that exits though the Blue Defense Zone gains an additional +1 XP.
24
Scenario (6): The Brawl Background Both warbands are headed back out of Mordheim after a day of searching the ruins. They run into each other next to a city gate and a big brawl ensues! Deployment
1. Both players divide their warbands into Combat Groups as described under ‘Scenarios’.
2. Each player deploys two of his groups, determined at random, on turn 1.
3. At the start of Turn 4, each player deploys his last Group in his own deployment zone.
4. Warriors may be deployed up to 8” in from the table edge and also on the upper floors of any buildings that are within 8” of the table edge.
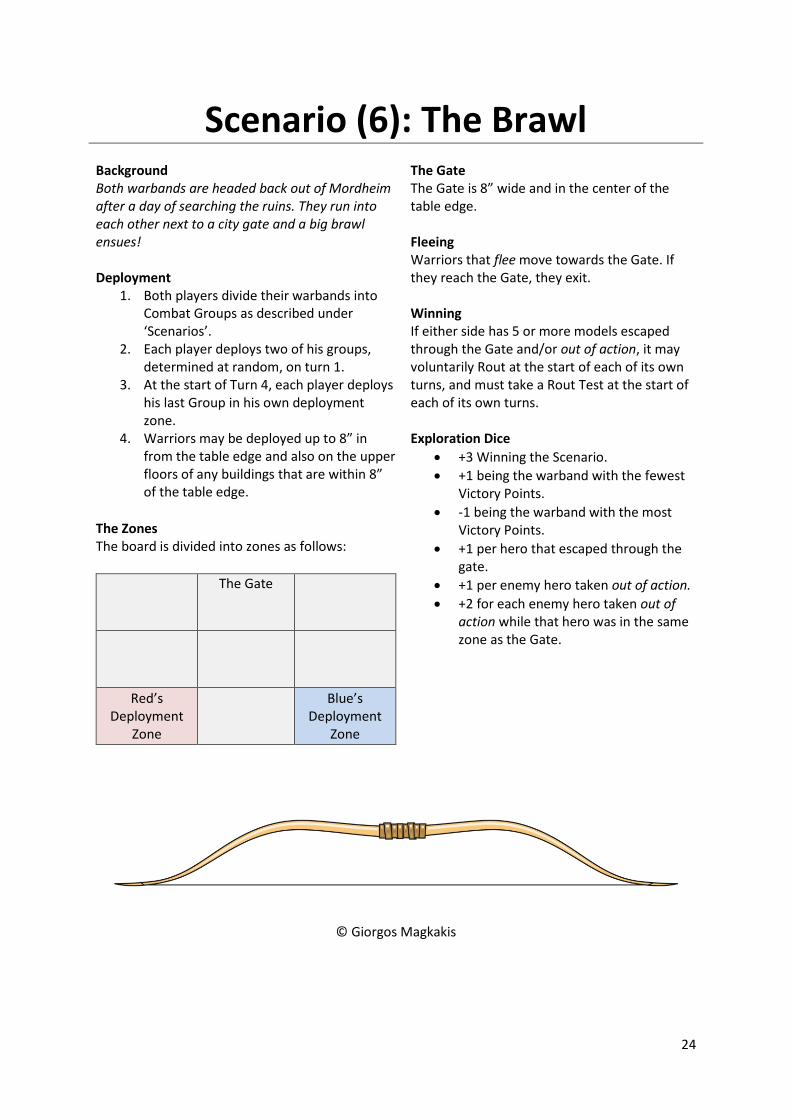
The Zones The board is divided into zones as follows:
The Gate
Red’s Deployment
Zone
Blue’s Deployment
Zone
The Gate The Gate is 8” wide and in the center of the table edge. Fleeing Warriors that flee move towards the Gate. If they reach the Gate, they exit. Winning If either side has 5 or more models escaped through the Gate and/or out of action, it may voluntarily Rout at the start of each of its own turns, and must take a Rout Test at the start of each of its own turns. Exploration Dice
+3 Winning the Scenario. +1 being the warband with the fewest
Victory Points. -1 being the warband with the most
Victory Points. +1 per hero that escaped through the
gate. +1 per enemy hero taken out of action. +2 for each enemy hero taken out of
action while that hero was in the same zone as the Gate.
© Giorgos Magkakis
25
Scenario (7): Skirmish Background Both warbands are spread out, searching the ruins for valuables, when a detachment from each warband stumbles upon the other. Deployment
1. Both players divide their warbands into Combat Groups as described under ‘Scenarios’.
2. Then each player rolls a D3 to determine which group that is deployed on turn 1.
3. Warriors may be deployed up to 8” in from the table edge and also on the upper floors of any buildings that are within 8” of the table edge.
4. At the start of Turn 4, each player deploys another Group, determined at random.
5. At the start of Turn 7, each player deploys his last Warband Group.
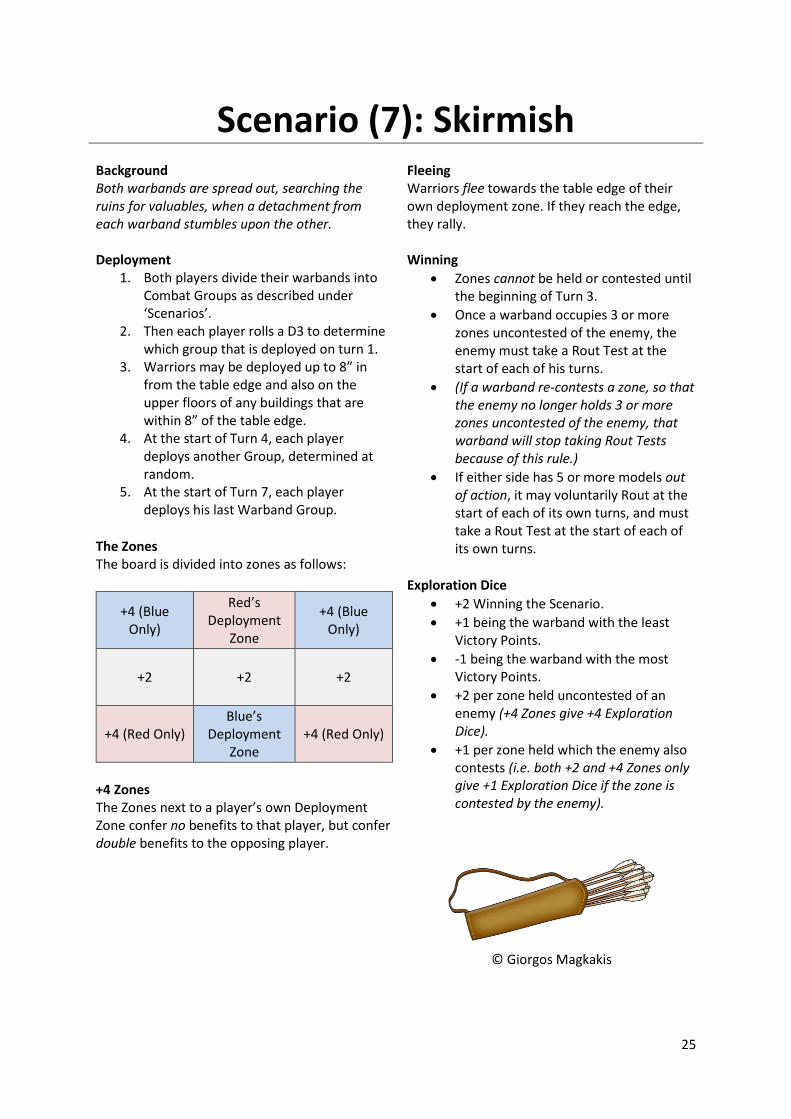
The Zones The board is divided into zones as follows:
+4 (Blue Only)
Red’s Deployment
Zone
+4 (Blue Only)
+2 +2 +2
+4 (Red Only) Blue’s
Deployment Zone
+4 (Red Only)
+4 Zones The Zones next to a player’s own Deployment Zone confer no benefits to that player, but confer double benefits to the opposing player.
Fleeing Warriors flee towards the table edge of their own deployment zone. If they reach the edge, they rally. Winning
Zones cannot be held or contested until the beginning of Turn 3.
Once a warband occupies 3 or more zones uncontested of the enemy, the enemy must take a Rout Test at the start of each of his turns.
(If a warband re-contests a zone, so that the enemy no longer holds 3 or more zones uncontested of the enemy, that warband will stop taking Rout Tests because of this rule.)
If either side has 5 or more models out of action, it may voluntarily Rout at the start of each of its own turns, and must take a Rout Test at the start of each of its own turns.
Exploration Dice
+2 Winning the Scenario. +1 being the warband with the least
Victory Points. -1 being the warband with the most
Victory Points. +2 per zone held uncontested of an
enemy (+4 Zones give +4 Exploration Dice).
+1 per zone held which the enemy also contests (i.e. both +2 and +4 Zones only give +1 Exploration Dice if the zone is contested by the enemy).
© Giorgos Magkakis
26
Scenario (8): Flanking Background As patrols from each warband catches sight of the other, both parties’ comrades rush to the scene to help out. Deployment
1. Both players divide their warbands into Combat Groups as described under ‘Scenarios’.
2. Both players start with one Combat Group, determined at random, deployed in their main deployment zone on turn 1.
3. Warriors may be deployed up to 8” in from the table edge and also on the upper floors of any buildings that are within 8” of the table edge.
4. At the start of Turn 4, each player deploys another Group, determined at random.
5. At the start of Turn 7, each player deploys his last Group.
6. Groups that are not deployed on turn 1 are always deployed in Flanking zones, see below.
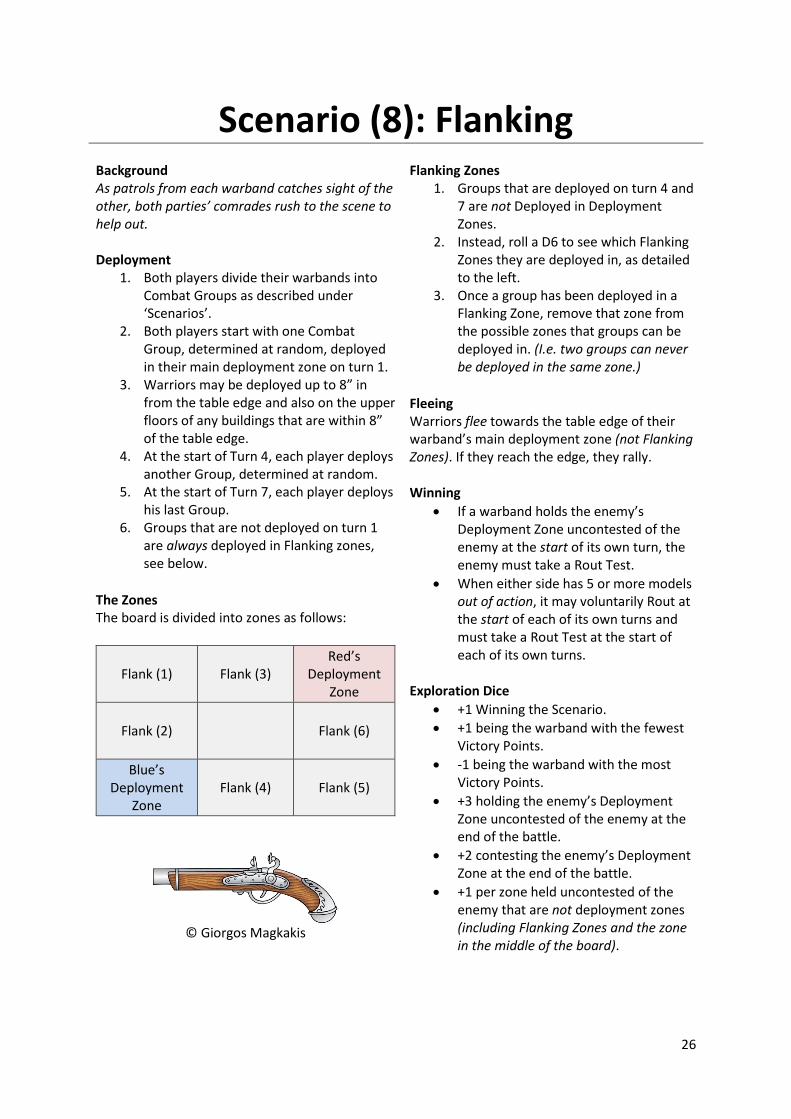
The Zones The board is divided into zones as follows:
Flank (1) Flank (3) Red’s
Deployment Zone
Flank (2) Flank (6)
Blue’s Deployment
Zone Flank (4) Flank (5)
© Giorgos Magkakis
Flanking Zones
1. Groups that are deployed on turn 4 and 7 are not Deployed in Deployment Zones.
2. Instead, roll a D6 to see which Flanking Zones they are deployed in, as detailed to the left.
3. Once a group has been deployed in a Flanking Zone, remove that zone from the possible zones that groups can be deployed in. (I.e. two groups can never be deployed in the same zone.)
Fleeing Warriors flee towards the table edge of their warband’s main deployment zone (not Flanking Zones). If they reach the edge, they rally. Winning
If a warband holds the enemy’s Deployment Zone uncontested of the enemy at the start of its own turn, the enemy must take a Rout Test.
When either side has 5 or more models out of action, it may voluntarily Rout at the start of each of its own turns and must take a Rout Test at the start of each of its own turns.
Exploration Dice
+1 Winning the Scenario. +1 being the warband with the fewest
Victory Points. -1 being the warband with the most
Victory Points. +3 holding the enemy’s Deployment
Zone uncontested of the enemy at the end of the battle.
+2 contesting the enemy’s Deployment Zone at the end of the battle.
+1 per zone held uncontested of the enemy that are not deployment zones (including Flanking Zones and the zone in the middle of the board).
27
Scenario (9): Extraction Background A hero has ventured too far ahead of his warband and has been surrounded by the enemy warband. Now his comrades attempt to break him out. Red and Blue The warband with the fewest Victory Points may choose to be either Red or Blue. Deployment
1. Both players divide their warbands into Combat Groups as described under ‘Scenarios’.
2. One random Blue combat group is deployed in the Extraction Zone on turn 1 (this may be a warrior from a Combat Group that has not been deployed yet). This Group is known as the Vanguard.
3. Two random Red Combat Groups are deployed on turn 1 in the two Red Deployment Zones.
4. The remaining two Blue Combat Groups are deployed on turn 1 in the Blue Deployment Zone.
5. Warriors may be deployed up to 8” in from the table edge and also on the upper floors of any buildings that are within 8” of the table edge.
6. At the start of Turn 4, each player deploys his last Combat Group.
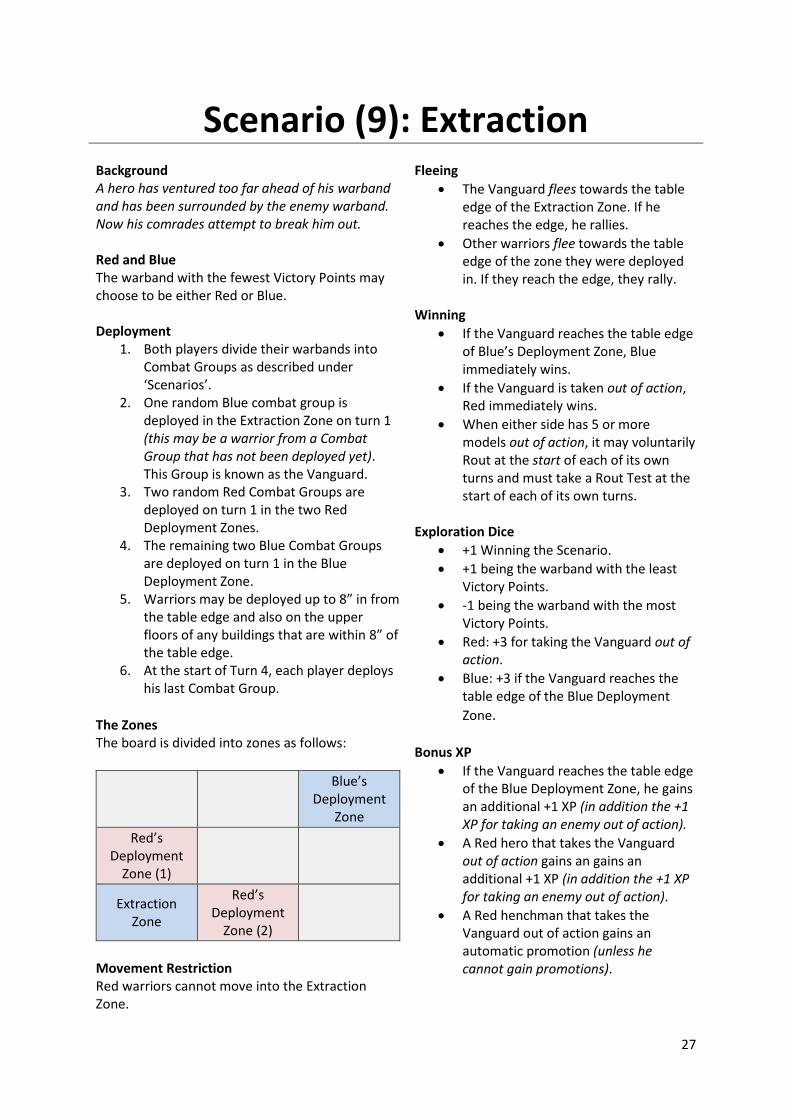
The Zones The board is divided into zones as follows:
Blue’s
Deployment Zone
Red’s Deployment
Zone (1)
Extraction Zone
Red’s Deployment
Zone (2)
Movement Restriction Red warriors cannot move into the Extraction Zone.
Fleeing
The Vanguard flees towards the table edge of the Extraction Zone. If he reaches the edge, he rallies.
Other warriors flee towards the table edge of the zone they were deployed in. If they reach the edge, they rally.
Winning
If the Vanguard reaches the table edge of Blue’s Deployment Zone, Blue immediately wins.
If the Vanguard is taken out of action, Red immediately wins.
When either side has 5 or more models out of action, it may voluntarily Rout at the start of each of its own turns and must take a Rout Test at the start of each of its own turns.
Exploration Dice
+1 Winning the Scenario. +1 being the warband with the least
Victory Points. -1 being the warband with the most
Victory Points. Red: +3 for taking the Vanguard out of
action. Blue: +3 if the Vanguard reaches the
table edge of the Blue Deployment
Zone.
Bonus XP
If the Vanguard reaches the table edge of the Blue Deployment Zone, he gains an additional +1 XP (in addition the +1 XP for taking an enemy out of action).
A Red hero that takes the Vanguard out of action gains an gains an additional +1 XP (in addition the +1 XP for taking an enemy out of action).
A Red henchman that takes the Vanguard out of action gains an automatic promotion (unless he cannot gain promotions).
28
Scenario (10): The Map Background Both warbands have heard tales of a famous cartographer who lived in a certain quarter of the city. With the fall of the comet, his maps have been scattered around the place where he lived. Red and Blue The warband with the fewest Victory Points may choose to be either Red or Blue. Deployment
1. Before it is determined who should be Red and Blue (i.e. who deploys where) players take turns to place Map Piece tokens anywhere in the three Zones marked ‘Pieces’. There are 6 Map Pieces all in all.
2. Both players divide their warbands into Combat Groups as described under ‘Scenarios’.
3. Both players start with one Combat Group, determined at random, deployed in their main deployment zone on turn 1.
4. Warriors may be deployed up to 8” in from the table edge and also on the upper floors of any buildings that are within 8” of the table edge.
5. At the start of Turn 4, each player deploys another Group, determined at random.
6. At the start of Turn 7, each player deploys his last Group.
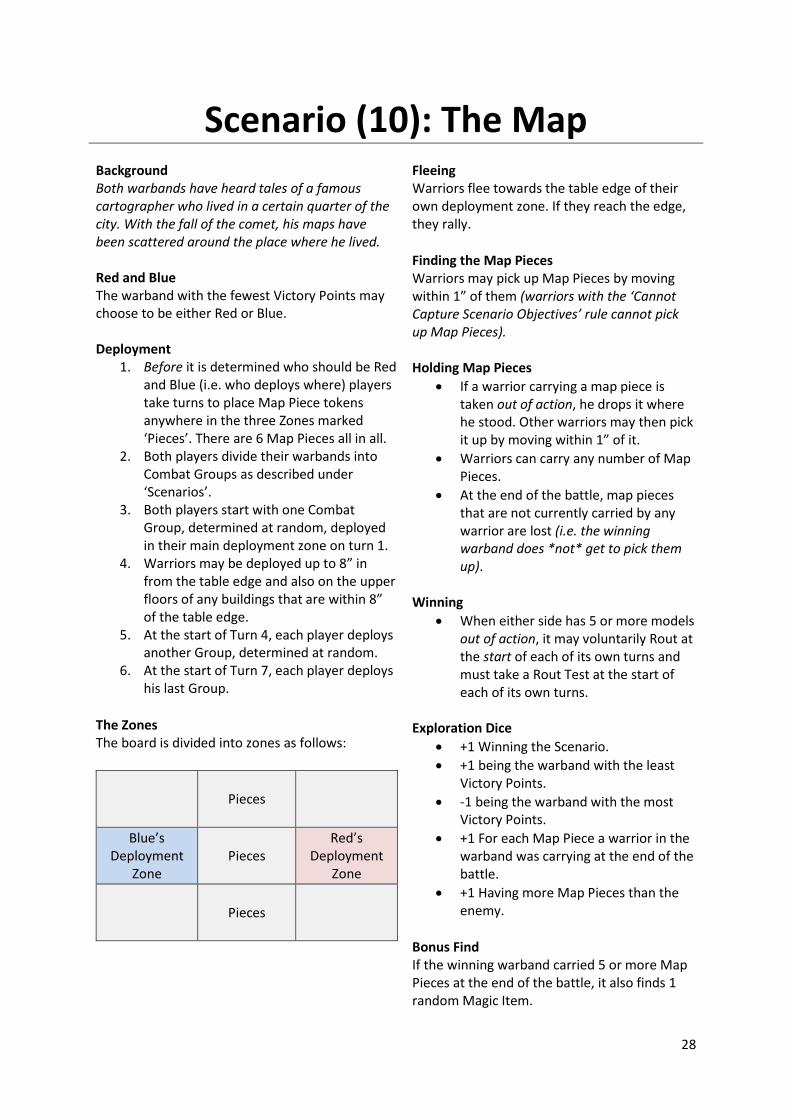
The Zones The board is divided into zones as follows:
Pieces
Blue’s Deployment
Zone Pieces
Red’s Deployment
Zone
Pieces
Fleeing Warriors flee towards the table edge of their own deployment zone. If they reach the edge, they rally.
Finding the Map Pieces Warriors may pick up Map Pieces by moving within 1” of them (warriors with the ‘Cannot Capture Scenario Objectives’ rule cannot pick up Map Pieces). Holding Map Pieces
If a warrior carrying a map piece is taken out of action, he drops it where he stood. Other warriors may then pick it up by moving within 1” of it.
Warriors can carry any number of Map Pieces.
At the end of the battle, map pieces that are not currently carried by any warrior are lost (i.e. the winning warband does *not* get to pick them up).
Winning
When either side has 5 or more models out of action, it may voluntarily Rout at the start of each of its own turns and must take a Rout Test at the start of each of its own turns.
Exploration Dice
+1 Winning the Scenario. +1 being the warband with the least
Victory Points. -1 being the warband with the most
Victory Points. +1 For each Map Piece a warrior in the
warband was carrying at the end of the battle.
+1 Having more Map Pieces than the enemy.
Bonus Find If the winning warband carried 5 or more Map Pieces at the end of the battle, it also finds 1 random Magic Item.
29
Scenario (11-12): Artefact Hunt Background Both warbands have heard a rumor that a Magical Artefact is hidden in this quarter of town. Now they race to find the stash. Deployment
1. Both players divide their warbands into Combat Groups as described under ‘Scenarios’.
2. Both players start with one Combat Group, determined at random, deployed in their main deployment zone on turn 1.
3. Warriors may be deployed up to 8” in from the table edge and also on the upper floors of any buildings within the area.
4. At the start of Turn 4, each player another Group, determined at random.
5. At the start of Turn 7, each player deploys his last Warband Group.
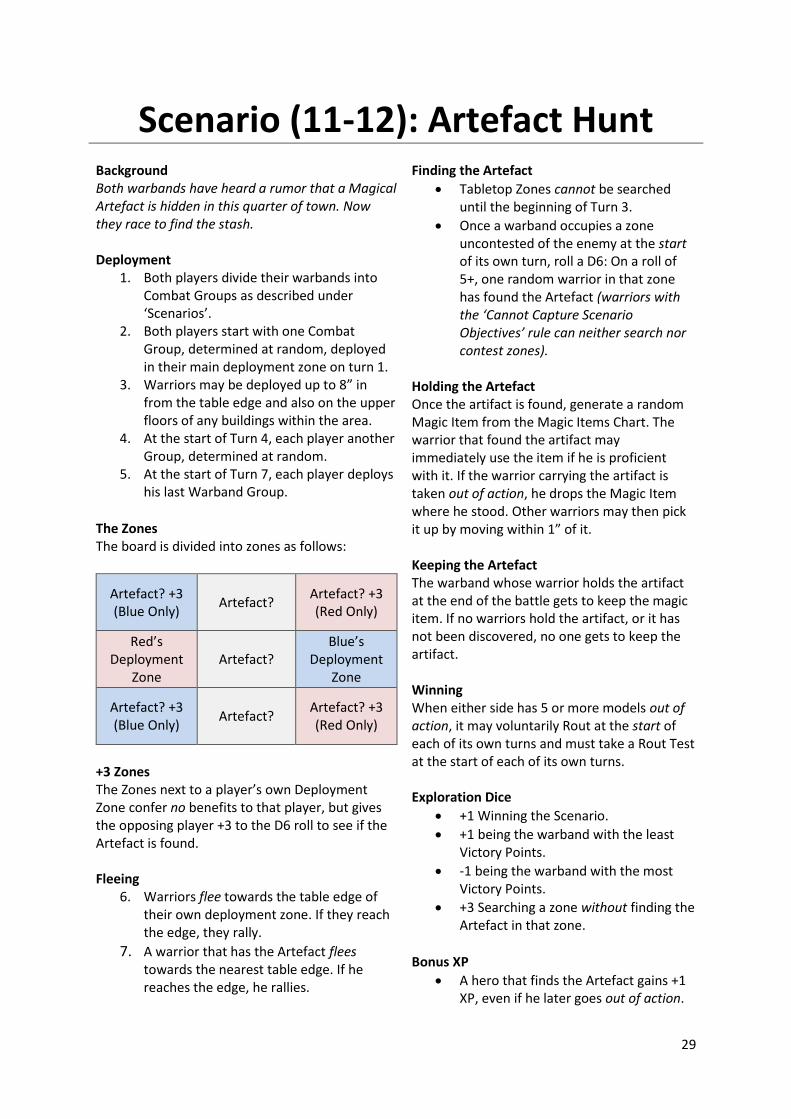
The Zones The board is divided into zones as follows:
Artefact? +3 (Blue Only)
Artefact? Artefact? +3 (Red Only)
Red’s Deployment
Zone Artefact?
Blue’s Deployment
Zone
Artefact? +3 (Blue Only)
Artefact? Artefact? +3 (Red Only)
+3 Zones The Zones next to a player’s own Deployment Zone confer no benefits to that player, but gives the opposing player +3 to the D6 roll to see if the Artefact is found. Fleeing
6. Warriors flee towards the table edge of their own deployment zone. If they reach the edge, they rally.
7. A warrior that has the Artefact flees towards the nearest table edge. If he reaches the edge, he rallies.
Finding the Artefact
Tabletop Zones cannot be searched until the beginning of Turn 3.
Once a warband occupies a zone uncontested of the enemy at the start of its own turn, roll a D6: On a roll of 5+, one random warrior in that zone has found the Artefact (warriors with the ‘Cannot Capture Scenario Objectives’ rule can neither search nor contest zones).
Holding the Artefact Once the artifact is found, generate a random Magic Item from the Magic Items Chart. The warrior that found the artifact may immediately use the item if he is proficient with it. If the warrior carrying the artifact is taken out of action, he drops the Magic Item where he stood. Other warriors may then pick it up by moving within 1” of it. Keeping the Artefact The warband whose warrior holds the artifact at the end of the battle gets to keep the magic item. If no warriors hold the artifact, or it has not been discovered, no one gets to keep the artifact. Winning When either side has 5 or more models out of action, it may voluntarily Rout at the start of each of its own turns and must take a Rout Test at the start of each of its own turns. Exploration Dice
+1 Winning the Scenario. +1 being the warband with the least
Victory Points. -1 being the warband with the most
Victory Points. +3 Searching a zone without finding the
Artefact in that zone.
Bonus XP A hero that finds the Artefact gains +1
XP, even if he later goes out of action.
30
Rules for Random Happenings
Happenings are Optional Rules Random Happenings are hazardous to your warriors and their effects introduce more randomness to the game. Random Happenings should only be used in a campaign where all players agree to use them. Using Happenings At the start of each player’s turn, that player rolls a D6: If the result is a natural 1, a Random Happening takes place.
The player must then roll D66 and see what happens by consulting the chart on the following pages. (To roll D66, roll 2D6 where one dice designates ‘tens’ and the other designates ‘ones’, e.g. if you roll 2 and 4, the result is 24.)
Happenings Affect Active Player Unless otherwise noted, the effects of Random Happenings always pertain to the player whose turn it is.
If there are no eligible warriors for a given happening then the happening has no effect (e.g. if an event effects a warrior “inside a building” and none of the active player’s warriors are inside a building, nothing happens).
© Giorgos Magakis
31
Random Happenings Chart (11-12) Rat Swarm A swarm of rats suddenly emerge from a sewer or drainage pipe and race down the street. One random warrior in the active player’s warband that is on ground level takes D3 automatic Strength 1 hits with armour saves as normal. (13-14) Earthquake The ground suddenly quakes and rumbles. All movement, running, and charging distances are halved (rounding up), all Initiative tests, that have to be taken by any warrior for any reason, have an extra -2 modifier to that warriors’ Initiative. Furthermore, all shooting is at -1 to hit this turn. All effects from this happening are absolved at the end of this turn. (15-16) High Winds Swooping winds suddenly start roaring among the rooftops. All Initiative tests, that have to be taken by any warrior for any reason, have an extra -1 modifier to that warrior’s Initiative this turn, and all shooting is at -1 to hit this turn. Additionally, all models (friend or foe) that are a full 2” or more above ground level must take 1 Initiative test; if failed, they suffer 1 automatic Strength 2 hit with armour saves as normal. (21) Lucky Find A warrior has discovered gold crowns! One random warrior in the active player’s warband that is not fleeing, or engaged in close combat, finds a purse containing 2D6gc. If the warrior is not taken out of action this battle, your warband keeps the money. If the warrior is taken out of action, he drops the purse where he stood. Other warriors can then pick it up by moving within 1” of it. If no one had the purse at the end of the battle, the money is lost. This happening cannot effect warriors with the ‘Cannot Capture Scenario Objectives’ rule and warriors with this rule cannot pick up the purse.
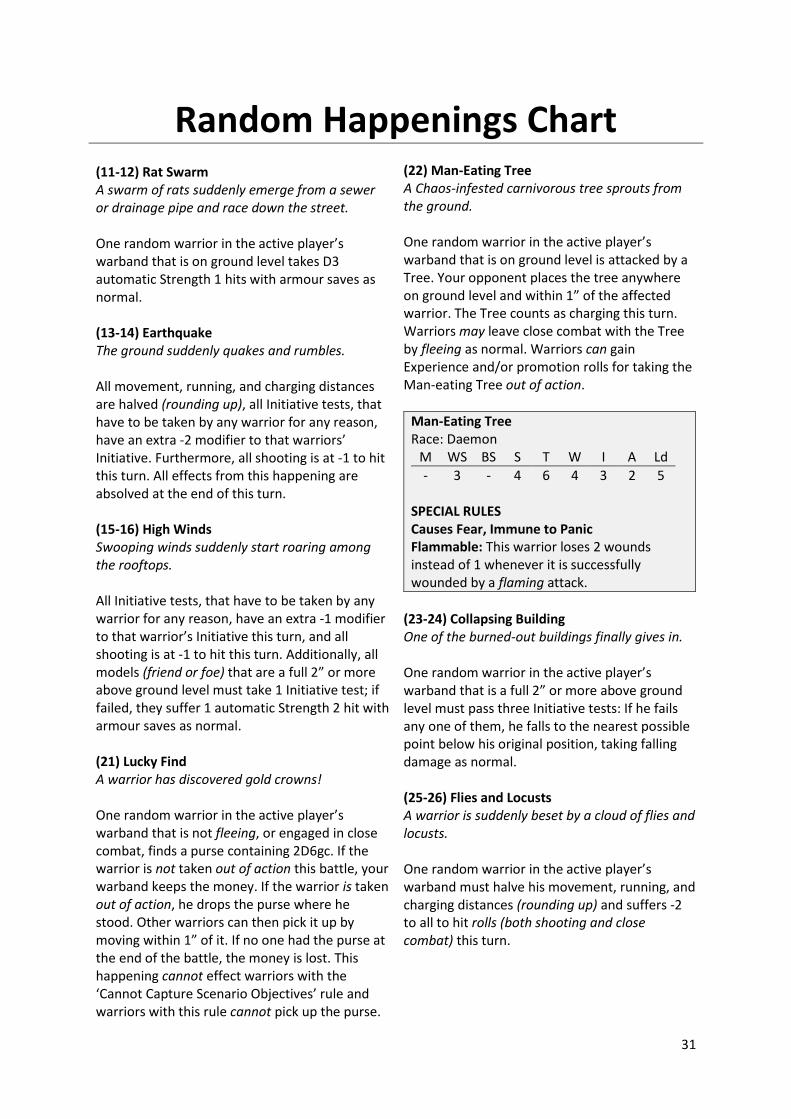
(22) Man-Eating Tree A Chaos-infested carnivorous tree sprouts from the ground. One random warrior in the active player’s warband that is on ground level is attacked by a Tree. Your opponent places the tree anywhere on ground level and within 1” of the affected warrior. The Tree counts as charging this turn. Warriors may leave close combat with the Tree by fleeing as normal. Warriors can gain Experience and/or promotion rolls for taking the Man-eating Tree out of action.
Man-Eating Tree Race: Daemon
M WS BS S T W I A Ld
- 3 - 4 6 4 3 2 5 SPECIAL RULES Causes Fear, Immune to Panic Flammable: This warrior loses 2 wounds instead of 1 whenever it is successfully wounded by a flaming attack.
(23-24) Collapsing Building One of the burned-out buildings finally gives in. One random warrior in the active player’s warband that is a full 2” or more above ground level must pass three Initiative tests: If he fails any one of them, he falls to the nearest possible point below his original position, taking falling damage as normal. (25-26) Flies and Locusts A warrior is suddenly beset by a cloud of flies and locusts. One random warrior in the active player’s warband must halve his movement, running, and charging distances (rounding up) and suffers -2 to all to hit rolls (both shooting and close combat) this turn.
32
Random Happenings Chart (31) Hidden Cache A warrior finds a hole in the cobblestone. Something appears glittering inside. One random warrior in the active player’s warband that is on ground level and not fleeing or engaged in close combat may stick his arm into the hole if you want him to. If he does, rolls a D6:
(1-2) One automatic Strength 3 hit with armour saves as normal.
(3) A suit of Light Armour.
(4-5) A Sword.
(6) A Pistol. If an item is found, it may be used at once. If the warrior cannot use the item found, he keeps it on his body for the rest of the battle. If the warrior is not taken out of action this battle, your warband keeps the item. If the warrior is taken out of action, he drops the item where he stood. Other warriors can then pick it up by moving within 1” of it. If no one had the item at the end of the battle, it is lost. This happening cannot effect warriors with the ‘Cannot Capture Scenario Objectives’ rule and warriors with this rule cannot pick up the item. (32-33) Sinkhole A warrior is swallowed up by the ground. One random warrior in the active player’s warband that is on ground level must take 1 Initiative test: If failed, he takes 1 automatic Strength 5 hit with armour saves as normal. (34-35) Mordheim Survivor A panicked survivor lies injured in the gutter. This happening does not take place until the end of the battle: Whichever warband wins the battle may roll 1 extra Exploration Dice.
(36) Silence The warriors are suddenly unable to speak. No warriors, neither friend nor foe, can use the ‘Leader’ ability or cast spells/prayers this turn. (41-42) Dense Fog A thick, unnatural fog descends on the city. Roll 2D6 and mark down the sum in inches: No warriors (neither friend nor foe) can charge, shoot, or cast spells if the range to their target exceeds the distance rolled on the 2D6. Lasts until the beginning of your next turn. (43) Forbidden Fruit A lush, otherworldly bush appears amongst the ruins, glowing with a faint white light. A shrubbery appears in base contact with any one random hero in the active player’s warband that is on ground level and not fleeing or engaged in close combat: Your opponent must place a piece of shrubbery terrain roughly 1x1”, and 1” high, anywhere within 1” of the effected warrior. The shrubbery has D3 fruits on it and the effected warrior immediately eats the first fruit. Roll a D6:
(1-4) D3 automatic poisonous Strength 3 hits with no saves of any kind allowed.
(5-6) +1 XP If the warrior survives and is not fleeing, he may immediately eat more fruit if you want him to. The warrior can keep eating fruit, as long as he survives.
Any pieces of fruit that the warrior opts not to eat will vanish (other warriors cannot eat them), but the shrubbery remains in play.
33
Random Happenings Chart (44) Screaming Walls Daemonic faces appear in the walls, screaming and twisting and intermingling with the lost souls of the people who were killed by the comet. One random warrior in the active player’s warband that is not fleeing or immune to panic must take a panic test. No effect vs. Undead, Daemons, and warriors immune to fear or panic. (45-46) Suffocating Heat A sudden heat wave arises and smothers the warriors. All warriors (friend or foe) suffer -1 to their Movement characteristic and -2 to their Initiative characteristic this turn. Undead and Daemons are not affected. (51-52) The Challenge Heinrich Schmoller is a flaccid asparagus and the son of a motherless goat! This happening does not take place until the end of the battle: After the battle you may send one of your heroes who were not out of action, chosen by you, to fight in the pits, exactly as if he had rolled a ‘Thrown to the Pits’ Campaign Injury (see Campaign Injuries). (53-54) Flooding The sewers suddenly run over and flood the streets in an ankle-high layer of sewage. All warriors on ground level that wish to move this turn must roll a D6: On 2-6 they move as normal but on a natural 1 they fall over, cannot move, and take 1 poisonous Strength 2 hit. (55-56) Power Surge The winds of magic twist and swirl in the skies above Mordheim. Whenever a wizard (not priest) from either warband attempts to cast a spell, using at least 1 Power Dice, an extra D3 Power Dice are added to that roll (roll separately for each spellcasting roll). Lasts until the beginning of your next turn.
(61-62) Deep Rumble The ground shakes mildly and a deep rumble startles the animals in the area. All Animals (friend or foe) must take a panic test. No effect vs. animals immune to fear or panic (warriors that cause fear are immune to fear themselves). (63-64) Chaos Gate A warp gate appears and a whole building (or similar feature) is sucked into the realm of Chaos. You nominate a piece of terrain and your opponent nominates a piece of terrain. Then roll a D6 to see what piece is affected:
(1-2) Your piece
(3-4) Opponent’s piece
(5-6) Nothing happens The affected piece of terrain is removed from the board. All models inside or standing on the affected piece of terrain that were elevated a full 2” or more above ground level fall to the ground as the terrain piece is removed from the board. (No effect vs. warriors that were already on ground level.) (65-66) Wheel of Fortune A maelstrom of magical energy hovers in the sky, hissing and crackling out magical energies. All of the following happens:
1. All currently active spells (not prayers) with ‘remains in play’ are dispelled.
2. All wizards (not priests) currently deployed lose all accumulated power dice. Then each wizard currently deployed gains D6 power dice. (Roll separately for each wizard.)
3. All wizards (not priests) currently deployed must re-roll their spells on their spell chart to see what spells they know this battle. (E.g. if a wizard knows two spells, he forgets them both and rolls for two new spells.)
34
Post-game Sequence 1. Update Victory Points: +1 VP: If you lost. +2 VP: If you won. 2. Explore
A. Roll the number of Exploration Dice determined by the Scenario just played.
B. When exploring you never choose more than 6 Exploration Dice as your final result. If you are allowed to roll more than 6 Exploration Dice, roll the total number allowed and then choose any 6 to keep as your final result.
C. If you roll any doubles, triples, etc., you have found a bonus location.
D. Calculate the sum of all your exploration dice to see how much Wyrdstone you find.
Finding Wyrdstone
Dice Result Shards Found 1-4 1
5-11 2 12-17 3 18-24 4 25-30 5 31-35 6 36+ 7
Selling Wyrdstone
Number of Warbands in the Campaign with at least 3 Victory Points more than you:
All incomes are listed in gold crowns.
Nu
mb
er of Sh
ards so
ld
4+ 3 2 1 0
1 45 40 35 30 30
2 60 55 50 45 40
3 75 70 65 60 55
4 90 85 75 70 65
5 105 95 85 80 75
6 120 105 95 90 85
7 135 115 105 100 95
3. Locations When exploring the ruins after the battle, if you roll any doubles, triples, etc. you have found a Location. You can only find one Location after each battle. If you score multiple Locations after a battle, you must choose which one to resolve. 4. Determine Injuries
A. Roll a D6 for each henchman that was taken out of action: (1) = Dead and equipment is lost. (2) = Dead but equipment is recovered, except for heirlooms. (3-6) = Survives with all equipment.
B. Roll a D66 for each hero that was taken out of action and see ‘Campaign Injuries.’ (To roll D66, roll 2D6 where one dice designates ‘tens’ and the other designates ‘ones’, e.g. if you roll 2 and 4, the result is 24.)
5. Gain Experience and Level Ups A. Each hero that survived the battle gains
+1 XP for participating, even if he was taken out of action.
B. A hero gains +1 XP each time he takes any enemy out of action.
C. Heroes that reach 2, 4, 6, 8, 11, 14, 17, 20, 24, 28, 32, 36, 41, 46, 51, 57, 63, 69, 76, 83 and 90 XP roll for Level Up.
6. Buy, Sell, and Reinforce
A. Each warband may sell up to 7 Wyrdstone shards for gold, using the table to the left. Shards that are not sold are lost.
B. Each warband may sell weapons, armour, and equipment that it owns at half the base price, rounded up.
C. Each warband may buy new recruits, weapons, armour, and equipment.
7. Ready to Fight Again!
35
Exploration: Doubles (1 1) Well If you wish, choose a hero that was not out of action: He must take a Toughness test. If passed: +1 Wyrdstone. If failed: Miss next battle. (Multiple ‘Miss next battles’ stack.) (2 2) Shop D6gc. If you roll a 1, you also find a Lantern. (3 3) Corpse Roll a D6: (1-2) D6gc (2) Club (4) Axe (5-6) Light Armour
(4 4) Straggler +1 Exploration Dice after next battle. (5 5) Overturned Cart Roll a D6: (1-2) Light Armour (3-4) 2D6gc (5-6) Blunderbuss (6 6) Ruined Hovels D6gc. If you roll a 1, you also find a Club.
- Exploration: Triples
(1 1 1) Wine Cellar Choose a hero that was not out of action: He must take a Leadership test. If passed: 4D6gc. If failed: 2D6gc. If all heroes were out of action, you automatically fail the test, gaining 2D6gc. (2 2 2) Smithy Roll a D6: (1) Sword (2) Great Sword (3) Flail (4) Halberd (5) Great Axe (6) Heavy Amour (3 3 3) Prisoners +D6gc and a 30gc discount on the next single henchman you hire. Must be used before next battle or discount is lost.
(4 4 4) Fletcher Roll a D6: (1) D3 Short Bows (2-3) D3 Bows (4) Long Bow and Hunting Arrows (5) Crossbow Pistol (6) Crossbow (5 5 5) Market Hall 3D6gc. (6 6 6) Returning a Favor 30gc discount on the next single hero or Hired Sword you want to hire. Must be used before next battle or discount is lost.
© Giorgos Magkakis
36
Exploration: Four of a Kind (1 1 1 1) Gunsmith Roll a D6: (1) Blunderbuss (2-3) Two Pistols (4) Dueling Pistol (5) Handgun (6) Handgun and Heavy Rounds (2 2 2 2) Shrine Roll a D6: (1-4) Any one hero in your warband, chosen by you, may learn the ‘Acolyte’ Academic skill. The hero may learn this skill even if he does not normally have access to Academic skills, however, he cannot learn it if he knows it already, or if he is a Wizard or Priest. (5-6) 1 random Magic Item. (3 3 3 3) Townhouse 3D6gc and D3 Lanterns.
(4 4 4 4) Armourer Roll a D6: (1-2) D3 Shields (3) D3 Suits of Light Armour (4) Heavy Armour (5) Heavy Armour and Shield (6) 1 random Magic Item. (5 5 5 5) Ancient Library Roll a D6: (1-4) Any one hero in your warband with access to Academic skills, chosen by you, gains +D3 XP. (5-6) 1 random Magic Item. (6 6 6 6) Catacombs If you wish, choose a hero that was not out of action: He must take a Toughness test and an Initiative test. If he fails either, he suffers a roll of ‘Multiple Injuries’ (see campaign injuries). If he passes both tests, the warband gains 1 random Magic Item.
-Exploration: Five of a Kind (1 1 1 1 1) Merchant’s House D6x10gc. If another warband has more Victory points than you, you also find 1 random Magic Item. (2 2 2 2 2) Alchemist’s Laboratory You find 1 Spellbook and any one of your heroes, chosen by you, gains the ‘Streetwise’ Academic skill, even if he cannot not normally learn Academic skills, though he cannot learn it if he has it already. (3 3 3 3 3) Jewelsmith D6x5gc and 1 Aiming Scope. If another warband has more Victory points than you, you also find 1 random Magic Item.
(4 4 4 4 4) Elven Ruins Roll a D6: (1-4) D6x5gc (5-6) 3D6gc and 1 random Magic Item
(5 5 5 5 5) The Fighting Pits If you wish, choose a hero in your warband that was not out of action at the end of the battle: That warrior must fight a Pit Fighter exactly as if he had rolled ‘Thrown to the Pits’ as a campaign injury. However, if your warrior wins, the warband also gains 1 random Magic item, in addition to the normal gold and XP. (6 6 6 6 6) Ruined Cathedral One wizard or priest in the warband, chosen by you, may desecrate or pray at the site for +D3 XP. In addition, roll a D6: (1-4) Holy Tome (5-6) 1 random Magic Item
37
Exploration: Six of a Kind
(1 1 1 1 1 1) The Comet Pit If you wish, choose a hero in your warband that was not out of action after the battle: That hero ventures down into the Pit. Roll a D6: (1-3) The hero is devoured by the chaos abominations that infest the pit. (4-6) The hero comes back up with 2D3 Wyrdstone and 1 random Magic Item. If another warband has more victory points than you, the hero comes back with D3 random Magic Items instead.
(2 2 2 2 2 2) Slaughtered Warband Roll a D6 for each of these:
D3 Suits of Light Armour 4+ Heavy Armour 5+ D3 Halberds 5+ D3 Swords 3+ D3 Shields 3+ D3 Bows 4+ D3 Axes 5+ 2D6gc 5+
(4 4 4 4 4 4) Moneylender’s House D6x10gc and 1 random Magic Item. Furthermore, the warband in the campaign that has the most Victory Points loses 1 Victory Point (this may be your own warband).
(3 3 3 3 3 3) Chaos Shrine 1 random Magic Item. In addition, one wizard in the warband, chosen by you, may study the chaos runes. If he does, roll a D6:
(1) The wizard suffers a roll of ‘Multiple Injuries’ (see campaign injuries). (2) The wizard now permanently knows 1 spell from the lore of Chaos Rituals.
(3) The wizard now permanently knows 1 spell from the lore of Tzeentch.
(4) The wizard now permanently knows 1 spell from the lore of Nurgle. (5) The wizard now permanently knows 1 spell from the lore of Slaanesh. (6) The wizard now permanently knows 1 spell from the lore of Kin-Magic.
Learning these spells will not cause the wizard to learn the signature spells from these lores if he did not know it already. (5 5 5 5 5 5) Hidden Treasure 1 random Magic Item and roll a D6: On a roll of 5+ you find another random Magic Item. (6 6 6 6 6 6) Noble’s Villa D6x5gc, pair of Dueling Pistols, and 1 random Magic Item.
o
© Giorgos Magkakis
38
Rules for Magic Items Gaining Magic Items Magic items cannot be bought. Your warband will find them through explorations, or in scenarios. Finding Magic Items Finding magic items is done by exploring the ruins and rolling doubles, triples, etc. on the exploration dice after a battle. See the exploration section for details. Which Item is Found? When a magic item is bought or found, it is always randomly generated from the magic items chart. The new owner cannot decide what type of magic item it will be. Once a new item is definitively found, roll D66 to determine which item is found.
(To roll D66, roll 2D6 where one dice designates ‘tens’ and the other designates ‘ones’, e.g. if you roll 2 and 4, the result is 24.)
Magic Items are Unique All magic items are unique. This means that if one warband already owns a given magic item, no other warband can acquire it through rolling on the magic item chart (keep re-rolling the result until a magic item that is not already present in the campaign is generated).
If a magic item was present in the campaign, but disappeared (e.g. because the hero that was carrying it died) that item can be generated anew if its number is rolled on the magic item chart.
Selling Magic Items Magic items cannot be sold. Magic Item Types Where magic items belong to a given class of weapon or armour, that magic item will gain all of the usual properties of the type of weapon or armour to which it belongs. (E.g. if an entry says that a magic item is a ‘Close Combat Weapon: Club’ that item will have all the properties of a normal Club, in addition to its magical effects.) Magical Shields Where a magical Shield gives increased armour saves or ward saves, the warrior wielding the Shield must still be eligible for that type of save as per normal rules for Shields. (I.e. warriors armed with weapons that have the ‘Two-handed’ rule, or with missile weapons of any kind can only use Shields in close combat.) Magic Items and Skills Magic items and skills can be used in conjunction. (E.g. a warrior with a skill that affects Great Weapons and is equipped with a magical Great Weapon can use his skill while wielding that Weapon.) Magic Items and other Items Magic items and other items that usually boost such items cannot be used in conjunction. (E.g. a warrior with a magical Bow and Hunting Arrows cannot use these two items in conjunction.) The exception to this is poison, see below. Magic Items and Poison Magic items may be poisoned by skills, rules, or Special Equipment that the wielder has as normal (though note that if an attack is both flaming and poisonous, poison has no effect).

39
Magic Item Chart Skull Staff (11) Close Combat Weapon: Club Whenever caster rolls on the miscast table, he may re-roll his result. Can only be carried by Wizards. Skull Wand of Kaloth (12) Close Combat Weapon: Club Enemies wounded by an attack from this weapon must take a panic test (unless they are immune to panic). Can only be carried by Wizards. Sword of Striking (13) Close Combat Weapon: Sword Attacks with this weapon have +1 to hit. Sword of Battle (14) Close Combat Weapon: Sword Wielder may re-roll 1 failed roll to hit with this weapon each turn (including the opponent’s. Re-rolled dice cannot cause critical hits.) Sword of Might (15) Close Combat Weapon: Sword Attacks with this weapon have +1 Strength. Shrieking Blade (16) Close Combat Weapon: Sword Wielder causes fear (this also makes him immune to fear himself). Biting Blade (21) Close Combat Weapon: Sword This weapon has Armour Piercing (2). Sword of Command (22) Close Combat Weapon: Sword Wielder gains the ‘Leader (6”)’ rule or adds +6” to the range of his Leader ability if he already has the ‘Leader’ ability. Skabskrath (23) Close Combat Weapon: Sword Enemies within 1” of wielder must take fear and panic tests on 3D6, using the highest two as their result.
Filth Mace (24) Close Combat Weapon: Great Club Attacks are poisonous. Whenever wielder takes an enemy out of action with an attack from this weapon, he causes fear for the rest of the battle. Black Axe of Krell (25) Close Combat Weapon: Great Axe When this weapon wounds an enemy, roll a D6: On a roll of 5+ that enemy takes 1 automatic Strength 3 hit with armour saves as normal. Battleaxe of the Last Waaagh! (26) Close Combat Weapon: Great Axe Wielder has -1 to hit with this weapon but +2 Strength to attacks with this weapon. Chaos Tomb Blade (31) Close Combat Weapon: Great Sword Ignores armour and regeneration saves. Enchanted Shield (32) Armour: Shield This Shield grants a 5+ armour save instead of the normal 6+. Shield of Ptolos (33) Armour: Shield This Shield grants a 5+ ward save vs. shooting attacks instead of the normal 6+. Spelleater Shield (34) Armour: Shield This Shield grants a 4+ ward save vs. spells instead of the normal 6+. Dragonshield (35) Armour: Shield Wielder cannot be wounded by flaming attacks. Dragon Bow (36) Missile Weapon: Long Bow Range: 36” Strength: 4 Asp Bow (41) Missile Weapon: Bow Range: 24” Strength: 3 Shots are poisonous and ignore cover.
40
Magic Item Chart Ring of Volans (42) Special Equipment Wearer starts each battle (and pit fight) with 1 free Power Dice. Can only be carried by Wizards. Wand of Jet (43) Special Equipment Wielder has +1 to all spellcasting rolls. Can only be carried by Wizards. Book of Ashur (44) Special Equipment Owner gains one random spell from any of the 8 basic Magic lores (chosen by you) each battle. This does not cause him to know the signature spell from that lore if he does not know it already. Can only be carried by Wizards. Heart of Woe (45) Special Equipment When wielder is taken out of action all warriors (friend or foe) within 1” of him take 1 automatic Strength 6 hit with armour saves as normal. Then Heart of Woe is lost. Wearer can gain experience for taking enemies out of action this way, even while out of action himself. Horn of Urgok (46) Special Equipment Use only once per battle: Owner may use horn at the start of each of his own turns: All fleeing warriors in the warband immediately rally. This does not require line of sight. They may shoot missile weapons or declare a charge, even though they just rallied. Owner cannot use the horn while he is fleeing himself. If the owner is hiding, he immediately becomes un-hidden for using the horn. Grudgebringer Sword (51) Close Combat Weapon: Sword Attacks with this weapon are flaming. Wielder gains access to the ‘Fireball’ spell from the lore of Lore of Fire and generates power dice each turn as if he were a Wizard. Cannot be carried by Wizards. Wielder may wear armour and cast Fireball. Wielding the Grudgebringer Sword does not make the warrior count as a Wizard.
Crown of Command (52) Special Equipment Wearer gains +1 Ld and Stubborn. (May re-roll failed fear and panic tests.) Van Horstmann's Speculum (53) Special Equipment Use only once per battle: At the start of each of wearer’s own turns, choose an enemy within 12” of wearer and choose a profile characteristic that is not Wounds: Wearer and that enemy then swap their values for that characteristic for the rest of the battle.
This ability requires line of sight and wearer cannot use this ability while fleeing.
Only the unmodified characteristics values are swapped between the two warriors: Modifiers from skills, spells, prayers, injuries, etc. are not counted.
Skull of Katam (54) Special Equipment Bearer must add +D3 to all his spellcasting rolls, but also loses 1 Wound with no saves of any kind allowed each time he fails a spellcasting roll. (This D3 does never contributes to miscasts.) Can only be carried by Wizards. Golden Shield of Atrazar (55) Armour: Shield Wearer cannot be critically hit. (Treat critical hits as normal hits.) Hail of Doom Arrow (56) Special Equipment Use only once per battle: Bearer gains Multiple Shots D3+1 this shooting phase with any non-magical Short Bow, Bow, or Long Bow that he is carrying. This ability follows the normal rules for firing multiple shots (i.e. all shots must be fired at the same target and additional -1 to hit on all shots) and replaces any other ‘Multiple Shot’ abilities that the warrior may have that turn. Book of Grudges (61) Special Equipment Bearer hates all enemies.
41
Magic Item Chart Ruby Chalice (62) Special Equipment Shooting attacks have an additional -2 to hit wearer as long as he is down to 2 Wounds or less. (A natural 6 is always a hit.) Morning Star of Fracasse (63) Close Combat Weapon: Morning Star Attacks with this weapon have Concussive (D3). Flail of Skulls (64) Close Combat Weapon: Flail The first successful hit each battle is automatically a critical hit. If the hit was already critical (i.e. the attack rolled a natural 6 to hit) add +D6 to the roll on the critical hit chart instead. Crimson Amulet (65) Special Equipment Wearer automatically passes all characteristics tests that are not Leadership tests. (May also be used during exploration, i.e. with locations.) Black Gem of Gnar (66) Special Equipment Use only twice per battle: At the start of any close combat phase (i.e. also opponent’s) choose any enemy within 1” of bearer: Neither bearer nor the targeted enemy may strike any blows in close combat or be struck at in close combat this turn. Any passive abilities they may have (such as fear) are still active.
© Giorgos Magkakis
42
Experience and Level Up Hero Experience Heroes gain experience as follows:
+1 XP: Taking any enemy out of action.
+1 XP: Surviving a battle. (Even if out of action and having to roll for injuries, they still gains experience as long as they survived.)
Heroes Level Up Heroes Level Up whenever they reach 2, 4, 6, 8, 11, 14, 17, 20, 24, 28, 32, 36, 41, 46, 51, 57, 63, 69, 76, 83 and 90 XP. Whenever a level up is gained, roll 2D6:
2D6 Level Up
2-4 Choose New Skill
5 Choose +1 S, I, or Ld
6-7 Choose +1 WS or BS
8 Choose +1 I or Ld
9 Choose +1 A or T
10-12 Choose New Skill
Racial Maximums Heroes must re-roll any advances that would take them above the following thresholds.
Note that these maximums only apply to Level Ups: Warriors can still exceed these values through effects from weapons, skills, diving charges, spells, prayers and the like.
WS BS S T W I A Ld
Human 8 8 4 4 3 8 2 9
Halfling 7 9 3 2 3 9 2 8
Dwarf 10 8 4 4 3 6 2 10
Elf 10 10 4 3 3 10 2 10
Skaven 8 8 4 4 3 9 2 7
Ungor 7 7 4 3 3 8 2 7
Gor 9 6 4 4 3 8 2 7
Daemon 10 8 5 4 3 9 2 10
Vampire 10 8 5 4 3 10 2 10
Skeleton 10 7 4 4 3 6 2 8
Ghoul 7 7 4 4 3 8 2 7
Orc 8 7 4 4 3 7 2 9
Goblin 7 8 3 2 3 8 2 7
Dryad 10 7 4 4 3 9 2 10
Hobgoblin 7 8 4 2 3 8 2 7
Skink 7 8 3 2 3 9 2 7
Saurus 9 7 4 4 3 6 2 10
Slann 7 7 4 4 3 6 2 10
Ogre 8 7 6 5 3 7 2 9
Henchman Experience: Henchmen do not gain experience, but whenever a henchman takes an enemy hero (not henchman) out of action, roll a D6:
(1-5): Nothing happens.
(6): The Lad’s Got Talent! The Lad’s Got Talent! After the battle you may promote that henchman to a hero. If you already have six heroes, you may fire an existing hero to make room for the new hero. Alternatively, if an existing hero dies after the battle, you may have the new hero take his place. The new hero gains access to three skill lists of your choice. These may be any mix of the five basic skill lists, as well as any special skill lists that are available to your warband. (Note that Special skill lists are not automatically gained, but count as a choice in this regard.) If the promotion is not used after the battle where it was gained, it is lost. Experience, Promotion, and Grey Areas With any grey areas (such as a warrior knocking an enemy off a building, causing him to go out of action from the falling damage) the default is always to let the hero gain XP or let the henchman gain a promotion roll. However, warriors never gain XP or promotion rolls for taking members of their own warband out of action, e.g. through the accidental effects of spells, shooting, and the like.
© Giorgos Magkakis
43
Victory Points Victory Points Victory Points are used for winning the campaign. Warbands gain victory points as follows: +2 VP for each scenario won. +1 VP for each scenario lost. Maximum 25 Victory Points Warbands cannot have more than 25 Victory Points. Any Victory Points gained while at 25 are discarded.
Winning the Campaign Once a warband has accumulated 25 victory points, other warbands that lose a battle against the warband are eliminated from the campaign. When there are no other warbands left, the warband will have won the campaign. No Warband Rating As opposed to normal variants of Warhammer skirmish rules, there is no need to calculate warband ratings in WyrdWars. Victory points fill that function instead!
Injuries Hero Injuries Heroes that went out of action must roll D66 and consult the chart on the next page.
(To roll D66, roll 2D6 where one dice designates ‘tens’ and the other designates ‘ones’, e.g. if you roll 2 and 4, the result is 24.)
Heroes can acquire multiple instances of the same injury (e.g. two Hand Injuries for -2 WS).
Injuries are not counted for the purpose of racial maximums (e.g. a Human with WS 8 and two Hand Injuries cannot gain further WS advances even through the injuries have reduced his actual WS to 6).
Warriors can gain injuries that exceed their characteristics. (E.g. a warrior with WS 2 can gain any number of Hand Injuries, even though he only has WS 2. Characteristics cannot be reduced below 1, so a warrior with WS 2 and three Hand Injuries still has WS 1 in battle. But the injuries are still there and count against future advances.)
Henchman Injuries Henchmen that went out of action must roll a D6:
(1): Dead and all equipment is lost.
(2): Dead but all equipment except Heirlooms is retained.
(3-6): Survives and all equipment is retained.
© Giorgos Magkakis
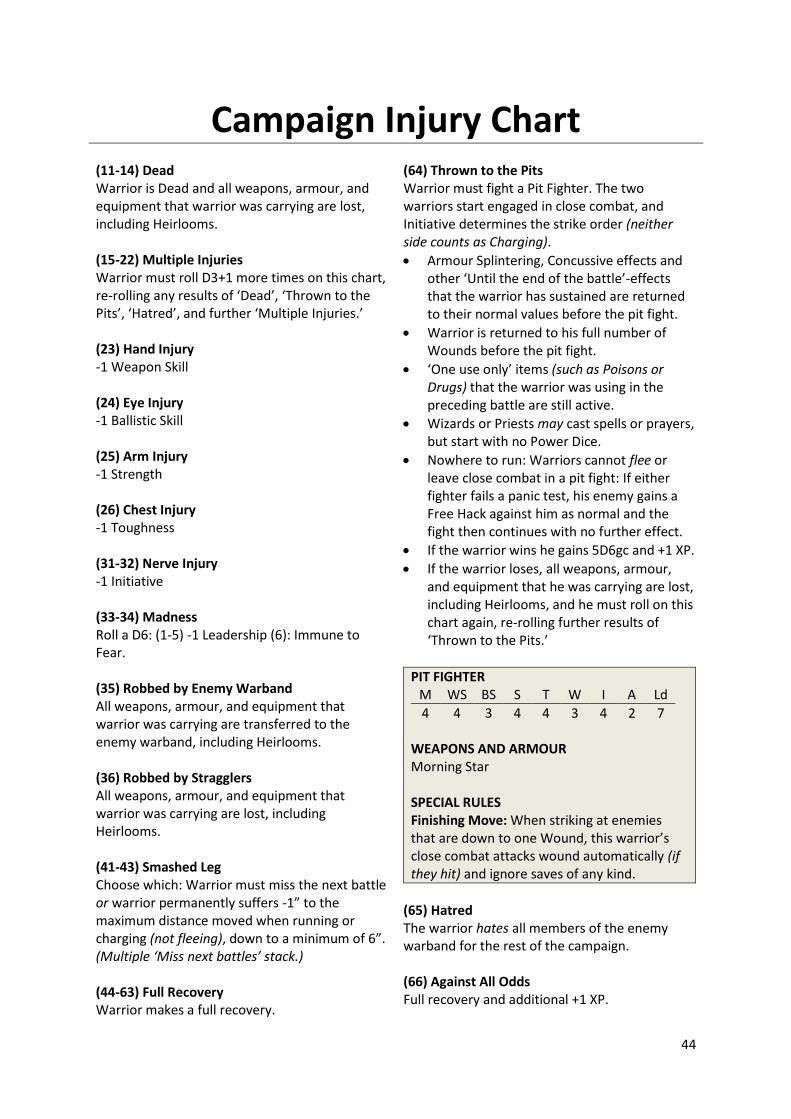
44
Campaign Injury Chart (11-14) Dead Warrior is Dead and all weapons, armour, and equipment that warrior was carrying are lost, including Heirlooms. (15-22) Multiple Injuries Warrior must roll D3+1 more times on this chart, re-rolling any results of ‘Dead’, ‘Thrown to the Pits’, ‘Hatred’, and further ‘Multiple Injuries.’ (23) Hand Injury -1 Weapon Skill (24) Eye Injury -1 Ballistic Skill (25) Arm Injury -1 Strength (26) Chest Injury -1 Toughness (31-32) Nerve Injury -1 Initiative (33-34) Madness Roll a D6: (1-5) -1 Leadership (6): Immune to Fear. (35) Robbed by Enemy Warband All weapons, armour, and equipment that warrior was carrying are transferred to the enemy warband, including Heirlooms. (36) Robbed by Stragglers All weapons, armour, and equipment that warrior was carrying are lost, including Heirlooms. (41-43) Smashed Leg Choose which: Warrior must miss the next battle or warrior permanently suffers -1” to the maximum distance moved when running or charging (not fleeing), down to a minimum of 6”. (Multiple ‘Miss next battles’ stack.) (44-63) Full Recovery Warrior makes a full recovery.
(64) Thrown to the Pits Warrior must fight a Pit Fighter. The two warriors start engaged in close combat, and Initiative determines the strike order (neither side counts as Charging).
Armour Splintering, Concussive effects and other ‘Until the end of the battle’-effects that the warrior has sustained are returned to their normal values before the pit fight.
Warrior is returned to his full number of Wounds before the pit fight.
‘One use only’ items (such as Poisons or Drugs) that the warrior was using in the preceding battle are still active.
Wizards or Priests may cast spells or prayers, but start with no Power Dice.
Nowhere to run: Warriors cannot flee or leave close combat in a pit fight: If either fighter fails a panic test, his enemy gains a Free Hack against him as normal and the fight then continues with no further effect.
If the warrior wins he gains 5D6gc and +1 XP.
If the warrior loses, all weapons, armour, and equipment that he was carrying are lost, including Heirlooms, and he must roll on this chart again, re-rolling further results of ‘Thrown to the Pits.’
PIT FIGHTER M WS BS S T W I A Ld
4 4 3 4 4 3 4 2 7 WEAPONS AND ARMOUR Morning Star SPECIAL RULES Finishing Move: When striking at enemies that are down to one Wound, this warrior’s close combat attacks wound automatically (if they hit) and ignore saves of any kind.
(65) Hatred The warrior hates all members of the enemy warband for the rest of the campaign. (66) Against All Odds Full recovery and additional +1 XP.
45
Smooth or Classic? Two Ways to Play WyrdWars has been designed so that there are two ways to play: Smooth or Classic. The only difference is how to resolve ‘to hit’ rolls in close combat. Classic Uses the classic WS vs. WS tables from classic Warhammer Games. This makes games slower and close combat less bloody, but more nuanced.
Smooth Uses a static ‘to hit’ table as known from modern skirmish games. This makes games quicker and combat more bloody, but less nuanced. Which One to Use? Discuss with your group which method you prefer!
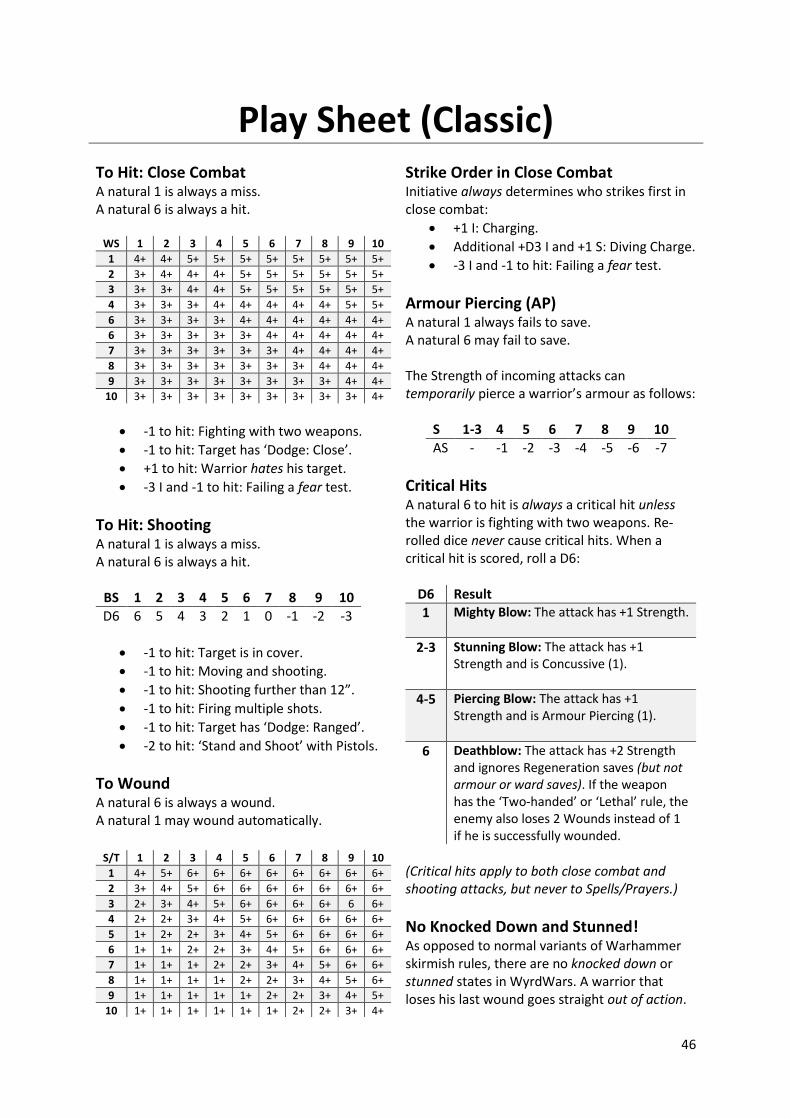
46
Play Sheet (Classic)
To Hit: Close Combat
A natural 1 is always a miss. A natural 6 is always a hit.
WS 1 2 3 4 5 6 7 8 9 10
1 4+ 4+ 5+ 5+ 5+ 5+ 5+ 5+ 5+ 5+
2 3+ 4+ 4+ 4+ 5+ 5+ 5+ 5+ 5+ 5+
3 3+ 3+ 4+ 4+ 5+ 5+ 5+ 5+ 5+ 5+
4 3+ 3+ 3+ 4+ 4+ 4+ 4+ 4+ 5+ 5+
6 3+ 3+ 3+ 3+ 4+ 4+ 4+ 4+ 4+ 4+
6 3+ 3+ 3+ 3+ 3+ 4+ 4+ 4+ 4+ 4+
7 3+ 3+ 3+ 3+ 3+ 3+ 4+ 4+ 4+ 4+
8 3+ 3+ 3+ 3+ 3+ 3+ 3+ 4+ 4+ 4+
9 3+ 3+ 3+ 3+ 3+ 3+ 3+ 3+ 4+ 4+
10 3+ 3+ 3+ 3+ 3+ 3+ 3+ 3+ 3+ 4+
-1 to hit: Fighting with two weapons.
-1 to hit: Target has ‘Dodge: Close’.
+1 to hit: Warrior hates his target.
-3 I and -1 to hit: Failing a fear test.
To Hit: Shooting
A natural 1 is always a miss. A natural 6 is always a hit.
BS 1 2 3 4 5 6 7 8 9 10
D6 6 5 4 3 2 1 0 -1 -2 -3
-1 to hit: Target is in cover.
-1 to hit: Moving and shooting.
-1 to hit: Shooting further than 12”.
-1 to hit: Firing multiple shots.
-1 to hit: Target has ‘Dodge: Ranged’.
-2 to hit: ‘Stand and Shoot’ with Pistols.
To Wound
A natural 6 is always a wound. A natural 1 may wound automatically.
S/T 1 2 3 4 5 6 7 8 9 10
1 4+ 5+ 6+ 6+ 6+ 6+ 6+ 6+ 6+ 6+
2 3+ 4+ 5+ 6+ 6+ 6+ 6+ 6+ 6+ 6+
3 2+ 3+ 4+ 5+ 6+ 6+ 6+ 6+ 6 6+
4 2+ 2+ 3+ 4+ 5+ 6+ 6+ 6+ 6+ 6+
5 1+ 2+ 2+ 3+ 4+ 5+ 6+ 6+ 6+ 6+
6 1+ 1+ 2+ 2+ 3+ 4+ 5+ 6+ 6+ 6+
7 1+ 1+ 1+ 2+ 2+ 3+ 4+ 5+ 6+ 6+
8 1+ 1+ 1+ 1+ 2+ 2+ 3+ 4+ 5+ 6+
9 1+ 1+ 1+ 1+ 1+ 2+ 2+ 3+ 4+ 5+
10 1+ 1+ 1+ 1+ 1+ 1+ 2+ 2+ 3+ 4+
Strike Order in Close Combat
Initiative always determines who strikes first in close combat:
+1 I: Charging.
Additional +D3 I and +1 S: Diving Charge.
-3 I and -1 to hit: Failing a fear test.
Armour Piercing (AP) A natural 1 always fails to save. A natural 6 may fail to save. The Strength of incoming attacks can temporarily pierce a warrior’s armour as follows:
S 1-3 4 5 6 7 8 9 10
AS - -1 -2 -3 -4 -5 -6 -7
Critical Hits A natural 6 to hit is always a critical hit unless the warrior is fighting with two weapons. Re-rolled dice never cause critical hits. When a critical hit is scored, roll a D6:
D6 Result
1 Mighty Blow: The attack has +1 Strength.
2-3 Stunning Blow: The attack has +1 Strength and is Concussive (1).
4-5 Piercing Blow: The attack has +1 Strength and is Armour Piercing (1).
6 Deathblow: The attack has +2 Strength and ignores Regeneration saves (but not armour or ward saves). If the weapon has the ‘Two-handed’ or ‘Lethal’ rule, the enemy also loses 2 Wounds instead of 1 if he is successfully wounded.
(Critical hits apply to both close combat and shooting attacks, but never to Spells/Prayers.)
No Knocked Down and Stunned! As opposed to normal variants of Warhammer skirmish rules, there are no knocked down or stunned states in WyrdWars. A warrior that loses his last wound goes straight out of action.
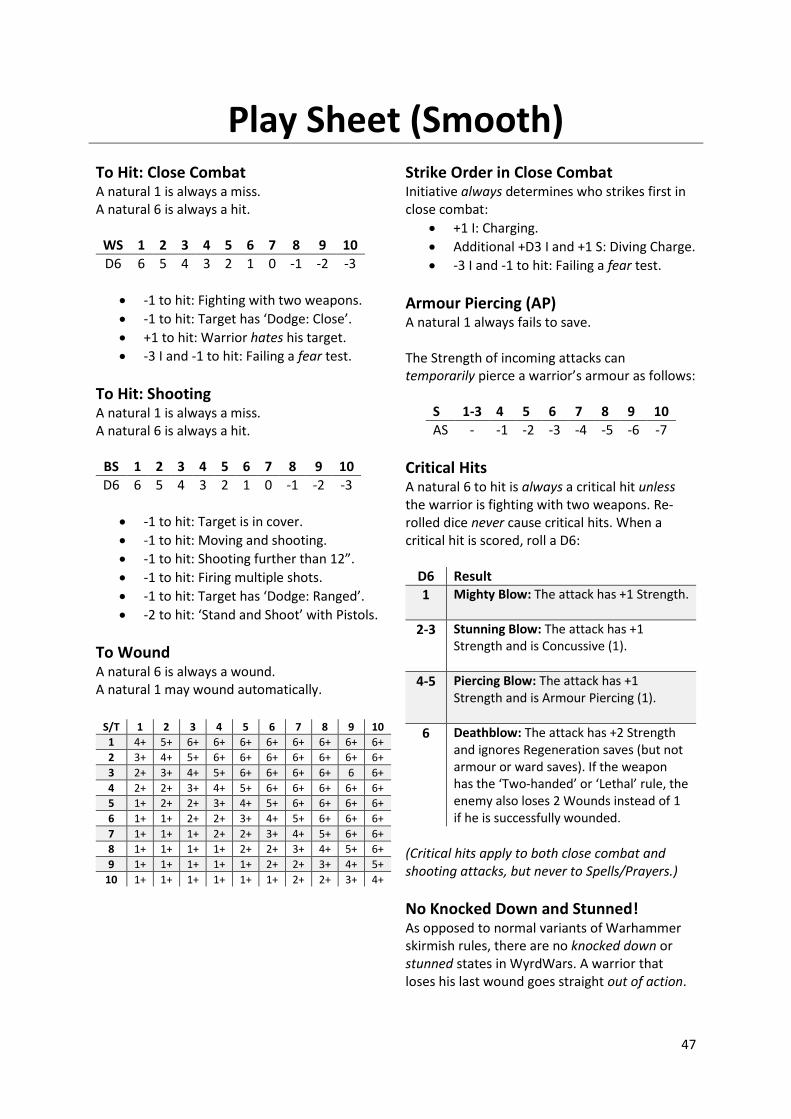
47
Play Sheet (Smooth)
To Hit: Close Combat
A natural 1 is always a miss. A natural 6 is always a hit.
WS 1 2 3 4 5 6 7 8 9 10
D6 6 5 4 3 2 1 0 -1 -2 -3
-1 to hit: Fighting with two weapons.
-1 to hit: Target has ‘Dodge: Close’.
+1 to hit: Warrior hates his target.
-3 I and -1 to hit: Failing a fear test.
To Hit: Shooting A natural 1 is always a miss. A natural 6 is always a hit.
BS 1 2 3 4 5 6 7 8 9 10
D6 6 5 4 3 2 1 0 -1 -2 -3
-1 to hit: Target is in cover.
-1 to hit: Moving and shooting.
-1 to hit: Shooting further than 12”.
-1 to hit: Firing multiple shots.
-1 to hit: Target has ‘Dodge: Ranged’.
-2 to hit: ‘Stand and Shoot’ with Pistols.
To Wound
A natural 6 is always a wound. A natural 1 may wound automatically.
S/T 1 2 3 4 5 6 7 8 9 10
1 4+ 5+ 6+ 6+ 6+ 6+ 6+ 6+ 6+ 6+
2 3+ 4+ 5+ 6+ 6+ 6+ 6+ 6+ 6+ 6+
3 2+ 3+ 4+ 5+ 6+ 6+ 6+ 6+ 6 6+
4 2+ 2+ 3+ 4+ 5+ 6+ 6+ 6+ 6+ 6+
5 1+ 2+ 2+ 3+ 4+ 5+ 6+ 6+ 6+ 6+
6 1+ 1+ 2+ 2+ 3+ 4+ 5+ 6+ 6+ 6+
7 1+ 1+ 1+ 2+ 2+ 3+ 4+ 5+ 6+ 6+
8 1+ 1+ 1+ 1+ 2+ 2+ 3+ 4+ 5+ 6+
9 1+ 1+ 1+ 1+ 1+ 2+ 2+ 3+ 4+ 5+
10 1+ 1+ 1+ 1+ 1+ 1+ 2+ 2+ 3+ 4+
Strike Order in Close Combat
Initiative always determines who strikes first in close combat:
+1 I: Charging.
Additional +D3 I and +1 S: Diving Charge.
-3 I and -1 to hit: Failing a fear test.
Armour Piercing (AP) A natural 1 always fails to save. The Strength of incoming attacks can temporarily pierce a warrior’s armour as follows:
S 1-3 4 5 6 7 8 9 10
AS - -1 -2 -3 -4 -5 -6 -7
Critical Hits A natural 6 to hit is always a critical hit unless the warrior is fighting with two weapons. Re-rolled dice never cause critical hits. When a critical hit is scored, roll a D6:
D6 Result
1 Mighty Blow: The attack has +1 Strength.
2-3 Stunning Blow: The attack has +1 Strength and is Concussive (1).
4-5 Piercing Blow: The attack has +1 Strength and is Armour Piercing (1).
6 Deathblow: The attack has +2 Strength and ignores Regeneration saves (but not armour or ward saves). If the weapon has the ‘Two-handed’ or ‘Lethal’ rule, the enemy also loses 2 Wounds instead of 1 if he is successfully wounded.
(Critical hits apply to both close combat and shooting attacks, but never to Spells/Prayers.)
No Knocked Down and Stunned!
As opposed to normal variants of Warhammer skirmish rules, there are no knocked down or stunned states in WyrdWars. A warrior that loses his last wound goes straight out of action.
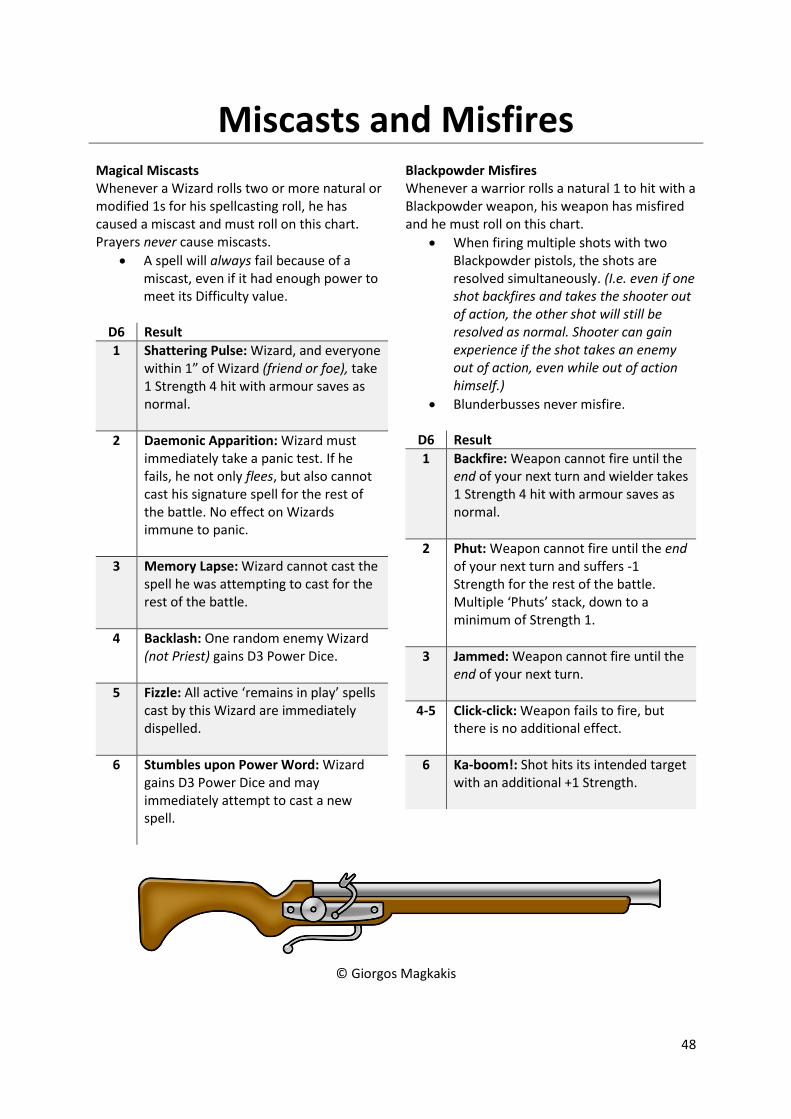
48
Miscasts and Misfires Magical Miscasts Whenever a Wizard rolls two or more natural or modified 1s for his spellcasting roll, he has caused a miscast and must roll on this chart. Prayers never cause miscasts.
A spell will always fail because of a miscast, even if it had enough power to meet its Difficulty value.
D6 Result
1 Shattering Pulse: Wizard, and everyone within 1” of Wizard (friend or foe), take 1 Strength 4 hit with armour saves as normal.
2 Daemonic Apparition: Wizard must immediately take a panic test. If he fails, he not only flees, but also cannot cast his signature spell for the rest of the battle. No effect on Wizards immune to panic.
3 Memory Lapse: Wizard cannot cast the spell he was attempting to cast for the rest of the battle.
4 Backlash: One random enemy Wizard (not Priest) gains D3 Power Dice.
5 Fizzle: All active ‘remains in play’ spells cast by this Wizard are immediately dispelled.
6 Stumbles upon Power Word: Wizard gains D3 Power Dice and may immediately attempt to cast a new spell.
Blackpowder Misfires Whenever a warrior rolls a natural 1 to hit with a Blackpowder weapon, his weapon has misfired and he must roll on this chart.
When firing multiple shots with two Blackpowder pistols, the shots are resolved simultaneously. (I.e. even if one shot backfires and takes the shooter out of action, the other shot will still be resolved as normal. Shooter can gain experience if the shot takes an enemy out of action, even while out of action himself.)
Blunderbusses never misfire.
D6 Result
1 Backfire: Weapon cannot fire until the end of your next turn and wielder takes 1 Strength 4 hit with armour saves as normal.
2 Phut: Weapon cannot fire until the end of your next turn and suffers -1 Strength for the rest of the battle. Multiple ‘Phuts’ stack, down to a minimum of Strength 1.
3 Jammed: Weapon cannot fire until the end of your next turn.
4-5 Click-click: Weapon fails to fire, but there is no additional effect.
6 Ka-boom!: Shot hits its intended target with an additional +1 Strength.
© Giorgos Magkakis
49
Version History v.1.4.2 Page 11: Clarified that a warrior can only have one instance of Nets. v.1.4.1 Javelins 5gc (was 10gc) Handguns 20gc (was 25gc) Mastercrafted Handgun 30gc (was 35gc) Changed Nets (Thanks to red5711 and Carlos3) v.1.3.4 Changes Changed Nets. Clarified: Grudgebringer Sword: Wielder may wear armour and cast Fireball. v.1.3.9 Changes
Changed Strength skill Indomitable to give +1 AS value, removed restriction that warrior has to wear Heavy Armour.
Changed Combat skill Sentry to re-roll failed to hit rolls when charged while using Spear/Halberd.
Replaced Quick Draw Speed skill with Flanker: +1 to if in Close Combat if enemy was already engaged in Close Combat at the start of the turn.
Quick Shot Shooting skill also works with Blowpipe.
Replaced Headshot shooting skill with Blackpowder Expert.
Shield Ward Save also works with Spears.
Revamped Combat Whip.
Blunderbuss 15gc.
Revamped Academic skills.
Renamed Armour Splinter ability to Oversplinter to avoid confusion between the rule and the ability; generally removed almost all Oversplinter effects from the main rules (some warbands still have these abilities).
Removed ‘Exposure’ penalty of great weapons (was: Exposure: Enemy close combat attacks (not shooting, spells, or prayers) have +1 to hit wielder, except the turn he charges).
Clarified and simplified some scenarios (most notably ‘Extraction’).
New concept art.
Added “an Ld test where the result was 11 or 12 always fails” to prevent warbands auto-passing Rout Tests and other Ld tests.
Removed Oversplinter from Handguns; Replaced with Concussive.
Added that anyone who can use a normal bow can also use a Short Bow.
Moved Nets to armour and streamlined rules for nets.
Campaign Injuries Multiple Injuries rolls D3+1 more times rather than 2D3 times.
Corrected typos and added more rules examples and clarification text to make the rulebook more friendly to new players.
v.1.3.8
Changes Changed Strength skill Indomitable to give +1 AS value if wearing heavy armour.
50
Changed Combat skill Sentry to give enemies -1 to hit in the first round of combat while using
Spear/Halberd Replaced Quick Draw Speed skill with Flanker: +1 to if in Close Combat if enemy was already engaged in Close Combat at the start of the turn. v.1.3.7 Changes
Spells/Prayers changed from Run and Fire to Run or Fire.
Crossbows and Handguns gain ‘Lethal’ rule: Cause 2 wounds instead of 1 on ‘Deathblow’ critical hits.
Blunderbuss loses Armour Piercing, -5gc price.
Shooting Skills: Splintering Shot replaced with Headshot: (Any missile weapon that warrior uses gains the ‘Lethal’ rule in all turns where he did not fire multiple shots (shooting twice in the same turn with two Pistols also counts as multiple shots).)
Strength Skills: Impale changed to: All of warrior’s attacks with Javelins and Throwing Axes have +1 to hit and are Armour Piercing (1).
Strength Skills: Whirling Death changed to: Attacks with Flail and Morning Star have +1 to hit and Concussive (1) the turn warrior charges.
Acolyte Academic skill cannot be used in turns where warrior made a running move.
Toned down some Magic Items; made it easier to find Magic Items through exploration.
Moved Nets to armour; made Nets a support weapon to avoid lots of clunky extra rules.
Strength skill Splintering Blow replaced with Indomitable (if wearing heavy armour, his armour save cannot splinted beyond 6+).
v.1.3.6 Changes
Changed rules for Fighting Claws s to allow re-roll to hit the turn wielder charges and +1 I in first round of combat. Removed all other bonuses.
Wizards and Priests entering the battle on turn 7 start with 1 free power dice - (thank you to red5711, Menco90)
Skirmish scenario: +2 Exploration Dice for winning (up from 1) - (thank you to red5711, Menco90)
The Brawl scenario: +3 Exploration Dice for winning (up from 1) - (thank you to red5711, Menco90)
(Thanks also to everyone else who gave their opinion on the Wyrdwars Reddit Forum.)
v.1.3.5 Changes Clubs lose Armour Splinter Axes lose Armour Splinter Great Axe loses Armour Splinter; upped Armour Piercing from (1) to (D3) Aiming Scope may be given to henchmen ‘Slow Swing’ rule of Great Weapons and Halberds changed to mean that warrior cannot use these weapons for Free Hack attacks at all. Changed ‘Bodyguard’ Strength skill to ‘Backswing’; may use Great Weapons and Halberds for Free Hacks. Clarifications Corrected typos. v.1.3.4 Changes Blowpipe may re-roll ‘to hit’ if shooter was hidden at the start of the shooting phase.
51
Nets ignore Ward saves Added Lucky Charm special equipment. Spellbook -5gc price. Holy Tome -5gc price. Heavy Rounds -5gc price. Clarifications Clarified that being hit by multiple Nets is a stackable effect. Clarified that a spell will always fail because of a miscast, even if it had enough power to otherwise go off. Clarified that the D3 from Power Scrolls does not contribute towards miscasts. Clarified that when warriors being blocked from running by visible enemies within 6” is measured at the start of the move. Time for Switching Weapons in Close Combat moved from close combat phase to Power phase to prevent in-game exploits. Cleaned up lots of wrong and missing words throughout the document, courtesy of user Lecorth. v.1.3.3 Changes Mandrake Root drug also protects against critical hits (4+). Clarifications Clarified that everyone who can use normal pistols/handguns can use duelling pistols / mastercrafted handguns. v.1.3.2 Changes ‘Leader’ ability can be used for rally tests. Added Ogre racial maximums. Clarifications All Random Happenings tweaked for clarity. Now only Scenarios to go! v.1.3.1 Changes Failing a fear test also means -1 to hit. Animal Handler skill also gives animals +1 Initiative. Reduced campaign winning threshold from 30 to 25 victory points. Tweaked Exploration Locations lists to make sure all names are correct. Still needs updating: Scenarios, Random Happenings. Post your thoughts on the forum! Clarifications Clarified that henchmen receive full recovery on post-battle rolls of 3. Changed mentions of lesser magic to proper magic lores. Rewrote magic section to be (hopefully) completely newbie-friendly. v.1.3 Changes Great Weapon wielders have +1 to be hit except when charging. Great Weapons and Halberds down to 10gc price. Warband max size reduced from 18 to 15. Combat groups reduced from 2 heroes, 4 henchmen to 2 heroes, 3 henchmen. Bodyguard strength skill also gives +1 to hit. Breakthrough scenario: Red cannot exit before turn 5. Combat Whip -1 S except the turn wielder charges.
52
Clarifications Clarified that Splintering Shot stacks with other Armour Splintering effects. Clarified that ward and regeneration saves stack, but cannot be increased beyond 4+. Changed Mercurial Rounds to proper name: Heavy Rounds. Clarified that you may intercept fleeing moves. v.1.2 Changes Mace gets Armour Splinter (1). Great Weapons upped to 15gc. Great Weapons and Halberd get ‘Slow Swing’ – cannot be used for free hacks. Combat Whip changed to +2 I in first round of combat and -1 S, +0 I in other rounds of combat. Combat Whip must use Club, Axe, or Sword in off hand. Clarifications Clarified that a warrior can only carry one Shield Clarified paired weapons. Swapped Shooting and Close Combat sections of rulebook. Clarified that a warrior needs line of sight to strike at an enemy in close combat. Clarified that the correct game setup procedure is (1) divide warband into combat groups (2) roll scenario (3) roll spells and prayers. Clarified that promoted henchmen also count as one of the warband’s 0-6 heroes. Clarified that template spells may be cast into close combat. Clarified that, with shooting attacks, cover is literally anything that obscures the shooter’s line of sight to his target; even the slightest obstruction/reduction will count as cover in this regard. Clarified that critical hits apply to close combat and shooting attacks, but *not* to spells and prayers. Clarified that the strength skill Splintering Blow stacks with other splintering effects. Added that warriors that opt to “lean through windows” when shooting may be shot back at by any enemy able to hit the pane of that window in the opponent’s next shooting phase. Fixed multiple typos. Hap tip to Tashin and his group for playtesting, compiling notes, and suggesting changes! v.1.1 Multiple edits and tweaks. v.1.0 First Release!