Embed Size (px)
Citation preview

New York, WWTC Network
IMPLEMENTATION PLAN
Group 5
CMIT 495
03/01/2015

Implementation Plan Template Group 5 Page 2 of 39 UMUC CMIT 495
Table of Contents
1 INTRODUCTION .............................................................. ERROR! BOOKMARK NOT DEFINED.
1.1 PURPOSE ...................................................................................................................... 3
1.2 SYSTEM OVERVIEW ....................................................................................................... 3
1.2.2 Assumptions and Constraints ......................................................................................... 3
2 Implementation Requirements ................................................................................................. 3
2.1 DESCRIPTION OF IMPLEMENTATION ................................................................................. 3
2.2 POINTS-OF-CONTACT ..................................................................................................... 3
2.3 MAJOR TASKS .............................................................................................................. 3
2.4 TOOLS REQUIREMENT .................................................................................................... 4
2.5 LAN IMPLEMENTATION ................................................................................................. 4
2.5.1 LAN High Level Diagram, IP scheme and Equipment List .......................................... 5 2.5.2 Switch Interconnections and Redundancy ..................................................................... 6
2.5.3 IP Hierarchical Scheme.................................................................................................. 6 2.5.4 LAN, VoIP and Wireless Equipment List ..................................................................... 7
2.6 SECURITY IMPLEMENTATION TASKS ................................................................................ 9
2.6.1 Physically install Cisco ASA 5500 firewall................................................................... 9
2.6.2 Configure ASA 5500 firewall ...................................................................................... 10 2.6.3 Setup access to the public server farm in DMZ in ASA 5500 ..................................... 11
2.6.4 Configure VPN for IPSEC in ASA 5500 ..................................................................... 11 2.6.5 Configure firewall rules in ASA 5500 ......................................................................... 12 2.6.6 Physically install Cisco IPS 4270 ................................................................................ 12
2.6.7 Configure IPS 4270 for “inline mode” between ASA 5500 and WWTC network ..... 12 2.6.8 Install McAfee E-Policy Orchestrator (EPO) .............................................................. 13
2.6.9 Install and configure Cisco Access Control Server (ACS) 5.4 .................................... 14
2.6.10 Install and configure KG-175D ................................................................................. 14
2.6.11 Configure VLAN security on network devices ......................................................... 15 2.6.12 Configure port security on network devices .............................................................. 15 2.6.13 Configure DHCP snooping on network devices ........................................................ 15
2.7 ACTIVE DIRECTORY IMPLEMENTATION .......................................................................... 15
2.7.1 Prepare the Forest Root/Parent Domain; WWTC.com ................................................ 15
2.7.2 Create the Forest Root/Parent Domain; WWTC.com.................................................. 15
2.8 CONFIGURATION OF ROUTERS ....................................................................................... 16
2.9 CONFIGURATION OF SWITCHES ...................................................................................... 18
2.10 VLAN CONFIGURATIONS ............................................................................................ 20
2.11 VOICE VLAN AND WIRELESS ...................................................................................... 21
2.12 SECURITY TECHNOLOGIES ........................................................................................... 22
2.13 DHCP AND DNS ....................................................................................................... 24
2.14 ACTIVE DIRECTORY POLICIES ..................................................................................... 26
2.14.1 Configure Global Catalog Servers and FSMO roles ................................................. 27
2.15 ACTIVE DIRECTORY FOREST DOMAIN OU FORMATION ................................................... 28
2.16 ACTIVE DIRECTORY GROUP FORMATION ...................................................................... 30
2.17 ACTIVE DIRECTORY GPO IMPLEMENTATION ................................................................. 32
2.18 PROJECT TIME LINE ................................................................................................... 35

Implementation Plan Template Group 5 Page 3 of 39 UMUC CMIT 495
1 Introduction
1.1 Purpose
Purpose of this plan is to implement LAN, Security, Active Directory and Wireless devices,
configurations and policies into a state of the art network for WWTCs New York City office.
1.2 System Overview
WWTC has a regional office located in New York City and as the Director of the IT Department, I and
the IT team have been tasked to set up a state of the art network that can help increase company revenue
and reduce company costs.
1.2.2 Assumptions and Constraints
The network infrastructure is solid and a gigabit network is in place. All existing wiring has been tested
and the connections are true. The existing power supply is sufficed to meet the current and future demand.
2 Implementation Requirements
2.1 Description of Implementation
The IT team has proposed an implementation timeline. The network installation will be accomplished in
separate phases. Our WWTC customer has received each phase proposal, and has decided to move
forward with this project.
2.2 Points-of-Contact
Consultant Project Team Customer Project Team
Project Manager: Steve Ricker
Telephone: 555-555-0001
Email: [email protected]
Project Manager: Bill Gates
Telephone: 555-555-7889
Email: [email protected]
Configuration Engineer: Chanel Bernal
Telephone: 555-555-1000
Email: [email protected]
Configuration Engineer: Yin Chung
Telephone: 555-555-5555
Email: [email protected]
Project Coordinator: Mohamed Haidara
Telephone: 555-555-0023
Email: [email protected]
Project Coordinator: Bhagwati Bansal
Telephone: 555-555-1234
Email: [email protected]
2.3 Major Tasks
LAN Implementation
Security Implementation
Active Directory Implementation
Configuration of Routers
Configuration of Switches
VLAN configurations
Voice VLAN and wireless
Security technologies
DHCP and DNS
Active Directory Policies
Active Directory Forest Domain OU formation
Active Directory Group Formation
Active Directory GPO Implementation

Implementation Plan Template Group 5 Page 4 of 39 UMUC CMIT 495
Project Time Line
2.4 Tools Requirement
The NY.WWTC LAN will require several tools for different installation tasks. The tools in the
following table are needed to complete the WWTC network installation.
Tool # Tools Required
1 PC with VT100 emulator, SCP Server, TFTP Server, FTP Server, Text Editor
2 Console port cable DB-9-RJ45/ DB25 with USB Adapter
3 Standard Tools such as: screwdrivers, pliers, inspection mirror, ratchet drivers and socket bit set,
electrical tape, multi-meter, tape measure and anti-static mat.
4 Fiber Optic installation kit
5 Ethernet installer kit which includes: Ethernet crimpers, UTP wire strippers, wire and Kevlar
scissors, cable tester with remotes, and label maker.
6 Operating system software and drivers
7 USB optical drive
8 USB thumb drive
9 HyperTerminal.exe
10 Laptop (aka console terminal)
2.5 LAN Implementation
Effective deployment of the NY.WWTC.com network infrastructure, with all of its collective services
requires careful thought, rigorous planning, documentation and well-coordinated execution between all
members involved with this deployment. NY.WWTC’s Local Area Network (LAN) implementation plan
describes how the accumulation of materials relating to these objectives will be configured and
transitioned into a leading edge operational networked IT system. Company leadership, management and
implementation teams are focused and committed to excellence. WWTC’s executives have described the
business goals of increasing revenue while reducing operating costs to the team with clarity and these
have been at the forefront during this process. Under the leadership of WWTC’s president, schedules has
been documented and the team is ready.
To ensure a smooth and well-coordinated deployment, the following list outlines the sequence of details
that will accomplish the specific hardware and software implementation for WWTC’s New York regional
office.
NY.WWTC planning consists of the following LAN Implementation Tasks:
Providing a high level diagram of the network
Providing the IP scheme of the intended network addresses
Identifying the equipment needed for this roll-out
Identifying the topology of how equipment will be connected
Descriptions of redundant connections to achieve 100% connectivity
Security technologies with solutions
Active Directory implementation tasks
Router, Switch and VLAN configurations (to include Voice and Wireless)
Implementation Plan Template Group 5 Page 5 of 39 UMUC CMIT 495
VPN Configurations
Ant-virus Deployment and Management
DHCP and DNS Implementation Planning
AD and Group Policy Deployment and Configurations
Active Directory Organizational Unit Formations
Active Directory Group Formations
Project schedule release with time-line
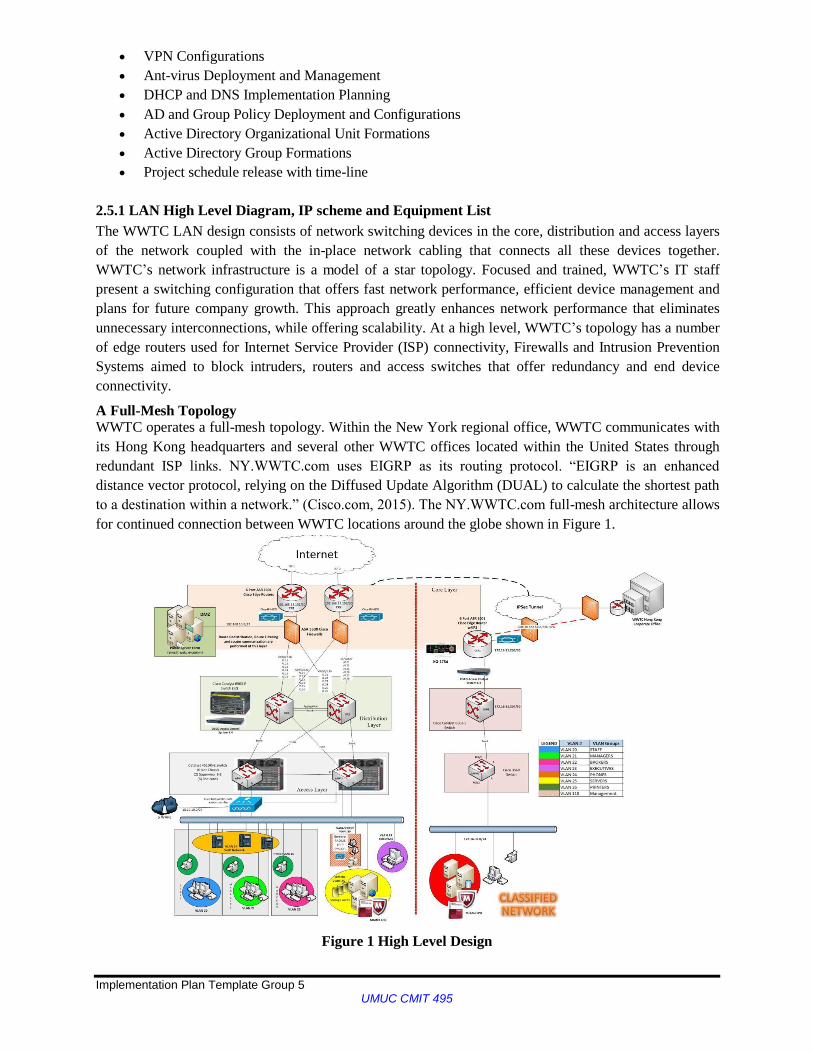
2.5.1 LAN High Level Diagram, IP scheme and Equipment List
The WWTC LAN design consists of network switching devices in the core, distribution and access layers
of the network coupled with the in-place network cabling that connects all these devices together.
WWTC’s network infrastructure is a model of a star topology. Focused and trained, WWTC’s IT staff
present a switching configuration that offers fast network performance, efficient device management and
plans for future company growth. This approach greatly enhances network performance that eliminates
unnecessary interconnections, while offering scalability. At a high level, WWTC’s topology has a number
of edge routers used for Internet Service Provider (ISP) connectivity, Firewalls and Intrusion Prevention
Systems aimed to block intruders, routers and access switches that offer redundancy and end device
connectivity.
A Full-Mesh Topology WWTC operates a full-mesh topology. Within the New York regional office, WWTC communicates with
its Hong Kong headquarters and several other WWTC offices located within the United States through
redundant ISP links. NY.WWTC.com uses EIGRP as its routing protocol. “EIGRP is an enhanced
distance vector protocol, relying on the Diffused Update Algorithm (DUAL) to calculate the shortest path
to a destination within a network.” (Cisco.com, 2015). The NY.WWTC.com full-mesh architecture allows
for continued connection between WWTC locations around the globe shown in Figure 1.
Figure 1 High Level Design

Implementation Plan Template Group 5 Page 6 of 39 UMUC CMIT 495
2.5.2 Switch Interconnections and Redundancy
WWTC’s LAN design model consists of dual switching at each layer in order to achieve network device
redundancy. Along with this two device design, WWTC ensures redundant cable connections are
established beginning with each computer on the network. All computers are equipped with dual network
cards and have been connected to two different switches. Redundancy is also built into the access layer and
the distribution layer of its network. The distribution layer offers redundancy to core switches through
similar cross-connected links. This means that each switch is connected to at least two other switches by
two independent physical cable connections. Figure 1 above is a high level illustration that shows the
implementation of the network architect supporting redundancy and all levels. Figure 2 below is a
physical connection model planned for the NY.WWTC client computer roll-out.
Figure 2 Redundant PC links
2.5.3 IP Hierarchical Scheme
The following diagram and table (Fig. 3) provide a high level view of the IPv4 addressing scheme
planned for NY.WWTC.com. The legend represents different color coded VLANs appropriate to Figure 1
(above), the topology diagram. The switches provide VLAN summarization points and NY.WWTC has
provisioned two Internet Service Providers (ISP’s). The EIGRP protocol will be configured on the
network and TCP/IP is used as the routing protocol.
Figure 3 IP Hierarchical Scheme

Implementation Plan Template Group 5 Page 7 of 39 UMUC CMIT 495
2.5.4 LAN, VoIP and Wireless Equipment List
The IT team has evaluated the networking equipment requirements for WWTC’s New York based office.
As a whole, WWTC recognizes Cisco equipment as being the industry leader regarding internetworking
equipment. By utilizing Cisco as the standard manufacturer, WWTC’s qualified Cisco Certified Network
Administrators (CCNA) can work within a common body of knowledge. This eliminates any possible
learning curve and subsequent delay. Focused on efficient management, similar design and standardized
configurations, the IT team presents the following equipment list.
LAN EQUIPMENT SECTION
WWTC Equipment QTY Description Cost Total Cost
Unclassified Network
Brokers laptops w/OS 20 Dell Laptops (Provided for Broker mobility) Windows 7 Ultimate $899.99 $17,999.80
Brokers Docking stations 20 Dell E-Port Plus port replicators USB 3.0 w/dual monitor capabilities $299.99 $5,999.80
Monitors 87 Dell 22" Monitors $149.99 $13,049.13
Computer Workstations w/OS 67 Dell Precision T1700 Workstations - Windows 7 Ultimate w/TPM $689.95
each
$42,226.65
Total Unclassified Computers 87
Company printers 20 HP Color LaserJet Pro (MFP M176n) $249.99
each
$4,999.80
Storage Area Network (SAN) 1 HP - HP Storage Works EVA4400 AG637BR Hard Drive Array $37,500 $3,750
Servers 7 HP ProLiant DL580 Servers $4,758 each $33,306
- Configured with Hyper-V
- Dual processors and dual power supplies
- Will Create 42 virtual servers to include (6 VM per server):
Application, File, SQL, Web, Email, RADIUS, library card-catalog
- Will Create 2 Domain controllers that include DNS & DHCP
Access Layer Switches 2 Catalyst 4510R+E Switch $7,890
Names: ASW1, ASW2 10 slot Chassis with (2) Supervisor 8-E, and (6) line cards
288 PoE, Gb ports $3,945 each
Distribution Layer Switch 2 Cisco Catalyst 6503-E $83,990
Names: DR1, DR2 34-Port GBIC-Based GB Ethernet Module
Model: 6503-E $41,995 each
Core Layer Routers 2 Cisco ASR 1001 Routers $23,610
Names: CR1, CR2 Dual power supply $11,805
each
Core Layer Firewall 2 Cisco ASA 5500 $9,936
Names: CFW1, CFW2 6 Port
Model: Cisco ASA 5500 $4,968 each
Cisco Intrusion Prevention Sensor 3 Cisco IPS 4270 Sensor $4,995 each $14,985
Cisco Access Control System 5.4 1 Centralized identity and access policy solution $200 $200
Polycom Video Conferencing 2 RealPresence Group 500 Media Center System
- Includes EagleEye Cameras
- 65" Wall Mount LCD for video conferencing Conf. Rm

Implementation Plan Template Group 5 Page 8 of 39 UMUC CMIT 495
Polycom speaker phones 2 Polycom SoundStation IP 6000 $379.95 $759.90
Suite Entry Security System 3 Biometric smart card reader for entry doors $99 $297
User ID Badge system 150 USB CAC Card readers (1 per pc) $20 $3,000
Model: SCR331
Server Room raised floors 2 Server Room raised floor systems Server
rooms
Server room cooling systems 2 Ceiling-Mounted with Direct Free-Cooling Server
rooms
Server room fire suppression 2 Server room fire suppression Server
rooms
Facility video monitoring system 10 Network Camera $99 each $990
Model: EN-7531HD
Facility smoke detection system 4 Facility smoke detection system $79 each $316
- Very Early Smoke Detection Apparatus
Server backup battery power 2 APC Smart-UPS SRT 5000VA 208V $4,150 each $8,300
Server cabinets 3 TrippLite 42U Rack Enclosure Server Cabinet $985 each $2,955
ISP 1 1 Verizon FiOS ISP 150x150 Mbps Internet
Provider
ISP 2 1 AT&T Metro Ethernet Internet
Provider
Microsoft Office 2012 87 Client Access Licenses $149 each $12,963
Microsoft Exchange 2013 1 Email application All
Microsoft Exchange CALs 87 Email application licenses $149 each $12,963
Market Tracking Application 1 Provides real-time status of stock and bond market to brokers and
their clients All
Stock & Bond Analytical
Application
1 Provides analysis of stock and Bond to WWTC Brokers All
On Line Trading Training 1 Application for training new clients in online trading All
McAfee Anti-virus 133 89 computers, 44 Servers $199 each
Total Cost Total Cost $232,536.28
Classified Network
Computer Workstations 2 Dell Precision T1700 Workstations (Classified side) $689.95
each
$13,799
Monitors 2 Dell 22" Monitors $149.99
each
$299.98
Total Class. Computers 2
Company Servers 2 HP ProLiant DL380 Servers $9,516
- Will Create 2 Domain controllers that include DNS & DHCP
- Dual processors and dual power supplies $4,758 each
Access Layer Switches 1 Cisco Catalyst 3560 $3,499
Name: CASW1 12 Port PoE
Model: WS-C3560V2-12PS-S $3,499 each
Distribution Layer Switch 1 Cisco Catalyst 6503-E $41,995
Name: CDR1 34-Port GBIC-Based GB Ethernet Module
Model: 6503-E $41,995
Core Layer Routers 1 Cisco ASR 1001 Routers $11,805
Name: CCR1 Dual power supply $11,805
each
Cisco Intrucion Prevention Sensor 1 Cisco IPS 4270 Sensor $4,995

Implementation Plan Template Group 5 Page 9 of 39 UMUC CMIT 495
Taclane High Assurance IP
Encryptor
1 Network Encryptor KG-175d $1,999 $1,999
Cisco Intrucion Prevention Sensor 1 Cisco IPS 4270 Sensor $4,995 $4,995
Suite Entry Security System 1 Biometric smart card reader for entry doors $99 $99
Total Cost Total Cost $88,006.98
Wireless Equipment
Cisco Aironet 1250 Series 5 Wireless Access Point $200 $1,000
Cisco 4404 Series WLAN Controller
1 Wireless LAN Controller $7,899 $7,899
Total Total $8,899
VoIP Equipment
Cisco 7912 IP Phone 94 Cisco VoIP Phones $55 $5,170
Cisco Unified Communications
560
1 Call Manager System $1,895 $1,895
Cisco VG350 144 FXS Bundle 1 Voice Gateway $24,500 $24,500
Total Total $31,565
2.6 Security Implementation Tasks
Step # Task
1 Physically install Cisco ASA 5500 firewall
2 Configure ASA 5500 firewall
3 Setup access to the public server farm in DMZ in ASA 5500
4 Configure VPN for IPSEC in ASA 5500
5 Configure firewall rules in ASA 5500
6 Physically install Cisco IPS 4270
7 Configure IPS 4270 for “inline mode” between ASA 5500 and WWTC network
8 Install and configure McAfee E-Policy Orchestrator (EPO)
9 Install and configure Cisco Access Control Server (CACS) 5.4
10 Install and configure KG-175D
11 Configure VLAN security on network devices
12 Configure port security on network devices
13 Configure DHCP snooping on network devices
2.6.1 Physically install Cisco ASA 5500 firewall
The device is a Cisco firewall and will be located in the unclassified IT closet, room 3 in Suite A. First
step is to confirm all the equipment shown in Figure 4 is in package.
Figure 4 Equipment
Next step would be to connect a notebook directly with an Ethernet cable and configure the notebook
with DHCP while connecting it to appropriate ports shown in Figure 5.

Implementation Plan Template Group 5 Page 10 of 39 UMUC CMIT 495
Figure 5 Configuration Ports
2.6.2 Configure ASA 5500 firewall
Use the setup wizard to configure basic and advanced features thru the graphical user interface that allows
you to manage the ASA from any location by using a web browser.
Step 1 On the PC connected to the ASA, launch a web browser.
Step 2 In the Address field, enter the following URL: https://192.168.1.1/admin. The Cisco ASDM web
page appears shown in Figure 6.
Figure 6 Cisco ASDM web
Step 3 Click Run Startup Wizard. The main ASDM window appears and the Startup Wizard opens
shown Figure 7 and enter the following configurations.
Hostname: WWTC_NYFW_01
Domain name: NY.WWTC.com
Administrative passwords: letmein
IP addresses: 192.168.23.191/195
Static routes: 192.168.20.0, 192.168.21.0, 192.168.22.0
DHCP server: 192.168.20.189

Implementation Plan Template Group 5 Page 11 of 39 UMUC CMIT 495
Figure 7 Startup Wizard
2.6.3 Setup access to the public server farm in DMZ in ASA 5500
NY.WWTC.com has a DMZ that contains Public Server for the internal network, such as a web, email,
which need to be available to an outside user. By placing the public servers on the DMZ, any attacks
launched against the public servers do not affect inside NY.WWTC.com network. The figure below
shows the setup process for each public server. For example Figure 8 is setup for the web server.
Figure 8 Add Public Server
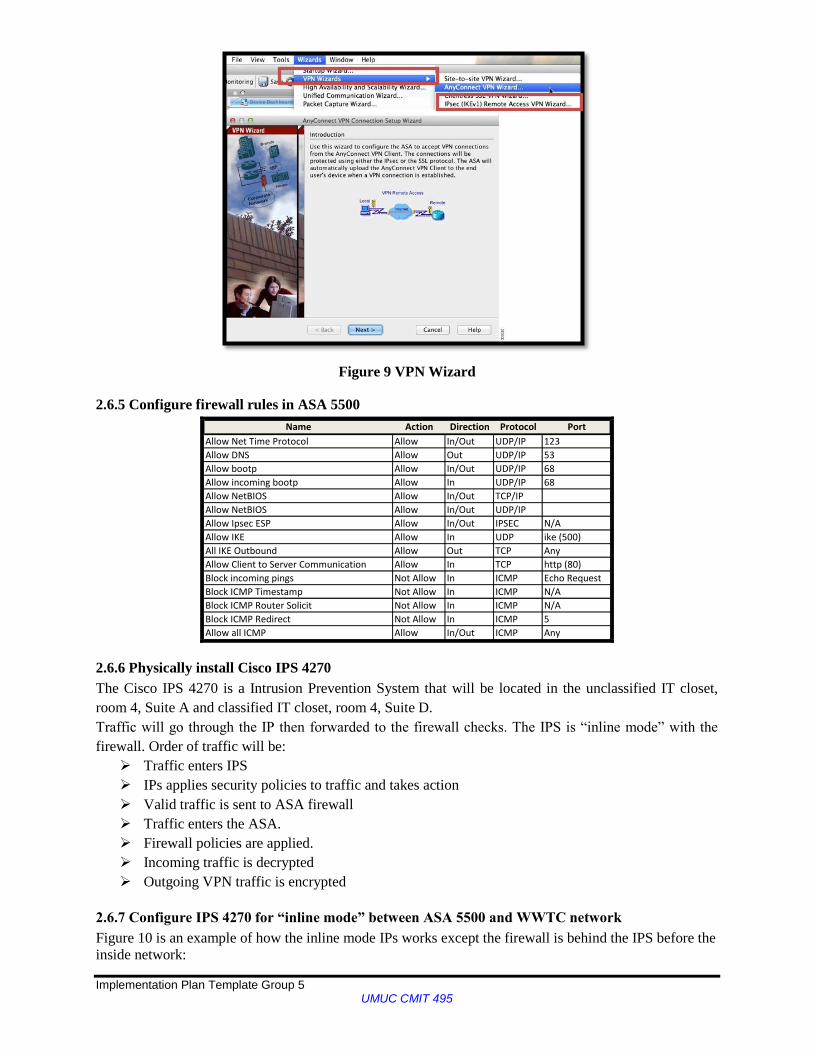
2.6.4 Configure VPN for IPSEC in ASA 5500
Step 1 Site-to-Site VPN Wizard—Create an IPsec site-to-site tunnel between two ASAs or the client can
run either the SSL or IPsec IKEv2 VPN protocol.
Step 2 After authentication, users access a portal page and can access specific, supported internal
resources. The IT Team will provide access to resources by users on a group basis by department such as
Execs/HR/Brokers/Management/Finance and IT. ACLs will be applied to restrict or allow access to
WWTC resources.
Step 3 IPsec (IKEv1) Remote Access VPN Wizard—Configures IPsec VPN remote access for the Cisco
IPsec client shown in Figure 9.
192.168.10.10
Implementation Plan Template Group 5 Page 12 of 39 UMUC CMIT 495
Figure 9 VPN Wizard
2.6.5 Configure firewall rules in ASA 5500
Name Action Direction Protocol Port
Allow Net Time Protocol Allow In/Out UDP/IP 123
Allow DNS Allow Out UDP/IP 53
Allow bootp Allow In/Out UDP/IP 68
Allow incoming bootp Allow In UDP/IP 68
Allow NetBIOS Allow In/Out TCP/IP
Allow NetBIOS Allow In/Out UDP/IP
Allow Ipsec ESP Allow In/Out IPSEC N/A
Allow IKE Allow In UDP ike (500)
All IKE Outbound Allow Out TCP Any
Allow Client to Server Communication Allow In TCP http (80)
Block incoming pings Not Allow In ICMP Echo Request
Block ICMP Timestamp Not Allow In ICMP N/A
Block ICMP Router Solicit Not Allow In ICMP N/A
Block ICMP Redirect Not Allow In ICMP 5
Allow all ICMP Allow In/Out ICMP Any
2.6.6 Physically install Cisco IPS 4270
The Cisco IPS 4270 is a Intrusion Prevention System that will be located in the unclassified IT closet,
room 4, Suite A and classified IT closet, room 4, Suite D.
Traffic will go through the IP then forwarded to the firewall checks. The IPS is “inline mode” with the
firewall. Order of traffic will be:
Traffic enters IPS
IPs applies security policies to traffic and takes action
Valid traffic is sent to ASA firewall
Traffic enters the ASA.
Firewall policies are applied.
Incoming traffic is decrypted
Outgoing VPN traffic is encrypted
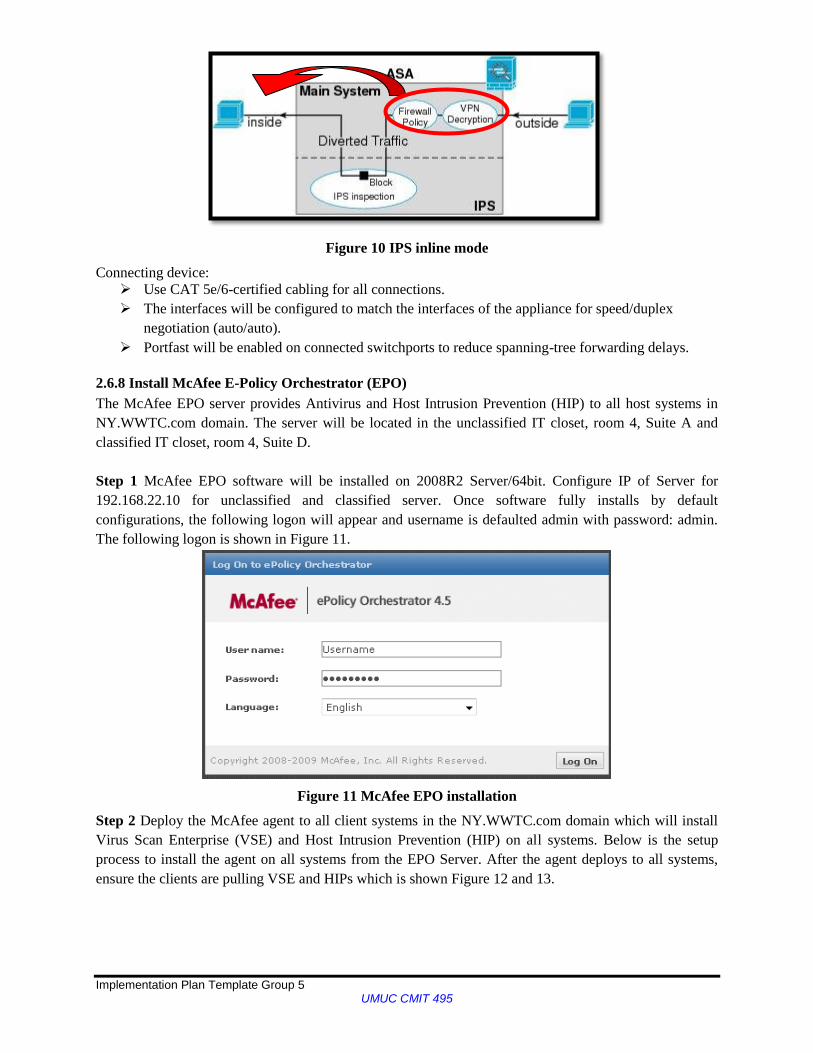
2.6.7 Configure IPS 4270 for “inline mode” between ASA 5500 and WWTC network
Figure 10 is an example of how the inline mode IPs works except the firewall is behind the IPS before the
inside network:
Implementation Plan Template Group 5 Page 13 of 39 UMUC CMIT 495
Figure 10 IPS inline mode
Connecting device:
Use CAT 5e/6-certified cabling for all connections.
The interfaces will be configured to match the interfaces of the appliance for speed/duplex
negotiation (auto/auto).
Portfast will be enabled on connected switchports to reduce spanning-tree forwarding delays.
2.6.8 Install McAfee E-Policy Orchestrator (EPO)
The McAfee EPO server provides Antivirus and Host Intrusion Prevention (HIP) to all host systems in
NY.WWTC.com domain. The server will be located in the unclassified IT closet, room 4, Suite A and
classified IT closet, room 4, Suite D.
Step 1 McAfee EPO software will be installed on 2008R2 Server/64bit. Configure IP of Server for
192.168.22.10 for unclassified and classified server. Once software fully installs by default
configurations, the following logon will appear and username is defaulted admin with password: admin.
The following logon is shown in Figure 11.
Figure 11 McAfee EPO installation
Step 2 Deploy the McAfee agent to all client systems in the NY.WWTC.com domain which will install
Virus Scan Enterprise (VSE) and Host Intrusion Prevention (HIP) on all systems. Below is the setup
process to install the agent on all systems from the EPO Server. After the agent deploys to all systems,
ensure the clients are pulling VSE and HIPs which is shown Figure 12 and 13.

Implementation Plan Template Group 5 Page 14 of 39 UMUC CMIT 495
Figure 12 Virus Scan Enterprise
Figure 13 Host Intrusion Prevention
2.6.9 Install and configure Cisco Access Control Server (ACS) 5.4
The ACS will be located in the unclassified IT closet, room 4, Suite A and classified IT closet, room 4,
Suite D. Authentication verifies user information to confirm the user's identity. Traditional authentication
uses a name and a fixed password. More secure methods use cryptographic techniques, such as those used
inside the Challenge Authentication Handshake Protocol (CHAP), OTP, and advanced EAP-based
protocols (User Guide for Cisco Secure Access Control System 5.4, 2015). ACS supports a variety of
these authentication methods (User Guide for Cisco Secure Access Control System 5.4, 2015). A
fundamental implicit relationship will exist between authentication and authorization. The more
authorization privileges granted to a user, the stronger the authentication should be. ACS supports this
relationship by providing various methods of authentication (User Guide for Cisco Secure Access Control
System 5.4, 2015)
Step 1 Add network devices, users and create authorization rules to allow or deny access through
RADIUS authentication. RADIUS authentication port number is 1812.
Step 2 Install ACS license, system certificates and configure password policy rules for administrators and
users.
2.6.10 Install and configure KG-175D
The KG-175D is a TACLANE that separates the classified data from the unclassified data through
communication security.
Step 1 Physically install KG-175D
Attach a ground wire to an earth ground
Loosen or remove the nut from the “GND” ground binding post on the TACLANE as needed.
Attach the ground wire to the “GND” ground binding post on the TACLANE and tighten the nut.
Make sure that the TACLANE is powered off.

Implementation Plan Template Group 5 Page 15 of 39 UMUC CMIT 495
Connect the power cable to the power connector on the TACLANE.
Plug the power supply cable into a standard 110 VAC power outlets.
Connect the Ethernet cable to the PT or CT RJ-45 jack on the TACLANE
Step 2 Configure KG-175D to separate classified from unclassified network
Configure ASA 5500 firewall in the path between communicating TACLANEs to pass SDD,
IKE, and ESP.
Insert CIK
Power on TACLANE
CIK activation will initialize
2.6.11 Configure VLAN security on network devices
All unused ports will be shutdown or placed in a black hole VLAN. By shutting down or isolating all
unused ports will disable trunking of the unused ports. In addition, Dynamic Trunk Protocol will be
turned off to prevent automatic negotiating to trunking mode which only allows manual configuration for
trunking a port. The command will be (config-if)# switchport negotiate on the interface.
2.6.12 Configure port security on network devices
Enabling port security limits the amount of MAC addresses that can connect and send data on the ports
they are connected to. This prevents unauthorized MAC addresses from connect to a port and obtaining
access to the network. The command will be (config-if)# switchport port-security on the interface and to
have the port shutdown due to unauthorized connections, a protection will be enabled. The command will
be (config-if)# switchport port-security violation protect.
2.6.13 Configure DHCP snooping on network devices
Enabling DHCP snooping can provide another layer of defense through the router by acting like a
secondary firewall between the DHCP server and untrusted systems. The command to set up DHCP
snooping is (config)# feature dhcp and is configured on the switch.
2.7 Active Directory Implementation
Step # Task
1 Prepare the Forest Root/Parent Domain; WWTC.com
2 Create the Forest Root/Parent Domain; WWTC.com
3 Create a Child Domain; NY.WWTC.com
2.7.1 Prepare the Forest Root/Parent Domain; WWTC.com
1) Deploy the First Forest Domain Controller. Review the AD DS and logical structure design.
2.7.2 Create the Forest Root/Parent Domain; WWTC.com
Step 1 Enable Windows Server 2012 R2 AD DS advanced features by raising the forest and domain
functional levels. It is recommended that you raise forest and domain functional levels while you run the
Active Directory Domain Services Installation Wizard (Dcpromo.exe).
Step 2 Creating the Forest Root Domain: WWTC’s Hong Kong Headquarters office had previously
established the WWTC.com Forest domain. Reportedly, they installed the Active Directory Domain
Name Services (AD DS) role onto their first domain controller by utilizing the Windows Server 2012R2
Server Manager tool. Installing AD DS is performed through “Add roles and features”, a wizard that
automatically adds in the needed tool sets and features required for active directory. Once AD DS was
installed, Server Manager alerted the administrator that a post-deployment action was needed entitled,
“Promote this server to a domain a controller”. Upon selecting the deployment configuration wizard,

Implementation Plan Template Group 5 Page 16 of 39 UMUC CMIT 495
Hong Kong created the Forest named WWTC.com. (Figure 14) Once the prerequisite checks passed, the
domain controller promotion completed successfully and WWTC.com established the schema.
Figure 14 Add AD Forest
1) Deploy the First New York Domain Controller
a) Install Active Directory Domain Services (AD DS) by running the Active Directory Domain Services
Installation Wizard on the server selected to be the first domain controller.
b) Add new domain to an existing forest (Fig. 15)
Figure 15 Child Domain
2.8 Configuration of Routers
The following information is provided in order to configure the NY.WWTC routers. This is the first time
the routers are accessed and they contain a default configuration from Cisco. The router holds an IOS
(Internetwork Operating System). This IOS is considered proprietary software and should not be accessed
or modified unless specifically handled by WWTC’s IT team. Figure xxx illustrates NY.WWTC’s Core
Implementation Plan Template Group 5 Page 17 of 39 UMUC CMIT 495
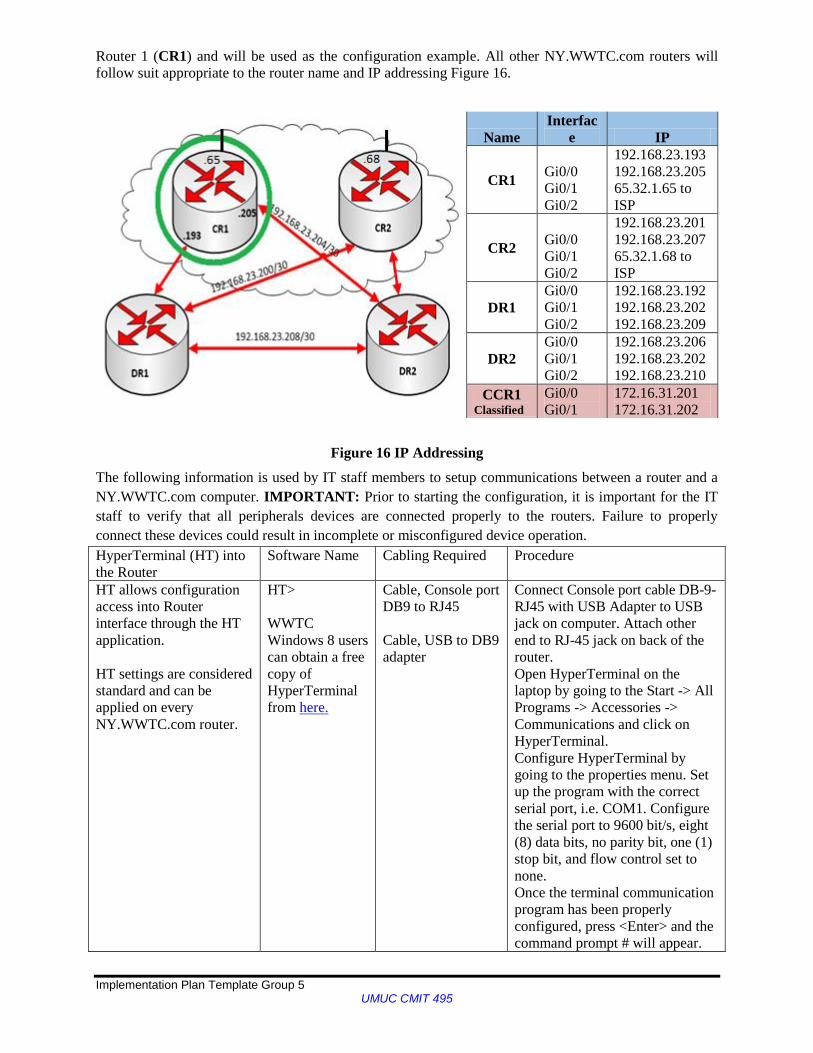
Router 1 (CR1) and will be used as the configuration example. All other NY.WWTC.com routers will
follow suit appropriate to the router name and IP addressing Figure 16.
Name
Interfac
e IP
CR1 Gi0/0
Gi0/1
Gi0/2
192.168.23.193
192.168.23.205
65.32.1.65 to
ISP
CR2 Gi0/0
Gi0/1
Gi0/2
192.168.23.201
192.168.23.207
65.32.1.68 to
ISP
DR1
Gi0/0
Gi0/1
Gi0/2
192.168.23.192
192.168.23.202
192.168.23.209
DR2
Gi0/0
Gi0/1
Gi0/2
192.168.23.206
192.168.23.202
192.168.23.210
CCR1 Classified
Gi0/0
Gi0/1
172.16.31.201
172.16.31.202
Figure 16 IP Addressing
The following information is used by IT staff members to setup communications between a router and a
NY.WWTC.com computer. IMPORTANT: Prior to starting the configuration, it is important for the IT
staff to verify that all peripherals devices are connected properly to the routers. Failure to properly
connect these devices could result in incomplete or misconfigured device operation.
HyperTerminal (HT) into
the Router
Software Name Cabling Required Procedure
HT allows configuration
access into Router
interface through the HT
application.
HT settings are considered
standard and can be
applied on every
NY.WWTC.com router.
HT>
WWTC
Windows 8 users
can obtain a free
copy of
HyperTerminal
from here.
Cable, Console port
DB9 to RJ45
Cable, USB to DB9
adapter
Connect Console port cable DB-9-
RJ45 with USB Adapter to USB
jack on computer. Attach other
end to RJ-45 jack on back of the
router.
Open HyperTerminal on the
laptop by going to the Start -> All
Programs -> Accessories ->
Communications and click on
HyperTerminal.
Configure HyperTerminal by
going to the properties menu. Set
up the program with the correct
serial port, i.e. COM1. Configure
the serial port to 9600 bit/s, eight
(8) data bits, no parity bit, one (1)
stop bit, and flow control set to
none.
Once the terminal communication
program has been properly
configured, press <Enter> and the
command prompt # will appear.

Implementation Plan Template Group 5 Page 18 of 39 UMUC CMIT 495
The following commands are Global Configurations mode commands used to configure the Router Name
and set up security passwords.
Display Command
1. Router> Press <Enter> to connect with the router (The terminal should display: con0
is now available
2. Router> Type enable
3. Router# Type configure terminal
4. Router(config)# Type hostname CR1 (sets the device hostname)
5. CR1(config)# Type enable password letmein (sets the enable password)
6. CR1(config)# Type enable secret NY.R0uter (sets an encrypted secret password)
7. CR1(config)# Type line console 0 (enters console line mode)
8. CR1(config-line)# Type password letmein (sets a password on the line console login)
9. CR1(config-line)# Type login (forces the use of the password) Type exit
10. CR1(config)# Type line vty 0 4 (enters the vty mode for all 5 vty lines)
11. CR1(config-line)# Type password letmein (sets the password for the vty lines)
12. CR1(config-line)# Type login (forces the use of the password) Type exit
13. CR1(config)# Type line aux 0 (enters the auxiliary line mode)
14. CR1(config-line)# Type password letmein (sets the password on the aux port)
15. CR1(config-line)# Type login (forces the use of the password) Type exit, Type exit
16. CR1# Type copy run start (saves configuration to NVRAM)
The following commands shown below are to assign an IP address to the interfaces and to assign a login
banner.
Display Command
1. CR1(config)# Type ip domain-name NY.WWTC.com
2. CR1(config)# Type router eigrp 1
3. CR1(config-router)# Type no auto-summary Type exit
4. CR1(config)# Type interface Gi0/0
5. CR1(config-if)# Type ip address 192.168.23.193 255.255.255.0
6. CR1(config-if)# Type no shut
7. CR1(config-if)# Type interface Gi0/1
8. CR1(config-if)# Type ip address 192.168.23.205 255.255.255.0
9. CR1(config-if)# Type no shut
10. CR1(config-if)# Type interface Gi0/2
11. CR1(config-if)# Type ip address 65.32.1.65 255.255.255.0
12. CR1(config-if)# Type no shut -- Type exit
13. CR1(config)# Type banner motd # (Terminal should display: Enter TEXT message.
End with the character ‘#’)
Enter WARNING …You are accessing a company proprietary
information system that is provided for WWTC authorized use only.
Unauthorized access is prohibited! Enter your username and password.
#
14. CR1(config)# Type exit
15. CR1# Type copy run start (saves configuration to NVRAM)
Power the laptop OFF by performing normal computer shutdown procedures and disconnect the console
cable from the laptop USB port and from the CR1 router console port.
2.9 Configuration of Switches
The following steps are required to configure the NY.WWTC switches. This is the first time the switches
are accessed and they contain a default configuration from Cisco. The switch holds an IOS (Internetwork
Operating System). This IOS is considered proprietary software and should not be accessed or modified

Implementation Plan Template Group 5 Page 19 of 39 UMUC CMIT 495
unless specifically handled by WWTC’s IT team. Figure xxx illustrates NY.WWTC’s switch (ASW1)
and will be used as the configuration example. All other NY.WWTC.com switches will follow suit
appropriate to the switch and IP addressing in Figure 17.
Name Interface IP
ASW1 Fa0/0
Fa0/1
192.168.23.22
3
192.168.23.22
9
ASW2 Fa0/0
Fa0/1
192.168.23.23
2
192.168.23.22
6
CASW
1 Classified
Fa0/0
Fa0/1
172.16.31.205
172.16.31.206
Figure 17 Switch IP Addressing
The following information is used by IT staff members to setup communications between a switch and a
NY.WWTC.com computer.
HyperTerminal (HT) into
the Router
Software Name Cabling Required Procedure
HT allows configuration
access into switch
interface through the HT
application.
HT settings are considered
standard and can be
applied on every
NY.WWTC.com router.
HT>
WWTC
Windows 8 users
can obtain a free
copy of
HyperTerminal
from here.
Cable, Console port
DB9 to RJ45
Cable, USB to DB9
adapter
Connect Console port cable DB-9-
RJ45 with USB Adapter to USB
jack on computer. Attach other
end to RJ-45 jack on back of the
router.
Open HyperTerminal on the
laptop by going to the Start -> All
Programs -> Accessories ->
Communications and click on
HyperTerminal.
Configure HyperTerminal by
going to the properties menu. Set
up the program with the correct
serial port, i.e. COM1. Configure
the serial port to 9600 bit/s, eight
(8) data bits, no parity bit, one (1)
stop bit, and flow control set to
none.
Once the terminal communication
program has been properly
configured, press <Enter> and the
command prompt # will appear.
The following commands are Switch Configuration commands used to configure the switch name and set
up security passwords.
Display Command
1. Switch> Press <Enter> to connect with the switch (The terminal should display: con0
is now available
2. Switch> Type enable

Implementation Plan Template Group 5 Page 20 of 39 UMUC CMIT 495
3. Switch# Type configure terminal
4. Switch(config)# Type hostname ASW1 (sets the device hostname)
5. ASW1(config)# Type ip domain-name NY.WWTC.com
6. ASW1(config)# Type no ip domain-lookup (This disables the switch from translating
unfamiliar words)
7. ASW1(config)# Type enable password letmein (sets the enable password)
8. ASW1(config)# Type enable secret NY.Switch (sets an encrypted secret password)
9. ASW1(config)# Type crypto key generate rsa
How many bits in the modulus [512]: 2048
10. ASW1(config)# Type line console 0 (enters console line mode)
11. ASW1(config-line)# Type password letmein (sets a password on the line console login)
12. ASW1(config-line)# Type login local (forces the use of the password)
13. ASW1(config-line)# Type transport input ssh
14. ASW1(config-line)# Type exec-timeout 1 00 Type exit
15. ASW1(config)# Type line vty 0 4 (enters the vty mode for all 5 vty lines)
16. ASW1(config-line)# Type password letmein (sets the password for the vty lines)
17. ASW1(config-line)# Type login local (forces the use of the password)
18. ASW1(config-line)# Type transport input ssh
19. ASW1(config-line)# Type exec-timeout 5 Type exit
20. ASW1(config)# Type line vty 5 15 (enters the vty mode for vty lines 5 through 15)
21. ASW1(config-line)# Type password reallykeepout (sets the password for the vty lines)
22. ASW1(config-line)# Type login (forces the use of the password) Type exit
23. ASW1(config)# Type line aux 0 (enters the auxiliary line mode)
24. ASW1(config-line)# Type password letmein (sets the password on the aux port)
25. ASW1(config-line)# Type login (forces the use of the password) Type exit, Type exit
26. ASW1(config)# Type no logging console Type exit
28. ASW1# Type copy run start (saves configuration to NVRAM)
2.10 VLAN configurations
The following information is used by IT staff members to setup the individual VLANs on ASW1 and
ASW2. VLAN 20 “Staff” will be used as the example.
The following commands will assign the appropriate VLAN to the appropriate switch.
(Refer below above for name and IP assignments).
Display Command
1. ASW1# Press <Enter> to connect with the switch (The terminal should display:
con0 is now available
2. ASW1# Type enable
3. ASW1# Type configure terminal
4. ASW1(config)# Type interface f0/1
5. ASW1(config)# Type vlan 20
6. ASW1(config-vlan)# Type name staff
7. ASW1(config-vlan)# Type switchport mode access
8. ASW1(config-vlan)# Type switchport access vlan 20

Implementation Plan Template Group 5 Page 21 of 39 UMUC CMIT 495
9. ASW1(config-vlan)# Type switchport port-security mac-address sticky
10. ASW1(config-vlan)# Type switchport port-security maximum 1
11. ASW1(config-vlan)# Type switchport port-security violation shutdown
12. ASW1(config-vlan)# Type ip address 192.168.20.254 255.255.255.0
13. ASW1(config-vlan)# Type no shutdown Type exit
14. ASW1(config)# Type ip default-gateway 192.168.23.193
15. ASW1(config)# Type no shutdown
16. ASW1(config)# Type password letmein (sets the password for the vty lines)
17. ASW1# Type copy run start (saves configuration to NVRAM)
Power the laptop OFF by performing normal computer shutdown procedures and disconnect the console
cable from the laptop USB port and from the ASW1 switch console port
2.11 Voice VLAN and wireless
NY.WWTC site requires network access for users and guest users in limited areas of the three lobbies and
two conference rooms throughout Suite A-C. Since NY.WWTC is providing a private network, WWTC
wireless users will be designated to VLAN 27 to keep wireless users from accessing the WWTC intranet.
Creating a VLAN for the wireless users provides enhanced security to keep unauthorized users from
accessing WWTC’s sensitive data. WWTC requires a state of the art VOIP network. The voice and data
must be integrated to reduce cost and maintain 100% connectivity. Voice over IP provides a latest
platform for internal and external communication. The technology is cheap, simple, and scalable and has
high degree of fault tolerance. To prevent network congestion, NY.WWTC isolates the VoIP traffic from
the data traffic because VoIP traffic is extremely sensitive to network delays that occur from unavailable
bandwidth and bottlenecks. The isolation of the VoIP traffic is accomplished by the creation of separate
VLANs. The VoIP traffic will be designated to VLAN 24 to keep VoIP separated from the data traffic on
NY.WWTC’s network. By dedicating VoIP to a VLAN, IT managers allow the VoIP services to be easily
managed. Table 18 and 19 outline the VoIP assignment and topology.
Figure 18 VoIP Assignment

Implementation Plan Template Group 5 Page 22 of 39 UMUC CMIT 495
Figure 19 VoIP Topology
2.12 Security technologies
The security goals of NY.WWTC.com are to protect key assets which in today’s industry are vulnerable
to four common threats. Those are: reconnaissance attacks, intruder threat, denial of service attack and
malware infiltration. In addition to those security threats, WWTC is focused on eliminating the lack of
security training for WWTC employees. Quarterly, WWTC conducts an all-hands training session that
reviews the latest security threats for business. The WWTC’s IT team is also aware that weak security
devices (or those lacking functionality), could cost WWTC time and money if/when not properly
positioned. The fix: implement a collection of security devices and properly configure and position those
devices within the network.
Key Assets
The NY.WWTC site presents a High Level security plan where key applications, servers and network
resources (data) will be kept secure. NY.WWTC presents these security technologies based on current
industry standards with multilayered security and a defense-in-depth models. The following areas have
been identified as NY.WWTC key assets and will be protected.
Market Tracking Application Servers
Stock and Bond Analytical Application Servers
On Line Trading Sites and Methods
Finance data
Human Resources data
All NY.WWTC Internal Servers
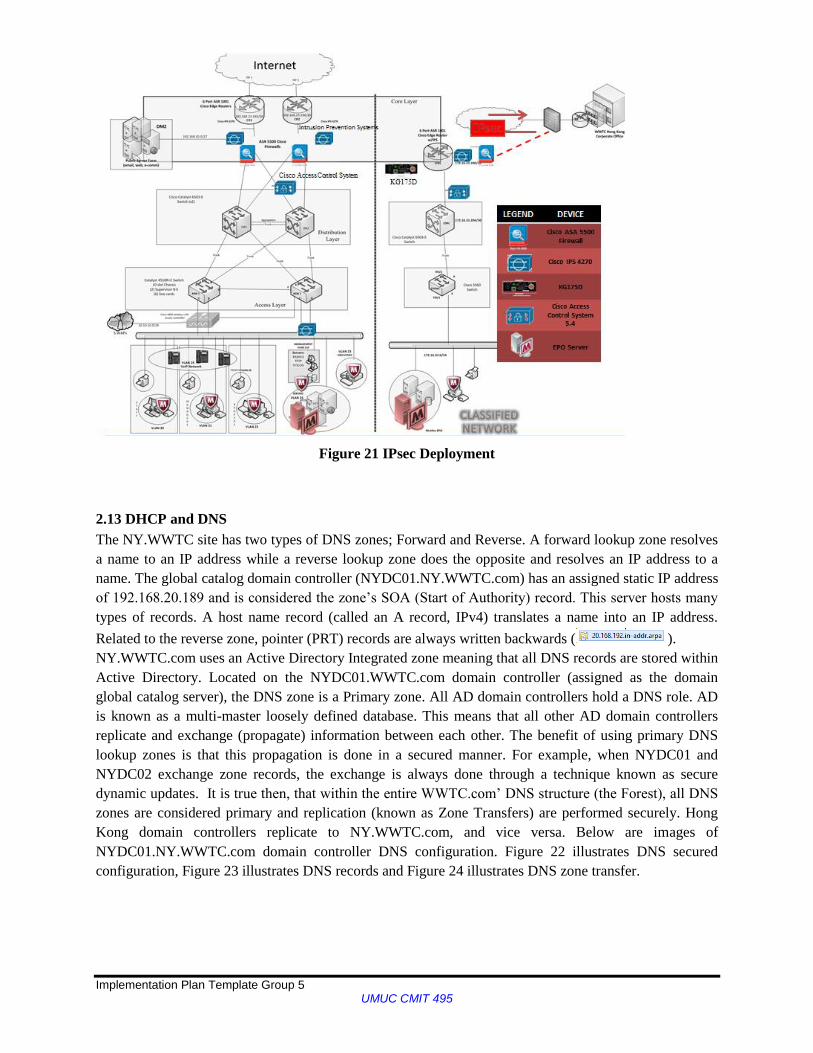
The following table lists and describes the security device roles that will be used to protect NY.WWTC
key assets. Each icon is represented in Figure 21. The illustration aims at presenting a high level
representation and the placement of these devices.

Implementation Plan Template Group 5 Page 23 of 39 UMUC CMIT 495
Icon Item Name Description Role
Cisco ASR 1001
Edge Router
These routers sit at the edge
of the WWTC network
connecting the company to
the WANs Internet Service
Provider links
1. Managed services, including VPN
and firewall
2. Provides WAN aggregation and
secure, encrypted WAN connectivity
3. Provides WWTC with Deep packet
Inspection (DPI)
Cisco IPS 4270
These Intrusion Prevention
Systems monitor IP traffic
within WWTC's network
1. An inline network security
appliance
2. Detect threats to intellectual
property and WWTC customer data
3. Stops sophisticated attackers by
detecting behavioral anomalies,
evasion, and attacks against WWTC
vulnerabilities
4. Reduce the time and effort required
to implement and update security
measures
KG175D High Assurance IP
Encryption
1. Encrypts WWTC traffic from NY
to Tokyo.
2. Remote HAIPE-to-HAIPE keying
3. Ethernet, IPv4/IPv6 Dual Stack
compatible
Cisco Access
Control System
5.4
WWTC's centralized identity
and access policy solution
with network access policy
and identity strategy
1. WWTC managed access policy
device that defines
policy rules in both IPv4 and IPv6
networks
2. Integrates with external identity
and policy databases, including
WWTC's Windows Active Directory
to control network access
3. Provides standards-compliant
Authentication, Authorization, and
Accounting (AAA) services to the
WWTC network for VPN and
wireless users
McAfee EPO
Server
Provides host base security
to prevent malware,
exploitations,
reconnaissance, denial of
service, loss of data,
intrusions and is managed
from one server.
Provides Virus Scanning Enterprise.
Integrates Host Intrusion Prevention
(HIPS)
Prevents data loss with Data Loss
Prevention (DLP)
Figure 20 Security Technology
Figure 21 illustrates the positioning of key asset protection devices. IPsec technology will be deployed on.
Implementation Plan Template Group 5 Page 24 of 39 UMUC CMIT 495
Figure 21 IPsec Deployment
2.13 DHCP and DNS
The NY.WWTC site has two types of DNS zones; Forward and Reverse. A forward lookup zone resolves
a name to an IP address while a reverse lookup zone does the opposite and resolves an IP address to a
name. The global catalog domain controller (NYDC01.NY.WWTC.com) has an assigned static IP address
of 192.168.20.189 and is considered the zone’s SOA (Start of Authority) record. This server hosts many
types of records. A host name record (called an A record, IPv4) translates a name into an IP address.
Related to the reverse zone, pointer (PRT) records are always written backwards ( ).
NY.WWTC.com uses an Active Directory Integrated zone meaning that all DNS records are stored within
Active Directory. Located on the NYDC01.WWTC.com domain controller (assigned as the domain
global catalog server), the DNS zone is a Primary zone. All AD domain controllers hold a DNS role. AD
is known as a multi-master loosely defined database. This means that all other AD domain controllers
replicate and exchange (propagate) information between each other. The benefit of using primary DNS
lookup zones is that this propagation is done in a secured manner. For example, when NYDC01 and
NYDC02 exchange zone records, the exchange is always done through a technique known as secure
dynamic updates. It is true then, that within the entire WWTC.com’ DNS structure (the Forest), all DNS
zones are considered primary and replication (known as Zone Transfers) are performed securely. Hong
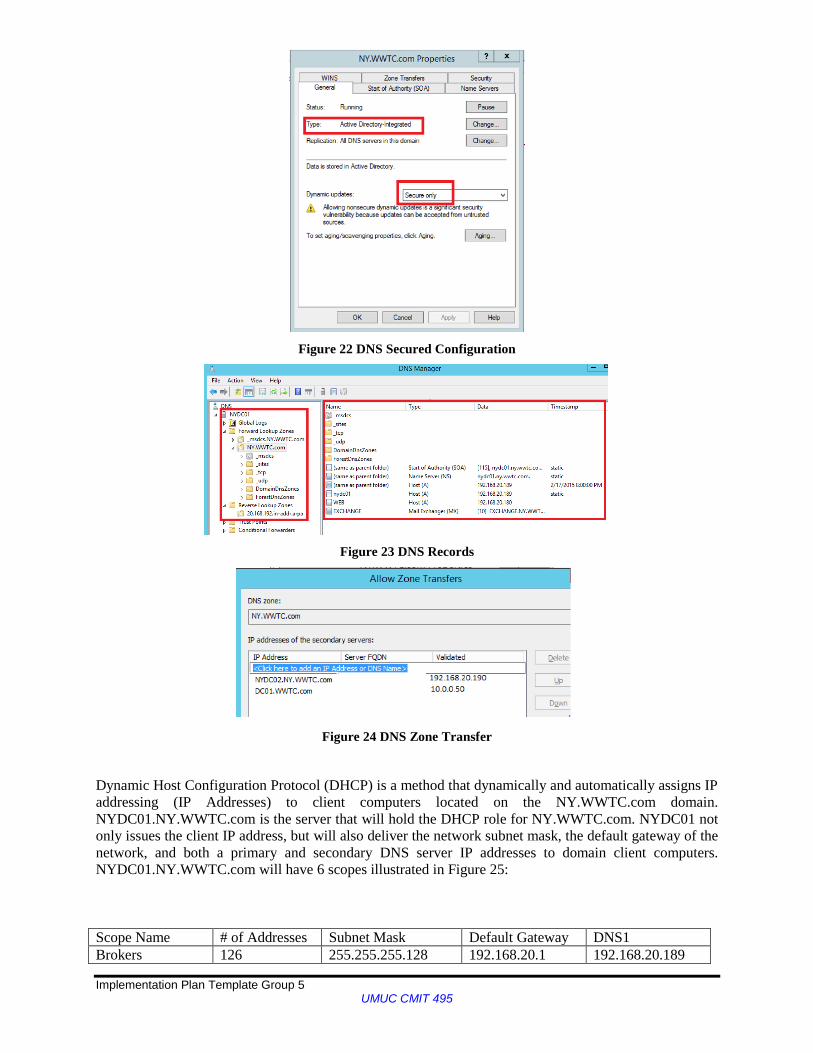
Kong domain controllers replicate to NY.WWTC.com, and vice versa. Below are images of
NYDC01.NY.WWTC.com domain controller DNS configuration. Figure 22 illustrates DNS secured
configuration, Figure 23 illustrates DNS records and Figure 24 illustrates DNS zone transfer.
Implementation Plan Template Group 5 Page 25 of 39 UMUC CMIT 495
Figure 22 DNS Secured Configuration
Figure 23 DNS Records
Figure 24 DNS Zone Transfer
Dynamic Host Configuration Protocol (DHCP) is a method that dynamically and automatically assigns IP
addressing (IP Addresses) to client computers located on the NY.WWTC.com domain.
NYDC01.NY.WWTC.com is the server that will hold the DHCP role for NY.WWTC.com. NYDC01 not
only issues the client IP address, but will also deliver the network subnet mask, the default gateway of the
network, and both a primary and secondary DNS server IP addresses to domain client computers.
NYDC01.NY.WWTC.com will have 6 scopes illustrated in Figure 25:
Scope Name # of Addresses Subnet Mask Default Gateway DNS1
Brokers 126 255.255.255.128 192.168.20.1 192.168.20.189

Implementation Plan Template Group 5 Page 26 of 39 UMUC CMIT 495
Managers 62 255.255.255.192 192.168.20.1 192.168.20.189
Executives 30 255.255.255.224 192.168.20.1 192.168.20.189
Staff Scope 30 255.255.255.224 192.168.20.1 192.168.20.189
Phones 254 255.255.255.0 192.168.20.1 192.168.20.189
IT Management 30 255.255.255.224 12.168.20.1 192.168.20.189
Figure 25 NY.WWTC Scopes
2.14 Active Directory Policies
Windows BitLocker Drive Encryption is a security feature that provides enhanced data protection for
computers by encrypting all data stored on the Windows Operating System volume (Microsoft, 2014). A
Trusted Platform Module (TPM) is a microchip that is built into computers to store cryptographic
information such as encryption keys. BitLocker uses TPM to help protect the Windows Operating System
and user data, and helps to ensure a computer is not tampered with in the invent it is lost or stolen
(Microsoft, 2014). To encrypt the workstations and servers in NY.WWTC, the IT team will deploy the
BitLocker encryption technology onto these devices. BitLocker drive encryption is a technique that is
used to secure data at rest behind unique, hard to crack passwords. BitLocker Drive Encryption encrypts
computer data using a strong encryption algorithm offering maximum security for the WWTC business
user. As an extreme example, imagine a computer being stolen from WWTC. The thief, after starting the
computer, or even removing the hard drive and placing it into a different computer, would be restricted
from accessing any information due to the encryption technology. To the thief, the information is jumbled
and unreadable.
Implementing BitLocker Encryption technology onto WWTC devices requires each employee to have:
1. A separate UBS flash Drive used to store a PIN or key. Or,
2. A computer with a Trusted Platform Module (TPM). A TPM is a special microchip located in the
computer that supports advanced security encryption features. TPM version 1.2 or higher stores its
key in the TPM itself
Enforcing BitLocker encryption on a USB
WWTC employees are known to occasionally take data off site. To enforce that BitLocker encrypts only
the used space of a removable storage media device (e.g. USB drive), WWTC enforces a group policy
that sets BitLocker drive encryption on removable media. WWTC’s IT team sets a GPO under Computer
Configuration | Administrative Templates | Windows Components | BitLocker Drive Encryption. Figure
26 provides a visual sample of where this setting(s) can be found.

Implementation Plan Template Group 5 Page 27 of 39 UMUC CMIT 495
Figure 26 Bitlocker Encryption
BranchCache
To provide increased manageability, scalability, and data availability, the WWTC IT team enables a
technology known as BranchCache across the network. BranchCache is a technology that copies content
from WWTC’s Hong Kong file servers and caches (saves in memory) the content on to WWTC’s New
York regional office file servers allowing client computers at the regional offices to access the content
locally rather than over the WAN. (Microsoft, 2015). A benefit of deploying BranchCache results in
efficient optimization and use of bandwidth. For example, when a client accesses remote content in Japan,
BranchCache is used to store (cache) the desired content locally on the NY site. If a client wants to access
the same content later, that data does not need to be downloaded a second time as it already resides within
the BranchCache in NY. By default, BranchCache allocates 5% of the disk space for the cache, but this
value can easily be changed by creating and assigning a GPO. One of the concerns is bandwidth.
Bandwidth can become quickly saturated if wireless networking (WLAN) is utilized alongside wired
methods. Shown in Figure 27 enabling BranchCache on WWTC client computers is done through a group
policy. WWTC’s IT team sets a GPO under Computer Configuration | Policies | Administrative
Templates: Policy definitions (ADMX files) retrieved from the local machine | Network | BranchCache
shown in Figure 4. (Technet, 2015).
Figure 27 Branch Cache
2.14.1 Configure Global Catalog Servers and FSMO roles
The Schema Master and Domain Naming Master will be located at the Forest root
(WWTC.com).
Implementation Plan Template Group 5 Page 28 of 39 UMUC CMIT 495
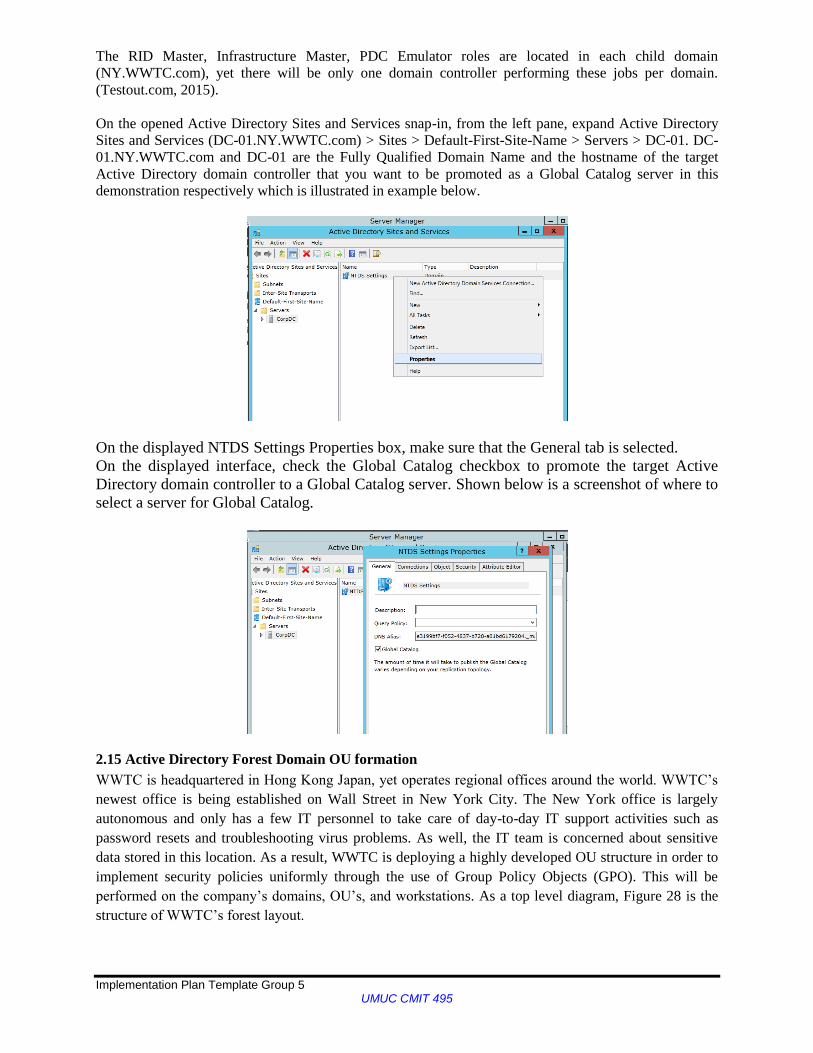
The RID Master, Infrastructure Master, PDC Emulator roles are located in each child domain
(NY.WWTC.com), yet there will be only one domain controller performing these jobs per domain.
(Testout.com, 2015).
On the opened Active Directory Sites and Services snap-in, from the left pane, expand Active Directory
Sites and Services (DC-01.NY.WWTC.com) > Sites > Default-First-Site-Name > Servers > DC-01. DC-
01.NY.WWTC.com and DC-01 are the Fully Qualified Domain Name and the hostname of the target
Active Directory domain controller that you want to be promoted as a Global Catalog server in this
demonstration respectively which is illustrated in example below.
On the displayed NTDS Settings Properties box, make sure that the General tab is selected.
On the displayed interface, check the Global Catalog checkbox to promote the target Active
Directory domain controller to a Global Catalog server. Shown below is a screenshot of where to
select a server for Global Catalog.
2.15 Active Directory Forest Domain OU formation
WWTC is headquartered in Hong Kong Japan, yet operates regional offices around the world. WWTC’s
newest office is being established on Wall Street in New York City. The New York office is largely
autonomous and only has a few IT personnel to take care of day-to-day IT support activities such as
password resets and troubleshooting virus problems. As well, the IT team is concerned about sensitive
data stored in this location. As a result, WWTC is deploying a highly developed OU structure in order to
implement security policies uniformly through the use of Group Policy Objects (GPO). This will be
performed on the company’s domains, OU’s, and workstations. As a top level diagram, Figure 28 is the
structure of WWTC’s forest layout.

Implementation Plan Template Group 5 Page 29 of 39 UMUC CMIT 495
Figure 28 Forest Layout
The WWTC forest design is:
1. One forest for WWTC.com (Hong Kong based) – this is called the forest root or Parent domain
-- WWTC.com is a Tree domain that establishes the company’s name space
2. Within this forest, the IT team has created a second domain called NY.WWTC.com
-- NY.WWTC.com is known as a Child domain that shares the common name space
3. WWTC.com and NY.WWTC.com domains trust each other
4. NY.WWTC.com can share resources with WWTC.com and vice versa
5. WWTC.com uses a common schema where all objects within the Forest take advantage of common
applications (e.g. mail services (Microsoft Exchange), Intranet web sites, Market Tracking and Stock and
Bond Analytical applications)
6. The WWTC Forest can easily accommodate growth (such as additional domains)
In general, all WWTC.com computers belong to a domain. These domains have been established based on
the physical location of where the local resources reside. The users in Hong Kong belong to WWTC.com
and the users in New York are members of NY.WWTC.com. A standardized, shared naming convention
(a common space (WWTC.com)) is in place and both domains “trust” each other. Like that of Hong
Kong, the New York office has established OUs that mirror the logical structure of the company’s NY
office mission. Shown in Figure 29 is the NY.WWTC.com infrastructure of ten OU’s.

Implementation Plan Template Group 5 Page 30 of 39 UMUC CMIT 495
_New York
Organizational Units
Brokers
Users
Workstations
Execs (Executives)
Users
Workstations
Finance
Users
Workstations
HR (Human Resources)
Users
Workstations
IT
Users
Workstations
Managers
Users
Workstations
Printers
Servers
Clustered Servers
Security Groups
Figure 29 OU Structure
OU’s for each department within the NY.WWTC.com domain have been proposed. Inside each
department OU are two other OU’s; Users and Workstations. All employees (users) and their computers
(workstations) will be properly placed inside of these nested containers according to their department.
2.16 Active Directory Group Formation
Universal groups can be assigned permissions to resources anywhere in the forest. Universal groups can
contain members from any domain in the forest. These include Universal groups within the forest, Global
groups within the forest and/or Users and computers within the forest (Labsim, 2015). The Universal
Groups, who require access within WWTC.com and NY.WWTC.com, are:
1. Execs (Executives)
2. Finance
3. HR (Human Resources)
Domain Local groups have permission within the current Domain. The following groups will be created
for personnel who need access to only the NY.WWTC.com domain. Below are the Domain Local
Groups:
1. Brokers
2. IT (Information Technology)
3. Managers

Implementation Plan Template Group 5 Page 31 of 39 UMUC CMIT 495
Global groups can be assigned permissions to resources anywhere in the forest. Global groups can contain
members within the same domain. The Global Group is created for users with VPN access when traveling
between sites. The following Global Group is:
1. VPN Remote
Figure 30 shows the role and the group scope of each type of group:
Figure 30 Group Scope
PowerShell Scripting
Powershell is a command-line tool that offers administrators an alternative over the standard graphical
user interface (GUI) environment. Servers are less burdened without memory intensive GUI applications
and video rendering software. Related to Active directory, groups can be built by using Powershell
scripting. To do a bulk build of groups through a Powershell script, WWTC IT staff recommends
importing .csv file that holds data identifying the group information. An example of the NY.WWTC
group structure, the below is a representation of information found within a .csv file.
GroupName GroupType GroupLocation
Brokers DomainLocal
OU=_New York,OU=Security
Groups
Execs Universal
OU=_New York,OU=Security
Groups
Finance Universal
OU=_New York,OU=Security
Groups
HR Universal
OU=_New York,OU=Security
Groups
IT Admins DomainLocal
OU=_New York,OU=Security
Groups
Managers DomainLocal
OU=_New York,OU=Security
Groups
VPN Remote Global
OU=_New York,OU=Security
Groups

Implementation Plan Template Group 5 Page 32 of 39 UMUC CMIT 495
In order to execute the group Powershell command, specific syntax is needed. The following example
represents the script syntax required to automatically create NY.WWTC groups.
$csv = @()
$csv = Import-Csv -Path "C:\Desktop\bulk_input.csv"
#Get Domain Base
$searchbase = Get-ADDomain | ForEach { $_.DistinguishedName }
ForEach ($item In $csv)
{
$check = [ADSI]::Exists("LDAP://$($item.GroupLocation),$($searchbase)")
If ($check -eq $True)
{
Try
{
$exists = Get-ADGroup $item.GroupName
Write-Host "Group $($item.GroupName) alread exists! Group creation skipped!"
}
Catch
{
$create = New-ADGroup -Name $item.GroupName -GroupScope $item.GroupType -Path
($($item.GroupLocation)+","+$($searchbase))
Write-Host "Group $($item.GroupName) created!"
}
}
Else
{
Write-Host "Target OU can't be found! Group creation skipped!"
}
}
2.17 Active Directory GPO Implementation
An important management process for NY.WWTC.com is having the ability to define unique yet
managed configurations for all users and computers across the WWTC.com forest. The deployment
strategy and designed use of group policies is for security configurations, updating and installing software
and protecting the confidentially, integrity and availability of WWTC.com computing information
systems. For security purposes, the following Group Policies will be applied to the NY.WWTC.com
Default Domain Policy shown in the Figure 31 below:
1. Rename the local Administrator Account Policy
2. Disable the Guest Account Policy
3. User Access Control (UAC) Policy

Implementation Plan Template Group 5 Page 33 of 39 UMUC CMIT 495
Figure 31 Default Domain Policy
Renaming the local Administrator Account on hundreds of systems can be very time consuming which is
why enforcing GPOs allows for easier management. This GPO offers security to all systems in the
NY.WWTC.com domain by renaming the local Administrator account which could be exploited.
The settings for creating this GPO are found in Computer Configuration\Policies\Windows
Settings\Security Settings\Local Policies\Security Options, which can be seen in the flowing Figure 32.
Figure 32 Renaming Local Administrator Account
Disabling the Guest Account can also be a time consuming task when required on hundreds of systems.
The benefit of Active Directory is it can be enforced in the domain. Disabling the Guest Account prevents
unauthorized access from a threat.
The settings for creating this GPO are found in Computer Configuration\Policies\Windows
Settings\Security Settings\Local Policies\Security Options, which can be seen in Figure 33.

Implementation Plan Template Group 5 Page 34 of 39 UMUC CMIT 495
Figure 33 Disabling Guest Account
User Account Control provides security which enforces standard user level access and administration
authentication for any changes or modifications to a system (Technet, 2015). It prompts a user for
Administrative rights when accessing applications, registry or file systems. This enables Administrators
to use their user account without having to log on and off systems to enforce Administrator actions.
The settings for creating a UAC GPO are found in Computer Configuration\Policies\Windows
Settings\Security Settings\Local Policies\Security Options, which can all be seen in Figure 34.
Figure 34 UAC

Implementation Plan Template Group 5 Page 35 of 39 UMUC CMIT 495
2.18 Project Time Line
Date Completed Project Milestone
January 25 Business and design requirements identified for
the LAN, Wireless, VoIP, security, and Active
Directory implementation. Please refer to Group
5 DR Assignment document.
February 4 Preliminary design for the LAN, Wireless, and
VoIP has been submitted for client review. Please
refer to LAN_VOIP_Wireless Assignment
document.
February 11 Design modification requests for the LAN,
Wireless, and VoIP received from the client.
February 15 Preliminary security design submitted for client
review. Please refer to Security Polices and
Network Security document.
February 21 Security design modification requests received
from the client.
February 22 Preliminary Active Directory Design submitted
for client review. Please refer to Active Directory
Final document.
February 29 Active Directory design modification requests
received from the client.
March 7 Final Design for LAN, Wireless, VoIP, Security,
and Active Directory submitted to client for
review.
Implementation Plan Template Group 5 Page 36 of 39 UMUC CMIT 495
References
Be’ery, Tal. (2014). Smart Card Logon: The Good, the Bad and the Ugly. Retrieved on February 18,
2015 from http://www.aorato.com/blog/windows-smart-card-logon-good-bad-ugly/
BitLocker Group Policy Settings. (n.d.). Retrieved January 25, 2015, from
https://technet.microsoft.com/en-us/library/jj679890.aspx#BKMK_detypefdd
BitLocker: How to enable Network Unlock. (n.d.). Retrieved January 25, 2015, from
https://technet.microsoft.com/en-us/library/jj574173.aspx#BKMK_NUnlockCoreReqs
Bond, P., & Bement, A. (2002, December 3). SECURITY REQUIREMENTS FOR CRYPTOGRAPHIC
MODULES. Retrieved February 10, 2015, from http://csrc.nist.gov/publications/fips/fips140-
2/fips1402.pdf (Bond & Bement, 2002)
Cisco Router and Security Device Manager 2.5 User Guide - Site-to-Site VPN [Cisco Router and Security
Device Manager]. (2009, July 13). Retrieved January 25, 2015, from
http://www.cisco.com/c/en/us/td/docs/routers/access/cisco_router_and_security_device_manager/
25/software/user/guide/SDM25UGD/VPNS2S.html#wp1015553
Cisco ASA 5500-X Series Next-Generation Firewalls - Products & Services. (n.d.). Retrieved January 25,
2015, from http://www.cisco.com/c/en/us/products/security/asa-5500-series-next-generation-
firewalls/index.html?referring_site=bodynav
Cisco ASR 1001 Router. (n.d.). Retrieved January 25, 2015, from
http://www.cisco.com/c/en/us/products/routers/asr-1001-router/index.html
Cisco Aironet 1250 Series Access Point Data Sheet. (n.d.). Retrieved January 25, 2015, from
http://www.cisco.com/c/en/us/products/collateral/wireless/aironet-1250-
series/product_data_sheet0900aecd806b7c5c.html
Cisco Catalyst 3560 Series Switches - Products & Services. (n.d.). Retrieved January 25, 2015, from
http://www.cisco.com/c/en/us/products/switches/catalyst-3560-series-switches/index.html
Cisco IPS 4270-20 Sensor. (n.d.). Retrieved January 25, 2015, from
http://www.cisco.com/c/en/us/support/security/ips-4270-20-sensor/model.html
Cisco Router and Security Device Manager 2.5 User Guide - Site-to-Site VPN [Cisco Router and Security
Device Manager]. (2009, July 13). Retrieved January 25, 2015, from
http://www.cisco.com/c/en/us/td/docs/routers/access/cisco_router_and_security_device_manager
/25/software/user/guide/SDM25UGD/VPNS2S.html#wp1015553
Cisco Secure Access Control System - Products & Services. (n.d.). Retrieved January 25, 2015, from
http://www.cisco.com/c/en/us/products/security/secure-access-control-
system/index.htmlhttp://www.cisco.com/c/en/us/products/collateral/unified-
communications/unity-express/reference_guide_c07-566560.html
Cisco Unified IP Phone 7912G Data Sheet. (n.d.). Retrieved January 25, 2015, from
http://www.cisco.com/c/en/us/products/collateral/collaboration-endpoints/unified-ip-phone-
7912g/product_data_sheet09186a00801739c0.html

Implementation Plan Template Group 5 Page 37 of 39 UMUC CMIT 495
Cisco Wireless LAN Controllers. (n.d.). Retrieved January 25, 2015, from
http://www.cisco.com/c/en/us/products/collateral/wireless/4100-series-wireless-lan-
controllers/product_data_sheet0900aecd802570b0.html
Cisco Unified Communications 500 Series Model 560 for Small Business: Platform Reference Guide.
(n.d.). Retrieved January 25, 2015, from Technet. (2015). Windows Deployment Services
Overview. Microsoft. Retrieved on February 20, 2015 from https://technet.microsoft.com/en-
us/library/hh831764.aspx
Dell Precision T1700 Workstation. (n.d.). Retrieved January 25, 2015, from
http://www.dell.com/us/business/p/precision-t1700-workstation/pd
Enhanced Interior Gateway Routing Protocol. (2015, January 5). Retrieved February 27, 2015, from
http://www.cisco.com/c/en/us/support/docs/ip/enhanced-interior-gateway-routing-protocol-
eigrp/16406-eigrp-toc.html
Failover Clustering Hardware Requirements and Storage Options. (n.d.). Retrieved January 25, 2015,
from https://technet.microsoft.com/en-us/library/jj612869.aspx
HP 5900 Switch Series. (n.d.). Retrieved January 25, 2015, from
http://h17007.www1.hp.com/us/en/networking/products/switches/HP_5900_Switch_Series/#.V
MQBUivF-Cl
HP Color LaserJet Pro MFP M176n. (n.d.). Retrieved January 25, 2015, from
http://store.hp.com/webapp/wcs/stores/servlet/us/en/pdp/printers/hp-color-laserjet-pro-mfp-
m176n
HP NC365T 4-port Ethernet Server Adapter. (n.d.). Retrieved January 25, 2015, from
http://h18004.www1.hp.com/products/servers/networking/nc365t/index.html
Hardware requirements for BitLocker Drive Encryption. (n.d.). Retrieved January 25, 2015, from
http://windows.microsoft.com/en-us/windows-vista/hardware-requirements-for-bitlocker-drive-
encryption
HYPERTERMINAL Trial. (2015). Retrieved February 22, 2015, from
https://www.hilgraeve.com/hyperterminal-trial/
IPAM Deployment Planning. (n.d.). Retrieved January 25, 2015, from https://technet.microsoft.com/en-
us/library/jj878312.aspx#hard_soft
Information Security Policy Templates. (n.d.). Retrieved February 8, 2015, from
http://www.sans.org/security-resources/policies/
Internet Connectivity Options [MPLS]. (n.d.). Retrieved January 25, 2015, from
http://www.cisco.com/en/US/tech/tk436/tk428/technologies_white_paper09186a00801281f1.sht
ml
Labsim. (2015). Group Facts. Retrieved on February 20, 2015 from
http://content.testout.com/client/labsimanywhere.html?mincachedate=01-08-2015-23-50

Implementation Plan Template Group 5 Page 38 of 39 UMUC CMIT 495
MacMall | TrippLite 42U Rack Enclosure Server Cabinet 47.25" Deep 29.5" Wide SR42UBDPWD.
(n.d.). Retrieved January 25, 2015, from http://www.macmall.com/p/TrippLite-Racks-
Enclosures-And-Arrays/product~dpno~8146725~pdp.gbhdhhb
Microsoft. (2014). BitLocker Drive Encryption Overview. Retrieved on February 18, 215 from
http://windows.microsoft.com/en-us/windows-vista/bitlocker-drive-encryption-overview
Microsoft. (2013). Failover Clustering Overview. Retrieved on February 19, 2015 from
https://technet.microsoft.com/en-us/library/hh831579.aspx
Microsoft. (2012). Plan for Automatic File Classification. Retrieved on February 19, 2015 from
https://technet.microsoft.com/en-us/library/jj574209.aspx
Microsoft. (2014). IP Address Management (IPAM) Overview. Retrieved on February 19, 2015 from
https://technet.microsoft.com/en-us/library/hh831353.aspx
Springston, Tim. (2006). Smartcard Logon Considerations, or How I Learned to Love Authentication
with Smartcards. Retrieved on February 18, 2015 from
http://blogs.technet.com/b/ad/archive/2006/11/13/smartcard-logon-considerations-or-how-i-
learned-to-love-authentication-with-smartcards.aspx
S813 Biometric Smart Card Reader. (n.d.). Retrieved January 25, 2015, from
http://www.amag.com/Products/Card-Readers/S813.aspx
SIP Trunking With AT&T IP Flexible Reach. (n.d.). Retrieved January 25, 2015, from
http://www.business.att.com/enterprise/Service/voice-services/null/sip-trunking/
Sales and Service. (n.d.). Retrieved January 25, 2015, from http://www.ricoh-
usa.com/about/sales_and_service/sales_and_services.aspx?alnv=sas
Security with Smart Cards. (n.d.). Retrieved January 25, 2015, from https://technet.microsoft.com/en-
us/library/cc962052.aspx
Security with Smart Cards. (n.d.). Retrieved January 25, 2015, from https://technet.microsoft.com/en
us/library/cc962052.aspx
Small & Medium Business. (n.d.). Retrieved January 25, 2015, from http://shopping1.hp.com/is-
bin/INTERSHOP.enfinity/WFS/WW-USSMBPublicStore-Site/en_US/-
/USD/ViewProductDetail-
Start;pgid=jDJwlVlq2W9SR0Yk2kO1Yuen0000gcHWdeHl;sid=F8tNwyQ7coxTw3D44yCBV_
00xcV1sqwevBU=?ProductUUID=sLAQ7EN56zsAAAEuiwpzzsjt&CatalogCategoryID=4e
Symmetry Network Cameras. (n.d.). Retrieved January 25, 2015, from
http://www.amag.com/Products/Video-Management/Network-Cameras.aspx
Technet. (2015). BranchCache. Microsoft. Retrieved on February 18, 2015 from
https://technet.microsoft.com/en-us/network/dd425028.aspx
Technet. (2015). Client configuration using Group Policy. Microsoft. Retrieved on February 19, 2015
from https://technet.microsoft.com/en-us/library/dd637820%28v=ws.10%29.aspx

Implementation Plan Template Group 5 Page 39 of 39 UMUC CMIT 495
Technet. (2015). BitLocker Group Policy Settings. Microsoft. Retrieved on February 18, 2015
from https://technet.microsoft.com/en-us/library/jj679890.aspx#BKMK_netunlock
Technet. (2015). Try it out: encrypt used space only. Microsoft. Retrieved on February 18, 2015 from
https://technet.microsoft.com/en-us/windows/jj983729.aspx
TestOut, Online IT Certification Training. (n.d.). Retrieved January 25, 2015, from
http://www.testout.com/
Using the Common Access Card for Remote Access VPN with the ASA 5500. (n.d.). Retrieved January
25, 2015, from http://www.cisco.com/c/en/us/products/collateral/security/asa-5500-series-next-
generation-firewalls/product_implementation_design_guide0900aecd805fc1d0.html
Very Early Smoke Detection Apparatus - Dallas Fire Protection Contractor. (n.d.). Retrieved January 25,
2015, from http://www.baconfire.com/Advanced-Smoke-Detection.html
What is Mbps? (n.d.). Retrieved January 25, 2015, from http://www.verizon.com/home/fios-fastest-
internet/?AID=10416649&PID=1785757&SID=ti38854877#plans?promotion_code=JUNCT/W
04&CMP=AFC-CJCON_002PZ2_005_014


