Embed Size (px)
Citation preview
Setting the standards for over 40 years. www.wunderbar.com
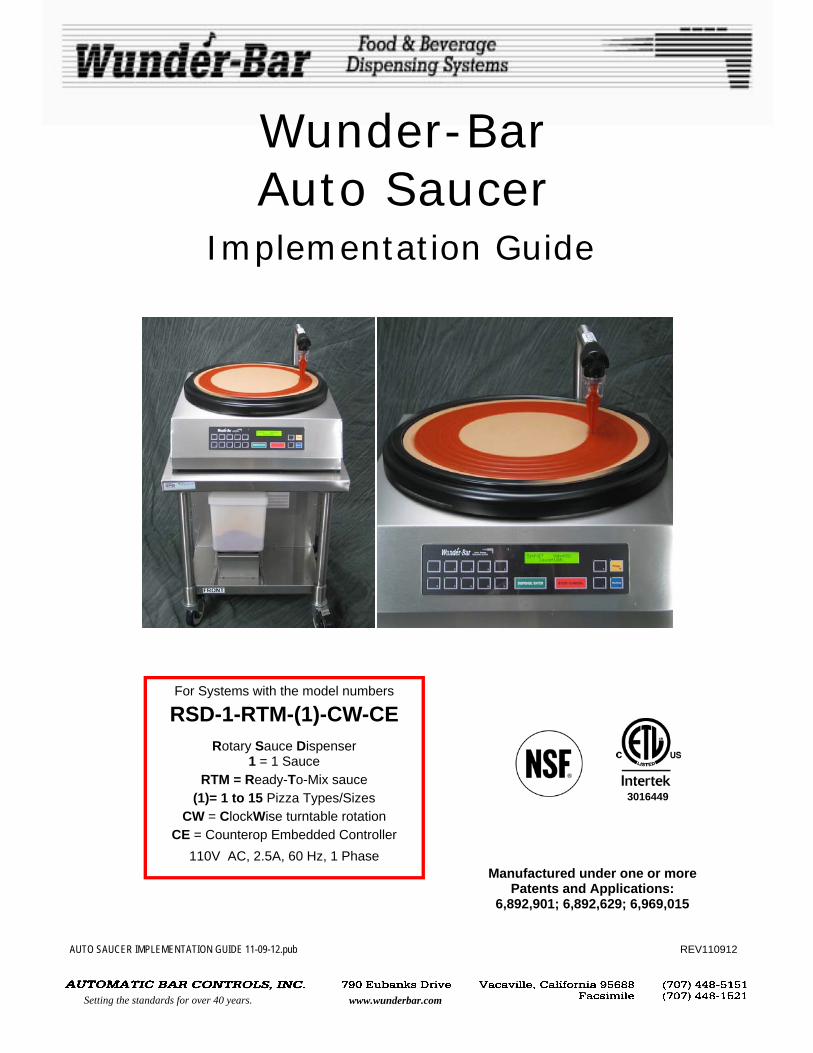
Wunder-Bar Auto Saucer
Implementation Guide
For Systems with the model numbers
RSD-1-RTM-(1)-CW-CE
Rotary Sauce Dispenser 1 = 1 Sauce
RTM = Ready-To-Mix sauce
(1)= 1 to 15 Pizza Types/Sizes
CW = ClockWise turntable rotation
CE = Counterop Embedded Controller
110V AC, 2.5A, 60 Hz, 1 Phase Manufactured under one or more
Patents and Applications: 6,892,901; 6,892,629; 6,969,015
3016449
AUTO SAUCER IMPLEMENTATION GUIDE 11-09-12.pub REV110912
2
ATTENTION! • Read all Instructions before setting up or operating the dispenser.
• Always disconnect the main power cord from the electrical source before removing any access panels or attempting to perform any servicing of this dispenser.
• Do not operate the dispenser with a damaged power cord or if the equipment has been dropped or damaged—until it has been examined by a qualified service person.
• The dispenser should never be cleaned using a water jet.
• Service access panels should be removed by qualified service technicians, ONLY.
• Access to the service areas of this dispenser is restricted to qualified technicians with safety/hygiene knowledge, experience, and training for servicing this specific dispenser.
• Install and use this dispenser only as described in this instruction manual. Use only the manufacturer’s recommended attachments.
• This dispenser should be operated in the ambient temperatures: MIN: 2° C, 36° F MAX: 40° C, 104° F
• Lire toutes les instructions avant d'installer ou d'utiliser le distributeur. • Toujours débrancher le cordon d'alimentation de la source électrique avant de retirer les panneaux d'accès ou
de tenter d'effectuer toute intervention de ce distributeur. • Ne pas faire fonctionner le distributeur avec un cordon d'alimentation endommagé ou si l'équipement a été
échappé ou endommagé, jusqu'à ce qu'il ait été examiné par un technicien qualifié.
• Le distributeur ne doit jamais être nettoyé avec un jet d'eau.
• Panneaux d'accès aux services doivent être enlevés par des techniciens qualifiés, SEULEMENT.
• Accès aux zones de service de ce distributeur est limitée à des techniciens qualifiés de la sécurité / des connaissances d'hygiène, l'expérience et la formation pour l'entretien de ce distributeur spécifique.
• Installer et utiliser ce distributeur tel que décrit dans ce manuel d'instruction. Utilisez uniquement du fabricant les accessoires recommandés par.
• Ce distributeur ne doit être utilisé dans les températures ambiantes: MIN: 2° C, 36° F MAX: 40° C, 104° F
Cet équipement est conçu pour une utilisation en intérieur. Il ne sera pas fonctionner en sous-température de congélation. Dans une situation où les températures descendent en dessous de zéro, l'équipement doit être éteint immédiatement et correctement pour l'hiver.
Retrait du service / Hivérisation GENERAL Des précautions particulières doivent être prises si le distributeur doit être retiré du service pour une période de temps prolongée ou exposé à des températures ambiantes de 32 ° F (0 ° C) ou au-dessous.
ATTENTION Si l'eau est autorisé à rester dans le distributeur en températures de congélation, de graves dommages dans une certaine composants pourraient en résulter. Les dommages de cette nature est ne sont pas couverts par la garantie.
PROCÉDURE HIVÉRISATION 1. Fermez le robinet d'alimentation et tous sirop. 2. Débrancher et vidanger la ligne d'eau entrant à l'arrière du distributeur. 3. Souffler de l'air comprimé dans l'ensemble entrants eau/ sirop entrées et les ouvertures de vidange dans le fond du distributeur jusqu'à ce que plus de l'eau sort les vannes d'eau / sirop ou de drain. 4. Assurez-vous pas d'eau ou de sirop est pris au piège dans une les conduites d'eau ou de sirop ou de lignes de drain. 5. Débranchez l'alimentation électrique au niveau du disjoncteur ou l'interrupteur de service électrique.
This equipment is rated for indoor use only. It will not operate in sub-freezing temperature. In a situation when temperatures drop below freezing, the equipment must be turned off immediately and properly winterized.
Removal from Service/Winterization
GENERAL Special precautions must be taken if the dispenser is to be removed from service for an extended period of time or exposed to ambient temperatures of 32°F (0°C) or below.
CAUTION If water or sauce is allowed to remain in the dispenser in freezing temperatures, severe damage to some components could result. Damage of this nature is not covered by the warranty.
WINTERIZATION PROCEDURE 1. Turn off the water and remove sauce supply vat. 2. Disconnect and drain the incoming water line at the rear of the dispenser. 3. Blow compressed air into all incoming water/syrup inlets and the drain openings in the bottom of the dispenser until no more water comes out the water drain valve. 4. Make sure no water or sauce is trapped in any of the water or supply lines or drain lines. 5. Disconnect the electric power at the circuit breaker or the electric service switch.
Setting the standards for over 40 years. www.wunderbar.com
2

3
Setting the standards for over 40 years. www.wunderbar.com
TABLE OF CONTENTS INTRODUCTION What It Is 4
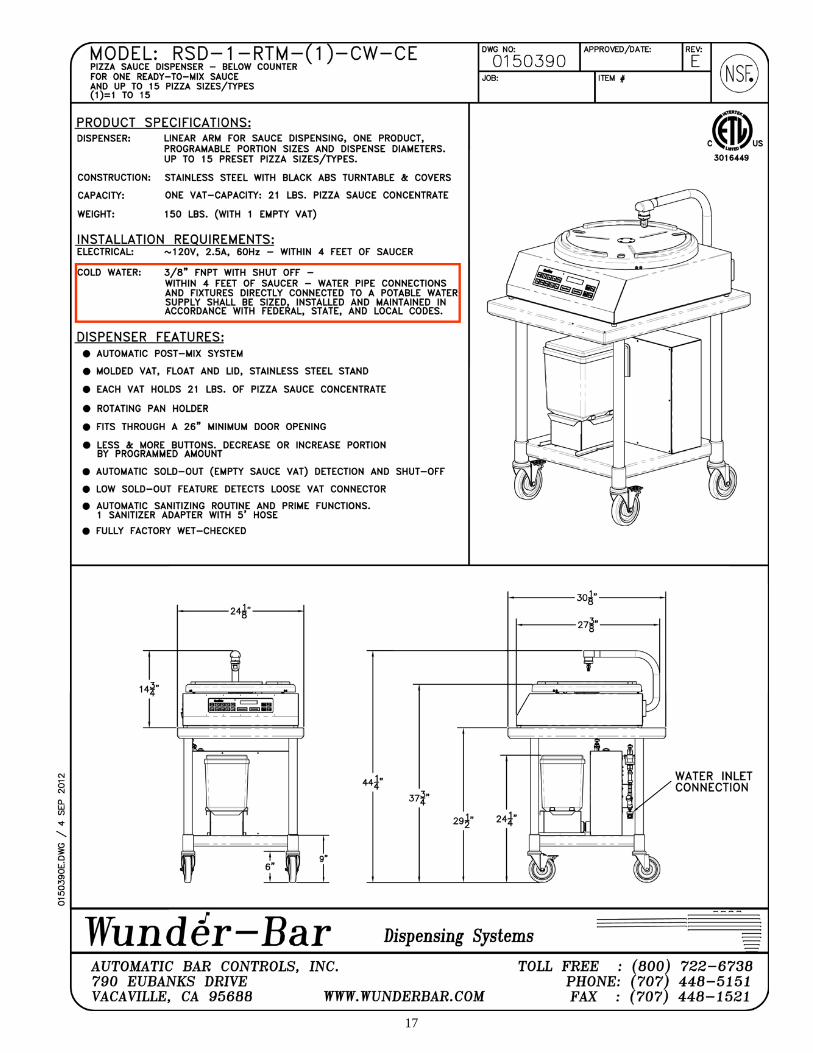
INSTALLATION Table Assembly Instructions 5 Water Line 6 Unpacking 6 Set-Up 7 Parts ID 8 OPERATIONS Filling Sauce Vats 9 Operating Procedures 10 Closing Procedures 11 TROUBLESHOOTING Priming Issues 15 Saucing Issues 15 Turntable Issues 15 SERVICE Phone Numbers 15
Spare Parts 16 Spec Sheet 17
4
Setting the standards for over 40 years. www.wunderbar.com
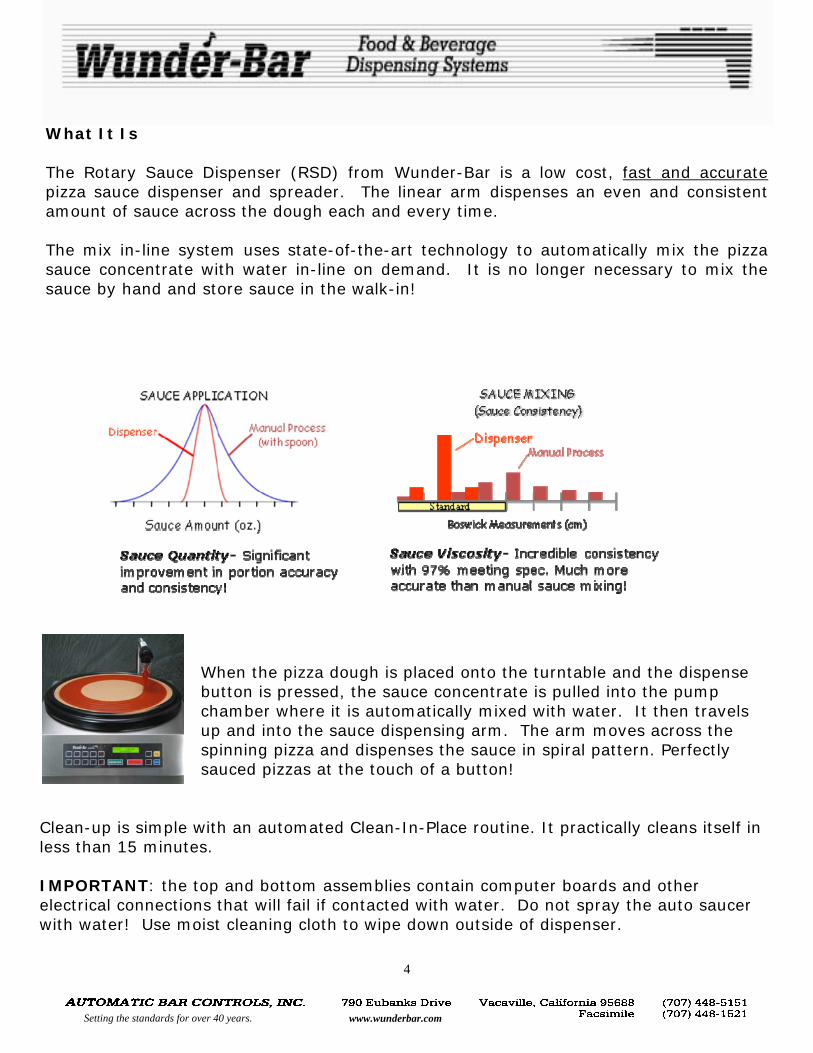
What It Is The Rotary Sauce Dispenser (RSD) from Wunder-Bar is a low cost, fast and accurate pizza sauce dispenser and spreader. The linear arm dispenses an even and consistent amount of sauce across the dough each and every time. The mix in-line system uses state-of-the-art technology to automatically mix the pizza sauce concentrate with water in-line on demand. It is no longer necessary to mix the sauce by hand and store sauce in the walk-in!
When the pizza dough is placed onto the turntable and the dispense button is pressed, the sauce concentrate is pulled into the pump chamber where it is automatically mixed with water. It then travels up and into the sauce dispensing arm. The arm moves across the spinning pizza and dispenses the sauce in spiral pattern. Perfectly sauced pizzas at the touch of a button!
Clean-up is simple with an automated Clean-In-Place routine. It practically cleans itself in less than 15 minutes. IMPORTANT: the top and bottom assemblies contain computer boards and other electrical connections that will fail if contacted with water. Do not spray the auto saucer with water! Use moist cleaning cloth to wipe down outside of dispenser.
5
Setting the standards for over 40 years. www.wunderbar.com
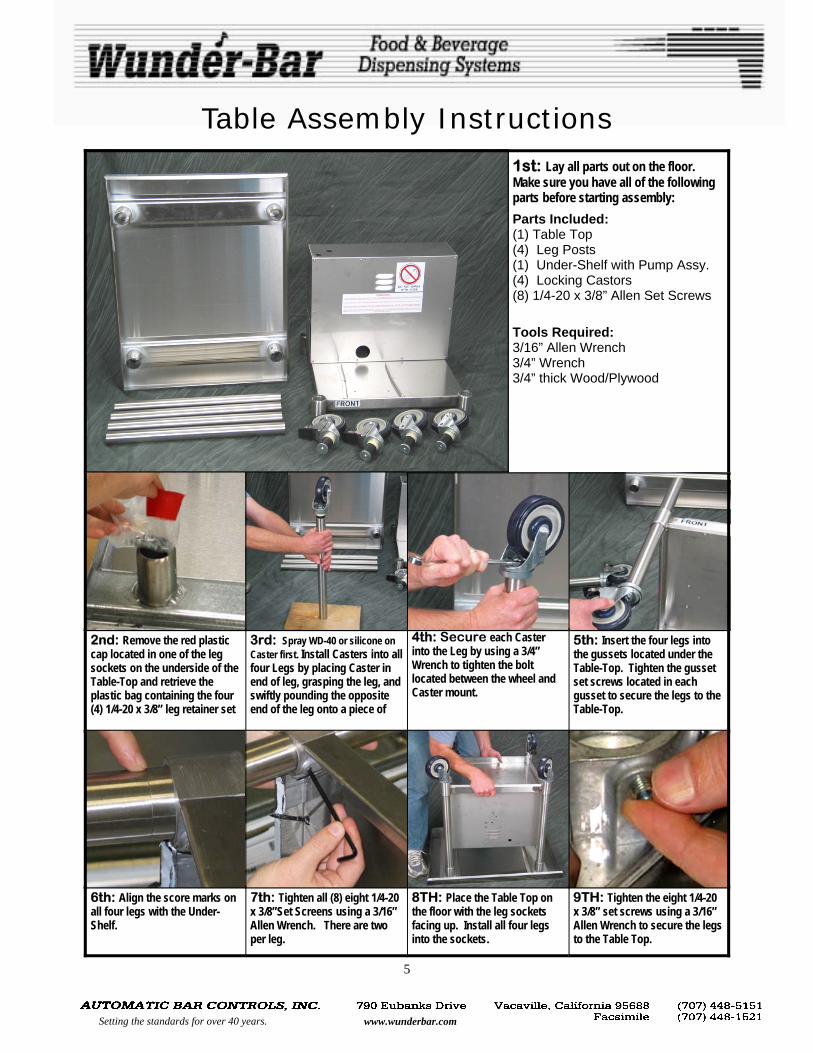
Table Assembly Instructions
1st: Lay all parts out on the floor. Make sure you have all of the following parts before starting assembly:
Parts Included: (1) Table Top (4) Leg Posts (1) Under-Shelf with Pump Assy. (4) Locking Castors (8) 1/4-20 x 3/8” Allen Set Screws
Tools Required: 3/16” Allen Wrench 3/4” Wrench 3/4” thick Wood/Plywood
2nd: Remove the red plastic cap located in one of the leg sockets on the underside of the Table-Top and retrieve the plastic bag containing the four (4) 1/4-20 x 3/8” leg retainer set
3rd: Spray WD-40 or silicone on Caster first. Install Casters into all four Legs by placing Caster in end of leg, grasping the leg, and swiftly pounding the opposite end of the leg onto a piece of
6th: Align the score marks on all four legs with the Under-Shelf.
7th: Tighten all (8) eight 1/4-20 x 3/8”Set Screens using a 3/16” Allen Wrench. There are two per leg.
8TH: Place the Table Top on the floor with the leg sockets facing up. Install all four legs into the sockets.
9TH: Tighten the eight 1/4-20 x 3/8” set screws using a 3/16” Allen Wrench to secure the legs to the Table Top.
4th: Secure each Caster into the Leg by using a 3/4” Wrench to tighten the bolt located between the wheel and Caster mount.
5th: Insert the four legs into the gussets located under the Table-Top. Tighten the gusset set screws located in each gusset to secure the legs to the Table-Top.
6
Setting the standards for over 40 years. www.wunderbar.com
INSTALLATION
OVERVIEW
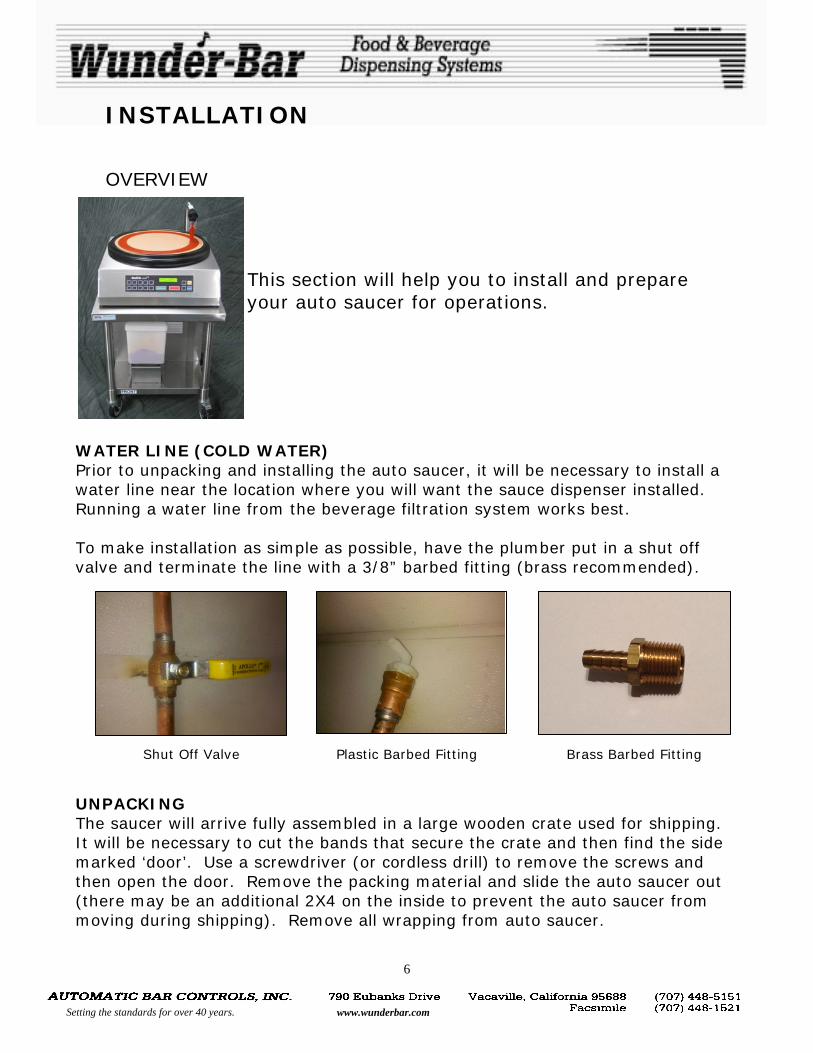
This section will help you to install and prepare your auto saucer for operations.
WATER LINE (COLD WATER) Prior to unpacking and installing the auto saucer, it will be necessary to install a water line near the location where you will want the sauce dispenser installed. Running a water line from the beverage filtration system works best. To make installation as simple as possible, have the plumber put in a shut off valve and terminate the line with a 3/8” barbed fitting (brass recommended).
Shut Off Valve Plastic Barbed Fitting Brass Barbed Fitting
UNPACKING The saucer will arrive fully assembled in a large wooden crate used for shipping. It will be necessary to cut the bands that secure the crate and then find the side marked ‘door’. Use a screwdriver (or cordless drill) to remove the screws and then open the door. Remove the packing material and slide the auto saucer out (there may be an additional 2X4 on the inside to prevent the auto saucer from moving during shipping). Remove all wrapping from auto saucer.
7
Setting the standards for over 40 years. www.wunderbar.com
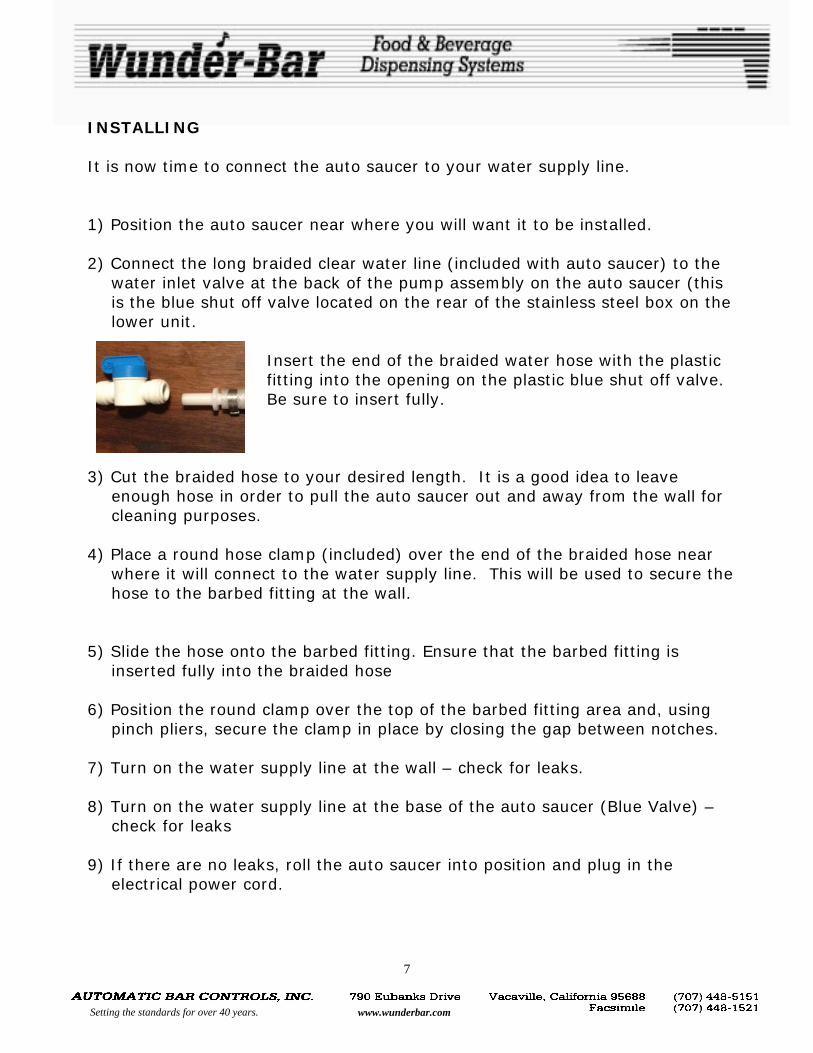
INSTALLING It is now time to connect the auto saucer to your water supply line.
1) Position the auto saucer near where you will want it to be installed.
2) Connect the long braided clear water line (included with auto saucer) to the
water inlet valve at the back of the pump assembly on the auto saucer (this is the blue shut off valve located on the rear of the stainless steel box on the lower unit.
Insert the end of the braided water hose with the plastic fitting into the opening on the plastic blue shut off valve. Be sure to insert fully.
3) Cut the braided hose to your desired length. It is a good idea to leave enough hose in order to pull the auto saucer out and away from the wall for cleaning purposes.
4) Place a round hose clamp (included) over the end of the braided hose near where it will connect to the water supply line. This will be used to secure the hose to the barbed fitting at the wall.
5) Slide the hose onto the barbed fitting. Ensure that the barbed fitting is inserted fully into the braided hose
6) Position the round clamp over the top of the barbed fitting area and, using pinch pliers, secure the clamp in place by closing the gap between notches.
7) Turn on the water supply line at the wall – check for leaks.
8) Turn on the water supply line at the base of the auto saucer (Blue Valve) – check for leaks
9) If there are no leaks, roll the auto saucer into position and plug in the
electrical power cord.
8
Setting the standards for over 40 years. www.wunderbar.com
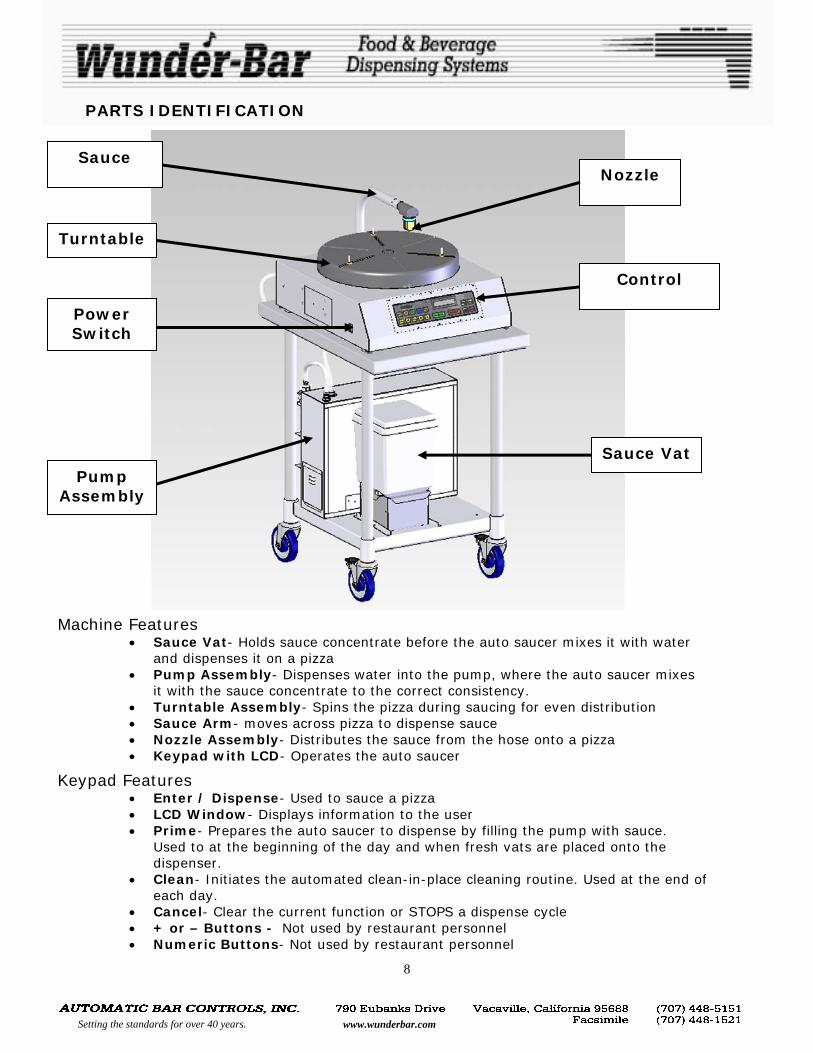
PARTS IDENTIFICATION
Nozzle
Pump Assembly
Power Switch
Control
Sauce Vat
Sauce
Turntable
Machine Features • Sauce Vat- Holds sauce concentrate before the auto saucer mixes it with water
and dispenses it on a pizza • Pump Assembly- Dispenses water into the pump, where the auto saucer mixes
it with the sauce concentrate to the correct consistency. • Turntable Assembly- Spins the pizza during saucing for even distribution • Sauce Arm- moves across pizza to dispense sauce • Nozzle Assembly- Distributes the sauce from the hose onto a pizza • Keypad with LCD- Operates the auto saucer
Keypad Features • Enter / Dispense- Used to sauce a pizza • LCD Window- Displays information to the user • Prime- Prepares the auto saucer to dispense by filling the pump with sauce.
Used to at the beginning of the day and when fresh vats are placed onto the dispenser.
• Clean- Initiates the automated clean-in-place cleaning routine. Used at the end of each day.
• Cancel- Clear the current function or STOPS a dispense cycle • + or – Buttons - Not used by restaurant personnel • Numeric Buttons- Not used by restaurant personnel
9
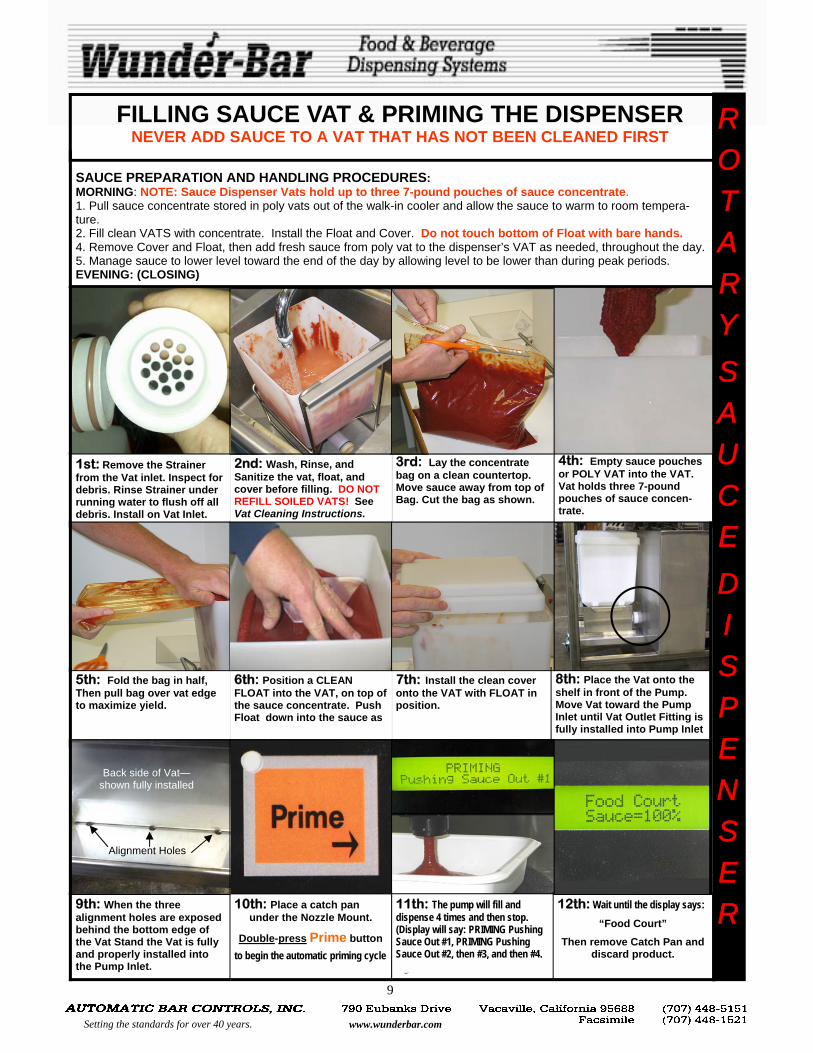
SAUCE PREPARATION AND HANDLING PROCEDURES: MORNING: NOTE: Sauce Dispenser Vats hold up to three 7-pound pouches of sauce concentrate. 1. Pull sauce concentrate stored in poly vats out of the walk-in cooler and allow the sauce to warm to room tempera-ture. 2. Fill clean VATS with concentrate. Install the Float and Cover. Do not touch bottom of Float with bare hands. 4. Remove Cover and Float, then add fresh sauce from poly vat to the dispenser’s VAT as needed, throughout the day. 5. Manage sauce to lower level toward the end of the day by allowing level to be lower than during peak periods. EVENING: (CLOSING)
4th: Empty sauce pouches or POLY VAT into the VAT. Vat holds three 7-pound pouches of sauce concen- trate.
2nd: Wash, Rinse, and Sanitize the vat, float, and cover before filling. DO NOT REFILL SOILED VATS! See Vat Cleaning Instructions.
3rd: Lay the concentrate bag on a clean countertop. Move sauce away from top of Bag. Cut the bag as shown.
1st: Remove the Strainer from the Vat inlet. Inspect for debris. Rinse Strainer under running water to flush off all debris. Install on Vat Inlet.
12th: Wait until the display says:
“Food Court”
Then remove Catch Pan and discard product.
11th: The pump will fill and dispense 4 times and then stop. (Display will say: PRIMING Pushing Sauce Out #1, PRIMING Pushing Sauce Out #2, then #3, and then #4.
FILLING SAUCE VAT & PRIMING THE DISPENSER NEVER ADD SAUCE TO A VAT THAT HAS NOT BEEN CLEANED FIRST
6th: Position a CLEAN FLOAT into the VAT, on top of the sauce concentrate. Push Float down into the sauce as
5th: Fold the bag in half, Then pull bag over vat edge to maximize yield.
7th: Install the clean cover onto the VAT with FLOAT in position.
ROTARY
S A U C E
D I S P E NS E R 10th: Place a catch pan
under the Nozzle Mount.
Double-press Prime button
to begin the automatic priming cycle
8th: Place the Vat onto the shelf in front of the Pump. Move Vat toward the Pump Inlet until Vat Outlet Fitting is fully installed into Pump Inlet
9th: When the three alignment holes are exposed behind the bottom edge of the Vat Stand the Vat is fully and properly installed into the Pump Inlet.
Alignment Holes
Back side of Vat—shown fully installed
Setting the standards for over 40 years. www.wunderbar.com
9
10
ROTARY
S A U C E
D I S P E NS E R
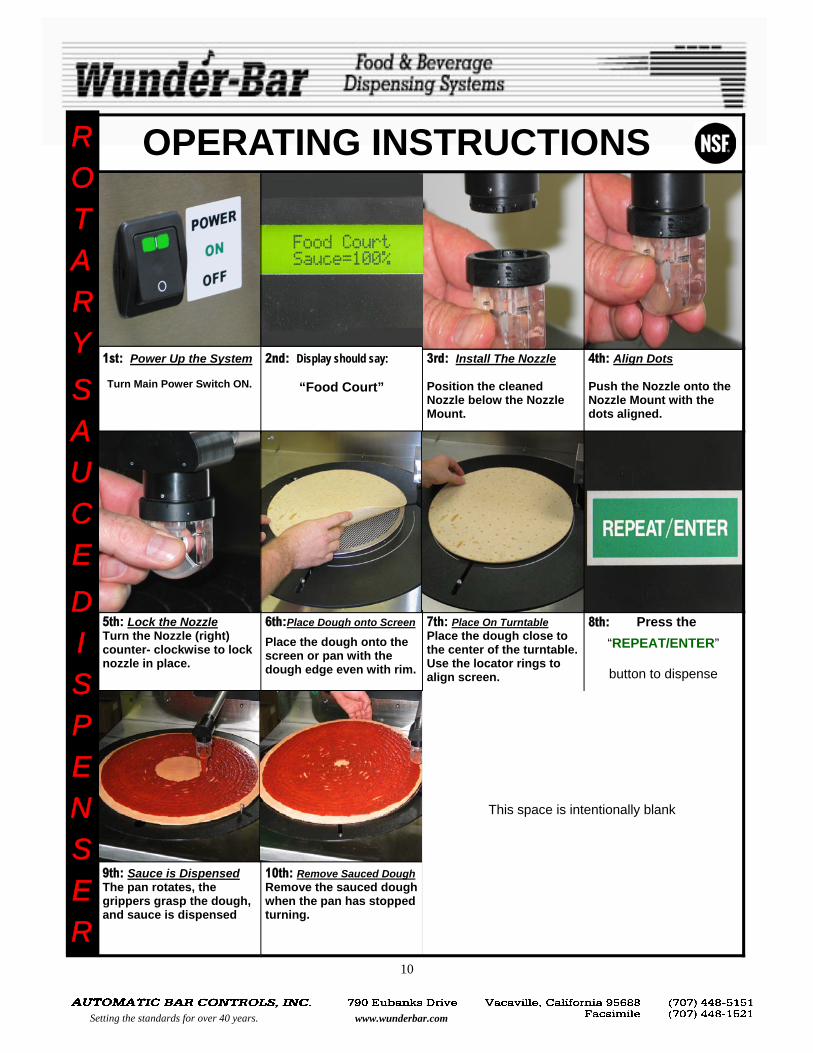
1st: Power Up the System Turn Main Power Switch ON.
2nd: Display should say:
“Food Court”
3rd: Install The Nozzle
Position the cleaned Nozzle below the Nozzle Mount.
4th: Align Dots Push the Nozzle onto the Nozzle Mount with the dots aligned.
5th: Lock the Nozzle Turn the Nozzle (right) counter- clockwise to lock nozzle in place.
6th:Place Dough onto Screen
Place the dough onto the screen or pan with the dough edge even with rim.
7th: Place On Turntable Place the dough close to the center of the turntable. Use the locator rings to align screen.
8th: Press the
“REPEAT/ENTER”
button to dispense
9th: Sauce is Dispensed The pan rotates, the grippers grasp the dough, and sauce is dispensed
OPERATING INSTRUCTIONS
10th: Remove Sauced Dough Remove the sauced dough when the pan has stopped turning.
This space is intentionally blank
Setting the standards for over 40 years. www.wunderbar.com
11
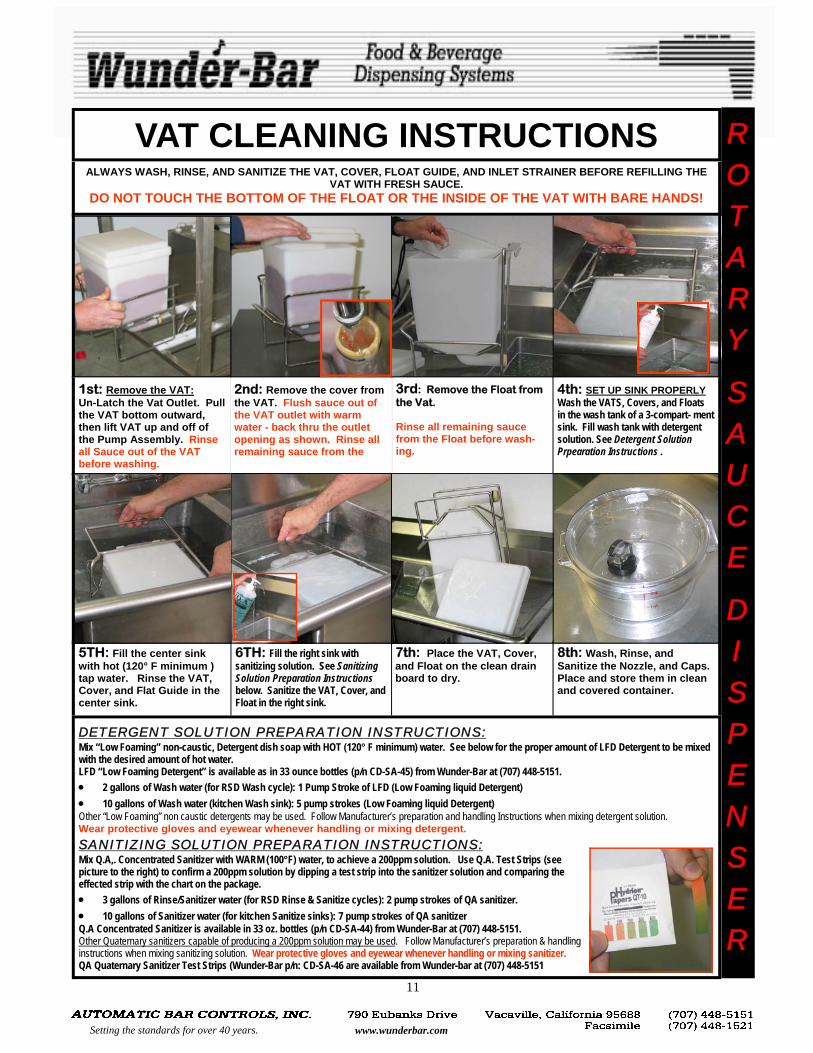
VAT CLEANING INSTRUCTIONS ROTARY
S A U C E
D I S P E N S E R
ALWAYS WASH, RINSE, AND SANITIZE THE VAT, COVER, FLOAT GUIDE, AND INLET STRAINER BEFORE REFILLING THE VAT WITH FRESH SAUCE.
DO NOT TOUCH THE BOTTOM OF THE FLOAT OR THE INSIDE OF THE VAT WITH BARE HANDS!
DETERGENT SOLUTION PREPARATION INSTRUCTIONS: Mix “Low Foaming” non-caustic, Detergent dish soap with HOT (120° F minimum) water. See below for the proper amount of LFD Detergent to be mixed with the desired amount of hot water. LFD “Low Foaming Detergent” is available as in 33 ounce bottles (p/n CD-SA-45) from Wunder-Bar at (707) 448-5151. • 2 gallons of Wash water (for RSD Wash cycle): 1 Pump Stroke of LFD (Low Foaming liquid Detergent) • 10 gallons of Wash water (kitchen Wash sink): 5 pump strokes (Low Foaming liquid Detergent) Other “Low Foaming” non caustic detergents may be used. Follow Manufacturer’s preparation and handling Instructions when mixing detergent solution. Wear protective gloves and eyewear whenever handling or mixing detergent. SANITIZING SOLUTION PREPARATION INSTRUCTIONS: Mix Q.A,. Concentrated Sanitizer with WARM (100°F) water, to achieve a 200ppm solution. Use Q.A. Test Strips (see picture to the right) to confirm a 200ppm solution by dipping a test strip into the sanitizer solution and comparing the effected strip with the chart on the package. • 3 gallons of Rinse/Sanitizer water (for RSD Rinse & Sanitize cycles): 2 pump strokes of QA sanitizer. • 10 gallons of Sanitizer water (for kitchen Sanitize sinks): 7 pump strokes of QA sanitizer Q.A Concentrated Sanitizer is available in 33 oz. bottles (p/n CD-SA-44) from Wunder-Bar at (707) 448-5151. Other Quaternary sanitizers capable of producing a 200ppm solution may be used. Follow Manufacturer’s preparation & handling instructions when mixing sanitizing solution. Wear protective gloves and eyewear whenever handling or mixing sanitizer. QA Quaternary Sanitizer Test Strips (Wunder-Bar p/n: CD-SA-46 are available from Wunder-bar at (707) 448-5151
1st: Remove the VAT: Un-Latch the Vat Outlet. Pull the VAT bottom outward, then lift VAT up and off of the Pump Assembly. Rinse all Sauce out of the VAT before washing.
2nd: Remove the cover from the VAT. Flush sauce out of the VAT outlet with warm water - back thru the outlet opening as shown. Rinse all remaining sauce from the
3rd: Remove the Float from the Vat. Rinse all remaining sauce from the Float before wash-ing.
4th: SET UP SINK PROPERLY Wash the VATS, Covers, and Floats in the wash tank of a 3-compart- ment sink. Fill wash tank with detergent solution. See Detergent Solution Prpearation Instructions .
5TH: Fill the center sink with hot (120° F minimum ) tap water. Rinse the VAT, Cover, and Flat Guide in the center sink.
6TH: Fill the right sink with sanitizing solution. See Sanitizing Solution Preparation Instructions below. Sanitize the VAT, Cover, and Float in the right sink.
7th: Place the VAT, Cover, and Float on the clean drain board to dry.
8th: Wash, Rinse, and Sanitize the Nozzle, and Caps. Place and store them in clean and covered container.
Setting the standards for over 40 years. www.wunderbar.com
11
12
ROTARY
S A U C E
D I S P E S E R
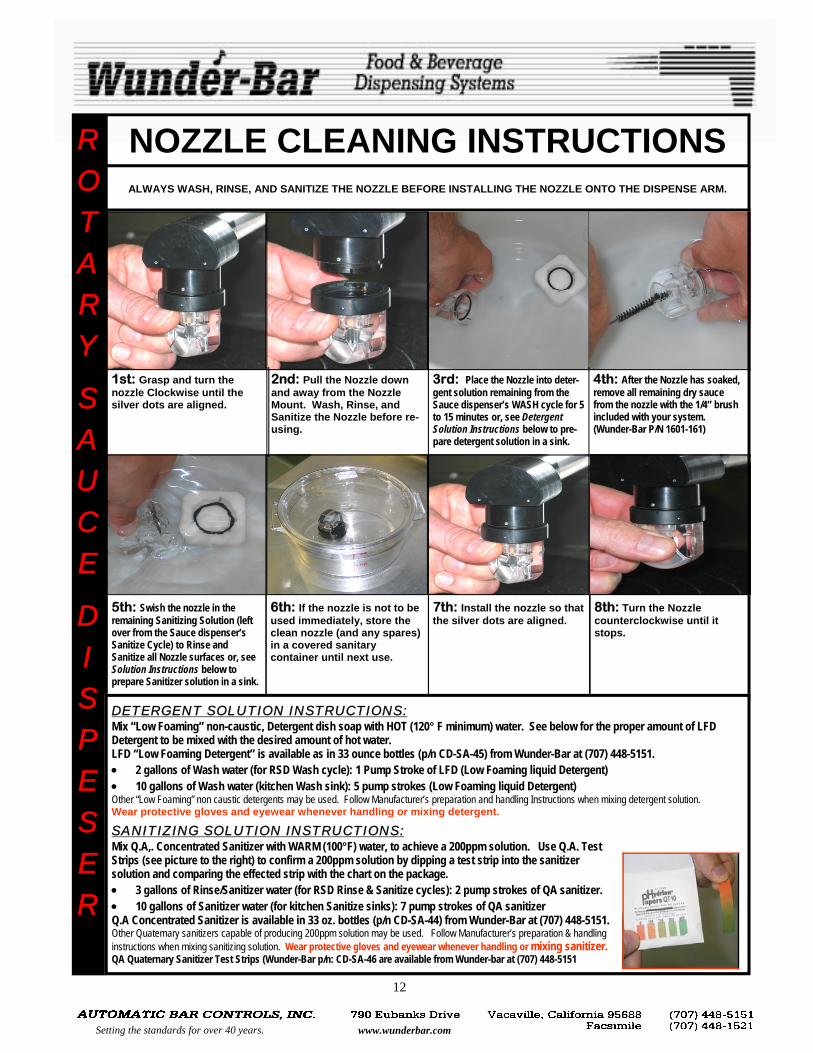
7th: Install the nozzle so that the silver dots are aligned.
5th: Swish the nozzle in the remaining Sanitizing Solution (left over from the Sauce dispenser’s Sanitize Cycle) to Rinse and Sanitize all Nozzle surfaces or, see Solution Instructions below to prepare Sanitizer solution in a sink.
6th: If the nozzle is not to be used immediately, store the clean nozzle (and any spares) in a covered sanitary container until next use.
8th: Turn the Nozzle counterclockwise until it stops.
DETERGENT SOLUTION INSTRUCTIONS: Mix “Low Foaming” non-caustic, Detergent dish soap with HOT (120° F minimum) water. See below for the proper amount of LFD Detergent to be mixed with the desired amount of hot water. LFD “Low Foaming Detergent” is available as in 33 ounce bottles (p/n CD-SA-45) from Wunder-Bar at (707) 448-5151. • 2 gallons of Wash water (for RSD Wash cycle): 1 Pump Stroke of LFD (Low Foaming liquid Detergent) • 10 gallons of Wash water (kitchen Wash sink): 5 pump strokes (Low Foaming liquid Detergent) Other “Low Foaming” non caustic detergents may be used. Follow Manufacturer’s preparation and handling Instructions when mixing detergent solution. Wear protective gloves and eyewear whenever handling or mixing detergent.
SANITIZING SOLUTION INSTRUCTIONS: Mix Q.A,. Concentrated Sanitizer with WARM (100°F) water, to achieve a 200ppm solution. Use Q.A. Test Strips (see picture to the right) to confirm a 200ppm solution by dipping a test strip into the sanitizer solution and comparing the effected strip with the chart on the package. • 3 gallons of Rinse/Sanitizer water (for RSD Rinse & Sanitize cycles): 2 pump strokes of QA sanitizer. • 10 gallons of Sanitizer water (for kitchen Sanitize sinks): 7 pump strokes of QA sanitizer Q.A Concentrated Sanitizer is available in 33 oz. bottles (p/n CD-SA-44) from Wunder-Bar at (707) 448-5151. Other Quaternary sanitizers capable of producing 200ppm solution may be used. Follow Manufacturer’s preparation & handling instructions when mixing sanitizing solution. Wear protective gloves and eyewear whenever handling or mixing sanitizer. QA Quaternary Sanitizer Test Strips (Wunder-Bar p/n: CD-SA-46 are available from Wunder-bar at (707) 448-5151
ALWAYS WASH, RINSE, AND SANITIZE THE NOZZLE BEFORE INSTALLING THE NOZZLE ONTO THE DISPENSE ARM.
1st: Grasp and turn the nozzle Clockwise until the silver dots are aligned.
2nd: Pull the Nozzle down and away from the Nozzle Mount. Wash, Rinse, and Sanitize the Nozzle before re-using.
NOZZLE CLEANING INSTRUCTIONS
4th: After the Nozzle has soaked, remove all remaining dry sauce from the nozzle with the 1/4” brush included with your system. (Wunder-Bar P/N 1601-161)
3rd: Place the Nozzle into deter-gent solution remaining from the Sauce dispenser’s WASH cycle for 5 to 15 minutes or, see Detergent Solution Instructions below to pre-pare detergent solution in a sink.
12
Setting the standards for over 40 years. www.wunderbar.com
13 13
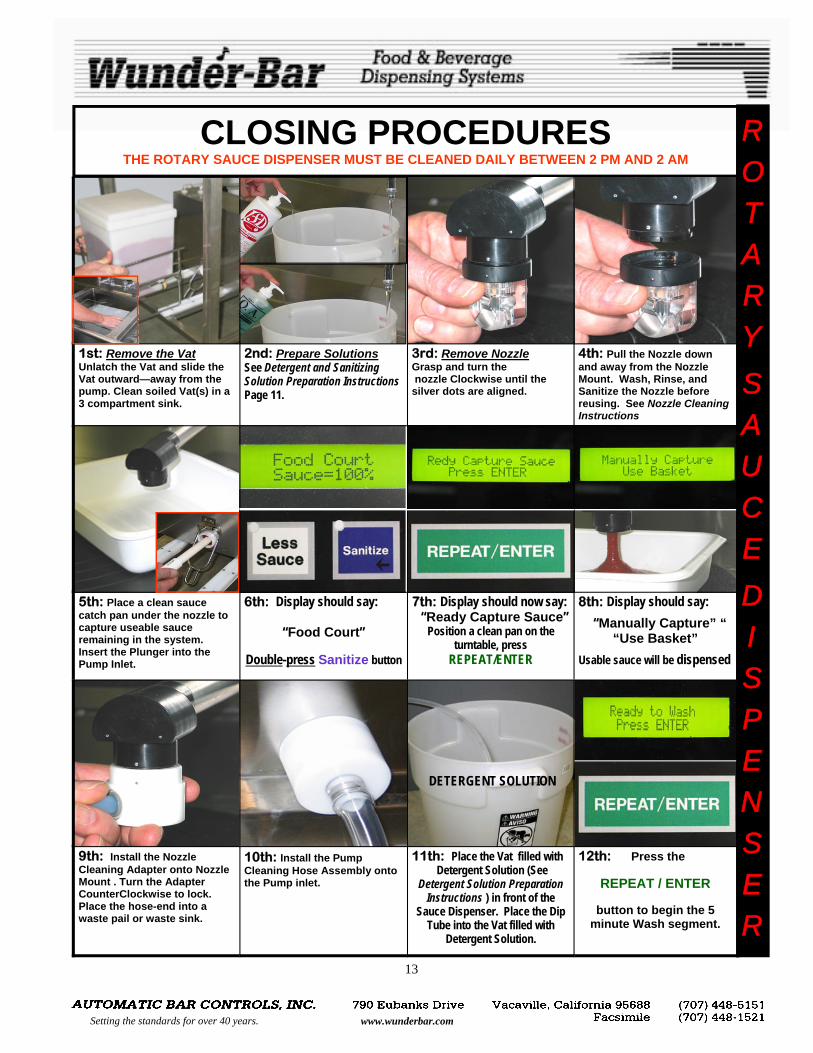
1st: Remove the Vat Unlatch the Vat and slide the Vat outward—away from the pump. Clean soiled Vat(s) in a 3 compartment sink.
CLOSING PROCEDURES THE ROTARY SAUCE DISPENSER MUST BE CLEANED DAILY BETWEEN 2 PM AND 2 AM
10th: Install the Pump Cleaning Hose Assembly onto the Pump inlet.
11th: Place the Vat filled with Detergent Solution (See
Detergent Solution Preparation Instructions ) in front of the
Sauce Dispenser. Place the Dip Tube into the Vat filled with
Detergent Solution.
2nd: Prepare Solutions See Detergent and Sanitizing Solution Preparation Instructions Page 11.
9th: Install the Nozzle Cleaning Adapter onto Nozzle Mount . Turn the Adapter CounterClockwise to lock. Place the hose-end into a waste pail or waste sink.
4th: Pull the Nozzle down and away from the Nozzle Mount. Wash, Rinse, and Sanitize the Nozzle before reusing. See Nozzle Cleaning Instructions
3rd: Remove Nozzle Grasp and turn the nozzle Clockwise until the silver dots are aligned.
5th: Place a clean sauce catch pan under the nozzle to capture useable sauce remaining in the system. Insert the Plunger into the Pump Inlet.
6th: Display should say:
“Food Court”
Double-press Sanitize button
7th: Display should now say: “Ready Capture Sauce”
Position a clean pan on the turntable, press
REPEAT/ENTER
8th: Display should say:
“Manually Capture” “ “Use Basket”
Usable sauce will be dispensed
DETERGENT SOLUTION
12th: Press the
REPEAT / ENTER
button to begin the 5 minute Wash segment.
ROTARY
S A U C E
D I S P E NS E R
Setting the standards for over 40 years. www.wunderbar.com
14
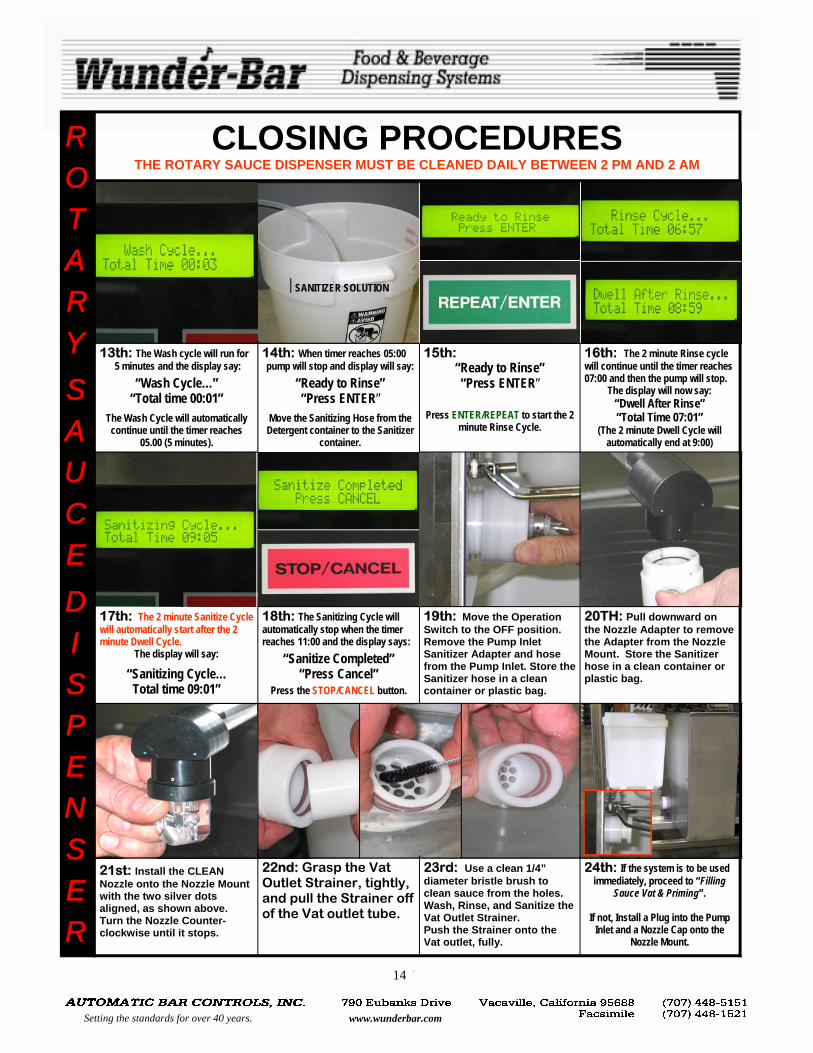
CLOSING PROCEDURES THE ROTARY SAUCE DISPENSER MUST BE CLEANED DAILY BETWEEN 2 PM AND 2 AM R
OTARY
S A U C E
D I S P E NS E R
13th: The Wash cycle will run for 5 minutes and the display say:
“Wash Cycle…” “Total time 00:01”
The Wash Cycle will automatically continue until the timer reaches
05.00 (5 minutes).
15th:
“Ready to Rinse” “Press ENTER”
Press ENTER/REPEAT to start the 2 minute Rinse Cycle.
17th: The 2 minute Sanitize Cycle will automatically start after the 2 minute Dwell Cycle.
The display will say:
“Sanitizing Cycle… Total time 09:01”
18th: The Sanitizing Cycle will automatically stop when the timer reaches 11:00 and the display says:
“Sanitize Completed” “Press Cancel”
Press the STOP/CANCEL button.
19th: Move the Operation Switch to the OFF position. Remove the Pump Inlet Sanitizer Adapter and hose from the Pump Inlet. Store the Sanitizer hose in a clean container or plastic bag.
20TH: Pull downward on the Nozzle Adapter to remove the Adapter from the Nozzle Mount. Store the Sanitizer hose in a clean container or plastic bag.
16th: The 2 minute Rinse cycle will continue until the timer reaches 07:00 and then the pump will stop.
The display will now say: “Dwell After Rinse” “Total Time 07:01”
(The 2 minute Dwell Cycle will automatically end at 9:00)
SANITIZER SOLUTION
14th: When timer reaches 05:00 pump will stop and display will say:
“Ready to Rinse” “Press ENTER”
Move the Sanitizing Hose from the Detergent container to the Sanitizer
container.
24th: If the system is to be used immediately, proceed to “Filling
Sauce Vat & Priming”.
If not, Install a Plug into the Pump Inlet and a Nozzle Cap onto the
Nozzle Mount.
21st: Install the CLEAN Nozzle onto the Nozzle Mount with the two silver dots aligned, as shown above. Turn the Nozzle Counter- clockwise until it stops.
22nd: Grasp the Vat Outlet Strainer, tightly, and pull the Strainer off of the Vat outlet tube.
23rd: Use a clean 1/4” diameter bristle brush to clean sauce from the holes. Wash, Rinse, and Sanitize the Vat Outlet Strainer. Push the Strainer onto the Vat outlet, fully.
Setting the standards for over 40 years. www.wunderbar.com
14
15
Setting the standards for over 40 years. www.wunderbar.com
TROUBLESHOOTING - please call the factory for additional assistance at 1-877-Wunder-Bar
FOR SERVICE- PLEASE CONTACT REPTEC AT 1-877-737-8320
Dispenser will not Prime/Sauce. Display may read ‘check vat connection’ 1) There is a slight air leak that is preventing the sauce from being pulled into the pump. 2) Turn off and then back on power to the auto saucer. This will send the pump to the ‘home’
position and Clear the error message 3) Remove the vat, inspect the o-rings and re-insert the vat into the pump inlet. Be sure that
the vat is inserted fully so that a good seal is obtained. 4) Inspect the pump inlet and remove any dried sauce or debris which may prevent the vat from
sealing 5) Try cleaning the auto saucer with very warm water/sanitizer to clear any obstructions 6) Try switching to a different vat which may provide a better seal Dispenser will not Prime/Sauce. Display may read ‘sold out’ 1) The vat is empty and the plastic vat float is at the bottom- creating a seal which triggers the
pressure switch that the vat is empty (normal operation) 2) The plastic float is actually at the bottom of the vat under the sauce concentrate- preventing
the sauce from entering the pump… yes- it has happened a few times J 3) The screen at the end of the vat connection is blocked (typically with dried sauce and usually
only happens if the vats are not cleaned regularly) 4) The inlet chamber leading into the pump is blocked with dried sauce (again, this only happens
if the unit is not cleaned regularly) 5) The inlet has sucked in a foreign object (plastic corner of sauce bag?) and is blocking the
pump. (this only happens if the strainer is missing from the vat) 6) The water is turned off to the sauce dispenser which means the concentrate is too thick
causing the pressure switch to activate 7) Try cleaning the auto saucer with very warm water/sanitizer to clear any obstructions. 8)`Try switching to a different vat.
Turntable Operations There are three parts that perform together to ensure smooth turntable operations
1) The black plastic turntable 2) The grippers that hold the pizza pan 3) The wheels that allow the turntable to rotate
If the pizza pans are not being held securely in place, check to ensure the grippers are not
bent outwards. If they are, simply use pliers to gently bend them so they are straight or slightly inward.
If the turntable is not rotating properly, the wheels may not be spinning correctly. Remove the turntable - check to see that each wheel is clean and spins properly.
If the wheels are very dirty, remove and thoroughly clean them. If you continue to have problems after cleaning the wheels, there may be a problem with the turntable motor.
A quick test - Remove the turntable and press the dispense button on the auto saucer (remember to place a container under the nozzle!). Watch the turntable motor to see how it turns. If it turns properly, then the plastic turntable is causing too much drag on the motor. Double check that the wheels are spinning freely. If the turntable motor does not spin correctly without the turntable present, then a replacement motor will be needed. Please contact the factory to order a new turntable motor
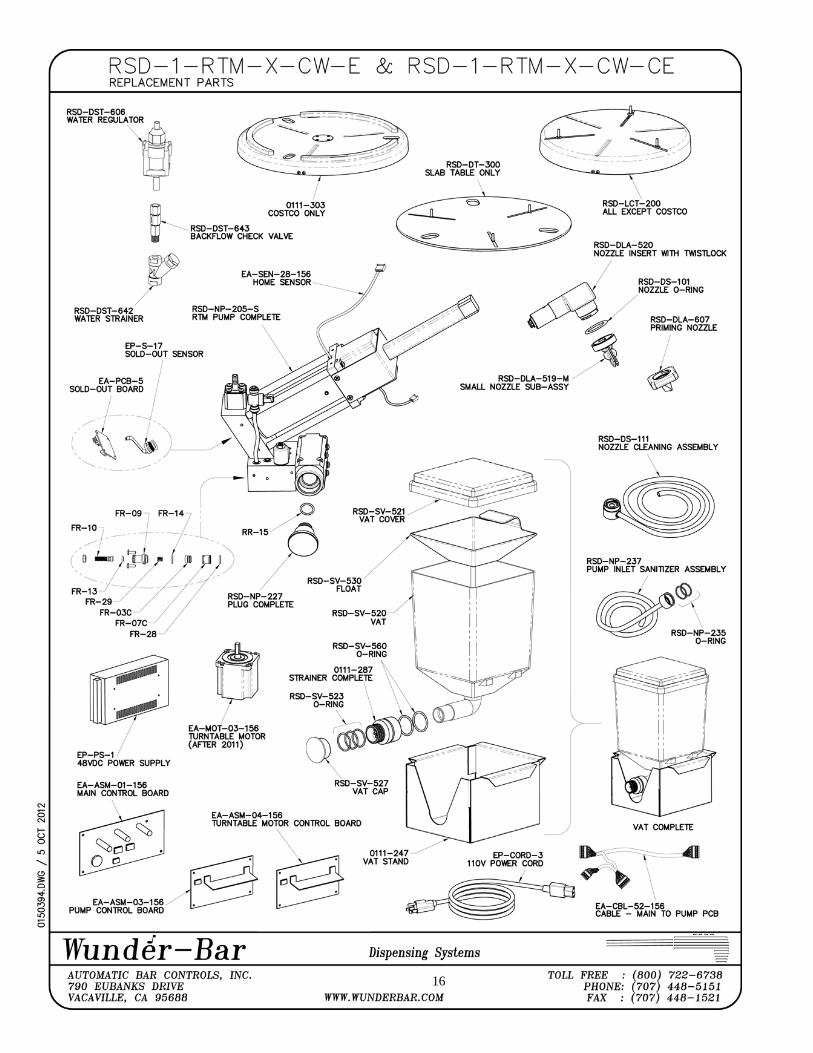
16 16
17
17

18
This page is intentionally blank