Embed Size (px)
Citation preview
.
WSD-F30User’s Guide
Thank you for purchasing this watch.Before trying to use this watch, be sure to read the Safety Precautions inthe Quick Start Guide that comes with it. Make sure you use the watchcorrectly.
EN
© 2019 CASIO COMPUTER CO., LTD.
ContentsIntroduction ....................................................................................... EN-2
Watch Features ............................................................................ EN-2Measurement Functions ............................................................... EN-4Overview ...................................................................................... EN-6About This Manual ....................................................................... EN-7
Getting Ready ................................................................................... EN-8Basic Operations You Should Remember ................................... EN-14Using Outdoor Watch Functions - Using CASIO Watch Faces and Apps........................................................................................................... EN-19
Using CASIO Watch Faces ........................................................ EN-20Using the Location Memory App ................................................ EN-23Using Point Navigation ............................................................... EN-30Using the TOOL App .................................................................. EN-33Using the Activity App ................................................................ EN-48Using the MOMENT SETTER App ............................................. EN-54Using the Extend Mode App ....................................................... EN-58Using the Multi Timepiece App ................................................... EN-63Common Outdoor Function Settings .......................................... EN-67
Troubleshooting ............................................................................. EN-82Important! ........................................................................................ EN-84
Precautions During Use .............................................................. EN-84User Maintenance ...................................................................... EN-94Chargeable Battery Handling (Please recycle!) .......................... EN-95Personal Information Protection Precautions .............................. EN-95
Main Specifications ........................................................................ EN-96Supplementary Information ......................................................... EN-102
EN-1
IntroductionAttention iPhone Owners!● When using this watch while it is paired with an iPhone, be sure to have the
Wear OS by GoogleTM app running on the iPhone. If the Wear OS by Googleapp is not running, functions that require communication with the iPhonewill not operate.
● Some watch functions are restricted when it is paired with an iPhone. Fordetails, visit the website below.https://support.casio.com/wsd/en/
Watch FeaturesDual-layer Display for Improved ReadabilityYour watch comes with a dual-layer color and monochrome display. The colordisplay employs high contrast ratio organic electroluminescence (EL). Themonochrome display is designed to show a greater amount of information(compared with previous CASIO products).Extend ModeExtend Mode activates an original power management system for the dual-layer display, which allows access to maps and GPS, even during overnightactivities. For details, visit the website below.https://support.casio.com/wsd/en/Powered with Wear OS by GoogleGoogle, Android, Wear OS by Google, Google Play and other related marksand logos are trademarks of Google LLC.Wear OS by Google works with phones running AndroidTM 4.4+ (excludingGo edition) or iOS 10+*1. Supported features may vary between platformsand countries.*1 Recommended. However, a WSD-F30 watch that is already paired with
a smartphone running iOS 9.3+ can also be used.
EN-2
Five-atmosphere Water Resistance + MIL-STD*2
Even though this watch has a built-in voice recognition microphone, it still iswater resistant up to five atmospheres. This means you can wear your watchwhile swimming, fishing, etc. MIL-STD-810G standard environmentresistance allows you to wear your watch while engaged in a variety ofvigorous outdoor activities, including: mountain climbing, cycle sports,fishing, and more.*2 United States Department of Defense Military StandardBuilt-in GPSThis watch has GPS*3 built in, and you can acquire location informationwithout connecting with a phone. The watch itself can display a map*4 of yourcurrent location, measure and record data for a variety of activities, and more.*3 In addition to GPS (U.S.), your watch also supports GLONASS (Russia)
and QZSS (Japan) positioning. This manual uses “GPS” to refer to all ofthe above positioning systems.
*4 To display the map when you do not have a smartphone, you need to havethe map data downloaded beforehand.
Three Side Buttons Designed for Sure OperationThe three side buttons are designed for sure operation even when outdoors.Apps can be freely assigned to the MAP button and the TOOL button.
EN-3
Measurement FunctionsYour watch can take barometric pressure, altitude, bearing, and otherreadings. Its built-in watch faces and applications can use readings for displayand other useful functions. Note that this watch is not a special purposemeasuring instrument. Readings produced by measurement functions areintended as general reference information only.Compass (Bearing Measurement)For serious mountain climbing and other activities that require accuratebearing readings, take along a highly reliable compass to use in combinationwith the watch’s compass.
Important!● Note that accurate compass readings and/or correction will not be possible
in the areas described below.ー In the vicinity of a permanent magnet (magnetic accessory, etc.), metal
objects, high-voltage wires, aerial wires, or electrical householdappliances (TV, computer, cellphone, etc.)
ー On trains, on boats, on aircraft, etc.ー Indoors, especially inside of reinforced concrete structures.
EN-4
Altimeter, BarometerThe watch’s Altimeter uses a pressure sensor to measure barometricpressure, and then calculates and displays relative altitude based on themeasured value. Because of this, readings taken at different times at thesame location may produce different altitude values due to changes intemperature, humidity, barometric pressure, and other factors. Also note thatvalues displayed by the watch may be different from elevations indicated forareas where you are located. When using the watch’s altimeter whilemountain climbing, it is recommended that you perform regular correction inaccordance with the local altitude (elevation) indications.Tide Graph (Graphic Display of Tide Information)The Tide Graph feature of your watch is intended to provide a rough imageof current tide conditions. Do not use its tide information for navigationpurposes. For navigation purposes, be sure to use official tide charts issuedby a reliable agency or authority for the area you are navigating.
EN-5
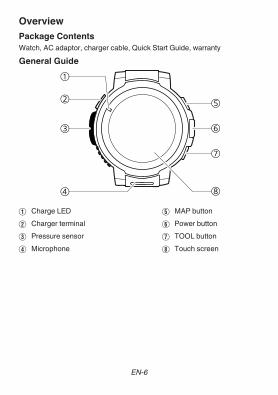
OverviewPackage ContentsWatch, AC adaptor, charger cable, Quick Start Guide, warrantyGeneral Guide
①
②
③
④
⑤
⑥
⑦
⑧
A Charge LEDB Charger terminalC Pressure sensorD Microphone
E MAP buttonF Power buttonG TOOL buttonH Touch screen
EN-6
About This Manual● The contents of this manual are subject to change without notice.● Copying of this manual, either in part or its entirety, is forbidden. You are
allowed to use this manual for your own personal use. Any other use isforbidden without the permission of CASIO COMPUTER CO., LTD.
● CASIO COMPUTER CO., LTD. shall not be held liable for any lost profitsor claims from third parties arising out of the use of this product or thismanual.
● CASIO COMPUTER CO., LTD. shall not be held liable for any loss or lostprofits due to loss of data caused by malfunction or maintenance of thisproduct, or any other reason.
● The watch and sample screens depicted in the illustrations in this manualmay be different from the actual appearance of the watch.
EN-7
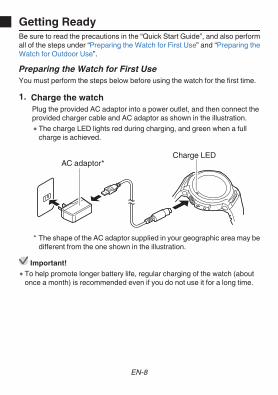
Getting ReadyBe sure to read the precautions in the “Quick Start Guide”, and also performall of the steps under “Preparing the Watch for First Use” and “Preparing theWatch for Outdoor Use”.Preparing the Watch for First UseYou must perform the steps below before using the watch for the first time.
1. Charge the watchPlug the provided AC adaptor into a power outlet, and then connect theprovided charger cable and AC adaptor as shown in the illustration.● The charge LED lights red during charging, and green when a full
charge is achieved.
AC adaptor*Charge LED
* The shape of the AC adaptor supplied in your geographic area may bedifferent from the one shown in the illustration.
Important!● To help promote longer battery life, regular charging of the watch (about
once a month) is recommended even if you do not use it for a long time.
EN-8
2. Install the Wear OS by Google App on a SmartphoneAndroid smartphone: Download the Wear OS by Google app on GooglePlayTM.iPhone: Download the Wear OS by Google app from the App Store.
3. Pair the Watch with Your Smartphone● If the watch is turned off, hold down the power button for about two
seconds to turn it on.● When pairing, it is recommended that you have the smartphone and
watch within one meter of each other. Refer to the websites below forinformation about how to pair the watch with a smartphone.
Wear OS by Google Helphttps://support.google.com/wearos/CASIO Smart Outdoor Watch Support Sitehttps://support.casio.com/wsd/en/startup/
4. Update Your CASIO Apps● In order to use all of the functionality provided by this watch, be sure to
update all of your related CASIO apps to their latest versions beforeusing your watch. For information about the update procedure, visit thewebsite below.https://support.casio.com/wsd/en/basic/preparation.html
5. Install the CASIO MOMENT SETTER+ App on theSmartphone (Android Only)If you are using an Android smartphone, download the “CASIO MOMENTSETTER+” app on Google Play and install it. Installing the app enablesuse of the functions below.● Notifications you specify with MOMENT SETTER as you approach or
move away from a registered point● Display of the smartphone’s battery level
EN-9
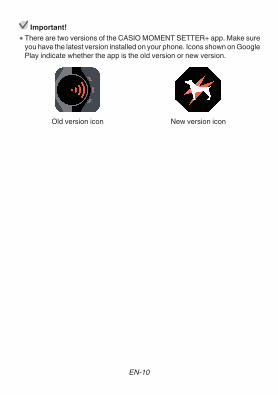
Important!● There are two versions of the CASIO MOMENT SETTER+ app. Make sure
you have the latest version installed on your phone. Icons shown on GooglePlay indicate whether the app is the old version or new version.
Old version icon New version icon
EN-10
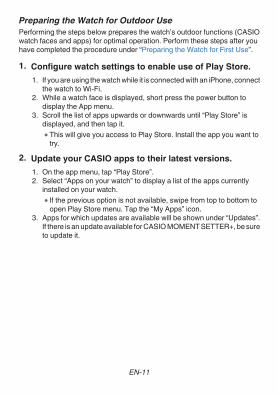
Preparing the Watch for Outdoor UsePerforming the steps below prepares the watch’s outdoor functions (CASIOwatch faces and apps) for optimal operation. Perform these steps after youhave completed the procedure under “Preparing the Watch for First Use”.
1. Configure watch settings to enable use of Play Store.1. If you are using the watch while it is connected with an iPhone, connect
the watch to Wi-Fi.2. While a watch face is displayed, short press the power button to
display the App menu.3. Scroll the list of apps upwards or downwards until “Play Store” is
displayed, and then tap it.● This will give you access to Play Store. Install the app you want to
try.2. Update your CASIO apps to their latest versions.
1. On the app menu, tap “Play Store”.2. Select “Apps on your watch” to display a list of the apps currently
installed on your watch.● If the previous option is not available, swipe from top to bottom to
open Play Store menu. Tap the “My Apps” icon.3. Apps for which updates are available will be shown under “Updates”.
If there is an update available for CASIO MOMENT SETTER+, be sureto update it.
EN-11
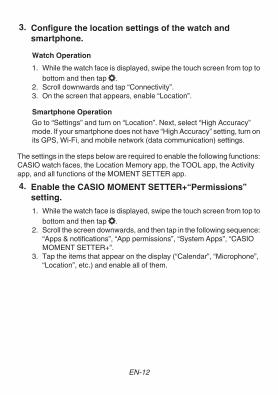
3. Configure the location settings of the watch andsmartphone.Watch Operation1. While the watch face is displayed, swipe the touch screen from top to
bottom and then tap D.2. Scroll downwards and tap “Connectivity”.3. On the screen that appears, enable “Location”.Smartphone OperationGo to “Settings” and turn on “Location”. Next, select “High Accuracy”mode. If your smartphone does not have “High Accuracy” setting, turn onits GPS, Wi-Fi, and mobile network (data communication) settings.
The settings in the steps below are required to enable the following functions:CASIO watch faces, the Location Memory app, the TOOL app, the Activityapp, and all functions of the MOMENT SETTER app.4. Enable the CASIO MOMENT SETTER+“Permissions”
setting.1. While the watch face is displayed, swipe the touch screen from top to
bottom and then tap D.2. Scroll the screen downwards, and then tap in the following sequence:
“Apps & notifications”, “App permissions”, “System Apps”, “CASIOMOMENT SETTER+”.
3. Tap the items that appear on the display (“Calendar”, “Microphone”,“Location”, etc.) and enable all of them.
EN-12
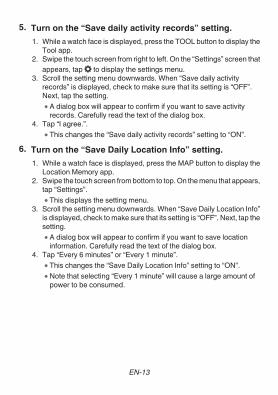
5. Turn on the “Save daily activity records” setting.1. While a watch face is displayed, press the TOOL button to display the
Tool app.2. Swipe the touch screen from right to left. On the “Settings” screen that
appears, tap D to display the settings menu.3. Scroll the setting menu downwards. When “Save daily activity
records” is displayed, check to make sure that its setting is “OFF”.Next, tap the setting.
● A dialog box will appear to confirm if you want to save activityrecords. Carefully read the text of the dialog box.
4. Tap “I agree.”.● This changes the “Save daily activity records” setting to “ON”.
6. Turn on the “Save Daily Location Info” setting.1. While a watch face is displayed, press the MAP button to display the
Location Memory app.2. Swipe the touch screen from bottom to top. On the menu that appears,
tap “Settings”.● This displays the setting menu.
3. Scroll the setting menu downwards. When “Save Daily Location Info”is displayed, check to make sure that its setting is “OFF”. Next, tap thesetting.
● A dialog box will appear to confirm if you want to save locationinformation. Carefully read the text of the dialog box.
4. Tap “Every 6 minutes” or “Every 1 minute”.● This changes the “Save Daily Location Info” setting to “ON”.● Note that selecting “Every 1 minute” will cause a large amount of
power to be consumed.
EN-13
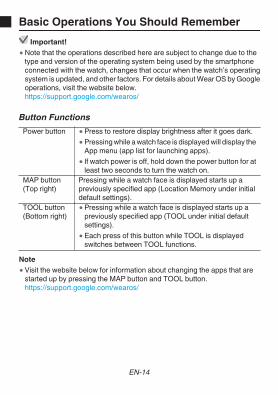
Basic Operations You Should RememberImportant!
● Note that the operations described here are subject to change due to thetype and version of the operating system being used by the smartphoneconnected with the watch, changes that occur when the watch’s operatingsystem is updated, and other factors. For details about Wear OS by Googleoperations, visit the website below.https://support.google.com/wearos/
Button FunctionsPower button ● Press to restore display brightness after it goes dark.
● Pressing while a watch face is displayed will display theApp menu (app list for launching apps).
● If watch power is off, hold down the power button for atleast two seconds to turn the watch on.
MAP button(Top right)
Pressing while a watch face is displayed starts up apreviously specified app (Location Memory under initialdefault settings).
TOOL button(Bottom right)
● Pressing while a watch face is displayed starts up apreviously specified app (TOOL under initial defaultsettings).
● Each press of this button while TOOL is displayedswitches between TOOL functions.
Note● Visit the website below for information about changing the apps that are
started up by pressing the MAP button and TOOL button.https://support.google.com/wearos/
EN-14
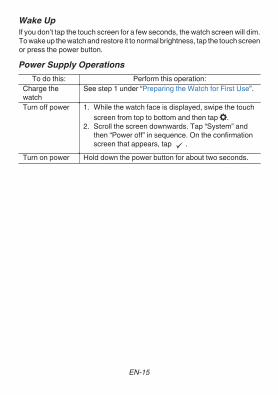
Wake UpIf you don’t tap the touch screen for a few seconds, the watch screen will dim.To wake up the watch and restore it to normal brightness, tap the touch screenor press the power button.Power Supply Operations
To do this: Perform this operation:Charge thewatch
See step 1 under “Preparing the Watch for First Use”.
Turn off power 1. While the watch face is displayed, swipe the touchscreen from top to bottom and then tap D.
2. Scroll the screen downwards. Tap “System” andthen “Power off” in sequence. On the confirmationscreen that appears, tap .
Turn on power Hold down the power button for about two seconds.
EN-15
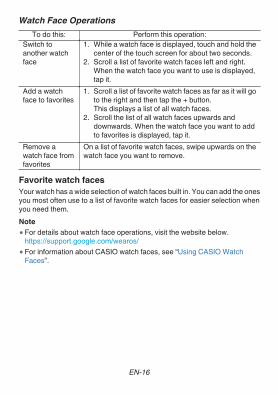
Watch Face OperationsTo do this: Perform this operation:
Switch toanother watchface
1. While a watch face is displayed, touch and hold thecenter of the touch screen for about two seconds.
2. Scroll a list of favorite watch faces left and right.When the watch face you want to use is displayed,tap it.
Add a watchface to favorites
1. Scroll a list of favorite watch faces as far as it will goto the right and then tap the + button.This displays a list of all watch faces.
2. Scroll the list of all watch faces upwards anddownwards. When the watch face you want to addto favorites is displayed, tap it.
Remove awatch face fromfavorites
On a list of favorite watch faces, swipe upwards on thewatch face you want to remove.
Favorite watch facesYour watch has a wide selection of watch faces built in. You can add the onesyou most often use to a list of favorite watch faces for easier selection whenyou need them.Note● For details about watch face operations, visit the website below.
https://support.google.com/wearos/● For information about CASIO watch faces, see “Using CASIO Watch
Faces”.
EN-16
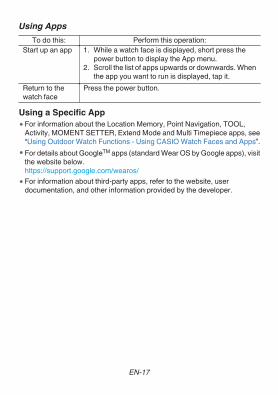
Using AppsTo do this: Perform this operation:
Start up an app 1. While a watch face is displayed, short press thepower button to display the App menu.
2. Scroll the list of apps upwards or downwards. Whenthe app you want to run is displayed, tap it.
Return to thewatch face
Press the power button.
Using a Specific App● For information about the Location Memory, Point Navigation, TOOL,
Activity, MOMENT SETTER, Extend Mode and Multi Timepiece apps, see“Using Outdoor Watch Functions - Using CASIO Watch Faces and Apps”.
● For details about GoogleTM apps (standard Wear OS by Google apps), visitthe website below.https://support.google.com/wearos/
● For information about third-party apps, refer to the website, userdocumentation, and other information provided by the developer.
EN-17
Wear OS by Google FunctionsThe Wear OS by Google operating system of this watch provides thefunctions below as standard.● Dictation and voice command operation● Messaging and incoming phone call notification● Google FitTM, Timer, Agenda, Translate and other standard Wear OS by
Google apps● Watch faces and apps can be added using the Play Store app● Wear OS by Google SettingsFor details, visit the website below.https://support.google.com/wearos/Smartphone Dependent FunctionsThough you can use a wide range of functions without connecting to asmartphone, some apps and services (dictation, smartphone related apps,etc.) are not available unless there is a connection between the watch and asmartphone. For details, visit the websites below.https://support.google.com/wearos/You can also visit the website below, enter “What can I do with the watchwithout connection with a phone?”, and then tap the [Search] button.https://support.casio.com/en/support/faq.php?cid=019
EN-18
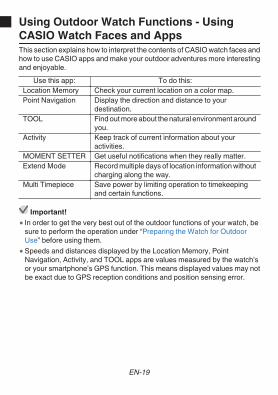
Using Outdoor Watch Functions - UsingCASIO Watch Faces and AppsThis section explains how to interpret the contents of CASIO watch faces andhow to use CASIO apps and make your outdoor adventures more interestingand enjoyable.
Use this app: To do this:Location Memory Check your current location on a color map.Point Navigation Display the direction and distance to your
destination.TOOL Find out more about the natural environment around
you.Activity Keep track of current information about your
activities.MOMENT SETTER Get useful notifications when they really matter.Extend Mode Record multiple days of location information without
charging along the way.Multi Timepiece Save power by limiting operation to timekeeping
and certain functions.
Important!● In order to get the very best out of the outdoor functions of your watch, be
sure to perform the operation under “Preparing the Watch for OutdoorUse” before using them.
● Speeds and distances displayed by the Location Memory, PointNavigation, Activity, and TOOL apps are values measured by the watch’sor your smartphone’s GPS function. This means displayed values may notbe exact due to GPS reception conditions and position sensing error.
EN-19
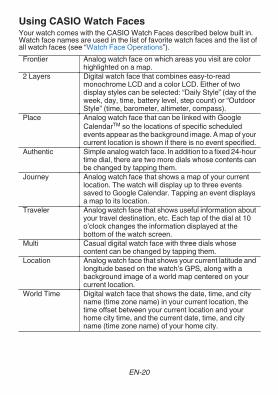
Using CASIO Watch FacesYour watch comes with the CASIO Watch Faces described below built in.Watch face names are used in the list of favorite watch faces and the list ofall watch faces (see “Watch Face Operations”).
Frontier Analog watch face on which areas you visit are colorhighlighted on a map.
2 Layers Digital watch face that combines easy-to-readmonochrome LCD and a color LCD. Either of twodisplay styles can be selected: “Daily Style” (day of theweek, day, time, battery level, step count) or “OutdoorStyle” (time, barometer, altimeter, compass).
Place Analog watch face that can be linked with GoogleCalendarTM so the locations of specific scheduledevents appear as the background image. A map of yourcurrent location is shown if there is no event specified.
Authentic Simple analog watch face. In addition to a fixed 24-hourtime dial, there are two more dials whose contents canbe changed by tapping them.
Journey Analog watch face that shows a map of your currentlocation. The watch will display up to three eventssaved to Google Calendar. Tapping an event displaysa map to its location.
Traveler Analog watch face that shows useful information aboutyour travel destination, etc. Each tap of the dial at 10o’clock changes the information displayed at thebottom of the watch screen.
Multi Casual digital watch face with three dials whosecontent can be changed by tapping them.
Location Analog watch face that shows your current latitude andlongitude based on the watch’s GPS, along with abackground image of a world map centered on yourcurrent location.
World Time Digital watch face that shows the date, time, and cityname (time zone name) in your current location, thetime offset between your current location and yourhome city time, and the current date, time, and cityname (time zone name) of your home city.
EN-20
Important!● While the “Always-on screen*” setting is off (default setting), the watch will
automatically switch to the monochrome LCD when display illuminationdims after the prescribed period of non-use, regardless of the currentlyselected watch face. To switch back to the original watch face, tap the touchscreen.
● When remaining battery power is 0%, the watch will automatically switch tothe monochrome LCD when display illumination dims after the prescribedperiod of non-use, regardless of the currently selected watch face, and evenif the “Always-on screen” setting is on.
* “Always-on screen” is a Wear OS by Google setting item. For details, visitthe website below.https://support.google.com/wearos/
If the message “Perform magnetization correction.”appears...The “Perform magnetization correction.” notification may appear while youare using a watch face that includes a compass.To calibrate the compass, tap the notification and then tap D. Move the watcharound as shown in the animation that appears on the watch display.
EN-21
If you feel that altitude, barometric pressure, or otherreadings are not correct...Perform the operation required to calibrate the readings you feel are incorrect.See “Common Outdoor Function Settings” and perform one or more of theoperations below.
To calibrate this: See the information here:Barometer “Barometric Pressure Calibration”Altimeter “Altitude Calibration”, “Correct Altitude Using
Location”Compass “Compass Calibration”, “Compass Magnetic
Declination Calibration”Changing CASIO Watch Face SettingsSee “Common Outdoor Function Settings”.
EN-22
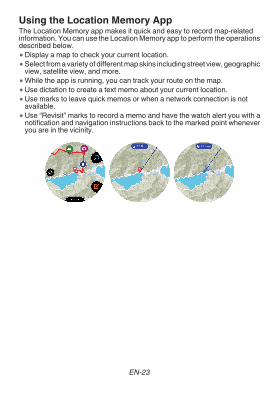
Using the Location Memory AppThe Location Memory app makes it quick and easy to record map-relatedinformation. You can use the Location Memory app to perform the operationsdescribed below.● Display a map to check your current location.● Select from a variety of different map skins including street view, geographic
view, satellite view, and more.● While the app is running, you can track your route on the map.● Use dictation to create a text memo about your current location.● Use marks to leave quick memos or when a network connection is not
available.● Use “Revisit” marks to record a memo and have the watch alert you with a
notification and navigation instructions back to the marked point wheneveryou are in the vicinity.
EN-23
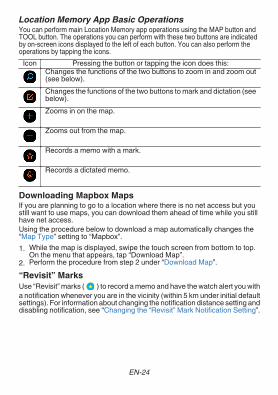
Location Memory App Basic OperationsYou can perform main Location Memory app operations using the MAP button andTOOL button. The operations you can perform with these two buttons are indicatedby on-screen icons displayed to the left of each button. You can also perform theoperations by tapping the icons.
Icon Pressing the button or tapping the icon does this:Changes the functions of the two buttons to zoom in and zoom out(see below).Changes the functions of the two buttons to mark and dictation (seebelow).Zooms in on the map.
Zooms out from the map.
Records a memo with a mark.
Records a dictated memo.
Downloading Mapbox MapsIf you are planning to go to a location where there is no net access but youstill want to use maps, you can download them ahead of time while you stillhave net access.Using the procedure below to download a map automatically changes the“Map Type” setting to “Mapbox”.1. While the map is displayed, swipe the touch screen from bottom to top.
On the menu that appears, tap “Download Map”.2. Perform the procedure from step 2 under “Download Map”.“Revisit” MarksUse “Revisit” marks ( ) to record a memo and have the watch alert you witha notification whenever you are in the vicinity (within 5 km under initial defaultsettings). For information about changing the notification distance setting anddisabling notification, see “Changing the “Revisit” Mark Notification Setting”.
EN-24
Important!● In order to be able to receive notifications triggered by “Revisit” marks, your
Android phone must have the CASIO MOMENT SETTER+ app installed,and there must be a connection between the phone and watch.
● Note that notification receipt triggered by “Revisit” marks is not supportedwhen the watch is connected with an iPhone.
● You can have up to 50 “Revisit” marks registered at one time. Adding a newRevisit mark while there are already 50 marks in memory will delete theoldest one in memory to make room for the new one.
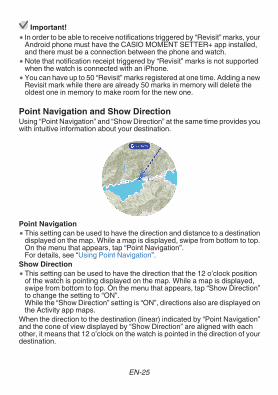
Point Navigation and Show DirectionUsing “Point Navigation” and “Show Direction” at the same time provides youwith intuitive information about your destination.
Point Navigation● This setting can be used to have the direction and distance to a destination
displayed on the map. While a map is displayed, swipe from bottom to top.On the menu that appears, tap “Point Navigation”.For details, see “Using Point Navigation”.
Show Direction● This setting can be used to have the direction that the 12 o’clock position
of the watch is pointing displayed on the map. While a map is displayed,swipe from bottom to top. On the menu that appears, tap “Show Direction”to change the setting to “ON”.While the “Show Direction” setting is “ON”, directions also are displayed onthe Activity app maps.
When the direction to the destination (linear) indicated by “Point Navigation”and the cone of view displayed by “Show Direction” are aligned with eachother, it means that 12 o’clock on the watch is pointed in the direction of yourdestination.
EN-25
Other Operations● To view a recorded memo, swipe the displayed map from bottom to top. On
the menu that appears, tap “History”.● For information about how to track your route on a map, see “Enabling Route
Tracking on the Map (Route Display)”.● For information about map display settings, see “Common Outdoor
Function Settings” and perform one or more of the operations below.ー To switch the map between Google MapsTM and Mapbox: Map Typeー To change the map skin to geographic view or satellite view: Map Skin
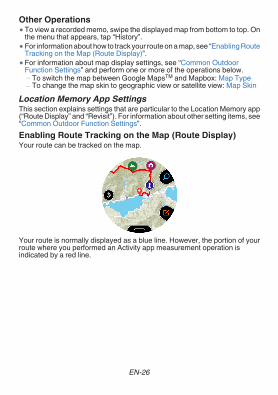
Location Memory App SettingsThis section explains settings that are particular to the Location Memory app(“Route Display” and “Revisit”). For information about other setting items, see“Common Outdoor Function Settings”.Enabling Route Tracking on the Map (Route Display)Your route can be tracked on the map.
Your route is normally displayed as a blue line. However, the portion of yourroute where you performed an Activity app measurement operation isindicated by a red line.
EN-26
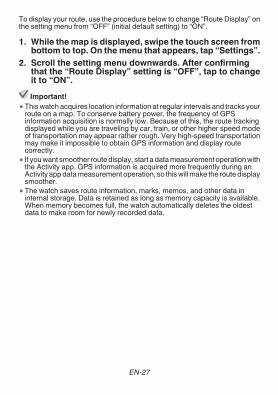
To display your route, use the procedure below to change “Route Display” onthe setting menu from “OFF” (initial default setting) to “ON”.1. While the map is displayed, swipe the touch screen from
bottom to top. On the menu that appears, tap “Settings”.2. Scroll the setting menu downwards. After confirming
that the “Route Display” setting is “OFF”, tap to changeit to “ON”.Important!
● This watch acquires location information at regular intervals and tracks yourroute on a map. To conserve battery power, the frequency of GPSinformation acquisition is normally low. Because of this, the route trackingdisplayed while you are traveling by car, train, or other higher speed modeof transportation may appear rather rough. Very high-speed transportationmay make it impossible to obtain GPS information and display routecorrectly.
● If you want smoother route display, start a data measurement operation withthe Activity app. GPS information is acquired more frequently during anActivity app data measurement operation, so this will make the route displaysmoother.
● The watch saves route information, marks, memos, and other data ininternal storage. Data is retained as long as memory capacity is available.When memory becomes full, the watch automatically deletes the oldestdata to make room for newly recorded data.
EN-27
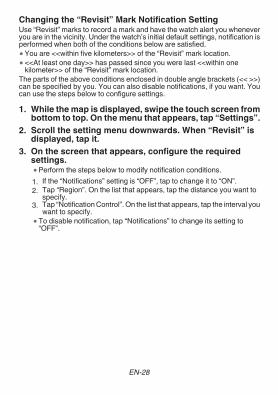
Changing the “Revisit” Mark Notification SettingUse “Revisit” marks to record a mark and have the watch alert you wheneveryou are in the vicinity. Under the watch’s initial default settings, notification isperformed when both of the conditions below are satisfied.● You are <<within five kilometers>> of the “Revisit” mark location.● <<At least one day>> has passed since you were last <<within one
kilometer>> of the “Revisit” mark location.The parts of the above conditions enclosed in double angle brackets (<< >>)can be specified by you. You can also disable notifications, if you want. Youcan use the steps below to configure settings.1. While the map is displayed, swipe the touch screen from
bottom to top. On the menu that appears, tap “Settings”.2. Scroll the setting menu downwards. When “Revisit” is
displayed, tap it.3. On the screen that appears, configure the required
settings.● Perform the steps below to modify notification conditions.1. If the “Notifications” setting is “OFF”, tap to change it to “ON”.2. Tap “Region”. On the list that appears, tap the distance you want to
specify.3. Tap “Notification Control”. On the list that appears, tap the interval you
want to specify.● To disable notification, tap “Notifications” to change its setting to
“OFF”.
EN-28

Viewing Your Route on a PhoneYou can perform the procedure below to export a route stored in watchmemory and view it on a phone using Google EarthTM, etc. Note that yourphone needs to have “Google DriveTM” and “Google Earth” installed in orderto perform this procedure.To output a traveled route from the history display1. While the map is displayed, swipe the touch screen from
bottom to top. On the menu that appears, tap “History”.2. Select the date of the history data you want to display.3. Tap “Show on Map”.
● This displays the history data of the route you traveled on the map.4. Swipe the touch screen from bottom to top. On the menu
that appears, tap “Output as KML file”.● If this is the first time for you to perform this operation, an account
selection screen will appear. The KML file will be stored on GoogleDrive, so select your Google account.
● Once export starts, do not perform any operation on the watch until itis complete.
● The exported KML file will be stored on your Google Drive in a foldernamed “CASIO-WSD”.
To output a traveled route from a normal map display1. While the map is displayed, swipe the touch screen from
bottom to top. On the menu that appears, tap “Settings”.2. Scroll the setting menu downwards. Tap “Export” and
then “Output as KML file” in sequence.● If this is the first time for you to perform this operation, an account
selection screen will appear. The KML file will be stored on GoogleDrive, so select your Google account.
3. Select the date of the route you want to export.● This will start export. Do not perform any operation on the watch until
the export is complete.● The exported KML file will be stored on your Google Drive in a folder
named “CASIO-WSD”.
EN-29
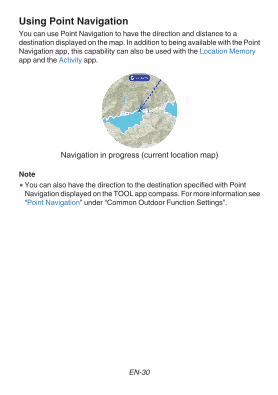
Using Point NavigationYou can use Point Navigation to have the direction and distance to adestination displayed on the map. In addition to being available with the PointNavigation app, this capability can also be used with the Location Memoryapp and the Activity app.
Navigation in progress (current location map)
Note● You can also have the direction to the destination specified with Point
Navigation displayed on the TOOL app compass. For more information see“Point Navigation” under “Common Outdoor Function Settings”.
EN-30
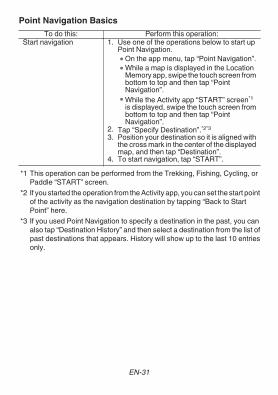
Point Navigation BasicsTo do this: Perform this operation:
Start navigation 1. Use one of the operations below to start upPoint Navigation.
● On the app menu, tap “Point Navigation”.● While a map is displayed in the Location
Memory app, swipe the touch screen frombottom to top and then tap “PointNavigation”.
● While the Activity app “START” screen*1is displayed, swipe the touch screen frombottom to top and then tap “PointNavigation”.
2. Tap “Specify Destination”.*2*33. Position your destination so it is aligned with
the cross mark in the center of the displayedmap, and then tap “Destination”.
4. To start navigation, tap “START”.*1 This operation can be performed from the Trekking, Fishing, Cycling, or
Paddle “START” screen.*2 If you started the operation from the Activity app, you can set the start point
of the activity as the navigation destination by tapping “Back to StartPoint” here.
*3 If you used Point Navigation to specify a destination in the past, you canalso tap “Destination History” and then select a destination from the list ofpast destinations that appears. History will show up to the last 10 entriesonly.
EN-31
To do this: Perform this operation:Change the destinationduring a navigationoperation
1. Perform step 1 of “Start navigation”.● This will display the message “Navigation
being performed.”.2. Scroll the message downwards, and then
tap “Reset Destination”.3. On the confirmation message screen that
appears, tap “Stop”.4. Perform the “Start navigation” procedure
from step 2.Stop a navigationoperation
1. Perform step 1 of “Start navigation”.● This will display the message “Navigation
being performed.”.2. Scroll the message downwards, and then
tap “Stop Navigation”.3. On the confirmation message screen that
appears, tap “Stop”.
Reaching Your Destination During a Navigation OperationWhen you arrive in the vicinity (within approximately 80 meters) of yourdestination while a Point Navigation map is displayed, a notification messagewill appear on the display. To stop the navigation operation tap “Stop”. Toresume it, tap “Resume”.
EN-32
Using the TOOL AppThe TOOL app displays a wide variety of information about the naturalenvironment around the watch.TOOL Function List
Compass Shows a compass needle on the face. A color displayshows the latitude and longitude of the current location.
Altimeter Two color screens are available. An Altimeter Screen(A) that shows a value and dial indication of the altitudeat your current location, and an Altitude Graph Screen(B) that shows a graph of altitude changes over thepast 24 hours.
Barometer Two color screens are available. A Barometer Screen(A) that shows a value and dial indication of thebarometric pressure at your current location, and aBarometric Pressure Graph Screen (B) that shows agraph of barometric pressure changes over the past 24hours.
Sunrise/sunset Two color screens are available. A Time Screen (A)that shows details of the sunrise and sunset times atyour current location, and an Azimuth Screen (B) thatshows the sunrise and sunset times and azimuths.
Tide Graph Two color screens are available. A Tide Graph Screen(A) that shows a Tide Graph of a preset point (port),and a Fishing Time Screen (B) that showsrecommended fishing times for an ocean or river in thevicinity of your current location.
My Graph Graphically represents the amount of time during thecurrent date spend engaging in the following activities:resting, walking, running, riding.
EN-33
Basic TOOL OperationsTo do this: Perform this operation:
Change theTOOL function
● While the TOOL app is running, press the TOOLbutton or MAP button.
● While the TOOL app is running, swipe the touchscreen from top to bottom, or from bottom to top.
Switch betweenthe two colorscreens (A andB) (See “TOOLFunction List”.)
To switch from screen A to screen B, swipe the touchscreen from right to left. To switch from screen B toscreen A, swipe the touch screen from left to right.
Change TOOLapp settings
See “Common Outdoor Function Settings”.
TOOL App Color Display and Monochrome DisplayYou can switch the TOOL app screen between color display andmonochrome display. Outdoors in bright sunlight, the monochrome displayprovides better readability than the color display.
To do this: Perform this operation:Switch from the color display tothe monochrome display
Hold down the TOOL button or MAPbutton for about three seconds.
Switch from the monochromedisplay to the color display
Hold down the TOOL button or MAPbutton for about three seconds or tapthe touch screen.
Note● While the TOOL app is running, it will shut down automatically after about
one minute of non-use.● “My Graph” TOOL app function cannot be displayed under the watch’s initial
default settings. For information about the operation required to display MyGraph, see “Using My Graph”.
EN-34
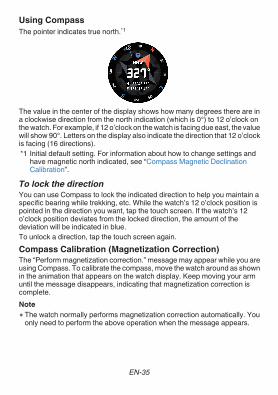
Using CompassThe pointer indicates true north.*1
The value in the center of the display shows how many degrees there are ina clockwise direction from the north indication (which is 0°) to 12 o’clock onthe watch. For example, if 12 o’clock on the watch is facing due east, the valuewill show 90°. Letters on the display also indicate the direction that 12 o’clockis facing (16 directions).*1 Initial default setting. For information about how to change settings and
have magnetic north indicated, see “Compass Magnetic DeclinationCalibration”.
To lock the directionYou can use Compass to lock the indicated direction to help you maintain aspecific bearing while trekking, etc. While the watch’s 12 o’clock position ispointed in the direction you want, tap the touch screen. If the watch’s 12o’clock position deviates from the locked direction, the amount of thedeviation will be indicated in blue.To unlock a direction, tap the touch screen again.Compass Calibration (Magnetization Correction)The “Perform magnetization correction.” message may appear while you areusing Compass. To calibrate the compass, move the watch around as shownin the animation that appears on the watch display. Keep moving your armuntil the message disappears, indicating that magnetization correction iscomplete.Note● The watch normally performs magnetization correction automatically. You
only need to perform the above operation when the message appears.
EN-35
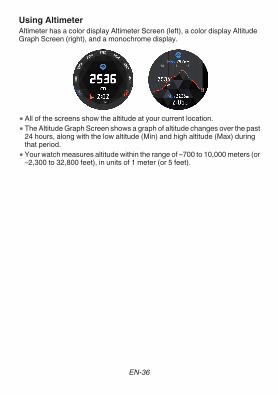
Using AltimeterAltimeter has a color display Altimeter Screen (left), a color display AltitudeGraph Screen (right), and a monochrome display.
● All of the screens show the altitude at your current location.● The Altitude Graph Screen shows a graph of altitude changes over the past
24 hours, along with the low altitude (Min) and high altitude (Max) duringthat period.
● Your watch measures altitude within the range of –700 to 10,000 meters (or–2,300 to 32,800 feet), in units of 1 meter (or 5 feet).
EN-36
Before Using Altimeter● The watch’s Altimeter can be configured to use positioning information
(GPS) to correct altitude readings automatically. Configure the settingsbelow to use this function.ー Correctly configure the “Location” setting on the watch and smartphone.
For more information, see step 1 under “Preparing the Watch for OutdoorUse”.
ー Select “ON” for the “Correct Altitude Using Location” setting.After reading “Common Outdoor Function Settings”, perform theoperation under “Correct Altitude Using Location”.
● Since the watch displays relative altitude based on changes in barometricpressure, it may display different altitude readings for the same location, orincorrect readings due to changes in the local barometric pressure. “CorrectAltitude Using Location” uses GPS information to correct altitude. Even so,since GPS information generally includes some error, there may be largeerror between the altitude readings produced by this watch and actualaltitudes indicated locally. If you want more accurate altitude readings whileclimbing or hiking, manually inputting locally indicated altitude values isrecommended. After reading “Common Outdoor Function Settings”,perform the operation under “Altitude Calibration”.
● When taking altitude readings, keep the watch at as stable a temperatureas possible. For better accuracy, strap the watch to your wrist for some timebefore taking readings in order to allow the watch’s temperature to stabilize.Changes in pressure sensor temperature can cause measurement error.
EN-37
Altimeter Precautions● Do not use this watch while skydiving, hang gliding, paragliding, gyrocopter
flying, glider flying, or engaged in other activities where altitude changessuddenly.
● Altitude readings produced by this watch are not intended for special-purpose or industrial level use.
● In an aircraft, the watch measures the in-cabin pressurized air pressure, soreadings will not match altitudes announced by the crew.
● Large changes in barometric pressure due to atmospheric conditions, largetemperature changes, or subjecting the watch to strong impact may makecorrect readings impossible.
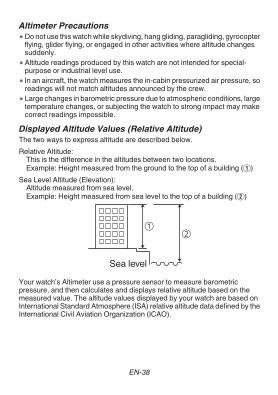
Displayed Altitude Values (Relative Altitude)The two ways to express altitude are described below.Relative Altitude:
This is the difference in the altitudes between two locations.Example: Height measured from the ground to the top of a building (A)
Sea Level Altitude (Elevation):Altitude measured from sea level.Example: Height measured from sea level to the top of a building (B)
Sea levelYour watch’s Altimeter use a pressure sensor to measure barometricpressure, and then calculates and displays relative altitude based on themeasured value. The altitude values displayed by your watch are based onInternational Standard Atmosphere (ISA) relative altitude data defined by theInternational Civil Aviation Organization (ICAO).
EN-38
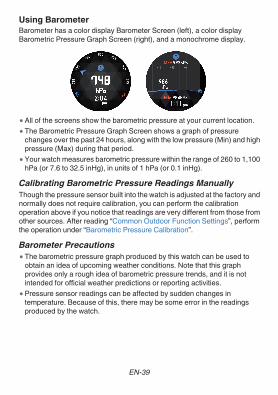
Using BarometerBarometer has a color display Barometer Screen (left), a color displayBarometric Pressure Graph Screen (right), and a monochrome display.
● All of the screens show the barometric pressure at your current location.● The Barometric Pressure Graph Screen shows a graph of pressure
changes over the past 24 hours, along with the low pressure (Min) and highpressure (Max) during that period.
● Your watch measures barometric pressure within the range of 260 to 1,100hPa (or 7.6 to 32.5 inHg), in units of 1 hPa (or 0.1 inHg).
Calibrating Barometric Pressure Readings ManuallyThough the pressure sensor built into the watch is adjusted at the factory andnormally does not require calibration, you can perform the calibrationoperation above if you notice that readings are very different from those fromother sources. After reading “Common Outdoor Function Settings”, performthe operation under “Barometric Pressure Calibration”.Barometer Precautions● The barometric pressure graph produced by this watch can be used to
obtain an idea of upcoming weather conditions. Note that this graphprovides only a rough idea of barometric pressure trends, and it is notintended for official weather predictions or reporting activities.
● Pressure sensor readings can be affected by sudden changes intemperature. Because of this, there may be some error in the readingsproduced by the watch.
EN-39
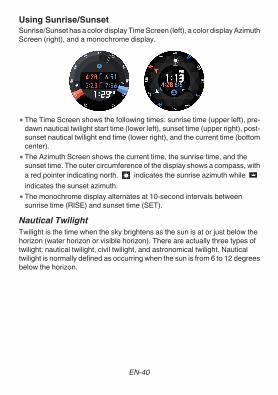
Using Sunrise/SunsetSunrise/Sunset has a color display Time Screen (left), a color display AzimuthScreen (right), and a monochrome display.
● The Time Screen shows the following times: sunrise time (upper left), pre-dawn nautical twilight start time (lower left), sunset time (upper right), post-sunset nautical twilight end time (lower right), and the current time (bottomcenter).
● The Azimuth Screen shows the current time, the sunrise time, and thesunset time. The outer circumference of the display shows a compass, witha red pointer indicating north. indicates the sunrise azimuth while indicates the sunset azimuth.
● The monochrome display alternates at 10-second intervals betweensunrise time (RISE) and sunset time (SET).
Nautical TwilightTwilight is the time when the sky brightens as the sun is at or just below thehorizon (water horizon or visible horizon). There are actually three types oftwilight: nautical twilight, civil twilight, and astronomical twilight. Nauticaltwilight is normally defined as occurring when the sun is from 6 to 12 degreesbelow the horizon.
EN-40
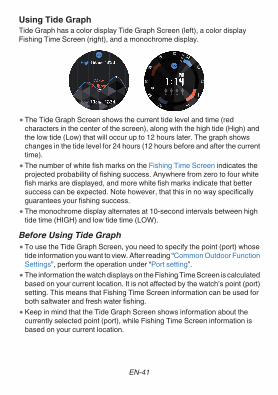
Using Tide GraphTide Graph has a color display Tide Graph Screen (left), a color displayFishing Time Screen (right), and a monochrome display.
● The Tide Graph Screen shows the current tide level and time (redcharacters in the center of the screen), along with the high tide (High) andthe low tide (Low) that will occur up to 12 hours later. The graph showschanges in the tide level for 24 hours (12 hours before and after the currenttime).
● The number of white fish marks on the Fishing Time Screen indicates theprojected probability of fishing success. Anywhere from zero to four whitefish marks are displayed, and more white fish marks indicate that bettersuccess can be expected. Note however, that this in no way specificallyguarantees your fishing success.
● The monochrome display alternates at 10-second intervals between hightide time (HIGH) and low tide time (LOW).
Before Using Tide Graph● To use the Tide Graph Screen, you need to specify the point (port) whose
tide information you want to view. After reading “Common Outdoor FunctionSettings”, perform the operation under “Port setting”.
● The information the watch displays on the Fishing Time Screen is calculatedbased on your current location. It is not affected by the watch’s point (port)setting. This means that Fishing Time Screen information can be used forboth saltwater and fresh water fishing.
● Keep in mind that the Tide Graph Screen shows information about thecurrently selected point (port), while Fishing Time Screen information isbased on your current location.
EN-41

Interpreting Fishing Time Screen ContentsFish Marks (Projected Probability of Fishing SuccessIndicators)The number of fish marks on the Fishing Time screen indicates the projectedprobability of fishing success. Anywhere from zero to four white fish marksare displayed, and more white fish marks indicate that better success can beexpected. Note however, that this in no way specifically guarantees yourfishing success.The fish mark indicator display is based on the current Moon age and Moonposition (hour angle). Fishing timing is said to be best when the Moon age isnew Moon or full Moon, and second best during the Moon’s first quarter andlast quarter. For the Moon hour angle, 00:00 and 12:00 is said to be optimal,while 06:00 and 18:00 is said to be second best. The correlation of thesefactors results in the fish mark indications shown below.
Hour Angle00:00/12:00 Hour
Hour Angle06:00/18:00 Hour Other
New Moon/ FullMoon*
First Quarter/Last QuarterOther
* Including Moon ages 26.9 to 28.6, and 12.1 to 13.8.Note● Hour angle is one of the coordinates used to give the direction of a celestial
body (planet, moon, etc.) point on the celestial sphere. The hour angledirectly overhead is 00:00, westward is 06:00, directly downwards is 12:00,and eastward is 18:00.
EN-42
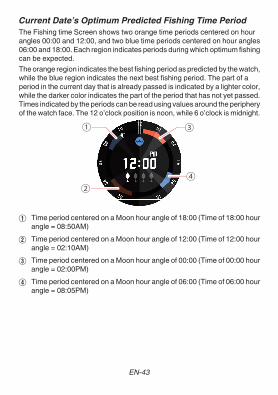
Current Date’s Optimum Predicted Fishing Time PeriodThe Fishing time Screen shows two orange time periods centered on hourangles 00:00 and 12:00, and two blue time periods centered on hour angles06:00 and 18:00. Each region indicates periods during which optimum fishingcan be expected.The orange region indicates the best fishing period as predicted by the watch,while the blue region indicates the next best fishing period. The part of aperiod in the current day that is already passed is indicated by a lighter color,while the darker color indicates the part of the period that has not yet passed.Times indicated by the periods can be read using values around the peripheryof the watch face. The 12 o’clock position is noon, while 6 o’clock is midnight.
①
②④
③
A Time period centered on a Moon hour angle of 18:00 (Time of 18:00 hourangle = 08:50AM)
B Time period centered on a Moon hour angle of 12:00 (Time of 12:00 hourangle = 02:10AM)
C Time period centered on a Moon hour angle of 00:00 (Time of 00:00 hourangle = 02:00PM)
D Time period centered on a Moon hour angle of 06:00 (Time of 06:00 hourangle = 08:05PM)
EN-43
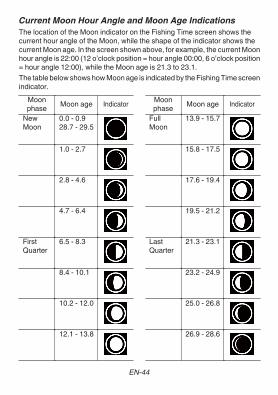
Current Moon Hour Angle and Moon Age IndicationsThe location of the Moon indicator on the Fishing Time screen shows thecurrent hour angle of the Moon, while the shape of the indicator shows thecurrent Moon age. In the screen shown above, for example, the current Moonhour angle is 22:00 (12 o’clock position = hour angle 00:00, 6 o’clock position= hour angle 12:00), while the Moon age is 21.3 to 23.1.The table below shows how Moon age is indicated by the Fishing Time screenindicator.
Moonphase Moon age Indicator
NewMoon
0.0 - 0.928.7 - 29.5
1.0 - 2.7
2.8 - 4.6
4.7 - 6.4
FirstQuarter
6.5 - 8.3
8.4 - 10.1
10.2 - 12.0
12.1 - 13.8
Moonphase Moon age Indicator
FullMoon
13.9 - 15.7
15.8 - 17.5
17.6 - 19.4
19.5 - 21.2
LastQuarter
21.3 - 23.1
23.2 - 24.9
25.0 - 26.8
26.9 - 28.6
EN-44
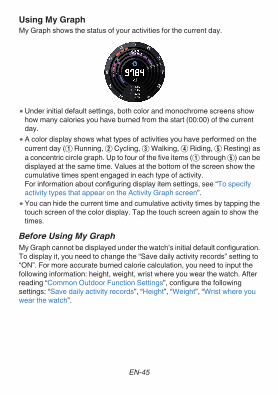
Using My GraphMy Graph shows the status of your activities for the current day.
● Under initial default settings, both color and monochrome screens showhow many calories you have burned from the start (00:00) of the currentday.
● A color display shows what types of activities you have performed on thecurrent day (A Running, B Cycling, C Walking, D Riding, E Resting) asa concentric circle graph. Up to four of the five items (A through E) can bedisplayed at the same time. Values at the bottom of the screen show thecumulative times spent engaged in each type of activity.For information about configuring display item settings, see “To specifyactivity types that appear on the Activity Graph screen”.
● You can hide the current time and cumulative activity times by tapping thetouch screen of the color display. Tap the touch screen again to show thetimes.
Before Using My GraphMy Graph cannot be displayed under the watch’s initial default configuration.To display it, you need to change the “Save daily activity records” setting to“ON”. For more accurate burned calorie calculation, you need to input thefollowing information: height, weight, wrist where you wear the watch. Afterreading “Common Outdoor Function Settings”, configure the followingsettings: “Save daily activity records”, “Height”, “Weight”, “Wrist where youwear the watch”.
EN-45
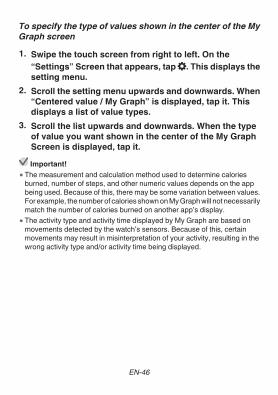
To specify the type of values shown in the center of the MyGraph screen1. Swipe the touch screen from right to left. On the
“Settings” Screen that appears, tap D. This displays thesetting menu.
2. Scroll the setting menu upwards and downwards. When“Centered value / My Graph” is displayed, tap it. Thisdisplays a list of value types.
3. Scroll the list upwards and downwards. When the typeof value you want shown in the center of the My GraphScreen is displayed, tap it.Important!
● The measurement and calculation method used to determine caloriesburned, number of steps, and other numeric values depends on the appbeing used. Because of this, there may be some variation between values.For example, the number of calories shown on My Graph will not necessarilymatch the number of calories burned on another app’s display.
● The activity type and activity time displayed by My Graph are based onmovements detected by the watch’s sensors. Because of this, certainmovements may result in misinterpretation of your activity, resulting in thewrong activity type and/or activity time being displayed.
EN-46
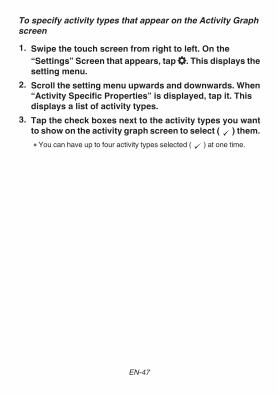
To specify activity types that appear on the Activity Graphscreen1. Swipe the touch screen from right to left. On the
“Settings” Screen that appears, tap D. This displays thesetting menu.
2. Scroll the setting menu upwards and downwards. When“Activity Specific Properties” is displayed, tap it. Thisdisplays a list of activity types.
3. Tap the check boxes next to the activity types you wantto show on the activity graph screen to select ( ) them.
● You can have up to four activity types selected ( ) at one time.
EN-47
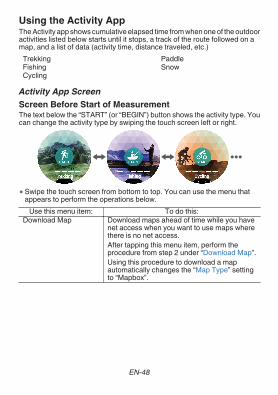
Using the Activity AppThe Activity app shows cumulative elapsed time from when one of the outdooractivities listed below starts until it stops, a track of the route followed on amap, and a list of data (activity time, distance traveled, etc.)
Trekking PaddleFishing SnowCycling
Activity App ScreenScreen Before Start of MeasurementThe text below the “START” (or “BEGIN”) button shows the activity type. Youcan change the activity type by swiping the touch screen left or right.
● Swipe the touch screen from bottom to top. You can use the menu thatappears to perform the operations below.
Use this menu item: To do this:Download Map Download maps ahead of time while you have
net access when you want to use maps wherethere is no net access.After tapping this menu item, perform theprocedure from step 2 under “Download Map”.Using this procedure to download a mapautomatically changes the “Map Type” settingto “Mapbox”.
EN-48

Use this menu item: To do this:History & Export→ Activity History
Display an activity history (activity end datesand times). You can tap an item in the history todisplay its measurement result screen and/ormap screen.
History & Export→ History Auto Save
Enable “History Auto Save”, which will causethe operations below to be performedwhenever you stop a logging operation with theActivity app. This means you can view historydata on the phone.● Auto registration of the activity type and date/
time data to Google Calendar● Auto save of traveled route data (KML file) to
Google DriveThe exported KML file is stored on GoogleDrive in a folder named “CASIO-WSD”.
For details about the required procedure, see“Enabling History Auto Save”.
History & Export→ View History onPhone (Android only)
Display a calendar (Google Calendar oranother similar app) on the phone. To view theroute you traveled with Google Earth or anotherapp, tap the desired data on the Calendar.For details about the required procedure, see“Viewing History Data on a Phone”.
Target altitude Specify the trekking target altitude.Point Navigation This setting can be used to have the direction
and distance to a destination displayed on theactivity map. For details, see “Using PointNavigation”.
MOMENT SETTER Configure MOMENT SETTER notificationsettings to get useful information deliveredwhen you need it during an activity. For details,see “Using the MOMENT SETTER App”.
● Tapping “START” or “BEGIN” starts speed and distance traveledmeasurement of the activity and switches to the measurement in progressscreen.
EN-49
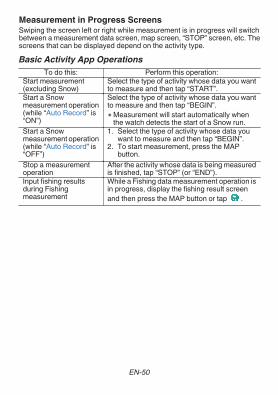
Measurement in Progress ScreensSwiping the screen left or right while measurement is in progress will switchbetween a measurement data screen, map screen, “STOP” screen, etc. Thescreens that can be displayed depend on the activity type.Basic Activity App Operations
To do this: Perform this operation:Start measurement(excluding Snow)
Select the type of activity whose data you wantto measure and then tap “START”.
Start a Snowmeasurement operation(while “Auto Record” is“ON”)
Select the type of activity whose data you wantto measure and then tap “BEGIN”.● Measurement will start automatically when
the watch detects the start of a Snow run.Start a Snowmeasurement operation(while “Auto Record” is“OFF”)
1. Select the type of activity whose data youwant to measure and then tap “BEGIN”.
2. To start measurement, press the MAPbutton.
Stop a measurementoperation
After the activity whose data is being measuredis finished, tap “STOP” (or “END”).
Input fishing resultsduring Fishingmeasurement
While a Fishing data measurement operation isin progress, display the fishing result screenand then press the MAP button or tap .
EN-50
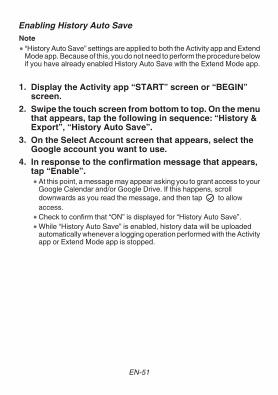
Enabling History Auto SaveNote● “History Auto Save” settings are applied to both the Activity app and Extend
Mode app. Because of this, you do not need to perform the procedure belowif you have already enabled History Auto Save with the Extend Mode app.
1. Display the Activity app “START” screen or “BEGIN”screen.
2. Swipe the touch screen from bottom to top. On the menuthat appears, tap the following in sequence: “History &Export”, “History Auto Save”.
3. On the Select Account screen that appears, select theGoogle account you want to use.
4. In response to the confirmation message that appears,tap “Enable”.
● At this point, a message may appear asking you to grant access to yourGoogle Calendar and/or Google Drive. If this happens, scrolldownwards as you read the message, and then tap to allowaccess.
● Check to confirm that “ON” is displayed for “History Auto Save”.● While “History Auto Save” is enabled, history data will be uploaded
automatically whenever a logging operation performed with the Activityapp or Extend Mode app is stopped.
EN-51
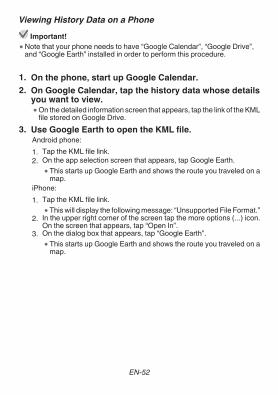
Viewing History Data on a PhoneImportant!
● Note that your phone needs to have “Google Calendar”, “Google Drive”,and “Google Earth” installed in order to perform this procedure.
1. On the phone, start up Google Calendar.2. On Google Calendar, tap the history data whose details
you want to view.● On the detailed information screen that appears, tap the link of the KML
file stored on Google Drive.3. Use Google Earth to open the KML file.
Android phone:1. Tap the KML file link.2. On the app selection screen that appears, tap Google Earth.
● This starts up Google Earth and shows the route you traveled on amap.
iPhone:1. Tap the KML file link.
● This will display the following message: “Unsupported File Format.”2. In the upper right corner of the screen tap the more options (...) icon.
On the screen that appears, tap “Open In”.3. On the dialog box that appears, tap “Google Earth”.
● This starts up Google Earth and shows the route you traveled on amap.
EN-52
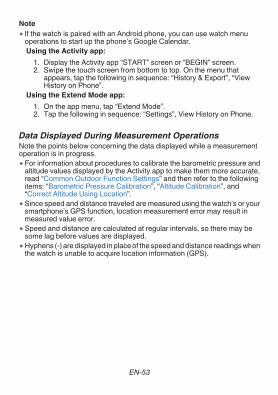
Note● If the watch is paired with an Android phone, you can use watch menu
operations to start up the phone’s Google Calendar.Using the Activity app:
1. Display the Activity app “START” screen or “BEGIN” screen.2. Swipe the touch screen from bottom to top. On the menu that
appears, tap the following in sequence: “History & Export”, “ViewHistory on Phone”.
Using the Extend Mode app:1. On the app menu, tap “Extend Mode”.2. Tap the following in sequence: “Settings”, View History on Phone.
Data Displayed During Measurement OperationsNote the points below concerning the data displayed while a measurementoperation is in progress.● For information about procedures to calibrate the barometric pressure and
altitude values displayed by the Activity app to make them more accurate,read “Common Outdoor Function Settings” and then refer to the followingitems: “Barometric Pressure Calibration”, “Altitude Calibration”, and“Correct Altitude Using Location”.
● Since speed and distance traveled are measured using the watch’s or yoursmartphone’s GPS function, location measurement error may result inmeasured value error.
● Speed and distance are calculated at regular intervals, so there may besome lag before values are displayed.
● Hyphens (-) are displayed in place of the speed and distance readings whenthe watch is unable to acquire location information (GPS).
EN-53
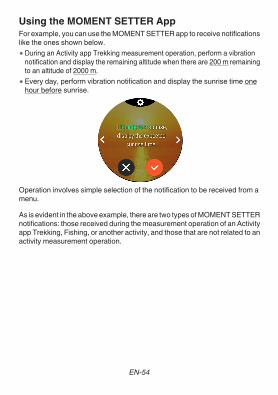
Using the MOMENT SETTER AppFor example, you can use the MOMENT SETTER app to receive notificationslike the ones shown below.● During an Activity app Trekking measurement operation, perform a vibration
notification and display the remaining altitude when there are 200 m remainingto an altitude of 2000 m.
● Every day, perform vibration notification and display the sunrise time onehour before sunrise.
Operation involves simple selection of the notification to be received from amenu.As is evident in the above example, there are two types of MOMENT SETTERnotifications: those received during the measurement operation of an Activityapp Trekking, Fishing, or another activity, and those that are not related to anactivity measurement operation.
EN-54
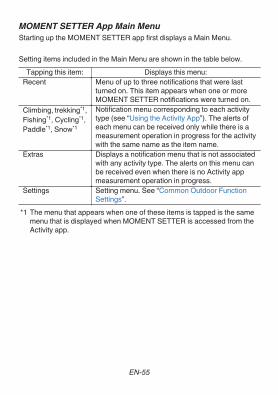
MOMENT SETTER App Main MenuStarting up the MOMENT SETTER app first displays a Main Menu.
Setting items included in the Main Menu are shown in the table below.Tapping this item: Displays this menu:
Recent Menu of up to three notifications that were lastturned on. This item appears when one or moreMOMENT SETTER notifications were turned on.
Climbing, trekking*1,Fishing*1, Cycling*1,Paddle*1, Snow*1
Notification menu corresponding to each activitytype (see “Using the Activity App”). The alerts ofeach menu can be received only while there is ameasurement operation in progress for the activitywith the same name as the item name.
Extras Displays a notification menu that is not associatedwith any activity type. The alerts on this menu canbe received even when there is no Activity appmeasurement operation in progress.
Settings Setting menu. See “Common Outdoor FunctionSettings”.
*1 The menu that appears when one of these items is tapped is the samemenu that is displayed when MOMENT SETTER is accessed from theActivity app.
EN-55
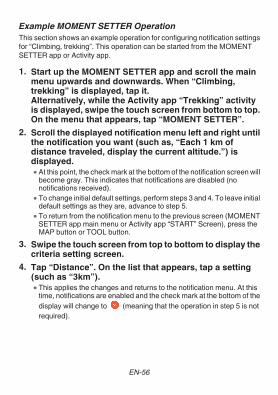
Example MOMENT SETTER OperationThis section shows an example operation for configuring notification settingsfor “Climbing, trekking”. This operation can be started from the MOMENTSETTER app or Activity app.
1. Start up the MOMENT SETTER app and scroll the mainmenu upwards and downwards. When “Climbing,trekking” is displayed, tap it.Alternatively, while the Activity app “Trekking” activityis displayed, swipe the touch screen from bottom to top.On the menu that appears, tap “MOMENT SETTER”.
2. Scroll the displayed notification menu left and right untilthe notification you want (such as, “Each 1 km ofdistance traveled, display the current altitude.”) isdisplayed.
● At this point, the check mark at the bottom of the notification screen willbecome gray. This indicates that notifications are disabled (nonotifications received).
● To change initial default settings, perform steps 3 and 4. To leave initialdefault settings as they are, advance to step 5.
● To return from the notification menu to the previous screen (MOMENTSETTER app main menu or Activity app “START” Screen), press theMAP button or TOOL button.
3. Swipe the touch screen from top to bottom to display thecriteria setting screen.
4. Tap “Distance”. On the list that appears, tap a setting(such as “3km”).
● This applies the changes and returns to the notification menu. At thistime, notifications are enabled and the check mark at the bottom of thedisplay will change to (meaning that the operation in step 5 is notrequired).
EN-56

5. At the bottom of the display, tap to toggle it to .6. Press the power button to exit the MOMENT SETTER
app.● After performing the above operation, you need to start up the Activity
app and start a Trekking measurement operation to actually receivenotifications. See “Using the Activity App”.
Note● A notification from MOMENT SETTER is deleted automatically after a fixed
amount of time.● Since speed measurement, distance traveled measurement, and current
location detection are performed using the watch’s or your smartphone’sGPS function, there may be some measured value error. Accuracy isparticularly poor in a ravine or canyon, among buildings, indoors, and inother areas where signal reception is bad.
● You can disable all MOMENT SETTER settings with a single operation.After reading “Common Outdoor Function Settings”, perform the operationunder “All Off”.
EN-57
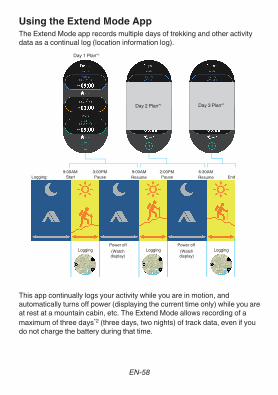
Using the Extend Mode AppThe Extend Mode app records multiple days of trekking and other activitydata as a continual log (location information log).
9:00AM 3:00PM 9:00AM 2:00PM 6:30AMEndResumePauseResumePauseStart
Power off Power offLogging Logging Logging(Watch
display)(Watch display)
Day 1 Plan*1
Day 2 Plan*1 Day 3 Plan*1
Logging:
This app continually logs your activity while you are in motion, andautomatically turns off power (displaying the current time only) while you areat rest at a mountain cabin, etc. The Extend Mode allows recording of amaximum of three days*2 (three days, two nights) of track data, even if youdo not charge the battery during that time.
EN-58
*1 One day of data (current day’s log start time and pause times, next day’slog resume time) must be input by you each morning.
*2 Maximum value based on eight hours of use and 16 hours of rest per day.Note● While logging is paused, the bottom of the display shows the scheduled
time until watch operation and logging restarts.● This is just a brief explanation about how to use the Extend Mode app and
perform its operations. For more information, refer to the Extend Mode helppage at the website below.https://support.casio.com/wsd/en/basic/extend_mode.html
Precautions when Using the Extend Mode App● Before performing a location information logging operation with the Extend
Mode app, be sure to first download a map that covers the entire area whereyou plan to be moving around while logging. For details, see “DownloadMap”.
● Wi-Fi and Bluetooth are automatically disabled during an Extend Mode applogging operation. Because of this, notifications from the phone and all otherphone linking operations are disabled.
● While logging with Extend Mode, displaying a screen other than the ExtendMode screen (another app screen or a watch face) will increase powerconsumption. If another screen is displayed, tap “Extend Mode” on the appmenu as soon as possible to return to the Extend Mode screen.
● None of the items below can be used while Extend Mode app loggingoperation is being performed.ー Location Memory, Point Navigation, all activity appsー MOMENT SETTER notifications
● Location information logging stops automatically whenever battery powerbecomes very low. Logging will stop at any time after remaining batterypower drops below 3%.
EN-59
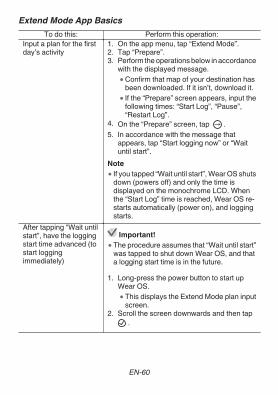
Extend Mode App BasicsTo do this: Perform this operation:
Input a plan for the firstday’s activity
1. On the app menu, tap “Extend Mode”.2. Tap “Prepare”.3. Perform the operations below in accordance
with the displayed message.● Confirm that map of your destination has
been downloaded. If it isn’t, download it.● If the “Prepare” screen appears, input the
following times: “Start Log”, “Pause”,“Restart Log”.
4. On the “Prepare” screen, tap .5. In accordance with the message that
appears, tap “Start logging now” or “Waituntil start”.
Note● If you tapped “Wait until start”, Wear OS shuts
down (powers off) and only the time isdisplayed on the monochrome LCD. Whenthe “Start Log” time is reached, Wear OS re-starts automatically (power on), and loggingstarts.
After tapping “Wait untilstart”, have the loggingstart time advanced (tostart loggingimmediately)
Important!● The procedure assumes that “Wait until start”
was tapped to shut down Wear OS, and thata logging start time is in the future.
1. Long-press the power button to start upWear OS.
● This displays the Extend Mode plan inputscreen.
2. Scroll the screen downwards and then tap.
EN-60
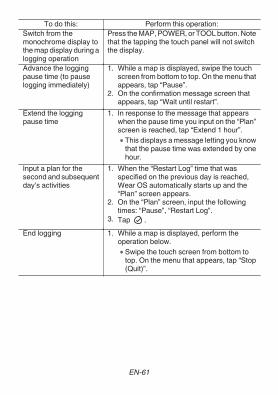
To do this: Perform this operation:Switch from themonochrome display tothe map display during alogging operation
Press the MAP, POWER, or TOOL button. Notethat the tapping the touch panel will not switchthe display.
Advance the loggingpause time (to pauselogging immediately)
1. While a map is displayed, swipe the touchscreen from bottom to top. On the menu thatappears, tap “Pause”.
2. On the confirmation message screen thatappears, tap “Wait until restart”.
Extend the loggingpause time
1. In response to the message that appearswhen the pause time you input on the “Plan”screen is reached, tap “Extend 1 hour”.
● This displays a message letting you knowthat the pause time was extended by onehour.
Input a plan for thesecond and subsequentday’s activities
1. When the “Restart Log” time that wasspecified on the previous day is reached,Wear OS automatically starts up and the“Plan” screen appears.
2. On the “Plan” screen, input the followingtimes: “Pause”, “Restart Log”.
3. Tap .End logging 1. While a map is displayed, perform the
operation below.● Swipe the touch screen from bottom to
top. On the menu that appears, tap “Stop(Quit)”.
EN-61
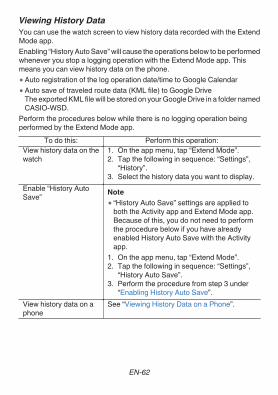
Viewing History DataYou can use the watch screen to view history data recorded with the ExtendMode app.Enabling “History Auto Save” will cause the operations below to be performedwhenever you stop a logging operation with the Extend Mode app. Thismeans you can view history data on the phone.● Auto registration of the log operation date/time to Google Calendar● Auto save of traveled route data (KML file) to Google Drive
The exported KML file will be stored on your Google Drive in a folder namedCASIO-WSD.
Perform the procedures below while there is no logging operation beingperformed by the Extend Mode app.
To do this: Perform this operation:View history data on thewatch
1. On the app menu, tap “Extend Mode”.2. Tap the following in sequence: “Settings”,
“History”.3. Select the history data you want to display.
Enable “History AutoSave” Note
● “History Auto Save” settings are applied toboth the Activity app and Extend Mode app.Because of this, you do not need to performthe procedure below if you have alreadyenabled History Auto Save with the Activityapp.
1. On the app menu, tap “Extend Mode”.2. Tap the following in sequence: “Settings”,
“History Auto Save”.3. Perform the procedure from step 3 under
“Enabling History Auto Save”.View history data on aphone
See “Viewing History Data on a Phone”.
EN-62
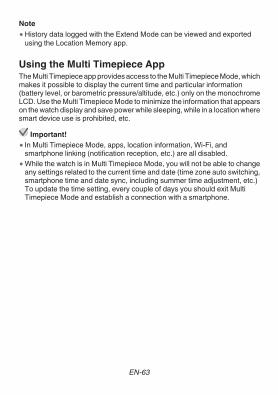
Note● History data logged with the Extend Mode can be viewed and exported
using the Location Memory app.
Using the Multi Timepiece AppThe Multi Timepiece app provides access to the Multi Timepiece Mode, whichmakes it possible to display the current time and particular information(battery level, or barometric pressure/altitude, etc.) only on the monochromeLCD. Use the Multi Timepiece Mode to minimize the information that appearson the watch display and save power while sleeping, while in a location wheresmart device use is prohibited, etc.
Important!● In Multi Timepiece Mode, apps, location information, Wi-Fi, and
smartphone linking (notification reception, etc.) are all disabled.● While the watch is in Multi Timepiece Mode, you will not be able to change
any settings related to the current time and date (time zone auto switching,smartphone time and date sync, including summer time adjustment, etc.)To update the time setting, every couple of days you should exit MultiTimepiece Mode and establish a connection with a smartphone.
EN-63
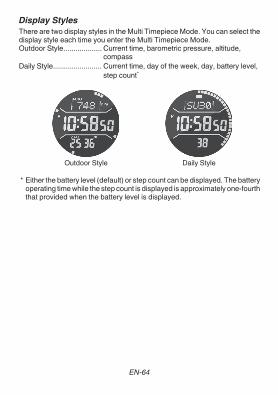
Display StylesThere are two display styles in the Multi Timepiece Mode. You can select thedisplay style each time you enter the Multi Timepiece Mode.Outdoor Style................... Current time, barometric pressure, altitude,
compassDaily Style........................ Current time, day of the week, day, battery level,
step count*
Daily StyleOutdoor Style
* Either the battery level (default) or step count can be displayed. The batteryoperating time while the step count is displayed is approximately one-fourththat provided when the battery level is displayed.
EN-64
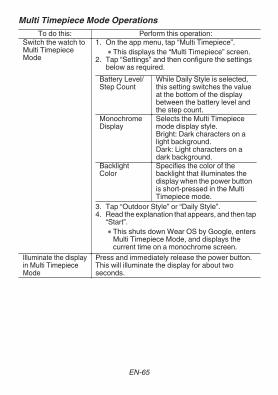
Multi Timepiece Mode OperationsTo do this: Perform this operation:
Switch the watch toMulti TimepieceMode
1. On the app menu, tap “Multi Timepiece”.● This displays the “Multi Timepiece” screen.
2. Tap “Settings” and then configure the settingsbelow as required.
Battery Level/Step Count
While Daily Style is selected,this setting switches the valueat the bottom of the displaybetween the battery level andthe step count.
MonochromeDisplay
Selects the Multi Timepiecemode display style.Bright: Dark characters on alight background.Dark: Light characters on adark background.
BacklightColor
Specifies the color of thebacklight that illuminates thedisplay when the power buttonis short-pressed in the MultiTimepiece mode.
3. Tap “Outdoor Style” or “Daily Style”.4. Read the explanation that appears, and then tap
“Start”.● This shuts down Wear OS by Google, enters
Multi Timepiece Mode, and displays thecurrent time on a monochrome screen.
Illuminate the displayin Multi TimepieceMode
Press and immediately release the power button.This will illuminate the display for about twoseconds.
EN-65

To do this: Perform this operation:Show or hide thecompass (OutdoorStyle only)
Short-press the TOOL button. Each press togglesthe compass between show and hide.Note● If “CALI” appears on the screen when you try to
use the compass, it means that you need toperform magnetization correction. Remove thewatch from your wrist, and rotate it on variousdifferent axes until “CALI” disappears from thedisplay.
Correct altitude andbarometric pressurevalues (OutdoorStyle only)
Important!● Use the operation below to input altitude values
based on elevation values from other sources,and/or barometric pressure values measuredusing an accurate barometer. For details aboutthis operation and why it is necessary, see theexplanation under “Altitude Calibration” and“Barometric Pressure Calibration”.
1. Hold down the MAP button for about twoseconds until the “ALTI” (altitude) value in thelower display starts to flash.
● This indicates the altitude calibration mode.2. Use the MAP button and TOOL button to change
the value as desired.3. Hold down the MAP button for about two
seconds until the “BARO” (barometer) value inthe upper display starts to flash.
● This enters the barometric pressurecalibration mode.
4. Use the MAP button and TOOL button to changethe value as desired.
5. Hold down the MAP button for two seconds.● This exits the calibration mode.
Exit Multi TimepieceMode and restorenormal function
Hold down the power button for about two seconds.This starts up Wear OS by Google and returns tonormal function.
EN-66
Common Outdoor Function SettingsCASIO apps and CASIO watch faces share the same outdoor functions suchas Compass, Altimeter, etc. This section explains settings that are commonto all CASIO apps and watch faces.Basic Operations for Configuring Common SettingsUse the setting menu to configure common settings. The required operationto display the setting menu depends on what screen is displayed, butoperations are the same in all cases once the menu is displayed. You canuse the steps below to configure settings.
1. Display the setting menu.From a CASIO watch face:1. Touch and hold the center of the touch screen for about two seconds.2. Tap D that appears in the lower part of the watch face. This displays
the setting menu.From the TOOL app or Activity app:1. Swipe the touch screen from right to left several times.2. When the “Settings” Screen is displayed, tap D. This displays the
setting menu.From the MOMENT SETTER app:1. Swipe the touch screen from bottom to top.2. Tap “Settings”. This displays the setting menu.From the Location Memory app or Extend Mode app:1. While a map is displayed, swipe the touch screen from bottom to top.2. On the menu that appears, tap “DSettings”. This displays the setting
menu.2. Scroll the setting menu upwards and downwards. When
the setting item you want to configure is displayed, tapit.
● Some items toggle between settings when tapped, while others displayanother screen for configuring settings. For an explanation about eachitem and its operation, see “Setting Item List”.
EN-67
Setting Item ListThe setting items displayed on the setting menu (see “Basic Operations forConfiguring Common Settings”) are shown below. After displaying the settingmenu, perform the operation required for the item whose setting you want tochange.Note● The letters to the right of each setting item indicate the screen from which
the setting item can be displayed. For example, the letters “WF” to the rightof a setting item means that the setting item can be displayed from a watchface (WF) screen.
WF: Watch face MS: MOMENT SETTER appTL: TOOL app LM: Location Memory appAC: Activity app EX: Extend Mode app
TP: Multi Timepiece app
Compass Calibration (WF)OperationTap this setting item and then move the watch around as instructed by theCompass magnetic calibration message and animation that appears on thedisplay. A message will appear to let you know when magnetic calibration iscomplete, and then the screen that was displayed before you startedcalibration (watch face) will reappear.DescriptionThis function calibrates Compass so it indicates direction correctly.If Compass Calibration is dimmed (and will not respond when tapped) itmeans that Compass accuracy is sufficient and that correction is not required.Compass Magnetic Declination Calibration (WF/TL)OperationEach tap of this setting item toggles between “ON” and “OFF”. The Compassindicates true north when on, and magnetic north when off.DescriptionThis function corrects magnetic north and true north error.
EN-68
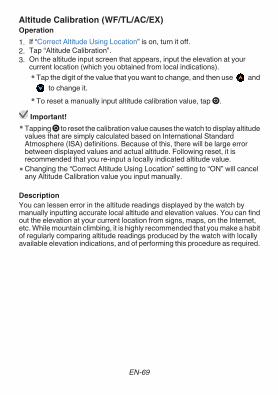
Altitude Calibration (WF/TL/AC/EX)Operation1. If “Correct Altitude Using Location” is on, turn it off.2. Tap “Altitude Calibration”.3. On the altitude input screen that appears, input the elevation at your
current location (which you obtained from local indications).● Tap the digit of the value that you want to change, and then use and
to change it.● To reset a manually input altitude calibration value, tap C.Important!
● Tapping C to reset the calibration value causes the watch to display altitudevalues that are simply calculated based on International StandardAtmosphere (ISA) definitions. Because of this, there will be large errorbetween displayed values and actual altitude. Following reset, it isrecommended that you re-input a locally indicated altitude value.
● Changing the “Correct Altitude Using Location” setting to “ON” will cancelany Altitude Calibration value you input manually.
DescriptionYou can lessen error in the altitude readings displayed by the watch bymanually inputting accurate local altitude and elevation values. You can findout the elevation at your current location from signs, maps, on the Internet,etc. While mountain climbing, it is highly recommended that you make a habitof regularly comparing altitude readings produced by the watch with locallyavailable elevation indications, and of performing this procedure as required.
EN-69

Correct Altitude Using Location (WF/TL/AC/EX)OperationEach tap of this setting item toggles between “ON” and “OFF”.DescriptionSelect “ON” for this setting to perform auto altitude calibration based on thewatch’s or your smartphone’s location information (GPS). “OFF” must beselected for this setting to perform altitude calibration manually using “AltitudeCalibration”.
Important!● When “ON” is selected for the “Correct Altitude Using Location” setting, the
correction operation is performed only when GPS reception is extremelygood. It is not performed in valleys, among buildings, or in any other locationwhere reception is poor. Since GPS information generally includes someerror, there may be error in relation to actual altitudes indicated locally. Ifyou want more accurate altitude readings, turning off this item andperforming the “Altitude Calibration” operation by manually inputting locallyindicated altitude values is recommended.
Barometric Pressure Calibration (WF/TL/AC)OperationTapping this setting item displays a barometric pressure input screen. Inputthe current barometric pressure as measured by another accurate barometer.● Tap the digit of the value that you want to change, and then use and
to change it.● To reset a manual calibration and display barometric pressure readings
based on pressure sensor measurements, tap C.DescriptionThough the pressure sensor built into the watch is adjusted at the factory andnormally does not require calibration, you can perform the calibrationoperation above if you notice that readings are very different from those fromother sources. To calibrate manually, use this item to input the currentbarometric pressure as measured by another accurate barometer.
EN-70
Centered value / My Graph (TL)OperationTap this setting item and then scroll the list that appears upwards anddownwards. When the type of value you want shown in the center of the MyGraph Screen is displayed, tap it.DescriptionThis setting changes the type of value displayed in the center of the My GraphScreen.Home city (WF)OperationTap this setting item and then scroll the list that appears upwards anddownwards. When the name of the city you want to specify as your Home cityis displayed, tap it.DescriptionThis setting specifies the Home city displayed on watch faces (World Time,Traveler).Styles (WF)OperationTap this setting item, and then tap “Daily Style” or “Outdoor Style” from theavailable options that appear. If you select “Daily Style”, another selectionscreen will appear. Select “Battery level” or “Steps”.DescriptionThe display styles are the same as those in the Multi Timepiece Mode. See“Display Styles”.Edit Color (WF)OperationTap this setting item, and then on the list that appears tap the color you wantto use.DescriptionThis setting specifies the face color of a watch face (Authentic, Multi,Location, Traveler, etc).
EN-71
Monochrome Display (WF/TL/AC/TP/EX)OperationEach tap of this setting item toggles the face background between “Dark” and“Bright”.DescriptionYou can select how the watch’s monochrome LCD displays data. This settingis applied to all of the displays below.● “2 Layers” watch face monochrome display● TOOL app monochrome display● Activity app monochrome display● Extend Mode app monochrome display● Multi Timepiece Mode monochrome displayPoint Navigation (TL/AC)OperationEach tap of this setting item toggles between “ON” and “OFF”.DescriptionWhen the setting of this item is “ON”, an icon indicating the direction to yourdestination is displayed on the compass color display during navigation withPoint Navigation.GPS Time Calibration (WF)Operation1. Move to an outdoor area where the sky is visible.2. Perform the required operation on a CASIO watch face to display the
setting menu, and then tap “GPS Time Calibration”.3. Carefully read the message that appears on the display and then tap
“Correct”.4. Wait until GPS reception is complete.DescriptionThe watch normally adjusts its current time setting by syncing with asmartphone. Should the smartphone battery go dead, if you lose yoursmartphone, or if syncing is not possible for some other reason, you need toperform the above operation each time you want to adjust the watch’s timesetting. Each time you do, the watch will temporarily adjust its time settingbased on GPS information.It is recommended that you perform this procedure in a location where GPSreception conditions are good and where the sky is visible. See “Appropriateand Inappropriate Signal Reception Location”.
EN-72
Port setting (TL)OperationTap this setting item and then scroll the list that appears upwards anddownwards. When the name of the point (port name or name of a city nearthe ocean) you want is displayed, tap it.DescriptionThis setting specifies the point (port) whose tide information is displayed bythe “Tide Graph” of the TOOL app.Re-calculation with Current Location (TL)OperationTap this setting item to start acquisition of positioning information for yourcurrent location. After positioning information acquisition is successful, theTOOL screen will reappear, which will show re-calculated data.DescriptionPerform this operation when “DEMO” is displayed on the TOOL app screenor when the message “Displayed result is based on location info from 000minutes ago.” appears. It re-calculates data displayed by the TOOL appbased on current location information acquired by the watch or yoursmartphone GPS function.
EN-73
Save Daily Location Info (WF/MS/LM)OperationAfter tapping this setting, you then need to select “Every 6 minutes”, “Every1 minute”, or “OFF”.
Important!● When you tap this setting item to toggle from “OFF” to “ON”, you will also
need to tap “Every 6 minutes” or “Every 1 minute” on the confirmation dialogbox that appears.
DescriptionThis item is for configuring a setting related to the Location Memory app.Selecting “ON” for this item enables maintenance of a daily location history,even when there is no Activity app measurement operation.
Important!● Note that once internal storage becomes full, the oldest location history
information is deleted automatically to make room for new information whenit is recorded.
Save daily activity records (WF/TL/MS)OperationEach tap of this setting item toggles between “ON” and “OFF” (initial defaultsetting).
Important!● When you tap this setting item to toggle from “OFF” to “ON”, you will also
need to tap “I agree.” on the confirmation dialog box that appears.
DescriptionThis item is for configuring a setting related to watch faces (Authentic, Multi),the TOOL app (My Graph), and the MOMENT SETTER app.Selecting “ON” for this item, allows the watch to record information (such asdisplayed workout time and calories burned) about your activities. If you wantto use this function, make sure that its setting is “ON”.
EN-74
Height (TL/MS)OperationTap this setting item and then use the screen that appears to input your height.● Tap the digit of the value that you want to change, and then use and
to change it.DescriptionThe value you input for this item is used as basic information when calculatingdata displayed on the TOOL app’s “My Graph”.Weight (TL/MS)OperationTap this setting item and then use the screen that appears to input yourweight.● Tap the digit of the value that you want to change, and then use and
to change it.DescriptionThe value you input for this item is used as basic information when calculatingdata displayed on the TOOL app’s “My Graph”.Units (WF/TL/AC/MS)OperationEach tap of this setting item toggles between “Metric” and “Imperial”.DescriptionUse this setting to switch between metric units (meters, kilograms, hPa, etc.)and Imperial units (feet, pounds, inHg, etc.) for values displayed by CASIOwatch faces and apps.Energy Unit (WF/TL/MS/AC)OperationEach tap of this setting item toggles between “Cal” (kilogram calories or largecalories, default setting) and “kJ” (kilojoules).DescriptionThe setting you specify here is used for the calories burned value displayedon watch faces (Authentic, Multi), and by the TOOL app (My Graph),MOMENT SETTER and the Activity app.
EN-75
Wrist where you wear the watch (TL/MS)OperationEach tap of this setting item toggles between “Right” and “Left”.DescriptionThe value you input for this item is used as basic information when calculatingdata displayed on the TOOL app’s “My Graph”.Target altitude (AC)OperationTap this setting item and then use the screen that appears to specify a targetaltitude.● Tap the digit of the value that you want to change, and then use and
to change it.DescriptionUse this item to input a target altitude before starting an Activity app Trekkingactivity.Route Colors (AC)OperationFrom the Activity app, perform the required operation to display the settingmenu and then tap “Route Colors”. This displays a screen showing themeanings of the route track colors.DescriptionRoute tracks are drawn on Activity app maps using multiple colors. This itemshows the meaning of each color, and is not used for configuring particularsettings.
EN-76
Auto Record (AC)Operation1. Use the Activity app to display the Snow “BEGIN” screen, and then tap
“BEGIN”.2. Swipe the touch screen from right to left as many times as necessary to
display the “Settings” Screen. Next, tap D.3. On the setting menu that appears, swipe upwards and downwards until
“Auto Record” is displayed, and then tap it.● Each tap toggles between “ON” and “OFF”.Important!
● The “Auto Record” setting can be modified only on the setting menu youdisplay using steps 1 and 2 above.
DescriptionThis setting is related to the Activity app “Snow”. When the setting of this itemis “ON”, the watch will start an activity measurement operation automaticallywhen operation by you is detected. When “OFF”, you need to startmeasurement operations manually. The initial default setting is “OFF”.
EN-77
Map Type (AC/MS/LM)OperationEach tap of this setting item toggles between “Google Maps” and “Mapbox”.DescriptionThis setting lets you select either Google Maps or Mapbox as the map typedisplayed by the Activity app and Location Memory app.
Important!● Maps displayed while “Mapbox” is selected use geographic information
from OpenStreetMap. OpenStreetMap geographic information can befreely edited by anyone, which means that information displayed on a mapmay not be correct.
● Immediately following execution of a “Download Map” operation, the watchwill automatically switch to “Mapbox”.
Map Skin (AC/MS/LM)OperationTap this setting item, and then use the list that appears to tap the name of themap skin you want to use.DescriptionThis item is for selecting the map skin displayed by the Activity app and theLocation Memory app. You can select geographic view, satellite view, oranother view to suit your location or purpose.
EN-78
Download Map (AC/MS/LM/EX)Operation1. Tap “Download Map”.
● This displays a list of map skin names.2. Scroll the list upwards and downwards. When the skin name you want is
displayed, tap it.● This displays a map with your current location in the center.
3. Scroll the map so the location that you want to be in the center of the mapyou download is in the center of the watch screen.
● You can scroll the map after using the TOOL (-) button to reduce thesize of the map and increase the display area. The area in circle in thecenter of the screen at this time shows the maximum downloadablearea.
4. Use the MAP button (+) and TOOL button (-) to zoom the map so the areayou want to download fills the screen.
● The area that is displayed at this time is the approximate area that willbe downloaded.
5. Tap “Fix”.● This may cause a message prompting you to use Wi-Fi to appear.● This starts map downloading, and show the progress on the display. To
cancel downloading, tap ×.● The downloaded map will appear on the display after download is
complete.Important!
● Except when you want to cancel, do not perform any watch operation until mapdownloading is complete. Performing an operation may stop the download.
● Map data is heavy, so use of a Wi-Fi connection is recommended.● Zoom levels are limited while a downloaded map is displayed. The smaller
the area of the map you display in step 4 of this procedure, the greater thedetail that will be shown when you enlarge the map. In step 4, specifyingthe smallest map area you might possibly need is recommended.
● Tapping “Fix” in step 5 may cause a message prompting Wi-Fi connectionto appear. If you are in a location where Wi-Fi is available, tapping “Wi-Fi”to switch communication over to Wi-Fi is recommended.
● The watch can have up to five sets of Mapbox map data (map area and skintype) in memory at a time. If you attempt to download more data while thereare already five sets of data in memory, a message will appear promptingyou to delete existing downloaded map data. Delete map data you no longerneed and try downloading the new data again.
EN-79
DescriptionThis item is for configuring settings related to the Activity app and the LocationMemory app. It is for downloading a map to watch memory when “Mapbox”is selected for “Map Type”. If you want to use the map in an area where anetwork connection is not available, use this item beforehand in an areawhere a network connection is available to download the desired map.Downloaded Map (AC/MS/LM/EX)OperationTapping this setting displays the map you downloaded.● To display another downloaded map, swipe the touch screen from right to
left.● To delete the currently displayed map, swipe the touch screen from bottom
to top and then tap “Delete This Map”.DescriptionYou can use the procedure under “Download Map” to view and delete mapssaved in watch memory.Route Tracking(Activity) (AC/LM)OperationEach tap of this setting item toggles between “Accuracy Priority” and “BatteryPriority”.DescriptionThis item is for configuring a setting related to Activity app. While “AccuracyPriority” is selected, the GPS positioning operation and refresh operation areperformed more frequently, and the route tracked on the map is moreaccurate. While “Battery Priority” is selected, the accuracy of the route trackedon the map is reduced somewhat, but battery power is saved.Except when you want to perform long-term Trekking or Fishingmeasurement operations, use “Accuracy Priority” for better speed anddistance calculation accuracy, and more frequent display refreshing.
Important!● Note that with Activity app Cycling, Paddle, and Snow measurement
operations, GPS positioning is executed at relatively short intervals evenwhen “Battery Priority” is selected for this setting. Because of this, batterypower savings are less in this case.
EN-80
All Off (MS)Operation1. Tap this item and a confirmation dialog box will appear asking if you want
to disable all MOMENT SETTER notifications.2. Tap “Turn off.” to disable notifications or “Cancel” to leave notifications
enabled.DescriptionRemoving all check marks from the MOMENT SETTER app menu disablesall notifications. Note that once you perform this operation, there is no singlebatch operation to re-enable notifications. You will need to use the MOMENTSETTER app menu to individually re-enable each notification you want.Route Display (LM)For information about this item, see “Enabling Route Tracking on the Map(Route Display)”.Revisit (LM)For information about this item, see “Changing the “Revisit” Mark NotificationSetting”.
EN-81
TroubleshootingRefer to this section whenever you are experiencing problems with watchoperation.If you don’t find the solution to your problem here, visit the website below.https://support.casio.com/en/support/faq.php?cid=019Restoring Watch OperationIf you find yourself unable to obtain proper operation from the watch for somereason, restart it and then try performing the operation again. For informationabout restarting the watch, visit the website below.https://support.google.com/wearos/If the watch will not restart...Perform the procedure below to force it to shut down. After the watch is forcedto shut down, it will restart automatically.
1. Hold down the power button until the display goes blank.● Wait for a while until the watch restarts automatically.
Error Code and Error Message ListIf an error code or error message appears on your watch, look it up in the tablebelow and take the required action.
Error CodeError Message
Required Action
1001, 1009Normal charging is notpossible for somereason. If thismessage keepsappearing, requestservicing.
Remove the charger cable from the watch, turnoff the watch, and then try charging again. Useonly the AC adaptor and charger cable thatcomes with the watch for charging.If this message/error code keeps appearing, itcould mean that the chargeable battery hasdeteriorated. Request servicing by your originalretailer or an authorized CASIO service center.
1003Too cold to charge.
Charge the watch in an area where the ambienttemperature is between 10°C and 35°C (50°Fand 95°F).1004, 1007
Too hot to charge.
EN-82
Error CodeError Message
Required Action
1021Data acquisition fromthe sensor may havefailed. Use the Settingsscreen to perform aSystem Restartoperation.
Data acquisition from one of the followingsensors may have failed for some reason:pressure sensor, accelerometer, gyro sensor,magnetic sensor.Restart the watch by performing the followingsteps:Swipe the watch face from top to bottom.> Tap D. > Tap “System”. > Tap “Restart”.If this message/error code keeps appearingafter restart, request servicing by your originalretailer or an authorized CASIO service center.
9000Some problemoccurred with the watch.Power will turn offshortly.
To restart the watch, first charge it for at leastone hour. Next, hold down the power button forabout 12 seconds until the display colorchanges.
9001, 9002, 9003Some problemoccurred with the watch.Power will turn offshortly.
Take your watch to an authorized CASIOservice center or to your original retailer forinspection and repair.
9010Watch temperature ishigh. Power will turn offto protect it.
Remove the watch from your wrist and leave itin a location that is not exposed to directsunlight, where the temperature is between10°C and 30°C (50°F and 86°F) to allow thewatch to cool down. You will be able to turn thewatch on again after it reaches a lowertemperature.
EN-83
Important!Note the precautions in this section whenever using this watch.
Precautions During UseDisplay Information AccuracyTide Graph PrecautionsFor Japan area oceans, tide times and level changes are predictivelycalculated using harmonic constant data obtained from Bibliography 742Tidal Harmonic Constants Tables, Japanese Coast (February 1992)published by the Hydrographic Department of the Japan Coast Guard, andfrom the List of Tidal Stations (2015) published by the Japan MeteorologicalAgency. For other area oceans, tide times and level changes are predictivelycalculated using harmonic constant data obtained from NOAA, NOAA CO-OPS, and the NOAA Tides & Currents website, and the U.S. DEPARTMENTOF COMMERCE / COAST AND GEODETIC SURVEY January 1942 TH-1.Actual tidal phenomena fluctuate in accordance with weather, the season,and various other factors, and may give rise to irregularities not in accordancewith calculated values. Certain conditions may result in some deviation fromactual tides. Because of this, the information produced by the Tide Graphfunction of this app and watch should be treated as approximate referenceinformation only. Never use it for navigation or any other decisions about tidethat may put safety at risk.Sunrise/Sunset PrecautionsSunrise and sunset calculations are performed using the following azimuths:North: 0 degrees, East: 90 degrees, South: 180 degrees, West: 270 degrees.Calculation results include error of multiple seconds, and error becomesgreater at higher latitudes. Calculations assume a level horizon, and localtopography is not taken into consideration.
EN-84
Moon Age PrecautionsMoon ages displayed by this watch are based on the calculation describedbelow.(1) Elongation is calculated using solar and lunar coordinates produced byfunctional calculus.(2) Moon age is calculated based on the correlation between the elongationand average moon age.Though the lunar period averages 29.53 days, it actually fluctuates by asmuch as ±1 day, so this calculation produces an error of up to ±1 day.Water ResistanceThis watch is water resistant up to five atmospheres, which means it can beworn while working around water and while swimming. However, note theinformation below.● Even if a watch is water resistant, note the usage precautions described
below.ー Avoid using this watch while windsurfing, skin diving, or scuba diving.ー Do not operate the buttons while your watch is submersed in water or
wet.ー Do not charge the watch while it is in water or wet.ー Avoid wearing your watch while in the bath.ー Do not wear your watch while in a heated swimming pool, sauna, or any
other high temperature/high humidity environment.ー Do not wear this watch while washing your hands or face, or while
performing any other task that includes the use of soap or detergent.● The touch screen does not work while the watch is submerged in water.● After using the watch where it is submerged in seawater or fresh water, or
where it is soiled by sand or mud, rinse it with clean water as describedbelow and then thoroughly dry it.1. Fill a bucket or other container with tap water or other clean water.2. Place the watch in the water and leave it there for about 10 minutes.3. Gently move the watch back and forth in the water to remove any salt,
dirt, mud, sand, etc.ー If the touch screen is dirty, do not rub it without first washing it clean.ー After washing the watch, use a clean, dry, soft cloth to wipe away any
remaining water. Next, leave the watch in a well-ventilated, shadedlocation to dry thoroughly.
● To maintain water resistance, have the gaskets of your watch replacedperiodically (about once every two or three years).
● Be sure to leave battery replacement up to an authorized CASIO servicecenter or your original retailer. Unauthorized battery replacement maycause problems with the waterproof performance of the watch.
EN-85

● The inside surface of the watch glass may fog when the watch is exposedto a sudden drop in temperature. No problem is indicated if the foggingclears up relatively quickly. Sudden and extreme temperature changes(such as coming into an air conditioned room in the summer and standingclose to an air conditioner outlet, or leaving a heated room in the winter andallowing your watch to come into contact with snow) can cause it to takelonger for glass fogging to clear up. If glass fogging does not clear up or ifyou notice moisture inside of the glass, immediately stop using your watchand take it to an authorized CASIO service center or to your original retailer.
● Do not charge the watch if the watch or charger cable is wet. Wipe off allmoisture and make sure the watch and charger cable are dry beforecharging.
Using GPSYou watch can use radio signals from Global Positioning System satellitesto determine your current location and the current time anywhere on theglobe. The process for determining your current location is called“positioning”.
Appropriate and Inappropriate Signal Reception Location● A good location for signal reception is outdoors where the sky is visible and
not blocked by buildings, trees, or other objects.● You may experience GPS signal reception problems in the areas described
below.ー Where the view of the sky above is narrowー Near trees or buildingsー Near a train station, airport, or other congested area, or where there is a
large amount of vehicular trafficー Near railway aerial wires, high-voltage lines, TV towers, etc.
● GPS signal reception is not possible in the areas described below.ー Where the sky is not visibleー Underground, in a tunnel, underwaterー Indoors (Reception may be possible near a window.)ー Near wireless communication equipment or other devices that generate
electromagnetism.● GPS satellites are in constant motion, so your location, the time of day, or
other factors may cause a delay in the positioning operation or may evenmake positioning impossible.
EN-86
Using GPS Outside Your CountrySome countries or geographic areas put legal restrictions on the use of GPS,on the collection and logging of location information, etc. Your watch has built-in GPS functionality, so before embarking on international travel to a countryor area outside of the country where you purchased your watch, you shouldcheck with the embassy of the countries you plan to visit, your travel agency,or some other reliable source of information to find out if there are anyprohibitions or restrictions on bringing in devices with GPS functionality, oron the logging of location information, etc.Long Periods of Non-useIf you allow the watch to remain discharged and unused for a long period, itwill take a long time to acquire GPS signals and perform positioningimmediately after you charge the watch and start using it again.GPS Function Precautions● Whenever you are in any area where radio wave reception is prohibited or
restricted, perform the operation below to turn off the “Location” setting.1. While the watch face is displayed, swipe the touch screen from top to
bottom and then tap D.2. Scroll downwards and tap “Connectivity” and then “Location”.3. On the screen that appears, disable “Location”.
● Map data may include information that is incorrect. Also, all countries andgeographic areas may not be provided in the map data.
● Some location and address names may not display correctly due toapplicable laws and restrictions in certain countries and geographic areas.
● The location information provided by the GPS function of this watch isintended for reference purposes only and locations shown may not beaccessible or difficult to access. Also, map information may show mountain,jungles, deserts, and other dangerous or lawless locations. Before going toan unknown location, be sure to check on the latest information availableabout laws and safety.
EN-87
● Using this watch in the vicinity of a mobile phone or other device that uses1.5 GHz band radio waves may make signal reception impossible.
● Depending on reception conditions, GPS positioning information mayinclude error up to several hundred meters.
● Location information is not acquired while flying on an aircraft or otherwisemoving at very high speed.
● Never use the GPS function of this watch for surveying or any othermeasuring that requires high accuracy.
● Never use the GPS function of this watch for navigation of boats, aircraft,motor vehicles, individuals, etc.
● Location measurements are performed using satellites that are operatedand managed by the United States (GPS), Russia (GLONASS), and Japan(QZSS). Because of this, there is always the possibility that access to itsinformation may be disabled at the discretion of these countries.
Wi-Fi connectivityNote that when using a Wi-Fi connection you need to be aware of the watch’sbattery level and your surrounding environment. A low battery or extreme coldcan cause Wi-Fi operation to shut down automatically to protect the watch’ssystem.
EN-88
MIL-STD-810GThis watch has been tested for the items described below in accordance withthe MIL-STD-810G standard established by the U.S. Department of Defense.● Shock resistance is based on the assumption of normal daily use. Throwing
the watch, or subjecting it to excessive dropping or other extreme shockcan cause it to break.
● Be sure to read the information in this manual under “Precautions DuringUse” and “User Maintenance” in order to ensure proper use of this watch.Failure to use the watch in accordance with this information creates the riskof overheating, fire, electric shock, personal injury, and accident.
● The functions of this watch have been confirmed under test environments,but no guarantees are made concerning operation under all environmentswhere it may be used. Also, no guarantees are made concerning the abilityof the watch to withstand damage or malfunction.
Shock Tested in accordance with Method 516.7Procedure IV.
Vibration Tested in accordance with Method 514.7Procedure I.
Humidity Tested in accordance with Method 507.6Procedure II.
Low PressureTransport
Tested in accordance with Method 500.6Procedure I.
Low PressureOperation
Tested in accordance with Method 500.6Procedure II.
High TemperatureTransport
Tested in accordance with Method 501.6Procedure I.
Low TemperatureTransport
Tested in accordance with Method 502.6Procedure I.
Temperature Shock Tested in accordance with Method 503.6Procedure I-C.
Ice Accretion Tested in accordance with Method 521.4Procedure I.
Protective stickers● Be sure to remove all protective stickers and/or paper tags that may be
affixed to your watch (including its back cover) and/or its band when youpurchase it. Using the watch without removing protective stickers and/orpaper tags may result in the build-up of dirt between the watch/band andthe sticker/paper tag, which creates the risk of rust and skin rash.
EN-89
Charging● The watch and AC adaptor may become warm to the touch during charging.
This is normal and does not indicate malfunction.● Do not charge the watch while its charge level is high enough for watch
operation. Waiting until the charge level is low until you charge will help toextend battery life. Disconnecting the charger cable from the watch after itreaches a full charge is recommended. Any of the following can hastenbattery deterioration and should be avoided.ー Frequent charging while the battery is fully charged or near fully chargedー Continuing to charge over a long period (multiple days)ー Connecting and disconnecting the charger cable multiple times during a
single day even though the battery is fully charged● Do not charge the watch in a location where large amounts of moisture,
dust, or fine metal particles are present, in a location subjected to vibration,or near a hard line telephone, a TV, a radio, etc.
● The charger cable of this watch is magnetic. Contact with sand containingiron particles can make it unusable for charging. Should the chargerterminal or cable become soiled with mud or sand, thoroughly wipe off allforeign matter before charging.
● In an area where it is extremely cold or hot, you may not be able to chargethe watch or the watch may not charge completely. Charge the watch in anarea where the ambient temperature is between 10°C and 35°C (50°F and95°F).
EN-90

Band● Tightening the band too tightly can cause you to sweat and make it difficult
for air to pass under the band, which can lead to skin irritation. Do not fastenthe band too tightly. There should be enough room between the band andyour wrist so you can insert your finger.
● Deterioration, rust, and other conditions can cause the band to break orcome off of your watch, which in turn can cause band pins to fly out ofposition or to fall out. This creates the risk of your watch falling from yourwrist and becoming lost, and also creates the risk of personal injury. Alwaystake good care of your band and keep it clean.
● Immediately stop using a band if you ever notice any of the following: lossof band flexibility, band cracks, band discoloration, band looseness, bandconnecting pin flying or falling out, or any other abnormality. Take yourwatch to an authorized CASIO service center or to your original retailer forinspection and repair (for which you will be charged) or to have the bandreplaced (for which you will be charged).
Temperature● Never leave your watch on the dashboard of a car, near a heater, or in any
other location that is subject to very high temperatures. Do not leave yourwatch where it will be exposed to very low temperatures. Doing so cancause malfunction.
● Leaving your watch in an area hotter than +60°C (140°F) for long periodscan lead to problems with its display panel. The display panel may becomedifficult to read at temperatures lower than 0°C (32°F) and greater than+40°C (104°F). Watch operation that is stopped due to high temperatureswill not resume until watch cools sufficiently. Wait for a while to allow thewatch to cool.
Use in Cold Environments● Under cold conditions, the operating time provided by a battery is shorter
than normal, even if the battery is fully charged.● Extreme cold can cause Wi-Fi operation to shut down automatically to
protect the watch’s system.
EN-91
Magnetism● Some watch functions may not operate normally in a location where
magnetism is present. Very strong magnetism (from medical equipment,etc.) should be avoided because it can cause malfunction of your watchand damage to electronic components.
Chemicals● Do not allow your watch to come into contact with thinner, gasoline,
solvents, oils, or fats, or with any cleaners, adhesives, paints, medicines,or cosmetics that contain such ingredients. Doing so can causediscoloration of or damage to the resin case, resin band and other parts.
Storage● If you do not plan to use your watch for a long time, thoroughly wipe it free
of all dirt, sweat, and moisture, and store it in a cool, dry place.● Disconnect the charger cable from the AC adaptor and unplug the AC
adaptor from the power outlet when not charging. Store them in a safe placefor later use. The charger cable is magnetic, so keep it away from magneticcards, precision equipment, and analog watches.
Resin Components● Allowing your watch to remain in contact with other items or storing it
together with other items for long periods while it is wet can cause color onresin components to transfer to the other items, or the color of the otheritems to transfer to the resin components of your watch. Be sure to dry offyour watch thoroughly before storing it and make sure it is not in contactwith other items.
● Leaving your watch where it is exposed to direct sunlight (ultraviolet rays)for long periods or failure to clean dirt from your watch for long periods cancause it to become discolored.
● Friction caused by certain conditions (strong external force, sustainedrubbing, impact, etc.) can cause discoloration of painted components.
● If there are printed figures on the band, strong rubbing of the printed areacan cause discoloration.
● Daily use and long-term storage of your watch can lead to deterioration,breaking, or bending of resin components. The extent of such damagedepends on usage conditions and storage conditions.
EN-92

Watch Sensors● A watch sensor is a precision instrument. Never try to take it apart. Never
try to insert any objects into the openings of a sensor, and take care toensure that dirt, dust, or other foreign matter does not get into it. After usingyour watch where it has been immersed in saltwater, rinse it thoroughly withfresh water.
Metal Components● Failure to clean dirt from metal components can lead to formation of rust,
even if components are stainless steel or plated. If metal componentsexposed to sweat or water, wipe thoroughly with a soft, absorbent cloth andthen place the watch in a well-ventilated location to dry.
● Use a soft toothbrush or similar tool to scrub the metal with a weak solutionof water and a mild neutral detergent, or with soapy water. Next, rinse withwater to remove all remaining detergent and then wipe dry with a softabsorbent cloth. When washing the band, wrap the watch case with kitchenplastic wrap so it does not come into contact with the detergent or soap.
Display Panel● Display figures may be difficult to read when viewed from an angle.● The display panel of this watch uses high-precision technology that
provides a pixel yield in excess of 99.99%. This means that some very smallnumber of pixels may not light or may remain lit at all times. This is due tothe characteristics of the display panel, and does not indicate malfunction.
EN-93
User MaintenanceCaring for Your WatchRemember that you wear your watch next to your skin, just like a piece ofclothing. To ensure your watch performs at the level for which it is designed,keep it clean by frequently wiping with a soft cloth to keep your watch andband free of dirt, sweat, water and other foreign matter.● Whenever your watch is exposed to sea water or mud, rinse it off with clean
fresh water.● For a resin band, wash with water and then wipe dry with a soft cloth. Note
that sometimes a smudge like pattern may appear on the surface of a resinband. This will not have any effect on your skin or clothing. Wipe with a clothto remove the smudge pattern.
● To clean the metal parts on a resin band, use a soft toothbrush or similartool to scrub the band with a weak solution of water and a mild neutraldetergent, or with soapy water. Next, rinse with water to remove allremaining detergent and then wipe dry with a soft absorbent cloth. Whenwashing the band, wrap the watch case with kitchen plastic wrap so it doesnot come into contact with the detergent or soap.
Dangers of Poor Watch CareRust● Though the metal steel used for your watch is highly rust-resistant, rust can
form if your watch is not cleaned after it becomes dirty.ー Dirt on your watch can make it impossible for oxygen to come into contact
with the metal, which can lead to breakdown of the oxidization layer onthe metal surface and the formation of rust.
● Rust can cause sharp areas on metal components and can cause bandpins to fly out of position or to fall out. If you ever notice any abnormalityimmediately stop using your watch and take it to an authorized CASIOservice center or to your original retailer.
● Even if the surface of the metal appears clean, sweat and rust in crevassescan soil the sleeves of clothing, cause skin irritation, and even interfere withwatch performance.
EN-94
Premature Wear● Leaving sweat or water on a resin band or bezel, or storing your watch in
an area subject to high moisture can lead to premature wear, cuts, andbreaks.
Skin Irritation● Individuals with sensitive skin or in poor physical condition may experience
skin irritation when wearing a watch. Such individuals should keep theirleather band or resin band particularly clean. Should you ever experiencea rash or other skin irritation, immediately remove your watch and contacta skin care professional.
Chargeable Battery Handling (Please recycle!)The built-in lithium-ion battery includes valuable resources.When you are ready to discard your watch, follow proper procedures in orderto recycle resources. For information about the proper procedure to followwhen discarding the watch, contact an authorized CASIO service center oryour original retailer.
Important!● Do not try to replace batteries by yourself. Request battery replacement
from an authorized CASIO service center or your original retailer.
Personal Information Protection PrecautionsTo protect your personal information, be sure to unpair the watch from yoursmartphone before transferring ownership of the watch to another party orbefore disposing of the watch. For details, visit the website below, enter “Howdo I unpair from a phone?”, and then tap the [Search] button.https://support.casio.com/en/support/faq.php?cid=019
EN-95
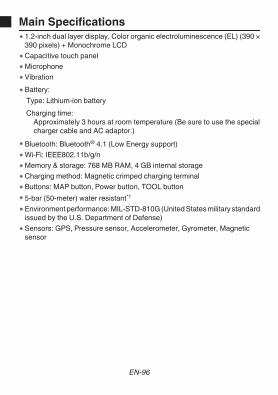
Main Specifications● 1.2-inch dual layer display, Color organic electroluminescence (EL) (390 ×
390 pixels) + Monochrome LCD● Capacitive touch panel● Microphone● Vibration● Battery:
Type: Lithium-ion batteryCharging time:
Approximately 3 hours at room temperature (Be sure to use the specialcharger cable and AC adaptor.)
● Bluetooth: Bluetooth® 4.1 (Low Energy support)● Wi-Fi: IEEE802.11b/g/n● Memory & storage: 768 MB RAM, 4 GB internal storage● Charging method: Magnetic crimped charging terminal● Buttons: MAP button, Power button, TOOL button● 5-bar (50-meter) water resistant*1
● Environment performance: MIL-STD-810G (United States military standardissued by the U.S. Department of Defense)
● Sensors: GPS, Pressure sensor, Accelerometer, Gyrometer, Magneticsensor
EN-96
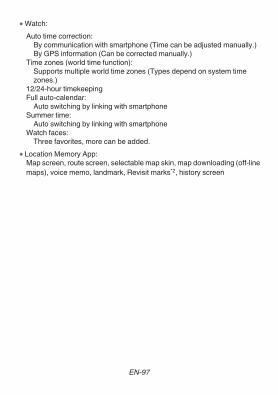
● Watch:Auto time correction:
By communication with smartphone (Time can be adjusted manually.)By GPS information (Can be corrected manually.)
Time zones (world time function):Supports multiple world time zones (Types depend on system timezones.)
12/24-hour timekeepingFull auto-calendar:
Auto switching by linking with smartphoneSummer time:
Auto switching by linking with smartphoneWatch faces:
Three favorites, more can be added.● Location Memory App:
Map screen, route screen, selectable map skin, map downloading (off-linemaps), voice memo, landmark, Revisit marks*2, history screen
EN-97
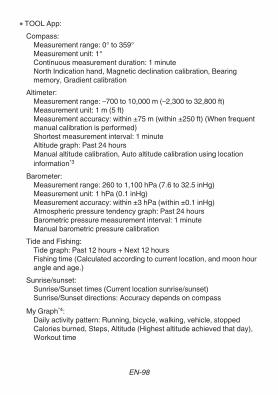
● TOOL App:Compass:
Measurement range: 0° to 359°Measurement unit: 1°Continuous measurement duration: 1 minuteNorth Indication hand, Magnetic declination calibration, Bearingmemory, Gradient calibration
Altimeter:Measurement range: –700 to 10,000 m (–2,300 to 32,800 ft)Measurement unit: 1 m (5 ft)Measurement accuracy: within ±75 m (within ±250 ft) (When frequentmanual calibration is performed)Shortest measurement interval: 1 minuteAltitude graph: Past 24 hoursManual altitude calibration, Auto altitude calibration using locationinformation*3
Barometer:Measurement range: 260 to 1,100 hPa (7.6 to 32.5 inHg)Measurement unit: 1 hPa (0.1 inHg)Measurement accuracy: within ±3 hPa (within ±0.1 inHg)Atmospheric pressure tendency graph: Past 24 hoursBarometric pressure measurement interval: 1 minuteManual barometric pressure calibration
Tide and Fishing:Tide graph: Past 12 hours + Next 12 hoursFishing time (Calculated according to current location, and moon hourangle and age.)
Sunrise/sunset:Sunrise/Sunset times (Current location sunrise/sunset)Sunrise/Sunset directions: Accuracy depends on compass
My Graph*4:Daily activity pattern: Running, bicycle, walking, vehicle, stoppedCalories burned, Steps, Altitude (Highest altitude achieved that day),Workout time
EN-98
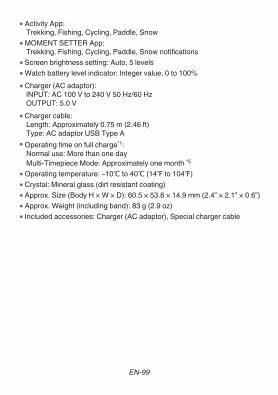
● Activity App:Trekking, Fishing, Cycling, Paddle, Snow
● MOMENT SETTER App:Trekking, Fishing, Cycling, Paddle, Snow notifications
● Screen brightness setting: Auto, 5 levels● Watch battery level indicator: Integer value, 0 to 100%● Charger (AC adaptor):
INPUT: AC 100 V to 240 V 50 Hz/60 HzOUTPUT: 5.0 V
● Charger cable:Length: Approximately 0.75 m (2.46 ft)Type: AC adaptor USB Type A
● Operating time on full charge*1:Normal use: More than one dayMulti-Timepiece Mode: Approximately one month *5
● Operating temperature: –10℃ to 40℃ (14℉ to 104℉)● Crystal: Mineral glass (dirt resistant coating)● Approx. Size (Body H × W × D): 60.5 × 53.8 × 14.9 mm (2.4” × 2.1” × 0.6”)● Approx. Weight (including band): 83 g (2.9 oz)● Included accessories: Charger (AC adaptor), Special charger cable
EN-99
● About MIL-STD-810G (United States military standard issued by the U.S.Department of Defense):Description:
1. Shock2. Vibration3. Humidity4. Low Pressure Transport5. Low Pressure Operation6. High Temperature Transport7. Low Temperature Transport8. Temperature Shock9. Ice Accretion
Procedure: MIL-STD-810G, w/change11: Method 516.7 ProcedureⅣ2: Method 514.7 ProcedureⅠ3: Method 507.6 ProcedureⅡ4: Method 500.6 ProcedureⅠ5: Method 500.6 ProcedureⅡ6: Method 501.6 ProcedureⅠ7: Method 502.6 ProcedureⅠ8: Method 503.6 ProcedureⅠ-C9: Method 521.4 ProcedureⅠ
Attention:The functions of this watch have been confirmed under testenvironments, but no guarantees are made concerning operation underall environments where it may be used. Also, no guarantees are madeconcerning the ability of the watch to withstand damage or malfunction.
● Phones and tablets that work with Wear OS by GoogleWear OS by Google works with phones running Android 4.4+ (excludingGo edition) or iOS 10+*6*7. Supported features may vary between platformsand countries.Visit g.co/wearcheck on your Android phone or iPhone® to see if it’scompatible.
EN-100
*1 CASIO test conditions*2 In order to be able to use these functions your Android phone must have
the CASIO MOMENT SETTER+ app installed, and there must be aconnection between the phone and watch. These functions are notsupported in the case of iOS.
*3 GPS altitude information is used, so the indicated altitude may not exactlymatch the actual above sea level elevation or altitude.
*4 Default: OFF*5 Displaying the step count reduces the battery operating time.*6 Limited functionality when connected to iOS device.*7 Recommended. However, a WSD-F30 watch that is already paired with
a smartphone running iOS 9.3+ can also be used.
EN-101
Supplementary InformationOpen Source InformationCASIO uses GPL, LGPL and other source code that comes under an opensource license in this product. CASIO discloses the source code inaccordance with each open source license. For source codes and detailsabout each open source license, visit the CASIO website. Source code isprovided “as-is” without any guarantees. However, this does not affectwarranty conditions by CASIO concerning product defects (including defectsin the source code).Copyrights● The Bluetooth® word mark and logos are registered trademarks owned by
Bluetooth SIG, Inc. and any use of such marks by CASIO COMPUTER CO.,LTD. is under license. Other trademarks and trade names are those of theirrespective owners.
● Wi-Fi is a registered trademark of Wi-Fi Alliance.● Google, Android, Wear OS by Google, Google Play and other related marks
and logos are trademarks of Google LLC.● iPhone is a trademark or registered trademark of Apple Inc. registered in
the United States and other countries.● App Store is a service mark of Apple Inc., registered in the U.S. and other
countries.● Other company, product and service names used in this manual also may
be trademarks or registered trademarks of others.Regulatory InformationYour watch is a device that supports electronic way of display. To displayregulatory information, perform the steps below.
1. While the watch face is displayed, swipe the touchscreen from top to bottom and then tap D.
2. Scroll the screen downwards. Tap “System” and then“Regulatory information” in sequence.
EN-102
This device complies with part 15 of FCC Rules and Industry Canada’slicence-exempt RSSs. Operation is subject to the following twoconditions: (1) this device may not cause harmful interference, and (2) thisdevice must accept any interference received, including interference thatmay cause undesired operation.
FCC CAUTIONChanges or modifications not expressly approved by the partyresponsible for compliance could void the user’s authority to operate theequipment.
NoteThis equipment has been tested and found to comply with the limits for aClass B digital device, pursuant to part 15 of the FCC Rules. These limitsare designed to provide reasonable protection against harmfulinterference in a residential installation. This equipment generates, usesand can radiate radio frequency energy and, if not installed and used inaccordance with the instructions, may cause harmful interference to radiocommunications. However, there is no guarantee that interference will notoccur in a particular installation. If this equipment does cause harmfulinterference to radio or television reception, which can be determined byturning the equipment off and on, the user is encouraged to try to correctthe interference by one or more of the following measures:ー Reorient or relocate the receiving antenna.ー Increase the separation between the equipment and receiver.ー Connect the equipment into an outlet on a circuit different from that
to which the receiver is connected.ー Consult the dealer or an experienced radio/TV technician for help.
This transmitter must not be co-located or operated in conjunction withany other antenna or transmitter.
EN-103
The available scientific evidence does not show that any health problemsare associated with using low power wireless devices.There is no proof, however, that these low power wireless devices areabsolutely safe. Low power Wireless devices emit low levels of radiofrequency energy (RF) in the microwave range while being used. Whereashigh levels of RF can produce health effects (by heating tissue), exposureof low-level RF that does not produce heating effects causes no knownadverse health effects. Many studies of low-level RF exposures have notfound any biological effects. Some studies have suggested that somebiological effects might occur, but such findings have not been confirmedby additional research. The WSD-F21 has been tested and found to complywith FCC/IC radiation exposure limits set forth for an uncontrolledenvironment and meets the FCC radio frequency (RF) Exposure Guidelinesand RSS-102 of the IC radio frequency (RF) Exposure rules.
This product is subject to the Export Administration Regulations (EAR) ofthe United States, and so it cannot be exported to or brought into countriesthat fall under U.S. Embargoes and Other Special Controls.
Frequency band and maximum output power● WSD-F30
IEEE802.11b/g/n:2.4GHz band≦19dBmBluetooth(2.4GHz)≦10.5dBm
Product Quality InformationCASIO collects information about watch usage in a way that keeps usersanonymous. This information is securely stored on CASIO servers and is notaccessible by third-parties. It is used to improve product quality andfunctionality.
EN-104

CASIO COMPUTER CO., LTD.6-2, Hon-machi 1-chomeShibuya-ku, Tokyo 151-8543, Japan S05_MA1907-C


![[MobCamp 2014] Android Wear and Google Glass](https://img.pdfslide.us/doc/110x75/5537ffc04a7959437c8b4650/mobcamp-2014-android-wear-and-google-glass.jpg)