Embed Size (px)
Citation preview

How to access, create and complete WPCG Electronic Clearance Form
1
1. Log into your WPCG profile and click on Work Clearance Form
2. Click on to generate a NEW Form
The Form number, your WPCG ID and Expiry Date are automatically generated
Status of the Clearance Form starts in
3. Start by completing the Work Details Section including identifying if the work will be conducted inside the hazardous area or inside site shop, office or outside a hazardous area
4. Acknowledge the three General Conditions which are mandatory requirements you must comply with:
How to access, create and complete WPCG Electronic Clearance Form
2
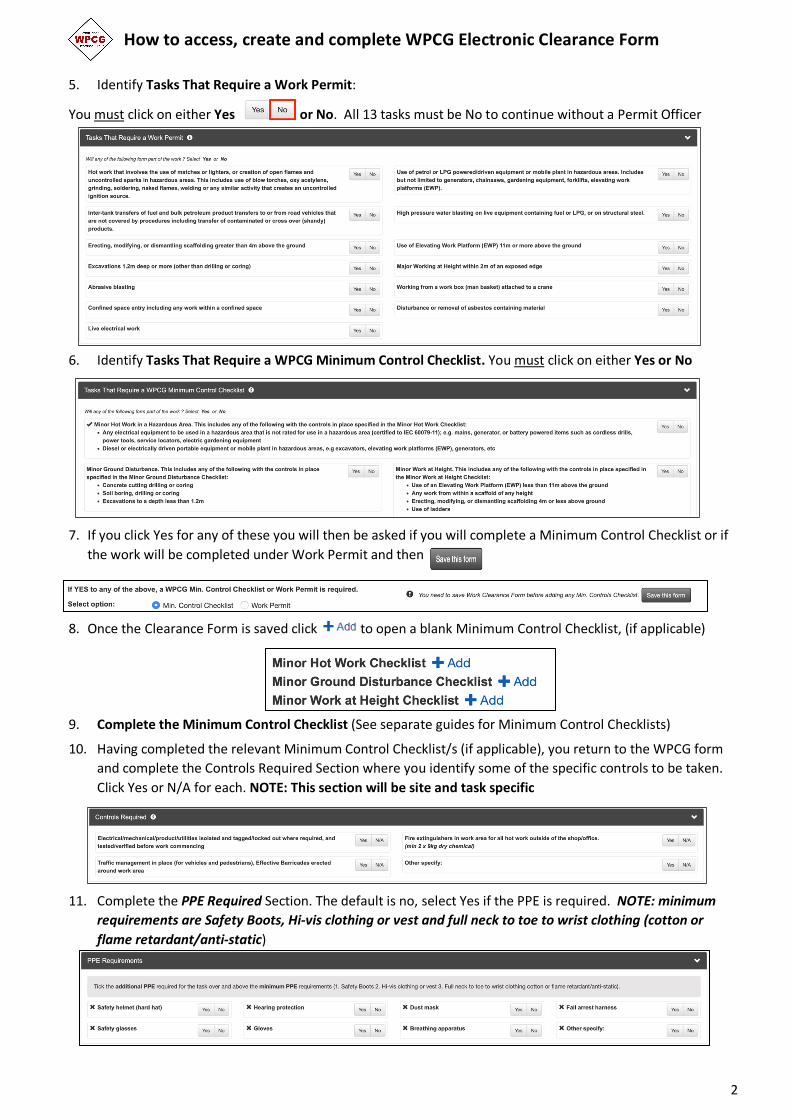
5. Identify Tasks That Require a Work Permit:
You must click on either Yes or No. All 13 tasks must be No to continue without a Permit Officer
6. Identify Tasks That Require a WPCG Minimum Control Checklist. You must click on either Yes or No
7. If you click Yes for any of these you will then be asked if you will complete a Minimum Control Checklist or if the work will be completed under Work Permit and then
8. Once the Clearance Form is saved click to open a blank Minimum Control Checklist, (if applicable)
9. Complete the Minimum Control Checklist (See separate guides for Minimum Control Checklists)
10. Having completed the relevant Minimum Control Checklist/s (if applicable), you return to the WPCG form and complete the Controls Required Section where you identify some of the specific controls to be taken. Click Yes or N/A for each. NOTE: This section will be site and task specific
11. Complete the PPE Required Section. The default is no, select Yes if the PPE is required. NOTE: minimum requirements are Safety Boots, Hi-vis clothing or vest and full neck to toe to wrist clothing (cotton or flame retardant/anti-static)

How to access, create and complete WPCG Electronic Clearance Form
3
12. The final control section is the JSA/SWMS check to ensure that you have amended your JSA to include any site-specific risks or conditions and record of the JSA/SWMS number or numbers
13. Click on and
This changes the status of the Clearance Form to and opens the signature fields located at the bottom of the form.
14. Both you and the site operator Sign The Form. This can be done using the mouse or a fingernail if using a touchscreen.
NOTE: The Site Operator is not authorising the work, they are confirming you have discussed the work with them. You are self-authorising the work.
15. Next you click on and then to self-authorise the work and issue the Clearance Form.
This changes the status of the Clearance Form to
16. When the job finishes, or it’s the end of the day, ensure you have left the area clean and safe. Return to the form and click Open End of Day Sign Off
17. Complete the End of Day Sign Off located at the bottom of the form. Invite the site operator to inspect work and sign the form agreeing you have discussed the works completed and any potential impact to the site. There is also room for comments.
18. Click on and then
The Form is now all work under this Clearance Form must now have stopped; any additional work will require a new Clearance Form to be issued.