Embed Size (px)
Citation preview

GX-100/150a b s m o l d e d l o u d s p e a k e r
L A U T S P R E C H E R M I T A B S - K U N S T S T O F F G E H Ä U S EA L T A V O C E S E N M O L D E A B S
E N C E I N T E S A B S M O U L E E S G X - 1 0 0 / 1 5 0
In the USA: If you experience problems with this unit, please go to http://www.geminidj.com/support.html or call 1-732-738-9003 for Gemini Customer Service. Do not attempt to return this equipment to your deal-er. Gemini stands behind their products with a 1 year limited warranty on all audio products. For larger images & detailed specs visit our website @ http://www.geminidj.com. WE ARE NOT RESPONSIBLE FOR TYPO-GRAPHICAL ERRORS OR OMISSIONS. WE RESERVE THE RIGHT TO CHANGE WITHOUT NOTICE. Parts of the design of this product may be protected by worldwide patents. Information in this manual is subject tochange without notice and does not represent a commitment on the part of the vendor. Gemini Sound Products Corp. shall not be liable for any loss or damage whatsoever arising from the use of information or anyerror contained in this manual. No part of this manual may be reproduced, stored in a retrieval system or transmitted, in any form or by any means, electronic, electrical, mechanical, optical, chemical, including pho-tocopying and recording, for any purpose without the express written permission of Gemini Sound Products Corp. It is recommended that all maintenance and service on this product is performed by Gemini SoundProducts Corp. or its authorized agents. Gemini Sound Products Corp. will not accept liability for loss or damage caused by maintenance or repair performed by unauthorized personnel.
USA:Gemini Sound Products Corp.Worldwide Headquarters120 Clover PlaceEdison, New Jersey 08837Ph: 732.738.9003Fax: 732.738.9006
Germany:Gemini Sound Products GmbHLiebigstrasse 1685757 KarlsfeldPh: + 49 8131 39171-0Fax: + 49 8131 39171-9
Spain:Gemini Sound Products S.A.Rosellon 516 local08026 BarcelonaPh: + 34 93 436 37 00Fax: + 34 93 347 69 61
UK:Gemini Sound Products LTDUnit C4 HazletonIndustrial Estate,Waterlooville P08 9JUPh: +44 (0)87 087 00880Fax: +44 (0)87 087 00990
France:GSL France1, Allée d' Effiat,Parc de l'événementF-91160 LongjumeauPh: + 33 1 69 79 97 70Fax: + 33 1 69 79 97 80
Worldwide Offices

<2>
CAUTION: This product satisfies FCC regulations when shielded cablesand connectors are used to connect the unit to other equipment. To pre-vent electromagnetic interference with electric appliances such as radiosand televisions, use shielded cables and connectors for connections.
The exclamation point within an equilateral triangle is intended to alertthe user to the presence of important operating and maintenance (servic-ing) instructions in the literature accompanying the appliance.
The lightning flash with arrowhead symbol, within an equilateral triangle,is intended to alert the user to the presence of uninsulated "dangerousvoltage" within the product's enclosure that may be of sufficient magnitudeto constitute a risk of electric shock to persons.READ INSTRUCTIONS: All the safety and operating instructions should beread before the product is operated.RETAIN INSTRUCTIONS: The safety and operating instructions should beretained for future reference.HEED WARNINGS: All warnings on the product and in the operatinginstructions should be adhered to.FOLLOW INSTRUCTIONS: All operating and use instructions should befollowed.CLEANING: The product should be cleaned only with a polishing cloth ora soft dry cloth. Never clean with furniture wax, benzine, insecticides orother volatile liquids since they may corrode the cabinet.ATTACHMENTS: Do not use attachments not recommended by the prod-uct manufacturer as they may cause hazards.WATER & MOISTURE: Do not use this product near water, for example,near a bathtub, wash bowl, kitchen sink, or laundry tub; in a wet basement;or near a swimming pool; and the like.ACCESSORIES: Do not place this product on an unstable cart, stand, tri-pod, bracket, or table. The product may fall, causing serious injury to achild or adult, and serious damage to the product. Use only with a cart,stand, tripod, bracket, or table recommended by the manufacturer, or soldwith the product. Any mounting of the product should follow the manufac-
turer's instructions, and should use a mounting accessory recommendedby the manufacturer.CART: A product and cart combination should be moved with care. Quickstops, excessive force, and uneven surfaces may cause the product and cartcombination to overturn. SEE FIGURE A.VENTILATION: Slots and openings in the cabinet are provided for ventila-tion and to ensure reliable operation of the product and to protect it fromoverheating, and these openings must not be blocked or covered. Theopenings should never be blocked by placing the product on a bed, sofa,rug, or other similar surface. This product should not be placed in a built-in installation such as a bookcase or rack unless proper ventilation is pro-vided or the manufacturer's instructions have been adhered to.POWER SOURCES: This product should be operated only from the type ofpower source indicated on the marking label. If you are not sure of the typeof power supply to your home, consult your product dealer or local powercompany.LOCATION: The appliance should be installed in a stable location.NON-USE PERIODS: The power cord of the appliance should beunplugged from the outlet when left unused for a long period of time.GROUNDING OR POLARIZATION:
- If this product is equipped with a polarized alternating current line plug(a plug having one blade wider than the other), it will fit into the outletonly one way. This is a safety feature. If you are unable to insert the plugfully into the outlet, try reversing the plug. If the plug should still fail to fit,contact your electrician to replace your obsolete outlet. Do not defeat thesafety purpose of the polarized plug.
- If this product is equipped with a three-wire grounding type plug, a plughaving a third (grounding) pin, it will only fit into a grounding type poweroutlet. This is a safety feature. If you are unable to insert the plug into theoutlet, contact your electrician to replace your obsolete outlet. Do notdefeat the safety purpose of the grounding type plug.POWER-CORD PROTECTION: Power-supply cords should be routed sothat they are not likely to be walked on or pinched by items placed uponor against them, paying particular attention to cords at plugs, conveniencereceptacles, and the point where they exit from the product.OUTDOOR ANTENNA GROUNDING: If an outside antenna or cable sys-tem is connected to the product, be sure the antenna or cable system isgrounded so as to provide some protection against voltage surges andbuilt-up static charges. Article 810 of the National Electrical Code,ANSI/NFPA 70, provides information with regard to proper grounding ofthe mast and supporting structure, grounding of the lead-in wire to anantenna discharge unit, size of grounding conductors, location of antenna-discharge unit, connection to grounding electrodes, and requirements forthe grounding electrode. SEE FIGURE B.LIGHTNING: For added protection for this product during a lightningstorm, or when it is left unattended and unused for long periods of time,unplug it from the wall outlet and disconnect the antenna or cable system.This will prevent damage to the product due to lightning and power-linesurges.POWER LINES: An outside antenna system should not be located in the
vicinity of overhead power lines or other electric light or power circuits, orwhere it can fall into such power lines or circuits. When installing an out-side antenna system, extreme care should be taken to keep from touchingsuch power lines or circuits as contact with them might be fatal.OVERLOADING: Do not overload wall outlets, extension cords, or integralconvenience receptacles as this can result in a risk of fire or electric shock.OBJECT & LIQUID ENTRY: Never push objects of any kind into this prod-uct through openings as they may touch dangerous voltage points or short-out parts that could result in a fire or electric shock. Never spill liquid ofany kind on the product.SERVICING: Do not attempt to service this product yourself as opening orremoving covers may expose you to dangerous voltage or other hazards.Refer all servicing to qualified service personnel.DAMAGE REQUIRING SERVICE: Unplug this product from the wall out-let and refer servicing to qualified service personnel under the followingconditions:
- When the power-supply cord or plug is damaged.- If liquid has been spilled, or objects have fallen into the product.- If the product has been exposed to rain or water.- If the product does not operate normally by following the operating
instructions. Adjust only those controls that are covered by the operatinginstructions as an improper adjustment of other controls may result indamage and will often require extensive work by a qualified technician torestore the product to its normal operation.
- If the product has been dropped or damaged in any way.- When the product exhibits a distinct change in performance, this indi-
cates a need for service.REPLACEMENT PARTS: When replacement parts are required, be sure theservice technician has used replacement parts specified by the manufactur-er or have the same characteristics as the original part. Unauthorized sub-stitutions may result in fire, electric shock, or other hazards.SAFET Y CHECK: Upon completion of any service or repairs to this prod-uct, ask the service technician to perform safety checks to determine thatthe product is in proper operating condition.WALL OR CEILING MOUNTING: The product should not be mounted toa wall or ceiling.HEAT: The product should be situated away from heat sources such asradiators, heat registers, stoves, or other products (including amplifiers)that produce heat.DISPOSAL: This product shall not be treated as household waste. Insteadit shall be handed over to the applicable collection point for the recyclingof electrical and electronic equipment. By ensuring this product is dis-posed of correctly, you will help prevent potential negative consequencesfor the environment and human health, which could otherwise be causedby inappropriate waste handling of this product. The recycling of materialswill help to conserve natural resources. For more detailed informationabout recycling of this product, please contact your local city office, yourhousehold waste disposal service or the shop where you purchased theproduct.
C A U T I O NPLEASE READ BEFORE USING APPLIANCE,
IMPORTANT WARNING & SAFET Y INSTRUCTIONS!RISK OF ELECTRICAL SHOCK DO NOT OPEN!

<3>
Cables demonstrate numerous possible methods of connection & is not an exact depiction of the wiring set-up.Power cable & electrical outlet shown are for US standards only. Other countries will be provided with theappropriate power cable at authorized dealers.
Parts Checklist:1 x Speaker Cabinet1 x Power Cable1 x Manual with Warranty Card2 x Mounting Eyelets
1. Speakon In/Out Jacks2. AC Inlet with Fuse3. Power Switch4. Voltage Selector Switch5. XLR Line Input
6. RCA Line Inputs7. XLR Mic Input8. XLR Line Output9. Mic Volume Control10. Amplifier Volume Control
11. Power LED12. Clip LED13. Locking Pin
POWER
LEVEL
MIN MAX
CLIP
POWERLEVEL
AC/110 V / 50, 60 Hz
350 WATTS
MICIN
LINE IN
CD IN
LINE OUT
MIN MAX
GX-100 GX-150
Rear
1
2
3
4
5
6
7
8
9
10
11
12
1313

13. Locking Pin14. Rigging Points15. Stand Mounting Socket16. Rubber Feet17. Stacking Grooves
Top
Bottom
13
14
16 16
16
17
1717
17
1615
14
<4>

GX-100/150 ABS MOLDED LOUDSPEAKERS
INTRODUCTION:
Congratulations on your purchase of a GX-SERIES trapezoidal loudspeak-er, engineered & manufactured by Gemini Sound Products. The Gemini GXspeaker range includes the very latest technology in lightweight ABSdesign. Available in 8”, 10”, 12”, and 15” passive or powered units, the newGX-SERIES is a superb addition to Gemini’s comprehensive speaker line.The GX-100 and 150 are backed by a 1 year limited warranty* and are sureto provide years of reliable service with the proper care and maintenance.
FEATURES:GX-150 Powered Professional 8" Two Way ABS Loudspeaker
- 8" Aluminum die-cast woofer with high temperature voice coil
- Compression driver with 1.25" titanium diaphragm
- Durable black ABS plastic molded shell & full metal grille
- 100w RMS, 250w peak power amplifier
- Frequency response: 65 Hz - 20 KHz
- Power & clip LEDs
- XLR Mic input with rotary volume control
- XLR and RCA Line inputs
- XLR Line output (for linking multiple speakers)
- Rotary Master volume control
- Stand mounting socket and rigging points
- Rubber feet and stacking grooves
- Mounting eyelets included
GX-100 Professional 8" Two Way Passive ABS Loudspeaker
- 8" Aluminum die-cast woofer with high temperature voice coil
- Compression driver with 1.25" titanium diaphragm
- Durable black ABS plastic molded shell & full metal grille
- 100w RMS, 250w peak power handling
- Frequency response: 65 Hz - 20 KHz
- Speakon input and output (for linking multiple speakers)
- Stand mounting socket and rigging points
- Rubber feet and stacking grooves
- Mounting eyelets included
CAUTIONS:
1. All operating instructions should be read before using this equipment.
2. To reduce the risk of electrical shock, do not open the unit. There areNO USER REPLACEABLE PARTS INSIDE. Please refer servicing to a qual-ified Gemini Sound Products service technician. In the USA: If you experi-ence problems with this unit, please call 1 (732) 738-9003 for Gemini
Customer Service. Do not attempt to return this equipment to your dealer.
3. Do not expose this unit to direct sunlight or to a heat source such as aradiator or stove.
4. This unit should be cleaned only with a damp cloth. Avoid solvents orother cleaning detergents.
5. When moving this equipment, it should be placed in its original cartonand packaging. This will reduce the risk of damage during transit.
6. DO NOT EXPOSE THIS UNIT TO RAIN OR MOISTURE.
7. DO NOT USE ANY SPRAY CLEANER OR LUBRICANT ON ANY CON-TROLS OR SWITCHES.
LINE VOLTAGE SELECTION (GX-150 only):The GEMINI GX-150 speakers are a dual voltage unit operating at 115 or230 volts. Be sure to set the proper voltage before operating:1. Place the head of a screwdriver in the center of the VOLTAGE SELECTOR (4)switch found on the rear panel. 2. Slide the switch to 115 or 230 volts.3. Do not force or twist the switch. Excessive force may cause damage. Ifthe switch does not move smoothly, contact a qualified technician.
CONNECTIONS:1. Make sure ALL your equipment is completely OFF and lower ALL VOL-UME, LEVEL, & GAIN controls and before connecting the speaker. 1. For the GX-100 passive speaker, use a SPEAKON CABLE from your AMPLIFIEROUTPUT to the SPEAKON INPUT JACK (1) on the rear of the speaker.2. For the GX-100 passive speaker, you may CHAIN-LINK additional speakersby running a Speakon Cable from one speaker cabinet to another. The abil-ity to do this may depend on the output power and load conditions of youramplifier, as Chain-Linking speakers in this fashion will affect the overallimpedance. 3. For the GX-150 active speaker, the amplifier is built into the rear of thespeaker cabinet. This means that you can connect a Microphone directly tothe XLR MIC INPUT (7), or you can connect a balanced Line Level device tothe XLR LINE INPUT (5). Alternatively, you may also connect a Line Leveldevice to the RCA LINE INPUTS (6)3. For the GX-150 active speaker, you may Chain-Link additional speakersby running an XLR cable from the XLR LINE OUTPUT (8) of one speaker cab-inet to the XLR LINE INPUT (5) of another speaker. Since each cabinet isamplified independantly, this process can be repeated indefinitely.OPERATION:GX-100:1. First turn on your MIXER or other signal source.2. Then turn on your AMPLIFIER and increase the VOLUME or GAIN controlas recommended by the AMPLIFIER’S owner manual.3. Start playing a typical audio program through the system, and adjust thevolume from the sound source to a reasonable listening level.GX-150:1. First turn on your audio source (or connect a Microphone), then turnthe Speaker’s POWER SWITCH (3) to the ‘ON’ position. ,The POWER LED (11)will light. Start playing a typical audio program through the system, andadjust the volume from the sound source to a reasonable listening level.
2. Use the AMPLIFIER VOLUME CONTROL (10) control to adjust the volume ofthe speaker. If the speaker is overloaded, the CLIP LED (12) will illuminatered. If the CLIP LED (12) frequently illuminates red, then lower theAMPLIFIER VOLUME CONTROL (10) control, or lower the volume from theaudio source to avoid damaging the speaker or its built in amplifier. 3. Adjust the volume of a connected microphone by using the MIC VOLUMECONTROL (9).NOTE: IT IS POSSIBLE TO MOUNT THE GX SERIES SPEAKERS ON A SPEAKER STANDBY INSERTING THE STAND INTO THE STAND MOUNTING SOCKET (15) AND TIGHTEN-ING THE SOCKET USING THE LOCKING PIN (13). ANOTHER WAY TO MOUNT THESPEAKER IS TO USE THE SPEAKER RIGGING POINTS (14). SPEAKER STANDS AREAVAILABLE SEPARATELY. THE RUBBER FEET (16) ARE FOR STACKING THE SPEAKERSON TOP OF ONE ANOTHER WITHIN THE STACKING GROOVES (17) LOCATED ON THETOP PORTION OF THE SPEAKER.
SPECIFICATIONS:
GX-100 GX-150
Woofer Magnet Weight: 41 Oz 41 Oz
Woofer Voice Coil: 49.5 mm 49.5 mm
Woofer Impedance: 8 Ohms 4 Ohms
Woofer RMS Wattage: 100 Watts 100 Watts
Woofer Peak Wattage: 250 Watts 250 Watts
Compression Driver Magnet Weight: 23 Oz. 23 Oz.
Compression Driver Diaphram Size: 32 mm 32 mm
Compression Driver RMS Wattage: 60 Watts 60 Watts
Compression Driver Peak Wattage: 120 Watts 120 Watts
Crossover Specification: 3 Khz, 12 dB/Oct. 3 Khz, 12 dB/Oct
Nominal Horn Dispertion: 40° X 90° 40° X 90°
Sensitivity: 97 dB/m/w 97 dB/m/w
Frequency Response: 65-20 Khz 65-20 Khz
Type of Amplifier: N/A MONO
Stand Mount Hole: 25 mm 25 mm
Cabinet Weight: 8 lbs (3.7 kg) 11 lbs (4.9 kg)
Shipping Weight: 10 lbs (4.7 kg) 13 lbs (5.9 kg)
Power Requirements: n/a 110/230VAC / 60~50Hz
Cabinet Dimensions: 405x223x293/217mm (16x8.5x11.5/8.5in)
Specifications and design are subject to change without notice for purposeof improvement.
*The stated warranty does not affect statutory local warranties.
<5>

VORSICHT: Dieses Produkt erfüllt die FCC-Regeln, wenn Sie zumAnschluss abgeschirmte Kabel und Stecker verwenden, um es mit anderenGeräten zu verbinden. Auch um elektromagnetische Störungen andererelektrischer Geräte wie Radios oder Fernseher zu vermeiden, benutzen Sieabgeschirmte Kabel und Stecker für die Verbindungen.
Das Ausrufezeichen im gleichseitigen Dreieck weißt Sie in derBedienungsanleitung auf wichtige Bedienungsanweisungen und Wartungs-/Serviceanweisungen hin.
Das Blitzsymbol im gleichseitigen Dreieck dient dazu, den Benutzer vorgefährlichen Spannungen an nicht isolierten Stellen im Gehäuse zu war-nen, die so groß sind, dass Sie eine Gefahr für den Benutzer darstellen.ANWEISUNGEN LESEN: Lesen Sie alle Sicherheits- undBedienungsanweisungen, bevor Sie mit dem Produkt arbeiten.AUFBEWAHRUNGSHINWEIS: Bewahren Sie alle Sicherheits- undBedienungsanweisungen gut auf.WARNHINWEISE: Alle Warnhinweise für das Produkt und dieBedienungsanweisungen müssen genau eingehalten werden.ANWEISUNGEN BEFOLGEN: Alle Anweisungen zum Betrieb des Produktssollten befolgt werden.REINIGUNG: Das Produkt sollte nur mit einem Polier- oder einemweichen trockenen Tuch gereinigt werden. Benutzen Sie dazu niemalsMöbelwachs, Benzine, Insektenmittel oder andere flüchtigeReinigungsmittel, denn Sie könnten zur Korrosion des Gehäuses führen.ERWEITERUNGEN: Benutzen Sie keine Erweiterungen, die nicht vomHersteller empfohlen sind, da sie zu Risiken führen könnten.WASSER&FEUCHTIGKEIT: Benutzen Sie dieses Produkt nicht in der Nähevon Wasser, z. B. in der Nähe einer Badewanne, einer Waschschüssel, einesKüchenspülbeckens eines Waschbeckens, in einem feuchten Keller, einemSchwimmbecken oder an ähnlichen Orten.ZUBEHÖR: Stellen Sie das Produkt nicht auf eine wackelige und labileUnterlage. Das Produkt könnte herunterfallen und dabei Kinder oderErwachsene verletzen, wie auch selber beschädigt werden. Stellen Sie dasProdukt nur auf vom Hersteller empfohlene oder verkaufte Unterlagen.Jede Befestigung und Montage des Produkts sollte nach den Anweisungendes Herstellers ausgeführt werden. Nutzen Sie dazu ein vom Herstellerempfohlenes Montageset.
MOBILE UNTERLAGEN: Bewegen Sie eine Kombination aus dem Produktund einer mobilen Unterlage mit Vorsicht. Schnelles Anhalten, zu vielSchub oder unebene Böden können dazu führen, dass sich Produkt undmobile Unterlage überschlagen (SIEHE BILD A).BELÜFTUNG: Schlitze und Öffnungen im Gehäuse sind für die Belüftungvorgesehen. Sie stellen den zuverlässigen Betrieb des Produkts sicher undschützen es vor Überhitzung. Diese Öffnungen dürfen nicht verschlossen,blockiert oder bedeckt werden. Stellen Sie deswegen das Produkt niemalsauf ein Bett, ein Sofa, einen Teppich oder Stellen mit ähnlicher Oberfläche.Wenn Sie dieses Produkt in einer festen Installation wie z. B. in einem Regaloder einem Rack einbauen, sorgen Sie für ausreichende Belüftung odersorgen Sie dafür, dass die Bestimmungen des Herstellers genau eingehal-ten werden.STROMANSCHLUSS: Dieses Produkt darf nur mit dem auf dem Gerätangegebenen Strom betrieben werden. Wenn Sie sich nicht sicher sind,welche Stromart Sie bei sich zuhause haben, fragen Sie den Verkäufer desGeräts oder Ihren Stromversorger.AUFSTELLUNGSORT: Stellen Sie das Gerät an einem festen Ort auf.ZEITEN DES NICHTGEBRAUCHS: Ziehen Sie das Stromkabel aus demGerät heraus, wenn Sie es für eine längere Zeit nicht gebrauchen.ERDUNG ODER POLUNG:
- Wenn dieses Produkt mit einem gepolten Wechselstromstecker (EinStecker mit einem Kontakt mehr als andere Stecker) ausgestattet ist, passtdieser nur in einer bestimmten Richtung in die Steckdose und ist einbesonderes Sicherheitsmerkmal. Sollten Sie den Stecker nicht komplett indie Steckdose stecken können, versuchen Sie ihn andersherum einzusteck-en. Sollte der Stecker auch dann noch nicht in die Steckdose passen, beauf-tragen Sie einen Elektriker, um diese veraltete Steckdose auszutauschen.
- Wenn dieses Produkt mit einem geerdeten dreipoligen Stecker ausges-tattet ist, hat der Stecker einen dritten (Erdungs-)Kontakt und passt nur ineine Steckdose mit entsprechender Erdung. Auch das ist einSicherheitsmerkmal. Sollte der Stecker nicht in die Steckdose passen,beauftragen Sie einen Elektriker, um diese veraltete Steckdose auszu-tauschen.SCHUTZ DES STROMKABELS: Stromkabel sollten so verlegt werden, dassman nicht auf sie treten kann noch dass sie von darauf stehenden odergegen sie stoßenden Gegenständen gequetscht werden. Achten Sie beson-ders auf Kanten, Sicherung, Stecker und Buchsen.AUSSENANTENNENERDUNG: Wenn Sie eine Außenantenne oder einRadio-/Fernsehkabelsignal an das Produkt anschließen, achten Sie darauf,dass die Antenne oder das Kabel geerdet sind, um dafür zu sorgen, dassÜberspannungen und elektrostatische Aufladungen nicht auftreten kön-nen. Im Artikel 810 des National Electrical Code, ANSI/NFPA 70, finden SieInformationen über die richtige Erdung des Antennenmasts und weitereInformationen zu diesem Thema. (SIEHE AUCH ABBILDUNG B).GEWITTER: Trennen Sie das Produkt während eines Gewitters oder wennes unbeaufsichtigt ist oder wenn es für eine lange Zeit nicht benutzt wirddurch Ziehen des Stromkabels vom Stromnetz. Trennen Sie auch dieVerbindung zu einer Antenne oder Radio-/Fernsehkabeln. Dadurch vermei-den Sie Beschädigungen des Produkts durch Blitze oder Überspannungen.STROM- UND ÜBERLANDLEITUNGEN: Stellen Sie eine Außenantennenicht in der Nähe von Überlandleitungen, elektrischen Licht- oderStromkreisen oder an Stellen, wo sie in eine solche Leitung fallen könnteauf. Wenn Sie eine Außenantenne aufstellen, achten Sie besonders darauf,dass Sie auf keinen Fall irgendwelche Stromleitungen berührt. Das kann zugefährlichen Auswirkungen führen.
ÜBERLASTUNG: Überlasten Sie keine Steckdosen, Verlängerungskabeloder Sicherungen. Das kann zu Bränden oder elektrischen Schlägenführen.EINDRINGEN VON GEGENSTÄNDEN ODER FLÜSSIGKEIT: Führen Sieniemals irgendwelche Gegenstände durch Öffnungen in das Produkt ein.Sie könnten mit Strom führenden Stellen in Verbindung kommen oderKurzschlüsse verursachen, die zu Bränden oder elektrischen Schlägenführen können. Gießen Sie niemals irgendwelche Flüssigkeiten auf oder indas Produkt.SERVICE: Versuchen Sie nicht, das Produkt selber zu reparieren. Durchdas Öffnen des Gehäuses oder Entfernen von Schrauben können Sie mitgefährlichen Spannungen oder anderen Risiken in Kontakt kommen.Beauftragen Sie im Reparaturfall nur qualifiziertes Servicepersonal.WANN SERVICE NÖTIG IST: Unter den folgenden Bedingungen ziehenSie auf jeden Fall das Stromkabel aus der Steckdose und beauftragen Siefür eine Reparatur nur qualifiziertes Servicepersonal:
- Wenn das Stromkabel defekt ist.- Wenn Flüssigkeit auf oder in das Produkt gelaufen ist oder Gegenstände
in das Produkt gefallen sind.- Wenn das Produkt Regen oder Wasser ausgesetzt war.- Wenn das Produkt trotz Befolgen der Bedienungsanweisungen nicht
normal arbeitet. Stellen Sie dabei das Produkt nur nach den Anweisungender Bedienungsanleitung ein, andere Einstellungen können das Produktbeschädigen und den aufwändigen Einsatz von Technikern für dieWiederherstellung erfordern.
- Wenn das Produkt hingefallen oder auf andere Art und Weise beschädigtist.
- Wenn das Produkt eine eindeutige Veränderung im Betrieb zeigt.ERSATZTEILE: Wenn Ihr Produkt Ersatzteile benötigt, achten Sie darauf,dass der Servicetechniker nur vom Hersteller erlaubte Ersatzteile oderErsatzteile, die die gleichen Eigenschaften wie die originalen Teileaufweisen, einsetzt. Falsche Ersatzteile können zu Bränden, elektrischenSchlägen oder anderen Risiken führen.SICHERHEITSTEST: Bevor der Service oder eine Reparatur für diesesProdukt beendet sind, beauftragen Sie den Servicetechniker, einenServicetest durchzuführen, um sicher zu stellen, dass das Produkt einwand-frei funktioniert.WAND- ODER DECKENMONTAGE: Das Produkt sollte nicht an einerWand oder der Decke montiert werden.HITZE: Stellen Sie das Produkt nicht in die Nähe von Wärmequellen wieRadiatoren, Wärmespeichern, Öfen oder anderen Produkten (auchVerstärker), die Hitze erzeugen.VERWERTEN SIE WIEDER: Dieses Produkt sollte nicht als Haushaltsmüllentsorgt werden. Entsorgen Sie das Produkt im Bedarfsfall bei einerzuständigen Entsorgungsstelle, die das Recycling der elektrischen undelektronischen Bauteile übernimmt. Wenn Sie das Produkt dem gemäßentsorgen, schützen Sie die Umwelt und die menschliche Gesundheit. Beinicht sachgemäßer Entsorgung gefährden Sie die Umwelt und die men-schliche Gesundheit. Das Recycling verschiedener Materialien hilft, dieNatur und Ihre Ressourcen zu schonen. Für nähere Informationenbezüglich der Entsorgung dieses Produkts nehmen Sie Kontakt auf mitIhrer lokalen Stadtverwaltung, dem zuständigen Entsorgungsunternehmenoder dem Händler, bei dem Sie das Produkt gekauft haben.
<6>
A C H T U N G !BITTE UNBEDINGT VOR BENUTZUNG DES GERÄTS LESEN!WICHTIGE HINWEISE UND SICHERHEITSANWEISUNGEN
GEFAHR EINES ELEKTRISCHEN SCHLAGS. GERÄT NICHT ÖFFNEN!

<7>
Die Anschlussskizze zeigt verschiedene Anschlussmöglichkeiten auf und ist keine genaue Beschreibung der Verkabelung. Diegezeigten Stromkabel und Steckdosen entsprechen US-SStandards, Ihr GPA-LLeistungsverstärker wird mit dem passendenStromkabel geliefert.
Lieferumfang:1 x Lautsprecher1 x Netzkabel1 x Handbuch & Garantiekarte2 x Flugösen
1. Speakon-Ein- und Ausgänge 2. Netzbuchse mit Sicherung3. Netzschalter4. Spannungswahlschalter5. XLR-Line-Eingang
6. Cinch-Line-Eingang7. XLR-Mikrofon-Eingang8. XLR-Line-Ausgang9. Mikrofon-Lautstärkeregler10. Verstärker-Lautstärkeregler
11. Netz/Power-LED12. Übersteuerungs-LED13. Sicherheitsschraube
POWER
LEVEL
MIN MAX
CLIP
POWERLEVEL
AC/110 V / 50, 60 Hz
350 WATTS
MICIN
LINE IN
CD IN
LINE OUT
MIN MAX
GX-100 GX-150
Rückseite
1
2
3
4
5
6
7
8
9
10
11
12
1313
<8>
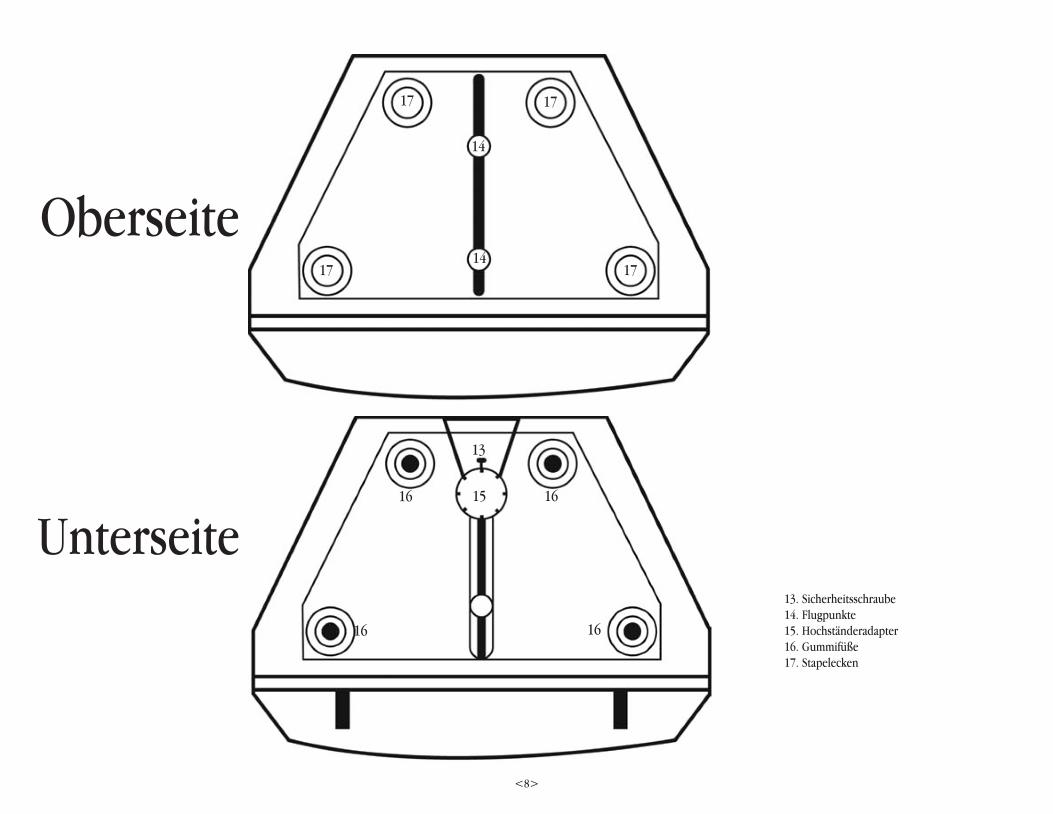
13. Sicherheitsschraube14. Flugpunkte15. Hochständeradapter16. Gummifüße17. Stapelecken
Oberseite
Unterseite
13
14
16 16
16
17
1717
17
1615
14

<9>
GX-100/150 LAUTSPRECHER MIT ABS-KUNSTSTOFFGEHÄUSE
EINLEITUNG:
Wir beglückwünschen Sie zu Ihrer Wahl eines trapezförmigenLautsprechers aus der GX-SERIE, entwickelt und hergestellt von GeminiSound Products. Die Lautsprecher der Gemini GX-Serie stellen denaktuellen Stand der ABS-Kunststofftechnik dar. Die neue GX-Serie bietetLautsprecher mit 8”, 10”, 12” und 15” sowohl in passiver als auch in aktiv-er Ausführung und erweitert das umfangreiche Angebot an Gemini-Lautsprechern. Die GX-100 und 150 sind mit einer limitierten 1-Jahres-Garantie* versehen und sie werden bei richtiger Behandlung und Pflegejahrelang zuverlässig arbeiten.
FEATURES:GX-150 Professioneller Zweiwege-Aktivlautsprecher mit ABS-Kunststoffgehäuse- 8" Aluminiumspritzguss-Woofer mit Hochtemperaturspule- Hochtontreiber mit 1,25” Titanium-Membran- Langlebiges gegossenes ABS-Kunststoffgehäuse mit Metallschutzgitter- integrierter Leistungsverstärker mit 100 Watt RMS, 250 Watt Spitze- Frequenzgang von 65 Hz bis 20 kHz- Power- & Übersteuerungs-LEDs- XLR-Mikrofoneingang mit Lautstärkeregler- XLR- und Cinch-Line-Eingang- XLR-Ausgang für Verlinkung mit weiteren Lautsprechern- Laustärke-Drehregler- Hochständerflansch und Flugpunkte- Gummifüße und Stapelecken- Flugösen im Lieferumfang enthalten.
GX-100 Professioneller 8"-Zweiwege-Passivlautsprecher mit ABS-Kunststoffgehäuse- 8" Aluminiumspritzguss-Woofer mit Hochtemperaturspule- Hochtontreiber mit 1,25” Titanium-Membran- Langlebiges gegossenes ABS-Kunststoffgehäuse mit Metallschutzgitter- Leistungsaufnahme: 60 Watt RMS, 180 Watt Peak - Frequenzgang: 65 Hz - 20 kHz- Speakon-Ein- und Ausgänge (weitere Boxen können verlinkt werden)- Hochständerflansch und Flugpunkte- Gummifüße und Stapelecken- Flugösen im Lieferumfang enthalten.
VORSICHTSMASSNAHMEN:
1. Vor Anwendung dieses Geräts bitte alle Anweisungen sorgfältig durchle-sen.
2. Das Gerät nicht öffnen, um das Risiko eines elektrischen Schocks zu ver-meiden. Es enthält KEINE VOM ANWENDER ERSETZBAREN TEILE. DieWartung darf nur von befähigten Wartungstechnikern durchgeführt wer-den.
3. Das Gerät keinem direkten Sonnenlicht oder einer Wärmequelle wieeinem Heizkörper oder einem Ofen aussetzen.
4. Dieses Gerät darf nur mit einem feuchten Tuch gesäubert werden. KeineLösungs- oder Reinigungsmittel benutzen.
5. Bei Umzügen sollte das Gerät in seinem ursprünglichen Versandkartonund Verpackungsmaterial verpackt werden. Dadurch verhindert man, dassdas Gerät während des Transportes beschädigt wird.
6. DIESES GERÄT NICHT REGEN ODER FEUCHTIGKEIT AUSSETZEN.
7. AN DEN REGLERN ODER SCHALTERN KEIN SPRAYREINI-GUNGSMITTEL ODER SCHMIERMITTEL BENUTZEN.
SPANNUNGSWAHL (nur GX-150):Die GEMINI-GX-150-Lautsprecher können sowohl mit 115 oder 230 VoltSpannung betrieben werde. Stellen Sie sicher, dass Sie den richtigen Wertvor Verbindung mit dem Stromnetz eingestellt haben:1. Führen Sie die Spitze eines Schraubendrehers mittig in denSPANNUNGSWAHLSCHALTER (4) auf der Rückseite ein.2. Schieben Sie den Schalter entweder auf 115 oder 230 Volt. (inDeutschland muss 230 Volt sichtbar sein)3. Wenden Sie keine Kraft an oder verdrehen Sie den Schaltern, das kannzu Beschädigungen führen. Wenn der Schalter sich nicht leicht bewegenlässt, kontaktieren Sie einen qualifizierten Servicetechniker.
ANSCHLIESSEN:1. Stellen Sie sicher, dass ALLE anderen Geräte Ihres Equipments AUS-GESCHALTET sind und ALLE VOLUME-, LEVEL- & GAIN-REGLER aufNull stehen, bevor Sie die Lautsprecher anschließen.1. Zum Anschluss der passiven GX-100 Lautsprecher benutzen Sie einSPEAKON-KABEL, um den VERSTÄRKERAUSGANG mit dem rückseitigen SPEAKON-EINGANG (1) des Lautsprechers zu verbinden.2. Um weitere Lautsprecher an den passiven GX-100-Lautsprecheranzuschließen, verbinden Sie diese mit Speakon-Kabeln miteinander. Diesist nur möglich, wenn Ihr Verstärker die entsprechende Leistung undImpedanz anbietet, da weitere Lautsprecher in einem Verbund dieGesamtimpedanz verändern.3. Der Verstärker des aktiven Lautsprechers GX-150 befindet sich aufdessen Rückseite. Sie können ein Mikrofon direkt an den XLR-MIKROFONEINGANG (7) oder ein symmetrisches Line-Signal an den XLR-LINE-EINGANG (5) anschließen. Alternativ können Sie ein Line-Signal auch an dieCINCH-EINGÄNGE (6) anschließen.3. Um weitere aktive Lautsprecher mit der GX-150 zu verbinden, verbindenSie den XLR-LINE-AUSGANG (8) eines Lautsprechers mit dem einem XLR-Kabel mit dem XLR-LINE-EINGANG (5) eines anderen. Da die jeweiligenLautsprecher über eigene Verstärker verfügen, können Sie nahezu unbe-grenzt viele Lautsprecher miteinander verlinken.BETRIEB:GX-100:1. Schalten Sie zuerst Ihren MIXER oder Ihre Signalquelle ein.2. Schalten Sie nun Ihren VERSTÄRKER EIN und regeln Sie den/die Volume-oder GAIN-REGLER gemäß den Anweisungen der BEDIENUNGSANLEITUNG IhresVERSTÄRKERS.3. Starten Sie nun die Wiedergabe von typischem Audiomaterial überden/die Lautsprecher und stellen Sie die gewünschte Lautstärke ein.
GX-150:1. Schalten Sie zuerst die Signalquelle ein (oder schließen Sie ein Mikrofonan). Jetzt stellen Sie den NETZSCHALTER (3) in die Position ‘ON’, und dieNetz-/POWER-LED (11) beginnt zu leuchten. Starten Sie nun die Wiedergabevon typischem Audiomaterial über den/die Lautsprecher.2. Mit dem VERSTÄRKER-LAUTSTÄRKEREGLER (10) stellen Sie nun die gewün-schte Lautstärke ein. Der Lautsprecher wird übersteuert, wenn die ÜBERS-TEUERUNGS-LED (12) rot leuchtet oder blinkt. Sollte die ÜBERSTEUERUNGS-LED (12) dauerhaft rot leuchten, reduzieren Sie mit dem VERSTÄRKER-LAUTSTÄRKEREGLER (10) die Lautstärke des GX-150 oder reduzieren Sie dieLautstärke der Signalquelle, um Beschädigungen des Lautsprechers oderdes Verstärkers zu vermeiden.3. Die Lautstärke eines angeschlossenen Mikrofons regeln Sie mit demMIKROFON-LAUTSTÄRKEREGLER (9).WICHTIG: SIE KÖNNEN DIE LAUTSPRECHER DER GX-SERIE AUF EINENHOCHSTÄNDER (NICHT IM LIEFERUMFANG ENTHALTEN) MONTIEREN, INDEM SIEDIESEN IN DEN HOCHSTÄNDERFLANSCH (15) SCHIEBEN UND MIT DERSICHERHEITSSCHRAUBE (13) SICHERN. SIE KÖNNEN DIE LAUTSPRECHER ABER AUCHMITTELS FLUGÖSEN AN DEN FLUGPUNKTEN (14) AN ENTSPRECHENDENBEFESTIGUNGEN AUFHÄNGEN. DIE GUMMIFÜßE (16) PASSEN IN DIE STAPELECKEN(17) OBEN AUF DEN LAUTSPRECHERN UND DIENEN DEM SICHEREN STAND, WENN SIELAUTSPRECHER ÜBEREINANDER STAPELN.
TECHNISCHE DATEN:
GX-100 GX-150
Woofer-Magnetgewicht: 1,16 kg 1,16 kgWoofer-Schwingspule: 49,5 mm 49,5 mmWoofer-Impedanz: 8 Ohm 4 OhmWoofer-RMS-Leistung: 100 Watt 100 WattWoofer-Spitzenleistung: 250 Watt 250 WattHochtontreiber-Magnetgewicht: 0,65 kg 0,65 kgHochtontreiber-Membran: 32 mm 32 mmHochtontreiber-RMS-Leistung: 60 Watt 60 WattHochtontreiber-Spitzen-Leistung: 120 Watt 120 WattFrequenzweiche: 3 kHz, 12 dB/Okt. 3 kHz, 12 dB/OktHornabstrahlung: 40° X 90° 40° X 90°Empfindlichkeit: 97 dB/m/w 97 dB/m/wFrequenzgang: 65-20 kHz 65-20 kHzVerstärkertyp: keiner MONOHochständeradapter: 25 mm 25 mmLautsprechergewicht: 3,7 kg 4,9 kgVersandgewicht: 4,7 kg 5,9 kgStromversorgung: keine 110/230VAC/60~50HzAbmessungen: 405 x 223 x 293/217 mm
Aus Gründen der Verbesserung können sich die technischen Daten unddas Design ohne vorherige Ankündigung ändern.*Die allgemeinen gesetzlichen Gewährleistungen bleiben von denHerstellergarantien unberührt.

PRECAUCION: Este producto sigue las regulaciones FCC siempre que seutilicen cables y conectores blindados para conectar este equipo a otrasunidades. Para prevenir interferencias electromagnéticas con otrosaparatos eléctricos como radios y televisiones, utilice siempre conectores ycables con blindaje a masa.
El símbolo de exclamación en un triangulo equilátero alerta al usuario deinstrucciones importantes de operación y mantenimiento (servicio) en eltexto marcado.
El símbolo de luz flash con un rayo en un triangulo equilátero, alerta alusuario de la presencia de "voltaje peligroso" no aislado en el productoque puede ser de suficiente magnitud como para causar un shock eléctri-co a personas.LEA LAS INSTRUCCIONES: Todas las instrucciones de manejo y seguridaddeben ser leídas antes de poner en marcha el aparato.GUARDE LAS INSTRUCCIONES: Las instrucciones deben guardarse parafuturas consultas.OBVIAR LOS AVISOS: Todos los aviso en el propio producto y manual deinstrucciones deben ser tenidos en cuenta.SEGUIR LAS INSTRUCCIONES: Todas las instrucciones deben ser estric-tamente realizadas.LIMPIEZA: El producto debe limpiarse solo con un trapo suave y seco.Nunca utilice cera para muebles, gasolina, insecticidas u otro producto quepueda corroer el chasis.ACCESORIOS: No utilice accesorios no recomendados por el fabricantepara evitar posibles daños.AGUA Y HUMEDAD: No use este producto cerca del agua, por ejemplo,cerca de la ducha, el baño, la pica de la cocina, o del lavadero; en unasuperficie húmeda; o cerca de una piscina o similar.COLOCACION: No colocar este producto en mesas, soportes o brazos queno sean totalmente estables. El producto podría caer y dañarse seriamente
o causar daños a personas. Utilice solo soportes recomendados por el fab-ricante, o vendidos con el producto. Al montar la unidad, siga las instruc-ciones del manual, y utilice los accesorios recomendados por el fabricante.MOBILIDAD: El producto montado en soporte móvil, debe ser desplaza-do con cuidado. Frenazos, excesiva fuerza, y superficies deslizantes puedenhacer volcar el conjunto entero. VEA FIGURA A.VENTILACION: Las ventanas y aberturas del chasis dan la ventilación nece-saria para asegurar la correcta operativa y proteger la unidad de sobreca-lentamientos, y estas aberturas no deben ser bloqueadas o tapadas enningún caso. Estas aberturas nunca deben bloquearse colocando el pro-ducto sobre un sofá, cama, alfombra u otra superficie similar. Este produc-to no debe instalarse en un sitio cerrado como una librería o rack que notengan la suficiente ventilación. ALIMENTACION: Este producto debe operar solamente con fuentes de ali-mentación del tipo indicado en la etiqueta de voltaje. Si usted no tiene laseguridad de la tensión que tiene en su casa, consulte a su distribuidorlocal o compañía de electricidad.COLOCACION: Este producto debe ser colocado en un sitio estable.PERIODOS SIN USO: El cordón de alimentación debe ser desenchufadode la corriente en caso de no uso durante un largo periodo.MASA O POLARIZACION:
- Si este producto esta equipado con un cable de polarización alternativa(un conector con una pata más ancha que la otra), solo se podrá conectaren una posición. Esto es una característica de seguridad. Si usted no puedeintroducir el conector, pruebe a invertir la posición. Si continua sin intro-ducirse, contacte con un electricista para reemplazar la base. No desechela posibilidad de utilizar conectores de seguridad.
- Si el producto viene equipado con un conector de tres bornes, es decircon toma de masa, solo encajara en una toma de corriente del mismo tipo.Esto es para su seguridad. Si el conector no encaja en la toma, contacte conun electricista para reemplazar la base. No deseche la posibilidad de uti-lizar conectores de seguridad.PROTECCION DEL CABLE: Los cables de corriente deben colocarse deforma que nadie pise o pinche los mismos, poniendo particular atenciónen la unión con el conector, y en el punto donde se une a la unidad.TOMA DE TIERRA DE ANTENA EXTERIOR: Si hay conectado a este pro-ducto un cable de antena o antena exterior, asegúrese de su correctaconexión a tierra para proteger de posibles entradas de tensión y cargas deelectricidad estática. El Articulo 810 del Código Eléctrico Nacional,ANSI/NFPA 70, da información de la correcta conexión de masa de lossoportes utilizados, del cable de conexión de descarga de la antena, medi-das de los conductores de masa, colocación de las antenas, inserción deelectrodos de masa, y características de los electrodos. VER FIGURA B.RAYOS: Para protección adicional de este producto durante una tormentaeléctrica, o cuando este desatendido o sin utilización durante un largoperiodo de tiempo, desconecte de la toma de corriente y desconecte laantena del sistema. Esto evitará cualquier problema debido a rayos y
subidas de tensión.LINEA DE TENSION: Los sistemas de antena exterior nunca deben colo-carse en la proximidad de líneas eléctricas de alta tensión o centrales detransformación eléctrica, o donde puede ser afectado por este tipo delíneas. Al instalar un sistema de este tipo, extreme la precaución de notocar ningún tipo de línea eléctrica ya que esto resultaría fatal.SOBRECARGA: No sobrecargue las tomas de corriente, cables de alargo, oladrones de conexión ya que esto podría provocar fuego o shock eléctrico.ENTRADA DE OBJECTOS & LIQUIDOS: Nunca introduzca objetos deningún tipo en las aberturas del producto ya que puedes provocar corto-circuitos o tocar con puntos de alto voltaje provocando fuego o shock eléc-trico. Nunca tire líquidos en este tipo de productos.SERVICIO TECNICO: No intente reparar la unidad usted mismo abriendoo quitando las tapas ya que el producto funciona con niveles peligrosos detensión. Contacte con el servicio cualificado para cualquier reparación.SOLICITUD DE REPARACION: Desconecte de la toma de corriente el pro-ducto y contacte con el servicio en caso de:
- Cuando la toma de corriente este dañada.- Si se ha vertido líquido u objetos dentro de la unidad.- Si el producto ha estado expuesto a lluvia o agua.- Si el producto no funciona según las especificaciones del manual. Ajuste
tan solo los controles que le indique el manual ya que el modificar ajustesinternos puede dañar la unidad y eso requerirá mas trabajo del serviciopara reajustar la unidad a sus parámetros iniciales.
- Si el producto ha caído al suelo.- Cuando el producto no actúa de forma normal.
RECAMBIOS: Cuando se necesiten recambios, asegúrese que los técnicoshan utilizado recambios originales especificados por el fabricante o tienenlas mismas características del recambio original. La substitución incorrectade piezas puede crear fuego, shock eléctrico, u otros daños.COMPROBACIONES: Tras una reparación, solicite al servicio que testee launidad para comprobar su correcto funcionamiento.INSTALACION EN TECHO O PARED: Los productos no deben ser instal-ados en techos ni paredes.CALOR: El producto debe estar alejado de Fuentes de calor como radi-adores, estufas, u otros productos (incluyendo amplificadores) que pro-ducen y emiten calor.RECIRCULACIÓN: Este producto no debe tratarse del mismo modo quelos desechos domésticos. En su lugar, usted debe llevarlo al punto verdede recogida más cercano para reciclaje de aparatos eléctricos y electróni-cos. Asegurándose que este producto se desecha de forma apropiada,usted esta ayudando a preservar posibles consecuencias negativas para lasalud humana que se producirían por incorrectas manipulaciones en casode utilizar otro método de desecho. El reciclaje de materiales ayudará aconservar el entorno natural. Para información más detallada sobre el reci-claje de este producto, por favor contacte con su ayuntamiento local, el ser-vicio local de basuras, o la tienda donde usted adquirió el producto.
P R E C A U C I O NPOR FAVOR LEALO ANTES DE UTILIZAR LA UNIDAD,
INSTRUCCIONES IMPORTANTES DE AVISO & SEGURIDAD!RIESGO DE SHOCK ELÉCTRICO NO ABRIR!
<10>

<11>
Los cables muestran uno de los posibles metodos de conexión y no son descripción exacta de su conexión.Los cables y conectores de alimentación muestran solo los estandar US. Otros paises serán suministrados con elcorrespondiente cable de alimentación.
Comprobación de Partes:1 x Recinto acústico1 x Cable alimentación1 x Manual con carta de garantia2 x enclave montaje
1. Speakon / Jacks2. Alimentación con fusible3. Interruptor general4. Selector de Voltaje5. Entrada linea XLR
6. Entrada linea RCA7. Entrada micro XLR8. Salida linea XLR9. Control volumen Micro10. Control volumen master
11. LED alimentación12. LED clip13. Palomilla fijación
POWER
LEVEL
MIN MAX
CLIP
POWERLEVEL
AC/110 V / 50, 60 Hz
350 WATTS
MICIN
LINE IN
CD IN
LINE OUT
MIN MAX
GX-100 GX-150
Atras
1
2
3
4
5
6
7
8
9
10
11
12
1313

<12>
13. Palomilla fijación14. Rigging para colgar15. Vaso para tripode16. Pies de goma17. Muescas de apile
Superior
Inferior
13
14
16 16
16
17
1717
17
1615
14
<13>
GX-100/150 ALTAVOCES EN MOLDE ABS
INTRODUCCION:
Felicidades por la compra de sus altavoces trapezoidales GX-SERIES, dis-eñados y fabricados por Gemini Sound Products. El rango de altavocesGemini GX incluye la ultima tecnologia en diseño ultraligero con ABS.Disponibles en 8”, 10”, 12”, y 15” pasivas o autoamplificadas, la nueva GX-SERIES es una perfecta incorporación a los ya existentes altavoces Gemini.Los GX-100 y 150 están respaldados por 1 año de garantía* limitada y ledarán servicio durante muchos años con el adecuado mantenimiento ycuidados.
CARACTERISTICAS:Altavoces profesionales autoamplificados ABS de 8” dos vías GX-150
- Woofer 8" en Aluminio extrusionado con bobina de alta temperatura
- Bocina de compresión con diafragma de titanio de 1.25"
- Recinto de ABS negro con rejilla metálica completa
- Amplificador de 100w RMS, 250w pico
- Respuesta de frecuencia: 65 Hz - 20 KHz
- LEDs de alimentación y clip
- Entrada Micro XLR con volumen rotativo
- Entrada linea por XLR y RCA
- Salida linea XLR (para linkear con otros altavoces)
- Volumen master rotativo
- Vaso para tripode y puntos de rigging para colgar
- Pies de goma y enclaves de apile
- Alojamientos de Montaje incluidos
Altavoces profesionales de 8” 2 vías pasivos GX-100
- Woofer 8" en Aluminio extrusionado con bobina de alta temperatura
- Bocina de compresión con diafragma de titanio de 1.25"
- Recinto de ABS negro con rejilla metálica completa
- Potencia 100w RMS, 250w pico
- Respuesta en frecuencia: 65 Hz - 20 KHz
- Speakon para entrada y salida (para linkear multiples altavoces)
- Vaso para tripode y puntos rigging para colgar
- Pies de goma y enclaves de apile
- Alojamientos de Montaje incluidos
PRECAUCIONES:
1. Lea detenidamente estas instrucciones antes de usar este equipo
2. Para reducir el riesgo de shock electrico, nunca abra este aparato. NOHAY PIEZAS REEMPLAZABLES POR EL USUARIO EN EL INTERIOR. Porfavor acuda a un servicio tecnico cualificado Gemini Sound Products. En
USA: Si usted experimenta problemas con esta unidad, contacte con elServicio de Atención al Cliente 1 (732) 738-9003. No trate de devolver launidad a su proveedor.
3. No exponga esta unidad a sol directo o a fuentes de calor como radi-adores o estufas.
4. Esta unidad debe limpiarse solo con un trapo seco. Evite utilizar disol-ventes u otros detergentes.
5. Para trasladar este equipo, utilice el embalaje original. Esto reducira elriesgo de daños durante el traslado.
6. NO EXPONGA ESTA UNIDAD A LLUVIA O ROCIO.
7. NO USE NINGUN SPRAY LIMPIADOR O LUBRIFICANTE EN LOSCONTROLES E INTERRUPTORES.
SELECCCION DE VOLTAGE (solo GX-150 ):Los altavoces GEMINI GX-150 pueden operar en doble voltaje a 115 o 230voltios. Asegurese de ajustar el voltaje apropiado antes de operar launidad:1. Coloque un destornillador de pala en el centro del SELECTOR DE VOLTAJE(4) colocado en el panel trasero. 2. Desplace el interruptor a 115 o 230 voltios.3. No fuerce o doble el interruptor. Una fuerza excesiva puede provocardaños. Si el interruptor no se desplaza suavemente, contacte un tecnicocualificado.
CONEXIONES:1. Asegurese que el equipo está en OFF y todos los controles VOLUMEN,NIVELES, y GANANCIA antes de conectar los altavoces. 1. Para los altavoces pasivos GX-100, use un CABLE SPEAKON desde su SALIDADE AMPLIFICADOR HASTA LA ENTRADA SPEAKON (1) en la parte trasera delaltavoz.2. Para los altavoces pasivos GX-100, puede LINKEAR altavoces adicionalesllevando un cable con Speakon de un recinto a otro. La posibilidad dehacer esto dependerá de la potencia del amplificador y las condiciones decarga, ya que el linkeado de altavoces de esta manera afecta a la impedan-cia total. 3. Para los altavoces activos GX-150, el amplificador está incorporado en laparte trasera del recinto. Esto significa que usted puede conectar directa-mente un micrófono en la entrada XLR MIC (7), o puede conectar unaseñal balanceada de linea en la entrada XLR LINE (5). Asi mismo, puedeconectar una unidad de linea en la entrada RCA LINE (6)3. Para los altavoces activos GX-150, puede linkear altavoces adicionales lle-vando cable de señal XLR desde la salida XLR LINE(8) de un altavoz a laentrada XLR LINE (5) de otro altavoz. Al estar cada unidad amplificada inde-pendientemente, puede repetir este proceso indefinidamente.OPERATIVA:GX-100:1. Primero encienda su mezclador y fuentes de sonido.2. Luego encienda su AMPLIFICADOR e incremente el VOLUMEN o GANANCIA
siguiendo las recomendaciones del manual.3. Inicie un programa de audio tipico a traves de sistema, y ajuste el volu-men desde la fuente de sonido a un nivel apropiado para la escucha.
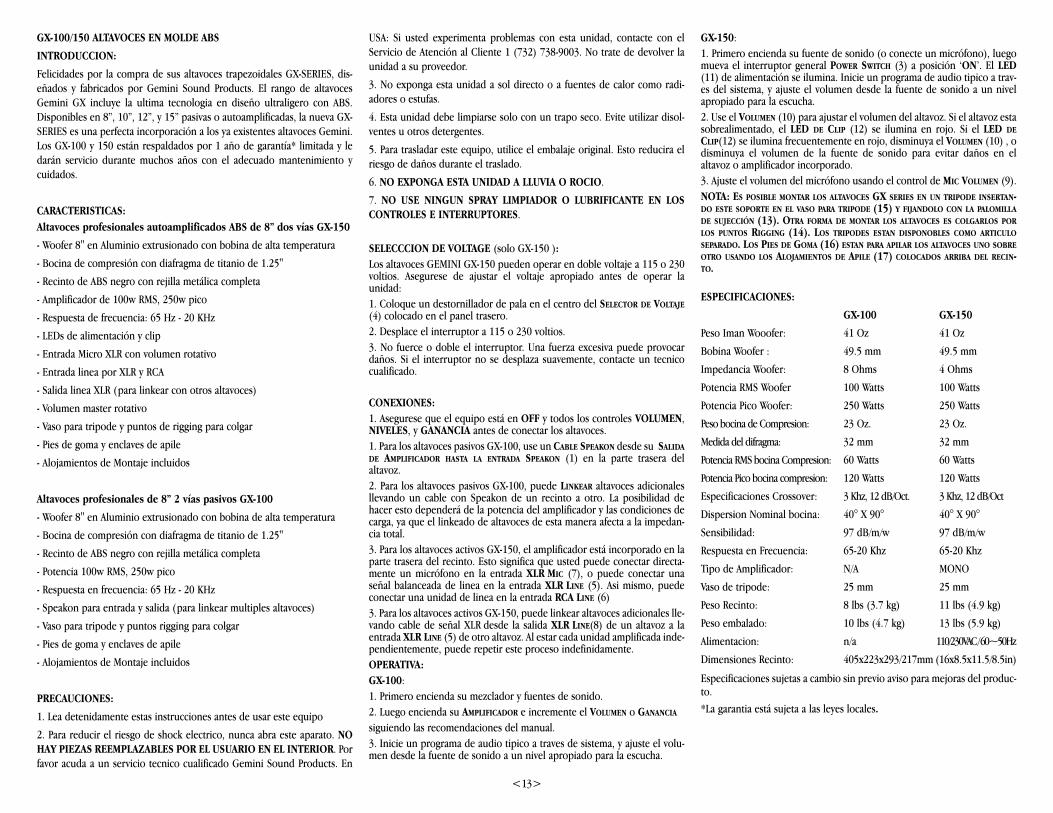
GX-150:1. Primero encienda su fuente de sonido (o conecte un micrófono), luegomueva el interruptor general POWER SWITCH (3) a posición ‘ON’. El LED(11) de alimentación se ilumina. Inicie un programa de audio tipico a trav-es del sistema, y ajuste el volumen desde la fuente de sonido a un nivelapropiado para la escucha.2. Use el VOLUMEN (10) para ajustar el volumen del altavoz. Si el altavoz estasobrealimentado, el LED DE CLIP (12) se ilumina en rojo. Si el LED DECLIP(12) se ilumina frecuentemente en rojo, disminuya el VOLUMEN (10) , odisminuya el volumen de la fuente de sonido para evitar daños en elaltavoz o amplificador incorporado. 3. Ajuste el volumen del micrófono usando el control de MIC VOLUMEN (9).NOTA: ES POSIBLE MONTAR LOS ALTAVOCES GX SERIES EN UN TRIPODE INSERTAN-DO ESTE SOPORTE EN EL VASO PARA TRIPODE (15) Y FIJANDOLO CON LA PALOMILLADE SUJECCIÓN (13). OTRA FORMA DE MONTAR LOS ALTAVOCES ES COLGARLOS PORLOS PUNTOS RIGGING (14). LOS TRIPODES ESTAN DISPONOBLES COMO ARTICULOSEPARADO. LOS PIES DE GOMA (16) ESTAN PARA APILAR LOS ALTAVOCES UNO SOBREOTRO USANDO LOS ALOJAMIENTOS DE APILE (17) COLOCADOS ARRIBA DEL RECIN-TO.
ESPECIFICACIONES:
GX-100 GX-150
Peso Iman Wooofer: 41 Oz 41 Oz
Bobina Woofer : 49.5 mm 49.5 mm
Impedancia Woofer: 8 Ohms 4 Ohms
Potencia RMS Woofer 100 Watts 100 Watts
Potencia Pico Woofer: 250 Watts 250 Watts
Peso bocina de Compresion: 23 Oz. 23 Oz.
Medida del difragma: 32 mm 32 mm
Potencia RMS bocina Compresion: 60 Watts 60 Watts
Potencia Pico bocina compresion: 120 Watts 120 Watts
Especificaciones Crossover: 3 Khz, 12 dB/Oct. 3 Khz, 12 dB/Oct
Dispersion Nominal bocina: 40° X 90° 40° X 90°
Sensibilidad: 97 dB/m/w 97 dB/m/w
Respuesta en Frecuencia: 65-20 Khz 65-20 Khz
Tipo de Amplificador: N/A MONO
Vaso de tripode: 25 mm 25 mm
Peso Recinto: 8 lbs (3.7 kg) 11 lbs (4.9 kg)
Peso embalado: 10 lbs (4.7 kg) 13 lbs (5.9 kg)
Alimentacion: n/a 110/230VAC / 60~50Hz
Dimensiones Recinto: 405x223x293/217mm (16x8.5x11.5/8.5in)
Especificaciones sujetas a cambio sin previo aviso para mejoras del produc-to. *La garantia está sujeta a las leyes locales.

ATTENTION: Cet appareil répond aux certifications FCC lorsqu'il est con-necté à d'autres appareils à l'aide de cordons blindés. Afin de prévenir toutrisque de parasites électromagnétiques avec un poste radio ou TV, veuillezutiliser des cordons blindés.
Le point d'exclamation situé dans un triangle est destiné à attirer votreattention durant l'utilisation de votre appareil ou d'un entretien péri-odique de ce dernier. Vous en trouverez plusieurs dans le mode d'emploide l'appareil.LIRE LES INSTRUCTIONS: Toutes les instructions et consignes d'utilisa-tion doivent être lues avant l'utilisation de l'appareil.CONSERVEZ LES INSTRUCTIONS: Nous vous recommandons de con-server les instructions et consignes d'utilisation en cas de nécessitéultérieure.RESPECT DES CONDITIONS D'UTILISATION: Nous vous recomman-dons de respecter les instructions d'utilisation.SUIVRE LES INSTRUCTIONS D'UTILISATION: Nous vous recomman-dons de respecter la chronologie des instructions d'utilisation.NETTOYAGE: L'appareil doit être nettoyé avec un chiffon légèrementhumide. Ne pas utiliser de produits chimiques corrosifs & volatiles (cire,essence, insecticide…) afin de ne pas endommager l'appareil.CORDON: Ne pas utiliser de cordons non préconisés par le fabricant afinde ne pas endommager l'appareil.EAU & HUMIDITE: Ne pas utiliser l'appareil à proximité d'une sourced'eau (cuisine, salle de bain, lavabo…), ni dans un endroit sujet à l'humid-ité (piscine…).ACCESSOIRES: Ne pas installer cet appareil sur un support ou dans unendroit instable. L'appareil pourrait tomber au risque de blesser une per-sonne et être endommagé. Veiller à utiliser des accessoires (Pied, support,crochet..) recommandés par le fournisseur ou vendu avec l'appareil. Toutmontage ou installation doit respecter les instructions du fabricant et utilis-
er des accessoires d'installation recommandés par le fabricant.TRANSPORT SUR CHARIOT: Tout produit installé sur un chariot doit êtremanipulé avec précaution. Un déplacement brusque ou trop rapide surune surface non plane pourrait entraîner la chute de l'ensemble et endom-mager l'appareil. VOIR FIGURE A.
VENTILATION: Les ouvertures et ouïes d'aération situées sur l'appareilpermettent une ventilation optimale de ce dernier afin d'éviter toute sur-chauffe. Ces ouvertures ne doivent jamais être obstruées. Ne pas placerl'appareil sur un support souple risquant de bloquer les ouïes d'aération(Lit, sofa, canapé…). Si l'appareil est intégré dans une installation ou dansun rack, veillez à la ventilation et consultez le fabricant pour toute informa-tion complémentaire.ALIMENTATION: Veillez à respecter la tension d'alimentation située au dosde l'appareil. Si vous n'êtes pas certain de la tension d'utilisation dans votrepays, contactez votre revendeur.EMPLACEMENT: Veillez à installer l'appareil sur un support stable.PERIODE DE NON UTILISATION: Débranchez le cordon d'alimentationde l'appareil en cas de non utilisation prolongée.MISE A LA TERRE:
- Si l'appareil est équipé d'une alimentation à courant alternatif (Prise pos-sédant un contact plus large que l'autre), celle-ci se connectera correcte-ment à la prise uniquement si vous respectez le sens de branchement. Ils'agit là d'une mesure de sécurité. Si vous n'arrivez pas à insérer la fichedans la prise, inversez la fiche. Si vous ne pouvez toujours pas insérer cettedernière, contactez un électricien afin de remplacer votre prise électriquequi est obsolète. Veillez à respecter cette consigne.
- Si l'appareil est équipé d'une fiche d'alimentation avec terre, veillez à laconnecter à une prise électrique équipée d'une connexion à la terre. Il s'ag-it d'une mesure de sécurité. Si vous ne pouvez insérer la fiche dans la priseélectrique, contactez un électricien afin de remplacer votre prise électriquequi est obsolète. Il est important de respecter cette mesure de sécurité.INSTALLATION DU CORDON D'ALIMENTATION: Les cordons d'alimen-tation doivent être déroulés et rangés proprement afin d'éviter de se pren-dre les pieds dedans, en particulier les cordons reliés aux prises élec-triques.ANTENNE EXTERIEURE: Si vous reliez votre appareil à une antenne ouun câble extérieur, assurez-vous de la présence d'une connexion à la terreafin d'éviter les surtensions et les décharges d'électricité statique. L'article810 du National Electrical Code, ANSI/NFPAS 70, précise toutes les infor-mations nécessaires afin d'effectuer correctement le branchement à la terredu pylône ou de la structure porteuse, la connexion du câble à l'antennede décharge, dimensions des connecteurs de mise à la terre, connexionsdes électrodes, consignes de mise à la terre des électrodes. VOIR SCHÉMA B.ORAGE/FOUDRE: En cas d'orage et de non utilisation prolongée,débranchez le cordon d'alimentation, le câble d'antenne et les cordonsaudio. Ceci afin d'éviter les dégâts occasionnés par la foudre et les sur-charges électriques.
LIGNES ELECTRIQUES: Une antenne extérieure ne doit pas être située àproximité immédiate de lignes électriques et/ou d'un transformateur élec-trique, afin de ne pas tomber dessus en cas de chute. Lors de l'installationd'une antenne extérieure, veillez à éviter tout contact avec des lignes élec-triques : tout contact peut être fatal.SURCHARGE: Ne surchargez pas les prises électriques, blocs multiprises &rallonges en y connectant trop d'appareils. Ceci afin d'éviter tout risque desurcharge électrique ou d'incendie (Surchauffe).INSERTION D'OBJET & DE LIQUIDE: N'insérez pas d'objets dans lesfentes ou ouvertures de l'appareil afin d'éviter tout risque de choc élec-trique et d'incendie. Ne jamais renverser de liquide sur l'appareil.SERVICE APRES VENTE: N'essayez pas de réparer cet appareil ; en l'ou-vrant ou en le démontant afin d'éviter tout risque de choc électrique. Encas de problème, veuillez prendre contact avec votre revendeur.PANNE/SITUATION NECESSITANT UN RETOUR EN SAV: Débranchezl'appareil de la prise électrique, remettez le dans son emballage d'origineet contactez votre revendeur en tenant compte des situations suivantes :
- Lorsque le cordon d'alimentation est endommagé.- Si un liquide a été renversé dessus.- Si l'appareil a été exposé à la pluie.- Si l'appareil ne fonctionne pas correctement malgré le respect des
instructions d'utilisation. Ajustez uniquement les réglages préconisés dansle mode d'emploi, toute manipulation ou réglage non conseillés dans cedernier peut endommager l'appareil et procurer plus de travail en cas d'in-tervention SAV afin de remettre l'appareil en état de marche.PIECES DE RECHANGE: Lorsque vous avez besoin de remplacer despièces de l'appareil, veillez à utiliser des pièces d'origine ou possédant descaractéristiques identiques. L'utilisation de pièces non autorisées peutendommager l'appareil : surchauffe, court-circuit, choc électrique…CONTROLE DE SECURITE: Avant de récupérer votre appareil, assurezvous que le SAV a effectué tous les contrôles de sécurité nécessaires afin devous restituer un appareil en état de marche.INSTALLATION AU PLAFOND OU SUR UN MUR: Ce type d'installationest déconseillé.CHALEUR: Veillez à installer l'appareil loin de toute source de chaleur telleque radiateur, réchaud ou tout autre appareil produisant de la chaleur.RECYCLAGE: Cet appareil ne doit pas être considéré comme un déchetdomestique à usage unique. Vous devez le déposer dans un point de col-lecte destiné au recyclage des appareils électroniques et électroménagers.AInsi vous préserverez l'environnement et éviterez les problêmes de santépublique vis à vis de conséquences négatives; liées à leur dépôt dans unendroit non approprié. Le recyclage contribue à préserver les ressourcesnaturelles. Pour plus d'informations sur les conditions de recyclage de l'ap-pareil, veuillez contacter les autorités de votre pays, les institutions localesou votre revendeur.
<14>
A T T E N T I O NAVANT TOUTE UTILISATION DE L'APPAREIL, MERCI DE PRENDRE CON-
NAISSANCE DES INSTRUCTIONS D'UTILISATION & DE SECURITE!RISQUE DE CHOC ÉLECTRIQUE, NE PAS OUVRIR!
<15>
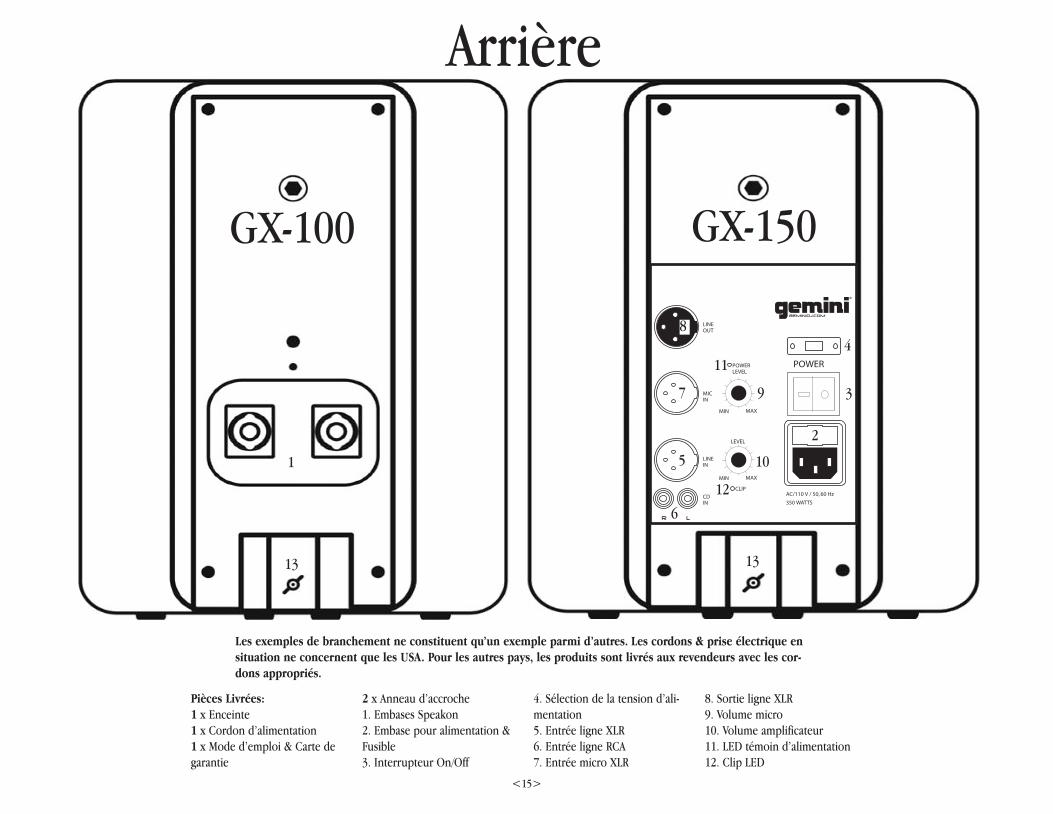
Les exemples de branchement ne constituent qu’un exemple parmi d’autres. Les cordons & prise électrique ensituation ne concernent que les USA. Pour les autres pays, les produits sont livrés aux revendeurs avec les cor-dons appropriés.
Pièces Livrées:1 x Enceinte1 x Cordon d’alimentation1 x Mode d’emploi & Carte degarantie
2 x Anneau d’accroche 1. Embases Speakon 2. Embase pour alimentation &Fusible3. Interrupteur On/Off
4. Sélection de la tension d’ali-mentation5. Entrée ligne XLR6. Entrée ligne RCA7. Entrée micro XLR
8. Sortie ligne XLR9. Volume micro10. Volume amplificateur11. LED témoin d’alimentation12. Clip LED
POWER
LEVEL
MIN MAX
CLIP
POWERLEVEL
AC/110 V / 50, 60 Hz
350 WATTS
MICIN
LINE IN
CD IN
LINE OUT
MIN MAX
GX-100 GX-150
Arrière
1
2
3
4
5
6
7
8
9
10
11
12
1313

<16>
13. Vis de serrage14. Points d’accroche15. Embase pour pied d’enceinte16. Pied caoutchouc17. Empreinte de calage
Dessus
Bas
13
14
16 16
16
17
1717
17
1615
14

<17>
ENCEINTES ABS MOULEES GX-100/150INTRODUCTION:
Félicitations pour votre achat d’une enceinte Gemini de la Série GX. Lagamme d’enceintes GX, développée par nos ingénieurs, bénéficied’une fabrication robuste en ABS , ainsi que des dernières avancéestechnologiques. Disponible en 4 modèles 8”, 10”, 12” & 15”, passivesou amplifiées, elle constitue une solution polyvalente en complément desgammes existantes. Les modèles GX-100 & GX-150 bénéficient d’unegarantie de 1 ans et vous assureront des années de fonctionnement entoute fiabilité.*
CARACTERISTIQUES:Enceinte Professionnelle Amplifiée 8” ABS 2 Voies GX-150 - Boomer 8" (20cm) avec chassis moulé en aluminum & bobine haute tem-pérature- Compression 1.25" avec membrane titanium- Fabrication robuste en ABS & grille pleine de protection- Puissance 100w RMS, 250w PGM- Bande passante: 65 Hz - 20 KHz- LEDs d’alimentation & de surcharge (Clip)- Entrée mico sur XLR avec réglage de volume- Entrée ligne sur XLR & RCA- Sortie ligne sur XLR (Liaison avec d’autre enceintes)- Volume général- Embase pour pied d’enceinte & points d’accroche- Pieds en caoutchouc & possibilité d’empiler l’enceinte- Livrée avec 2 anneaux d’accroche
Enceinte Professionnelle Passive 8” ABS 2 Voies GX-100 - Boomer 8" (20cm) avec chassis moulé en aluminum & bobine haute tem-pérature- Compression 1.25" avec membrane titanium- Fabrication robuste en ABS & grille pleine de protection- Puissance 100w RMS, 250w PGM- Bande passante: 65 Hz - 20 KHz- 2 connecteurs Speakon (in/out)- Embase pour pied pied d’enceinte & points d’accroche- Pieds en caoutchouc & possibilité d’empiler l’enceinte- Livrée avec 2 anneaux d’accroche
MISES EN GARDE:
1. Nous vous recommandons de lire l’ensemble des instructions avanttoute utilisation de l’appareil.
2. Afin d’éliminer tout risque d’électrocution nous vous recommandons dene pas démonter l’appareil. Il n’y a pas de pièce détachée REMPLACABLEPAR L’UTILISATEUR dans l’appareil. En cas de problème veuillez contac-ter votre revendeur. USA: Si vous rencontrez un problème, appelez leService Technique de Gemini au 1 (732) 738-9003. Ne renvoyez pas l’ap-pareil à votre revendeur.
3. Ne pas exposer l’appareil à la lumière directe du soleil et à toute sourcede chaleur telle qu’un radiateur.
4. Cet appareil doit être nettoyé à l’aide d’un chiffon légèrement humide.Ne pas utiliser de détergents.
5. Lorsque vous déplacez l’appareil, veillez à le remettre dans son embal-lage d’origine. Ceci afin d’éviter tout risque de dommage durant le trans-port.
6. NE PAS EXPOSER L’APPAREIL A LA PLUIE & A L’HUMIDITE.
7. NE PAS UTILISER DE VAPORISATEUR ET DE LUBRIFIANT SUR LESBOUTONS & INTERRUPTEURS DE CONTROLE.
SELECTION DE LA TENSION D’ALIMENTATION (GX-150 seulement):L’enceinte GEMINI GX-150 est commutable en 115V ou 230V (France) afind’utiliser l’appareil partout dans le monde. Avant toute utilisation, veuillezsélectionner la tension d’alimentation en vigueur dans votre pays:1. Placez un tournevis au centre du COMMUTATEUR DE TENSION (4) situé àl’arrière de l’appareil.2. Faîtes le glisser sur 115V ou 230V (France).3. Ne forcez pas au risque d’endommager le commutateur. Si ce dernier nepeut être positionné correctement, contactez votre revendeur.
CONNEXIONS:1. Assurez vous que l’ENSEMBLE de vos appareils soient hors tension(OFF) & diminuez TOUS LES REGLAGES DE VOLUME & DE GAIN avantd’effectuer toute connexion.1. Pour l’enceinte passive GX-100 utilisez un CABLE SPEAKON afin de relierla SORTIE HP DE L’AMPLIFICATEUR à l’EMBASE SPEAKON (1) située à l’arrière del’enceinte.2. Pour l’enceinte passive GX-100, vous pouvez relier plusieurs enceintespar l’intermédiaire de cordon(s) Speakon/Speakon. Attention, vérifier lacompatibilité de votre amplificateur en termes de puissance et d’impé-dance de sortie. Le fait de relier plusieurs enceintes modifie l’impédancede fonctionnement de toutes les enceintes connectées ensemble.3. Pour l’enceinte active GX-150, l’amplificateur est situé à l’arrière de l’ap-pareil. Vous pouvez ainsi y brancher directement un Micro à l’entrée XLRMIC INPUT (7), ou un signal symétrique à l’entrée XLR LINE INPUT (5). Vouspouvez aussi relier une source de niveau Ligne à l’entrée RCA LINE INPUT(6)4. Pour l’enceinte active GX-150, vous pouvez les relier ensemble par l’in-termédiaire d’un cordon XLR/XLR. Branchez votre cordon sur la sortie XLRLINE OUTPUT (8) d’une enceinte et connectez vous à l’entrée XLR LINEINPUT (5) d’une autre enceinte. Chaque enceinte étant amplifiée l’opéra-tion peut être répétée autant de fois que nécessaire.UTILISATION:GX-100:1. Allumez votre CONSOLE DE MIXAGE ou tout autre source.2. Allumez votre AMPLIFICATEUR et augmentez les réglages de VOLUME ou deGAIN en respectant les consignes d’utilistion de l’AMPLIFICATEUR.3. Démarrez la lecture d’un programme audio et ajustez les réglages afind’affiner le niveau d’écoute.GX-150:1. Allumez votre source (Ou branchez un Micro), puis mettez l’interrup-
teur POWER SWITCH (3) en position ‘ON’, la LED POWER (11) s’allumera.Démarrez la lecture d’un programme audio et ajustez le volume d’écouteà un niveau raisonnable.2. Utilisez le potentiomètre AMPLIFIER VOLUME CONTROL (10) afin de réglerle volume de l’enceinte. Si le niveau devient trop élevé, la LED CLIP (12)rouge s’allumera. Si cette dernière s’allume fréquemment ou resteallumée, diminuez le volume avec le potentiomètre AMPLIFIER VOLUMECONTROL (10) ou diminuez le volume de la source afin de ne pas endom-mager l’enceinte et l’amplificateur intégré.3. Le niveau du micro se régle par le potentiomètre MIC VOLUME CONTROL(9).NOTE: IL EST POSSIBLE DE MONTER LES ENCEINTES DE LA SERIE GX SUR UN PIEDD’ENCEINTE EN UTILISANT L’EMBASE STAND MOUNTING SOCKET (15) ET EN VER-ROUILLANT L’ENCEINTE PAR LA VIS LOCKING PIN (13). VOUS POUVEZ AUSSIINSTALLER L’ENCEINTE EN LA SUSPENDANT GRACE AUX POINTS D’ACCROCHE SPEAKERRIGGING POINTS (14). LES PIEDS D’ENCEINTE SONT VENDUS SÉPARÉMENT. LESPIEDS EN CAOUTCHOUC RUBBER FEET (16) PERMETTENT D’EMPILER EN TOUTE SÉCU-RITÉ LES ENCEINTES LES UNES SUR LES AUTRES GRACE AUX STACKING GROOVES (17)SITUÉS EN HAUT DE CHAQUE ENCEINTE.
CARACTERISTIQUES:GX-100 GX-150
Poids de l’aimant du boomer: 1.160Kg 1.160KgDiamètre bobine boomer: 49.5 mm 49.5 mmImpédance boomer: 8 Ohms 4 OhmsPuissance boomer RMS: 100 Watts 100 WattsPuissance boomer crête: 250 Watts 250 WattsPoids de l’aimant de la compression: 0.650Kg. 0.650Kg.Diamètre membrane compression: 32 mm 32 mmPuissance compression RMS: 60 Watts 60 WattsPuissance compression crête: 120 Watts 120 WattsCoupure filtre: 3Khz, 12dB/Oct. 3Khz, 12dB/OctDirectivité pavillon: 40° X 90° 40° X 90°Sensibilité: 97 dB/m/w 97 dB/m/wBande passante: 65-20 Khz 65-20 KhzType amplificateur: N/A MONOEmbase pied d’enceinte: 25 mm 25 mmPoids enceinte: 8 lbs (3.7 kg) 11 lbs (4.9 kg)Poids enceinte (Emballée): 10 lbs (4.7 kg) 13 lbs (5.9 kg)Alimentation: N/A 110/230VAC / 60~50HzDimensions: 405x223x293/217mm (16x8.5x11.5/8.5in)
Dans le cadre d'un souci constant d'amélioration, les produits peuvent êtremodifiés sans préavis.
* Les modalités établies concernant la garantie n'affectent pas les garantiesen vigueur localement.

WARRANT Y AND REPAIR:All Gemini products are designed and manufactured to the higheststandards in the industry. With proper care and maintenance, your product willprovide years of reliable service.
LIMITED WARRANT YA. Gemini warrants its products to be free from defects in materials and work-manship for One (1) year from the original purchase date.Exceptions: Laser assemblies on CD Players, cartridges, and crossfadersare covered for 90 days.
B. This limited warranty does not cover damage or failure caused by abuse, mis-use, abnormal use, faulty installation, improper maintenance or any repairsother than those provided by an authorized Gemini Service Center.
C. There are no obligations of liability on the part of Gemini for consequentialdamages arising out of or in connection with the use or performance of theproduct or other indirect damages with respect to loss of property, revenues, ofprofit, or costs of removal, installation, or reinstallation. All implied warrantiesfor Gemini, including implied warranties for fitness, are limited in duration toOne (1) year from the original date of purchase, unless otherwise mandatedby local statutes.
RETURN/REPAIRA. In the U.S.A., please call our helpful Customer Service Representatives at(732)738-9003, and they will be happy to give you a Return AuthorizationNumber (RA#) and the address of an authorized service center closest to you.
B. After receiving an RA#, include a copy of the original sales receipt, withdefective product and a description of the defect. Send by insured freight to:Gemini Sound Products Corp, and use the address provided by your customerservice representative. Your RA# must be written on the outside of thepackage, or processing will be delayed indefinitely!
C. Service covered under warranty will be paid for by Gemini and returned toyou. For non-warrantied products, Gemini will repair your unit after payment isreceived. Repair charges do not include return freight. Freight charges will beadded to the repair charges.
D. On warranty service, you pay for shipping to Gemini, we pay for returnshipping within the Continental United States. Alaska, Hawaii, Puerto Rico,Canada, Bahamas, and the Virgin Islands will be charged for freight.
E. Please allow 2-4 weeks for return of your product. Under normal circum-stances your product will spend no more than 10 working days at Gemini. Weare not responsible for shipping times.
E-mail Address: ___________________________________________________________________________________________________________________________________________________________________________________________________________________________________________________
Phone #:
Initial:
State: or
First Name: Last Name:
Province:
Address: (Number and Street)
City:
Apt #:
Country: Postal Code:
Model Number: (Example: CDT-05) Serial Number: (Located on back of most units)
Serial Number: (Located on back of most units)
Month Day YearDate of Purchase:
Month Day YearDate of Purchase:
Purchase Price: .00$(EXCLUDING TAX)
Dealer:
Zip Code:
Age:
City:
or
Month Day Year
Date of Birth
Model Number: (Example: CDT-05)
Save postage and register your product onlineat www.geminidj.com and automatically beregistered for great prize giveaways! If you do not have internet access, fill out the form below and mail to the appropriateaddress listed at the right side of this page.
USAGEMINI SOUND PRODUCTSWorldwide Headquarters120 Clover PlaceEdison, NJ 08837 USA
Tel: (732) 738-9003 Fax: (732) 738-9006
SPAINGEMINI SOUND PRODUCTS S.A.Rosello, 516,08026 Barcelona, Spain
Tel: 3493-436 37 00 Fax: 3493-347-6961
FRANCEGEMINI FRANCE (GSL) 1, Allee d’Effiat,Parc de l’evénement, 91160Longjumeau, France
Tél: + 33 1 69 79 97 70 Fax: + 33 1 69 79 97 80
GERMANYGEMINI SOUND PRODUCTS GMBHLiebigstr. 16,Haus B – 3. OG,85757 KarlsfeldGermanyTel: 08131 – 39171 – 0Fax: 08131 – 39171 – 8
UKGEMINI SOUND PRODUCTS Unit C4 Hazleton Industrial Estate, P08 9JUWaterlooville, UK
Tel: 087 087 00880 Fax: 087 087 00990
IN SPAINEn caso de mal funcionamiento deesta unidad, por favor contacte con elServicio de Atención al Cliente en elteléfono 93 436 37 00 que le aseso-rará sobre el procedimiento correctopara solucionarlo. En caso de sernecesario enviar la unidad para sureparación, el Servicio de Atención alCliente le proveerá de un número deincidencia, así como de la direccióndel Servicio de Asistencia Técnica máscercano a su residencia.
IN THE UNITED KINGDOMIn the event that you need service onyour Gemini product under warranty,simply write a letter describing theproblem, along with your contactinformation. Make sure to enclose acopy of your receipt for proof of war-ranty information. A return number isnot required. You will be responsiblefor shipping charges to Gemini UK,and Gemini UK will pay to return theunit to you if it is considered underwarranty.
IN GERMANYDie allgemeinen gesetzlichenGewährleistungen bleiben von denHerstellergarantien unberührt. DerGarantieanspruch erlischt beiEingriffendurch den Käufer oder durch Drittesowie bei unsachgemässerBehandlung.Gewährleistungsansprüche sind auss-chließlich gegenüberIhrem Fachhändler geltend zumachen.
IN FRANCEEn cas de panne, merci de contactervotre revendeur. Tout appareil enpanne doit y être retourné, accompag-né de sa facture d'achat, de sonemballage d'origine et d'un descriptifde panne. L'appareil sera ensuiteexpédié au SAV de GSL France. Toutproduit reçu sans facture sera réparéhors garantie. GSL France ré-expédiera l'appareil au revendeuraprès intervention.
Cut along this line & keep the rest of this page for your records.
For your records