Embed Size (px)
Citation preview
OpenEdge BPM An introductory guide to the fundamentals of Business Process Management for OpenEdge

2
P a g e | 2 © 2013 Progress Software Corporation and/or its subsidiaries or affiliates. All rights reserved.
Student Summary
Using a fictitious Automobile Manufacturing process as an example, we’ll take you through an entertaining step-by-
step guide to let you build your first BPM-enabled OpenEdge application.
In this workshop, you’ll learn how to:
Articulate your ideas - Easily create detailed process flow diagrams that precisely describe the steps that must be
performed, by whom, and exactly in what order.
Build your application – Using the power of BPM and OpenEdge you’ll soon be building a real business applica-
tion.
Control your processes – Start processes, get visibility into how they are executing, and look for issues and prob-
lems.
It’s as easy as learning your A, B, C’s!

3
P a g e | 3 © 2013 Progress Software Corporation and/or its subsidiaries or affiliates. All rights reserved.
Table of Contents
Student Summary 2
Preface 5
How to Use this Tutorial 5
Conventions Used in this Guide 5
Introduction 6
Just what is a business process? 6
What is the OpenEdge BPM? 6
Much more than a flowchart designer 7
Workshop Setup 8
Vehicle Order Process Overview 8
Connecting to your OpenEdge BPM Machine 9
Your Workspace 10
Lesson A – Desinging your Process 11
Task 1. Creating a BPM Project and Process Template 12
Task 2. Familiarize yourself with the process modeler 14
Task 3. Adding Performers 16
Task 4. Defining DataSlots 18
Task 5. Adding Swim Lanes 22
Task 6. Adding Worksteps 24
Task 7. Designing Forms of human-performed worksteps 28
Task 8. Controlling the process path 32
Task 9. Sending an Email 35
Task 10. Working with Multiple Links and Conditions 38
Task 11. Adding Decision Steps 41
Task 12. Defining Alerts 44
Lesson B – Deploy, Run and Manage Process 46
Task 13. Configuring OpenEdge BPM 47
Task 14. Viewing data in the CarSales Database 53
Task 15. Adding OpenEdge ABL Code 55
Task 16. Linking your process to your OpenEdge application 56
Task 17. Timelines and Process Flows 58
Task 18. Publishing to your Progress Business Process Server 60

4
P a g e | 4 © 2013 Progress Software Corporation and/or its subsidiaries or affiliates. All rights reserved.
Task 19. Breakout: Re-Publishing 65
Task 20. Administer the basic BP Server setup 68
Task 21. Creating a Process Instance from a Process template 70
Task 22. Checking out My Tasks 72
Task 23. Checking out My Alerts 74
Task 24. Things to Try with the VehicleOrder Process 75
Task 25. Working with the BPM Portal Management Views 76
Task 26. Defining your Dashboards 78
Advanced Lesson – Controlling your Process from the ABL 79
Task 27. Showing a Task List in an ABL GUI 80
Task 28. Using the ABL API: a walk-through 82
Task 29. Things to think about with your ABL business application 87
Conclusion 88
Fun things to try with the automotive manufacturing example 88
Fun things to model on your own 88
Additional Training and Demonstrations 88
Appendix 89
Vehicle Order process template (complete diagram) 89

5
P a g e | 5 © 2013 Progress Software Corporation and/or its subsidiaries or affiliates. All rights reserved.
Preface
This tutorial is designed to quickly introduce you to the basics of BPM Process Modeling, Automation and Control
for use with your OpenEdge application. Although it is just an introduction remember OpenEdge BPM in a powerful
platform for developing process-aware business applications.
How to Use this Tutorial
The tutorial is designed to flow from one task to the next, with each task building on the previous. Starting with a
brief overview of the basics of process modeling using Progress Developer Studio for OpenEdge BPM, we will then
connect this simple model to a simple OpenEdge business logic, and finally we will use the BPM Portal to execute
and control the process.
To best leverage this tutorial, it is recommended you perform the operations as you read them, taking breaks be-
tween tasks as required. After you’ve completed all the tasks, the tutorial will make for a practical reference that you
can dive into at any point to refresh yourself on the concepts.
Conventions Used in this Guide
This document uses the following conventions to distinguish elements of text:
Terms – indicates new terms
Notes – offers remarks, tips, expand on details and used to define terminology (e.g. car terms)
Alerts – indicates key advise
Identifier – reference labels of menu items, tabs, buttons, options, etc.
Type as shown – Text that you need to type as shown.

6
P a g e | 6 © 2013 Progress Software Corporation and/or its subsidiaries or affiliates. All rights reserved.
Introduction
Just what is a business process?
A business process is defined as a collection of tasks or activities and the relationship between those tasks with the
intent of producing a specific set of outcomes. It entails the execution of a sequence of one or more process steps
in a predefined and particular order. A business process is defined by the inputs and outputs, all the operational
steps required to produce the output, the sequential relationship between the process steps, the business decisions
that are part of the event response, and the flow of material and/or information between process steps. Examples of
business process are an order fulfillment process, a customer service process, a billing process, etc.
What is the OpenEdge BPM?
Progress OpenEdge is a highly productive, highly scalable, extremely open business application development and
deployment platform. It includes Progress Developer Studio for OpenEdge, which is the integrated development
environment for OpenEdge, as well as the OpenEdge runtime environment and OpenEdge database for executing
these business applications in a variety of configurations.
Building business process applications requires you to have not only a BPM suite to model and automate the exe-
cution of business processes. You also need a business application development platform that makes it easy to
develop and deploy the core business logic that makes up the tasks and activities that are part of each step of the
process.
OpenEdge BPM is an easy to use development and runtime environment for modeling and executing business
processes. With the eclipse project facet “OpenEdge BPM”, Progress Developer Studio for OpenEdge is a visual,
easy-to-use tool that empowers you to design processes, run simulations, and build and test processes. To put it
simple, people use Progress Developer Studio for OpenEdge to “articulate the way they think” about their business
and to link their thoughts into real-world applications. Progress OpenEdge BPM also includes BPM Server which is
a robust, highly scalable runtime environment for executing business processes.
Whether you explain to your team how you want escalations handled, or when you want to analyse, design, simu-
late and document business processes prior to deployment – the process modeling capabilities of Progress Devel-
oper Studio for OpenEdge provides you the tools you need to quickly and easily accomplish your objectives. Best
of all, process modeling in Progress Developer Studio for OpenEdge is easy to learn so you can build your process
in just a few minutes! You can give these models directly to your development team who can immediately start to
create your BPM enabled application – all within a single development environment.
This tutorial will introduce you to OpenEdge BPM and show you what it’s all about.

7
P a g e | 7 © 2013 Progress Software Corporation and/or its subsidiaries or affiliates. All rights reserved.
Much more than a flowchart designer
Let’s talk a little bit more about modeling using Progress Developer Studio for OpenEdge. On initial inspection you
might think Progress Developer Studio for OpenEdge’s process modeling capability is a flowchart design program.
But do not let its good looks fool you. It provides powerful capabilities for prototyping and running simulations of
business processes and individual worksteps long before coding is needed. Once you’re happy with your models,
right from within the same tool you can start to build your real BPM enabled applications.
With Progress Developer Studio for OpenEdge you can:
Articulate ideas - Easily create detailed process flow diagrams with rules, events and exceptions, so you
can discuss and collaborate with the rest of your team.
Simulate reality - Review and test process designs before you implement them. Allocate costs, re-
sources and time to your process, and then run a simulation to catch problems and bottlenecks before de-
ployment.
Build the application - By using the built-in adapters for email, Web services, JMS, OpenEdge and a host
of others you can rapidly and easily build your OpenEdge-based business process application, based on
your documented Business Processes.

8
P a g e | 8 © 2013 Progress Software Corporation and/or its subsidiaries or affiliates. All rights reserved.
Workshop Setup
Vehicle Order Process Overview
Progress Developer Studio for OpenEdge allows you to develop and prototype virtually any business process from
supply chain management and customer care, to order taking and inventory management.
To best illustrate this, we’ll take you through an example process describing how a customer can place an order for
a car. While we make no claims as to the veracity of the example, it will nonetheless provide you an excellent
grounding in the Progress Developer Studio for OpenEdge process modeler that you can abstract upon to quickly
build and test your own business processes.
To give you an idea of what you’re going to build, here is a diagram of what the finished process will look like using
the industry-standard visual notation called Business Process Modeling Notation, or BPMN.
This is an overly simplified business process that lets a customer order a new car in an automated fashion. There
is a Start step represented by a circle, which lets the customer place the order. A call to ABL Logic retrieves some
customer financial data, needed for approving the credit. Then there is the approve credit task that will be carried
out by an employee in the finance group. If the credit is not approved, the customer gets an email telling them so.
Otherwise a salesperson at the car dealership has to review and approve the order. If he approves, the order will
be processed.
Now, let us get started with the hands-on tasks.

9
P a g e | 9 © 2013 Progress Software Corporation and/or its subsidiaries or affiliates. All rights reserved.
Connecting to your OpenEdge BPM Machine
At this workshop, you will use your distinct virtual machine. An OpenEdge development environment is installed.
You just need to get access to your distinct machine.
Step 1. Get the Internet Name (DNS) of your virtual machine running on ARCADE. Open a browser (Google
Chrome, Mozilla Firefox or Apple Safari). Navigate to these URLs
Morning Workshop’s URL: http://23.23.210.136:8980/WorkshopApp
Afternoon Workshop’s URL: http://54.225.237.144:8980/WorkshopApp
Step 2. Enter your email address and press the button Get Arcade Instance. This will give you a DNS for a
running Arcade instance, which you use to connect your Remote Desktop session.
Step 3. On your laptop, open your Remote Desktop Client
of choice (Windows: choose Start| Accessories| Remote Desk-
top Connection) and paste the obtained DNS into the Comput-
er field. Click the Connect button.
The Remote Desktop Connection client shown here may vary
slightly depending on your operating system and version.
Step 4. Again click the Connect button to say you trust this
remote connection.
Step 5. The Windows Login Dialog appears. Enter your Credentials
Username: Administrator
Password: Exchange2013
You should now be connected to your personal workshop machine running in
Progress Arcade.
The machine instance has been setup using a default English (United States)
keyboard. If your laptop has a different keyboard, you will need to set this up
yourself on the machine instance through Control Panel| Region and Language
settings.

10
P a g e | 10 © 2013 Progress Software Corporation and/or its subsidiaries or affiliates. All rights reserved.
Your Workspace
This tutorial comprises two lessons and
offers an advanced lesson. The workshop
time is limited and should allow you to
complete the essential steps of Lesson A
and B.
When starting Progress Developer Studio
for OpenEdge (PDS) you will be asked to
choose a workspace. These workspaces
are all in the folder c:\OEBPMWS.
There are three workspaces available.
WS_LessonA is empty. Please choose this workspace to begin with.
WS_LessonB takes you right to the start of Lesson B. All steps of Lesson A are finished and the Setup of OpenEdge at the beginning of Lesson B is done too.
WS_completed provides you with the completed workshop.
The BP Server is not yet setup. You will do this in LessonB.
You are now ready to start designing your process.

11
P a g e | 11 © 2013 Progress Software Corporation and/or its subsidiaries or affiliates. All rights reserved.
Lesson A – Desinging your Process
US ING P RO CE SS MO DE LL I NG TO A RTI CUL ATE YO UR I DEA S

12
P a g e | 12 © 2013 Progress Software Corporation and/or its subsidiaries or affiliates. All rights reserved.
Task 1. Creating a BPM Project and Process Template
Now that you’re logged into the demonstration machine, you’re ready to get started with OpenEdge BPM.
Step 1. Start Developer Studio. You find the
shortcut in the Windows Start Menu
Start/Programs/Progress/OpenEdge 11.3, Name
Developer Studio.
Step 2. Choose your workspace WS_LessonA.
Progress Developer Studio for OpenEdge (PDS)
opens.
Step 3. The Welcome page appears.
Step 4. Click Workbench.
Workbench might be already open. You will simply see
the chosen perspective when you closed PDS.
Step 5. You will now be presented with the
default PDS perspective “OpenEdge Editor”. It
is empty since there is no open project.
Step 6. Select the menu option Window |
Open Perspective | OpenEdge BPM Designer.
The BPM Designer Perspective opens. It is
from here that you create different Projects.
Step 7. To create a BPM Project, select the New Button
and choose BPM Project.

13
P a g e | 13 © 2013 Progress Software Corporation and/or its subsidiaries or affiliates. All rights reserved.
Step 8. Name the Project VehicleOrder and then click
Finish.
Your OpenEdge BPM
Designer Perspective
will now have a
VehicleOrder Project
and an empty Pro-
cess.

14
P a g e | 14 © 2013 Progress Software Corporation and/or its subsidiaries or affiliates. All rights reserved.
Task 2. Familiarize yourself with the process modeler
You’ve just created a new
blank process template file.
You’re going to draw your first
Business Process in a mo-
ment.
But first take a minute to famil-
iarize yourself with the user
interface.
The Palette bar contains the Select icon ( ) used to select items, the Color icon ( ) used to color the
selected shapes, and the Check Diagram icon ( ), used to verify if the process template diagram is correct.
The Task pane contains the following selections Select and Change Layout, Create Phases and Swim lanes, Draw
Shapes, Connect Shapes, Assign Participants, and Create Annotations. Each selection facilitates process model
design and is in essence the 'paint' for your Content pane canvas.
The Content pane is the canvas on which you design your business process template by clicking and dragging
elements from the Process Modeler Task pane.
The Content Tabs provides information relevant to the currently open process content pane. Tabs include:
Diagram - The default page (as shown) for designing process template diagrams. Uses a graphical drag
and drop approach.
Overview - An alternative area for designing process template diagrams by entering the information in a
tabular fashion.
Path Analysis – A kind of Gantt diagram which displays the process flow with duration and effort by listing
all possible process paths.
Dataslots - Global variables which are used to manage information flow and for the exchange of data
across worksteps in a business process. There are a few built-in dataslots and you typically define sever-
al additional dataslots that are specific to each process.

15
P a g e | 15 © 2013 Progress Software Corporation and/or its subsidiaries or affiliates. All rights reserved.
Performers - Contains the list of performers for the current process template. This page may also be used
to define new performers. A performer is a specification of who performs a particular step in a business
process and may be a user (or group of users), a managed adapter, or a sub process.
Alerts – Enables you to define alerts to notify application users when certain conditions occur in your pro-
cess.
Logic – The Graphical Event Logic Editor is a central view that gives access to all actions defined in this
process template. You can easily create and edit scripted actions by point and click.
Should you require a larger view of the main content pane,
other features like the Tasks pane (visible by default) can be
hidden.
To hide the Tasks pane, click the adjoining Hide
icon (>).
To show the Tasks pane again, click the Show icon
(<).
You can also expand (and then collapse) any of the panels.
To expand or collapse a panel, click the icon ( ).
Alternatively, you can expand (or collapse) a panel by click-
ing the panel header.
For an extra degree of freedom (especially helpful if you use a large display or have a multi-monitor system) you
can detach the various views (but not panes such as the Tasks pane) from the Process Modeler interface by select-
ing them with your cursor and moving them to another position on the screen.
16
P a g e | 16 © 2013 Progress Software Corporation and/or its subsidiaries or affiliates. All rights reserved.
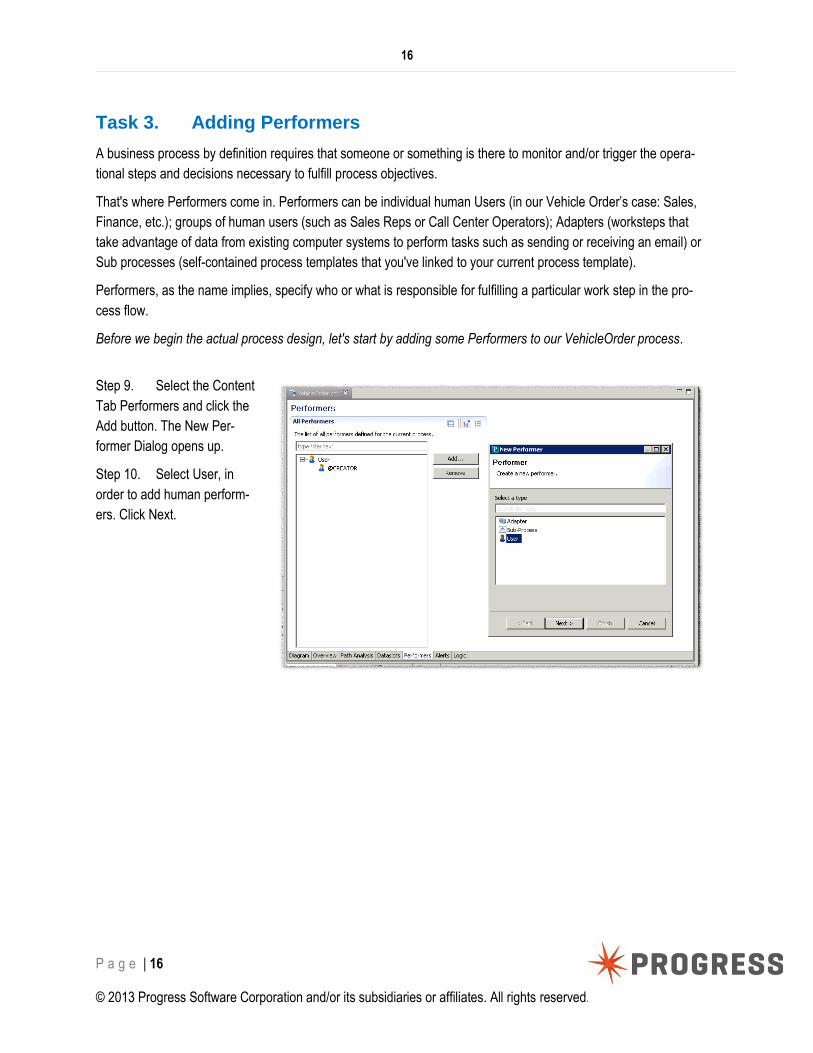
Task 3. Adding Performers
A business process by definition requires that someone or something is there to monitor and/or trigger the opera-
tional steps and decisions necessary to fulfill process objectives.
That's where Performers come in. Performers can be individual human Users (in our Vehicle Order’s case: Sales,
Finance, etc.); groups of human users (such as Sales Reps or Call Center Operators); Adapters (worksteps that
take advantage of data from existing computer systems to perform tasks such as sending or receiving an email) or
Sub processes (self-contained process templates that you've linked to your current process template).
Performers, as the name implies, specify who or what is responsible for fulfilling a particular work step in the pro-
cess flow.
Before we begin the actual process design, let's start by adding some Performers to our VehicleOrder process.
Step 9. Select the Content
Tab Performers and click the
Add button. The New Per-
former Dialog opens up.
Step 10. Select User, in
order to add human perform-
ers. Click Next.
17
P a g e | 17 © 2013 Progress Software Corporation and/or its subsidiaries or affiliates. All rights reserved.
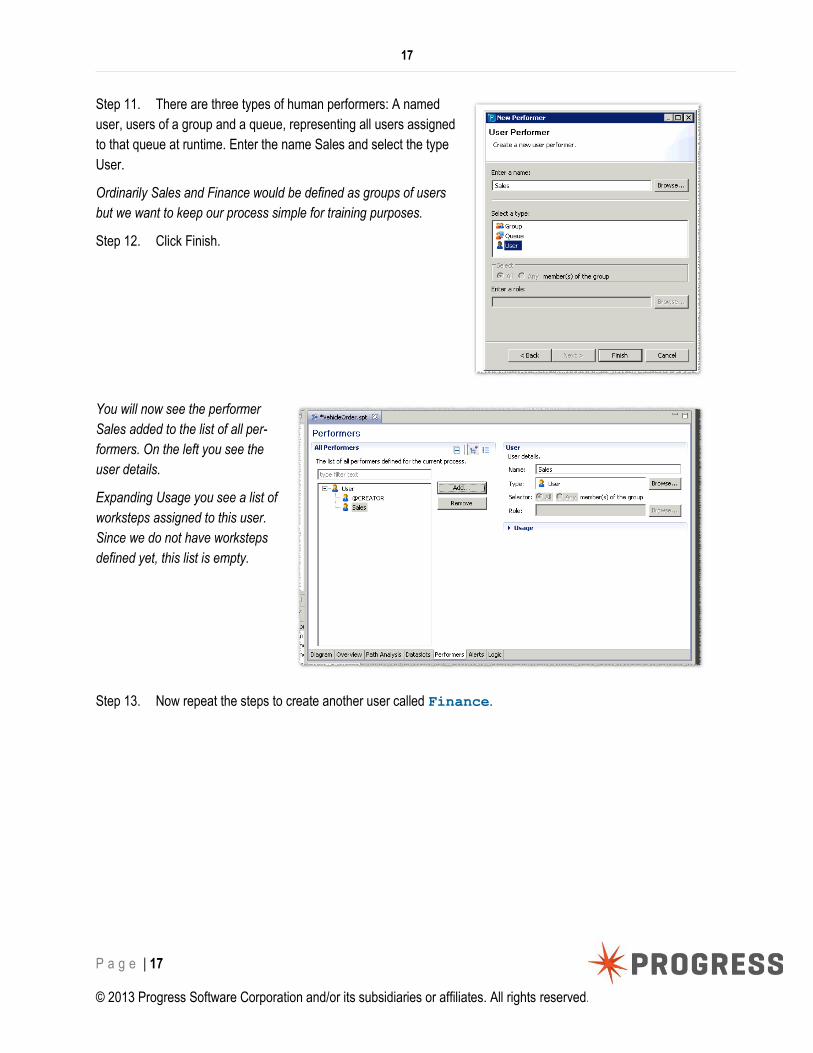
Step 11. There are three types of human performers: A named
user, users of a group and a queue, representing all users assigned
to that queue at runtime. Enter the name Sales and select the type
User.
Ordinarily Sales and Finance would be defined as groups of users
but we want to keep our process simple for training purposes.
Step 12. Click Finish.
You will now see the performer
Sales added to the list of all per-
formers. On the left you see the
user details.
Expanding Usage you see a list of
worksteps assigned to this user.
Since we do not have worksteps
defined yet, this list is empty.
Step 13. Now repeat the steps to create another user called Finance.

18
P a g e | 18 © 2013 Progress Software Corporation and/or its subsidiaries or affiliates. All rights reserved.
Task 4. Defining DataSlots
Just like other software applications, BPM processes need variables to store certain key data. In OpenEdge BPM
we call these variables Dataslots. Dataslots can be used:
To pass information from one activity to the next
To read and write data to and from forms
To read and write data to and from adapters such as Web services, Database or OpenEdge Application
Server calls
To decide on a path within a process
To expose key process data to management dashboards and other monitoring tools
Step 14. To create dataslots, click the Content Tab DataSlots.
You see a list of all defined dataslots. Since we did not yet define
any dataslots the ones listed here are System DataSlots.
Step 15. You can group dataslots either by data type or by
Tags. Select the button for “group by tag” and expand the System
Symbol in the dataslot list.
All currently defined dataslots are tagged with System. Tagging is
a very helpful means of managing dataslots. You can attach multi-
ple tags per dataslot. You would typically group dataslots by Busi-
ness Entity, e.g. “Customer”, or by usage with in the process, e. g.
“ProcessControl”.
Step 16. Click the Add button on the right. The New DataSlot Dialog
opens.
Step 17. Name this new dataslot CustomerName. This dataslot will be
used to store the name of the customer who wishes to order a new car.
As we want to allow users to enter any alphabetic text as their name, make
sure to define this dataslot with a type of Character and give it a new tag
called Customer.
The types listed comprise of two groups: ABL data types and legacy data
types. The ABL types are listed first (CHARACTER down to TABLE) and
are indicated by an icon with a little Acronym “OE”.
The legacy data types List, Map, Number, Object and Business Object are
still supported for backwards compatibility and for internal purposes. Please
avoid using the legacy data types.
19
P a g e | 19 © 2013 Progress Software Corporation and/or its subsidiaries or affiliates. All rights reserved.
Step 18. Click Next. You may now enter an initial value. It is not required here.
Instead of providing an initial value, you will set such values at process instantiation time.
Please note, that the ABL data types support the UNKNOWN value.
Step 19. Click Next. For documentation and developer communication purposes you may enter a description for
this data slot which.
Step 20. Click Finish.
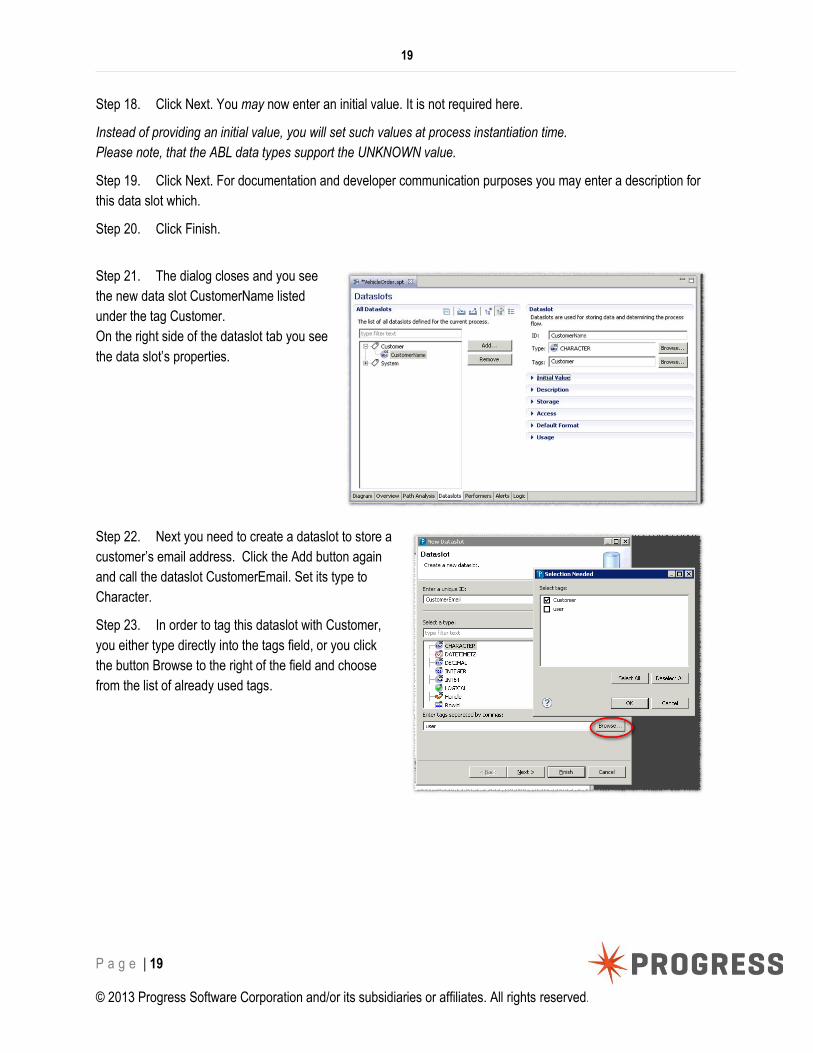
Step 21. The dialog closes and you see
the new data slot CustomerName listed
under the tag Customer.
On the right side of the dataslot tab you see
the data slot’s properties.
Step 22. Next you need to create a dataslot to store a
customer’s email address. Click the Add button again
and call the dataslot CustomerEmail. Set its type to
Character.
Step 23. In order to tag this dataslot with Customer,
you either type directly into the tags field, or you click
the button Browse to the right of the field and choose
from the list of already used tags.

20
P a g e | 20 © 2013 Progress Software Corporation and/or its subsidiaries or affiliates. All rights reserved.
Step 24. Built into Progress Developer Studio for OpenEdge
we have the ability to define Data Formats for commonly used
dataslots. Select the data slot CustomerEmail to display its
properties.
Expand the Default Format folder and select the Required
check box to specify that this data is required.
Step 25. Select the Validation field’s Browse button and
select the validation rule Email address from the drop down.
The changes are saved automatically.
Step 26. You need to create another
dataslot called DealerName, type Character,
Tag Dealer.
Step 27. This time change the default for-
mat type to Combo. This allows you to define
the default display format for this dataslot as a
combo box.
Click on Add on the right of the choices box,
enter the label and value and label, and click
OK.
Add two Label/Value pairs: SamsScubaroo,
and FredsFjord.
Have the label mirror the field names.
Select the Required field to specify that this
dataslot does not accept the Unknown value.

21
P a g e | 21 © 2013 Progress Software Corporation and/or its subsidiaries or affiliates. All rights reserved.
Step 28. As a last step, take any of the choices make it the
initial value of this dataslot.
Step 29. Save the process template.
Step 30. Using what you’ve learned in the preceding steps, define three additional dataslots.
Create the dataslot VehicleBrand of type of Character, tag Order, with a format of type Combo,
and two values as follows: Scubaroo and Fjord. Set its labels to the same strings.
Create the dataslot OrderNum with a type of Integer and tag Order. This is going to hold a whole
number value.
Create the dataslot CreditLimit with a type of Integer and tag Customer, an initial value of
20000.
Step 31. Add a Validation Rule for
Credit Limit. Expand the DataSlot Proper-
ties Area Default Format.
Click on Browse right to Validation and
select Number Validation, Number type
of Int64 with a Minimum value of 10000
and a Maximum value of 50000
With these six dataslots defined so far, you are done defining dataslots for now and you can click on the diagram
content tab to return to the main canvas.
22
P a g e | 22 © 2013 Progress Software Corporation and/or its subsidiaries or affiliates. All rights reserved.
Task 5. Adding Swim Lanes
As designing business processes can become quite involved, OpenEdge BPM employs a unique organizational
metaphor called Swim Lanes to keep things manageable. Used in workflow diagrams to organize processes across
functional boundaries, swim lanes are horizontal sections that delineate which performer is responsible for a group
of user-type task steps. A benefit of swim lanes is that when an Activity shape is dragged to a swimlane (or moved
from one swimlane to another), the shape automatically becomes a user-type task and inherits the performer as-
signed to the swimlane. Other non-user type tasks can be included in a swimlane for ease of reading or for docu-
mentation purposes.
A swimlane always represents a human user-type performer and not the object of their action.
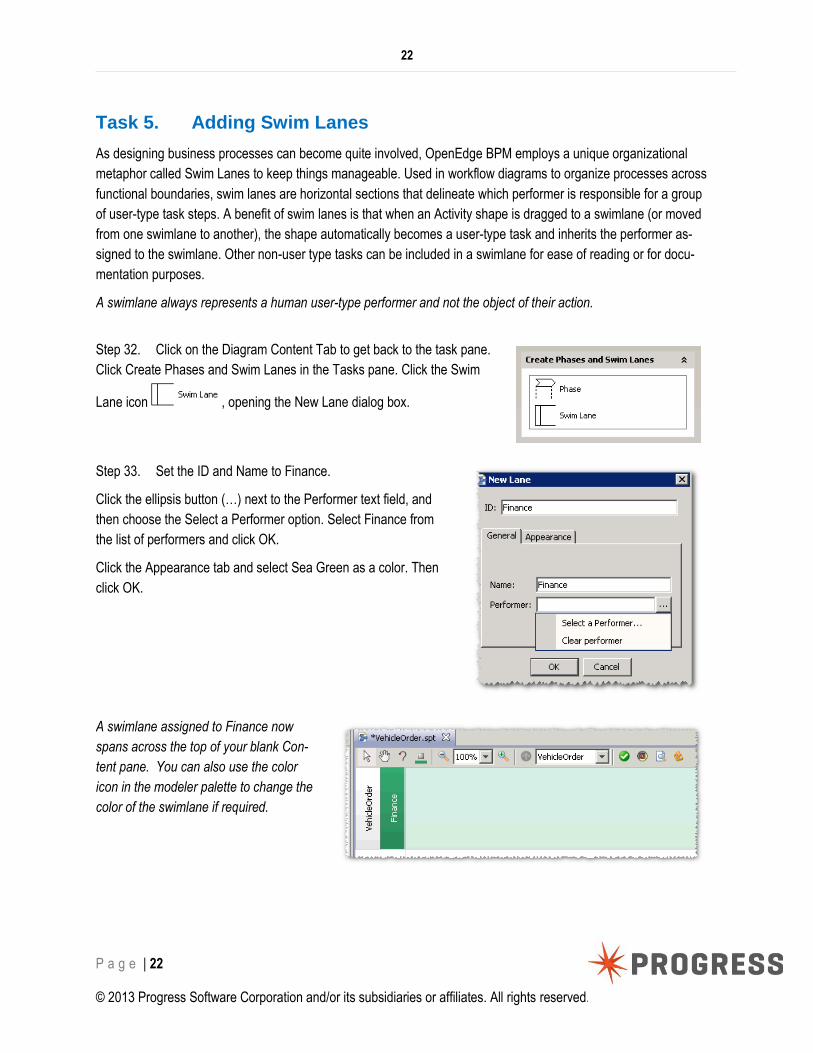
Step 32. Click on the Diagram Content Tab to get back to the task pane.
Click Create Phases and Swim Lanes in the Tasks pane. Click the Swim
Lane icon , opening the New Lane dialog box.
Step 33. Set the ID and Name to Finance.
Click the ellipsis button (…) next to the Performer text field, and
then choose the Select a Performer option. Select Finance from
the list of performers and click OK.
Click the Appearance tab and select Sea Green as a color. Then
click OK.
A swimlane assigned to Finance now
spans across the top of your blank Con-
tent pane. You can also use the color
icon in the modeler palette to change the
color of the swimlane if required.

23
P a g e | 23 © 2013 Progress Software Corporation and/or its subsidiaries or affiliates. All rights reserved.
Repeat steps 1 – 4 to create swim lanes for Sales (Light orange) and NoPerformer (Light blue). For No Performer,
just leave the performer field blank.
You main canvas should now look similar to the following:
At this point you have your performers, dataslots and swim lanes defined so you’re ready to start modeling the
Vehicle Ordering process.
Step 34. In order to avoid uninten-
tional changes of performers, please
make sure, that the Preference (Main
Menu Windows | Preferences) of Run
auto layout after using Tabular View is
not checked.

24
P a g e | 24 © 2013 Progress Software Corporation and/or its subsidiaries or affiliates. All rights reserved.
Task 6. Adding Worksteps
There are two ways of modeling a process in OpenEdge BPM.
Enter the process steps into the Overview table. This is often helpful for entering a linear process.
You can also draw the process on the Diagram Canvas.
As we already defined swim lanes we go for drawing.
Step 35. All processes must have a single start step, representing
the entry point into the process. To define the start step, choose the
Draw Shapes task in the Design Tasks pane from the process can-
vas.
Drag the Start shape onto the canvas and drop it within the No Per-
former swimlane.
This specifies that an external user (i.e. someone who is not internal-
ly involved in the process) will initiate the process somehow.
Processes can be started in various ways, such as from the
OpenEdge BPM Portal, from an external user interface such as an
OpenEdge User Interface, a website, by a message, dropping a file
or by schedule. For this workshop we will start processes only from
the OpenEdge BPM Portal as other approaches are outside the
scope of this introductory
workshop.
25
P a g e | 25 © 2013 Progress Software Corporation and/or its subsidiaries or affiliates. All rights reserved.
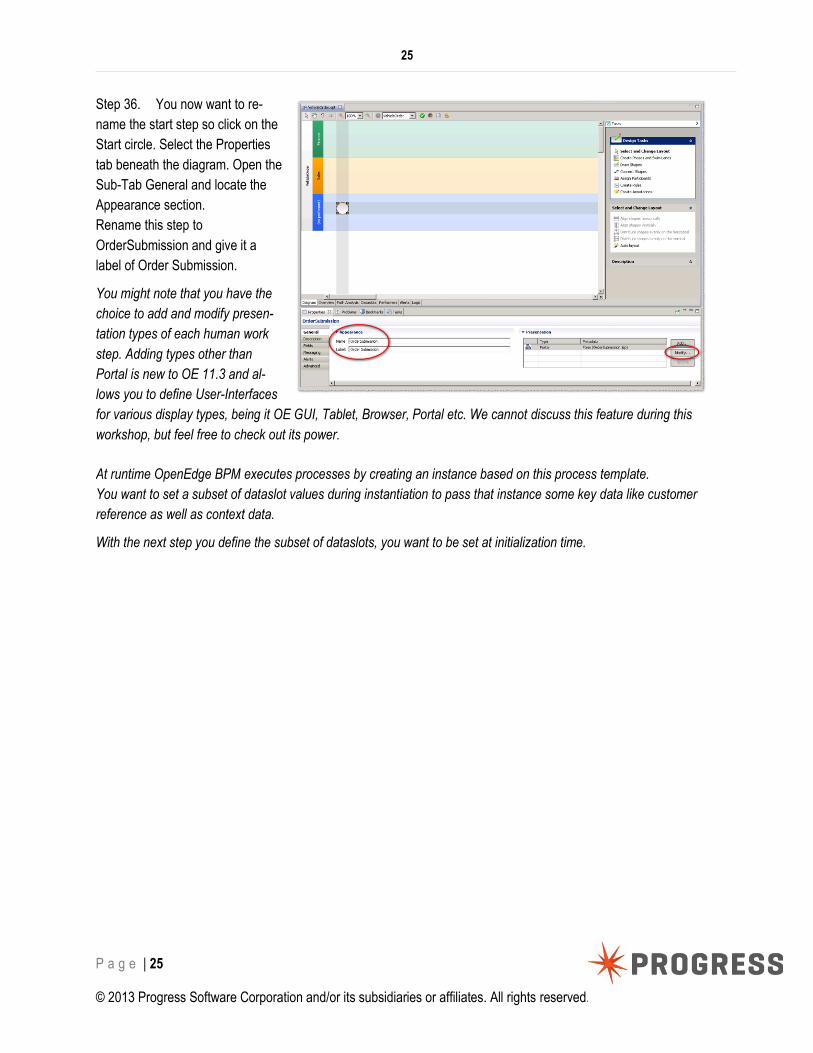
Step 36. You now want to re-
name the start step so click on the
Start circle. Select the Properties
tab beneath the diagram. Open the
Sub-Tab General and locate the
Appearance section.
Rename this step to
OrderSubmission and give it a
label of Order Submission.
You might note that you have the
choice to add and modify presen-
tation types of each human work
step. Adding types other than
Portal is new to OE 11.3 and al-
lows you to define User-Interfaces
for various display types, being it OE GUI, Tablet, Browser, Portal etc. We cannot discuss this feature during this
workshop, but feel free to check out its power.
At runtime OpenEdge BPM executes processes by creating an instance based on this process template.
You want to set a subset of dataslot values during instantiation to pass that instance some key data like customer
reference as well as context data.
With the next step you define the subset of dataslots, you want to be set at initialization time.

26
P a g e | 26 © 2013 Progress Software Corporation and/or its subsidiaries or affiliates. All rights reserved.
Step 37. Select the Fields sub-
tab on the left. Click the Add but-
ton, and you will be shown a list of
currently-defined dataslots. Select
all dataslots items you want to
add.
For this example please add the
dataslots CustomerName,
CustomerEmail, DealerName,
VehicleBrand and OrderNum.
Step 38. If you picked these
fields at once, then they will be
added in alphabetical order as
shown in the screen shot. You
have to use the Move up and Move down buttons to set field sequence as listed above. It defines the sequence in
the initial form layout.
This list of fields also defines the list of data slots which are accessible from an ABL Client or Application Server via
the Progress ABL Classes Progress.BPM.*.
The list of data slots is also used to pre-populate presentation forms that will be used to show work step dialogs in
the BPM Portal. Use the Move up and Move down Buttons to set the sequence of fields in the pre-populated forms.
Step 39. A default presentation or type Portal gets
created for each human and the start work step.
Since we need to access the start step’s form just for
testing purposes, we have OpenEdge BPM create
an auto-generated Form. In the presentation Section
select the Portal entry and click Modify.
Select Auto-generated from the Form Type drop
down.

27
P a g e | 27 © 2013 Progress Software Corporation and/or its subsidiaries or affiliates. All rights reserved.
Step 40. The next activity is performed by a human performer. Drag the Activity shape from the Draw Shapes
palette onto the canvas within the Finance swimlane.
Step 41. Select the Properties Tab and therein the Sub-Tab General.
Change the name of the work step to ApproveCredit and label to Approve Credit.
Step 42. Change the Presentation Form file’s name to ApproveCredit.jsp.
You will notice that the performer has been set to Finance. This was done automatically for you because this activi-
ty is within the Finance swimlane.
Step 43. You might also notice
that there is a slight difference be-
tween your current screen and the
screen as shown above. The Con-
tent Pane displays the shape’s
labels instead of the shape’s
names. You can adjust settings by
right-clicking into the canvas, open-
ing the pop-up menu and selecting
which text to display in shapes.
28
P a g e | 28 © 2013 Progress Software Corporation and/or its subsidiaries or affiliates. All rights reserved.
Task 7. Designing Forms of human-performed worksteps
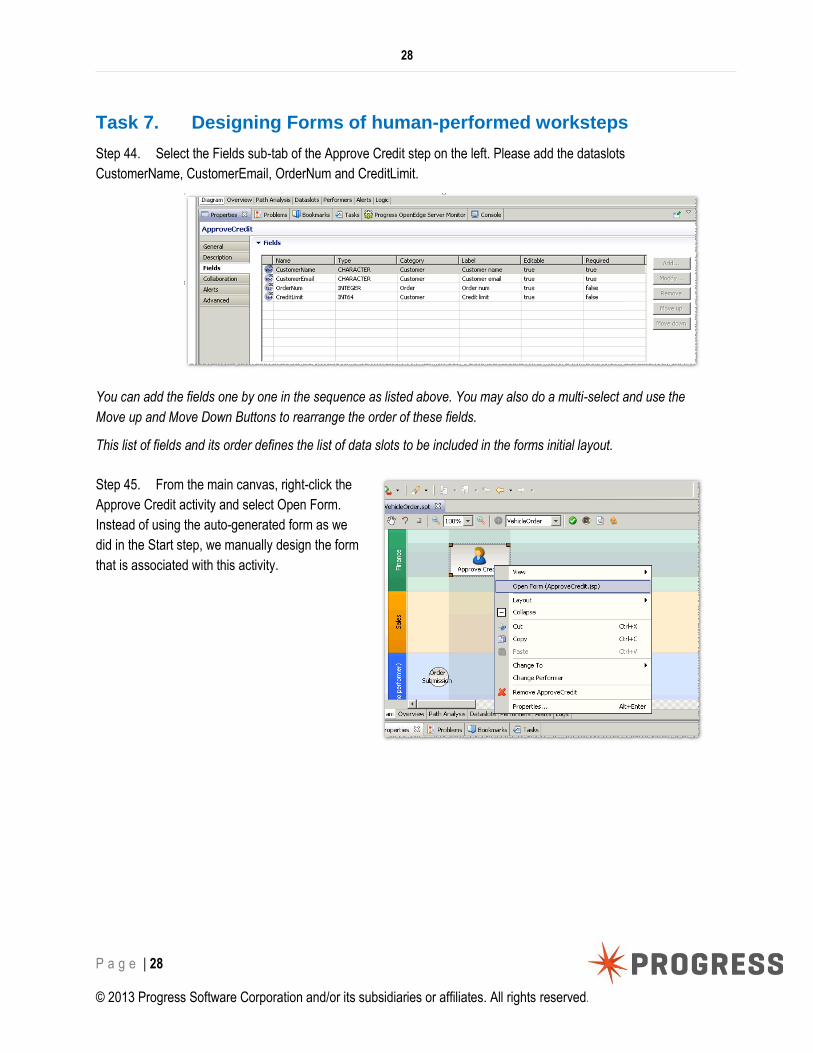
Step 44. Select the Fields sub-tab of the Approve Credit step on the left. Please add the dataslots
CustomerName, CustomerEmail, OrderNum and CreditLimit.
You can add the fields one by one in the sequence as listed above. You may also do a multi-select and use the
Move up and Move Down Buttons to rearrange the order of these fields.
This list of fields and its order defines the list of data slots to be included in the forms initial layout.
Step 45. From the main canvas, right-click the
Approve Credit activity and select Open Form.
Instead of using the auto-generated form as we
did in the Start step, we manually design the form
that is associated with this activity.

29
P a g e | 29 © 2013 Progress Software Corporation and/or its subsidiaries or affiliates. All rights reserved.
Step 46. After the initial layout
is built by a generator (may take
a few seconds), you will see the
form opened in the form editor.
You see the canvas with the
initial layout, the task list and
Palette with its elements based
on the selected form task.
At the bottom you see a list of
attributes and events of the
currently selected form element.
Header and footer are prebuilt
elements that will be visible
when deployed.
Step 47. Select the Overview
tab. It displays a hierarchy of
form elements. For data-bound
widgets it lists the source and
target dataslots bound to that
widget.
You may change the layout and to your needs.
Let us for example add another field, bound to the dataslot CreditLimit.

30
P a g e | 30 © 2013 Progress Software Corporation and/or its subsidiaries or affiliates. All rights reserved.
Step 48. Right-click into the
Order Num row of the html-
table and select Insert Rows
Above.
A new row is added.
Step 49. Do this twice.
Step 50. Select the Form Task Data Sources.
Expand the Dataslots tree. Navigate to User Dataslots and drag and drop the dataslot DealerName into the new
table row. A new data-bound field with label is added.
Step 51. Return to the Layout task tab. As a final step, pick the label Dealer Name and move over to the left
column similar to the labels of the rows above. (Not shown here.)

31
P a g e | 31 © 2013 Progress Software Corporation and/or its subsidiaries or affiliates. All rights reserved.
Step 52. Now add the DataSlot
VehicleBrand the same way.
You Form should now look like this.
Step 53. You are finished with this example of modifying a layout manually. Save the form.

32
P a g e | 32 © 2013 Progress Software Corporation and/or its subsidiaries or affiliates. All rights reserved.
Task 8. Controlling the process path
A simple process may be a linear sequence of worksteps. More commonly you have several process paths which
are activated depending on some condition.
Step 54. At this point in the de-
sign process you need to add a
dataslot that you will use to indicate
whether a customer’s credit was
approved or not. Select the
DataSlots Tab of the process tem-
plate and add a dataslot called
CreditApproved of type Logical
tagged _PathVariable.
Please recall that tags are arbitrary.
It is just a means to group your
dataslots by whatever structure you
like.
Step 55. Add this dataslot to the form like
you added Dealer Name and Vehicle
Brand.
You’ve finished defining your form, so all
that’s left to do is save and close it and
return to the VehicleOrder.spt process.
33
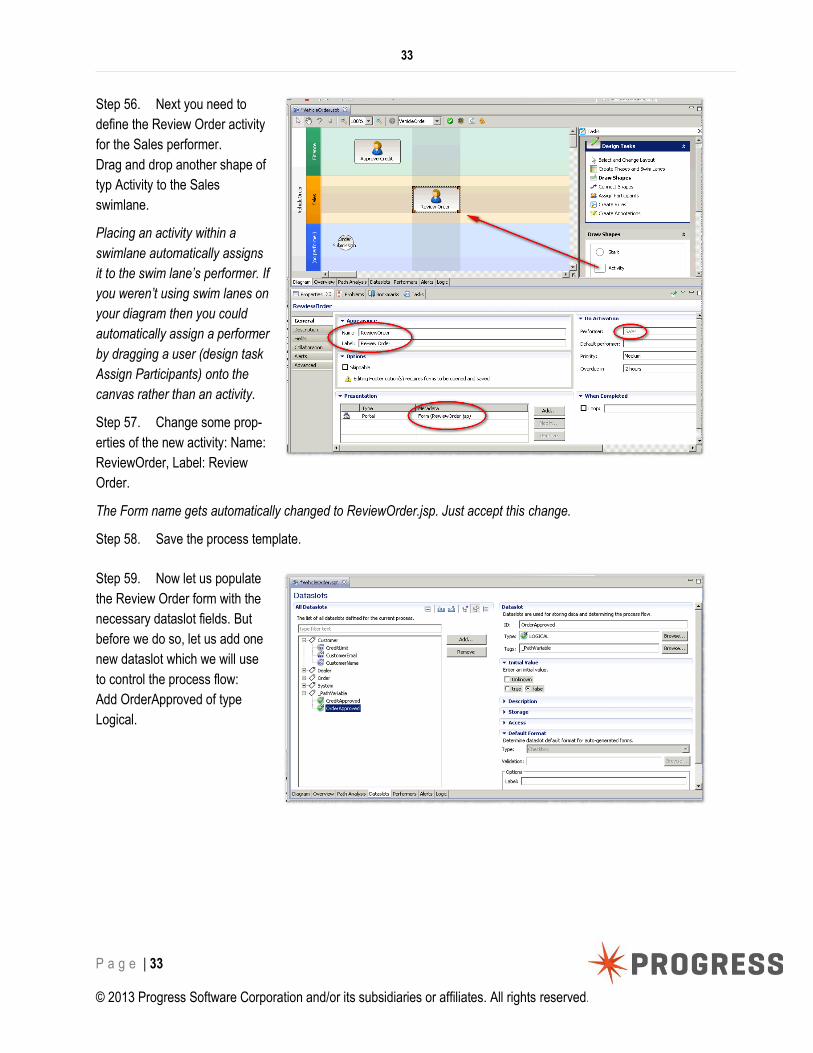
P a g e | 33 © 2013 Progress Software Corporation and/or its subsidiaries or affiliates. All rights reserved.
Step 56. Next you need to
define the Review Order activity
for the Sales performer.
Drag and drop another shape of
typ Activity to the Sales
swimlane.
Placing an activity within a
swimlane automatically assigns
it to the swim lane’s performer. If
you weren’t using swim lanes on
your diagram then you could
automatically assign a performer
by dragging a user (design task
Assign Participants) onto the
canvas rather than an activity.
Step 57. Change some prop-
erties of the new activity: Name:
ReviewOrder, Label: Review
Order.
The Form name gets automatically changed to ReviewOrder.jsp. Just accept this change.
Step 58. Save the process template.
Step 59. Now let us populate
the Review Order form with the
necessary dataslot fields. But
before we do so, let us add one
new dataslot which we will use
to control the process flow:
Add OrderApproved of type
Logical.
34
P a g e | 34 © 2013 Progress Software Corporation and/or its subsidiaries or affiliates. All rights reserved.
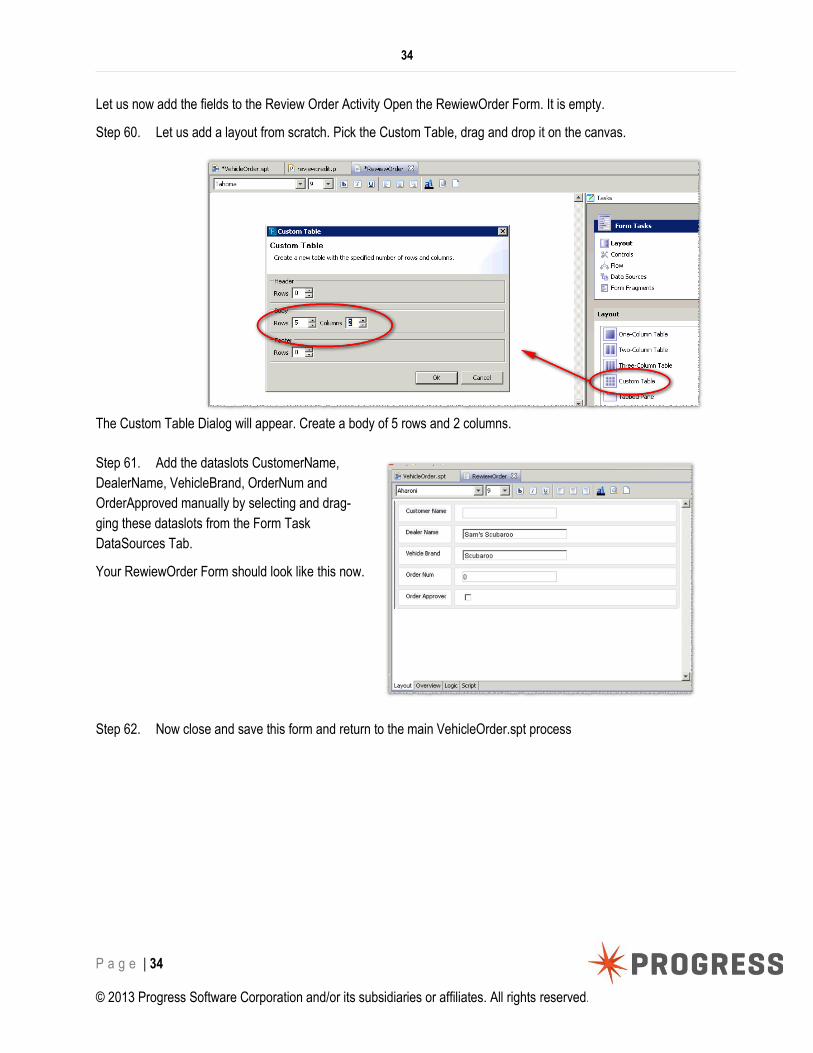
Let us now add the fields to the Review Order Activity Open the RewiewOrder Form. It is empty.
Step 60. Let us add a layout from scratch. Pick the Custom Table, drag and drop it on the canvas.
The Custom Table Dialog will appear. Create a body of 5 rows and 2 columns.
Step 61. Add the dataslots CustomerName,
DealerName, VehicleBrand, OrderNum and
OrderApproved manually by selecting and drag-
ging these dataslots from the Form Task
DataSources Tab.
Your RewiewOrder Form should look like this now.
Step 62. Now close and save this form and return to the main VehicleOrder.spt process

35
P a g e | 35 © 2013 Progress Software Corporation and/or its subsidiaries or affiliates. All rights reserved.
Task 9. Sending an Email
Step 63. If a customer fails the cred-
it check performed by our Finance
person, you want to send them an
email. You do this by adding an Email
Adapter to the model.
Select the design task Assign Partici-
pant.
Step 64. Expand to Adapters| Man-
aged| EmailAdapters|
GenericEmailAdapter and drag it onto
the canvas within the No Performer
swimlane.
Step 65. In the properties section
change the EmailAdpater Name to
SendRejection and Label to Send Re-
jection.
Step 66. Then select the configura-
tion tab and within the tab the Config-
ure button.

36
P a g e | 36 © 2013 Progress Software Corporation and/or its subsidiaries or affiliates. All rights reserved.
Step 67. Set the From field to your own e-mail
address (for testing) and the Subject field as Re-
jection Notice.
The From Address you see in the screen shot is
just an example.
After the workshop or during - if time permits - you
may also set up a test mail server on your ma-
chine, e. g. http://www.hmailserver.com. And with
a Mail Client like Mozilla Thunderbird, you could
also setup a test mail account to receive these
mails locally.
Step 68. Select the Message Body tab and type
the following in the editable text area:
Dear $CustomerName,
Sorry, but your order number
$OrderNum for a new
$VehicleBrand has been rejected
because your credit limit of
$CreditLimit is too low.
Regards
$DealerName
The $ prefix indicates an email template substitution variable which needs to be mapped to a dataslot.
Step 69. By choosing the button Extract Variables all strings prefixed by $ get extracted and listed below.
Step 70. Click the Configuration tab and enter your
Mail Host name in the Mail Host field. Add your Mailbox
User Credentials. Then click the OK button.
Again, localhost is just a placeholder for you real e-mail
Server. If you do not got any e-mail account, you could
set the skip attribute on this step to have it skipped, that
is not sending a mail.

37
P a g e | 37 © 2013 Progress Software Corporation and/or its subsidiaries or affiliates. All rights reserved.
The Dataslot Mapping Dialog gets opened for you.
Step 71. Map the To address to CustomerEmail by
choosing it from the drop down list.
Step 72. Next choose the tab Part1: Velocity Template.
You will map each email template substitution variable to
the according dataslot.
Simply map the five substitution variables (Source) to the
dataslots (Parameters) of the same name.
Step 73. We have now finished configuring the email adapter so you can click OK to return to the main canvas.
Save the process template.

38
P a g e | 38 © 2013 Progress Software Corporation and/or its subsidiaries or affiliates. All rights reserved.
Task 10. Working with Multiple Links and Conditions
Your process should look like this.
You are now at a stage where you can start to join up
each of the items that you’ve defined. Let’s begin with
simple links.
Step 74. The easiest way to link two
shapes together is by selecting the Connect
Shapes| Draw normal flow connectors from
the palette. You then click the Start step
and drag the arrow to the Approve Credit
activity.
It is also possible to connect shapes while
you are in “Select and Change Layout”
mode by holding down your Control Key,
right-clicking on the shape you want to con-
nect from, and dragging the arrow to the
shape you want to connect to.
For changing the connector layout change the mouse mode first to Select and Change Layout, then select the
connector and grab the end you would like to attach to a different activity or different edge of an activity.
Step 75. Go ahead with connecting shapes. Draw a
connection from Approve Credit to Send Rejection and
another one from Approve Credit to Review Order.
Note that you created two paths from the Approve Credit
work step. The slash at a connector marks it the default
path. Since you only have one default, we need to add
some more details.

39
P a g e | 39 © 2013 Progress Software Corporation and/or its subsidiaries or affiliates. All rights reserved.
Step 76. But first, for the sake of readability, give
each path a meaningful name. Select a connector,
select the properties tab and change Name and
Label to Credit Approved and Credit Denied. Omit
the blank space in the name.
Step 77. Since we want to
control the process path, we
need to branch on a condition.
Select the Credit Approved con-
nector and uncheck the Default
check box in the properties of
this connector.
Step 78. When you unchecked
the Default box, a Condition
section opens below. Select the
dataslot CreditApproved and the
condition to is true.
Did you notice that the connector
base now changes to a diamond
to indicate a conditional path.
You might need to move the
focus away from the Condition editor to get the changes accepted.

40
P a g e | 40 © 2013 Progress Software Corporation and/or its subsidiaries or affiliates. All rights reserved.
Step 79. If the Send Rejection
email adapter is executed, this is the
end of the process. You must add
an End step to the diagram to termi-
nate the process. Select Draw
Shapes| End from the palette and
drag it onto the canvas next to the
Send Rejection email adapter. You
should then create an unconditional
link from the Send Rejection email
adapter to the End step

41
P a g e | 41 © 2013 Progress Software Corporation and/or its subsidiaries or affiliates. All rights reserved.
Task 11. Adding Decision Steps
OpenEdge BPM supports a number of gateway shapes that allow the flow of a process to be forked and merged in
a variety of ways, such as decision (conditional split), XOR Join, OR Join, and AND gateways. These gateways
taken together allow for pretty much any forking or merging of paths that you may desire including determining the
next step based on a condition, executing multiple subsequent steps in parallel and later joining them, continuing
execution of multiple paths when one path has completed, etc.
For the sake of simplicity, for this workshop we are going to work only with the decision shape. In the previous
lesson we defined a condition by connecting multiple links to an activity. In this lesson we will define a condition
using the decision shape.
Step 80. To use a decision gateway,
select Draw Shapes| Decision from the
palette and drag it onto the canvas next
to the Review Order activity within the
Sales swimlane. Then link to it from the
Review Order activity.
Step 81. You may want to change the
name and label of the decision step to:
Name =Decision_CheckApproval, La-
bel: Check Approval. (See next screen
shot.)
This decision determines the path of the process
based on whether the order was approved in the
Review Order step or not.
Step 82. You now need to define a link from the
Review Order activity to the End event with a name
and label of Order Not Approved.
This path will be chosen if the Sales performer
chooses to reject the order for some reason.

42
P a g e | 42 © 2013 Progress Software Corporation and/or its subsidiaries or affiliates. All rights reserved.
This order process is far from being complete. But for
the sake of restricting the complexity of this workshop,
we just add one more activity to this process example
which is meant to represent all subsequent worksteps
needed in real life.
Step 83. Add another Work Step Activity to the Sales
Swim Lane and call it “Process the Order”.
Step 84. Create a connector from the Check Approval
decision step to the process the order activity. Call this
connector Order Approved.
Step 85. We need to add a condition to be evaluated
by the decision step. (The other connector is the default
connector.) Uncheck the Default check box and set the
condition to dataslot Order Approved is true by using
the drop down boxes in the condition area.
Step 86. Add a last connector
from the Process the Order Activity
to the End step.
At this point your process should
look like this.

43
P a g e | 43 © 2013 Progress Software Corporation and/or its subsidiaries or affiliates. All rights reserved.
Progress Developer Studio for OpenEdge BPM has
a process template validator which checks for
many common errors that make a process invalid.
You can check your diagram to ensure that it is
valid at any time.
Step 87. Click the Check Diagram icon ( ) on
the tool bar.
Double-clicking any errors in the Problems view will
let you select the component that caused the error
(particularly useful in large multi-workstep process-
es).If all is well and good you shouldn’t have any errors with your diagram, so now you’re ready to turn your model
into a completely executable process.

44
P a g e | 44 © 2013 Progress Software Corporation and/or its subsidiaries or affiliates. All rights reserved.
Task 12. Defining Alerts
Alerts are a means of gaining transparency during process execution. During the normal execution of a process
alerts are raised when certain activities are activated or conditions are met.
From the main VehicleOrder canvas select the Alerts tab.
Step 88. Click the Add
button to add a new alert
called LowCredit. You
should also set Severity to
High.
Click Next.
Step 89. Click the Condition
Button. You will see the condi-
tion editor allowing you to add
the condition CreditLimit <
20000. Click Next.
Add the message: The cus-tomer’s credit limit is less than 20000 dollars. Click Next.
Step 90. Add Alert recipient. This alert should be sent to Finance.
Click OK to save and create the alert.

45
P a g e | 45 © 2013 Progress Software Corporation and/or its subsidiaries or affiliates. All rights reserved.
Step 91. You now have a new alert
that you may attach to any work step,
where a CreditLimit is to be moni-
tored.
Step 92. From the main
VehicleOrder canvas, select
the Approve Credit activity
and select the Properties|
Alerts tab. Then selected
the When Completed sec-
tion and add the LowCredit
alert you created in the
previous section

46
P a g e | 46 © 2013 Progress Software Corporation and/or its subsidiaries or affiliates. All rights reserved.
Lesson B – Deploy, Run and Manage Process
As well as building your process, OpenEdge BPM helps managers analyze the processes under their control and
identify and fix problems at runtime.
US ING DEV ELO PE R STUD I O TO B UI L D YOUR OP E NEDG E BP M AP PL ICAT IO N
USI NG BP M P ORT AL TO CONT ROL YO UR PRO CESS E S

47
P a g e | 47 © 2013 Progress Software Corporation and/or its subsidiaries or affiliates. All rights reserved.
Task 13. Configuring OpenEdge BPM
This is the start of LessonB and you may want to switch the PDS Workspace to WS_LessonB, in case you did not
finish all steps of Lesson A.
The next steps of configuring the OpenEdge BPM are already set up in WS_Lesson B. If you switch to the
Workspace Lesson B, then take these steps for your reference only. Advance to “You will also need to add some
ABL code to the VehicleOrder project” on page 51.
Step 93. Let us first make sure that the CarSales Database and AppServer are running.
The database directory has a copy
of the CarSales DB. It is similar to
the Sports2000 db with a few
extensions.
Please make sure the CarSales
DB is running. If not, start it with
OpenEdge Explorer or Manage-
ment or at the command line.
You log in to OpenEdge Explorer
or Management with the creden-
tials admin / admin
There is an AppServer Service called CarSales. Make sure the agent configuration contains:
Server Startup parameters: -db CarSales –S 10301
(or whatever the RDBMS Broker port happens to be).
The Propath should include: C:\OEBPMWS\deploy\VehicleOrder\src\appserver; …

48
P a g e | 48 © 2013 Progress Software Corporation and/or its subsidiaries or affiliates. All rights reserved.
If not yet running, startup the
Appserver CarSales.
Now that we made sure, a database and Application Server is setup and started, return to the Developer Studio.
We need to the database for PDS, in order to be able to add a database connection later.
Step 94. Choose Window | Preferences from the PDS main menu. Expand Progress OpenEdge | Database Con-
nections.
Step 95. The Add OpenEdge Database connection
dialog opens. Set Connection name to CarSales. For
Physical Name browse to C:\OEBPMWS\database and
choose CarSales.db. Set the port to 10301.

49
P a g e | 49 © 2013 Progress Software Corporation and/or its subsidiaries or affiliates. All rights reserved.
Step 96. You also want to define a new SQL Connection, which
allows you to see the database structure and data in the DB Navi-
gator. Click Next.
Step 97. Just accept the defaults. Click Next.
Step 98. You may check Auto-Start database
server, but since we did this manually (or set to
auto-start in the OpenEdge Explorer) you should
uncheck it. Click Finish.
You now defined a database connection.
Click OK.

50
P a g e | 50 © 2013 Progress Software Corporation and/or its subsidiaries or affiliates. All rights reserved.
OpenEdge BPM provides an integrated development environment for process enabled OpenEdge applications
using Progress Developer Studio. You will add OpenEdge functionality to the existing VehicleOrder project, by
adding an OpenEdge Facet.
Step 99. In the Project Explorer, right-click the VehicleOrder project, and select the Properties option.
Step 100. Select the Project Facets option, and select the OpenEdge option.
Step 101. Select the Further configuration available
… link near the bottom of the dialog.
Step 102. You will now be presented with options to
configure the OpenEdge aspects or facet of the pro-
ject. The first set of these determines the project’s
layout and AVM (ABL Virtual Machine) locations.
Keep the default values for the OpenEdge AVM
group
51
P a g e | 51 © 2013 Progress Software Corporation and/or its subsidiaries or affiliates. All rights reserved.
Step 103. In the Project layout group, select the ‘Use
separate source and r-code directories’ option, and
deselect the R-code directory option. Select Next to
continue.
Step 104. The next screen (not shown here) allows
customizations to the PROPATH; none are necessary
and you can select Next.
Step 105. The last configuration step is to add the
CarSales database connection to the VehicleOrder pro-
ject. You setup the database connection earlier and all
you need to do is to select the CarSales database con-
nection and press OK.
This will close the configuration dialog and take you back
to the project properties dialog.
Step 106. Press OK here.
You will see the OpenEdge splash screen briefly while
the OpenEdge AVM restarts.
You will also need to add some ABL
code to the VehicleOrder project, for
use in some subsequent lessons.
This code is provided as an archive
(zip) file, which you will import into
the VehicleOrder workspace.
Step 107. From the workspace File
menu, select Import.
Step 108. Expand the General
node, and select Archive File. Click
Next.

52
P a g e | 52 © 2013 Progress Software Corporation and/or its subsidiaries or affiliates. All rights reserved.
Step 109. Click the Browse Button
next to the field “from Archive file”
and browse to
C:\OEBPMWS\backup\ABL.zip.
Import all its contents to the work-
space root folder VehicleOrder.
Step 110. You can validate that the
import succeeded by expanding the
src and appserver nodes to see the
existence of the reviewcredit.p
program.

53
P a g e | 53 © 2013 Progress Software Corporation and/or its subsidiaries or affiliates. All rights reserved.
Task 14. Viewing data in the CarSales Database
As mentioned in the previous section, a CarSales database is used as a
database for this workshop.
Step 111. To view the data contained in the CarSales database, click the
Open Perspective Button and choose DB Navigator.
Step 112. This will open the DB Navigator perspective from where you can maintain schema and examine data
contained within the CarSales database. Confirm that the database was connected automatically by examining the
Active Connections in the Connections view on the lower left of the screen. If not right-click on the CarSales Con-
nection Profile and select Open Connec-
tion ….
Step 113. In the DB Structure view on the right
side of the screen, expand the tree view Data-
base|CARSALES|TABLE [25].
Step 114. Next click on the Customer table to
populate the DB Details view in the bottom half
of the screen.

54
P a g e | 54 © 2013 Progress Software Corporation and/or its subsidiaries or affiliates. All rights reserved.
Step 115. Now click the Preview
tab to display the contents of the
Customer table.
You may double-click the DB
Detail tab to expand the view (or
use the scroll bars).
Step 116. You will see that the
Credit Limit for Match Point Ten-
nis is $11,000 and the Credit Limit
for Fanatical Athletes is $38,900.
You’re finished looking at the
CarSales database data for now.

55
P a g e | 55 © 2013 Progress Software Corporation and/or its subsidiaries or affiliates. All rights reserved.
Task 15. Adding OpenEdge ABL Code
Step 117. Open a new PDS perspective called OpenEdge Editor and find an ABL program called reviewcredit.p
located within the src\appserver directory.
Step 118. Double-click this program to open it in the
OpenEdge editor.
The ABL code represents simple business logic that:
Finds a customer in the CarSales database
using the ipchCustomerName variable as
search criteria.
Sets the oplgApprovedDeniedCredit variable
to TRUE if the customer’s Credit Limit field in
the database is greater than $20,000, other-
wise set it to FALSE.
Sets the opinCreditLimit variable to the value
of the Credit Limit field.
Step 119. Export this file into a directory that is in
of the Application Servers PROPATH. Set the To
Directory to C:\OEBPMWS\deploy.
The AppServer will find this file now on its
Propath.
We added the directory
C:\OEBPMWS\deploy\VehicleOrder\src\ to the
Propath. The procedure file needs to go there.
Make sure you chose “Create directory structure
for files” to have PDS create it for you.
Instead of importing those source files into the
same OE-BPM Process project, you would import
an AppServer project into the workspace contain-
ing that .p and deploy to the CarSales AppServer
broker. That way you would just publish from the
Servers tab - consistent deployment across
AppServer and OE-BPM projects

56
P a g e | 56 © 2013 Progress Software Corporation and/or its subsidiaries or affiliates. All rights reserved.
Task 16. Linking your process to your OpenEdge application
OpenEdge BPM allows you to call ABL code hosted on an OpenEdge Application Server using the built-in
OpenEdge Managed Adapter.
Ensure that the current perspective is set to BPM Design and open the VehicleOrder.spt process if not already
open.
You are going to add a new OpenEdge Managed Adapter, a system-centric step, immediately following the Start
step to call the OpenEdge program that you wrote in the previous lesson. This step will be used to perform the
following:
Take the CustomerName dataslot entered in the Start step and map it to the ipchCustomerName input pa-
rameter used to look up a Customer record in the CarSales database
Take the oplgApprovedCredit output parameter and map it to the CreditApproved dataslot
Take the opinCreditLimit output parameter and map it to the CreditLimit dataslot.
Step 120. Expand the No Performer swimlane to make room for an additional activity.
Step 121. In the Project Explorer, select the
reviewcredit.p file and drag it onto the main canvas
between the Start step and the Approve Credit step.
Step 122. The OpenEdge Adapter Configurator dialog will
automatically appear. In the OpenEdge Adapter Configura-
tor, set the Application service to CarSales. The session
model is Session-free. This needs to be consistent with the
setup of the Application Servers Session Model.
Step 123. Make sure you also set the two check boxes
under Procedure Properties and Click OK.
This will add annotations to the .p file, which are needed to
create an interface description file, called BIZOE file (done
by PDS on the fly), which is the Interface definition for the
Adapter to call the Application Server.

57
P a g e | 57 © 2013 Progress Software Corporation and/or its subsidiaries or affiliates. All rights reserved.
You can leave the other fields as the defaults. Information from that procedure file is shown on the lower half of the
OpenEdge Adapter Configurator dialog including the name of the ABL program, reviewcredit.p, and the three
parameters that are defined for the program. In this case there is one input parameter and two output parameters.
You can now click OK to save the adapter configuration.
Step 124. In the Dataslot Mapping dialog map
the ipchCustomerName parameter to the
CustomerName dataslot in the source column
and map the oplgApprovedCredit parameter to
the CreditApproved dataslot and the
opinCreditLimit parameter to the CreditLimit
dataslot in the target column.
Click OK to save the mappings and return to the
main canvas.
Step 125. Save the process. You will be asked
to also save the reviewcredit.p file, since it got changed by adding the annotations. Accept to save it.
Step 126. Change the connectors so that the Start step connects to this new
OpenEdge Adapter and this in turn connects to the Approve Credit step. Adjust
the diagram layout as needed.
Step 127. Change the name and label of the OEAdapter1 step to Determine
Credit.
Step 128. Save and validate the process.

58
P a g e | 58 © 2013 Progress Software Corporation and/or its subsidiaries or affiliates. All rights reserved.
Task 17. Timelines and Process Flows
You are now ready for publishing your process. Before doing so, let us take a brief look on other process views that
PDS provides. If you (not part of this tutorial) choose to add overview flows and activities you will need to define
durations on work steps and the process itself. This taks shows some of these additional features.
All Processes and Activities can
be allocated the amount of time
they are expected to take.
Step 129. Clicking anywhere on
the process canvas select the
Properties tab at the bottom of
your screen will display default
information about the overall
process.
You’ll notice that the default
Duration time for this process is
1 day (i.e. from the point of a
customer placing an order
through to it being delivered).
Leave this as 1 day.
Step 130. Select the Approve Credit activity and see its Properties. You can set the amount of time (the default
here being 2 hours) allocated to this activity before it is classed as being over due. You can set the value to a literal
or use a dataslot which’s value can be dynamically changed. Accept all of the defaults by clicking OK, which returns
to the main canvas.
In addition to being able to see the
overall VehicleOrder process as a
diagram you can also view it in a
number of other formats, for exam-
ple a tabular format.
Step 131. Click the Overview tab.
As you become more proficient in
process modeling you may choose
to use this view of the process to
define your processes, change the order of events, add additional activities, etc.
59
P a g e | 59 © 2013 Progress Software Corporation and/or its subsidiaries or affiliates. All rights reserved.
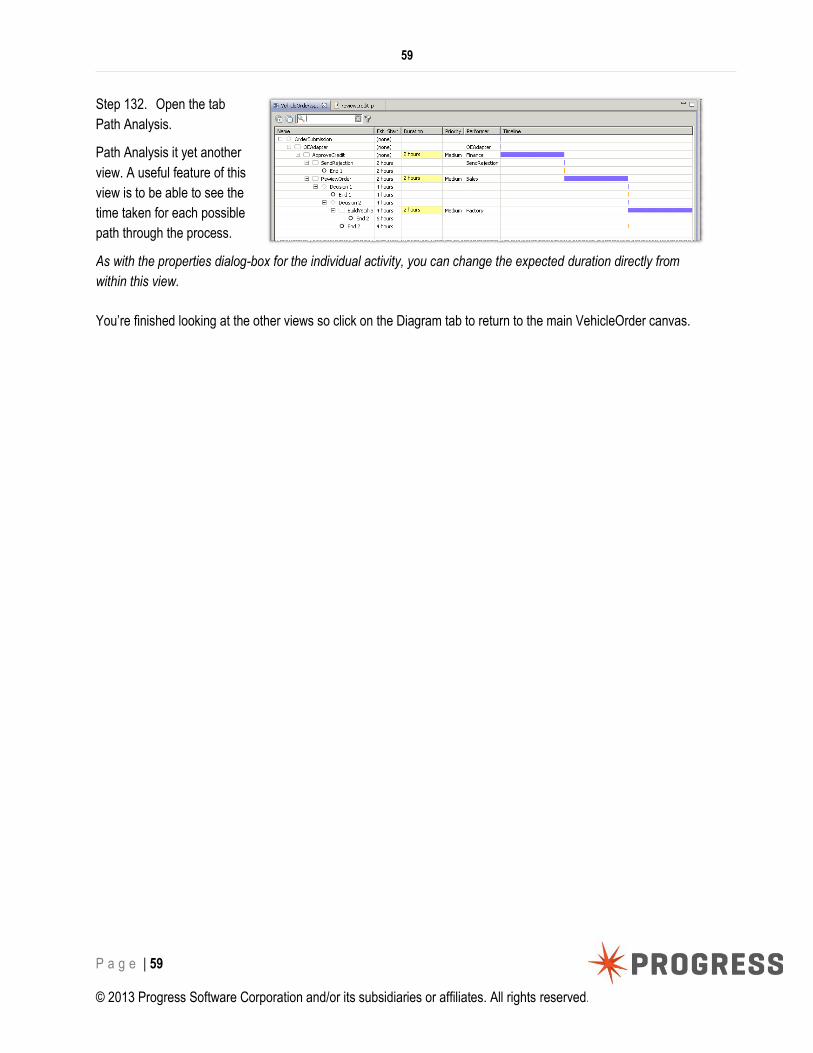
Step 132. Open the tab
Path Analysis.
Path Analysis it yet another
view. A useful feature of this
view is to be able to see the
time taken for each possible
path through the process.
As with the properties dialog-box for the individual activity, you can change the expected duration directly from
within this view.
You’re finished looking at the other views so click on the Diagram tab to return to the main VehicleOrder canvas.

60
P a g e | 60 © 2013 Progress Software Corporation and/or its subsidiaries or affiliates. All rights reserved.
Task 18. Publishing to your Progress Business Process Server
Once you have finished modeling and configuring your Process you’re ready to publish it to the OpenEdge BP
Server to test it.
PDS for OpenEdge BPM has a built-in deployment test server that allows you to publishing and run a BPM Process
with just PDS installed. You may however also deploy to other OpenEdge BPM Servers, for example on a Team
Test Server.
Step 133. Check your Publish
settings. In PDS open Windows |
Preferences and expand Pro-
gress OpenEdge | BPM | Publish.
There is one default entry called
local.
Step 134. Select it and click on
edit. The default location is
http://localhost:18793
/sbm/deployment. You may add
more locations to publish to mul-
tiple targets in one go.
Step 135. If the host reference
to localhost does not work in an
environment, you may enter an
IP address or a machine name,
whatever works in your environ-
ment. You can simply edit the
default local entry or create addi-
tional publish configurations.
The machine name is the con-
tainer name that is displayed in
OpenEdge Explorer and Man-
agement.

61
P a g e | 61 © 2013 Progress Software Corporation and/or its subsidiaries or affiliates. All rights reserved.
As a last setup check open the Server configura-
tion for Progress Business Process Server for
<your machine>.
Step 136. Navigate to the Servers View in the
bottom left corner of the Progress Developer
Studio and double-click on the Progress Busi-
ness Process Server entry.
Step 137. You should see on Overview similar to this one with connect and publish information.
The link Open launch configuration give you access to the server runtime configuration.
Your host name might differ.
You are finished with your configuration check.

62
P a g e | 62 © 2013 Progress Software Corporation and/or its subsidiaries or affiliates. All rights reserved.
Now, let us get started with publishing your
VehicleOrder process.
Step 138. Select the Servers view in the left
bottom section of the screen, right-click on
Progress Business Process Server for
<machine name> and open Add and Re-
move.
Step 139. You will find all available resources that
can be published to this server listed. Select the
VehicleOrder Process and click on Add > to assign
it to this server. When publishing to this server, all
configured resources will be published.
While developing a process, automatic
immediately publishing should be disabled. You
need to manually publish when you are ready to
test.
During testing and debugging it might be useful to
enable it to make sure, your changes are always
synchronized to the server.
Step 140. Click Finish to close the dialog box.
You will now be able to expand the BP Server
and find the Vehicle Order Process assigned for
publishing with this server.

63
P a g e | 63 © 2013 Progress Software Corporation and/or its subsidiaries or affiliates. All rights reserved.
Step 141. The Process Server
status is stopped. Right-click
and select start from the pop up
menu or press Ctrl-Alt-R.
In the PDS Status bar you will
see an animated progress bar
indicating that the server is
starting.
Starting the BP Server will take
a couple of minutes depending on your machines performance. Take a break.
As soon as the status has changed to started, you may
publish to this server.
Step 142. Again right-click on the server entry and
this time choose Publish or press Ctrl-Alt-P.
A progress dialog shows
up. Eventually the Server
status will change to
Started, Synchronized.

64
P a g e | 64 © 2013 Progress Software Corporation and/or its subsidiaries or affiliates. All rights reserved.
Step 143. After publishing (or
republishing) you should see this
status picture. The Business
Process Server is started and
synchronized. The VehicleOrder
resource is Synchronized.
You should also find the CarSales
AppServer being started.
If you are not sure, then please check that the CarSales Database Server is also up and running.
You are now done with Publishing your application.

65
P a g e | 65 © 2013 Progress Software Corporation and/or its subsidiaries or affiliates. All rights reserved.
Task 19. Breakout: Re-Publishing
This Task is information only. It offers you some more information about deployment at development time.
There are no activities at this step, just read these additional details.
Using just the Development Environment (you installed PDS only), you find the development BP server in
C:\Progress\OpenEdge\oebpm\server and all deployed processes in the
C:\Progress\OpenEdge\oebpm\server\ebmsapps folder.
If you publish your process the very first time, the BP Server will create all necessary entities in the BP Server
Database and copy all files project files to their appropriate deployment folders on the BP Server.
However, you will design your process iteratively and
therefore will re-deploy your process a couple of times.
When re-deploying you have to choose the type of
deployment, i. e. the scope of deployment.
Right Click on the to be deployed resource, that is the
Process entry of your BP Server.
There are three modes of re-deployment:
Type 1) Copy Files Only: Use this type of deployment in case you did not
change the process template itself; that is the files processname.spt,.xml
and .properties files. By just copying files, all active and new process
istances will use the changed files right after synchronisation.

66
P a g e | 66 © 2013 Progress Software Corporation and/or its subsidiaries or affiliates. All rights reserved.
Type 2) Refresh Template: If you changed those three files, you may still try to apply the changes to currently
running process instances ( and of course to any new instances). Refresh template tries to update the process
definitions even for active process instances. It may fail to apply those changes, depending on the scope of
changes. The details are beyond the scope of this tutorial.
Type 3) Reinstall: This will replace your current version of published process template and all its BP Server DB
entries. That is, you will loose all historical data (which you do not have in case of just development anyway) and all
running process instances.
It is good practice to also force the publish mechanism to clean all deployment artifacts in the deployment folder. In
order to do so, choose Clean … instead of Publish. This cleans up the deployment and then publishes the
resources in one go.
In addition to do a Clean Reinstall, it is also good practice to uninstall your previously deployed process first.
Go to the BPM Server Portal. There are
several ways of doing so. One is to use the
pop up menu.
Another is to just open any browser and enter
the URL
http://localhost:18793/sbm/
bpmportal
Login in with the credentials “admin” / “admin”.
Open the BPM Portal, log
in as administrator,
choose the tab Admin-
istration, Choose BP
Server in the drop down
Applications and choose
the process template aka
application that you need
to uninstall. Click the
button Uninstall.

67
P a g e | 67 © 2013 Progress Software Corporation and/or its subsidiaries or affiliates. All rights reserved.
In case you have active
process instances (that
is, not finished instances)
you will be asked whether
you want to force the
systems to scratch all
instances and then
uninstall the process
template. Choose Force
Uninstall and click Yes.
An uninstalled process is
removed from the BP
Server DB. (It is still in the directory ebmsapp for you to re-install it in case you would need to in a deployment
scenario. At development time you would want to just replace it by a new version, that is why you should publish by
choosing the Clean option.
This finishes our breakout on re-publishing.
68
P a g e | 68 © 2013 Progress Software Corporation and/or its subsidiaries or affiliates. All rights reserved.
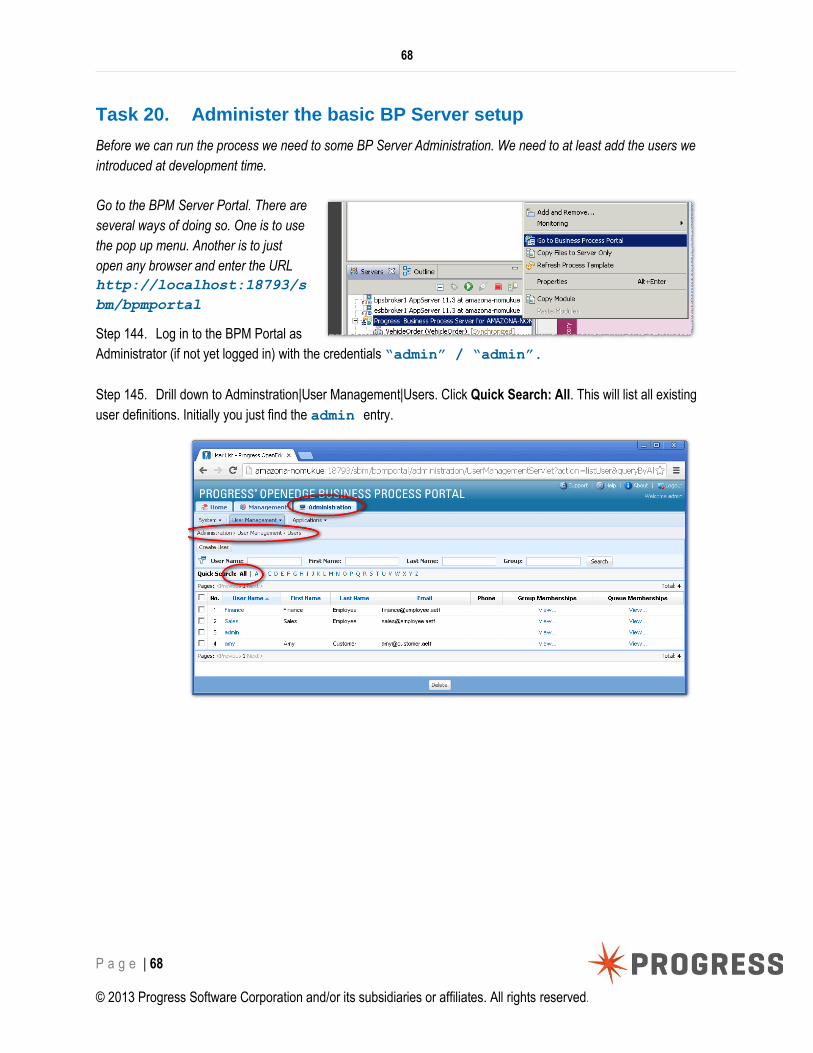
Task 20. Administer the basic BP Server setup
Before we can run the process we need to some BP Server Administration. We need to at least add the users we
introduced at development time.
Go to the BPM Server Portal. There are
several ways of doing so. One is to use
the pop up menu. Another is to just
open any browser and enter the URL
http://localhost:18793/s
bm/bpmportal
Step 144. Log in to the BPM Portal as
Administrator (if not yet logged in) with the credentials “admin” / “admin”.
Step 145. Drill down to Adminstration|User Management|Users. Click Quick Search: All. This will list all existing
user definitions. Initially you just find the admin entry.

69
P a g e | 69 © 2013 Progress Software Corporation and/or its subsidiaries or affiliates. All rights reserved.
Step 146. Add the user Finance. Click the
button Create User.
Step 147. Give this User the User Name
Finance. Give it a password of
password.
Add a first and last name and e-mail
address of your choice.
Step 148. Click Save.
Step 149. Create another user called
Sales, User Name Sales and
Password password.
These two users suffice for our tutorial. You
are finished with administering the BP
Server.
This tuturial cannot touch the area of BP
Server Administration at all. Please see the
documentation and visit PSCs trainings in
your region.

70
P a g e | 70 © 2013 Progress Software Corporation and/or its subsidiaries or affiliates. All rights reserved.
Task 21. Creating a Process Instance from a Process template
We now want to see how a business user works with OpenEdge BPM.
Typically a business user would log on to his application at the desktop, a tablet or a Browser.
Process Users that do not work within a given application, will log on to the BPM Portal via a bookmark in their
browser. This bookmark would point to a URL similar to http://localhost:18793/sbm . The protocol, host and port
might change, depending on the settings provided during installation of the BPM server.
For the sake of the limited scope of this few
hours, we will only show how to run a pro-
cess from the BPM Portal.
Aand since you are already using Progress
Developer Studio, you can use the handy
shortcut built-in to the Server view.
Step 150. Right-click the Business Process
Server and select the Go to Business Process Portal option to start the portal login.
Step 151. Enter the username Sales
and a password password. (both
case sensitive).
Step 152. Then click the Login button.
If the browser screen is empty not show-
ing this dialog, then close the browser
and repeat the previous step.
Step 153. Once logged in, select the Home | Applications
tab. You will find the published process (aka application)
listed.

71
P a g e | 71 © 2013 Progress Software Corporation and/or its subsidiaries or affiliates. All rights reserved.
The OeDDLOperations process that you also see listed, is a helper process. This helper process is needed for the
time being to address some OpenEdge RDBMS limitations. Just disregard it.
Important: Each deployment should have this application installed and one instance created and running.This
application is provided with your OpenEdge BPM installation and the Business Process Administrator might need to
install it. In order to do so, log in as BP Administrator, default login credentials “admin”/”admin” and navigate to
Administration | Applications | BP Server. Select “ready to install” and install the helper process. Then create a
single instance from this process.
Step 154. Click on the VehicleOrder Process Name, which is a link, that creates a new process instance.
Step 155. Enter the following details and click the
Create button to create an instance of this process.
CustomerName - Fanatical Athletes
(please check for the exact spelling; if a
customer cannot be found by name, the
retrieved credit limit will be just 0.)
CustomerEmail - <your e-mail>
DealerName - <any choice>
VehicleBrand – <accordingly>
OrderNumber - <some number>
Step 156. You will see a message
saying that an instance of the
VehicleOrder process has been creat-
ed. Click the OK button to continue.
Step 157. You can now logout from the Portal.
Step 158. Just for your information
/ don’t do this now:
If you ever want to remove
unfinished aka active instances,
you can do so by loggin in as Sales
(the creator of the instance), go to
My Instances, check the check
boxes on the left for those
instances you want to remove and
click the button Remove.

72
P a g e | 72 © 2013 Progress Software Corporation and/or its subsidiaries or affiliates. All rights reserved.
Task 22. Checking out My Tasks
The instance of the process that you just created would in the real world just be one customer order amongst many.
Users of the BPM Portal can see all of the instances assigned to them, their priority and whether they are overdue.
Step 159. Log back into the BPM Portal
but this time as a user called Finance
with a password of password.
By default all BPM Portal
users are placed into the
My Tasks tab (this can
be changed by an ad-
ministrator if required).
As you can see, the
instance of the
VehicleOrder process
that you created as the
Sales user is allocated
to the Finance user.
The task that the Fi-
nance user is expected
to perform on this in-
stance is the Approve Credit task.
Step 160. Click on the ApproveCredit#<instance> link.

73
P a g e | 73 © 2013 Progress Software Corporation and/or its subsidiaries or affiliates. All rights reserved.
Step 161. In addition
to the details that you
entered as the Finance
user, notice also that the
CreditLimit and
CreditApprove fields
are populated. These
values were populated
from the OpenEdge
Managed Adapter call,
made as a prior system
centric step.
Step 162. Change the value of the
CreditLimit to 15000. Leave all other
values as they are.
Click the Complete button and click OK on
the subsequent message.
You’ll notice that the My Tasks list is now empty. That’s because the instance of the process has been passed to
the Sales person to perform the Review Order step

74
P a g e | 74 © 2013 Progress Software Corporation and/or its subsidiaries or affiliates. All rights reserved.
Task 23. Checking out My Alerts
Step 163. Click on the My Alerts tab.
Step 164. You will notice that the LowCredit Alert is displayed. That’s because the CreditLimit that we entered
on the Approve Credit task of 15000 is less than the condition we defined for this alert previously

75
P a g e | 75 © 2013 Progress Software Corporation and/or its subsidiaries or affiliates. All rights reserved.
Task 24. Things to Try with the VehicleOrder Process
You may wish to “play” with the process at this point. Try creating several instances of the VehicleOrder process
with different values to see the effect that it has.
Try to enter a CreditLimit less than 10000 or greater than 50000 on the screen. What happens, and why?
Similarly, try to enter an invalid email address.
If you want to test that the email adapter works, use the customer email [email protected]. You will find a Thun-
derbird email client on the machine configured for this username.

76
P a g e | 76 © 2013 Progress Software Corporation and/or its subsidiaries or affiliates. All rights reserved.
Task 25. Working with the BPM Portal Management Views
Step 165. Log into the BPM Portal once more as the Sales user with a password of password Select the My In-
stances tab to see all of the instances of the VehicleOrder process started or created by the Sales user.
Step 166. It is useful to be able to
see where a particular instance of
a process currently is. You can
easily see that this instance is
current assigned to the Sales performer to perform the Review Order task.
You can also see this information using the process diagram. Click on the PSV Flow View icon (the middle of the
three).
Step 167. This view shows that
three steps Start, Review Credit,
and Approve Credit have all
completed and that this particular
instance is currently with the Sales
performer waiting for the
performance of the Review Order
task.
From within this view you can also
see the current values of the
dataslots, the current status of the
process in a tabular format, and a
complete Audit trail of the tasks
executed so far in this process.
Step 168. Now select the
Tabular View option.

77
P a g e | 77 © 2013 Progress Software Corporation and/or its subsidiaries or affiliates. All rights reserved.
You can see which the
current activity is and
who the performer is,
among other
information. You can
also assign the task to
another performer, or
complete the task.
Step 169. Select the View Dataslots link at the top right side. This shows all of the dataslots and their values and
also allows you to change the values from a basic UI. This capability can be useful for oversight purposes, or for
making updates to the process without having to start a new process.
Step 170. Change the
value of the CreditLimit
dataslot to 10000 to cause
the Alert defined earlier to
fire, when the task is com-
pleted. Select Save when
you are done.
Step 171. Switch back to the Tabular View, and complete the task, by selecting Complete from the Action drop-
down, and then clicking Save at the bottom of the page.

78
P a g e | 78 © 2013 Progress Software Corporation and/or its subsidiaries or affiliates. All rights reserved.
Task 26. Defining your Dashboards
The BPM Portal also provides customizable dashboard capabilities. The default dashboard provides insight into the
current user’s Tasks, Alerts and Instances, and can be customized to provide additional insight and visibility
into your processes.
Step 172. Select the Dashboard tab in the portal, while logged in as the Sales user. The default dashboard –
Performance Dashboard – is shown. Administrators can create multiple dashboards containing data visualizations
and other widgets which can be specialized per user or per business function.
Step 173. You can customize a dashboard by selecting the Edit Dashboard link on the right-hand side of the
portal. There are a number of way in which you can customize a Dashboard (layout, content etc). Try customizing
this Dashboard.

79
P a g e | 79 © 2013 Progress Software Corporation and/or its subsidiaries or affiliates. All rights reserved.
Advanced Lesson – Controlling your Process from the ABL
At this point, you’ve seen how OpenEdge ABL business logic can easily be called from OpenEdge BPM via an
OpenEdge Managed Adapter. This business logic can provide data to the process for decision-making purposes, or
can be used to capture data in the application database.
This is not the only way in which OpenEdge can interact with the process: as part of the integration of OpenEdge
and BPM, an API was created which allows the ABL to easily communicate with the BPM server, using simple ABL
calls. This API allows you to easily integrate the task-based workflow into your existing or new application. You
might want to do this to keep a consistent UI for your users so that they don’t need to switch between the ABL-
based UI and the BPM Portal. Alternatively, you may also want to start processes from your ABL business logic.
At a technical level, the API allows us to start processes, view and update dataslots, and complete tasks, amongst
other functions. At a more conceptual level, it allows us to create BPM processes that shadow or monitoring our
ABL application’s processes. All business applications have processes in them. These are usually informally de-
fined and little or no visibility into the state of these processes is available. An example of such an informal defini-
tion might be a set of menu options that should be followed in a specific order, or some “tribal knowledge” that a
particular person has. BPM allows us some insight into these.
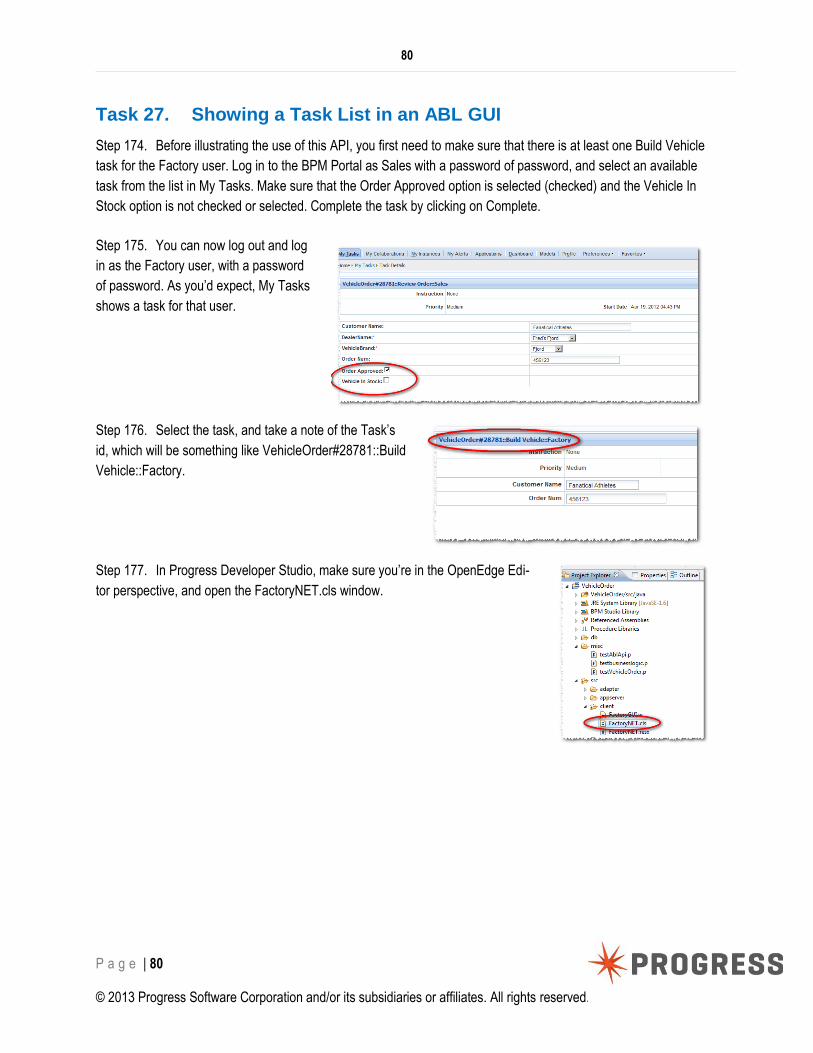
80
P a g e | 80 © 2013 Progress Software Corporation and/or its subsidiaries or affiliates. All rights reserved.
Task 27. Showing a Task List in an ABL GUI
Step 174. Before illustrating the use of this API, you first need to make sure that there is at least one Build Vehicle
task for the Factory user. Log in to the BPM Portal as Sales with a password of password, and select an available
task from the list in My Tasks. Make sure that the Order Approved option is selected (checked) and the Vehicle In
Stock option is not checked or selected. Complete the task by clicking on Complete.
Step 175. You can now log out and log
in as the Factory user, with a password
of password. As you’d expect, My Tasks
shows a task for that user.
Step 176. Select the task, and take a note of the Task’s
id, which will be something like VehicleOrder#28781::Build
Vehicle::Factory.
Step 177. In Progress Developer Studio, make sure you’re in the OpenEdge Edi-
tor perspective, and open the FactoryNET.cls window.
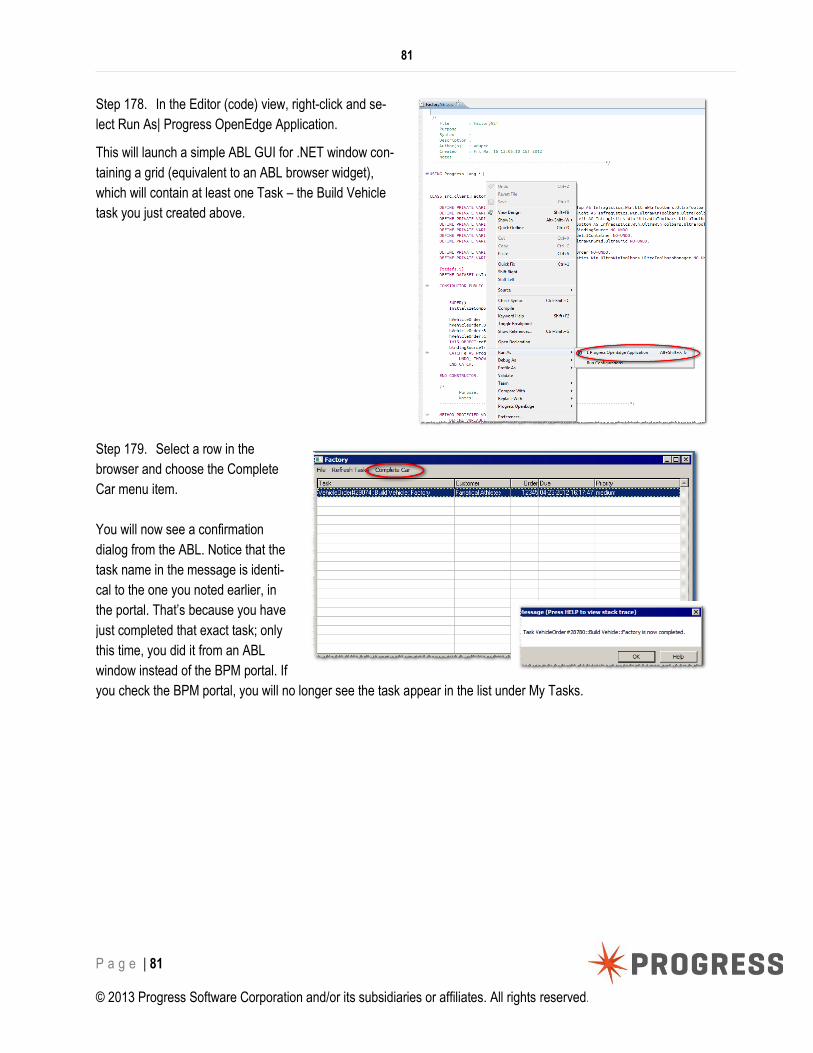
81
P a g e | 81 © 2013 Progress Software Corporation and/or its subsidiaries or affiliates. All rights reserved.
Step 178. In the Editor (code) view, right-click and se-
lect Run As| Progress OpenEdge Application.
This will launch a simple ABL GUI for .NET window con-
taining a grid (equivalent to an ABL browser widget),
which will contain at least one Task – the Build Vehicle
task you just created above.
Step 179. Select a row in the
browser and choose the Complete
Car menu item.
You will now see a confirmation
dialog from the ABL. Notice that the
task name in the message is identi-
cal to the one you noted earlier, in
the portal. That’s because you have
just completed that exact task; only
this time, you did it from an ABL
window instead of the BPM portal. If
you check the BPM portal, you will no longer see the task appear in the list under My Tasks.

82
P a g e | 82 © 2013 Progress Software Corporation and/or its subsidiaries or affiliates. All rights reserved.
Task 28. Using the ABL API: a walk-through
By the event-drive nature of
UI code, the calls to the ABL
API are interspersed with
other code. For illustrative
purposes, we will now walk
through a simplified version of
the code used in the UI
above, in a single program.
This code is available in the
VehicleOrder project in a
program called
misc/testAblApi.p (shown with
annotations below). The
code performs the following
functions:
The first thing to do
is to establish a
connection to the
OpenEdge BPM
server, and to log in.
We log in as the Factory user, using the same credentials as before.
Once logged in, we need to retrieve a task list for the logged-in user. This task list is returned as an array
of Progress.BPM.Task objects.
We then display each Task’s Name and Performer.
The individual Task’s DataSlots are now retrieved, again as an array; and
The Name and Value of each DataSlot is displayed.
If desired, the Task is completed.
Once we have processed all Tasks, we log out of the BPM server and disconnect from it.
Detailed help on all the calls made in this code is available in the Help documentation, available in Progress Devel-
oper Studio.

83
P a g e | 83 © 2013 Progress Software Corporation and/or its subsidiaries or affiliates. All rights reserved.
You can run this code, by opening the testAblApi.p program in the edi-
tor and using the same right-click, Run As| Progress OpenEdge Appli-
cation method as we used for the ABL UI. This results in a simple ABL
screen, similar to the one alongside.
You can also step through the calls made
in this program using the OpenEdge de-
bugger in Progress Developer Studio.
Prior to starting the debugger, you will
need to set an initial breakpoint in the
code, otherwise the code will run without
giving you the opportunity to debug. To
add a debugger breakpoint, double-click
in the left-hand side gutter (the grey area
in the diagram below) and you will see a
blue dot appear. Set the breakpoint at line
15 (starting with oTaskList = ).
Debugging a program is as easy as running it: right-click the in the editor,
and select Debug As| Progress OpenEdge Application.

84
P a g e | 84 © 2013 Progress Software Corporation and/or its subsidiaries or affiliates. All rights reserved.
Once you have selected this option, the
AVM starts a new debug session. You will
be prompted to switch to the OpenEdge
Debugger perspective; select Yes here. You
may choose to select the Remember my
decision option, to prevent being asked this
question again.
Progress Developer Studio will now switch to the Debug perspective, and pause program execution at the break-
point you set earlier. The arrow in the diagram below indicates the breakpoint and the currently-executing line of
code (line 15). The circled button is for the Step Into action, which you will use to step through the program.
Take a look at the variables view in
the upper right-hand side of the
perspective. Notice the oTaskList
and oDataSlots variable both have
a value of [?], which indicates an
uninialized array. You would expect
this situation for the oDataSlots
variable because, by observing the
code, you can see that it has not yet been populated anywhere. The oTaskList variable has not yet been assigned
because debugger execution stops before the line executes, but after the last line has executed.
You can also see that you have a valid, connected BPM session, per the oBPMSession variable’s SessionID and
Connected properties

85
P a g e | 85 © 2013 Progress Software Corporation and/or its subsidiaries or affiliates. All rights reserved.
Press the Step Into button to
advance to the next line (line
17). Now take a look at the
variables view again. Notice
that the variable value has
changed. This tells us that
there is now data in that vari-
able.
Expand the [+] icon on the left of
the oTaskList variable to see the
contents of the variable. You can
see the array has one extent, and
also the object reference to that
content.
Further expansion of the oTaskList
variable allows us to see the details
of the Task.
Continue to step through the pro-
gram line by line, inspecting the
program’s state by inspecting the
variables’ contents. You can either
step through the entire program, or
select the Resume button for the
program to run until it ends or hits
another breakpoint
You can switch back to the OpenEdge Editor perspective using the button on the perspective bar, at the top right-
hand side of Progress Developer Studio.

86
P a g e | 86 © 2013 Progress Software Corporation and/or its subsidiaries or affiliates. All rights reserved.
The OpenEdge debugger also allows you to alter the program flow by changing variable values while a program is
executing. In this case, you will change the value of the lComplete variable from FALSE to TRUE, in order to cause
the Task to be completed.
Run the testAblApi.p program with the de-
bugger as above. The program should stop
at the breakpoint you set earlier, at line 15.
Press the Step Into button three times to
advance to line 19 (DISPLAY …).
In the Variables view, select the lComplete
variable. Right-click and select the Change
Value … option.
In the dialog that appears, change the value to
TRUE or YES, and press OK. Once you have
done so, notice that the value of the
lCompleted variable has changed in the Vari-
ables view, and will alter the flow of the pro-
gram accordingly, especially at line 37, when
the decision is made whether to Complete the
task or not. Continue stepping through the
program using the Step Into button, or choose
Resume. You can confirm that the Task was
correctly completed using the BPM Portal.
For a more advanced look at how the ABL UI
uses the API, look at the src/client/FactoryNET.cls and src/adapter/VehicleOrder.cls programs. There is also a
client based on the OpenEdge ABL UI available (src/client/FactoryUI.w).

87
P a g e | 87 © 2013 Progress Software Corporation and/or its subsidiaries or affiliates. All rights reserved.
Task 29. Things to think about with your ABL business application
How would I model my business application’s processes in OEBPM?
How would I expose a task list to my application’s users? What would this replace – a set of menus? A
browser or grid?

88
P a g e | 88 © 2013 Progress Software Corporation and/or its subsidiaries or affiliates. All rights reserved.
Conclusion
As you’ve seen in our lessons, OpenEdge BPM allows you to conceptualize and simulate virtually any real-world
business work flow no matter how esoteric. Here are some suggestions to expand upon your learning:
Fun things to try with the automotive manufacturing example
What worksteps could you add to the Vehicle Order process template that would ask for customer feed-
back after delivery of a car?
What additional worksteps might be needed if a dealership placed an order on behalf of a customer?
How could you define a process to allow product recalls on a given car?
Fun things to model on your own
How would you design a business process for a restaurant? A hospital? A realtor?
What processes can you model and test in your business?
Additional Training and Demonstrations
This workshop has given you an introduction to OpenEdge BPM but there is a wealth of functionality
available to you including:
The ability to simulate processes to help identify bottlenecks and help with resource planning
The ability to use data retrieved from your OpenEdge application directly in BPM forms and processes
How to create sub-processes to allow sections of a process to be used and reused within other processes
How to build Web Applications with a browser User Interface for your BPM enabled processes
How to integrate processes directly from your existing OpenEdge GUI, Web, and Character User Interfac-
es, and even for batch jobs
Don’t forget, Videos and white-papers describing this additional functionality, including a demonstration of building
the Vehicle Order process used in this workshop, are available from the Welcome Page in Progress Developer
Studio, or on the Progress Communities website at http://communities.progress.com/pcom/docs/DOC-106994.
For details relating to architectural best practices for building your OpenEdge BPM application, based on the princi-
ples of the OpenEdge Reference Architecture (OERA), please check out the following on Progress Communities:
http://communities.progress.com/pcom/community/psdn/openedge/architecture/autoedgethefactory.

89
P a g e | 89 © 2013 Progress Software Corporation and/or its subsidiaries or affiliates. All rights reserved.
Appendix
Vehicle Order process template (complete diagram)
Progress Software Progress Software Corporation (NASDAQ: PRGS) is a global software company that enables enterprises to be operationally responsive to changing conditions and customer interactions as they occur. Our goal is to enable our customers to capitalize on new opportunities, drive greater efficiencies, and reduce risk. Progress offers a comprehensive portfolio of best-in-class infrastructure software spanning event-driven visibility and real-time response, open integration, data access and integration, and application development and management—all supporting on-premises and SaaS/cloud deployments. Progress maxim-izes the benefits of operational responsiveness while minimizing IT complexity and total cost of ownership. Worldwide Headquarters Progress Software Corporation, 14 Oak Park, Bedford, MA 01730 USA Tel: +1 781 280-4000 Fax: +1 781 280-4095 On the Web at: www.progress.com For regional international office locations and contact information, please refer to the Web page below: www.progress.com/worldwide Progress, [ALL PRODUCT NAMES LISTED IN PUBLICATION] and Business Making Progress are trademarks or regis-tered trademarks of Progress Software Corporation or one of its affiliates or subsidiaries in the U.S. and other countries. Any other marks contained herein may be trademarks of their respective owners. Specifications subject to change without notice. © 2013 Progress Software Corporation and/or its subsidiaries or affiliates. All rights reserved. Rev. MO/YR